Transcripts
1. Intro: Hello and welcome to this class. My name is high. The end of the day, we are
going to be painting together a beautiful banana
plant in a pot. I will be giving due
to the whole process. If that invite F getting
or run an a plant, then choosing a
color palette for the whole painting and
creating your own jade is too. They'll have a big honor that I am proposing in this class. I wouldn't be gay due to the technique that
we're going to be using into how do can make a dude blend at really beautiful and appealing to
the ones that look at them. I hope to join me just
to have fun in there, something new and we can get that painting
or when an apply. Seeing you in the next video.
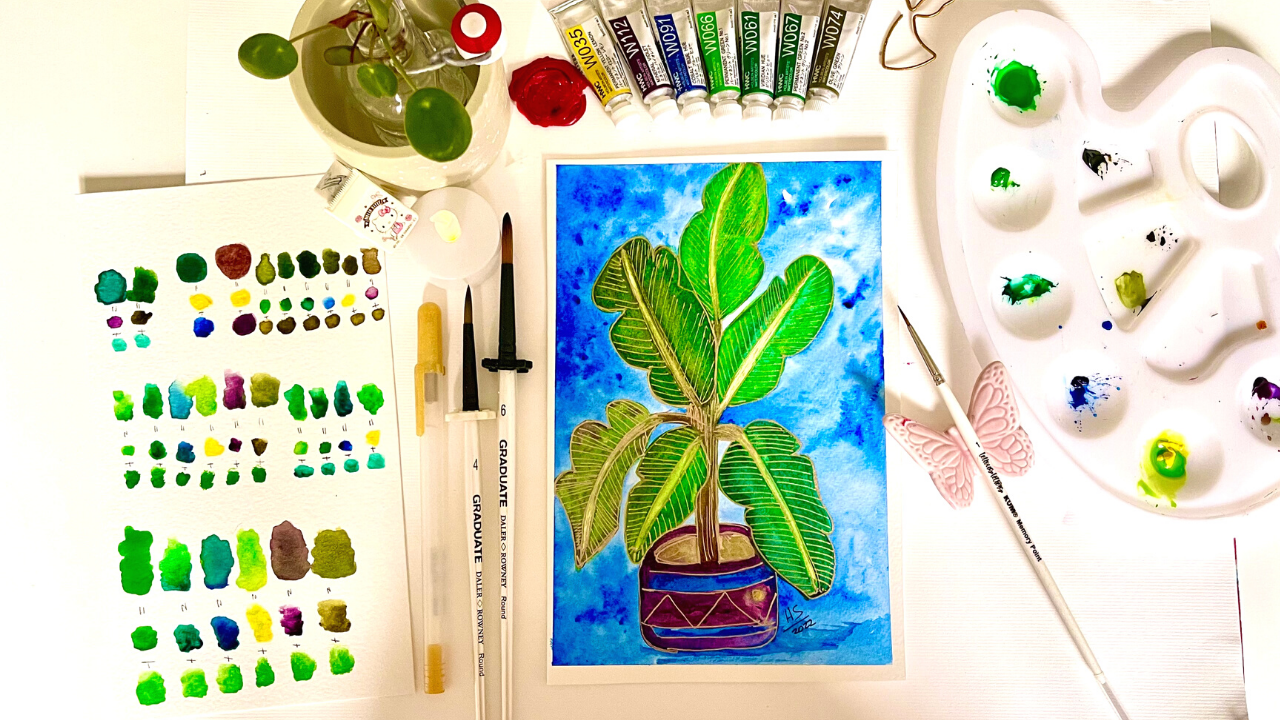
2. Supplies: Let's take a look at the materials and supplies
we're going to be using. In this class. You need water in a container,
clean water, tower. Mixing palette to
mix the colors. A gold gel pen, or you can use a gold ink brushes in three
different sizes. But I'll, brushes
are recommended, but you can use whatever. You have. Watercolor paper. I am using Canson, the brand cancer, pencil, eraser for the sketch. Last but not least, watercolor in green shades. Whatever you have in
green is perfect. And these three other colors, blue, yellow, and
violet or magenta. To make it, to mix the
colors and made the details. Please now go and
download sketch so that a sketching
endure banana plant. It is in the resources
for this class. During the next video.
3. Color mixing: In this part of the class, I went to charge
you all the greens. I have a layout and how I will be mixing them to create
my color palette. You can follow me with the
same colors as I'm doing. I didn't using Holbein
watercolors in tubes. The first one is
permanent green. The second one is paramount
in getting NOPAT. Number two. The one is BDD and the last
green tone is olive green. You can use the same greens
tones in you have them. But if you don't have them, use the greens that you have, just tried to use. Different shades of green. If you don't have any
green in your palette, then you can mix the two primary
colors, blue and yellow. And do will have a green. It will be more darker and more lighter if you add more jello, for example, to the blue and it would become lighter green. Or if you are more blue, then it will become
adult category absolute. You can use water to dilute
the pigment in the color. And it will help you get
differentiate those green to add more depth
to your painting. The violence or the magenta will help you to create a
more brownie color. For example, here
for the stem of the leaf or for the trunk
of the banana leaf. I would play around
with all my greens, mixing them together, and also with the blue jello and violet. I have an idea of what shade I will be using
during the painting. This is called the color
wheel or color chat. And I have a class
for these two, can take it up in my Beale in this class on how to create
your own color palettes. And it will help you understand
more dirt watercolors. I will be playing around
with all my greens, mixing them, playing around, adding more water, less water. I will ligament due to the same. So do you have a better understanding
about what colors you have and how you can get
all the changes with the limited palette, color palette that
you have at hand. And you will discover
the magic of watercolor. It doesn't do, doesn't do that. Needs to have all the colors or all the watercolors do need. You just need it to
have the right once and then to play with
them to discover how amazing versatile
these watercolors are. If you add more water, they would call the pigment of the watercolor
will become lighter. If you add more pigments to another pigment mixed together and give you another
color to play with. You will also
notice when you mix darker colors with
lighter colors, you can discover new
changes that are not available in other forums. And you can really, you can do with this. I will keep playing with my watercolors and
then I will come back to show you
the whole pallet. Be free to upload. Playing around
with the colors to the class project
section for this class. I just finished bleeding
with all my colors. Look at all this beautiful
chase that I discovered now, and I will be choosing them
to use on my painting. I hope to get inspired and you find new colors to play with. And I will see you
in the next class. Please make sure to
download the template to start sketching
do banana plan. See you in the next video.
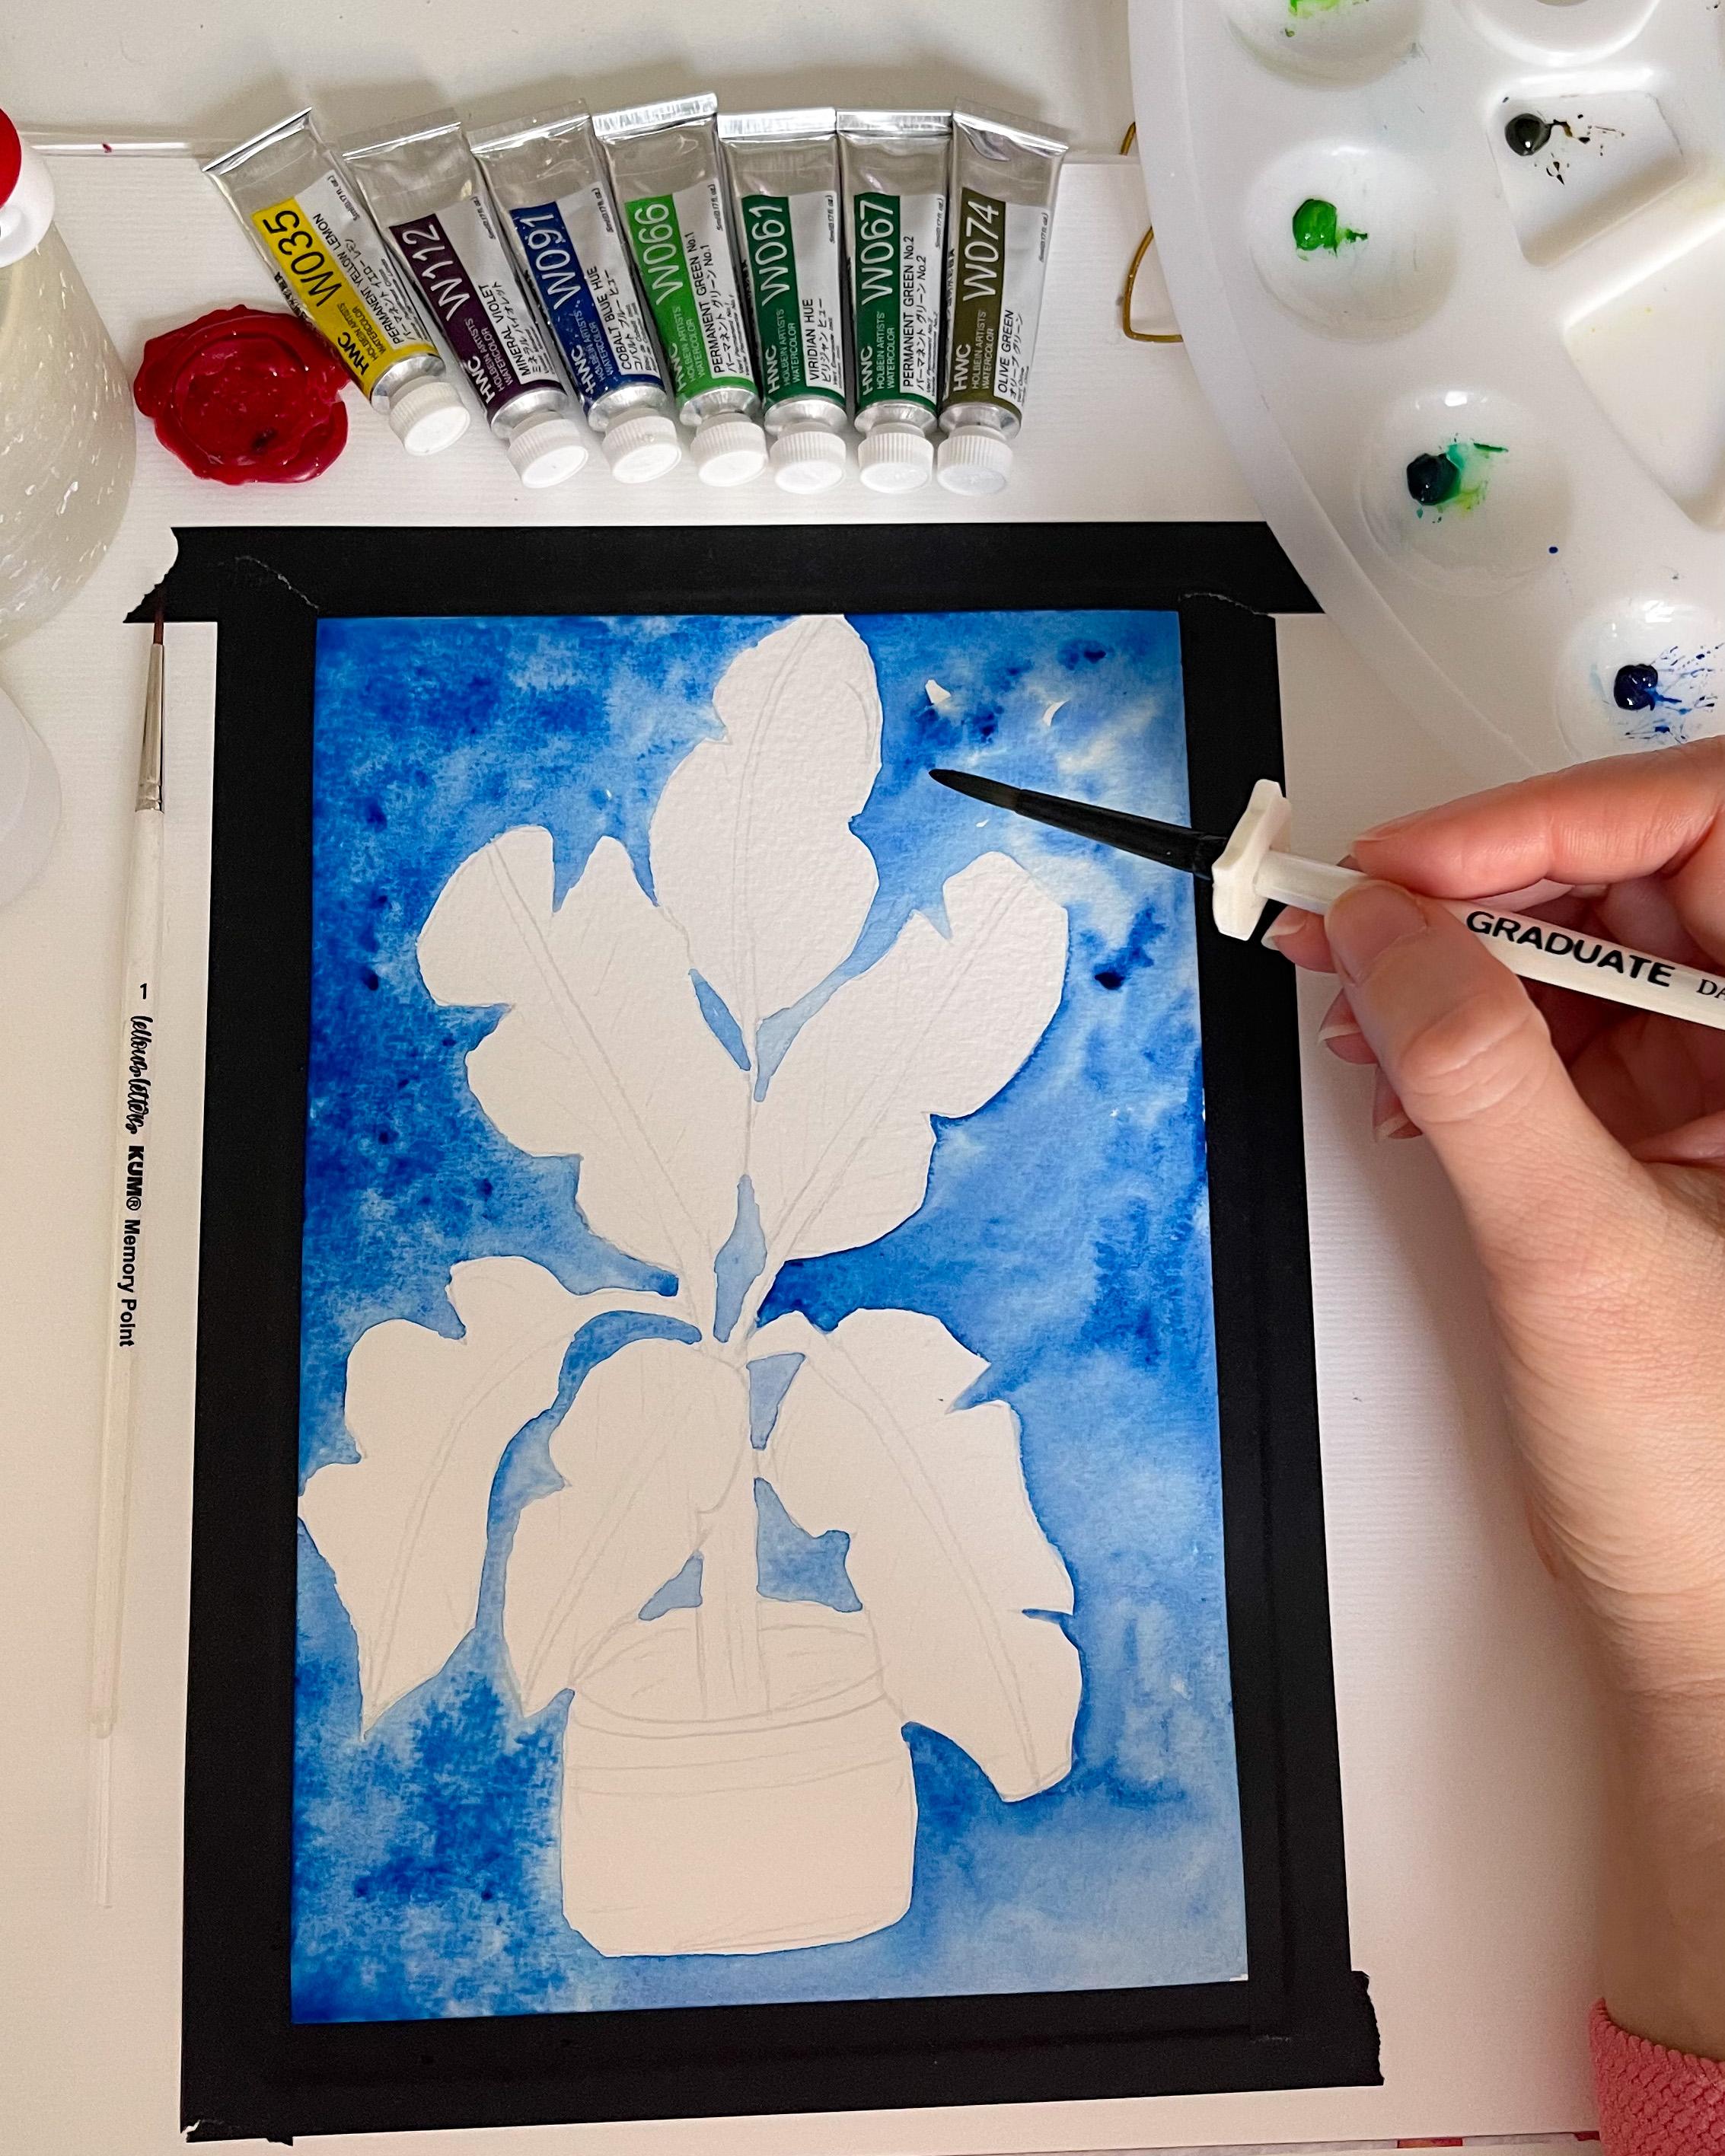
4. Negative Space - Background: When I was looking for any
spiritual for this painting, I found this beautiful
banana plants. Houseplants did this looks like. I choose the left one
to make this sketch. But for the course, I also
look around on the internet to see the colors of the leaves because when
they are, the wild, banana plants can be more
affected by the weather, by the sun or by the rain and the wind and all
the nature. Elements. And leaves can look really different when do
see those plants in pots or in some gardens and where
they are more like, save. These two pictures I
took as a reference and thus is the sketch that
I chose for this painting. You can look out in the
Internet or in nature. If you live in a
tropical country, that would be pretty nice. Let's see what's
due. Come out with. I already did my sketch. Here. You can see it. And if you did as well, then we can proceed to
start our painting. And if not, then
please do this first, we start to gather, reducing the technique
negative space. Starting first with
the background. I will paint the background
with the blue that I have. This is cobalt blue if
you want to use the same. So I went to assemble
the sky because it makes a very beautiful contrast
with the color of the lips. And I will be using the
technique wet on wet. This means I would be wetting
my paper with my brush. We're starting with
the right side. So you can see what we are going to be doing in
the whole painting. When I finished the right side, I will add the watercolor
on my wet paper. I am using clean water in
my production number four, you can use a bigger
one or a small one, depending on dual
brush control skills, you're going to use a
bigger or smaller if you feel confident
onto brush control. Please control the amount of water that you are
adding to the paper. Be very gentle so you pay with
those and get it too wet. Because it will make, it will add an axon, most of the watercolor
in some places, so be gentle and make
sure that they do. Add the word. And
in all the places that will be the background
on the right side. When you are finished,
I, the water. Then we're going to
start adding watercolor. In this case, is
the cobalt blue. If you want to use the
same process is vertical time-consuming
because you need to avoid adding the watercolor
inside the leaves, in this case, the dental
and take your time. I will be adding
the watercolor very slowly and leaving white spaces so it make their effect
as clouds on the sky. It looks realistic. And you will see that the way we proceed to paint the leaves, they contrast with
these two colors. This very beautiful because
it resembles the nature. When you, when you are going through the lines be bed is low, done, damaged at
shapes of the leaves. And we'll see that
it becomes like alive when do make
those outlines. But it's slowly to make the watercolor a little bit that good when you are
close to the leaves. Add a little bit of
depth to your painting. I say what's telling
you I will be painting the buy-side first. Do gun, see what we are going
to do with this painting. Then the left side, I will be SP that
the BBR a little bit because it's the
same process just in the left side of the paint. Make sure to add more blue
there would do think, do need more blue. You can also add water to move the watercolor because thes is the whole thing
with what their corrupt. You can move them with
water very easily. Go down all the lines and you will see how amazing
this effect. And be very gentle while
adding your watercolors on the paper because this will make a big difference when it dries. Use water to move the colon. And you will see
that it will be so easy to manage your painting. I choose the background. Blue because I went
into resemble sky. Because when I was looking
on the Internet for the examples of the
banana trees or plants. I saw one that I wanted to
make is more in the wild. Of course this one
is in upwards. But the sky background was
the most appealing to me. So that is why I'm painting
the background blue. Literature being inspire. And you can do whatever
background you want. You can also, I'm good
at these three on the wild and on the nature
without the pot, just as they are naturally. But for this class was more
convenient for me to use a pot I house plant because it's easier to paint in a class. So it doesn't involve
many elements are young, I just want to focus on how
to paint the tropical leaves. So you can focus
on that as well. But you can do more
realistic banana plant leaf. And that will be very
nice to see in the class. Almost finished with my fierce
part of the background. And again, just taking a moment to look where mod
blue is needed. We'll add those little
touches, those blue. Now, I will do the left side. I am speeding up that part
of the video so you can just join me or post the video and do it
as your own piece. Then it will readiness IN
doing the same just within my left side of the
painting and then add in the watercolors needed. When it is ready, I will let this
dry completely and then plus seed to start
painting the leaves. Adding more blue. But neither. My painting. To see more realistic, I will see you in
the next video.
5. Painting the Banana Plant Leafs: Looking up or fears reference
picture this below. The lease, that there are
very green, dark green. So for our first leaf
and we have six leaf, I will be using the mix of my permanent getting
number one in my BDB ON cubed
gives me the fields later on this very dark
rich pigment, that green. If you don't have
these two color the same as I am using here, you can use it the
green that you have. And you can add a
little bit of blue dye to make your testing before
uploading it into the leaf, I will be tied to use six
color that we are having here. Showed you the
difference that you can get with the code
that you have at hand. As I was telling you that fierce choroid is
this better green because this is the main
color of a healthy leaf. Banana leaf. This very rich, bright and shiny green. And that is what we are looking
to get this fierce leaf. I am using that technique. Wet on dry my paper or my leaf
space is dry on the paper. I adding water on my watercolor to make the color run very easily as I want. And then I am just
making the color go on the places that I
worked on the bottom of the leaf and on the
coordinates of the leaf. The second leaf, I will be using the same fears layer
as we did in the leaf, the same green, the
same combination, mixing the two
colors, permanent, getting number one
gets a very light colored with my BDI VM. That is a more pigmented green. Because I want to make
another effect in this leaf. But fears we need to add
layer we using this type of bargaining in
adding afterwards a little more of the dark green
that I have on the corner, on the edges on the bottom
of the leaf to keep these leaf or fierce layer
of beneficial pigment, then I will let this dry. Meanwhile, I will be painting
the rest of the leaf using other combination of color that we are
going to be using. This process go around and you can use the same chat or you can use your own type of shape. But I wanted to show
you the colors that I used in this very
beautiful banana leaf. You see I'm just taking
my dad gets green and adding it to the
coordinates, to the chair, to the silhouette
of my banana leaf, I will repeat this
process of layering the darker colors upon the
quarter that I already have, starting with the
recorded and then adding a little bit of water
to move my watercolor. Then I will start
painting my pill leaf using the reference or the second plant that I
showed you in the past video. And you can see this belief is a little bit more M,
lighter in green. And the hat, some spots
on them on the leaf, on the part of the leaves. And I NDC for this, my olive green in my green, permanent green number one, that is a little lighter. I will combine those
two colors using the technique wet on dry assess we're doing
in this painting. If you have a little
bit of water, then the olive green will
turn editor bit lighter. That is very good
because the effect that we want to accomplish here is this more lighter
color on the leaves. Us. If they are receiving
very much sunlight, those brownies spots are becoming more
visible on the leaf. I wet my brush in clean water and then
adding it to my leaf. Be mindful of maintaining
the silhouette of the banana leaf while you are adding watercolor
with the Pradesh. Add more pigment on the edges
to maintain those lines. When do you see in contrast, contrast with the background is the fact that it is on top
of the sky, so to speak. Go down and your leaf with
just wet on clean water, the color start to move. Now I will be adding some
Pitman in green one, the lighter green that I have on the some
spots of my leaf. It will start becoming like
those brown spots as I am, as I am adding other colors or all other ledgers on this leaf. But it is a process. We need to take time and we
needed this to let this dry. But this is the fierce
code of watercolor. So it is okay. To start like this. Then you will feel confident
about the chip and then du will add all the tones
if you feel like it. Or just water as
I am doing here, I am doing this just to
move my watercolor as I want to go more that
get on the edges, a more lighter on the center. Near to the stem of
this banana leaf. I am going around
with whether again, to move my car. And now we're going to
be painting the leaves. I am mixing here my
blue, cobalt blue, then cleaning my brush, but it really adding yellow
to create a shade of green. Then we are going to be
painting the first layer on the leaf, banana leaf. And you can see, yet, you can see the contrast, the different shades of
green that we're using. And it is looking very good. I like how it is turning out and this is
just the first lady. Later we are going to be
adding some highlights and details and you will see how dude banana
leaf will become. Delete everything. Just adding these, getting that I just create
with my blue, my jello. Now on the edges
I will be adding the violet will give me this. But I'll need tones on
the spot that I want. Like the picture for the
second reference that I have. Ideally like this. Appearance of this leaf with these brown spots
on lethal spots. Digital gentle touches. Do we'll get that effect. If you use magenta is it will
be doing the same effect.
6. Watercoloring Banana Plant Leafs : For the fifth leaf, I would start adding Jello
on the gardeners of my leaf. The whole silhouette of
the leaf. The jello. Make sure that your
brush is really clean when using yellow because these colors is
barely sensitive. Now I am using the
fears combination from the leaf which we made with Batman in green
number one and BD VM, who that is or that green. And I will be mixing
these two colors. My leaf to give more putting like New Leaf or my
banana leaf plant. You can make this with the blue to this mix,
yellow and blue, but creating the green mixing first the blue and the
yellow onto mixing pan and then starting with the generous with it here and then
add in the green that you created with the blue
and the yellow mixing pad. If you don't have
this green that I'm using right
now in this layer. Go around the whole
silhouette and add those ketones on the
upper side of this leaf. Effort, the last
leaf we are using, the first combination
that we use, but I am adding here a little bit more of water on my brush, so the green becomes a
little bit lighter pigment. You can see adding the two frontonasal leaf
that has a more near to me, the spring CLI or the
new leaf kind of tone. So feels like they're near
to you. The painting. I will be covering
the whole live with this really light green. I will be at some that
are getting on the edges. Because if you see these plants, this one on a blank
layer buried, the degree that they have
fears is beriberi dark. China. Mostly when the
banana plants are young, they have these luscious
green color in the leaf. When they get older, then the leaf become
more effective for the passage of
time and the weather, what they are, and the sunshine and everything that's
according to these plants. So I will be adding some highlights with
different tones of colors to all the leaves
where I think they need it. And as you notice that you're
leaving in this themes, the center of the
plant in white, because this is when
do you see the plant? These centerpieces are
very light in color. Afterwards we would be adding a little bit of
Betty light, agree. But for now we're just touching those parts of the
banana plants leaves. The colors because I'm becomes more accentuated
on those places. And this would be the
second layer of colors. Remember that we rarely
gentle awareness applied in the second layer. Use water to move. There was a color
that these already the right on the leaf. Now, when we finish with this step of the
part of the painting, then we are going to be doing
using the technique glaze. This is just going
through all the spaces. In this case the
leaves with my brush just dump in water
and clean water. I will go through
the whole space. The watercolors, as you can
see, become like laser. Light shining because
with the water, I will move the
watercolors around. This keeps the motor
cohesive blend of the color that I use in the fierce layer and
in the second layer. Do it very gentle and slowly and go through the whole leaf. Did you see ETAs more? How to modernize their weather goddesses harmonics
on the paper. Be mindful about the amount of water that you are
putting in your brush. We are not looking for
a very width brush. We're just dumping them in the clean water and
going through the whole, the whole surface of our plant, leaf off or banana plant here. The watercolor becomes cohesive and the blends look
more harmonious. The idea is to get
the two layers of watercolor mix and to
blend better together. And when it is dry, we'll see the very nice effect. We will be going through the whole six leaves
using this technique, the glazing, like the cake. And then we're going to
proceed to paint the trunk and the stems are in the
part of banana plant. In this step is not necessary
to add more water colors. You just need to go through all the leaves
with a damp brush. You will see that the
colors will become blend. Blend more easily. M, beautiful, giving this. But in our total effect, when we have everything
we are going to leave this leaves that I completely
and then proceed the paint, the stem and the trunk and the bottom
of our banana plant. I will say to you
in the next video.
7. Banana Plant Trunk and Pot: For the trunk, we
are going to be mixing the permanent green
and the olive green. Denote this trunk from
the banana plant. They are in this
color there some, they have some lines looking
like violet or brown. We'll be adding these
details afterwards as well. Don't make it look more. Classes. Go through
only the trunk and not inside the leaves
because we are adding inside the leaves very
light green. Later. Cover all the trunk with
the color that we chose. And now we are going to be
adding the violet to make a blending look more
in the brown side. As you can see, it's
turning more brown. Because the two colors
are mixing together. Don't overdo this step, but try to let some spaces with the first
quarter that you added. And you will see that the
effect will be more not to run idealistic in color. If you overdo this, then try to pick up the color
with that paper or a towel, or add a little
bit more of water, so the color or the
pigment becomes light. Now we are certain to
paint the ETH in the pot. You've seen the olive green and the violet to make
the color brown, but not too dark. With a little bit of water. We're just letting this
color mix together. Now to that as possible, I am doing many
layers on this part. So I will be coming back to this spot to add more
colors or more pigment. Would I see if it is needed? For the path I choose
the color violet domain. A little bit, contrast with this blues and the greens
that we have here. Then I will let a line in blue. But you can choose
whatever color you want. Maybe orange will be nice. Or leaving the white line in the lines of the
body with a fine liner. That will also be
a nice contrast here thing Violet isn't nice. I didn't just painting the
hard part with this color. And then I will be adding blue, where those spaces
I want the blue, I will be adding layers of color to make the
pigment mode brighter. And then I will just let it die and proceed
to the next step. See you in the next video.
8. Banana Plant Details: Now it's time to add some
highlights with the colors, using and darker tones to elevate the shapes
of the leaves. As you can see here, I am adding some darker greens on
the edges of this leaf. The color of their eyes
becomes more asymptote. You can choose to do this, or you can leave the
leaves as they are. For this one, I went
to make it look more oxidated like more leaf. So I added this
yellow highlights. Then I will mix them
so they blend with the already dry layer of watercolor that use
the first time. The second time. Be very gentle here as
well and try to be more into defense sensitive about
where do you want to add. This highlights pieces of color. During this process, I will be painting the leaf with the
jello, whether colors. And then I will stop when I
feel and I see it is enough. I will add some highlights
on this other leaf, on the tip of the leaf to make it a little bit more
oxidated on the one. And then I will decide as I go, but I want to make the outer part of the
leaf a little bit. Today did in this case, for using the jello
water column. As you can see, alumnus
you are painting, do will be seeing and feeling how do want
your paint to be? So do we then choose what kind of change do
you do want to add? Maybe if you look at the Internet for your
reference picture, then you try to sample those reference
picture that I introduce, the similar in tones and colors that you see
on those pictures. Take time to observe
painting and to see where do you want to add more color or what do you
want to transform the color? And you will see that
your painting be as beautiful as do you want to make the oxidation effect a
look more realistic? I am adding a little
bit of violet. The gel over the
current is still wet. And I am also adding more
water with my damp brush. The colors mixed together
and move in the painting. I am taking the time to observe the painting and see
where I want to do more highlights and add more pigment and make
oxidation in this case, adding yellow and violet. Again, taking a step back
and look at the picture and then start to add the color that I think
will make the picture, or the painting looks
more beautiful. This is, I think the older
leaf that I am painting here, the effect that
the older leaves. So this is why I am
adding so many layers, allowing the watercolors
to do the job. Those spaces where I think the colored is needed with my brush, if I think they need. The problem here will
be to decide when are you satisfied with the
looking of whether code or MB. Very careful because you
can damage painting. But there is always a solution. If you are thinking this
is two that can pigment and then you can
remove the color. A damp brush. If you need more pigment, then do more color
onto your painting. I will be repeating this process of highlighting their places. I think it needs more
or less watercolor. Looking. If I want to, then to look more oxidated
or more brightening pigment. And then I will continue
with the internal parts of the leaves using my jello
am my lighter green, which is permanent green. Number one, it is more
like a spring-like green. And with the gender they
display very light. And we my finest brush, I then just moving
the color through the whole stem to pick up
a little bit of the trunk. The codon mix give
the natural effect of the color in my
brush in the water. So the watercolor front, easily through the stem. I think the stem are really cohesive and I liked
that. They have. So I will stop
adding the colors. When you are ready, please proceed to the next step and I will see you
in the next video.
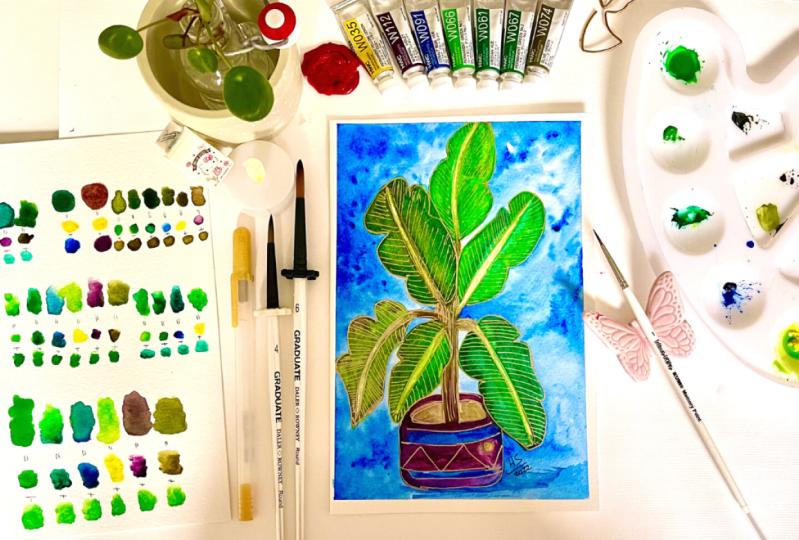
9. Banana Plant Gold Highlights: Now let's make a banana
plant leaf China. And for that we are going
to be using a gel pen. Or if you like, you can use a gall ink using the finest brush that
you have at hand. We are going to be tracing very fine lines the most closest to each
other as possible. Going in this direction
through the stem of the leaf. You will see when you
finish this whole six, it leaves the
painting weight gain so much brightness and it
would look so beautiful. I will be going through all
the lines in my painting. And it will take ten. So I will speed up the video so it doesn't get too
bored for you too long. But this is the
part of this class. Just add those lethal
called lines to the center of the leaves and to all
the lines in your painting. This very easy and
please do it slowly. Because then you can
have more control of the lines that you are
adding to the leaves, to the center of the leaf. Enjoy the process
and I will talk to you at the end of the PBO. Now I will add some effects
to the Earth as well. And I will do some lines here to make it a
little bit more beautiful. Can you see how
beautiful the leaves are looking now with
this gold lines? Amazing how little effects in highlights can change
the whole picture. In one moment. Take your time and
have fun doing this beautiful gold
highlights to your painting. And it will be so pretty
and beautiful as it is. I will see you in
the next video.
10. Important Artist Practice Tip: This is the most satisfied in bar of every painting we do. Look how easy those
washi tapes go off the paper
without damaging it. Using the technique that I
showed you in my past class and other classes that I am
teaching here on Skillshare. I explain how to
make these happens. You can watch out for
those classes and learn this very easy technique
on how to make your washi tape go of
your paper very easily. Painting is already, look
how beautiful and shiny. Wonderful it looks. And I went to remand do about very important and specific step do need to take every time you finish a painting
that is sign up to your paintings
because does is still masterpiece and
does it still work? I can't wait to see what
you create in please. I will see you in
the next video.
11. Class Project: For your class project
to consider with us uploading a picture
of your color palette. Process like the negative space. Sketching your materials
are two final pieces. Upload a picture to the class project
section for this class. And I will be so
happy to review them. Went to upload. See you in the next video.
12. Thank you: Thank you so much
for taking my class and I am so proud of
your beautiful work. I can't wait to see what the
PT aide and you can please upload your work to the
class prior for this class. I will invite you to join me in my other classes
if you like them. If you want to learn something
new and does this do to skins and go
more deep in them, then I will be glad
to have two in-class. You can also join me in stem. If you have a source and medium, we can add change or practices. I wish you a very happy moment creating and I hope to see
you in my classes. Bye bye.
 Artjourneywithme Heidi, ARTIST AND FACILITATOR