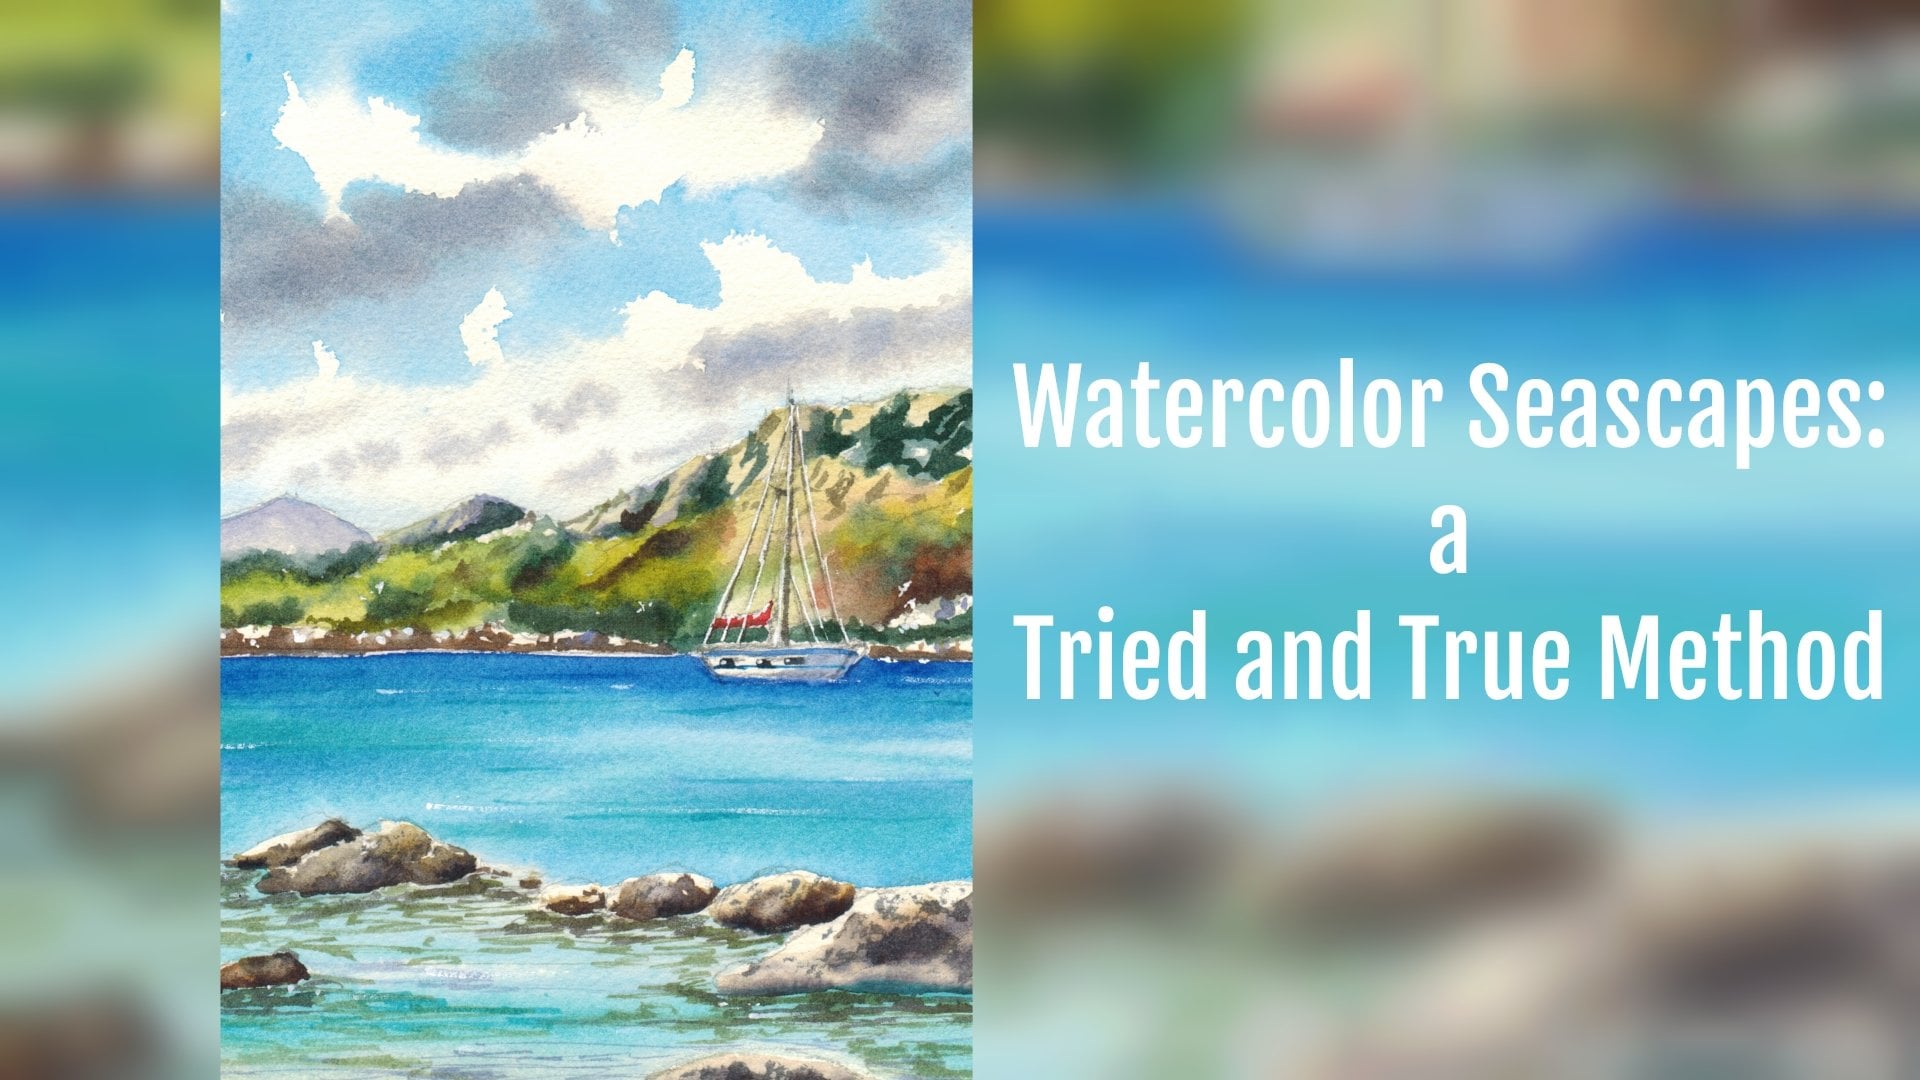
Transcripts
1. Intro: Have you ever been fascinated by the strength of a storm while
you were at the seaside? And have you ever
wanted to capture in watercolor the energy of
motion and crashing waves. If you want to know
all the tips and tricks to find those
subjects with a very natural to find out a result that this class
is just right for you. Follow me in this lesson. So everyone, My name is Alan
Alda, wasn't galleries. And in this lesson, I will teach you two
different methods to find Ignatian waves. And one of the method is with masking fluids
and the other one is readouts that you will be able to get the best of both worlds. And that's where
your cell phone, which will be the
most suitable one according to the subject
that you want to buy it. But in this lesson, I'll teach you also some key elements of
composition we will see which are the
most beautiful colors that you can use for painting. You're very beautiful,
stormy sky and RFC. And last but not least, I will teach yourself how
to make proper use of white goulash or if you're ready to join me,
let's get started.
2. Materials : So let's see what materials we are going to use for these what are called ofcourse paper. My paper is a 100% cotton. They 100 grams per square
meters and it is cold press. You can use whatever
brand you want. Mine is Saunders,
Waterford, our she's fine. Fabriano spine use
whatever you like. The most important
thing is that, which is a 100% bottom that, that eat is 300 grams
per square meters, at least in thickness
and cold pressed. Other than that, we
will use, of course, the masking tape, but you
will need some paper towels. You will need also
your water and see it. So these are things
that you want, say camera, but they
are all around me. Then of course you will need, you're putting together
your mechanical pencil. I have a mechanical pencil, but feel free to use
whatever you want. And I will have also my trusty ruler because I have to draw the
horizon line and I don't want to have something
very awkward in my drawing. I if you can one thing in use
also some spare pieces of February if you want
to check your color is so as for the colors that
we'll be using tubes, but you can use bands, you can use the brand
that you prefer. I will tell you the name of my pigment because
they are very common, but I will leave you also at least with a
piece so that you can exactly pick out the
exact color from your, the colors that you have because maybe they have different names. But when you look
at the composition, you can know exactly what kind of pigment
I'm going to use. So the first one
is Naples yellow, reddish or which is a very
common Naples yellow, in which you have as
light pink, pinky tone. If you don't have a reddish
version of Naples yellow, you can use a normal
Naples yellow with a teeny tiny bit of burnt
sienna or quinacridone, red or permanent come in. Then I will be using raw
sienna and burnt sienna, and I will be using also
a bit of cadmium orange. If you don't have
cadmium orange, that's not a problem
because you can mix a bit of yellow and a bit of red that you
like and you're done. I will be using also red ocher, which is a color that
I really like and use. And this one is a PR one-to-one. So whatever name you
have in your collection, if you have a color
that is PR one-on-one, that is perfect spread. I will be using
permanent Academy because it's a color
that I really liked. But if you don't have
a permanent currently, you can use quinacridone, red or purple, magenta or rose madder lake,
whatever you like. And these are in creams and eye color, which
is very similar. For water, I will be using
tallow green and blue, and also ultramarine blue. For the sky. I'll be using also called
blew and beat off. Cerulean blue, my wife
Shirley and Louisa. Cerulean. And it is very strong
and powerful as a color. If you like something
more delicate, feel free to water it or
use something lighter. And is further brushes, which are the last thing
that I want to mention. It depends on the size of
the paper that you're using. If you're working
big, use big brushes. Otherwise, if you're working
small, use smaller brushes. I will be using a surface which is more
or less than A4 size. So feel free. Choose brushes
according to that. The most important
thing is that you will need some brushes that
you really don't like. It doesn't matter if they're point is completely
ruined or whether because we will be using them
for the masking fluid part. And I will be using
synthetic brushes around. This one is an
imitation of Mongoose. I haven't mutation and squeal, I have imitation of
sable or synthetic. And I will be using
also brush for the sky, but it's not necessary
if you are fine in painting clouds with round
brushes, they are fine. The most important thing is
that you have round brushes. All the dimension
because we will be using also very small point for the details of the lighthouse
and something bigger for the sky and the waves. And other than that, that is the most
important thing. We will be using white gouache. And you will keep the Eater's site and don't put it in your
palette otherwise, all of you, we've become opaque. So this would be used
at the very last. Then I will be using
a piece of soap. This is a solid soap. And of course we will be
using masking fluid and use whatever brand of masking
fluid you want and you can use white masking
fluid or colored one. I prefer the color one
because I can find it easily on the paper. And I think that I've
mentioned everything. So let's move on and let's
get started with a drawing.
3. Technique focus : Okay, so we're going to see
how to use masking fluid. It can be used in
two different ways. And we're going out. I was showing you both of them
and the two ways that I'm going to use where
these water color and there is no I mean, it comes to personal preference. You can work with or
without masking fluid. It depends on how you feel confident about what
you're going to paint. And I will show you
both techniques. So because I think that
we can get the best of both worlds and
in a certain way, masking fluid, it's
a sort of insurance. Maybe pure watercolor is
maybe don't want to use that and eat something
that you can do. You can work without
masking fluid, but you still need to be very, very careful while
you're painting. So if you're an
author careful or if you prefer to protect your white areas because
you think that maybe you're working on a commissioner
and you don't want to run any risk. I will show you both ways. So let's say that we have
this is the horizon line. I'm not going to paint all the area and just
want to show you the what are the main concept. Here? Maybe we have a rock, okay, and then here we
have the crushing waves. Okay, let's work on this. So we want to mask the Move, want to use masking
fluid for masking out the area of the way of
the foam crashing way and how we are going to
because we can choose something with very harsh lines because the form
is something very, very floating and eats more like it has a feathery borders. So we're going to apply
masking fluid on wet surface, which is something probably
you've never heard before. But anyway, first things first, you use a brush with
clean water and you wet all the surface that you want to be covered by your phone, then you have your brush
with very bad Bristol study. I don't mind if it
gets all gummed up. You have yourself and then you rob yourself on I use
the brush on yourself. And then you have you
take your masking fluids and you do your masking
fluid on the wet surface. Stay a bit. Sorry, the buffer
has already guy anyway. Let's wet it. Okay. So you see that
the masking fluid, it spreading in the water that you audit and it
will create that soft, feathery effect that
you want to create. Okay? See, whoops. It's more or less one, the same browser that you
use if you want to mask, for example, some bushes
or in a green area. And in this case you have a very do you feel you have a very good result
and then why it is drying? We are going to find the the crushing way with the other method which
is without any masking. We will go back to this
area once it is fully dry, just to show you what you get at the end and how you
need to tackle this area. Okay, so what are
these part is drying. We are going to concentrate
on the other half. Be careful not to smudge it. So let's say that we
have always do line. Let's say that we
have a rock here. And then we want to put in a
crushing wave in this area. So for the second technique, you need your tissue or
paper towel close to you. We are going to use some color. I will be using
ultramarine blue because I have already a bit of
ultramarine blue in my palette, but it's just for the sake of the learning
of their techniques. So you can use whatever
color you like. If you don't like
ultramarine blue, you can use cerulean
blue, cobalt blue. With that you have in
your palate and the like. And I will be using
also smaller brush. Okay. So this would be fine. So let's start with the horizon. We should paint wet on wet. Slot. Says I want you to
be very careful. I'm starting wetting. And then moving very slowly towards this area because you have to
create a gradient. Because the horizon, of course his dark it
but also be used. You are approaching the area where you want the phone to be. So you see that I'm diluting these with the help of water. Now is I want to create the
movement of the wave. I'm adding color
in the upper part. Diluting with water. Now I use all my towel
and I start to adopt. And I will go on moving this way because they
want to wet all the area. And I'll put in very, very diluted site sign. So very diluted drops of
water because as you know, the foam reflex the
colors of the sky. So just to create the movement, because you see that the
form is not perfectly white. You can put in some darker areas here and there just to
create the movement. And then I have a bit of red
ocher and my palette and I'm using that just
to show you the rock. We can mix them together
to get a darker brown. And you need to be careful
because if you want to have the same soft results
also for the rock, you need to use your tissue and Dhabi to create the soft lines. Paper dries very quickly as
it's happening to me today. You can always go in with maybe a stiffer brush like
this one that I have. And smudge a bit the contour of your walk so that you
get a diffused line. And then of course at
the base of the way, there is a C again, you use the same day, the very same process. You want more diffused areas. You can do wet on wet. In this case. I'm wetting my area
and then putting in my college so that it gets
these feathery movement. Or if not, because maybe
you need to put in some straight lines
like in this case, you will use it more wet on dry. And then you can go in Darby
with your tissue so that you get the movement of the
sea and water as well. So you can always
control that and decide also the the
degree that you want. This is same rules apply
also on the other side. So in any case, be sure of the fact that if
you have some harsh lines, you can use white
goulash to Spark and Spark job and you
turn on that so that you get a very soft effect. And so this is the way that I prefer because it's very
natural, very soft. But Um, I will show you that also using the masking
fluid, I mean, you, you get very good
effect in the same way. And it is very
useful, for example, if you have to protect some delicate area of fieldwork and you can
achieve a very good result. So in this way, as
it is fully dry, we can go back to this one. So let's go back to
our first painting. The masking fluid is completely
dry and we can move on. So I've always in my palette, my blue, ultramarine blue. And this is what
I want you to be. I mean, no, I want you to
focus on these kind of things. So I'm wetting and
painting all these area. And I am using a
very light shade. So let's put a bit of
ultramarine blue again, because I've been out of that. Is this area. Now the sky is waiting
for that to dry. And you will have you will need to remove the
masking fluid later. And now you can move on with the same technique that
I showed you before. This time wetting and then softening immediately and
then dabbing your tissue. You have to consider that
the sky, sorry, the, the, the wave is moving and be aware also of the
gradient that you need to respect because it is darker towards the horizon and it is
darker also under the way. So you put in your color, then you have to
use this gradient from the base of the way
towards the lower part. Then you can always soften. As with the other method. Then you can apply water again in color and
go on in this way. In this way, sorry. With the very tip of the brush, you can decide to add water to soften just to create
the movement of the waves and why it is still dry. You can put also color at the base off the
masking fluid area. And your tissue. You can dap to
create the movement. And then you need
for that to dry before removing the
masking fluid totally. Okay. It has fully dried. So now we are going to
remove our masking fluid. You can see that we have the
three feathering effect. We were looking for. You see you have the
perfect contour of the way, sorry, of the crashing waves. Now, we're going to wet
slightly some areas because we want to put in some blue. The areas because we know that the foam is reflecting
the colors of the sky. And you have a very
light, delicate way. And then if you want, you can add your rock here. Just to give you an idea. And you can soften a bit of a tissue
working this way. Let's put in some more
color just to give you an idea of the contrast. And so you protected
your sky, for example, you could have had, I
know are very stormy sky. So that the white
off the phone and he's completely obtained
without using any dark color. I mean, without using any
strange or different though are very complicated
ways and you have the very feathery softer effect. And if you want to
accentuate that, you can use also the arm, obviously white gouache
on spotting them. And you will see in our final project that
has the sky is darker. It's a lot darker than this. In this case, the white of the form will be
even more evident. So before moving to
the final project, I want you to take confidence
with two method. To recap. The most important
thing is that you use masking fluid on
a wet surface if you want to obtain the wet
it feathery effect of the flow that you apply. The color in gradient moving always from
the darkest Spark, which is at the base
of the wave or at the Verizon towards you. So you have first
gradient from the horizon towards the, towards
the observer. And then we have a
second, Second gradient, which is darker under the wave and always towards the observer. Then you need to prepare some colors of the
sky to put in in your crashing waves because you want them to reflect the
colors of the sky as well. You can use the masking
fluid technique or you can use also
the tissue technique. Most important thing
is that you adopt at the correct time
and then you don't wait for the paper to be true, dry, otherwise, you won't be
successful in your dabbing. That said, you are ready to
go where the final product.
4. Elements of composition: Okay, so before moving on to the drawing and diving
into the final project, Let's talk about composition because when it
comes to painting, technique is just one of the elements that
you need to know. If you want to get a very
successful law resolved, pleasant to the eye
of the observer. You have to check
out also some rules. I'm rules of thumb
that you need to know. And one, for example, is the rule of thirds. So in this case, the horizon
seats at the lower third and the two-thirds more or less are Ralphie occupied by the sky? Then we have also the
shape of the composition. So we have the Lighthouse
stands at the left side and it creates a sort of
L. So in this case, this is a lighthouse. It's just like the
focal point and the eye of the observer is
drawn on the left side. And finally, we have
also the color elements. So for example, the roof
is red because red is a very contrasting color with the blue and the
white of the sky. And it leaves the
eye in the corner of the painting where the main
action is taking place. So before starting to paint, you need to plan in advance to end carefully your composition. And now that you know what
we're going to paint, Let's dive into
the main project.
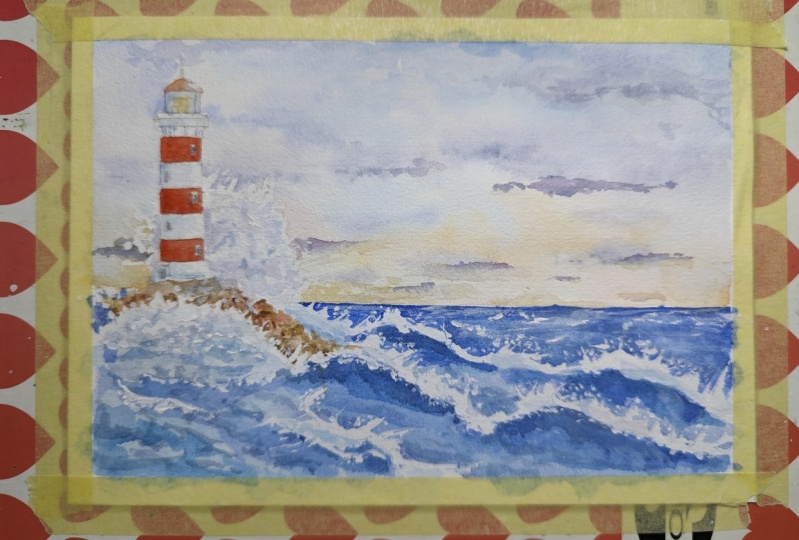
5. Final project: step 1 - the drawing: Okay, So now we're ready to draw our lighthouse
with our RC. So as for the sake
of composition, we're told that we discussed
in the previous segment. Let's say that we want to divide into two-thirds for the sky and 1 third roughly for the C. The whole favorite is 21, so it will be 14. And so this is more or less. And also here. And now we're going to
trace the horizon line, which is something that must be. Okay. So we're now going to make a quick
sketch of the rock. Maybe we can stay a bit
under the horizon line. Just a bit, sorry, just a bit lower. And don't worry about the shape of the rocks
because they will be partly hidden by by the
waves, crashing waves. So the most important things
that have been asked space, where the waves and o k. So we will have the
small house here. Then we will draw
the lighthouse. So if you want to
be really precise, you can usually, so
if this is the base, it's, let's say two centimeters
at one centimeters here. Using the masking
tape as a guide. The half is here, okay. Said one centimeter. So here we go. Okay. So it should be, let's say one centimeter, so it's half centimeter on
one side and often the other. And then you can trace your your line for the base off the lighthouse. Then we will trace also the software line just
to have something solid. Okay? And then we can go off. And always following
the half-life. This is the roof and have also the part inside them. Very intimate,
very, very simple. So you need to be precise
but something suggested. So it's also very far. It must be credible though, because it's a
man-made structure. And you must be precise
in your drawing, but don't get frustrated. The most important thing is
all about the atmosphere and movement of see the rough seas. So let's trace the waves. The waves are our focal point. I'm not really happy
with my horizon line. I think that I will delete. This white is important to use a very light pencil
when you are drawing. I'm using a to B. Okay, Let's go one centimeter
up from the bottom. From the upper part is ten
centimeter and a half. Centimeters and a half. Yeah. I wanted to stay a bit
higher because I want enough space to
trace my my waves. So as I was telling you, I am using a to B pencil, mechanical pencil because I want you to see
exactly what I'm doing wrong favorite sites for
just for this purpose. But if you are using, if you are drawing at home and you'll feel more
comfortable with a lighter touch or a
lighter pencil that, that is perfectly fine. So we will have, let's say, a focal point here. And we have two waves, one in this direction, and maybe even a bit higher. You will say, why should
I trace the waves if they are not something really precise because
they're moving. It's everything you
trace on your paper. It will serve you as guidance while painting so you know
that you will need to leave. For example, I'm tracing
the areas of fall. Sarah have a very precise idea of where I want my phone to be. And in this way, I will be more
precise afterwards. So this part is very important because it's in the front
and we have a big wave here. And also another
big way up here. And it becomes smaller. Then it becomes
speak again. Here. I want to really, really big. So we'll be using a lot of
different techniques in these in these tutorial. And I'm sure that in the end you will be
really satisfied. And then we have also the
trace also small window here, it's not really important
then we have the biggest way, which is the one
near the lighthouse. The one that will give
also a very nice effect. And in fact, I am using, I am tracing very, very lightly this part
because I don't want it to be too thick. Even if when I will be
applying my masking fluid, then I will remove that April. Okay. But anyway,
stay as light as possible in this area
because, you know, what quality is very transparent and we
don't want to have any pencil size once
we are, we are done. So what I should do now
is to lighten my drawing, but I will leave that even
if it's a bit too hard, It's a bit too dark because I want you to see exactly what I'm doing and any way I will
be putting masking fluid on. So when removing
my masking fluid, I'm sure that the pencil lines will be lighter and it
should be no problem at all. But if you want, you can, you can
do, for example, you can take your putting
rubber and just roll it on your drawing just to
have it lighter or dust move. Very, very likely. Anyway, IM doing that. Just to show you, I
did that just to show you how to lighten
your pencil lines, but I just want them to
be a bit more darker. So don't want to
lose my guidance. So now that we're
done with the drawer, when we move to the next step, which is the masking fluid part, which is very, very important. And we must be very
careful because they eat, will be the foundation
of all our watercolor.
6. Final project: step 2- masking fluid: Okay, now we're ready to use our masking fluid
just so first of all, use your old ruined brushes. Have your water at their
Eddie, have also brush. Clean brush that you use
n Of course you have your masking fluid by your side. So first things first, we're going to apply the masking
fluid on our lighthouse. And in this case I will
be using my small brush. Okay, so first thing first before applying the masking
fluid, this is water. We're going to do. So we're going to take our salt. They're going to rub
our brush on our salt. In this way, we are going
to protect the basal side. It will end all gummed up. In this way equal. You're going to try to
to prolong his lifespan. And then we're going to dip
it into our masking fluid. And we are masking
the lighthouse. This is important because we want the area behind
the lighthouse dark, because the lighthouse
is almost white. As I told you before. Talking about the elements
of composition in this way we have
something contrasting. And it is a very good
idea to have to protect the lighthouse so
that you can find your sky easily
without any concern. And then you can go on in
a very tranquil place. So as I told you before, we are going to take the
best of both worlds, both masking fluid and
without masking fluid. And in this case, I'm going to mask this way. These are sorry,
These crashing way, the foam in this area. Why I will not mask all these
other waves that I have. But if you prefer, if you find a more comfortable, feel free to mask out
also the alpha waves. I encourage any way
to practice with the two ways of masking
and especially in the technique thanks to which
you can paint your phones without any masking
fluid because the result is more natural
anyway in this case, and just in this case I'm
going to apply masking fluid. So I'm wetting the area that I want to be
covered by the phone. Really all the area. And I want that to
be very, very wet. I will go a bit further. So even if my y just want
my phone to stop here, I just wet it a bit more because I want it
to spread very easily. So I'm always taking
my brush and you see it spreads very natural way. And it is something
that I really like because it gives
a very natural effect. Now, I will also splatter beat off masking fluid
here and there. Because once we remove that, we will have some
very nice white area without doing too many of them, because otherwise it
will be too much. You find that there
are some places where you can encourage them to go. That's fine. And now we have to
wait for it to be totally dry before
starting to bind to. So if you don't like some
splashes here and there, once it has fully dry, you can just remove it. So I just in case I mean, you discover that you put the masking fluid and
places to do it and what? It's not a big deal because
you can just wait for that to be dry and then remove
it with no issues. So let's see, let's move
on to the next step. And then we will start
with the sky colors.
7. Final project: step 3- the sky: Okay. So it has totally dry. I just want to remove this drop off masking fluid
because I don't like that. It's too obvious, too big. And now we are ready
to start with the sky. So let's mix the
colors for the sky. Is I told you before, I just want to put a very light touch of Naples
yellow towards the horizon. Really liked it. And my Naples yellow has
really laid off red in it. But I want it to come sit down
with a bit of raw sienna. And then I will be
using ultramarine blue. Also for the implied here, ultramarine blue. And I want also
certainly in blue, I have my alias cerulean, as I told you before it some
more bright version of the. So really I'm blue
and I really like it because it gives some
boost in my sky. I will have also a
Beta of red ocher. Just because I like
this color so much. I find it very useful. So for sky tint because it keeps very bright and clean grace, but if you prefer, you can use also bit
of burnt sienna. I will put up just a
teeny tiny bit here. And I will be mixing. I don't know, it depends. Ultramarine or cobalt blue and burnt sienna or red
ocher to get my grades. And what else? Subito of permanent coming? Yes. My red color B. Okay. So just a quick recap. Because I was a bit
out of Commerce. We have Naples yellow. I dropped too much of it, just a teeny tiny bit. Then we have raw
sienna, burnt sienna, red ocher and permanent Kami or rose matter,
whatever you like. Ultramarine blue and my
alias cerulean blue. And I want also bit
of cobalt blue. And it will be in this position, just a teeny tiny bit. So now that I have all of
my colors in my palette, I will start to mix the
colors for the sky. So first of all, we need something very
light for the site. I'm just cleaning my I just
want my Naples yellow. Let's make this white and
then my Naples yellow. A bit of raw sienna. More of a yellow. You see warmer version. Slide. Some awesome theory. These color, which is very opaque color because
it's going to Naples, yellow has white in it. I really like it because
it gives to the sky just hygiene or
something more special, let's say a very special light. Especially when we have storms, then we are going
to mix cobalt blue. Later beat off very, very small lead off. My permanent calming. And let's start raw sienna,
sorry, burnt sienna. Teeny tiny bit. So that I get these color, which is a very
nice purple color. If you wanted more gray, add more burnt sienna to
your coal blue mixture. I'm preparing a bit
more because I see that this is too much too
much money county wishes to powerful
when you need them. I need to use it very sparingly. Okay. Let's see if
it's dark enough. Okay. More bluish gray. I really like this color for my sky with the clouds
because as there is, they're off see, so we have some dark clouds from
a previous store. Then we're going to mix
ultramarine blue with my towel. Sorry, my cerulean blue. And we get this
very powerful tint. More ultramarine, just
to darken that a bit. Okay. So here we go. You're now ready. If you want, you can
incline the board. Prefer. It's something
that you can do. I will be using a soft brush, like a squirrel
brush and mutation. You can use also something
like this to wet my paper and I think I'll
use this one, this one. This one will be enough.
And I want also some smaller points for the Cloud. And I have also my flat
brush handy because I want to paint the clouds also using
that eat will depend. So. Okay. Let's bring some clean water
and let's put in the forest. So remember, we want to go a bit darker underneath
behind the fault. And I am waiting in
a very random way. Because if I have some harsh
lines or some white areas, it will be something very
welcome in this kind of skies. And so you see, the most important thing is that you don't go below
the horizon line. Be very careful because
that is the only place where we don't want we don't
want water to go over there. So always using
It's a bit too big. This one, like it's
a smaller brush. And let's start with
our mix of Naples, yellow and raw sienna. And let's paint beneath it behind the lighthouse. So don't worry, if you are going To up too far though,
don't be aware of that. Don't be worried about that
because if you connect this with the upper part, we will get a gray color. So it's something really I mean, we need to be precise
but not that much. And if not, don't worry because the colors can
mix together very well. And you won't get any, any dark or strange
fluttering in your sky. So let's go on with this kind
of hit and miss the fact. Stay like this. And maybe I want to take the brush that I used before to mix the
color or the nose. So this one is a bit too dark. And we can put in
some dark at the very top just to increase the
area of perspective. And then I will use this smaller brush and pick
up my violet purple color. And Putin the ah, gray clouds. Sorry, I prepared two. Not that much. Okay, So here we go. We have more blue, a bit of raw sienna. Let's go with ultramarine blue. Let's check the quality. Yes, that's more
or less the same. So let's put in thousands. So here behind the lighthouse will have a very nice effect. Ovaries almost dry,
so it's very hot. This route. So to be sure that you have a very nice effect,
use clean water. Wet your sky until the base of the cloud that
you have already e1. Otherwise you'll end
up with flowers. Then let's put in with the
very tip of the brush, some clouds on the
horizon in this way. Also, here. You will have a very
nice aerial perspective. And if you want, you can add a bit of dark
color. Also the top. Okay, Now, you can encourage the movement of your
clouds and correct them that they need albedo file. And you can add some few
clouds here and there. But don't cover all of your sky. The only thing that we
have to check is that behind this form area, we have enough contrast. And if you want to be more color towards the horizon,
you can do that. But you have to work quickly
because if paper is drying, then you can use, you cannot add anything else. Or you will end up
with a poly flowers. And a very bad result, which is something
we don't want. Okay. I think that our
sky is completed. I am really pleased also with this contrast between very
soft edges and also hard ones. And so I think that
although we have to do is to wait for
that to be totally dry, if you think you need some more polarizing some
area, you can do that. Okay, I will stop. If colors are separating, you see different shades
are really nice and pleasant to see in
the sky because they represented different
colors of the clouds. And when it will be totally dry, we will move on and
let's Google start to tackle the lighthouse and
then the C and the foam.
8. Final project:step 4- the lighthouse: Okay, So as the sky
has completely dry, now we can start painting the lighthouse and then
we will move to the to the c. So first thing
first what we are trying to remove the masking
fluid from the lighthouse. And please be careful because
we don't want to remove the masking fluid from
the foam area, wanting to be clean, protected. Remove the masking fluid and
using your fingers as I'm doing for you can use
also your pretty rapidly. Sometimes we need
to scratch a bit. Since I told you before
the pencil lines, I'm almost lady by
the masking fluid. I'm using my need a bit. Okay. Anyway, this portion of the house will be shut
off, so no big deal. Anyway. Let's try to clean this area. Little bit of plain water and
then dabbing your tissue. So if it happens that you paint even in a place
you didn't want to, you can just clean this way. So before we start,
there's some very, very small thing to do that
is to prepare the color. And then I want you to have ND, also your very small
brushes because we will have to pay the
details of the lighthouse. So if you have something really small with a
very smaller point, and now it's time
to wrap this up. That S where the color
is off the lighthouse. We want something
very contrasting. And I've chosen the red color because I think they've read is a very good color to put in. The blue of the sky and the
blue of the, of the seat. It's very contrasting
if you like. Permanent timing is fine, otherwise you can use another
red color of your choice, can be scarlet red, or you can add a
bit of red ocher or burnt sienna to have it more of a terracotta
color as I'm doing. I'm mixing my colors here, okay? Now I had a bit of permanent
coming in my palette and I'm adding a bit of burnt sienna just
to have it more. I'm brownish color. You can add also a bit of raw sienna if you want
more of a yellow color. Now we're going to
paint wet on dry. I must be very, very careful. You want to paint just
the front, the top part, and then it clean water, dragging the color
on the other side. So there is a bit too
much water on my brush. Let's go back to my car
is a bit too watery. Want it to be more
concentrated, okay. So try to keep this part
of the lighthouse light. While these bright, this darker. You can put in also bit
of ultramarine blue. As we say, that the light is
coming from the right side. So this area will be in shadow. And then using also a
bit of permanent Tommy. We're painting the
very top of the roof. Then we have the
two columns inside the body of the lighthouse. And then we prepare a bit off. Shadow color using ultramarine blue and a beta of
permanent County. We have this nice purple
color put in a bit more on this side here and at
the base of the lighthouse. So now it's time to paint
the body of the light house. So we will paint with fresh follows because
we cannot use these ones. So first of all, let's have plenty of
our shadow color, which is made of ultramarine
blue and permanent Kami. And I want it to be good amount because there will
be some shadow to date and they want to use
this same color also later. So we have this very dark blue, bluish, purple color
that you can see here. Then I want you to mix the
colors for the lighthouse. So let's clean my palette
from the unwanted colors. So the lighthouse, we have to different colors,
mix it together. So a bit of raw sienna. And I ran out of that. So I'm going to take
a bit of raw sienna. And we put in also a bit of the purple color that we just prepared and I
think it will be enough. So first thing first, we are going to wet the body, the lighthouse. So we will take a bit of raw sienna, very diluted here. And we put in starting
from left side. And we're dragging our
color towards the, sorry, first from left to right. And be careful because we don't want to
have the colors too. To be too dark. We want to leave a white area, almost white area on this side. And then as it is still wet, we will take our purple color. And putting the shite. We are doing this
while it's still wet. Because in this way we will get perfect diffusion
of the peripheral. And it will get the round
shape that we want to achieve. And then we are going to put
in the shadow or the base, the very top of the lighthouse. So you think it's
too light within some more color, just right now, which is the right
time, becomes too dry. And always very carefully. Move the color towards
the right area. And now we have to go back
to the top to the roof of the of the lighthouse because it is too light and I
don't like that sound. We choose a smaller brush
are very, very small one. And maybe it'd be more
concentrated color. I've put in some more. I wanted to be really bright. And now with my purple color, the color of the
shadow. Go back. Yeah. And always using shadow color, laundry line, the structure of the lighthouse in
a very subtle way. Then we have to wait for that to dry before adding
the other details. And so we are going to
paint the rocks in. Then we will start to tackle
all the area of the sea. And so let's prepare the
colors for the, for the rocks. So let's go back to our palette. And something want to
swatch my painting so I will be using burnt sienna. I have burnt sienna
on my palette, but it's almost water
because I've added that. So let's put some
burnt sienna here. I still have my ultramarine blue and I will be mixing them to get the
very dark brown color. I'm not using any
Van **** brown or burnt umber because I like to obtain my color from my limited palette in
any way if you want, you can use, I'm a bit of burnt
umber or Quantic Boehner. I'm adding a bit of cobalt blue because
cobalt blue granulate in a very nice way and with my burnt sienna would give me
some more texture my rocks, even if the rock side
dust as small line. And then I have to prepare
the colors for light. We think that we get a
bit more off red ocher. And just a teeny tiny bit. I will put it a bit. Okay. So now we're ready to go. Before starting, we need
to ensure the lighthouse, the base of the lighthouse
is completely dry. So we will take a bit of raw sienna as the
base and I want it to be my light value. And I'm putting here, then I will add a bit of burnt
sienna exactly as it is. I want the car to make
sense on paper because sometimes they have
very nice effect and then I need my dark values. So I'm using cobalt blue and mix it with burnt sienna to
get these very chocolatey. Yes, let's say chocolate brown. And if I want a
bit darker value, I can use cobalt
blue, ultramarine. And let's say a bit of red
ocher and burnt sienna. So let's add a bit more of that. Burnt sienna to the
first one so that we get two different
shades of brown. So we have this one and we have also this one
which is darker in both. They will give a nice
texture on my rocks. We need to consider wrong thing so that we have the base of the way at the base of these rocks. So we need to clean
with clean water. We need to soften the edges. And then we're going
to use a small brush. I think I'll use this one. And with my dark values, with my dark grounds, are we putting some structure in my rocks just to give
a bit more dimension? And you find neat. I can put in some very
dark elements here. But the most important
thing is that I, I keep the lower part very soft. Then it's time to paint the
inside of these small window. I'm using a very dark
brown that I prepared with ultramarine blue
and burnt sienna. And I can put in more of the shadow of the lower
part of the lighthouse. Then we can put in the lower part of the the insights. So let's take a bit of
cerulean blue Berkley one. Let's suggest an ID outside. Then with a beautiful sienna. Painted the small house. And with power, purple color that the one
that you use for the shadow. The sounds is old,
musty shadowed, so we can go with one color over the
other without any fear. You think it's too dark. You can take it up
either way with a tissue so that you create also a
bit of texture in the house. And then while we are
waiting for that to dry, we are going to prepare
a bit of green. And I'm using my
dollar green is I want the very inside of
this lighthouse to be, to have a sort of green element. And take a very, very small amount of free, putting the very
corner of my palette. And he doesn't really matter what kind of green
you're going to use. Just dilute it. We will paint very insight central column, the very contrasting color. Okay, then, so I'm checked
if this part okay, is dry so we can put in the
with the purple or sorry, with the dark brown. We can put in a
line number group and a hint for the
small, the small window. Then we will add some
details here and there. We have there a way ending here. And also here. Okay, so the lighthouse is
completed and the rocks also. So now we're ready
to find the c, But before we have to
stop because we want this part to be completely
dry before moving on.
9. Final project: step 5 the sea: Okay, Now you're ready for the most complicated but
also more exciting part of this tutorial wishes the C S, where the color is, I will mix them on another
clean palette. I still have the other one
that previous that I used before because I will need probably also some
colors from here. And as I don't want to waste all the color
that I already had, I just do another one also because I think that
it's a good idea to keep the two the two colors
divided them in separated water on one side and all the other
elements of the offer, our landscape on the other one. So before starting, we are going to mix and
prepare our colors. And we will have a very dark
blue at the horizon so that we have a very high contrast
between the sky and the sea. And also because it
happens to be in this way, it all in nature also. And I will be mixing ultramarine blue and have a bit of the ultramarine blue on my palette. Also, we've tallow blue. Now I'm going to put in all
the colors that I will need. Let's say here, I've
titled blue is darker, darker tone of blue. And if you don't have
title blue, you can use, let's say, then train
a blue or if you want also in Diigo now using
also tyler green. Because it's something
that we will use to win some green because the
water is not just blue, It's also green as well. And also cadmium orange. Just a very teeny tiny beads. And I'm putting my orange on the other side
of the palette. And I'm using just a bit to get the green that I want because
the C yeast rough and I, so we won't have that
transparent green. We have, for example,
on tropical seas. So for the horizon
line and this part, we will mix ultramarine
blue and a bit of tau. Then we get a very
nice dark shade. And let's say that maybe
I'm adding also a bit off. I have my other palette here. I'm going to take a bit of permanent carmine so that I get are also these
purplish shade, something that recalls
the colors of the sky. And you see it's a
very bluish purply, not exactly, but
very dark blue area. And that would be enough
for the for this part. But at the same time we will start to remove the
masking fluid or also from the main crashing wave on the rocks and
on the lighthouse. So we will have to be prepared and have ND also the colors that we
used for this case. So the shadow color, the
purple color that we mixed a beat off, the colors of the sky that is ultramarine blue
and cerulean blue. I have this cerulean blue
which is very strong. But anyway, as I told you in the technical part of the water, they form some a little
particles of forms. We reflect the
colors of the sky. And we want to underline the, the color that we have. We want to underline
the reflection. We will need all of them
and maybe we will use also beat off this
Naples yellow as well, because it makes us very well
with the color of water. And it gives a very
nice impression. Oh sorry. So let's start
removing the masking noise. And says we use
contrasting color. All around our form area. We get a very nice, clean free for February shape. That is something
that we really like. So maybe if there is some
fancy pencil lines, 312. Remove everything very nicely you can use also you're putting
rubber as I'm doing here. So first thing first, I recommend you to have
clean water it handy because we don't want to have any strange
colors in our faults. So before wetting the area, clean off your brush, have your paper towel
very close to you. And what we're going to
do is to just to wet all these area because
we are going to build the movement of water. So here we have also, I have my smaller brush. Now I'm going to
take the colors that I told you before that
were present in our sky. So let's start with
our purple color. Thing must be very light because we want to create
the impression of shadows. Now we're going to take a
bit of Naples yellow also. And of course, means that these rays rinse your brush between one
color and the other. A better mood. Ultramarine blue. Now we will go back. It's some splashes. So don't, don't
exaggerate the mean. If you see that it's two op, using some points,
just soften that. We will go back also with some white goulash
or the very end. But we need to build this
fluffy idea of the wave crushing very powerful way on the lighthouse. And also this area will be
if it needs to be softened, you can try with
your stiff brush, clean water, stiff brush. And you can rabbits and then the paper towel. Okay. And while it's still wet, maybe you want to put in some color to give it a bit of movement. As you see, the colors
that I'm using are really, really soft because
it's mainly white. But we will have
also some bartering after the beta of the
other colors that we used. Now, be careful, Be ready. Have enough color, maybe. Prepare a bit more. Okay, Now we're going
to proceed in this way. We will work at first, dry on wet, wet on dry. We will be aware of this area that we need to keep very soft. And we will start with the more intense color
here and we'll create it, create a gradient moving towards these edge of the, of the way. Sorry, I have some pencil lines that I don't want to be visible. They are just a guidance, but they need to disappear. And have your a paper towel in one hand because
we are going to soften the color of
the color just more or less at the very beginning of
this contour of the waves. And we will have to
drag the color in a very soft way in order
to create a gradient, as I showed you in the
technique of bonds. So be careful also when
painting the horizon line. And you need to go straight. East, few leaves, some
whitespaces, that's good. That's because we want this
area must be softened. Dilute your water. You want it to be really soften. Now with your brush. Just create the movement. If you think it's too weak
this color you can add. Some more dark. It says it will be a request
for leave some white areas. That's fine in the form that
we see in the very far end. Now, we're creating the
gradient coming down here. Okay? So maybe you need to go darker. And then you need to soften at the very base and just stop dark what your tissue. Now maybe you want some darker area here is to create a bit
more movement. Maybe it's always ultramarine
blue and a bit off. I'm an incoming. Do not exaggerate
and keep it soft. Soft as possible. Now, we have to repeat the
process for these spot. But I want to change the color of the color of water is likely. If you see that you have
some harsh lines forming, tried to adopt and keep
them as soft as possible. Anyway, keep in mind
that we will use also white goulash or
spotting in this area. So let's create
the other colors. So we have green
Calibri or tallow blue. Mixing them. Maybe more fallow green. And a teeny-tiny
beat off my orange. So you see we get
these nice dark color. That is a very nice bluey green, very dark one. And I want this color
to be a bit thick because I just wanted to create
the gradient that I want. So I am going to wet the
area under my way now. And I have to keep
in mind there. I am going to to
create some movement. So we want a feathery atmosphere and sorry, feathery edge. So we are moving. See very concentrated,
but very also very feathery and soft. And now clean my brush and absorb the color to
create the gradient. Some more color on the way. But here we have to keep
it very, very soft. So let's go in and
dab with a tissue. Let's repeat the process. So across the
length of the wave. And then at the very base, go in your color. Okay, so let's try
to keep very soft, also the lower edge. So rinse your brush and
go back with clean water. We create the impression
of another way. So let's put in, let's make some more color
that is duller, blue, green. Orange. Ibm orange. And let's repeat the
process so wet with clean water in some color and keep moisture and very, very soft and your tissue. Now we're approaching
the other part. Let's do the other big way. Now. We will go in peace. So we will leave this area
white for the moment. If you think that
it's a bit too light, you can go back as
it's still wet. I can add some color, maybe some more blue. And then you can soften. You see it's more or
less the same technique. We got a harsh line here. I'm trying to grab it
with my stiff brush. You see we get a
very feathery edge, which is something that we want. So you can use this
technique also easily want to smudge the, you lift the color away. For these kinds of process. Saunders Waterford to me, is the most beautiful paper
because it can it allows you to correct or to change things very easily while
you're painting. But since we choose, I mean, from what the
paper that you prefer. And now just go back
with my that way. And we will prepare
for the very big one. We were wet very well. We will leave the whitespaces, but we'll paint very well. This area. Not until the end because we will do a bit of dry
brush work as well. So if you haven't
got enough color, just put in some more
paper, some more. Orange. And maybe I need a bit
more phthalo blue. Painting water is
something very rewarding, but you use a lot of color. So let's start far from the, let's say the contour. Maybe this part can
be also lighter. So let's lift a bit of color just to create
some more movement. If you let if you start
on the lower part, water reflow to where? To the upper area where you wet your paper and it will
create light itself. The movement that you're
trying to give to water. And as we see, putting some water at
the edges will give you the right feathery
edge, feather. This nice surface that you
need without any effort. So lets the water help you
and let it work for you. So you don't need
to be very precise because the waves or
something not predictable. So on my paper I have
this shape of the way, but you can have
a different one. Also. So we are calming. We're approaching
the very front. So I think I like to have
something stronger as a color here to be
the impression. The way. And now
I'm going to use the pure color as it is to create the
impressions of the Nazi. But no, I'm using all the colors also, ultramarine blue as well. I want to increase the
density and the dark swipes. And you see it's
still really wet. Just something nice. Now, we can drop our tissue. If you need to clean
some areas because they are too harsh. You can go back to
your stiff brush here. And you see the foam is
almost fainted by itself, so need to do anything. So I think that I
will put in a bit of the shadow color that
we used before to make this area even darker. And I will add also
lead off orange. And you saw more of talent. Blue. Knight has become brown, which is something
that I don't want. But okay, So taller
blue and green, dark green and orange was
already on my product. And try to create the
movement of the sea. Still wet. Now it's not still wet. So I have to solve them that you need to soften. It depends really
on many things. It depends on how hot is in
your room you're painting. It depends on whether sorry. Yes, I think that we are done. So let's stop here. Sorry. You're doing an apology. Was saying let's stop here and we would go back
when he tests fully dry.
10. Final project: step 6- final touches: Okay, So we are really
close to the end. Now we have just our
finishing touches. So first of all, I noticed that the shadow
here is that a bit too light. So I'm going to re-wet my
area with some clean water. And I'm going to take a
bit of my shadow color that I prefer before mixing ultramarine blue and
permanent coming in, I am applying another wash
because I want it to be a bit stronger so that my
painting has a bit more depth. I'm adding a bit of shadow
also on this part of the roof. Now you see that it
has become really cylindrical and it
is really lightened. Have a nice translation. I'm adding clean water. Okay. And I am sure it will be fine
once it has fully dried. A bit of shadows. So in the upper part as well. A bit of shadow also
knew the inside. Now, what we have to do is to add a bit of
structure to our rocks. And if you have a bit of the dark brown
that we use before, you don't want to
reactivate our color. And with a bit of dry brush work some nice sharp dark elements to increase the
structure of the rocks. Not too many dots are there
because we want to give the idea went and
shadow as well. Now, we have to go
back to this way, to this light area. We are going to wet
with clean water. The tip of the brush. We're going to put in some
colors as we did before. A bit of Naples, yellow, ultramarine blue, too strong. Let's soften it. And a
bit of the purple color. So if you have run out
of the car as I am, just quickly, once again, so it was ultramarine
blue and providing comic. That's just you. We want to eat away. A bit of structure
if we're putting our white wash on
top and soften, always soften with clean water. And then as I've noticed that this area
is a bit too evident, just want to cover it a bit. I'm using the mixture
of blue and I'm sorry, I had to make the mixture
of tau blue, yellow, green and a bit of cadmium
orange color here and there. And soften it very, very lightly with
clean water until I meet the edge of my way because I don't
want any harsh lines. So creating the gradient. As I told you before. And if that is your case, you can soften that a
little bit of tissue. Okay. Now, why it is trying the
upper part, I'm adding some. Texture to the slide. And then softening. Always adding clean water. And wanted to be more
dark area also. Yeah. So this time on Wednesday, then softening, maybe in your thighs. This wasn't necessarily
because you had a very strong here or
dark value as well. So now why it is drying? I will prepare two things. So one is my tissue or paper towel because
I want to cover sky, the lighthouse, because
I am going to spotter my flush and I don't want to help white
gouache in the sky. But we will be spattering also
purple color around here. So be prepared. I'm using the paper towel
that I've used before, but you can use also
something else. Okay. In this way, it should
be more or less all covered in then with
our white brush. I usually placed white
goulash in one of the corner of my AT on
the tape because I don't want that to go on
my palette and mix with my colors because they
will become really opaque. And this is something
that I don't take. A stiff brush that could be
the one that you use for your masking fluid or also
these were flat brush. I have two of them. So I will start with a
flat brush because to meet somebody that served
the purpose will be better. Anyway, I am diluting
not that much. My my brush and I'm spattering all the
rocks on the very front. Really have fun with this. Try more or less to follow
the direction of the waves. Don't overdo this,
but let me try to be fair to cover the
most important areas. Okay, I think that this
is enough so we are going to add some
sort some color. Also. We're going to spot it clean, thoroughly your brush
from the brush. And now I want to
spotter a bit of the purple colored this area. So just around. And also a bit off. You have this will give a bit more structure
and it would be, you know, something
more credible because water is reflecting
all the colors of this guy. It's not just one
that we are done. Maybe just I'll lead to
veto and peripheral. Be very careful because
there is no protection on the lighthouse
and we don't want to smudge all the things
that we've done. And now we have to add a bit
of white also to the waves. This time we're going
to use the brush. Always use the white goulash. You can add a bit
of the details. You think they are unnecessary. Size or white. And maybe a bit also under yeah. But try to use as, let's say, not diluted. Because in this way it
will be more realistic. We'll give more of the
idea of the way and try to follow the movement of the sea. Vary randomly. And I think that we
can call it finished. And the only thing that you
need to do, maybe more white. Strongest. Increase the intensity of white. If you think that
it's necessary, like maybe some spattering
also in this side. Okay. And now we are finished and
leave it to dry completely. And we'll see you
in a minute where a quick recap of the most important thing
that we learned today.
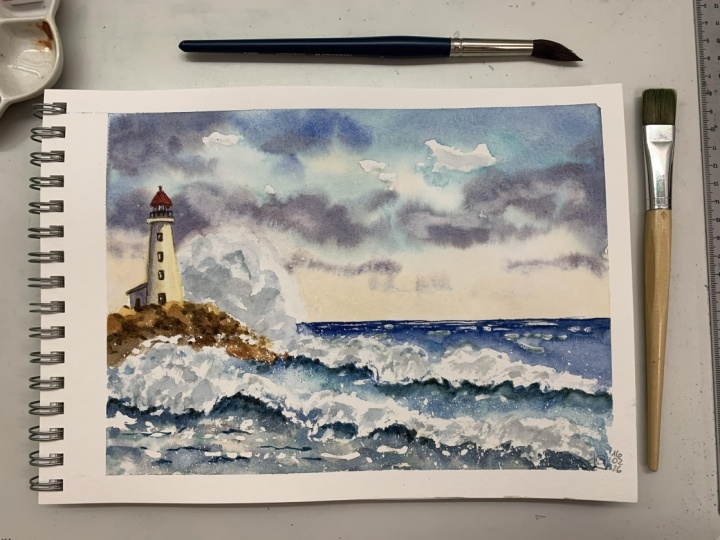
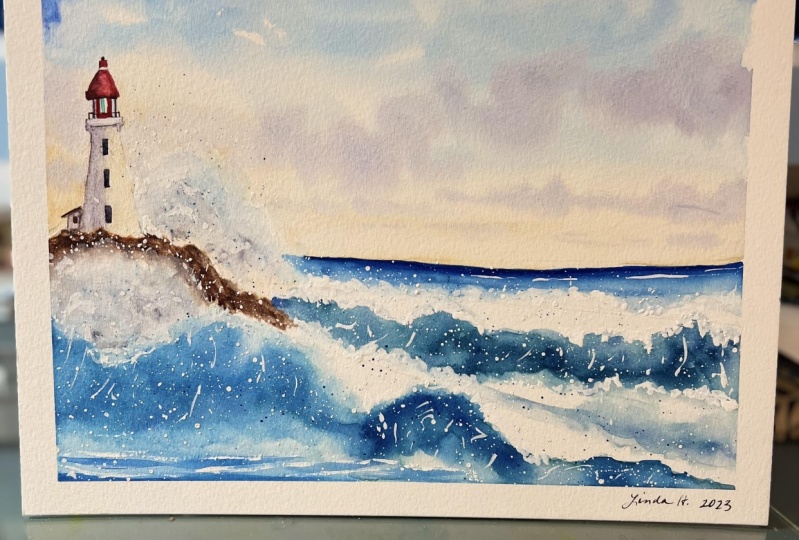
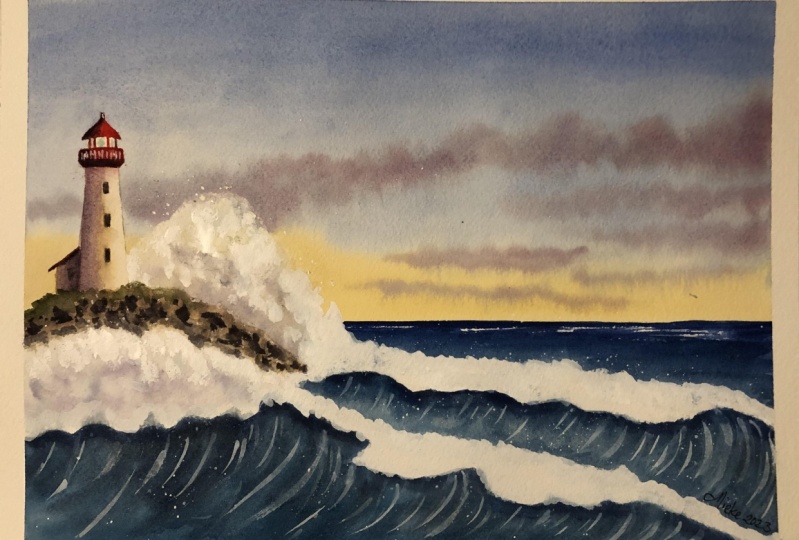
11. Final thoughts : This column at the very end
of this lesson and adjuster, I wanted to share
some final thoughts. This is our final result. We've seen how to find ways with and
without masking fluid. We also had a very kills off to some key elements of
composition we learned, which are the most
suitable colors for a stormy sky full of light and where the columns
are painting a rough sea. And we've seen also how to make proper use
of white goulash. So I'm really looking forward to seeing your projects
and you find them. And if you'd like, you can follow me
on my social media. You will find the
link and micro fight. I hope to see you soon
for my next test. If you're less than any of the meantime, happy
painting everyone.
 Eleonora Serra, Italian watercolorist