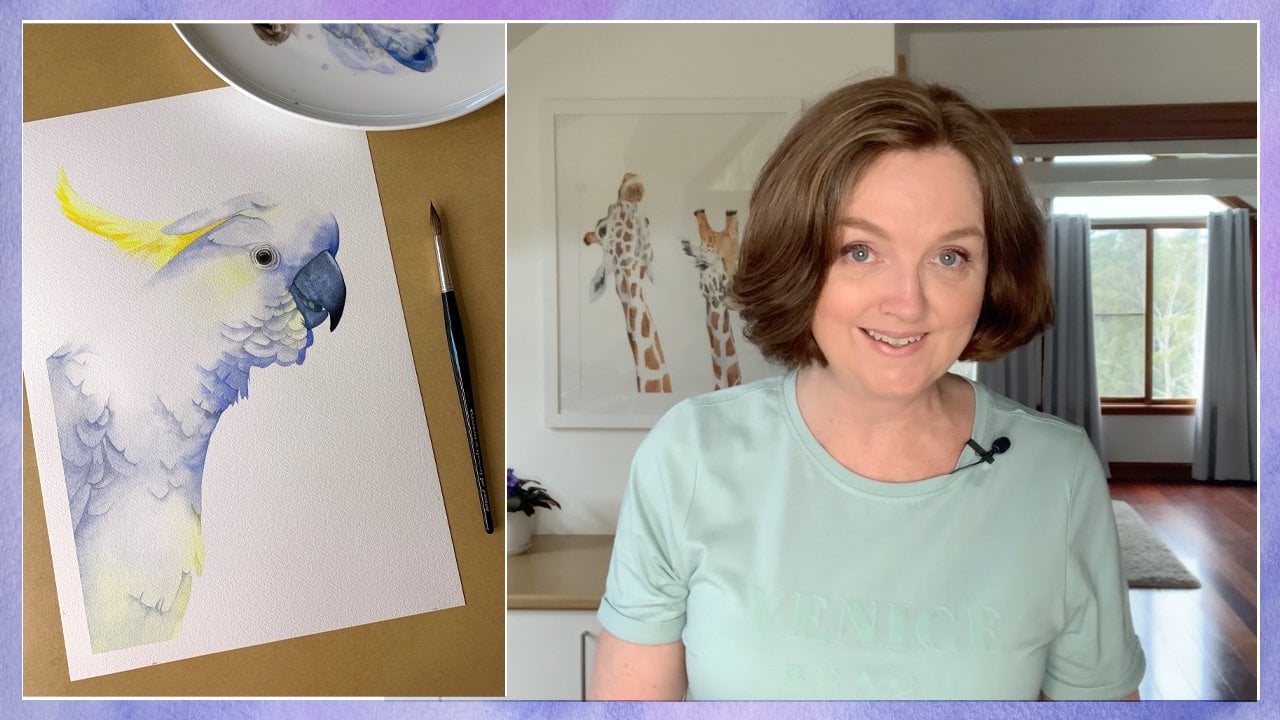
Transcripts
1. Trailer: Hi, my name is Louise. I'm a professional artist and I specialize in painting in watercolor. I've used other mediums over the years, but nothing compares to the wonder of painting in watercolor. It's a lively, unpredictable, and irresistible medium that never fails to satisfy. One of the subjects I really enjoyed painting are flowers. In this class, we're going to paint a beautiful rose from my garden. The main theme of this class is to focus on the external edges of the rose so that we can learn to create some depth and some dimension in our paintings. Edges are a really important element of a successful painting and being aware of how those edges can help us create more form and more depth in our subject is an important skill to learn. Another way we can create depth in our paintings is to use the element of contrast. This rose painting will demonstrate that to you quite well. I'll take you step-by-step through my painting process so that you can follow along and paint the rose with me. I'll provide the reference photo, the line drawing, some progress photos of my painting and my completed painting for you to download. If you're ready to improve your painting skills, grab your paints and brushes and let's get started.
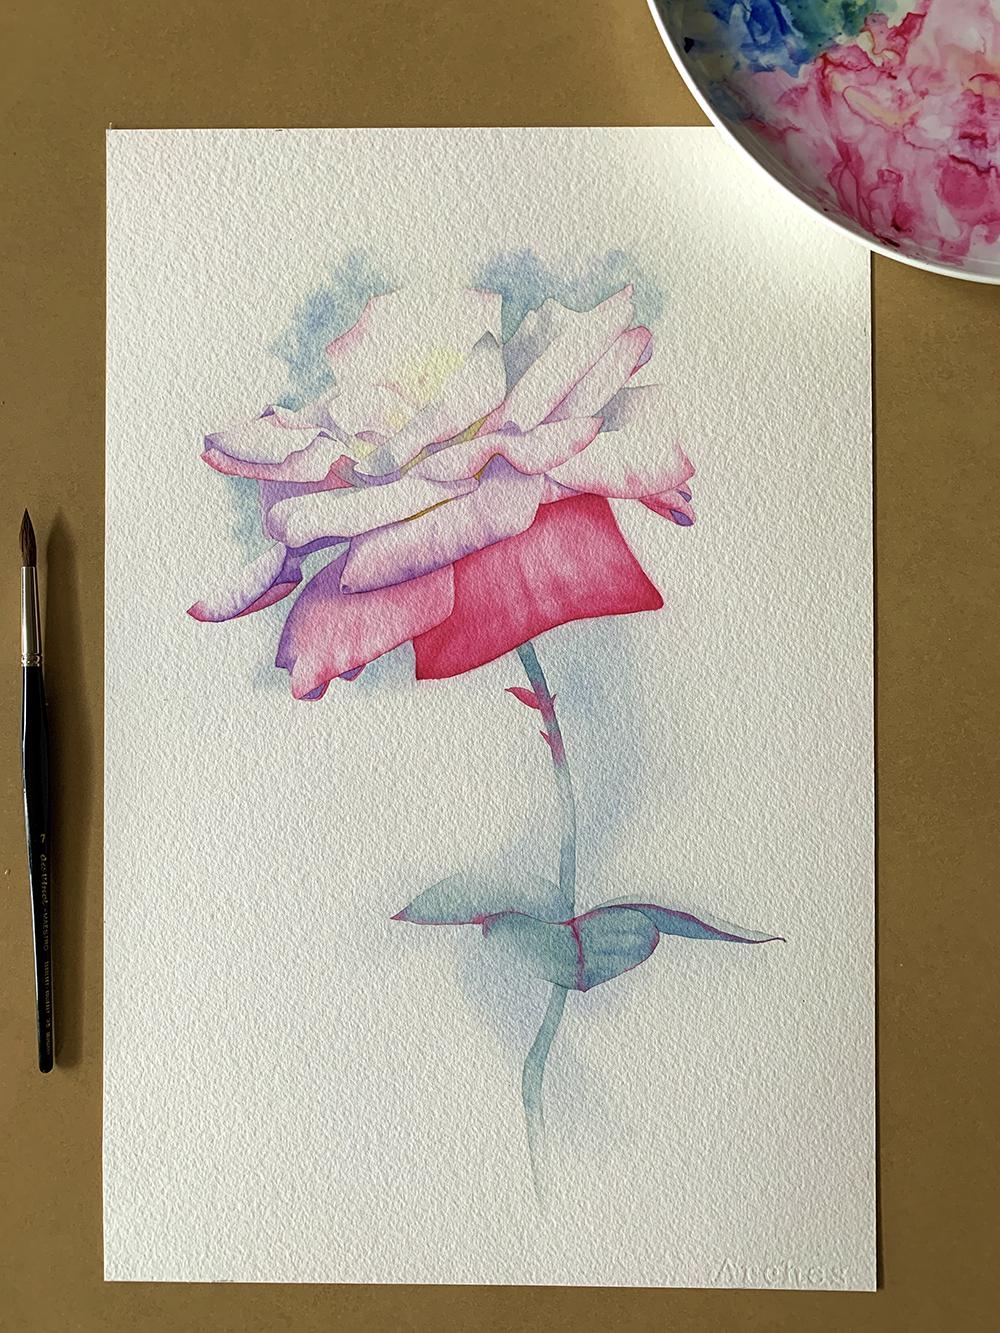
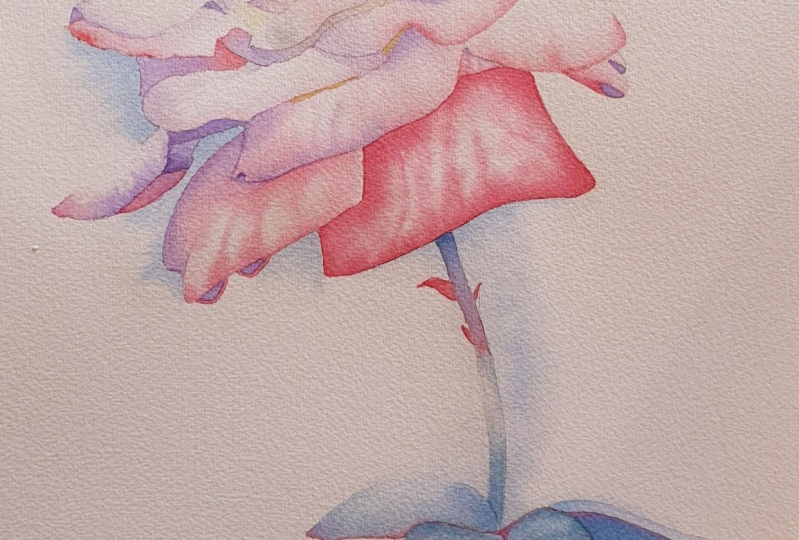
2. Welcome and Information About the Class: Hi everyone. I'm Louise, welcome to my class. In this class, we're going to paint a really pretty rose that I grew in my garden. What I want to focus on is creating lost edges to increase the sense of dimension and to also create some depth in the painting. A lost edge is one where the edge disappears into the background because the edge is got the same value as the background. Value refers to the lightness and darkness of something. Don't worry, it will become clearer when you start watching the videos. Up until recently when I was painting, I would focus on my internal edges, so the edges within my subject and I neglected to think about the external edges of my subject. All of my external edges on my subjects on my older paintings were hard. When you paint like that, your subject tends to look more flat on the paper. I did some reading and I learned that I should also pay attention to the external edges of my subject and I should be creating a variety of external edges as well. Since I read that, I've been starting to pay attention to those outer edges and I feel that my paintings have started to improve. I wanted to share this with you, so I painted this rose. On this rose, you'll see that some of the external edges are lost, meaning there is no edge. The edge fades off into the background. By doing that, I've increased the sense of depth and form on the rose. The other thing I've done on this painting to create depth is I've made use of the element of contrast. Here on the front of the rose, the colors on these petals are much more vibrant and intense than the colors on the petals at the back of the rose. That helps to bring the front of the rose forward and push the back of the rose back. One thing I want to draw your attention to before you start is the line drawing. I've deliberately not drawn those lost edges in. When you put the line-drawing on your paper, leave those sections of the edges blank like I have and that will remind you where the lost edges are. In the next video, I'm going to show you all of the supplies that I used and then we can start painting. Okay, have fun.
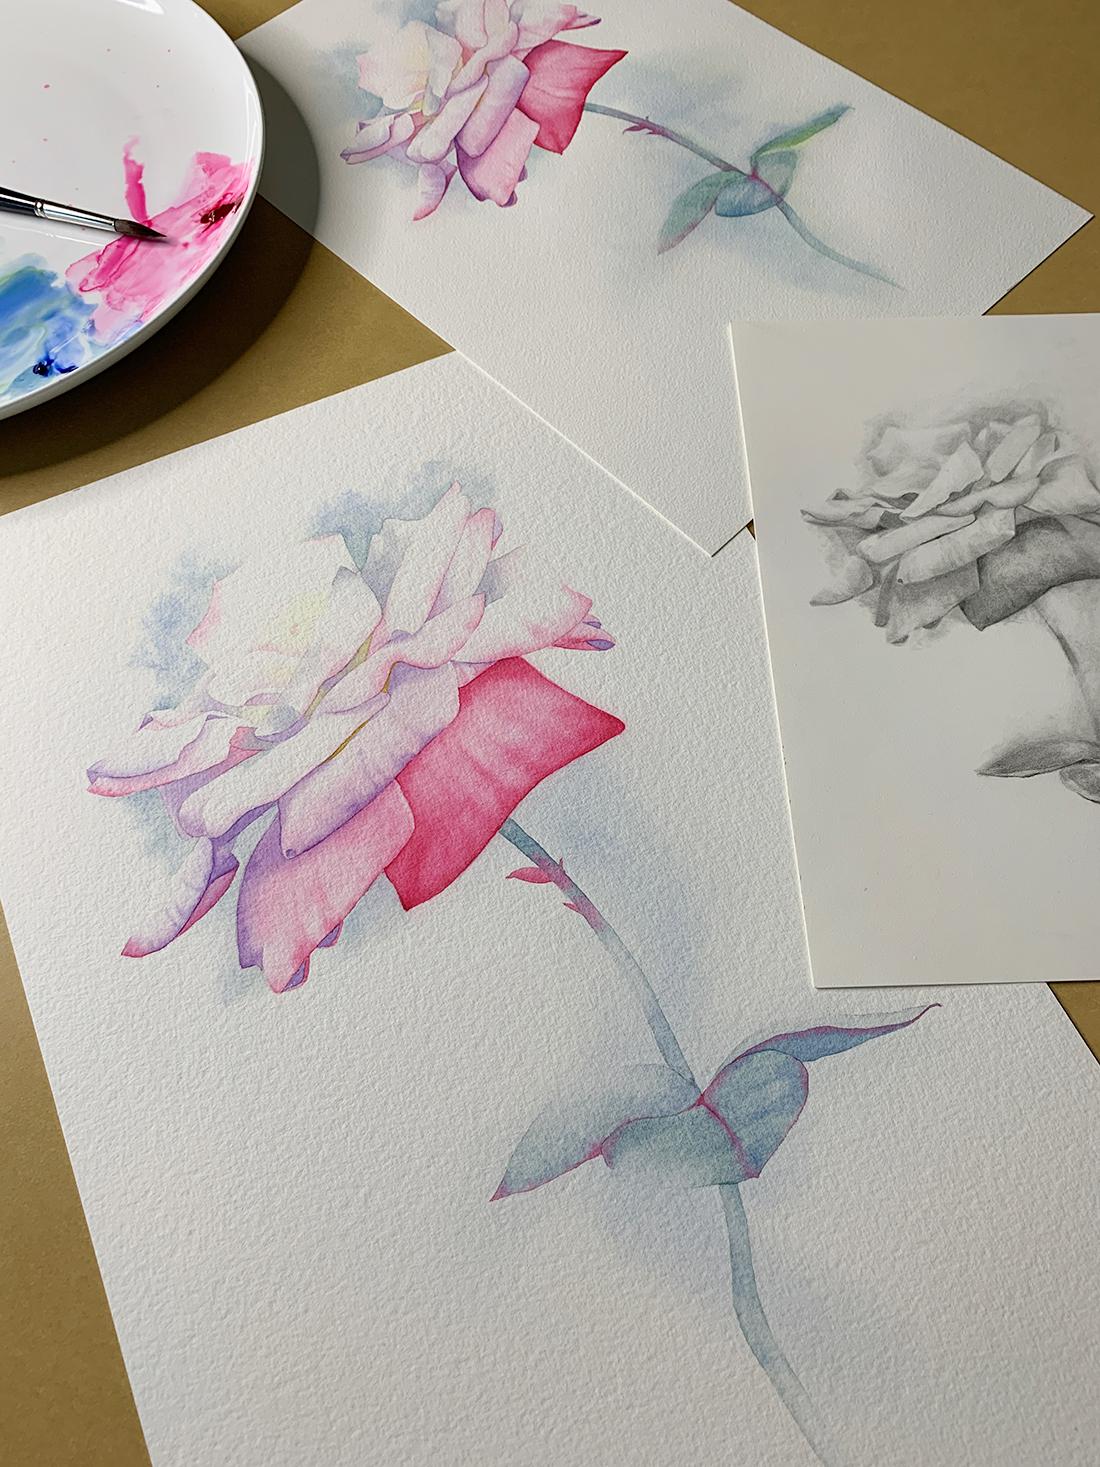
3. Supplies: In this video, I want to show you all the supplies that I use to complete the painting. You probably won't have all of these supplies, so use what you do have, but please be aware that different supplies may create a different outcome. The most important component of any watercolor painting is the paper. For this painting, I used Arches cold pressed watercolor paper. This is 640 GSM in weight or 300 pound, so it's heavy paper that you don't need to stretch. I did, however, stretch my paper before I used it just to make sure that it stayed flat while I was painting on it. Sometimes, this heavier paper will bow like a banana if you don't stretch it first. You don't need to use this thick paper. I do also use 300 GSM paper which is about 140 pound. This is a study that I did before I painted the main painting. It's really important to use 100 percent cotton watercolor paper when you're painting watercolor. Now for the paint colors that I used. I used five Winsor & Newton colors and one Daniel Smith color. I'll show you the Winsor & Newton colors first. This color here is Winsor Lemon, which is a cool, transparent yellow. I mixed this with blue for the background color, and I also mixed it with some blue for the leaves. I used a small amount of it on the flower as well. If you don't have Winsor Lemon, use a cool yellow that you do have. This is Winsor Violet which is a warm, transparent violet. I use this color a lot, but if you don't have it, use a violet you do have that looks similar to this one. This color here is Permanent Rose. This is a beautiful, cool, transparent, pinky red color that I often use when I paint flowers. Here's another color that I use in many of my paintings, and I'm never without it. This is French Ultramarine. It's a warm, transparent, granulating blue. This color here is Burnt Sienna. This is another color that I use a lot. It's a warm, transparent, orangey brown color. This is the Daniel Smith color that I use. It's called New Gamboge. It's a warm yellow. I only use a tiny little bit of this color, so if you don't have it, use any warm yellow that you do have. Here are the brushes that I used. I used this Da Vinci Casaneo, oval-pointed wash brush. This is a series 898, and it's a number 16. I mainly use this brush to get some water onto the background. These two brushes here are Da Vinci Maestro round brushes. They are series 35. I used a number 5 and a number 7. I adore these brushes. They are natural hair brushes, and they have a beautiful point on them. I reach for these brushes more than any others whenever I paint. These two brushes here are called eradicator brushes. I use them to remove paint after it has dried. I bought them online from a company called Rosemary and Co. They're a flat chiseled brush, and the bristles are fairly soft, they don't damage the paper. If you don't have these, you could use a stiff-bristled brush like this one here. This is a cheap flat brush that I used to use when I painted with acrylic paint. It's a synthetic brush and its bristles are a little stiffer than my watercolor brushes. Here are the other things that I used. I have a large water bucket. I've always got a box of tissues handy. The palette that I put my paints on is an ordinary white ceramic serving plate. I put the paints around the outside edge and then I was able to mix the colors in the middle of it. I use my mechanical pencil and my Staedtler Mars plastic eraser. I also had a towel to wipe my brush off, and I make good use of a hair dryer whenever I paint in watercolor. It speeds up the drying process for me. They're all the supplies that are used. All of these supplies are listed on the supplies list that I've included for you to download.
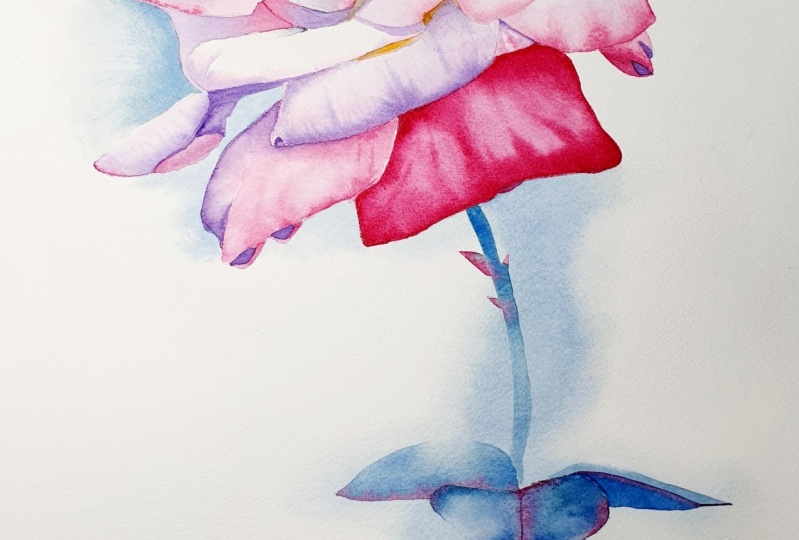
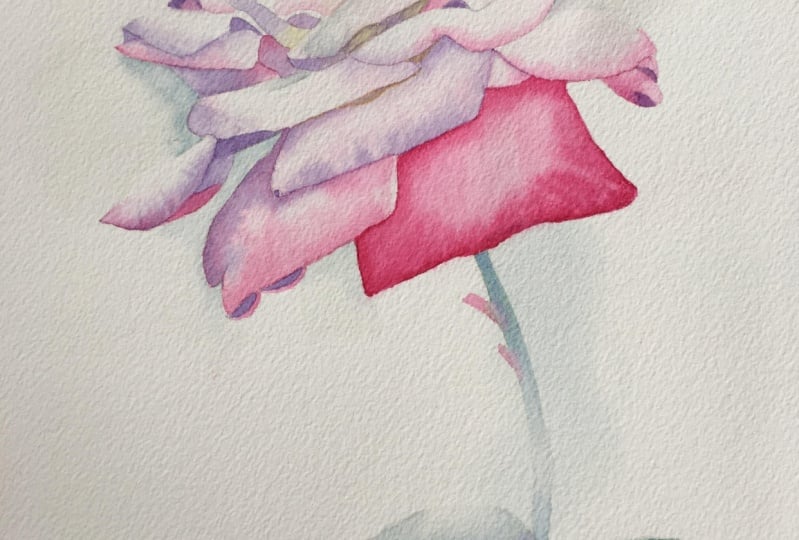
4. The Background: I've got my paper stretched onto my board and ready to go. In front of me, taped to the wall, I've got my color study and my graphite study, and I'll refer to both of these as I paint. When you put your line drawing on your paper, make sure that your pencil lines aren't too dark. You want them fairly light like I've got them here. I'll show you my line drawing a little bit closer. What I've done here on this top petal right up the top, you can see I've got no pencil line along here. I've left that edge off because I want to remind myself when I'm painting that I don't want to put any paint there. The same thing here on this petal. I've left the edge off the side of that one. This one over here on the left-hand side, you can see I've left the middle section off the top of the petal just there. Up here on this petal on the side, I've got no line running along the top. I've just going to draw in that one above and the end there. So I've got a gap between there. Here on this long one, I've got a gap there at the top where I don't have my pencil line. I'm going to put my paints on my plate. This is permanent rose. I'm going to put them around the outside edge of the plate. It's on a little bit of an angle there. Then I can mix in the middle part of the plate when I need to. This is French ultramarine. I'll put that along the edge as well. I have some Winsor lemon. This one here is Winsor violet. Those four colors were all Winsor and Newton colors. Now I'm going to use a Daniel Smith color. This is new gamboge. I only use a very small amount of this color, so I'm not going to put much out. I've got some permanent rose, French Ultramarine, Winsor lemon, Winsor violet, and new gamboge. In the next video, I'll be getting out a little bit of burnt sienna as well. For the background, I'm going to use some French Ultramarine, and I'll mix it with a little bit of Winsor lemon. I still want it to be a blue color, so I'm not going to put a great deal of the Winsor lemon into the blue, otherwise it'll turn it to green. That's only a little bit of the lemon in there. I'll see what it looks like on a piece of scrap paper. I'll mix a touch of water with it first because I don't want it to be too dark. That's probably a touch dark. I'll dip my brush in the water and see what it looks like. That's pretty close to what I want. French ultramarine with a tiny bit of Winsor lemon mixed into it. Then make sure you mix a bit of water into it so that it's not too dark. This is my da Vinci Maestro brush number 7. I'm going to use these brush to paint the background. I'll paint some water on first and I'll work section by section. At the moment, I'm starting with this section right here. I've painted the water against this edge here, and I've taken it off into the background. In a moment, I'll show you the water on the paper. Now I've taken the water down to the edge of these petals down here. I think that's enough. I'll show you the water on the paper now. I've got it against the edge of the petals and I've taken the water out onto the background further than where I'll be putting the paint. It's nice and glossy, it's got a good sheen, and it's ready for me to put the paint on now. I'll pick up some of that paint I mixed earlier, and I'll start to paint this right against this petal at the top. Because a lot of these petals are mainly white, this blue paint will form the edges of some of them. Just down here, somehow I managed to get myself an extra petal in there that's not on the reference photo. I don't know why I did that. I must have miscalculated something. So just here, there is an extra petal that is not on the reference photo. I discovered it later, but I'm not particularly worried about it. Just here, I'm only going to take the blue a little way across and I'll leave that area there blank, and that will give me a lost edge there. Just along here, you can see I've got no paint there. Now, without disturbing the other area, I can continue some water over the side. Over here, I do the same thing. I take the water carefully around the edges of the petals, and then this blue paint will form the edge of the petals. Here again, I make sure I extend the water further than where I'll be putting the paint. That way, the paint won't drift all the way out to the edge of the water and create a hard line. I make sure I've got enough space between the edge of the water and the edge of the paint. I pick up that blue paint I mixed, and I paint it on directly against the edge of the petals. Here I'm just filling in that other edge, and then I'll leave the rest of it blank, so your eye will fill in the edge of the petal for you. That edge along here has become my first lost edge. I just push it out a little way. I don't really want much of a background, I just wanted a little bit of color there. I've got nothing on my brush now, I'll push it out a bit further. There's no paint on my brush, I'm pushing the paint that's on the paper out. I keep going around the petals on the wet paper and making sure that I'm keeping my paint within the edges of the water. That brings in that top section of the rose. Now I'll move down here to this section. I want a little bit of color over here. Here again, I've got a lost edge on two petals, so I need to be careful where I put the paint. Then I start to put the paint onto the wet paper. I make sure the edges of the petals are the way I want them. So I'm looking for a nice, smooth edge. I want them to be the correct shape. Now I can paint some water underneath this one. This is the little curved over one on the left-hand side. Once I've got the water where I want it, I'll start to put the blue paint on. I was just fixing up the shape of that one. It's taking the water in there, and like the top of the rose, the water extends further than where the paint will be sitting. I've put my finished painting up on the right-hand side of the screen so you can see where I'm painting. You can see there's not a lot of blue down here, it's just a little bit around the petals. Now I'll wet this area here at the bottom, and I'll paint that little bit of blue in there too. Just a little bit in there. That's as much as I'm going to do around the rose. I'm going to paint some blue down further where the stem is now. I'll use my flat brush to do this. This is a da Vinci Casaneo oval-pointed wash brush. This gets the water and paint on the paper fairly quickly for me. Before I wet the paper, I'll mix some more color for myself. French ultramarine with a touch of Winsor lemon mixed into it. It doesn't matter if my color isn't exactly the same as the color I mixed for the area around the rose. I'll get it as close as I can, but it's not going to be a perfect match. There's more French ultramarine than there is the lemon in it. I've got some clean water for myself and I'm using my large flat brush to paint some water over this bottom section of the paper. This is going up against that bottom petal and over the top of the stem and the leaves. I want a fair amount of the background wit so that my paint edges will remain soft. I don't want them to drift to the edge of the water and create hard edges. Now, I'll pick up some of that blue paint with this brush, and I'll paint it on directly underneath the main petal at the bottom, the pink one, over the top of the stem. I'll get a bit more paint, and I'll continue. I'll take it over the stem, over the leaves in a backwards S shape. I'm just trying to create a bit of movement. That's over the top of the leaves, very loosely. I think that's just about as much as I want to do. I don't really want to fuss with it more than that. I've got my number 7 Maestro brush now, there's nothing on it, it's just damp, and I'm feathering some of those edges out a bit further. Just rubbing this side of my brush on them. I think that will do. I've taken a photo of my painting at this stage and I've included it for you to download. This is progress photo 1.
5. Painting the Grey Areas: Before we start painting the flower, I just wanted to show you how much water I use when I paint. All the way through this painting, I work on wet paper. I just wanted you to have a quick look at the water that's on the paper. Whenever I put the water on the paper, I make sure it's evenly covered. There's no puddles of water lying anywhere, and there's a good sheen on the surface. It's not sopping wet. The water's not sitting above the paper. It's just giving the paper a nice sheen and that's ready now for me to put some paint on there. I'm going to put a little bit of burnt sienna onto my palette. What I want to do is mix this burnt sienna with some French ultramarine to make a gray that I'll start to use on the petals. I usually prefer a cool gray, so I'll probably use more French ultramarine and a little burnt sienna. That looks pretty close to what I want. Remember in the last video, I noticed that I had an extra petal, what I've done is I've just extended that petal that's there, so it sticks out a bit higher than what it does on the reference photo. There are a couple of light gray areas that I can see scattered around on some of the petals. That's what I'm going to paint on in this video. Right at the back here, I'm wetting where I see a really pale gray on the petals. I'm wetting that with water, and then I'll use that gray that I just mixed from French ultramarine and burnt sienna. To paint on these gray areas, I'm going to use my number 5 to De Vinci Maestro brush, it's a bit smaller than the number 7. I'll use the gray that I mixed. Give my brush a little twirl to get the point back, and then I paint that onto the wet paper. This gray area has a hard edge along the front where my brush is now, but back here where the gray finishes, their paint edge will be soft, so that will be on the water and the water will create the soft edges for me. I think I pulled it up as far as I want now. Now what I'll do is take the paint out of my brush, so I'll wash it out in the water, I dabbed it on my cloth, and now I can spread the paint out that's already on the paper. I don't have any paint on my brush. All I'm doing is moving the paint that's there. There's a little pale shadow on this one here that I'm going to use the gray for. Again I'll paint it on wet paper to keep the paint edges soft. I'll use my gray paint again. I paint that onto the wet paper. Again at the front of this shadow, there is a hard edge, and at the back of the shadow just here, there's a soft edge. I'm going to take the paint out of my brush again and I'll use my damp brush to move the paint around that's already on the paper. There's nothing in my brush now. It's just slightly moist, and I'll use it to soften the paint edge and move the paint where I want it. Still on the water here, I'll wet this area. It gives me that soft paint edge there. On this long petal here, I can see some gray on the left-hand side of it. I'm going to wet the paper where I see that it's gray on the reference photo, and then I'll put some of that color here as well. I've got some of the gray paint now, I'll paint that onto the wet paper. I think that's probably enough paint. I'll do the same thing now, I'll take the paint out of my brush again, and then I'll use it to spread the paint towel. It helps to soften the paint edges. Just here along this top edge, I'm going to put some gray paint. That was water, and now I've got the gray paint, and that indicates that top edge of that petal. That's giving me a lost edge through the middle here. Because the petal behind is white, and this petal is white, you're not going to see where one petal finishes and the other one starts. So that's why it's a lost edge. That will help to give the rose more form, it will make it look more three-dimensional hopefully. Later on in the class, I put some very pale Winsor lemon on the petal behind, just there, but it's so pale you hardly see it, and it still looks like a lost edge after I've done that.
6. Painting Colour on the Petals - Part 1: I want to start to paint a blush of permanent rose onto some of these petals. I'll start with this one right at the back. I'll wet it with some water. Everything else is dry. I'm wetting the paper because when I put the paint on, I want all my painted edges to be soft. I'm only going to put a small amount of color on the petal because the petal is predominantly white. I want to put a blush of color on here so that I can add some interest to the painting. I've got some watery permanent rose here. I'll use the watery paint so that I don't make the color too dark. I'll paint that along that top edge, and I'll let the paint bleed along the water. I'll put a little bit of it over here on this edge. That's where I've got the blue paint in the background. You can see I've got a lost edge along here now because I haven't put any paint there. The petal is white, the background is white and I haven't put any paint there deliberately to create that lost edge. Down here at the base of the petal, I'm wetting the paper with some water because I want to paint a very pale wash of Winsor lemon down there. I'll get a little bit of lemon, I'll mix some water with it because I don't want it to be very bright. You can see how pale that color is. I want these colors to be quite pale at the back of the rose to help create some form and make the back of the rose look like it's further away. Over here, there's that little tiny petal right at the top, I'm wetting that with water. I pick up small amount of watery permanent rose and I'll paint that onto the wet petal. I know this petal is white on the reference photo, but I wanted to put a bit of the pink on there just to add interest. On this petal here, you can see the back of it. I'm going to paint that in now. This area just here, I'll put some water on there, and then I'll put some permanent rose on there. This is permanent rose. I'm painting it onto the wet paper. I've left some white paper showing at the bottom. Now I'll take the paint out of my brush and I'll use one brush to soften that paint edge. Over to this petal now on the left-hand side, I'm wetting it with water and I'm going to put some of the permanent rose on this one as well. I wet the entire petal with water and what I do when I finish over this side, I go back over to here and put some more water on, because by the time I finish over here, this side is starting to dry. So make sure it's evenly covered with water. Then I get the permanent rose again and I paint it onto the wet paper. I dub it along the edge, and I let it bleed over the surface. On the right-hand side of the petal just here, it's white, so I won't put any paint there. I've been using this paint here, now I want to use the darker paint, so I want my brush up here where the pigment is. I'll give it a little twirl and now I'm going to dab my brush on a cloth before I touch my paper. I've got that darker pigment now. The paper's still wet. I'm tapping the edge of the petal with this darker pigment. I just want the edge to be slightly darker. Because the paper's wet, the paint bleeds and gives me those soft paint edges. I try to watch my paper as it dries. Sometimes when I put the paint on, the paint will drift to the edge of my waterline and it will give me a hard edge where I don't necessarily want one. Just here, I've got a hard edge forming so I can take my damp brush because the paper is still damp and use it to soften that paint edge. I have to try and make sure my brush is a similar wetness to the wetness of the paper. I don't want to put any more water on the paper, because if I do, I might create a watercolor bloom where I don't want it, so it's important to make sure that my brush isn't too wet when I do that.
7. Painting Colour on the Petals - Part 2: Continuing on as before, I'm going to get some watery permanent rose now. Then I use this on dry paper this time. Right under here, there's a little shadow that I'm painting on. I think you can see it on the reference photo. That's watery permanent rose on dry paper there. Just fixing the shape of this one over here. I think that's better. This word with water now and I'll put some permanent rose on here. I've got to keep jumping all over the place because I don't want to disturb the petals that I've just painted on. I want some watery paint, but I want a little bit more pigment mixed into it and I'll paint that onto the wet section here. If you look at the reference photo, it's a little bit pink down in there. I'm establishing the shape of the petal and then because there's water on the paper, that will give me a soft edge where the paint finishes, so just here. If you need to soften it further, take a damp brush and rubber over it to soften the edge further. I'd like to run some color along the front edge of this petal. so I'm wetting that area with water. Again, I want soft paint edges. Permanent rose again and I'll paint that along the front edge where the pencil line is. Then that bleeds back over the petal, it gives me that pretty soft edge. If you put the paint on the paper and it spreads too far, it could be because your paper is too wet, or your brush is too wet, or it could be both so adjust one of those things to see if that helps. Here's one of these little hard edges that I was talking about in the previous video, where the paint has drifted to the edge of my water and it's created a hard edge. I can use my little eradicator brush here. This is a small rosemary and co-eradicator brush. I can gently rub on that and soften it. The paper is dry, the brush is wet; that gets rid of it. On this little petal here that you can't really see the edge of, I'm painting some water, but I've left a little gap of dry paper just here that will create a little white edge along that petal. I'll use some of the watery permanent rose, and I'll paint that in there just a blush of it. You can see a tiny bit of pink on the reference photo. I'll get a touch of that watery Winsor lemon, and paint that just there. I think I might try and bring this edge in just to suggest it, so I'm waiting on the bigger petal behind. I'll use some permanent rose here, very pale, just to suggest the back edge of that petal. I won't put any color there so that will be our last edge there and that little bit of permanent rose there suggests the side of the petal. Up to this petal here, this was the one that I made a bit wider or larger than what it is on the reference photo without realizing. I'm going to put some color on that one now, but I won't paint on the wet paper again. Make sure that petal that we just painted is dry before you put this on. I'm going to use some Winsor violet now. That's too dark, so I'll mix some water with it, and I'll make sure I dab my brush on a cloth before I touch my paper. Because my paper's wet, I don't need a lot of water on the brush. I paint that onto the wet paper. Make sure your color's not too dark. You can always paint another layer over the top, if it's not dark enough, but if you put it on too dark, it will look strange because all the other color values are fairly pale. Now I want some Winsor lemon again and I'll paint it on at the base here. Add a touch more violet, and I'll paint it on here while it's wet. I was just a bit concerned that mine may have been too light by the time it dried and probably might not have seen it. Now I've got nothing on my brush. I've taken the paint out of it, and I can spread that paint out. You can see I've left the outer edge, where it touches the blue, a bit lighter. I haven't really put any paint there. I've taken a photo of my painting at this stage, and I've included it for you to download. This is progress photo 2.
8. Painting Colour on the Petals - Part 3: Everything is dry. Now, I want to start to get some color on this petal here, so I'm wetting this one with water. I'll put some color along the outer edge. I'll take the water further up the petal than where I'll be putting the paint. I'm using my Number 5 brush here as well. I'll pick up some Winsor Violet, not too dark, and I'll paint this along the front edge of this petal. This one's got a lost edge just here, so I want to make sure I don't put any paint up there. I'm going to take the paint out of my brush now, and I'll use my damp brush to spread that paint out. Sometimes it doesn't move as far as I would like it to on the water, so I have to give it a little push with my brush. I'm going to put a little bit of color on this one above. It's white on the reference photo. There's no color there really, but I feel I need to lift it off the petal below. I thought I'd put just a fine blush of color there. This is Permanent Rose. I'll take the paint out of my brush again, and I'll use my clean brush to feather that edge here a little bit. Later on I'll come back and paint all these curved over sections and little shadows that you see. Now, I want to get some color on this petal that's tucked in the back here. Again, I want to paint on wet paper, so I wet it with water. I think I'll use some Winsor Violet here. I don't want it to be too dark. I'm keeping everything similar color value at this stage. As I keep mentioning, I want these petals at the back of the rose to be fairly pale, and when I move forward, the front three or four petals will be quite dark. That will help to bring the front of the rose forward, and push the back of the rose where I'm working now back into the background more. Now, I'll get some Permanent Rose, fairly pale, and I'll paint that down here further. It looks like it changes color to me on the reference photo. The outer part looks more violet, whereas the inner section looks more pink to me. Because I'm working on the wet paper, I get a soft edge where the two colors merge together. I've gone over the edge here with my paint, so I'll use my damp brush to clean that up. I'll come over to this side of the rose now so that I can leave this other side of the rose to dry. I'll wet this one with some water. This one seems to have a crease running through it, so I'll see if I can paint that on. I haven't wet the cold over part underneath, just the top of the petal. This is Permanent Rose that I have. I'm trying to keep a similar tonal value to the rest of the rose so far. Down here there's a bit of a crease running through it. I'll pull that color along that front edge as well. There's some color just here on the reference photo, so I'll put a bit of the Permanent Rose down in there as well. My paper's still wet. I'll take the paint on my brush now, and I'll tidy up that hard edge that I've got just here, soften it away. I'll get some color on this petal now. This one has a lost edge down the side here, so I need to make sure I don't get any paint over there. I'm going to wet the front of it with water. I'll be putting some paint along that front edge where my pencil line is, but I need to wet further than that. I need to take the water up the petal further so that my paint will spread over the petal. I've got some Permanent Rose on my brush. I'll run it along my pencil line, and then I'll flick it up in places just randomly. I'll take the paint right to the edge, and I'll take it up the edge a little bit to tell the eye, "Here is the edge of this petal." Then you can line it up with the top edge, and you can see where the edge of the petal would be if I was to print it in, which I'm not. That gives me the lost edge there. My paper is still wet, so I can use my damp brush to feather that paint off a bit more if I want to. I'm thinking I might put a little blush of pink over the top of the shadow here, so I've just wet it with water, and now I've got a tiny bit of Permanent Rose. I'll take the paint out of my brush now, and I'll use my damp brush to smooth away that edge. Now I want to paint a little bit more gray on one of the petals. Remember I mixed up some French Ultramarine with some burnt sienna. On this petal here, I want a bit of water. I'm going to put some gray in there into the shadow area. I'll pick up some of that gray, and I'll paint that in here where I see the shadow. I'll wash that paint out of my brush now, and before this turns into a hard edge, I'll use my damp brush to soften that away. Now I want to get some paint onto the rest of the petal, so I'm going to wet the entire petal with water now. I'll make sure I don't let the water touch that little patch of gray that I just painted because that will create a watercolor bloom there. Now for some Permanent Rose, again, not too dark. I'll paint that along the edge now. I'll take that all the way along the front edge. It's only got a little blush of color on it, not a lot this one. I'll take it up underneath the other petal because there's a bit of color there on the reference photo I can see. Now I want a touch of Winsor Violet, again, not too dark. I'm going to paint this over here on this corner to push it back a bit further. The paper's still wet. I'll put some of it over here under this other petal as well. There's a shadow there, and I thought that would cool it down a bit. As I said, my paper's still wet. If yours had started to dry, you need to let it dry, and then re-wet it with water to put the violet on. Just depends how quickly your paper dries, and how quickly you can paint.
9. Painting Colour on the Petals - Part 4: Painting these little petals over on this side. Now I've got some watery permanent rose on my brush. When I say watery, it means I've mixed a little bit of water with the paint to make sure it's not too dark. You've seen me pick the paint up in the other videos. I'm using my number 5 to Da Vinci Maestro still. I'll paint some of the color on this little petal here at the back as well. I'll come back later and finish those petals off. There's a little curved over petal just here, tucked in between these two bigger petals. I've just wet it with water, and now I've got some more of the permanent rose. Over onto this petal on the left-hand side, this is one of that petals that has a lost edge along the top. I'm painting some water onto it just like I've done all the other petals. This is Winsor Violet. I'll paint it onto the wet paper and leave the top section of the petal with no paint on it. This area here in the middle, just there. I won't put any paint. I've taken the paint out of my brush, and I can use it to feather that paint up a bit higher. Now I want some Permanent Rose, but I don't want the watery Permanent Rose. I want some darker paint, so I'll wipe my brush over the pigment. I've dabbed my brush on a cloth to get rid of excess moisture, and now I'll touch the paper with it, just the tip of it, to get some dark color on the tip of this petal. Now I've got nothing on my brush. I can spread that paint out that I just put the blades with the water on the paper. What I've done, I've got an edge here. I've got an edge here. The bit in the middle's got nothing on it, so now your eye can marry up the two edges. There doesn't need to be any paint there for you to see that there's an edge on that petal. I'll leave that one to dry now before I finish it off, and I'll come over to this one here right in the middle. This one doesn't have a lot of paint on it. It's mainly along the front edge of it, but I'll put water all over it so that the paint can bleed. I'll quickly show you the water on the paper now, so you can see what I've done. Here it is here. You can see the water is evenly covered. There's no puddles of water lying anywhere, and there's a good chain on the surface. I've got my permanent rose again, and I'll run that along the front edge where my pencil line is. The blade's softly back over the petal. Now I have some violet on my brush. That's Winsor Violet. Quite pale. Just picked up a bit more. Now I'll get some color on this big petal here at the front. Again, water all over it, the same way I've been doing it on all the other petals. The petal I just painted above is dry, so I'm not going to disturb that one. I'm using my large number 7 brush to put the water on this one because it's bigger, it'll put some water on there quicker for me. Switched down to my number 5 to put the paint on. This is Permanent Rose again. I'll run it along the front edge of the petal, right over my pencil line. I'll push a little bit of it up further. I'll take it around the edge to join up with this side of the petal. I'll get a bit more paint, and I'll put some of it over here. You can see a little shadow on the reference photo there. Now I've got a touch of Winsor Violet, so I'll paint that over the pink while it's still wet. That's a bit of interest. There's a shadow up in here underneath these petals, so I've got Winsor Violet here. I've just picked up a tiny bit more of the Permanent Rose, and I'm going to paint some streaks straight over the wet paper. Everything's nice and wet still. If I make a mark I don't like, I can take it off with my damp brush. I'm going to let that dry now.
10. Painting Colour on the Two Front Petals: Everything is completely dry. Now, I want to get some color on the two remaining petals at the front. I've got my number 7 brush here and I'll paint some water onto this one. I'll paint the water all over it. That's all covered with water now. I've got some permanent rose on my brush. This petal is different to the other petals that I've painted because the paint is going to go all over this petal rather than just on the edges. I've put the water on the paper to help me get the paint on quicker and easier and, also, so that I can leave a few little white patches on the petal. I'm not completely covering it with paint in a flat wash. You can see how I've left some white paper showing. I'm also going to try and keep it away from that outer edge because if you look at the reference photo, that outer edge is lighter in color. I've got my white paper showing in places, it's not completely covered. The petal is completely dry, I dried it with my hair dryer. Now, I can get some water on this main petal at the front. I'll use my larger number 7 brush to put the water on. I put the water all over it, same way I've been painting the other petals. That's completely covered with water now all over it. I've switched to my number 5 brush and I've got some permanent rose again. This color, again, I'm going to paint all over this petal the same way I painted the last petal. I'll leave some areas of white paper showing. I've mixed a small amount of permanent rose back into the watery mixture just to darken it a little bit, not a lot. I will come back darker on top of this color, but I just wanted it slightly darker than the other petals. This requires a few layers, this petal, so don't go too dark too quickly. I'll leave a few little white patches if I can. Now, I've taken the paint out of my brush, I'm using the paint that's on the paper. I'm spreading it out. I thought I had enough paint there, I don't need anymore just yet. Now, I need to leave that to dry. It's completely dry now and I've got my little eradicator brush. I went off the edge here with my pink paint so that little eradicator brush would tidy that up for me. I've just taken a photo of my rose and I've included it for you to download. This is progress photo 3, so use it to help you to get to this stage of the painting.
11. Painting in the Undersides of the Petals: Everything is dry. Now, what I want to do is paint all the little turned back sections, and all the little shadows, and undersides of some of the petals. Just in here, I've got some Winsor Violet on my brush. The paper is dry. All I'm doing is painting in that little underside section of the petal. I do the same thing on this one. That's Winsor Violet on dry paper. Now, I'm picking up a bit of darker Winsor Violet. I've wiped my brush over the pigment, and I drop that on there when it's wet, just to darken that bottom section. Same thing here, watery Winsor Violet on dry paper. Over here, I'm using the same watery Winsor Violet on dry paper. Watery in the sense that I've used the water to make the paint lighter in color. Same thing down here, in the intersection of these two little side petals that I can see, and in that one as well, that's on dry paper too. Over here, Winsor Violet again. On these two little curved-over sections I'm going to leave some white paper around the edge, and I'll put some Permanent Rose on there later. I can see a little pink edge on the reference photo on both of these. This one in here with Winsor Violet on the dry paper as well. I'm filling this little section here with Winsor Violet, and over here too on this curved over petal. That's on drawing paper there as well. I'll give this little one up here another layer of paint. It's not quite dark enough, I don't think. Up here, I've got a little bit of Permanent Rose. I'm painting on the outside of that section to create that outer edge, fairly pale. On this curved-over section, I've got some Permanent Rose that I'm painting on the dry paper. Everything else has dried. I haven't taken this petal down quite as far as it is on the reference photo, but that doesn't matter, I've got a bit of a gap between the two petals. While the Permanent Rose is wet, I'll drop a bit of Winsor Violet in there for interest. Coming back to these ones down the bottom, this is Permanent Rose along the edge that's on dry paper, and some Permanent Rose here on the dry paper. This bottom section has got more pigment in it, so it's darker than that top area. I think I'd like to see that edge there a bit softer, so I've got my damp brush now softening the paint edge. This area under here now, I want to paint, but I'll paint some water on it first. I want to put more than one color in here, and I want the colors to blend together gently where they touch. That's why I've put the water there. I'll use Winsor Violet in under here, rather than Permanent Rose. I think the Winsor Violet will push that area back a bit more so than the Permanent Rose will. I'll leave a gap and put some more here. Now I've got some Winsor Lemon. Because the paper is damp, the two colors blend together where they touch without forming any hard edges, which is what I want. Over here, there's another little section that's in the shadow, so I've painted that in with Windsor violet on the dry paper. Just in here, you can see the back of the petal. That's Permanent Rose I've got on dry paper there. Now, if I'm quick enough, I can get some Winsor Violet on the bottom of it and because the Permanent Rose is still wet, the Winsor Violet blends into it as though it was on damp paper. That gives me a soft edge where the two colors meet. You can also put that on damp paper if you prefer. Now I'm going to use this tiny bit of New Gamboge that I've got, and I'm going to paint that in under here. I can see a bit of a golden glow there. That's on dry paper, and there's another section just here in between these two petals. I'm painting that on dry paper, and I run it along where the two petals touch each other. I've taken a photo of my painting at this stage and I've included it for you to download. This is progress photo 4.
12. Deepening the Colour on the Front Petal: Now I want to work on darkening that large petal at the front. This is water that I'm painting on with my number 7 maestro brush. I want to wet the entire petal and I'll put some darker color on there that's wet with water all over it. Now I want some permanent rose, but this time I want the paint to be darker. I'll make some more pigment into it and I'll use my number five brush again. I start around the edge. If you look at the reference photo, it's darker around the edge of these petal. The center part of the petal is lighter in color, so I won't be putting much paint there. Keep going around the edge, and dub it up a bit higher so that it spreads further. Still taking it around the bottom and I'll paint it up the top here where it touches the other petals. It's a bit darker there on the reference photo. Also over here underneath these petals it's darker. You can see I've tried to leave the larger paper in the middle of the petal. I'm going to pull a little bit of color down and I'll push a bit of color up, back into the light area. I've just picked up a bit more paint. I'm pulling that down through the lighter section. Everything is still nice and wet. Now I want some even darker paint, so I wipe my brush over the pigment. I'll run that darker pigment along the bottom edge while it's still wet. If it had started to dry, I would have to dry it off completely and then re-wet it with water to put these on. But mine is still wet enough so I can continue on. I just want it a bit darker around the edge. That's why I wiped my brush over the pigment. That gives me that thicker richer pigment. I've just put a bit more there, you can see I've pushed it up a bit higher. I've got my brush with a bit more of that darker pigment and I push it up a bit higher. That needs to dry now and I'll see what it looks like after it's dry, I may have to come back and give it another layer. While it dries. I'll give this section here another layer of paint. This is Winsor violet on dry paper. I felt it wasn't dark enough. This one here needs some more color too. I've just laid over these two on the right-hand side as well. Coming back to my main petal, can you say that mark along the bottom there? I have no idea what that is or how it's occurred. I don't know whether it was something I did on whether it's in the paper. What I'll try and do now is I've wet it and I'm trying to put some more paint over the top to disguise it, but I found that didn't work. Then what I had to do was dry it off completely and scrub over at least my little brush that I've got that's a bit stiffer than some of my other brushes. I ended up taking off a bit of paint. You can see here I've had a bit of a scroll to try and get rid of that line that ran across the bottom. I'm going to redo mine the same way I did it before. I've wet it with water and then we've got that darker pigment and I'm going to do exactly what I did again a second time. Of course you won't to have to do this because you won't have that mark on your paper. But I just wanted to show you how I fixed it. Don't do this if you don't need to. But if yours isn't dark enough, go ahead and give it another layer like I am here. I'm working on the wet paper with the dark pigment around the outside edges. It's a mystery to me. I really have no idea what that white mark was underneath the paint, but I had to scrub it the paper to get rid of it. Luckily, I'm using ash paper because ash paper is pretty tough. If I was using a cheaper paper or a different paper, I may not have been able to correct that. It ran across there and you can't really see it now, it's more disguised. I think it must have been something I have done to the paper because it ran along with the direction of the bottom of the petal. I really don't know what it was that I did, but it's fixed now.
13. Deepening the Colour - Part 2: I'm happy with the way that dark pink petal looks now. Now I'll come over to this petal on the left-hand side of it, this one here, and I'll paint the shadow that I see in there. I'll wet it with water using my number 7 brush. There's a shadow on the left-hand side that I want to paint on, and it runs underneath that petal that's above it. I'll paint some water under there as well. I want some Windsor Violet, and I'll paint that onto the wet paper where I see the shadow. I think I need a bit more color on my brush now. It's making it a touch darker along that back edge. I'll bring that color across to the crease that's on the reference photo. A bit more paint up here and then I need to take it underneath this petal. I've just taken the paint out of my brush. I don't want it to spread down quite that far. With my clean brush, I can soften that edge there, push it back a bit. Over here to this one, I want to put a bit more color along this one, so I'm wetting it with water. I've got to keep the color away from my lost edge at the top. I've got some Windsor Violet. I run that along the bottom edge. It bleeds with the water, it gives me those soft edges. Now if it's not too wet it, I'll see if I can paint some little streaks over the top. If it's too wet, the streaks will go everywhere and they won't be streaks anymore. If your paper is a bit wet, just wait a little while until it starts to become less wet, and then see if you can paint a few little streaks like that. I need a bit more color in this little curved over section in here. That's Windsor Violet on dry paper. I'm not putting it all over it, I'm just putting it at the top section of it. Here, I've got a bit of Permanent Rose. I'm darkening up that right-hand side of the outer edge, and I'll do the same thing here on this one. This petal is dry now. I'm re-wetting it with water. I think the front of it is a bit uninteresting looking, so what I want to do is paint a few streaks of color over the top to give it a bit of texture. I've got some Permanent Rose here, run along that bottom edge, and I'll see if I can paint a few little streaky marks over the top like I did on that curved over petal above it, on the far-left side. Permanent Rose on the wet paper. Here we go. A few little streaks. Again, if the paper's too wet, the streaks that you make will bleed too far, so wait until it's not quite as wet and then they should sit where you put them, but they'll still have those fuzzy edges. Of course, if you make a mark you don't like, it's easy to wipe it off with a clean brush. I just felt it needed a bit. It was a bit bland-looking. Increase that shadow there. I think that makes it look a bit more interesting. I managed to get a little bit of paint on this petal above, so my little eradicator brush should get that off.
14. Deepening the Colour - Part 3: To make this petal here more interesting, I'm going to do the same thing that I did in the previous video. I'll wet this one with water and I'll run some color along that bottom edge and streak it upwards. There's water all over that petal now, and now I've got some Winsor violet. I run that along the bottom edge, and then I'll streak some of that color back up into the petal. I think there's enough paint there on the paper, so I'm going to take the paint out of my brush now, and then I'll use my damp brush to move that paint that's already there, softening that edge there. Then I push the paint up towards the top edge randomly. I don't want them to be even strokes that I make, just little random strokes here and there. I think I need a little tiny bit more paint on my brush. I need a bit more water right up the top there, it's a bit dry. That's a bit more water. There's a little shadow right up here, so I'll paint that on. This is a bit of violet here too. There's a shadow right up under here. I think I started to paint it earlier, but it needs some more color on it. That's better. Over here on this one, I want to deepen the color, so I'm wetting it with water. Now I have some more permanent rose, I'll run that along that bottom edge. This one over here, the little curved section, needs a little shadow along it where the other petals touch it, so that's a bit of water on that one. I've got Winsor violet on my brush. I'll run that along this right-hand edge where this larger petal touches it. I've got a touch of permanent rose now. That spread a bit further than I wanted it to, so I'll spread it out with my brush. These little petals over on the right-hand side look a bit flat looking, a bit uninteresting, so I'm going to put a bit of a darker color along the edge of this one as well. That's water and this is permanent rose. I'm not painting all over it, I'll just run it along that front edge. I just picked up a bit more paint. Now I've taken the paint out of my brush and I'm spreading that paint out that's on the paper. I'm thinking this bottom petal should be a bit darker now, so I'm painting it on with permanent rose on the dry paper now. I think that looks better to my eye now. This petal up here, I feel needs a bit more color on it. It looks a bit flat looking and bland, uninteresting to me. I'm wetting this one with water as well. This is permanent rose. I don't want a lot of color on here because there isn't a lot of color on that particular petal, but I just felt it needed a bit more. I'll let the paint bleed with the water. I'll put a bit over here too. I'll carry it over to this other side, too. I think that's better. Cool colors tend to recede, whereas warm colors tend to advance. I've got yellow here, which is advancing towards us because it's bright yellow, it's a warm color, so what I'm thinking is I'll paint some watery Winsor violet over the top to push it back down underneath that petal where it should be. You can still see that it's yellow, but with that violet over the top, it's not coming forward at us like it just did. That's Winsor violet, and I've just extended it further into that shadow. I think I'll take my brush and soften that edge now. There's no paint on my brush. I think that looks better now. It's not advancing quite as much, but I'll put a little bit more on just to make sure. Winsor violet is technically a warm color, but it's not going to advance as much as that warm yellow did. I think that looks better now. Over here, there's a little shadow underneath here. I can see it on the reference photo, so I think it would look better if I put a shadow there, it'll lift that petal above off this one. That's some water and this is Winsor violet. Now I'll take my damp brush and tidy up that edge. Sometimes it spreads too far, so if you take a damp brush, you can clean it up and soften up further. I've got some Winsor violet here on the back of this petal. I did wet the paper before we put it on. The same situation here with the yellow underneath the petal. As I said, warm colors advance, cool colors recede, so if I run some watery violet over the top of that yellow, that'll push it back a bit. You'll still see that it's yellow, but it won't be so vibrant. Even though Winsor violet is a warm color, it won't advance as much as the yellow did on its own. I've neutralized the yellow with the violet. Just here under this petal, there is a little pale shadow, so that's a bit of watery violet on the dry paper there. I'll paint a small shadow under this one as well. Again, watery violet here, and when I say watery, I mean, I've mixed a little bit of water into it so that it's not too dark. I take my clean brush and soften that edge further. On this little curved over petal on the side, there's a darker shadow in there, so I've just put some water there and I've got some of the violet here as well. I'll put some of the Winsor violet on this petal under here as well, and that'll look like it's more in the shadow there. I'm painting that one there on dry paper. I painted the one underneath on the wet paper so that I get that soft edge along the top of it. I'm going to leave the flower for now, and in the next video, I'm going to paint in the stem and the leaves.
15. The Stem and the Leaves: I've cleaned off my palette. Now I want to make a green for the leaves and the stem. I'll use French ultramarine blue and I'll make some Winsor lemon with it. I want a fair amount of blue for the screen, I think. Now for some Winsor lemon, I'm not trying to match the color that's on the reference photo, I'm doing my own thing with this. I want more of a blue green so I'm mixing a bit more blue into it. That looks pretty close to what I want. I'll clean my brush out now and I'll wet the paper from the rose to the top of the leaves. I'm using my number five round brush and I'll keep the water within the edges of the stem. Down to the top of the leaves. Now I'll pick up the green that I mixed. That paint is going to separate slightly, but that's part of its beauty. Don't worry about it if it separates, if you find you get little bits of blue and little bits of yellow. That's what makes watercolors such a beautiful medium to use. There's plenty of color at the top of the stem, near the rose. As I work my way down towards the leaves, I'm going to leave an area that's a bit lighter in color. To add some variation here I'm ongoing lighter with the paint, so there's less paint on my brush. I'm doing that deliberately. Now we'll get a bit more paint closer to the leaves. That lighter spot on the stem adds a bit of variation and it makes it more interesting to look at. I'm going to take the paint out of my brush now and I'll use my clean brush to run over that lighter area to soften the edges there. Now I want some permanent rose and I'll paint that just here where there's a little leaf. When the permanent rose touches the wet green paint, the paint bleeds and creates that lovely soft edge. There's another one just here. You can see that bleeding into the stem. Now I'll do the bottom half of the stem. I'll wet it with water. I've put the reference photo up in the left corner, but I'm not really following it. As I said, I'm going to do my own thing with these leaves and stem. I've got some more of that blue green color that I mixed down the bottom here. Again, I want it to fight off. I don't want a great deal of color down here. I'll take the paint out of my brush now. Then I use my clean brush to feather that away at the bottom. Just picked up a bit more paint just to tidy up those edges. The stem is dry now. Now I can start to paint in these leaves. I'll start with this one at the front. I'll wet it with water and make sure there's no puddles lying anyway, smooth it out. I pick up the blue-green that I mixed and I paint that onto the wet paper. I need some more paint. I don't have enough here, so I'll quickly make some more. It doesn't matter if it's not exactly the same color. Close enough is good enough for this. I'll paint that on there, that's better. All I'm doing is filling in the shape of the leaf. Notice I've left the color of the left-hand side of the leaf. That's because I want to try and create a lost edge here. I've kept the paint away from the edge. Now I'm going to wash the paint out on my brush. I'll use my damp brush to soften those edges and fade it away into the background. That gives me more of a lost stage on that side of the leaf. Just here it's matching the tonal value of the background. I'll put a little bit more color there so you can see that that's where the leaf curves around. Now your eye can see that there is an edge there, even though there isn't. I'll get some permanent rose now and I'll run that down the middle of the leaf to form the center vein. The paper is still wet, the paint is wet and this permanent rose color will bleed softly with the blue-green. I'll pull it down towards the tip of the leaf. I'll just get a tiny bit more of it and I'll darken it slightly. I'll run that around the edge as well and then that bleeds back over the leaf. It creates a pretty pink edge, I might do it here too. I'll get a little bit of French ultramarine here. I'll drop that onto the front just here to darken it up slightly. I said I wasn't going to follow the reference photo, but it's a little bit darker there on the reference photo and here as well. It's only very soft and subtle. I might put a little bit back here too along the edge. That leaf has dried, so now I can paint in this leaf on the right-hand side with water first, just that top section of it. Now I've got some of the green paint that I mixed. I've kept the color fairly pale. I'll let that dry and I'll go across to the other leaf. I'll wet this one with water. Good even coverage over the entire leaf. I pick up the green paint and I paint that onto the wet paper. On this leaf, I also want to leave a lost edge at the back of it. You can see I'm keeping the paint off that outer edge in the middle. Just put a bit too much paint then I'll do the same thing with this one. I'll take the paint out of my brush now and I'll use my clean brush to soften away that edge. Again, the back edge of this leaf matches the paint fits in the background. That gives me that little stage there. I'll put a bit more color at the front of the leaf. I'll run some permanent rose along that front edge. Because the green paint is wet, bleeds over it and creates those lovely soft edges. For this other leaf, I want some darker color, so I'll mix a bit more French ultramarine into it. I'll paint that on the outside part of this leaf. Here, I'm on dry paper. I didn't bother to wet it. Just wanted that front section of the curved over part of the leaf to look a bit darker. I'll put some permanent rose along that edge too, while it's wet. I come back over this one on the dry paper with the permanent rose straight down that center vein and that's the stem and the leaves finished.
16. Final Details: There's a few last-minute things that I want to do to the flower. Just here, I want to deepen the color on the petal, so I'll wet it with water. Just a little bit of water, I don't need a lot. I want to put the two colors on there, but I want them to blend softly where they meet. Now I've got some Permanent Rose on my brush. I'm deepening that pink area. This is Winsor Violet that I've got on my brush. I'll take it all the way out to the edge. I think I might just soften this outer edge and leave that lighter color showing there. Over here on this one, I'm painting a little Permanent Rose edge that's on drying paper there. This little tiny shadow that's tucked in here, I thought I'd make that a bit darker. Mine looked a bit insignificant-looking. That was Windsor Violet on the dry paper. I got nothing on my brush now, and I'll soften the edge. I want to put a little bit of color along this edge of this petal. I'm not looking at the reference photo at this point. I'm just looking at my painting and seeing where I can improve it. This is Permanent Rose now. I'll run that along the edge where the water is. It creates a bit of interest on that petal. I didn't like how white and flat-looking it looked. I'll push the paint up a bit I think, here and there. I got nothing on my brush now. I'm just moving that paint that's there around. Over here, I think I need a shadow between these two petals, so that's a bit of water on that one. This is Winsor Violet. It creates a little shutter between the two petals. I got nothing on my brush now. I'm spreading that paint out. I've just wet along the edge of this one, and I've got some Permanent Rose here, just making it bleed with the water. I felt that one needed a bit more color. Here on this one, I want to paint more of a shadow, so that's water. This is Permanent Rose now. I will put a bit along this bottom edge as well. I'll push it up. I'll take the paint out of my brush now, and I'll use my brush to move the paint where I want it. I think that will do. Now I have a look at my edges and make sure I've got them the way I want them. I've got a lost edge here which I'm happy about. There's another lost edge along this petal. There's one just here. I might grab my eradicator brush though and see if I can soften away that edge further so that you can't see it at all. I use the brush wet and the paper dry, and I give it a little scrub. I'll do the same thing here on this lost edge just to make sure there's no paint there. Sometimes, the paint will drift and you get a really light line. Over here on this side, I've got a nice lost edge here on this petal. I'll use my eradicator brush here though, just to make sure there's no faint line of paint. As I said, sometimes, it drifts with the water and you get a very pale line there. Over here, I've got my lost edge on this petal as well, and then on the leaves, I've got my lost edge here and also a lost edge on the leaf at the back. That's how it looks. I'm fairly happy with it. Now I can take it off my board, and there's my finished painting.
17. Thank you.: Congratulations, you've made it to the end of the class. I hope I've shown you how, paying attention to those external edges and use objects, and using contrast, can help to add interest and depth in your paintings. I'm constantly learning about this beautiful medium. I know that it will continue to inspire and motivate me, to keep painting with it for the rest of my life. I hope you will too. Thank you so much. Let's continue to explore this beautiful medium together.
 Louise De Masi, Artist - capturing beauty with watercolour