Transcripts
1. Trailer: When painting in watercolor, I try to make my paintings glow with beautiful color and light and transparency. It's not that difficult when you're working with colors, but if the subject is white, that can be slightly harder to achieve. In this class, I've got a few tips that I can share with you that might make the task of painting white subjects in watercolor a little less daunting. My name is Louise De Masi, I'm a professional watercolor artist and teacher from Australia. In this class, we'll paint a gorgeous white cockatoo in watercolor. We'll mix a luminous cool gray using two transparent colors, and we'll use it as the main color on the painting. We'll complement the gray with yellow, blue, and some violet. We'll work broadly to begin with, and then I'll share with you a simple technique where I render the feather detail negatively. We'll work mainly wet-on-wet with some wet-on-dry work. With this painting, you'll learn how I like to express myself with color by exaggerating the colors that I see, and I'll show you how we can use cool colors to push some parts of the subject further away from us. There's lots to learn and plenty of techniques that you can practice with me. For me, no other medium compares to the magic of watercolor and by the end of the class, you'll see why I find painting in watercolor to be such a joy. Let's get started.
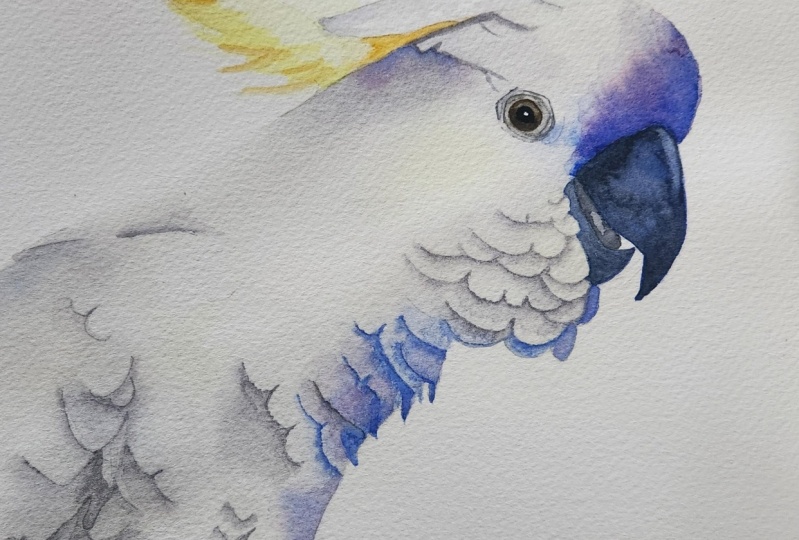
2. Painting White Subjects. Hints and Tips.: Hi everyone, I'm Louise and welcome to my class. In this class we'll be painting this white cockatoo in watercolor. In this lesson, I will share a few tips that I have about painting white subjects in watercolor. One way that we can paint white subjects is to leave the white of the paper showing, and you can see here on my painting that I've done that. This area here is the white of the paper, and I've also left some white paper showing up on the head. Sometimes when you're painting white subjects, the white of the paper might be too stock to leave it showing. You might want to paint a soft blush of color on your subject. To do that, you need to add a lot of water to your pigment so that it becomes more like tinted water rather than a mixture of paint. As far as colors you could use to indicate white, that's up to you. Think of white subjects as being either warm or cool. Here on my palette, I've got a really small amount of light red by Winsor & Newton. That gives me a really soft blush of warm color. There's hardly any pigment there, and here we've got one of my favorite colors. This is burnt sienna by Winsor & Newton. Again, I've mixed a lot of water with it. Again, that gives me a soft, warm blush of color. Here's another color that I love. This is French Ultramarine. I'll mix a lot of water with it, and that will give me a cool blush of color. It's very subtle. There's hardly any pigment and there's lots of water. This color here is the radian by Winsor & Newton, I'll do the same thing with this. Lots of water, hardly any pigment. Again, I get that really pale, soft pustule blush of color. If I wanted a soft hint of color over the top of my white subject, I could either choose warm colors or cool colors from my palette and mix lots of water with them before I wash them over my subject. That's a good exercise to do. Take some of your colors and dilute them with lots of water so that there's only a hint of color, and paint them on to a scrap piece of paper and see if any of them appeal to you. Here I've done a few studies of white subjects using different colors. Here on this daisy, I used Winsor Violet finned right down with water and I also used some Winsor Lemon on the petals. I left some white paper showing in the lightest areas, and then I use those colors to paint in the background. On the tool up here, I went for a cool color scheme and I used some viridian by Winsor & Newton. In the gray areas, I mixed a touch of permanent rose into viridian and the yellow here is Winsor Lemon. All the colors are mixed with lots of water so that there's only a hint of color. On the magnolia, I mixed a gray from French Ultramarine and burnt sienna, which are the two colors that we'll be using when we paint the cockatoo. On the petals at the back of the magnolia I used more blue in my mixture. I wanted a cool gray on those back petals because I wanted them to recede. Whereas on the front petals, I used a warmer gray because I wanted those petals to come forward. Cool colors tend to recede, whereas warm colors tend to advance towards you. Another thing to do when you paint a white subject is to look for reflective color. For example, if you're painting a white flower, you might see some of the green of the leaves reflected on the white petals. Here's another example of what I mean. This is a photo of some ducks that I took a few years ago. I can see this area of the duck, neither grass has got some reflected green yellow from the grass. So I would paint some green onto the dark view. The shadow is here on the duck, look more blue or violet to me. If I was to paint this duck, I'd exaggerate those colors and have some fun with them. Like I did here with this cow painting. I saw some blue shadowing on the reference photo that I used. I grabbed some pale blue and I overstated the colors that I saw, which resulted in painting that I think excites the eye. Another technique that you can use when you're painting white subject is to painting the background. Here on this rose painting, I painted in several layers of green and dark gray to really make the flower stand down. Here on this painting of two corellas, I used a paler background around the birds to give the painting more of a soft, dreamy atmosphere. Repeating those steps for you. Number 1, you can thin your paints with water to create a soft color that you can wash over white subjects. You don't always have to leave the white of the paper showing to represent the whitest or lightest areas. Number 2, think of white subjects as being either warm or cool and remember that warm colors advance, whereas cool colors recede. Use that technique to your advantage. Number 3, look for reflective color on your subject and don't be scared to exaggerate those colors that you see because it'll make for a more interesting and dynamic painting. Number 4, you can paint the area around your subject and incorporate the background if you want to make the white subject pop like I did here with these rose. Or you can create a soft moody painting like I did with the corellas. With the cockatoo painting that we're painting in this class, we won't be painting a background. Instead we'll exaggerate the colors that we see in the reference photo, we leave quite a bit of white paper showing and we'll use cool colors to push some parts of the bird further away from us. In the next lesson, I'll show you the supplies that I use to complete the painting.
3. Supplies: In this video, I'll show you all the supplies that I used to complete my painting. The most important supply is your paper. I always advise students to use 100 percent cotton paper. For this painting, I used an A3-sized piece of Arches cold press watercolor paper. A3 size is 29.7 centimeters by 42 centimeters. I stretched my paper before I used it, and I attached it to a piece of gator board and that ensured that it stayed flat while I was working on it. Now for the paint colors, I used Winsor & Newton watercolor paints. This color is French ultramarine. That's a beautiful transparent granulating blue. This one is burnt sienna. It's another transparent color that mixes beautifully with French ultramarine to make some gorgeous graze. This yellow is called Winsor lemon, which is a semi-transparent color that I use on the cockatoo's comb. This dark gray is Payne's gray. I use this color on the beak. I use a small amount of Sepia on the eye of the cockatoo, and I use a very small amount of Winsor violet at the end of the painting. These are the brushes that I like to use. These are Da Vinci Maestro Series 35. These brushes have got a beautiful point on them. They hold a lot of paint and they allow me to paint loose areas on the painting and also highly detailed areas. This is the largest one and this is a number 8. I also use a number 5 and a number 3. This little brush here is called an eradicator brush. It's from Rosemary & Co in the UK. I use this brush to remove paint after it has dried. It allows me to make corrections and remove highlights. It's a flat brush with soft, short stubby bristles. These are the palettes that are used. I put my paint on the little ceramic palette on the left, and I mix my paints on the round palette on the right. The round palette is simply an inexpensive white ceramic serving dish that I bought in a kitchen shop. I used an ordinary HB graphite pencil. This is my mechanical pencil. It's a Staedtler Marsmicro pencil. It's 0.7 millimeters and it's an HB as well. I used a kneadable eraser at the start to lighten the pencil lines on my line drawing, and I used an ordinary plastic eraser as well. I like to use a small bucket as my water container and I always have a hairdryer plugged in beside me ready to use so that I can quicken the drying time of the paint. I use an old tea towel to wipe my brushes on. I have a box of tissues nearby to debit the paint if I need to. On this painting, I used some washi tape at the bottom and side of the painting to give me clean white borders along those edges where the cockatoo touched the edge of the paper. Washi tape is low tech so it won't damage the paper when you remove it. This is the tape I use. It's not expensive. I bought it from an office supplies store here in Australia. That's all the supplies that are used.
4. Transferring the Drawing to the Paper.: In this lesson, I'll show you how I transferred the line drawing onto my watercolor paper. I've stretched my paper, and I've attached it to some gator board. I've got some washi tape here. I'm going to run that along the two edges where the cockatoo touches this side of the paper. Washi tape is low tech, so it won't damage the watercolor paper. Putting this on my paper will give me a white border around my edge when I take it off the board. I've traced my drawing onto some tracing paper. Notice that I've left some of the outer edges off the cockatoo. That's to remind myself to not paint those edges in. I want some external lost edges that will help to give the cockatoo more form and it will look less flat against the paper. When I start painting, that will become clearer to you. To get the drawing onto my paper, what I'm going to do is scribble over the back of it with some graphite. This is an ordinary HB pencil, and I rub over the lines with it. Once that's all done, I turn it back over and then I place it into the position that I want. I tape it in place with some tape, so that it doesn't move when I trace it on there. Then I use my pencil to draw over my lines and that should leave a graphite imprint on the watercolor paper. You could use a biro here rather than a pencil so you can see where you've been. I try not to press too heavily in case I dent my watercolor paper with the pencil. Let's have a look at that. I think I've got everything there that I need. Once I've got the drawing traced on there, I come back with my mechanical pencil and make sure everything's the right shape, particularly the eye and the beak. Here I'm making sure that I've got it the way it should be. I don't want my graphite to be too heavy and dark on this painting, so I'm using my kneadable eraser to take some of the graphite off to make it a bit lighter in color. I still need to be able to see the feathers, but I don't want them to be too dark. That's ready for me now to start painting.
5. Painting the Initial Wash.: In this lesson, we'll start painting. We'll get the initial wash painted over the cockatoo, we'll work on wet paper, and we'll leave some white paper showing in the lightest areas. I'll also show you how I mix my favorite gray from two colors. One thing I'd like to note is that because I mix my colors on a flat plate, as I'm painting the mixture on the plate will start to separate as it spreads out which means that I'll see some variations of the gray paint on my painting. That is nothing to be concerned about. In fact, the variations in the color actually enhance the painting. On my palette, I've got some French ultramarine, some burnt sienna, this is Winsor lemon, this is Payne's gray, and some sepia. Right at the end of the painting, I get a little tiny bit of Winsor violet as well. To mix my favorite gray, I'll start with some French ultramarine. My brush is damp with water, so I'll mix a bit of the water that's on my brush into the paint. My paint is freshly squeezed out, so it's quite wet. Now I'll use some burnt sienna. I don't want a great deal of burnt sienna in this mixture because I'd prefer to have a cool gray. I add the burnt sienna sparingly. I need a bit more I think, so a bit more burnt sienna. That's looking close to what I want. I'll try that on a piece of scrap paper first. That gives me a cool gray that I like. If I was to add more burnt sienna, that would make the gray warmer in color. That gives me a warm gray. But I think for this painting, I'd prefer a cool gray, so I'll mix a bit more French ultramarine into it. You can adjust the temperature of your gray depending on how much blue or brown you put into the mixture. I'll put a tiny bit more burnt sienna in there, I think. The other color I'll be using will be some Winsor lemon. I'll get that ready as well. This is my number 8 round brush. I'm going to use this brush to paint the initial wash onto the cockatoo. I'll work wet on wet so that the different colors I'll use will flow into one another and I'll get those lovely soft paint edges that I want. Here I'm painting some water onto the cockatoo. I'll avoid the eye area so I won't put any water over the eye. Once I've got the water on here, I'll show you what it looks like on the paper. You can see I'm painting around the eye there. This is clean water. I'll keep the water on the top half of the cockatoo. I won't wet down the bottom just yet. I think it will dry before I get to it if I do. This area down the bottom, I haven't wet just yet, I'll do that later. Now I'm using my brush to make sure there's no puddles lying anyway, smoothing the water out. Here's a closer look at the water on my paper. I haven't taken it all the way down to the bottom of the cockatoo. It's evenly covered. There's no puddles of water floating on top and is a good sheen on the surface. That's now ready for me to put the paint on. You can see here that my gray mixture has started to separate on my mixing palette. As I mentioned at the start of the video, that's nothing to be concerned about. You'll see when I paint that there will be some variations in the gray on the paper. I'll use my wet brush to pick it up. I'll start here on the head in front of the eye. When I look at the reference photo, I can see some gray shadowing in front of the eye. I can also see some gray on the front of the head above the beak. I have to look closely at the reference photo to see the variation in the color. Then I can exploit those variations and I can exaggerate them on my painting. I don't paint exactly as I see it on the reference photo. The photo is a guide only. I don't want to copy it exactly as I see it. I want to create something new with my painting. Here I'm painting a little bit of gray on the back of the neck. Paper's still nice and wet, so it's giving me this soft paint edges. I'm pushing the paint where I want it with my brush. There's a gray shadow that runs towards the eye from the back of the neck. There's a little shadow just under the. I'm using a big brush to stop myself from fussing too much as well. I want to keep everything loose and broad at this stage. I'm not looking at detail, that will come later. The first wash is soft and loose and fresh. Here I'm going to leave a little bit of white paper showing on these feathers at the front. Even though they look white on the reference photo. I'm putting some gray painting. At the back here I've got a pencil line. I need a bit of gray paint there, but I'm not going to carry it all the way up the back of the neck. I want to create a lost edge along here. I won't put any paint along their. Now I'll wash the paint out of my brush and I'll pick up some of the Winsor lemon. I'll paint that on under here. I can see a bit of yellow. I'm also going to put some yellow onto the cheek feathers, even though I can't see yellow there on the reference photo. Here behind the eye, I can see a bit of yellow on the reference photo. It's very pale, so I'll make sure the color is not too dark. Let's have a look at what I've done so far. I've left the paint off this edge here, the back of the neck, and also here on the top of the head. That gives me two lost edges that will help to give the cockatoo more full and make it look less flat against the paper. I've run out of gray paint, so I need to mix a bit more for the bottom half of the cockatoo. I'll use French ultramarine and burnt sienna again. I'm not concerned if the color's not exactly the same as the first color that I mixed. I want a cool gray so I use less of the burnt sienna, more of the French ultramarine. I give it a quick mix, it doesn't have to be mixed perfectly. Down to the bottom, my waterline comes to here. Now I need to wet the bottom half of the cockatoo with water. Now I've got some Winsor Lemon on my brush. I've got a pretty bit of yellow down the bottom here. I think I can see a touch of yellow on the reference photo here. I thought I might as well exaggerate that a bit. Now I want some gray paint and I start to paint that down the side. I'm going to be up the front of the cockatoo against my pencil line. I push the paint where I want it. I'm leaving white paper showing. There's a big area through the back here where I've left white paper showing. I'll leave some white paper showing here on the front of it. Now I've picked up a bit more Winsor Lemon, I'm painting that right down the bottom. I've got Winsor lemon down the bottom and then the gray. Then I've got that big open space of white on the back of the neck. Right up the top here, I've got a little feather that sits in front of the yellow comb. I'm painting some water onto it at the moment. Now I've got my gray paint again. Paint that along the bottom edge and at blades back over there further because it's wet. Paint it along the top edge as well. I'll leave some white paper showing on it, I won't completely cover it with the gray paint. Zooming out so you can see my painting so far. I'm going to take a photo of my painting at this stage. Here it is here. This is progress photo 1, and I've included it for you to download. Use it to help you paint in the initial wash.
6. Deepening the Initial Wash.: In this lesson, I'm going to deepen the color on some areas of the initial wash. To do that, I'll use some French ultramarine, but I only want a small amount of burnt sienna mixed into it this time. That's my French ultramarine, and then a small amount of burnt sienna. This is less than what I used for the initial wash in the previous lesson. Before I paint another layer over the top, I need to make sure the previous layer is completely dry. Otherwise, I risked disturbing that layer, and I might end up lifting some color off. To prevent that from happening, I always dry each layer really well with a hairdryer. I do it even if I think it's dry just to make sure. Now that I know it's dry, I want to increase the color here on the head, and work wet on wet again. This is some water that I'm painting on. I put the water on to a large area than where the paint will be seating. I need to make sure that my paint doesn't drift to the edge of the water. Otherwise, I'll get a hard paintage where the water finishes. My water comes down here, and around the front. Now I've got the mixture of French ultramarine with a touch of burnt sienna. I'm deepening the front of the head. The paper is wet, it's not as dark as this on the reference photo. I'm exaggerating the colors now. I'm using blue because it's a cool color, and it will make this area recede. Now I want some French ultramarine on a time without the burnt sienna mixed into it, and I'll drop down here, just here I've got a little hard edge, so I will use my damp brush to soften another way. Down here I thought I'd deepen the color. If you look at the reference photo, it's a little bit darker here. I thought I might as well put some of that color down here as well. That's why I've that coloring more than one place. We're seeing a larger area than what I'll be needing. Then I use that mixture again that has a touch of burnt sienna mixed into it. So this is on wet paper. Push the paint where I want it. See it's giving me soft paintages. Taking it right to the edge of the cockatoo. Here I've got fringe ultramarine on its own with none of the burnt sienna mixed with it. Now I know it's not as dark as this on the reference photo or it's not as blue as they say that. But I'm not copying the reference photo as I see it. I'm exaggerating the colors. Now I have two areas on the painting that are darker than the rest. Again, I'm going to take a photo of my painting for you. Here it is, here I've included this for you to download. This is progress photo 2.
7. The Comb.: In this lesson, I'm going to be painting in the comb. I've just use my eraser over the top of the comb to make sure that my pencil lines aren't too dark. Once the yellow covers this, you can't get the pencil line off. I'm making it as pale as I possibly can. For the comb, I want winsor lemon. I don't want it to be too dark to begin with so I'll mix some water with it. I'm still using my number 8 round brush. I paint the winsor lemon onto the dry paper. Two important points to remember here, make sure the pencil lines aren't too dark and also make sure that your color isn't too dark. Whatever yellow you're using, mix some water into it to turn it down so that it's not full strength. Now I'll use my brush to flick out some of those longer bits. That needs to dry. While that dries, I'll come down here and put a bit more color on some of these feathers at the front or switch to my number 5 round brush. I've got some French ultramarine and I'm painting on the dry paper. Painting over the top of that feather right underneath the beak. I might do this one too. That's French ultramarine with nothing mixed with it on the dry paper. It doesn't have any burnt sienna mixed with it. I might do this one too while I'm here. That cool color should push those feathers further away from us. I'll take the paint out of my brush now and use it to soften that painting just there. Now I want some winsor lemon but I don't want it to be quite as pale as it was when I washed the combing, I want it to be darker. I'll just picked up a bit more. This time I haven't mixed any water with it. I've got my number 3 brush now. I'm painting on dry paper here with winsor lemon. I'm not following the reference photo because there's not a great deal of difference of color variation in the comb. Here I'm doing my own thing with it. Running that yellow along the bottom edge of it. Keep reloading the brush. Now we've got the paella yellow that I washed it in with and the full strength yellow on top of it. I'll get a bit more and I'll pull it up underneath that gray feather there. Here I'm mixing a touch of burnt sienna with winsor lemon. I want it a bit darker still. It's winsor lemon with a little bit of burnt sienna mixed into it. I'll put a bit of water into that too so that it's not quite so creamy. Then I use that on here where it's a little bit darker on the reference photo. It's going to be on the bird then. It's winsor lemon mixed with a touch of burnt sienna and also a little bit of water to thin it down. That's going on the dry paper there. I might put a little bit up through here. The paper is dry here as well.
8. The Eye.: In this lesson, I'll show you step-by-step how I painted the eye. I need some sepia to paint the eye, so take a little bit of that and I'll mix some water with it because I don't want it to be too dark just yet. Using my number three-round brush, I paint that sepia onto the eye on dry paper. I fill in the entire eye, the pupil as well. The thing to watch here is that you don't make it too dark just yet. I will be going darker, but I need some lighter areas on the eye, so carefully paint it in on dry paper with sepia that's got some water mixed into it. Now I want to mix some black. I'll take most of the moisture out of my brush so that it's fairly dry when I pick the pigment up. The key to mixing black is to use pigment with this little mortar in it as possible. That is French ultramarine and I'll mix some burnt sienna with it. Just trying to get the pigment off my brush. Mix the two together. It's quite sticky because my brush is dry. There's very little water here. If I add water, it's only going to dilute it and make a gray, so I need fairly thick pigment. I'll have a look at that on a piece of paper, so there's my black. Now if you don't want to mix black, something like lamp black. I'll be using this black that I mixed on the pupil, but before I do, I need some more sepia to darken the eye. I'll mix a bit more sepia into my mixture to deepen the color. My eye is dry. I've got the darker sepia. Now I'm painting it on the bottom half of the eye. This is on dry paper. I paint it straight over the top of the pupil. Using my number 3 brush right up on its tip. Trying to be as careful as I can. Take your time and don't rush. I need to try and keep that round shape. I'm going to run my brush over the top of the eye there as well. Now I'm drawing it really well with the hairdryer. I want to put the black over the top on the pupil but needs to be dried before I do that. Now I want some black and I'll paint that onto the pupil. If it's too sticky, dip the tip of your brush into the water container to get a bit more moisture onto it and then paint it on. If you find your brushes dragging on the paper, you need a bit more moisture there. I carefully make the circle trying to be as neat as I can. Paint slowly and carefully and use the brush up on its tip. My eye is dry now. I want to take a bit of paint off the brown area. I've got some water on my brush just trying to loosen the pigment and I'll get a tissue now. I will do it a second time, bit of water on the dry paint and then the tissue. This is my small Rosemary and CO Eradicated brush, so I think I might use that instead of the round brush and see if that gets it off there better. I do the same thing. I use a wet brush and the paper is dry. Then I use a tissue. Here I've got a little bit of paint that is smudged on the feathers. I'll see if I can get that off with this. I've lost a couple of lines around the outside edge of my eye, so I will quickly draw them back in. I'm using the reference photo as a guide, I'm not following it exactly as it is. Now I've got some water on my brush and I'm painting it around the outside edge of the eye. I'm keeping it within the edge of that first pencil line. For this, I want some gray, but I think I want it to be a bit warmer, so I'll mix a bit more of the burnt sienna into it. I'm going to paint over the top of my pencil line and because the paper is wet, it should blade back towards the eye. You don't need a great deal of paint. Just a little bit on the tip of the brush, paint it over the pencil line, and if you paper is wet it should blade back towards the eye. Now I can wet this outer ring that I've got. I won't do the next one right next to the one I just painted because I'll disturb the first one, so that was water. This is the gray mixture. I run it over the pencil line. It bleeds back towards the eye. I'll do the same thing here with this one, that's a mortar. Pick up the gray paint and I paint that over my pencil line. You don't need a lot of moisture in your brush if you paper is wet there. With this one, I've decided to paint the gray straight onto the dry paper, so all I'm doing is painting over my pencil line. Just filled in a bit more there, the front. All of those paint marks are dry now, so I'll use my eraser to take off the excess pencil. Now I've got my eradicated brush. I'm tidying up between the lines. If I think the paint has spread too far, I use the brush wet when the papers dry. Here, I've got my mechanical pencil and I'm defining some of those lines again. Now I've got a bit of sepia on my brush. It's fairly dark. I'm painting that around the outside edge on dry paper. I've got a bit of water on my brush now. Bring that paint down with my wet brush. Now I've got a touch of the gray mixture on my brush. This is on dry paper here. A little bit of feather detail behind the eye. Just taking the paint out of my brush. I'll use my damp brush to soften that back edge away.
9. The Beak.: In this lesson, I'm going to paint in the beak. The first thing I'll do is paint a wash of French ultramarine over the top. I'll use my number 5 round brush. Mix a bit of water with it. This is French ultramarine. I'll paint that straight onto the beak on dry paper. I'm going to be putting some Payne's gray over the top, but I want these French ultramarine on there because I want the blue to show through. I won't be completely covering it with Payne's gray. A light layer of French ultramarine on dry paper. I do the same thing with the bottom beak as well. That was on dry paper there too. I'll leave that to dry and I'll get my Payne's gray ready. The beak has dried, so now I'm re-wetting the bottom beak with some water. I dried it with the hairdryer to make sure that it was completely dry. I want to work on the wet paper now. I do the bottom beak first. I'll use some Payne's gray and I'll paint that along these white feathers that overlaps the beak. When the paint touches the water it bleeds. Run it down the edge of the feathers. It's fairly dark, the Payne's gray. Just created a little feather separation or two on that one. Then I push the paint up the beak. I'm always careful when I paint the beaks of birds because you've got to make sure you get the shape of them right. Otherwise they look strange. I've just taken the paint out of my brush now. I want to try and leave some of that blue underwash showing. I don't want to completely cover it with this color. Now get a bit more paint. I'll put a little bit more there, dabbing it on, trying to leave some of that blue is still showing. I'll put a bit more of it up the top here. I'll spread this area here, add a bit more. You can still see the blue underwash showing through. Now, I'll paint in this top beak. Again, I'll work on wet paper and I'll do the same thing with the Payne's gray. Now I want some really dark Payne's gray, so we'll get some more pigment. I'll start right at the bottom of beak with the darkest pigment. You can see how dark that is. It's quite opaque. There's water on the paper. As I work my way up, it will get lighter in color. I might dip my brush in the water. I've just picked up a bit more water on my brush now. I'm careful along the edge so that I don't change the shape of the beak. Then I can dot the paint on in the rest of the beak. The edges are important. Once I get them in, I can be a bit more relaxed with where I put the paint on. Now I just do it really quickly and I try and leave some of that blue underwash showing. As I painted this, I'm not really looking at the reference photo other than for the shape of it. There is a highlight though at the front of the beak that I might try and put back in in a moment. You can see it's really dark at the bottom of the beak, but up higher, it's more patchy so that I can keep some of that underwash showing through and I can give it more texture that way. Now I'm taking the paint completely out of my brush. There's nothing on my brush now, just a little bit of moisture. I'm using it to spread the paint out a bit more and make it look a little bit less patchy. Now I'm using the brush like it's a sponge and I'm taking a bit of paint off there. There's a highlighted section there on the reference photo that I thought I would like to paint on. I'm flattening out the bristles and sucking up some of that paint that's there. It creates a highlight. I've waited a few minutes for it to start to dry. I don't want to disturb these dark patch of pigment down here, but I thought I might drop a few little water droplets up into this area just to create some watercolor blooms which will add some texture to the beak. If I do that too early, it doesn't really do anything other than push the pigment out to the edges. So I have to wait until it's starting to dry and then I drop the water on it. That disturbs the pigment and creates the blooms. It's dry, so now I can paint in the tongue. This time I don't want the color quite as dark, so I mix a bit of water with it. Using my number 3 brush, I'll paint in the tongue on dry paper this time. I want it to be lighter to start with, and then I'll put some darker pigment over the top in a few places. Now I'll get the darker pigment. Still Payne's gray, but it's thicker this time, more pigment, less water. I'll paint that onto the tongue while it's wet. That's virtually a full strength Payne's gray. You can see it's quite a lot darker than that first wash. That first wash is still wet. If it had started to dry, I'd need to dry it completely and then re-wet it with water to put this darker pigment over the top. Just picked up a bit of water on my brush. I've taken the paint out of it. Now I'm using it to feather that paint around. I want to try and leave a few lighter patches on the tongue. Okay, that will do. Now I'll take a photo of my painting at this stage. Here it is here. This is progress photo 3, and I've included it for you to download.
10. Feather Detail Part 1.: In this lesson, I start to paint in the feather detail. To do that, I'll paint negatively. What that means is that I paint the area around each feather rather than the feather itself. It's not that difficult, but it requires some patience. Take your time with it. I need to make some more gray. Again, I'll use French ultramarine and I'll mix it with some burnt sienna. Remember if you want it to be a cool gray, you add more of the blue. If you want it to be a warmer gray, use more of the burnt sienna. Otherwise use equal quantities of both colors. Just mixed a bit of water there. I put a touch more blue in and I think that'll give me a cooler gray. At the top of the head here, I've got a pencil line that indicates one of their feathers there, I'm painting some water underneath it. I pick up some gray paint and I paint that underneath my pencil line. That creates a little shadow underneath that feather. Just taking the paint out of my brush. Now I can smooth that paint out. If it bleeds a little bit too far or if you don't like the way it sitting, you can use your brush to clean it up. There's another pencil line underneath that one. I'm wetting underneath that line as well. There's another feather just here. I use the gray mixture again and I run it underneath the pencil line. Take the paint out of my brush and I can spread that paint out. I've got a bit more paint now. I'm going to run that along that edge where the yellow color sets. Creates a shadow. That was on dry paper though. This is water on my brush again. Another feather just here or shadow underneath the feather. Paint some more water here. This is the gray mixture again. By that, underneath that feather. Now I've washed the paint out of my brush. It's slightly damp and I can use it to spread that pigment now. That's created another [inaudible] just by painting the shadow underneath it. Now move on to these cheek feathers and I'll do the same thing. I wet underneath the pencil line or on the feather below the feather that I'll be painting. Gray paint again. I paint it underneath the pencil on blades over the feather below and it creates a shadow. If I need to, I use my damp brush to tidy that shadow up. Now I'm wetting underneath the next pencil line. Sop some of that water up so it's not too wet. Then I use the gray paint again. I run it on the bottom of that pencil line, creates a feather separation. Take it all the way to the beak. Now if that paint spreads too far or you don't like the way it sitting. I get my damp brush and I clean it up. If I'm happy with the way it's sitting, I leave it. I'm going to skip a few feathers because I don't want to just move those feathers that I've just painted, painting some water along this group. Then the gray paint runs along my pencil line again, a bleeds over the water that's on the paper. I'm concerned about is getting in the edge of those feathers. Then I take the paint out of my brush and use my damp brush to soften away the outer edge. I'm happy with the way the paint has bled underneath, so I'll leave it [inaudible] that. Now I'll get some water underneath this group of feathers. Let's run it carefully along my pencil lines. Pull it down further than where I need it. Smooth it out and then get some gray paint. I run it along my pencil line, forms the bottom edge of those feathers above. My paper seems to be drying there, so we'll get a damp brush and [inaudible] Then I can use my damp brush to pull the paint down a bit further. Now I'll wet this one. Some water and this is the gray paint. I've skipped over some feathers because I don't want to disturb the area that I've worked on. I'll wait until they dry and then I'll come back and paint them in. I dried it off with my hairdryer. Then I use my pencil to draw some of the feather detail back in. Now I can paint in this group here. I paint the water underneath my pencil line, I paint the water down further than where I want the paint to go. I'll get the gray paint again. This is the gray mixture, not Payne's gray, it's the mixture that I made myself from French ultramarine and burnt sienna. Again, if you find that it spreads too far or you don't like the way it looks. Use your damp brush to tidy it up a bit. Now I wet the next group of feathers underneath the pencil line. Then I use my gray paint to run it along the pencil line. [inaudible] over the water creating that shadow. My focus is on the edge of the feathers above. A little bit of paint into the feather to create a little feather separation. I take the paint out of my brush and use my clean brush just to smooth it out, tidy it up if it needs it. Here, I've got water again. I'm painting underneath that feather there and then the gray paint again. I run it along the pencil line. I think I'll stop it there because I want to put some more French ultramarine on that feather. I'll skip the next feather and I'm painting this too, water goes underneath my pencil line. Here instead of using the gray, I'm using French ultramarine, these feathers are in blue area that I created. I thought the gray would look a bit strange there. I've used a French ultramarine on its own instead. Now I'll put it under here where I didn't continue it before. That's French ultramarine there as well. Now I'm wetting along the edge of this feather. Again, I've got French ultramarine instead of the gray this time. Along the feather's edge. That helps to find that feather. Let the area dry. I'll come back up here to this one that I haven't painted yet, water underneath. On this one, I'll use the gray paint again, the gray mixture. Take the paint out of my brush now, clean up that edge. I've just painted a bit of water under one of them, this one here, and this is a bit more of the gray mixture. I felt it needed to be done again. Take the paint on my brush now, tidy up everything. Now I want some water on that one and I'll put a bit more gray paint there too. Now some water onto that one. Here I think I'll use French ultramarine. That's without the burnt sienna mixed with it. Now for some water along this group of feathers. This is French ultramarine again. When I pull the paint up onto the feather itself, that creates those feather separations. Some more water. Down here, I've moved out of the blue area, so I'll use the gray mixture, French ultramarine and burnt sienna mixed together for the separation to feel like. I've taken a photo of my painting at this stage for you. Here it is. This is progress photo 4 and I've included it for you to download. Use it to help you when you start painting in the feather detail.
11. Feather Detail Part 2.: I'll continue on to the bottom of the painting now adding a few more feathers. I decided to simplify the feathers at the bottom, and not paint too many of them in. If I was to sit there and paint them all in the way that I see them on the reference photo, the painting might become too busy and they'd be no areas for the eye to rest. I want the head to be the main area of interest. That's where I put most of the detail, and that's where I put my darkest colors. I want the view of his eye to be drawn there. As I work my way down the body of the bird, the colors become less intense and so does the detail. There's a little cluster of feathers just here so I'll paint some water underneath my pencil line. Here I've got my gray mixture again, running it down the pencil line letting it bleed over the water. Here I'm pushing the paint down a little. Now I'll take the paint out of my brush, and I'll soften away that edge just with a damp brush. Some water there, and this is the gray paint. I'm trying not to put the paint on too dark down here as well. I've just noticed up here I've got a feather missing so that's a bit of water, and then some more paint there. I've just wet under these pencil lines, there's the gray paint again. Now I'll tidy up those edges. Now I want some Winsor Lemon and I'll mix some of this gray mixture with it to dial it down a bit. Okay, a bit more yellow. I'll use that under this feather here. I wanted more of a muted color rather than the vibrant yellow so that's why I mixed the gray with it. Here I'm on dry paper, painting in that shadow. Then I use my damp brush to soften that edge. I'll use that same color just here to separate one feather from another, so I painted on the lower feather. That's on dry paper as well. Now I'm painting some of that color on this feather right down the bottom. You can see I've kept the color fairly pale. A little bit of water here. There's a group of feathers that I can paint in there too. This time I've got my gray mixture of burnt sienna and French ultramarine. I might have to pull the paint up onto the dry feather to create a separation there. I'll take the paint out of my brush now and I'll use the damp brush to pull that paint down a little bit and soften it slightly. Among that ones we had I'll put a bit of gray there too so the yellow area is still damp. If it had dried you can put a bit of water there before you put the gray on.
12. Feather Detail on the Wing.: In this lesson, I'll start to paint on the feather detail on the wing. I've got my number 3 brush again and I'm painting the water underneath my pencil line, doing the same thing that I did in the previous two lessons. I use some of the gray mixture. Just as I've been doing in the other lessons, I paint that on underneath the pencil line. Let the paint bleed over the water. I don't want my colors to be too dark here either. If you look at the reference photo, the colors are very pale on the wing. I wanted to paint a bit of detail here because I felt that it needs it. Again some water around my pencil line and then the gray paint. I'll take the paint out of my brush now, I soften the edges, and I push the paint out a bit further if it's sitting in one place. There's a little feather here that I'm painting around. You can actually see it on the reference photo. A little thin feather right at the top of the wing. I put some water around it and I've got the gray paint there as well. I'll take it down underneath that one. I'll get the paint out of my brush again, soften away edges or any marks that I don't like. Now, with this one and this one underneath them and beside them, I put the gray mixture again, that's Bent Sienna mix with French ultramarine. It's not paint gray. I've just wet underneath that feather. That's the paint going on there and then I'll take it down the side here. Pull a bit of color up onto the dry area to create this little feather separations and then I use my damp brush to soften away the paint edge feather, some water underneath that line, and gray paint again here. Be careful that you don't disturb the areas that you've just painted. If they still wet, leave them alone and work somewhere else or dry them off with a hairdryer. A little bit of gray paint again. You can see the water on the paper is giving me a combination of hard and soft edges every way. I've just wet next to my pencil line here and under this one as well, this one here. Also move to right down the bottom here. Here's the paint again. There's another little one just in here group of feathers just there, that was water and there's the gray paint again. What I need to do now is dry all of them off really well with my hairdryer. I need it dry because I'm going to wet it all again and I don't want to disturb it. It's completely dry. I've got some clean water now. My big number eight brush and I'm painting water over the top of that area I just painted. That helps to soften some of those hard edges. It also helps to fade the color out a little bit. I don't want the color down the bottom here to be too dark, I want it to be paler in color than the head of the cockatoo. Here I've got a tissue and I'm dabbing at the paint. You can see it's lifted a little bit of color off. Now, I need to dry that off with my hairdryer again.
13. Deepening the Colour.: I've got everything painted in. Now is the time when I stand back and have a look at my painting and try to determine what else I can do to improve it before I call it finished. In this lesson, I'll deepen the color in a few areas. Down here on the neck, I think I could probably paint a little bit more French Ultramarine blue. I've just wet that with water and now we've got a little bit of the blue. I don't want it quite as dark as what it is up on the head or underneath the neck. But I thought I could put a little bit of color down here toting it onto the water. I'm no longer looking at the reference photo. I'm just looking at my painting to see how I can improve it. Up here, I've got some of the gray mixture, French Ultramarine mixed with burnt sienna and I'm painting it on the dry paper adding a bit of detail at the top. Now I'm thinking I could probably increase the color just here underneath this feather. That was water. This is the gray mixture again. Take it over the eye there. Get underneath the eye. There the paper is dry where I painted around the eye. I'm about to extend that line a little bit further. You may not have to do that because of my line drawing that I gave you. Little bit of water here in front of the eye. This is French Ultramarine again. Just on the side, [inaudible] burnt sienna mixed with it. Right up on the head here on the right-hand side, I think I could probably deepen the color there a little bit. That was water, this is French Ultramarine again. I feel I could have made it quite a bit darker there. I'll give these little feathers another layer of the blue. That's on dry paper. Just deepening the color, making it a bit darker. Pushes them further back. I'll paint a bit of water up here again that has dried now. I'm thinking maybe a bit of French Ultramarine up there as well, just a little bit. I can't see this blue color on the reference photo but I know that putting it on my painting enhances it. Whenever I use a reference photo, I try not to let myself be inhibited by it. I'm not afraid to experiment with color. Now I'm thinking the yellow area on the cheek is a bit pale. I've just wet that with water and I'm going to increase the yellow there. This is Winsor Lemon. I think that looks better.
14. Final Details.: I finished the painting in this lesson. Just before I finished my painting, I stood back and I looked at it, and I realized that it would benefit from the addition of a few areas of violet. Violet is the complementary color of yellow. I felt that it would really help with the color harmony and bring the painting to life. I want to paint a few more final details before I'm finished. The first thing I want to do is paint some clean water over these cheek feathers. Remember I did this on the wing feathers to soften them and to lighten the color slightly. Here I'm doing the same thing. The water softens the hard edges and it meets the color just slightly. That makes the feathers look a bit softer. You need to make sure that your painting is completely dry before you do that. At the back here, I want to paint in a little feather that was water, I'll get some gray paint again. That's the mixture of gray Burnt Sienna and French ultramarine. Paints a little feather in there. I'm also thinking of bringing the top of the wing here, at the moment, I don't have anything there to indicate where the wing starts. That's a bit of water and again, gray paint. That just brings in the top curve of the wing. I'll paint in a little feather just here the, paper is wet there, that's the gray mixture. I might put a little bit of color down here too. That's the gray mixture. Here I've got the yellow with the touch of Burnt Sienna mixed into it. Winsor Lemon with a tiny bit of Burnt Sienna into it to darken it slightly. That's on dry paper there. You can see some of those feather flicks small. Up the top here I'll put a bit more there too. I've just got a bit of Winsor violet out. I want to add a few little areas with the violet. I think it will complement the yellow beautifully. Just here on the head I'm wetting it with water. I've got some Winsor violet now, I'll dub that on there. The addition of the violet will compliment beautifully with the yellow. I might put some down here on this patch of French ultramarine as well. I'll wet it first with water, and here is the violet again. I'm gently patting it on there and then I'll spread it out a bit. Changes the color of the blue slightly. Now I'll soften those edges a bit more. Now I'm painting it over the top of these little blue ones here right under the peak. That's on dry paper there. It gives it more of violet blush. Maybe along there too. I'll put some along the back here right next to the yellow, there. I think that's finished it off nicely. I've kept my painting off my board, and there it is finished. I think the addition of violet has really made a big difference.
15. Thank You and Your Project.: You made it to the end, thank you. I hope you enjoyed the class and learned a little bit about painting white subjects in watercolor. All of the files you need to complete the painting are available to download on the Projects and Resources page. You can access them, if you login to Skillshare through your Internet browser. I don't think that you can see them, if you're using the Skillshare app on an iPad. Please upload a photo of your painting when you've completed it, you can do that on the Projects and Resources page. I love seeing all of them, and I'm sure that you do too. Take care, happy painting. I'll see you in my next class.
 Louise De Masi, Artist - capturing beauty with watercolour