Transcripts
1. Welcome to class: Re-mix everyone happy
in one or the Adobe. Beat ionization in the
atmosphere or signals to bring rain helps us enjoy
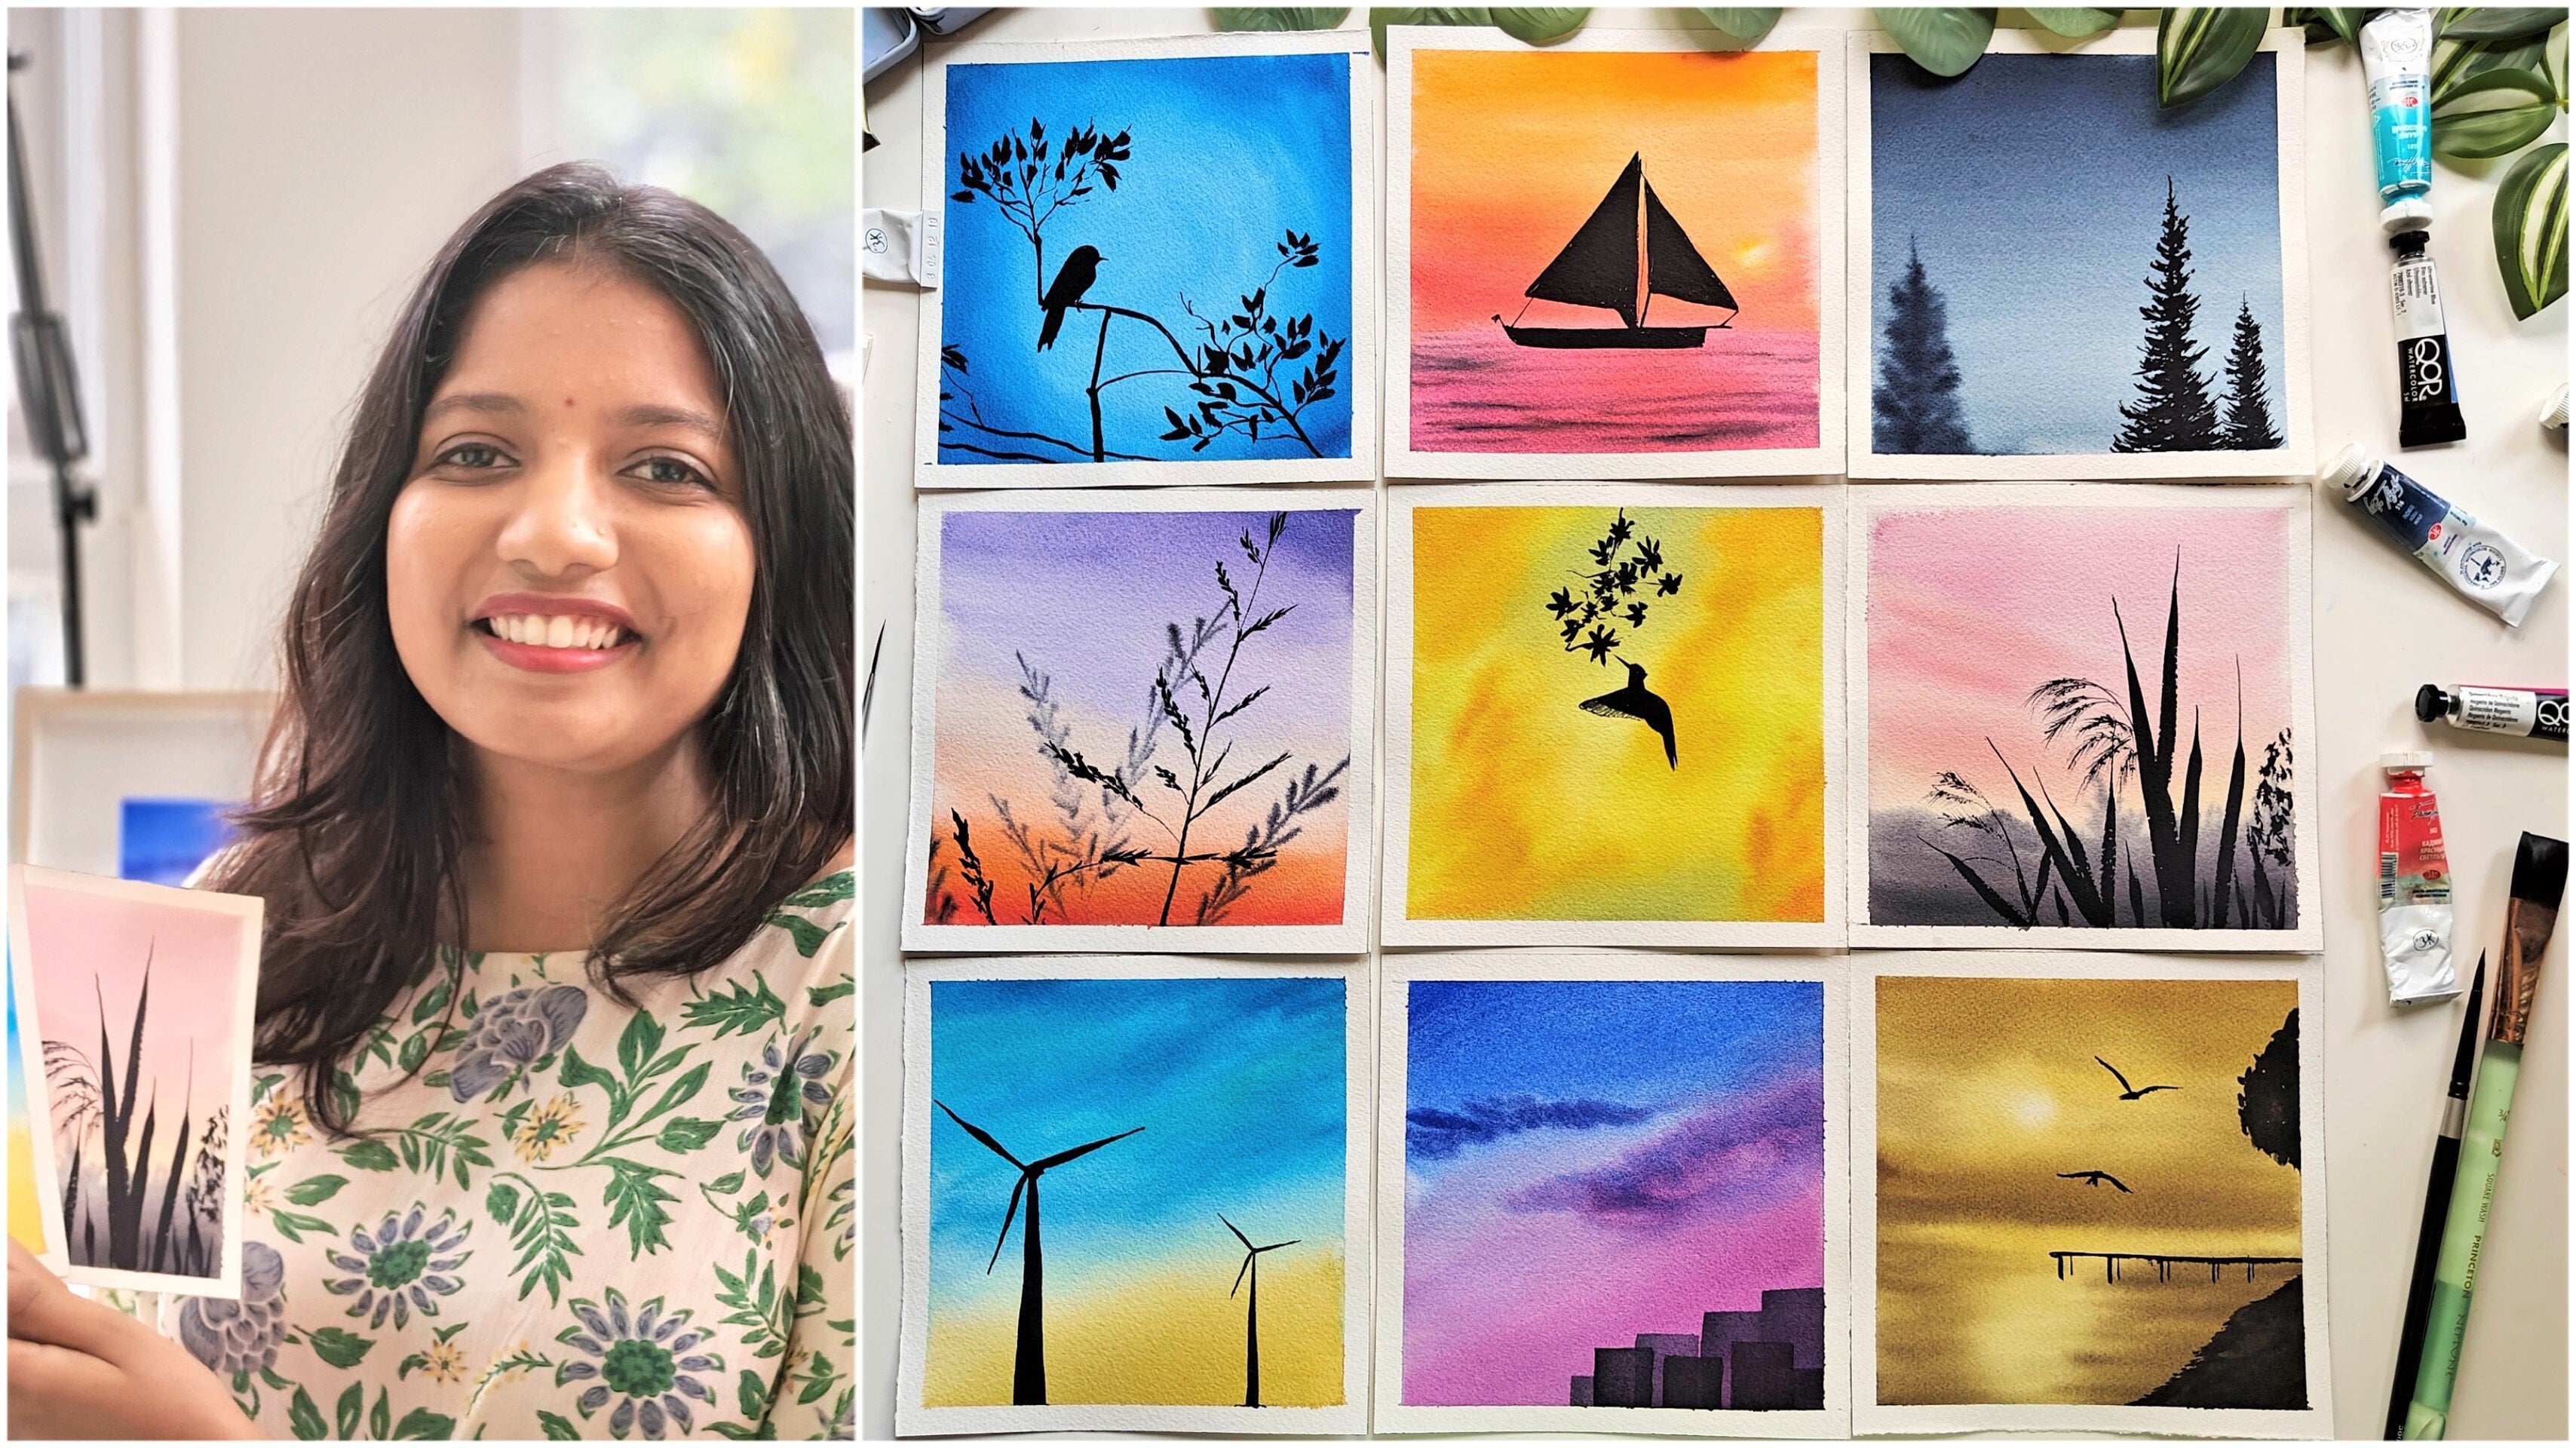
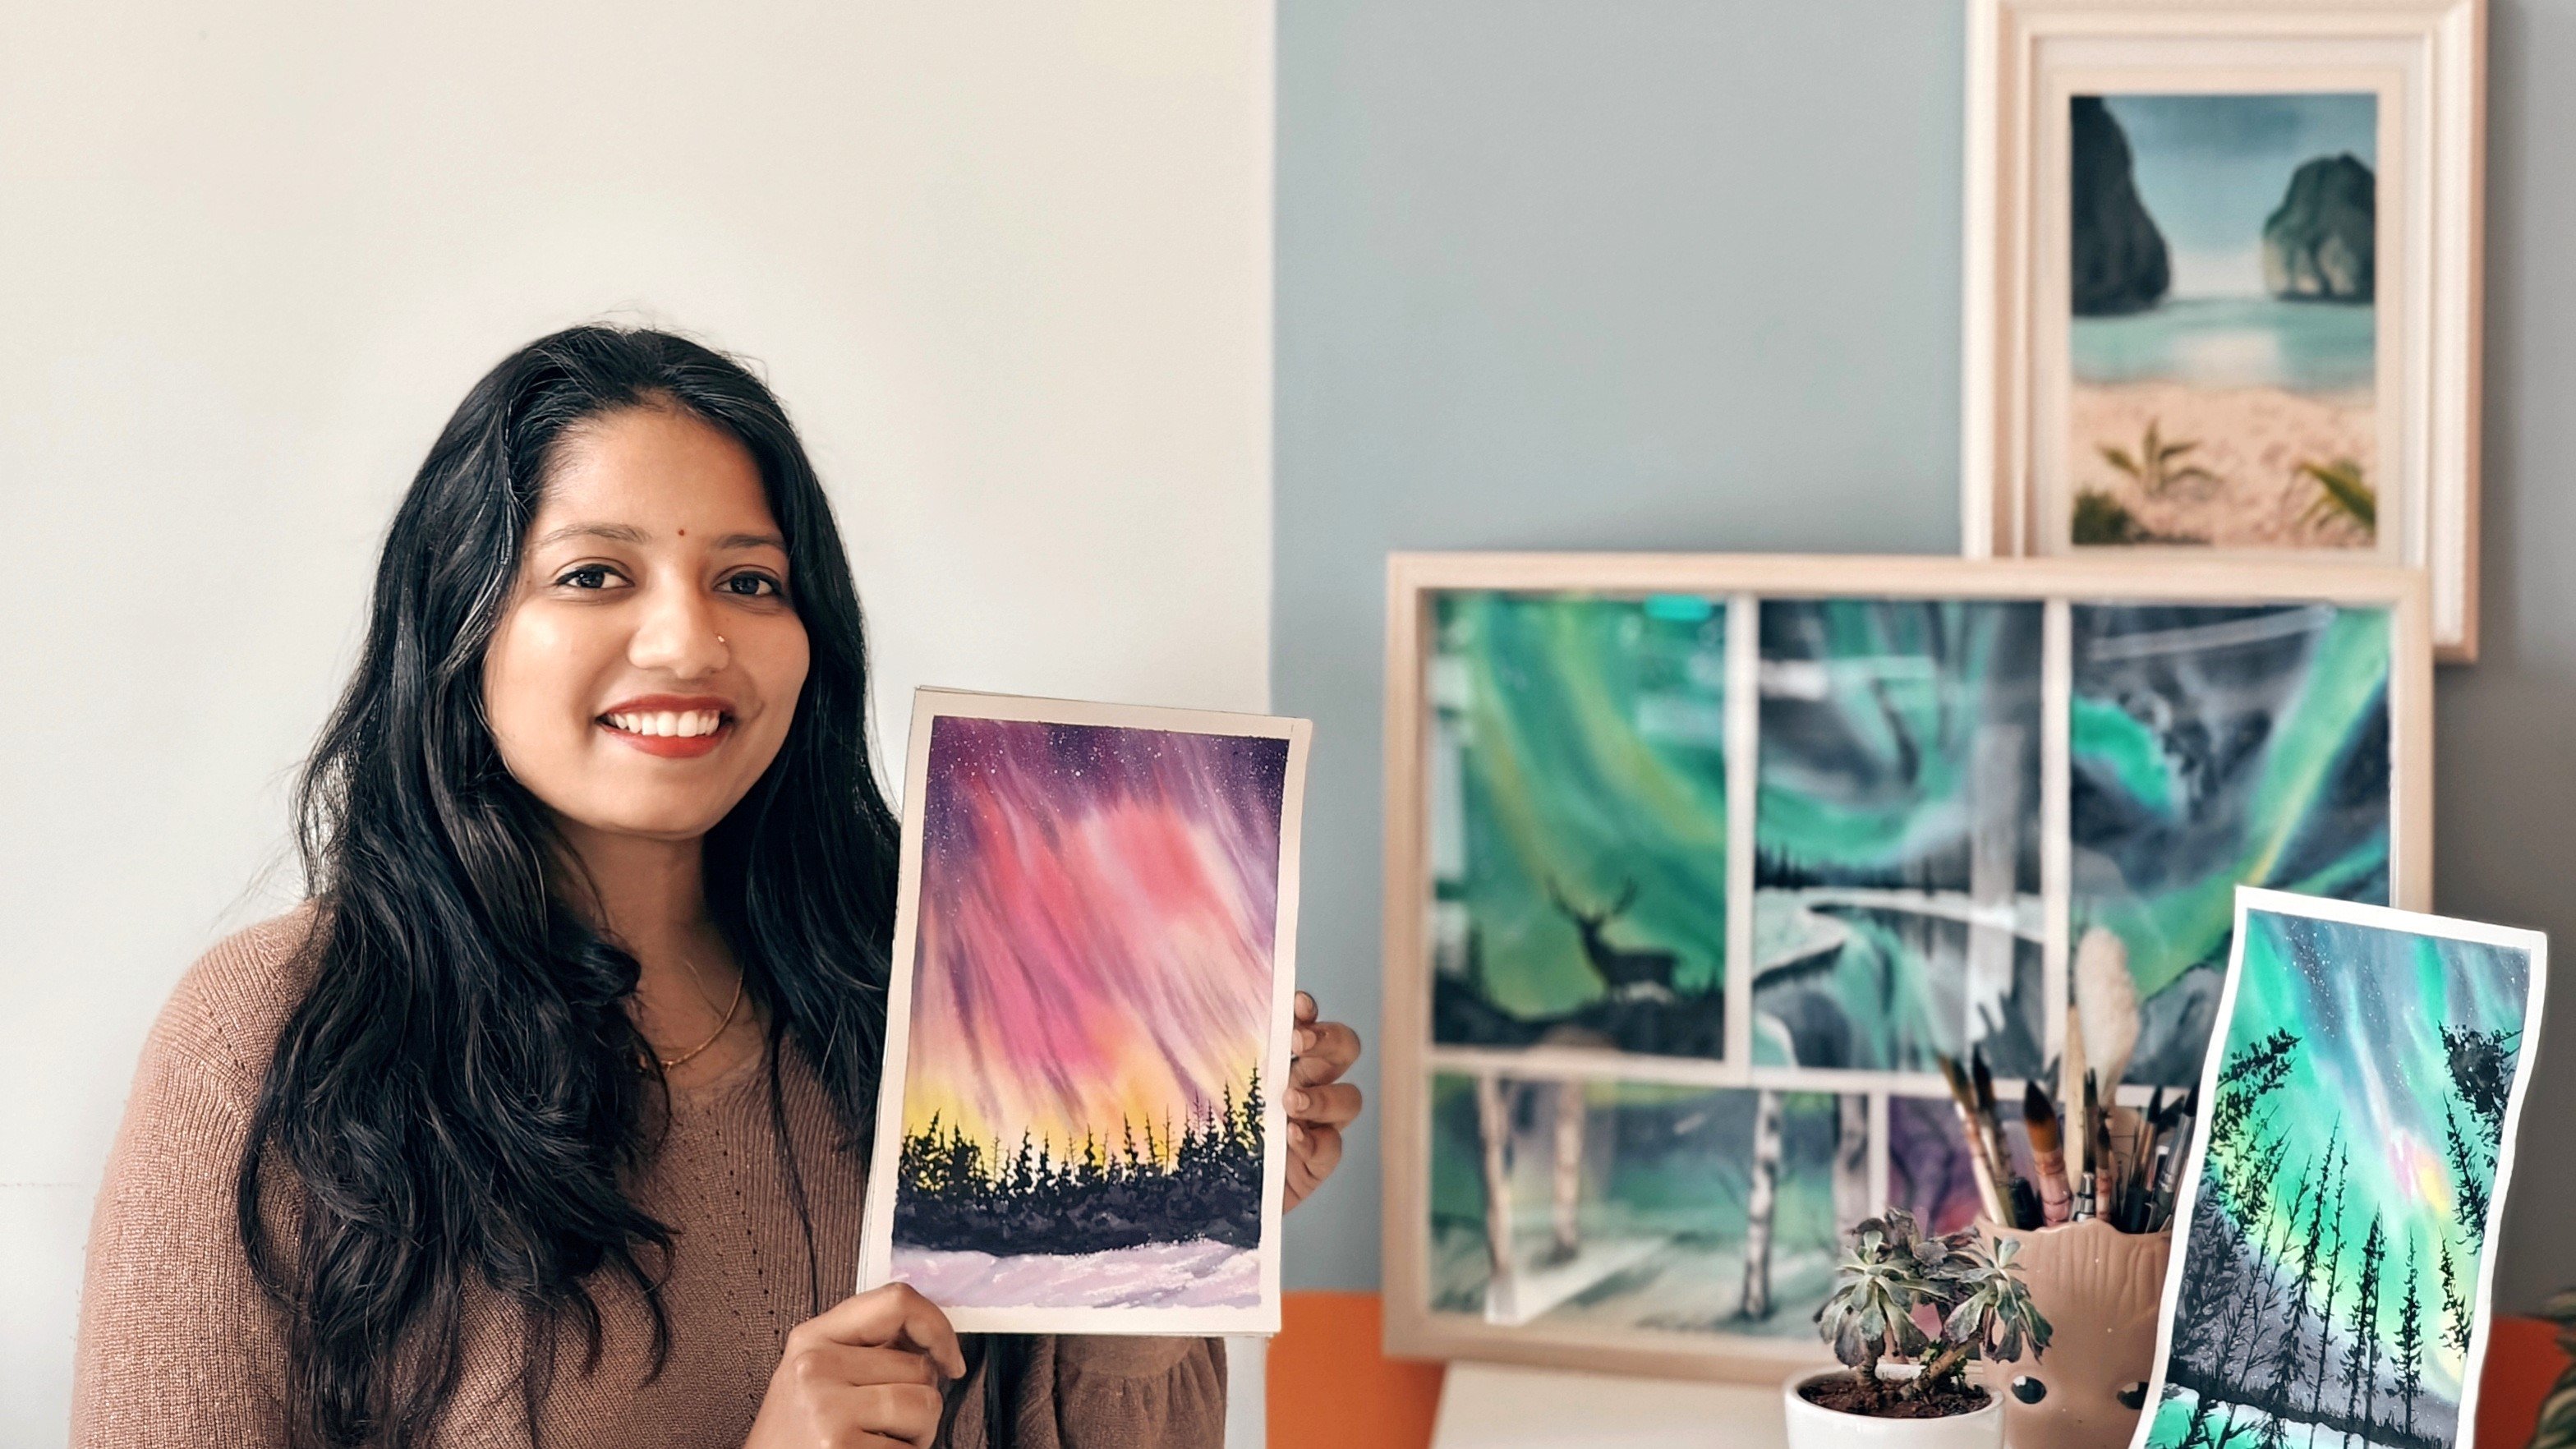
the experience and be happy. Hi, I'm swathi jihadi, a watercolor artist based
out of Bangalore, India. I'm a Product Manager
by profession, but definitely painting
watercolors is my passion. I wish to explore
unique concepts while painting a
watercolor subject. And during one-off
my explorations, I figured out that
a palette knife or a credit card works the best
when it comes to painting, a rainfall, it gives the perfect amounts
of precision needed. And we feel like it is
definitely a rainy-day scene. Painting rainfall in watercolors is a very calming effect
on the mind as well. You can use your favorite
techniques for painting a blurry background with
any colors of your choice, you will have ample
amount of time to focus on our main object. With the right tips
and techniques, you can create a beautiful and realistic representation
of a rainy day. In this class, we will
cover all the concepts, the basic concepts of
watercolors that is required to paint a rainy-day along with
all the supplies needed. The paints composition, and we will finally
come to paint. Two different class projects
offer rainy-day scene. Whether you're a beginner
or an experienced artist, I'm sure you'll find something new to
learn in this class. So grab a hot beverage or a snack and because it
is going to be rainy
2. Class Orientation: Painting a watercolor
rainfall scene can be rewarding yet a
challenging experience. With the right tips
and techniques, you will be able to understand
how to approach the scene and to understand what is the object and how
to paint a rainfall. To start with, we'll go
through all the materials required to paint a rainfall. The basic ones will explore how with the
limited color palette, we can create a cohesive
and harmonious painting by using different
shades of blue, gray, and greens to create a moody and
atmospheric painting. We will then explore basic watercolor techniques
required for painting that, that would include wet on wet techniques,
lifting technique. Dry brush technique will
observe how Water control can make or break your Painting by using wet-on-wet techniques. Will also observe how quick brushstrokes are important
to capture the movement and energy off rainfall will
apply all these lessons learned into painting to beautiful class projects and
have an amazing experience. I would highly
recommend you all to post your projects in the
project section along with any of the queries that
you have so that I can help you and also help others
who are willing to learn. But on your favorite
music or grab a snack. I'll see you in the class
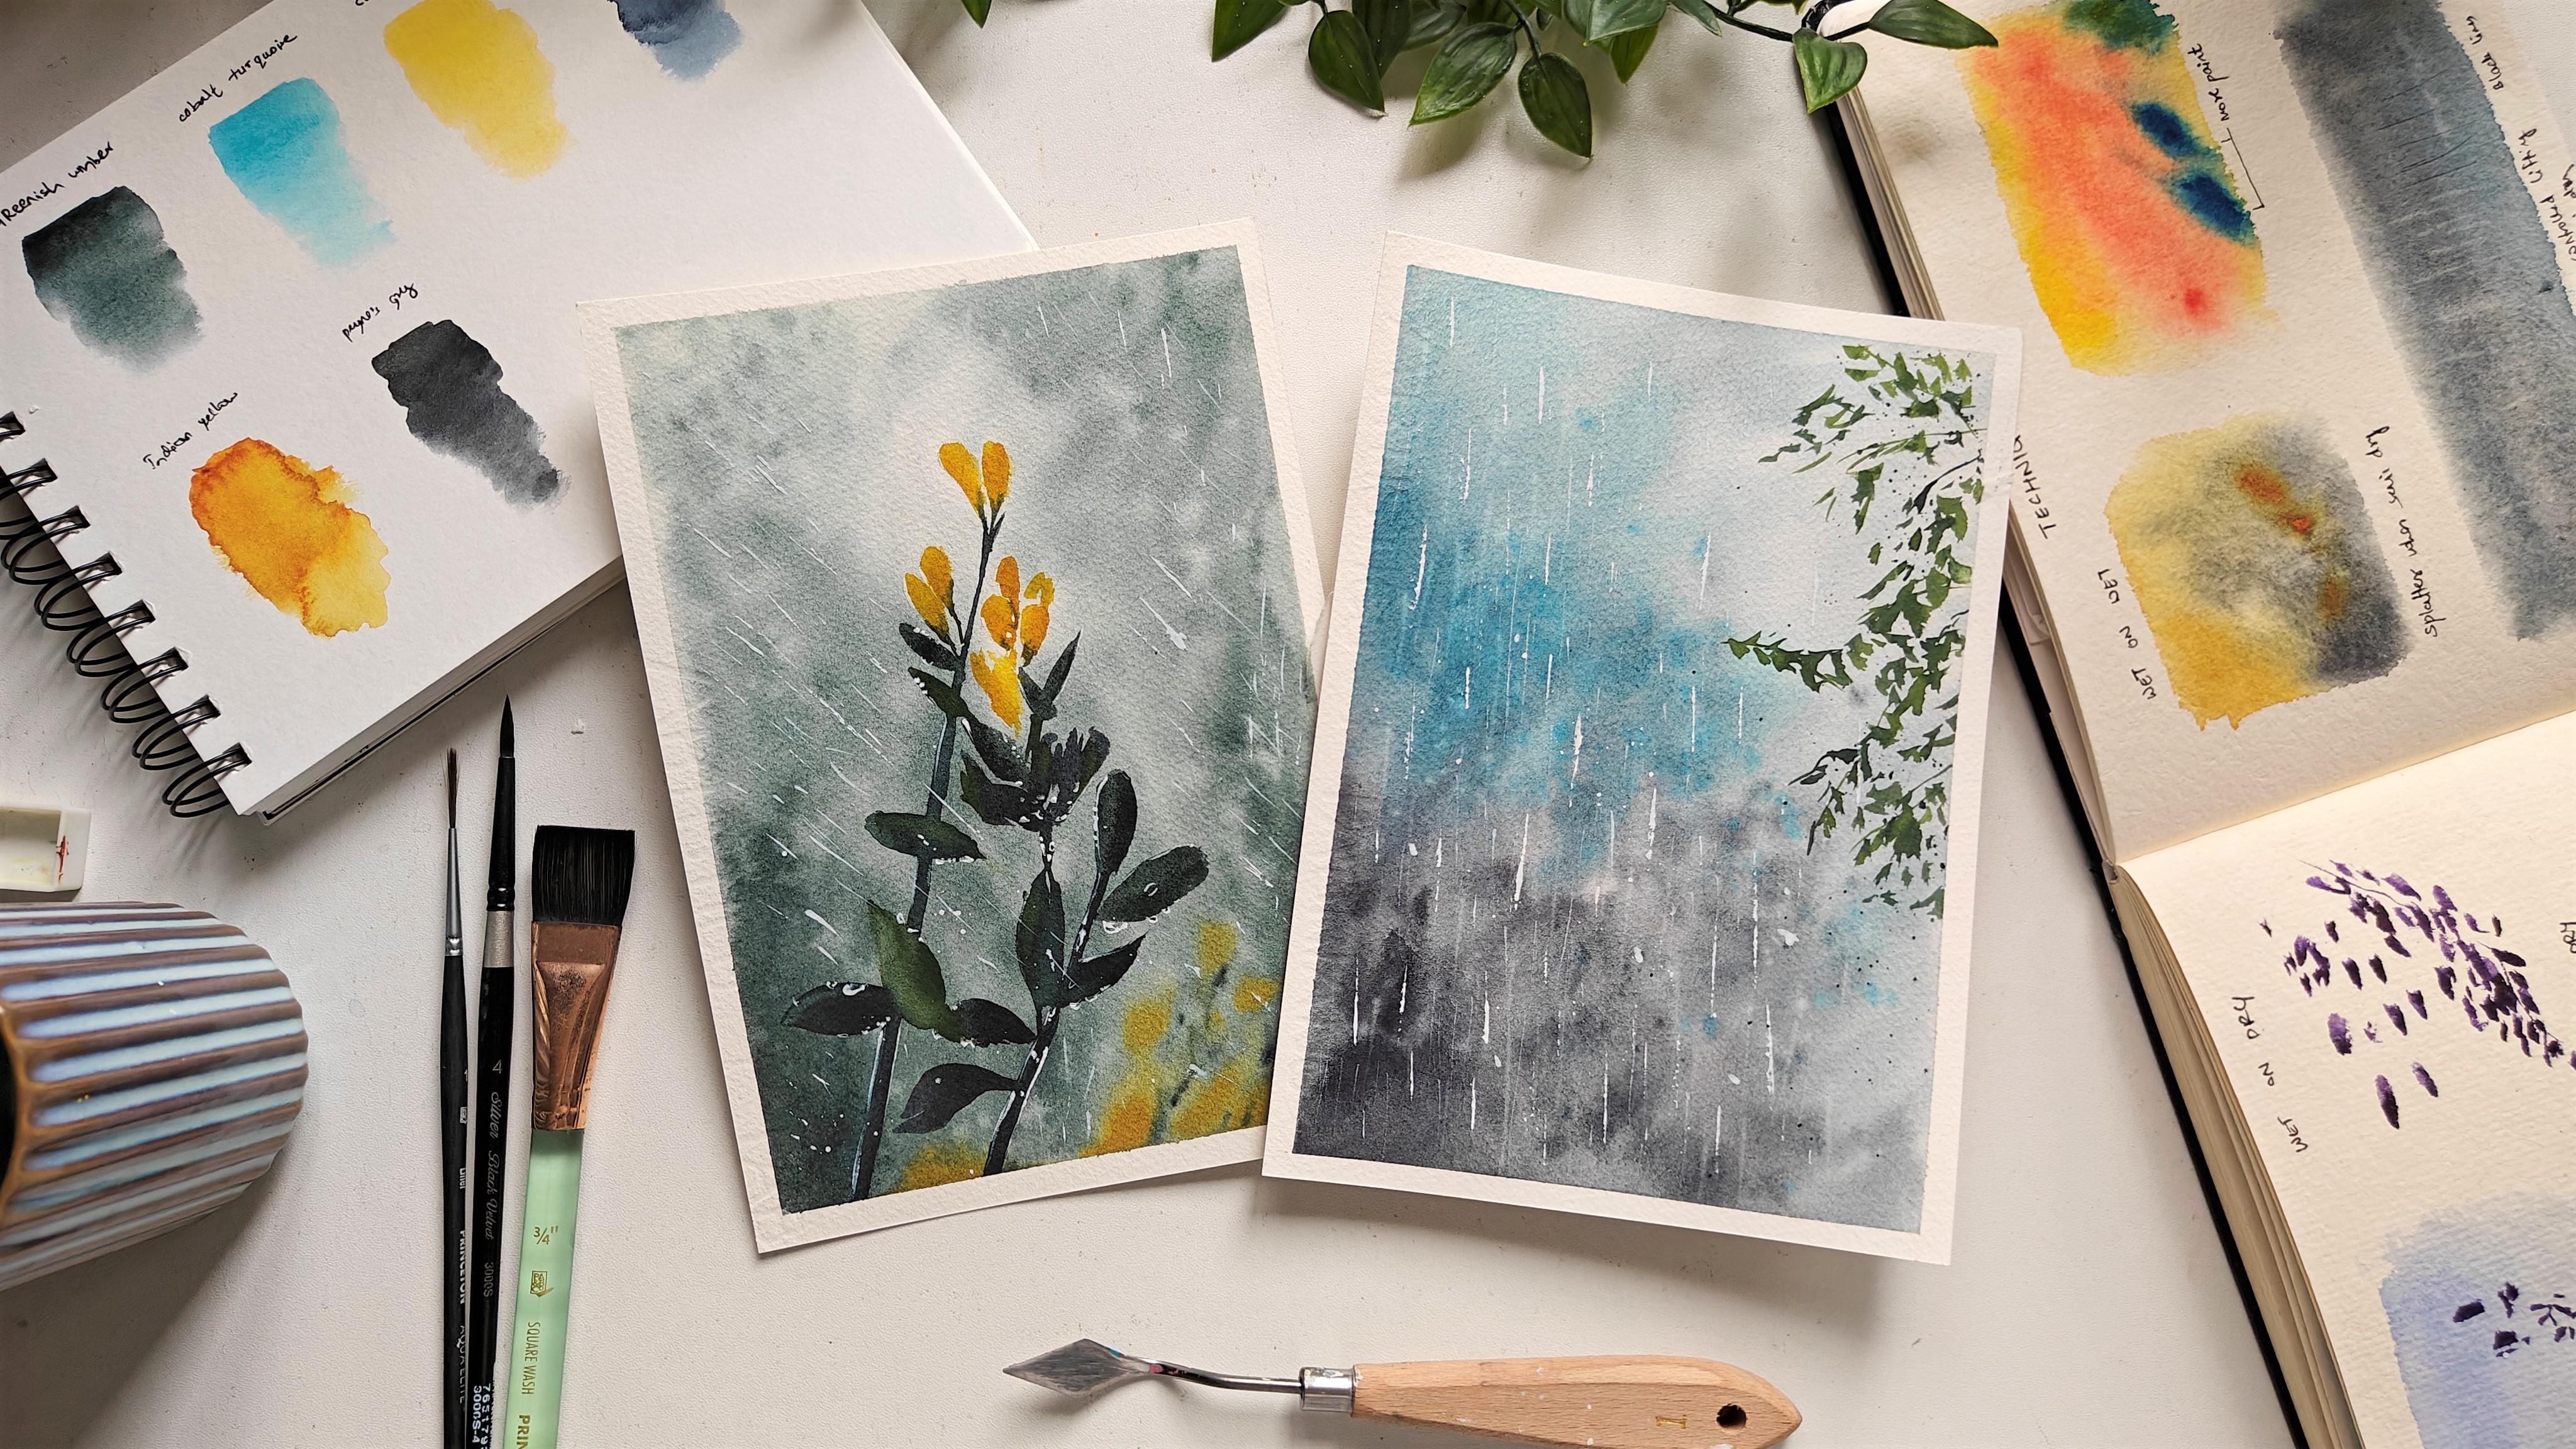
3. Supplies required: Let's look for all the supplies that is required for this class. Starting with the
watercolor paper, I have a cold pressed 100%
cotton paper from Fabriano. This is of size A5. Next is a Masking tape for
taping down the paper. I have a Ceramic palette here
for mixing up the colors. You can use any
palette that you have. Some of the Watercolor paints that I'll be using in the class. That is cobalt, turquoise,
greenish, umbo, cadmium yellow medium. Indigo. And I also have
some of the pans, that is Payne's gray
and Indian yellow. So all these colors I'll be sketching out in the next video. Of course, I have White
gouache for adding the green. Now coming to brushes. These are some of the brushes
that I will be using. Here is the Pencil that I'll be using for a rough sketch and kneadable eraser for removing excess of graphite
from my sketch. Round size brushes of size
8.4 from silver brush. It has a pointed tip, hence, it is easy for me to paint. A Liner brush of size
one from princeton. Flat brush of size three-fold
from Princeton, Neptune. These crystals are
really good for applying water or for
lifting techniques. And the palette knife, you can use a palette knife
of any size that you have, or a credit card as well. Let's see all the watercolor
swatches in the next lesson.
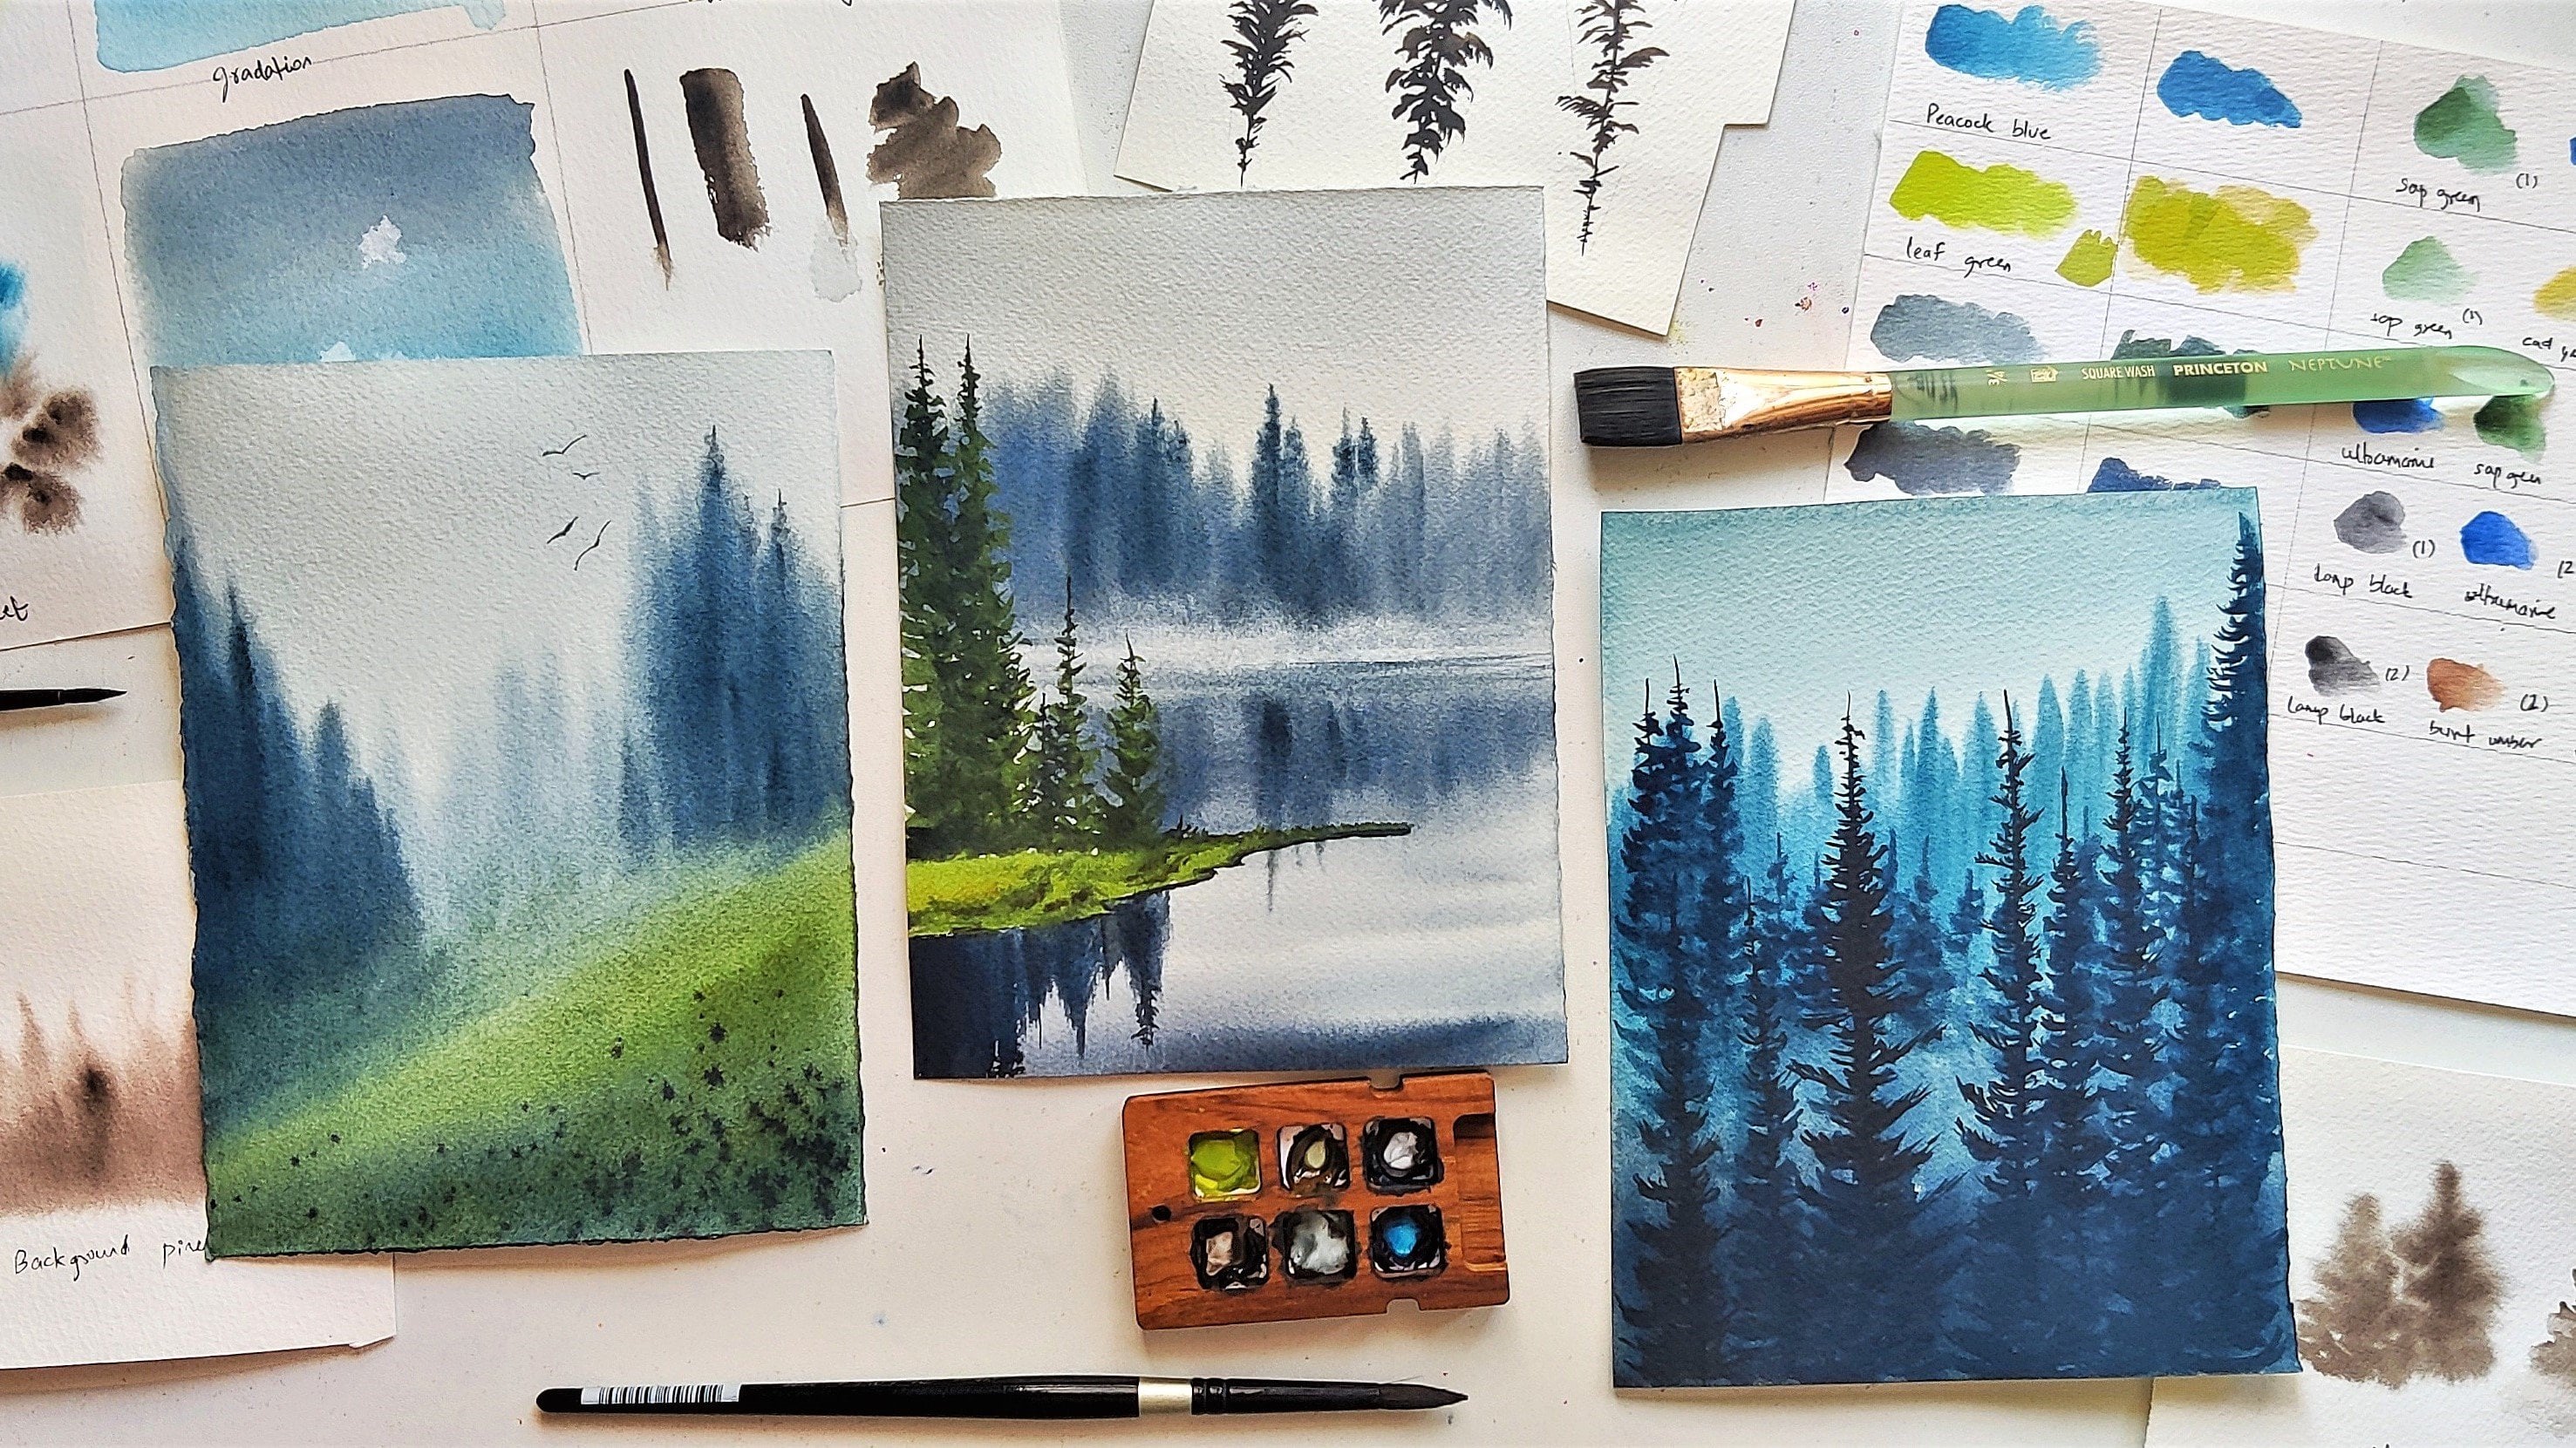
4. Watercolor swatches : Okay. Coming for swatches, I'm using a round
brush of size four from Silver Brush for
showing all dispatches. This is greenish, amber
from the brand Sennelier. It's a really great, Fine color that I love for
adding any Moody paintings. It gives a very calming effect. And if you do not
have the same color, you can prepare
it by just mixing some indigo to your green. This is cobalt, turquoise
from brand White Nights. This is one of my
favorite basal color, as well as granulating color when it comes to Watercolors. Cadmium yellow medium, it gives a very good opaque
texture to the painting. Since it is a cadmium family. Indigo. This is also
from White Nights. This is Indian yellow from
brand White Nights as well. For lifting off
paint from the pan, just take some water, dip it into the pan and it
can be easily activated. This is Payne's gray
also from White Nights. This is White gouache. You can use any white quash
or even White Watercolor. We are done with all dispatches. Now see you in the
techniques lesson.
5. Techniques | Water control in wet on wet: Welcome to the
techniques lesson. Here I have my sketch book
open and I'll just go through all the required and basic
watercolor techniques that are required for
painting any rainy-day scene. So starting with wet
on wet technique, I'm going to apply
some water onto people and spread the water across evenly so that there are no lumps on
this patch of people. I'm going to take some colors, see Payne's gray for my palette. And you can see how beautifully the color
spreads on the paper. That's because
there is water and it is trying to move
across variable. The water is there on the people in the
same patch of people. I'll take another color. Here. I'm taking Indian yellow
and I'm trying to mix it. But this wet-on-wet technique, we can mix these two colors
directly on the people. Even in the class projects, we will be doing this
where we will use multiple colors
directly on the paper. Here, I'm taking
concentrated mix of the pigment and trying to apply so that when it
completely dries off, we can see how each of the
pigments here will behave. That is the transparent shade, as well as the pigment which is applied in
the concentrated form. I'm going to apply water on the, another patch of
paper here as well. Now, I'll take some cadmium
yellow medium and apply it. Okay? Now I'll take some cadmium red light or you can take any other
color of your choice. I have a lot of
water in my brush. So when I apply, you can see how the water paint merges with the background
that is applied. Now, I'll take some blue in a very concentrated
form on my brush to show how differently it behaves when the paint
is in concentrated form. With a swift motion, I just do one Texture
and you can see that it doesn't mix
with the background. Now, if I tried to mix it again, wet, there is lot of water. It makes us with the yellow
and forms a shade of green. This is a very
important technique for controlling water for your painting because
the amount of water in your brush changes
the behavior of paints, interaction with your people. So here it is more water and
that is how it is behaving. When there is more paint, we see that it completely
stays and doesn't spread much. We'll come back and observe
how it shows going. It is completely dry. Moving on to the next technique. As we are talking
about water control, Let's see what will
happen if I do some water splatters on the
first patch of the people, it is semi dry and I'll just
take some water on my brush and tap it on the belly of my brush and absorb
what will happen. Here you can observe where
water droplets have formed. There is a clear indication
of white part of the people. I'll repeat the same step on the people where there is
lot of water and paint. And we do not observe any
bifurcation in the paint. That is because
here there is lot of water and more
water you apply. It gets mixed up. On the left side. Water and paints are semi dry. So once you apply more
of water onto it, it will remove the
excess of paint. At that particular place. I'm going to apply some water again for our next technique. But this can be dry, but this can be wet on wet or wet on dry as per your choice. I'm going to take
some Payne's gray and apply it on the paper here. I also have some bright
blue from my palette. Mixing some random
colors here that is totally of your choice. We are going to learn how to lift off and when it
is the ideal time to lift off water and the
paints from our palette. Here, I'm going to use Liner brush of size one
from Aqua Elite Princeton. We observed how the
water splatter behaves when the paper is
semi dry. It is same. Same concept can be applied for lifting techniques as well. I'm keeping my paper
cloth reading. I'm trying to lift
some of the paints. I'm going to take some water in my brush with one swift
motion and a bit of pressure, I'm going to lift the paint off. Even after I left off the paint, you can see that water
spreads and mixes with the neighboring colors without forming the texture that I
need for Background rain. So let's wait till
the paper semi-trucks and come back and see
how this effect works. That is happening. I'm
going to take a card, goes, this is an expired card, and with the corner of my card, I'm going to add some lines
here with bit of pressure. I will let it completely dry and come back and
see how it behaves. I have let the
paint to dry a bit, so now my paper is semi dry. So let me try the
lifting technique. Again. I have some water
on my brush and again, I'm following the
same technique. You can clearly see some
lines getting formed here with the amount of pressure I'm applying
on my brush. This is exactly what we need for depicting Background rain. That is the rainfall
that is happening a bit further from the eyesight. I would highly recommend
for you to observe how with which Water consistency
it works best for you with the set of
brushes that you have. The help of card, you can always achieve
a black lines. You can always achieve rain. But that would not
be white in color. You can see the distinct rain, but in a darker shade, usually the black sheet or any darker shade of the
color that you have applied. This would be a control lifting when the
paper is symmetric. Now it is completely dry. Let's recall what all we have learned in our wet
on wet technique. Even with wet on wet, we can directly mix
paints on paper. With more water. Paint merges with
the background, but with more paint
in the brush, it stays as it is. Lifting technique can be useful if you have a control V
of applying and lifting. When the paper is dry. These lines can be easily achieved when the
paper is semi dry. And the black lines
can be easily achieved with the
help offer card
6. Techniques | Dry on dry using art tools: For the next techniques, let's go through wet
on dry and Dry on dry. I have already applied Paint, two patches like lavender
and bright violet. Lavender shade
patch off my paper is currently not completely dry. So let's observe with applying of dry paint
on it, how it behaves. I'm going to take
some and apply it on the part where
it is still wet. You can see that it merges
with the background, creating a watercolor bloom. Trying it with a
differentiator as well. I'll try the same
On the other part where it is
completely dry and we see the brushstrokes retaining as is in the form
that we have applied. Here. I'm going to show you
some minimum techniques to add leaf or the branches just by pressing on
belly of the brush, wet lot of paint in your brush. You can get this oval shapes
from the brush itself. Putting half
pressure, you can get the triangular shapes
that depicts leaves. This technique is really helpful for lose painting of
leaves or branches. Now let's go to Dry on dry. Here, my patch off the
paper is completely dry. I'm going to take some
Payne's gray and dab off the excess
amount of paint on my brush on a tissue people. And here I'm going to
apply it on this patch. You can see that paint is
getting applied only on the curvature of my paper
rather than the entire length. This is Dry on dry technique, wherein the paint
is dry as well as the paint in your brush is
very concentrated form. This is helpful when
you're trying to add the final details
to your painting. The first layer of
rainfall that is visible, or the details on the leaves. Let's observe how
using a palette knife, we can add the Foreground ring. Here I have two pallets. You can use any palette
knife that you have. Make sure it has a straight line at at
least one of its sides. This is how I'm going
to be holding it. Let me try with showing
In Watercolour itself. I'm going to dip it into my mix and put a little
bit of pressure. This is the way I'm holding. And just with one swift motion, I'm going to bring it down to get the desired straight
line that we are looking for. I observed that also
with just the tip, I'm able to draw
the entire line. Make sure you always hold
it in the straight line. If there is any angle, there is a chance of
paints getting out of our desired state. Let's practice this one's
with White gouache as well. I have squeezed out some
paint on my palette. Mixing some water to get the required consistency
for the rain makes sure that it
is opaque enough to be visible even when
it is completely dry. This consistency
works well for me. So once it is done, I'm going
to take the palette knife and use my brush to quoted it, my brush with the same swift
motion that we practiced. I'm going to add rain. You can test it out with the other palette
brushes that you have and observe which
works best for you. You can also use any
other credit cards, they expired ones for
the same purpose. I'm going to take some of
the paint from my brush directly onto the credit
card and pull it across. This way you can
control the length of the rain as well as
the thickness of it. Let me also show how the type of a Liner brush
I'm going to apply. Let's do a quick recap. We saw how Wet on Dry works when the paper is not completely dry and when the paper is dry. Load how to paint
loose leaves as well. Along with the branch. We also saw how
Dry on dry works. We use different tools
to depict the rainfall. Be it a credit card, a palette knife, or
even our Liner brush. This is all for the
techniques class. Now, let's get started with
painting our class project
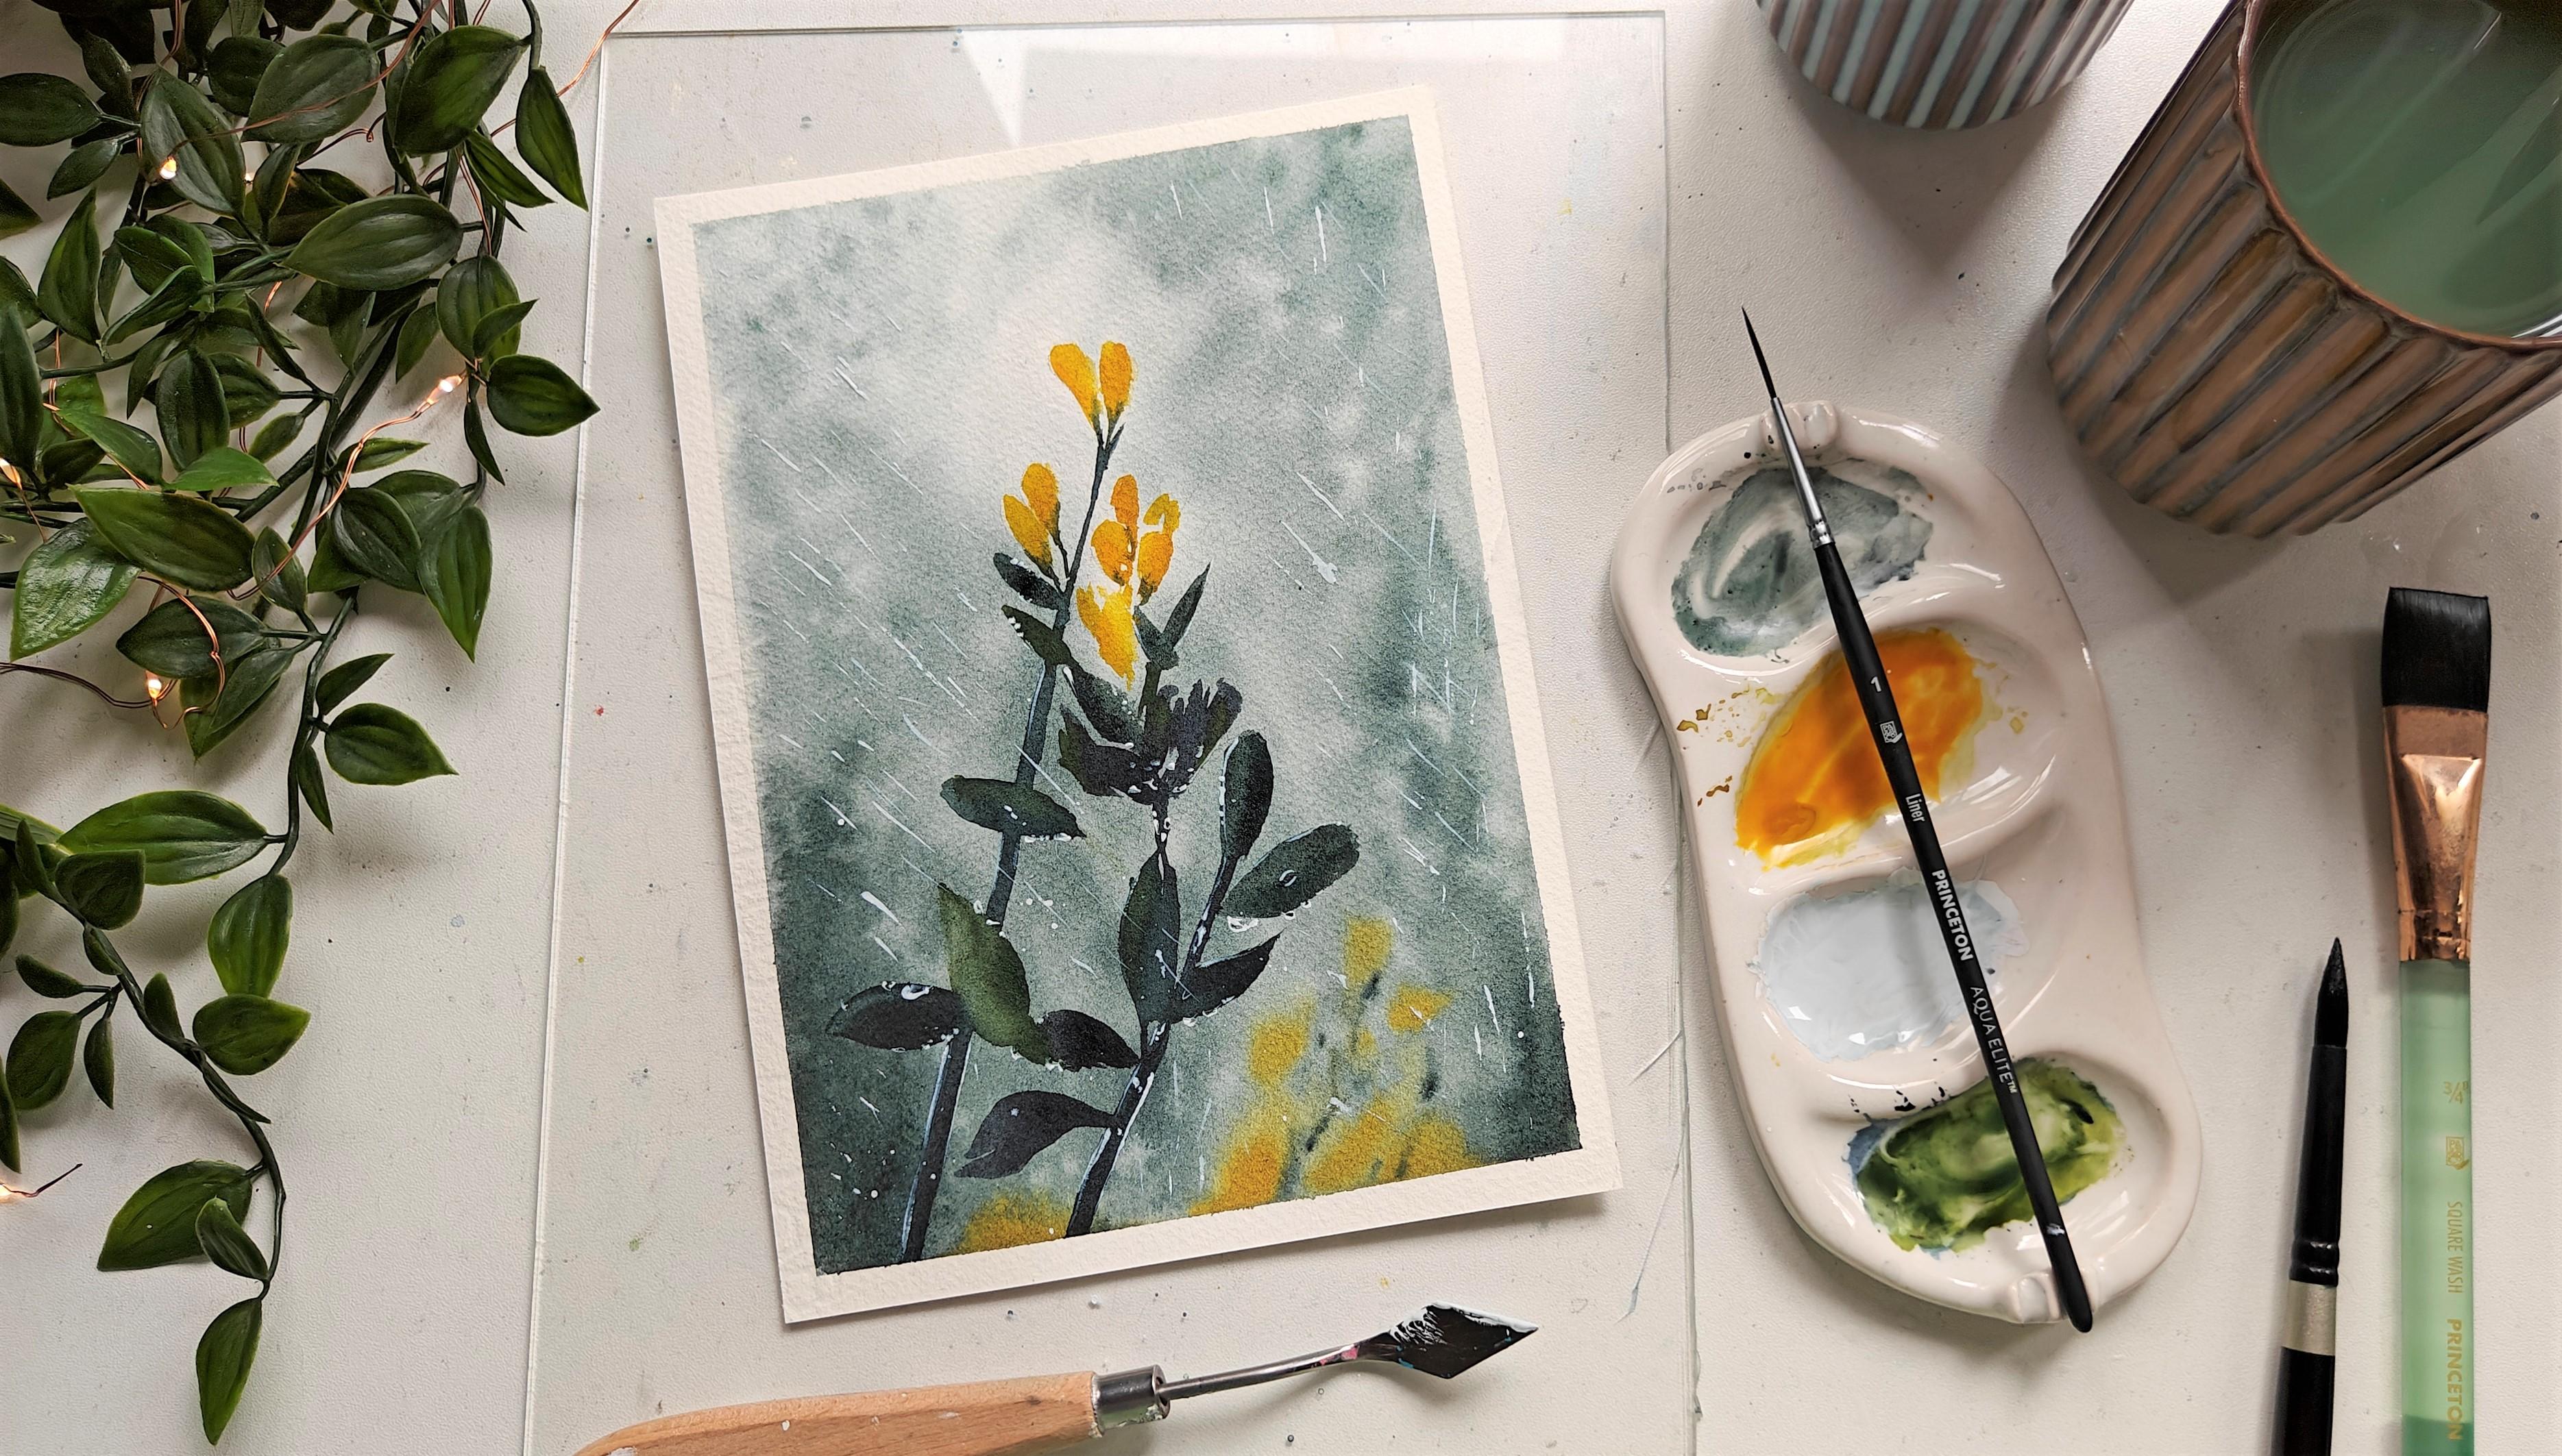
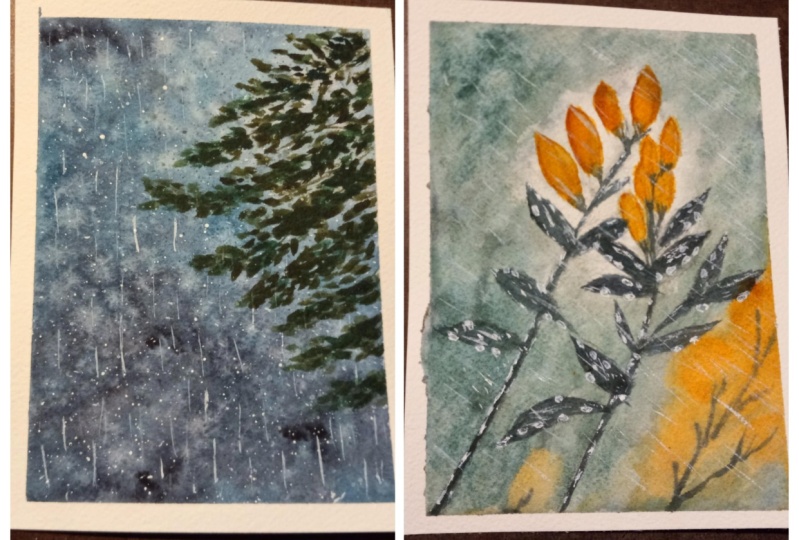
7. Project 1 - Rainy day | Background wash: Here I have taped on the
paper using a Masking tape. And I'm going to apply water onto the people for our
wet-on-wet technique. I'm taking a flat brush
for that purpose, you can use any other
brush of your choice. I'm going to apply approx, three to four layers
of water onto it, making sure that there are no puddles of water
on the people. In order to retain the paper with water for a longer
duration of time. I would highly recommend to
do a full coats of water on the people and wait
until there is a thin, shiny surface of water visible
on your paper surface. Now for the first wash, I'm starting by taking some
Payne's gray on my palette. I'm using size eight
round brush for the wash. Here. I'm going
to apply randomly from bottom left of my people. As it is a rainy-day scene, I want the main focus of mine painting to be on the rainfall. Hence, my background is going
to be of a lighter shade and completely blurred from
the Painting perspective. Now, I'm taking some cobalt
turquoise onto my palette, mixing it with a
tenth of Payne's gray and applying it on the
top portion of my people. You're welcome to choose any
other colors of your choice. In order to make the
mixing process easy, I'm going to tilt the paper with the help of my left hand. I'm keeping this paper
in an angle so that water can flow on the people. Mix my paints together and
form a beautiful background. For over Painting. I'm going to keep
some whitespace here on the top right corner. This is so that
when I come back to add, my foreground leaves, it will be popping up easily
and vibrant on the paper. Now I'm taking some more Payne's gray and adding
it here in there. Please focus on the brush strokes that I'm
trying to add here. Once the paper dries off, these strokes will be
evidently visible. For sure. I'm trying to add some contrast
with tonal values of the same sheets that are used so that the painting is
not completely blind. I'm going to take the same
mix and do some splattering. For this, I'm taking my brush with good amount of
water or the paint mix and tapping it on the
belly of my brush so that there are
splatters on the paper. I'll continue with
the same process, but now with pure water, there is no color in my brush. You can see how beautiful those ports are getting
created on the people. This is one of the
easiest textures I would say that you can create and use in any one of
your rainy-day paintings. Now to start with
adding of Rainfall, the paper is still wet. Take some water
onto it and move it across on the people
in a swift motion. Creating lines of
rainfall and in one straight line creating an illusion of rainfall
on the people. And I'm going to add one
layer of rainfall here. We did come back later
once the paper is dry. To add the Foreground
part of frame. This is to depict some of the blurred lines of rainfall that are
happening in distant. This can be completely random. Having correct
amount of water in your brush matters a lot
while doing this technique. If you do not have Liner brush, some of the alternatives
that you can use here are credit cards or
backoff your pen, or backoff your brush, or a round brush with very minimal amount of
water in the brush. So now I'm very happy with how the background of
rainfall has come up. I let the people completely
dry and come back to paint the final
layer of Rainfall
8. Project 1 - Rainy day | Foreground & Rainfall: Now the paper is completely dry. I'll squeeze out some fresh
whitewash onto my people. I'm adding some water to create the dilute consistency that
I would need for rainfall. So you can see there
is a thin layer of paint coated on
my palette knife. I'm good with this consistency, so I'll go ahead and start
applying on my paper. You can also alter the length of these rain droplets by just adding limited amount of pressure on the
palette knife. And by keeping it in an angle, you can continue to
use the Liner brush or a round brush with sharp
tip for this purpose, if you do not have
a palette knife, I'm splattering some of the
White gouache here using the same brush because
they can be water droplets that are coming off
by hitting a surface or dropping from any
objects that are available. This looks good
and I'm happy with how the entire background and the rainfall has turned out. Now to add with
the other object, that is the branches of a tree, I'm going to mix some
cadmium yellow with indigo. This forms of beautiful,
vibrant green. And I'm going to
add some leaves. I'm falling the
same approach how I have covered in techniques class So just by dabbing the
belly of my brush, I'm adding some textures
that looks like leaf. Since it's a rainy-day painting. The leaves can be, leaves can be moving in any direction since it's
a rainy-day painting. So it is completely
okay for you to depict in your own imagination. Mixing some Payne's
gray to the max and adding contrast onto
the leaves as well. Taking some more
indigo and adding to the mix to get a darker
shade off the color. For splattering purpose,
I'm using a round brush, the same Round Brush for
splattering as well. This looks good. I'm happy with how the painting
has turned out. It was a really quick and
very relaxing one for me. I'm happy with how this
has turned dark now, I will start by peeling
off the masking tape. I wanted to show how to correct the peel off
of Masking tape. If the paper starts to come off. In my first peel off, the paper is already stuck
onto the Masking tape. And if I pull it further, it might take the paper. What I would do what I would
do is stop it right there. When I see that there's
paper coming off and start with the opposite
edge of Masking tape. And slowly and slowly
pull it off in the definite angle and make sure that the
people stays back there. This is the paper
that was coming off. I will slowly peel it off and make sure that the
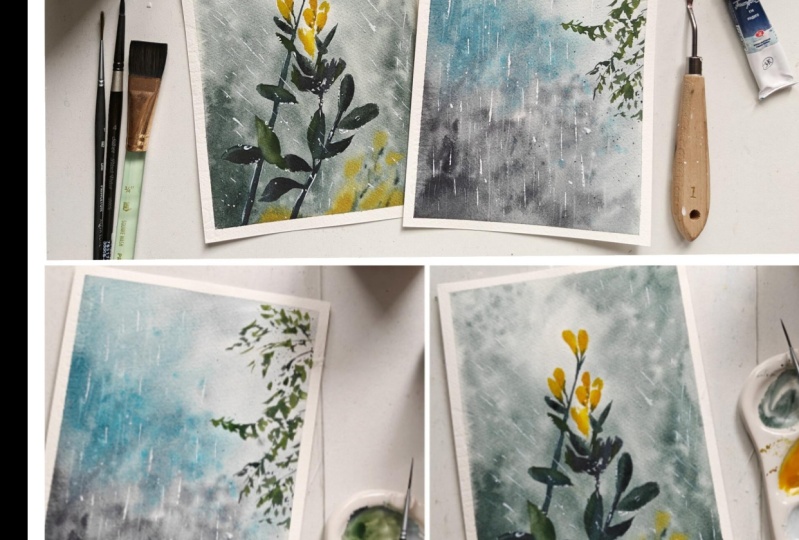
painting is not affected. This is our final outcome
from our class project one. Make sure to post your works in the project section and
see you in the next class.
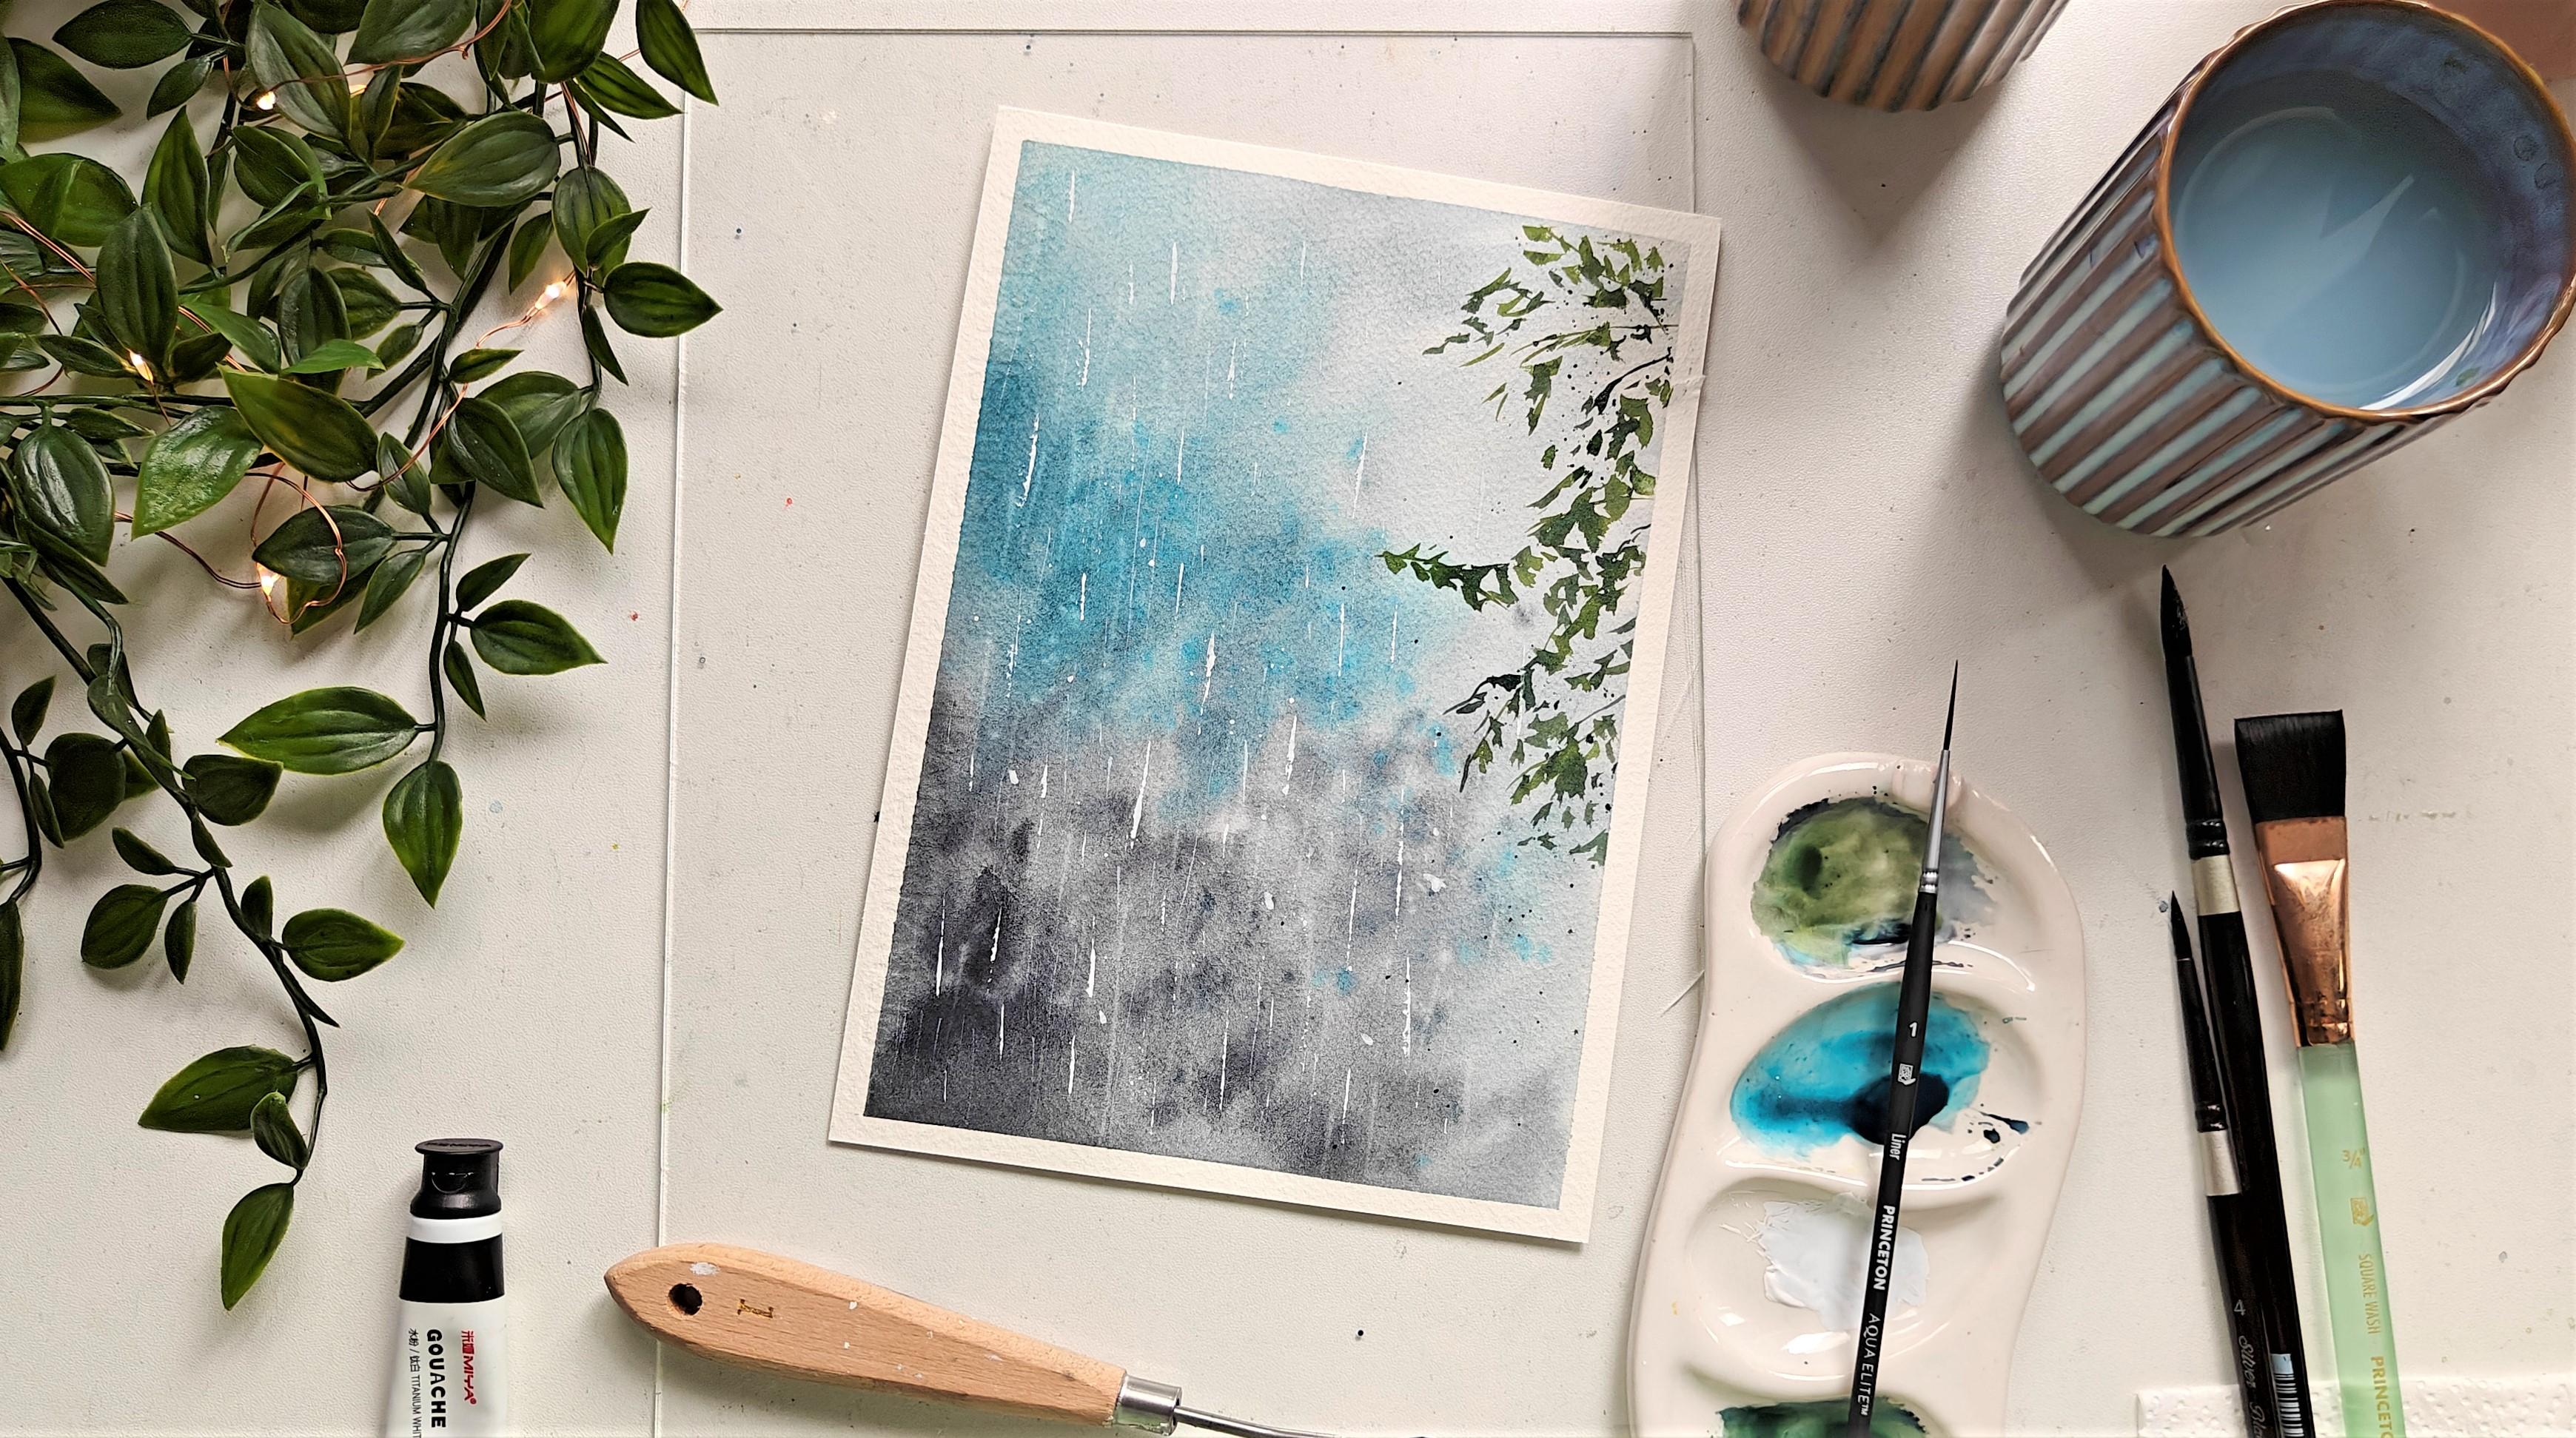
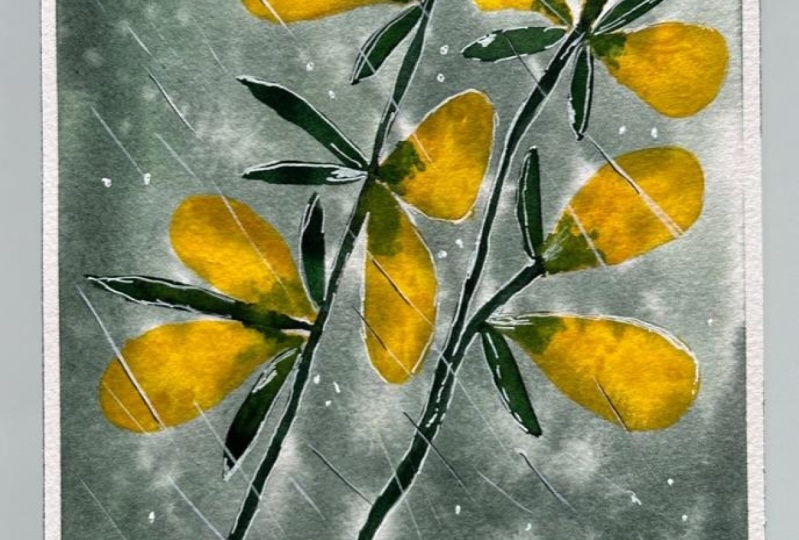
9. Project 2 - Bloom in rain | Background wash: Let's start over
next class project. For this, I'm going to
have a basic sketch drawn. I have given the reference
image on the side so that you can refer to
it while sketching it out. This is going to
be my main branch. This is a very freehand
drawing like again, see, if you want very
particular drawing, you can always refer to
those reference image given going to take a
kneadable eraser and remove excess graphite
from the paper. This is an optional step, but it is always good to remove the darker
marks from the Pencil. I'm good with this.
So now I'll start by applying water onto
the entire people. Sketch will really
help us to understand where to put the concentrated
pigment and well, to leave some blank
spaces while painting. I'm going to apply good
amount of water on the paper since it is going
to be a wet-on-wet technique. And I want my paper to retain water for a
longer period of time. I squeezed out some
greenish amber on my paper. So I'm going to take that first
and start by applying it. I'm applying a randomly
here in there, and also leaving some
whitespaces on the people. This can differ from
my people to yours. According to my sketch where
I have the law flower, I'm going to leave
a good amount of whitespace there and
not fill it with green. I'm working with different
tonal values here on the paper Once I'm happy with
the Background wash, I'm going to do splattering
with the same color. Taking some more water on
the brush while I still have pigment and using
it for splattering. Next, I'm going to splatter pure water on the people
without any pigment. Like we have seen them
in the techniques class. You can see how beautifully
water disperses the color beneath it and
forms this beautiful blooms. Dabbing off the brush
so that there are no clear visible lines when
the paper is completely dry. When the paper is semi dry, like how we had learned
in techniques class. I'm going to take Indian
yellow and apply it here. This will be some
of the blurred or the background florals
that might be available. I'm going to apply
it at random places as per the reference image. Switching to my small size
brush and doing the same that greenish amber for
leaves and branches. I'm not going to apply any
Background rainfall here because the droplets which are available that will
do the work for me. I'm going to let it completely
dry and come back to paint the foreground object
as well as Foreground rain
10. Project 2 - Bloom in rain | Foreground bloom: Now it's completely dry. You can see that it has
dried off with the Bloom. We can fix it while
applying the rainfall. To start the painting of
the branch and the leaves, I'm going to take some
paint in my brush. This is cadmium yellow medium with a small size
brush of size four. I'm going to paint the flower. And painting just one side of the petals because
On the other side, I'm going to show a contrast
with a different color. With limited amount
of water on my brush, I'm going to fill up the
other side of petal as well. Mixing Indian yellow back to the cadmium yellow medium mix. And I'm going to apply it on the other
side of the petals. This will create a
beautiful contrast and difference in tonal values. Once it completely dries off. Going to take greenish
umber on my brush. All this I'm doing with
just my size four brush. And I'm going to start
painting the branch. I'm applying green right
now because the cadmium, because the petals
part is still wet. So Brene will merge
beautifully with the petals and get the
desired effect that we need. For adding leaves. I'm going
to add a little bit of more pressure on the belly of
my brush and drag it along. You can also use a
bigger size brush for painting the bigger leaves. For darker shade of leaves. I'm going to take
some indigo and mix it with cadmium yellow medium. After adding the leaf, I'm going to take
a damp brush and lift off the excess off
paint from one side of it. This is the defect, a
reflection or a highlight on the leaf that is formed by
rain droplets on the leaf. I'm going to continue apply
leaves on the people. As per my reference. I'm not following the
reference entirely. I made sure to add different tonal values in
the leaves with the help of either lifting off the
excess of paint or by mixing more amount of
cadmium red yellow to it. Now with the Liner brush, I will start to add highlights. Let me, let me activate my White gouache with
some water here. Now we type of a Liner brush. I'm going to add the
highlight on to branch. Usually in a rainy-day scene, we will see a lot of
highlights on the people when the foreground object
is in our main focus. That is because there is always a coating of water
on the object. And when viewed from an angle urban captured in a reference, or when captured in a picture, it tends to live a
highlight on its borders. So we're trying to
show the same here. I'll also continue that
on some of the leaves. The scene Liner brush, I'm going to show
some water droplets coming out of the leaves. This can be of various
sizes and dimension. If you do not have
a Liner brush, you can do the same
with any white gel pen
11. Project 2 Bloom in rain | Rainfall: Now I'll get started
with adding the rain. I'm going to take my
palette knife and this is the direction in which
my rainfall will be. It'll not be straight like how it was in our class project one. Okay. Let me squeeze out some
fresh gouache here. I'll bring it to the
consistency that is required by adding good amount
of water onto it. Once I have the
desired consistency, I'm going to take the paint, the white quash on
my palette knife, and start by applying
it in this direction. This is a crisscross rain. We are going to have
rainfall from the sides. Some of the rain droplets
here and my becoming bouncing off of any other
plant which is above this. Or it can also be
falling off the roof. It can be anything. We just know that
the rain droplets here coming from two
different directions. With the Liner brush,
I'm going to add the remaining of the rainfall. I'm going to take green
in my liner brush and move it along with the white droplets
that we have added. It is all part of the
detailing of a painting. So you can skip
this step and just continue to have
divide droplets. I'm happy with how
this has turned out. So I'll just below of the deep. Hopefully this will not
dare up like how we did in the last class project. Oops, okay, it happens again. So I'll just stop
right there where the paper is coming off and start with the
opposite direction. Slowly, I peel it off making sure that the
people doesn't come off. And in the intersection, I'm going to go very
slow and peel it off. Yeah. I have managed to not tear off my people and coincidentally does happen to both
of my projects. So all you have to
know is how to manage it when it starts to tear off. Okay? Hope you had a lot of
fern and learned a lot from this class project as well. I hope to see your entries and projects and
resources section. Thanks for joining and see
you in the conclusion.
12. Thank you for joining: Thanks to everyone for
joining the class. I hope you had a great
learning session. I for sure had
amazing time Keurig in this entire
experience for you. Make sure to post your works in the Projects and
Resources section. Ceiling the next
class where I'll come a bit something new and exciting
 Swathi Hegde, Watercolor artist | Aqua | Night sky