Transcripts
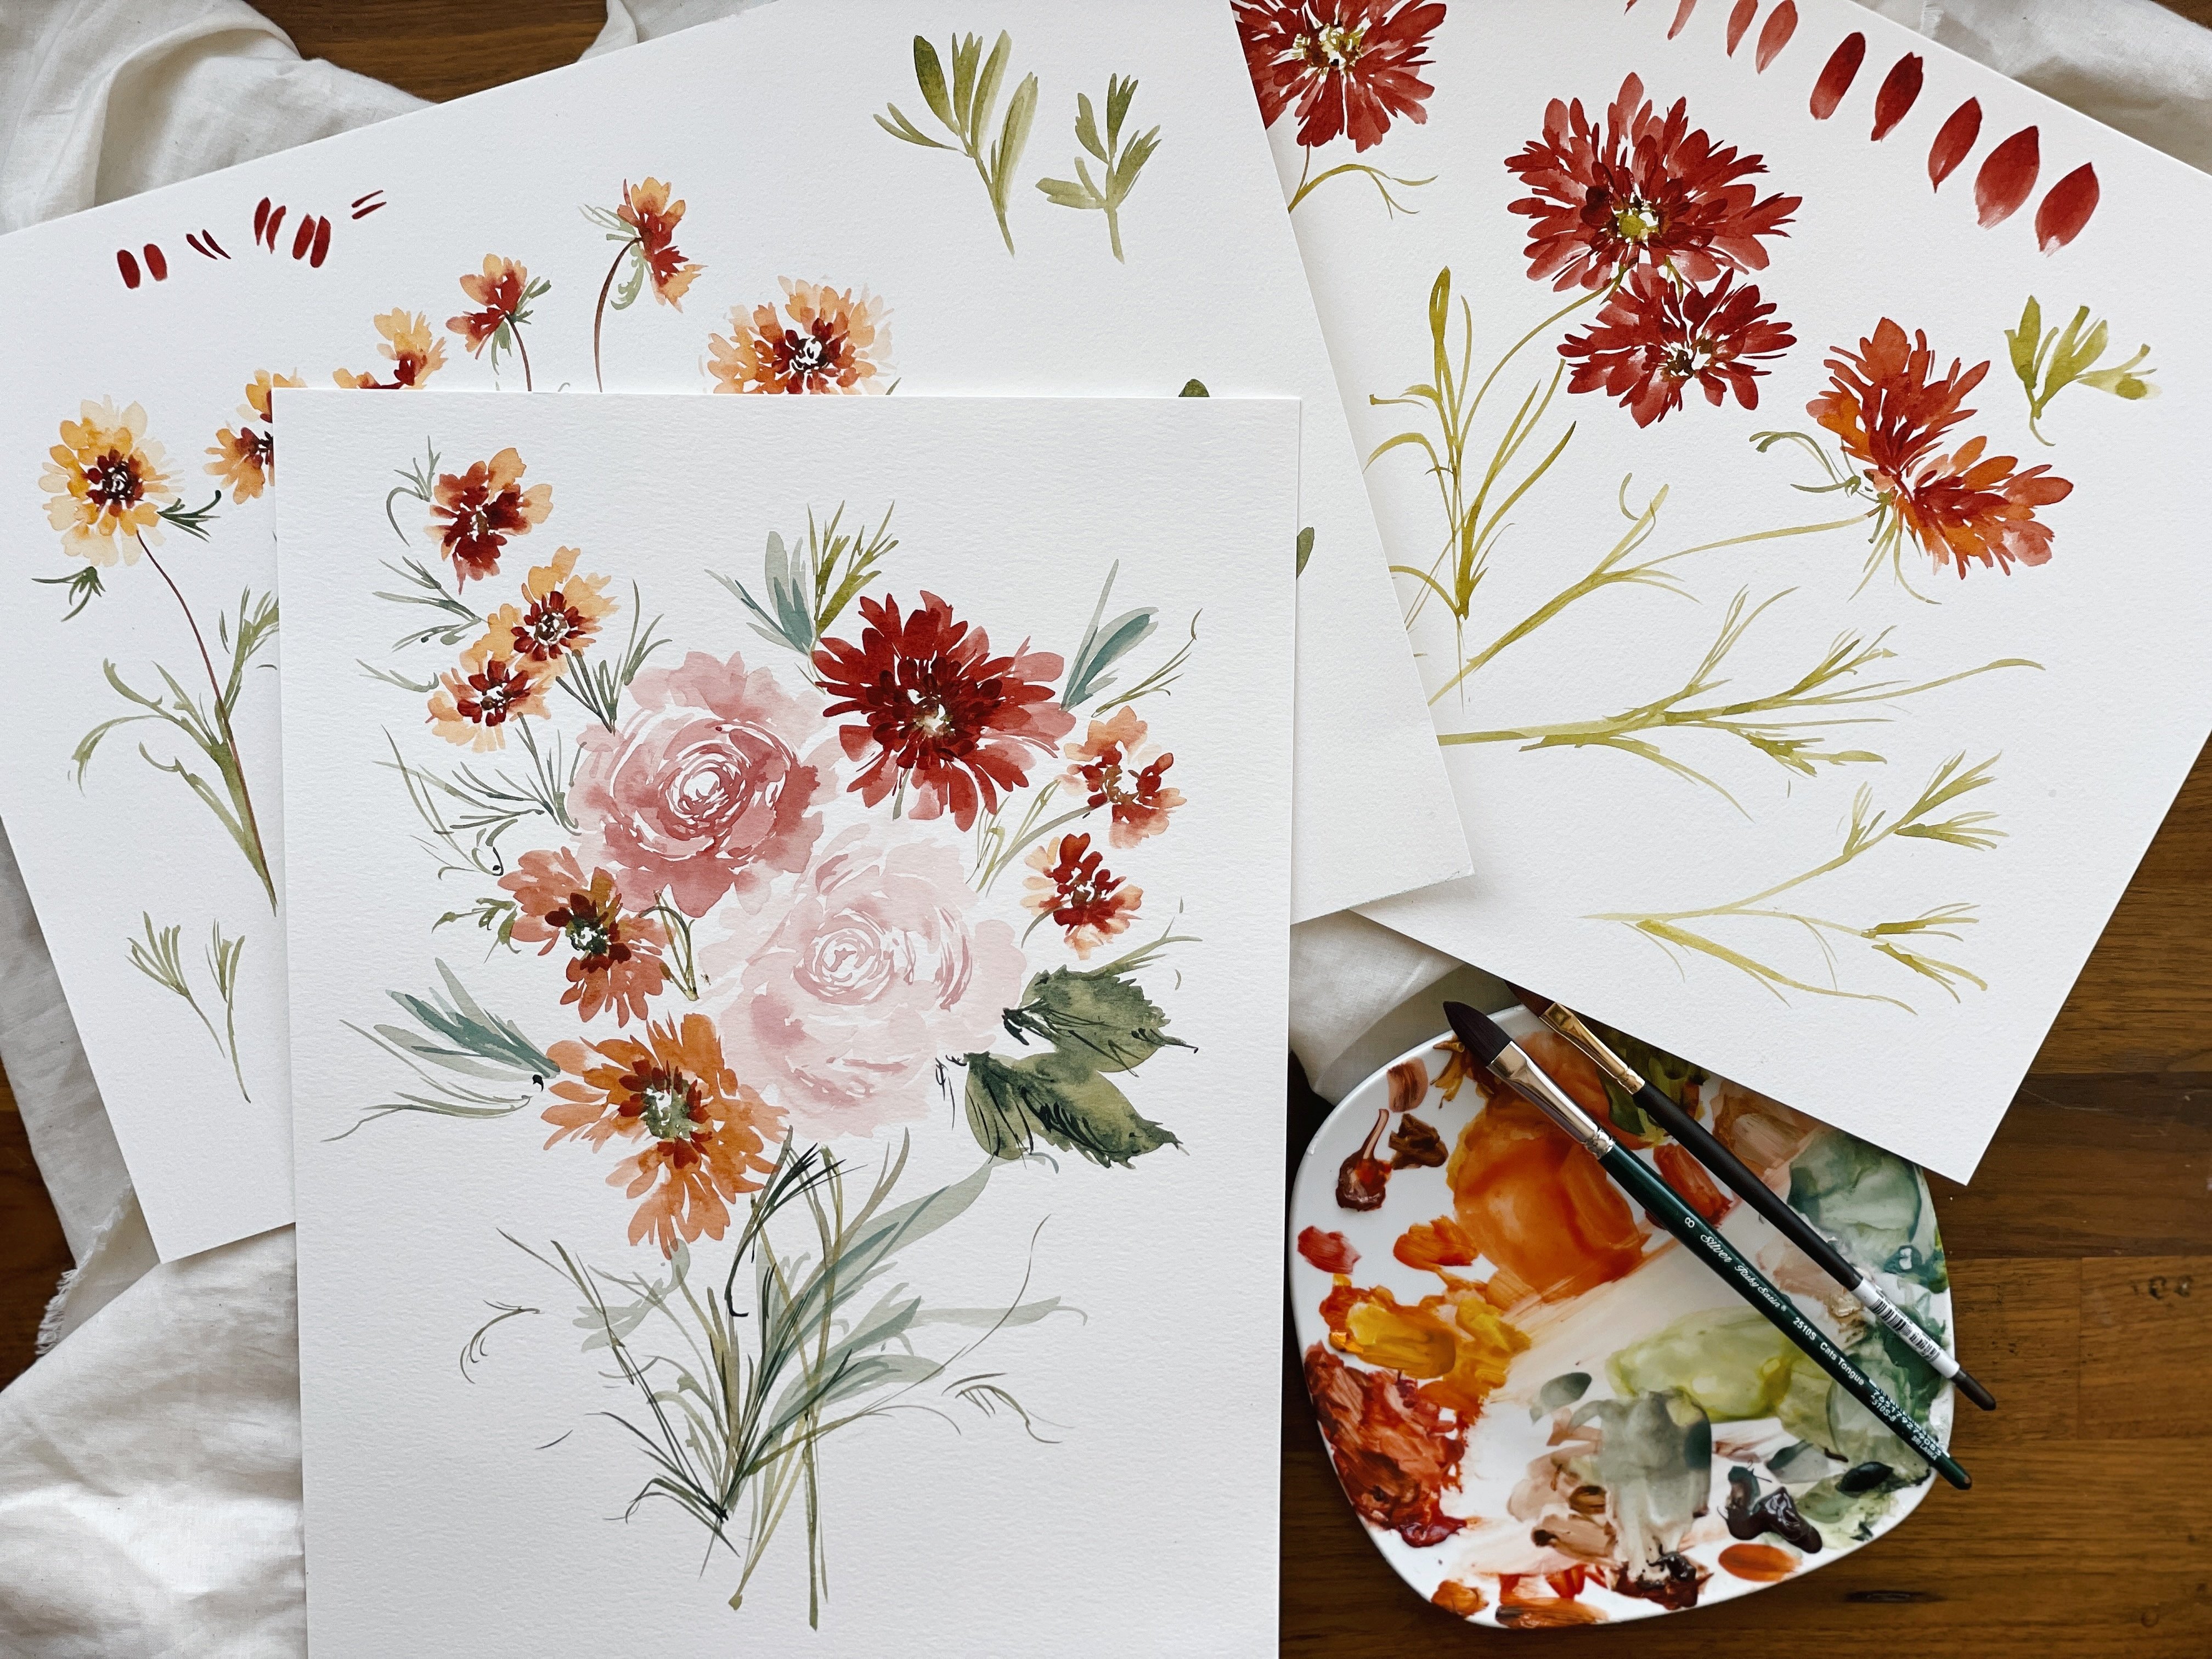
1. Discussing Supplies: Okay, let's go ahead
and take a look at the supplies with which we
are gonna be working today. Nothing too new other than the brushes obviously at
the focus of our class. I will start with the paper. I'm gonna be using
Canson £140 cold press. This is the 11 by
15 watercolor pad. We're gonna be using the
smooth side of this paper. So if you don't know already, watercolor paper has two sides. I've mentioned this several
times in our classes. So if you've taken
a class with me, you probably already
know that there's a more textured
size like this one, and then there is a less
textured side like this one, a little smoother,
similar to hot press. So we're going to use
the more hot press side. We may flip the paper over, but we're going to
start here for now and I'll let you know
when we switch over. We're gonna be using
a variety of paints. I've listed all of the suitable
paints in my supplies. So so long as you have a brand that is artist
grade, you're gonna be fine. I'm gonna be using a Daniel
Smith, my merry blew. And if you have, like I said, Winsor and Newton or Van Gogh, Sennelier, all of those
are fantastic brands. If you have any questions whether or not your
paint is suitable, just go ahead and drop me a message and I'll let you know. We're going to use rows of
ultramarine, yellow ocher. Step, yeah, green, gold. We may pop in another
green here we'll see. And then a little bit of violet. We're going to have
a cup of water, a palette for mixing, maybe two, maybe clear way, a couple of different
spots for mixing paint. We're gonna be having a lot of different consistencies as
we're building these peonies. So I want you to make sure
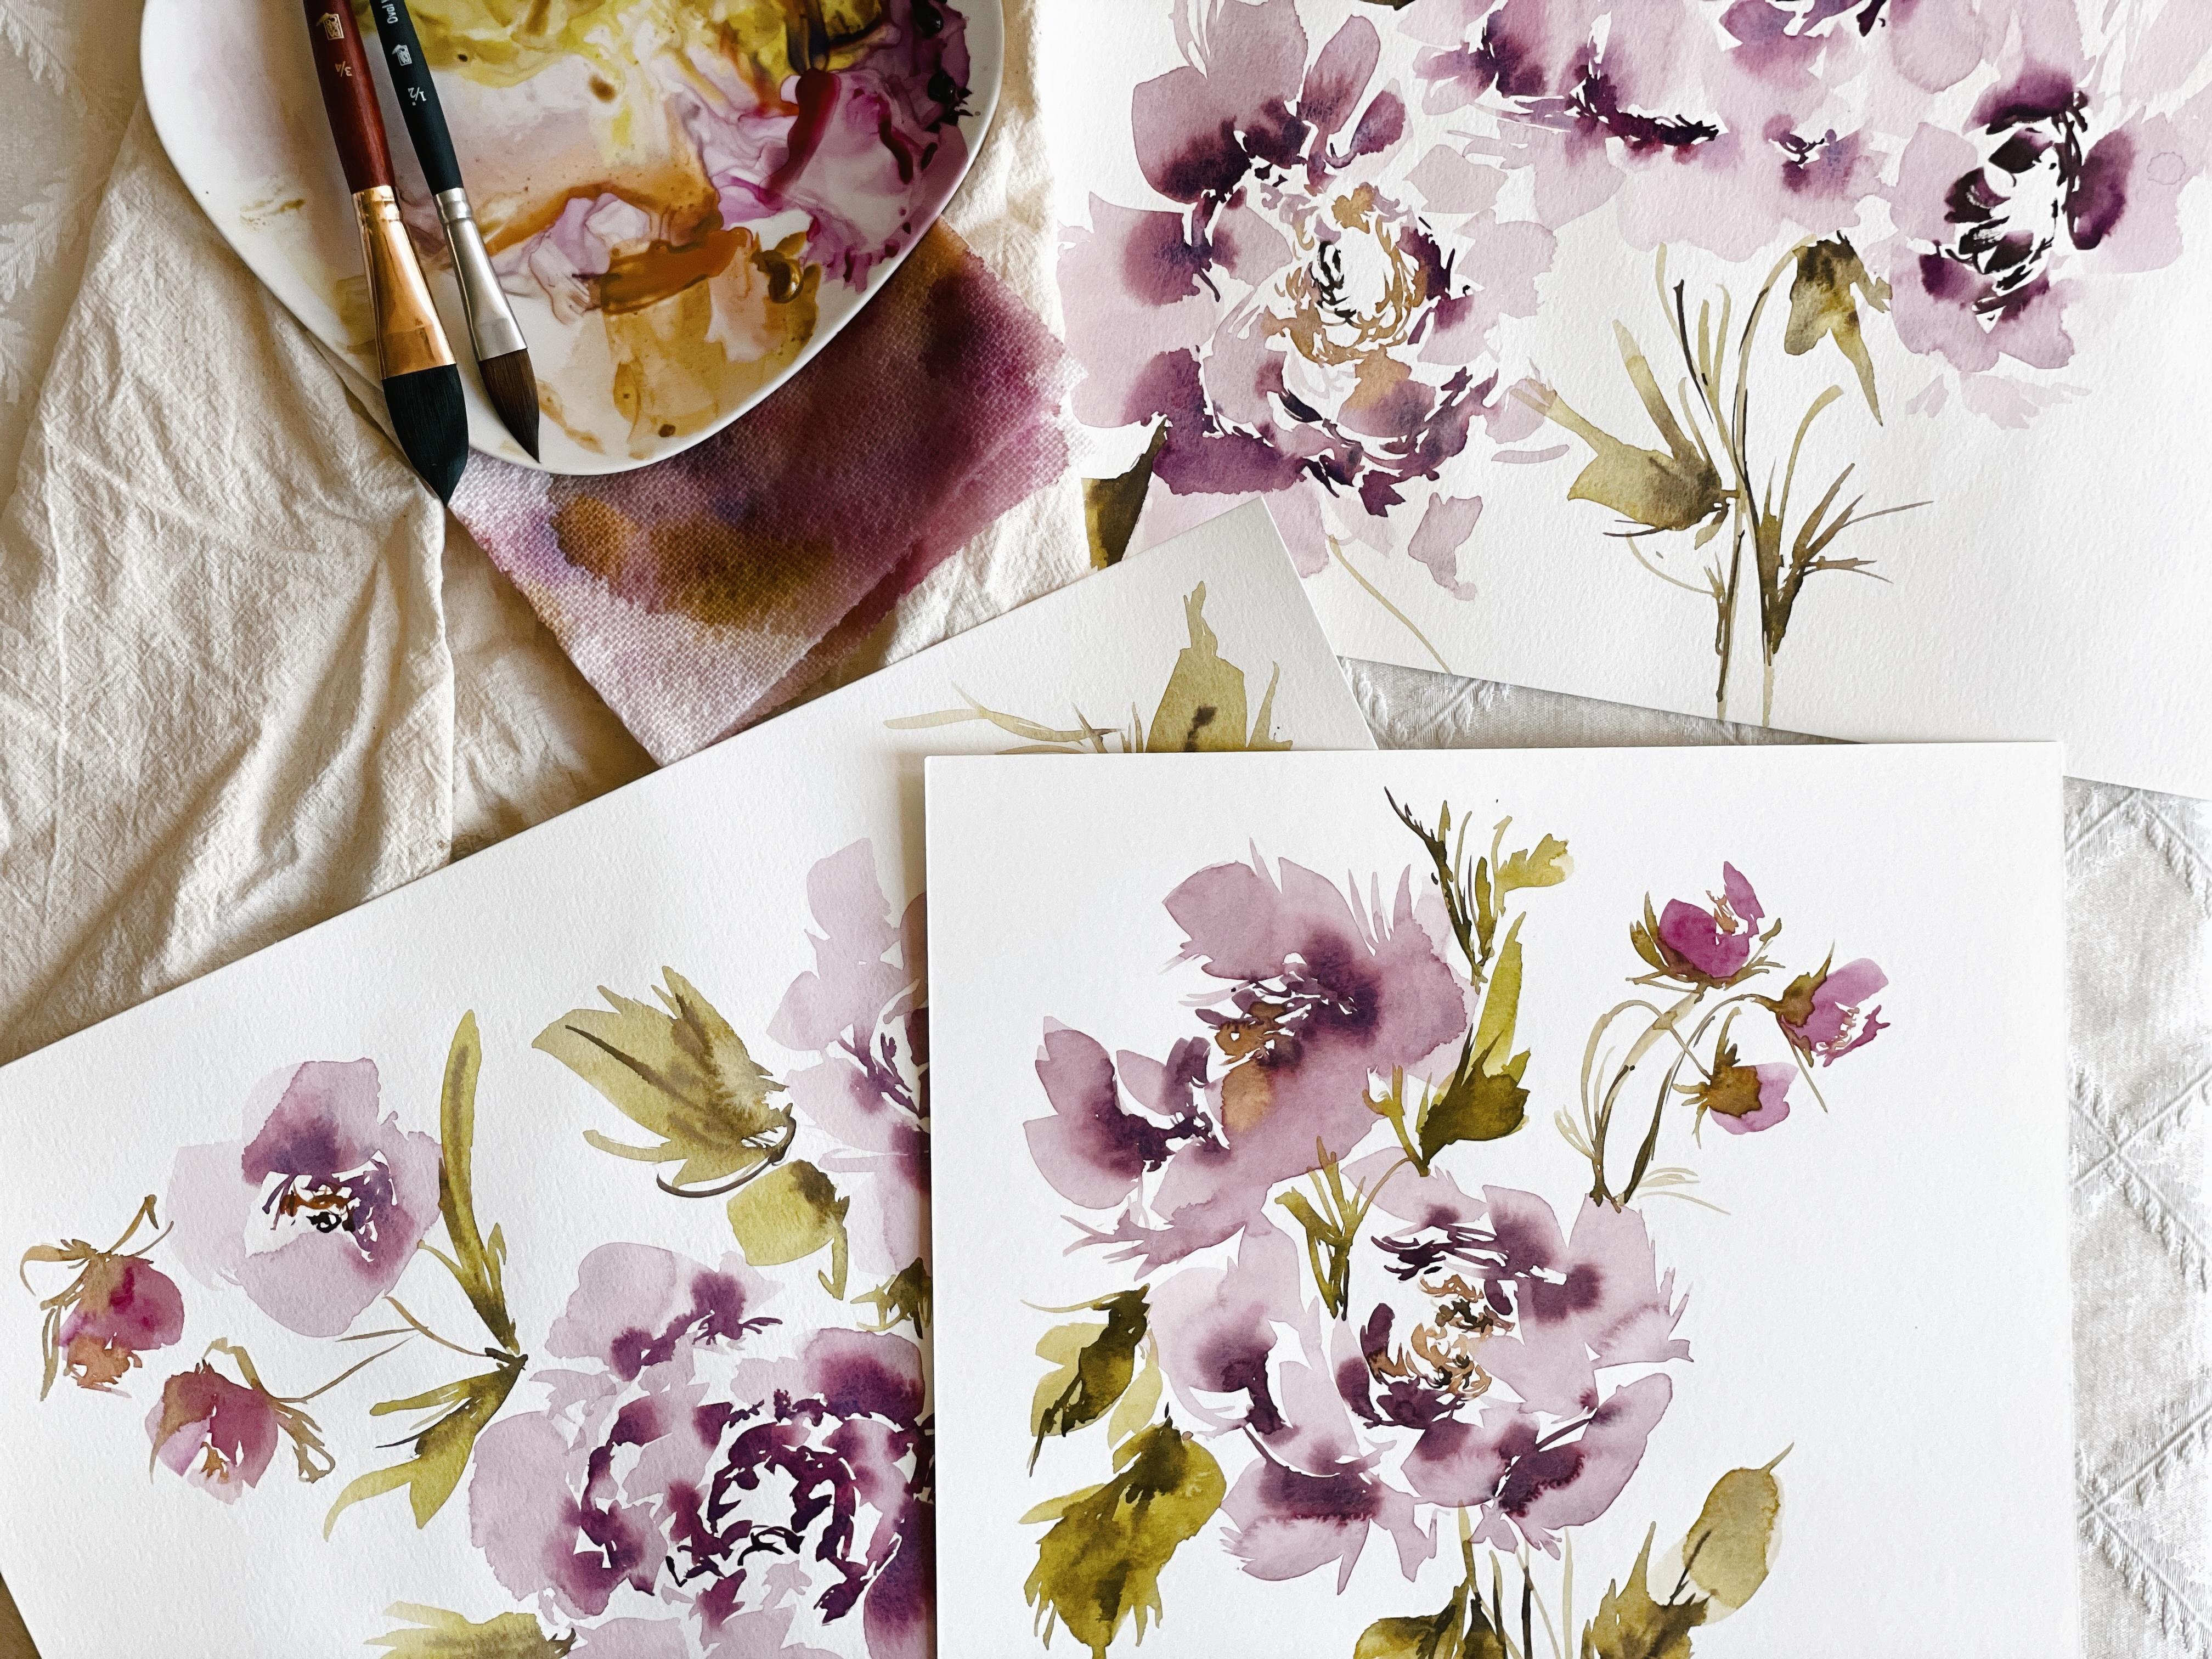
you have room and you're accommodated and don't have to stop as we're doing things. To clean off your palate. Our brushes, which if you are
not already familiar with, this is the Princeton Neptune. Three-fourths of a wash. This one is gonna be the big boy of the brushes is
an amazing brushes. A ton of water or
paint is so great for providing
versatility of strokes, as you will see, it
has this giant belly and then it has a very fine tip. And so we're gonna be able
to do a lot with this. Then its little brother. This is the half wash, this is the half oval wash and this is the
Princeton Aqua Elite. Same deal. A nice big belly and then a very fine point is
just slightly smaller. As you can see, typically, I use the smaller one
a little more often this one I use if I'm
painting really big. So we're not painting
really big today, but I'm still going to show
you how you could use it. If painting big is something that you would
like to learn how to do, this would be a great
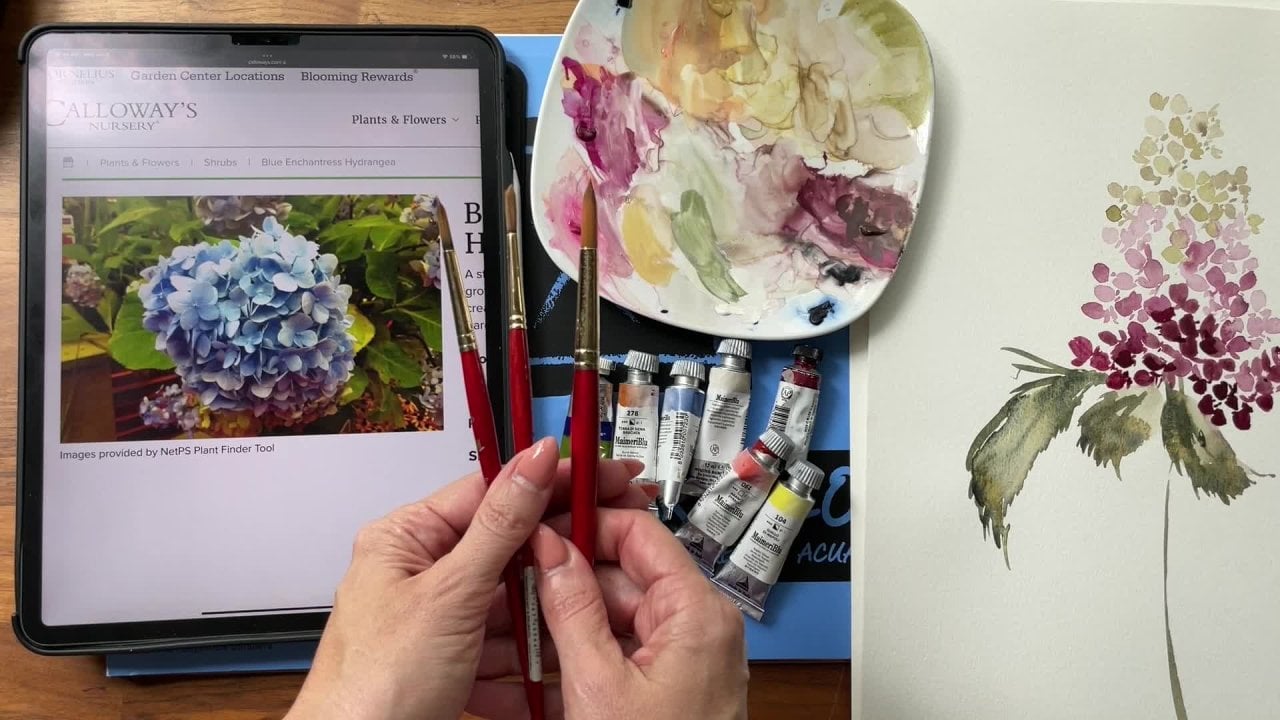
brush to do that with. Then I would also love
for you to either have like a laptop or an iPad, something that you can bring up some pictures of inspiration. We're going to be pulling from a couple of different
peony images that I found on the web just to kind of get an
idea of shape and structure and just the
formation of the petals. So spend a little time
if you haven't already and grab a couple of images that speak to you in a
variety of shapes. So I'd love for you to
have a closed peony, for you to have an
open one full bloom. Some on their side, some painting down,
just a variety, save it on your Pinterest board, or just take a screenshot of it. I'll be sharing the
ones obviously that I'm working with
as we move along. But it's just nice
for you to also have some images that
you really love. So that later on you
can head back and then paint the peonies that
you were really drawn to. The Other than that, we are
ready to go if paper towel, obviously for just blotting off your watercolors, but that's it. So we're going to launch into the next portion
of our class now.
2. Paint Consistencies: So before we head too deep into familiarizing ourselves with the brushes
we're gonna be using. I want to go over consistencies. As I mentioned in the
class info section, this is an intermediate
class only because we're using brushes that aren't
your typical shape. The principles, however, are
going to be beginning based. However, we are going to cover
intermediate techniques. So if that makes sense, It's going to be like
a immersion blend, hybrid of beginner concepts
with intermediate technique. And that way we can just all jump on board
wherever we're at in our watercolor journey and not feel like it's either
too far out of our depth or not
challenging enough. So before we had, like I said, into the next part of our less than I
would really like to just review consistencies with you so that we're all
on the same page. So we're gonna be using
three consistencies. If you're familiar with my book which just launched last month, you probably already know all about the consistencies
that I use. Three main ones. Horseradish wishes a 90% paint, 10% water, a cough syrup, which is 70% paint, 30% water, and then broth, which is
505050, 50% percent water. Those are the three
consistencies is the way I've labeled them out to kinda help familiarize ourselves with what they're
supposed to look like and how to use them. So go ahead and pick up your
half path, half wash brush. We're going to dip into the
violet and I would like us to really roller brush
around in the paint. If it's dry, then it may need
a little bit of working. If you've just squeeze
it out of the tube, it's probably still very
sticky and unctuous. Won't need quite as much work. So just kind of take that look at your paint and see what it is that
you're working with. Mine is kinda slightly dried, so I'm going to just block
my brush off here on the paper towel and
then I'm gonna rule the tip of it back-and-forth
and it's very sticky. It's like goo right now. I'm just going to
roll the tape around, blot off a little
bit on the palette, and then I'm going to drag it. This is a horse
radish consistency. Basically is paste it, paste consistency of that feels a little bit
better to you. You're going to see
a lot of dry stroke, dry brush in this consistency. And I, we use this
for sometimes to just provide a
little complexity, a little interests into
the middle of our peony. I love this consistency because it's very
similar to gouache, which is a newer
love of mine and something I'm enjoying
using watercolor can actually be quite versatile and flexible if you know how
to use it the right way to, or at least the right
way for this technique. So that's going to be your
horse radish consistency. Let's just paste. So to achieve what I would call a cough
syrup consistency, which is something like I said, akin to like NyQuil. You're going to take your brush, which already has
lots of paint on it. And you're going to mix
it in your palette. Pulling a little bit more paint, pulling a little bit more water, and pulling a little
bit more paint until it is at a pretty high value. Color value is something that we study in our beginner,
beginner classes. So if you need a
refresher on that, please head back to the
cone flowers or the tulips. And you can learn
all about that. This is right about at what
I would call cough syrup. This is going to look like this. Let's just do a couple
of strokes just so we can kind of see what
it's gonna look like. Coffee easily. You can see we're losing a little bit of the
paint as we move along, but this is a cough syrup. Okay. Pulling it out even further, dipping into our water, starting a new pile, blotting off a little bit. Pulling a new water, we're going to dilute it, decreased the color value until we have something
that can tip broth. Rolling the brush around
to get a nice even stroke. We have our three
consistencies, paste, horseradish, cough
syrup, and breath. So just a quick little
refresher on that. I wanted you to be able to
kind of get a feel for that. The other thing I
would like you to do is to keep in mind.
3. Brush Fundementals 1: Okay, In this segment, we are going to basically figure out what
our brushes are capable of. We are going to take
them for a test drive. If you've never used
these brushes before, then you are not going to know
basically what it is that they can do and how they will
serve you when painting. We're going to do that
with both brushes. We're going to start with
our big brush this time. So our 3 fourth wash, and I would like you
to mix this around in your broth consistency so you should still have
some on your palate. Now listen, this brush, like I said, is going to hold
a ton of paint and water. You can already
see it's soaked up everything that's on my palette. And it's still asking for more. It is parched when
it looks like that. So I'm going to dip
into the water. I'm going to pull in more
paint from my cough syrup, mix that up and it's eaten up everything
that was on my palate. It is a thirsty brush. Keep that in mind. If you don't load up your
brush properly enough, you're going to get dry strokes, which isn't bad if that's
what you're aiming for. But you want to be
able to control what sort of stroke
that you are cheating. I've ruled the brush. The brush holds the bristles
around quite thoroughly. They are ready to
meet the paper. We're gonna go ahead and
start with very thin strokes. We want to see how fine
we can make these lines. So let's do a little bit of stroke implementation right here next to our consistencies. You're going to want to
come right on top of the brush to maximize the tip. You're gonna do light
pressure and you're going to press down for
a downward stroke. Try and get those lines
as thin as possible. We want to see what this
brush is capable of. To do a nice line, get a feel for what that
balances between you, the brush and the paper. I always told my
students It's a dance. It's a very delicate
balance between your head, your hand, brush on the paper. It's all working together to create the strokes
and the artwork. Get a feel for what
that feels like. As you make these strokes feel wet comes back to you as you press the bristles
into the paper. And even if you miss
a stroke or two, That's good because
you're learning what is the distance between the bristles and the paper
to achieve that fine line, you're gonna do the same thing. I want you to press down
just a little bit firmer this time to increase
the size of the stroke. We're going to
come on this side. You could also come down
this way if you like. But with this brush,
I typically use it on its side more than
I do or excuse me, Flat than I do on its side. Suggest increasing
the stroke size. Getting a feel for the
bristles and the paper. And then we're gonna
do that one more time. Really finding out, Okay, what can this brush do? How big can I get my strokes? Let's go ahead and do
that one more time. You want to make
sure you're getting quite a bit of size
difference between strokes. There's no need to just have
a tiny bit of difference. You want to see
something significant happening between these strokes. Let's do that one more time. And we'll get the very
last and widest stroke. Pressing down as
firm as possible, tip all the way until your
belly is nice and flat. Slow that stroke down to the, can really feel the weight
of the brush against the paper. There you have it. This is what you can achieve
with a single brush. This is why I was so excited to teach you guys about these
brushes and how to use them, because there is so much you
can do with a brush like this because it has that really nice point
and that nice big belly. You can make strokes
that are quite fine. Moving into medium,
into very large. And you'll see as we start to practice the strokes
of the peonies, how this works in your favor. Let's go ahead and do the same
thing with our half wash. It may seem a little
redundant to those of you who have prior
watercolor experience. Or if you've already
used this brush, you're more than welcome to
skip on to the next segment. I want to cover
everything so that we're both on, not both. All of us are on the same page. Okay, so let's flip
my paper around. We don't need to be running
our poem into wet paint. And we're gonna
do the same thing starting here at the top, coming on top of the brush. For some very fine strokes, these are going to be
slightly finer than the strokes that you
used or the strokes that you achieved using
the 3 fourth oval wash just because it's
a smaller brush. Flip my brush around. Seeing if I can get any thinner. Really figuring out the
distance between me and the paper and that balance. We're going to do
the same thing. Get a little bit more paint on your brush and press
down slightly firmer. I'm going to say
instead of a 10%, Let's press down 30%. Again, I'm flat on the
brush, not on the side. You can try aside stroke which would be about
the same size. Let's go ahead and do
a couple of those. You get the point at
a different part. So that's something that
you can explore later on as you are discovering
how to use this brush and pedal shape, turning it either
flat or sideways. It's going to slightly vary how the petals turn
out with their shape. So again, coming back flat, you have more of a
rounded finish here. Okay, Let's go ahead,
write about 50%. Nice size difference. We can see a significant
increase in that stroke. Let's go ahead and
do it one more time. Let's try and go for 70%, but we may not see
a huge difference between this one and the final. Yeah, we're right
about the same. Increasing pressure
a little bit. Not full belly yet. These ones were a
little similar. These ones we got a little bit, do a little bit of a bigger
stroke and now let's go full belly vessel. Keep wanting to say brush and
bristles at the same time. Bristles flat on the paper. Make a nice long stroke. So you're feeling
that balance between the breasts and the paper. Okay, So there you
have it that is just the basic strokes as you're getting
familiar with your brush, I wanted to have a page
filled up with all of that. Put this off to the side
so that you have it. We are going to continue
with stroke formation, but now we're going to get
into actual P and E strokes, not just the strokes that we can achieve
with the brushes. So let's head into
the next segment where we explore this a
little bit more in depth.
4. Brush Fundementals 2b: Alright, so let's talk here for a moment about
gestural technique. Again, it's something
I feel like I need to reiterate for those
of you who may just be joining me for a
class now or have not taken any of my additional classes where we focus on
gestural techniques. So in the loose
watercolor spectrum, there is loose, so much
as to be abstract. Just wide strokes to intimate that there is some
floral representation. Then you can find things about loose art
that are a lot more structured and fall not necessarily into the
botanical category, but artwork that just feels a little bit more
pull together a little tighter in that loose artwork
spectrum with gestural art, we're somewhere in the middle. We're not super structured, where we are creating
a flower that looks very much like a flower. Something like this, where
it's very clear that there's 12345 petals and then there's something in
the middle happening. This is still
considered loose art. However, it's more structured with something like gestural. We would take a shape like this. And we would do something
more like this with it. Just be a little bit more
carefree with our strokes. Not singling out any part of
the flower in particular, but more looking at the art
or the subject as a whole. So with that in mind, we create petals
that feel as though they rely on each other
and they're balanced. But we're not so over-focused on capturing every
single detail and being able to recreate exactly
what we see in nature. With something like this, we would have a middle that's
maybe just a little less refined, a little bit looser. So you can see that there is quite a bit of difference
between these two, these two stylistic
approach it approaches. So that's what we're going
to keep in mind as we paint these peonies that we're in that middle bracket
of loose art, we're going to form them. But we're also going to
be gesture with them, intimating the structure and the composition without feeling as though we are so tied to the details that we have to
capture every little thing. So I have broken down these strokes to make
it a little bit more. Just a little easier to follow something that feels manageable. As you get further into your experience
with these brushes, you're really going to feel
like you can take liberties. And I already know that's going to happen and
that's going to feel so liberating to you to
be able to just move your brush around and get all of these really
unique strokes. But to begin with, we have some just some foundations to just kinda help
build the structure. And then you can again
build upon that.
5. Closed Outside In: You'll see I've pulled up an
image from a fig and bloom. This is an example
of a closed peony. We're going to paint
both of these and see how they would cluster together. We're going to start with
this very light peony. And then right behind it, we're going to do this
additional closed peony kind of on its side here. So what I wanted to do
with this class was really explore different
angles and positions. Is that was something
that was highly requested when we petitioned
for student feedback. So I want to make sure we addressed that and
we cover that. And you feel as
though you're able to move forward with a lot of different a lot of different education
as far as how to use it and how it's going to
serve you personally. For this very light peony, I want you to take your
half wash and I want you to mix it into your paint where it's going to still
use the violet here. But we're also going to
pick up a little bit of the sepia to just
mute it a little bit. So we have a nice
muted pink here. And we're gonna be using
this in broth consistency. As you can see, it's
a very light peony, kinda covers two basis is we're using the
broad consistency, which is just very light. Then we're also focusing on what it's going
to feel like to paint with this brush
with a closed peony. I'm diluting that down, adding a little bit more sepia here until I have a nice broth. And with this, we are going
to work from the outside. And there's two different ways. Actually, there's more than two. But typically when I paint, I either work from the inside
out or the outside in. I want to show you
both that way you can feel like that way you can get to experience both
and then know which one works better for
you in your approach. So we're gonna start
with outside in first. Go ahead and take your brush. And we're going to begin with those petals that we
adjust practiced a moment ago with a few outer
formational pedals. Swishing the brush around, creating what is going to be
the outside of that peony. Coming up on the side here to kinda close it
off a little bit. We're using the side of that
brush to come up here now. Using the toe of the brush
to rough it up a little bit. We're going to have some
thinner strokes over here. So some of those wiggles. And then again here,
some thinner strokes. There we have based the basic
formation of our peony. It's close. We have all of these
petals that are folding over and
inward and we're just going to continue that on now using a series of
wiggles and flicks. So all of these puddles you're gonna see are gonna be a lot smaller than what we were
working with on the outer side. We'll do a few more here. As we see them in
our picture here. Creating a little bit
more depth and interests. Using the toe of the brush to create the inner
workings of our peony. And here we have
a lot of ruffles. Using the toe of the
brush to flick it around. And now we're looking at this again with a bird's eye view. We're not painting it
exactly the way we see it. We're looking at what we, what our inspiration is, and then we're feeling our way towards something that
feels like a peony, but that isn't so obvious
and its representation. Taking the toe of the brush, what we could do now is
dip into our sepia to create a little bit of a darker shadow in
some of these areas. Taking the toe of the brush and where you see a
little bit of whitespace, which is so important
in watercolor. We're now adding in a little
bit of that darker sepia. Still in broth consistency is just leaning
into our sepia now, creating some interests
in between those puddles, letting the wet into wet happen, using the toe of our
brush to move around. So looking at this, it still feels very
formational to me. We're going to try it now
with a looser mindset. I want you to do the same thing, but I want you to now
just keep in mind, okay, basic structure and shape. Adding intentional strokes that feel represent story of
what we're painting. But also as though
we were looking at the peony with a bird's-eye. Okay, so let's start with
the broth consistency, the pink and the sepia. Let's do that right here. We're going to move a little
bit quicker this time. And the reason we're gonna do that is because
when we slow down, we tend to overthink the
strokes and we're not able to just open up our mind and allow for just
the creation of the process. So move a little bit quicker
as you make these strokes. Feel the ease of them. And allow yourself
to really play. Still using the same
approach as before, coming up and down, but I'm not being so slow and so deliberate. You can see here, we really thought about each
thing that we were doing, trying to distance
yourself a bit here. The idea is just to
capture the sense of it. Scratching that brush
against the paper, moving it and flicks
and jabs and swishes. Taking a little bit of the sepia now and pulling in some shadows. We have something that you
can see the difference here. We moved a little bit quicker. We didn't quite
overthink everything. We have this closed shape here, can add a couple of
different maneuvers here using the toe of the brush. If we wanted to just solidify the shape a little bit more, we could add another close pedal here to close off that
shape if we like. We don't have to.
Again, the idea is just to capture the
essence of this peony, not feel as though
we're attached to it. This to me feels a little
bit more over thought, overworked, whereas this
feels looser to me. We could even then if
we wanted to pick up a little bit of that
for Xeno violet to get a third consistency. So we're going to
have cough syrup. Again, this is our
very light peony. But just to show you what
we could do if we wanted to plug in a little bit
of that pink in here, going over where we
had added that step. Yeah, we're taking the toe of the brush running and along
that open whitespace. Not in every area, but being intentional
about where we lay in that color towards
the middle and a little bit on
those outer petals. To me, this feels like the
perfect balance between consistency of paint
and gestural approach. You can see we have
something different now. We could also do the
same thing here. Now we're dry, but we can still add in a little
bit of pink here. This is called a
layering technique. This is where we wait
until the paint is dry, and then we add darker layers. To achieve something a little
bit stronger in value. Some people don't
like it because it feels like it breaks
those laws of watercolor where
everything's just supposed to be loose and
wet and running together. But it's a wonderful technique. If it's something that
you feel drawn to, you're just taking the
toe of your brush, adding in that cough syrup
consistency to the areas of negative space and creating a little bit of interest here. Now we can really feel as though we're looking
into this peony, whereas before it felt
very one-dimensional. Now, we could easily
alleviate that by using two consistencies here, which is what we'll do
in this next peony. We're going to use both brushes. We're going to use cough
syrup on our smaller brush. We're going to use broth on our bigger brush
and we're going to see how these two
consistencies work together. Let's go ahead. And keep in mind
that we're going to be aiming for this peony here on the left over
here. Excuse me. Okay, so go ahead and take a moment to load
up your brushes. We're going to use the sepia and the Zeno violet in
broth consistency. Then we're going to use our half wash in Brasilia violet at cough
syrup consistency. And again, we're still
working from the outside. N. Alright, my brushes
are thoroughly loaded. It takes a moment. So really give yourself the
space and time to do so. And then a lot of times what
I'll ask my students to do is to move their paper
to suit the angle, which it can be extremely
helpful for people. I'm not gonna do that
just so you can see how I would use my brush, where I not to move the paper. It gives you a better idea
of the strokes and how the arm and the hands and the fingers should all
be working together. But if you like,
you can always move your paper so that it's
more facing this direction, a vertical versus horizontal. And that gives you those the
ease of the downward stroke. Most people feel more
comfortable bringing that stroke down than they
do pulling that stroke up. Okay, So again, we're
going to try and avoid that really structured feel
that we have with this peony. Not that it's not beautiful enough that I don't love it and think that it would work
beautifully in a painting. But for this class, we're
trying to really lay back, let our minds just open up and achieved something
a little looser. Okay, so let's go ahead
and we're going to cuddle this peony right
here on this side. Let's start with this stroke. We're going to use the
side of the brush. And then we're also
going to be rotating our risks so that we
get some flicking to achieve the pedaling that we see here happening along
these outer petals. So here we go. We have our initial
formational petal here. I'm going to open it
up just a little bit more so that we have some room. Then I'm going to start
building from the outside n using just brought consistency. Taking the brush, moving it
in nice, generous swoops. Using the toe of the
brush for some of those finer areas and bringing
it down to connect it.
6. Closed Inside Out: Okay, so same thing,
same principles apply. We're gonna be
using both brushes, are gonna be using the same
approach and technique. We're simply going to be
moving from the inside out. So go ahead and load up your half wash brush
with the darker, violet and cough syrup. And then you're going to load up your 3 fourth brush
with that sepia. And personal violet. Having just a touch of
that beautiful muted pink. We do have to be mindful that
we're working wet into wet. So we want to be able to
conjoin these strokes together. So we're going to lay down that darker pigment and
then we're going to be intentional about the
strokes we lay on top of it so that there is the same thing that
happens over here. We're just doing it in reverse. So starting here, again, this is closed peony formation. So we want there to be a
sense of these petals coming over and folding in towards
the middle of the flower. Here we go creating
our center with a series of flicks and jabs. And we're taking our brush now. 3 fourth wash and
laying it on top. Being mindful that we want
these strokes to point back towards the inside
of the flower here. Try and move a little quicker than what
might be comfortable. And move the toe of that brush around to achieve
all the different angles. That Wildbelly stroke. And then coming up on
the toe of the brush. We can now take our
brush loaded with the cough syrup
consistency and plug in some darker,
darker strokes here. Some ruffling happening. And then continue onward. Using our 3 fourth wash. Pointing those pedals back towards the middle
of our flower. Just swooping and
cuddling until we have what feels like a formation folding inwards now with our peony
in full bloom, which will move on to next, you're going to see how
these petals really open up, get big and luscious
and voluminous. You can now if you'd like, find a little bit of
that negative space and plug in some of that. Cough syrup consistency. Let's go ahead and do the same thing working
from the inside out. But let's do a tighter
closed peony so something that feels
almost completely closed. So for that, we're
going to start with our cough syrup
in our half wash. We're gonna make
some small strokes here and create a center, leaving whitespace in the
middle to act as that center, to draw the eye inward
and intimate that, okay, this is where the
sunlight would be entering. And then we're going
to take our brush or 3 fourth oval wash. And
we're going to move in the same direction
as our center. So we're finding a
bot here and here. And we're really grounding
the shape of this peony, leaving it very
loose, very open. We then later on do is add some leaves to
give it some flow, some movement and shape. But this would be the general
shape of that gestural closed peony and very
simple stroke formation. It's just a few strokes being mindful of where
you're placing them. If you wanted here, to intimate a peony
that was opening up. So here we have our
closed formation here. We would then take a brush
and draw a line to intimate. Okay, this is where that pedal is folding back from the flower. And we would take our
brush and be very generous with that pedal
to intimate that, okay, something's
happening here. We're starting to open up. We have the center of this peony and now it's
beginning to open up. We could continue on. That it's opening up
right here so we can see these are the petals
that are cuddling. This is the center and
this is where that pain is just starting to ripen. I wanted to make
sure I showed you several different approaches and ways to do this because
as you can see, there's no right way. And all of it achieves
a lovely result. So I want you, the artists, the one who is making these decisions to
be able to decide. Okay, I like this. I feel, I feel connected to
the way that this looks. And I want you to use
this knowledge to develop your style,
your artistic voice. My job is just to simply give you the tools and the technique, and then you get to run with it and create something
that feels very much like you and
represents what you want, what story you want to
tell with your artwork. So let's go ahead and
do that one more time. We'll create a
little bit more of a definitive center
with this closed peony. Loading up my halfway wash. Same thing here,
but we're going to add a few more markings. A little bit too much water. So I'm blotting off a bit, picking up a little more. Here we have our closed using the toe of the
brush, leaving whitespace. But I'm just creating a little
bit more interests now. Little bit more happening. Okay, so now we still want to achieve closed peony formation, but we have something
a little bit more busier happening. Now. We take our brush, we're going to run it along its side to act as a pedal that is
cuddling with our peony. We have a peony that's facing
up and towards the left. We're going to cover
angles a little bit more as we move
through the material, but wanting to show you here
as well as we're learning. Cuddling, cuddling. Moving those pedals back
towards the center. You can again add
in a little bit more of that cough
syrup consistency. And if you like, you can dip into your rows
of ultramarine, which we're going to be
using in the next segment. But we can use a little here. At cough syrup consistency. This is more of a purple, pink. And plug it in here for even
more interest and intrigue. You can see what happens here. As we move along, we use more consistencies
and more colors. And immediately the
flower just becomes riddled with interest
and intrigue. So we'll explore that more as we move into full bloom peony. But I wanted to show you a
bunch of different approaches to closed moving from the outside in and
also the inside out. So hopefully one of
those approaches resonated with you if you
like them both fantastic. But now you have
the knowledge and the tools to feel like you
can move forward with this.
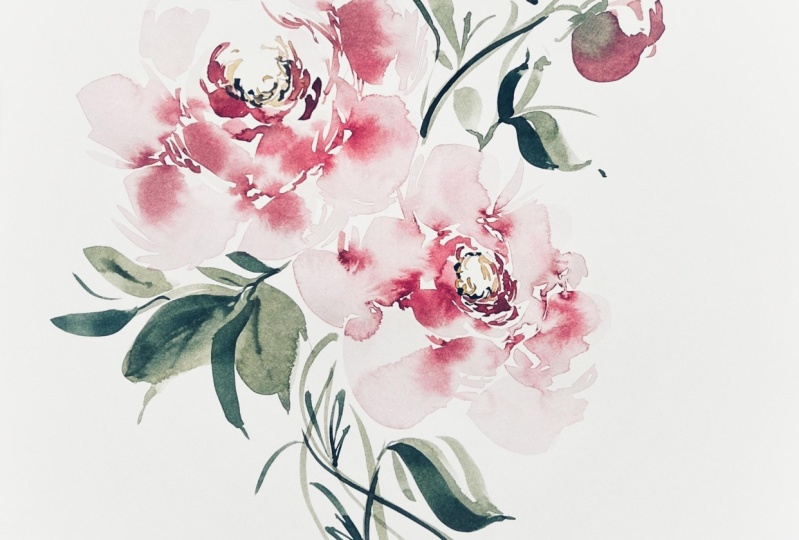
7. Full Bloom Outside In: Here to the left you
can see that I have a beautiful image of some
peonies and full bloom. There's still obviously
that clustering towards the middle as P0 and
peonies are prone to do. But the majority of the petals are reaching
out towards the back. And we're really
going to explore that shape and
practice painting big. For those of you who
have longed to do that, we're also going to be
using two different colors. Now, we're going to be
using multiple consistency. So we're getting into
more of the intermediate, more challenging aspects of
the brushes and the approach. And just really deepening your understanding of how it's all going to work together. So you can use the same
image if you like, from white flower farm
and paint along with me as I recreate these with
the gestural mindset. Or you can pick a
different full-blown peony that you like and just applying the same principles
and technique. Okay, so go ahead and take your 3 fourth wash and you're
going to mix up sepia and violet to broth consistency
right about here. And then you're going to take your half wash and I want you to dip into the Roosevelt from marine, so
that's your purple. And then I want you to
add a little bit of sepia to that as well. To kind of tone it down, make it not quite as purpley. Just a bit more of a grape now, makes sure those two
consistencies are ready for you so that you can easily reload
your brush when necessary. Again, we're going to
move from the outside in, and then we will move
from the inside out. We're going to start
with those most generous and luminous petals. Are those luminous means bright, but that is where the
light is touching them. That's where they
are the most bright. And we're going to be
really playful here. I want you to lean
into this brush, really allowing the capacity to enter into the shape
and the composition. We're going to aim for doing this peony first right
here on the left. So let's go ahead and
use that as a guide. But again, we're
shaping this peony. We're allowing it to become
what we want it to be. If our puddles end up feeling as though they're
facing a different direction, we will roll with that. We will allow
whatever's going to happen on the page
to happen and we're not going to try and
control that and miss the opportunity to be a part
of the creation process. Okay, so let's go
ahead and start with these outer petals here. We're going to start with
the side of the brush. We're going to come
back up to allow for the toe of the brush
to do some flicking. But we're really going to lean into those generous strokes, moving up and down, making sure it's
staying mindful that we have a lot of work
here to do in the centre. Moving down towards
the left here. Coming up on the toe
for some of those lighter or those
thinner strokes here. Cuddling those petals back
in towards the flower. Leaning into this
brush to really allow these beautiful
petals to take shape. Playing with the shape now, coming up behind it to create some ruffling
behind the peony. And now we're going to
start moving inward, angling our petals
so that they're facing back towards
the middle here. Working from the
outside n really moving my brush and my wrist around to maximize the capabilities
of this brush. Staying playful. Leading whitespace in
between our petals. That is watercolor, one-on-one, always leaving white-space as our negative space that
acts as the light. Okay, We're going to switch
here to our half-life, and we're going to
start plugging in a different color and a different consistency
and see how this peony really starts to wake up using the brush, flicking it around and
jabs, wiggles and flux. Coming back into the
whitespace here. Adding in some areas
where the petals, we imagine they are dark from the inside and then they
are light on the outside. Again, using the
toe of the brush here to really play
with the shape. Take your time. Don't feel
like you have to rush. The media should still
be nice and wet. Really play with that color. Dabbing it in there,
allowing it to spread into the petals here. Those two consistencies
love each other, the broth and the cough syrup. They are a happy union. They're gonna make magic. You just have to take your time. Can even do a little bit
back here if you like. You might run into some dry
areas, but that's okay. You achieve more of
that layering effect. So we don't have something
that looks exactly like this, but we have something
that's close. This is a full-blown,
peony open face. We're looking pretty
much directly at a slight angle here. We could, if we like to continue this peony by moving
these petals downward, opening it up just
a little bit more than taking our brush and
cough syrup consistency. And let's watch
that magic happen. Beautiful. Absolutely. Standing there, you have it that is outside in a beautiful peony
in full bloom. We're going to do
the same thing. I like breaking this
up into segments so that you can really focus
on what we're gonna do. And then the next segment
come back with the mindset. Okay, We're working now
from the inside out, so we'll cover that
in the next portion.
8. Full Bloom Inside Out: Okay. Literally just seconds between
these two segments for me, perhaps a little bit longer for you can see my paint
is still drying. As we know with watercolor, whatever you lay down in paint's going to try two to
three times lighter, which is why I went heavy, heavy here with our open
faced full-blown peony. And that way when it dries, it still retains a
lot of that vibrancy. Roosevelt's run Marina's
a beautiful color. A Daniel Smith, a
bit of a splurge, but definitely worth it. And so the primary blue, violet is also very
vibrant and very lush two, okay, we're gonna
do the same thing, working from the inside out. So mindful, Let's envision that this
is our open space here. We want to keep that open. We can always add strokes, but we cannot necessarily
take away strokes into Roosevelt's from marine, slightly tinted with sepia. And we're starting here
at the center now. Creating a center that feels
as though it's full bloom. But there's also some closed
petals here happening. Alright, now we're gonna take our 3 fourth wash with the VR Zeno violet and
set up yet and we're going to start laying in those
lighter petals inside out, building our peony
smaller strokes at first. And then we're really going
to open up the peony here. Generous side strokes. Then we're going to
pull this stroke down. Generous. Coming up on
the toe of the brush. Again, moving in the angle, our petals are shaping up. So this peony took
on this direction. So we're going to
work with that, continuing to mold the shape. Bringing those petals back here. Remaining open face. Then we're going to
head back in width are cough syrup consistency and plug in this consistency
to our negative space. Let those bleeds happen. Increase the bleeds that had
happened initially by just taking the toe of your
brush and gently blotting, blotting, blotting the
area of wet media. Can sit there for a good
minute and just do that. And just watch the
magic and be dazzled. We can now come in towards
the middle if we like, and create some more
flicks and jabs, or we can leave it open. It's completely up to you, the artist, you get to decide. But there you have
the same concept of those beautiful petals. You're just working
from the inside out. You can take your brush, run it along the
outside to get a little more of the ruffling if
that's what you like. Really lean into this
brushes capabilities, moving it on its toes
and full bodied. We're going to do a closed
peony using this this, these colors and consistencies. We only did that
once, so I wanna make sure that we
cover that as well. And we're also going to
play with the angle. Like I said, Angles
were something that were really important
to students. So I want to make sure we
cover that in great depth. Let's go ahead and
take the sepia and the version of violet. And we're gonna be looking
down into this closed peony, creating a nice baseline, coming in with those
smaller markings. And then switching
to our half wash. For those finer markings. Very loose, very gestural. But you get the sense
of what's happening. You can see how these different shapes
would work together. We're rebuilding a bouquet where we attaching
it altogether, which is what we will do. We're gonna do peonies
in multiple angles and different consistencies
and our final project. So you can see how this
all works together. This nestled up against this and this moving in conjunction with these is going
to all look really beautiful together and
create a gorgeous bouquet. We haven't even added
the centers yet. And we also haven't used
the textured technique, which we're going to do next. So exciting things ahead and take a little water
break if you need it, and then join me back
for the next segment.
9. Full Bloom With Texture: I wanted to mention now that
I flipped the paper over, I'm using the practice
pages from earlier. I'm just trying to save paper here and do a little something
for the environment. But also, I want to introduce you to what these approaches look like
on both sides of the paper. So you have a feel for
what it's gonna look like. Using a more textured side
versus the smooth ER side. You're still going to get
great bleeds. Either way. It's just gonna be 11
paper is going to feel, or one side is
going to feel more of a hot press and
the other side is going to feel like you're
more traditional cold press. So I did want to mention
that before we move forward. So a lot of times when
people look at my work, my watercolor work,
they noticed that there's quite a bit of
texture and they ask, is it gouache, is it acrylics? And sometimes it is garage, but a lot of times it's just me, it using watercolor as
that cough or excuse me, at the horse, radish
consistency that paste. And so I wanted to answer that question by demonstration
and show you how I achieve that textured look
within a loose floral and just give you a sense of
how it all comes together. So we're gonna take our half wash brush and we're
going to lean into our rows of ultramarine using the toe of the brush to really
pick up some chunks. Okay, So it should
still be sticky if you've squeezed it out recently. If it's super dry, you'll
need to wet it a little bit, get it to a point
where it feels sticky almost almost as though the
paint blob itself has tar. That's the consistency
you need to achieve. The consistency that
we need for painting, which is that horseradish. I'm just plotting the
brush back and forth. And we're going to create a full-blown peony with texture. And we're going to start from the inside and work our way out. Let's go ahead and start
right here at the middle, where you're going to do an open face peony using
dry brush strokes. So we're just taking the brush, adding a tiny bit of water to
achieve these dry strokes. It's a whole different
concept here. Now if you pick up
too much water, you're gonna get cough syrups. You gotta be mindful
that it's nice and sticky to get
that dry stroke. See, I'm verging into cough
syrup, which is okay. We're eventually
going to move there. But I want to make sure I have this dry stroke. So there we go. We have a little bit of
texture here you can see the paper coming
through on that stroke. And then what we
can do is lean into cough syrup to create those petals
touching the center. And then we're taking our second brush here
into that sepia. And for Xeno violet. And we're going to start
building the Peony using two different colors and three different
consistencies. So a little bit more
challenging here. Building that peony. Taking the toe of the
brush to come up, create some finer aspects. Really giving it
some nice shape. Nice open face peony. We can continue
building it if we like, adding another stroke
here, up and down, wiggle using the toe of
the brush to flick back. You might see your
peony start to take on an elongated shape. What we do for that is we balance it out with more petals, creating some back petals here. And then we can once more take cough syrup
consistency and plug in some areas where there
is wet into wet happening. And you get the dimension. Continuing to build
out that peony. Nice and generous here. With these strokes. You have a peony that is
very much in full bloom. A lot of different
things happening here. Trying not to capture every
little stroke in the peony, just enough to feel as though it highlights the most beautiful
and important parts that's gestural is
very intentional. We're taking what we
feel most drawn to, what feels most significant
about the flower. And then we're tying that
together with our creation. Okay, I'm just
cleaning off my brush a little bit off to the side. Going to prepare
the color again, adding a little bit of sepia to it so that it's ready for me. And then we can once
more, if we like, head into the areas where they bleeds are happening and darken things up if we like. So we have a really beautiful
centered texture here that kinda acts as the framework and the
groundwork for the peony. If you like that, look
at something that can be continued and expanded upon. We can take our brush. And let's do another peony. Let's do a peony that's
facing down this way now. Using the dry brush, coming around, creating that
center flicks and jabs. Really leaving it open
for interpretation. Staying mindful that we
want this center here. And then we're gonna take
our 3 fourth oval wash with the sepia and Bernardino,
violet and breath. And we're going to start
building that peony. So we can see that
peony is clustering up against the original
peony and we can head back in with our brush
and darken up some of those areas into that wet, into wet for a nice
rich dark center. You can see here adding
a little bit more sepia to that Roosevelt or marine
really darken things up. We can, if we like, blot a little bit of that off, pick up more of the
ultramarine and create a bridged color gap here so that it's not so stark
between these two colors. There's a little bit more of a gradual fade of color moving from that horseradish to the
cough syrup to the broth. And you can do that either
way. You can use it. You can do that using outside
in approach or inside out. Then you can take
your 3 fourth brush, rough up those outside
petals a little bit just to create some
gestural movement here. And really maximize what's
going on with this peony. That's the textured approach. It basically means we're
leaning in to that 9010 ratio. That cough syrup
consistent or excuse me, that horseradish consistency for the center and then moving
into cough syrup and brought. So it's more of a a progressional peony than it is with the
two consistencies. Okay. That's that we're
going to move into the next segment where
we're adding a center.
10. Studying Peonies Angles: I know there is a lot of
repeating of things in my classes and I
want to thank you so much for your patience
and your understanding. I do that to reiterate
the material, but also because it is a
priority of me and my team to listen to you
when you provide feedback or
constructive criticism. We want each class to be an
improvement upon the last. And so when we sit
down and brainstorm these classes and
what it is that we're going to do sometimes
it's very easy, it's very obvious what it
is that we're gonna do. But other times we
really need to flush out what's that gonna look like for the beginner and
the intermediate, there's a lot of moving parts. We try and make classes that
are going to both appeal and appease watercolors of
different skill sets. And so with that, there was a lot of ask, a lot of requesting of
different angles of flowers. That seems to be something that many of you struggle with. So if that isn't something
that you struggle with and you feel as though
you are just ready to launch into the next segment, please go ahead and
feel free to do that. If not, if you feel
as though this will be beneficial to you, stick with us and work with
us as we show you peonies in multiple different angles aiming for a
positioning of flour. A lot of times
when I'm painting, I really like to leave it open. I start with a center, either working inside
out or outside in. And whatever happens happens. But sometimes I'm making a bouquet and I need it
all to work together. And so things need to be
facing the right direction. So we're gonna do that. Now. It's going to basically be a practice for our
final composition, which is going to involve
everything we've done. We're going to use
all of the colors, including the green
that we have not even used yet for leaves, the yellow ocher, the Sophia, the purple, different
bleeding and different strokes to create a
beautiful Peony composition that is rich with versatility. For this, this will be
a practice of that. We're gonna be using both
of our brushes again, and we're going to be
focusing on upward, downward, inside,
sideways angles. We've already practiced
open face plenty and closed plenty. So we're going to focus
on these two positions. Okay, So let's go ahead and
if you haven't already, make sure you have
a good amount of diverse enough violet
and the sepia mixed up. Then I would like you to also have that Roosevelt from
marine and step yeah, in cough syrup consistency. Keeping it with
outside information. Let's go ahead and let's attempt to create a peony that is facing in
this direction. So we want all of our petals
to be facing the upper-left. To do that, we start with a center that is aiming in the direction
that we want to go. We don't necessarily
have to start with the center of the flower, but we need to be mindful
that we're leaving room for the center so
that when we get there, we're facing in the
same direction. If it helps to even lay
down a pencil mark, just a very light
pencil mark here, or even just lay your brush
here as you're moving around, you can work around your, your brush and you
can see the shape, and you're mindful that okay, I'm always working in
this direction here. This is a good way
to reinforce angles, intentional angles where we're
really trying to utilize the brush to get the
correct direction in positioning of the flower. Okay, let's start with
some back petals, creating a line and
then being very generous here with a back pedal. Let's do the same thing, but we're now going to
cluster up and to the left. Always aiming in this direction. We're gonna do the same thing, aiming up, but we're on
the right hand side now. Still working in broth
consistency here. Now we're going to do a
pedal that is closed, making two markings, roughing it up a little bit so
that we can showcase. This is the back pedal here. This is where that pedal is
coming up and over the peony. And then we're
closing off this area to show that the petal that's happening
here is very light. We're going to create one
more petal here on his side, using the toe of the brush, leaving Rick negative space so that we can enter in here with our cough
syrup consistency. While the media is still wet. Let's take our brush again. That 3 fourth wash and continue making strokes that
aim in this direction. These ones are gonna be facing back towards the
center of the flower. Working our way
towards the center, creating some very
light gestural markings here on the outside. Just to show that there's some
delicate things happening. But always staying mindful. This is the direction
we're moving in. Hopefully that feels like it's broken down and
simplified for you. I know angles can be really
tough when considering a floral and it just
feels like you have no control over
what's happening. And I honestly like I said, when I paint, I try not to. I feel like I have better
results when I let go. But there are times
when you need to be able to know what to do. Working back towards the middle, I'm using the cough
syrup consistency. And I'm just finding pockets
of negative space to add in the cough syrup consistency and create that beautiful
fading of colors. So there you go. That is a sideways kinda
open face peony on its side. We're going to do a downward
facing Pete peony now. So we're basically
going to cuddle it up against this one, how they would lay next
to each other if we add one facing this way
and one facing this way. So this is all we're doing here, taking the brush and now
we're moving this direction. I'm not going to move my
paper around so that you can see how I move around the paper. But if I were to move it
to get the best angle, I would flip it around
just like this. And I would work this way. Because now I'm doing
downward strokes. These are so much easier. And I'm pulling this way. And this just creates a sense of ease between me and the paper. I'm not having to do
one of these things. If that feels better to you. You're more than welcome
to move your paper around. Pam, loading up the
three-fourths oval wash. Let's start again with the
back peonies or excuse me, the back petals
laying in those big, heavy thick strokes guiding
this peony in this direction. Closing it off just a tiny bit. Using the toe of the brush
to create some finer areas, some delicate parts
of that Paeony. And then moving, pulling the brush this way to
create that pedal. That's going to act as the pedal that closes that peony off. This is where it's folding over. These are our back petals. These are the peonies that are facing the other direction. This is how we get
that sideways angle moving in this direction. Taking the brush, being
very playful with it, very gestural, guiding those petals in
the right direction. Taking my half wash into my Roosevelt or
marine and set up yet in cough syrup consistency and
plugging in that color. Really wet media here. So the colors are just very eager to explore the wet media. You can wait until things
are a little drier, so there's more of a slow fade. But this is fun too. You can start to plug in a
little bit of the darker area. You can, even if you like, pick up your round brush
into your yellow ocher, Cynthia and plug
in a center here. Just flicking the brush around very playful with
it using the toe. And you have a peony now that is clearly leaning on its side. You can close it
off if you like, but you don't have to. You can use the toe of
the brush to create some really beautiful,
delicate areas. That is simply just using
the toe, like I said, to come up and create some shape here. So there you have it. You have a peony that's facing
clearly in this direction. And you have a
peony that's facing clearly it sideways and down. Let's go ahead and face one up. We're gonna do the same thing. Plugging in a little
bit of my version of violet and my Sophia has kinda
all running together now. I do not mind it. It all works beautifully for this peony we're
facing upward. So we're going to have
a nice puddle that's closing off the
center of our PAD. So we start with a
generous stroke. And a generous stroke. We use the toe of the brush
to really rough up the edge. Here. We come around the side. And then we create some very
delicate back pedaling. Running out of space here
a little bit because these peonies are so
gigantic and amazing. We're just taking the
toe of the brush. Heading back towards the center. Always mindful of where we're
heading, which direction. Some petals are coming this way, some are coming out this way. It's all ruffling together. But we clearly have
the structure here. To make that a little
bit more concrete, we can take our yellow ocher and Sophia and plug
in that center. Let those two colors run together so that it's
clearly definable. What's happening here?
The center most pedals happening right here. We can also take our
half wash brush, moving it all together. Finding the negative space, that white area and
plugging in the color here, dropping in a little bit
of color here and there. As you'll see when we move
into our final piece, we won't run out of room here. But you'll see how we
can continue this up. And it would continue on here. You wouldn't add too many
more petals up here because then you're going
to lose that sense of it facing upwards. So there you have
multiple angles. You have to the left, to the side and the right, and you have facing up. So hopefully that gives
you a good strong sense of shape and positioning. We are going to launch into peony buds and adding green
leaves to our project.
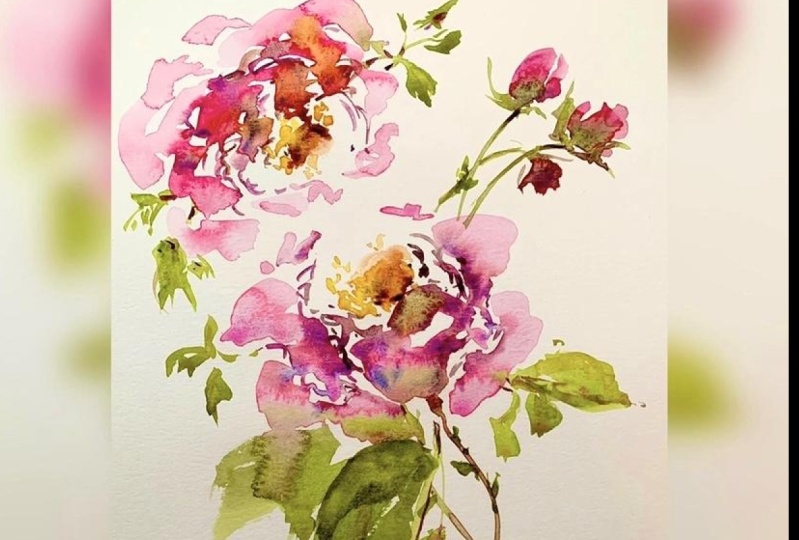
11. Open Face Adding the Center: So as lovely as I
believe our peonies are with just the three colors, or excuse me, the two colors
with three consistencies. Even more, interests
can be added when we decide to latch onto the
center of the peony. So you'll see in a lot
of cases the ***** is closed up so you can't see what's happening
in the middle. Also depends on the
variety of peony. Lot of times, the way
that everything grows, you just can't see what's
happening everywhere. It's just the nature of it. But in some cases like
the one shown here, you can see that there's some beautiful rich
stemming stamen centering happening. And that's something
that I wanted to make sure we addressed so that you can implement it in your
peony work if you like it. I'd use both. There's times where I just
struck by just focus on just the colors and the
bleeding and the wet into wet and just allow
this to speak volumes. And then there's times where
I really liked to play with that third color and
add a lot of interests. So we're going to cheat here. I know we said we
were just going to use our oval wash brushes, but to keep the consistency and the color loaded
on our brushes, we're going to use
a third brush. I'm going to use an Aqua
Elite eight round brush. If you have a six or a
ten, that'll work too. This is just a good medium size. And we're going to use this for that gestural center here
where we're showing okay, something is happening here in the center of the flower that is different from the petals. We're going to paint a
peony right down here. And we're going to
move, we're going to structure it the
same way, this one. So we're going to have some
beautiful back petals here. And then we're going
to shape our peony facing in this direction. We'll modify that a little bit. But for the most part, That's the shape that
will be aiming towards. Okay, so you're gonna go
ahead and take your brush, your round and I want you to
dip into that yellow ocher. Go ahead and start a little pile out a little bit of sepia to it so that it becomes
just a little bit richer, more of an earthy
yellow mustard. I want you to get that to cough syrup consistency, a
little bit of water. If you need to. Then go ahead and just lay
that brush off to the side. Because we need to, if you haven't already, makes up more paint
for our big brush. So that's diverse
enough, violet. And that's sent via want plenty of it in there so
that I can get those big, generous puddles without
having to stop and mix. Adding more water. It's okay if it's running
together a little bit. We're going to work
from the outside in, I want to go back and forth so that you're not
feeling as though we are favoring one
style over the other, but that both work and those are great ways to
approach the peony. I'm going to start with these
beautiful back petals here, so that I can begin to shape the peony a little darker
than I necessarily wanted, but it's also going to
dry quite a bit lighter. And we're going to fan out here creating this side of the peony. Scoot over a little bit. Challenge to get it all
in the frame and also avoid this little ring
of light that pops up. Don't have great light
at this hour of the day. We have a little helper here
in the light department, but it also creates
the ring on the iPads, so we'll work with that. Okay, So let's create these
beautiful back petals. We're going to bring this stroke in and then pull it back out. We're gonna do the same thing, drawing those generous,
generous pedals. Nice big peony. So there we have the
framework for that peony. Come out a little bit
more just to create some distinction
between this pedal lifting up and this one
lifting out this way. Alright, we're gonna do a
little bit more of that, creating petals that are
moving in this direction. This is the positioning that we're aiming for
with this flower. Wiggles, medium wiggles, and
pulling down strokes here. We're going to come out
on the outside now to really build the structure. Staying loose and open. Don't close it off too
much so that you lose. The beautiful
ruffling happening. A lot of people
that mistake they make is to close off
that peanut because they're so over-focused on the ruffling and the layers
that are happening here. But we have to be intentional
with the layers in this technique so that we're not overburdening
the flower. Using the toe of the
brush and the side, interchangeably, closing it, but also leaving it open, heading towards the
middle of that flower. Now, we have the base shape. We're going to pick up our
oval wash and we're gonna do cough syrup that Roosevelt
for marine and sepia. And we're going to plug in
a little wet into wet here. While everything is
still nice and wet. Finding those areas of negative space to
really draw from. You can see here we have
a lot of beautiful color. We could use version of
violet with sepia to do that, create more of that pink. We are leaning towards more
of a purple peony here. You can modify if you like, using the version of violet and the sepia to create
the same effect. It just won't have as
much purple in it. Which might be something
that suits you more. Really playing with the
shape and consistency here. Laying in to this petal. It's still nice and wet. I want to utilize that to
create some depth here. Can even bring it
up a little bit. This puddle still nice
and wet over here. So I'm going to
take advantage of that and play in some
more color here, just taking the
toe of the brush. Here's where we add the
center of our peony. Let's pick up our round brush. And let's create a
series of flicks and jabs in the middle of the peony. Nothing too structured here. We're just running the
brush very lightly, light pressure to
create a center here. Don't have to fill in
every little spot. It's completely up to you how much of the
peony you fill in. But as you can see, it
already starts to add a lot of beautiful texture. And that merge of the
purple into the yellow, which is just so beautiful. I'm going to use my half wash just to create a
little bit more of a union here between
these petals in the center so that they
are acting together. We can lean into the separate
a little bit if we like, create a little bit of
a darker area in here, don't have to, It's just
an option, but as you see, as you add more colors, there is just more
interest to this peony. You have something
that's a little simple, little more loose. And then you have
something as you add more colors in more details, it gets a bit more structured. There you have it. A beautiful open face, full bloom peony working from outside in adding
that the third color, that yellow ocher and also
the addition of the sepia. You have it facing at an angle. So you have these beautiful
back petals which are really heavy on the left. And then you have these
lighter petals on the right to create that balance of peony to show that
it's leaning on its side. So hopefully that gives you a really good sense of open
face, full bloom peonies. We're going to take a moment to just play with a bunch of
different angles at once. You can kinda see when, what does it look like when
we're trying to achieve a certain angle and
not necessarily just rolling with it and seeing
what happens on the paper. So we'll do that
just in a moment.
12. Buds and Leaves: Okay, So I want you to
have a little bit of space as you're working. So I'm have this room here where we're going to
create a peony buds. It's gonna be a very
simple structure, but I just want you
to have room to create a stem and to add some beautiful green leaves
happening around the bud. And so just make sure
if you don't already, to clear away a little
space for that. Also going to want to
make sure you have your green gold loaded on
your palette and ready to go. Go ahead and with
your half wash brush. Dip into that green gold. This is a color we haven't used, which is why I chose it. Because I like to try and pick a new color or something
we haven't explored yet. And we're going to add a
little bit of sepia to it just to make it a little
bit more rich. With our peony beds. The less is more
certainly applies here. We're going to use
two consistencies, but we're going to be very intentional about the way
that we paint these so as not to overfocus on the
structure of them, losing that, that whimsical when
suddenness of the peony bud. So go ahead into your sepia
and your version of violet. Create a broth consistency. And we're going to do a
nice generous stroke here, a thinner one on its side. And then we're
going to close off that peony with
another stroke up top. I like to use that three
stroke technique when I'm, when I'm doing, but
it's now not always, sometimes I do
something different. But in general, that's the structure that
kinda gets me through. Then I might take the toe of the brush and create a little bit of
interest on that side. Then the idea is to let that rest for a moment
because what we wanna do is to pick up a
little bit more for Xeno, violet and cough syrup and
plug it into the edges. We're gonna do a couple
of these because what I want to happen is for when we add our green to not dominate
completely the petals, we want the petals to be wet, but we don't want that
to be so saturated that the entire peony bud takes
on the color of the leaves. So let's go ahead and
do that one more time. We're going to create
a couple here. Generous stroke,
a thinner stroke. And then we're going to
close it off up here. Can take the toe of the brush, rough it up there a little bit. Then we're into cough
syrup consistency, letting it rest
just for a moment, and plugging in a bit of color. Let's also create one been using the broth consistency
that's closed completely. For that, it's merely a blob. There is nothing elegant
or particular about it. It is a shape that is
not to round to oval, but something kind
of in-between. And then we're also going to
play with the shape as we add the green gold
and the sepia. I'm gonna go ahead
and do that now. A lot of times peony buds have a little bit of
leafing left on them. So we're gonna play
with that here. As I said before, we don't
want it to completely dominate the color
which is happening here because we
just painted that. But for the bud, I do like that effect. And then we're going to take the toll road brush
and we're going to create some thinner leaves along the sides to the same thing, angling them just a bit. And then we're going to
create a stem running from the middle of the peony down. We're gonna do the
same thing over here. Angling the paper just a bit. Adding the yellow in my green, gold, coming up
on the side here. Leaving, coming down here. Just kind of roughing
up the edge a bit. Same concept that we use with our petals, that
we use with our leaves. We're going to add leaves
and I'm going to go into more of that
structure soon. But just to give you
just the basic overview, it's the same concept. And then we'll take our
brush and we run down. I can also add leaves using the side of the
brush and then a toe of the brush to roughen
up the edges. Same thing applies here. Plugging in a little
bit of that green, gold and sepia down
here at the bottom. Let's really go for some
delicate strokes here. And plugging in that stem
right there at the center. I miss the page.
Sometimes that happens better to undershoot
and overshoot. And adding some leaves
here along the stems. That is basic but structure, I like to guess, like I said, to keep it simple. Three strokes,
sometimes a little bit more, sometimes just one, like with the peony
bud here on its own, it may look a little
funky. What exactly is it? But when you combine it
in a floral arrangement, it really speaks
for itself and it feels like a beautiful, delicate counterpart to the
rest of what's happening. I, I chose to do the beep, the buzz on this page so you can see how in conjunction
they would work with your beautiful open
face, full bloom peonies. There's always the
potential to intense, intensify or increase the
interest and the buds. You can add a different color. You could use the rows of
ultramarine once more to touch along the outer petals here at the tip where
they are darkest. That's something I
don't typically do. Just because again,
it starts to become a little overworked for my taste, but it's something that
you can do and explore. As you create these. I'm going to set my brushes down and then we're going to
come back and we're going to be adding leaves and practicing how to move the brush to create leaves
in the next segment.
13. Practicing and Adding Leaves: I've decided to devote an
entire piece of paper to leaves because I love
painting leaves, they bring me so much joy. I don't know if
you feel the same, but I feel as though they
can make the floral. And as, as essential obviously as the flowers are to the painting, I feel like the leaves are what actually tie it all together. The stems, the leaves, and just being very
playful with them. So we're really going
to explore that. And then what we'll
do is we'll take the practice peonies
that we've been painting up until now and
we'll add leaves using the technique that I
am going to show you here. Let's go ahead and use, we'll use both brushes just so you can kind of get an idea
of how it's going to work. But let's go ahead and
start with our half wash. And I'm just going to
refresh my palette here. It's a little more gold
than I think I would typically want for leaf. But we use a lot of sap, green, undersea green, Hooker's green. And so I wanted to use a color that's just a
little bit different, one we haven't used in
our florals before. So that's, like I said, our intent is to always
just be increasing the value the classes and introducing you
to either new paints, new material obviously, and
improving upon areas that may have gone
overlooked or just not addressed in previous classes. Alright, so let's go ahead
and start here at the middle. And for this leaf, I want you to simply just
get the feel of the brush. So I want you to go
from full belly to tip. Your starting here at the top
with the toe of the brush, gradually increasing
pressure and then coming back to the toe. This is a very
straightforward leaf that you can create using this brush TO. And then you can create
a little stem here. Just do that a couple
of times to get a sense for the pressure. If you like. And my book we talk
about compound strokes, which is basically the
combination of a simple stroke. So we're taking one stroke and then we're combining
it with another stroke. Do that again, one stroke and combining
it with another one. Now this is all very, for me, very structural, even though it can be
used in a loose way. Opening up that wrist, sitting back on the brush, it just feels again, just very structured so
we're going to loosen up. But it's a good idea to just
have the fundamentals feel what the connection between the bristles and the
paper should feel like. I'm gradually changing
the pressure so you have that light pressure
and then you lean full belly into the brush
to get that white stroke. So let's go ahead
and create something just a little bit
looser than that. Let's come at an angle now. All we're doing is increasing
the speed of that stroke. We're starting at
half belly and then changing the shape down here to come up on
the toe of the brush. And then what we can
do is come towards the side and create a
little bit of leafing here. And then we can come
back on this side, create a little leafing there, are pulling the strokes in towards that center.
Let's do that again. Come on the side here. And then come back here to create something
that just feels a little bit more gestural. It's the same concept over here. We're using the toe and the
belly and then back to toe. We're just coming
at an angle now. Let's do the same thing
moving at this angle. So we're moving
our wrist around, changing the direction from
which we pull the leaves, either coming down or
pulling them to the side. You can also increase
the stem here. I'm coming close
to the feral here. You can sit back,
but for leaves, I tend to come a little bit
closer unless I'm working really big and I want that
mobility of my wrist. Let's go ahead and do that
just a little bit bigger now. We're just gradually
increasing the size of things. If we like, we can also take
our brush and pull it down. So we have full belly, median belly and mostly TO and then we're coming up
here for Tim TO strokes. And then pulling down. And we worked down
through a stem. Let's try that again over here. Nice big stroke. Need a little bit more
paint on my brush. Coming down and then coming
up and out to the side. And then pulling
down for a stem. I want you to feel as though there's a lot of room
for interpretation, a lot of room for modification. Leaves are very subjective
and I'm merely just teaching you the way
that I approach them. I don't want you
to feel as though this is exactly what
it needs to look like. If you already feel like
your leaf game is on point and you need no
instruction in that regard. Feel free to add the leaves to your p.sit
knees as you like. This is simply one
way to approach it. Let's go ahead and do
like a wiggle leaf. So we take the toe of the brush, we just kinda wiggle it out. And then we do a
stem that again, wiggling it
back-and-forth. Stem. I like that leaf. I think it's very
playful and fun. Use the right way. I think it could add a lot
of character to a painting. Could even do a little
bit of adding hair. So we could do a wiggle leaf, we could do a simple stroke
and then use some more TO, to create something
that's very layered. Having a little bit more paint, a nice big stroke. And then we can wrap up that edge a little
bit if we like. Sometimes I like to call
it just scribbling. That's all we're
doing is we're just scribbling stroke and then we're roughing it up with
the toe of the brush. Nice gestural leaf here. You have a lot of
different options. You can use simple strokes,
compound strokes, sideways, using both the
belly and the toe, gradually increasing the size. Wiggle leaves, you can add a combination of
these, adding to that. And then you can just
do one giant stroke like we showed you here. And just roughing that out. A lot of times I use that stroke and then what I'll
do is head back in with a different consistency
or different color. So this is cough syrup. We could do the same thing here. We could even add some
veins if we like. Very gestural with them, keeping it super loose. Really sitting back
on the brush and just allowing your risks to
flick and move along. Remember that these are
accompanying your florals. They're not the centerpiece. They should feel loose. They shouldn't feel
too over structured. Sometimes the vein can really help to brighten and
open up the leaf. You have lots of options that the media here is
still nice and wet. So what you could do is add that second color in and
then wait until the media is dry and then head back in for a third layer
where you would get some more layering effect. So the vein would be
on top of it rather than this blend
of colors though, this is my preferred route. If I'm being honest. Sometimes what I like
to do around a flower, which we'll do next, is just some flicking. So let's just take the
brush and just kinda flick. We're using the
toe of the brush. Flicking it around. Just keeping things really
nice and loose and open. Different angles,
different directions. Take your brush, run it into
the upper right-hand corner. And then take your brush,
pulling and pushing. Pulling and pushing. You can thicken up any of
those leaves as you like, leaving one side thinner,
one side thicker. Adding in a little bit
of that sepia here. Running it through the leaf
while it's nice and wet. So that is a lot of different
options for you to explore. Like I said, leaves are
one of my favorite things. They really do, add such great interest
to the floral piece. So let's go ahead and put
that off to the side. Go ahead and pick up one of
your practice peony pages. Let's go ahead and add leaves
to our existing peonies. Mix up a little more color here. I'm going to go
ahead and see, okay, where would my peony
benefit from a leaf? If we wanted to add a stem, we would probably
believe that it's existing somewhere
around here and we would drag that
stemmed down and we would drag that stemmed
down. So we can do that. We can take it
from the bottom of this petal and just kinda give it a little character here, make it thin and thick. And then we can
do the same here. We imagine those two
peonies are kind of laying like that
on each other. Now, we're going to
imagine that the leaves are coming out from the
bottom of the peony. So let's go ahead and
pull that stroke. Then let's work the sides of it using the size of the brush. And then we're going to pull that stroke so that we
have something that's very loose using a combination
of the strokes that we just use using full belly and then also the
toe of the brush. Let's go ahead and
do a little leafing here attached to that stem. Again, your peonies
are going to look a little different than mine. So obviously, what I'm asking you to do here
is not the exact thing, thing I want you to
look at your peony, figure out where it
would benefit and then apply the same technique. So I'm going to pick right here is another spot to
pull down a leaf. I'm going to come out
with a thin stroke and then another one. And then I'm going to start
roughing it up here on this side, angling a little bit. So it's not coming
straight down. And then I'll wrap it
up over here as well. Come out with some
thinner strokes, adding the leaves here and here. And I think if I were to add one more leaf, it
would be right up here. And I want to go in
the same direction that my peony is going. So let's work with that here. Let's take this and do a stroke. And then let's just
rough it up a little bit so it's not so
over structured. Just using the toe of the
brush now to shape it. And then I'm going to use
a little bit of the sepia now to plug into the
bottom of that leaf. Running what I
imagined some veins to be through the leaf. Do the same thing down here. Running it through the
center of the floral. I was a little hesitant
to use this green gold as the only green because
it is very green gold. But I'm loving the
combination between the sepia and the green gold. So I think, I think this was a great call.
It's very different. It has more of a fern feel to it than it does a peony leaf I give you that is not a traditional dark
green peony leaf, but I like to switch it up and take things a little off the cuff
every once in awhile. Okay. I'm gonna move that
piece off to the side. Let's go ahead and grab another peony piece if you have one. And I'm gonna do the
same thing here, adding the stems first. So let's imagine where do
we see stems emerging? So this peony is facing
in this direction, so we're going to bring a
stem right around here. Then this one I would
imagine kinda coming down to meet it
right about there. This one, we wouldn't
really see a stem. If we did, it would
probably be coming in that direction so we can
roll with that eventually. Like I said, we're gonna
be putting this into a bouquet so we want to be
able to identify, okay, where would that stem be
and how would it work in conjunction with
the other peonies? I'm going to start with
the leaf right here, up at the top, kinda
sprouting out to the left. I want to with my leaves. The idea here is to create movement within the
floral arrangement. So rather than having
a leaf coming up this way in the same
direction as the peony, I'm going to create
some movement by facing the leaf going
the other direction. This is naturally just
going to create an opening, a feeling of openness and
a sense of composition on the page starting there. And I'll leave that
alone for a little bit. I'm gonna create
another leaf down here, kinda coming up over this peony. Really just allowing
these colors to play. Not overthinking
consistency here. I know I haven't
been talking a lot about cough syrup or broth. It really doesn't matter
here we're adding in that sepia in cough syrup later, which kinda takes over
and is really beautiful. Let's add some finer
details over here. Kinda where we would see
the stem little roughed up. These delicate little gestural
markings really helped to tie together the
balance of the piece. If you're gonna make some
big beautiful leaves, having these more delicate areas just provide that rest for the eyes at rest for the piece. And then I'm going to
create one more leaf right here at the top. Facing in this direction
to once more and provide a little balance and direction and sense
of flow and movement. Now we can head back
in with the sepia, starting with the
leaf we did first, it's going to be the driest. We want to catch it
while it's still wet. And gradually moving around, this leaf is getting dry. So I'm going to
head in there real quick and continue
moving around the page, adding in that sepia and cough syrup near the
base of the leaf. I'm going real quick
here as you can see. Again, the more I stop and
overthink and analyze things, usually the worst off my paintings are just going
to be honest with you. I like to break
things down really simply and really
slowly at first. But then when we start to
get going and painting, I want to show you the actual speed that
I paint with because that is a huge part of how my paintings turn out
the way that they do. When I slow things down
and I'm really deliberate, my work tends to take on
an overworked sensibility. I think this gives you
a good sense of leaves, a way to use the belly of the brush
for that downward stroke. Pulling those strokes towards the center of that leaf
and then also pushing those strokes out to create those beautiful, delicate areas. And again, the toe of the brush is your friend
really utilize that? I'm gonna go ahead
and switch over to the three-fourths
wash just so you can see what it would look like. We have one more
beautiful peony painting. I think I'm upside down here. Actually, before I do that, I'm going to add a
little bit more step yet while this is still drying. Just because I know
what's going to happen. It's going to dry two
to three times lighter. So let's get that color in
while we have the chance. Here we go. Staying very playful
with that color, can even add a little bit
of darkening and the stems, they're very playful,
very carefree. There we have it. Okay. Let's go ahead and do
the same thing with our 3 fourth wash. We're going to start with
that big fat stroke, nice full belly. And then we're going
to use the side of the brush to wrap it up. There you have it. Don't overthink it. Sometimes this brush is
better for leaves because you get that initial big stroke. And then it's just a
matter of playing with it. You can see how the
difference here, you get those smaller
strokes with the half wash. And those are really fun too. But this is great
because you get those big giant
statement leaves. So if we were to
add a stem here, kinda probably come
down to off to the side, something like that. To balance out this
floral which will do more in our main project, I would add some leaves here, leaning into this
peony right there. Coming back in this direction to create some movement
and some flow. This thirsty brushes soaking
up all of the paints. I'm going to add a
little bit more gum. We have our closed
peony over here. Let's go ahead and add a stem. Right about there. I usually aim for the center of the
peony unless I'm really clearly trying to get
a like a severe angle. And then I'm gonna come up here, peonies facing this way. So I'm going to
create some leaves going in the opposite direction. I'm gonna do the same
thing and I'm going to create leaves lower down here. And the peony, that
really gives a sense of, okay, this peony is
facing down here. This one's kinda coming up. These leaves could
either be tucked into here or they could
be on the stem. You don't really know. It doesn't really
matter because it all working together so beautifully. We can add a couple
more leaves here just to fill in this negative space. And then using this brush again, we're going to pull the stroke, nice, big, generous stroke, and then roughing it up. Using the toe of the brush
for some finer areas. Then let's head in with our
half wash and add some veins. I like to move all
around the page. I pick which area is drying
first and I attack that. I do kind of attack
it with my brush. Because once things are dry, it becomes a layered
look, which is great. And it works. But you lose that moment
when things are wet to get that natural
progression of color. This should set you up really well for our final
piece together, this was a long segment and really takes you through the ins and outs of
what we're gonna be doing. The only difference in our final project is
we're going to be combining and working with composition to kinda
pull it all together. So you'll get to see how these different florals lay next to each other when we're
combining them in a bouquet, which was another big
requests we got when asking for feedback was being able to put it all
into a bouquet together. We've been doing
that for awhile, but it's something that we
continue to want to provide. And then again, you can
use the toe of your brush, creating some delicate
areas on the stem here. You can play with
it as much as you like that this point I really, I'm just playing with it and
that's what I want for you. This is, this is my style. This is my approach. When people see it,
they know that it's me, they know that that's
my artistic voice. I'm not aiming with these
classes to turn you into me. I'm clearly giving you the
techniques and the end the tool mindset so
that you can take all of this and apply it to the way
that you want to paint, in the way you want
your florals to appear. So I hope with all
of this you feel that sense of not separation, but no obligation to have it
look exactly like my work. I'm already in the world, but there is only one of you. And so there is something
that you're going to bring to this world, to the canvas that only you can do because there
is just one you, and that's what I really
want you to tap into. And I want that
magic that happens between taking the tools,
taking the mindset, and then turning it
into what it is that you feel most drawn to
when creating florals. So I hope I have
done that for you. This has been quite
an expansion of our initial class and I hope you feel as though
it was very thorough. We're going to, in
our project section, I'll put this all together in a beautiful bouquet and that will be the way I send you off. And hopefully you feel as though you have been introduced to a beautiful new brush and a way of painting this
particular flower. Alright, I'll see you in class.
14. Class Project Part 1: So we've reached
the project portion of our time together. And in this project
we are going to be utilizing everything
that we learned today. So those big, beautiful
open face peonies, the sideways peonies, the buds, the leaves, the stems, all of it tying it together
in a beautiful peony bouquet. We'll talk a little bit
about composition and why we are putting flowers
here and leaves here, and how it all works
and balances together. I'll also be making
commentary now and again regarding what colors I'm using it, what consistency. But a lot of it is
just going to be painting along with
me as our usual, with our classes where you
are entitled and free to make your own moderation
along the way and just really enjoy this
process of creating a piece. So without further ado, I have a little
classical music on in the background to help just
kinda keep us moving through. Hopefully that sounds
soothing to you. If not, you can always just
mute me and paint along. Alright, let's get started. So we're going to start
with an anchor flower. And this is the, this is typically what I do
when I'm putting together a piece where I am mindful of all the
whitespace around the edges, not wanting to run
up against it. And in an essence, crowd in my florals, I like to begin with what
is likely to be my biggest, most center centered flower. And I kinda deviate that usually off to the
right or to the left, but usually typically
right around the center and then
I build from there. So that's what we're gonna do. We're going to start with a big, beautiful open face peony
right here in the middle. Then we're going to gradually
work over to our left, creating a side angled peony. And then we'll come up here for some beautiful peony buds. And then we'll begin to add
in the foliage and the stems. At that point. We are going to implement some of just the pink and the purple hues
and our flowers. And then we'll also put in some yellows into
the center to just create even more complexity within the piece. So go ahead. And if you haven't
already mixed up on your palette the Xeno, violet and sepia to
broth consistency. And with your other brush,
you're going to want to load it up with the Rooseveltian marine and the sepia and cough
syrup consistency. Want to have quite a bit of
this because we're gonna be peening several
peonies together. So make sure you take the time ahead of
time to really mix up these consistencies and have them exactly
where you want them. So all you need to do is load your brush when the time comes. Alright, we are going to
work from the outside in, I'm also using the smooth
side of the paper. It is your choice,
artist's choice, whether or not you want to do
the same or turn your paper over and pick up a little
more tooth in the watercolor. I'm going to start with
our big sweeping petals as we practice in
earlier segments. I'm going to plant that peony. Oh, I forgot to mention. I'm also changing the paper from landscape to portrait
just because this is a little bit
more conducive to a bouquet arrangement versus
a landscape can be done, but typically we
don't add stems to that because it runs
up against the edges. So I've turned my
paper, like I said, port portrait so
that we can really get some beautiful length
here with our flowers. Like I was saying,
we're going to plant our peony right about here. I would say that it's about one inch above the
middle of the page. Nice open face peony creating these beautiful sweeping petals, roughing them up
along the edges. Curling those petals
back towards the center. Creating some finer aspects
here in the center. Coming back to the edges to really play
with those petals. Now's a good time to use
your half wash brush, find some of that
negative space, and add in some
beautiful bleeds. Coming into the center now, going to use our third brush. Don't worry, you have time if
you haven't already loaded, it doesn't need to necessarily
run in with these colors. To put a little bit of yellow, ocher and Sophia together
in cough syrup consistency. And we're going to add
that into the middle here. Can run that into your purple. It should be nice
and wet for awhile. Checking in on those bleeds, making sure there
where we want them. We want to add a little
bit more to the areas we can just using the
brush really playfully, dropping in a little bit
more color here and here. So we're going to continue now. Placing a peony on its side, right on top of this one
is slightly to the left. Using our VR Xeno, violet and Sophia mixture. Let's go ahead and
form our top petal. Just playing with it now. Picking up a little bit more of that personal violet and Sophia laying it right in
here at the tip, just to create a little bit of a darker edge along the top. I'm going to take the
half wash brush and add in some darker elements. Letting those two colors blend together and create
some beautiful bleeds can also pick up a little
bit of the yellow ocher and the sepia and plug that
in here at the middle. And we can even using
our 3 fourth wash, head back in for a
little bit of layering. Missing a little
bit of drama here. On the sides. I'm going to plug in a
little bit more color, really allowing these
two consistencies to play and read together. Using the toe of the brush
to move that paint along. Going to pick up that
yellow and really let that run into
this top petal too. It's so beautiful when those
colors blend together. Really playing with loose form
here and gestural strokes. I like to keep an eye on whitespace coming up to
the top of the page, the bottom of the page and
just making sure along the way the right
things are happening. And so I like where
this middle flower is slightly deviated to the left
and the one on top of it, we're not too close to
the top of the page. We're gonna be placing some
buds right here on top of this big focal peony to
create a little bit of balance to offset the heaviness of the flowers that
are happening here. And then finally at the end, we're going to fill in
with foliage shooting in all different
directions to really bring the whole piece together, angling our stems and finding a way to
bring it all together while utilizing the entire
paper at our disposal. For our buds, let's
lean into the version of violet to get a little
bit of a different color. At broth consistency. Way there's a little
bit of difference between our peonies
here and our buds. Let's go ahead and do that three stroke maneuver
that we've covered. Let's go ahead and turn our page just a little bit so that we can imagine the angle of this peony and how
it might come down. Playing with the
toe of the brush to create some back
ruffling here. Then let's go ahead
and do one that's just merely a nice
circle, oval shape. Nothing to definitive
here, just an idea, just intimating that
this is a peony bud.
15. Class Project Part 2: Go ahead somewhere
on your palette. Clear off some space
to mix up our greens. Now that this has been
sitting for just a minute, go ahead and use your round brush to plug in
just a little bit of yellow into the center of
either one or two buds. It's completely up to you. I'm gonna go ahead
and plug the yellow into both the centers here. I'm going to rinse off
my brush thoroughly. You can always pause
here if you like. Rinse out your cup of water, which may be taking on a purple or pink hue
when still looking. Okay. So I'm just going
to thoroughly rinse my half wash brush and
my three-fourths brush. And I'm going to prepare
the palette with both breath and cough syrup
consistency mixing together. The green gold and the Sophia. A little bit more green
gold on my palette. This thirsty brush,
it's asking for more. Bring it back to a gold color. Not so ground because
when we add in the SFIA, we really want to
see a significant difference in color here. I have it about coughs
or consistency. So when I need to use it
at broth consistency, I will simply add more
water to this mixture. I'm going to load both
brushes that I know that each brush is ready. And then I can reload
as necessary with the excess paint on my palette. I'm going to look for where
the painting might be served by adding
additional foliage. I see that there's
a nice open space here that there's clearly
some room for some leaves, possibly creating a
northern most part of this painting with a few leaves shooting up in this direction. I don't wanna go
too far over here because then I'm going to
run up against this side of the page and I'm gonna lose that beautiful negative space around the elements which
act as breathing room. I'm gonna do the same
thing over here. Adding leaves, not getting too close
to the left-hand side, but just enough to create some beautiful thick greenery
that serves the florals. Then I'm going to do some stems working my way
over to the right, adding more leaves over
here on the right, and finishing off with the buds. When I use my 3 fourth wash. Now to create some
bigger leaves. Roughing up those edges
as we have before. Moving back and forth
between the brushes, not getting too
close to the side here and creating some
nice balance and flow. I'm going to go ahead and
plug in the stems now to see where we might
want them to land, I'm going to aim for over
here in the bottom right. Rather than doing the stems and the direct middle of the page, which is typical
of most paintings. I like to put them
off to the side. I feel like it gives the page a little bit more
movement and flow. I'm going to plug in
another stem right here at the bottom of
where I would imagine that peony is sitting at in a little bit more
roughing areas of the stem just to create a little bit more movement
within the piece. I'm going to bend
this leaves so that it's coming out from the stem. We have a nice heavy part of the painting happening
here with really rich, beautiful florals and foliage. And we're going to aim for something a little
bit more light. On the right-hand side, though, no less vibrant. While the media is still wet, you can use your 3 fourth
wash and load it with sepia to plug in to the leaves
that are drying over here. Adding some stems or
just some darker areas. Just really playing now
with the watercolor, allowing it to do what it loves. These leaves are still
a bit too wet to really see any significant difference. But it's starting to happen. Using the half wash
to spread along the leaf and create
some darker areas. Coming up here at the top. To really enhance the Northern
part of this painting. We can clearly see that
there is a top antibodies to this painting and
it feels very well balanced while
remaining complex. I'm gonna go ahead and plug
in a stem to our peony buds. Really being playful
with the stem here. To create some
movement and flow. Within the piece. I'm going to create some
delicate areas here on the peony, still wet. So I'm going to let that green
gold sit on the pink here. And let those colors
blend together by changing the
direction and the thin of a thinness and
the thickness of the staff of the stems, we really see a playfulness that comes out in gesture form. Let's go ahead and
connect these stems. Pulling them back
into our main stems. We don't want them so far
apart that they feel separate. This is a moving, breathing bouquet and we want it all to feel
tied together. Just running a few lines and the general direction
helps to serve that. And then we're gonna take
our half wash brush, putting it into the sepia
and run a little bit of dark against the stems
to create some contrast. We don't really need to know what stem belongs
with which floral, as long as we're just
indicating that there is some connection happening
somewhere in the piece. It's going to all
feel tied together. Adding a little bit of
sepia to our buds as well. Rinse off my brush and pick
up a little bit more of the green gold and rough up the stems a little bit here with some leaves and some
delicate branching. Like I said, we wanted to
keep this side a little bit lighter to help balance the
heaviness of the left side. We're going to shoot
for a really big, beautiful leaf here though, so that we don't
get so off-balance. Using the 3 fourth oval wash. We'll start with that big giant stroke and then we're
going to wrap it up here with the
toe of the brush. Having this leaf here
acts as a balancing, acts as a balancing maneuver between everything that's
happening in between it. A minute. My half wash, brush through the sepia and cough syrup consistency to pick up a little bit of paint
so that I can run it through and create
some beautiful bleeds. And then I'm just gonna go over the areas where the
bleeds didn't quite take and create some more
finer, delicate areas. And some leaves. It's
nice to see that the stems are really
prominent while and others leaving it more open
and interpretive as to if it's just a dark
part of the leaf or if it is in fact a
vein running through. And do the same thing up here, creating a little bit of
contrast and the stems. This relaxing classical music
has gotten quite intense. I'm not sure if you hear
what's happening so much. I can't keep it pretty
low so that it's further away from
the microphone. But if you're picking up on
this, I'm very passionate. Operatic male vocals. Bear with us really now
just kinda playing with it. Looking at the piece as a whole, I feel like this painting
is well-served by all of the different maneuvers
with this anchor flower, a peony on its side facing
a different direction, and then well balanced by the three smaller peony buds that are going in
the other direction. By having these pieces situated together so
as to stay connected, but also moving
across the canvas, we really create a painting that feels restful but also exciting. If you'd like, you could take the Sophia and head back into your peony to create a little bit a little bit more detailing. It's not necessary, it's just one step further as to something you could do to add a little bit more complexity and interest to the painting. I really like
what's happening up here with the green
gold or excuse me, the yellow ocher and the
Roosevelt from rain. So I'm not going to
really mess with that because I think it
looks really beautiful. I also really love
the way the green is situated here at the
base of the pink. And love that too. So I'm not going to play or
tinker with that too much. Hopefully you feel as
though you were able to create something
that if not similar, it's still speaks to you. It still feels like a well-balanced and
beautiful painting. This is only one option. There are so many
different ways that you can put all of these
pieces together. The open face peony and the
side peony and the buds to create something
that's totally unique and feels right to you. I hope you will continue
to do that even after finishing this painting. I want to thank you again
so much for just being here and continuing to learn and
grow and explore with me. I always have so much fun and learn a lot myself actually, when we're painting together. Such a great way for me to
let go and to just enjoy the process and be able to
take you along with me. So I appreciate you don't forget to post your work
here on Skillshare so that we can see and if you have
any discussions with love for you to begin one so we can keep talking about this project. Or if you like, you
can post on Instagram. I always love getting your
tags and being able to come see what you're doing and
how you enjoyed the class. Thank you so much for
your time today and I wish you a wonderful
rest of the week.
 Cara Rosalie Olsen, Floral Designer + Watercolor Instructor