Transcripts
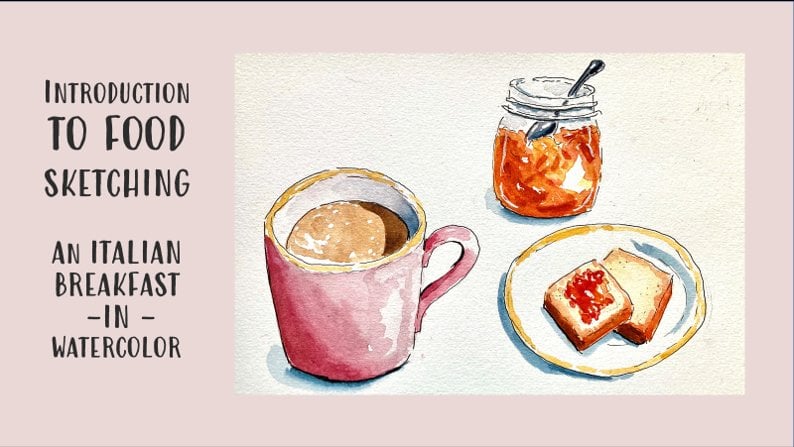
1. About this Class: Today I have a new class
for you in disease about one of my
favorite subjects. When I'm stuck with the creativity or I
have an odd block, I draw coffee, or coffee makers or cappuccino
or a cup of tea. And I know that I am
in my comfort zone. I told myself, why shouldn't I share this passion
with my students? That's why today
we are sketching. The nice sketching. You see there are all
the iconic symbol of coffee, coffee to-go. There is a climax.
There is a mock-up art. There is a small espresso. So we're going through
these different subjects. They have a different
level of difficulties. But we will learn together many, many secrets or watercolor with this class from the
easiest subject to the more complex ones. This is why this
class is suitable both for Guinness and
intermediate student, because you can pick the subject that is
suitable for your level. So we're going to have a
lot of fun with this class. We're going to relax. But also we will learn
different techniques. For instance, wet on
wet and wet on dry. We will learn how to mix
colors directly on paper. One of my favorite techniques, we're going to learn how to
layer and glazed water color. We're going to learn how to lift water color for highlights. We're going to learn
how to add shadow. We will add some final
details for really smell. Coffee is sketched in
ink and water color, which is one of my favorite techniques
because it's fresh, it's a sketchy, can be loose. It's very forgiving. As usual, I will take
you step-by-step through each single
phase in real time. So you won't get lost. Don't be afraid. So what are you waiting for? Grab your supplies and
CountSketch with me.
2. Supplies: The supplies for these
plants are very basic. We start from his pencil sketch, so you will need a
pencil HB or to be, or I like to use mechanical
pencils like this. This is professional. It's very heavy. It's very nice to draw with mechanical pencils and
an eraser for this face. Then you will need a pen. Watch out. It must
absolutely be waterproof. This humble simple
pens, uni-ball, Eye Micro is
absolutely waterproof. I love this pen is my go-to pen. This is very popular
among urban sketches. You can use this one. I like. These two are very much and it's easiest also very waterproof. Then of course, you
will need some paint. I'm using my watercolor set. And you can use either student grade
or professional grade. Results are somehow better if
you use professional grade. The colors are very basic ones that we will be using
some yellow ocher, raw sienna if you have it. But the yellow ocher
is more than enough. A lot of burnt sienna and Brown. Any brown we'll do burnt
amber or Van **** brown. Sepia. You can use it and
we will be using some black or neutral
tint. No worries. If you don't have it,
you can mix it with burnt umber and
ultramarine blue. And you can make a very
dark neutral tint. Then we will be using
some pure yellow. You find yellow
in any basic set. And also we'll be using
some Payne's gray. Once again, if you don't
have Payne's gray, you can mix a gray with burnt sienna this time
and always ultramarine. But if you have Payne's gray, always comes in handy. We will also be using purple
too dark and our brown, earthy colors, black, purple,
Payne's gray, yellow. Some very basic colors. And if you don't have them, you can always replace them. Experiment, it's a good
exercise for final details. It's optional, but it's useful. White gel pen. I have these unipolar
sign gel pen. She's very good. Also, you can use
Raleigh gel pen brushes. I'm using to round brushes
with a fine point. And the smaller one
for details or to spawn just one we defined
point is perfect. Number four, this is number 12. But nonetheless, very, very
much according to brands. So this is a medium-size, not too large, and this
is a smallest size, then you will be needing some kitchen paper and
two jars of water. One will always be cleaned
so that you can take clean water for rinsing your brush that will become
dirty during your sketch. And of course, you
will be needing paper, which is the single most
important piece of supplies. I have tried to sketch
it in two formats. I have sketched it in
one big sheet of paper. And this is cellulose, cellulose plus small
content of cotton. Or I have also sketch did in three smaller
sheets of paper. And four, we count is plus. And this is also another choice. This is a 100% cotton. The result is maybe vector
with a 100 per cent proton. But you'll see that he's also
very lonely with cellulose. So it's really up to you. The important, very
important thing. It must be watercolor paper. And the way to must be better if it is 300 GSM
per square meter. So that's all for supplies. And we start sketching.
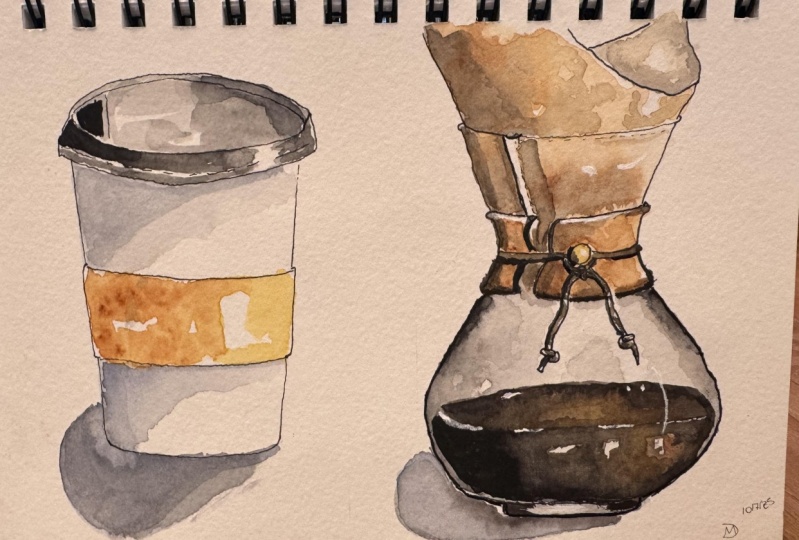
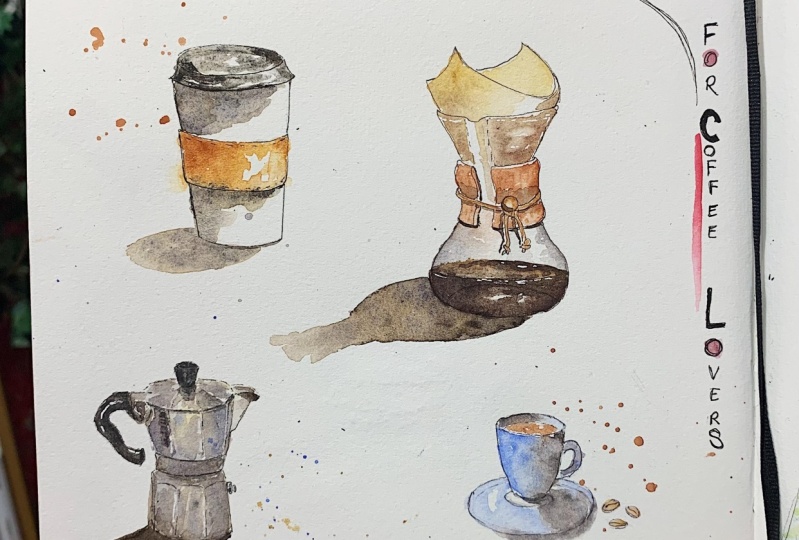
3. Coffee to Go: We started from a
very easy sketch, which is the coffee to go. To draw this, we, we started by drawing a boxer. My marks are a bit darker, but you can make them lighter, but if I make some drama, you will be not able
to see them on camera. And draw a rectangle. And inside this rectangle, we will draw our coffee to-go. We find here very light. Mark the half. Okay, this is the middle line. Then we start from,
start from top. You make these cross. This is ANOVA. Looks a bit daunting, but actually it's quite easy. The ova don't put a
sharp angle here. The secret is to make
almost a straight line here so that the overall
is very realistic. Just we are in the pencil phase. You can erase as
much as you want. So like this, just
draw what you see. Then it goes down
like this Alito. And you draw another line that is completely
parallel to the first one. Here. There is a little pattern. Here. You have a whole okay? Here it goes down like this, and then another parallel line. Below this angle. There are three is the kappa. Here you should measure, let's say images three
centimeters each, measure a distance that is the same from the center
of this rectangle. You can very lightly
go with a ruler. Go with a ruler, because in the pencil
face we can use a ruler, will not be using a ruler. When we are in the pen
phase when we outlined, we want to have a sketchy
here parallel to this one. In here. We need to be exactly
the same height. So how we market. Okay, we got a little
outside of the car. And another parallel
line here also occur. Here. It goes like this
and like this. Realistic. And that's it for
the pencil drawing. You can erase. You don't like it. Now we go to the pen outline. Here. You can have
your own style. My style is a line that is
a bit sketchy, a bit round. I don't want sharp angles here. And lines that are on the edge are a bit more, a bit stronger. This line that is just apply is freely adopted because this
is a ply of the plastic cup, especially in the center. Here we have this. And here. Also. Here we have our plight. And here the cap itself. So you see it's a
very easy drawing. If you make mistakes
even in pen, you can just go over it. Just slowly erase
them, embrace them. You see that my lines
are not straight, very sketchy because
I like these to be obviously hand-drawn. You can also just break them in some points so that this
obviously hand-drawn. I made a mistake, so
I'm redrawing it. Okay. That's all for the pen. Now you wait until this
is completely driving, and then you raise everything
with a simple eraser. That was very easy. Right? Now we go
to the fun part. We just add to put color and it's going
to be very simple. I take mine color palette. You see that I have this mixing space
that it's well-used. Don't really clean it because I can always use this
color, rewet it. And it is also useful
because I don't have colors that are
straight from the palette, but they're always
a little mutate because they mix with
the other colors. So when it's too dirty, I clean it, but
now it's perfect. I can just continue
using my mixing space. I take a medium brush
synthetic star from birth. So I'll take some black
or some neutral tint. If you don't have black cat, you can always mix it with ultramarine blue
and burnt amber. Make it very dark and you
will get almost black. But I have this black, so we'll be using it. But before we go on, we need to decide
the light source. And for me, the last
source is from here. So I know that all my drawings, we have a consistent light, light here and shadow here below our objects on this
side of the cap, because there is a cast shadow from this rain shadow here, shadow below the late shadow
below the cartilage, ring. And shadow here cast
shadow from the Mac. So I start from the darker corner and then pull the color
in the direction. Okay, now I just pull it. I leave some white here
for some highlight. And I finish on this side. Same here with maybe leave
some white to between these two parts so that there isn't a highlight
with three supply. I don't want the GSR will
clean my brush and inwards. And more black here. I start from here because
here we have shadow, because light is from here. Just little dots here. And here we will have
light hitting from here. So now we've pulled
the color here. And here we're going
to have shadow. And I can leave some white for a highlight here. The center. Maybe we need the second layer, but we'll see later. You see I always keep them. Some kitchen paper in my
hand so I can dry the brush. Here. We have a shadow, but we wait until
everything is dry. Before we apply shadow. We can apply some black, but that needs to be
different colors. So we will add some
purple relate. Now, wait until this dries and we can go to
the cardboard ring. I change brush because this rationals dirty
was full of black. So take some yellow ocher and apply on the light part. Leave some white
here for highlight. And then we changed to
Rosanna for instance. Or burnt sienna. If you don't have Rosanna, Rosanna, nice or some
burnt sienna here. It's also nice. Some burnt
sienna. I have both. So you can just
limit yourself to burnt sienna and Rosanna. Rosanna is a beautiful
color to have. I just commanded everyone has. And I can even take
some burnt amber. And dotted here where
we have shadow. Here. We get some color variety. Okay, This is spent on there. So we have mixed burnt
sienna, burnt umber, and just put some dots here, but less concentrated in here. And this is our first layer. Now we need to weight
everything dries, but we can start to
add cast shadow here. And for cast shadow, we take our black
and we add some purple that we have a
different color from black. Or if you don't have purple, you can add some
ultramarine blue so that you have a cold
called the shadow. You can use Payne's gray
if you want, but wait. Use these lovely. And that would make
it nova. Yeah. And the same color. The same color can be
used it below here. Along the side to give some less. We have bleeding because
we haven't waited, but it's not perfect. It's always good to make
mistakes so we can fix them. Touch here like this. And also can take a smaller
brush if you prefer. But below would be
a shadow below. Hey, ADL is to wait for
these layers to dry. But if you're on the
go does not always. You can wait. Just fixing sakes. We laughed a darker
shadow there. And there was some darker
shadow just below. I can add some plaque just
below the Mac, like this. And we take some pure purple. And we added here, we have the home. And you can also take
these shadow color and add some shadow here and
here, and also here. And now we can stuffed
him these edges. And we let these dry
and regular coffee to go. He's ready. If you want to add
a touch of realism, you can always add some smoke. And you take some Payne's gray, mix it with some blue that
I have on my palette. But you can take some pure
green and just smoke. Now we let this dry
and it's ready. If when it's dry, you find that it's
tweak the color. You can add a second
layer of the same color. But I like a very
spontaneous instance, sketches like this. It's finished.
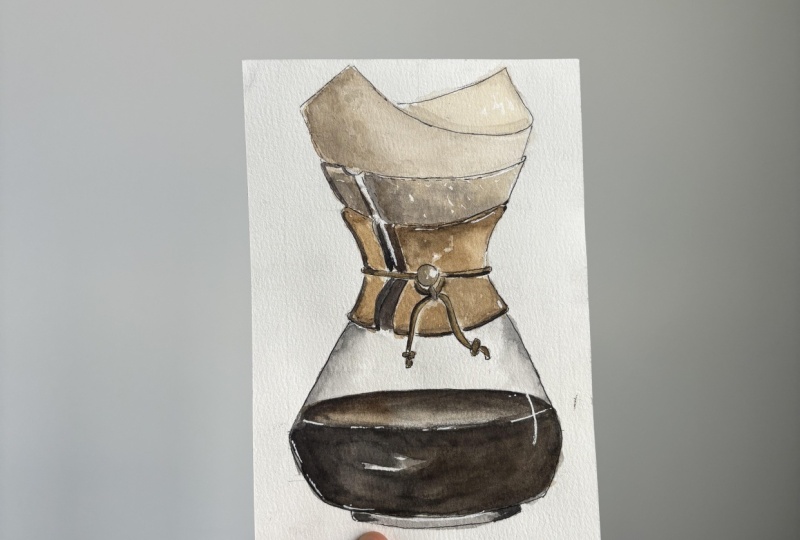
4. Chemex Sketch: The second subject in our
coffee series is a Cemex In iconic classical way
of preparing coffee. I find it's so beautiful
that I don't own one, but I want to take one. We take our ruler, so we assure that
everything is symmetric. We draw a box, a longer one this time. Because I want to put paper on top ten centimeters, so it's easy to
divide it in half for two straight lines and center lines as well. So we start from these heights, so we have space for
the paper. The eyeball. Here we have our
downward wooden cone. And it goes like this here, symmetric there
is a wooden cone. I insist on the importance of eyeballing and the
importance of hand drawing. So you just draw what you see. This is very important and
this is slightly round. And this is more
complicated drawing. Here you make around
angle and you make another parallel line to this. Once again, I made the
dark marks so you can see in camera but you
can make lighter. In any case, you
will be erasing. Just try to be as
symmetric as you can. Here you have an opening and you have a
certain thickness. Here. You have the plastic cone goes upward and you have a parallel line always. But here we have these opening. You will have that. There is. Okay. He's here also where you pour
coffee and it continuous. So you have an
interruption here. And here you have the
other side of the opening. Because ponder, okay, like this. And a good array. The array is, you don't
get confused. This end. Here you have a ball, wouldn't hold a leather string. You'll see it's quite a
complicated full of details. And you will have a not below. You can really
simplify this node. Here you have a piece of string. Here, you have this, and then you have going down. Now they're not the same. Here you have the
glass going down. Tries to be a
symmetrical as possible. Here you can use the ruler. So you can pick the
same height for both. Okay, So it's symmetrical. And then here you go. John curve parallel to this one. And here you have
small base like this. Now we need to draw the paper
goes upwards, seamless, same configuration
of the plastic cone. You have these paper
at an angle. Here. You also have it
and it goes down in a round way until
the Dutch, nice. And then he goes back and here. Okay, I hope that it was
easy for you as well. And now we outline
it with our pen. Now I take my pen
and I outline it. Remember it softer lines. You can break them
in some points. Okay. Here it goes around. And you can have a
dream hair. Here. You can put this here. It goes around, around. Remember, maybe start
with the strings. So remember everything
that is over. You draw it fast. You can always
refine your drawing. Does it have to be perfect? Yeah. So maybe you can
just draw some lines here. It say family lucky. So you remember the Shanda? Here you have glass. So the small base. That's it for the ink
drawings by crazy.
5. Chemex Watercolor - part 1: Now that we have
erased everything, we can start adding watercolor. I will take my
usual round brush. It's quite large one, but you can take a
smaller one and if you prefer the staff from top, but as usual, I will put
my light source from here. Let's watch attentively
the reference image. And let's try to just
copy what we can to really paint and
sketch what we see. So we start from paper. We have a two colors
that are very similar. It's the mood and the paper. And we need to
differentiate them. We need to make a choice. The choice I made is the made the paper colder and
the wood warmer, but you can do the opposite. So for the paper, I will apply. We mix some burnt umber. Here. The container use the
same mixing space. If I have used for
them coffee to go. Touch of yellow ocher, just a touch and then
I will watered down so we have a very light color, but it's colder
than burnt sienna. And start from here
where we have shadow, where we have shadow
stuff from here. Now remember that we have
some reflection here, so do not bind. Here. We have reflections. So it's going to be white
to leave a white line here. I'll show you how. You can just leave it. Leave a line if you forget
to do so, don't worry, because we will do later. Why did these wet to
add some shadow here? Especially where do you
think you have coffee? And then you continue
towards the light. Maybe you can use some white
here where you have glass, but here also, you cannot
do with a gel pen. Here where we have light. This is transplants, so you will have some
light on this side. You go even lighter. Or you can add some
more yellow ocher here. So you can see that light is coming from here and
it's transparent. Paper is transparent. You can add some
white highlight. Some of these yellow
ocher here too. Then it is still wet. We take some number and we add some dots are here because it's going
to be coffee powder here. Stocks. I did here. You can even take
some sepia if you have some blacker neutral chain and you mix the black with the bedtime or you take some sepia and just statuary, you think you would have coffee? Okay. Now, you got to glass because we don't
want to touch here. It's all wet and we don't
want this to bleed. We can add glass
and I would take the fan brush smaller
one and I would take some black because
I think that black diluted is the best
color for glass. And so what I will do, it will take some pure
coffee, so pure black. And what I will do, I will just worked my area. And I would take some black and go along the rim. Spend also the base knowing that the reason why maybe we
can leave some white here. Okay, We'll disperse
beautiful name. We can just soft and you can also decide that here we will
have some highlight. So remember to leave
some white over here. Same here. Don't put water where you don't
want to have glass. If we decide that we
have a wax reset here, you're just leave this dry. You don't put water and take care with black or our Payne's gray
if you don't have black, disperse the color with beautiful
dispersion is it's wet. Some more pure black here. Green here. Leave some white here, and we can add some more
black just along the rim. And we'll let this dry, soften the edge and
we'll let this dry. I will start painting the board. Now. Here also I would like
to leave some highlight. Here. We'll mix some yellow ocher with some burnt sienna or
red ocher so that I get the very warm,
very warm brown. You can also paint over the string because in any
case that would be darker. We carefully paint, leave
some highlights here. You see the border can be here. I need to make it
go behind this. Same here. Just
add warmer tones. Just some variety. You some warm, some
yellow ocher somewhere and then some burnt sienna. Same here. Okay. I just tried to add
some variety with some yellow ocher towards
see light added to the mix. Some burnt sienna
towards the shadow, towards the part that is away from the light
source that is here. Leave some white
towards the rim. Here also you can
leave some white. Here you have shadow
because it goes inward. Take some more burnt
sienna and just dot, dot here adds textures, the dots and heroes. Shanda. Okay. Then we
can add some texture. You can even add
some burnt umber on the side here because
you have dark. So just go Seat.
6. Chemex Watercolor - part 2: Now we can add some
coffee, signed for coffee, I would take my pencil and draw a very light parallel line
here and here behind. And that's it. I don't
want to use ink. Just this is the
level of our coffee. I would take the same
color that they have used, the burn center that I used, the form, the ward
size cohesive. I can have some of these
color on this side. On this side, because
like this from here, I will hit here. We can hit here, just some color here and there. And then you stop taking
some burnt umber. And you add some black or
maybe better, some purple. You've got some purple
to your phone to Brown. And from this corner, just you can even
take a larger brush. You go with confident strokes towards the light.
You can leave some. White. Can be somewhat. But if you don't, you can always go back
with a white gel pen. Some pure, some
pure burnt umber. If some white here and there. And some more confident strokes, plenty of color, especially on this
side and on this side. Leave some white
between the two. It's bleeding. So we do
something very nice. This is called Sir2 branch. You go with a dry
brush and you're just absorb the
excessive paints. Now we also put some brown him. So you can take a smaller brush for this. Along here. Along here. Maybe you can use some
yellow ocher here and just go here and here. We let these dry. Check the detail,
brush like this, and take the mixture of burnt sienna and brown
so that I will have a different ground
and I would add some pure yellow so that
it's even different. And they go over this first layer. Then we will add shadows. We need to differentiate our brown so that they
were all different. Now the small bowl, it can take some, some burnt
sienna with some yellow. This is also WuDunn. We forgot to paint it and they will have some bait leaving. I liked somebody tamper on this side so
that the roundness. Now we take some burnt amber and we add some shadow below. Here below on this side. And this will also serve
as a shadow on the wall. You take the same burnt amber and we add some shadow here. Now we take some black, mix it with some
purple that we have from the previous sketching. We add some hand, we add some shadow here or you can always leave some color, highlight, some highlights in. Okay, So we'll leave some color, but we will be adding
some white gel pen. Here it says apply, Here's just a shadow. Here is shadow. Here is shadow, and then we just
prolongs the shadow. We soften yet. Some Shanna though they would. Now we need to add maybe some
of these shadow here where we have the cone, the cone. So we need to somehow define
these plastic or glass cone, maybe glass, I don't know. I'm not sure. We accentuate
this with some shadow color. Here. We can accentuate
shadow here. Below that my shadow color, major, purple and some black. We add some shadow here and then it's alive. It's more realistic
on some hand tool. Soften the edges. She had. Maybe we have some shadow. Here is going to be fairly dark, so it can also add some purple. Then also better defined
our coffee with Sam. I'm Tampa, and black or purple. And we can turn this, just draw a line like this. And like this. So the bank define coffee. I can also add
some purple color, variety and reach darkness. You can define these. And then you just so maybe we can add some
yellow ocher, some kind. Okay. The woud, like the mood. So we have a cohesive
drawing and also the coffee is reflecting the
colors that they see around. Here. For a highlight. Just go over with some clean water and
then I rinse my brush. I tried. I can
accentuate maybe here, the dark in the base, some black mixed with
purple, our shadow color. Now we add some shadow here. Some blue collar variety. Just turn it if you don't not satisfied with the
angle gesture, what is whatever is
comfortable for you. Okay. Immediately, shadows make the Cemex becoming more alive. I will add some purple to add
some difference from. So. Especially here, we'll
add some shadow, some purples so it
makes a difference from the Cemex itself. I take these shallow corner
and the centroid here. The darker the
shadows the better. Remember the detail. Brush just below. Yeah. Yeah. Yeah. You can also refine this, add some shadow here. Refine this edge, and soften some brown stick. Let this dry and then we
might add some white. To add some variety. I add some shadows, some darker brown here. And we just blend it
towards the upper corner. And that would put
a touch of yellow towards the light. Here's two. Then I will soften it. Yellow is decoded by
our brain as light. So it's always a good
idea to add some yellow towards the light. Okay. I'll let this dry. Now that everything is dry. If I want to, not compulsory, I can add some details
with my white gel pen, so it may be accentuate. Here in there. The separation
between the surface of coffee and the side. I can also help
with the resupply. Add some white lines. Here also. The rim of the glass. The cone can continue
the white line. It would just stop here. Looking at some white points. We can add the white line. It will give me an
idea of deaths. You can also do this
with whitewash. I'm doing with my
white gel pen more. And can accentuate some shadows. Maybe with your pen. You see shadow, you can. Just another layer of Penn. Okay? Right For me, this is finished. I hope you are happy. And I'll see you
in my next sketch.
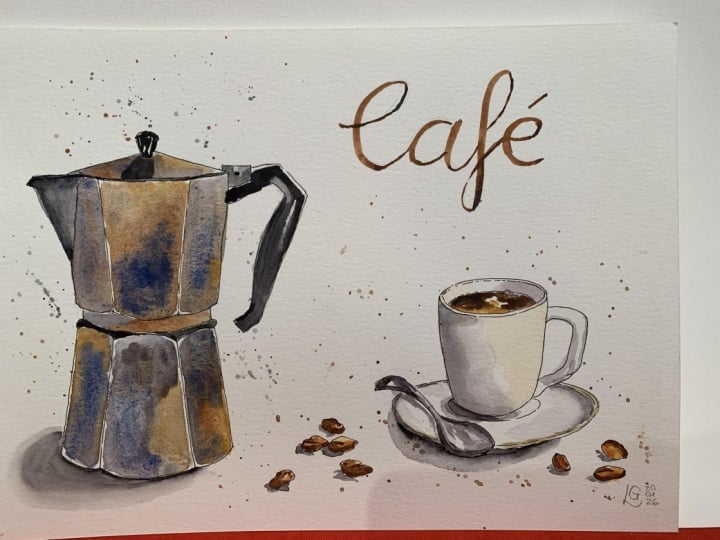
7. Moka Pot: Okay, we're now drawing my
favorite way of making coffee, which is the mockup bought. This is also slightly
complicated, so we draw it together. We start by drawing a box. This time, I think I will make
it only eight centimeters. This slowly if you want, on the left hand side. Because here we will
have the handle. It's nice if it is slightly
on the left hand side. You just you should be
also distance eight. Yes, it is. And can be 13 centimeters. So we can divide it in half. You draw this little box. Okay? This is half. The mockup bot has a ring here that divides the two parts, will be here too. The first thing is to find half. So here is four. We divided in half. So it's divided
in four quarters. And we can start
from the appellate. Here. You can use a
ruler if you prefer. In this phase is acceptable
with the small handle. Here, what we do is
we draw this sort of ring that divides
the mockup bought into the little perspective. So you make two curves. And here you got Lisa. And you go like this. But actually, this is gonna
be a literal inwards. So this is like this. And you will not,
you can erase this. So the ring will
be here and here. And this will be the
upper part of the mockup. Now, at least a
two-thirds, 1 third. You will have m this side, you will have a line that goes
slightly inward like this. Here we will have we
divided in three parts. This will go this way. This way. This is
going to disappear. And here you have a curve. Curve. And the curve here also, you will have slanted inward. Just a little perspective. Here is the pouring beak. And this is going
out, slightly out. From here. You will go in this direction. And here you will have
a small triangle. Because out like this. Because behind, just believe me. And here you will have like a small v and then it goes here. So this is, can be
slightly inside. Same thing here. You go. Seize it much easier. The lower you will have here. Goes around, here,
goes around nine. And then you will have another curve
parallel to this one. But now you must draw the curve exactly in
the opposite direction. And here, and here. I know it looks complicated, but I hope it's not. Here. You go downward, downward. And cars like this with a curve. You mentioned curve. And you draw the
base exactly like. Here it was straight. Here it is curved curb curve, curved line, curved line. This is the only straight line. Here you handle. The handle is going
from literally inside. And here you have the plastic. Plastic goes Start Here, it goes like this. I draw the inner
part first curve. And up towards this angle. Then it goes down. Goes around, is this
tray around here. And we will be
refining this F18. These can be slightly bigger. In the pen face. This is slightly champion
you see can be Tinder. Depends for how many cups
this is for one cup. The mock-up I for one cup. Like this, little choppy if
you have it for more cups. Longer and thinner, but
this is perfect for one. Okay. I will go to the pen face. Now with the pen and
we can refine if we're not be aware
finished sketch. I always start from the top
so I don't smudge anything. Start from the lead. Everything which is in
front can be drawn faster. Can be sketching. I have a cold press
paper which is, um, it's difficult to draw straight lines
on called the press. So it's naturally sketching. Always look at the
reference image and try to do as realistic
as possible, but don't stress,
you don't need to. Remember that these
lines do not exist. Just concentrate on
the outer edge and just dot here and you
just stopped this line. Here. You can make a solid line. Hope not too curvy, just slightly curve. Okay? And this is a thicker line. You can make it a double
because you have a lead. It can be a double line. Here, slightly inside. We'll have the ring, goes around, comes around. Slide is straight. And here you will
have these curves, finite curves. And this is a mock-up art. Final ink face was
very easy, right? The pencil phase was
slightly more complicated. Now we'll wait a couple of minutes and we erase everything. Now we've got to have
a lot of fun with these because we're going
to use wet on wet hair. The feeling of older metal, I would take a round brush. Maybe this one has
a sharper 0.1. For details like this one. I will start from
this side. Here. I will take the
smaller one because there are some detail part. I will use basically three
colors, ultramarine blue. And we'll mix it with
some burnt sienna of red ocher to get some gray. You'll see that it
combines with gray. We'll also makes
them a lot on paper. So we get some color
variation is usual. I will have my light
source from here. I start from the lead. And then we'll also
introduce some yellow ocher so that I will have
some light as well. So let's start from I will apply some of
these watered down. You see that applied on Directly on paper. Some blue, suddenly they
get some variation. And here I have the line, so we'll add some yellow ocher
or raw sienna even better. So we'll have some
color variation and you can leave some part untouched. We'll draw these in sections, and we will try to leave
some white between sections. So nice here. Here we have a nice
color variation. Because all the mockup
hours have sort of the, the flame gives this
old look and feel. So here it's darker. So I'll put some blue rule and then I will apply
some sienna. Sienna. Now I will mix them on the palette. Thanks them. On paper. You see how it goes.
Now some blue. You have some interesting
color variation. It can even, some will not stay blue if you find
it is to blow us and here we have more lives. So we start by applying
some yellow ocher. Just some water will
flow better on paper. And then I will continue
with some burnt sienna. I tried to stay away
from the edges. And some blue somewhere. My burnt sienna here. Just let them make some paper just for the filler metal. And now you go back to our gray. We have some yellow
just to add variety. Some burnt sienna, maybe hear. Some blue. I need more blue here and there. I think, especially here. When I have Shanda. So this gray and put in here. I need some paper. I use the same paper
from previous drawings. Now I started, we've
done some gray here. I would also go
inside here. My gray. And I start introducing
some more burnt sienna. Then some yellow ocher just on this side where
I have more light. And I leave it, then I will add a shadow here, but not touching now because
I'm afraid that it bleeds. I do the same that I did here. From gray hair. Maybe near the ring. I see that I can introduce
more than Sienna. Blue. Yeah, most important thing is color variety and
some white here. So you see we'd all
working wet on wet. Now here, you could
take some of our gray. We start by applying
this like this. Then we are the
different colors. Just as we live, maybe here. How we apply some burnt sienna. I have used the small brush
rollover, but it's okay. Yeah. Maybe more yellow ocher
towards the upper path. My blue here. You see that they
never turn green. Yellow ocher. So
that I add light. And a touch of yellow ocher. A touch of Bergson calls. So here it turns gray. Okay? Now here I see that maybe small fasting phase. And then I go definitely
don't go with some blue. So we mix it on paper. Then it's time to
add some yellow. Nice color variety. Now we can introduce
our black for the handle and the
little handle here. And we try and leave some white here on this side
because we know that. Also, if you can.
8. Espresso: Now my favorite subjects that
is smart cup of espresso. This is so easy. I do it so often, I draw it so often that I don't even need a
reference image. So we can still use our box and we put the paper in landscape
mode in previous sketches. It was in a portrait mode, but this will keep
it horizontal. Draw it on the right-hand side. Slightly. Total box is not a rule. It's going to be a rectangle. I find the center with
this little rectangle. Here. I put a little cross, these cross this over. I always tell you don't
draw a sharp angle here, a bland angle, ANOVA. Then I go down with
a central line. Because to use a ruler, if you want to show and calculate a smaller
distance here. And you go downwards. Downwards. Can be shorter. Actually.
Hear a curve line parallel to this one. Here you draw coffee
line for coffee. Here the handle is really nice. There are many types of handles. Will draw the easiest
possible handled, which is like half and half. Or maybe an ear. You can add some
embellishments if you'd like. Just now complications. And here you can take a
ruler to make sure that the little dish below
the cap is symmetric. We can draw this
late tall plate. Just, okay. You see our sketch. And then we can draw, I can draw these
directly in pen, but if you don't feel confident, maybe you can draw some
coffee beans in pencil first. Just Kiran, they're
known directions. Some pointing upwards,
some pointing downwards. Just make sure to make NADH
Ananda not even numbers. So maybe five or seven. Okay? Like this. Now we take our pen,
we take our pen. We sketch. As usual. The outer lines are
going to be stronger. Still you can read them for
more natural organic feel. Okay. Here, it's a bit
tricky because here you have a double line here you will
have a dotted line into REM. And here these down
will be dotted. And this one, which is over it, it's going to be
continuous. Okay. Now, dish here. Okay. Yeah, you can dot the border. Okay. They told base. We could
also add small spawn. It can be after thought, which means even if we have drawn the tissue ready, we can, if you prefer, we can
go with a pencil, fast curve line like this. My dog has come to see me. You can maybe hear it
in the background. Norman here. Family lines. Not the
most beautiful spoon, but it's not important. Here. Some dotted lines
and coffee here. You can put some bubbles in
a corner like this. Okay. I want to fix this
and it even in pen, you can still fix your sketches. Okay, Just wait a minute and
then we can erase this here. Very sketchy. Just a hint of a
drawing or to detail, very loose like this. Okay, now we can
erase everything. Now I take now I take the smaller detail brush because some areas
are very small. I can start from shadows in the car because it's a white cap and we only
need to add shadow. So I take my usual
gray plus purple, which can be neutral
tint plus some purple. Okay. I like purple
for shadows. Cold. It's lovely. It's
sketchy, it's painterly. Let's say that is usual. Light source is from right-hand
side, from top, right. And I will have shadow
on this side of the cup. And we can just
soften these handed. Just roundness. On this side, I have it white calf, this t. I can take some yellow
and yellow will do and add a touch of yellow. Just means light yellow. Now I play. Now the opposite on
this side of the cup. So we'll take some shadow color and then we'll apply here. And then we'll take some
very little yellow light. When the light hits,
are we applying? Very, very likely just to hint. Now we will have shadow on
this side of the handle. And also below. I will
have a cast shadow here. We have a shadow
below the spoon. Now we can take
some Payne's gray, Payne's gray and corner here. And we can feel our spoon. Just be careful to leave
some highlights around here. Splitting, go around,
but leaves some. Remember light is from here, so we will have some light here. On this side of this form. Here we will have
shadow and we will have probably a striper 12 here. We reinforce this side. Now, let's go to coffee. Could have waited here
because it's split in shadow, but we'll put that because in any case we will layer. Yeah. We'd love to solve
it with the brush. Now, for coffee will
use some burnt sienna. Will go very carefully. Here we have light. Leave some white in this area for reflections,
for highlights. And some burnt timber. Any brown we do fungi
or burnt amber. And to blend the two
colors together, you will have a darker brown on this side because
there is shadow. Maybe around the corner here. This, now with the detail brush, you paint this Babel but
you live and what spot? Maybe just half. You can add it later
with the white gel pen. Okay, We have reached some
color variation here. Also. The little dish. We will have some
shadow on this side. Shadow just soften the edge. Soften. On this side we have some shadow because
the ring goes like this. And the little base, you have some shadow
and more cast shadow around the country,
darker shadow here. The dark in value. Around the H. Here is going to be jobs. For sure. Immediacy comes
alive, gentle find. Also somehow darker. Be afraid of shadow. So you have different
layers of shadows. Now the first layer
of the coffee beans must be very warm and light. First layer will be
in burnt sienna. Now although still wet, you can touch of dark
brown below, behind. To treat darker brown.
That this trial. Now, if you want to add
interests to your Kafka, we can add the rim, a golden green with yellow ocher mixed with some
yellow yellow ocher. And I don't know, caught
me yet, for instance. Gentle, straight
line but broken. Just about some high act to indicate highlight into broken. Now the handle, maybe a sin cast shadow. We'll add some purple here. Okay, now we add some
shadow to the coffee beans. Jake have a shadow colors heavy, shortly to line just behind. So immediately this comes alive. Take some burnt umber. I mix it with some burnt
sienna, will meet that. And I will accentuate
shadow here. And also this line should be the darker
brown accentuated. Cns. Okay. If you find that
those are two-page, just add some dark color. Remember just the
direction of light. Now I will add
more definition to my sketching with my pen. So we lacked shadow on
the side of the spoon. I will add more shadow. On the site of the cup. I will draw the shadow. I will just helping
my sketch with the pen because the beans
needs more definition. This is also very nice. I find when you just use
your pen to add shadow. Here you can also Shanda. Stronger line here. Here. Hello, small capitalists presto. We can do.
9. Wrap Up: Thanks for having joined
this class with me is usual. I'm sure that you have the
reach that very nice results. That's why I'm asking you to upload your projects
in the gallery. And also if you have
lacked the class, so why not preview it? That would be awesome. I would be so grateful. You can also post your
projects on social media. You can tag me and you can find me on Instagram under
my name and he's a bit. Then you can also
find me on YouTube. Believed them as supplies
review. Thanks a lot. It means a lot for me. You follow me after
all these classes. She don't want to
miss my next classes. You can follow me
on skill share. That's all for now, and I'll see you
in my next class.
 Elisabetta Furcht, Anyone can paint!