Transcripts
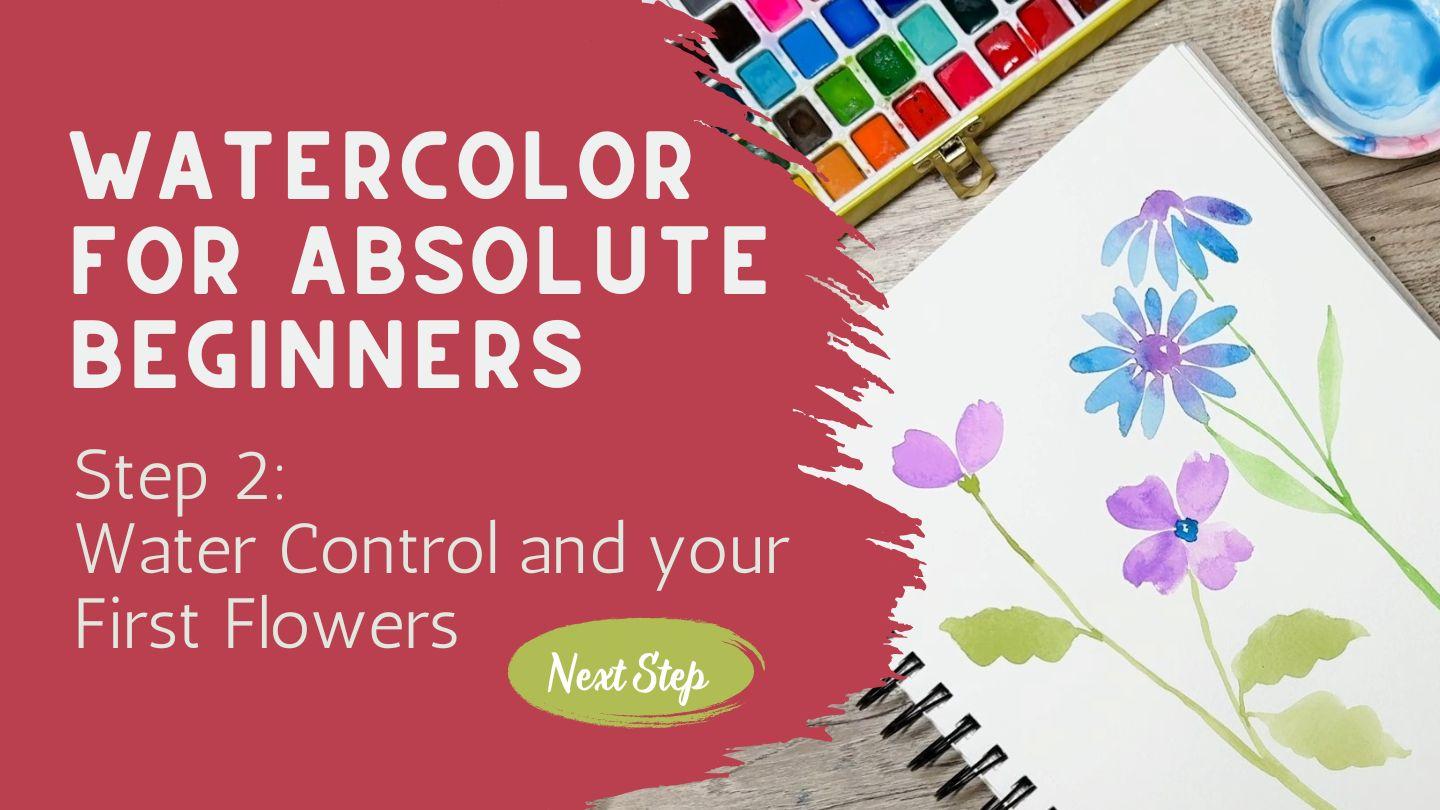
1. Introduction – Welcome to Step Two Water Control and Confidence: Welcome back. I'm so
glad you joined me. Hopefully, you've
already gone through the class for
Absolute beginners, all the supplies that
you're going to need. That's back in class one. This is class two,
where we are going to discuss how water moves, how the paint is on your paper, how much water to use, how much paint to use, all the different things that you're going
to need to know as an absolute beginner
watercolor artist. I want to encourage you and let you know that by the
end of this class, you are going to
be able to paint a flower. I'm so excited. I hope you stick with me,
learn some new techniques, and then paint a
beautiful flower at the end of this class. Just remember that watercolor
is not about perfection. It's about building
comfort with watercolor. We're going to be
making a lot of mistakes and learning
through our mistakes. That is just an important
aspect in life, isn't it? When we make a mistake, we just learn from
it and we move on. Sometimes we can even make our mistakes into a
happy little accident. Let's see what happens
when we do that. What I want you to do with
each of the lessons is watch the lesson and
then rewatch the lesson. That way, after you
have rewatched it, you're going to be able
to follow along in a much more intuitive
way so that you can dive right in and really know
what you're going to be doing because you've already
watched the lesson once. As a reminder, you can go to my Link tree in my
bio and in there, you're going to find a
list of the supplies. We had discussed that
in the other class, but I just wanted to remind you, in case you didn't get a
chance to do that class yet, there are a lot of
different things, a long list of items and
supplies that I recommend, and you can find
that list there. You can also always
just shoot me a message in the discussion
and I'd be happy to help you.
2. Facing the Blank Page – Courage to Play and Experiment: I am so excited to be
starting lesson one with you, but I want to acknowledge
a couple of things that I am pretty sure you
might be facing. One is your concern
about wasting supplies, whether that is wasting your
paper or wasting your paint. Like, what if you make a mistake and you've used your paint, or what if you've
made a mistake on your paper and now you've
wasted your paper. Please remember that paper is
just that it's just paper. You could even use the backside
of a paper that you've already used and just reuse it. There's so many different
ways of reusing things and finding
little corners that maybe you haven't
painted in yet. You can use that paper so many
different times and ways, especially by just flipping it over and using the
backside of something. Please have fun, experiment, and just see where the paper
and the watercolor goes. When it comes to feeling like you're going to
be wasting paint, these paints last
absolutely forever. You actually need such
a little tiny amount. If you've bought tubes and
you've put some paint, some of the wet paint into a container or
palette like this, you just let that dry and then
you're going to be able to reactivate that and use those paints over and
over and over again, just letting them
dry in between. Right now, these are completely dry and I'll be
activating them shortly. You do not need to worry about wasting your paints because
it lasts such a long time. Even in a palette like this, you are going to be able
to just spray that down, use the amount of
paint that you want, leave it open to air dry and this palette like this should
last you well over a year. So there's so many colors. So even if you ended up
using up one of the greens, just choose another
green to use. But I really don't think you're going to even run
into that problem. Watercolor lasts
such a long time, and I want to encourage you to not worry about your supplies. You are worth it.
You art is worth it. You hobby is worth it, and the time that
it takes for you to have fun is worth it. As a reminder of something that you would have learned
in my last class, try to pick up some kind
of a watercolor pad. I would really prefer if
it was watercolor paper. This is not going
to be cotton paper, but it will be a pulp
paper, wood pulp paper. But it's really great
for you to be able to practice in and experiment and see what happens and try out your different things
that you want to test in. We're going to be
using this a lot in the class for the
next couple lessons, and this comes in a large size like this and it also comes in a smaller size. Either one works really well. I definitely
recommend picking up something like
this because it is cheaper paper and easier to use and then because
it's spiral bound, you get to keep all your notes together and you're going to be able to have a chance to look back over your
projects and say, look at where I started. Look at what I did
in the beginning now at the end of the class, look how much better
I am already. One of the things I've
noticed with new artists is the fear of putting
paint on paper. They just can't seem to get
past that to actually putting some paint into your paint brush and laying it down on the paper. I want to dive us right in
before we do anything else. I want you to just
immediately put something down on this piece of paper that you
have in front of you. In fact, that's going to
be our very first lesson. What we're going to do is wet down our paint brush,
have a tablet. This could be your
watercolor tablet. It could be mixed media paper, whatever you happen to
have in front of you, use something that is not
a high quality paper, just something, some scraps. It could be something from
your children's art supplies. Whatever you happen to have, we're going to use that paper, a simple brush, and
a glass of water. And then with that,
we're going to just dive right in with one
of these colors. We're going to choose
something nice and bold like that red. I'm going to spray these to
remind us how we do this. We spray down the the palette
so that it gets activated. If you don't have
a spray bottle, you could use a dropper, so you could add
some water that way, or you can use just your
regular old paint brush and drop droplets of
water on that way. That's just a really
slow way of doing it. I prefer a spray bottle. Now, for your very first lesson, the thing that I
want you to do right away is grab some red. Or whatever color
you happen to have, I am going to be trying to
put as much red as I can get onto that brush so that
the brush is completely full. Now I want you to hold the
paintbrush on the top half, could be even all the way
up here if you wanted to. What we don't do
is we don't hold our paintbrush down here
like it's a pencil or a pen. You want to at least
hold it above the metal, and I personally prefer
to at least hold it at half or leave it a
little bit further up. We're not going to be painting
anything in particular. We're just going to be
putting paint onto our paper. Just make a swish. Just do that. Go ahead and
pause this video and do that. Now that you've come
back, I'm going to dip my paint brush
back into my water and I'm going to
put it back into that paint and fill
that brush up. I don't want you to just dab it. I'm not looking for you to
just dab it in the top. I want you to fill it up, maybe even twist it and fill
that paint brush all the way up with color and come back over here and
make another one. Just make a swish.
Any shape will do. It doesn't have to
look like this. Any shape will do. Go
ahead and do it again. Dip your paint brush into
water and this time, instead of going
back into the paint, just put it down here on
paper and make another swish. How about we do it again? Without putting it back
in water and without putting it into paint,
make another swish. Do it again. How many
times can you do it until you start to run out of paint and water on
your paint brush? Play around with it, experiment. Have fun. See what happens when. Now we're going to try it again. I'm going to be filling that paint brush
up with that red, and I'm going to just make
a line. Make another line. I'm holding my paint
brush more up and down. These, I was laying it
down and going flat. For this line, I'm just going to make a line going
straight up and down. See how fat you can make it. See how thin you can make it. If you need to dip your
paintbrush back into water, dip it back into your red or blue or whatever
color you're using, and see what happens when
you just make a little dot. Make another dot. How
many dots can you make across the page before your paint brush
runs out of water? Can you make it this many times? Did you think you had enough
water in your paint brush? Did you run out all
the way over here? Hm. Maybe you didn't
have enough water and paint in your
paintbrush. Try it again. Fill that paintbrush
up with water. Come over here and
fill it up with paint. Get that soaked so it's
almost dripping off. Try it again. How far across
can you make your dots go? Test it out, pause this video, play around with it, see if you can get your dots to
go all the way across. Now that you've done a
little bit of fun and you've just put some
paint onto your paper, let's just let that dry and we're going to move on
to the next lesson. I can't wait to show you all the different things that
we're going to be learning. Join me in the next class.
3. Understanding Water Control – Transparent to Opaque: When working with people
who have never painted with watercolor before or
basically new to watercolor, one of the things that
is always asked is how much water do you
use and how much paint? How thick should your paint be when you are mixing it
inside of your palette? For this class, I have
these four little cups. These are just
little sauce dishes. But I'm going to use them
so that I can help you see how much water to
how much paint and how to make a wash and
different textures and different amounts of
paint to water ratio. So what I'm going to
do is I'm going to add a little bit of water into this little dish just
by dipping it into my water and brushing it against the edge
of my little dish. Whether this is a dish that
you have that's in a palate or on a dinner plate or if you have little
cups like this, whatever it is that you're
using, it doesn't matter. You could have something
metal or plastic. You know from my last class
that I prefer something that is in a ceramic. So now I'm going
to come in here, let's choose another color. Let's go in with green. I'm going to add a little
bit of my green right to my paint brush and
fill that paint brush up and I'm going to
bring it in here and add it into this little dish. You can see that I have
just added a lot of water and just a
little bit of pigment, a little bit of the paint. I'm going to actually add in
even more water to make it even more water down so
that that is almost like, um like a tea, like a drink, like iced tea. It's so liquidy and
thin. Very, very thin. I could even add
in more water into that to make it
even more diluted. And look how
transparent that is. So when you have it like this, which I'm going to consider
it to be T strength, I want to show you
what that is like when you paint here, this
up a little bit. You can paint it and look
at how transparent that is. That is very, very transparent. That is just going
to create a very, very light wash on the
painting on the paper. So we can just allow that
to dry and we're going to call that our tea strength
or the very lightest, most transparent, the
most amount of water. Now let's try it again. And this time, we will add
a little bit of that green. And it's a nice amount of water. It's still fluid. I still moves around a lot, wiggles around, it flows. But let's compare it to the wash. See how these
are flowing differently. How this one takes just a little bit longer to get across. See how this one, when
you tip it on its side, it's almost clear
along the top here. It's almost like
it's all pulled down here where this one
as it's tipped, you can still see the
green up at the top. We'll tip it that way. See that? This one we're going to call coffee strength where it's
just a little bit thicker. And we're going to see what that one looks like when we put that onto our brush
onto our paper. Again, you can see,
it's the same green, and it's just a
little bit thicker, a little bit darker, a little bit more opaque. That one is our coffee strength. Now we're going to
make something that is more milk strength
where I'm going to come into that same green Now, when we are looking
at this strength, when you push your paint
brush along, it separates. Do you see what
I'm talking about? You can create a line in
between because it's so thick that it actually
separates milk. Okay. So we can even
add a little bit more. There we go. That's
what I'm looking for. Okay. You see what I'm
talking about there. And if I compare that
to our T strength, I can't separate that. It's just all liquidy. That's not going to separate. If I compare these
by the rolling, you can just see how much
thicker this milk strength is. Let's take a look at
what milk strength looks like on paper. I'm going to put my paintbrush all the way down
into the bottom, roll it around so
that I'm having the entire paint brush
bristles getting filled. I'm not just dipping
it in the tip. I'm making sure it's
completely full. Now let's see what
that one is like. A look at how much
darker that is. We'll let that dry. Now I want
to show you the last one, which I'm going to
call cream strength. Cream is where you're just
dipping it into the water, bringing it over
here to your palate, and bringing it into
a container here, or you could be just
dipping it right out of there and not putting
it over here. But this is going to
be your thickest, your strongest, your
cream strength, like cream that you would put
on your face or your body. Very, very creamy. So let's take a look at what
cream strength looks like. Look how dark and creamy it is. Go ahead and make
your tea strength, coffee strength, milk strength, and then cream, where
it doesn't even really move around inside of the
dish because it's so creamy. Practice that on your paper. You could make an
entire page and see what happens when you use
the different strengths. Now that these four are dry, I just wanted to
show you up close exactly how those
look with the tea, the coffee, milk, and the cream. The next thing that you can
practice is if you come in here and let's use
the cream to begin with. If we use that cream and we fill up our paint brush
with that cream, and then I want to make a
gradient that goes across, I can start here
with the darkest, the cream, dip my paintbrush into the water, brush
it off on the side. Don't put it back
into the paint, bring it over here and make a gradient as
you're going across, dip it into the
paintbrush, wipe it off. Come back over here,
dip it into the water, brush it off, come
back over here. You're seeing how much lighter and lighter and
lighter it's getting, it is creating that
same transparency as you're getting lighter and lighter by adding in
more and more water. See if you can go
all the way across your page by making it as light as you can
possibly make it by the time you get to the
other side of the page. You can practice that with
several different colors. Could make an entire
page of starting a rainbow of your Roy D Biv
all the way down and try that and see how
far across you can get it and how fat you can make it by just dipping into the paints once and then
putting your paintbrush into water and going
over and over and over again until you've gotten it as faint as you can
possibly make it. And
4. Practicing Brush Control – Lines, Pressure, and Flow: This next lesson,
we are going to be making some more
strokes on the paper. Again, if you have
a notebook like this that has the
watercolor paper in it, I would love for you to get this out and make your notes in here, make all your
practice strokes in here so that at a later date, you can come back and say, well, how did I do that again, and you're going to
have it all in here? In fact, it would
be a great idea for you to date this and put the date of when
you were working on so that in two
years from now, when you are becoming a really great artist
for watercolor, you can come back and
take a look to see where you started and
what did you look like and how much did
you know when you first started compared
to two years from now? You're going to be
absolutely amazed. I have books and books. I probably have ten
different books like this that are filled
page after page, front and back where I have added in all of my notes
and all of my practice. I really love to look at that
to remind myself of where I came from and the way I
started just a few years ago. The next thing we're
going to learn this class is how to hold our paintbrush and how to
put it onto the paper. It doesn't matter which
one of these we use, whether you're using
tea or coffee or milk. I'm just going to be
using this one for now until it gets used up and then I'll probably just
move my way across. Now that I have filled this
up and like I said before, I mean, I am filling it up. I'm not just dipping it in, I am laying it down
and getting it completely filled as much as
can possibly go in there. If I have picked it up
and it's too drippy, I can always just brush
it against the edge of the cup to dip some of it off
and to take off that tip. I could also use my cloth
that's next to me and just dab it here to make sure that it doesn't
drip onto my paper. Holding the paintbrush
about halfway up at about a 45 degree angle, I'm going to just let the tip of the paintbrush
touch the paper, the tip of the paintbrush. I'm going to draw a little line. Now what I'm going to do is
lay my paintbrush down so the whole head of the bristles lay all the way flat
against the paper. Then I'm going to draw it
out and slowly pick up. Don't lift up the
tip all the way, draw a little line, and then lay it back down and slowly draw out
and pick back up, draw it out slowly
without picking it up, lay your paintbrush down, draw it out, pick it up slowly, draw a little line, lay it down, draw it out, do this over and
over and over again. I cannot stress. When I say over and over again, I mean I want pages and pages of this movement where
you are holding the paintbrush at an angle
at least halfway up, if not higher, draw
a little line. Put down, draw out, up, line, down, out, up, line,
down, out, up. Draw line, down and up over
and over and over again, I'm trying to make
this a little bit of a darker color so that it
really shows up for you. G to add in some extra colors here to
make it a little bit bolder. I want to make sure that
you can see this on camera. We're just going
to make it darker. Let's try it again. Fill my paint brush up. It's in that creamy somewhere
between milk and cream. It's nice and creamy. Fill it up, brush off the extra. When I say brush off, I don't
mean brush it, brush it, brush it, brush it, it, brush it so that it's empty. I mean, just take it, fill
it up as much as you can, and just stop it from dripping. And now we're going to do
it again. A little line. Put the brushle down, out, up, line, down, out, up, line, out, up, line, down, out. You can go ahead and
pause this video whenever you want to and
practice this motion. See how see if you
can make this, keep going all the
way across your page, dip in at the beginning
of the line and see if you can get that paint
to go all the way across. If you can't get it to
go all the way across, is your paint brush
full of water? Is it full of paint? If not, let's try to fill it up. Let's see what we can do to go all the way across your page. Over and over and over again. I know that you feel like this is maybe a little monotonous. Think of it like learning how to play a sport or how
to play the piano, and you have to
learn your scales and you have to figure out
how your fingers work, and you have to learn how to
catch or to throw or to bat, and you have to do it over
and over and over again until you have that muscle memory and until you have learned it. Being an artist is not
something you are born with. I don't actually believe that
many people in the world at all we ever born
to be artists. Artists are created and they
are created out of practice. What you're going to do is
practice every single day, about ten to 15
minutes a day of doing this work where all you are doing is practicing your scales. For anybody who has taken piano lesson or any
other musical lesson, you know what I'm talking about. It's just a monotonous. But this, I'm telling you, is going to make such
a big difference in how quickly you learn and
how advanced you can get. If you get tired of doing green, switch over and do blue. Try a different color. See what happens when you use a different color or when
you mix another color in with this so that you can experiment and
keep this interesting. Have an entire page at least one until yours
start to look like mine. Once your page starts
to look like this, then we're going to move
on to the next lesson. If your page has
started to look like this and you've really
figured this part out, you can then move on
to the next thing, which is to draw a line, push it down and arch it and bring it back
down like that. Start up, put the
paint brush down, and arch it and
bring it back down. Put your brush down, arch and gently pick
back up slowly. Let's try it again. You can make it a
soft branch off, or you can make it a big tall branch or you can do
a soft one again. You make some squiggles like
that and see how that goes. When you have figured
out this motion, then hold your paintbrush
up more straight up and down and draw
a straight line. You'll notice that I'm not even resting my hand on the paper. I'm just barely touching
the paper and letting my paintbrush float across the page as I create some lines. You might have an
entire page of just creating lines over
and over again. How thin can you make it? Here I got this big
skip. That's okay. Doesn't matter. Go
ahead and do it again. How thin can you make it? Once you have an entire page of these shapes and these shapes and another page of just lines, I think we're going to
be ready to move on to actually putting something
together to look like a leaf.
5. Painting Simple Watercolor Leaves – Finding Flow: I sure hope you took me seriously and did at
least three pages, one page of these, one page of this, and
one page of lines. If you need more
time, slow down. Enjoy this. This
is a long process. This is a lot of exercise
and practice that I need you to do in order to
get into the next lesson. For this next class, we are going to be
learning leaves. In this class we'll be
using this green again. I really like that color, so I'm going to be mixing up some more of that color here. Okay. So we're going to
be talking about leaves. A leaf is very, very similar to what we
practiced right here, and that is why we
did this practice because a leaf is
pretty much that. If I were to block off everything else, what
do you see there? It's just a leaf.
That's what you did. That's what you've been doing is you've
been making leaves. You just didn't
actually realize it. And when you were making
these, what did you do there? You made a leaf that
was on an angle. That's all it is. A very
simple angled leaf. So we had a reason for this, and these are your stems. This is something that you can bring and you can make a stem, and then you can bring a
leaf off of your stem. So we're gonna be
putting this all together on this page
where we practice. Right, using our cream texture, somewhere between
milk and cream, where when you pass the
paintbrush through it, you can see the bottom, but then it slowly
pulls back together. That's what we're looking
for. To paint a leaf, what we're going to
do is start here with a little line just like we
started all of our practices. That's going to be
your little stem. You're going to take
your paintbrush holding it about halfway up, if that's uncomfortable,
you can bring it down to right above the metal. Your little line, take
your paintbrush down, draw it out, lift up, and come out to a tip. There's your first leaf.
Let's do it again. A little line down, out, slowly come up so
that you can create a tip. Make another one, a
little line down, slowly come out and lift up. Notice that I'm
not having to put my paintbrush back into
my paint every time. That's because my
paintbrush is able to hold a lot of
water and paint. I yours is not doing that, either you need to pick up a different paintbrush or you need to make
sure that you are putting your
paintbrush all the way down into that and make sure that there's enough water in your paint and then
it's not too thick. So one of those things needs to change if you can't
make at least five. Four or five would be an ideal. This was an exceptional amount. My paintbrush that I'm
using is a size eight. This is a Princeton round. It is my favorite paint brush. It's a little bit
more expensive, but it is probably my absolute favorite paint
brush for watercolor. So you've done that, I want you to do it again
over and over and over again. You're practicing your scales, you're creating a leaf
by making a little line. Put that paintbrush
all the way down, draw it out and the
further you draw it out and the longer
you take to come up, the longer your leaf
is going to be. If you want to
make a short leaf, you can just put it down and pretty much prick it back up. See how they're just
making different shapes by doing the exact same thing, but it just has a
little difference as to when you pick
up your paint brush. I I pull it out and I push it
down and I pull it back up. You how that works? All
these different shapes, basically using the
same technique, but allowing that
paintbrush bristle to be down longer or shorter
amount of time. We can even make it get curved. We can make our little line and then do that arch
that we were doing earlier and have it bounce
back down that way. Now your petals or your
leaf is facing back down. We'll do it again,
a little line. Push it all the way down
and this time just curve it as you slowly pick
up the paint brush. You're slowly lifting
up your hand, slowly lifting up that paintbrush
as it comes to the end. A little line, push it down, curve, and slowly lift back up. Make an entire page of this because this is an
important thing to learn. You're going to be practicing leaves for pretty much
the rest of your life. It is never going to
stop because there's always something you can
learn about painting leaves. We're going to move
on to another style. It's the same leaf, but it's with the stem. Remember when we were painting those straight lines over here. Let's use one of
those straight lines and then we're going to
put some leaves off of it. I'm going to make a straight
line this direction. I'm going to hold my paintbrush
again, near the middle. I'm going to have my angle near the top, near
straight up and down. And just drag my
paintbrush all way. That doesn't have
to be straight. It's allowed to be jagged. Then once you get to about
where you want to stop, I'm going to make a leaf
right here at the top. I'm going to put my
paintbrush down and drag it and pick it up. Then we're going to
make another one here, a little line for the stem, put your paint brush down, drag it, and pick back up. Now I have two leaves
off of one stem. Here we're going
to do another one. See how I'm making them face different directions?
Let's try another one. This one's coming up
to meet that one. Making it very organic. We can have them coming
off of this side too. Maybe the stems come
across from each other. You put that little one down, lay your paintbrush down
and slowly pick it back up. If you need to move your paper, you can move your paper so
it's more comfortable for you. Whatever you need to do so
that you are comfortable. Look at that. Now
you almost have a little fern or a palm. And you can have this go all
the way down if you want. You can bring them
off different sides. Let's bring some over
here on this side. No. We're gonna bring this one back down and arch it back. This one I think we're just
going to bring straight out. This is a really fun
exercise to do because it takes it from this scales or lessons and moves you from this lesson into something that actually starts to
really look like a leaf. Go ahead and make
a couple pages of this and go ahead and
upload that for me. Show me your artwork. Show me that you
have made these. Put that into the
class discussion so that we can talk about that. Talk to me about
what you're having a difficulty with and maybe I can add an extra lesson in where I can help
you with that. Go ahead and practice
this on pages and pages and make
some more of these. I'm going to go ahead and
show you another one using the same technique of
that down out and up, but we can make it smaller and
we can make a little line. Then we're going to
just same paintbrush. This is a size eight and I'm just going to make
a little tiny one. All I'm doing is down, put the paintbrush tip down
like that and then down paint brush tip and down tiled it so that it's
better for my ankle and down. And here I made a
little tiny leaf that I can add in as a filler. Make a couple of those until you feel comfortable with it. Let's see what else can
we make with a leaf? We can do a double sided leaf. Let's start a new page. It's the same technique. It's just a little line, and I'm going to
make one out and up. I'm going to make a second one, and I'm just going to start
here and I'm going to line it up on the other side and
bring it up to the same tip. Tu. Instead of just having one, I'm doing two, one. On the other side of
it, making it thicker. See how it's getting thicker, bringing it up, two, and now it's a thicker leaf. One, two. Line, down and up, down and up. Line down and up right
next to it, down and up. Go ahead and make an entire
page of that style leaf. So many leaves that we can make with that same basic lesson, which is why this is so
important that you get this down and that you understand that
technique of drawing it out, pushing that paintbrush
all the way down, dragging it out and
slowly lifting back up. Because we're going to
use that same technique over and over again
throughout this whole class. While we're working on leaves, I want to show you one more before we move on
to the next lesson. This one's just a little
bit more advanced because it has a wiggle
in it, but it's not hard. It's just a little
bit more advanced. You're going to draw your line. You're going to lay
your paintbrush down just like we
did the other times. This time, I want you to
wiggle your paint brush, wiggle, wiggle, wiggle, and
then slowly pick it up. Make your line. Wiggle,
wiggle, wiggle, wiggle. Pick it up. Do it again. Little line, wiggle, wiggle, wiggle. Pick it up. The more you wiggle,
the more lumps and bumps you're going to get. The less you wiggle,
the smoother it'll be. Let's do another one. A line. This time we're just going to do a couple wiggles and pick it up. This time we're going to add a second layer on
the other side. To make it even fatter.
Let's try that again. A little line. Lay your paint
brush all the way down, wiggle, wiggle, and pick up. That's half of
your paint this is half of your leaf
on this other half. Meet in the middle, wiggle, wiggle, and pick it up. You can go ahead and practice this as much as you want to. You can make this really
a long wiggle, wiggle. If you want to add
this onto a stem, you can create a arch like that it's just a thin
line at the top here, wiggle, wiggle, pick it up. Wiggle wiggle, pick it up. Try my page a little bit. Wiggle Wiggle, pick it up. Maybe you're making
maybe this is holly. You know how holly has
little jagged edges? Maybe it's a rose leaf. One of the now I got
my paintbrush too dry. You see how that started to get just too dry and it's
not going to work. I need to put my
paintbrush back into that paint to be able
to finish that leaf. When I'm painting in
loose watercolor, I'm not making a specific
leaf for a specific flower. You are welcome to do that. I am just not that particular. I like the loose organic, whatever happens happens a flow. You're going to notice
many times that I might put a rose with a
leaf like this, even though this is not
technically a rose leaf. Personally, I don't care. Um if that bothers you, then you need to learn some additional leaves so that you can do it the way
that you want to do it. But for my art and the
way I like to do it, I just like to make
organic looking leaves. I forgot that there was
one other style leaf that I wanted to
discuss with you. As we've gone through here, we've made some
nice long leaves, some textured leaves like this, which is a fern, tinier leaves. We've made a double leaf
and a wiggle leaf here. Now I want to make one
that does not have a tip. Here, all of these
end with a tip, and even these end with a tip. I want to show you how you
can make them without a tip. And all it is is picking up your paint brush and not
drawing it into a tip. It's just that simple. You're
going to draw little dot, the little line for the stem. You're going to draw
out your paint brush and then you're just
going to pick it up. See I didn't draw
it out and then slowly pick up, I
just picked it up. I could make this one a fatter
one and just pick it up. There's a beautiful leaf. I can make a stem
and make a spot there and make a spot
here and there's a leaf. It doesn't have the tip. It's more of a rounded leaf. There's one side. Here's the other side.
Here's one side. Here's the other side. Here's a little stem.
Let's make a big one. Here's a stem. Here's one side. Here's the other side.
A nice big leaf. These don't have to
have two sides to them. It could just be a stem with a piece that comes
out like that and it can come out as long as
you want it to be and then just pick it up
instead of drawing it out. In the other class,
what we're doing is taking a stem, laying it down, and drawing it out and slowly picking it up
to create this tip. In this class, we're
just picking it up instead of slowly
drawing it out. Just down and up. If you want to make
a nice big leaf, you can make it come out and come out again and then you can
fill in the middle. These leaves are
going to be coming very much in handy
at some point, and also you're
going to be needing this technique for when we go
to make some flower petals, which we're going to
be working on next. So go ahead and practice
this leaf for a little bit. Go ahead and pause your video, rewind it, watch it
again, stop, practice. And then when you're
ready to move on, come join me in the next class.
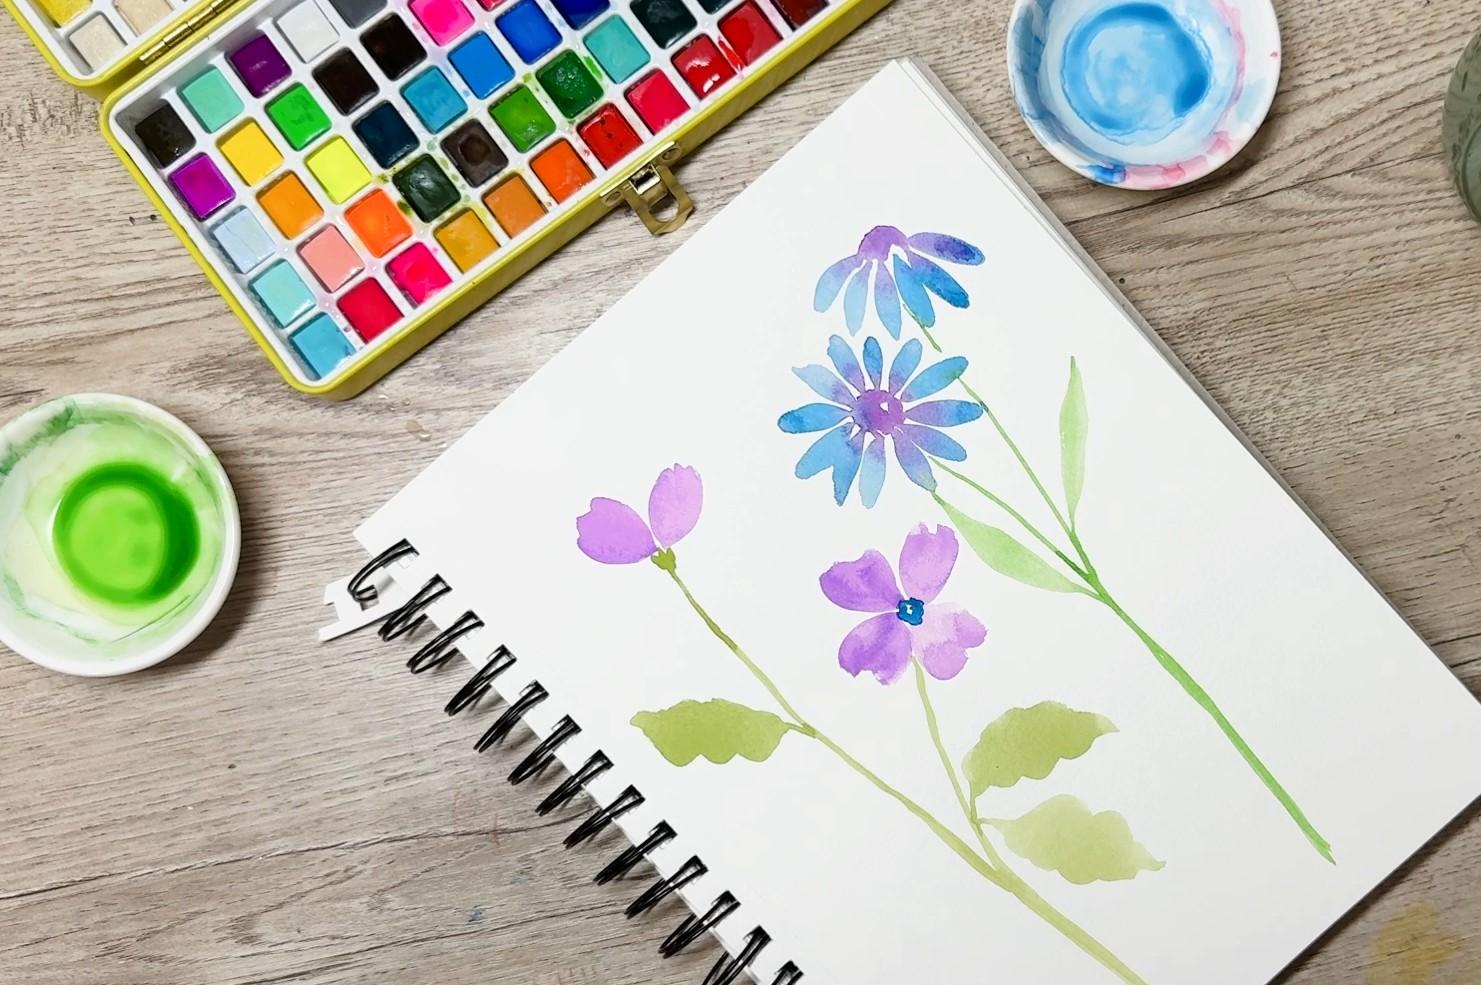
6. Painting Loose Flowers – Two Simple Styles for Beginners: Next class, we're going
to be talking about flowers and we're going to learn a little bit
about making flowers. First, we had
practiced this stroke. This is going to also come in handy when you go to
make your flowers. This is why we've practiced this over and over again because just this stroke alone
is going to help you with a multitude of flowers
that you need to learn. I'm going to use one of
my little cups here, switch out my water so I have a fresh water
because I'm going to be using reds and pinks
and things like that. I re wet my paint. I'm going to fill it
in here with some red going to make it nice and dark so that
you can see it again. I want to make sure that you
can definitely see this. In that class when we were
learning to go straight and then down and then
up to make a leaf, we're going to use a similar
technique to make a petal. One of the things that
we can do is we can make a daisy and we're
going to have it go down. We're going to start like that, and we're going to push our paint brush all the
way down, draw it out. And up like that. It's the first leaf of
our petal of our Daisy. We're going to do another
one right next to it. There's a second one. I make a third one, drawing
it down and back up. I'm just not making as deep
of a tip here at the end. Put another one right
next to it and up. Picking up my paint brush
just a little bit quicker so they don't have a long
drawn out tail there. And one more over here. Are you starting to see it? Do you see the flower starting? Something like that? So if I've done that for
a petal, for a flower, I can then come in with a nice beautiful
orangy yellow color and I can make a flower
head right here at the top. Look at that. I've made
my first little flower. Go ahead and try that. You're
basically making leaves, but they're turning into petals because of the direction
that you're putting them. I can start with some of this yellow color and make some little dots around here
and make it the center. And then I can come
back over to my pink, and I can make it go
all the way around. I can start at the top
and I can just pull them out and make it daisy. It goes all the way around using that exact same technique
that we use to make leaves. And there's your little flower. Very simple, very
straightforward. But absolutely beautiful. Practice making some of these. Make them facing this direction up and make them
facing towards you. If you are concerned
about that blade, you see how that pink bled
right into that yellow, I don't mind that.
I am okay with it. You can lift some of
that out by just using a clean brush that
just has water on it, dry off your paint brush
and just come in here and lift up some of
that color that you didn't care for that
it blend in there. Straight down, and up
straight down, and up. Straight down, and up. Straight down, and up. Straight and up. You get to choose how
many different petals that you want to have on there. It's up to you. Maybe you want to make this one fun and
add a little blue center. You can go ahead and do
that. This is your flower. You get to make them
whatever color you want too. Make an entire page of
these little flower heads, having so much fun
making little daisies. Now I'm going to show
you one more flower because it's the same technique. It's the same brush
stroke that you have been practicing
this entire class. I'm going to call a four petal
flower, four petal flower. Let's start it here. We're
going to make a one side, and then we're going
to make a two side. That's your first flower petal. So it's just like
when we were making the two sided leaf
without a tip. I'm just not adding the
little stem down at this end. Now I'm going to make a
second one right next to it. One side, pick up, two side, pick up. Do another one. We'll do it up here.
One side, two side. It's okay that it's all jagged
at the top. I like that. It's also okay that
this one is longer. However you want to make it. I'm going to make another
one. One side, two side. All nice and jagged. That's the start of
your four petal flower. As this starts to dry, you're going to have an
opportunity to come in with maybe a little
bit of brown or some yellow and drop it
into the middle here to make the inside
the center of your flour. You don't want to do
that when it's too wet, but you can add it in when
it's starting to dry. And there you have the starch of a four petal flower.
Let's make another one. Fill your paintbrush with all the paint so
it's completely full and start over here and make a flower petal with two strokes. Another one with two strokes. Another one. Another one. It's okay for them to touch. We can make as many of
these as you want to make. You can make them smaller. You can make them bigger.
You can have them touch. You can have them not touch. Make over and over and
over and over again. Make as many as
you want to make. You can get them really quick, where there's just
two little strokes. Make as many as you
can on your page. This is one of my
favorite flowers to make. I'm going to come in with
a little bit of blue. I'm going to just add
a little center of blue because I can,
because it's pretty. Now that you have practiced both daisies and a
four petal flower, you could make these in
any color you want to. You could have made these
in blue with a pink center. Let's just make one for fun. Let's make a blue 12 strokes, two strokes, and it has
a beautiful blue flower. We're going to just add a
really bright pink here. Let's see. That one's
pretty fun. Let's try that. I bet. Isn't that fun? So it doesn't matter
what colors you choose. The colors are up to you. It's whatever you want
to do that's going to make you happy that
brings you joy. Join me in the next
class where we actually work on
your class project. I'm so excited.
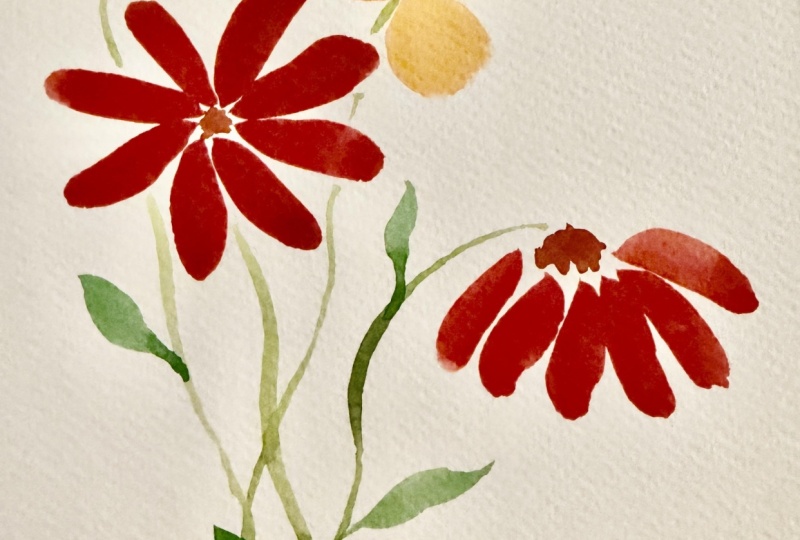
7. Class Project – Combine Your Skills into a Loose Floral Painting: We're going to put everything
that you learned together, and we're going to start
with your very first flower. I hope you're excited because this is going
to be so much fun. I'm still going to
work in my notebook. I would recommend
that you practice it one time inside
your notebook and then move on and find some
little better paper and use it on a better paper. Use that same example and
do it again and practice it several different
times until you've gotten a flower that
you're really proud of. And maybe you can even
hang it up on your wall. This is going to be so much fun. Let's get started. And maybe for this one, we'll
make it purple. This is already wet, so I'm just going to go right
in there and grab that and maybe make a one
petal, two petal. And then maybe make another one like this is almost
like the bud. Then here we're going to
use that same composition. Remember how we were doing
that with two strokes there? Something like that. With some green because
this is the bud, I'm just going to create
that little bud look right there and then draw this
one down to the bottom. Then we're going
to bring this one over and thicken it up. See how mine is not straight. It's nice and jagged,
totally fine, happy to have it that
way because in nature, you're not going to
find straight stems. Now, let's make the
little squiggly leaf where we bring it
off and we squiggle. Like that. I well put two here. I'll add another one up here. Wiggle, wiggle, wiggle,
wiggle, straight up. But they need some centers. We'll use the blue. Add in some pretty little
center circle. Because this is the bud and
it's looking straight up, I don't need to put in
the blue onto that one. Next to this four petal flower, I'm going to be making
the little daisies. Let's take a look at
what that looks like. I think maybe I will do the
reverse and add a purple top. So the centers will be purple. Maybe I'll put a round one here. Very, very jagged. This one is just going
to be looking down. I'm sorry. This one will
be it's looking straight up and this one will be
looking straight towards you. Using the blue. I am just going to make
some little petals. Even if I touch that
purple, that's okay. It's going to bleed down
in here. That's fine. I don't mind that
at all. I actually adds a really nice look to it. Really fun because I'm using these bright colors that are not really
traditional for flowers, but it's really a fun way of
adding in some extra color. Then we're going to
make a little daisy. Again, we're not
going to draw it out. We're not gonna get a long tip. We're gonna be picking
up our paintbrush fairly quickly so that we don't
get a long tip at the end, like we would if we
were making leaves. But fairly close together. I'll turn my paper. All, go. Now, we
use a little green. I'll bring this flower down. Stem. Maybe this one is
going to come across, skip over and draw all the
way down and join in again. Make it a little thicker
down here at the bottom, little thicker where it joins. And then pull off a long stem. A long leaf. Long leaf. That's
all we need for that one. Now you have finished your
two different flowers for the class project. I'm hoping that you take a
photo of this and upload it to the class so that
we can all celebrate you. We're very excited to
see what you chose. What colors did you
choose to make? What composition did you choose? Did you put more than two
of each? Did you do three? What was your decision
as an artist? I cannot wait to see that. Please take a photo
and upload it and make sure that you put
a review in for me as well so that I know
how I can improve or if there's something that you would
appreciate learning. Join me in the next and
last video for this class where we talk about
what we're going to learn in Part three, I can't wait to tell
you all about that. Because as a beginner
watercolor artist, there are so many different
things that you can learn and I can't wait to show
you what you're going to be learning
in the next class. Join me in the video
and I'm going to tell you all about that as
a little sneak peek.
8. Finishing Touches – Signing, Framing, and What’s Next - Follow Me: Let's take a look
at everything that you've learned in
this class so far. I know that you were struggling
with the idea of just putting paint to paper and
look at how far you've come. You went ahead and just
put some blobs and some lines down and some dots and played around with that. That was just so relieving and refreshing for
you to be able to just put that paint down on the paper and not care
about what it looks like. And then you practice
different thicknesses of paint from something
that was very, very pale to something
that was darker. Hopefully, you also
made a couple of different fades where it started out darker and went
to being very, very thin, using
more and more water. This is something
that you can practice over and over and over again until you really get a handle on how much water and how
much paint to use. We then of course,
did our line work, which you then
discovered later was absolutely important because
once you learned this, you were able to do
all the other things for the rest of the class. We then practice different
leaves and even were able to put it together into a
beautiful leaf like this. I'm really hoping
that you practiced all these different styles
of leaves because you were going to find them
to be so important as you continue your
watercolor journey. There are so many different
flowers in the world, and it was just fun to
make two of them here. It's always a fun
way to practice different colors and
different color combinations when you add things
together that are not maybe necessarily something that you're going to find in nature. Go ahead and explore and find a different
color combination. It's really fun to just have
fun with different colors and to see what happens when you add four petals together. What would happen if
you put five petals or six petals instead of making
it a four leaf petal? There's so many
different ways that you can expand on that lesson. And then hopefully you
did the class project where we painted two different
flowers in one area here. Maybe you put them
onto different pages. Maybe you took them out of your notebook and you put them onto a real piece of paper that was
much higher quality paper, and you've discovered that that is actually so much fun to paint something that is something that you could
hang up on your wall. Did you make two flowers or
did you make four or five? How many of the different
stems did you have? Please take a photo
of it and upload it. I would love for you to give
this class a review as well. It would be so nice to see
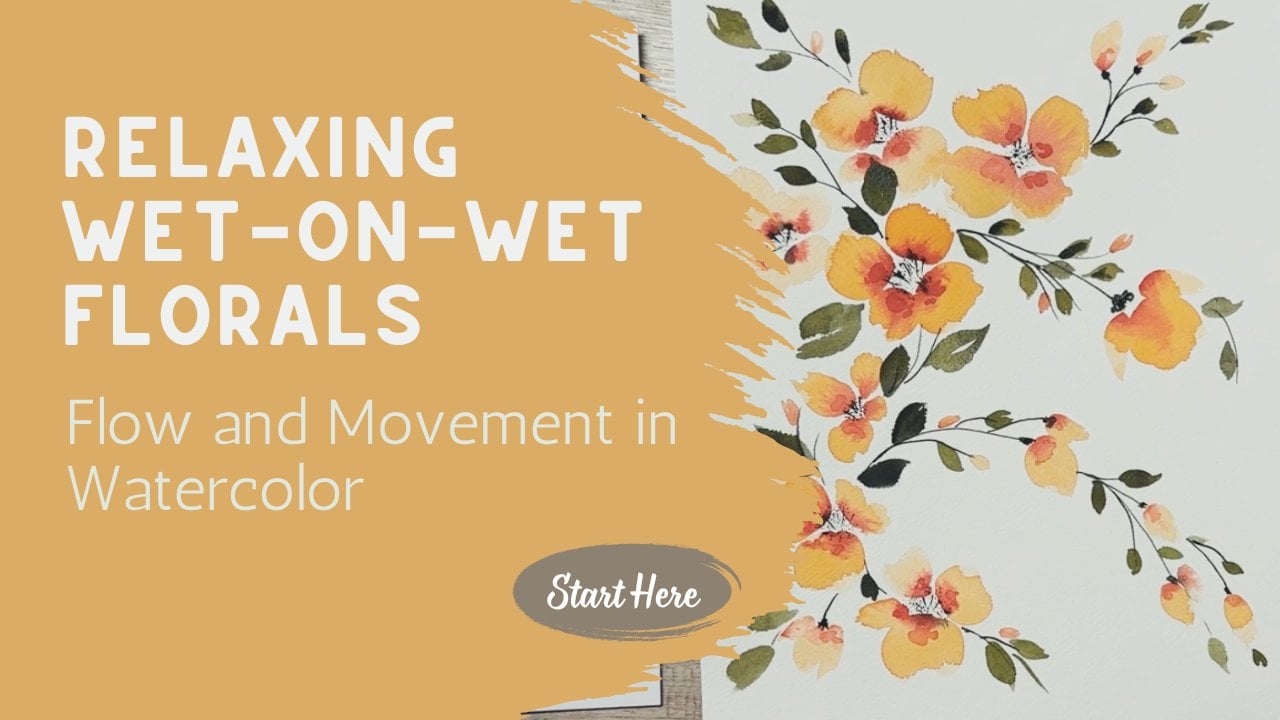
what you've been working on. For the next class, what we're going to be
doing is working on a wet-on-wet technique and some other watercolor techniques that maybe you need to practice, maybe you've never
even done before. Maybe you've never even
heard of wet-on-wet. Everything that we have
been doing is a wet on dry. The paper is dry, the paint was wet and we were putting wet paint on dry paper. Right here in this section, I did more of a wet-on-wet
technique here. In this area, I showed you just a little bit of a wet-on-wet
technique where we had wet paint in the center
and we were using wet paint on the little petals. And as I brought them out, it was able to
blend out through. And so this created a little bit of a wet-on-wet technique, even though it was wet
paint on dry paper. So I snuck that in
there to give you a little clue as to what we're going to be doing
in the next class. I can't wait for
you to join us for the Absolute
Beginners part three. Take a minute to photograph
your artwork, sign it. Make sure that your
artwork gets signed, publish it to the class so
that we can celebrate you. The last thing I
want to show you before we say goodbye
for this class is what a difference it makes when you mat
your new artwork. If I had done this
on better paper, I could have matted this. Here's a mat that I could use and I could choose
to put this wherever I wanted to and selected an area to mat and
may hang this up. Doesn't that make
such a big difference when you have matted your work? Here's a smaller mat. Look at that. Look
how fun that is. You can really start to
see what that would look like if you put
this into a frame. And then you could cut this out and you could be like, Well, that's the part that
I really want to show and cut it out and put
this inside of a frame. So take your time to
paint your stuff. And if there's an area
that you don't care for, you can always cut that out
and just be like, Well, this is the spot that I
want to actually frame. But make sure you
get that signed before you frame it so that everybody who comes
into your home can see it and can know
that you painted it. Congratulations on painting your first watercolor flowers, and I can't wait to see
them. Have a great day. See you in the next class.
 Brenda Jones, Watercolor Artist & Teacher