Transcripts
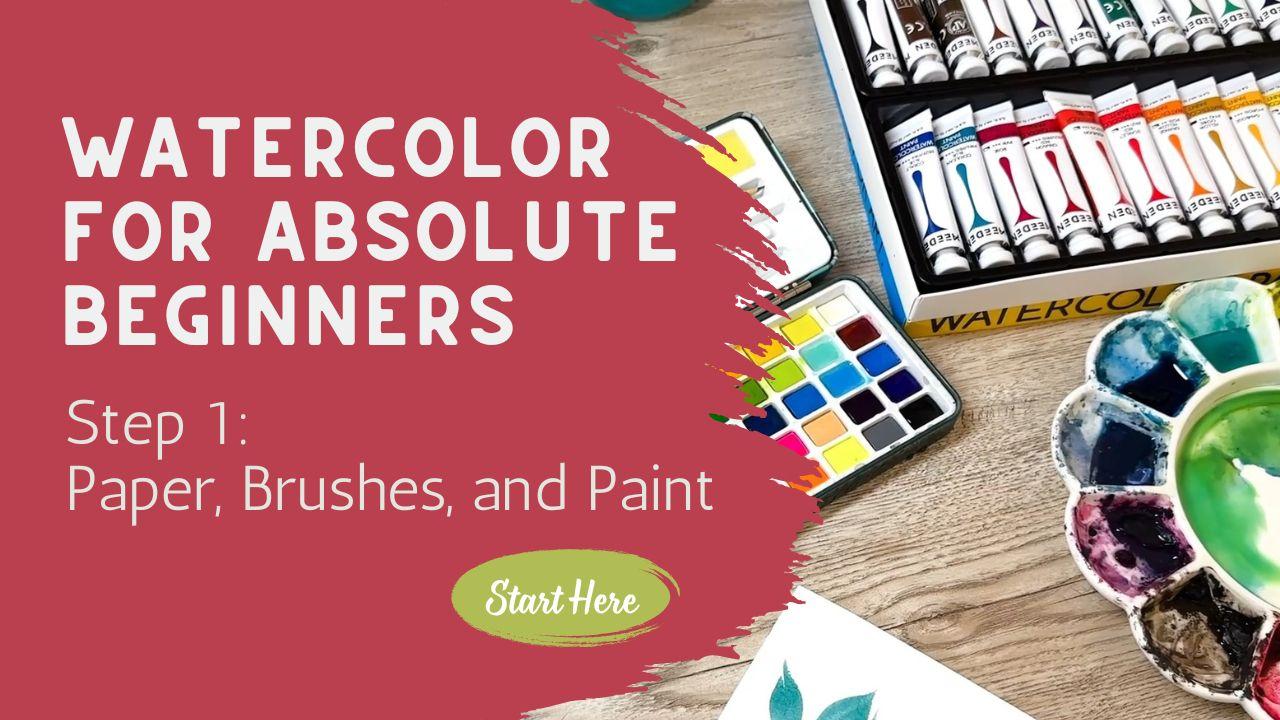
1. Welcome to Watercolor for Beginners: I'm so glad you're here. If you've ever felt overwhelmed trying to figure out which is the best watercolor
supplies to buy or what you really need to get
started, you're not alone. This class is here to take that pressure off.
Let's get started. This is a lot. Over time, I've collected more watercolor supplies
than I really need. If you've ever scrolled through an art tutorial or walked
into an art store, you might think you
need all of this too. But the truth is, you really
don't I was starting today, this is all I would use, one or two brushes, a small pan or tube set, a decent pad of
watercolor paper. That's it. You can absolutely begin with
whatever you already have. Even if it's a basic kid set, the art doesn't come
from the tools, it comes from within you. In the next few lessons, I'll walk you through each
supply one at a time, what to look for, what matters, and how to choose
what's right for you. I'll show options at
different price points and explain why I personally
love certain tools. But remember, you don't have to buy anything
to keep going. Use what you have, and I'll
meet you right where you are. When you're ready, join
me in the next lesson. We'll be starting
with watercolor paper and talk about why it can make such a
huge difference in your experience.
I'll see you there.
2. Finding the Right Paper: Start in with choosing paper. Choosing paper can be
a little overwhelming, but I think there's
a way that we can make this a little
simpler for you. There's three things regarding
paper that you want to pay attention to the weight, how thick it is, whether it's
cold press or hot press, which has to do with the
texture on the paper. Third is the material. What is it made out of? Is it made out of a wood pulp or is it made out of cotton? This paper right here is probably my personal
gold standard. This is the one that
I make sure that I always have in stock. I don't like when I run out
of this particular paper. Obviously, you see that I have other kinds of paper
here in stock, but this is the one that I
want to make sure I have. It is 140 pound, which is also the 300 GM. It can come in lighter weight, which is the 200, I
don't recommend this. This paper is much thinner and I don't care
to paint on that. The paper can come in
several different sizes, and the size doesn't
really matter. You choose what size
you prefer to paint on. The reason I like this is because it is the
weight that I prefer. It is cold press and I prefer cold press which has a little bit more of a rough texture to the paper surface and
it is 100% cotton. Do prefer 100% cotton, but we're going to
dive a little bit deeper into all of
those three things, but I thought you might
want to know right out the gate that this
is my favorite. Let's talk about each one. Let's talk about weight first. This one is the thinner paper, and let's take a little
bit of look at this. I did remove one for you
so that you could see it. See how flimsy it is. It has a nice texture,
but it's really thin. I don't care for
this paper as much as I do paper that
comes from here, which is a 300 GM or
140 pound weight. You can see how much firmer
this is. It's much stiffer. And thicker paper
compared to this, which is much more flimsy. The next is going to be texture. You can get a cold press
or a hot press paper. Cold Press is going to have this texture on it.
I see that in here. When I change the direction of the light, you can
probably catch it. It has a little scratchiness. It's a little rough, has
just a nice little texture. What's really great about
that is as you're painting, the paint kind of settles in different little
grooves and it really helps the paint settle and smooth out and leave
some nice textures. I prefer a cold press
over a hot less. Take a look at what
cold press is. Here is cold press from the
same company that I like, but it is a satin finish. This is a doesn't have
very much texture at all. It's very smooth to the touch. You can see that there's hardly
any texture there at all. What's nice about
this and it does have its place and some artists
will prefer a hot press. When I do loose
watercolor like this, more of an abstract. I want that texture to be able to help my flow of my paint, and I'm going to always
go with a cold press. It is also an easier paper
to use as a beginner. I would highly recommend
that you only buy cold press watercolor
paper, not your hot press. Third thing that's
important to recognize is paper comes as both wood pulp, just like your standard paper, or it can be made with cotton. It's 100% cotton is going to just work so
much better for you. I definitely recommend
the cotton 100% cotton, but I will recognize that 100% cotton has a
higher price point. When you're just
starting out, there's definitely a place to
be buying the pulp. These two here are
the ones that I might recommend if you're
buying standard pulp paper. And you're looking for
a lower price point, they're still cold press. So they will have
texture on them. Let me open this
up and you can see that has a nice texture on it. But it is a cold press, and so your paper is
not going to absorb the paint the same a
cotton paper would. The cotton paper really
lets you manipulate that paint and it stays really nice and movable for
a longer period of time. Where your wood Pulp is not going to allow
that to move as much. It's going to dry and
soak in much quicker, and it's going to be a little
bit harder to paint on. But it is a lower price point, and there's nothing wrong
with starting out with that. You're going to know
that it's 100% cotton because it's going to say it. It says 100% cotton. Here it says 100% pure cotton. And over here on these, it's going to say 100% cotton, where these just
don't address that. It doesn't say that
it's wood pulp, and it doesn't say
that it's 100% cotton, which means it is
not 100% cotton. When it is 100% cotton, it will mention it right there. Now, I personally, when
I was starting out, I did not have very many pieces of paper that was 100% cotton. And when I did have them, I kind of saved them as my special paper.
And that's fine. I don't have a problem with that because you are starting
and you're going to be doing a lot of practically
having you doing a lot of brush work and figuring out your ratio of water and paint. And so I'm going to need you to be using a lot of
different paper, and that's going to feel like it gets expensive really quickly. So I have another alternative for you that we want to discuss. It's this. This is a spiral
bound watercolor paper. And it is cold press, but it is pulp. It is the wood pulp. But what's really great
about this is it has a nice texture and it has
a ton of sheets in here, and you can practice
front and back on this. The backside is more
of a hot press, so it has a much
smoother finish, where the other side is rougher, like a cold throughout
my whole course, you're going to be
hearing me talk about these notebooks and how I'm expecting you to fill them up with
all your practice. While you are just starting and you're just trying to figure out how to hold a paint brush, how much paint to use, how much water to use, you do not need to be using your high quality
expensive paper. What you need to be using
is getting some of these. They come in a set of three. I definitely recommend you get that because you
are going to quickly be able to fill up this entire
notebook with your practice. The last thing I want to mention regarding paper is that paper can come where it
is loose papers, loose leaf like this
where each sheet can just get ripped out one at a time, and then you could
tape this down to your desk so it
doesn't move around. So it comes as loose
leaf paper like this, or it can come on a pad. The pad comes with glue, which glues down all the pages
on several of the sides. So let's take a
closer look at that. You are going to see
that it has glue here and here and here and here. But there are a ton of
different pages in here. You can see it right there,
but there's different ones. There's always one spot edge where you can slip
in a palette knife or if you have a bone knife or even just
a regular butter knife, slip that in there in between and work your
way around to remove it. Now, what I want
you to do is finish painting on this first.
You always paint. If you have a pad, the whole purpose is
to paint on it first, and then after it
is completely dry, you can remove it
by going around the edges and lifting
it off very carefully. One of the good
things about having a paper pad like this, a block is that as it is
drying, it doesn't warp. If you have used a lot of water on your paper
and as it dries, sometimes your paper will warp. I'll get a little twist to it. One of the great things
about working on a pad is as it dries, it has to dry back to this original position and then it's no longer going to be warping for you, which
is really great. It's another good reason to be picking up this style paper. As you go to shop,
I would highly recommend that you
find watercolor pad. This one is from FunT. There are other
brands out there. It's where you're
going to be able to practice and not have
such a concern about, am I wasting paper, B this is much less expensive. It has a perforation, so you can fold it and take it out if you
would like to take it out. You're going to have all of your study all in one
notebook so that you can keep this and even refer back to this in the future to
say, Where did I come from? What was I learning before? Let's practice out again. And then maybe pick up one pad of paper like
this that is 100% cotton, making sure you're getting
the 300 GM in the cold press. And then you're
going to be able to do your coursework on this, maybe more of your project that you're going
to want to frame. This is your better
paper because it's 100% cotton and
definitely a little bit more expensive
than buying all of this paper. I hope
that was helpful. Come back for the next lesson
when we talk about paint.
3. Understanding Paint Choices: Are so many watercolor
paint options out there, tubes, pans, student
grade, artist grade. It can be hard to
know what to choose, especially when you're
just starting out. In this lesson, we're going
to take a closer look at the differences and help you find what's going to
work best for you. Pan sets are the most
common place to start. They're tidy,
portable, easy to use. You activate the paints with water and they last a long time. To paints are softer
and more concentrated. They're a little messier, but they give you strong
quick color quickly. When you use to paints, you're going to be squeezing them right onto your palette, and they're going to be wet and immediately ready to be used. Unlike these palettes that
are going to be needing to be wet down and sprayed
before you can even begin. Not only can you get them
in tubes or in pans, but they come as student grade or expert or professional grade. Let's just address
that a little bit. Something like this, this
celllo watercolor paint set would be considered
a student grade. There's nothing wrong
with using this. In fact, I'm going to recommend
that if you were just beginning that you go ahead and get a palette that is
very similar to this, whether it's this company
or somebody else's. There's lots of
different companies out there that have
student grade pans. You can also get a pan
that is like this that is from a professional
watercolor company, which would be Windsor Newton. I definitely like
the Windsor Newton. They are great paints. They have a very high pigment, which means that they're
going to be very strong, very solid colors. Nothing wrong with this either. If you are looking to spend
a little bit more money, you get less paint colors
than your student grade. And it will still cost you more than buying
something like that. So it is up to you as to
what you are looking for. If I was you and
you're just starting, I would recommend that you
start with this student grade. It even has some fun colors
like some Iudscens and some metallic colors in here as well as these
brighter colors, which would make really
fun things for spray. If you're thinking about
getting into watercolor paint, and you would like to start with the tube paints, you again, can buy student grade or your professional
artist grade paints. This maiden set,
which is right here, this set is a complete set. You get in a box and it has
all of these standard colors, nice big bold colors, these are all going
to be your two paints and it comes in one kit. Great, reasonably priced. If you're looking to start out, you can pick up this med in set, and I do have that linked
in our description. These paints, which is
probably my favorite paint, this is a Daniel
Smith watercolor, and these are absolutely my favorites. These
are my go to. These are the ones
that I have a lot of because I use them a lot. Now, I have to tell you
the tubes last forever. Although one tube
might cost ten to $15, they do last for
a very long time. So they feel expensive and it's a big outpour of
money right upfront, but they do last for
a very long time. If you buy tube paint, what you are going
to be needing to do is have some
kind of a palette, something where you can pour and squeeze this paint
into your pale. It comes liquid in liquid form, and then you're going
to be squeezing just a little tiny bit into the palette and
it'll dry in there. And you'll be able to use
this over and over and over. It is always going to be less expensive than buying
individually pieced ones. But something like
this versus this, which are both student grade, these prices are going
to be similar in price. All you have at home
is something that your kids used or something that you drag
out of your closet, and this is what you have
in your house right now. There is nothing
wrong with using a elementary grade paint
that that's what you have. Go ahead and use this. Have fun with it. You do not need to buy any of
these other paints. Just enjoy what you have and use what you
have in your cause it it for you to start painting than for you
to have this perfect. We're talking about paint. I do want to show
you how to activate these paints because
they are different depending on if you are
buying them in a pan like this or getting
the tube paints. So let's take a minute
to practice with those and to show you exactly how you're
going to handle that. Personally, I like to
use a spray bottle. Any spray bottle,
you could also use a dropper if you had a dropper that you
could put water in. That would also work. If you
don't have either of those, you can absolutely just use a plain container of
water and your brush. You can get your paint
brush wet like this and then just drop water right
onto your paint. That works. There's nothing wrong
with doing it that way. Personally, I like to use a spray bottle because
it's much quicker, and I can just spray bottle and spray the whole palette
and get that all wet. Now, what I like to do
is after that is wet, I want to give that
about a minute to loosen up and to allow those paints to really get
a little bit more watery, softer, they'll be so
much easier to use. This palette, I
use all the time, and this palette has
the tube paints in it. I have squeezed some
of this paint into these palettes and now it is dry and so I want
to activate this. Again, I could use my paintbrush and I could
drop water bits in here, but that's just going to take a long time and I am
not that patient. So again, I will use my
spray bottle and I will spray down this palette
and activate that paint. Again, we're going to need
this to soak for a minute, maybe two until that is
activated and ready to go. While we're waiting
for this to activate, I do see that I'm missing
a color right here, I'm going to go ahead
and fill that in. I'm going to be putting
in some cobalt turquoise right here by the
Daniel Smith Company. You open these lids up and then the paint is right there and you can squeeze out. I'll see if I can get that
so as you can see it. Just a little tiny bit. As I said, this is
going to go a long way. You are going to use such a
little amount of this paint. Make sure that you
get your lids back on and that they're secure
so that they don't dry out. I'm going to whip my paint
brush and then I'm going to come over here to my pan. Now, these are student
grade quality, because I'm going to use
the turquoise over there, I'm going to go ahead
and use a turquoise that's over here as well. Maybe this is a little bit on the bluer side, but that's okay. So I'm going to really soak up my make sure that
is soaked in there, coming over to my paper, and I can make a little
leaf out of that paint. A little blue leaf.
Gonna add another one. And there is absolutely
nothing wrong with using paint that
comes out of a pan. Over on this side, I will pick up some of that turquoise that we
had just activated. Again, just using a little bit, but you can already tell how
much creamier. Look at that. See how creamy that
is and luscious because it is a higher quality
professional grade paint. You're just going to get a
little bit more creamy texture than your student grade. And layer another leaf here. Both make beautiful leaves. Both are beautiful colors. You're going to have
more standardized colors over here and maybe a little bit of specialized
colors over on this. If I had one thing
to recommend to you and you're brand new
and just starting out, go ahead and buy yourself
one of these kits, whether it's from Marcello
or somebody other company, where you have a nice
variety of colors, it'll just be really a
nice kit to get started in and you're going to feel like you have a lot of options there, especially when these kinds of paints are very expensive
to get started. Now, if you are already a painter and you've
done watercolor painting before and you know
that you're going to be getting into
watercolor painting, I would then go ahead and upgrade into the
higher quality paints. This set is also always
an option when you can buy an entire kit of 24
colors all in one set, and you can then have your
two paints all here together. What a fun way of doing that. When you're first starting
out, choosing the right paper is more important than choosing the right
paint, ironically. So when you're
first starting out, just go ahead and choose
something that you can afford and that
makes you happy. In our next lesson, we're going to be talking
about brushes. So many different brushes
that you can choose from.
4. Brushes of All Shapes and Sizes: So many brush shapes
available for watercolor, but you really don't need to
get them all to get started. Some of the most
versatile shapes is just a round brush like
one of these two red ones. We're going to dive
really deep into all the paintbrushes and
discover why you might want to have other paint
brushes or why one simple round paintbrush
can do them all. Using our watercolor pad,
spiral bound notebook, we're going to use this
to experiment with all the different
paintbrushes so that you can determine which
paintbrush is right for you. They're just a simple round Princeton Heritage paintbrush. I love them. This
one is a size eight, this smaller one is a size six. You can see that the
head, the bristles are just slightly
different in size. If you were going to buy one paintbrush and that is all you were
going to ever buy, I would ask that you
purchase this paintbrush. It is a Princeton Heritage
round brush size eight. A size six is also
nice because it is slightly smaller
and you could use that for detail work
or for line work. But if you could only buy one, by this one, Princeton
Heritage Round eight. My paint has already
been activated, I'm filling the bristles up with all of that
wonderful paint, and we're just going to again paint a little leaf because
that's what we're going to do to show the different outlines and
show the different shapes. This one brush can
paint over and over. It has lots and lots of
ability to hold the liquid and the pigment in so
that I can just keep on painting without
having to re dip in. The smaller one we'll do
the exact same thing. Fill that one up and it'll do the exact same thing and I
can make it the same size. There is hardly even
any difference in size between this
leaf and that leaf. You can really make them
any shape you want to, it doesn't matter that this
is a little bit smaller. But if you've seen a whole bunch of different styles of
paint brushes being advertised and you
would like to have an opportunity to
play with a lot of different paint brush styles, patet here, this paintbrush
set is the one I'm going to. It's called Transcon and it comes with all of
these paintbrush shapes, and we're going to
go through them so that you see what they are. This whole kit probably costs just a little bit more than buying one of these
paintbrushes. This is going to be your
high quality paint brush. This is a student grade
style paintbrush, but you get all of these
different ones to play with and actually I like these a lot, and if I don't reach for these, this is my second set
that I reach for. I like these a lot and I have no problem
with using these. I would actually
recommend that if you're going to buy one thing
for paintbrushes, go ahead and buy
this transcend set. It has a lot of
really great brushes. Let's take a closer
look at them. It has flat brushes,
several different sizes. I think it has these three
different sized flat brushes. What you can do with these,
I'll start one here. What you can do with a flat
brush is you can make a wash. You can get a lot of
paint down all at once. You could use it to wet down your paper and then
drop in paint. A flat brush is really fun for painting with,
but not necessary. You could do the same
thing with a round eight. It also has a cat's tongue, which is a very different shape. See how it has a
shape with a point. And when you get that one
wet and you paint with it, it creates some
really unique shapes and you could make
little fun flowers or leaves out of that. It has a dagger brush. This is a nice
dagger brush and you can see how it is
shaped like a knife. Really nice and soft and floppy, especially once it is wet. On that one, let's see if we can get a lot of paint
in that brush. You're going to be able to draw a nice thin line using the tip. When you push it
down, you can make a really interesting
fun flower or leaf. More advanced a brush, but it's fun to have
that in the set. You're then left with a
bunch of round brushes. This brush is a size 16, a size 12, a size eight, and a size four and a zero. I'd be able to create a lot of different beautiful flowers
using a larger brush. I often gravitate to using a larger brush
just because I find that it holds a lot
of water and I get a better look for what I'm going for when I have a larger brush. I do want you to take note
that there is no standard. When you're talking
about paint brushes, this is a transcend size eight and this is a
Princeton size eight. You can see that the
bristles at the end, the Princeton is
larger than the trans. The transensize
eight is probably closer to a Princeton size six. Just because somebody is
an artist is teaching you and giving you a demonstration and tell you to
use a size eight, you should use whatever
size you have in stock at your home where you are painting because the differences
don't line up. There is no standard, it also doesn't make any
difference at all. You can make any flower, any leaf, any design
using any paint brush. There's no magic to
the specific size. The smallest two
that Transn has are for doing more line
work or detail work. So you would be able
to use this one, which is more of a line, which I might call
a liner brush, and you're going to be able
to make different squiggles and designs or leaves or a stem, or you could add in little dots for the inside of a flower. With this sail brush, you're going to be
able to use that to create other things within
the flower themselves. If you're somebody
who wants to have a whole lot of
paintbrush options, go for this transcend. It comes in several
different color handles. But if you are looking to
have one high quality, then I would recommend
this Princeton round. Um, size showed you a whole
bunch of other brushes, and you're like, but
what about those? Can we see more brushes? Absolutely. Let's
take a closer look. There are water brushes. You fill the ends with water. You can use these to paint. They are in a class
of their own. Not my favorite
style of painting. I know some people
just love that, so you can give those a try. There are mop brushes. These mop brushes are from grabby and they come
in a set of ten, having some very large
size brushes all the way down to something that is
much smaller like this one. A whole set. These little fun stippling
brushes are really interesting when you dab them with just a little
bit of pain on the end, maybe dab it off on your rag, and then you can add in this
little stippling effect and create little
interesting additions, maybe they're extra filler
flowers or something. Here's another liner
brush or I also call them a rigor brush
that you can use to create a line and sometimes it is really
helpful when you're trying to add in some little squiggles or lines in your brushes because it just creates
this nice flow. You can also use it to
outline your flowers. Brush care is simple
but very important. Always rinse your brush
thoroughly after use. Swirl it gently and clean water until the
water runs clear. Now, this water is
nice and dirty. If you're at the
end of your lesson and you're ready to clean up, always start with clean water in a new cup so that you can
really get them clean. Have a rag sitting nearby
that you can use to dab off, making sure that there's no more pigment left
inside of that. Never, ever lay your brush inside of a cup and
just let it sit there. What that does is
not only does it put pressure on your bristles when it is laying on the bottom, which will then bend this. I also is allowing
the glue that is behind here to soak up and
potentially loosen this. That is really
gets annoying when that gets loose and you
don't want that to happen. These brushes are
not inexpensive and you want to take really
good quality care of them. Just brush them off, rinse them like that, dab
them on the side. And they're ready to go, you
can lay them down to dry. If you put them
upright to dry, again, the water that's
in here can soak down into this glue
and loosen this up. It is best to just let this dry naturally laying on a rag. The next thing we're
going to look at are palettes and mixing surfaces
and what works best, how to keep it simple and how to create space that
supports your flow.
5. Choosing a Palette that is right for you: Ts. There are so many to choose from and
so many different options. In this lesson, we're
going to break it down and talk about all
the different styles, the ideas behind them, and what they're made
out of so that you can pick the kind that's going
to work best for you. As with everything, as we go
through this whole class, the concept is for you to
use what you have in hand or what you can
get your hands on easily and without having
to spend a lot of money. That might even
mean that you just use your dinner plate
or a salad plate, something that's flat, ceramic, and easy to clean. If this is all you have
and you don't feel like spending money on
any of these other ideas, this would work absolutely fine. Then we can get into some of these larger ones and this one. And there's the options
are so endless. All three of these are ceramic. They are made out of just a
fabulous ceramic material. They have a nice finishing. I am putting my tube
paints into that. I'm just squeezing
a little bit of each color that I want to use. And sometimes I
might even just use, maybe it's fall and I might have a fall palette and I
have one of these with all the golden amber colors
and browns and warm greens. And then for another one,
I might make it more Christmasy or for
florals or for. Another idea is these. These are very popular and
available in most locations. This one, what I
love about it is each well is a nice
size compared to this. This one is pretty much just big enough to store
your colors in it, and then you mix it out
here in the center. With this one, you
could actually really just dip right into this
after they're them down. I let them dry, and then right before I'm
ready to use them, I'll come in with
a spray bottle or a water dropper and I
will just spray these down and give them a minute to soften and to reactivate,
and then I can use them. I love this palette. This
is one of my favorites. I love the amount of different colors that
I can put in here. I often when I design
my color palette, I go towards the color wheel or at least I put
things together that I like I put all
my greens together, my blues together, my
reds and my yellows. That's an option. This is
probably one of my favorites. Then this big guy, now this is a big expense and you need a large
space to store it. This is not going to
be for everybody. But when you get really into watercolor and you know that this is something
that you love, you might want to
invest in this palette. This is one of my
absolute favorites. Again, you can see
that I have them color coordinated so the
colors go together. Sometimes even when I do
these and I lay them out, I decide, well,
which colors do I use most frequently and
I put those together. So you can break this
down however you want to, but then you have
this huge center where you can mix your colors. So this one is a
plastic palette, it comes with the
colors are here. This is from Windsor
Newton, and these are, you just your dry colors
ready to be activated. Then you could use
this as my palette. And then this one is metal. Sometimes you can get
these that have metal. Sometimes you can
find something like this that's in
plastic or in metal. Again, not my favorite
is not the way that I prefer to paint. You'd be able to
use metal if you wanted to as your palette, and you could use
either sides of this and mix your
colors right here. I want to show you
in detail why I prefer the ceramic over
a metal or a plastic. And it's not going to make any difference to your
final finished product. So this really comes down
to a texture that I prefer. If this is not important
to you and you happen to have a metal
palette or a plastic palette, and that's the one you love, there's no harm in using that. Your finished art piece is
not going to be any better or worse because you use plastic or metal
instead of ceramic. I just want to make sure
that that was clear. So here is let me
see if I can show you an example of what
I'm referring to here. So here I'm mixing that blue and pink together to make
this beautiful purple. And do you see how
it is pulling? Do you see how that
just it just groups together and separates
and pulls back together. And it also doesn't really
mix. You can still see. I'm not sure if you can
see that on camera, but you can see how that
blue just kind of floats around inside of
that and doesn't really want to mix as nicely. So let's move on and look at
that in a plastic container. So when you work with
a plastic palette, I don't really have a great
plastic palette to show you because it's actually the one that I like
the very least. I think I've gotten
rid of any of them. But here's a plastic palette. Do you see how it
just really separates and acts kind of in a weird way, almost like oil, where
it just pools and separates that just bothers me. And I don't care for that. So if that's not going
to bother you and you have a plastic one
that you really like, that's fine. Go
ahead and use it. Like I said, that's not going to affect anything of
your finished product. It's just something that
kind of grates on my nerves. So I don't really particularly care for the plastic palettes. So when you're working with a porcelain or ceramic palette and you have wet this down and, um the paint has
become very creamy. Look at how nice and
smooth that is inside. Almost like it gives
that creamy effect because it's on a porcelain. When you are using it
inside of your palette, it creates it feels different. I flows differently, and it has a really nice texture when you have it
inside of a palette. Um, and then because you have this nice big wide space
in the middle here, you can then come in and maybe add a little
orange to that and really change up the color and you can mix your own colors. But just look at how
beautiful and creamy that is because
it is on ceramic. So we'll do another one here. We're going to activate that
by dripping in some water. And now that is nice and creamy. Then when you bring it out here, you see how that really feels good and looks
nice as you're using it. That's going to also blend really nicely
because it's on ceramic. Now this big guy, the big boy. He is my absolute favorite
and for good reason, it holds a lot of
different colors. This is on the expensive side. It does cost more than
these other ones. So I'm not recommending that
you start out with this. This was something
that I asked for for Christmas after I
had been painting for a year and I
realized that this was going to be a hobby that
I wanted to invest in. But I can come and
I can just add all my colors in here and I can have a green spot over here, and then I can be working on my yellows and golden
colors over here. And then over on this section, I can be adding in my pinks and creating a custom color
over here for my pink. Then over here, I can be
putting a spot where I'm like, Oh, this blue is really pretty, but that's maybe a
little too bold, so then I want to
tone it down a little bit and maybe add just a
little bit of purple to it. You might be saying
to me, but, Brenda, I'm not going to be using these kind paints that
are in the tubes. Maybe I don't need this
kind of a palette because this is the palette
that I would be squeezing the paint right in here and then letting it dry. Same with this one,
maybe you're saying, but I don't plan on
using these two paints. I am just going to be wanting to use a palette
similar to this, where it comes with all
the different colors, and this is going to be a
good enough palette for me. You are absolutely correct. You can use this and
you can move forward confidently that what you have is going to be
working good enough. You might want to get out a plate so that you
have a larger surface. Maybe even it's a platter that you might serve turkey
on or something, so that you have a nice big area because even if this
is what you're using, you're going to spray this down and get this nice and wet. Clean up some of this so
that we have a spot to work. Let's pretend this is your
palette that you have. Maybe it's a turkey platter
or something that's really nice and big that you're going to be able to
mix your colors. But then you have
something like this palate or a cheaper palette like this one that I
showed you earlier. And these are the kinds of palettes that are going to
have your paints in them, and you would like to be
able to mix these colors. If you had a big
ceramic platter, you can do the same thing. You can take some
red and put it out here and then maybe grab a little bit of
this blue and add it, and then you can custom
color and custom make your colors right
on your platter. So this is going
to work for you, even if you have this
and you could do the exact same thing over
here by putting some blue, some red here, see
how that works. See how different that is. I'm going to add in
some of this blue. And I'm coming to
the same color. But do you see that
difference of how creamy this is and how it stays nice
and flat on your palette? And here it just pulls. You see how that is different? So that is why I don't
care for the metal and the plastic because
I want it to look like this when I'm
painting, not like this. I hope that makes sense, and I hope that I've
been able to help you to see the difference. So go ahead and buy these. These are perfectly good to use, and then just get a palette that is ceramic or
porcelain that you can mix these colors out on another plate so
that you can custom mix your colors to be exactly what it is that
you're looking for. And if you're anything like me, there's never enough palettes. You can never have too many. This is just a fraction of the different
palettes that I have. I have palettes for travel and I have palettes
at our mountain house, and I have palettes that are in drawers because for some reason, I just can't seem to
get enough of them. My very first
palette that I ever started with was this.
It came in a set. I think maybe there was two
or three different ones and I thought this
was just going to be the perfect thing
because I could put my different colors
here and then I could use these
wells for mixing. This worked really well
for a really long time. The other nice thing is
if I flipped it over, I had a nice flat well right here where I could do
the mixing on this side. This would be another idea is to look for
something like that. There are so many choices and I don't want to
confuse you with it because basically it comes down to is how much
space do you have? Do you have space for
this or this one? Or do you have space for
one of these bigger ones? Or is this all the space you have and all the things that
you want to be purchasing because you just want to
have a little plastic one or a little metal
container that has your colors here and
your mixing is there, that will work perfectly fine, you are going to
be successful with this just as much as
you would with this.
6. Extras That Make Painting More Fun: Last lesson regarding
supplies is just my catch all of the things that you
certainly do not need. Some of these things you might have laying around your house, but these would be things
that if you were looking to purchase a little bit extra or to make it a
little extra fun, you could pick up some
of these things as well. One of the things
you're definitely going to want to have is either some paper towels or I use just a little
stack of old rags. What you're going to
be using that for is when you are using
your paintbrush and you have too much water
on your paintbrush or you're afraid that that
paint is going to drip off, you can just dab it off onto
a rag or onto a paper towel. So these are really handy to
have paper towels or rags. You're going to want to have two different containers with water. One is going to be
considered your dirty water, and the other one is
your clean water so that when your dirty water starts to get a
little too dirty, you can always rinse off
in your clean water. So I use just mason jars. There are things that you
can purchase for that. I've always found water in
mason jars to work out fine. When you are going to
activate your paints, whether it's in a
pallet or in a pan, you are going to
need some water, and I find one of three
ways to work best. I prefer the spray bottle. The spray bottle like
this works really well. It's a continuous spray, so my hand doesn't get tired. I recommend that. You
could also find a dropper. You could put a
whole dropper full and then drip some water
right onto your pan. The other option is to use
just your paint brush, and you can dip your
paintbrush into some water and activate the
paint with your paint brush. Even if you don't
have a spray bottle or a dropper, that's fine. You can still activate these
by just dripping taking your paint brush into the water and dripping it right
onto the paint, that will absolutely work. It's just that a spray bottle
is much quicker and easier. But while you're
getting started, use what you have on hand. Some other things
that you may want to have are some reading glasses. If you're like me, I definitely need to have reading glasses. I like to have a ruler that if I want to make sure that I am painting within a five by seven, I can use my ruler to
decide what my size is. Once I'm deciding
what my size is, I like to have a pencil. You can use a mechanical pencil or just a regular
number two pencil, something that you can use and draw really, really lightly. It's also a good idea to
have an eraser so that you can lighten up your lines if
you've made them too dark. While watercolor is ideal
if it dries on its own, you can also use a heat gun. This heating tool, you could
also use a hair dryer. Then if you don't want
to purchase this, start with a hair dryer. But a heat tool or a
heat gun is going to speed up the process of waiting
for your layers to dry. If sometimes when
you are painting, it is ideal if you just let it dry naturally
without forcing it. Then there are other times where it will not make any
difference at all, and you can experiment with when it does matter
and when it doesn't. I prefer to have a heat gun. I always use one when the painting deserves it and it is not going
to interfere. I like to have some tape. I like to have masking tape or painter's tape or washi tape, anything that is going
to have a low residue, something that's not
going to be overly sticky so that I can lay this down on my paper and I
could mark out, if I was going with
that five by seven, I can mark out what is a five by seven and
stay within there. Or if I want to have a border, I can keep my masking
tape on there or my artist's tape so that I stay within and I can have a
nice crisp, clean border. That is always something
that is good to have. I love to have a micron pen. The Micron pens, they usually come in a
set similar to this. They have all
different sized tips. So it goes from a very, very, very tiny tip to a great big tip and possibly even a brush tip. But these tips are so tiny, and you can use these for adding extra details or for
signing your artwork. So I love a micron to pen. They come from
multiple different companies that you can find. There are also gelpens
and acrylic markers. If you're looking to add
a little extra detail or highlight or maybe
the eye of an animal, you can use these gel
pens that are white. You can add a little extra from that same with these
acrylic markers. They come in different colors. Sometimes they even come
with a metallic colors, which is really fun
for adding something. This is called it's
like a white paint, and this is a really
nice additive. It's dry. You have to activate
it again with your water. But that is a really
great way to add white because watercolor
doesn't really come in white. And so this is something
that's actually a really fun thing to play
with, certainly not necessary. And then, of course, I like to have a couple different
books, you know, something that is
going to give me some ideas and I can
learn from a book. Of course, I want
you to follow me on Skillshare and learn
what I'm teaching you. But sometimes it is also
nice to have a book. This book is really
fun because you get to actually practice
right inside of here. So this was started out
as a little line drawing, and then I got a chance to follow the
instructions and paint, paint along and see how I did. So this is a fun
way of learning. And so books are often
something that I try to pick up when I get
a chance or I have a little extra cash for myself. So pretty much this
is the extras. Of course, there's other things
that you could add to it, but let's stop it here and
say that these things, some of these things
are important, like paper towels and water containers and a way
to wet down your paints. But then there are other things like the pens and the books that you don't need to have those things, but they are fun. And if you're looking to advance your watercolor or to bring in a little
bit more excitement, you can always add something
like this into it.
7. Final Thoughts and Your Next Step - Follow Me on Skillshare: You're feeling more
confident about your watercolor supplies
after finishing this class. You now understand each
tool and how it works, how to make smart choices,
and most importantly, that you don't need every single item just to get started. Remember to download and print your supply companion guide
from the resource section. Fill it in and go through
your supplies at home. See what you already have
tucked away in a drawer or craft box before
you buy anything new. Then add to your list only the
items that you truly need. You can find all of my favorite
watercolor products and beginner friendly
supplies through the ink tree in my
Skillshare bio, including my curated list
from my Amazon storefront. Gathered the materials I
personally use and love, so you can explore
them easily if you're ready to invest
in a few new pieces. But there's something I
really want you to remember. No brush, paper, or fancy pen
will ever replace practice. The more you paint,
the better you'll get. Every brushstroke,
every experiment, and even every little mistake is helping you
grow as an artist. Start where you are, use what you have,
enjoy the process. When you're ready to
join me in step two of the watercolor for
Absolute beginner series, be diving into the paint and water control and learn how to create beautiful leaf shapes. This next class will help you bring all your new
supplies to life and start building that foundation for everything you'll
paint moving forward. Thank you for spending this
time with me painting. I'm Brenda Jones and I can't wait to see you in
the next class. Until then, keep painting, keep practicing, and keep finding joy in every
drop of color.
 Brenda Jones, Watercolor Artist & Teacher