Transcripts
1. Introduction: I'm Darren from
watercolor mental and welcome to watercolor
essentials, turn and values made simple, do you want to have
some paintings have that three-dimensional feel and depth that a photograph has. Sometimes through painting, you can feel your right
there in the moment. Getting the right tones
or valleys will prevent you from creating flat
and dow paintings. In this class, I'll help you understand how to create depth and ambiance to the use
of light and dark colors. Tone or value is the
essential component in any form of drawing and painting that
includes watercolors. It allows the expression of
detail, time, and place. For example, a night
scene will have many dark tones contrast
that with light ones. Whilst the biasing will
mainly have lot of tones contrasted with
a few darker ones. In this class, you learn the essentials of
tone and how to apply simple principles
and techniques to sketch and paint 10
different watercolor. Since this class is aimed towards beginners
with 10 demonstrations, which I'll help guide you
through step-by-step. There are scans, drawing, and tracing templates
included as well for each demonstration to help you transfer your drawing
over quickly. Easily. You can follow along to
my real-time drawing and narration videos for all
of these demonstrations. In this class, I explained every technique I use
while I'm painting, such as using watercolors to
paint petals on a flower, or to create a Docker
contrasting background. I'll also discuss color
choices and the strength and specific mix of pigment I'm using to help you
get the right tones. If you have a pencil, some watercolor paints and paper, then you're ready to go. So join me in this class. Let's create some paintings
that you can be proud of.
2. Materials Required: So I wanted to talk a
bit about materials, what you're going to be
needing for this class. So first you're going to
need something to draw with. And I'd recommend a mechanical
pencil because it's just more convenient way
around everywhere these days. And basically anything
that's 0.5 lead and above, just sketch in your landscape before you get
into the painting. Now, I have some other materials here which I'll go
through and it's going to help you to understand is all just in case you're
wondering what I'm using. And if you want to get
similar results as well, what are the materials
you should get? But again, if you have any
watercolor materials at home, it doesn't have to be the best materials and the
practices certainly more important and you can paint on pretty
much any paper. It's just going to be
a lot better if you do have some proper
watercolor paper. So this stuff here
is 100% cotton. It's also cold press, which means that it has a
slight texture to the paper. Okay, So you can actually feel the texture is little indents
in there and it really helps allow some of the color to spread and sort
of mix a lot more evenly. I do find with hot press paper, that area's pull little bit, you do get just some
inconsistent drying, which is actually quite nice to look at depending on whether
you like that style or not. But it just makes
it a lot easier. We do have some
cold press papers and kind of textured paper. So that's what I use here, paint directly into
my sketchbook here, in terms of the
paints that you need, I have so many paints
as you can see here, k, This is an overcoat. All you going to need is
basically a bit of yellows. If you've got your
primaries and a yellow, a bit of red, and a bit of blue. So these ones here
are basically Hansa, yellow, perylene read, and I've got a bit
of where is it Here? Ultra marine. So those are your
basics in there. And I do use a few
other colors as well. A bit of buff, titanium, a little bit of yellow ocher. What else do I use? Do I use a bit of orange here? And they're also love using
purples in the shadows, but you can mix some purple
with your blue and your red. So the primary is
your main ones. A lot of these colors and not so necessary when you sort
of get more into it, you'll find some colors that you enjoy and come back
to more often. Also do love using cerulean blue and sort of greenish light, sort of blues as well. Even Tarkovsky colors too. So that's all I'll talk about in terms of paints
now, a little bit. In terms of brushes. Now for most of
these sings only use a really small
number of brushes. And the main ones
that keep in mind, basically you're going
to need a wash brush. So a larger brush, it can
be something like this, like a mop brush or
do have a really large on over here
on this side. Okay. But something that you can
get a large area of coloring. So basically if
you're doing a sky, doing all these buildings, getting in those warm colors, one of these larger brushes is going to really
save you a lot of time and create a
consistent sort of effect. Now the other two brushes here, just smaller round brushes. This is a number 8 to 10, I think, and this is
a number six. Okay. So they're just a little bit smaller
and they allow you to get in smaller details or
maybe some tree branches, maybe some windows, a
little bit of detail on cars and figures
and things like that. Okay. Here is a little
brush that I have. It's a fan brush. Okay. It's a specialty
sort of brush. Once you have these basic
larger brushes out of the way, the smallest specialty brushes, they allow you to get in some
strokes that would normally be impossible or very difficult to get in
using these brushes. So this one here allows me
to get in these nice sort of multiple strokes
that look kinda like grass, grass growing goal. Even use this to paint
bushes to try to get in some inconsistent edges in a funny sort of shapes going on. So I use that also have
smaller rigger brush. This is sometimes
good for getting individual bits and pieces
or things like tree trunk. This rigor is pretty good. I don't use flat
brushes too often, but with buildings, I'm
known to use them as well. And that helps when you're
painting something that has a squarish or a
rectangular shape or something that just
has a very hard edge, hard straight edge
like this one here you'll find that flat brushes can really get them in
quite quickly and easily. Now the risk with that
also is that you can, buildings can look
a bit too stiff, a little bit too perfect. So just be careful with that. Obviously, some level
of accuracy is quite important to identify
the scene, that context. But you don't want
to overly identify. Think sometimes it's best to leave a bit for the
viewer's imagination, for them to put in a bit of their own interpretation
of blood. They're impersonal
interpretation into the scene. So those are essentially the
main materials that I have. I do have a hairdryer. The hairdryer just helps to dry off the scene
between washes, that does help as well. But if you have all
these materials, That's all you need.
3. Introduction to Tone: Before we get started,
I wanted to talk a little bit about tone. So specifically, why
is turn important? Now, when you look
at a painting, you'll notice that there's
a lot of different ranges. So light to dark, There's all kinds of different and textures
and what have you. But the main thing is
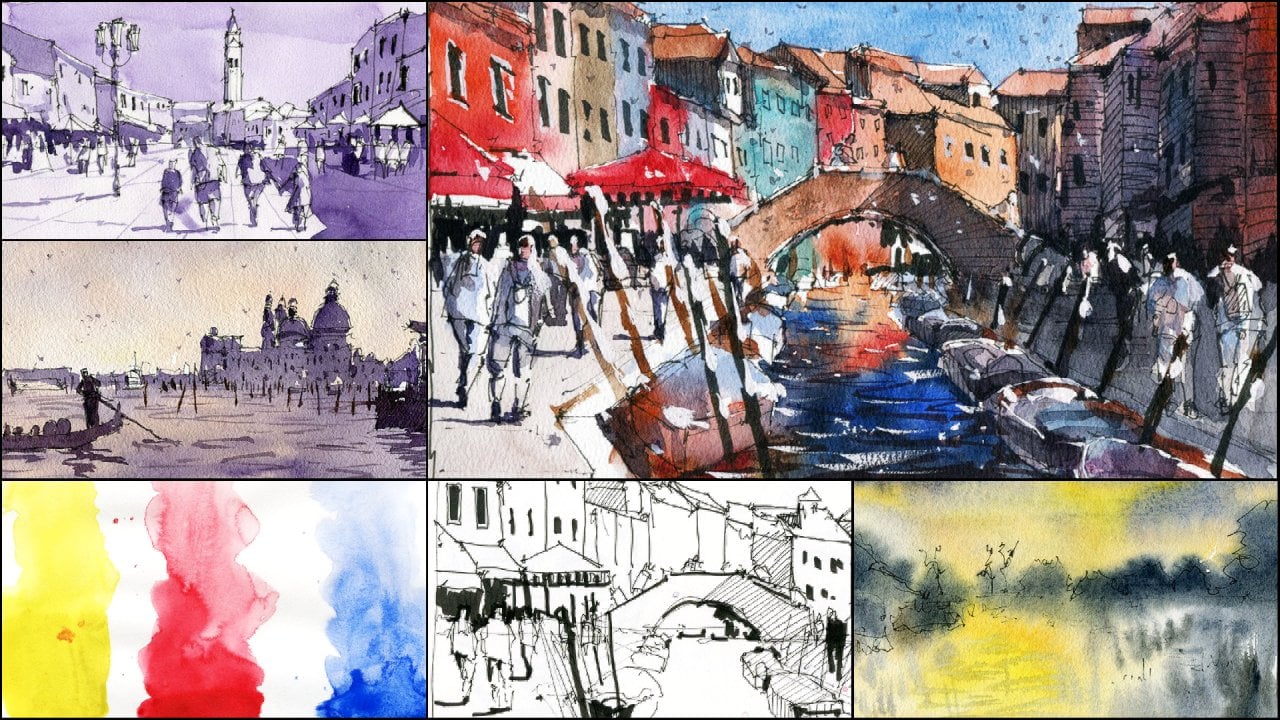
that you have areas of light and dark. And here's a few examples of some scenes that I've
done in the past. And you can see just some very, very obvious contrast here. If, for example,
you've got the sort of dark area behind here and then the lotta area here
and then on the ground. So in order to create a sense
of depth in your painting, in an order to create a feeling of light
in your painting, you need to have all of
these tones present in the same painting and you have different
types of turns as well. I simplify them down
into three main types. So you've got your
lightest tone, so things like the yellow
here, maybe the blue. Okay, those are your
lightest tones, maybe a bit of the white here. Then you've got your midtones. So you've got things
like the shadow here, which aren't as dark as the shirt of this person or
this shadow here perhaps, or even the areas
underneath the roof here. But there's sort of
in the middle, okay. And then you've got
the full tones, which are basically
the darkest areas. But they can also
include the darkest of basically the darkest of any other tone that
you have on there. So when you talk
about a full tone, you can talk about
a red as well. That's a form tone red. But one thing you
have to know is that every single color has its
own maximum tonal range. So when you're using a
yellow, for example, you're never going to
get that yellow to be as dark as this gray color here, that black, even if you use
it straight from the tube. So it can be a little
bit confusing, but mainly just look at turn as all the light and the
dark sort of areas. Okay, So if you can break
everything down into light to dark, you'll be fine. Okay, so that's just a little
bit of an introduction. Another thing that makes turn really important
is detailing. Now, if we used the
same tone, for example, for everything's Every just used a gray and the same gray tone, the same mixture of gray
that's mixed from water. So 50 percent paint, if 50 percent water, we painted everything
that same color, It's going to look awfully, Darwin is going to
look awfully flat. So in order to get extra
detail and extra contrast, for example, with the shirt
off this person here, the shadow, really light sort of shadow here compared to the darker shadow here and here, you're going to have to vary
the amount of water that you mix in with your paint. And that's how you add detail. So, so tone is so important
for these reasons. I mean, creates depth, creates detailing the ability to detail all different types of
tones and, and variations. And also it creates a
sense of atmosphere. Now, in terms of atmosphere, what I'm talking about is, you know, areas that distant and we look at things
like air or perspective. That's another sort of a
name for tone as well. So I'll give you an example
here of a scene I did. And you can see here, if we look into the
background, the tone, generally speaking,
is pretty light except for maybe here there's
still about a midtone. But for most of the
terms in the bag, that pretty light and as
we move down to the front, they get a bit darker and
darker and darker yet, it's how you create a sense of depth in your painting
and a feeling of air and atmosphere of smoke and
missed that kind of thing. So there's a few things that I would demonstrate
for you now, I just thought I'll go through really quick
introduction because I think it's very important for you to understand why tone is so crucial
in a painting. And if you can choose
between color and turn, always focus on tone. Color, I think comes secondary. And as long as you've
got your primary colors, a good combination of
warm and cool colors. Toad is the most
important thing. People often ask what colors using for this area
and that area. It's not all that
important as much as how dark or how
light that color is. That's going to be basically deciding whether your painting
looks convincing or not.
4. Introduction to Color and Tone: So I'm going to move
on now and I'll do a few little demonstrations just to give you an idea of what
I was talking about before, because I think this is
always the best way to learn. Okay, so I've got a blank
sheet of paper here and I'll talk to you a little bit about
colors and in particular, they relation to toe. Now, like I mentioned before, some colors are
going to be very, very light no matter how
heavy you sort of mix, how heavy that color is. So if you really use it
straight from the tube, just like this yellow here, That's about the dark
is that you can get even if you squeeze a
straight out from the tube. Okay. And then you can mix
a bit of water and dow lots in that
down bit by bit. And you can see that
decreasing ever so. And if you add even more
water on the side here, you can see it almost goes
completely transparent. Okay, bye. That's the largest tonal value that you can get
from this yellow. And that Here's the
darkest tonal value that you can get
from this yellow. Okay, so let's go ahead
and try another color. Hansa, yellow medium, okay, very common yellow
that is often used. But let's try
something like a blue. So over here, I'm going to mix up myself a very light blue. This is truly in blue. And cerulean is known to be
quite similar, I suppose, to be yellow in terms
of tonal variation, there's not a huge
amount of tones, but I think it's still bit as a larger value range
than the yellow. So if we go and this is just as thick as you can
get it like that. And then I might drop in a bit of water here and
move this across. And then still kinda
move it across here. And you can see there is a
certainly a larger range. Okay, that'll
values that you can get from this blue, from pretty, fairly dark over here to very, very, very lots on
that right-hand side. Everything in the middle here. Okay? But there's still not a huge amount of
tonal variation, but let's try another color. Let's try ultramarine blue. So I'm getting a very thick
mixture of ultramarine blue. And let's drop that in here, the top like that. Okay? And we can see already super dark as the darkest
out of all three. I'm using it very, very thickly. And then I'm just going to
drop in some water here. And you can see it start
to spread out a bit more, a bit more water
that's going in with some almost pure water over here and that
right-hand side. And then almost again
over on that side. So you can see the ultra marine certainly has the
highest tonal range. Add up all of these colors. Okay. You can get really
dark to very light. So often when I'm using dark colors or when I'm
putting in shadows, you know, any buildings that are backlit and what have you. I'm going to be using
colors that have a high tonal range because
that means I can get in a really dock building are very dark shadow if I needed
to or getting a very light. So the shadow as well, the probably the
dock is color that I have here is a neutral tint. Okay. Which is basically a gray. It can mix your primary colors together to make this gray. And you can drop that in. You can see that it's almost
almost completely black. Okay. And then we can add in some more color of water here
in that right-hand side. Okay. That's an even better
color if you're looking for something with a
high range of tone, something that's
capable of painting, something very, very
light and very, very Doc. Okay, so now that we
have an understanding of a color and tone, some of the inherent properties of some colors and
a tonal range. We're going to talk a little bit about understanding
light sources. So join me in the next video
and we'll go through that.
5. Tonal Exercises: In this video, we're
going to be doing a few exercises to help you understand
the basics of tone. Already gone through some of the theory and some
of the colors. And talking about value ranges depending on the
color that you're using. So normally looking at warmer colors or lighter
blues like Cyril the ends, but mainly warmer colors,
burnt sienna, red, yellows, generally
speaking, those colors have a more narrower tonal
range and they tend to be lighter as you go down
to the caller side of the color spectrum
with your blues and purples, even your greens. And of course you've
got the kind of brown and black colors as well. Tonal range becomes quite high. You can basically use those colors to paint
very light objects, not very dark objects. So we're going to
be going through, and I'm going to simplify this
one down a little bit and will basically do a bunch of
scenes and see how we go. So this one here
is just a circle. I've just drawn a quick circle and I'm going to go through, and I've got a bit
of violet here, very dark sort of
carbs or violet. And basically we're seeing that the light source just due
to the shadow I put in, we can see the light sources
coming in from the left. So what's going to happen
is that we're going to have darker tones running to
that right-hand side. So I'm going to go
in and just put in really almost the
darkest tones here. Okay? And just getting
in some small bit of the edge of that
circle with the brush. And of course, underneath, well, where we've got
the actual shadows. So let's just add in a really dark sort of shadow like that and lift
off near the end. Okay. Something like that. Right. And it's all pretty dark
on that right-hand side. But what we're gonna
do is now just add a bit of water so
you can see and now we're going lighter
again until we pretty much get the lightest
value on the left-hand side. You can even leave
part of it white, but I'm going to color it in just so as to keep
things consistent. Okay, so we're using
the same color. Okay? And we can see
already, you know, that that large value range with this cooler sort
of color and even drop in a bit more color
in the middle to try to get a middle
range in the center. But on that left-hand side, we have most of the
light colors. Okay? And basically this here is, in terms of light sources, you have to be very mindful
of that when you're implying light is where you're applying the
light is coming from. You're going have
to make sure all the objects that you paying. I mean, it could be a person walking down this other side. So for example, we'll
do these person here. And i'm, I think hey,
let's put in some of the dock has sort of times
on the right-hand side of the person because
we want to imply perhaps a lot coming in from
that left-hand side. Okay. Because simplifying
this of course, because I don't have and they'll putting
in any other colors. But as you can see,
the darker colors and that right-hand side. And you can even
leave it that way. Okay. And then maybe put in a shadow going over to that right there. And you can already see the
effect that that's providing. You seeing that sort
of lighter side of that figure in white. You can even go in a little bit lighter and just
blending some purple, some of the lightest sort of purples there as well so that it blends a bit
better like this. Okay. But it still looks, it's
still the same sort of deal, okay, here, again implying
that light source. So you always have to remember the opposite direction where
that light is coming from. It generally going to
have a darker shadow. I'm now sometimes you have a light source that's coming
from behind a figure. And when that happens, basically a lot of the figure or whatever the
shape is or object that you're drawing is going to be very consistent and
dark color, okay? Because it's basically, you're
having a lot of contrast. The light in the background is being blocked by this
figure running through, so it's going to appear a lot darker and then the
figures in the back. So we're going in with a
pretty dark turn here. And also some people like to put extra darkness in the center and also a bit of light
around the edges too. Okay, and the reason why you might want to put some
light around the edges. Sometimes, sometimes
you might get a kind of highlighted sort of look
in this region as well. Especially with the, you've
got sunlight or something hidden the shoulders
or that kind of thing. Okay, there. And notice that the
color of the shadow was almost the same darkness as
the body now depends as well, really depends on, on the Seine. Some people do like to. Have shadows that are really
dark compared to the body. I tend to try to make, find a balance between them so I don't wanna
make them too dark. I want them to be
roughly the same value as the actual figure. Okay? But again, it just depends
on the light source. Sometimes you might
have a light source and that's pretty weak. And so that shadow
is going to be yeah, Just it's not going to
be a very strong tone. Okay, do another practice, one on this figure here. So let's put it in
a bit of water. For that right-hand side, we're kind of imagining
some light coming in from that right-hand side of
that figure like that. And then getting some
darker colors here again. And that's going to look little bit like the light is coming from that right-hand side
and see over this one, It's actually mixed
in a fair bit. You can always do something like this
where you're lifting out a bit of paints as well. And that's going to help
increase that sense of light. And that side, you've
still got a lot of darkness on that
right-hand side. Again, you can go
in and dropping some more paint if
you if you wish. Okay. But that's sort of
sort of thing as well. Basically implying
a bit of light coming from behind that figure. And of course the shadow cast to the left of that
figure as well. Okay? And I'll go through a
couple of exercises here. That's basically you're going
to show you how to adjust tone and get different
tonal variations using wedding wet and wet
on dry techniques. We'll do the wet on
wet technique first. But what I'll actually
do is actually paint this one at the same time. So hopefully while I'm
done with this one, this one will have
already dried. So first things first, I'm gonna just getting
a really light wash of a warm color and I've got
a bit of yellow here. So putting a little yellow on this side, I have some orange, a little bit of this connected
to input orange as well. So putting some of these over here and that
left-hand side, and it's getting some over this right-hand side of
putting a thinner layer. So hopefully this does dry. Does dry a bit faster than
than that one on the left. Case, I just mix that around. Too much water in there. Hopefully this
will dry off soon. Ok, we'll come back to
this in just a moment. Okay, but here on
that left-hand side, we obviously we want
to wait for these to sink in just a little
bit into the paper. And what that's gonna do is basically create a
nice Prime surface for us to put in some women wet. Okay, so you've got to
look at the paper from an angle and if it's looking, It's a bit of a
sheen to the paper. You know, that's good to go. Okay, so this is a pretty light tone that
we've got in here again, instead orange and there's
not all that dark. As much darkness is. You can get in with
that orange him if I use it straight from the tube. Now what I can do
is pick up a bit of purple and let's drop that in. And there you go. I mean, this could be a cloud, for example, coming
through the sky. And you notice also
within these Cloud, there's variations of tones. So this stuff out in the
corner, it's lighter, right? But over here it's
darker perhaps. And put a bit more
there like that. Okay? It's also works quite
well with abstracts. Do this sort of effect. Okay? Smaller ones below. So that allows you to get
in a darker tone on top of a lighter tone. Normally I use this with
cool and warm colors. I'll get the warm colors
in first and then the, the cool colors on top. Nice contradictions and
hopefully complimentary colors. Okay, so that's one way
that you can do it. Now the second way
is wet on dry. I'm going to actually
dry this off first. So you can see this
is pretty dry. And what we've done with
all these other sketches, this is all wet and wet. So you'll notice that
there is, you know, you can certainly
make out the light on that right-hand
side of that figure, a bit of the light in
the left hand side of that figure there. But because we're
painting wet into wet, those tonal variations will be gradual and they're
not going to be sharp, okay, So you're not gonna
get these edges like here. Now, what do you think's
going to happen when we go in with a bit
of purple here. Let's have a look. So it stays, it doesn't spread
because that paper is dry. But now you can
basically getting a little bit of a
tonal variation there, perhaps to indicate who knows some mountains or
something off in the distance. Yeah. I'm just trying to. Estimate, just guess something
that we can put in there. Okay, and look at that. The edges don't move, they stay very sharp and
when it dries it will dry with this same patents going to draw it a
little bit lata, which brings me to
the point of when you're painting in watercolors, everything that
you paint is going to draw it a little bit lata, so if you want to get
in a particular tone, so for example,
let's have a look. Maybe this color here. Okay, If you wanted to
draw this this doc, you're going to have
to add in a little bit extra paint to anticipate
for it to dry lighter. And it's not an exact
science that really depends on the color
that you're using. But generally
speaking, you want to add just a little bit
more, not too much. Okay. Perhaps perhaps that 10 percent less water into your mix and it should dry that
color that you put it on. And you can always layer
over the top as well. So it's not the end of the
world if you don't get it in the right tone to begin with. Now, we're doing
some little trees. And you can notice here that the term that I'm
using here is very, very dark compared
to everything else. And so what happens is that
it brings that object, that subject forwards
in the scene. Always remember
that a darker tone, or draw forwards that
particular object or subject. So in terms of a
scene like this, we're looking at
distant mountains. What you wanna do
is go in with a really strong purple
to begin with, because that's going
to bring it forwards. And especially if you
aren't these trees to stick out and look like the closer, it's super important to make sure that you get a lighter
tone in the background. And it could be some rocks
or something like that, that could be bushes
here on the ground. Okay. That couldn't be even
some other stuff here in the foreground. So other bits and
pieces here, okay? Generally speaking, and this is what you'd call atmospheric
perspective as well. Okay? And this is a phenomenon
that we observe in reality when we look out
at objects in the distance, often what will happen is that the objects will
increase in corners, the colors will cool down. You'll get lighter. And the edges also
will become slightly blurry due to the distortion
and due to our atmosphere. So we're going to basically try to imitate that effect through these little techniques
that I'm showing you. And they're not masterpieces, but they're just
exercises that will help you to apply this technique and be more mindful when
you're painting your scenes.
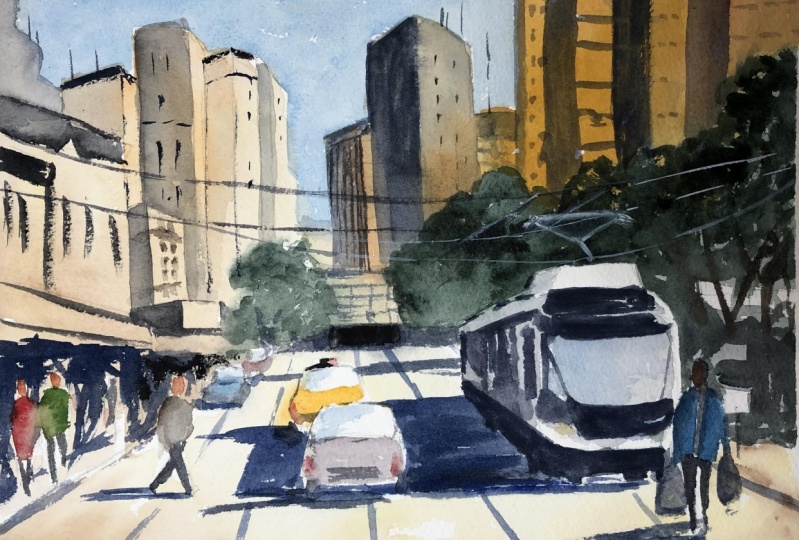
6. Simple Monotone Landscape: Interesting, say in a
very complicated scene. But nevertheless an
interesting scene that we can use to practice some values. And one of the things
that you notice is that the light source is not
a 100 percent, uh, parents. So we would kind of have to really focus in and see where that light source
is coming from him. If you notice that
booty on the far right, you see it's completely
illuminated. Okay. So you'll notice
also that there are shadows cast from the left to right from that large
middle building over to the back section of that highlighted
building on the right. So that implies the light
sources coming somewhere from the left side of the scene. Same thing goes with those
small little figures, the pedestrians and the
bottom left-hand corner of the photograph, the aloo dark in
some kind of shade, again suggesting that the, that the light source is
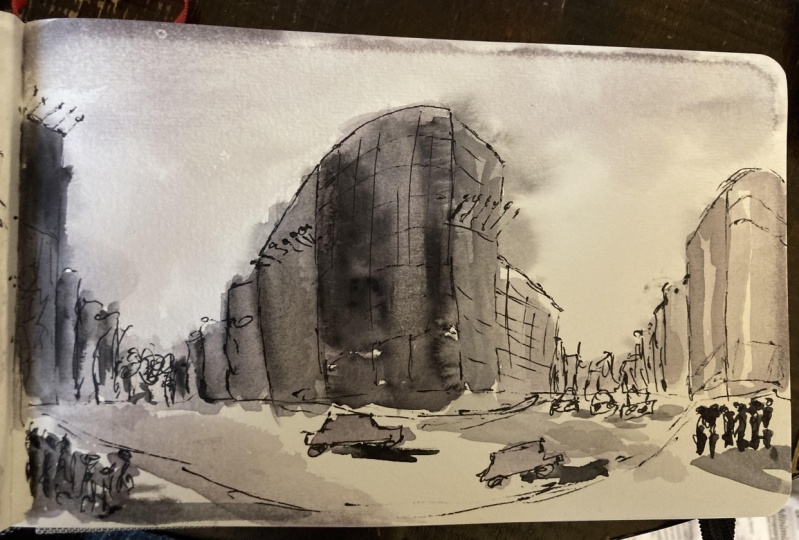
coming from the left. So we're going to have to suddenly exaggerate things here. Why porn exaggerate
out the tones? Now, firstly, we
are going to get a quick preliminary sketch in. One of the things I
want to do as well is I want to raise that horizon
line a little bit. The reason why is
because there's just so much detail in here
that I think that would be able to just get in a little bit more structure and just kind of
narrow into things, maybe some larger
figures by just raising that horizon
line a little bit. So I'm putting it in like that. Okay, and the next
easiest thing to do, of course, is the side building. So let's simplify that down. It's just one shape
that comes all the way down like this. Okay. Something like that. That building here on
the right-hand side, roughly the same height
as this one as well. That comes down and then
just goes off all the way to the distance somewhere and then again hits
the ground decay. So that's the gist of this
building here on the right. Again, it's not a 100
percent accurate, but we've got a basic
indication there. There's little signs really, this is just separated out into rectangles and squares and
all that kind of jazz. There's a large a tree here also running
it from the side. It's kinda hard to see, but there are some
figures you've noticed, just a whole bunch of them
kind of standing around it. Very small sort of figures. Way to cross the road
or what have you. I'm just drawing in a few
here over on that side. Okay. And probably the next
easiest thing to do is this building
right at the center. And you see that it starts roughly in the
middle of the page, so I can start
drawing a line up. Okay, and the building
is taller than all the others wrote about here. Then this Gideon,
that sort of section, It's an interesting
looking building. There has an edge on
that side too like that. And then it just comes straight down into the ground like that. Left-hand side kind of
comes out to be like this. And then of course comes
down as well like that. And then we're
going to put it in a few bits and pieces here. Like that. There's a bit of darkness here. Again, we can leave that for
the watercolors, lighter. But again, focusing on tone. If we really try to
simplify this down, you'll notice that the
really just a lot of dark colors running across
that area of the scene, even the right-hand side
of that building here, we can do little
hatching like that. Okay, so pretty simple
hatching kind of pattern. Let's go ahead and draw in a basic outline for some of these buildings here
in the background. And again, they don't
have to be perfect. Just a indication of what
you think might be there. I'm going to bring up these
other buildings here, connect them on to
that one like that. Again, it's no big deal. The detail in here, we're just trying to look at mainly just the tones running behind there with
a very light or dark. And we can really just simplify
all this down almost to just one and one time like that. Okay. Normally I wouldn't coloring
this much with the pen, but I just want to
highlight for you the exaggerated sort of shadow pattern that we are
working with now these cars, we've got to put
them in the sun. So that's one thing you can do. You can sort of cut
around the causing, leave a bit of light on those
ones as well as figures and people kind of walking towards the scene
here on that side. They're actually
pretty far away. But one naught, Let's just
put in a few more that are getting a bit
closer like that. Okay. Maybe another car perhaps
coming a bit closer. Like here. There. We might have a coffee
and we get this. It's like a cab or
something like that facing sideways and it's just
going through the same. It's not a supermarket
car by any means, but it is a little college is going through maybe a shadow
coming through like that. I also think perhaps a shadow patented more obvious shadow
pattern here would be good. Okay, so something like this. We've also got buildings and things over here
in the background, just putting some of
those details there. And then of course, this big
block of buildings here, we can just simplify that down. Because a large sort
of toll of building here runs through this. So other complexes running
through here as well. More bit of a screen or
something like that here. Okay, and then of course
next to this one, we now have the last sort of building here that connects on with these bigger building. Right in the center of the page. It's all just shapes. So just very simple
shapes essentially. Okay? And they kinda connect
dominant form, bit of darkness
behind here as well. Okay? Darkness underneath these
buildings and what have you. Okay. And here's the shadow pattern
coming across like these, these kind of imagined
shadow pattern that I've been drawing. So he just drawing in and
scribbling a few figures. What have you down
that side as well. Okay. And we can also
just tried to gain some little shutters
here for some of these buildings maybe just
caused across like that. Yeah. Okay. Maybe some
videos shadow pattern on this building
here to like that. Again, but it really, this
is simplest way to do it. Now let's go ahead, let's go ahead and adding
some colors and bring out the basic shadow
patterns here. Now, I'm going to be
using a round brush. This is number 10, round brush. And simplification. We're going to be doing
this only in one color. And the perfect color for these right now
is neutral tint. You can also use, You know what, I might actually use some
neutral tint plus some purple. So it'll be mostly kind of a purply because I
know this is common. Dopa was very as a very, very strong value range. So it can go from soup
adapt to very, very lot. So I think this is a
good choice actually. Getting bits and
pieces like that, leaving some of that
shine on the windows. I mean, even on the top here, this isn't really is
bits of the building. So to showing through
like that, they're okay. And then we've got this
darkness running behind there. Let's lighten up some of these but still keep
it fairly dark here. Okay. And the main thing is I just want to preserve if you look on the left-hand side of that
building, there be light. Okay. We salt in there
down a little bit with some water there. But really running
through the center here, you've got a bit of bit
more dark color, okay, maybe here, the base, here, the base for this
building as well. Maybe here. Okay? And we're going to create more shadow patterns
on this building here. Just really basic
shadow pattern. And notice that they're not, There's not really much, There's really not much, much color in here. Just a bit of okay, so go through and
we'll just put on some more color running
to create a shadow. Kind of imply that
this building is casting a shadow onto the
right-hand side as you can see. And we're going to be consistent
down the bottom as well. So dark and off here. Okay. Doc and off there and you're
going always feel just walking like that and that's going to be a
nice little shadow. Even the cars little shutter running towards that
right-hand side. This one here running across
the ground like that. Okay. They're always just keep varying the amount of
color in your mix. Okay. There's some legs here for these figures and notice
it's still pretty dark. I'm going a little
darker in the, in the foreground because these
objects are closer to us. Okay, you know the
figures and what have you and get through and we'll go through this
background as well. So you notice all the
stuff in the back here. I'm not done as dark as the the bits and pieces
that are getting closer. Okay, then we will go through, let's put on a bit of color
for this one like that. And this can be kind of, again, the shadows of this
building maybe cost on these Fielding here. But I do want to
leave a fair bit of light coming through. You can even put in some lights, some darkness and the right-hand
side of those buildings to imply that light
source, I'd be better. Okay, Let's have a look
for these buildings now. They're going to
be pretty much in darkness here because
the sun is just behind, so I'm going fairly dark. And also because they
are closer to us, which will make them APHAB, DACA, lot in off the ones
in the background as well. Again, just to help increase that sense of depth
in your painting. Often know I'm a lift off
paint if I feel like an air is dock to make sure
that I'm preserving, preserving a sense of
what they're okay. Now for the sky, I'm going to just use a very, very light wash of this purple. It's so, it's so light. In fact, I'm probably using
5% of that actual paint. Okay, now I want to get a bit of bleeding into this
region because the bottom and beats
already dried. But that's really how lot
you have to go there. The only other air, the painting which
would be lighter, I would say is the
ground just over here and cut around
this building. And notice cutting around this side and we've left
that white on there. It brings out the contrast
and that's on the building. So that really helps. We're going to be dot there and that's sky, but that's okay. We'll just bring this down. It's very, very light and often begin as make the mistake
of painting the sky. To dock. You have to you have to keep it
pretty light in the sky. What I like to do is also add in a little
bit more color in the top section of
the sky as well. It's a perspective technique because what happens is as you, as the recede further
into the distance, the sky, she gets lighter. So further down
the horizon line, it actually gets lighter,
marginally lighter. So by doing this,
you're creating depth. You can already see
that I don't think the kinda look like clouds. If you notice the
clouds that are closer to us and normally appear a bit, a bit darker, a bit
more detailed in the shapes, a more formed. Okay, so that's what
I'm trying to do here. There we go. Now, this is still a bit that standing out
and that's the ground. The ground is just
to kind of want. So I'm going to go in and
let's add in a little bit of this sky sort of color like
that, then I have to do this. You can, you can also
just leave it white, but it's, it's just a
personal choice that I have. I want to darken that down
a little bit like that. Okay? And here we have that. We have a very simple
sort of a sketch, okay? A tonal sketch. But it's really quite easily implies a bit of light coming
from that left-hand side, casting a shadow
towards the right. So really from here, it's just up to you
how much extra detail and things you kind of want
to you want to add in. Sometimes I do
like to emphasize, especially underneath the
shots, extra darkness. You find them little
bits of dark. Kia. Any way for me to create a little contrast to make
things more interesting is certainly always welcome as even trees and
things here as well. But we'll trees because
I'm only allowed to use one color here. Okay? But all these building here, you can see it just pretty
much just in a lot.
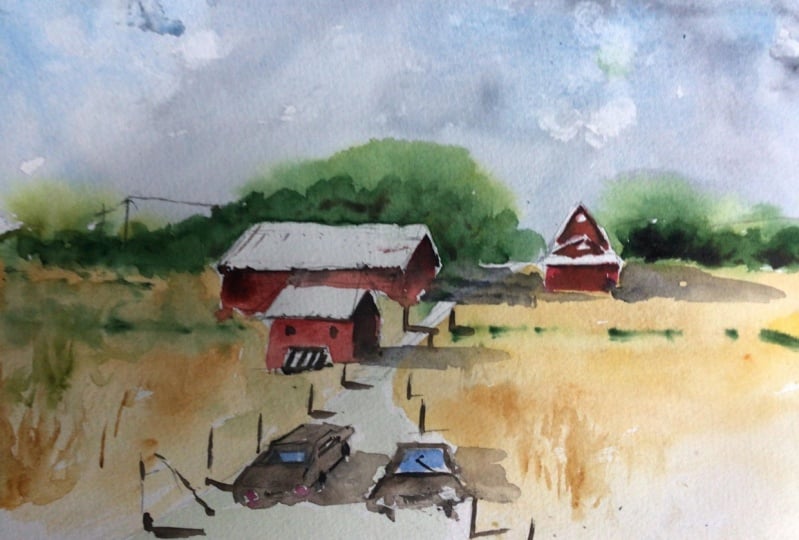
7. Simple Colours Tonal Landscape: This photograph here, it's an interesting photograph
because we've got quiet, strong contrasts and
two different tones. Essentially you've got all the light tones here have been on the lot area here for
the path or the roared going through to
the back and we've got the darkness running underneath the
buildings and just behind as well with
some of the trees, some of these polls as well, you notice that they have little bit of darkness
on the right-hand side. So this is great practice
for a tonal piece. And I'm going to go through how I do this in the painting. So firstly, we need to
get in the drawing. So let's go ahead and let's keep it's
pretty loose as well. I'm going to draw a line
about halfway through the page like this to
put in the horizon line. Now there's actually
a little bit more sky then there is land. So remember to just leave a
little bit more up the top. We'll do some interesting
wet in wet clouds, perhaps, maybe some wet and
dry areas as well down here. So let's, as we leave, we would have that the
watt and the paper, but tonally this area of the sky and the ground
and pretty much the same, the rooftops as well. Now, we'll go in and I think the easiest thing to do really is just to getting the path. Now we've got a bit of the pod coming in over the
side like that and all the way down to the back and
disappears behind there came and we sort
of comes forwards here. And then branches all the way. Branches all the way up
the front of the page. Comes down here. This one comes down and just goes forward
right about here. So a little bit right to
the center of the page. And we got it. We
have a bit of a path. I think what would be
nice as well as if I put perhaps a car and HEA
little bit further down, It's just I'm just estimating, estimating out and
middle concha. It's just a box. Just think of it like a
box sitting up there. Maybe we have a car also
coming forwards and this side, so putting it in another
one here, just like that. So we've got three cars
coming through. This car. I'm putting a little bit close down the front and
just want to have one that is closest to the
front of a scene like this, and we get a shadow
running towards that right-hand side as well, but just a little indication of that one and calm maybe
in front over there. Now you'll notice
that because we're on an inclined position where the hill basically you
had a hill at the back, the cars will appear just
below the horizon line. And as we get closer to the top, they will tend closer to the actual horizon
line over this. That's the way to imply
that we're kidding uphill. Now, time to get in house here. So I'm going to roughly
put it about here. Just go ahead and put
in like a kind of rectangular shape needs of
the road just like this. And then we'll go in and put in triangular roof here like this. Okay, I'm coming off that
edge and there we go. I've got a little house all hots or something like that around the
side of that road. When to make a little DACA
underneath those sections. And of course, we actually
have some fence posts and things just running across
down the road as well. So this is what I'm doing, just putting in a few
and try not to be too perfect with how
they look as well. It's better if we
keep it pretty loose. Okay. But remember to increase
the size of them as you move closer to the front
of the page like that. Now we've got a couple
more things to put in. Are you going to
house here to put up needs of the
edge of the road? It starts roughly here. Okay. There's a little section
of the roof top here. And that kind of just extends
beyond the horizon line. And then there's another looks to be as a secondary kind of house behind overlaps
and bit like that. Okay. So we do notice that
there's a bit of a shadow running towards that right-hand
side of the house. Along with these larger
shadows as well. This house here behind is going to be interesting
because it starts just about on the horizon line. It's not, it's just about on the Just 100 to look
underneath the roof. The air underneath the roof
starts on the horizon law, but you'll notice over
here it actually, and in it goes up again. So sort of sitting out of it, sitting on elevation and
part of it's sitting Loa but need to worry
too much about that. Go in and just putting
that sign there. Okay. That's the sod of
the house like that. And again, similar to
what we did for that one, this little triangular
section like that. Okay, and the edge of the house, here, it is a bond. Well, if some solar is
definitely in the house. Okay, And behind, of
course we go Some Trees, so little errors
to mock him out. Like that is some trees
back here as well. Okay. So we've identified
all the kind of light areas which are
basically the rooftops, the road B to these grasses, golden yellow we
looking dried grass and then the dark areas which are
underneath the buildings, the shadows mean
caused the right, of course, and some
of these trees. So let's go ahead and get
started with the painting. We'll be starting off with
a number 10 round brush. And it has a sharp points, makes it a lot
easier to work with. And let's go ahead. Let's do the scarf. Is it a Simulium strip
that in and you know, a little bit of neutral tint
perhaps as well in here, would love to have
some grays if I could mix up some
that would be nice. A bit of yellow and a bit
of red and a tiny bit of blue here creates a kind
of a grayish color like that. And we can drop some
of that in the sky. And the rest of it. Making kind of leave in, use the cerulean blue as well. To cut around some areas. We just want it to
be nice and light. Softness in the sky. And pretty much the most losses sections of the painting that
there is a Cloud I've just decided to put in
a lot of cloud at the edge. We can do the same here. We can just sort of get a
rough edge for that cloud and then perhaps another one
underneath here like that. And so it kinda leave
that to dry a little bit. And then I'll come back
to it in a moment. So back here, a
little bit of gray, bit more blue bit of
cerumen in here just to get rid of that
lots of paper off. And on the left side we've got a soda light blues in here, just like as nice. What's cerulean? And the sky. These fantastic. And dial it down a bit more, the base like that. Okay. That's looking pretty good. Let's pick up a bit of
this gray and see you. I'm just dropping some of
that into the clouds and some areas connected
on in places as well. Okay. We've got this broken sort of cloud like a fit which is nice or roughly That's all
around the same tone, except for the day, which is the lightest
of the whole scene. So I'm going to work my way down the page and I'll go
to beneath the sea Grant's one of my
favorite greens I've been using these days. And it separates out nicely into a so another blue and
gold and green color. So I'm going to
add that in here, the back like this, that bid like that. I'm going to actually
leave in the roof top, we'll just leave
it in that color, which is essentially just white. And I might drop in some a
little bit more color later, but exaggerate that
to also getting a little bit more darkness on this light on the roof
is I'm trying to say so. Some of these will go up
into the sky like that. There. If it's foreign that
an inner is too sharp, you can also soft and
down a bit like that. These areas, I can just drop in a few little indications for trees and stuff here
on the horizon line. There. You can always get it a
bit of mutual tint as well if you want to dock and off some of these trees more, I do find that the trees in this section on a quiet,
certainly quite dark. And I like to have
these granulation also. So I'm going to just drop in some more darker color and hope that my
granulate out a bit. Okay. Drop that in here, a little bit more
darkness on that age. Do notice there are some trees on that
left-hand side as well. So it's putting a bit over here. And the and it helps to yeah, I just drew out the edge
of this building as well. So it does make a difference. And again, let's
move down the page. I've got a bit of this
color called causal. Quinacridone, burnt orange and diluting that down to
like a really light mix. And the quinacridone
means at ease, just a really beautiful color
to use in lots of areas. Hi, granular sites nicely. And I do want to make some
of these Kronecker dine with a teeny bit of yellow ocher, yellow color like that. And we'll just want to
get in this kind of golden look to the ground. The ground, but basically the, you know, just, just basically
the crops and things here. Bits of grass. Okay. Say it's what I'm doing, a lot of cutting around. And some of this
green, as you can see, as you can see, it's actually moving down the page as well. But that's her OT and I'm
cutting around the road. We'll be cutting
around the road. Okay. Trumping. You will notice as well
in some areas that it is a little bit darker, say, and becomes more of a greenish color
hue to the left. And we'll just make some more of that orangey may still want it to be fairly light. Okay. Cut around that
building like that. Move this console. Orange color. Quinacridone, orange
cone you callosum, cut around the cars.
Bring that down. Here. You can already see that
green start to granulate out. Create some
interesting textures. That saves me some time painting and textures that you can't really paint in any
way even if you tried. So I'm bringing that all
the way down to the ground. Here. I'm also adding a
bit of these white. It's a Buff Titanium, essentially just into the
base here with the Kazaa. But I'll leave in a good
chunk of that road because we want it to be still pretty
a lot in that area. And what I can
start doing now is basically adding on some
weighting with beads. We know that we've
got a I don't know, I like a bit of grass or
something heading across there. Let's have a look where
of where else can we put in maybe some bits
and pieces here. Just dropping a bit of
grass or something. Just some Winning Wit work. Some quick waiting might work. It doesn't take too much effort. Do have a lot of this green, darker green, then I can just drop in here and
see what happens. Will spread out nicely. Near to the, this little
shit would be good. Okay, great. We just draw out
the edge of these. We're getting a bit
more like that. Okay, good. So now what I'm gonna do is
I'm going to start working a little bit on the buildings
and the cars just put in. I'm a bit of texture
to the verb, but I'll draw it off quickly
into the building. Now. I'm going to pick up,
I want to pick up some scarlet powerline Scala ID. And let's mix it in with
a bit of Ben Sienna, because the bent Sienna is
going to mute this down a bit, as well as adding in at tiny
bit of these neutral tint. And then we have it. I think we've got almost
the color of this building. She was a kind of
a very muted down red color in the background. So I'm going to paint that
in quickly like this and cages the underneath the top
of the building like that. Of course, we have
got this area here, runs around the back. The comes down like that. Here's towards the
left and it was cut around this
building as well. It'll be on the foreground. We're just trying to get in that general shatter shapes
that don't worry too much about the
accuracy just yet. Okay. But certainly be accurate
enough to cut around the originally that
roof white cup down there. Cut around it. This roof here below as well. There we go. Bit of extra darkness if
you think it needs it. This one here, we'll
do this one like that. And I'm using about 50%
to 70 percent paint and the rest water. So that's how I'm
getting a really dark tinier and tinier. The colors I'm using also have a naturally dark tone to it. Some colors, it doesn't
matter how thick you use it. It's going to, it's still
going to look pretty lot. Example being most yellows and, and most surreal Lean's
turquoise kind of colors. So there we go and we'll do
this part of the house now just the middle
and cutting around as usual when leaving a bit of wives on the edge of that roof. But really all of it is
just these columns doc, this dot and this running around going towards
the ground like that. Then a good thing to do now
is also to start getting in some of the shadows and the shadows and things
running around the back so I can do that quite easily. They just join these building
up and on the ground. And to move connect
towards the rot there. There are some trees and shadows and things off
in the background. I'm not want to add a little
more blue in there too. Coming through the path,
that kind of thing. Then what else do we have? These building here? Bit of shadow, a bit as shredder running towards that Ryan side, but this one here runs
towards that end. Rot Saad are the same. Like that. We've got some
little pose here in the foreground which I can
just join on like this. Okay, and not to forget
these cars as well, because we do need to getting a bit of color for the cars. So I'm going to go around
the back into the camera here and dial this down, the color like that. And I'll just color and a bit of the rod side
of that car as well. Okay. Using a pretty
dark, neutral tint. Almost the same
strength is that okay? Bring it down and then we've obviously got the wheels
here at the bottom, which we need to connect
up at the base like that simple connection
at the base there. And there's also another
car in front here. It's coloring that
in a little bit. And then at the same time, we can put in the shadows. So that's one kind of
hits this carbon and that car runs all
the way crazy shadow to the right-hand side. Okay. Roughly. All these as very similar time. And of course we've got
little blue poles running, wooden poles running
along the side like that. So taking care to get a mean
and somewhat accurately. And of course, a
little shadow for these pose is quite
important as well. So following that
same structure, just bringing that
across legalese. Some of them can kinda
skip a little bit, but something like that. Okay. And running towards
that right-hand side, I don't know what this is. It looks like a tree
stump or something. Okay, good. So that's essentially
the gist of what we want to put in here. Now for these other areas on
the left and the right side, It's really just trying to find areas to put
into big texture. So I've got this little brush, Xia, little fan brush, and I'll just be experimenting
around a little bit to getting just this, some textures and
things like this. Can you just do these little orange and a bit to the left of
a gray on the palate. And that's what I can do. I can getting some smooth
marks just basically indicating some of
his garage and it's a very lot time, very light. It's almost 8080 to 90 percent. And very little
pigment in there. Okay. Bit more of this yellow. It's basically they do them. Yellow RCA goes up
near is like this. And here, peak mole
here on that side. Yeah, so it'll kinda
joins up a little bit. I know it's quite simplistic. And that spend more time on it. If you want to get more details. But this helps to kind of
connect up the whole scene. So it's important
to have some of this going on like that. Okay, Great. So we are just about done. Soften off this
back area a little bit of shadow just
looks a bit funny. Running across that right-hand
side from a soft and it off a little and give it a dry. Come back to it. Okay, some little
finishing touches to put on the really
dark tones in here. Another thing I do want to Adyen is perhaps a bit of blue
for these wind screens. Just an indication here
for the wind screens of the two cars up ahead. There's there's
one there as well. We can put in a bit
of paint there. Just something different
because there's no coolness near the ground. So really just looking for some bits and pieces to tidy up. I mean, caused not really
much we can do for them. Just want to reshape, perhaps try to reshape
that one a little bit. Because you've got these
poles here as well. And underneath the the
buildings in the back, you've also got
like a little bit of little bit of
darkness under the roof. You roofing areas like that. Then a little bit here. Just bringing out the doc
has bits of the painting. You've also got close
doors and things. So that's going to be a dole. Then one here. Shape this car
little bit better. Put it in a few, little, few little birds up
and up in the sky. And the other thing you
can do, some of the trees, you can, of course, getting a bit more detail by using the side of the
brush and a bit of neutral tint to dock and off areas to get it as
just mult takes choose. Here in the background. That's probably too much. The habit. Mole, the dry brush
technique like that. They're running around
smaller branches maybe going up
like that as well. Okay. It's more of a a
bit of practice as to getting it you'll largest and darkest times correctly rather than Amy for complete
accuracy and all the shapes. But I hope that's helped out.
8. Boats and Sunset: Painting: Okay, I will be doing
a quick little boat. Same is three bytes here. And it looks like the sales. Down on all these buds. I really like the reflections
and how they sort of, you can see that the mosques sort of reflect into the water, these wavy sharp reflections. So we're gonna go ahead
and give this one a go. And the drawing would
take too long at all. We just look at the horizon
line, it's about halfway. Halfway. That's just draw a line halfway through the
page in the background. We've got all kinds
of things in here. And really what I'm going
to do is simplify down. We know we've got lead
to buildings like these tiny little buildings running across the
background like that. You've got a bit of a hill, the couple of trees, a lot of it's just gonna
be reduced down. Okay? But if you look really
close in the background, there's actually some hills running just on the
back like this. And there's one
over here as well, kind of hidden in the midst. So I'm going to
just carry this one up towards the back there. Okay, that is done
and we're going to work on these three buds now, we need to work out the
position of these buds. And if you look at the
backside of the birds, you'll notice that the
kind of a rectangular like shape and they kind of finish about halfway
down the water areas. If you look at the
horizon line there, halfway roughly
halfway down is where this boat finishes off the
back end of the boat anyway. So we can use that as a guide to draw the shape of that
boat in like that. Then of course, some little
details on the boat. And at the end of the day, we just look at this
as very simple shapes. Okay, so that's one in, and I'll draw a generic
mosque going upwards like this bit of darkness into
the back of the boat. Okay. Like that. The shadow here underneath
the reflection, I'm not going to bother
too much with it. I'll just outline generally it's location or something like that. And we are essentially done. Okay with that. One, will go on to
this other one here, to the right-hand side. Pretty similar height-wise. The back of it finishes ran about the same point as
the other one as well. It's a slightly different shape to the back of his throat. Something like this. And it kinda comes
out like this. There is a section here
and the back like that. The side of the boat here, here. And the front of the boat here. Just like that. And we'll get the mast
going up into the sky. Here. That section, there are a few little bits and pieces
of that boat as well. Make that a lot of
it is white except for the back and the side. Then I'll just put
in at the last one, roughly here in the center. This one is the easiest to
putting because it's sideways. It's not too much
three-dimensional shapes that we need to get him
something like that. It actually goes further along towards the
right-hand side, but I'm not going to
bother too much with that. So we're just getting
a little bit of that side was ankle that boat, There's some windows there. But again, I'm just
indicating them quickly. The mast up like this, the mass is going to be a little shorter than the
other ones because that boat is of course,
further back in. We've got objects further back. They're going to appear smaller. Little indication as
well here for this, for this point here
in the foreground. Just a little sort of reflection there,
something like that. There's also some smaller boats here in the background,
little ones. And I'm just going
to outline just like that small little areas and
we pretty much ready to go. So first, I will just
go in with some warmth. Got some puzzle orange, lovely granulating orange
that I got recently. And it's the early granulating
orange that I am aware of. So I'm pretty sure. As curve is orange, It's quinacridone burnt orange. And they used to make
these color actually in the automobile industry. I don't think they
actually make it anymore, so it's quite a rare color. I don't see many
paint manufacturers actually offering this color. So it's something I thought
I wanted to try out. And it's, uh, it's quite beautiful the way that
it granulate out. And it's not, it's a
little more subdued, so it's not as vibrant. And out there is a pyro orange, purlin orange, that
kind of thing. So there we go. And just putting in a
few little indications of these houses
here at the bottom. There's not much in the area. They just did a
little bit of color. The car was all here in
the background is just to indicate a little bit
of this kind of sunset. Okay. Now, I want to make
sure I wet this down. I don't want it to dry. As I move up into the sky, I will be picking up a
little bit of purple. So this is imperial purple. Put that into the sky like this. And then also what
I'll do is be using a little bit of cerulean, cerulean blue off the top. So then that all
nicely together. I always like to put in the
warmer colors below first. I find that the warmer
colors just have a higher tendency of mixing
into some form of green, which I don't really
want to happen. So I'm taking a bit
more care with that. Now I've got a bit of carbs or purple here and
I'm just dropping it in to indicate these
distant mountains. And also what we can
do is use them to kind of cut around some of these buildings and
things that bottom. Okay? But actually as we get
down to the bottom, that's going to need
to be a lot stronger. So what I'll do is
while we get in these, some of these
background shapes here. And perhaps you might want to add in a cloud or
something like that. Input in a cloud here as well. Okay. Larger sort of shapes. And while the paper is wet, it just melts in. Looks quite beautiful. Let it do its thing. Now. Moving further down the page, one of the things that
I mentioned was I just wanna make sure I create
extra darkness here. I'm going to pick up a bit of undersea green now this
green is a combination of quinacridone gold
and ultramarine blue. And it creates a beautiful
granulating color. And it's separates out
amazingly into some kind of blue and green,
any sort of mix. So I'm going to
drop that in here. And you notice I'm doing a
little cutting around some of the buildings,
that kind of thing. Just dropping in
that color as such. Here. Here. Okay. Making sure that we've got
extra darkness at the base. And we have extra
darkness at the base. This is of course going to bring forwards some of these
objects and the objects, but they basically houses
and basically houses. So there we go. That's looking all good for now. And what we will
do is we want to bring down that Cardozo. Love your carbs or orange and
I'm going to have carbons orange and maybe do just use any other orange
that you've got. But I'm going to just drop
that in at the base here. And you'll notice it's wet in some areas still
in the buildings. Don't worry about that at all. We just want to have a flowing kind of wash
from the back downwards. And you've got some boats in here as well if
you really want, and you can leave them out. New white like this. Certainly going to cut around
these larger boats as well. In case a little
bit more orange, but it's amazing, subtle. And it dries off with that. It has this golden, beautiful golden sort of color. That extra touch that
I just can't seem to get with other oranges. So carrying this
all the way down, keeping it very, very light. It's not much rain here or down even into
the shadows here. And that's really dark, that cobs all He doesn't matter. He calling it color's orange, It's quinacridone, burnt orange. Fill here. Here. Okay. Now around this stage, this is where I want
to just adding in a little purple into the water. And especially
here at the front, we've got a combination
few different PRB was actually on my palette. I'm going to be using
this up like that. Especially in the foreground. Having it blend a bit here and darken is going to help
with that perspective. Okay? Looking through, now, of
course, this is what I'm doing. I'm just putting some
little indications of softness in the water. This is a good time to do it
when the paint is still wet. Just drop in small
indications like this. Then here in the
background, here, here on the sides as well. And Destic router. And I'm not gonna
touch that anymore. I mean, we can also put in
a bit more at the bottom, but apart from that, I do want to keep it quiet. Basically swash. Okay. But you can
always go in through the back and darken off more. If you like, add some
more of these waves. And two, you feel happy
with the final result. So at this stage I
dry it off a little and we will get back to
finishing the painting. Okay, we'll be adding some of the cooler
colors now on the buds. And I've got some
ultramarine blue, which I'm going to use here for the back end of this boat. And I'm actually going
to make it pretty dark, almost the same darkness
as the reflections. And to do that, I can
actually add in a little bit of little bit of neutral tint. So there we go. We got to back area
like that of the boat, and then we've got a strip
that just runs across like this to that front
end and the North. So this bit here that runs across sot of the boat
and goes up at the end. It doesn't have to be perfect, but just that inflection at
the end is quite crucial. But I've left a bit of
that white on there. So you can see this grid
of sale or whatever it is. It's darker as well. Okay, so a little bit
of that blue in there. We'll do the same thing
for this one here. Just a quick stroke here
for the actual boat. And Peter darkness
underneath there. Here, here and here. Okay. So that's about the bottom
section of it and the top I'm just going to
really leave as is. And we know that
there's actually a little a sale here
as well on that boat. Okay, fantastic. We'll do a bit
here. This bird has a little cell on it to
100 and know what it is. I'm not an expert with birds. So back into the boat. Bit of that darkness here and a bit of that backside here like that. And then of course, line here, line here, just leaving a little
bit of that white in the center again and
finishing it off here, the front and more neutral tint I'm going to use just
the basics are color here. We can also use a bit of a brownie color here for that back-end of the
boat, something like this. Bring that down but
we want to leave a fair bit of the
white on there. It's actually a little
more little warmer here. Put in a little bit
of a warmer color. Okay. And then inside the boat, it's actually just a very light, cooler color inside,
just like that. Man is a window here. You kind of just finding
areas that you might want to darken and lighten essentially. But a lot of it is
just what okay. So we've got that in now. I'm just going to start putting
in shadows underneath and get your neutral tint
bit of ultramarine. Okay, and we're gonna
do this all in one go. That's the bottom
of the boat here. And of course, that side here, we're going to just
getting more color here. The bottom, the edges of the
bird do have this kind of You can see that the waves just sort of flay out a little bit
from the sides like that. You might have some bits of the water just
showing through bit of that previous color
there, the orange. And then of course, we've got the sale, which I forgot to put in, but we can do it now just in a dark neutral tint coming
up at the top like that. Then the boat there. And of course,
this reflection of the section there, the mast. Keep forgetting the
terminologies of what this is. So yes, this thing. So anyway, we're going
to go in and put in this sales mast here. I really need to learn
my boat terminologies. Afterwards. I'm going
to have a read. So we're gonna get into this under the
underside here as well. Just this darkness that
blends little with the boat. Again, leaving a little bit of that orange showing through. Now the shadows. You'll find that the boats in the background and not going to go and extend
down as far one. And we have a little
bit like that. Okay, tiny bit, however, this mask will continue down like this case suggests,
take a bit of care. You only get one
chance to do this. So you have to be
pretty deliberate, pretty deliberate, and accurate when you're measuring it out. Okay. Here's the other bit here. And again, following
that little guideline that I put in for that shadow, That's pretty dark now this
is again some neutral tint. And I'm trying to blend into
the boat and the edges of that boat there like that. Okay. And we will carry this
down again like this. Okay. It's not perfect,
but good enough. And we will get in the mast, which kind of started out here. Okay. Stops on top
of the boat there. Then we have a reflection again, just carrying down
the page like that. Okay, By this point we are, we are almost finished, okay? The only other thing you
might want to do is add in some little bits and
pieces on the boat. Little areas of darkness. And I often dry brush as well. Use a little dry
brush to indicate some details on the boats. And there's some windows
or something like that. Another thing you can put in is these little rails
and stuff here. I think if we got a little
smaller brush like this, would help a little brush
to put in small details. And if it blends, then don't worry, because I think it's going to look better if it blends anyway. There we go Just a bit there. Some of these are kinda
connected obviously that it's connected
up a bit there. You do. Notice also on top, the masts have sections which actually come down
and connect onto the boat. And the trick would
bes is just to leave them with a kind
of broken edge in areas so that we don't make them look too
obvious and sort of stick out. Kinda makes it look
like the light is catching on as well. Really helps if we do this. Okay. Dr. Rush is your best friend
here with a dry brush. Okay. That top bit, I've indicated that too
much as you can see because of matter there. Okay. We're almost done.
The only other thing that we can add in as again, these little smaller
boats here and background which I will just put in some basic details
is not even much there, but just to indicate that yes, there are perhaps some
other smaller boats out there off in the distance. Okay. And you can
even do some that weren't drawn in as well. The bits and pieces here in
the background you can pretty even Windows and some of the
buildings if you'd like. I wouldn't suggest one suggested
to do too many of them, just a few here and there. Of course, a bunch of
birds and will help bring the scene together
in terms of getting that sky to connect
on with the land, creating a bit of
interests as well. Okay. And and we're finished.
9. Boats on Harbour: Painting: Okay, so to start off with, we are going to be doing
a sketch of these boats. And one of the things that we want to have a look
at before we even start sketching is what
are the areas of highest contrast areas
of light and dark? Essentially ODE, I guess
in terms of contrast where light areas interact with
dark areas come very closely. See in the middle here, basically where that second, third boat from the left is. There's almost a very
high contrast between the white strip that goes
across the front of the boat, across the sides and in
the bottom of the boat. So you do have
obviously the white of the tops of the boats
and contrasting with the blue beneath. And also here in the
water where we have a darker reflections
going through the water. And mostly.
10. Flowers: Painting: Here's the same with very, very obvious contrast,
and I thought this would be a good one to do here. And we do have almost like a
sliver of light just running across dive from the page and there's a shadow
account of cost was left. But really almost everything in the background is dark
besides that allows, those are some little
bit of softness and the flowers in
the background. So let's have a go at this one. And I'm going to get in the cup just a basic indication for the opening of
the cup right here. Now you're not going to
be able to see much else. Certainly say, have a look
at it and estimate rough ER, the rough size of it. And I'm gonna go and read about that and I'll put it in
the bottom of the cup. Say roughly you read here. Okay, comes up. She comes down more like this. But look, it's a cup. There's many of them, so we don't have
to get it perfect. Long as it looks like a
cup and you'll be fine. So main goal here is just
to practice tones and understanding light and
dark tones to bring out some extra vibrancy
in your scene. So there we go. There's a basic carpenter. This one kinda comes
all the way down. It actually goes further down, but I'm not going
to I'm not going to bother too much with
the specifics here. Okay, Now we have some flowers and these ones are just
some other little daisies. And so we can just putting a bit of detail like that
just for the pedals. Now, very quick
pedals is not much. Then I want to put in there apart from just a
few little ones. And then you've got some here in the background which, you know, you've got the center part
of the flower and then the petals coming
off them as well. So putting in a few
in the distance, there's actually many of them. And the challenges to keep them separated just enough so that we can paint them
in almost individually, but still have enough of the shape that joins
them together roughly. So This little,
these little stems and things I like how they come out from these tiny little dots, these little branches
or something like that. So these are very nice and might even get another one coming out here and there's
not one day, but let's put one
in there anyway. Above here we have
kind of yellowy sort of flowers and then more of
these daisies over here. Most of them are
just white in color, so there's not that much
that we need to do. And we're just going to
leave out that white, then initial wash
and perhaps use some titanium white
in some sort of Tao. Bunch of down. Really had that sort of middle section and
that's about it. The rest of it is
just these tiny of a the yellow flowers. I'm not sure what
they had actually, but they're quite beautiful. And then you've
got these kind of stems or whatever you going
over to that left-hand side. Another flower here. And another one here has like a few kind of pedals
still attached. And again, this
sort of come down another large white
flower there. Okay, So mostly these
are white flowers, so we don't need to do
all that much to them. They're some yellow
ones here in the back. We can change the
colors around too. If you feel certainly that
they too boring for you, you want to add
some other colors. Certainly, certainly do that. Okay, So that is essentially the shape
that we're looking for. There's not that much to it. And in the background, essentially that's
all pretty dark, but as long as you have the cup, general shape of that copying. And then we can use that and basically cut around the cup
for Omega and k. So we've, again, we've got
these kind of wooden boards in the background. And, and I know
some of them just sort of cut through here and here sort of thing. Okay. And then we've got the it's
kinda like a table then the copies on coming
through here like that. Okay, and that's,
that's about it. I mean, you might
want to draw out the handle of the
cup a bit more. But apart from that, there's not all that much
that we need to add in here. Maybe the flowers, the
shape of that cup. Okay? And we can get straight into it. So some little colors. I'm using a number
6 round brush. And I'm going to pick up
a bit of lemon yellow. That firstly, I'm just going
to clean off this brush. There's a lot of
previous painting there. Go to be careful. It's a bit of yellow here in
the center of the flower. And some of them
here, here, here. Now you can also
just splash a bit of paint here and there on the page and just let it sort of move around a bit as well, okay, But notice
just the very basics of bits and pieces in here. You'll notice also that
there is these little, these tiny little flowers
I've descended here, which I can just do a bit
of autonomy of capping to getting some of these flowers quickly, something like that. And we do have these other flowers he
was around just putting in a little dash of color here. They test take. We do also have some greens. So I have a bit of this
undersea green here. Actually. I'll use a smaller
brush and maybe a rigger brush
would be better for these actually bit
of undersea green. And use this to join up some
stems and bits and pieces. That's true, Doc,
we're going to pick up some lotta colored green. This is basically
just sap green. That's better. Okay. Good. It's getting
a few little stems and things we mix in a bit, a darker green as well at
times they came but you want to just getting
a few the stems running through the same. And we can put in a bit of
purple in there as well, just a dock and some
of these stems. But keeping it very loose, as you can see,
very, very loose. Just to getting some stems
to join up with the flowers. It's gonna make sense
this way and using the, using the end of the brush, holding the end of
the brush as well. I'm just trying to say to draw in these lines so
that it's a bit more. So you can essentially
just a bit more looser and connect
them up in between. So a squiggly areas in the back collect grease
coming out here. Okay. Something like that. Remember a lot of these flowers, like I was saying before, they're going to be done. Kind of negatively painted. Do have some purple here. I'll slowly thinking
of just putting it in a little bit of this
going to be this purple and in some of the areas. Okay. Just like that. And then the base as
well, It's pretty dark, but we'll leave that for later with the DACA sort of pigment. I'm going to pick up the smaller number six
round brush now. And I'm going to
get in a little bit of color for the cap. So at Foleys, it's
just a cooler color. I'm going to pick up
a bit of ultramarine, mix that around here. Pick up a bit of this
brown and ultramarine. Struck this into the
left-hand side of the cup. Okay, that's that's all right. Just a bit of color
like that. Fantastic. I'm going to go into the
flowers and tried to get in some indications of the edges of the flowers and the
background as well. And for that, I've got, I'm going to be using
color-code GSI, and also another
brown raw umber. I think this looks
very nice if we mix it in with a bit of
ultramarine as well. They granulate that both
granulating colors. So you can get some
incredible variations in here and add in a bit of neutral
tint and some parts too. So here are the kind of flower petals and you
can see them like that. And that's where
you just want to do a tiny bit of cutting
around work like this. Just draw them out, Okay? And hold the brush a
little bit closer down to getting those petals as well. The detail on those petals. Okay. So not a huge amount
of detail with just a bit, just enough to imply
something there. But more of this old tra and
the neutral tint as well. I love this color,
just granulated out beautifully and it's very
dark in the background. So I'm going to just go doc
are way more so up the top. But here the sides we need to
bother too much with that. It's just kind of like
a lot of brown color. Here I can put it in
a little bit of these Rhonda and the side like that. Okay. And keep working
around this area. I'm going to bring this, bring this down and adding
some more ultramarine. Just dock and off a bit
MOM can putting a bit of this neutral tint as well. Nature of tens is very useful. I'm going to use that to
cut around the cup, right? Maybe we go with cutting
around that cup. And it goes all
the way down into this kind of almost like a lot. A spirulina blue
down the bottom. Okay. But before I even get into that, I just want to finish off this area doc and it off
a little fist like that. Okay. Destic. Leave a bit of water in here so that it just mixes
for lights are on. Radha is some more color off
the top and I'm picking up more of this neutral
tint as well. I can pick up a bit of violet, really dark sort of violet. And that helps, again to draw
out some of these flowers. Okay? They stand out,
really stand out. And you might think of
picking up a smaller brush to if you having a bit of
difficulty controlling, which I was early
as suits kind of finding a balance
between, between both. And you can also
lift off some of the paint for these flowers laid out to just
create a softer edge. Okay, which is what I'm
really thinking of doing bit lighter but just
doing some cutting around in the
moment while I can. You'll notice through the
center areas like this as well, that the background will mix in. So we have to make some of
these coloring to join it, leaving some of the
stems and things. But at the same time, we also coloring in
some of these areas, joining them up nicely. Okay. Kinda, gotta do both. Finds a bit of balance
in this section. And we're looking
over this side, then cut around this. Wow, I like that guy. This is more of a violet, the kind of color nouns
turning out to be at the top. Notice how I've let
that mix as well. Bit softer in these
sections here. I want that background and
come down a bit, but yeah, I don't want it to just destroy all these bits of green that we've put in an
LEA for the stems. So, you know, you're taking little bit of k in those areas, but at the same time, we want it to mix me. One error is to mix. That's the beautiful
thing about watercolors, The Lost and Found edges and some of the
wet on wet to fix. Unpredictable and beautiful
way don't wait to fix. And in a way you can't predict
what's going to happen, but just not exactly, always will dry a
little bit different. So the background, if we look at the tone
that we're using, it's very, it's very dark. But I would say the
combination of painting is roughly 1.5 pigment
to 1.5 water to one, perhaps about a
quarter of pigment to a three-quarters water. But given how dark colors I'm using are because
they're mostly neutral tint and
a bit of purple, bit of this sort of
brownie kind of color. Essentially. It's going
to look really dark, even if you use a
little bit of it. Compared to say, if you use the if you used a yellow
or something like that, which is dark and
down quite heavily. So that's difference. Going through to the back here, I'm just putting in a bit
of dark color at the top, seal it off a bit, and just create a
bit of interest. But it's extra
darkness is suppose those top segments
bring it down here and beautiful flowers and things that we can
cut around and doing bits and pieces with. Again, as you move
through this section, you can pick and choose some
bits that we want to color in and some bits that we don't. Okay? But it's important that some of the background does
blending with it so that it just looks more
joined up, more cohesive. Destic. Here is a
flower in the front. And then we'll add tiny little flower brush for this smaller
brush that might help kind of like
an angled brush. Very dock in this section
just behind the cup there. So I'm using this
brush to just cut around some of that dock, this sort of dark section
there and that cup almost the dock is
that I can really get it is using almost
pure neutral tint. They're just cutting
around that cap. Then comes close here
to the white the cup. Just finishing off like that. Okay. And then we've got becoming around the left-hand
side like this. Go right down the
bottom of the cup. Okay. I'm gonna grab the other brush. Just print some of
these color around. It's really dark up
this, these areas. So I want to be faithful. We will fade from to
the reference photo and getting some extra
contrast in this section. Okay, so I'm, I'm really using
quantitative neutral tint and also some causal
violet mixing, which is a very,
very dark purple, has an extremely large range. And you can already see how much of a difference
that's making just by dropping little
bit of that through the letting it do its thing. And of course we
coming down further now to the bottom of his cup. And I'm just adding in
some more color like this. And as we get down
to the bottom, this is where i icon of, you know, we want
to make it dot, but at the same time, we want to make sure
that there is a bit of that yellow as it
would be a lie. But the and nice cerulean blue that just joins
up at the base. Because that's going to be
out kinda light source, this cerulean blue. And this is a funny sort of thing now because
that's going to probably have to redo that. And I'm going to pick
up just surreal Ian. I mean, I've got some
lavender as well, which I think will
work just as well. Okay. We've see it. Stein can blend upwards because I left
that age slightly. I'm touched before
sloppy wet, I mean, coming across and just
cutting around the cup here. I'm being careful
with the shadows will I don't want it to mix too much though because I'm
probably going to have to redo it anyhow. Okay. Some of it will make
scene like that. Let's just see how it looks. Okay. Very interesting. Just polishing off
from the edges there. And you can do it
over here as well, just around the
edges of the cup. The cup also is not
exactly this color. It's actually a little darker. So it helps to put in
some just a bit of blue bluish color
running around here. And this is a mid-tone. So it's, uh, it's
certainly not as dark as, as certainly the flowers or some of these stems or
stuff running through. But it's kind of
in the middle of the super dark tones and
the super light tones here. So a little bit
of, little bit of darkness like that, like that. And then we've
essentially just got the left-hand side of the cup just softly underneath the
stock bonus soft area. He is soft enough that
be handled as well. Well, once some of it to mixing. Okay. Let's get a little mixing
going on like that. Bottom of the cup like this. And do you notice also
in the background that this area here is
Dhaka is a line, just the strong line
just separating out, just separating out
this section out a bit. So I'm going in there like that. You've got another one up here and kind of
going through the wall. So the bit of water,
what have you? I notice I'm using a bit
of dry brush as well, using this edge of the brush
to do some of these work. The side of the brush. Because I want to get into
some super dark tones running through yeah, like that. Okay, So right now we've
got a lot of contrast, just a lot of contrast through this area
and a lot going on. I'm going to just
merge some areas like these kids and have kind of dirtiness running through there. He is just a bit of an extra
darkness and that edge, I like that edge here. And I'm going to just
create extra shadow behind like this. Okay? Cup goes towards
the back like that. So you can certainly see
that shadow move all the way towards the back section, then k, Looking good, get 0. So just like with that painting, I'm going to put a
brown on my brush, just a bit of oops, that's supposed to be dry brush, but bit of dry
brushing like these, maybe with some neutral tint mixed with a bit of the brown. And then just drag the brush
over some sections like these to getting some
texture for these pizzas, wooden planks of bolts
on the wall like that. So it's just extra texture. What Norway areas
but yet some pots. So she's lot of pots
really makes a difference. I'm using the edge of
the brush like that, wipe it off a little bit to dry off the
brush and then goes straight in some
interesting textures, we can get someone to the table as well and testing. So in terms of how much
detail you want to put in some T sub t, You can go in and define
more like what I'm doing. We can just leave it and
be happy with what it is. What it did before. Okay, last step I'm gonna do is just add in a little tiny bit of extra detail with
some of these stems. Okay, just a little
bit of darkness because I feel it needs a little bit molten in
some sections in case. I'm just going to dry, brush a little bit of this. And the stems and
things running through. Soft enough as well in pots. I kinda just with my finger. Okay. Help to create a
bit more darkness, slight, slight dot bits
inside the, near the top. And also certainly
inside the cup. There's a lot of darkness that we do need to just implies. So I'm going to go around
these flowers like that. Okay? Maybe we could just
see the edge of that cup and the darkness
that's inside it. Okay. Something like that. And we can go into some
areas here as well and just can just draw out some of these flowers
and bits and pieces. It's a darkness in
some areas like this, the layering is
just so important. It's what gets you the
extra detail and contrast. So now I've made it
pretty dark here and the cup inside the Kaaba
conscious sort of stop it up. Brought up. He actually carries on. And depending how far
you want to do this, you can keep on
going, but it just, you know, certainly
carries on in some spots and some areas
goes into the background. I came merges into
the background. And this is all that
pot of creating a scene that merges and has life to it that not quite short times
where one pot begins in May, another pot stops. Okay. Okay. Okay. And I'll call this one finished.
11. Melbourne Street: Painting: For this same, we have some really obvious areas
of darker tones in here. Firstly, you can see it in the tram here on the
right-hand side, underneath the top
part of the trends, little white areas but to
the left side as well, the shadow on the ground, the trees behind the tram on that right-hand side as well. They pretty dark
shadow is almost crossing over the
road from the trees. Also some areas of darkness underneath these shops
and what have you. So you've got quite
simple contrasts here. And a lot of these
terms are actually are the mid-tones or full toads in terms of the shadows
and the dark areas. And I'm going to show you my
technique in terms of how I getting old those
mid-tone shadows and still preserve a
favorite of detail. And then in the last stage at, in their final sort of dark bits and pieces in
terms of the light tones, I always go through and put
them in first so we can go over the top of this
second layer of darkness. So firstly, let's go ahead
and get into the drawing. So I'm going to start and look at it in
a roundabout here. It's about a third
of the way through the paper where the buildings
or the back finish. So I'm gonna just put in a quick little line
just like that. The easiest thing really to do at this stage is
to just penciling the general kind of outline of the buildings here
in the background. We've also got this tower here in the background,
this clock tower. And actually underneath
this building is actually being renovated or restored
or something like that. So there's actually a few more bits and
pieces of detail there, which I'll try to indicate. Lighter though I don't have a
reference picture for that. But really at this stage
I'm just trying to mock out some little bits and pieces, some little details of the
buildings in the background. But what we have, of
course, is this tremor. And the important
thing is to mark out the bottom of the
trematodes starts, say about in the middle of
the page, right about here. So we've got the back air, that's where the
buildings start, the vendor and the tram actually
starts right about here, then comes forward. Like that. It's really just a box. If you look at it, it's
just a square shaped object like this and then
it just runs towards the back, just like that. So we've got a little indication of maybe some doors here. Looks there is little
window here as well. And we've got, of course, the center of the tram
underneath this section here, the kind of little indicator
that tells you what kind of tragedies is a very
common in Melbourne. Everywhere. Quite iconic. The wind screen. So now the windscreen ends about halfway through
the tram so we can just draw a line
roughly like that. Okay. And there we go. We have
a rough indication of this of this tramp
and now, okay, there's little bits
of details and navy goes some lights and things here at the
bottom which we can and then just
drawing quickly. Okay, But really the
bottom of the tram, it's all quite dark. And that carries on. We've got this shadow
sort of running over to that left-hand side like this and a carryover
all the way like that. So we'll look at the
shadow. It's kind of coming out a little
bit like this as well. So drawing in that
shadow does help to getting a more
accurate shape for later. Okay, so there it
is. Over there. There's also a car here behind. So remember, just make it
a fair bit smaller too. Okay, Just a box really, just something like that. And then we've got a bit of a shadow underneath like that. They're okay now
the car is around the same height as the hits the horizon line Bay
where the buildings are. Okay. They're not a 100 percent
exact as per the reference, but they are fairly
close enough. Use the Beck into the
wind screen for this car, Couple of the tail lights. And then the shadow
underneath like this. Like that. We've got some overlapping
shapes in front as well. Now the car is SOD of it. There are of course
going another one, sort of peeking out the
back like that. There. Okay. There we go. So with three cars here and that left-hand side, a smaller one here in the medulla makes
you expand that out a teeny bit more smaller one for this larger trend here as well. And of course, the top
of that trend does also have some small details
on it like this, which I will just
add in like that. Actually has a little prompt at the top which get gathers. George electricity from these y's are just run all the
way down the street. So to see some of them
running down like that. Okay. And you'll notice the shadows
as well for everything, they all just run towards that
left-hand side like that. Some of them run through
the car like that and then some of them just run over on
top of a curve here. Okay. So I'm just putting in a
little bit of detailing. We've also got some fetus here, which great to add in, to add a bit of context
and life into the same. Make sure you don't make
them too big as well, just a little bit taller than the cars and they're
the ones at the back. It'll figure here
in the back. There. You might even think of
putting a larger figure here, perhaps just waiting to cross the road or just on the way, like crossing the road
like this as well. Is the figure there? Oops. There. Now the shadow running
across the ground like that. Okay. Did it is side coming
in from this angle. It looks to be like
a traffic island or something fantastic. And of course you've got trees and what have you,
what are these trees? But we do have buildings
behind those trees. And I want to go ahead
and start drawing a little bit of
these little bit of it in but not too much detail. We don't need all
too much. In here. We notice this whole big set of buildings on the
right-hand side finishes roughly around
the center of the page. So I'll draw a little
line like that just to mark off that extra saw
to that building there. And the rest of it we can
can you just make up? I mean, a lot of it goes through the buildings
and the trees anyway. So we don't need to necessarily
add in too much detail. We've got a lot of trees and these abstract shapes that sort of cover everything
up like that. So I can make a bit
of this up later. Good thing though is
having some of them, almost like having some of
these buildings peek through and having somebody who's signs on the buildings
and stuff like that. But apart from that,
it's not a massive deal. This clock tower in the center aisle drawing little bit more
detail like this. Okay, and I'm going
to have to make up the train station as well because we're
not unfortunately, there's just not a
reference photo that I can find which will show
me the middle of it. Okay. But this certainly
small windows and things I remember kind of coming on the front
of that building like that to train station. So I can just kind of a
quick little scribbled air to get in some small details. And then of course,
the top part here, I'm just separating this out
again into another square, looking at the shapes
within the there we go. Something like that. Here we're going to have
a couple more buildings off in the distance. Looks mostly like this. Big a building here in
the background as well. Notice the tone of
that building in the background is actually a lot darker than the actual
Tower in front. So you notice the sand here,
it's actually pretty dark, so that's going to
help bring out some of the lights on top of that. And that would tell us, or some of these things can be used strategically and
they are already present in this reference photo, but they may not always be in. Sometimes you have to
make things up and change the shadow
patterns depending on what works for you of
picked this photo because you don't really need to
do any of that at all. It's, it's a, it's a
nice sort of seeing that I think sort of
stands alone on itself. So, but just as a
general reference, you need to do that at times
for other reference photos. Trees here, another tree
Docker sorta shape here. Underneath as well. You notice that some
darkness under there. Now these shop fronts, they have these little air
that comes out like this. There. You can see it. I'm going to come down
more actually like that. So what can draw that in? And
notice how it comes down. It's around halfway, halfway
points on the paper. And here is where we
can actually just put in some general details. All of the buildings already. Okay, there's not
that much, really, not that much that we need
to add in here at all. Just some little indications
in the windows I think are a good a good thing to
add in here as well, a bunch of these little windows
and, and what have you. So here's another one here. And then we might have another. One here, here, here, here. Few more buildings
off in the distance. Say, doesn't matter
all too much, you just gotta make sure that we've got something in here. Okay. That could be
a sign or something. But apart from that, I'm pretty happy with how this looks in underneath years old, just pretty much darkness. So there's not a huge amount
of work to be done there, but I do feel that
the figures will add a great deal of interest
in the same I mean, we've got that one
there, especially. But I'll keep it simple. So first step, what we
wanna do is actually start adding in lots of
colors in here first, and I've got a number
10 round brush that help accomplish this. So if we go through
and I really just put on our lightest sort of colors, I'll start a bit with
the trim and unknown. It's not completely white. I'm going to put a kind
of creamy sort of color here and that left-hand
side of the trend, but I wouldn't do it
for the other pots. Great thing is that I can make a little bit
of dark color here, which is basically did a
blue mixed with a tiny bit of Rwanda or burnt amber. That can be fine as well. We're going to get a darkness
underneath like that. Okay. I just thought
sometimes it's good to have a little bit
of a grayish color interacting with some
of these creamy sort of colors in here, if you can. Here and there. Even in the windshield
you noticed it's actually not completely white. It's actually it's going to bluish tinge to a coolish tin. So I'm just dropping in a
little bit of coolness in here, but not overdoing
it and oh, okay. Would be the coolness
underneath like that. Then it's also OK, sort of blending, do
its thing together. Now, let's have a
look at what's going on in the background. So over here we're
going to put in a bit of grief and
trees, just a slide. Washington is just a little
bit of undersea green, which is a doubt, a really doubled down. Slightly muted green. Okay, but it granulate
out beautifully. But it's not as
strong as a, say, a not strong but not as
vibrant as a sap green, which I normally use. But I've switched over now
to try to use more, I guess, subdued colors and
then play around with the saturation of everything right at the end to add in a
few really saturated colors. Okay, so that's the
sod of the tram there. You'll notice I'll
skip over parts of the buildings and stuff in the background like
that as well Here. Okay. And I can just cut
around is trim and sort of find some
little contrast. But I'm not trying to put an all too much detail
at the moment. Okay. We're just putting in a
little bit of color and I'm going to continue over
on this top section here. That's putting some warm colors. I'm going to use some orange. I've actually got
already some warmer kind of orange colors
leftover on the palette. So why not dropping in
some of these here to kind of mixing with the
greens and what have you just drop a bit of that
into the background. A slightly muted down
yellowish color as well. There there is a bit of yellow ocher running through that. Okay. And a tiny bit of this
white is just a bit of buff titanium here running
on that top right-hand edge. Okay, and then we've
also got, of course, some of these buildings
here in the background. Just also good. Again, just dropping, if you go to a bit of a cooler color, dropping it and little
bit of that here. Yeah. Sure. To cut around some of
these buildings in front and with the
buildings in front, again, that's just
pick up a bit of yellow and a warm McCullough. Drop that in like this. I don't want it to
be too obvious, so trying to keep
it super muted, but definitely a little more
muted than, than usual. Okay, like that. And down the bottom as well, it's going to have to be warmer. Just to be warm. I like these. Okay. Fantastic. Wyatt, on that
right-hand side and then some more of this green, which is basically a
bit of undersea green. So I'm dropping that in. And allowing it to mix and
mingle do with sine think. He's tram, just
being careful to cut around that top part of that trend as well to
create some contrast. And having looked back, so more colors would have conus you in that
left-hand side there. And as we move
over to this side, I'm going to pick up
some more of these warm, kind of orangey color that I've got and just drop
that straight in. It's a muted sort of color. You can really
subdue that down a lot and just add in some more. I've got a bit of this
buff titanium which I'm just adding in very quickly. Not too much contrast
or anything at all. Okay. Drag that down. Like this. Okay. As you get down to the bottom, It's always good to just adding
a bit of extra darkness, a tiny bit of extra darkness
to create further contrast. Okay, and while
I'm here as well, Let's pick up a little bit of Ciceronian to add into the sky. 30 lot mix. If it mixes into the
buildings, That's good. Kinda want it to
do that too much, but just a little. Okay. So that's all done
its thing up there in the sky and think there's anything else I really
wanna do there. Across the ground. Again, it's a pretty
warm colored scene and there's a lot of
lights on the grounds. Or I'm going to just use the brush here to bring
down some of this color. Perhaps warm it up with
the little yellow. This is just a bit of
yellow mixed gain. Some of these warmer. It's basically Buff Titanium mixed with a little
bit of yellow. Very, very light mix. Okay. I really want to aim for a high level of contrast
here and the ground. So this is going to look
fairly weak as we put it in. But once we go through
later with the shadows, it will make sense and
will create more contrast. But at this stage it always just looks too light
when you add it in. A little bit of color for the cars and other
sum right here. So let's want to put
in a bit of this red. So that car like that. Don't want to, I don't want
to add too much contrast. Of course, there are some other class here in the background, which truck and then
color like that. This one here in the
middle is really just touch it color
here like that. Poverty and leave this to dry
and we'll come back to it. Okay, so now that
everything's dry, you're going to go
ahead and add in all the remaining tones and basically all the
darker tones and shadows try to get most of the midtones and even some of the food times
in all at once. Okay, So the other
thing I want to start with first axes is
actually the tram. I just not for any
particular reason, but I think, I mean, I guess I started with earlier. So I'm going to go in with a bit of ultramarine mixed with a tiny bit of just, just a little bit of rounds. So we'll drop that
in like these can, if you've got a bit of
neutral tint as well. And that will help darken
up this mix a little. Okay, so just
bringing it across, That's going to be just
the top section of that. And sram. Then of course we've
got a little shadow just underneath here. These are pretty
dark tones that are most of the darkest
and the entire scene. Okay, so carry
that along even to that left side of tram kind of joins on
like that as well. Okay, Great. And we do have little bits of darkness running down that
edge there of the tram. They're also got Sandman Doc and bits on that
left-hand side as well. But I'm hoping to just imply a little downward
strokes like these, some of them for the
windows like this. Some of them just
cutting through. Okay. Something like that. We'll do notice as well underneath the trend is going
to be a bit of darkness. So this is now the opportunity
to getting some of these DACA sort of
time like these. Bring that across here. Across the bottom. Here. Here. Okay, Fantastic. Now a little bit of water and lots of sort of wash connecting
it up like that. That's going to be nice. And also running over to the left-hand side
of the transistor. Bit of darkness like that. Okay. I'm just
going to darken up this little sign
underneath here. Second advertisement,
so on actually. All right. Okay, fantastic. You might even want to
use a smaller brush that helps you out. Um, I have another number
6 brush which you can also use if that
creates interest. And that allows you to detail that it easily, more easily. I'm going to mix up
some primaries as well. I've got a bit of red Hanukkah, yellow medium over here from It's getting a little
bit of this blue. Whenever the side here, d is just to mix up another doc, a koala here on the side that's hopefully
going to approximate the kind of grayish color. At the moment it looks more
but brownie sort of color. But it's starting to take
a bit more of a bluish, cool, a tinge to
it, which is nice. So want to get some
more that cool, a color that cool. Okay? And also some
of these green, some of these tiny bit of green here in the
background like that guy. And I'm just not putting in some of the
background details. Okay. Just for these trees that cutting around
the back of the trim and one of the things to
remember is to make sure you're leaving in as much
of that wide as possible. On top of that tram
we can actually use. And I've got a bit of
neutral tint here. And that neutral tint is
going to help as well. To draw around the
edge of the Tran, kind of ends around about here. And what this allows
me to dock and off some of these areas and that Ryan saw connected
up to the tram. Okay. Then of course we
have things like these branches and stuff
like that was just goes up and cuts through all this bits and pieces here is even cars and stuff in
that section as well. Which I don't think I'll
really get the mean, but just a bit of
darkness running through that background areas, fine. I'm going to leave this
figure for a moment. We're getting some more details
on that figure later on. But for the time being,
I just want to focus on this area to get into some more darker
bits and pieces. As we move towards the back, decrease the strength of color. And this is going to
help push back that, that area of tree are the
days more water in that mix. And you're going to be
able to get a lot of tone and more paint. You're going to be able
to get a doc a time. So just always remember
that when you're painting. And some of these paints are going to already have
a very naturally doc time to begin with. So there's not much
you can really do to lots of them except
just water them down. Okay. But rather than
looking at the colors, I'm just looking at whether
it's light or dark. I think that's one of the most crucial
things to remember. Here. There's a sort
of a building and I'm just going to
cut around that tree and just get a little bit
of that sod in like that. We sought that building lots coming in from that
right-hand side. So we need to imply bit of just a bit of light
coming in like that. It is coolness in there again. Okay. Now you can actually
start putting in some of these bits and pieces of
the buildings like that. Just these are really
just loose windows or what have you then not anything too detailed
or something like that. Great. Cross the back as well. You're going to get a
brief lot that cuts across that building there. So I'm just going to cut across, they're getting that lot
very quickly like lat, bit more ultramarine
and perhaps I can dock and down this
side of the building. Few little brushstrokes. And this building
behind as well. You just a little touch a
darkness there. Like that. Darkness on the Sage
of the building. I'm trying to get it all
to connect up nicely. So that's my whole aim here. And all of these times
kind of run together, but we've got bits of
lights on there as well. It's just managed
to peek through. So I think that
it does the trick for that right-hand side. For now we're going to move
over to the left-hand side. And that's getting a
teeny bit of coolness. He and I remember it's
going to be very lot still. Say, I'm seeing some coolness here on that left side
of this building. So you've got the right side which gets a bit of
light bouncing off, but for that side just
behind the corner, it's not going to be
catching much of the line, so I'm just going to
dial that down to a cooler sort of color there. We can just change up
some of these other ones as well to have that in there. Some of them can just have a little indication
like these for Windows is you can see just some little bits and
pieces of the top like that. And those can we
have there? Okay. Some buildings over the
distance or something as well? Could even be smuggled. Okay. And as we get down
to the bottom, this is where I'm
going to create a bit of extra contrast. This is neutral tint. We're using here, neutral
tint and a bit of ultramarine cut around
and leave a bit of that color running
through the entire mix. Now you've even got darker
spots on there as well. Okay? But there's quite a lot of contrast in here,
what a darkness. And so I'm going to
just use that cut around some of the cars
that we've got in here. The figures as well, like that, just a simple little
brushstrokes and we have some objects here
in the front as well. These little not
sure what it is. It's a control panel
or something there. Okay. So that's bit of that
darkness in there. Okay. Excellent. I'm going to work on
the cars and just getting some more darkness
underneath as well. So we've got these
wheels and I'll just join them up
nicely like that. Underneath them creates a bit of shadow underneath like that. And we can have some here
for these car as well, creating a bit of darkness
underneath there. There's also a shutter here
for this trim like that. But it was shown
as running towards the left-hand side and it
extended out a little more, actually coming out
all the way to here. Okay. And some more shutters
of bits and pieces maybe running in from that
side of the same to. The good thing is that you
can get in some perspective on some little bits
and pieces like these just running across the ground while the paint is still
wet so that it will kind of hopefully just joins
together a little bit nicer. A little bit more naturally.
You do it this way. Okay. Good. Sdk. Of course, got this figure on
that right-hand side, little couple of legs like that. And join them up and create a bit of a shadow
here to that left, left-hand side as well. The bit of darkness, maybe with the head as well. Leaning forwards. I'm realizing some bids, you just need to be
darkened up Molson dropping a little bit of this
neutral tint on the knee. And letting that sort of sinking as well to this section nicely. Here. And it has tick. Try to just redo that
shadow a little. So then I've got a little bit of light running underneath
the cow there as well. Behind the cod is also
some soft shadows. You can barely see him, but I'm going to put them in anyhow. They just run a cross like this, almost as if they are caused by the buildings were the
outcomes but in the booleans. But I'm running all the
way towards the back. I'm like that that will
help me kinda cut around the roof top of
that car as well. Also the tram slightly. Okay. And then of
course underneath there's a lot of darkness just
at the back of the scene. So I'm going to just use some neutral tint
for this section to dock and off that area shaped some of the cars
and bits and pieces. You know, another thing
is that you can work on these little bits on the tower, the Clotel say
something like that. Getting a small, then we indication of what
is going on in here. Little weed does or
what have you as well. Now, I'm just making some
of these windows up. But it's simple enough to
drawing my fancy self, haha, I want a bit
more darkness, a little bit more cutting around the tau us and we
can just drop in a bit more blue and
paint coolest sort of paint around that
right-hand side like that. Help to draw it out and adheres. Well, we could do that.
Same sort of thing. Okay. It doesn't matter as long as it will kinda connects together. You're fine. Okay. Now, let's look at
the fetus here. A little bit of darkness
underneath this one, legs. These are pretty much mostly just pigment with a little bit of water editing very dark, and run run those shadows to
the left-hand side as well. And the cars can do
with a bit of work. And I came. And the rest of it
is just really just touching up areas that you feel. You might want to
work on a bit longer or I guess detail a bit more. We've got, for example,
or something like that. We can get the branches in, running through a bit, DACA, that sort of thing. That can always be a,
can always be good. Will be forgotten to
put in a tree here. Just going to put it
on a dark country. Soften that up. You can add that in here. Can be as sharp as sort
of shape once it dries. Okay. Mm-hm. When screens you
could you could put it mean to be the blue
something if you want. It's not too necessary. Other figures, again, bit of more color or
whatever you want to, whatever you want to
do for those color, for that figure there. Okay. Windows, you might think a bit more reinforcement
in some areas, but more just identifying
what's happening in here. It's always a good
It could think. Okay, you know, smaller
windows running through. And it could be like little
windows here as well, just dropping some color into
the sides of the buildings. Like that to imply a
few little windows of things going on on the sides of the buildings being these
very quickly normally on, go a bit longer. Take
it a little bit longer. But it's not a huge do for this sort of
style of we going. And as long as we got the times, the, the main times in here, we've got some light times and we've got some meat time t, and we've got some fu times
here, here, for example. It all comes together
quite nicely and it looks cohesive
sort of paintings, putting a few, it'll just something here flying
around the backgrounds. I think we're done.
12. Mountain Landscape: Painting: This is a really interesting
scene and basically we've got a few different
layers and thought this would be interesting
and helpful for you to learn how to layer
different sort of tones on top of
each other because we have quite a different layers of trees you can see
in the background. For example, we have firstly, the background of the
sunset and the sky. Then we've got some
mountains in front and just slightly darker than the sky. And then we've got
another layer of trees, which is again slightly
darker, band the mountains. And then another, and yet another layer
of trees even here, which is slightly darker than
the previous background. And then we've got one here
and o the foreground areas. So there's almost maybe
three or four different ways that we can add on top. And I'll show you how I
will approach the same so that you can get into all these
different turns in the air. And it helps you to
practice as well, tended to be mixing and how to, how much water and then
mixing and to each, to each layer and a case. So firstly, we want to
just get in a quick sketch and I'm going to just put the horizon line or
read about here, which is the third of the
way through the page. Not much drawing is really
required for this one. And we have grass and all
kinds of things here. Kind of just comes off
and near the water. Ran about here. Okay. And ran the middle. You'll notice there's a
lot of warmth here and the water as well because the
sky is reflected in there. There's a few little rocks and sharper edged objects
here in the water. So it's always good to
add in a few of these, they're just going to be
really kind of dark areas. Some of them are clumped. And what have you
you hear the back. You'll notice the center here. It's pretty, pretty
lights even around here. But then you've got some dark
and beads here and here. And then of course here as well, which is just all the grasslands
and things like that. We've got a little shrub here. We've got a shrubs just
popping up everywhere. And this is how I do it. I just really indicate quickly
because a lot of the work is going to be done with
the brush and later on. So we don't necessarily need to draw everything
in just yet. It's more just outlining
where things are. And probably the next
easiest bit nice to put in with the mountains come
in and you can see, leave a bit of room
on top for the sky, but you can see it
kinda coming like that. Come down and then around
the center of the page, it kind of dips to around here. Okay. Just connect this
up there and then you can see it kinda
come up again here. Oh, and the distance,
distance like that. Okay. There's even
multiple layers of mountains you can see. So we decide what to do. I'll probably simplify it down. But even through
here you can see this layer of mountains here is actually in slightly darker than the back ones there as well. So quite interesting.
Now, again, that's putting this tree
line here that back again. And notice how quickly
I'm doing this as well. Not really bothered too
much about the shape of it. It's just more of the
general location. So then we go into the brush. We've got an idea of
where to put everything. It's a clump of trees, little shrubs or something
down here as well, which we can get him
maybe with a bit of quash and a bit of winning work. Okay, that actually
comes in around about halfway through the page here. Okay, so that's all the drawing that I really want
to do for this. We're going to get straight
in to the painting. And firstly, I'm going to be
picking up a larger brush. This brush here is just
a large mop brush, really helps to get in all of the I guess the lots of washes. I mean, you looking for
really large washes too. So first thing I'm
going to be mixing up a little bit of this yellow here and a bit of this
quinacridone burnt orange as well. So it's basically
just little bit of Hansa yellow,
quinacridone, burnt orange. Okay, I want to get in orangey, yellowy kind of thing. If you've got a gamboge yellow, that works well too. Okay, That looks nice. So little bit over
here like that. And another thing you can
do is pretty wet the page. It's not a prerequisite, but sometimes I like
to do that as well. So there we go. Just
put it in a bit of that bit of that then
maybe a tiny bit of this is just a bit
of red that I thought would be nice on
the top as well, just to kinda, kinda of a
slightly pinkish hue perhaps. So I'm excited with
a bit of this. This, this here is just
a bit of buff titanium. Okay. It kinda of
an off-white color. Okay. And the sky is predominantly it's predominantly warm
though at the top. Notice it kind of almost goes to a bluish color.
Very, very slightly. It's just cuz down very
slightly in the corner. And I think that's due
to just a bit of this, this cerulean that we could potentially put in there,
even if, you know, any kind of cool
color will be fine, but just loose ruling and I think we'd be good up that top. Blended in like that. Okay. And testing. And more slowly in here. And now for the mountains. And again, we're
just going to get in a very light wash of everything. First one, I have to get into the shop
and so that actually later on there's not much we can do at this stage in
terms of sharpness. We're just trying
to get in just some basic colors to begin with. Okay? So let's put in some, I'm going to go with
a bit of ultramarine. Ultramarine mixed with some
purple here on the palette. And I'm just going to
put in a little bit of that color here for those distant mountains
here, here as well. Okay. Like that, as we
move down the page, Amal just dropping some green, just a quick impression
of some green here. This is some undersea
green like that. Just mix this around
here, there like that. I'm moving down to here. Again, I think I'm going to go with a bit of undersea green, just a little bit darker, softer, edge like that. Now, going back to that
orangey color as well, I want to grab some more of
that orange and a little bit of red and some yellow, just a warm color here
to mirror the sky. And it comes all the way down to the bottom of the
page like this. Course. On the left
and right-hand side, it's just cool down. So over here again, I've got some ultramarine
blue and I've got kind of mixed up
with a bit of purple. And I can just drop this in very lightly and over the
top of the paper as well, you might see some
of these little, little light bits of color. Lots of bits of
paper show through. Just leave that don't worry about the paper sort
of skipping in areas, the paintbrush skipping
over the paper. It's actually a good thing. It creates a lot of interest
if we do it that way. So just going to put it in that wet little impression
of the Bushehr in the side. Okay? Okay, so continuing on
now what we will be doing is working on
these background shapes. Now essentially, we
just want to put in the mountains in the
distance and I'm going to be using just some ultramarine Qia. Stay light wash of ultramarine and perhaps a bit of little bit of
purple mixed in there. Just a dull it down a little. Just as long as it's a
cool, a sort of color. And we're going to
follow these kind of one in the back okay. Where we put the amounts into fours or
something like this. Okay. Coming down like that. Now if we of course go
down a little bit further, it's no big deal because
we're going to be going over it in another layer anyhow. Okay, but we want
to make sure that this layer is very, very live. I'd say the mixture is about
one one-quarter pigment or probably less than
one-quarter pavement and three-quarters water, probably even 80 percent water. Okay. So depending on how
long you want it to be, make sure it's pretty light, but it's darker than
the background. The sky. That's the important thing. You'll notice as well that
I've done a slight bit of feathering further
down the page to kind of just to make sure that it blends out smiley down the bags and
don't want it to cut out with this really sharp line. Another thing you can do is
dropping a little bit of water into some areas
once they've almost dry. And what happens is
that you might get some textures and slight
blue shaded areas as well, which I think are quite
desirable to create. Just some micro textures and
things in the background encouraged this mixture to move around in granulate a bit. Okay, so I think that's about it. I don't want to do
really anything else for that for that pot. Now, I'm going to give
this a really quick dry and then we'll get back
to it and do the treelines. Okay? Now I'm going to go and pick up a little bit of
these undersea green. It's basically just a
duller sort of green. I'm mixing it with the 10, just new bit of purple. And I'm going to go in and
put this layer of trees in and over in the background
that's actually use. You can use a whole different
variety of brushes. I do have this fan brush here, which I think will
work quite well. I should be able to get in
some shapes without too much, too many lines and
things I guess going through just wanted to
be required loose here. But at the same time, you're going to make sure that these trees are
still large enough. And this darker than
the background shapes, but at the same time, dark enough to come forwards. Okay, see slowly increasing the concentration of
paint as you continue on. I think that's the
most important thing. And so going through it's
put a bit more here. I'm mixing a little bit of this ultramarine blue here as well. Okay, Fantastic. Coming down. Let's bring this down a
little bit further as well. Just further down the
page, actually, please. Okay. Here's some more
there in the background. It's not all too much
detail back there is just a few bits and pieces and just making
sure that it does come forwards from the
mountains as well. Super important. Notice I'm using just a mixture of blue to blue and a little bit of green together to
get these row of trees. This over in the corner. And this one down still
a little further. And I'm dropping a bit of color, a bit more color
in there as well, just to darken up,
sometimes it draws off and you realize it's not
actually dark enough. And so you still got that opportunity while
the paint's wet. Depending on how the weather is, where you are living. Just making sure
this whole layer is Dogen those mountains
in the background. Yeah, you, you might
want to put in more detail for the trees. For me, I think
that's fallen out. I wanted to kind of
stick out old too much. Okay. Continuing on. Great. Now I'm going to start working my way into
the foreground. And the midground actually where all these bits and
pieces over here. So just this darker
section of land is, it's mainly just green. And I'm going to go
in here and dropping in a bit of this
green is dark green now it's going to be
fairly dark and I knocked them mixing a bit
of purple in there as well. And the good thing
is just having bit of connection as well between
those trees in the back. So that it is just a bit
of wind, wind effect, but I wanted to stop
all of a sudden. Okay, so the mixture
of paint I'm using is about half paint to half
water, maybe two-thirds water. Okay, So this is coming
forwards and I'm leaving just the Buddha yellow
in the background. They're just little bits
and pieces like that. And I know that it sort of
stops right about here. And this is dot her as well. I'm, I'm comparing it
to the background. It's quite, quite dark compared to
those trees in the back. So again, just further
increasing the, the tone and therefore
the contrasts. As we move further down, you've even got,
you know, in the, in the in the water, like I mentioned before, just these little rocks
and things that I can just painting
quickly like that. I'm just using the
same fan brush, but it's also, you can
use other brushes too. Okay, now I've got
a round brush which works pretty well
in a flat brush. I think a flat brush
would be nice for some of these little waves and
things, just new indications. So pick up a bit of And this darker purple paint and I can just drop in
a bit like these that combine that with the bit
of land in the background. And remembering to
preserve of course, this bit of orange,
yeah, super important. That, yeah. As we move down the page, It's member to leave that background
coloring of the water. I don't want it all
the same color. Well, the same time,
more importantly. Okay, So here we go, Just a bit running through the back and you
might even have some running through these little
sunset area here as well, just to keep it consistent. But notice over on that left-hand side
it gets pretty dark. Two turns into a greenish
sort of blue color, which I'll just mix up
ultramarine and a bit of fun to see green and getting a darker section
like that of that water. And then we'll come
down here to the front. Good thing about this
flat brushes that it just makes it so
easy to get some of these little sporadic
wavelike effects running through a case. And now what we will be doing is just going through
and getting 0. The final touches,
basically the really dark areas or reinforce some of this stuff here and the full in the midground bit in the foregrounds and
these rocks and also some of these
trees here as well. So I'm going to grab more of these undersea green college, the dark green column is
putting a bit here firstly into the these shrubs and trying
to get an indication of the leaves and the areas
that are coming off as well. Like that. Just quick little bits
and pieces, okay, so that we've got some also just some previous colors in there, some of the lotta tones as
you can see showing through. And then we've got
DACA juicy at times. Which Appiah afterwards as well. Say, it's good to have a
combination, as I was saying, just making sure that we've
got a nice range of times. And he has some DACA beats bit more DACA under
here as well. And I'm just sort of looking at the reference picture very generally and try to find
some small areas like that. Okay? Even neutral tint mixed with the green and get a
really dark green. Not much water in here as well. There's probably about
here very little water, 10 percent, 20 percent
water to paint. And now we can do
this sort of thing. We can get in some and Dhaka contrast can just basically can draw
the brush off a bit on the, on the Ital. What have you then go in
and Japan getting a shape of some trees basically
just stick out like that, is the dark color. Drop that brush. And the reason I say draw
it off is that it just allows you to get in a hay kind of funny edge like that
kind of Burkean age. And it kind of skips
over the paper. And I think that's important to imply just a bit of
looseness in there. So that is not 0
shop everywhere, maybe could be branches, leaves, that kind of thing. There's going to be
painting this loose. Different brushstrokes
really add up and make a difference to
the overall scene. There we go. Some more neutral tint as well. And it's putting a
bit on the Neith, some of the plants is
even somebody like that. Just anyway, looking
around where you might find a bit of darkness. Don't be afraid to put it in. And it helps to also form
the edge of the bank. Okay? But if darkness
like that, okay. If you do find
that the trees are sticking out too much
of these little bushes, he can go over them again just quickly while the
paint's still wet. And of course we do have some rocks and things
just in the water, which I'll redefine like this. And trying to make it pretty
and pretty basic as well. I don't want to do it. Okay. But smaller ones like that. Yeah. And then we might have larger ones running
through in areas. Notice as well, I'm just sort of touching guard with the end. With these rocks were
not trying to getting any complex shapes or
anything like that. I think a more spontaneous you are the
better it actually looks. Okay. And again, let's getting some darker tie-ins for some of these little
ripples on the water. Because we've got against this layering effect having a few different
times running three. Okay, interesting. I'm also going across these
yellowy sort of area, orangey area through the middle. Go through do these
ones as well. A sharp sort of reflections and bits and pieces
in the water. And the bits of why this do showing
through as you can see. So we have almost
33 different tones, three or four different times
running through this water. That's why it's so
important to Layout. Okay. This area is pretty
much drawing now for this kind of bush
or what have you, so you can put in another layer. Another thing is if you have a rigger brush like
I've got here, I tend to have a bit
of fun with this, or if I've got a little
fan brush and I'll use these before that fan brush. And I'm mixing
some little quash. Knew what gosh. Okay, with some green. Often though you sap
green because it's a very vibrant green. It mixes quite well with
the, with the goulash. And here we can get in
some finest strokes, finer details like these
that just make it a, make it stick out a
teeny bit like that. Okay. You overlap them a
little like that. So that just gives the
impression of these just the little leaves or
whatever you have them, the bush textures. And always keep a tube of white gouache with
me all the time. It's such a useful thing to have when you're doing
kinda shapes like this. And you want to get
in a little texture. Really makes such
a big difference. Okay? Try not to do with them. Okay? You might have in the
background little ones as well, little bits and pieces
here and the bank, just little bits of grass or
what have you going through. And it helps when he got some of that kwashiorkor create
some kind of darkness, a little bit of darkness,
little bit of white. So looking at that, Look at that time that, that's almost the opposite
tone to this here. So you've got really, a lot, really dark colors
running through the same. Okay? And that's how you
create contrast in here. That's how you create
an impression of them, of lights and interesting
mixes of times running through here you have to
have these colors and these tones just right next to each other kind
of mixing around a bit. And obviously this is not super accurate or
anything like that, but you get the idea
as a general exercise. You can certainly
apply these techniques and get yourself a very
interesting scene. It's full of depth. Okay? So I think that's about it. We'll call this one finished.
13. Soft Landscape: Painting: Okay, We had this lovely scene here with this soul tree
right in the middle. And you will notice the tree has pretty much the
only darkest tones. So we're going to
be using a lot of darker tones there with
very little water. And I'd say about 80, 80% percent darker pigment, either a neutral tent or
purple mixed with a ground. And to get those in
right at the end is also some sharper
shrubs and trees here, which are just
basically wet on dry. So there's not basically any soft edges or anything there where you might
find some soft edges. Basically here in the grass, a bit of the darker
shade areas in the grass as well in the
mountains in the back. So let's go ahead and
get some of these in. So we'll firstly just draw the point halfway
through the page. So just about here.
And you just to line running across that
halfway part of the page. And this is going to just
allow me some time to put in basically no town time but gives me indicates that
we are putting the mountains. So there's a mountain
here in the back and it just comes down here like that. But we've got this
large shape is large, kind of Mount Sharp
in the background, which I really love, which we can just getting a basic indication
of it like that. Just goes all the way
up almost to this point here to mark out where the largest point
is and then go from there makes it easier to draw that finishes coming
downwards like that. So there we have it,
we have the mountains that there are
some distinct ones in the background there, but I'm not going to bother
or too much with it. The tree I think we will put here around about
the same place, but perhaps a little
bit more left. And you can, having
more fun with this. You can just use it as
a bit of a reference, but it doesn't mean
you have to put it in exactly as it appears. Okay? But remember, we do have some edges here that kind of
just curve around like this. Really just branches, maybe
some leaves in there, but I'm just putting
the general shape of that tree in like that. But the base of it, of course, is going to have a
lot more darkness. And so that's why I'm using
just drawing in a bit of a dark a trunk here to
indicate that essentially. And we can go over
again with a bit of watercolor and
docker pain later. Okay, but I want to
preserve this darkness on here and it will help you
as well as you're watching. Sometimes it can
be tricky to see exactly what I am
doing if it's drawing, if the drawing is
much too light, you'll notice some dark sort
of shrub here on the side. There's some here as well. Okay, So putting in
a bit like that is a good kind of guarding point. Okay. Do you notice there is a shadow? And I'm just running
across like this, but this is the shadow
cast by a bit of grass running around that
sort of back section, like a kind of undulating
grass and a planes over there. Not sure whether it's
quite beautiful. Now, the next bit that I
want to do is this section here where the grass finishes and then we've got
to essentially just sand. And if we cut, so we
look underneath the tree and probably easier if we look just underneath
the mountains, that middle part of the
page that we drew in. If we cut that part roughly into half or a bit less than a half
somewhere around here. That's about where
the grass ends. So little point
here where we can just draw in the edge of
the grass is a good idea. Don't go too far forwards and leave and lit it until I sort of go up and
down like that. Okay, and I'm going to put in like the second row
that here as well. So sounds like three rows, 12 and then three, which gets the sort of darker
section is running through. Okay, it does help to
just putting a bit of this to start off with. And then on the front, we don't need to
do all that much. So essentially that's older, the drawing that we need to do. So let's go ahead and we can start putting in little
bit of color first. And firstly, I'm going to
use a number 10 round brush. Pick that up. Number 10 round brush. And this is going to
allow us to get in a softer shape running
through the background, basically for the clouds or the really lots
of sections here. Little bit of yellow. Very, very, very light. Yellow running through here. The way to the back. Home
is lift off that paint. Just a tiny bit like that. Then. Maybe good. Fantastic. And then I'm going
to pick up a bit of red. It's a bit of purlins scholar. And I'll drop in some of it
in the yellow like this. Okay, so we've got the sun around about there
and then we can dropping this lovely
red perylene, scarlet, some orange
in here as well. I've got a bit of this. What is it? Quinacridone burnt orange. More than Scholar. And you keep it
very light as well. And you don't feel like you need to go to dock in this area. And while this yellow is wet, this is why I'm trying to just getting as much of these colors. I can just sort of
blending, joined together. Soften this whole area down with almost pure water mixed in with the beauty of this
other color like that. And we'll bring it
all the way down the mountains as well here. Please. Read more here. And that edge there. Fantastic. Okay. And now time to put in a bit
more vibrancy into the sky. I like a bit of orange or
something on this side. Okay. Rid of orange here, we just dropping
them like clouds, orange clouds just kinda
running across the sea. Nail those 10 slightly bluish up the top edge corner so
I can drop in and blue, this is Sui and blue. Tiny little bit is truly
in blue in some of these areas and they might
help to combat combat, but basically offset a bit of
the woman colors in there. So we're having that
around like that. Be more of that orange. That's true as to
dock actually spread this rabbit. And Destic. Be more than red, would be nice. Pinkish red car. Mistake. And I will carry this down the bottom of bead and dropping
some of these warmth. Again, this is just
some quinacridone, burnt orange rod
at the base here. Now the thing that lobby
good is yellow ocher. Little bit of yellow
ocher into this region to leaving a bit of
space on the top there will have to do the
mountains and just a moment, but I want to let that
dry off the touch first. So quinacridone burnt orange, a bit of this yellow
RCA, trumping that in. And I carry this down
the page like this. I'm I going to be the
color coach at g of a GSI, which is a granulating
brown sort of color, which I want to drop
in there as well, perhaps some of these green, which is undersea green, It's a nice granulating
green color, which I think be
nice for some of these bits of grass and
what have you here. Okay, just running through
the golden sections. So I'm doing a few
things at once. Okay, but they be yellow. It's always important to try
to put that yellowing first. Okay, as I'm doing here. And then over the top, that's where you want to
drop some of that green in some of the
dark colors essentially. But down the bottom it's very, it's almost like a, it's
like an orangey yellow, like a really doubled
down on NGOs. So I'm just mixing a
bit of this color up, which is basically
a bit of brown, orange, and a bit of yellow
at orca download grace. Okay. And I'm going
to just cut a bit around those that section there, that bit of the grass
or what have you. And just drop that in here. So we have some warmth running
through at the bottom. Okay, but it's pretty
basic for now. And just the essential, essential colors
running through. It's always good to do a bit of tapping around like this
if you've got a bit of Bit of paint that you can
sort of think around. Just some DACA be It's
usually I'll pick up some browns or even
some neutral tint, something like that
and just give it a tap over here to get in some sections of congruencies
and things like that. Too much. Okay. And of course we need to
put in these mountains in the back and I'm going to
be using a bit of purple. This is a bit of
imperial purple. And we're mixing it up about 50 percent water
and 50 percent paint. Okay. We want to make sure
that these mixes dark enough so that it doesn't
spread too much as well. And because that paper has
done some drawing already, see you noticed as I put
it in, it does spread, but it pretty much stays
around about where I put it. So I don't want to to document, but these will dry off. Lighter too, so don't worry. Okay. As we come down
the page, again, just finish it off down
the base. Like that. I've got all these
bits of white Vietnam. I'm going to leave a mean. Sometimes they can indicate with warehouses and things as well. You notice around here as
well, It's pretty light. The purple is a lot lighter
because near the Sun Li area, it's just illuminating pot of
that area of the mountain. So I'm just going to go lotsa
in that section over here. And then two, it sort of
gets up to this section here where we can dock
and off again, please. This is a little
bit of darkness. Then. In fact, this mountain
years actually a little softer than that. It's kind of like this. Soft purple. Just kinda like runs across
the scene. Like that. Great color, great sort of
granulating purple of color. So now everything is
starting to dry off. I'm going to go ahead and start putting in some of the
dock at times and yes, so this is just a bit
of undersea green, a little bit of purple. So I can just add in
some B2V basically, but a shadow areas on
the grass and shrubs, soft the shrubs, that
kind of thing in here. Remembering that we
still have the shop and shapes to do later on. Okay, but this is just
some of the stuff, the bids, especially for the, these undulating bits
of grass here as well, It's good opportunity
to add, to add the Min. See this area here is kind
of draw it off too quickly. So it's difficult for me
to soften off this edge. We can still do it over
here, dropping some here. See this area hasn't
completely drag it, so it's a lot easier certainly to getting
this darkness in here. It's just purple and green
mixed together like that. Okay, fantastic. The sod of the brush is
good as well to sort of create blending effects. This time. And getting a few
bits of joining areas at the bottom,
we get some. So I'm just like smallest shrubs and sticks and things
like that here. Just move upwards
towards the same. But it's not all too
complicated in here. They're just really
bits and pieces. Okay? It can use a little
fan brush as well. I use this quite often. Getting some sharp
blue shapes and things helps to blend and
connect up areas. So you see that's a bit of
grass that it's kind of connecting upwards to the
other section of grass. I mean, this gets wet into wet, so it's going to be softer, as you can see here, a lot, a lot more softer. Okay. Then you mix in a bit more darker paint
and then we'll get a sharper sort of darker shape like that
and running through. Keep the mocks kind of
inconsistent as well. That some of them out the back which starting to
dry off as well. Yeah. Here. Right under the tree and
all that kind of thing. Yeah. Yeah. Here. It just sticks and things here, the ground up in the foreground. And always re-wet this
area with a spray bottle. But I'm not going to really bother with that for this one. What I wanna do is also just try to lift off a little
bit of paint here. This area has kind
of draw it off. And it always plays if
you've got a bit of tissue. She used a tiny bit
of tissue here. Wet, this area with
some clean water just around the areas
that you want to soft and off and just lift. Anything is that this does damage your pressure little bit. So if you've got some, you've got a brush
that you don't really mind missing
up a little bit. And I've got these
little flat brush. This is very quiet. Hadi, so try this one. Just a bit of water here
with it off like that. This would help soft
and some of the edges and perhaps recover a bit
of the white of the paper. And she's using 100 percent
cotton paper as well. It's a lot easier to do this. And much easier to do
this on cotton paper. Because paper is
just a lot more. Hadi can take quite a few
washes and bit of punishment. Okay. If alpha,
beta, these, yeah, PPF apps running
throughout the top there. Ok. And you can already see it's a kind of
bringing out a bit of this sunset in
the background. And you can always add in a little yellow in
there as well if you want to just brighten
up some areas quickly and just dab off like that. Okay. But I wouldn't recommend adding in any Gua Sha
anything like that. You can just work with
what you've got like that. So that's a generally and a
bit of a sunset over there. Now, the rest of these
has almost dried and it's the point where I start to
pick up a smaller brush. I've got a little rigor here, which all we use, essentially just
neutral tint to put in a bit of neutral tint
and perhaps a bit of brown to gay in this tree. Okay, and remember it's
kinda shop a shape as well. So you're going to have here, these branches here if
you notice them that just very dark and they don't create any of these soft edges and
things like that as well. Okay. Maybe a little on some of these areas that haven't
dried completely. But you can see
in the dry areas, it's quite dark and the paint
doesn't mix and spread. So that's the effect
that I'm aiming for, especially coming
down the base. Here. We're kinda hits those
shrubs and then maybe there's some middle
DACA shrubs here, even here like that. So these are the dark has
the darkest tones really. Here's some other ones. We can put it into some
darker B2C as well. No shadows, anything,
they just darker bits of grass and delighting bits of grass here
in the background. Because some here as well, maybe a little bit here. And be good to have. Being here as well
in the foreground. Just, just turn the brush on this side and getting
a little bit of that. Here. Think a bit of a
spray would be good. A spray bottle. This will help me out down
the bottom. What more? Ray this bottom product that
and perhaps a logic brush, something like this,
best actually. Neutral tint. And yeah, He's still preserving a favorite
of that green. But underneath the green, you've got these dark
and B, it's okay. So you can see spray the
bottom and little mole. I feel like it's just it
would be good if we had a bit more color down bottom and a little
bit more strength, something like this.
That's better. You're trying to make it 25
aren't as well. It's tricky. And it's just nice to have a funny little dog a tone than what it is because this this area down the front, It's actually a little darker
than this area at the back. If you look, it's marginally dark and down
the front and the back, you see this sort of sun
catching onto some of them at the back region is. So we need to imply that here in the front and that's
how I'm doing it. I can drop in a few of these
little darker bits as well. Okay. Games outlining the edge of these bit of grass or
what have you there? There's even bits
here where the yeah, just sort of connects on, creates this sort of dark is
section in areas as well. So we can just use the
edge of the brush, the side of the brush and do
something like this company. I didn't want to rewet
this section again, so I'm just doing this
for the time being. And that should be enough. Little rigger brush
again and again, just using some neutral tint and a bit of brown
mixed together, get a very dark sort of color. And we can go in and I'm
just using the edge of the brush to imply, yeah, just some dark, scratchy
sort of shapes in here for the The SUM than the
leaves and some images. It's at the branches
and stuff sticking out. Okay. This is the way to do it that
make it very, very quick. We didn't have few
bits like that. And then over the top, just grab more of that, paint and connect up. Get those branches moving
through and defined bit more. Use the finger as
well to just get in there and and a bit more color. Scratch out some
highlights on that. Notice there's even
some little trees and things here in the back. Very, very shops or the trees running around and
distance and what have you. And some of these you can even turn to
houses if you just put a little and little bit of a squishy shape at the
bottom likely is like that. Looks like a house. Could be could be
like a little half. So who knows one? This little trick? Comply. The bits and pieces there in the background and
the font distance. Few more trees off the
trees running in here. Maybe some up here. And forming an edge to show that this is like
a mountain going up. That Yeah. Okay. And bunch of birds here and
there in the scene like this helped kinda connect
up the sky with the ground. And I'll call that one finished.
14. Sunset Scene: Painting: Okay, For this video, we're going to be painting a loose sunset scene and would
have basically a lot of, lots of tones in the top
section near the sun over here wasn't DACA sort of clouds over on that side loop to be sort
of suddenly from the back. And here is a bit
of a sort of smoky, maybe misty sort of wool McCullough down
the middle section. And then we see the front area, which is probably the
doc has section of the entire painting apart
from some of those class. But I'd say these
are more photons. We've got some maybe half
times up in the sky. So we're gonna go through and do a little
bit of a sketch. And I think through the sketch, we can also plan out how light or dark you want
everything to be. I think that's
always a good stage to start planning
what you wanna do. Now, what I'm going to do
first is put in the area of the horizon line and just around about where
those mountains, right, or the distant mountains or in the back finish off and they finished not about
halfway through the pager that kind of a little
bit higher than halfway. Okay, So putting it in a little, just a line up there, like that. There's not really much
drawing needed in here at all. Okay, so that's
about where it is. And of course here we've got some little shrubs and trees, something here coming
in from the side. Then we've got a little
bit of this mountain. He had little hill
which comes across, disappears off variants
at a distance and a k. And then we've got, of
course another let me have a look at another section that just runs across here. Yeah, but you've mainly
just got this, I guess, this little area over
in the background and then some other bits and
pieces here in the foreground. And some shrubs and
things like that. There's maybe a shrub here, is no shrub or something
here in the foregrounds. These are good for making
literal shadows for later on. Okay? Okay, but I think
that's about it really. There's not too much
drawing a needed in here. And it's really
the horizon lines. So I want to get straight into the actual painting and
I've got a round brush. And it's basically a
number 10 round brush. And I'm going to go
through and firstly, getting the warmer colors, the warmer hues on everything. So whichever this palette, so that colors
really close to me. I've got a warm colors
over in the top. So I've caught, I've been at this a little bit of a
Kronecker to that orange here. Okay, I'm going to put
it in a little bit there and their eyes and lines, and it's a kind of a dulled
down orange like that. And then also I've got
some Hansa yellow. And I want to make sure
I've got enough of that Hansa yellow here as well. So just keeping it really, really light like these. And remember, we can actually lift out a bit of
that paint light up. But we want to keep it as pretty much the inverse is a lot is we can run this section here. I'm making sure
making sure we're essentially that it's
almost all entirely water. Okay, so a bit more of that
orange further down and get it to blend in a bit with
that yellow like that. Okay. Some more of that yellow
and just up the top here. I'm keeping it
pretty light still. Okay. More of that orange, I'm thinking just over that
right-hand side as well. And perhaps a bit over the
left-hand side to here, so that it blends out to a lighter blue dark a
color actually on the edges. And also because
I want to add in some blue through
this area as well. So just popping a bit
of that orange while we can It's a lot of water in here. And then I'm going to pick
up some cerulean blue. Let's keep it pretty, pretty light, just like that. And then we'll just
drop it in to create some little contrasts in
that top section like that. It's always good if you want
to pick up a bit of this, a little bit orangey, you can drop little bits
into the sky like that and just get that blue to
mix intuited touch. Okay, So you have some
interesting mixes. Sort of drop it into this
orange as well further down the page so that it mixes, does its own thing. Okay, let's have a look here. I want that to mix nicely there. Okay. Fantastic. Over the top like that as well. All the way to the
edge of the page. Like to put in a
bit more darkness in the corners as well. It's nice to just have an extra bit of
darkness at the top. I can't pick up a little
purple and drop that in, in some pods as well like this. It's not really
in the reference, but I thought one on
this document down a little mole K. And so
very granulating colors, all the purples,
even the oranges. Aquatic tiny lighting
as well that I'm using here is a green, a little bit of that
coolness down the page here. And k, I'm trying my best to preserve and preserve
that nice orangey, warm color here for
the sun set area. I think that will be fine. I don't really picture
anything else I want to do. You can again, like I said, just add in a bit of darkness
at the top if you want. And as we move down the page, also what we have
here is we do have some kind of dark clouds. I'm just using a bit of purple, little bit of purple here to dropping around
the horizon line. Wow. The paper's still wet. And this here and then
it's nothing too defined, but some DACA cloud here. And there was a lot to remember. This is going to draw a
significantly larger as well. Okay, So just drop it in. It kinda carries all the
way towards the end. And I'm there actually some
of it comes up like that. There is some little softer bits of clouds and things here. So he's dropping
a bit like that. Yeah. Yeah. Beauty clad like that. Okay. And Destic. It all sitting nicely. Campaign. Fantastic. So that's about the sky, Don. I'll move down further
and I'm going to pick up some more current
acridine orange and drop some back in here for DC area of that mountainous
region in the back. Okay, and just drag that
across here as well. And it's going to be
a darker section. They all have to get a bit more, little bit more color later. But I want to just have a solid and warm kind of orangey yellow color running
all the way through here. And basically I've achieved that by mixing a little bit of Hansa yellow medium
with a bit of the burnt orange stick. Bit of softness as we move
down the page. Like that. Female, bit more
orange anemia as well. Bit of yellow. But then enter in the back. I just wanted it to be fairly
soft as we move down this just just creating a little
bit more color here. And also what's good is
if we put in some green, I'll put a little bit
of the sea green here, just kind of a dulled
down sort of green. And I'm going to use that with the quinacridone, burnt orange. Thanks. I will have some undersea green and
areas like here. And remember this stage
we're still looking at very light colors. This is just to indicate
the foreground. Here. Daca, the
front, like this. Remember a lot of
this we're still going to be painting right on to wet down like this bit of backing paper
here so it doesn't leak through to the other side. Here we go. So really it's a
mated sort of grain, but it does separates out
very beautifully later on. Okay. And test take, I've also
got some sap green, which is a lot more
vibrant sort of green that you can draw Payne
3 some areas as well. Maybe up here, this
edge like that. All right. Excellent. Now while
the paint is still wet, I do like to pick up a bit of collaborative extra
commas and the browns, maybe some of that
green just mix a bit of that green and
brown together and get some color and just
tap a bit of that in case two to get basically just a little bit of
color running through. And want to ever do it. Flick. It's like a brush like
I'm doing here as well. So inconsistency is in there. Thank you. I'm pretty messy when you
do this and go overboard. Okay. This will just create a textured effect here
in the foreground. It's very subtle,
but it will make a, certainly make a bit
of a difference. Okay, that's enough. If you've got a little
fan brush as well, and recommend you play around with the fan
brush to put in some of the little bits
and pieces as well. So you might think, let's put in some little bits of grass like this and
coming up in areas. This will help to indicate some softness and some
details in the foreground. This can be tricky
to put the staffing, but remember to
keep it very light. Very lots of stop putting a
bit more purples and blues. And in some of these
areas as well, notice some of
them someday or is thought to drive it in
T and U in the front. Okay, So I'm just
trying to get to it. Some of the other
bits and pieces before it completely dries off. But you'll notice
it's mostly quiet, doc or DACA down the back, sort of areas here. And then it starts to get lighter as we
move into the scene. Okay. But a bit here
and it kind of trying to get the sort of golden
look up ahead. Okay. But we would certainly some dark areas and scratching
us here in the foreground. Okay. Good. And I'm going to
stop picking up. Maybe they'd have purple with the this little fan
brush, little purple. And a little bit of neutral
tint maybe mixed in there. Let's put in a bit of brown
just to dial that down a bit. Maybe like a shrub or something. You notice this air is con of drawed
already so you get some extra sharpness
and detailing out in the Back
Bay which is good. Some more purple,
maybe a bit of blue. It's really just getting a
dark color through these, some of these trees
and shrubs and things. And this can be a bit
of a tree, a shrub. That touching, touching
go just like that. Kind of mocking out
this section here of the air, the hill. Okay, helps. And the good thing is
that you can just create nice shadows running
across like that, joining on to the trees and
shrubs at the same time. Yeah. So Witton will look like this. Could be a beautiful shrub
or something like that. The shadow here. Okay. So committee bit more HIO, beauty of indication
of something, some kind of tree here. Now this shrub or
something. Okay? And we've got some more
here in the corner. A little bit more
here in the corner. What have you? And a lot of dry
brush work is well, it's not it's not perfect. It's just trying to get
into a bit of that color to mixing with the gold in here. Well, I can putting a bit of color in that
background as well like that. Now the thing is
that little line at the back for the mountains, so we can do that while
the paint is still slightly wet as well, like that. And so that it just
looks like it's blending a little bit with
all that missed and stuff in the center there. Okay. So looking around and seeing if there's
anything else that we want to apply and
change around in here, doesn't really look like
it's all visible too much. I'm quite happy
with those clouds. I mean, we could probably add a bit more darkness into this, these trees and things. They all quite amazingly
soften down when they dry. So you'd have to go a bit stronger even this
one's kind of, it's almost disappeared here I say this will help
create a little, and there was like a
little boundary here. And of course, this
area starting to dry so I can start putting in
a few these little marks like this to indicate
some shop a sort of bits of grass and
things like that. Then even kind of like make out a path here or
something as well. That's another thing you can do. Just, oops. Something like this. Yeah. It makes it look a lot more
three-dimensional as well. You have some of these
like shop as shrub, like shapes and things
running through the scene. Okay. So often maybe this area. And if you want to put
in a bunch of birds, you can put in a
little few birds up in the back there That's
guy's pretty dried so I can just drop in a few little
indications like that of some basic birds up
here in the sky. I like to pick out these
little highlights as well. And they help
indicate some of the, maybe just catching some, some meta someone or something. Left out a bit of white here. Externally. That's okay. Could just be something here in
the background noise. Okay. And that is pretty much
it. That's finished. So we've got all pretty much all of the lighter
the kinda of times that we've got it and
then we dropped in thicker pigment to get to
in a little bit of these. And Dhaka shapes in there.
15. Tokyo Street: Painting: Here's an interesting
scene from Japan. Actually it's Tokyo scene. And really like this
because there's this kind of tunnel view
running through and we have a very strong contrasts in these same as bone
order to practice tone. So we've got the sort
of brightness coming in from that left-hand side
for the SAT, this building. And then of course you've
got the darkness all the way through that
center section, almost like if you
draw it out and do that whole square section with a bit of a light at the end. Then on the right-hand side is going to be a lot creeping in. But all these signs
and what have you, we're a fairly doc so we can get all that in
with a bit of a midtone and get some food turns in the train that's running
across the top section. Darker tones for the shadows, some of the figures here. So let's go ahead
and start drawing. And I'm going to
go in firstly with this building on
that left-hand side. And the photo reference is
actually a square shape. So I'm going to have to
enlarge bits and pieces. Okay, So here that's the edge of that ran about
the age of that building. And we know that it comes in
a random at here as well. Okay, So we're going
to be rooftop here. And then we've got like a
first four here as well. Right there. There's a shop here. It looks like it's just got
a little shade that comes out like that of the
edge of the sharp. There's no middle shutter, not a window in. Perhaps, perhaps this
is actually a door. And then you've got
another section here which looks to be a
larger door as well. You've got a little sign
here as well on the ground. Okay. And of course we have a figure walking into the scene here. Okay. So just putting a new indication of where I want to
put that figure in. We do have a window that comes straight
through like that. Few little bits and pieces
with a railing there. Okay. And there's also a
sign for this shop. It's little rectangular sign like that which connects to
the side of the building. And that's about it for
that side of the building. So the rest of it here, this becomes interesting because there's obviously all this, all these things
here in the front of the store that you could be a chair or something like that. But here it's almost
just like a wall and you can see it
and just go behind that sign like that. And it comes all the
way down to here. I'm going to extend this
out a fair bit as well, just to make and make sure that I've covered
up this whole area. It's another sign here
on that side as well. But then we've got
this this train. So it seems to snap
that photo just at the right time is
that train comes across. But I can get it a bit of
that top section of it. And it's really just the
side of the triangle. Can't see much of what is essentially going on at
old in the age is little, little bits in pieces in there for that
side of the train. Like that. Fantastic here. And just some more
windows and what have you like that which is nice. For another kind of doorway
or something like that. You see you have a top sections. They're these little
sections of the door. And there you go. It's
more of that train. So just the little bits and
pieces, you can almost, almost can't tell that there is a train or lyse
sort of concentrate. He can't see at all too much. But there's all
these little bits of wiring and things running
towards the top section, which helps to also indicate that it is, they're fantastic. Now this whole area
here is very dark. Sort of just goes
all the way through this tunnel area
towards the back. And then you've got
that roof top part of that section here
for the train tunnel. So it's like the
edges like this, but it forms a little tunnel
as you go through here. And the great thing is that
we have these kinda areas of shadow here that run
through underneath. Of course, there is
another kind of sign here as well at the side, and I'll just put
it in the scene. Quickly like that. And that creates a
little shutter is all running towards that left
under joins on here as well. Okay? So we can start putting in some, some figures and people. So a lot of little bits of detail and things going
into the background, but we don't need the moreover, the fact we got to remember that this whole section
is pretty dark. Yeah. So that's going
to be the main focus, focal point in this scene, this tunnel and the contrast between the
light and dark areas. We have some figures in the front is a
little girl here on a stubby she's on some kind of like scooter
or something? Yes. I can just put in a bit of
a dress and legs there. And you can really
a 100 percent C, but she's got was coming
and forwards like this. Okay. Very basic. And then we've got
another figure here sort of reaching out is a bicycle like this as well. There's a lake, the other ones kind of hidden
behind there. And then the names, of course, coming forwards here like that. So it looks like this, this
person's riding a bicycle. Okay. Thank these figures here at walking around in
the background, so he's one. And then we can put in
another figure here, getting a little
closer to the scene. And of course we do
have another bit of shadow running here too,
which is interesting. So cross from this sign
in the foreground here. And it's really just
a really big pulled. It goes up into the
sky behind this sign. And this actually forms part of the it's it's like a little
lamppost or something. Yeah. Isn't that so it's just a little little
lamp area. That's one. And then we can get
an another one here. Then if this kinda
connects on to the, to these two lamps
and the streets, someone here as well. Nicely street sign. And beyond you see kind of a poster on the
wall, rectangular poster. And a lot of this stuff here. This could be another poster or a billboard or something
here in the foreground. And then you've got, of course, these other buildings, which I'm going to
try to indicate. Okay, and that comes down
and select the edge of that building is a kind of a shade cloth here.
Didn't see that before. It looks like a restaurant
or something like that. So in food on the edge here, like that, I'm going to be some darkness
in there for sure. And then we've got, of course, some more of this section here, which is just the another sign coming out the side of
that building like that. But it's a lot of this is
just quiet doc. Anyhow. Okay. Fantastic. Putting another figure here
in the background there. And a few more, maybe
walking around. He ends up being the distance that I'm kinda overlapped would
be with each other. Little indication of the legs and some at the back as well. Here it's mainly
just trying to get their heads in the body. I think that makes the
biggest difference. Okay. Okay, fantastic. So we're looking good. I think for the sketch, I'm going to go ahead
and get started with the painting again. What I want to do
first is again, just add on all the
real light colors. So really I want to begin with some orange for this area here, which is basically the
side, This building. Little bit of orange, and
then here as well at the top. And if it's too dark, you can
always mix in a tiny bit of this burnt sienna as well, which is what I'm doing. Just a dull it down, a touch like that. Notice as well, kind of in the Windows zooms
and that you're gonna get a little bit
of a wooden frame. What have you? So we can draw some
of that in here. On top. Bit of this brownie sort of
paint underneath as well, just to getting the kinda
little shadow shape there. There's well, might get inhibitor these
blue collar as well. For this shade cloth. Some coolness running
through like that. Really underneath it's
just kind of a wall. Mccullough, hey, like that
bit of the brown again, using that here and to darken
up some of these areas. Okay, cut around that
song as well and getting a little darkness
behind that figure. And imagine bits and
pieces through there. Okay, so it's hard
to connect this onto that right-hand side over
here and leave that sign. Oh, that sounds song partially
white as well like this. Okay. And we'll go along and
again just dock and this tram up the top and
be like this blue color. This little cool color, very cool sort of color. And dock in this down like that. Are we dropping a bit
of extra color lighter, but I'm not worrying too
much about it just yet. And underneath the bridge
is where I want to focus some DACA tones, bottom gravitate of
purple and neutral tint. I think this would be a
nice color combination just underneath here. K to get in some DACA
bits k that will help pushes some of these. And area Beck created an effect of this kind of
darkness running through. Okay. Getting it quite
accurate as well so that it's nicely matching
with everything. More warmth me a little bit
more darkness back here. Notice how I'm cutting
around the fingers as well. It just helps to do it
this way so that we can get in the color for them
a little bit lighter on. And of course here we have
the signs and all that, kinda like Chaz
over here as well. So you can have some fun just, simply just pick up a
few different colors that you might want to indicate. For example, these could
be more like yellow. You might want to put
some yellow on here. Model on some red here. Where's it? And I'll put a sign
here somewhere. Here is no sign here. Beta read for that
sign that could be a bit of red here as well. For that sign. And a bit of coolness to the
left-hand side like that. Underneath here, bit
of coolness here. Then a lot of it's
more cooler than, than warm, but you do have these little bits of
warmth and mixed in here. So that's why I'm gonna mix
it up a bit in this section. Create some extra contrasts. Okay, so bringing that up, that's just trying to cut around these
little lamps as well. And this whole wall is almost
like a burnt sienna MOOC. So I'm just putting in some
burnt sienna for that. Carrying this down the page. And we got elements of just this stronger tones running through and
areas and strong Hughes, I mean, just like more vibrancy. Just jump out at
you had some spots. But I'm letting that sort of sinking as well so
that it's not too vibrant so that the call is kinda mixed
through this as a bit of white that I'm using here. K. Let's have a look. Join that on nicely like that. That's kinda read as well. Okay. It more neutral tint in a bit
of purple mixed together. And what this is gonna
do is allow me to get into a bit of this
shadow across on the ground. So I'm cutting
around the figures. You might want to use
a smaller brush and just hoping to a number 6 round that now and we just want to put a shadow and maybe running
across like in there. Okay. So the trick is, is yet cut around those figures. Being careful enough is to leave out some of
the lakes and things. Okay. Actually goes all the way
across here. You have a look. Kinda shatter that just
runs across like that. Moves downwards here. Bring that sort of
around there as well. Soft the shutter. And then you put it in
their rooftop here. This section of darkness
soften that up as well. I don't want too much
detail just yet. Okay. So look what else
we can do to be more purple bit of neutral tint, still preserving that lights. And the figures and the little people that are
walking around here as well. It pays to just start adding in a little bit of
detail on the ground and joining up the shapes of the figures and that
kind of thing here. That's a very basic
sort of bicycle. They're just putting
in the shadows of these phases like this. Okay. Little bit of that shadow
running a curse the ground, the figure here as well. Like that. Good to put in a bit of love through some parts of
the figure it out there. And this figure
here, maybe we are bold color is slightly warmer. Okay, so what I want to do also is while this
area is still wet, is to get in a bit of this cool color running
across the ground here. It's a little bit of this
cool color and I'm creating some little lines
and little line a fixed as well for
the sign like that. Okay, maybe leave a little
highlight three then I'm going to move these
purplish gray sort of color through the page to create a darker shadow
down the front. And I want it to be almost
as dark as that area in the back is not true. Not too dark, but around the
same tone is back there. Leaving this whole
area of whites, as well as you can see, really creates, really
creates a big contrast. Normally, I'll use a light
wash of color in that section. But if we leave it white, then just able to get
a logic contrast. And it looks funny
to begin with, then you really tempted to painting because it just
looks so out of place. But if you just leave it for now and paint the rest of
it, you see what I mean? It just starts to come together, but it's not apparent until
later on when that happens. Really just have to sit taught and wait for
that to happen. There's also a, if you
look at this sign here, a little a little
bit of shadow going to the left of that sign running through to
the back there. It's not an almost exact as
well you do it gets mola jagged shadows and things even running in from the
edges and things like that. So I always try to create
some inconsistency, some Lou, just some little shadows here
and there like this. And that's going to help you out because if you
make it look too perfect, It's not going to he's not
going to read properly. Okay. These tiny little
scenes imply that the little bits of shadow
and what have you, they imply that there is objects that are
outside the field of view. And yet they're just
create more interest. Say ruby, color there. Just trying to create
a little bit of contrast underneath. It's almost like a
shadow underneath the shade, areas like that. Okay. And of course I
forgot to do the sky, so we're going to
put in a bit of cerulean blue just into the sky. And I'm using quite
enlightened mixture of it. I don't want to overdo it. Something like this. If it mixes in the building, don't worry, just continue on. Okay. Just a light wash and
then I actually just add more water and shift
that around there. Okay. The buildings and the train here have actually
dropped off a little bit. So. Not all too much I
can do about that. Just rather wait and see how it turns out this perhaps supported me to blue
back there as well. Indicator an air back, back in the distance
for the sky. A little warmth. Perhaps a little
orange just off in the distance like that as well. Just a warm up that
area back there. Okay, good. And that's looking fine. So while some of this stuff
is, of course drawing, I'm going to go and
add in a bit of color, some of the figures, and we don't have to add
in a color to all of them. But I think a little
bit of color on some of them is going
to certainly help. So I've got a bit of neutral tint here and
colorful the heads. These sort of heads
air hit area like these kind of implies some hair or something like
that on some of these some of these figures. Okay. And if you put
the you say, Well, notice that's pretty
much the dock is a term that I've used so far. Okay. I've lost this
figure here economist. So we can always bring out the
head by adding in a bit of darkness up the top
here like that. And that can be the leg there. It's not super obvious, but you can see there's
something going on. Sometimes it could be
holding implying like a bag or reef case or
something like that. Some of them you
might want to add a bit of lots of comments, like a bit of blue in the mix. So he is just a teeny bit
of blue through there. Okay, now leave a bit of watt and that right-hand
side of the figure, a mix it up and just pick up some of these
other color hue, which is sure what color it is, but it is a Walmart's
let me warm and mix running
through the background and then get some legs at perhaps some legs
running down the back. Therefore, the figures,
these figures here, it just, they all pretty
much in darkness underneath. But because this area is
actually still width, I can actually dropping a bit of darkness here for the legs. And the great thing
is that it allows these little subtle darker
shadows to show through. Like that here you can
see that the paints, the paint's dried
and so you've got to shop a shadow going
to lap it here. It's a softer dark shadows and they look a
bit more abstract. Okay. Fantastic. I wouldn't dock and
down this person's leg a bit as well here that we've got to
figure over here, which I'm going to add
in that beautiful blue. There's still a
lot of blue here. For the torso. It's too much just
lift off and continue on the legs and
just a dark color, really just neutral tint running through like that little bit of hay to the back of that figure, some some hair for
assemblies Because as well earlier in the distance, they kind of look like
they go spiky hair because it's so Witton width. And then the rest of it
is really up to you. I mean, if you want
to leave your fingers wide or you want to
add in some color, I might add in a bit
of color for that one. And you can cool
it down and then warm it up in areas
and then just leave and just leave some white for the
other ones as well. That's completely
fine. And okay. And now I'm going to put
in a bit of darkness here. So this can be just
the windows of the train that's running above. We've got quick I'm doing that
is just one brush stroke, one brushstroke to
keep this style in line with everything else underneath the
bridge as well. You do notice that there are these little sections here too. And I'm going to just
indicate that like that. Some little lines running across the top section there, the roof. Okay. Maybe some running downwards
like this as well. Yeah. Bit here. Sometimes you have to do this, especially when we've lost
some of that pencil work. Well, just outline a little
bit more in the watercolors. And it's kinda just, we
basically just drawing. And on the top here,
beats of the cabling and things which indicate
the currently the lines, the electrical
components and things. So that will spring to attention
the is train a bit more. They're just trying to get a little more accuracy
into the train like that. Do notice that there There's a little section
underneath here as well. It's kind of like a rail just
runs vertically like this. I'm not going to do it. I'm going to imply
that all too much. And also, let's put in some shadows a bit
underneath that building, maybe a bit on the sign, that left side of the sign. We've got some inside
the windows here. We might have a
bit, for example, I just running through some
of these areas of the roof. And they're not
really the simple, but I'm just trying
to simplify it down. Like that. Get a bit of texture to these tiles and the
roof, I suppose. Like that. Here. Here. Again, some more
darkness around these figures. The figure over here, I mean, the Neith of that sign. There might be a doc a shadow going towards the
left like that. I mean, history is pretty pretty dark in there any anyway, so there's not really too
much for me to do there, but just looking for
other opportunities, other areas that
we can lighten up. Over here, we've got
like a lamp post so I can just dropping a
bit of dark and paint, bring that down here. Okay. Like this. And of course they're just putting some of the
detail for this lamp. Here. It's just the one we
want is a couple of LED light lamps elements. So I just drawing this, drawing them in with
watercolors like that. And you can see that's
fairly effective. Associate white to that
area has dried a bit in. You're able to, to get
in some more details. And there's maybe a pond
that Sana can't see. Some of it just runs
through and we got cables and stuff
as well connected. So we can certainly go ahead and add on a little detail
through the buildings. You'll notice as well
just little verticals and things like this. They're just some
dry brush strokes as well to get innovative. This other stuff. And that's it. I think we'll leave it as that. So we've got a few lot
of different times. You've got some of
these lots of times. And we've got these midtones and really dot times
running through here. And that creates this
lodge sort of shadowed impression of watts and Doc.
16. Venice Landscape: Painting: This is a very interesting
scene here and there's a lot of detail and a complex
data on the buildings. But I'm going to show
you a simple way to just reduce it all down to just really one value or maybe it's basically just
a bunch of middle values. And essentially what we wanna do is just get an idea
of all these buildings. Maybe you'd have
light coming in on the left-hand side of some of these buildings
here to the right. But it's basically
this light that's reflecting across
the canal here. In the middle part
of the same we do have some buildings here
and things in the front, but I think I'll probably
leave these out. I might just actually bring
this scene forwards just a little bit so that we can
cut out that building. Okay, so let's go ahead and give this a go in terms
of the drawing. So we know the horizon line
is roughly here now it's about a third of the way
from the top of the page. And the sky is the lightest
part of this whole scene. You can see it basically then some of the
buildings to the bag, maybe some of the roofs here, but essentially the sky and
perhaps a bit of this canal. So how can we get
in these shapes? How can we basically
getting a real simple, I guess it's still aware
of all these buildings. Well, we can have
a look at where the buildings sort of disappear
off into the background. So if we look right
in the center here, we know that there's
a bunch and it just kind of small buildings kinda coming through
at the back like that. You can see bits
and pieces of them. And it's not a
really too apparent, but you can see basically
they come down and then they can now goes
all the way down. Just putting a very
simple line just where the canal might
finish off to bed a third, little bit more than
a third of the way, actually through the page
somewhere around here. And then you've got the other
side of the canal which is essentially just going straight
up the back like that. And then it comes down
something like this here. Okay? Something like this. Alright? And that's basically it. And essentially
what we wanna do is get in a lot of these shapes of the buildings and make this sort of three-dimensional
kind of look in. I always like to start with
the stuff in the front first, just make it a lot easier so you can go in and get the
rooftop of this building. And I know I just wanna
make sure that there's enough room in the background for all the other buildings. So we just have to make
sure just out to be very mindful that we are
leaving enough space. Okay, so this second
building there roughly runs about half the
way through this whole scene. In fact, this should
be further down about roundabout here actually. Okay, but it's not a huge deal. We can certainly make do. There's a bit of a bush
or something here. There's even some trees
and stuff here as well. Okay. And there's just putting a
little edge of the building. Use something like this there. Fantastic. And again, we've got this
other building, Ron front. So just a simple little
scene like that, just the rooftop and another
one here in the front. Again, the rooftop just disappearing off into the
scene at the back there, they kind of just line
up nicely like that. It looks like there's a
kind of courtyard here. Okay? And there's a house here. Let's just simplify this down. Okay, something like this. It's a rooftop here
that comes down there. Like that. There's another building that just runs up all the
way towards the side. There's a rooftop to
that building as well. And that comes down like that. And really all the
back buildings here can be condensed
quite simply as well. But let me just get in a
little tree here on the side. This whole courtyard here
is going to be fairly dark. So we don't need to put
in too much detail there. There's looks like there's
some kind of path here that we can perhaps emphasize. We'll see how we go later. There are some Lada bits
and pieces in here, but it's not too certainly. You don't need to worry
too much about that. Okay? So maybe just the
sides of these houses. You'll notice that it might be, there might be a little bit of light catching on
the sides of them, so it's good to have a
few of them in there. And this is like another
building out the back. This is going to be quite dark. Lot of these buildings
here fairly dark. And the only thing
that you might be able to see off them
as just the rooftops, which is why I'm taking
a bit of care to just draw in some
of these rooftops where I can and the
buildings here in the back, they become smaller
and obviously more difficult to make out the detail on what's
actually happening. But just reduce them down
to these sort of box, box-like shapes
and the distance. Pick out a few rooftops
that you might want to drop in like this. Um, you know, there's actually a few triangular sort of
rooftops that just duck out, jot out the sod here like that. Okay, so we can get in a few
bits and pieces like that. That's a larger building. He kind of comes all the
way up this triangle shape. Okay? Lots of
details and things. And then of course got this. And look tower here
and the distance it goes about the roundabout here. Okay, so let's just draw in
top of the tower like that. Look how simple that is. And there's some
buildings back here as well that we can just
begin simplify down. A lot of these will just
be a basic silhouette. And like I said, the rooftops are going to be the main indicator that there are perhaps some houses
sides of the buildings, that kind of thing as well. Button really a lot
of that is going to be indicated quite lively. As we get up into the distance. You notice it's just hard to see what's going
on in the end is just you can almost just see
rooftops running through. Okay. So I think that side's done. I'm fairly happy
with that over here, you'll notice as well, there are some kind of
bridges that kind of go over crossover to the
other side of the canals. Like this beautiful
photo of Venice. There's another one
here as well that kinda crosses over that. So simple and simple
does it nothing to suddenly just putting some of these little handrails and
things like that you notice is a little shadow underneath
as well like that. And then the light just kinda comes and reflects
downwards like that. And you might have a few
bits and pieces here. You look at these
tiny gondolas here that just barely visible. But again, they have a
little sort of silhouette and shadows underneath
them, which will help. Hope, I guess, give
a bit of interests, add a bit of interest
in this area. Now there are some, of course, buildings and
things here as well. So we're going to have to just draw a little bit
of this going on. And of course, these towel
which we can't forget, I'm just going to go out
and draw it in and we know it sort of finishes
quite high up the page, but I'm gonna reduce it down a little bit so
that it doesn't go off the page completely. And the little edges
of it like that. Then top of the tower, there's three sections in here. The towel like that. Here's all the way down. It's actually got an
edge to the side of it. If you look, It's almost you can see the side of
that tower as well. So something like
that comes down. Let's have a look at what are
this is going to be again, just another silhouette
of the other buildings. So we'll go in and
roughly indicate, I think this is some
kind of church. It looks to be some
kind of church or something like that or a larger
building, whatever it is. There. We've got a triangle
up the back of air and this kinda civil look, this kind of finishes
ran back here actually. Just behind. Look, just behind the tail. I'm sort of stops around here. So again, I don't need to really detail too much
here because it's, I'm just planning to have
these mainly as a silhouette running through the same
route than anything too. Detailed in this section
is the link tower. Here's where we
can barely see it, but there's a little towel and buildings and things
off in the distance. Notice there's all these
overlapping shapes, even these little house here. And that overlaps with
another house here. In a just, it's just continually evolving
and changing as we go. And we have this rooftop here, which is just like a just
a building essentially, it's facing the canal. So I'm going to get that
coming in like this. Yeah. Ac and down the bottom
here it looks like a kind of a little balcony area resting error or something. Of course, these two buildings here are going to have
rooftops as well. It's actually a lot
more detail on here, but again, simplify this down. We're going to look mainly at the tones
running through here. There's this Bush running through the center area as well. Of course, this kind
of why building huge. We might, may or
may not actually getting there we go this other building we can just getting coming
through this side. And what's like that. Okay. And what else
do we have to put in? I think just a few little indicate a buildings
here in the background. Sort of getting the sides of buildings in that kind of thing. Keeping it pretty simple
as we move further back. I'm like that. So we are ready to get
started with the painting. So the first thing I want to do is get in the
background colors. And I do want to add in
a little bit of warm, but perhaps it just a tiny, tiny bit of wont hear
in the background. And I'm going to use a
number 10 round brush. And a new favorite colleague, Louise cobs, all orange. Drop a bit of that in here
into that Becker in area. So nice to beautiful
granulating sort of orange trophoblast do that. They're just a bit of warmth and it's not
saturated enough. You can pick up a bit more pyro orange or just a more saturated
orange and mix that in. A bit of red as
well, would be nice. Let's put that in,
in the horizon line. And you notice that you also start seeing some of
it in the buildings, especially over on this side, the rooftops and
things like that. Okay, bit of sienna does
work fairly well too. So bits and pieces dropping very light colors
running through this area. Some yellow ocher, this will be good. That's more like it. Then we don't have to worry if we cover
these buildings. Because again, we're
going to go over the whole lot with
the doc a time. But we'll try and getting
old a lot times n It turns out that all the light
tones more often than not, are actually quite warm colors. And of course, you do
have some lighter tones like sorrow in blue, for example, naturally,
which is quite light. And also other
blues, if you don't use them in much
higher concentration, there are also quite, quite lots as well. So it'll be go orange here. I'm gonna get some into
the water like that. Again, more that
covers all here. Bit of titanium white
is good as well. Just light colors. Let that kind of mixing. What would it be green here. Get some of these
indication of this shrub. And then of course, the little courtyard here, which is sap green, but I might want to dial
that down a little. Let's add some neutral
teens in there so it doesn't overwhelm,
look too overwhelming. Drop that in there like that. Remember still keeping
things pretty light. I'm not just re-wet this area of the sky very quickly because I know it's at potentially going to draw if
I'm not careful. Sienna, move the orange is warm color running
through that left-hand side. And that's a bit
of this titanium, why it's also running through? Yeah. Okay. We go up to the sky. I'm just going to start to
add in a little teeny bit of this purplish color like that and some ultra ultra marine, but very light still. Okay. We do want
this area to be, yeah, just very, very lot. Given that it is the sky. Can a bit more color on
that town. That blue. And then all the way through to the side and I'll get
that one in as well, just a bit around
that tau. Like that. Ultramarine is a
beautiful granulating color texture to it. So even when you use
in quiet light mixes. Okay, That is looking good. While the paint is still wet. This is a again, it's a good time to indicate indicates some
small ripples in the water. I'm going to pick up
a little principle with a number 6 round brush, maybe a little early for this, but I can just try. I'm dry off the brush a little bit and notice the
dropping in a doc, a tone in a lotta
area like that, but it spreads quite nicely, unevenness shadow
underneath the bridge. And if you notice, pretty, pretty basic so to shadow. Okay, but we're going
to have to go over it again later anyhow. Okay. I think what's
known as though is that we just sort of white for this top area to
dry just a little. And once that's done, we'll go in and
do the rest of it all wet into wet and I'll use the hairdryer to
speed versus lot. Okay, That's all dried now. And what we are going to do
is we are going to go through and getting the details for the buildings and reduce this
old down to a silhouette. So we've essentially
got to maintenance. I mean, obviously the
with the dark tone, it's going to be slightly darker and a slightly
louder in some areas. Okay. But for the most part, we're going to have it
fairly consistent in tone. So we'll work across on this side first and I'll
show you what I mean. I've got a number
eight round brush slightly larger than the
one I was using before. And I'm going to be
mixing up a bit of this brown here is
basically a raw umber. But I've also got myself
some neutral tint here and a little bit of cerulean blue so that we
can get in a nice, a very kind of
brownie bluish color that hopefully granulate out. Okay, We'll try that on. Okay, That looks it looks good. I'll just drag that
brush a little bit. And what I wanna
do is just getting some small details for the tau. Okay? And notice I'm just painting the whole tower in like these. It's not even it's not even much that I'm adding in just
a little basic components. Notice at the top is the
literal air is stick out. Okay. Move downwards like this. Pick up some more paint and yes, it is again, just
move down the page. Okay, good. This side of that tower
and like that here. Bring that all the way down
to the base, like this. Okay. You'll notice also these
buildings here on the side. So I'm going to make these just with a little
bit more coolness in them. And I'll get in a bit of
that building like that. Okay, just to, again, this is a silhouette
against the sky. And it may sort of touch
this tower as well. So I have to reinforce that
tower and little bit more. On the side edge like that. We know that it kind of
comes all the way down to the ground there, like that. Okay? But the idea is just to
have all these shapes kind of mixing with
each other nicely. And you might have obviously air is that stick out
a bit like that. Air here, maybe a bit
of a highlight for that building in there,
that's completely fine. You want to have some areas contrast in this same for sure. There's a little towel or something out in
the back like that. But the main goal that I have here is basically just wanting to get in that large
shape that just overlaps. And then as we go into the back, you'll notice that the the shade of the tone is actually just
getting a little lighter. And that's something
that you have to keep in mind as
well as you move back. Everything gets just
that little bit lighter. That's a bit of this is a
little bit of buff titanium I dropped in there. Okay. We're going to leave I'll
leave this bit of roof showing through like that. Okay. And then this side of the building coming down, okay. Let's get a bit more
of that brown bit of ultra marine down the front. Fantastic. Okay. These rooftops of some
of these buildings, I'll just leave in like that. Okay. And down the front, we can add in a
little bit of green. I've got some undersea
green over here, which is a nice kind
of granulating green. And so I'll just put in a
little bit of that over here. Change that around a bit, leaving that rooftop here, perhaps adding some
more darkness and browns and on this side. Okay. But it all kind of
goes and hits further down here near the water. Okay. Firstly, I just gotta
get everything else in. Fantastic. And you know, the
buildings and the back that just so that there's not all that much that you even want to
indicate in there. Just very light washes. I mean, I could even
swapped down to this number six brush and just adding a little
water and that's it. I don't want to
overpower everything. Okay. So let's go ahead and we will move on to this
right-hand side of the scene. And again, the rooftops
are so crucial because they indicate little
bit of light coming in. So I'm taking care to preserve some of those
rooftops like here. But then, you know, through
the center you do have little bits of darkness and
things running through, which is important
to imply as well. Okay, so that there we
might have like a bit of darkness running behind
that building here. But most of it is
actually pretty light on the top and then on
the size the edges of that buildings try to leave a sharp edge there for
that building like that. Of course, in this section
it's pretty Doc too. It's just that's like a wall retaining pole
or something like that. But then through this area, it's all just courtyards stop. And obviously we've
got a bit of that path or what have you that we drew
out a little bit earlier. But it's generally pretty
doc through this section. Okay, so I'm going
to use a lot of neutral tint and just some cooler colors running
through here. Okay. That seems to be a tree
or something like that, Ryan side, so I'm
going to leave that. But for buildings, for example, this here is the side of a building and the
roof top here. So I'll get in that side of the building
quickly like that. This building here as well. This is the base of another
building here as well. So you just finding
some bits and pieces to use and you kinda cutting around the shapes of
other buildings as well while you're
going through here. Okay. More here. This edge of the building and leaving
that rooftop as well. So essentially these rooftops
that we gotta leave in, keep them pretty sharp
as well, like that. Then as you move up
to the back, again, it's just pretty light, so there's not that
much to put in there. Okay. With you using the rooftops
and these white areas to cut around imply little bit of darkness going on in
the back there like that. And of course, this slide kinda just connects on
in this building is a tower in the
background as well. I'm just going to bring a bit of that color up into the tau. Much just a little
bit of color there. Carry that along and cut
around this building as well. That could be a rooftop
in something like that. Here we go. Another potential rooftop
here in that right-hand side. One thing that we wanna do is also join up this
bridge at the bottom. We're going to be using some
neutral tint to do this. It'll be neutral tint is
just put in a bit of color. I've got a small brush. I've got a smaller
number 4 brush that will help me do this. Destroying them like this. The bridge, that little bit of shadow underneath
that breach could have, could have done this
one a little better. It's a little sloppy. Show again. There's a strike and then
comes down like this. And then we've got
little kind of railing or areas like that
on the bridge. Okay. A little bit of a
shadow underneath. And of course we've got
these boats here that we, again get them in quickly with a few
brushstrokes, these gondolas. And they've got a little
shadow underneath. But these kind of old connect
up nicely, as you can see. That's the great thing. It just all these little
waves. Ripple was running. Third, you can get in just a nice sort of connectedness through this water and even through the
back end as well. If you notice just
a little little bit of that running through. And as we move
down to the front, I'm just going to make this a little more obvious, darker, fat so that it just looks like a kinda Lazada shaped rippled water
repos, that kind of thing. And then again, this
drawer out the edge of the canal mole, just like this. And the buildings connect
downwards like that. Certainly got a
similar thing going on here on the
right-hand side as well. So I can just put in a bit of that pathway like that Here. Let's kind of just doc in
here as well in sections. Okay, but we've obviously got the edge of that building
which is catching the light, which we don't need
to detail too much. This is a sort of thing I do
as well for the rooftops. You can indicate some
of these tiles and things on the roof
just by getting in a few little simple
strokes like these. That keeping it very, very lot. And you can only really do
this once it's almost dried. K note over all of them, but just I think I have some
of them that it does help. Okay. He even got some
areas here perhaps that you could benefit from doing
this sort of thing. And also just gesture
was out some detail. Because when we're doing
this all in one shape, you will find bits of
data will just disappear. And you'd be able
to bring it back. Doing what I'm doing here. There's windows and
things as well. You notice here
there's like a window and like DACA sort of spots. So I've dropped in a
bit of color like that. Extent we connected that one up. You won't have the bead
here and here, for example, here is a bits and pieces on
the sides of the buildings. That could be Windows. Example here. Just a little quick. Marks on the building like this. And you can also
use the brush to draw or little and to
get some structure to the tower and as much
as you want really, I mean, I wouldn't
want to overdo it, but it just brings
a little bit more forward and makes it look a bit more present with suppose. And again with the
darker colors. Using almost out of darkest
mixes of colors here. Dropping, summing the sides of the buildings where I want
to emphasize extra darkness. Saying things like
windows for example. There are little, tiny
little windows all the way through a lot
of these buildings. So in a trauma getting a
little indication of that, It's certainly can be
challenging at times. Okay. Notice I'm also just getting
bringing out a little bit of detail in the sides of the
buildings like that one there. That touches dropping in some colors in the
background as well. You might notice
little just dark bits. Indications and
things like that, rooftops and
something like that. And it'll rooftops that you can draw out and indicate more. Now that the paint has
essentially dried. Almost draw it anyways. Allows you to do
this sort of thing. You know, you've got these air, this kinda courtyard
here as well. So there's a, looks like there's a path or
something just going out. So I can imply that
more like this, draw out some of the
features and yeah, these courtyard or what have you here, It's
beautiful courtyard. Okay. Doing a lot of this
while the paper is still slightly, slightly damp. But the good thing is
that you get a balance of detail in here as well. So it's not all the same tone. And we're adding
detail, soft details. This side of the building. I do wanna getting a little
line here like that. And it kind of just bring out this sought of that
building a little bit more. That type of record else do we have down here the
sides of this building on his church that has like a few little features
in there as well. So we'll just neutral
tint that I'm using here. It's nothing special. Bit more to indicate the
structure of that building. And you might think of a couple of bits and pieces here as well, running through the side. And it's a darkness. And whenever you, you
might even invent, could put some windows
here on this building, even though there's
not really any, their top out of kind of lost these top
part of this building. So I can just drop in a bit of that to indicate
what's going on there. Like that. Little bit more for the
waves and the repos. Because you might have also just some little ones and they connect on to that
right-hand side. I do want to make these
little dark on that left. If I can get him to the mix. Just mix around mole that's come down from the buildings and just drawn up a bit like that. K and Destic. This building here
and the lights just want to dock and around it will create more contrast
with the rooftops. Kay? Said in a few birds and
stuff over in the distance. And maybe around the tower
as well would be nice. That loops very
obvious looking good, turn into like a
flock or something. Then want to keep them a little lives are
in the background. She birds here in and intestine. And I'll call that one finished.
17. Class Project: Your class project is to draw and paint your own
watercolor saying using the tonal principles and techniques covered
in this class. This can be a saint
featured in one of the class demonstration videos, all based on one of
your own photographs or scenes you've
observed outside. You can also refer to the scanned drawing and
painting templates attached, which will allow you to trace the drawings if
you wish to do so. I recommend during
each scene, freehand. Drawing is an important step in improving your
painting skills. It allows you the opportunity to compose and plan
your painting. So I'll just put in a
few preliminary tones. Once you finish the drawing, use the watercolor
steps and processes included in the
class demonstration to complete a painting. Finally, upload your project.
 Watercolour Mentor (Darren Yeo Artist), Art Classes, Mentoring & Inspiration!