Transcripts
1. Class Intro: Hi there creative friend. Welcome to class. I'm Sarah. I'm an artist and designer, and in this class, we'll be painting one of my
favorite summer flowers, the black eyed Susan. This class is part of my
watercolor bloom series, where we'll slow down,
pick up our brushes, and paint one beautiful
flower at a time. So grab your
watercolor supplies, get cozy, and let's get started.
2. Art Supplies: I'm going to go
over the supplies I'll be using for this class, but please feel free to use your favorite tools
or supplies you have. So for this class, I'll be using this
mixed media paper, and I really like it because
it paints very nicely. The colors are very vibrant and there is minimal
warping on the pages. And as you can see, it
does not bleed through. So I've linked everything below. I got this sketchbook
at Hobby Lobby. You can also use watercolor
paper if you like. I found this one at Walmart, and I really like how smooth the paper is and the
pages are really thick. So I also really like
this paper as well. And for the brushes, I'll be using my number six round brush, and it just is a really
nice when I'm painting, I really like the way the brush creates the petals
and the leaves. Again, I've linked all
of these supplies below. And then for my palette, I've had this palette
for a really long time, so they don't sell the
exact same colors, but I have linked a
watercolor set that is almost the exact same colors and
also this little palette if you'd like to use the
same colors I'm using. So now that we have all
our supplies ready to go, we will begin our
floral painting.
3. Observation: Before we begin, we are going
to observe our florals, so we know which direction
we want to paint them in. So I have also included this little reference
image sheet for you, and you can find
that right below this video in the Project
and resources tab. So here we have the black eyed
Susan in different angles. So as you can see, they're
not all just straightforward, and that's what gives
your painting character to draw the flowers
in different angles. So we can just analyze
this right here. We'll start with the one
that is straight on. So that one would
just be a circle. With the center and then the petals coming
straight out from the center. That's the easiest
one we will do. Then we have these
right here that are on completely the side. So it's basically the center, and then we see that the petals are coming
out from the center. Like this in a curve shape. And then I like some of these. They're really interesting.
They're almost just like slithers. So we see that they
are just like a slice. We have the center, and then we get very small
portions of the petal showing. And it just is kind of
like a slice of that. Then we have one more
where you can see the back of the
petals and the front and the center is
nestled in between. That one would be more kind
of like the side angle. We have our center and then
our petals are coming out. But this time we'll see
small bits in the back just like this and they lay on top of each other and
then we have our center. So that's kind of the
shape we will be painting. So I encourage you to take
your photo and analyze the flowers you're
interested in painting and just roughly sketch them out just so you kind
of get an idea. So then now that we have analyzed the angles
of our flowers, we can begin painting
our composition.
4. Brush Strokes: Before we get into the painting, we're going to practice
some basic brushstrokes we'll be using for
this painting. And I'm going to keep
my reference photo on the side so I can
look back on it. And I forgot to
mention you can find the reference photo right under this video under the
project and resources tab. So I'm just going to move
this over to the side, so I can keep an eye on that if I need to come
back and look at that. So I'm just going
to grab my brush, and I love mixing colors. I don't just stick
with one color, so I kind of mix a lot of different colors till I
get a color I really like. So I'm going for this
darker yellow right here. And I'm just going to
start mixing it up with some of my other
lighter yellows. And don't be worried
to try and experiment. You may want to try drawing blue sunflowers or
purple sunflowers. Make it your own
and make it unique. I'm going to stick
with just the yellow, and I'm going to
just keep mixing till I feel I like that. And I like to start off with
a base color and sometimes add different color variations on the top to give
it some depth. I just have this piece
of watercolor paper. And we're going
to practice brush strokes for the flowers, the petals, and leaves. Some of my favorite ways
to get that leaf shape is, I make sure I load up
my brush with paint. And then I just slightly I
have my brush at an angle, and I make sure the
point is down and I slightly press
to feel the page. And then as I'm pulling up, I put more pressure to
make the brush thicker. And then as I'm
coming to the end, I lightly pick up and let
the point go to the edge. So it gives kind of
this petal shape, and I'll be using that brush stroke a lot for the
leaves and the petals. We can try that
again at an angle. You slightly put pressure on your brush till you
feel the point, touch the page, and
then you press hard. Little belly of the brush opens up and then lift to the point. It gives you these nice
little petal shapes and practice that. That's the technique we will
be using four hour petals. You can just practice that
till you get comfortable. That's the basic Bushchoke we'll be using in
this entire lesson. For the leaves,
it's very similar. Again, I'm just going to be
mixing different greens. And it's going to
be the same thing. But this time, we're
going to start again at a slight
45 degree angle. We're going to press and go up and then I'm going to complete it on the other
side, do the same thing, slightly press, push down, and up and it gives this nice little leaf shape and you can fill in the middle. I want you to practice
that before we start, so we can give ourselves a center it helps
out just slightly. Then on one side, we're going to do
the same technique, press and pull up. And then we'll do that
to the other side. We're going to press and pull up quite a nice little
leaf shape this creates. Do it again, go on one side,
and then the other side. You can just practice that
till you feel comfortable. Once you feel pretty
good about it, your hand starts getting
really used to this motion. We can do one more leaf. Just give ourselves a center, press and pull up, and then we'll do
the other side. Press and pull up. So those are the
basic strokes we'll be using for our flower. So I want you to practice that, and when
you're comfortable, we'll move on to our next
lesson where we will begin painting our little black
eye tooth and plant.
5. Painting Flowers: Now that we've practiced
our brushstrokes, we're ready to begin, and this is the piece we're
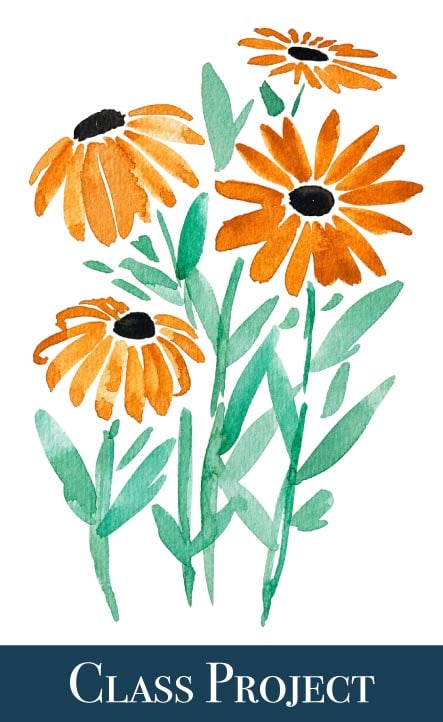
going to be painting. So as you can see,
we're going to make a little floral like arrangement
of the black eyed Susan, and the flowers are all at
different little angles. So this one is straight on, like we had analyzed. This one is to the side. This is the one that's kind
of nestled within the middle. And then here we just
kind of have a slice. And then we have
all the branches coming down with
leaves coming out. So this is what we're going
to be painting in this class, and have a clean sheet
right here of paper. Get that out of the
way. So as you saw, from the example,
we're going to be painting them in
different spots. If it helps, you can mark
it off with a pencil, like a dot where you want
your little flowers to be. If you want to just
put a little dot of pencil so you know where you're going to paint
your flowers or you can just go straight for it. So I'm just going to go for it, and I'm going to get
a dark brown color here, and I'm going to mix it. It's my darkest brown
from the palette, and I'm going to mix it
with black because I want a really rich almost
completely black center and it just has a
touch of brown in it. But again, feel free to
make these any color you want if you want a yellow
center or even a red center. Sometimes I like
to experiment with different colors and
see how it looks. Now that I have my
paint mixed in, I'm just going to start
with my top flower here. I'm going to start off
with putting in my center. So we have our top, which will go around right here, and then we have
our next flower, which I'll place around here, and then our other
one right here and then our last little
flower down here. So I kind of am visually
mapping this out. So I'm going to start
with the one at the top. And this, I'm just going
to make a little center. So nothing too special, kind of, like, a little rounded. Bottom will be a little flatter, and the top will be a little
more rounded black eyed, Susan, that's something
very classic. The little center is kind
of like a little dome. So that's our first
one at the top. That'll be like our slither. And then we have our center
one that's straight on. So that one I'm going to place. Just kind of estimate
with the leaves. I think you'll place good here. And this one, I'm just
going to make a circle this one we want it to
be straightforward. So just as best you can
make a little circle. And then we had one up here, which is going to be
just totally halfway, just seen it from
the side angle. So again, I'm going
to do another one kind of similar to that, where we have our center, and then it's like
this little dome. So we'll just paint that in like a dome shape because
this is from the side. And then, lastly, we have our last one
somewhere around down here where it's going to be kind of nestled within our petals. So we want to also give
it like a little dome, but not as much as this one. So kind of smaller. And the more organic, the more realistic it is. So don't feel you need to
make any of this perfect. So now that we kind of
mapped out our flowers, clean off my brush, make sure
I don't have any more of that black brown color. And I'm going to start
mixing for my petals. Again, I like to mix a
lot of yellow colors. So it's not one
particular yellow. I like this lighter
one right here. It's more like a lemon yellow, and I love this darker
kind of wheat color. So I'm just going
to mix the two. I think I really like that. Now I'm going to start off with this one that's straight on, we're going to use the
techniques used earlier where we lightly place the brush, press, and lift up. We're going to do that
all around the center. I'm just going to start
as close to the middle. If the black mixes in with the yellow,
that's perfectly fine. But I'm going to just not
really touch the center, just get right at the edge. Again, I'm going to
just place the brush, press, and pull up. We're going to do that all the
way around as you can see, it gives it a very
nice realistic petal. It looks just like little petals are coming up from the center. We're just going to go
all the way around. You can add as
many petals as you want or make it more sparse. That is totally up to
you and you can look at different reference images
to see what you like. I'm just going to
keep going around and it's hard sometimes you
can move your paper around if you want it gets a little difficult
coming around the backside. I'm just going to
keep going until I feel it all the way in. Then you can come
in if you want to add some little
extras in between, you feel there's a gap. I think that looks good. I think I'm going to
stop right there. I think that looks very nice. So that's our first flower. Now we're going to do our little slice up here at the top. As you can see, the
petals are very short in the front and very short in the back and longer
on the sides. So we'll just do that.
I'm going to grab. I don't want all my flowers
to be the same color, so I'm going to make this
one a little darker. I'm going to really load up the brush with this
darker yellow. I like for there to be
some variation in color. I'm going to go to
the two sides and we're going to do the same
technique we did here. We're going to press and pull these petals are going
to be a little longer. So I'm going to come
around. Press and pull. Then as you can see here, the petals are much
shorter in the front. It's almost just a little line. Then as they go out, they get a little bit longer
but not drastically. We can just like that. Then in the back,
the same thing, it's just very minimal
that we are seeing. So we're just going to press and pull almost just little lines at the very top and then we can add some longer
ones here at the edge. And that's it. You can see
it's just a little slice. Now for our side one,
these are my favorite. You just swoop around
from the center, so we'll get some more water, thin the paint out a little bit. Again, we'll start at the corner and work our way
toward the middle. I'm going to go to
the edge and we're going to just slightly touch, press down, and this time, we're going to curve around
and lift up our pen. It gives this little hook
with a point at the end. I'm going to do that to the other side so then
I know where to place. Center center petals. You just keep going all around. Center, curving them in. I can give you a little
one here, right here. That looks great. Now,
for our last flower, this one's nestled in
the middle and you see the flowers curl around because you're seeing
the depth of the petals. I'm going to mix in
some lighter yellow. And then I'm going to add some water to
thin out the paint. Here we're going to begin. I'm going to add some
more to the back, but I'm going to start
off exactly like I did this one, start in the edge. Again, we're just
going to lightly press and then lift off
and start curling them. I do that to this
side and give it a little hook because
I'm starting to see the edge of the
flowers, how they lay. Curl in I want these to be a little bit wider because we're seeing
them from the front. I make this petal
a little thicker. Then now for the
back, we'll start adding and we're going
to just see little bits. We're not going to
make the petals go all the way down
to the bottom. We're just going to
start curving them over and to the side, we're going to see a little bit and make them smaller
as they go up, so it looks like
you're seeing it from the angle, just like that. Just little strokes.
Just like that. Now we can spread out the paint. It pulls a little
bit at the bottom. It's all preference. If you like for there to
be little blotchy pulls of paint, you can just
leave it like that. That is how we get our petals. These are the flowers. I'm going to just darken
some of the petals here. In the next lesson, we'll add
all our stems and leaves.
6. Painting Stems & Leaves : For our final lesson,
we will be adding all our stems and leaves
to our Black-Eyed Susan. And as you can see in
our example, painting, all the stems are facing down, and then we have lots
of little leaves coming out from in between. So I'm going to put my
reference painting here, and I'm going to start
mixing my green. So again, I don't have a
specific color I go to. I just mix till I
like the color. So I'm getting some of
this like lime green, and then some of these other
kind of darker greens. I'm just going to mix
them till I like it. I'm going to add a little
bit of black because I want a little bit darker. I think I'm liking that color, so we'll just go with this. And I'm going to clean my brush off so it won't be too wet. I want the pigment
to be thicker. So I'm going to load up
my brush with paint, and I'm going to visualize where the stems should
be coming from. So we know the stem is coming straight from
the center here, so we're just going to bring it down from right here
where the petals break. I'm just going to
bring it down and kind of curve it inward a little bit. So with this, I'm just going to lightly keep my
brush almost straight. Up from the slightly angled. I have my hand slightly
angled from the paper because I want my stem to be
a little thinner. I'm just going to bring
it all the way down and don't feel the line
has to be perfect. I want it to stay
looking organic. Then here, the stem would be curving more
downwards like this. We can bring it out from here, visualize where it would be and I'm going to
stop right there and just continue it down. This one as well,
it would be curving downward this way and this one would be curving
downward this way. I'll just add the
stems, bring it down. This one is well, I'm going
to stick it in between the petals just like that. I make more green up. We're going to use
the same technique we used earlier it's the
same as the petals, but this time, we're going to bring both sides to make a leaf. You can add your center
if it helps give you a guide and then just pull, point and then press and pull up and then
fill the middle. You can do it like
that, or you can just go for it and
start painting leaves. I like to overlap the leaves
with the stems because it gives some really nice depth and dimension to the painting. And I like to make some of the leaves
darker green and some lighter it really gives a nice
contrast to the painting. So just start placing leaves. I don't have any
particular, like, order. I just kind of go and place them where I feel there's
gaps in the painting. Like I see where
there's a lot of empty spaces like right here, a leaf should be coming
from here, I feel. So I'm just going to add a leaf and keep it
very nice and loose. And then right here, I
think I want to add one. And maybe a little
one right here. This is where you
have to just feel the painting and
see what you like. Just practice this and
if it becomes overdone, you can start over again
and try new painting. I'm just overlapping the leaves
because I like for it to look lush and full if it's
growing in the garden. I'm just going to keep adding
and then I'm going to add maybe some little strokes
that aren't connected, if the leaves were floating, if they were just falling off, just gives it a
little garden scene. I feel there needs
to be something down here and I'm making
it a little darker, I'm grabbing some
of my lime greens and just adding little bits. We definitely need a leaf here, maybe a little blob there.
Maybe one right here. I think that looks really nice. I think that this
painting is ready to go and you can keep playing around
with it if you want. That, my friends, is how you
paint the Black-Eyed Susan. If you have any questions, please feel free to ask them in the discussions tabs below.
7. Final Thoughts: You so much for
joining me today. I hope you enjoyed
the process and found a little time to
slow down and relax. Don't forget to share your beautiful project in
the class Project Gallery. I'd love to see what you create. And if you have any questions, feel free to leave them
in the discussions tab. I'm always happy to help. Thank you again for
painting with me and I'll see you in the next
Watercolor Blooms class.
 Sarah Raquel, Artist & Designer