Transcripts
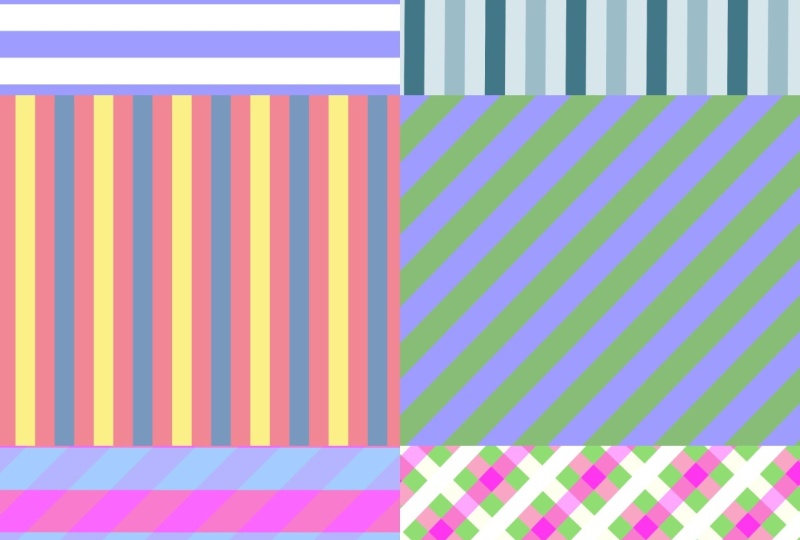
1. Intro: Who doesn't love a good stripe. In this class, I'm going
to show you one of the easiest and
quickest ways to make striped patterns in
the Procreate App. We will create vertical, horizontal, and even diagonal
stripes within minutes. Grab your iPad and
let's get started.
2. Vertical Stripes: So we are going to start
off with a squared canvas and it can be any size you
want as long as it is squared. My favorite is 12
inch by 12 inch. I'm going to start off with
a 12 inch by 12 inch canvas. Make sure it's at 300 DPI and our color
profile will be RGB. Now we can tap on Create. So now that we have our Canvas, we can turn on some guides. We will turn on our
drawing guides. We will click on Edit
drawing guides because we want to make sure we
have a vertical guide. We will click on symmetry, make sure it is on vertical, and now we can click on DE. So we're going to
make sure we're on a brand new clean layer, and we're going to
want to just fill this entire layer
with one solid color. It can be any color you want. It can be just a
color placeholder for now and later you can
switch out the colors. Or if you already have a
color palette in mind, you can select your colors now. So I'm going to grab
this light pink color. I will drag and drop to fill in the entire canvas and that
will be our first step. Now I will go and create a brand new layer above that and we're going
to do the same thing, but we will select
a different color. I'm just going to grab
this dark pink color and I will drag and drop it. Now we're going to want
to get this entire layer and slide it over to only
fill half of the canvas. I'll make sure I'm on my top
layer. I will select it. Make sure we are on free form and our snapping and
magnetics are turned on. We will grab this little node and just slide it over till it snaps right in the middle
and now we can deselect it. And now we will merge
our two layers together. We can either pinch
them or tap on the upper layer and
tap on merge DL. As you can see, it
is one unit now. Now that we have our base layer, I'm going to select the entire thing and I'm going
to do the same thing. I'm just going to
slide it over until it snaps right in the middle
and we can deselect it. Now I will go and
duplicate that layer. Make sure it is selected
and I will just grab it and slide it over till it snaps to the other
half of the canvas. Just like that, and
we will deselect it. Now I will merge
these two together. I'm going to do the
exact same thing. I'm going to select
the entire canvas, slide it over till it snaps
in the middle, deselect it. I will duplicate my
layer, select it, and slide it over to fill the
other half of the canvas. Make sure it snaps right in the middle and I can deselect. Now I will merge my
layers together. That is how you make a
quick stripe pattern. The more I slide over, the thinner the stripes will be. If you want a thicker,
broader stripe, you can just do it less
times that you slide over. But if you want a
very thin pin stripe, you can keep doing this till your stripe width is
exactly how you want it. I think I'm going
to do it one more time because I want
them a little thinner. I'll just make sure that
everything is merged together. I will grab the entire layer, slide it over till it snaps in the middle and I
will duplicate it, slide it over to the other side. Now I will merge my
layers together. We can test our pattern to
see if it repeats seamlessly. We'll make sure we have
our original layer. We're going to duplicate it. We're going to turn off our original layer here
at the bottom. I'm going to turn on
my quadrant guides to make sure I have four
even spaces on my canvas, we'll select quadrant and tap on done because now we're going to be
testing our pattern. So I'm going to make sure
I'm on my duplicated layer. I will select the entire thing and I will make sure now I'm on uniform because
I want it all to go together into this
square up on top. I'll grab this little node, slide it over till it snaps
into my first quadrant. Now I will just duplicate it to fill each one of my spaces. I will duplicate
it, slide it over, I will just continue
doing that till I have filled the entire campus. Now we can turn off our
drawing guides to make sure everything repeats
seamlessly and as you can see, I'm not seeing any white
hairlines anywhere. We know our pattern is good and that it
repeats seamlessly. So now that we tested it out, we can get rid of
our test pattern. We'll turn on our original layer and here's the fun part
where we can change color. We will duplicate it. I always like to have
my original layer. I'm just going to turn
off my original layer. Now I will just grab
a different color. I think I'll go with this dark blue color and you can just drag and drop it into the
stripes you want colored. If everything is coloring in, just slide your pencil
to adjust the threshold. Then we can tap on
continue filling, and then you can just
tap on the stripes you want We can play with
maybe a three tone color. Again, I'm going to go
back to my original layer. I'm going to duplicate it. I will turn it off
my original layer and now I will work on
my duplicated layer. I'll grab this gold color. I'm going to drag
and drop it here. Then maybe I want to make. You can just play with this and try all kinds of different unique color
combinations with your stripes. You can just keep practicing and experimenting and
you can also test your pattern to see if you like the way it is looking or if
you want to make adjustments. You can just test out.
That looks great. Just play around
with the colors, try different combinations. In the next lesson, I'm going to show you
how to quickly take this vertical stripe
and turn it into a horizontal striped pattern.
3. Horizontal Stripes: In this next lesson, I'm going to show you
how to quickly take your vertical stripes and turn them into
horizontal stripes. We're going to go back
to our original layer. Again, we will duplicate it. We're just going to
make sure we're on the new duplicated layer. We will select the entire thing and rotate at 45
degree angles twice. Now we can test it to make sure everything
repeats seamlessly. You will just
duplicate our layer. Again, we're going to
make sure we put it in the four quadrants to make sure everything
repeats seamlessly. I'll just snap it into place, duplicate and slide it over till I fill in my four sections. As you can see, it
repeats seamlessly. Now we have a vertical
striped pattern. In the next lesson, I
will show you how to take our stripes and turn them
into diagonal stripes.
4. Diagnol Stripes: In our final lesson, I will show you how to
take our vertical stripes and turn them into
diagonal stripes. Again, we will go to
our original layer. We are going to duplicate it. Now I will select
the entire layer, go to rotate 45 degrees, and I will just rotate it once. Now, make sure you are on
free form for this part. I'm going to just
grab our little nodes and bring them in till
they snap to the corner. We're going to do it
to our right side and our left side only. Make sure you bring
it in till it snaps and it should
look just like this. It will fill the middle
portion of our canvas. Now for these two sides, we're going to grab these
little notes and stretch them all the way past the
canvas like this. I'm going to do the same thing
to this bottom one right here and that's exactly
how you want it to look. Now we will deselect it. Now that we have it like that, we're going to go
back to that layer. I'm going to duplicate it once. Now I'm going to
grab this top layer. I'm going to select it
and I'm going to snap it till it hits that top corner, an, the fourth quadrant. I can turn on my guides to help me you can see,
they're turned on. I will just now grab my duplicated layer and
I'm going to slide it over vertically and then slide
it up horizontally till it snaps in perfectly
in that center. And now I will deselect it. I will go back to my layer
panel and I'm going to grab that first bottom layer that we rotate it to the side and I'm going
to duplicate it again. This time, I'm going to bring
it to this bottom quadrant. I will slide it down
until it snaps in place, and then I will slide it
over till it snaps in place, just like that, and
I will deselect it. And now I can merge my three layers together
just like that. There are my diagonal stripes. Now we can test out the pattern to see if
it repeats seamlessly. I will just duplicate it. I'm going to turn off my
original diagonal stripe layer. The same thing, we will
fill in our four quadrants, make sure we're on uniform. Fill in our four quadrants. Now we'll just duplicate
and make sure I place it in each one
of the four squares. Now I can turn off my guides
to make sure I don't have any hairlines and then
everything repeats seamlessly. That my friends
is how you create striped patterns in
the Procreate app, how you make vertical,
horizontal and diagonal stripes. Play around with this, try
different color combinations, different widths of stripes, and see which is your favorite.
5. Thank You!: Thanks a whole bunch for
joining me in this class. I hope you have fun creating all kinds of striped
patterns in Procreate. I love seeing your
pattern creations, so please share
your beautiful work in the project gallery. And if you have any questions, please don't hesitate to ask. You can start a
new discussion in the Discussions tab
and you can find that located right
below this video. Thanks again, and I'll
see you next time.
 Sarah Raquel, Artist & Designer