Transcripts
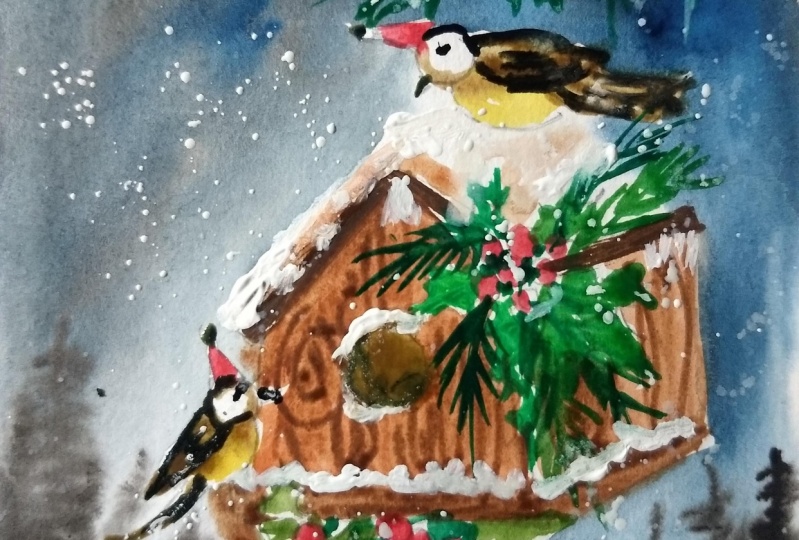
1. Introduction: Christmas is such a
joyous season where we spend time with our
family and friends. We have laughter and cheer everywhere and we
create lovely memories. In this class project, we have two little
bodies who are cozy in their little bird house in this snowing Christmas
window wonderland. Hello friends. I'm loving. Or a watercolor artist
from Mumbai, India. I go by the name life's little
treasures on Instagram. In this project, I will take you through a
step-by-step process of all the colors that we will need for creating this project. I even show you
the techniques and all the details that
you will require. Although it may look
a little complicated, but this is a very
simple project and this class is suitable for
beginners and all levels. So you can create this beautiful card and give it to your
friends and family. I'm so glad that you
have joined me in creating magic, this window. So let's explore this
watercolor winter wonderland and have our cute little birdies in their cozy bird house. So let's get started.
2. Art Supplies: So let us look at the supplies that we will need
for this class. I'm using this Arches cold
press watercolor paper, 300 GSM, and a 100
percent cotton. It is important to have a
very good watercolor people. So make sure your watercolor
people is 300 GSM and 100 percent cotton so that it has good
absorbing properties. Next, we will need a palette. So I'm using this
ceramic palette here. You can use any valid that
is available with you. We will also need these
watercolor paints. I will explain all the
colors that we're going to use in this project
in the next section. Next, we will require brushes. So I'm using this
silver black velvet, size eight and size four here. So you can use any round
brush between the Size 6, 8, or 10 to have the
background effect and a smaller brush for the details of the bird
house and the birds. I'm also using this thin brush here in this project to
apply the masking fluid. So there are certain
areas like the holly leaves and the birds, which I will cover with
the masking fluid so that it is easier for us to
apply the background layers. So this is a baby with
masking fluid that I'm using. Make sure you use a
rough brush to apply the masking fluid so as not
to use foil the brushes. So I'm also going to use these black and white gel pens to give the finishing
touches to our composition. We will also need a light pencil to draw our sketch
or to place it out. We will also need an
eraser to lighten the pencil marks so
that they're not visible through the watercolor. Also, we will need to be posed to dab off
the excess water. And most important, we
will need plain water. I'm also going to use here this lovely sketch
books from Zen Sangam. This is size if it is 20
percent cotton and 245 GSM. So we will see the different color
swatches and techniques that we will require by practicing it in
this sketch book. So for our class project, I have cut my Arches paper into roughly size 16
centimeter by centimeter. And I'm going to stick
your stick it on this hard board with
the help of tape. You can also use any writing
pad or drawing board. And I'm going to use
this scotch tape here as it is easier to
remove with the scotch tape. So that is it for the suppliers. See you in the next section.
3. Colour Swatches: So now let us see the colors that are required
for this project. So I'm using my Zen Sangam
watercolor sketch book for swatching colors. So the first set of
colors that we will need our indigo and beans clean. So I'm using these
from Daniel Smith. You can use any other brand
that is available with you. So these are the dark colors that we will require to
create our background. So the first color that
we will need is indigo. This is a beautiful dark
bluish kind of shape. Next we're going to
use Payne's gray. So we're going to create our winter wonderland
background effect using these two colors, indigo and Bain screen. Next we will use sepia color. This is a beautiful
dark brown color. I'm using this from the
brand Winsor and Newton. You can use it from any vendor that is
available with you. Or you can mix a
little black color to your round shields to
get a dark brown color. Next, we will use
some cadmium yellow. You can use any other yellow
that is available with you. I'm using this cadmium
yellow from Daniel Smith. So we're going to use
this CPR and yellow color for the birds. Next we're going to
use burnt sienna. So we're going to see the variations as we will create the
wooden texture using. Now to create a lighter
tone of the bone sienna, I'm going to make some
cadmium yellow to this. So this light mix
of burnt sienna and cadmium yellow will, we will use this as the
base for our bird house. We will create a darker mix of Sienna by mixing some indigo. So from the same color
we have t dollars now. The lighter shade
by mixing yellow, by mixing some indigo. Next we will use sap green. So we will use this to
create the holly leaves. Leaves. Next, we will use some permanent trade. And for the little heads
that we are going to create. Lastly, we will use the
undersea to give the pine cone. So these are all the colors side we will need for this project. Feel free to experiment and
create your own color mixes.
4. Techniques: So let us look at some
of the techniques that we will be using
in this project. So I'm digging some indigo and I will rinse my brush
and spread the color. So this is called
as color pooling. Also, we will see
dry brush technique. After this portion is dry. We will be using this
technique to create our little snow hills
around the bird house. So while this dries, let us see how to
create the binary. So we will make a vertical line, and on the top
portion we will make some small dash around
this vertical lines. As we move down, we will just make some slang
like it need not be perfect. We just need some slant
lines on either side of this vertical line to
create our pine tree. So let us practice
one more time. So I'm creating a
vertical line the same. It is a smaller Lind. So in the first week, we really the length
of the trees to depict depth of the trees that
are in front and behind. So we follow the same technique of creating random strokes, dynam sliding motion along this vertical lane to
create that by intrigue. So let us look at the
dry brush technique now. So our bag longest
dry and we are taking color on the brush
with very little water. So I'm just dabbing my brush on the tissue paper to
remove any excess water. And it is almost dry
with only the paint. And I'm rubbing it over the surface so you can
see it gives a beautiful, beautiful texture
on our Snow Hill. Now let us see how we can create the wooden texture
for the bird house. So I'm mixing some
cadmium yellow and burnt sienna to get
a light brown color. So this will form the
base for our bird house. So we will add some lines with burnt sienna while the
base layer is still wet. So this will give soft edges and color variation for
our wooden block. Next, we will mix
little indigo color in the burnt sienna and get a
dark brown mix of color. Now Michael, small, I kind of shape and make ovals
circles around this. Also extend the
lines and we will make a same oval shapes
and other places. So this is the wooden effect that we will try to
get for a bird house. Now let us see how we are
going to create the birds. So I'm just applying or
plain water on the surface. I will take some cadmium
yellow and apply on the top portion of
this wet surface. I will rinse my brush and
then spend the column. Make sure you remove
any excess water from your brush by dabbing
it on a tissue. As our surfaces already read, the excess water will create a paddle and it will not
give a very good effect. Hence, we should dab it on the tissue paper before
spreading the color. So this is how we will
be creating the bird. I have used this technique
for creating the body. So these are some
of the techniques that we will be using
in our project. So let's get started with our project in the next section.
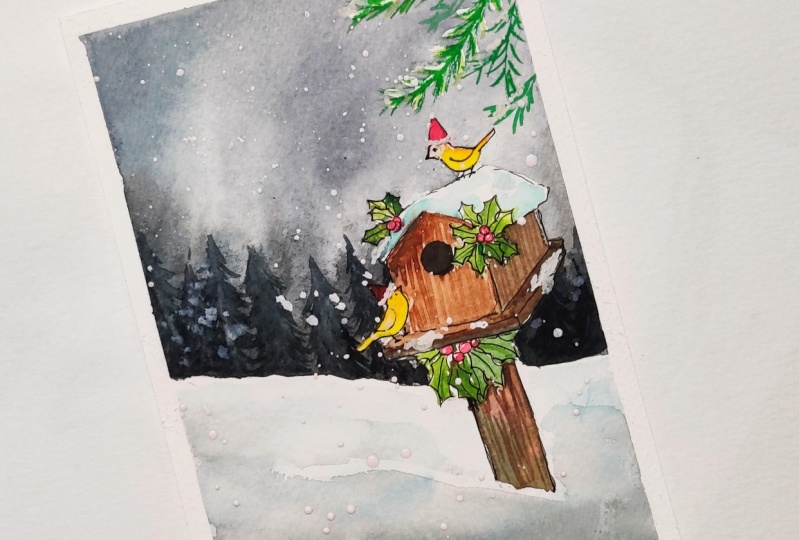
5. Applying Masking Fluid: Welcome back. So you must have
seen the sketch of this project in our
project resources section. So I urge you to check the resources section and take
a printout of the sketch. You can either trace it onto watercolor people or you
can draw it freehand. So here in this sketch, we have made this
little bird house and do boards are
chopping over it. And it is surrounded with
these beautiful holly leaves. So I'm applying masking fluid as our background
is going to be dark. So on the edges of our design, I'm applying the masking
fluid so that we can really create the background. Make sure you use a rough brush. So I'm using inexpensive brush over your to apply
the masking fluid. Also before a plane the fluid, I'm just erasing the lines. I'm making them lighter so that the lines are not visible once we remove the
masking fluid. So over the edges of our design and applying this masking fluid. So with these small
lines over the heart, I'm trying to give a snow effect with by using the masking fluid. So once we paint around this and we remove the masking fluid, this portion will remain white and it will give the
indication of snow. Also playing some
masking clearer. What are this is optional. You can either avoid
bending over this area. All you can cover it
with the masking fluid. A blank some masking fluid
for the pine cones we want to buy in contrast to stand out against the dark background. That is why we're covering this portion with
the masking fluid. So once we remove
the masking fluid, we will apply the green color for this pine cones and also leave some of the abortion
right to the big snow effect. So you can apply this masking
fluid at your own pace and make sure it is completely
dry before we start painting. The masking fluid is
when we divide ground, it will spoil the
brush and we do not want with the
expensive brushes. So we are done applying
the masking fluid, dry completely and see you in the next section for
creating the background.
6. Base Layer and Bird House: So as our masking fluid
is completely dry, let us work on the background. Then I'm taking my size 8 brush and I'll be using indigo first. So take some indigo and apply on the top portion of the painting. So I'm taking a
concentrated mix of indigo and spreading
it on the top portion. So this will be our sky. It is evening or night sky. So I'm diluting this
indigo as I move down. So it is a concentrated mix. Mixing a little more water as as we move down on the paper. Now I will pick
some Payne's gray and pull it further down. So I'm diluting the
Payne's gray as well as we move down to get
lighter shades. Now I'm using Payne's gray and creating these
vertical strokes. So this will debate though. Let's create this
vertical strokes. Payne's gray or indigo mix. So I will take some
concentrated indigo and create the
vertical lines again. So this will give the
depth or the pine trees. You can vary the length of the trees to depict
the different. Now we will create
the small dashes and slammed lanes on both sides
of this vertical lane. Our background is
still wet while we're creating these pine trees. So these by increase are far away and not in the photo down. Hence we are using, it means that the bike down is due weight as the colorless
Togolese matching. So we will come
back to it after we paid our little snow hills. So I'm taking some indigo and spreading it on the
bottom of the people. So this is the base
for the small hills. Now I will gradually dilute
the color by adding in more water and pulling the same color on the
top portion of the hill. So I'm just I'm not
taking any more color. I'm just adding water and
pulling the same color. So you can see we are
getting the snow effect. Now let's get back
to the pine trees. So we will create
the pine trees of different lens and have this zigzag motion. Pine trees. Pine trees are done. Let us complete the others
following the same technique. So I'm applying the dark mix of indigo and Payne's gray at the base and bullying
by diluting it. Now let us create
the bird house. So as discussed in the
technique section, I'm mixing some
cadmium yellow to burnt sienna and getting
the light brown color. So I'm just applying this first layer
over the bird house. Let us continue applying
this laid down mix on the bird house.
Wooden texture. I'm painting that is told
the person with the ground. As you must have observed, I have switch to my size four
brush for this bird house. Also, we will be using the
same brush for the birds. Now I'm mixing some indigo to the bone sienna and
getting a dark brown mix. I'm applying this
to the base blank. This is where the bird
house is pleased. And on top of this plank, we have snow that is gathered. So we are not covering the
entire plank that bungalow. So now we're playing
the same dark mix on the top portion
of the bird house. Now let us give more texture and details to the wooden house. So as we saw in the
technique section, I'm using this dark mix and
creating these wooden planks. So we will create the
wooden texture by creating these concentric oval shapes and extending the lines
on the, on the plank. So we will make these
concentric ovals at different places and vertical lines
with this dark mix. So this will give the
beautiful wooden texture to a bird house. So I'm really loving how
the beautiful background is looking at the contrast
of the bird house. So let us create further
details in the next section.
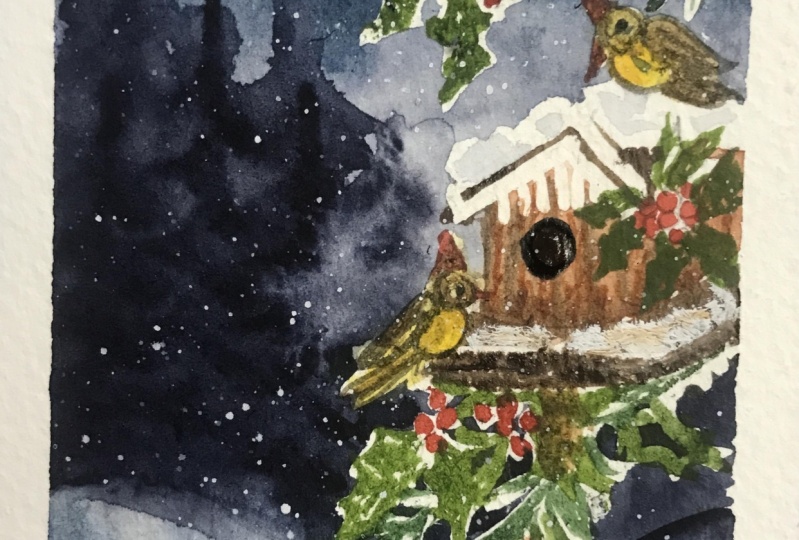
7. Birds and Leaves: Welcome back. Now as
our background is dry, let us remove this
masking fluid and welcome to adopt part
of our composition. So I'm just gently
rubbing off this fluid. You can also use an eraser to remove this dried masking fluid. Let us start with the body. Just as we saw in the
technique section. I'm not a blaming this
on the entire area. I will just rinse my brush and spread this yellow
to the bottom part. So this way we get a
nice gradient effect for the body of the bird. In the same way, we will apply clean water for the
rest of the board. We will apply it over the head, the faders and the tail
portion of the board. Now we will take some sepia
and apply it over the wings. Fine just creating
small lines with this color for the
tail and the wings. We will also create the
outline for the head and let it mode on its own
in the same proportion. We are not applying
the color near the eyes because
the services wait. It will automatically blend
towards the center as well. We will also apply
sepia color over the central little hole that is present in
the bird house. Now I'm mixing a little
sepia to a permanent red to get a dark color. So this we're going to use over the head little
hearts of our birds. So this will give a
beautiful Christmas Eve feel to our composition. We will also use this red
mix to create a base. So just make small circles at the center of
the holly leaves, which will depict database. Now let us take sepia again and give the
details to the feathers. So I'm just creating little lines over our
previous surface. So these lines will
give more texture and definition to the faders
and details of the bird. We will also, again
do the outline for the head and create
the little beak. Make sure you use a brush
with a pointed tip for these. So that you can get
these fine lines. I'm using your silver
black velvet size for as it also has
a very pointed tip. So that is why I did not
switch to a liner brush. So again, for this again bird, we are creating the
outlines and also the beak and little lines for
the feather and the data. To create the eyes. I'm just creating a little. Now let us take some
sap green holly leaves. So I'm filling the
leaves completely because the white portion will give the impression of snow. That is really the color
of these holly leaves. To get a darker shade. If the design is not visible, you can again sketch the holly
leaves and then I'm just painting the leaves as for my understanding and not
doing the sketch again. And then use the beam. So I've been doing is
coming together so beautifully with these holly leaves adding to the
Christmas charm. So there is no strict rule
of how many leaves you want. You can vary it as
per your preference. Now we're taking
some undersea green, creating the pine cone
leaves, mixing a little. So I'm just creating liberal
extinctions from the radius. So this will give
a fuller look to our holly leaves and
pine cone links. So I'm taking a little bit
burnt sienna and creating the ball on which our
bird houses standing. So this is a mix of the
green and burnt sienna. To give an impression. It is a very old and it
has some moss over it. So let us work on the
leaves on the top portion. So as you can see,
I'm not covering the entire rights of this with the green color because the white will look like the snow has settled
over the leaves, creating some more
extensions from the babies. Now I will take
some Payne's gray and create some
texture over the snow. So this will give an ablation of the shadow and the
little snowy effect. This is all the snow that is gathered over the wooden plank. So that's it for our
little bird house. Now let us give the
finishing touches in the next section.
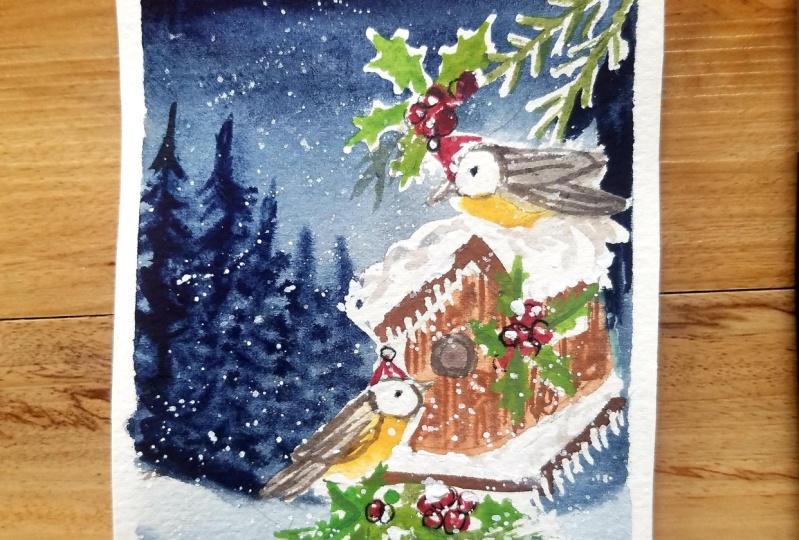
8. Finishing Touches: Welcome back. So now I'm taking a blank gel pen and giving the finishing
touches to the board. So I'm just creating
little outlines. So using a band is very
convenient and it helps to add a little more texture
to our composition. So this is completely optional, but I feel it gives a nice highlight to the
different components. You can also give some
outlined to the berries and create tau plane and
texture for the leaves. So I am giving the outline
randomly to all the leaves. So I'll just covered little
more of the white space. So here we have modelled
the wooden block. I will try to remove the color so that our snow is visible. Also, we will give the
finishing touches to the central hole
by applying sepia around the so-called
white gel pen and cleared little
stars in the sky. So I'm just creating a little, I'll claim to the bird with a black pen to demote
them from the snow. Now I will load my brush with white paint and tap it
using another brush. So this will add a lot of snow. Toward composition. You can be very liberal and enjoy this process of
adding the snow to create our winter
wonderland composition with little birds enjoying
this knowing Christmas. You can also use white
goulash for this. So just to add some
finishing touches, I will drop in the white color. So you can feel some snow is gathered over the
babies and the leaves, and it is falling
from the house. Feel free to add more snow by doing the tapping technique
with the white paint. You can also add
some texture using the dry brush technique
over the snow hills. I'm also highlighting
little dots with using white paint
over the height of a bird. So this will create their cute
little Christmas heights. So that's it for our
cute little window, window length scenery
are littered. Birds are cozy in
their bird house and celebrating Merry
Christmas with each other. I hope you enjoyed
creating this project as much as I enjoy teaching it.
9. Final Thoughts: Congratulations on completing
this class project. I hope you enjoyed creating this beautiful
dismisses scenery. As much as I enjoyed
teaching it. I would love to look at your creations and shared
it with my students. So on Skillshare, you can
go to the Project section. You can click on this link
would say snappier to access this class project
details and upload a project. When you click on this, it will take you to a browser. There you can create a project. You can upload your image
and then publish it. So it will be visible in the
Skillshare project section. Also, you can share
it with me on Instagram at life's
little treasures. So thank you again
for joining me. Happy creating.
 Lavina Agarwal, Water Color Artist and Educator