Transcripts
1. Intrduction: Monsoon is such a beautiful time when nature washes away the dirt from all places and make
everything pure in peacetime, the land is filled with beautiful
blanket of green grass. There is abundance of water and food for all living beings. In this class, let us
capture the beauty of one such rainy day
as observed from a glass window and with a rainbow and raindrops
and all things. Monsoon. Hello friends. I'm loving each other while and artist based out of India, watercolor is a beautiful
and unpredictable medium. And I love to share all my learnings through these Skillshare
classes of mine. I go by the name life's little
treasures on Instagram. In this class, we
will learn to paint this beautiful hazy backdrop with mountains and
rainbows and pathway. We will learn how to create this hazy effect using
wet on wet technique. We will also learn how to create water droplets
which are tripling down on the glass surface and adding the
highlights to them. We will look at all
the colors that are required for creating
this painting. So let us dive into the
class and learn to paint this beautiful rainy
day scenery and enjoy the reins with a hot cup of tea or coffee and get cozy. See you in the next section.
2. Art Supplies: Welcome back. So let us look at
the art supplies that we will need to
create this project. So I'm taking my Arches
watercolor paper here. So this is a artist
quality watercolor people. You can go with other
brands that you have like Canson or Saunders, Waterford, or any watercolor
paper that you have. But make sure it is 300
GSM and a 100% cotton. I'm sticking this paper on this cardboard with
a masking tape. For the watercolor brushes, I will be using these
three brushes, mainly. This is a big mop brush which I will use
to wet the paper. This is a size
eight round brush, and I'm using size four round
brush to give the details. Next week we'll require
an eraser and a pencil. To practice the sketch. We will require a
glass jar of water. And most important, we will require some watercolor paints. So I am using this set over here with my watercolor paints, mostly from Daniel Smith
and Winsor and Newton. So I will be showing
all the colors that we will need in
the next section. We will also need a
pallet to mix the colors. Optionally, we can
use a spray bottle to wet the paints and paper. We will also need
some tissue paper or I'm using this
kitchen travel video. So that's it for this applies. See you in the next section.
3. Color Swatches: Welcome back. Now, let us quickly look at the colors that we will
need for this project. So the first color
is Payne's gray. This is a very beautiful
and versatile color. We will be using this
Payne's gray and indigo to paint our beautiful
moody monsoons chi. Next we will be
using some indigo. Next, we will take brown color. So here I'm using
when **** brown, you can take any dark brown
color like raw sienna, burnt umber, or Scipio. Next we will take some
yellow ocher color. So this is used for
the road and it gives a beautiful country like feeling when we use
it in the road. Next, I'm taking some sap green. I'm using all these
paints from Daniel Smith. You can use any brand colors
that are available with you. Next time, swatching
undersea green. So this is one of
my favorite colors. I love this beautiful,
earthy green. If you do not have this, you can make some
brown to your sap green and get this
earthy tone of green. Apart from these, you can
also use burnt sienna. I have used very little
burnt sienna for the road, but it is optional. Next we will see the colors
required for the rainbow. So the first one is red. So you can use any red
that is available with you next time using orange. So we will be covering the
web cure color palette. So it will be violet, indigo, blue, green, yellow,
orange, and red. So these seven colors we will
be using for the rainbow, you can skip any color
if you do not have it. The rainbow will still look
very pretty. For the yellow. I have used cadmium yellow. The blue is French
Ultramarine blue, and violet is, it's
the imperial purple. So you can use the colors
available with you. I'm just using
some white gouache for creating the highlights. So that is what I
have switched here. So that's it for the colors that we will need
for this project. So see you in the next section.
4. Thumbnail design: Now let us create a thumbnail
of our class project, which will help us understand
the design better. So this is a
landscape orientation of the paper that I have taken. So I'm drawing this
rectangle here. And around 1 third
from the bottom, I'm creating this horizon line. Next time adding some mountains. So these are the
faraway mountains. I'm adding a bot in the
center of the page. So this will direct the movement of the eyes from the path
towards the mountain. Next time adding a rainbow. So this is a monsoon scene
that we are creating. So that is why I'm adding a lovely rainbow
for our landscape. And we will have lot of
grass in the foreground. And also we will add some trees
in front of the mountain. So this is the basic sketch
or guideline that we are going to follow in
our class project. Next, we will see how to add
the elements for the car. So I'm just trying to add
some red real meters. So this is half of the window that we are seeing
the scene from. So that is why I have
created half read review. And I'm just creating
some outlines to depict the
surroundings of the car. So you can observe different
vehicles and you can come up with your own design for
depicting the vehicle. You can even add some wipers. You can even use a
side view measure. So there are endless
possibilities. So I have added a
wiper over you. You can even create
the entire screen of the car with the front
portion having to wipers. You can try different options. You can even create the
scene in the back view of the car or in the side view. Or it could be any
other glass surface. So that's it for the thumbnail
and the design options. See you in the next section.
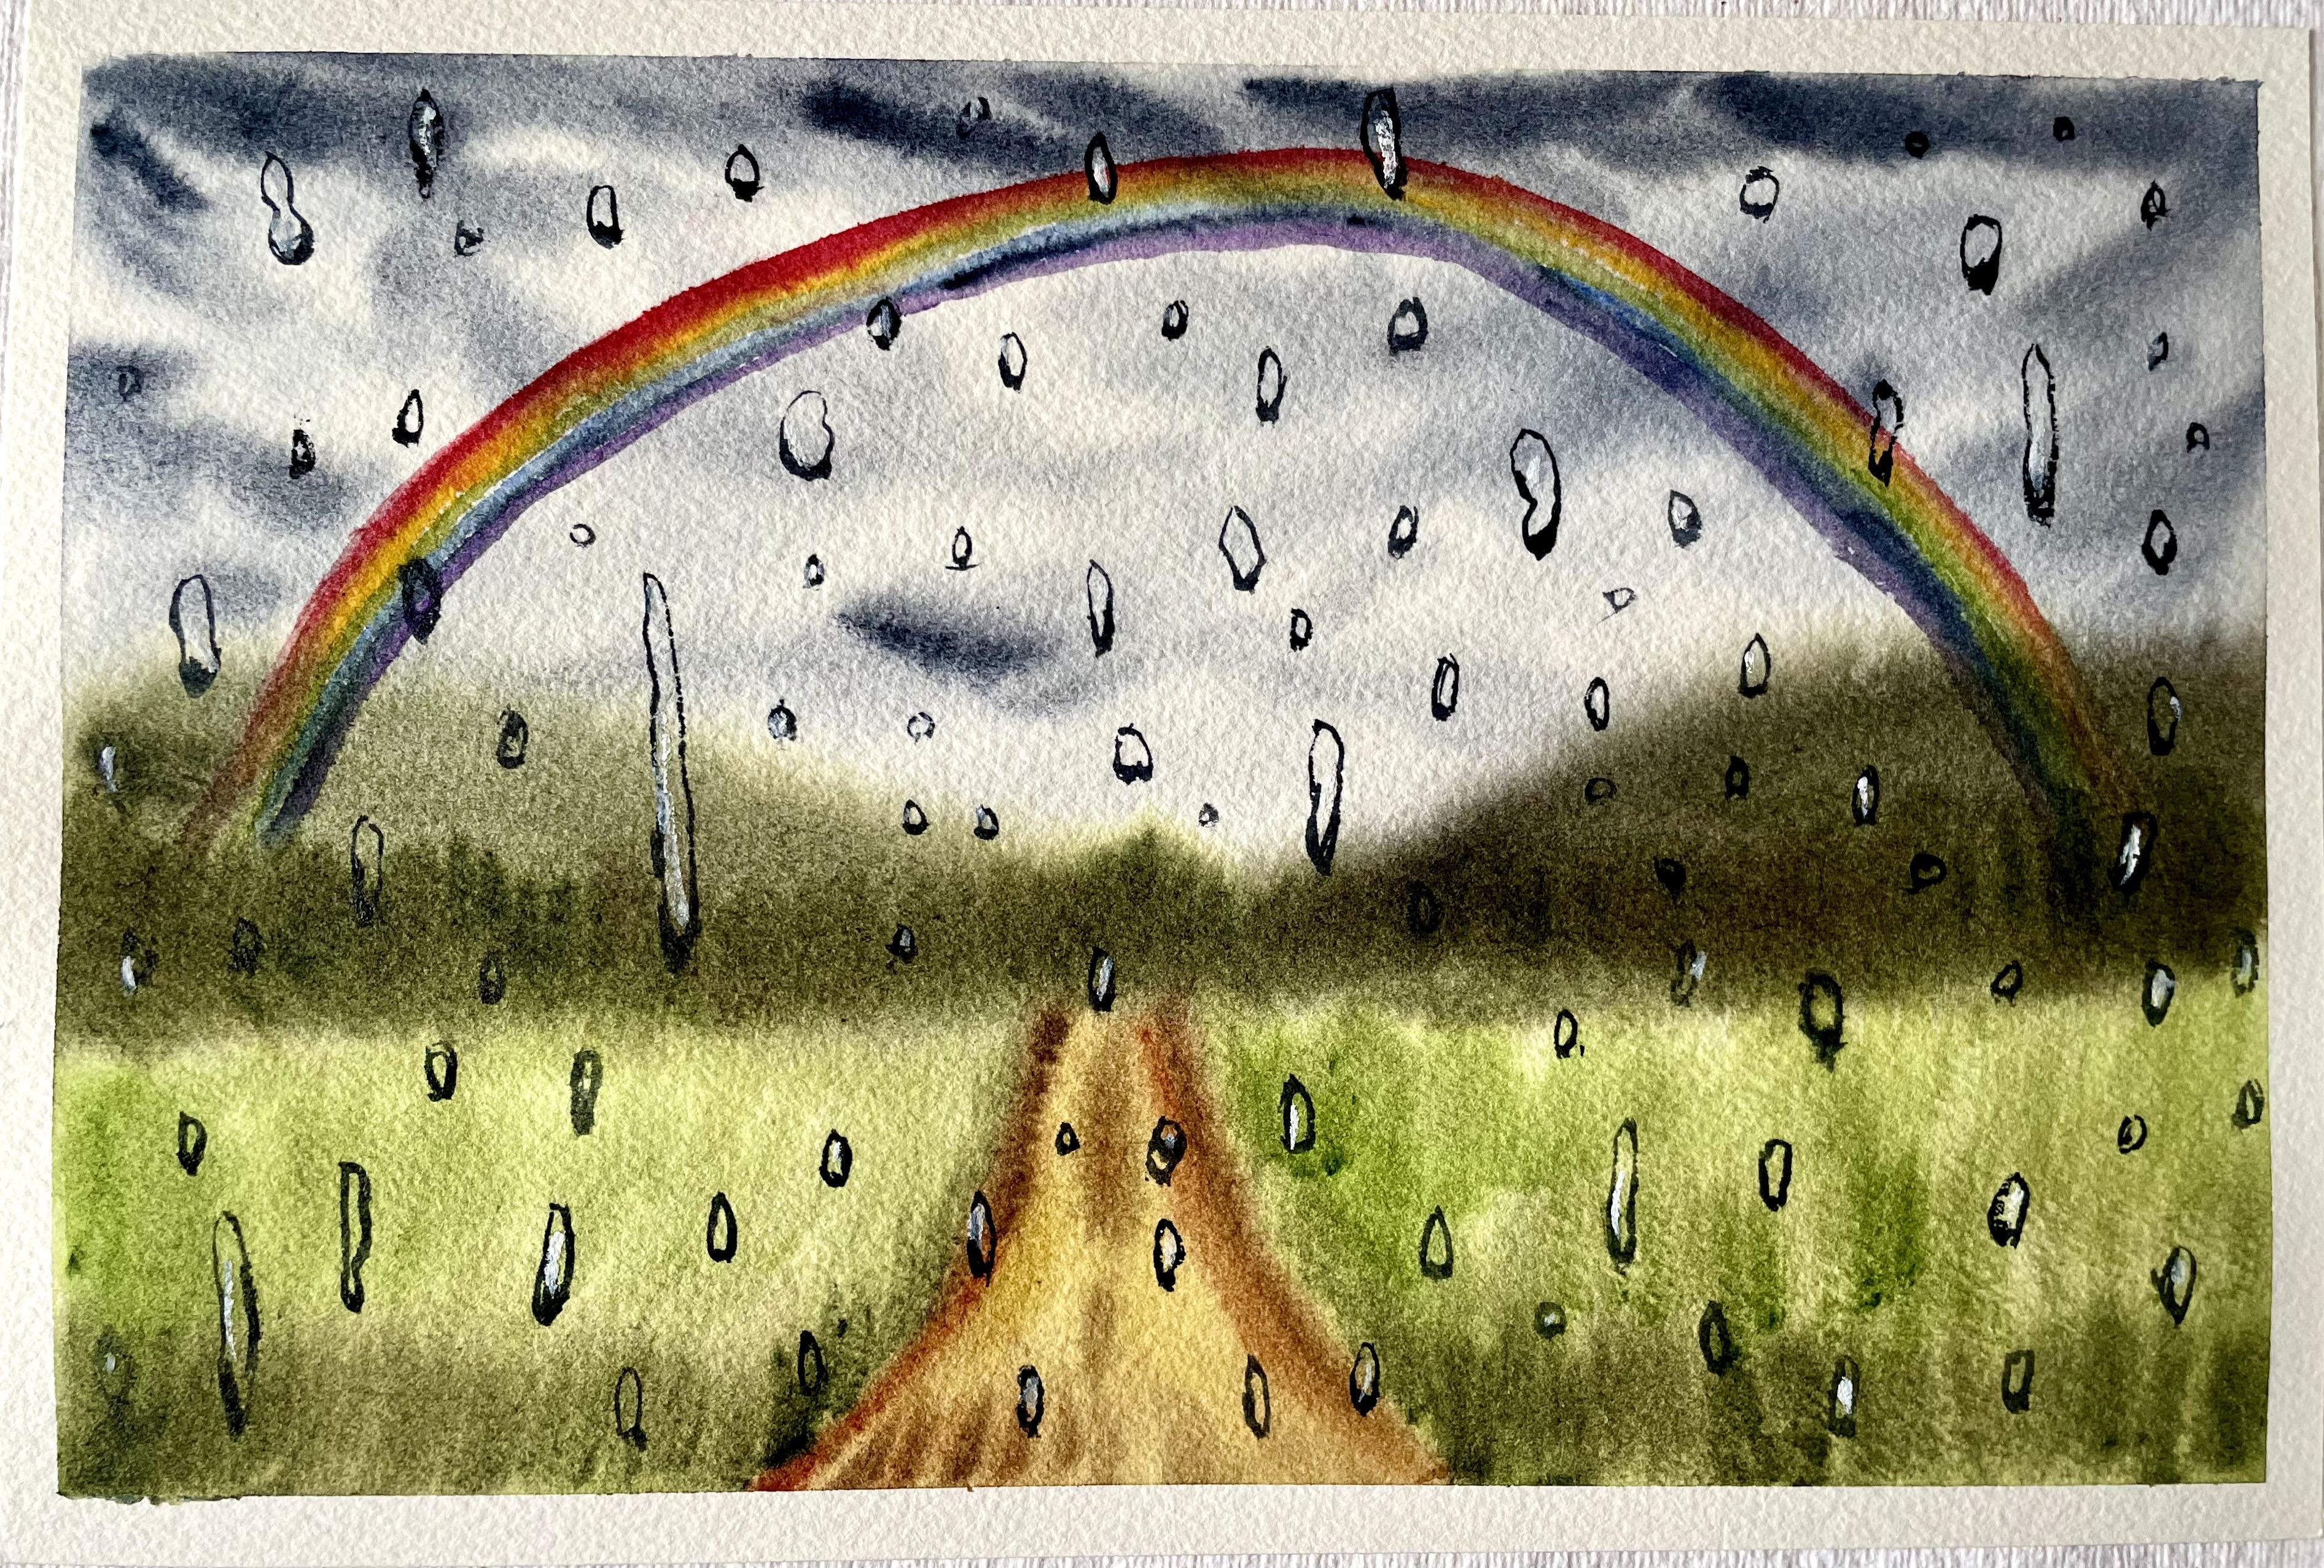
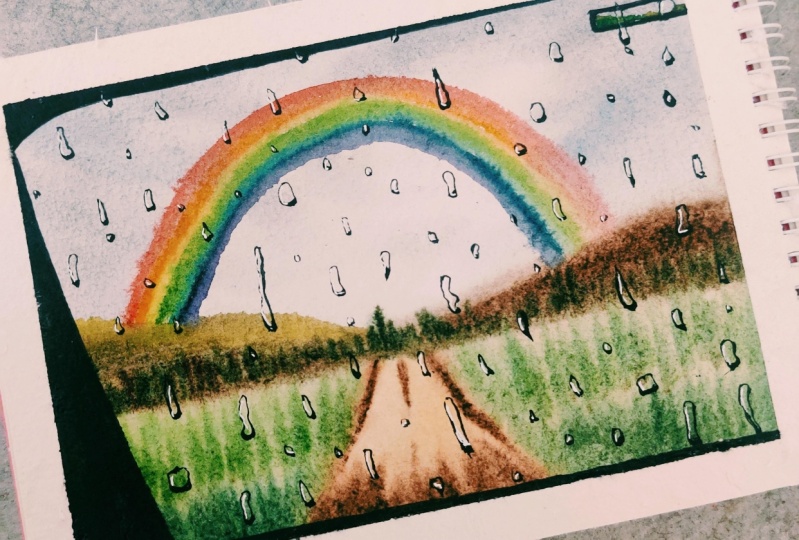
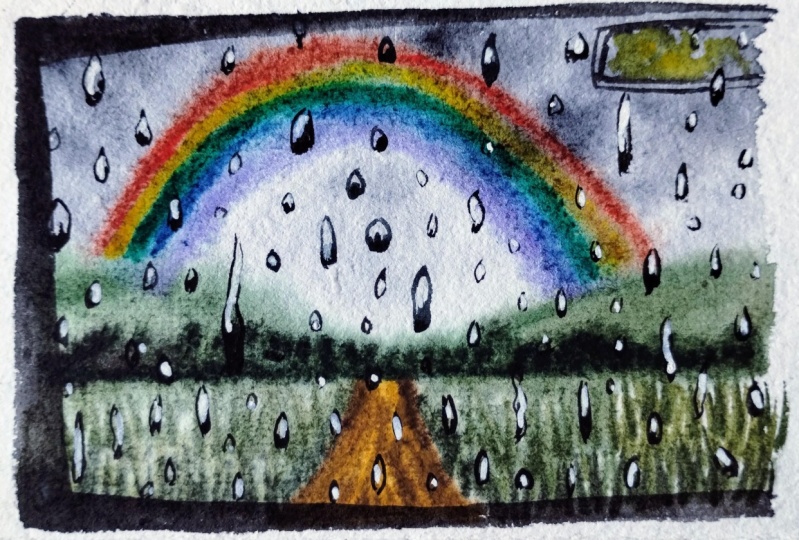
5. Painting background landscape: Welcome back. So here I
have secured my Arches, watercolor people on this board. So this heartbeat is the back of watercolor paper pad
that I had purchased. And I have to go
this paper using a masking tape and make sure there's no air bubble between the tape and the paper otherwise
the water can seep in. Now I'm picking up my
Princeton mop brush. This is a big mob brush which
I'm using to apply water. You can use any flat brush
or big brush to apply water. So make sure your paper
is very nicely wet. So I'm doing this horizontal and vertical
motion with the brush. So now the water is very
nicely absorbed in the paper. This will ensure that the paper remains wet for a
long period of time. Now I'm beginning
my silver black velvet size eight brush. And I'm taking
some Payne's gray. So we will be painting
the clouds over you. I'm also adding some indigo
as it is a rainy day. We want to show dark
clouds in the sky. So we are using Payne's
gray and indigo to create or dark cloud
or a dark sky. So towards the top of the paper, we will add more dark colors. So I'm applying indigo
and dark shades of Payne's gray towards
the top and the sides. And as we come to the center, we will make it lighter. So you can see we are
using lighter shades in the center and we are
applying very little paint. This is because the
central part is near the horizon and that is furthest from the
viewer's eye point. So the sky is very light as it moves away
from the viewers. So we will paint
the mountains now. So I'm taking some
Van **** brown. You can take any dark brown. And I'm also adding
some indigo to it to create a rich brown shade. I'm just tracing the outline of the mountain and applying the
paint on the top portion. Now I will rinse my brush
and pick some dark green. So I'm using the undersea
green color over here. So this is the undersea
green and I will use this in the lower
side of the mountain. So I'm taking some
undersea green and mixing it with
very little brown. For the other side
of the mountain. You can see these
different shades when you see set of
mountain ranges. So some brown, some are grayish, some are very dark green. Light green in color, so you can read the
shade of the mountains. Now I'm picking
some yellow ocher and we will trace out the path. So this is the road that
we are going to depict. And I'm just tracing it in
the center of the page. I have not made any
sketch over here. I'm just going
with my intuition, but feel free to
create a rough sketch if you're not comfortable in directly applying the colors. Now without rinsing my brush, I'm picking some green color. So it has a yellow ocher as well as undersea green
color on my brush. And I'm applying this green
on the sides of the road. I'm also picking some sap green, so I'm mixing these greens
and applying on the sides. As you can see, I'm
creating vertical strokes. So this will depict
the grass What a beautiful field that
we have around the road. Again, picking some
undersea green and applying towards the
bottom of the page. As we move towards the mountain, I'm applying the sap green. Now I'm painting
some burnt sienna and applying on the
sides of the road, also towards the
end of the road. So this portion is closer to us. And it will appear darker. Now I'm picking some
Van **** brown and applying a darker layer on
top of the burnt sienna. So this will give a beautiful depth defect with the light and
the dark brown. I'm also creating these lines
in the center of the road. You can see my paper
is still very nicely wet because we had applied
the water layer very nicely. Now I'm taking a mixture of undersea green and brown color. So this is a very dark and
earthy green that we get. And I'm creating some bushes
or trees near the mountain. I'm just creating Ralph
impression of trees. I'm not being very, giving it a tree shape, but just Ralph impressions because all this will appear as a bloody beautiful scenery from the window that we
are going to create. So just adding these routes, trees in the background to give a completeness to
our scenic beauty. As a paper is still very wet. You will not find a lot of demarcation between the
mountain and the trees. So just try to vary the colors. But even if it is getting
mixed up with the mountain, it's okay because it's a very hazy scene that we
are going to create it. So monsoon, hazy seen. So once it is dry it, it will not be this prominent. It it is going to mix up. And that is completely okay. That will only add to the
beauty of this painting. Now I'm picking up some
undersea green and we will reinforce the
greens a little bit. So just going over through
the grass and creating vertical strokes to
depict the grass. I do not have lot of
water on my brush. So you can see it creates such a lovely dry brush
pattern of the grass. I'm creating some grass
on the sides of the road. Now are people is less weight, so it isn't a semi dry state. I'm taking my size four
silver black velvet brush, which has a very
nice pointed tip. And we will be creating
the rainbow with this. So I have loaded the
brush with the red color, which is the first
color of the rainbow. And I'm just tracing out this semicircular shape and giving it a little
more proper shape. You can draw it with a
pencil if you're not comfortable in painting it
directly with the paint. I have picked up
orange color for this second line that we
are working on right now. So the red and the orange
are almost blending. But that's okay
because we're not able to actually distinguish
that much from a far. So just go with the flow and I have picked a
third color as yellow. The colors are beautifully
blending as they are still wet and we are applying
them so close by. So that is a beautiful blend
of the colors and we can see how they mix and
create wonderful shades. To complete our rainbow
with your colors. I'm picking the fourth
color as green. So I'm taking sap green here. I'm not taking very
concentrated one, just a light shade of sap green and placing it beside
the yellow color. Next we will take some blue. This is French Ultramarine blue. I'm taking a diluted
shade of this blue. You can use any blue that
is available with you. Next, I'm taking one of my favorite colors
that is indigo. And I'm taking a diluted mix of this color and painting
besides the blue color. So just try to maintain the semicircular
shape of the rainbow. I know it's a bit difficult, but nothing is impossible
with practice, right? So just keep going. Last but not the least, we will take violet color. So I'm digging this imperial
purple or you can take violet color and apply
it next to indigo. So this will complete
our rainbow colors. I'm just extending some of the colors and blending
them a little bit. Hope you enjoyed creating
this background. See you in the next section where we will paint
the raindrops.
6. Adding the raindrops: Welcome back. So now our
background is completely dry and we have this
beautiful scenery with little hazy field to it. And we will add the
raindrops here. So for the raindrops, I'm taking some Payne's gray. So I'm taking a
concentrated Payne's gray. I'm not diluting it much. And I'm sketching
some random shapes. So as we're looking at this
beautiful scenic view from the window of a car
or a big vehicle. So that's why these raindrops have got accumulated
on the glass. So you can directly paint these rain drops with random shapes. So they can be smaller, or a big rain drop, which is tickling through the
entire length of the glass. And make sure you add this shadow portion towards
the bottom of the rain drop. So you can see I'm adding a little dark shade as I move towards the end
of the raindrop. So this will depict the
shadow of the raindrop. And this is also very random. So there is no particular
shape that you need to follow. Just follow your intuition and create these
multiple raindrops. So here I'm adding this
big water droplet, which is tickling
down from the glass. You can also add some
raindrops on the rainbow. So this is a
repetitive process and you don't need to
think much about it. Just relax and
enjoy the process. You can even put up some
music and enjoy this. It is like a meditation for
me because it just lets me be there and just try to create something
without any pressure. So you can add these raindrops abundantly and freely and make sure it is covering all the different parts
of the seniority. Because on the glass we will have multiple
raindrops everywhere. We are almost done
adding the rain drops. You can add as many or as
less rain drops as you wish. And in the next
section we will add the highlights to
these. See you there.
7. Adding the highlights: Welcome back. Now let us add highlights
to these raindrops. So I'm using this white
gouache over here. This is from Bruce, true. You can use white gouache
or white watercolor paint, whatever is available with you. So if you have observed
the rain drops, it has a beautiful white, beautiful shine to it. So that is what we are
trying to capture here. So I'm just adding these random white drops or white lines on the rain drops, which will depict the
highlight for the raindrops. So as I, raindrops
are very random, there are no rules to
add these highlights. Just feel free to add
it where you feel suitable and it will make
the rain drops pop out. I'm adding these highlights
to almost all the raindrops. So you can see now our
raindrops are looking so much alive and it's looking like the water is trickling
down from the glass. Have you noticed that
adding these raindrops and the highlight is making the background look
even more blurrier. So we had this misty background, but it is looking even blurry and misty by addition
of these raindrops. And that is the
beauty of watercolor. So we are done adding
the highlights. Now, let us remove the masking
tape and see our creation. Make sure your
painting is completely dry when you remove
the masking tape. And also always remove the masking tape at an
angle and never straight. Otherwise, there are chances
of tearing off of the paper. So there we have our
lovely monsoons seen. I will just add a few more
rain drops wherever I feel there is some gap or we can have some more water droplets. So I was going to leave this
painting at this point. But I got a feedback
from my child that it's not very clear as to where
you're looking at it from. So then I decided to add
a little structure for the vehicle that the scene
is being viewed from. So that is what we will
paint in the next section, we will paint the little
structure of the car. So it's always good to
seek feedback and try to incorporate it from
viewers point of view. And my child is always
ready to share her opinion. And that gives me a very nice
perspective and I feel so blessed to have her, as my critic, see you
in the next section.
8. Adding the car feel and conclusion: Welcome to the last section. So now our beautiful monsoon
scenery is completely dry. We will add the car that we discussed in
the last section. So onto top right, I'm painting this rare view. So I'm trying to pay it half or three-fourths of
the rear-view mirror. And I'm just creating
a rectangle. So you can observed the vehicles and you can
modify the shape if you wish. I will pick some green color. And inside this
rear view mirror, we will try to paint a similar scene that
we have created, but in a miniature version. So I'm trying to
create this grassland and also using yellow
ocher to depict the road. I've just used a dark green for the bottom part and light green for the top
part of the grass. And in-between we're depicting the road with the yellow
ocher or brown color. Now I can sketch out
that part of the car. So I'm just creating
the outline to depict the inside
portion of the car. And we will just
fill this outline. So I'm using Payne's
gray over here. And I will fill this
portion completely. So this will depict the
interior of the car. I'm using concentrated
Payne's gray over here because I do not want
it to be light in gray, but it should be darker. Going towards black. You can even use black
color instead of gray. Make sure you create
a nice solid border and it should have clean edges. Now I'm creating a slant line to depict the sides of the window. And we will fill this as
well with the solid color, that is Payne's gray or black. Try to do this step before removing the masking
tape so that you do not have to worry about the colors spreading
in the white border. So now I'm turning my
paper upside down and creating an outline in the
bottom portion of this window. I'm just creating a
little curvy line for this bottom portion. If you wish, you can
even add some wipers. Yeah, We're almost
done with our project. I hope you enjoyed creating this monsoon scenery with
a beautiful rainbow and the hazy field and water droplets which are
drizzling on the glass window. I can't wait to see
your creations. So do upload them in the project gallery so that I
can share the projects with my students and it will motivate other students to create
their own project. I would also love to
hear your feedback. So do leave a review
for the class so that I can incorporate those things
in my future classes. Thank you for joining
and happy creating.
 Lavina Agarwal, Water Color Artist and Educator