Transcripts
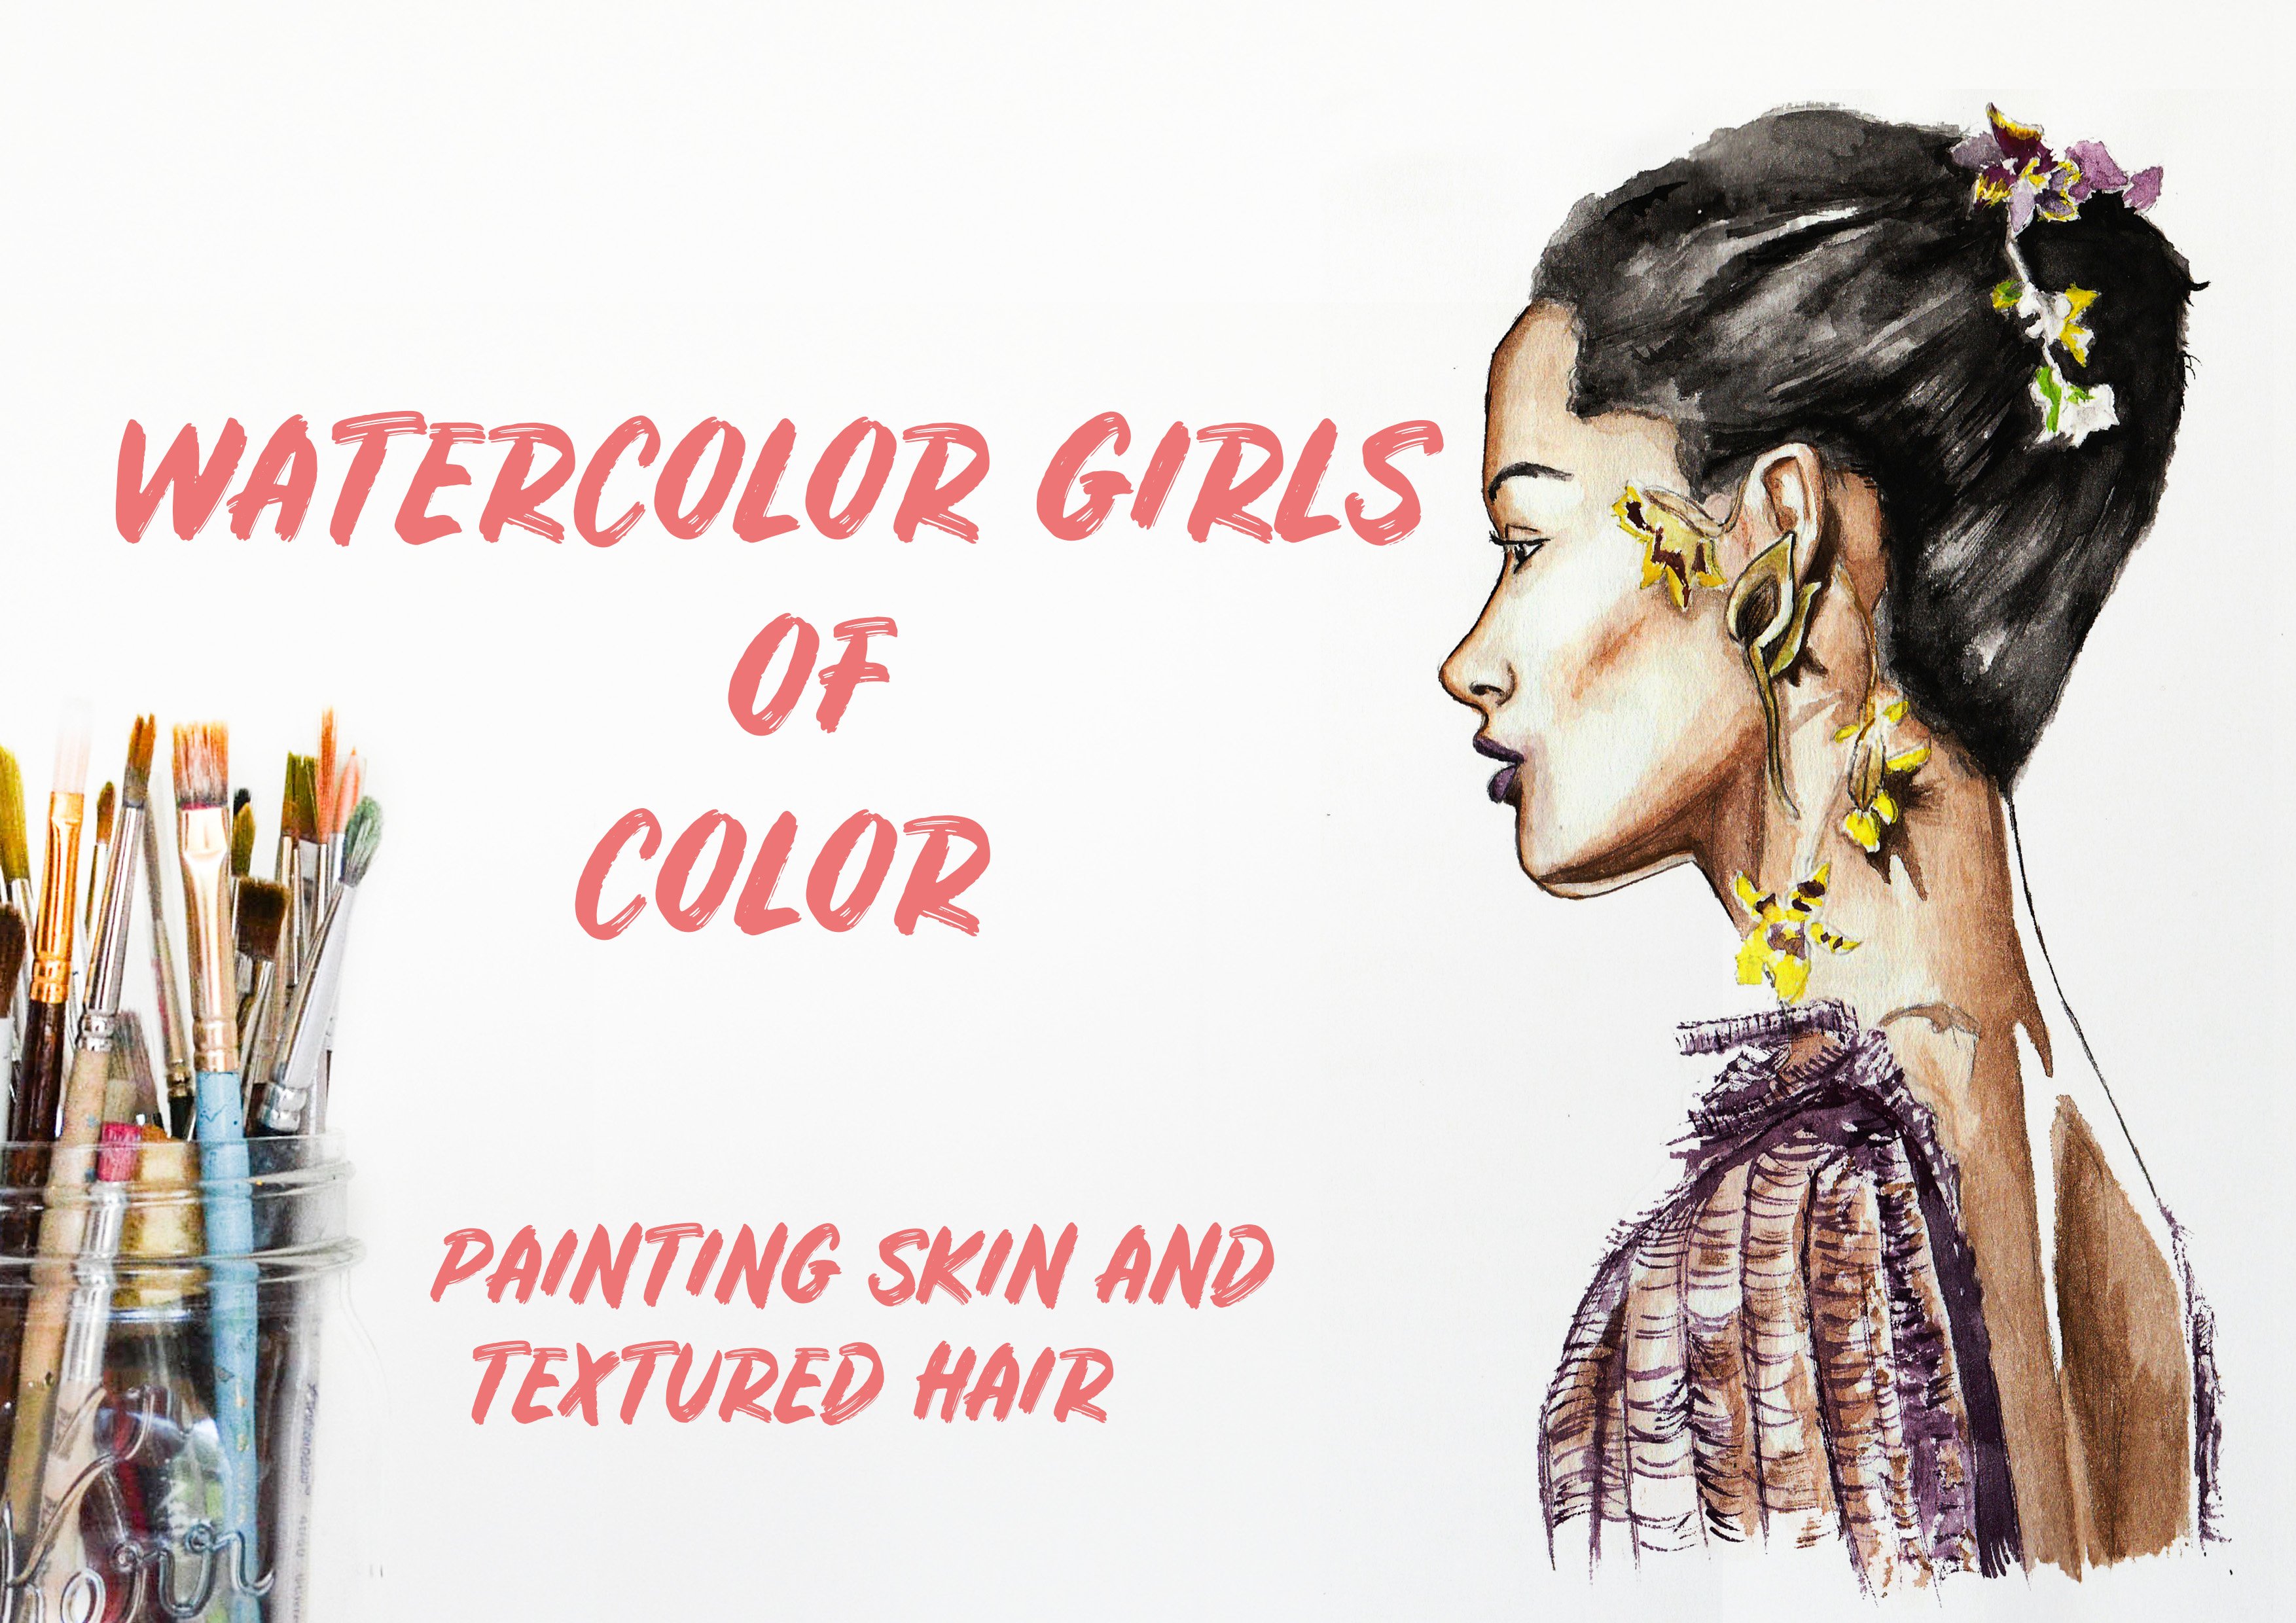
1. Intro: Hello, everyone. And welcome to watercolor beauty, A step by step guides and how to paint detailed portrait. It's from a side profile angle. I'm going to demonstrate how to paint all the features on the face, from the eyes to the nose, lips and eyebrows. We're gonna go in with detail. So if you're looking to improve your skills and watercolor portraits, I believe this class can help. I'm gonna show you how to paint the lips complete detail, how to create beautiful, captivating, realistic looking eyes. How to get those angles and shadows rights and what you're gonna need are some water color tubes. I'm gonna show you which colors to use to make some create a skin tone color, tubes of cakes. Even one work perfectly fine. Some clean water instead of brushes. The smallest size you can get on a size right above that and some clean water. So let's get started
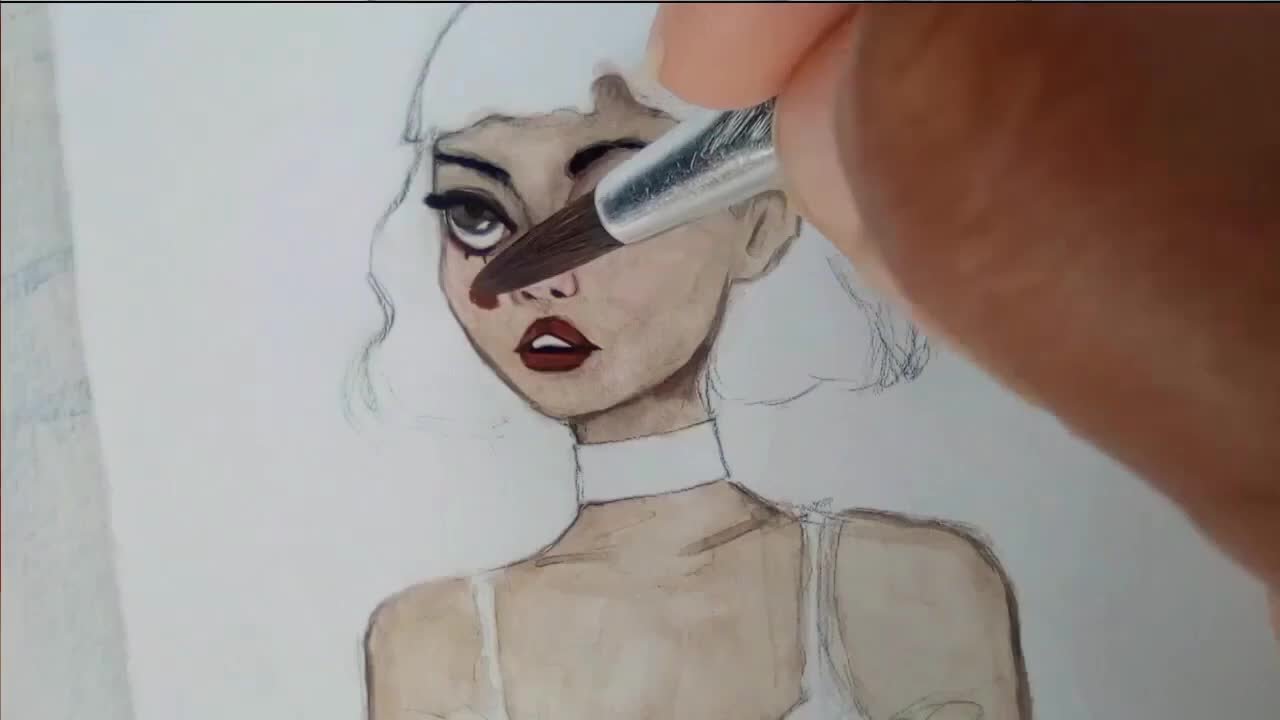
2. The First Eye: So this is a swatch of the coastal and be using This is the nude colors. And I created that by mixing this yellow occur, which is like a light brown color. I mixed it with whites and then I also gonna be using this flesh red toe. So these are the colors that I am going to be mainly using. And if you look up my sketch, I have these lines. This is to allocate women and replacing my shadow. I always need to know where I'm gonna place before I start, and I'm going to start with a dark brown. And I created the stuck brown because my water color said did not come with a dog brown a created using just adding a little bit of the black to the yellow car and a little bit of whites to get the stone. So you have to experiment with your colors with the paints that you have in order to get the right shade and tone, but you want to get. But of course, the easiest thing would be to just buy what a color said that has specifically skin total colors. If you are obituary about mixing your paints, so I'm starting by painting on the side of the nose over here, so that's gonna be a bit darker because it's a side profile. So, of course the left, I will be just a little bit darker than the right eye. And on the lids, it will be lighter and right above goes darker. And it was, be aware of the direction off his shadow. Where is the light coming from? Always keep that in mind. So that's your portrait. Looks realistic. So I painted in the crease for the island, and then I'm starting to add a little shadow. So the shadows from the island moving upwards towards the eyebrow and on the side of the nose is shadow. And again, if you want to follow with me, if you want to draw the same picture that I'm drawing, there is a link right below, so just click below and will take you to the picture. If you want to follow along with me, if you look at my brush, it is super super small, and I'll be very honest, actually trimmed this brush. Sometimes it can be hard to give those tiny brushes, but they are the best when you want to paints the I to get that detail. You don't want the smallest brush that you can get your hands on, because it's really helpful when it comes to painting your eyelashes as you'll see later on minute pink rice here by the nose, cast a shadow and then I'm gonna do my eyebrow and the little hairs are curved. So if you see him just painting curved lines but first and go back in and I start to blend , add a little bit of water. So you start by just painting these lines, and you go back in a little bit of water when you blend in between those lines, those strokes that you have painted fight around an awful the I dyes green. I forgot to add that color when I was speaking. My pains. That's the color I'm gonna be using is a dark green, and it said, Of course, you have the black for the pupil and here can you see what I'm talking about about the lashes and why you need a super thin brush. Go back and finish my my eye and sell it in with color. I'm gonna fill in the iris off the eye with green. And I have a tutorial that teaches you hot control eyes because it does help to understand the properties of the eyes and so forth. So the area with the colors, the iris and then the centers, the pupil that's the black them painting here and then always leave 23 spots completely and painted. I mean, you have these little lines up. Move from the outside, off the eye, moving towards the centre. Time tiny little lines. It's always paint those in. It would give that realist too quick to the I and then for the whites of the eye. You want to paint just a little bit of black on the outside and then blend. And with a lot of wort size, you moved towards the middle blend with a lot of water so it doesn't look flats there for the bottom of the I paint with the same skin tone color painted with above. It's a dark brown, and then I did the lashes, and this is the results. Never gonna move on to the nose
3. The Nose: okay, I'm using a medium sized brush. It's a size four. So the first tiny brush, like a size one, and I start by painting on the edge. And this color is the yellow occurred that I mixed with white to get this milky nuts this milky tend color. And then I blended out with water. So I already know where I'm going to place my shadow and we're not gonna paint and place some paint right above the nostril and around Do not gonna paint the whole nose with painting. We wanna add some character to the overall portrait with water colors. You want to leave certain areas and painted to create an effect, so to speak, on the right, on the tip and on the bottom I'm gonna play some paint and then on the side of the eye, the same color. And I'm following an image. So where they shut on the image? That's where I am paying placing paints. So where I see on the picture if there is no shadow, I'm just leaving that completely and painted keeps it really easy. So you know where it's a place your paint and around, and I and then I blend in between. So to start off with, I start off with the lightest colored. This is the This is the color of her overall skin, but it's not the color off the shadow and Linda paint on top of this with a dark color. But I do want to start with a darker color just in case. And make a mistake because Dr Colors or just a bit harder to blend out. If you make a mistake, you want to start off light and then build. Keep that in mind. So when you're painting your shadow, look at her skin. A look at your subject skin. What's color is hope is her skin. When these absolutely no shadow and starts by placing that tone underneath way, you're gonna place the shadow and then place your shadow on top. Place the paint on the tone that you would have decided to use for the shadow right on top of that's. And it would be much easier to control in case you make a mistake. Because, of course, mistakes a goingto happen and the beauty of water colors that you can blend it out if you make a mistake but to make it easier to start off light. And if you see him, not so into Leia Blade down my shadow. I'm using a darker color. Now, this is the same brown that I was using on the side of the nose by the left eye the dark brown that I created using black yellow occur in a little bit of whites and a place that around to the nostril to create this roundness and to make it to look more more. Three d, I guess, is best way to put it because we don't want a picture to look flats. Oops, you blends So right on the tip of the nose and at the top by the bridge, I'm gonna place a little bit of shadow, and I'm just blending right on the bottom and then the step off the nose. You want to leave a certain area unpainted. So it looks like these lights and it makes them knows, look more rounded and below the nose. Right here is a little bit of shadow right above the Cupid's bow. And then we paint the nostril and I'm painting it with a very dark brown along the way around. Like so
4. Sculpting The Face: finishing off where we left off with the nostril. And if you look at the nostril, I painted in a way to show that there's a little bit of brown that is entering into the dark brown. If you look at the nostril, it has to look like the shadows fading out right here. Keep that in mind. Him added a little bit of red just for texture, just so that the whole the overall picture is a bland and flat. If you use different bones to your paint into your portrait, it will make it less likely for it to look flat. You want to use a few different tones, I would say about three, three different tones off brown, and then you add a little bit off red in its and it will help make the portrait just look more realistic. So instead of red, you could actually add Inc. Or you could add a nude peach just to add character. And here I'm painting the skin tone color right below the nose keeping and pretty lights. Just sweep riot across and below. The knows there is always a little bit of shadow, and you have to blend that out. In other words, it fades out, says darkest, closest to the nostril. And then it's in a circular motion, and then you blend it out. So you keep adding more and more water as you moved down and right over here's with the cheek starts or meets the nose that will have a little bit of shadow and always constantly be blending your features out their system. Minimize mistakes because if you start off really strong, really dark, it gets harder to blend it out if you want to erase something. But if you look at the picture, we can start to see a face forming, and it's being created and right in the corner off the mouth. But if you see where we've painted away, I have painted. It's not a lot of places. It's just certain areas that I'm hitting certain areas that I'm painting, and it's creating, in effect, off of facial portrait. It's and right here, below the nose and around the chin. Place a shadow, and over here I start. I just placed the Doc Brown without placing a lighter brown, because I'm pretty certain that really know that there's gonna be a lot of shadow around here, so I know that I'm not gonna have to erase. So I just start off by placing one the Doc Brown.
5. Lips: now for the lips love painting lips. I mixed that red color painter. I showed you the beginning. This is the original color. I'm gonna blend it out in the litter on. I'm gonna add a little bit off whites and a little bit of purple, but this is what I'm going to start off. And I place a lot of the paint on the bottom, off the top lip and then I just blend everywhere else and then the lower lip. It's adding a lot of water first and just wanna get my shadows writes. I know where I'm gonna place my shadow. I'm gonna please my pains to my shadow. I was going to be around on the top off the bottom lip and on the sides and on the bottom. And don't forget those tiny little lines that you always see on the left and more the more noticeable on the bottom lip. And I'm not painting all across the lip. I just place where I see a little bit of the shadow on the lip. That's why I placed the paint. And everywhere else I just blended out. For now, I'm just keeping a really light and really soft and with lips. You can have a little bit of final eclipse, and you can mix a lot of, um, tolls and a lip. You could have like five different tones. You could have a peach, a pink, a red magenta in one lip, and it was still look amazing. I'm painting a little bit more of the paint on the bottom, and the shade is darker, and I made it darker by adding a little bit of blue to create a dark purple. It's a play around with your paints and creates a really beautiful, rosy tone with your lips and with your top flip. Always blend up, move from the bottom of the top, lip moving up, and then when the bottom lip you wanna blend in a rounded effects said that it looks more plump and rounded. Keep that in mind, and in order to have to create that roundness, you leave the middle off the bottom lip and painted. That creates a rounded effect because you have the paint moving from the top and the bottom off the lip moving towards the center. We see it looks more rounded and then you leave that middle sector unpainted, or you just add a lot of warts around there to just blend it out. I always try and create effect off a shadow moving on the lips. And then I'm gonna fill in between the lips with a black, and then I'm gonna wait for the lips to dry, and we will go back and finish them.
6. A Bushy Eyebrow: while I wait for my lips to try. I'm going to go and do the eyebrow on the right side. Curved fin strokes like so quick and wispy and then with little bit. Award, sir. Blend in between really simple. It's all you have to do. The little bit of water. I'm using the duck brown. Then I go back in and I'm free. Paint those strokes so it's like I'm building the eye brown and it starts to make it look slightly bushier. I just want to use system of the paint on my top eyelash. And then on this bottom off the I draw a line. This is a pretty duck proud. So it's kind of looks like black, and I'm going to fill in those shadows by the nose. What above thigh With the Doc Brown. I'm just following my image where I see it, what I see shadows on placing shadow and I'm blending out with water. I always add a healthy amount off water. That's your best friends when you do a lot of colors for obvious reasons into students with ease, don't be too stressed about it, and I'm gonna go back to the lips. Now they've tried. I'm gonna add more paint. I'm adding those tiny little lines and then blending on the bottom. I'm, in other words, sculpting my lips to make them of look more rounded and more realistic. I'm leaving the top off my top lip, pretty lights and the middle of my bottom lip. Also pretty lights again. You could use other colors and other tones to make you lips stand up, but for my lips, I want them to be pretty. Um, I want them to be dark purple, some just building on. So I started light. If I just started with a dog purple, if I'd made a mistake, could've just being a bit tricky to induce certain parts. So I just started off really light. Have those tiny little lines on the left, and over here, everything you do, just do it with ease.
7. The Second Eye: now we're gonna do our other. I fill in the iris with the color. My chosen color is green. It's a dark green salad up andan every I. The rim with the edge of that circle is always like a thin, dark lying if you look at eyes, some painting around with a very dark green that has black and sides all the way around. And then I fell in my pupil with solid black, and I'm gonna leave certain areas blank for the lights. Then for the eyelids. Get that shadow rights right around, see of curved line that goes right around in a little bit of shadow on the corner really blended out. Don't make that too dark. Do not make the shadows on the eyes too dark because it's will not make it look rounded and realistic. And then the bottom eyelash and in the corner off the I. If you look, they'll be a little bit of shadow like little lines. She definitely want to get that and then blended out. So when you're painting around the I blend out your shadows pretty well, do not make them too harsh, too. Don't make them to Dr that make them too deep. The deepest colors to come from your eyelashes is I'm drawing here my top eyelash and from your eye, every around blend blend. Blend with water so it looks, is of the shadows are moving and below blend and blend. Keep that in mind. Do not make the shadows rum. The I too strong. It just won't look great. And if you see the eyes starting to have a lot of character to it with a little bit off that flesh, read that I showed you in the first video that I picked up from the water color sets. I paint that in the corner of the eye when I paint a little bit of black on the inside of the eye, and then it blended out with water so doesn't look flat now. Looks rounded, and it looks like an eye so that a bull little detail that I've placed, but it's already creating what it is that I want to create, which is a a realistic looking I. It's gonna go back and add a little bit more black to my eyebrow and on the side to, and I blend outs
8. Contouring The Cheekbone: we're 3/4 through. It's gonna fix my shadow around the corner off the mouth, and then we go into starts to paint the cheekbone, starting from close to the ear, moving all the way down towards the corner of the mouth and a thick stroke. Our paints down and it created this color by mixing the yellow occur white and a little bit of that flesh red just a thick stroke down. And then you move up slightly to meet that line of the off the cheek. It's gonna you raise my pencil markings, okay? And then I'm going to paint right over with a lighter color. This is the yellow coat with a lot of whites to create a milky, creamy nude paint color. And I'm gonna paint right above, and then I'm gonna place my shadow around the jaw very, very thin line, and then I'm gonna blend that line so it doesn't love too harsh, so that's planted out and as a little bit more just following the image. And if you look at the pictures so far, most of the characters really coming from the eyes and the lips. So you definitely want to get those rights and everything else, which is fall into place right below the head. Her place, the same tone of shadow the Doc Brown. So overall I've used duct brown yellow cream mixed with whites. The yellow comix with white level of red, green and black. So five covers service five colors to paint my portrait to try toe. Stay around those colors except for the lips, of course. And I just blended that around the neck and right below the ear you would have shadow here . See, just lying that and moving down right by the jaw, keeping a pretty dark right below the heads to show the break between the head and the neck I've been I blinked. Now we're gonna do the year.
9. Ear: for the ear music. My nudes color the yellow Kerr mixed with white. A lot of the whites to get that skin tone color is pretty milky, and I'm painting around the year. If you look at your year, it has ridges. What kind of dips in it? So where it's comes out is where it's gonna be pretty light on my goes in, of course, much darker, some of just painting around the year and leaving certain areas and painted. That's what the year sort of comes out those little bones negocio what to cold? Um, but if you look at your ear, you'll get it. And then I paint where the shadow is those lines and she see when you look into the ear using a dark brown and then I'm gonna blend it out and with the ear, the ear is pretty special. I would say if you're not very familiar with joint years, don't detail the ear. Just keep it really, general. It just needs to look like an ear. Don't go in and do the little ridges and so forth. That's what I would advise. But if you're pretty comfortable with your water colors, then go in and get those and get all of that detail in those those dark lines and blends out to create the shadow like I am doing. I'm just blending. So when you look at the shadow using a pretty dark brown and then the skin tone colors much slightest, it immediately creates depth. When you add a little bit of Fred, just four character to the whole picture you don't have to do is I'm doing. I'm just doing that just to add character to it, just to make the overall picture stand outs more and just to avoid it looking flats. So instead of red again here, you could just add a little bit of nude peach if you would prefer or even pink, like a milky pink woods would work. And if you see, look at the lobe in the center. I didn't paint it. I painted a rounded, and by doing so, it looks more like a lobe looks more rounded. So the key to making something look rounded is to paint around. It's literally Then I'm just gonna line the ear. We'll go back, and I'm gonna make those ridges in the ear more defined That's what I finished with. And I'm gonna place the shadow on the forehead. We're gonna blend that, and it's going to be a pretty blended line. I'm not gonna paint across the forehead just on the edge just to create the effect of shadow falling there. And I blended out with my larger brush right here. Lots of water just painted out. You don't need to pink the whole foreheads, re adding a bit of shadow on the neck. And the head of the neck is pretty done. Now, no gonna move on to the hair.
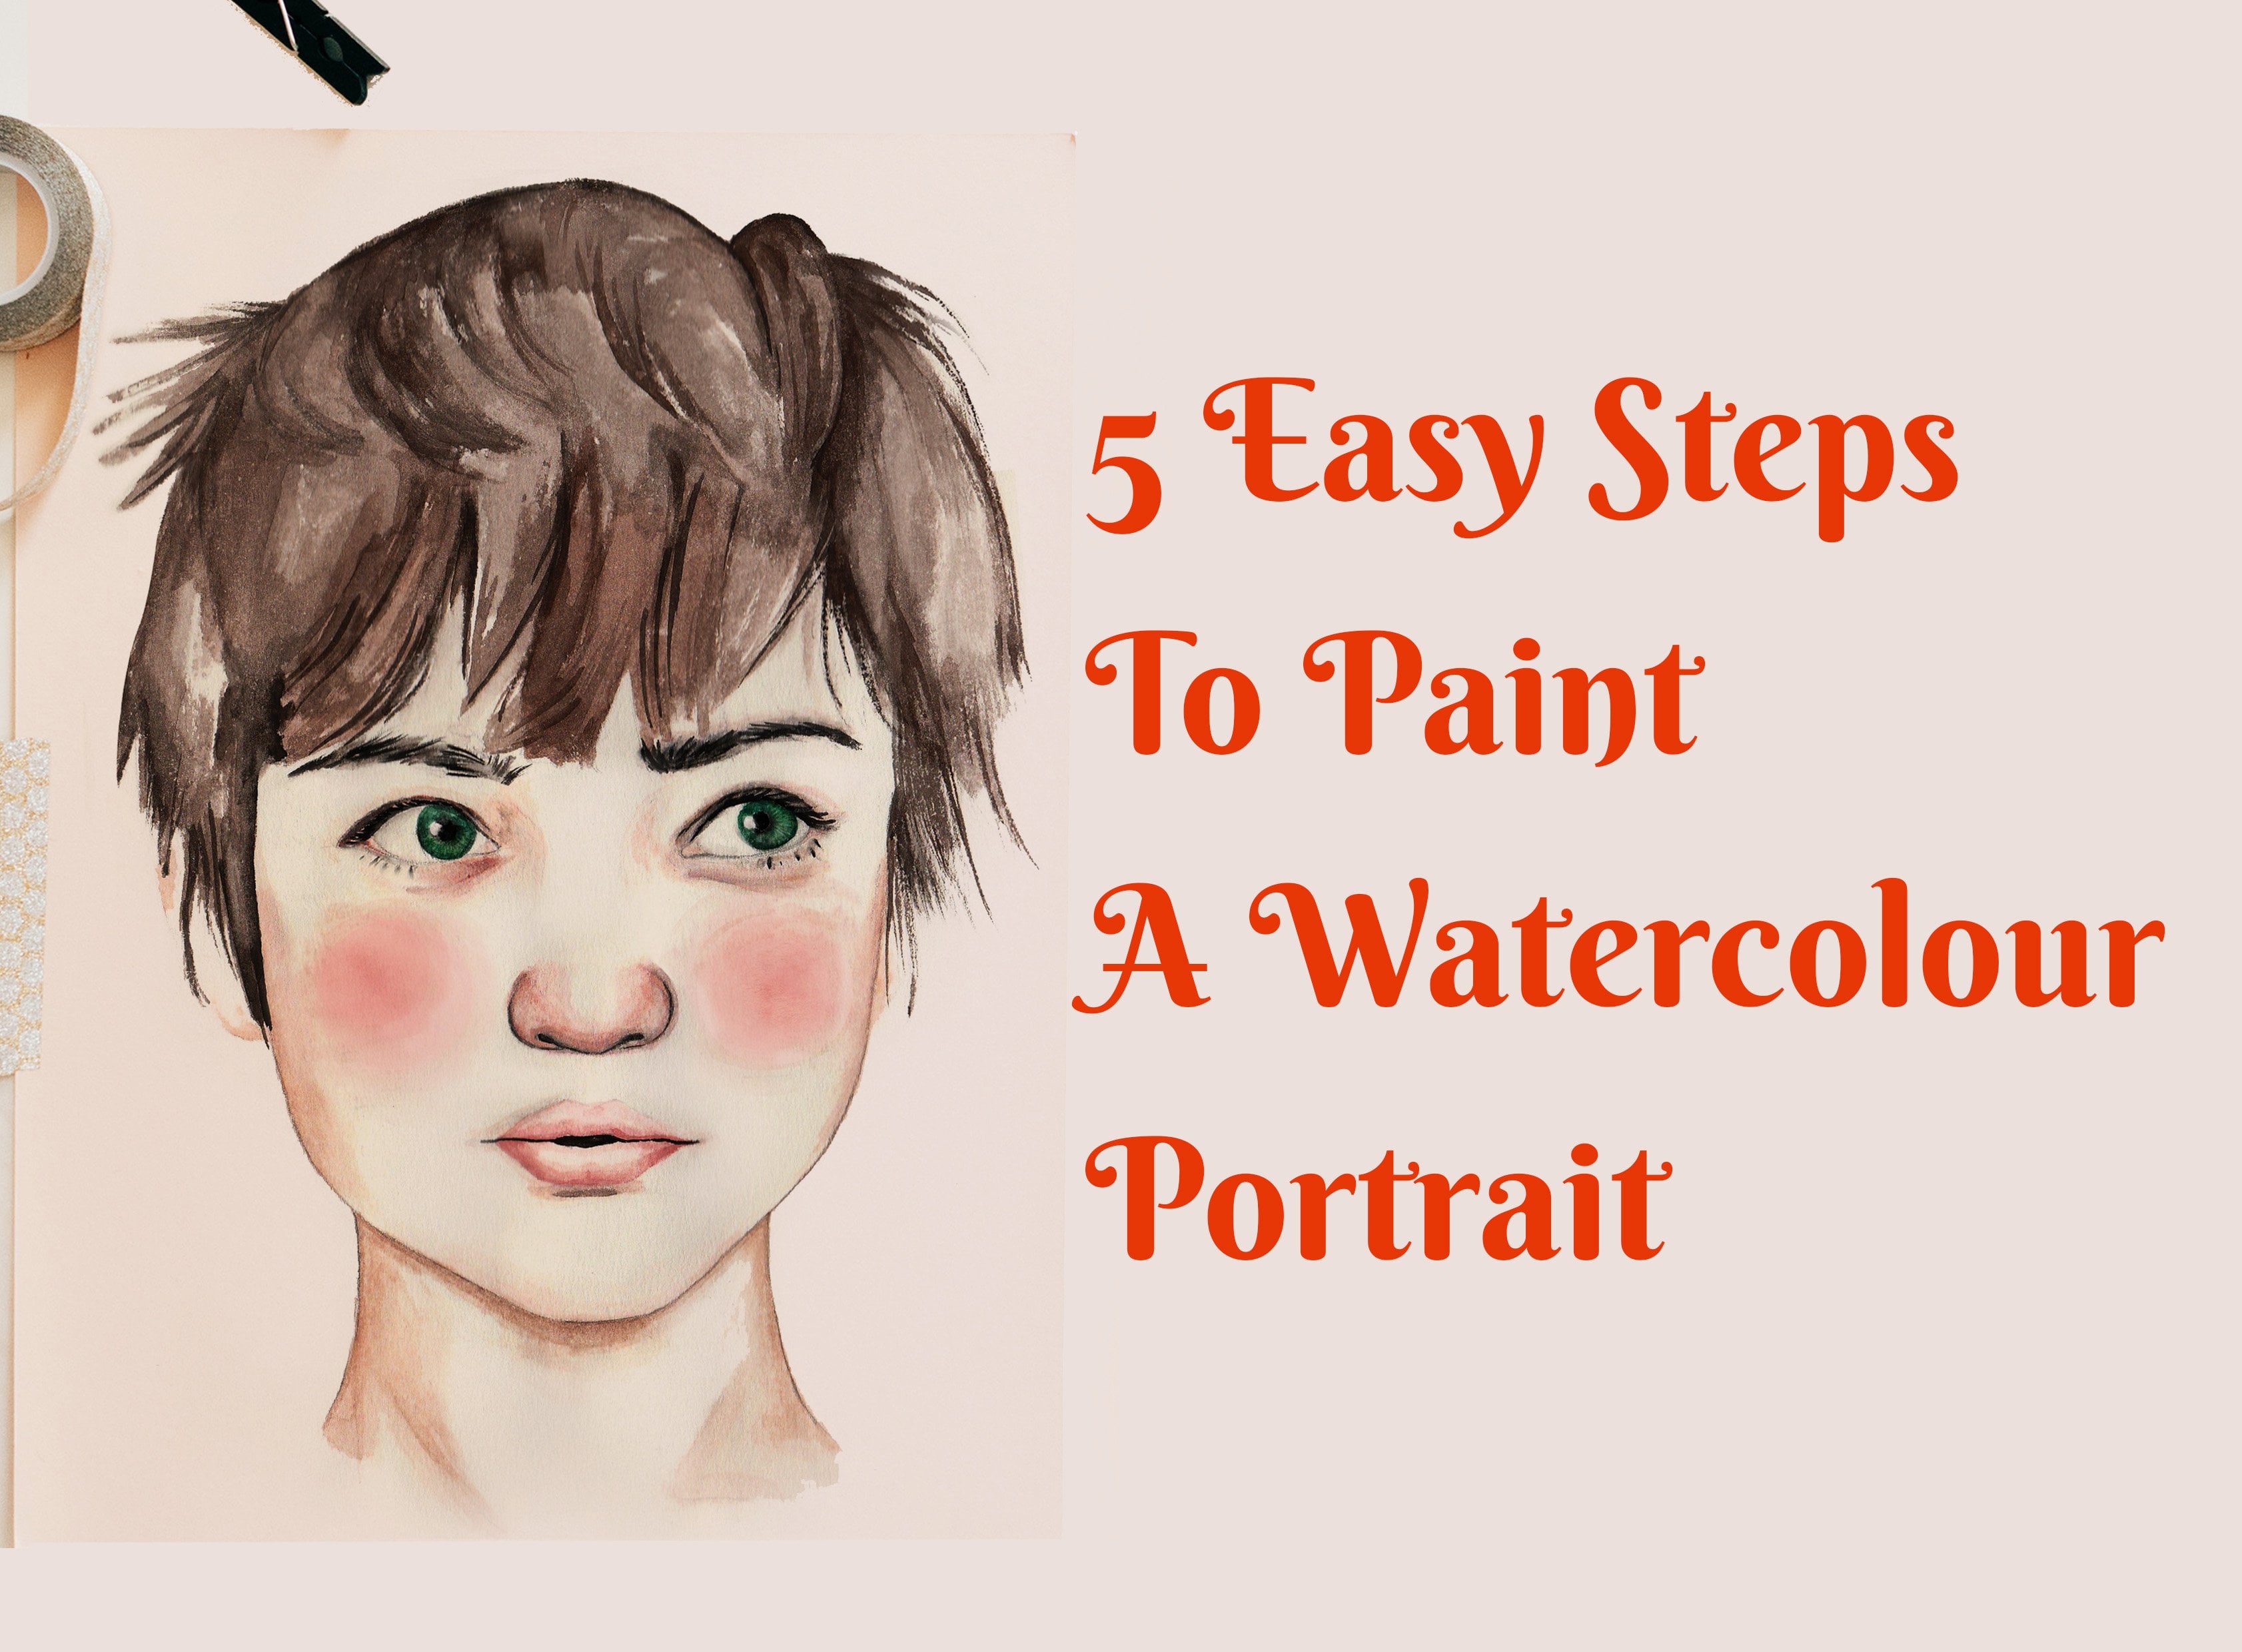
10. Hair: so if you look at my portrait, it's a pretty detailed, strong portrait. So in order for the face to really stand out, I have to pick a color that would compliment. That's with the hair. I've chosen to pick gray any more towards whites to add a little bit off against fantasy to the overall picture. If I had painted a hair brown, I would come out looking very realistic. We're just fine, but that's not really the direction I want to go in. Any other color would fight against her skin tone. So keep that in mind. When you're picking hair color, you don't want to cut the wood, be fighting against them the color of the flesh. So I'm just painting in specific areas with the light gray, the lines around the ear and everywhere else. I'm just gonna paint with white and the strokes, keeping it very minimal because I want all of the focus to go to the face or immediately when you look at the portrait you just drawn to the face and even looking at it now, when I look at him immediately drawn to the eyes, which is pretty good. So let's just go over again. The key things to remember when you're painting your portrait number one always start off lights and men build on and add your shadow. He used the smallest brush you can get your hands on when you're painting those eyes, especially for your eyelashes, and always be blending around the I do not in tree Lee Harsh, strong shadow blend, blend, Blend around thigh This is the overall picture. Thank you so much for joining in on the class. I hope it was very helpful for you. If you have any specific questions, please do not hesitate to leave them below. Thank you for your supports. If you enjoy the class, definitely share it and let others know about it and take care.
 Sharon Mapuvire, Anything Is Possible