Transcripts
1. Introduction: Hello there and welcome to
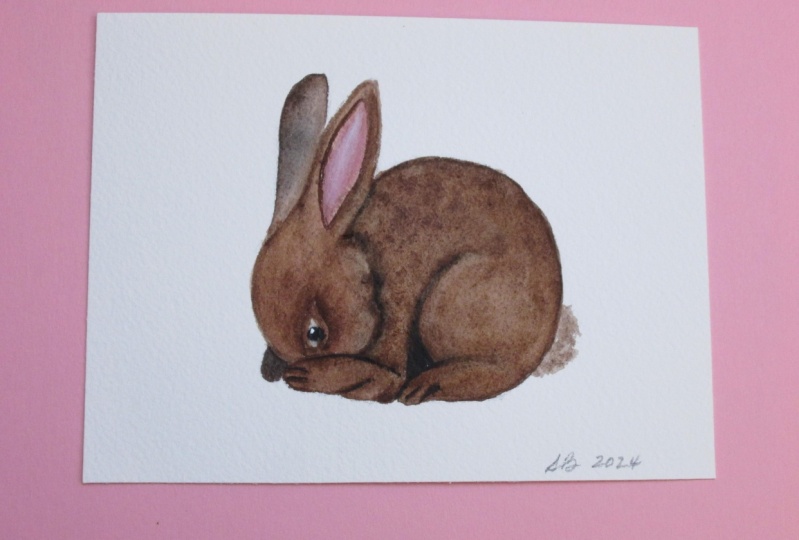
my new watercolor class. My name is Alexandrina, and I will show you how to
paint this cute little bunny. We will start by creating
a simple sketch, then we will move
to color mixes, and finally, we will start
painting with watercolor. In the end of the class, you will create a
class project with one of the two bunnies
from the lessons. Don't forget to submit
your class project. Click on Submit Project
button inside the class. Then applod image
with your painting and publish your painting
into the class project. Please don't forget to deliver you as it helps me to improve my future classes and
for other students to understand if this class
is a good fit for them, this class is suitable
for the beginners. So if you want to paint
these cute little bodies, I'm waiting for you in the
class. Let's get started.
2. Wet On Wet for Beginners: Hello and thank you
for joining my class. Before we start
painting our bunnies, let's practice in wet
on wet technique. This technique is essential
for watercolor painting. If you are not confident enough, if you are a beginner, I suggest you to exercise
and practice on scrap paper. I will show you the
main principles of this technique on this
round shape and two colors, spinel, brown, and sepia. As you may guess, this technique requests a lot of water
in the color mix. Also, brush strokes should be in the same direction
that the shape. With first layer, I'm
covering the shape with a very light color and
quite a lot of water. Then I introduce color while
the surface is still wet. Once I cover the
shape with the color, I need to create high light. I'm cleaning and drying my
brush on the paper towel. I'm lifting the color
from the surface, creating this nice
and smooth highlight. Now I can paint the shadow at the bottom of the shape with pi. You can see that the color is
nicely blend on the paper. This technique
doesn't allow you to control a lot of the
painting process. The more you practice, the more you will understand
damp should be the paper. And how color do you
need on your brush? When to stop, when
to add colors? The perfect paper for a weton
wet technique is cotton, cold pressed, or rough paper. Cotton paper dries slower than, for example, cell lose paper. And it allows you to work
longer on the wet surface. Because with this technique, you have to paint while
the surface is still wet. Now let me show you another
exercise when we will paint one object behind another using wet
on wet technique. We will start by covering the round shape at the
bottom with first layer. Our main challenge in this
exercise will be to make the upper round shape darker
than the bottom round shape. And to separate them
by the color value. I repeat all the steps that were made with
the previous shape. Creating highlight with
a lifting technique and adding shadows while
the surface is still wet. Now I will move to
paint another shape. As you can see, I'm
using dark color for the second shape and
the color starts to go on the first
shape at the bottom. It's normal when you're painting with wet
on wet technique. But we have our
lifting technique. I will remove the
color from the shape at the bottom to separate
these two circles. The most important
thing that you have to learn when
painting with wet on wet technique is how much water do you need in your color
mixes and on paper? The more water you
have on paper, the less control you have
over your painting process. I'll see you in the next lesson where we will paint bunnies.
3. Class Project 1 - Sketch: Hello again and
welcome to my lesson, where we will prepare a
sketch with our first bunny. I'm using mechanical pencil, 0.3 millimeters, you can use an ordinary
pencil is totally okay. I will just show you how
I'm making a sketch, but you can also find
the final painting. In the attachments
to this class, I placed bunny not in the
middle but on the left side, because on the right side I
will paint another bunny. In this class, if you have a postcard paper or just
another size of the paper, you can place your
bunny in the middle. My sketch is ready and I will
see you in the next lesson, where we will paint a
bani with water color.
4. Class Project 1 - Color Mixes: To paint this cute little bunny. Let's start by exploring
the materials. Let's start with colors
and color mixes. For this painting, I'll
be using four colors, Ruby per paints,
gray and yellow. Ok, I'm using 100%
quot paper by honey, mud, and two round brushes. Number six by silver brush
and double zero by Pbo. Here are the main color mixes we will use for this painting. We will need light
color for the bunny, body and face, middle color, Dark color and color
for painting ears. Basically, the color
for painting ears will consist of yellow
ocher, ruby, and sepia. For the bani, we will use
mostly yellow ocher and sepe. In dark parts, we will use
mix of sepe and paints green. In the description
to this class, you can find all the names of water colors I'm using
for this painting. Prepare your color mixes on the palette and I'll see
you in the next video.
5. Class Project 1 - Painting: I start by covering the body of the body with a very light
mix of yellow water and CPM and use a lot of water in this mix because the first layer
should be very light. For now, I'm avoiding
painting ears. And gradually I will
build up the color, adding some more intense color in some parts of the bunny. While the surface is still wet, I'm working with the
darker shades and I see that behind the ears and behind the pole of the bunny will be
the darkest parts. I'm adding a little
bit darker color, a pure pa, pa, with paints gray. I'm slowly moving to painting
the head of the Bonny, adding some more intense color. Just be careful because around the eye there will be
a very light area. I will try to avoid painting
it with the dark color. If you didn't manage it, you can remove the paint
with Dr and clean brush. I'm adding some more dark
color on the body of the bony. Actually, the wetonvet
technique is pretty difficult. And I had to practice
a lot before I managed to control water color a little bit during the
wet, wet technique. Don't worry, it's not so easy from the
first time you paint. But just practice
and observe how to get more control
over the wet colors. The first layer is. And I can move to paint in
darkest parts of the painting. And I'm using P and paints for painting
these darkest shades. Don't forget to blend some edges of the elements
that you painted. Because I painted here and it's still the rough edge and I
want to make it more smooth. I'm using the just pure water or a very light mix of water and some color that
I have on the palette. Now I'm moving to
painting the ear. And I'll start with a very light color
with a mix of shape, yellow, ocher, and ruby. And also I will keep a very thin white line between two ears so
they would be separated for painting the inner
part of the year, I'll be using mix of ruby and paints gray
that already have on my palette and it will be pretty dark part
of the painting. Now the only thing
left is to paint eye and some final details on the bonny imitating
the fur texture and adding some details
and maybe more contrasts. I'm basically using
all the colors that I already have
on the palette, Adding it with a very light
and simple brush strokes. And here, for example, area around the eye. I told you that it
will be very light, but we cannot keep it
white as it is right now. So I'm covering it with light mix of the colors
that I have on the palette, adding a lot of
water into the mix. Now we can add shadows and
some final details With the very tip of the brush we
can paint texture of the. Now it's time to use the smaller rush for
painting the eye. I'm using paints
gray and I'm keeping some small white areas unpainted to represent
the highlight in the eye. I add some final details with a smaller brush and
our painting is done. If you share your
paintings on Instagram, my account and I will share
your painting to my stories. I'll see you in the next video where we will paint
another bunny.
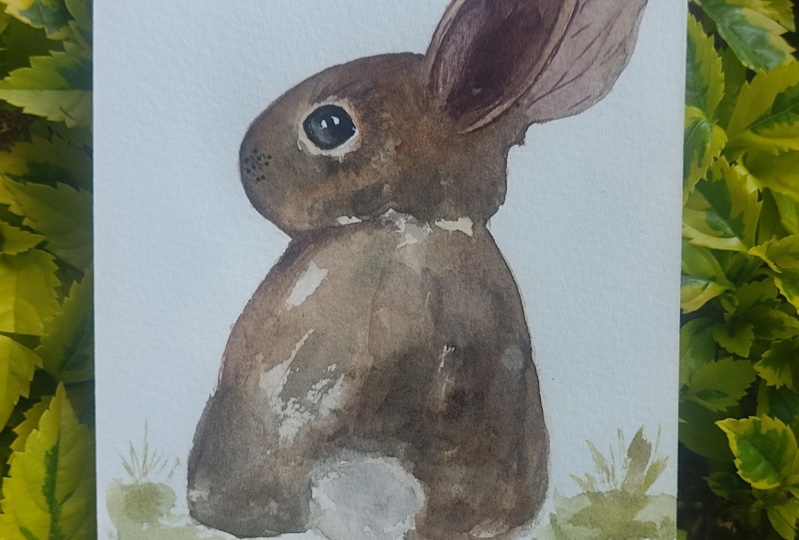
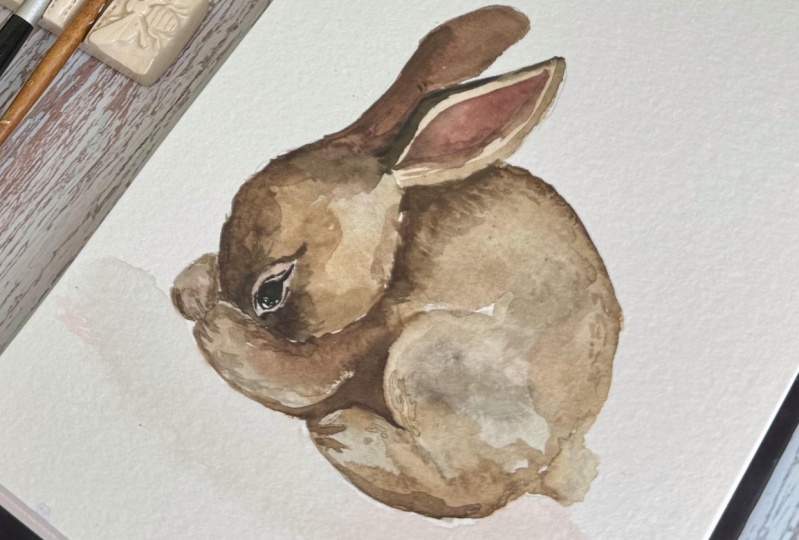
6. Class Project 2 - Sketch: Welcome to the second
part of the class, where we will paint
the red bunny. Before we start painting, let's prepare the sketch first. I'm using the same mechanic
pencil that I used before, and I paint on the right
side of the paper. When you prepare a sketch, it's easy to think
of the shapes, not the particular lines
or parts of the object. Just go with the
shapes that you see. For example, the
biggest shape that I see here is the body's body. I will start by creating this round shape with a
small tail at the bottom. Then again, I see the big
shaped head of the body. So I paint the shape first
and then I will add details, eyes, ears, and
some other stuff. My sketch is ready and I will
see you in the next video, where we will start preparing the color mixes
for the painting.
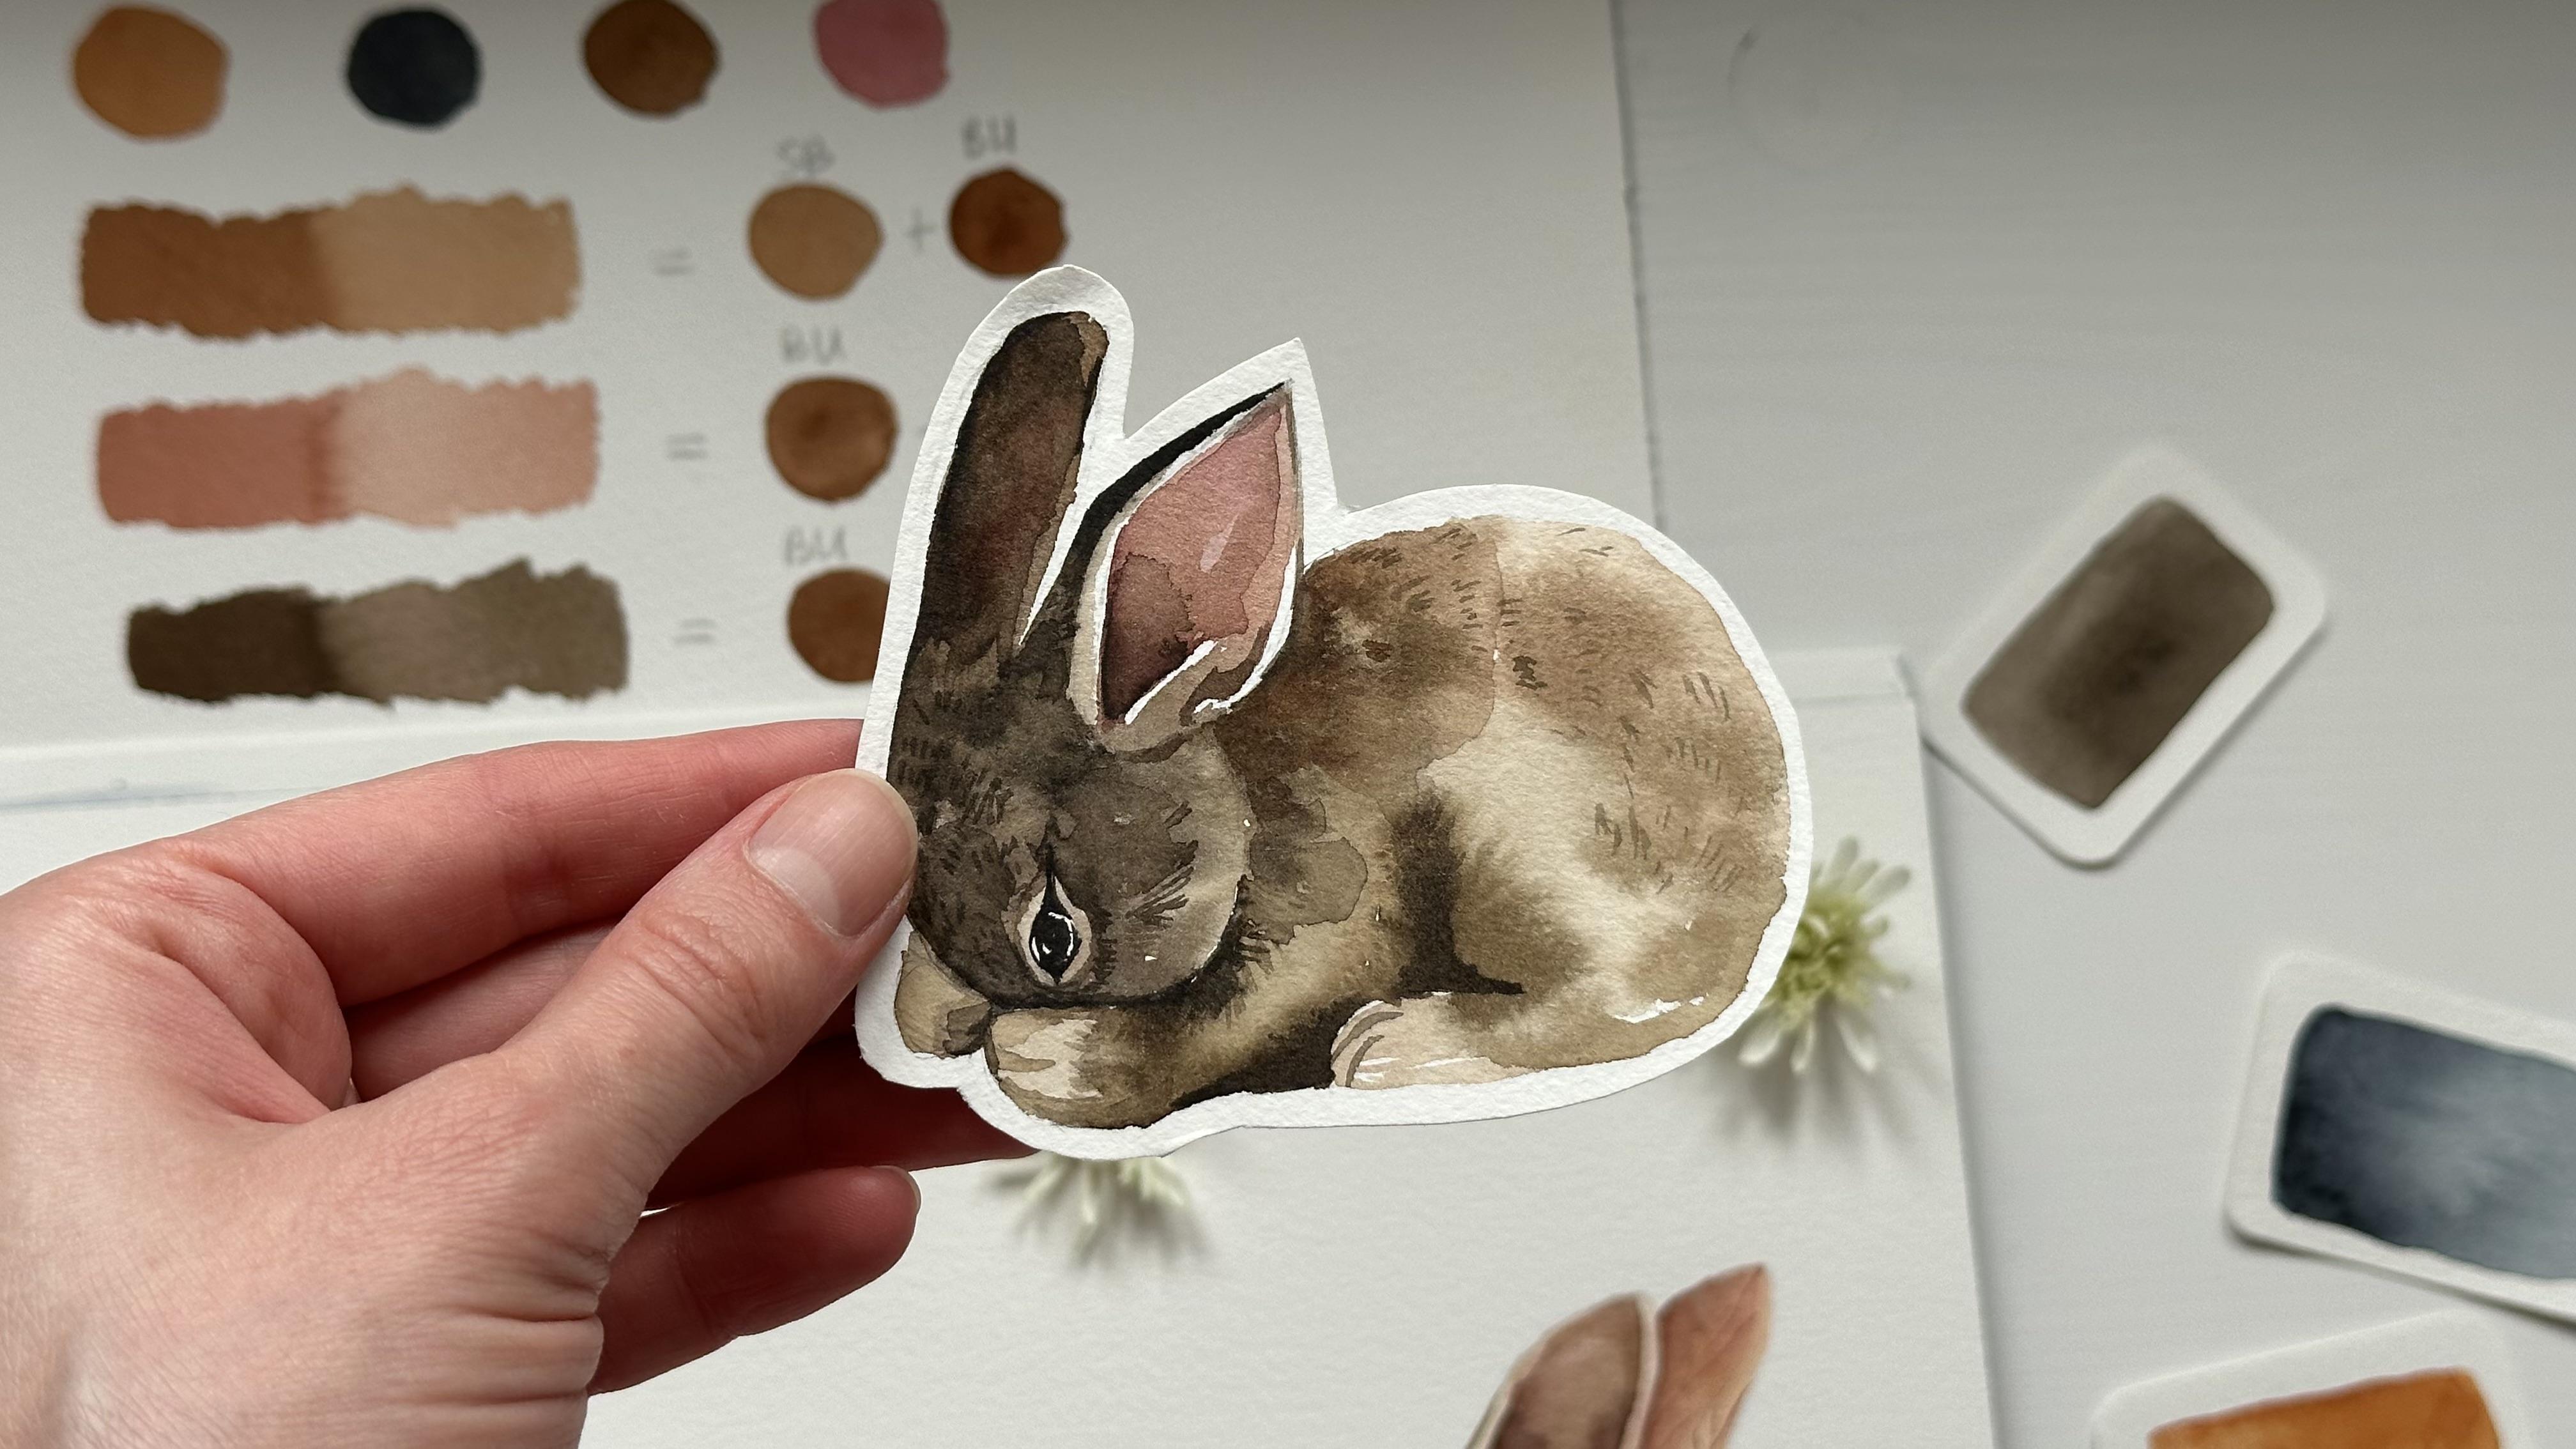
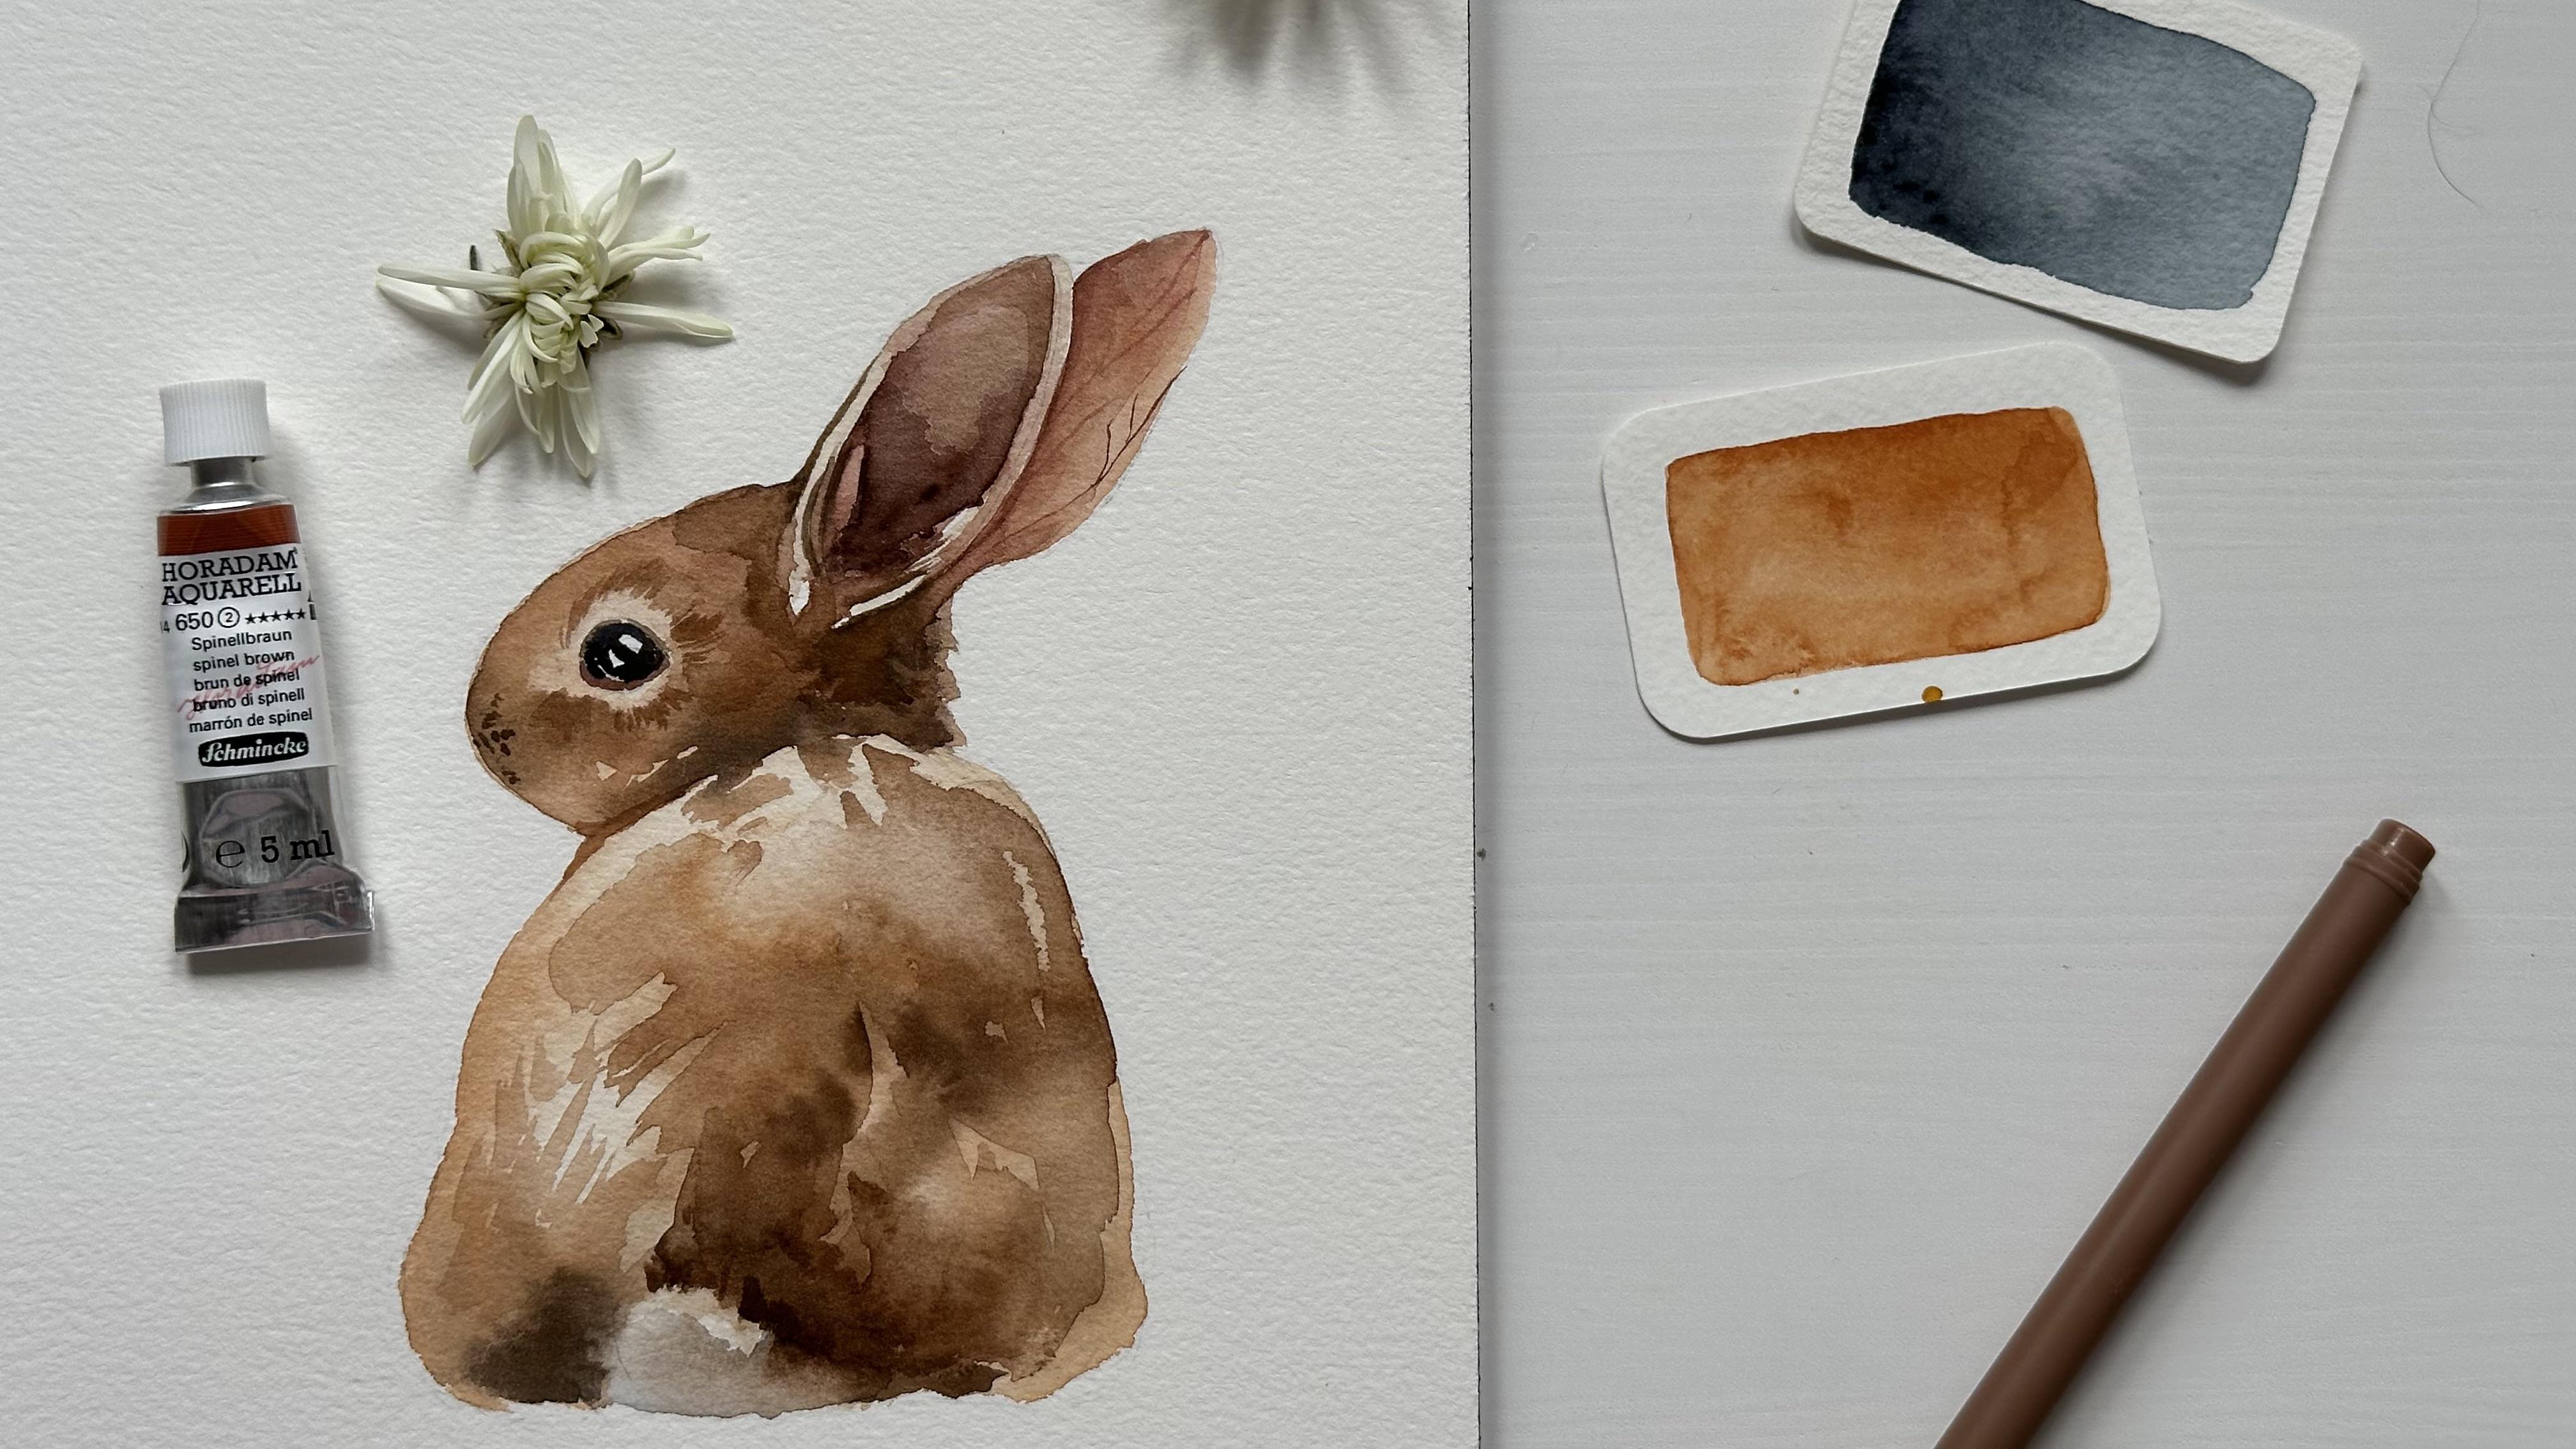
7. Class Project 2 - Color Mixes : Before we start
painting red Bani, let's talk about materials and color mixes for this painting. I'm using 100% cotton paper by honey mull and
four water colors, spinel brown by Schminke, paints gray by Van Go, burnt umber by smink, and a ruby by white nights. In the description
to this class, you will find the full
composition of each color so you can replace it if you don't have particular colors
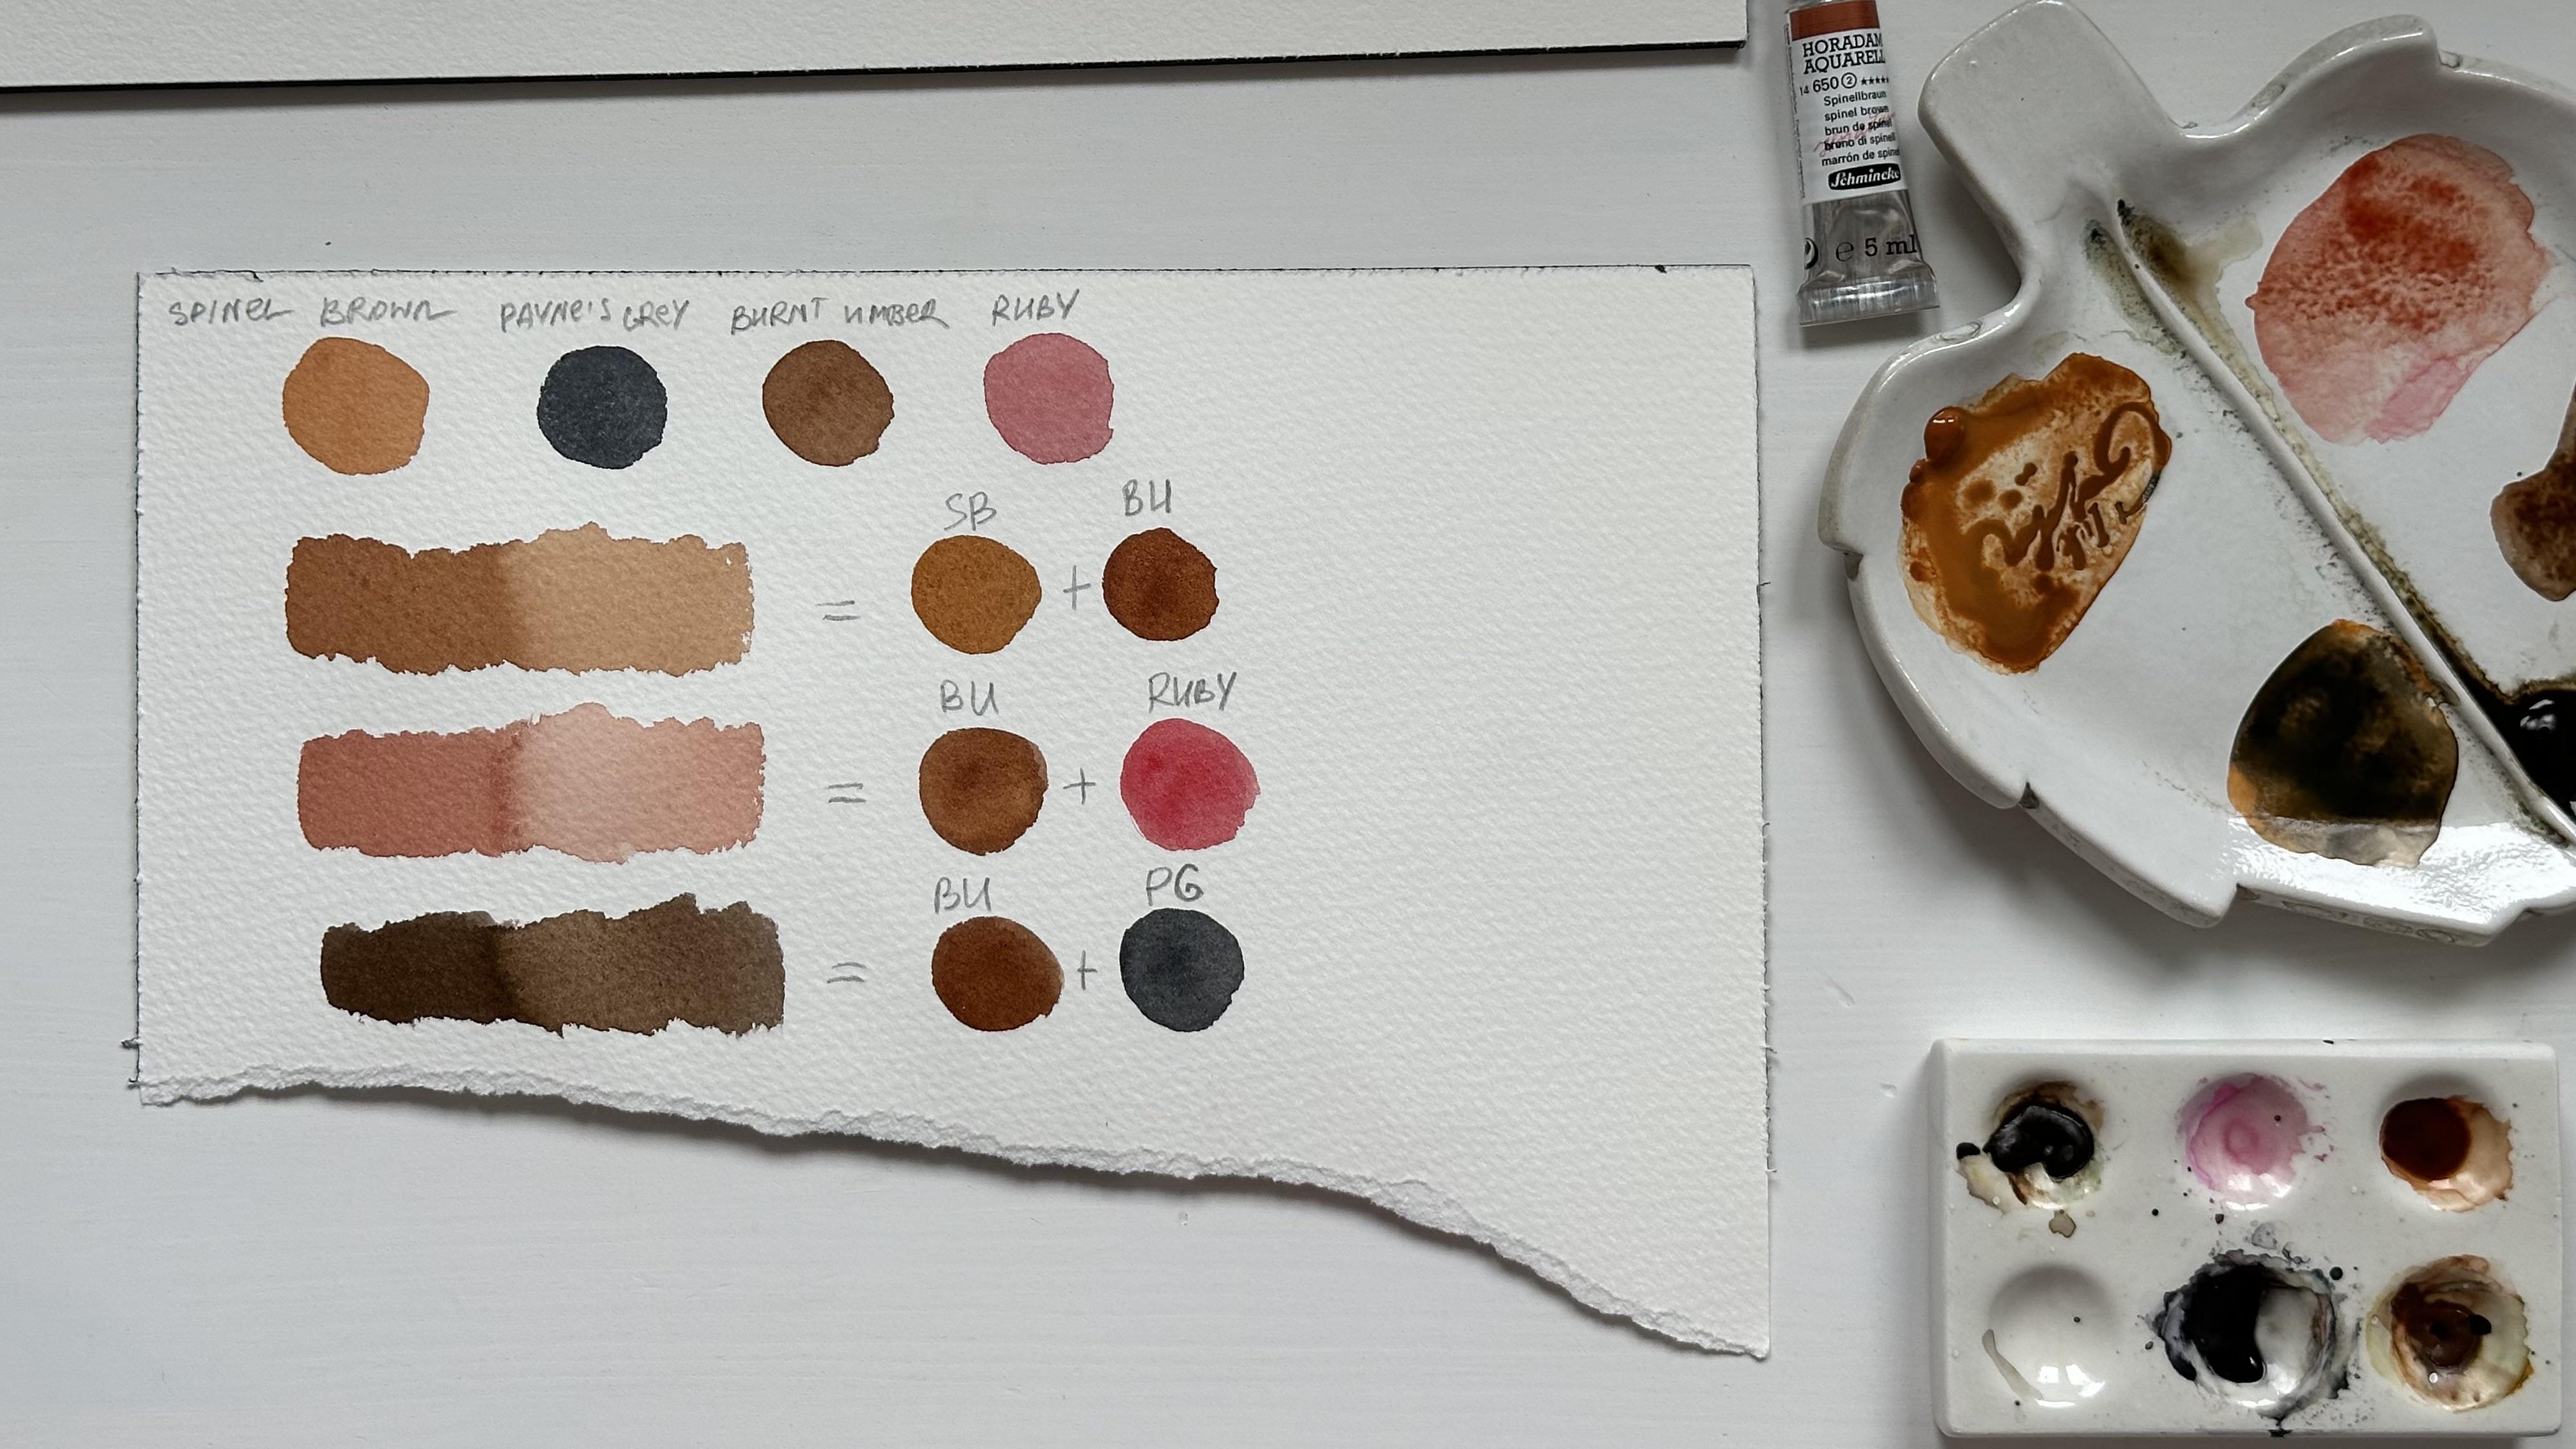
in your palette. Before we start painting, we're analyzing our image
in terms of color values. We need to understand which parts are the
lightest, the darkest, and the middle value to prepare the color
mixes for these parts. Right now I have mix of spinel brown and burned
umber for middle value, mix of ruby and burned
umber for painting years, mix of burnt umber and paints gray for the darkest
parts of the painting. If you don't have burnt
umber in your palate, you can use burnt sienna. And instead of ruby, you can use carmine. Prepare your color
mixes on the pallet, and let's move to
the next lesson.
8. Class Project 2 - Painting: I already have a sketch, and before I start painting, I will use needable eraser
to remove the pencil lines. We will paint this bunny
using wet on wet technique. Right now, I'm preparing the color mix for
the main color. We will cover the whole body. It's a mix of water, spinel brown, and burnt umber. For now, I will avoid painting the ears because
they will be darker and some parts will be lighter than the head and the
body of the body. So I will cover the head
and the body first. Don't forget that the bunny has these very light
areas around the eye. I'm trying to not cover
it with very dark color. And also I can remove some color with a
dry and clean brush. For making dry, I'm
using paper towel. I'm moving to painting the body of the bunny
with the same color, using a lot of
water in this mix. And working very fast so
the surface won't get dry. I'm starting building
up the color, gradually mixing the burnt umber and paints gray on the palette. And adding this
mix to the body of the body and some of other
colors I mentioned before. Right now is the first layer. It's not really important how
you will make the strokes, but it should be not too dark because the first layer
should be quite light. Also, don't forget that
the bunny has a tail. I'm removing some of the color from the small little
tail in the middle. Now we can start painting ears. I'm using very light mix of
spin on brown and water. And I'm slowly moving from the top to the
bottom of the ear. I'm mixing all the colors that I have on the palette and add some ruby to create this pinkish color for
the inside the ear. The color should be
intense and dark. And I'm connecting this
part that we painted and moving to the second layer
and painted the bunny's head, creating more intense
and brownish color. The edges of the painted
area are too sharp. I'm using the clean water and
I'm just lifting the color. And also don't forget
that we have to keep the light area around
the bunnies eye. Once again, we start painting
with wet on wet technique. I will add some
darker shades while this layer is not dry also, this is how we can separate
the head from the body. It will be different color
values because we see on the photo reference that the head is darker than
the body of the body. The darkest parts
of the painting are the ears and the
eye of the body. So I add a little bit
more intense color using a mix of ruby, burnt umber, and paints gray. I'm adding a bit
more darker colors around the ears,
around the eyes. And to divide this space
between body and the head, making the head
darker than the body, I let the heat dry and
I'm moving to paint some more intense color
on the body of the bunny. Here, I have to create some brush strokes that look similar like the
fur of the bunny. By the way, I'm
using a round brush. Number six by silver
brush, black velvet. It's one of my favorite brushes. Now I will paint a very
light and thin line around the eye using the brownish color that I have on the palette. And I'm using the very tip of my brush to create
this very thin line. Now I will move to painting
the last year that we have. The second year using the mix
of spinal brown and Ruby. This year will be lighter
because we see the light coming through this very thin
skin of the bunny. Basically, it should
be like almost orange with a very
light tint of ruby. Now I'm switching to the smaller brush to paint the eye with
paint, screen color. The main thing that you have
to remember when painting the eye is to keep
the white areas, white spots in the
eye around the pupil. It will represent
the high light and the eye will look shiny
like in real life. I also decided to
highlight the ear, and to separate it from the
head and the ear behind. So I'm just using
the darker color and applying it around the ear. But we have to blend it, the edges would not be sharp. I start to add a very simple
and light brush strokes with a small brush to create this feeling that
the body is fluffy, that he has a fur. I'm doing basically
the same with the hat, separating it from the body
in terms of color value, highlighting the separation with the very thin and dark line
between these two parts. Our painting is almost done. The only thing left is to
paint some final details. And one of them is the veins
on the ear of the body. I'm using the color that I
already have on my palette. Just make sure that it's
not too dark because right now I see that it's too
bright and it shouldn't be. If you are just like me and you created too dark color
for these veins, you can now cover it with a pale mix of spine brown
and ruby and a lot of water. It will mute the
color of the veins. Our painting is done. I hope that you like this class. Please review and submit
your class project. Thank you for painting with
me and joining this class. Please leave a review and I hope to see you
in my next class.
 Aleksandryna Gromyko, Watercolor tutorials for everyone