Transcripts
1. Introduction: Hi, my name is Alexandrina, and I'm a watercolor artist. I invite you to
join my class and paint a majestic owl
with watercolor. First, I will show you art materials and colors
watches I am going to use. Then we will move to drawing a sketch and applying
masking liquid, and finally, we'll
start painting. You learn how to use the wet on wet technique to create
smooth, natural transitions, how to preserve highlights
with muskin liquid, and how to mix beautiful shades
using just a few colors. This class is designed
for all skill levels. So whether you are a beginner or have some experience
with watercolor, you'll find easy to follow guidance to help you create
a beautiful painting. By the end of this class, you will have a stunning
owl painting and new watercolor skills to use
in your future artworks. Grab your brushes,
prepare your watercolors, and I hope to see
you in the class.
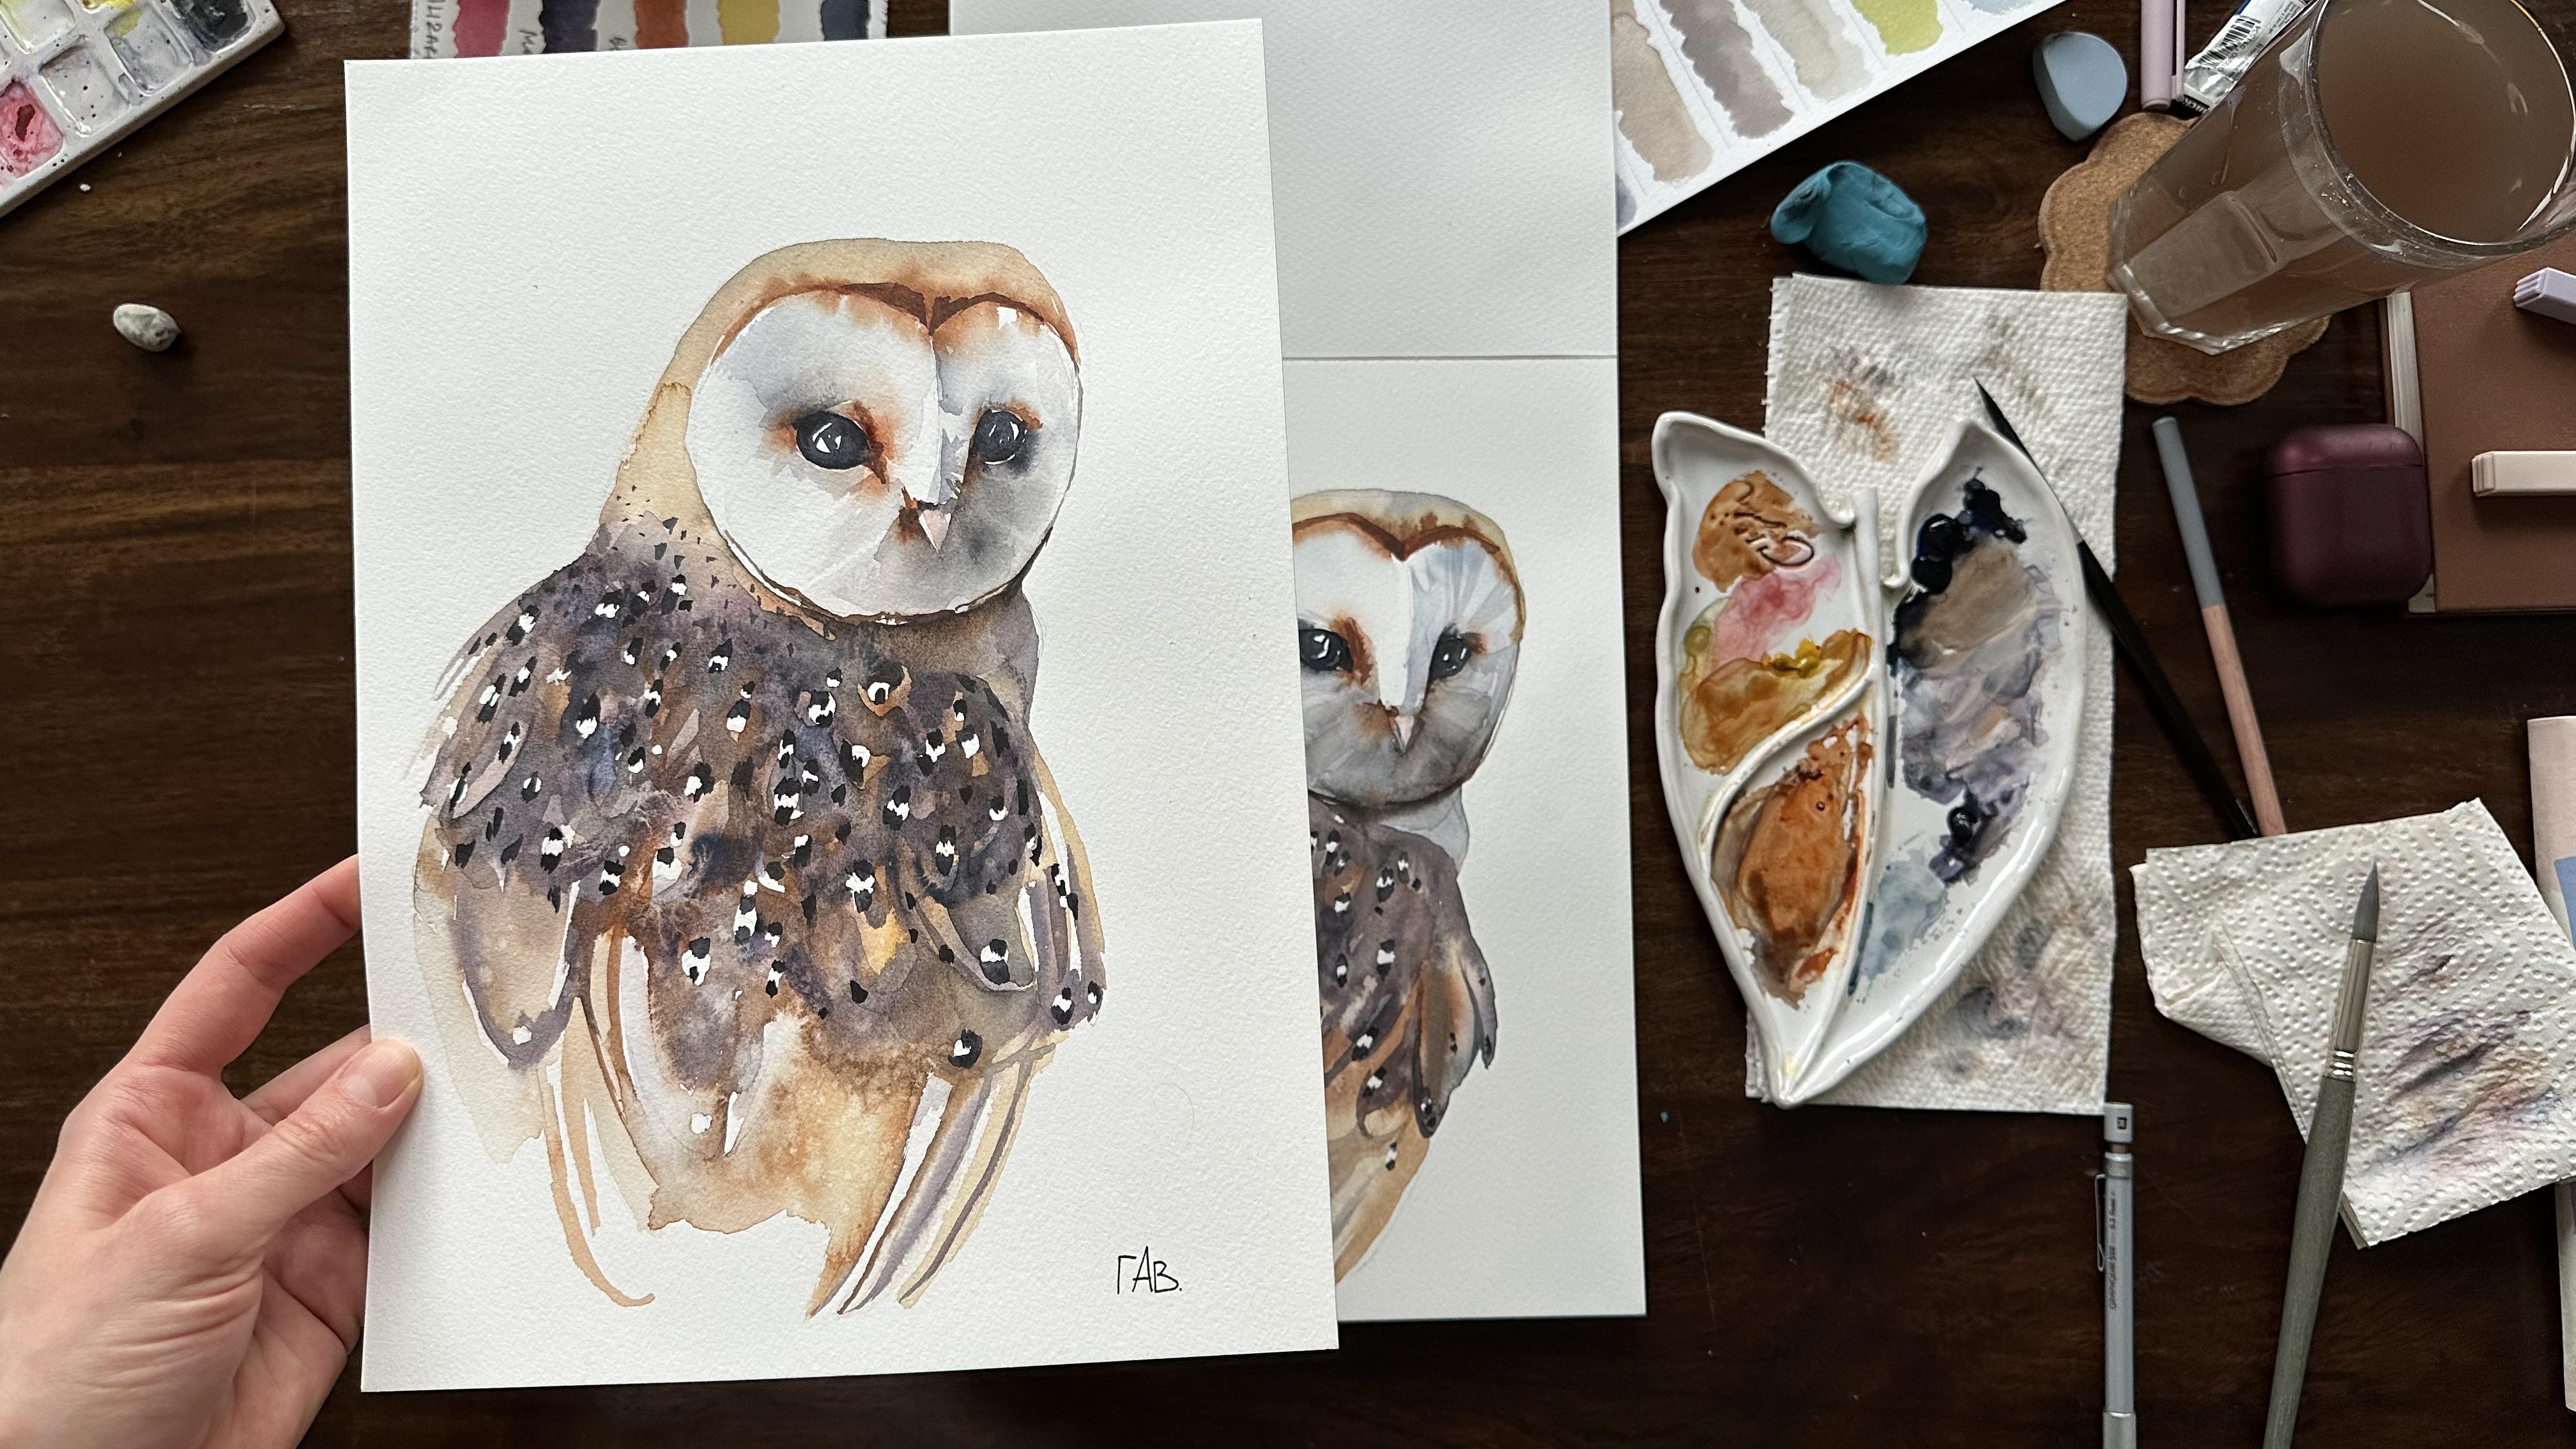
2. Art Materials: Hello, my dear students, and welcome to my new
class where we will paint this majestic owl
using watercolors. We will practice in
wet on wet technique, and also we will use
granulating watercolors. For this class, I used 100% cotton paper by Kansan Moulin Duroy
called pressed texture, and also four main watercolors, paints gray, yellow Ocha, moon glow, and burnt sienna. I also used a little bit of zarine crimson for the color
mix for painting the big. I will also use musk
in liquid by Sminke. Now let me show you
the colors watches. If you don't have
particular colors, you can try to find some
similar colors in your palette. You can find a list of
materials I used and links to the products in the
description under this class. All these colors, except
for the moon glow, are in my limited palette. It means that I use
them for painting basically anything from
animals to landscapes. You can find my art supplies guide in the attachments
to this class. Munglow is a
granulating watercolor that I will use for
painting the feathers. It was actually the first granulating watercolor
I ever bought. If you don't have Munglow, you can just use mix of Alyzerin
crimson and ultramarine. I will use also a little bit of Alyzarin crimson for
painting the big. You can use other
red that you have in your palette. Oh
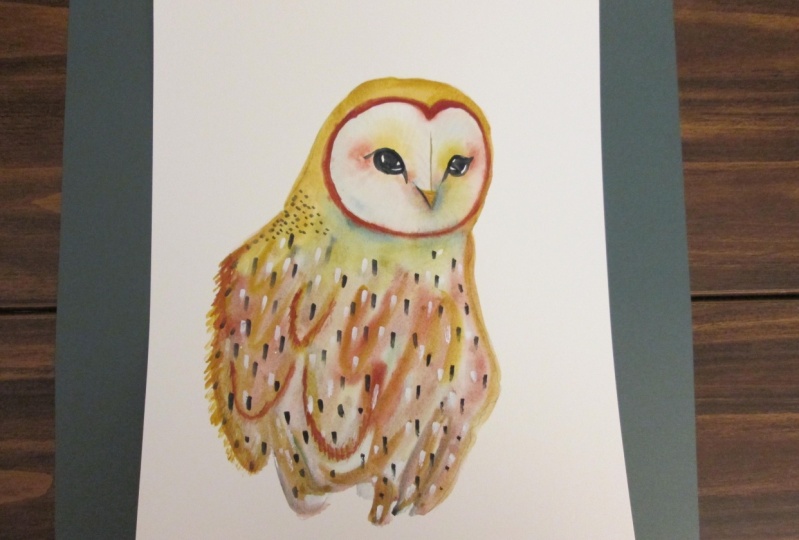
3. Sketch an Owl: I will start by
drawing a sketch. You can find the scan of my sketch in the
attachments to this class. I always start with
simple shapes, and this time, it's a
round shape of the hat. Also, don't forget to
draw a middle line, so it would be easier to understand where the nose
will be and the eyes. I'm not drawing a
separate feathers, but I'm trying just to
catch the direction and the main shapes
of this area. The owl is positioned in
a three quarter view, so the distance between
its eyes won't be equal. We need to depict this
distorted perspective by adjusting the placement
of the eyes accordingly. Now, my sketch is almost done. I will use kneadable eraser
to remove hard pencil lines, and I will apply
some skin liquid. I need to apply skin
liquid in some areas on the feathers to keep them
white because in watercolor, the white colour is represented
by the white of paper. So I'm carefully
applying these spots, and I will wait until
it will get dry. If you don't have
the masking liquid, you can just use zin white or white quash in
the end of the painting. I will see you in
the next lesson where we will start painting.
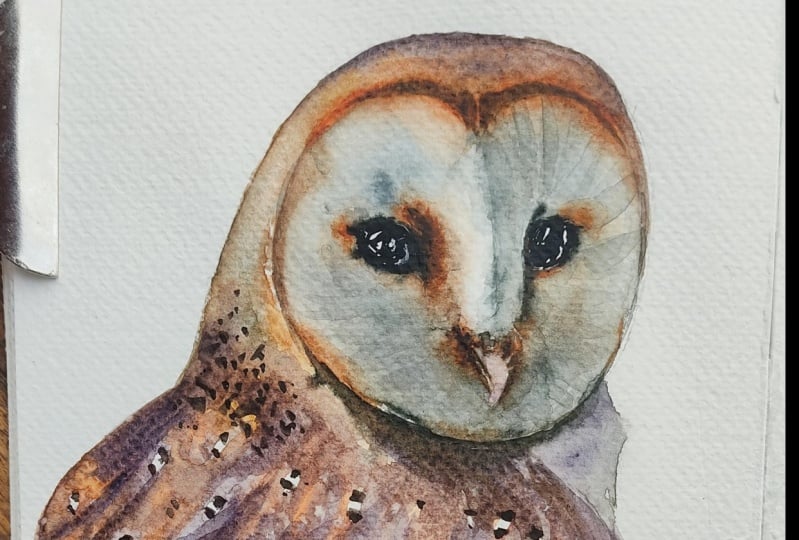
4. Painting the Face : I use brush number
12 by Soda Perla. It's a synthetic brush with
a very pointy end which allows me to paint big
washes and little details. First, I will cover the
area that I'm going to paint of the face of the
ole with a clean water. I don't apply water on the nose of the ole
from the left side because there will
be a border between right side and left side and
the right side will be dark, so we have to leave the
left side almost white. Now I will load my brush with a very light mix of paints gray, and water, and using this mix, I will paint the
face of the owl. We have to paint pretty fast until the paper
will get fully dry and also avoid creating
puddles on the paper. If you see a lot of water, you can just remove the water with a clean
brush and paper towel. I'm going close to the
middle of the nose. This body between
right and left side, that will help us to show
the difference between right side in the shadow
and left side on the light. I'm just moving
the color around. I can apply some color on
the left side as well. But just keep in mind that the left side should be lighter, so we use more water
and less color. Now I can clean my brush and create more smooth
edge on the left side, so it won't be visible
where the edge is. Now I will load my brush
with Berntena and I will carefully apply this color in the corners of the
eyes of the hole. The color will nicely blend
with the main first layer, but be careful it
can travel too much. In this case, I'm just lifting the color with a
clean and dry brush. Now, I can introduce more dark color to
the main first layer. I'm mixing pins gray with Burnsiena maybe a
bit more pink gray, creating this very
neutral shade, and I will apply this
color at the bottom of the face where the shadow
below the beak will be. If you see there is too much
color or unwanted blending, you can just remove it by lifting color with a
clean and dry brush. I can reapply the burn
sienna in the corners of the eyes and also on top
of the head of the owl. The surface is almost dry, so the color won't
travel too much, and I can apply
very thick paint, almost the paint from the tube. So use not a lot of water. Now let's mix a bit
of yellow cha and Bernsena creating lighter shade, and I will continue working
on the top edge of the face. I can also introduce some nsiena next to the
beak very carefully. And when I want to
add some color, I'm waiting until the
surface will get almost dry so the color won't
travel and blend a lot. Now I want to mix some neutral shade for
painting the head of the owl. I'm mixing yellow ocha with
a little bit of moon glow. I'm using this neutral
shade and a lot of water on top of
the head of the owl. Mm now I will use a very thick
pins gray and I will apply it at the bottom
of the face of the hole. Again, the surface
is almost dry, but it's still a
little bit damp, so the color will
travel and blend, but not too much. You have to catch
this moment when the surface is not too dry. I can also mix Burnsien
and pink gray. It creates very
nice brown shade, and I will apply this dark brown shade at the top and at the
bottom of the face. Now I come back to painting
the top of the hat, and if the mix on the
paper is already dry, you can reapply some water. I'm moving this color mix towards the neck
and the feathers, and I apply more yellow oka to this area on the left side. Since I have this wet area, I can place some thick color next to it to create
watercolor effect. I'm mixing paints gray and Bonsiana and placing this color on the left edge of the face
and at the bottom as well. While I have this
color on my brush, I can also apply it at
the corner of the eye. Now, I want to mix even more this dark brown shade and using
the very tip of my brush, I'm creating this very dark line between the nose and the eye. I use paper towel to clean my brush and remove
some excess liquid from the belly brush and to create the smooth edge
of this painted area. And now I will come back
to painting the neck. I'm using yellow oka, and I apply this color
down to the feathers. But right here, I can paint
some neck that in the shadow, so I'm using pains
gray with water. I can also add a drop of moon
glow or mix of mounglow and pains gray that I have on the
palette into this wet area, and I will move to
painting the feathers.
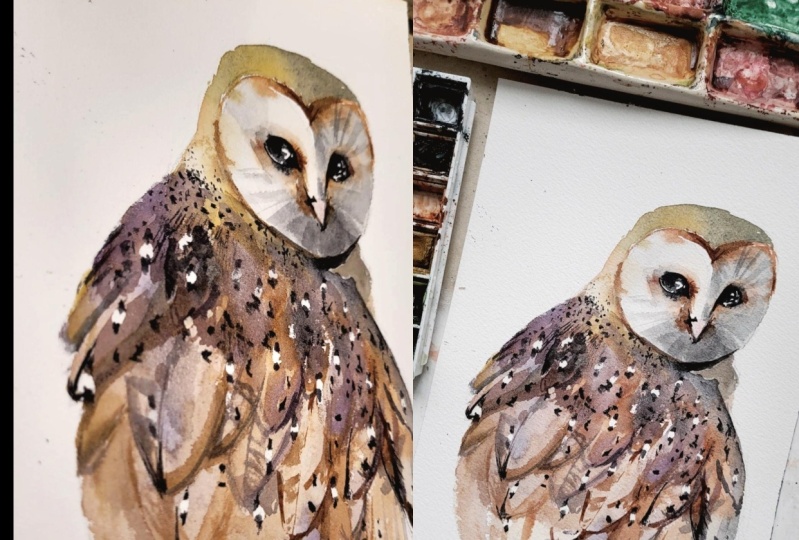
5. Feathers: I will use granulating
watercolor for painting the feathers, and for the granulating
watercolor, it's essential to
have a lot of water. So first, I will cover this
area with a clean water. I will mix a bit of yellow
oka and burn sienna, creating this bright color, and I will apply
it in the middle. Take a moment to
analyze the reference, and you will see that there are a few hue on the feathers. It's brown shade and it's also
some purple or blue shade. So for now, we are creating this first layer of the feathers using this brown shade that
I mixed and moon glow. I'm keeping some
uncovered area where I will apply a pure
moon glow color. Now I can start introducing
moon glow into this surface. If you don't have moon glow, you can try using ultramarine
and Azarin crimson, for example, and mix
some nice purple shade. I'm applying moon glow to the wet surface if by this time, the surface that you
painted got already dry, rewet the surface because it's essential for the
crenulating watercolor to show its nice effects to
use it on the wet surface. The big advantage
of masking liquid that it allows you
to just paint and cover big area with a
watercolor wash and don't think about
where you have to leave these white areas
of unpainted paper. In some places, I can use
dark color and come back to the areas already painted to increase the intensity
of the color I applied. I honestly don't think that I'm good at painting feathers, but you can see that
it's pretty random, and I don't paint some
particular feathers. But closer to the bottom, I'm trying to use
more light colour, almost water and a
little bit of color. And these brush strokes just imply that it's feathers without painting
particular shapes. And again, we are creating
the first layer right now, so our main task
is just to create a very diverse first layer
of different shades. Later, we will create dark
and light feathers and areas. While the surface is still wet, I can introduce more and more
colors to the wet surface. Now I want also to create this dark brown shade and
to highlight the bottom of the face that is
actually connected to the feathers in some area. So I carefully apply this color, and I'm connecting this
area with the feathers, and I can apply some of the color in some
areas on the feathers. Bonsiana and unglow are blending on the
surface of the paper, creating very nice muted shade. And we can also prepare
this mix on the palette, mixing unglow and Bnciana. I want to create
some water splashes using just my fingers
and clean water. You can use your brush, and it will create nice
watercolor effects. You can also apply some table salt on the wet
surface and leave it dry. It will also create
very nice texture, and it is commonly used by artists to paint the
feathers of the birds. I see that paper got already
dry in most of the areas, so I have to be careful when
applying some more colors. And I want to create more dark shade at the
top of the feathers and also apply some little dots which will represent this
pattern on the feathers. But I don't want to
leave this rough edge, so I will have to clean my brush and drag some water
towards the color, creating this smooth edge. A bit more water splashes
with my fingers, and I will leave it dry. Now, I'm switching to
the brush number six, and I will move to
painting the ice. And first, what I need
to do is carefully apply clean water around
the ice because I want the edges to blend and to create
these very blurry edges. Will paint the eyes with
just one paint gray color. But the only thing I have to remember is to keep
some highlights, white areas inside the
eye and be careful because the color will a little bit travel
on the wet surface. And if it travel too much, I can also clean my brush, dap it on the paper towel, and lift some color
that I want to remove. If you are afraid of losing control over the
travel of the color, you can just apply color to the dry surface of the
paper and then clean your brush and apply
a little bit of water closer to
the colored area. I'm doing the same
with another eye. I will apply this clean
water around the eye, and I want to add
some burn sienna first because here in
the corner of this eye, it will be a pretty bright
area of burn sienna. And also, I can apply some of the burn sienna to another eye. And I'm also applying this dark paints grey color and leaving some white
highlights inside. You may just wait a little bit until the wet surface
around the eye will get a bit more dry so the color won't
travel too much. I'm using pretty thick paint like butter consistency
for painting the eye. If you know there are three
consistencies of watercolor, tea, coffee, and butter and
butter the most opaque one. We will come back to painting the ice when the surface
will get fully dry. Now, I will use a very
light mix of moon glow and a little bit of pink gray and create the shadow
under the beak. My brush strokes repeat the pattern or texture
on the face of the owl. Let's apply some more
Burnsiena next to the beak. Once the paper got fully dry, I can remove the musk and
liquid using just my fingers.
6. Final Details: Once the skin liquid is removed, we can move to paint
in the final details, and I want to paint the beak. I will mix azarin
crimson and yellow oche and use this very light
pink colour on the beak. I will just cover it with one color and later
I will add details. Now the painting looks
quite pale and we need to add some dark areas
to increase the contrast. And I will start with the ice. I will apply some dark paints
gray color on the dry area, and it will increase the contrast and bring more
attention to the ice of the. I will keep white highlights, and in some areas, I will keep the first
layer of paints gray. I'm doing the same
with the right eye. This technique is called
wet on dry and it helps to create
more precise edges. Normally, when we
are using wet on wet technique for
the first layer, then we need to
create more details and contrasts with the
second layer or third layer. Now let's mix moon
glow and paints gray and start painting
some feathers. I apply this dark color in
some areas creating the depth, and also I can lift color with a damp brush for
softness of the edges. Now I can move to painting
this pattern on the feathers. And for this purpose, I use very dark
paints gray color or paints gray mixed
with moon glow. And I'm just placing
these dark dots on the top and the bottom
of these white spots. Meanwhile, I can add this color with a bit more water to
some areas on the feathers. Oh This is my favorite part of the painting because
when we add contrast, painting looks more final
and more eye catching. M. I can use mix of Burnsian
and Monglo in some areas, highlighting the texture
of the feathers. I want to add some
dark and Munglow color at the top of the feathers area. I can use mix of yellow Oca and Bonsiena in some places
to make it more diverse. Now I will add a little dots on the neck using
paint's gray color. Now I want to come back
to painting the beak, and I will mix burn sienna
and moon glow and use this dark color to create
shadow below the beak, highlighting this light
area of the beak. Now I can apply a bit of pure
bounciena next to the beak, clean my brush dupe it
on the paper towel, and create a smooth edge. Using mix of Bnciena and Monglo, I will continue painting
the shadow around the beak. And first, I will
apply this dark color, then I will wet the brush, and with damp brush, I will drag the color around
creating this shadow area. Using a very light mix, I will create these
brush strokes on the right side of the face, creating the texture of
the face of the whole. Using a very light mix
of paints grained water, I will apply some of
this color to highlight the contrast between
right side and left side in the
middle of the nose. Using mix of Bern
Siena and Monglo, I will come back to the
top part of the face and will reapply the color create and darker
shade in the middle. I have this color on my brush, I can apply some spots
on the feathers as well. It helps to unite
the whole painting and to connect different parts. And also, I want to apply some just random dark
dots on the feathers. Our painting is almost done. Now I want to add some more contrast and dark
shadows around the beak. I'm using mix of pinks
gray and Pinsiena and I apply this dark color on the
right side next to the beak. In order to create
the smooth edge, I clean my brush Dabo on the paper towel and drag
the color of the shadow. I continue increasing
some contrasts and last thing I want to do to bring more attention
to the face, I want to increase
intensity of Bonsiana. So I load my brush
with pure Bonsiena and apply it into the
corner of the eye. Thank you for joining the
class and painting with me. I hope to see you painting
in the class project. If you have some questions left, please describe them
in the class project. Keep practicing and
I hope to see you in my other classes. Mm
 Aleksandryna Gromyko, Watercolor tutorials for everyone