Transcripts
1. About the Class: Are you looking for a
fun and simple glass to improve your painting skills? If so, I invite
you to join me in painting a red mushroom
with watercolor. Autumn season is my favorite. It's so colorful and
full of inspiration. We spend more time at home, and painting can be a fun
activity for a cozy weekend. Hi, my name is Alexandrina, and I'm a watercolor artist with over ten years of
painting practice. I invite you to explore this beautiful world
of watercolo with me. In this class, we'll explore
everything from finding the perfect red shade to getting familiar with the key
materials we'll be using. You'll just need five
watercolos, two brushes, some watercolour paper, and a masking liquid to get started. I will show you every step
of the painting process, how to draw a sketch, apply muskin liquid, and use wet or wet technique
creating smooth, natural shadows with soft edges. In the beginning of the class, I will show you basics of wet on wet technique and main
steps of mushroom painting. In the attachments
to this class, you will find full list of my
favorite watercolor paper, art materials, and some
references for your inspiration. This class is perfect
for beginners, but also makes a fun
and relaxing project for those who are a
bit more experienced. As a class project, you will paint a
beautiful red mushroom, perfect for adding
a touch of autumn to your artwork collection. Sounds exciting. Grab
your supplies and join me as we dive into this autumn
inspired watercolor journey. Enroll now and let's create
something beautiful together. I hope to see you in the class.
2. Art Materials: Before I share art materials and colors I use
for this painting, I wanted to share
with you the process of searching for the
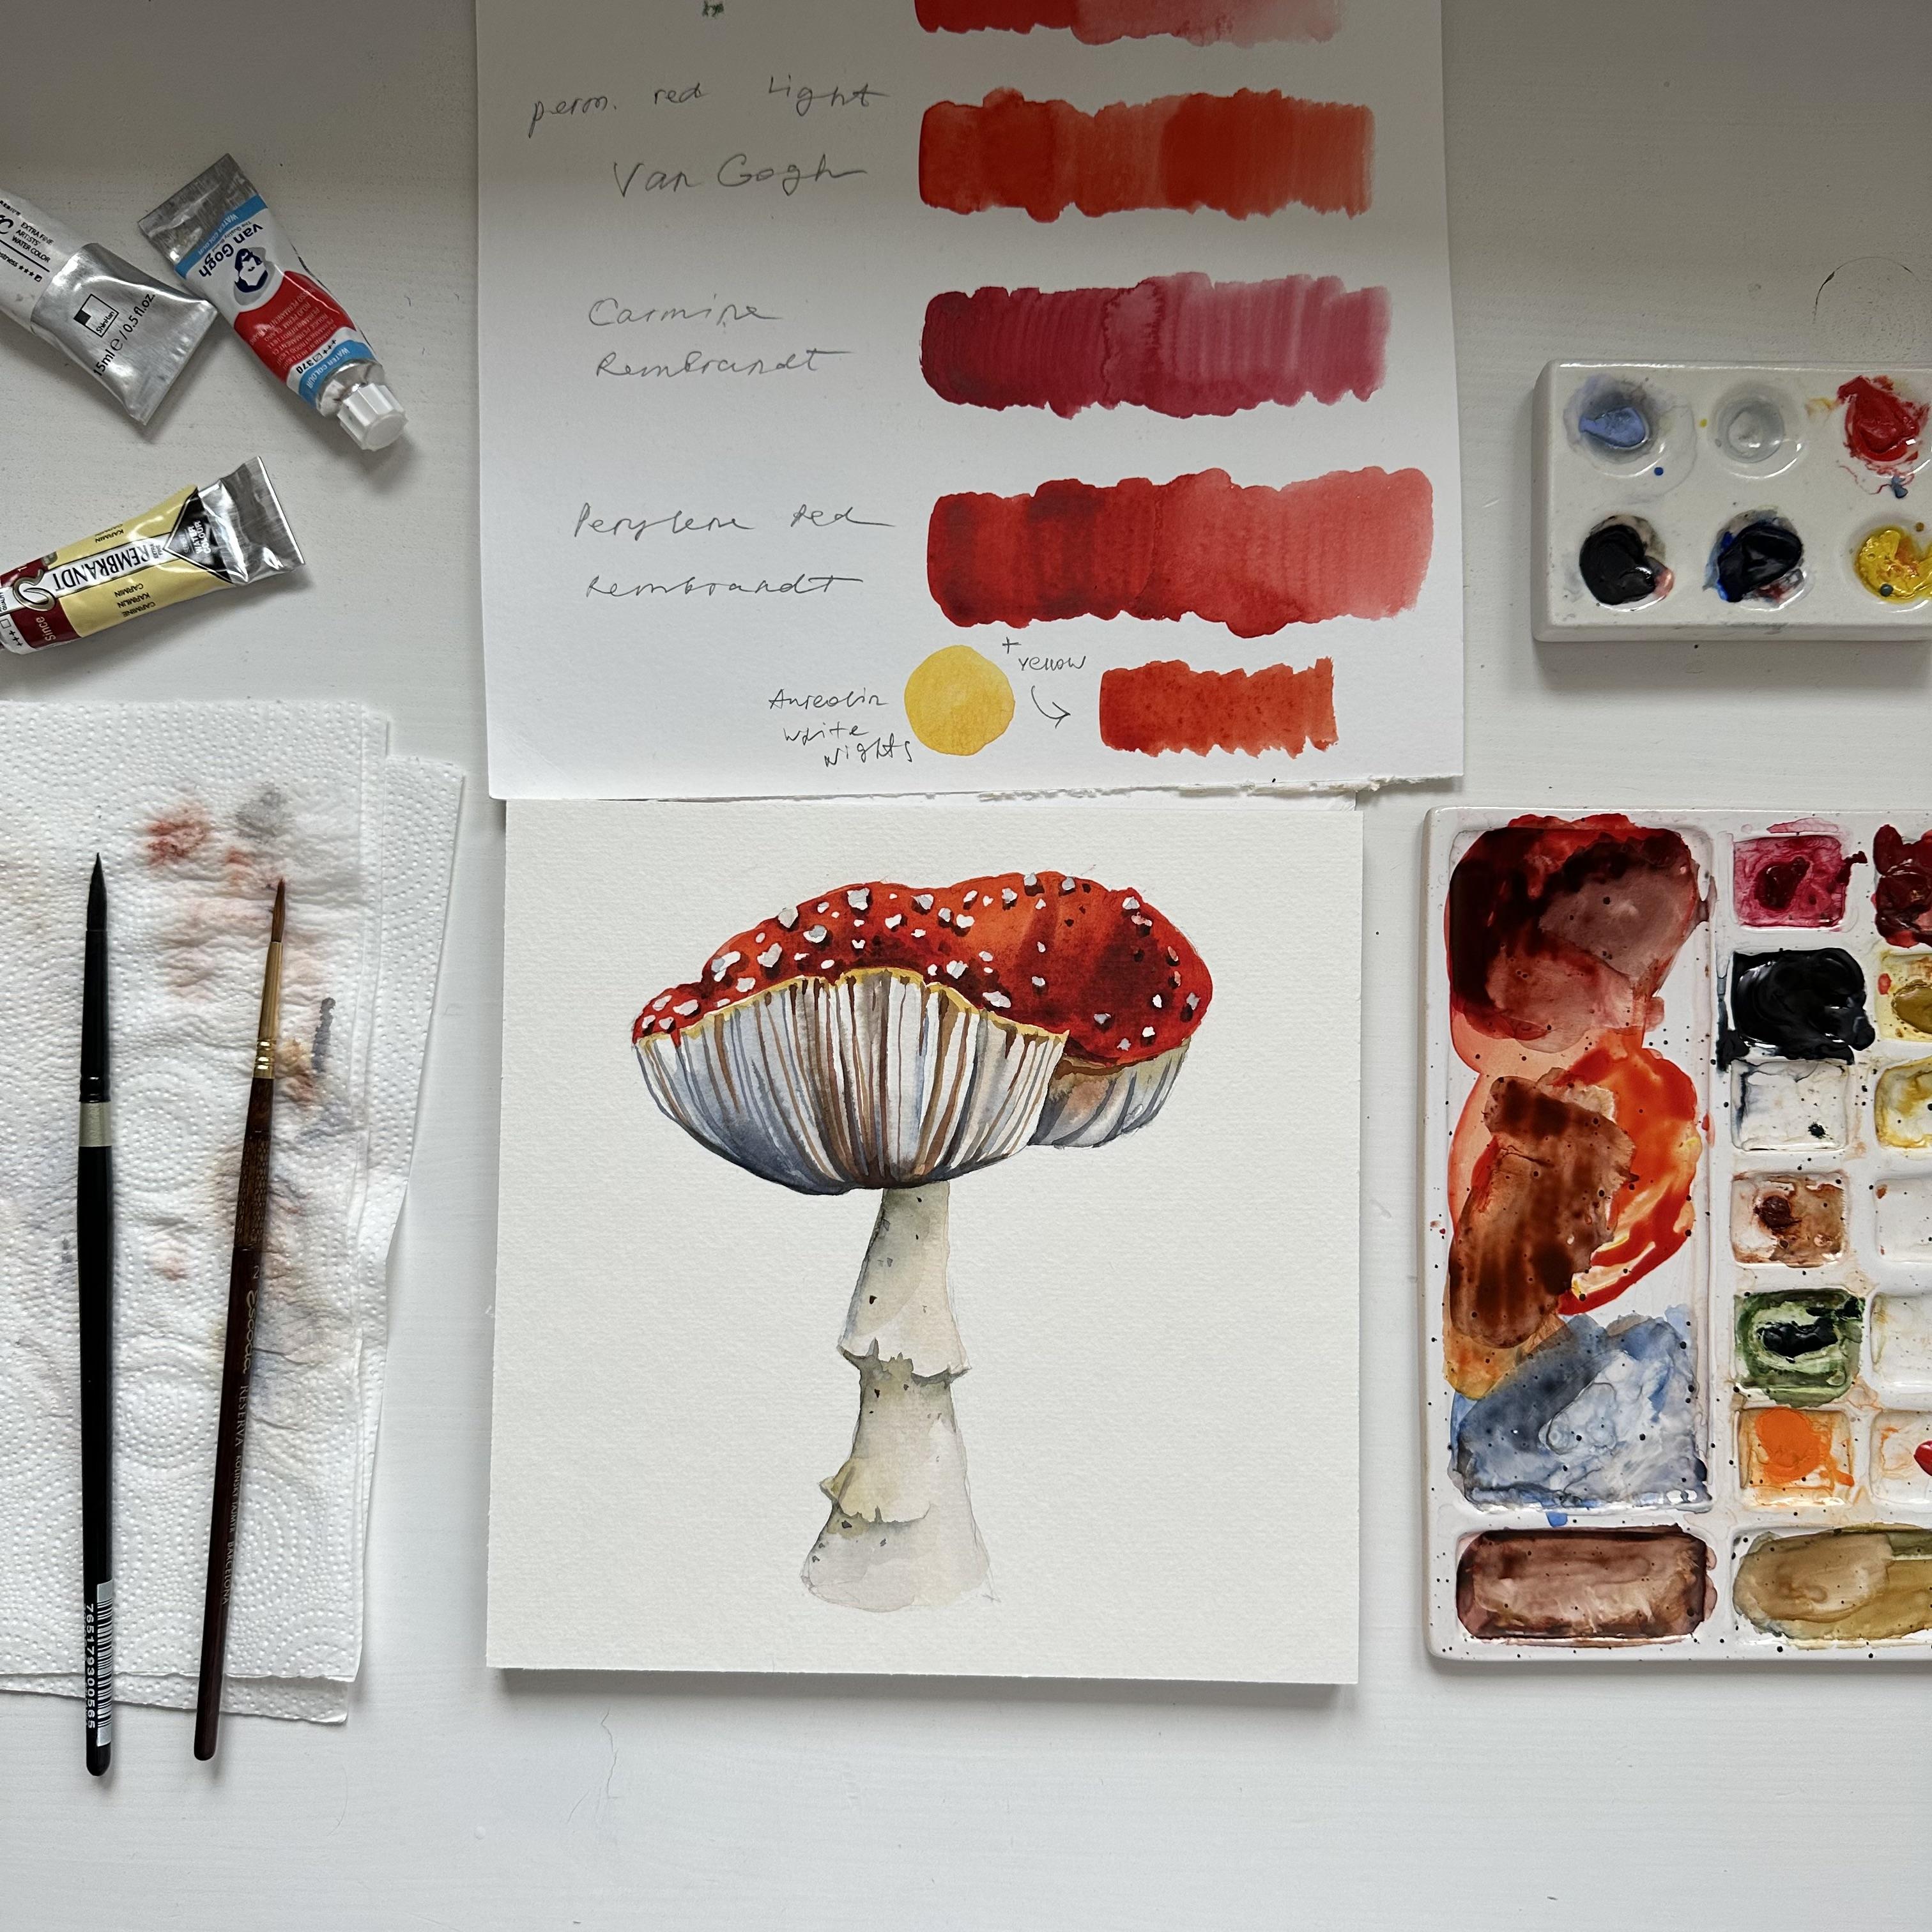
right red color. I see by the reference photo that I need quite warm color. So I picked four colors
from my palette. That can be quite warm. It's cadmium red deep by PVC, it's permanent red
light by Vang, it's carmine Byron Brand, and it's Berlant
red Byron Brand. Before every painting, it's very important to choose
your color palette, and to do that, you need to make swatches on the scrap paper
like I'm doing right now. I can see that out of
these three colors, permanent red light
by Van Gogh is the most close one
option that I need, but it's too light. I need more intense color, and now purlin red seems
like the perfect one. If I want to make a
bit of warm shade, I can add a bit of
yellow to this color, creating more orange mix. Now I need to find some additional colors
that will help me to create more dark and
more lighter mix with this main red color, and also colors that I will use for painting other
parts of the mushroom. So I picked paints gray and ultramarine that will
help me to darken my mix with red
and also to paint some other parts of the mushroom with a
light mix with water. And for the light
parts of the cap, I can mix Pearl and red
and yellow or reline. So for this painting, I will use the
following materials. I will use 100% lose paper, aurora, cold breast texture. Muskin liquid by Sminke. You can use other muskin
liquid by other brands. I will use it for these scales. You can search for the right red out of your palette like
I did with the watches. I will use Berlin
red, Brim Brant. Also, I will use allene,
which is yellow, and this mix of Berlin red and line and also ultramarine
and paints gray. I will use two
brushes number eight, S Coda Bar, and number
two, Scud a reserva. Now let's move to
the painting. Mm.
3. Wet on Wet Basics for Beginners: Before we move to painting, I would like to show
you a simple step by step of wet on wet technique. First, I cover the area with water with a
very light color mix. Then I add diluted paint. Move your brush in the same
direction as the shape of the object and from
light to dark areas. You can lift color on the wet surface by pressing
and moving the brush. Wet on wet creates
seamless blends and soft organic
transitions between colors. While the surface is wet, you can build up a color by applying color again and again. This technique can be quite challenging
for the beginners. So if you don't feel confident in this wet
on wet technique, I recommend you to practice
in a simple shape just to feel how you can control
this flow of the paint. Normally, I apply color on
the edges of the wet area and let the colors travel and blend on the
surface of the paper. The main challenge
with this technique is that we have to work
until the paper gets dry. So the cotton paper is
better in this case, because it gets dry slower
than the cellulose paper. You can remove some color from the wet surface with a
clean and dry brush. Lifting the color can be useful
for creating highlights. Now let me show
you the difference between 100% cotton paper and a cheap cellulose paper
with not very good quality. You will see how the paper can affect the
result of your work. I will repeat the same steps first cover with a
very light color mix, then building up the color, and I will create a highlight by lifting the color
on the wet surface. I've tested a lot of paper, and I have a few brands of
cellulose paper that I love. You can find the list in the
attachments to this lesson. Now you probably can see that the color doesn't go so smoothly
as on the cotton paper. So you can see the edges of
the color I newly applied. The main difference between cotton and cellulose paper is that we can work layer by layer, creating a lot of
layers on cotton paper, and it looks okay, while the cellulose paper
sometimes look like this. You see that I'm trying to leave the color
creating highlight, but I already damaged
the paper with a brush. And here are the main steps
when I paint an object. First, I analyze the reference, and I see where the light comes from and where
the shadow will be. Normally, it's opposite sides. So it means that every
part of the object will have light areas and dark
areas at the same places. For example, here
on the right side, we will have shadow, darker areas, and
on the left side, we will have light areas. Also normally the
light comes from top, so it means that darker areas will be at the bottom
of the object. I created the first
very light layer, and I start applying
dark color at the right side where the
shadow is and at the bottom. Also, we keep in mind that every object has the
shadow under it. So basically, here we will see the shadow under the
cap on the stem. Now, I see that the
edges of the shadows are too rough and it doesn't
blend on the surface. It happens when the surface
of the paper is too dry, so the color doesn't blend and it stays in the area
where you place it. So it means that I have to re wet the surface of the stem. And very carefully,
I'm moving my brush from the light areas
towards the dark ones. Now I can reapply the
color at the shadow and let the color blend with
the existing light layer. Now I will do the same steps
I did with the round shape. First, I will cover the
area with a light mix. I marked the area of the
highlight for you so you can understand where I will
leave the lightest area. And I'm again, moving my brush in the same
direction as the shape goes. As I move to the right side, I start applying more
dark intense color as on the right side,
we have shadows. Now I can clean my
brush and dry it on the paper towel and remove some color, creating
the highlight. And I continue
building up the color, adding more and more color
mix from the palette. I'm mixing up some
daka shade and I apply it at the
bottom of this area. Now, I see that the edge
is still quite rough, so I decide to reapply
some light red color into the mid tone and to connect the aa of the shadow with
the main tone of the object. Now I want to paint the last
part is this under cap area, and I use pretty dark color the darkest that I
have in this painting. I can apply color straight to the dry surface using
wet on dry technique. Usually, I use this
technique when I need to paint very dark and small area. These are the main steps I follow when I'm
painting the object. And, of course, the final
step would be some details. I hope this was helpful, and now you feel
more confident in moving to painting
your masterpiece.
4. Sketch: Let's start with a sketch. First, we need to create
the middle line and to build up main shapes like the cap and the stem
of the mushroom. The cap has irregular shape, so I'm trying to catch the
main direction of the lines. Now, when my sketch
is almost done, I have to refine
the main shapes and edges to check if it's correct according
to the reference image. Also, I can sketch
some direction of the lines on the gills to make it easier when I
will be painting. The main thing is to not
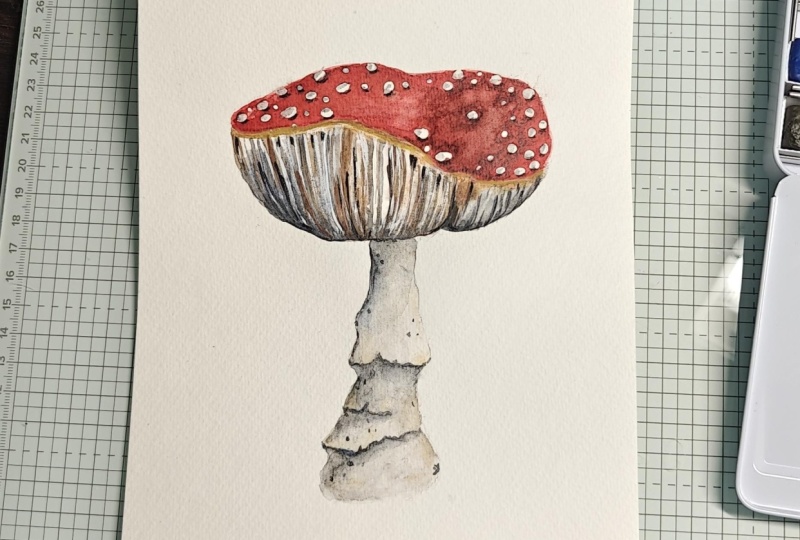
press the pencil too much. The lines should be very light. This particular mushroom
is called flyer garic and it has a very specific
pattern on the cap. If you know this red mushroom
has these white spots or very light spots that we will also sketch
a little bit. It's called scales. So I draw scales, and now I will just remove the strong pencil lines
with the need poliza. Now I need to cover the
scales with a muskin liquid. I take a wooden stick
very sharp one, and I apply muskin liquid
on these little spots. You can use brush
for this purpose, but be careful because
the muskin liquid will damage the
hair of the brush. So if you use it, use the one that you
don't need anymore. When you apply masking
liquid onto these spots, try to make them
not round but quite irregular in size and in shape. Now I will let it
dry and meanwhile, I can prepare color
mixes for the painting.
5. The Cap and the Stem: Let's start painting. First, I will prepare color mixes on the palette
for painting the cap. I need some light shade, which is Berlin red and yellow. I'm using Aline
by white knights, but you can use other yellow that you have in your palette. So I have this pretty
warm red shade, almost orange, and I
start painting the cap. It will be pretty
light and warm at the top and closer to
the gills on this edge, I will add more
intense red shade. Mm hmm. Now when I created the
very light first layer, it's time to build up the color. I will apply some
darker colors closer to the edges of the wet area. That's why we're using wet on wet technique because
it allows us to create very nice smooth edges between the light
areas and dark areas. I can add even more color
while the surface is still wet because watercolors tend to become lighter
when they get dry. Now, I'm darkening my red color by creating a mix of ultramarine and peril and red and using this intense color
in some areas. It I can also create daka shade of the red by mixing paints gray
and pearling red. It is quite dark then mixed with ultramarine
and also mixed with ultramarine can be pretty cold because ultramarine creates more cold shade mixed with red. Now, I will let it dry and I will move to
painting the stem. For the stem, I'm
creating mix of ultramarine and water
very light cold mix, and also a yellowoca
and paint cream. I will use a lot of
water in these mixes because I need very light color. So now I will clean my brush
and I will cover the area of the stem with a very
light mix, almost water. Once I cover the whole area of the stem with a very light mix, so the surface is wet and I
can apply some more color. I'm using this mix of
yellow Oca and paints gray, and I apply it at the
very top of this area. Also on the left side, I will apply a little
bit of ultramarine. For now, I'm just trying
to build up the color, and I can use my clean and dry brush to lift some color from
the right side. The beauty of the
wet on wet technique is that if I see that
the color is too dark, I can always remove it with a clean and dry brush
like I'm doing right now. I want to wait a little bit
until the paper will get a bit drier to paint the shadow below the
rings on the stem. And meanwhile, I can prepare the brown shade for
painting the gills. I'm mixing basically
all the colors I have on the palette, paints gray, pearl
and red, yellow oka. And basically, that
should be enough. I add more yellow
oka to make the mix more yellowish, and that's it. Now I switch to the
smaller brush number two, and I add a bit of shadow
under the rings on the dam. I will clean my brush
and try it and drag the color a little bit down
to create more smooth edge. To make these
shadows more smooth, I clean my brush and apply some water next
to the dark area. Then I move this water
towards this dark area, creating this more smooth edge. You can also use paper towel to reduce amount of
water from the brush, and I will do the same with
the very top of the stem, applying first the shadow, and then slightly
lifting the color, creating the smooth edge. Now I can add a little dark
dots onto the wet surface. It's almost dry, so the
color doesn't travel a lot, but still creates very
nice watercolor effect. Now we can move to
paint in the gills.
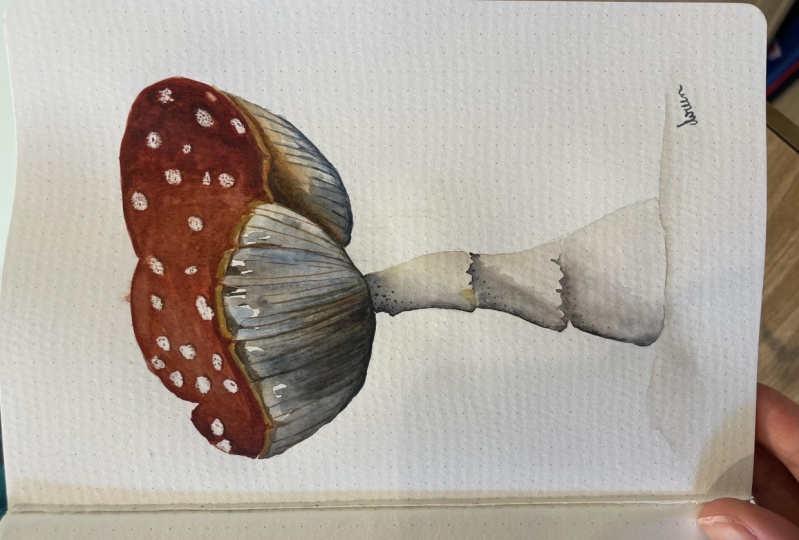
6. Gills: Let's move to the last part
of our mushroom, the gills. First, I will cover
the surface with clean water using my
brush number eight. If you see on the reference
and on the sketch, the gills are like
splitting into pieces. A right part will be
darker than the left one. So now I will paint
the left part. I'm using mix of ultramarine
and paints gray, and I apply this mix
onto the wet surface. I move my brush from top to the bottom because
at the bottom, we will have dark
areas and the shadow. When at the top, we will have more
warm colors like yellow Oka and brown
shade that I mixed. I started painting the texture, creating the direction
of these lines, and I'm using my brown color that I mixed in previous part. The paper gets dry pretty fast, so that's why I have to apply
some water and color again. I mix ultramarine with the
brown shades I already have on the palette creating
more interesting shades. I leave some space with
the light colors or even white paper between
these dark lines. And in general, the
first layer should be always pretty light because
we always can make a daka, but to make it lighter, it's pretty difficult
with watercolor. I switch to the
brush number two, and I apply some yellow Oca at the very top
of this wet area. Now I can continue painting this texture with the
lines on the gills. And I can move brush also
from top to the bottom, adding some dark
color in some places. Like I see on the reference, the middle part of the
mushroom will be dark. The surface of the
paper is still wet, so somewhere colors
blend on the surface, and I'm okay with it
because we will create some more detailed strokes
when the surface will get dry. And now is the right time to add some dark shadows
at the bottom. But be careful because we don't
want to make it too dark. For these dark areas, I use mix of ultramarine
paints gray and a little bit of brown color
that I have on the palette. Oh. Now I want to create
some bright brown shade. So I'm mixing yellow Oca with some red and some colors that
are left on the palette. Using this color, I
paint some other lines. I use very tip of my brush
and not too much water, so I can control the line
and make it very thin. It's important that the surface of the paper is
already fully dry. Otherwise, you won't
control your brush stroke and you won't be
able to make a thin line. But Now I want to dock in some areas. So I mix in the colors that
are left on the palette, creating pretty neutral,
brownish or grayish shade. Using this color, I will move again from the top
to the bottom, and I will create different thickness
of the brush strokes, making somewhere more thin lines and somewhere making
more thick lines. Try to make different
distance between these lines so they wouldn't
look like the pattern. There are no perfect
shapes in the nature. So basically, when we painted the scales on the
cap of the mushroom, we also created
very diverse shapes and not round but
more irregular. So we are doing the same with
these lines on the gills. Now, I'm moving to the
right part of the gills, and I will use say mix of
ultramarine and paints gray. First, I will cover
it with clean water. And I will apply some yellow cha right at the edge
of these two parts. I can add some brown shade
right away at the corner. When I see that the color is too dark or it travels too much, I can always reduce
the water from the surface of the
paper using dry brush. Now I want to add some very light mix of ultramarine and water
from the palate to the left side of the
gills to make it also more in shadow than
the middle of the mushroom. While I'm waiting for the
right part to get dry, I can also add
some dark lines in the middle of the mushroom
where the surface is dry. This contrast between
these light areas and dark areas will also catch some attention and bring it to the middle
of the mushroom. Now I can come back to
the right area and I will add some dark color at
the edge of two parts, creating this more
intense contrast between them and also some lines
highlighting the texture and direction of the gills. H
7. Final Steps: Welcome to the last lesson. First, let's remove
the masking liquid from the surface of the paper. Make sure that your
whole painting is fully dry at this point. You can use fingers or the
other side of the brush. Now, I switch to the
smaller brush number two, and I use mix that is
left on the palette, ultramarine and paints gray. I add some water to the mix, and I use this color to cover these white
areas, white scales. Normally, in painting, we
can't leave the white areas, and we have to cover it with
even just light colour. Every object, even a tiny
detail has its shadow. So now we will paint the
shadow below these scales. For this, I will use mix of paints gray and
pearl and red. Also, I will add some colors that are
left on the palette, and I will try to make
this mix not too dark. And now I will apply this
color under the scales, not every one of them, but at least under some of them. I can darken the
color on the edge between the light gills and
the cap of the mushroom. And also, I can add
some little dots on the tam and our painting
is almost done. I can add a little
bit more dark color to the right part of
the gills to again, highlight the contrast between the left and right
part, and that's it. I hope that you
like this tutorial. Please don't forget to submit a class project and
share your painting. If you decide to share your
painting on Instagram, don't forget to tag my
account Art Kurdikov. You can also submit
a review about this class and share
your experience. Don't forget to submit
your class project. Inside the class, click on
the button submit project. Then upload the image of your painting as a
cover for the project. Write a few words about your painting experience and
give your project a title, and click on Publish. I can't wait to see your
beautiful paintings, and I hope to see you
in my other classes.
 Aleksandryna Gromyko, Watercolor tutorials for everyone