Transcripts
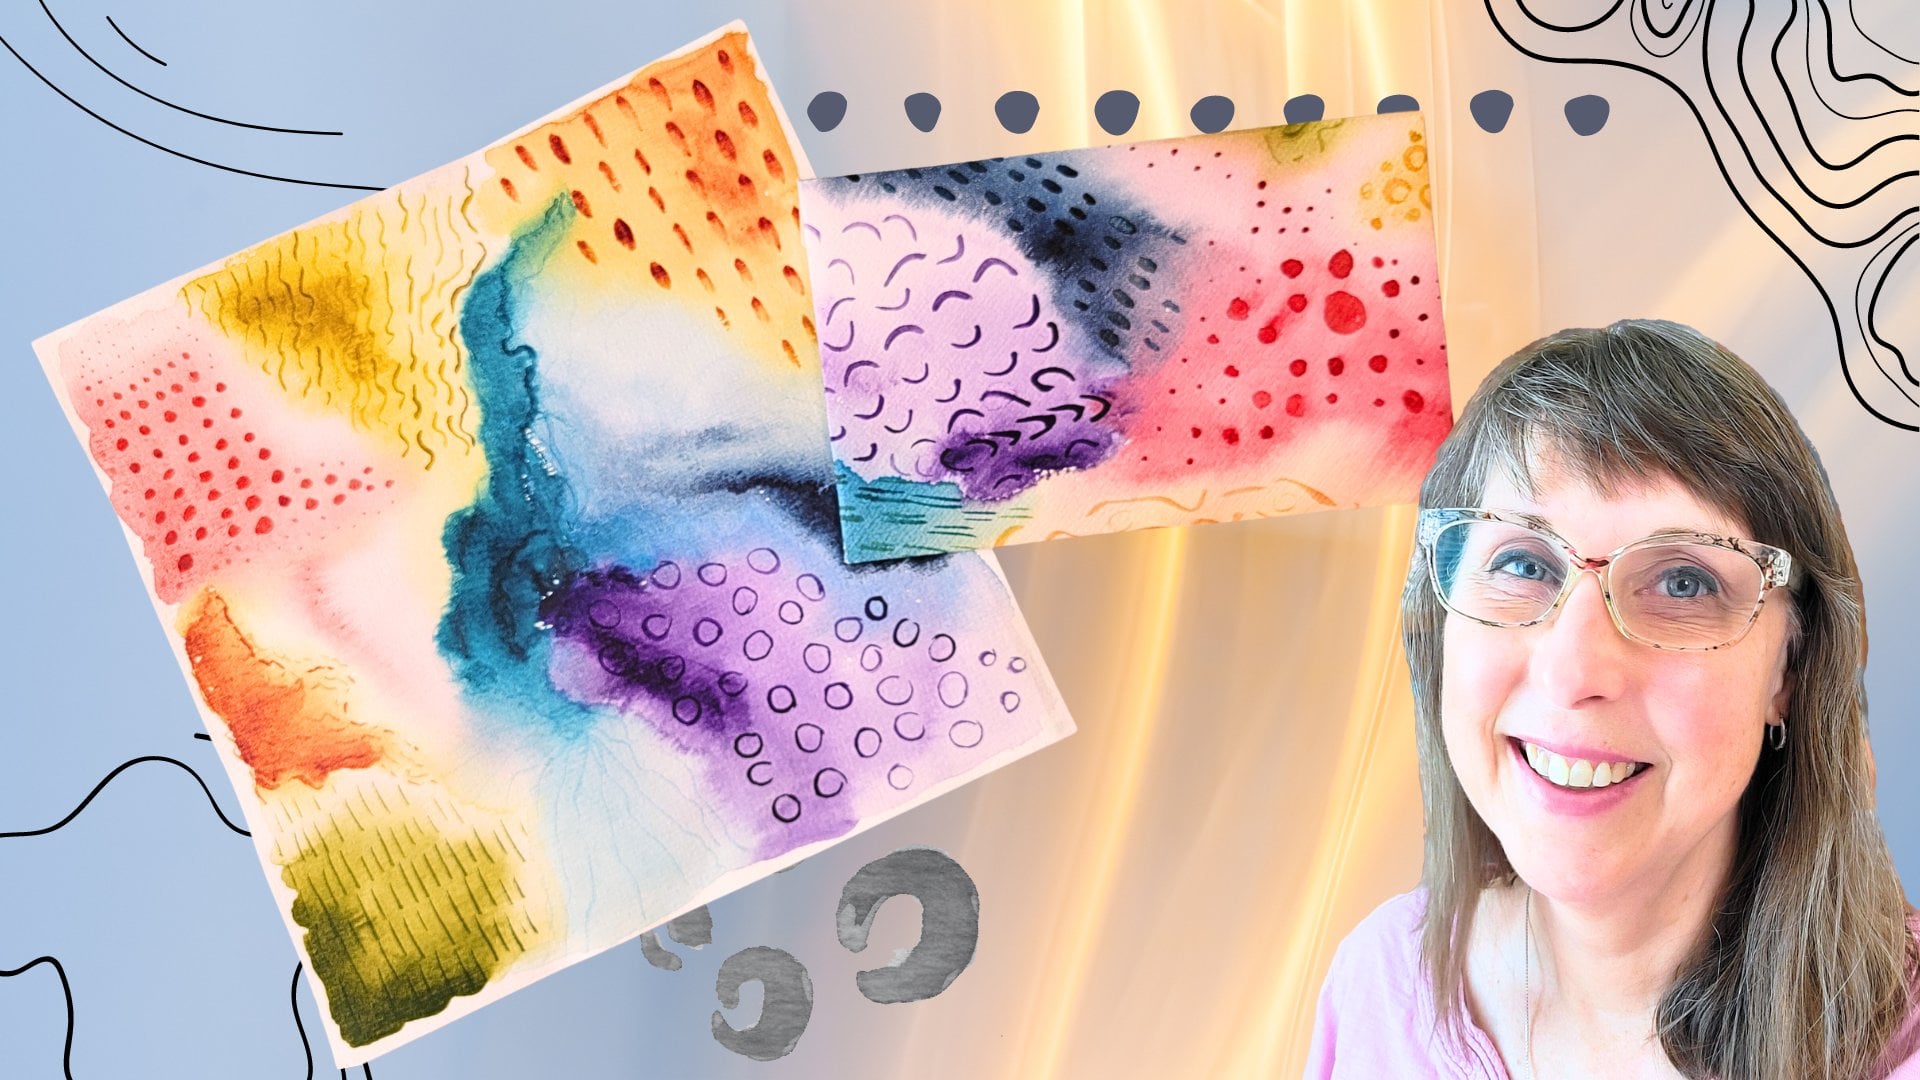
1. Expressive Botanicals for Collage: Hi friends. It's Tammy Pereira. And thank you for
joining me today to learn some watercolor and doodling with pen techniques to create what my husband named, clippings, a clip, these are small pieces of art that
are handmade and then they're just clipped out
of the paper and used as a focal point for collage or
an embellishment on crafts. Each clipping is many art. It is hand designed and it flows from the mind
of the creator. I especially enjoy
botanical themed clippings. So you will see ideas
for flowers and leaves in this class
I'm all about. That's sketchy, loose art style the watercolor
and pen creates. First because it lets
me create quickly. And secondly, because it
helps hide imperfections. I show students how
a few shapes can be combined to create
various fantasy florals, which means no reference
photo required, just your watercolor paper, paint, and a pen to get started, students will learn a few
watercolor techniques as well as how I doodle over the paint in a
reverse coloring book style. With these skills,
students can apply this style to any of
their favorite themes. I'm an artists on
Instagram and I have a great affection for collage. I was a beginner just
five-years ago and I've come to learn watercolor and doodle
from many wonderful artists. I'm proof that anyone
can learn given enough encouragement
and time to practice. Creating is meditative and calming and helps with
focus and concentration. When you keep experimenting
with your art supplies, you learn the materials and that broadens your
abilities with them. Go ahead and use my
practice lessons to gain competence with
your art supplies. And at the same time, come away with your
own clippings. I recently found out about
the smallest collage yet, and it's called clusters. And a bonus lesson, I will demonstrate cluster
making and how easy it is to add your clipping
to the art piece. I encourage you to pull out your paints and paper
and let's get clipping. And your final project
will be one of these great little pieces
that you're going to make to share in the
project section. And maybe you'll go
on to make a cluster. And I hope you share
that with me as well.
2. My Favorite Supplies: Supplies. Please
use what you have. You don't have to
have artists grade or fine quality are going
to be experimenting. But as far as the
collection goes, Here are my favorite supplies
to make these clippings, which you can see require paint and pen and watercolor paper. First, we're going to need
the watercolor paper. I have 140 pound
watercolor paper. It's just a scrap I have, and it's cold press. So you're going to
see that texture, that grainy feel to it. And this one happens
to be cotton, but please use what you have, whatever you have on hand
if it's scrap paper, as you can see, these
are only a few inches. So you won't need a lot of
paper for our practice. I really liked
having a sheet that would hold as many as possible. So this is about 12 " or so. And you can tell I like the
white pen and a black pen. So here are some of my favorite this signal, uni-ball pen. This is a one point size tip. And I really liked brush pens. I think brush pens make a
great fine and thick line. But I also this pilot
precise rolling ball, extra fine tip. It's a hard tip. Really excellent for these
scratchy lines look. So those are my favorite pens. Now, watercolor brushes, plays, you'd really don't need
anything very special. I'm using these today, a 6.1 and it's by Princeton. And I chose these
because you can find them just about
any craft store, and definitely on Amazon
if you're looking for a synthetic brush, these are round tip brushes. And how do I prepped my palette? I use some water, I love squirting water in
my watercolor palette. Or you could use
a mystery too wet and activate your pans of paint. And copy paper. No special paper. Just copy paper so we can
practice doodling together. My watercolor supply has
grown over the years. I actually use this ten I found on Amazon to hold as many
pans of paint as I could. And I've collected these. These are Winsor and Newton. Artist grade colors. Not a requirement
for this project, but because this is what
I have and preferred, that's what we're using
today for my demonstration. If you are interested
in collage, you probably have
papers on hand, different fabrics on hand, maybe some thread and ribbon. And together for my bonus class, I will show you how
to make a cluster. And this is a, you can see how tiny this little
piece of art is. And it's just another
piece of watercolor paper. And whatever scraps you have
will make that together and stay with me as we continue practicing before we get
into the final product.
3. Doodle practice: Here I have some sample doodles. I've been working out, practicing shapes
and variations. Working out different
funny, crazy doodle ideas. Because part of our clippings
is to be imaginative. Just start with a circle. If it's not perfect. You know, just a few
hundred more out of work for you to
get that straight. But my sketchy ideas do not
require perfect circles. Fact, we like to see
some irregularities. The once you've got your circle, try giving it a
slight variation. More of an oval. Elongated oval, maybe something with a tip to it,
a teardrop shape. Practice doing it. Coming and going
backwards and forwards, flip-flopped around
so that you're comfortable making shapes
and all the directions. But those slight variations is what makes these clippings. Just interesting. Maybe this wide pedal or
leaf has a wide base. A square is one of the
shapes we will be painting. Might want to practice a few
hundred of those as well. What if that square had that flat top but slightly
curved at the bottom? Practice starting
on different sides. Going backwards and
elongating that bottom. All of these
variations will make your doodling the clippings, it will help make them
more interesting. Practice some leaf shapes, maybe something
very exaggerated, elongated, or both
ends are pointy. Fact that's one of
my favorite shapes. I could just draw
those all day long, starting at the
bottom curve and even just drawing over that tip as you come out the other side. What if we start layering these and coming out the side and touching
the same point, coming out the other side and coming down to that same point. This will be really helpful
with our botanicals. What about attaching
them at the 0.4, a four petaled flower. We could make a five
petaled flower. And this time I'm not
going to be touching. I'm going to leave those
points kind of free floating. And what's so sweet and meditative about this
is it's a no stress, no worry type of drawing. Because I'm not
going for realistic. I'm really not, I'm not
going for realistic. I'm going for something
abstract, something. I call them fantasy florals. And so these are
all ideas that you can incorporate with
our watercolor. Now you might say, well, what am I going to do with
the squares are the circles. This is where that
doodling section comes in. If we practice painting squares, then what if we add
some extra elements? Abstract design patterns. We could poke a dot here
and poke a dot there. Maybe little scratch
marks over here. You could add a little
base to it and a stem. I definitely like
having a thicker stem. It definitely makes it
easier for cutting. One. We're going to use
our clippings. How about practicing
some leaf shapes? I know we worked on this
one, elongated tear shape. You know, a few
hundred of those. But what if our leaves were
rounded and doubled up? These are all different ideas
that we can incorporate. Here's a few other leaf ideas. Now that might be a little
difficult to cut out. But here's some great ideas I like coming up over
myself making that like, like I've got the eye of
the needle right there. And look, it's really
the same shape. It's just a teardrop. Or adding circles to the tips of branches.
Just go for it. Have some fun. Practice different shapes. Maybe a vase. This is one way to use
your, your squares. And then you can attach
these flowers to your vase. One of these ideas, this reminds me
of a snake plant. Those long skinny leaves
as part of the plant. Just go for it. Play around, enjoy your tools, and use as much copy paper as you need to come up
with lots of ideas.
4. Watercolor Tips: I have my favorite supplies out. I have my favorite
paintbrush tool out. I have around six. And I already have my sample
of where we're going. We're doing different shapes or practicing using our paintbrush. And then we're doing
those same shapes like we did doodling. Only this time with
watercolor papers, pre-cut. I am ready. I have my water
and let's dig in. I always kept my brush wet and my palette is
already pre wet. First thing we did, as we did with our doodling, is making a circle. So one of the things about using your paintbrush is
going over those edges, making that circle do
what you want it to do. There you go. And as you consume more still I still have
water and paint. I'm pushing that are around. This is just my preference. I'm always cleaning my brush. I don't like cross
contaminating my colors. That's just me. That's
my idiosyncrasy. Let's make our square. I want you to really experiment with your
tool, your paintbrush. Or the fibers are the bristles. Splitting or dragging,
holding a lot of water. What do you notice about
your tools and your paper? And how the colors are
reacting to each other. To the two. How much water to your brush? Let's just do this again,
making another circle. No big special thing except just to take the tip
of your brush and lay your brush down
on its side a bit. Just like doodling. I am not concerned
about imperfections. That is what my
clippings will be. They will have imperfections. And that is awesome. I'm, I'm just not
worried about it. So this whole practice
time right here, this is about you. This is about you and
your tools and getting comfortable with making shapes with the tip of your brush, the side of your brush. And please don't worry
about imperfections. That is the last thing
we're really focusing on. This next shape could
be used as a pedal, could be used as a leaf. You just touched the tip, press down and lift. Touch the tip, press
down and lift. Now you can see not
a perfect shape. Got a little bit of
drag mark in there. What if I just touch and
press and lift in the body? I'm not. Wanting a pointed
edge will fill that in. Practice using your
paintbrush as a pen. That's totally fine. Imagine those shapes. This one has no strong tip, just a very light tip to it. And I hope you see it's okay to manipulate your brush and your paint to do those
different shapes. Now I want you to take your paintbrush and
just barely touch. You are practicing. How much pressure? How lightly can you go? And can you do it across and diagonal? And what will happen? What kind of brush do you have? Do you need to use
a smaller brush? Then go for it. This exercise is
really, really fun. We're making dots. We have a round tip paintbrush, and that means it's
fine on the very tip. And I can make the tiniest dots. Or I can give it a
bit more pressure. I can get larger. I'm filling that in just by practically just
scratch and around, poking around with the
tip and this color. See if you can do it with your color that you're choosing. We can lighten it up. Experiment with how
many different values, different tones you can get
from very deep to very light. Okay, Let's work out this. How about very smooth, tip? Smooth and to a point
on the other end. Then I'm filling it in. I like to drag as much color to the tip and let it be
lighter on one end. Can you work that out too? We can start at the bottom on
the tip and lay your brush down and come down and then come back and
fill it in if you'd like. That allows you to keep
a bit of a highlight. I didn't have any paint right
there where that green is. What about touching and pulling? Touching and pulling. Touching and pulling. Doesn't that look
like the doodle we made with the round
shaped leaves? Now let's try something with that bumpy top That's that came down a bit of a
triangle, Don't you think? Maybe a heart-shaped
top and a point here or an oval. No point. That this just takes practice. Learning control of your brush, your water, your
paint, the paper. This is practice. We're playing, we're
experimenting. We're seeing what
does our paint do? That seemed really kinda
chunky, not very wet. So I'm just putting here
some on my palette. I dipped my brush
into some water. To thin that out. I'm probably practice drawing
four different directions. That would make a
perfect sample flower. What about five petals? And they're all
touching in the middle. While that paint is still wet on your paper, move it around. Round out your tops of if one got more pointy than
the other, rounded up. Very simple. Just takes time, takes patients, and a whole lot of practice. But this is also very meditative and no concern about perfection. No, do not worry
about perfection. We are just putting color
on paper and making shapes.
5. Reverse Coloring-Book Ideas: Now if you've practiced over
and over and over again, you probably have several
cards worth of watercolor. And I have my samples around
me that I've done before. I've got some mark making tools. I'm ready to go immediately. You're stumped, right? So that's how you have your practice doodles
out in front of you. There's one of my
ideas for square. Let's, let's start there then. So I'm drawing right on
top and outside the lines. That's the look we're going
for when you want a sketchy, scratchy look, what
can I do with that? Well, a wavy line as always, one of my go-to this warm-up
exercise is just to help you get your brain engaged
and imagine and play. There's only so many doodle
shapes. There really is. So from a dot to a circle
to a filled-in circle, to a larger circle, the oval. Remember all those
different variations of the same thing? That's what's very
interesting to me. I might add in that third line. I'm going to leave it for now. I want to try out some white. I have a white pen and I
thought I would try it on the dark color
that I had painted. Now, obviously because
I did watercolor, I'm not going to go so
much on the outside. It's not going to give me that big difference
that I'm looking for. Again with jots and small dogs
and randomly placing them. What about Scratch
lines from the side? That's another look. I wanted to show
off a brush pen. And the thickness of
that line might lead you to just wanting to
do a single line, single outline and not that scratchy
multiple times around. And just going to play with shapes with
different directions. It's kinda looking a little
bit like a rose bud. You've seen that technique
about filling in pointed lines with a bit of a softening of the edges so that there are no hard edges. That might be a fun look for are very abstract looking piece. Now again, just a simple
following the outline. I'm not worried
about perfection. The one thing about
this brush pen, as I can do a thin
and a thicker line. Of course, you can always
go back on your line and fill it in totally up to you. I like following the
curve of the leaf instead of just a straight end-to-end. Let's see what else we
can make with these. Definitely like the
scratching us on very long, elongated, don't
forget your circles. You can always outline each of them and give them
very wonky shapes. Some are completely
off the mark, some completely enclose it. If we round those edges, rounding it off, and following the
different patterns you have of your watercolor. Do you see any watermarks
of your watercolor? Doodle those shapes? This is very dark. So let's go back to our white and see about
matching that line. Maybe adding patterns. One idea just flows and you get another idea
and then that flows. And that's what's great
about practice time. So I had a rounded leaf, but I went over it
with a pointy tip. Alright, I'm rounding
it even softer. I'm going to curve that enter. And could have
lines on one side. Asymmetrical lines
coming up with new and crazy things to
do with your shapes will make a lot of fun with
your, with your clippings. Okay, so here we have maybe two leaves
and they're joined. You can draw whatever you want. Here. I grew, I drew straight
into that middle. The night, tell you that was
one of my favorite shapes. And then this one looks
like it's overlapping because I didn't draw that edge. And this little flower, we could doodle in
some middle parts of that flower and take
this wavy edge. Right? There we go. It's just a touch. Drag, lift. Very quickly, lift that edge. Kinda scratch it out
hashtag, hashtag. And add these looks like
fold lines of your flower. You can come down and adding
those little details. Don't forget your leaf. Here. I drew a line and then the leaf. So it looks like
there's a stem to that. And that's whatever. Put it in a highlight
of your leaf. Okay, we're back to our white. I'm really enjoying this
white on the, on the petals. Gosh, that's kinda cool. Okay. That's what I'm looking for. That's the look for my clippings
that will look so cool. In fact, I know
this is practice, but I absolutely see
me cutting these out to be used on my cards. Oh, isn't that fun? I love that. Okay. More ideas for
you to experiment.
6. Clippings Part 1: Here we are. We're putting our
ideas together. And one of the first things
you're going to want to do is to give
yourself more space. I'm going to put a flower here. I got some chunky
paint on there. Fact I think I'm
going to add a bit of water that's getting very dry. There we go. And the next flower I create, I want to space it out. This is what I'm referring to, is making sure I have space, one to cut and to doodle. But what if I wanted to add
leaves next to my flowers? Now I have room to do that. So let's mix up some green here. And I'm gonna do
my press and drag. Press and drag. Oh, isn't that cute? Um, maybe one on the other side. All right. Now to stem to it. Right, we practiced our lines, practice making very
long, elongated. And I'm going to attach
this just to the very tip. It's bleeding through to the red a little bit because it was mostly dry so it didn't take off and run all over
the place too badly. This might look like I'm trying to draw the most
perfect flower, but no, we are just still playing with shapes
and different looks. In fact, I think I'm
going to do a circle. I really liked making patterns on just the
most basic shape. I'll make him a
little bit bigger. Now this color is rather
opaque, isn't it? That's not a very
translucent color. I think I want to
have maybe puddle up some color to one side. I'm going to come
back and definitely put up a leaf around that one. Hop out. Um, uh, for petal. This is one of my
favorite, favorite colors. I really want to
lighten that up. So let's try something
very pointy. I'm going to leave
a bit of white. I'm not touching there in the middle. Okay, what? I'm going to leave that. And let's try a
little bit of this. And it's still wet. I can still see
how glossy it is. And I'm touching my tip. And it's touching right
to the base of my purple. Pretty darn cool. How about my other violet? I'll just try that. Okay. Leaving lots of room to get those leaves between my flowers. Let's see. I get the paint to
move a little bit. The app, you can tell
it's how wet it is when your paint is still
running around your paper. And in fact, I think I will, I'm going to take when
to take some green and just make myself some leaves. There we go. Maybe I'll make two of those. Clean up those leaves a
little bit. That time. What the leaf shape as that. I'm so grateful for imagination. I don t have to be that
particular on my leaves. And they can be whatever
I'm looking for. Or that's the thing
with collage, right? You putting unusual things together to make something new. And these watercolor clippings
are perfect for that. Don't you think? Just really broadens
the opportunity of being experimental
and creative and, and bringing out that
part of you that is wanting something handmade, something, something to
make your piece unique. Now, I guess it does look like
I'm not being too sloppy. Because even sloppy flowers, sloppy leaves work with this. They really do because the pen can fill in what's
missing for the eye. That's so cute. Okay. I'm thinking those
purple might be dry. I don't know yet.
I'm going to turn it this way to give
it more space. Kind of a very gray. How about using the tip of your brush and getting
curly with it? That's fine. Okay, Very fun. I'm going to wait
for these to dry. Can't wait to doodle over these.
7. Clippings Part 2: My gold out to help,
you know what? Maybe a touch of outline
wouldn't hurt either. Can we add up here? Oh, yeah. There we go. And that pen is
not I don't know. Yeah. It looks like it's
bleeding with the gold, so that is not a pan for water. This is not indelibly good to know now that
I'm almost done. Do some scratchy
out here as well. I know I worked a lot with
that thick pen on my practice. And I'm don't think that practice is
going to go to waste. So I'm definitely be
able to use those. I think I'm going because
I have to I think I'm going to try both ways. So let's, let's
give this a stem. Here we go. Okay, now I want to
try the sketchy look. Let's see what we come up with. You know what this
is reminding me of. I have seen some gorgeous
work of people who, so they do free hand stitching. And that's what this
is giving me that feel of a stitched look. And now you know, the two
different looks we have here. I'm gonna go with
the thick line here. And I'm going to give my top, not a point, but
something rounded. I'm leaving my bottom open. And see how you can alter that. Look. Instead of
circling the red, I'm just adding dots in there. This will have a
more pointed leaf. Not the rounded look
like the petals of the fantasy flower that
I've got going on. I'm going to leave
the highlights. I'm going to leave that
one completely alone. And are funky. I don't know what that is. A golf ball on a t. That's
okay because we can just play. This one is for fun. Member, I love my stripes. I'm gonna give that a
definite up and down. Or some white pen would
be great on there. You can alter, go ahead
and not match your, your leaves. It all. Make it look like it's got
ten leaves. By doing that. Man, this signal is a signal. Yeah, this pen, this
white pen is amazing. Really impressed by. It's almost like a whiteout
that is nice and vibrant. Wow, Very impressive. Let's see if I can dot. And even does something
finer, That's great. And I think, should I fill it in? I'm going to fill it in. A scratchy fill in, a solid fill in. I'm going to leave it scratchy. And maybe some stripes
down the stem. It is kinda skipping
and I actually, I don't mind that look, I think that looks fine. Okay. Did we do them all? We got one more flower. And I definitely see
black on that one. So let's do that. I think I may do some
stripes on this. When we practice that
on our practice. And remember I'm coming down. Even though that
paint had joined, I can separate it with my pen. And I'm going to give
it do all of them. A couple of them. One more. Okay. We'll come over here
and see how he like it. I'm going to leave it. Put some black. These are all touching that. Oh, and don't forget the leaves. Okay. So I'm gonna put
us down and come up. Gonna give it a
stem and come up. This one, no stem
because it's right end of the flower. Awesome. That came out great.
8. Making the Cut: Ink is dried, the gold is dried, and now the cut apart. Maybe not the most exciting
part of my part three. Who doesn't know how to cut. But I do have a couple
of tips for you. So one, keep your elbow
in and turn your paper. And one of the things I strive
for is leaving a white. The white of the eye. Watercolor paper still showing. This gives me a border. Kind of like framing the item. And if I want to trim that off because I don t need it
or it's my pieces too big. I'm trying to fit it
into something small. Then I have a place to trim. I can always trim it down. But the first, I'm giving
it a border and I'm loosely following all those little
dense and crevices. And to get to that pointy part
right there in the middle, I come in on one side and I come even though I can't necessarily see what's
going on on the other side. It helps me get
right into there. The alternative is to come in and open up your scissors
and just turn your paper, but that can bend. And I don't know, I found the other way
works better for me. And like you see, I cut them apart, so I have something
smaller to work with. And personally I really do like cutting deep
into those crevasses. Because a lot of times my
background looks kinda cool. I want it to show as
much as possible. So instead of cutting a big
fat circle around my flowers, I want to see around the petals. I want to see what was
behind that flower. Here's a good example of
why I'm going to come in and get deep in there. So these are just tips. One of the reasons of me making so many of them is because
i've, I've found that, okay, I, I like that shape, but it's too big, or I really liked that flower, but the color is not
what I was looking for. So just make as many as you possibly can just do
a batch collection of all of these so that you'll have what you're
looking for when you need it. And write really,
we're having fun. We're, we had, had, gosh, 30 min of practice and that
practice time was relaxing. I truly hope this was a no
stress experience for you. It was just getting to
know your materials. There's no reason to be anxious or upset or things
didn't turn out, right. You just learned something. You just learned how
that paint reacts, how that pen reacts, how your papers reacting. Maybe you have the exact
same colors as I do. But your papers
different and the look you are achieving as
coming out differently. All of those lessons you're learning with your
materials makes you more comfortable and
it makes you want to come back to your desk and
do it again and again. Wish I had made these
closer together because I'm feel
like I'm wasting so much good watercolor paper. Did you know you could even
do this on card stock? The effect you're
going to get with your watercolor is
going to be different. But if you are
concerned and worried about the expense of
watercolor paper, go ahead and use
different kinds of paper. Do you have gouache? Experiment with it? This is a style that
you can achieve with many different materials. Alright, I might need that tiny scissors for these leaves. Will see how I, how I do with
the with the large part. Leaves like this can be used in combination
with other elements. So I sometimes I like making
extra leaves, skinny, round, flat, whatever because
I can tuck them behind. Maybe a flower that
didn't have leaves. I have a couple here that
would look well together. If you've got space
on your paper, go ahead and put in some leaves because you never know when
you might want that filler. Alright, I'm going
to trim this around. Then. Let's go back in and see
how close we can get. Boy, I don't know. That's tight, isn't it? And if I need to go more for
the project I'm working on, we can always do that
just a little bit. Okay? See what we can do here. Just a little indent. That's, that's good. And the tops got that curve. So we're okay there. I want curves around my rounded leaves and points
around my pointed leaves. So I think that did it. That did it. Wow, that's our Does
your collection. I hope you followed
along and made some for yourself and please share
that in the project section. I'd love to see your progress.
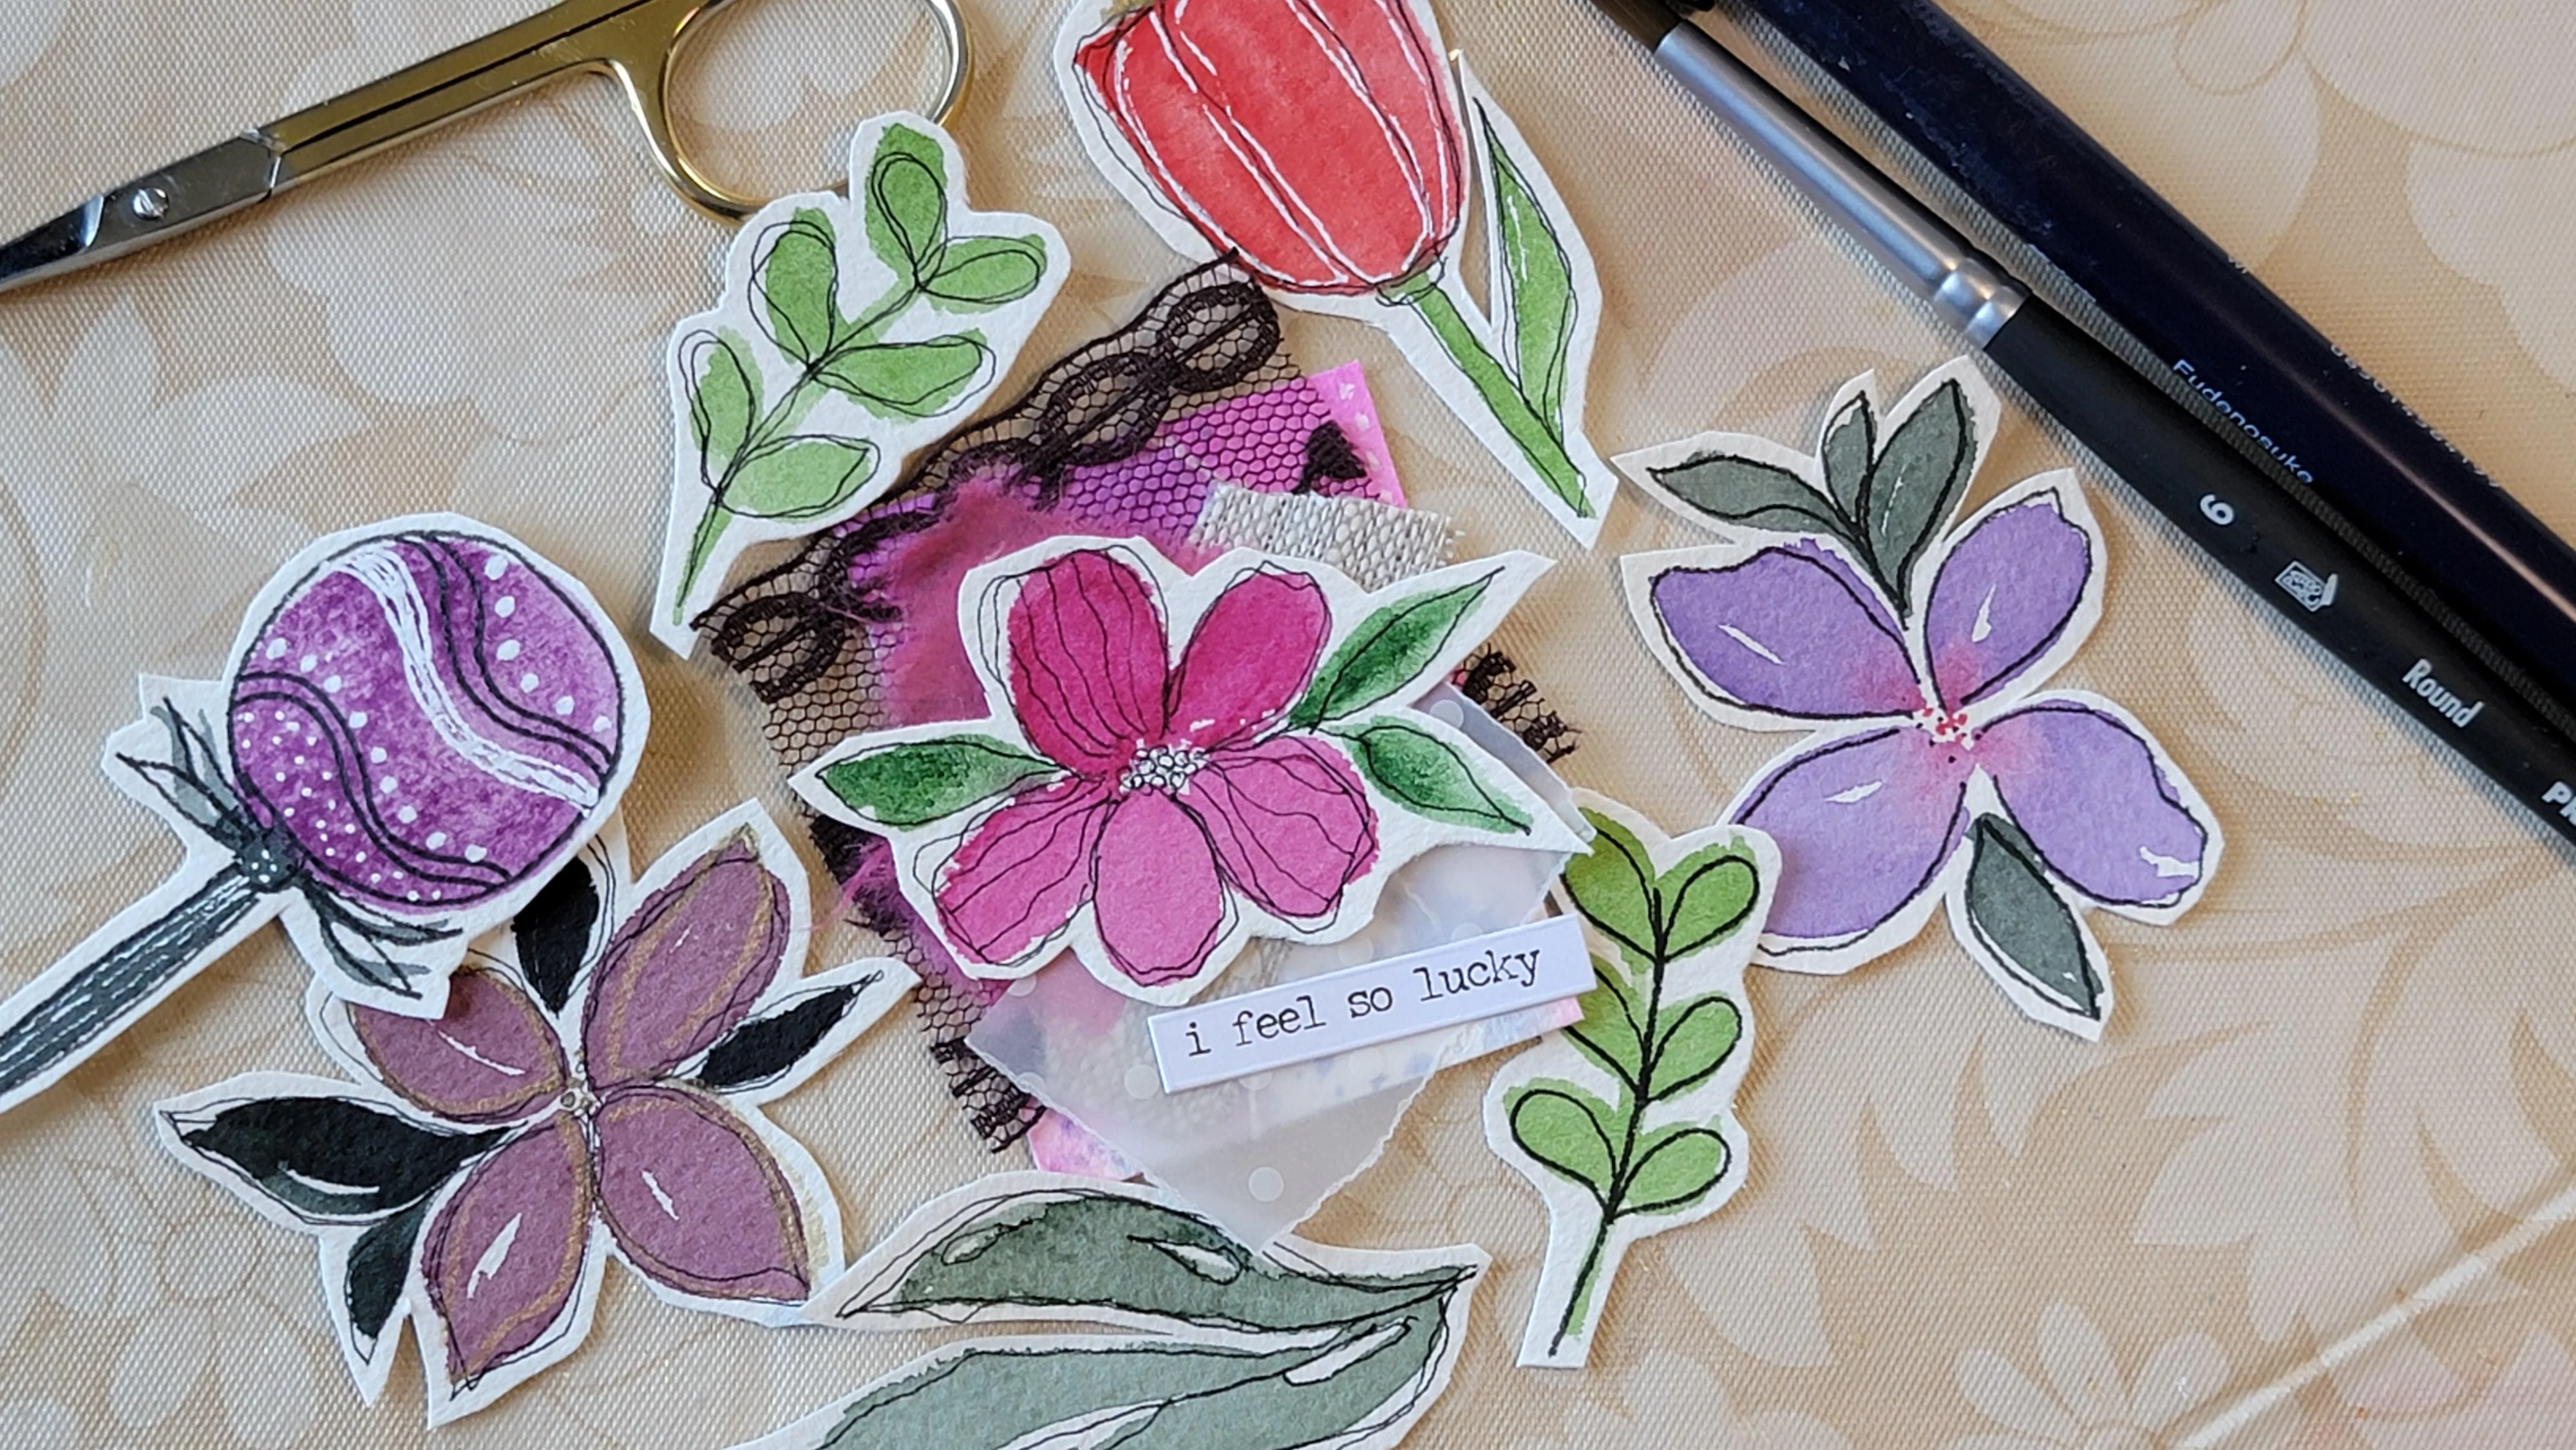
9. Bonus! Quick Collage Clusters: So with our elements, what can we use them for? I'm suggesting clusters. Clusters is tiny
pieces of art that you can use to embellish
a card or an ATC, artists playing
card, your journal, what I recommend is
something heavy. So this was an old piece
of watercolor paper. Obviously, you need three
or four things to combine. Maybe fabric may be some lace, different kinds of papers. And we're going to just clip
them, tiny little things. And then this is
our focal point. So pick one of your focal
points and let's see. What are you feeling, kinda feeling this one today. And we're going to
layer up a few things. Why this fabrics calling
me so much blue, okay, and a touch of more pink. Touch more pink. And I'll take off
that hard edge. You don't need much, you do not need much. Maybe that's too much. Let's cut a strip here. Right? The thing with clusters, I imagine it as the fastest work of art you will ever collage. And actually I think what
I might want to try with this lace is bundling it up. Why do you think
making it thicker? Is it a background? How do we That's a cluster. You're done. They do think I might
want to make this a smudge and smart. Oh, I forgot the pink. How about a a touch of paint? Okay. Maybe. Ah, okay. Got it. Got it. Got it. Alright. Glue worked for me. Going to should I follow them? All right, forget it. It's gone on big. That's going on big, big and strong. Okay. And this down, maybe
pinks peeking out. How about that? The pink can pick out and
the velum can come down. And look at what a great match. Look at that is a
mini work of art. I found the words, I feel so lucky. Why? Because it worked. Clusters are the most fun, fast piece of art you
can ever play with. This feels so good. I love seeing the textures and the focal point just
works really well. Isn't that sweet? All we did was experiment and tried our paints and
we tried our pans out. It works. It's a great way to
add to your art. I hope you make a cluster. I hope you put together little tiny pieces of art
using your clippings. They look so cute,
they look so fun. I can see them in
journals and ATC cards. Maybe the feature of a card
you're making for a friend. And I love this idea. I hope you utilize it and please share this in
the project section. If you've made a
piece of many art, share that with me.
10. SK 18 Clip 10 Wrap Up: Thank you for joining me today. I hope you came away, inspired and ready to make as
many clippings as possible. Wasn't it's simple, right? Just a few shapes combined make these wonderful
flowers and leaves. And doodling can just
take off all on its own. It's, it's so meditative
and calming to do. I hope if this was a class you really enjoy the
Gillette. Me know. If it wasn't, please
let me know as well, review my class. I'd love to hear from you. And especially I can't
wait to see your projects. Please share them in the
project section with me. I find so much joy in
seeing what you can do. And I'm inspired, and I know other students
feel the same way. They're inspired by seeing
what other students are doing. So please share that with me. Please review my class and join me in my other
classes to explore more collage techniques and
watercolor and doodling. Thank you again for your time. Have a great day.
 Tammy Prara, Making Matters