Transcripts
1. Whimsy Doodle Bookmark Introduction: Hi friends. It's Tammy Prara. Thank you for joining me today. In today's class. I have a very simple bookmark. And we're going to combine my two favorite things,
watercolor and doodling. And we're going to create a very simple bookmark,
no stress bookmark. And this is for you if you are
a beginner or you are, needing some inspiration
for what to create next, this will be perfect. I have three simple drawings and they came from my idea book. If you've seen my past class, you'll know what
I'm talking about. And so follow along
simple steps. A cute, fun bookmark. And this whole
project can be put into envelope art or a card. Maybe you have a
birthday coming up. This would be really fun to add. So I hope you join me as we make a whimsical bookmark with
doodling and watercolor.
2. Whimsy Doodle Supplies: A word about my supplies today. First off, please
use what you have. But that being said, these are the
products I'm using. I have some Tombow markers. They are water-soluble
and dual tip markers. That means they have a
marker on either end, a bullet and a brush tip. But I liked them because
they're water-soluble and they become my watercolors
for the project. I have Tombow, 636403133. I chose them because
they are what's called analogous on
your color wheel. That means they are all
next to each other. The greens and the blues and the violets, the cool colors. So they look and
work well together. I'm also using a Pigma
Micron by Saqqara. I'm using a 0.02. It's a very hard, fine tip. To do our line doodling. I have a brush, water pen. The water is in this reservoir and you can squeeze it and
water will come out the tip. You could even put liquid
paint in here if we wanted to, but no, we're just keeping
it with water today. My idea book from
my previous class, if you haven't seen that, I hope you give it a look. But I have added to
it since my class. I've put in more doodles. I'm using that as a springboard. And the paper for our
bookmarks is actually a Canson paper,
watercolor, £140. And any watercolor paper
will work if it's a £140. I cut it into 5.5 by
two to an a corridor. You make it the bookmark
shape you want it to be. And we will create some doodles with some
watercolor background. Join me in the next
lesson as we get started.
3. Whimsy Doodle Watercolor: I am getting ready
to paint my panels. Just like this sample. I used the Tombow pens and my palette is just
a white porcelain dish. You could use a
piece of plastic, a piece of acetate. These are water-soluble
markers, Tombow 636. Because they're water-soluble, I have instant watercolor paint. That was a Tombow 403133. It's the dual tip marker. I've rubbed some onto
my porcelain dish. I have my water pen, my water brush, the
reservoir holds the water. You can also use a jar
to clean off your pen. And look, I can
activate that color. I can add more water
straight from my pen. And all we're going to
do is to make a square, a rough shape of a square, and fill it in. You can go as far as you want to go to the ends if you wanted to. I like leaving a sketchy border. Maybe make one corner a little
bit darker than the rest. So I tap in some more
and I rinse my brush. This is not complicated. This is not meant to be
anything taxing, just fun play. I'm trying to approximate
the same size, but that's not even
the whole point. Our lesson today
is about doodling. But I thought it'd be fun to
add a bit of a background. And hence the bit
of watercolor play. I'm going to lighten that up
a smidge and make my square. Make it a little bit wider. Oh, that's a nice tall square. Look how they all three
have different shapes. Not an issue, not
a problem at all. Because it's fun.
It's just play. And that's all there
is for the watercolor. I'm going to let this
dry before I doodle.
4. Whimsy Doodle Warm up: I'm going to share a few shapes that we're going to
be working with. And I've put them
in my idea book. Do you remember my class
when we created this book? So today's, I'm
going to do a house. We're going to do an owl, we're going to do a mushroom. I wanted to show exactly how I even came up with the shapes. If you look at this lumpy thing and it turns
up to look like a mushroom. I basically started with maybe an upside down
light bulb shape. Something that comes larger on the bottom and curves
up to the top. You can make that into a vase. You can. And we turned it
into a mushroom. The top of the mushroom. I basically made
like a bean shape, something that's
rounder on the top, that comes in like a lagoon, like a real bean. And we can fill this in. And like my example above, we could add circles. Look like little cutouts
onto our mushroom. And maybe concentrate
your circles on one side. And they're not great. Circles are the third
just circle like shapes. The same idea translates
with the owl. Kind of a bean shape or it's
in or lower on the bottom. I'm just adding more
of a chin in here. And kind of that bit of a
mushroom shape on the bottom. Wider on the bottom. Add on the outside a wing, but you could add on
the inside a wing. I just threw some swirly
doodle lines in here. That was a filler we had used. Now the eyes look how many circles I've
done for the eyes. One to one skinny
one in the middle, one, and then loop the loop and a skinnier
one in the middle. I just took his beak is one
big v-shape with a curve. That's these shapes right here. That curvy V-shape fill in the I put in lashes if you'd like. Maybe a curly Q or
two for feathers. Just whimsical, That's
what we're working with. These little half
circles on the chest. Then I even just dashed it up. Maybe add a little accent
on the nose up to you. Just have fun with very
loose shapes. Houses. Not too complicated. Why? Because it's
just square shapes. Do you have a peaked roof? Do you have a dome roof? Maybe a dome door. Just fill in crazy
doodle shapes. Let's add a window or two. Doesn't have a pain inside. These are anything
in your imagination. Want if you have a
really tall house or maybe that's more
like a chimney. And if it's chimney, do I have stone work on here? Do I have lots of blocks? Maybe it's a castle. I'm just playing with shapes, with lines, making it
really, really basic. And that's all we're
playing with right here. Those are the three shapes. A bean squiggly circle. Nothing too complicated. You can do this. And if you don't have an
idea, book, make one.
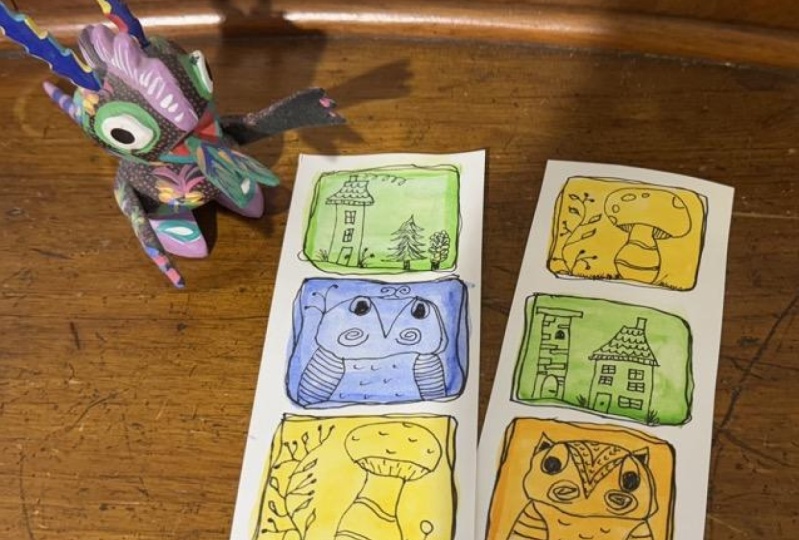
5. Whimsy Doodle Mushroom: So I've kept my idea book out so I can have my
reference for drawing. I have my card. It's all dry and ready to go. Look at this big water drop, made a bloom of watercolor. And I love it. This is gonna be really fun. So following the same pattern, I think I might do
mushroom, owl and houses. I'm not going to pencil draw. I'm using my micron O2 and my mushroom is really
just a vase like shape. I'm going to start about halfway for my stem
of the mushroom. And a little bit wider on
the bottom than on the top. And I'm going to swap
out if I have it. Another to know. Yep, here it is. And I'm gonna put my top on it. It's kind of a wobbly
ovalis round shape. I come just under the stem. And that allows me to put away the attached line
just above the stem. Now, you're welcome to put
little arcs are full circles. I think I feel like a
big circles on here. I'm going to draw one
coming off the side. One oval that's going flat, maybe one that's
more up and down. You can concentrate
them on one side. I think I might do that. Maybe one more on
the side there. And I really liked
this wavy line bit. So I'm going to try
to replicate that. And all I did was starting at
a bend of my wobbly shape. Start there, go across
and follow the line, but try not to follow the line. Maybe one more down here. And there we go. Now I didn't give myself a lot of space under the mushroom. I think I'm going to just
put a tiny lines in here. And it basically is
going to fill in that space a little bit of
grass, that's a scribble. Maybe pretend you're
writing a signature. And I'm going to make some fun. Dutifully. Wine. I have been pulling
weeds lately like crazy. And I wish they were this
pretty this one's going to have two kinds of
bits coming off. One has an open circle, the other is a closed circle. Not hard to do. You can add more. You can add. And I'm going to scribble
some grass under it also. Now this one I framed. So let's frame this one too. You can go outside
your painted lines. Inside the painted lines. And you have just set a
frame around your piece.
6. Whimsy Doodle Owl: Making the owl. Now this owl has a
really large face. This owl has a little face because my square
is a bit smaller. I'm going to stick with the larger face and
maybe only face. Let's see what happens. We're going to draw
not a perfect circle. Something, something jolly. Maybe a bean shape. If that helps to think about it. I'm gonna double that line. Make it that sketchy look. Now the eyes, It's
three circles. So I start with one
big circle and I go inside that circle and then
a really narrow circle. So we'll do one. They do not have to
look exactly the same. And that's the fun of a
sketchy looking drawing. Then I liked it come from
the inside of that one. I make us beak and come
up on the other side. Maybe a little
sketch right there. Twirly cheeks. I'm going to make them
facing opposite ways. So starting at the
bottom and going in, starting at the bunk,
go back to the center. Now I'm going to
color in his eyes. This is something you could use, different
doodle strokes. These are just going to
be squiggles right there. And I actually liked my idea
of the dots on the inside. I think I'm gonna
do little dots on the outside of this guy's eyes because I have a bit more space. I do like putting some lashes. Those lashes or feathers. Right. And how about a very
squat little body? It's just like
making a caricature. You can add a little
leaf shape to the sides. And we're going to
make a barber pole, some kind of swirly
edging there on the side. And then I'm gonna come in
and do the opposite way. I like how his little chest has some roughly feathers and those are just
little half circles. Here. I ended up just making
scratch marks at the bottom.
7. Whimsy Doodle Houses: Last square is going
to be some houses. Now I have a nice big green
square like this one. I actually thought I was making a tower with
a little house. This one is more
free form shape. It is not square sides. So let's see what happens. Right? We're having fun,
we're just doodling. I'm going to come down to almost straight lines and
I'm going to cap the top. If it's a castle, I'm going to have
more of a round door. And I felt like, oh, he's got a lever for our handle, not a door knob. Then I added some
stonework and so it's just lots of little lines
coming from any direction. Do they touched,
do they not touch? It's just kind of free form. Playing with the idea of shape. Are they break or they stoned? It's all good. Maybe another one in here. Have you ever seen a arching
windows in a castle? I filled that in. This store, might need a
little bit more prominence. Give it a bottom. I do like that sketchy, so I'm going to
outline this shape. And I have space for house. Now you could do a peaked roof. You can make a
thatched looking roof. I do. Like how it comes up
and across and down. I'm going to give it a
chimney on this side. And I just think there's
something old fashioned about the scalloped
looking roof shape. Texture on here. Going from the inside of each. They look a little bit like
fish scales, don't they? Store will be more square. I'm going to give it a knob. We can add little
windows to the top. And it has the pains
in the window. And let's see, doesn't
need another one. I won't give it a bit. The grass here. I don't have room for my
tree, but that's okay. I think I will frame
this one as well. Don't forget to sign your piece. Your three framed bookmark.
8. Whimsy Doodle Wrap Up: Thank you so much for
joining me today. I hope you found this relaxing. The simple, just very playful, and fill in your idea
book with more ideas and continue along building
your repertoire of doodles. Put them on bookmarks, put them on cards to send a
friends, maybe envelope art. Have a great time with it, and share what you've
created in my project area. Share your projects with
me and everyone So we can encourage each other and be inspired to continue to create. So how fun of you explore watercolor and fill
in your idea book. Have a great day.
 Tammy Prara, Making Matters