Transcripts
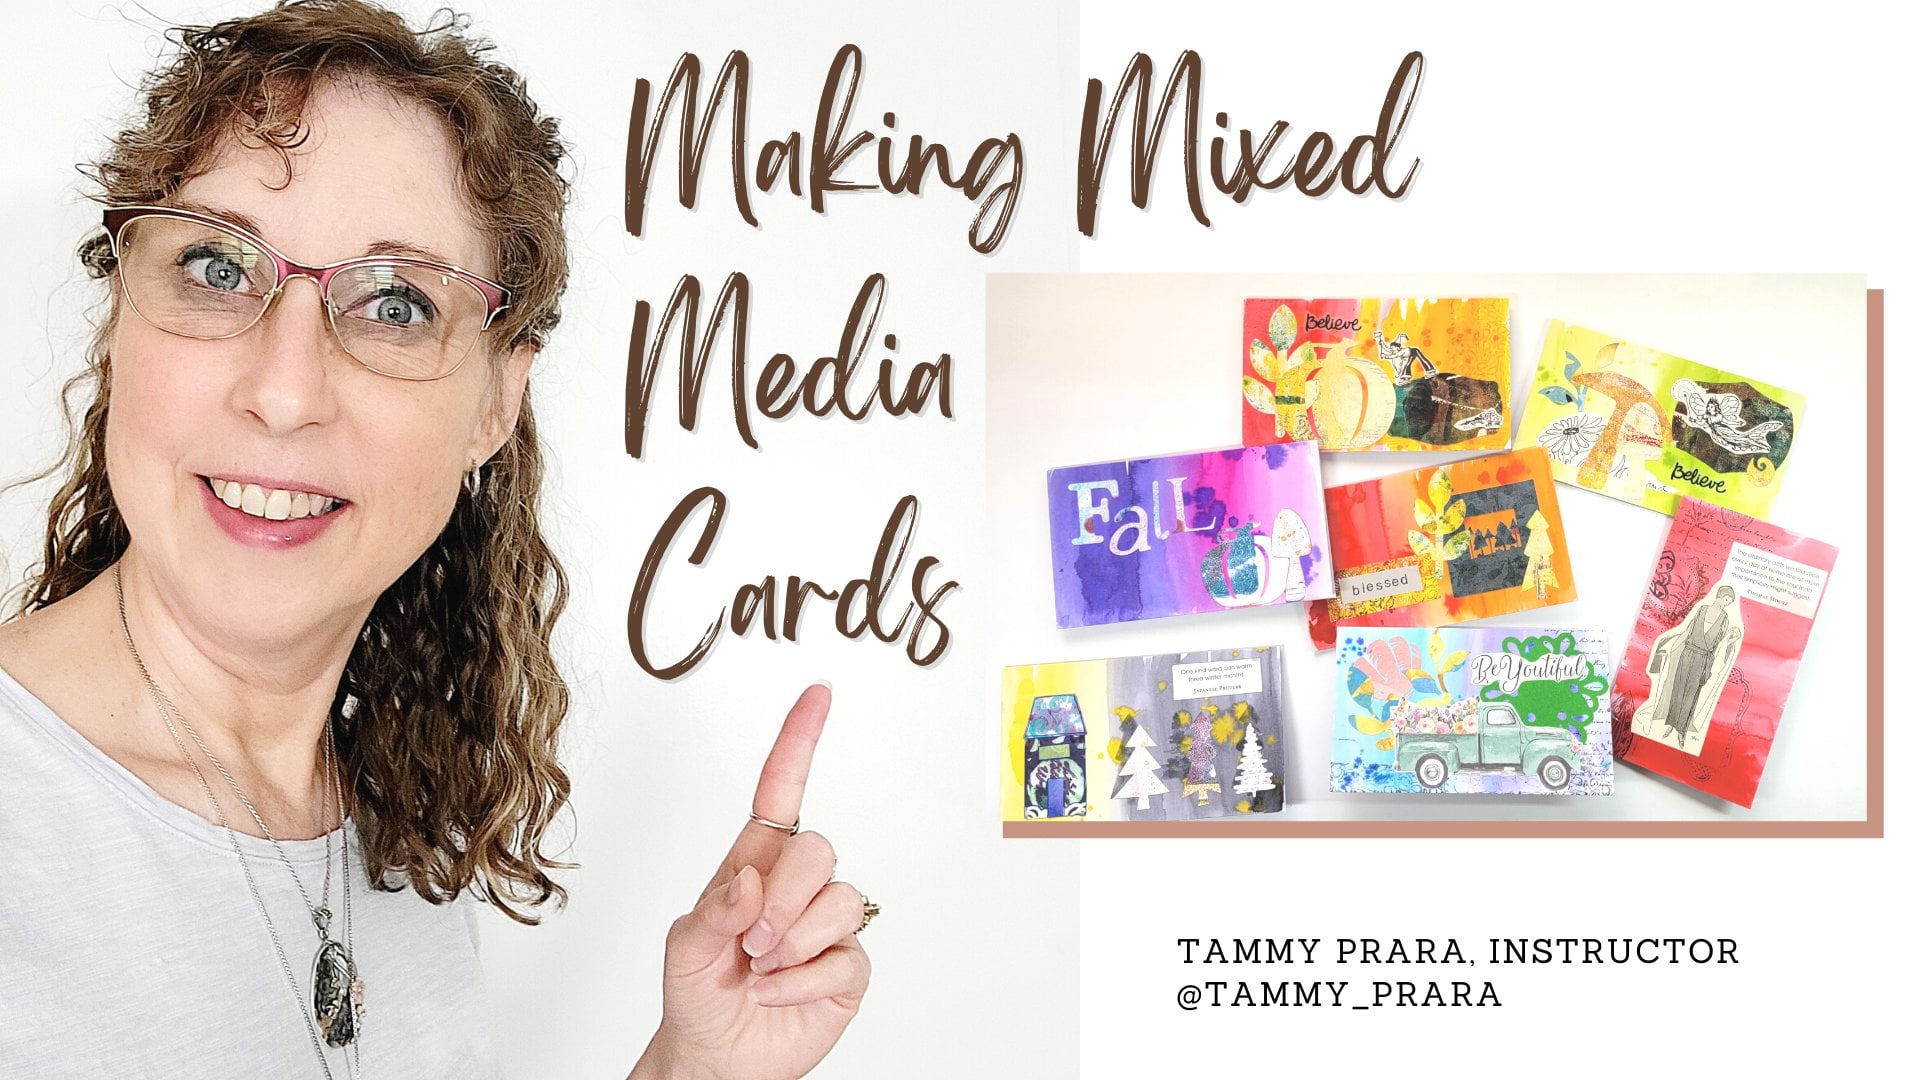
1. Festive Fall Doodling: Hi friends. Tammy prayer. Thank you for joining me today. I have a great simple
collage project where we really
focus on doodling. I'll walk you through
step-by-step, how to create the
shapes were using and doodling and putting
in some watercolor. I hope I take all the
intimidation out of it for you. It's something that I
truly believe in that we are all created to create. And I think this goes back to my earliest memory is
when I was a child. I want to coloring contest in elementary school
at a local mall. And since then I had
painted with my mom, crochets with my grandmother. And when my children
were little, I got into that
scrapbooking phase just even four years ago, I embraced collage
and mixed media. So that's a little bit about me, but my biggest purpose
for you today is to come away with something
you are proud of. But mostly that you
spent some time, time engaged with
your creative side. I hope I give you
some tools that you can use in other
projects as well. I hope you really embrace
the Happy Meal trend. That's such a lost
art right now. And encouraging others
through your creative side and sending it
through the mail is such a positive experience. But maybe you like bookmarks more or little sayings on your desk to inspire
positive sayings, happy mottos to get you through the day or to stay
focus on a goal. Any way you use these skills that I'm
teaching today will go a long way for creating joy in your life and a peaceful
calming experience. And that's what it's given me. And as a skill share teacher, that's what I want
to bring to you. So come along with me as we make a collage, especially
using doodling.
2. Supplies: Supplies. How to make these cute but very simple doodling and
watercolor collage cards. In fact, I'll be
showing you how to make this one right here. First off, we need
some watercolor or markers or colored pencils. But today I'm using watercolor
and I have my own palette. I'm using a size one,
Kaufman painting details. And this is my own palette. There are Winsor and
Newton professionals. And I have a very simple palette of maybe five or six colors. You probably already have something similar
in your collection. We're going to need
glue for our collage. I like a stick in a liquid glue. I like distressed oxide
ground espresso and a daughter to get that effect across the
sides of our cards. Card stock. And I'll talk about
that in just a minute. You're going to need
an archival ink. I'd used a here we
go, Here we go. An O2 Pigma Micron scissors
using ribbon as an element. And I found these at
my local craft store. They were clearances out. So I grabbed a couple
in some fall colors. And now for the index paper, I'm not using a real card
stock or watercolor. This is index paper,
that's a £110. I can run it through my printer
because I have supplied a PDF of the shapes were
using tissue paper. What colors do you have on hand? Pull it out. We're going to use tissue
paper and our sings. Come up with your own. Or I have a selection on a PDF ready to go for some
fall ponds and sings. Now my index card is cut to
3.5 by five and it's folded. So that's ready to go when
we start our projects. So you might want to prep
that before we begin.
3. Drawing the Outline: First thing we have to
do is draw some pumpkins and acorns about
mechanical pencil, I'm using a 0.9 Pentel. It's just a thicker lead. I want my drawing to show
up for you on the camera. Generally, I would use something much thinner, pumpkin shape. Well, because these are
going to be whimsical. I'm just doing kind of a blob, but I don't join at the top. I'm going to put a
little arc right there. I'm going to bring two lines up. And the cut mark of this stem, we can make pumpkins tall. There are tall shapes. Then again, I'm going
to leave a space, make a little arc and
put in two curved lines. And the cut mark, maybe you want a really
flat and wide one. So let's start and
get a little lumpy. I'm gonna make my arc, I'm going to draw my stem
a different direction. Now you can leave it that
way or you might want to do a curve over
the top of that. That's up to you. We're going to leave the
details for right now. But I wanted to draw
a couple acorn. So my acorn has two part. I'm going to more or
less a straight side the curves and you can add
a tip to it and come up. That's the bottom of our acorn. Connect the two and make a top. Another little point. If you want to. Maybe this acorn
will be more around. And it's Kappa, be much taller. And that's the joy of a pencil. We can erase what we don't like. I like that it's little
tip is to the side and not exactly symmetrical, gives it some character. Now I did say I wanted
to make more of a squat. So let's make that much shorter. Let's connect. Let's draw up and make
just a tiny little hat. Now, you could add
a bit of a stem for your acorn to just be aware that you're gonna
have to be cutting that. And it might be really thin, but that's okay for now. This is totally fine. Going to use a micron. This isn't O2, so fairly thin. And I'm going to
outline my shapes. And at this point, if there's anything you don't
love about your drawing, make a correction with
your pen at this point. Just follow along,
trace along your lines. If they don't match. Not an issue because we
are allowed to erase. And that's what's great about these archival ink,
these microns. They are water resistant and really great for drawing. And then hence, you can erase what's behind them
that's not going to smear. I really liked that
part about it. I think I'm gonna
leave that off my stem for now and cut across. Looks like it's a little
Bray, doesn't it? Come back? I made it a little thicker, so it would be easier to cut. Now this one, even my pencil lines didn't
even match, but that's okay. It all gets corrected
with your marker. I'm going to go more
right across my cutoff, that pencil line right there. And my last one. Now, here is a secret. I probably drew 30 of these before I bring this
project to you or more. Do as many as you need. In fact, put them
in your idea book. And that will give
you way more practice on figuring out what
shapes you really like. Like I said, erasing time. I want to make sure
that that is completely dry because it will smear
if it's not completely dry. So just a paper test
to double-check that. I have this Staedtler
Mars plastic. It's the hard white rubber. And as you can see, no smearing of my black line, the pencils coming up just fine. Gonna get that cleaned
up really well. Excellent.
4. Doodle Shape Review: So we have our pumpkin
outlines, which is great. But I want you to take a moment and think about some
design elements. And if you have your ADEA book, then let's do a little
flip through and remember, what are some shapes? Zigzaggy shapes, looping shapes. How to do some fills,
straight lines, curved lines, hash marks a here at
the ends for shadowing. Oh, all are funky circles. The loop de loops, the little tiny arcs. Here. I did practice
my pumpkins Like I told you many times. Oh, some stone
works, zigzag lines. Some dots to tiny circles
to larger circles to ovals, curves, okay? Lots of floral ideas,
loops and leaves. Shapes inside of shapes. See how dots just add a
little extra something. The curved lines and then multiples of the curve
lines work together. Let's see all the swirls. Okay, so here's some
new fill ideas. Alright, the shapes
within a shape. Okay, I think I have some
ideas that I want to try and go ahead and you
can look things up online. You can make your own idea book. And let's see what
we can come up with.
5. Doodling Whimsy: I'm ready to doodle and
I do have an idea book. And I have a paper, not card stock, but actual copy paper and make as many of these as you'd like. From my PDF that's
included with the class. I actually practiced some more. And you could either trace these as you hold
it up to a window. You could trace it that way. Or you could take this
and put index card stock in your printer and actually
make a copy of this. Or let's just draw directly
onto the card stock. Again, I'm using my
ode to Pigma Micron. Feeling like you can
re-create is awesome. Go ahead and experiment
some more if you haven't drawn a
handful of these, just continue on, continue on. But I think I will use my drawings from my first page and recreate them over here. One was just little
elongated sees, maybe a few more on one
side than the other. I really liked a tall round like a little hobbit hole
kind of door right there. And filling in a few
dots along the top. This is a curve is
slide and just a loop. And out with a loop on the end. That's all it was. This would look really good
with a more smaller tip, maybe an O one or a 0.005. Now this may be wave it up and make a tall
leaf on this side. Maybe even a second one. And over here, my idea was to have some
little tendrils coming out. And when I was coming
up from the bottom, I'm going to add one. And then I thought, well, that actually doesn't look bad having little little
tendrils along the bottom. Now look, I really didn't give myself a lot of
room for a window. I think I might just do a
bit of a circle window. Some crossbars to it, adhere. It was just little loops
across the top of the stem. So they don't have
to be exactly alike. You can take the
best things that you did like and recreate it. This one does look very busy. I think I will tone
it down a bit. But each of those
tiny spaces can be a really great place to color. I started with making ribs, those lines on a pumpkin. And they're just long curves. From the top to the bottom. I just drew the tiniest circles down one side of the stem. They almost look like buttons
on his shirt, don't they? For one of the areas, it was a bit of a zigzag, just a back-and-forth with
a bit of a curve to it. And my very last one, I made a big loop, de loop there at the bottom. Another idea is vines, flowers, different
shaped plants. This is just an
easy loop and loop. Maybe a few things coming
down from the top. I do like groups
of threes, fives, a single odd numbers seem to
look really nice together. Some diamond shaped. This will have to be a
real tiny one right here. Maybe a tendril coming up here. And one the other way. One really Curly, right? They're not filled in that
middle section of the pumpkin. Now the last time I did this, I did these loops, these bumps on the
opposite side. This time I'm putting them
on the right-hand side. Maybe giving a
circle to each one. Little less busy, right? Because I've been so curvy, I thought I would do
more linear shapes. Something with points. And so these diamonds
come down this side of the rib. Few dots. More loops. A third larger. And because I've
made them so large, I can do something inside them. An extra shape mimicking, but just a bit smaller. This pumpkin I did
have making it look like a little house
shape over the doorway. Think I want to make it a curve, an extra tall curve
over the top. And I liked this idea
of a window on top, maybe a real high
window up here. This one has many tendrils. And you can add
leaves or dots or curly cues about a
heart at the end. This one has a leaf
just coming out at the side of the pumpkin. And this was a curly cue that
I hi to go back on itself. Came up and back down like a really tall blade and gave it a curly Q right
there down the side. It was more of a wave. Maybe dropped down
a few more hearts. Just wherever your
imaginations going. This one I gave the
stem bit more of a realistic look with the the ribs on the stem
part for the pumpkin, I'm going to come down here. And on this cap of the acorn, going to just give it a wave. And then a second wave. And a third or a fourth. Giving this big space
is going to look really great when we
paint and color that in. And the idea that came
to me for this one had to do more like icicles. Hanging down from the top. Straight lines, dots, very squiggly line with
the diamond at the bottom. And a straight line with maybe a bigger
circle coming down. And along the bottom. Just a grouping of tiny circles that lead into
dots off to the edge there. This idea actually
came to me as leaves. Like maybe a strawberry
or orange sections. I don't know, It gave
me an idea of a fruit. And then I just drew a quick and release press and lift up to put the
vein of that leaf. And then I added two little
leaves of an acorn in there. This idea was meant to be a
bit of a just a hash marks, a grid lines, and next to
something that's a grid line, a heavy wavy line. So when I mean heavy, I mean thicker, fuller,
not very tight. And from there, I
actually looped up and across and looped
over m on the other side. I didn't draw them individually. It's really one big squiggle. Then the third thing I did was add a line and each
bump that came out. And it gave it a bit
of a leaf effect. Now I can darken in
this line of the cap. Give it more of a wavy
definition there. Let me give this pumpkin a leaf, but I'm going to bring
it out to this side. And there again,
little diamond shapes, curvy, funky diamond shapes. What I really liked was
these elongated ovals. That was one of my happier
ideas on how this turned out. And then when I came out here, I just made them the full
circle, the full oval. And the more I came
out of the middle, towards the middle, I just
got smaller and smaller. So this side was
more densely filled. This was a fun look. It's just a Gosh, I'm sure there's a plant that probably does look like this. But it reminds me so much
more of a Dr. Seuss effect. I added a diamond on the side. And these little dots kinda came up the side like
one of the ribs. Now I did try an experiment of a window that went sideways. And I wasn't a big fan of that. So I think I might just do more. Foliage from the bottom. Easy loop on the
top of each stem. Easy to do. Fact, I might even add
one here in the middle. I'm going to fill in this
line to be a little thicker. But here are three
pumpkins and three acorns. Ready for more details.
6. Watercolor Palette: Hi, I am prepping, getting ready to paint, and I have some paint brushes, some water, my paint palette. I do have some paper towels. And I just wanted to go over a little bit
about the palette. I'm going to be using this as a palette I bought
off of Amazon. It's, um, or dean, it was empty. And each one of
these pans I filled, they are all Winsor Newton,
professional watercolors. And so I'm going to add
some water to the colors. I'm mostly just squirt
into the few pans that I like or all of them because I want to
keep my options open. But I'm going to
focus on these colors and these goldfish colors
and some of my orange, a little bit of red and
a couple of grains. And I'm going to use my palette blending
right down in here. Oh, I do like some
of those purples. So I just squirt it in my water
to activate my dry paint. A couple of yellows
case I want to oh, you know what, maybe
some blue. Okay. Practically my entire palette is now has a little
bit of water. And this is just a tiny tube. You could spray your palette, whatever works for you. I am using some really,
really tiny brushes. And I've got a 0, also have another 012. And it just has to do with
the size of the feral. How many hairs that will have
inside these are all round. And I think I got
this one off of Amazon when I was beginning. These are Cotman, Winsor Newton brushes and I do have
a Princeton round. I am going to activate some of those already to
show you what I have. This one is called
a perylene violet. And as you can see, rather dark, but it will
lighten up with a lot of water. That's how you can get your
light and dark effects. I'm rinsing my brush in-between
with my jar of water. Another one of my favorites,
quinacridone, gold. I love this one so much because it's one of
those colors that comes across brown
and then yellow. I get multiple colors. Just from using that one. I am going to use some
permanent sap green. Now, look how Brighton
yellowish that has when you mix it
with your other colors, It's going to meld into a really beautiful
green for autumn, Winsor red, maybe a
bit of Windsor red. That one's rather opaque, meaning it's not going
to be as translucent as say my permanent sap
green, Winsor yellow. And look how that one is completely very,
very transparent. Windsor violet dioxane. It is so dark and so vibrant. But it's going to be a
lot of fun to play with. Putting these out
here to show you the color palette and will be blending a few of
these together. If you have markers,
use your markers. If you have water-soluble
watercolor pencils, use those. Here's a few samples of
me doodling and painting. And basically that's that color
palette that we're using. They came out pretty good. So I'm going to continue with that off to the side
for my inspiration. And I'm ready to paint.
7. Coloring with Watercolor: Noticed I didn't even
pull down any orange. And here I have three
great pumpkins. So to make these fantasy whim z, I am going to have some
fun and play with this. I want you to have fun and
play with this as well. Experiment. Get your colors out if you haven't gotten
your colors out in a long while and just
start placing it. Try to stay within the lines. Not a huge deal if you
can't or prefer not to. Now, card stock is very
different than watercolor paper. It's going to soak up
the color like crazy. I'm going to put in
that quinacridone gold. And because my file
it my undoes that. Yeah, that violet perylene
violet was still a bit wet. I'm going to fill in both of
those spaces with that gold, some green along this. Maybe stick within my, my wave shapes first. I could probably
even use my 0 brush. Right now I'm using my one. I'm going to keep that green
and fill in my leaves. Well, how typical, right? Not very fantasy when z
is it. But that's okay. Just going with the flow, just experimenting and playing
more quinacridone gold. And please Winsor Newton, don't shoot me for not
saying that word correctly. The lookout, a cub brownish, it's coming out with a
deeper amount of paint. Something I just love
about that color. So if you do get to
come across that, I hope you find it. Now. I I just I don't
know what it is. I just love creating
things and small. I like things that go quickly. I like making something. And it didn't take
me days, weeks. Now I had mentioned I have
crochet made and I am not a huge fan of creating
something that does take days. So I've actually learned
how to make a beanie. In this Winsor red
is really vibrant. So if you thin it
out with water, you can get a, a pinkish hue, see how the colors have changed. And that's all based on the amount of water
that's on my brush. This is something else about me. I love to clean my brush. I I don't know what it is. I really like a clean palette. I like my colors staying true. Unless I purposely mix
them for a different, different kind of color. But I'll wash this palette off. There's other artists who
loved to keep them filled with paint and dip the brush
into many colors. Oh, that just drives me nuts. Are you that type two. Now, I did get that
quite, quite wet. And I'm going to take a tab, a bit of my paper towel and I just mopped up
that extra water. Really lightened up. You can almost see it. It's like a completely
different color. I think I may fill this
area in with the green. Now, I've watered this
down several times now and with water on my brush
that also lightens it up. I do have those itty
bitty tiny circles and I'm okay filling those in. Because we can go
back with gel pens. Maybe we could put
white on those spots, gold, or fill them in
completely with black or come back when it's dry and add
another color of paint. All right, Do I dare this
vibrant, vibrant purple? I think I dare. Now, as I said, vibrant and then watered
it down so much. It's coming up very pale. And that's okay. My experiments with
this color has really led to an almost black. This color can be almost black. And here it is. Such a faded soft. But that's what
autism is, right? The colors have faded,
connect widowed. Now sticking with this palette, I am using my, my
perylene violet. I'm gonna come over here
to this one and then I tell you, it's fun. Watercolor is, it's
just fascinating to me. Really. So many colors can come from just
one pan of paint. Now, I had bought these
all-in tubes, like I said, and I filled a pan with color. I do not paint from the tube. I do not use the wet watercolor. This just can last
forever and ever. It, for as much as I paint. Other artists love
that straight color. And I tend to be a bit on the conservative side and
my painting and my art. I'm not someone who's a
huge, vibrant color person. I think I want to
fill in my dots. Now. Here you go. Now. My clinic. And then come down
with much lighter. Did you see me wipe
my brush on my hand. Instead of a cross
a paper towel. I have such little water on
my brush when I wash it out. I don't mind just
touching the tip to my hand so that that any drip, any excess will just just touched my hand and
my brushes more dry. That's a way to keep the color, stronger color on the
brush and less water. But sometimes you
want more water, you really want to thin it out. And you can see we used more water on the
bottom and less paint. I wanted these little stars
and diamonds to stand out. I just take this
yellow bit of Winsor yellow and have something
much more contrast. Something bright. You go, I filled in that space. And maybe my little diamonds
need a hint of yellow. That's great. That's kind of a, you get a Harry Potter field going on with that, with that maroon.
8. Coloring Part Two: So I think I'm going to
bring in, um, Winsor orange. I'm going to add it to
that cad yellow deep. I know I said I'd
stick to that pellet. But I want you to
use your colors. What do you have that you
haven't used in awhile? What's coming up that says, Hey, this piece needs to be
something different. Go ahead and go for it. You know what? It's an experiment. This is actually one reason
I made six different images. Because when it comes time to art with them and
make our collage, I may actually feel like
doing something different. This moment, this time
and space right here. This is you spending time with something you really love
or are coming to love. Maybe you are so new to art. You just don't even
know where to begin. And really just begin. Start splashing
your color around. Adding lots of water, not using a lot of water. In fact, I think
I'm going to try blending this orange out
that I had laid down. And yet I was able
to activate just enough that one had some bleed
through, but that's okay. That dark orange
I put on the side decided to play with us. And that's okay. In fact, I think then I'm going
to fill in right there. Just the lightest touch. I'm going to bring it
on the stem as well. Taking some of this green and work it into the
stem I have over here. And maybe this stem
I have over here. This green and orange
look great together. Really do. Don't forget purple. Purple's fun with orange. I'm going to dab that
again like we did before. Because it was a bit
dark and I couldn't see. My heart. Wanted to be able to
see that heart shape. So just a touch of color. And look, you can paint over. And I'm gonna give
this side of the door, oh, very light wash of that
purple quinacridone, gold. It's very similar to the orange. I see that. I think what will really help? Let's put in a bit of that red. I think I'm going
to add it to that. Orange and orange red. Muddy up my palette. Because I've blended two colors. There you go. Maybe here at the top. Putting your color
in multiple places, that really gives
it a good balance. Now as we begin our last two, I've actually added
some yellow turquoise down here in my palette. I just felt like I wanted
to play with blue. So we're going to
play with blue, pumpkin, and three acorns. How did you do?
9. Swash Technique: The other suggestion was to do a swash and splash
and mess it up. So let's go ahead
and do that with the quinacridone gold on it still has a bit
of yellow in there. I'm going to smear
it across the page. And maybe a bit of
orange bladder. There you go. We can do it all right on top of
that when that dries, no skill required because I worked out these
doodle shapes. I'm going to translate them
over to my card stock that I pre painted with
swatches of color. Remember this pumpkin just had a few circles down the side, reminding us of a buttons
and some ribs down the side. Starting at the top and
going towards the bottom. And this I actually got kind of wavy with
they weren't extra, extra strong, clean lines. Lots of space. I think I might add in flower. Right there in the
middle. Here we go.
10. Gel Pen Accents: Here I have several jelly rolls. Did you know the whites
come in different sizes? 70508, a tan. I have a couple. Sarissa, I have a
gold and a white. I also have just
a colored pencil. This is a current arc and
it's in a soft white. So we're going to see what's
going to work for me today. Sometimes my white jelly rolls
do not want to play nice. So we'll see what I can
get activated here. Going to just make
my dots white. I decided to try that. See, it's not playing very nice. It's not showing up like I want. But it does give an extra
element and that's okay. I'm going to switch
over to my goal. If I can get that activated. And I can see it, I don't know if you can see it. Little bit, little bit little bit good enough for
some up-close details. How about that? Fact and just etchings
scratching out a few lines here. And I can definitely see the gold where we've
left different elements. You can make design patterns
in those empty spaces. Maybe a gold heart instead
of the Purple Heart. Fill that in and fill in a bit there. And if all you had
were gel pens, art with your gel pen. This coloring time, this time
to play with your pains. It's all part of an experience. That's what I liked
about creating. Once I became an empty nester, was really appreciating
the time I had alone that I didn't have for all those
years raising kids. And if you can EQ that out now while you still have
a busy household, more power to you, good for you. Maybe a scratch of gold in
the window right there. And I'm going to fill
in this one space of the door that all the
doodling I'm adding, I'm ready to cut out.
11. Finishing Off: Hope that you have
scissors met for paper, that they don't cut anything
else but your paper. And as your freeing, rough cutting, your
designs for our collage. Keep your elbow in. Keep the paper turning. I'm going to record
each of these out and decide which one I want to put on
her collages today. For the small work, I'm going to use my
tiny, tiny scissors. Like I said, you keep your elbow close and close to the body. And these are so omega
sharp and pointy, it can really get
into those crevasses. Now, this is an option. Do you want to stay close to your black line or give
yourself a border? If you feel like you've messed
up any of your painting, you want to get nice and
tight to that black line. I have a trick for
helping that along. Now, definitely among
these outer elements, I am making them a bit wider so that they don't
stay super fragile. If I have more of a
base to work with, it really helps with glowing and not any tearing or ripping. I am going to work out this tiny little
triangle right here. Here is my one trick
I want to share. I'm going to take one of
my Micron pens and fill in any white and make
my border look bigger. Make my outline of
my object stand out. And I actually think this helps. If this is going to
be your focal point, the image on your collage, having that definitive space, that black line will
really help it to pop. It kinda covers up any of your painting that
you didn't like. You could even reshape
your element right now. I'm going to cut out a few more of these and you do the same. I've cut out my pieces. I have a couple
still to outline, but my one final tip is
to save your scraps, your painted scraps and maybe
a little bit of white as a collage or you may want
a little bit of element, a little bit and
do dads something. And there'll be great to have
those on hand because they perfectly coordinate
with what we've created. Now I'm going to finish
outlining where I had cut a little bit past that black line and
fill it in and make it dark. And we will collage
right when we get back.
12. Festive Fall Collage: And now it's time to collage. I have all my supplies out. And this is what I'm going for. Cute, right? I have my card stock. It's already pre-cut. I have some tissue
paper ready to go. I have my sayings, ready to go, my ribbons,
scissors, my glue, and a little bit of inking and my cutout shaped and my
scraps are ready to go. So the first thing we will
do is I'm going to glue down my green tissue paper and it
has a bit of stamping on it. It was from another
project I was working on. Getting glue on here. And on my card stock. Tissue paper is kinda finicky. It will adhere very quickly. And if you don't
like those bubbles, you can smooth them out with
a credit card gift card. I found this at
the dollar store. And I'm going to trim
away that excess paper. Back, ground is done. That's the first
element of collage, is you're backing paper. Next I want to add
in some ribbon. I think I'm going to stick with this gold versus
this brighter gold, because I think it matches
better with my elements. And I'm going to decide
where it's going to go. So one thing I'm
going to do is cut me a strip and then decide
if I want long or cross. I guess it depends on what
shapes I'm going for. I'm I going to use my colored. Am I going to use one or two? You know what, that turquoise
really stands out nicely. I want a pumpkin or
another acorn ago with it. Oh, oh, yeah, I
really like that. That's really pretty okay. And one trick I'm
going to use this because I really don't
have those little dots people put behind to make their elements stand up is I
want this layering effect. I'm going to have it
covering part of the ribbon. But the back of it needs to be just as high as
the front of it. So I cut a tiny strip
to lay that a corn on. I'm going to glue that
down with my liquid glue. This is something
I found on Amazon. I'm not sure I love it only because it seems to
clog quite a bit. I'm always seeming to fight
to get glue to come out. And I thought I liked
this up above my ribbon so that acorns going there, That's the magic
warm hand press. Let's see if I can
get any glue to come out from my ribbon. Not as much as I want. I'm always fishing for a
pen to clear that out. And we're working on the
second element of collage. That's that midground. The midground here is my ribbon. My I found this at Hobby Lobby and they're
calling it frayed trim. So I'm guessing
that's what it is. Frayed trim. Get something here. For my top part. So it will lay up tall when I
glue it here to the ribbon. Come on. I know I'm going to need quite a bit because I'm
working with that ribbon. And I need definitely need
some on the top part as well. I gotta get my ribbon
up here to glue down. Okay, That's plenty, plenty. I just love that overlay effect over that bar to make
corn and that top acorn. Now here's one reason I
said the save some of your scraps because I'm
going to pick a saying, I've got my pumpkin wind, nuts, nuts about you. Let's go nuts. Fall it a day. Happy fall you are I'm going
to stick with this one. Api fall y'all. Using my acorn on for this. Now it could stand alone. But I'm thinking maybe I
should grungy that up a bit. I have ground espresso
on a little pad. I think I found this at
the Dollar Store as well. If you have any
makeup applicators. Definitely a good use
for that as well. I have any more colorful scraps, something with a bit
more color I do, I do. In fact, I might even just
gonna terrible things. Look a little too fishy to you. Maybe I'll cut that
off later that up. There you go. Okay. I hope my glue is still
flowing. I liked this. Yellow and orange on
top of the green. That looks really nice. And I'm thinking
rules of thirds here. As far as placements, enough glue on, they're going
to off-center it a bit. Use the warm ham
press right there. I'm okay with this frayed
edge on this side. How about you? I'm going to leave that
the last step I want. I'm going to get this lid
off of my ground espresso. And let's just throughout
this side. Got it. A little dirty. Nothing says Fall like a grungy, not dirty enough
your project, right? How's that? And rehab. Collaged doodle card. Congratulations.
13. Wrap Up: Now what will you do
for your class project? Will you make a card
for a friend for fall? Let's go nuts. How about squash, goals
and encouragement card? Any happy card you make, a friend, family
member will love it. So show me in the project area. What did you make? Did you use my
acorns and pumpkins? Or did you create your own? Please share it in the project section so we
can cheer each other on. We can squash those goals
of being more creative. So thank you for joining me. I appreciate your time. I believe we've all
been created to create and please share
that side of you. Asked me any questions. Leave your comments. I will respond to each
and every one of you. I would love to hear from you and you can follow
me on Instagram, share your projects
there as well. So thank you again. Have a great day.
 Tammy Prara, Making Matters