Transcripts
1. Introduction: Hello and welcome to class. Today I'm going to teach you
how to paint and customize watercolors so that
you can paint more of your own with your unique
touch all year round. Hi, I'm housewives and
I'm a watercolor and mixed media artist
when France and I've been teaching painting
for beginners on YouTube, Instagram, and Skillshare for
the last couple of years. Along the way, I formed many partnerships with art brands. I started painting with
watercolors in 2019, and I remember that
back then I was pretty eager to learn to paint with confidence and to ditch
that feeling of being stuck because I'm missing knowledge and practice about
something in particular. If this sounds familiar and
if after taking a class, you often feel like you
need more knowledge to take it to the next level and keep painting on your own. You're in the right place. [MUSIC] I designed this
watercolor forest class to enable you to create in more of a flow and independent
state of mind. We will learn and practice
a basic forest project, improve several exercises
and fun variations. You will finish the class
with knowledge and practice about what to modify
or to add in, in order to create the
woodland scene you're inspired to paint at any
given time of the year. I organized information
and the lessons in this step-by-step and simplified
approach so that anyone including a beginner can benefit from it and keep you
evolving afterward. First, I'm going to
show you my supplies. We will keep them very basic. Then we'll, we'll learn about
perspective, color treat, and branch painting techniques with several easy exercises. Then we'll be ready to
paint our basic forest, starting with a simple sketch and finishing the
painting with volume, texture, and a few
impactful details. After that, I will
show you how to take what you've learned
with the exercises and basic project to turn a simple painting into gorgeous
forests for the winter, the fall, spring, and summer. This class will
keep you inspired throughout the year and
boost your knowledge, creativity, and
motivation to take us supplies out and practice
with confidence. Over time, you will be building your skills which
will encourage you to explore watercolor forest some more and develop your style. Without further ado, let's learn more about our project
and get started.
2. Class Project: Today's project is a
basic forest landscape that you will be able to
modify to your taste. To get into this project
with some knowledge and awareness about what
you can change, first, we'll practice the fundamentals for such a woodland scene, the perspective,
color combinations, ways to paint the
trees and branches. Then together we'll go through the entire process for painting this basic
woodland scene, starting with a sketch. Then we'll study the paint
consistency that's best for the project and we will spend some time on
the background, trunks, and branches
to learn how to make this type of painting
come to life on paper. Later, you will have the
possibility to add on to all these basic elements
with accents for the winter, the fall, summer, and spring. To make the most
out of the class, I will suggest to
take it in order with the exercises first, the basic project, and then the
seasonal variations. You may also refer to
the supplier's list, to a tree reference photo, and my own paintings at any time in the resources
section of the class. When you hear this sound, I will be giving you a
tip so pay attention. To better process
what you'll learn and manage the
project with ease, I suggest to take the time
to pause and practice as our basic woodland
painting will serve as a foundation for your future forest landscapes
if you want it to. Please reach out in the
discussion thread down here, if you need any help, and feel free to
post your project to the product and
resources section of the class so that me and other students can take part and help you
out if you need it. We're ready to start so maybe next to learn about the supplies that
we're going to need.
3. Material: I believe that with
basic supplies, it's possible to paint
anything all year long. In fact, I noticed I always
use the same things to paint. In this lesson, I'm
going to go through all the supplies
you will need to complete our main project, the basic forest, as
well as the winter, autumn, spring, and
summer versions of it. First we'll need
watercolor paper. The project and featured
paintings are all six by eight inches
pieces I cut out of a large Saunders
Waterford sheet. Please refer to the
supplies list I attached to the resources of the
class or precise references. Overall, I strongly recommend 100 percent cotton paper with a cold pressed finish
and a weight of 300 GSM. You will find having
scrap paper is useful to practice
the exercises. For that all types of
watercolor paper will do. Next, we'll need a
large round paintbrush, one that fits your
paper nicely enough that you can paint a
background on it with ease. I suggest to grab two
smaller paint brushes. One of them at least should
be random pointed at the tip so we can practice painting
fine branches with it. For a watercolor
is to degrade or professional grade will
make a difference here. You can use watercolor from
tubes or pens as you prefer. We will need a pencil, eraser, and ruler
to trace the trees. Anything basic is just fine. We will also need 4-5
sheets of paper towels, two jars of water to wet and
rinse our paint brushes. I recommend some masking tape to tape your sheets down firmly and you might also like to use this for a technique
from the class. An old sponge will be useful
for part 16 of the class, the variation for spring
and summer paintings. We will use white
gouache and press 14 and 16 of the class, winter and summer and spring
variations of our project. If you have some
masking fluid or drawing gum will come in
handy to mask our trees. If not, I'll suggests more ways to go about masking
trees later on. Along with masking fluid, I suggest to grab an
old worn-out paintbrush or a color shaper. Finally a heat gun or hairdryer
will save you some time, so painting is drying faster. It's up to you to decide
if you would like it. Again, you may refer to
the supplies list in the resources section for
all details and references. We're ready to get started, so meet me next for our
perspective exercise. [MUSIC]
4. Exercise # 1 : Experiment with Perspective: [MUSIC] In this first exercise, I would like to
introduce the concept of perspective within easy to draw subjects such
as tree trunks. Such forest landscapes are
a great way to experiment with perspective because we're standing inside the forest. We're not dealing with anything else in the
trees themselves. It's convenient as
we will only need vertical lines for a perspective in this type of landscape. They can be placed
wherever we want them to go since forest trees
grow very randomly. Switching their perspective
and a tree painting will help set a total different
look and feel to your work. It's a great way to
spice things up, and this lesson is
going to teach you three common ways I use
perspective in a forest painting. In the most basic
tree landscape there is the one we'll
practice on today. We can imagine we're
standing in front of the trees and the trunks
are seen at eye level. In this case, I suggest
not to even worry about perspective at all and just draw these trunks with
plain vertical lines. [MUSIC] I'm using a ruler here and in the next
examples to illustrate this. However, it's absolutely
okay to make a tree's bumpy and a bit bent
or crooked in places, while still keeping the
perspective you choose to create. In this second example, we're going to imagine
we're looking up or that the trees are
located above us. To achieve this impression, let's use a focal point. We will place our focal point outside the painting frame
towards the top part. I'm going to keep it plain
and simple by placing it here so it aligns with
the middle of the sheet. See how this causes the
bottom of the tree to look larger and the
top much more narrow, which is how we get that
effect of looking up. In the same way, we
could make it look as though we're sitting
up in one of those trees. Why not? And looking down. In this case, we're doing the same thing with our focal point, except this time it will be
located beneath the frame. [MUSIC] This time, the top of the trees look whiter and the
bottom are narrow. Because as the saying goes, everything is a matter
of perspective. To keep the perspective
consistent, you want to merge
all of the lines towards that one focal point. With a ruler and pencil, it is easy to make
sure all lines converge towards
our focal point. This is why I recommend to trace the lines
this way to start. I find this composition to look more dramatic
than the others. I have used it in paintings that have a magical field before. This one, for instance,
was painted for a Disney-inspired challenge
from the Brave movie, and I made it up entirely
thanks to perspective. I added the ground and
the heart for fun. This is an example of how you
can make forest paintings even more fun and unique
when you feel comfortable. In this last example, we're going to apply the
same concept differently to achieve the impression
we're laying on the ground and
looking at the sky, at the tree canopy. This one is popular with photographers and
very easy to paint. Let's place the focal point in the middle of the painting. Keep in mind, this
is a basic example since as mentioned earlier, you can move the focal point
anywhere else you want. Once more, let's merge all the lines towards
the focal point. With this type of perspective, I recommend to make
the trunk stop at random to show some are taller
or nearer than the others. [MUSIC] Towards the edges of
the frame it is clear the trunks are nearer to us because they're
noticeably wider. Everything there
towards the edges is going to appear much bigger. Remember, everything is
a matter of perspective. Move the focal point within and outside of the sheet
to switch perspective. Use a ruler for help. But remember for a natural
look in your painting, no matter the perspective, some of the trunks will be
thick, others more narrow. They will be placed
very randomly, more or less close
to each other. Remember to adjust the size
of your branches as well. The closer to us the bigger, the farther away the smaller. Most importantly, have fun
making your trees look bent, crooked, which we're going
to work on in the class. I hope you enjoyed this
lesson on perspective. Feel free to share this exercise in the project section on the course and to use and reuse this technique in
your forest paintings. Next, we're going to
play with colors. So meet me there. [MUSIC]
5. Exercise # 2 : Play with Color: A two or a three-color
background can be very easy and fun to achieve with
watercolors and it's a great way to start a forest
painting like the ones featured in this class
since we're keeping it simple here by
focusing on tree trunks. In other words,
we are free to do as we wish when it comes
to the background, and use colors of our choice to portray any season
or atmosphere. I'm going to show you
two-color combination options for a season and I'd like
you to keep in mind, these are suggestions only. You're welcome to
use my combos if you like or make your very own. Let's start with spring. Colors you could use include various bright shades of green, yellows, pinks, blues, purples. I personally like to look
at Easter photos for ideas that fit the
spirit of spring well. My first combo is going
to be yellow and green. I don't think we need
to worry about using specific shades for this since they vary from
brand to brand. For reference, I can such as common colors that are
bright like lemon yellow, Hooker's green, olive green. To make this as easy as possible, and because there
are going to be a lot of trees in our painting, I suggest to mix the paints
so they are creamy like so, which means I added water, but there is still a
lot of pigment here. Then we're going to
apply this directly on paper without wetting
the paper first. This way, the colors
will stay vibrant when dry because there is
less water involved. To make a simple background
like this interesting, start by applying your
mix as you prepared it. Then right away, add water to your paintbrush before
the original mix dries, and create a lighter shade
of it directly on paper. We can now add our second color and I do
the same thing to make sure it's not just
one solid shade of yellow and one solid
shade of green hair. The second color combo
for spring is going to be just greens and I balance a bright green
with a darker one. For a darker green, I can suggest perylene green. For summer, my suggested picks would
be shades of blue, brown, and gold,
pinks, light greens. Common colors to use
could include all blues, in fact, golden yellow, yellow ocher, burnt sienna, quinacridone gold, opera pink, green gold, Hooker's green. Let's try pink and green first. Now I'll try blue
and brown together. It is all a matter of
your personal taste, mood and inspiration so don't be afraid to be as
creative as you'd like, and keep in mind that, anyways, the background won't be what's most visible
in your painting. So have fun. For the fall, we can use reds,
oranges, yellows, browns, greens, dark blues, and purples
would look great too. I like colors like
Indian yellow, transparent yellow deep, yellow-orange, any reds, any greens mixed to yellows
and oranges work too for me. The first combination
is red and yellow, which makes shades of orange. A second combination
idea is yellow, green, and some brown. For our winter, anything blue but deep
blue and ice blue, deep greens, browns, and blacks are great. Remember that you can use your colors pure or mix them up. You can prepare creamy mixes of paints for more
vibrancy on paper. On paper, add water in places
to create lighter parts. Also, mix your chosen
colors together directly on paper to
create new shades. Use blues and browns to
make any color darker. I can't wait to see what
combos you have come up with, so if you'd like to share
them in the project section, please feel free to do so.
6. Exercise # 3 : Ways to Paint the Trees: [MUSIC] Previously we saw how perspective and
color can help you create a large variety
of forest paintings. The same goes with the way
you can paint the trees. There is not a single one
but many to choose from. [MUSIC] For instance, you may
paint your trees directly on paper with a paintbrush
and dark paints like so. [MUSIC] Another way to do it is to paint the lights trees like the
ones featured in the class. They are inspired by
birch trees which seem almost white
in color sometimes. To prepare for painting
white trees like these, you can use some masking
fluid or drawing gum. It's a product you
can apply anywhere to prevent the watercolor
from spoiling the paper. Masking fluid can ruin your paint brushes very
easily when it dries. So I like to apply mine with
a silicon base color shaper. You can use an old
paintbrush too. I just paint trunks like this
and once the paint dries, we're able to paint without
worrying about our trees. [MUSIC] If you don't have
such a thing at home, you can also use your masking
tape to mask your trees. Tear one or both sides of a masking tape to make the tree look less straight and perfect. [MUSIC] Let's make the background
and see how it looks like when we remove the masking
fluid and the masking tape. [MUSIC] You can see how the shape of the trees was fully
preserved here. I don't think one is
better than the other. I personally find
masking fluid a bit more convenient to roll my
watercolor practice. For such easy shapes as tree trunks both
methods work great. When you're very short
on supplies that you're getting started and have
only the basic supplies, you can also paint around
the shapes you drew. [NOISE] With the type of quick background we need
to complete the project. Painting around simple shapes, such as tree trunks will
be fast and easy to do. While we paint the white trees
in our project together, feel free to use the
technique you prefer to paint the background using
either masking fluid, masking tape, or nothing
but your paintbrush. Later if you are to paint such forests on a very
large piece of paper, this technique will work. Although I recommend using the previous masking techniques so the paints don't dry before
you complete the section. Remember there are several
ways to paint trees in this type of forest landscape
taught in the class. With dark trees, keep the
background light and discrete. With light trees, let the
background stand out more. There are also various ways
to tackle the background, pick the one that is
most convenient for you. You may share this exercise and what technique you prefer
in the project section. Next, let's talk about brushstrokes and how they
affect the painting. [MUSIC]
7. Exercise # 4 : Practice Brush Strokes: In our sample for us painting, you can also modify the shape of the trees and
branches to create your own unique landscapes with brushstrokes like
perspective and color. It will also help set a unique
atmosphere in your works. I'm going to show you a few
shape ideas you can use. On small sheets I like using small round and
pointed paint brushes. For trunks it's a good thing to add little bumps here and there. [MUSIC] Another easy one is to
paint some of them at an angle to make the painting
look more interesting. [MUSIC] There are many ways
to paint branches. For example, you can paint the main one and add a
lot of baby branches. [MUSIC] Again, also keep it very
simple with just one branch. Make it look more or
less gracious with how thin the tip
of the branch is. We will practice on tree volume and texture
with the project. So don't worry about
this part for now. [MUSIC] For minimal work, you can also keep them
very short like this. On Google you can find more
inspiration and ideas. [MUSIC] When you paint branches that look like they're sticking out, make the color you used
for the other branches darker so that they do appear to be closer
to us as intended. [MUSIC] Remember to vary the shape
of your trunks and branches, how they're positioned, how
thick or thin they look, etc. Press with the sight
of your paintbrush to start and finish with a tip. Experiment with
various paint brushes to find the one you like. Add branches on the edges of a painting and places
for more realism. The closest of branches and trees to darker still gonna be. Share this in the project
section of the class. This exercise in the
previous ones are a nice occasion to share
our ideas with each other, so I'd love to see you there. But for now, meet
me next as we're getting started on
our basic project. [MUSIC]
8. Basic Forest Part 1 : Getting Ready: In this lesson,
we're going to learn how to draw and
prepare the sketch for a basic forest painting
so you can later paint more of your own
and with your own touch. The sketch itself is
very easy to achieve. We're going to
paint white trees, so you will need masking fluid and if you don't have any, make sure to refer back to the third exercise titled
ways to paint the trees, because there I
explained how else you can paint the trees
with minimal supplies. The first step is to
tape your sheet onto a firm surface so it doesn't
move around when we paint. It's also going to create a nice white frame all
around the painting. You can tape more or
less close to the edges depending on how large you
would like that frame to be. I prefer mine pretty
slim, so that will do. Now with the pencil, let's trace vertical lines
that represent our trees. Notice how my lines aren't
perfectly straight. Some trees are
larger than others, some are a bit bent. In this painting, I imagined
we will be standing among the trees and staring
right at was at eye level. I still try and
make the bottom of each trunk a tad larger, since the bottom of the
trunks would be beneath this. I'm going to grab
my silicon tool called color shaper to
apply masking fluid. I like it because
the masking fluid comes off very easily
when it's dry. Do not worry if you
don't have one like it, you can use an old paint brush. I use this one a lot
with masking fluids, so at this point it's completely ruined and that's why I
started using my color shaper. I started applying
masking fluid from one edge mostly
because it's easy to get confused with
what lines make a tree and what lines the
make the space between trees. I remember clearly starting
with a trunk right there. If you make a
mistake, it's okay. You can remove masking
fluid easily once it's dry. You can also paint
dark trees next or behind any of
these later on to conceal any mistake you like or maybe even just
to fill out a gap. We are done preparing
for this painting, so make sure the masking fluid is completely dry
before moving on. It shouldn't take more
than five minutes if you manage to apply
it in thin coats, you can run your finger
over it to check. Remember that you
can sketch and mask your trees in many different
ways, not just this one. With masking fluid, use an old paintbrush
with dish soap or a tool like a color shaper so it's easy to
clean up afterwards. Don't be afraid to have fun with how you place the trees,
making them predictable, a bit messy and wait for masking fluid to dry
fully before painting. See you in the next lesson
for some color mixing.
9. Basic Forest Part 2 : Color Mixing: [MUSIC] In this
color mixing lesson, I'm going to show you my mixing
process for our project. I'll be specific about
paint consistency, so you know exactly how
to mix your paints. I decided to use [inaudible]
paints in tubes. It's the same as painting pens, except they're not all dried up, which makes them
easier to dilute. I chose a dark green,
cold forest green, and a common shade
of brown and black. [NOISE] Black is not a must, so you can skip it, although it will make your
brown even darker. That's why I added it. I like it for more contrast between dark colors
and light tones. Light tones in our painting being represented by the trees, even after we paint them. With tubes, I just deposit
some paint in each wall. With pants, I would wet the
paint brush and reactivate the paint in the pan to then
deposit it in each well. I'm not going to mix
a whole lot of paint. I can still add more
later if I need it. For the background,
we always want paints to mix and
flow with each other. That's why I'm going to
be adding lots of water until each mix goes from
creamy to slightly watery. Not too much of water
though because in this class I'm going
for one layer only. If we add too much water, colors will dry very light. Our trees will look white
so I recommend a darker, more vibrant background
so that they can pop off the
page better later. [MUSIC] We're ready to move on. Before that, remember
you can substitute my colors for others or
make your own combo. Add water to your paint,
but not too much, just enough for the paint to spread and mix with
others on paper. Prepare enough paint so
you don't have to later, especially if you're a beginner. We're ready to paint
the background. See you in the next lesson. [MUSIC].
10. Basic Forest Part 3 : Background Painting: [MUSIC] We are all set to paint an easy and quick to do background for
our first painting. Easy because it will be
done directly on paper, and quick because
there is not going to be any extra layers
after this one. Let's grab a paintbrush. For me, it's going to be my
Size 3 Raphael paintbrush, because it fits the size
of the paper really well. I dip my paintbrush in
the water to wet it. If it was dry before, this might take a few seconds. Then let's pick up some of that dark green color
we mixed before, and apply it directly on paper [MUSIC]. The goal here is to cover all of the sheet with
all your colors, and then keep working on them by adding more to intensify colors. [MUSIC] I see I already need more green, that's why I suggested
to mix a lot beforehand, when you're not accustomed
to watercolors. [MUSIC] I find the bottom to be
a bit light to my taste, so I'm going to add
a brown and black. You can see I tap my
brush in places to break down the line between what's green and what's brown. It's a technique I use
a lot with backgrounds to make gradients look natural. [MUSIC] I'll use my heat gun to
try this completely. We want to remove
the masking fluid when all the paint is dry. [MUSIC] Let's take a paper towel to
remove the masking fluid, but before that, just makes sure there is no remaining wet paints on
the areas that were masked. [MUSIC] You can shape your paper
towel into a bowl, or wrap around one finger. We need to apply some pressure and move in circular motions, to remove the fluid
without tearing the paper. If a little bit of
the paper towel comes off, that's fine. Even if the paper itself get's slightly damaged here and there, it's not a big deal. Although I recommend to take
your time for this step, and work on one section at a time [MUSIC]. Remember to cover
the whole background quickly so the paints
don't dry separately. Overlap colors with
each other using a paintbrush to create
nice gradients. Let the painting dry completely before you remove
the masking fluid. Take your time when you
remove masking fluid, to avoid damaging the
paper or a masking tape. Getting started is always
the hardest thing to do, and we managed to do so. In the next lessons
we're going to work on the trees and have fun painting shape,
texture, and details. See you next. [MUSIC]
11. Basic Forest Part 4 : Adding Volume: [MUSIC] In this lesson, we're going to be adding
volume to the trunks we created so they look more
dimensional and realistic. Just like each step
we have taken so far, you'll notice you're
able to create volume effortlessly with this technique
I'm about to show you. First, let's grab
two paint brushes. Pick the ones that
will make it easy to paint narrow areas
like tree trunks. I'm going to work with
two of my round ones. We're going to mix it
into something creamy, so it's a little bit thicker than what we made
for the background. We don't need colors
to blend here, but we want this to show. This is why it's okay, there isn't a lot of
water in the mix. As you can see, I want
a clean paintbrush. I tap it quickly on my paper towels so
it is not dripping. I'm going to wet
the first trunk. We don't want to wet
the whole trunk, just the middle part, almost touching the
sides, but not quite. The way I decided
to paint my trunks, the light will be showing more on the left side of each trunk. This is why I'm painting only
the right side and letting the paint spread out to
the wet areas slightly. You could do it the
other way around. The reason for a
wet paintbrush in the first place is we want
to create a gradient from a brown creamy mix
that comes from the other paintbrush to
something more subtle. We're not touching the edge of the tree with the wet
paintbrush because we need the creamy paint to stay concentrated with pigment there. I've decided to create two
trees out of one here. You can do that if you think one of your trunks is too large. [MUSIC] This kind of small detail I'm creating on the trunks' basic strokes makes the painting
look more realistic. It creates an
impression of shape. [MUSIC] Let's try this so we can later add texture on these trunks. Remember to match your
paintbrushes to the area to be painted to make the paints a bit thicker for trunk volume. To use some water to
create volume with a natural gradient and create subtle shapes
on the wet parts. We're done, so see you next
for more detail on texture. [MUSIC]
12. Basic Forest Part 5 : Adding Texture: [MUSIC] In this lesson, we'll make the trunks look
more compelling with texture. We're going to use
several easy techniques. The 1st one is basic trick
called dry brush technique. I attached a reference photo to the resources that will
help you visualize how texture could look like on light-colored trees
like birch trees. First, let's make our brown
color darker with black. [MUSIC] We want the paint to be quite thick so we can use the dry brush
technique effectively. As you might have
guessed, from its name, dry brush means there
is little water. To make sure it is
really the case, after dipping your
brush into the paint, tap it once or twice
on your paper towel. Now let's run our
paintbrush onto each trunk. You can do so on both sides, anywhere you like on the trunk. [MUSIC] Try not to get carried
away with too many marks. [MUSIC] When you look closely, you see I use the side
on the paintbrush and I swipe it gently
against the trunks. At times I'll press a bit
more to deposit more paint. There are many ways to go about it and different
marks to create. [MUSIC] A second technique you may use this to create thin lines using the
tip of your paintbrush. You can pick up more
paint or thin it with water a bit here so
it's easier to apply. [MUSIC] I love this stage in the painting and
the next ones a lot because that's where
it all comes together. You can use these
techniques for anything in landscape when the time
comes to paint details. I have used them on rocks, cabins, dirt, and asphalt. It's very useful. [MUSIC] If you like, you can even splatter
some paint too. On the trunks, it
always looks great for texture and on
the background, it's always fun to do. [MUSIC] Before moving on, make sure this has dried to avoid smearing paint elsewhere. [MUSIC] Use color mixing to
make paints darker. Use a thick mix of paint to
nail the dry brush technique. Be random when you
create texture. Use the side or tip of the
paintbrush to create details. Make splatters for
great added texture. See you next for
our last step in this basic forest
painting, the branches. [MUSIC]
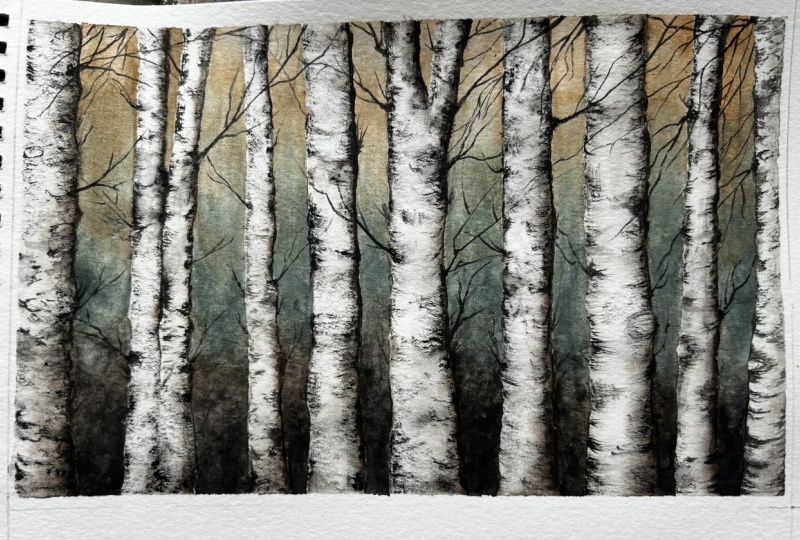
13. Basic Forest Part 6 : Branches: [MUSIC] In this last part for our basic forest
landscape and before we move on to painting
the seasons on top of it, let's add some branches. Branches are fun way to finish such a scene and how you paint them will have an impact on the final looks and
atmosphere of your painting. Doesn't have to be very thick. We only need to add
just enough water, so it's easy to paint with. Keep it thick enough, it will contrast very nicely
with the trees. This is typical of some birch
trees and it's actually the type of tree I got
inspired by for this class. I find there are
spots in between trees that look a bit bare so my suggestion to
you is to mix and match tree types to
fix such things. This is why here, I'll use my dark mix to create
a few dark trees, just like the ones
I showed you in the third exercise about
ways to paint the trees. There are so many
species, I imagine, it's okay to paint the
trees however we want. It doesn't really matter, they don't match any
particular kinds and they will still
look like trees. It's what I love
about this project. [MUSIC] I'm going to start painting branches and I'll
use my random pointed, Da Vinci Petit Gris
Mix paint brush. I love it because it gives me very thin lines if I want them. Don't forget to check
out the supplies list to find all of this information
in the resources section. [MUSIC] My technique for branch painting is to
start with a side of the paintbrush and release
till I reach the end. By the end of the branch, I'm painting with a
tip of the paintbrush. Above all, I try
to stay random and not go overboard with
painting branches, even though I love this exercise
and it's very tempting. [MUSIC] To finish a tree
painting like this, I find it interesting to add big branches that stick
out from the sides. It makes it look more realistic, more dimensional, and
interesting to look at. It's a lot of fun. [MUSIC] Remember, add contrast to white
trees with dark branches. It's possible to add
some chunks now. Vary the shapes,
angle, thickness, etc. Paint branches all
around the trunks. Stay random and with
a light hand on painting branches and add dark branches that stick
out from the edges. I want to use this basic
project to show you how I build on top of it in the next lesson
for our winter variation. In the meantime, feel free to share this forest with
us in the project and resources section of
the class and see you next for some fun additions. [MUSIC]
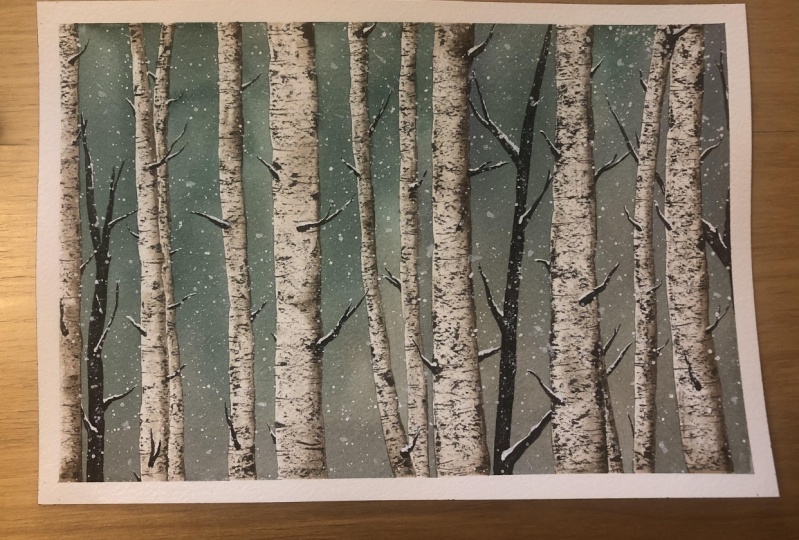
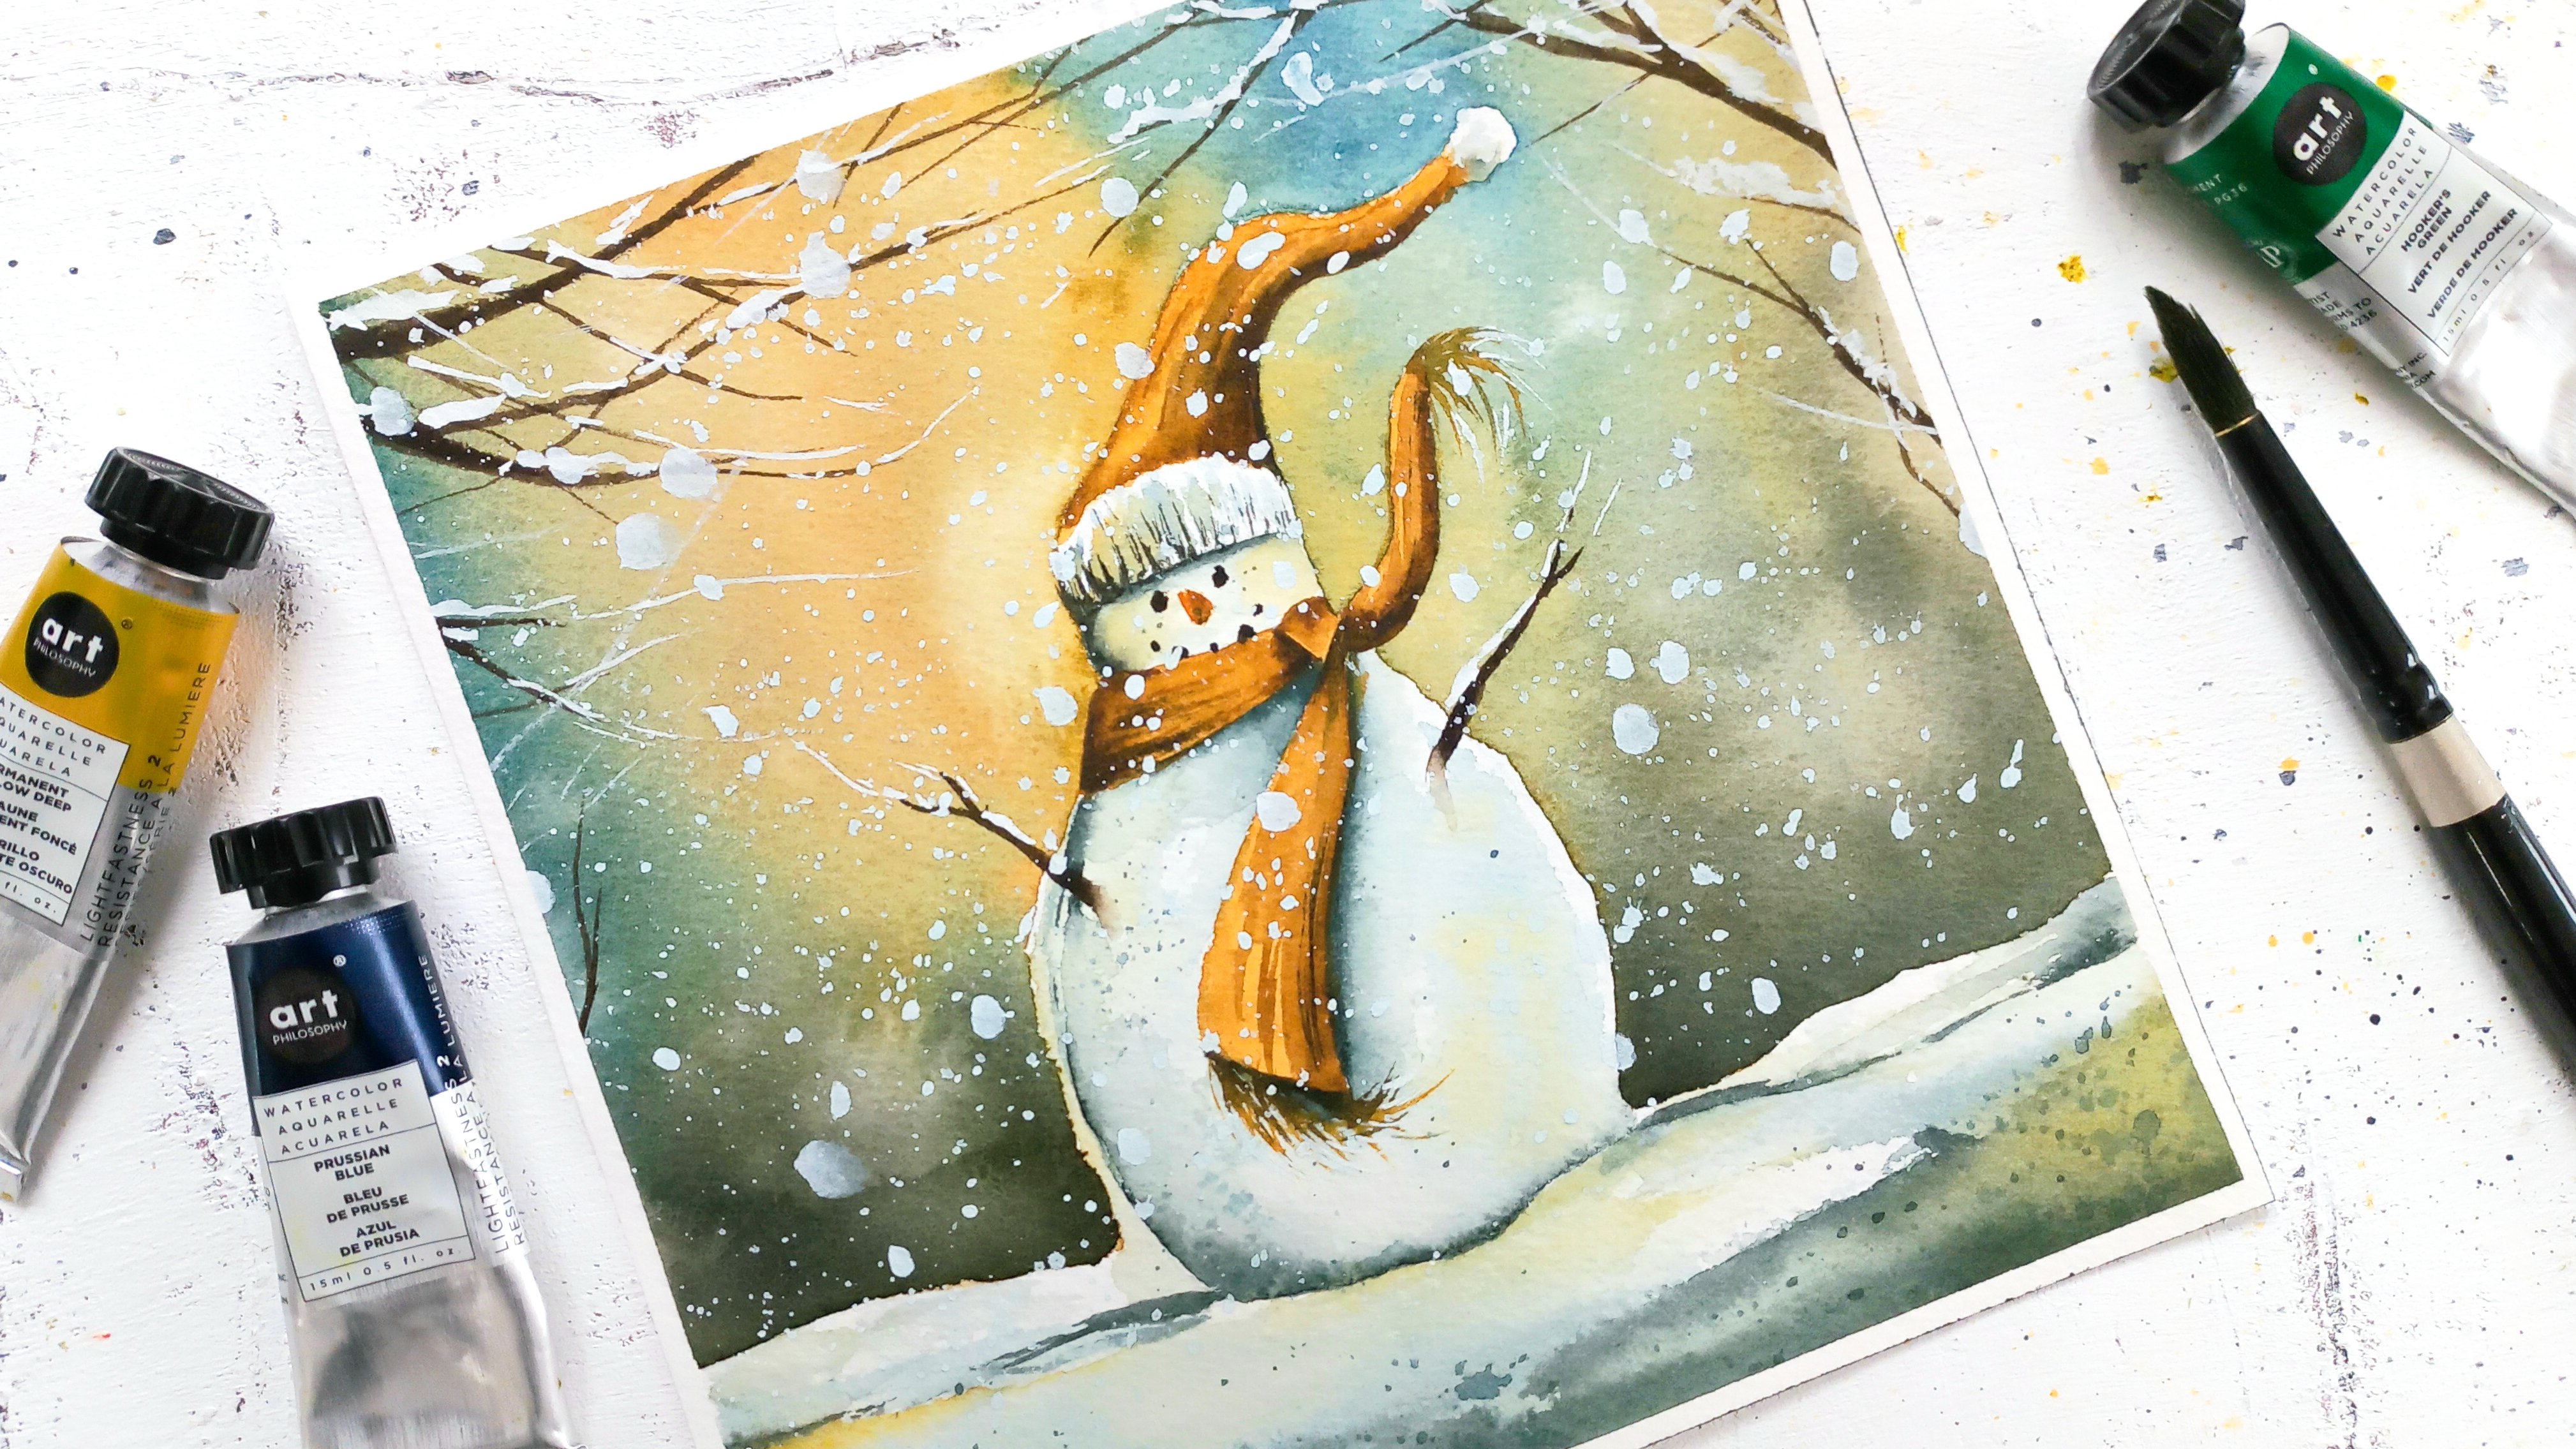
14. Variation # 1 : A Walk in Winter Wonderland : [MUSIC] In this lesson, I'd like for you
to experience how adding white gouache to
basic forest painting like the one we
just finished will transform it into
winter wonderland. Let's get some white gouache. I'm going to pour some here
so you see the consistency. Now it's pure. I'm going to mix a little
bit of water to some of it. We'll need that later. For now we'll be using it pure to add snow
to the branches. This is the best way
to get it to look opaque and to stand out
as much as possible. Since gouache can
turn transparent, the more water you add. [MUSIC] I use my small round and pointed paint
brush strokes to stay as precise as they
were for the branches. [MUSIC] Sometimes I tap the brush in these thick branches areas where we could imagine
more piling up. When I reached the
end of a branch, I keep going a bit with a
thin line of white gouache. Right away you can see how this brightens up
the whole painting. [MUSIC] We're going to use the
gouache with thinned with water to paint
snowflakes now. It's optional to add those. You can have the snow
resting on branch has only. I think I need more water. I'm going to use my large
round brush for this. It's easy to tell
if the paint is the right consistency
for snowflakes. If the splatters are not
coming out of your paintbrush, the paint was too
thick, add more water. If the splatters are quite big, maybe add more gouache. [MUSIC] We're done so let's reveal. I love the outcomes so
much I decided to paint a larger one just like that,
but without snowflakes. Before moving on to
painting an autumn forest, remember to use the gouache
as purist can be for branches and to thin it with
water a bit for snowflakes. I'd love to see you
what you're painting, so please share it in the
project and resources section. See you next to paint the fall. [MUSIC]
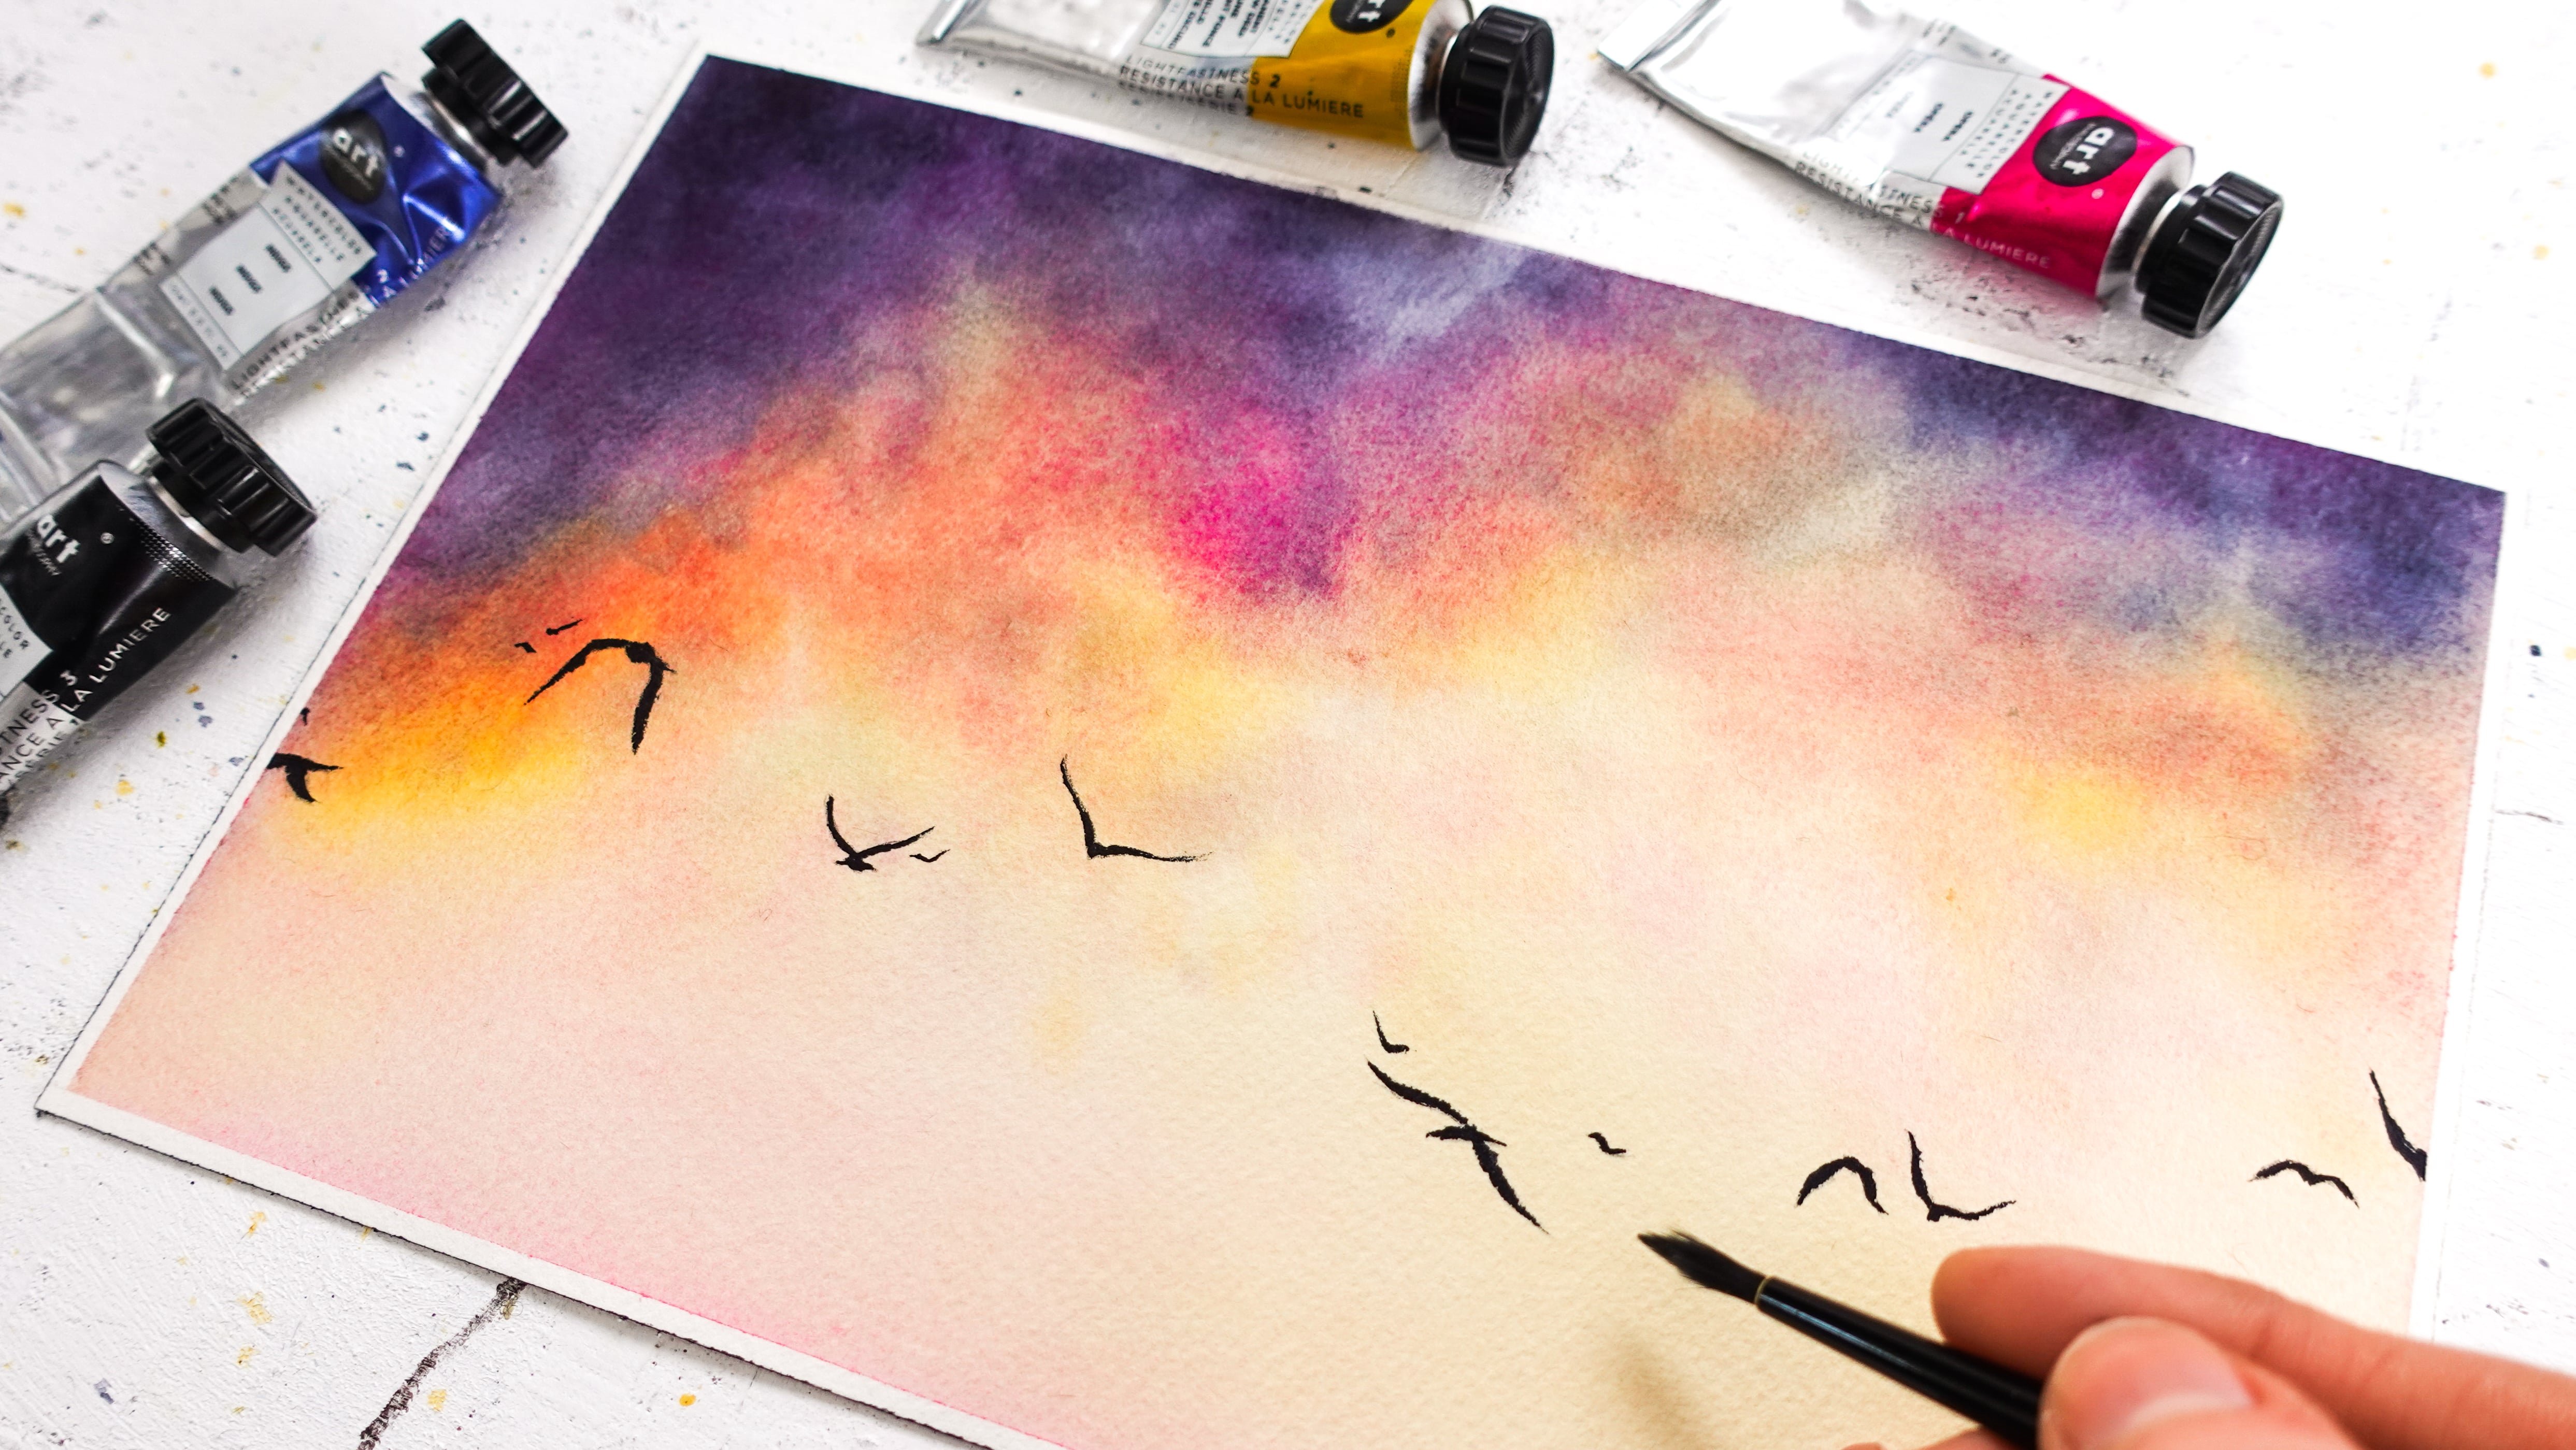
15. Variation # 2 : Mystical Autumn Forest: [MUSIC] With this lesson about
painting an autumn forest, you're going to learn an easy
leaf technique and how to add color to basic tree landscape
in a matter of minutes. With this variation, I decided to change
the perspective. You see what it looks like, and I also added very
small curvy branches. I suggest to pick colors
like yellow, red, and brown, or something
burnt umber or burnt sienna. Yellow and red will
turn into an odd shade. Brown will make all those
colors darker in places. [MUSIC] This will give us
a wide range of shades. For a long time, I was afraid to paint foliage, because I find in
watercolor it can look bulky when painting
with a paintbrush. I found while experimenting
that using splatters and my fingers has taken the worry out of achieving
beautiful foliage. To achieve this, it's
best to thin the paint a bit with water. I
start with yellow. [MUSIC] I'm splattering
yellow in places, and when I find the splatters to look more like
splatters than leaves, I use my fingers to
alter the shape of it. [MUSIC] While it's still wet, I do the same with orange, then red, and burnt sienna. Colors can mix in places, while in others,
they remain pure. [MUSIC] Let's add some more directly with our fingers here for fun. [MUSIC] Remember, feel free to be creative with the
colors you're using. Use splattering, your fingers. In other words, have fun. I look forward to seeing
your project and hear your impressions
about your experience in the project section. Let's meet next for
another variation, the spring and summer, using a very
different technique. [MUSIC]
16. Variation # 3 : Spring or Summer Canopy: [MUSIC] In this lesson, we're going to paint
a forest canopy for spring or summer. You're going to learn a
technique for the addition of fresh and vibrant foliage
on a basic tree painting. To draw the trunks
from this canopy, you can refer back to the
Exercise 1 about prospective. I would suggest using a bright
shade of green along with a darker one and a brown
shade as well for shadows. In this painting you can
see I had all trees emerged towards the middle as if
we're looking up at the sky. I traced the trunk directly with a paintbrush
and brown paint. Let's mix our colors. This time I'm making
the mix as quite creamy because of the sponge technique
I'm about to show you. Find a piece of dried
sponge around the house, cut it in half if it's too big. We're going to take care
to wet it just a bit. We want to just damp, not too wet otherwise the
paint will look very light. With all the added
water from the sponge, we will not get the texture
effect we're after. I'm adding water by hand
just enough that I can bend the sponge easily and
go pick up some paint. Let's dip the sponge into the bright green color and tap it onto the paper
with some pressure. If it is not too wet, the paint should show nicely as well as texture from
the sponge itself. [MUSIC] I alternate between colors and I keep
tapping the sponge. Soon, you should see the
canopy taking shape. [MUSIC] A little trick now, if you take a look,
you might notice this painting is
lacking highlights. In other words, a light color to balance with the
greens and dark brown. I'm going to add
white gouache to the trunks to achieve
that balance. I add the gouache to one
side with one paintbrush. Use another one to fade the
gouache into the brown trunk. Not only the white gouache
brightens up the whole piece, it also adds volume
to the trees. We're working exactly in the
same way that we did with the white trunks when
we were building the volume there in
the basic project. [MUSIC] Remember to keep your sponge just damp before
painting foliage. Use creamy mixes of paint and overlap them
on the trunks too. Tap the sponge firmly for
texture to show well. Leave some of the background
showing to suggest a sky. Add a white gouache to the
trunks to make them pop. We are done with our spring
and summer forest project. Feel free to share this one to the project section as well, and we'll see one more time
for some final thoughts. [MUSIC]
17. Final Thoughts: Congratulations for completing the project and learning
about watercolor forests. I'd be glad to see
your paintings, so please post your project to the project and
resources section of the class, so me and other
students can give feedback, help you out, whatever you need. You can let me know
what you thought of the class with a review, and if you enjoyed this class, if you want to
learn more from me, I suggest to follow me
here on Skillshare so you're always updated every
time I upload a new class. You can also find
me on YouTube and Instagram for more
tips and process. On Instagram, you can use the hashtag createwithfrancoise
to connect. Thank you so much for
taking this class with me today and see you
in the next one.
 Francoise Blayac, Professional Artist