Transcripts
1. Introduction - Village inspired Landscapes: Hello, I'm Shannon. Some fun in this based
in Bangalore, India. Most of my work or nature-inspired and I
paint using watercolors, academics and gosh,
you can check out my latest works
on my ID Beach, which is what the cons. Lately I've been feeling very inspired to paint village
or countryside landscape. I followed my infusion and
hopped onto this journey. In this adventure of
exploring the countryside, I visited a village in the
outskirts of Bangalore. I had an amazing experience seeing the subjects in person. I also did a planar session. During this session, no
source of inspiration was drastically different from
that of the online images. In this class, we are going to paint for religious
inspired projects. I'll help you understand
how to determine the factors influencing
the shadows on the subjects weeping. I'll also walk you through the pictures that I
took during my visit. I'll be explaining each and
every step as we paint. Before diving into
the class project. That is a practice session
which would help you boost your confidence
with the class projects. So without any further delay, let's get started
with the class.
2. Inspiration: Welcome to the class. I'm so glad you decided to join. In this chapter, we will go through some religious-based
inspirations. Here are some of the images
that I have clipped. I'll use them to
demonstrate how light and shadows influence the
appearance of the subject. Let's take the example
of this house first. If you observe the right
side of the house appears brighter because the source of light is from the right side. The other side of the
house appears darker. The inner area of this house appears even
more darker because of the lack of the light absorbed
as greenhouse as well. You can notice the shadow
and light clearly. Here's a second example. You can see all of these houses. The front part of the house is brighter when compared
to the backside. Another example
where you can see the light and shadows
under the roof. The shadows are very darker. Noticing these little things
in your surroundings in day-to-day life will help you paint in much more creative way. In this house, you will see
the shadows under the roof. And the roof of the house
appears very bright, even though the actual color of the roof will be some
red or brown color, but it appears much brighter. Now, look at the light and shadow play on the
walls of this house. It is the same color
throughout the house, but it appears
totally different. Again, on this house, that is sharp difference. And also on the plants here, you can see the upper area of
the plants appear lighter. And on the inner parts
that are these shadows. Let's have a look at
the next example. This picture was clicked somewhere around 03:00
PM in the afternoon. And you can see the
shadows are very intense. Sunlit part of the house
is very much glowing. And if you consider
this example, the house looks normal, but the shadows are cast
it onto the ground. Area means that the sunlight is falling from the top area. Let us move on to
the next image. Here. This bluish purple
color on the walls. I feel differently
because of the light falling onto the walls. This below, over here in the front appears very
bright and it's glowing. Rest of the part
is not so bright. And the roof, if you observe, is bright and glowing to again, over here, you see
they're different. So this image is very simple. There are no shadows as such. It looks like a cloudy day. However, if you zoom in, you can see the cast shadow
of the wall on the shutter. In this image, the roof
is bright and sunlit. On the top area that is
partly sunlit APRNs. In this example, the
roof IPOs bright and under the roof use
either a darker shadow. I hope these images
have helped you understand the subject
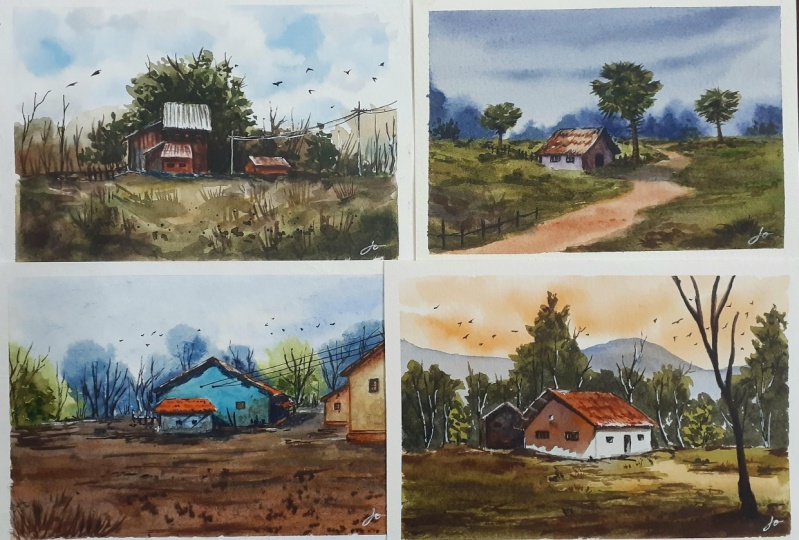
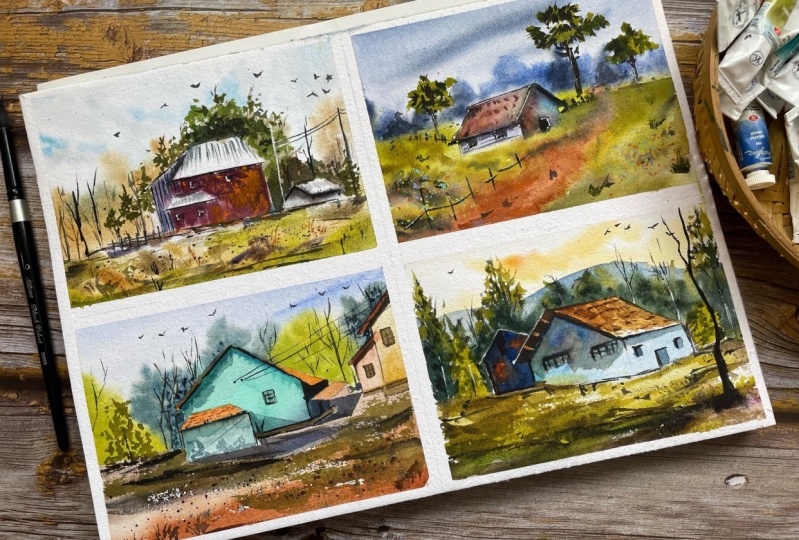
in a better way. Let me show you some of the practice pieces
that I have spin did. I mean, these are
relays inspired paintings before I decided
to make this class. And let me tell you, I did fail sometimes to
achieve desired outcome. But I kept trying more and more. You'll see some
are still pending, but I'm glad that I tried. I'll be diving deeper into this subject in the coming days. So please do let me know. If you want to learn more
such religious base classes, I would be happy
to teach you all.
3. Art supplies: Okay, so let me walk you through all the art supplies that
I'll be using in this class. Let's start with the paper. I'm using cold press paper. So this is 300 GSM cotton paper. You can use any similar
paper of your choice. The size of this paper
is approximately 7.5 by 5.5 inches. Next, let us talk
about the brushes. Here. I have Princeton brush. It is of size six. I'll be using it for the washes. It holds a lot of water in it. Next I have size
two, round brush. It is by saying, well wait. Then size eight, round brush. It is for the regular
brush strokes. And I have another round brush, which is a size six, but it doesn't have
any pointed tip. And a size two round brush. But I'll use this
as a fine tip or a fine liner brush
for tiny details. Then I have a flat brush. This brush is optional. I might use it somewhere
or in any painting. Then we have pencil and
eraser for sketching. Next we have colors. It has all the basic colors, like shades of yellow, orange, blues, and browns. Next for the pallet, I'll be using this. So use and throw container. It has two wells which is ideal for washing the
brushes while painting, and another jar for
taking Clearwater. Then you would need the masking tape for taping down the paper while painting. I would recommend you
to tape the paper on a hard surface so that you can move it around
while painting. Next, we would need white gouache paint for
highlighting purpose. So you can see how I have added all these white lines to highlight the elements
in the painting. Then it is really helpful if you have a water spray
bottle to wet the paper. And then when we need hairdryer to speed up the
drying process of the painting, then we would need some
tissues and napkins. This napkin I'll use for
wiping my brushes and the tissue to perform lifting technique or
dampening the surface. This all clawed to clean my palette while
painting because I do not want to have a dirty palette and achieve a muddy mixes. So I'll regularly
clean the palette. Then you can also have OB, so for similar paper
to test your colors. Yeah, that's all about
the art supplies.
4. Tonal values: What is a tonal value? Tonal value is the lightness
or darkness of a color. It is used to suggest or to create a dramatic
atmosphere in a painting. Now, let's take an example
of this blue house. Now to create the shadows
and lighter effects, I'm using different tonal
values of this color. I'm adding more white. I'm sorry, adding more
water to it makes it transparent and reflects the background color of the paper that is white
color of the paper. Similarly for this purple house, I'm painting the brighter
side with diluted color. It does not any face
to color separately. I'm just watering it down to achieve this transparent color. For the other house here, which is lighter blue color. I'm using diluted version
of surreal in blue. So this demonstrates
the tonal values. The darkest tone is the concentrated paint
from the tube or the pan, and the diluted color wheel, they pick the lightest tone. Now to achieve the mid
tone of the color, we will be using 50% of paint
and 50 per cent of water, which is one is to one ratio. For the maroon house, I have used the darkest tones.
5. Light & Shadows - Practicing houses: In this chapter, I'll be
demonstrating the change of light and shadows based
on the source of light. I wouldn't want you to practice
these examples with me. Let's take an example of a hat. So here I will be drawing
this very simple heart. You can draw it
however you want. The source of light here
would be from the right side. So this side of the
house looks brighter and the other side looks
in the upper right. So let's paint the bright
reflected side of the house. For the wall. I'm going
to use lighter or diluted purple
color for the roof. I'm going to use
some shade of brown. Very diluted color. Again. Leave some
white spaces as well, so that it reflects
the bright light. And either side of
the house appears darker due to the
lack of light here. So I'm going to apply
some bonds here now. Ultramarine blue
and other colors depicting the cast
shadow of the house. You can use any darker color. Near applying the paints on the other side makes sure that the darker paints seep
inside the lighter color. Now let's dry this area. I'm using a blow dryer to
speed up the drying process. As I would have to
wait for 1015 minutes. I'm making it faster. Okay, so this is dry enough. Now, let's go to medium on mid-tone color and apply some lines to suggest the
texture of the tiled roof. The cast shadow under the roof. On the brighter side. Here, I'm using a mid-tone
color of purple and brown. Next, I'm applying
the darkest shadow, which is so purple
plus payne's gray. So when we add
this darker color, it automatically highlights
the lighter color, making it appear like it has
some sunlit effect, right? I want to further
darken the shadow side. I'm adding some Payne's
gray and brown. And now adding on
doors and windows, adding some more
detail on the roof. I feel that I've added
a lot of darker color. So I'm lifting
some of the paint. Okay, so the house is done. Now let's demonstrate
the second example. You're drawing the
similar house, but I'm considering the light
source on the other side. Let's say that the light
source is on the left side. So the left side
will appear brighter and the other side of the
house will appear darker. Alright. So I'll start
with the lighter color. In this example, the
roof of the house will be darker because it
is on the other side, which is those shadow side. So I'm going to paint it
with the darker color. Let's add some more shadows. Shadows will highlight
the brighter side. So you have to
keep that in mind. Now, I darken the walls as well. So now you can see the front
part is being highlighted. Unlike the previous example. I didn't go shadow off the
roof on the front side. Some wobbly lines on the roof suggesting the title appearance. You can already see
the difference, right? In the first example, the source of light
is from the light. In the second example, we have source of light
from the left direction. So based on the light, we have different types
of light and shadows. So whenever you paint something, you the direction of the light and the color and
the tonal values. That will help you understand the subject in a better way. Now, let's demonstrate
another example. I'll be drawing a similar house. If you see this painting, you do not have any
sharp shadows as such. That is because the source of light is on the
top of the house. Like it is not somewhere
in the opposite direction. Let's paint this house. You can use any color
of your choice. Applying some darker
colors under the rules, suggesting the cast shadows. I think in some brownish or contrasting colors in order to achieve a dirty
look in the wall. Painting the roof
when darkest color, assuming that the sun is
right over the house. Now, adding the cast shadows
using slightly darker color. Okay, so we're done
with this house. Now. We'll go ahead and add some background or
the surrounding elements. I'm going to paint a ground. So this is not same as
though other paintings. I'm just showing you an example of how you can add element. So as you can see, I'm
adding this ground using a dry brush technique and then smudging though
paints using clean water. Here, I'm just guys
really applying the colors without following any pattern or rules as such. For this, you would
have to practice and have to let go of
your fear of failure. I'm just how fun with colors. Watercolors are
really beautiful. It gives you
unpredictable results. Isn't this amazing? I've painted it with some
simple casual brush strokes. Now I'm going to add a
tree near the house. So this is just a
practice piece to boost your confidence
with loose style. The lighter green color depicts the light
falling on tree, and the darker color
depicts the shadow. Once you are done with
painting the greens, you can add the branches
and trunks of the trees. I would highly recommend
you to practice these examples so you have better understanding
of the subjects.
6. Practicing Trees : If you look at these paintings, there are trees with
different colors, right? So how do you decide which color should we use and
when do we use it? So let me show you an example. Imagine you're viewing some
trees from a distant area. Then what color do the
trees appear to you? Are they very
bright green color? Are the darker and
cooler shades of green. It is mostly cool
shades of green. So the original color of
the trees tend to fade out and they appear dull
or bluish green color. One of the easiest ways to
depict aerial perspective in painting is to paint distant
objects with cooler colors. Here, I have left
this tiny space to suggest a tree in
the midground area. And rest of the blue color is to depict the distant trees, which means the green color tree is closer to the observer. He can see the actual colors
of the tree. But I stopped. The trees are further
away from the observer, so it appears bluish and deal with this example. I hope that you understand how to achieve the
aerial perspective. Once we have the
base colors laid, then we can go ahead and add
all the details required, like shadows and highlights. The district trees are
far from the observer, so he cannot see all
the details, right? So we will just add some tiny
lines depicting the trunk. That's it. So this
is also optional. Moving on, I'm going to show
you how I paint the trees. First of all, hold the
brush in a very loose way. If you wanted very tightly, then you are willing to get
some control brushstrokes, which we do not want your apply some loose
brushstrokes, something like this. Practice it on a piece
of rough paper before you actually go ahead
with the class project. This will boost your
confidence for sure. Alright, so these were the
tree trunks and the branches. Now on the same figures, let us practice
some tree foliage. I'm going to use the belly
of the brush to press against the paper and
create this foliage FH. This technique will
help you cover the larger area in an easy way. Make sure your brush does
not have a lot of water. To wipe off the extra water. Just dab the brush
onto the tissue paper. It will give you the
right amount of water. And with the right consistency, you will get this beautiful
foliage effect for the trees. Now, let us practice
to paint some trees. Some trees I'll be painting
with wet on wet technique. And some other trees. I'll paint with wet
on dry technique. Now, let's start with wet on
wet, applied clean water. And now I'm applying some
different colored paints. You can go with any
pains of your choice. If you absorb the colors
played really well. Next, I'm painting some trees
using wet on dry technique. So I've taken wet paints and I'm directly applying the
paint onto the paper. You can practice
these three shapes and decide what
you like the most. If you are aiming for a
blurrier and soft background, then you can go ahead with
wet on wet technique. And if you want defined edges, then you can go ahead with
wet on dry technique. All these exercises are not just related to
the class project. You can even apply them on any other painting that
you want to create. If you are practicing
along with me, you will understand your
strength and weakness in the medium and you'll be
able to gauge it very well. Once the colors have dried, we will add all the details. I'm using darker green
color for the green trees. So here I'm randomly adding
some collective dots, adjusting the leaves of the trees and then
adding the branches. Image though, tree foliage. For the brown background, I'm using brown color. We will repeat the same steps for the other trees as well. You don't have to follow
exact same steps. Like how I'm doing. How fun and play around
with the loose strokes. You never know you might come up with a new style
of painting tree. Just allow yourself
to be playful. It is completely okay
if you do not get it right in the first
attempt, keep trying. That's how you learn. So back to the painting. So you can see how loosely I'm adding these tree branches. Practice these trees as
many times as you want. Maybe with different colors
when different strokes.
7. Practicing Grasses: In this chapter, I'm going
to show you how I paint the ground or the grassy
texture in the paintings. I'll be demonstrating three
examples for you all. The first one goes like this. I'll be applying clean water on the paper to go with
wet on wet technique. You will see me apply
various darker colors which will combine together to give a beautiful combination. So here I have used
burnt umber wildlife, ultramarine blue, Payne's gray. Once you are now COC, on, these colors are getting
blended into each other, giving a nice, beautiful ground. Aprns. You can splatter some Payne's giving
it an uneven finish. So I usually try to avoid
painting anything flat. I want some drama or row visually interesting
elements in the painting. So splattering does the job, dry the surface completely? And in the next layer, we will add some
lines and textures, making it look busy, and it also adds visual interest in the
subject, so forth, flattering. I'm using darker paints here. Moving on, we will
paint another example. Again, wet on wet technique. So this will be almost
like a grassy surface. I have applied a low
as the base layer and then go with the blue colors. So if you add blue on yellow, it gives you a greenish
shade. The brown color. The green depicts the soil. Remember there is no strict rule as such to follow
those same steps. You can play around
with the colors. Third example goes like this. I lose very minimal
colors trying to depict the reflected
light on the ground. We really try to retain
the white areas of the ground so that it feels
like a sunlit effect. Also, adding darker colors naturally highlights
the lighter colors. I found it. Okay, so once you have the base
colors laid on the paper, then you can dry it completely. And then once it dries, go back and add the details. Now I'm adding some
glassy texture. Apply some loose brush
strokes around the area. You can add any texture or any glass shape as
per your choice. You could even go with
dry brush technique or some splattering. Anything that you like.
8. Day1- Thumbnail/Colors : Before we begin our
first class project, let me walk you through its thumbnail and all
the colors required. First, mug the horizon line, somewhere in the lower half. Then we will draw
our focal point, which is the house. I'm not so great when drawings. So I'll try to keep it
as simple as possible. I've always loved colors and paint more than
sketching or drawing. Behind the house. We will
have this she treat. Then there is a small
heart near the house. On some bare trees
along the horizon line. The foreground area will have these loosely spread glasses and do electric poles connected to each other
and to the house. This is what our
composition, it looks like. Now, if you feel the houses
bit difficult for you. So here's an alternative
way that you can draw. Here is another one. So this is the simplest
way that you can draw. The next IV, explaining the light and shadow
using the pen tool sheet. Under the roof, we
will have the shadows. The roof of the house
will reflect the light. So it will remain as it is. We will shade the area
behind the house, which is the tree area. So as you can see, the
tree is really dark. Er. Next we will have a look at the colors
that we would need. The first color is sap green. But I'm not going to use it directly as it will
appear an organic. So I chose to mix my
sap green when bond on board in order to achieve
this brownish green color. So here in this painting, the background trees
are very dark. All right, so you
can make smaller for brown are also a bit of
Payne's gray or black. To make it very dark
color for the shadows. At some areas, I would also
be mixing violet with green. So that didn't give us
really nice different color. Makes you really talk about the background trees and
the foreground grasses. I'm using draw, umbo and local. In order to achieve this, you have to use a diluted
tone of these two colors. You'll see this reflected light
in the grass area, right? So I have to use diluted color. And then we will be adding some random Brown's
wallets or Payne's gray, but also green. For this guy. I'll be using blue with a bit of Payne's gray
for the shadow of the clouds. All these in diluted tones makes for really have a look
at the color of the house. So I'm going to
mix burnt sienna, red, a bit of black. So the idea is to
have a midtone shade. You can mix whatever you want. But I wanted very darker in order to highlight the
roof of the house. So you can see I have achieved
this middle initial color. Now for the extension
on the side, I have also mixed a
bit of solute in blue. You can see that color there. Also you would need white gouache paint for
the finally daily work. So let's move on to our
first class project.
9. Day 1 - Class Project (part 1): Welcome to day one of the class. Today we are going to
learn this painting. Alright, let us get started. So we'll start by marking the composition of the painting. Somewhere in the lower
part of the paper. I'm mocking the horizon line. Then I'm going to draw a house. So this is like an old-fashioned,
multistoried house. If you want, you can
draw simple shapes, just like I showed in
the thumbnail part. On the side, we will have
an extension to the house. When slanted roof. You'd need not have
to worry about drawing the exact same house. You can come up with your
own version of the house. Adding some polls and
fence around the house. And a small hotline shape, adding in the window shapes. Okay, so that is pretty much it. Now, let us start the painting. I'm going to wet the paper
using my spray bottle. You can use thicker or larger
brush to wet the paper. That's totally up to you. Using my size two round brush to spread the water
throughout the paper. I'm wetting the paper to
perform wet on wet technique. Right now, I'll start
by painting the sky. Sky. I'm going to use
boolean blue color in medium consistency and apply some patches depicting the blue colored
clouds in the sky. Right below that, we will add the cast shadow
of the clouds. So use Payne's gray or any
darker grayish blue color. So make sure you're leaving
this white spaces in between. This will depict the white
colored clouds in the sky. So here I am just
randomly adding these clouds that add
no buttons as such. Moving on, I'm going
to paint the house. I'll be mixing a Moroni shared. So let's mix the
color for the same. I'm taking scarlet, red, burnt sienna, and
a bit of black. So this will give me
omega will initiate. You can go with any
other color as well. No restriction. No beam this color
onto the walls. Know this that I'm not applying the paint on the rules part. If the color spreads
into the roof area, you can use a damp brush
to wipe off all the paint. I think in some shades of blue
on the walls of the house. This is to achieve a
shabby APRNs on the walls. I don't want the walls to look as if they're
newly painted. I'm going with this step. Lingo and I'm mixing
a darker green color. So I'll take sap green, red and some cobalt blue. So let's paint the
tree behind the house. So this will be the base layer. Next for the bottom
area of the screen, I'm using darker brown shade. Full suggests the shadows
around this area. Adding in some
darker brown color in between the tree foliage. This wheel again, the
pig, the shadows. On the leftmost part, I'm applying some raw umber. You could even use bluish tones. But for this painting, I'm going with brown
because I want to suggest some dried
leaves, APRNs. So here we are loosely trying to debate the elements of nature. Again, on the right side, I'm applying very diluted sheets to depict the distinct elements. Next, let us move on to the
tiny hut near the house. So I'm going to paint the walls and leave
the roof as it is. Alright, now let us paint
the foreground area. I'll first start with
the yellow ocher. Then apply clear water
for diluted tone. This will reflect the light and we will be
leaving it as it is. Then adding in some
ball number in the bottom part and also
some darker green sheets. So I'm trying to preserve the
white areas of the paper. And loosely the PID,
the foreground grasses, the white color that
we have saved your, it will act as, oh, bright light being
reflected on the grasses. The house. I'll apply
some loose brush strokes, adding some character to the
composition of the painting. Use any darker color to add some definition
to these glasses. Again, you can play
around and have fun. You don't have to follow the
exact same brush strokes. That is why I was
interesting you all to practice before we start
the class projects. Though, paints have bleeding
inside the roof area. So I'm using this dry
tissue paper to lift off all the paint that
so inside the roof. So I'm aiming to retain
the whiteness of the roof. Using a blow dryer to speed
up the drying process. You can also let
it dry naturally. It will take around
five to ten minutes. Alright, the paper
is completely dry. Next I'm going to paint the darker colored
foliage on the trees. I have mixed darker green color. User tissue paper to wipe
off the extra paint. Now, dab the brush
onto the paper to create this nice foliage effect. You can press the belly of
the brush against the paper to create the smooth
though foliage thing. I'm applying darker
foliage around the house to make the
roof appear brighter. So in general, if we want
anything to appear brighter, we apply darker
colors around it. This will enable the focal
element to glue on itself. Now you can see how bright
or how their peers, by applying darker
colors around it. Leave white spaces
wherever required. Next, let us begin the roof. I'm going to use very,
very diluted colors. I'm using diluted,
so Julian blue and applying some tiny
lines, thicker lines. This will add some mighty
dimension to the roof. Next to him, darker color. I'm adding the
outlines for the roof. I'll switch to my
size two round brush. For the final lines. It will be very easy to add these lines using a
fine liner brush. Painting though Windows
using darker color. Next, I'm going to
take some diluted black and add some
lines on that roof.
10. Day 1 Class project (part2): Now I'm going to make
the was a bit darker. So I will take cool though
concentrated tone of metal, apply this darker
mix onto the walls. Next we will move on
to the adjacent walls. So here I want to
retain this blue color, the walls, so I just
apply some lines. I'm painting goes
in a loose style. So I do not want to go to each and every layer and
add all the details. So I'm going to add some
random strokes here and there. For any element to appear
visually appealing, we need to have right balance of lighter and darker colors. So under the roof we will
have some shadows, right? So I'm going to add that
using darker color. In order for our white
areas to appear brighter, we need to add darker colors
to the rest of the element. So that's what I'm doing. You're adding darker colors
around the white areas. You can see how our house is
turning out really beautiful with a nice balance of
darker and lighter colors. Now, let's add some
contrasting colors on the trees as well. So I'm using darker
green color by mixing black and
brown to sap green. I will add some more tree
foliage around the house. So here you can
use a round brush. Glide the belly of the brush to create this impression
of green foliage. Towards the house,
I'm going to add some more touch of blue color. To satisfy some stuff
around the house. It is always good to allow viewers to interpret
on their own, rather than being
very literal and direct by drawing
each and every thing. Lately I've been doing
this in my art journey. And it has given me
the freedom to be more creative and get rid of
all the perfectionism. Next, I'm adding some
upper brushstrokes to depict the grasses. Again, it doesn't
have to be perfect. Gently gliding the
brush to create or achieved or texture
on the grasses. The glasses here will be
a little more detail in the foreground then that
also the background grasses, because it will be
closer to the viewpoint. So it will have some details
visible to the viewer. In the background area, we have three foliage. Now for these tree foliage, we will add the tree trunk. I'm using a fine liner brush to add these little
branches and drunks. Adding some branches and twigs on this tree
in the center. Using darker color
to add the fence. Add some texture on the
roof using diluted colors. Now I'm going to use white
gouache color to paint though. He only feel
painting is lacking. Some highlights on the
house or anywhere. You feel that you
need some highlight, you can use white gouache paint. It will help you achieve
the desired highlights. Now with the help
of four fine liner, brush and white color, I'm applying some lines
depicting the wires. This was further darker area
to highlight the wires. And now for the lighter areas, I'm using diluted black
to paint the wires. So you can see it has
formed a nice connection. Adding some bare tree trunks to add some interests
in the composition. And some darker
contrasting colors on the grasses to make
it more appealing. Lastly, we will add some
birds flying in the sky. So usually in watercolors, the colors tend to
appear after drying. So here, That's
what has happened. That really looks so. I'm adding more darker color. This color is close to black. So after adding
this darker color, the roof is appearing
much brighter. So that was my intention
to highlight the roof of the house because that's the focal element you
are in the painting. Now, I'm adding some orange
and blue shades around the house to make
it more dramatic. So applying some darker color under the roof of the house, adding more tree branches. Okay. So I'm
sprinkling the paint in the grass area so you can cover the upper part to avoid the paint on the
houses or this guy. Right. Let's remove
the masking tape. We'll do find them. Look of the painting. There you go. This is the
final look of the painting. I hope you enjoyed
painting this with me.
11. Day 2 - Thumbnail/Colors: Before we begin our
second project, let's discuss the company and the colors that goes
into the project. First, we will determine
the direction of light. The source of light is
from the left side. You'll see the roof and
the wall on the left side appears brighter than that
of on the other side. Similarly with this tree, you can see on the
left side it appears brighter and on the other
side it appears darker. Similarly, absorb the
light and shadows on the grasses and
on the pathway. Alright, let's draw a thumbnail. So men in the center, we have this house. You don't have to create
exact same shape as mine. You can come up with your own composition for this painting. The only thing that you
need to remember is the source of light and
then the cast shadows. And we have some palm trees. So this tree is
close to the house, somewhere around the
middle ground area. Then the trees that you
see in the background, they are closer to
the horizon area, so they appear smaller or leg. Now, from the midground area, we have a pathway coming
towards the foreground. Next, I'm going to mark
the shadows on the house. The whiter area on the paper suggests that reflected
light on the walls. The last green area in this painting will suggest
a slopey grassy land. So like I said earlier, depending on the
direction of the light, color on the walls will
appear differently. The wall and the roof facing, the sunlight would be brighter. I on the other side
would appear darker. Also, we have the shadow
of the entire house. Go straight onto
the ground area. In the foreground,
we have offense. Now, let's take the same example and change the source of light. Consider the sunlight to
be on the right side. I'm just drawing this house. Because the source of
light has changed. The shadows will also
change your, in this case, though, other side that
was darker earlier, now it will appear brighter. Alright, let us have a look at all the colors that we
would need for the class. We'll start with the sky. I'll be using Payne's Gray in diluted and mid-tone
consistency. Next we will move on to though the student hazy or treeline. Next we will move on to
the student tree line. So you can either go with ultramarine
blue or cobalt blue, any color that you already have. So you can use a
diluted tone for the furthest layer
of the tree line. For the next layer, you can mix Payne's gray and
ultramarine or cobalt blue. You can see these
two layers being formed by using
different tonal values. Next, for the grasses, I'm going to use a
yellow, green color. This is a really are the
end warmer green color. If you do not have this color, then you can go with sap, green plus so orange or yellow. Any similar shade. So let me show it for you. Orange plus sap green. Mixed them together. I think it needs more orange. I'll also add a bit of pelo. See you have this
similar shade now. Next for the pathway, you can use burnt sienna or
any similar brown color. You could also use
bond Dumbo row on board or any brown color. And on the grasses, you'll see these
brown shades, right? So you can splatter
some paints or add some greenish brown color. So it doesn't have to
be exactly like mine. Just play around with colors and you will come up with
something of your own. So going back to this
hazy blue layer, I realized that it looks very
vibrant and very bluish. In order to mute it down, you can add a bit of burnt
umber with the blue color. So adding brown or
complimentary colors to the blue shades will give you some and
less vibrant tones. Now let me show you the colors
that I used for the house. So I will be using violet. Or you can even go with purple in a lady that
I knew, take tone. And on the inside, I'm going to add
some darker colors to suggest the shadow
part of the house. So here I'm dropping
in some sheets of one-channel ultramarine
blue and violet. So the reflected
part of the roof, you can use any reddish
or brownish shade. I'm using a mix of scarlet red. And once you are now
in a diluted tones, the shadow part of the house, you couldn't go with black or darker mixture of Payne's
gray and burnt umber. For the trees in the painting, you can go with sap, green, and a little
bit of burnt umber. Why am I adding burnt
umber is to remove our new down the vibrant
artificial green color. I always prefer
adding some browns are complimentary colors
to the existing colors. Now, if you observe
these two trees, the distant palm trees appear slightly
bluish green, right? So you can make so sampling and cobalt blue with
a bit of burnt umber. This will make it appear
a bit cooler and suggest, oh, signs of aerial perspective.
12. Day 2 - Class project: Welcome back to the class. This is the second project, and we're going to learn to paint this artwork
in this chapter. So let's get started. The paper is taped down
neatly using masking tape. Now, let us sketch the basic
composition of the painting. So somewhere in the
middle of this paper, I'm going to draw a house. So first, let's
start with the roof. The house is being
viewed from the side. Next, I'm adding the
extension to the roof. So you might have seen
the tiled houses. It usually has this
extension which provides shade for
doors and windows. So you can see, I'm adding these extension makes the house look
more dimensional. I didn't even know to the house and then
offense by the house. Okay. So the house is done. Now, I'm going to add
a three by the house. So this is a palm tree. You can even draw a
coconut tree or pine tree. And neatly of your choice. Then we will draw
our pathway that is coming towards the
foreground area. On the left. I'll just mark
those slopey area. We will define the overall
shape when we are painting it. But for now, just simple
lines would be enough. Also adding the horizon
line in the background. Adding some distant
trees as well. The size of the tree depicts the distance
in the painting. The tree that is closer to
the house is slightly bigger. This tells us that it is
closer to the viewpoint. Then we have this line for
the cast shadow of the roof. Okay, that is it with the sketching rest of the elements we will
add as we paint. So let's begin
with the painting. I'm going to apply clear
water throughout the paper. That is to perform
wet on wet technique. Generously applying water. Let us paint the sky first. I'll be using Payne's
Gray plus so a bit of ultramarine blue and applying
it in a graded wash, which means the
upper area will be slightly brighter
than the lower area. So as you can see,
how the color has faded as it reaches
towards the horizon. Applying angular brushstroke
with slightly thicker color. The stupidest, the
darker clouds. Mixing Payne's gray
and ultramarine blue. To achieve a darker blue color. You can even use cobalt
blue, or indigo. Now apply this for
the distinct area. It suggests the hazy
atmosphere in the background. Adding offense of aerial
perspective to the painting. So he odd, since
the paper is wet. So we are getting
smoother blend. That's the beauty of
wet on wet technique. Next I apply slightly
darker tonal value. That is concentrated tone. This tonal value range adds a sense of depth in
the background area. This will make us
feel that there are two layers of trees
in the background. The darkest one somewhere
in the mid ground. And the lightest color being
in the farthest area was. You can see the colors
bleeding onto the roof area. So I'm going to fix that
using my damp brush. Now let us paint the
lush green grassy area. So I'm going to use this
yellowish green color. If you do not have such color, then you can make so sap green plus orange
in and diluted. It doesn't matter which
one you're using. The idea is to depict all
greener atmosphere here. I would recommend you to
use a Walmart or Brene. I'm intentionally
avoiding to paint this foreground
area on the left. Now let's paint the grassy area on the other side of the road. Make sure you leave this
gap for the pathway. Now, let us go ahead
and paint the house. I'll be using the
color while it you can go ahead and use any
color of your choice. I'll be painting this side of the house with very
diluted color. The other side of the
house will appear darker. So I'm going to paint the
shadows on that side. So use any darker color. I'm using, violet,
blue, and burnt sienna. So using only one
color will make it look a bit artificial. So in order to give
that organic look, I'm mixing these three colors. At this point of time. It might appear darker. Do not worry, you can
fix that as well. The roof of the house is also reflected by
those harmonic. So we have to paint
it very light. I'll mix the color for the roof, which is burnt sienna
and scarlet red. Make it diluted because we do not want it
to be very dark. Now, apply some strokes, leaving some white
gaps in between. You can spread it out
using clear water. In this stage of the painting, you might feel like everything
is looking very lighter. Where are the contrasting
values and all sorts of things? But trust me, this is
going to turn out really pretty at the end when
you add darker colors. Alright, Now let us
use a blow dryer to speed up the drying
process of the paint. Alright, though
paints have dried. Now let us move on to the further elements
in the painting. Moving on, I'm going
to paint that, please. Let us mix the colors that are required to paint the tree. I wouldn't need two
types of greens. One is lighter, diluted green, another one for shadows, which will be darker green. For the lighter color, I'm using green plus orange to make it a
little warmer green. So let's take this
diluted green paint, the lighter shades. So this being the base wash.
You don't have to worry about getting the exact
shape at this point of time. We can define the shape
in the next layers. I think getting some
darker colors as well to add some variation
in the base layer. Next, I'm going to
paint the pathway. So I'm using a water spray
bottle to wet this area. If you do not have
a water spray, you can use a thicker brush and gently apply
some water there. Now I'm applying burnt
sienna to the pathway. You can also use
a burnt umber or sepia mixed in the
foreground area. I'm going to add
some darker colors. I'm using sepia and also
sap green mixed recipient. Adding this color. Adding these colors,
we'll add a sense of noise and busyness in
the foreground element. Otherwise, it is going to
appear very dull and flat. So in order to add some extra
interest in the painting, I'm randomly applying
these colors. Also applying some of the brushstrokes in domain
ground area as well. This creates an
illusion that the grass is not flat and it has
some unevenness to it. Next term mix any
darker brown color? I'm mixing Payne's gray and CPR. I'm adding this
darker brown to bring out the vibrancy of the
lush green grasses. Without darker color, the lighter color wouldn't
appear brighter, right? Okay. Now is the time to add the shadow areas
of the palm tree. Use any darker green color. Here. I flipped the brushstrokes to depict the palm tree leaves. I hope you guys know how
boundary looks like. So I'm trying to
depict the same. For the trees, I'm mixing
a bit of blue color because in the
distant future we'll see more of hazy Greece, right? Repeat the same for the
other tree as well. Using burnt umber
for the tree trunk. The trunk part needs to
be slightly thicker. Okay, let us cover
the sky and trees and splatter some paint
onto the foreground area. So this adds a sense of a straw, drama and some interest
in the foreground area. Next, I'm going to intensify the shadows on the other
side of the house. You can use colors
like brown, orange, blue, violet, or
any similar shade. Applying some wobbly lines on the roof to define the
structure of the roof. Now, use any darker shade
like black or darker brown or Payne's gray and indigo color and apply it
under the roof. This will act as the shadow. On the shadow side. The roof part is going
to be even more darker. I think this burnt
sienna on the corner, the pigs and that the
roof is partly sunlit. Now live in, use concentrated colors to suggest the darkest shadows
around the house. I think in a fence
around the house. Any darker color. And we will cast shadow
of the roof on the world. Now with the help of
this darker brown color, I'm defining the
trunk of the tree. So adding this outline on the side makes it look
more dimensional. Since the light is
from the left side. So the right side will
have darker edges. Some extra branches
off the palm trees. So the fence in using the
backside of the house as well. Okay, so we have
painted the house, but where does the shadow? So now let's add the shadow of the house in the
opposite direction. I'm using shades of blue
and all shades of brown. The distant area. I'm adding these tiny dots and some simple lines depicting that there's something
in the background. You can leave it up to your
audience interpretation. You don't have to define
each and every thing. Adding more trees in
the background area and smudging it
with my fingertip. Because I do not want any
sharp edges over here. With the same color. I'm drawing some wobbly
lines vary randomly. Alright, let's dry the paper. Switching to my size
two round brush and adding some extra
details on the roof. To be honest, you
don't need to add so many lines and these colors, you can leave it minimally. Sometimes you get
carried away with the process that you keep
adding a lot of details. So be mindful of that. On the shadow side, we need to intensify shadows on some of the areas in order to bring out the brighter effect on the front side of the house. I hope you are getting my point. The other side should be darker, not completely, but
I don't the door. And under the roof, these parts needs to be darker. So the houses almost done. Now there are some
other parts that needs our attention
and some detailing. Now I'll apply some bold
strokes and all endorphins. And for the trees as well. Adding some darker
colored lines inside this tree foliage to suggest the pointy
leaves in the palm tree. Now let's go back to the pathway and add
some texture to it. So as you can see, I'm just scribbling
some paint over it. Now it's time to add some
definition to the grasses. Suggest though cast
shadows on the grasses. On this corner of the house. The edge seems very darker, so I'm softening it
with clear water. I think one of the greatest
skills that you can acquire in watercolors is to
fix your mistakes. With regular practice, you will know whether you have made mistake and how you can fix it using different techniques. Now, I'll be adding in offense
in the foreground area and adding some
random texture using darker color or late. So we are done
with the painting. Now let us remove
the masking tape to reveal the final
look of the painting. There you go. This is how
our painting looks like. Isn't this gorgeous, nice
balance of light and shadows? Amazing, right? Share your class projects with me under the projects gallery. I would love to
see your artworks.
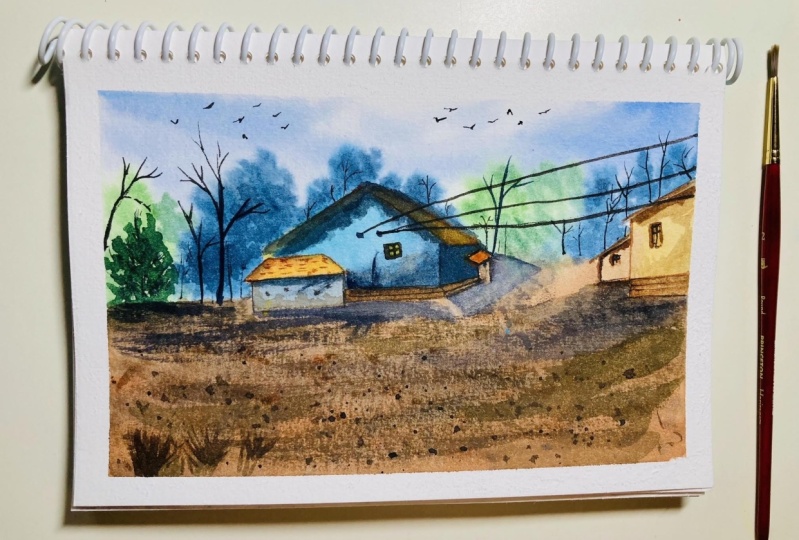
13. Day 3 - Thumbnail/Colors: Before we start
our third project, let us discuss the
composition of the painting and also
the Palo is required. So here in this painting, we have these distinct trees and they appear very
soft and blurry. And there are two houses. One is partially visible. The source of light in this painting will be
from the left side. Because the shadow here
falls on the right side. We have simple foreground area. Alright, now let's draw the thumbnail sketch
for the painting. I'm drawing this house
somewhere in the center. There is a shelter or a small heart right
beside the house. Since the light source
is from the left side. So we will draw the cast shadows on the
right side of the ground. And also the cast shadow of the roof on the
walls of the house. And again, on the adjacent
side of the house, there will be a small
shelter or roof like thing. And on the right side, we have partially visible house. Again, it has a shelter
in that house as well. In the background, we have these trees which are
blurry and very soft. We'll do this using
wet on wet technique. And a rough texture. Foreground, which depicts
the soil on the ground area. This was the basic sketch. Now let us add the shadows. Martingale cast shadow of the roof and the
walls of the house. This shadow is at
an inclined angle. Let me draw the house again
to simplify it for you. So I'll be drawing this
triangular shape and then making it look like
How's on the adjacent side. I partly extend this shape so that it appeals more
three-dimensional. On the brightest idea, I'm adding this extension like a shelter or a small heart. Again, on the adjacent side, I'm adding this
another extension. If at all you feel that the
house is complicated for you, then you can draw a simple
shape, something like this. That will be completely fine. You don't have to follow each and every step
that I teach you. Alright, so let
us have a look at the colors that we would
need for this painting. So first, let's start
with the house. This house in the center. I'm going to use an
aqua blue color. You can take a ruler and blue or even deal on any similar color. So here I'm using
diluted version of this color to achieve
this lighter blue color. For the Sharpie
appearance on the house, I'm going to add a dash of bone, Dumbo or Payne's
gray to the existing blue and make it a little
darker and darker. Mixed for the roof of the house, I'm going to use slightly
diluted red colors. You can mix red and
orange in a diluted form. On even read N-H bonds here. Now, any color,
this lighter color, such as the reflection of
the light on the roof. And to add definition
on the roof, we will use darker colors. Maybe you can make a
bunch of Ghana and red or reddish brown color. For the other house that
is partially visible. I'm going to use
yellow ocher and diluted form for the
shadows I'm going to make. So yellow ocher with
slight bond Dumbo. And once you, Hannah,
Next for the tree, it is a yellowish green
and a bit of sap green. For the distant trees, you can mix cobalt
blue with a bit of burnt umber to achieve
the blue color. Now for the foreground, soil or the ground area, I'm going to use burnt sienna, burnt umber, raw umber
mix of all these colors. So you can see the front part is burnt sienna and midground
part is raw umber. And then I'm also adding
in some Payne's gray, just playing around
with the colors. Now to this flattening some pains in order to
achieve the texture, the illusion of texture. This was splattering
on wet-on-wet. Now we feel splatter
on a dry surface, you will get sharp
or textured effect. For the sky. I'm going to use ultramarine blue in
a very diluted form. I'm going to paint
this blue house and show you how I balanced
the light and shadows. Darker, shabby
effect on the walls. I'm mixing this blue color, window, brown and paint. Great. Now for the cast
shadow under the roof. I'm going to make so Payne's
gray and burnt umber. This is already darker mix. You can even go in black or mix all the colors that
you have to form a darker color. You want. If you mix bond Dumbo and
cobalt blue or ultramarine, you will still get
a similar shade. For the trees. We
will randomly add these loose brush strokes to
depict the three branches. Alright, so let us move
on to the class project.
14. Day 3 - Class project: Welcome to day
three of the class. Today we are going to
learn to paint this. So let's get started. I have taped down
the paper already. So let's start with
the sketching. Now we will draw the house. So start with the baseline
and then draw the wall. Adding a dot in the
center of the baseline, which will mark as
the tip of the roof. Now, to make the house
appear 3-dimensional, we will extend though. I just sent wall and the roof. The left side of this house. I'm going to add a shelter. This is the roof. This is the reason why I did not add the wall on the left side. Next we will draw another house, which is partially visible
in this painting frame. Even in this house, we will draw a
shelter like shape. Then we will add in no windows, mocking the horizon line and
more skeleton for the trees. Next, on the adjacent
side of this house, I'm going to mark this
shelter like structure. Then I'll mark the area for the cast shadow of the
house onto the ground. Next, we will have the cast shadow of the
rules on the wall. This is the shape
of their titles. Alright, we will
leave it here for now and move on to the painting, but the rest of the details
we will add as we paint. Okay, so let's get started
with the painting. Use any larger brush for
applying clear water. I'm using my size
12 round brush. Next, let us apply clear
water above the horizon line. Except for the house part. The people should not
have a lot of water. Just enough water to apply the paint to go with wet on
wet technique one, right? Let us paint the sky. I'm using ultramarine
blue in diluted tone. Leave some blank spaces
to suggest the deal sky. Next I'm going to mix
a lighter green color. So I'm taking this so Eloise green and a
bit of sap green. I'm painting the tree foliage. So these are the trees
around the houses. Next we will paint the trees
that are in a distinct area. So pain, distinct trees. I'm going to use
the shades of blue. So I'm mixing cobalt blue and a tiny bit of bond Dumbo
and burnt sienna. Apply the veins around
the green foliage. So doing this will help you distinguish two different
layer of trees. Adding in some darker shadows in there using slightly
darker tone. So here I am using clear water to soften these hard
edges near the horizon. I want these trees too softly
blend into the background. Next, lettuce mix
cobalt blue and a tiny bit of burnt umber
plus payne's gray. So this will give us a
darker bluish color, which we will use to add
shadows in dollar tree foliage. Let us move on to
paint the houses. I'm painting this house
with bluish green color. Gently apply the paint on
the walls of the house. In the bottom part of the walls. I'm adding in some
darker paint in order to achieve that
shabby up your current. Next, let us paint the
house on the right side. I'm using a yellow ocher. Notice that I'm applying different tonal values
on the upper part. It is very diluted. The shelter attached
to this house, I'm using a brown
shade plus depth like a mid-tone color
and then water it down. Now I'm painting the shelter
attached to the blue house. It is very diluted in color. Now, let us makes the paint for the adjacent side
of this blue house. I'm going to mix a
darker blue color. My mixing Payne's gray and blue. Leave some space for the
roof Flagship. We have here. Now let us find the roof. So I'm going to use, so here I'm using orange and yellow ocher mixed
in diluted form. Next, I'm going to use mid-tone brown color as the
foundation for the house. The weight for the other houses, and dropping in this
color on the windows. Now, let us start working
on the cast shadows. So I'm adding these cast shadows
of the roof on the wall. So here we have
the cast shadow of this shelter on the
wall of this house. This is the darker shadow
area until the tools. Now let's go ahead and add some shadows on this
partially visible house. I'm using slightly darker color. Also keep in mind that
watercolors and dry, lighter weight,
they appear darker. So you have to choose the
tonal value very wisely. All right, now, let us
paint the foreground area. So I'm taking my larger brush and applying a stroke of water. Just single stroke. Mind around that I am
applying this moon sienna. You can see the color just
bleed into the water. Next I'll mix of burnt
umber and Payne's gray. Apply some random brushstrokes, applied the same diluted
color around these houses. Alright, next we will perform
splattering technique. So I'm covering
the upper part of the paper and taking
a nice thick mix, all four burnt umber
and Payne's click. On the white foreground area. With the help of my
size eight round brush, I'm smudging knees
or splattered paint. I'm doing this to
avoid making it look patchy and very obvious. Next time using darker
concentrated color to strengthen the shadow areas. Next I'm going to apply clear water around the
edges of the roof. This will enable me to add multiple colors
for the shadows. On this wet area. I'm going to apply
various colors. First I'll start with
ultramarine blue. Then want Dumbo. You could use any blue
or brown orange sheet. Next I'm going to take
concentrated burnt sienna. Using this color, we will define the shape of this object. So here I'm defining
the shape of the roof. These tiny lines will
suggest though tiny shapes. Adding darker shadows under
the roof of the other house. Using a mix of Payne's
gray plus burnt umber to outline the
shape of this house. So adding this darker color will enhance the brighter
color of the walls. This is going to
be the cast shadow of the house on the ground. I have used Payne's gray
for the shadow part, adding some similar colors in this empty space in order to blend it
with the background. Now, if you feel you're
not doing it right, you can lift off the colors
using a tissue paper. This is the shadow of
the Shelter House. It is partly on the wall
and partly on the ground. I'm adding some random
lines here and there to build some visual
interest in the painting. Feel free to add
your own element. There's no restriction as such. So here I'm adding some outlines to define the overall
shape of the house. So he are on the wall. I'm adding these tiny dots. Later. In the end, we will add some
wires connecting. At this point. Painting or three very loosely, and leave some blank
spaces in-between. Those are just to highlight, since we already have
a base wash. You don't have to paint
all the details. The blank spaces in-between will act as the
highlight in the tree. Now, apply some brown color and blend it with
the background. Okay, next, I'm going to
paint the tree trunks. Have a tissue paper
handy so that you wipe off all the extra
paint from the brush. I'm using this fine liner. And I'm going to add these tiny lines depicting
the branches and the drunks. We will add the branches
very irregularly. Next, I'm going to take a mix of Payne's gray and burnt umber. It will be closer
to our black color. And we will add some details at the bottom part
of the houses. Now, in this blue house, I'm adding some random
brushstrokes when diluted color. This will make the
house a PR, bit shabby. So usually the houses
in the villages will be covered with dirt and
they usually APR, shabby unless it
is newly painted. Next, I'm going to make so a
bit of green and raw umber. This is like a
greenish brown color. I'm applying some
loose brushstrokes. Also, I'm gliding the brush to create this dry brush effect. Adding the same color
around the house. Towards the foreground. I'm adding some
glass-like brushstrokes. Now we will splatter
some more paint. So cover the upper area. We don't want the paint
to be fallen on the sky, on the house and
splatter the paint. I'm splattering
using a tiny brush. So the dots will
be tiny as well. If your paints are very watery, you'd get bigger dots. And if you're taking
somewhere around mid tone or some
concentrated tone, you will get these tiny dots. So based on what size you want, you can choose the
consistency of the paint. Adding in some extra trees and some tiny
details, urine there. Next I'll take
concentrated or Payne's gray and glide my brush to
create this texture defect. This is called dry
brush technique. Applying this darker color will enhance the other lighter
colors in the painting. It is all about balancing
the right amount of contrasting values so that you
get a harmonious painting. With the help of a fine liner, I'm going to connect
the wires to the house. Okay. Before you do this, make sure you wipe off all the extra water
from your brush. Otherwise you would end
up getting married. Thicker lines. Now with the same darker color, I'm adding some birds in
the sky, very tiny birds. Let's assume they are very
far from the viewpoint. Adding some darker paints, again around the
corner of the house. So when I add darker colors
around a lighter color, it automatically
gets highlighted, like I said in my
previous projects. Adding in some diluted sheets on the wall to show some stains. Okay, So we are done
with this project. Let us remove the masking tape. There you go. This is the
final look of the painting. I hope you enjoyed painting
this project with me. Please do share your class
project and other projects. Gallery. I'll see you in the next step TO
until then, bye-bye.
15. Day 4 - Thumbnail: Let us discuss the thumbnail and the carrier's required
for this painting. Firstly, let me
show you the source of light. In this painting. The source of light is from the right side and the shadow
falls on the left side. Even with the grasses, it is the same thing. On the right side you'll
see writer grasses, and the left side
has darker glasses. Alright, so let's
do the thumbnail. So somewhere in the
center we have a house. This is a very simple house. It shows the two adjacent
sides of the house. And that is an extension to
the roof on the left side. So you can see the
sharp shadow off the roof on the left side wall. Right behind this house
we have a small heart. This heart will appear darker because the light will be
blocked by domain house. And then there are some tiny
trees around the house. And the background trees. Also a mountain in the distance. The foreground area
will have some grasses. In the foreground.
We have bear tree. Now, let me draw this house again in a much
more detailed way. So first you have to draw the shape of the roof,
something like this. And in order to get
that perspective right, we will draw the incline lines
starting from the bottom. If you see, I'm not drawing
00 like a straight line. It has inclined
angle in-between. You will need to remember that when you're drawing
that in the painting. I have seen some of my students draw straight lines
in the bottom, which will make it appear
something like this. See the bottom line. If you draw it straight, you will get a
weird perspective. So try to avoid that. And then we have the shadow
of the roof on the house. In this painting, we will
have a sharp shadow. The light source is
from the right side. And the shadow falls
inclined in the left side. Moving on, let us have a look at all the colors that will
go into the painting. Firstly, I'll start
with the sky. So for sky, I am using a diluted
version of orange color. You can go with any
other color as well. Now for the distant
mountain you see here, I'll be using a bit dull
or the blue color mix, cobalt blue with a
dash of burnt umber. You can apply a single stroke of color and then blend
it with clear water. This will give you a misty
APRNs in the mountain. For the trees, you can use any organic looking green color. So I'll be mixing sap, green, burnt sienna, and a
bit of cobalt blue. The consistency of
the paint also matter here because if you take a
lot of paint in your brush, you will end up getting blobs
and very thicker paint. So in order to achieve
the shapes of the trees, you have to take
right consistency. For the upper areas
of the trees. I'm going with a
lighter color first and then adding some
shadows. This will. Suggest though lighter and
darker colors and the tree for the foreground area. Oh, so you can first wet the paper with a very diluted
color or even clear water, then apply a logo. So you can even go with
the lemon yellow or any other L0 and slightly add some darker
colors towards the foreground, like green and brown. Then we will slightly
drop in some texture, enhancing the brightness
of the highlighted color. For darker shadows. It is same mix of burnt
umber plus payne's gray or any color that
you already have. Now let me show you the
colors for the house. So I'll be using Boolean
blue in a very diluted tone. It has to be very light, almost like a transparent color. Then we'll be adding shadows using colors like cobalt blue, burnt sienna, orange, purple, or any, any color. That doesn't matter much. Then we will add the darker
cast shadows under the roof. So adding darker colors, it enhances the brighter
part of the house. So these shadows are
really important to create that drama and sort of interest in the
subject tree paint. Next is the roof. So here I am using shades of brownish red along
with some orange. We will see everything in
detail in our class project. Also for this project, you would need
whitewash paint to add the final highlights on the trees and some other
areas of the painting.
16. Day 4 - Class project: Hello and welcome
back to the class. This is the fourth
class project. I hope you have enjoyed
rest of the project so far. Let us begin with
the fourth project. Came down the paper neatly. Now let us get to
the sketching part. I'm drawing this house in
the center of the paper. I'm drying it in a
way that you can see two adjacent
sides of the house. And that is an extension
to the roof here. Notice the starting
point of these lines. I'm leaving a tiny space
from the corner of the roof. Then we will connect
the base part with slightly inclined lines. Draw the boundaries
around the house. And then we will add in
a door and some windows. Behind this house. We will have a tiny heart, which is actually visible. Then we will draw the shape of the trees that will
be around the house. Rest of the details
we can add later as we paint on, right? So let us start
with the painting. I'm going to apply some clear water on the
upper part to paint the sky. I am not applying the
water on the House. Regarding this guy,
you can paint with any color you want.
It's up to you. For this painting, I'll go with orange color in a diluted form. This will suggest
a bright sunny day with orange-ish yellow sky. Alright, now I'm going
to paint the house. So I take settle in blue
in a way diluted tone. I fly this on the
walls of the house. In this painting.
The sunlit area is on the right side, right? So we will apply even
more diluted color there. Next, let us paint the roof. By now, you might already know what color I used for the roof. It is a mix of burnt
sienna and scarlet red. Apply this in a diluted form. So today we have
an LOS sky, right? So we will try to
deflect some shades of orange or yellow
onto the roof as well. Adding a dash of diluted orange along
with some red shades. Next, I'm going to mix a lighter green
color for the trees. These little trickier can be painted in different
colors as well. So let's say it is the spring season and you want some pink or purplish trees. So you can feel free to go ahead with your
choice of colors. It is totally up to you. Now, I'm painting the heart
that is behind the house. This house will appear darker because it is
covered by this main house. I'm using these darker shades
like once you are now, ultramarine blue
and Payne's gray. The ground area
around the house, I'm going to apply
some diluted shades of these darker colors. Notice how diluted it is. It is almost like water. Make sure to leave some dry
space in the bottom part. We are not fully applying water. I'm going to use
yellow ocher and apply it on the
same wet surface. So this has helped us achieve
the wet-on-wet effect. Next, apply green
around this area. Towards the foreground, I'm applying makes all
for Brown plus green. So you can see how we have created that lighter
to darker effect. Well, does that the area closer
to the foreground is dry. So I'm able to create
this dry brush effect. Next, I lied though, darker shadows around
the roof of the house. So I'm using darker brown color. Notice how I left the
blank whitespace. This will help us create a separation between
the two houses. Now with the same shade, I'm applying some strokes on the brighter
side of the roof. This will provide some
definition to the roof. Right? Next, we will paint the shadows. So here, the shadow of the entire roof or fall
on the adjacent wall. So I'm creating the boundary for the cast shadow. Once I know. Once I have marked the
boundary for this, I'm going to add paint
within this area. I'm going to apply
various sheets like burnt umber and
ultramarine orange. You could go with any color that is complementing the
blue color of the wall. Also applying the shadow
on the front side of the house, under the roof. Applying the same shade for
the door and the windows. Next we will paint the distant trees using
or the blue tone. So I'm going to make so
cobalt blue and burnt sienna. Now I'll add in some
more cobalt blue to make it a little
bluish in color. And paint for distant mountain. Just apply one stroke and then
blend it with clear water. This will create a misty APRNs. If you have noticed, I just remove the
tree that I created. But it's okay. I'm going
to paint the trees again. So adding this mountain
was an impromptu decision. So I had to fix
the background and then the trees in
the next layer. So I think it is completely
okay if you want to add or remove some elements
while you're painting. Next I'm going to
mix a darker tone. I've taken cobalt blue, burnt sienna, sap green. This will form a very
darker green color, like a bluish green
color actually. With this color,
I'm going to paint the trees in the background. Here. I changed my mind to go for greenish blue color
for the background trees. Because that way we will bring out the beauty of the
distant mountains. Long with mountains,
we are also making these lighter green
color trees shine very bright with the
darker background. Be mindful of the
paints consistency. If you have a lot of
pains in your brush, you won't get these foliage
effect of the trees. Always dab your brush on a
tissue or a napkin to wipe off the extra paint that will help you achieve the
right consistency. Notice how I'm leaving this
tiny space above the roof. This will help us define
the shape of the house. Next, let us add some grassy texture
onto the ground area. I'm using this
diluted green color. Applying some horizontal strokes leave some hint of the
lighter areas as well, but not completely
covered this area with the green paint. It will act as the highlights
on the grassy area. Also dropping in some
brownish green color. Going back to these
green colored trees. In order to add some dimension
to these little trees. I'm dropping these
darker colors. Also adding some highlights
on the distant trees as well. If we add some
lighter green color on the background trees, it will create a highlight
on the upper part, suggesting the sunlit affect. Who make the background
more appealing. I'm increasing the
size of this tree. I have wiped off
all the extra pins, which will help me create
these leaf-like textures. Repeating the same on
the right side as well. Now for the shadows, you can make some green with purple and brown and apply it on the
inner areas of the tree. Also apply tiny dots
on the upper area, suggesting the tiny leaves. Applied this brownish tone
on the foreground as well. You just have to dab your brush, leaving some gaps in-between. There is no complex brushstroke or any step that I'm following. It's very simple. You just have to be mindful of the amount of paint that
you have in your brush. If you have a lot of pain, then you will end up getting
bigger blocks of paint light. So I'll try this
area using a hairdryer. Okay, so the paper is dry. Now, let us add some
details on the roof. So I have taken this
darker red color. And with this, I'm adding some lines defining
the shape of the roof. So we have these arrangements
of titles, right? Moving on, we will paint some
darker colors on the roof. So I'm using a darker color. I'm leaving these tiny
spaces in between, suggesting the wooden
base of the roof. Also outlining the
front side of the roof. Adding some darker shadows
on the windows and the door. Going back to the roof, adding some more darker color to enhance the brighter side. Now, we will add some shadows on the backside heart LAD
in some windows as well. Alright, adding this
darker color in the lighter areas to enhance the rightness
of these lighter color. Without these darker colors, we cannot bring out the essence
of these lighter colors. So it's really
important to maintain a nice balance of darker
and lighter colors. Now, to further strengthen
the shadow area, I'm adding some more darker
colors onto the shadow side. So I'm adding purple,
orange, and blue. Blend the colors, retain the boundaries that
we had drawn earlier. Adding some diluted orange
on the backside heart, because I don't want it to
be shining so brightly. Now with a darker color
and my fine liner brush, I'm adding some
simple brushstrokes depicting the grasses. We have already painted
door tree foliage. Now, let's add the trunk
and the tree branches. Bend them in a very
loose, irregular way. Now I'll add some tiny dots and some leaf-like
shapes on the trees. Lastly, I'm adding some
tiny details here and there on the glasses
are in the house. Now let's add some
birds in the sky. If you want, you can
keep it simple as well. But I would prefer having
some birds flying in the sky. No **** white
gouache paint and we will add some highlights
on the tree trunks. You can use it to highlight the other parts of
the painting as well. Next, I'm going to add another tree in the
foreground area. Main trunk, a bit thicker than the upper
body off the tree, branches in any direction. Now I'm going to add the cast shadow of the
tree on the ground. I don't want it
to be very sharp, so I'm blending it
with clear water. On my impression of the
shadow will be enough. You don't have to
make it very obvious. Now, I'm going to darken the
grasses on the left side. So this is an important step. Since the light is
on the right side. I want the graph on
the left to be a bit darker than that of the
glasses on the right side. So I'm applying some
brownish green color on the left part. After doing this step, you can notice that there is much brighter appearance on the right side of
the painting, right? Alright, so we are done
with this painting. Let us remove the masking tape. There you go. This is how our
final painting looks like. I hope you enjoyed painting all the class
projects with me. Do share your projects
under the Projects can be. I would really love
to see your works. Also, please do share your review or your
feedback on my glass. That would really
helped me a lot. Thank you so much for
joining my class. Your support really
means a lot to me. But by and happy being thing.
 Shanan Subhan, Watercolor/Gouache | Art Educator