Transcripts
1. Introduction!!: Hi everyone. I am Shanan Subhan, an artist and an art educator based
in Bangalore, India. Welcome to my Skillshare class
on this dreamy landscape. In this class we
are going to cover all the basic watercolor
techniques to get our hands dirty before
working on the main project. We will also discuss
the supplies and colors that will be
required for the project. The class includes subjects like painting the sky
with a single color. Along with painting the
distant treelines, painting grasslands, reflections, and many
more subjects. It also touches on topics like dimension and
depth of the painting, which helps you improve
your watercolor skills. Without any further delay. Let's get started. I'm excited to see you all in my class.
2. Art supplies!: Before we begin the class, let us have a look at all the supplies that we are
going to need for the class. Firstly, talking about paper. So I'm using BOAHONG, 300 GSM, a 100% cotton paper. This paper has cold press texture. As you can see, this has this, slightly
rough texture. So you can use any
textured paper. I would highly
recommend you to use a 100% cotton paper so that you can easily
follow along with me. You can use paper
from any alternative brands. just make sure it
is a 100% cotton paper. Next, let us talk
about the brushes. I have four brushes here. Let's talk about these
brushes one by one. So firstly, I have this
Princeton mop brush. This is size 4 brush I'll be using this
for the water washes. Like to wear larger areas
because it pulls lots of water and it is easier for
me to cover the entire area. Next I have this silver
black velvet brush, silver black velvet
brush of size 12. This is again a larger brush. I'll be using it for the
larger brushstrokes. Then I have a size
eight-round brush. This is for the
medium brush strokes. Lastly, I have size two, silver black velvet brush. This is used for ending
the final details like these branches or
these grass blades. That's all about the brushes. Moving on to colors. We will be using these
colors and I'll be explaining all about the colors
in the upcoming chapter. I have stored the
colors in this palette. I'll be using it
directly from this. For mixing the colors. I have this palette,
I'll be mixing it. Then we have this glass sheet where I'll be keeping
down my paper. Using a masking tape. You would need any hard surface and a masking tape to tape the paper down so that it doesn't buckle up
when applying water. Next we have a spray bottle. I'll use this for row, swing the water in some areas. Then I would need two
jars of clean water. One is to clean the dirty
brushes and other one, who take the clean water
for the mortar washes. You would need two
jars of water. Alright. We would also need
a napkin or tissue paper. Wipe off the paint. Water, something like this. That you can have a damp brush. That's all about the supplies that we would need
for the class.
3. Colors..: The colors that we would
need for the class. Scarlet red, crimson. Burnt umber, sap green.
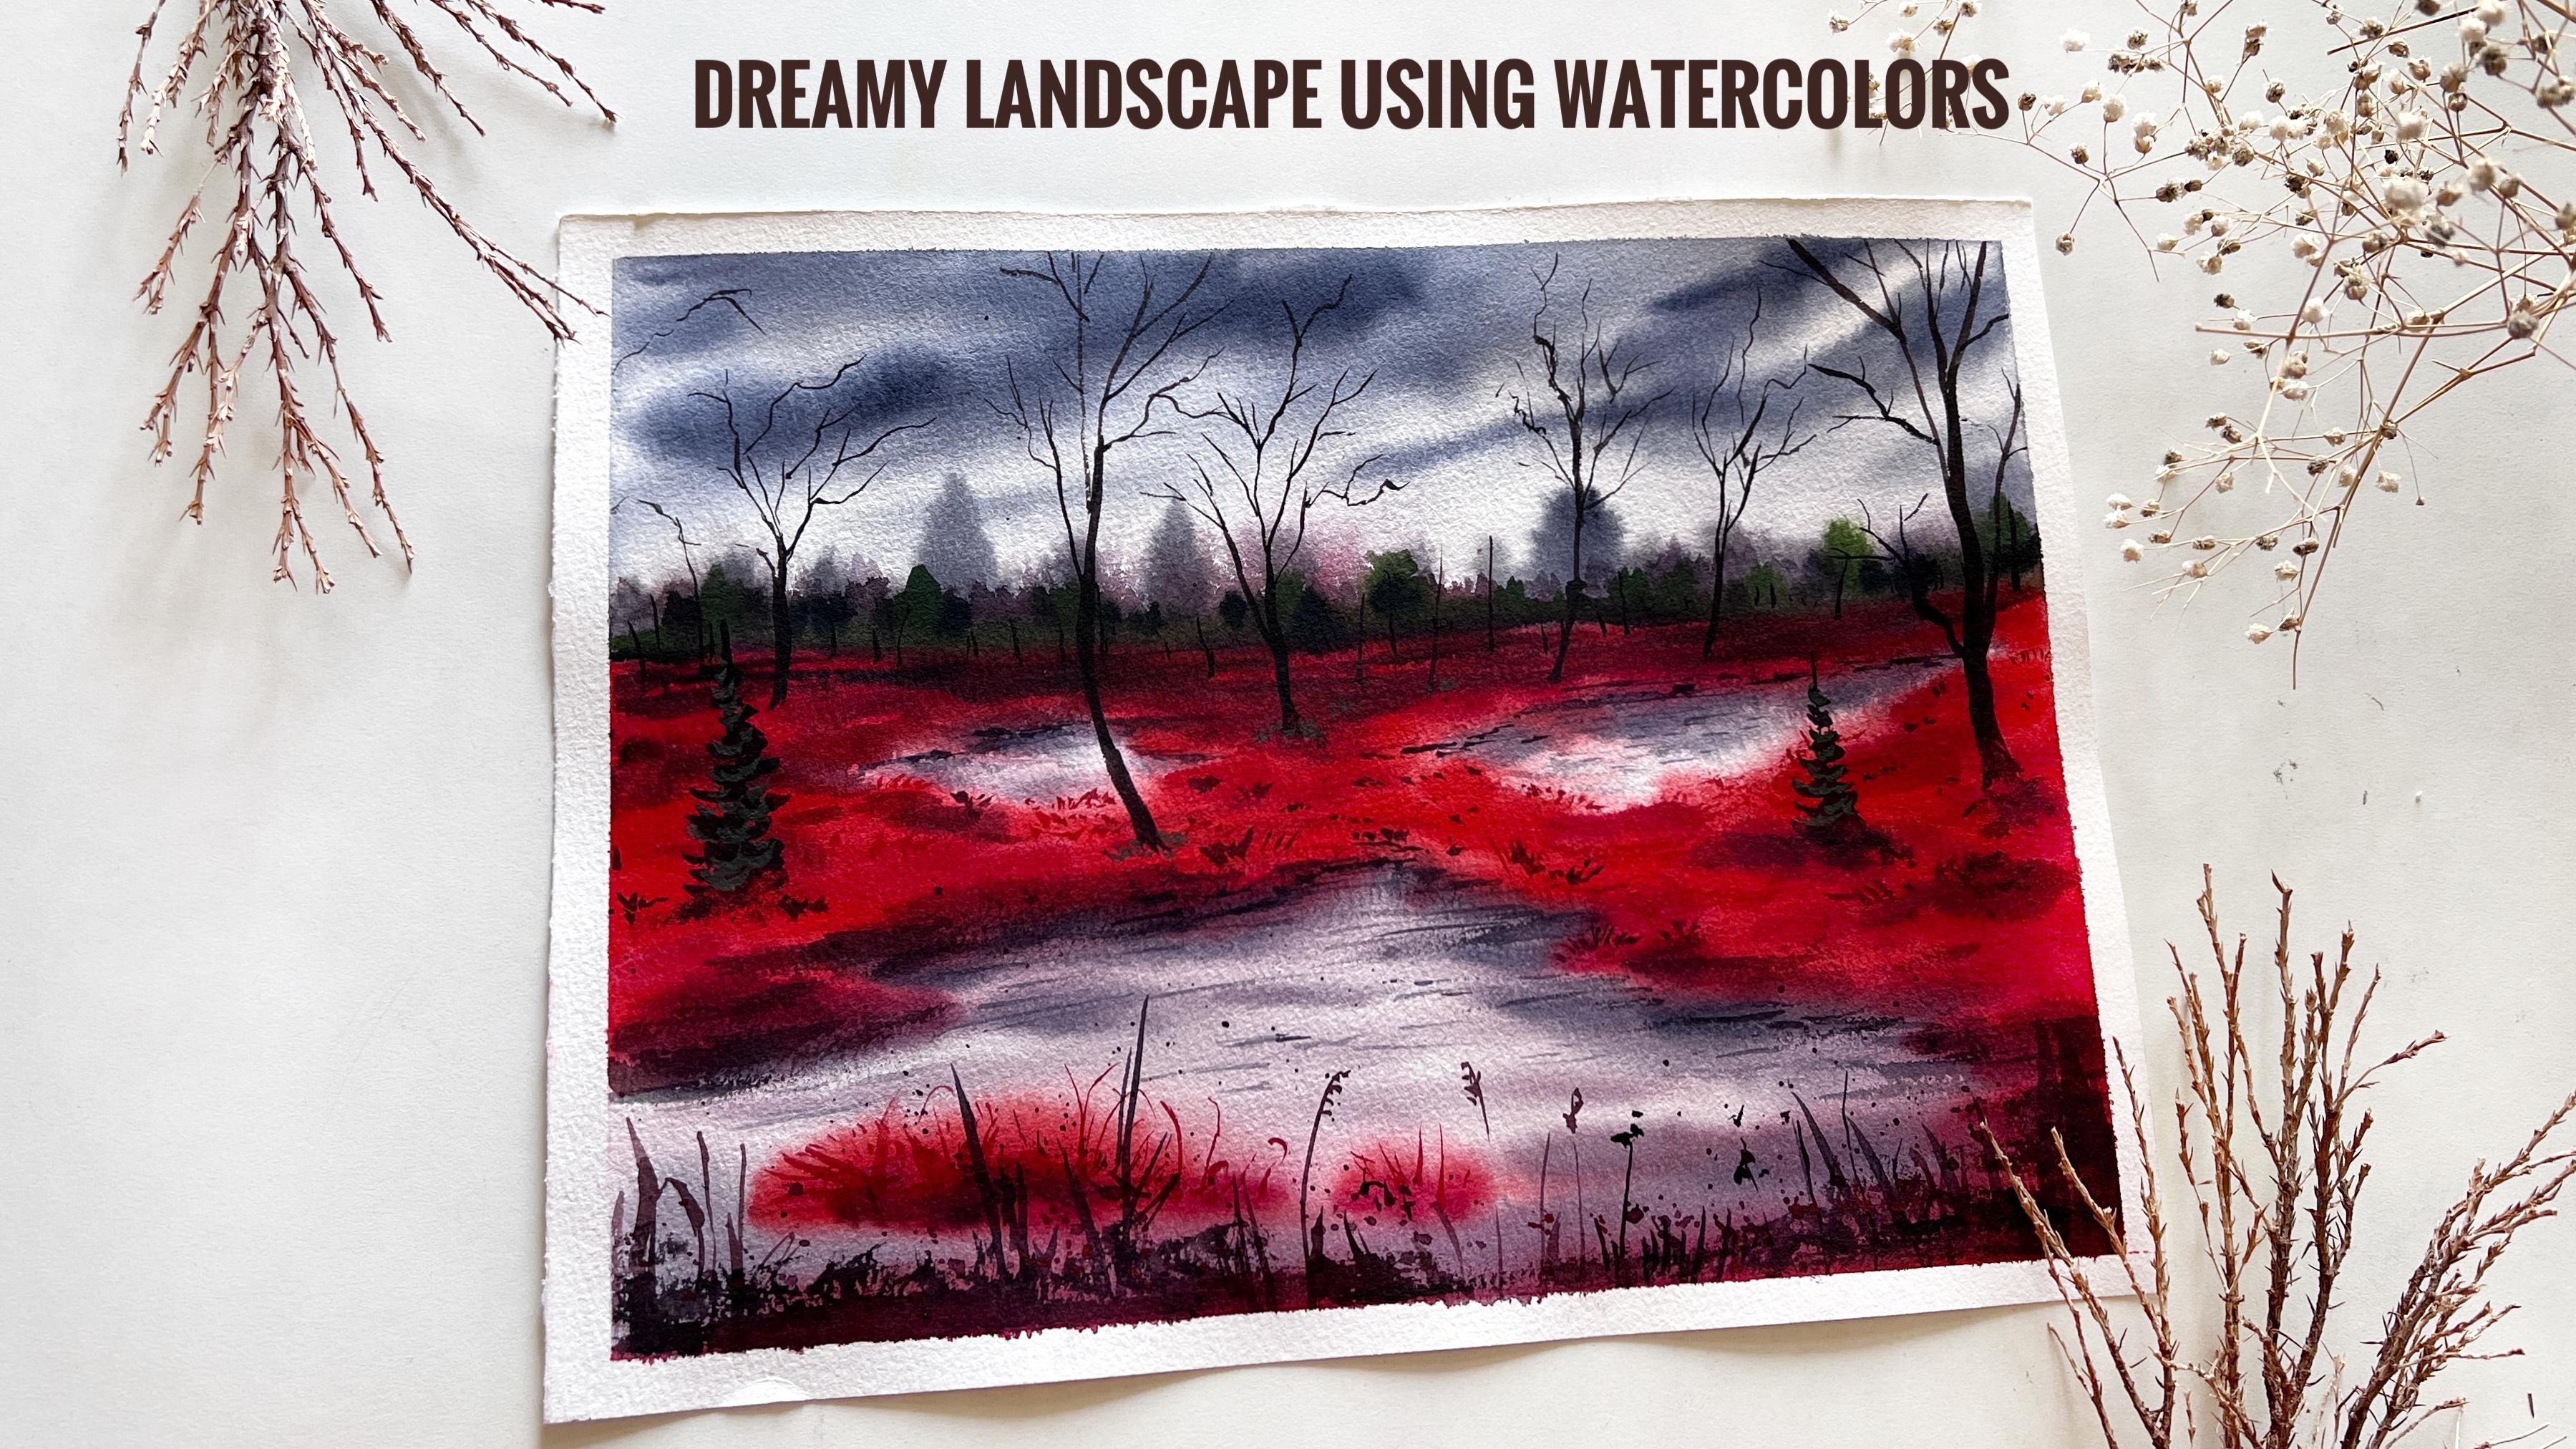
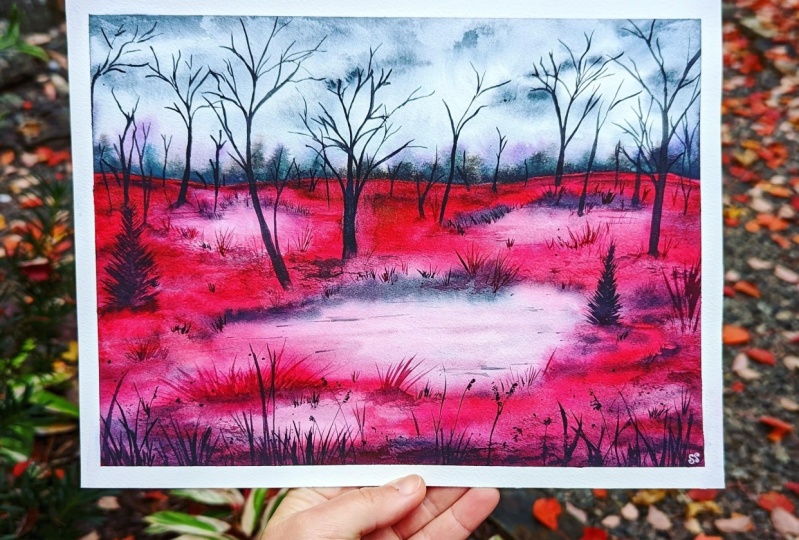
4. Composition : Let us discuss the
composition of the painting. On the top part, we have sky with angular shaped clouds
in the distant area. That is this clustered realign. In the midground area. Vibrant red grassy area. Some smaller batches
of water bodies. In the foreground area. We have Lake, which reflects
the color of the sky. And closer to the viewpoint, there are some
detailed grass hips, awesome beard trees,
pine trees as well. Okay, so I'll draw a simple thumbnail to
explain it further. We will draw the horizon
line on the upper half. Then we have this in
distant treeline, which appeals quite blurry. Another layer of trees
closer to the midground. Then we will define the boundaries for
the red grassy area. The foreground part
will be the lake. The grasses in the foreground
will be detailed ones because it is closer to the viewpoint so we will be
able to see the details. Then there are some where trees. We will add some
ripples in the water. Alright, that's all about
the thumbnail sketch. Let us move on to
the next chapter.
5. Techniques and Practice: Before we start the class, let us go through some of the basic watercolor techniques that would be required
for this class. First one is wet
on wet technique. I'll be waiting the
surface using clean water. Next, I'll be applying wet
paints on the same surface. With this technique,
the colors spread really well and we get
a soft background. This is ideal for painting the sky and the base
layers of the painting. The next technique
is wet on dry. We apply wet paint on
wet surface and it helps us create sharp edges
and the detailing work. We will be using this to paint
the trees and the grasses. Other sharp edges that
we wanted to achieve. Next we will perform
lifting technique. Now, imagine we have painted something and we want
to lift the colors. You can use your ****
brush and our tissue paper to lift the paint from
a painted surface. This is used to
create highlights and fix the mistakes
that we have made. Next, we will learn to
soften the sharp edges. So imagine you have
painted something. It looks very sharp
and unappealing. Then you can fix it by
using a damp brush. Just have those
mashed up brush to soften the paint on the edges. Next is flattering technique. You can splatter the paint on a surface or on a dry surface. So depending on the
texture that you want, you can either pick any
one of this technique. Moving on, let us practice
the elements of the painting. So first one is
the grass blades. We will paint the
bottom part, take God. And the upper parts of
these blades in shape. Something like this. There are these wild grasses with some flowers on the top. So you can paint those
plus or both pips. Then I add these tiny lines. You need to control
the pressure on the brush in order to
achieve finer grass blades. Next, we will use dry brush technique to
create the texture. You have to wipe off all the extra paints
from the brush and then glide the brush to achieve
the sort extrude effect. This can be used to paint
the texture on the grasses. Next, we will practice
though distant grasses. In the distance area, we will be adding these tiny grasses because it
is away from the viewpoint, so it appears smaller. We are going to paint
it something like this. Next we have bare trees. We're going to start with
the trunk of the tree. Then we will slowly
add the branches. You can fork the branches
as many times you want. The more you add
the tiny branches, the denser it is going to look. Also, we would need all fine liner brush
for the tiny tweaks. Lastly, let us practice
though distant trees. To achieve this
ten blurry trees. We are going to first
have a wet surface. Then we will apply wet paint
in the shape of trees. You can paint any kind of tree. It will kill those same effect. You can vary the
dollar values as well. This reason the paintings will be painted with this technique. Similarly, for the reflection
of sky in the water, we will use the same
technique that is wet on wet. Some of the techniques.
6. Dreamy Landscape - part 1: Okay, so let's get started. I have a glass sheet
here. On this. I'm going to tape the paper
down using a masking tape. This is 3 fourth
inch masking tape. I'm going to give
it a nice border. It also helps us
prevent the paper from buckling up when
we apply water washes. Once you have the paper, just drawn your finger on the edges to make sure
it is tightly sealed. I'm placing this
masking tape under the paper to give it a
little while we paint. Before we begin, let us just roughly mark
the composition of the painting so as to know where the elements will be placed
here in the painting. Somewhere in the upper half. I'm going to mark
the horizon line. This is the sky and the trees. Below. This is the land
and the water body. Mixed, mocking the area
for the lake water. This need not be
exactly same as mine. You can just randomly do it. These are the purchase
of line lake upon. Okay. These are the this part is for the water and
this is for the sky. This one is for the land. Okay. I hope I'm clear. We will proceed with
the painting now. I'm going to apply clean
water above the horizon line. This is wet on wet technique. Use a large brush to
easily cover the area. New Brush multiple times. Make sure that the water
is evenly distributed. We will add wet paint
on this wet layer. We would depict our
sky in the painting. Next, I'll take my palette
and size eight round brush. I'll take Payne's gray in thicker consistency
on my palette. Paper in the tilted
position to allow the paint to flow
downwards while painting. Load your brush with
this thick paints gray. Apply some diagonal
brushstrokes on the upper part. This will act as the
darker clouds in the sky. Also apply some
tiny brush strokes. Since we have applied
paint on a wet surface. Just move the board
around that we don't get these Haley lines. Next we will apply
some darker strokes to add a sense of
depth in the Cloud. Some diluted paint. The lower part of the sky. All right, The sky is done. Next, we would be in the distant trees on
the same damp layer, mixed a tiny bit off bond on board with the
Payne's gray mix. This will create a darker color. Now apply this mixed to
suggest the entries. We will pin the disjunct trees in irregular shape and size. The reason behind going with
wet on wet technique is to achieve or soft and
blurry layer of treeline. This point, the paper
is 50 to 60% damp. It is easier to
retain the shape. I didn't get in some
concentrated on in-between to ruin the uniformity
in this layer. I feel that is a button or a
similarity in all the trees. So to break that uniformity, I'm adding some color trees, your alright, this
layer is done. We have painted those sky
and distant treeline. Now let us allow
the paint to dry. I'm using a blow dryer to
speed up the drying process. Alright, no panes have dried. Now, look at those blurry
trees at the horizon. Next we shall move on to paint the layer
below the horizon. I'm applying clean water. We are applying only below the horizon line and not on the sky and the
distinct area. Alright, the paper is wet. Now, let us move on to
paint the red grasses. The colors needed a scarlet red. I'm going to mix this color
in thicker consistency. Next we would need crimson. So these two are shades of red. Scarlet being warm tone, and Clemson is
cooler tone of red. On this wet surface, I'm going to apply scarlet red. Applying it only inside
the sketched area. And we will leave this
blank space for the lake. Now I'll remove this masking
tape because I do not want the paint to flow downwards
At this point of time. Applied domains. And here on the left side, I leave some whitespace
again for the lake water. Again, we will apply the
scarlet red in the bottom part. On the right side. I do not want this area to
be blocked by red color. I lived the painting
choosing or damp brush. I'm adding some more patches of red gases in the foreground. Next we will add some
overlapping brushstrokes on the red area using
the same scarlet red. Now, as you can see, the colors have spread on the blank areas and created
these heavy textures. We will treat those areas using a damp brush
and our tissue paper. Lift all the colors near
the edges of the lake. I will not lift the paint on the upper areas of these
grass patches because we will use those
hairy texture to our advantage and give
it a glassy appearance. Soften the sharp edges
using **** brush. Next we will take Crimson. Apply some brushstrokes
on this red area. This will act as the darker
patches on the grasses, which in turn creates a send. So for grassy area, we will leave it here. I loved the paint to dry. All right. No paints have right. Now, let us paint the water. We are going to wet
the entire area for this to perform
wet on wet technique. When you are applying water over the red surface as though
it might live the paint. Clean your brush after applying
each and every stroke. Also, you can lift
the paints if at all the expert on
the blank area. Next, we'll take Payne's
gray in medium consistency. We are going to
add the reflection of the sky in the water. The sky is grayish in color. Theme will be reflected
in the water. Apply the same on the
edges of this grassy area. In the foreground. We are going to roughly apply this paint. Because we are going to paint some grasses in the foreground. This will act as the
base for the grasses. You don't have to
worry if this Payne's gray and red gets mixed up. Applying some darker
tone of Payne's gray. On the lake. I had some horizontal strokes to suggest a moment
in the water. This will basically act as
the ripple in the water. Now let's make so
these three colors, not as Scarlett
crimson, Payne's gray. This will create a darker shade. Now, I'm adding
this darker shade on the base of this grassy part. This will act as the
shadows and creates or dimension in the grassy area. Right now let us allow
this layer to dry. So I'm going to use my blow dryer to speed
up the drying process. If you do not want to use a blow dryer and you
can leave it as it is for around ten to 15 minutes
to completely let it dry.
7. Dreamy Landscape - part 2: Alright, the paper
is completely dry. We will apply another layer of treeline in the district area. This will be suggested as the trees in the midground area. We will apply clean water
along the horizon line. On this wet area, I'll apply some red color. Load your brush with paint gray. And Abbott worked with a link to create these three shapes. This is not the final layer, the green trees, but this is just the base photo
upcoming layer. The upper area of these
trees have sharp edges. So in order to
soften these edges, I'm going to spray some water. It's okay. If you do not have
the spray bottle, you can leave it as it is. Next, I'm going to mix bond number paints
gray and crimson, because this will create a very darker color
closer to black. I'm going to dab this color near the horizon to create
or dark or APRN. Next we shall mix green color
for the distant treeline. I'm going to take some green. A bit of white gouache paint will make it a little opaque. The reason behind using
white gouache paint is to cancel out the transparency
property of watercolor. Now I'm going to apply
this and green paint along the horizon in
the shape of trees. Next, we'll tape or mics off burnt umber
and Payne's gray. Similar to black color. We will add in-between these green trees were depicted as the shadows
off these trees. Apply some brushstrokes
on the red area as well, creating some more
loose purines in the district area or
something I need to tell. You guys need not replicate each and every
step that I paint. Just understand what
I'm trying to do and then try to paint
it in your own way. How fun. Enjoy the process. Okay, So I will stop it. And I'm going to let the paint dry again using a blow dryer. Okay, So we are done
drying the people. Now let's take one plus Payne's
gray to paint the trees. I'm using a fine liner brushes. This is size two round brush
by silver black velvet. Somebody in the
center of the paper. I'm adding this tree here. Start with the trunk and then gradually keep
adding the branches. Since this isn't
the midground area. So we will not be able
to see all the details. You can add as many
trees you want. It's totally up to you. If you are intending to paint a tree somewhere in
their district area, then make it smaller in size. Closer to the horizon, I'm adding some smaller lines. I just though distant trees. Next year really much
closer to the foreground. We've learned the bottom part of the trunk using your fingertip. You can fork or tree branch
as many times you want, will make the tree look. Also, you can add more
straight trunk as well. It's totally up to
you because it's your painting and
it's your choice. You can move your
paper and board to find a comfortable position
to paint certain shapes. Third, one page, or for taping the paper on a separate surface. I personally find it
very difficult to pin certain shapes on
a fixed surface. So I tape my paper on a
separate hard board or any hard selfies Rather than or keeping it
on a fixed table. So moving on, we will paint
some texture on the grasses. So I'm going to mix
a darker shade with red and add some tiny
lines on the glasses. I'm using my size two
fine liner brush. We have a base red layer. Now we just need to add
some texture to it. Simply add some grass blades. In some tiny grass blades
on the midsection. Gliding the brush
to create extra. Next we are going to take our darker mix,
all four Payne's, gray and red, we will
get a darker color. Now with this mix, we will add some widely. But officers in the foreground, these glasses need not
have a defined shape. You can just randomly add some lines and some
flowers on the top. The brush horizontally near
the edges of the lake. Next, we will add
some tiny grasses in the midground area. By painting these tiny lines. Using darker mix
for these grasses. Since these gases are away from the viewpoint and are present
in the midground area. So we will move them
as smaller lines. Again, there is no fixed
position or shape. I'm just randomly adding these tiny lines
on random areas. Going back to the foreground
area, I've mixed up, I'm gonna add some more grasses like the brush to create
this rough texture. Go into stamp, really create a noise and texture
in the foreground. Since these glasses are in
the foreground in demand, some more detailing work
right here in the foreground. I'm adding some
vertical brushstrokes, very roughly, just some
shot glass plates. Okay, so I hope you have
achieved similar results so far. Next, let us add some pine trees in the
middle ground area. I'm using r.com mix to paint a pine tree paint or pine tree using
zigzaggy brushstroke. Use your fingertip to blend
the bottom part of the tree. Next, we will add
another pine tree on the other side
of the painting. We will leave these trees
yard and come back to them. Once this layer dries. Moving on, we will add some
ripples in the lake water. So I'm going to take
diluted paints gray, and add some horizontal
lines on the Lake area. These lines in the water makes it look organic and gives us, And so for movement
in the water, we will add some darker color. Near the boundaries of the lake. You can smudge it using your fingertip or
leave it as it is. Now going back to the pine tree, I'm using the same green color that I had used for
the decision trees. Make. So widen, gosh. Now on this black country
that we have splintered, we will add these details. Why we are adding
gouache painters, because it will make
it appear opaque. If it was only watercolor, it would have
appeared transparent and we could see the
background layer. So to prevent the background from seeing through this layer, we are using gouache
paint. Alright. Lastly, we will splatter
some black paints on the foreground area to add
some extra to the grasses. All right, We are done
with the painting. Now let us remove
the masking tape. Gently peel off the masking
tape and opposite direction. There you go. This is how
our painting looks like. Let us take a moment to
appreciate this beauty. Such a dreamy landscape, right? I hope you like it. Guys. I'm waiting to see
your class projects. Go share them under
the projects gallery. I would love to share
my views on them. Thank you all for
watching my class. Please do share your review or feedback in the review section. So I'll see you
in my next class. Until then. Happy
painting, Bye bye.
 Shanan Subhan, Watercolor/Gouache | Art Educator