Transcripts
1. Introduction : Hello everyone. I'm
Michael Hughes. You may know me as hugs yachts. And I'm a professional
artist based in the UK. By professional artists, I mean, I do this full time. It's my main source of income. And it's really
great to have taken the plunge and started doing something
that I really love. That's basically what
professional meetings I'm a freelance artist, take on commissions and I do tutorials and create
my own brushes and et cetera, et cetera. One of my main passions
in the art world, along with the character and cartoons, is urban sketching. Now, your traditional
urban sketching, you are going to be arriving at a location with a sketchbook. I take a pencil just to
sketch out my composition. I take some fine liners
and waterproof inks. I take my watercolors, I've got a little Cotman
travel set and some water. So what I wanted
to do was to get this traditional
urban sketching feel and transfer that onto
the iPad and Procreate. I knew it was possible, but it's taken some time to
get that traditional feel. So in this class, I'm gonna be teaching you
how I sketch on Procreate. I've created some brushes which mimic watercolor brushes
and watercolor splashes. I have a mimicked the ink, the ink lines that I want. So it looks authentic and great. I'm also going to provide
you with the Canvas. So you've got that
traditional paper look. Yeah, it's so much
fun. That is no bad. Urban sketch. You, it never looks
bad in my eyes. You just have fun with it. Let it flow. And yeah, I'm excited. I'm excited for this class and I hope, I hope
you really enjoy it. So all that being said, and I'll see you in the class.
2. Planning our composition : Hello everyone. Welcome to the first
lesson in this class on how to urban
sketch on Procreate. I'm super excited about this one because I loved
doing it so much. And I'm pretty sure
you guys will too. So this is one I did
actually did this morning. Just so maybe I could just put a little time-lapse on
whilst I'm talking. Just suited to see the process. So we're going to
be just loosely sketching and inking in our, our, our composition first. And then we're going
to add some lines. And then we're going
to add some shadows. And then we're going
to add some color. And it's as simple as that. That's the sort of
process behind it. For every single thing we do. You haven't got to be
too accurate here. This is urban sketching
and it looks lively and more alive and bursting
if the Lucy you are. So this is one of
them techniques, urban sketching, where you
can't run from your own style. Your style will shine through and find
you no matter what, you can't hide from it. If you're a neat person, you're going to be a
neat urban sketcher. If you're very loose
and quick strokes, you're going to be a very loose and lively urban sketcher. It's the beauty of this
whole urban sketching is it blends to everybody style. I'm really excited to see
your attempts at this. If you could upload
them to the project and resources section. I
can't wait to see them. But here you can see
on the time-lapse, I added in a bit of sky color, decided against it in the end. Just wasn't sitting
right with me, wanted more paper to show. It looked more traditional. But this is the sort of thing. I'm talking about this
as urban sketching. All very loose and very free. Yeah, just gives great, great, fantastic looking
results at the end. And another thing, if you
start doing popular locations, people will want one. So be prepared to print
them or print off and do it on some nice
papers and textured paper. And you'll be selling,
you'd be selling your prints of these,
I guarantee it. This is a bit different, traditional urban
sketching where you haven't got to go and sit for hours in a
bustling city center, sketching away with your
thousand pound iPad. Which in some city centers, which I've been in,
is not a great idea. You can literally just snap photos as you're out and about. You go to a nice
place with the kids. So nice zoo or something, or a nice urban area, cinema or a town. And just grab photos, try and look for
the composition. You want the things
popping out in a near view as you can see the
tree and things like that. And it just adds to that thing. Composition gives
it a bit of a feel. So good, fun. Take pictures everywhere you go. So that will make a
great urban sketch. On the other hand, if you want
a new live in a nice area, go out with your iPad and
sketch it from scratch. That'd be fantastic. I'd
love to see that. That's me. Yeah, So for this first-class, I just want to just quickly
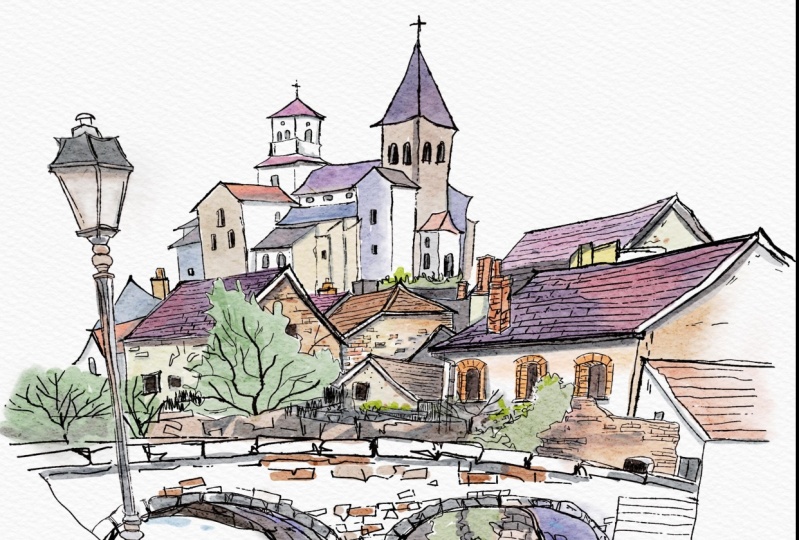
run over the composition. So if we look at another one, I mean, I did this one, actually got the
whole process of this one on my YouTube channel, which is my YouTube
channel is youtube.com, forward slash at hugs yachts. And I've got the whole the
whole full process of this. One of me doing this one. Loose as you can
be, a great fun. This was a gift to my nan, is our local town bridge, which she's quite fond of. So again, I did this, I printed it off on
those texture paper. And it looks the business and people to this day have no idea. It was done on my drawing app. They think it was done on
normal watercolor paper. They're clueless. So that's
the beauty of this technique. So the first thing
you want to do is to open up a canvas size. I'm gonna be using
as a large size, 6,480 by 8,100 pixels. It may be a bit too
large for some iPads. It's no problem. I got this one as well. 5,400. By 6750 pixels.
So it's the same, it's the same dimensions. So it's, it's a great size, especially if you're
gonna be sharing your work on Instagram. It's a great size thing because it gives you
the maximum size. But in terms of layers, you're not really
going to be needing 1 million layers to
do this technique. It can be done really simply. So pop your Canvas open. Hopefully you've grabbed
your brushes and your canvas now from the project
and resources section, go to insert file. Pop your canvas down, spin it around if needs be. Stretch it out so it
covers the whole canvas. Like so. And set that layer to multiply. And just take it down a touch if you want to
see totally at two. So this is going to remain our top layer throughout
the whole process. I will just quickly say
when it comes to printing these off, remove that layer. So you've got your clean sketch. I let the real textured
paper do its business. Don't print with this layer on. It, won't come out
right unless you have a serious printer. Okay, so just remember that. So we got our canvas ready. We just need to find a
reference because we're not, I'm setting my little
studio in the kitchen here and there is nothing
really great to draw. So as you saw me taking some little pictures from
the Internet, from Google. So what I did actually
was typed in urban towns. So if you can find
anything on Google, but it's quite hard to
find good stuff on Google. You'll get a lot of bumps. If you're typing urban towns
or urban cities, you'll get, you'll get some good
stuff like this where the composition is
there for you already. So once you have your
reference, I like to work out. First of all, I might go in
straight off the edges with my composition. Or
does it not work? And don't tell me my pen has run out as it Let's
give it a little. Now. On rather you are joking. Okay. I'd like to
work out, okay, whether I am go into the edges, my composition, or if I'm going to leave a gap like some of
the other ones I showed you. So the way I would do that, if I wanted to just frame it
into the center of a piece, I would get my selection
tool up there. I'll go to rectangle. Let me just pop that back on. Go to rectangle
and just work out roughly from this corner how far and you're gonna
go and say right. Okay. Like so. I'd fill that in black. I will go back to my
selection tool and rectangle. I would just very roughly I'm
gonna be precise like that. It would remove that. And now I'm kind
of giving myself a little frame to work within
if I wanted to keep it. If I wanted to keep it within this little boxed frame area, which is nice if you want to add some splatters at the
end and stuff like that. I think in this case
for this tutorial, this is how I'm going to do it. So that's how I lay
out the composition. We've got our, we've got
our reference ready to go. So join me in the next part. I'm going to keep these parts is low on the time as possible. So it's really bite-size
and it sinks in. For the next part,
we're gonna be putting the ink on the paper and just putting in a rough sketch to see that we got our
angles and stuff right. Okay, see you in the next bit.
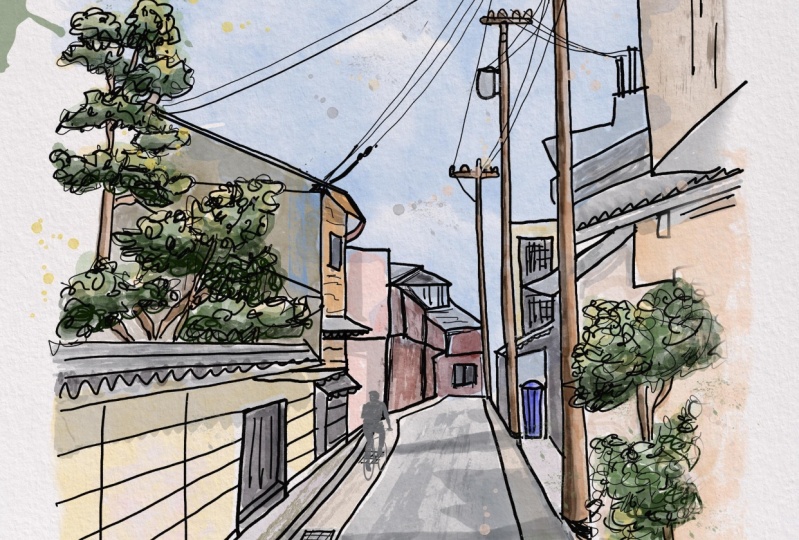
3. Finding correct angles and perspective : Hello everyone and
welcome to part two. We're going to just be
laying out our sketch, our initial part of the sketch onto the canvas
for the first time. So we're looking at angles
in relation to each other. We've got this here, which is a convenient size
because we're not trying to shortcut anywhere. It's basically what we see is what we're gonna
be putting in. We're just going to have
fun and do our best. Let yourself go. So I'm going to start
at the bottom here, and I'm looking for this angle
going up there and around. Not worried about
detail at the moment. I mean, I don't worry
about details too much in all my sketching as a whole, any way, I like to
keep it quite loose. That's just my style. I'm using the side of
the frame sides here to find my street down angles, which is quite convenient thing, would come in at a slightly
different angle there. I, my sketching on
the same layer, cos cos I don't sketch on the
same layer as your frame. Go on a separate layer. Let's try that again. A little gate there.
Am I going to become more of a flat
angle there? For this bit? Loose? I'm being as
sort of not a lot of technical craft going on more lively whilst still trying
to capture the actual place. So we've got that roof
going over there. Roof come in the same angle behind bit of a lip on
that roof coming down, a bit of a lip coming out there. Back into more of this, this path we angle. Now that I'm like so sort of our vanishing points is going to be roughly there. If it helps put your
vanishing point street. And at the start. I try not to get too
technical with it. Just have fun To be fair. I think it works best,
especially on Procreate. You can get too bogged down with all the tools that's
available to you. And you're going to lose some charm if you've
got a bit carried away. Let's put a bit of this
building in here then. Like so, a bit of a roof
coming down at an angle. Now there's some stunning. But artists out there, I got a couple of my Instagram
that I follow. Traditional artists,
one of them being friendly or family,
needs something else. We put so much time and
effort into his line work. That is really a joy to behold. And then he just slapped
some watercolors over the top to give it a great look. There's others who
are really loose. They do what I'm doing now and they just
leave it at that. But I like to just do some parts which are detailed and
mix it up a little bit. That's sort of angle there. Post this sort of building without and there's
some buildings over here which I'm not going
to get too bogged down on. So I'm just going to put
some random shapes like so. You can see we got all
foliage and trees coming out. So we're gonna be adding them. A tree and a bit of green can
help with the final piece. Especially if you're working
well with the colors. They can say allow
you to farther it goes down behind here
though, beyond this wall. Yeah. We haven't got
to get every brunch. We're just loosely sketching
in their composition. And to be honest with my style, I don't really differ much from what you're
seeing right now. I like to keep it as
lively as possible. This is what it was when I
saw it. This is what I saw. I need an artist. You sort of, you're
giving people a taste of what you see. And we all see
stuff differently. Wall coming in a bit
of a drop on the curb. Windows. Like so. Green pipe come out. So you can go as
detailed as you want if that's your style
and you enjoy it, and you'd like to take
your time. Go for it. It'll look absolutely awesome. Whatever you decide to do. Some trading is going in there. So that's my sort
of rough sketch. We knock out a frame off the
composition of what I want. So now I'm just going to add
in where I want my shadows. I'm gonna take this
up to the max. I want a different layer. I'm going to grab a felt pen, C Sharp felt pen. Just go to a gray because I
don't want to go full black. I'm just going to mark in
where I want my shadows. So I'm going to be
having a shadow there. One going up on the curb
coming from this post. A bit of an angled one day, one day, all the way along. Okay, so shadows are quite important in sketch
and they can really take your drawing
to the next level, even though it's
just a loose sketch, just some little hints
that shadow will, this is all in shadow. They'll separate
yours from the rest. So that's all going
to be in shadow. Under there is going
to be a shadow too. That's all in shadow. Literally loosely sketch it in any way I can see a shadow. Like so. So that concludes this part. We'll turn the
opacity down on that. I've got my composition now. I've got my sketch down
and I've got my width, I want my shadows to go. So there are people out
there who will think right, okay. That'll do me. I'm happy with that. That's
frozen water paint on it. That's fair enough.
Yeah. You look great. I like to ink it with something that's close to my fine liners
that I actually do use. So in the next part, we're going to be inking.
4. Inking with a loose and authentic Line art: Welcome back guys. So now we're going to
be inking our sketch. So we are going to be lowering the opacity on our
sketch we did. And lowering the opacity
on our shadows too. And we're gonna be starting
a new layer up above, taking it straight
back down to black. You can go with deep
blue black if you want. As long as it's
nice and deep ink. I like to just go
jet-black on Procreate, makes it pop out a
little bit more, especially with the textured an overlay Canvas
that we're using. So let's go and grab a pen. Give these a go, see which
one works best for you. I'm going to be
using this one here, the tech pen 812. I not gonna go too
thick with my lines. I'm going to go about there. It's good to mix your
lines up and get some thick and thin
lines in your, I'm gonna go mad, but just
add a little bit of variety. And I'm just going to begin. Little touch thicker
that actually. If you're a fast, you'd like
to do fast marks like so. So be it. Like I said, your style will find you. I like to go a little bit
more purposely wobbly. I just find I can be
a bit more careful whilst maintaining that sort
of life that I'm after. We got some lines coming
down, start Building. I got the lines about
road coming in, step there, and another
line coming in there. Then we've got, what is this
slight edge on the road. Obviously, every country has got their own different styles
with their drainage systems. So if you are drawing
somewhere abroad, you're going to see
a lot of things that's not familiar to you. That's all part of the fun. Bit thicker for these polls. I'm going straight down like so. There's another bit
of a pole there. I know I've marked it there, but I'm gonna go a
little bit lower. Straight time with that poll. It's a bit thick. So we got some
foliage coming in. If you're ever bogged down
by the minute details. A bit like me. I mean, what I simply like
to do is just put a little, a little random shapes and
maxing like the foliage. I'll just be sort of put in random shapes and lines and swishes and
curves and whatever. It adds interest at the end. To see now it's not exactly
what's on the photo. I'm just filling in gaps. Go back down a touch. This goes back around. I'm not just tracing it blind. I'm basically looking at the reference whilst
I do with this. So if there's anything
standing out, i'll, I'll grab it. Grab it now. Let's go a bit thicker
and get this tree in. Shri and like so. Smaller. Just throw in some details. Angle because soil comes down. For this bit. Down. We've got a bit of a
pole there which I missed on the sketch
for I'll put in now. Every now and then
if you could just pop in a correct angle, it'll just bring things
back to reality. If you're looking at it. And you think I was way off, just get the odd
one which is right. You can maintain that life
then whilst being loose. Here, I'm not gonna get bogged
with the details up here. So this is where I'll be. This is my personal style. You can, you can put
details in here. I'm also trying to speed it
up for the, for the class. Got that bit of a
lip come in there. A bit of a bush. Going to go nice and small and my pen now and
I'm just going to things like this, like Telarc, telephone
wires and things like that. They're going to set
your work off because this is detail that
people notice. For some reason they people will notice these little wires and
cables and stuff hanging. So get them in. Definitely, definitely
get them in. So in a bit more random
little lines here and there. And that will
complete that stage. So that is just remove
our sketch layer. And this is sort of what
I like to finish with. You could leave
your sketch layer on with your ink if you want it. So it looks great as it is. It all looks great to me. Honestly. I like to remove that though, and I'll be redoing my shadows
with a multiply layer. So join me in the next
part where we're gonna be going over our shadows.
5. Adding shadows to create depth: Welcome back guys. So I'm just going
to be going over the shadow areas now
with the same pen, but only on a multiply layer and a little bit tiny
bit more neater. So let's open up a new layer
and set it to multiply. Before I start, I just want to quickly inking
because I've just noticed a bit of a road coming down here
which I've missed. So on I just want to just
get it and bring it back. It's a bit of a curve there. So just want to bring that little touch
back. No harm done. Okay, shadows. I'm gonna be using my marker pen and this one is also good. And I'm gonna be
going in with a cool, a cool blue or dark gray. If you hold the shadows
on your picture, it'll give you an accurate
representation anyway. This is the color I'm
going to be going for. Just deciding which
marker pen to use. I'm going to be
using flat sharp. So like so. We've got this one
which comes out there. That's got some points
on the top too. So we've got this one which
runs down across the curb. And we've got our you know,
what you're thinking? I don't look any different to the last time you
did it, but yeah. I'm just seeing it differently
and I know where I am. That's why I'm redoing it. A couple of shadows
coming over there. And of course this is
going to be in shadow. Shadow, that's gonna be in
shadow, shadow, shadow there. And we're going to
add some shadows. Also randomly scattered
all over the place. So I'm just going to be
Tottenham in here and there. The undersides of
these telephone poles are gonna be shadow. I know what you're thinking. Why is he using a marker pen? Yeah. Yeah. Yeah.
Urban sketches. Main tool. In fact, I forgot to mention that when I go to Sketch him, because one thing that
I take is a marker pen, like some capex or something, some Winsor and Newtons. The bottom of these trees. Like so. That's shadow. Happy with how it's
coming along so far. I don't think I've ever done
one and not be happy though. I just love everything
about this style of art suits me down to the ground. Okay, we got some shadows. I'm just going to remove some shadows from where
they're not needed. Like the site there. Maybe we've gone over
a bit certain parts. I'm just going to remove
them because we can. That's why. Just because we can. It's a bit on the
end of this tree. I'm just doing some little
bits and bobs like that. Can, it can set you off a bit of texture to the
bottom of that shadow. Shadows are quite important. That's why I'm taking a
bit of time on this part. And now we're quite
happy with that now. So that's gonna be
my shadow layer. And it's going to
remain at the top. Underneath our, our
main canvas texture. We can play with this to
wherever we want it now. This is where we are now
with this little scene. So the next process, in the next part, we're just going to be adding some paint and it's super fun. Just roll with it and slap colors on and we'll
see what looks best. Join me next part.
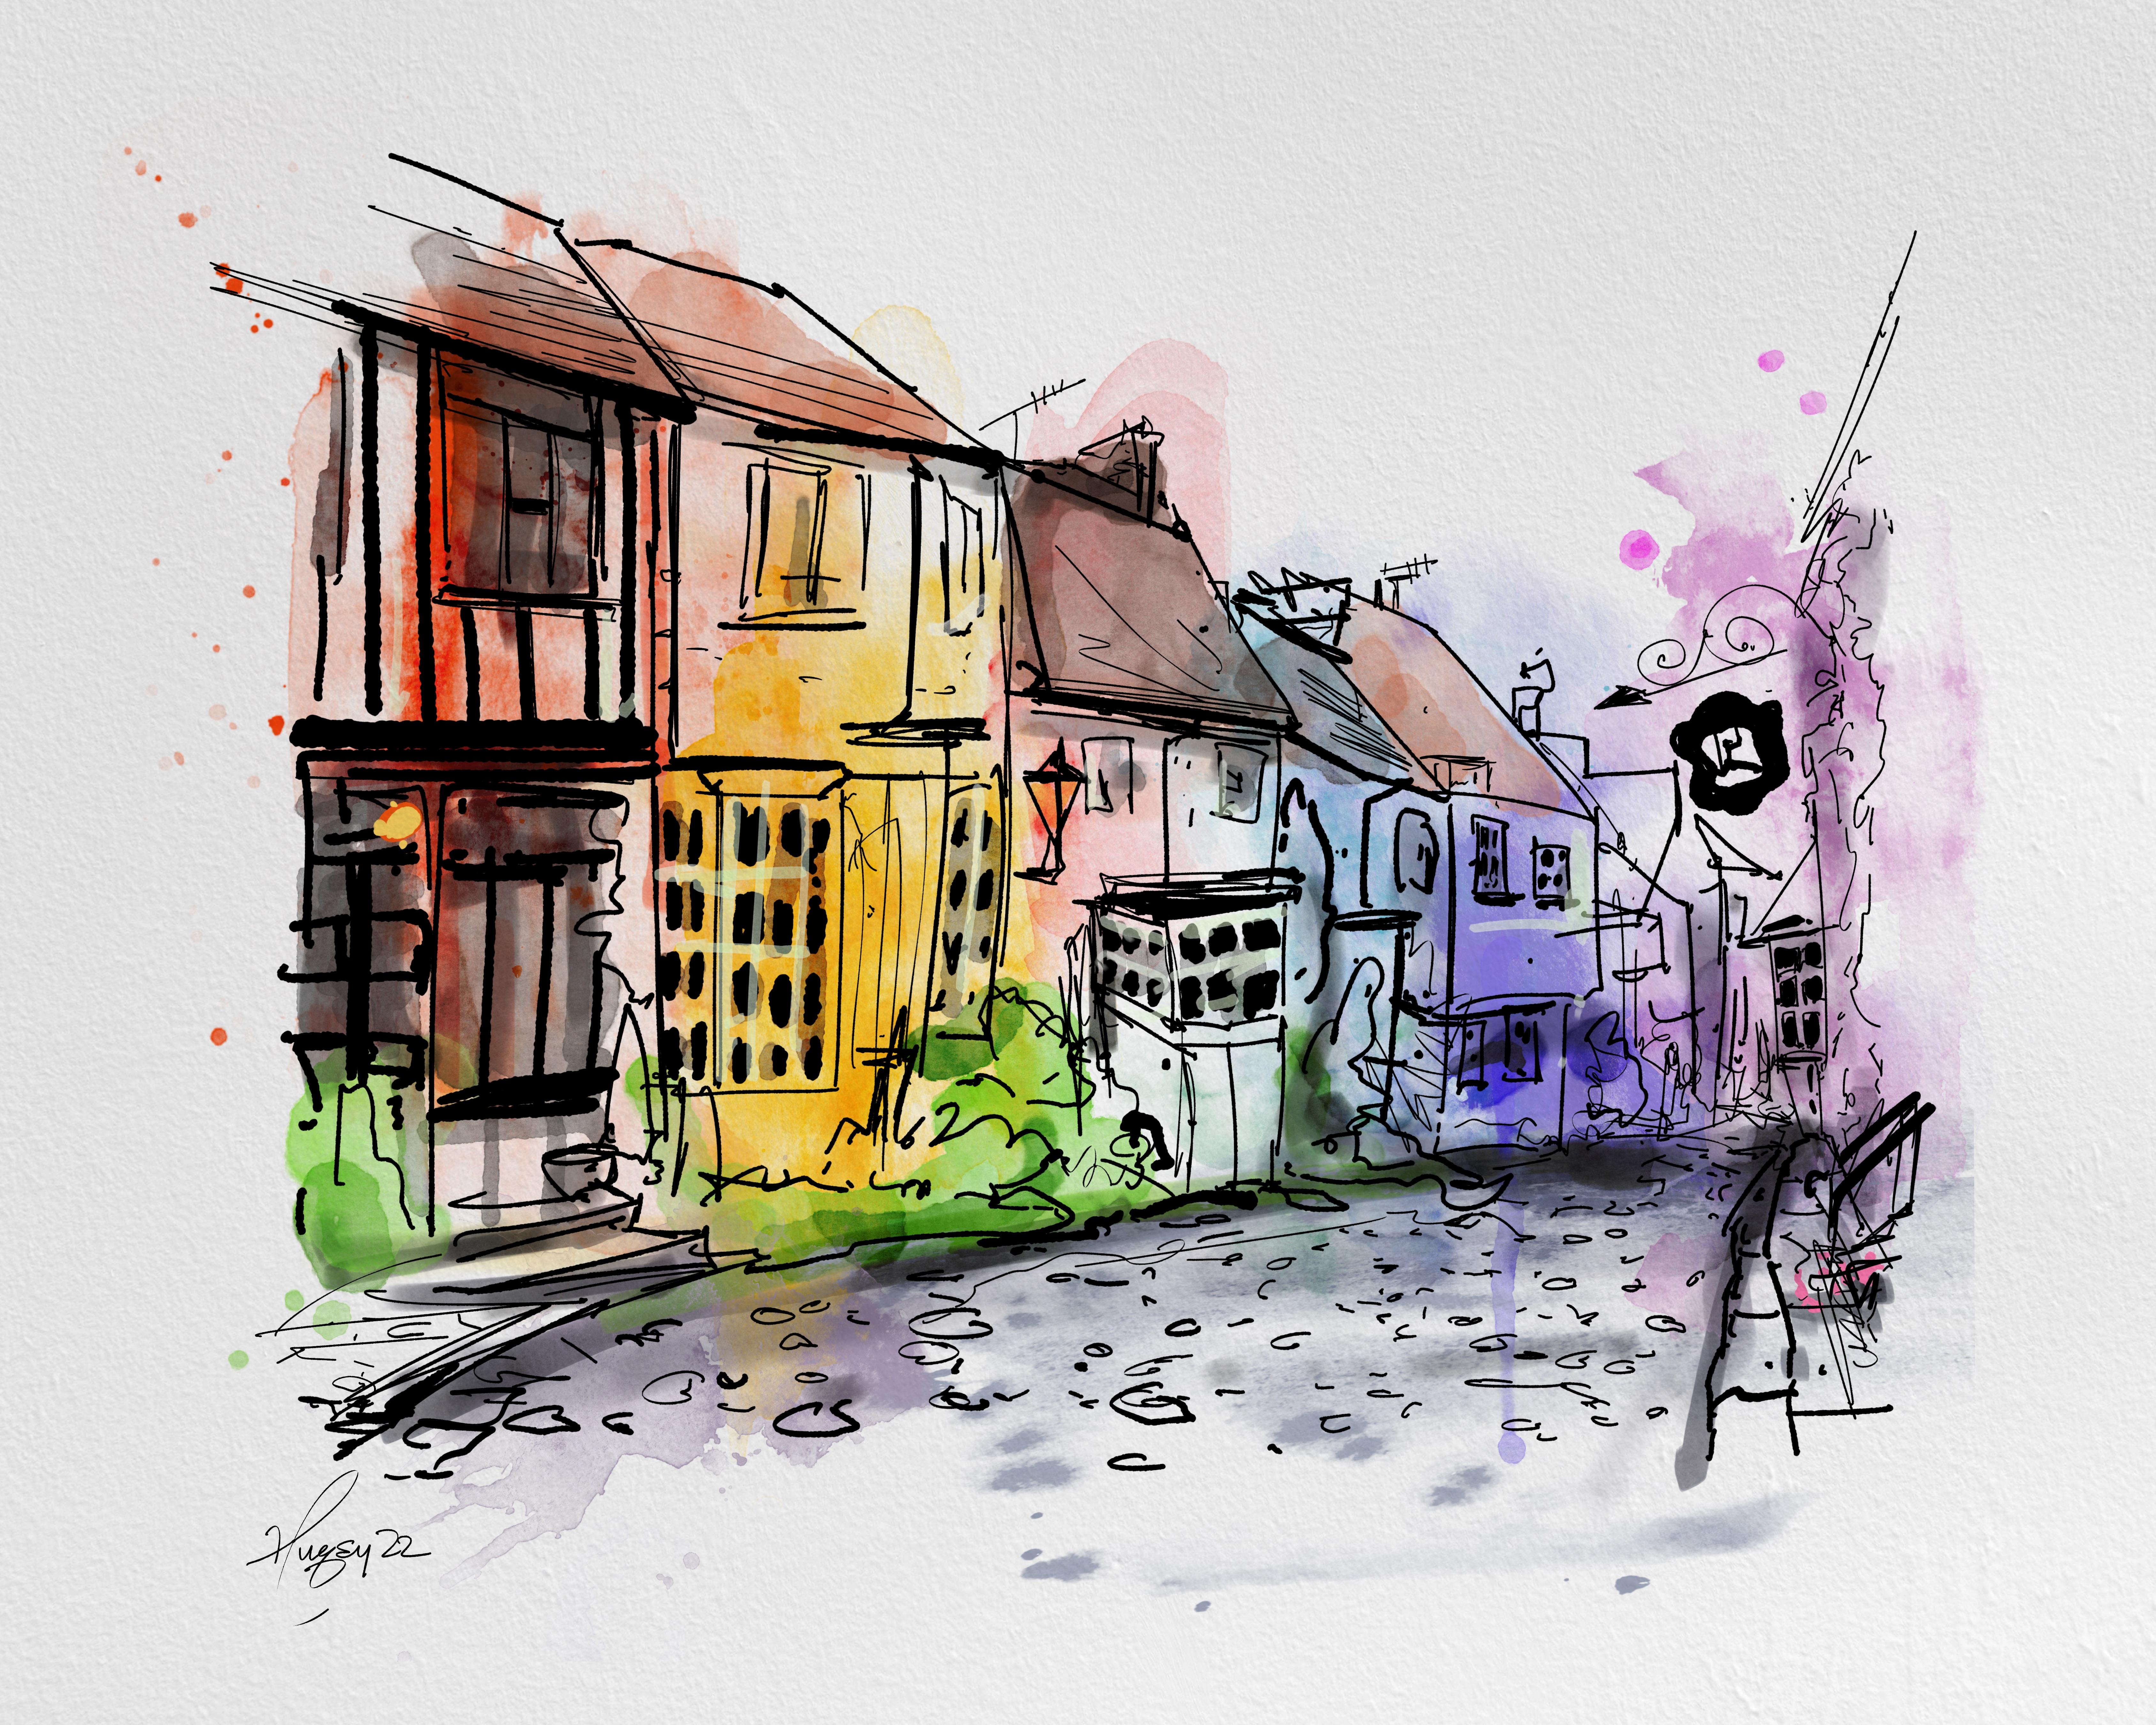
6. Watercolour techniques and colour selection: Welcome back guys. We've shadowed and sketched an inked urban sketch
to this point. So there's options
available to you now, and it's gonna be down to your own personal style
on how you color this. Urban sketches vary
their styles same as me. So I'm going to show you
two different techniques. First one is just, I say
adding random color. It's not really
going to be random. I'm gonna be adding
cools and warms. With the warms being sort of where I want
the eye to be drawn. So that being said, I just want to show
this brush set. I can't provide you with
these brushes unfortunately, but I can highly recommend them. They're not Trailhead their
trail head watercolor brush set that I think it's called the Perfect perfect watercolor. I can't remember the
exact name of it. I'll get it for you though. And they come with
preset washes, which are brilliant for this. So we could just
slapping at the back our cool colors because we want our mean warm
colors to be the focus. So pop one down and distort it. I've just popped that
on the multiply layer. I'm so good at this. So let's open up a new
layer for our color. And we can put that
down by there. And you can see instantly, it just adds a bit of class
and a bit of a greatness. We can put a bit of pink in on a new layer because I
want to move it by there. Let's just put a bit of pink. Like so. Because we don't really want
that to be the focus. We want this area
to be our focus. These are cool. This is our cool
area of the slider. And we're sort of
working towards our warm colors over here, which would be more saturated. Let's get a nice warm color. Put a nice wash. Somewhere like that. Let's take another one. This one's really good. It's got a nice warm orange coming off like so. You can get some reds. Like so. Maybe get some green, some cool green for the day, which is not really important. And then we can use
some bluey graze too. I mean, literally washing with a watercolor pen like this. Just so some of it's
got all of it a color. We can add a bit of
green if we want to. So foliage, like so, we can add some splatters
and some frills if you want. What I like to do is
add more black parts. So I like to go in with some really heavy deep grace
and get them get them again. Even darker. Actually. Don't
be scared of the dark parts. We don't want it to wash out
too much to our line work, especially with what colors, they're not very quiet. Oh, what's the word? Opaque? Is it compared to our dark inks? So we can just sort
of a bit of that. Maybe go in with
our alcohol marker, adding some small
angles and lines. So that's one way
of doing it where you're just sort of
randomly adding in colors and drawing the eye to a specific point
using the washes. There's another
way which we take a bit more care and we try
and color it as we see it. So we can use a watercolor
marker for this. We can just color it in
like so why is that? Okay, That's pop that
down where it should be. Did I just yeah, I thought so. Just erase the whole thing.
Because it wasn't on. We just it's actually
still there. Okay. And we just color
with watercolor pan. We can color pick if we want to. Like so this is sort of how I
prefer to do it to be fair. Lots of grades in the areas
are not really keen about. This part here is like a, I'm going to go more saturated
than the photograph. Color in color it in like, so. It's a bit paler this building, but we've got the color on. Even though we've multiplied
this whole section. You still get a bit
of color on there. That's white circle, very
blue and cool for this color. Mixing your warms and your calls nicely, it's going to look good. My orange and my yellows
are gonna be my warms, my blues and purples and stuff. My shades are going
to be the cools. Green is a funny one
because it's kind of a coolish color. So it's good when
it's surrounded by warm tones of brickwork
and stuff like that. They're welcome to occur. We shall go darker. I got a bit of foliage
going on there. Lots of foliage. Road. As to the road, this is more of a sandy
color, this rim part. So we'll keep with the sandy color for
this whole part here. Will go all the
way up with that. And then we'll bring
our blue gray road in. Like this. It's like Okay guys,
I'm going to stop that. They're join you
in the next part. We will continue this
coloring process.
7. Directing attention with careful details: Guys, welcome back. Just want to keep
the parts long. I want to keep them
as small as possible. So small bite-size, the telegraph poles
we need to get in. So we'll go nice
and brown for them. So there's some very cool Like parts which I'm going to
grab with the marker. Is it gotten that one?
Just going to grab some some white parts. They're like so not connect the right angle
for us on the eraser. That's why that was a bit wrong. Some cool parts there. It's a very red brick
building in the back. I'm going to try and grab bar. Right? Okay. So the bottom
of this house is actually off put
in a little bit, goes a bluish color
from there down. So I'm gonna grab that. I'm going to grab it there too. It's a bit too blue. Bit better. I didn't some blue now to the shadowed areas.
Very light blue. I'm asked about it. I mean, if you wanna do the sky, you can get your
water color brush out and pop it in. I like to just give it
a bit of this and then erase with the same brush to
sort of get some clothes. You could use my you could use my where's my
clumpy fair brush, which is pretty good
for everything. And you could make some clouds with that
if you wanted to. Probably the breast and brush ever made on
Procreate by the way. For me. So yeah, we could
call it done there. We could add in some
little ink splashes and splashes to give it some
more with our ink pen. So we could sort of
got full pelt with it. We can add more fine
details if you want to, just to add a bit
more interests, just random shapes,
more to look at. It looks like you've spent longer on it and put
more thought into it. But they're just random shapes. Actually didn't call
that bit there. And you're going to add some watercolor splashes
if you want to as well. Now, if you are lucky enough to own the trail head Brushes, wherever they are, There's some splatter textures on
there too, which worked well. Always add a bit extra pieces. As you can see. Now a lot of people would be happy
with a picture like that. It's an urban sketch and
it's done on Procreate. So join me in the next part. I'm just going to show you
the process again really quickly with a
different reference just to make sure we grasp it. And I just wanna show you one more coloring method because there's one thing
that I forgot to mention that some people
like to leave some parts of the urban sketch
untouched and uncolored. So where we have this, we could erase away apart. That's not that important. Maybe even all this, maybe all this whole area
here we could we could erase that away and leave
some just pencil work. Even this. The sky. I mean, I wouldn't have added
the sky anyway to be fair, you see my last picture? Bbc, it just takes on a
different sort of vibe. We can erase away some of that shadow that we've
loaded on there. Obviously we still got our
base shadow on as well. And so it gives it a nice effect which
I like to look for when I'm doing
my urban sketches, to leave some parts untouched. Like so. That's actually
a tree which I've missed their nice,
beautiful orange tree. And I'm sure you never
missed it, but I did. I'm just going to put
some splatters in there to insinuate that it's there. Join me in. The next part goes well quickly, quickly run through
another, another reference.
8. Recap: Hello guys, I got a
new reference up now. And I just wanted to
show you something. This is the last one we did with the two different styles. So I wanted to show you a different one
just to show you that. It's a very repeatable process. To your sketch
pack, your ink pen. And as you can see, this
reference is a wide viewed one. So we could either
draw it like that. But if you don't want to and you want to draw it like this, set your reference finder to
the same size and then try and try and work the best you can to get a bit of
everything in like so. Okay, now I'm happy with that. I can sort of work with that. So again, we'd just go
in with our sketch. So we would put a pot there, a bit of a brush there, there's a bit of a
flag going on there. So another pot. I'm going to get this big
tree in a big flower pot. Their spend. Pay special attention
in particular to things like signs poking out of the
thing there and get them in. Never leave them. They're
quite important to the scene. Building there we got this
building going up the front. Remember guys, this is my loose composition sketch
stage where I'm just trying to get it to
look a little bit realistic. Got that sign popping
out with a giant I will sign popping off there. So we're going to keep that. And there's another
one hanging below it. Then we got buildings. It's a building goes
up tall when they're basically dealing
with tree, tree edge. Being, I think there we go, this big flower pot coming
into our view there. I sort of disappears
off into the woods. A lot of greenery going
on there on this picture. I haven't used the
border this time, guys. I wanted to just
show you that you can work straight to the
edge if you want it to. Move and sketching. In my book, I like to leave a little gap around the outside for just flicks and splatters. So how I usually do it, I've gone straight to the
edge here with this one. So I do that. Even
this sign here which says To the north, add little details like that in it will set your
work off big time. Somebody they're walking, dog. Sort of pop pop hurting. Some little tables and chairs. In the background there. Along the side. There's my rough
sketch of this one. And this was a trickier
one because it wasn't, the composition wasn't
there initially. So we've sort of zoomed in. To find, to find a
picture out of it. So I lower the
opacity and I'd go over that then a
little bit neater whilst looking at the reference. Another thing I wanted to
talk about was number one, I want to talk about
these brushes, okay. They're quite expensive brushes. You've got the whole
set all three. The splatters are really great. Nice finishing
touches to your work, which you can't really get
when you're on Procreate. And the washes. Really brilliant. I particularly like this one, which I use a lot, adds a nice wet soaking look. So consider purchasing
them if you can. Okay. Another one I use a lot. You're not just limited
like you are with urban sketch and you can
draw anything you want to, as I showed you earlier on
in the video with my car, which was a little bit random. So Drew drew a car. The whole video for this
one is up on YouTube. Take a look at that
at youtube.com, forward slash at hugs the arts. And this is a little time-lapse of me doing that one again. Loosely sketch out the
composition like I've showed. Going over it with the ink, slapping some color on using those brushes,
I'd showed you. Some washes, some
whites in a bit more dark and an epsem certain
areas and signed it. I don't think I've even
got the gold out on. You see, when you zoom in, people at close,
they struggle to see that it's not a
genuine urban sketch. Another one I've done,
this was really loose. This one, it was just again
left to a great effect. Again, super loose. A bit too close to be fair, that one started
playing around earlier. And the latest one I did
of my local town center, exactly the same process
that I just showed you. So thanks so much
for watching guys. Make sure you've got your
brushes ready to go. You can keep them forever. And I hope you enjoyed it. Please share your work with me. I really want to see it. I love this art and
I loved seeing it. So thanks a lot for
taking my class. She has guys and if you
could leave a review, I mean, an honest review. That will be great. Thank you.
 HugsyArts, Aspire to inspire