Transcripts
1. INTRODUCTION : Okay. Hello, everyone. Michael
Hughes here, AKA Hug, and I want to give you a
quick tutorial on how to turn your pet pictures or photographs into
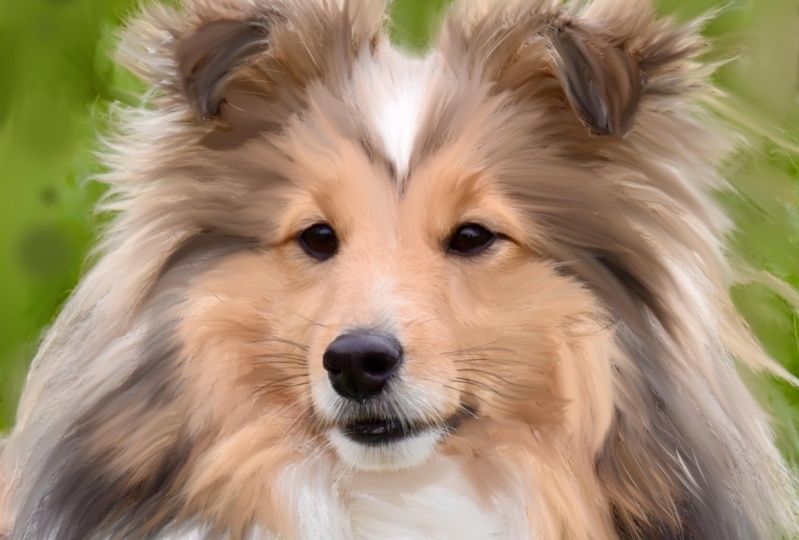
those pet portraits, which look really authentic
and cool like this one here. I've just done this one.
I'll be taking you through step by step on this
same doggie here. You can see this one here
actually took me 57 minutes, probably closer to 50 minutes because I've been back
on message about, but Yes, a quick process
by the end of the course. Hopefully, you'll know
exactly what you're doing. I provided all the brushes
you need because I think that's quite
important when you're doing pets with the fur, it's a little bit
different to doing skin. This whole course is
a little different from my photos to cartoons one, if you've done that, as that one is a little more
forgiving the cartoons. The slightly different
process for this because we're going for a
more realistic look. Like I say, Hopefully, you've downloaded
your brush pack, which is pet portraits. I've given us a splatter
brush for the background, just to liven things up, a bouquet brush just
to do the bouquets, which you see in so many
digital art pieces these days. Some shine for the
eyes or the tongue, some soft dark fur and a brushing lightly at
the ends we'll be using. We've got some hair strokes. The main one we will be
using is the clumpy fur too, which is a brush I made, which is perfect for blending out the photograph and
it's nice and wet, not too wet, that it
gets too diluted. It's just right
for what we need. So it's been specially designed. As usual, most of my brushes are usually based around
the blending ability. But some of these are not
like the glossy shine is definitely one is right for painting like the hair stroke. With this one, I'm going to be taking you through the
step by step guide. And this one is a
little bit different and there will be some
elements of drawing involved. If you can see the
little white hairs here, I've drawn all them
in on afterwards. You can see they're
nothing technical, that the brush is
perfect for it. I'll show you when we get there. There's the glossy shine
on the tongue there. And, download your brush
pack and let's get stuck in.
2. PHOTO ENHANCEMENT : So, guys, Hugsy here again. Let's get street and
then to part one of our pets or our photos to pet
portraits. Let's call it. So this is a
photograph which I've found of Pexels,
is a free image. I think it's quite ideal for what we're going to do because it's a little bit tough. You've got fine fur, which I know can be a
little problematic. So this is the photograph, bog standard as it is. No editing been done to it yet. I've also provided this
photo so you can draw along with me and do as I do. The first thing we
need to do is edit this photograph and get it a
little more rich in color. And get the saturation
levels up slightly. We're just going to hit edit on the iPad and click this
little magic wand. It'll just give it a
little pop and bring out some different hues
and brightness. Now, as we scroll down, we have lots of
different options here. Depending on the
color of the animal, you may want to add a if it's
a really dark photograph, if you could just slide
this brilliance up, it can really bring out a
lot more color and detail. We'll be keeping eyes
about there for the date. There's no sort set
method to this. You just got to go with
what you feels right, but our main goal is to make the colors pop a lot more
than the photograph. Let's just check out a
contrast. That's fine. Let's check out a
saturation. It's really low. We could probably push a little more, get
some more colors out. I've got up to 29 there
on the saturation, if you are following
along, vibrancy. Yeah, we can give
that a little push. I've got up to 39. Warmth. I think that's quite a little
bit cooler. I've got -17. Tint, I'd like to go
for a cooler color. Tint, I've gone up to 49 there. I'm happy with that. I don't really mess with
noise reduction. Usually just keep it off, sharpness, I'll keep it down. It's only really the
vibrancy and saturation, tint sometimes brightness,
contrast, shadows. You'll also see black point. If you've got some pictures
which are really gray, you can increase
the black values. If you want it, obviously,
ours has already been taken care of a really
good quality photograph. We're fine. As edited,
I'm happy with that. That's good to go.
I'm just going to double check the saturation. Okay, I I 44. So happy with that. Good to go. Photos ready, done. I'll see you in part two when we prepare to do our blending.
3. CANVAS PREPARATION : Hey, guys, welcome
the part two of my photos to pet portraits.
Now, this is the part. We've already added
a photograph, and we want to get
stuck straight in. So we want to be looking for
an end result like this one. Let's open up a canvas. I'm going to use a large square, which is 5,000 pixels
by 5,000 pixels. Okay. That's going to
do me. Open that up. Now, when you download or when you receive your
photographs for commission, always keep or duplicate it straight away
before you edit it. You've got the
unedited version and you've got your newly
edited version. What we're going to do
is we're going to add them both at the same time. It does this a lot, why? If I close it, go back
on, I should work. Yeah. So it non edited, go in there it's
only done the one, which I think was our edited, so we'll add the unedited. We've got both
photographs there. What we want to do
is select both, and we want to resize them both together to keep them
at the same size. Okay. Okay. So excuse
me if I sniff slightly. I do suffer a terrible hay
fever and it's been awful the last few days in the UK can't complain,
though, the sun is out. So place your pet
wherever you like. I'm going to place out
there because I'll be dragging Some of his fur over anyway, so that'll be fine. Okay, so he's going
to live there. So purely for
reference purposes, this original photograph. You see, we turn it off.
There's our edited version. There's the original photograph. The first thing we want to do is get stuck straight
in on our layer, the originals off now, and we just want to cut
out this background, using the S to Make sure you're on free hand
and don't go too mad. You haven't got to go
too, you can if you want, if you're inclined to but just loosely and roughly cutting out. Try not to get too much
background color like that because it'll it'll
play with the colors which we don't want
because the main step is getting the correct colors Try to stay inside the
colors of the dog. Or rabbit, or whatever
you're doing. Don't worry too
much about losing all these loose hairs
because we'll be pulling our owning at the end
in one of our steps anyway. Mang gets to get the mean shape
of the pet like so. Okay. And that's where we run out of room, straight to the bottom. If you click in a position, it'll snap to a straight line. If I click now on
this circle, it's, we want to hit invert the
finger swipe down clear layer. There we go. Dogs
ready to be worked on. There's the original
and we're ready to go. Just going to do one more
thing because I thought I had. No, not sorry. I was going to just pull him down,
but it's okay. We'll grab that anyway.
There's no problem at all. All right. So that's
the end of part too. Our dog is ready
to be worked on. So for the next stage, we're going to be going straight in and blending this body, and it can appear tedious. It can appear like a big
job ahead. It's really not. You've seen my picture, I just showed you it
took me 50 minutes, and I did play about quite
a bit on it as well. So with the correct brushes, it really does make it
a lot more efficient. So, see you next part, guys.
4. BLENDING THE FUR BODY: Hi, guys. Welcome back to
my photos to pet portraits. So we've edited our photo. We've enhanced the saturation
and the vibrancy slightly, and we brought out some of
those dark tones a bit, so it's a little bit more
detailed for us to work with. It's in position, and we
got our reference ready. We've cut out our dog,
so he's good to go. Now it's time to
start the blending. Okay, so Okay. Okay. Click on your smudge tool
and you want to be using. The brush I provided
hugsy clumpy f two. This is the base brush
for all the blending. Check the size six seven, is quite a watery soft brush. It's not as powerful as the ones I've used previously
in my cartoons, think be going for a
different type of effect. You can see it is quite washy. It does dilute slightly, but it's what we want for
the soft painted finished. That's going to be too big
for us. Let's try seven. Too small. 11. We're just going to get
stuck in then on size 11%. Let's go. When you're blending in, try
and work on the darker areas first because more than likely that's going to
be the area underneath. The fur. You're going
to be coming back on top of it later on. It's always better get the darker areas just
smudged in first, and we're just going
with the flow. Don't worry about losing
certain white hairs and stuff. We're going to be
using our reference later to add them back in. There will be some
drawing involved, but it's really basic for the finished product
that we're going to get. Here, I'm just
keeping the colors. And I'm just stroking in.
Same as my other one. We're getting rid
of that photo fuzz, which because we want it to look painted like
a painted portrait. I'm getting rid of
that at the same time, just following the
way, single strokes. I'm just following the
way that the fur is running this dark area there. I'm just going to
wash that in there because I'll be coming back
over the top, like so. All this dark area here. In fact, I'm going to go
slightly bigger for this area. I've just go up to 16 there just to get
all this dark area. Washed in. Then we can start bringing this
shade down over the top. Just following the
flow of the hair. I know it's a bit soft and
a bit washy. It's okay. A will be explained. The main focus is not to
wash away too much color. That's the main focus
for the moment. Don't worry about
the little hairs and I just washed all those
little white hairs away. Don't worry about them.
We'll get them later. That's why we got our
reference in place. Just flick up and down, keep some of the brown
tones hues he got there. S at the bottom where
I cut out here now, S his hair starts to swh over to this side. We'll do the same. We'll over follow the hair. So you can see what I mean with this
brush, it's just perfect. It took ages to do. Probably one of the brushes that I've played about with the most because I didn't want it to diluted and
too wishy washy. I have to have some power to it, but not too much power. We can get best of both
worlds with this one. We can get nice soft fur whilst still keeping
some sort of form, if you know what I mean, and the way the fur runs. I'm
just going to go up now Try and grab some of these
browns. Brush in there. Some browns up there. Some brimby color went
down, what we have. Again, deepest
apologies if I sniff. It is heavy hay fever season. Unfortunately, I suffer with it. We can't have it all come here. So just going up to there. We'll sort the chin
out in a minute. I don't want to get carried
away with a chin just yet, because that's going to That's going to have his
own part to play. Main focus is the
body at the moment. You see he's got a lot
of white fair with a lot of brown tones in it. I sort of in all different
directions there. Okay. Okay, have a quick check. See what you're
up against. Yeah. That's good. Remember, just
trying to keep the color. Now, it's very easy if you've
got white with this pen to brush in too much mud
distort it a bit. That's no problem at all. That's to be expected.
Do your best. We'll sort that out
towards the end. That's not a problem at all.
If it happens, don't panic. In fact, is to be expected. I'm just going to
get some of this darker area over
this side first. Before I go bring out
the fluffy belly. I'm just bringing
them out there. This kind of process. I mean, it'll work
with all pets. Curly, whatever, this
brush will do it. If it's curly, you're just
following the curls instead. I know it can seem like a long
process. It's really not. It's a lot quicker than actually painting
it, I can assure you. And you're getting very, very good finished result to really really appealing
and efficient, no matter your skill level. Just going up there now. Get that brown there. Some
of them brown black hair. You can remember he had really fluffy wild hair
coming off, didn't he? We won't go too mad, but we
know where the wild bits are. Just that brown.
Brown bits there. Again, just dabbing and pulling. Same as you know, I showed you in the
cartoony tutorial. I will be doing another
tutorial soon on. I do the more realistic humans. Again, it's slightly
different to the cartoon. Same principles,
different brushes and slightly different strokes. I'm going to get right in
there now to that point. Okay. Like so. And I'm going down slightly. So I'm down to 9%. I don't want to bring a bit
of this white to fur over. Like so. And then the
black side of the head can just pop over. Like this. Okay. So Now, I'm just going to give
it a little once over. Maybe go a little bit smaller and get a bit of
that chin hearing. Okay. Adds to the effect when you're going to pull
some little hairs in again. You haven't always got
to go mad and detailed, things will catch
your attention. Things like the fact that
we're following the stroke of the doggies hair and
it's quite important. Now, we sort of went
too far with the black because we wanted
to make sure it was going to be covered, so
it's going to be covered. Let's just pull out some
of this white hair. Just have a quick check
where we're going? Pull out some of
this white hair. Again. Anymore. I mean, you can see
there, for example, if you look at this photograph, it's got the white over there, mine is looking a
bit gray and a bit, bit muddy, we'll be fixing
that. There's no problem. No problem at all. Okay. Ok. Now, he has got really
wild hair coming off. We may as well do it
while we're here. We'll just pull them out
and swoop them around. Just like our
doggie friends got. Oh, what actually
happened there. Like that. You can see does get a
little bit wilder up here. And I'm sort of if I just
grab a pen for a second, I show you kind of in these sort of directions for these
loose hairs, okay? Let's have a look just to make sure what's the importance
of a reference photo, see. It's not just a
simple we're not just pressing a button
and editing a photo. You're still putting a lot
of work into this to get a nice result for people for
commissions or for whatever. As long as they know what they're getting absolutely
no problem at all. Okay. I'm just going to go
up to the top of this ear and we will be calling
this part done. With the brush strokes,
I just want to say. It's got a bit of
fall off on it, so we will die off anyway. So I'm just pulling the
brush off at the end, so be mindful of that. Working to a thin point. If you will. Let's just look at the top of
this I've got that wild sort of here
at the top there. Lovely jobbly it
really gives you that soft beautiful sort of
finish as well, this brush. So it really does look like
not just any old painting. It looks like a really
nicely done painting. You can really impress
people with this. Okay, I'm not going to
delve into that part yet. That's going to be the
next part for his head. You can see where we are and you can see how
good it's going. It's a fantastic technique. This is where we are.
Now, well, I'm here, we're just going to grab
a nice thick brush. I mean, this one will do it. We just want to pull
the rest of our doggie over here because he wasn't
quite on the page, was he? So we're going to fill it up. Again, you can see
minimum method. This is why. I wasn't too worried about the positioning
of him in the beginning. He was always going
to be filled in. Cumm Just have
another little go. Again, you can go over
as much as you like. You're going to get it
done in double quick time, which gives you
even more time to double and treble
check your doggy pick. Just before you send
it off to the customer or to your family,
whoever. Okay. Okay, so I'm just going to
finish off this body here. Pull some more lights back over. I've got a bit of
purple going on. I like that. I like to
have a bit of purple. Goes with anything. Okay. Especially on a black dog. It's good just not
to be all black, be a bit boring and
a bit amateurish. I've got some big clumps
fear coming out there. And I'm just going to go
up slightly to vary it up. I'm just going to go
with the flow like so. Okay. Okay. So you could sort of really get carried away
if you know what I mean. You could you could go full on and create a a
masterpiece if you wanted. But there you can see
the body is done. That's the end of this part.
Happy with how it's going. We've done up to
that ear is done. It's just his head and
that right here ear now. I'll tell you
something now, we're going to be using
the same brush, the clumpy fur to, to do even his eyes and his nose
and all of his mouth. This brush is going to be used
for the entire next part. It's only when it comes to actually drawing in our details, that we'll be switching up. This is how we're going.
There's the photograph, beautiful dog mind,
really healthy looking. There's the dog. And
this is where we are. So we're doing right.
We're doing good. And I'll see you
in the next part.
5. BLENDING THE HEAD & FEATURES: Hi, guys. Welcome back. So just a quick recap
of where we're at. So we've got a doggy photograph
of our free site pexels, which provide thousands of great free images. You can use. And we've enhanced
it slightly with vibrancy and colors and
brought out some brilliance, just to make it slightly different from the
original picture. Then we've cut it out after
add it into procreate. We've cut him out, knowing
that we're going to be going back over the edges
with some soft fear anyway. That's just why we didn't
have to be too neat there. We've already blended in all of his body and kept all
his tones and colors, and we've just got
his head to do. Let's crack on. Let's
get stuck in now. With the head and that last ear. Size, I'm still 8% 28%. Now, I don't know
if this could sort of maybe make your arms ache for some people who
are not used to it. Because it's a lot of a
lot of this, you know. So I think when I used
to start doing it, I think I did get
a bit of arm burn. It's it's not a race, you know, put the pen down, come
back, certainly not a race. I mean, I'm going pretty quick to try and show
you know how quick they can be done and have a video size that's uploadable but when you're
sort of doing it on your own, just take your time,
there's no rush. If your arms aching,
take a little break. I think when I first started doing it, my arm used to ache, but I kind of do 1 hour sitting now pretty fine.
You get used to it. Even more. I'm on 7% for around the eye. Using this brush and it's quite a powerful brush
even though it's diluted. The content of 5% actually. Yes, a powerful
brush for wetness. We want it wet because
we want to pull th multiple hash keeping
colors as best we can. Okay. And now I'm just kind of doing a little dab push push push along
the edges there. I can have a little trick
to keep the color there. I just blend out
that photograph. Like pupil in there now at the highlight. It's very watery
watercolor effect. This brush will give
you a beautiful. Really give you a nice
painted look nice and washed, gives a beautiful effect. We'll be having another
look at the eyes in a bit. You know, nothing major.
We're not going mad, but we will be having
another look at them. There's one tricky
little part done. The eyes are always daunting
for out three bodies. So we'll get the
other one done out the way too daunting part. De The daunting be you'll find
the when you're doing it, there's nothing to be worried
about. Nothing at all. What's the worst
that can happen? You'll have to double
tap. Double Tap, no. So over we go. Sorry if I'm waffling guys. Or helps me concentrate. Been doing a lot of
traditional sketching and drawing lately just to keep the demons fulfilled. They do like to
wonder sometimes. Again, when it comes to
commissions, this is my method. This is why I made
it, sufficient quick produces
fantastic results. So back to the wishy
washing of the eye now, keeping color without
pulling color away. Da, you know. Just dabbing without pulling the colors all over the shop, kind of keeping them
where they are. But losing any trace
of photograph. Like pupil A bit of
subsurface there. See if I can grab
that bit of pink. A bit there too a bit of blue. We'll keep that bit of
subsurface scatter, by the way, sort of next to light on
things like eyes and skin, you'll get really
saturated colors. Next to lights on skin and eyes on a lot of
things actually. Okay tip for you. If you want to really
make your pictures pop. Okay, so two tricky parts done, the eyes are done, always the most daunting bit because you know that
if you mess that up, your whole picture is not
going to look good, all right. Nothing to be scared about.
You've seen what I've done. I just dabbed and washed
in the colors stayed in exactly the same
places as they were, another daunting part of
pets is the nose, I suppose. Don't be scared. Get stuck in. I think to be scared about. I'm just going to
go straight in now. I'm going in a size four because I want to
get this outline. I'm trying to drag the
darker colors of his nose around to create some sort
of outline here of his nose. I'm not too worried about the little dots and
things like that. It's not this style. I'm just trying to get
the lights in the darks. We're going for that painterly vibe effect we're going for. It's a beautiful vibe to the painterly
pictures. Beautiful. Daba. Try to keep them shines and lights so I know
where they are. I'll enhance them in a bit, so they're even shinier. Okay. Shadow by there. Light. A bit of a
high light by there. Obviously, we've got
a reference anyway, so when we come back in later, we can we know where to
put our shoes and stuff. G light in. I go to go a bit six. Just to get this done. Okay. Okay, and I'm just going to
do the actual nostril now. Like so there's no little
hidden fuzz in there. It's small I like to get
this barrier in. Like So the most daunting
parts now done. The eyes and the nose. Most daunting parts,
probably on humans too, because it can make
or break pieces. The tongue, start
with the darkest bit. To go a little bit
bigger at 10%. It's just the color I'm after. Just the color. Light. Darker there. Okay. Smaller of this back pit, go right up. As
close as you can. We'll be bringing them little
hairs back over at the end, a lot of places in areas
like that, go right up. Wh it all in. Okay. A little bit smaller and back at 4%. You kind of have
a rule of thumb, you could kind of stick at
4% for your fine around the edge detailed areas
where you want to get stuck in around noses and eyes and tongues and things. You really want to go
much smaller than 4%. You maybe a while Okay. And that's his tongue done. Okay. Happy with that. Okay, back to for
I'm just going to guess some blend into
these teeth here. Try to get all the
different tones if I can, a bit of pink, a bit of yellow. Dark area. D bring the teeth
back out, wash it over. As soon as you start
using this brush, you'll realize wow what a tool
for the job. I thank you. I'll just say thank you
because I did work hard on this brush to get it
to suit the purpose, and there's millions of
f brushes and all sorts. But none suited the purpose. So we've got to be a pink
gum Dark too. Da da da. Again, like we did
with the eyes, we're just kind
of doing that dab wash sort of thing,
kind of effect. Da push. Really give us a nice genuine sort
of effect going on. And Try and remember where you're going as
well as you're going, you know, try and work
your way navigate your way through kind of memorizing where you've got where you've
gone and where you've been. You don't want to be wasting time going over the same area. Not just that, you don't
want to be washing away too much color. You want to verblending is an
amateur most common fault, I'd probably say, as soon as
they discover the smudge, whether it's real
life or on procreate, if they got a bit of
tissue and a pencil. Myself, I've been there. You
still got guilty of over blending and washing
away detail. Not everything in
life is smooth. Put it that way.
Remember that tip here. Okay. I'm going to lose that
because that's just a here, so I'll be bringing out back in. Da. I am being a little bit
pedantic with this mouth. I'm not going to
lie. I didn't do this with my trial run earlier. I did it from up here. So I go a little bit more overboard on the
detail to be fair, so we should get a much better
finished looking piece. As for short. He's got some darker underneath. This is the last stretch
now of the blending. Is right to. I've navigated, so I know exactly
what I've got left. It's just right or left, whichever way you're
looking at him. Right up to the pink. I just bringing in some suggestions that the
hair is running that way. Okay. Ok. I. Let's do that here. Did we do the There you go. Didn't navigate
very well, did I? I think we did actually. I think we just
rushed through it, didn't we with a big
brush, well, bonus. So for this sort of stage, I'd just like to have
a little look at. I mean, I'm sorry,
I'm just going to blend in these hash cutolines
which I can still see, which are playing on my mind
a little bit, like that. I want it's soft blend them out. At this stage now we're
pretty much done. We've blended in
the whole thing. I'd like to have a little recap. We're going to end
this part now. I'm just going to
have a little stare at it. There's the original. There's mine. There's
the original. There's mine. There's the
original. There's mine. I'm just going to have
a little stare at it. I'll see you in the next
part where we'll be adding some details to
the doggie portrait.
6. ADDING DETAILS: Okay. Hello, guys. Welcome back. So I hope you've had
a good comparison now and just zoned into the
photograph and your painting, the photograph and your painting like I'm just looking at it now and you can see
that he has got some wild loose gray hairs. Firing off everywhere. We
can see our white coat. Maybe not quite as one color
white as the photograph. The white around his nose. We can have a little
look at that. The main thing, we just want to add some loose hairs, don't we? This is the trick
for the next one. The first thing we want
to do is we want to open up our reference
photograph, and we want to
lower the opacity. Let's see, we want
to see those hairs. I'm just looking at this
hair in particular for now, if I just put it back up. Lo at, little area here for now. I want to be able to see that. If I go down that
far, I can see it. I can also see where I'm drawing because I'm going
to be drawing on our layer. Sorry, I'm going to be
drawing on a layer above. We may as well because
we've got the space. I mean, with only two
layers in, we may as well. Let's grab a pen. This is the hugs a stroke stunning
stunning brush for eyelashes, eyebrows and single has. Just stunning. We've
got our brush. We're not on smudge anymore. We're on hair we need
to pick a color. Is white going to be too strong? Probably. We can have a bit white, but not for the moment. What we want to be doing is just grabbing a color
from over there. It's kind of a yellowy yellow off white is
what we're going to be going with here just
for the loose ones. Maybe a bit lighter than that. Yes, that's the one. Yes. We got the opacity down here on our photograph
and it's a perfect guide. This is why we did what
we did at the beginning. It's exactly the same position
as we edited photograph. We can easily add what we like. Just going to start
adding in. Some hairs. Now, less is more, maybe maybe go with
that attitude here. You haven't haven't got to
add in every single here. You can see that it doesn't
look like I've done anything, but as soon as you
turn this off, I have. That's the bottom
line of it. Go easy. Otherwise, you're
going to be lowering the opacity and
smudging it back in. I'm just lowered the
opacity even more actually. I'm on 60% there now, and I'm going to go
down a touch to 4%. Let's crack on. Following the hairs, just loosely brushing in the way
that this fella's hair runs. That's all. It's nothing. And it just adds such
a massive effect to the picture at the end. And it's just
absolutely nothing. Okay. So mad hairs there going on. Just going to go a little
bit white for this part. I want to see it a
minute. Let's grab that. Let's go slightly off. Okay. I'm py with that. Very fine hair by there, so. We'll go with that and
we'll run with it. Doesn't look like
anything's happening. I am actually still
drawing on my layer with very fine hairs as you can
see, or for the effect. So very fine hairs
over here, too. Hasn't always got to be the
light to hairs, you know. You can add in some
wild darker hairs, too. Okay. So whites. Just a. Just going to go up on the
opacity to touch there. I think I want a bit
too mad on the opacity. If you go too mad can really see where all these
little hairs are. Not all of them need to be
super bright and white. Mix it up, said that. I don't really know
what I think I pressed the button there, such a such a pro idea. D have a look at that. Yes. That's okay. Probably got a bit too mad. That's what I mean. Less is
more. That's okay though. I'm happy with that. We're going to give it
a little blend anyway. So No panic done. No panic. Face. We can have some white
hairs on his face. Maybe not. Very fine to suggest more than anything. Just to suggest. Let the mind
of the viewer do the work. They'll fill in the banks. Okay, look at that bridge, there. And, you know, like I've
tried to see before. Absolutely to worry
about it, is there. I think the worry
about. It's just easy. Just go with the flow. Got a little bit
of gray going on there a little bit of gray, so we'll have a little
bit of gray, very fine. Just mixing up the
stroke slightly. So all kind of running exact. Okay. Hey. Just adds to the effect.
I mean, to be honest. Looked pretty cool before
we started doing this. To be perfectly honest. Okay. Okay, I think pad struggling yet again. Really is on his last
legs, this old boy. Okay. You can see I'm
kind of selecting Where I want to
draw these hairs. I'm not going to go mad
absolutely everywhere. No need. Like that's
just way too light. I'm not going to go with that.
That's more like I think. I'm just going to suggest. Just suggest that his
hair is running that way. It takes all it takes. I haven't got to go mad. I am going to go a little bit more mad though
with the white, maybe a bit of a yellowy white. Just coming off
his top lip there. I'm just going to
use mine for this. Pretty much know
what's going on. Just going to be some
very fine hairs. Coming over adds to the
effect really greatly. In terms of it looking
like a drawing, which is what we want it
to look like a painting. If we wanted to just
to be an edited photo, we just use an app or something. We're putting a lot
of effort into this, you know, pro of it. Okay, we're going
to have a little. A little go right there
too around this chain. Adds to the effect,
isn't it? Yeah. Okay. Okay, guys, I'm going to literally call
at the end of this session. Pretty happy with it was gone. So at the time,
Canvas information statistics with an hour in. We're an hour in now. We're slightly behind schedule, but this is a higher
quality piece than what we're
usually dealing with. There's the photograph. Let
me just turn the opacity up. There's the original
photograph of the fella. This is where we are Okay. Okay, so it's looking great.
Join me in the next part. We're just going to
add some more detail. We're going to bring some colors out and add a bit of depth. Using brushes, no layers, no multiply layers or
nothing like that. Just going to add a
little bit of depth to the darks and bring
out some lights, put a bit of gloss, shine on
his eyes, and on his nose. Bit of background, and
then we're good to go. Not a lot left. Thank you, guys.
7. CREATING DEPTH WITH DARKS & LIGHT: Oh. Hello, guys. Welcome back. So I've just had a
little drink there, so I'm all refreshed and ready to finish off this
puppy portrait. So we've done well. I hope you're happy
with yourselves if you've drawn along with either my picture I provided or picture of whatever pet you. It's gone really smoothly. I usually does to be honest. So there's our
photograph, we are. Now, we're just going to add
a bit of depth and light to the dog just to bring
some three D effect to him. So we're going to be using our
park brush for the moment. I'm going to look at these eyes, and we're going to
select a darker tome. S there. And this will
come out extremely dark. Let me just on the right layer. Let's go on our actual photograph
layer that might help. The opacity. I'm just going
to go slightly darker. I'm just going to vary up. I'm going to go way
down to just for this pupil lightly brush some darkness around the eye. Not all of it.
Obviously, some of it, just to add some
contrast variation, adds to the effect massively. Even if it don't look like much While we're there,
let's add some light. CightGrab a light part. That's a bit huge. You can see it quite a progressive brush a
little bit bigger. We don't need to go that mad. Grab colors and
it'll light whatever to hue that you've selected. Let's go back to our dark. Let's see if we can
go nicely around. I'm just going to go up
this capacities on 70%. My brush is on three. Let's try to
carefully go around, so we've got a bit of a
nice edge to this nose. I'm going to go a bit. So we got a nice bit of an
edge to the nose. And there a bit of
darkness in there. Now I'm going down
on the opacity. Bit darker around
the edge there. Again, it just adds
to the effect. It really does. Down on
the opacity up slightly. I just add in some dark parts. Where needed a bit
darker in there. The longer you
take on this part, really make your work stand out. To be brutally honest with you. You could have called this
picture done a while ago. But we wanted to do everything, get it all in, show off
what we can do here. Okay. So we go a bit darker. Just washing in a bit of
contrast, that's all. Once we've done that, let's just around the nose a minute,
had a bit of a shadow. Just around the nose there. Again adds to the effect. Light Pick a light color, and let's just start That's
a bit too big, isn't it? 5%. Okay. Just washing in some color, something there. 3%. You see you've got quite a dot dotty kind of
nose dotty texture going on. So we can do that, my dot Dirty darts, little darts, and this
is what's going to give us know effect. Okay, and finally, we
will go a bit brighter and we'll add brighter
ones in there. Nose done. Dark I'm going to get some
texture on this tongue. Not too much, really washy. I just had a bit of depth. Add a bit of contrast. Like so. Little bit just goes
a long way, really does. Like the guy's tongue, the guy. Okay. Way too big, some lighted areas in there. It's light? Yes. It's
quite light running up against that
dark line I thought it would not that much. Okay. Likeness on the teeth. More areas around his
tongue. What's going on? I swear I swear that pad. He's snappy with me. He's
just snappy with me anymore. I think he wants to leave and have a rest,
and I'm not letting him. Okay. Let's add a bit of
definition to the fair super soft darken and
let's just grab black. And let's have a look at how much opacity
we're going to need. Quite a bit by the of it. All right. I'm on
8% very large size. I'm on 70%. Just looking to add a little tiny bit of darkness
to some areas. That's all. Adventurous adding
a bit of contrast. A bit goes a long way. B there. Bit on his face there. I think I'm starting
to sound like is it Bob Ross? Starting to whisper. Okay, okay. We can't play around all day,
especially when it's done. Now we're going to add some
contrast with the light. So we'll call it the white way
down again. You know what? Let's go with our clumpy light because I think it'll
give us a better effect. We're only looking just to
bring a bit of color in that's all. Okay. Okay. Daddy Dad. Daddy da. He's got some nice
shines going on there, isn't he on his forehead. So let's see if we can
replicate a bit of that. Slightly. Not that much. It's not going to work,
try this lighting brush. Okay. I just wanted to just emphasize some areas like so that's the one I wanted
it. That's the one. Okay. Are there. Back to our clumpy
bruh original layer. Now I want to make
sure the hair around the edges is spot on. Lower the opacity down to
where you can still see. But we're going to be
working on our layer. So get your blend
clumpy brush power, and I'm going to be at 6%. Okay. And I'm just going to be replicating some of this clumpy soft fur,
which is coming off. And I'm going to be trusting. What's going on underneath. It's have a little. Okay. Okay. Okay. Okay. All the way down. Now we need to look at
our hairs. We drew. Are we happy with them? Or do the opacity need to
go down slightly? Maybe take it down. Just a few pegs down to 96. I'll take a soft lighting brush. I'm just lower the opacity, see if we can just
soften some of them. We're on the wrong
layer. Never mind. Yeah, just trying to just take the edge off some of
them. That's all. Some of them a
little bit strong. One brush of this sort that out. So you can see, give you a lovely lovely
authentic finish. Soft soften guys, we're done. I mean, we're done there.
We're happy with that. We've got our strong
hair brush strokes going in. We got
it all going on. If you want it to just carry
on and just pull out a few hard A few hair is off the main photo you can. You don't want it
all to be soft. It's good to mix it up. It's good to have the odd odd flailing off really adds to the effect, especially this brush because
genuinely looks like hair. Okay. Ok Coke. We are looking good finished. Now we're just faffing. Come back in the last bit, guys. Well, I'm just going to show you a little basic background. I'm not going to patronize you, you can do whatever background
you're happy doing. I mean, you could just keep the original background
of the dog if you wanted, what was already there because
some photographs are nice. G and blur it out. Just duplicate
your edited photo. Go and blur out if you wanted. I'm just going to do
a basic couple of splatters and some bushes. We'll see how we go from there. Join me for the last bit, guys. Thanks for watching
take part so far.
8. CREATING A BACKDROP: Hello, guys. Welcome
back to the final part. So we've done really well. We've comfortably turned out a doggy photograph into a doggy portrait with no
problems along the road. No problems at all. So
this is where we are at. You can see we've
gone a bit wilder with some of these
hairs on the edges. No problem. No problem. It hasn't got to be exact. This just got to look
not like a photo, basically, and still
bear resemblance. This is where we're
at. I'm just going to check one thing Whiskers. Okay, so Whiskers are no
problem. We can add them in. I'm going to do them white, and I'm going to use my
hair strong brush. Very small, 2% full opacity
a couple of whiskers, which I didn't really
notice, shooting off, so we're going to add them now. Got one there. I got a
couple coming off there. We've already added some there, a couple of very small ones. So I'm going to go down to 1% for these ones which are
just loosely coming off. Some coming off there and there's one shooting off over
there, so we'll have it. We will have it there. Any eyebrows? I think we got
that earlier, didn't we? Again, this is how
I do my whiskers. I always fly them in at the end Okay, guys, we've done. Right. So backgrounds, you
can sort of do what you want. I mean, depending on
the color of the dog, the style of the photo, what do you think of
what the customer wants? I mean, you can kind of go wherever you could go sort of dark backgrounds
if it's a white pet, for example, because we
got a pretty dark picture, kind of go down whatever
road we wanted to, if you will, you could sort of go for a nice blue or green. I love in this sort of color at the moment
for backgrounds. Kind of a teal. I think it is sort of color. You know, you kind of go
down whatever road you want. You could kind of just
do a base color like so. I've added you a little
bouquet brush there so you could just kind of add your own little bouquets
in if you wanted to. No problem at all. Okay.
Give a little blue. Where are we there. Give a little blue, but you just going in again with some smaller sharper ones. Okay. You kind go
with save that for. Okay. For the purpose, just to show how easy and quick
that back grain was. Once again, my iPad struggling, really on his last legs, this boy. Save image. Ok. Oh, I think I've just
made a mistake. I've just added all that
bouquet in on a layer we need, and now there's no do. It's not pretty,
is it? Never mind. Okay. So you'll have
to delete this now. The other option is, of course, the splatter, which I just love. I don't love a splatter. You could just pit
colors from your doggie. I've provided my
ultimate splats brush, so be very grateful. You could come from behind, open up a new layer and
just come from behind with some splats if you
wanted mix it up a bit. You could call for that effect. You good. Go for the
mad splatter effect. Do you what you want? I
think for this example, I think it just looks quite
nice with a solid color. A solid color, and some
good bouquet. Okay. So good bouquets blurred in. Just wiggle these around
with the pen still on and you can get any
size that you wish. Any size you wish. Go. I throw a few smaller sharper ones in. Like so guys. I'm going
to call that a wrap. There's just one
thing that I have forgotten to tell you about, which is this fantastic
glossy shine brush. So we're going to be right
down on the opacity. White and 22% on the size. If you just want to add
on the right layer. If you just want to add some
lovely little wet details. I mean, this is the
one is perfect. I'm just going to
add a little bit of wet down there.
It's quite random. I'll shoot out
differently every time. Be prepared because
every now and then, you'll get exactly what
you're looking for. A bit of wet on
his nose as well. Why not? But as you can see, it's a funny brush. Really funny. The opacity
couldn't be any lower. And it still shoots it out. Add a bit of wet over
the bottom of this eye. Like so and so. Lovely july. On the nose there. Right, guys, we have done. All that is left for me to do is to sign this
fantastic picture, which I'm really pleased with. And well, sorry, but I'm going to use
my brush to sign it. There you go, guys. Thanks
so much for taking part. Really appreciate it. He hope to see all your
finished doggy portraits, portraits, elephants,
whatever you chose to do. I hope this really
helps you as well. Thanks, guys, cheers.
 HugsyArts, Aspire to inspire