Transcripts
1. HELLO AND WELCOME BACK: Being an interior designer, observing buildings. And it's my new details has always been wonderful. During my college time, we went to different cities and urban sketching has always been one of the most important part of our studies. So what usually happens is that we vent to that particular building structure. We take our sketchbooks and start sketching and scribbling on the people, right? And the light location. Generally, I always had enjoyed doing urban sketching a lot. And this is one of the most amazing art forms that I had come across. And I was wondering, let me share this title of what urban sketching that I do. Everybody, welcome back to class myself, rhetoric buddy, I must have thought independent artist, pleasing, good job, India. I'm also a professional interior designer. So people who might not be knowing me and drive me recently can find most of my involves being displayed on Instagram. I go by the name Chicago auditions. In this class, I'll be taking you through all the materials and art supplies that you will need. Will be starting with basic practice, exercise. And I'll be also talking about the perspective in each particular painting. We are going to start with our basic sketch first, and then we'll be moving towards the inking part. No need to worrying, I'll be taking you through all my new details and drawing methods. We are going to talk about the colors that you are going to use in each painting. The most amazing part is that for completing the entire painting will be needing a single brush only. There'll be talking about the movement of your brush. And we'll be also talking about how you can control the water capacity in your watercolors. You are definitely going to enjoy the method that I apply on my urban sketching. And we are going to paint three different paintings. No need to worry a dog. The entire classes that are grounded in real time frame so that you can understand everything clearly and properly. I'm very sure that you are going to learn something new out of this class and you will be definitely enjoying the process. I'll be really happy if you try all the three paintings. So without any delay, grab your art supplies, join me and let's get started with all the three painting.
2. ART SUPPLIES: Hey everybody. So before we start, it is really important to know the correct art supplies that you will need in this class. No need to worry. You will find all the art supplies very easily in any nearby local stationery. For now, let's just talk about DO handling materials. Pause. So there is a Benson that I know that everybody will be having. Then we'll be needing a single brush for the entire class, which is size 12. Round brush. From camera. You can use any other band as well. It's not compulsory to use that same need. Black pen, which is inking pen from Sakura Gelly Roll. Then we'll be needing a black marker. The marker that I'm using is from domes. And it is a nice tip marker. Will be using the marker to give depth and our sketches. Now it is very important that you know what kind of watercolor paper you should use. So I'm using watercolor papers from Scala, and these are 300 GSM. And that is what you have to take in mind. So you can use any brand for your watercolor papers, but it is very important that you use the correct GSM. So the GSM is basically the thickness of your paper so that you can apply heavy washes on it. Now, let me take you towards Michaela ballot. Please just don't line it's ready dot d right now. So this is basically watercolor organizer and it has a nice mixing space also. If you do not have those kind of palette, you can use a ceramic palette as well. Then let me talk about the watercolors that I'm using. These are watercolors from Bristol and these are artists grade watercolors. If you are a beginner, I would say less than gold for us students range watercolors. Then we'll be needing certain zones or erasing. And I'm going to use glass jar with clear water so that you can clean up your brushes. So yeah, that's it. So these are all the art supplies that you will be meeting for the entire class.
3. LETS PRACTICE PART 1: Hey everybody, Welcome to the practice session and this particular factors. But we do, you're going to learn all about different methods and techniques that are used in all these paintings. All the three paintings are different and visuals, but the techniques are holding your pencil and making different strokes in gang and water coloring are similar to each other. Now, if you're an artist, it is very important that you maintain a schedule for yourself for practicing so that you can maintain it on a regular basis. And it wouldn't be kind of a journal to you where you can bold and preserve all your stuff together. Now, let's just talk about one of our paintings in which we'll be talking about the prospect to how you can identify that, what kind of posts that goes in the painting. As you can see, that we have our main building block, which is in the center. And I'm drawing a basic rough sketch to make you understand. So after you know that there is a central building in the center portion, Vi have two houses and the left side and some building element in the right side, which is attached to that center part. For the kind of perspective which is used in this painting is a one-point perspective. And the point that I had just simply marked in the central building is the vanishing point from which the entire scene and margins. Let me just write it down so that you'll get to apply your idea. So now from the vanishing point, we have doodle friends line and the right portion and doula friends line and the left portion. The using these reference line, you have to draw your painting elements so that you get a nice visual. And your entire sketch comes in the right perspective, which is 1, both spectrum. Now as you can see that we have a building element in the right side, and at the same time we are having trees on the bottom. So what happens is that the trees get bigger as it comes towards the outer portion. And that is where the vanishing point, please at all. So towards the vanishing point, all the elements that are coming into the big term gets smaller, as you can see. And this is the entire basics. More two you got to learn about. And this is particularly known as one-point perspective that is used in this particular painting. So I hope that you weren't correct idea of how you can identify the perspective and particular sketch using this technique, you can create your sketch in the correct manner. Now let's just rectify all the elements together. So this is the central building that we draw. And this is where it is coming in the painting. Though, right? Mulling portion when the trees, which is coming in the painting, that idea. And then we are having two houses and the left portion, which are coming in the painting right over here. I hope that you got the exact idea of one-point perspective. Now let us talk about the tools that we are willing to make with our pencil and our inking pen. And the same time we are going to use the marker also, but in a very limited. But now let me take you towards them as date that generally people mean, I'm going to draw two rectangles. The 4s, two rectangles is one with benzyl and one width are thinking, Ben, the basic mistake, but generally people make, is that they draw a solid and both true with their Ben and Ben that you can see right now, which I had drawn. And other kinds of strokes that I hadn't made in my painting. I very much Landon and rough in nature. So you're not only supposed to give us single line, you have to give multiple lines and rough and random manner. And it should be darker in the edges and partners. And these type of strokes make your painting and your sketching a little bit more attractive. Now similarly with your ink pen also, you have to do the same thing as you can see. There had just given a random strokes at shouldn't be straight, but it shouldn't be a single line. You have to make multiple lines and it should be darker in the points and corners. I hope that you'll want a clear idea of how we do give talks with your Benson and Ben. So I particularly call this as a rough strokes. Now, let me take you towards a little bit of sketching through this kind of technique that I had shown you end up below rectangles. So we're going to draw on the central element and that central building part, which is in this particular painting, which is on the left than just family Foster. And I'm the video so that we can zoom a little bit of time. You can just simply observe the way I'm making strokes with my Benson. Similar to the one which we had done in that rectangle. So you can see bad, we had made multiple strokes and with photon and Dhaka back in the corners and edges. Now once you're done with your sketching with benzene, you have to simply trace it with your ink pen. And again with your ink pen also you have to make similar kind of stroke without giving us simple plain line you how to make it a little bit rough in nature. They're going to absorb that we have given those talks and these are a little bit darker in the edges and corners, that will then do a sketch becomes a little bit more attractive.
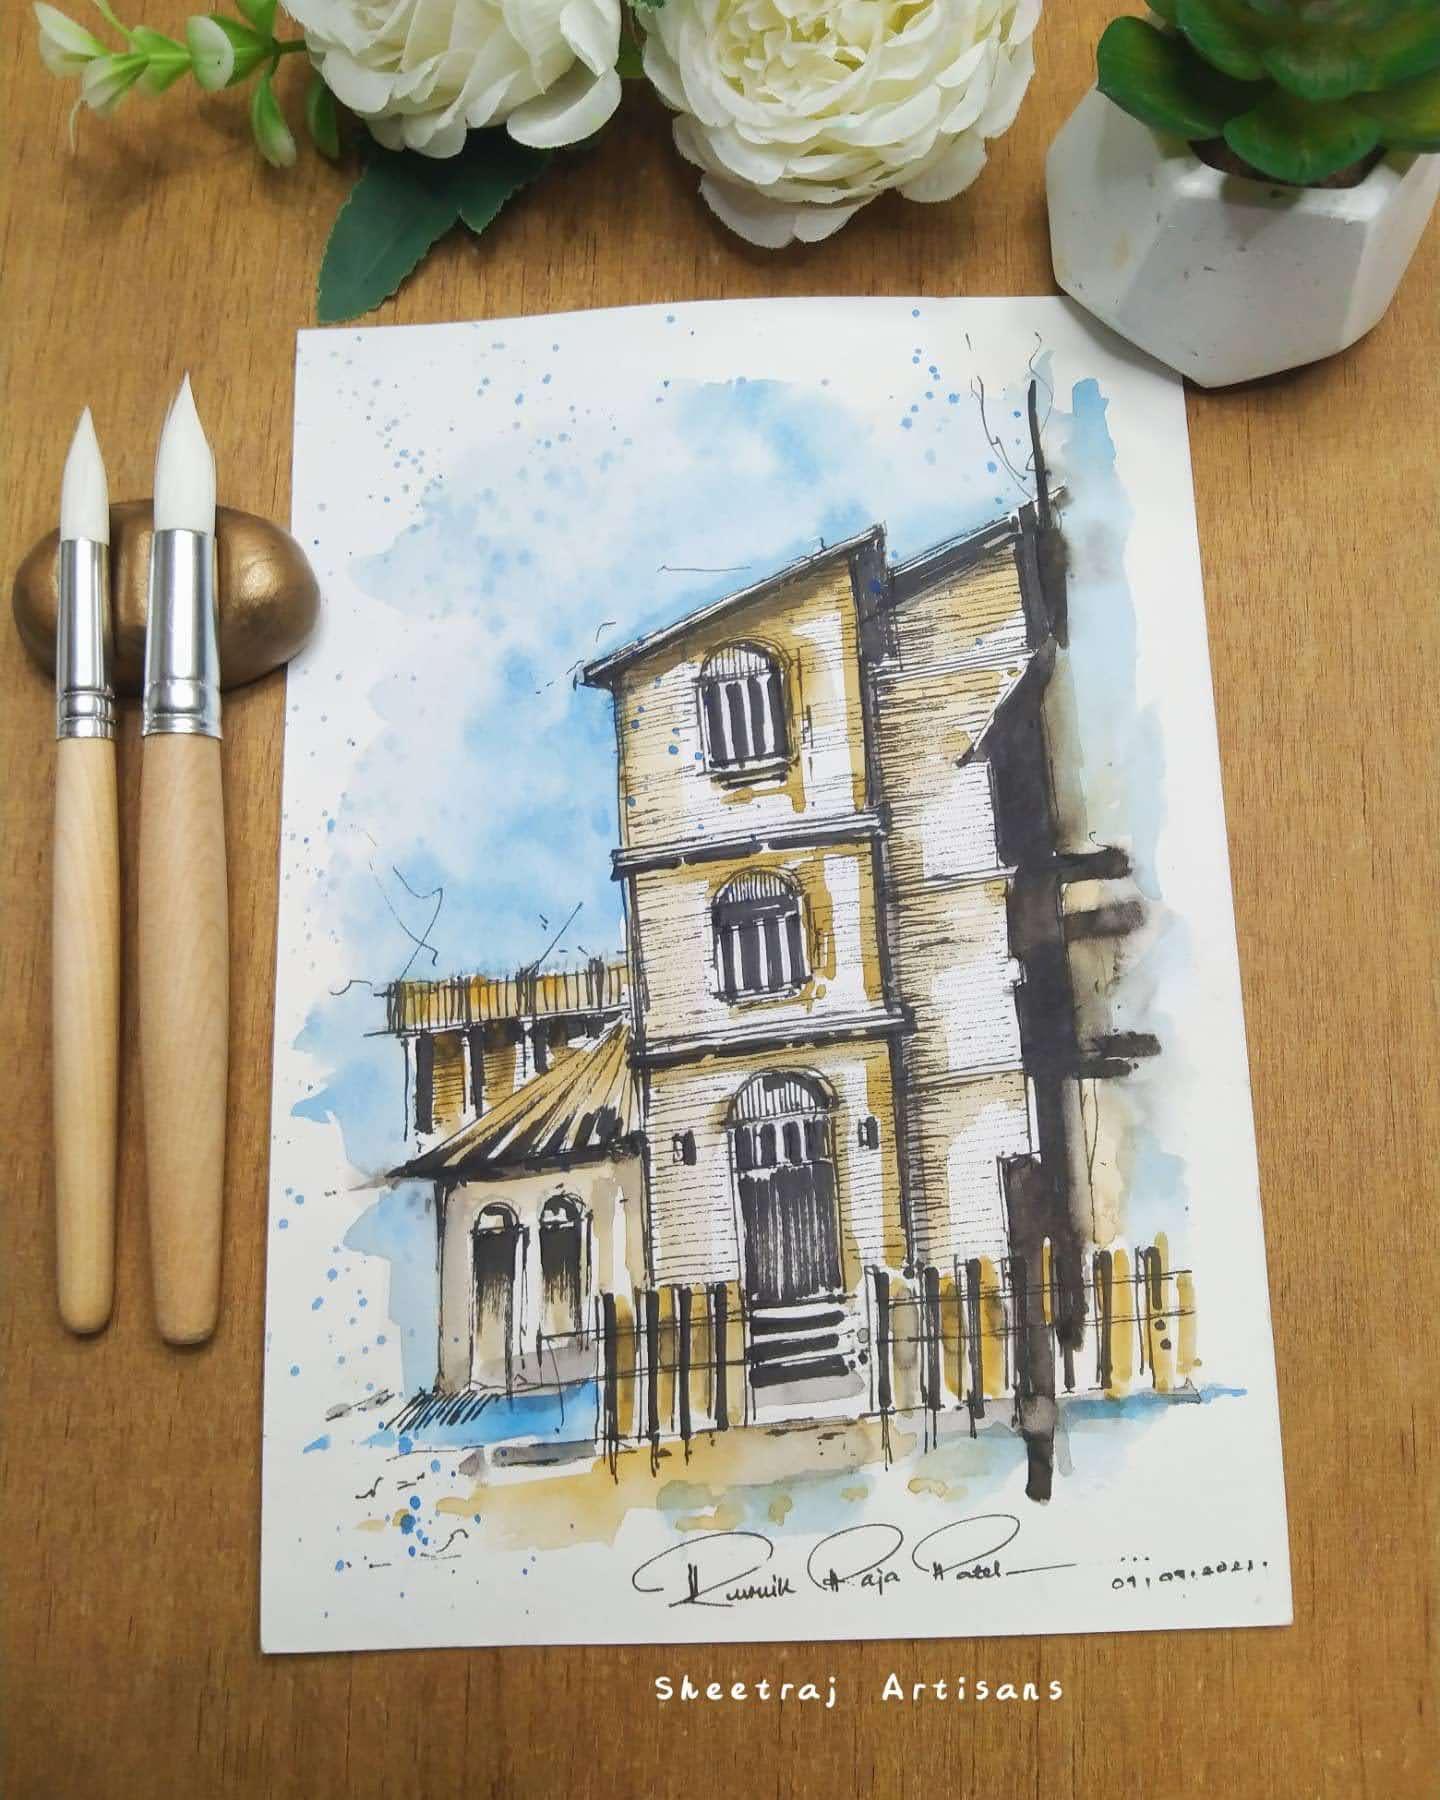
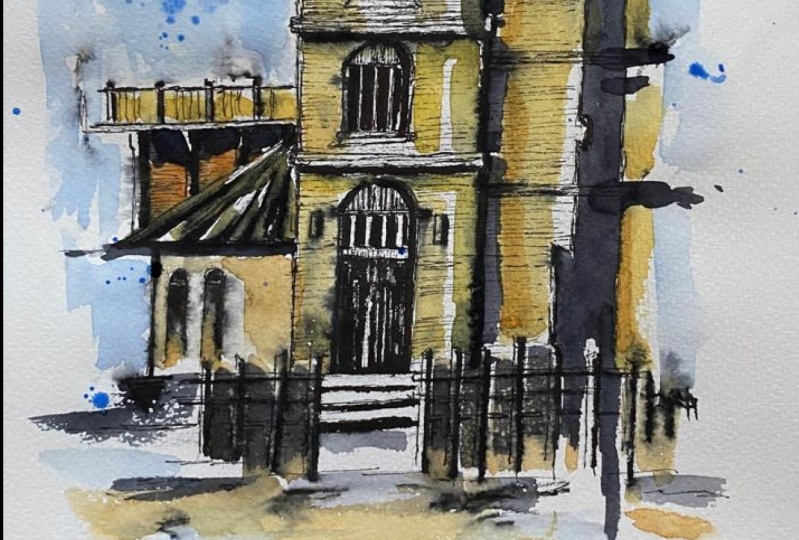
4. LETS PRACTICE PART 2: I hope that you've got to learn something new and practice session first part. Now let's begin with our second part, where we are going to take another painting of ours. Now as you can observe the painting on the left part, that it is a simple sketch of a building without any perspective included. So it is called a 2D view, where you will not be having any vanishing point and still you can paint a very beautiful urban sketch out of it. So basically for the practice session, and this particular painting is that you've got to learn about the strokes that we hadn't made to give certain texture and the building. But before that, let me talk about the basic geometry of the building. So we have our central part, where we have one door with two windows and a building element in the right part and a little bit of building element in the left part. So let's just start with our basic sketch. I would suggest you to take the practice session part 1 if you had not taken so that you get the correct idea of hobby, you have to meet your pencil strokes. If not, let me repeat it once again. You have two which are then downstroke making. That shouldn't be a single plane line. You have to be just random with your pencil strokes being a little bit darker in the corners and edges. Now you can see I'm just drawing the basic elements of the sketch so that you get an exact idea. So now you can see this is blamed two-dimensional view. Now let us just take element and let me take you through all the things we're doing being drawn. As you can see, that central IT building element is divided in three bonds, basically. The first one is having a single window with arch, and the second part is also having one window on the ground floor. Definitely we'll be having our door. And the door is a little bit at technique and style. Bad, just drawn a benefit of gauge. Now, before we ink the building element, let me take you towards the style of inking, giving the texture in the building element. So the first one, which I had just scribbled in the right part is wrong metal. You have to apply least pressure on your ink pen and give these parallel lines so that you get a nice textured manner, the way we had done below. So let me show you this and the rectangular box I had drawn. You can observe I'm applying the least pressure on the bend and being gone. Nice, amazing texture. And you can observe that it is similar to the one we had done in the painting. So what I would particularly suggest to you that you can take a rough scrape off people audio if you hadn't maintained a sketchbook like me, you can practice these kind of strolls on it first and then move to your final painting. Now I had simply end the building element with our black pen. And you can see again, I hadn't made a rough random stroke. So you have to apply multiple strokes on your middling element with certain darker portion in the edges and corners. And this is how you have to apply texture. Now that we've practiced and let rectangular portion that home that do what are correct idea of how you have to apply and use your inking pen. Now let me show you how to use your marker. Similarly with your marker also, you have to just simply use it to give shadows and darker values to your sketch. And also do not apply simple and plain line. Again, as you can see, we have to just make random strokes. So these are all the techniques and methods used in all the three paintings. Now let's get started with our faults painting.
5. PAINTING 1 - BASIC SKETCH: Hey everybody inside. I hope that you got to learn something out of the practice session. Now let us start with our fourth painting. And as you all know that before starting any Bing, Bing, it is very important that you know how to draw a basic sketch of it. Tool here, I have my, if I sized paper, which is our watercolor paper, basically 300 GSM, as I had shown you in the materials section. Now one thing that you can keep in your mind is that whenever you are getting either it's a portrait mode or landscape mode, sketching from the top portion of your page so that BOB ending do not get spoiled with your hand being placed on the bottom portion of your paper. So I'm starting with the central element, which is the building structure in the same tone, which has two windows and one door in the ground floor. Try to hand your pencil in a very loose and easy method. Don't get too much stuff. You have to make random and rough strokes, as you can see right now. Now we can simply observe how I'm sketching the middling portion. And you can make your pencil strokes a little bit lighter and dawn because we are also going to ink it. Now if you had absorbed the practice session carefully and you can also go back to fit on and off, scrape off paper. You can see how I'm making strokes with my pencil. Strokes have to be random. It shouldn't be a single tool. You can just give them multiple strokes on the single pencil line. And also it shouldn't be a little bit darker in the corner and edges. Now I'm trying to sketch the window. So as you can see, I'm getting my new details also, but in a very rough and down the Meno has you can see. So this little window is a little bit on the upper portion and it has these railings. Now similarly, we have unmoving nor in the first blow to Gan just simply match on that. It comes in an alignment. Now we are almost done with the two windows. Let us just start with the door on the ground floor. So again, you have to maintain the alignment. The door on the ground floor is also a little bit on edge and the top portion. And you can see how ugly I am giving my new details to the door also. Fadh just Assembly Bill and a double line goes shoulder frame. And we can also give it a little bit of rendering effect by giving some nice darker values. And drawn two little windows just beside the main door. Now one thing that I want to live to know is that urban sketching is basically about getting on a live location on what you can do is that if the weather conditions are, the climatic conditions are not that good. You can use your cell phone or camera and click the image of that particular element that you wanted to sketch. Then you can just simply use that particular reference image and sketch and you're safe place. Now the urban sketching that I'm painting right now are I'm sketching right now is also from a reference image. Now one more thing that you can keep in your mind is that either your painting on a live location or you are painting with a referencing when it is not a bond necessarily, that it has to be exact same as you see. So now I'm sketching the billing portion in the right side and we are also just making a little bit of scribbling so that we know where we have to give darker value. That represents the shadow. Now I'm moving towards the left portion. So you can see, imagine we have a little bit all living structure and the left side autism. So you can see that my sketch is looking very much for us to do that I had in the practice session. Now we can see that we are almost done with the sketch. I'm just getting some darker shades on the abortion where we are going to have darker color dawn or we can say shadows. You can just simply scholarly or pencil on the areas where you need a little bit of darker tones. So yeah, we are done with the sketch. Now let's move towards the inking pond. I own that you want an idea on how we are to do we are urban sketch.
6. LETS START INKING: Hey everybody, welcome back to the ending part. Now we are going to sketch, or I can say we are going to use our black pen to enhance the sketch that we made with PennSim. So here I have my black pen from Sakura Gelly Roll. You can use any other band also, this is a very good, fine tip pens. I'm using this. So we are starting with the top portion and you can see how I'm making my strokes with black pen. So again, the method is absolutely thin. You do not need to worry at dawn. Just make some rough and random shocks with Japan. It should be straight, but you have to make multiple strokes so that your sketch looks even more attractive. One thing I always tell my students to do is that always keep your hand very much three and lose value at drawing. They're not keep it steady. And also beyond what you get on it, because in sketching, the VR sketch should look, should be always very much rough and drastic rather than being perfect. So at times it happens that we do make slant lines. Are, you know, on that much perfect. But you can definitely connect it by getting multiple strokes. So now again, I'm starting with the central building bond. Levy have these beautiful windows and one nice plastic Dole in the ground. Absolutely. Sketching. So now I'm DHAP. And you can see, and now you can observe that we are almost done with the inking. And now I'm using my black marker from loans. You can find any other marker also from a very good brand. So no need to worry if you do not have the same. One thing you have to just keep in mind is that the tip of your marker should be a little bit thick so that you get a nice dense black stroke. Now where I'm adding darker values of black letters, shadow happening on the building block so that it looks a little bit more realistic and trading effect. Now one more thing that you have to observe is that the deal market also, you have to give a random and upstroke and wanting to be that much perfect. So we are now simply giving the dense and darker dawns to the part where we are willing to have shadows. You can see why using the marker on the windows, you can have these nice thin white lines by leaving some space, by applying the Amaka. And you can also see the edges getting realistic. I had given rise to this day. Now we are painting. Now we are done applying the marker or our sketch. So by using your pen again, the black pen, we are going to go texture to the entire building block. So if you are not, lack much of it of how we are to give this beautiful texture to your building block. You can definitely go to the vectors fashion bed I had simply showing how you can make these amazing textured line on your building. No need to worry, this isn't that difficult. You just have to lose your hand up. And it should be a much, do not apply it that much pressure. Because if you will apply pressure on your pen, then you'll get solid line. You just have to give random drop lines with a little bit of pressure on it. Now you can see how beautiful this is looking. Repeat the same process, Indian diverting block. Now let us also enhance. Now we are almost done. And candy and dice game. You now you can add some random rough strokes around your sketch so that it looks even more elastic and attractive. So these are just random strokes around your painting. And we are done. So now let us move towards the 12 colors.
7. LETS PAINT: Hey everybody. So after completing being gained in our entire sketch, now we are up to our last segment for the post painting. So now we are going to apply watercolors to our painting. Now, the reason behind it is that it will make your painting even more lively and it would look even more beautiful when you apply a little bit of colors to your painting. So we are going to start by applying the shadow bar. So I had just taken a little bit of Titanium black in my color palette. As you can see, make sure that you do not have access amount of water in your brush. That would definitely is while you're painting. Now we are just simply applying shadow to the outline which we had done on the right building block. And also you can see that I told you we are going to paint the entire painting with one single brush, which is of size two, round brush. No need to worry. If you'll find certain areas difficult to paint, you can just simply use the round brush tip, which is ten. Also one more thing that you can keep in your mind is that the shade that you are looking right now will appear one shade lighter when it dries up. So tapioca values accordingly. Now we're done applying shadow towards the right building blocks. Now let me apply a little bit of shadow in the bottom of the cantilever, the balcony, and a little bit of shadow just below the roof. Now this is very natural. If there is room, there would be certain amount of shadow falling in the vaults. You can similarly give shadows variable. You'll find it necessary. Applying shadow will make your billing rock a little bit more trading effect. You can see I'm applying a little bit of shadowing that central building block. Also. You can use the Titanium black with certain amount of mortal to enhance the ground area. Also, the more amount of water you have in your brush, the color tone becomes a little bit more lighter. So here I have our gambiense and we are going to apply this to our building block. Template takes on gamboge and your color palette with total amount of water. Again, I will tell you don't take excess amount of water that will definitely follow your painting. Now, that isn't a particular method of applying this. You just have to simply tap your round brush in areas where you feel necessary. For right now what I'm doing is I'm trying to enhance the central building block because it is in front and it is coming a little bit ahead out often being right and left building blocks to Riyadh, just applying darker tones of campaigns. You can apply it near the shadow also, so that the color gets even more enhanced. I'm applying a little bit of gamboge and in-between the appendices. Now add some water to the color that we took in the color palette of gambit, so that we get a nice lighter tone of it. Now, I have simply taken some water and color palette and we are applying this lighter tone of gamboge in the right building block because it is behind the central building block. So it should be definitely a little bit lighter. And you can add some color where we have given the shadow. Here are your round brush plays a very important role. You just have to simply use the brush enough gland manner so that you get nice random strokes. Make sure that you do not apply solid batch that would not make a sketch more rustic and drop. And you can also see that we are not applying a solid color to the entire building block. We're just trying to enhance the building by applying the color. So now you can see that I had also given some gamboge and the left building block where we have the cantilever, the balcony. And these. Little House portion. Now to make your sketch even more attractive, what you can do is that you can take some amount of water in your brush with a little bit of damage. And you can add this color tone where we have given undock shadow patch on the right building blocks. So the reason behind taking some amount of water is that it will be blending with the black shadow and it will look really nice when it dries up. So just because I'm finding a little bit more white space, I'm adding a little bit of color in the central building block also. So now we're done painting the entire building block. So let us move towards the background, which is going to be a little bit blue. So what I've done is I've just simply cleaned up my brush and I had taken plain water. You have to apply a 10 gold of water in the background. And the technique is known as wet on wet technique. So initially what we did was wet on dry technique where we are not applying shade or we can say a coat of water in the background. But for sky you can do this. What happens is that when you will be using blue in the background, it will bend very well. Now we're going to use a combination of two colors. One is cobalt blue and one is ultramarine. So just simply take more amount of water and less amount of color. So yeah, having a blend of ultra marine and cobalt blue and you have to simply tap your brush. Now you can observe that we are getting a nice blend of blue. Now the reason behind those bad, we had already applied ten quote of 1 third in the background. As you can see, the light is also reflecting, so the paper is still wet. Now similarly tried to apply the shade of ICT on Medina and cobalt blue and the white spaces. So you can see that we had got a very nice combination of gambit and the nice blue background. Add some more in the ground. This is not something that is representing the guy on the ground. This is just to give a nice combination of the entire sketch. Now I'm digging a little bit darker values of alternating and go buy blue so that that guy in the background becomes even more vibrant. The reason behind doing this is that I already told you that the shade that you are looking right now is in great condition. So it will appear one shade lighter when it dries up to again accordingly that your color values. Now you can see that we are getting batch of nice. I've drawn lettering and go by and blue and some portion which will look really nice when it dries on. So you can see that we are getting good cloudy effect in the background. Now what I have done is that I had simply taken rough brash, which I'm not using on a regular basis and it is boiled. So we have to just simply take this brush and dip it in the solution of vitality and then go back and blue and just tap your finger and it plateaus. You can do this with your round brush. Also, it does not involve compulsory to use a damage brush. So you can see how beautiful this drops looks in the background. Now use your inking pen, and this is not necessary to do, but if you wanted to put your signature just below your paintings, you can give that. It tells about the artist and it also gives a nice representation of a proposal and you are. So I just put my name in the bottom portion. Also. It is at timings. Good to mention the date so that you remember venue painting, this painting. Now we are done with the first painting and I hope that you're enjoying the process and got to learn something new out of it. Indeed was any doubts, if you have, and let us move to our second painting.
8. PAINTING 2 BASIC SKETCH: Hi everybody and welcome to the second painting. And again, we're going to start with a basic sketch. So now for the second urban sketch, this building is kind of a commercial building and it is going to be a little bit more in detail. So I'm going to start with the top portion of the entire building block that has a kind of triangulated structure in the top portion. As you can see. Now again, one more thing I would like you to observe is the kind of strokes I'm making with my benzene. You can see that I'm not making a solid and straight. Ok? I'm making a straight stroke, but it has to be lost and random in manner to try to make multiple strokes out of it. Don't make a single line. Now just behind the triangulated structure, that is this building block, which is a little bit higher. And this is what I love about urban sketching that are minute details that you would love to sketch out. And it gets to the early enhanced when you get a nice inking on it. And that are willing to be a little bit of Davos and adopt portion. So you can do that with your pencil as well. Doesn't mean these small scribbling and make your sketch even more attractive. Now to move a little bit in detail, there is this nice drain bulk and the triangular structure. So you can just again double line. Now let us move towards the central building block. Now for this particular sketch, that isn't a particular perspective that we are going to use. This is also a two-dimensional urban sketch view that we are going to draw it right now. So you can see that we are having a bite block also, which is in the left portion time just simply giving lighter lines right now, once we are done with finalization will be darkening it up. And this is something my father always told me that whenever you ask sketching, try to draw in a lighter tone first and then when you are satisfied with the sketch, then give darker strokes and darker tone to your sketch. And trust me, this made my sketching journey amazing and much more better than it was earlier. So you can also practice this on your regular basis. Also, I'm a kind of a person that loves to listen to music while I'm sketching. You can also listen to some good music led us getting transmitting. That also makes it getting even more better. When I'm done. Telling my opinion, it is absolutely fine because some people also like to get in silence and bees. So that is also fine. And now you can see that we have these nice little windows in the central building block, which I a little bit in the top portion. So there's a set of three windows and the dark portion, then we are having another set of three windows just below that. Now we can add some more windows in the side portion or the cell. So now let us give some more details to the left building block. These mini little windows looks really nice when you ink them and also apply watercolors. So again, you do not need to be that much perfect to Afghan be random and applying your pencil strokes. Okay, so we're having to bigger windows in the bottom part, in the left building block. I'm applying a little bit of darker shades. And then those so that we can represent Shadow. You can do this in last step also. And now let me do the right side building block. But there are going to be too huge windows. But some little windows in the upper portion also. And that is a central portion with some huge columns and one big door and the center of the building. So I had just simply faster than WE DO. But if you are painting with me and you are observing autosome, so there's an option below. You can slow down the video. Now we are done with the basic sketching. Now let's move towards the ending part. And I hope that you've gotten the edge correctly.
9. LETS START INKING: Now once we are done with the basic sketch, it is time to ink our sketch. And the inking pen I'm using right now is from Sakura Gelly Roll. It is black pen basically. So you can use this pen for giving nice inking to your sketch. And you can also use another band also. It is absolutely fine. So just like the sketch we started from the top portion, we are going to ink the entire sketch with the top portion only. Because if your hand will be get on the wet ink, it will definitely foil Leon painting. So I'm just trying to get a nice shadow and the triangular portion in the elbow pad so that it can define a nice shadow. And you can see that I had made these little strokes by applying less pressure on my pen. If you want to learn how to make these amazing rough strokes for applying texture to your building blocks. You can definitely go to the practice session where I had taught you how to make these last line strokes. So now we are going to add a little bit of inking in the top portion where we have these curved roof structure. I think that applying ink to your sketch is also very satisfactory lives. I just loved doing this. Especially when we enhance the building block by applying a little bit off then during effect. Okay, So now you can see how I'm making my strokes. So we have these three-point did on the ocean and I'm completing the code, feeding a bot. Now, let us move towards the main building block in the Santa. I'm trying to have a little bit of Dhaka abortions where I'm having edges and corners. This looks really amazing when you apply watercolors. Now you can see that I had made some mistake and the line that I drew right now. So it is absolutely fine morning to get scared. This is basically rough urban sketching that you can go random and rough sketching. So it's fine. You can make multiple strokes on it so that it looks straight enough. So the central building structure has a little bit of elements in it, which I looking really nice. So let us start inking the window. Now that is a little bit of double line in the right portion of the window. So we are going to apply darker dawns dead so that we can give an eye shadow effect. These tiny windows will look really beautiful when you are applying watercolors to it. Let us do a little bit of framework also in between so that our scheduled look even more detailed. Now similarly, you have to repeat the same process making the same stroke in the entire central building block. I had just simply fast enough the video so that we can consume some old time. Don't worry at all. If you are painting with me, there's an option below. You can slow down the video. Now you can see I had added some details and the horizontal members coming in the central building block. And it looks really beautiful venue add these minute details to your sketch. So the IDH1 and came the other three windows. So there is this horizontal member in the side portion of the building block as when the Malalai AND gate. So since this is the inside portion of the central building block, it is going to have less of natural light, a codons. So we are going to add some black strokes so that we can give a nice shadow effect to the side portion. So the left portion, and we are going to get into, I'm adding a little bit. You can apply a little bit of shadow effect, right? And you can observe that we are having my new details away or also the have fencing in the top portion, which is some sort of like a castle. And we have minute little windows. And the horizontal member of this building block. So there is this nice window which is huge in size and the frame work with local Rowley, beautiful. Then we are done with the sketch. Just add a little bit of pen strokes and that side so that there is a nice shadow effect. Now finally, we are almost done with inking. So we are going to apply a little bit of pen strokes in the ground area. And the last element, which is the central building block with columns and adore. So we have just given some darker values to the door so that the shadow looks really nice. Now to enhance the columns, you can give a little bit of pen strokes in the side portion. Now I am just simply making these rough lines so that your sketch looks more elegant and drastic in nature. I know this looks a little bit dirty, but trust me, that this will make your sketch even more elegant. So you just have to apply these studies strokes around your sketch. And I have just simply given some darker tones in the code, the ceiling in the top portion. So now we're done with our inking and we are going to apply a little bit of marker in the entire sketch. So the barker that I'm using right now is from two ohms and it has a really thick tip on different portion. As you can see, if you've got a good Marco from any other brand also, we do absolutely fine. Now make sure that you apply very less pressure on your marker. Because if you are willing to make a hand sticks and apply more pressure and that will definitely give you a very bad and solid batch. Just give lighter strokes with your Morocco and make your hand very much. And we are not going to outline the entire schedule. Yeah. Just enhancing certain elements. So you can see the eye just putting the marker in the edges and corners and just darkening up. Baby, I'm going to have what amount? Ok. Shadow. Then just enhancing the windows right now and the door in the bottom portion. You can see it by applying a simple stroke. I had just an handle, the columns and the bottom line. Now similarly repeat the same process and use the marker variable. You find that that is going to be a good amount of shadow happening, the fans happening. So you can see how I'm just a little bit more time using them. So that is going to be a little bit of shadow on the left building block on the center part. So you can do that with the OEM alcoholism. So now we're done inking the entire sketch. Now let us move towards the next step, applying some water colors to it.
10. LETS PAINT: So the colors matter you will need to do water coloring is gamboge, cobalt blue, bone down low, and cadmium yellow. So now I have just simply taken my round brush size 12. And we are going to start with the central building block first, and then we'll be painting beside blocks. So let us start with the upper portion. So I'm taking some cobalt blue and my color palette as you can see, and we are adding some amount of water also. I'm just adding a little bit of Titanium lack in it so that we get a nice darker values. So we are starting with the top portion, which is called feeling part of these enjoyed building block. So I'm just applying our random graph stroke in the top portion as you can see. So again, I'm telling you that we are not going to apply watercolors in the entire building block. We are going to give some nice rough patches also, so that we can get a nice rustic look to the entire sketch. Now let me make a nice batch in the triangular building structure. With our cobalt blue. You can see how beautiful it looks when you add some amount of watercolors to your painting. Now there is this nice vertical element in the top portion. We are leaving that for now and we are starting with the left building block. I am just taking DACA values of cobalt blue mixed with some titanium black. So that is this horizontal member. Now let us apply a nice random badge. You can see how I'm holding my brush. And the Alessandro nano. No need to give a solid batch to the painting. We are just applying it in our plastic manner so you can give this nice random strokes. Also apply DACA values. Where do you find shadows happening in the building structure that we had already applied the mako. So you will find it very easily. So we are almost done painting the left building block. Now let us move towards the right building block. So again, I'm just taking some darker values of cobalt blue with some titanium black. And I had just painted and be on his own to remember for now, let us take some gamboge and our round brush and to get some very cleaner in your color palette so that it doesn't match it with your BYU. Okay, and now I'm applying some amount of land on bar and gamboge together to the horizontal members in the central building block. So just try to fill in the white spaces in between. Make sure that you do not put Amber MER windows because we are going to enhance their windows with a different color. So I had just painted the thickened horizontal member Olson. And I'm filling up the spaces between the windows. Also apply gamboge to the horizontal basis carefully. And now I'm putting it in between the vertical column members. Now just below the horizontal main laws, we put in our marker so that we can give a nice shadow effect. You can take a little bit of bond and water in your brush and mix it with some amount of water. And you can give darker dawns. Bright portion of the central building element. You can see how I had holding my brush and asked land manna. And similarly, you can practice this and adopt scrape off people forced. Now taking some titanium black, I'm just enhancing the ground area by giving these jobs strokes. As I said, that we are not going to apply watercolors completely to the sketch. We are just giving some nice batches and random strokes. Now you can observe how beautiful the painting is looking. I'm just adding a little bit of more gamboge with lighter tones in the right building block. And of course, you have to apply a little bit of darker shades that you find shadows happening. So the reason behind doing is that you can give a nice 3D effect. Now to enhance the huge window on the right building block, I'm applying titanium black to the modal windows also. So by applying darker dawns to the windows and doors, you can see it looks even more beautiful and get and the hand and the lighter background. So we are almost done painting the entire buildings structure. Now I am just simply taking a little bit of gamboge and putting it up in the ground area so that we get a nice brownish shade on the ground level. Now, let us apply a nice little bag down to represent this guy. And now the technique that we used in our false painting was a wet on wet technique. But now for this painting, we are going to use the wet on dry technique only. I had just simply taken some cobalt blue and mix it with a little bit of water. And you can see I'm just making these rough strokes in the left portion of the background. Now we are going to have a nice mix background of Band-Aids and cobalt blue altogether. So now I had taken some Gambian, my brush with a little bit of water, and I'm trying to merge it with the cobalt in blue. So you can see we've gone to online lab run for the sky. Again, trust me, you do not need to be that much both it, you can give these down-strokes and meet your sketch elastic. Now just simply take the soft brush our RNA used brash, which is damage, and mix it with a cobalt blue. You can use your round brush also. I just like to use this one. And you can splatter some drops on the background to make it even more attractive. So this is really cool and I just like to plateau, this drops. It makes your sketch even more beautiful. Now once you are done with your entire painting, don't forget to put your signature at the bottom or wherever you like to, as it signifies your particular style. And it is also very important to give your significance. I hope that you liked the second painting and I'm very much happy to share this painting with all of you. Now let us move towards our last and final painting.
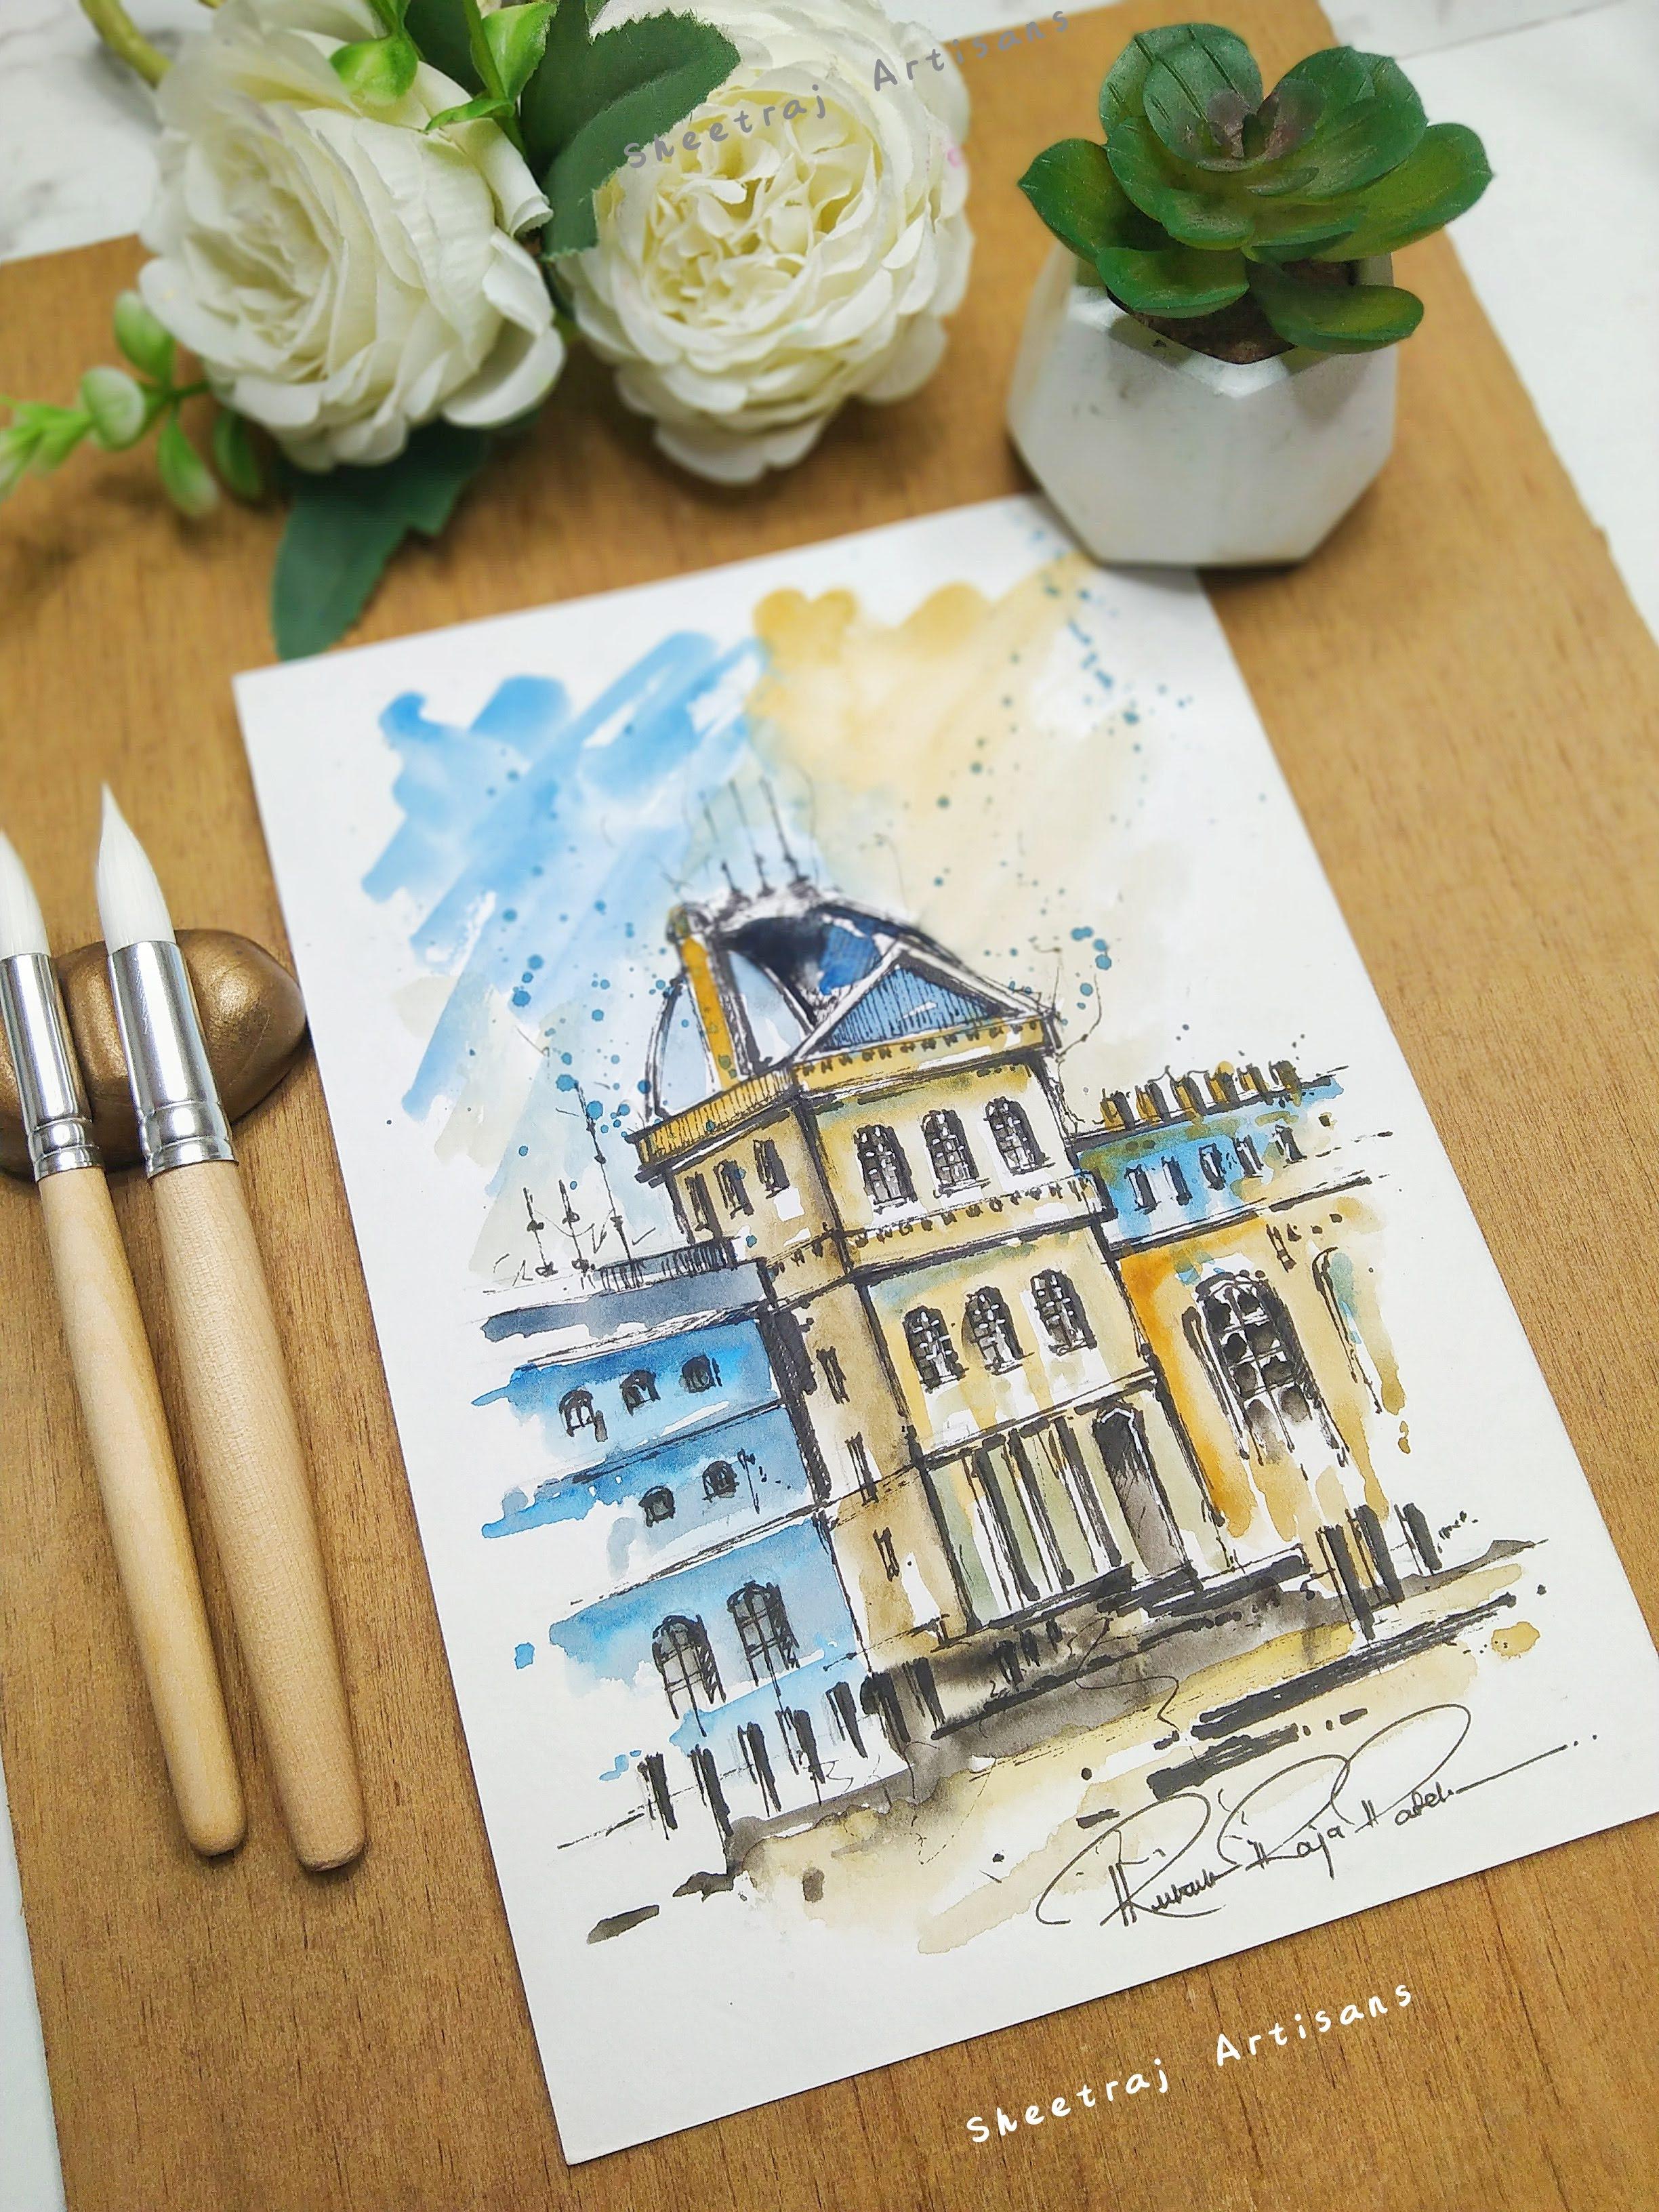
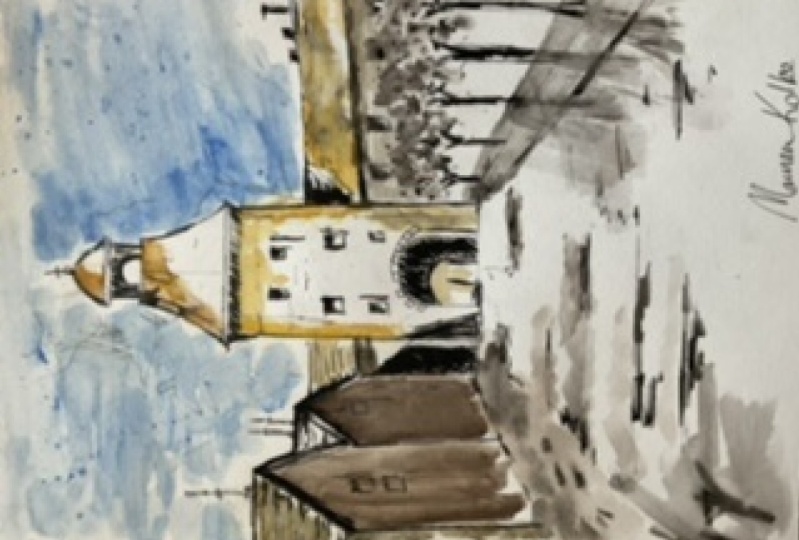
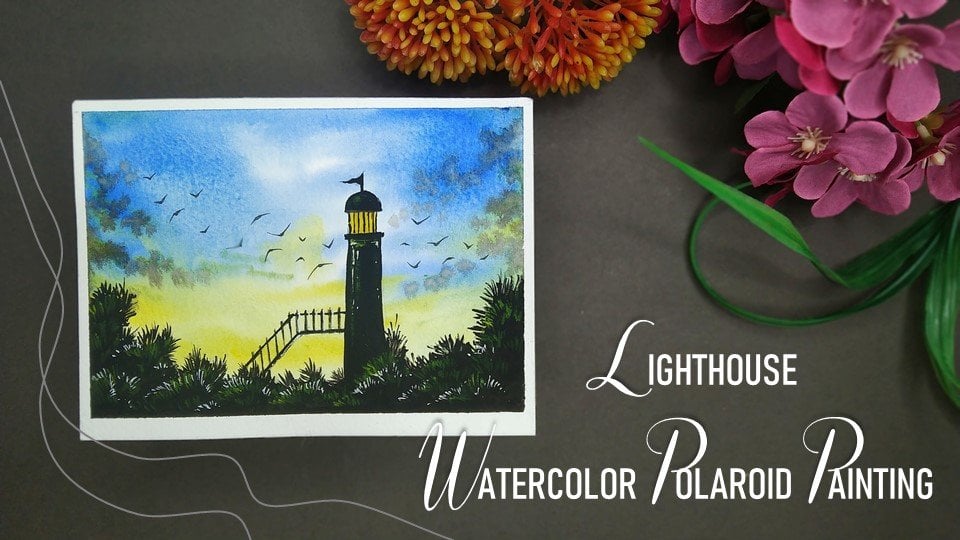
11. PAINTING 3 - BASIC SKETCH: Hello everybody. Welcome to the final and the last painting of our urban sketching. So for this particular sketch, we are going to have a nice building look, which is based on a one-point perspective. So let me start with a basic sketch as usual. Now this sketch is particularly based on more off or heritage kind of building with some old houses around. So let me start with the central building forest. And as you can see that we had against dotted the sketch from the topmost portion of the page. And the reason behind this is that if you sketch on the bottom portion first and then you put your fist on that, then the paper will definitely as much with graphite. So it's always good to start with the topmost portion. So I'm starting with the roof falls. And it is some sort of a triangulated rule with small dome structure in the topmost portion. And we can make a nice little pointed antenna in the dorm. And you can see that we have somehow drawn Beatles really nicely. You can give IV, doesn't. So as you can see that I had also drawn the walls are the main central building. And these are not too bad. A little lines, these are a little bit planned in nature. Now we are just drawing the building element in the right portion. And you can definitely observe my Benzer's tool if you are having any difficulty and doing this kind of scrolls and your stores are becoming very much defined and straight in nature with a solid take line, then you can definitely go to the practice session. They had, I had given a nice brief about how you can make beautiful rough strokes with your inking pen and your benzene. So since this is a one-point perspective view from the main building block, we are going to enlarge do sides. And for the left portion, we are having two houses. And for the right motion, which I'm doing right now, we are going to have trees which are coming in the bot little bit Benson, you are just supposed to draw the trunk bond. Now let me draw a line. Now simply make a nice gold HR, or we can say an edge and the bottom portion of the main building block in the center. So this is kind of an engines are a pathway through the next segment. And we can just enhance it by giving some random dots strokes in the eye so that we can all trade the shadow well, while we are applying inking and watercolors to it. So I have added some details on the edge by giving some nice little bricks drop jazz. And I'm adding some more windows in the building, but now let us draw the portion in the left part. So it is a little bit of the structure and non manner of a house. So we are going to have two houses which are in both spectrum view. So what happens is the forest, how it will be visibly smaller insight. And the second one is a little bit bigger insights. As you can see, I have simply drawn to triangulated structure, which are the rules. Now let me attractive, lighter tone sketch with your pencil. Because any which ways we are going to apply a nice ending on it. And we are also went apply watercolors for your benefit package, won't be visible after that. So you can draw it in a lighter tone. So now under part B, we are going to have some nice shadow formations of the houses which are being built up on the left portion. So using your pencil, you can just simply add these rough strokes on the bottom portion. And this would act as that action line while we are painting. So as you can see, that our sketches almost ready. Now simply using your pencil, we are going to create some shadow effect. So that while giving ink to your sketch, you get an idea where you have to give darker values. As you know that definitely if there is a rule that is going to be a little bit of shadow forming on the walls. So by using your pencil scribbling, you can make that. So you can see that we have given a nice shadow effect on the wall. And the same time that is some shadow effect on the building block, which is just assigned the main building block in the same time. So that is a little bit of shadow forming their own. So you can also enhance the windows by giving some darker values on the top portion. And now I'm enhancing the arch, which is on the bottom, are the main building block in the center. Now by giving depth with your pencil, using this enough scribbling than darker values, you can see that your sketch becomes even more effective and attractive. And it starts giving you a 3D effect. But there's a little bit of roof present in between the houses in the left and the main building block. You can also enhance that by giving summed up strokes. And the same time I'm adding some rough strokes and that two houses also, so that it becomes a little bit more realistic. And I'm adding some anti-Nazi which are always there in all houses. Now once you are done with the sketch and these rough, dirty strokes, just allowing your sketch, it makes it even more attractive. Trust me. Now let me add a little bit of shadow, neon, the houses ozone falling into the building block. And we are done with the entire sketch. So now without any delay, lead document, the inking.
12. LETS START INKING: So we are done with the basic sketch. Now we are going to start with the inking. So I'm having my black pen from Sakura Gelly Roll. It has a really fine tip and it does not at all compulsory to use the same, then you can go for any other good alternative. So now we are going to start inking the entire sketch by tracing your pencil lines. So again, I would suggest do that dot windows dot portion of your page because if you are willing to start with the bottom portion, then your hand will definitely bending and your paper will get dirty. So you need to be very much careful while making these amazing strokes. And if you wanted to know how you can make these rough and random strokes, you can definitely will do the factors session where I had taught how you can make these simple strokes with your inking pen. So as you can observe, I'm not making a solid thick line out of my inking pen. I'm just moving my pen draft manner. And you are not supposed to draw a single line, you have to make multiple strokes. So initially we are starting with the main building block which is in the Venta. And I am also enhancing the shadow portion by adding my ink pen. Now let us end be smaller windows which are looking really beautiful. So we are just simply tracing the pencil line. And I would definitely suggest you make sure that you do not make hurry and do it in a fast way. I had just been passed on up WTO so that we can zoom a little bit of more time. If you are painting with me or you are in the process with me, you can definitely slow down the video. There's an option below. So now I had just given the arch which we drew in the bottom portion. And I had also an handed by getting some ink. Now let us start inking the building block in the right portion, I had also enhanced the shadow of the main building block. So you can just simply observe my ink. It is darker in corners and edges and you can have strokes and in-between. So in this painting, I'm having these beautiful houses on the left portion, and I'm just kinda liking it a lot. So these are looking dirty, beautiful. So on the roof also you can add some nice that are strokes. Let us also disappear. Now I'm adding some nice results, which we added with tools that make it even more realistic and drastic. Let us also, in the trunk, that tree trunk, which is on the right side. You can also enhance the pathway by giving some rough strokes with your ink pen. So as you can see, that all of the inking is done very well. And now we are going to enhance it even more by using our marker. So the marker that I'm using is condones and hazard early nice tick dip on the front. So as you can see, and if you have a mock of it, another brand, it's also absolutely fine. Just make sure that we are not going to apply it with a thick and dense line. We are just going to apply it on random areas. Very wanted more depth and shadow to happen. I'm just trying to give the shadow effect where there is drove on the top portion. Here can also enhance the main building blocks shadow, but may join that you do not apply it completely. Just give some stuff and little strokes. Yeah, definitely. You can give shadows happening. You can see off to applying them becomes even more attractive. Now using your MOC or you can also add some depth to the ground. To add some more details. I'm just using my inking pen tool. Enhance does enter a building block. And finally, we are just adding some MCA strokes and Lee down. And we are done with the inking part. Now let us move to the watercolors.
13. LETS PAINT: So we are into the last step of applying watercolors to the final painting. So the colors that you will need are ocher yellow, bone, sienna, cobalt blue, and cadmium yellow. Now let us start with some burnt sienna and mix it with a little bit of Titanium black so that you can get a nice dark codon. Make sure that you do not have access amount of water in your brush. And that will definitely is boiler painting died to have optimum capacity of water and color altogether so that it does spread is not that much. Now, I'm just simply trying to paint the room and make sure that we are not going to apply a solid batch. We are willing to apply random patterns through the entire sketch. Now let me take some titanium black and enhance the corners and edges. Now let us paint the walls of the central building block. Again, I had taken some burnt sienna and ocher yellow together. And we are going to give it some nice badge on the edges of the building block. Also, as you can see, I'm just applying some rough batches. We do not have to be that much perfect. Laila, plain watercolors. This isn't perfect painting VR just doing urban sketch. So it has to be random. Now, you can see that I had given some nice been CNI and ocher yellow in the middle of the building structure. And the Add, adding some in the left milling structure also. Now take some titanium black and apply it very well. You'll find shadows farming. And whenever you want to give some depth to your painting, this is completely on you. How you give that does not necessarily that to paint the same way I am painting. But you need to be a little bit rough and random while applying color patches. And also one more thing that I would like to tell you is that you can also leave some white spaces in between. That also means your sketch look really nice and a little bit incomplete autosome, so that it gives you that nice rustic look. Now let us make the tiny windows a little bit more attractive by adding some darker values. So now I'm taking some titanium lab and mixing it with our ocher yellow. Now simply just move your round brush on the roof, on the houses in the left. You can observe the movement of the brush. No need to give us solid batch. Just use the tip off your round brush, which is very 10. And you can just give the tenant strokes using that. Now to get a nice dark black color. I had just taken DACA values of titanium black and added a little bit of burnt sienna in it. And as you can see, we made a nice combination. So we are going to apply it on the house wall. So again, you can see that I haven't given folate bad. It is rough and random stroke mapping mean with our round brush. So here it is very important that you know how to use your brush ready. And you can also observe that we painted the entire painting with a single brush. And if you want to know the details of the branch, I had already told it in the art supplies action. But it is a down brush oxides to L. Now using the same DACA values of black and brown sienna, I had given the shadow, which is happening on them down. And you can see how beautiful it looks. So the darker patches that are visible to you makes your sketch more in detail and depth. As you can see, I'm tapping a little bit of Titanium black in certain portions. You can also apply a little bit of Titanium lagging just below the rules so that your shadow looks even more beautiful and enhancing in your painting. Now to enhance the pathway, I'm just using some titanium black and we are just making these tokens coming out of the main building block. So now we had also when to apply the watercolors to the tree. I had just taken some vodka and made a nice wet wash on the pathway. And now I'm just going to apply the darker values of the tree trunk, which is reflecting on the cell phase. Deflections the tree trunk. Let us just add onto the tree trunk. Just simply take some titanium lag with water and add random strokes or I would say random patches on the tree trunk so that you are trees look Betty, much abstract. And now let us add a little bit darker dawns. So by adding these DACA badges, you can enhance the liens. Thank you. So we are almost done painting the entire building block, but that is a little bit of present in the left houses. So you can just add some cadmium, yellow and brown sienna together to the wall. And just simply given a random batch. Now let us give a nice background to the entire building block. So this technique battery I wouldn't do use to apply the background is known as wet on wet technique. And it is very easy. You just have to clean up your brush, debit in clean water, and give a nice blush on your paper. So you can see I had just given a nice quote ofs water and a random, they only be haven't applied it on the entire paper. Now we are taking some cobalt blue, as you can see, my color palette and the ad taking some water altogether. Now, make sure that this time you have water and good amount in your brush and color. It wouldn't be a little bit lighter in tone. Now simply that feel, brush on the wash back be made based on the background. And one more thing that I would like you to know is that the shape that you are looking right now? We will come up one shade lighter when it dries up. So accordingly, make the Alcala values. So you can see how nice and dark sky looks. And it also gives you a nice cloudy effect. Menu and B's random badges. Now what you can do is that use rough brush on abrasion that is damaged. Or you can use the same down rationalism, It's absolutely fine. The exam DACA values of your cobalt blue and some ocher yellow. And you can thank me. Blat edit on your background so that you can get a nice effect, as you can see right now. Now once you are done with the painting, you can definitely drop your signature on the bottom portion or red. And what you like to that is significance of your arm. And from urban sketching.
14. FINAL THOUGHTS AND REGARDS: I'm very happy to share all the three paintings with all of you. And I hope that you've got to learn something new and creative, outdoor and direct class. Urban sketching has always been one of the most favorite art forms of mine. My final thoughts and guidance to my students is that not always about perfection. Doing some just walk and scribbling can also create something really beautiful. So navel, give up on practicing and be very much honest with your art. Fiji to ask any doubts if you have in the discussion and flexion engaged you out on Instagram to tag me. I would love to repost your work. I go by the name should Rajan patients don't forget to leave a feedback as it encourages me to come up with even more creative classes. Happy painting guys.
 Rutvik Patel, Artist and Instructor