Transcripts
1. Intro: Have you ever seen a place that's so beautiful and you thought to yourself, this is so pretty, I wish I could sketch it, but I don't know how to? Then this class is for you. Hi guys I'm Vivica, an artist, illustrator, and surface pattern designer from India. I have been painting my whole life and a few years ago I decided to take a huge leap of faith and commercialize my artwork under the brand name, The Artsychoke. In addition to selling original paintings, I also license my art on print on demand websites like Society6, Redbubble, and TeePublic. This is my first Skillshare class and I'm so excited to have you here. In this class, you will learn how to illustrate buildings and places in a super fun, super easy, and colorful way by captioning them in minimal details and striking colors. We will start with the basics by exploring some simple geometric shapes and I will show you how to break down complex building geometries into these simple shapes. I will also introduce you to some of the commonly seen architectural features like rooms, windows, and doors. I will share with you my chief code on how to draw buildings in three-dimension without using rules of perspective. We will illustrate two places in this class, One is Burano, which is a very cute and colorful fishing village near Venice. The other one is Manarola, also a place in Italy. The reason I picked these two places is that color is a very strong part of their identity and in this style of illustration, the character or the feature that we emphasize the most is color. This is a beginner-level class and you do not need any prior art education or skills or to take it. However, I welcome everybody to take it, whether you are an established artist or someone who is just starting to explore their creative side. By the end of this class, in addition to two colorful illustrations, you will also have the skill and confidence to sketch any building or place in this particular style. So let's get started, I will meet you in the next video.
2. Class Project: For your class project, you are free to paint the same two illustrations of Burano and Manarola. In fact, I encourage you to paint along with me through the class. You will find the reference images to these two in the projects and resources section. However, you are also free to paint any other place that you would like. If you need help choosing a place, think of a place you visited and fell in love with, a place you'd love to visit someplace, or any place that has some meaning to you. It's always a great idea to sketch a place or urban scene in an actual outdoor setting. But sometimes it isn't always possible to travel to all the places you want to. Some people like me are more comfortable painting from the quiet comfort of our home or studio. If you're one of those people, you can always use a picture as a reference just like we're doing in this class. You can use a photo you clicked while on a holiday, or an image of a place you'll find online. Something to note here though, if you do select a picture online and you intend to use your illustrations for commercial purpose, make sure you use a copyright-free picture. You can find them on websites like Pixabay, Unsplash, Pexels, and as such. If you're totally out of ideas and you have no idea of what to sketch, don't worry. I have created a Pinterest board with images of a few places which I think would be fun for you to sketch. You will find the link to this board also in the Projects and Resources section. As soon as you're done with your illustrations, don't forget to upload them in the projects gallery. I would love to see your work and I'm so excited to see what you guys come up with.
3. Materials: In this video, I will quickly run you through the materials we'll be using for this class. Let's start with the usual suspects. First thing we'll need is paper. It's best to use watercolor paper, which is 300 GSM thick. GSM is basically the thickness and the capacity of the paper to hold water. If you use paper that is less than 300 GSM, it might work or buckle when you use watercolor on it. I'm using Canson brand, but you could use any brand available to you. You just have to make sure that it's 300 GSM thick. Next material we'll need is pencil. I usually prefer to use a H grade pencil like this 3H here. The reason for this is that H grade pencils have harder lead than the usual HB or B grade pencil, and hence, they won't leave graphite's match marks on the paper. But if you don't have H grade pencil with you, you're totally free to use any pencil that you have, like the usual HB. We will also need an eraser. Next on the list are black fine-liner pens. My favorite fine-liners are the Pigma Micron by Sakura. They're great quality and are waterproof. We will be using two nip sizes today, 03 and 05. I also have this pigment liner from Faber-Castell in size 0.1, which I'll be using for thin lines and detailing. However, if you don't have any of these with you, you can just use any black pen. You just need to make sure they are waterproof. You may also need a ruler, although this is optional. I usually use a ruler to draw margins along the edges of the paper. Of course, we'll need paints. I will be using watercolors for the illustrations, but I want you guys to know that you're free to use any medium you have. You can use crayons, markers, or even color pens. After all, we'll just be using a limited color palette of very basic colors like red, blue, yellow, green, etc. I have this palette I filled with colors from different brands, and I also have this small pan set from Sennelier. I don't usually worry too much about the watercolor brands, but I do make sure that the artist grade because I've observed that artist-grade watercolors are a lot more pigmented and last a lot longer on paper. This is something to keep in mind if you plan to sell your art. But if you're doing this as a hobby project, then don't stress about it at all. If you're using watercolors like me, you will need brushes. Again, with brushes, I'm not at all worried about the brands. I usually buy whatever brand is available from my local art store. We will be needing round brushes in medium and thin sizes. We will also need a cup or jar to hold water to wash the brushes. I have an old coffee mug for this. Last but not the least, a paper napkin or old cloth piece to wipe the brush is clean or clean up any mess that you might create just like I usually do. All right guys, so we've covered the materials required for this class, now let's actually move on to the lessons. I will meet you in the next video where we will talk about basic geometric shapes and simple buildings.
4. Basic Geometric Shapes & Buildings: Let's start with the basics, shapes. What are some of the most common geometric shapes have we see in our lives? There's a circle, and there's a semicircle which is a half circle. Then there is an oval or an ellipse, a triangle, a square, and a rectangle. Then there are also shapes that are very common, but we don't always pay much attention to, like the parallelogram, or the trapezium, which looks like this. Now let's try sketching a simple house. I want you to picture the most basic house you can think of. Pretty sure it would look something like this. Now Let's draw more rectangles here and a couple of squares. Our house has a door and two windows now. What if we were to draw this house from the side? I imagine it would look something like this. Here instead of a triangle, we have a trapezium above the rectangle, like this. Let's add in another door and a couple of windows. Now, I want to draw a tall building with more than just one floor, maybe like four or five floors. I will first draw a vertical rectangle for that and split it into different floors using horizontal lines like this, so each segment is a floor. Now I'm going to add in a small door here and a window. I will repeat these windows at each floor, and I also imagine each floor having balconies. For balconies we'll need to give hand rails and they would look like this. Let's also give doors at each level to access these balconies, like that. Just shading this to make it look more interesting. Let's finish this off with the roof. Now we could leave the top as it is and it would look like a simple flat terrace, or we could make it a bit more interesting like this. I'm going to draw a trapezium on top of it and maybe give some detailing like this, so it looks like there are tiles on top. Now we have a good old-fashioned roof with terracotta tiles, like the ones we see in many old European towns. Also like the many buildings we will be drawing in our illustrations. What have we learned so far? Any building or architectural feature can be made easy to sketch by breaking them down into simple geometric shapes. Let's apply this theory to an arch now. Now we can call the arch a combination shape, because it's a combination of a rectangle and a semicircle. We have a vertical rectangle here and a semicircle on top of it. How about a row of arches? If you observe old architecture from many parts of the world, you would often come across a lot of arches, especially arches in a role like this or this or this. Now let me show you a quick way to draw arches uniformly in a row. We already know how to draw one arch. Now to draw more arches and make them all look consistent and same height, one quick tip is to draw guidelines. I will draw a very light horizontal line from the top of the arch. Now I'm going to make this line a little dark so you guys can see, but these are meant to be very light lines. I draw one from the top of the arch, another one where the semicircle meets the rectangle, and one's at the base. Now when we start repeating arches, we have to two measures in mind. One is the distance between each arch, and two, the width of each arch. Now, I'm going to draw vertical lines like this, and the first line I draw will mark the distance of the second arch from the first arch, and the second line is going to be the width of the arch. Suppose we have A, B, C, the distance from A to B is the distance between the arches, and the distance from B to C is the width of the arch. Now we can repeat this how many ever times we want. I'm going to draw two more lines and again, another two more lines. Now I have a very light good system for the arches. All I need to do now is go in and draw my semi-circles and the vertical lines like this. We can drop off these guidelines when we are done with the arches. Now we have a consistent row of arches. Note that this isn't really a rule for you to follow, is just a quick tip to make drawing arches easier for you. Let's try to sketch a dome now. A dome when viewed from the side would pretty much look like a semicircle, like this. You could say this is a dome that you're viewing from the side. Now I'm going to draw something by putting together a few geometric shapes, say like a dome or something. I'm going to start off with a semicircle like this, and a rectangle below it, and another rectangle on top like this, and a vertical one, an arch inside it, a triangle, and I'm going to split this dome into segments. Taking that down to the rectangle as well, and adding in some circular windows, there. Does this look familiar to you guys? We've just drawn the dome of the Florence Cathedral. Do you see how I broke down the seemingly complex structure into simple geometric shapes and made it so easy to sketch? What's the key takeaway from this lesson guys? It's this, any building or architectural feature can be made easy to sketch by breaking the geometry down into simpler shapes. Now let's move onto the next video where I will talk to you guys about drawing shapes and buildings in three-dimension without using the rules of perspective. See you there.
5. Sketching Buildings in 3-D: In this video, I'm going to share with you guys my cheat code on how to draw buildings and shapes in three-dimension without using complicated rules of perspective, like one-point perspective and two-point perspective. Let's get started. The first shape I'm going to draw is a cube. We all know the cube is a square in three-dimension. The profile of a cube is a square. Let's start by drawing a square like this. Then I will draw diagonal lines up like this. It can actually be up or down, it doesn't matter. Let's stick to upright now. I drew these diagonal lines from three vertices or the corners. I'm going to join these. These lines should be more or less the same length. I join these two lines with a vertical line and these two lines I'm joining with a horizontal line. There, we have a cube. It's the same process if you want to draw a cuboid. For a cuboid, we start off with the profile, which is a rectangle like this. Then we draw diagonal lines. This time I'm going to draw them down like this from three corners and I will join them like this. You have to make sure this line is parallel to the line in front of it, and this line is parallel to this line. Now you may have noticed for the cube, I drew these diagonal lines in the upward direction like this and for the cuboid, I drew them in the downward direction. Let's talk a bit more about the direction of these lines. It requires a discussion because the direction in which we draw these lines will determine whether we are looking up or down at the building, or whether we are viewing the building from the left or the right. Here is a tip. If you want to sketch a shape that you're looking down on, you draw these diagonal lines up. If you want to sketch a shape that you're looking up at, then these diagonal lines would be drawn down from the corners. I call this My Rule Of Opposites. Let's take this cube for example. For this cube, since we drew the diagonal lines up, it does look like we're looking down at it from this direction. Now let's draw a cube with the diagonal lines drawn downward like this. It would appear that this is being viewed from the down or being looked up at. It's like the rule of opposites like I mentioned. When you look up, you draw the lines down and when you look down, you draw the lines up. Interestingly, we can apply this rule for left and right as well. That is, if you are viewing a shape or a building to your right, you will see the left side and if you're viewing a building to your left, then you will see the right, hence you will sketch the right side. This is pretty basic, but keeping this in mind will help you get started out in sketching. Now just as an exercise, let's draw a cube that we're looking up at from your left. Applying what we have just learned, we start off with a square. Now since we're looking up at it, we know that we have to draw the lines down. Since we are looking at it from my left, we also know that we have to draw these lines from the right side. Now let's apply this to draw a basic house. I want to draw a house that I'm looking up at from the ground and it is to my right. Something like this. I will start by drawing the house profile like this. Then I will extend the diagonal lines in the downward direction and I will join them. Now, something to note here though, we do know that the diagonal lines go down like this, but in reality, we won't be able to see it like this. Instead, this line will get cut by the ground line like this. I'm going to drop that off just to give you a better idea. This is how it will look. However, this is not necessarily the case when we draw buildings that we look down on, like this one here. Since they're looking down on, our diagonal lines will go up. This bottom line here will be visible and it will not get cut by the ground line. Now I'm going to add a little bit of detailing here and give a little bit of detailing for the roof. Now we have a house in three-dimension. Now let's try a different building shape like an L-shaped building, which would look like this in profile. I'm going to start by drawing diagonal lines up from every corner and I will join these. I have drawn this L-shaped building in three-dimension. Now I'm going to add in small details like doors and over here too maybe split this floor into two. I add windows and I imagine this like a terrace. I'm going to draw handrails here and even on the roof like that. Here, we have an L-shaped building which we have managed to draw in three-dimension and we didn't even use the rules of perspective. Now that we've covered some of the basics like geometric shapes and simple buildings and how to draw shapes and buildings in three-dimension, it's time to move on to the next lesson, where I will show you some of the most commonly seen architectural features like roofs, doors, and windows, and how to sketch them. Let's move on.
6. Sketching Roofs, Windows & Doors: In this video, we will have a quick look at some of the most common architectural features like roofs, windows, and doors. Let's start with roofs. The first type and also the most basic one is a flat roof. It's also the easiest to sketch. You can literally draw a rectangle like this and it would look like a building with a flat roof view from the side. In 3D it would look like this. Then there is the shed roof, which is basically a slanted flat roof and from the side it would look like this. In 3D, it would be like this. Imagine if you have tiles here it would be drawn like this. The third type of roof is a gable roof which in my opinion is everybody's favorite roof to sketch and this is how a gable roof would look from the side. This is a roof we've been giving all our basic houses, and in 3D it would look like this. Then there is also the hipped roof, which is similar to the gable roof. The only difference is that it's covered on all its four sides. It would look like this, and in 3D it would look like this. This part would be covered as well. Up next, we have a dome which you've already covered, but let's sketch it anyway. Basically a dome is a half sphere and a dress on circular walls like this. Another interesting type of roof you will see in a lot of old churches or on castle is a conical roof. We have a cone and a cylinder. Then there is the barrel roof, which is pretty much an arch in profile. Now you don't have to remember the names of all these roofs of course, I just thought it'll be fun to add it into the class. Also, this is some of the most common types of roofs that you will come across if you happen to sketch a lot of old towns and cities. Let's move on to windows now. Again, think of the most basic shape of window that we've all seen. It's like a simple rectangle or a square and you have a frame and divisions like this. How about a tall arch shaped window? For which we draw a rectangle like this and the semicircle on top. Then you'll have a frame around it and some divisions like this. Now imagine a window in that old European down like Murano. They usually simple rectangular with wooden shutters. We draw a rectangle like this and they will have a frame around and wooden panels like this. You can also see the hinges. Now what if these windows are open? Again, you start off with a rectangle and you can see the top of the frame and the bottom of the frame and you just draw these rectangles on the side. Sometimes you can see curtains on the inside and many of these windows also have like cute potted plants on them, like this and another one like this. I usually start with a detailing here and darken the insides like this. Sometimes these window shutters also have lures and they would look like this. An open window would look like this and maybe a curtain. That's all for windows. I'm going to quickly cover the next element, which is the door. Again, very similar to windows, we have the basic door which is a simple rectangle. Doors also have frames around them and a door knob. What if it's a two-way door? Then you can sketch it like this. Be a little wider frame and like this and sometimes they also have panels like this. We usually also see a lot of arch doors and they would look like this. Don't forget to draw the door frame and they just maybe sometimes just wooden doors with vertical panels like this. Or it can be like this which opens both ways. Now let's try drawing something more ornamental like this door. Here we have an arch, which is the basic shape of the door. Again, a frame and then there's a circle and another arch below it. The circle is split into segments and so is this arch. We have this ornamental door. You can see that I'm sketching all of these very loosely and casually, like I'm not too bothered with getting my lines straight or my curves perfect and that's totally intentional. This is just the style that we're adapting for this illustrations. It's completely casual, very loose, and there is no stress about getting it perfect or realistic. We've also covered some of the common architectural features that we will come across in our illustrations. Now it is time to actually start working on the illustrations, and that is exactly what we will do in the next videos. I meet you there with a paper and pencil.
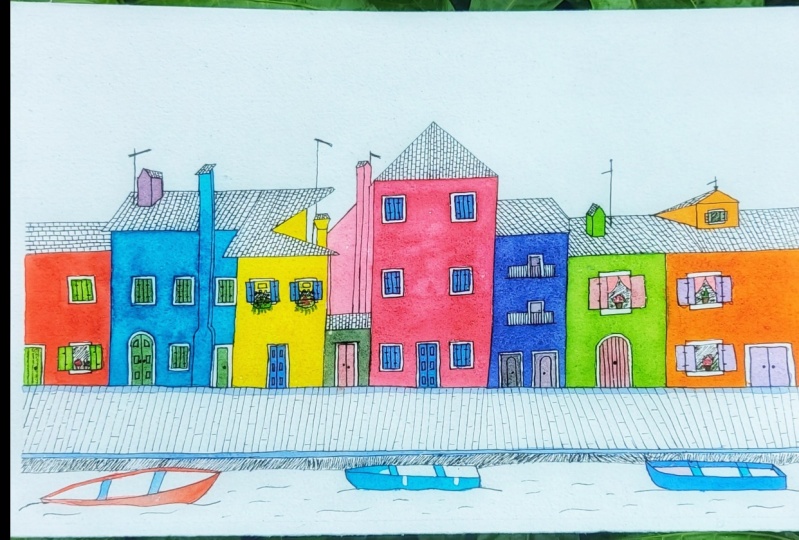
7. Illustration 1 - Burano (Sketch & Inking) : Guys, now it's time for the fun to begin. Our first illustration is a row of colorful houses in Burano. The first thing I always do when I'm starting a painting or illustration is, I take a ruler and draw a thin border on all four sides. It's not a mandatory step, but it's something of a habit for me and I've learned that it helps to leave that bit on all sides, especially if you plan to frame your work later. The border is done, now it's time to start sketching. I'm going to start sketching with the pencil here, but I do know a lot of people prefer to do it directly with a pen, and if you're one of those people, feel free to do so, you can completely skip this pencil step. But I personally always started painting or illustration with pencil because I feel it gives me a lot more flexibility, because I can go back and erase and redraw something that I don't like. Also, I have this really bad habit of redrawing the same stroke again and again, so a pencil is really my friend in this case. Let's have a look at our reference image. If you haven't already, you can download it from the Projects & Resources section. Here's a tip before we start sketching. This is something I always do when I start sketching from a reference image. I usually identify a point, line, or even a feature in the reference picture, which I can use as a starting point to sketch. In this picture I can already see some horizontal lines that I can use. Like this floor line where the building starts and another one below which marks the edge of the pavement, and the third line indicating the wall height of the first building from the left. Now that I've identified these, I'm going to sketch them on the paper. I'll start with the floor line, which starts somewhere a little below the middle of the paper. Then the next one below which is the edge of the pavement. I also have a rough idea where the water starts, so I'm sketching that line as well. Now, I'll draw the third reference line, which is the wall height of the first building. By first building, I mean the first building on the left. I sketch from left to right because I'm right-handed. For me, the first building is the first building on the left. Now, we have a starting guideline sketched on paper. Now, let's sketch our buildings. I start by estimating the width of the first building, and I figure it and sum around here. Next we have the lilac building, which is this wide. In the picture you can see that the second building is slightly taller than the red building, but I'm going to sketch it a little more taller than it actually is, because I want to emphasize that contrast. Then we have our third building, which is a yellow building, which is just about this wide. The height of that is the same as the first building. Like this, I'm going to estimate the heights and widths of all the buildings and sketch them. Let's sketch the roofs now. Again, I'm taking a rough estimate from the reference picture and drawing the roof height. For the first building, the roof ends somewhere around here, and for the second building, we can give a slight slant on the roof edge, and the height is maybe this much. I'm extending this line further because the third building's roof also seems to be the same height. Like that, I'm going to finish sketching the rest of the roofs as well. Once I'm done, I'm also erasing the horizontal guidelines wherever I don't need it anymore. Some of these roofs have chimneys as well, so let's sketch those. The first one is on the second building and it's in the shape of a basic house, and let's sketch it like that. We are simplifying the geometry into a simple shape here, just like we learned in our earlier lesson. Now, we have to draw it in 3D and it looks like we're looking up at it, so I'm drawing the diagonal lines downward. The baseline here is getting cut by the roof's surface which is slanted, so we have to draw it in that slant too. There is actually another chimney on this building, but let's leave that for later. We will sketch it when we sketch the windows and doors on the building. Going to finish sketching the rest of the chimneys now. Now, we're going to sketch the doors and windows. For that we're going to use the same method we used for drawing out just in a row, that is, draw guidelines first. Let me show you how. So I'll start by drawing the first door in the first building. Now, if you look at our reference image, the height of all the doors are the same. So I'm going to establish that as a guideline for drawing all the doors. Now, I want you to look at the reference picture again and this time observe the windows in the ground floor. You'll see that the top of all the windows are also pretty much in the same level as the height of the doors. This line we just drew can be used as a guideline to draw windows also. Now, let's draw guidelines for the window sill, which is the bottom frame of the windows. Again, I'm going to take this as a common guideline for all the windows in the ground level. We can do the same step for the windows on the top floor as well. I'm roughly estimating the bottom level of the windows in the first floor starting here. I'm extending that to all the buildings. The height of the window would be somewhere here so I'll draw my guideline here. Now, this tallest building has an additional level of windows, so I'm going to need to draw guidelines for that also. Now, it's time for another tip. I give the position of one element relative to its position or distance from another element that I've already sketched. Like in the picture I can see that the window here starts a little above this roof line. That's where I'm going to draw the bottom guideline, and the top line would be somewhere here. The horizontal guidelines which mark the heights of the windows are drawn, now let's draw the guidelines for the width of the windows. We already have one window here, we just need to extend these lines vertically above, because we know from the picture that the windows are aligned vertically. We just repeat this for all the buildings. We can also now sketch the chimney on this building. Now, you can see that my chimney is a lot slimmer than the actual picture. In fact, the dimensions of many elements are way off. I'm not really bothered by it, because what we're doing here is illustrating the scene by capturing its character. We're now trying to create a photo realistic painting. Like I said, don't worry about getting your dimensions precise. Now I'm going to finish drawing guidelines on the rest of the buildings. We have this nice grid drawn for the doors and windows, now let's start sketching them. I will draw the frame for this door. The first window is an open one, and we've already learned how to sketch them. We can see the top and bottom frames and we can see the open shutters. I also see a couple of potted plants. The window on top is closed, so we just draw the frame and the closed shutters. The second building has an arch door, and closed windows on top. Now in our reference image, I can't really see the details on this door, so I'm just going to use my imagination and draw some panels on it, like this. Now the windows on the third building are very interesting. They are all open and have some canopy or blinds to keep the sun out. We sketch the open windows with the shutters open like how we've already learned earlier, and the canopy looks something like this. The windows on top also have these pretty plants on their seal. I'm just scribbling a cloud-like shape for the plant. Let's finish up all the windows and doors. Another thing I'm tweaking in the illustration is the curtains in front of some of the doors. I don't really fancy them, so I'm just going to not draw them. Instead, I'll just sketch the doors. We've finished sketching our windows and doors, and with that, the major part of the scheduling work is done guys. The last thing to sketch are the boats. Although there are multiple boats in the reference image, I'm not going to sketch them all. I feel it looks too crowded there and drawing all of them will make it look a little chaotic in the illustration. I'm just going to keep it simple and sketch only the two blue boats on the right. But before that I'm going to add another line below the edge of the pavement, just like we see in our reference image. Now the boats. We can draw wavy lines like this for the water below the boat. Here again, I'm tweaking the second boat just to make it look more interesting. Now we're done with the pencil sketching for our illustration. Now it's time to ink them. The inking stage is where we will add in details like tiles on the roof, the little wavy lines for the water and a little bit of shading under the pavement, and like that. I will start with my 03 Pigma Micron pen, and I will just ink the outlines of the building like walls and roofs, the chimneys, pavements, and the boats. Now that these are done, it's time to ink the smaller details like doors, windows, and the roof tiles, et cetera. For this, I will use my smaller nib pen, which is a Faber-Castell liner in 0.1, and the process is same as before. We just have to ink over the pencil lines. The doors and windows are done. Let's add some details on the roof, like roof tiles. Now, I'm going to show you guys two ways to do the roof detailing. You can watch both and then decide which one you want to adopt. In the first style, you just have to draw vertical lines across the roof like this, and then small horizontal lines staggered. It's like how you would draw a brick wall, but at 90 degree angle, and you can just do very light strokes here instead of rigid lines. In fact, try to give these lines as quick and random as you can. We're not really aiming for perfectly staggered rectangles here. Now let me show you the other way of doing it. Here our vertical lines will be slanted and parallel to the roof edge, and important thing here to note is that this slant changes direction as you go from left to right of the paper. Let me show you how. You can see that the initial lines I drew are slanted to the right, and as I move from left to right, this changed. The last lines I drew are slanted to the left. This is another easy way to give a sense of perspective or depth to the illustration. Now I just have to go in and add my small horizontal strokes across these lines. Don't forget to detail the roof for chimneys. I'm also going to add in some lines as details for the pavement. Next, I add in some random horizontal strokes here and there. I won't give these horizontal strokes on all of the rectangular segment because that would make the pavement area look very dense on our illustration. Now let's add some details for the water. By the details, I mean these small wavy lines. Again, just here and there, and invading lines. There's really no method to it, just draw some lines here and there. Now the last bit of inking we have left to do is shading the inside regions of the open windows. For that we can use a 05 Pigma Micron. I'm just going to go in and fill the space with these slanted strokes. Try not to fill it in perfectly. Go ahead and leave some of that paper white you can see through the strokes. I feel now is a good time to share with you guys my motto for this illustration style. It's, strive for imperfection. I'm pretty sure this is the only time you'll hear this quote in life. Now the final bit of detailing is some shading under the pavement. I feel it adds more depth and balance to the illustration, and finally we are done with the inking also. Now we can take our eraser and rub out all the pencil strokes, and that's done too. Now, it's time for coloring.
8. Illustration 1 - Burano (Painting): We're ready to paint our illustration now. I've got all my paints at place with me. We will first paint the walls of all the buildings and then do the windows and doors. I will use my medium sized round brush for this since the areas to paint are relatively large. Now, I'm going to start painting from the left side of the paper. The first house from the left is red color. I'm loading my brush with red paint and giving it on the walls of that house. I won't be painting the frames of the doors and windows. As you can see in our reference picture, they are all white and so we leave them as they are. While using watercolors, always make sure your brush is loaded with lots of paint to get a smooth and consistent layer of paint on the paper The first building is painted, well, at least the wall is. Now I'm going to start painting my third building, which is a nice yellow color. I load my brush with a good amount of lemon yellow and start painting the wall. The reason I'm painting the third building is this: I know my red paint is still wet, and if I start painting the second building right now, the colors might bleed into each other and I don't really want that. To avoid this, I will paint the third building, and after that, the fifth building, and like that, every other building. By the time I finish painting the seventh building, the paint on the first building would have dried. Like that, I will beat alternate buildings first and then go back and paint the remaining ones. Now some of you may actually like this bleeding effect. If you do, you can totally ignore this step. You can also ignore this step if you're painting with a dry medium like markers, pens or crayons. The third building is also done. Let's move on to the fifth one. The walls of this building are a shade of magenta, but I'm just going to give it a crimson or a deep red shade. I realize as I'm painting that this side wall is in fact adjacent to the yellow wall I just painted. That's not a big deal. I'm just going to have to be very careful not to touch the wet paint with my brush. This building is done too. Let's paint the last building, which is an orange color. I'm taking orange paint on my brush and giving that on the walls of this building. Now the red paint on my first building is dry so I can go ahead and paint the second building. I don't really like that lilac color for the second building. Again, I'm going to change things up a little. I'm going to paint this one a light blue color. Remember, don't be afraid to tweak things here and there. We don't really need to draw or paint things exactly as they are in the reference picture or scene. The idea is to capture the essence of a place. In this case, changing one or two colors isn't going to affect what we are trying to show through our illustration, that this is a row of colorful houses. Now that I've finished painting the light blue, I'm going to move on to the little doorway for which I'm going to give a dark green shade. The last building left to be painted has light green walls. I quite like that color, so I'm sticking to the original reference here. Let's not forget about our little chimney. The building walls are done. Let's move on to our doors and windows now. I will be using a thinner brush for this step since the areas to paint are smaller. I'm going to quickly finish this up. You guys can watch me paint and enjoy the process. Make sure not to touch any wet paint on the paper causing them to smudge. If you feel your paints are still mostly wet, you can wait till they are dry to start this step. Remember to stay clear of the frames. We won't be painting them at all. Now you can see that for doors and windows, I'm mostly sticking to the original colors except here and there. Like the second building where I've picked a sap green for the doors and windows and this last orange building for which I have whipped up a purple shade by mixing red and blue paints. We're almost done guys. We just have a few things left to paint. Like the sunshade or canopy in our yellow building, and the plants, and the boats. Last tiny bit of detail, I promise. Let's take some red paint on our brush and dab it lightly on the green here, and we have flowers. Congratulations, we've finished our first illustration. We are done with the first illustration, guys. I hope you had lot of fun. Now it's time to move on to the next one.
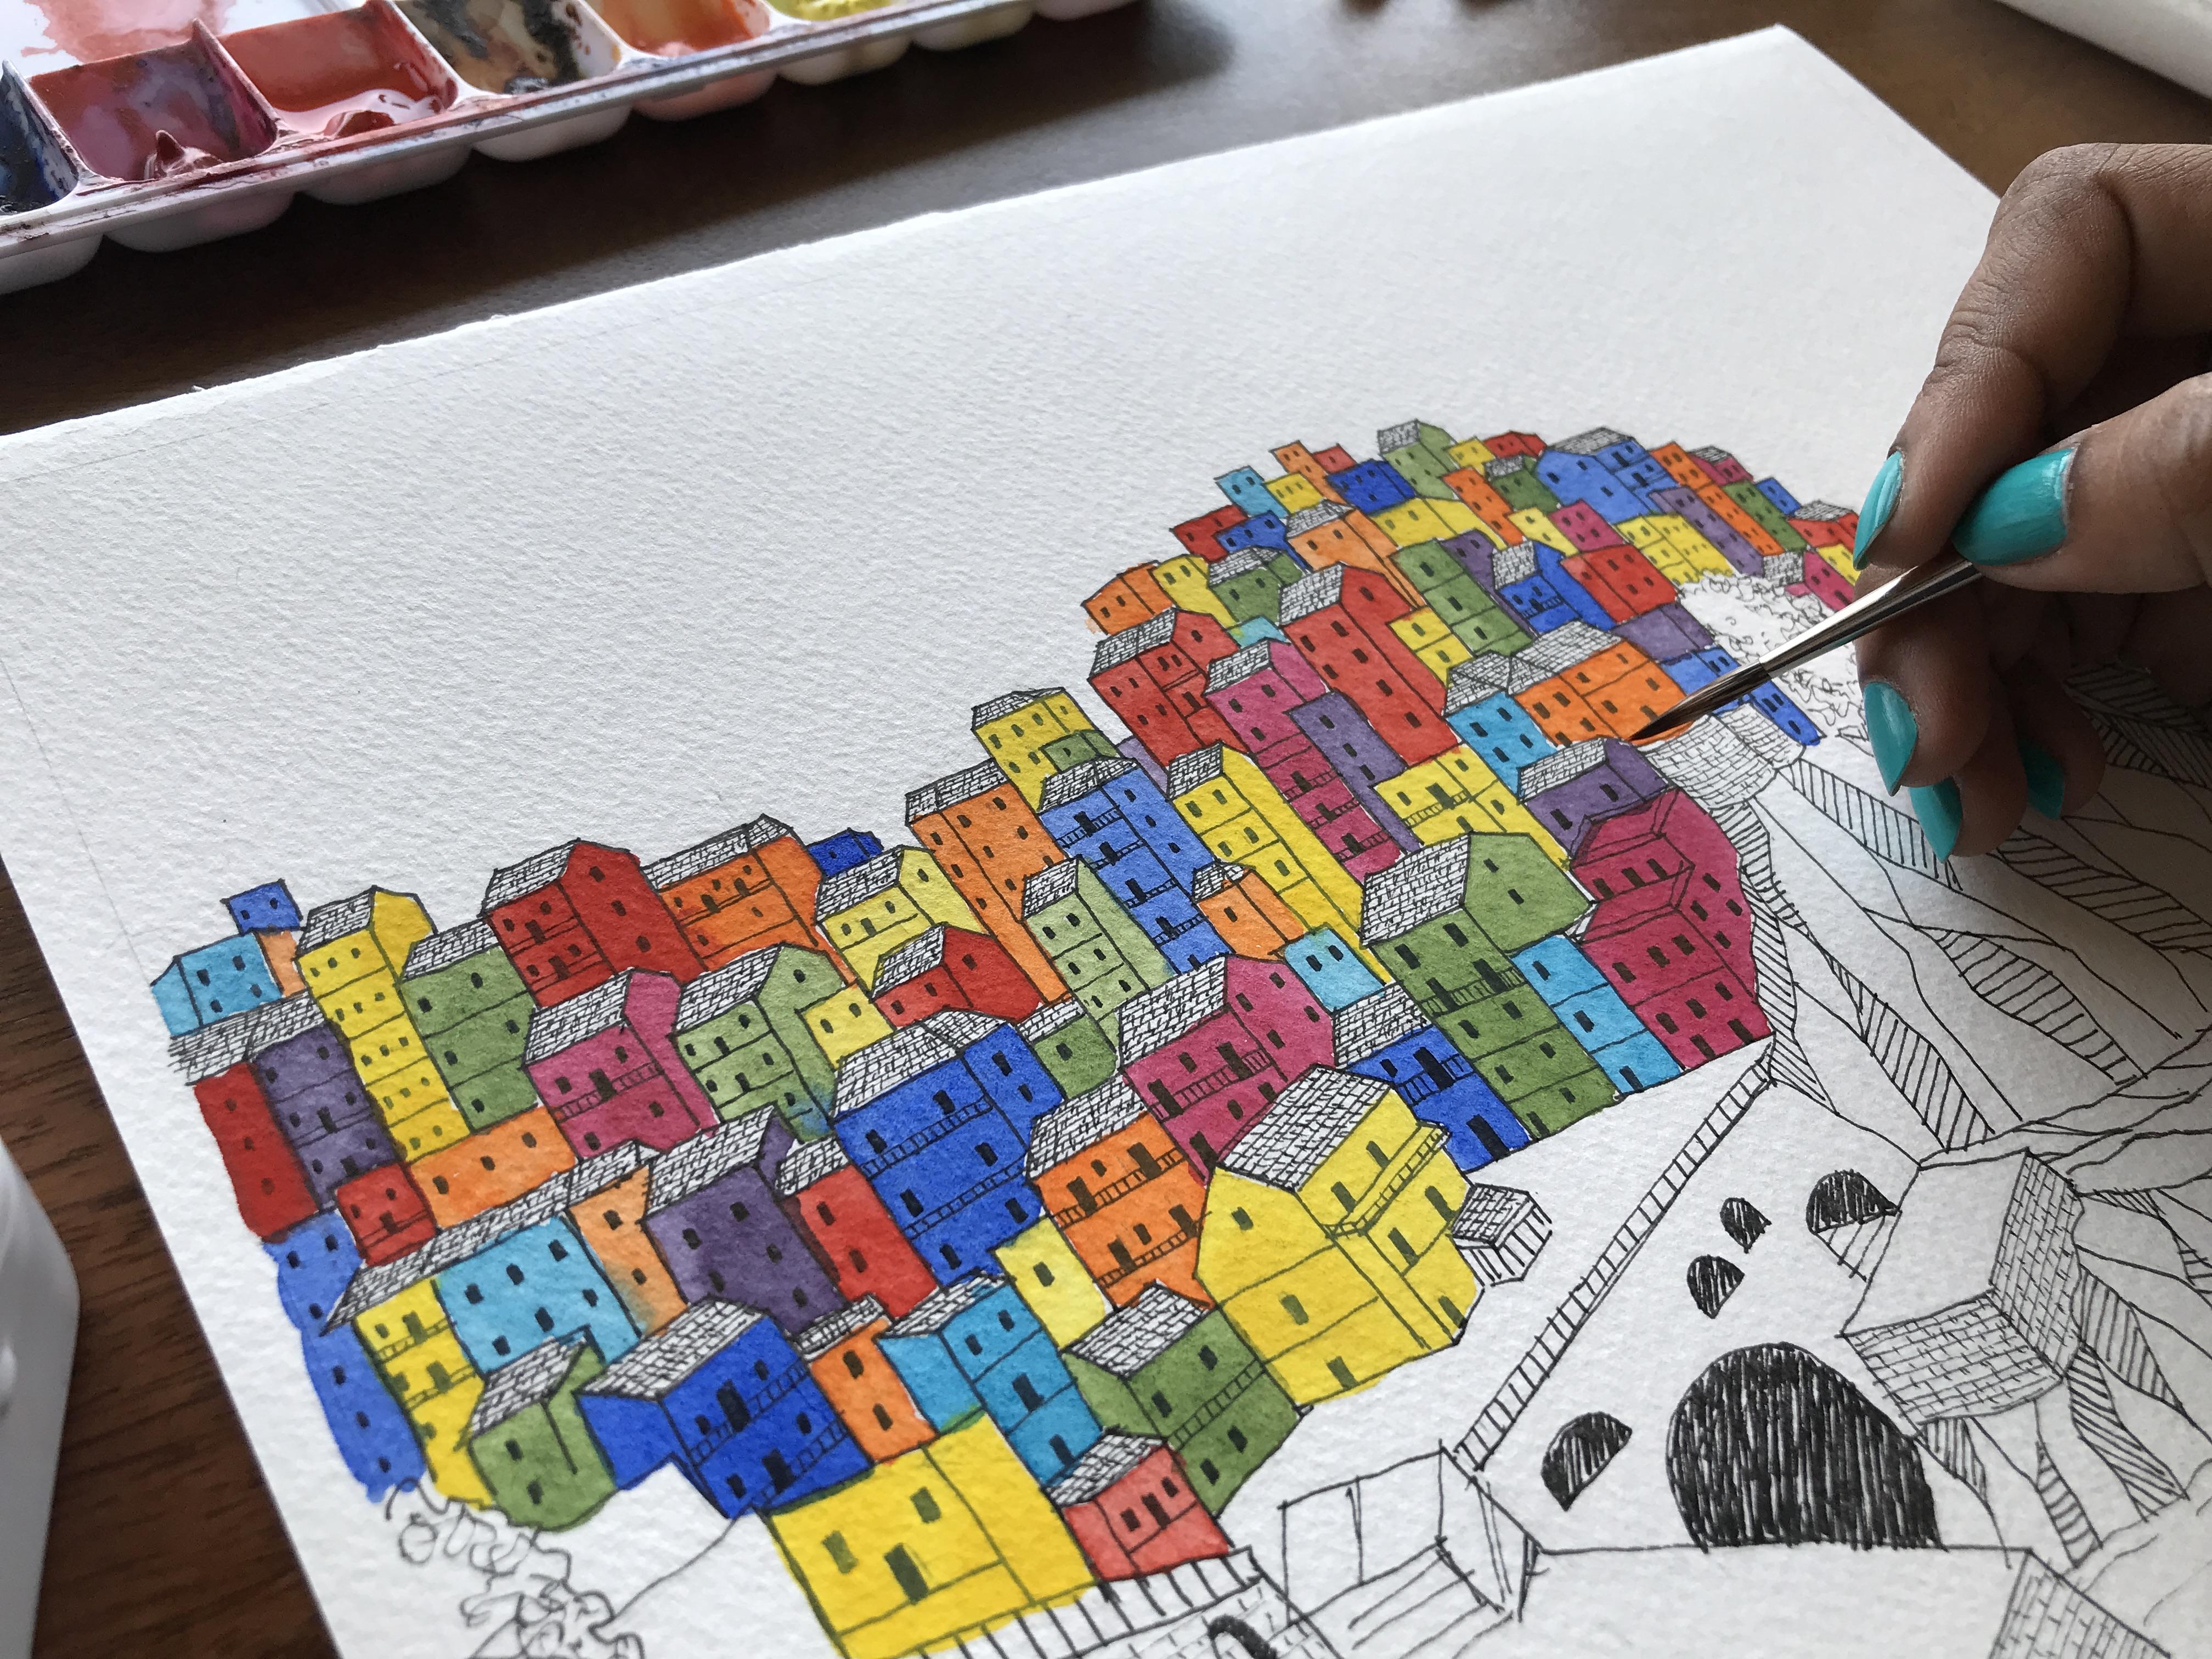
9. Illustration 2 - Manarola (Sketch & Inking): It's time for a second and final illustration, Manarola. This is a beautiful town in Italy, which is well-known for its bright and colorful houses and its wine. But let's focus on the colorful houses for now. Let's start. As you can see, I've already drawn the borders on my paper. Again, this isn't a mandatory step. For this illustration too, just like we did for Murano, we're going to start off by identifying some elements on the reference image and then using those as guidelines to start sketching. Let's have a look at our reference image. I can immediately mark this guideline, and then this line which marks the region where all the buildings are, then this waterline and the horizon, this rock, and all these structures. All right, now we have something to start with. Let's mark these lines on the paper. Now we can start sketching the buildings. For this step, I want you guys to recall the tip I shared with you earlier regarding relative position of elements in the picture, which is gauge the position of an element in the picture by estimating its relative position or distance to something that you've already drawn. I start sketching this one building, the position of which is very conspicuous. Then I sketch the building across it and this little shack-like feature about here. Then I go back to the first building and sketch the ones next to it. Like that, I keep sketching buildings one after the other, estimating their dimensions in relation to the ones I have already drawn. But as the number of buildings increases, this method obviously gets harder. After sketching the initial few buildings in the front, I'm going to take it real easy and just start sketching buildings all around. I won't sketch them completely random, and I will try to get it as close to the reference image as I can. But I really won't stress about capturing them exactly as they are. For instance, I can see that some of the buildings in the middle section of the region are very tall and slim. So I will sketch some tall and slim buildings around there. Something else I take note of and keep in mind as I sketch is that the buildings appear to get smaller as I progress further away to the top of the cliff. After sketching the buildings, I'm moving on to the other features like foliage, the arched wall, and the other structures. I'm not going to sketch people or all those boats that we see in the picture because I want to keep it minimal and simple. Let's add in some details like windows and doors for all the buildings. Here again, I'm going to use our image just as a vague reference and that too, only for those first few buildings we sketched. After that, I'm just adding in doors, windows, and balconies as I like. Remember, we're not trying to paint a photo-realistic picture here. Just as with the buildings at the back, the windows and doors also appear to get smaller as we get further away from the first row of buildings. Make sure you keep that in mind as you sketch. Now that those are done, let's add some more details like the stone wall texture. We'll just add in very light lines. We can even do this directly with a pen during our inking step. Next, let's give some details on the surface of the cliff. Now, I usually draw lines like this to give that jagged effect to the cliff. They make it look sharp and steep. Then I shade some of the segments by giving these slanted lines or strokes. The angle of the strokes are different on every segment I shade. What I'm trying to show here is that the surface of the whole cliff is split into multiple planes that have sharp edges and are at different angles. All right. With that, the sketch of Manarola is complete. You know what comes next. That's right, inking. We already know how to do this. Just ink over all the pencil lines. It's that simple. We will use a 03 Pigma Micron and ink all the building outlines first, then the cliff and other structures like our stone walls. Let's quickly do that. Now, we can do the windows and doors. Here, since the windows and doors are too small to give any kind of details, we will just fill them up with black ink. We can use the same 03 pen for this. Once we've filled all those little rectangles, we can use our 0.1 pen to add a little more detail, like the railings of the balcony handrails, wherever we've sketched a balcony. It's time for the roofs now. For the roofs, unlike the last illustration, this time I'm drawing horizontal lines first and then staggered vertical lines across them. These vertical lines are drawn parallel to the roof edge line. There's no particular reason for why I'm doing it different here. I just feel like it looks better for this illustration. Also, I wanted to show you guys that there is no hard and fast rule for picking which direction to draw these lines in. Roof details are also done. Let's go in and add detail lines to the stone walls. I'm also adding in some wavy lines for the water, just like we did in the previous illustration. Now, for the foliage, I'm adding in some scribble lines to give it more density and shadow play. I'm switching back to my 03 pen because I feel like 0.1 doesn't give the desired effect. The last step in inking is adding in these strokes with the 05 pen to shade and darken the tunnels and this area too. Now we can erase all the pencil marks and then we are done with the inking as well. We're so, so close to finishing this class guys, I'm so thrilled that we've come this far. Now, let's quickly move him to the final step which is painting Manarola.
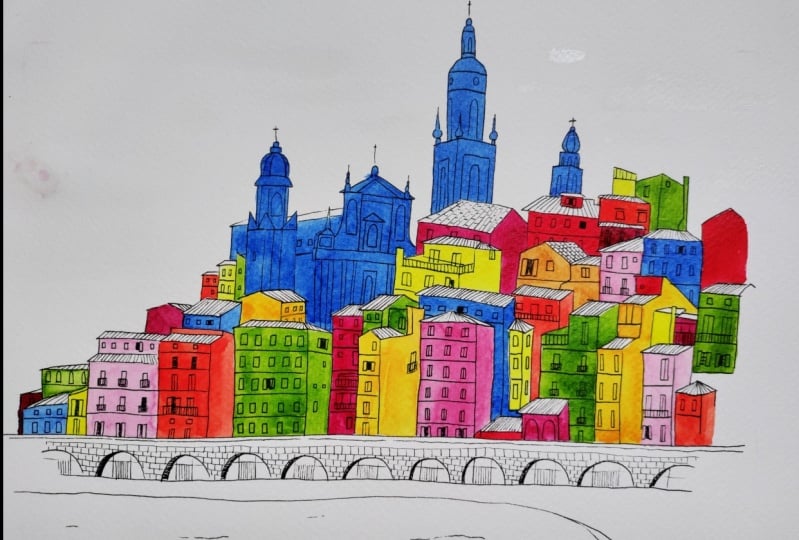
10. Illustratio 2 - Manarola (Painting): We're nearing the end of this class, guys. All that's left to do now is add some color to this illustration. Let's get started. Here too we can take the liberty to pick our own colors for the houses. In fact, I'm hardly going to stick to the same colors as in the reference picture. I want to give brighter and more contrasting colors to really bring out the character of displays on my illustration. One color that I will pick from the reference image though, is yellow. It's such a bright and happy color, and we can't not use it here. I'm loading my brush with the yellow paint and filling in different buildings. This is where the real fun begins, guys. From here on, I'm just going to have fun picking random buildings to give yellow color. There's really no pattern to this. I'm just painting yellow on any building I feel like. I do, however, make sure that the buildings I pick are scattered, and I don't end up painting a group of adjacent buildings the same color. The next color I've picked is orange, and I'm repeating the same step of giving this color on randomly scattered buildings. Try not to fill in too many buildings right in the beginning itself. The third color I've picked is a bright red, giving that on some of the buildings, and then a sub green color. After I've given sub green to the buildings I want, I move on to the next color, which is a dark blue, and I repeat the same process yet again. Next color is a crimson or a deep red shade. Be careful not to touch any wet paint with your hand. You can wait till each color dries before you move on to the next one. Next, I'm giving some of that purple color I had mixed earlier for the Burano illustration. Now, I'm going to put my brush down and just take a moment to really look at the illustration and analyze it a little to see if I'm happy with the color composition so far. I'm having two thoughts here. One, I don't want to add more colors to this composition, and two, I can definitely brighten it up with more yellow. So I'm painting a few more buildings yellow, and then some red. Like that, I'm going to keep repeating this step with every color till I get a balanced composition I'm happy with or I run out of buildings to paint. Now at this stage, I do feel like bringing in a new color to the composition, a light blue. I'm giving that to a few buildings here. I'm not giving this color to too many buildings because I already have dark blue here, and I don't want to end up with too much blue. Finishing up with that. That's it, guys. Our second illustration is also complete. Congratulations on finishing two illustrations in this class. Let's meet in the next video, where we'll wrap things up.
11. Final Thoughts: That's it guys. You've reached the end of the class. Congratulations. You've come so far, starting with simple geometry sheets to illustrating two beautiful terms. I hope this class help demystify the whole idea of urban sketching for you, and now you feel a lot more at ease about illustrating an urban see. More importantly, I hope you had a lot of fun through the class. I had a lot of fun putting it together for you. I would love to see your work, so please upload them in the projects gallery. If you do share it on Instagram, please tag me @the_artsychoke and Skillshare @skillshare. You can also follow me here on Skillshare by clicking the "Follow" button, so every time I release a new class, you will be notified. Feel free to start a discussion or ask me anything in the discussions panel if you get stuck or need help along the way. If you like this class, please take a moment to leave a review. It would mean a lot to me and also help me get better as a teacher. Again, thank you so much for taking this class. I'm looking forward to seeing all your illustrations. See you again soon. Take care.
12. Quick Update!: Hi again. I just wanted to update you guys on
a new development. I am now offering
1-on-1 sessions. 1-on-1 sessions are great
because they let you have a more focused, responsive and personalized
learning experience. Pre-recorded classes are great, but sometimes they lack that personalized touch which can make all the difference
in your learning journey. In a 1-on-1 one session, the focus is entirely on you, your strengths, your goals, and your areas of improvement. Every minute of the session is dedicated to your unique needs, and I'll be able to give you immediate guidance and
feedback as and when required. I offer two different sessions. One is a 15 minute
feedback session for any of my classes
on Skillshare. So if you enjoyed this
class and need a personalized feedback or need a little bit more help
somewhere along the class, you can book a 1-on-1
session with me. You can show me your
progress or ask me questions regarding the
class and I'll help you out. The second session is
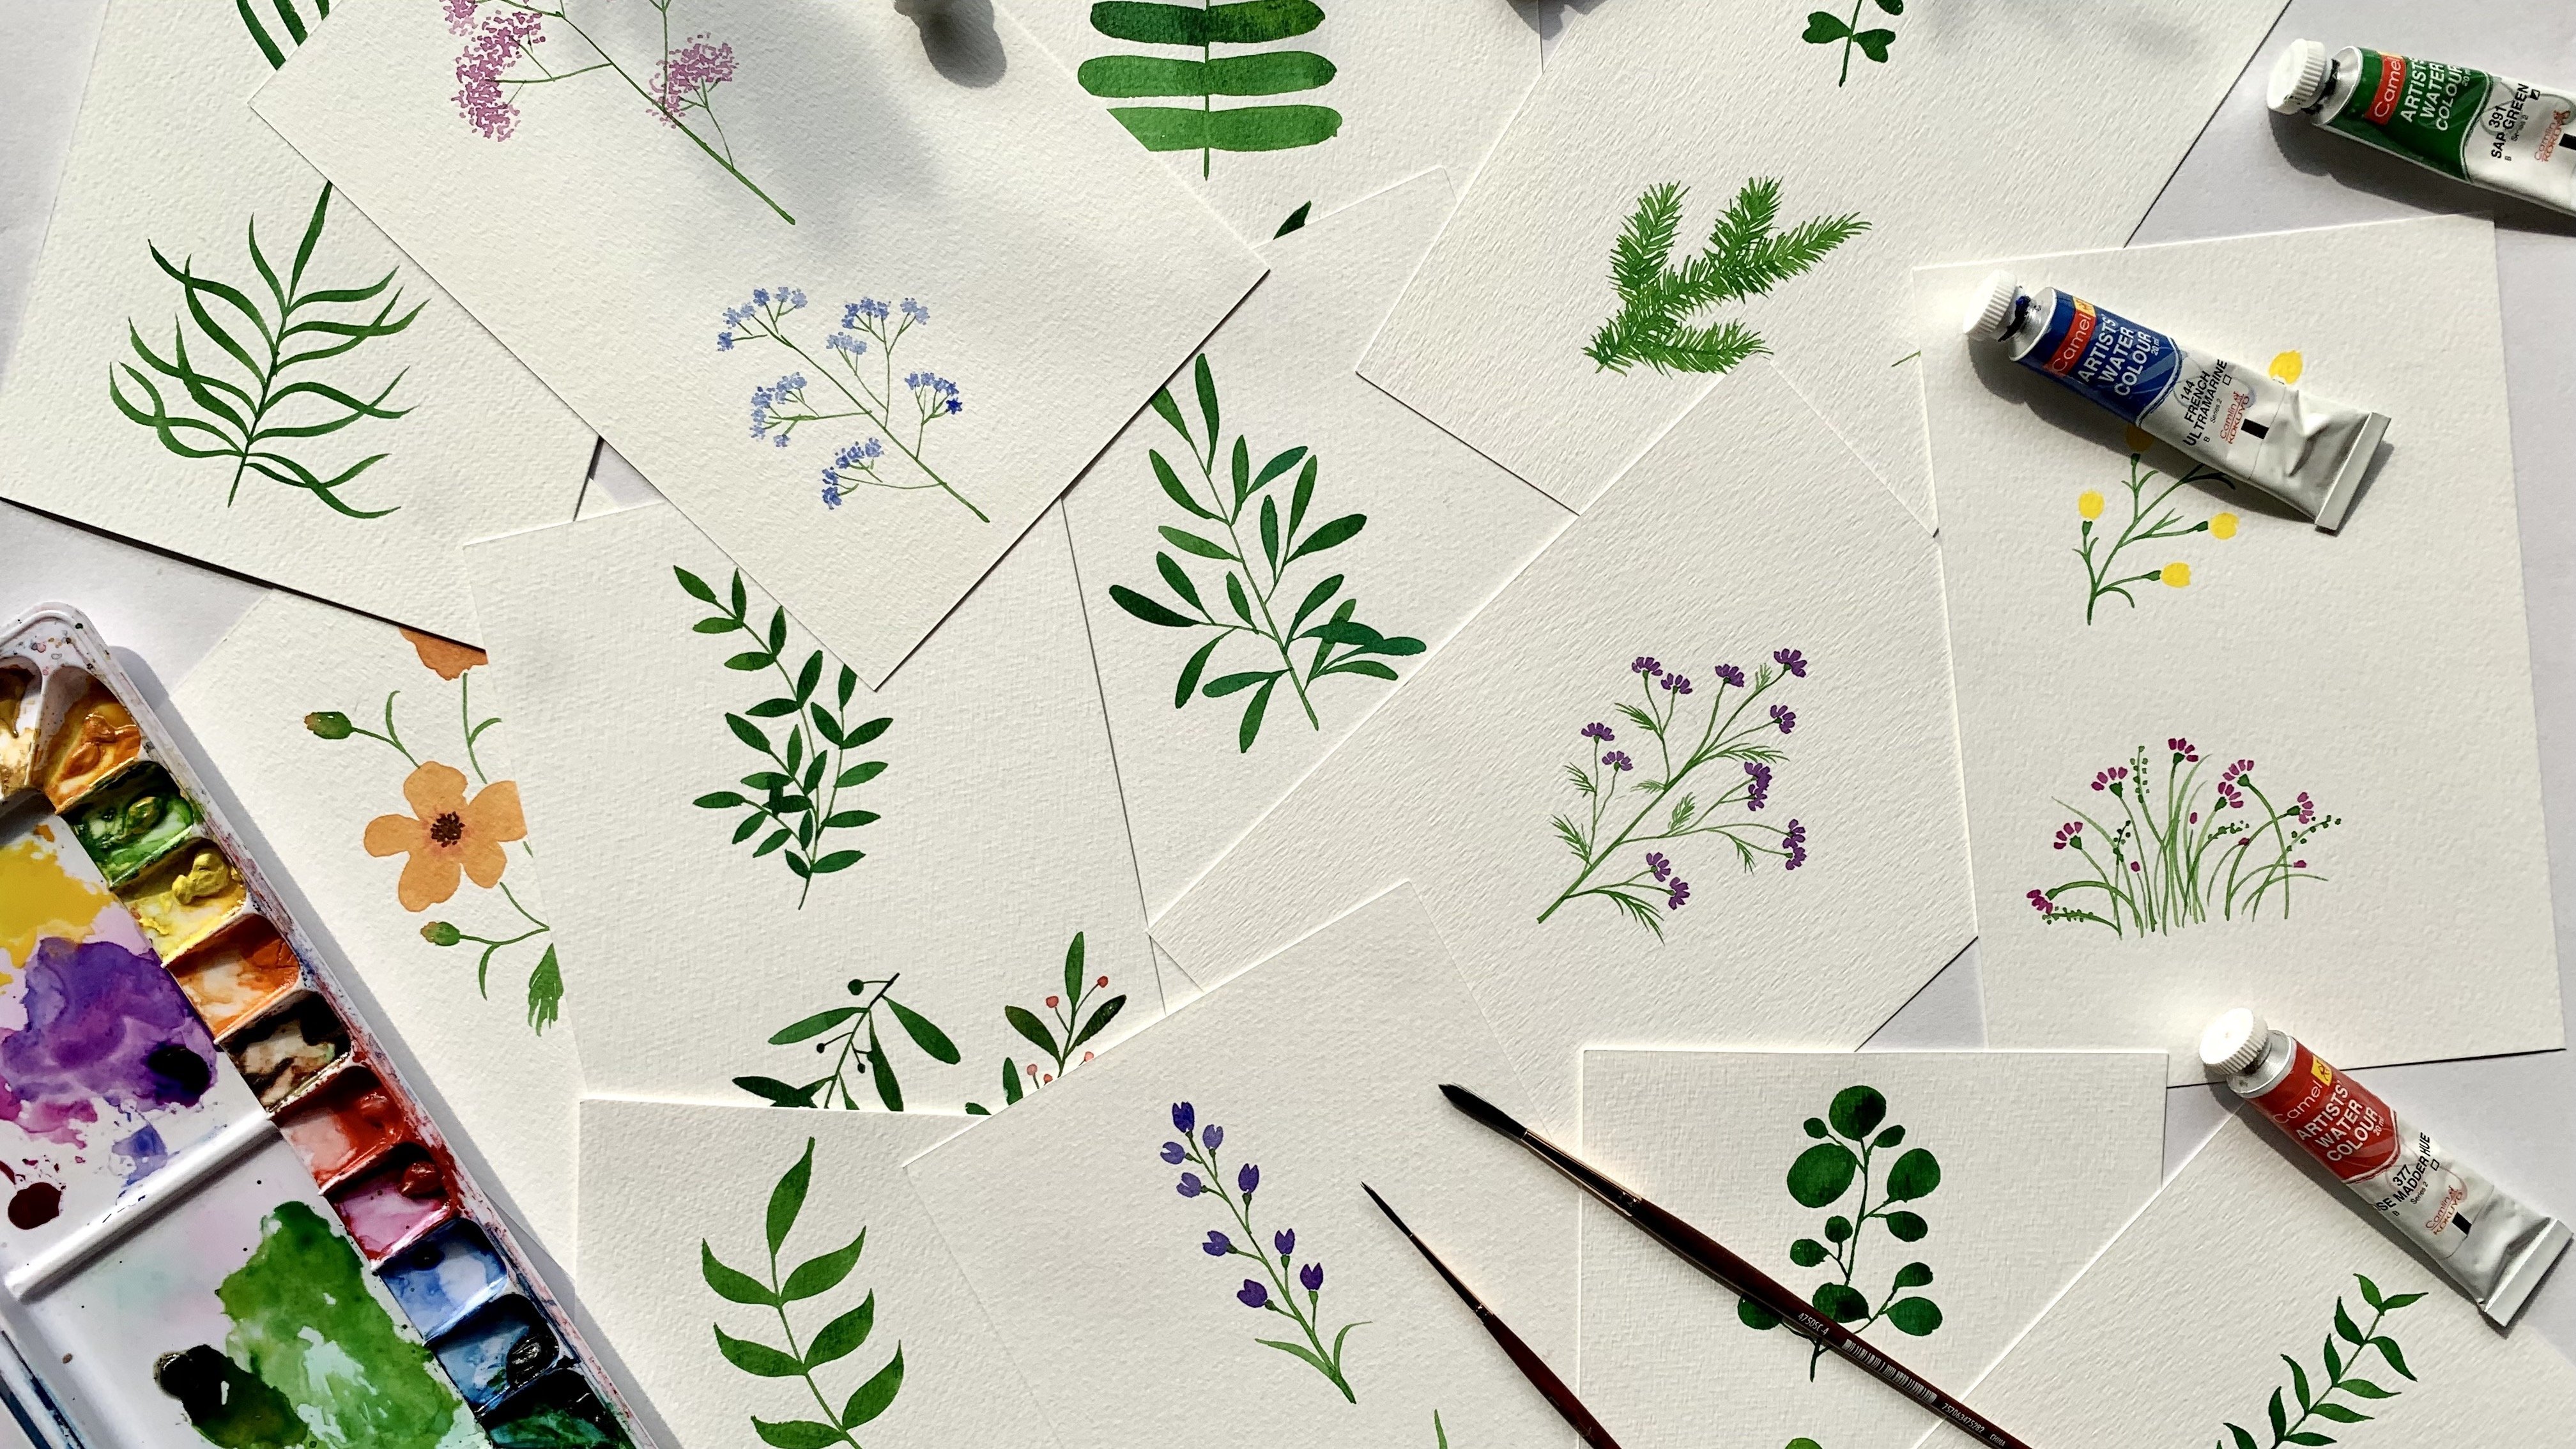
a 30 minute session on finding inspiration for
drawing botanicals. Over the 30 minutes, I will list and explain eight places to look
for inspiration while drawing botanicals for your illustrations or patterns. Unlike pre- recorded classes or other online courses which follow a one size
fits all approach, 1-on-1 sessions can
be personalized to your specific needs
and learning pace. To book a 1-on-1
session with me, just go to my Skillshare
profile page. It's really an investment
in your creative journey and I hope I can help you
and guide you through that.
 Devika Mahajan, Artist and Founder of The Artsychoke