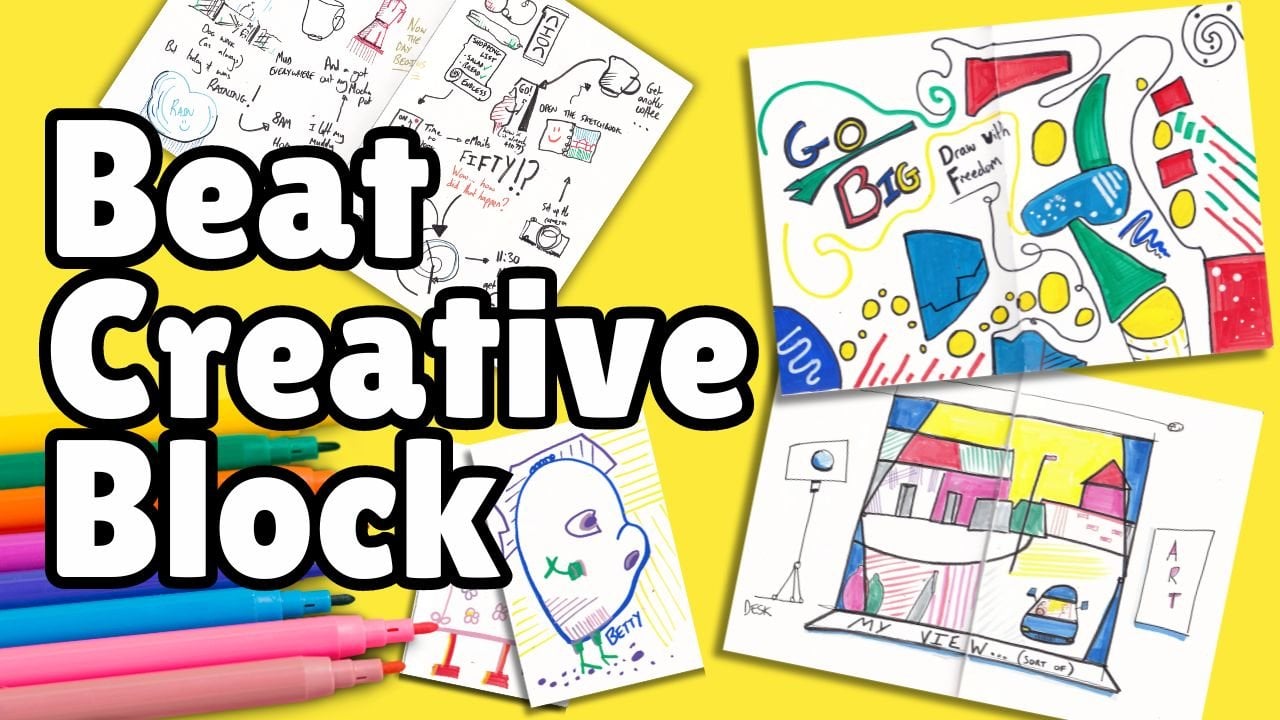
Transcripts
1. Introduction: Have you ever seen those deep, intricate, fascinating doodles, which fill up a sketch
book, and wondered, how on earth does someone
actually come up with the creativity to create
that from their mind? Well, today, I want to show
you exactly how to do that. I'm going to guide you through
really simple exercises, a few basic techniques
which allow us to build, wander around the page, and explore our story, our sort of building
of our sketch. In a gradual way. These sketches are not
something that you have to have a vision for before you set your pen onto the page. They are something which
organically creates itself on the page if you follow
some really simple ideas. All you need for this class is a piece of paper and a pen. Any pen will do, and you
can dive straight in. Today is all about
our inner creativity, exploring what our
ink pens can do, even playing around
with Posca pens or any other pens that you
might have lying at home. And by the end of today, producing an amazing
set of doodles. I'm also gonna show you outside, I'll take you to a local cafe. And I'll show you how
I use inspiration from the environment to produce exactly the same kind of thing. But each doodle with
its own unique twist because of the unique twists
and story that it went on. Don't forget, if you
enjoy this class, you can find me, top me sketch
loose across the Internet, but also follow me for
loads more, doodle classes, ink and watercolors and
more on skill share.
2. Techniques and Sketchbook Tour: This lesson is an introduction to the techniques that
we're using in doodling. I'm going to very briefly show you each of the ideas
we'll be using. And then I'm going to take
you on a sketchbook tour, showing you the
things I have been doodling and how
these techniques can directly apply to some of my
favorite doodles recently. What we're going to do
in the first handful of lessons is look at some simple techniques that allow us to build up a doodle. In a more interesting way
than if we're just totally mindlessly creating
chaos on the page. And we're going to start with
simple idea, simple lines, so going from sticks and tubes, discussing how overlapping and
underlapping is important. Next, we can move to shapes. I'm just going to show
you two examples again, circles and sort of
squares and rectangles, and how we can start to develop them a little
bit more as well? Notice the hatching
and the darkness. These same concepts could be applied to objects or people, pv and fruit and atle
crowd of people. And then we can also think about how we can tell
ourselves a story? We can use our experiences. Here, I've built a city. I will show you what
I mean as I do this, I will talk you through it. The story, the way that this is my house and
where I grew up. This is my school, where
the bus used to take me. And then lastly, we'll have a little examination of
principles of contrast, whether that's through textures, through hatching or
through blocking in areas. And why that makes things
just pop a little bit more. Within this sketchbook,
I have some of my more traditional
Toby Style art. This is ink and wash, but I've also taken
the opportunity to do an awful lot of doodling. So you can see some of the ideas I've shown
you already here, more intense with the
black leaving gaps and allowing myself to
create interesting shapes. Here's some more fruit
which are overlapping. Then I've taken these simple
ideas and played with them. I called this coffee corner. So what I was actually
doing was watching a point of view video where
someone was running a cafe on a busy day on YouTube. So it may not be obvious. This is the coffee filter
from the espresso machine. And I just picked that
moment that they were holding it to capture the shape. And then doodle my own
shapes from the net. Here is someone's fum as
they are holding a cup. And again, I took that
moment to find that shape, use that object, and then doodle around it
with hatching with contrast. This is the coffee machine with, sort of coffee
cups on top of it, lots of darkness around
it to make it pop. And this is me telling a
story. I sort of built this. I was like, Oh, it looks like a factory city
and a factory city. Every good factory
city needs a crane. You can see these same ideas developing. This is a station. Not sure what kind of station, perhaps a sort of space
station ready to launch. This is what I call field of dreams because it feels
like an open space. And it just started with a
really simple silhouette. This is under construction. I built this sort of
skyscraper series of towers. And as I found it developing
from left to right, I thought this would be fun to have a little arm coming down. It's part of the simple story. And I built some
sewers underneath. I drew this train as a
semi realistic train, and then I used
sticks around it, within it, bits of hatching, which is sort of like
close together sticks to provide just something interesting and
doodling and turned a normal train into my
electric steam train. Like sticks, tubes
are super versatile. You can see this features,
not just sticks, simple lines, but also
this area of tubes, which I think has
worked really well. They have a feel like they're ducking and diving,
they're tangled. Not all of them make sense, some of them are just finished. Some of them just sit
there on their own. But the complexity, the
fumbling and twisting around, and just breaking out from this area in a few
places as well, makes I think something which is really visually interesting. We can use the same ideas and make them a
little more complex. So here, we've got tubes, but they just feel like
they're something, maybe a little bit of
cotton hanging down. These are big tubes. And a little bit of hatching,
some other textures, make them feel like maybe
a dream catchers ribbons or some leaves dangling down. Contrast, of course,
you can find evidence in all of these
little deals of mine as well. I think this one
is a nice one to show really deep contrast. This one was done using an
acrylic marker apostopen, which enables really bold, deep dark to develop in
places quite easily. And that lets us really
make elements pop, especially when you see it
over this big spread with simple lines and big boldness contrasted all in the
same sort of visual area.
3. Sticks: Now, we've seen the techniques and we've seen what they can do. I want to show you just how simple these
techniques really are. And it's really about
taking our times, being slow and careful and
allowing our mind to wander. And with that, let's start
with our first techniques, which is simple sticks. It's time to look at a
few simple techniques. Lesson my lesson at how we
can think about our doodling. And by thinking about it, we can start to develop
our own techniques, our own style, and also tell ourselves a
bit of a story as we go. So the first technique
that I'm going to suggest is to just
think about sticks. Think about sticks as an idea. When we're doodling,
we're trying to sort of sewn into sort
of another place, a more imaginary place. And so having repetitive
ideas to curate, to channel our ideas through or to just develop our ideas
is really important. So really simply sticks
would be just drawing ourselves a series
of sticks in a box. Or it doesn't have
to be in a box, the six could be
just on our page. What you'll notice
is gradually we want to start overlapping the sticks, and you might find
things developing. You might find a grid
develops. That's great. You might find something more chaotic and
interesting develops. The most fascinating way is if they are
interacting a lot, these two sticks are less
interesting being separate. Then if they come
all the way up to this other stick and
start interacting, and then all these other ones can interact with
one another as well. You have another one that
comes all the way across. And if they go under, we
can leave a little gap. If they go over, we can make
them bigger and bold under a little gap over, big and bold. And look now our sticks have got curves and
movement and loops, so let's introduce
some curving sticks. By having these
different shapes, having them go up around even, we're going to develop a sort sense of it being a bit more than just
two D. Simple line, they're going to
be two D, but if they are going up under, if they're going in between, if they are interacting. So here we go under and over under and over If we're having
all these interactions, suddenly, the scene is
far more interesting. The doodle, the scene,
whatever we want to call it, far more interesting
than if there's no interactions
whatsoever on our page. Just by continuing to
build that up with some of the other ideas that we're
going to be looking at, you will soon enough start
finding things are happening.
4. Pipes: Time to take the next
step beyond sticks, which is where we
start to introduce a three D element.
Let's see what that is. The next thing to move
from our simple sticks. If we just label our
first lesson as sticks, is to start considering tubes. Tubes. Well, perhaps, this is a stick and a tube
a three D stick. It's got two sides to it. This is where we
can start adding even more depth to our drawing. Now, this time, we remember that we want things to interact. That's not how we
started last time, but. We remember this time, we
want things to interact, so we'll start by
drawing our sticks, but we'll do them a little bit random and we'll
leave lots of gaps. And I don't know what's going
to happen in these gaps. I have no idea if anything is going to
happen in these gaps, if we're going to ignore
them, fill them in. But by leaving gaps, suddenly we can find that y, this tube stops here because
there's another one that comes over the top here and actually comes
over the top here. Looks at things, doesn't it?
Then this one comes like that as well. Then
look at this gap. This one is huge. That
must mean there's another one that
comes through here. And it gets to this
tube, and it stops. But then it sweeps around. And we're just
finding ourselves, drawing a three D
network of three D lace interlocking sort of meshwork
of these interesting tubes. When they go up and under up and under up and
under and all interact, we can find that they become
far more three D. Here, look, this one is
going under that one, but this one is going
under this one. But this one is going under this one, which is
going under that one. Now we have this very three D feel where the only way that these tubes can
actually be working here is if they're existing in a three D space where we
have height and depth. Here, we can again, just fill in our
gaps, find them. We can have this one simply
loop around and again, it's kind of tied in
a knot now, isn't it? Looping around like that. And where's our
little edge here? Well, look, I've gone wrong if that's
possible to do here. L this edge is high
and this one's low, but it doesn't matter
because it's a doodle. It doesn't have to
make complete sense. Suddenly, we can have
a visual anomaly. And just like that, we can
sort of quickly loop around, finish off a few
more of our tubes. Some of them might
literally finish somewhere, some of them are just
going to sort of exist as just these
little blobs in space. And then we can advance
just a little bit further. We have our twisting,
turning, interacting tubes, but to help them
really make sense, we can add little
bits of hatching. Every time one goes
under another, we can pop it in shade. Now we suddenly
have lots of things explaining to us
where the light is, where the dark is, where the height is,
and where the depth is. Because adding depth to our doodles is ultimately
something that is going to make our doodles move from really simple into something
quite clever. Beyond hatching, you can actually just black
in areas as well. That's also going to
provide a sense of depth. There you go. Sticks to tubes, and in the next lesson, we will, of course, look at
something else.
5. Shapes: Beyond sticks and tubes
or pipes are shapes, things which are a
little more two D instead of just long of page. So let's have a look at
how we can use those. So next, I want to suggest
the idea of interacting and interlocking shapes as an
interesting way to doodle. Here, we might, for
example, take circles. What happens if we
have a circle here, a circle here, a circle here, and they're all fine. They're all separate. We could imagine a sense that the light is coming from one direction
and we could add hatching, we could add lines to suggest some shadow,
and they're okay. That's an interesting
enough start. But as soon as we then really
start doing interactions, and here we might find, again, that we want to leave some
semicircles on the page and then find other circles which overlap, underlap, and interact. We might want to find that we
leave empty space as well. Notice how these have
got empty space, but by just allowing all
our circles to interact. We've got this far
more fascinating, interesting, compelling
story emerging on our page. Said the word story
a couple of times and it's not by
accident because we will get to the storytelling
creative space soon enough. Again, a little bit of hatching, again, even blotting things in. This is why I do like
fountain pens and posca pens because it makes
it really possible to blot in areas to hatch to
produce a real range of ideas. And simply by overlapping
underlapping, and interacting
different shapes. We can make a fascinating
doodle scape. Let's do it with
different shapes now, simple squares, which
overlap, underlap, an underlap, where it's
going to go under something, another one here, a underla which can then
overlap another one. It all gets very confusing
to talk about But it's rather sort of satisfying
to just keep going, keep moving through
your space that you're creating on your page or across your pages or
in your sketchbook. And just to develop different
patterns, different ideas, using hatching, using
blotting in, blacking in. Maybe you can find a
square within a square, and if you want to
block in another, you can have them cleverly underlaping and overlapping
where you're not quite sure which one this is you can have a black
meets a hatch meets a white. Same here. Maybe we have another clever
connection between them and same over here. You can find all these ways to start interacting with lines, three D lines, shapes. And that, of course, will move
us on to the next lesson.
6. Objects: Next, we take our simple
geometric shapes, and we can use
these same ideas to incorporate objects or
people into our scene. And one of the finished
doodles we're doing at the end of this class will incorporate objects in a very
similar way to this. So these are all
definitely abstract. They are focusing
on sort of tie, focusing on simple
marks and shapes. We can begin to expand that into broader ideas of perhaps a concept that
we're looking at. So you might, for example, start with wanting
to doodle some free. So here's an apple. And
there's an apple again. What makes it interesting is having these simple shapes
and these simple lines, which are simple doodles, under, overlapping, and interacting and providing a sense of depth. Maybe we even have something a bit like a pineapple
in the background. Then we can have a series of maybe these grape like fruits with an apple or something in the
background as well. And we can have the fruit
disappear off to the side. Then we can use the
same hatching ideas to make them a bit
more interesting. We can use blocking in. It might be tempting
to do this in a way which this is never
going to be realistic, feels a bit realistic, that's fine. Follow
that temptation. It might also be tempting to start exploring different ideas. Hatching in in a more random way or hatching in in a way which appreciates the shape instead of what the shape
is supposed to be. In that sense, you
might suddenly start filling up your page, and in this case, not a page, but your little frame might fill up with
different shapes. You could imagine doing this
with any object you wanted. Maybe you're good
at drawing cars. You want to doodle cars, maybe you want to doodle overlapping people
as an example. Then have a think about
how you can use hatching, how you can use blocking in to really create
a sense of drama. Maybe in this little
doodle scape. I just blot in this area. Blot in all the way underneath. We mentioned the idea
of doodling people. Let's have a little
go at that as well, and see how we can find a series of overlapping
people like shapes, which really are just a sense of a doodle coming together. Kind of becomes a bit
abstract, if you want. It becomes not
abstract, if you want. Really, it's sort of up to you, how you use shapes, how you use your imagination, how this all sort of builds up, interact and locks together. Or if you want a bit of space. And then just drawing
that space up. Maybe maybe that's
someone wearing a coat, and maybe there's some fantastic
hair in the background. And this, again, is
the idea of a story. Why is this person
been ostracized? And we didn't plan
to ostracize them. It just happened as part of the sort of authentic
doing that we're doing of the authentic kind of
creation process that we've taken ourselves along. And here, some simple lines, just some boldness, and we
start to create some depth. We can block in some areas. We can hatch in other areas. You might block in
faces, for example. You might pick out
some colors and make everyone's head a fun color. Maybe you want to pick
out a postoan and go. Everyone's head is
going to be green. Or perhaps you want
to stick like me and just keep sort of with
the black and white, the dramatic feel to all of
your doodle scapes today. And then as I come along, I'm just thinking
of ways to make the space seem interesting. And for me, that's a bit
more of an opportunity to apply some hatching,
awesome blacking in.
7. Stories: Now, I keep mentioning
this idea of telling a story or allowing
your mind to wander. And in this little example, we're going to do just that. So I'm going to describe this as building a city. You'll
see what I mean. But these same ideas of
wandering around our page, telling a story of our day, seeing what's in front of us, and putting that on our page, they can all be incorporated
into your doodling. Again, this is a simple example, but we'll be doing a
lot more of this story, mind wandering in our
bigger finished doodles. Now, gradually, what we've done in the previous lessons is moved from simple to
complex to object. And now I want to talk
about the word I've used a few times, which
is storytelling. And storytelling allows
us to take anything that is happening on
the page and give ourselves a reason to
keep it moving forward, a reason to expand on our ideas. So bear with me as I use an analogy which very
much dates my age. But if anyone played Sim City, you'll perhaps
recognize the idea of popping a little shape down here and maybe this
is a little city block, and then I wanted
an industrial area as I've built my city. Sim City is where you
simulate building a city. So then I can make this black. That's I'm showing it's
a industrial area. Here is a load of little random
higgledy piggledy Houses. This is where we've moved from maybe America into Britain, where things higgledy
piggledy and connected. And then I'm board over here, and then I'm going
to go travel a bit. And I'll give this
a nice broad sort of pipe or tuber highway. So this is our Sim
City connection. Maybe I just fancy replicating like this is where I grew up. There's my little street. There's lots of houses
along the street. Then at the back we have
this really big field. I'll just represent that with a kind of fair set
of rectangles. There's lots of football fields there. There was a school here. I didn't go to this school, but there was a school
here and there was a little primary school
here, which I did go to. But I got on a bus. That bus went a long way actually all the way to
the other side of town, where there was another area. This one was a newer build, so it was more regimented. Like this, I've told myself
a silly little story. I've explored just the nonsense, the worrying nonsense that
goes around in my brain. Then we can come back and we can look at what
we've done and we can find maybe there's some
more shapes in here, which we can underlap
and overlap. Maybe here, we've got some
room for some more swells, which just link
and loop together. And maybe eventually,
we start to just think, we're a little bit bored of
this doodle. And that's fine. That's an opportunity
to move on and try something different or
to move to another area. So we just sort of
go, you know what? I want to build a bit
more of my city here another little sprawling area. Next to our sort more
industrial area, next to another sprawling area. And know my word, this is
taken over, hasn't it? There's a sort of divide
between these two towns. And my story
continues to evolve. As I just waffle in my head, allow myself to
tell a silly story, which is connecting
this whole thing here. I've got two sides of the town enraged because
of the excessive building, which is happening over here, which is building up. We can even start to develop
a little sort of well, ghettoi area, you know,
really overbuilt, undercred for area,
perhaps we could call it. And there you go. Another
interesting, sort of doodle, completely different
and more fluid, more following the
abnormalities of my brain.
8. Black and Contrast: Last, but not least, I want
to explicitly show you the value of
contrast dark darks, using black areas to make
things more dynamic. Next, I wanted to just
cover something again that we've mentioned a few
times and is really, I think, a valuable part of creating a very
dramatic composition. And that is the idea of
creating some contrast and even going as far as to use lots of areas of black
within our scene. That's if we're using black
ink like I am at the moment, for example, which is
a good way to start. So here I might just do some really simple tubes and some simple kind
of sticks as well. If I just create these
different areas of my doodle, I'm doing this quite quickly
for demonstration purposes, it's not going to completely finish everything off
exactly as I might, if I was just allowing
myself to drift around. But hopefully, through
these little connections, we can see something developing, something a little
bit interesting, hopefully developing
on our page. But it's just perhaps
slightly flat despite our attempts to unlap overlap, it is
a little bit flat. But if we start to just find areas where we can
color them in. So we just find this area, and we make it
really deeply dark. Then already it starts to just
pop out a little bit more. Maybe we find another
couple of these areas, make them deep dark, really the blackest
black we can. Or you might use another color. You might make them red, yellow. It might just make
them pop or make them not pop so that other areas can pop more effectively. You might use hatching. You might use fine hatching to fill up areas in a
slightly different way. Or you might use repeating
patterns to do the same thing, little repeating circles,
applying a different texture, but still crafting and creating that deep contrast and that variation between
different areas, which allows things
to just pop out. This could be part of
your story as well. Up here, this could
be a little field encroaching on our city as well. Something as simple as
that. We use bits of black, and you could dance
around all of these, perhaps finding you black
in in between your tubes or you find more
interesting hatching or textures within your sticks. Suddenly, all of these things will pop out a little bit more. And I'm going to leave
it just there for now. But I'd encourage you to keep going and exploring
these techniques to give you a really
powerful way to move on with the
more complex dots, to give you ideas which
are at your fingertips as we craft bigger
things on our page.
9. Section 2 - Advanced Doodles: Now, we've done loads of
different techniques there. They're all very simple. Hopefully, you remember the
sketchbook tour I gave you, which really just
used these ideas, these simple ideas to doodle to create things which
seem much more complicated. The key is just taking our time. So I'm going to show you
three finished doodles, one by one across the
next few lessons. I'm going to show you how
they build up, indeed, rather cautiously, rather slowly,
but also progressively, also in a mindful way, allowing our mind to
wander around the page. The first couple are
going to be done in my studio under the
lights I've got here. The last one is going
to be showing you that this is not something which
traps you in your house. In fact, it's a
wonderful thing to do out and about in a cafe, for example, which is
exactly where I'm going to take you for our final
doodling session.
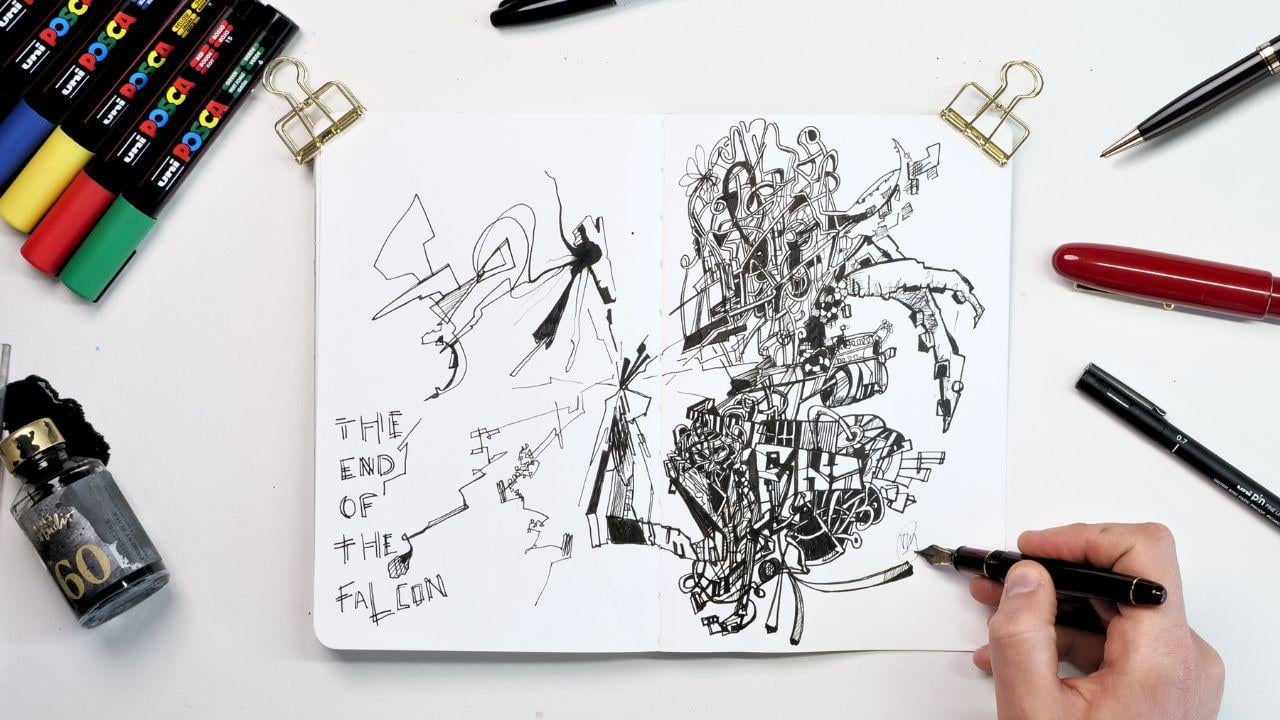
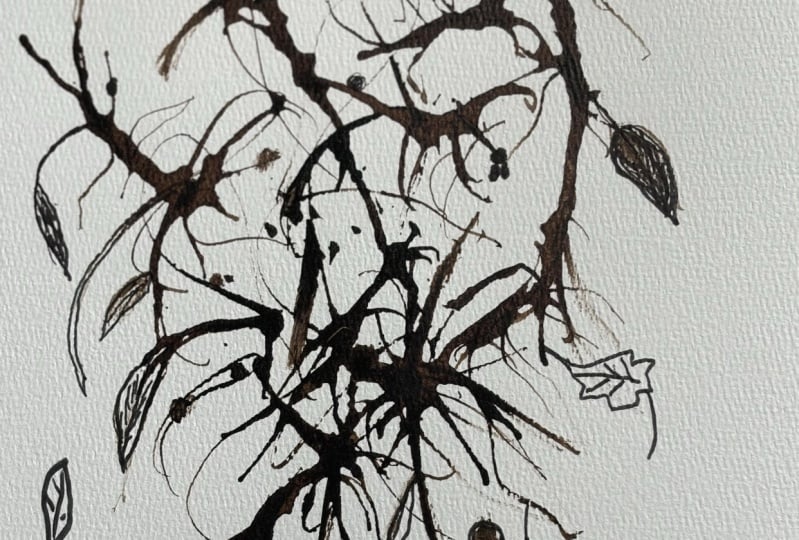
10. Project One - Splash: So Doodle Scape number one, Doodle Scape number
one is going to be introduced to us
by some randomness. We're going to use
an ink splash. So let me show you how I achieve that in
this first lesson. And then the next
couple of lessons, we'll move on to defining our splash and
doodling around it. So we have some ideas. We're aware that telling stories is how we will
flow through our scenes. And we know that contrast and
textures is going to poof, make them pop and jump. But that might not make it fully un scary for
want of a better term. So we're going to do it
digital together now. And I'm going to give you a
interesting way, let's say, where you can make it easier, where you can give
yourself a little bit of inspiration to start. So if we find
ourselves a new page, and I'm using these clips just to hold things nice and flat. What I'm going to do
is use a pipette. Some ink and a bit of tissue
to get ourselves started. Now, this means we're using
a little bit of randomness, a little bit of chance, which takes away some of that
creative burden from us. If I just draw up
about a mill of ink, that might even be too much. I'm going to drop
it around the page. There we are. That looks
like a lot of ink. I've only used maybe
half a mill of ink, a tiny little bit of ink. Think about if you make an
ink sploge if your pen leaks, Just how disastrous that can be for your
carpet, for example. So just don't need
to go overboard. You can just use a little bit of inc. You could
even use coffee. You could use wine,
you could use probably beet troop juice,
anything which stains. And now we can just
move it around. Now, that could be letting
gravity move it around, just being a little bit
careful. Doesn't go too far. You could blow on it. Look at those amazing textures
which develop. It's a bit like that
psychologist test. What do you see in the ink plot? But also, we can use tissue
to quish it and move it. Try not to control it
too much because if you start trying to
control it, of course, are losing some of that or regaining some of that control, but losing some of
the randomness, which perhaps we don't want. We want randomness to come in and support us a little bit. But you might want to
just move it around so it's nicely positioned
within your page. Then when you're happy, maybe give another last
blow, and there you go. We'll let that dry for
just a few minutes, and we can craft
from this a doodle, where we already have contrast. We already have
little shapes and textures that are
built up on our page.
11. Project One - Detail: With our splash on the page, let's see what we
can make of it. I'm going to talk you
through this one. We'll see little snippets
as I move around, wander around the page. I'll explain how we
are using lines, sticks, tubes, hatching, shakes. Everything that we have talked about is being incorporated
into this sketch. And here we are ready
to get started. Our ink splash is nice and dry. We can see there's some
variety, some shapes, and now, it's a case of looking
and seeing what we see, seeing what happens
as we move around. I'm using a simple
ink roller pen here. It's just a standard kind of ink rollerable pen you might buy in any supermarket in the UK. And any pen goes. And you can see,
just like before, I'm using it to
create sort of what might be hatching or
it might be sticks, but these linear
simple elements. Now, filling up a
whole page like this can feel a little bit
scary as we get started. So it's important to
remember to move around. Here's some shapes. As we move between areas, we might get inspired
or we might get scared, we might get bored. So again, we move
to another area. We try something
different. Here is a nice little white area. I'm imagining maybe this
is some kind of machine, and this is the inner pipe,
the inner pipe works. It's obviously not a
well crafted machine is look how Higle De
Piggledy that splashes. So these pipes need to
be Higle De Piggled. If this was a well formed
machine or well formed robot, then perhaps we take
a different approach. Perhaps, at that point, these will be really neat pipes. And we'll do a
little bit of that, perhaps in a later doodle
or even later in this one. The key is just to keep
yourself interested. So here, look, the pipes aren't all symmetric. They're
not all identical. There's a little lumps
and bumps in them. Fun little things to explore, to change in different scenes. Here, just starting to
introduce tiny areas of dark, but I'm feeling a
bit overwhelmed, or not sure where to
go. So, let's move on. We talked about objects, but objects don't
have to be real. They can be imaginary. So I'm thinking that maybe
this is something tall, and is it standing
on something or does it have things
sort of dangling down? That first thing was in
my head, it was a leg. And here, I'm not
sure what these are, but let's give them funny
little textures to unify them. Let's make their lines bolder, more certain, just
working on that contrast. Like what they do to the
image, they change it. There's something
different that I haven't tried before in this sketch, and they start to build
a composition, perhaps. This is now a linear
object with stuff below, and it's kind of
pointing upwards. Again, I'm not certain
what they are yet, and I may never be certain. But instead of sticking around in one area too long,
I'm going to move. I'm going to kind
of start imagining what might be at the
top of our thing, the top of our splash,
the top of our page. And again, simple ideas, incorporating both tubes, and here's lots of
overlapping circles. It's like I'm building a city, but really quick this time. Then looping it,
adding another tube. I'm feeling more confident now. I was working quite slowly and
steadily at the beginning. And now you can
probably tell I'm moving just that
little bit faster. The other thing I'm doing
is repeating ideas. Those dots I've used below, these looping lines
I've used below. So I'm trying to keep this
sketch sort of unified, gradually fmatic in
some way or other. Here, I'm looking around. I just seeing where
haven't I approached yet? And I haven't approached
the right hand side at all at the bottom, Have I, so let's get some
kind of symmetry. Not symmetry at all, but asymmetry in weight
of ink, I guess. We got something on
the left lower edge. Now we have something on
the right lower edge. And again, simple shape, simple hatching on a
different scale this time, but still repeating ideas, still things which have
happened before on the page, and hopefully helping it
build up and feel unified, more of the same
texture down here. And like I said, I wasn't sure what this was
before I moved away. I wasn't sure what
the other bit was, so I Leaving back, gradually making things
become a little more certain, a little more sort of defined. And through this process
of wandering around, through this process
of seeing how we feel, and remembering at each
stage, remembering, for example, here, that it
doesn't have to be clever, doesn't have to be complicated. It involves simple
techniques like sticks with contrasts and
boldness, repeating our ideas. Soon enough, we start
to fill up our page. However, what I want to do here is bring in
some more ideas. Perhaps think about
changing pens, and that's what we'll
do in the next lesson.
12. Project One - Contrast: With the sketch
beginning to take shape, I'm going to change up my pen, and there's no reason
that basically any pen can't be
used for sketching, or to say it the other round. Every pen is a
possible doodle tool. So with this, I'm going
to use some bolder pens, a big posca pen, for example, to create contrast before
moving back to the story. And we are back again. So here, what I've
got is a posca pen. This is a really bold posca pen with around a
two millimeter nib, and it's got deep
dark acrylic ink in it or acrylic paint in it, which is going to give us
more immediate contrast. Now, again, what we have this page is rather
large, isn't it? It's big. It's scary. We have this rather scary blob we're trying to
make something of. Sometimes, just coming in
with these bigger marks, remembering the same ideas, remembering contrast,
remembering here, look tubes and sticks, remembering to use simple ideas, but it can help us move a little bit faster
towards a goal, perhaps bringing us more
structure more quickly. Don't want to overwhelm
the image, of course, but I wanted just to try
something different. I was a little bit bored
of using that other pen. Now that I have more boldness, though, I can come back in. Again, with another pen. This is a fountain pen, the same fountain
pen I was using for the little warm up ideas. It's got a medium b, and it's really good at
creating varied lines. And here, I'm continuing that idea of balancing
out of creating a sketch of repeating ideas of getting flowing shapes
of using hatching. What did the stand below? But this is now maybe it's not an object which was
standing on something. Io I thought it was
standing before. But now it's got these sort
of looply textured leaves or feathers or ribbons
hanging off the bottom. So having done these, they just felt
right at the time, they felt what I wanted to do, and there was no better
reason to do them than that. But having done them, we've got something which
is probably floating. Maybe it's floating.
Maybe it's hung up. I need to put more thought
into it than that. For now, I can just move around the shapes,
move around the image, and repeat my textures,
repeat my techniques. Here, the hanging idea is
obviously got into my head. So we've got more
hanging structures. This is really creating something very
vertical on the page. It's really creating
something on the page. Not sure what yet. Can see again this pen, the variety, the ability
to pop in contrast. And that is what this
is all about now. We have lots of fine details from that fine rollerball pen. As we wander and wander and
wander around the page, as we wander what's
going on in our minds, we're able to apply more
depth, more contrast. We're able to take some
simple details from before and make them
perhaps more defined, something else, or just add
a little bit more interest. And hopefully, you're getting the idea from
what I'm saying and from what you're seeing
that it's not about really focusing with
a purpose in mind. We're not really trying
to create something. We're going through a story. We are going through a story, which can take any
direction we want. We've talked about
how the story, this idea has developed into a hanging, floating,
flying structure. Well, here's more of
those hanging elements, and with that in mind,
what could it be? And I just feel like
it needs a top. I'm just looking at it
going what could be on top, and it needs something
which contrasts the bottom, the complexity of all those
overhanging structures. Maybe it's a rocket
ship. Who knows? Maybe this is a rocket ship? Maybe it's a fancy
clock on my wall. But it felt like it needed
that shape at the top, which kind of
mirrors the bottom, but is far more symmetrical,
far more simple. And I think starts to
complete our sketch, starts the journey
of completing it. What I want to do is incorporate as much of this
splash as possible. So I'm also finding
as I wander around as I investigate what I've done and what the
splash has done. I'm finding elements
I've missed out or not incorporated or not seen yet or been too scared of perhaps. And now that I've got
more on the page, and I've got this hanging idea, this vertical idea,
this floating idea. I feel really good about
incorporating lots more odd hanging
vertical elements, but still using all
the same ideas. Here, I thought, let's
use some hatching. And it's not a terrible idea, but it doesn't do much, does it? And that's fine. Not all of our ideas will work. Some of them will
feel like mistakes. Some of them like this will
feel a little bit pointless. That's fine. Explore
them and move on. A mistake in one
world can turn into an opportunity just
a few minutes later when we move away from
it and then come back. And actually, these
finished textures from that atching do add a subtle bit of interest
into that in splot. So they're not as bad an idea as I thought
they were initially. Here, I'm using
contrast again with our big bold two
millimeter posca pen. I'm defining my
outline a bit more. The fact that I'm defining
an outline means I feel comfortable that my
doodle is almost finished. You might start
to see something. You might start like I have here to see some kind of It's some
kind of ship in my mind. It's a weird rocket ship and
because I now know that, because I see that in my
psychologists splatter. I can start to build that. I can start to define
it with contrast, I can start to make
it interesting with these bold contrasts as well, and I can proceed confidently
down my doodle skate path. That's all that this is about, letting your mind wander,
seeing what happens, taking your time and
exploring your story, the story of your day,
the story of this page, the story of your pens, the story of the random splatter that we allowed to
develop on our page, whether that's in ink or
in wine or in coffee, in Bett juice as I said, or something else that you
had sort of hanging around. Now to make this feel finished. To make this feel in
my head, Satisfactory. I'm coming back with
my original pen. This is going to let me add
tiny little fine details. I've given an outline. I've given this story kind
of almost a finished point. The finish, of course,
comes in a moment. But now I can just fill in
those little areas of white, these bits which perhaps
want a tiny bit more detail. These bits, which
perhaps feel unfinished. And then I take a step
back and I have a look. And I'm satisfied. And
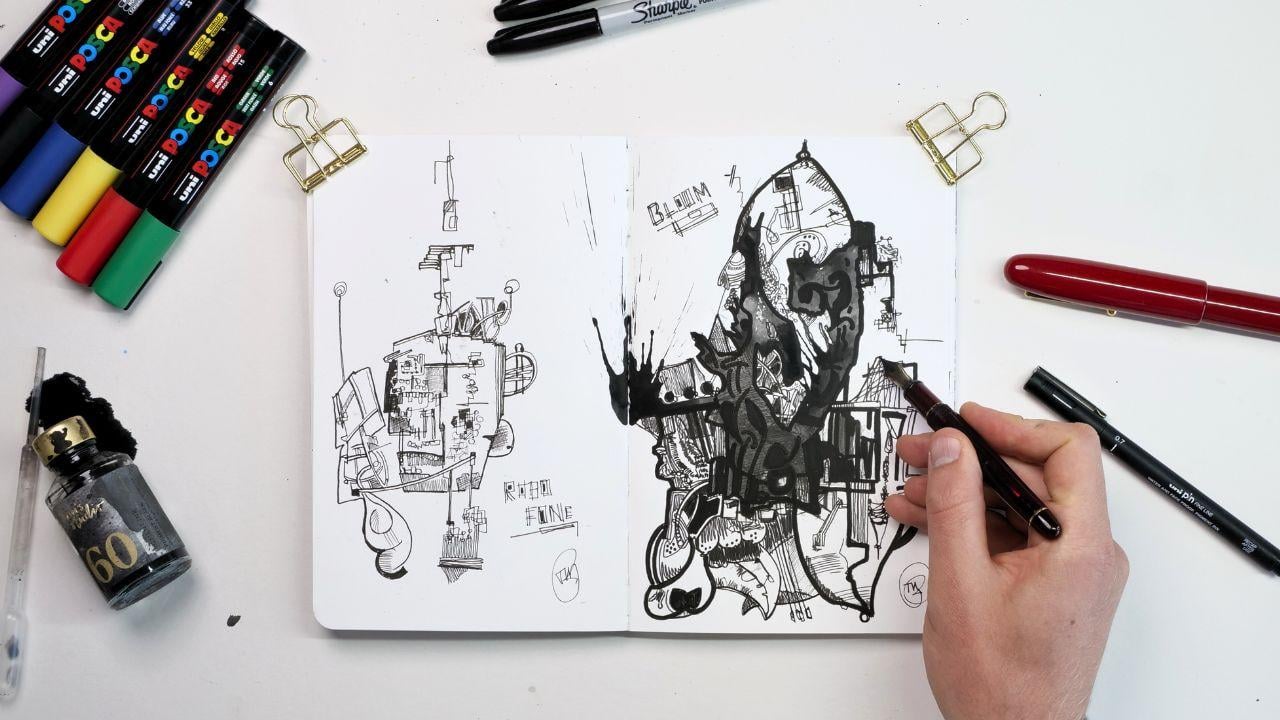
because I'm satisfied, I can give it a name. And I think for
doodles like this, naming it something is
way of going. I'm happy. I'm done. I'm finished
and finishing the story. So this one I call bloom. And the bloom is the idea of the objects blooming
underneath our rocket. Or perhaps it's the idea
of the ink that bloomed on our page and set us off
down this whole journey. Nonetheless, Time now to turn to a new page and start our
next little doodle scape.
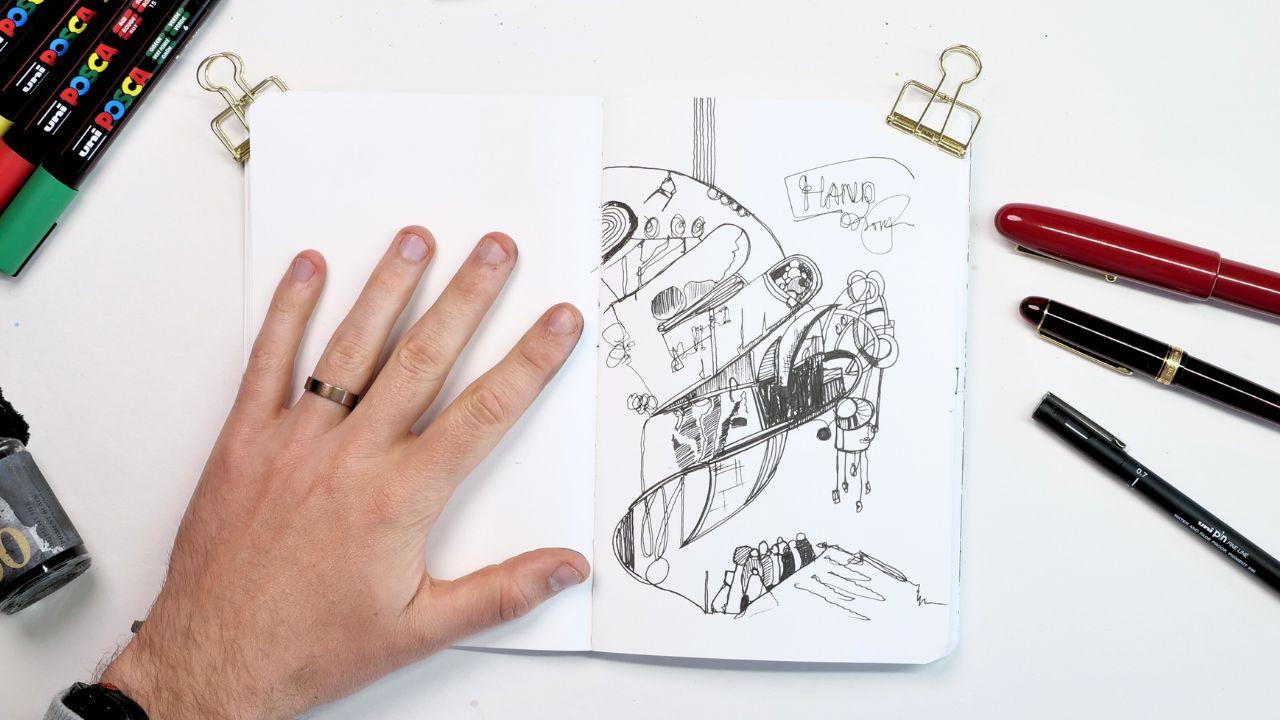
13. Project Two - City Building: Our next doodle escape is going to be more
about fine details, little hatching, seeing what emerges as we move around
the page and tell a story. This is an interesting one. This is going to be about
seeing what develops. And then seeing the direction
that takes us as we allow our mind to just
let things happen, and then explore what's happened and create
something from it. Bear with me, and
you'll see what I mean. So we're going to try telling
a story, building a city, using these ideas to create
something less olden brash, but something which we can sort of flow through and
invent in our minds. So I'm using a much
finer pen here, and I'm starting
with those ideas. Where's this little
city building ging? Where does this one link? What road joins up? And again, using ideas. This is the same sort of what
does my street look like? From above, and where
did I used to work. All of these ideas allow us
to just think of shapes, link them up, and
move around the page. As well as just remembering
the basic techniques, when we get a bit stuck, we can introduce a
bit of hatching. We can introduce tubes. We know that they'll
look interesting, they'll develop on the page. Equally, when you get bored in one place, move somewhere else. That is the amazing
thing about doodling. It doesn't matter if you're bored can stop, you can change. You can do another thing. Again, my wandering has taken us to incorporate here
some different shapes, and to smoothly add in
amongst that some contrast. Maybe, amongst all
of this wandering, we're starting to see
something emerge. I certainly are sort of starting to see
something on the page. Perhaps a little face, perhaps an eyebrow on top, will start to bring
out that face, and perhaps I can just make a more clear outline because my story is
starting to develop. This is not a city. It's a circuit board. This circuit board of overlapping
shapes is building up. But before I get too stuck in, let's go back to basics, back to shapes, allowing us to explore a bit more of this
page. What do we see here? We see some simple
tubes developing. Overlapping, underlapping, moving around,
creating some swirlls, and getting a bit
of depth through hatching and contrast
through this. I haven't got to stuck in
trying to draw a robot, which would be really scary. I don't know how
to draw a robot. Imagine from a reference, it wouldn't be too hard, but instead, I'm dealing, keeping myself entertained,
keeping my mind active and wandering and
something will emerge. Maybe it'll be a
robot. Maybe it won't. And as we continue just
to build up these shapes, build up different ideas, incorporate tubes,
shapes, contrast. Again, the scene just takes
shapes. We've moved on. We've found this
little swirly pipe, but it's become
something different. It's become another
of those kind of leafy feathery
hanging structures. Forget boldness, don't forget
making it feel free D. All of these things are useful
not just for our doodling. They're also useful
when it comes to draw from life from reality. And this is great
practice if we let it be. We've got something
hanging, again. Maybe we want to incorporate
something else hanging or maybe we just want to move
elsewhere on the page. So I'm going to start building another city and to
see what happens. Here we've got a
more dense city. Maybe this is some farmland with all those sort of tracks
running up and down. Maybe it's a circuit board. Maybe it's connected.
There it is. It's starting to hang
from the structure above. Just taking our time
playing with ideas. And again, back to
those concepts, those ideas we practiced, a bit of boldness. And now, that boldness, again, is allowing me to build on the structures that
I think I can see. Now I'm not going
to tell you what I think I can see. Yet. I'm going to sort
of let you have your own brain for a little while longer as
soon as someone says, Oh, look, do you
see a butterfly? Then we tend to start to see
the same as other people. But the key here is seeing
in your own doodles, what you want to see,
what you do see, or exploring when you
don't see anything, just continuing to
have a bit of fun. I am seeing. Can
you see it as well? Yet? I'm seeing a robot
talking on a phone. Of course. We've kind
of got a chin here. We've got some teeth. This downward hanging structure is the phone pulled up
to their right ear, their right ear, which is
on the left of the page. I'm not sure what is hanging off the phone on
the right, doesn't matter, but to make it a phone, I can start incorporating ideas, which make sense like
giving it an aerial. Now, I want to fill up the page. So I'm going for a wonder. And I just feel a
little light bulb, you know, we sat
in a living room. If we were this robot, we sat in the living room. We've got a light bulb
hanging above us. Why not? And then continue
to move around and explore. So I've delineated
a little bit of what I think this scene
is developing into. But that doesn't mean
that's what it has to stay. I'm going to go and
find out what might happen on empty sheets of paper, make it contrast, but
also feel connected. The way that it does both
of those things is by using the same repeating ideas of
tubes of lines of shapes, but doing them in different
ways of exploring the page, where it feels empty, we
add a little bit more. So here, a new texture. So really fine hatching, which will feel like a gray rather than feel like a black. Then we feel empty down here. We add some more fine textures. Then it just feels balanced. We've got the phone or
whatever it is on one side, diagonally opposite from that. Let's add some tubes.
If we don't know exactly what to add,
we'll add some tubes. Maybe this is a funny satellite
dish. Maybe it's nothing. Maybe it's the
background. Maybe it's a traffic jam which is
happening in our streets, and this is still
to you, a city. Just by using these
simple ideas, feeling in the contrast, we suddenly create this sketch, this doodle, which has
some kind of depth to it. But without having to go through
the conscious process of actually drawing an object
of drawing a scary object. Remember to
incorporate curves and get that balance between
different parts of the scene. That is what we're
thinking about. But we're not trying to
set out from the get go. We're not setting out
from the beginning of our doodle to draw
something really specific. Again, all I want to do here is incorporate
some overlaps. I literally add in some tubes to make this side of the
image feel busy and to incorporate techniques
that we have talked about incorporate contrast,
overlap, incorporate shapes. Then I can take a
little step back and see how has my
story developed. You know what? I gave it
away already, didn't I? To me, especially when
you take a step back, what's happened here is a
robot talking on a phone. Because why not?
And this is an aim. This is something which
organically developed. Like before, I called the
previous Doodle Bloom. Well, this one's got a much less creative name, Robo phone. I really do think, though, giving our little doodles names, giving them a purpose, and idea is great, and we'll do even more of
that next in our cafe.
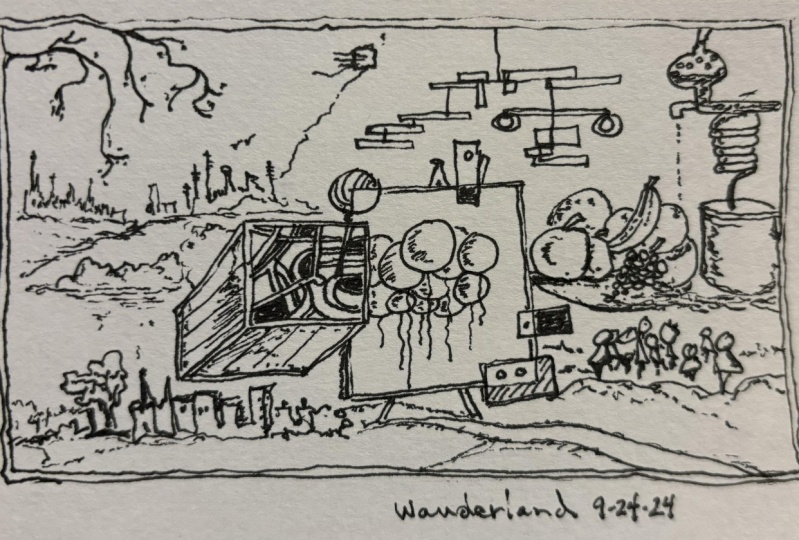
14. Project Three - Cafe: And finally, we're at the cafe. So here, I'm going to
incorporate objects around me, things which change
from the scene, or things which are
ideas from the scene. For example, some smoke, which I imagine coming
off the carafe of coffee, which comes halfway
through our sketching. The real And here we are. There are the ambient noises of a bustling cafe near the
outskirts of Cambridge. I actually come here
with my brother who's kindly allowing me
not just to film near him, but use him as a
bit of inspiration, and we'll get to that later. The idea here is that we're surrounded now by
interesting things, and we can use those objects to inform our doodles to
give us inspiration. We've ordered a coffee, but
on the table at the moment, is that fascinating sugar pot, a kind of clip top or kilna jar. Full of shapes. And why not just start by what you can see
start by drawing that in? We can inform our
sketch further. Inside the sugar pot, our crystalline
crystals of sugar. So here's me making
my version of that. Lots of little circles
overlapping, underlapping. I'm not drawing the
sugar. I'm going Ah. Sugar, circles,
shapes, crystals. And then my mind does the
rest, It wanders off. And I'm not rushing like before, I scared of that
big ink spatter. Now we're being ale
bit more informed. We're taking a slower approach
when we built our city, we're just allowing
ourselves to wander, but instead of totally
hinging this off the story, the ideas in our head,
we're able to take inspiration ideas
from the environment. Now that can be
quite overwhelming. So don't feel you
need to draw every little Just take ideas
which interest you. So here another idea. A phone just sat on the side. And as I'm drawing
the phone overcomes the coffee with loads, more shapes, inspiration,
ideas to explore. And this crap of coffee, you can see has interesting, swirling, looping, shapes,
dark contrast, reflections. Got everything. Scary, no doubt, to draw. Absolutely petrifying. If we were to try and
recreate that as a sketch. But as a doodle as an idea
where we just take shakes, we take loops, and we
allow our mind to wander. You know, what, I
think it's really fun. And that's what I've done
here. These textures, these contrasts are
ideas, which I thought, Oh, you know, that carafe
looks a bit like this, but I'm just going to go
off on my own tangent. Perhaps tell my own
story along the way. We can inspire ourselves
more abstractedly, as well. The little reflections
of light on the craft. I've turned into circles, which interconnect and if I take a step back
and look at it, you may have noticed there's a little bit of condensation. I'm going to imagine that there's more than just
a little condensation. I'm going to imagine
that this is steaming. And that lets me introduce
some sw, some loops above. This is still like
drawing an object. It's more of an abstract object, but I'm just trying to create almost a cartoon
version of what I would imagine these swirlls
to look like. Then I've got hatching,
I've got sticks, I've got tubes
which can interact with this new object
just like down below, the coffee has interacted
with the cafe, which is interacted
with the sugar pot. Now, of course, I said,
I'm here with my brother, who's kindly allowing me to
incorporate his presence. He's wearing a fun hat. He's somewhat of a philosopher. So here's my version
of my brother, sort of abstract
doodle of his head, sitting above the smoke
coming from the craft, which is where he's sitting
with respect to my vision. He is above all these objects. It's a fun play. At least for me, it's
a fun play on the kind of perspective of the
scene I'm seeing. Then incorporating
some of the jars, the kind of things I can
see in the distance before coming back, giving
more texture, more interest to
my brother's face, or what is increasing become an abstract version of a face. And here, you can
hopefully start to get an idea of what
I'm talking about. There's his hat,
there's his face. He's also doodling along. There's the bar in front
of me, and of course, below all of that, the coffee that you can see
in the background now. Now, here, I'm starting to build again a composition a bit like our plume at the beginning. The composition is
quite vertical. L et's get things hanging down. And then as I hang
down, I start to go, what else can I see around me? Cinnamon buns? Now, this ate isn't
in front of me, but when I went to
order my coffee, it was a huge effort of will not to order myself
a cinnamon bun. So this is something
in my head that I thought would look
just fantastic here. It's a little swirl.
It's a little loop. And within those
swirls and loops, I can add sticks, I can add hatching. I can add shapes. Within these shapes,
I can add contrast. To finish that all off, you can see on the screen
just above my pen. We have the rather fascinating
edge to this table. This table is made
of a single sheet of live edged wood
or wine edged wood, depending on the
terminology you use. So I'm getting that idea in. And from there,
you can see one of my favorite motifs to finish
off a vertical structure, bring in these kind of
leaf like patterns. And then moving on. Don't need to finish
everything off, moving on to another edge. I wonder what you can see here. Going through my head at the
time was a vertical swell, something to counteract
all that sort of linearity going
on in the middle. Looks a bit like a
balloon, though, doesn't it floating up and then little perhaps
reflections in the balloon, or contrasts or just
meaningless but fun ideas that we allow our brain to create
if we let it wander, and if we keep in mind, the techniques we looked
at the beginning. Here, again, I wanted
something else. These are some coffee beans. So where we say coffee beans, you might also just say shapes. I wanted something
else that sort of abstractedly
talked about the day, and then They're now a nice center to what was
initially some smoke, and perhaps they're
exploding outwards. So we have a story
that our brain can tell to start to make
this interesting. We can build in some
contrast, some hatching, some interesting
textures all building up just from telling
ourselves a fun fun story. Now, back, as we
say to the story, the idea of object, I think if you do
sketches like this, what can be really interesting
is to give silly labels. Or, not silly labels. So you might have
created a robot and give the terminology to various
bits like switches, and control panels,
things like that. Here, I've got
different objects. Seven, I've got my coffee. So I've gone for sour input, which is obviously well, the opposite of what it is. It's sugar. I'm
just being silly. Dopamine, you know, from
doom scrolling on new phone. You get that dopamine here. I've called the cinnamon Bonner, sweet input, the
opposite of the sugar. I hop just being a bit silly. Philosopher. That's my
brother at the top. And then beans because
that's what they are. They are the coffee beans. Maybe I could be a
little more creative. Maybe bean or there you go. Something a little bit silly, a bit unique just to continue
to make our pad feel busy to also allow people to see where we've
done something specific, but without telling
them, you know, I could have written, these
are supposed to be beans. This is supposed to
be a cinnamon bun. Lots of things which are sort of supposed to be things or not. So here, product facility. What does that mean? Well, it's the af that my coffee was in? Or actually, it still is in because whole time
I've been doodling. I forgot that I
ordered a coffee, and really, I should
be drinking it. Nonetheless, it is
wonderful that we can get into our doodles so easily, that it can lead us
to sort of zone in, be mindful, spend
time in a flow state, which is far more enjoyable than getting
that dopamine hit, of course, from our phone. And I really encourage
you just to have a go. Be brave, try incorporating
objects into your story, objects into your doodle, but don't be tied down to them looking
like what they own. You have no reason, no
need to let people know exactly what you were
aiming to achieve, because you probably didn't know if you were doling
really what you were aiming to achieve other than having a mindful time
practicing some techniques, improving your pen control, and creating something
rather fascinating and fun on your page that
represents your mind today.
15. Final Thoughts: Thank you so much for joining me for today's sketching session. I hope this gives
you lots of ideas and tools to doodle to be peaceful at home or out and about great interesting
landscapes, doodle scapes, and fascinating scenes in your sketch book. I think it's a wonderful
way to pass the time. I think it's a wonderful
way to practice our skills. Please do leave a review. If you've enjoyed the class,
it means the world and pop your project up in the class project and
resources gallery. If you want more of my doodling, more of my ink and watercolors, follow me on
Skillshare and beyond at Toby Sketch Loose.
I'll see you there.
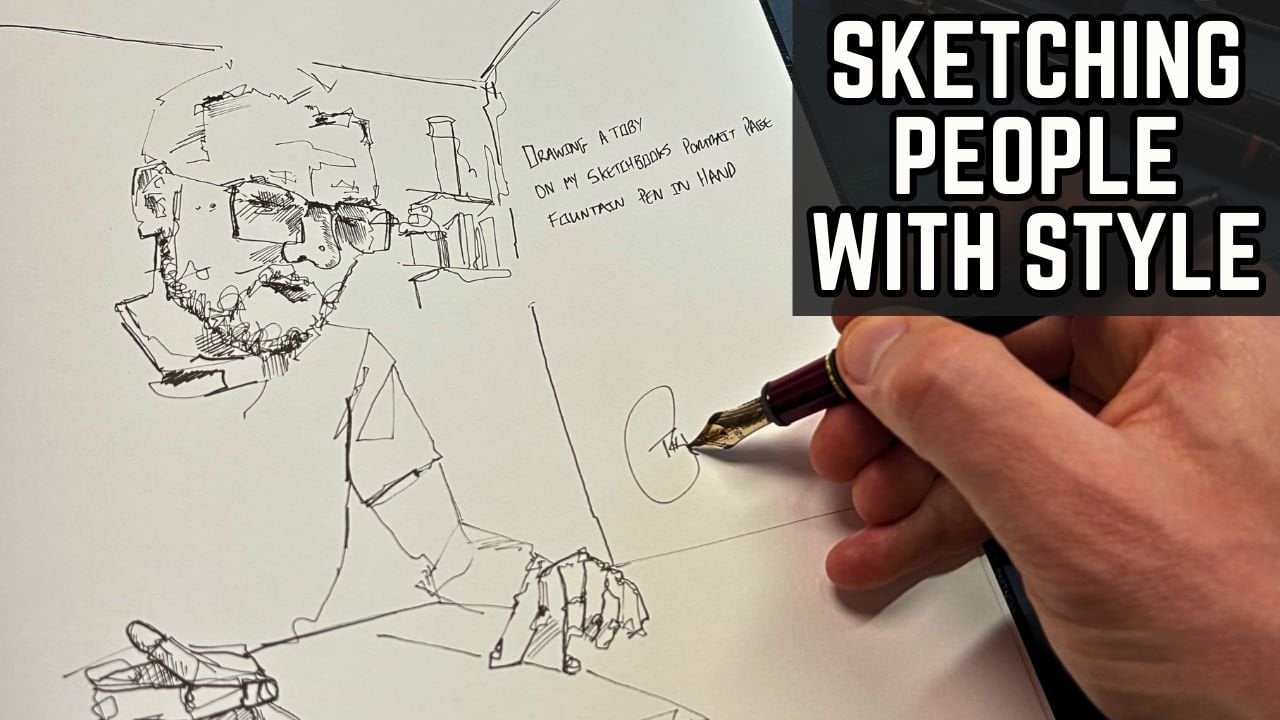
 Toby Haseler, Urban Sketcher, Continuous Lines