Transcripts
1. Introduction: Welcome to this class on
drawing and sketching people. But we're not just going
to be drawing people. We're going to dig deeper and develop our style
of drawing people. When you look at
artists you admire, you'll discover that they
have their own way of seeing, their own way of creating their own way of making
marks on a page. That doesn't just
appear overnight. It comes from research. It comes from studying
other artists and practice playing around
and seeing what happens, reflecting what we enjoy
and repeating that cycle. Now, this class is designed to build on previous
classes I've done. In particular, I've got a
class on doodling people, which is how we approach people
as really simple shapes, and I've got a class on
sketching people made easy, where we focus again
on things like shapes, but also building
into proportions that create a realistic
sense of a person on a page. The next step is to
develop your style. You'll notice all
those artists that we all love have a style, a way of drawing people that allows them to move
away from perfection, allows them to move away
from perfect proportions, and yet still capture
something magic on the page and often still
capture a likeness, even if all the
proportions are wonky, quirky, or just plain wrong. I want to show you how I personally learn and study, not just for
sketching people. This is the same process
I go through for developing my urban scenes,
developing my landscapes. It's a really enjoyable, light hearted and engaging process that I am sure you'll
love and learn a lot from. By the end, you'll not just have developed your understanding
of drawing people. You'll have developed your
understanding of what you enjoy about drawing, and that is the key to sustainable learning and sustainable improvement
in our sketching. So with that all said
and done, let's dive in.
2. Your Project: Today, we are going to
be sketching people, which can feel very scary. But for your project, we're going to be going through
a series of simple steps. The first thing is a couple
of minutes of research, and you can spend longer
on that if you want. We're going to
show you how to do it in a couple of minutes. Then we're going to be doing one or two stages
of active study, where we are studying our
chosen bit of research, our favorite artists, perhaps, but also making
marks on the page. So we're seeking to understand through action,
which sounds great. Then we're going to be putting that understanding into
I've already used the word, but into action and
developing our own style. So what I would love to see from your finished project is,
if we start at the top. Something finished. A sketch, a drawing of a person that you feel you have
added something to, which is new for this class. In between, there's all
these developmental stages which I would love you to share if you're feeling
confident in them. I understand sometimes
those developmental works can feel scrapfy or untidy, but sharing can
also be liberating. And then at the very bottom, because it's really
useful for us all to find new things and as a sort
of social bit of research, let us know the kind
of artists that you discovered or that
you already knew about, which informed the style
that you developed today. If you share those
aspects as a project in the class resources
and Projects tab, I think we'll all learn
a lot from each other.
3. Research: So how to research a style, how to find an artist you like? Well, there is both a
quick way and a long way, as with all things in life. Now, the quickest thing to do is make use of the Internet. There are obvious
websites, YouTube, Instagram, doing a simple Google search
or using Pinterest. And you could literally
type in sketching people. When you start to hone in
on these kind of sketches, you might discover certain
styles which ring out to you more like absurdist sketches
or cartoons or caricatures. And I would just advise you or suggest that you have a
little dive and look around, maybe just ask the Internet what styles of people sketching
are there in the world. And that will give
you lots of ideas. And don't spend forever
on this because for everything that you
sort of study today, that you play with today, you'll learn a lot and it'll
give you new ideas. This is an endless and very
exciting rabbit warren that we can travel
down to research. And this is just
the first steps. Today is those ideas which
will get you started. Now, what's the long way? I think the long way is for me, more enjoyable, but I wouldn't suggest it until you've got a little idea what
you're looking for. And that is going to
a library or buying some second hand books which are by artists you
know you really like. So for me, I've got a few
artists I can suggest. If you like my style, then it's inspired
by people like Quentin Blake, by Ronald Searle, Gerald Scarf, Alan KobaO a modern or a very modern example would be Felix Sheinberger. These are all fantastic, quite cartoony and a little bit absurdist kind of sketches. You have a real just I think
wonderful style about them. Doesn't mean you
have to like them. But I will be examining some of their art
to give you an idea of the processes
that we go through. What are we looking for to pick out our kind of
research subjects? A little spark of joy, that kind of June sei Qui. Just if you look at something,
you go, I like that. I want to know more. That is a good enough reason
to pick it out. And again, as you develop, you might find an
artist and then discover you like looking it, but recreating the
style isn't for you, but that will be information that we can move forward with.
4. Copying or Studying: So I want to cover before we grab our pen and
paper and our books, I want to cover the idea of
copying versus studying, because what I am going to
be doing and showing you how to do is literally copy
another artist's work. And for some people, that
might raise, like, a red flag. Whoa. Understandably so.
What we don't want to be doing is copying
someone's work, not attributing
that work to them, so claiming that it's
our creative work or profiteering off
it in some way. So selling it or using it
as part of our portfolio. Now I recognize I'm on dodgy
ground here because I'm going to be showing and copying some amazing artists
work in this class. But the legitimization of that is that I'm doing it for fair use
reasons, for teaching. I'm going to be showing
minimal parts of their work, and I'm going to be
focusing on stuff which I know is easily available
on a Google search, but it's also found
within my books. As a final note on this topic, this is how the masters have learned since forever by copying other artists who preceded them by learning and studying their mark making
and their decisions. Now, that's going to move us
on to the great copy versus study debate or definition or whatever we want to call it. So I'm going to define here
copying in a loose fashion. I think if we are copying
another artist's work, we are seeking to
primarily recreate it, make something which
is exactly the same. We're asking the question,
where does the next line go? In what direction does
the next line go? Where do I have to
put my line to make it look exactly like this
other artist's work? We're not seeking to understand, and it can be a very
mindful thing to do, but it's not leading
to deep learning. If we are studying, what we're doing as we
look at their art and yes, recreate it is we're looking to understand how and why
certain things are done. Not just what are the marks. Where are the marks.
We're thinking, why is that mark there? We're taking an extra
logical step down the path. We're thinking, why is the mark a bit thicker
here, a bit lighter there. And we might start
picking out the kind of intention versus unintentional
happy accident stuff, which has happened on the
page from that artist. So I thought I'd just
take a little moment to point something out that I've sort of started discovering
and drawing these hands. The lines are kind of rubbish. They're not rubbish.
They're what I would think of rubbish
if they were my lines. And that enables us to start
thinking about technique and a real understanding of how to incorporate these things
into our own art. Pulling apart the how, the why allows us to put
that onto our pinch. Then you see, loose marks like
that, which are so clever, capturing this sort of person definitely leaning over which I would really struggle with, but look how simple
these little marks are. So there you go. That
is my background to copying versus studying. And for the rest of this class, I hope you'll agree that
I'll be showing you how to study to improve the sketching of our people and the
style we can achieve.
5. First Steps: So time to do some
studying in action. Now, as we study the art, we are going to
be recreating it, but we're going to
be breaking it down, not a whole scene and starting specifically just
with individual features. For a person, those
features are what we would naturally call features, anyway, eyes, noses, and ears. And each time that
we're doing it, we're going to think about
approximately five things. We have the weight of the line. Thick, thin, expressive. We have the variation
of the line. Does it wobble? Does it
break up? Is it rigid? We have the shapes
we're observing. And how natural or geometric
have those shapes been? We can look at proportion
and exaggeration. Do these things
in isolation feel real or not? They cartoony? What's our kind of
gut instinct on them? And then there's the
energy, the intentionality. Does that line that
you're looking at feel like it was done
on purpose quickly, slowly, or is it something
that just got added accidentally with a quick flick of the wrist or a
splodge of ink? Now, to demonstrate that idea, let's have a look at
me studying some eyes. So what I'm going to use here is from Ralph Steadman's work. The book I'm using is
called A Life and Ink. And he's done this absolutely amazing breaking bad series. So we have here this rather
cool cartoon caricature of Walter White. Also available. If you Google it,
you'll find it on Ralph's own blog and Ip up a link to that
down below as well. What we're going to be doing is picking out a single feature. We're not going to
copy this whole scene, then we'll get lost in all
the complexity of how you put various things together
rather than just focusing on the marks. And that's the first
step in really understanding how a style
you like is put together, we need to look at how the
marks are made with that pen. So take your time as you are observing on one side and
drawing on the other. Consider each line. And think about those things we talked about the
weight of line, the speed of line. Is it broken? Here in Ralph's work, we see a rather
amazing variety from really thin and
quick lines through two lines which feel much more bold, much more purposeful. Even something like the glasses have a huge amount of variety, which suggests lots of things, suggests fragility, it suggests shadow,
it suggests shape. Now, I'm going to repeat
the same thing from this same scene
with the other eye, looking for similarities
and differences, but also recognizing
where I divert, sort of criticizing or
critiquing my own marks. So here, I've got far more
rigid than Ralph's marks, and that's why it
looks different. It doesn't look as intricate
or maybe intelligent. These are words I would use about Ralph's art,
which I really love. So recognizing when
you're diverting from it and how that changes is a really important
learning point. Now hopefully that
little demonstration and the framework at the beginning gives you
something to get to grips with. Making little notes
is really helpful. So hopefully, you noticed,
as I talked you through it, that I was adding notes
to sort of cement my understanding what I took as my understanding
from each recreation, each sort of element
that I was copying out. That, I think, is quite
a useful thing to do. It really just reinforces that deep learning
that we're aiming for. Now, to help reinforce that
deep learning as well, I set you your first challenge. Try an Internet or library or bookshop
based bit of research, and then start filling
up your first page. This, for example, is me
filling up a page with various eyes based on the eyes from the artists
I've mentioned previously, Felix Sheinberg, Alan Coba, Ralph Steadman, Gerald Scarf, all of their works are
filling up this page, but I'm focusing on I'm understanding or I'm at
least trying my best to. See what happens, and
maybe you can post your page as part of
your final project.
6. Next Steps: Oh, what are the next steps
with our studying in action? We've made a page of
eyes. We've made notes. Well, there's kind
of two next steps I would suggest
taking. Maybe three. The first is to start
studying more features, build up little reference pages. I've done eyes, so I
can move on to ears and noses and lots of
other things like that. So taking that same example
from Ralph Steadman, this rather wonderful portrait, we'll pick out a
different feature. And here we can see the ears
are definitely a feature. Now, one thing we can
immediately notice when we're looking at them is that
they're not in proportion. That's one of our
things to pick out. But we can also look closer and look at the
intention of the marks. I notice zooming in
some really bold marks, but also some marks
which look like maybe they're not adding
anything to the shape. They just kind of there, and then they've been
corrected a little bit. So maybe not everything
this artist I really admire is done
totally purposeful. So to be fair, I actually
know that about him. A lot of his art is
designed to be a mix of real intentional marks
and real purposeful marks. And that's one of the things
which draws me to him. And from there, I can
start thinking how can I adapt this towards my style
and what I enjoy doing? How can I take the bits
which work for me and use them and then enjoy the bits
which don't work for me, but keep them as something I
admire about another artist. So for me, for example, I focused here on this here on doing it more
as a continuous line, not a totally continuous line. But I did find it felt better. I think it looks
more like my art. And that's another really
valuable learning point. These are fine details we're looking at
within small features, within individual elements, and yet we can learn
so many broad points. The next one, which maybe
we should split into two is start spreading
out your influences. I used an example
from Ralph Sill, for example, now I could do similar things
from Alan Coba. Just as another favorite
example of mine. So here we are drawing from
the forgotten Society, which is an amazing book,
really inspirational. And it's really useful to do this direct cross
comparison for me. So I like both these artists, but you can immediately
tell even from this tiny corner of a tiny
page, how different they are. And there's something
about how fine Alan Coba's marks are
that I'm really drawn to. He also uses a lot of hatching, and I love using hatching. So trying to understand
the fineness, the intricacy of his hatching is something that I can
hopefully learn from. And we can keep trying
different things as well. Here on the front cover is a really interesting
hand to get stuck into. And that will come up useful in just a moment when I do
my next demonstration. But also start developing
your own ideas. You've just studied lots of Is. Why not take a reference
photo of your own and think about what did you really enjoy doing when you were
sort of examining, studying? What did you feel
you both enjoyed? But also, what did you
really understand? Where did you think?
Right? I got the shape. I understood the why and the how of the sort of shapes,
the weight of line, the character of line
that was being used, and put that into action
from your own references. Now, I will be doing
something from my own reference as part
of my finished project, so you can hold
out for that where I'll show you how
I look at a photo. But also, as a really
simple example, having just drawn this hand
from Alan Coba's work, I thought I'd just
demonstrate that we can do this anytime we can put away the book and put our own hand into the limelight. There we get a reference
to start drawing from and putting these
ideas into practice. Now something really useful that I sort of think
is an important part, like I said before,
making notes. So here I notice
myself diverting from the very elegant simplicity I've noticed in the
artists I really enjoy. So I made a note,
keep it simple, and then I seek to go
back to my own hand with that simplicity back in
the forefront of my mind. Also, remember that
comment I made in the previous lesson about
how the lines were rubbish, but they weren't just
were lines I wouldn't let myself do because
they weren't perfect, or what I would perceive
a lack of proportions. Well, I'm trying to channel
that and get the idea of a quirky caricature of a hand
rather than a perfect hand. Then learning again, trying things out that I've seen
in another artist's work, Alan Kobe uses that really
dense intricate hatching. That gives us a lot
of light and dark and a big focus wherever
that hatching is placed. Can I introduce that myself? Something he doesn't use, but Ralph Steadman uses are
some of these bolder lines. So now I'm incorporating,
hopefully, a couple of styles into my finished version. Just
seeing what happens. This is all part of the process, all part of that study, that practice which goes towards developing and
building our style. So now I set you your
second challenge. Hopefully, we've
filled up a page with one feature
like eyes already. But now we can go towards
filling up a couple more pages with both things sourced
from either artist. Here's a page of ears, for example, and noses. Also start building
up things from that, things from your own
photos, from your own body, from things you can
see in front of you, and see what happens
to your understanding and confidence in building up all of these
different features.
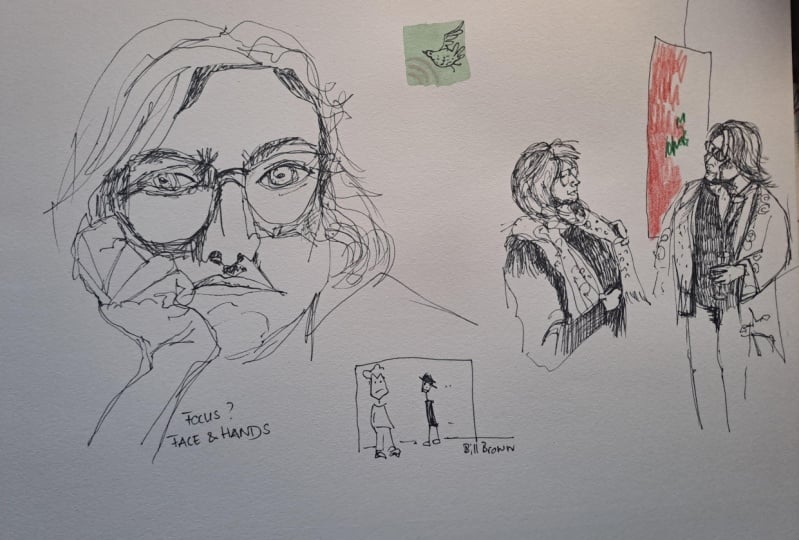
7. Zoom Out: Now, after studying
zooming in so much, it is time to zoom out and look at a whole scene copy
or study a whole scene. And here, we're going to
look at two main areas. Firstly, the focus. What is your artist focusing on and how are they
achieving that? For my artists, it's often the face and the hands. So
we'll have a look at that. The next thing is kind
of the opposite of that. How are they using space and simplicity to make the
drawing more achievable, more interesting and also
to point back at the focus, if other areas are simple,
the focus stands out. So I'm getting out, again, this same book by Alan Coba. And we're going to focus
down on half of this scene. No need to copy the whole thing. So for most of this
video, I'll just show you the lady on the left. And what we're looking
to do is recreate it, yes, and consider the
lines like we have been. Now with a broader focus. So we're looking at those
compositional elements. We're considering
where the lines are building up and how
the different features sit next to beside each other and how that
works as a whole. So we don't need to replicate the exact lines in quite the same level of
finicty detail this time. Instead, we're considering
the simplicity of how the lines are used, noticing the
composition a lot more, for example, looking at how, you know, we've got this
interesting quirky hand. But then we've got
this sort of fluidity of proportion and
elimination of realism, at the same time
as really drawing attention to fine details. These are all aspects
of building up a focus of using space and simplicity. We can start to notice within that that it's really simple. The further we get away
from these areas of focus, hands and face very
often for my artists, the less detail there is. However, there are some cleverly chosen
details, aren't there? Like this really cool drawing of a painting on the background. Some extra details, a
few clever key details do seem to add a lot. Now, we can divert
away a little bit, and I'll mention this in
the upcoming lessons. But start thinking about
how a focus is generated. If we look at the
chap on the right, he's bolder and darker. My eye has drawn more
to him. Why is that? I think it's because of the
hatching and the boldness. So, in trying to get some of my own creative
processes to work a little better without
immediate direction, I tried adding a couple
of bold lines and some hatching to
see what happens, and I certainly got that focus. Now, I want to just
finish off here. With a little note
about proportions. Because I know that
here in this course, this class, we're talking about developing,
researching a style. So we haven't
talked about making a perfect likeness very much. But just as an extra
thing to have a look at, when you're looking at
a figure as a whole, just recognize if the
style that you enjoy most, are the proportions really real? How many details
are really there? That comes down to the focus as well that we
talked about at the beginning. But just zoom out and
recognize, for example, in the styles I'm enjoying
that Walter White that we looked at earlier,
not realistic at all. Yet, the likeness is there, despite the proportions
being way off. Just something extra
to think about. And now it's your turn. Find a scene by an artist
you enjoy and recreate it. Not every single mark, but with a focus on trying
to understand what's happened on the page to create
a composition with focus, simplicity, and space, or the other important
things that you notice that feel
valuable to you.
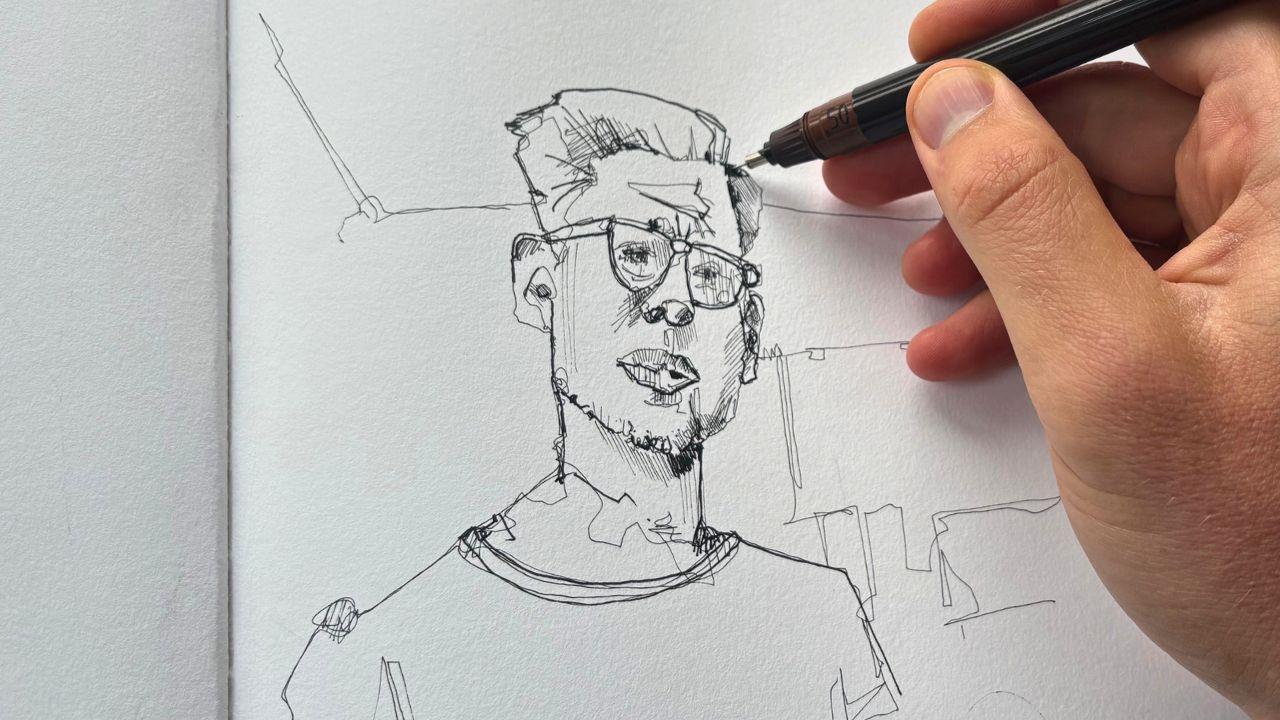
8. Your Final Scene: Now time for the big one time
to create our own scene. And I'm looking forward to
it. It's a very scary thing, but I'm looking forward to it. I'm going to use a nice photo. Just take a photo of myself because I'm a giant narcissist, maybe, but also because it's easier to find a
photo of myself, which I'm happy to
share on the Internet. And I'm more than happy for
you guys to sketch that or to sketch something of your own as well
and share that. What I would love you to do
as you are sketching this is have two or three things that you're actively
thinking about. Everything else doesn't matter. We're just going to focus on two or three really
key learning points. For me, the things I've taken
away from my artist style, most of all, get
that focus down. So that's number one. Focus on the face and the hands.
I enjoy that the most. To do that, I'm going
to use a mix of fine lines to start with some
hatching and bold lines. So that's my kind of
linework focus. Number two. Number three, real simplicity
in space everywhere else. I'll have a think
about the background. What clever little thing can I add to the background
to make it interesting, but without drawing away too much or adding too much
work for me to do, which isn't that stylized
interesting person. So like that, it's ready to go. Now, one little tip,
straightaway is have your reference photo
close to your page. It is much easier if it's sort of a alongside
where you're drawing. And if you're drawing
a similar size, it doesn't have to
be exactly the same, but if you're drawing
a similar size to your reference photo,
it's much easier. What I'm doing is I'm remembering the sort
of level of detail, level of intricacy
that went into all of my artists in how
they drew the eyes, the glasses, the
nose, and the ears. So I'm starting there.
I'm going to put a little bit of
focus and energy. And you might remember
me marking on one of our ears earlier on
that corrective line, that line where I thought I reckon that wasn't on purpose. I reckon they made a
mistake and corrected it. So I'm not going to worry
if I make a little mistake. I'm going to keep my
lines really light, which is one of my focuses, which will let me then
mark in that correction. I'm also not worrying about
that perfect likeness or the perfect proportions. What I am going to do is try
and get things about, right? But that's not my focus today. And actually, when I look at all those artists
I've really enjoyed, I did talk about how actually, none of them had a very sort of accurate portrayal of
proportions, did they? They were all off or
fluid in different ways. And it's not the
focus of this class, nor is it actually something which
interests me, evidently. I couldn't tell that from all the research I'm
studying that I've done. Now, coming into the
rest of my face, starting to think
about how I can build that focus and the
light in the dark. We had that very
dense hatching from Alan Cober liked the
feel of the hatching, but I didn't always feel
it was totally for me, totally exactly how
I wanted to do it. I like that continuous line. And when I did the second
ear of Walter White, I enjoyed it much
more when I made it more feel like
a continuous line. And those are the bits, the ideas that I'm
trying to channel here. So the beard hatching
has been made up of lots of continuous lines
building into hatching. As I move around, capturing the kind of shapes that appear from the T shirt, instead of drawing
individual lines, you'll see I'm drawing
connected lines, not totally, totally connected,
but look, all of this arm so far
has been one line. And I'm remembering said, those fluid proportions,
far from perfect, far from actually realistic. And in the hands and
in the forearms here, we have some nasty
foreshortening, which is a kind of term of perspective where something's
coming towards us, it appears very
short on the page, even though we know
it's a long object. Well, rather than
worrying about that, making it a bit simple and
abstract and then bringing that focus back to the hands. Again, all of these
learning points, I'm trying my best to remember them and bring them out here. To do that, bring
out that focus, I'm starting with
a very light line, I hope what feels like a
light line in the hand. And then later we
can add more depth. But even just with
this light line with lots more of the line, building up, focusing on
a lot more of the detail, hopefully we can agree. We already actually do.
If we look at this page, we have that focus on the
right corner of my chin, on my eyes, and on my two hands. So I think I'm already managing to channel these ideas that I've been looking at and I've
been inspired by into this, my first creation, my own thing, which I can legitimately
call Toby's art. And that's the kind
of positivity I'm moving for looking for where
things are going well, where I am managing to
focus on those goals. And if I spot myself
deviating a little bit, just bring it back,
bring it back to those specific goals. Here, of course, I've
chosen the photo, because I thought it was a
fun one to do a photo of me sketching on the sketchbook that I'm currently sketching on, and a big feature
of that is pen. So when we talk about interesting additions,
the background, the bits which go
beyond the person, and making it simple, spending a bit of effort on the pen
I thought was important. Now, here's one of the first
decisions I've got to make. When I took the photo,
I had my door open. It covers up a lot of my room. It's also quite confusing
and complicated. I know behind that door
is a little bookshelf. You can see a little bit of it. And I think if I
channel the ideas that I've learnt from my favorite artists,
simplifying that. Having that is a little
detail to look at, but keeping it flat and simple, little bit abstract,
very light lines. Actually, that I think
is the right idea. That is what I've been learning. Instead of thinking,
right, I've got this whole scene to draw
and drawing the person, focusing on the hands. Tiny little bit of interest
in the background. And that's all I need to
do to achieve my goals. Now comes the aim to draw in a little bit
more of a focus, a little bit more of the
detail with some bold lines. Now, I must admit,
my first thoughts, as I'm drawing this are Oops, I've probably gone too far. I've probably gone a little bit bolder than I meant
to. But that's okay. Let's just stop going
so bold on the hand, move on to this little bit
of that fine hatching that I found quite interesting
in Alan Coba's work. And we'll see what
happens at the end. In worst case scenario, I've got another
nice learning point. To balance it out, though, I will do boldness elsewhere. But here, on this hand, just being a little more gentle, not outlining everything
in those bold pen marks, leaving a little bit
more to the imagination. And already, this whole
journey is a journey. It's all part of a process. We're not seeking to immediately produce exactly what we want to, nor will we realistically ever because we'll
always be evolving. Immediately, I can see
if I'm focusing on those key points that I wanted to that I
mentioned at the beginning, I can keep my mind
on track and I can recognize when I'm going a little bit off kilter or a little bit away from the
goals that I set out. A lot of what I'm trying
to achieve now is, as I mentioned, that focus. So where do I want the focus? I want the focus on the
hands and the face. That means popping in some hatching in the
hands and the face. And this is where I found
having practiced lots of ears, lots of eyes, lots of
noses really helpful. Because when I am just now focusing in only
on that feature, I've already got the outline. I've got the big thing in there. Just focusing on that feature, all that practice
really pays off and makes it far easier, far more sort of
easy for me to feel confident as I build up these marks and
build up that focus. And also, it's allowing me
to leave things unsaid, leave things unfinished. Air not important. And if we're honest,
it's sort of gradually disappearing
as I get older as well. So let's not hang on
to it too deeply. But a couple of little
marks a suggestion. That's all we need. The beard. That does add a lot of
depth and contrast. And so I focus more
of my marks on there. The nose. That's the key part. So I'm going to channel some
of those Alan Cobra like, very fine hatchi marks around there as we build
up the contrast, build up the intensity, and build up the focus
on these key areas. As we move through the sketch, it will deviate and
this certainly is deviating from looking
like someone else's art. It's looking like my art, but with changes and refinements
that I've learned by studying over the last few
weeks and also for this class, amazing artists, which
I really admire. And that's the really
important sort of part of doing your
own scenes, as well. When we are just copying,
you'll never get the confidence to just find out
what works for you. But when you get ten, 12, 15 minutes into your own sketch, you'll start to
forget things and do things back into
habit or an automatic. And that's when you'll
really learn what you do, what you enjoy, and perhaps what you'd like
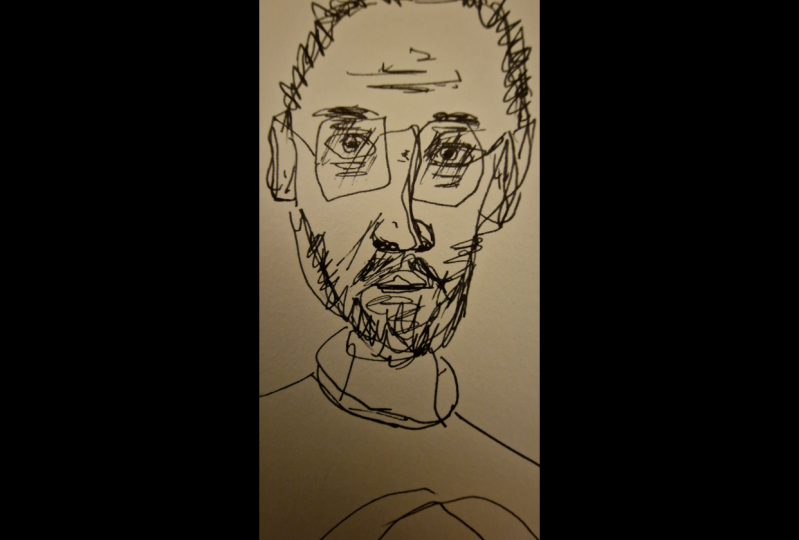
to change in the future. Now the exciting point is nearly upon us because I'm
remembering that less is more. I'm remembering the simplicity I enjoyed and all
the other artists. And you may have noticed
through this whole class, I've not signed any of the art because it's not
creatively mine. I don't want to pretend
it is, but this one is. This is me learning from others and putting
it into practice. So I can sign it, and I even treated
myself to a little bit of a haiku on the side
as a celebration. And there you go. My
finished version. There's a likeness there, but more to the point I enjoyed it. I learned a lot through
the whole process. There's things I
would change, sure. But there are things I'm so glad that I've done really
well and that I've focused on. And that's the most
I can ever hope for. Now, before we jump
into the final lesson, I just wanted to show you other things that
you could try with this. The principles for drawing
a dog are exactly the same. It's focusing on those features, having a loose approach,
simple background. So, if you want to draw
your pet, please do. You can also play with colors. Here, I just splashed on a
few bits of acrylic ink, played with some
watercolor pencils to see what would happen. And if you want to try some colors on your
portrait and share it with me in your class
project, then please do. I'd love to see some real
creative use of these ideas. Anyway, give it a go, share your version, be
proud of what you achieve, and I'll see you in
the final lesson.
9. Another Thought to Leave You With: Just to recap, the process
we've been through, it's a little bit of research, some active learning processes, some processes where we create our own thing using
that active learning. And now the cycle
can begin again because we've had time
to learn what we like. And there will be things you hopefully enjoyed from today. But you also have learned
things that you don't like. It might be that you absolutely loved looking at a
certain artist's work, but when it came to either
the way of creating it, or the sort of level of
detail you needed or the level of attention or just the time it took
to create their style, it's not for you at the moment. It's really important to
recognize there's things we like looking at which
we don't want to make. I think that's a really
fringing concept. So take your learning today
and keep that cycle going. Find something else
by the artist you love to build on ideas
you'd like to know more about or find another artist who has other ideas that
you want to learn. And keep going, keep
going and keep going. That is the way that we sort of proceed and enjoy ourselves
and develop as an artist, as a person, as a creative. Now, in my previous classes, which I mentioned in
the introduction, we do dive into how to use simple shapes
to create people. We do dive into how to
measure proportions to accurately represent
a person on the page. If you're not feeling
super confident about the stylistic elements, do give those classes a go. They might give you that
extra little burst of confidence that you need to
dive in here a bit more. If you would like to do more
kind of loose sketching, then perhaps, yes,
feel free to copy my stuff or join me in another
of my Skillshare classes. You can also find me on YouTube, on my website, Sketch
Los dot G to UK. And just Google me. You'll
find lots of different things. Thank you so much
for joining me. If you have enjoyed this,
leave review means the world. But I don't want to take
up any more of your time, so get back to sketching.
 Toby Haseler, Urban Sketcher, Continuous Lines