Transcripts
1. Introduction: Sketching exercises.
Boring, right? Well, usually, I'd agree, but there is one idea, one technique that I
always come back to. We could call it an exercise in that it's
something that you can repeat, that it helps build your skills. But it is so much
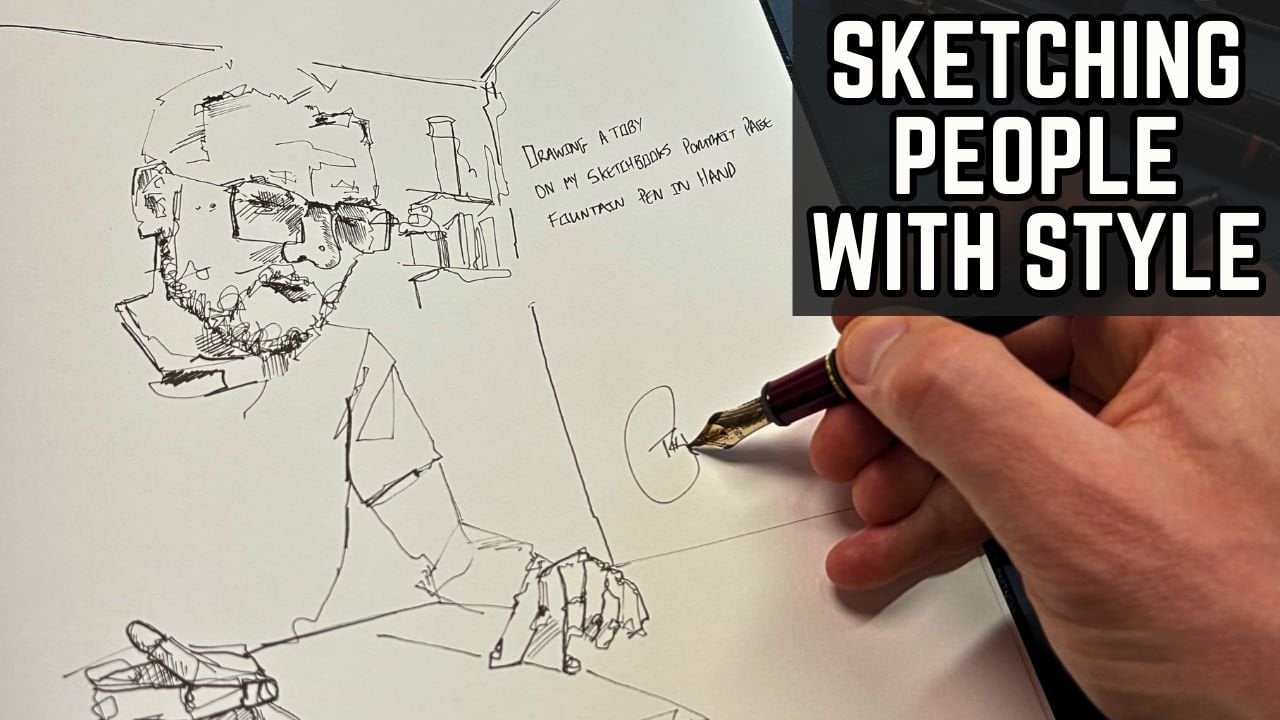
more than that. My name is Toby, known as Toby Sketch Loose on
YouTube, here on Skillshare. And across the Internet
to some extent. If you've seen my style before, if you've seen any
of my other classes on Skillshare, you know, I'm all about making
sketching fun and accessible whilst also building
confidence and skills, which is exactly what we're
going to be doing today. In this class, I'm
going to show you how the humble art of
the thumbnail can, yes, build skills
and confidence. It can help you learn
ideas about composition, but it can also
boost creativity, and it can introduce you
to a lot of sketching opportunities that you may not even have known you
were missing out on. Oh, and it's actually a pretty awesome art form
all in and of itself. By the end of this class, you will have filled a
few pages with life, with energy. With drawings. You'll discover and
rediscover tools and techniques that you perhaps thought you'd
forgotten or lost. And you'll have made
some very lovely art. Now, this class is
super accessible. What you will need is whatever you normally
draw or sketch with. I won't be using anything
particularly fancy sort of any old brand
sketchbook and some of the sketching suppliers I have
at the back of my drawers. In a couple of places, we are specifically using stuff
we'd forgotten about. Picking up things we haven't used for a while and
getting creative. In other places, we're
thinking a little harder, and so we're using our
favorite sketching supplies, things we feel comfortable with to take a little bit
of the pressure off. There's a number of
reference photos to download if you
want to use them, but you could use
your own photos. You could go outside
to a cafe or there's points in
this where using your own imagination might
be something you want to do. Anyway, this class is
packed with ideas. I'm looking forward
to showing you the more. So let's get started.
2. Overview of class: Okay, video one. And this one, I just wanted to give
you a little overview. And don't worry. Everything from here is sketching and drawing. But this video, I wanted
to explain what you'll find underneath to
give you a head start. One thing worth thinking
about is what is a thumbnail. Now, we probably get the idea of thumbnails maybe from art, maybe from a computer
or we have lots of thumbnails as little icons. A thumbnail in art
is the same thing as those computer files we're
so used to seeing now. It is a small image. Now, traditionally, perhaps, we think of having to draw
a frame around it. And I'm going to say that usually that's what
we're talking about, a very small image with
a frame around it. And the reason for that frame
will become very obvious in some of the lessons that
we're going to be doing, some of the videos coming up where we'll look at the power of a frame and how
a frame can help with composition, for example. However, a thumbnail is really just a small
focused drawing. So in the first set of ideas, we're not going to
be using frames. We're going to be taking
a step back and doing thumbnail drawings
which are kind of quick, short doodles. For me, they fit the same idea. They fit the same
learning purpose. If you want to get started
with a thumbnail straightaway, then a nice warm up that you might do right now
before anything else would just be to create a couple of squares on a scrap of paper and fill them with abstract
doodle marks, abstract lines. That, for me, is
still a thumbnail. Even though we haven't
drawn something specific, we haven't picked out a subject. We have done something which
is focusing our practice, and we focus our practice in this instance on
controlling our line. And again, key thing about
thumbnails, they're focused. So we're not trying to draw a perfect image
within our thumbnail. We're taking an image, and we're practicing
an aspect of it. That might be making it simple. That might be trying
different colors. That might be trying
different tools. It might be trying
different compositions. But each of your thumbnails
isn't supposed to be perfect. Together, they're supposed
to be a whole load of ideas. Essentially, in each
video below this one, we will be looking at a new way, a new idea for drawing from
nails or sketching small. In each of these videos, I will demonstrate
these ideas to you using in places
things in front of me. Or using a photo, which you'll be
able to download as a reference from the
class resources tab. And, of course, in that class
resources projects tab, I'd love you to share
your own project as well. Now, accompanying this class, there is also a
downloadable handout, which is packed with
ideas, little tips, explainers, and
more ways that you could use ideas in the videos. For example, in
one of the videos, I'm getting creative
and picking up a few supplies I haven't used an awful lot and certainly
haven't used recently. This is an opportunity
for you if you wish to grab stuff that you
haven't used for a while, or things that you
bought and never really got around
to playing with. And through this video, we will experiment and learn a little bit more about
each of those supplies. But in the handout, I can
give you way more examples, ideas, prompts
than I can record. So the handout will give you more ideas to play
with so you don't feel excluded just because
you don't have the random stuff I
picked up today. In another, we will
use our thumbnails to break down the
composition of a scene, which sounds very intellectual. And to some extent,
it does start to use arty ideas and art theory
in a very accessible way. Of course, we can break down that same scene or any other
scene in numerous ways. So in the handout, I
give lots of examples, as well as a little bit of
the art theory to back up and explain the composition ideas that we use in this exact class. I guess the sort of TLDR too long didn't read
version of this video, is download the handout. It will probably add
a bit of value to this class and give
you more ideas and things to play with
3. Draw small: Idea one, we are
onto the sketching. Now, Ida one is the idea of getting comfortable
with sketching small. Now, I didn't want
to come in and start with very forceful ideas, where we have to rigidly draw a box because a thumbnail has to have a box
around it, right? Now, thumbnailing is
about making drawing, painting, sketching, whatever
you want to call it, quick and easy because if we
can do it quickly and easy, we'll do it a little bit more and probably therefore
enjoy ourselves, develop our skills
a bit quicker. Out more about what we
like. So idea number one is oodles of doodles. In this video, we're
going to explore a range of ways,
not just one way, but a number of
different ways that this idea of doodling
can be really powerful in developing
various aspects of our artistic skill set. So like that, we can start with our first idea of
the first video, tackling something
that but isn't. With the idea of doodling
being something you can take a step back from, it means we can explore
and experiment with things which are traditionally
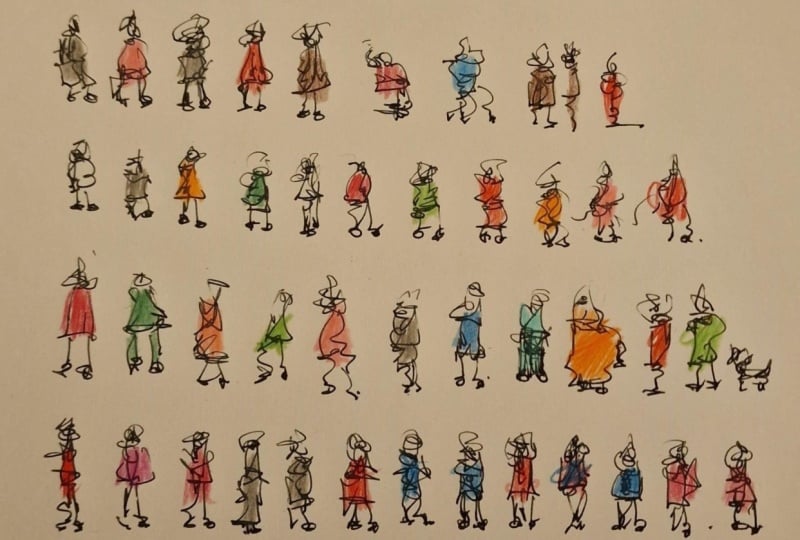
tricky subjects. So one of my favorite things to do is fill up pages of people. And it's only through
doodling that I discovered that people can be
a couple of simple shapes. So do you see here
essentially a circle, a triangle, and a triangle? And if you just keep drawing circles,
triangles and triangles, and you start adding little bits of extra
shape to your doodles, you will find yourself suddenly able to more confidently draw sort of complex versions
of these things as well. So as a starting point,
perhaps, just like me, you want to fill up a page
with really simple but gradually more complex
and kind of live people, just as a simple idea. So as a very first idea, why not try something
as simple as this to just get you in the mood
for sketching small? Now, some of you will really enjoy the idea of drawing
these tiny little people, and it's definitely
one of the most enjoyable things I
personally find. In the class resources,
what I'll do? I'll pop a page full of people like
this that you can see, and you can copy and develop
from if you would like. Equally, don't feel like these ideas you have
to stay at home for. Just like I said in
the introduction, you can take this from
your imagination from references or you
can get outside, draw people in a cafe, pick out little scenes,
little thumbnails. All of this is just
about learning to tackle those tricky subjects
in a really low risk way. And if we can do it small,
we can do it a bit bigger. If we can do it a bit bigger, we can do it bigger than that. And eventually, you
kind of build up to the point where you're
not doing thumbnails. You're sketching these
tricky subjects, and they just work. Now, for some people,
that might be a bit scary because that is people
from our imagination. And I know that imagination is something which isn't
necessarily for all of us easy. For some people, super easy
for others, including myself, is something we have
to work at if we want to be able to do
it with confidence. So let's take a step back again and see what can we
just doodle in front of us? So I've got things
like my big mug. I've got things like
or my brushes just sat here waiting to be used or waiting to be used
as a subject to draw. So how can we usefully doodle them and gain
something from it? You also needn't
confine yourself to a single subject in your kind
of exploration sessions. One of my favorite
things to do is just draw what's in front of me. So here, I've got my ever
present mug of coffee. Which is simple, but we can do lead in different ways,
try different textures, different things like
hatching or even take our little doodles
a step forward and add a tiny bit
of water, perhaps. By sketching these things
quickly and small, we find really interesting and new ways to approach things. And that exploratory nature
of sketching small is definitely the starting point of why I think this
is so powerful. As an artist, you'll
probably also have lots of art stuff
in front of you. Another lovely thing
to just warm up with. These small sketches of
things in front of you. Well, they let us
control our lines. They let us practice getting
a different weight of line. They let us practice getting hatching or thinking about how we might add a
sense of detail, or even in the case of, I might see if I can work
out how I get the effect of writing on my
little implements. That can be useful
for urban sketching when you've got shop signs
and things like that. Again, don't feel that you have to push yourself down
just one route here. I'm sketching tiny
objects in front of me. I'm sketching my mug, which is one of my favorite
muses, I must say. But there are tons of
things in the house which can create really
interesting scenes, whether you just draw whatever's in front of
you in the living room. You pile up some books, or you create your own
interesting still life. All of these ideas will
just get you drawing. They'll get you
filling up pages. And remember, the aim with
all of these is small. It's easy to suddenly
fill the whole page, but then we've lost the kind of purpose of what we're doing. Now, this idea of doling
from observation, as well, we can make it
a little bit bigger. In the final video
of this class, I'm going to be showing
you my little sketchbook. But before that, I can actually show you the kind
of thing I do with it, which incorporates observation,
doodling, thumbnailing. And that is drawing
stuff in front of me. One of my favorite
things to do is carry around a tiny little sketchbook, and this can come
with me anywhere. And this is where we
can start turning those doodles into mini
scenes, into those thumbnails. All you need is a
willing volunteer. Betty, come here,
sit, wait there. Now, we're gonna do some
thumbnail drawing today, so I need you to stay
nice and still for me so that we can get a
nice little scene here. No? Still you're moving a lot. There's a lot of movement
going on here, Betty. There we go. Good girl. Oh, there's a bit more movement
there and a bit more. Not the best sitter
today, are you? But luckily, I'm
drawing nice and small, so we can get an idea of you on the page without getting too worried that you
keep moving your nozzle. What do you think? Right?
The sniff of approval. Now, the idea here is that my willing volunteer doesn't
sit still for very long. Of course, I'm not going
to get something perfect. Of course, if I try to do more than a few
minute long sketch, I might get a bit stressed because Betty's gonna be Betty. She's going to wander
off and get bored. Yes, I could do it from a
photo. That's an option. But there are lots of
these environments where we are just
sat with people or watching people or watching an animal or with a
scene which is rapidly changing where all of these doodling ideas we can use to quickly
capture a scene. So there you go.
There's another idea for how to use
Oodles of doodles. Now for the last one,
we're going to dive back into our imagination
to some extent. Or perhaps a better way of
putting it is our memory. So whenever we are
sketching and drawing, to some extent, we
are taking shortcuts. We are trying to create
something on the page, often very small, even on a bigger piece of art.
It's still very small. That resembles
something very complex, and trees, for example, are
a good example of this. And trees are something
people always ask how to sketch, how to draw. And how I draw them is
how I like to draw them, but it might not suit you. And the best advice, the biggest advice I can
give is just try stuff out. You can create a simple
grid on your page or even I'm just gonna fill up the bottom of my page
here, as you can see, and just get a photo of a tree up and try it in three
or four different ways, or just imagine three or
four different trees. What are the shapes
within that tree? Where's the light and the dark? What are the textures
that you can see? It doesn't matter if
you get it wrong, doesn't matter if
it looks weird. This is a doodle, but it will
inform how you incorporate those ideas into bigger
scenes later if you want. So there you are four
ways in one video, four different ways
to use doodles. Now that we've hopefully
warmed up a little bit and got lots of small things that you can
do just anytime at home, let's move on to some
slightly bigger thumbnails.
4. Be creative: Now we get to the
real thumb nailing. Here's a controversial idea. Why not repeat a scene? Now, that I know,
sounds incredibly dull, but we all have these piles of unused sketching
stuff at home. I have my favorite pens, and I seem to always
use these ones. So I sort of see a
scene and I go, Right, I know exactly how I'm going to sketch
that with this pen, and I can usually quite
confidently just go in with my continuous line and capture myself a
quick version of it, because that's what
I do all the time. Then I'm like, Oh,
maybe maybe one day I should try something different. I've got all these things, these pencils, these other
pens, hining around at home. But the idea of getting them out and actually
learning to use them, experimenting when so comfy with my favorite pens and
my favorite colors. Well, it feels like a lot. So one way of getting over this, one way of learning new
things and experimenting is, yes. Do your thumbnail. So here, a nice, quick, loose version
of the scene, not worrying too much about the specifics and just sort of working it
out a little bit, working it out, but also
just doing it the way I normally would
nice and comforting. But we can then repeat this whole scene
three or four times. Sounds boring, but
it's not boring if we do it with a bit of purpose, if we change
something every time. So why not, for example, use this a beautiful
magic pencil. This is something I have used a little bit to
capture quick scenes, draw people when
I'm out and about. And it's really fun. But I only learned to use
it through experimenting, exploring and seeing
what it does. So you'll notice drawing this. My line is much bolder. So I'm drawing a bit
bigger just naturally. That's something
which is happening. It's really interesting
to observe. I'm learning something already. I'm seeing if I rotate
this a little bit, I can get a different
color of line. Look at that blue one direction, green and red and orange
and other directions. And all of this is just experimenting and learning
new things about my tools. Getting more comfortable
with what is not an easy scene in a
very low risk way. And from here, I might go right. Well, this actually
gives a nice big line. So maybe I can explore
the idea of shading, which isn't really something
we can do with ink. Normally, with ink, we
hatch or we leave it white. Maybe we add some
color in a little bit, but we don't tend to come in and provide this
kind of soft tone. And in practicing this, well, number one, it's low risk,
takes no time at all. I can just do it in a spare
few minutes here or there. Number two, I'm
learning something. Now, those of us
out there thinking, Ah, but what's the point? Well, you know what? If I want to do this scene
now as a bigger piece of art. Having practiced it
a couple of ways, I'm gonna be so much
more confident in achieving that because I've
worked this scene now, and it'll probably
take me less time, rather than wasting time,
I've probably saved myself a bit of time and a bit of
heartache by practicing it, by working it out
by playing around. And if you're willing to
experiment and explore, you might discover
new things to do. For example, here, super minimalist version
where I'm actually going to just move a lot of
pigment around from this water soluble
pencil with my brush, rather than drawing everything, I'm sort of half painting, half drawing, and the other
half, all three half there. I'm leaving to the imagination. And lastly, something you
haven't used for ages, really chunky pigment liner. You probably have things
like this lying at home, things with funny nibs, chunky nibs, and you don't know quite what
to do with them. Well, you'll find out
if you play around, and that is what
this is all about. And this is why these
thumbnails are, what I would call
incredibly powerful. So here I can work out right. When is the bold line too bold? When is the dancing line
dancing just enough? Can I hatch with this pen or is it going to create something
I don't like on the page? And it doesn't matter in
this instance if I get things wrong because it's all
taken a couple of minutes. There's no big outlay. It's not like setting
up my paints, ruining 100 pound canvas. All I'm doing is playing around in a series
of small areas, experimenting, learning
all sorts of new things, relaxing as I do it, taking the pressure off
and enjoying the art, Just hopefully, a little
bit more or maybe more. Than a little bit more.
That's a little bit of side from our doodling idea, but let's say you
also want to explore some new colors or new
color combinations. Well, isn't this the
perfect time to do it? You can just see what happens. These are low risk, low
intensity thumbnails. And maybe just by splatting a little bit of color in just a
couple of places, you might discover new ways, new inventive ways of
using your colors, new color combinations and
mixes which work well for you. Or you might even discover
the sort of simplicity of minimal colors on your
minimal thumbnails and how well that
can work together. So there we are. I've
used a few things there. I had a bit of a play. Don't forget there's loads of other ideas in the
downloadable handout. You might, for example,
paint first or only paint, just draw with a paint brush. You might use graphite pencil. You might use a really
tiny fine liner. There are loads and loads
of ideas which are probably at least some of
them just sitting in your house waiting to happen. A small thing, which I
think is really important, when we do our
little bits of art, pop a signature on maybe
pop a title or a date, it gives you that sense
of closure and ownership, which I think makes the whole
experience more powerful.
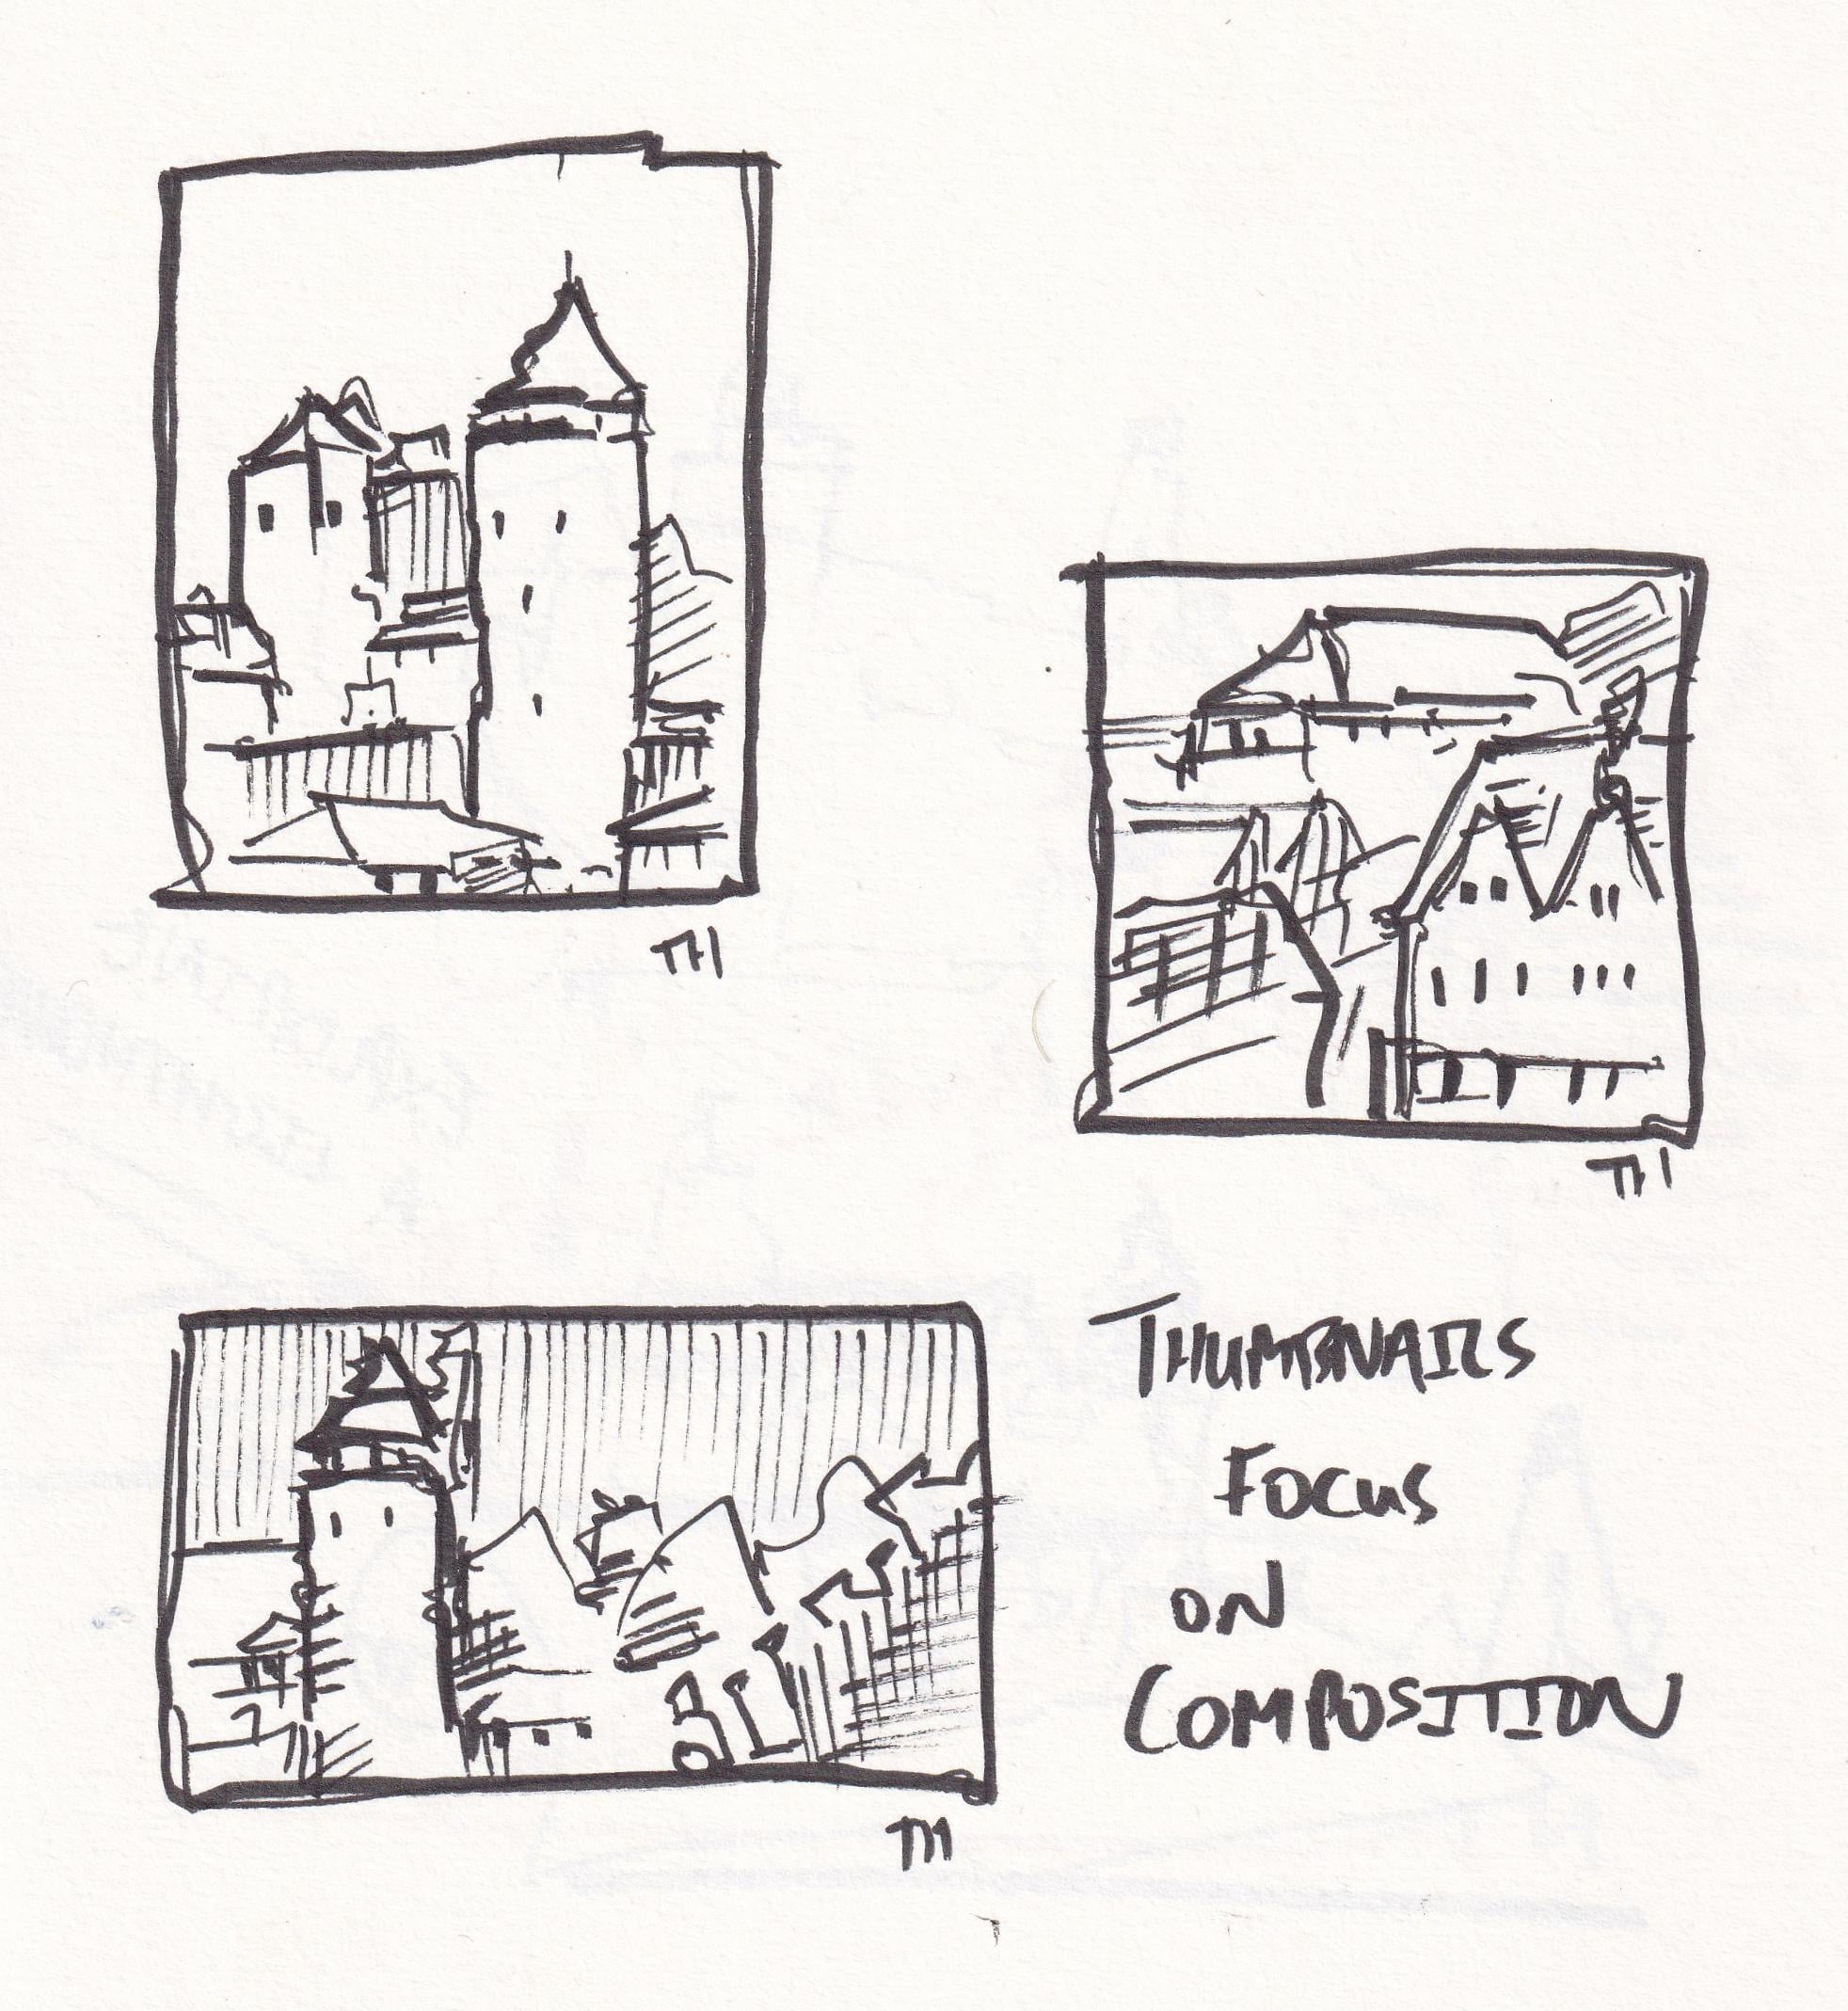
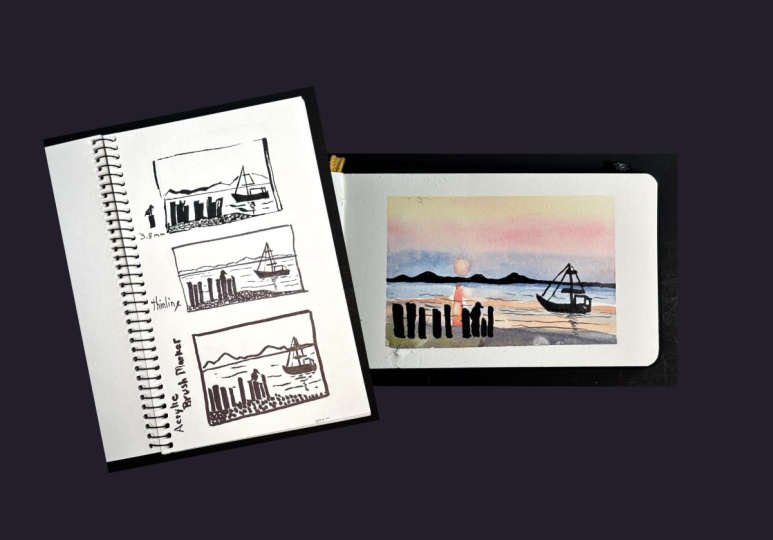
5. Have a work out: This use of thumbnails
is the one I think is the most useful in the sense that it can be the most helpful in
working out scenes, in taking something challenging and making it feel achievable. So using one of the pens
I experimented with earlier and found or
remembered I enjoyed, I have this photo. Now, this photo was sent
to me by someone saying, Oh, maybe you want
to sketch this. And my immediate thoughts
is, No, I don't. There is something very
interesting about it, but my word, it is complicated. So if we were to try and draw it in my way of simplifying
to find shapes, well, this might be the
first thumbnail I did. So I try and find right,
got this triangle, little rectangle underneath, another rectangle underneath. Lots of little
shapes within that. There's a kind of
rectangle here, a triangle with a
triangle next to it. And Wow. Already, my head is
beginning to hurt. And what we've got
in this small photo is an awful lot of
complexity of business, of stuff going on. There's a couple of
focal points here. We've got one up in the Tower. We've got another below. We've got shapes
underneath that. Maybe a third of the photo is this bland
roof in the front. Another third of the photo is this large tree cutting
through the entire image. And if we kind of take a moment to look at
the photo itself, and if we were trying
to, let's say, break down the kind of
shapes in it, we'd go right. Tiny triangle, tiny triangle,
big rectangle, rectangle. There's another rectangle
triangle, triangle, triangle. Wow, there's so much going on. And it's going to
take us forever to really work out
this entire scene, which is fine, if
you really like it. Which I don't don't think
all of this is necessary. I don't think it's
that interesting. If we think about our
rules of composition, that kind of rule of thirds, we divide our page into three within our frame,
which is about this. Notice, our focal point, we'd expect to be
either here or here. We've got one in the middle,
one at the very top. It's just not exciting. Along come the thumbnails. So let's ignore this. And
let's come over here. So with our thumbnails in a kind of more systematic way rather than just experimenting, this time, we can try using our thumbnails to
explore an image. Now, that might
be too simplified a lot to find the shapes. We kind of did that in the last idea we
were experimenting. Here, it might be to try purposefully different
compositions to see how we take a scene from a photo or in reality and make it
work on the page. So here we go. Option
one, portrait. Now, think of your
rule of thirds. You've got a line
coming down here, down here, another one
across here and across here. We want our interesting point to be on one of those lines. So I'm going to
take my tower and I'm going to pop it so it
intersects those lines nicely, and so we have room
at the top for a sky. I can then find some of
the shapes within it. I can find some of the windows. And I can explore
the relationships around it, for example, little building
underneath, which is made up of a series of
triangles and rectangles. We're always doing a bit
of that simplifying, but just not the main focus. This time, it's all
about composition. We've then got a kind
of wall big rectangle. We've got our other tower
here, triangle, triangle. We've got some stacked up, little shapes off to the side, which are less important now because they're
not our focus. We know we've clearly
identified our focus over here. We'll pop in some more windows, maybe a bit of texture,
a bit of hatching. We can find our trees here. And there's some
important feeling trees off to the side, as well. We also want to just work out
what's going on in front, and this has kind of
become the foreground. This building just sneaking in the bottom of
our composition, maybe with the
idea of that tree. Maybe with the idea of one of these other buildings there. And here, if we just restate some of our
lines more confidently, now that we've
worked it out a bit, we have a much more, I think, much more engaging
composition already, through some very simple
thought processes, which we can try out on
a small thumbnail scale before we dive in and risk it all on a
big piece of paper. But let's try something else. Let's not assume our
first idea is the best. Here, quite an interesting
building, isn't it? So let's try it in our
square composition. Again, imagining this idea
of the rule of thirds. I'm going to pop it
off to the side, get that triangle in, get the next triangle next
to it has these areas. The roof coming up. Got
this funny shape here. The perspective
is a bit awkward, so I'm glad I'm practicing
it before diving in because it will give me
confidence for the next one. We've got this tree, kind
of a little framing object. Then we've got some other little triangles off to the side, which are these buildings
here. They're a bit dark. Try some hatching, get the
lines with the roofing, big tree in the foreground. And how are we
achieving a background this time? That's less obvious. It actually ends up being
the same building again for me. A few of the windows in. Pop in a little bit
of hatching in, and again, we can
restate those lines, having done them gently to
start with just to check, is our composition
really working? How is it feeling?
Is there anything else that we would
change about this one? And also, this is
where it's personal. I can tell you all the
rules in the world. But no rule is better than
how you feel about your art, because the rules are
there really, I think, only to be broken so that you
can start to experiment and understand what it is that you enjoy and what
brings you a bit of fun when you are
making your own art. Again, though, this
composition, it's okay. I probably I'm
looking at this area, thinking it's a bit unexplained. So if I'm doing this bigger I'll I'll work that out again
with another thumbnail. Probably, overall, I prefer
this composition still. Is it great? No, I
know that. One more. One more to try, though. So here, we've got
a big landscape. What I'm going to do, I'm going to go back to
my favorite building, and I'm going to think
about my rule of thirds. And it's in the middle
here, isn't it? So why do I have to
put it to the right? Why not try putting
it off to the left? That feels less obvious because Oh, there's
lots of stuff here. But there's also lots
of stuff on the right. It's just that on the right, it's more about the
trees and the foliage. You might even find
that you identify a building that you left out before that
you just forgot about. There you go. By
repeating things, you're exploring and
always finding new things. We'll do a little bit
of these buildings off to the right or
sorry, off to the left, but they are not
our main focus now, or they're not our main
part of the scene. The main part of the scene,
it's going to be finding these interesting
shapes for the trees. We've got this
building, I think, hiding just behind, so we'll
pop an idea of that in. Extend this line down. And now we can actually
make use of this big tree. It can form a foreground. So these scenes don't
really have a strong, like, really close
foreground or, like, framing element that
frames off the scene. But here we do have that. Which is great. Something
different to play with and see if it adds interest. Find a bit of hatching in the
trees. Just treating this. Remember, this is a thumbnail. This is about
treating it quickly, getting it on the page. Not about a perfect
version at all. So I'm just doing some quick
hatching so I can start to understand my scene
a little bit more. Maybe even we can try
some rogue stuff. So sometimes I might
just use thumbnails. To practice, for example,
you can hatch your sky. Skies have tone,
they're not white, they're rarely white unless
your photos very exposed. And that can give us something else about the
composition, as well. Maybe you can use
ideas like that, not in the sky, in
other forms of arcin. And there we go. So now we've explored the composition
in a few different ways. And I've discovered, well, not that
interested in that one. I find it a bit more
challenging and less exciting. So maybe I would do it if I
wanted to challenge myself. But if I want to
relax and just do something which I think will work and I'll
feel good about, I actually think
I'd do this one. There's more looseness to play with these
trees and things. We can have more fun
with the colors. This, if I had a
sketchbook which was portrait in orientation,
that would be my choice. So thumbnails, exploring
a scene with this time, a focus on composition. But you could focus
on the textures. You could focus on
the light and dark. You could focus on the shapes. You can just take
these thumbnails and use them to
break down a scene. And that, as I said, at the beginning of
this little section, is what I think the most
useful use for thumbnails is. Not the best, the most fun, but the most useful and the most maybe confidence boosting for challenging scenes.
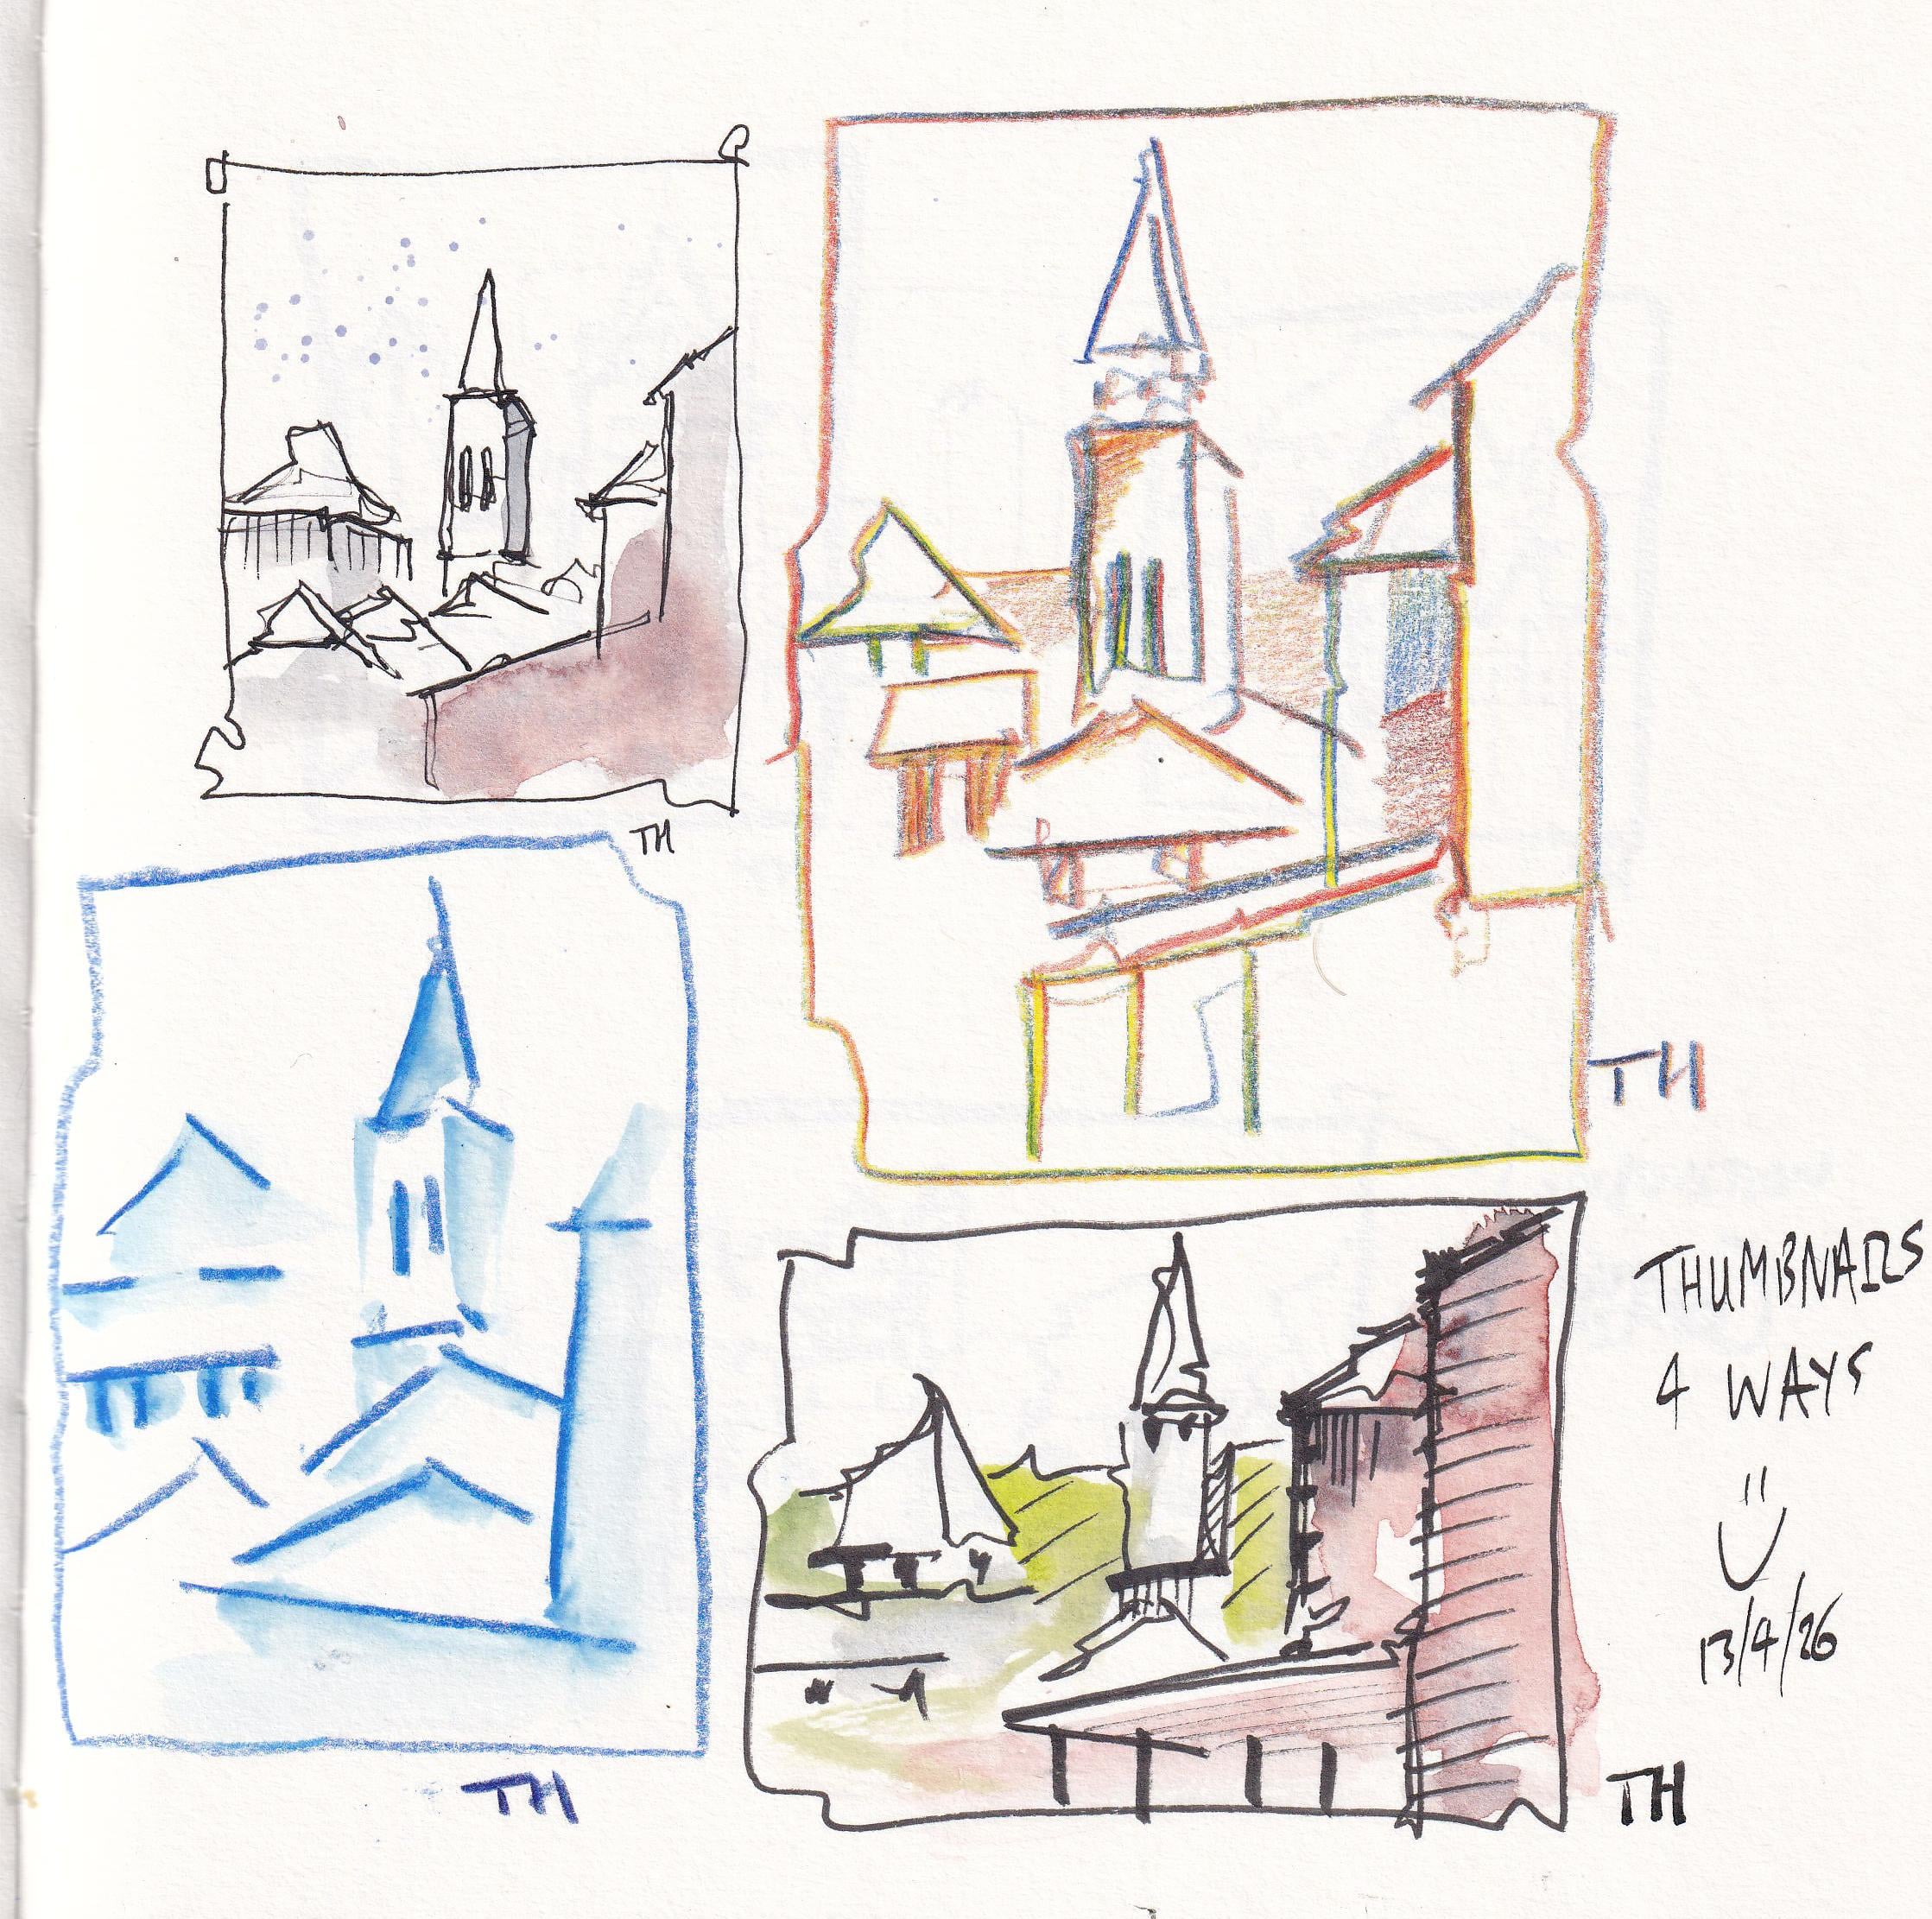
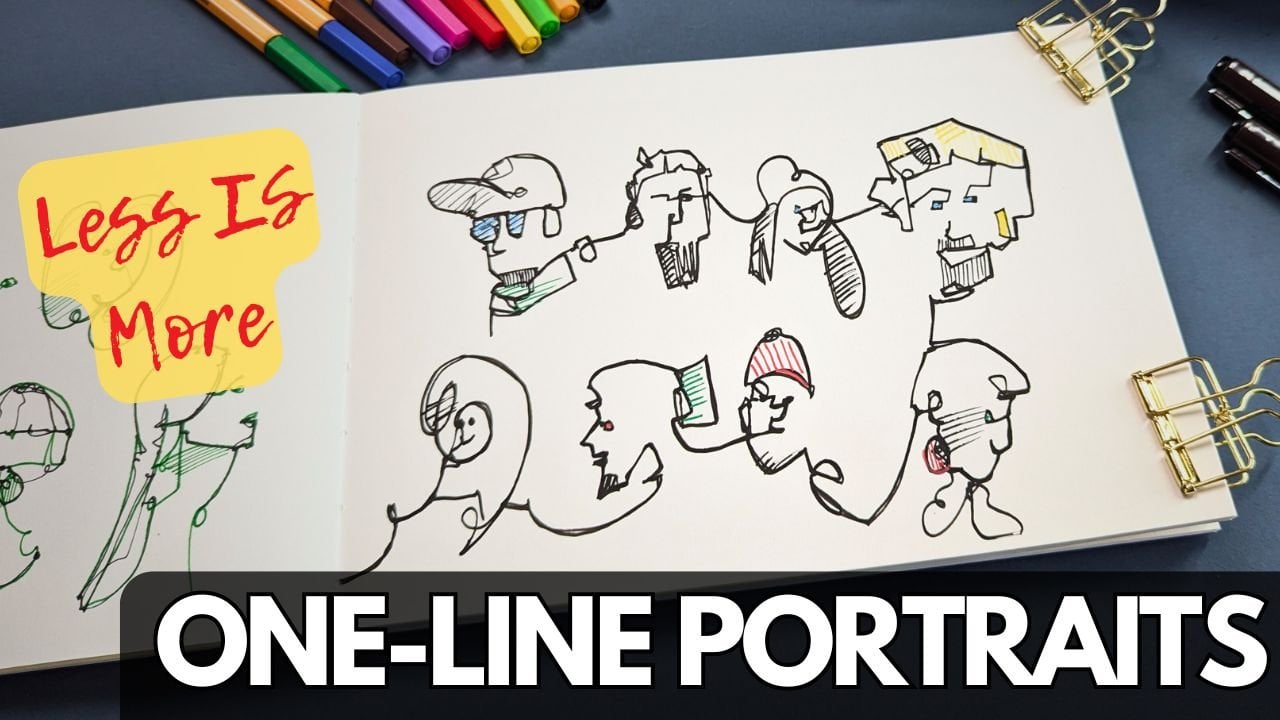
6. Make tiny art: Last use of thumbnails, which I'm going to leave you
with is the idea of making tiny art because if we can
learn to love small things, then suddenly it makes art
very possible all the time. This tiny sketchbook is one
that I carry around with me, so I can do faces
on a Zoom meeting. I can draw people when
I'm sat in a cafe. I can draw from memories, but also from observation. And it doesn't take long
because it's so small. Now we can take this
idea one step further. For this, all you'll need is a new page and a
little bit of tape. I've got some washy tape, which is just like low
tach masking tape. Important thing
when you're using this is just burnish the tape. So popping it on your jumper a few times or rubbing it
on the edge of a desk, that just protects
your paper for later. And what I'm going to do
mark out a little square, a couple of centimeters
or an inch or so around. Now, for the sake of argument, I've got a little photo here. And we're going to create
what I call micro art, which is one of the most pleasing things that you
can do with your time. It is creating a small
thumbnail sketching which fills up a tiny sketchbook, and
you can even frame them. They look beautiful
in middle frames. So what I try and focus on with this is really simplifying. So I might say, right,
I'm going to do this whole scene in one line, which is one of my
favorite ways of drawing. But here, I'm going to
really focus on that idea. Of simplifying it into
one very clear line. And that might mean I
leave lots of stuff out. It might mean I use my little tape as a
barrier to bounce off. But whilst doing that,
I'm thinking focus, composition, bit of texture, and also not overdoing it. We have at times restated
our lines, haven't we? And that's still an
okay thing to do. Yes, we said one line, but one line and
then coming back, restating clear
lines will get you a little bit more of a sense of that focus
within your scene. And you might even like to add things like a
bit of hatching. Not much, but a
little bit starts to create that clear
focus, as well. So we've worked on our
composition, we've simplified it. We've made it interesting, and now we're using
thumbnails as art, not just as a practice
tool, but as art. Now, here is where you might want to bring
in some colors. And there are no rules here. So firstly, yes, I will
play with some watercolors. I'm going to use my
watercolors with little cheap border brush. And pop them in the sky. You might have noticed my
paper is kind of toned paper. So the colors are going to be different to
what I'm expecting. In that they're going to mix
with that underlying tone. We're going to not get a
beautiful crispy yellow. We're going to get a mellow
yellow from this underneath. We're going to get a slightly
toned down red because it's touching that color
underneath on the paper. Off to the left, look at that beautiful kind
of bluey purple. I've got just the color here. It's called Tundra violet. And that will move in there, that blue, that red, the violet all mixing together, and creating that soft
idea of this sky. Now, you're going to do a tiny bit more yellow just to
neaten up the edges here. And then I'm going to try
something I wouldn't normally. So instead of my watercolors, why don't we get some of these magic pencils
I was using earlier? I've got just a couple here. I've got a brown, a
yellow, a gray, a blue. And I'm just going to say, what can I see in the foreground? So maybe I see some grays. I don't see much
blue at the moment. We might use it, and I see
some yellows and brands. So I'm going to instead
of going in with colors, my little micro arc
can come to life. With some pencils,
instead of watercolors, playing in here
with some pencils, which gives you this
immediate effect. Don't have to wait
for it to dry, plunk it down and away we go. And it creates an
interesting contrast. And maybe you're looking at
this, thinking, Ah, yeah, but it doesn't look
that great, does it? Could be more exciting. But what we're trying for here
is number one, simplicity. We're not trying for, like,
complex overdone art. We're trying for
beautifully simple art. And number two, the magic from
this comes when you remove the tape and you unveil your framed miniature
work of art. So with that in mind, I've
let my page pretty much dry. I can gently remove that tape. Oh, there we go.
And look at that. Isn't that a bit of fun?
If you've done it on a separate piece of paper,
literally frame it. You'll be amazed
how good it looks. Here, in your sketchbook, maybe crisp up the edge
with a bold ink or here I'm gonna make use of my little gray magic pencil
again. Pop a signature. And it's a lot of fun. You
can take this idea outside. You can take this to cafes. You can keep it inside. You can make fool sketchbooks or trip ticks and dip ticks
of your micro art, have an experiment,
and start finding way more opportunities
to make art because it takes less time,
but it still looks great.
7. Final thoughts: So there we are a few uses for sketching small for thumbnails
from building confidence, getting warmed up,
building skills and knowledge to actually just
making quite cool the art. There are loads and more
things you could do here. You can do timed sketches. You can do watercolor
only sketches. You could focus your sketches on things like light and
dark contrast, hatching. You could try different
color schemes. So you repeat the same
scene four times, and each time, you use a
different sort of set of colors. And if you've ever
wanted to get outside, these are the perfect tool to get started
with that as well. If you've enjoyed this class,
please leave a review. Means the world helps other
people find it as well. So if you think
it's worth finding, you're doing the world a favor. I love seeing people's creations from these classes as well. So please do pop
your project up. That might be pages
of thumbnails. It might be one that
went really well. It might be something where
you've got a question for me, and I'll come back and
answer that, as well. You've enjoyed this,
perhaps follow me here on Skillshare or find me on
sketchloo dot Code, you okay? I'm also on YouTube. I'd love to stay connected. Most importantly,
keep sketching. Keep enjoying yourself, and
I'll see you in the next.
 Toby Haseler, Urban Sketcher, Continuous Lines