Transcripts
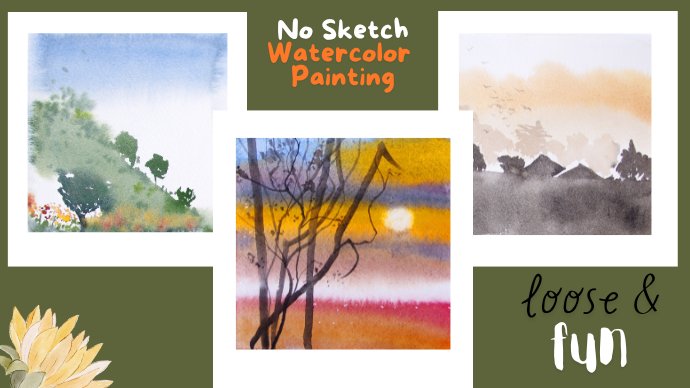
1. Introduction : Look deep into nature and then you will understand
everything better. Hello, Welcome, and
thank you so much. This is Turner, a
phrase, Filipino artist, illustrator and educator
online and locally in Spain. I mostly enjoy painting
landscapes in loose, intuitive and unique way. And in this class, I'm
going to teach you all of these in a
straightforward manner. We are going to focus in watercolor techniques such
as loose and dry brushing. All throughout the class, I'm going to share
to you a lot of tips on becoming
a better artist. This class, I'm going to guide you step-by-step in real time. All of these glass was created
for intermediate level. I believe that any
students can challenge themselves and give it a try if you haven't
heard about me. Yeah. Well, I'm a self-taught artist. And most of my art, our travel inspired why
did internationally. And I collaborated with some galleries and
interior designers. I sold around 200
odd pieces around the globe since I started
painting straight years ago. My goals are to
inspire other artists teach art in a
simplest possible way, create a unique art piece
and most especially touch, others had allergies painting in the challenging situation. So I believe that everyone can achieve their dreams
through constant practice, dedication, and hard work. So without further ado, let me invite you to join
me in this journey in the most beautiful
landscapes in France and discovering their unique
q in watercolors.
2. Technique and Practice: So I'm super excited to start
this painting with you, but before that, we have
to do some practice, dry on wet using
brush number two, my brush on a dry paper, on a rough dry paper. So I'm holding this
brush in this way and I'm going to press N and
do some brush strokes. And I'm just going to let the
watercolor flow on its own. Wet-on-dry technique. We usually use it for landscapes that are a
little bit traditional. And probably this is the
most common technique, technique use in
landscape painting. Next, we still have wraps or phase watercolor paper and we are going to do dry brushing. Gay. So dry paper and net, so wet brush. The brush should be not so wet in order for us to
leave that white. Okay. So these white
will be left the white of the paper when
your brush is not very wet. And we will be using
this technique lot during this painting
process of our landscapes. Now, I'm wetting
it with using my, my boy water spray and we
are going to do wet on wet. So here the paper is wet. A nice NSC can see
with wet on wet, it's really loose and the water just gradually flow on its own. So we're using this as well. The loose effects on our
watercolor painting and then drying our brush again to show you again the dry brushing. Because we're gonna use
it a lot so you can practice as much as he can gaze. So dry paper, dry brush, and we have the
white on our paper. That's it. I can't wait to paint with you. I'm super excited and I
will see you in the class.
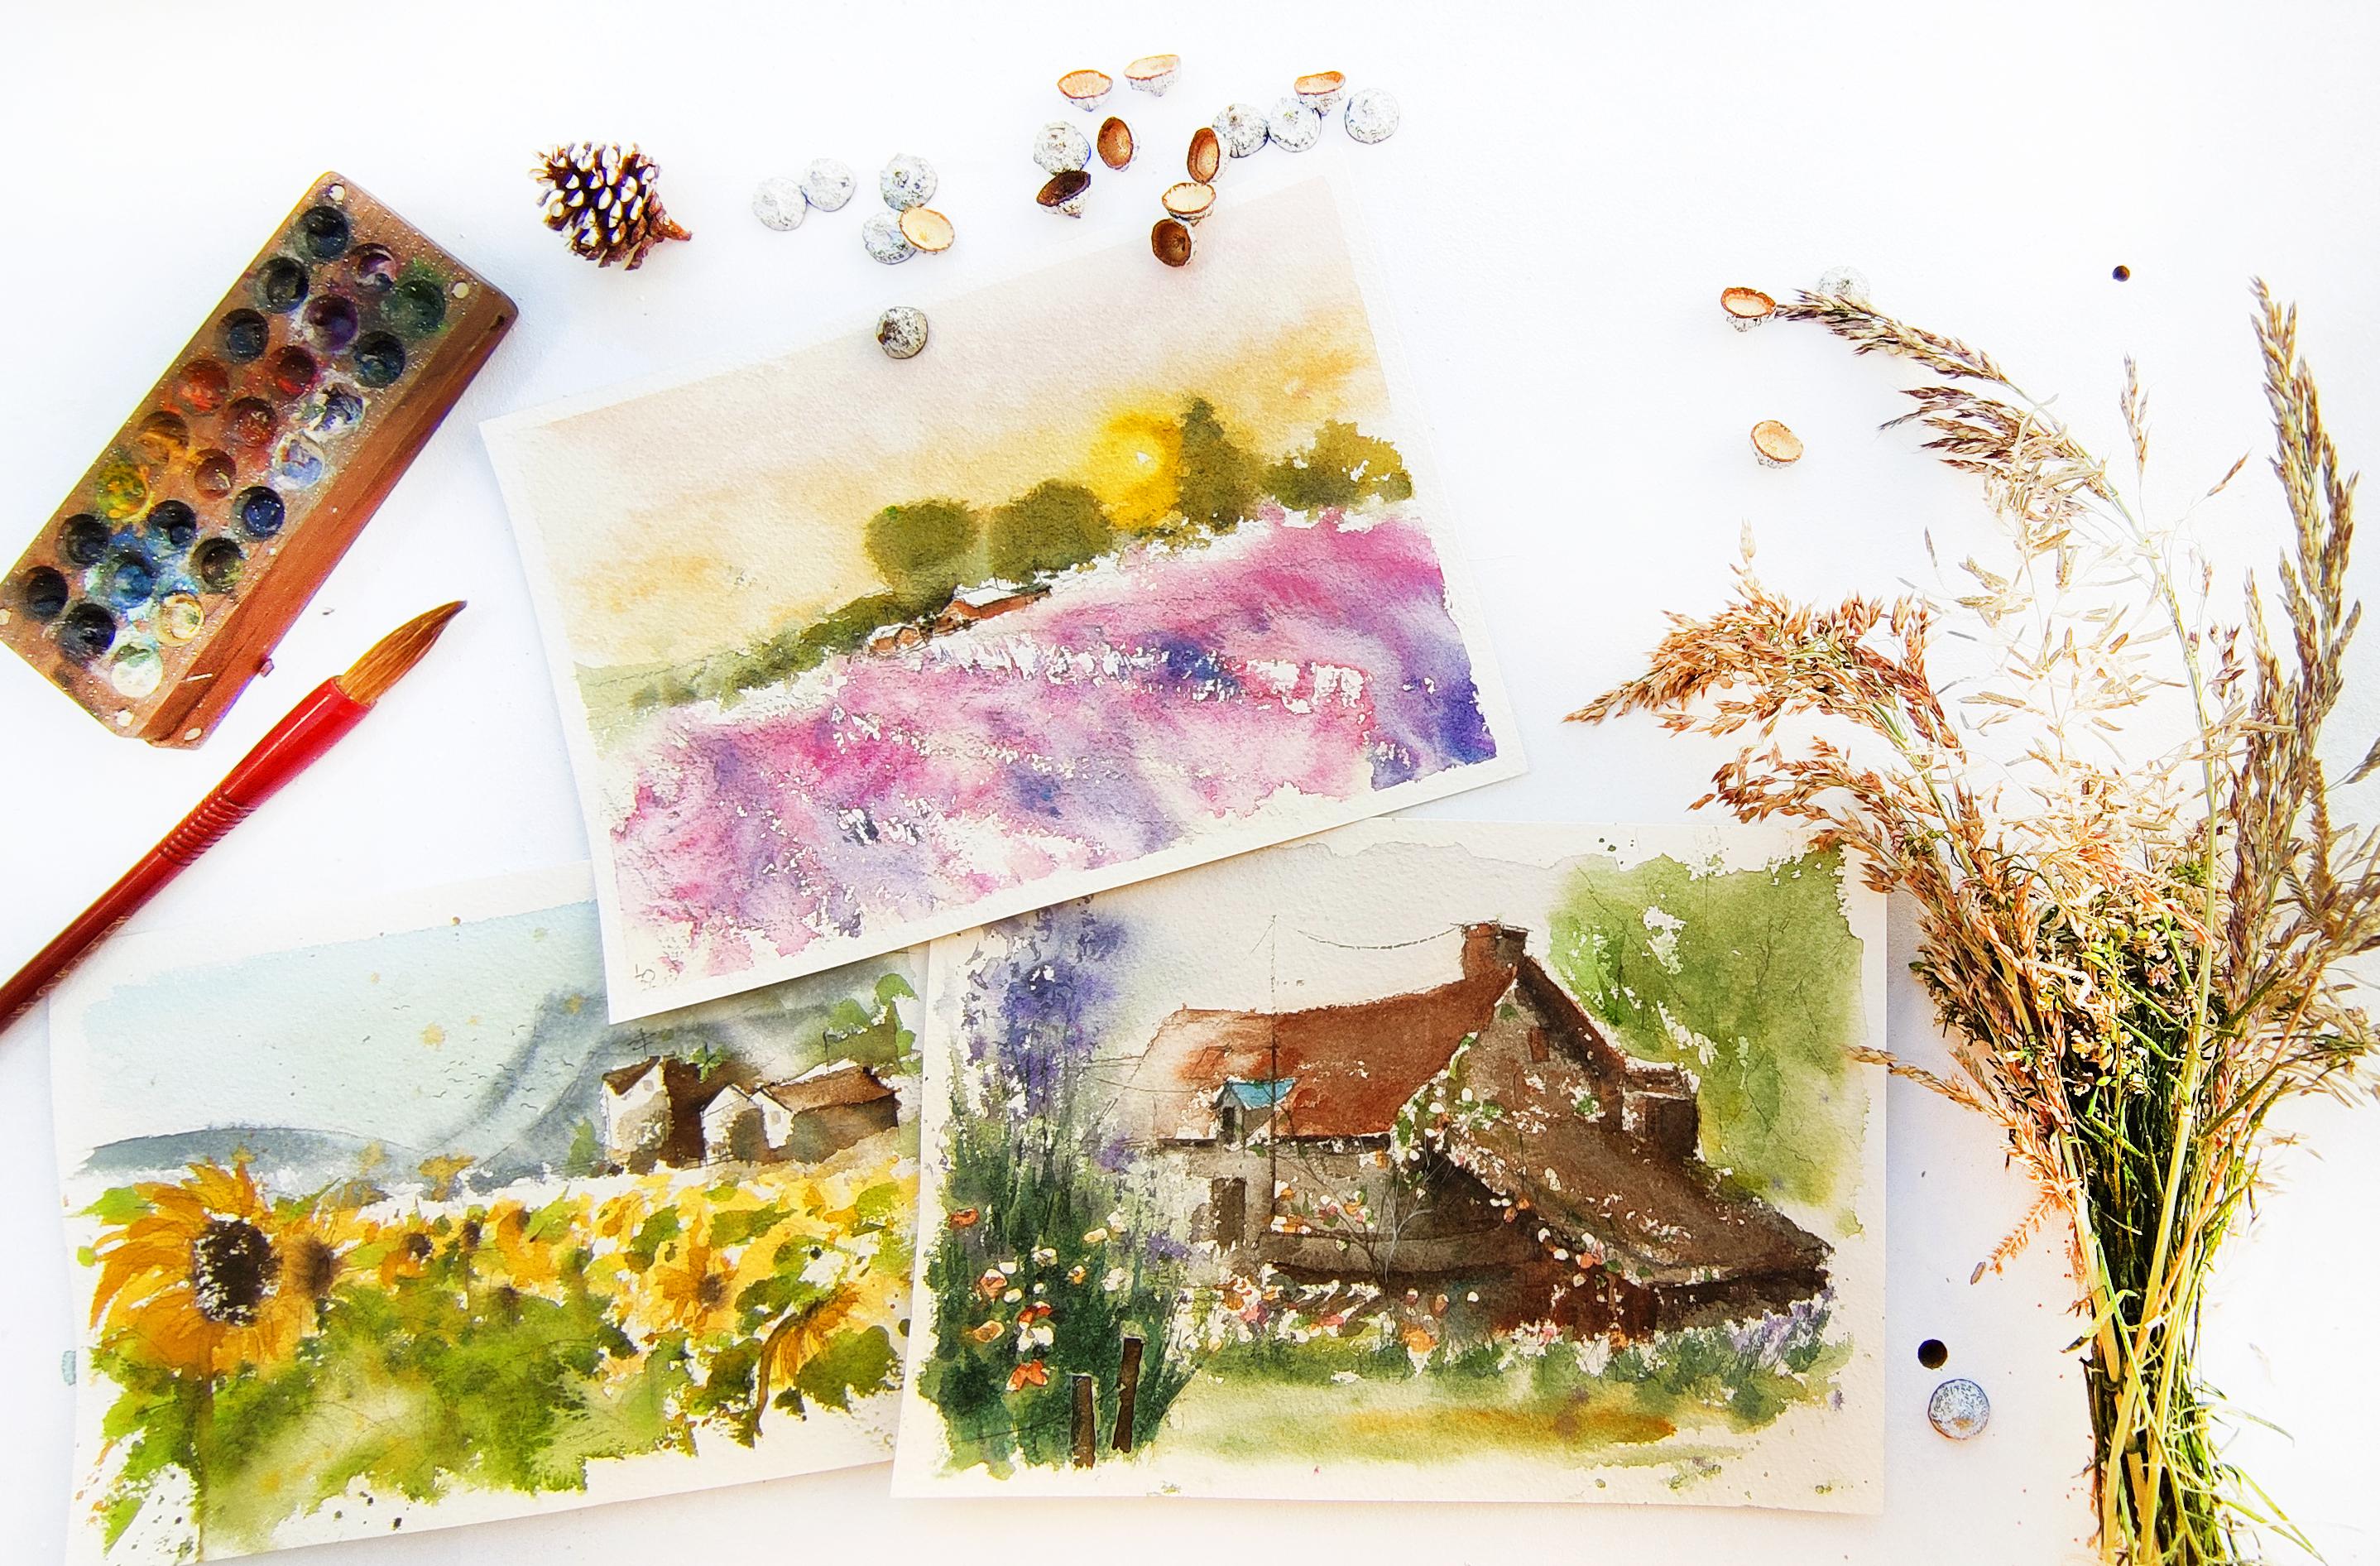
3. Materials : Hello everyone. Thank you so much for
joining me in this class. And without further ado, these are the materials that we are going to need
for this class. It starts with a
watercolor paints. I'm using cut mine, student grade watercolor paints. We have ivory black. I usually use the
big tubes because I find them cheaper and they
last longer in the end. Cerulean blue. This is my favorite yellow arc. I usually use them in
most of my painting. And of course, burnt sienna, cadmium yellow, cadmium orange. And for the trees and greens, we have Sap greens. And I use a lot of
Chinese white as well. And I would mix it with
another watercolor paint. We have crimson alizarin
and bright red. I'm using Arches,
watercolor green to show our rough surface. And this is 12 them 16 in size. And we are going to set them into two and divide
them into two. So we are not going to use
big paper for this painting. But of course, if you want
to have a bigger paper, as long as it's in landscape, then you can use it. For the watercolor brush. We have, I made this
brush with pointed one. And this is the Vinci brush
number two mop brush. I don't have a lot
of brush because we are going minimalist
with my husband, But I think I will need
to buy more brush a little bit and to try
other brushes as well. And of course, the
bucket of water. So this is the beer bucket
because it's paying, they drink a lot of beer, so I might as well use
it as watercolor bucket. And then we have the palettes, and this is middle board
and is very small. And it's very handy. They're masking fluid. This is Windsor watercolor, medium masking fluid that I usually shake before
using it, of course. And the water spray. So I advise you to have a bigger water spray so that you don't need to fill
water all the time. And of course,
your tissue paper. So yes, these are the materials that we
are going to need. And thank you for preparing
them ahead of Gore's. And I'm looking forward to see you in the painting process.
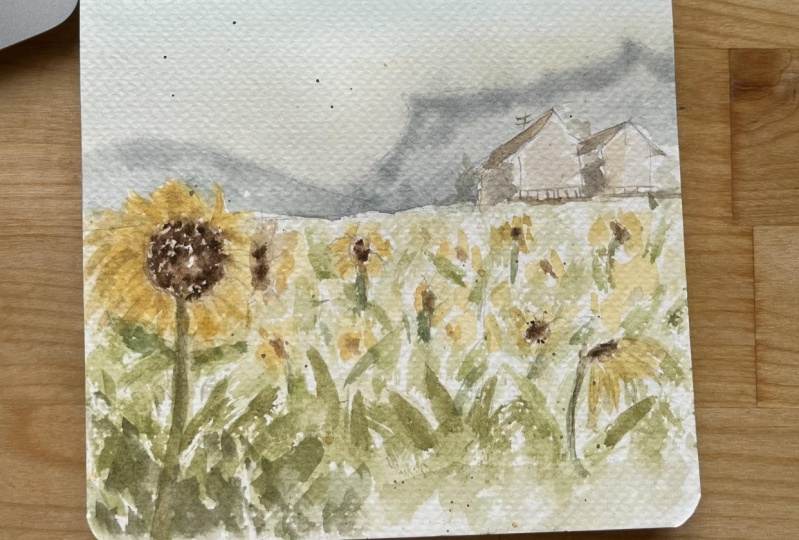
4. Sunflower Sketch: Welcome to this class and
we are going to sketch now. Thank you so much
for joining me. Let's sketch the sunflower
fields in Rome, France. I'm using gastric
number six, pencil. And notice the position
when I'm making straight line and the
way I'm holding it. So the more you hold
your pencil this way, close to the tip, you have more control
on the lines. The more you hold your
pencil close to the edge, then that means you can
make more straight lines. So holding this pencil like
this is very important for you to be able to sketch
easily and maybe properly. So we are painting. We are sketching the
house in the middle, the houses in the middle, and they are the focal
point of this painting. So when you are sketching, you always have to plan
ahead because it's going to save you from times and
a lot of correction. So make sure that you are
doing the planning before. You paint. Like, where
is your focal point? Where is the
foreground background? Is this going to be important? Do I need to sketch this
and add more details? This, we are going to make an oval shape for
the sun flower. And this flower will serve as the focal point
of your painting. I am not going to add details on my petals because I am
going to paint them loosely. And I will do the same in the
other sunflowers as well. So here I'm just sketching
a little bit because this part is going to
be the foreground. One of the things that
I would do is I would grab my small notebook and sketching pad and have
it all the time with me with just a short
pencil like this. And I would practice
sketching whenever I can. I whenever it's possible. Like if I wait for my daughter from school or we
go to the park, I would sketch and of course, making sure that my eyes
is still with my daughter. That's very important. So you see, I think
you can really improve your sketching skills. Whenever you sketch. More often. I'm adding some stem. And also make sure that you
don't have to sketch in details if you are
going to cover them with watercolors on
your painting process. That's why planning
ahead is very important. Composition, composition,
as I've mentioned before, is probably the most important and fundamental
part of your painting. Because they are going to determine the success and
failure of your painting. And how are you going to
improve your composition? Where I think by experience, I was able to improve my eye on composition through a lot
of sketching parties and observing other
artists and looking at some Mars semester masterpieces and just practicing
how I see the subject. I would also observe
that nature. So your composition, it
has to be very strong and it has to be
something that you can, that you can continue painting and set up
your style yourself. Well, well, it's a
correct composition. Your sketches will definitely tell us you and make you
feel if it's correct. So some painting may look at, and that is definitely
because of the composition. So we are almost finished in this painting in the
sketching process. And I can't wait to see you
in the painting process. This beautiful sunflower field. So I'll see you very soon and please download the PDF
files before fainting, man, I can't wait
to see you there.
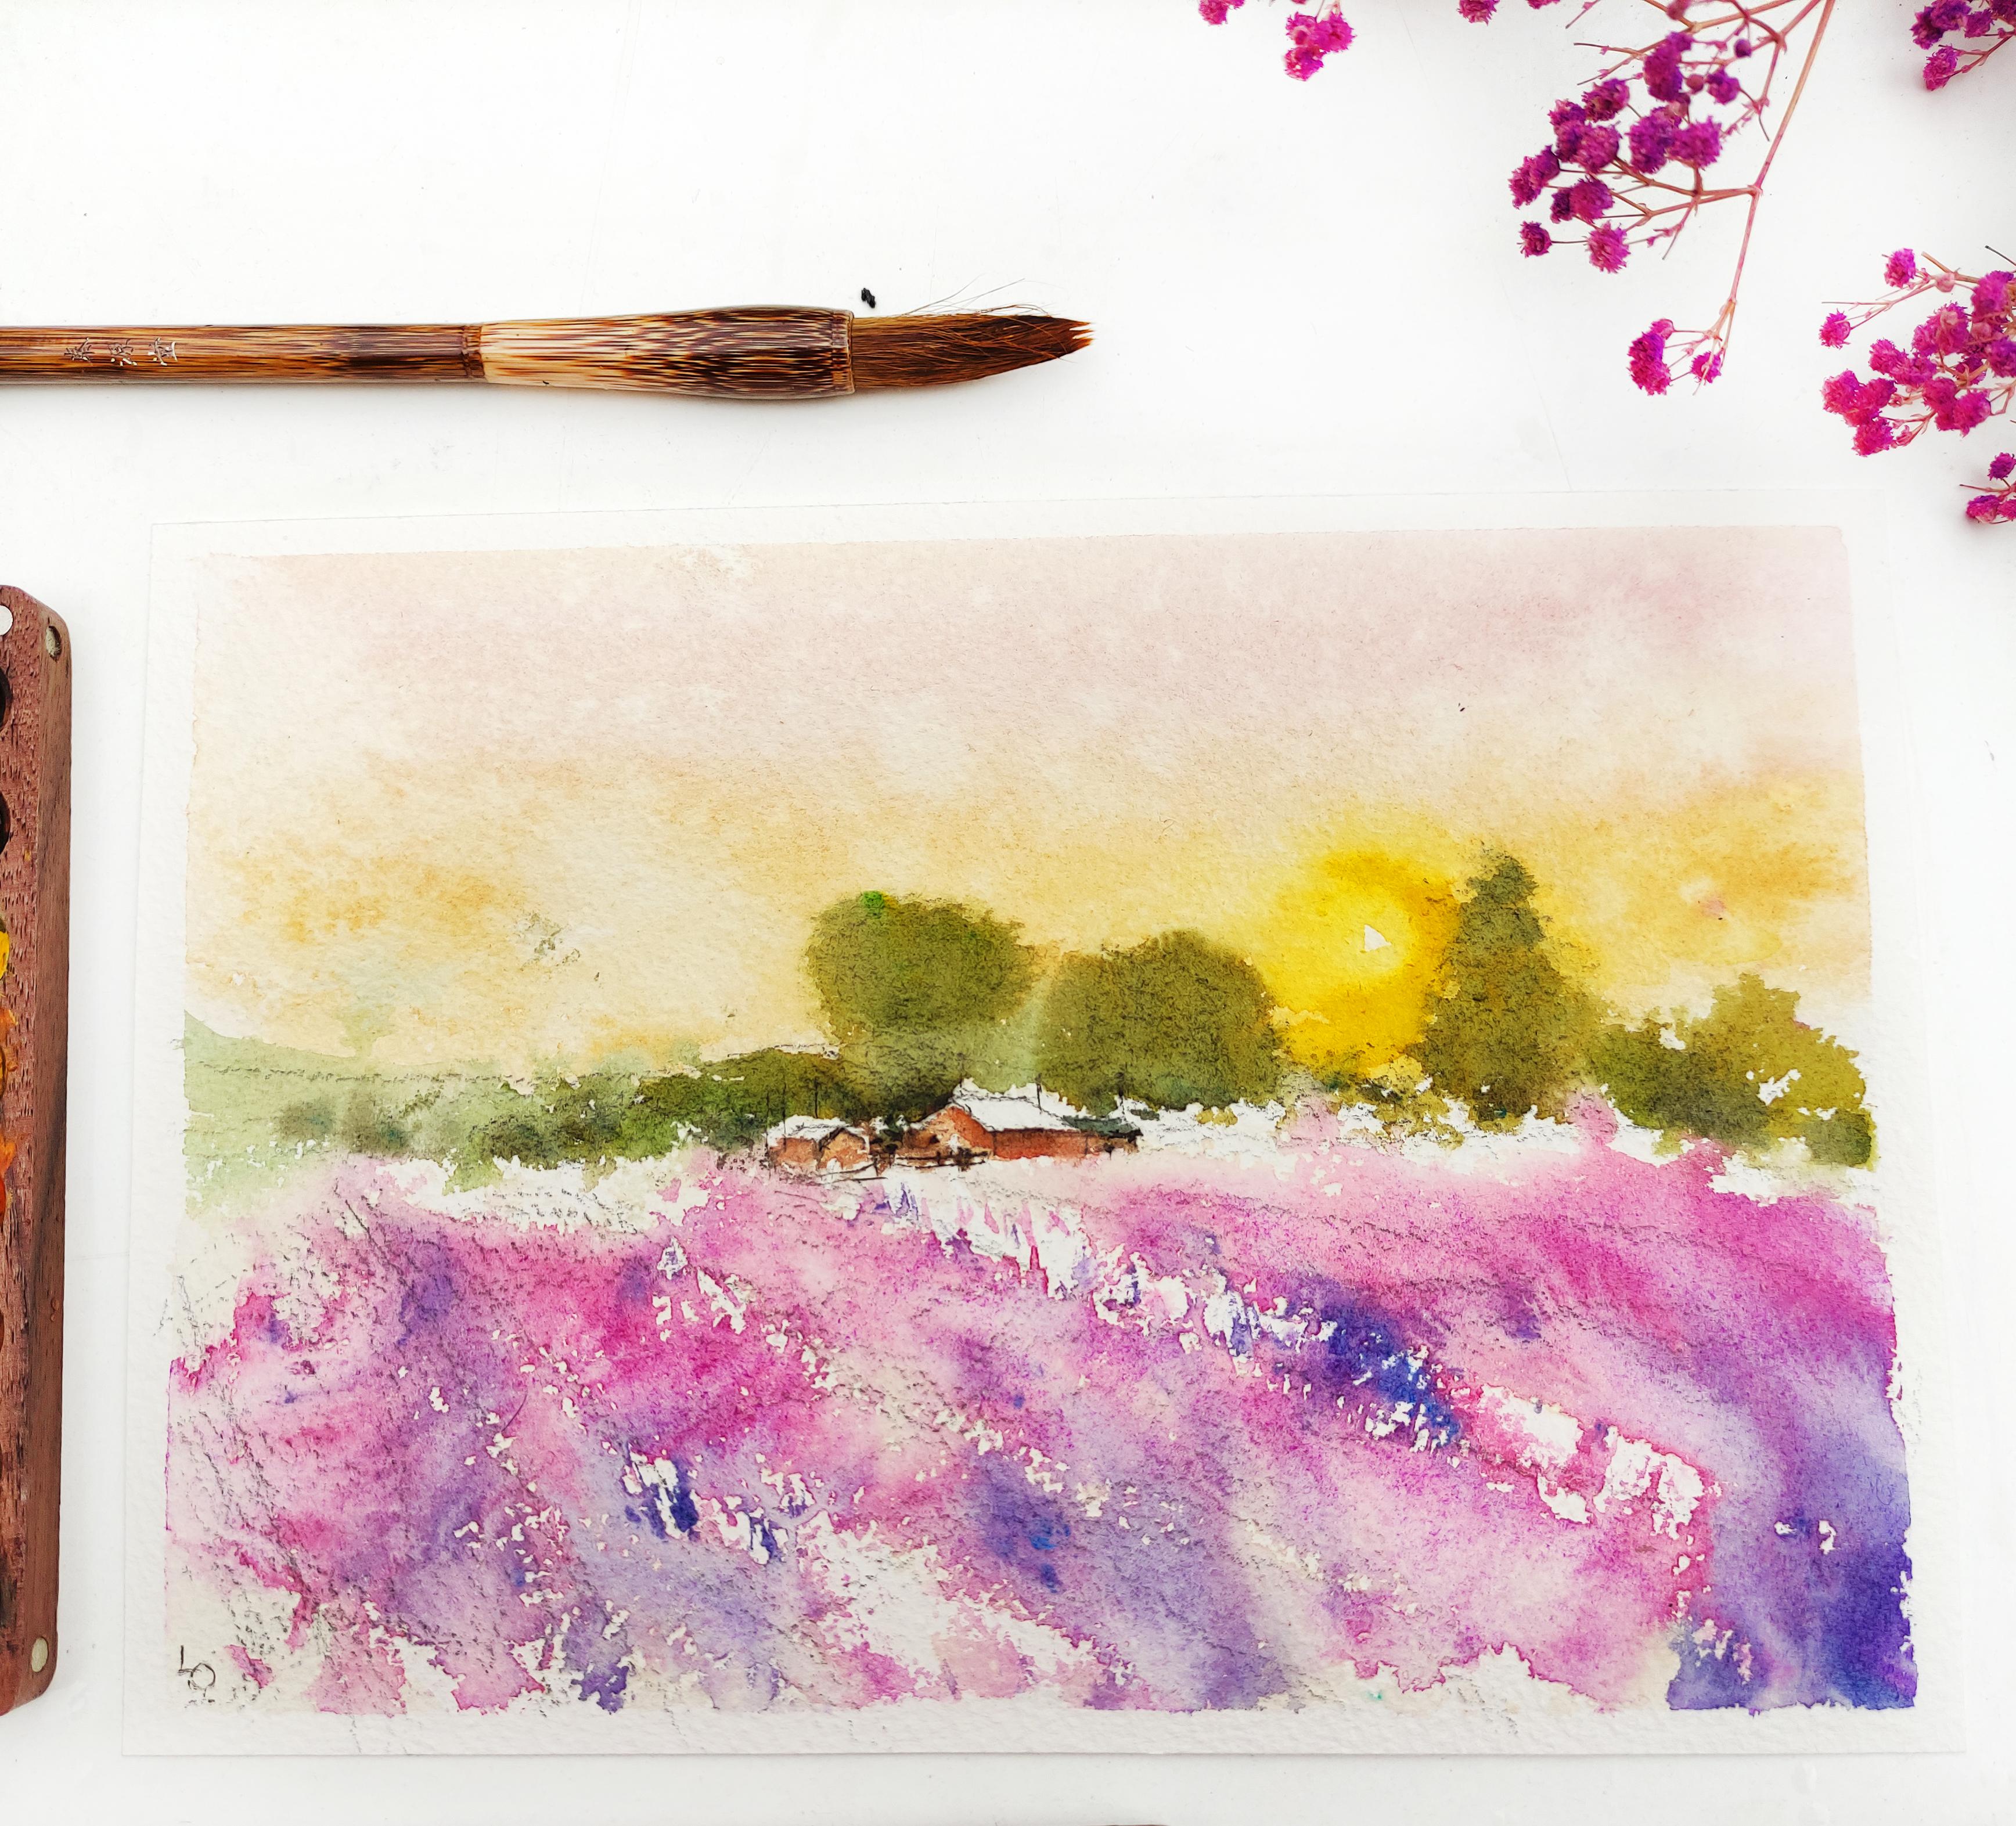
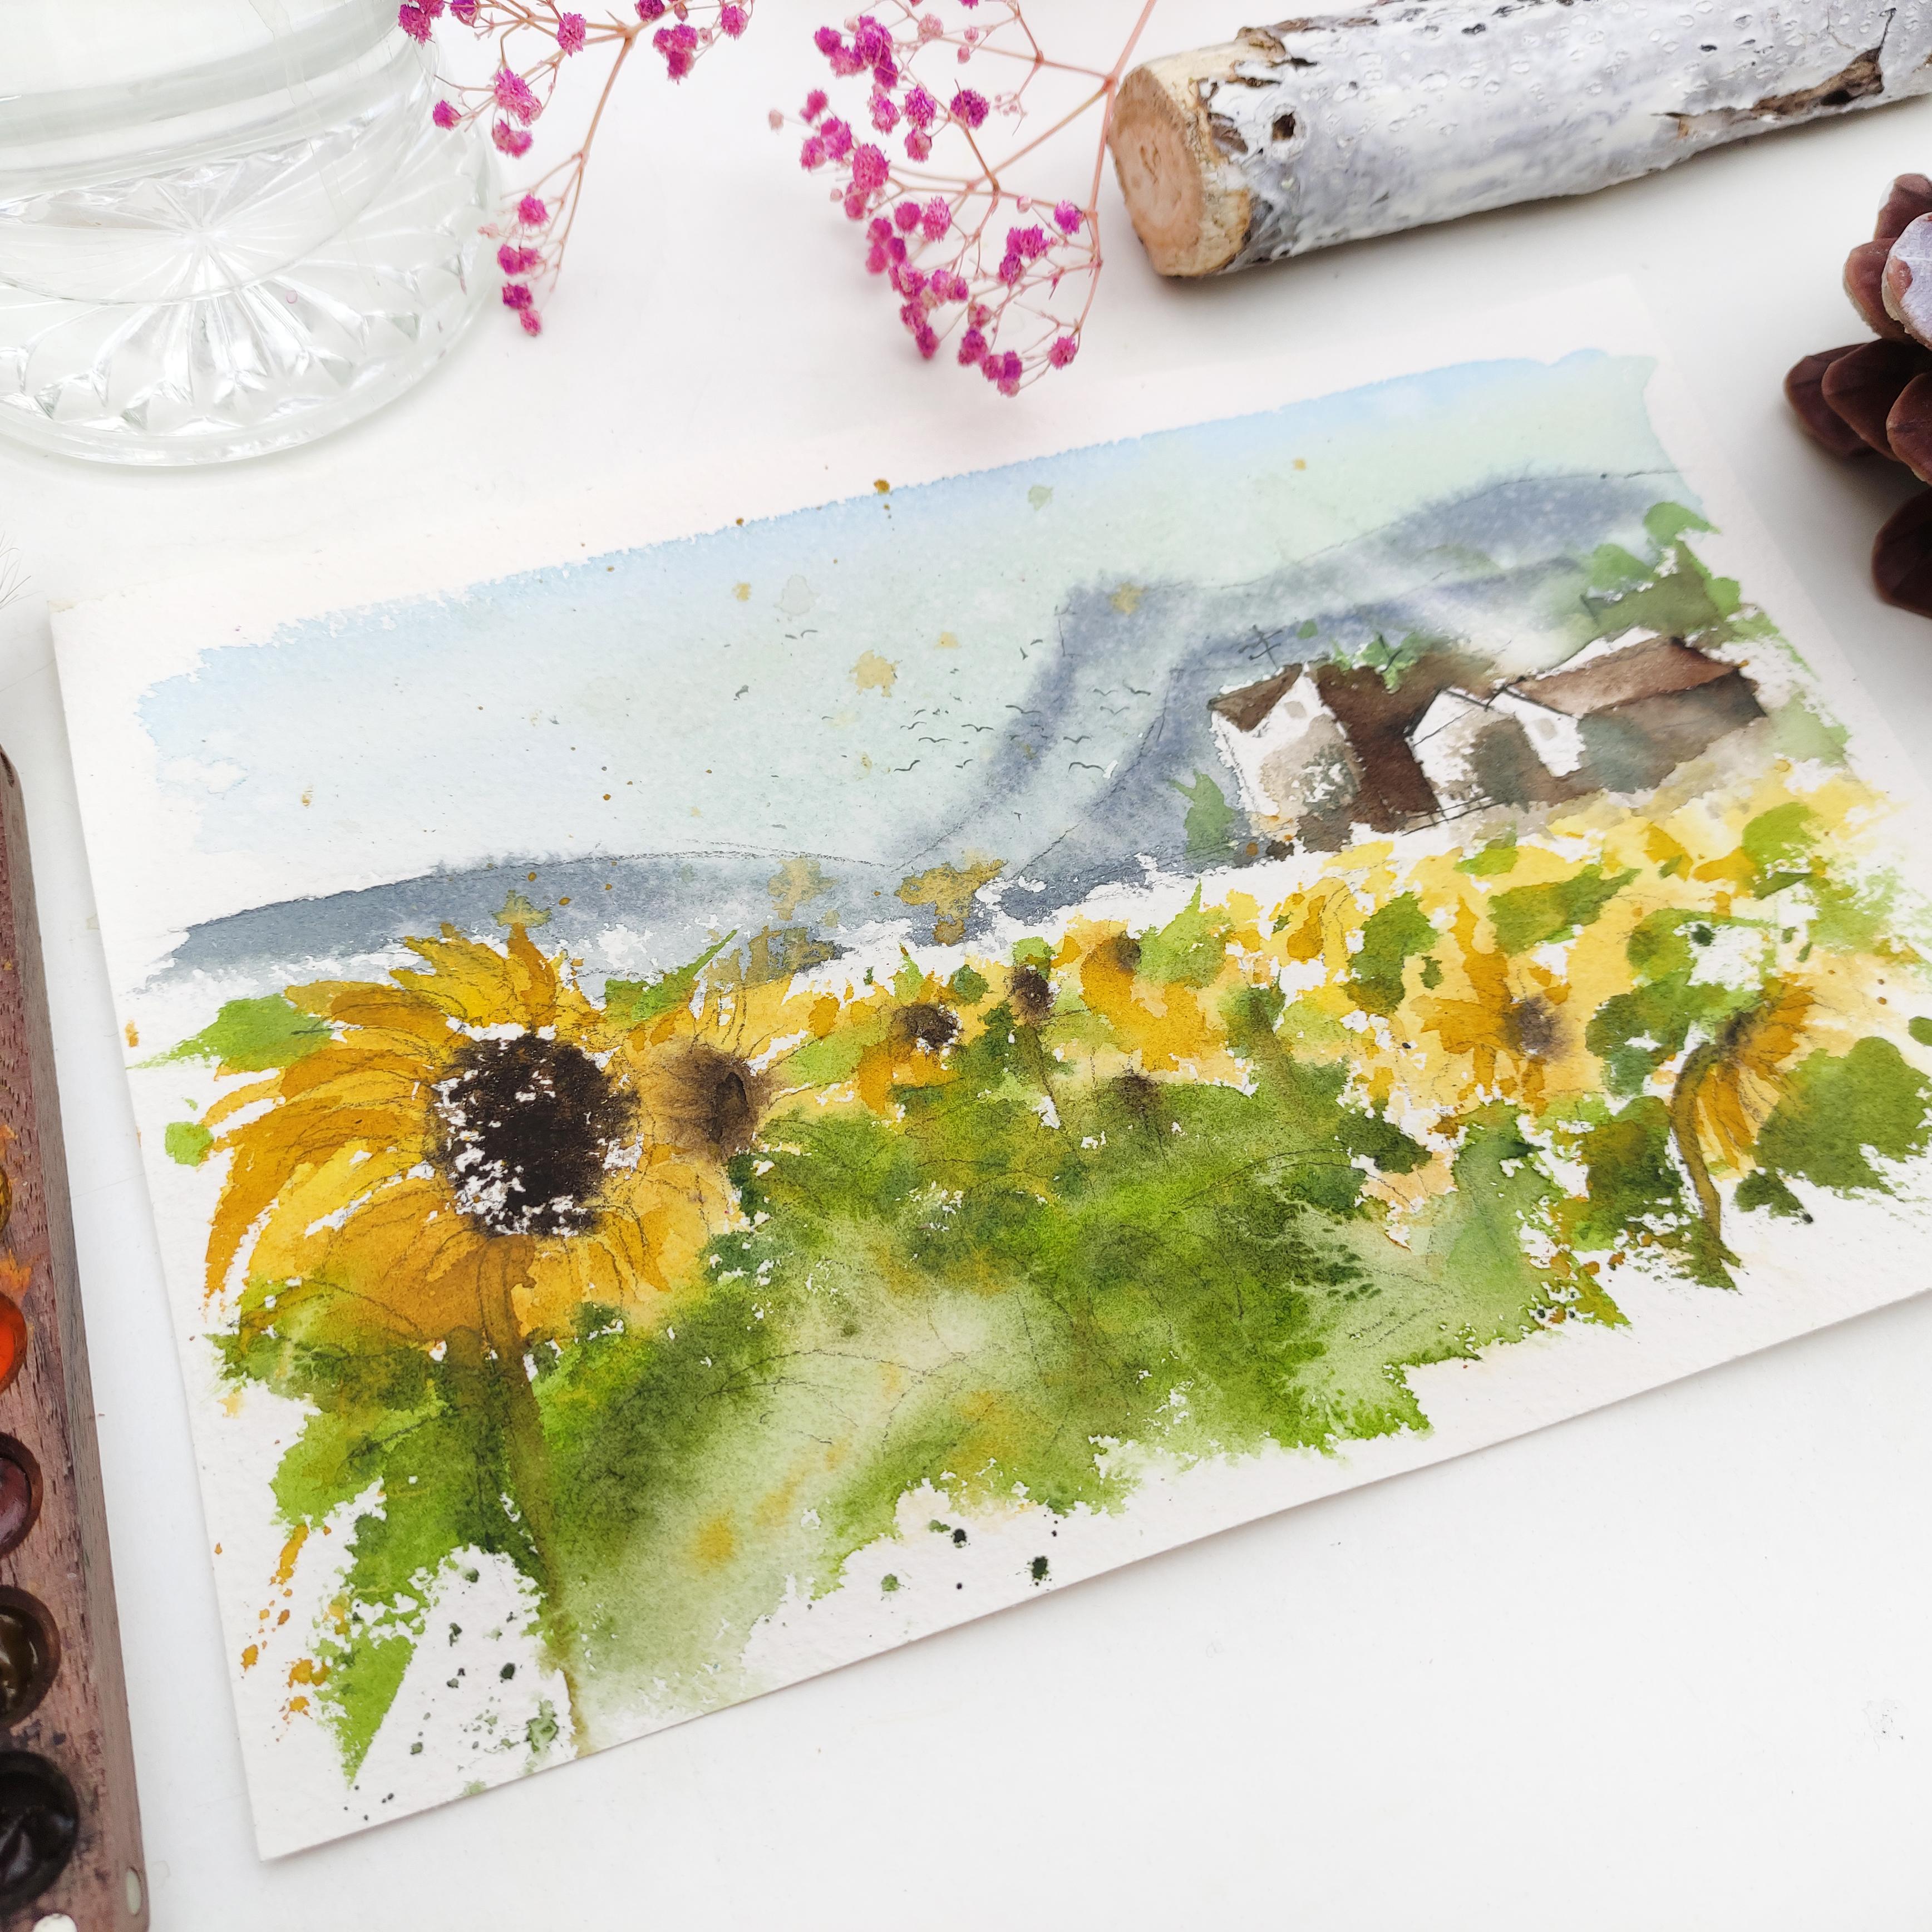
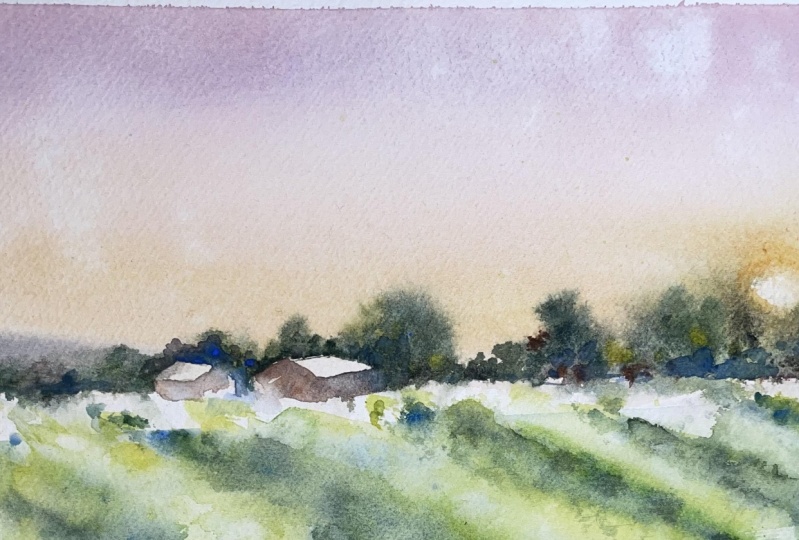
5. Sunflower Field - Background: Welcome to the sunflower
or watercolor paintings. This is a landscape in France, in Rome is a beautiful village with mountains and flowers. And yes, it's really nice. So now we are working and this is the painting that
we are going to, to achieve at the end of
the painting process. I'm wetting the background with my flat brush and making
sure that it's even. I am avoiding to, to wet the houses, which is the focal
point of this painting. Here. Um, something is
missing in the house, so I'm just going to
make a quick line. So this is the focal
point of our painting, the middle of the houses k. So here I'm just adding
a quick okay. So the reason that we are wetting the background
is that the mountains, they are far away. So the more loose they are, they are suggesting distance. Okay? So the focal point and the
light is on the houses. So this is the reference
photo that you have and and I'm sure that you
already have that with you. So here I'm using
the same brush. It's brush number six. I'm adding Chinese
white and Syrian blue with a little bit
of bright yellow, blue and yellow orb. And I'm mixing them very well. So I'm actually mixing warm
and cool color for the sky. So we are working for this guy. So one quick brushstroke
for this guy. We try to keep it
loose as possible. And as you have noticed as well, we didn't put any
tape on this one. So sometimes you you don't have to put a
tape on your paper. I'm just holding it. Here. I've added
a bit of yellow, a mixture of bright
yellow and green, sap green and of
course the blue, but not too much. Because this will
indicate the shapes. The mountains are adding
more tonal values, darker tonal values
on the mountain. So more Chinese, white. And I'm going to add a bit of ivory black and Van **** brown. And of course, I'm
going to add more blues and a little bit green as well. The purpose is to have darker pigment still painting in the garden and
each summer here, it's, I mean, it's
autumn here in Spain. And we have a lot of flies and bees and all the insects
that you can tape. So yes, there are joining
us in this class. Here. I'm avoiding
the focal point, which is, which are the houses. I'm painting the mountains
and we tried to keep it loose here it was dry. So I've dragged the colors, the water colors a little
bit to keep it loose. And I'm trying to
leave the white paper. So if you've done the practice
exercise for this class, then you must know
how to do this. Anyway, you can always go back and practice it on
another piece of paper. Here using the tip of my brush, I'm adding some shadows
on the mountains. So darker tonal value
of Chinese, sorry, ivory black, a little bit of Van ****
brown and cerulean blue. So we're adding darker
colors and Amontons. I'm cleaning my brush very well before working
on the foreground, which are the sunflowers. Now that I have a clean
brush wetting the petals, the sunflowers in some
parts that I will add, the drop of yellow
square the sunflowers. So no stress suggests enjoy the process and
always tell yourself that when you make something what we don't
like good watercolors, you can always get another watercolor paper
and do it all over again. I do paint daily and
I practice daily. And I can assure you that there
are a lot of frustration, but I think it's only this
way that you can then how to be better in
anything that we do. K. So I wet the foreground
a little bit with my spray, water spray. I usually use bigger palette, but for the purpose of the video so that you
can see it better and using a smaller wooden
palette on this one. So I keep adding
watercolor paints most of the time are almost done. And for this part, and we are so excited to start
painting with our flowers, but our sunflowers,
this canopy, awesome. It's good to be cute. And I really wish that you are enjoying the process
as much as I do because I looked at do I look board but I'm
not bored and just trying to relax in this video
and just enjoy the moment. Okay, so we're still using
the same paint brush, but I decided to use the
smaller one brush number two, my brush for the petals. So the smaller your
watercolor paper is, is the smaller your
paintbrush as well. And of course vice versa. So quick brushstrokes for the petals and we try to
keep it loose as possible. Because this is just
the foreground. This is in the focal
point k. So I'll see you. What makes next video.
6. Sunflower Field - Foreground: Thank you for continuing
painting with me. And we're still painting the
sunflowers in Rome, friends. And I've wet the
foreground where we dropped the yellow
cadmium yellow WHO? For the petals of our sunflower. So they are wet and we're
still painting in my garden. And it's gonna be an exciting painting
with bright colors. And I'm sure you will love it. Okay, so let's keep on painting, grabbing the yellow with
my mop brush number. I'm just scattering the bright yellow and
the cadmium yellow WHO, and now I've added
a little bit of yellow arc for darker pigment. So the shadow of this painting
is coming from the back. And we also try to
leave some whites. So these are the
darker tonal value that we're adding on our
sunflowers that will indicate, that will suggest rather
the shadows in our flowers. So we, when we are
painting sunflowers, especially if they
have this tan, so you just drop the color. It doesn't have to be
very well detailed. Dislike now, the only
detailed sunflower that we have is this one, the biggest one in
our foreground? As you can see when I
splashed this add flowers is kind of scattered all
over my painting paper. So you can cover with your raise your hands
if you want to. But for me, it doesn't really matter as long as
they are small. In the background
is not very wet. So we're still adding
yellow arc for darker tonal value
of our sunflowers. I'm splashing. In this process you might want to cover with your
hands the foreground. Here. I'm really mixing my
watercolor paint very well. Here is Van **** brown. We are going darker and
darker with our tonal values. In watercolor, you usually
starts from light to dark. And it's very
important to do this. Although there are other method. Because when you start
from light to dark, you can always make it darker. But if it's dark too dark, then it's not easy to go back. So we're adding the middle part, the seeds of the sunflower. So we're just dropping the Van **** brown
that we are mixed. And on the biggest
flower that we have, I tried to leave the white. And I'm also from time-to-time, I'm cleaning up the table because we don't want to mess
up our watercolor painting. Here. I'm dropping
the mixture of Van **** brown and ivory black in the middle
of our sunflowers. I'm still trying to leave the whites and we
tried to keep it loose because the
middle is still wet. The paper actually
it's still wet. And since I am painting outside, it's drying faster
than you paint inside. So I have to wet the
paper from time to time. And when I splash
with the spray, I have this flash far away. So it seems to be going well
with a loose foreground. And now with my palette, I'm going to clean it
with a tissue paper. Really quick. Clean up k. So we're going to work on
the leaves with a sunflower. And I am using sap green. So sap green is the light and
still my brush number two. So as you can see, I keep adding watercolor paints because my palate is smaller than the
usual when I usually have. But this palette
is really handy. You can bring it anywhere and you can almost add
any colors that you like. Here. I'm mixing sap green with cadmium yellow who,
with bright yellow. And notice how I'm doing my
brushstrokes from the middle, then make a quick
brush movement. Just like the flowers, the yellow flowers, we
are adding the leaves. I'm all over the foreground. So we tried to keep it
as loose as possible. So we are painting on the wet
middle part of the paper, although this part is
already dry. But it's okay. It's one of the effect that
I would like to achieve, especially is the foreground. But try not to leave too much of the white
because it will take away the focus
on our focal point, which is the houses were
just trapping quick brushes. They are suggesting
leaves in a distance. Try to keep it low. So here is, this part
is dry, but it's okay. We don't have much
white in this part, so we can leave it like that. Here is the stem. So when you're doing this, always try your best to
make quick brushstroke. Here it's still dry, but I'm not going to
wet it right now. So we're still adding more
greens and the leaves. So look at the result and we will try to achieve
this in this painting. I hope that you are still
enjoying this process. And I said, as I've said before, to get better in watercolors, you just have to practice
daily and sketch. So sketching is very important
to draw correct shapes. That looks right in our eyes. So here I've added sap green. With sap green, I've
added Van **** brown, add shadows, darker tonal
values on our leaves. So if you can see
when you are painting outside and you
notice the leaves, they have shadows so they
have darker tonal values. So when you are
painting landscape, tried to go out
and paint outside. I think it's really important. And also try to eat of
Sarah, your nature, that nature that surrounds
you and this will help you to know to improve
your landscape paintings. So observe and put
them on your paper. And one thing that I
would like to ask you is that tried to share your paintings in the
result of this painting, whether you are happy or not, because I think it's one
way to improve and I will do my best to
comment on your project. When I started as a painter, I was always scared
to show my work. I was always hesitant because I didn't think
people will like it. Well, sometimes
they they like it, sometimes they don't, but
that's not the point. I think the point is for you to share and for you to improve. And it's always, always
important to listen to your, to yourself and to
others as well. So this way we can
always improve. Case, I'm just scattering and the darker tonal
values are green. So here I've added, of course, the Van **** brown and a
little bit of ivory black, but just a little
bit drop of it. And we are still tried
to keep it loose. Hey, here, I've added
some blue as well. So I've added blues on the
fixture that we already have. So that's serial
yen three and blue. Also when you are, when you are buying
your materials, especially the paint, try to
buy in big volumes in too, because they last longer. And I think they don't damage your brushes
when narrowly damaged, but they are gentle to your
brushes if you're using too. Other than the band
here up splash. And I'm covering the foreground, the background of our
painting this time. And I will try to
leave it like this as a special effect on our painting and cleaning
up a little bit. So with your brush, we are doing lifting
to have this effect. Lucy, fake and I'm splashing water on the
foreground as well. So you are using clean brush. And we have some visitors trying to say hello,
so that's okay. So we're almost done with
this sunflowers painting. And you just have to relax and
enjoy this, this painting. And I hope that you will also try the other paintings
that goes with it because they can
help you achieve the loose and dry technique that you want in your
watercolor paintings. So I am in Instagram and you can share your
paintings there as well, are in the scale
share and you can just tag me and I will
do my best to reply. Okay, so now that it
dried up a little bit, I feel like I need more
yellows on our sunflowers, so I've added more details. You seeing the yellow OR and try to make it
more dramatic case. And now you can see that the whites on the
paper that were left, were left is popping up. So that's why it's
always important to leave whites on your paper. But just be careful
when you're leaving whites not to
exaggerate it too much. So well done congratulation. Going this long in this process and we can't
wait to finish this painting, it will be awesome. So yes, I'll see you in the
next part of this painting. Now, I'm just dropping more and more details and splashing colors here and there. And maybe you will wish
to cover the background. So I'll see you in
the next presence.
7. Sunflower Field - Details/Project: Let's finish this
wonderful painting. A set of brands, durum, wheat, sunflower, fields and houses. And I've added unto
the sap green, Van **** brown to make the
little steam of the flowers. So the paper is still damp. It's a little wet, but not that wet. And here I'm adding a little steam as well
on the sunflower. And I'm still using
my brush number two. So it's a mop brush and are
still painting in my garden. And I hope you're
enjoying this process and we are excited to
finish it here. I will change
something because it doesn't feel right
to me, the stem. So when you're painting, tells you, Oh, that
doesn't feel right. You have to listen
to your intuition. So this is more like actually like tweety intuitive painting. It's loose but intuitive. So follow your intuition. So here I'm just
covering the stem with more yellow org and flower
petals. The big one. And I'm adding more and more yellow and some Van ****
brown in the middle. So we're trying to add more details on the
sunflowers by using yellow or from time-to-time, I'm cleaning my my table
and my brush and my palate. So using brush number
two, Brad, mop brush, I'm lifting the background
and we're trying to create like a smoke
from the chimney. Okay, so here we're going to add more pigment. So the paper is a
little bit wet. The color that we're
using is Van **** brown. And I'm going to mix
it with cerulean blue and a little bit of ivory black. So now we're going to add more details and
shadow on the houses. So more and more
contrast so that our focal point, which are, which is now this is going to pop up and take
the center stage. Okay, so SCM noticed, and there are more edges now, there are more visible edges on the house because this is the focal point
of our painting. So we want to have
it more edges. I'm adding a little
bit of color for the shadows of the
houses and mix. The Van **** brown bid
another bit, cerulean blue. I'm adding more details. So as you can see, this is the reference that
I'm sure you already have. And this is the
paintbrush that really cheap paintbrush that I have. And I made it pointed myself. And yes, I hope that you're enjoying this painting
and let's continue. So I've added more
lines onto the houses, are defining the shape of the house and adding
more and more shadow. To the most important thing to remember is that
tip should be very, very thin k. So here I'm adding some visible
fences on the houses. So keep in mind that
here some parts of the paper is wet and
some part is not. So make sure that when
you do the lines, your watercolor
paper is very dry. So when you're adding
details like this, keep in mind that your
paper is dry enough so that it won't spread
your watercolor paint. So we're almost done
in this painting and I congratulate you for
getting this far. And I really hope that I will see the
result of your painting. I'm very excited to
see that and be proud. And even if you don't feel like it's one of your
best, It's okay. Just show it and that
way you will improve in. I will do my best to
comment on your paintings. Here I've added
windows and some blue. So this slide, just
like window pigment. And with the tip of
this small brush, I'm making some birds. So make it as thin as possible. Almost like not
visible on your paper. So notice the
position of my brush. I'm holding it like a pencil. So we're adding more and more
birds in the background. When you're making a landscape. Three things that you should remember is that when it's far, it has to fade away and always makes sure where is the focal point and the
lights are coming from. So well done. This is the final result of your watercolor painting of
sunflowers in Rome brands. And I look forward
to seeing your work and see you in the
next painting project. So thank you. Thank you
so much and well done.
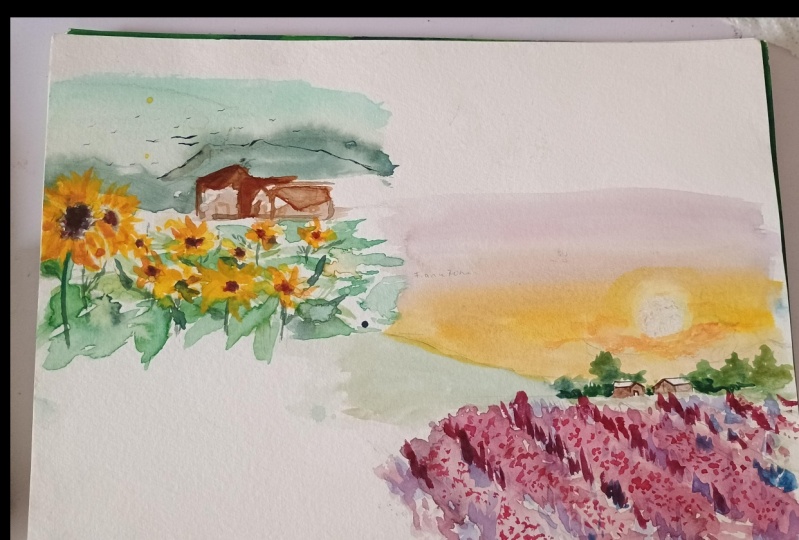
8. Lavender sketch nov: Welcome and thank you so much everyone for
joining me in this class. I'm so happy to have you here. And we will be sketching love in their fields
in a set of brands. I'm using Castrol Number six, and we are drawing lines for the foreground,
the middle ground. This is 20.80 per
cent on your paper. And for the composition, the focal point
will be the house. The house is in the middle. So notice the position of my pencil and how
I'm holding it. So as I've said there in this reference that
you already have, I think we don't have
the house, two houses, but I'm going to add them as the focal point
for this painting. So this is, like I said, in the south of France, and we have a lot of lavender fields there
and it's so beautiful. We will be adding as well now the trees in a circular motion. So when you are sketching, it doesn't have to be so
well detailed when they are just the foreground
and the background. So here these are the lavender fields
in a slanting lines. And I'm holding the pencil to the edge so I can
draw straight lines. And notice the position
when I'm holding it. I'm making some
lavender flowers here. So if you don't feel you're comfortable with
this drawing yet, you can practice
in another paper. Practice makes perfect. So we're almost done
and I can't wait to see you in the
painting process. See you.
9. Lavender Field - First Wash: Welcome and thank you
for joining me and, or painting the limitless
in the south of France. And we are going to use
the flat brush and my web, seeing the background of our watercolor surveys,
watercolor paper surveys. And I'm using brush number
six mop brush as well. And I'm mixing cadmium yellow. But it's more of
Chinese white, gay. And of course we are painting
in my garden here in Spain. And it's autumn, bit chilly, but not that much
against the arm layer, making sure that the
pigment is thick enough. Okay, so there's a lot of
Chinese white on our brush. And the paper is wet. Still follow the brush
strokes that I'm doing. And we're just gonna
let watercolor paint flow on its own. Now I'm adding with
the Chinese white and a yellow cadmium who I'm
adding a little bit of purple. And that's bright
violet for this guy. So as you can see, we have the warm and a cool
combination of our Skype. We are painting done seen in this lavender
fields with houses. We want to make it warm
and stay warm gray. So also pay attention on the edges of your
paper because you don't want it to
be an even better time you peel up
your packing tape. Although of course he can paint this without any
packing tape at all. Okay, so now where are
you seeing yellow arc? We're getting a bit brighter. And one big quick brush in
the middle, our background. And we are going to paint the trees as well
with the yellow 4k. And I'm just going to let the watercolor
paint make signage. So as you can see here
is the pay raise, the reference photo that
we're going to pay it. And it looks really bright. But in this painting, we're not going to paint it as, as well as bright as a
scholar for us this. But if you want to
make it colorful, we'll go ahead and you know, you can do a take and
add more pigment. So one thing that they
should remember is that your mop brush can hold more water and more pigment than
your normal brushes. K. So we're going to work on
the field of love vendors. And in most of my paintings, I use a lot of Chinese
whites and I'm mixing it with different,
I'm cold colors. So here we're adding a
little bit shades of yellow, so Chinese whites. So I didn't clean the
palette from the sky. So I'm still using
the same palette. A little bit of bright violet, Chinese white, and
cadmium yellow, WHO. And of course we still have
the yellow arc as well, but it's more on Chinese way. And I'm going to splash
really far with water spray. So while the warm color on
the field is still wet, I'm going to combine
and mix colors. Bright violet, as you can see
in the reference photo that I think you already have
downloaded before this class j. So I've changed my paintbrush
into a smaller one, and that's my brush
number two, Da Vinci. And of course you can use
any brush that you have. Just so you remember
that my brushes have said they have more
pigment and water. So you're going to need more
tissue paper on your site. K is follow the brush
stroke, the upward strokes. And we are painting
the lavender. So this is bright violet. And I'm just spreading it to tell us that we're painting the 11
days, the webinar field. So. You've seen the
lavender fields before. You know that it's not only 11 does there
are other colors, there are warm colors because
some lavender thereof. Sometimes there are
some wild reeds or wild plants that's
growing in-between. And I know how it looks like because it's my
favorite place in France and we usually take a lot of photos in
lavender fields. So when my sister would call
it love vendors, hunting. It also helps when you know, when you know
exactly what you're painting and you
visited the place. That's why watercolor
painting and traveling, it goes hand in hand together. Because although you
can imagine some scene, but I think it's
always better if you have first-hand experience. We are painting the sun. So as you see, I did a little bit of
lifting in the middle. And then I painted
with bright cadmium yellow with a semi, semi, semi wet brush,
brush number two, I'm going to soften that
circle around the circle of the white spots so that
it doesn't look edgy. And I'm just going to make
it dissolve on the paper. So we're back and we're going darker with our lavender fields. So this one, I mix crimson, alizarin, bright violet
that we already have. I'm sorry, we have a lot of
flies in summer and autumn. We have a lot of lives in Spain, so you can see them everywhere it when I
paint in this video. So excuse me for that. Okay, so let's continue. We're getting darker and I encourage you to have this
really quick brush strokes, upward brushstrokes when you
are painting the 11 days. And I'm just using
the tip of my brush, sit at the edge of
our lavender flowers. They are usually pointed, gay, and please leave the whites
as much as possible. So we did dry brushing, as you already know
at the beginning. And I've left a lot of
white on the paper. So that is dry brushing. And you already know
how to do that because you saw already there
practice video. Okay, so let's continue with our next painting
class, the lavender.
10. Lavender Field - Background/Foreground: Welcome to the next part of 11. There's landscape
painting and fries. And we're adding bright violet
and cerulean blue to make that toe to the values of the big men shredder
for our 11 deaths. And this is the results
that we want to achieve in his painting using the
same brush, my brush, number two, I've splash the watercolor paper
once and far with it. And we're working
on wet paper for the, for the foreground. Gay. So notice deposition
of my paintbrush. It's upward and I'm
dropping the mixture of serum blue on blue
and bright violet. And we're trying to leave the white as much
as possible, gay, so it's wet and I'm holding
the brush on its tip. I've also added the
crimson alizarin as well, but not that much. This is much more on blue, grey silver getting darker, and these blues will
initiate shadows. More tonal values, darker
tonal values on the 11 deaths. So these techniques,
these techniques, they're loose, thick,
thick and dry brushing. You have already
familiarize yourself because we've done
it on the exercise. But this painting video, over this painting
process rather. Okay, So I'm just
mixing more blues. And I'm using the tip
of my paintbrush. And I really hope that you are
still enjoying this class. No stress. Just relax. Tell yourself that if something goes and
you don't like it, they can do this
painting all over again. It takes me several years to, to practice and to kind of get better
with this technique. So go ahead. I think everyday is
a learning process. So here I'm doing
a magical twist. So well water and splashing the foreground to make it
keep it loose as possible. And as, by doing so, it wet the background as well. So if you want, you can cover with your hands those spots that you don't want to get wet. Okay. So these are the greens. So this is the sap green. And I did wash my Pali palettes. I've just added the sap
green for the trees. And I don't want the
trees to be very green. So I've added yellow arc and
another bit, cadmium yellow. Who? The secret on these is to have the rich pigment as possible. Here when I splash, it can ruin my son bit. So I'm lifting it
with tissue paper and lifting it in
a circular motion. So by the same brush, my brush, number two, we're going to paint the trees
and the background. And these trees is going
to make your focal point, which are the houses pop-up. I've added Van ****
brown as well. Gaze and notice the
position of my brush. So I feel that this
brush is too wet. Especially it's my
brush sets holding more water than they used
to all normal brushes. So I'm drying it up
way, the tissue paper. I'm leaving some white on
the paper as well for trees. Because these will any
shades, lights and details. The background. That means the light is
coming from the back. So we add, delete some white to initiate to suggest like k. So I'm just dropping the greens for the trees and
it's still wet. We want to keep it loose because they are not the center or the focal point
of the painting. We don't want them to be taking that tension
of this painting, so we want to keep it loose. That's why I painted it and I had to splash it
with water all over again. Here, I've added
some blues as well. So we don't want to
have green green. So I've added the mixture
of cerulean blue and sap green on the palette
and mix it very well. Okay, So this is the reference, and I think you already
have it next to you. So now I'm going
to cover this part because I don't want to ruin
my painting and make a, make a careful splash of butter. This part as they will
initiate a faraway mountains. And this one we tried
to keep it loose. So you always have to
ask yourself when you're painting which part is the
focal point with spots, I should have the
light or the shadows. So the more loose it is, the more it will
initiate that distance. And the more detailed is when
it has more sharp edges. So those sharp edges will definitely take the focal
point of your painting. That's why I'm dragging
some colors here. Because the whites on some parts of the paper,
they're taking attention. So I want to keep them loose. So we only want the focal
point to be in the houses. I'm just dragging some
colors because the whites are they are very prominent, so they're taking my eyes
away from the focal point, which are the houses. So here I've added thick
pigment of fun **** brown. And yes, so we are going to
add more and more details. Van **** brown, cerulean blue, and can't wait to finish this painting we do is
getting really exciting. And I hope that you're enjoying this process and just tell
yourself if something happens, I can always do it
all over again. And this is how we learn, right? So keep enjoying, and, oops, that's not right. Paint. I'm going to add gay, so I'll see you in the next. And the final process
of this painting.
11. Lavender Field - Details/Project: Welcome again and thank you
for continuing painting with me in this saddle
France lavender field. And so as you can see, I didn't wash my
palettes and I'm still using the same
ballots as before. I've just added more sap green. And we're dropping
colors on a wet paper using the same brush to
brush number two, my brush. The paper is of course
wet and I've added sap green and blue of course. Because we don't want
to make it as green. We want to have it a
little bit of blue. So I'm adding more sap green. And we also have the Van **** brown here
and add a little bit, just a little bit
of ivory Anwar. So we are using the tip of the watercolor brush to paint the trees while the watercolor
paper is still wet. So we just allow there watercolor paint to spread on its own,
on damp paper. One of the tip I can give
you is to, you know, you have to mix your
watercolor paints very well. Here. I'm just lifting some colors. So South of France is one of my favorite places in France
because it's warm weather. There's a lot of strawberries, lambdas, winds, and the
ambiance is really nice. So it's one of my
favorite place in my, in my home country of France. And yes, if you
haven't visited it, then you will go ahead
and I think you already love the place k. So now I'm adding orange and that's burnt
sienna for our houses. So I'm still using the tip of my watercolor brush to add
more colors on the houses. Okay, and we are going to leave the roof white
in, as you can see, we left a lot of whites on the paper surrounding
the houses, so please try to leave
it because they will initiate lights
on your painting. So the light is coming from
the back where the sun is, so we want to make it
as bright as possible. Here, I've added Van **** brown as well to
add more contrast on the houses
because they will be the focal point
of this painting. As you notice, the lighter, the watercolor
pigment that we drop next to the white of the paper. The light, there's more
light. It will show. So notice how I'm holding the watercolor brush when it's
time to add some details. One thing I can tell
you is you have to hold that watercolor brush very
tight when you're doing this. Because accidents happen when I just dropped the
watercolor brush. These tonal values of dark Van **** brown is
initiating the shadow, shadows of the houses. So we actually get a one main house in the middle and small
houses around it. And here, I've used a different tonal
value of the mixture, green and, and Van **** brown for the
House to have more contrast. And here, since we're using a student grade
watercolor paint, so I have to add more
pigment for the sun. So I've added more yellow. And then I'm lifting
in the middle of the white so that it
will not be too edgy. We don't want the sun to take away the focal point
of the painting, which are the houses. And now I'm showing you the watercolor brush
that I made myself. And we are going to add
this little details, the lamppost on the houses. So we tried to make it
as thin as possible and make sure that
when you're adding the last details and our houses, that the background
is completely dry. K So are adding the post and we're going to add
some fences as well. So this will actually make your painting a
little bit more realistic. We're adding a little
bit more of details and contrast on your painting. If you need to use
your fingers to, to correct some, some shapes. So I'll go ahead while the
watercolor paint is still wet, we're just actually adding more and more details so that the focal points
will be the house. So this is the combination of Van **** brown and
I were in war. So we're almost finished
in his painting. And I hope you
enjoyed it as much, as, much as I did. And as you can see, I'm dropping more tonal values that will initiate the shadows. So I feel like I need
to add more colors. So this is the bond sienna and a little bit of scarlet red. And I'm using the tip of my
paper, my watercolor brush. This will initiate more contrast in tonal values and the houses. Okay, so if you need to
lift up some colors, watercolor, pigment,
while you can use your brush and of course,
your tissue paper. So well done, bravo, thank you for finishing this
wonderful lavender field in southern France with me and I hope to see you in
the next painting. Well then, and
thank you so much. I wish, and I hope to see
you post your own projects. I'm really excited to see it. And you can tag me on
Instagram as well. So please share, and
I'm really happy to see you in the
next class. Bye.
12. House nov sketch : So thank you so much for
joining me in this class. Welcome, and I'm so excited
to be painting with you. I am going to sketch
with you the House, which is the focal
point of this painting. I'm using Castrol Number six, but you can use any
pencil that you have as long as it's pointed
and we'll sharpened. So always remember before you sketch to have well
sharpened pencil. So notice how I'm
holding my pencil. When I'm making lines, big and long lines, I'm holding the pencil
close to the edge. And when I want to have
more control of the lines, I am holding the pencil
close to the pointed tip. So composition is very important for every painting
because they will be, they will determine
their success and failure of your painting. So you always have to make
sure that your composition is strong before you
start painting it. So how do you achieve
strong composition? So it's strong composition
can be achieved through constant practice of surveying. And I'm of course, a
lot determination. When I started painting, I think I was a little bit lucky because I've always
when I always sketch since I was little. So again, I've helped
me to, you know, to start something
that from zero. But as I go along, I noticed that the more
I practice sketching, even if in daily life, like something that's important, I will sketch it out, sketch a lot of
things in the park or while I'm waiting
for my daughter. And it really helped that
helped and made me improve my, my sketching and my
painting in general. So if you are an
impressionist artist, it's really important to have strong composition and
correct sketching. Houses are a bit more challenging
than trees and flowers, I would say, because it's a structure and it has to
be it has to be correct. When you look at it, when you look at the lines
and shapes with your eyes. So human eyes is subject to
see the shapes and lines. So if something is there, you will definitely feel and
see it in your painting. So correct sketch and strong composition
is really crucial, as I've said, on your painting. So a little story about this painting that
we're going to make. These was inspired by
the France countryside. By French countryside
where we used to live for almost 11 or 12 years. And we still we still
have our home there. And this place close to switch your lines in knots or
why they have a lot of chalet, like
wonderful chalet. And it's really nice, especially during
winter when it's all white and beautiful. So, yes, if you want to
visit France One day, I think I'd recommend
this place. It's like heaven on earth. Okay, so let's
continue sketching. So when you're sketching, tried to make lines that are not very visible during
the painting process. You might need to erase
some because it's not easy to erase them when you are already
started painting them. While I'm doing this, my pencil is sharpen,
well sharpened. But at the same time, I think I'm making
lines that are too big. And this is because
I want you to, is for filming reason, I want you to see the lines
more while I'm filming it, but I will have to erase some of them during
the painting process. I mean, before the
painting process, one of the things I would do. To improve my
skills in sketching is to have a small
sketching bad. I put it in my bag and
I just a pencil and a rubber hand I will
sketch when I had a time while I'm waiting for
my daughter from school while I'm at the park or just
anywhere I could sketch. And it's amazing how you
can improve in one year. Because I started painting probably two-and-a-half
years ago. And I've always wanted to sketch ever since
I was a child. I will sketch in schools. Although I was introduced to
water color 2.5 years ago, on probably three years ago. Match sketching is something
I was always fascinated. I've also noticed that
the best watercolor is, and painter out there. They are really good at
sketching the good sketch, anything you would
ask them to sketch. And I think they
definitely understood fundamentals of painting
and that is sketching. So a strong composition
as sketching. Here we are drawing or
sketching fence and flowers. And one of the things that
I've learned when you're sketching is that you
really have to plan ahead. So meaning you don't
sketch things, subjects that are not so
important and that you are going to paint and cover them
on your painting process. I think there is no use. It's clutching your paper and then you are going to
cover them with paint. So sketch only those
spot that will have an impact on your painting and that you are not going
to cover them with paint. So I'm just making lines for
those part that I don't need to be so clear during
the painting process. So those lines are just like leaves and branches
on this painting. And focal point of
the painting is, of course, the middle
parts of the house. So planning is also really essential when you
are sketching. I would usually try to avoid rubbing
rubbing the papers, and erasing as much as possible because it can damage the
grains on your paper. Here, because this is
impressionist style, we are just going to make quick sketches of
leaves and flowers. And this part, the roof, is going to be, the focal point, is part
of the focal point. So I'm just adding more lines. And this part we are
going to cover as well with some masking
fluid for the flowers. And the vines. Are
the video files and the sketches for
this painting process. They are made available for you. So just look at on the right side of this video
and you will see everything. So make sure you download them before starting this process. So how says, I think most of the time they
have straight lines. But I think if you use, like some people would use rulers, especially
the beginners. But I wouldn't recommend
using rollers because your, your houses will look
very, very steep. So to make it look
natural, you know, just practice catching it with your hands and
without a roller. I think this project is, this part of the class, is probably the most
challenging one because of the house structure and I
think the process in general. So it takes a little bit of
patients to do this project, but I can assure you
that your satisfaction and fulfillment at the
end of this painting, if you are able to make this
house, would be really, really wonderful because
it's a great practice to sketch structure and
landscape at the same time. And I will show you how to
do it step-by-step in this. So everything is in
real in there is is there's no there's no video or part of the video that
you're going to skip. That's why this
class is a bit long. Because I do my best, do that a bit for this process. Here, we've almost
finished with a sketch. I'm adding some small
windows and just more details and
the House suggest to guide me during
the painting process. So if you feel like it's
not easy to do this, so you can grab a piece of paper before painting on
your watercolor paper. And you can practice this
sketch all over again. And when you are more
confident than you know, your sketch will always
tell you if it's, if it's the right
lines and shapes, then you can go on your paper. So here I've shown you
the masking fluid. I'm Winsor and Newton. I'm using a very old
brush with nuts, so pointed tip to apply the masking fluid. So when you are applying
the masking fluid, I recommend that you really
shake the bottle very well. And you have to wash your brush every probably
10 s, if it's possible. And dry it and dip it again on your masking fluid if you
don't want to ruin it. So to be sure, just use an old brush because it
will the masking fluid, we are definitely row in your
brush k. So almost there. Well done. Thank you so
much for your patients and narrow going to paint
them magical house. So I'll see you in
the painting process.
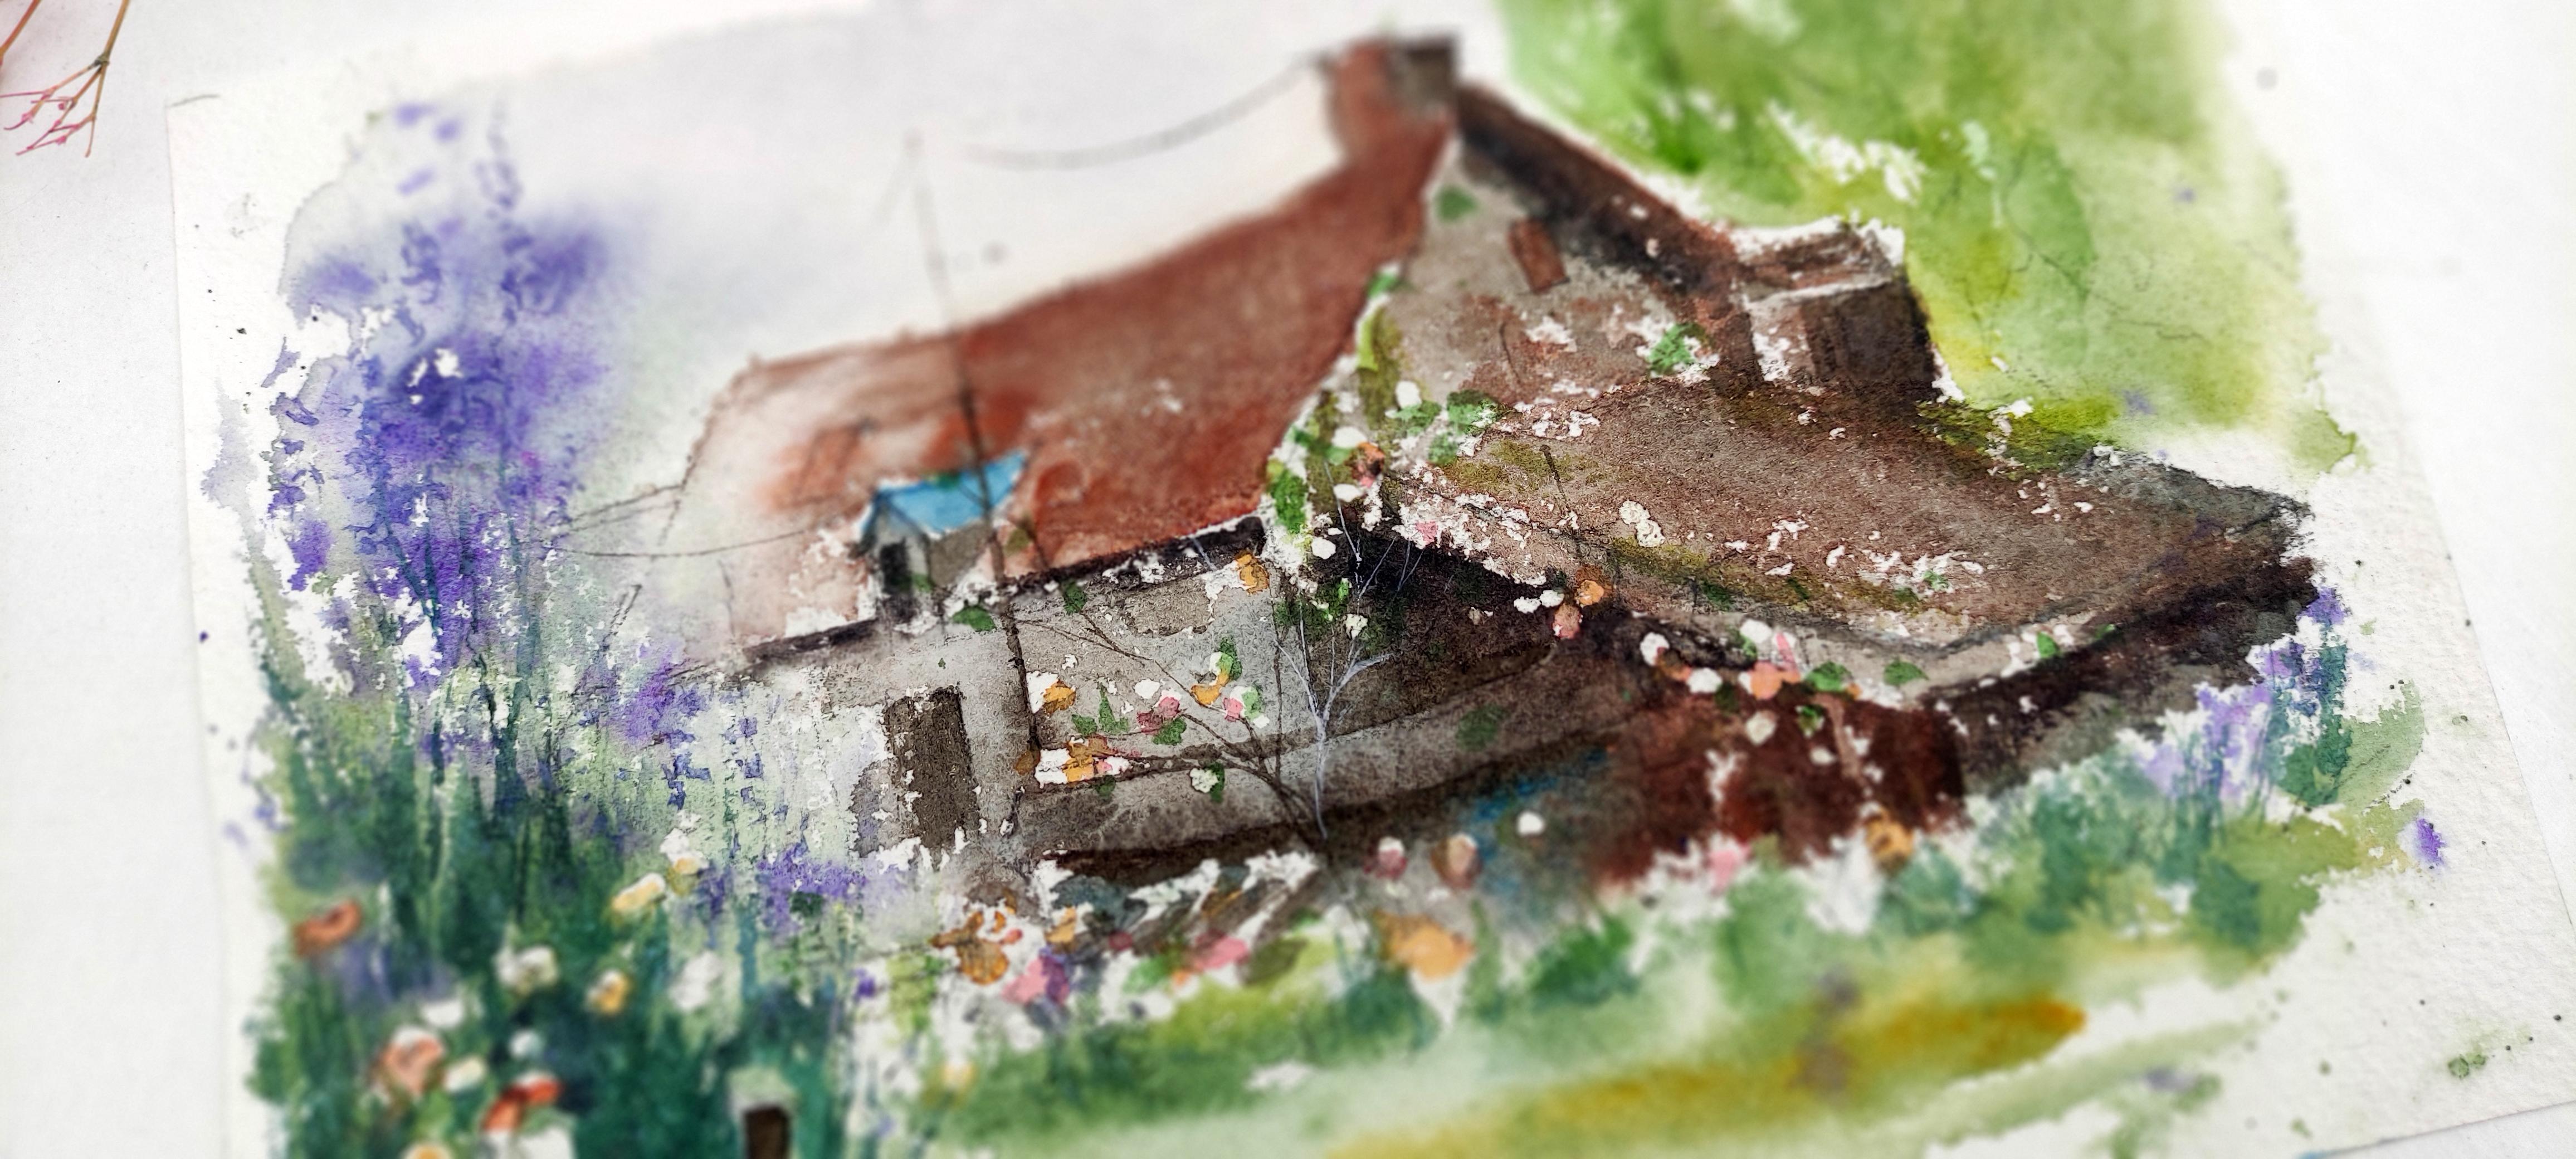
13. Magical House - First Wash: Welcome and thank you so
much for joining me in painting this magical
house in France. And these must be in hertz. So while we're there
are lots of chalet and beautiful houses in greens. And I'm sure you will love this painting is truly
nice, is magical. And I would say that
this is going to be more challenging than the
other paintings with it. But I think it is very
rewarding in the end. So I'm using brush. Number six, mop brush is
still the same brush. And we are adding warm color on the background and we
are avoiding the house. So that's Chinese whites with another bit of
cadmium yellow WHO, and it's more pigment,
tennis white. So the purpose of this is
to give warm ambiance, this, this warm atmosphere
in our painting. So I'm also within an adding these warm colors on the
foreground, but not everywhere. So we're trying to
avoid the house. Still painting in the garden, and it's autumn here in Spain, So we have a little bit of sunshine and it's really
nice to paint outside, especially when it's not too
hot and it's not too cold. So we're going to add more
colors on the background. So bright violet, severity
and blue, Chinese white. So this is a background
that is going to fade away. So we're going to make
it a bit more loose. And we're just dropping
colors for our background. So this is like the sky
and maybe far away trees. And of course that's our reference photo
that we're painting. And I think you already have that next to you when you
are painting this project. We're going to add more greens. So that's sap green
mixed with cerulean blue and a little
bit of ivory black. So the purpose of
this is we don't want to have really
green, green color. So we're adding more
blue and more pigment. So it's really necessary that you mix your watercolor
paint very well. And probably put more paint
or water on your palette so that you don't have to do
the mixture all over again. Okay, So I really hope
that you are going to enjoy this magical house
and don't stress too much, and just enjoy the
process and relax. You can always pause the
video if you have two. So now we have our greens and it's really important that you still leave some white. Although we've added already the masking fluid on the paper, which will allow us to make
brushstrokes more free. But try your best to
leave some white. So that's why at
the very beginning, and in the materials
I really recommend using rough watercolor paper. I'm really convinced that for every painting is the paper,
especially watercolor. It's really the
paper that matters. And as you can see, I'm not using professional
watercolor paint. I'm using Cotman. We considered to be a second grade Winsor and
Newton watercolor paint. So here I'm just really paying
attention on the paper. So now notice the brushstrokes
are moving forward. My brushstrokes
are moving upward. And the foreground is a little bit wet because
I've splash it with water. And if you are going
to make some splashes, make sure that it's a
little bit far away. Okay, so I've added a
little bit of yellow, this cadmium yellow
Who on the foreground. And sunshine, it's sunny day and I'm really, it's
Emerson person. So when it's sunny, I'm
kind of happy and excited. And so this is the
reference that we have. And as you can see, we've changed the
composition and it'll bit so the focal point of this
painting is the house. So it made their house more big. I'm going to splash this part of the paper because I want
this part to be more loose. And here I'm going
to add some trees. So pay attention that
to wet the house. So we're going to
avoid the house. So upward, quick brushstrokes. This the mixture of sap green
and cadmium yellow goo. And I think you can also
have your own experiment, I'll colors in this part, you can add any
colors that you like. This painting has spring fears, but you can always add
any color that you like for the trees
and the flowers. K. So we're starting
working on the house. So these are dry, brushing. Some leaves on the roof. I'm splashing colors with my mop brush and just make sure that the water
is not too much. And it may be if you want
to cover the background, then you just do what you feel. Here. I'm not
covering it because I feel like I can control
it on the right side. And we're cleaning up the brush and a palette
from time-to-time. I'm, I'm a very messy
person when I paint, but in this course I'm
trying to be a good model. Okay? So this is the painting that
we are trying to achieve. And we are going to paint
the flowers, the flowers. So this is bright violet. And we're going to add civilian blue so that they will
have like a bluish purple. And we're going to
add purple flowers. The background, this
part on the left, and the background is still wet. So it's really nice when
the background is wet, when the paper is
wet rather because the watercolor paint will just flow on its own and
it's beautiful. It's really loose. But the app, the lower part of this is, has dried because of the sun. So I waited a little bit
encumbered with my hands the house because we don't
want to paint the house yet. Here I'm still using
the same brush. It's number six, and I'm just
using the tip of the brush to add more purple flowers. And I'm also dragging some greens to indicate
some leads to, as you can see, that
beautiful mixture. The warm color that we have added at the beginning
for the background case, we're almost ready for the
next painting process. And I hope that you are going to enjoy this painting
of the house. I can assure you is
going to be magical and you'll be very proud at
the end of this painting. So, yeah, let's continue and I'll see you in the
next part of this painting. We're adding more purple. I'm just dragging the colors and some greens just
follow the position. Brushstrokes. Again. See you.
14. Magical House - Foreground: Thank you so much for
joining me again. And it's continued painting this beautiful house
in some arthritis. So we have bright violet, Syrian blue, and we'll
continue to splash flowers, purple flowers around the house. And I really hope
you're going to enjoy this process and
painting this house, although I know it's
going to be challenging. And but I can assure you that it's really rewarding
when you finish this. I would pay three to four times. Some subjects that I
am not happy with. And in the end, I always learn something and I always improve. So this is how we get better. Never give up and just keep on painting daily as
you can and sketch. Anytime that you can. See, I'm still using
my brush number six. And we're using the tip to
drop some purple flowers. If you haven't visited France, especially
the countryside. And I really recommend you
to visit the countryside because it's really
different from Paris. It's really nice as well. So I'm going to splash colors on some pot on the right side, this side, because I want to
have loose purple flowers. And yes, it's still sunny, so it's a happy day and it's a sunny day in atoms,
so it's lovely. So we're splashing more
colors around the house and try to cover the house if
you feel like you have to. And so we're drying and cleaning up the brushes
as well from time-to-time. And I'm using some
exists colors to add more pigment on a
purple flowers. And in this part, I will leave it
dry a little bit. And then we're going back. So we're cleaning up the brush. And I will go back
in few minutes. K. So this part, we are preparing the watercolor paints for the orange flowers
in the garden. Hopes. So I'm going to do it. They're up all over again. So orange flowers in the
garden. We are back. And before I do that, I have to peel off the masking fluid
and I will clean up just a little bit before
I come back painting. And I've decided to
change my paint brush. And this is the painting
that we're going to achieve by the end of
this painting process. So the paper is dry and
we're dropping burnt sienna. And you can also
add a little bit of bright red if you have
to mix it burnt sienna. So we're painting the flowers and we're leaving some whites. The whites will indicate
the light in the flour. Flour, so we don't color
everything orange. Here am I doing really like
color of cadmium yellow, flowers as different colors
like orange, purple, yellow. So the secret is to have different tonal values
on the flowers, which will indicate the
shadows on your painting. The shadows and the
lights on your painting. So although I'm a very
quick ping painter, I'm a bit fast when I paint. Sometimes. It's a challenge
to be patient and wait. This part I had to stop
and I had to wait. And so I will be
able to peel off the masking fluid
because you cannot paint while your mask you can add fill up your masking
fluid while the paper is wet, it's going to ruin everything. So just be very
careful with that. You have to wait. That is completely
dry before you peel off the masking fluid. Okay, So this one
I've added colors such as cerulean,
blue, sap green. I've also added a
bit of ivory black, just a little bit of it. And we're gonna get darker. And here the paper is, is just a little bit wet. So it's a kind of dried already. I'm going to splash it with water again, really quick one. Now that we don't have the
masking fluid anymore, so I had to be very careful. So I'm just using the tip of
my paintbrush number two, small brush that we have. And I'm avoiding the fences. And we're not going
to paint all greens. We're gonna leave the first wash that we did on the garden. These will indicate that darker tonal values will indicate the shadows
on the leaves. So the same paint, brush, brush strokes is upward. And this part is really
fun because you are, the darker tonal values will kind of make
your painting pop up. And you are starting to see the overall of your painting and your garden is
starting to have life. So enjoy this pot and you know, always tell yourself
that you can do it. There will be some moments about or is it gonna be a
beautiful painting? Am I going to make it? Never doubt yourself
because it's the confident that
destroys the painting is not the technique, but it's their confidence to
always remember that and, you know, try to be more
positive in the process. They always have to remind
myself that as well. Okay, so here is the
brush that I made myself. So it's really small,
teeth, really thin. And I'm just dragging the
colors up wide to make some branches on the purple
flowers that we have. So I'm dragging the
watercolor paint, the greens app Y to
indicate some branches. So notice the white. We're trying to
keep the white that we have left from the beginning. And this one is
challenging as well, because we don't want to touch the flowers
that we already did. But it's okay if you
had because sometimes, you know, the, the
garden is messy. So if you, if you do this and
you will touch on flowers, he can paint the
flowers. It's fine. So cleaning up the
brush very well. Now we're going to add more
purples on the flowers again. So I will make another wash that Julian blue
and bright violet. Splashing a little
bit very far away. So always do your splashing
about are far away. I'm trying to get more and
more darker pigment here. I still want to have
it loose so I'm adding more wash on the
paper or purple. So small petals of flowers
on our purple flowers. So really small brush that we need to, we're adding more
details on the flower, but not too detailed. Because we don't want
these flowers to take away that tension in
our magical house. So we have now a
beautiful garden, purple flowers and
all other colors. And as you can see, it's the middle of the flowers. You can still see the house
with a fade away color. Your tonal values is
really important, is the light and dark of
your watercolor paint. Because it's going to create
drama on your painting. Too. The more you paint landscape, the more you will understand how important it is to
understand the tonal values. I have more lessons, more classes in Skillshare. And so feel free to
visit some of my classes and practice some landscape
painting that we already, I already did before. So here I'm adding more
greens and this part. And it's going to be
really, really nice. So keep going well done and
keep enjoying the process. And you can always
post if it's too fast. Although this is real
time painting process. So here I'm just mixing watercolor paint
that I already have. And we're going to
paint the house. I've added Van ****
brown, bone, sienna. So we have darker color now. Sometimes I don't
clean my palette. I'm just adding the colors, especially if I'm going
to use darker colors now, here with a tick, with a thick pigment. I'm starting to
paint the roof of our house using
brush number two. Please watch and
observe and follow. Please notice that
I'm avoiding some white on the house as well. And this part is fight
away, fade away. We're coloring the other
side of the house. So there it will
have a little bit of contrast on the main roof. So I'll see you.
15. Magical House - Focal Point: Welcome. So thank you so much for
continuing painting with me this magical house in France. And I'm still using the
same brush number two. And we are using Van **** brown and burnt
sienna for the roof. And the paper is dry. So I'm pressing my brush so
that we can leave the white. And we've done this practice in our practice video
for this course. Press your paint, your brush so that you can be
able to leave the white. So you will be able to leave
the whites and the paper. So notice that
brushstroke, I'm doing. This is that girls that were going to achieve
within this painting, the beautiful magical house. I hope that you're enjoying this painting and never give up. So now we'll be working on the, of course, the focal
point of this painting. So we are working on their
roof and the chimney. And I'm pressing my my brush in order to leave the
white on the paper. So it's very important to use a rough watercolor
paper for this project. Now, we are getting darker, so we'll be using darker
values and have more contrast. Sprayed, one quick spray. So you have the spray far if you don't want to destroy the house. Okay. So for please spray a little
bit far from your paper. And here we're still working in my garden with all
N6 here in Spain. And it's fine. I hope you will enjoy painting these in your house or in your garden and you know, just relax and watercolor is the most difficult medium
probably you can ever have. So I really applaud you and you are using watercolor
as a medium because if something that is
not easy to control, but once you do, it's magical, just
like this house. Okay, so I've added
some cerulean blue for the paint because we're doing a darker tonal value
now for the house. This paper is now at
a little bit width. So as you can see, the more your paper is wet, the less white you will be
able to live on your paper. Okay, so let's go
and it's finished. This beautiful magical house. So in this part, this is the focal
point of our painting. So I'm adding more dark. This is Van ****, Van **** brown mixed with
ivory black and cerulean blue. And as you can see
that the white is, the white is leaving the one we put with our masking fluid. The reason why we put
masking fluid, of course, are so that we are more free to do brushstrokes
and movement on our paper and still have
the white on the paper. So notice I'm looking
at my reference photo. Actually this house is
more like the style is. It's more like a
suggestive painting because you don't really follow everything on the
reference photo is more like you are suggesting
the details. We are actually working more on the details on the focal point. And all the rest are all
the parts of your painting. They are not very important, but as a whole, they should be able
to know, to go, to correlate and work as a whole or else
your painting will look a bit odd if you only
focus on your focal point. So all parts of your
landscape painting, of any painting, of
course, they're important. And you just only have to work a little bit more
on your focal point. So here I'm using the
same watercolor paint, eats Van **** brown and I were
in war and civilian blue. And we're working
on the chimney. And the paper is a
little bit dumb. Okay, so the chimney, what you should remember is
they are not the focal point, so it shouldn't be very edgy. I'm adding a little bit more. Darker tonal value for our roof. And that's Van **** brown
mix with born sienna. If you feel like you want to add more colors on your roof, we'll go ahead and play. Go ahead and play with
your colors and enjoy it. And you doesn't have to be exactly what I'm
doing right now. But this is only like
as serve as an example, as a guide or what
you want to do. So, you know, go ahead and
be in, there'll be creative. So we're adding
shadows in the house. So as you can see, the light is actually like starting from the
back of the house. So that's why the back of
the house is a bit lighter. And the front, we can
see some shadows. Here. I'm adding more details
while it's still a little bit wet so that it will
have the loose effect. Usually, we put all the
washes altogether first 1, s one, and then we add a detail. That's the normal process. But if you want to
have this wet effect, like this wet, wet on wet
effect on your paper. I suggest you work on
Persian by portion. That's what I'm doing right now. K. So those those spot that I want to have like loose
effect, I usually work. I'll wait a few minutes and I actually add details right away. Okay, So here we're
adding more shadows. The more you paint, the more you practice
landscape painting, the more you will understand how watercolor
works and when is the right time to splash and
to add watercolor paints. At the beginning. I'm sure it's always
difficult like, like a like a
experience as well. But every day I tried to learn, I tried to paint more. So here I've added
a trap or blue. So the more darker your, your watercolor, your
tonal values, I mean is, and the more the focal point
the focus will go there, and the more edgy it is, the more loose it is, the more it will tell you that this stance,
your painting. So e.g. like mountains
and faraway mountains, they are usually in wet on wet process because
they are far away. So here we're just
adding more shadows. And I'm adding some
cerulean, blue, sap green or the mix of colors, Van **** brown to
add more shadows. And I'm using the tip of
my watercolor brush to add more details why they are
a little bit down here. I don't want to
leave this part of the roof and do a details later because now is
the perfect time to add details because it's
still a little bit wet. Adding another cerulean blue
for this part of the roof. And I've added a different
color to add a little more. Like life is not always
brown k. So you're doing very well and thank you so much and it's continued
painting this house. In the next process,
I'll see you.
16. Magical House - Contrast/Light: We are almost getting
there to finish this magical house in France. And we will be working on
the flowers it houses. So as you can see, we peel up some masking
fluid in the house. So when you are filling up, just remember that your
watercolor paint is really dry on your paper because you don't want to ruin
your watercolor painting. I'm still seeing your
brush number two, brush. And now we're going to add more colors on
our magical house. And I hope you're still
enjoying this part. And don't be too stressed. And we're still, I'm still
working in the garden. Her a lot of flies
and mosquitoes. I don't know where
they're coming from. In Spain, you almost have them
everywhere during summer. So here I'm adding some cerulean
blue and Van **** brown. And I were in war. And we're going to carefully
paint the fence so the paper is dry and we are leaving some white on the fences
to indicate the light. So as you can see that the
light on his painting, it's coming on back from
the back of the house. So in this part, you can use the tip
of your paintbrush. And now we are
adding more details. At the front of the house. Here in chalet, they
have stuck goods. So here is like a storage. Storage or a place where
they stack the woods. So now we can add more details because this part of
the paper is dry. Adding more words in here, but be careful not to paint everything and leave
some white to the lie. The whites will indicate
the light on your painting. So we are adding more contrast
and darker total value, the light and dark of your painting and
adding more shadow. So here I've added a
post and I'm adding more shadow on our
chimney as well. When I start, when I
painted this this class, it was a bit more summer, but now it's a bit cold
because it's winter. We don't have lice anymore. Maturing this shooting. We still have a lot of lysosome. I am so sorry about it. Gay. So here we are
adding more details on the house with dry paper. So we are actually
more suggesting details on impressionist
style painting. But it doesn't
really mean that you don't look up the details of
your houses. You still do. But it's just that
it's less obvious. Here we got a small window. And this is the
painting that we're going to achieve by the
end of this process. If you've been to the
countryside of France, is also really nice because
they have a lot of chalet, especially in a place where
we live in the South, in the in the hood subway area. It's not far from Switzerland. And they have lots of chalet now that we are in Spain
with my family, I kinda miss it. Here. I'm using the paint
brush that I made myself. And this part, it has to
be as thin as possible. So make sure that you're
doing this adding of detail while your paper
is completely dry. So one thing I can advise you, if you're doing
watercolor landscape, you have to understand
the fundamentals, of course, and a basic. So you have the foreground, the middle ground, and the background is
always like that. And I think it's
really important to do practice as much as
possible as he can. And if you leave your house, then you can bring a
small pad to sketch. So also sketching, I'd say
is really indispensable. So it's something you,
you should do very often. Because making a correct
and accurate drawing will really play a big
part of your painting. So here I'm adding more
branches on the trees. I'm adding lines while
the paper is dry. So they're just adding more. It's like decoration
on your your house. So it doesn't look too boring. From time-to-time. I'm cleaning up my
palette as well. As I said, I'm kinda
messy and buy them making an effort for this process. So yes, this is the house and we're super excited
to finish this. And if you haven't visited some other courses that I
have here in Skillshare, then I invite you to visit and do some of the
classes I have there. And I, I'm also very
much present right now in social media
and Instagram. And you can post your
project as well there, and you can tag me. Here. I'm using alizarin crimson. Alizarin suggests that you will use any color
that you like on this part for adding flowers. But make sure that you have the cool and
warm colors together. Let's say we have some reds
and we have some blues. Because in every
painting that you do, it's always important to have the warm and cool
colors mix together. So I'm adding watercolor
paints on the flowers. This is the most
enjoyable part of this painting because it's really giving live
on your painting. And this realistic appear even though it's an
impressionist style painting. So I'm just adding the tip. I'm just adding watercolor paint using the tip of my brush. We don't want to color
our flowers too tight. So when you are getting
color from your palette, make sure that it's
mixed well and it has enough thickness. The paint that I'm
using student grade. So more or less I will have to go back and color
it and a little bit because the color will fade away eventually by
the end of the process. So if you are studying as
water colorist and then you can start to with the
Winsor and Newton Cotman. This is a student
grade they have and it works really
nice as well. It's the one I'm
using right now. And I'm usually
buying in big tube. And his kind of messy with this little palette that I have. Because I'm not used to
use that big palette. And small palette right there, I'm used to use big palette. But for this, for the video, say for the video sake so
that you can see it better. I'm using a small one. And I always have a towel and tissue paper
right beside me. So I added sap green and a mix of cerulean blue
for our leaves. And I'll try to make it
as small as possible. So I really invite you
to post your projects. I am very excited to
see your own version or this magical house is very interesting to see other
version of a painting. So please, please, please post your projects so
that we can see it. And I think it's really a good start to
improve your painting. So we're adding greens in
the house because there are some vines in the house. So this part is really
on, on dry paper. So I hope that you are learning from this and enjoying
at the same time. Watercolor, as I've said, is one of the most
typical medium. And I congratulate you for, for getting this
far in this class. And here I'm adding just dark in the
middle of the flowers. I want to do your own
experiment with the flowers. And you know, it, it, I'm sure it will look a
little bit different. But this is how you learn.
This is how we learn. I paint almost every day and I sketch almost
every day as well. I usually paint landscapes, but I also paint a
portrait as well. So the secret, I think is just sketching anytime that I can
because I have a daughter, so I don't have much
time all the time. But yes, sketch all the
time and just enjoy what you're doing and
everything will go well. So I'll see you in the part
of the painting process. We're going to see the results. So see you.
17. Magical House - Details/Project: Well done. Thank you
so much for finishing this painting with me
and so proud of you. And I really wish
to see the results. Okay, So almost there, we're adding details
and I'm just checking what other details
in this house I can improve. So with the dry paper, I'm adding the greens. So that's sap green, of course, as I've
mentioned this before, I'm using code minds is
a student grade paint. That's why I will have
need to, you know, to do it all over again
when the colors fade away. Here I'm using the smallest
brush that I have, the thinnest brush
that I have to have the thin lines as possible. And I'm getting Chinese
white straight from the to be just a little
bit of water. So we're adding more
details and contrast and light in the branches of the
trees in front of the house. And still painting
in the garden. And I really hope that I will be able to see the
results of your painting. And you can also post
it in Instagram, not only in Skillshare, and you can tag me, I think is really
one way to improve your painting and to share it. Be proud of it because she
works so hard for that one. So we want to see it. K to the more, the lowest part of
your brush or holding, the more control you have. If you're holding
it like a pencil, you have more control over your watercolor brush
and watercolor paint. So here I'm just adding
light and offenses as well. So there you go. Or the flies are
celebrating as well, because it's the end of the painting, this
beautiful house. So I hope to see you in some of my classes I
have already published. So go ahead and visit them. So well done. Thank you so much
and I hope to see you in more classes that I have enjoyed priming and don't forget to sign your
wonderful masterpiece. So bravo, bravo, bravo, and well done. I'll see you.
 Dawna Mae, Watercolor Artist & Illustrator