Transcripts
1. Welcome to the Class: You will not throw your perfume
bottles after this class. Using the medium of
watercolors and acrylics, you're going to convert
a perfume bottle into something
artistic and creative. Hey, everybody. You're most welcome to my new class, myself, Patel I'm a self taught, independent artist and an interior designer
by profession. I personally love to explore different art forms and styles and not stick to
one particular thing. So if you are joining
me, you'll find a variety of classes
that I create. Before we start creating, we are going to understand about the object that we
are going to use. We are going to talk about
all the art supplies that you will need
for the entire class. The first step is to create the base using white
acrylic color. The second step is to paint a beautiful rose using the
medium of watercolors. Then we are going
to add some leaves to enhance the entire painting. The painting techniques
are going to be very easy and satisfying. By the end of the
class, you'll have a beautiful transformation of a plain perfume bottle into something
artistic and creative. It's a short class that will
not take a lot of your time. So without any delay, grab your art supplies and join
me on this creative journey.
2. Art Supplies: Hey, everybody. Now
let us talk about all the art supplies that you will need for this
particular class. There are going to
be very less amount of art supplies
that you will need. So no need to worry about that. You'll find it very easily in
any nearby local art store. So this is going to
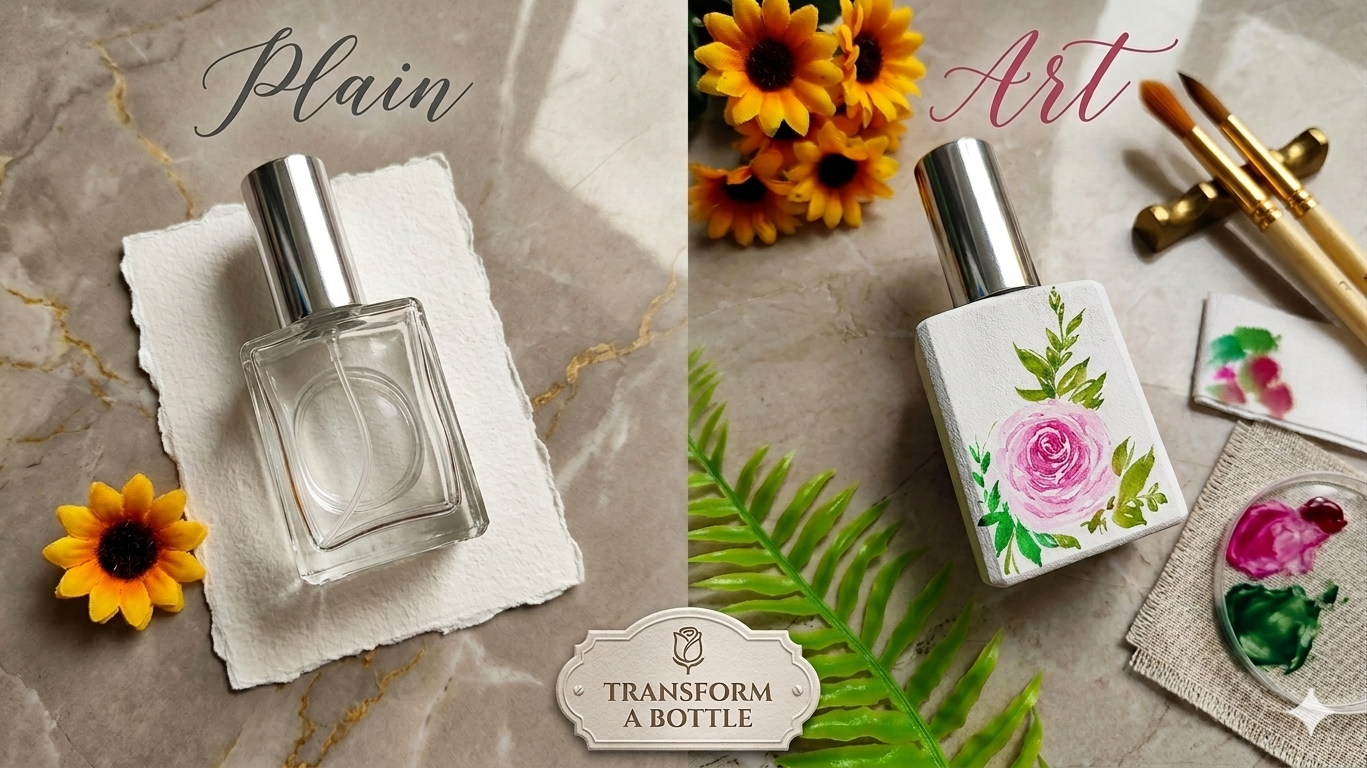
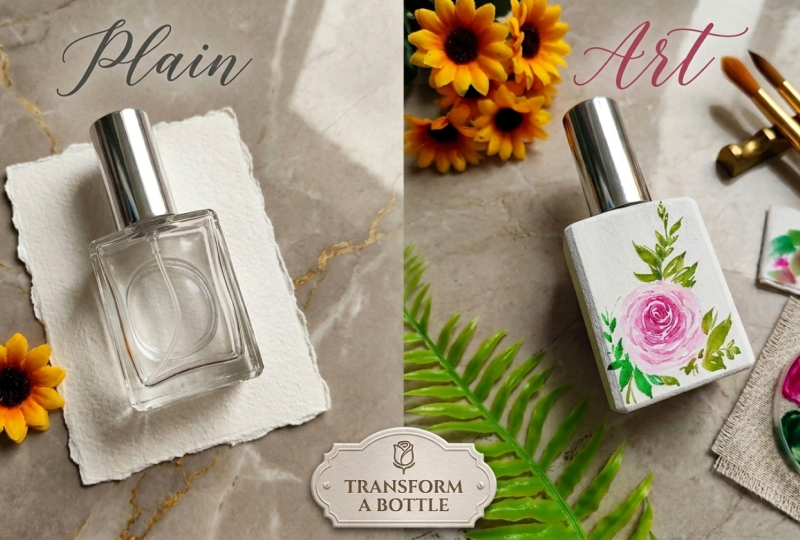
be the art piece that we are going to create. It's a simple perfume
bottle that I have used and converted it
into something artistic. You can observe a simple
plain white background. And some beautiful florals
that we are going to paint. So now, let us talk about the art supplies that you will need. So the first art supply is a simple white
acrylic color that we are going to use to create the base of
the entire bottle. The perfume bottle
is made of glass, so that's why we are going
to use acrylic colors as a medium to apply
on the entire surface. Then comes a simple
glass container in which you can already
observe some pink color. So definitely, we are going
to take some clear water. Whenever we are working
with watercolors, water is an essential
element that you'll need. It will also help you to clean your brushes and use
water wherever required. Then comes the next art supply, which is a simple color
palette that you can observe. It's a little color
palette because we do not want a lot of colors. There are a little bit of colors that you can already observe. Just make sure that your
color palette is having enough space to take out multiple colors and have
some mixing space in it. You're free to explore
with the color palette and use the colors according to your
convenience, as well. Then comes the next art supply, which is a simple tissue
paper that you can observe. It is good to keep a
tissue paper nearby whenever you're working with
watercolors or any colors. It helps to remove excess amount of water and color
from the brushes. So you can keep it nearby and
use it whenever required. Now let us talk about the
colors that we are going to use to paint these florals
on the bottle surface. So there are going to
be three basic colors that you'll find very easily. So the first one
is Rose Mdarake, which is basically
a pink color that you'll find very easily
in your watercolor set. Then the remaining two are
going to be safe green and deep green that we are going to mix together to
paint the leaves. Now, it is not at all
compulsory for you to use the exact
same color palette. You're free to explore
and experiment. You can use the colors according to your
convenience as well. Now comes the most
important art supply, which is the brushes that
we are going to use. There are going to be two basic brushes that we
are going to use. The first one is a round
brush of size zero, and the second one is again a round brush of
size two or one. You can use any
good alternative, it is absolutely fine. Just make sure that it is a detailing brush and
it is a round brush. It will help you to paint in a very smaller and minute area. So how amazing it is, you'll need only two basic brushes to paint
the entire part. So these are all
the art supplies that you will need
for the entire class. I hope that you got
an idea about it. Now let us move
towards the next part.
3. Understanding the Object: Hey, everybody. Now
let us understand the object that we are
going to use for painting. So as you can observe, it's
a simple glass bottle, which is basically a perfume bottle that we are going to use, and it is empty. Instead of throwing
it away, I thought, Let us create something
artistic on it, and we can use it
as an art piece. Now, in case you
want to paint on a filled brand new
perfume bottle and give it to someone,
it is absolutely fine. But this particular
perfume bottle is empty, and we are going to
create something artistic on this
particular surface. So you can observe we have this beautiful rectangular
flat surface, and there are these little rectangular surface
on the sides. So we are going to
create a nice base on the entire surface. So make sure that whichever
perfume bottle you select, it should have a nice
flat surface on it, where you can paint in
a comfortable manner. So I hope that you
got an exact idea about the object that you should select for painting and creating
something artistic. Now let us move
towards the next step, which is painting the base.
4. Painting the Base: Hey, everybody. Now let
us paint the base of the perfume bottle before we
start painting the florals. So you can observe I have placed my perfume bottle
on the surface, and we are ready with
our white acrylic color. So the white acrylic color
that I'm using is from camel. It is going to have a
nice solid white color. I have already taken it
in the color palette. Extremely sorry if I was
not able to mention about the flat brush to apply it on the surface of
the perfume bottle. But it is absolutely fine. You can use a simple flat
brush of size two or three to apply it on the
entire surface of the perfume bottle. No
need to hurry at all. Take your time and take some good amount of
color from the color palette. You can remove the cap of the
perfume bottle if you want to so that you can paint
in a comfortable manner. Again, no need to hurry at all, take some good amount of
solid white color and try to apply a nice even coat
on the entire surface. Now you can hold the
perfume bottle using the topmost surface where
we have the prey part. This is going to
be the first coat, so no need to worry about
the irregular surface. We are going to
apply another coat once this particular coat dries using a sponge so that we get a beautiful solid white
color on the entire surface. So we are almost done
applying the first coat. I'll apply the color on
the last surface as well. Make sure that you
do not use a lot of water to lose
the acrylic color. Rather, you can directly
use the solid white color. It will give you a
nice opaque surface. Now you can observe there is a little bit of glass
surface on the topmost part. So you can hold the bottle carefully and apply the
color there as well. No need to hurry at all.
In case you want to use a round brush to paint this particular area,
it is absolutely fine. So now we are almost done
painting the first coat. You have to let this
particular coat dry for a while, give some time. Now, once the
entire coat is dry, we are going to use
a little sponge and use some solid white color from the color palette again. And we are going to
apply another coat. This will help us to give a nice solid white color on the entire surface
of the bottle, and it will give us a
beautiful opaque look. So take a little bit of color in your sponge and start applying
it on the entire surface. No need to hurry at
all. Take your time. You'll observe that
the irregular surface will vanish automatically. Now, in case you do
not have a sponge, it is absolutely fine. You can use your flat brush
again and apply another coat. Now slowly, we are
going to apply this on the entire
surface of the bottle. Now again using the topmost
part of the bottle, you can hold it in a
careful manner and apply this particular second coat
on the entire surface slowly. I have not used any water and mixed it with my
white acrylic color. It will lose the opacity and the color will become a
little bit translucent. So that's why we are applying solid white color
directly from the bottle. In case you find that your color is getting finished
from the sponge, feel free to take some more
color from the color palette. Make sure that you apply
an even coat and it looks really nice once
the entire color dries. I'll hold the bottle in a different angle and apply the color on the sides as well. And I'll take some more color
from the color palette. And then using the entire
surface of the sponge, I'm going to apply it
on the sides as well. Now, you'll observe carefully that once you apply
the second coat, the entire surface of the
glass bottle is covered, and it gives a beautiful,
solid white color. Covering the entire surface of the perfume bottle is also
a very satisfying process. You'll definitely enjoy this
particular part as well. Now, in case you want to use a different color to
paint the background, and instead of white, you want to explore
with a different color, it is absolutely fine. I have used white because it will give a nice contrast with the colorful florals and it will make them look a
little bit more attractive. In case you want to
experiment and explore, it is absolutely fine. So we are almost done
covering the entire bottle. Let it dry for a while,
give it some time. Now let us move
towards the next part.
5. Painting the Rose and Leaves: Everybody, now, let us
paint the rose leaves, one of my favorite parts
in the entire class. We are going to take a
little bit of rose Mdarlake which is basically a pink color that you'll find very easily. I've taken it a little
bit in the color palette. I'm going to use a
highly saturated color, so that's why I'll take
a little bit of water. Now in the color palette
you can observe that it is giving a nice pink
colored texture. Try to use very less amount
of water and more color. Now using the tip of
this round brush, we are going to start with
the center part of the rose. It is a very simple and easy
technique to paint the rose. You just have to create
these little strokes in this circular manner and start moving towards
the outer part. We are not going to
paint the entire rose using this dark pink color. Now, once we have added these
little circular shapes, just take some more amount of water this time and very less color and start applying it towards the outer
portion of the entire rose. You can observe it gives a beautiful variation
of the petals. So there is going to
be a darker shade in the inner portion and a lighter shade in
the outer portion. No need to hurry at
all, paint it in a very slow and steady
manner in case you want to practice the rows
on a rough scrap of paper initially and then come towards
your final painting. It is absolutely fine. It will help you to develop confidence, and the chances of making
mistakes will be very less. Now using the same round brush, I'll just enhance the petal
in the outer portion. I'll take a little bit
of pink colour from the color palette and just apply these
little strokes around. You can do this according to your convenience. It
is absolutely fine. No need to worry
about perfection or painting it in
the exact same way. You just have to know
the basic technique. Now, we are going to use some
Sap green and deep green. You can use any of the either
colors that you want to. I'll use the round
brush of size two and mix a little bit of water in the deep green
or Sap green color. You can dab it onto
the tissue paper if you find that there is excess amount of water in your brush. Now in a very random
and natural way, we are going to
apply some leaves around and create some foliage. Again, this is going to be
a very satisfying process that you'll definitely enjoy. No need to paint it in
the exact same way. You're free to explore
and experiment with the painting of the leaves
and the rose as well. You can observe
that I'm creating these little leaves around, and it creates a
beautiful contrast with the solid white background
and the rose as well. To create a nice variation in the saturation of the leaves, what you can do is
you can increase or decrease the amount of water
from the color palette. So in order to create a
beautiful composition, it is not only compulsory
for you to paint the leaves, you can add few little
strokes around as well, using the tip of
your round brush. It is very simple and easy. You just have to use the
tip of your round brush, apply very less pressure and keep your hand very
much loose and free. This will help you to create little strokes and paint
little leaves as well. So now you can
observe that we have painted these beautiful
leaves on the bottom part. It is covering the left hand side and the
right hand side. Now let us paint few leaves
on the topmost part as well. So again, you're free to
compose and experiment. You can paint the leaves according to your
convenience in case you want to create the
composition using a pencil first and
then paint it. It is absolutely fine. So I've created a little stem, and then I'm going
to cover it with these little leaves around. You can have a
variation in the size. Whenever I'm having
a very hectic day, painting florals always makes me feel very much
calm and peaceful. And it is not at all compulsory for you to paint it
on a perfume bottle only in case you want to paint these florals on
a watercolor paper. It is absolutely fine. So we are done with the entire
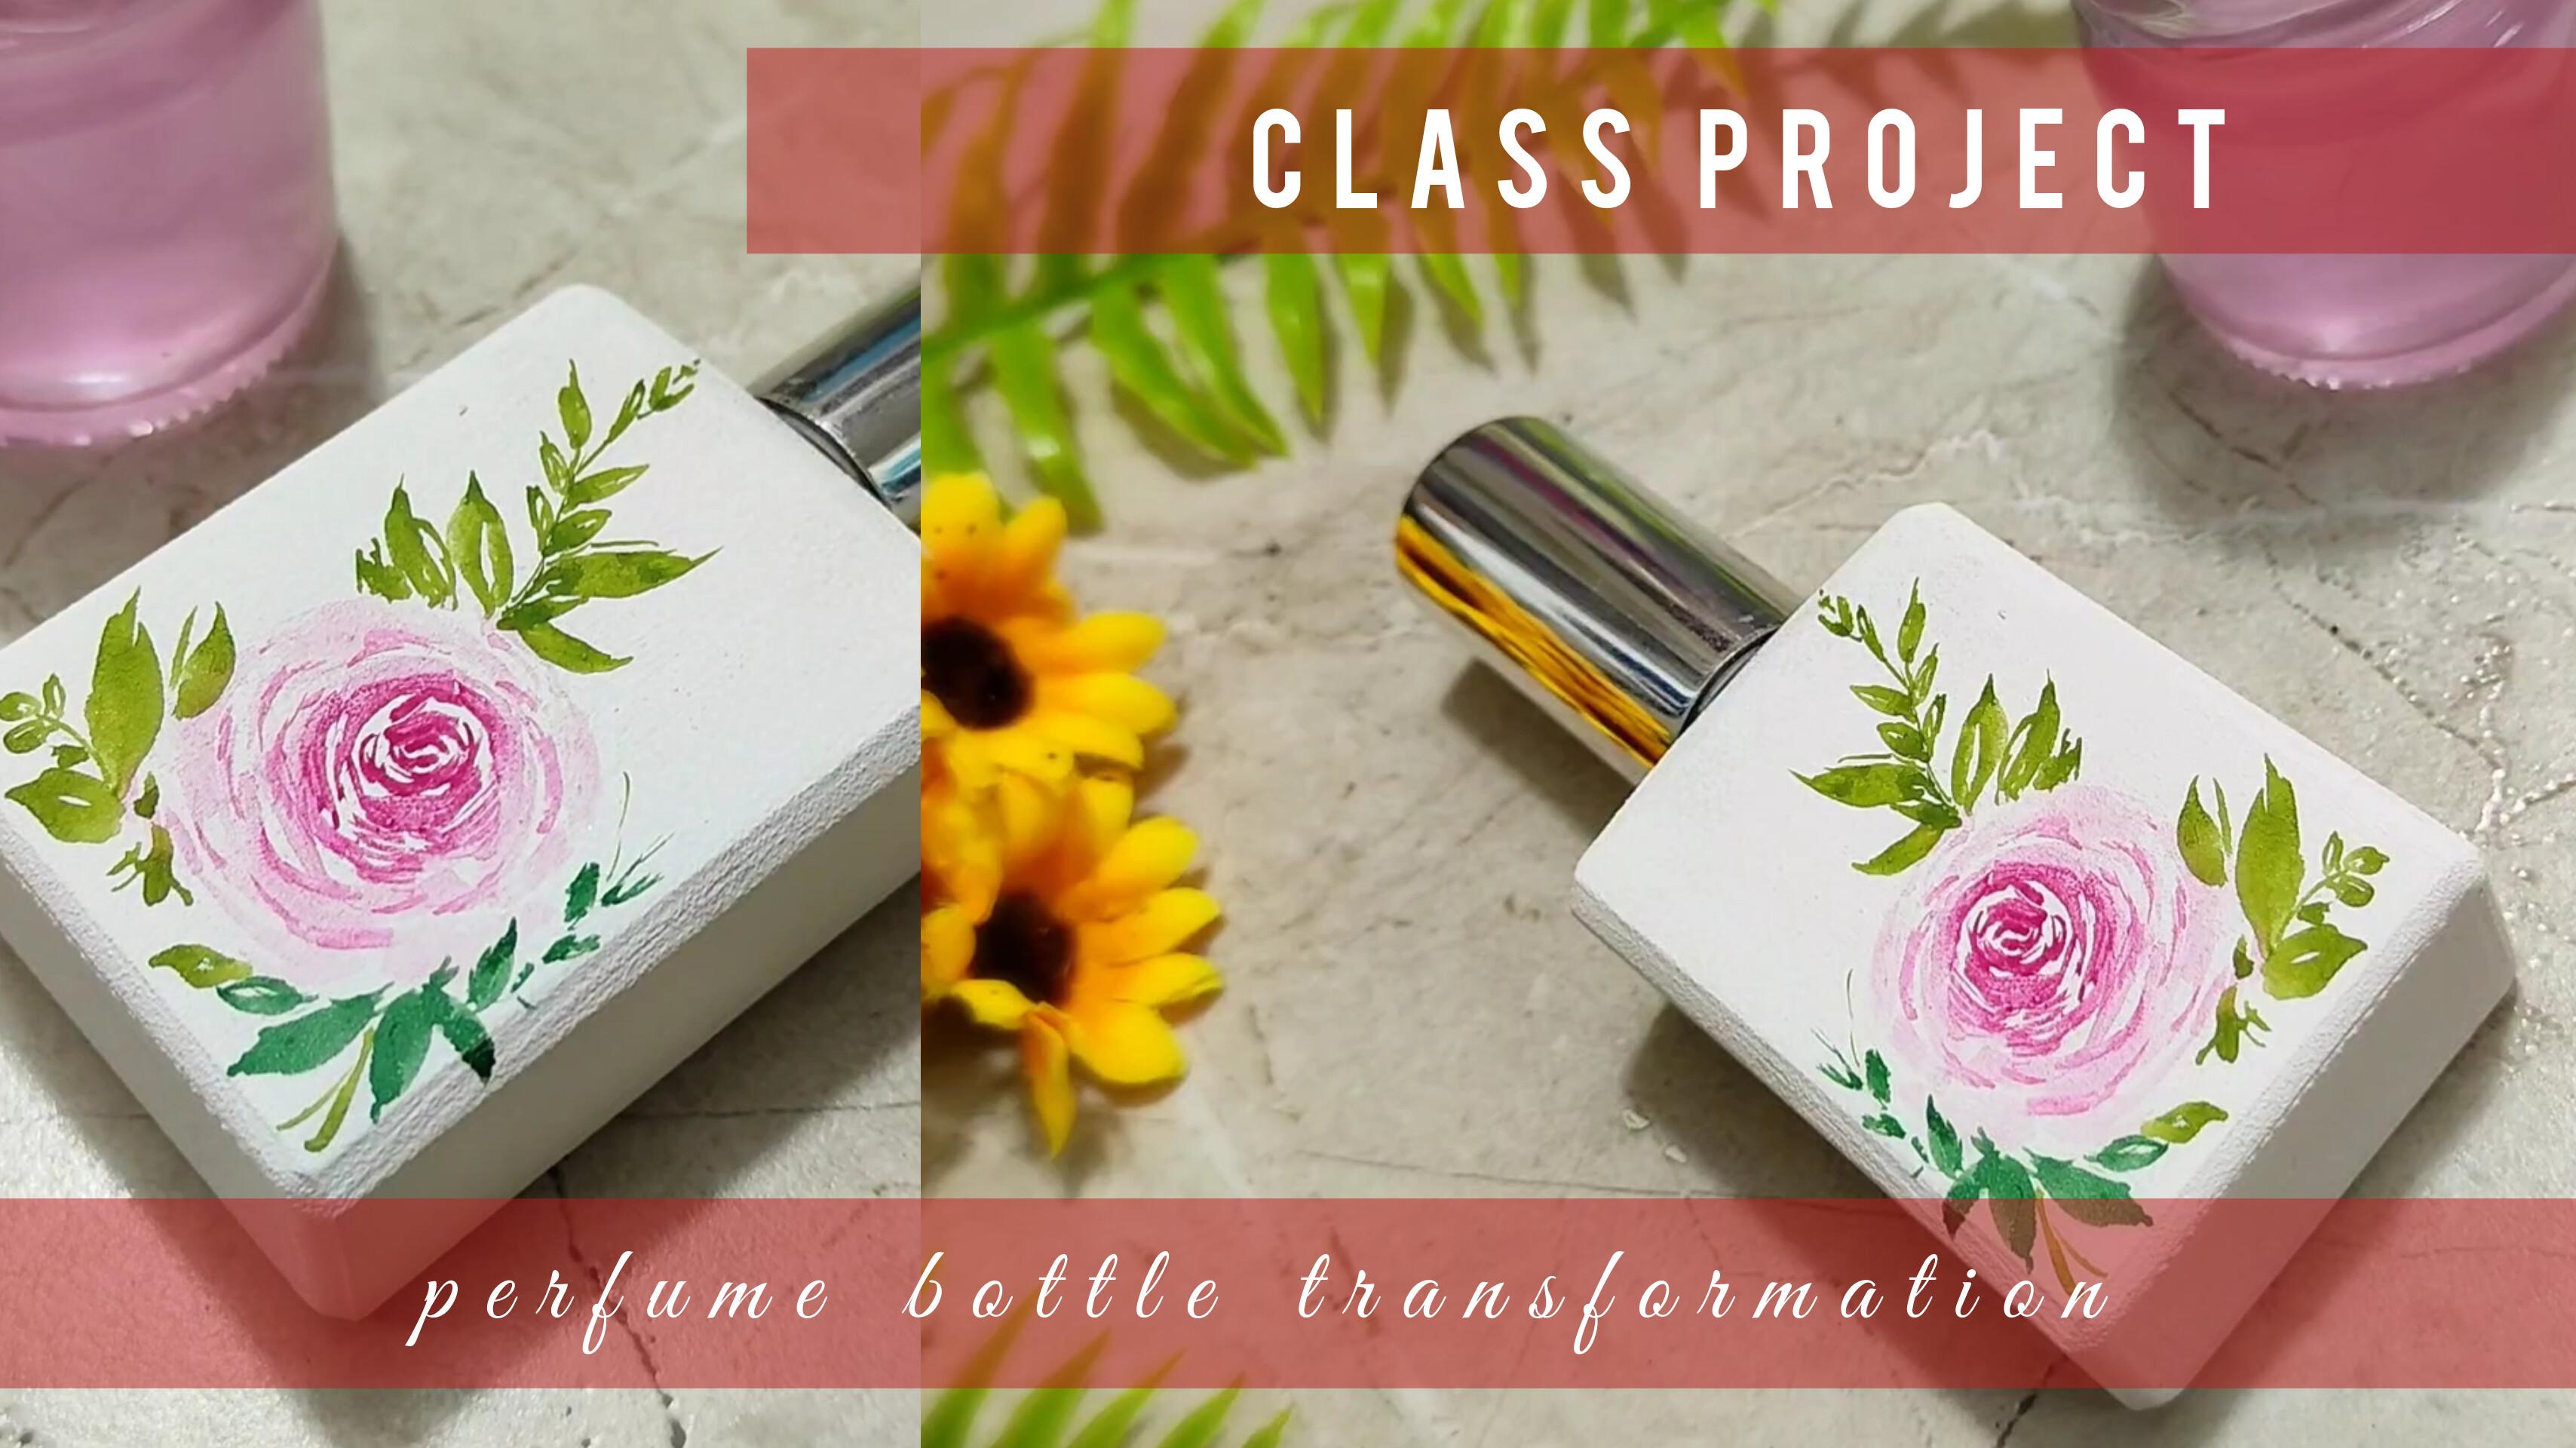
painting and converting this beautiful plain perfume bottle into something artistic. Let me take you a
little bit closer so that you can observe all
the details carefully. I hope that you enjoyed the
entire process of converting something very simple and
plain into something artistic. You are free to explode and experiment with the
entire project. It is absolutely fine. I'll be super excited to see all of your
products as well. Feel free to ask any
questions or doubts. Enjoy the process, and no need
to worry about the output. Now let us move towards
the class conclusion.
6. Class Conclusion: Hey, everybody. You're most welcome to the class conclusion. I hope that you enjoyed the entire class and got to learn something
new and creative. While I was creating
this particular class, I made a lot of mistakes, and that is something
that I always tell my students never to be
afraid of making mistakes. It's part of the
learning process. It would be really great if you add your projects into
the project gallery. I would be really excited to see all of your class projects. It would be really great if you leave a review
for the entire class as it encourages me a lot and my class can reach many
more students like you. At the end, I would like to say, keep learning, keep practicing. Thank you so much for joining the class and no need to
worry about the output. Just enjoy the
process of creating.
 Rutvik Patel, Artist and Instructor