Transcripts
1. Intro: Hi, everyone, and welcome
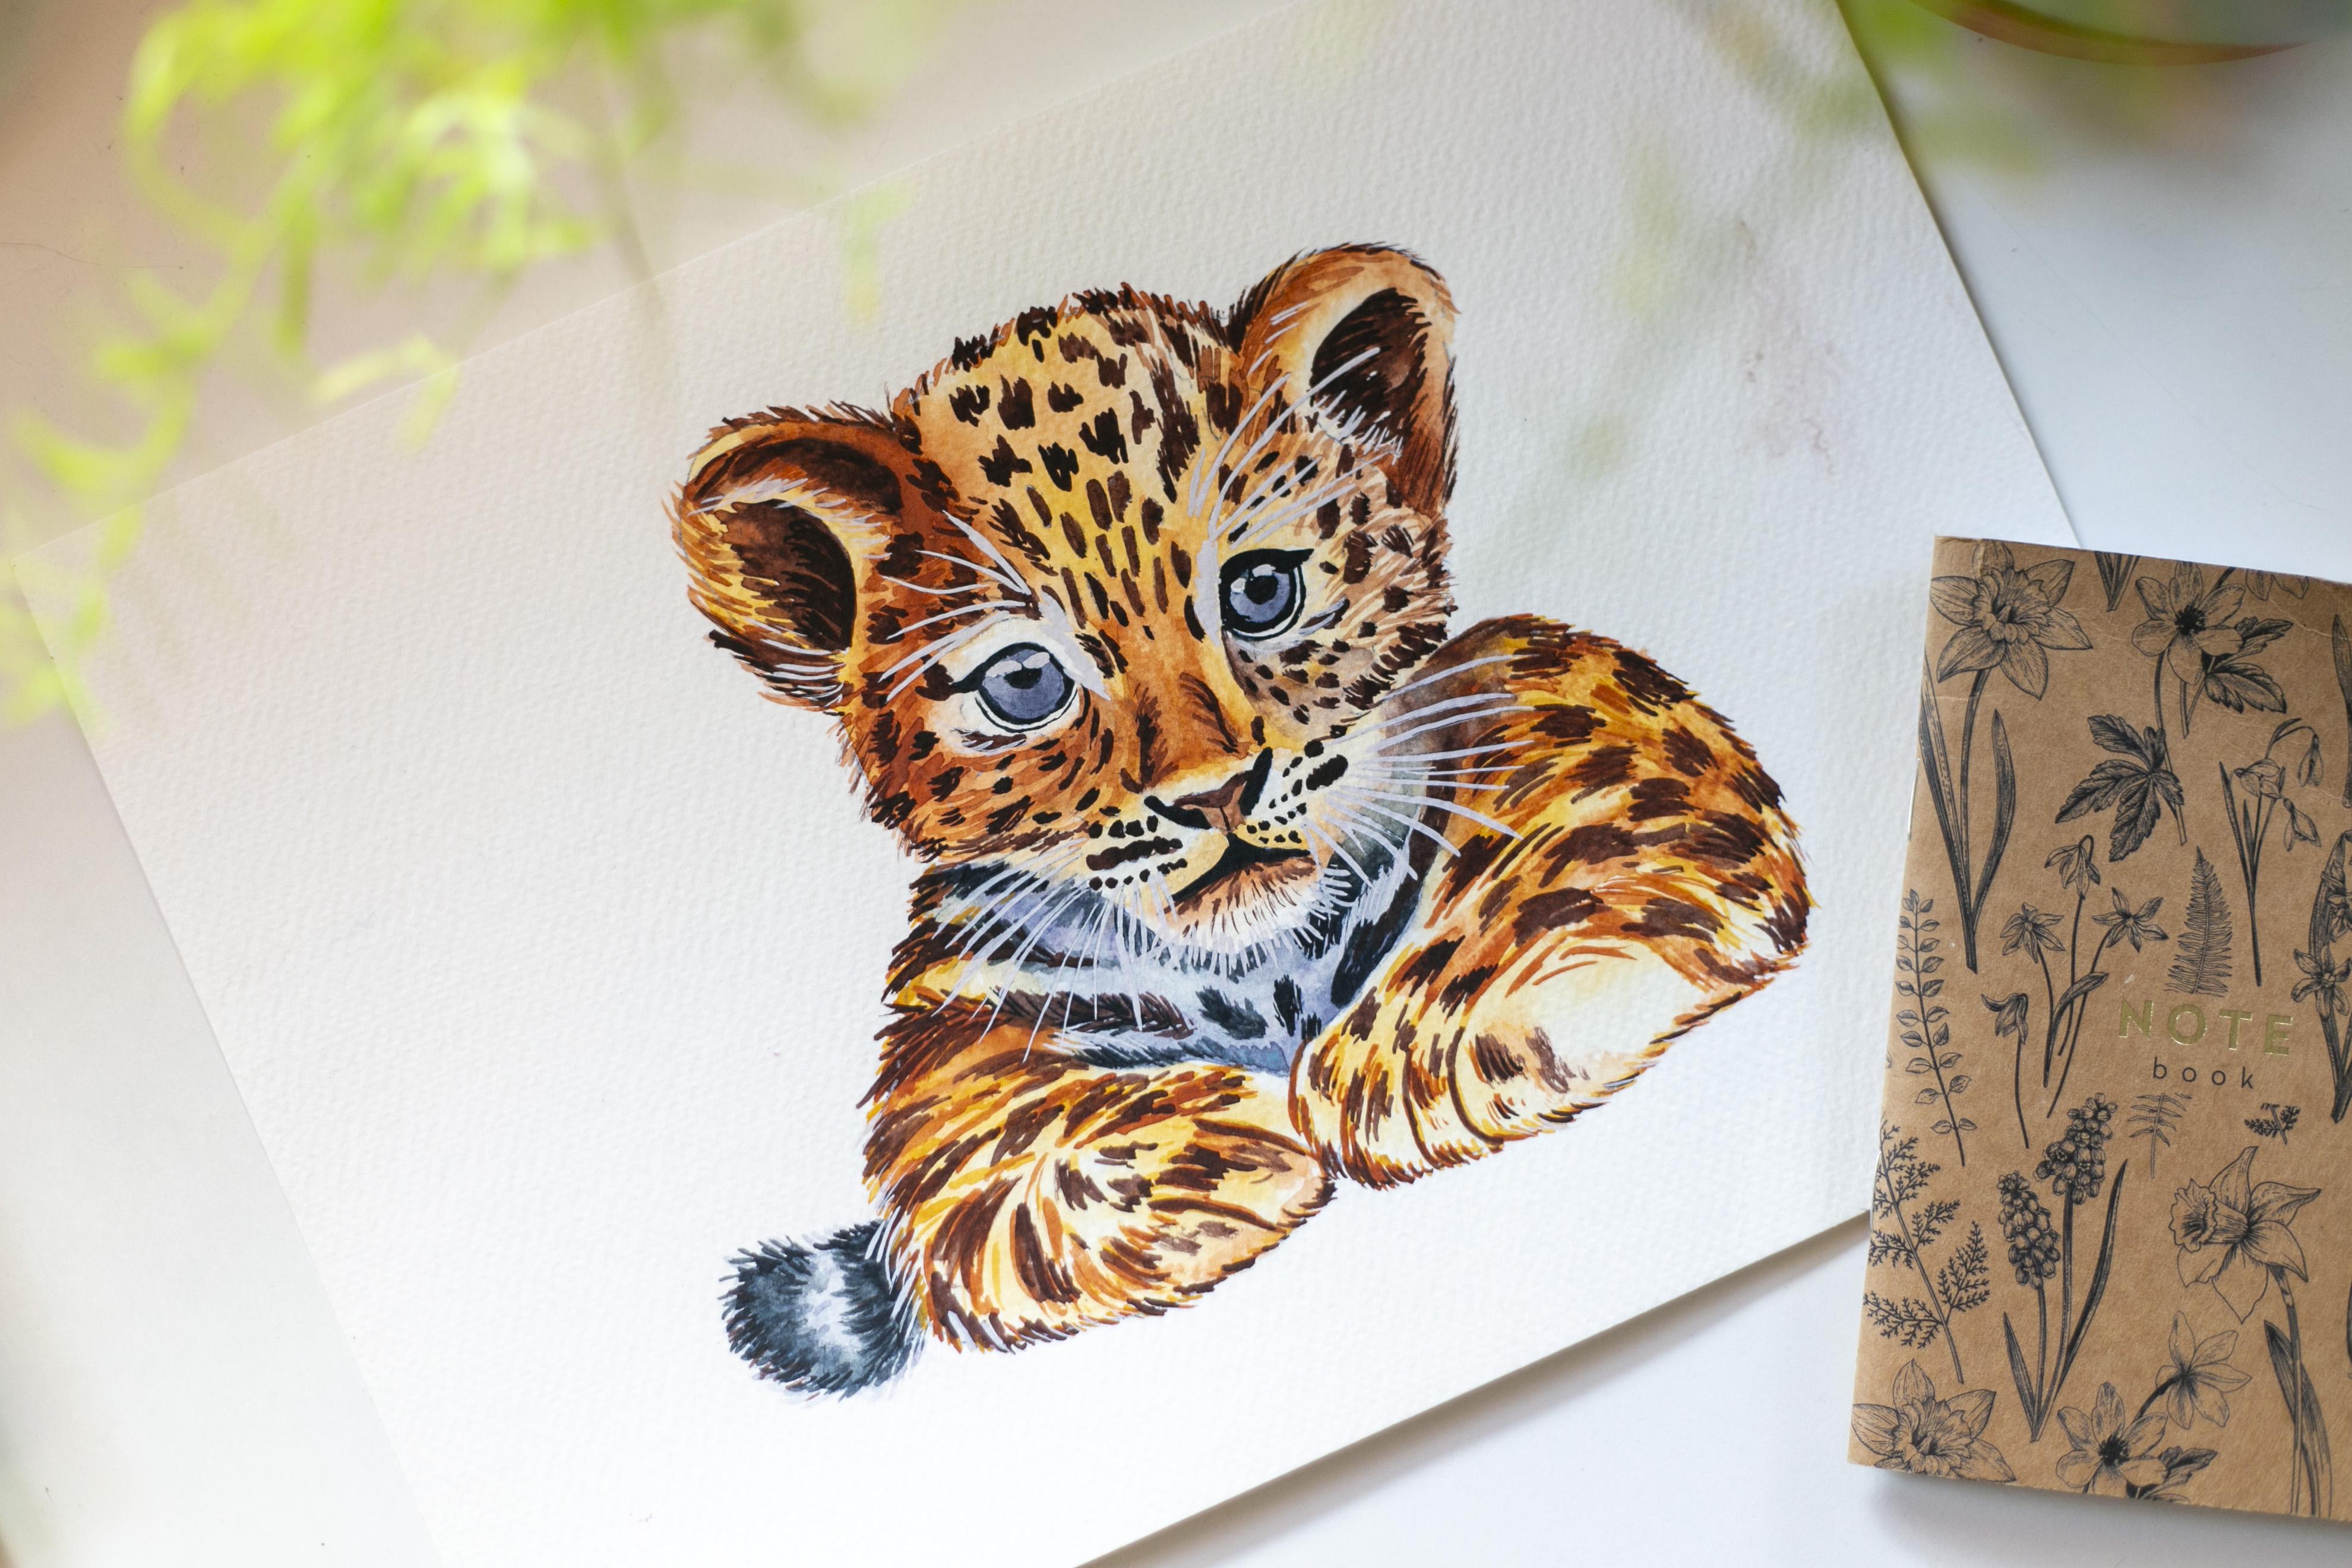
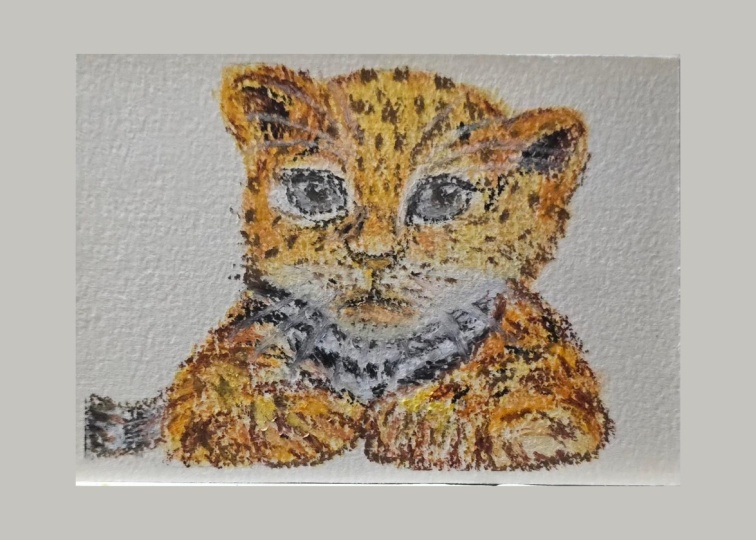
to this watercolor class. Today, we're going to paint a charming little loopard
step by step from the very first underpainting
layers to the final details. I'll guide you through
the protest slowly so you can follow along
at your own pace, whether you're a beginner or already experienced
with watercolor. You will learn how
to build up layers, capture the lopars
beautiful spots, and bring your painting to life with texture
and expression. I love painting animals and this little leopard has been one of my
favorite to create. I can't wait to share
the process with you, grab your paints, brushes, and paper and let's
start painting.
2. Materials: Hi, what we will use
during this class? First of all, you will need a watercolor paper and
I will use a five size, and it's 100% of cotton. I usually use it during my
classes and I'm very fond of. I recommend you buying similar, it doesn't matter what
company you will use, but I suggest to 100% of cotton. The second thing, of course, paints, but you don't need
the whole set of paints. During this class, we will
use only five colors. You will need a Sienna
light or similar color. I call it light brown, but it's a red ocher in my case. The second color,
the first color is I call it dark brown. It could be any dark brown
you have on your palette. But in my case,
it's October 2023. I will use light gray and it's misty morning from
Roman Schmal Aquarius. It's a granulating color, but still if you don't have it, you can use whatever
light gray you have. And if you don't have
light gray, still, you can dilute the
paints gray with the water to achieve
this light gray mixture. And the last color
which we will use is, of course, paints gray just
like I mentioned before. These five colors from water colors we will
use during this class. As a last step, we
will use guash, and I usually use Winson and Newton designers
Guash Permanent white. But still, you don't have to buy if you
don't have this squash, you don't have to buy it. If you have some other white
quash, you can use it, of course, if you don't
have white quash, you can use posca pen or Jelow white gel pen.
It's still useful. And we will use mixing
palette some brushes, mostly thin for the first layer, bigger brush because we will
be painting wet on wet so we need a bigger brush to cover
the whole area with water. Of course, paper
towel and water. I have a dirty because I just finished recording this class. But at the beginning
of this lesson, we will start with
the fresh water. Just like on the
other of my courses, you will find the sketch for Tiger in the
project section, so you can download it and transfer it to the
watercolor paper. Without further ado,
let's start painting.
3. Underpainting on tigers head: Okay, so let's start
painting our tiger. We will paint layer by layer. So the first layer which we are going to
paint is the head. We need to mix our
colors for the head, and we will mostly
use these two colors. Sienna light, and I
call it light brown, but it's red or her color. And we need to mix them
with a lot of water. We need them to be
translucent, these colors. This is my first color. I have my cuts for everywhere. This is first color, and this one is red ocher and perhaps I will add a little
bit more of paint. Okay. And with the two colors, we will paint underlayer on our face of the tiger and
we will paint wet on wet, but we will avoid painting the eyes around the eye we
will leave white unpainted, and the rest we will paint
with our two colors. We start with the water and I don't I don't paint water
around the eye, so I simply leave it this way. I paint the whole
nose and the mouth. Okay. Let's start with
the Sienna light. Almost on the whole face, I use the Senate color. I forgot. I was too quick. But still, we can rescue
this with the paper towel. We can make it dry. Once again, I will take my senate and place
it on the face. Once again, I was too
generous with strokes. Okay. Now I will switch to smaller brush
because it will be easier, less accidents I will make. And with my brow, I will place it
somewhere in here because the ears will be in
shadow and somewhere in here, onto the cheeks
and under the eye, and the second ear, the head under the other eye, still, this is the underlayer. I will probably be very
light after it dries. We just for the beginning, we need the subtle colors
and we leave it to dry. This is our first layer.
4. Eyes: First layer is still wet, but we will move on to the ice. This will dry in the
meanwhile right now, we will make some
colors for the ice. I will use one of
my favorite colors. If you see my other courses, you know that I usually use the same colors over
and over again. One of my favorite colors is misty morning from Roman
Aquarius from an Schmal. This is a gray color. So I will mix it in
50 50 ratio here. If you don't have
this gray color, still, you can use, for example, paints gray mixed with a lot of water to create this gray tone. Mistemonic is
granulating colors, it creates this
effect of two colors. It granulates on red
um and bluish tones. I will use it for my eyes
for my tiger's eyes. We don't need much
of these colors, so I will mix it in here
and we will kat pains gray. I don't mix paints
gray on my palette because I want this paints
gray to be very thick. I simply put a drop
of water into my pan, mix it with my colors to
create this very thick color. So I have my palette somewhere near me because I will
need my paints gray. Right now, I will switch to
the smallest brush I had. This is a number three brush, and we will paint
the iris of the eye. We will paint it
with our gray color. We can even paint
this middle part. Still, we can even paint on the whole of
the eye because we will use squash to paint back
the reflections on the eye. At that stage, it's
easier for us to paint the whole
iris, the whole eye. I will clean my brush, make it dry on paper towel, and let's wait a little for this paint to dry and I
will take my paints gray. Check on the paper if it's
thick enough because I want to paint a very thick
lines with it. It also depends on
the brush you take. But this is the smallest
I have number three. I see that they are still wet, so we need to wait a minute. Perhaps we will start
from this line in here because it doesn't
touch anything, so it's safe to paint it. You need to be aware that
if the iris is still wet, the plains gray could
bleed into your iris and iris if your plains gray
have a lot of water in it, it also could bleed. Let's do similar on the part. Oh, I have This is still wet. So let's try to fix that. I can place a little of my
sandal light in here and perhaps I will dry my work with the hair dryer and go back to
you when everything is dry. I have dried my eyes and the
whole face of the tiger and let's go back to painting the
iris with our paint scray. Let's go back in here. Okay. And the same with the second eye. Okay. So we have ice ready. In the next stage,
we will move on to the shading of our tiger's face.
5. Shading: So for shading for this first
part of shading goes we will place two additional layers of shading on our tiger's face. We need this brown color. I call it light brown, just like you perhaps remember, and I'll need more
of this paint. I'll add water to it, and again, I will add some paint, and I don't need this
very translucent shade. I call it 50 30% of faint. So it's like two shades
darker than it was before. So we need to add more paint to it to achieve two
shades darker color. And for that stage, we only need that one color. We need just one color, but I usually use two brushes, one smaller, one medium,
and one smaller. Let's start with shading. So we need to make this
area under the eye, perhaps smaller than this. We need the area under the
eye even a bit darker. I will place my color in here. And only with the wet brush, I will blend it with
the rest of the face. So we do similar
on the other side. I will place my color in here and with the
wet not very wet, but with the damp brush, I will blend the
edges of my color. We need to define our nose. Still, the nose doesn't start
in here at the beginning. Tigers usually have this white, lighter area in here, we will start from
this little part away from it and I will place my color the line of
the nose and I see that I have here something I don't like
with the wet brush, I will blend it with the rest of the background and the same with the
other side of my nose. I will place a
line and blend it. And a little blend of
the edges in here. I don't want the sharp lines, so I also blend the
edges a little. We need this mouth
under the mouth to be a little darker so I
will just like before, place a line of my color
and with the wet brush, I will blend it Okay. Ears in here and starts
from the top in here, the ears are darker because they are like shade we play
color and blend the edges. Almost all ears are darker, so I will there's a color on all of them blended. And the same on the other side. So let's play some color and to the top of the head
blended a little and the rest of the ear to that point, let's blend it. I think we should also do similar stuff on the
side of the cheek. Let's put some color and blend it I usually leave it to try and do the
first layer of blending. See you in the next video.
6. Shading part 2: Okay, so my layer, my face of the tiger is dry now, so we will place a
second layer of shading. This time we only
need two colors. The first one will
be once again. I call it medium brown, but this is my red color. I will mix it once again and I'll mix
it in 50 50% ratio. I call it that way.
So it's not very translucent and not very
thick, not very solid. And the second color
is my dark brown. In my case, it's October 2023, I need to add more pigment into this mixture because
I spread some water in it so I diluted it by accident and the second
color will be my dark brown, it's October 2023 from Roman Schmal Okay. When I have my two pints ready, I'm going to switch my
palette to my work. Well, I will use two brushes, one smaller one because
my number four I think my cat just took it and I don't know
where exactly it is, so I don't have my
favorite brush for now. So I will paint with my
number six Da vinci, it's not so soft. This brush is not so soft
as the Princeton one. That's why I will use to to
brushes to paint this layer, and we will start layering and shading
once again our tiger. Let's start with the easiest
part and the details. Let's paint the nose. Here I will paint with smaller brush and
this middle brown so red her goes in here. And leave it for now to dry because it's quite wet and
I don't want this to bleed. That's why I will
leave it to dry. Once again, I will
with my smaller brush, I will take the dark prawn
and let's define our nose. Once again, similar
just like before, let's paint a line, clean our brush, make it dry a little and
blend the edges. I placed a lot of water in here, so I know that if I will
paint this site right now, it will bleed in the
way I don't want. That's why I leave it to dry for a moment and paint this area. I will place my darkest brown
under the eye over here. Clean my brush, make it dry a little because I don't
want much water on my brush and blend it in here to
create a smooth transition. Similar goes to the side, I will place my color
this dark brown. Make it clean in the
water and dry a little in a paper towel and blend the edges Here you see that the left side of
the nose is already dry so I can do similar thing
on the right side. I have my line in my brush, make it dry a little, and perhaps it will
be easier if I rotate the work and blend it. Blend the edges in here. Okay. For a moment, I palette back and let's pick
a very dark brown, very thick dark brown
straight from the palette. And let's paint this area. We should do the same in here, but this is still wet and I'm wondering if this
will not bleed too much. Let's move on to the other
side of the Tiger's head. Let's start with our ears. Just like before we will
place dark brown in here, I was switching to a
bigger brush to Princeton, so I will place my color
in here in my brush, make it dry on paper
towel and blend it. Perhaps I will rotate. Okay. This area is very dark, so I will place color
in here and once again, blend it to the inside of
the ear and I will pick my dark brown straight from the cube straight from the pen and I will add
this brown in here. I know that it bleeds out there, but it doesn't matter. And I think we should also add some dark color over
here and blend it. Perhaps we should even make this area a bit darker
so it's still wet. I'll just add this color and
it blends with the rest. But if it doesn't bleed, so I see that some
part is dry now, then I will slightly with
the tip of my brush, blend it with the rest. Okay. And we do the same
on the other side. Let's start with our
dark brown over here. That's why I like the
softer brushes for this because easier to blend with
them if they are softer. I will add more pigment in
this area to darken this part. And just like before, And I will add once again color straight from my once again, I will add it in here and we'll do similar stuff on the side as we
did on the right. If you see that
somewhere just like in here is the paint creates
not very beautiful, not very pretty texture, you can still blend it. With the dump brush,
you can still do it. I switch to smaller
brush and once again, pick my thick dark brown. I see that the center of
my nose is already dry so I can paint the rest. I think I need to darken once
again the nose a little. It's already dry. That's why I will pick
once again my dark brown. I just layer on that part. Once again, one line and
with the dump brush, I don't have much water in it. Blend this part. I want more contrast
in these areas. Again, on the right part, we'll do the same
align and let's blend it I think I will do similar stuff over here. Once again, I will put
my paint and blend it oh I will take my lighter brown
this medium brown, lighter from this too, and
I will place a line in here and I will blend
just a little the edges. I don't want them
to flow very much down to the bottom of this area, but I want the area
next to the mouth to be a little
darker than it was. I see that here I have some not very pretty texture. So I just blend it a little
and perhaps once again, let's add some over
here and lend a little. The second part, so
this part the same. When I did this workshop
with my Polish people, they said to me, it's just like makeup blending
on your face, it's just shading the
makeup on your face. Yes, this is similar, we shade the face of
the tiger just like we can shade our faces
with the makeup tools. We need this layer leaf to dry. Because we only need to add some details with the
pains in the next step, so we need this layer
to be dry completely, see you in the next step.
7. Head details: So now we will move on with the details on our tigers face. We will use the same two colors as we did in the
previous lesson. And I'm going to paint
with the smaller brush. If you have, for
example, rigor brush, it also will be fine
because we need some very light andthin lines. So let's start with
the medium brown, so it's red or her in my case. I will test if it's dark
enough or light enough. I don't want this color
to be very dark because I want to achieve this very
delicate texture effect. Let's start with the ears. We will paint fur on our face. This is my smaller brush,
it's number three. But if you have some
smaller two or one, you can choose it. We will paint this just like in the birds class with
the tip of our brush, very thin simulation of four. This time, this will be four. In the birds class, it was
simulation of the feathers, simple lines, a little curved. With a tip of our brush.
Let's start this. I will rotate my work
with lighter color, I will paint some four in here and we can go
beyond this outline. Over here, we will create
rounded shapes because we want to show that this part
of the face is rounded. We also will do in
here, some four. We will do exactly the
same on the other side. For example, if it's
easier for you, you can rotate your work. And the same so Sometimes it's hard when
you rotate two seats. It's hard because you don't see exactly the whole
the whole area, the whole work, how is
it how it looks like. We have our first layer. Now we will do similar stuff, but with the darker colors. I will pick my dark brown. I will start with this part
because it's already dry, so I will add this darker details and in here, I will add more shadow
in my ear and this time, I won't blend the edges. I will simulate the fur in here. This darker color, I
will not use everywhere. Only in the areas which are more in shade are to create
more triedy effect of our face in here, not very much. We will do similar
on the other side. Let's start with the
center of our ear. Right now, I will remove my mixing palate and I
will take my palate. Perhaps I will switch it
this way because I need only the dark brown and I
need it to be quite thick. So it's easier for me to take
it straight from my pan. I will add some water
to it to make it more to blend it a
little with water. I just added a drop
of water to blend it and to have this very
dark brown color. On my scrap paper, I'll just check if I can
paint lines with my color. If it doesn't bleed as much, I don't want this color
to bleed with others, so I need it to be thick. With this color, we will
add some details in here. We will paint the places from
which the whiskers grow. Let's start with the left side. Some of them you
have on your sketch, but you can paint some
more if you like, if you feel that it will add
something to your painting. We start painting our
texture on the tiger. Some of these lines have textures you
have on your sketch. But I didn't want the sketch
to be very detailed one. That's why I didn't draw
everything in here. So this is for you
to be creative. To make your own tiger
patterns over there. These spots are getting bigger while we paint to the top of the head so they can be bigger. I see that this
area is still wet. That's why I for now
will avoid painting on it and I will move on
to the other part. I will paint this you can add some more over here. We can still darken this side, so we will draw once
again the shade. Imitation of the four. This side is still wet. That's why I don't
do that right now. The check I have my
cheek is dry now, so I can safely paint in here. This area is a little bit wet and I know that if I paint something
over here, it will bleed. That's why it's safer to just create some
texture on this cheek. You just observe your
work and make decision, which side is safer to paint for you for the
effect you want to achieve. Paint in this area right now, I think it's quite safe. I think that's almost it because I see that I missed
some texture over here. I think that's it. One more thing. Let's
do one more thing. Let's make this in this part with a little darker with these two lines and I'm thinking while I'm
cleaning my brush, I'm still thinking if
I should blend it. With the very dry brush, I will try to blend these edges. One edge. I think I will
leave the other ones. Let's leave that way. We
already have finished our face. The only thing we need
to paint in this space is white details with the guash, but we will add
these details with the at almost at the end of our course because
we will also add some white details on
the rest of the body. From the next video, we will move on to the body
of our cher. See you there.
8. Body first layer: Okay, so let's paint the
first layer of the body. Just like before, we will
use the same colors. So let's prepare them. So I will need for
my tiger's body. Red ocher, so light brown. I call it light brown color. This is my red ochre. But I need more of this color. I will spray some
water into it and we need 30% ratio more
translucent than solid color. So let's check on paper. We will paint wet
on wet techniques. Dilute the color will
dilute with water. We need some sienna light color, and we prepare it
in the same ratio. 30% ratio. I call it 30% because
it's not very translucent and it's
not medium value. So it's like 30% of
paint and 70% of water. And the last color
is my favorite one, so it's light gray. I call it pigeon gray color, but it's this misty morning from Aquarius Roman Schmal.
It's very beautiful. So once again. For now, we will not do shading. Shading we will do
in the second layer. For now, only we need the base colors for
our tiger's body. Also, we will need some
paints gray for the tail, and this color is not diluted with water
much, it's 50% ratio. Okay. Let's start from this section under
the bed in here. This is in shadow and I have simulation of
darker fur in here. I'm picking the
right brush right now because the bigger
will be better, but this one is a stiff
one and I don't like the stiff for
painting with water. I want the soft. I need the soft brush. This one is soft and
also this one is soft, but this one is too big
for me for this area. That's why I will pick this
number four for that stage and let's start with
the water and only with this area where we will
place the gray colors. Let's start with our gray color. I want it to flow in this area and I will leave it this
way to dry a little. I will do the same on my tail. Without the layer of water, I simply place my gray as a
base layer, clean my brush, dry it a little on paper towel, pick my paints gray, and I will add the spins gray in here and at the
end of the tail. I want this pins gray
to bleed with my gray. Also, I will do
similar trick in here. I will add the spins gray under the head and in here
where we have the shadow. Okay, let's place a water. Let's do the left part for now, but be aware that
this black could bleed and it's not a
big thing if it bleeds. With the water and
let's start from this sienna light and add it to the pose my tiger
and somewhere in here. While we're going up, we will take this
red ochre color and make it blend with the rest. Let's do the same
on the right side. We need to perhaps I will take
the bigger brush for that. Let's place the water. Let's place water on the
right side of the body. Once again, let's start
with this light ocher, place it in here, make it flow. Take this light brown
and add it in here. Also make it flow. And I see that I have
some which I don't like, bleeds, which I don't like. I will take a smaller brush
with brush with a dump brush. I will blend this bleeds
which I don't like. I have the same bleed over here. It won't be visible after
we place shadow layer, but still I don't like
them on this very moment. That's why I'll
simply blend them. And still I'm waiting a
little this area to dry because it's too wet to add
colors to add more color. I want to add in here, it's because I use this brush. It holds a lot of water. That's why I have a
layer of water in here. I'm trying to pick some of this exit water from this area by touching a
little my brush very gently. Right now, I will add more
pigment because I want this area to be naturally
darker than the rest. That's all for this stage. We need to dry this
completely before we move on.
9. Body layer 2: Okay, let's paint some
shadows right now. We will use the same mixture, the same colors
just like before, but I will take a
smaller brush for that. So let's start with
this gray color and let's add more shadow
under the head of the tiger. Sorry for my cat. Just like before, let's
add a line with the color, clean our brush and
with the damp brush, let's blend the
edges of the color. We will do the same
trick over here. I will place my gray in here, clean my brush, and
let's blend this color. If you still have paints
gray on your palette, you can add this paint gray
over here to make it flow a little similar
trick over here. And let them blend. I will switch to a larger brush. I will take my number four
and with some red ochre, perhaps I will add more
pigment to my paint. And let's add some details, I think it will be better
with the smaller brush. Let's add some shading and for simulation.
Or our tiger. Just like before, I will place a layer and blend the
edges with my brush. That's why I like
the softer brush. With the tip of my brush, I will also paint the
simulation of the four. Perhaps that's why I took
a smaller one because it's easier to paint this four
with a smaller brush in here, I will try to
simulate the stripes. Some details in here, simulation of the
four and in here, let's simulate the
four of our tiger. With the short strokes, here also with short
and rounded strokes, we simulate the roundness of the poet's do the same
on the right side. At the beginning, let's
paint some shadow area, it's blend the edges. And let's paint these stripes. I need more paint, so I will make it quite fast. Again, I know that it flows, but I don't mind that it
floats at that moment. I can even add more pigment in here
because I want it to be the darkest These lines where we have the
poll, I don't blend. They should be rather sharp. Let's add some more details. And let's move on to the tail. For that, we need our
painscray and I will add a line of the
color to the top of my tail and with a
damp brush blended. A little with the
rest and similar, we will do in here. I will place line and
with the dump brush, you can rotate your
work if it's easy for you and if you don't want by accident amuch everything
you have over there, so you can rotate
your work and blend this I think in here,
it's too light. That's why I will add a touch of my gray to create
a softer effect. That's all for this stage. In the next lesson, we will move on to the
details on the body.
10. Body details: Okay, so it's time to add some details to
the tiger's body. So to do that, we will need some colors, and this will be exactly the same colors
as we used before. The first one is paints gray, and I will mix them
in 50 50 ratio. So they are quite thick. The paints are quite thick. First one, we also
need a red ochre. I call it light brown, but in my case, the exact color is red ochre. Is 115 from Aquarius
Roman Schm and it looks like this Fir color
will be dark brown. In my case, it's October 2023 from Aquarius, Roman Small pins. Okay. Let's take a smaller brush. I will take number three
from Restor House. Let's start with
the smaller brush. Let's start with
the darkest area. I will take paints gray
and with this paints gray, I will add some details on
this area and on the tail. But we will be painting
with the very tip of the brush and these
very short strokes. Shirt and even curly. Don't paint the strokes
to be very straight. Try to round them a little. They will look more natural
if they are rounded a bit. So let's start with paints gray. And let's start with the tail because I will not smudge it
when I move to this area. So we will paint
try to remove it, and we will paint this simulation of the fur on the tail. We don't paint only in the center part where the
background is the lightest. We only add this four to the area where the
background is darkest. I forgot to curve a
little on my hair so you see how it looks and still, once again, if you have
this gray color which you used before, you can use it. My gray is a mixture
of red and blue. That's why when it dries, it looks like red, but it's granulate in color. I will add with my
gray a bit in here. I want to clean my
brush and once again, take the paints gray. I have four my cats four
everywhere. So sorry for that. And we it is very short strokes. I don't mind. Well, there is
unpainted areas like this. So in here in the shadow. I think we will have
somewhere over here. Some of the spots you
have already sketched on a sketch on the sketch. But still, you can add your own. Okay. Let's clean our brush, and let's switch to
this darker brown. Let's start with
this left side of the tiger and let's
do similar things. Here, I will connect this
brown with this black. Let's define here the pulse and second layer of four
in here and in here. Details in here and just
like before, let's define And let's do the same
on the other side. So again. To add more interest, we will use this light brown, its red or her color, and we will add more
simulation in here. I'll paint with
that color between. My left side is already dry, so nothing will
bleed at that stage. So I can add everywhere where I see that
more details is needed. And the same in here. But first, I want this
part to be darker. That's why I will place what's left on my palette
with my dark color in here. And blend a little. Perhaps I will do the same
with the very rest of what I have with my dark brown and pains gray because I
don't have dark brown. I just used the
rest, which I had, I used Pains gray because
this area is in shadow. This should be darker. Let's do the same
with the light brown, the same what we did
on the left side. Let's add more details
with the slight brown. It won't be visible much, but still it will create
this texture on the four. In the same pose here. That's all for that stage. In the next stage, we will
add details with white gwash, and this will be
the final stage.
11. White gwash: At that stage, we will add
details with the gwash. Just like you see in
the material sections, I will use designer
gwash permanent white. I have squeeze it in
here and let it dry. Right now, I will only
add water and mix it to create this very
thick paint effect. On this piece of paper. I will test if I can paint thin and solid line with
my tip of the brush. If I can, then I will go back to my work
and I will add the details. Let's start with the
eyes and let's paint this dot on the iris. Just like you see, even when we add only these two
dots on the iris, the tiger looks much better. If your white in here lost, you can paint it with the white. We will do the same
on the right eye. These two dots on iris, around the eye mid our. But this is my first attempt to paint this tiger from Mid
Journeys reference photo. In my reference photo, the tiger had the
white area over here. So we will do similar. We will do with simple strokes. Simulation of this
lighter fork over here and with the tip of my brush, I will paint the whiskers. Let's do the same
on the other side. Perhaps it will be easier
for me if I rotate the work and I see that I have a blob on the end of my brush so and the whiskers. And while we on that
area of Tiger's face, we will add some
details over here. On the ears, something
over here, not much. Still this texture gives
us interesting point to look at and the same
on the other side. I will rotate my work. Sometimes it is just
easier to rotate. I have a thicker paint
on my brush right now. It creates thicker line. I see that these are too thin
in comparison to this one. That's why I will
make them thicker. Let's move on to the whiskers over here
to the main whiskers. I trying to round them. And on the other side. Still, if you don't
have white gwash, but you have white jalpin,
you can do the same. Let's add some more. I see that my guash is too dry because it creates
this texture I don't want. So I just add some water to it. Okay. Let's add some simulation
of the fork in here. So whatever tip of our brush, Well, I hope you like it because I like this
I like how it looks. And the rest the very
last thing, I guess, will be to add some
details on this for here. And we can still add some
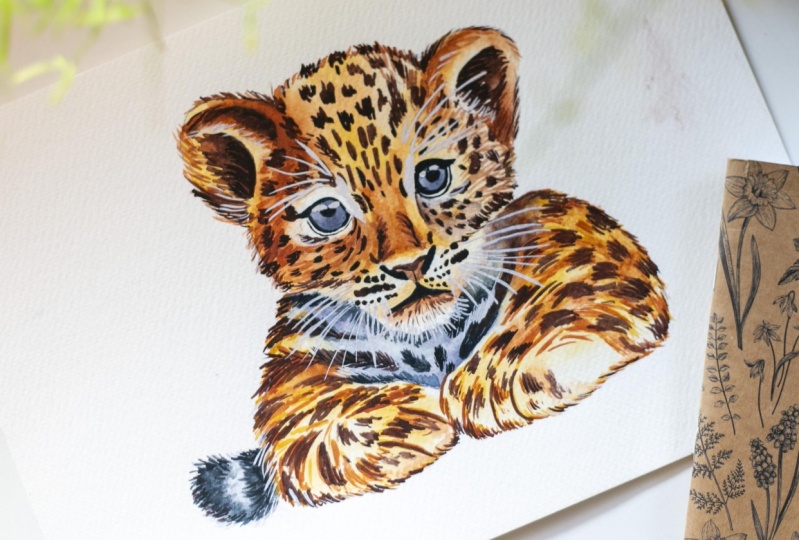
simple single strokes. Oh, let's leave it that way. Okay, so this is so this is it. We have finished our tiger. I hope you like the effect
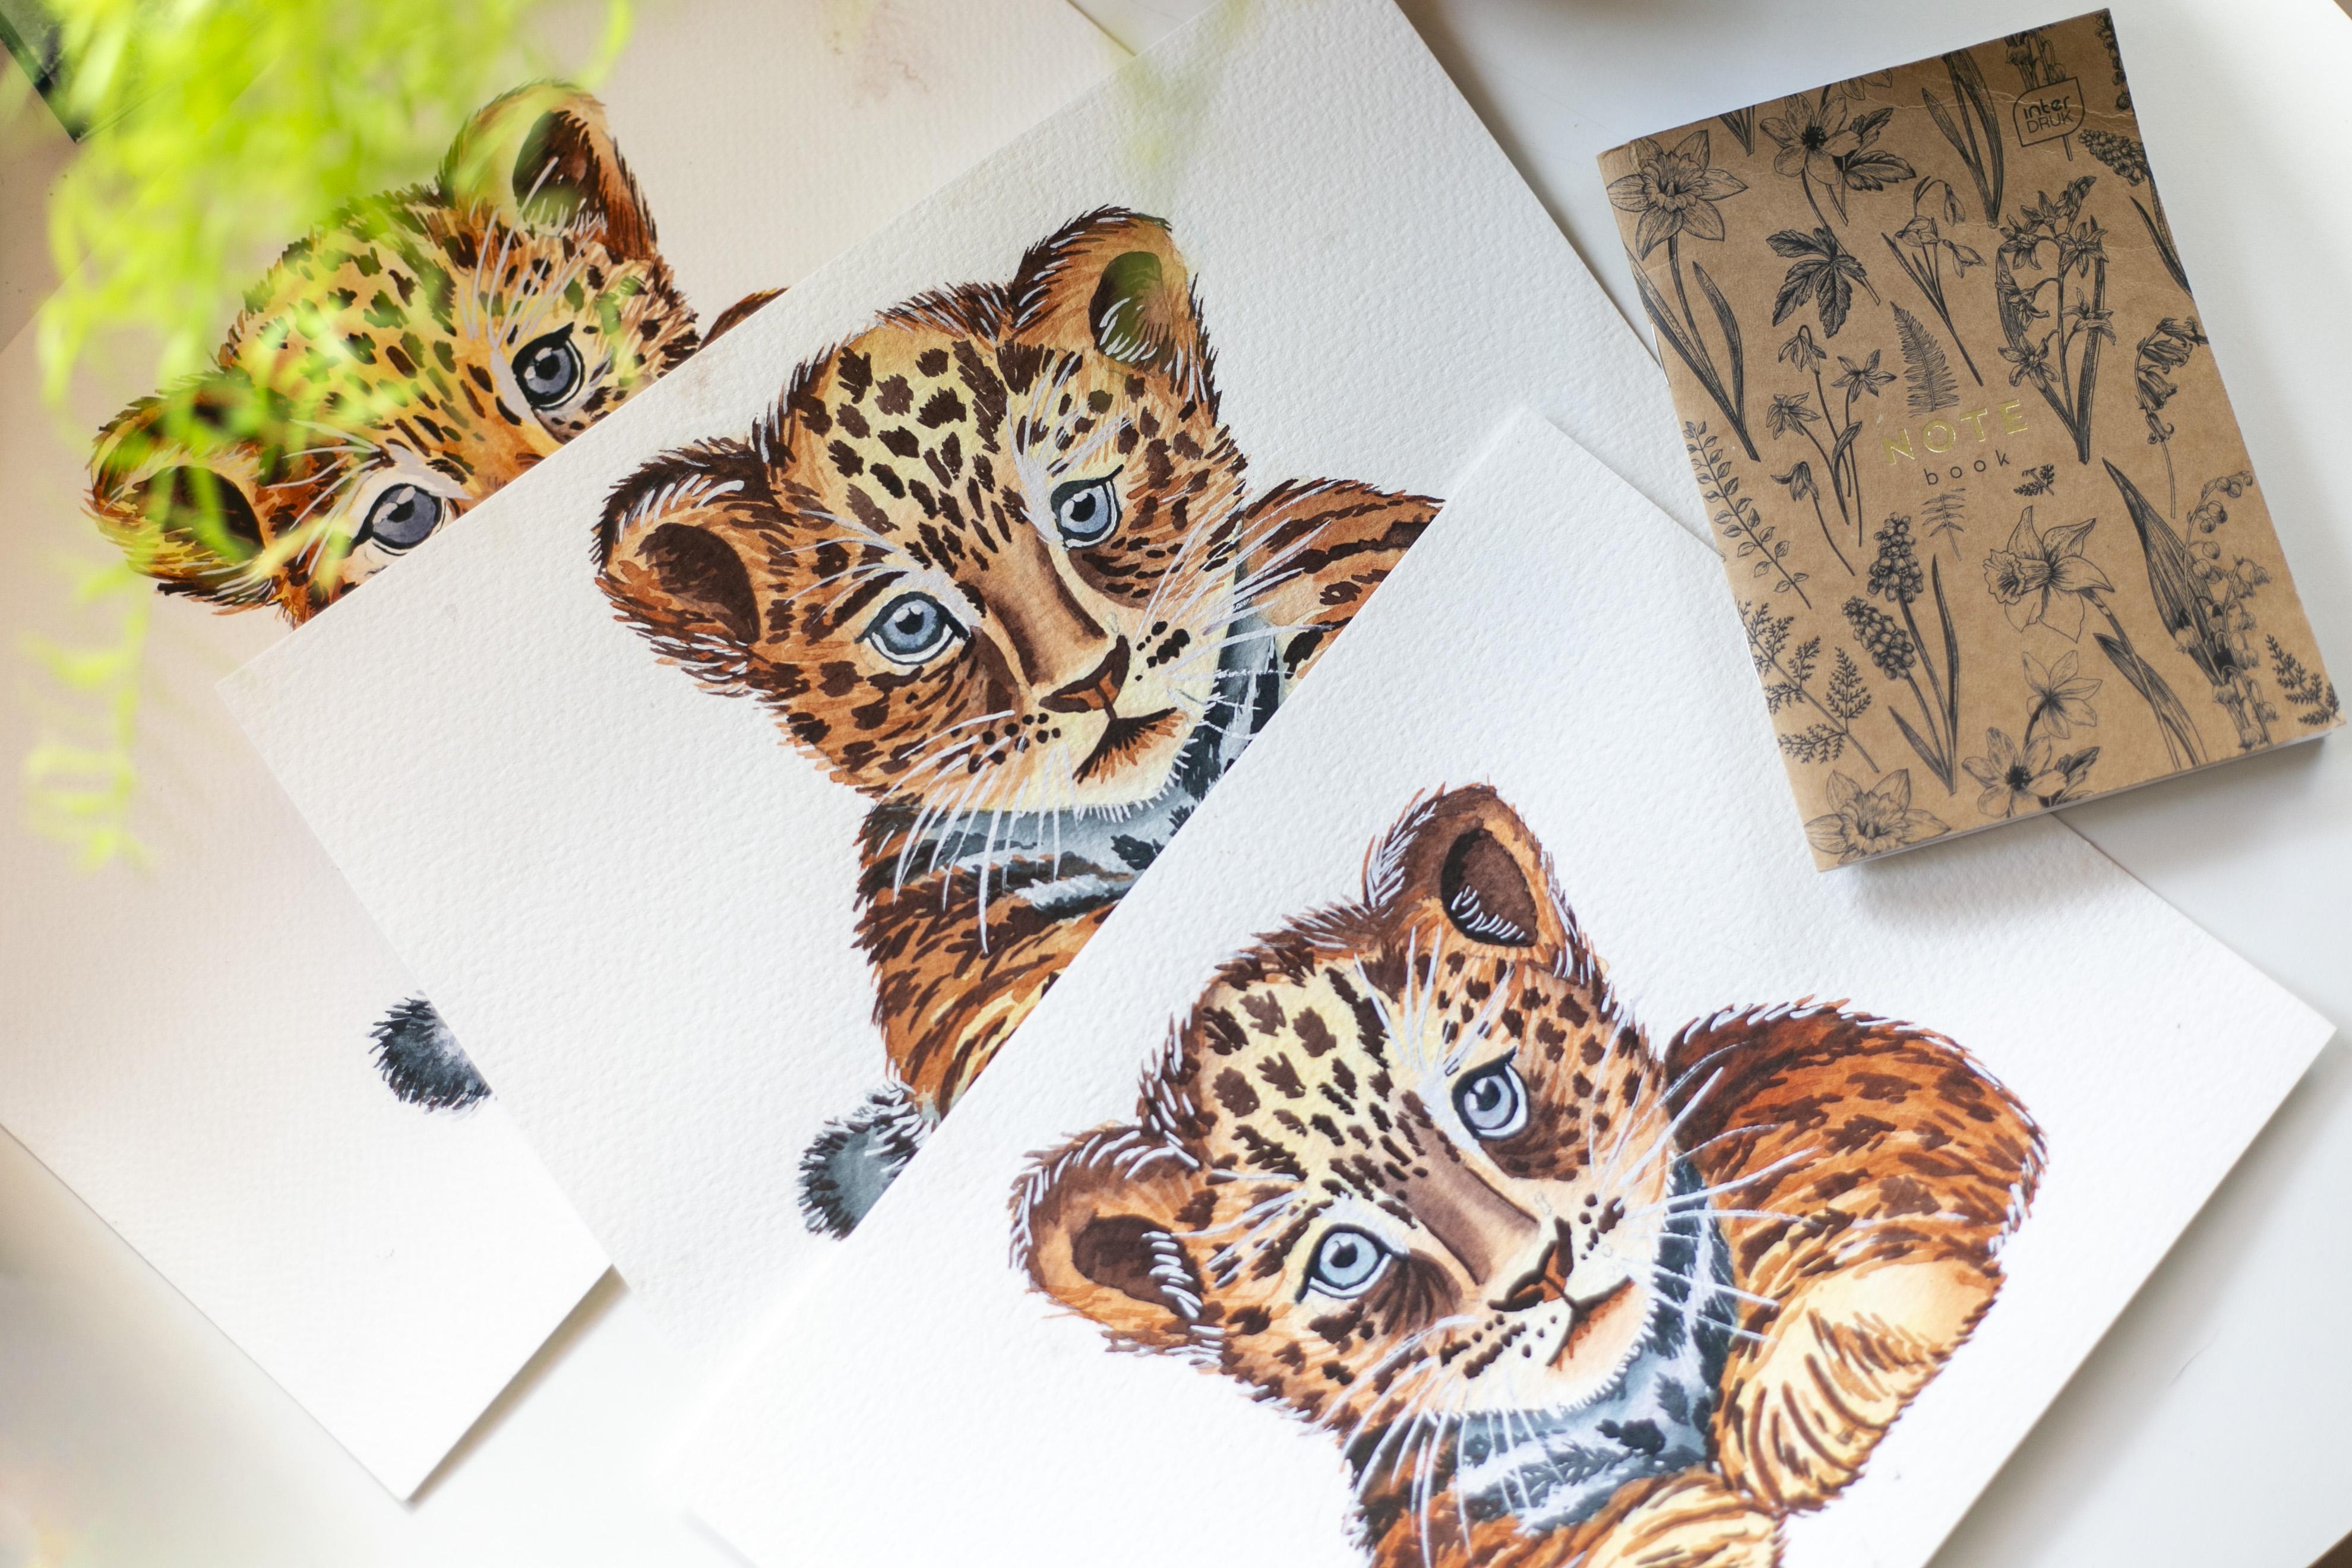
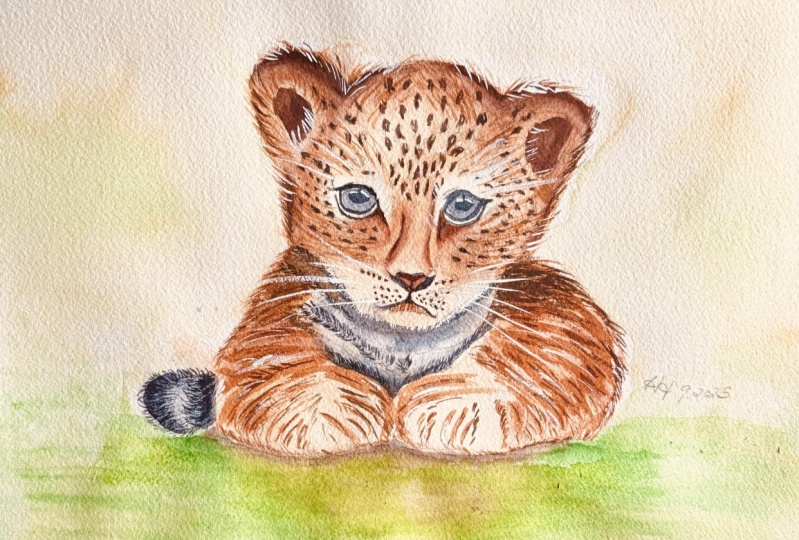
which you have achieved. It could be a bit different than mine
because just like you see, I painted it three times and every time it
looks a bit different. Don't worry if it's not
exactly how mine is. But still, I believe that
your work is beautiful. See you in a wrap up video.
12. Outro: Thank you so much
for joining me in this class and painting
your own little loopard. I hope you enjoy the
process and learn some new watercolor
techniques along the way. I love to see your finish work, so please upload it to the project section so I can take a look and leave
you a feedback. Seeing your interpretation is always the most
rewarding part for me. If you enjoy this class, it would mean a lot if
you could leave a review. It helps other students discover
it and join in the fun. If you're ready for more
watercolor adventures, check out my other classes. You will find plenty of animal and botanical projects
to keep you inspired. Happy painting and see
you in the next class.
 Anna Krupa, web developer & graphic designer, mix media artist