Transcripts
1. Intro: Hi, I'm Anna, a
mixed media artist. Welcome to this evolving class. In this class, we will
explore how to paint landscapes inspired
by reference photos, not by copying them, but by interpreting them. We will start with one
simple winter scene and paint it twice, once in gouache and
once in watercolor. Over time, I will be adding more landscapes and
photo based projects. This class will continue
to grow and expand. There will be no pencil sketch and no fixed outline to follow. Instead, I will show
you how to observe a reference photo and decide what's essential,
simplify shapes, colors, and values, approach
the same subject in different mediums and trust your intuition while painting. Each added project will follow
the same idea, one photo, multiple interpretations, and a focus on process
rather than done perfection. Whether you work in gouache,
watercolor or both, this class is about building confidence and learning how to translate photos into
expressive personal painting. Let's get started.
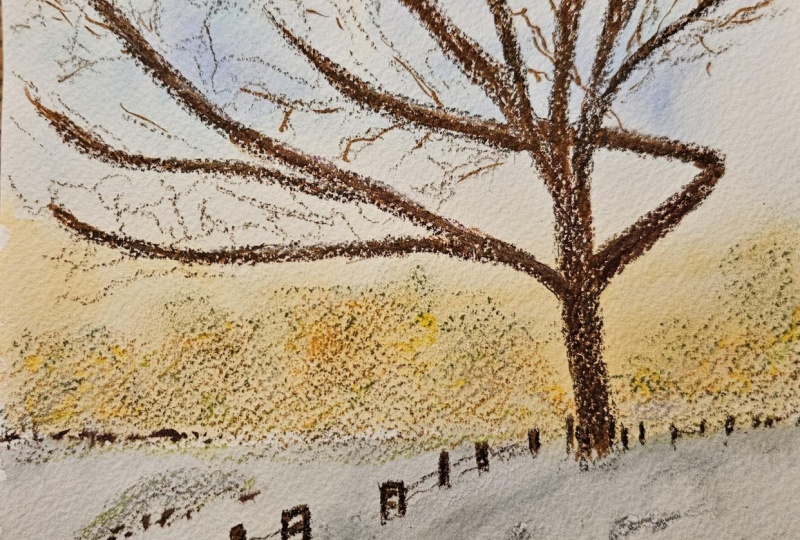
2. Watercolor background: Okay, so today we are
going to paint with watercolors and first thing we will prepare is the
background itself. So this is the final image
we supposed to achieve. So first thing, we need
to prepare our colors. Because we will be painting
with wet on wet technique. I usually paint on not
on 100% of cotton. That's why I need to have all colors made ready before I start to
paint the background. This time, I'm painting
on Renaissance sketchbook and it's 300
grams and Turcoton. I suppose there won't be a
problem with fast drying, but just as usual, first, we will prepare the colors
and then we will start paint. The one thing, I usually like to have border
on my sketchbook. I will draw it with my pencil. Because sometimes I'd like
to give the inscription or title to my work so I
need the space to make it. This is the only
preparation for now and let's choose our
colors for our work. I have my palette ready and a scrap paper and let's
mix some colors. First, we need a
color for the sky. So I usually use steel color
for that and I will mix in 30% ratio of 50 my colors. It's 50% of water
and 50% of paint. I will use the steel from Roman Schmal color. I will place the
exact numbers and exact names of these colors in the description
of this class. For the snow, I usually like
to paint with misty morning. It's also from
Roman Schmal and I usually call it pigeon gray color because
it looks like that, but this color is
granulating one, so it will create beautiful
effects on your work. And I mix this color
in 50 50 ratio, so not very diluted because we were painting wet
on wet so it will dilute itself on the background. When you look at that photo, you see that there is a bit of green gold in here,
the green grass. So it reminds me of this color also from Roman Schmal and it's
called green gold. I need just a touch
of this color. I also prepare it on my palette, but I don't have it
much in here because it's only in this area and
it's just some details. It doesn't cover
much of my work. The last color will be for
this area where we have bushes and I will
use Brown Ochre, I usually use red Ochre, but red Ochre is too much
red for that work for me, and I wanted more
brownish color. That's why I will use
Brown Ochre instead. And I also mix it
in 50 50 ratio. When I have my colors ready, I will put away my palette but not very
far away from me because sometimes I my colors are ending and I
need the color fast, or sometimes I just
need the colors straight from the pan
to be very solid. That's why I usually leave my palette just
somewhere near me. Also, let's change the water. Let's wet the whole paper. To make it faster, I usually
use a spray bottle for that. I will spray water on my paper and I will use wet brush to
move that water. Okay. I have a lot
of water this time. I see that I have a lot
of bottles of water, for example, I don't want. Okay. Let's check
on the photograph. You see that the sky is almost
to the half of the image. I think even 60% the sky has, but we don't need to
exactly paint like this. We can make the horizon
line a bit higher. I will take my mop brush
because it holds a lot of water and also it holds a lot of paint and I will start
from my teal color, and I will start
painting my skies oh, I have a bottle in here, and so I think I have too
much even too much water. I'll paint something like that. When I have too much water this time, I spread generously. I want some areas to be darker. That's why I will place more
pigment to these areas. I will reuse all of my pipment. I will clean my brush, make it a little dry
over the dump brush. I'm trying to correct the edges Okay. I will take my till straight from the
pen and I will add it in a few places to make my my clouds bit darker and perhaps
I will just blend them. Next, we have in here this little
green gold color. I want this area to
be only slightly with the bluish tone
because I don't like the effect when these two
colors meet with each other. So there is not much in
here of the blue and with the dump brush try to achieve a transition here. Next, I will take my brown. I will add it in here also on the green gold because I want to achieve this
slightly transition. I know that this will dry light. That's why I will add
more color in this area. To the bottom, I will
paint with misty morning. I will place my Misty
Morning in here. And I need to paint this line. I'm picking misty
morning straight from my pant and I will draw this line while
this is still wet. I just want this to
blend with the rest. Also I would like to have this area where we
have the bushes. With the rest of my misty
morning, I will clean my brush, make it damp and
with a damp brush, I will pick my brown orch straight from the pan and
I will add it in here. We also have this color, this brown elements in here, but perhaps this
will be too much. That's why I'm blending it with the rest water and
paint on my palette and with the rest, I will add just the
details somewhere in here. This is still wet. I would like to also give
a darker line in here. I'm picking my brown
straight from the pen. I will add this line in here. Wow, this flows very beautiful. I love the effect
which created in here. This is all for that stage. We need to make it dry totally. You can use hair dryer if you want to speed
up the process, or you can leave it to dry by itself and we will
come back tomorrow. I will come back tomorrow
with the pencils, colored pencils and
we will do the rest.
3. Colored pencils which we will use: Okay. I think I will show you the colors which we will
use during this class first and we will use it both on watercolor layer
and on gouache layer. So it doesn't really matter which tutorial or which part of this class
you're going to paint. I think it will be easier
for you to prepare first these colors and then
start to paint with me. First color is this one is
Turquoise Blue from Luminance, so it's number 178. This is 178 Turquoise Blue. The second color is Cobalt
Blue, genuine cobalt blue, 662 from Luminance, 662 Blue. Sorry. The fut color
is French Gray, 10%, eight or two, another one is this
one looks like green, but it's not green,
it could be green, but it also could be olive brown and this name is
also olive brown, one oh 39 Luminance olive. I have also medium brown
and this is sepias 50%. And the last color
from Luminance is Warm Earth Tone seven or one. And we also need dark brown. I don't have any from Luminance. I have one from ink tens, and this is it's not
ink tens from Dervent. So I have Derwent
Watercolor Chocolate 66. I wanted to buy ink tens, but I just missed
the right page. On the webstore, I just didn't notice that I'm ordering
not the one I wanted, but it's quite okay. I I think we should
use the stuff we have in our home if I have
this dark brown. The last thing, but
it's not for everybody. If you don't have pan pastel, you don't have to use it. I bought one for tests and this is my first
work on which I will use it. This pan pastel is dir
light, yellow, extra dark. I will show you
how it looks and I usually use it with my fingers. This color is similar
like this olive brown, but I think it's one to
warmer than olive brown. If I will place my color here, this one is with more
yellowish tones, this one with olive brown
is more with browns. But still, it's not necessary. If you don't have it, you still can draw or paint with
me in this class. This is PanPastel. This is all let's start drawing.
4. Watercolor bg colored pencils details part 1: Okay, let's start drawing. I have my crayons, which I showed you in
previous video with me. I won't be using
anything except this. I have my reference photo
near me, and let's begin. The easiest is to
start with the fence. I will pick my Warm
Earth 5% color. This is very light brown. Now I will start to
draw this fence. Just like you see,
the bigger is near us and the further it's away
from us, it gets smaller. This is the line on which
we will paint this fence. I'm starting to paint it we will add details with the next
crayon in a moment. I know that this area
is fairly visible, but yesterday I painted it with my Polish forks and this
area was a bit lighter, so it's more visible, but don't worry, we
will see how it goes. This is this. It has this
and something like that. Then we have this and it
gets smaller in my painting. Something like that.
I'm drawing too high. That's why I correct my fence. Next, I'll take but I
need to sharpen it. I'll take Sepia
50%, nine oh six, this is dark brown and we will draw the details
on this fence. I'm drawing the shadow, some little marks on this fence. I forgot to draw this
horizontal elements. I just look on the picture and see the details where
I can add something we will draw this and I
will draw them slightly. I don't want too much
pressure with my crayon. That's why I'm taking my crayon very far away
from the bottom and I'm trying to simply draw these lines and they
shouldn't be straight. They should be just like this way uncertain moves. They are very delicate. We have our fence ready. Still, when you see on
a reference picture, we have some shadow over here. For shadow, I will
go back to mine 741, so it's warm 5% ton and I will with the
side of my pencil, I will draw the shadow here. Again, I think I would like to add more
blue to the shadow. I'll pick my 171 color, it's turquoise blue
from luminance. Also with the side
of this pencil, I will slightly add bluish
tone to this shadow. I'm going forward
with my crayon. Want also to draw the sides
on an signs on the snow. I'll pick my French Gray 10%, eight or two, and I will draw. I usually start from this one. Just like you see on
a reference picture, they are smaller when
they are far away from us and they get bigger when
they are next to us. If you're not sure, you can draw this very slight line and then next to the line,
draw the shadows. Remember, they should
get bigger while they are moving towards us. This is the first root. There is the second root. For example, it will get
something like that. And then we have this
frutootF example, it goes something like that. And still, while we
have this color, we should add some shadows, but with the side of
our pencil to the snow. So they are just marks
left on the snow. Let's go back for a moment to this color to the Warm Earth, 5% seven for one, but I will sharpen it. And I will add to
some of these signs, a bit of color because I want the signs on the snow
to have different shades, it's harder to achieve
it with the pencils. That's why I'm adding
a second layer with the second color on top of it. Not on all, just on a few. When you look at that
reference picture, you see or notice that you have some grass looking through the snow here next to the fence. I will also make a suggestion that there is something looking
through the snow. And here, I know that there
are just marks and details, but the details do the work, we have some grass over here. Also with the same colors, I will try to imitate
that in this area. Okay.
5. Watercolor bg colored pencils part 2: So let's move on to the main object of
this piece, the tree. To paint it, I will
use mostly Sepia 50%. This is my first choice. And when I draw the
tree with that color, I will add details with this
dark brown chocolate 66. First, let's start
with the main shape. I think my tree will
start somewhere in here. So I draw the shape very delicate. With the pencil. After that, let's see
how the branches go. Mostly, they go for the
left part and to the top. There's only one
branch which goes to the right side and it turns
to the left in this area. I think it will be easier to start from the bottom and
start withdrawing this one. I think it goes
something like that. Okay. When I see that
the shape is correct, I'm pressing my pencil harder and I will
also make it thicker. It has something here. For example, it will go like that and make this
branch a little thicker, can correct my shade and
we have some which goes. We will draw all the branches
almost in the same way. Draw the main branches first. When we have main branch, just like you see on
the reference picture, we have a lot of very delicate. No pressing hardly to the paper, I'm drawing this
smaller branches starting from main ones. And there is a lot
of them and they can end with even smaller
branches at the end. This is my first part, let's to this side. I for now will draw
this branch and make it thicker and perhaps
I will sharpen my pencil. This has some Okay, and have some variety
in the upper part. So for example in here. And also let's draw
the light ones. There is a lot of them in here, and still we don't have
to and need to draw all these main branches. Again, we have something
in here which happens. I'm trying not to draw
straight branches. And remember, the ink, the photo is only the reference. You can just go
with the flow here. Okay, so I can color that in. I will do that. I will draw more branches
going to the left side. We have some which
goes like this, so they can cross each other. I have some in here, because there's a
lot of empty space. That's why I would like to add another branch in this area. I think we're almost
done with the tree, but it lacks something
in this area. I want to draw this branch and we can draw it
outside of our work, or we can draw it exactly
how it is in here. It's something like that, and then it changed
its direction, so it goes like this. This is my branch. And then it goes
to that site and I Now it's time to use our dark brown. I will use just like
I said before number 66 from the vent watercolor. So with this dark brown and we will add the shadow
with this dark brown. We have the shadow on the
left side of our tree. Okay. Sorry, I replaced my crayon and took 68 from Mondes because I couldn't just sharpen
my chocolate color. This one is not as dark, but if you have this dark this kind of dark brown
color, you should use it. I will draw with this one. I will add a shadow on the
left side on my branches. Also, in this area, we have some shadow over here, so I'll draw it and also we
have some shadow in here. Now, I want to add branches, these branches, which
I have in here. I will do it with my three
colors at the start. You can also use
olive brown in here. For example, I will switch warm Earth to
olive brown and first, I will draw this
horizontal line. For example, my branches
will start something in here with the site. I'm doing it with my
side of my pencil. Then I will add the branch, the bushes where
I seem the most. This is the darkest. This is the darkest
on the picture, and we have some bushes in here. They will be just they don't have to be very sharp because they
in the distance, we only see that there
are some bushes. Then I will switch my color to Sepia still with the
side of my pencil, I will draw this shadow. The areas where I
see on a picture, it is the darkest. Again, draw some bushes. And again, let's take the
darker brown and just in the simple places like here, I see that this is almost
dark on the picture, and here it is almost dark
in the picture and here. So I'm trying to mimic
that on my illustration. So I will only add in these
places these darker details. So for example, I will take
once again olive brown, you know, because I see that they are just symmetrical
and I don't want that. That's why I want to create the illusion that
this one is bigger. That's why I'm drawing with the lightest shade I had and
with the side of my brush, the illusion that
there is something more there more bushes in here. We have this space also
to draw these bushes. Once again, with olive brown, let's shade the area where
we will draw these bushes. This is the whole area
and I want to mimic that and with the tip of my
pencil draw some texture. Like the shadow or this grass which look
through the snow in here, let's draw the bushes. Once again, I'll pick my Sepia 50%, just like before in here, let's add some more details and more bushes. In this area, I won't be adding the darker shade because they are murals and
they don't look, they don't seem to be as dark as this ones
on the background. I think I will see
from my previous work. I think this is almost done. Perhaps I will take once again Turquoise Blue and draw with
the side of the pencil. Some marks on the snow to create the different shades of shadow. Also on a few signs, I will add this color
to make it cohesive. So the very last step
and only for once who have the pan pastel and I showed you that I have dilt
yellow extra dark. I will add the slight touch
of this green on my work. But just like I said before, you don't have to do it if
you don't have pan pastel. The work is already done, so it's not necessary step. I will add my green with
my finger I'm here just to add more greenish this effect
onto my work. But just like I said before, the work was already
done so you don't have to do it if you don't it. That's all. I wonder how you felt with painting with watercolors and
the crayons on it. In the next video, we
will do the same study, but with paints with the gouache
and the pencils. See you
6. Gouache background: Okay, right now, we will
paint the same picture. But with the gouache paint, I have this Himi set
with a double 36 colors. And we will use them. I just love this gouache set. It's very versatile. I will paint in mixed media pad. This one is 30 grams,
300 grams paper. It's mixed media, but it's
not suitable for watercolors. I will test my gouache paints
on it during this video. Okay. So I will test if this paper is suitable
for gouache paints, but I think it will. So I have just colored
pencil to make my area where I will be drawing my scene I suppose here I can test my colors. In this step, we will only paint the background
with gouache. Just like with watercolors, we will wait until it dries and then come back with pencils
with colored pencils. So I will use my brushes
from the Himi set. I have number eight
and number six, but I will mostly use
this number eight. Just like before, we
see on this picture that the sky is almost to the half of the picture
is something below. But in my first brush painting, I left 50% for the sky for this part where there is this
area where we have bushes. We will do similar. For this part, I definitely will be using sky blue
color, so this is it. I will use white
because we have some white they look almost
grayish the clouds, but I will use white for
that and I have titanium white and white and I
will use titanium white. For that core bushes in this area where we
have a bit of green, I won't be using
green this time. I will use color Earth. I just love this color. I painted with it a few
times, it's Earth yellow. This Earth yellow reminds
me of natural senate. I will also use a touch
of this brown sois Ochre, I suppose that is all when
it comes to gouache paints. Let's start. I can just even draw a
line where my for example, sky should end and it's in
the middle of the square. First, I will paint my sky to
the two thirds of the area. I want this part where we have bushes to be slightly
larger than it is on my picture because we don't need to paint exactly
how it is on this picture. I will switch right now between sky blue
and titanium white. I will start with sky blue. I will just when I see
that my brush is dry, I'm retting it slightly
with water and I don't usually mix gouache
colors because I have a variety of
colors in my gouache set. That's why I don't
need to mix them. I can go beyond this frame. I'll start with the sky blue. I have this area painted. And I will clean my brush. Clean it on paper
towel because then I see if it is clear
enough if the water which drains into my paper towel is white, not white translucent. I know that he don't have any rest of colors
which I used before. Now I will perhaps
rewet my brush and take my white to create
this white clouds. And sometimes I just went
with the dabbing motion. Sometimes I take more
paint and place it with this thicker layer on the work places where I want
this white to be more solid. For example, in the
center of the clouds, we have more white color. Okay. It doesn't have to be perfect. We don't seek perfection here. Still, we can see and create this dry brush
effect and it's also okay. I will rewrite my brush. And I will add just a touch
of this blue in here, and then I will switch
to Earth color. I go with this Earth color onto my blue because I want
them to mix slightly. Of course, they won't
mix the same as in watercolors because
they are thicker, but still Now, I
don't clean my brush between these two colors and because I want them
to mix slightly on my paper and now I will take
ocher and place it in here. I see on the marks that
my brush is a little dry. And here I want this
transition to white. That's why I will clean
my brush right now, see if it's clear enough
on my paper towel. Perhaps I will even take away my paint
on the paper towel. It's already dry, so I will
wet my brush and say white. It's titanium white
from the set, and I will add it in here. Again, I will
switch to sky blue. It's okay if we have the marks on our
paper, it's very okay. And here we have too much blue. That's why I will take titanium white and place it
on my snow in here. So perhaps more white. Just like before, we
need to mark this line. With my brush, I could even
take this smaller one, but honestly, I don't
like this number four. I just don't like
the way it works. That's why I mostly
don't use this brush. I usually paint everything
with this number eight. I will take sky blue and mark our path on which
we have a fence. Mo and on which the
tree will be placed. This is very important
line with wet brush, still, I can make this line to be not so much
with sharp edges. I don't want this to sharp edge. Is to have sharp edges. And the same, we need this
area and I will mark, I already have it, but still
I can add more marks here. If you don't like that it's
too much blue in here, you can still use white and correct that perhaps
it goes too high. Gouache is quite
forgiving painting. You can still correct mistakes. This one dries a little
so perhaps we can add more white areas. Or we can add more blue to the colors. Okay. And I need more
white to this part. Okay, this sharp motion. Okay. We need to leave it to dry. Of course, you can dry it with the hair dryer if you like. And after the drying stage, we will continue with pencils. See you then.
7. Gouache bg colored pencils details part 1: Okay. My background is dry and we will use the
same color pencils we used for watercolor step. So 171 requires blue from Luminance 662 cupboard
blue from Luminance. They are almost all except
this dark brown from Derwent. All of these colors
are from luminance, but I had to change
this Derwent pencil for Mondeus 68 because I just couldn't
sharpen this pencil. The last one, PanPastel I will use dilt yellow extra dark, but it's optional.
It's not necessary. I just want to play around
with it and to test it more. We will do the same as before, we will take this Warm Earth. I have my cats for everywhere. This is this color and we have this area where we mark where we will be
drawing the fence. Just like before, let's start
with drawing the fence. Remember, while going far away, this fence is getting smaller. So here then cut this part. Now I will say Sepia 50%, it looks like dark
medium volume brown. Before, I will
draw some details. This paper I thought
it is better, but my pencil is sliding on it. I don't quite like this effect. I'm drawing right now the
sides where we have a shadow. Once again, let's
draw this cord. With the same technique we
used in watercolor stage, I simply pick my brush far away because I don't want these lines to
be very straight. We can also make some marks
in here to indicate that it's This is something we didn't do in watercolor. But it is okay that we can translate the
image differently. Now I will pick my number 662, so it's covered blue. I will draw this shadow
which we have in here, in this area, just like before, we see some grass
looking through the snow in this area
and I will pick for that warm Earth five and I
will just make some marks. Perhaps with the
side of the brush with the side of the pencil, I will create some
texture so we have a shadow and Also let's
draw just like before, this marks on the snow. For example, first will
build something like that. The second will be like
that. This is this one. The last one goes beyond our illustration,
beyond our border. Without pressing too
hard with my pencil, I'm drawing this I
think these are steps. Somebody steps on the loan. Still with my 662, I will just make some texture. Because when you look
at that picture, you see that there
is some shadow, but you don't exactly tell
where, but they are there. I'm just creating Also, we have some grass over here. For example, we can also
with the side of my ans create something like that and this grass looking
through the snow.
8. Gouache bg colored pencils part 2: And I think we are
going we're moving to the main subject
of our pictures. Once again, it is the tree. I think I will start it
somewhere in here because it's two elements away
from this main part. I think it will start
something in here. At the beginning, I slightly drew my tree and perhaps I will also color it in. Just like before, let's
start with the branches. The easiest way is to
start with this one, it's something like that, and it goes away and I will
make it a bit thicker. Okay. Then we have this branch salts. It goes from that
one and something. Something like
that. Remember, it don't have to be perfect. I'm saying that because I see
that I place it too high, it shouldn't bother you. Everyone makes mistakes,
it's too high for me, but it's okay. Let's
leave it that way. We have this branch, so it's something in here, which connects to this one. Okay. Just like before, I will go to this branch because
it is easier for me. It's something like that. It has some arms of this branch. And we have a lot of going
on here, for example. This tree definitely
will be different than the one we painted on a
watercolor background. And we have some
branches going here. We also have a lot
of going on in here. But when you see that picture, you see that this branch is the one which
starts from here, it starts from here
and goes like that. We have this branch which
is something like that. Then it turn out and goes Okay. Let's do some more over here because this
part is too empty, perhaps I will
sharpen my pencil. We also have the
texture from the quash. Perhaps it's not very
easy to draw on it. The last main branch
with this one. Right now I'm I start to
add these little branches. Just like before, without
pressing too hard, I will draw the
smaller branches, a lot of smaller branches. These branches just
make a crowd in here. Drawing branches is very relaxing because you have
to paint a lot of them. You have to draw a lot of them and they are just easy to draw. You can even switch off your
thinking and inner critic These branches are
even overlapping each other drew a lot of them because there
is a crowd of branches, crowd of this small branches. I think that is enough
and that's all. Right now, I'm switching
to the darker brown. It should be this
chocolate color, but just like I said, I couldn't sharpen it. That's why I will use this one Mandi 68 and I will a shadow on my tree. Left when you see on picture, you see that the left
side is in shadow and I noticed it just right now that the right
side have a bit of discolor warm Earth
on the right side. We can at some strokes on the right side of our
branches and make the left side darker to create this illusion
that this tree is not flat. Well, it should be even
darker color than I have. But sometimes you have
to use it what you have. I don't like the way the drawing with pencils
fits on this paper. But overall, I just like the
effect which we achieved. I don't know, perhaps
I should draw two or three more works
with the pencils on this paper to make up
my opinion about it. Strange feeling. The
way that I felt about painting with wash
and it was fine. It was very fine with painting
with uh on this paper. But the crayons, I
don't quite like. Let's move on just like before to this area where
we have bushes. Similar like yesterday before, we will start with warm Earth, 5% and I will just mark the area
where we have bushes. I don't have to have
any obvious shape. Also, let's draw this. We have some grass looking
through the snow in this area. I will just make some marks over here and let's create the bush. I with the side of my pencilon not
pressing very hard. If I want the layer
to be darker, I simply drew over that
layer a few times. Let's switch to Sepia, 50% from luminans 96
and just like before, let's throw some
bushes over here. They are in the distance
so they don't have to be um visible in all its form. They could only create an illusion that there
is something out there. And with the side of my brush, I want to create some the same, let's draw
some bushes over here. Perhaps I did it too much. I mean, that I supposed
to make it a bit lighter, but let's leave it that way. Sometimes you just draw
to learn something. For example, that you
shouldn't do something. It's also okay. The last thing with
the darkest brown. Let's add more
contrast in this area. My dark brown is not very dark. Sorry for that. I'm
trying my best, but this one didn't
work as I wanted. But it's also okay. You learn from
every work you do. I think the more the
most you learn from the ones which didn't turnout
how you want it exactly. Let's finish this part
and it's optional step. I will use this pun pastel and I mostly use
it with my finger. This is first time when I test the pen pastel
on this paper. I don't know exactly
how it will work. I'm adding this green shade to this part where
we have bushes. But just like I said before, it's optional, you
don't have to do it. The work is also fine
without the step. Okay. Well, I think it works
quite well on paper. And the final touches
for our work, I will take my lighter blue so Turquoise Blue, and I will add the marks here on the snow let's take French Gray percent and
also add the shadow. Once again, the second
layer on the shadow. And on the steps on
the left side of the steps to create more like shadowing here. So I think this is all I think I like the
effect which we achieved. This is my first work
on a different paper. It is talents sketchbook and it has a different
paper than this one. This is a very smooth paper
and this one is also smooth, but the pencils don't slide as much on this
paper on this one. I hope you enjoy this painting, and I think this
class will grow. I think I will add some more videos with
other pictures where we will be painting
them with watercolors and the same project twice, just for you to see which of these two techniques you like better or maybe
you like both. See you in the wrap up video.
9. Outro: Thank you so much for
painting along with me. I hope this class showed
you that working from photos can be flexible,
intuitive, and creative, and that the same
reference can lead to very different results depending on the medium and your choices. This class will
continue to grow with new landscapes and photo based
projects added over time. Feel free to come back
whenever a new lesson appears. I'd love for you to upload your project
to the class gallery, whether it is one painting or several and share your
interpretations of the reference. If you enjoy this approach, you can also explore my other classes where we
focus on intuitive painting, simplifying complex subjects, and working with
different materials. Thank you for being here and I will see you in the next lesson.
 Anna Krupa, web developer & graphic designer, mix media artist