Transcripts
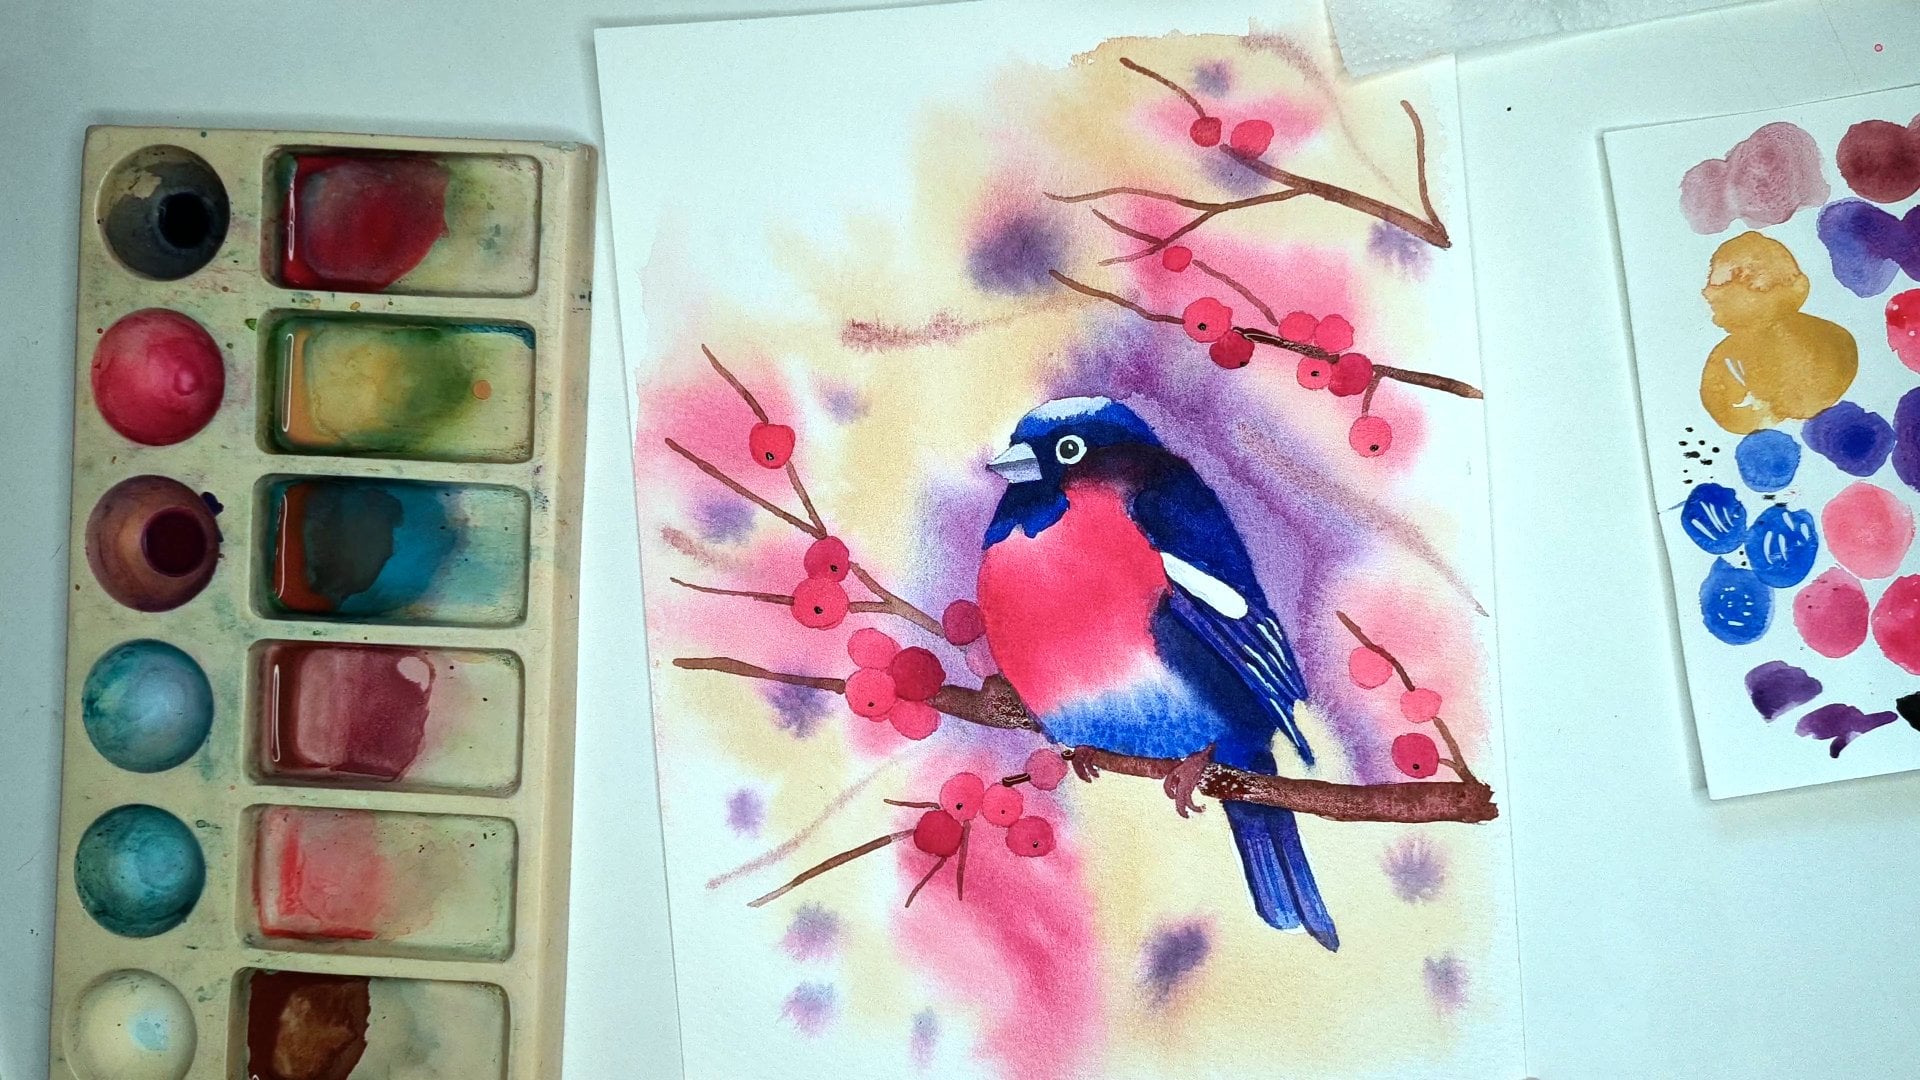
1. Intro: Hi, I'm Anna, your watercolor
artist in this class. I help beginners build confidence with
watercolor by focusing on small steps and by making the process
fun and relaxing. I teach here on
Skillshare and also run my own creative community
called Art Club, where we explore different watercolor
techniques each month. If you'd like to
see more of my art, sketchbook pages or
upcoming workshops, you can find me on Instagram. This particular class, we will
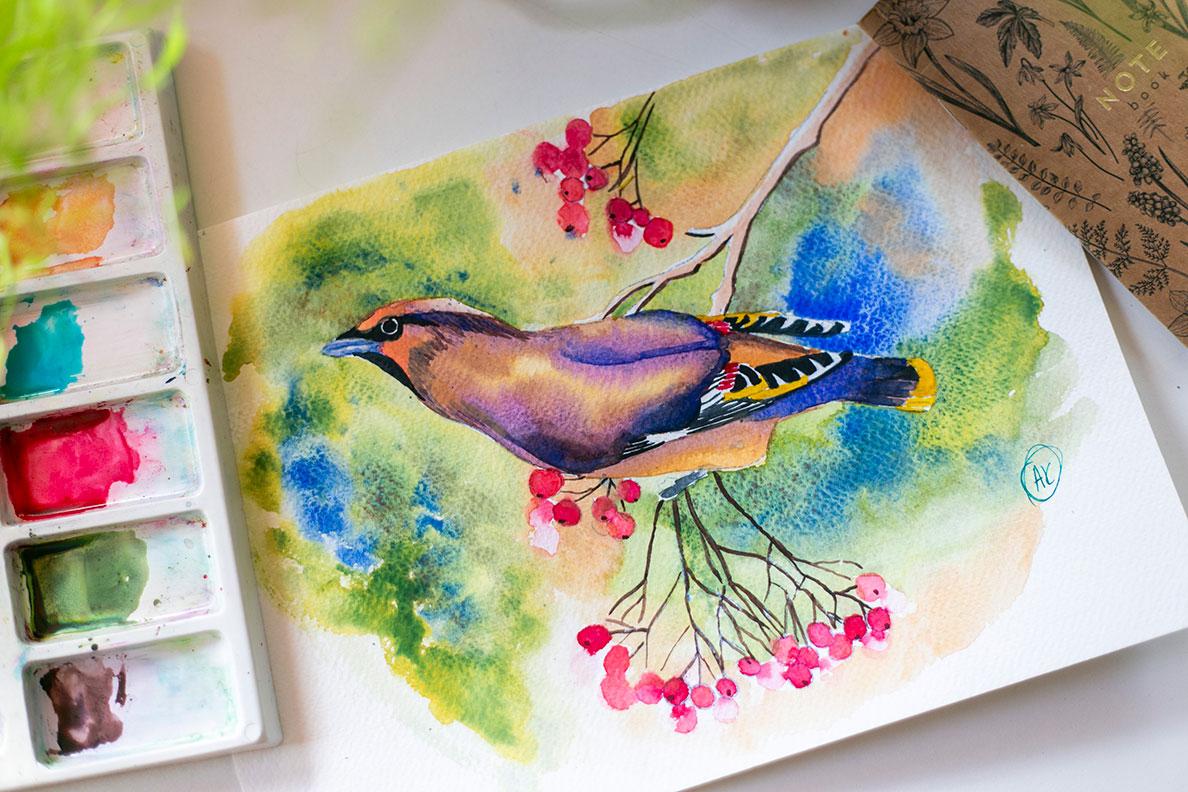
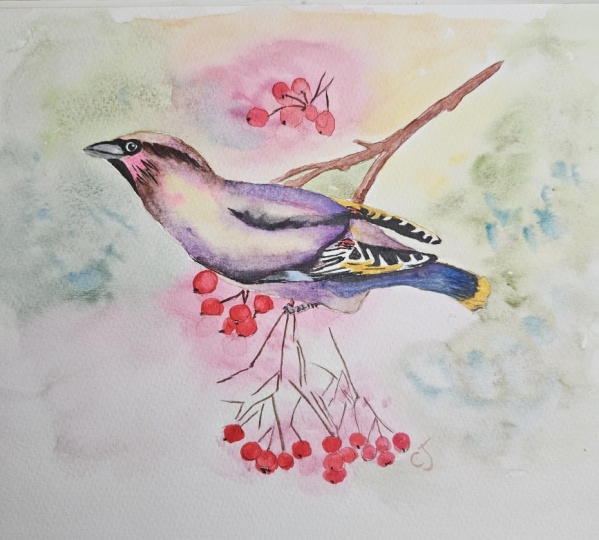
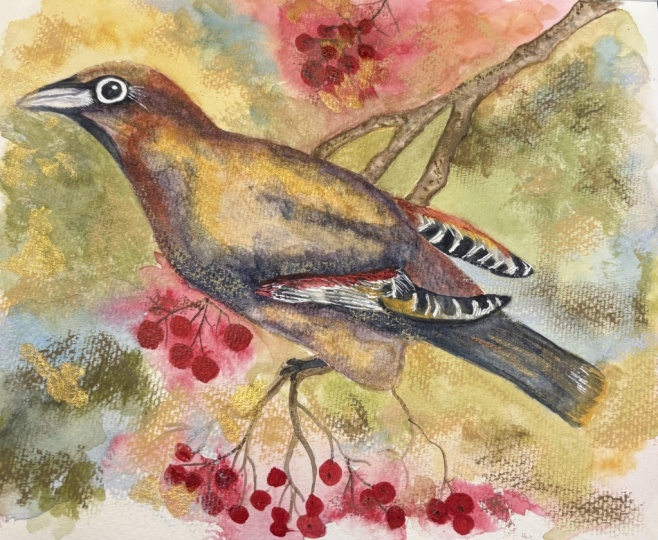
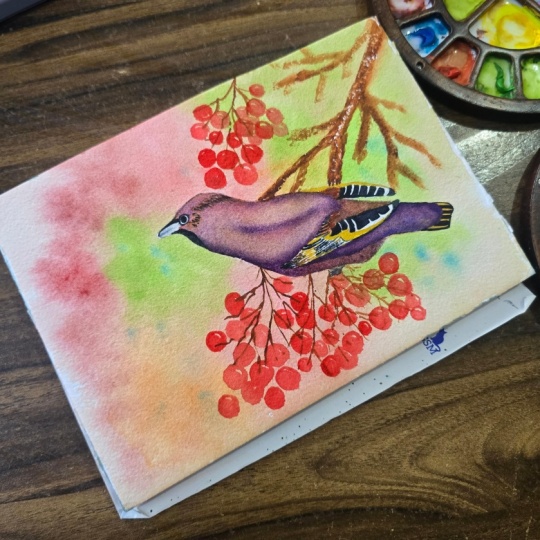
paint a beautiful waxwing, a perfect subject to
practice blending, color layering,
and brush control. Even if you're
just starting out, you'll be able to
follow along easily. By the end, you will have your own soft glowing
bird painting and a few new techniques to
use in your future project. Let's get started.
2. Materials: So hello. In this video, I will talk you quickly through the materials which we will
use during this class. First of all, we need just
like usual watercolor paper. I will use 100% cotton paper. It's a five size. I will paint on that, but just like usual, you can use whatever paper
you have in your home. But still, I suggest you 100% cotton because
it will affect the work and this will affect the time on which
your work is wet. So first watercolor paper. The second are, of
course, paints. This is my set and I mostly
use white Knights paints and Roman Schmal it's a polish
company set set of paints. These colors I use during
all of my classes. If you see my previous classes, I mainly use the same
colors over and over again, so we will use the same colors. But still, if you don't have exactly the same
colors just like me, you can use whatever paints
you have in your home. It really the company, it doesn't really matter. The next thing are brushes. We will use smaller brushes for details and bigger brushes. And just even bigger
than this one for painting background and painting
some layers on the bird. Just like before, we also
need water just like usual while painting with
watercolors and paper towel. That's mostly all. We don't use crayons during this class, so you don't need to have one. You have also the sketch
in the project section, so you can download it and transfer it to your
watercolor paper. I hope you enjoy this class and see you
in the first step.
3. First layer: Okay, so hello in
the first lesson. In this stage, we will paint
the first layer on a bid. We need to prepare
our colors for that. I have my paints, my mixing palette, and a
scrap paper to test colors. The first color which we
will use is Sienna light, and I will mix in 50 50 ratio, 50% of paint and 50% of water. I don't want them to be very
thick or very translucent. They should be in the middle. Stage, as I call it. This is my first color Sienna. The second color will be rose. This is my second color. The first color, we need
a medium value brown. I don't have medium value
brown on my palette. That's why I will
mix a dark brown. This is my dark brown
and it's called October 2023 from
Aquarius Roman Schmal. I will mix it with red ochre. I call it light brown
because I use it mostly as a light
brown and I will add this red ocher to my October 2023 mixture to achieve this
medium value brown. This two gives me
this kind of brown and the last color
will be tramarin. This is tramarin blue
mixed with magenta. We need this violet. This is our violet or purple. That's all. We also need
to exchange a water because we will start
from painting wet on wet. That's why we need a clear one. Let's start. I will take smaller brush and let's
start with the water. On the first theory. We will lay water over
here and over here. We don't lay our water
on the beak and in the place which are very dark on my picture and on the eyes. We also don't paint this section of the
wing, and this section. We want them to stay white for this moment and also we
don't paint the end of the tail because
it's a yellow on a picture if we place
a layer under yellow, it won't be yellow at the end. That's why we need this
section to stay white, and in the next stage, we will add some
details to the wings. But for now, we only paint
the main body of the bird. I will take a smaller
brush because I want to lay water in this area. And after I place the
water in this area, I switch my brush
to a bigger one. This is number four
from Princeton and I will lay I have
some paint on my brush, but it doesn't really matter. Now I will place water
on the rest of the bird. Rest of the body of the
bird without the wings, like I said before, we don't
cover the wings with water. For now, we also don't cover
the lower part of the bird, only the main part. Okay. And while we have that, we will start with the
sienna color and we will add it and let
it flow on a bird. Let it flow. All over the body. Next, I'll take this rose
color and add it a touch. I just touch the
bird in here and here almost where the belly
is and something like that. I clean my brush and dry it
on paper towel and for now, I'll take this violet color
and I will add it in here. At the bottom of the part
on the wings in here, I will define the border
between two wings. I will add just a hint
over here where you have the lines sketched
here on the back. I don't want it to flow
as much on this part. That's why I will remove it
with my wet but damp brush. I will pick once again sienna light color and I
will add the sienna in here. Right now, I'm cleaning my
brush and make it dry on paper table and I will
take a brown color. I will add in this
area where I want the bird to be um the
shadow to be the darkest, but still just like you see, it flows very beautifully. I just love how it
flows in that stage. I will also add just
two touches over here, and I want it to flow by itself. Okay. And right now, let's move on to
the bottom part. I will clean my brush
and with a clean brush. I will start adding water, but I know that the
upper part is still wet. That's why I don't want to touch that because I know that it will flow and I don't want the pain to
flow to the bottom. That's why I don't touch
right now with the water. I cover this area. I leave the end of the
tail unpainted with water. Okay. Let's pick a Siena light
and I will add it. I give the upper part time
to simply dry a little. I want to clean the part
with them clean de brush. I use a clinton brush as a
eraser sometimes over here, right now, I will take my
violet and add it here. To make it flow. Okay. Let's switch to
the smaller brush and I will take a Senate and I will paint this
area in my brush, dry on paper towel,
take the brown, and with my brown, I will add it under the wing. Just a touch because I took a smaller
brush because I don't want this brown to flow very much to the bottom
part of this area. And with the smaller brush, I have a bigger
controls how it flows. That's why I use smaller brush for that and
let's leave it to dry. You can still correct any areas which you have
and you don't like. For example, I have
some paint over here so I can remove it
with my dump brush. You can also clean
it with paper towel. That's all for this stage. We need to leave it to dry. See you in the next video.
4. Bird - second layer: Okay, so my first layer is dry now and we will finish
the bird right now. We will do this in two steps because we won't mix
colors for the first step. I will only show you which colors which colors
we will use for that. I have my palette in here
and my bird over here. For the first part, we
need just a few colors. First one is um Yellow, and this is Hansa
yellow and I don't mix these colors on my palette because I want them to be thick. That's why I just take them
straight from the palette. This is my first color. This is my second color and it's light gray and it's misty
morning from Roman Schmal. This is a misty morning. The third color will
be Alizarin crimson, just for some
details on our bird. The last one is pains gray, it's like dark gray color. For that stage, we will
use a smaller brush. I will use number three
from restore house, and this is a number three, but if you have a smaller brush, you can take even a smaller one. This is the smallest
which I have, so I have no choice to use it and we will start from raton. I will take a misty
morning and I will paint just align on my
beak, clean my brush, and dry it a little
on paper towel and blend this color on a paper. Okay. I will take paints gray. We will paint the eye
the iris of the eye I will leave the rest
outline of the eye alone for a bit because I
know that the beak is still wet so it could bleed a little. That's why I will paint
this part under the beak, which is also dark. Once again, paints gray, and I wonder if I can paint
the upper part of the big. The pain is thick. That's why it shouldn't
bleed smudge. And around the eye. We will leave this
white area unpainted. I think it's easier
with a smaller brush. But still, if you paint it, we can paint it back with the white
quash on the next stage. This is our eye still with
the paints gray on our brush, we will paint details
on our wings. Okay, so we have our
first wing and once more, the second wing the same
with the same color. Okay. That's not all with the
black with our paints gray. We also need to paint some
marks on the wings over here. These are just the
stright lines. We have a straight line in here. We have some lines in here. We have some lines in here. Also the same here, I forgot to paint this area. Let's move on to the right now. Let's take Alizarin crimson. And with Alizarin, let's make some lines over
here and some lines over here. I see that I also forgot
to paint this area black. I will do this once again with the
red, details in here. Now, let's switch to the yellow and let's start with the end of our tail and give some
minutes to the wings to dry. This is my first thing and let's move on to this part and we will add this yellow to our wings. On my picture which I had, yellow didn't go to the end of the wing and it's somewhere
in here and the same in here. We will add to this
area and we will add this yellow to
this area. Okay. I will clean my brush. And remove my
painting to the side, move my painting to the side. And now we will do
layering on a bird, so we need to mix some
colors once again. So I have my palette
and we will use the same two colors out of this three or four which you
still have on your palette. So first color will be brown. So we have our mixture red
ocher with October 23. So the brown with light brown
to create medium brown. Once again, I will do that and we mix them
in 50 50 ratio. This is my first color. The second will be the
same as we had before. I need more of this color. That's why I will once again mix my ultramaing with magenta. With magenta, and now we have this violet, this
beautiful violet. We also need ultramarine alone. I will mix it in here. And just like we mix
ultramarine three times. The last one will be ultramarine
mixed with pinks cream. To create this dark blue shade. Just like D in black. Okay, very beautiful. I will take a softer
brush for that, and we will start from detail. I will take ultramarine color and paint a shadow
here under the wing. Clean my brush, make it dry, and I will take the
ultramarine with plains gray and add it
to the end of the tail, and in here where the shadow is. Looks great. I clean my brush and make it dry on paper towel because I don't want to dilute these colors
on my palette. That's why I usually make my
brush dry on paper towel. I will not take my brown
and add it in here. Take a smaller brush and blend the edges in the upper edge of this area, we will do the
same on the check. I still have my brown
on my second brush. We'll place it in here and
with my smaller brush, I will blend the edges. I will take my violet and place it under the eye and
once again blend the edges. My brown is still wet. That's why I will
add just a hint of this violet to this area because I know that
this will bleed. If I see that somewhere, it creates not very
pretty bleeds. I will blend them with my smaller brush to
create smoother effect. Still I need a damp
brush with my okay. That's quite nice. Right now, let's paint
this part of the win with the dark brown and blend the
edges with the damper brush. Okay. I want this wing to be darkened and so we
will do that in that moment. We will darken this wing and we will create the
shape of the other wing. Let's take a violet color. Well, it doesn't
matter if you take a first violet and then
blue or at that stage, blue and then violet because
we will do it wet on wet. First, I place a violet
in the place where I want the wing to be darker and blend that with
a smaller brush. We could do the blending
with a smaller brush. So I will blend it. The edge of that color. We can blend with
a smaller brush. And right now, I take my blue
and add it. Just to touch. Tu Modnop should change
to motaki miss took Jim should we in squad nibski colour
to ta Marina, a pencil CvcheraOange
nick E two pprotbandua on Robia Albo granite. BetamnichTT tataram color pinot Gubbio chin, Schipanzel dot rate of the mist tap dub BsbamaTas Adam slumbers rbintnactT Ruben bo chants to refold. Postbinato panzeleru orange, orbnkak got them. So prostobnd hold Dambrot tags china big change group panzel train ultramarine to Dak Burguman the coral Chango pencil, Splendov tert chino
pencil and be a filled a sweet
sout. Parties nata. Drags Marina. Dsenzddtten fragment butemaraTt
dmcinovaecn fragment telco Odopncpravi rapenzbeu
orange Nick is novum no dates. Paper roche pizza goodn Tac jab in two trascpin
two Na quadramTstropenzl, angicaxcgon a quadum trachol JstopenzGerum orgicndua Okay. Meta nav colorfast Cenk Cham obi Motai similar pure do. Wow. Do eat a duck. A mixture misty morning. Proto prostpalet Ebatroahcena, ins Branvbbostra. Job. In his opinion spaz twist to Dani crop ki, Yam vam elbow, bow, gallopisl. The crop can arab the Rubi
BrdRuine do the tutte odd Blaskkpros two Duda major
shape and odd Plask, Asma spoppraza attach
to Zobiev sho casing, Did feel a bit of gland. Stop crop co. I do not tank Color and misty morning. Godin don't know okay. Okay. Saia from a Serbian
go, sonara contain.
5. Background: Okay, right now, we will be
painting our background. For that, we need
to mix some colors. We need two colors, two reddish tones
for our berries. One will be rose just like four. I only add water here into my
palette and add once again, and we mix it in 50 50 ratio, 50% of water, 50% paint. We also need dark red tone. I will use Alizarin for that. This is my second red. This is my second fret. We once again need ultramarine, so I'll add water to my
palette and once again, I will add some paint. Color and I need
some warm yellow. In my case, this will
be apples yellow. But if you don't have apples lob and perhaps you
have sienna light, it's also a good choice. This is my naples yellow. We also need two greens. One medium green. In my case, will be
my favorite autumn green shade from Roman Schmal. This is my favorite. The second one, I don't know exactly the name of this paint, but it's number 231
from Roman Schmal. And it's not a very dark green. It's just like two
tons darker than autumn green and it's green in similar shade
like autumn green. But still, you don't have to use exactly the same colors as
me. You can use your own. If you have, for example, green color, it
also will be fine. So see what you have
on your palette. Also, if you have a
granulating greens, like autumn green is
a granulating shade. For the background,
granulating colors are also fine choice. Use whatever you have
on your palette and we also need to change
our water because we will be painting
wet on wet technique. I will take a bigger brush. Mop from Roman Schmo. We will start painting
from the upper part to the bottom because it will be easier and we don't
paint the branch. It's the only thing we
don't paint right now. Let's start with the water. Also I will lay a layer in here. I don't cover the whole
area with water right now. I will be painting areas. Let's start with the latest. Let's clean our brush. I always clean my brush
between colors because I don't want them to make them dirty. Next to the green, I will
lay yellow because I know that layering
green could be tricky. That's why I'm trying to avoid creating
mud colors on paper. That's why I use
yellow for that stage. I will take my autumn green
and lay it in this spaces. I see that I have a
lot of water in here. I'm trying to gather
this water with my dry brush and I will lay my green here and I
will see how it flows. I see that paper dries a little. Okay. I clean my
brush and I will take ultramarine
and I will add it somewhere in here to
create this blooms. Let's go further. For now, only water. I will take my first green. I will take my second green to make some darker
areas in here, and I will clean my brush, make it dry on paper towel, and perhaps I will add just
spots of ultramarine in here. Okay, let's move
on with the water. I'm trying to move this paint away from my
berries because I don't want these berries to be in muddy
colors because I know that I will add red right now, light red in the beginning. And now dark red next to the reds, I will place my yellow. In this area, I will put more yellowish
tones and after that, I will take my
autumn green Okay. Here, I don't have
water right now, I will place water. Also I will place the water
in here because I don't want this area to get dry. Okay. Let's start once again with the light
red, so rose color. Dark red. And over here, let's go with the green. With my first green, I will call it first
green, autumn green. The last part. Let's stop for a moment because
this is in one shape. I want to add some
details in here. That's why I will
add some spots with darker green and some
spots with my ultramarine. Okay. And the last part
of our background, just like before we start with the water and here we have yellow and here
we have light green. We can't put here any other color because
it will look strange. That's why I will start
from these two colors. I will take the rest of my
yellow and place it in here and I will take
my first green so autumn green and I
will place it in here. Just like before, I
will undray my brush, we can add some details
with the other colors. I don't have turquoise anymore, but if you have some turquoise, you can still add it in here and we need to leave it to dry. In the next step, we will finish our work. We will add a branch. We will paint a brunch, berries, and we will add
the rest details. See you then.
6. Details: Okay. This is our final
step in this project. So we will paint the berries and the
branch and the details. First, let's mix colors
for the berries. I will use the same colors
just like before, so. The first one will be rose. I'm just adding a
water where the rose was and I will add more pigment. Let's check I need this color to be rather
thick non translucent. This is my first one. The second will be Alizarin. So this is my Alizarin. Okay. And let's start from
the top to the bottom, and I will use
number four brush. And let's start with
this lighter color. I see that I have
some darks in here. So I will start with the darker
color with the alizarin. And still, you can paint
some more berries, not just the sketched one, but you can crush some more. I will clean my brush, dry it a little on a paper
towel and with the wet brush, I will draw just with the water, another berries in here. I just want the colors
to bleed in it. And if you have a background
just like I have, you can still add for example, this rose color to displace
to make it bleed more. Okay. Here are my
berries in this area, and we'll do the same
process over here. I will start with the dark one. Paint with the Alizarin,
clean my brush, make it a little bit drier on a paper towel and
with the red brush, I will paint some more berries. If they don't flow, if the isarne color
don't flow as much, I will simply add the rose one. To the side, and I
will paint some more very simply with
alizarin. With the rose. Sorry. Lighter shade. And the same process
goes in here. But this time, let's
start with the rose color because I have some lighter
background over here, so it doesn't have to
be dark from the start. I clean my brush and
with the wet brush, I will add some more. We can now prepare some
colors for our branch. Mostly, we will use the same colors just
like we used before. I need my dark brown, which I have in here, so I will only add
water to this mixture and I will add because I see that this
mixture is quite translucent. I need rather thick
paint than watery. That's why I will add more
pigment to my mixture. Okay. And the second color red ochre. I call it light brown, but this is red ochre. And we will have our palettes just nearby because
we will use Colors. We need fi colors for
the last details and we won't mix them on a palette because we
just need them thick, so we will use it straight
from the palette. We have our two browns ready. I will take a
smaller brush number two from Princeton
to paint my branch. I will start with the lighter. Color. I will use red Oh Okay. Let's switch brush. Just like you see,
this is number two and this is number three
from restore House. They look similarly,
they almost the same. Even though this has
a bigger number. Well, the number of the brush usually
depends on the company. But this brush is rather soft and I need
more stiff brush. That's why I will change
my brush to this one because it's stiffer one. I will take my dark brown with
just the tip of my brush, I will at some shade on
the bottom of my branch. Because with the stiffer brush, I have bigger control. That's why sometimes I like
to use the softer brush, just like you see here, I see that my branch is dry in this area
and it doesn't breed. If that happens, you can
still clean your brush, make it dry a little
on paper towel and with that dump brush, or you can at second layer of the lighter color
to make it flow. With the stiffer brush, I have more control. I will take my palette and
I will take my light brown. This is red chur straight
from the palette. It's a thick paint. I have thick paint on my brush. With the thick paint, I will add some
details. On my branch. And with the same colors, I will start painting the little branches
next to the berries. I don't draw all with one color. We will use two colors for that. That's why I only paint some of them right now and leave
the rest unpainted. The same in here,
I will add just a few and leave rest
unpainted in here. I will only paint
the sum of them. And it really doesn't
matter which one. Let's change our
color right now, I will clean my brush
and with the wood brush, I will take the
darker brown color. In my case, October 2023. Once again, let's start
from the upper part let's draw some more details. My hand is shaking and it's totally
normal if you have the same because I want this line to be perfect for
you to see the perfect work. But the more I want the
work to be perfect, the more my hand is shaking. It's perfectly normal
if you have the same. We can go back to the one, lighter color red ocher
and we will do the rest. You can even add more because you don't have
to exactly follow my sketch you can add more of these little branches because
when you see on a picture, almost every berry
has its own branch. That's why you can draw
some more in here. I think it's enough. I want to clean my brush. And I will take right now pins gray color straight
from my palette. I will check if I can
paint some dots with it. Sometimes when there is not
enough water on my brush, I can't paint on dots. That's why I check and we will add the dots, not all berries. You can leave without. Okay. If you see that the
berry is still wet, just like the one in
here, just leave it. Don't do this dot on that
berry because it will flow and it won't
have a nice effect. It will be stress if it happens. And on different sides. Okay. We've done. We did it to
the end of this tutorial. I hope you like it. I hope your birds came out beautifully.
7. Outro: Thank you so much for
joining me in this class. I hope you had fun painting
the wax win and learn a few new watercolor techniques you can use in your
future projects. Remember, every
painting you create, no matter how small is a step forward in your
creative journey. If you haven't yet, applaud
your project below. I love seeing how each
student adds her own colors, brush strokes and
personality to the painting. It's always the most rewarding
part for me as a teacher. If you enjoy this class, please take a moment to leave a review and follow me
here on Skillshare. That way, you will be the
first to know when I release new watercolor tutorials
or seasonal workshops. You can also find me on
Instagram where I share sneak peeks behind the scenes moments in my daily
sketchbook practice. Thank you again for painting
with me until next time, keep your brushes wet
and your heart inspired.
 Anna Krupa, web developer & graphic designer, mix media artist