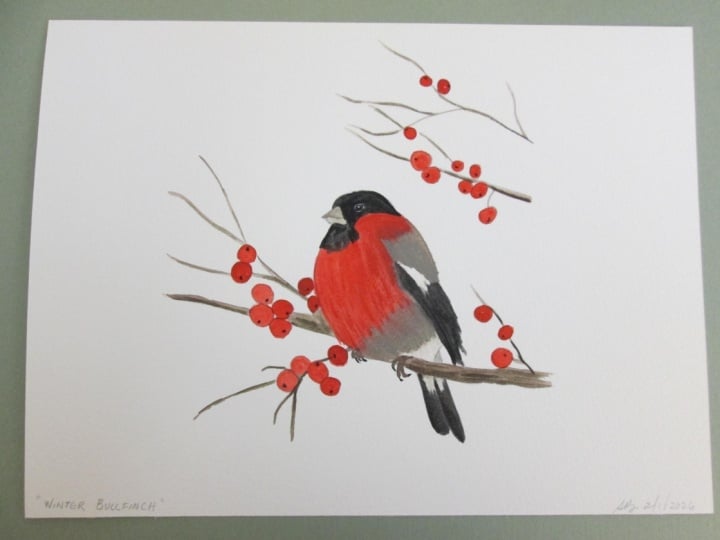
Transcripts
1. Intro: Hi, I'm Anna and I'm
so happy you're here. In this class, we're going
to paint a bullfinch one of the most recognizable
and charming winter birds. Together, we will create a
soft expressive watercolor painting without focusing on
perfection or tiny details. This class is suitable
for beginners, but it also perfect if
you already paint with watercolors and simply want
a relaxing, mindful project. We will focus on simple shapes, gentle color transitions, and building the
painting step by step. Will guide you through
the whole process from transferring the sketch to watercolor paper through
layering colors to finishing the bird and creating a soft
atmospheric background. You don't need perfect
supplies or advanced skills. Just take your time,
enjoy the process, and allow yourself
to paint freely. Grab your watercolors, make yourself comfortable,
and let's begin.
2. How to transfer the sketch to papier: This class will start with
the ready made sketch. I often get the
question from you, how can you or do I do it? How do I transfer the sketch into watercolor
Watercolor paper. I usually transfer it through I think it's called
purple carbon paper. This is the way I do it
because I don't mind the very harsh invisible
trace on watercolor paper. So I usually do it like
I have watercolor paper. I'll place my carbon
purple carbon paper on it, and the sketch, I usually check, especially when the size
of the paper is smaller, where it ends if the sketch is placed on
the center of the paper, and then I'll use a Tig my micron usually all two or one or all three to trace it. I just drew on top of my sketch. But you need to be cautious not to move
your sketch around. Still, I can check if I have
everything from this side of drawing and then move
on to this left side. Okay, let's see. If
I traced everything. I see that I didn't
finish this leave, so I will trace the inclines. Let's check once again. I suppose I have all. I'll just remove my
sketch and remove the carbon paper and I have my sketch ready
on watercolor paper. I know that you cannot raise it with
eraser, but I don't mind. I just like the even
darker sketches sometimes. I like even to trace them with
my fine liner at the end. That's why it doesn't
really bother me that this is quite visible. Is that you can't erase.
3. Bird's belly: So high, we will start
to paint the bird. But the first part of the bird which we will
paint is his belly. As usual, we need to mix
some colors for our belly. I will spray the
water on my paints. We need just two
colors for the belly. The first one will
be Ultramarine. This is my Ultramarine and I
will mix it in 50 50 ratio, 50% of water and 50% of paint. This is my first color. The second one will be
Alizarin plus rose. Alizarin is rather dark red. This is my Alizarin, and this is my rose. Rose is light red. It's like Sherry red, I think. I will mix them together to
create just medium blend. I'm sorry at Rose. This is my final mixture. It's something
between these two. We will only paint this area perhaps a
little bit over here, but mostly this area to the
side where the tail starts. I will use number
four brush and it's soft brush and I will play
some water on my bird. I see that my water is in
reddish tone, but that's okay. I will start with
this red color and add it in here and
make this red flow. Here I will start
not from the top, but a little lower and I will add this
red to make it flow. The darker shade of red should be in here in the
center of the belly. I'll just add more pigment to this part and leave the
rest to flow by itself. Then I'll switch to my Ultramarine and I will add it at the
bottom of the belly. And also allow it to
blend with this red. Once again, I will take my Ultramarine and I will
add it to the bottom because this area I
want to be the darkest. Here I will just add once
again, my Ultramarine. And perhaps I clean my brush and make it dry on paper towel and I
will take my red again and I will add it in here because the cheeks
I want to be the darkest to have more color and the same here in the
center of the belly. I just add more
color in this area. Now we need to leave it to dry. It was a very quick step. In the next step, we will move on to the wings. Of course, you can dry it with the hair dryer it
to if you have, and we will go
back to the wings. We see you in the next video.
4. Wings and tail: Okay, let's mix colors for our wings and also for
the head and the tail. Once again, from a
ring just like before. I have, but we need
the second mixture. In here, I will mix
Ultramarine with magenta. This is I usually use magenta from aquarlb from her. Well, it's not readable anymore. So I will just place
a drop of this color. It's watercolor, but
it has an acryl base. It says here that it's liquid
watercolor acrylic base, in my opinion, it's it
has more solid base. In this area, I will mix my Ultramarine
with this magenta. But if you have some purple color like mineral
purple, you can use it. Still, you can use it
and it will be okay. I'm picking just a
touch of this magenta because it's quite
strong color and I'll test I think I need some more and I will test. Let's test. Yes, I need more
purple than bluish. I need this violet to be
more purple than bluish. That's why I usually test
how it looks because it will be transitioned between
this color and Ultramarine. That's why we need
something in between. We have our two colors done. Let's start with
the tail and with the head and then
move on to the wings. Remember, this is
the first layer, and let's start with the
tail and on the tail, perhaps I will
take smaller brush because I have a
little area in here. This one is too big to paint it. It's easier to take a smaller. This one is number
two and I will take this Ultramarine
and paint my wing. And that's enough and I will paint with this number
four soft brush, the tail, tail, the whole area with this Ultramarine after that, I will clean my brush, make it dry on paper towel, and I will pick my purple
mixture and add it to the stop. And two both sides, this one. And I will take
the smaller brush and also this purple color. And in the middle where
these two like feathers met, I will add this color. Okay, and I will
clean my brushes. Into the head I will take. Let's do a bit different. Let's change a little. I will take a smaller
number three house because I forget about the beak. I will take Wood
from a ring color, add it on a beak, clean my brush, and
with the wet brush, move this color around. This is the first layer on the beak and I will
leave it to dry. That's why I won't
paint my head right now because afraid I'm afraid that the
color will bleed on the beak or beak on the head
and I want to avoid that. That's why we will
move on to the wing. But remember that this bird
have white area on the wing. But still, if something
moves on the side, you can still um correct it
with the guash later on. Don't worry if it happens and with the beak with the tail, I will start with the
Ultramarine color and so I will here first layer with ultramarine. Remembering that
this side is white. Okay. And in here, clean my brush, make it try
and pick the sparple color, add it in here and place a
very soft blend over here. With the wet damp brush, let's blend the
edge of this color. I will add it slightly like that and still blend
with the dump brush. Once again, I see that I
thought it was dry now, but this is color. This paper is some cotton. That's why it is still wet. I will add my mixture
in here and blend. I see that this area
is too light for me. That's why I will pick my ultramarine and
this is still wet, so I will add this
Ultramarine once again. This part, I will ut. Perhaps I will lend this edge because it is too sharp. This part of the beak
should be darker. That's why I will add
my purple in here. I see that my tail
is already dry. That's why I can do it. Clean my brush, make
it dry on paper towel, and I will take my ultramarine
and I want to darken. This part. Blend, we have soft edges. Take once again Ultramarine
and draw the details. While this is still wet, we can add just a touch of the purple to the
top of the side. I think we can move
on to the head, but I need to mix more
of my ultramarine. The head is quite dark, only the upper part of this bird on the
head is a lighter one. The bird looks like it
has some cap on its head. I will start with the
Ultramarine here. Surround the eye. Make the darkest parts
of the beginning. Let's paint it this way. I will take a slightly
bigger brush so number four, make it dry and we this dry but wet brush slightly move this blue to
the top part of the head. We have a lighter lighter head. If we want here, we can still add a touch
of our Ultramarine. Okay. Wings are still wet, but I think we need to make this part a
bit darker so we can do it with this
one or this one color. It doesn't matter. Perhaps
I will take Ultramarine, place this color like that. Make it and with the
dump brush, blend it. Blend the edges of this area. It's similar on my
previous birds. We can add this mixture with magenta while this
is still wet in here. Okay. That's not
all when it comes. That's not all when
it comes with a bird. We need to add a second
player on the wings. We need to finish
our eye and our big. We will do that in
the next video.
5. Bird second layer: Okay. Let's add the rest details to our bird and I forgot that we also need to paint his feet. We will do that in a minute. But first, let's start with the smallest
details. The big. I'll still have ultramarine the rest of my ultramarine here. I'll take number three and
this is more stiff brush. I will take this
one or this color, it doesn't really matter, and I will draw a single
line in the middle of the big perhaps it's too dry. I will draw this in my brush, make it dry on paper towel
and with this dump brush, let's blend it a little. My big. Also, let's do the
eye and for that, I will take black you can pick two colors
black or pains gray, it's up to you, but
I will use black mostly because I usually
don't use black. This is still my first
cube of black and this is a second and third of pains gray and I want to
just reuse this black. That's why I mainly
use it for eyes. I will pick it straight from the pan because I want
it to be very thick. I only check with my brush
on the scrap paper if I can paint a very thick
and solid lines with it. Let's draw our I I know that I painted
on this white, but still, I will make it white again
with gouache later on, so it doesn't really matter. It's not a very big
thing if it happens. When it comes to the feet, I will definitely
use um Potter spink. This is my color just
like with the eye, I will use it straight from my pen because I
want this color to be rather thick and solid. With my potters pink
and with a small brush, let's paint this feet feed spirits are not
something I like to paint. Okay. Okay. They usually look quite strange to me. I also need to add more
details on my wings, but for that, I will only use one color and it
will be alizarin. That's why I will mix
it once again here, and I want this color
to be rather thick, so I will just check. Because I want to paint straight lines
with a smaller brush, and I will take this one, which is stiffer and
with a stiff brush, I can paint thinner lines. You can take if you have, for example, liner
brush, you can use it. It's a perfect place to use. It's a perfect place
to use liner brush. And let's paint the details. Okay. And I will switch to
number four and soft brush. And I would like to make
this part a little darker. That's why I will take
my ramarne place it in here and with a d
brush blend it. Okay. That's quite fine. I think that's all when it comes to the
bird and watercolors, we will add some details later
on with the white guash. In the next step, we will
move on to the branch and to the background
as a last step, we will add some white details
to our work. See you then.
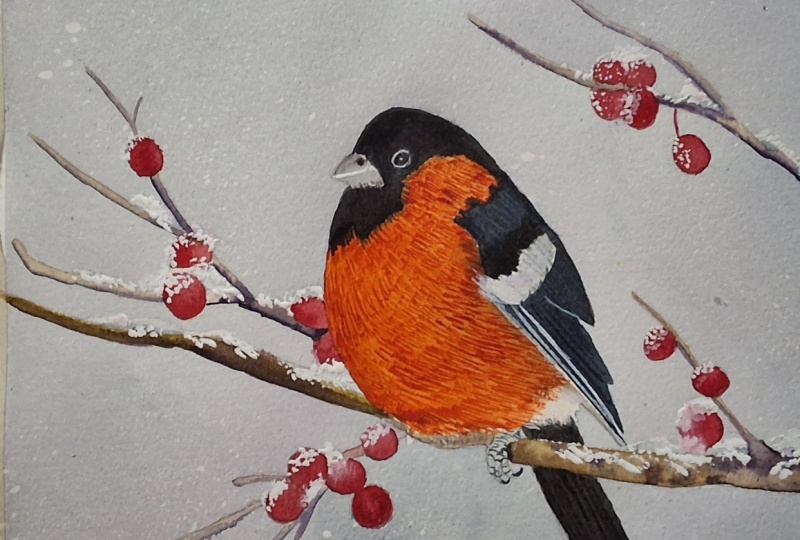
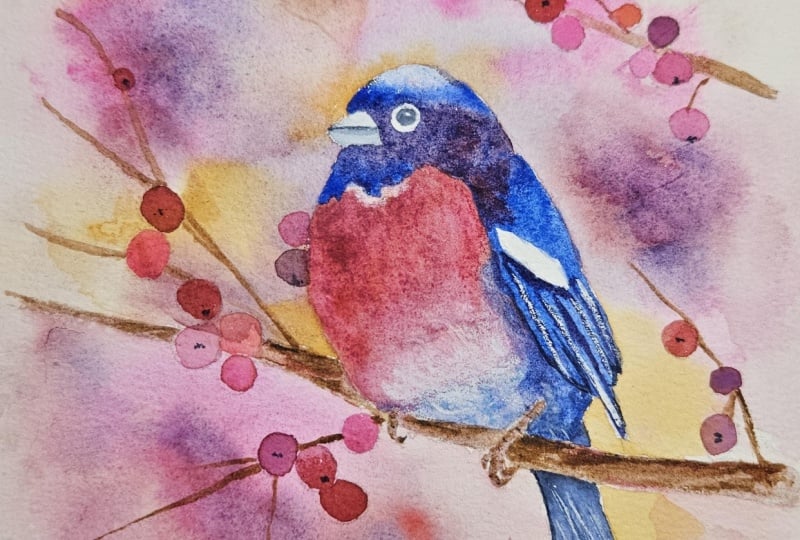
6. Bird details: Okay, so we will do a second
layer on bird's head, and this will be just slightly changing the
color of the bird's head. So we need a darker
shade of blue. That's why I will use
ultramarine once again. Ultramarine and to
make it darker, I will add paints gray to it. I think I will make
more of this mixture. I will add ultramarine once again and once
again, paints gray. This mixture is in 50, 50% ratio, 50% water, 50% paint. I will take soft four and I will lay slightly darker
in here, a layer. And with the dump brush, let's dilute the edges. I will take stiffer
brush number three, it's smaller and stiffer
and I will once again, add a touch of this mixture
in here and here under the branch I will blend
the edges in here. I only want this part to be
armor in shadow and let's do similar thing in here we will create this shadow
effect, illusion of shadow. I will place my paint,
clean my brush, and with the de brush blend
this color with the rest. I think I will also do
the same trick in here, I will place my color. Clean my brush, and
with the stump brush. Blend the edges. Perhaps I will add few lines on the wings to make it more interesting because we
will have the illusion of different shades in here. Also with the same color, let's draw very thin
line on the beak Something like
that, and perhaps I will blend it slightly, with the very almost
dry brush, I blend it, and let's darken the area here and under the beak and let's blend the edges. That's fine. This is
all for the bird. In the next step, we will do the first layer on the
background. See you then.
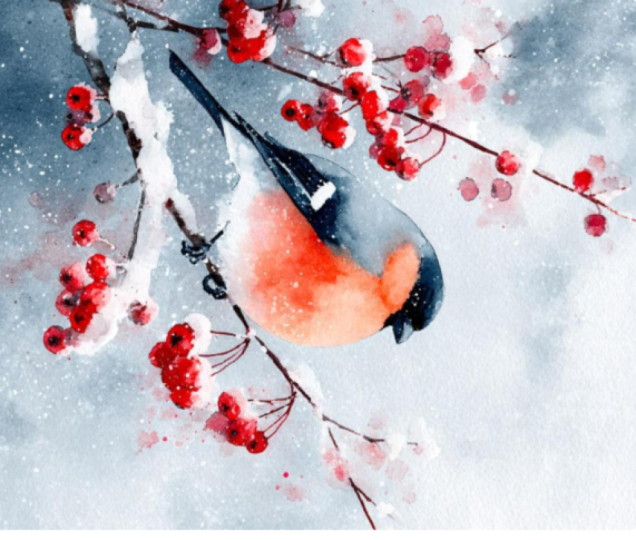
7. Background: Okay, for the background, we need a few colors. Colors for berries. I usually use two
shades for berries, and one is just like always. If you watched my
previous class, I used Alizarin
and I usually use Alizarin and rose
color for my berries. This is Alizarin. And I mix them in 30%
more water, less paint. I need them to be watery
to flow between shades. This is my first color. The second is rose. So Rose looks like that. We also need SNA light
and I need it quite much. That's why I will
spray water onto my mixing palette and then
I will use my SNA light. This is my SNA light. I think I need more. That's why I will spray once more and I will also
add the water to my ultramarine and
magenta mixture because we will
need it once again. We will need a purple
or violet color. This is sienna
light and I need to mix once again Alizarin
once again ultramarine. And magenta. Check. Perhaps I will add more magenta to create more
reddish tone than bluish. So this looks like color. If you have a mole or this purple in your
palette, you can use it. For example, if you have
mineral pink or violet, it would be also a good choice. I forget about one color. We also need a color
for the branches and I will use Potter spink. I will use potter
spink for that. These branches will be
blur in the background, so we don't need much and it's not necessary
to add these branches. If you don't have this color, you don't have to use it. You don't have to
paint these branches. Right now, we need
to change our water. I will go and change
and I will come back. We will be painting wet
on wet on the stage. We need to water our
background with water. We need to water our background
and to make it faster, I will use a spray
bottle and I will slightly spray on some parts. I will use bigger brush. All my background. You don't have to water this
area where the branches. Only around the bird. Around the bird. The harder is here where we have tail. We will start from the
darkest color which we have and this will be
the purple shade because we need it to flow from the bird like the bird is some casting the color
to the background. Let's pick our purple
and let's add it in here and make it flow
and the same in here. Wow, how beautifully it flows. Then let's pick color
for the berries. I will one or the second
one, so the lighter one. I even forgot to switch my brush to mop one because I just love
painting with mop backgrounds. I will say senate and I
will add it in places between the rest of the colors. Okay. I'm trying to do it fast
because my paper is drying. I see that I forgot to add the red colour in
here and I will add rose because it's lighter and I don't want this very dark, perhaps maybe I will
add just the toys. Yes I'm trying to pick my water from
here because I don't want the water to
create this edge. Still, I will use my
purple and add it like dots in a few places. Let's switch to
the smaller brush. I will pick my I will pick my number two and I
will say or spin. For example, but
it's not necessary. I see that a lot of
is going on here, so it's not
necessarily the step. I did it in here over here
and over here and over here, but I didn't do it
in my first work. It's up to you if
you want to add it. Suppose I will add
something in here. This will create the illusion of branches in the far
distance of our bird. It's not necessary
should be visible. I just love how these colors
flow flows into each other. So I only in this stage, while this is still wet, I see that I didn't paint this area in this area and here. I'm trying to correct it. Here I will place my sienna light because it's the nearest color
which is in here, and here perhaps I will take a mixture of ultramarine
and the same here. Again, I see on a light and I will correct the places
near the legs of my bird. And we need to make it dry. You can dry it with the
hair dryer or you can leave it and paint the next step tomorrow
just as you wish. The next step, we will
add the branches and the berries and
some details like this white around the eye and
make this white more solid. This will be our last day.
8. Details: Okay, my background is dry now. So we need to
finish the details. So just like before, we will use the same colors. So for the berries, we will mix Alizarin and rose. I will use the same colors
which I have in here. I will only add more
pigment because now I need the colors to be more solid and
less translucent. That's why I will add more
pigment to my colors. This is Alizarin and
the same with the rose. I will add pigment for the rose. I also need two browns
for my branches. Let's use the potters
pink like we did before. The first one will
be potter spink. The potters pink is
perfect for branches and all kind of trees. I remember that when I
was ordering this color, I thought it will be
more pink than brown. So when I unpacked it, I was very disappointed some kind of disappointed
that it looks like this. But after a few works few works which I painted with this color, I now see the potential of it. I kind like to use it
in my nature painting. This is first as a medium brown and the
darker brown will be brown. This is my darker brown. It's not very dark
as you can see, but it's different
shade than peters pink. I will use my number four
and number four soft brush, and this one is from Princeton. We will start from
painting the bees. We will only use these
two shades of red. Let's paint with Alizarin first. And I usually paint
with this darker red, the berries are under which
are behind something. Red with alizarine. Let's switch color to rose. Also because I make
too little Alizarin. I already finished
it on my palette. That's why I will use rose and I will paint
the rest of my berries. I I will add a rest of my Alizarin here. Well, it looks even more
beautiful than it was before. I think in this work,
the background makes the picture because it's so we have a lot
of color in there, so the eye just wanders
around and it's not solid and it creates
very interesting effect. To LC. Right now
I'm switching to smaller brush and I will
take at the beginning, number two from Princeton because it's soft
brush and after that, I will switch to number three from restor
house because it's stiffer. I need stiffer brush to paint
this very thin branches. I forgot to paint these two
berries. Let's correct that. I forgot about
these two berries. I'm starting with
these bigger branches. That's why I will use softer
brush and I will start from potter spink I know that it's
the same color as the legs. The legs are already dry, so it shouldn't be a
problem in this area. I will just lay the first color of butter spink Okay. And with the stiffer brush, I will take my darker brown
and add it from the top. In the areas where there
should be a shadow. I will do the same tric in here. With softer brush and
with the potters pink, I will paint my branch
because this branch is quite wide in here with the stiffer brush and
with the darker brown, I will add some shadow. Okay. I'm putting down my softer
brush and I will stay with the stiffer one and I will take once a potters pink and
once the darker brown. I just Let's, for example, start from the top. I'm cleaning my brush
between switching colors between
changing my colors. Right now, I only have
the darker brown, so I will paint the rest
with this darker color. Perhaps I will slightly rotate my work because
I don't want to smudge my colors because this area is still wet and I don't want to smudge
it with my hand. That's why I need to
rotate on the tomb. But still, if you want to have lighter shade
of this brown, just lay some of
this brown on paper, clean your brush, and dry it a little on paper towel and
with this dump brush, move this color on a paper. The last one Okay. So I see that my berries
are not quite dry yet, and I want to add this
black dot sometime. That's why I need to
wait while this dries. But while we have that time, we can add white
details with the guash. You can use guash or you can use poscapen white
alpin like Oscapen Like this Posca pen, but I don't like to use it because it's not
working anymore. I have it, but it's not working. Me, that's why I will use guash. I will add a water
to my guash to make it quite thick on my brush. I have this paper where I tested colors and I can check on it and I can check on it if
my color is thick enough if I can
draw the fin lines. If that's so I will make this
white around the eye again. Correct the shape
of this area on the wing and add just a slightly illusion
of light on the wing. Perhaps I'll add a very, very thin line on the big. The only thing left
which we need to add to our picture are
these dots on the berries, and for that, I will use
black or you can use paints gray and I don't mix it
on a mixing palette. I just add a drop of
water to my paint. And because I need
this color to be very thick and not watery. I will check on my
scrap paper if I can paint dots and I
will paint these dots. Just look, we don't paint on this black
dot on every berry. Look which berry is dry already and added only to the drip, but not for all of them, quite nice. This is all. We finished our bird.
9. Outro: And that's it. Well done. Thank you so much for painting
this bullfinch with me. I hope this class
help you slow down, enjoy the process, and feel more confident with watercolor. Even if your painting didn't turn out exactly as you imagine. Every bullfinch is different. That's what makes
your artwork unique. If you'd like, I'd love to
see your finished painting. Please share it in
the project section. I always enjoy seeing
your work and how you interpret the same
subject in your own way. If you found this class
helpful or relaxing, leaving a short
review would mean a lot and helps me create
more classes like this. Thank you for being here and I'll see you
in the next class.
 Anna Krupa, web developer & graphic designer, mix media artist