Transcripts
1. The Blender 4 Ultimate Guide Introduction: To this beginner modeling guide designed to get
you from learning the very basics of blender up to a professional
finish model. All of this in one course
in around 20 hours. The course has been specifically
designed to take you through the entire pipeline
of three D modeling, right from the idea with
referencing to gray boxing, to modeling and texturing and finally rendering
and compositing. My name is Neil and I'm the driving force
behind three D tutor, A front runner in the
industry for courses spanning from blender to honorary
engine At three D tutor, we pride ourselves on offering an extensive curriculum with
over 30 specialized courses. Our range is broad and deep, perfect for those
passionate about animation, eager to craft stunning
three D models, or looking to dive into
interactive game development. What sets us apart is not just the breadth of
our course offerings, but also the meticulous
attention to how they're structured with
hundreds of hours of content. We've designed each
course to be easy to navigate and maximize
your learning potential. Our expert guidance stems from industry professionals who bring years of hands on
experience to the table. Their insights and techniques
are woven into our courses, ensuring you receive
an education that's both top notch and
practical at the same time. Joining three D Tudor means more than just
accessing content. It means becoming part of a thriving community
of learners. You'll benefit from peer interactions, share
your progress, and have your queries promptly answered by
our supportive team, whether you're aiming to
kick, start a new career, enhance your existing skills, or pursue a personal project. Three D Tudor is here to guide
you every step of the way. Welcome to the Blender
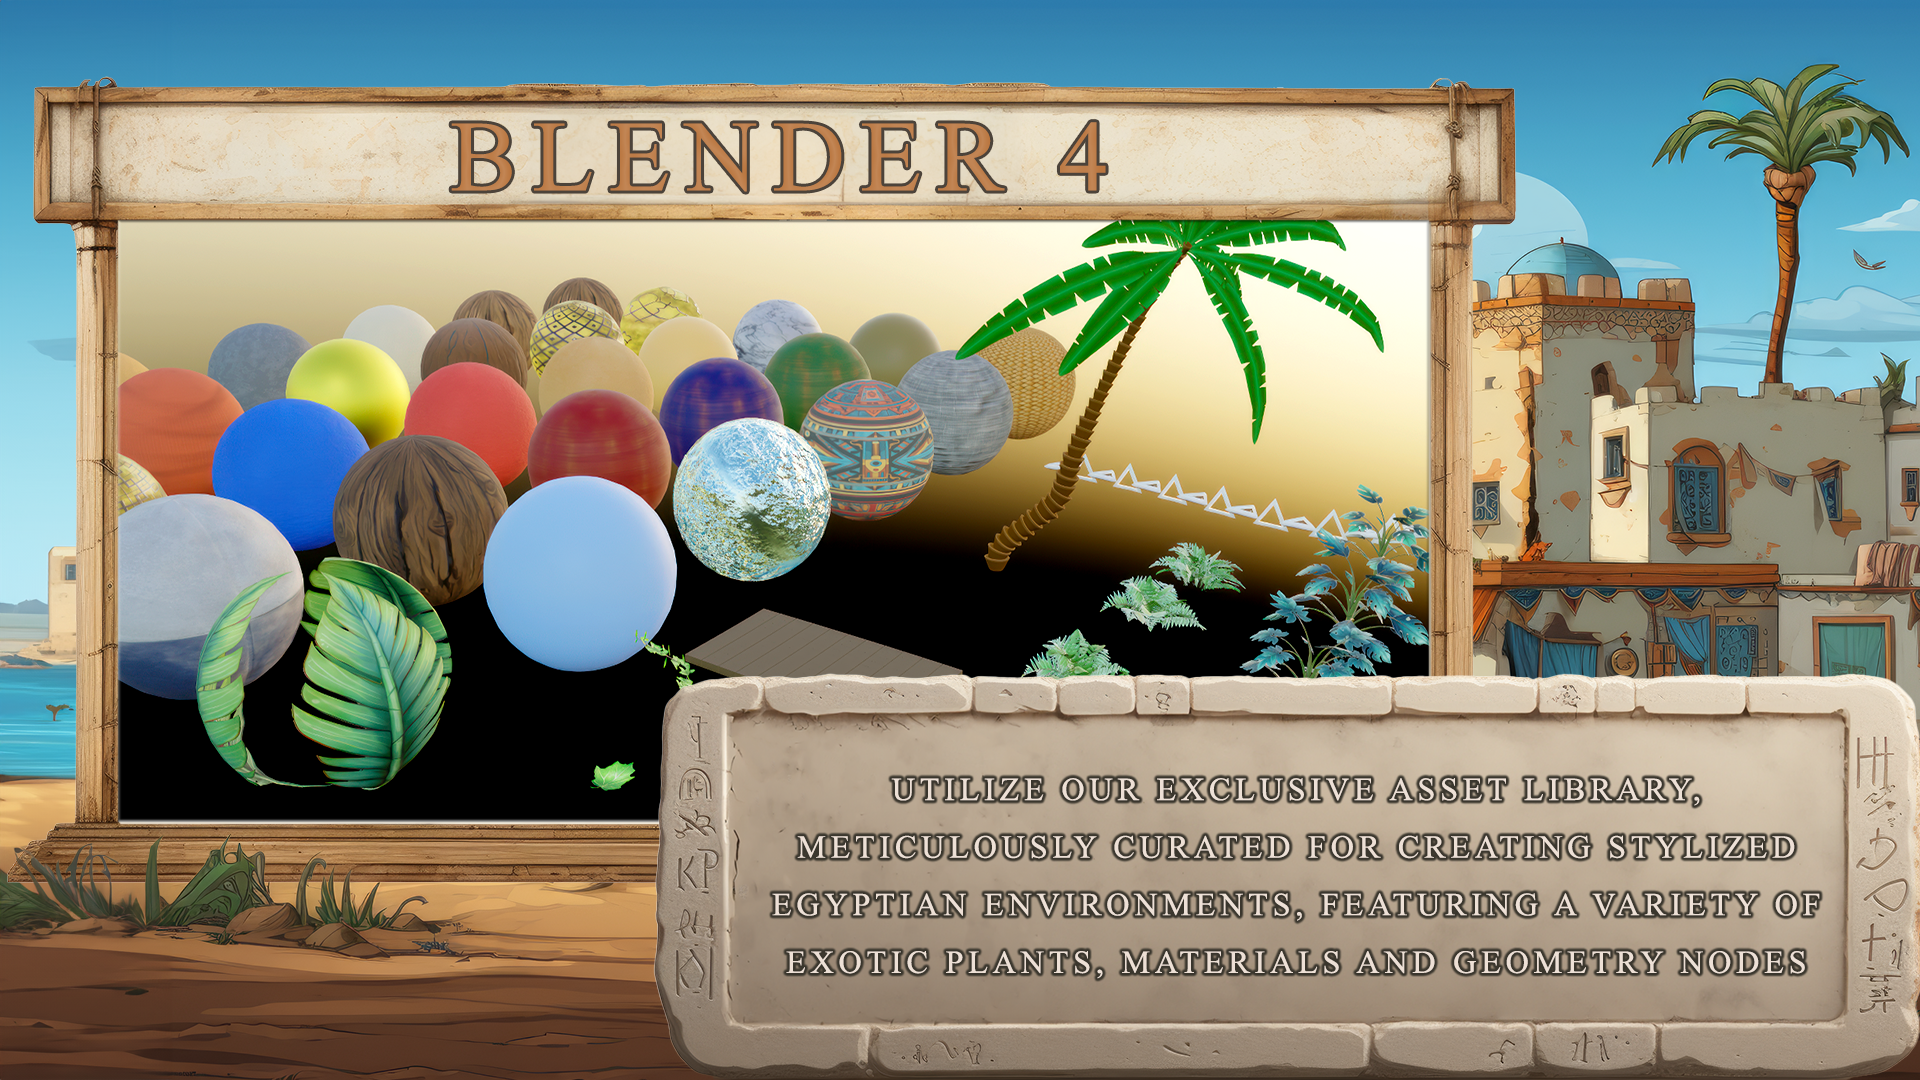
Four Ultimate Guide. Our first step is
an explanation of blender's asset
manager armed with a download pack
rich in materials, plants, and geometry nodes. This tool kit is
your launch pad, equipping you with
everything necessary to begin crafting
your three D visions. Understanding the art of
referencing is our next focus. You'll learn why meticulous planning and detailed references are crucial to bringing
an idea to life. I'll guide you through finding
and utilizing references. Employing tools
like pure rev and Mid Journey to
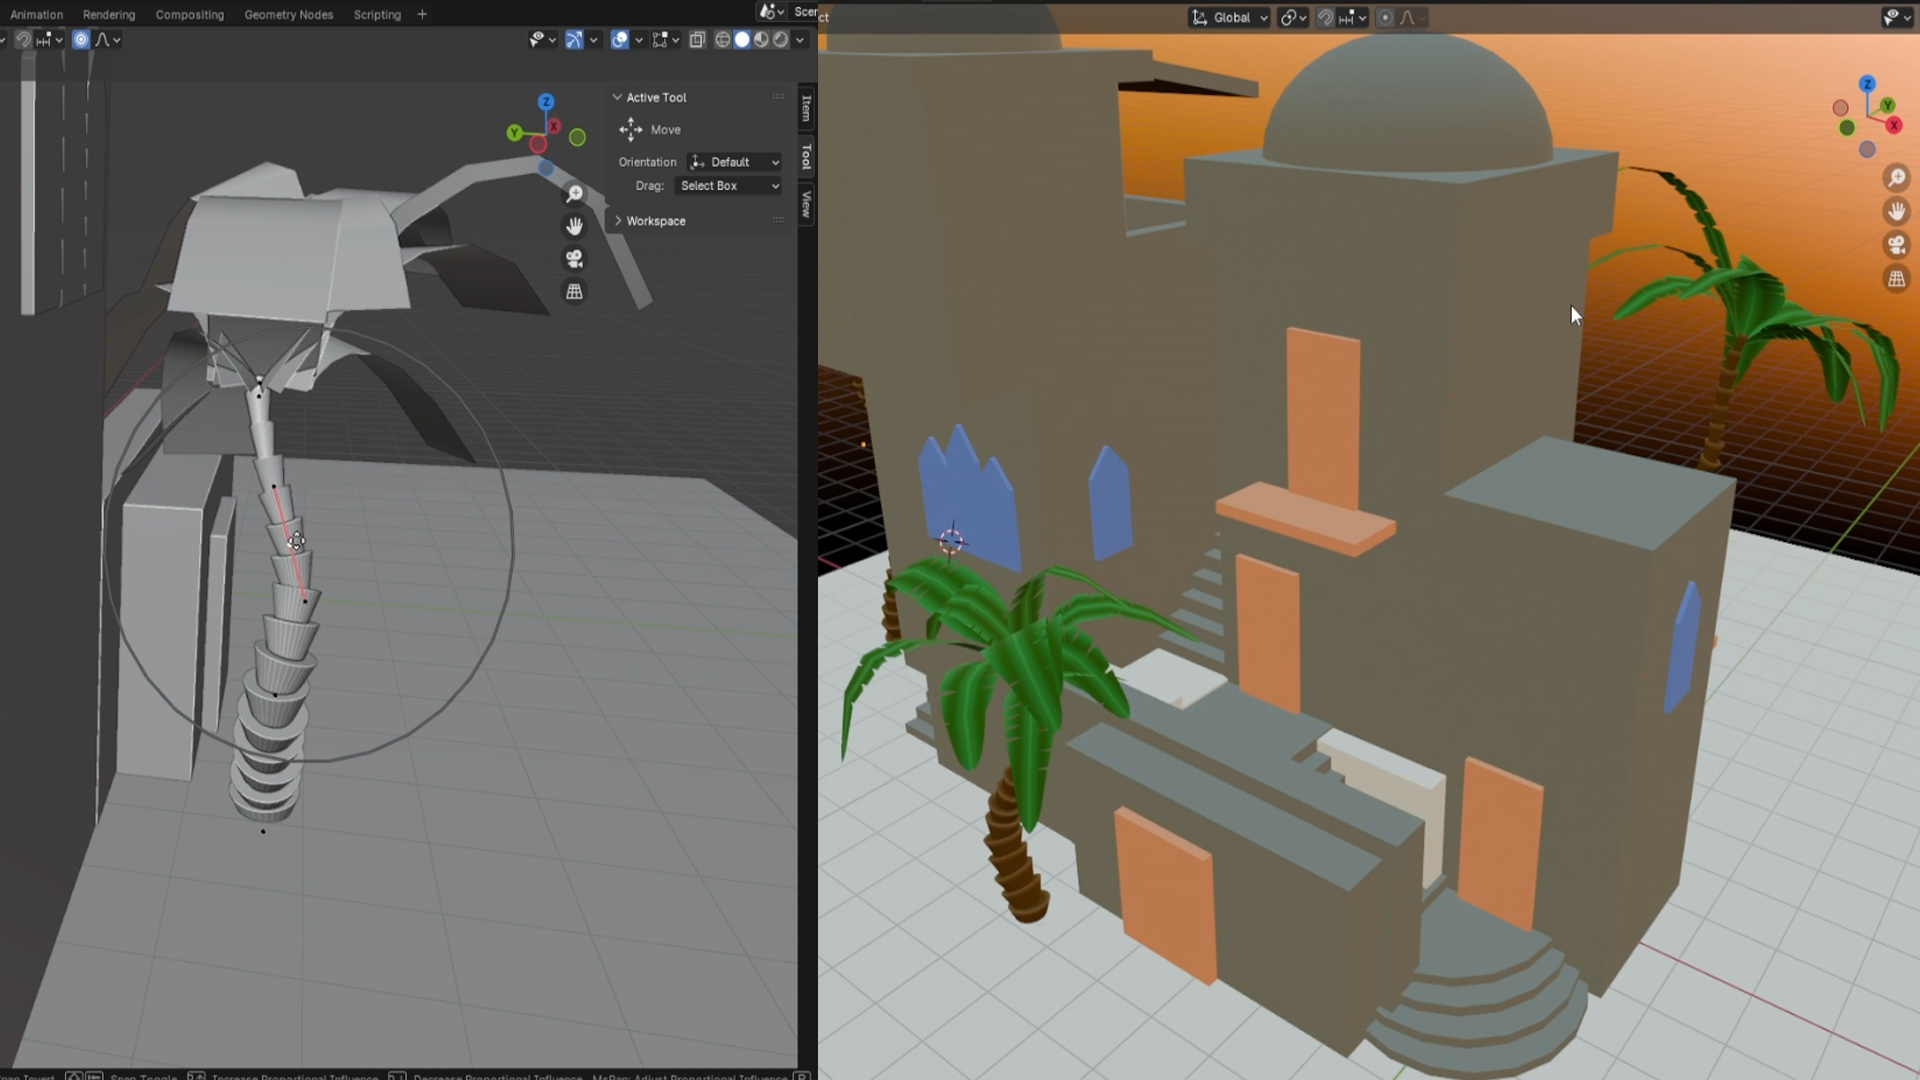
elevate your designs. We then dive into gray
boxing and a radian theme. Building a key industry
technique for establishing composition and understanding structure before
detailed modeling. This process isn't just
about building models, it's about crafting
stories and worlds. As you gain confidence, we'll transition into the
basics of modeling and shade a set up here you'll start applying textures to
your first models, seeing your creations
evolve in real time. This hands on approach
keeps you engaged and demonstrates the
Y behind each step. Blend the cycles X and the
new EV options are up next, offering you the power to render your scenes at any stage. Witnessing your progress in real time is not just rewarding, it's a testament to
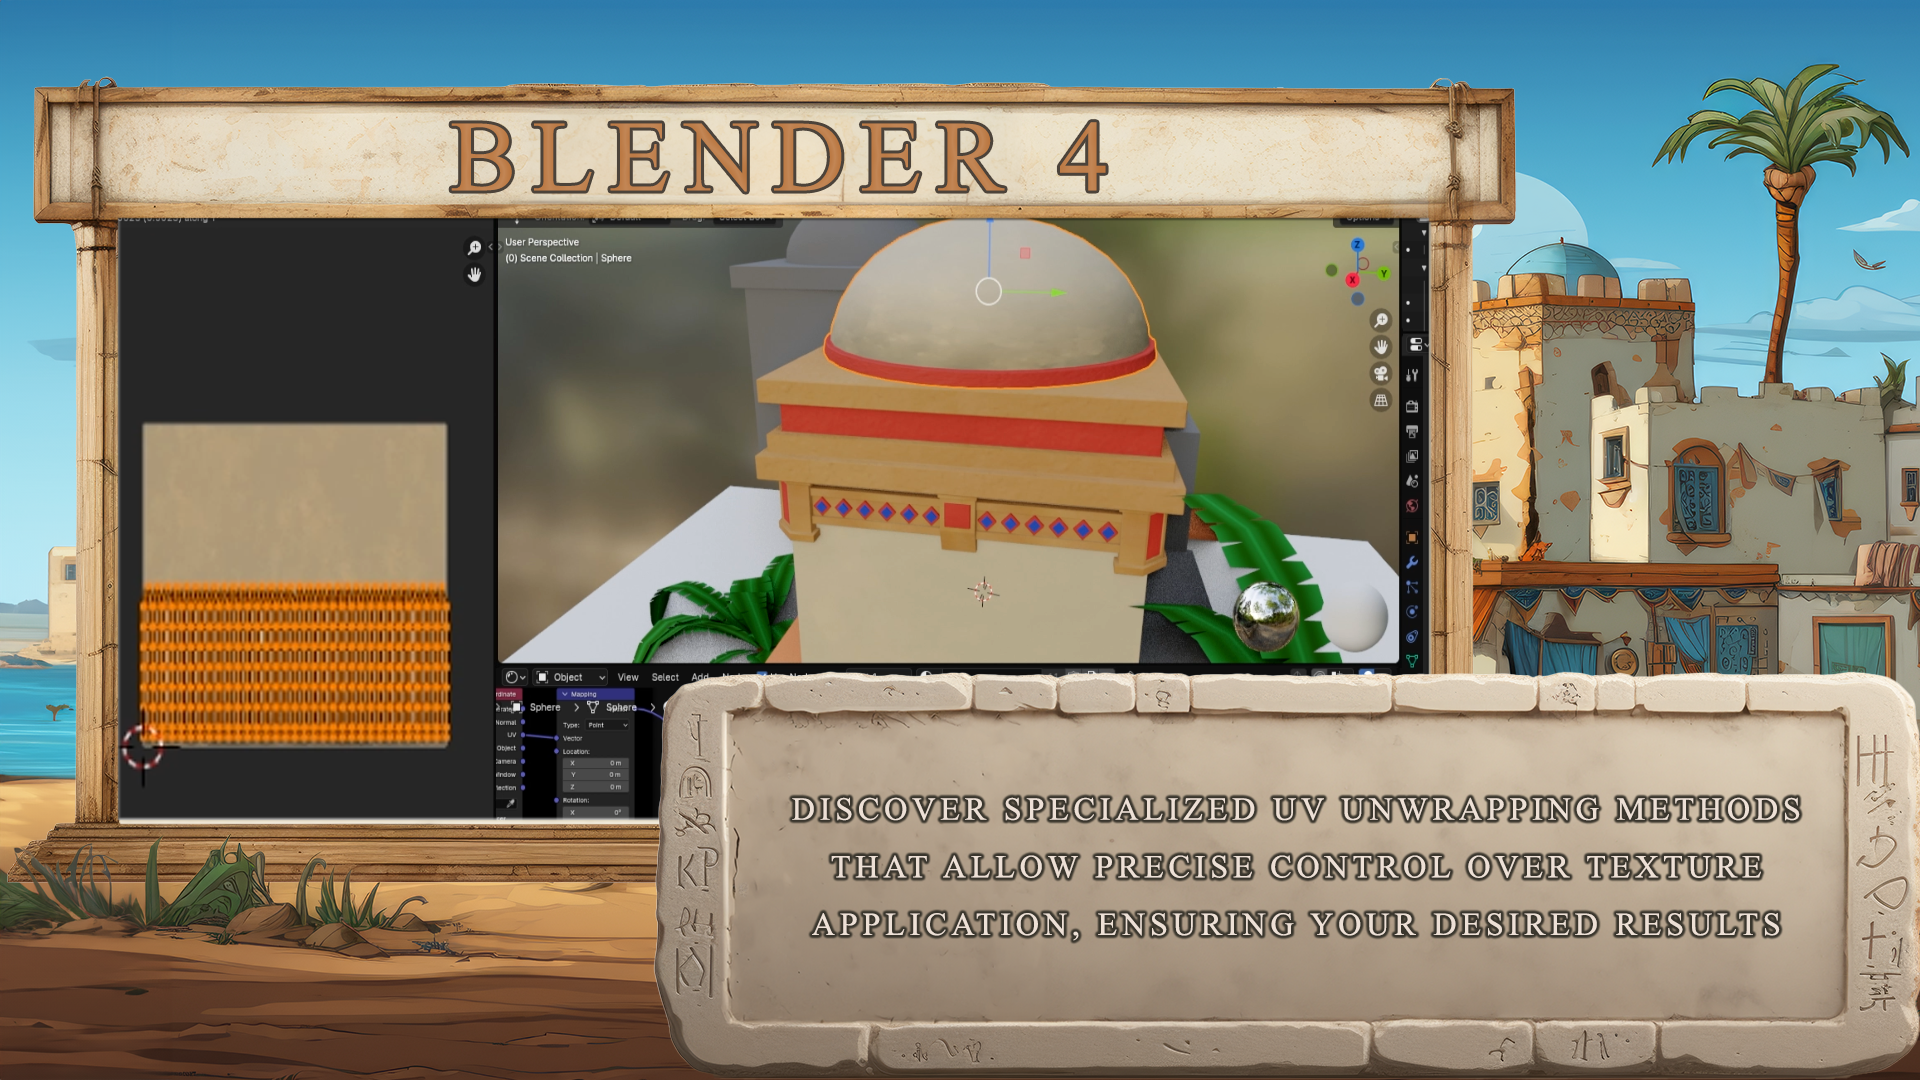
how far you've come. Our journey then elevates you to more advanced modeling
and texturing techniques. Along with diverse
methods for von wrapping. These skills are
crucial for adding depth and realism
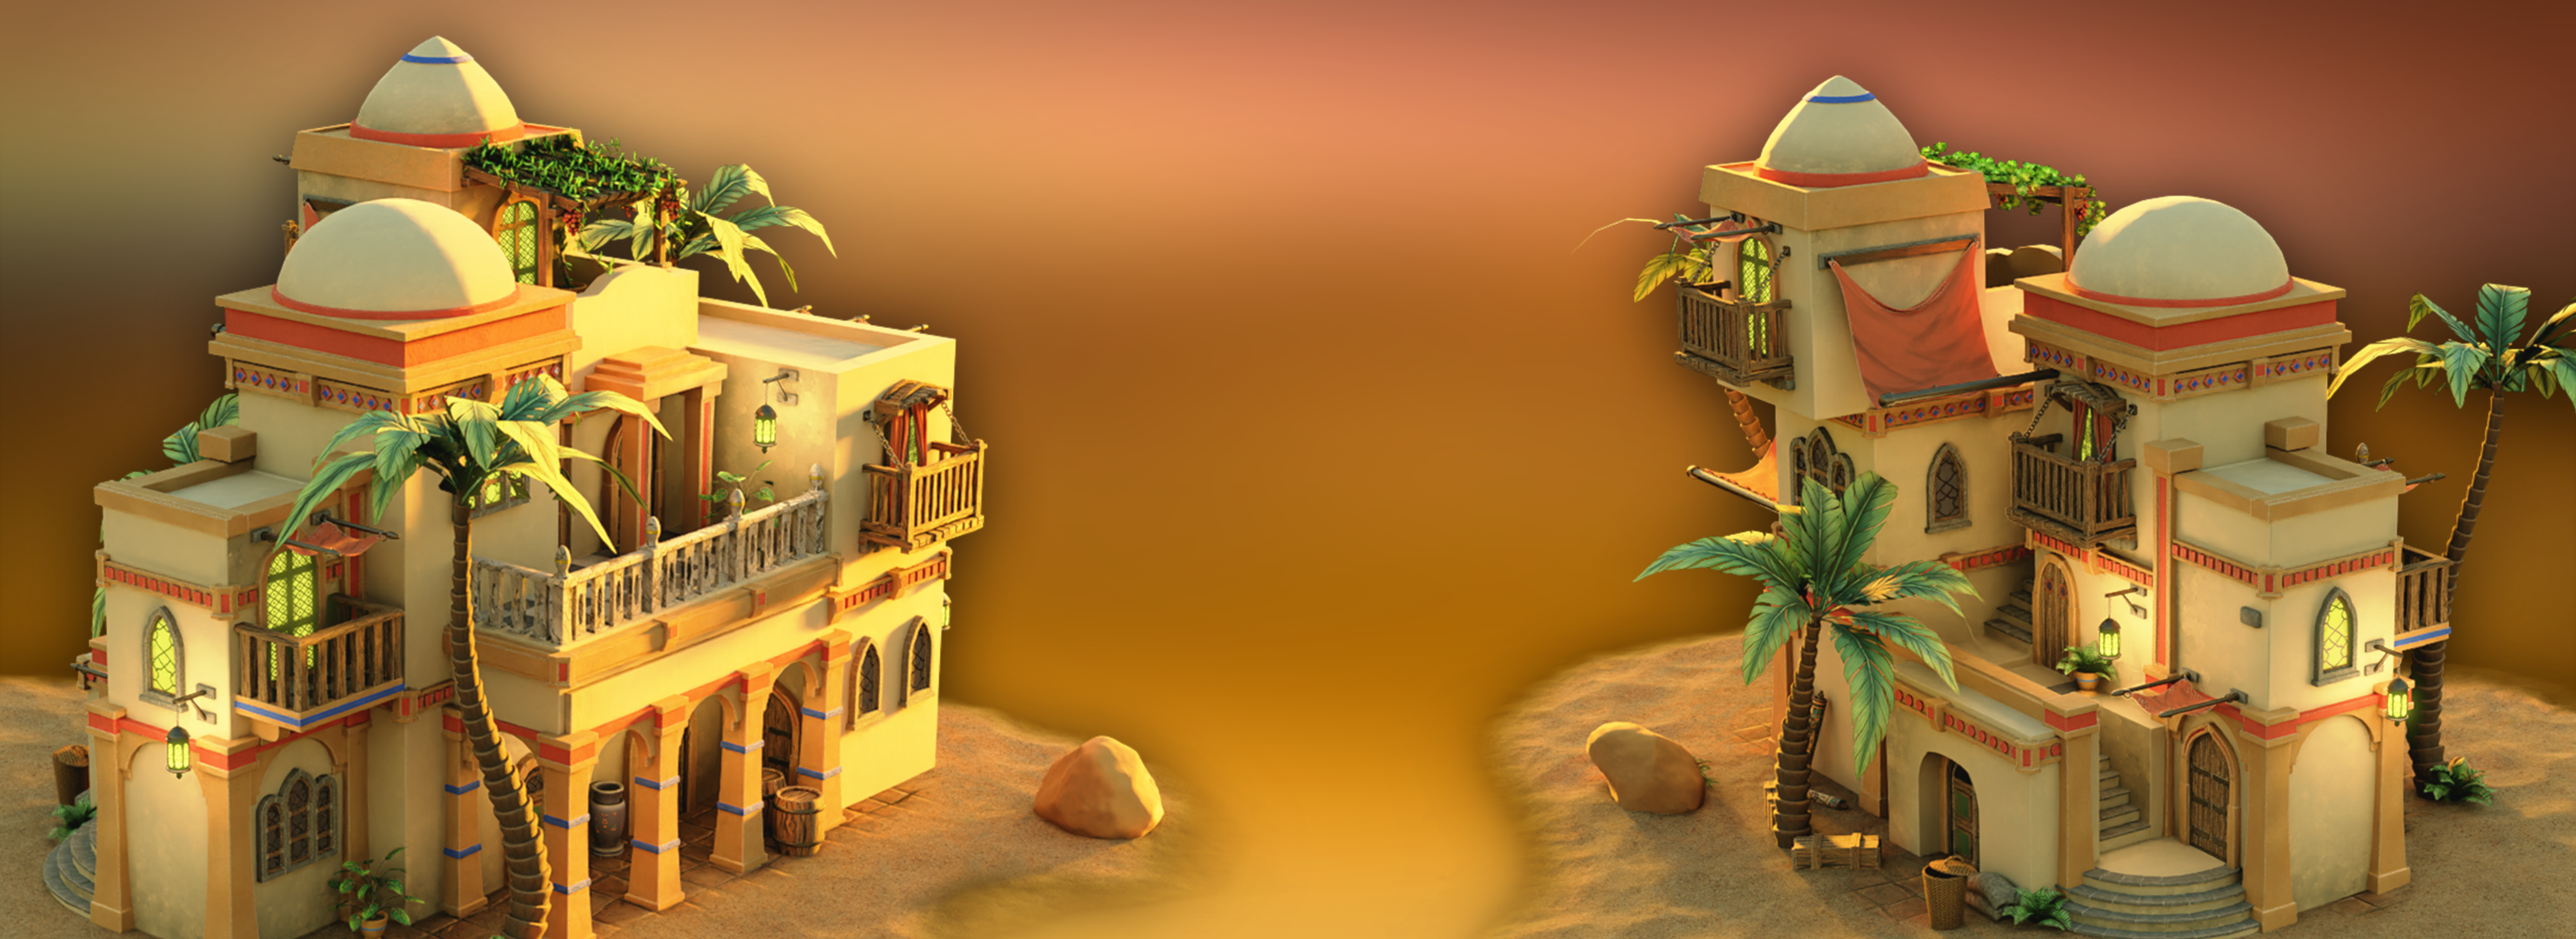
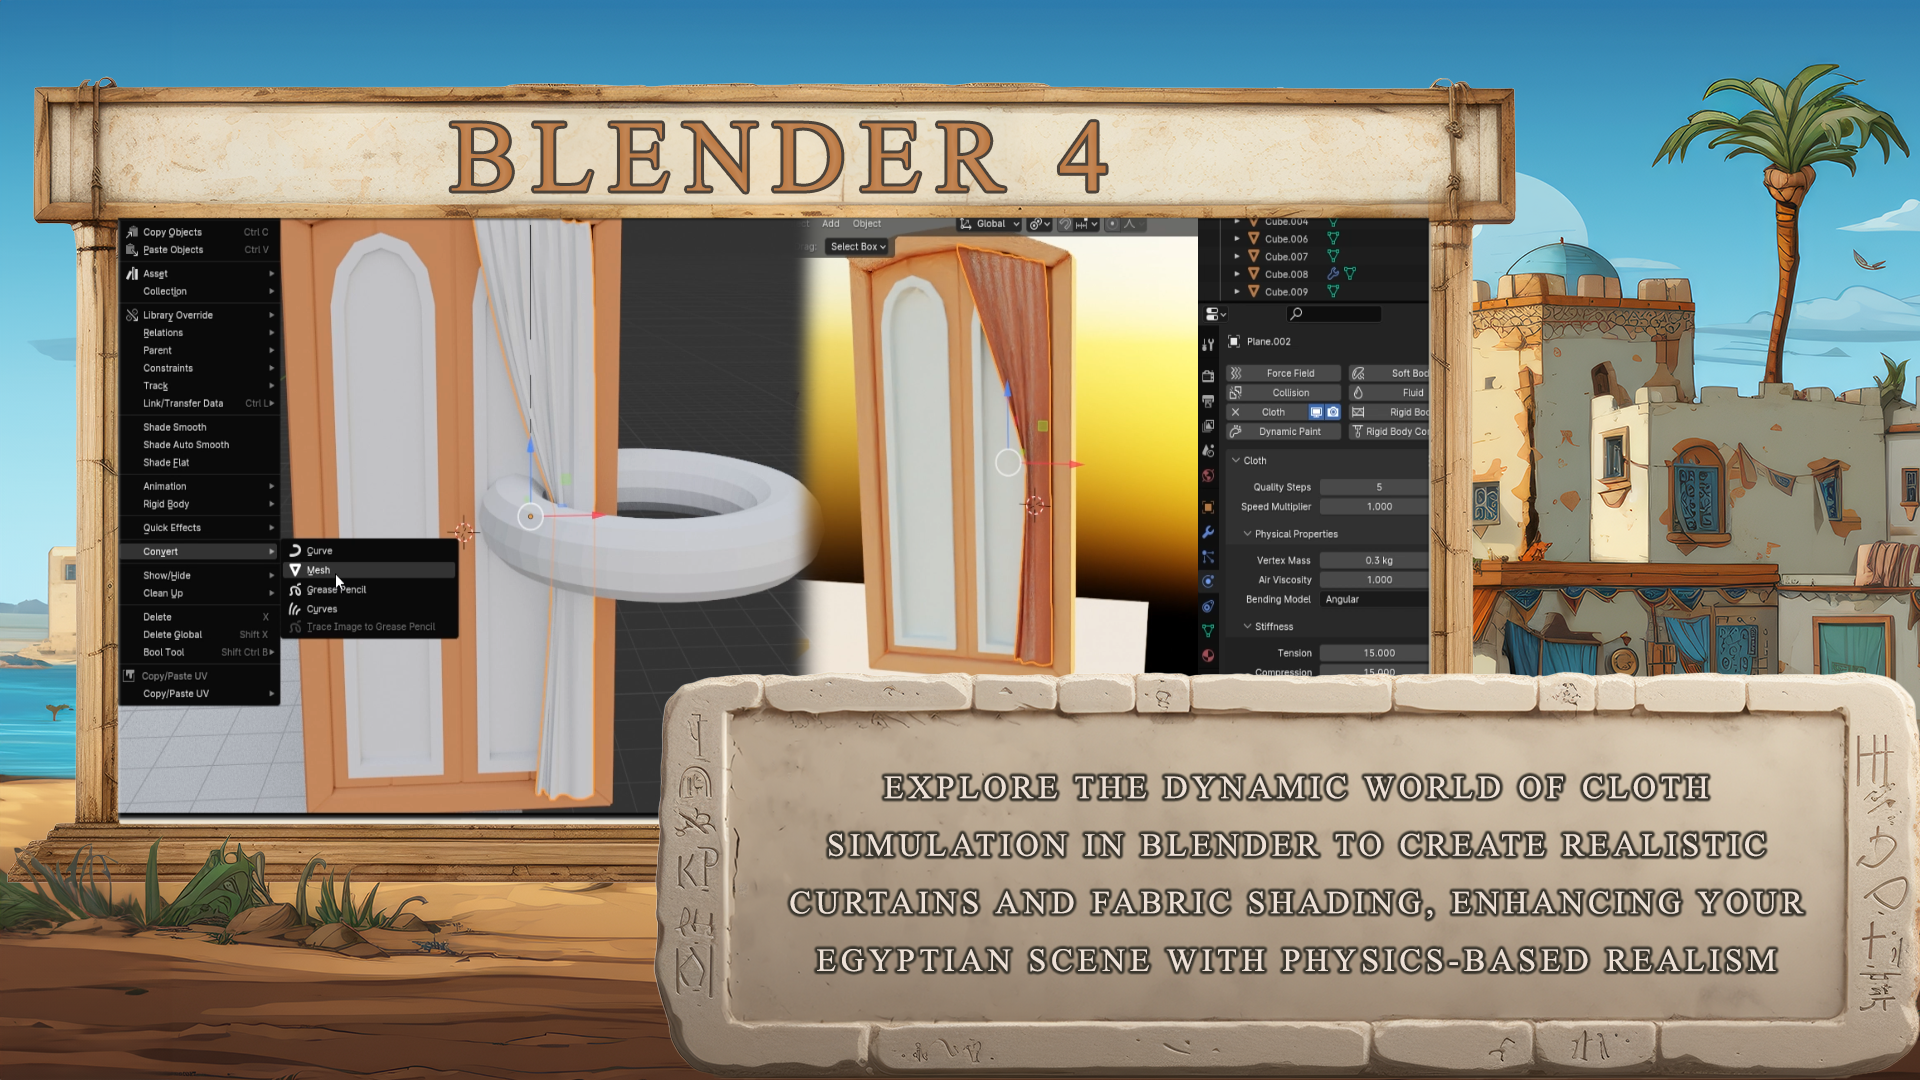
to your creations. An Arabian themed building
isn't complete without exquisite cloth
simulations and you'll discover the game changing new cloth generator in blender. This section is
dedicated to bringing fluidity and life
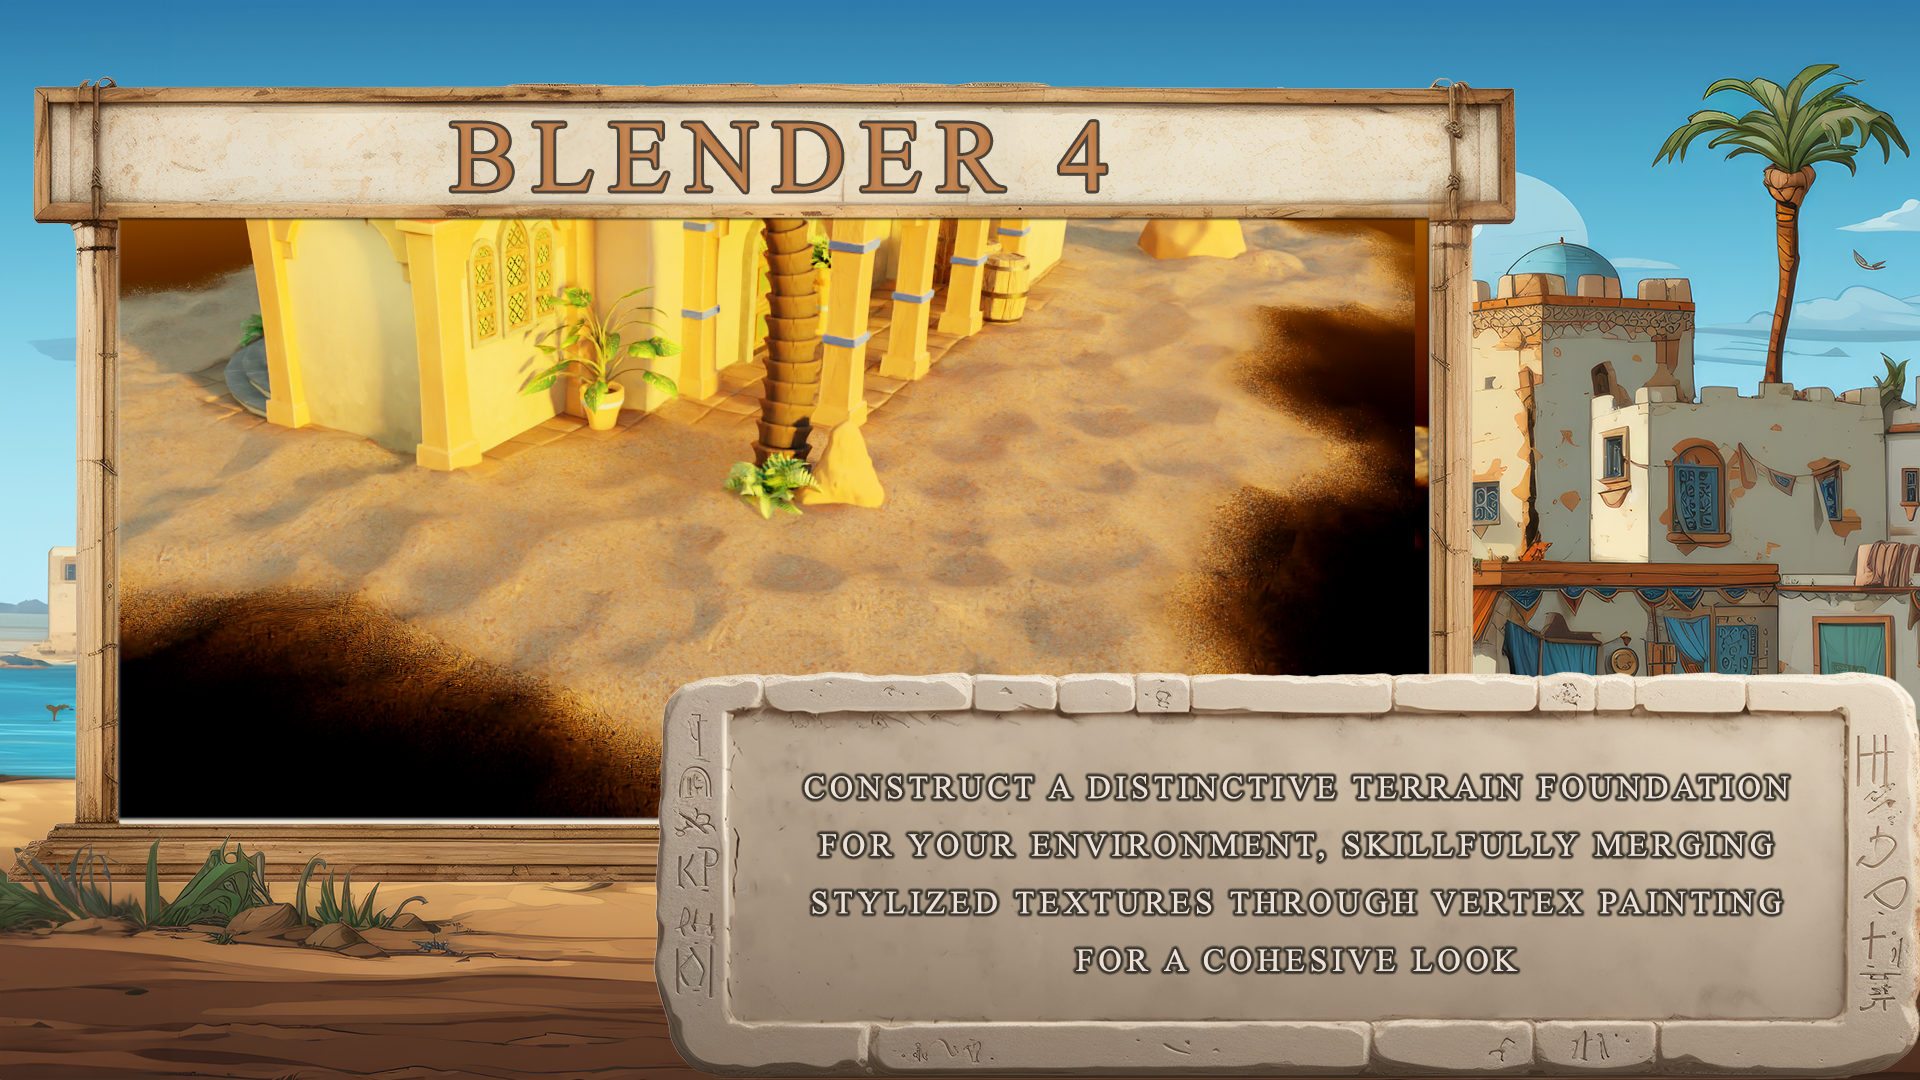
to your designs. The rain creation in blender reveals a world
of possibilities. You'll learn to craft terrains
with vertex painting. Blend textures
seamlessly and create transparent edges for a
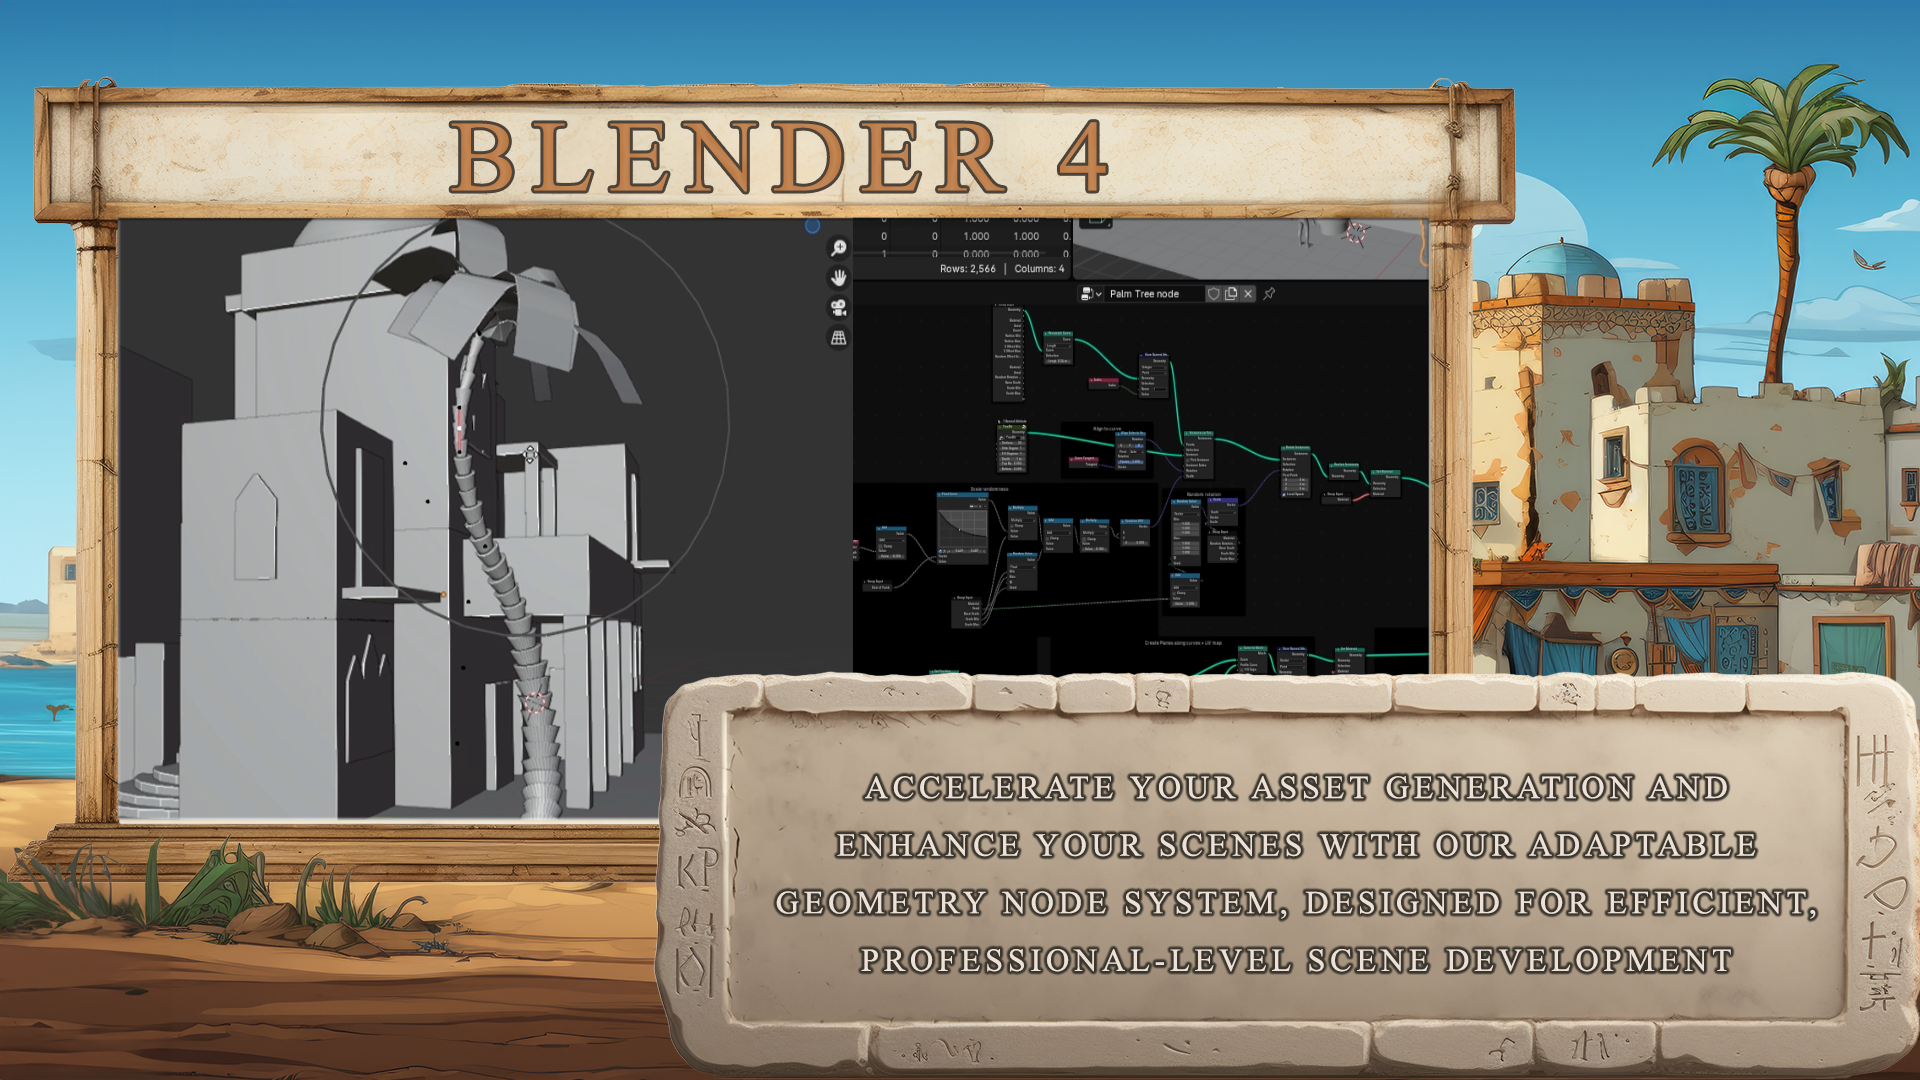
stunning professional finish. Our exploration extends to geometry nodes where
you'll create palm trees, wooden planks, chains,
and grape vines. These skills aren't
just for the course, they're for your
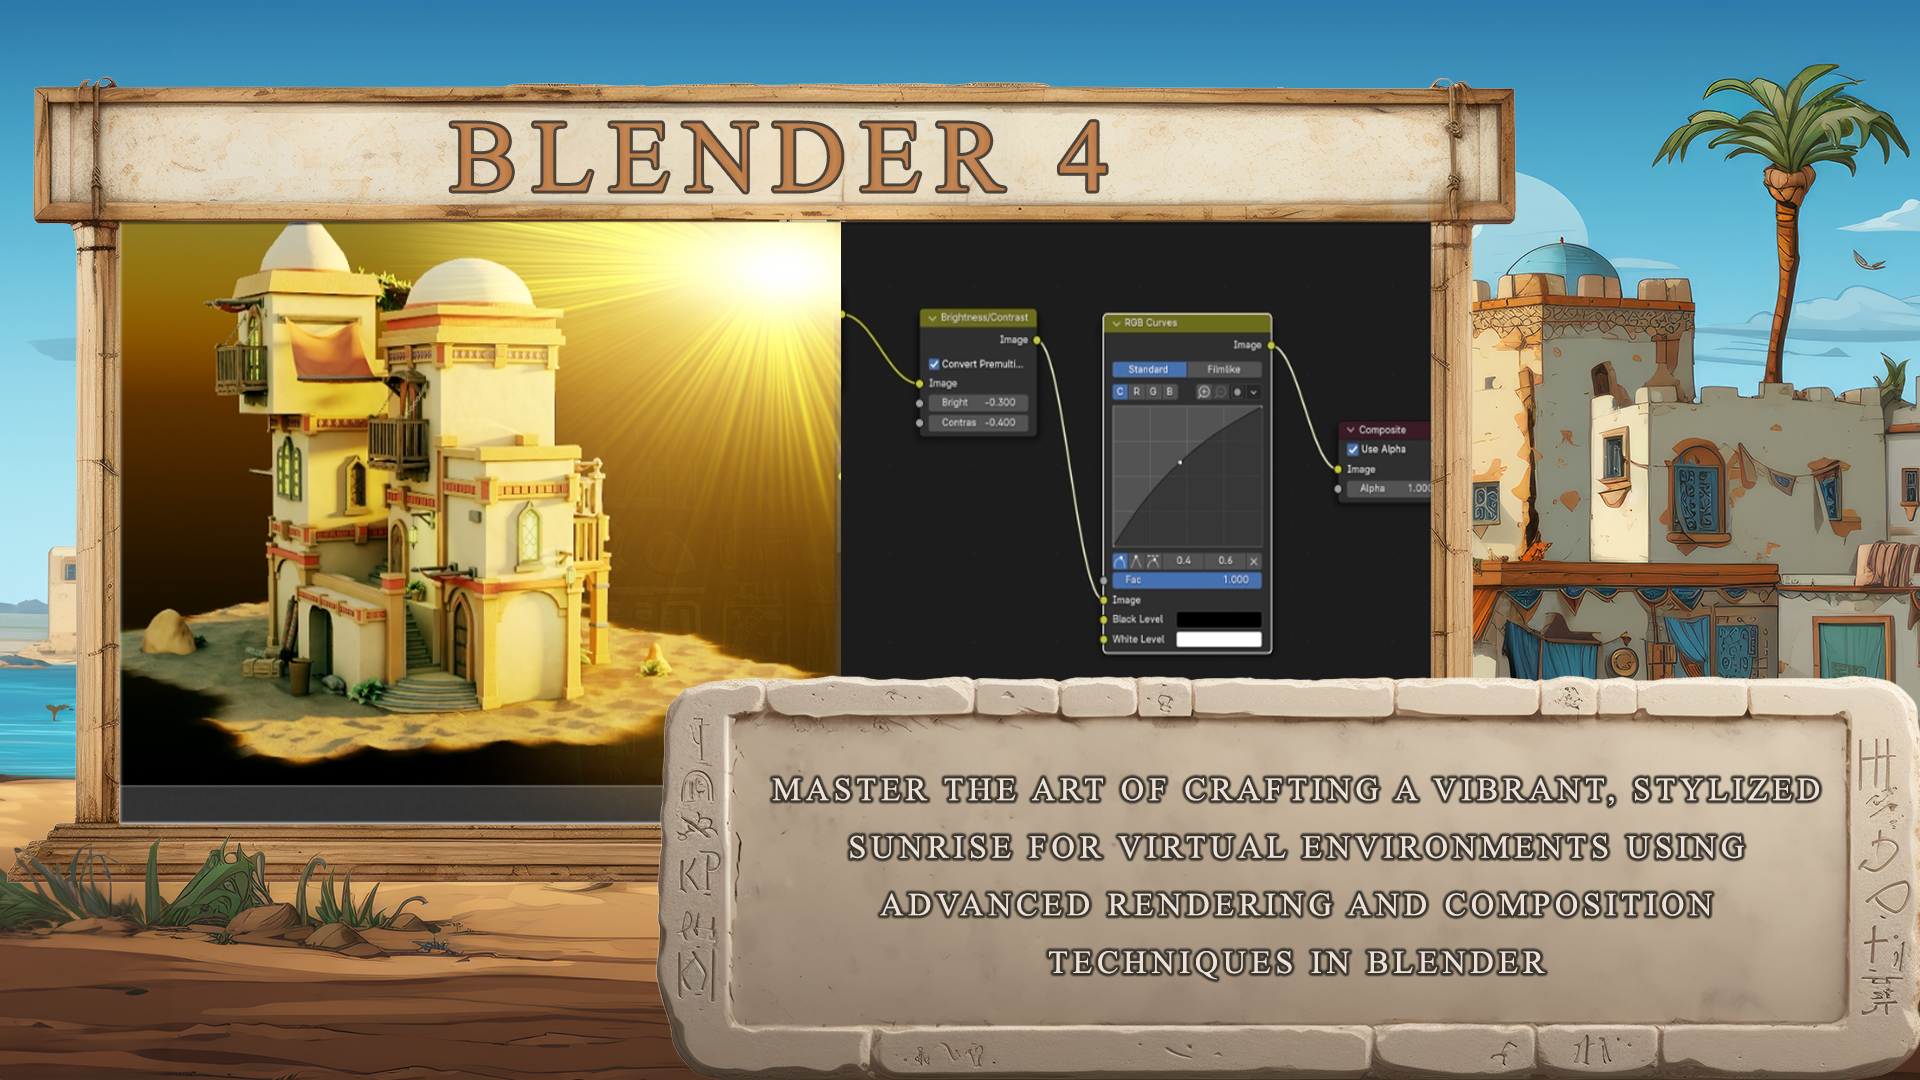
future projects. Building a library of assets to speed up your own workflow. We culminate with
not just rendering, but also lighting
and compositing. This final phase is pivotal. Transforming your work into a masterpiece that looks
years in the making. This course isn't just
about learning blender, It's about revolutionizing
the way you model, turning your creative visions into breathtaking realities. Join us at three
D tutor and let's reshape the world of three
D modeling together. Don't just dream of being
good at three D modeling. Take this course and by the end, you will have laid
the foundation to becoming a professional. All you need now is time to refine the skills
you learn here. Happy modeling,
everyone. Cheers.
2. Blender Basics Overview: Welcome everyone to the
Blender Four Ultimate Guide. And in this course,
our aim is to take any beginner and
have them finish a project to the
professional finish. You see on the screen now. I'll be honest with you guys, this will be tough,
especially for beginners. But please stick with
the course even if you have to rewatch a
lesson a few times. I promise you by the end you'll have a complete
understanding of the full scope of how to create this model and any other
project like it in the future. We've picked a model here and a scene that covers
blender from A to B with perhaps only the animation and
particle system missing. Now before we begin even
building our model, it's important to
spend a few lessons going over things like
the basics of blender. Such as moving around the
viewport and things like the resource pack and
referencing with these parts. If you already know the stuff, then just move on
to the next lesson. But I highly recommend though, working through them as there's always something you can learn. But enough of all that.
Let's get started. And the first thing we'll
be doing before doing anything else is going
over the blender basics. This will be
covering things like getting around the
viewport of blender. And lastly, before we do that, I'm using a Blender
four version. Now, you don't need
to use Blender Four. In fact, you can use
anything pretty much from Blender three onwards to
follow along in this course. And you shouldn't have any
problems at all for those of you who are using anything
below Blender three. So Blender 2.8 onwards, be aware the Asset Manager wasn't available
to Blender three. Okay, everyone. So
let's get started on the basics of blender moving around and of
course, the viewport. And I'll see you on
the next lesson. Thanks a lot. Bye bye. Hello everyone, and welcome to the basics of blender
part of the course. I recommend grabbing
a pen and paper or a Word document and joining down these keyboard shortcuts. He will be going through
the very basics of blender and the keyboard
shortcuts you will need. With all that said,
let's get started. On the left hand side your kit. See I have key casting on. This will show you the keys
I'm pressing in real time. And this will be on pretty much, if not all, of the
entire course. The next thing I'd like to show you is any new keys we use. There will be a
small animation that will appear down at the
bottom right hand corner. This will only appear
the first time we use that particular new key. And I think it really
helps keep the flow of the lessons to a decent rate, both for beginners and those
more familiar with blender, because they only appear once, they won't plow up the screen. And there's always screen
casting to rely on. Also down the bottom
right hand side, you'll see a detailed animation of anything that
needs more context. This is useful if you're new to three D model in particular
because there's a lot of jargon and technical
terms that need a decent explanation or more context of why we
are doing something. I recommend then if you
need more information, jumping onto the blender
website and checking out their detailed explanations of pretty much anything
blender related. So now when we mention
blender viewport, this is actually viewpoint. You can see it. All of this gray area here
is actually viewport. Now if we go to the UV
editing bar up here, you'll see that on the left hand side, it's
now in two screens. And if I say the UV
editing viewport, all that means is just
this gray box over here. So now let's go back to
modeling and let's go a little bit further into how to move around in actual blender. So the first thing I will discuss is that the middle
mouse port, actually, if you hold it down, you can rotate anywhere within
the blender viewport. And then if you want to zoom, it's just scrolling in
and scrolling back. Now you can also press control shift and
the middle mouse, hold it down and then just push it forward or push it back. And you can scroll
in very slowly. Now to pan, all you need
to do is you need to hold shift one and
the middle mouse and then you can pan from left to right to zoom to the object,
which is very handy. Let's say you're really far out and you really need
to zoom to it. All you need to do is press the dot on the actual
number pad and that will zoom you right in to the object you want to zoom to. For instance, if I'm zoomed out and I want to zoom to my light, for instance, it's very easy then to come across
the sen collection. Click on your light, press
the dot on the number pad, and that will zoom you right in. Now the next thing we need to discuss is just
deleting objects. So to click on an object
is just let click. And then what you
can press is you can press the delete key, and that will just delete
it out of the way. So I've just lead to my light there and
now I'm going to come across to my camera and actually delete that
out of the way as well. The next thing I want
to discuss is if we click on this cube
and we press shift D, what you'll notice if
you move the mouse now, it's actually going
to make a duplication of my actual cube. If I don't actually
click anything on my mouse and I just click
the right click button, it will drop that back in place. Now you can't see there's
actually two cubes in at the moment, but
there actually is. So we need to bring
in the gizmo. And the gizmo is basically
something that we can move things left and right, up and down,
things like that. So if I press shift space bar, come down and you'll see
we've got one that says And now we actually
have our gizmo. And if I pull this to
the right hand side, you can see now we
can pull this away. And now we're able
to move this around. You can also freely
move this as well. If you press the G key, you'll notice if you
got it selected. Now you can move it basically anywhere around the viewport. You can drop it back
with the right click, or you can put it
wherever you want it. And then it click left click, and it will put it
wherever I wanted it. Now also why the door, the zoom tube born is important. If I press the dot born. Now you will see
that if I just zoom Mou and hold the middle
mouse and rotate around, you'll see that I
actually rotate around the origin of this actual cue. Now if I click on the other
cue and I press the dot born, you can see now
that I'm actually rotating around the
origin of this cue. The next thing we
want to discuss is object mode and edit mode. At the moment we
are in object mode, we can't really do a lot with this cube except move it round. Now if I press the tab on, we will then go into edit mode. And in edit mode
we can actually do a lot more things
with this cube. Up on the top left
hand side here, you will see that we've
got three different icons. One of them, this one
here is vertices, the next one across is edges, and the next one across is face. Now if we're on vertices and we come over to this
vertices for instance I, then if I press shift space part to bring in my gizmo again, I then can move this around. Now if I come into edge select, I can grab the whole edge and move this around
like so finally, if I come into face select, I can now grab a whole phase
and move it around like so. Now the other thing is if we
come to our verte select, I can select a vertices, you can also select another vertex or another object or something else like that just by holding the Shift
button and actually clicking on the other
verte or the other object. Or if we come to face
select for instance, we can grab this phase, shift, select the second phase. This is how we can
select multiple objects. Now the next thing we need
to discuss is the axis. So we can see here we have a
red axis and a green axis. Now just to show you what
this actually relates to, if we come up on the top
right hand side here, where you've got these
two interlocking balls, and you click this
little down arrow, you will see that we
can turn on the z axis. Now we're just going
to turn this on, just to show you what I
mean, we turn that on. Now you'll see another
axis appears here. Now the green axis is
representation of the Y. If I want to scale
this out on the y, all I would have
to press is and Y. And now you can see I can
scale it out along that axis. Now if I want to
scale out on the X, so that's the red axis, I'll press S and X, and I can scale out along the
axis again, the same thing. And Z, the up and down
axis is, and it's S and Z. And then you can scale it up
and down. Finally as well. This is also important if we
actually want to rotate it, because we'll rotate
it on an actual axis. What I'm going to do is I'm
going to grab the whole of this by pressing the button. And then I'm going
to rotate it around. So I want to rotate it on
the Y axis, so it's Y. And then you can see it will
only rotate on the Y axis. And no matter where
put on the mouse, it will always
rotate on that axis. To click it back to where it was just again, the right click. And if you want to turn it, all you need to press
is and Y again. And then let's give
you a degrees. All we're going to do
is we're going to press 90 on the actual number pad. 90 to button. And now you'll see it's
rotated by 90 degrees. So just to summarize
that is scale. And R is rotate normally when we scale something
or we rotate something, it's followed by the actual axis and then it's
followed by a number. Specifically, when
we rotate something, normally when we
scale something, we just hit scale, pull them outside and
we'll scale it up. When we rotate something, it's normally
followed by the axis, followed by a number
on the number part. So now the last thing I want to discuss is if we
go to object mode. Now we need a way
to actually view this a little bit easier than the way
it is at the moment. Let's first of all
turn off the z axis. And what we'll do now is we'll use the number pad to
actually view this. So if I press one
on the number pad, that will go actually into the front view of our viewport. If I press three
on the number pad, that will go into the side view. And if I press seven
on the number pad, that will go into the top
view of our viewport. Now the opposite. To
get to the opposite, all you need to do is you
need to hold control. On this occasion we'll
press control and seven, and that will bring us to the bottom of this
object in the view pot. Control one is the
rear of the object and control three is the
opposite side of the object. Now before we finish this
section of the course, I need to show you something
that's also very important. If we come up to the
top left hand side, you'll see you've got a
button here that says Edit. And if we come down
to Preferences, one thing that you
should always do, that when you first
download a blender, you should always put
on the Status Bar, which is this button here. And if I click all of these on, you will see now if
I click them all on, and I close that down down at the bottom right
hand side here, you have all the
details that you need. For instance, we've
got how many faces and how many triangles
are actually in the scene and the objects
are in the scene. And the memory and V Ram
that's actually taken up. This is really important
if you want to get a good idea
of how much power your computer is
actually using and how many polygons and
triangles are in the scene. Polygons and triangles
you'll learn more about as we progress
through the course. That pretty much covers
the basic of blender. And hope you'll found that
both helpful and informative, but more importantly, easy to understand now as they
say on with the show.
3. Setting Up New Projects in Blender: Welcome back if you want to the blender for Ultimate Guide, and this is where we left off. Again, absolutely
nowhere because we haven't done anything yet. But you will be greeted with a viewport like this and now
you know how to get around. What we're gonna do is
we're just going to left click our little point light
here and press delete. Key, left click our cube. Press delete and left click our actual camera
and press Delete. So we've got a clean viewport
now. As you can see. Now I've reset my blender
two factory settings. And if you want to
learn how to do that, just come over to file, go down to default and
load factory settings. And as soon as you
click that, you will be greeted by
the screen again. I'm just going to drag across them and delete them all again. So I've got nothing
in my viewport again. Now the next thing
you want to know is how to actually
save a file out. So what you're going to do is you're going to come to file, and you can see it
at the top here. Or you might not be able to
see it where it says unsaved. Let's go down then to File. And let's go where
it says save As. So click save As, and then we're just going to
save out our file. I'm going to save it here. And I'm going to call
it to the Blender for ultimate guide course like so. And then click Save As. Now whenever I need
to save this out, I just go to File And Save now. And it will save
it out over there. Now the next thing you need to know is what happens
if you lose your work? So what you want to
do is you want to come over to file and you want to go down to where it says
recover and then auto save. Once you click auto save, you'll see that you've got
all of these save from all of the files that you actually
have been working on. And the one normally you want
to pick is the one which is normally closest to the time when you actually
lost your work. In other words, when Blender crashed or something like that. So this is how you can
recover a save file. Now at the moment, if we go
over to Edit and Preferences, you will see if I come
down to save load, that it saves one
version of the file. So in other words, it saves one save and then one other
version of the save file. It also saves recent files to up to 20 different
blender files. So you can increase this,
but of course it will put more stress on your machine depending on how many of these
you've actually got saved. And finally, the auto
save is set at 2 minutes, which I find is actually
really adequate for, you know, in case you lose
work and things like that. In other words, you might
lose a minute or two of work. But honestly, most of the time, and I say most of the time, that should be absolutely fine. Now, before we begin
with anything else, the other thing that you
need to know is if you come over to the interface here, you will see that
if we come down, we've got something where
it says Status part. Now this status part
is where we can actually see everything down at the bottom right hand side. So in other words, we've
got blender version ticked on at the moment, which is Blender 4.0
0.1 As you can see, we can also turn
some of these on, so this doesn't really cost a lot when you're
running blender. So you might as
well turn them on, especially things like
scene statistics. We're is going to tell
you how many polygons or vertices or faces
you have in the scene, how many objects you
have in the scene. And the other one
you want to put on is the system memory, which is going to tell
you how much memory you're actually using
within this blend file. Because some of you might be
working on lower machines. And that then might
cause an issue, especially when we get into some of the more
difficult things. And then you can see that, hey, this is running too much memory. And then you can actually
separate them out and pull them in a different
blend file if needed. The other thing is
the video memory, this has more to
do with how much Ram it's going to cost to
actually render things out. So using new graphics
cards and stuff like that. Finally, then before moving on, the last thing I want to talk about is going to
be under system, and you can see
that on our system we have actually
undo steps of 32. Now be aware if your blender
is running extremely slow, you can turn this down
to something like five. But just be aware that
obviously you won't be able to undo the steps
if you make a mistake. But this is normally
one thing you can actually do that will really speed up the blender viewport,
especially getting around. So you might want
to turn that down. And if you have got a really, really high machine and you're apt to make
a lot of mistakes, then by all means turn this up. And if it's capable of doing, then it should make it a
little bit easier for you. Now, the other
options within here, we're going to be
going through a little bit later on in the course, but here is a few things
just to get you started. All right. I'm going
to close that down. I'm going to save out my work and I'll see on the
next on everyone. Thanks a lot. Bye bye.
4. Mastering Blender Asset Manager Setup: Welcome back everyone to the
Blender Four Ultimate Guide, and this is where
we left it off. Now before going any further, I think it's a good idea to first of all show you how to use the asset manager because it's such an integral part of what
we're going to be doing. And not only that, we
have the resource pack that is also based on
the asset manager. Now unfortunately, if you
don't have blender and above, then you will have to
use other ways which I will show you how to
use the resource pack. But for those of you
blender three and above, especially on blender four, the asset manager makes
it extremely easy. And actually it makes it really, really easy to build
anything going forward. So first of all, let's come over and you will notice I'm
on layout at the moment. So these tabs up here, I'm actually on layout. And we don't really
need to be on layout, because layout
basically gives you a dope sheet or a timeline here, which is basically
there for animation. So what I'm going to do is I'm going to come to modeling first. This is the one that
we're mostly going to be working in when we're
actually building things. It's a very, very nice clean
viewport as you can see, and you can basically get
to everything from here. Now we want to though,
use the asset manager. You don't see an asset
manager across here, and that's because
there isn't one. So basically what we're
going to do is we want to create a new tab just
for asset manager, because we're going
to be popping in and out of that all of the time. So when it comes to plus,
and you'll notice that I can add in a workspace
when it come over. Then to the right hand side
here where it says General, you will see that it says
Asset Manager there. Now the thing is on
Blender below Blender Ft. I don't actually think
this is available there. I think you'll have the
other ones but not that one. Basically just
pick any of these, but if you can pick
the animation, because I'll show you
actually how to set it up just in case this asset
manager isn't there. So what I'm going to do is
I'm going to click animation. And you will end up with
something like this. So it's created a
new tab and here are then the three kind
of viewports of, you know, the four animation. So a dope sheet, a
timeline, and a viewport. All right, but we don't need
these two and we basically want this one changing into the asset manager. So
let's do that now. So if I come up to the
top left hand side here, you'll see that you've got
a little cursor there. If I left click and just drag, you'll see that you've
got a left arrow there and the screen kind of
goes gray. Just let go. And then what it'll do is
you'll get rid of that screen. If you want a screen coming in, you can just left
click and drag it out and then you can
have a screen coming in. Now let's just left click and drag this way to drop that back. Now we have, at the moment,
got in our timeline. We don't really
want that. What we want this to be is
the asset manager. So always on all
of these screens, you will have a little icon
on the left hand side here. Just click the down arrow and then pick whichever
one you want. Now for us, the one we
want is asset browser, which is this one over here. So once I click that on
here is our asset browser, and this basically is
the asset manager. Now one other thing
on the top here, you will see that I've
got animation 001, because they already
have an animation tab. I need to change that. So what I'm going to do is I'm just going to double click it. I'm going to backspace
and then put Asset manager smell that wrong Manager manager like. So press the end to
button and there we go. Now I don't want
the asset manager actually being over here.
I want it more over here. So what I'm going to
do is I'm going to re order two front. So click it and then it'll
be over the front there. And really nice and
easy for you to grab this one or grab
your modeling one. You can also grab this one
and re order to the back now. So then you've got
your asset manager and you've got your modeling
next to each other. So we've got modeling and
we've got our asset manager. All right, so now
we've done that, what we want to look at is
the actual asset manager. And you can see at the moment we have all of these kind
of things in here now. Don't pay too much
attention to these, most of it is just hair, and we certainly won't be
using that in this course. So what we want to do
is just close that up and what we want to do
is create our own now. So what I'm going to do is
I'm going to come down to all I'm going to put
it on current file and all that then will
disappear because that's basically just there
as a template. Now what I want to
do is I want to bring in a couple of objects and put them in
our asset manager to show you how it
actually works. So what I'm going to do
is I'm going to press Shift A to bring in a primitive. I'm going to click
Mesh in a cube. I'm going to then
press Shift and Spacebar to bring
in my move tool. Move that over to
the left hand side. Then what I'm gonna
do is I'm gonna pres shift A and bring in a plane. So now we've got a
cube and a plane. And bearing in mind
this has nothing to do with the actual project
we're going to build. We're just learning
this so we know how to use the asset
manager. All right? Not only with the asset manager, can you add in there
things like objects, but you can also add in
there jumptodes materials, pretty much anything
that you can think of. There are a few limitations on animations and
things like that, but apart from that, even Sky, even HDRIs you can
also add in there. But let's keep it simple. And let's keep to our cube plane and a couple of materials. So the first thing I'm going to do is I'm
going to come over. To the right hand side up here. And you'll see that we
have four options here. One of them is the viewport
shading, which is wire frame. If I click on that, you
will see now that you can see all of basically
it's a wireframe. It's like an x ray but
not quite the x ray. It's just a wire frame where you can see
through everything. The next one here is
the one you're on, this I'll be referring
to as object mode. And basically all this is, is just showing you the basic
objects that you've got. You see. Then the next one
over here is material mode. And you will see at the
moment they're both white. And the reason they're
both white is we haven't actually poured
material on these. So what I'm going to do is I'm
going to click on my cube. Come over then to
the right hand side where it says Material, and let's add in a new material. Let's make them where
it says base color. We'll just give this a
very, very basic color, so we're going to click
red on there like so. And then what I'll do is I'll
click on my actual plane, New, and we'll put
this as a green. So now we have two objects
and we have two materials. And now all that's left
to do is we really want to put these into
our asset manager. So all I'm going to do is
I'm going to shift select both of them because you
can do them all together, it doesn't matter how
many you've got selected. And then what you
can do is you can right click and markers asset. And you'll see now
they actually start to populate the actual scene. Now you can also right click and you can come up
and clear asset as well. Now the thing is I'm still unsure if I'm going
to front view with the three My number pad and then I right click and
a markers asset. You'll see that sometimes let's
say you've got a door and you want it to be
a front view view, so you're looking at
the front of the door. Sometimes when you
do asset management, your right click
and market asset, you need to be in front view or you need to change
the orientation. Now we will come a little bit more into that
as we move on. But just be aware in case
it doesn't look right in your viewport when
you mark assets that we will be covering that a bit later on in the course. Now the next thing
we want to do is we also want our
materials in here. So if I click on my Cube, come over to the
right hand side, right click mark as asset. You'll see now that we now have a material
in there as well. And we can do the same thing on the material for
the plane as well. All right, that's all good. We've actually got
two objects now and two materials in
our asset manager. Next of all, what
we want to do is we want to actually put these in some sort of order because we don't want
everything down here. So I'm going to come over,
click the Little Plus button, where it says All, and let's
call this one Materials. And then what we'll do is we'll click the little plus one again, and we'll call this one Objects. Just to keep it simple. Normally you would
have things like doors, windows, roofs, walls. And you would split them all
up so you can actually build a vast asset manager to actually bring things
into your other projects. So that's the reason
why we're doing this. All right, so then
what we'll do is we'll come to unassigned. We'll left click our
cube and control. Left click our plane and drag
those into object like so. Now what we'll do is
we'll do the same thing for our materials now. So we have these two
materials, shift, select them both, drag and put into materials.
And there we go. Now we've got materials
and we've got objects. Now let's come up and
save out our scenes. So we're going to
go to save like so. And then what happens after
a little bit of time, you'll see those little
stars disappear. Now what happens if
we actually open up a new asset manager
or a new blend file? These won't be available. Now what I'm going to do
is I'm going to show you how you can actually
make these available. So here is the file where we actually saved out
the blend file. You can see we've got blender
for the ultimate course. This is what we saved it out as. And you can see that we have one white version of it here. This is that other save
that I'm talking about. You can delete this
if you want to. It just gets updated
every time we do a save. You can see here, this one is
saved out 1034, this 11044. And as this one gets saved out, this one will be updated. Now, you will also see
that we have a text file. This text file is
actually very important. This actually is when
you open up Blender, what will create this
material and these objects or ever another many categories you're
actually have in there. So it's very important
if you're saving out your blend file that you
actually save this with it. Now I'm going to put these, you can see here, I've
got one that says Asset Manager and there's
nothing in there. What I'm going to do is
I'm going to drag all of these and drop them
in Asset Manager, just so you can see how
this actually works. Now if we double click that, you can see those
are all in there. Now let's drop that down again. And what we're
going to do now is just look at the file system. So if I come to file, you can see if I come
down to external data, we've got one here that says automatically pack resources. Now when we're dealing
with the asset manager, it's important that we do automatically pack
all the resources. Because if not, the
textures and things like that will not be actually
saved out anywhere else. In other words, if
you want to then send this to someone else, the textures will
just appear pink. And that's because we
haven't packed them in. So always, always, when
you're dealing with your own asset manager
automatically pack them. Then what you want
to do is you want to go to file and save it out. Now because you might have
a ton of textures in there, the file size will
go up exponentially. Of course, you might end up with a gig in an asset manager file because there's so
many textures and things like that. Alright then. So we're going to leave it
here and we're going to pick up on this on
the next lesson. I hope you enjoyed it and I hope you're able to
follow along so far. And it gets a little bit
complicated on the next one. All right everyone. Thanks a lot and I'll see on the
next one. Bye bye.
5. Efficiently Storing Files in Blender's Asset Manager: Welcome back everyone to the
Blend Four Ultimate Guide, and this is where
we left it out. All right, so now what I
want to do is I want to open up a new file to show you
how this actually works. So what we're going
to do is I'm going to open up a new blend file. And you'll notice the
first thing is I've got a splash screen here telling me what a version of blender is. And when I click it off, you'll see that we've got no cube, no camera, and no point light because we reset the
factory setting. So what we did was we had
default safe start up file. Now you'll also notice that
we do have an asset managing now because we saved it
out as if I click on this, you will see nothing in it. How come there's nothing in it? Well, we can't select
anything either. We've only got the user
library, nothing in it, or the hole, which is
just what we had before. So how do we actually get to those assets now
that we saved out? We go to Edit Preferences and then we're going
to go to File Paths. And you'll notice here
that we actually have a file path over here where
the assets should be. So you can see user
library is here. What we want is a
file path here of all of our actual
asset manager files. So what I'm going to do is
I'm going to click this bot. And then what I'm going to
do is I'm going to find the asset manager where
we actually saved it out. Now it's a good idea to actually
come in and left click, press control C on your file. And then what you're
going to do is you're going to control V, press the end to button,
and there you go. Here is my actual file. So now what I can do is I can
store all of my blend files with objects in that I
want in my Asset Manager. Within this file itself, you can see it's
called Asset Manager once I click Accept like so. And then what I'm going to do is I'm going to close that down. And now what I can
do is I can come to where it says all and I will have one that says user library. And now you can see that
under user library we have got all of these
assets again in there. Now what we can do is we can actually pull these
out into place. And you'll see that
this comes out if put on material with
the color add on it. But not only that, it actually gets better than that
because we can actually bring out now and just drop
our materials on objects. So you can see now that is
how we actually use it. You can see that this is
how you really want to save out your U, your blend files, especially when you want to use them within the asset manager, you can see how you actually add them to the asset manager,
including materials. And you can now see just
how easy it is to use. So I'm really hoping
that covers it. I know some people
find it, you know, a little bit complex to
actually use the asset manager. But that's really
as simple as I can actually make this
part of the course. Now what we're going to do
on the next lesson is we're going to actually be
using the resource pack. And the resource pack, I will be going through it,
but that is where, that is what we're
going to be putting in this asset manager, not these cubes and you
know, all of this stuff. We're going to actually delete
this file out of the way and then save that
resource pack into there. Now bear in mind when you
actually get the resource pack, it may be zipped up. Make sure you're zip it
because if you don't unzip it, you'll be looking for the assets and there won't be
anything there. All right, for now then
let's just close that down. Let's click Don't Save. And then we should be
back to this screen here. Now what we're going to
do is we're going to, instead of using
what we've got here, we're just going to go to File. And we're going to
open up a new file. So I'm just going to click
General. And there we go. We've opened up our new file, and now what we can do
is we can save this out. So file, save Os. I'm going to save it as the
name that I had before, so the blend for
automate course. Double click it and now it's
actually saved out as that. All right everyone. So
I'll see on the next one. Lots to look forward to. I hope you've
learned a lot about the asset manager.
Cheers. Bye bye.
6. Resource Pack Configuration for Blender Courses: Welcome back to everyone.
To the blend of four ultimate guide and this
is where we left the art. So now what we're going
to do is we're going to actually take a look
at our resource pack. Now when you download
your resource pack, make sure it's
actually unzipped. Once you've unzipped
it, you will have this actual resource pack. You will have the text, well, two text files. That's
normally how it comes in. So all need to do then is just double click this
and open it up. And then once it's opened, you will be greeted with
something like this. You can see at the moment
it's compiling shades. That's because we have a lot of shaders in here which
you're going to be using. All right, So now we can also
see if we come out to file, you should have make
sure that this is a automatically ticked
on which it should be. And then what that means
is whenever you save this resource pack out or
send it somewhere else, it will be available with all of the textures
and things like that. So now let's just wait until these actual shaders update the first time When
shade is update, it might take 5 minutes,
something like that. That's just the
way that it works. It even works like
that with my machine. And my machine is 2070
super on the graphics card, so quite, you know, high end. All right, so now
everything's updated. Now what we can
actually do is we can quickly now go through these which we'll be using so we can see
everything is named, everything is really
nicely laid out. And everything over on the right hand side is also
put into a nice group. Actually, we're going to go through the collections as well, but you can see
everything is grouped up here very, very nicely. All right, so the first one then is we've got geometry notes. We will be using these
within our scene. And what this will do
is it'll make it much, much easier to create certain
things like palm trees. If we had to go through
and create, you know, palm trees from scratch, it's going to be a course within itself, to be honest with you. Now, these geometry nodes
are all made in house. We made them here
at Three D Tudor, which means that
you're free to use them in any of your projects. As long as they're
not commercial use, you can get a
commercial use license from any of our stores. Now the geometry nodes as well is we've made them as
easy to use as possible. And we will be going through how the geometry
nodes actually work. And we're basically just
going to be dropping these into our scene to create
things like palm trees. And I'm going to show
you how to use them. Same as they're not ivy, they're actually vines for the grapes and things like that. We've also got one here
which is planks of wood. And finally we have
one for chain. Although the chains
looking a bit weird at the moment,
don't worry about that. It's gonna all come together
as we move on in the course. All right, so the
next one we've got then is the
displacement reference. And the reason we
have this in when we come to actually
do our floor, sometimes you can
get a bit muddled up with the actual
displacement options. So we've just kept that in there to make sure
that we're going to get it really nice and you have a really nice looking scene. In other words, you could
actually take this and copy the modifier
onto your own floor, but let's not worry about that too much. That's
what it's there for. Next of all, we
have our plants and foliage again, plants there. Sometimes it can be a
little bit tricky to make, so that's why we've
supplied those in there. Now you can go out, of course, and buy many, many plants and foliage
packs out there. There's lots of them,
there's lots of free ones. So all you need to know is how to use them
within this course. So how to bring them in, how to put them good ways
of placing them, and good things like that. I will show you though as we go further on how these are
actually structured, how we actually, which shade we've actually got in these
and things like that. All right, then we've got our
good old human reference, which you'll see in many,
many of our courses. I don't know why he's
turned that way round. But he's back. He backs
to us, but never mind. Here's 1.8 meters, which means he's a great reference
to bring into your scene, especially when you're
building out your gray box. Because you're going to find him really useful to actually create things to
a realistic size. Even if you're dealing
with stylized projects, generally you want
to be keeping to realism when it comes to sizing. You don't want ten foot doors or 50 foot windows or
anything like that. Also important if
you're actually taking it out on
real engine or if, you know, you send it
through a pipeline. You do want models that are, you know, accurate
in terms of scale. And finally, then we're moving on to all of our materials. Again, with these materials, we've got them all named. As you can see, if
we come over to the right hand side floor and brownstone and
things like that. And basically they're all named, they're all set up,
ready to be used. We will be going through them
and showing you the set up. A lot of them are
very simple and we'll show you actually
how to bring in your own textures and
things and then you'll be able to see from this how
to set them up yourself. Basically, this resource
pack is going to save us a lot of time
within a big course. And all of these things you
can either create yourself, we'll show you the
fundamentals of them, or you can get them
from somewhere else. So leading you to focus
on creating your model. All right, so now that's done, let's go over to
the asset manager. And you'll see on the
left hand side here, everything is set out
really, really nicely. So we have things
like geometry node. You can see we've got
our human reference, we've got all of our materials. We've got plants and
foliage in there, and we've got our sand and displacement flooring in there. So everything's in there
that you're going to need. Now the next thing that you need to do is you
need to save this out in a place where you can actually find it
and actually use it, because we're going to
need this in our scene. So you can see here, it's
called an Arabian building. It's a course pack and
it's in my resource pack. So what I can actually do now is I can actually
close this down. Then what I'm going to do is I'm not going to save it because mine's already saved out and I haven't done
anything to it. I can close this down now. And now I can finally do is come up to Edit and preferences. And what I'm going to
do is go to file paths. And now I want to
change this file path. So I want it to go to
where this is over here. So if I come on and left click all this press
control set to copy it. Come back then to this
blend control press center and there is my
Arabian Resource Pack. If I click accept now
and close this down, come over to asset manager
and now you'll see if I go to use a library here is
all of my packs in here. Now the thing is with
the asset manager, we will be creating our
own assets within our C. So this project that
we're doing now, we will be creating
our own assets. So all you need
to do, you've got user library and you'll
have current files. So the current files, you
can see nothing in here apart from these two things
that we actually created. Let's actually delete those because we don't
need these catalogs, so I'm just right clicking
and deleting catalog. And then I'll go back
to my user library. And now you can see
that these are in here. More than that though, you
can see we'll bring out our human that can
just bring him out and drop into our scene. And basically this
is coming from another blend file which
you're actually using here, which is really, really nice. All right, so all of
that is set up now. Now the next thing I want to go through is just
on the collections. So we're just going
to go quickly through now the collections
to keep your, you know, you viewport tidy so we know what
things are named. If ever I'm not
naming something. You might want to go and make sure everything's tidy. So
let's discuss that now. So what I'm going to do
is just pull that down a little bit like
so I'm going to go back then to modeling
and there's my human. And then what I'm going
to do is I'm going to come to him and to rename him, all you've got to
do is press F two. So you can press
F two and you can rename something like
human reference. It's two, human
reference like so. And then you'll see now
it changes over here. Now the other thing you can do is you can name it
over here as well. You can double click it
and name it over here. But trust me, when you've got a hundreds of objects in here, it's a real pain
to do it that way, as well as putting
them in collections. Gone are the days where
you're going to be dragging them up and putting
them into collections. What I can do now
is I'm going to get my human and then I'm going to put him up
onto the next one. So in here hopefully like so. And then what I'm going to do is I'm going to delete
this collection. So I'm just going to
come to this collection, I'm going to delete the
collection out of the way. And then we should end up
with something like that. Now I'm going to do is I'm
going to grab my human once more and I'm going
to press the button. And now you'll see
I can either point in Steam collection or
make a new collection. So I'm going to left
click on the collection. I'm going to call a Human
Reference or press Okay, Click okay. And there we go. Now we have a collection
called Human Reference. If I then bring in just a cube, quickly, shift day,
let's bring in a cube. Let's move the cube just
a little bit over here. Now you will see
that, first of all, if I press F two, let's name this cube cube. You will see over the right
hand side, now it's changed. And to pull down
its own collection, press the Born New Collection, let's call it cube, like, so click okay and now we
have two collections. So you can see really, really easy to actually make collections
to rename things. And that's basically it
as far as collections go. So let's now come over to the right hand side and
what we'll do is we'll just delete this out
the way you'll see now what it does is it
doesn't delete the cube out, which is great because
we don't want that. But now we can come over and delete our cube
over here as well. So we'll just delete
that out the way. Now there are some other
things that we will be going through about
our collections, especially to do with
these little icons here, but we'll be doing that
a little bit later on. What we're going
to be doing on the next lesson is we're going to actually be starting our
grade box. No, we're not. What we're going to be doing on the next lesson is we're going to be going through referencing because that is the
most important thing before actually
starting anything. It doesn't matter if you're
making a piece of rope. It doesn't matter if you're
making a whole city. We need references.
So I'm going to show you how I do references. Some of the options
will be paid for, some of them will be free, and some of them will
just be via Google. But I'll show you the process of doing it. All
right, every one. So I hope you enjoyed that
and I'll see on the next one. Thanks a lot. Bye bye.
7. Efficient Reference Setup for 3D Environment Design: Welcome back everyone to the
Blend for ultimate guide, and this is where
we left it off. All right, so let's
talk about references. So whenever I first begin, the first thing I
will do is I will go onto Google. So
let's put this up. I will go onto Google
and I'll put in whatever it is I'm
thinking of creating. So this could be a
medieval castle, it could be an Arabian building, it could be anything, even
if it's a prop just put in wheelbarrow or whatever it is you're thinking of creating. And from there, I will then decide whether I want to
make something realistic, whether I want to
make it stylized, or you might actually
have something in mind or a genre in mind. Even so, it could be an Arabian building which
is haunted, for instance. For that, then what
I'll do is first of all get an idea of how it is I
want to build something. So you can see here many, many styles of everything. You can see here, this
is a modern building. You can see here,
this is very ancient. And you can see this is modern, but still in the architecture
of not ancient times, but going back perhaps
two or 300 years. So there's many, many different
ways of building things, many different styles
of building things. So this is the first
thing that I'm going to go for to get an
idea of what I'm doing. Now, I usually use Google
when I'm actually doing this. And then from there, once I have an idea what I actually
want to create, then I kind of move on to
something like Pinterest. And I kind of nail down
my idea even more so. In other words, I will get images then from
Arabian building, let's put in stylized and
see if we can get anything up so it's stylized
Arabian building. Since we are doing
some stylization, and this then is
where I'll be getting tons of images off of Pinterest. Now once you've
actually done that, what you want to do is you
want to go and download something called Pureref.
So this is Pureref. And then what you want to
do is you can see here Pureref.com You can
say get Pureref. And you'll see that if you
scroll down at the moment it's $15 But we can
get this for free. If we go to custom amount, put this to zero and then you will be able to
get this for free. And it's such a lifesaver, this thing, it's amazing to use. And I'll quickly be going
through that as well. But get your hands
on this or you can use some other software as well. There's plenty out
there. But working in the industry so long, I can say that pure for me at least is the best software
to use for what I do. All right, so let's
open up pref. So once you've downloaded, you will be greeted
with an empty screen. Now what I've done is I've populated this with the things
that I'm going to need. Generally, I break down my scene into parts
that I'm going to need. And the way that I do
that, first of all, I get building references. So the main building reference, you can see this is the
style I'm going for. These are loads and loads of different styles which
I'm going to show you. You know, you can get
those of Pinterest. You can generate them
in AI software like Mid Journey or Dolly or any
of the others out there. There's so many out there now. Some of them are free,
some of them are paid for. In everything we do here, there is obviously
a free version, or there's a paid version. It's completely up to you
what you actually want to do. So you can see my main
building is there. You can see then
I've got my doors, so you can see all of
these doors, you can see. Then I've got
plants and foliage. I've got windows,
I've got lighting, and I've got lights,
and finally props. So what I tend to do is
get my main building, then I'll move on to
doors and windows, then I'll move on to props. Then I'll move on to lights, and then finally
plants and foliage. How I'm going to put the
plants and foliage out and right at the end then I'll
be looking at lighting. So let's go through
some of these now. So we can see that these are all the buildings that
I actually generated. I did this using mid
journey, but as I said, you can actually put your own in there from Pinterest,
from Google. And what I tend to do is then
I'll grab a main building. So this was my main
building that I really liked and I want to take a
lot of inspiration from. And you'll see as we're
building this out, how much inspiration
came from this. You don't want to take a
building and just copy it. You really want to
get away from that. But what you want to do is
take probably one building, which is going to be
your inspiration. And then what you do is you
take all these ideas from all these other
buildings and kind of add those into your own work. Now, it takes time
to learn to do that. So in the beginning,
just try and focus on two or three of them. So you can see
here, we could pick this one and we could have, instead of this
part being on here, so this roof being on here, we could take this and
put it on here instead. So just mix and match
them a little bit in the beginning before you
get good at taking many, many images, keeping
them in your head, and then using those
little parts of all of these parts
within the building. Next of all, go on to doors
and windows you should move onto because you can see within buildings you've got a lot of different doors and windows. And you definitely want to have references for these because
it's going to make it much, much easier when
you come to build. You don't want to
be in a situation basically where you've got
your building and then you're just copying
the windows off of here because they're
very, very hard to see. Anyway, normally when
they're generated like this, there's not a lot of put
into the windows and doors anywhere you can see.
I don't know what this is. This window is a little bit weird if we're
really zoom into it. I mean, trying to
make that blender anyway is going to be difficult. So the thing is, generate
some more doors and windows, or find them on
Pinterest or Google. And you can see, now I've
got my windows here, and I'm going to show you now how we can actually do this. So let's say we've got all of these, let's
just take these out. So I'm going to show you a
little bit how to use PRreF. So what I'm going to do is I'm just going to move them around. So you're going to be
dropping in windows, left, writing center
or props in this case. And then what I'm going to
do is I'm just going to drag and select
them all like so. Right click and go to
images arrange optimal. And then it's just going
to arrange them in an optimal place for me and then I can put
them all together. What I'm saying is
grab all your images, put them all together, and then just drop them
and arrange them all. Now to bring in a
name of something, all you need to
do is just hover. Wherever your mouse is, that's where it's
going to appear. Press control then, And then
you'll see a note appears. And then you can simply type
in something like Windows. Press the Enter Born,
and there you go. Now you can drag
this around as well. Extremely easy to use. Next of all, then
we've got our Windows, we can do the same
thing with those. Again, sometimes I tend to
get a lot of references. This is basically, you know, I usually have a
lot more than this. When I'm actually
building something, I might have 30
different windows. Just remember though, they
have a lot of pure rep files, we already have a
lot of windows in. So this is just to show
you how I actually do it. So we've got windows and doors, and then we need foliage. When you're creating a scene, especially when
you wanted to look professional and you need
to fill out the scene, you need to make sure you've
got lots of props in there, and especially you've
got plant life. In most scenes
you're going to need some sort of plant life. And it really, really
brings out the scene. So in the scene we're
going to create, we're going to have palm trees. We're gona have some
ferns down at the bottom. We haven't put any cactus in, but you could really put
those in if you want to. But you can see this
really gives you a good idea of how you
can actually fill out your scene and all
these ideas of not just plants and foliage, but cactus and you know, plant pots and just a
really good feeling of how you can fill it out. You can see here,
I've got an idea from this of having some
vines and some grapes, and you're just really, really building on ideas. All right, so over here
then is the props. And obviously that's
the other thing. What you want to do is,
as we're building now, you break your building, whatever you're
doing into chunks. And on those chunks you make sure that there's
some life in there. You always want to
do that, and this is what really brings
an image to light. So you don't want just blank
walls with nothing there. You want to steer
away from that, especially when the
focus is on a building. If you're dealing
with a whole town, of course you're
going to have walls where you know not
a lot is happening. But generally when
you're building out a project like
this one where it's a building and you're going
to be doing a turntable and it's going to look really professional, really
nice building. You want to make sure that you broke your building
down into chunks, and there's life in every bit. You can see here,
I took a lot of inspiration from the things
like the cloths, the barrels. You can see this arch here. Lots and lots of props in here. Now, the next one
I do is lights. I probably went a little
bit overboard on this, creating all of these
different lights, but it did give me a
lot of inspiration, not only how to create a light, but how the lights
are actually lit. A lot of these, you can see
we have kind of oil lights, we have some candle
lights in here. And sometimes it's not obvious
what's actually in them, but you can see the actual
overall style gives you a lot of variations
to what we need. All right, and finally, then
moving on to the lighting. Now the lighting normally, I always leave till
near the last. And that's because I want to decide whether I'm going
to light my lights. In other words, you can't light your lights in
something like this. So there's no point in
having a building like this and focusing on the lights now. Although this looks really nice, it's probably not
going to teach you as much about lighting as if you
have something like this. Because in something like this, as you can see, we have
a lot of lights here. I think this is a
sunset actually. We have a lot of lights on
the water, so you can see, you're probably going to learn
more from that one then. Just this way is just
a daytime scene. So that's why we've
picked the kind of lighting that we've
gone for now. We could have gone for
something like moonlight, but again, that comes
with other problems. That's probably making it
a little bit too difficult because moonlight is
pretty hard to get Right. Actually, we've steered away from that and what we've gone with is a dusk basically. So the sun's going down, we've got some lights
that are coming on, or it could be early morning. You can use it either way. And I think that is going to, one, teach you the most, and two, not be so
overcomplicated. So when you're actually building
your own scene, really, really think about what lighting you're going
to want in there. Is it what time of day
it's basically going to be in there and I think
that is really important. All right, so on the next list, and then what we'll do
is I'll show you how to generate some of these images and how I do it in mid journey. But of course you can use your own AI system
if you want to, or you can generate
them through, as I said, Pinterest or Google. All right everyone. So I
hope you enjoyed that, and I'll see on the
next one. Thanks a lot. Bye bye.
8. Generating Creative References with ChatGPT AI: Welcome back everyone to the
blender for Ultimate guide, and this is where we left it up. All right, so now let's pull
over our actual mid journey. So here is our mid journey here. Let's open that up a little bit. And we can see here that
we've generated some images for some other things we were doing. It's use mid journey. All I'm going to do is I'm
going to left click down here. Imagine let's put
in something like stylized Three D model building, Arabian themed. Arabian themed. Now of course this
could be spooky themed, it could be medieval themed, could be Roman theme, could
be anything based there. But we're just going
to put that in. We're going to wait
then for mid journey to think about it and let's
see what it generates. And from there then
we're going to take some of these ideas that
it's actually generating. So you can see now we're already
getting some nice ideas. We're getting some
nice ideas for lighting as well on top of
there. And here we are. If I click this now we can see this is what
we end up with, some really nice ideas already. Now from there, what I'll do is I'll pick the
ones that I like. So up here we've got an upscale, or we can make a variation. Now when we're generating ideas, generally I don't want to waste time with making variants. So all I'll do is I'll
upscale each of these. Don't let me just turn it off. Upscale. Upscale, and upscale. And then we'll see
that it's upscaling all of these images
now ready to use. What that means is then it's
going to be putting them into our actually mid journey where we can actually
download them. Now once you've got
the idea and you're actually happy with the
images that it's generating, What you can actually do is
you can actually copy that. Come to imagine again, so imagine control
V to put that in. And then what you can
do is you can press two dots, repeat. And then let's put something
like three repeat, three, Press the B. And then it'll ask you, are you sure you want to repeat it? Click Yes, and now what's going to happen
is, as you can see, it's going to start
repeating them three times, three times repeat. As you can see, now
here is 12 and you can generate the
ideas really fast. As you can see, now
they're already done. Now I've got some
really nice ideas to actually work with. Then simply what I'll do is I'll actually go in and
upscale these. You don't have to, by the way, you don't need to upscale them. You can actually use the
ones that you've got here. So basically I can now
copy this copy image. Go back to my pre
press control V, hey, presto here, my image
that I generated from there. Then I can go and grab all of those images and basically
put them in here. We can also do the same
thing as well for Windows. So if you want to
generate Windows, you're just going to put
in something like three D, stylized window, Arabian themed just to match
the theme that we've got. And that is the way that
you can do it using AI, like mid journey
From there as well. What you can do is you can
have all of your ideas here. And then what you can do is you can click download all this, then will download all of these
from that particular day, and then you can
actually download them all the separate images and then drag the images
into your Pureref. Once you drag them in,
then they will put them all nice next
to each other, so they'll be all nice next
to each other like this. And then it's really,
really easy to wit with. So you can see just
how easy it is now to actually generate
images, you know. Gone are the days of
needing, you know, a full time concept artist, you know, you know, with whatever you're doing. Gone are the days of being, struggling to find, you know, the actual reference
that you actually need. And I think this is
the best way now of generating ideas for
sure. All right everyone. So what we're going to do
then on the next lesson, is we're going to actually
start with our gray box. And we'll start
building that out and actually start in blender. So yeah, a bit of a long
intro into all of this, but I feel like these are
really fundamentals of actually creating professional looking buildings and assets. Alright, everyone, hope
you enjoyed that and I'll see on the next one.
Thanks a lot. Bye bye.
9. Techniques for Blocking Out 3D Scenes Using Primitives: Welcome back everyone to the
Blender Four Ultimate Guide. And that's where we left off. All right, so we've got
our little guy in here. What I'm going to do is I'm
just going to left click on him and move him
over to the side. So again, when you're
doing your own, you will be looking at
your own references and then you will be building
something off of that. What we're going to do is we're going to create a great box. We're going to have a
look at the lighting, make sure it looks
right before we start any sort of
building at all. This is the way that you want to work building anything,
whether it be, you know, something
like a wagon, whether it be a castle, whether it's big,
whether it's small. You always want to
build a gray box. You want to check your light in then before doing anything. So what I'm going to do is
I'm going to bring in a cube. So let's press shift a mesh. Bring in a cube.
And at the moment, I don't know what
size this cube is. So what I'm going
to do is I'm just going to open this up
on the right hand side. You can either click
this button or you can press the end button
to open it up like so. And then what I'm going
to do is I'm going to come down to where
it says dimensions. Now we can see at the
moment it says x, y, and z. Now the x axis is
always going to be in red and the green axis is, the y axis is always
going to be in green. And then the Z axis, which is what you can't see, it's normally going
to be in blue. Now, if you want to
put on your X axis, you can just come up to
these two interlocking links and put your X
axis on like that. Generally though, I find that you're not
going to need that. Now let's actually come in and make this the right
size to start with. So what I'm going to
do is I'm going to come in to where it says X and put this on 2.5 meters, press the tab, 2.5
press the tabor, and let's put this on three. And I think that generally
gives me a really, really nice building
block to start with, especially when we're dealing
with something like this. If I then press one
on the number pad, I just want to bring
it up and I want it to be above this
actual ground plane. I'm going to call this
the ground plane. And basically it's the line
that goes across this x axis. Or if I press three, the Y axis, we want to make sure
that this block is placed on top of there. And this is because this is
where we want our floor. Anything below here is
basically going to be underground and anything sat on here will be
sat on our floor. So there is that just to take
into account from there. Then I can see that my guy, if I look here and
I put a door in, let's say I put a door in here where he can
actually walk through. You can see that 3 meters is going to be about
the right height. You can see this guy over on the dimensions is 1.85 meters, which is about the average
height for a human being, depending on where you're from. So that is the block that
I want to start with. All right, from there
then I want to actually bring this block up a little
bit to the next story. So what I'm going to
do is I'm going to press Shift D. I'm
going to grab it. So I've duplicated
it with shift, and then what I'm going to do is just place that on there. So now we've duplicated
it, put it on there. And this is then our main
part of our actual building. Now as you work through
this and you're putting more parts on here
and things like that, then you might want to
actually, you know, lower these down or
bring them back up. It just all depends. Okay. So I'm happy
with that and now we want to move across
to the next part. So what I'm going to do is I'm going to grab this block again. And then on going to do
is I'm going to press shift again to duplicate it. I'm going to bring it over
to this side this time. Then I want to probably
make this twice as long. So what I'm going to do is I
can see the x axis is here. So I can put this on
5 meters instead, not far on the x axis, 5 meters. And then I'm going to
drag it across like so. And we can also see that I'm going to need
some stairs down here, because I need this
guy to be able to, I'm going to put a door here and then some stairs
coming down here. So first of all though, what I'll do is
I'll drag this up to be around the
halfway point of here. So I'm going to press Tab
to go into Edit mode. And then what I'm going
to do is I'm going to come over to the
left hand side here. So once you press Tab, basically
you're allowed then to move the geometry with
inside the object itself. So what I'm gonna do now is on the left hand side here
we have three options. We have the, if
you hover over it, I'll tell you it's
called the vertex. So we have the vertex, we
have the edges and the faces, Now this one's vertex edges. And click the vertex, I can click on these and I can move them around
with the board. And if want to right click
to drop them back in place. If I come to the edges, I
can grab the edge again. Right click to drop in place. And if I come to the face, I can grab the top face again. Right click to drop
it back in place. That's what each of these do. You can also press 12.3 on your number pad to
actually do the same thing. Now what I'm going to do
is I'm going to come in, I'm going to grab my face, and at the moment you'll
see that I've got no gizmo. Now you can come
in and click this over the left hand side
where it says move. Or you can press
shift space bar. Click the move tool, and then you've grow it there
Now now I'm going to do is I'm going to
drag this up to be round about the
halfway point. And then what I'm going to
do is I'm going to press Tab to go back into object mode. And now I'm going to press
Shift D and bring it back up so to make it a little bit higher than what
this building is here. And then what I'm
going to do now is I'm going to
probably come in and drop this down just
a little bit, so. All right, so that's
looking good so far. Now the thing is though,
if I come round here, this at the moment isn't very square looking,
as you can see. If I come out, we can see
that this is nearly 4 meters. So let's put it
actually on 4 meters. So I'm going to put it on four, and I'm going to
put this one on. This one's at 4.5
so that's fine. Now what I want to do
is I want to drag these out to be kind of
square at the moment. We can see that this way going across here is going
to be 5 meters. And this way going across
here is 2.5 I want to change this on the y
to 5 meters like so. And also want to change it
on the Y to 5 meters like so just then so I can move it out and put it more
into place now. From there I can
actually bring it back now to get it more in line
with what I actually want it. Because the thing is,
I don't really want it going out all
of that distance. So although this is square, what I want to do is I want
to make them more in line. So in other words, I want
them to be roundabout here, but I also want to
make sure it's square because I want to put
a top on here as well. So how do we actually do that? Well, what we want to
do is we want to bring them back to the place
that I want them. So what I'm going to do is
I'm going to come in and you can see now I can drag
this all this way. So you can see before
I actually do that, I'm going to show you, you
can actually grab them both. So I've grabbed the first
one, grab the second one, press the taboon, and now I can actually go in and move
them all at the same time. So I can shift select this face, shift select this face, and then I can move
them back like so. Now, how big is that exactly? Because you can see now it's
4 meters at the moment. So if I put this on four, and I put this on four, now you can see that
that now is more square. So I've put this one
on four as well, and I put this one on four. And there we go. And now we
can see four by four by four. And now we should be
able to grab them both and pull them into place. And I think that kind of
gap there is looking fine. And now going up here is
going to be a square cube, which is easier to, with,
to put a top on there. And then we've got
this part down here where we've got our
steps leading up to, again, we're just building out the very basics of it for now. And once we've
done that, then we can actually start building out, you know, all of the other
parts that are going on here. All right? So this is probably probably the hardest bit because once you've
got this bill, everything kind
of follows along. It makes it much easier. So what I'm going to do
now is I'm going to come, I'm going to grab
this part here. And what I'm going to
do is I'm going to press shifty and I'm
going to bring it over. And what I want to do is I want to put some stairs
going up here. So what I want to do is I
want to make sure my guy is able to fit in there and walk up some stairs
like you can see. Now, how much gap do you
want between each of these? For the stairs, I don't
think we need quite so much. So I'm going to create something like that and imagine
he's got plenty of room then to walk up there
for these actual stairs. All right, so that's that bit. Now what I want to
do is obviously I want to pull this out, so I not only want to have
this go into the back, so the back level more or
less with this building here, but I actually want to
pull it out along here. So what I'm going to do is
I'm going to grab the object, press the tab button to
go into object mode, or press Tab, grab this face. And then what I'm going to do is I'm going to pull this out. Now the way that
I'm pulling it out is I want some stairs
to go up here, and I want some stairs
to come down here. So again, I want
to make sure that the stairs coming down here are again level
with this guy. In other words,
you don't want two huge stairs going up there. Okay, So now we've
got this in place. The best thing now to do is
actually bringing the stairs, because then it's
going to make it much easier to visualize
what we're doing. So down at the bottom here, you can see on the
thumbnail we actually have some rounded stairs and then
some stairs going up here, and then finally some
stairs going up here to the top probably level
with this building. So that's what we're going
to do on the next lesson. All right everyone. So I hope you enjoyed
the start of this. It does seem fairly complicated when you're breaking
it down like this, but trust me, it's
worth the effort. And you'll see it is, you know, when you come to actually
start putting parts. And you'll see all that effort is really, really well rewarded. All right everyone,
thanks a lot. Say the next one, bye, bye.
10. Mastering Greyboxing for 3D Environmental Design: Welcome back everyone to the
Blender for ultimate guide, and this is where we left off. Now I think the first thing
we should do before doing anything is we should come up and always save out our work. So make sure it's
always saved out. After every lesson, I
will try and do that. Next of all, what we're
going to do is we're going to start
bringing in a door. This then will enable us
to decide where we want our stairs and how high each of these
actual parts should be. So we need to create a basic
door and a basic window, and then that'll
give us a good idea. So what I'm going to do is
I'm going to come to my guy, I'm going to move him
to the side like so I'm going to press the little dot
button on the number pad. And that then will
zoom me in to my guy, making it able to
orientate around him. You'll notice if I try and come to this building
and orientate, it's still orientating
around my guy. If I press dot though, on this part of the gray box, you can see now I'm orientating around my actual
cube that I've got here. So grab your guy,
press the dot button. And then what you're going to
do is you're going to press Shift cursor to Selected. And then what you're going to do now is you're going
to bring in a door. So I'm going to press shift, I'm going to bring in a cube. And all I'm going to do then is make my cube a
little bit thinner. First of all on the Y axis. So if I press and Y, you can see then I can actually scale that in along that Y axis, like, so I'm going to pull
it back then a little bit. And then what I'm
going to do now, I'm going to come to a front view. So if I press one
on the number pad, I'm going to lift it up so it's actually on the
actual ground plane. And then what I'm going to
do is I'm going to press and X and bring it in and make
it the right size of a door. Now you can see that pretty much this is going to be the
right size for the door. No one walks around with their
arms spread out like that. Everybody keeps their
arms at the side. We don't walk like we're
in T pose or anything. So a door should be round
about this size with a little bit of head room at the top to actually
actually walk in the door. 'cause what you've
got to remember is this is just a cube. It's going to have
something on the sides. You know, to put the
door in the wall, it's going to have something
on the top as well. So generally, I would
say I would make this door perhaps a
little bit taller, so maybe 2.1 and then press
one, and let's have a look. Maybe something like that, I think should be
absolutely fine. Now what we're going
to do is we're just going to bring our
door over now. And what I'm going to do is I'm just going to lift my door up just to something like this. And now I've got a good idea of where I actually
want this to start. So if I put my
door into here and now I have a good idea
of the first part. So the first door
is going to have a round part coming across here. And then what it's going
to do is it's going to lead up to some more
stairs going up there. Now, the other thing
is at the moment, we don't have anything kind
of giving us any visual on how rounded this should be
or where it should come to. So what I would say is
the next thing I will do is I will bring in another, I'll actually take a part of
this and bring that over. So what I'm going to do is I'm going to press Tab on this. I'm going to grab just the
front of it, so Face Select. I'm going to press Shift D.
And then what I'm going to do is I'm going to drag
this over to here. Now of course, I don't
want this, first of all, to be part of this, so I don't want it to be part of this bar and I also
don't want it so tall. So the first thing
I'm going to do is I'm going to press the bottom. And what that'll
enable you to do is separate it out from
this actual object. So if I collect selection, now you can see that we
have two objects here. Now I'm going to grab this one, I'm going to press control A. And what I'm going
to do is I'm going to reset all the transforms. And the reason I'm
going to reset all the transform is
at the moment Blender knows this pretty much is a cube even though we've messed around with
it a little bit. But on this we'll still
think this is also a cube. When you come into doing
anything like even you've unwrapping it
or adding modifiers, anything at all, really blender still
considers it's a cube, which means things
don't work properly. If there's anything not working properly within
your own builds, you can pretty much guarantee it'll be down to
one of two things. And the first one is
the transformations. We'll discuss the second
one a little bit later on. So let's press control A, all transformed right click, set origin to geometry
and then it's going to set it back
to the geometry there. All right, now what I want to do is I want to lower this down. If I come in, I'm going
to go to edge select. I'm going to bring this down,
then something like that. And then what I'm
going to do is I'm going to pull this
out a little bit. So I'm going to press
L, hovering over it. Press L, will select everything. And then what you're
going to do is you're going to extrude it out. Extrusion basically means you're creating a new piece of
mesh from the old ones. So if I press now, you can see I can pull this out. Like so. And now we've got, instead of a two D object, we've now got a three D object, which makes it much
easier to use. Now I want to do is
I want to drag this over to somewhere
where it should be. So I'm thinking
somewhere around here. So let's come in face, select, grab this face, and
let's just pull it out to somewhere like this. And now we can see
that we should have enough room for him to
walk up some steps. So he's going to walk up
some steps to this door. And then some steps are going to go up to round about here. And then finally some steps
are going to go up to there. And also we want
another door in here which is going to go
under the stairs. Because the more you actually
build these buildings, the more you'll see that, the more intricacy add
to the actual gray box, the better it's
going to turn out. So just bear that in mind. All right, so now let's come in and make our actual stairs. So what we're going to
do is just make a very, very rudimentary
stairs along here. So what I'm going
to do, I'm going to make sure my cursor is
in the right place. In other words, if I
shift right click, you can see I can put my
cursor wherever I want. You can also press shift S and put the cursor
to the world origin. Now it's important
where the cursor is, because wherever the cursor is, whenever you bring
in a new cube or a, whichever primitive
you want to bring in, it's always going to come in
where the actual cursor is. So I'm going to come
over, go to cylinder. And now you can see
the cylinder has appeared where my
actual cursory is. Now the other thing to bear in mind when you're bringing
in something like a cylinder or a curve is you nearly always at the bottom left hand side get
an option down here. So you can see this
menu down here. If I open it up, we can see we have a lot of
options on here now, depending on what you
set these at every time, then you bring in a
cylinder or a cube. It will actually come
in with these options. In other words, if I
put this down to three, you can see now
this has changed to three sided instead of 32 sides. Now I'm going to set this to
something like 20, like so. And then basically every time
now if I move this over, the moment I move this,
this will disappear. So just bear that in mind. You don't really want
things disappearing, so make sure you've got this
right before moving it. Once I've moved
this, move it over, press shift A, bring
in another cylinder. And you'll notice now it
comes in 20 vertices, not 32. All right, so now
we've got that. We're going to
delete this one out of the way because
we don't need it. And what we're
going to do then is we're going to put this into place here to make a
start on our steps. So what I'm going to do is
I'm going to press and Ed and it's important we
get these steps in. And the reason
being is that from these steps we can
decide how big we want, everything else, that's why
we're actually doing this. Now, once I've got
this like this, you can see that I need to
make it a little bit bigger. Because I really want
my steps to come round here to here. The bottom step that is. So what I'm going to do
is I'm going to press and pull it out where I
actually want it. So I wanted something
a bit bigger, maybe something like this. And then what I'm going
to do is just pull it back into place. We can see that one of our steps is going to end around here, and one of them is
going to end here. And that's exactly what I want. Now I'm going to do
is I'm going to press one on the number pad
to go in front of you. I'm going to lift it up just so it's on our
actual ground plane. Doesn't need to be right on top. It's okay if it's a tiny, tiny bit under
that absolute fan. Now the next thing
we need to look at, if we grab our man
and bring him over, you will see this step
is massive right now. We really don't want this step
to be this big from here. We don't actually
want that. What we want to do is we want
to make it smaller. Because although
this is a gray box, we still need to figure out how everything's going
to come together. So having huge steps in your
gray box makes no sense. So what I'll do is I'll grab my actual cylinder and I'm going to press Tab
to go into edit mode. Make sure I'm in face select
and grab this bomb face and then pull this down to where I actually want my steps. Generally speaking,
when you've got steps, you want them to be
around where the shin is, so it's going to
be walking up one, step two, step three step. So just bear in mind that is
where it wants to be around. You might want it a
little bit lower, depending on what
kind of look you're going for or a
little bit higher. But generally keep
it around there. So I think I'll pull mine
down just a tiny bit, so more or less between his shin and his ankles,
somewhere around that. And I think that's going to look good like this. All right. The next thing then I want to do is because it's a gray box, I don't really want
to mess around. So all I'm going to do is
I'm just going to press shift and I'm going to
bring up the next one. Place it on the top of this one. And then all I'm going to do is I'm just going to pull it back. And trying to keep the
same distance between each of these
pressing one and just making sure then that I
put it on top of this one. So now I'm going to do is I'm just going to do
the same thing again. Shift D, bring it up, press one just to make
sure it's on top of there. You can see it's a mile
off at the moment. So then all I'm going
to do is just bring it back and then pull it back into. So then the final one, I'm just going to press shift D. Bring it up, let's
take that off. Bring it up that they actually press shift
D? I don't think so. Let's bring it up, Press one, make sure it sat
on top of there, pull it back, and then
pull it this way as well. And there we go. Now you can see pretty much our door
is near enough, sat on top of there. That tells us that
now we can pull our door down a
little bit like so, and have it sat on top of there. And that's going to
look pretty nice. You can see the steps are
already looking nice. Now, the one thing I did forget
to say is that the steps, you should always leave a gap, which will be the
length of his foot. In other words, if I
spin this guy round, so if I press R D -90
and spinning around, you can see at the moment these are not actually wide enough. So you can see he's going to be tiptoeing to actually
get up the steps, which is not going to be great. So what we'll do
on the next lesson then is we'll pull these out a little bit just
to make sure that he's able to walk
on them properly. You can see over here,
they've got much, much thinner over here. We don't really want
that, but again, we're going to
rebuild this anyway. So we're just having it
there for a gray box. We just need to know to make sure everything is
fitting in place. All right everyone. So I
hope you enjoyed that. And I'll see on the next one. Let's save that,
our file as well before I forget. Cheers.
11. Elevation Techniques for Greybox 3D Scenes: Welcome back everyone
to the blend of four ultimate guide in
this where we left off. All right, so now let's come in and what I'm going
to do is I'm going to grab all three of
these stairs and I'm going to pull them
back then altogether, just to make sure that his
feet actually fit on this. You can see now his
feet are fitting on there a little bit better
than what they were. And then what I'm going
to do is also pull it this way, like so. And you can see now I'm going
to move up to the next one. I'm going to pull them
back a little bit. You can see that his
feet on the next one, near enough fitting. Let's put him down, so
he's actually fitting on there maybe a little bit more. So I'm just going to
grab both of these. Pull them back a little bit, pull this back a little bit, pull this back a
little bit like, So now I'll come to
the fourth step. And then what do is
I'll pull him up again on top of here, put his foot in, then do is, I'll pull this back
and pull it back. So now we can see that we've got the steps, they're
in the right place. The door though, needs
obviously moving, so I'm going to move the door
now to be more like this. And then also we can see that probably this needs
moving a little bit because this is going to be hiding the stairs going up, someone just going to pull it back to something like that. Now if I put my guide in here, we can see now we
have a good idea of how wide this is going to be, and I actually think that this is going to be wide enough. The one thing I'm not so sure about is the actual
height of this part here. And I think actually it, yeah, it might be, might want to bring it
down just a touch. I'm just going to
go into edit mode. I'm going to pull
it down like so. Just a little bit and then we'll see if that
actually works. Once I've got those
steps in there, then what we can
do is we can put another staircase
going that way, and then we can
see about getting some lighting and really
seeing how this looks. The other thing, before
moving on as well, we'll tell you there's
another real handy tip to actually see how your actual scene is
going to be coming along. And what that is is if you're in the object mode and you come over and you click
this little arrow, this little arrow button down, just put cavity on. And you'll see now
it actually makes everything a lot more
visually appealing. The other thing you
can do is as well, when you check in gray boxes, you can actually click off
these two interlocking links. It'll hide everything
out of the way, and now you have an
even better view of what you're
actually looking at. All right, let's click that on. I want to leave the cavities on, of course, because that is the main thing that's going
to help me visualize this. And the other thing
is, at the moment, I've still got my
resource pack open. Just make sure it's saved out. You're not actually going to
need that open like this, because that's what we're
using the asset manager for. So if you have still
got yours open, don't use the resources, Just close that down and then we can actually carry
on working with this. All right, so what
I want to do now is the other thing is I want
to make sure that this pulled far enough out
because I want this to you see where
these are turning. This first one, I actually
want that to be in the wall. So what I'm going to do
is I'm going to come in, I'm going to grab
the end up here. I'm going to pull
it out like so. And then what I'm going
to do is I'm going to grab this end now
and I'm going to pull that out like so
just so it ends really, really nicely as you can see. The other one then
is I'm going to pull this out along here, just so the top of the step
ends also really nicely. And I think now
that is going to be enough room to put some stairs
up there and we shut out, have everything laid
out really nicely. Okay, so now let's actually
bring in our stairs. So we'll bring in our stairs
to make sure it all kind of lines up really
nicely going up there. And then from there,
what we'll do is we'll decide if we need to
pull out our steps, you know, these steps here a little bit more, which
I think we will. So what I'm going to do is
I've got my cursor here. I'm just going to leave it there for now. I'm
going to press shift. I'm going to bring in a cube. I'm going to make
the cube smaller. And what I'm going to do
now is bring my guy over, put him back on
the ground plane. So I'm going to pull him down. And then what I'm going to do
is I'm going to bring this up and I want to make
this the stairs. So the first thing I
want to do is I want to make sure his feet are
going to fit on each stair. So you can see here, his feet are fitting on the
stairs very nicely. So we know it's okay that way, but it's certainly too
high at the moment. So what I'm going to do
is I'm going to bring this over like so. And then we're going
to press the tabborn. Make sure I'm in face select. Grab the top face, press
one on the number pad. And then I'm going to
bring it down so it's level with the shins
as we've spoke about. So we know now that
everything's fine that way. We know it's fine
the height wise. So now we need to do is
make these long enough. So I'm going to press
L to grab them all, and then we're going to press
and Y and pull them out. Now, it doesn't really matter on this point how wide
they actually are, because they're
going to be going into here anyway, and up. So once you've actually
got a certain width, then what I'm going to do
is I'm just going to have one more check and make sure
that I'm happy with it. I've got those
stairs a little bit. Too wide. I think
I have, actually. So what I'm going to do is
I'm just going to come in, pull them back to
where his heel is, and I think that's
looking much much better for a flight of
stairs. All right. Once you've got it, let's
move it over and bring it up. And we're going to bring it up, so we don't obviously want
to have our door there. We want it starting just before our door, something like this. Put it on the bottom one. I'm maybe going to have
a pillow in the door. Maybe I want to move
it a little bit over. Then what I'm going to do
now is I'm going to press Control all transforms, right? Clip set origin to geometry. Now I want to actually
make a few steps. I'm thinking, let's try nine steps To start with
all I'm going to do, I'm going to come over
adding a modifier. So I'll be a first modifier. And the first modifier
we want to bring in is going to be an array, because we want to
array it up here. The other thing is because
it's bringing in a modifier, I'm just going to say
if I'm gonna work, just to make sure I don't crash your anything add modifier come over and on the new blender
you actually have to find it. Generally you can go through
each of these and find it. Generate is the one that you're going to be
using the most, so just hop over, Generate, and then go to a ray. Alright, let's set this
then now to minus one, then we'll put it
on the other side. And then what we'll do is
we'll set the Z to one. And then you'll see now that you've got these one
after the other, We no gap in between. Now what we can do
is we can increase these to nine,
something like that. As you can see from there. Then I think I can
actually build in another door on here. Now, as I said, this
now will give you a good idea of how wide
you want everything. Is this in the right
place? For instance, do I want these a
little bit wider? So what I'm going to do is I'm going to bring my guy over, I'm going to pull him up like so I certainly think that these
are not quite wide enough. What I'm going to do is
instead of doing that, I'm thinking that
I will pull this, I'm going to pull
this and these parts. So I'm going to shift,
select all of them, just out a little bit and make it perhaps a little
bit wider like that. All right, So I'm happy
with how that's looking. I think my stairs are going
to be fine like that now. And all I want to do now
is make sure that I'm happy with the height of this. So basically I want a door, which is going to
be in this part here going under my stairs. So I need to make sure that this part on here is
actually wide enough. So what I'm going to do is I'm going to come to this part, grab the top of it, and just
pull it down very slightly. Now we've got our stairs. Let's actually
duplicate our stairs and bring them round
the other side. And then we'll have
a really good idea of how tall to make everything. So I've grabbed my stairs, I'm
going to press shift deep, I'm going to pull them over. And what I'm going to do is
I'm going to set it to be right at the top of this
step. Right at the top. Let's bring it over.
The top step is there. You can see now the near
enough level with each other. It doesn't have a
little bit out. And then what I'm going to
do is I'm going to press Z -90 Z -90 Spin that around. And now I can put my stairs, the other stairs right
into this corner here. If I pull them over, I can put them right
into that corner there like So now we
need another door. So we're going to have
another door on this part. This is where we can see. Now, do I need to
pull these all out? So I'm going to grab
my door that I made shift, bring it over. And then what I'm going to
do is I'm going to pull it up now to here. And I'm going to pull it
over a little bit to where it's going to sit. So
something like that. And I can see that
I never want to door right on the corner. So what I want to do is I want to pull these
out a little bit. So I'm going to
grab this one and this one and I'm going to
pull them out a little bit. Now bearing in mind
if you look at these, let's go to this one first. You can see that the x
axis is at 4 meters. Let's put the x axis
before we do anything on 4.1 So let's pull it
out now into place. Let's pull it just into place
now We've got a little bit, maybe 4.2 Let's try 4.2
Pull it out a little bit. Let's come to this one.
We'll put this one also on 4.2 and pull it out. Now we've got a problem of that, it's not quite square anymore. We might need to
make it a little bit wider on the y.
I'm going to do is 4.2 then 4.2 then what I'm
going to do is grab them both, shift, select them
both and just pull them back a little bit. So this is what we
should be left with. Now, I'm not 100% sure if
this is out far enough, but we'll see as we
work a little bit more or if this actually needs
to be a little bit bigger. I'm thinking this
at the moment is 2.5 and this is also 2.5 So what I'm going to do
is I'll delete this one. I'm going to put this on 2.7 by 2.7 so make it just
a tiny bit bigger. Now the other thing is you
can also left click and drag. And put this, let's
say on three. And it'll do them both
at the same time, so I'm just going
to drag them 2.7 So then what I'm going to
do is I'm going to pull this out a little bit. So this gap here is the one I'm looking for to
make sure I get that in place. Now I'm going to do it because
I deleted the other one. I'm just going to press
shift D and bring it up and just put
it on place like so. Now finally, before we actually
bring the enlightening, it would be a good idea on the next lesson if we
brought in our floor. And then we can really see how this is all going
to come together. We can also see that this
over here needs moving in. So I'm going to pull
that back in like so. And then I'm going to have a good idea then what
it's going to be like walking up those stairs
as well. All right everyone. Once we've got this gray box in, it's going to be
really easy then just to put all the parts in. But as I said, the gray box
should take a fair amount of time to make sure that you're happy with how the
building is going to look. Alright everyone. So I'll speak you on the next
one. Thanks a lot. Bye bye.
12. Designing 3D Greybox Staircases: Welcome back everyone to the
Blender Full Ultimate Guide, and this is where we left off. All right, so now
what you can do, because you've got so
many cubes in here, it's very easy just
now to grab a cube. So grab this one, press Shift, and then all you
can do is now you can just press the S button and you can really get away with actually pulling
it into place. And really, really like
not taking so much, you know, time green, the right size and
things like that. Because as I said,
it is a great box. So all I'm going to do
is now is press tab, grab this face and pull that
out into my floor light. So, and then what I'm going to do is I'm
going to grab it, drop it down a little bit, and then just make sure the
stairs also fits in place. So now you can see this
is looking pretty nice. You can see our stairs are actually peeking through there. And we don't really want that. So what I'm going to do
is just pull them back. I'm going to pull my, my actual door a little bit this
way. And there we go. Now we've got a
really, really good idea of how this is
actually going to look. And I think this is
pretty nice so far. Now what we'll do is, before
bringing in the lighting, is we'll actually
make another door. So I'm going to select
this door, press it deep, and what I'm going to
do is drag it out, press one, bring it down to where is the
ground plane like so. And then what I'm going
to do is drag it over. And now I basically want this to be a little bit
of a bigger door, so in other words, a
double door if I can't. So all I'm going
to do is press and X and pull it out a
little bit like so. Now if you're unsure, always
grab your guy and make sure that he's going to be
looking like a double door. So you can see that looks
like a double door. And then the next thing
we need to know is we need to know how big
this double door, how far back it's going to be. Because within our actual
scene on this part especially, we need to make sure
that it's realistic. In other words, if you
have a double door there, you don't want to lead
in just to the stairs. So he needs to make sure that this is going to fit in there. So what I'm going to
do is I'm going to actually pull this out
now on the y axis. So I'm going to press S and Y. Pull it all the way out,
make it really long. And now I can see where
I need to put this, so there's no way it's
going to fit just there. So it has to actually
come back a little bit. So you can see here, it's
probably going to have to be somewhere somewhere
like over here. Which means I'm not
very happy with it because I want it to be more
or less somewhere like here. So what it means
is I need to make these stairs a
little bit steeper. So I'm going to do that now.
Do I need to make them? Yeah. I think I need to make
them a little bit steeper or I need to make the
door not quite so high. Let's see how high this door is. You couldn't get away
with making the door a little bit less as high. I'm going to put that there. I'm going to come
to my stairs then, and we've still got
our modifier on there. What that means is then I can bring these stairs back and make them a little bit taller. But that means then it's going
to come all the way back to kind of this point in here, which I'm not so sure about. So I think what I'm going
to do is I'm going to pull these back a little bit to get them to fit in place,
a little bit bare. So something like that. And then I'm going to
pull this door a little bit this way to get
it to fit a bit more. And then what I'm
going to do finally, is pull these stairs just to start a little bit lower down. Now finally I want to make
them a little bit steeper. So to make them a
little bit steeper, all we need to do is move this X so you can see if I
want them really steep, I can actually make
them really steep. So something like that. But I don't actually think
I'm happy with that. What I need to do is
make them less steep. Just so you can see now the jaw is starting
to creep along there. Something like that I think
is going to look much better. That then enables me then to figure out how tall
I want my door. So if I come back
to my door now, and I grab the top of it and
pull it down a little bit, you can see now
it's near enough. Near enough fitting into place. I just need to pull it back
a little bit that way like so and now that doors going to fit into somewhere like that. Now the other thing
is, do I want, you know, this corner
to be so thick? I don't think so. I think
what I'm going to do instead is I'm going to
grab the front up here, pull it back a
little bit like so. And then what I'm
going to do now is I'm going to
create another one. And this will be the
front to this door here. So I'm going to grab
all of this here, press Shift to duplicate it. And then what I'm going to do is I'm going to pull it out now. So I'm going to grab
the front of here, so this front here, I'm going to pull it
back a little bit. And then on I'm going to
do is I'm going to grab this part over
here and I'm going to pull this all the
way back like so. And then finally I'm
going to pull this down, pull this down like so I think that then is going
to leave us with a nice door that'll
lead into there. So now I'm going to do is press and y and squish my door back. Put it on the front
and there we go. You remember we're going to
have an arch around here. As long as the actual door fits in there, that's
absolutely fine. So now you can see
what I need to do is I need to pull this back
now a little bit, or pull everything over a little bit to make
sure everything fits in. And that's the problem
with dealing with these. You just got to make
sure everything fits in. So I've probably made this
a little bit too long. So what I'm going to do is
I'm going to pull this back. Like so. And then I'm
going to pull this back. So grab this, pull it
back to my stairs. And now finally then I'm
going to come onto this bit. Now again, as we
pull these back, we need to make sure that
they all fit in place. So what I'm going to
do with this time is I'm going to press and X, pull them back, pull them back into place,
making sure they fit. That's looking there, and
now I can see that it's on 3.68 Let's put them on 3.7 It will only alter
once you have to come to the next 13.7 And now
we can come to our Y, 3.7 and then we can come to
our Y on this 13.7 like so. Now finally, let's
pull these back. And everything should
be fitting in place, much, much nicer than it was. This back here is
looking better as well. I'm happy with that, and
now I can simply pull this out a little bit like so now these stairs are not going
to be any good because we want them to be the same
steepness as these stairs. So what I'm going to do
is I'm going to delete these stairs out of the
way. Grab these stairs. Shift D, let's pull them over R -90 and let's pull them
up to where we want them. Let's pull them into place. And this should call a very nice place now
if I just put them jaws before they
come into the floor. And then bring
them out to there. Perfect. That is perfect. Because then we can actually put an arch coming through here. And that's going to
work very nicely. All right, now let's bring in this back to my stairs like so. And then finally
we can also bring back this here, this part here. Do here like so. Now finally we can come in and pull this
out a little bit. This part here, let's pull it out so it's more in line
with this one here. So I'm going to press tab, pull it out, double tap. And there we go. Now
we're actually at the point where we can actually bring in
some lighting again. I'm going to save our
my work file and save. Now at the moment, if we come over on the
right hand side, we will have on V Render engine and we've got one
which is cycles. Now V is really good to work
with because it's real time. In other words, if
I put on our V, which is this born
here, you'll see when I click it on, it's dark. Nothing. You're not able to really see anything but the
moment I bring in a light. So let's press shift day, Bring in a Sun. Now we can actually
see what we're doing. If I bring this sun up, rotate it on the X, our X now, we can actually see what this
is actually looking like. So all right, so now
you can see this has give you a good
idea of what it's going to look like when
it's actually built. This is the way that you
should be visualizing it. I don't actually like
visualizing it like this though. I do like using EV, but I don't like it when I'm
working with my grade box. But if you want to work
like this to visualize it, you can simply bring in a light, click the EV on over
here on the shader, and then visualize it that way. What I'm going to show you on
the next lesson is though, is how I like to visualize it, which is using Blender cycles. Now we are going to go
through a lot more of the EV options like the ambient occlusion and
things like that, but that's a little bit
further on into the course. On the next lesson,
I'm going to show you how we use the
cycles render engine. And we're actually
going to set up some decent lighting so we can actually get a good
visual on what we're doing. All right everyone,
So I hope you enjoyed that and I'll
see on the next one. Thanks a lot. Bye bye.
13. Implementing Lighting Skyboxes for Greybox Environments: Welcome back everyone to the
Blender Four Ultimate Guide, And this is where
we left it off. All right, for now, let's
just put this back on shader. Let's actually delete this
light out of the way. And then what we're going
to do is we're going to come to our world options here. So you can see on the
right hand side here is our world options and this is the one that we want to be on. You don't actually have
to have this clicked on. You can simply go into your shader option and then
you just put it on the world. But I'm just showing you
where it is based if you need to alter it over
the right hand side. So now all materials are going to be based in
the shading panel. So this panel here is going
to have all the materials. So whenever you click on, let's actually just
give this a material. So I'm just going to come in and give this a new material. And as soon as I give
you a new material, you'll see that this pops up. So this is basically
the shaded panel. This is why it's called shading because it is the shaded panel. But within here, not only can you add materials or mess
around with materials, but we can also mess around
with the world view. Now, before we start that, let's actually get
this set up properly because I don't like the
way that this is set out. I'm going to move these
over to the left hand side. And then what I'm going
to do is I'm going to grab the top of the UV. So this is the UV map. We'll go more into UV's as
we move along in the course, but for now just come over, get your little
course of the left click and pull it up and
you end up like this. This is basically what I want
you to have the viewport, the shader, and the UV. Let's come over then
and hit the Sam. And now what I want to do
is show you that within here you can also alter
your world settings. First of all though, let's
put it onto our shader. Let's come over then to
the right hand side. And what we'll do is
we'll put it onto cycles. So we're going to put
this onto cycles. And now we'll see that it's looking a little
bit more defined, which is exactly what we want. Then what we're going to do
is we're going to come over now and instead of it
being our object mode, let's put it onto world. And now we'll see that
this is this over here, so our world is this. If I delete this now, you'll see at the
moment this is gray. If I turn this up, you'll see it actually
affects our whole world. You can also change the strength to make it
much, much brighter. We're not going to
both with that. What we're going to do
is we're just going to delete the background
out of the way. And what we're going to
do is we're going to press Shift and bring in a sky texture
one search for it. So shift like you
do for primitives, click the search
and the first one there's going to be sky texture. If it's not there, type
in sky. And there we go. All right, so now
we've got sky texture. Let's plug this in now. You can see, wow, that's looking great already. This is the thing about the
sky texture within blender. It is one of the
best nodes in there. It's so good at what it does. You can bring in HDRIs and
bring in lots of light in, but honestly the sky texture can get you most of the
work done there. All right, so now
we'll do is we'll actually set a few
of these things up. These basically
are the sun size, so when you look out, you will see, let's look, If I set the sun size, let's say something like 6.5 And I'm still looking for my son. I
can't see at the moment. I think my son's down here. So once I've put these in, we'll have a good look round
of what we're looking at. Let's set the sun intensity to 3.450 Let's set the
sun elevation to 172. Based on what that's doing is it's based on
lifting up the sun, so whether you want
it to be a night sky, whether you want it to
dusk, something like that. The sun intensity
is obviously how bright you actually
want your sun being, as this is a deserty theme, we want some
brightness in there. Next of all, we want our sun
rotation set this to 190. And now you can see that this is moving where the shadows
are actually going to look. And you can see already
that we've got some really, really nice idea of how this gray box is
actually turning out. All right. The next
one is the air, the dust, and the ozone. But before that, the altitude
is basically as you go up. So as you climb up a mountain, the sun is going to be less, more intense, but it's not
going to be as yellow. So if I put this, let's
say at 20,000 you can see now it's
more blue because actually we're much higher
up in the atmosphere. We've got rid of, you know, a lot of that ozone has started to disappear
further down, and this is why
it's gone a blue. So I'm going to set this at zero because we're near
enough at sea level. Anyway, with this, I
mean it is the desert, so you're not going to find
it up in the mountains. And then what we're going to do now is mess around with the air. So let's put the air on 20. And you'll see that air makes that ozone much, much thicker. So what I'm going
to do is, well, you can see you've
got ozone here, So you can see the air thicker, the ozone thicker, and
the dust is thicker. That's basically what these do. So let's put the air to 2.972 0.97 let's put the dust to No, 0.545 and let's put the
ozone to 3.794 like. So now we'll see that we've got a beautiful sky there
is our sun there. Now we can finally
show you sun size, You make it bigger or smaller. All right, so now we can see, we've already got some
really nice lighting. We can see that we
do have a problem in that whenever we
turn this around it goes all greeny and we don't really want
this gradiness on there. So all we're going to
do is just come over to the right hand
side and within the cycles in the viewport you will have one
that says Noise. And once you click
that on, you'll see now it smooths
out everything. So now we've got some really, really nice idea of how this
gray box is going to look. And we can really now start to define the shapes that
we're going to work with. All right, so we can now anytime click on that and have a look at what that's
actually going to look like. All we need to do is just
come back to modeling. And then what we can
do is press Tab. When we come up,
put our shader on, double tap the just to make sure nothing selected, so a twice. And there we go. That is what
it's going to look like. Okay, let's actually
now carry on. So I'm just going to come
to my object mode again. And then what I'm going
to do now you just carry on with the actual bill. I think now I've got that set up will be a good time
to save out our work. And then what I'm
thinking now is I'll bring in my first balcony. So what I'll do is I'll grab this door that I've got here. I'm going to press
shift D. I'm going to drag it up then to where
I actually want it. I'm going to figure
out I'll want to balcony around here somewhere. So what I'm going to do is
I'm just going to create a gray box balcony for now. So what I'm going to do is I'm just going to duplicate this. So I'm going to press Shift, bring it out a little bit, and then we're going
to squish it right in. And squish it right in. Like bring it down then to
the bottom of the door. And then what I want to do is I want to pull this out now. So I'm going to press
and X, pull it out. And then I'm going to
press and Y pull it out and then just
pull it out to there. This is going to be a very rudimentary balcony
as you can see, but it does give us an idea of where it's
actually going to go. I'm thinking that that's
probably a little bit too wide, so I'm going to pull it
back on the X. So S and X. And I'm also thinking
if I bring my Guyopia, let's get it round
about the size that it's going to be
if I put him on here. Turn him round so as
90, pull him back. Has he got enough room
to stand on there? Maybe he wants to be a
little bit a little bit wider and it's pull out a
little bit more. All right. So we've got our
balcony and now we've got where it's roughly
going to go under there. So now we can
actually decide how much above here is going to be the top
and things like that. So what I'm going to do
first of all though, is join these two together. So shift, select both of them. And to join things together, or you press is control and J. And then that will
join them together. Normally when I've joined
something together, I'll press control all transforms rightly
so, origin geometry. All right, so there we go. Now let's think about
the top of here. So let's put in our top.
I think also as well. I might as well pull this
more into the middle, so, so now it's
more in the middle. And now let's think
about our top. So to get on top, all I'm going to do is I'm
just going to grab this because I know this
is the right size. So 3.73 0.7, it's
already squared. And that's the main thing
that I'm looking for. So what we're doing is
we're going to press Tab. Make sure you're on face select. Grab this face shift D, Pull it up a tiny bit. Press P again to separate. And then what we're
going to do is press Tab, grab the top of it. Press control A, all
transforms right clicks, origin to geometry just to get that right back
in the middle. And then what we're going
to do is we're going to press to pull this out like so, making it so it's just overlapping our actual
top of our roof. And then what we're
going to do is just pull it up so it's level then. And then press tab
A to grab it all of it and then extrude it up to
where we actually want it. So something like that I
think is good to wear with. So again, we're
actually defining now what our actual gray
box is going to look like. So let's now put a
top on here as well. Now at the moment our
cursor is over here. We have our cube over here. We're not a cube but the
top of the roof over here. So what we can do is being
as our origin is right here, we can press Shift S
cursor to selected. What it'll do is it'll
put the cursor wherever the origin is of the one
you've got selected. Now basically when I bring
in another primitive, it will come exactly
where my cursor is. This time we're going to
bring in a UV sphere. And then what we're
going to do is we're going to drag that UV sphere up. Then I'm going to
go over the top. So I'm going to press
seven to go over the top. I'm going to press the
S bond to bring it out. And now you can see what
we're actually doing here. Now I'm going to squish
this down a little bit. So I'm going to press En's head, pull it down a little bit. And then what I'm going
to do is finally get rid of the bottom half of here. The easiest way to do that, the easiest way is just to
come in, have face select on. What you're going to do
is you're just going to select one face where you
actually want to cut it. We're going at this
halfway point, if you imagine it's
coming down to here where it's straight and then
it starts tapering in. So I'm going to do is I'm
going to press Olton shift. Ol shift out shift again. And then what it
is, it'll select going all the way around there. Now, depending on where
you are on the face, if I do Olt shift here,
you'll see it'll select. And going that way, the closer you are to whichever
direction you want to go in, that is the one that's
going to be selected. So now I've got all
of these selected. What I can actually do
now is just press delete. Delete. Come down and
delete the faces. And there we go.
We're left with that. Now, of course, we've got another part of this
already in there. So all I'm going to
do is I'm going to come up turn on
this button here, which is toggle x ray. And now I can actually
see inside my mesh. So now I can come to any
of these faces here, press the L button, and then that will select all of the island. Press Delete. And instead of faces, make sure when you're
deleting these things, always select
vertices and that is to make sure that
nothing is left behind. I remember when I first
started out creating models, they had loads and
loads of little points, just empty points all over the place because it didn't
delete them properly. And they're called
empties and they don't, all they do is just add. You can't see them when you rendering or anything like that, but it just adds more
complexity to the scene, which means it takes a
lot more Ram to actually, you know, render it out
and things like that. So just make sure
you've got no empties, make sure it's nice and clean
when you've got a part. If you can always delete the reason why we didn't delete vertices
on the first page. If I click delete Tes, you'll see what happens
if we just turn this off. Delete, you'll see it
deletes the next one up. We don't really want to do that, so what we want to do is
want to delete faces, then go in L to select them all. Delete Ts, and there you go.
Now it's nice and clean. Let's turn off x ray and
what we'll do is we'll put that on the top of
there. All right everyone. I'm going to save
out my work now. So file and save, and then we'll carry on with this gray box on the next one. Alright everyone, I hope
you're enjoying it. See on the next one.
Thanks a lot. Bye bye.
14. Planning Windows and Balconies in 3D Models: Welcome back everyone to the
Blenderful Ultimate Guide, and this is where
we left it off. Now one of the things
you might see on here is that this
is really blocky. Even when we put
it on shady mode, it's still really,
really blocky. As you can see, we
don't want that. And the reason why that's there is because you need to
actually sometimes, so let's put it on object mode. Well, most of the time you
want to smooth things off. So how do we do that? We see so many renders on
Facebook and things like that where it's really blocky and the person has
not smoothed it off. So just learn to write click
and shade auto smooth. Now those of you who are
using blender below three, you can just come in
and click Shade Smooth. So I'll just show you.
Shade auto smooth. Then come over to the right
hand side and you'll see down here we've got normals. And this is where
you can increase or decrease how smooth
it actually is. So make sure that you
have it on smooth. This is useful as well if you're dealing with
things with change. And you want to smooth
it off a little bit more than that 30 degree angle. All right, let's close that up. That's that dumb. Now what we need is we need another part. So we need another
part coming up here, probably halfway level
to this part here. Once we've got this
part in as well, we'll bring in a window
and then we'll use that as a reference guide to
where we want our windows. All right, so what we'll do
is we'll come to this part. I'm going to press Tab.
Come to the top and face let press one
and then I'm going to press and make it halfway
level to this door here. I think something like that
should be absolutely fine. Okay, now let's think
about our windows. So what I'm going to
do is I'm going to, I'll grab this door because
it will make it easier. I'm going to press shift
D, and then what I'm going to do is I've
duplicated it. I'm going to pull it up. Pull it in front of my guy. So pull in front of here. So then what I'm going to do is now I'm going to
make it smaller. So I'm going to make it smaller so the size roughly of a window. And then what I'm going to do is I'm going to press control A all transforms right clicks
at origin to geometry. And then I'm going
to come in now and just bevel off the top of it. So I'm going to grab this edge. So I'm in edge select now
as you can see over here. So I'm grabbing this corner and I'm shift
selecting this corner. And then to bevel it off, what I'm going to do is I'm
going to press control. And now if I pull that out, we can see now we can make
a rudimentary window. Now we can see as well. We've got a lot of
options on here. We're not going to go
into those right now, because all we need is a
very, very simple window. So we'll discuss these
options in a little bit, but yours, if you've
done it properly, should end up like that. Now the one thing
about this window is, is it long enough? Probably needs to
be a bit longer. So essence, let's make
it a little bit longer. It is, you know,
a deserty themed, a Arabian theme to
build after all. All right, so now
we've got that. Let's once again reset
all or transforms, but let's just reset
the rotation and scale so that then will keep
the little origin there. If you press control
a reset transforms, it does move the orientation
to the center of the world. We don't want that, so instead of doing that,
just press control A, and then you can reset rotation and scale because we're
not moving it anywhere. All right, now let's
spin it around. So our Ed at 90. And then what we're
going to do is going to press three on the number pad. And we're going to bring
it in to the top of here, so jaws above this door. We're going to put it in
somewhere somewhere like this. As he's walking up, there'll be a little window
leading to there. That's looking pretty nice. Now what we'll do is we'll bring this window round to
this side as well. So I'm going to press Shift D, Bring it around Z -90 I'm going to press
one on the number pad and bring it into here. Now we do need some
variations in windows, so I want to have this window in particular to
be a different variation. So what I'm going to do
is I'm going to press S and Z just to make it
a little bit taller. I'm going to level it
up then with over here, so you can see it's nice
and level over there. And then what' going
to do now is I'm going to bring in
another window. But I'm just going
to duplicate it. So I'm going to press Shift, Bring it to the side, so press
En's ed, squish it down. And then just drop
it down near enough, the level of this one. And then shift D, then just drop it all
over the other side. This doesn't need
to be accurate. Remember it's a gray box. So all you want is just
something like that. Shift, select the mole and
then all we're going to do is join the moll
together with control J. And now we can press control
and rotation and scale. In fact, we need to
do a moll actually because the orientation
wasn't in the right place. Control all transforms right
clicks, origin to geometry. And now we can
actually put those into place in here so
we can see already. Now we're starting to really, really get somewhere with how we're actually
building this out. Okay, so now let's think about
this part on top of here, it's going to need to be much, much taller than the rest of it. We've also as well got to think about this bag bit on here now. I'm also thinking
that this part, this part here, mainly needs to be pulled
back a little bit. So what I'm going to do is
I'm going to come into here, I'm going to grab this face and this face and what I'm going to do is just
pull them back. So it makes it a little bit more intricate from this to
this as you can see. So I'm going to carry on
pulling them back a little bit so that this starts near enough, just as we get to the top
of the stairs like so. And I think that's going
to be looking pretty nice. Okay. Now, let's come to
the back of this one. So what I want to do is
I want to pull this up. I'm thinking whether
to split this off. I think it's easier
to split this off. So what I'm going to do
is I'm going to press 50. I'm going to then
press Selection. To split that off,
press the Tab button, and you'll see now
we've got two, So you can see top and bottom. This is the one that
I want to play with. Control all transforms, right? Click the origin geometry, the grab the top of it. And then what we're going to do now is we're going to Ext. So I'm going to press to Ext. Like the reason why I actually wanted to do it that
way is because now I want to bring my guy over
and I want to put him over the top of here. And I want to make sure that if he's looking
over this balcony, for instance, he's
going to be in the floor perhaps like that. If he puts his hands, imagine
this to be a balcony. Is then going to be just up to nearly as waist
as you can see. Which is about what
I actually wanted. Then what I'm going to do is now I'm going to come into here and what I'm going to
do is I'm going to actually press control. So I'm going to come
in, I'm going to press control hovering over this way. You can go this way or this way. What that's going to
do is it's actually going to bring me
in an edge loop. I'm just going to press
Control left click. And now you can actually move this edge loop
wherever you want. Now if you want to
put it in the center, you can just right click and that'll drop it
right in the center. Don't really want
that at the moment. So what I want to do
is I want to press control Z, just to get that off. We can also press control R, and you can actually
press five on the number pad to bring
in five edge loops. Or you can actually
move your mouse burn up or down to bring in
more edge loops as well. So that's another
thing you can do. What I'm going to do
though is I don't want to run in the sense
I'm just going to press the left button and
I'm just going to pull it back to
something like that. And then what I'm going to
do now is I'm going to come in and make this balcony
that he's going to have. So what I'm going
to do is I'm just going to press the eye button. And what that's going to do
is just going to give me an insert to pull in to
something like this. And now what I can do
is I can extrude it, not out but down. Down to where is
that shut feet are. So if I press now,
I can pull it down, pull it down, and then I can let this little arrow now
do the rest of it. And pull it down to his
feet. And there we go. Now we've got a really,
really nice balcony. Okay? The next thing is now
I want to pull this out. If I've come in and I
come to this part here, what I can actually do
now is extrude this out. Now I want to
extrude this out so it's the same length as
here. How do I do that? What I want to do is I
want to come over to this little down arrow here
I want to look at. Let me just I'm just
wondering if it is this one. Nope, it's this one here. These little squares here. If you come down, you'll see
one that says edge length. Now we can see that this one going across
here is 4 meters. And these coming in along
here is 1.9 meters. We need to pull this, this
part here out to 4 meters. If I bring this out now, you can see it's not
pulling this part out. That's not what we want.
What we want to do is I want to come in
and grab this one. And this one, pull them out. And now you can see this
number here going up. So you want to pull it
out to near enough. If we can 4 meters, can we get it up to 4 meters? Because this here is 4 meters. Actually, let me
just have a look. That is four, 4 meters, 3.52 Let's see how far out, because it might end up where I'm pulling
this way too far out. I'm going to pull this out to the four meter mark like so. Because I want to
put a top on there. Now the one problem
I have got is of course this is going to
be part of the balcony, so I'm going to
have to now squish it all in and have
these the same length. In other words, it
doesn't matter. It just needs to be square. That is the point that
I'm trying to say. It needs to be more
or less square. And I think this is way,
way too big at the moment. Let me just show you
what it means if I come in and I grab this part here. So this is what
we're going to use. We're going to press
Shifty. We want to put a top onto here. And you'll see that if I go over the top and put it right
in the center there, and press the button, I need to make sure that this top is going
to fit on there. You can see that I
can probably get away with pulling it back a
little bit this way, and then pulling this bag
so it's nice and square. I'm going to pull this
up, something like that. Then what I'm going to do
is I'm going to come in now and I'm going to grab
this part and this part. And then I'm going
to press and pull that up like so now we can see we've got a bared
visual on the length of this. Now I can come in and I can pull these back where they
actually need to be. Now you can see that's being on there really nice
and beautifully. And you can see there's
a difference in the height on each
of these, I think. Yeah, that's looking
pretty nice now. All right, so now we
can turn off our lens. Let's come in then and turn
these off edge lens off. Then what we can do
now is this is where our grapes and things like
that are going to come down. So that's why we want to
build this out over here. The first thing though, we'll do before finishing
is we'll just come in to our semi,
what is the sphere? And then what we'll do is we'll just grab the top of here. Now there is a way
we want to grab each one of these and pull them up, but there's a very, very
nice way of doing that. In fact, we're
running out of time because it's around 12 minutes. So we will do this
on the next lesson. I'm going to save out my work and I'll see you on the next. And everyone, thanks
a lot. Bye bye.
15. Roof Shape Planning in Blender: Welcome back everyone to the
Blender Full Ultimate Guide. And this way we left off. All right, so rather than
coming in and pressing Alt, Shift Select to
select all these, you can see it's not
really working that well. So we don't really
want to do that. What we want to do is we want to come in, press the button. And then what you can
do is you can move the mouse backwards and
forwards to make it larger. So you can actually come
in left click to select the Or middle mouse to deselect the right click to take it off. So I'm going to press
C. I'm going to zoom it in. I'm going
to select them. All right click
to take them off, and now it's all selected. Now if I pull this up, you'll see that it
looks a bit of a mess. So we don't really
want to do that. What we want to do instead is use something called
proportional editing, which is this born up here. If I come in and I select this now you can see that I've
got all of these options. So on all of these, we're not really
going to worry about any of those right now. All we're going to do
is have it on smooth, and then all I'm going
to do is pull it up. Now the other thing is same
as the actual C select. You can move your mouse
in to have more effect. Or you can move it out,
sorry to have less effect. Or move it out to
have more effect. So we can move it out like so. And just pull this
up a little bit, making it a little bit different
from this one over here. Now I'm thinking how small do want this or
how big a want this? I'm thinking actually that's probably around the right size. But again, with
things like that, I'm not going to worry too
much about it at the moment. Now, one thing I do want
to do though is I want to make sure that this is
around the right side. Because at the moment, I'm still thinking it's a
little bit too big. And in the gray box is
a place where you want to fix as many things
as you possibly can. So what I'm going to do is I'm
going to bring in a floor. First of all, I'm going
to come into my steps. I'm going to pre shift S just to bring the accursor
in the middle of it. And then what I'm going to
do is I'm going to pre shift and I'm going to
put to mesh plane, pull it out and then
let's pull it up like so it's going to be right
at the top of there. Now I'm going to
do is I'm going to bring my guy down again. I'm going to put him
on top of this plane. So I'm going to figure out if these steps are
going to be tall enough. Because straight away
I think I don't think these steps are going to
be quite tall enough. I'm just looking if they
are going to be Yeah, actually that's going
to come across there, that's going to have
a window in there. And then we're going to go yeah, actually it might
just be because I think we should have
it coming down to there. All right. Let's give it a try.
So what I'll do is I'll come into my plane
now, come to edgelect. What I'm going to do
is I'm going to pull this out without
proportional editing on. So pull this out like so. And then what we're
going to do now, I'm going to pull
it out this way. So I've grabbed this edge, I'm going to pull this out
to something like that. And then what we're going
to do is I'm going to pull this out to the other side. Now all the way to the end of here like so now this is going to be a balcony
that comes out there. So what I want to
make sure is if I have a door in here,
how big is this? Because this now
looks a little bit, a little bit too big. I think this is a little
bit too wide on this way. So I'm going to
actually fix that. First of all, though, I'm
going to bring in a door. So we've got another door shift. Duplicate it, bring it out. We don't have to
spin it around or anything because it's
the same always. And then what I'm going
to do is I'm going to put my door into place
where I want it. And I can see that this, if I put my door
there, is going to be, I think this is a little
bit too much this way. So what I'm going to do
is I'm going to come now, I'm going to grab both of these. So this one and this one. And then what I'm
going to do is I'm going to come in now, facet, grab this face, this face, this face, this, and this face. Now, if I pull these in now, we're going to have a problem
because it'll actually just make this thinner
as you can see. We don't really want that. So what we want to do
is we want to grab this face and this face as well. And hopefully now, yeah, when I pull it in, we
still end up with that. So let's grab the
inside one as well. And now when I pull it in, we should be able
to get away with pulling it in all
the way like so. Now of course we have got
a problem if we press Tab, now we need to
line this back up. The problem we might have is, is there going to be enough
room now on top of there? And yes, actually that's
worked out pretty nice. Now I'm going to put my
windows back into the middle. I can also probably
get away with pulling these back a little
bit as well because I feel like that's a
little bit too far out. And then all I can do now
is come to this top it, make it a little bit smaller, and put it back in
place. And there we go. Now there's a real distinction between this one and this one. There's enough room on there
to put my guy back up there. He's got enough room
there to actually, you know, water his plants
and things like that. So that's all looking good. Finally, then let's
pull this balcony a bit back a little bit. So I think now I'm
pretty happy with that. All right, now then we
need a top for this door. Let's come into this door, press shift Ursa selected. Let's press Shift, and what we'll do is we'll
bring in a cube. Then we're going to
press S and's Ed to make it smaller
on the z axis, I'm going to pull
it up and I want my top of this to be over here, probably coming out this
distance like there. And then what we can
have is we can have a, a couple of pillars coming
down each side of here. I'll press S and X and pull
it out a little bit more, and then we can have a couple of pillars coming down there. Okay, now while I've got this, I might as well put this into the top of there,
as well as the door. So what I'm going to
do is I'm going to grab this, I'm
going to grab this, I want to press shift D.
I'm going to drag it up. And what I'm going to
do is I'm going to put this into the top of here, so the door just under there like so.
And then this bit here. Now I can actually put
where I actually want it. This is basically going to tell me is this part on top of here. So this part on top of
here, Is it high enough? I don't think it is. So
what I'm going to do is now I'm going to
make another top here. Remember, this is not going to actually bend in like this. This is just because
it's a gray box. So what I'm going to do is I'm going to grab this part here. I'm going to press and I'm going to put it
somewhere over there. And then what I'm going to
do now is just line this up. So I'm going to press S to
make it a little bit smaller, press seven to go
over the top press. And let's just line this up. It's going to be in
the right place. Now you can see roughly
in the right place. I'm going to make it thinner
then and make it thinner. And then we're going to
press to pull it out. And then we're going to
put this back on top of the roof like so there we go. That is what I'm actually looking for,
something like that. What that means is
now I can pull this out and put it at the
top of this roof. Let's pull it out this way. And this is going to be my
little groves of wooden thing, vines and some grapes. Now what I'll do is I'll pull it out a little bit as well. So x and x, pull it out a little
bit, and then we go a thing that's going
to look pretty nice like so. All right, so let's come
up and save out our work. What we'll actually look
at now is this part here. We need some actual thickness to this part because he's going
to be walking around here. So this, as you can imagine, is going to be a balcony here. So let's put him on it properly. And he needs to
have enough room to walk around here and
walk into the door, or walk to the end
of the balconies and you look at his empire
or whatever he's doing. The other thing is
as well, we need to have some nice arches
coming around here, so we don't want
this bit too thick. So what I'm going to
do is I'm going to see now is this a
little bit too low? So you can see here,
these steps that we've discussed,
are they too low? If I bring this out, if I come to this plane
here, grab it, also, grab the center of it, press and pull it down like so. Now what I can do
is I can say, okay, that seems to be the
right thickness. If I bring him down though
now and press three, you can see now that we can have some arches going up here. Basically we want the arches to really start around
this level here. This, this should be the high. I think probably our door wants to be a little bit higher. So what we're going to do is
we're going to move the door up. Something like that. And then what I'm going to do is I'm going to come to this now just this bit here,
grab the top of it. I'm going to move it up there. And I think now that's
going to be much better on the actual thickness. Now we need to make
our steps fit. So what I'm going to do is I'm going to come to our steps. We've still got
the muddy fire on. What we should be able to
do now is bring them up. We've said if we move this, you can see that
they get taller. What I'm going to do
is I'm going to press shift and move it along because that then will make
it so that I'm going to actually be able to get
them into the right place. Now we can see that we
do have another problem, in that these steps, they're not quite wide enough. Now, what we want to do is want to make
them a bit thicker. Now luckily for us, because
we've got on a modifier, it means it's non destructive. In other words, you can
actually come in and still make these steps change
the way the mesh works. In other words, if I
bring this, if press G, pull it out, you can see it's altering all the other steps.
So that's really good. So what we want to do
is we want to pull this up a little bit and then we
want to bring them down now. So what I want to do is
I want to come back to this press shift and bring them into place now on
top of each other, making sure they fit
on the stairs like so. And the reason we've
done it that way is because if I bring
my guy up now, so press G and
pull him up there, we can see that now these steps we're just going to make sure that he actually
fits on them still. Before we do anything else, we just want to make sure that he's going to be able
to walk on those steps. You can see they're
a little bit steep. Maybe they need to be pulled
out a tiny, tiny bit. So what I'm going to do is I'm
going to come to my steps, I'm going to grab
this one and I'm going to pull it
out a little bit, like making them a
little bit wider. Somehow I can pull my guy on. I can see now that
they are about right. So they're looking
much, much better now. And he can climb up those steps. You can see those steps are a little bit different
from those ones. And you can see now that we have enough room to
create our balcony, we can see that we've got a door here and an arch that's going
to go over the top of it. And it's just all fitting
in much, much nicer. So now what we need
to do is we need to bring in some models. And we need obviously, to have a wall under here. So in other words, a
wall coming from here to fill up this area
going over there, which we'll do on
the next lesson. Before we do that though, let's actually save this out. Let's double tap the
A and then we'll just put on our lighting and
actually have a look, turn off the interlocking links and actually have a look
at what that looks like. It's a little bit too hard
to see at the moment. And the reason is because
we have a lot in here now. This is really, really
bright sunlight now. We could go over and we
could rotate the sun round. So we could change
the rotation of the sun and have it there to actually have a
look at what it looks like. But rather than do that, probably better off giving these a materials just giving all
of these a grayish material. I think that then
is going to give us a better idea of what this
is going to look like. We'll do that on
the next lesson. All right everyone, hope you enjoyed that and I'll
see on the next one. Thanks. Bye bye.
16. Structural Support Considerations in Blender Scenes: Welcome back to the blender
for Ultimate Guide, and this is where
we left it off. All right, so what we'll
do is, as we said, we will first of all put this
on Material mode this time. Let's click these two
interlocking links. Back on so we can see
what we're doing. And then what I'm
going to do is I'm just going to bring
in a material. So I'm going to come
in to my material. I think we already
have one in here. So we've got Greystone
and all of these. I don't know why wall and
things like that are on there. But anyway, we'll just use the default and what I'll do is I'll just
call it gray box. And this is a really good
idea when you're working with gray box to actually bring in just a material
you can actually see. So what I'm going to do is
I'm going to put this on a gray material like so I'm going to put then
my lighting back on. And now you can see already, if I come around to here, just how easy that is to see. The other thing is
you can also turn down your roughness value. So turn it all the way up. And now what you'll
end up with is you will end up with a lot
of light bouncing off. Because if we turn this down, you'll end up with
it like a mirror as you can see. And we
don't really want that. So let's turn it
all the way up now. The easiest thing is let's
go back to material. We can just grab all of
this apart from our guy. You can see our
guy at the moment. He's actually, in fact,
we'll leave him great. We'll leave him great. We
won't do anything else. We'll keep him there. So
what I'm going to do is I'm going to press B Box select, and then he's going
to select everything. Now just make sure you've
got everything selected by pressing and then right click and dropping
it back in place. Then what you want to
do is you want to shift select whatever you want
to copy something off. In other words, we want
to copy this shift click. And now you'll see
this is yellow, everything else is this
dark orange color. And now all we can do
is we can press Control and L. So control
and L. And what we want to do is we want to link materials like so double
tap the and there we go. Now all of these have
this gray box material, making it really
easy than having to go in and add this
material to everything. All right, now let's
look at our lighting. Now we have a
really, really good idea of what it's
going to look like. So we can see already if we turn off these
two interlocking links, this is what it's
going to look like. If we come around to the back, we can see exactly now, or imagine in our head how
everything's going to work. All right, so I'm
happy with that. Now let's come in back
to our object mode. Let's put these
interlocking links on. And let's actually come in
and fix this part here first. So we can see this part
definitely needs to be a wall going under here coming all the way
up to this part here. The easiest way, actually, is to come into
my gray box here, Press tab, press control
seven, to go over the top. And what I want to do is I want to line it up
with this here. You can see this wall
here. I'm going to press control left click. And just drag it down to line it up with this
one here like so. Now we should be able to
grab this and pull it over. Now we will have another
problem in the min, come over level as
you can see here with our I'm wondering actually we should be able to
get away with that. It's just like it
goes all the way up to here and we don't
really want that. I'm going to do is bring
another edge loop. We'll put on X ray
first press control, and then just bring it up
into the center of here. Now you can see it's
actually inside here, which is good for turnoff x ray. Now now what I should be able to do is select just this space. And I'm just going
to extrude it out. So I'm going to press and
extrude it out level. Pretty much with this over here. Now you can see we've
got a nice level place because we want to put a
couple of doors in there. Now what we need to do now
is we need to figure out, this is going to be our balcony, so we need to now bring in something that's
going to represent that. The other thing is we haven't
got a floor on here at all. And what that means is
we can't really get a good visualization of how the actual building
is going to fit. So what I'm going to do is I'm
going to bring in a floor. I'm going to press Shift
cursor to selected. And then what I'm going to do is I'm going to press shift. I'm going to bring in a plane. You can see a plane there. I'm going to then press and
just pull it out like so. And then we're going to level
it with the ground plane. So I'm going to press so one, and I'm going to pull it down. We're going to put it on just on the ground plane like
so now you can see, if I pull that over, you can see exactly what
we're looking at. Now if I put this on now, you can see that's how our
building is going to sit and now we really do have
a good visualization of how it's going to look. All right, now let's think
about our actual pillars. I'm going to come in
to object mode again. I'm going to make
a quick pillow. The pillars pillow a pillar. The pillars want to be coming
up to roughly around here. This point here, we can see we've already got a
nice height for them. So what I'm going to do is
I'm going to grab my guy, I'm going to press
shift a selected shift. Then what I'm going to do
is just bring in a cube. Then I'm just going
to make it smaller, pull it down to the floor
just it sits on there three. Just making sure that on
that ground plane and then all I'm going
to do is that's the right thickness
for a pillow tab. I don't know why I keep
saying pillow pillar. And then let's pull it up
to the height of here. If I press one, I can pull it up to the height
off here like so. All right, so that's
an easy pillow to me. Let's now press control. Or transforms, right? Clicks, origin geometry,
and there we go. Now let's put these into place. So I'm going to have
one around here. I'm going to need four, I think. So I'm just going to
press shift D. I'm going to bring this over
all the way over here. I'm going to press
shift D again. I'm going to bring it over
to somewhere like that, shift D again, let's
bring it over to there. All right, that's looking good. Now that gives me a good idea of what I'm actually
going to do. The one thing I can see is that the pillars probably
need to be a bit bigger. So I'm just going to
grab all four of them. I'm going to press S because
I want them to be slightly bigger and then put them
underneath like, so. All right, now we need a
couple of doors in here, so I'm thinking one door here. One door here. So
let's come round. We want the double doors,
so I'm going to use those, so I'm going to press shift D, I'm going to drag it out. I'm going to put one door. Then maybe in here, if we're putting it there,
let's put it a bit that way. If I press one, you'll see her go
round to the front. If I press control one though, you'll see her come
round to the back of it. And then what I can
do is I can press D, duplicate it, and
put another door in. Then what I can do is I can work out where I actually
want my door. I'm going to want them not quite in the center
where you can see these pillows are a
little bit over it. So I'm just going
to put my pillows there and I think I'm going
to want my doors like that. That's looking pretty nice. All right, now let's think
about the last part. The last part, I want
another cube in here. I want it coming up to
somewhere around here, and I want some stairs
leading from the back of it. The stairs are pretty easy because I can just
grab these stairs. So I'm just going to press
shift on the stairs, spin them around -90 and then I'll put my
stairs into the wall, like bring them down to that ground plane,
holding the shift bone, slow everything
down and then just pull them in
something like that. I'm thinking that
these stairs on this bit probably a
little bit too wide. So I'm just going
to press S and X, leave them a little bit thinner. So then what I'm going
to do is I need, then, it's going to be a
door at the top of there. Let's grab this door, Sid. So let's pull it, Jaws to top of here. So now let's think about
bringing in our cube. From here I'm going
to do is I'm going to press Shift S selected. What I'm going to do is I
think will basically we want this one to be
under the window here. I'm just wondering
where to put this cube. Probably the height
here, around here. All right, I've got it,
Let's grab this cube then I'm going to press shift D
and just move it over there. And then what I'm going to
do is I'm going to press Shift and I'm going to put
selection to curse that. Then it's going to move the
cube right where I want it. I'm just doing that because
it's going to be easier rather than making some
new piece of mesh. I'm going to pull the cube
down into the ground plane. Then what I'm going to do is
I'm going to pull it out. Then finally I'm going
to pull it back tab. Let's pull it all
the way back to here like so there's going to be a pillar
on there, of course. And then what I'm going to
do now is I'm going to pull this to the halfway
point of here, making sure that door is
actually going to be in there. Now I can see at the moment, we can't see where the door is. So what I'm going to do
is I'm just going to pull it back there. Then what I'm going
to do is I'm going to put an edge loop down
this bottom here. So I'm going to press
control our edge loop. Just move it a little
bit sideways from the door and then we're going
to come in and grab this. And then I'm going to press and pull that out to where
I actually want it, which will be something like that's just so we
can still see our door. Now if we put a lighting on, you can see now that is what
it's going to look like. You can still see that even when we've got this
top over there. Now I'm going to do is I need a top going over
the top of here, covering that, maybe a
little bit higher up. What I'll do is I'll use this
part that I've got here. So I'm going to grab
each one of these, that's go into object
mode once more. Each one of these,
let's save our work so we don't actually
don't lose anything. What we'll do is we'll
just pull these up now. And I'm thinking, I want
to pull these up to be slightly higher than this. Maybe I'm going to press,
just let me grab them again. I'm going to press and
pull them up to be slightly higher like so. Now the only thing I'm
not sure about which I'll decide on the next lesson, is where do I want this? Where do I want this
part to come down to? Because I think I want it
quite high up here also. How wide is this walk? Because at the moment
it looks a bit, it doesn't look wide
enough, this part here. But we'll do that
on the next lesson. All right everyone. So I
hope you're enjoying it, I hope you're having a great
time and actually learning loads about building gray boxes. And the best thing is,
I hope you're really seeing your gray box
and your building actually coming together now. And you can imagine where
everything's going to go. And that's the whole idea of building a gray box
in the first place. Alright everyone, So I
hope you enjoyed that. See her next one.
Thanks a lot. Bye bye.
17. Arcway Design Techniques for Greyboxing: Welcome back everyone to the
blender for ultimate guide, and this is where
we left it off. All right, so now let's
actually come to this part. So first of all, I think this is going
to have to be wider. So we're going to
grab all of these and we're going to pull
it out and make it a little bit wider so we're not going to put a window or anything
like that in there. I think this is coming up to about the right
height actually. And I think we just need to
put a top on this part here. Now, putting tops here is going to be a little bit
harder to put it on exactly. I don't really want to
mess around putting this on exactly at the moment. So what I'm going to do is
I'm just going to come in, grab the edge of this
seven to go over the top. And then what I'm going to do
is I'm going to extrude it. And I want to extrude
it along the y axis, just to the end of there. So because this is a gray box. Now what we want to
do is we want to come in, grab this face, and then I want to press and pull it down then
to where I want it, which will be
somewhere like that. Now, bearing in mind, sometimes when you extrude things down, you will lose the top of it. In other words, it just
takes it and pulls it out. We don't really want that. So what we want to do is we just want to
come in and grab this one. And this one press and
put a top on it like, so. All right, let's
double tap the A, And let's look at
what that looks like. And we're just going to
have a look round it now. We can see that's
looking pretty nice. Now think with the
doors actually, because it is a gray box. And I want to see, I have a real good visual
of what it looks like. I'm going to change the
material on the doors. What I'm going to do is
I'm going to come in and minus this one
off click New. And then I'll just make
it a different color, like an orangey color, turn up the roughness. And then what I'm going
to do now is I'm going to grab this. Where is it? That one then these two
doors and then this door. And then what I'm
going to do is I'm going to grab this door last. Because that's the one
I put my material on, press control and L and I'm going to copy
or link materials, double tap the and there we go. Now we have a good idea. Hopefully put this some material of what our actual
doors look like. And you can see because
they're orange, it really, really did bleed that
out as you can see. But at least we have a visual. Let's actually put the post
then as well as the gray box. I'm going to grab the
gray box and control L link materials
that will tap the A. And there we go. Now
we have a nice visual. Now the next one I want
to do is the windows. So we'll come to this window here minus this
off, and then new. And then just make it
a bluey color like so. And then let's also
turn up the roughness. And then finally
what we can do now is we can grab this window. I don't think I've actually put many windows on the ear
anyway, so that's fine. I'm just going to
grab that window. And this window,
I'm going to press control L and link materials. Double tap the. And there we go. Now we have a
really, really nice visual of what we're
actually looking at. What we'll do now is
we miss door there. Let's grab this one con
cholel link materials. So what we'll do now is we'll
actually come in and think about where we're going to put all our windows and this is what I recommend
that you do next. So you really want to look at where are things going to go, so where are windows
going to go and you want to place them in
realistic places. You don't just Mr.
over door there. You don't just want
windows and doors, just placed willy nilly. We don't want that
all we want to placed in some kind of
area that's going to, you know, kind of make sense. The other thing is just making sure I'm happy with
how this is all built. Of course, generally I want
to make this bit as well, a little bit uneven. So I tend to put in now some cubes that are just going to make this a
little bit uneven. Just so we can put some
nice things on here. That's what I do to cut
along such stories short. What I'll do is first we'll
sort the windows out, sort out the balconies, and then we'll actually
make just a little bit of a few more changes on these actual blocks that
we've actually created. And then from there
we can actually start building this out, which actually once
we start get going, it's going to be much easier. All right, so let's
go to object mode. Let's first of all bring a door. So I'm going to grab
this door here, shift. And what we're going to
do is we're going to put a door right at the end of here, so right at the end of the. In here so they can come out of here and then go
through to here. Because you've also
got to think about how are they going to get anywhere
around this building. So we need plenty of doors and
we need plenty of windows. Ours, 90. Let's put it back
then into place. So let's press the
dot B to zoom in. And then we'll do is we'll just put that in place like so. So that's that one. We
need a couple of windows. I'm going to go around
here, steal this window, shift D, drag this
window out here. And then what I'm going to
do is I'm going to press And 90 I'm going to press control
one to go to the rear. And then what I'm going to do is I'm going to pull a window perhaps, just like so. And then shift D,
another one here. Grab them both with shift select and then let's pull
them back into place. So, all right, now
we want to balcony. I'm going to grab my balcony here and I'm going
to press shift, I'm going to pull
this over here and then 180, spin it around. Let's put this
balcony into place. We want it something like that and then just
make sure that it's in. Then I want another balcony, then this side here, round here, shift D 90. Let's pull this
balcony over here. I think on this part here we'll actually
have it in the middle. Maybe there a little bit, tiny bit lower than this one. Then what we'll do is we'll pull it out just a little bit. Then I'm going to
grab this window. I'm going to press
shift then 90. And I'm going to
press control three. And I'm going to put this window over here and put
it into the wall. All right now we're
want to grab a pillow. So I'm going to grab
one of these pillars. I'm going to press
shift to bring it up. I'm going to, of course, make it a little bit smaller
so I'm going to press S, make it a little bit smaller. What I'm going to do is
I'm going to put it under there because that I want this on a couple of
pillows, shift pillows, pillars. There we go, like so. And then this one we've got obviously a balcony that's
going to come over here, which I don't actually
think we should model. I don't think we should do that. I think we know something's going to go there,
so we're okay. I think what we should do though is we've finished these now. We've got doors here
leading through to there. We've got a couple of
windows here here. We need a well down here, which we're going to point
in a little bit later. What I need to do now is I need my windows and my
balcony in here. So let's grab this part first. I'm going to press
Shift, bring it over. My other balcony is
going to be over here. So let's make sure
that'll fit on there, which it will, that
should be nice there. Then what we'll do is on a
window here and a window here. I'm going to grab my window. This big window, shift
D, let's pull it out. Let's press control one. And then let's press, and then we can put
that one in place. Let's pull it back into place. Then I'll have one more thing
here. Control one again. Shift D, let's drop it
somewhere around here. So then I think we need just
one more window around here. I'm going to grab this again. Shift D, bring it out. Press control and 33, and then let's pull that down. Or pull it into
the middle. Yeah. Make sure it's in the wall. Now I'm thinking that's pretty all of the windows
and doors in there. I'm just looking around
just making sure it's got a nice view
going down there, we can see it's got a nice view. I think one thing we would
need on here is an arch. We'll put the arch in
as well. We'll do that. I'll grab this part
here, shift S. In fact, we'll use this, we'll use
this actually for the arch. So I'll press shift D, because one thing we want to make
sure is that they'll still, I'm pressing S, be able
to walk through here, I'm going to press S
again just to get it going to the sides and Y, and the arch wants to come just back past this wall. So
somewhere like that. And what we need to also
do is we need to make sure that he's going to be
able to walk underneath it. And I think if I put it there, he should be able to do that. So I'm going to press instead, make it a little bit chunkier, make sure that it's
in the wall, like so. And then what I'm going to do
is just make a quick arch. So what I'm going to do
is I'm going to press control to bring
in an edge loop. Left click, right click
to drop in the middle. And then a little trick
you can do is you can press control B to bevel. And then you can just pull
it out to wherever you want the edges of
the arch to be. So here and here. So now if I go underneath and
grab this one in face leg, so this one and this one. And then what I can do is I
can just extrude them down. So pull them down
and there we go. We've got our makeshift arch. And now what I want
to do is just make sure my guy is going to be okay and
the Kenny fit in there. So let's press G,
let's bring him over. And just make sure
he can actually walk underneath here.
So let's pull him up. And he walked through
there, that's the question that
we need to ask. And yes, he can
he should be fine going in there like so. Okay. So that is pretty much done with the very
basics of the gray box. There are a few things
that I would like to fix. I just want another
part in here, I think, and just one
small part in here. And then everyone, we are done with our gray box and we can start moving on and
start building this out. We'll just put a
couple more parts in here including the well, and then we're ready
to rock and roll. All right everyone. So
I'm going to save that out and I'll see
on the next one. Thanks a lot. Bye bye.
18. Crafting Palm Trees Using Geometry Nodes: Welcome back everyone to
the blender ultimate guide. In this way we left off. All right, let's bring
our guy over here now. So what we'll do is we'll
put in round about here. And I'm going to spin it around. So I said 90. Let's spin it around. It doesn't really matter which
way he's facing. I just want to make
sure that there's going to be enough
room if I pour a little bit of a wall coming down here to make sure
it's still going to, you know, kind of fit in there. So what I'm going
to do is I'm going to press Shift selected, shift A, And then I'm
going to bring in a cube. I'm going to make the cube
a little bit smaller. And then what I want to do
is I want to pull this cube into roundabout into here. Jaws coming down to this bottom step where I can put some plants or
something else like that. And then what I'll do
is we'll pull it out. I'm going to grab the side of it, I'm going to pull it out. And then what we're
going to do is I'm going to come underneath, grab the bottom of it and
then pull it down into there. When it come in
jaws to this step. And you can see it's going to make it little bit different. I think it's a little bit
still too wide of the up, so I'll pull it
back, jaws to tad. So that then is adding just that little bit extra to our build. I think it was checking that is going to look a little
bit nicer than what it did. I'm just wondering
whether this is a little bit too thick.
I think it is. So what I want to
do is just grab this and pull it back there. Yes. And I think
that looks nice. All right, so one
more piece then. I think I want one more
tiny step over here. I'm, I'll grab this cube again and we'll
use that as well. So shift D, bring it over. And then what I'll do
is I'll pull it up. I'm going to press
S and's head then just to squish it in like so. And then what I'm
going to do is I'm going to press S and
hit and pull it out. And then what I'm
going to do is I'm just going to put it into place, something like that. There's a little
bit of unevenness, Double tap the A
now going up there. Then finally I think I want one more bit
coming along here. I'm going to grab this again. I'm actually going to pull
it in a little bit more. Let's pull it in a little bit. Then I'm going to press Shift
and Duplicate once more. And then and then and y, just move it over here and then just pull
it out a little bit. Then let's just grab the
top and pull it up into place and just make it a little bit of a ridge just
on that bit over there. All right. I'm happy
with all of that. Now I want to come round
to the back and I want to put my well in just to get
the right dimensions for it. So I'm going to bring
my guy over once more, put it on there. And then what I'm going to
do now is I'm going to press shift S just to put the
cursor back to the guy shift. And then what we're
going to do is we're going to bring in a cylinder. Should come in at 20 because we still haven't closed
down our blend pile. And then what we can do is we
can make this a little bit smaller like so when we
want a little bit of a well so ands ad and then we're going to
put the well around here. Now normally I don't bother with props and things like that, but because this is something a little
bit more than a prop, it's actually part
really of the build. So we need to understand where
it's actually going to go. Same as the palm trees. Sometimes I'll come and I'll put some just rudimentary palm
trees in there as well. Just to get an idea of how
everything's going to look. By the way, I have
my other building, the first building built on the other side, on
the other screen. So that helps me then reference where I'm
going to put everything. But pretty much the
way I build it in the first place is the way
I'm showing you right now. I just took longer
to actually have you actually have to work out how big everything's
going to be. All right, so now we've
got this in here, let's make it a bit more like a well so we can see what
we're doing with it. So what I'm going to do
is grab the top of it. I'm going to press Enter
to pull it out like so. And then to pull it up. Then for Insert to pull it in and then to pull
it down into place. Then all I'm going to
do is I'm going to grab the two of these. Here, this one and
this one, like so. And then all I'm
going to do is I'm just going to press and pull them up and just
make a rudimentary, well now I'm going to
right click and shade or to smooth, double tap the A. And now I have a really, really good idea of how this
building is shaping up. I'm thinking that
looking around now, just making sure I'm
happy with everything. Yeah. Th, this is
really, really nice. All right, so now let's
come in and save this out. And what we'll do is
we'll actually use one of our first parts of, of our actual resource part. But before we do
that, let's just make sure that everything is in
where we want it to be. What I want to do
is I want to grab this part here and
I'm going to press M, I'm going to make
a new collection. I'm going to call it
grade box like so. Okay. And then what I'm going to do here is I'm
going to come to this one, I'm going to press
M New Collection, and we'll call it ground. So click Okay. All right, so we have ground, we have gray box, and now
we have all of these parts. What I'm going to do is I'm
going to come to the ground. I'm going to hide the other way. I'm going to come
to the man, I'm going to hide the other way. And then what I'm going to
do is I'm going to press B box, select everything. And then all I'm
going to do is press, and I'm going to put
that into gray box. So now you can see really, really nice and tidy and
that's exactly what we want. Okay, so now why do we do that? Well, it means now that we can hide any of these parts
out that we want, so you know, we hit it with H to bring it back is old age.
That's where you need to press. And what it also
means is now that we can hide our man
out of our way, or we can hide our gray box, or we can hide our floor, which makes it much, much easier when we want to deal
with all of these parts, we want them basically
in a big chunk. All right, finally then, before we do anything else, let's have one more look around with our actual
lighting on double tap, the A turn off these
two interlocking links. And now you can see this is
what it's going to look like. That is really nice, and I think it's
well proportioned, we've got height to it, we've got depth to it, we've got intricacy it to it. And that is what makes
for a really nice scene. Just take all of those things in your mind when
you're creating your own scenes and
you won't go far wrong no matter what
you're actually creating. Okay, let's come to object mode, and then we do is turn on
these interlocking links. And now we can come
to our asset manager. And the first one, just
make sure you're on use the library going to
come to geometry nodes. And what I'm going to do is I'm hoping I can bring
in a palm tree. Which I can now, you can see the palm
tree isn't really, you know how I want it
or anything like that. So what I'm going
to do is to make this a little bit easier. I'm going to press shifts
baseball first of all to bring in my move tool so we can move
the palm tree over there. And the first palm tree I want is going to be
round of the back. So I want it round
of the back shaping and going kind of up here. So what I'm going to do is
I've got my cursor there. I'm going to press shift
A, bring in a plane. I'm going to rotate
this plane round, so R Y 90. So I'm going to put the plane a little bit further
towards the wall. And then what I'm going
to do is I'm going to make this plane a
little bit bigger with the S and then and's G to
make it a little bit taller. So something like that. And I'm just going to
leave my plane there. Now what I'm going to do
is I'm going to press control three just to face my actual plane
that I've created. I'm going to pull it
up a little bit more. And then what' going to
do is I'm going to come over to my geometry note. This is my geometry note. Let's take a quick
look at this then. On the right hand side, if you click on the little spanner, you can see this has
add a geometry node in. Now to add in a geometry node, let's first of all discuss that. I'm going to bring in a curve. So we've got a bezier curve
that I've just brought in, so here's our Bezier curve to make this into
a geometry node. Then add modifier. Let's go and add
in geometry node. And the geomet Ode wants pick
is going to be palm trees. Note now you can see this
is what is brought in now. I can spin this round, Y, Y, -90 Spin it around
the right way. Now you'll notice when you
bring in this palm tree, first of all, it hasn't
grow a top on it. But now we can
actually add a top. If I come in, press
the tab bottom, press the born on here, like so. Now we can actually
join it with this one. You'll notice on
this one it's two. On this one it's zero. And the reason it hasn't
got any of those tops on is because we just need
to change the count up. And now it'll give us
some leaves like so. All right, so that's how you can actually bring in
this Geomet note. This Geomet note in
particular works with curves. Some of them work with objects and some of them you
don't need anything. But now you understand
now to do that. So what I'm going to do now is I'm just going to delete
this out of the way. And I'm going to show you an even better way
of doing this. So what we're going to do
is we're going to come in, delete the other way,
press control three, just to look at this plane. And then what I'm going
to do now is again, I'm going to bring in a curve, Bezier curve. It's
appeared here. If I press Tab, you can see now we've got the points
on our Bezier curve. Actually, I'll show
you that if I press G, now you can see we
can move these points around so we can extrude them out to
make more of a curve. So, but we don't really
want any of that. What we want to do is we
want to select them all. Press Delete, Delete vertices. Now, even though we've
actually deleted the vertices, that actual curve
is still there. So if I press control three, now I can come over to
the left hand side, click this little arrow
over here, Or press. And what I can do
now is and come down and click this little draw. If I click this little draw now and zoom out a little bit, what I can do now
is draw in a tree, so I can bring it out, bring it round exactly
where I want it, like. So how do we turn this into a tree exactly
as we did before. Add modifier geometry
node down arrow. Click on palm tree node, and there we go,
a beautiful tree. Let's give it some
more leaves on top. Now you can see just how
easy it is to drain a tree. We can actually come in
as well, grab our tree, make sure we're on the move
tool, grab one of them, press the borne, and we can actually move
it around as well. We can even come in, press the borne, and extend
it out if we wanted to. It's a really, really powerful geometry note while
we're here though, and we've already
gone through that. On the next lesson,
I'm just going to show you quickly how
the geometry node actually is put together. We'll actually delete
this other tree. We're not going to need
that one out of the way. And then what we're going to
do is we're going to move this plane over to
the left hand side. And now we can see if we
move this more into place, let's press control A first. All transforms directly,
surrogen geometry, and let's put this
into place like so. And this is where
our first palm tree is roughly going to be. Now I can see if
I put that there, I need to move this window
a little bit over like so. And now I'm thinking that's
looking pretty nice. Now you can see it's
very, very straight on. What I tend to do with that
is I just tend to just make it a little bit more
of an uneven shape. And don't worry, we're
going to replace all this. These are just templates. And we're going to put
more palm trees in here, but we'll do that
on the next lesson. All right everyone.
So I hope you enjoyed it and I'll
see on the next one. Thanks a lot. Bye bye.
19. Adjusting Stylized 3D Palm Trees for Scene Integration: Welcome back everyone to the
blender for ultimate guide, and this where we left it off. Now the one thing you might
be asking is geometry nodes. Where do you get from?
How do you create them? And the thing is, you can
create them yourselves. They're extremely
complex to create, but it's like anything. Once you get the hang of them, then you'll realize
how to create them. Let me show you this
one. So if we come over to geometry
node, click on it, zoom out, you'll see this is how this geometry
node is created. We can see we have lead
curves, is all of this. And if a zoom over to it, this is basically
based on curves. So what this lead curve is doing is it's basically telling the blended geometry
node at the end of the curve you need to
put on a load of leaves. And then this, it's basically
telling it how to do that, how to distribute them,
how to bend them, and all that sort of stuff. As we move further along, we can see we've got
scale randomness. These are all these
options here. Now, in a bit or a bit later on, when we change the palms
out for different palms, we will be altering a
load of these as well. Because what these allow you to do is change, for instance, the that's the leaves, let me just put that
back the radius of the bay scale for instance. So we can change that, We can change the size of the
trunk overall and things, so many things we
can actually change. And this is the main
point of geomet nodes. You want to do everything before actually applying it to mesh. You want to make things as easy as possible for yourselves. So you want to
create geomet nodes which are like planks or like roofs and just make the whole process easier when
you're creating anything. So palm trees for
instance, can be lose, used in many, many
instances, many projects. And that's why we've
actually created this. We've also got ones for roofs. Creating roofs much, much
easier, ones for planks. We're going to create 14 steps, meaning that the process of creating steps is
just going to be that much easier rather
than having to go in make a cube and then, you know, array in it and perhaps curving it or something, just make it with
a geometrenode. Then we can just add the steps, change the steepness and
all things like that. This is why we do this. Geometry nodes is a real game changer,
Very, very powerful. And we do have a load
of geometry nodes. You know a three D tutor, so you can take a look
at that if you want to. These nodes that you've got
come with the course anyway, so you're free to use them
in any area projects, just not in any commercial
capacity. If you want that. We have commercial
licenses available. All right, so now
enough of that. Let's actually move on then. And we've got this tree here. What I'm going to do then,
I want another tree, so I'm going to come
over to modeling again. What I'm going to do
now is I'm going to put another tree round here. I'm going to pull this over, spin it round so S D 90 and I want another
tree up from here. So what I'm going to do
is I'm going to press control one to go
to the reverse. I'm going to press Tab. What I'm going to do is I'm going
to grab this tree again. I'm going to press Tab To
get into the edit mode, I want to come to my
drawer function again. And I'm just going to
draw this up from here. From, here's the start,
I'm going to draw it up all the way up to there. Like one problem you will see is that it
didn't draw on here. I'm just going to
press control A, go back and I'm
going to show you something else which
I completely forgot. If we come into this again, press control, one press tab. And before we draw,
let's make sure, first of all that
we're on surface. So you can see at the moment we wasn't drawing on the surface. So let's draw on
the surface then. What we can do is we
can now come up and it draw on the surface of
this. Yes. Which are? So you can see on the
surface of our plane, it's drawn a nice
beautiful palm. Let's also make sure that the orientation of this
plane is in the center. So right click. So
origin to geometry. Let's move that out of the way. And there we go,
our second palm. Not quite happy with
the top of here. So what I'm going to do is
I'm just going to come in, I'm going to rotate
this round, so R Y, rotate it round and then
let's move it a little bit, so let's like so and I think
that's going to look there. And then all I'll
do is I'll move it now just so it's
not so straight. So you can also use Propulsion
leediting on this as well. So if I press now, you can see we can
bring it all out and move it all together like so. And there we go. That's
looking pretty nice. Except the Bom bit
probably probably not. Straight enough. So
let's pull it up. And there we go. And
the good thing is you can see how we
all moved together, making it really, really easy. Okay, so now we're at the back. Let's bring in then the last
palm on the last palm doing is come in just above,
just above here. And over this bit I'm
going to press one. And then what'
going to do is grab this palm, press the tab. I'm going to make
sure I'm on draw. The surface will
already be on now. I just want to bring it up. I want this one to be a bit of a smaller palm tree nowhere near as high as the other one. Something like that. Now
I'm going to come in and delete this out the way I
don't need this plane anymore. And then what I'm
going to do is just move this around so
I'm going to come, oh, the other thing is as well, you can also adding
extra points on that. All you do is grab two of them. Right click, subdivide, and then what I'll do is
I'll give you a point in the center giving you even
more ability to move this. What I'm going to
do is move these over and just have it slightly, slightly hanging
over here like so. All right, again these are
just place mats at the moment. Don't worry about them too much. We are going to change a lot
of things as we move along. This is just to get
everything in there to make sure that all of our
grade box is done correctly. So finally, when
you've got that, let's first of all save
our work and let's put it onto our lighting.
And there we go. Now we can't see these. And I'll tell you
the reason why. The reason why is
because sometimes in blender EV and cycles they work on different
render engines. Which means that the
way that transparency works is completely
different from each other. These palms are self for V. If I come in and set this to EV, you'll see sky disappears. But as it compiles the shades, you'll see once these load up, you'll actually have
some transparency. And there we go, here's
the transparency in house. You can see them. You
can see though why use cycles is because at the moment on V we
can't really see a lot. Now there are some
things that we can do to actually change that.
I will show you those. If you come over to
the ambient occlusion, click that on, open it up, and just change the distance
you'll see now that we actually start to get some
better shadows on there. We can also change this
up and bring the more, just keep moving it
up and you will get more and more if you
change the factor back. Now you can have a much
better control over that. The other thing we have in V
is screen space reflections. This is used for when
you've got high reflection. If we came in to the material and we brought
down the roughness, we can see now that we've
got reflection on there. And if I go back to V, turn that off, you can see
the difference that it makes, it makes the reflections a lot more realistic with V. Now, of course, I don't want those reflections
looking like that, so I'm going to turn it back up. Now with V, you
might be better off having a little bit of
reflection actually, But anyway, that's where
you can see from the V, so you can see still quite nice. It isn't real time, so it's going to be much, much quicker. We can see our palm trees
looking pretty nice. So what I'm going
to do now is I'm going to put it back two cycles. Because that's why I
like working with, even though I can't see
the tops of my palms, I still get a better
visual for me, at least, of what everything's
going to look like. So on the next lesson then, what we're going to do is
we're going to actually start building out
the main parts. Because I'm going to
show you a way of how to build which is going to
make it not only viable, so you can build
things in the future. Not only viable so
you can actually save them out in your asset manager, but also a really, really fast way of working and producing professional work. It's took me ten years to get to this stage and I think I'm
really at a stage where I can show you the best and easiest and most professional
way of doing things. All right everyone, So
we enjoyed that and I'll see you on the next
one. Thanks a lot. Bye bye.
20. Crafting Stylized Pillars in Blender: Welcome back everyone to the
Blender Ful Ultimate Guide. And this is where we left off. All right, let's put
this on object mode now. Let's make sure
that our palms are also going to be in with
our gray box like so. And now what we can
do is we can actually start making the pillows. So let's first of
all bring in a cube. I'm just looking
for my little guy. Where's my little guy gone? Here he is. Let's
bring him over. I also think before
we do anything else, let's center this more. So I'm going to go over the top. And then what I'm going to do
is I'm going to center out the ground plane a
little bit more. So then what I'm going
to do is I'm going to grab all of I'm
actually going to Yeah, I think I'll grab
the ground plane ship S cursor selected. So the curse is right in the
center of the ground plane. Grab everything now. So what I'll do is I'll move it all more to the
center of here like, so it's more centered now within our actual
viewport of blender. And I think now if I'm
looking around there, yeah, that's pretty centered. Now, that's good. Now we've got that all the way. Let's come in there. We'll
do is we'll grab our guy. We'll press one on the
number pad shift S, cursor selected just
to bring in a cursor. Then what we'll do is
we'll bring in a cube. Should they mesh,
bring in a cube. Make the cube a
little bit thinner. So we want this to
be an actual pillar. It's going to be relatively
thick, but not too thick. You don't want to crazy thick. I think something like
that should be found. But we'll have a look as
we build out this more. Now what we want to do
is we want to make this, let's go to the item on
the around 3.3 meters. 3.3 meters. So I'm going to give
this a test before, so I'm going to pull this over. I'm going to put this
into this corner just to make sure it's
going to fit okay. It's going to be like this. And then let's pull it
up to the ground plane. And then it's just
going to stick above this line as
you can see here. All right, so let's pull
this out now. We've got it. And then what we're going
to do is we want to turn this into some pillow. Pillow. What we're going to do is we're going to bring
in edge loop here. So I'm going to press control.
I'm going to bring in an edge loop round about
somewhere around there. And then I want
another edge loop at the bottom for the uctoal
base of it control, bring it down to
something like that. All right, so let's
do the base first. So what I'm going to do is I'm
going to come to face set. I'm going to old shift
click just to make sure I've got those all
selected around there. And then what I'm going
to do is I'm going to press one to go into
front view again. I'm going to press Enter. I'm not going to extrude it. So in other words, just
press E and Enter. And just remember
that you did press, you don't press two or three
times because you'll end up with loads of extrusions on there and you
don't want that. So now you can see
if I press S and pull this out without
portion entering on, you can see that we've extruded it and now we can pull it out. Now if I just go back, if you're worried that you've
pressed too many times, you can actually just go back, select the whole
thing, come to mesh. We're going to go to
clean up and what we're going to do is
merge by distance, Merge by distance,
eight vertices removed. And the reason that happened
was because we had extruded it and those vertices were sat over the
top of each other, Which means that if
you extruded it again, by mistake, you'd have 16 vertices sat at the
top of each other. So then you've just
cleaned them up. So now you'll see if I try and pull this out, nothing happens. So we're going to
extrude it again. We're going to press
one on the number pad. We're going to press E and enter without moving our mouse. And then what we're
going to do now instead, is we're going to press
alterns, not ENS alterns. What you'll find is we can now bring this out
in a straight line. So in other words,
the difference, if I press, you can see
it comes out like this. If I press old s, you can see it comes
out much straighter. Now the other important thing to do when you bring it out
like that is just come down and actually make sure
that offset even is on. Now the other thing is at the moment I'm just
going to put it back. So I'm going to press control head and I'm
great like this. What I want to do is
though I want to actually make it a little bit
of a bend within here. What I'm going to do is I'm
going to press control. Bring in five edge loops. So five, left
click, right click. Grab the center edge loop. So Alt shift click. So it's
going all the way around. And now I'm going to
do is going to come in and use my
proportional editing. So we're going to try
this on probably, let's try it on inverse square, let's put it on inverse square. And what I'm going to do
now is press the S one. And you'll see now we
can actually bring this in in a really, really nice way,
giving us a really, really nice form to
our actual pillar. Now you will see that we
need to smooth this off. Right click, shade alto smooth, and now it's nice and smooth. And now find that
we can come back. All should click. And then
what we can do is press one. Let me see if I've got any yet. You can see there,
if I take this off, press all test, you can see I've got no extrusion on there. So I'm going to press Enter and then AlternS
and pull that out. Now the moment I
pick click alterns, sometimes what will
happen is the offset of this won't be even you're better off once
you've done that. On the left hand side, you'll have the menu that
opens up here. Just click offset. Even on if it makes it a little bit bigger
than what you intended, just press alternates and
you can still pull it back in like so offset even
on, and there we go. All right, so that's looking
good for the bottom. Now let's think about
the actual top. You notice that I've made
the top a little bit bigger. If you get it wrong the
first time, don't worry. Actually, you can fix pretty much anything, so
don't worry about that. So what I'm going to do now is I'm going to bring in
another edge loop. So I'm going to press control
left click, right click. And then I'm going to press
control B to Beverly. So I'm going to
hold the shift on then to just drag it
into where I want it. Because what I want
on this one is a top. And the bottom on here now
I'm going to do is I'm going to press Alt Shift and
click in Facelift. Click Shift, Click. So then what I'm
going to do now, I'm going to press again, Enter AlternS, bring
it out like so. Now we've got basically
a top and a bott. Now the one thing
is I should have really brought out all
of this to start with. In other words, I'm going to
press controls that again. And what I'm going to do is
press old shifting click, going all the way around here. I've got all three of these. Then what I'm going to
do is I'm going to press Enter AlternS, bring it out. So now we can see we've got fairly chunky outside of here. And then what we
do is offset even, and then alternates,
bring it in a little bit. Offset even on there we go, a thing that's
looking pretty nice. And now finally we
can go the other way. So we can grab all this
going around here. We can press Eat and Enter, and then alternates,
but drag it in instead. And then we can click Offset, even on, and then alternates. Bring it out a little bit.
There we go, our first pillar. Now let's look at the
bottom of the pillar, because I want the bomb to actually be coming
out a little bit. You can see at the
moment, if you press one, it is straight down. So you can see we've
got a nice curve here. You can see if we press three because we use proportionate, it's non, we've got a nice
curve in there as well. But what we want is the bomb just to come out a little bit. So what we're going to do is I'm going to grab this bomb now. I want to select it going
all the way around there. You could come in and
press Alt Shift click. But what you can also do is you can press Control and Plus. So what that does is it basically selects
the next one up. You also press control
a minus and get it to exactly where you want Control plus and then let's press one. Let's press the S one and pull
it out very slightly, so. All right, so I'm really
happy with how that looks. Now want to create
another pillar to give us a bit of variation. In fact, we want to create
three pillars in total, but these are the
most complex pillars. Let's create one more pillar. So I'm going to do
it, I'm going to grab this one ship D, bring it over. All I'm going to do for my
next pillar is I'm going to grab this edge lupia
and this edge looper. And I'm going to press
control B, beveling again, holding the ship bond to
get the right size like So I'm going to press
and enter to extrude. It alternates and I'm
going to bring them out. Now you can see that Alts on here is not actually pulling
out in the right way. And that is because
we're trying to extrude them based on the middle of here. We don't
really want that. What we want to do
is we want to come down individual
origins, alternS. You'll see sometimes that happens where it still tries and pulls them
out from there. If that does happen, the best thing to do
is to press control Z. And instead of pressing old S, just press S, and then you'll be able to pull
them out like so. Then what you can
do is you can press and Z and you can
now pull them down, making them a little bit more even like this sort of
effect like you see here. All right, so I'm really
happy with how that looks. Let's create them
the final pillar, which is going to be a little bit smaller
than the other two. So what I'm going to
do is I'm going to take an edge of here. I'm going to come to the middle. What I'm going to
do is a shift click because I like the
size of this pillar. I'm going to press Shift D, Jaws to bring this
out as you can see. And then I'm going to
press to extrude it, I'll tie it to the z axis. Z. And then it's
tied to the z axis like so now I want to
do is I want to fill these in to fill in the top of it just basically means fill,
it'll fill in the face. There are other ways of
filling things in which will probably come across
further on in the course, but is the way to go, especially when it's
just a polygon. Let's come to the bottom
and we'll press again. There we go. We build that in. Now we just want to split this off from this pillow and pillar. And we also want to make it a little bit taller
than what it is now. Of course I'm going to
come in LP selection. And then what I'm
going to do now is I'm going to now split it off. I want to press control or
transforms right click, so origin to geometry.
Then ' press one. I'm going to bring it down
the same where this one is. And then I'm going to do
is I'm going to come in, grab the top of it
with face select. So grab the top here, press one, and then I'm going to
pull it up like so, and make it a little bit
smaller than these other two. Okay, everyone on the next one. Then we'll get these
pillars finished, and then we'll
actually be moving on to bringing in some textures, and you're going
to find out how to actually bring in your
own textures as well. We'll go through
that and we'll go through our first shader. All right everyone. I
hope you enjoyed that. I'll see on the next one.
Thanks a lot. Bye bye.
21. Introduction to Seams and Sharps in Blender: Welcome back everyone to the
Blenderful Ultimate Guide. And that's where we left it off. All right, with this
one, then what I want to do is I want to
put a top in it fit, so I'm just going to
press control left click, drag it up. Something like that. And then what I'm going to
do is I'm going to come in, grab the faces going
around o shift and click. And then what I'm going
to do is enter alternans. Pull them out, make
sure we've got offset even on and then I'm going to pull
them back a little bit. So alternates like so Officer, even on there we go.
As simple as that. All right, So what we want to do a little bit different
on this one is we want to put a little bit of an insert on the front of here. So what we're going to do
is going to press Tab. Make sure I'm in face leg, grab this front face. Now when I bring this in, you'll see when I press it does come in kind of
even, which is great. And normally though,
before using it, insert, make sure toys press control
all transforms right. Clicks, origin, geometry, press the tabo and now bring it in. So I'm going to bring it
in round about like that. And then what I'm
going to do now is I'm going to extrude. So we're going to press
and just pull it back to where you want it like, so. All right, so they are
looking pretty good now. Before we do anything
else, before we move on, I think it'll be a good idea if we actually go
through the textures, marking seams and sharps. I think that's something that
we should go through first, so then we can cover that, and then we can actually
unwrap these properly. So I'm going to
play that video now and I'll see you on
the next lesson. On the other side, if
you already know how to mark seams and sharps and you're a bit of
a whizz with that, then just move on
to the next lesson. Welcome everyone to the
short introduction to marking seams and sharp
part of the course. So before I give you examples of what I'm actually
talking about, let me just briefly
explain what they are. Seams, you can think of like seams on a piece of clothing, like a shirt or
pair of trousers. The main job of seams
is to make sure the texture that
you're trying to place on your mesh
goes on correctly, but more importantly, gives you control of how that
texture will look. Sharps are marked like seams, but serve an entirely
different purpose. We use sharps to
give us control of how sharp and soft angles
are on our measures. This makes them look realistic. It is also important
that we do this not only for rendering in Blender,
but also sharps. Carry on through to other software or games
engines wearing one to use like Substance Painter or Unreal
Engine as an example. So with all that said,
let's get started. Here we are in Blender
with our starting cube. Now if I click on my Cube
and go to my UV editing, you'll see that the Cube is basically unwrapped
in this actual way. Basically, it unwrapped
like a present. Now if I come across
and I grab this cube, and I press Shift D, and then we press shift Spacebar
to bring in our gizmo, and we move it across. Now let's say I want to alter
this cube a little bit. So what I'm going to do is I'm going to press the Tab button. I'm going to go
Interface select. Click the top face shift Spacebar to bring
in the move tool. Bring it up. So now let's
say I want to unwrap this. Now if I grab this
with L just to grab everything and I press
the U button for unwrap, you'll see that it unwraps
exactly the same way. Even if I reset the
transformations of this, it will still unwrap
exactly the same way. Now let's mark some
seams and see how that has an actual effect
on our actual unwrap. So let's grab the top and
we'll come down to the bottom. And what we're going to do
is we're going to press control Le and then come down to where it
says Mark Seems. Now it's important to
remember that it's control leap to mark
seams in Facelect. But if for instance
we're in edge select, so if we come to this edge, if we press control leap, you will get this
option up as well, mark seams, but you can also
right click in edge select. And you can also see we can
mark Sem this way as well. So for now though, I'm not going to actually
mark this scene. What I'm going to do
is I'm going to grab the whole thing with L, like so. And now I'm going
to press Unwrap. And you can see it unwraps
completely different. Now let's bring in
some textures so you can see what exactly
I'm talking about. So if I press Tab, I'll come up to my
materials panel up here. And I'm going to
give this material. So I'm going to come across
to the right hand side, click on my Material button. So let's now bring the material
I've already prepared. So if I come across this little
down arrow, come on down. You can see I've got
one here called Wood. And let's click that on now
you can see what's happened. We've actually applied our
material to this object, but you can see it's
pretty much a mess. The top of it looks fine, but the bit going around the
side is all bent and skewed. So if I zoom out
and I press Tab, now you can see that
the reason is that It's not actually UV
unwrapped correctly. So, how do we fix that?
If we come up to edge. Let let me grab this edge. And now I'm going to do is
I'm going to right click, come down to mark seams. And now I grab the
whole thing again. I'm going to press you unwrap, and now you'll see it. Unwraps absolutely fine. You can see that
wood's looking really, really nice actually,
on this mesh now. So what this does the seams do is actually gives you control of how this actual texture
is placed on this mesh. You also need to take
into account that this is basically
an infinite loop. If I come round and I look
at this face and this face, you can see that they're going
around if we have no seam. When I talk about
infinite loops, it's basically going
around and around. And blender doesn't actually
understand how to unwrap it, so you'll end up with
that mess we had before. Now the other thing
to take into account is if I turn this wood
around, for instance. What I'm going to do,
I'm going to come over to the left hand side, the viewport of my UV editing, Press A to grab everything, R 90, spin it round. Now the other thing I
want to show you is that where we join these
actual seams up is also really important
because you'll never ever get it perfect on here where
there's an actual seam. So let me exaggerate
this a little bit. So what I'm going do is
I'm going to press Tab. I'm going to make this a lot
smaller and I'm going to move it into the
center of my UV map. And then I'm going to press Tab. Now you can see that
these edges don't line up whatsoever against
this other side, so this texture here doesn't
line up with this texture. And the reason is because
we've got a seam down there. And that is the actual
break in the texture, yet if we come round to this
side and I spin this round, so if I grab it or z 90 and now go to this
one where we can see, you can see that these
line up perfectly. And the reason is because
obviously there's no seam there. The seam is here. So you need to take
that into account on your own measures and
objects that when you're applying textures and materials that try and put seams where you're not
going to see them, if it's on a door
handle for instance. Try and put them on the inside where no one's actually
going to see them. So always bear that in mind when you're actually
marking your seams. So now let's discuss sharps. So if I bring in
a new primitive, so if I press shift A, I'm going to go across the mesh. I'm going to bring
in a cylinder. Now you'll notice
that this cylinder has all these little
edges around there. And let's say you want to
make a cup or something. The last thing that you want is all these hard edged
faces in there. Now there are things we
can do to sort this out. So the first one we can do is we'll bring in another cylinder. So I'm just going to move
this one out of the way. So shift space part, bring in ma gizmo. Move
it out of the way. Shift a, bring in a,
another cylinder. And this time I'm going to
come down to where it sits, add cylinder, and turn
up the vertices to 100. And now you'll notice that
we do have a round edge. But the problem is
that we've brought in 100 vertices to
actually achieve that. And that's not
something we want. We want to use as
few polygons as possible while still getting
a really good looking mesh. So how do we achieve that? Well, there are a number
of things we can do. First of all, we can come
across to this right hand side. What we can do now
is come to where it says normals and
click on Auto Smooth. Then we can right click on the viewport and
click Shade Smooth. Now you'll notice it's
actually been smoothed off. But the problem with this is
if I turn up my auto smoove, you can see if I
turn it up all the way it goes really,
really funky. And that is because
at 170 degrees, Blender decides that these
edges along here needs moving. So it doesn't give
us a lot of control. If we do this on the other
one, sever, grab this one. Right click shapes,
move autos, move on. You can see, again, even with
lower amounts of polygons, we're still able
to smooth it off. But if we turn this off, we're still going to end up with the same problem as
what we had before. So how do we solve that? Well, if we come in now, press a tab button,
come to the top, grab the top shifts like the bottom press control
because we are in face select and we'll
come in and mark a shot. And now you'll notice
if I press tab that now it's got
hard edges on there. This gives us control. So this is why we
actually use shops. No matter what, I turn
this up to 180 degrees, which is the highest it goes, it will not get rid of
those shops that we mark. We can also mark shops
around the edges as well. Sever, grab this
one and this one. And now because we're in
Edge select, we can write, click, come down, mark
a shop, press the tab. And now you'll see you've
got hard edges on there. So it's very important
that you mark sharps where you're going to
actually want hard edges. It's also important that
you get into the habit of marking sharps when you're
actually marking seams. And then what happens is
when you join two objects together and you turn up
the auto smooth if needed, you're not going to end up with some measures like
this. Okay everyone. So I hope you enjoyed that
introduction to marking seams and sharps and as they
say on with the show. All right everyone. So
hope you enjoyed that. See on the next one.
Thanks lot. Bye bye.
22. Techniques for UV Unwrapping Pillars: Welcome back everyone to the
blender for ultimate guide, and I hope you enjoyed that. I hope you learned a lot about basically how to
mark seams and sharps, how to UV unwrapped, because that's what we're
going to be doing now. So what we're going
to do then is we're going to come to this one first and we're going
to mark in some seams. So let's come in. And the
other thing is about this, we want to also bevel these off. Now, I recommend beveling
off before marking seams. In other words, you want to
do it non destructively. So there is a way of doing that. What we can do is first of all, grab all three of
these press control or transforms right click, surrogen geometry because we are going to be using a modifier. Let's then come to
this one first. And what we'll do is we'll come over to the right hand side, click the little
spanner, add modifier. And the one we want is
to generate a bevel, generate a bevel like so. And you can see it's basically
done what we do with control B except we can
turn this on and off, so we can turn this
on and off if needed. No problem there. Also,
when we come into the mesh, you'll see that none of those
bevels are actually there. You can see this is
still a straight line. It's not actually beveled, which makes it really easy
to mark the seams and things like that while
still keeping a bevel. So that's why we do
it. Also, we can press Tab and we've still got
this available to us. Now let's turn this
down a bit though. What I tend to do is I'll
turn it down to zero, turn it up one, and have a
look at what that looks like. And I think actually that's looking pretty
nice like that. And I don't think I'll need
to do anything with it. What I'll do then is rather than adding this on to all
of these other parts, I'll just grab this one, grab this one, shift
select this one, Press control L.
And then what I'm going to do is copy
modifiers like so. And now we'll end
up with exactly the same bevel on all of these, and you can see just
how nice they look. Now, why did it put
a bevel on there? Putting a bevel on there makes
things look so much nicer. And the reason is, nothing in life except a razor
blade is straight. Nothing no corners on your desk are absolutely
perfectly straight. And especially when
you're dealing with something as stylized as
what we're doing here, you really want to bevel off
as many edges as you can. Now, there are certain
times when you don't need to bevel,
when it's, you know, a really, really
small prop or it's a piece of cloth or
something like that. But generally on any
of the building, you want to make sure you've
got some nice soft edges, which will look much nicer when you come to
actually render it out. So make sure you're falling
along and you don't cut out this bit because it's
actually really important. All right, so now
we've got that, now it's time to
actually unwrap these. So what we'll do is we'll come in and we'll get
some seams marked. Now, I always find that
I've got my bevels on, so what I'll do is
I'll come to this one. I'll just Turn it off a minute. This one. Turn it off. Turn it off if you knew. It's just going to be easier to see what we're
actually doing here. So what I'm going to
do, first of all, I'm going to mark a seam
going around the top. So I'm going to come
in old shift click, No one's ever going
to see the bottom, so we ain't got to worry
about that as much. You can see there, tried to grab it going all
the way around. You can also see that
it's grabbed it, going all the way around there. Now, I'm going to do this
again because I'm wondering. Yeah, I'll grab it. Going
all the way around the top, I'm going to right
mark. See, there we go. We've got a seam
going around there, which means now that
this piece of mesh is split from this piece
of mesh in the UV map. Only in the UV map as a build, it's still stuck together. All right, so let's
come down to the bott. I'm going to press
three just to, sorry. I'm going to press three to
bring in my face select. I'm going to select
the bomb on them. Control. And then we're going
to mark seen middle one, then controle and mark scene. What we want to do is we want
this opening up properly. So we need to select
all of these, going around here, going
all the way around here to make sure this
opens up properly. So I'm going to come in,
select these like so, right click, mark Sem. Now we can see we've
got this on the inside. It's going to be
an infinite loop. In other words, it doesn't really know where
to unwrap it from. If you're going to mark
a seam on the inside, always mark it with
the least place where people are
going to see it, which will be probably
in the top there. And what that means is now, now mark a seam there, it's going to go up
around an end there. In other words, it's
going to open up and this is where the
breakpoint is going to be, like you're wrapping up
a parcel or something. Okay, so now we've got that, let's mark a seam on
the underside of here. So like this. And then what we're going to do is
right click mark Sam. And the other reason we're
doing this, by the way, is because we're
going to be using these pillars over
and over again. They're also going to be
in our Asset manager, which then is going
to make it really, really easy to just
bring them in. They're already UV unwrapped. They've already got
materials on really, really easy then to put in
against our building. Okay? So now let's come in and we'll mark a same going all
the way around here. So right click, mark scene. So I've got a same going
all the way around there. And then the last place
you want to mark a same is come in down here. Because at the moment, again, this is an infinite loop. There's no place where
it actually ends. So we're going to click here, right click a Marx scene. Now we'll show you what
infinite loops look like. Now under the bomb,
you can't have an infinite loop because that's flat anyway, so that's fine. But again, on this corner, there will be an infinite loop. So let's show you
what I mean by that. So let's go over to
our shading panel. You do have one that's
called UV editing, but we don't want to
use that because we already set up our shading
panel, so it looks good. Anyway, let's press dot, let's put it onto
material mode like so. And let's put this onto object. All right, so let's see
what this wraps like. So what I'm going
to do is I'm going to grab the whole thing with a, I'm going to press smart. Sorry. Unwrap. Let's have a look why that's not unwrapped. Let's try that again. Wrap,
I'll know why it's not unwrapped because on
the left hand side we've got this on image editor. Needs to be on UV editor. Now when I click on this, let's hopefully you on the rap, And there we go.
Now it's unwrapped. Now you can see if we
look at this UV map, we have got a little bit of a
problem with this one here. This one just doesn't
quite look right. And the reason it doesn't
look right is because this is that infinite
loopowertandarbout. If I are going and grab this, you can see it's
tried to unwrap it. We doesn't know
where to end now. This will cause your issues when you bring in your material. Let's now in our material. So what we're going to do is
we've got the resource map. So I'm going to go to where
is it, my asset manager? I'm going to come
down to my materials and the one we want to put here is going to be
the brown stone. So this one here, we've got all of
these brown ones. But it is the brown
stone, the one we want. So I'm just going
to click on that, come around to my pillar. Now you will see that
these materials at the moment there not
set as materials, the set as spheres. So what you can do
is just drag it out, put it onto material, and when this loads up, you'll see now this is
the actual material. And I've done it
like that. Just so you have a bare reference of what they actually look like once you brought this out. You can now come to your pillar. Come over to your materials, click the down arrow, and you will have one
that says brown stone. And now you can put that on. Now you will see that this
looks great and all that. But what's happening here, and this is because we
didn't mark that M on, so let's come in and fix that. So what I'm going to do
is I'm going to come in, grab this edge. Right click, Maxing. Now I'm going to grab it
all pressure, you unwrap. And now you can see that's unwrapped really, really nicely. Now I will tell you that
sometimes on blender you can see some of these blue
clay didn't come through. They don't look the
way they should. And sometimes that happens. So although the asset manager
is extremely powerful, he still has some bugs. We now won a red paint. So we want red painted stone. So let's bring in
red and we'll have one that says red
paint material. If we bring this out and
put it at the side of this, you will see that doesn't look like red paint doesn't
look like there. But anyway, that's what
actually happened with it. So let's now come in and
we'll come to this pillar. And what we'll do is now we'll
come to this middle bit. And then what we'll do is
click plus down arrow. What we're looking for is the
red paint, this one here. Click a sign, and there we go. That is the first pillar done. Now before we move on, let's actually come over back to our shading panel
and what we want to look at is these materials. The first thing I'm going
to do is I'm going to put this onto shader, and we're going to see
if we come over this way that we actually
have edging on here. Now, edging is incredibly hard to get when you're
using seamless textures. These textures that we're
using are actually seamless. If I go into this, you can see that this is a
seamless texture. This texture can be repeated
thousands of times. It doesn't matter, even if I grab this part here
and I make it really, really big, you will see that
it just makes it bigger. You can't actually see any edges or anything like that in there. Let's put that back a minute
and basically now I'm going to explain how we actually achieve that on the next lesson. On the lesson after that,
because on the next lesson we're basically
going to be going through how to actually
bring in textures, how to use the Node Wrangler
and all that good stuff, because now is the time that you're going to
need to know that. All right everyone, So I'll
see you on the next one. Thanks a lot. Bye bye.
23. Basics of Texture Import and Material Setup: Welcome everyone to the
Blender Four Ultimate Guide. And now what we're going
to do is we're actually going to be taking
a look at textures, how to bring in textures, how to apply textures, and how to create them. And then after that,
on the next lesson, what I'll be going through is showing you how
you can actually take those textures even further and you're going
to really enjoy that. Welcome everyone to the short
introduction on importing texture maps and creating
materials within blender. Here we'll be going through
basic material set ups and easy ways to import your texture
maps all within blender. Then we'll be moving
on to an explanation of what maps do and
why they're important. So with all that said,
let's get started. So in this basic scene
that I've set up, you will see that I've got these three objects and
they're all UV unwrapped. So now let's succumb
to our first object, and let's say we've already marked our seams as you can see. Now let's come up to
edit first of all, and what we're going to bring in is a add on called
Node Wrangler. And this is going to
make it very easy to set up materials
within your scene. So let's come to edit,
Come down to preferences, come over to where
it says add ons, and then we're going to
search for node N, O, D, E, and you'll see one
called no granulate. Make sure that's
ticked on. And then let's close this down. Now what I want to do is
actually create our material. So if you come over to
the right hand side, you'll see this little
football kind of icon. Let's click on the Plus. And then what that actually does is create a new material, and let's click New
and give it a name. So let's call this Wood because I've already
created a ward. It will come up as wood 001. If you've got 001, it will come up as
wood 002, and so on. You'll notice as
well that this has come in as a principle SDF. This basically is the
magical node shader within blender that makes
it easy to import all your maps and things like that. So now we've got this. What we need to do now
is we need to head on over to our shading panel, which is this button here. Once in the shading panel
you'll see basic set up, same as what we had in
the modeling panel. And now if I zoom out
of here a little bit, you'll see that we've actually got a basic
set up already. So we've got our material
output, and of course, this is where all the
nodes end up in the end. Then we've got our principled, which is what I
told you about is the magic kind of blender node. And if we zoom in a little bit, you'll see we've got all of these things where we
can plug things in, or we can mess around
with these without actually a map plugged in. So now let's come and click
on our principal BSDF. What we're going to
press is Control shift. And, and that then will open up the file of where you want
to actually find your map. So make sure you store them in a place where you know where
they are, go find them. And then you should
end up with five maps. Normally it's five maps that
actually you can download. One is the base color, the next one down is metallic, the next one down is roughness, the next one down is height. And then you've
got normal there, normally the basic five maps. So now what we need
to do is you need to come to the first one and shift, select the bottom one and then that'll select them
all and then come over to say it's principal
texture set up and click that
on. There you go. They've all actually come
in and you'll notice Blender has automatically
set everything up for us. And this is part of what the
node Grangler actually does. Now if we zoom in a little bit so we can
see what we're doing, and now we can
actually go through some of these nodes over here. Let's zoom into here as well. The first one we've got
is texture coordinates. Now basically this node tells blender whereabouts to place
this texture on this object. So you notice at the moment it's basically plugged
in from the UV. Now if we quickly
just go over to the UV and I grab
everything you can see this is our UV
map and this is how basically this texture
is placed on this. So for instance, you can see that this one has
been turned round, so it's going the correct way. Now let's go back over
to our shading panel, and if we plug in the generator instead to the vector,
let it load up. And you'll see now that
blender is trying to generate how this texture
is actually going to go onto this object. This is useful when you create in textures within
blender itself without maps but useless if you're actually
bringing in your own map. Let's put it back on UV. Next one macros is
called mapping and this basically is how this texture
is mapped onto this object. You can see here that we can
actually move the location of our actual texture and this basically is
moving the UV map. Now if we come, we can also scale this up as
well as you can see. So you can scale it
smaller and bigger. And it gives you a lot of
control within actually the shader to mess around with the scale
and things like that. Normally, I would actually
do this in the UV map, but if there's any small details that I want
to make, you know, a little bit smaller or
something like that, I will do it within the shader. Moving across, you can see that all of these nodes over here, which are our maps, are
plugged into our mapping node. So let's come to the first one. The first one is color and basically down on the
right hand side here, I'm going to be showing you
exactly what they mean. And then if you want
more information, you can go onto the blender
website and find all of the rest of the
information out about all of these maps that
we're talking about. So as I say, the first
one is the color, and if we unplug that, it's basically what we can see is it's just the base color. Now sometimes you'll get colors where they come in with
ambient occlusion. And I'm going to talk about ambient inclusion just
in a few minutes. If we plug this in,
we can actually alter the color with
other nodes that we can kind of slide into here. I'm quickly going
to show you that, so if we press
Shift, do a search, and we'll just bring in a Gamma, which is just going
to lighten or darken our actual color. Now I've put that in there, you can see if I bring
that down or bring it up, I can make it much
darker or much lighter. So that's something
that we can actually do and the Node Wrangler enables us to bring in a new node
and just drop it in there. So what I'm going to do
now, I'm just going to delete that and I'm
going to plug that in now to go onto the
next map is metallic. So I'm just going to
head on over where we've actually brought in
a metallic texture. So here we are in
our set up now with our actual metal
texture and material. So if we zoom in now, we can see that we have the next one down which is metallic. And we can see that if we come
and actually unplug that, you'll see that
not a lot happens. And this is because
this metallic is very closely based on the metallic that's already there,
which is zero. It's quite a dull metal. Now if we come in and we
turn up our metallic, you can see that it goes really, really, really metallic like. So you don't have to actually use a map to make
something metallic. All you need to do is
turn up this metallic. Now normally when
we're doing things like using this slider
here and no map, either something is metallic, so if I turn this
down or it isn't. So we don't really
have anything in between when we're not
actually using a map. So if we plug this
back in now to our metallic and let it
load up and there you go. Now the next one
down is roughness. And roughness is basically, if you think of a
sheet of glass, when you look at it, it's
not completely see through. You might have certain
scratches on there. You might have
things like smears, hand marks, things like that. And basically that is what
the roughness map does. Basically, the roughness
is determined by this map. So if I unplug this map, you can see we've
got a lot of kind of shinier parts and
duller parts on here. So let's unplug this
and then you'll see that it's all
one kind of shine. You can also see if I
come in and actually turn the roughness
up or turn it down, I can make something like ice, or I can make something
very, very dumb. And this is why we use
this map because it gives us a lot of control of how much smearing and things like that and makes it
look a lot more realistic. So now let's move over
back to our wood. And what we'll do is now we'll come down and look
at our normal map. So if I double tap the quickly, that'll just un highlight this. And then we can just zoom in a little bit and look what
this normal map does. As you can see, the
normal map always plugs into a normal map node. And then we can mess
around with the strength. So if I turn this
strength right up, you can see now
we've got a lot more pushing through of that
actual texture now. Just be very careful
when using this node. You can't turn it up too high and it won't look very
real in other words. So try and just get
it somewhere where you're really happy with it
and it still looks realistic. For instance, you do get some
wood which looks like this, where it's really kind of
elevated from the base, but I wouldn't go again
too high with this. Okay. So that's the normal map. And now let's move to
the displacement map. Or displacement map. I'm actually going to bring
in a new material now, so I'll head on
over to that one. So here we are with our
cobblestone texture, which we're going to use for
our displacement example. What displacement does is it basically gives this texture. It basically pushes it out. It's like using tesselation, as you'll see shortly. But the one thing is, if you're using the
displacement map, well, you really need
to know two things. First of all, it
doesn't work in. Second of all, it really needs a lot more geometry than what you would
normally have here. We've got a flat plane, and we can see that they're
slightly pushed up, and you can still see that this is basically a three D texture. So, how do we create
displacement on this? First of all, what we're
going to do is we're going to come over to our little spanner. So first of all, what
we're going to do, we're actually going
to subdivide this a couple of times.
So let's press Tab. And what we're going to
do is right click and subdivide, right
click, subdivide. Now what we're going to do
is we're going to press Tab. And we're going to
bring in a modifier. And what we've done
now is basically increase the geometry a lot. So let's come over
to add modifier. We're going to come
down to where it says multi resolution and we're
going to subdivide. Subdivide And again, and again four times. And if you press Tab, you'll see that it still actually
looks like this. So you can't really see all
the subdivisions on here. But when we finish this I'll actually apply it and then
you'll be able to see them. Next of all, what we
need to do now is we need to put this on cycles. So if we come over
here and we change it from V and we put it on cycles. And then what we can
do is we can come down now to our material, which is this pot here. Scroll down and you'll see
one where it says settings. And under settings you'll
have one that says surface. And what you need to
do now is change this, it should say bump only. Change this to
displacement and bump. Once you've done that,
then all you need to do is go to your Cycles shader, which is this put in
here, and there we go. You can see now how actually
realistic that looks, and now you can actually
mess around with these. So we can really, really bump up the scale as you can see. We can also change
the mid level, like so it really push it out or you can really
pull it in as well. Okay, so that's a bit of
an explanation on there. Now as I said, I will move over now to the actual spanner. We're a modifiers
on, I want to press control A to apply that,
I want to press Tab. And now you can
see just how much geometry that actually took. Now you can get away with a
little bit less geometry. So if I press control Z
and just bring it back. And just bring it down one. So if I bring this
down one like so, and you can see that it's
still looking quite good. But if we put the viewpoint
level up a little bit, it's nowhere near
the level of this. If we put it on three press
control, press the tablet. You can see now there's
not so much geometry, but we're still getting
a pretty decent effect. Okay, so the last
thing I want to show you is if we come back to our material shader
and we put this back on V. So we've come
to our computer icon, put it back on V, and
now we'll just scroll around and zoom in to this wood. Now, what does
ambient occlusion do? So I'll put a brief
explanation down the right hand side
of what actually ambient inclusion is. But we can actually enable it by coming over to our computer, putting this on V, and you'll have one that says
ambient occlusion. When you click this on, you can see already that we really, really get much more
shading on here, much more realism and
things like that. Now as I said, you can get textures where they have ambient inclusion
already built in. But I find actually
doing it this way generally gives
you a better result. Now the other thing you can do is you can mess around with the ambient inclusion and
really bring it up or down, mess around with factors
and things like that. And really get kind of
the shadows that you really want on the surface
of the actual object. So that concludes
the material and texture introduction
part of the course. And I hope you all got a
lot out of it and have a much better understanding of maps and materials
within blending. So with that said,
let's get on with the show. All right everyone. So I hope you enjoyed that and I hope you enjoyed
this texture guide. And I'll see you
on the next one. Thanks a lot. Bye bye.
24. Applying Textures to Pillars for Enhanced Realism: Welcome back everyone to the
blended full ultimate guide, and this is where
we left it all. All right, so now you've learned how to actually bring
in your own textures. You've learned how to
use the node wrangler. You've learned how to put
them all into the principled. So now run to the next stage which is basically
making these edges. So you can see here we've got some really nice edging
on our actual pillows. Now this is just achieved
by using a bevel. So when you've actually
finished this course, when you come to
your own projects, I highly recommend taking
this and putting it within. All I simply do now is
I take this, I grab it, press control C. I'll go
to my other material, I'll press control V, drop that in, and then
I'll plug them all in. So you can see that all we
have here is this color ramp. And this color ramp
is just to mess around with the color of
this, but the rest of it, so if I plug this
into here like so, you will see that that
is brown at the moment. And the reason it's brown is because I use the same texture as we've got with the other
part of the actual column. If I now plug this back into here and
plug this into here, you will see we've
got a red back. Now if I plug this,
we'll go to this one. Actually, we'll go to the brown because it'll be more obvious. You won't be able
to sit in there. I'll just go quickly
to the Brown. Let's find it exactly the
same self as you can see. What I'm going to do is
I'm going to show you, I'm going to plug this
just into the base. All that edging disappears. As you can see. You can see just how powerful
this set up. It's very simple.
Let's plug that in. Plug this into here and there you've got your
beautiful Ledging back. Now the one thing
we're not showing on here even, is our bevels. So let's click those
on. There we go. Now we can see just how nice that pillow looks
with just a really, really simple texture
and a really, really simple set up, which is going to
be the same across pretty much all of the shaders
that we've got in here. When we come to a shader that we haven't gone
through before, we'll show you the shader, same as the geometry nodes. And then you'll be able
to set your own up. Plus you'll have this as reference to set
them up as well. All right, so now let's
go back to modeling. And what we want to
do now is we want to actually do the same
thing to both of these. All I'm going to
do, first of all, I'm going to mark some
seams in because I want to make sure that these are
unwrapped really nicely. So I'm just going to
come in old ship, click and mark in all of
the seams along here. So what I'm going to do is
we're going to come in right click and mark a same bearing in mind if you're
on face select. So if you're on face select
and you're right click, you can't mark a same. You have to press control E
and then you can mark a same. So just remember that. Okay, so now we need to get
rid of these infinite loops. So I'm going to come in and grab each of these going down. I don't need to grab these ones because they're not going
to be infinite lops. It's just the ones
going down the side. So I'm going to
come to this one, instead of selecting
all of them going down, I'm just going to select
this left click with this. And then it's just going
to select them all for me. Let's come all the way down now. Right click, mark. Same. Now I'm going to do is unwrap. Let's go back now to our
shade in shading panel. Let's press Tab, and let's have a look what they wrap like. I've missed some of my edges. Wherever missed these edges. This one and this one. This one. I'm going to right
click mark, seen, grab the whole thing, view wrap. Let's have a look what
else I've missed. It looks like I've
missed something else. Yes, I have. You can see it's
miss going up under here. Shift click. I think I've
missed all of those. Actually. Old shift click, Shift click, and O shift click. Then let's have a
look over the top. Yep, I missed the top as well. Shift, click, shift,
click, shift, click, shift click, right click, mark Sam. Let's put
it on material. So you can actually see
now we've marked a seam going to bottom edges, corners, but not
this top inside. Now if press a press
unwrap, there we go. Now it's wrapping
really beautifully. Now we need to actually
give this some materials. So what I'm going to
do is rather than find the materials or
anything like that, I'm just going to
shift like this, press control L, and I'm
going to link materials like that gets most of
the job actually done. Come over now to materials. You can see you've got red
paint and brown paint. But I do need another material. Overasset manager, let's put
in blue this time. So blue. The one we're looking for
is blue paint material. This one here, I'm just
going to drag this out. Drop this there,
and there we go. Now, because I've done that, even if I delete this off, that material will
still be in there. So what I can do is I
can just come in now, delete these out of the way
because I don't need that. And then I need to
add another material. So I'm going to
come to my pillar. I'm going to click the plus bot. Click the down arrow. Blue
paint is the one I want. All right, so I've got
my three materials now let's go in
and add those in. So I'm going to come in face, I'm going to grab this face. And the reason I went
on to face Lex is because face leg
will grab an island. If I come into edge select
and try and grab this face, you'll see it just
selects the whole thing. So that's why we
want to come in face sl, select this face. And then what I
want to do is come in red paint, Click a sign. Now we want some blue
on here as well. So we're going to
select all of these. So what I'm going to do
is I'm going to come in of click old shift, click control plus just to grab those lines going
up there, blue pane. Click a sign and there we go. There's our beautiful pillar. All right, one thing, I add
these, I don't want those on. You can see here, I've
messed up on that. So what I'm going to do is
shift click control plus brown a sign and then shift
click red a sign. There we go. There is our
pillar. All finished. Now let's take a look at
these on our rendered view. Let's also make
sure that we've got our modifier on like
so. And there we go. We can see just how nice
they actually look. Okay, so now let's move on to the final pillar, which
is this one here. And pretty much the
same thing again. And what we're going to
do is we're going to come and old ship click, just going all the way around like so I'm going
to work my way round, coming down to the bomb so, and then right click
and mark a scene. Now you might be thinking, well while we put some
texture on the bomb, well if you've got a pillar that might be tipped
over in a project, you might actually
won that on the bomb. Being as these are going
in the asset manager, you may as well actually
text to the bottom of them. And then if they're not needed, just take them off
in your project. All right, so now let's
come to the back of these, what the reason we mark a seam. These are not infinite loops. So shift sleg, control
select shift sl, right click, mark seam, then A, and let's unwrap. So now let's add
in our materials. So again, I'll grab this column, this one press control and L, and I'm going to
link materials like. So now let's come in and add in the one material
which will be here. So all I'm going to do is I'm going to come into this one, select this one, face
select, grab this. And then I'm going to come
over to materials red pane, click a sign, and there we go. All right, so they are,
sorry, three pillars. So they're already now. And now what we need is we
need some kind of corners. Before we do anything else, we need some corners
and we need an arch. So what I'm going to do
is we also want to put these an asset manager,
but not quite yet. We want to work
out, first of all, how big the actual
arch is going to be, because the arch needs
to fit over a door. In other words, I'm
going to grab this door, I'm going to press shift D, and we want to make sure that the arch is going to
be fitting over there. If I put that over there, I'm also going to grab
this cube as well. Shift D, let's grab this cube. Let's put that over there. So I just want to make sure everything fits really nicely. Now I'm going to do is I'm
going to duplicate this one. So I'm going to press shift D, bring it over like so. And then I'm going to grab
this one, press shift D, bring it over, and you'll notice some printing on the
corners of here. And now I need is I need an arch on the next lesson
that's going to fit pretty much into this space here and have a nice
arch going round. That's what we'll do on the next lesson.
All right everyone. So I hope you enjoyed that. And I'll see on the next one. Thanks a lot. Bye bye.
25. Designing Archways in Blender: Welcome back everyone to the
Blender Four Ultimate Guide, and this is where
we left it off. All right, so now let's think about making our little arch. So what I'm going to do, I'm
going to grab this door. First of all, shift S Kurt, selected shift and then
what we'll do is mesh. Bring in a cube. And then what I'll do is
I'll bring this cube up to roughly just under
there. Something like that. And then what I'll
do is I'll press and Y and bring it back then. And then let's put it
right in the middle. The thing is we want it to be long enough so we can
actually pull it out. So if I pull it out
a little bit more, what I mean is if I now grab this wall and
just pull this up, we want it to be
sat in the wall. But sat far enough out so
that you can see here. Actually, this is
a bit of a mess. And I don't know why I
need to check that out. I think that's from
over here. Yes, it is. I'll have to fix that, actually. So I didn't check that UV map, so we'll fix that in
a minute. All right. So we can see that this arch
wants to be far enough out so that it's come in just
probably around here somewhere. And then what we want
to do is we want to shape this so it's rounded, so it comes from round
here and round to here, and then some parts
going down here, just into the top of there. So the first thing
I'm going to do is I'm going to grab
the bottom of it. Shift space bar, click the move to pull it up to where
I actually want it. I think where I want
it is probably to come just about at the
bottom of here, so. All right, so that's
looking pretty nice so far. What I'll do then is
I'll press controller. I'll bring in an edge loop, so left click, bring
it up slightly. So then what I'm going to
do now is just pull it out. So I'm going to press
S and Y or S and X, pull it out into place, it's just fitting into there. And then next, make it
a little bit wider, just so it's fitting
into the wall like so. All right, before
I carry on then, I'm just going now grade in the right size
it needs to be. I'm just going to come
delete this one out the way. I'm going to then come back
to this one here and just see why this didn't
work out properly. And I can see straight
away why it's not, because I didn't put an actual edge loop in the
right click mark seam. Now that should unwrap properly. Let's see if it unwrap, you wrap and now it's
wrapped perfectly. Next thing I want to check is, as you can see under here, this is now, it
shouldn't be like this. So we want this to be
on the brown stone, like so you just checking the rest
of it just to make sure I've not made
any more mistakes. And the other thing is as well, this also wants to have this ticked on so it's actually
beveled. And there we go. Now, all three of these
should be ticked on. All three of these should look really nice,
which they do now. All right, so let's grab
another one of these. Let's press Shift and bring this over. Something like that. Now what we can do
is I'm going to pull this actually a bit
out, just like that. Now we can see this is the
center of this control A all transforms rightly
origin geometry. Now what I'm going to do is
I've got the width there, but it is going to be easier
if we pull this bit out. First I'm going to do is
I'm going to come in, press tab, grab this face. Then what I'm going
to do is I'm going to press and pull that out. Then we're going to
press Tab again. I'm just going to pull
it back into place now. Something that looks pretty good then what I'm
going to do now is I'm going to create
the round part on here. I've got my origin
right in the center. Might as well press shift
Custer selected shift. Let's bring in a cylinder. Let's save out our work as well. In fact, we'll spin this
cylinder round before. Let's see how many it is. It's on 20 at the moment. I think for this arch we can probably get away
with slightly less. Let's put it on 18.
Let's save our work. Let's spin round this
cylinder, then x 90. Let's make it a little
bit smaller and let's pull it down to
where we want it to go. We want it something like that. I'm thinking I can probably get away with pulling it
out a little bit. So what I'm going to
do is press and X and pull it out just
a little bit like so. Then now all I need to do is decide if that's going to
be the right size to see that it's probably better
off if we press and Y and bring it a little
bit back more into place. I'm thinking that arch is
going to look pretty good. The only thing is you can
see that probably want this where it's starting to go flat on this part
here at the moment. We've got like n of this
edge going like that. If I press one I'm going
to do is going to press, we're going to bring
it up into place. Press the born again. Bring it up into place and
that's where I want it now. Can press maybe. And then and X. There we go. That
to me is going to be a lot better fit
because then it's arched and then we
can actually make a nice part coming
down here. All right? I'm happy with that now to actually get this to
actually work in, in this arch that
where we need it, we need to use something
called bullion. So what I'm going to do is I'm
going to grab my cylinder, grab my soon to be arch
press shift and H, what they'll do is they'll
actually hide everything else around us except these
parts that we're working on. Which is great because that's
why we now we can cam two our main part and you can see if I actually
Bouley in this, I will have a problem because it's not going all
the way through. If you bouley in anything, just make sure it's going all the
way through the objects. So I'm going to press S
and y and pull this out. And now it's going
all the way through. Now if we grab this part, again as important control all transforms right
clicks, origin geometry. Before we add on any modifier, add modifier generate, and we
want to generate a Boolean. The Boolean object, so you can see it's going
to be an object. The object is going
to be this cylinder. So I'm just going to
click that one now. Normally I always click
on the fast solver. I feel it works much
better than the exact. The exact seems to work there when you've
got more topology, in other words, more polygons. But soon as these are
very simple shapes, the fast solver seems
to work better. So what I'm going to do
now, I've done that, is I can come over on
the right hand side, press control A, and then
I can grab my cylinder, press the let, and there we go. There is our actual arch. Now we've not quite finished there because we
want to actually put another edge of going across here and pull
it down a little bit. So what I'm going to do
is I'm going to grab my arch press tab controller,
bringing an edge. Love going down this
way. Left click, pull it forward
slightly like so. And then what we're
going to do now is grab the bottoms
off here like so. And then press and pull
them down. There we go. All right, let's right
click and shade. Auto, smooth. And we should end up with something like this. Let's press Alt and
bring everything back. And there we go. There
is our actual arch. Now we can see if we pull
this out slightly now. So if we pull it out slightly, we've still got that bit there which is going
to be into the wall. And to me, that
looks pretty nice. It doesn't matter if we
put it down to here, it's still going to
fit in relatively nice within our walls or scam. Okay, so now we've done that, it's time to actually delete. We'll just delete this
door out the way. But we will keep this cube here. What I'm going to do now,
I'm going to keep that cube, by the way, just to make sure when I'm creating
the other parts. Because what we want
to do is we want to create three pillars, three cross beams, and a corner. And then a part that's
going to go in the center, they are the main bits
of the actual structure. Once we've actually
created those, pretty much we can start doing more or less
the whole building. We will have doors and
windows and things like that, but these are the main
parts of the building. When you look at the reference, it looks a lot more complex than that, but
actually it isn't. So once you get loads
of parts built up, especially in your
asset manager, you'll see just
how easy it is to actually put things together. All right, so now
we're going to do is I'm going to come to my arch, I'm going to press shift H to hide everything
out of the way. And then what I'm
going to do now is I'm going to mark some seams in, so I want it to be red around the top and the rest
of this to be brown. Now luckily for us, because it is actually, it's a wall basically, You're not going to have like
the wood green on there. So it's much easier sometimes to unwrap in a different way. I'm going to show
you that now. So I'm going to press Alt
Shift and click. Just going around here,
all the way around, right click and
Marx scene like so. And then what I'm going
to do is instead of A and U and wrapping in this way, what I'm actually going
to do is I'm going to click Smart UV Project, Unwrap. Click Okay. And now you'll see that if I come
in, press all teach. And if I grab this one and
this one and press control L. So we're going to link the
transfer data, link materials. You'll see it's
actually unwrapped. Pretty nice as you can
see. That's pretty good. Right Now what we're going to do is we're
going to come in, we're going to grab just
this top in face let, we're going to press L come
over to the materials, red pane clicker sign like. So you can see there's really no difference that you're
going to see there. As I said, with simple shapes, Smart UV project works
very, very well. And especially when you've got very simple materials where it's pretty much consistent
all the way through. All right, so the last thing
we want to do with this then is we want to come
over and add in a modifier. So I'm just going to press
control all transforms, right click se origino geometry, and we're going to
add in a modifier, sorry, generate and come down and we're going
to add in a bevel. And you'll notice on this
one not a lot happens. So I'll show you
on the next lesson is exactly how we're
going to fix that. All right everyone. So I
hope you enjoyed that and I'll see you on the next
one. Thanks a lot. Bye bye.
26. Creating Decorative Beam Elements: Welcome back everyone to the
Blenderful Ultimate Guide, in this where we left off. All right, so if you put
this on object mode, we will see that although
this has a bevel on it, it looks nothing like
this bevel on here. And that is because we have got an arch in here which is making this shape kind of non uniform. You'll also see if
I press tab that we've got little parts
coming off here. And it's a little
bit more complex than something like
this pillar over here. But there is a way to fix that. All we need to do is we need to come down to where it says geometry and turn
clamp overlap on. And then what we're going to
do is put this down all the way down zero and put it up one. And then you'll see it's
more or less the same bevel as what we've got here and all the way around,
which is quite nice. So now let's put our
material back on, let's double tap the,
and there we go. There is our arch. So now what we've got is we've
got three pillows, you know, three
different pillows. Pillars. We've got an arch. So now let's make a start on the bits that are
going to go across here. So what we're going to
do is I'm going to leave both of these
pillars out the way. I'm going to pull
my arch over here. I'm going to come to file save. And then what I'm going to
do is create the next part. Now don't worry about
naming anything or even putting him in the
asset manager or anything, right at this moment. We're just going to create
these basic parts and then you're going to be
putting in your asset manager. Now if we come to our cube, and if we come over to the right hand
side here and open this so we can see
that this cube is around 2.7 meters
long and 3 meters high. What I would suggest
doing is create a piece, a top panel that we're
going to be using, around 3 meters maybe. Let's see what that looks like. First of all, what
I'm going to do is I'm going to press shift S being am on my cube curse
to the center of there. Then shift a mesh. Bring in a cube,
make it smaller, and let's put it to
the outside of here. Let's make it a little bit
thinner, something like that. Let's then make it S and Y a little bit
thinner on this way. And then let's pull
it out to 3 meters. If I go to this, we're going to pull it out along the x axis, the red one, to 3 meters, so something like that. And then what I want to do is I want to make sure that
it's going to look right. So what I'm going to do
is I'm going to grab this pillar once more, shift D, drag it over, put it in place, so then I'm going to grab both
of these, pull them down. And then what I'm
going to do is check where it's actually going to come on this part. So we can see we're probably not going to be
using it in the pillar, we're going to use
it on corners. I'd say this if I
did put one there, probably going to
be a little bit too thick on these axes. Said, let's make it a little bit thinner if I put on
this side now shift, I just want to see what it's
actually going to look like. All right? I think
that's going to be round about the
right thickness. Now, before I actually go ahead and finalize it or
anything like that, I will be checking it anyway,
so don't worry about that. Okay, let's press shift H. Let's then come in and press control
and give you an edge loop. So left click, right click. Let's then press control
and bring that out light. And then what I'm going to do is I'm going to actually come in, grab both of these top
parts and bo part. And I'm going to press and
pull them out slightly. So then what I'm going to do is I've got
this one here now. So what I'm going to do
is 'ren to press shiftD, I'm going to drag that one over. And then what I'm going
to do is 'ren to press Shift D again, drag it over. Now with these two, I'm going to make them the same size, so
I'm going to grab this one. And this one I'm
going to press and Z and just make them a little
bit wider than this one, then probably this one here. I'm probably also going to make these a
little bit thinner. So what I'm going to do is I'm
going to come to this one. This one I'm going to press S
and's Ed and pull them out. Now if they're not
going to pull out, just make sure you're
on medium point S's. Ed, just pull them up slightly. So just to give them
a bit of a variation. All right with this one then I'm going to come
to this one now. I'm going to press shift
S us to selected shift. Let's bring in Cube. I'm going to press, what I'm going to do is just
put that in place, so making sure that we've got a little bit of a gap between
the top and bottS again. And then what I'm going
to do is I'm going to put it over this side. I want the same amount of gap. Whatever gap I have here, I want that in between them. The easiest way to
do this is just come over adding the modifier, Generate, adding a array. And then you can
see it's already on the X. I'm going to move it over slightly and then we're going
to keep bringing those up, pressing one on the number pad until I've got a roundabout, the same gap on each side. Now you can see it's a
little bit more on this, so I'm just going to pull
them all over the level, so. Okay, so now what I want
to do is basically, before I carry on, I want to basically bring in some edge
loops going along here. I want the edge loops
to be in each of these. Now, can I do it
just by pressing control and then
bringing them over? You can see that I nearly
can, but not quite. If I put it there, actually,
that's not that bad. That's not that bad at
all, but it's not right. So what I'm going to
do is right click, just take that off. And then I'm going to
press control left click and put it in
the center like. So the reason I'm doing this is because we want to make
this very easy to use. There's a lot of times when
we'll have to cut these down because they'll
be too long. And the easiest way
to do it is just to put these edge
loops in there. Now what that'll mean is that whenever we
want to call it, we can just come in and fix
it with the edge loops. So what I'm going to do is
just press control law. Bring in another one right
in the center of it. And then control and then just control or work your way across
bringing more of them in. Now if you're
struggling to see it, just put it on
object mode and then you'll be able to see
it much, much easier. As long as they're
roundabout in the center, it's going to be
absolutely fine. We know that they're pasted out evenly because we're
using an array modifier. And the final one, you can see just how
quick that is to do. Now what we want to
do is we want to come to our actual cubes. We can see at the moment
they're stuck out this far. Let's stick them out
a little bit further, maybe even a little
bit past there. Yeah, thing that
looks actually bare. Then what we need
to do is we need to hide this part of the way. Come to the back of the cube. What I'm going to do is
I'm going to pull the cube out and then I'm going to
press Delete and Faces. And delete all of those
faces down there, because we're simply
not going to need them. All right, old, bring it back. There we go. That's what
we're left with now. And you can see that if I
need to fit this into place, I can simply just
drag it to the side, make it a little bit smaller. And then cut off either
this end and this end, or move it over, make
it a tiny bit smaller, and then just cut off
this end really easily. All right, now we've got that. What we want to do is then
we want to do similar thing on this one instead
of the cubes. I'm actually going
to use cubes but make them a diamond shape. I'm going to che al, I'm going to actually grab
this array here. I'm going to grab this
one and this one. Press Shift H and then
hide them out of the way. And then one got going to make
them a little bit bigger, so I'm going to come to
my C a little bit bigger. And then one is I'm
going to rotate it round, so 45 degrees. Now what we want to do
is we want to bring this X factor of the array down. So if you hold shift,
you can bring it back. Bring it back. Let's press one so we can see
what we're doing. And we now want
to make sure that this gap here is the
same on this side. Which looking at this, it
actually looks like it is. Maybe I'm going to
bring it back slightly. And then I'm going to
turn down the array now. Then I'm going to
move it across. I'm going to move
this just across, giving myself a little
bit of extra room. Now I'm going to
do is I'm going to do the same thing as
what I did before. So I'm going to press
tab control law and bring in some edge lips. And don't worry
because we haven't finished with the diamonds yet. We're going to do a little
bit more work on those. Like we just want to make sure that Bl split this up if needed in the
easiest way possible. There we go. So all right, now let's finish of these little diamonds I'll
do is I'll come in. I don't think these
have the backs on them. A look. So we'll
just have a look. See if they've got
back on them and No, they're not, I don't think so. Press Tab. Yeah, you can
see they don't have a back, because we only can
click on the front. Turn that off. Now we've got
them with the front now. So all I need to do is press, I bring it in, Insert, and then bring it out. Now they're a little
bit too far forward. These, So what I'm going to
do is I'm just going to press Tab and Y and squish
them in a little bit. Double tap the there we go. That's the second one done. Ol tag, bring everything back. Let's now we'll keep
this part again. We'll just move this over here and we'll delete these
pillars out of the way. I don't think we'll be needing
them for the next part. So we've got 12
and I'm wondering if I think I took
my squares and did. I'm going to have
to put them back now in there, unfortunately. So I messed up there.
Sometimes that happens. Okay, On the next lesson, what we'll do is
I'll put my squares back in 'cause I moved them, forgot to duplicate them. And then what I'll do is
we'll make the final one. All right everyone.
Sorry about that. I'll see on the next one.
Thanks a lot. Bye bye.
27. Variations in Stylized Beams: Welcome back everyone to the
blender for ultimate guide. And this where we left off. So shift did, let's bring in a cube and let's make
some short work of this. Because I did mess up.
And then, well there is. I'll just pull that out
to where I want it, make it a little bit smaller, and just get that
back into place. I'm going to poke that out
just past here like so. And then what I'm
going to do is I'm going to grab the back up here. I'm going to press Tab. And then I can really see
where I need it to be, so I'm going to press L. I'm going to drag that over. Then right into the
center of there, I'm going to press one
on the number pads so I can see where I am. And then what I'm going to do now is I'm going to select this. I'm going to come
round to the back. So let's put it onto x ray. Press the tabb,
grab the back one, press Delete and faces. Now what we can do
is we can come in, add in a modifier, Generate, and an array. And then what we're
going to do now, again, we're going to press one,
we're going to take off x ray. Grab the back here, press Tab. And then what I'm going to
do is I'm going to grab this first, then press Tab. And now I actually, I
can move this over. What I want to do now is
I want to line this up. So I'm going to move this over, as you can see, to
be near enough, right in the center of there. Then hopefully I'm going to
increase the cow like so. And then I'm going to
try and level these up. Sometimes it works and
sometimes it doesn't. I'm wondering why is it
not working this time? Let's see if I can increase
it, get it into place. And if not, yes, there we go. There we go. All right. Let's get it into that place just because
I didn't have enough. And then increase the count
by one and there we go. W it actually worked. Okay? All right. So what we'll do now is
then we've done that one, we've done this one now let's come to the last one
and the last one, we're going to keep it
pretty much the same. All we're going to
do with the last one is bring in some cylinder. If I press shift S, Ks selected shift D, let's bring in a cylinder. It's going to be set to 18. Now, I think if we go lower than that, we might
have a problem. And the reason is
I'll show you two, I'll bring one cylinder
in that's like this. I'll just pull that back and then I'll bring
another cylinder in, shift D. Let's bring
in another cylinder which is like this
and we'll put it to 1010 sided instead. Now I'm going to do
is with this one, I'm going to right click,
shade, auto, smooth. And you can see all the way around there. It's
nice and smooth. Now we'll come to this one. Right click, shade, auto smooth. And you see because
it's too low down, it can't actually
shade it smooth. You can come over and go to normals and actually turn
that up to shade it smooth. But you stand up with this
jagged bit on the front of it, which is what we don't want. That's why we have to
be careful with how far down we go when we're actually dealing
with cylinders. We do say that the
least amount of sides you can have on there is
going to be around 12. As long as you don't
go lower than that, you should be absolutely fine. All right, so we've
got this one now, so I'm going to let this one
and bring this one back. Then what I'm going to do
is I'm going to rotate it around our x 90. Press the B, press one, let's get it where
we want it to be, which is somewhere like that. I'm just wondering if, yes, my cavity is not on for some reason. I've
just turned that on. If you blender closes, generally you'll have to turn
your cavity on. All right? I'm going to pull
that out. I'm going to make it a little bit smaller. I'm going to pull it into place, then I'm going to press one. And then I'm going
to put it onto wire frame just so I
can see how close is, you can see it's
very, very close. I'm going to make it
a little bit smaller. Then what I'm going
to do is' add in modifier, generate an array, let's then pull this out, turn up the amount, let's pull
it out a little bit more. Yeah, like that. I think
that's going to be much bear. And then I'm looking now, you get the same distance on each side that
looks about right. Now finally, let's put it on object mode and let's make sure these are poking out far enough. So something like that. And then what we'll do is we'll come now to the back of it. Let's put x ray on tab,
Make sure you're on face. Grab this back face, then just pull it forward
and press delete faces. And delete that back
face. And there we go. Simple as that. Okay, so
let's take the X ray off. We're going to press one now. Again, I'm going to also press, just to close this panel out
because I don't need it. And then what I'm going to do now is going to press control. Just drag it over and
then just keep going. Same thing, this is
what we did before. If you haven't
done one properly, just press controls head
or old shift and click and then you can just move it
across. Very easy to fix. So there we go. All right, so there are the three
parts done pretty much. Now what we want
to do is we want to change these into mesh. So what I tend to do to do that is I'll come and
I'll grab them all, so we know they're
all pretty nice. Now what I want to do is object instead of basically
what I'm trying to do here, making things easy,
speeding up workflow. Instead of coming in and
applying the arrays one by one, what you can do is
you can come to convert mesh and then
I'll apply them all. You can also then now
join them all together. Control control J. Control J. Then what you can do
is you can grab the all right click and shade. Auto, smooth. And now they're
going to be near enough. All done for you.
Finally then what we want to do is we want
to come to the first one. In fact, we'll
select the control or transforms right click, set origin to geometry, because we can do that on
all three at the same time. Then what we can do is
come to the first one, add, modify, generate a bevel. Let's turn the bevel all
the way down to zero. Turn it up one, let's just
check with this side. If that's too much, it looks too much as you can see
in comparisons there, this is a smaller piece. Let's turn it down
to naught point naught five, like the thing. That then is going to
look a little bit better. Now what I can do is I can
grab this one and this one. And finally, shift,
select this one, control L, and then
copy modifiers. And now you can see all of
those are pretty much done. Now what we can do is
we can actually come in and we can give
these some color. So what I'm going to do,
I'm going to be using pretty much the same colors as what I've used in all these. So I'm going to pick this one because this one has the blue, the red, and the brown,
which is what we need. Then what I'm going to do is I'm going to grab this
one and this one, and finally this one. Press control L. And what I
do is link materials like. So then what I'm going to do is I'm going to grab them
all at the same time. So let's grab them all. What I'm not sure about
though is if it's going to try and put them
all in the same UV map. Smart UV project. Click Okay. Let's go over then to shade him. And what we'll have
luck at if I press Tab. Yeah, it's fair to more
into the same UV map. Unfortunately, that's
not what we want. So what I'm going to do is I'm just going to grab this one. And then what I'm going to do is instead of just
unwrapping it again, what you can actually do is
you can actually come over. If I open this up, I'm
thinking UV editor. Let me just put this
onto UV Editor. And unfortunately
the option I want on here isn't available on here. I don't think what
I want to do is I want to basically
pack the islands. So I'm just seeing, yeah, I can actually
do it through here. You see these three
dots on here? If you click on
that, you have one. If you come down to UV, which says Pack
Islands. This one here. Now, what you want
to do though is make sure you've got
everything selected. Now, while I was confused, if you go over to the
UV editing panel, you will see that you
have these options here. I'm not actually sure how to put these on, so if anyone knows, just drop it in
the messages to me because I'm not
actually sure how to bring these on either way. Let's do it through
here at the moment. So I'm going to do is and
then the press dot zoom in. And then what we're
going to do is press UV and pack islands. And we're not going
to rotate them, so make sure rotation
is clicked off. Make sure the margin is on. No, 0.01 or not 0.13 I think. N 0.11 for this should
be absolutely fine. Click Okay. And now it's going
to pack them all in there. Then we can move on
to the second one. We can press A and
what we can do is UV and pack islands. Click okay. Rotate should already be
ticked off when you do that. And then the same on this one. So a UV and Pac islands. And all it's doing is
basically packing all of these UV's nice and neatly
into the UV map. All right, so now
we've done that. Let's then go back to
our shading panel. And then what I can do now
come to each of these. This one here, for instance, what I'm going to do is you can see that it's some
wrap really nicely, we've got some really
nice detail in there. Let's then come to red paint. So what I'm going to do is I'm going to grab each of these. So I'm going to grab my red
paint and click a sign. And there we go,
that's that one done. Now let's come to
these ones here. Now, this one here. I'm going to do a little bit
different, I think. So what I'm going to do
is I'm going to grab, yeah, I'm wondering whether to grab it going all
the way around there. I think what we'll do is are the easiest ways
we'll just come in, we'll assign it to the
red paint, like so. And then we'll grab the
front of each one of these, holding the shift born down. Then what we're going
to do is press control plus blue paint. Click a sign, and there we go. And then we're going
to come to these ones. We're just going to assign
these red paint like so. All right, so they're
looking pretty nice. Okay, so we've got those. Now what we'll do then
on the next lesson is the last part of
these before moving on, which is the little corner parts that are going to go in
between each of these. So they have to be slightly
bigger than these parts, but we're really motoring on now and once we've
got those parts in, we can actually start making some progress on the
actual building here, once we've got them in
our own asset manager. All right everyone, so
hope you enjoyed that. I'll see on the next one.
Thanks a lot. Bye bye.
28. Organizing Pillars and Archways Using the Asset Library: Welcome back everyone to the Blender four alternate guide, and this is where
we left it off. All right, so now what we can do is we can come
to this one here. Let's go back to modeling. Actually, just to
make it a little bit easier so we can actually
see what we're doing, Let's put this on Materials, and let's come over
to this one here. So let's click on this one. Let's press shift De, just to make sure
our cursor is there. And then what we'll
do is press Shift, and we're going to
bring in a cube. And we're going to
make the cube a little bit smaller like so basically this wants to be a
part that fits in between. So in other words, we
want to be able to place something in
between the walls, so the top of the wall
and then have this kind of part that's coming along to be able to carry
on after it like. So you can see here that this is probably going to
be a little bit too thick, so if you press and
X and pull it in, pull it into place, pull
this one next to it, then we have a good idea of what it's actually
going to look like. And I think if I pull
this out a little bit, so something like that, that's actually going to
look about right. So what I'm going to do
now is I'm going to pull back this part here. Let's pull it back then. What we'll do is we'll bring
in an edge loops on control. We'll pull it down
maybe down to here. We'll grab the bottom of it, then pull it back. Then what we'll do is
we'll pull the top down. We'll pull that
down a little bit. Then what we're going
to do is I'm going to press to pull it up. And then finally I'm
going to put a top on it. O shifting. Click
Enter alternates, pull it out very slightly, make sure offset is on, and then just make sure
you're happy with it. Actually, thing that
looks about right now, the last thing I want
to do is I just want to put some motive on here. So what I'm going to do
is I'm going to come in, grab this face, press the bond. This is what I'm
talking about now. You can see because it didn't reset my transformations
that when I brought that in, we've got wider part on the top and bomb in
comparison to the side. What we do is press
control set control Yl transforms origin geometry. Now when I press I, you can
see it's much more uniform. I'm going to bring it
into that fall and I'm going to bring
it out slightly. So there we go. That is that part done. Now what I want to do is I
also want to corner part. So I'm going to press shifty.
I'm going to bring it over. I want something
to be like this, but to also needs to be round about the
same size of this, but on a corner I'm
going to actually use, I think I can get away with
using the bottom side of it. So what I'm going to do
is I'm going to come in, just grab these ones going
around here like so. Then one going is going to press shift and just pull
those out into there. Then I've got a rough side
of what it is finally. Then one going door is going
to press L, delete versus. Then we're going to
come to this, press L, just select press to fill it in. And then we're going
to come to my corner and see what I can
get away with here. Then do is going to pull it down, let's pull it down to the. Then what I'm going to do is I'm going to come in to the corner. Now one thing I can see here is this is not very
uniform at the moment. We can see x and y, 4.8 1.3 0.97 Let's copy
the y. Let's copy that. Let's go to the X,
press control V, and then we should end up with
a lot more uniform shape, making it easier to
pull on the corners. Then what we'll do
is we'll come to this corner, we'll
resell transformations. First come to this
corner, press control B, and then we're just going
to be level that out like so it goes on nicely
on that corner. Then what I'm going to do is
it's about the right size. I think it's about the
same size as here. What I'm going to do now is
put a top and a bott on it. So I'm going to come in and what we'll do is
we'll grab this one. And this one I'm going to
press then to pull them out. So now we can see as
we pulled them out, they pulled out in
this way and that is because we've got it on medium point and we want
it on individual origins. And now when I pull them out, they're going to pull
out a lot more uniform. So now what we can do
is we can press Enter. And then when we press N's Ed, you'll see they don't pull up. If we pull this on Medium
Point Sensed, pull them up. There we go. Now we can see we've got that shape
that we're looking for now. Finally I think what
I'm going to do, I want to pull these
actually down now. So I'm going to press Old
shift and click on going around old shift click
going around there. Old shift click
going around here. And then essence Edd
and just pull them down just to make it a little
bit thicker on there. Finally then what
I'm going to do is I'm going to come
into the center. I want to reset all
my transform again. Then what I'm going to
do is going to press the eyeball and bring those in. Finally, I'm just going to pull it back this
time and not out. You should end up with
something like this. I think that's going to be
about right for what we need. I'm just thinking to make
them a little bit smaller. Maybe they're too, maybe they're a little bit too
thick, is what I'm saying. I'm going to make them
a little bit smaller, so I'm going to make sure
on individual origins. Then what I'm going
to do is just shrink them down slightly. That one seems fine now
This one seems fine. Now you can see how this one
fits nice and snug in there. That's exactly what I'm looking
for, Something like that. Okay, now what you want to do is I'm just going to
put this onto object mode. What I'm going to do now,
first of all, wrap this one. So I'm going to grab this
one smart UV project. Then I'll come to this
one Smart UV project. Click okay. Then
we'll do is I'll add in the materials first.
We'll do that first. We'll put this on material,
we'll grab this one. This one and then this one. We'll press control
L link materials. We'll come to this one, then we'll grab this
face on the inside. As you can see, it's
already selected on mine. Come to materials, red paint. Yeah, select this one, red paint. There we go. Then let's come to this one and we'll do the same on here, but our press
control on this one, just so I've got those back
bits as well. There we go. Now let's grab this one.
This one and this one. Press control L, and this time we're going
to copy modifiers. If we press now on
the object mode, we can see that they've got
the modifiers on as well. Okay, that is pretty much it. Now what we can do is we can
put these into some place. Because what I'm
going to do next, we're going to put these in their own blend file
so that they can be used in another
asset manager. So basically, we can set
up another asset manager if you haven't got an
asset manager by the way, you can basically copy these and put them in place
as you see fit. But if you do have a
blender three and beyond, then we will be using
the asset manager. Let's now just delete this
and delete this cube. By the way, we're not going
to need them. Let's come in. First of all, what we'll
do is we'll rename them. We'll come over to this one rather than actually going
over to the right on side, I'm trying to rename them. Let's just come
here and press two. We'll call this pillar Plan. Then we'll call this
pillar double, double. Then we'll call this one
pillar insert like so. And then we're going
to call this one arch. I'm just wondering what we can actually call this
up at the top there. I think just to make it easy, what we'll do is we'll just
call it side, side one. Of course you can call
them whatever it makes sense to you two. And then side three. Then we'll call this
plinth middle, middle. Then we'll call this
one plinth corner. All right, so now
we've got these. What I recommend
you do. I recommend you open up another blend file. So we're going to right click,
open up a new blend file. Okay, I'll let that load up. And then what I'm going
to do is just put that down and we're going to
come to each of these then. The great thing about blender is we can press control C. And then what we can do
is we can go now to the blend file we just created,
which is this one here. I can press the control and you will see that we actually
have these in place, complete with the
materials, hopefully. And there we go. All of
the materials are there. Now the other thing is if
I click on one of these, you'll also see that
we've actually got the bevels attached
here as well, which is really, really great. Now what I want to do now
is I want to save this out as another blend file. And I'm going to save it out where I have my resource pack, because then this is
our own blend file. So what I'm going to do is
I'm going to go to File Save. As you can see where
my resource pack is, This is the blender four
ultimate course guide, the one that I'm talking about, if I go to my resource pack, this is the resource
pack that came with it. And now if I come, what I can actually do is I can also put this blend
file in there. So I can call this, let's
call it course Asset Manager. And let's save that out. Now what we're going to
do is we're going to put this into the asset manager. So what I'm going
to do now, you can see on the right hand side here, they're all actually named. So what I can do now is
I can grab them all. Select them all.
Let's press one. So we're looking straight on. And then what we're going to
do is we're going to right click and mark them as assets. So now let's go to our
asset manager near the L, and you can see within
this asset manager we've got these naming
what we had before. So what I'm going to do is
I'm going to make a new one, because this is
the current file, I'm going to make a new one. And what we'll do is
we'll call it Pillars. Pillars. And then we'll
name another one, and we'll call it
arches like so. And then we'll name one more
and we'll call it sides. So then what we're going to do is we're going
to save this out. But before we save it out, we're going to make
sure that we're automatically packing
all our resources. Make sure that's ticked on and
then file and save it out. Finally, then let's
come to unassigned. We can drop this one
into our arches. Then we can drop these three pillars into
the pillars down here. We can drop all of these sides, then into the sides
which are down here. And finally, then we
can save this out. So let's save it out now. You can close that blend file down we will be adding to it. So then you can open it back
up or you can leave it open. Just depends what
you want to do. Now, if you don't
want to do that, what you can do is you
can right click these on here and then you can
mark them as Assets. And then they'll be within
this folder as well. If we go to Asset Manager now, you will see that we
have one called Pillars. And what we need to do now
is we need to refresh this. If I come in and
click File Save, and let's see if I can
actually refresh this. Sometimes it means I have to reopen the blend file to
actually get them working. Let's quickly reopen that. Now, here is my new blend
father. I've opened up. I'm going to go to file,
I'm going to open, and it's this one here called Blend Fall Ultimate
Course Guide. Let's open it up, wait
for it to open up, and you'll see here that the pillars aren't
actually there. And the reason for that is just because we need to go to Edit, we go to Preferences, and then we're
just going to make sure that we have our
resource pack here. Also, I've also got blue
actually wrote in there, so just make sure
that's not in there. Let's see if they're
in there now. And here are our pillars. Now if I bring in this
pillar, as you can see, it comes in with the
actual bevel attached, which is even bar for
what we actually need. So if you click that on, we can see now we've got the bevel attached looking exactly like the one that we
actually created. The best thing is now because
we've done it that way, means that can actually
come in and delete all of these without worrying about what
will happen with these. So now I can leave
this one as well. We've got our pillars, we've
got our arch in there, we've got our geometry nodes. We've got basically
everything we need. So now any parts we
actually create, what we'll do is
we'll put them in their own asset manager and
then we'll make him much, much easier to deal
with other parts. And the best thing is you then will be able to
have your own kind of Arabian themed asset
manager file as well. So just to reiterate, so
I'm just going to go, I can show you that here is the resource pack and here
is our course asset manager. Because they're in
the same actual file and they're in the
same over here. So on it and preferences, they're on the same on here. So you can see if
I open up this, we've got our Arabian
Resource pack, our course asset Manager,
they're all in there. That means then
that we have access to everything
within that folder. So any blend files
you put in there, if anything's in
the asset manager, you know you've
right clicked and you've marked as an asset, you will be able to find it. All right everyone. So
I hope you enjoyed that one and I'll see on the next
one. Thanks a lot. Bye bye.
29. Integrating Pillars and Archway Supports into Scenes: Welcome back everyone
to the Blend of Four Ultimate Guide and
this is where we left off. All right, so now let's make a start on our actual building. So this is what we
have in the moment. Let's come in and first of all, bring in one of our pillars. So the first pillar we'll
bring in is this one here. So we'll bring our pillar in, we'll drop that into place then. So we're going to stick
it on this corner. And then what we're
going to do is we're going to duplicate
that one over then. So I'm going to press
shift, Duplicate it over. And what I'll do is I'll
just put them there for now. Because I'm going to
put an arch in here. And then once I know
that it's going to fit in nicely, then
I'll move them out. So what I'm going to
do is go to arches. I'm going to bring in an arch, so I'm going to spin
that round, then Y, -90 -9,080 There we go. And then what I'm going
to do is I'm going to press three and I'm going to put this into place up here, just under those ones
and then pull it back. So just making sure then that
these come out far enough. So I'm going to grab both of
these now. Pull them out. And there we go, our
first part in there, Hurry now let's come in and
bring in the next part. So what I'm going to do is I'm
going to grab this pillar. I'm going to press shift D.
I'm going to bring it over. Then maybe somewhere in front of this part
of the wall there, I'm going to pull it just to the bottom of the
steps actually, because that looks
pretty nice like that. I think this wall.
Then I'm going to put just to the bomb of
the steps, the thing. This is where you're making
all your adjustments. By the way, I'm going to press and X and just pull this
out a little bit more. So then what I'm also going to do is I'm going to grab
the bomb of there. So I'm going to come
underneath, grab the bomb, grab the bomb face, and pull
it down into the floor. Now I can finally grab this
pillar and pull it over A. So then what we'll do
is I'll grab this arch, I'm going to press Shift and D. Then we're going to do
it -90 Rotate it around, then we're going to
pull it into place. And I'm also going to move
this door over a little bit, and then what I'll
do is I'll move this over just a tad like so pull it back into
place then if I need to, I'm going to pull these
out a little bit. So I think that is going
to look quite nice. Now, the thing is, because
we've got all these in there, we can see now that
we're probably, we're going to have
to pull this floor. So all four of these, just over a little bit like so just to make sure it
fits in a little bit nicer, especially where this door is. So we want this door to be
right on the edge of here, while fitting in here nicely. So you can see that we
want it to look nice. In other words, once
we've got this door in, because it's going to have
a round the top in it, it should look really nice,
actually fitting in there. Now, we're not going
to do the door yet. What we're first of all going to do, we're going
to just check it. Now, double tap the
and there you go. You can see already that's
starting to look pretty nice. Okay, So now let's
actually carry on. We'll do the next part up here. So I'm going to do is I'm going to bring in
another pillar. So I'm going to bring
in this pillar here. And then I'm going to do is
I'm going to bring it up, sit this one on top
of this pillar here. So I'm going to pull it
out and I'm going to sit on top here. Now that means when I
sit this one on there, you can see that it looks
really nice the way it is. I need to pull it
up a little bit just so it's on there now. Never be worried about making these a little bit bigger
or anything like that. What I'm going to do is
I'm going to make this a little bit bigger and then
I'm going to pull it up. But I want to keep this, so I want to process ins, just this bit hanging out. But I want this
just at the top of there as you can see
now. Don't worry. The other thing is I'm
going to put a top on here. We're going to make some
things to put a top on here. But for now, what I
want to make sure is, as you can see, these
are not quite in there. I want this into the wall. In other words, I need to
pull this back a little bit. I'm going to pull it
back just to here. And then what I
want to make sure, can I now pull this wall back? Will it fit in very nicely so we can see here it's
just stuck over it. Might need going just this way. Just a little bit like that. It's got a little
bit more to it, and now we can see that's
fitting in nicely. Okay, now we've got
our window here, let's bring in our sides. Let's save our work as well
so it's file and save. We'll come to our sides. I think the first
side we'll have is the square ones. We'll
bring this one in. What I'm going to do is I'm going to place this
one above the window. I'll said 90. Let's pull it in. This is the first
test just to see if everything is going
to work out okay. I'm going to put that up there. We can see that it's a little bit too long for
what we actually need. I'm thinking as well that this part here wants to be a
little bit higher as well. I'm going to pull this
up a little bit now. I've got this in, let's
pull that up then. What we'll do is we'll grab this and we'll make it
a little bit longer. And we'll pull that
up and make sure it fits nicely into place. Something like, let's pull
it down a little bit, just so it's sat on
top of that pillar. There we go, That's
looking nice. Now we've got a little
bit of room on there to put something on top of here, and that's
why I've done that. Now we want our corner pieces,
which is this one here. So what I'm going to
do is I'm going to bring in this one. I'm going to spin it
around. Let's have a look, actually let's not
spin it around. Let's not make it
hard for ourselves. We'll just drop it in here. Then we'll make it easier. And we're going to press
seven to go over the top. I'm going to then press G
and put it in this corner. So then what I'm going to do is I'm going
to drop it down. Now we can see that it's poking through then. We
really don't want that. What I'm going to
do is I'm going to pull this, not this one, this one here over to the
side. Put this one in place. And then I'm going to
grab this corner now, press shift D, bring it over, and then just rotate it 90, rotate it round and
into this corner here. So now we can see why I
actually did what I did. If I come in now
to this part and I come in and I grab this
going all the way around, Alt shift and click
Control Control Plus. And then what I'm
going to do is you can see now it's just
going up there. I can press Delete and Bases. And then we're left
with this. I can hide this one out the way now. And just come in and
delete these tab Alta. Bring it back. And now
let's fit that into place like really easy. Now we've got that
in there, okay. Now I want, I want to bring this one over
the other side as well. So what I'm going to do is I could mirror it going
the other side as well. That might be something
that we could do or we could just bring
it in and rotate it around. Let's just press shift, rotate its 180, then just try and fit
it the same distance. That's what this one
is. We've got this now going down to here, we can see that this balcony is going to be a
little bit too wide. So what I'm going to
do is just grab this, pull it over slightly. I'm not going to worry
too much about that, because I know that once I've
got my balcony in there, I can see where it's
going to come up to. Anyway, this balcony
is probably going to be a little bit too wide anyway. I've just got that, there is
a placement as you can see. Then what I'm going to
do is I'm going to come in and grab this shift, pull it round O -90 press
one on the number pad. Let's see if it actually
fits in which it should. Now if it doesn't quite
fit in, don't be worried. As you can see, it
doesn't quite fit in. Don't be worried about making
it a little bit smaller and x make it a little bit
smaller and fit it in. That's looking pretty nice. Okay, now let's bring that
round to the other side, so shift D, then 180. You can see there that
as I've spun that round, I need to press control all
transforms right clicks, origin to geometry because
we did cut it down now 180. And now we should be able
to fit that one in much, much easier and need
to pull it over. So now we can see we're
going to have one problem in this door isn't
going to fit on there, but don't worry because we're going to cut that away anyway. You can see this door is
nearly to the top of there. But we're not going to, we're going to cut this
at the sides away. So don't worry about
that right now. Okay, so that's
looking good so far. Now the next thing we
want to do is we don't actually want it to just have
this gray box, of course. So what we want to do is we
want to actually replace this with an actual proper
wall and proper mesh. And the other thing
is we really want to make sure that this is actually leveled off on the edges because we will have some edges on there
as you can see. So what we'll do on the
next lesson is we'll start work on this part here
on this bot part, we'll make sure they've got some material on
them, on both of these. And then I think what we'll
do is we'll make a start on the actual door because
then it will give us a better idea of what this
is going to look like. Not only that, if we make
a door and a window, then we can use those
a lot of times, which means we'll be able to
build a lot more of this. All right everyone. So let's
actually save that out. So fill save it out and I'll
see you on the next one. I hope you're really
enjoying it so far. Thanks a lot. Bye bye.
30. Modeling Your First Door Asset in 3D: Welcome back everyone to the
Blender Ful Ultimate Guide, and this is where we left out. All right, so let's now
deal with this cube here. So what I'm going to
do is I'm just going to grab this cube. In this cube, I'm going
to press Shift H. Then just to hide everything
else out of the way. And what I'm going to do
is I'm going to come in and what I can do is to hide
even more out of the way. I can actually press
the little question more next to the shift board. And what I'll do is I'll isolate everything
else except this. What that means is now I can come in to the bottom
of this, for instance, because I'm not going
to need the bomb, press the lite and
click on faces. Now what I can do is I
can actually unwrap this. The way I'm going to unwrap the actual walls is I'm simply going to
grab the top of it. I'm going to press control
E. I'm going to mark a seam. And then what I'm gonna do
is I'm gonna come round to one of the corners that's
not going to be seen. I'm going to right click, I'm going to mark a seam like so. Then what I'm going to do
is I'm going to press Tab. I'm going to press the
little question mark again, which will bring
back the bottom one. I'm going to press
question mark again, which will isolate this one out. And this time I'm going to
delete the top and the bottom. So delete faces. And then I'm going to come
to this corner again. And then we're going to
mark a same in here, so rightly mark seam. And there we go. Now press
tab little question mark. And finally now we should
be able to grab this one. We're going to press tab U wrap. And we can see here it says
objects as non uniform scale. Unwrap will operate a non scale. What that means is
that we forgot to actually reset our transforms, so I'm going to grab both of these control all transforms, right click origin to geometry. And now let's go in and
try the same thing. And now we don't get a problem. So now we'll come to this
one as well a on the wrap. Now finally let's come into our materials and what
we're looking for is wool. So let's put in wool and
here is our wall material. So let's drag and drop
that in like so again, all we need to do
is just drop it in and then we can
delete other way. And finally now let's
come to this and what we'll do is we'll put
this onto wall instead. So I'm going to search for wool. So drop that on there. And then what I'm
going to do now isn't going to come to this one, jump to this one,
press control L, and link materials.
And there we go. There is our wall. Albeit I'm not very happy with
how this wall looks. So let's head on over now to our shading panel.
Shading panel. Let's actually press dot one to zoom into whatever part
we have. There we go. Let's press dot now
with these walls, if I press ol tag now we
can see that the dirt part, So this one here, you
can see where it's got some dirt on there should be more or less
down of the bomb. If I grab this one
here and press a, we should then be able to press a 90 G and drop that in place. Now you can see the dirt at the moment is at the
top we don't want that. So what we want to do
is we want to press or 180 and spin it around, and now it's down
more of the bomb, and that's where we want it. Now as for these bits here, we don't really want so
much dirt around there. So what we want to do, we
want to come to this one, press A, and then
what we're going to do is A over here, R 90. Let's spin it around,
and there we go. We don't want so much
dirt around here. You could have a little bit of dirt if you really wanted it. Just at the bottom
maybe of here. You can see as a
bring this down. You can see it's at the top of the moment like so we don't want that Re hundred and 80 and let's spin it around
And there we arch just a little bit down at the bottom. There we go. That's
looking pretty nice. Let's have a look
what that looks like. Then double tap the A. That's pretty nice
as you can see. Okay, so we've got that so far. Now what we should
do is we should make a start on our actual door. I'm just looking at
this bottom part, making sure the
bottom part is okay. Let's have a look
what's going on there. And I think, yes, we've put this too far over, you can see go to my UV map. It's not right down
to the bottom. So I'm going to press
and Y and lift it up. And there we go.
Now it looks bare. Okay. So I was wondering more
what was going on there. All right, so now let's work out where we want our
actual door to start. So in other words, where
we want it to watch. So if I grab my guy,
press you spacebar, and bring him over like so. And then what we'll
do is pick him up, pull him over, I'm going to
make him a different color. I think what I'm going
to do is I'm going to minus that off and I'm
going to leave him like this. Actually, just so
I can see a little bit easier when he's actually
stood against that gray. Okay. Now we can
see we've got this. Now what I'm going to do is I'm just going to
grab this door. I'm going to grab
this corner then. And this corner,
I'm going to press control and pull those down. That's roughly the shape
that I can get away with my door looking at
this now I've got that. What I can do is now I can
take this door over here. I don't need my Guynamore
pretty much got it worked out. How big this needs to be. What I can do now, I
can go into modeling like so now I can shape
my door from that. What I'm going to do
is I'm going to press shift Ursa selected shift. Let's bring in them a cylinder. Then with this cylinder, because I restarted my blend pal, you can see at the
moment on two, let's put this on 20, so something a little
bit more reasonable. And then what I'm going to
do is I'm going to rotate this round x and 90. Then what I want to
do is I want to make sure that the top here, so the sides up here
are right where this bit starts dropping down
this side and this side. So what I'm going to do
is I'm going to come in, you're going to grab front
and back of cylinder. I'm going to press
Delete and Faces. And then what I'm going to do
now is I'm going to come to where it starts coming down,
which is this one here. And this one over here, delete. Then L delete, we should end
up with something like this. Now let's make this a
little bit thinner, so I'm going to grab
the whole thing and Y pull it in like so. And then let's
pull this out now. So now we can see it looks
like an arch of a door, but it doesn't look in
the style that we're wanting it to All going to do is I'm just going
to pull it down. I'm going to come
then to edge slick. Grab this top, it here. Click on Proportional,
let it in, and I'm going to
click on the shop. Let's see if we can
do it with a sharp. Now, if I start to pull
this up now you'll see that's looking a lot more
Arabian Ordsity themed door. Let's press one then. And then one going to do is I'm going
to pull these down now. So I'm going to press
and pull those down. And then f, there we go. There's the main part
of our actual door. Now, of course it doesn't actually look right
at the moment, because, well, first of all, we need to have
our door in there. And second of all, we need a archway
going around there. Although we put a face there, probably better off if we
don't have that right now. So what we're going to do
is press delete and Faces. And then what we're going
to do is press control or transforms right click
origin geometry. And now I'm going to come
over to my modifiers tab, Add modifier. And this time it's going to be a modifier we've not used before, which is solidify and when to right click and
shade autos, move on there. And then what we're going
to do is I'm just going to press one now to go into there. And I'm going to
increase that thickness up to make it much, much thicker than what it
was, something like this. Now you will see as we get to
the top, once I apply this, we are going to have
an issue with the top of here because if you
keep bringing it in, you can see you're
obviously going to get some crossover on the top of there, which we
don't actually want. We're going to have to
go in and fix that. But just make sure that the thickness of this is
looking good enough for you. And I think at the
moment the thickness is looking really nice.
I'm happy with that. I'll go with that.
What I'm going to do then is I'm going to
actually apply this. I'm going to put even thickness
on first and then you can see it evens it
out really nicely. This is with and without. Then we're going
to do is apply it. Control. Let's apply it. Now let's press Tab
and have a look. And make sure that
this, if I press, and you can see actually
it's actually worked. So it's actually brought
it together really nicely. And that is looking pretty good. Now one thing we do have to make sure of is if we
press the x ray on, you can see it's a little bit wider than
what we wanted it. So what I'm going
to do is I'm just going to press S and X and just bring it in
very slightly, so. All right, let's
turn that off now. Let's bring our guy over, making sure he can still
fit in that doorway. Which he can, if
I spin in round, so Rs 90, you should still
be able to fit in there. You may want to make yours
a little tiny bit taller. But I think for me that's
that's looking good in fact. Yeah, I think I'll
make it a bit, just a bit like while
hopefully bring this over. Still fitting in
there really nicely. All right. I'm going
to press controls head to get that back now. I'm happy with this bit now. All I want to do is I want to shape this into what I need. The first thing
I'm going to do is I need the center part. I need it to actually
make my actual door. So what I'm going to do is I'm going to press old
shifting click, going all the way around here. And then I'm going to
press and fill that in. Then what I'm going to do
is instead of pressing, I can actually press Y. And what I'll do
is it'll actually separate it off away
from this mesh. Now I'm going to
pull it out here. And then what I'm
going to do is I'm just going to hide
the o the way. Now find that what I
want to do is I want to bring in a couple
more edge loops. But the problem I've got
is if I press one and I bring in an edge loop,
you'll see control. You can see there
at a slight angle. And I don't really want that. What I want to do instead is I'm going to press eight
to grab everything. I'm going to come over
there to mesh bisect. And what I'm going to
do is I'm going to have my pillar starting
somewhere around here. So I'm going to cut it
straight across here. Then what I'm going
to do is I'm going to come over to the
bomb left hand side, and I want this to be
perfectly straight. This is on the X axis going across because you can
see this is slightly out. So what I'm going to do is
I'm going to set this to zero and now you'll see that it actually
straight to Nell. Now, the good thing
about the bicect tool is you can also
come in and clear the bottom of it
or clear the top of it and you can
also fill them in. So if I come in, I can
actually fill them in now that on this occasion we don't actually need
anything like that. But what we can
also do is we can also pull it up or down
wherever we want it. We can also change the angle
of it if we want to do that. Now I'm going to
set this to zero again because I don't
want the angle changing. I'm happy with the
height of this, so I don't want to
do anything else. All I want to do now is grab
these, so I'll grab them. A shift click, shift, click, shift, click,
the insides of them. And then one going to do
is I'm going to press Enter AlternS and bring
those out like so. And then we're going to put
offset even on like so. And then alternates, bring
them back in tiny bit off, even on there we go, we should end up with
something like that. And that's looking pretty good. Okay. At the moment,
I'm going to then come in and what
I want to do is I want to split these
off because I actually want to bevel
them and I want to make a nice part that
goes in on this as well. So I'm going to do that
on the next lesson, and I hope you enjoy
creating this door. You're going to end up
with a really nice door when we've finished. And
I'll see you on the next. On everyone. Thanks
a lot. Bye bye.
31. Stylizing Doors to Match Environmental Aesthetics: Welcome back to the Blender
Four Ultimate Guide, and this is where
we left it out. All right, so now let's split off this one and
this one from here. So what I'm going to do
is I'm going to have old shifting click going
all the way around. Control plus and just go up
to the center point like so. And then what I'm going
to do is press Y. I always press just to make sure everything's split
that I needed to and then right click to
drop it back in place. Now I want to do is I
want to press Altern. Now I have got this part here, and I'm not sure yet if I want to have it as part of
this object or not. So what I'm going to do is
I'm simply going to press P selection and just
separate it off. Just going to make it probably a little bit easier to
actually work with. Once I've done that, I can
hide it out of the way. And now come back to this bit. Now at the moment you will
see I can actually grab this. And if I just move it
over here a second, you will see that it's now
got a hole in each of these. And we don't really want that. So if I press controls
to put it back, what I can do is I can press
A and I can come to mesh. I can come down to clean up. And then what I can do
is I can put fill holes. Now, it doesn't look like anything's happened
at the moment, but if I press L now, press G, you will see that those
holes now are filled in. And that's exactly what we want. Now the thing is that you can only do this when it's a quad. In other words, when it's four sides that needs filling in. If it's any more than four
sides, it won't actually work. So just bear that in mind
when you're actually working with automatically
filling in those holes. All right, so now
we've got that. What I want to do now
is level this off. But before I do that, I want to actually use my Insert to make a kind of difference on
this bar going down here. The other thing is, do I want to split off this bar as
well? So I think I do. So what I'm going
to do is I'm going to split it up to
probably this point here. I'm going to press shift, click, shift, click, shift,
click, shift, click. And then we're going
to do is press Y. And again, I'm going
to do the same thing. A, to grab it all. Mesh,
clean up, fill holes. There we go. Now let's grab this one going all
the way up to here. And then shift click this one going all the way down to here. Now before we use the insert, we need to resell our
transform control. A transforms right
click origin geometry. Now what we're going to do
is press I bring those in. Then what we're going to do
is move around to the side. Press break strewed
and just pull them back slightly like so. And that's looking pretty nice. Now for this, all
that's left to do is adding a deble modifier. And to add in the material, let's add in all materials. Now if we put this on material, let's actually go to
File and save it out. Let's come and grab this one. And let's grab this one here. Press control L, and let's
link materials like so. Now let's unwrap this properly. A smart UV project. Okay, there we go.
Now it's unwrapped. And finally then let's
come in and give these a different actual
material red paint flicker sign. There we go. Looking really nice. Finally, then to
finish this bit off, let's come to our modifier. Modifier bevel and let's
actually turn this down. We're going to turn this
down, turn it up one. And you can see that we
do have a problem in that this is way, way too much. As you can see, it's not
beveling off properly at all. Let's try pressing control
Al transform again. Sometimes that we work. Then what we'll do
then origin geometry, turn this all the way
down, turn it up one. What we'll do instead of that
is n 0.3 And there we go. Now it's looking much
nicer than it was. Let's put it onto our shader. And there we go, That's
looking pretty nice. Okay. So I'm happy with that.
Now we've got our door, so if I bring back
my door with Ol tag, we can actually make
a start on this now. So the way we're going
to do this is we're going to press control
A all transforms, right click, set,
origins, geometry. And then what I'm going to
do now is I'm going to come, the first thing I
want to do is I want to create the wood
going down here. I want to wooden slack going
straight down the middle. So how do we actually do this? Because you can't come
in and press control. You'll see you can't even add an edge loop or
anything like that. You can come in though and click K and bring
in the knife tool. So what I can do is I
can come with my knife. I can select the
top one of here. And you can see that
I can bring it down, but I'm struggling
to make it even. But if you press A,
you can actually straighten that up and then
drop it to the bottom part. And then press the Enter Born. And there we go. Now
we've got that part. Let's actually put it on
vertices so we can see where else we want these
other pieces of wood. Now we do want this
fairly even lease split and you can see at the moment. That it's not going
to be very even. Let's put one in here. Let's try one in here. Press A, Come all the way down. So let's press K again
and bring this one down. Press A all the
way down like so. And then what I
want to do is I'm going to come from this part here and press A, going
all the way down. I'm pressing editor now, the other problem we're going to have now, we've
done it like that, is the fact that you can see
that this is slightly out, so it needs to be probably
a little bit further over. However, if I pull this over, you can see it's going to
slightly take it out there. So what I'm going to do is
instead of doing that one, I'm going to put it
a little bit closer. So a little bit
closer like there. Bring it down. Now that looks
a little bit more even now. The next problem we've got
is that the other side, to get this to be
perfectly right with this is not
going to happen. What we're going to do instead
is we're going to come in and delete this
face off here. And then we're going to come
in with the edge select, I'm going to select that.
Edge shifts selected. And then what I'm going to
do is I'm going to come out press control or
transforms right click, set origin 23d cursor. And the reason I'm going
to do that is because I want to use a mirror
on the other side. So I'm going to come in now add generate mirror and it's going to put it on
the other side. Because the mirror works basically where the
orientation is. It takes the orientation as the middle of whatever
it's mirroring. In other words, now if I grab all of this in eddy
mode and pull it over, you'll see that we end up
with something like this. If we pull this over, you'll see that we end up with
something like this. So that's how the
mirror modifiers work, so let's actually put that back. So now what I can do
is that I can actually come in and apply that mirror, and now you can see that
we've got everything nice and even basically
what we wanted. Now from here we want to also make a little bit that's
actually going to go in. So what I'm going to do is
before doing anything else, I'm going to actually select it. Going all the way around
with control click. So I'm just control
clicking like so. And then what I'm
going to do now, I'm going to press Shift, and I'm going to pull that out. And then what I'm going to
do is I'm going to press, and then we should end up
with something like that, which is basically
what we started with. Now if we go on to face Select
and just select the face, Now what I should
be able to do is press I and bring that in. So what this is going to be now this part here,
delete faces. This then is going to
be the metal part that actually goes around
the wooden part. What I'm going to do then
is I'm going to come in L, I'm going to press E and
pull that out like so. And then what I'm
going to do now is I'm going to grab
the whole thing with L and pull it back into place. Now at the moment, these
don't really look like wood, and that's something
that we need to fix. So what I'm going to do
is I'm going to come in and I'm going to
grab each one of these. So then one Interiors going to press right click and
I'm going to mark scene. The reason I do that is because I find it they're much easier to come in and to grab each
one of these individually. And then one interiors
are going to press Y and split those off. Now the other thing,
at this point, we're probably going
to be better off splitting off this mel
part from the actual wood. So I'm going to press selection
and just split that off. Now I've got my wood,
I've got my metal, and I've got my actual. Let's come back to the wood now. What we're going to do now is these should be all split off. If I grab one of them,
you can see if I press G, it's split off from
the rest of them. What we're going to
do now is grab them all and then I'm going
to pull them back E, pull them back like so. And then what I'm going to
do is now bevel these off. So if I come over
to my old modifier, I'm going to generate and
bevel, you can see already. Now we get a nice
bevel on there. Let's press control
or transforms. Just reset the origins. Turn this all the way down. Turn it up one, there we go. That's how you make
a wooden door. Now we can pull that into place, so it's very nicely in there. Double tap the, let's put it on object mode
just to make sure. I think these be levels
are a little bit too high. So what I'm going to do is
I'm going to put this on. Not 0.5 like so. And now I think they
look much, much better. Now the other thing is when I'm using bevels sometimes on
doors, maybe not this one. You might want to make them
a little bit uneven with the doors because at the
moment they are straight down. Do we really want
them straight down? Probably not. What I'm going to do is I'm going to press one. I'm going to press Tab. And then what I'm going to do is press A to select everything, and I'm going to come to bisect. What I'm going to do is I'm
going to bisect across there. So make sure this is on zero. Then what I'm going to
do is I'm going to press a again mesh bisect. I'm going to bisect
across this way, make sure this is on zero. And then the same thing again, probably let's have luck maybe
a couple more times zero. And then a mesh
bisect like zero. And then one more time
on the other doors, I will show you how we can do this without dissecting so much. All right, so now
we've got all that. What we can actually
do now is press a come up to mesh transform and come down to where it
says randomize and then turn this down really low. And we can see now
we've got a lot of variations in our actual wood. Now that's probably still going to be a little bit too high, so I'm going to put this on Not 0.5 So I'm going to press Tab. And there you go, right
click shade to Smooth. And now you can see
that door is a little bit uneven and it looks
really, really nice. Okay, so on the next one, what we want to do to finish this door is we need to
actually look at the hinges. We're going to make some
simple hinges on there, and then we should have this
door actually finished. All right everyone, so hope you enjoyed that and I'll
see on the next one. Thanks a lot. Bye bye.
32. Creating Realistic Metal Hinges: Welcome back everyone
to the blend of four Ultimate guide and
this is where we left. All right, so now let's
make a start on our hinges. Let's first of all though,
put our door in place. So what I'm going to do is
I'm going to grab the wood, I'm going to grab the metal. I'm going to put it back into place. Let's
move our guy out. It looks a little bit too
close there. And there we go. That's our door so far. And then what we'll do is we'll move him just to the side. And then what we'll
do is we'll actually start with our actual hinges. And what I'm going to do
is I'm going to make sure the press one that the cursor
is right in the center. And then I'm going to press
shift, bring in a cube. So I'm going to want
three of these in there. I'm going to make them
probably around that height, 12.3 Then what I'm going to do is I'm going to make them a little bit thinner, so S and y finally I'm
going to delete the back. Deletes the back off. So now let's pull it into place, make sure that we're happy
with how that's going to look. It needs to be a
little bit SOS and Y. Then what I'm going to do is
pull this out so we can see the center of it is around here. Let's bring it down to
something like that. Let's also then, probably still a little bit
too thick sensed, let's actually grab it properly. So L en ed. So then what I'm
going to do now is press control all transforms, right click, set origin
to geometry just for now. And then what I'm going
to do is I'm going to grab this top part
and this bot part, I'm going to press control B. And then what I'm going
to do is I'm actually going to mouse my mouse up and get a nice round part to that. All right, that's
look in pretty nice. Now, the next thing I want
to do is I want to put some bevels on these parts here. I'm just wondering the
easiest way to do that, I think is to do this. So what I'm going to do is
I'm going to come in control, left click, drag it out. Just a little bit like so. And then what I'm
going to do now is I need to put another edge
loop going around here. Now you can see at the moment I can bring an edge loop in, but it isn't going
to go all the way around. That's not ideal. I really wanted to go
all the way around. So I'm just going to
press controls head. I'm going to then I
say out with question. And what I'm going to do
is I'm going to press Tab. I'm going to come in
and grab this one. And this one press G. We don't need to worry
about the back one. Now, I should at this point
also tell you about engons. We have triangles,
we have polygons, and we have engons.
What is a triangle? A triangle would look like
this if a press G on here. This is a triangle perfectly acceptable in any games
engine or substance, painter or zbrush, Whatever it is, it's
perfectly acceptable. Normally we prefer polygons
or quads as they're called. When we do animation, it does make the
topology flow better or move better when you
move in arms or heads. When you've got quads
rather than triangles. Generally, the reason
why things get triangulated when you send them through to a games engine is because it will
be optimized better. That's why it actually does it. But when you actually read, apologize in something,
you'll always read, apologize in quads are
quads, this is a quad, Four sides is a quad, three sides is a triangle. What is an end? End is something with more
than four sides. Generally, you want to
steer away from ends, especially when you're dealing with things like characters. Now generally with
something flat like this, you can get away with end guns. Because if you're going to send it through to
a Games engine, it's going to be
triangulated anyway. But normally, I would say, make sure that you don't
have anything like this. Now the easiest way to
deal with something like this actually is just
to grab both of these. Right click and you
will see you've got one that says triangulate faces. And then what you can
do is right click tries to quads and
then it'll convert it back to a quad if it can do and you can see it's done
a pretty decent job of that. But generally what we're doing, we don't actually have
to worry about Engon. You will see here if I
press the question mark, you will see if I go over to, let's bring it in,
I'll asset manager. Let's go to our sides and use
the library take off wall. Then let's bring in this
one here, not this one. The round one which is this one. You will see that every
single one of these is an end on because it just has
a plain face on here. This should all be
actual topology, but on something flat
again like this. It doesn't really
matter so much. So don't get over, you know, whether you should have
engons in there or not. It all depends on
what you're doing. If something's rounded,
not a flat face, generally steer away from engons because it will
affect the light. But if not, don't worry
too much about it, because it will be
converted to triangles. Anyway, if you've
actually created something you're going to
read, apologize it then. No, you don't want to engons, you want to make sure that
it's a beautiful quad mesh. Wherever you can. All right. So that's the
explanation of that. Now what we'll do is we'll
come back to this now. I'll press question
mark. No, I won't. I'll just put it on object mode. Press dot just to zoom into it. And now we've actually
pulled that in. So you can see how
we've got this in. We should be able to press control and get in
nice edge loop. So I'm going to bring in an
edge loop round about there. And then what I'll
do is I'll pull another edge loop
round about here. So roundabout, here will
be my next edge loop. I think this edge loop,
actually I could probably get away with putting
it round about there. Putting in this one shift click round about
there, all shift. Click them both, then see
you've got them both. And then what we're going
to do is press control B, pull your mouse borne out. Then what I'm going to do is I'm going to grab the back of the back of each of these, then I'm going to put
it onto medium point. Then what I'm going to
do is press and Enter, and then and's Ed
and pull those out. Now finally what I'm going to do is we're going to come
to each of these edges. This one here, this one
here, this one here. I don't actually know
what happened there. Did I hide them? Did I
hide them out of the way? What happened
there? There we go. I have no idea where
they disappeared to. Let's grab each of
these now. This one. This one, This one, this one. And then what' going to do now is just going to press control, pull them out and round them
off a little bit like so. All right, so you can see that's already looking
pretty nice, I think. Still it's a little
bit too thick. So what I'm going to
do is just press S D and squish those
in a little bit. Now the other
problem you can see is because I squished those in, I've also squished
in these parts here. Let's just fix those. So what I'll do
is I'll just come in and grab each of these, each of these S and pull
them out, and there they go. Now they're looking
a little bit back. All right, so finally what I want to do is I
want to come to this one shift, ka
selected shift. And let's bring in. I'm
thinking whether to bring in, I think I'll do
this with a cube. So let's bring in a cube. Zoom out, press the bone, make it much, much smaller. Press the On. Zoom in. Much, much smaller. Even still, let's put it into place.
Something like that. And then what I'll do is I'll
just delete the back off. So I'm just going to come to the back press, delete faces. And now I'm going to grab it all l drop it into place and Y. So then what I'm going to do is I'm going to come now
grab the sides of it. Press control, then what I'm going to do now is come to the top of it and press control. There we go. We've got
a nice bolt in there. Now I can do is I can right
click, shade, auto, smooth. Then what I can do now is
I can actually grab this, grab this Bh, bring it over. And then I can press shift, bring it over, and then finally
shift and bring it over. Now, before I do anything
else, what I want to do now, I want to split these bolts
off away from what I'm doing. The reason I want to do
that is because I want to bevel this part off before
doing anything else with it. So what I'm going to
do is quickly just grab all of this part here. Press selection, grab a
again control or transform. Right click Sar
reg into geometry. And then what I'm going
to do now is adding a Generate like so. Then I'm going to turn
that bevel down all the way down zero and then up to 0.5 or not three. Bevel it off just very slightly. No, no, no one. There we go very, very slight bevel on there.
We don't want too much. That may be a little bit
too low point n n two. Yeah, a thing that then looks
fine now with these bolts, let's have a look what we do in the east control all transforms, right? Clicks, origin geometry. Let's try adding in a
subdivision surface just to round those
off a little bit. Actually, that has made
those look much better, although I'm going
to squish them in and Y and pull them in. Double tap the Yeah, I think they look
a bit better now. All right. I'm happy with those. Let's come into these,
first of all and apply our subdivision
and then what we'll do is we'll also apply
will we apply that yet? I don't think we'll
apply bevel quite yet. What I think we'll do
first of all is we'll bring in our material. All we'll do is on the next
lesson is we'll actually bring in the material
just for this metal here. And then what we
can do is we can actually bring in
the other part. So we can have one
here and one here, and then three on
the other side. And then we can put
the actual materials on the rest of the door. And then we can save it
out in our asset manager. All right everyone. So hope you enjoyed that and I'll
see on the next one. Thanks a lot. Bye bye.
33. Adjusting Doors and Converting them into 3D Assets: Welcome back everyone to the
Blender Full Ultimate guide, and this is where we left off. Okay, let's come
to our materials and what we're going to
do is type in metal, this is our black metal
material. Let's bring that in. And then what I'm
going to do is I'm going to delete that off again. Now finally I'm just going
to put on shade mode. What I'm going to do
now is come to this. Come over to material, down arrow, black metal. Let's bring that in.
And there we go. Let's now grab it, a smart UV project. Click okay. And
there is the Mel. This Mel is really, really nice. If we put this on the
actual shader, sorry, the actual Renderview, you can see just how nice
the actual metal is with all of these
scratches and things like that going round in it,
really, really nice. Okay, so now we've done that, let's put it back on material. We might as well come in then and add the material
onto these as well. So I'm going to press
U Smart UV Project. Click Okay. And then we're just going to
click the down now. Black metal, like. So now let's join all
of these together. Now the thing is though, this
has already got a Bevlon. So what I'm going to do is I'm just going to press control. And then I'm going
to join all of this together with control J. And then what I'm
going to do is I'm going to press one
on a number pad, like so I'm going to put on an object mode so I can
really see what I'm doing. Press Shifty, bring it
down and then Shift, bring it down to the
something like that. And a thing that
looks really nice. Finally then what I can do
is I can grab all of these. I can press control
G. Then now what I want to do is make sure that my cursor is in the center, so all I'm going to
do is press shift on the actual arches or
selected back to my Mel. Add modifier, Generate a
mirror, put it on the Y. And you can see the
problem I got at the moment is I didn't
move my orientation. Right click, origin three, D, cursor, take off the Y. Put on the X. There we go. That's looking pretty nice. Just making sure I'm happy
with how that actually looks. And I think the one thing
I'm worried about is maybe I'm just wondering whether I need to pull
these back a little bit. In other words, is this too
thick going across here? Let me just check
that out because I might as well fix that. While I've got the
chance to do it, I'm just going to grab
all these press control then what I'm going
to do is just pull that back a little bit. Yes, a thing that
actually looks better. Now I've done now what I can do is I can just grab this one. Grab this one, deletes, Grab this one, L, press one, so I'm in
front view shift. And what I'll do now is
I'll follow it over on the mirror and then
put that into place, holding shift to get
them in shift D. Again, put them into place. So Yeah. And I think they look much, much better now I've
done that. All right. So now we've goll
those, What I'm going to do is press control A, and then I'm going to go
over to my shading panel. So over to shading. And what I'm going to do is
press dot to zoom in, press the tab A
to grab them all. And you can see this
is how they all look. And then what I'm going to do is I'm going to grab everything. I'm going to come up then to the three little dot v and
I'm going to pack islands. I'm going to take rotate off. Click. Okay. Let it think
about what it's doing. And then what I'm going to
do is now is pull them out. Pull them out. And then
I'm just going to have a little look at what
they all look like. We can see that's what
they're looking like. I'm just making sure that I have not pulled
them out too much. They look nice like that.
Okay, I'm happy with that. Now, the actual black metal, you can see that this was set
up the same way as before. We have our principled, we brought in all
of these textures. So we have all of these
textures actually brought in. And then what we've done is we first of all messed
around with the color. This here will mess around
with the color as you see, so you can make
it dark or light, or wherever you want to do. What we've done is we've brought
in an ambient occlusion. Because this is met,
you really want to accentuate your actual dark
and light. Let's have a look. If I can plug this one in. If I plug this straight
into my base color, you should be able to
see exactly what I mean, if I come in to my color around where my
ambient inclusion is. If I'm very careful, I can actually
come in and you'll see on here if we put
this on rendered view, you'll see if I move
this to the right, look at this part here, It's very, very faint.
Well, you'll see. You go lighter or darker. And that is where we've actually gone in and
made sure it's really, really finally just made a little bit darker
in those crevices. Because with metal,
it really is all about how the edge and how the crevasses are
to make the metal look realistic yet
still stylized. We've also then got the bevel, which is the thing
we had on before, which is all these edges. And we can control how much of the edges is actually,
as you can see there, we can control how much of that then of the edges is lighter, so we've got the lightness on the edges and the darkness
for the crevasses, and that's exactly what
we're looking for. All right, and then what we
do is we plug all of this in. So we've got the ammunocclusion plugged in with the base
color in a multiply, then we've got a control
over the entire metal. And then finally,
we're plugging in those edges into
this screen here. And then plugging the color and the ammunoclusion together. And finally then
into the principle. The other things
you've got here is a normal map which you
can turn up and you can create much more kind
of higher normal map, which means it looks more
bumpy and things like that. But with Mel, honestly, you don't really
want it that high at all, unless it's really, really weathered metal, you
know, with lots of rust, Dumbo, for this occasion, it's not anything like that. So that looks absolutely fine. All right, so we've
got that then. Now let's go back
then to modeling and let's come to our
door once more. And what we need to do now is
we need to actually figure out what we're actually
going to do with the metal. And I think with
this Mel on here, all I'm going to do
is just grab it. Smart UV Project. Click okay. And then I'm just
going to click on this press control
L link materials. And there we go. That's the Mel in there.
And now finally the door. So I'm going to come into all of this door and this will be the first time that
we use the wood. So what I'm going to do,
I'm going to come to Asset Manager and then I'm
going to come to wood. We have a number of wood here, but the wood that we want
is the light wood we want, the light wood. We're
going to bring that in. We're then going to delete it. And then what we're
going to do is come to our door, put it on material. Come to our material, and then we're looking
for light wood. Let's bring it in now. It looks like that, which
is useless, of course. Let's press Tab.
Grab everything, Smart UV Project. Click Okay. And there we go. There
is our actual door. Now you can see if we put
this now on the shader, this is what it looks like, really, really nice,
as you can see. Okay, So we can get
rid of this door. We can join all
this together now. And then we have our first door, which we can use multiple
times around our actual scene. Let's put it then
onto material mode. Then let's join all this up. So I'm just going to
grab it with selection. I'm going to go to
object because I know it actually has modifiers
on and things like that. So what I'm going to
do is go to object convert and we need
to select one. If it's never, not there
were you can convert. Just come in and
shift select one and then object convert and mesh. Finally, control J, control all transforms right click
origin to geometry. Now I'm actually going to rename this two and
we're going to call this single is not going to
be a double arch door single. Now I'm going to do
is I'm going to press control C. I'm going to go over then to my asset manager in my other file, which
is this one here. This is with the archers. Then what I'm going
to do is I'm going to press control V and drop that in the shift
spacebar to move it. And then what I'm going to do is I'm going to create a new one. I'm going to call it doors like. So I'm going to go over then to the right hand side
mark as I said. And then what I'm going to
do is file and save it out. All right. Let's
put that down now. So let me just think
about saving it out. And the other thing
is before I do that, I need to put my door
into my door there. And then finally I
need to save it out. Okay? So let's now
put this down. And then what I want to do
is I want to come over and see if I've got a door
there, which I have. And there's my door. So
it's already in there. I didn't have to reload it. All I had to do
was refresh it and now actually I can delete
this door out of the way. And I can bring in my door
that we've actually created. And there we go,
that is our door. How good's that? Okay, so what I'm going to do is I'm going
to save out this file now. And then on the next lesson, what we'll do is we'll
get this door into place. Then I think we'll actually make a start on
the actual window. So we'll do our first window. And then what we can
do is we can work a little bit on our actual steps. And finally, we'll work
on this top part here. But remember, the more
parts we actually create, the easier it is as we go along because we've got most
of the parts in place. All right everyone.
So I hope you enjoyed that and I'll
see on the next one. Thanks a lot. Bye bye.
34. Crafting a Stylized Window in Blender: Welcome back everyone to the Blend of Four
Ultimate Guide, and this is where
we left it off. Okay, if we pull this door into place and let's see what
it's going to look like, let's get it into
something like that. Just pull it up a little bit just so we can see that metal. Let's get it more centered. Yeah, I think that pretty nice. I think I'll pull it back into the wall just a little bit. Double tap the and there we go. All right, now what
I want to do is let's have a look
at our render now. We can see it's starting
to really come along, but let's actually come
in and turn down our sun. It's a little bit bright
for what we're looking at, so we'll come over to our world. Over here is what you can actually don't have to
jump into the shading. You can also come
on over here to the right hand side and
actually turn it down, for instance, the sun here. So let's turn it down slightly. Let's also then come down and turn down the air just slightly, just so it's not
quite as yellow. It's making that a
little bit pink. And that's not
something we want. Yeah, I think that's
it for the door. Now let's actually come in and
put this onto object mode. I'm going to do is I'm going
to take this window here. I'm going to rotate it round. So I said -90 And what we're going to do from this then is create our first window. The thing is about windows, you can make them as complex
or as simple as you like. I think we'll start with
a more simple window, probably in terms of complexity. Same as the door,
something around there. All right, so what
I'm going to do is, first of all, I'm going
to bring in a plane. So I'm going to go
mesh and plane. I'm going to put my
plane up a little bit and try to make it
round about the same size. This window X 90 S S button. Let's bring it
over. Doesn't need to be absolutely exact
or anything like that. Let's press the X
and bring it down. And then finally what I'll do is I'll try now to
actually shape this. So I'm going to pull the
top down first, like so. And then what I'm going to
do then is press controller, bring in perhaps
five edge loops. I think that's going to
make it quite easy for me. So left click, right click, grab, then this top one. And then I'll use the sharp so to create that
little edge on there. Now on the actual original that I may have made it a
little bit more rounded, but it's up to you really what actual shape
you want to make. We could come in and
turn this off and grab both of these and create it a little bit
of a different style, like the one thing I'm concerned
about is this top bit. It might be a little
bit too sharp, it's going to be stone
at the top of here. So what you can do as well, you can actually grab
the top of here, press control shift and B. And then what you can
actually do is bevel that out like so now, so it's like bevel,
but you can't, if you can try and grab
one press control B, you'll see nothing happens. So you have to actually
press control shift and B to actually get that done. So I'm going to bring
this down a little bit, and I'm thinking, who we need another edge loop in there
to round that off, maybe. So what I'll do is I'll press K, grab this one here, press A, go to the top, press Enter, and then I'll come
in, grab the top one. Just round it up a
little bit, like so. Yeah, I think that's
looking pretty nice. All right, so now
we've got that bit. What we want to do now is
want to grab the bottom. It's just easier dealing
with it like this. I press one again and
if I press Shift, bring it down very slightly
and then one wins, press and Z, pull it down. And that's just going to
be that window ledge. And now find I can
split this up. Lp selection control or
transforms origin geometry, and then S and X and
pull it out slightly. That's that bit.
All we need to do now is obviously give
this some depth. So what I'm going
to do is come in, I'm going to press Delete, and we're just going to
limited dissolve this. The reason is we've got a load of edge loops that we
don't really need, so we might as well
get rid of those. Delete Limited dissolve, and then E and pull it out like so. Okay, so back then
to our main window. So what I want to do
on this window is we want to have stone
going around it. Then we want a
little bit of wood going in between the
stone and the glass. And finally then our glass. The thing is the easiest
way to probably do this, is probably to come in,
grab the whole thing. Limited dissolve, so we end
up with something like this. And then what we can do
from there is we can press the eye button
and bring it in. And we'll have probably a
little bit of a problem in that these on the top you can
see might actually touch. First of all though, let's reset the transformations again. Now let's press Eye, and now we can see that
it's coming in much, much neater than
what it did before. Albeit we've got these touching now and sloking a
little bit of a mess. But we can actually
fix that, no problem. So what we're going to do to fix that is I'm just going to grab. All of these. I'm going
to grab this one last, and then what I'm going to
do is press the N bottom. And that's then he's going
to merge them and we can merge them at either the
center or at the last. We pick the last one so
we can merge at the last. So okay, so I'm happy with that. And now we just need
our piece of wood. I think what I'm going
to do is just pull that down just a little bit. So Yeah, and I think that's
looking pretty nice. Okay. So now let's
make the wooden part. That's actually going
to go in there, so I'm going to grab
the center up here. I'm going to press the eye
button to bring that in. And then we'll have our
wooden part in here. Now, then let's actually
split all these off. This is going to be
our main window, so I can just press Y on that. This is going to be
our wood, so I can come round and press Y on that. And then this stone
is already split off. Now now the one thing we want
to do is we want to have some stone blocks in here. The easiest way to do
that is to split this off away from everything if I
press selection like so. And then what I can do
now is I can come in, press the button
and grab all those. Make my mouse my circle
a little bit smaller. And then just left click
on each of those like so. And then come down to the
bottom one and just select it. Now we've got them split
off from each other. I might want some stone
down here as well. Let's see, Actually,
let's press Y. And then what we'll
do is we'll press controller and bring in perhaps three on this side
and then three on this side, three on this side as well. And now finally, let's
split these off. I grab the top one and this one. Top one and this one. Press Y, and now all of
those are split off. Now we've only got this at the moment all together,
so we can work with this. Again, we're going to press
control all transforms, right click, set
origin to geometry. And then what we're going
to do is come over to my modifiers and I'm going
to actually solidify this. So I'm going to add
modifier, generate, solidify, and let's pull it
out the other way like so. And then what we're
going to do is a little bit of modifier stacking. Now, modifier stacking is basically where you're
non destructively adding two or more modifiers onto the actual mesh
that you've got. This then makes it
so it's all non destructive and you can
change it however you like. Let's actually close that up. Add modifier, let's add in a
bevel, let's turn that down. Turn it up, maybe one, we've got that beautiful stone effect
that we're looking for now. Maybe this is a
little bit too high. I think 0.3 try that. Maybe that's a little bit low. Try not 0.5 And there we go. I think that then
is about perfect. Now it's up to you if you put something in the middle of here. So you could come in, for
instance, come around the back. Why you've got this
non destructive. As I said, you can press the
E, you can bring it in then. And then what you can do
is you can pull it back. So by press and pull it back, it should come back on
there. Which it hasn't done. Which is probably because I might as well actually
leave it like that. And then I can pull
it back in a minute. So in other words,
I can come in. Now I think I've done
with my solidify. So what I can do is I can
actually apply this solidify. Let's see if I can
actually apply it. I can't apply an edit motor. Let's click the down arrow. Apply. And now I should be
able to come in and grab just these and then press
and pull them back, and it should bevel. Now you can see we've
got a little bit of weirdness there in the bevel. Let's press control A, or transforms the origins geometry. And let's see now if we
can fix this actual bevel, because it is causing a
little bit of an issue. Let's try not 0.3 Now you can see that bevel
is looking a bit nice. Let's try one more
up. So not point nuh four. Let's try that. And there we go. I think that's
looking pretty nice now. Okay, so now let's
come to our wood. So we're going to
come to the inside. We should have this split
off away from our wood. So what I'm going to do
is I'm going to press on my window selection and then we're going to
come to my wood. Now with the wood, we
don't want a piece of wood that's going
to go all the way around because that's
not realistic. And even though we're dealing
with a stylized scene, we still want to
keep a little bit of realism within our scene. So what I'm going to do
is I'm going to come to the bottom part and then I'm going to come
to this part here, and I'm going to press Y. And when I'm splitting off, when they're very
close to each other, I always press H just to
hide them out the way. And then I know which
ones need to split, so I'm going to grab this one, go into here, and
then we're gonna split it and then
hide it out the way. Let's press all H then and
bring everything back. And finally then
what I'm going to do is I'm just going to press A, I'm going to bring
it out with extrude. And now finally what
I'm going to do is I'm going to also
level this off. So I'm going to press
control or transforms, set origin geometry, Generate, turn it down, turn it up one, let's turn it down, not
0.3 Let's try that. And I think that is going
to be absolutely fine. Now what we want
to do is just grab our window and pull
it slightly forward. So there we go. We've got a very, very
nice window there. Let's pull this up a little
bit as well while we're here. And then what we'll do on the next lesson is we'll actually get some
materials on here, get it in our asset manager, and then we can start
building this bit. I think then what we'll do is we'll just build
up this top bit. So we've got, I think
there's two pieces in here, and then we'll make a start
on our steps on here. Because these ones we
save to asset manager, they're something that
will only be used really in this actual
scene or project. So we don't really want to put those in our asset manager, you might want to, but I'm not going to do that
with the stairs. They're a little bit different. You might want to keep them
in your Asset manager. Alright, everyone. So I
hope you enjoyed that, and I'll see on the
next one. Thanks a lot. Bye bye.
35. Using Atlased Textures to Illuminate Windows: Welcome back everyone, to the
Blend Four Ultimate Guide, And this is where
we left it off. All right, let's come
in then and bring in our material shaded.
Let's click back on. Let it load up. And
then what we're going to do is we've got our
materials down here. You can see if you
search for window, you will have these three here. Now you'll notice that two of these should be lit, I think. And I think this one is unlit. So let's bring this one in. First of all, let's check
what this one looks like. And let's also bring
this one in as well. You can see actually
both of them are lit, so what I want to
do is I want to actually create two
materials on here. We can see if we go
to the right side, we've got windows two and
we've got windows three here. What I'm going to
do is I'm going to come to this one first. I'm going to click
the li plus bottom. I'm going to click New. And then what I'm going to do
is I'm going to call it Windows or window 02. And then we'll put Lin. What we'll do is we'll do
the same thing on this one, plus new window 03 and
then lit while we're here, we may as well do the
other one as well. We'll bring that one in as well. And then what I'll do is
we'll go to Plus New, and then we'll go Window 01 lit. So now I want to do is
I just want to come to this one first copy material and then we're going to come to
this one paste material. Now what I'll do is it'll inherit basically this material. It'll be near enough, well, it will be the same material. Now we're going to do the
same thing on this one. Copy and paste. And then the same
thing on this one. Copy the top one and paste
the second one like so. And then you'll see it
actually changes and it's lit exactly the
same as the other one. Just make sure all three
of them look the same way. Now all I'm going to
do is if I grab all three of these now and
just press shift D, shift D. So, and then I come to this one and I just
put it onto this material. The moment it's I think
it will be on this. I can actually check that
if we're going to face, just grab any face and you'll
see the switches over, which means that is the
material that it's on. So what I'm going to do is
just come down to this, grab the whole thing
with a and click a sign. And then I'll come
to this one tab, make sure it's all
selected, click a sign. And then the last one,
make sure it's all collected and click
a sign like so. Now we're going to
do is we're just going to come into
this first one, go to our shading panel and
all I'm going to do is just unplug the emission
so you can see the emissions actually
plugged in here. So I'm just going to,
I'm just going to press control on here and just
unclick it like so. And now if I press Art
and zoom into this, put my shader on, you'll
see when this loads up. Now that is how it looks. So it's exactly the
same as this one, except it has no emission
coming out of it. And the reason, of course,
why we're doing that is we want to have one
Lit and one on Lit. And the ability to actually
change them if we want. So now I'm going to do is I'm just going to come
into this one. I'm going to press, I
think it's Control. Let me just see if it is
Control. Yes, control. And then just unclick it. Same for this one, then we're going to go to the emission. So just make sure it's
the emission control and unclick like so. All right, so now we've
got those three materials. The one thing that we don't,
well we have them in. You can save these
out if you want, but they're so like
such a small change. Do you really need
to save them out? Because they're
still going to be in our materials on
here as long as we, you know, save out our file. So now what we can actually
do is delete these. So delete them
all. Not my human. So let's shift, click him twice and then
let's press delete. So now we've got
our windows set up. What we can do now
is we can come into this window and
we're going to press one. And then what I'm
going to do now is assign a new material. And the new material will
obviously be window. So we're going to
look for window, and I think it's
window one, I think. Let's have a look. Nope,
it's not that one. Let's go to window two. Yes, this is the one. So this is the one window, window two. And I'm not sure whether I
want it lit at the moment, but what I tend to do is
I'll click the plus buttom, and I'll click the down arrow. And then I'll put in window, and then I'll put in 02 lit. So now I have the ability, when I'm actually in the scene, to actually quickly
swap these out. In other words, if I
don't want this lit, all I can do is I
can just come in, grab it all, and click a sign. Or I can click on
this one and click a sign and then turn them
off and on as I like, there are other
ways of doing this, but you might as well keep
it as simple as possible. All right, so now
we want to do is we actually want to unwrap this. So all I'm gonna do is grab it. All I want to click, and the
way I'm going to unwrap this is then I'm going to
come down and you have one which is
project from view. And basically this is projecting from the
view that you are. So you definitely want to be straight on when you
actually do this. So if I click you now,
Project from View, and you'll end up with
something like this, which means you can't
really see anything. And that is because if we
go over to our shading now, you will see once I zoom
into this, press the tabon. This is our mesh here. So what I want to actually
do is I want to put this. Probably around this one here. You can see on the windows. What we've done is we've made
it lighter in the middle. We've got a really
nice, you know, kind of motive on each of these. And then finally, what
we've done is we've put some darkness
going around there. So we just really
need to grab this, press the button, bring it
into some sort of place. Press the S button then, just to make it a
little bit bigger. And you can see now how
nice that actually looks now you can also see that probably probably it
needs shrinking down. So and D, let's, no S and Y, sorry. Let's shrink it down a little
bit so it actually fits. And I think we'll pull it out. So S and X, let's pull
it out a little bit, just so we've got a little
bit more dirt around there. And there we go,
that is our window. Let's see what that
actually looks like then. So if you come up and
put it on a render view, this is what it's actually
going to look like. And we can also come down, so you can see here where
the actual emission is. What you can actually
do is you can open the emission
and you can see the strength at the moment is set to 2.2 Now at the moment, this is in bright sunlight, so you might not
be able to see it. But if I put this on 20, you will be able to see a
difference there as I say. Now I'm going to set
that back to 2.2 because I'm not sure whether
I want it that bright. Actually, let's try
putting this on ten. Let's see what ten looks like. I'm actually going
to come in and mess around with that once we've actually
finished the wind now, we're going to leave
it on ten for now. The thing is, on the
other build that I did, it was done with
Blender 3.6 I think. And the lighting has
definitely changed from 3.6 to Blender four. So we'll actually have to go in and see what this
actually looks like. I think actually the one
thing we will do right now though is we'll
just hop over to the right hand side where our cycles is and we're going to pop down to where it
says color management. And I'll just show you on the
old blender it used to be. If I put this onto filmic, you will see now just how
yellow that actually is. And you'll see the colors
look a lot more intense. If you put this back onto AGx, you'll see there's
a definite change in how the color looks. And the color on the GX is definitely designed for
more realism for sure. So it's up to you
whether you want to use GX or whether you
want to use filmic. Filmic, being from
the old blender, this is more in line with how
you know movies and things like that work and makes the lighting much
more realistic. So I'm going to
put it on filmic. And what I'm also going to
do then is just turn this down to 2.2 so I'm going to
turn it down a little bit, maybe that's a
little bit too less. Let's try five.
Something like that. And then what I'm also going
to do is we can come down, we can change the look of this. So what we can do
is we can put this on medium contrast
and you'll see, let's put it on a bit higher. Actually, let's put on very high contrast so you
can get an idea. What it does is it really, really saturates
the whole scene. If I put this on what
it had done before, so if I go to very high
and put this on none, you can see it looks
completely different now. So what I'm going to
do is I'm going to put this on medium high
contrast like, and I think that's going
to be good enough for this scene because it
is a stylized scene. If I put this though
back now on AGX, you'll see the difference
in how the color looks. This is something we're
gonna play around with once we've actually
finished our scene. Just to see what kind of
look we're going to get. But for now, so I have
a good view of this, I'm gonna put it on Filmec. I'm gonna keep it on
medium, high contrast. All right, so now
that's out of the way. And what we'll do then
on the next lesson is we'll get this stone in here
going around the outside. And then we'll also get
the wood in there as well. The wood we've already
got in our scene. The stone we haven't. And it'll be good
because we're going to be using this stone
for this kind of these steps going
up there as well. Okay everyone. So I
hope you enjoyed that. Let's save that our file and I'll see you
on the next one. Thanks a lot. Bye bye.
36. Modeling an Aesthetic Rooftop: Welcome back everyone to the
blender for ultimate guide, and this is where
we left it off. Now let's come in and what
we'll do is we'll keep in this shade panel because it might make it a
little bit easier. And we'll come then
to these two here. Well, I'll come to
this one first. And what I'm going to do is I'm just going to grab it all, press and then we'll go
to Smart UV Project. Click Okay. And then what
we'll do is we'll come over. I'm thinking we haven't actually got the material in here yet. So what we'll do
is first of all, come to our asset manager, let that load up,
and the one I'm looking for is
going to be stone. I think it's called
Gray Stone material. I think it's this one. Let
me just bring that one in. And I'm in edit mode,
so I can't bring it in. There we go. Let's
have a look at that. Looks like let's let it load up. Yes, this is the one
I'm looking for. So gray stone. That's fine. And now what I can
do is I can go back to my shading panel. And then what I can do
now is I can put this on material and I can come to this, click the down arrow,
and then we're putting gray stone, like so. Now the other thing is you will notice that we're
ending up with a lot of files going down here and sometimes you don't
actually want that. What you can do is to actually not have as many files on there. You can come off, just save out your file first and then file. And what we're going
to do is clean. Well, first of all,
we want automatically pack because if we're sending
this through, you know, if you send it through
to a different computer to work on or
anything like that, you want to make sure
everything is packed in there like we did
with the asset manager. So let's click that on.
Let's then click Save again, and finally, then let's come up and come to where
it says clean up. And what you can
do here is you can clean any external data. So in other words, if you're not using that particular
material within the scene or you're not using that sky texture within the
scene, anything like that. If you click it,
it'll say, look, purging 18 unused data blocks, four images, seven materials. And click here to proceed. And what they'll do
is it'll actually now shouldn't be nowhere
near as you can see, as many materials as what you had before because
it's only going to be using the materials that are
being used in the scene. Okay, so now we've done that. Let's also go up and
what we'll do is we'll clean recursive
unused data blocks, 31 unused data
blocks, 27 images. Click that on, and now let's have a look. And there we go. So it's now much, much cleaner, nowhere near as many materials. This then also reduces
the file size of blender, so it's a good idea
to actually do this. Just don't forget
though, anything you've not go and you've
seen maybe you, you know, deleted something and you still wanted it there or you still wanted
that material in. If it's not on anything, you're going to actually delete it. Unless unless you
come in and you hit this shield here
which says fake user. And no matter if the material
is being used or not, if you hit this or if
you click this on, basically when you actually
go to delete them, it won't delete this material. So that's a bit of a tip there. All right, so now
we're on our stone. We can see our stones
looking very nice already. So let's now come to our wood. What I'm going to do is
the same thing again, so a smart UV project. Click Okay. Let's
come down then. And the one we're looking for is wood and light wood like so. And you can see that that's
gone on pretty nice as it is. And I don't think I'll
need to do anything. Finally, then I'll
come to this part U Smart UV project. Click Okay. Now the one thing about
this one down here is I don't think I've
got a bevel on there. So what I'm going to do is
I'm going to click this one. Click this one, control L, and then we're going to
link or copy modifiers. And there we go. And then
I'm going to grab this one, grab a stone control L, and I'm going to link
materials like so. Now, is that unwrapped?
Okay. Yes it has. That looks absolutely fine. And now finally what I can do
is I can grab all of this. I can actually then come up
to where it says object. Let's go down to
convert to mesh. And then finally what I
can do is press control J. Join that altogether, and
there is my window with hopefully the ability to still come in and
click on the unlit. So you can see the unlit is
still here, so that's great. We can also as well, if we
want to put this to the top, put this one to the top, and then we've got them
both near the top like so. All right, so what I'm
going to do now is I'm going to press control C, and then I'm going to open up that other blend
file that we had open, which is this one here. I'm going to press control
V then and drop this in. So here is my window, let's drop this in like so. And then what I'm going
to do now is going to find this over
the right hand side. So I'm going to press the little dot board
on my number pad. It says plan oh four. At the moment we want to call this small window like that, let's turn caps off,
so small window. And then I'm going to press
the little dot born again. And then right click
mark as I set. Now you can see it's coming
in on the unassigned. So what I want to do is I
want to make a new one. So I'm going to click plus. I'm going to call this Windows. So I'm going to go to
unassigned then, like so. And then I'm going to drop this into the windows in there. Click on the windows, and
there is our small window. Let's go to file them
and save that out. And then what I can do
now, I can put that down, come back to my file now let's go to Asset Manager and
make sure that is there. So what I'm going
to do is you can see I've already
got windows here. Let's turn off this ST.
And there is my window. So now I can actually come in
and delete that other way. Bring in a new window, let it load up, or think
about what it's doing. And there we go. Now the one
thing I think I should do, it has great actually
in the middle, So we've got an
orientation in the middle, so it should be fine. So what I'm going to do
is press ours head 90. I'm going to press three then. And then what I'm going
to do is I'm going to a line that up with the
one I've already got. And then let's delete this
one and this one like so. And let's grab this one and
pull it back into place. So right on the
edge of the wall. So pull it back into
the wall like so. And there we go. We've got
our window on there now, which is looking
really, really nice. Now, I think what
we should do is we should have a look at the top. So let's have a look at the top of here and
create that top part, and then we can move
on to the steps. Now for these top bits, all I'm going to do is create
some simple mesh for these. So basically I'm going to
come into the top of here, I'm going to press
shift S curse to selected shift A and
then bring in a cube. Some parts you just really
don't need to actually put on to your asset manager because they're just
so simple to create. Also, we can actually
pull these out once I've created
them pretty easily. So I've just brought in a cube. I've brought it in, I've squished it down on
the S and z axis. And now I'm going to do
is just put it in place. What I want it to do is
basically fit under these, so I want to make these
a little bit taller. So what I'm going to do is
I'm just going to press and y and pull that out a
little bit like so. And then what I'm going
to do is just stick it down roundabout there. And then I'm going
to pull it out now, so I'm going to
grab the front of here and pull it out there like, So let's grab both of these
then at the same time. And what we're going
to do is just press and Z and pull them up. And then lift up this just so
it's over the top of here. And you can see that's
looking pretty nice. Now let's create the one that's
going to go on the front. Then this one I'm
going to press Shift, and D, I'm going to
rotate it round, so 90 I'm going to press control or
transforms right click, set origin to geometry. And I'm going to put this
into place along here. And then of course
with this one, I want it to be slightly
thicker than the other one, and probably slightly thinner, so it looks a little
bit different. So all I'm going
to do is press and X and just pull it
in a little bit, and then and Z pull it out a little
bit, so it's like this. And then let's give it
a nice top on there. So I'm just going to
press control two. In fact, I won't do
two most of the time. I don't actually bring in like two edge loops
and things like that. What I tend to do is
always press control, left click, right click, drop it in the middle,
and then control. And I do that because
I feel like you have a lot more control
doing it that way. So that's the reason I do that. Let's come in then and
grab the top face, and what we'll do is just press
and pull that up like so. And then what we're going to
do now is we're just going to pull it to the end up here. So I'm going to grab, in fact, to make this easy for us, so we can just grab the
end very, very easily. Let's press shift Tates, just to isolate out
from everything else. And then what we'll do
is we'll just bring in a marked seam along here. So right click and mark a seam. Let's make sure we get all. And then what we can
do now is we can actually come in and
select this very, very easily in case
we need to move them. We'll do it on
this side as well. All about making it
easier for yourself. Right click mark. Same. Now if I press Tab or tag, what I can do is now
I can grab this, come to face Select and
just press L on here. That then we'll make it very
easy to pull it to the edge like so let's leave
this one here for now. What I'll do now is I'll
just grab them both. Control or transforms, right
click, origin geometry. And then finally
what I'll do now, I'll give them both
the same material. So what I'm going to do
is click the down arrow. We're looking for brownstone. So I might as well grab both
of these. Grab this one. Press control L, link materials, then grab both of these
at the same time. Press a smart UV
project. Click, okay. And then they're actually done. Now what I can do is I can just drag this one over
to the other side. So shift D, let's drag it over and put it more in
line with this one. So you can see this
is how it lines up. So our jaws need to pull
this a little bit that side. And then finally what I'll do
is I'll come back to this, I'll make sure I'm Jaws
grabbing this one. Press L and then
pull it out like, so that's looking double tap the A. Pretty nice like that. All right, let's
have a little look at what it looks
like just before we finish. Yeah, and there we go. So what we'll do now on the
next lesson is we'll make a start on this actual
flooring down here. That's quite a
difficult task to do. And then from there
we can actually do the steps going up and just
keep working our way over. As we work our way over, we are going to come across more things we need to create. But eventually you all
get to a point where near enough everything's created and you can just bring
them into place. You can also see as well, once we've actually
created this, all of those parts we can use to create a building in this style. We could create a
town in this style. Because what you
can do is you could actually come down and
just grab all of this, for instance, join it together, and then you've got a nice block already built out for you. All right, let's double tap the, let's save that, our work. And as I said on the next
one then we'll actually make an attempt at this circular part here. All right? Every once. I'll see on the next one.
Thanks a lot. Bye bye.
37. Constructing Staircases with Precision Measurement Systems: Welcome back everyone to the
Blend Four Ultimate Guide. And this is where
we left t right. Let's put it onto object mode. And then what we're
going to do now, we'll come to this bit. I'm going to actually, I could probably use this one here
that we've already got out, but I think I'll just, I think
I'll bring in a new one. And the reason is I want a few more edges than what
this actually has on. So what I'm going
to do is I'm going to press shift selected, and then we're going
to press shift A. And I'm actually, before I do that, I'm going
to go to modeling. I'm going to then press, and then what I'm going
to do is press Tab. And then I'm going
to press Shift. And we're going to
bring in a cylinder. So let's bring in a cylinder, let's set the
cylinder on something like 2024, something like that. And then what we'll do, we'll bring it out to this
first one here. So I'm going to bring
it all the way out to this first one here and try and make it line up
as well as I can. What I'm also going
to do is I'm going to press En's ed and bring it down. And I'm also going to
come in and just put this on object mode just so I can
really see what I'm doing. So let's bring this down into place and let's see
how it's going to fit. So you can see at the moment
it's a little bit out. So let's press S and bring it
back here in a little bit. And let's pull it out this way. Because what we want
to do is we want to still keep the
roundness of this. We don't want it to be kind
of thin here and thick here. And that's what I'm
trying to avoid. So what I'm trying to do is keep it as close to this as possible. What I'm going to
do though, is I'm going to join all of these up, so control J, join
them altogether. And then what I can do is I
can hide those out the way. As you can see now
if we come and press Alt tag again and make
sure that this first block, so this first block here, is going to be the right height. So what I'm going to do
is I'm going to pull it up just so it sat on the
ground playing like so. And then what I'm going
to do is I'm going to come in and drop it down like so Now what we
can do is we can get a measurement of this
when we want to pull it up. So if I come and put on this here and put
on the edge length, and then I'll come
to this edge here, and we can see it's 1.22 meters. Now we're going to obviously
have a top on there as well. So just bear that in mind when you're
actually doing this. All right, so now we want to do is you want
to bring it in, so all I'm going to do is 1.22 so just write
that down somewhere. So I'll quickly just
write that down, 1.22 So then what I'm going to do is
I'm going to grab this one. I'm going
to pull it back. So I'm going to press to
insert it like so I'm going to insert it probably
to somewhere around there. Because we want to make sure
that he's fought again. He's going to be on there
and it's going to look good. So what I'm going
to do is press tab. We're going to bring him over, I'm going to sit him
on top of there. So I'm going to hide this one out of the
way just for now. And it looks a little
bit fiddly and it is. I guess what I'll
also show you if I've got my guy here and a press
control, all transoms, right? Play set origin to geometry. Now I want to do is I want
to rotate him round ours. I want to rotate him around. Let's say I make him a
little bit bigger as well. Now what you can do
is to get him back because you reset
those transformations, is you can press Alt S, and that'll rescale him back
to the actual size he was. And you can also
press Alt and R, and then that will point
to the rotation he was. This is useful for when we're going on the
steps like here, where we want to
rotate him around to see where his actual
feet are going to be. So if I pull him back, we can see now if I press Tab, his feet are going to fit
on there pretty nicely. So that's absolutely
fine like that. So now we know that we can bring it in to just
in front of his feet, so you can see No 0.131 So let's now try
and bring it in again. So we're going to press
and bring it in again. We can see we can get
to 1.131 like so. And then let's press
again and bring it in, 1.11 So then we need one more. I'm going to press,
and we can see already that we're probably, we're going to need either
three or four steps, but I think it's
going to be four. We might have gone a little
bit too much on there. Let's just see if we have we can bring them all back,
so don't worry about that. Let's press again, 1.31
It's 1.31 there it is. And this is how far it's
actually going to come back. So you can see now it's probably going to be a little bit out.
Let's grab them all now. Shift, click, shift, click, shift, click, shift, click. And let's pull them
back into play. So I'm going to
pull them back to, maybe here it's 1.10 0.11 Now I can see 0.11 and we can see that this one is 0.134
Let's do this one. Now I'm going to press,
we're looking for 11. There we go. And then
this one again. 11. There we go. And then finally
this one shift and click and then in one. And let's see if I can
get away with that. And that I might be able to get away with is just
this little step here which I could probably
grab the whole thing now A, and pull the whole
thing out a little bit, like, so now I'm hoping that
might just fit in there. I might need to pull
back the jaw tiny bit. I'm actually going to come to this one again and
just pull them back. J, a little sliver back, 1.051 0.05 and then 1.05 like so. And then finally this one.
Let's see if I pull this back to 1.0 All right, let's see if that works now. So we know it's 1.22 which means now we can
come to the center. We can press control
Control control plus. And then what we want to
do is now lift it up. So if I press, I
can pull that up then to 1.22 So
if a whole shift, 1.22 there it is. And then let's come to the
inner one, control and minus. And then what we can do is
we can pull this up again, 1.22 like so. And then control and minus, and then 1.22 And the other thing is we might have to make them all smaller, but we'll just bring
it up to 1.22 for now. Because what we
need to take into account is the fact
that we're also, on this one, going to have some steps which are
slightly above there. Okay, so now we've
got the whole thing. Now we know they're
all even going up. Now what we can finally do
then is pull them down. If I press and's on this, I can start to pull that down just below where
this actual door is. I can actually make sure as well that it's into the floor. Like you can see there.
It's into the floor and now you can see if I
move my guy back, it's adjust it's just like
you can just walk on there. I'm thinking, could I actually pull it out a little bit more? Maybe I could pull it out a
little bit more this way. But actually, I don't I think that's going to
be absolutely fine once we've got the slabs
going across here. All right, so I'm
happy with that. Now let's move our guy, so we're going to press
altar on our guy. Just move it back a
little bit over there. And then what I want to do now is I want to cut this away. So if I want to
cut this basically away from let's say here
all the way over to here, because most of this I'm
actually not going to need. So what I'm going to do is I'm going to come over the top. So I'm going to press
seven over the top. And now we can see
this. Let's then think about, can we do this? Yeah, let's have a look. Can we do this in there? Yes, we can. So we can see that we need
to come to let's say, let's just turn
that off a minute. I'm going look where I'm coming. So this bottom step is here. And then we've got this
part going over here. Yeah, that's what we'll do. So seven, let's go over the top. We're going to cut
here. And we're going to cut from here. I'm going to grab my steps. I'm going to put on our x ray. I'm going to press Tab, then A. I'm going to turn off my length. Now, I don't really
need that on. And then what I'm going
to do now is come over with what is it
called, the bisect. Let's bring that in. And
let's cut it going this way. We're going to go in that way. We're going to make sure each of these is on zero,
as we already know. And then what we're going
to do is we're going to clear the inner or the outer. So we're going to
clear the outer. Now we're going
to press A again. And I'm going to cut
it down this way, this time this way. If I have bisect selected down this way and then
put this to zero, you can see it's not
point north north four, let's put that to zero and we're going to swap these
over like so. Now let's have a look
at what we've got. So let's turn that
off. And there we go, some perfect, perfect steps. All right, the last one then what we need
to do is we need to use these parts to create our kind of slabs
that's going to go down here. We can see here as
well that this is, you know, a tiny, tiny slab, should we pull it that
way a little bit. Probably going to be a bit
better actually if we do that. You can see also,
there's a little bit of a gap down there as well
now. So let's do that. So what I'm going to do is
I'm going to grab this, I'm going to press and y and just pull it out and
then pull it into place like so I'm just wondering how far can
actually pull it into place. So let's pull it over
to here like so. And let's press S and Y and
pull it out, over to there. Now, why have done
that? It means that this slab here now, as you can see, is right
on the edge of the door. So I'm going to have to pull
it this way just a tiny bit, and we see now it's
fitting in perfectly. And we're just looking now to make sure everything's
fitting in. And then what we can do
now on the next lesson is we can actually
turn these into slabs. Now you will see on this bit it's actually not
fitting in, right? So we might need to cut this. So what I'm going to
do is just before I finish press control
and bring that across. And then what I'm going to
do is I'm just going to go to my x ray. And then I'm just
going to cut this one. So just this one from here. So if I grab this one, this one, this one and this one, I should be able
to then come in, press Delete, and Bases, and I can also come underneath. And I should be able to
delete this bottom part. So just grab that one there, press delete faces like so. And now let's have a look
at what that looks like. And there we go. Perfect. So that's perfect. What it
means is that this slab, now I can make as one, this one. And it means I won't
have any little kind of bits that I
don't really want. This one's okay if we
have a little bit there, but the rest of it
now is going to fit in really beautifully. All right everyone, So I
hope you enjoyed that and I'll see you on the next
one. Thanks a lot. Bye bye.
38. Adding Style to Staircases: Welcome back everyone to the
Blender Ful Ultimate Guide. Now before carrying on,
let's save out our work. And now what we can
do is we can actually start creating these
parts going over. So I'm going to grab
this going over here. So what we're going to do is
we're gonna grab this one. Control, click, control,
click, shift, click, control. And just control, click
along just so we're not grabbing anything
else like so. And then shift, click, control,
click, control, click. All right, now what we can
do is we can actually press Shift D and we can
bring those up like so. Now these are going
to be our slabs. And you can see just
how easy that is now. And now what we can do is we
want to select every other, every one of these. We can actually probably, I'm thinking if we can come in. Yeah, we want this
going all the way over. So I'm just going
to do this by hand. Actually, I'm just going
to make it easy for myself so it won't
take too long. There are ways of
selecting things, but on this occasion just
might as well do it like that. And then what I'm going
to do is I'm going to right click and
I'm going to mark. Seems like so. All right, so now I want to do is you want to split every one of these off. So all I'm going
to do is just come down and select every other one. So we're going to
split them off. The way I'm going to do
it is I'm going to press Y. I'm I'm not going to do that because
I need to just go back. I didn't select these two. There we go. Can I
select one in there? No, I can't. But I think
that one will be fine. I can pull that
one out, actually. So what I'm going to do
is I'm going to press Y, and then what I'm going to do is I'm quickly just going to pull this one out just so
it's fitting in there, right? So you can see this one
just in the corner there. Let's just pull
this one out into place like So now we've
got these split off. So what that means
is now if I press a, well, first of all actually
I'm going to split off this. All right, before actually
I split these off, what I'm going to do is I'm just going to split this
off away from it. So I'm going to grab
this, I'm going to press L selection. So that's a split off. Now I need to make a little bit more of a change
because at the moment, we can't actually bring
these out too far over here. So I'm just going to make
a little bit of change. What I'm going to
do is I'm going to press a on all of these. I'm going to come
to mesh because I'm messed up. Clean up. And then what I'm going
to do is merge by distance and we can see
40 vertices removed. What that means is now that each of these is not separated. So if I press Alt
shifting click, we can see now that they're
not actually separated. Which allows me then
to grab the front of them and press the S button and pull them out a little bit. Because at the moment we can see though when
I'm pulling them out, let's try al tests instead and see if I can
pull them out that way. No, I can't. So I'm going
to have to do this a little bit of a different way. One, we're going to have
to do it and we'll have to grab each of the
edges of these. We're going to have to go
over the top and seven, and we'll have to
put the x ray on. And instead of
doing it that way, what I'm going to do is we're going to pull them out like so. Because it's going to pull
them out a little bit. Even then what I'm going
to do is pull them this way and finally
pull them this way. And just get them
all lined up so you can see we can line
them up with this red. So now you can see the basically all
lined up and we have a little bit of an edge there
and that is what we want. We can see we're out
a little bit here. I'm just going to pull them down a little bit and
try and line them up, making this line,
this line going here the same,
basically, all the way. Pull it this way, you can see. So pull them out and then
let's pull them back. So, all right, so I think
that is looking pretty good. Now you can see we do have a little bit of a problem
if we turn this off. You will see that
they're poking out slightly on here and here. We're not going to worry
about that right now. What we're going to
do, first of all, is we're just going to grab the whole thing and just pull it back slightly now if we can. And I think that should
still be okay on there. And the other thing
is, I think this just being just on the edge here
should be absolutely fine. All right, so we've
got those in place. I'm happy with what
they look like. I might need to move this
one just a little bit. So I think we're
going to do that just to get it just in front of here. And yes, I know it's
a little bit fiddly, but we really want it to look pretty nice. All
right, like that. I think that's going
to be fine now. Now we have this
bit and this bit. So let's actually come in and
fix those while we're here. So I can grab this one
and I should be able to just pull it
back through there. I'm going to grab.
Let's have a look. This one, there we are. Or is it this one
that's poking out? Not even sure which
one's poking out. Let's have a look. Yeah,
it seems to be this one. So I'm just going
to pull that back and a little bit
more. There we go. And then let's pull
this one back. There we go. And let's pull this back as well. There we go. Now you can see that, that I need to grab the
top one as well. So there we go. Pull that back. Let's turn it on.
And there we go. Okay, we might finally be there. A little bit of fiddling around, but I think we're there now. Let's grab the whole thing.
Let's press A in fact. Yeah, we'll split it up. Actually, I think we'll grab
them all and split them up. Let's see if we can actually
split them up first. So what I'm going to do is
come into each one of these, I think it wasn't split up, so I'll just come in and
grab each one of these. So like so. And then press Y. And then what I'm going
to do is I'm going to press A to grab them all. I'm going to go over to this button here and put
it on individual origins. I'm going to press the S B then, and I'm just going
to make sure they're all split up, which they are. Now finally what I can do
is I can pull them down, to pull them down like so. And then I'm just going
to go around this side and look at the actual
height of them. And finally then what I'm
going to do is just pull them down so they
sit on top of there. And now they've got a slight, slight gap up there now that's looking pretty good now how
to turn them into steps. So yeah, they're looking really, really nice now actually, they come right up to the
place where I wanted them. So now let's turn
them into steps. So what I'm going to do is
I'm going to come over, I'll reset my
transformations first. So all transforms right Click
set, origins, geometry. Let's add in then a generate, and let's add in a bevel. So let's turn the bevel
all the way down, so we'll put it
onto something like not 0.1 Let's turn
up the segment. See what that looks like. It makes them look a little bit more, you know, stone like. Let's right click,
shade, auto, smooth. And then finally, what we'll
do now is we'll come in, grab everything like so. We'll come over to where
it says mesh transform. And then we'll go to randomize. Turn the randomization down, so let's turn it down
all the way down to nought 0.1 So we'll end
up with something like this. Now you can see they're
a little bit uneven. And then what you can do
is you can also come in again, mesh
transform, randomize, and turn it all the way
down again to naught 0.1 Let's try not, not five. Let's try that. Press
Tab and then we go. Now we've got a fair amount
of unevenness on there. And I'm just, I'm thinking, yeah, they're looking
pretty good anywhere. They're like touching
too much so you can see like this one
and maybe this one. We can just simply come in and grab this one and
this one and then press the S but and just shrink them in just a
little bit like so. So they're not touching so much. Okay, then they're
looking pretty good. Let's go over then
to our material. Let it load up and then
let's save that our work. And then finally Tab
to grab everything. And what I'm going to
do is I'm going to come over to my material, I think. Do we have a stone? Yes we
do. We have a stone here. So what I can do is
grab my stone flags, grab my window control, L, and I'm going
to copy materials. And then what' going to do is I'm going to come
to the top one. Minus it off, minus
the windows off, and then minus the
light wood off. In fact, I've took
them off of there. So let's come to this
one and then minus off, minus off, and then minus off. And there we go. Well that's
what we're left with. Double tap the A and they're
looking pretty nice, except the fact that we need
to press Smart UV Project. Click Okay and now they're looking fantastic,
as you can see. All right, let's put it
onto our rendered view. Let it load up, and there we go. Once we've actually got then this stone wall stone on here, you'll see those will
really start to pop out. All right everyone. Sir,
I hope you enjoyed that. Sorry it was a
little bit fiddly. Sometimes things like that are
a little bit harder to do. As I said, the stairs though
are going to be much, much easier than what
this round part was. All right. Every
once. So I hope you enjoyed that. I'll
see on the next one. Thanks a lot. Bye bye.
39. Utilizing the Array Modifier for Staircase Modeling: Welcome back everyone
to the blender for Ultimate Guide and
this where we left there. All right, so now let's
put this on material, let's grab this part here. And what I want to
do is I want to come over and just
give it this material. So I'm going to grab this, grab my wall press control
L, and link materials. And then we're going to come
back to this press Shift and H. And now what I want
to do is unwrap this. So I'm going to press
a smart UV Project. Click Okay. And let's
actually see what that's unwrap like.
Not very well. So if it unwraps not very well, let's come in and see
if instead we can just grab each of these
steps, including this one. Like so let's right
click Mark a scene. And let's instead just
press L U and unwrap. And now you can see they've
unwrapped much, much nicer. Still getting a little
bit of stretching. And that's probably
because we need to press all transforms, right click, set origin
geometry, and now unwrap. And now they should unwrap. Much, much nicer as you can
see. Now why do we do that? You can see now that if
I grab this part here, delete it out the
way you can see. Now we've got some
dirt underneath there, and they're looking really, really nice as you can see. Now, I'm just making sure
everything is lining up. I may need to just lift up
this door just a little bit, just so it sits on there a
little bit better like so. But I think I'm really happy
with how that's turned out. Okay, now let's think
about this part. This part here. We're going
to put another pillar in. I think I'll take this
pillar and I'm going to drop this right on
the edge of here. Let's grab this one. We're
going to press Shift D, and we're going
to bring it over. I'm thinking that it should
be at the same height. So it should be at the
same height as here. I'm just going to drag
it over and I'm going to put it I think just on
the corner of there. So I'm just going to make it actually fit
into place a little bit. Something like that I think
is going to look good. And then I'm thinking that maybe I'm just wondering how far back to pull
it you can see there. If I pull it back to here, it's not going to
cover this edge. But I might actually be
able to pull this all back. Then I could pull this part back into place because it's not looking quite right there.
I think I'll do that. So what I'll do is I'll
just grab this face and pull that back
just behind there. And then what I'll do
is I'll come into this, grab this face and pull
that back then into place like so double tap the let's have a look at
what that looks like. And I think that's
looking pretty good. Let's give this some
material as well. So what I'll do is
I'll grab this one. I'm going to press a
U Smart UV Project. Click okay. And then
what I'll do is I'll grab this win wall again. Control L, and we'll
link materials. Double tap the A, and let's look at what that's
looking like. I'm not going to
worry too much if it has got a little bit
of dirt down there, because that looks
absolutely fine. It's got a little bit of
dirt down here as well. Let's have a look rendered
view, what it looks like. And you can see that's actually looking
really, really nice. People are going to be putting the hands on going up here, so I don't mind that at all. This is actually
looking cool now. All right, so now
let's bring in, I think we'll bring
this part here. And what we'll do is
we'll put that on top of there and make
all of this fit in. And may need to pull
this out a little bit. I don't want it poking through
though, so maybe to there. And then what I'll
do is I'll put this part right at
the edge of there. Still might need to pull
this back a little bit. I'm going to pull it
back just a little bit, so then I'm going to
pull this one back. Now, just a little bit to
get it into place like, so. All right, that's looking
in there pretty good. Let's now grab this bit. So
I'm going to press shift, I'm going to bring it down. I'm going to press R 90. Then what I'm going to do is put this into place down here. Let's pull it back into place. Just fit it. It's just in there. Just in there. So
let's pull it down. One thing I just want
to check on these is, yeah, got a bevel on there. Look, yeah, we've got
no bevel on there. So that's something that
we need to sort out. What I'm going to do is I'm
going to bring a bevel in. Let's bring in a bevel. Let's turn it down, and
then let's put it on. Let's turn it up
to not 0.1 First 0.1 you can see it's probably going to be a
little bit too high. So what I'll do is
I'll put this on. Not 0.05 and that's
probably going to be more. Right? And then what
I'll do is I'll grab each of these like, so grab this one last
press control L, and I'll link or copy
modifiers onto those, and now you can see
they're looking good. And then finally, We'll come round now and what we'll do is we'll
grab this one here. So I'm just going
to go into space, select, grab the end of here. And then I'm going
to pull that into the wall over here so
it should fit in there. Don't worry about this wall. By the way, we're
going to actually put in another pillar over there. We're just trying to get this
bit in place. All right. Now the last thing to do, if
I go back into material now, you'll see that this is
stretched out a little bit. So let's press U Smart UV
Project and unwrap that. Okay, so you can see that wall now is really starting
to take shape. Now let's come to this wall and we're going to
do the same thing. So a smart UV
project. Click okay. And then grab this and this, press control L, and we're
going to link materials. Let's then double tap the A. Double tap the A and have a
look at what that looks like. I'm just wondering
if that's going to be okay or is it because I need to reset
all my transforms. So I'm going to reset those. And then you Smart UV
project. Click okay. And there we go. Now that's
looking a little bit there and I'm thinking at this point that we can probably get
now we'll finish this wall. Actually we'll come to this
and we'll come to this, We've got this part here. You can see if I move that, that's what that one looks like. And we can see this one. And this one is. I'll join those altogether. I'll press control,
Join them all. Then I'll press Control
all transforms, right? Click, set origin, geometry, and then Tab, grab them all. And then what we're
going to do now is press Smart UV, J click, Okay. And now let's join these to
these with the material. So control L link
materials like so. And that's how they've
actually, did I unwrap them. I wasn't even shut.
So let's try you Smart UV project. Click Okay. Double tap the A
and there we go. Now the final thing then I
want to do with these is I want to actually level
these off as well because we don't want
sharp edges on here. So as we're going
through, we want to make sure we're
beveling things off. So what I'm going
to do now is add modifier Come to Generate. And click on Bevel
and turn this down to naught point naught naught
one. Let's try that first. That's maybe a little
bit to less No, 0.5 Let's try that. And I think that's perfect. Now let's copy the modifiers
then onto this one. This one. Let's also look at this here because
we've got some edges on there. We might as well do
it on there as well. And then let's select
this one last control L, and we're going to copy
modifiers like so now we should have a beautiful bevel on all of these
parts going around. There we go. Okay,
let's have a look on our rendered view. There we go. We can see that's
looking pretty nice. Now, I'm happy with
how that looks. It's really starting
to come together. Okay. So now what we'll do is
we'll come to these stairs. So I'm going to save
out my work again. I'm going to come
to the stairs now. And we've got two stairs here. And I think they're a
little bit different now. The thing is we've already
got the array on here, which actually might make
things a little bit easier. So what I'm going to do is
I'm going to duplicate this, and then I'm going to slot them back into place once
I've finished with them. So I'm going to press
shift, bring it out. And then what I'm going to do with this one, first of all, I want to copy the top of here. So I'm going to copy the top of here like so I'm
going to press shift. Just bring that up and you'll
notice they all come up. And I don't really want that. Now I've copied
the top of there. What I want to do
is press controller and bring in a load
of edge loops. Left click, right click. We can see I've
brought in eight. That should be good enough. Because what it means
is I can split these up going all the way up the top. I'm going to turn
this up to ten, so ten edge loops
going all the way up. Now what I can do is I can
actually apply this array. So control, let's
apply that array. And now it'll end up
with is the stairs. So we're going to have each
of the stairs like so, so I'm just going to come
down select each of these. And I'm just basically going
to separate these away. I'm just going to go back
because I selected all of that away from these top parts. If I press nail selection,
now we've got the, so if we hide these, we've got these parts
here and then we've got the stairs underneath.
All right everyone. So that's it for this one. What we'll do on the next one is then
I'll show you how to make short work of these
stairs really, really easy. A little bit like we did with
the steps here and yeah, it'll really start
coming along now. Thanks everyone. See on
the next one, Bye bye.
40. Designing Stylized Tiles for Staircases: Welcome back everyone to the
Blender Four Ultimate Guide. And this way we're left the art. All right, so we've
got our stairs now what we want to do is
we want to split these up and we want to basically randomize where actually
the tiles are going to be. So you can see this
one, then three, and we're going to
randomize this one, so it's a little bit
different from the other one and the
same going down. So basically you want to
make it so that you've got different edges as you can
see in different parts. Like so it doesn't actually
take long to do this. And the reason we're doing
it obviously is because we want each of the steps
to talk independently, different from the other step. So that's why we're
actually doing this. So if you can see, you
can put it here, here, here, here, and
here, and then here. So right click, Maxine. All right, so now
we've still got these joined to the other one and we don't
really want that. So what I want to
do is I want to press a just to grab them all, selection, split them off. I'll teach them to
bring back my stairs. And now you can see, So Yeah. Should we just be able
to select both of those? All right, So now let's
come into these steps and what I'm going to do
is, first of all, I'm going to make them a
little bit longer this way, so I'm going to press and X
and pull them out like so. And then I'm just going to
pull them forward just a tad. Now I'm going to do this, I'm going to separate these out. So all I'm going to do is I'm going to come to each of these, so just every other one, just work your way down like so. And we're just going to then
separate these out like so. So you can see now they'll all be separated once to press Y, press the G, and then
they're all separated. And if you really want
to test what it's going to look like,
then just come down, make sure you on the
individual origins press the S born and just make sure that
they're all separated out, which they are finally. Then what you're going to do
is you're going to press, pull them up to create those
steps that we have or need. And then what we're going
to do is we're going to go in with the bevel again. Now at the moment we have
got our bevel on here. So we want to make these steps look exactly the same as these. So what you might as well
do is grab these steps. Grab these steps, in fact, before we'll reset
our transformations. So let's set origins, geometry, grab these steps, control L, and we're going to copy
modifiers like so. And then finally we're going
to come to these steps, grab them all with a, and then come to mesh
transform and randomize. Pretty much the same thing
as what we did before. We're going to bring it
down to Not 0.1 like so. Right click, shade, auto smooth. And actually I don't think I'm going to go
anymore with those. I think they're going to look
absolutely fine like that. Then finally what I'm
going to do is I'm going to grab these now. So shift select these ones. I'm going to press control L, and I'm going to link materials. Let's put it onto shade mode. And then finally
what I'm going to do is I'm going to grab
all of these steps. Now press A to make sure
to grab smart UV project. Click okay. And there's all of those steps now done
looking beautiful. And now finally, we can
come to these ones. We're going to grab all
these smart UV project. Click okay. And what
I'm going to do now is join them
up to this shift. Select this one, control L, and you're going to
link materials like so. Now let's make sure that these, because I'm not sure if I did, if I press control all transforms right clicks
at origin to geometry. And then what I'm
going to do now is I'm just going to
unwrap these again. So you where is it?
Smart UV Project. Click Okay. And there we go. Now we've got a little bit
of dirt on some of these. You might want to put more dirt underneath each of these.
You can actually do that. If we come to our shading panel, you'll see that
if I zoom in with a little dot born
and then press tab. This is what it looks
like at the moment. So all we need to do is just
grab the front of these. So if I grab each
of these fronts, you can see at the moment
they look like that. Let's actually
spin the all round and then I'll show
you what I mean. So if we grab the all a R 90, spin them all around
and then what you can do is you can just
drop these ones in. And then we can
grab all of these. So we can press B for box
select, Control plus. And let's drop them all in. And now you'll see we've got some dirty steps going up there and they
look even better. Okay, so now I'm going to
do is grab everything. I don't want to join them
together yet because I've still got some modifiers
on and things like that. But what I can do
now is just pull them into place where
they need to be. Now what I'm going to
do is I'm going to line them up with the bottom one. So I'm going to hold shift, pull them out, pull them out, pull them out very
slowly, like so. Then I'm going to hide
them out the way. Delete these steps
out of the way. Put the steps back, so
l tag, put them back. Double tap the and there we go. Finally then we want to move
just this pillar jaws a slight bit because of the moment you can see it's
a little bit out. Or we move our steps back,
whichever be the case. Maybe actually on this occasion because we've got
so much on there, it might be a little
bit easier just to grab my steps and move them
back just very slightly. Like, so, okay, so
that's looking good now. And now what we want to do is we want to come to our other steps. And while, because we're
doing steps now anyway, we might as well finish these steps and make them,
you know, look nice. So let's come to
the other steps. What we're going to
do is shift D. I think that these steps are a little bit
different from these, so let's just have
a look actually, so our sad 90. And let's see if I
press one and try and put these steps into. So I'm going to put,
let's have a look. Let's put X ray. Just look
in if I can get those in. X ray is not working, so
let's put the wire frame on. Let's see if they all line up. We can see that they're
a little bit out. A little bit out, unfortunately. So do we take these steps and try and make them fit round
the other side? I can see, I think actually
this step starts here. Yes, this step starts here, but it's got another
step on top as well. I'm wondering whether
it's easier just to make these steps a
little bit steeper. Let's have a go. Let's see
if we can actually do that, because it might actually work out much, much easier for us. What I'm going to do is
I'm wondering whether I I think I don't need my bevlon or anything
like that anymore. So what I can do is I can join these together and I'm going
to join them together. So I'm going to come to object. I'm going to go to convert
to mesh control J, join them together, and then I'm going to get
rid of these steps. I don't need these right now. And then what I'm going
to do is I'm going to press shift and I'm going to see if I'm
going to actually make these fit in to
where I need them. So -90 and then let's
pick them up like so. And then we'll put them into
place where I want them. And we can see we
have got a step missing and that
might be the problem. Do we just need one
more step on there? I think as well that
we're going to need them to be a little bit higher
than what they were. I think I can actually
make this work, actually. So what I'm going to do is I'm going to grab
them like that. I'm going to press and's
head, pull them up. Then I'm going to do
is I'm going to put them back a little bit now, see if I can actually get
them Yeah. Round about there. Let's make sure then that
they're in the ground, so it looks like they're
in the ground there. And then what I'll
do is I can come in, grab one of these steps. I'm going to come in
and grab this here. I'll grab this one here, L. And then what I'll do is I'll
grab these here as well. Now what I should
be able to do is I should be able to press shift, press shift space bath to
bring my move to move them up. And we should end up with
something like this, which then I should be able to put into place at
the top of here. Let's bring it back
into place now. Let's come in and just
delete the other steps, or hide the other
steps out of the way. Let's press G. Yeah,
let's hide those. Let's move these to the side, because I still might want them, so I'm just going to move
them over to this side. Then I'm going to press Alt
to bring back the steps. Then what I'm going to
do is double tap the. I just want to look to see if I've saved myself
a lot of work. Look, let it load up, let's come around to this side. Yeah, I think I've actually saved myself a lot
of work there. Now if we want to make them look a little bit different as well, what we can do is we can
press and X and pull them in a little bit so
they're a little bit thinner than the other steps. But yeah, I think that's
actually going to work. We've saved ourselves
a lot of work there. That's great. Now let's
delete this step out the way. We're not going to
need that. Now what we can do is let's make a start them on this part here, this is a much bigger
door on this part. So what we can do is we can pull this out like
we've done before. So shift, we know now
the size of the door. And then what we can do on the next lesson is we can
start shaping this door. Get it in our asset manager, and then boullion this back so we can have a nice door
that's set all the way back. And finally, then
just finish off this front bit from there. Then we can work
all way up here, all the way to the top. And then we've got
this first kind of bit actually done
and out the way. Alright everyone. So
I hope you enjoyed that and I'll see on the
next one. Thanks a lot. Bye bye.
41. Understanding Normals and Doorway Modeling: Welcome back everyone
to the blend of Four Ultimate Guide and
this is where we left off. So let's see now if our guy is going to be around the
right height for this, so let's put him down
to the ground plane. So let's press one then. And then we can see this is the height of what
it's going to be. It's probably,
we'll use this bit for the door and around
the outside then we'll actually create an
arch or something like that because
then the boolean doesn't have to quite
go in that far. So what we'll do
is we'll come in, first of all, we'll use this
block seen as we've got it. And then what we'll do is we'll
reset the transformation. So all transforms, it's
the origins geometry. Grab each of these sides then and control B. I'm going
to pull them down. And then what I'm going
to do is I'm going to round them off slightly like so. And I think if I press one now, that's gonna look
pretty nice for a door. Now let's think about
the outside of it. What I'm going to do is
I'm going to grab this, going all the way around here. Just this edge loop, we're using control click. And then what I'm going to do
is I'm going to press Shift D. I'm going to pull
it out a little bit. I'm going to press, and
I'm going to follow the Y and Y, pull it out. And then what we'll do
is we'll make this now into our stone around here. So I'll press control
left click, right click. Control left click, right click. And then I'll use
that for the stone. I'm going to separate
this off now. Lp selection, grab it again. Control or transforms. Right click, so origin geometry. And then we'll add in a
generate and solidify. Then what I'll do is
I'll put even thickness on and I'll pull
this out like so. Now you will see we've
got a problem there. And the problem, as I said with the modifiers or with materials, textures, is always caused
by near ing off two things. This is the other thing, so it's a good time to actually
show you what this is, so let's actually
hide the other way. Let's actually come up
then and what we'll do is we'll put face
orientation on. And you can see that on here. So on here, anything in red
means that the normals, so the way that the
mesh is facing, is facing the wrong way. In other words, when we take this through to a Games Engine, a Games Engine only
renders one of the faces. It doesn't render them both, because then it optimizes
the game or the scene, because it's not
having to render out two faces at the same time. You can have leaves
and things like that which are double sided
and they're fine. But anything else,
you really want to make sure the normals are
facing the right way. Not only do the normals
affect things like light, they affect materials,
and they're invisible. If you have them the
wrong way round, you need to come in and
fix them, basically. All right, so now we've
seen what the issue is. How do we actually fix them? Fixing them is so easy. We just come in press
to grow everything, and then just press Shift. And then what it'll
do is they'll just rotate them all round
the correct way. Now while we're here, let's come into these steps and
we'll do the same thing. So a shift, rotate them
all the right way round. Same for the door.
Then tab shift, rotate them all the
right way round. And then finally this part here, shift rotate the all the
way right way round. So you can see there shift sometimes doesn't actually work, and if it doesn't
work, you can see now this one's facing
the wrong way round. Just come in and grab the mesh or meshes that are at the issue. Press Shift and then come down to where it says
Recalculate Normals. Open that up and just
click on the inside. And then you can fix
them that way as well. All right, let's do the
same to these as well. So I'm going to press tab
shift N and reverse those. Ran. And the reason
I want to do all of these is because if I use
any of the parts again, I want to make sure that
I'm not going to go in and, you know, fix the
load of normals. All right, so now that's done, let's come and turn
face orientation off. And then what we can do now, we can come to this part, turn back on our modifier. And a presto, it's
actually working now. Let's bring this back. So I'm going to bring it back
the other way and make it something, something
more like this. And then what I'll do is I'll just move this back into
place where I want it. So something like that. And now I can actually
start work if I move my guy over
on my actual door. For this door, what I'm
going to do is I'm going to make relatively simple door. So the first thing I'm going to do is I'm going to come in, I'm going to put it
on object mode just so I can see what I'm
doing a little bit there. I'm going to press the eye button then
just to bring it in. And this then will
be the metal kind of part going around here like so Then what I'm going
to do now is I'm going to actually separate
this out from this. So I'm going to press P
selection, separate it out. And then what I'm
going to do now is I'm going to grab this
bit and I want to make this basically a door. The way I'm going to
do it is I think I'm going to make an insert
on here and here, and then two down the bottom. So I'll show you what I mean. What I mean is I'm going
to first of all need. An edge loop going
across this way. So let's come in and what we're going to do is
grab this vertise. And this vertese, we're going
to press G and then we're going to do face on
one on the number pad. And now I want to bring in
an edge loop on control. Let's bring it up to
something like there. And then one more control
right in the center. Left click and right click. So now I'm just looking to
make sure that this window, as you can see here,
they're probably going to be a little
bit small there. And I think that's
exactly how we want them. Now I want one more edge
loop going up the middle. Now you can see I
can get to there, and then I can't go any further. So what I'll do is
I'll left click, right click to drop
it in the center. K to bring in a
knife, grab the top, press A and make sure
it's going straight up, left click, and then
enter. And there we go. Now finally we want to be
able to bring this part in. So in other words, we want to
bring all of this part in. The way to do that is
we're just going to have to get rid of
this edge loop here. So what I'm going to do is
we're going to press Delete, and I'm going to
dissolve edges like so. Now you can see that we do lose a little bit of these
parts when I do that, and I didn't really
want that to happen. So let's see if I
can actually delete. Let's press Delete, and let's see if we can
dissolve vertices. That's not also going to work, so let's press control. And I want to just dissolve
the edges. There we go. That's the one, that's
what I want to do. I want to leave that on there. So the one I pressed
is if I grab this, I've pressed dissolve, sorry, Delete edges like so. And why I've done that,
it's because now if I come in and grab oh, yeah,
that's what it's done. It's leave the faces. So now let's come in. Fix that quickly. So
what I'm gonna do is I'm gonna come in and grab this one. This one going all
the way around here, press the F Bt to fill that in. And then just do the same thing, going all the way around here, press the F button
to fill it in. Let's press one now,
and then what I'll do is I'll come in now and
grab all these faces. I'm going to use the inserts. I'm gonna press I. But what I'm gonna do is instead of
just pressing I once, I'm gonna press I a second time. And now you'll see we
can actually bring it in in a completely
different way like this. Now what that's gonna enable me now is to put some windows on here and have some wooden
blocks in this part. So now I'm going to come in, I'm going to separate
these parts out. First I'm going to press Y, and then we're going to
separate these parts out, press in Y and then come
back to these parts. Now what I'm going to do is
I'm going to insert again. So I'm going to press I like so. And then what I'm going to
do now is pull these out. So I'm going to press, to
pull them out like so. And then I'm going to
press control plus, and I think I'm going to pull them out a little bit like so. So they've got a little bit of a beautiful edging
on them like that, and I think that looks pretty good Then what I'm going
to do now is I'm going to make the wooden parts off here so these windows
can stay as they are. These wooden parts need to
actually be coming out. So what I'm going to
do is basically I need to separate these out
where I want them separated. So we can see we can
have a piece of wood. We can actually have it
probably bending around here. Let me show you what I mean. First of all, we need to
separate this part out. So all of this is going to
be a piece of wood here. So if a part of
piece of wood here, here, you can see now we can have a piece of
wood going up here. And then we can have
a piece of wood being separated here and here. Here and here. And the same thing on this one. So I'm just going to
work my way down now. So you can see at the moment,
that's how it looks like. And then what I'll do is I'll
put one in here and here. Here, and here, and
here, and here. Now you can see
that these will be my pieces of wood going around. If I right click now
and put Marken now, you should have a better visual of what we're
actually doing here. Now if I come in and
I come to this part, you can see that I can
separate this part out. So I'm going to press it and H, and then L. L on this one, Y and H, and then L on this one, Y and H. Now you can see I've separated
all these parts out. I'm going to do the
same now on this one. This one and this one. I'm just wondering
whether I want a piece of wood separating
these two parts out. I think I do. I've missed one. I'm going to put one
in here, one in here, right click, mark seen. And then now we'll
separate these parts out. So I'm going to separate
this, this, and this. I'm going to press Y, H,
Hide them out of the way. And then this. I think that's all I've
pretty much got left. So, this and this, Y, H, and then this one, and this one, Y and H. I'm hoping that I've
separated them out enough. So, let's have a
look if we have. So what we're going to
do is in fact what we're going to do is we're going to just hide these
out the way first. Because at the moment they're going to actually get in the
way of what we're doing. So what I'm going
to do is I'm just going to press selection. And now I'm going to bring
out this piece of wood. So I'm going to pull
it out like so. And that's what you
should be left with, ready for the next lesson.
All right everyone. So hope you enjoyed that and I'll see you
on the next one. Thanks a lot. Bye bye.
42. Techniques for Unwrapping Door Frames to Enhance Wood Grain: Welcome micro everyone
to the blend, the ball ultimate guide. And this is where we left out. All right, so now let's
think about our wood. So the best way
to test this is I know that some of them will
probably be still be joined. So what I'm going to
do is I'm going to press A. I'm going to make sure again that I'm on
individual origins, I'm going to press
the S. And we can see that we do have
some problems here, mainly in these parts
here that are all joined. So you can see this one in here. So what I can do is I can simply come in and select both of these like so I can press Y then and separate them out. And then
I can have another go. Let's see where they're
all joined now. So we can see if we
bring all those in. We've just got these two here. If we grab this one
and this one Y, then we've got this one here, so we can see this
one and this one Y, S. And there we go. Now they're all separated out. That is exactly what I want. So now what I want
to do is I want to actually pull these out
and basically unwrap them. I might as well. Yeah, I'll
probably pull them out first. Let's, let's pull them out so there's our
wooden blocks now. And then what we'll do is we'll press right click and shade. Auto, smooth control
all transforms. Right click, set
origin to geometry. And I'm thinking
with these, yeah, I'm wondering whether I want to get rid of the back
if I need the back. I think actually I'll
leave it on for now. You could get rid of the
back if you wanted to. And what we'll do is we'll
add in and modify it. Will be a bevel and then
I'll turn the bevel down. Turn it up one and it's still probably going to be a
little bit too high that, so I'll put it on nought point. Not three, maybe. Let's try naught point N5o. 0.05 Yeah, and I
think that looks bad. Okay, so now let's see what it looks like
when it's unwrapped. So what I'll do is
I'll put this on shader, let it load up, and then what we'll do
is we'll press Tab, A Smart UV Project. Click Okay. And then what we'll do is I'll
come over to the material. And I'm going to
put this instead on wood type in wood like so. And that's what we
should end up with. And we can see that
these parts around here are the only parts
that I'm not happy with. All the other piece of
wood are going fine. Maybe they need to
be a little bit, let's look on the rendered view. Maybe they need to
be a little bit larger on the UV map.
Let's go into them. Let's first of all press
A and bring them out. I think they look better. Now let's think about
fixing these parts here. We can see these are the parts
here that we need to fix. Now generally we can
come in and fix these. If I just grab these parts and just pull them out the way, then what I'll do is I'll try and see if I can
actually separate these. I'm going to just separate
them out a little bit just so we can
see what I'm doing. And then I'm going
to grab this one and go all the way down to here. And then what I'm going to do is I'm going to right click. And we can see, we can
straighten out that. Now I can do is I can pull
it to the side like so. And X, let's pull
it to the side. Now let's try straightening out this one control click
all the way down. Right click straight, and then X and see if that
is straightened out. It's going to be
on the back there. So I'm going to
press shift and H, hide everything else
that the way let's put it on material motor or
I can see what we're doing. There we go. Now you can see that's actually being
straightened out. Let's try another way as well to see if we going
straightened out this way. So what I'm going to do
is I'm going to come to this one control
click to this one. And what I'm going to do
instead is I'm going to click, I'm going to click, Follow
active quads. Click, Okay. And we can see that that's not straightened out
very well at all. So let's try
different techniques. Light pack, click, okay, and then you follow
active quads. Click Okay. And let's have a look at that. And now spin it around 90. And there you go. That is a better way of
actually doing it. So I'm going to do is make this smaller now so it
actually looks right. Something like that, I think. And then what I'll
do now is I'll do the same thing on this one. We're going to grab it
going all the way around. Light Mac pack click okay, And then and follow
active quads click okay, and R 90 and spin it around. Now I'm going to show you
another technique as well, just so you don't
have to keep doing the same thing over
and over again. So what I'm going to do
is I'm going to come up to Edit Preferences. And this add on
that I'm going to show you is inbuilt
within blender. It's called UV magic, so you'll see one here
that says UV magic. Let's click that on, and then what we'll do
is close that down. Then what you can do now
is let's say to this one. So you can come to this one. And what you can do is you
can press U and you will have another part here. So you can come to
copy and paste. Copy and then Default, and then you can
come to this one. And then what you
can do is press U and you can come
to copy and paste. You're going to paste
Default, and there you go. Now these will be pretty much exactly the
same on the UV map. Now you can see that I do, Actually, let's see if they are. I do actually have a problem
with that and sometimes, sometimes that happens
when we copy like that, that actually
doesn't work. This time generally does work, but I don't know why
it's not work this time. Let's have a look if I've
put it the wrong way round, so our hundred and 80. Let's see if it
looks bear that way. You can see we've got
a bit of a block in there where it's
actually cut in half. It looks like it starts again. So what I'm going to do
is I'm going to go back. I'm going to press
controls head. We will use that a little
bit in the future. Not quite yet, I guess. So let's pull it back to there. And then what I'll do is
I'll grab this one now. Then I can come
in, grab this one, press the S one, make it smaller, and then
just drop it next to there. And just make it the same size. And there we go. That's
looking pretty nice. Now the back of them,
we don't need to do those because no one's
going to see those. So that's fine.
Let's now come in and press Lth. Bring
back everything. Let's save out our work. So file and save, and then now let's start
work on the actual metal. So we can see we've
got our metal here. So what I'm going to do
with the metal is I'm just going to come round
and click it all. Going all the way around. Do here like so. And then I'm going
to press Shift D. I'm going to bring it out. And then what I'm
going to do is press pull it out like so. Then I can now split this off. Lp selection control A, or transforms right
clicks at origin, geometry, right click,
shade, auto, smooth. And let's drop that back
into place like so. Now let's make it actual metal. First of all, we'll
come down and look for metal, black metal. Then we'll go in and press A
and U and smart UV project. So let's have a look what that looks like.
Absolutely fine. Then what we can do is
finally we can come in and we can level this off. We're going to add in a
modifier. Turn it down. Turn it up one, there we go. We definitely want to
make sure that we're beveling off the metal
because that then enables us to have
that beautiful edging on there that we
talked about before. So you can see now maybe this is a little bit
high, so not 0.5. There we go. That's
looking fantastic. Let's put it back on our shader. Let's save that, our work. And then what we'll do is
we'll bring in this one. Now this is this part here. We'll drop that just into there. The wood just in
front of it, like so. And there we go. And
then what we'll do now is we need to actually
unwrap these parts. So what I'm going to do is
I'm going to press L, L, L and L. Press one on the number pad
and I'm going to press, and what we're
going to do now is we're looking project from view. So let's zoom in. And now we're going to need
another material. First of all, I'm going to make these a little bit bigger. And now we need
one more material. So we'll go over to
our asset manager. And what we're looking
for here is painted. So if I go to All and
click on Painted, the one I'm looking
for is green painted. So we can see here
green painted wood, even though it's red. Don't worry about it.
Let's bring it in, make sure we're actually on object mode. So bring it in now. And then what we can do is we can delete that out the way. And now we can come two, our shading panel once more. Click on these parts, and let's click the down arrow. And we're going to look
for green painted wood. Let's click that
on, let it load up, and let's see what
that looks like. And there we go. Now we can see that these are going
the wrong way round. So all I'm going to
do is I'm going to come back to now shading. I'm going to press Tab and then I'm just going
to spin these round, so R 90. Spin them around. There we go. Now the last
ones are these ones here, so let's press one
on the non pad. And then let's come to project from View because that's going to make
it easier for me. And then what I'll do is I'll
come over to my materials, click the plus be, click the down arrow, and
we're looking for window. Let's look at what
window we've got. At the moment, we only
have Windows two. At the moment you can see
we've got Windows two. Which one is that?
Let's click this on. Let's see what these are.
So let's click a sign, that's the Windows two. Let's click the down
arrow and go to the 21. I don't think these
are named correctly. Yeah, they are the same ones. So I really don't actually
want that one on. I think I want a little
bit of a difference. So what I'm going to do
is come to Asset Manager, I'm going to go to window, and then what I'm going
to do is I've got 12.3 we've already
got this one here. So what I'll do is I'll
just drag this one in in object mode. Then what I'll do is
drag this one in. Now we can see what
the difference is. I think I'm going to
go with this one. Actually it looks like
it's Windows one. Let's delete those out the way, and then let's come into this and we're going to put windows. I
think it's that one. Yes it is. Okay. Now, if I come in back to shading
panel, let's press one. Let's come to these parts, and let's press
and pull them out. Now you can see on
these that I can spin them around and fit
them into this part. It's a little bit
harder to see on these, but you can see we can
just bit them into place. Let's press R 90 and
spin these round, and then R 180. Spin them around
again, and let's see if I can fit
these into here. So let's press and try
and get them into place. Let's try this one as well. So Y, pull that one
into place like so. And there we go. That's
the way that I want them. Okay, finally, then finally we'll be on the
next lesson onto our rocks. So I'm going to pull
this into place there, we're going to create
these into being rocks. I might as well
delete this part now. I don't really need it like so. And then once we've done that, we have another door
that we can add to our asset manager and we
can bring in our scene. This door, it's going to be used here and it's also going to be used on the back of here as
well. All right everyone. So I hope you enjoyed that
and I'll see on the next one. Thanks a lot. Bye bye.
43. Finalizing Doorway Entrances: Welcome back everyone to the
Blenderful Ultimate Guide. And this where we
left off. All right, so let's now work
on this part here. So what I'm going to
do is at the moment we can see I've got a solidify on. So what I might as well
do is I might as well, before I use my solidify, let's just turn it
off a minute so we can see what
we've actually got. Okay, so it's going around
the outside of there. So what I might as well
do, I might as well put this on object mode.
I might as well press. And what I might as well do
before doing anything is just come in and add
in all of my seams, ready to split this off. So if I come in right
click, mark, Seem, and then come in to
every other one, what I can do is
I can press Alt, Shift click, and
then come to Select. And what we're going
to do is check a D select so, and
then just press Y. So now we can just press Tab, Then it back on.
And there we go. Now I don't think, actually
I want it like that. So I think what I'm
going to do instead is, and we're just going to
press controls head. And instead of
splitting them all off, I've got them all mark seams. Let's now turn it back on
again. And there we go. We're going to have it like that and I'm going to split them up hopefully individually,
once have added this. So I'm going to press
control like so and now. Yeah, it's not actually worked. So you can see the seams
don't quite go through. So I'm just going to have
to do this the hard way. Just going to come in and
split them off the other way. It was weird for shot, so
right click. Let's mark scene. And then what we're going to
do now is come in with L, L, L, L, L and L. And then what
I'm going to do is press Y. Now I can come in and grab
the mole, press mesh. Come down and we're
going to clean up. And we're going to fill holes. Now we should be able
to hopefully come in, add a modifier,
generate a bevel, turn it all the way down. Turn it up one, there we
go. There is our stone. And that's looking
pretty good right now. Okay, so now let's
grab the stone. So this is the stone here we, we'll just go into shading and then what we'll do
is we'll grab these, we'll press control L, and we'll link materials. And then we'll come back
to that and then press A, just to make sure
we've selected it all. U and Smart UV project.
And click okay. There we go. There is our stone. Okay, the door finally done. Let's have a look
what it looks like. Let's double tap
the A. There we go. Looks really nice
now on the windows, let's just come to
the materials first. So we want Windows one. So what I'm going to
do is going to click down narrow window one. I'm going to click this
Windows one again. In fact, no not, I'm
going to minus it off. I'm going to click the
plus N. I'm going to call this window one lit. And then I'm just
going to copy this. I'm going to copy
material, paste material. And then all I'm
going to do is just unplug the emission control, just grab it and let it go. And then we've got one
that's unlit as well. Now we can just come in and
change those if we want to. Okay, finally, now let's
join this altogether. So I'm just going to hide my base out the way
I'm going to just put it onto our material shade just to make it a little
bit easier to work with. And then I'm just going
to simply select it all as always, mesh convert. It means if it's grayed out, you just need to select
one shift select and then object mesh control J. And finally what' going to do
is control all transforms. Right click, set
origin geometry, and then right click, and
I'm going to shade auto, smooth. And there we go. Now let's get this
into our asset manager control C. What I'm going to do then is just
open up my other blend file, which I've should be here. Here's the other
blend file control. Bring it in. Let's come
to it, put it here. And then one going to do is
dot over the right hand side, we'll call it large
double, right click. And then mark as asset. And then finally come
to a sign and we're going to drop that
into our doors. So let's then come out
and save that out. And hopefully again, it should. Now, even if I delete this
out the way, so delete it, Asset managers, turn the window off
and there is our door. All right, let's bring it
in. Let's put it on there. Let it load up as to think
about it. There we go. Okay, so now let's put that
into place where we want it. Now we do want it in this place, but there is a bit
of a difference. Obviously, we want
to actually use a boolean to go straight
back through there. So what I'm going to
do is I could either use this to actually boole or I could delete that and use
this to actually do it. So I'm just going
to bring it forward and what I'm going to do
is I'm going to press tab. I'm going to come in and
just grab each one of these. In fact, we'll grab
them from the outside, the outside on here, going
all the way down to there. And then what I'm going
to do is just press Shift D, pull it out. And then I'm going
to press Select. Then I'm going to select these. Hopefully if I press, can I actually fill all of
those in? Probably not. Let's press and
see if that works. No, it doesn't. So what
we're going to do is we're going to fill
in each of these. The easiest way is probably going to be to grab
this and this, press the, grab this and this, press the F and just
work your way round. Just so then we've got the
general shape of what we need. And we're not worried about
the shape of this anyway, because we're using it only for a Boolean and we're not
using it for anything else. We just want to set
it back a little bit. Again, adding intricacy
to our build, which is what we're
looking for like this. Now we should be able to
join this one and this one. Now finally we should be able to press Old
Shift and click. And then press, and there we go. Now let's decide how far
back we want it to go. So let's press, pull it back. And now let's press Tab
Control, Lay or transform. Right click, set
origin to geometry. And now we'll just pull
it back into place. And it should hopefully fit
in there as you can see. Now what I want to do is I'm just going to move
it this way and see how much room I've actually
got. Let's just move it. You can see it's just if
I move it a little bit, it will be poking through. What I'm going to do is I'm going to pull it
out a little bit. So we've got all of that room now to put this door
in if we want to. And then all I'm going
to do now is I need to put it through probably
both of these walls. So I'm also the one thing you want to make
sure is that you don't want to boole and have this little bit
of a bottom here. So what I want to do is come to the bottom of it
with face select, grab the bottom, and then just pull it down
all the way through. So we can see here,
it's going to be going through all of these.
All of these here. So what I'm going
to do now is I'm going to come to this one here. I'm also going to come to
this part here as well. I'm going to press control
all transforms, right? Click, origins, geometry. And then what I'm
going to do now is I'm going to come
and grab this one first and add modifier generate. And it's going to be a bullion. And the billion of
course is going to be this year,
large double door. And as I said, I normally put it on fast because
that seems to work. Bet. And then I'll
come to this one. What I'm going to do is I've
got a bevel on here already, so I can apply the bevel because no one's going
to see in there anyway. So let's apply the
bevel with control y. And then what we'll do
is add another Boolean. So generate Boolean and
then let's collect this. And then fast, and then
let's press control. And then hopefully, hopefully if I delete this
out of the way now, no I won't because I
need to apply that. Let's apply that one now. Let's delete it out of
the way. And there we go. It should be going
all the way through. One thing I just
want to make sure is it's not made a hole anywhere
in where the steps are. We don't want any holes there. And let's grab this now. And now we should
be able to put this back into place like so. Now finally, let's deal
with this actual wall here. So what we'll do is we'll
right click, first of all, shade auto smooth just to
kind of shade that off. Can I shade that
off? I'm not sure. I'm going to press control all transforms and then right
click shade auto smooth. And I think that's as best
as we're going to get this. And then what we want
to do is we want to add in the wall texture. So let's come in grab or
wool, press control L, and we're going to link materials and we're also
going to press control L. And what we're going to
do is link copy modifiers basically just to get hopefully a little
bit of an edge on there like you can see
going around there. All right, so that's looking
pretty nice like that. I'm really, really
happy with that. All I need to do now is I
just need to unwrap this. So I'm going to press
a smart UV Project. Click Okay, and we
can see that we do have some dirt
along here now. Do we want dirt along
there? I don't think so. I think we need
some dirt more at the bottom on this
one, to be honest. So what I'm going to do
is I'm going to, yeah, I think I'm going to do this maybe a little bit different. I'm just wondering
the best way to do this Is this one piece? This should be one piece. But what we want to
do is we want it to be coming in to here as well. What I want to do is I want
to unwrap this part separate. I'm going to grab
all this. I'm I'm going to press control
and I'm going to mark A. Then what I'm going to
do is I'm going to go over to my shading panel. I'm going to press Tab,
I'm actually going to press A and then R 90. Spin it around, G, Y, pull it down. I just have a little
bit of dirt on there. Also want a little
bit of dirt on here. As you can see here. If I
select all that we can see, it's this as the back. I'm just wondering where
this bit actually is. I'm going to actually
unwrap all this one. Now coming up here, I'm going to unwrap
it altogether. So what I'm going to
do is I'm just going to press you wrap. And then you can see
this is the bottom here. So what I'm going to do now
is this is this bottom. And this bottom hasn't got
anything as you can see. But if I turn this around, if I press a 90 pine place, now you can see
we've got going over most of it and I think that
actually looks better. Then we've got this part here. Let's spin this round, a 90, 90. Spin that round, and
then finally this part. Let's press A and then 180. Spin that round. There we go. A thing that looks at tomb. Except this bit I don't
really want it into the dirt, so I'm just going to press 90. Drop that in place like so. All right, let's
have one final look then at what that
actually looks like. Double tap the A, there we go. That's looking really,
really nice as you can see. Okay, so on the next lesson, and then I think we'll actually work a little bit more
on building this out. So we'll get the top on here and then we'll probably work on
building this little bit out. I'm trying to
basically split it up so we've got a little
bit of modeling, teaching you more and more
complex things as we go along. But at the same time
trying to keep you engaged by not doing too
much of the same thing. All right, every once. So
I hope you enjoyed that. And I'll see on the next one. Thanks a lot. Bye bye.
44. Decorating Doorway Entrances with Beams: Welcome back everyone to the
Blender Four Ultimate Guide. And this is where we left off. Now let's go back into modeling. Just for now, we'll keep
it on shade and what we're going to do is just hide out these palm
trees out the way. And then what we'll do
is we'll make a start on building this part here out a little bit. So
we'll do that now. So the way we're going to
do that is first of all, I'm thinking if, yeah, we'll have to go and
asset manager actually, because it will make it
a little bit easier. And what I'm looking for is
the one which is the side. So this one here.
And I'm going to, I think I'll need one of these. So this is the center 0.1 of these which is
the corner point. And I think I'll use
the round of ones which are I think they are these
ones here. No, not those ones. So they're going to be
these Yes, they are. Those those are the ones
that I'm going to use. All right, so first of all we will come and put
this corner piece in. So I'm going to press
seven squel at the top. And I'm just going to put this then into the corner like so. And then I'm going to
lift it up and just place it probably actually
just a little bit down. Now I am wondering on some of them we might be better
off making them a little bit smaller because
you can see this may be a little bit too
big for this part. It looks good up here, but
maybe they're too big for the. So I'm going to do is just
grab them all and I'll make them smaller,
independently like so. And I think that's going
to look like that. So now I can put it in there. And then what I'll do is
I'll put the other part, this part here, over
the top of here. So what I'm going to do
is I'm thinking I'll put it round here and let's see how that's actually
going to fit in there. Something like that. And I'm just trying to
fit them all into place. As you can see, if I press one, actually I'll put this
more in the center. And then what I'm going
to do is I'm just going to pull this
up and see if that's actually going to fit
in there nicely or not. I'm going to pull it out there. We can see probably we need to make them still a
little bit smaller, so I'm just going to
grab all three of them. Make them a little bit smaller so they're going to fit in
place a little bit better. Then what I'm going to
do is pull this down. I'm going to fit this
then into place. Pull it down a little bit, making sure there's
a bit of wall there. And then what I need now you can see it's not quite going
to go over to here. So I'm going to pull this up. What I'm going to do
is I'm going to bring this over and put it halfway so we can see if we
put it around there maybe. And then we can grab
this again, presi, pull it out over to here maybe. Then what I can finally
do is I can come in and delete this part here. I'm going to come
into this, I'm going to press out shift and click. So make sure you're on face, slick shift, click, shift, click control plus them. And then you can see it comes up to here, which
is absolutely fine. That's what we want.
Delete and faces. And then what I can
do is now I can come to this one because
we can see it's here. So we're going to
press Ot shift click. You know what? I'm
going to hide this one out the way so I can
see what I'm doing. I'm going to come then
to this one first. It's going to be around there old shift and click
and then delete bases. And then let's delete
these out the way. Delete bases. Now let's come to this part. And I'm thinking that I'll delete this one
here out the way. Deletes L delete
and then L delete. Now I'm just going to go into my x ray, which
is this one here. And you can see I've
missed one here, L delete. Now let's see what
that looks like. If you press Alt tag,
bring back everything. And now we can see that we're
probably going to have to, let's have a look how
much room we've got. I'm going to bring
this over very slightly so we can see we've
got another bit on this, so I'm just going to come in L, delete vertices, and then what I'm going to do
now is pull this one over and hopefully get
that one into place. And we can see that
it's a little bit out. So I just grab this, pull
it over very slightly. Grab this one again, and
we'll delete this part. So L delete it. Says ol tag. That actually is looking
pretty nice now. Okay, so now let's
grab this part here. Let's press Shift, and we'll
drag it over to this side. We'll press Z -90 And then what we'll do is
we'll put it into this corner. We can press one
on the number pad. You can see just
the distance here, so you can see it needs
to come out a little bit. And hopefully, hopefully now I should be able to
bring this one over. Let's have a look
shift. I think it's a bit longer because
of where the door is. So what I'll do is I'll
see if the next part, so I'll bring this one in again. And we'll put it on there,
so then we'll spin it round. So 90. Let's have a look. Is
that the right part? Yeah, I think that's actually the wrong it's, it's
the right part. Let's press R Y 90. And then heard hundred 80. Let's see if we look
at the scale on this. 1.24 and then we go
to the scale on this. Let's see if we can
make them size. If I grab this, the one thing is that we've actually
cut these away. I'm not going to do it
that way, actually. It's going to be a
little bit fiddly. I'm just wondering if
I can the same size, but then a little bit longer we might have to fiddle
around with this little bit. Let's press, let's make it a little bit smaller so
it lines up with this. That's the size
it's going to be, the length of it is going
to be from there to there. I'm wondering. I think it'll be easier just for me to
put this in place. Yeah, we'll do it that
way. We'll line it up. Let's line it up with this one, making sure it's in
the right place. Like making sure nearing
off it's the right size. And then what we'll do is
we'll pull this over here. And then what I'm going
to do is I'm going to come in and
pull this bit out. Alt Shift, and click hopefully
on this edge, there we go. And then what I can
do is I can pull this part out into place. Then what I can do is
now I can grab these, press one on the number pad, and then I can press
shift D and bring it over and have it in the
same space shift, then shift D, and then the world is I'll move
this one over very slightly. So there we go. All right, so that's
looking pretty good. Let's see if it's go lost stretching on here,
which I think it has. Instead we'll just
press smart UV project. Now we'll just see what
that actually looks like. Double tap, the A. Yeah, that's looking good now. Okay, I'm happy with
how that looks. Now we need to think about
these two side bits. So let's go back to shading. Let's save that our work. We'll come to this
one first because we can see we've got a bit of
a mess on this one here. So what I'm going to do
is I'm just going to hide that out of
the way H to hide. And the reason is
because this one, yes, this one here is
causing the issue. I'm going to hide all
of this out of the way, and I'm going to
come to this one and then I'm just
going to press L, L. In fact, I'll delete
that one in there as well. So delete versus. And then control our
pull. It's there like so. And then what we can
do now is we can just come and then Alt shift
and click like so. And delete bass tab. Oh, double tap and there we go. Okay, finally we got that bit. Still got, oh, what's happened
there? Wait a minute. Is there a mirror on what
is going on with this? I'm just wondering
that has changed. Let me just check to see. Yeah, that's not changed.
That's absolutely fine. I'm just wondering why
this went like that. Let's just have a
look at when that actually changed. Here we are. Did I actually
delete that out of the way independently from that? Maybe we've put that back there, we've got this one in place. I'm wondering why
this is decided. Hide the other way.
I've got this one here. I'm just wondering if I delete this and this delete vertices. Yes, it's actually
changing this one. What I want to do is I
want to separate this out. I think that's a
little bit of a book. So what I'm going to do
is I'm going to come in, I'm going to delete
the other way. And then I'm going to
come in and I'm going to see if I can delete just these. I'm just going to delete
these two delete vertices. And you can see that's
where the issue is. I'm going to go back
and what I'm going to do is I'm going to
bring this one back. And this one here, I'm
going to delete it. I'm going to grab this one, then shift D and then pull it over into place like
so, all into place. And then hopefully
I should be able to do now is I should be able to come in and L and
L delete vertices. And now it's kept those there, so I don't know why what's
doing that actually. So I'll come in now
delete vertices and then what I'll do is now
I'll come in old shifting, click control control plus
and then delete and faces. And now finally we should be able to
pull this into place. I'm just going to stretch
this a little bit. So S and X, just a little bit of stretching shouldn't
actually alter anything. Let's press S and X and
bring it back a little bit. Double tap the and there we go. Now what I'm going to do is
I'm going to use this one. So I'm going to use this part. I'm going to bring this
round to the side, so I don't know why it
had a little bit of buck there where it was
altering the other one. I'm not sure if I pressed
old D instead of shift D, but either way
we've fixed it now. So Rs 90 and let's
get this into place. So I'm just going to pull
this into place where you can see it's probably needs stretching out a
little bit as well. So I'm going to press and y, let's pull it out
a little bit and let's see if I can
get that into place. Now if it's really, really tight, what you can do is you can just
put it into there. And then what we
can do is we can probably get away with bringing these back jaws to tiny bit
so it covers that up like so. And I think that's still
going to look good like that. All right. I'm going
to save out my work. And then on the next one what we'll do is we'll
cut this bit off, get it over to the other side, and then we can move
on to something else. All right, one. So I hope
you enjoyed that and I'll see on the next
one. Thanks a lot. Bye bye.
45. Adding Foliage Ferns to Enhance Entrance Appeal: Welcome back everyone
to the blender for Ultimate guide and this
is where we left off. Okay, so let's then come
in and what we'll do is we'll take off this
born here, the x ray. And then what we'll do
is I'll click on this, and I'm just going to hide it out of the way so we
know we have three. Then what we're
going to do is click on this all shifting click, and hopefully it shouldn't
alter any of those. So delete. No, it's
not. That's good. Apart from we've
gone too far down. So delete faces instead. And then what I can
do is I can come in now and delete each of these. So delete vertices A tab Ol
tag, bring everything back. And there we go, double tap the A can see we're
little bit out, so we're just going to pull
it over very slightly. Double tap the A now
it fits in perfectly. And now what I can
do is I can take this little bit shift, bring it over to the other side. And then what I can do is I
can spin that round, R z 180. Spin it round. Let's put that then into place
where it needs to be, which will be
something like here. Now we can see with this one probably going to be too much. What I'm going to
do with this one instead is first of all, I'll pull this end out. Let's come into edge
slit or shift click. Let's pull it out into place. Then what I'll do is I'll see if I can pull
another one in shift. Let's put another
one right there. Let's see if I can
scrunch them up or split them up a little bit
better than what they are. L and then L, I think Matt's going to be fine. And then L on this and
you smart UV project. Click. Okay. All
right. There we go. Yeah, that looks actually good. Okay. So now let's make a start, I think on this part going around here
before we do anything. So we're going to, I think we'll use this
one that we add here. So this one here, which is, I think it's this one here. So over look, yes it is. And then what we'll
do now is we'll get these parts into place. So I'm not sure if we want to make them as small
or as big as those, but we'll see as we
actually build out. Probably going to make them a little bit of the
smaller ones I think, but we'll see as we build out. So I'll said 90, let's hide these
palms out the way because they're actually
starting to get in the way now. And then what we'll
do is we'll put it, let's put it coming over
just below this window here. I'm just wondering if I
can get away with using bigger or smaller At the moment, I've
brought that one in. Let's bring in then. Then
we'll bring in the corner. We'll press, in fact, do we need to press?
No, we don't. We can just put that in place, I think, pull it up into place. I think that's
actually going to fit. Okay, let's move this
down a little bit. Let's move it out like so. And then what we'll do is we'll
bring in a halfway point. We basically want to pull this
all the way to the stairs. So you can see that we're probably need to make these
a little bit smaller. What I'll do is I'll
bring in the halfway one. I'll drop that on there. And then what I'll
do is I'll press Y -90 So then we've got
all of these parts in. And then what we
can do is we can change them all together So you can see here not quite
fitting into the stairs. And that's where I really want, So I'm just going to grab it, I'm going to press S
then on all of them and make that fit in a little
bit better, as you can see. Now what we're going
to do is we're going to grab this part. I'm going to pull it
out so it actually fits in the stairs really
nicely like so. And then what I'm going
to do is grab this bit, put that in place
so I can see here. I'm going to put it in place
maybe a little bit up. So then I just want to
line this one up with it, which actually is lined
up pretty nice anyway, so then I can just grab
this one shift deep, bring it over and see
where that's going to fit. So it's going to fit
somewhere around there. I'm going to put it just there. And then what I'm going to
do is I'm just going to see if I can pull that
out a little bit. So now let's come in and
get rid of these x ray on. Let's come into this one. This one and this
one, and delete. And then let's come in now, shift click, control
control and delete. Double tap the there we go. Now let's bring in the window. What I'm going to do is I'm
going to come to my windows. This is the window
that we've got. The moment, let's pull it out, let's spin it around. R, Z 90, press three. I'm going to put it into place roughly where
it needs to be, which will be somewhere
around there. And then I'm going
to pull it out into place and' delete the other
window that we had there. It's one here. Delete
it and there we go. I'm also wondering whether I should line it up a little
bit. Let's line it up. Yeah, I'm wondering if
I should line it up more with this point
here actually. That's looking pretty nice. One thing I want to do
with this window though, is I just want to
come in and I want to grab the actual window. And what I want to do is I
want to put it on lit a sign. Double tap the there we go. This one's also
lit at the moment. Let's have a look if that
I mess with this one. Grab this one and click sign. Yeah. They both actually, they're both actually
doing the same thing. In other words, they both seem
to be copying each other. What I'm going to do is instead of bringing it in from
the asset manager, I'll just actually delete that. In fact, I'll actually
grab this one. I'll press shift D
to duplicate it. I'll grab this one,
shift selected. And then I'll delete
this one out the way. Delete, grab this one Shift and selection then
will do is now. And come in, grab just
this surface here. Click sign and there we go. Now we have one lit
and one on lit. So we just have to be very careful when we're using
the asset manager. As you can see that when we're changing something and
cutting splicing things, that we're not actually
changing the other part. So better to use shift D
once you've got a part in, so we're not altering
the asset manager. I didn't actually know
it actually worked so much like that, but now I do. So let's fix, now I'm thinking, let's probably work our way up. So what I'm saying is, let's get this in
the right place. Because I want to be able to
put something under here. Another part of this
going along here as well. I think what I'll do
is I'll lift this up a little bit because I want some rocks under
there and things. I'm going to put it
right about there. And then what I'm going to
do is I'm going to come in, I'm going to grab this one here. I'm going to press shift and I'm going to pull it
into place like so. And then pull it down just so it's probably going over the top of the.
Pull it into place. Double tap the eights.
Have a look at what that looks like and that's
looking pretty good. And then what I'll do
is I will bring in, I don't think we have a
middle section on here. Again, let's see if I can
bring in a middle section. So I'm going to go to sides. And this one is the same size. This one hasn't been
shrunk down in anyway, our middle section
should work fine. One, let's put this in place
where it's going to go, which is roughly going
to be roundabout there. And then what I'll do is I'll
steal this corner as well. Shift D, let's bring
that over to there. Then rotate it round 90, 90 and zed 90. And there we go, finally
that's where I wanted it. Then what we'll do is
we'll bring this back. First of all, let's put this in place where it needs to go, all the way back to there. Then what we'll do is
we'll grab this one shift. We'll also move this
one over to here now. And again, we're going to make sure that it fits in place. Let's pull it out
slightly this way. Pull this one out
slightly this way. And then we'll come in
now and alter this. Hopefully, again, we'll see
if this actually works. L not that one we're going to go into there. We don't
want to select that. We want to select
just this cube. There we go. We selected
the back there, but I don't think
it really matters. So we'll select this one and
this one delete vertices, and we can see, did we alter
anything? No, we didn't. So should click control
plus control control. Delete faces on this one. So delete faces and
then double tap the A and then just make sure nothing got altered, which it hasn't. All right, that's
looking good like that. So we worked our way round Now. Now I think what we should do is we'll tackle
this door here. But before that, I
think what we'll do is we'll actually
go to our foliage. I'm going to come in,
plant some foliage, and we have some really,
really nice ferns. Let's bring in these ferns. We're just bring in a fern here, we'll bring in a fern here. We'll bring in another fern, and we'll bring in one
final fern on here. What we'll do is we'll put one of these ferns. Let's
have a look at them. They actually, they're all
rotated the wrong way round. So we'll just rotate
them back, Y, S, X minus x, 90. We'll rotate them back. So then what we'll do is we'll
just pick one of them. You can see they're
all different. And we'll pick one and we'll
put it just in this corner. Yeah, let's put it down. Let's lift it up, so R and X, we'll just tilt it a
little bit that way. Double tap the A, and now let's just put it in place
where it's going to go. And then R and Z
rotate it around. We can also come in and just delete this one out the way
we can grab that press. Delete. And there we go. That's looking a
little bit there. The other thing
what we can do is, as well as we could also
come in and move that part. I'm just going to
press Al Tage and I'm going to see where
these parts are. I'm going to come
in L, L and delete. Then we go, now we should
be able to press and Z and pull that into place. Then finally let's
pull it down like so. And then A, mine actually
just rotate it on the Y as well. And there we go. Right. I don't need these
others in fact. Yes I will. I will keep one of them
because what we'll do on the next lesson is I'll just leave
these two other way. Pick whichever one you
want is we'll just make a simple pot
to put on here. I'm going to leave
this one this size. I'll make this one a
little bit smaller, but we'll make a simple pot
to actually put on here. And then we will kind
of build this out. Because what I want to do
eventually is I want to take a nice image of this with the render options just to
see how it's coming along. All right everyone. So I
hope you enjoyed that and I'll see you on the next
one. Thanks a lot. Bye bye.
46. 3D Modeling of Plant Pots: Welcome back everyone
to the blender, full ultimate guide, and this
is where we left the art. All right, so what I'm
going to do now is I'm just going to create a
little plant pot for us. So I'm going to grab the fern shift S sta selected and then what we're
going to do is press shift, we'll bring in, I think a cylinder will make it
really, really easy for us. Let's put this then
on something like, let's try 16,
something like that. Let's make it a little
bit smaller then. I just want to create
a basic plant pot. I'll deal with the size once
I've actually created this. So what I'm going
to do for now is I think I will come in and
add in some edge loops. I'm going to turn off x ray, we don't really need
that on control law. Left click, right click. Bring it down to there. And
then what I'm going to do at the bottom is I'm going to
put my proportional, It's on. And we'll put it onto, let's try inverse square.
Let's try that. We'll press, I don't think,
is it going to be right? Actually, yeah, maybe that's
going to be quite nice. It's a little bit different
from my last one, but I think actually this is looking quite nice the
way it's turned out. Then what I go do is turn that off and then I'll
press control B. Be level that off,
maybe bringing in two. And then we'll, I'll
grab the center, press the eyeball to insert
press to bring it down. And then what we'll do is
we'll bring that out then. And then finally bring it
down again. There we go. Actually that's turned
out pretty good. Now what we'll do is
we'll just be level off the edges Alt shift
and click control, so we'll bring in the inside. First I'm going to
come to the top. I'm going to press
the eye button. Then one going to do
now is press drop it all the way down and then
press and bring it in. Now I can come in
and grab the edges. Shift, click Alt shift, click control B and
bevel off the top of it. And now finally let's
bring in our fern. We're going to stick
our fur in the top of. You can see this is probably
a little bit too big, so I'm going to make it a
little bit smaller like so. And now we'll right click
and shade, auto, smooth. And then finally we'll just put a little bit of a band
going around on here. So all I'll do is
our press control are left click, right click, and then come in face
lect al shift click, enter alternS, then
just bring it out, make sure offset even is on. There we go, a
beautiful plant pot. Now the last thing I want to do is I just want to come
to the top of it. And what I want to
do is press control. Bring in another edge loop. And then all I'm
going to do is press and then Y and just
split that away from it. All I want to do with that
basically is just make sure that I can actually
put some soil in it. Let's now come to our materials. Let's press Tab and we'll do, first of voice search
for soil soil. We'll search for clay. We've got blue clay. We'll
bring in the blue clay. We'll also bring in the clay. And we'll also then
do a search for soil. We'll also bring
that one in as well. So we've got soil clay. Then what I'll do is
I'll delete those like so I'll then come
to my little pot, Come down and we're
looking for clay, then we're looking
for plus clay again. Stand the blue and then
down arrow soil, So Okay. So let's now unwrap this. So what we're going to do
is smart UVP J click okay. And then we're going
to sign the clay, which should be there now, so just a simple clay pot. And then what we're going
to do now is come in, click Control plus, and we're going to assign the blue clay. And then finally the
soil. Click a sign. Now I'm just looking
to make sure the soil shouldn't
really look like this. It should have a lot
less roughness and a bit of metallic to make
it look like actual soil. And then what we
can do is compress Altage now and bring
back everything. And now we can actually
move these altogether. So I'm going to select
my pot, select my bush. Then we're going to put them up here. Just on this step here. Some jaws are going to press jaws to bring those into place. You can see it. We're
going to have to make it much, much smaller. So I'm going to press S. You can see when I press I
shrink them independently. Don't really want
that. I want to actually shrink them
with medium point. This time, press the S Be, and now should be able to put that pot on top of
this wall here. Let's put it on
there. Let's make it then a little bit bigger
and put it into place. So let's double tap the
A, and there we go. You can see that's
looking pretty nice now. It's got some actual left
foliage in there Now, then let's think about where
we're going to go next. Also, this I think
is a little bit out, so if I pulled
this over, you can see it's a little bit out. So I'm just going to
pull it up a little bit, just to align it up
a little bit more. Now, let's work on the top
of here, underneath here, we're actually going to
have some more blocks, but we need room to actually have something
under this part as well. So we need to pull this
up. So in other words, we need some blocks under here, which means that this and
this is going to have to be a little bit higher to actually accommodate the top of here. Even higher than that, may
be something like that. So what I'm going to do
is I'm just going to come in and grab this and pull it up. Then what I'm going to
do is now I'm going to put in the corners of this, I might as well do this
all at the same time because it's all pretty much the same, going
all the way around. So it'll be easy if we do
it all at the same time. What we're going to do is
we will duplicate this one. And in fact, I think
we'll use these ones, so we use both of these. We'll press Shift and
we'll bring them up because that then will make
it a little bit easy for us. We'll also make sure
that this on here, this part on here is
actually going over this, so we don't want it
going under that. So what I'm going
to do is I'm just going to make this a
little bit bigger, just so it's going over. And then what I'm going to do is I'm just going to pull this back a little bit,
bare into place. So that was stuck out a
little bit too much that way. So I'm going to
pull it back into place like so you can see it's actually
sticking through there. We don't actually want that, so we're going to stick
it into place like so. And then what we're going to do is we're going to put this on the halfway point of this, and then we're going
to pull it back. It's actually under there. Okay, so that's looking good. Now one thing I want to make
sure of is if I grab this, I should be able to press
Shift S and Selection. Cursor selections. Cursors are selected. I'm hoping that's
right in the center. Now if I grab this and I set
the orientation to here, right click origin
to three D cursor, then what I should be able
to do is mirror that over. Let's see if you can add in
a mirror and you can see, now it's gone on that
side, we can see. Let's go over the top I think. Yes, it's a little bit out. As you can see, we
don't really want that. What I'm going to
do is I'm going to come in, grab this again. Press control all
transforms, right click, set origin to geometry, shift select, cursor
to selected, sorry. Then now what I'll do is
I'll grab this right click, set origin three D cursor. And now it's gone in perfectly. Now I can also press the bum and put those corners
on the other side. Now hopefully we should be able to do the
same thing with this. If I join this to this, let's see, join this to
this press control J. Is it going to do
the same thing? No, it's not. We don't
want to do that. What we want to do now
with this one instead, because the mirror is
obviously not working, is we want to press the little sideways V
near to the shift bottom. Then you'll see that you get a one that says three D cursor. It's the right one next
to the question mark. Click on three cursor. Now what happens
is if I move this, now if I press R and S, I can actually move it around the orientation of
that actual cursor. So what I can do now is press
shift D and then Rs 90, shift zed 90, shift zed
90. And there we go. Now it's going all the way around, following
round, beautifully. Okay. So now let's actually bring in then these
parts here that we want, they're going to be the sides, and I'm going to close that off. And the one we want now
are the triangle sides. They're the ones we
want to bring in. So let's bring these
sides in like so. And then I'm going to do now. You can see my cursor
is still more me, Gizmo still attached
to my cursor here. We don't really
want that, so I'm going to do a little
sideways V again. And let's put it on
individual origins. Now we can do is
to compress one, We can bring it up and
put it into place. Now once I've done one side, I can do the same little trick
that I've just been doing, and you'll see it
works perfectly. Let's make it a little bit
smaller and put it into place. Let's put it into place
something like this. Or maybe the halfway point
I think should be fine. Let's pull it back
as well just so it goes in nicely like. So then what we'll do now
is we'll come in turn on our x ray and then I'll come in and
actually delete these. First of all I'm going
to come in L, L and L, delete vertices and then what
I'm going to do is O click hopefully control control
plus and delete pieces. And I'm also going to delete that piece as well.
And there we go. That's what we're left
with. Now I can pull this out a little
bit into place, press and X, just pull it out a little bit more.
Double tap the A. There we go. All right, so far so good.
That's looking good. Now on the next list, and then
we'll just put another one here and then mirror them
over and spin them over. And then I think
we'll start work on this door and then we'll start
work on the top of here. All right everyone.
So I hope you enjoyed that and I'll
see on the next one. Thanks a lot. Bye bye.
47. Techniques for Modeling and Unwrapping Spherical Roofs: Welcome back everyone to the
Blend for ultimate Guide. And this is where
we left it off. All right, so let's grab this. Let's press Shift, and let's see if it's
actually centered, so we can see, no it's not. It's actually a long way out. So let's see if I pull
this to this side, how far is it going to be off? So we're going to put
it kind of if we press one we can see now we got a good view of what
these are look like. I'm going to grab this
one and this one and I'm going to instead put this
onto individual origins. And then we're going
to press S and X. And then I should be able to pull these down into place now. So now I should be
able to grab this one, pull it into place, and then grab this one and
pull it into place. And we can see we're
still a little bit out, so I'm just going
to pull it there, and then I'm going to
pull this into place. I'm going to grab
them both again, S and X, and just get them
to fit nicely in place. So okay, I'm happy
with how that looks. Now what I want to do now is I want to join these
both together. So I'm going to press
control J, like so. And then what I'm going to do is I'm going to play a
little sideways V again. Three decurshifz
90. And I'm hoping, yeah, it's going to
be a little bit out, so I'll have to
move those around. So what I'm going to do
is I'm actually going to come in and delete these off. Now we've got this part in place and then what I'm going
to do is grab this again. Shift 90. Shift 90. Then what we'll do is
we'll grab this one. Shift 90, shift
90, shift zed 90. So all right, so far so good. So that's looking pretty
good there as we can see. Now let's think about
this part here. So this part here, we
can see at the moment, comes up to here. So what I want to do is
I'm thinking that I can, I don't really want to paint. You can see if I paint this, I really want this
joined all together. So in other words, I
want this all joined, kind of together and
all unwrapped together. Also you can see it
comes all the way down and round to here as well. I think what I need
to do is I need to grab this part here
and then pull it down. So I'm going to come in and I'm going to come to this part. And then what I'm going to
do is I'm going to come to the bottom of here,
old shift click. I want to grab all of it
going around there like so. And then I want to pull it down. So it goes down to here. And this is the part that
I actually want to unwrap. Now we can see as I
work my way forward, I should pull this
out going along here. In other words, I should
basically create it again. But I'm not going to
do that right now. All I'm going to do is I'm just going to grab
this part now. So you can see if
I press shift H, we should just be left
with this part now. Now we don't need a top
and we don't need a bomb, so we might as well
get rid of those. So delete and faces. And what we're going to do now
is we're going to press A, and in fact, we'll actually
mark a seam on here. So we'll mark a seam here, right click mark seam. And then we'll press
A and U and unwrap. And it should unwrap,
absolutely fine. Now what we'll do
is we'll actually add in the wall texture. So we'll change this
to wall like so. And now we can see
we've got a bit of a mess and we need
to turn this round. So what I'm going to do is
I'm going to come back to my shade in now.
So shading panel. So put this onto Material, this is what it looks
like. Let's press Tab. Let's press A, then R
90, let's spin it round. And what we're going to
do is we're going to put it down on there. That's the wrong
way around though, so I'm going to spin it
around R hundred and 80. And then what I'm
going to do is I'm going to make this
a little bit bigger now and make it just fit Y. Now you can see
that's looking much, much nicer than
where it was before. Now if I press Ltage and
bring back everything, this is what it's actually
going to look like. You can see we've got some flash in there and that's because we've got another building behind it, which
is this one here. We can also see if
I hide this out of the way that's gone now. So I can actually
probably delete this out of the way and build that wall again when
I'm ready to do that. So I'm going to
delete the other way, press lag. This is
what we're left with. And now I'm going to do is I'm actually going to
bring in a bevel, or I can copy the
bevel from here. So you can see over
here, the one we still got on, we can
actually copy this. If I grab this one and this one, press control L. And what I
can do is copy modifiers and hopefully it doesn't work
because I didn't reset. Let's reset transforms right clicks the origin to geometry. Let's have a look at what
that looks like now. As it got, yes, it has now it's got
the bevel on there, very, very slight, which
is what we're looking for. I'm just looking to
make sure it's in line with that one, which it is. All right, let's
put the shader on. There we go. That's
what we're left with. Now I'm thinking that
we maybe want to. Now we've got all
of this in here. Before I put this top on, real, Can we put this top on? Probably probably could. Let's have a look at how
small we need this top first. So if I press the
S born and I press the little V just to get my
individual origins back, and now I press the S, I should be able to bring
that in to roundabout there. Now what I can do
is I can actually sp sculp but actually
model this out. So I'm going to bring it down. Something like that. And then what I'm going to do is when it comes to face
select, grab this face. I'm going to press and
bring it in a little bit. Then I'm going to
press, bring it up. Then we're going
to press I again. And bring it up like so. Then we're going to press, then we're going to press again, and then and pull it out. And finally. One more
time. One more time. So I think that looks very nice. All right, let's press
control or transforms. Set origins, geometry.
Let's add in a bevel. Then generate a bevel. Let's turn it all the way down. Turn one, Let's then
bring in a material. So if I grab this and I grab this pillar can press control
L and link materials. And then while there is our lunrapsmartUV
project, click Okay. And then finally
this part in here, Alt Shift click, and
let's Ase a Material. There we go. Okay, fantastic.
Now we've got that. What we might as well
do is we might as well also do the top of here because
the top is quite simple. Anyway, we can keep the top we've already
got, it's quite nice. All we'll do then with the top is we'll just press control, left click, right click,
right in the center. A shift and click Enter AlternS. Then just bring it
out very slightly, just make sure
offset even is on. And then what we'll
do is we'll press control and no we won't, we'll actually just press
control all transforms, right. Click the origins geometry, then we'll copy
the bevel on here. I think the bevels
looking okay. Yes it is. We'll just copy the
bevel control L, copy modifiers and
then we'll press control L and we'll
link materials. And finally then we'll grab it. U, Smart UV project. Click okay, and I'm hoping
that works out okay. So let's actually
have a look at that. Sometimes as you can
see with a sphere, it doesn't actually
work out too well. And you can see here, it's not actually
working out that well. What I'll do is I'll
just press control Ed. And I'll go back before. And you can see it was
much much bear before because it's actually been
unwrapped in the proper way. So what I'm going to do is I'm going to actually
leave it like that. And what I'm going
to do instead is I'm going to press Lt
shift and click. I'm going to press Control Plus. And then what I'm going to
do is I'm just going to sign the red paint on there, and that's looking nice. Now the only thing is that this top part doesn't
need to be this brown. So what I'm going to do is I'm just going to change that over. I'm going to put it
onto wall wall like so. Now we can see that that is
looking much, much better. Now if I come in and I
select just the top part, so if I slick this and
just click control plus, wait a minute, that's not right. So let's select it.
Going around here. Control plus going all the
way down to this part here. Then they have the power now
to press G and Y and move it down and actually create some dirt on the bar
measure you can see now, and I think we don't quite need so much dirt or do you want
it the other way round? So in other words, you
can spin it around. So our 180 and we can spin it around and then we can have dirt at the top. I find that when we're
dealing with spheres, the dirt being on the top makes it doesn't make
it look too good. So yeah, I probably don't
want it that way round. I'll spin it around
the other way. And I think now that
looks much, much nicer. Now what you could do if you
wanted to is you could also add these into your
asset manager. I'm not going to add
things like that because I think
they're pretty easy to actually create and we're
only going to be using this once within
the whole scene. This one over here is going to have a different top on it. The one thing I do want
to check though is just to make sure that this
now is high enough. And I actually think
that the difference in height here does
look about right. So I think I'm happy with that. I might come in and I'm not actually sure yet whether I want to make that a
little bit higher. Is it Or, you know, if I'm happy with the way it is, but I think for now
it's about right. So what we'll do then
on the next lesson, is we'll actually make
a start on this door. And then after that we might make a start
on this balcony. And this balcony
is pretty complex, so it will be probably one of the hardest models we have
done up to this point. All right everyone. So
hope you enjoyed that. I'll see on the next one.
Thanks a lot. Bye bye.
48. Modeling Another Stylized Door in Blender: Welcome back everyone to the
Blender Ful Ultimate Guide. And this where we left off. All right, so let's
take this door and what we'll do is
we'll bring it out again. So shift, let's bring it out. We know what our door is. I'm going to actually
go over to model in. Just to make it a
little bit easier for myself, I'm
going to press one. I'm gonna bring it down just to bring it
next to my guide, just to make sure
it's the right size. And what I'm gonna
do, first of all, I'm going to come in and
I'm going to grab the edges of here like so I'm going
to press control B then. And I'm just going to
bevel them round like so. Because I want this to be
more of a rounded door. In actual fact, I don't think I like how that is
actually coming out. I think I want it more
rounded than that. So what I'm going to do
is I'm going to press control A all
transforms right click, set origin to geometry shift S, Kurt to selected shift A. Let's then bring in a cylinder. Let's put the
cylinder on something like 20 and then
let's spin it around. So far x 90. Let's press one and let's
get it spun round like so. And I think this now,
if I put it like that, coming down here is going to be much based more of a arch door. We could stretch it
out a little bit, so we could press S and's ad and pull it out a
little bit more. And I think that might look
a little bit better now. Let's squish it in a little bit. So let's pull it in like so. And let's pull it
out. And then what I'll do is I'll delete
the front and back. So delete the front and
the back, delete faces. And then what I'm
going to do is again, where the downward points are. So we can see, we
can come down from this one and down
from this one here. So let's delete faces. And then what I can do is then
come in each of the edges, and we've built a lot
of these by this point, so it should be fairly
good at doing this by now. Let's press an S, bring it down, like let's press F,
just to join that in. The reason I'm joining that
in is because I want to actually take this part here, so this going all the way
around, press F, why? And then what I can do is I can bring that, I'll pull it back. Actually, I'll make it
a little bit easier. Now, I can come in and actually delete the bottom off here. So delete and faces like so. And then what I
want to do now is I want to put in one
more edge loop on here. So control left
click, right click. Control left click, right click. Grab both of these,
and let's just pull them up a little bit. So we're going to make it
a little bit like this, you see here, but a
little bit different. At the same time, these are
like halfway on the door. These are going to be a
little bit higher up. All right, so now
we've got that, let's actually think where
we're going to put this. I think what we'll
do is we'll make it probably come round to there. So what we'll do is I'm
going to mark in a seam. I know the seam will
get destroyed once I add in my solidify. So I'm going to bring
it down to there, and then there,
and then to there. I'm just marking them
in really to show me where we actually won the seam. So
something like that. I think it's going to
be absolutely fine. Now let's separate it out. So let's press selection.
Separate it out. Control transforms like,
so let's press one. What I'm going to do now is just put it onto object motor, I can really see what I'm doing. And then finally let's add a solidify and let's
put even thickness on. And let's pull it out this way or do we want to pull it in? You also need to decide
if we want to pull it in, is that going to be wide enough? That door, Let's grab our guy. Yeah, and I think that's easily
going to be wide enough. Now, the other thing is
this door is fairly tall, so I'm going to
grab both of these. I'm going to press and's head, and then I'm going
to pull it down. I think that is probably going to be
a much better height, maybe a little bit higher. So now what we'll do is we'll actually
apply our modifier. So let's come to the door, let's press control and fill that in. And then what we'll
do now is we'll just come in old shift click, all of the ones that we
actually marked out ready. And then we'll right
click and mark a seam. All right, now we'll
actually split them up. So I'm going to come into face, I'm going to press
L on each other one and then Y split them
up A to grab everything, Mesh, cleanup, fill holes. And then finally tab, Add modifier, Generate bevel,
turn it all the way down. Turn one, and there we go. There is a very nice arch. Now let's right click,
shade, auto, smooth. Now what we can do
is the actual door, I'm going to pull this
out to roundabout here. I'm thinking that you can see
it's a little bit too big. So what I need to do
is that I could make it smaller. I think
I'll actually do that. What I'll do is I'll just press Tab And bring it in
where it needs to go, so you can see the jaws there. And then what I can do is
I can bring the bottom. So can come down to the bottom, press one again, and then just drop it down
to where I want it, just above that line there, like So now I can do
is I can actually make the wooden planks
or wherever I want them. I always, nearly enough, always one to one, going
straight down the middle. What I'll do on this one
is I'm going to press one, I'm going to move
my guy to the side. Then what I'll do,
I will come in, I'll grab the door first. I'll grab the x ray on,
I'll grab this one. And I want to bring
this one down. I think this one here may be. Let's see. Let's press, let's press drop it down
to the press Enter. And then let's do the next one. And drop it down there. And then we'll do the next one. Then a drop it down there. All right. This is fairly
thick as you can see. And I'm just wondering
if I want it so thick so I'm not sure if I want to keep it more in line with the ones
I've already got. So I think I will. So what
I'll do is I'll come in now, I'll grab this one and I'll
basically do the same thing. So I'll go down to
the Bottm like so, and we could of course bring in a mirror and do it that way. But I think with this one
I'm just going to come in and use the knife tool. Whoops. Just to copy just
a copy of the other side. It's fairly easy to do that. Okay. Come to the other side, drop it down, press the
Serb, and there we go. Now what I'm going to
do is split these off. So all I'm going to do is shift, click each of these right
click and mark scene. Now let's come in and
what we'll do is we'll just grab each other, one of these, press the Y, and then they're split off. Now what we can do is we can
actually pull those out. Let's turn the X ray off. Let's actually pull those out. So then what we'll do now, we'll actually come
in and level them. So let's come in, add
modifier, Add in the bevel, turn it down, Let's turn
it one, maybe one more. Let's press control or
transforms. There we go. Now we've got it where
we want it turn up one. So yeah, and I think that's
going to be going to be okay. Now what I want to do
on this one is just put a kind of motive
on each side of them. So I'm going to press control A. I'm going to
bring in a cylinder. I'm going to turn
a cylinder down to something like 16 instead, a little bit too high. If it's 20 and x and 90. Let's make it smaller then. And then what I'll
do is I'll pull it out and then let's
pull it into place. So let's press one, I think. Yeah, that's looking good. So let's press S and
Y, make it thinner. Then what we'll do is we'll
just put it onto here. So then we'll do is I'll come to the front
of it in face leg, press the eyeball, then
let's bring it in. So I think that's probably
going to do it for them. You could put another one
in on the inside again. It could go and then bring
it out a little bit. So that might be
something like there. Right click and
shade. Auto, smooth, let's put it on the other side. Then shift and just have
a low that looks like. Let's make them a little bit th, I think they're a little bit
too thick at the moment. Like that. Yeah. And I think they actually
look pretty nice. Okay, so now what we'll do is on the next lesson we can
delete this out of the way we can
save out our work. We've already got now
pretty much all of the materials which we can
actually get off this one. We could add some
hinges in here as well. I think we'll do that
on the next lesson. Just some metal in the
parts on each side of them. You know the open in the
middle kind of thing. So we'll do that and then
once we finish that, we'll make a start on the
actual balcony over here. That'll take two or three
lessons to complete that one, especially with the curtains. That's something you're
going to learn how to use the actual cloth generator in blender. All right everyone. So I hope you enjoyed that
and I'll see on the next one. Thanks a lot. Bye bye.
49. Techniques for Applying Textures to Doors: Welcome back everyone to the
Blender Full Ultimate Guide. And this is where we left off. All right, so what I'm
going to do now is just make a couple of Jes
just on the sides. I'll press Shift,
I'll bring in a cube. Let's make it a
little bit smaller. Let's then pull it out. And let's see where
we're going to put this. So if we press one, we're
going to put it just one leading up just in front of this part here
we're going to do. Then press and y, bring it back a little bit like so then what we'll do is I think that'll
be okay in there. I think I need to make
it a little bit thinner. So then what I'll do is just
be level off these edges. So I'm just going to grab
this edge and this edge, I might need to reset the transformation.
So I'll do that now. Then I'll press control
and bevel them off. So I think that's actually
going to look good. Now, while we've got this here, let's give it an actual
bolt on here as well. What I'll do is I'll bring in, we'll do it a little bit different this
time what we'll do is we'll bring in a UV sphere. And what we'll do is we'll turn this down something like 12. Turn this down to something
like ten, like so. And we should end up with
something like this. Then all we're going to
do is we're just going to separate the bomb. I'll just come in, I'll grab this line going around
here, right in the center. And then what we'll do is
right click, mark seam. And then I'll come in, select
the bottom part in face, select Delete and Faces. Okay, now let's right
click and shade. Auto, smooth. Let's spin
it around our x 90. Let's make it much,
much thinner. Then let's pull those out. Let's press one so we can
go into the front view. Let's press to put
it into place. Let's press the S board then, then let's put this
right in place. Around about there like so. And then let's press
Shift. There we go now with this part here. Let's go to Add
modifier Generate. And we'll give it a
bevel, remember it's Mel, so better off giving it some edging on it that's too high still not point, not three. So I think that's going to
be pretty nice like that. And then I'm just looking
if I need to put these a little bit more level
with this plant on here, I think that I can
actually apply that now. And then what I can do is I can join all of this together. So control J, join it
all together like so. Then all I'm going to
do is press shift, bring it down into the
other place like so. And finally then I've still
got my cursor in the center. So what I can do is I
can grab both of these. Join them both
together with control, J control or transoms. And right click and this time set the origin to
three D cursor, add in a modifier
and we're going to generate a mirror to
put on the other side. And let's then just apply that. Let's then join
everything together. We'll just make sure actually that we have a bevel on
these parts as well. So let's join both of these
control J adding a modifier. And I'm just wondering, I think I'll paint these first
before doing anything else. So what I'm going to do is I'm going to add in a modifier. So I'm going to
generate a bevel like, so that's going to
be a bit too high, I think, so let's
turn it up one, maybe two. Yeah, like that. And then what we'll
do is now we'll come in and steal the
textures from here. In fact, we'll get them
from this one here. I think this is going to be,
we have some wood in there, we have some green paint. Actually, we'll just
grab it from there. So I'm going to grab
all of this and join all of this together because I don't need to do
anything else with this. So I'm going to come down and I'm going to convert to Mesh. And then I'm going
to press control J, Right click, shade, auto, smooth, grab this one. Then we shift click control L, and we're going to
link materials. Let's put it now on shade in. And then what we'll do is now we'll wait till
this loads up. Sometimes it does take a while, let's go out and save our work. And then finally
what we can do now, we can come into each
of these in edge leg. So we'll go to these
first like so. And I'm going to come in to materials and I want
it on brown stone. With these, I'm going to press
Smart UV Project. Click. Okay. They're done now.
They're out of the way. Let's now come into
the metal on these. So I'm going to grab
each one of these. So I'm going to press
and smart UV project, and then we're going
to put on black metal, click a sign, hide
those out the way. Now finally we're onto the
wood, which is basically, I can select it all with a, I'm going to press
Smart UV Project. Click Okay. And then light wood click sign.
And there we go. Now one thing is you can
see I need to. Oh dear. I've actually had them
both at the same time. So we're going to have
to go back and I'm going to have to Let's have a look. If Yeah, it's because I press. So I'm just going
to press, there's where the point was, where
I made a mess of it. I'm just going to press Tab. I'm going to select this one, then I'm going to press
A Now to select those. And then we're going
to press Light Wood. And then I'm going to
press Smart UV Project. Click. Okay. Okay. Little mistake
there. All right. So they're looking pretty nice. Now let's have a look what it looks like on
our rendered view. Let it load up, and there we go. Okay, that's looking good. Now let's come in and
put this back on here. And what we're looking for
now is all our paints. I think we brought
all of our paints in wood paints, that is. So if I come to
this, let's see if, then click the down arrow and
point wood. And let's see. So I've got light wood, I've only got the green painted, and we want the blue
and the red paint. So let's go over to
our asset manager. Let's go to materials. And the one we put
in on is wood. The ones we want then
is blue painted wood, so we can see blue painted wood. And we also want the
red painted wood. Let's bring those two
in, let them load up, and then we can delete
those out the way. Delete and now come
back to my door. And then what I can do
is now I can grab all of these smart UV project. Click Okay. And then what we'll do is
click the down arrow. And we're looking
for wood and we want the red painted wood
like so there we go. And then I want the
blue painted wood. So I'll put the
blue in the middle. So I'm going to
grab each of these. That one, this one here, control plus and then I'll
click the plus arrow down. And wood blue painted wood
pick a sign. And there we go. Let's double tap the A and let's have one final look
what that looks like. And then we should be able
to join it altogether. All right, so that's
looking pretty nice. Let's now turn this
off and then what we'll do is we'll join
these now altogether, I'm just making sure
I've still got Devlons. I'm just going to
press control A, and then I'm going
to join everything together with control J. And then finally one going
to do is I'm going to press control C. I'm going to go over then to my other file where I've
been pointing everything. I'm going to press control V. Now this door is
called Arch door single. So I'm going to call
this round door. So let's come to this one here, round do single,
like press the ban, find it right click. And then what we'll do
is we'll mark as asset. And then I'm just going to
put this into my doors, which is this one here.
Make sure it's in there. And then let's save
it out of the file. Save. And there we go. Now let's open up
our file again. So it's this one here. We can delete this door out of the way. Now we can come over to our, we can turn off the
wood and we can, hopefully, if we refresh it, there we go. Now
there's our door. So now I can bring in my door, let it drop in. There we go. And let's put it into
place where we want it, which will be something here. Let's delete this old
door out the way. Let's then pull this
out a little bit. Let's make sure the bomb of the door is right on
the bomb, like so. There we go. All right. One quick look then see
what it all looks like. Yeah, and it's really
starting to come on now. As soon as we've got
this bit here now, we've done pretty much half, well a third of it or something, but we've already
got all the parts now I think there's
two more doors, I think, and one more window. So we haven't got that
much more to even make when it comes to
doors and windows. But the next one is a balcony. And that one on the next lesson
will be quite difficult, but I'm sure we can actually
get that one sorted. Let's see then how we actually
do this as we move along. The one thing I'm just concerned about the moment is whether this needs to be a
little bit higher. Because this is the
point actually where we can actually make it
a little bit higher. I think what I'm going to do is I'm just going to
grab all of this. I'm going to press the G button. You can see that
I've got the option there to make this a little
bit higher if needed. And the reason is
because I might need to make this higher as well. So if I need to, I will make this higher. And then I'll also
bring this up as well. You know, bring it up
like slightly like that. And I think actually,
you know what, I'm going to leave
it like that because I think that looks much better. I'm going to come in then
and what I'm going to do is I'm going to
grab in shade mode. Turn off this. I'm
going to grab this one. And I'm gonna pull it up
just under there like so. And don't worry, we'll
make it all fit together. We just want to make sure that it looks really nice from here. You can see here now, I think that looks a little bit better. Alright. Alright everyone. So, I hope you enjoyed that
and I'll see on the next one. Thanks a lot. Bye bye.
50. Modeling Double Framed Windows Using Mirror Modifiers and Loop Tools: Welcome back everyone to the
blender for ultimate guide. And this is where we left off. Now this balcony is going to be pretty complex,
so fair warning. Take your time with it.
If you make a mistake, just go back and start again
or rewind the actual lesson. And just rewatch it just to make sure you're getting
all that information. All right. So what we're gonna do is
I'm going to first of all, press shift and I'm
going to drag this out. And then what I'm
going to do is this is the scale that I actually want it and I'm going to keep fairly consistent
with this scale. The only thing I'm
going to do is I'm just going to pull
up this top of it. So what I'm going to do is I'm
going to press controller. I'm going to press 12.3 And then what I'm going to do is I'm going to grab the top. And I want to round the
top off very smoothly, so this might actually work. So let's press one, and let's
see if I pull up the top like so that is going to work perfectly fine
for what I need. Okay, so the next
thing then I want to do is I want to actually
take this door now. So let's grab this
control, click shift, and let's pull it out without
portion editing on like so. And then one we're
going to do is I'm just going to hide this
part out of the way. So I need to actually
split it off, so LP selection and then we can grab that,
hide it out of the way. Now we've got this
part. Let's actually make a start on the
actual door then. So if I come in and I press Tab, I press A to grab everything, what I'll do is press I, and I want to bring that in. First of all, we want to
fairly chunky like so. And we might need to pull this
out a little bit, I think. So what we'll do is we'll
press A and then and X, just pull it out a
little bit like so. And I think that is
a little bit there, Don't worry about
any of these parts. You can see the bending slightly,
Don't worry about that. It will be absolutely fine. I just want to make sure
though that it is level. I'm just making sure that the
level going down the sides. Yes, it is, That's fine. It's just these are actually bending in because
we actually pulled that out. All right. Now we've got that. Let's first of all change
this bit into wood. I'm actually thinking that I might have actually gone
a little bit too far. Let me just come back again before we pull it
out and just go in again. I bring it in, I think I made it a
little bit too thick. There we go, like so. And
then let's pull it out. There we go, That's fine. Because we're going to
have some windows in here, we're going to have some
curtains and things like that. So let's come in now, and what we'll do is
we'll grab this one, and this one, and this
one, and this one. And then what we'll do is we'll press Y, and then this one. And this one, Y, and then we'll pull these out. So I'm going to grab this and I'm going to press the key
to pull it out to extrude. And then what we're
going to do is grab this one and this one, and I'm going to press the key to pull it out like
soap. And there we go. That's the start of our door. Now let's bring in
another piece of mesh. So we're going to
bring in a cylinder, and I'm going to turn
the cylinder down to 12. I know we don't
normally do that, but with this we might as well, because it shouldn't have
that many loops on it anyway, I think we'll be able
to get away with that. If not, we can
upscale a little bit. What I'm going to do then
is I'm going to turn this round to ox 90. I'm going to make it smaller. And then what I'm going
to do is I'm going to put it into place
where I want it. So let's pull it out and then what we'll do is
we'll shape this part there. So I'm going to
grab this part and this part, delete faces. And then what we're going to
do is we're going to grab this part going all the way around like
we've done before, delete faces, and then we're
going to grab this part. In this part, press one, and then you're going to press
and Z and bring it down. And then you're going
to press, and you should end up with
something like this. All right, so this
is going to be the shape of the
windows in there. You can see they're a little
bit too thick at the moment. I'm going to press and X N as to pull them in slightly
and then one wins. Do is I'm going to
pull them up slightly. So then what I'm going
to do now is I'm going to come to the bottom part
of it, come to the bottom. So let's press one again. And then we'll just pull it down to where we actually need it. And then finally now we want
to know where the center is. The center is going to
be there if I press Shift S cursor to selected. And now I can go back to this, this part here, press one. And now I can see
where the center is. The center is going to be there. Why is that important? It's important because I want a middle part
coming down here. In other words,
one piece of wood coming down here in the center. And I want to make
sure that I've got enough room either side to make another piece of wood that's going to be going
around the actual window. If I now come into this part and what I'm going to do is I'm going to
fill in the front, so I'm going to grab this front. And then press and come
behind and press like. So now I can see what I've got. Now I can, I can press
control or transforms. Right click, set origin
to three D cursor, add in a modifier and we're
going to add in a mirror. So we're going to end up
with something like this. And you can see
already it's really starting to form nicely now. Now I want to hide
these out of the way. And I want to come back
to this wooden part here. And what I want to
do is I want to make this so that it's a
nice piece of mesh. So what I'm going to do
is I'm going to come, I think this is already
split off, actually. Yes it is, so that's good. What I want to do is I
want to press Delete. And I want to limit
or dissolve that to keep everything but to make
them nice and straight. Now I have to press one. What I can do is I can halve this. So I'm going to press
K, I'm going to go two, so we can see them there. In fact, what we'll do is we'll
split this off selection. Let's split it off. Press one. Now press the tab. And now what we can do is we can pull this down with the knife. A, pull it down to the
bomb, press Enter. And then what we'll do is
we'll pull one more down here. K, pull it down to the
bomb, and then enter, and then K, pull it down
to the bomb like so. All right, so now we've got
that, let's split this off. So we're just going to
grab all three of those. Right click and mark scene. Then we'll split them
off now from each other. Shift click, Shift
click the other one y to split them off and
then a pull them out. Now what we'll do is
we'll be level these off. Control all transforms
right clicks, origin geometry,
adding a modifier. And we're going to add
in, or is it a bevel, there we go. Turn this down. Turn it one like that and then let's put
that back in place. Now we can see
straightway because we do want it to have
this edging on here. This needs to come
back a little bit. As you can see, what we'll
do is we'll come in, we'll just pull
this back a little bit, coming all the way around. All the way around.
All the way around. And then what I'm going
to do is I'm just going to pull that back to make it a little
bit thicker so we have more space to
put this in the wall. Okay, now let's hop back
on over to this part here. We want this to be
wood come into here. We don't want to
fall piece of wood. In other words, the way that
we're going to get around that is we're first of all going to come into the corners. Click Hopefully you can see that it's not
going into the corner. We can see that it's not
actually selecting them all. What we'll do is we'll just
hide this piece of wood here. And then we're going to come
back to here, a shift click. And if it's not, we're
just going to select it. Going all the way through like so and all the way around
taking a little bit longer. And shift click them
just to make sure. Right click and Marcos then we're going to do the
same thing on the top of here. We want to go all
the way around here, Here, all the way
around here and here. Here and here. All right. Let's right click
then max scene. And then what we're
going to do now is we're going to
split these off. So I'm going to come
to face select, I'm going to press L and L, Y. And then what we can do is
we can A to grab everything, make sure that
you're on individual origins, press the born, and then you'll see
that we've split these off like so now, I'm just wondering, this is
actually go off facing it, does this go off face on it? Yes, it does. So I think we
already split those off, but either way it
doesn't matter. So now we can just
press controls head and just put those back
next to each other. And then it can add a modifier. And we're going to
add in a bevel. We're going to turn the
bevel all the way down. Turn it up one, and let's have a look
what that looks like. So now we've got some nice
piece of wood in there. If a press ol tag, we've got some nice pieces
of wood here on the back. I can actually come in now. I think I will just hide
that out away again, because I'm going
to need it again. Now what I want to do
is I want to create the actual windows that
are going to go in there. So the way I'm
going to do that is I'm going to come to
my piece of wood. I'm going to apply. Do I
want to plan my bevel yet? I'm just thinking.
I think I will. I think I'll apply my bevel now. And then what we'll do is
I'll add in another modifier. And this time it'll
be a bullion. And we'll actually
select these parts here and then we'll
put it onto fast. And then we'll press
control like so. Now if I hide these parts
out of the way you can see, that's what we've ended up with, looking really, really
nice as you can see. And now what we want to
do is we want to make. So if I press Alt and then
hide this bit behind again, what we want to do now is we
want to make these slightly, slightly bigger than
what they were. So I'm going to press Tab.
I'm going to press A, I'm going to press the Born. Then just make them slightly bigger than what we were then. What I'm going to do
now is I'm going to press and Y and bring those in. What I want to do
is now is I want to bring them in with an insert. The best way to do that is I'm going to show
you another way. What you can do is
you can come up to Edit Preferences and we can go to one that says Loop Tools. So this one here that
says Loop Tools, tick that on, and then
we're can close that down. Now what we're going to
do is we're going to grab the front of this
and the back of it. And I'm going to
press to bring it in. Bring it in very
slightly like so. And then what you can
do is right click and you'll see that you've got on
there that says Loop Tools. And what you want
to do is bridge. And what that's going to do is it's just going to bridge
the front and back. Saves you a ton
of time actually. That U, that button. Okay, so what we'll do now
is press grab everything. And now we're just going
to pull them back. And we can see we're still a little bit out
on this part here. So what we want to do
is you want to bring in the middle of these because
it's not coming quite enough. Can I lift that up and let's see if you're not going
to see any wood there. That's the main thing that I want to make sure
that I'm not going to see any wood underneath there. Actually, a thing
that looks good. Finally, then what we
can do is we can come to this shift click, press the Bom, press Y, And then what I
can do is I can bring this forward now to create
that actual glass. And there we go. That
is the first part, near enough of this door. Done. As I said, it's a little bit
complicated this door. And now we've done that though. We're going to make it even more complicated because
we're actually going to be adding
in some curtains. All right, everyone. So
I hope you enjoyed that. I hope you're looking
forward to the next one, and I'll see you
on the next one. Thanks a lot. Bye bye.
51. Creating Curtains with Cloth Physics Simulation: Welcome back everyone to the
Blender Four Ultimate Guide. And this is where
we left it off. So now we've left it here. What we want to do is we want to actually create a curtain. Now the cloth simulation
is a little bit, it's kind of hard to use. It looks simple, but getting
the right cloth to be absolutely perfect
to what you want it to be takes a
little bit of time. So what I'm trying to say is, don't worry if it doesn't
work for the first time, just give it a few
more tries and eventually you'll get something that you're actually happy with. All right, so what I'm going
to do is I'm going to press Shift and we're going
to bring in a plane. I'm going to press
Art and X and 90. And what I'm going
to do is press one. Now I will also say that we will have some hanging
tapestries on here. They are much easier to
do than the curtains, so just bear that in mind. Now, let's pull this out, let's make it a
little bit smaller. Let's press one to
go into front of. And then what I want to do
is I want to actually set it a little bit bigger than
what I actually need it. So I'm going to press
S and X, pull it out. And then I'm going to put
it down to the bottom, joust above this
wooden slit here, and then going to
come in, grab the top of it and pull it to the top. So then what I'm going to do
is I'm going to come in and grab this side of it and pull
it down slightly like so. And that's what you
should end up with. Now let's press control A, and we'll bring in
four edge loops. So left click, right click. And then what we'll
do now is we'll actually press a right click. Subdivide, Subdivided. Subdivide, Let's have a look. Subdivide, maybe one
more subdivision, okay? Now what we want to do is
you want to select one, you want to miss three of them, and select the next one. Rather than keep doing
this all the way up, what you want to do is
press control shift and plus going all the
way up like so. And then what you want to do
now is why we've done that, is we want to pin this
cloth to something. So what I'm going to do now,
over the right hand side, you've got a little triangle.
Let's click that on. Click the plus bottom. And then what we want
to do is we want to click this group, put in pin. Let's click a sign. And then what I
want to do now is I want to press control. And at what we want to do
is hook to new objects. And what we should end up
with is an empty in there. Now, now basically we should
have a cloth and an empty. But the one thing I
forgot to do before doing any of that
is I'm going to delete this out the way I forgot to actually
reset all of my. Let's just actually go back
before I actually do that. So before I edit in these pins, I'm going to go back control El transforms right
click, Rogen geometry. And now I'm going
to do is come in, click the plus click pin. So let's put this as pin. Let's go down then
and assign them. And now we're going to press
control H Hock to object. And now I'm going to press
Tab to go into object mode. And what I'm going to
do now is save out my work before I
start the simulation. I'm also then going to grab
hold of this part here. And what I'm going to do is come over to the
right hand side. In fact, I'm going to
grab my cloth first. Come over to the right hand
side where it says physics. And then what I'm going to
do is put this onto cloth. So now what I'm going to do
is I'm going to come down and what I want to put this
on is where is it? Let's have a look. It's
going to be shape. Where it says shape,
you want to put this on the pin that
you actually made. You also want to put
on self collisions. So now what we're going to do is we're
going to go over to our layout and we're going
to basically set this 20, you're going to then
set the time line up to 2000, like so. And then what you're going to do now is you're going to simply press the space bar and nothing's
really going to happen. You're going to end up
with something like this. And you can see it's moving, Moving around a little
bit in the wind like. So let's just press space part, Let's put it back to
zero. There we go. You can see it's slower
as it works its way up. What we're going to do is we're
just going to wait for it to get up to round about
100 or something like that. And then what we're
going to do is we're going to alter this,
and you'll see, then we'll actually
start having curtains. Now, the thing might be a little bit funny because we
have self collisions on. So let's come down and
turn off self collisions. And what that's
going to do is going to make it much, much faster. Now we have a press space bar, now you can see
much, much faster. So what I'm going to do now
is I'm going to reset again. I'm going to come
in and I'm going to make this smaller as
the timeline is going. You have to be very delicate
with this press space bar. Press the S bar
and bring that in. And you can see a start
bringing that in. We start to actually have curtains like so that
now is set in there. If I bring this back
now, press the spacebar. You'll see that it's set in
there exactly as we need it. I'm just looking, bring
this out. Rest space bar. It's actually should
have been set in there, but it doesn't seem to be. I'm just looking to make sure I can actually work with this. What I'm going to do is I'm
going to reset this Olt, and let's reset it. Press space bar,
put it back now. I'm going to bring it in again. Bring it in now. We can see that's looking
better as you can see. Now what we need to do
is we need to, actually, I'm just going to re say back here and see if we
actually get the same result. Yeah, you can see that we
don't get the same result. We just have to be careful that. So what I'm going to do is I'm
going to reset this again. Alters, reset it again. Start the timeline again. And then I'm going
to bring it in now, very slowly to create
my curtains like so. And then I'm going
to do is pause. And I'm going to press shift. And what we're going to
bring in now is a mesh. And we're going to
bring in a Taurus. We're going to pull the
Taurus over to here. I'm going to make it smaller. And then I'm going
to just put it just in front of this curtain here. And what I want to do
now is pull it across. So I'm going to pull it
across round about here, Round about halfway, I'm
going to pull it across. Now the first thing
I'm going to do is put a collision on this donut. So I'm going to
put collision on. And then what I'm
going to do now is I'm going to
start the timeline. Now when this timeline starts, it means that I will only have a certain amount of time to
actually bring this over. Also, the gizmo will disappear. So what I want to do
is press space bar and then X and move it
over space bar X. Move it over very slowly. And you'll see now that it starts interacting
with the curtain. Like so now we can
actually let this finish. There we go, Nice
beautiful curtains. Now what I want to do is I
want this to be slightly out, so if I bring this
back a little bit, you'll see there
that we can actually bring it back to how
we actually need it. Now, these are probably the best curtains
I've actually made. I know that you doing this a few times
really, really helps. So what I'm going to do now,
I've got my curtains there. I'm going to come
over to object, come down to convert,
and convert to mesh. The other thing I
would say is as well probably put it onto object mode and you're
going to get a much, much better view of what your curtains are actually
going to look like. Now the next thing is I want to just delete my donut
out of the way. And then what I
want to do now is I want to smooth these
out a little bit. We already have a lot of
subdivisions on here, so that might not
be the best option, but we'll give it a try.
So we're coming over. I'm going to save my work so we don't crash or
anything like that. I'm going to delete
this hook bend because I don't need
my hook anymore. And then what I'm going to
do now is add modifier. And we're going to
go to generate, and we're going to bring
in a subdivision surface. And there we go, actually I think they look about perfect. Now let's pull them
back into where we want them, somewhere like that. I'm just thinking that
it's just stuck on there. And then what I'm going to
do is I'm going to pull them up into the actual wood. Yeah, they're pretty much perfect and I'm
happy with those. Now, if you need
to pull them out, all you can do is you can come in and what you can do
is you can grab it. Let's say here, make sure
you've got it on to smooth. And then what you're
going to do is you're just going to press G, and you can pull them
out very gently. Pull them out. So very gently and again make it
bigger if you need to. Not like that. Let's
pull them out. We go just make
sure we don't ruin. You can see here, probably gone a little bit too much
on this one here. Probably pulled it out
a little bit too much. It's probably bare to
pull them all out. And a thing that's going to
look there and now can come in and slightly move them out. Now if they're not coming out
in the way that you want, just put it onto
sharp or something. And generally speaking,
that actually moves them out a bit nicer than
the other way like, so now you can see how they're looking a little
bit more realistic, pulled out like this. Okay, so the final
thing that I'm going to try and do is I'm going to try and just give them a
little bit of thickness. Sometimes it works,
sometimes it doesn't. So let's generate solidify. Just want to make
sure that I'm not going any kind of going
through each other. You can see here, this is the
problem I'm talking about. So let's come in and
just bring it down. Just before it gets
to that point, just add a little bit
of thickness on there. Let's have a look how
much thickness we've got. And I think that is
just about enough. Okay, so the next thing
we can see is they're a little bit bumpy around here. So let's pull this up and
we'll pull this one up. And then add in one more modify, and we're going to go to deform, and we're going to
bring in a smooth. So let's bring in a smooth. Let's turn our smooth
up a little bit. So let's repeat the
action like so. And let's now bring it
back just so we can get them as smooth as we can
like so. And there we go. I think they are looking
pretty good now. Let's pull it back a little
bit and there we go. I'm happy with that. All right. I'm going to save my work. So file save again. I'll reiterate. Don't worry if it doesn't weigh the first
time, just copy what I did. Take your time with it and remember whatever
you're doing. It has to be slow and precise. So when you come to your hooks, just make sure that you're
really making that hook very, very slow, bringing it in. And then you'll end up with
a nice finish like this. Make sure as well that you do
it in stages. Don't do it. Try and do it all in one
go and finally keep trying out because the curtains
will definitely not turn out the way
minded the first time. I think I've done this
five or six times and these are the
best ones I've had. Alright everyone. So I
hope you enjoyed that and I'll see on the next one.
Thanks a lot. Bye bye.
52. Techniques for Window Mesh Cleanup and Stylization: Welcome back everyone
to the blend of four Ultimate guide and
this is where we left off. All right, so now
what I want to do is I'm just going to try and see if I can actually
drag this over. So I'm going to press,
bring it in a little bit, and Jaws bring it over like so. And then Jaws is going
to bring that one back just to get it
more in the center. I think that looks good. And then find the
one I'm doing do is going to select my curtains. And before I actually
apply all of these, I think I might try
and put on a material. So let's put it onto
our shaded mode. Let's then go over
to our Asset Manager when this loads up.
So let's save it out. So save Asset Manager, and then what we're
going to do is going to go to materials. And what we're looking
for is cloth like so. And here is our cloth material. Let's bring it in.
Drop it on there. Delete it out of the way, and let's come to our curtain. Let's click on the new, no, not the new, the down arrow. Let's find cloth like so. And there we go. Let's
press Tab Smart UV Project. And let's see what we've got. Okay, is that going
to be unwrapped? Okay, let's go and have a look
at what that's wrap like. No, I don't think it
is going to wrap wrap. Okay. So I'm going
to go to shading. I'm going to press
the dot on what I'm going to do instead
I'm going to press one. I'm going to press
and I'm going to go, Let's have a project from view. Let's have a look, if I press A, now press the, bring that out. Let's have a look if
that's going to wrap. Okay, now we can see, because we've got these kind
of marks on here that it's probably going to be
bear off if we go the other way, R 90. Let's take off
proportion editing. And now we can see if I can put these in a place where
there's not going to be many, that now they're looking
much more realistic. And I'm just looking, move this out, Y, X, move it out like so we're going to put
it on the render on. Just have a look what
they looks like and I can see that a little bit
to Sandy on there. So what I'm going to do is I'm
going to press the S born, I'm going to bring that down. What I think I need to do with the curtains is actually, yeah, what I need to do
with the curtains is now I need to go in and I need to bring that back a little bit,
just on the curtains. So what I'm going to do is
I'm going to click plus new. I'm going to put it
down as curtains. And then what I'm going
to do is I'm going to click the down our copy paste. And then minus like so. And then now I'll go
into my curtains. And what I'm going to
do is this bit here. I'm going to turn this up a little bit like so let's
see if we can bring it back. Going to see if I
can bring that back, but it's not quite as much. I'm going to go
down the other way. If I'm bringing
it down this way, yeah, that's the right way. So I'm going to bring
it all the way up. It's nowhere near then. Like what it was actually,
that's looking good. I can even come further. I think with this, I think I can bring this down even further. They're looking really nice now, really, really happy
with how they look. Now what I can do is I
can go back to modeling. Press the Tabon, and what I'm going to do is I'm going
to set the orientation. So set origin to three
D cursor add modifier. And we've got all these
modifiers on still, so modifier stack
in all the way, so mirror and there we go. Now what I want to do is finally I can apply all of these. So I'm going to come to object, I'm going to go down
to convert and mesh. Apply all of those, and then we should end up with
something like that. Now the thing is when
I click on these, can you see how much topology is on there? We don't want that. In fact, if I can
come down and see I think it's 166,000 triangles, we absolutely don't want
that many polygons. So what we're going to do
is we're going to come over to the right hand
side, add a modifier. And this time we're going
to look for a decimate. Now when I click my decimate, you can see interesting
thing is it tells you how many polygons
are in these curtains. 83,000 way, way too high. Let's bring them down
something like 10,000 and see if we can keep the same detail as what
we've gotten them. So what I'm going to do is
I'm going to put this down to not 0.2 even lower. I'll brate down to 0.1 15,000
brate down to 0.8 like so. And that's around
12,000 polygons. And actually I think
that's going to be okay. The thing is with polygons is you don't need to
worry about them, but you do need to
worry about them. You don't want to be creating. Things like lanterns with
1 million polygons in. Although it will go in you know, to unreal engine because
of nanite, it will work. The problem is when it
comes to texturing them or the problem is when it comes to actually exporting them out, they're going to be huge fouls. So we do want to reduce
polygons for that reason. And the other reason
is in blender, if you try bringing in something
with 1 million polygons, it's going to be
heavy on the system. So you want to keep things
down to a certain level. So these curtains being down at 12,000 we could probably
come in press control a, apply that and then
come in again and generate and bring
in another decime. This is how I tend
to work. I tend to try and bring them down as much as I can without
destroying the topology. All you can see here now, we can see there's a little
bit of fracturing on these, and we need to be
careful of that. So if I put this on not 0.5 now, you'll see now that we can probably get
away with that as well. So round about 6,000 so whatever you can
get these down to, that's what you're
probably off bear doing. So control a, let's apply
that, let's put it back then. Non material, and there we go. All right, so now
we've done that. All we need to do now is
we need to actually finish off the actual door here, and we need to finish
off the actual windows. If I hide my curtains
out of the way, let's hide them out of the
way. Let's come back to it. Hide those out of the way. I'm just looking now
at the wood wood. I need to just think
I want these to go in or whether I want
them to go outward. Actually, yeah, I think I'm going to
leave them like that. I think actually they
look quite nice. I could bring them in. Let's see if we
can bring them in. Let's actually reset
the transformation. So oh, we can't reseay because we need to press control
late first. There we go. Now we can reseay all transforms
cell region geometry. I'm just looking, would it be too hard to
actually bring them in? I don't actually think
so. I think I'll just leave them out a little bit. Yeah, I think actually that's going to be the best
way of doing this part of it. Okay. So what we're going to
do is we're just going to now make the wooden parts near just before I
applied that mirror. I'm just going to go back
bring on that mirror again. And then what I'm going to
do now is I'm going to come in an old shift click,
going all the way around. Old shift click, shift click, and then especially
in the corners, Right click, right
click, and max. Okay, so now what I can do is
I can select all of these. So I can come in L, L, and then Y, and then L, and then Y, And then
we split all those up. Now if I press A and I come in and make sure I'm one
of individual origins, we should be able to make
all of these smaller, which is exactly what we want. Now we can press tab
press control A. And then what I'm going to
do now is I'm going to start bringing in some
materials for these. So let's first of
all do the wood. So what I'm going to do
is I'm going to come in press control on there. Oh, I also need to add in
a bevel on this as well. So we'll just split these off. So I'll press on these two. I'll press P Selection,
Split them off. It'll make it much, much easier. And then we'll come
to these parts. Right click, Set origin to
geometry, adding a modifier. Bring in a bevel, we'll put it onto object
mode just for now, just so we can see
what we're doing. And then put it up to one
naught point. Naught three. Yeah. And I think that's
going to be enough. Right click and shade. Auto, smooth. There we go. We can see that's
looking pretty nice. What we can't see though is
those little ridges in there. And the reason for that is because for some reason we
haven't filled in these holes. So we're going to
do is press a come over mesh cleanup bill holes tab. And there we go. Now we can actually see these
like wooden parts as well. Okay, so now on the next lesson then we'll actually
finally be round to gain in the materials that was the hardest bit of this balcony. There's a lot more
to this balcony, but we're over the
hardest hurdle now. So it's going to be much, much easier now to create the rest of it. All
right everyone. So you enjoyed that.
And I'll see on the next one. Thanks a lot. Bye bye.
53. Using Geometry Nodes for Balcony Base Planks: Welcome back everyone to
Blender for the Ultimate Guide. Let's put it now on shader. And then what we'll do
now is we'll get right on into actually
unwrapping these. So smart UV Project. Click Okay. Let's
go to Materials. Click the down arrow.
We're looking for wood, and the one we're going to use, obviously, is the light wood. But we actually need to bring
in another wood as well. Because at the moment
when we only have light wood and we actually need, I think one that's a little bit a little bit lighter
than this one even. I think what we'll do is, well, we also have a dogwood. Let's just put it
on there for now. And then what we'll
do is, I'll actually apply this one and this
one, and this one. We'll press control L and
we'll link materials. And then what we'll do, we'll
come to this part first, Smart UV project click okay. And then we'll come to this one. And then Smart UV
project click okay. And then what we'll do now, I'm not going to worry
about these ones. We could of course, make
them a little bit bare, but I'm not going
to worry about them because you can hardly
see them anyway. So what I'm going to
do now, I'm going to come to this light
wood click plus. And I'm going to click
new click Paleo. Or we could call it
something like yes, we'll call it prop Wood
is what we'll call it. That'll make more sense. Pro. I'm hoping that we
don't already have one. Let's bring, see if we've
got one wood prop material. Let's see what that looks like. I'm just going to
bring that out then. What I'm going to do
is I'm going to come to this and I'm going to see what the actual
wood looks like. Wood. I'm going to click a sign. Let's have a look if there's
much difference in that. Let's double tap the and you
can see there's a slight, slight difference in it. And I think that's
just enough, actually. I think it's a little bit
lighter than the other one. So what I'm going to do
is I'm going to go to shading panel and we're going to come down
and we can see here, this is where we can alter it. If you notice here,
this is the bevel in, so all of the edges and this is the actual color of the wood. The RGB curve basically
is going to be able to make it darker or lighter
depending on what you need. So there you can see now we can make it tons, tons, lighter. Let's make it a little
bit lighter like that. And I think that
looks pretty good. Okay, now let's
come over and what we'll do is we'll
bring in our lights. So if I come over,
put it back on shading and I'll come
to these parts here. And then what I'm going to
do is select them both. Press one and I'm
going to unwrap. And we'll wrap. We'll
wrap, Where is it Project? From, there we go, we'll press A and we'll make them a little
bit bigger just for now. And then what we'll do
now is we'll come and bring in our window,
the window we want. Now we've got window two. Let's look, that's not the one. Let's have a look at window one. Window one I think
is the one I want. Let's actually have a look
at the other windows that we actually have under our
asset manager once more. Let's put in window,
we have this one. This one actually we're
going to use this one. This one I think is going to
suit the much, much bear. Yes, it is. Okay. So this
one is window three. So we're going to have
window three on there. We're going to come
to these and then we're going to put
in window three. Yes. That's looking much better. Now what we're going to do
is we're going to go over to shading Then what I'm going to do now is I'm
going to press Tab. And I'm going to come in and I want them
to be fairly big. So let's pull them out like, so let's just put them over. Just want to see if I can get
them right in the middle. I'm going to make them
actually a little bit smaller, G, x. What I'm looking at is
this right hand side one. I'm looking to see if I can actually get that to
fit in any of these, because at the moment I feel like this dirt on here is a
little bit too much for me. So I'm going to make them
a little bit smaller and I'm going to put
them into place like so. And then what I'm going to
do now is this one here. This is the one I'm
focusing on, just this one. I'm going to press and X, move it over more
into the middle. Then I'm going to press
S and X and bring it in, and then and X, move it over. So I think that is
actually looking good. Now I'm going to do is just grab this one and I'm going to put it over at the
top of the other one. So there we go There
looking pretty nice. All right, let's press all tag and bring back our curtains. Double tap the, and there we go. There is what our actual Balcony looks like so far. So now we need this part here. I'm going to use this
part just to give me an idea of how far
this should come out. I'm thinking
something like that. And what I'll do is I'll come
in and delete this door. Delete vertices, and then
I can pull that forward. So now at this point
for this part here, we're actually going to
use another geometry node. It's a plant geometry node, so to use that, let's
go to modeling first. Let's save our
work. So file save. And then what we'll do
now is we'll come to this part Shift S
Custer selected. And now I want to go back to
my asset manager, so sorry, I need to be an asset manager geometry node minus this off. And the one we want
is our plants. I'm going to bring those
out and then I'm going to go back into modeling
and error, our planks. Now first of all, let's
bring our guy up. So we can either bring
this all down to our guy, which is probably worth doing. In fact, the other thing
is we might as well join all of this together because it's basically
finished this bit. If I press, I just need to join the curtains and
what I'm going to do is object convert mesh and then control J join
it all together. And now I'm going to do is I'm, I'm going to bring this all down to the floor so we can see
how this is going to work. I can see if he's stored out. Let's move this over on
his balcony on here. How wide do we need it
dead, 180 spinning around. If I put up some wood here, stow some wood
going across here, I actually think that's
going to be okay. Now, how big do we
want our planks? Let's make our planks
a little bit smaller. First, let's pull them out. Actually they little bit bigger maybe are a good
size for our planks. I think they're a good size. So what I'm going to
do is just put those in to the place where
they want to be. I'm going to pull them back then to where I want them to be. And then what I'm going to
do now is just pull them back the actual width of them. If I come over to
my little spanner, you'll see it's a geometry node. Everything is all over
the right hand side. You can of course, come
in and you can have a look at how this geometry
node was actually set up. This geometry node
actually is much, much more simpler than the one that we did
with the palm trees. The only difficult part
of these is the bend. So the bend is going to be much harder to actually
recreate because it's a bend, we can basically put
it into anything. Okay, so now we've
looked at that, let's go back to modeling. Because we're not
actually going to be going through the
geometry nodes. We're not actually
going to teach you how to create the
geometry nodes, We're just going to show
you the benefits of them. And the fact that you
can pretty much get these things now off
many, many sites. Some are free, some are paid. But making geomet nodes is
a course within itself. It's so long to
create these things. Sometimes it takes
us a couple of days just to create one
geometry node. So very, very long, nearly as long as actually
creating this scene. So I think we'll do in
the future is bring out, of course, on geometry nodes, but for now let's not
worry about that. So now I'm going
to do is I'm just going to pull these
back a little bit. So we've got plank length
here where we can pull them back just a little bit
and put that into place. I'm going to leave them
there just for now. And what I'm also going
to do is just grab this bomb and delete
it out of the way. Now the other thing
is, at the moment, these planks aren't very thick. So let's come back to our
planks and let's make the plank thickness a little bit more before
we do anything else. So let's put them
under there like so. And they're looking
much, much better. Let's pull our guy
up and there we go. This is looking really
nice at the moment. Okay, Now let's make the
first of all, the balcony. So what I'm going to
do is I'm going to first of all come
in, grab a cube. I'm going to pull my cube
down into this corner here. So I'm going to press S, bring
it down over this corner. I'm going to press
S just to make sure it fits within that plank. Pull it up and in place, so make it a little bit
smaller. Pull it down. There we go. All right, so we're going to now pull
this up to where we want it. So I'm going to pull that up to something roundabout there. And then from there then, what we'll do on the next lesson is we'll get this balcony
actually built out. Then once we finish that, we need some chains
on there and then a slight canopy
going over the top. All right everyone,
So I hope you enjoyed that and I'll
see on the next one. Thanks a lot. Bye bye.
54. Modeling Support Structures for Balconies: We, Mike everyone
to the blend for ultimate guide and this
is where we left off. All right, so now let's make
a start on this part here. So what I'm going to do on this part here is I'm
going to grab it. I'm going to press Enter.
Pull it out like so. Press just to bring it up. And then what I'm going
to do is I'm going to press to bring it in. And then, and then to bring
it in, scale it in like. So what I want to
do is just make sure that I'm happy with
the whole scale of that. Actually, I think
now I'm going to do is I'm just going to
duplicate this shift D, bring it over to this side now. So. And then what we're
going to do now is I'm going to put a
bottom part going over. So let's grab both of these. Press Shift S curse to selected and then
what we're going to do is bring in another cube. So shift bring in a cube
and then I'm going to make it smaller like so.
And then pull it out. So SNX, pull it
out into place and then make it smaller a bit more and then make
it smaller on the z. So S z and then S and X
pull it out into place. Now again, let's
go to object mode so we can actually
see what we're doing. Let's press S and Y to shrink it in so it's actually
going to fit properly. And what we want is
it just above there, just so your feet
actually go under there. So that's normally
how it would work. And then finally, what we
can do is we can bring it up and put it into
place along there. And I think that's
looking pretty nice. Now, the one thing is I
just want to make sure. I think actually on here we'll make this a
little bit uneven. This bare bit uneven. This bare bit
uneven. And the way we're going to do that
is we'll come in, we'll add some
edge loop control, left click, right click. We'll do the same
then on this one, control left click, right click. What we'll do now is we'll
join these both together, Control J, join
them both together. Control or transforms,
right click, set origin to geometry. Adding a modifier. We want this to look
a little bit better. In other words, we don't
want it like the stone where it all looks new and
fresh and things like that. Cause it's stoney. It's not going to take a lot of damage. It's going to take a long
time to be weathered, whereas the balcony
is made of wood. It's not going to take so long. So what we're going to do
is we're going to come to where we're
going to go add it, sorry, add, modify it, generate. We're going to bring a bevel, we're going to turn that bevel
down then turn it up one, maybe not 0.5 Yeah, like that. And then what we're going
to do is press tab A. Grab everything, Mesh,
transform, randomize. Turn it all the way down,
maybe something like that. I think that's actually
going to work. Let's make a random seed
and we'll turn that up just so they look a little bit different
from each other. I think that is fine. Now let's make them, I think, a little bit thicker. So what I'm going to do is
I'm going to grab these. I'm going to press and pull them out a
little bit like so. And I think now they
look much better, right click or to smooth. And now I can do is
we can come in and just bring in a few more cubes. These obviously are going to be the parts that are going
to hold all of this together. I'm going to make it a little bit smaller,
something like that. Grab, grab the cube, pull it up. So it's just just in there. And then what we'll do is
we'll bring it up and put it into place like so just again, just in the top like so. And then I'm going to
move it to the side now. And then what I'm going
to do is add modifier. We're going to bring in an array like move the x factor
a little bit out. And then we'll increase it. And I want it to
be near enough by press one the same
distance away from there. I might need to move this
a little bit to the side. So now I'm going to do is
while I've got my array on, I'm just going to
come in control. Bring in a few edge
loops, left click, right click, add modifier, Bring in a Bevel like so. And that bevel has worked
out absolutely fine. Now finally what we'll do
is we'll just apply these. We'll go to object convert mesh. Now find we can grab
them all transformando. Then what we'll do is
we'll turn this down. Maybe not 0.3 so I look at that and what I'm going to do is as well, I'll do that again. Mesh, where is it
transform, randomize. Let's have a look at
what that looks like. Right click shade, auto, smooth. I'm just making sure.
I don't think I'm happy with how that is. And the reason is is because
I already added in my bevel. So what I'm going to do is
I'm going to actually press controls head and just go back just before I
added all these. And what I'm going to do
instead is I'm just going to apply the array,
leave the bevel on. And now I should be able to come in mesh transform, randomize. And there we go. Now think
it's looking better. So shade auto smooth. Because what happens is
if you add that bevel in, you've got extra
topology on there. Which means that when
it randomizes it, it's going to move these edges
away from each other on. So what I mean is at the moment you can see we've just
got one edge up there. The moment though,
I apply the bevel, you can see now we have
two edges on there and the randomization is
pulling those out too much. So that's why I don't
want to do that. It's okay to apply it now, of course, because we've
finished with the randomization. So what I'm going to do now
is I'm going to grab these. I'm going to press
Shift D. I'm going to press R and Z and 90. Step in to go over the top. What I'm going to do is
I'm just going to place them in the center up here. Pull them back so that these
then can go into the wall. So I just want to make sure that they're going in there like so. And then what I'm going to do is I'm going to do
the same thing. So I'm going to basically
press shift, bring them over. And then what I'm going
to do though instead, is I'm going to rotate
them around said 180 just so they don't
actually look too similar. And then I'm going to put
these into place like so now I'm going to do is
I want to cut them away. The easiest way to cut
these away is mine, be able to press three and I'm going to
come away from here, Press tab A to grab within mesh bisect and let's
bisect them from here. So let's make sure this
is set to zero like so. And let's clear the inner or the outer like so. And
it actually works. It's actually done them
both at the same time. What a wonderful
job that's done. Okay, control J. Let's
join them all together. And now finally, let's bring
these round shifty zed, zed 97 to go over the top. Let's bring them
into place when I'm thinking I could
probably got away with putting just
three in there, Three in there from here. And then I can grab these ones. So what I'll do is
I'll press Shift, Duplicate them, or Z
180. Spin them around. And then what I'll do is I'll
move these into place now, the same I have done before, so I'm going to go over the top so I can see what I'm doing. Move them into place roughly where I think
they're going to be. Press three on the number pad. And now what I can do
is I can actually move them near enough
into the same place. Okay. So I'm happy with that. Now what I'm going to
do is I'm going to join these all together
and I'm going to just go in and just select each of the ones
that I don't want. So all of these four
elite T, there we go. Now we can finally probably
join all this together. I'm going to join all of
these together like so. Then we'll go to object first, convert mesh control J. Join them all
together, right click, shade, auto, smooth.
There we go. Press, you can see they
all move together. That's exactly what we want now, the planks underneath them. Let's actually come to these. So we have all of these options. Actually what we
can do with these, we can see now we've got
enough room on the balcony, that's fine, everything's
good except these planks. These planks don't look
particularly good. So let's actually fix those. So what I'm going to do is
I'm going to come to my, we've got plank width, that's all fine, everything's fine. We just need to come
down to our rotation. So if we rotate them, you can see now we can
get some random rotation on them, which is really nice. We can also bring
them up or down set, so we can change that
seed if we want to. We can also rotate them to
the left or to the right. Just be very careful
when you rotate them. You don't want to
rotate them too much, so just a little
tiny bit on there. And then what we want
is a random width. So if we turn this up, we're going to bring it down, we're going to get a
random width on there, which is going to make them a
little bit better, I think. Let's actually turn that not so much, so something like that. Double tap the A. Yeah, and I think that's looking
pretty good like that. And then finally what we want is we want the random length. So we want to bring those out and have a random
length on there. And finally we've got an
angle or a compression. We really don't
want to bend these. We can come in and actually bend these if we
want, as you can see. But we don't want to
bend them on this one. We're going to bend
the canopy on top. I think maybe maybe we'll
use it for that. And J. Yes, I think actually we'll, we'll do that with the top one, so I'll show you how
to do that. All right. So they're pretty much done. Now, all I want to do is I
want to steal this one here. And what I want to do is
I want to bring it down. So I'm going to press
Shift D, bring it down. I'm going to then spin it round, so x 180. Spin it around. I'm also going to move
all of this up now. So all of this up. Let's
pick it up off the floor. So I'm going to grab this one, then come in and pull it up, like double tap the eight. And then what I want
to do is I want to make sure that this comes right to the edge of here because you know it's
holding it all together. And X pull it right to the
edge near enough of here. Let's press one, make
sure that's the edge. That's the edge. Let's
pull it down a little bit. So then what we're
going to do now, I'm going to pull it back
towards the back as well. So shift, pull it back said 180, just so it doesn't
look the same. Let's put it back to wherever it's going
to be in the wall, which will be somewhere
around about there. We can check that as we
actually work on it. All right, so this is this
part pretty much done. So what we'll do now on the
next lesson is we're going to actually put this against the wall to make sure
everything works okay. And then from there
we'll be able to carry on building it out.
All right everyone. So I hope you enjoyed that.
And I'll see on the next one. Thanks a lot. Bye bye.
55. Attaching Balconies to Walls with Chain Geometry Nodes: Welcome back everyone
to the blender for ultimate guide in
this where we left off. All right, so now we can
pretty much probably, I'm thinking whether
I should join. I think I'll join all
of this together. I just won't join the door. I'll actually keep that separate because I
might want to just put this door on and not have a balcony or have a
different balcony on. So I'm not going to join
all of that together. But what we can do is
we can now change this, these planks of wood
to actual mesh. So what I'll do is I'll come
to object convert mesh. And now you'll see that's being converted And there you
go, now it's all mesh. Now the one thing
that we want to do before actually joining it is I want to
actually level these off as well because I
haven't done that yet. So what I'll do is I'll come in, add a modifier,
generate a bevel. Also, you can see
here that there is an issue where the bevel
is not working properly. Again, as we know. First of all, try all transforms and then
set origins, geometry. And then after that, try a
shift and spin them around. And there you go. Now
they're working properly. And now we can turn that down. Turn it up to maybe not 0.3
maybe that's a bit low, so no 0.05 like so.
And there we go. All right, so now
we've all those, What I can do now is join all of these parts
together at least. So control J. Join them
all together, right? Click, shade, auto, smooth. And now finally, before
we do anything else, let's actually bring
in some materials. They're all going to be pretty
much the same materials. We've already put a
shader onto our window, so let this just load up. And then what we can do is
we can steal, you know, the material from here and
put it on this one here. All right, let's just
wait for it to load up. There we go. Now what we can do is
we can come to this, select this one,
press control L, and we're going to
link materials. And now we're going to go back and what I'm going to do is just minus off of that, one of this one. Minus off the wood
props and the window. And then what I'm
going to do is press U Smart U V Project. Click Okay. And there we go.
Now you can see the wood's not looking
too good on this one. And the reason is because it's a little bit too
small on the UV map. So let's go over to shading. Let's press Tab, Zoom in, and you can see all of this. All we need to do
is just make it a little bit bigger like so. And now you'll see it's
going to look much nicer. Let's have a quick look then what it's
going to look like, and then we go looking
absolutely fantastic. And now what we can do is
we can put this into place. I'm going to go back
to modeling now. I'm going to press
Tab. I'm going to grab this, grab this. And what I'm going to do is now, I'm just going to
pull them over here. Now, bearing in mind
I'm only doing this just so I can see how it's
going to fit on there. So I'm going to
leave this off now. I'm not going to need
that at the moment. And then I'm going
to pull it back into the wall and eventually
we're going to be able to have this so that
it will be able to be part of our asset manager. So you'll have that for your own projects
and things, okay? So we've got that there now. Now what we want to do is we
want to bring in some chain. So the first thing I'm
going to do before doing anything is just save
it out, file and save. And then what I'm
going to do now is bring in another geometry note. So I'm going to come over to my asset manager and I'm going to come to my chain,
which is this one here. And then what I'm going
to do is just, well, I'm going to pull
this chain into the scene like so, and
now it's in the scene. What I'm going to
do is I'm going to go back then to modeling. And here is my actual chain. And you can see
this is a really, really nice geometry node. Really, really easy way
to actually create chain. I'm just going to press control all transforms right click, set origin two geometry. And then what I'm going
to do is just make it smaller and I want
to make it usable. So what I'm going to do is
I'm just going to come in and I'm going to delete
one of the edges. So I'm going to delete
this vertex here. Not the handles,
just this part here. So delete vertices
and then I'm going to come to this part seven
to go over the top. And then I'm going to press
and y and just pull it out. Now sometimes this will happen, it's not quite right where it's actually working like this. When it's bending
like that, it's because we're using
the Bezier curve. So what I want to do
is instead of that, press shift S curs selected. And what I'm going
to bring in instead is I'll bring in a curve. And this time we'll
bring in a path. So we'll bring in a path, we'll spin the path round, so I'll z 90. We'll put it on object mode just so we can see
what we're doing. And then what I'm going to
do is I'm going to grab, grab this chain,
I'm going to press control L and I'm going
to copy modifiers. And there we go. Now that's sort of nice straight
chain to begin with. Okay, so let's move it into place then where
we actually want it. So I'm going to pull it up here. And then what I'm
going to do is I'm going to make it a
little bit smaller. Don't worry too much about the sizing or anything
like that right now. All we want to do is just get it into place where
we're going to put it. I'm going to put it,
it's going to have to be just at the top
of here, roundabout. Here is where we're
going to aim for it. Let's try that
again. X, Let's put it into the wood around there. Let's get it. Make sure it's straight seven to
go over the top. Make sure it's straight
into that wood. And then we can see that
we're going to have to tip the angle up a little bit x, bring it out, let's pull it up. That is more of the angle. I think I'm looking for
somewhere around there. Okay, Now what we want to do is we want to
convert this chain. So what we're going to do
is going to click on it, come to the right hand side, and the first thing I want to do is turn up the resolution. The resolution will just
give you more rounded chain, so the lower this is more, it's basically like, you know, when we look at the cylinders and we turn up the
vertices on the cylinders, that's basically what
we're doing here. We're turning up the vertices
to create more topology, which leads to a
more refined shape. Which means that you can
have them either really, really realistic or
really stylized. You could have them like
World of Warcraft wy, with kind of a lot more chunky. So this is what that does now. What I'm going to do
now is I'm going to change the chain link distance. You can see I can change this. And the reason you
might change that is because you can actually
change the chain radius. In other words, you
can make them much, much bigger if you wanted to. So what I'm going to
do is I'm going to pull them down a little bit and I'm going to change
the chain thickness. And then what I'm going
to do is I'm going to line them up with
a chain distance. So let's line them up,
hold in the ship bomb. Let's bring them down and get them into the place
that we want them. They need to be quite
chunky because it's fairly, fairly heavy part. And the other thing is we
want actually this part of the chain to
probably be straight as long as you get
it in that point. Same as this one.
This one is probably also going to be a
little bit straight. Then you should be
absolutely fine. Now, do we want to
stretch out our chain? In other words, do you
want to stretch them out? So they're actually a
little bit elongated. If you do, you can
stretch them out. And then all you
need to do is just change the chain distance again. And sometimes I find that
looks a little bit bare. Something like that I think is looking a little bit better
than what it was before. All right, so once
you've got it, you can press control A now
and actually apply these. If you can't press control A, just come up to object and
what you want to do is you want to convert to mesh
and then it will convert it. Now what we want to do
is we just want to come in and delete the ones in here. We don't want this one for
instance, or this one, or this one, or even this
one, delete vertices. Let's take that off
now. And then it should look something like this. Now I want to do is we
just want to bring in some metal to
actually hold this. All I'm going to do, I'm going to come to
this point here. Press L. I'm going to press
Shift cause Selected. And then what I'm going
to do is bring in a cube. So I'm going to bring in a cube, so I'm going to make my
cube a little bit smaller. And then I'm going to
press S Y, bring it in. Then what I'm going
to do is I'm just going to fit it
probably around there. So I'm going to press S and's just pull it down a little bit. And I'm going to have this
chain of thin, thin in there. So I'm going to make
it a little bit wider so S and X pull
it out a little bit. And then what I'm
going to do is just insert the middle
of it, come in, grab the face, and then
just press and insert, and then pull it back like so. And then finally we can
just pull this out now a little bit and then we can
actually pull this down. And then you'll see that if I now grab my chain and
delete this part. So L delete verts. Now you can see how that's
actually going to go in place. Now we need to do is we need
to just grab this part. So shift D, grab this part. Spin it round, so r x -90 It's
seven to go over the top. And what we want to
do is we want this to be a little bit smaller
and then we want it to be into the wood like
so I want it into the wood. So now I'm wondering if I want to pull this
bit back a little bit. You can see at the moment
might need to pull this back. So what I'm going to do
is I'm going to come in, I'm going to grab
my chain, sorry. I'm going to press L on
here, delete vertices. And then what I'm going
to do is I'm just going to grab any part on here, Make sure proportional
editing is on, make sure smoothing is on. And make sure that you haven't
got connected only on, because then we want to
move the whole chain. In other words,
if I now move it, you can see the whole chain is moving and that is
what we want to do. So we're going to vary gently. Just move the whole chain into place without getting
too much of a stretch. Okay, So that's
looking pretty good and I think that's going to be supported pretty nicely there. All right, so now
what we want to do is we want to actually
grab both of these. We want to press control J, control all transforms,
right click surgen geometry. Add in a modifier. We're going to bring in a bevel. Then we're going to turn that
bevel a little bit down. Bring it up a little bit nor 0.05 it's a little bit too high. Nor 0.03 And there we go, that's looking a
little bit beat. And then we're
going to do is Tab, and we're going to Smart
UV Project. Click Okay. And then we're going to
bring in a material which will be black metal like soap. All right, so we've got black
metal on there finally. Then what we want to do
then is with this chain, we need some actual chain. Let's see if I've already
got the material in here. Chain, Material, there it is. And then what I can
do is now I can press a U and smart UV project,
unwrap the malt. And now let's have a quick
look at what that looks like. We'll have a look on
the shader first, and then we'll actually
have a look on the render before moving
it to the other side. Then all we need to do then is put on the canopy
on top of here. And this is what I was worried about that might actually
have to move this part up. As you can see, there's
going to be not enough room because we need some rocks and bricks and things like
that under there. So we just have to probably
move this up a little bit, which is not a hard thing. Anyway, let's double tap the then let's now
save out our work. Let's now put this on rendered view and
have a look at what that looks like. There we go. That's looking pretty nice. If I come back here. Yeah, you can see that's looking
pretty professional. All right, so let's, again, I'm not just
going to go to modeling. And then what we'll
do on the next lesson is then we'll get that
over the other side. And then finally we'll put
some bricks actually in here. And then what we'll do is we'll create the canopy over the top. And then we have a
really, really nice piece for actually putting
into our asset manager. Alright everyone, hope
you enjoyed that, and I'll see on the
next one. Thanks a lot. Bye bye.
56. Modeling Attachments for Balcony Rooftops: Welcome back everyone to the
Blender Pot Ultimate Guide, and this is where
we left the art. All right, so now we've
got these two parts. We can actually join
these together. So control J, let's
join them together. And then what we can
do is just right click and shade auto, smooth. And then all I can do
is press Shift and D, Duplicate it and put it
over the other side. Just making sure
that it's fitting in that piece of wood nicely
like that other side. Now what we want to do is
we want to actually create a kind of canopy going
over the top of the. So before I do that,
what I actually want to do is I want
to create the wood. And then once I've
created the wood, then I can actually work on
pulling this up basically. So what I want to do is I want
to come to this part here. I want to go in and just
grab the center of here, so you can grab these two press shift desk
because it's selected. And then what I'm
going to do now, I want to bring in
another geometry node. So let me just see if I
can just bring in a cube. And let's see if I can change
that to a geometry node. So geometry node,
click the down arrow, and the one I'm
looking for is planks. Planks. Geometry
node. There we go. That is what I wanted to do. Okay. So now what I can
do is I can shrink this down to where I want it so you can see
something like that. I want to make them a little bit thicker, so plank thickness. Let's bring them up.
I think I'm happy with the size of these. What I want to do
then is bend it. I'm going to bend it, so it's
actually going to go round. And you can see already
that's looking really nice. Then what I'm going
to do is make these a little bit bigger, pull them out a little bit, because what we
want to do is we're going to need one on
each side of these. We need a few more than this. What I'm going to do is I'm going to increase
the plant count. So you can see now if I
increase that plant count, I'm going to pull
that back in like so. And then I'm just wondering,
is that going to be enough? Maybe 14. And then what I'll
do is I will pull this. So if I press Form,
I want to just make sure this is in the
middle, like so. And I'm thinking that is
near enough in the middle. I think I can work with that. Then what I'll do
is I want to pull this out a little bit
once to actually go, so I'm going to pull it out
there, something like that. Now what I want to do
is I want to basically put a plank on the top of here. I'm going to come
in and press shift. What I'll do is I'm just
wondering the best way to do this probably going
to be with a plane. Yeah, I'll bring a plane in. I'll press and Y, and bring that back to
this point here S and Y's. Bring it back a little bit more, and then what I'll do
is I'll press S and X, and then I'll bring
in some H loops now. So control bring
in some H loops. Make sure there's
one in the center, so one in the center, like,
so grab the center one. And then what we can do is we
can actually pull this up. Hopefully it will
work. There we go. That is exactly what we want. So we're going to
pull it up near enough, just to the top of the. Turn this off then.
And then what we'll do is we'll
pull these down. Now each of these sides, we're going to pull down one, pull them down into place. And then finally, we're
going to pull this one, this one here, and
this one here. This one here, press one, and we're going to pull
those down as well, making it a little bit flatter. Like next of all we're
going to do then is going to press a and and pull it up. Now we have a
fairly, fairly good idea of how much higher
this needs to be. What I'm going to do is
now I'm going to grab all of these going around, all of here, and we're going to pull all of this up together. So we're going to
grab all of these. Let's see if we've got them all. You can see I've
missed two there. So I'm going to move them up. I can see I've grabbed them all. And then I'm going
to grab this, I'm going to grab the
top one as well. And what I'm going to do
then is just move them up, so this is rather the top. So let's pull them
into place like so. And then what I'll do
is they'll just hide this part out of the way.
So hide it out of the way. And what I'm going to do now
is I want this part here. This part going all
the way round here. I actually want to pull
up a little bit higher. Let's now press al tage. Bring back everything.
So oltage, what I want to do now is just check to see what that's
going to look like. First of all, I'm going to
check it on my shade of view. Then what I'll do is I'll
check it on my render view. I also want to make sure
that now I've done that, Is this going to be high enough? Again, it's the
same old question, we moved it before now I think it is the
right high actually. I think looking from there, it does look very nice. Might just move it up just a slight bit.
Let me just grab this. Move it up just a
slight bit more. And then what I'll
do is I'll come to the top, I'll grab this one. And this one actually press
Tab and I'll grab the top of the slick top of this one
and then I'll grab these. I'm just looking to
pull them up just a slight bit, actually. That'll probably look
nicer like that also, it gives a bit more
room on this part here. Yeah, that's looking better.
I'm happy with that. All right, finally
then we'll just save it out and then
what we'll do is we'll actually just have
a quick look at our render now just to make sure that it's looking good. And I think, yeah, that's
looking pretty nice like that. All right, so now
what we'll do is we'll come back
then to this part. And then what I'll do
is I'll actually take this and I'll press
shift D. Duplicate it. And I'm going to pull it out, not quite to the end, probably
somewhere around there. And then what I'm going
to do now is I'm going to come to my plants because
now I've got them. I know how big they
need to be now, so all I need to do
now is make these a bit not so uniform basically. So now I can come down, I can turn up the randomness
a little bit like so. And then I can turn,
let's have a look. So we've got a set up and
down rotation left and right. I don't really want to
change that too much, just a tiny, tiny bit. And we want a random width just a little bit
further down, like so. And then what I want to
do is the random length, I want to pull that out just a little bit like so as well. Maybe a little bit more. Because we're going to actually be doing something with these, so we've got the right angle. Yeah, something like that.
A little bit more uniform. All right, once I've got that, then I can press control
A hovering over there. And now finally I can come in. Let's come into these. And what I'm going to do is
I'm going to grab the two, the two at the front like so. And then what I'm going
to do is I'm going to put this onto sharp I think. Let's press seven
to 12 over the top. And then what I'm going to do is I'm going to pull these out. So I think that then
is going to look much, much nicer than what it did. And then finally I can actually press and Y now, and
I can pull them in. There we go. All right, that's looking pretty
cool like that. Now let's put the
parts on the side. So I'm going to press Shift Cube to make it a little bit smaller. Bring it to this side, make it a little bit smaller. Then what I'm going
to do is I'm just going to pull it out
to where I need it, which will be
somewhere around here. And then I'm going to press and X to make it a
little bit thinner. Put it into place now let's just pull it out and see
where it's going to come to. So I'm going to pull it
out without portion of editing on somewhere like there. The other thing
is I want to make sure that it's just
going to cover that. I'm going to press L
pull it into place. I'm probably going to
need to pull it up a little bit to make sure
it's not in there. Now, the other thing is, is
that a little bit too thick? Maybe it is. Let's pull
it back a little bit. Let's pull it out a little bit. I'm just wondering,
this part top of here, these two parts are a
little bit too thick. So what I'm going to do
is I'm jaws going to pull them down a little bit, which enables me then, to pull the top of this down, making it look a
little bit better. Thing, that looks a little
bit better than what it did. Now finally I can
grab this shift. Let's grab this and
let's pull it down. We need to basically make
this a little bit longer. First I'm going to press and Y, make it a little bit longer. Then what I'm going to do is I'm going to rotate it around on the X and then
just pull it down. Now I want to actually make
it smaller on this way, but if I pull this down now, you'll see it completely destroys the angle
that we're at. Instead of doing that, what
you can do is come to normal, and then you can pull
it that way instead. And then you can keep that
beautiful angle you've got. Then what I want to do now is I want to pull it back as well. So I want to pull it back into place wherever
it's going to go. I want to have the
ability to do that. What I'm going to
do is I'm going to press and X and pull it in. And then what I'm going to
do now is pull it down. Now remember because
normal still on, you might get a
little bit punky with moving it around on the
gizmo, so just remember that. And then what I'm
going to do is now I'm going to pull that
out into place. And I'm also then
going to pull this back into place like so. And I think that's pretty nice. So I'm going to press
control J on both of these. And I'm also then going to set the orientation to the cursor
and then add modifier. We're going to bring in a mirror just to put it on
the other side. Press Control. Now let's join
all of these up together, including these planks as well. So control J, join
them all up together. Control right clicks
at origin to geometry. And finally, on the next lesson. Then finally, we're going
to finish this off. We're just going to actually
give it to some actual wood. And then I think
what we'll do is we'll actually leave
this one in there, put one out as our
asset manager. We've also got just a few
bricks to put underneath, but we can actually
certainly sort that out after building this part. All right everyone. So I
hope you enjoyed that, and I'll see on the next
one. Thanks a lot. Bye bye.
57. UV Unwrapping and Straightening Wood Supports: Welcome back everyone to the
Blended four Ultimate guide, and this is where we left off. All right, so before moving on, let's first of all
add in a modifier. We're adding a level, and then what we'll
do is we'll turn that all the way down to one. And let's have a look
what that looks like. Again, we've got these planks, we've got an issue with them. So all I'm going to do
is press a shift in, because I know that's
what the issue is now. And then what I'm going to do is I'm going to put this down to not 0.03 Let's try that. Maybe not 0.5 Yeah, that looks much much better. Now, let's press Tab. In fact, before
we press the tab, let's just join them to this. So if I get, grab these, grab this press control,
L link materials. And then what I can do is
I can come into these. Now I won't apply my bevel
yet. I will apply it soon. First things first though, what we'll do is we'll
actually come to materials and minus
off the plank. And then what we'll
do is we'll press Tab Smart UV Project. Click Okay. And there
we go. All right. I actually think, I'm just wondering whether I want
to straighten these up. I could actually straighten
them up if I wanted to. So let's come in
and do that first. So I'm just going to
grab both of these. I'm going to press Shift in H, then just to hide
everything out of the way, I'm going to go over
then to Shader. And what I want to
do is press Tab, and we can see the ones that are actually Ben out of place. So all I'm going to do is I'm just going to grab them like so. And I'm going to right click. And let's have a look, how do we want to
straighten these? And the way I'm going to
straighten these first is I want to make sure that I'm
grabbing the right ones. So let's see if these on top. Yeah, it is just though,
so if I grab them all, I can see that there
are these ones here. So let's come in
and what we'll do is we'll grab this one going
all the way down to here. And then what I can do is I
can put straighten and then, and move it out
on the x like so. And then I can grab this one. And this one right click, straighten and then
and x, move them out. Now what I can do is I
can do all of these, hopefully at the same time. So I'm just going to
grab all of these. Going down, right
click, straighten, and then and X, pull them all over
to the side like so. And then I can come
in now and grab each of these have the bend. And I can go and hopefully
straighten, rag, click, straighten, and then and
x and pull them over, make them as thin as those. And now you can see
the look really nice. Okay, so this is all
of this done now, except a few rocks
on the underneath. So let's actually do those now. So what I'm going to do is I'm just going to bring in a cube. Bring in a cube,
make it smaller. Let's make it a little
bit thinner as well. So we'll make it a bit smaller. We'll pull it up to the wall, We'll press and y just to
make it a little bit thinner. And then what we're going to
do is we're going to press and's ed just to make
it more like a brick. And then what I'm going
to do is I'm going to actually put this
underneath this. I'm going to make
it even thinner and Y and I'm going to stick it against the wall
and just under here, so something like that. Then all you're going to do
now is you're going to press Shift and D and bring
in another one. And you're going to press and X and just make that one
a little bit thinner, putting next to it
and then shifting D. This one will be
a little bit longer, something like that, shift D, and this one will be
somewhere more in between. Then what we'll do is
we'll press shift in D. We'll make this one
a little bit longer. I'm also going to grab this one and press shift
in D as well. And what I'm going to do
is I'm just going to put this over here because
I think it looks nice. All right, now we've got that. Now let's come in and
actually grab this one here. And we're just going
to pull it down. I'm going to take
it off of normal. It's normal, It's pre global. Then what I'm going to do is I'm going to come to this one. I'm going to pull
it up a little bit, and then this one,
pull it down like so. And then finally this one. Let's pull this
one down as well. So grab the bottom
of it, pull it down. So let's grab them all now.
Grab them all together. So control J. And then what
we're going to do is now we should still have
on our modifier. I don't think we've got our
modifier on, That's a shame. Never mind. We'll
actually make a new one, so we'll actually
press control a first and then add a modifier. Generate a bevel, we're going to turn the
segments up to two. And then what we're going
to do is we're going to drop this down now to make them look like
stones, like so. And you can see already,
they look pretty nice. Now all we need to
do is bring in. We'll bring in the material, we'll come to this
one and we'll press control L link materials. And then we'll go to these. We'll just minus off
the wall like so. And then we'll press
tab a smart UV project. Click okay, and there's
those blocks done. So now if we look from this
angle, put it on render. You can see now that looks starting to really,
really come together. All right, let's go back now. And then what we'll do is
we don't actually want these stones in the asset
manager or anything like that. All we want is this part here. We might as well come over and join all of
this part together. So I'm going to
grab all of these. All of these include my window. I'm going to press G just to
make sure grow everything. I missed the chain
there as you can see. And then what I'm going
to do is come to object, we're going to go to
convert and mesh. And then what I'm going to do
is press control J and then right click and shade. Auto, smooth. Okay,
there we go everyone. That's that part
actually done finally. Okay, so what I can
do now is I can actually press Shift
D, Bring it over here, and then what I can do
is I can press control C. And then one going to do
is open up the other file, so the other blend
file, bring it in and there is our balcony. So now I would actually put
these in a clean order. I'm not going to be
using these again, but I would if I was you put these in a nice clean
order so they're, you know, in a
really nice place. But, you know, we
make these things and we have a stock of these anyway. We normally make things again. Anyway, we don't because
obviously we're teaching people, so we're not going
to be bringing in loads of assets or
anything like that. We use them when we need to
create scenes for courses. Sometimes we'll use
these if it's a scene where people need a scene to
actually do something with. But apart from that
we don't do that. All right, let's press dot. And then what we'll
do is we'll call this balcony with
curtains like so. And then I'm going to
write plate Mark's asset. And then what I'm going
to do, I'm going to go to assigned and I'm going to put this in my doors because I think
it could go there. You might want to
make another one for a balcony
completely up to you, file and save out. And then what I'm going to
do is put that down and then what I'm going to do is now I'm going to delete
this out the way. And hopefully, hopefully, if we come to our asset manager, now we have the doors, our balcony, which
we be able to, let's see, pull out, let's see if I can pull it out. Let's put it on
material. There we go. Drop that in, let it load up. There we go. There is
our balcony again. The one thing we did
forget though is I forgot to put windows
unlit on there. We can put that on in a bit. We don't need to worry
about that too much. Now what I want to do
is basically I want to put this balcony also
on the other side, being as I've got
it, I'm as operating our 180, spin it round. Now what we're going to
do is we're going to build a little bit
more of this out. I think I'm going to put
my other balcony in here, up against here like, so let's just make sure
back against the wall. I'm just going to zoom into it. I can see here a little bit out as you can see if a pull back, pull it back there we
are into the wall, making sure it's level
with the other part. I'm going to press control once I can see the
rear view of it. I think it just
needs to come over a little bit this way, like so. And then I'll delete
this one out of the way. This one's going to be
a different balcony, so I'm not going to worry
about that one right now. But this now is
looking really nice. What we'll do on the next lesson is we'll actually make a
start on this part over here. Because we've got pretty
much all of the parts. The only things we
need to do is we can delete these parts we
don't need oh, sorry. These are the
windows, aren't they? So they're just placements where we can pour
windows a thing. What we'll do is we'll get
all of this part built out just to take a break from
such a heavy modeling, which gets pretty tiring. Actually. The other
thing is I'm just looking on my reference here. We will need another
balcony as well. I think that one
then is the final, once we've created
this door on here, that is the final door. Which means then
we can actually, we only have one more
window left as well. So you can see now
we're pretty motoring along in terms of what we actually need to build
for the actual building. All right everyone,
So I hope you enjoyed that and I'll
see on the next one. Thanks a lot. Bye bye.
58. Working on the Backside Entrance Design: Welcome back everyone to the Blender Ful Ultimate Guide and this is where we left off. All right, so now
what we're going to do is we're going to actually make a start on this
part round here. So what we're going to
do is you can see at the moment I've got
these pillars in here. These aren't the ones
with the blue in, in other words the pillows here. This one here is
the ones that want, so we're going to make it
a little bit different. Moving on round to here. So let's bring the
first pillar in. Hopefully it's going
to just fit in there really nicely as
soon as you've got one in, the rest of them
fall into place. What I'm going to do is we're
just going to press shift. I'm going to bring out the other pillow pillar onto there. What I'm going to do is I'm going to try and get them a bit more centered so you can
see now more in the corner. Then as soon as I
bring now the arching, we will get a good idea of
how these are going to look. Now I'm hoping if I
stretch this arch, or if I make a huge,
it's not going to make all the other arches
huge or anything like that. So I'm just checking that. And then what I'm going
to do, I'm going to press our head 90. And I'm going to put this
into where it's going to go. I'm going to hide my
palms out of the way. And then I'm going to
press three just to go into a nice few. And then what I'm going
to do is I'm going to see how these are
going to fit in. And if I need to pull this out, because there is a
chance that I need to pull this part out, it might not be
actually long enough. And I think once I
get this part in, better idea of how far I
should be pulling out. If I put it down to
something like this, let's pull it back
a little bit more. Let's put it just under there. Something like that,
so it's going on top. And then let's pull
this one out to where that one needs to go and
see how much gap we need. That looks round about how
much we're going to need. You can see here,
going down here, I'm thinking behind
the other way. I'm just looking now
at how long this is. I think I need to make
this a little bit thinner. Actually, I'm going
to press S and Y. Make it a little bit thinner, and then pull it back
this way a little bit, and then pull this back
this way a little bit. So now we still need to
bring this out a little bit. So what I'm going to do is
I'm going to come down and pull this out just so
it lines up there. And that means then I need to bring out my balcony
just a little bit. And then what I'm going to
do is I'm going to bring out these windows as well.
Just a little bit. And then I'm just going
to come down to this. I'm going to pull this out just to line up with this part here. So I'm going to pull
it out a little bit, line up with this part here. And now finally, let's
put back our balcony. So we'll put our
balcony back in place. And I actually think
that then it is looking a bit better because it's got a little bit
more width to it. Yeah, I think that looks a little bit better
than where it did. All right. So now
what we can do is we can actually start
bringing these pillows in. Then with the
pillows, we'll have 12 and we'll have
another one over here. So I'm going to press
shift, bring it over. That didn't work.
Shift there we go. Bring it over to here. And then shift, bring
it over to here. And then shift, bring this one over to here and
put that one in place. And I'm not sure
where I actually won that one at the moment. We'll see once we
get these parts in, if I bring this in now, shift D, and then what I
can do is I can spin it around so is at 90 and then
I can pull it into place. I want to make
sure that it's far enough back like this one here, so we've got the same distance. And then what I want to
do is I just want to make sure that it's going
to fit into place. In other words, I
want to just put it there for now, just
as a placement. And then I can put
the next one in, and I can see that
these probably going to want to be a little
bit wider, so shifty. I can see that they're
in the right place. What I want to do then is
I want to grab them all. I want to press and X and pull them all
out at the same time. Now let's come to this one. Now if I pull this
one over here, we can see that they're still going to want to be
a little bit wider, so I'm going to grab
them all and X. Now let's put this
one into place first, just like that, it's perfect. Let's then move this
one into place as well. This one's probably
going to need to be a, a little bit wider
as you can see. Because you can see we've
got this one. This one. This one. Just wondering if
it's worth using the array. I don't think so.
Actually, what I'll do is I'll grab this one, I'll press S and X, and I'll pull it out
step on its own. And then I'll use this one and do the same thing, S and X. Let's pull this one
out. Double tap the A, and there we go. That looks absolutely fine. Okay, so now let's think
about our wall here, because we never actually
fixed this wall in here. The other thing as
well is I would like a beautiful arch going
into here as well. So I'm going to
actually do that. I'm actually going to lead these pillars out of the way now. And we'll put our doors in first because that will in fact, will it make it easier. Let's actually come to
the underside of here. Let's actually move
our floor for now. So we're going to hide
that out of the way. And then what we're going
to do is we're going to jaws come underneath here. And we can see that
this underneath we don't actually need, so this underneath here
we don't actually need. We can actually create
our arch from there. So I'm going to press
the lit and face us and we'll end up with
something like this. Which means now we've got
loads of room to kind of bring this floor from here. So what I'm going to
do is I'm going to press control left click. Bring it down to
something like here. And then what I want
to do is I want to press control
and go up this way. So I'm going to press
control going up this way. Bring it over to
something like there. And now I should be able
to use this part here. So as you can see
this part in here, and I can extrude it out, or I can press shift D,
Probably going to be easier to be honest with
you if I press shift D. So I'm going to press shift D, and then what I'm going to do is then extrude it out
because then it means I can unwrap this completely separate
from everything else. Now I just want
to check and make sure it's not poking
out anywhere. It shouldn't be, you know, it's not going into
the back of there or something like that,
I don't think it is. So that's absolutely fine. So what I can do now, I
can grab the top of it. In fact, I'll isolate it out. Let's press shift
age, isolate out. We're definitely not
going to need this bit, this bit, this bit, or this bit. We're only going to need
this wall part here. So I'm going to press
delete faces, in fact. Oh, we're going
to need that bit. I'm going to leave
that bit on there. I'm just going to delete
these three. So these three. So delete faces and
then let's come in and let's press you and rap. Let's see if that wraps
Okay. And there we go. Now it is there too much of a difference there from this one and this one?
I think there is. So what I'm going to do
instead is I'm going to let's press control one
and go around to the back. And then what I'll do is
I'll grab all of these. I'll press and I'll
project from view. And then I'll go to shade in. I'm going to press Control one again so we get an idea
of what it looks like. And then obviously
we need to make this much bigger as you
can see, like. So what I'm looking at
is just this edge here. And I think all it is is the fact that I haven't
quite moved it over. I think. Let's have a look. A little bit of an edge
there, let's put on. You can't see it anyway.
You can see a tiny, tiny little line there. I think that is okay. I really think
that will be okay. The other thing I can do
to get rid of that is I could actually come
in and join these up. I think I can come in. Oh,
it's where the bevel is. That's why, that's
what's causing it. Yeah. So what we'll do
is we'll join these up. If I come into wire frame, I can actually come in then and press on these and grab them
both. And then right click. And what I can do is I
can merge at center. And then I can do the same thing on these
down here as well. So grab one of them and then
you can merge at center. Now if I put this onto here, you shouldn't be able
to see anything. There you go. All right, that looks pretty good. Now let's press sltage and
bring everything back. And that's what
we're left with now. Now what we can do is we can
come around to this side, or we can just come to our Sat Manager and we
can come into doors. What we want to do is bring in one of these doors like so. Now just remember though, actually I don't know if I want to turn one
of these lights off, so you know what? Instead of that, I'm actually
going to bring in this. I'm going to press shift,
I'm going to bring it over. And then what I'm going to
do is I'm going to spin this round now, 180. Spin it round,
Press control one. And I'm just going to
put that over there. I'm going to then press Shift and bring this one over here. And then what I'm
going to do now is I'm going to delete
both of these. Press delete, grab this. And then let's put
them back into place. Let's hide out this
palm tree again. Let's put these into
place on here, like so. There we go. All right, that's looking pretty nice. Now what we'll do
on the next one is then I'm actually going
to leave that pillar. Leave that, We'll create
this part going over here. We'll decide where we actually
want it to come from. I want it, realistically
the if I go in here, I want the arch to probably
come from the top of here, just so I'm not clashing
with anything else. So probably from the top of there is where
we'll put our arch, and then we can have it
going all the way down. And then if you was in a game
and you were walking down, you looked up for the ceiling. It'll look really, really nice. Okay, everyone. So I
hope you enjoyed that. I hope you enjoyed
the course so far. And I'll see you
on the next one. Thanks a lot. Bye bye.
59. Creating Curved Staircases for Back Entrances Using Simple Deform Modifier: Welcome back everyone
to the blender for ultimate guide and
this is where we left off. All right, so let's grab this arch and then
what we'll do is we'll press shift S
us to selected shift. And what we'll do is we'll
bring in a cylinder. We'll make our cylinder
something like 20. I think they'll
be fine for this. And then we'll rotate it
round on the y value like so then what we're
going to do is I'm going to delete the
front and back of it. I'm not going to need those. Delete faces. And then what we'll do
is I'll also delete the parts which are coming down and going round
like we normally do. So all of these following
round like, so delete faces. Now let's see what this is going to look like when
we've got it in place. So if I put it in place, so I'm going to go
around the back of here and we're going to look
if it's in place like that. As you can see it needs
to go up a little bit and then you can see
it's a little bit out on. I'm going to do is just press and y and pull it back
into place like so. Now the next problem we've
got is, as you can see, that it's still poking
out through here. And we don't really want that. We have two ways of
dealing with this. First of all though,
the first thing we should do is come
to the back of it. Shift and click,
and just move that. Then down here, move
it all the way down, all the way down into into here. Pull it all the way
down into here. Now you can see the
problem with guys, where do we want this to end? So you can see at the
moment it's coming over here and it doesn't
really end very nicely. I think instead what we'll do is we'll grab
the whole thing. We'll press and Y and then what we'll do is
we'll just pull it in. So I think if it
ended like that, so in other words,
we add one bit, coming out for here,
one bit there. I think that then is
going to look much nicer than it is at
the moment to do that. All I'm going to
do is I'm going to grab each of these sides
and then I'm going to press Enter and Y
and pull them out. Now if they don't pull out, just put it onto medium
point and then and Y, and then you should be able
to pull them out into place. Now just make sure this side, as you can see, is not quite level so I'm going
to grab the whole thing. And when to zoom
out a little bit, just so I can get
my halfway point. And then I'm just going to
move them over like so. And finally then I'm just going
to pull them all out now. So and y, pull them
all out like so. And there we go, Right
click, shade, auto, smooth. And then we think we've
got our arching now you can see not
working this side. So I'm going to
come in oak shift and click and then
I'm going to pull it back into place like so. And just make sure it's
near enough touching that part so you
can't see it coming through and you can't
see it up there. And I think actually
that looks really cool. Now, we've just got to
remember that we will need to put something in here
instead Walder is, I'll just grab it going all
the way around like so. And then walled is, I'll
just press and just give that color there. And I think I'll also do
it with this side as well. What I need to do is I need
to come in and find it. So let's put on our x ray. And there it is. We're going
to go into here old click. Pull it all the way out
your, so we can see it. And then pull it there. And then what we're
going to do is just grab this one and this one here, and press and there we go. Now let's maybe not
split these up, but what I'll do is I'll
unwrap these two separate. So I'm just going to
go into face leg, grab this one. And then
I've got that one. I'm going to press on wrap. And then what I'm going
to do is hide those out the way, grab
the rest of it. And then just press and unwrap, Press l tage, bring
everything back. And now finally
what I wanted to do is I just want to give
it the right material. So I'm going to give
it the war material. So if coming over, come
to wall, there we go. Give you that
material. There we go. I think that is looking, you can imagine you could put some pots and things
like that on here. You could even have some
ivy or vines hanging down here as well
in a little pot that would look really nice. That's what we're looking
for, something like that. We could also put some
light in here as well, some big chandeliers, maybe
to really set the scene up. Okay, I'm happy with that. Now what I want to do is now
I just want to replace this. Do. I'm going to come
round, I'll grab this. Do press then what I'll
do is I'll press the 90. I'm going to press three
on the number pad. And what I want to do is put this door in the place
where it's going to be, something like that.
Let's pull it back. So let's delete this
door out the way. And now we can pull
this one back. And you can see
we've got a bit of a mishmash on the door here. Don't worry, we're
going to fix that. Let's pull this back into place. First into some
place like there. Then what I'm going
to do is just think, let's have a look what we
can actually do with this. That's another pillar there, so we'll just get rid
of that. There we go. And then what we'll do is
we'll grab this wall here, and I think I'll make
a copy of this wall. What we'll do then is
we'll just grab this face. Just this face here.
Can I grab this face? I don't actually think
so. Actually hide that. There we go. This one here, and this is the one
that I'll need. So all I'll do is I'll just
check how close that is. I think the near enough levels.
So that should be okay. All I'll do is I'll
just press selection. And then what I'll
do is I'll just grab this face now with a, I'll press on the wrap. Then what I'll do is I'll just bring on instead
of the gray box, we'll have our wall, like
there we go, double tap the A. And there we go. The
one thing that you might want to do with this wall, you can see it's,
it's this wall. And we don't really I'm looking now to see if we
need it for anything else. We don't really need
it for anything else. The thing is we don't really
want to have the wall. So what I'm going to
do is going to come in and grab it here
and just bring it, pull it all the way back into
place where it should be. Then I'm going to go to here and pull it all the way back. I'm I can pull it back all the way just to
the top of there. What we're going to do
now is we'll just press a and we'll just
unwrap it again. Wrap, there we go. Now it's looking tons
bare. Okay. All right. So I'm happy with
all of that now. As I said, it's nice to take a quick break
from doing all that. I think what we'll
do now and we'll do it on the next list and
actually what we'll work on, I think next will be the
three windows together. I think we'll do those
because then we can near enough get most
of the windows in. I think while I'm
here what we'll also do is we'll just copy this. So we'll just press Shift D and we'll actually put
this door into place. So that's already, I
will bring it over here, so I'll also test out and see if I can steal the steps that we've already made instead of
making some new ones. Let's delete that.
Let's pull it back because if we don't have to make something,
then we shouldn't. If we steal these steps shift, let's bring these
steps around R, Z -90 Let's pull those
into place over there. Let's see if they will go
into place, which they will. So that's great. So let's
delete those out of the way. Let's put these into place, just make sure that
they're on the floor. We'll need a bit of a wall here. We're also going to make them a little bit thinner as well, so S and X make them
a little bit thinner. The final thing with
these steps is I want them to actually have
a rounded part them, so I'm just going to pull
that back out again. And I'm going to show you
a really nice technique to make things rounded. Also just a bit concerned with where these steps
are going to come to. They need to come just to there. And then this door
will certainly need lifting up a little bit like so I'm going to
save out my work. And then what I'm
going to do is I'm going to come to these steps. I'm going to press
Control layer transforms, right click, set
origins, geometry. And then we're going to
come in and add a modifier. And the one we want is deform. The one we want
is simple deform. And you'll see now that they're bend in a really weird way. But if we put it on
this way, you will see, hopefully not like
that on the Z. It's not actually bending
the way we want it to, but if we put it on Y, instead of doing it like this, what we can do is press
A to grab it all. And then what you
can do is you can put it on medium point. And then you can rotate it. Let's rotate it on the Z O Z 90. Press the tab and
then rotate it back. Our Z -90 and rotate it back. Now you might find that you can actually
twist it the way you want, as you can see,
because you basically swapped it over
in the edit mode. And then it bends the
simple deport works, changing the direction
that it's bending in. Now what I can do is I can
actually bring this down, can make a slight bend on
it like so there we go. We can see that it's looking pretty nice and it looks
a little bit different. It looks like it's
actually leading out. That's nice. Okay, so
we've got that in now. We can save about our work and we also need to
put a wall on there. But you can see
now because we've built already a lot of parts, it's just really, really easy to bring it all together.
All right everyone. So I hope you enjoyed that. I'll see on the next one. Thanks a lot. Bye bye.
60. Modeling a 3 Framed Window Asset by Merging Primitive Shapes: Welcome back if you
want to the blend, the ful ultimate guide. And this is where we left off. All right, so we want
to do our windows. So I'm going to
take this one and we'll use this as
our kind of base. And what we want to
do, I'm thinking is kind of one in the middle which is
a little bit arched. And then the other two on the side which will be a
little bit more round. So what we'll do is
you can also think about if you want to put all these windows
together as well, I'll split them up.
It's up to you. I think sometimes
putting them together looks nice and
sometimes splitting them up also looks good. So it's really down to complexity of what
you want to make it. I think with this one actually, I'll have a look at actually
putting them all together. So what we'll do
is, first of all, we'll press shift
S Ursa selected. And then what we'll do
is we'll press shift, I think first of all
I'll bring in mesh. Bring in a cylinder.
And I'm going to leave that on 20,
that should be fine. And then R x 90. Let's spin that round,
put that in place. I'm going to follow what this kind of sizing
that it is at the moment. And then what I'm going to
do is I'm going to come to the center part of
this center part here. I'm going to come in, grab
this, put it onto Sharp. So I'm going to press one
and then pull it up like so, making a slight tear drop. And that's looking nice already. All right, so the next thing then
is I'm going to bring in the other two parts now and work out what I'm going
to do with those. So I'm going to press Tab.
I'm going to press Shift Day. I'm then going to come down and bring in another cylinder, spin it around so R x 90. Let's put it this side, then let's press and X and
pull it out a little bit. Something like this actually looks what we're
actually going for here. What I'll do is I'll
just pull this out. Then what I'll do is I'll
join this up and show you how to actually
straighten all these out. First of all, let's look though where
this is going to go. If we join these two up, let's press control J. Let's go into object mode. Let's turn off our x ray here. Now we can see where they're
actually going to join up. So you can see it's
a little bit out. It needs to be probably
just about here. What I'll do is
I'll grab this one. I'll press one on
the number pad. I'm going to zoom
in a little bit. Now I can see where
it should join, So we can see that it can
probably on this one here. This one on here, I think
will make it the easiest one. This is the downward point, and this is also
the downward point. So what I need to do
is I need to pull it down and pull it out, and that is where
these two should join. That would be the most
efficient way, I think. All right, so that's
that one there. So what I can do now is I can come in and join
these two together. What I'll do is these two here. In fact, what we'll do
is first of all we'll actually split this
off selection. And then what we'll do is we've already got a cursor
in the middle. I'll get grab this one
control all transforms. Right click origin 23d, cursor add modifier and
we'll generate a mirror. Put that on the other side. Now when I come to join to
this it join much easier. I'm just wondering if I should also do the same with
this one as well. Yeah, we'll do it like that. So I'll come into this one, I'll get rid of front
and back press, delete faces, and then we'll do is I'll just delete this face
all the way down to here. Delete faces. Then finally we'll do is I'll join this to this control J. And then it's going to join me. Now when I come
in, I can actually come in and join this with this. If I come in here, press
the little dot just so I can orientate myself
around. Press the Born. Then what I'm going to do
is I'm going to press M, where it merge as center. All right, those two are merged. I might as well do the
same with this one. I might as well get
rid of all these. Now we'll come in, we'll come to this
side and I'll get rid of all down to
the delete faces. And then we'll do the
same with this one. Now, delete, delete
faces on this one. Then from here,
going all the way around here, delete faces. Now you can see we've pretty much a straight line
going all the way through. That's I'm going to do now is I'm going to
come in, grab them. Going all the way around.
You can see they're still going round or there and
I don't really want that. So what I'll do instead is control click, Going
all the way around. Shift click, Control click. And then press shift D and
then pull them out like so. And you should end up
with something like that. And basically that's
all you need, you don't need anything else. We can actually come in
and get rid of this. So delete vertices and then what I can do
now is then come in and apply that
mirror because I've got the base for y I
actually need now. So I'm going to do is
press tab A. I'm going to press and Y and pull
that out like so. Now we know that he's not going to be perfectly
straight along gear. So what we're going to do is we're going to actually come in. Press A and then what we're
going to do is mesh bisect. And I'm going to cut cross here like so I'm going
to set this then to zero and then we know that
is perfectly straight there. Now we'll just do the same
with the backside as well. So I'm just going to
come in mesh bisect. Do the same thing here, set this to zero, put it on
the other side this time. And then we'll end up
with something like that. All right, so now what we
need to do is we need to grab all of these like, so press one and then on we're going to
do is pull these down, seed, pull them
down, down to here. And there we are. We
have a beautiful window. Okay, now let's join
all of these up. We have to join them up
individually, I'm afraid. Then then finally on this one, just to fill in those faces. Now what we can do
is we can start working on what we're actually
going to do with these. First of all, we want to have the bit that's
going to be in the inside, so I'll do is old shift click like so going all
the way around here. And I'm going to fill in
this part here as well. So I'm going to press,
then I'm going to press Y, just to take that
away from there. This can be in fact, no, I won't press Y. What will do is I'll
do them all together. So if I do this one next, so Alt shift and click, going all the way around
like so Ol shift, click and then
fill them both in. And now what I want
to do is that Jaws want to come in and
grab each of these. Press tab control A,
or transforms, right? It's the origin geometry. And now I can press and pull
them in. Press I again. And there we go.
Now they're being pulled in really nicely. You can see how easy that was when we joined
those altogether. Yeah, I think I'm happy
with that. All right. So now what I want to do is I want to work on
these parts here. The easiest way is we'll have, yeah, we'll grab these. I'm just looking at the
moment we have this, we can probably do this
a little bit easier. So what I'm going to do is I'm
going to press Y on these, then they're split off, and then we're going to
press shift click, shift click, and
Alt shift click. And then what I'm going
to do is I'm going to press Y and then just pull those out and
then and Y, like so. And then grab your
windows and then we can pull those through
into there like so. And then grab the back bit.
Don't need that anymore. So delete vertices
and there we go. Now let's think about the wooden slats that are
going to go down here. We'll do a little bit different. I'll pull all these out
a little bit further, actually, just to make
it a little bit easier. And then what I'm going
to do now is I'm going to come in and I'll join
these two up first. And then I'll join
these two up as well. And then we'll do is I'll
join these two up as well. Now I'll do is I'll
press control. And I'll bring in two,
left click, click, control law two, left
click, right click. And now we'll bring
in one on here. Left click, right click. All right, so now we've got
those, these are the windows. Now what I can do
is I can come in, I can grab all of
these, like so. And then I can press and
bring all of these in. And now you can see that
we've got the wooden parts that we actually need
going around here. These thin bits will
be the wooden parts, these parts will be
the stone parts. Now I'm thinking is that in far enough so you can see there
quite small on the top. But I think actually, I think actually they're
looking quite nice, so I don't mind them
being a little bit thin. I'm just comparing them then to the other bits of
wood that we've got. Or they're going to be too
thin, that's the question. Maybe they want to be and
we're just going to go back. Maybe I want to bring them
in a little bit more. Don't worry if they're crossing
over like you see here. Don't worry about that.
We can actually fix that. All right, so I'm
happy with that. Now what we'll do is
we'll grab this one. And this one what we'll press is M and we'll go at
the last like so. And then this one and this one. And don't press it
again, just press shift or and then we'll just
copy that last command. Now you can go to this one
shift and then this one shift. And there you go. All
of that is fixed now. Okay, now let's split these off because these are actually going to
be our windows. So press Y, and then what we're going to do now
is split off this wood. We're going to have
wood coming from there. Pretty much basically
like we did before. I think actually if yeah, I'm going to come
down to these two first and then I can pretty
much do all of the next one. Right click markem, and then
I can hide all of these. So if I come in, I
just want to make as easy as possible for
myself and come in there. And then I can press hide those out of the
way and then I can come in once more and
then walk press now. I think that's actually
going to be fine. Okay, so we've hit
those ones out the way. Let's just grab them now. Going like this, this
and then press Y, H, Hide them out of the way. And then work all way down. We'll work all way down here. So we're just trying to get them all split
off from each other, Y and H. Then what we'll do is we'll
split these ones off, these bones and we'll go Y, H, hide them out the way. Then finally then and H,
hide them out the way. Let's press all the,
bring everything back. Now I want to do
is I just want to, I think I'm going to
grab all this one first and I'm going
to press selection. And then what I'm going
to do is grab my windows, because I also want
to separate those off just to make it
a little bit easier. So I'm going to
press selection now. Should be left with just these. Now if I press on these, I should be able to press when we're in individual origins. And now I'll be able
to see which ones haven't been split up. I'm looking at all the way
around here and they all look like they've been
split up. Which is great. Now what I can do is I can
pull these into place, I can press the Born and
pull them out like so. And then what I can do
with these now is I can split these off
away from each other. The easiest way to
do that is just to press A and then we're
going to go to mesh. And I'm going to go to clean up. And hopefully I'm going
to fill all the holes. And now I should be able
to add in a modifier. Bring in a bevel,
and there we go. Let's bring that down then. Bring it up, 12.3. There we go. There's are wooden
slats on there. And now all I need to do, right click, shade,
auto, smooth. Just to smooth all those off. Now let's bring in our glass. So what I'm going to do is
control A all transoms, right click its
origins, geometry. Pull them back into place, like double tap the A. There we go. They're
looking pretty cool. Now think what we'll do is we'll delete this
out of the way. We'll save out our work. And what we'll do
on the next one then is I think we're
going to need to split these up a little bit to differentiate
between the stone. And what I might do is I
might pull this window out a little bit just to make
it a little bit different. All right everyone. So hope you enjoyed that and I'll
see on the next one. Thanks a lot. Bye bye.
61. Fixing Mesh Gaps in Window Frames: Welcome back everyone
to the blend of full ultimate guide and
this is where we left off. All right, what I'll
do is I'll grab this. Now I'm going to right
click and shade, smooth. Shade, auto, smooth, sorry. And there we go. That's
looking pretty nice now. Now the only thing
I'm wondering is if I should bother now, I think what I'll do
is we'll have this as a full block of stone. If I should basically have
things like this in this one, I'm just wondering if I
should actually do that. Because if we want to do that, what it means is
we need to split off these two away
from each other. And I'm not sure how
easy that's going to be. I think I think we will.
I think we'll go for it. So what we'll do is
we'll come in and we'll mark a seam going all the way down here,
so all shift click. And then what I'll do is
I'll click on this one and click on the inside of this one and then
come to the back. And then just
underneath, just make sure they're all marked. Right click, mark scene. And then what we'll
do is we'll come into this stone one first. Notefully, if I precel now we should be able
to split all these off, so why H hide them
out of the way? And now what we'll do is we'll just fill in these parts first. Because then it will make it much easier for us to
fill in this part. Fill in this part. Now press old shift
in H, I think it is. Oh, there we go. I think control shift H, I think reverses it round. I'm not actually
sure. Let's come in and grab this one.
Hide it out of the way. And now we'll just fill these ones in and
you'll see there's a method to this madness
as we work through it. So now we've got these
at the moment and they're all split
up. Which is great. Now if we want to make
these look like stone, we need to certainly
bring these bottom parts. We need to cut them so they're not going
to look like wood. Because generally stone,
it doesn't join like wood. Wood joins in that way because
that's the strongest kind of seam you can get. But with stone, it's different. They sit on top of each other. So if we want that,
what we want to do, first of all, we'll
pull this out. So l shift click and we'll pull this one out so it stood
in front of the other two. And I think that's going
to look a bit nicer. Then what we'll do
is we'll come into this one, we'll grab all this. So we're basically
are going to fix this part first before
doing anything else, and then we can
pull this forward. Then finally what we'll do is we'll look at what's
going on with this one. Because you can see
that this here, for some reason, sat
all the way back there. I don't actually
know why it looks as though it's been spun
around this one. But we'll fix that in a minute. First of all, we'll
the windows in. Now, I'm going to come in L, L, L. And I'll pull
these forward. That's one at the front, and then all we've
got is this side. What we could
probably do now is, I'm just wondering if, if I grab these parts here, this is the one that's a
little bit all over the place. I don't know why it's
gone back there. I can pull this one forward. If I pull this
forward, there we go. Let's pull it forward there. And let's press tab, double
tap the there we go. That one looks fine now. Now, then let's
work on what I said we basically want to
make going round here. Old shift, click
shift, click shift, click, shift, click, shift, click shift, click, right click. Then what I want to do, I want a seam going
down the bottom. Now the only way to do that
really is if you press A, then you can come in to mesh. And what you can do is you
can bring in a bisect. And then I'm going to cut
across this way like so. And then I'm going to come in
and level this out to zero. And then what I'm
going to do is I'm going to bring this all the way down as close as I can to here. It should shine. Once
you've got it, there we go. That then is directly in
line with all of those. And what I can do now is I
can right click, mark a seam. Now we've here, we've
got all of our parts. So we've got these parts here. You can see here we've still got a seam going across there, so just make sure that you
grab them going all the way. I think what I'll do is first
we'll do these two first. So I'm going to grab
just these two shift, Hide everything else
out of the way. And what we want to do in
fact, let's press Alt Age. And what we'll do is make
this easy for ourselves. Hide the wood and the windows. Now we've made it very
easy for ourselves. Now what I can do is
I can come in and grab the bottom up here
and the bottom up here. And you can see here,
we've got this as well, So we want to make
a solid piece. So what I'm going to do is
I'm going to press Shift. Hide everything else
out of the way. I'm just wondering, let
me just check this. I'll deal with this one first. So I'm just going to grab
all of this one first L, and then shift H, hide everything else.
Yes, that's what I want. Okay. So now I can
come in, I can grab L, L, L, L, and on the underneath. And then what I can do is I
can press Y and then shift H, hide everything else
out of the way. And then we can fill this
part in and fill it in, press Alt H, bring
everything else back. Now that one's all done,
we've split those up. So now let's split
the other two up. If I come in, shift, click, shift, click, shift H. Now all I need to do
is fill in these tops. All I'm going to do
instead I'll go to mesh, clean up filloles there we go. For some reason top holes
haven't got filled, so let's fill them in manually. And then I'm going
to press all tag. So now what we should
have now if I come in and press control or
transforms right click, so origin geometry,
we're going to end up with a little bit of mess because we've not finished yet. But we're going to do
is generate a bevel, and I'm hoping that
this one here, you can see it's
still not split here. So that's what I'm hoping. So let's put this to naught
0.5 and there we go. That's what I'm looking
for. Now what I want to do though is I want to see
why this is not split off. So what I'm going to do instead is I'm going to grab this, going all the way
around the and press Y. And then there we go. Now it's split off,
but this side, for some reason, isn't
fixed very well. Let's hide it out the way, and let's see what's going
on. Let's delete this part. So delete faces, and then
let's fill in this part here. Let's press old. Now double
tap the A, and there we go. That's that part done. So
that's the first part done. Now let's figure out what
we're doing in this one. So I'm going to press L, and we can see for some reason, yes, I need to grab it on this. So L and then L, and then Y, and then shift H. Let's hide
those out of the way. Let's see if we can go to mesh, clean up, fill holes and
yes we can, that's good. All tage and there we go, we've got those parts done. Now finally just
the bottom bits. So we'll come in first of all, and we'll grab each of these so, and then we'll press Y
and then shift in H, hide everything out of the way. And then what I'm
going to do now is first of all I'm going to
fill this one in this one, and then I'm going to press A and then I'm going
to come to mesh, clean up, fill holes
that's filled, all of those in a tag. Bring back everything else. There we go. All we need
now is just to finish, to make this proper is to
finish these bomb parts. You can see I've grabbed them
going all the way around. I just need then just
to grab the tops. And then one going to
do is press shift age. And this is what I'm left with. You can see now what I
need to do is I just need to fill in these parts. We'll fill in these
two parts first. You can see these
two parts here. I'm going to press F
like, so I'm hoping. Yeah, let's have a look,
why is that joined there? Let's have a look again
without filling these in. I think actually for some
reason, these are still joins. So what I'm going
to do is actually I'm going to press L
on the whole thing, and L on the whole thing, Y, and there we go. That's actually going to
fix what we needed to do. So now what I'll do
is I'll just come in, I'll grab this one and this
one. This one and this one. And then, and then I'll
grab this one and this one. And that doesn't
want to join either. Look, that doesn't want to join. Let's see if I can do
the same on this, then. Then I'll press L on
this and L on this, and then press Question Mark. That doesn't work, so
we'll press Shift. Hide the other one
out of the way, so be able to join together. Now, press then, we've
just got this one left. I'm just going to
grab this bit here. Shift that one's fine. Tag, bring back everything. Double tap the Ala, bring
back everything else. Let's press all
tattle question mark. There we go. And let's
have a look at what we've created that is
looking really nice. It was a real pain
to actually create, but it is looking pretty nice. All right everyone, on
the next lesson then what we'll do is we'll get
the materials in here, we'll get the little
windows in here, and then we can start putting this window around our scene. All right everyone. Let's go and save that our work so we don't lose all that work we did and
I'll see on the next one. Thanks a lot. Bye bye.
62. Texturing Three Piece Windows: Welcome back everyone to the Blend of Four
Ultimate Guide, and this is where
we left the art. All right, so now let's come in. And now we've got
this, and let's actually get some materials on. So we're going to grab
all of these stonework. First I'm going to press
you Smart Uv Project. Click Okay. Let's come over
then to our materials. Let's put in gray stone like so, let's put it on material and let's wait for
it to load up. We've got a fair
amount of shaders now. We're going to clean
this up as well. After we've done these, get rid of any of the materials
that we're not using. The reason, by the way, the
materials keep coming in is because we're using the asset manager to bring them in. So we just need to
clean all of that up. Let's let this load. So 26 shaders
remaining. There we go. All right, so now we can see that's looking pretty nice now
before I'm doing anything, I'm actually going
to clean this up. So let's go to clean
up unused data blocks. Let's go to clean up. Let's clean up. And I'm just going to
clean everything up. Should be a board
which is clean up, but I'm just going to make
sure they're all clean. And then what I'm going
to do is now save it out. All right. Let's now
come to these parts here. These are the windows. I'm going to come
to these parts, which should be the wood.
These are the wood. I've got to make sure
that this one on here, for instance, this should have
a seam on there for sure. O shift click. Let's see if it's going all
the way around. Right click. And man, what we'll do is we'll come in
L and there we go. Okay, That's going to work on a smart UV project. Click Okay. And then what we'll do
is we'll put it on wood, light wood, double tap
the. Let's have a look. Well, they look like we could make this look
a little bit better. But actually, I
don't actually think it's turned out quite that bad. But we could certainly
straighten those up if we wanted to. The other thing is
let's have a look, double tap the ah, let's actually fix those just to make sure
they look good. So I'll do is I'll just grab this one and grab this
one and this one. Go over to my shade in press
the bond to zoom into it. We go press the tabb,
and here they are. All right, let's quickly
straighten those up. So I'll do is I'll grab
these two and these two. And hopefully if I right
click straight and then grab this one And
this one, not there. Let's come in again. We'll
grab this one, this one. And then go all the way
down through here like so. And right click and straighten. Let's see what they look like. Let's just press dot on them, so I can actually zoom
into them properly. And now they're looking better. What I'm actually going
to do then as well, is I'm going to grab them all. I'm going to pull them
out. Just give them a little bit more on the UB map just to make them look
a little bit better. And now I think they're
looking pretty nice. All right, so now
we've got the windows, so if I press one
on the number pad, I'm going to come in and
grab hopefully my windows, which are going to be these.
I'm going to press A. I'm going to press, and
then what I'm going to do is let's project from view. It's the easiest one when we do the windows and there we go. And then what I'm going to do
now, I can split these off. I'm going to press a and, and I'm just going to put them
over here at the moment. And then what I'm going to
do is I'm going to come in and bring in a window. But let's have a look
which window we've got. So we've got windows
three, which are these? We've also got, let's see if
we've got the other windows. I'm going to click
the down arrow. We've got Windows
two, not those. Then we've got Windows
one. Which are these? These are the ones
on Windows one. There we go. These
are the ones at one. I think they're going to
pretty much the best way. Now what I'm going to
do is I'm going to try and get these into place. If I grab these two first
I can drag those over and drop those into place like so this one is actually looking
quite nice the way it is. And these two here, we
can bring them over. What we can do with these is we can bring them over
to somewhere like this. I bring them over to there, I'm going to make them
a little bit bigger, then let's drop this
one then into place. We can see then that we
have a little bit of a difference in
how big they are. Let's move this one
a bit down like, so let's move the other
one a bit down as well. Like so. And then let's move
these now into position. So I've got these left. I'm going to do is I'm going to grab this one.
This one and this one. This one and this
one, and this one. I'm going to bring
them into place. I'll drop these in there. I'm going to press and X and just move them
over very slightly. I might make them just
a tad bigger just so we've not got those
little bits in here. Look, I'm going to do is pressed then x. Just put them in. And then we'll do is
I'll grab these now. And then and X, let's put it in the center. Like the other one,
you're just wondering, I'm going to put
it in the center. I'm going to just hold it
in the center like that. And then I'm going to do
is just press S and X and pull them in like that. I think then we'll do is I'll do the same
with these as well. So I'm just going to,
I'm going to press a pull those in like the
others. There we go. That's looking fantastic. If I put that on now
on our rendered view. And there you go, you can see they are looking pretty nice. Okay, we've got those now, let's put it back
onto material view. And then what we'll do now is we'll join all of
these together. I think we've still got some modifiers on some
of these which we have. So what we'll do is just
box select, box select, and then object convert
mesh control J. And then what we'll
do is press control C. Open up our other blender. We've got our asset
manager control V, and then we'll put it in. We'll call this window large
or something like that. Window large, like so. And let's find it with the dot and right click
and mark as asset. Then what we'll do
is we'll drop this into our window,
which is down here. Drop this into your window, and then finally
save out the file. And I'm hoping again that
it'll all come through. So let's see now
if I delete that, so delete it out the way, come over to Asset manager, come over to my windows
and there it is, Okay. So where do we actually
want this one? The first place
we're going to want it is we're going to want
it in this area here. What I'm going to do is
we're going to bring it out, let it spawn. And then what we can do is
I can press one and then press and put it in roughly the right place where
it's going to be for now. I think it's probably
going to be a little bit higher
than that actually. I think I'm going to lift
it up a little bit in there. Something like this. Then what I'm going
to do is just delete that one out of the way. Then I'm going to
grab this now I'm going to come to the other side. I'm going to bring it around
shift D and then bring it over and then R and R 180. Then what I'm going
to do is I'm going to put this one press control one on here in the middle. And just a little
bit, so let's pull it back in place like so. And then what we'll do now
is we'll put one here, shift D, bring it
down into place. Let's delete this one out
of the way, pull it back. And this one we may need to, we don't actually
actually fit in place. Then we have a look. I think that's the only two
where we're going to need it. I'm just looking on
my reference now. We've got actually all of our
windows. I'm just looking. And we have one
more door to make, one more door, and
pretty much a balcony. And then we can actually start with the rest. I'm
actually looking. Yes, we can actually
do it like that. So I think what we'll
do now is we'll create our last door
on the next lesson. And then basically near enough, then we've got all of the
doors, all of the windows. We need a canopy going
over one of them. But pretty much then
we can actually really start putting all this together once we've done that. So really, really moting along. Now let's go to file
and save it out. And I'll see on the
next one, everyone. Thanks a lot. Bye bye.
63. Creating Window Variants for Diverse Design: Welcome back everyone to the
Blender Ful Ultimate Guide. And now what we'll
do is we'll actually start with the final door then. So what I'm going to do
is I'm going to grab, do I have a door that can just give me a little bit of a base. So what I'm going to
do is just shift this. That'll give me the right scale. What I need said 90 and let's
just put that in place. And then what we'll
do is we'll create pretty much anything we
create at this point. It's going to be fairly simple to what we've actually done. So what we'll do is we'll
press one on the number pad. Press shift, just to bring in our cursor to the
selected shift. And then what we'll do is
we'll bring in a cylinder. Let's bring in a cylinder, let's put it onto something like 20, rotate it around, and
we should be really faster to actually
creating these now. And then what I'm going to do is I'm going to bring
it in a little bit, so I'm going to
press the S born, I'm going to keep it like this sort of scale apart
from I'm just going to pull it down just on the z axis, so
something like this. And then I'm going to put
it around about there. I'm going to make it a
little bit bigger then. So a little bit bigger, so it's just a little bit
wider. And there we go. Now what we'll do is we'll
delete the front and back. So delete the back.
So delete faces. And then what we'll do
is we'll come down now, come all the way over it with
control, click at faces. And now finally
what I can do is I can come down, grab
both of these. Press one, and then E and Z, and pull them down like so. All right, so that's looking a nice shape. I'm
happy with that. What I'll do then is
he come in, grab them, going all the way around, and press and then Y to
separate it off. And then we've got that part. And then what we'll
do is we'll just grab all of this now. So we're going to press L and Y, make it a little bit thinner, and then bring it into place. Then what I'm going to do now is separate this off
from everything else. Selection, separate it off. Let's come to this now. Control. Lal transforms right clicks the origin to geometry. Add in the modify, and
we'll bring in a solidify. Okay, let's press one and then what we'll do is
we'll pull this out now. So pull it out to the
thickness we want. I'm thinking whether
I want it to be in, I think it's going to be
better in, to be honest. I think if we don't bring it in, it's probably going to
be a little bit too big. So I'm going to bring
it in like that. It's already on the outside. And then what we're
going to do is we're just going to apply this now. Now let's come in and what we'll do is we'll bring this part. So this part here, we're
going to press one. And I'm actually
going to bring it up and then I'm going
to grab these two, and I'm going to bring
these up finally. Then I'm just going to come in, grab this sense part. Press the eye button
to bring it in. And then let's pull
it either in or out. I think I'll pull it in like, so let's right click
and shade auto, smooth. Let's put it onto object mode just so we can see what
it actually looks like. Now finally, let's come in and mock some same old
shift, click shift, click shift, click shift, click, right click, mock, same. Now finally, what
we want to do is we want to come
in and grab this. Going all the way over there,
all the way over there, y to separate everything out. A to grab everything and
then mesh, clean up, build holes and then contro all transforms rightly
it's origin geometry, add modifier and we're going
to bring in a bevel and you can just see how quickly and
easily the workflow is now. So quick. Now let's come in
and make this part here now. So what I'm going
to do first of all is I'm just going to press control all transforms
rightly, Srogens geometry. So pull it out. Actually we don't want to pull
that out because you can see at the moment that this is not the inside of there. So let's delete
that out the way, and now we've made this stone. What I want to do
is I actually want to come in and fix this, because I need to grab all of these going
around there instead. So I'll do is we'll grab
all of the back ones. So I'm just shift clicking
and control clicking. And then what I'm going to do
is I'm going to press shift D. And now you can see
if I pulled that out. So if I pull that out, you
can see now it's in the arch, whereas before it
wouldn't have been. Let's press P, then Selection. And now to fix that, all I want to do is I
just want to come in and press Tab and then mesh. Clean up. Merge by distance. There we go. So
remove four verses. Perfect, Press the bottom. And there we go.
And then what I'm going to do now is I'm
going to press one. I'm going to come in
then with my vertex, select this top one. And then what I'm going to
do is press K actually for the knife press to
move it down like so. All right, now let's join
these two over as well. So I'm going to grab
this one and this one. Press J, and then what I'm going to do is
press control two, left click, right click. Finally, then I'm
going to come in, I'm going to grab all of these. And then I'm going
to press press I again if it's not
coming in properly. And this is the way that
we're going to make our door. Now let's separate these windows off Selection.
Separate them off. And then what I'm going
to do now is I'm going to grab my wood and I'm
going to press Tab. I'm going to press A,
I'm going to press control and mark seams. And then what I'm going
to do is I'm going to see if I can actually come in. And unmark these ones. Because these ones I
don't need mark seams. So what I'm going to do is
right click and clear seams. All right. Now rather than actually
selecting all these, what I'm going to do is I'm
going to grab these two here. I'm going to press Y and
then hide them out the way. Then what I'm going to do is I'm just going to select
the rest of them. I'm going to come up to mesh and I'm going to go to split. I'm going to face us by edges, let's
split them like that. And then what we'll do
is we haven't got to go through all of that
that we did before. You can see they're
all split off. I'll take bring everything back. And then hopefully
I should be able to grab all of these. And
these shouldn't be split. So you can see
these are not split because they hid
them out of the way. So that makes it much, much easier to actually do
that is what I'm saying. All right, now we've
got that, Let's press E and extrude them out like so you can see we've already got a beble
on because we use this. Let's though turn this bebble down 'cause it's way too high. So all we'll put it on is
not 0.5 something like that. Right click and
shade auto, smooth. Let's press Control
all transforms. Right click, set
origin to geometry. And let's put those into place. So now just start glass. So control all
transforms right click, set origin to geometry. Draw up it into place, and there we go, there's
our final window. Now let's come in and
add in some material. So what I'm going to do
is I'm going to apply this bevel and then
we're going to go in. In fact, no, I'm not.
I'm going to come in and then Smart UV Project. Click Okay. Material down arrow. Let's look for what's it
called? Stone. Is it called? No, it's called greystone wood
props. What is it called? Let's have a look. I'm going
to just minus that off. I'm going to have gone here. Brownstone. There we
go. It is called that. What I'll do is I'll grab
this and I'll grab this. I'll press control
l link materials. Let's put it on our shader. Let it load up. And then the one we'll pick on is going
to be brownstone. Again, we have a
few shaders now, so it's going to take a little
bit more time to actually, you know, load up and
things like that. We're using a lot
more memory now basically as the scene
starts to get bigger. And I think also
asset manager also uses a lot of data actually
when you bring them in. So now we've got that,
we can see we need to unwrap them so you
smart UV project. And then what we're going
to do is this inside one, put it on red paint like so. And then what we're going
to do now is the wood. So I'm going to grab
all of the wood. I'm going to press you Smart
UV Project. Click Okay. Grab the outside press control, L link materials and
then come back to this. And then what we're
going to do is light wood, click a sign. Let's see what that looks like. We've got actually
some on this one, which is very strange going
the actual wrong way. So what I'm going to do
is I'm going to press control all transforms right. Click, Origins, geometry. Now a smart UV
project. Click Okay. And we've still got some
going the actual wrong way. And I'm just wondering
what is causing that. It could be all of these seams. Instead of doing it that way, I I don't know why all of a sudden it's actually turning them
around this way. Actually. I'm not so sure.
What I'm going to do instead is if I come
in and I try and grab, yeah, this one and this one, we can see why that is. Let's actually go on to
object mode once more. I don't actually know.
Let's go to shading. And then what I'll
do is I'll zoom out. I'll come to here,
I'll grab them all, and I'll just look
at the ones that are actually facing the wrong way, which I'm not sure. Let's
see if it's this one. Let's have a look
at this one, okay? Any facing that way, we can see now all of these that
are facing this way, I can just literally
come down and I can press all on any of
these and spin them around. What I'm going to do, I can see all of
these on this side. I'm going to press B,
go down them and then go up these ones
here. Press control. And then what I'm going
to do is I'm going to also grab this one, and then this one and this one, and finally this one. Spin them around,
so our 90 like. So now we can say that all of those are going pretty
much the right way, except these two on here, which we're going to
sort out in a minute. So what am going to do now
is I'm going to press A, I'm going to go, I'm
going to express you. I'm going to right click. And I think not on here. Where is it? Straighten. It's the
three dots. There we go. Three dots. Uv
lands, no rotation. Click. Okay. Letty think about it's going to
pack them in there, nice and neat for us Now, all we need is we need
the front of these. If I grab these two, let's see if any of them. So we've only got
one of them there. Which one is it? Is it this one? Nope. So we know it's that one. Let's grab the other
one. Nope, it's not that one. So this one. So we'll press G, pull that out. So now what I can
do is I can come in and straighten these two up. So I can straighten these
two up at the same time. So right click, straighten out. And then we've got this one going all the way
around to here. And this one going all the
way round here, I think. So round two, not
that way, this way. And then I can write,
click and straight them. And then what I can
do is I can press and Y and hopefully put
them in the right way. And then A, sorry, not a L and then 90. And there we go. All right, so they're looking pretty good. Now what we'll do then
on the next lesson is we'll get the
windows materials in, we'll get those into
the asset manager, and pretty much then we're finished with all of the doors. And I think I'm fairly sure we've finished all
the windows as well. They are the tedious part, actually doing all those. Alright, everyone. So, I
hope you enjoyed that and I'll see you in the next
one. Thanks a lot. Bye bye.
64. Strategically Placing Doors and Windows in the Scene: Welcome back everyone. And
this is where we left it off. Sorry, we should say
welcome back everyone. To the blender for
ultimate guide. And this is where
we left it off. It's been a long day, guys. So now all we'll do is
we'll actually bring in, I think we'll actually
copy this one. I actually like that one a lot. So what we'll do is
we'll press one and then what we'll do
is we'll press Tab. And we'll come to
actually our windows. So I'm going to grab
all the windows and we're going to project
from view like so. And then we're gonna go over
and I'm looking for a window and I'm looking for the
one I want, which is two. No, not that one. Let's try one. No, not that one. So
it's definitely going to be three. There we go. Okay. So now what we want
to do is I'm going to make these a little
bit bigger, like so. And then I want to put them in some sort of place
that makes sense. So I'm just going to pull
them to the side like so. And then what I'm going to
do is I think I'll move, so these two, let's move
them down just a little tad. I think that's looking fine. Let's then grab these two, and we'll just make sure
they also look fine. Y, A, G, Y. And we'll put those
more in the middle. Those ones are fine,
and these ones will also move a little bit y. All right, looking fantastic. Now let's join
them all together. So we'll come up to object convert mesh and then
press control J. And then what we'll
do is we'll copy that and quickly put them in our asset manager which is over here with the
press control. And we have at the moment, let's have a look what
the doors are called because we have a few
of these doors now. I'm also going to save this out so I don't actually lose it. I'm going to go to this one
round doing this door here. I wouldn't say, I would
say it's an arch single. What's this one?
Let's have a look. Arch single. Let's call this arch Glass.
We'll call it that. Arch Glass. Like so. And then right and Marks asset. And then let's drop it
into doors. This one here. And now finally
we'll just say that out and then we'll
just bring that in. I'm going to go
to Asset Manager, I'm going to go to Shade In. I'm going to delete this
now out of the way. And hopefully I'm
going to go to Do and find the last in there. There it is, there is our last. Now, let me just pull up my reference so I can see where these doors
are going to go. This it's going to go over here, so we can get this door in here, but it's going to have
part of a balcony. So what I'm going
to do is I'm going to bring in my balcony first. I'm going to press one on the number pad and I'm going to put in my balcony over here like, so the balcony also needs
some rocks underneath, so I'm actually going
to steal these rocks. And what I'm also going to do is I'm just going to press shift D. So you can see at the moment this rock is attached to then I
don't really need that. Let's grab this one
L delete verticesn what I'm going to do
with these rocks, I'm just going to move them over and I'm going
to right click and mirror on the X just
to move them around. Now you can see
they're looking a bit different from those rocks. And then what I'm going
to do is I'm going to put those into place where
I'm going to have them, which will be round back here. And then what I'll do is I'll
move them back into place, grab everything then, and then move everything back into place. Making sure that
my metal up here, the most important bit sticking
out the wall far enough, then these bricks are
in the actual wall. Now finally what
I'm going to do is I'm going to come
in and I'm actually going to delete all of this because I don't actually want this window in this one. I'm just going to press delete, hoping because I've
brought this in, I'm hoping it doesn't
affect the other parts. Now, let's give it a try and
see if I bring this one out. Yes, it has, That's the
problem I'm going to have. So I don't want to
do that. I don't want it to be
affected like that. So if I'd leave that
on the asset manager, the one that I've
brought in, I need to make a good
duplication first. So now we know that, we don't want to mess
around with that. So what I'm going
to do is I'm going to again press shift D. And now I should be
able to leave this out. I'm going to press one,
I'm going to press, put this into the
place where I want it, which will be roughly
around there. And let's pull it
back into the wall, so making sure it's
sat on these bricks. So let's pull these
bricks up a little bit. There's also to be, there's nothing going
to be along here, but there is going to
be something back here. Now along this top as well, on this top we're actually
going to have this on ever, we're going to actually have
something else on there. What we'll do is now we'll
come in to this part. I'm going to press Lth.
Bring everything back. Double tap the let's now come
in, select all of these. Then what I'm going
to do is I'm actually going to delete these
out of the way. So I'm going to press delete. And then I'm going to
come to this bit now, do pretty much the same thing
as what I've just done. We delete all of
these out of the way. So I'm going to press
delete vertices. Let's see what we've got
left. Not too much left. Let's come in. So delete Bert And there we go. All right. So now we can do is we
can get our door and then what I can do is I think
this one is the one I made, so I can actually bring in an asset manager
or use this one. I think I'll use this one. I'll pull it up into place. So one, put it to
the top of there, and then let's pull it out
and see what that looks like. Let's make sure it's
down to the floor. It's a little bit too
high as you can see. It's not quite
down to the floor, so let's pull it down into the floor like so. There we go. Let's press one just to make sure it's pretty even
I think it needs to pull in this way.
Just a little bit. And then what we'll
do is we'll put it maybe a little bit
further in the door. Double tap the A,
there's that one. I've got a window
there. I'm just looking where else I'm
going to need this one. I think round this side is
where I'm going to need this. So I'm going to
grab this Shift D, Bring it around this side, so Z -90 Let's
press control three G. Let's put this in place now in here we'll
delete this one out. The way we know that this is, this is going to be actually
a different balcony on. I'm going to do is
just come and come in L delete vertices and then
pull that back into place. We'll want it then. I want a couple or
more of windows. I'm going to grab a window like this one shift, bring it out. And then 90. I'm going to press control one. Let's pull that one into the place where I want
it, roughly around there. And then shift D,
bring in another one. Then one we're going to do now is delete these two windows and then pull these back
into place holding shift. So then I'm going to take
one of these windows, shift D and then Z
90 control three, and then into place like
delete this window. Now let's drop that
one into place. All right, that's
looking pretty cool. Now, let's look at this. Do let me just have a look
at my reference again. We're going to have this window. I'm thinking, is it this
window? Let's have a look. We've got this window,
we've got three. Do these two doors. And this one I think I'm
going to use this door again round on the top of here. So what I'm going to do is
I'm going to press shift D. We're going to bring
it round to here. We're going to spin it round. Then at the moment it's the
wrong way round, I think. Let's spin it round.
So was hundred and 80. Let's put that into
place so I can get rid of this. I
don't need this door. And then what I can
do is I can come in, drop this row fully into
place where it's going to go. And I can also make sure
that it's actually down on the floor not floating in the
air, Something like that. Double tap, the A. I'm also
going to make sure for press control one that it's
actually level at the moment. Now we've got an
even space this side and this side. We've
got that door in. Now let's grab the other door, which will be this one here. Let's press shift then. And then we'll do is
I'll pull this out, z hundred 80, control one. And then what I'm
going to do is press, and I'm going to
pull that and put that door in there somewhere. Let's delete this part out. Let's then pull this
part in like so, and let's make sure that
it's not off the floor. Double tap the so now
we've got that window in, we've got two windows in here, we've got this one in
here, we've got this here. Moving along, then
we need the same, this window again, I'm going
to use over here as well. So I'm going to press shift D. I'm going to bring it over. And then what I'm going to
do is pull it into place. And I can see that I'm
probably going to need either this balcony coming down or
this one going up slightly. This part here, in
fact. No, I'm not. I know what I'm going to do. I'm going to cut this one away. So I'm going to put
this one in there, so I'm going to delete this one from behind there I can grab it. This here where the balcony is. I'm going to come in L
on this, grab this L, delete vertices and now grab my, so let's put it a little bit more in the middle
and that's that door on. Then I've got three
windows down here, and then going around I've got one window on the back
here going around again, I've got balcony, one door here, one door here, and one
large door down here. I think actually, actually
we've nearly got all of those windows except
one little window that we're missing that's
going to be up here. So I'm going to press shift, and then what I'm going
to do is pull this up and pull it
across control three. Let's put it, let's
see if it looks good. Maybe more to this side. Let's pull it into place. There we go now, is that looking good there? Should move it a little
bit further over and I'm fairly sure that's it. All right everyone. Now on the next lesson, I think what we will do is we'll start working our
way around this bit. We'll start working
our way around here. And then we can slowly work
our way up to this part. But you can see now
already that if I come in and I put my camera
here, let's go in. There we go. You can really, really see it coming together. Now don't forget,
there is one thing that you're looking at here. You're not looking at
this with composite on, so you're only looking
at this as a basic view. It looks good and all that, But it's going to look really, really good once we
actually get into the compositor and actually start rendering
this out properly. Because the thing is, with
the compositor at the moment, all of this, it's got no
ambient occlusion on it, hasn't got any saturation on it, hasn't got any sharpness, it hasn't, you know, anything to do with the
lighting or anything like that. So once we actually
start in there, then this thing's really
gonna come to life. I think what we'll do
actually is we'll start just building round here and then we'll give
it a quick render. And actually I'll show you
what it's really going to look like just to give you
that extra boost to actually, you know, carry on
building out your model. All right everyone.
So I hope you enjoyed that and I'll
see you on the next one. Thanks a lot. Bye bye.
65. Working with Cloth Simulations for Shades: Welcome back everyone to the
Blend Four Ultimate Guide, and this is where we left off. Now I think what I'm
going to do personally, is I'm going to shut
my asset manager in that other file now and actually just spend the
time working on this one. It's up to you whether
you want to keep adding to that or whether you want to keep
everything in this one. Well, there's no
point keep going backwards and forwards
at this point. I'll just re use the assets because I've already
stored my assets anyway. Okay, With that said, let's get started then on this
bit around here. And what I'm going
to do, first of all, I'm going to hang this
bit of cloth from here, going over to here, and I'll show you exactly how to do that. First of all, let's
just grab this top pot. Press shift us is selected. And then what we're
going to do is we're going to
bring in the cube. We're going to bring
our cube over here. So I'm going to
press the S button. Bring it out, then this is going to be a
little bit of metal and then the cloth
can hang from here to round about here.
Let's pull it out first. In fact, we'll make it a
little bit thinner and X, let's make it a
little bit thinner. Let's pull it out S Y, so let's get more
into the middle. I think actually a little bit
more maybe then and zed and squish it in like so
this then will be made of rock or stone. And then what we'll do is
we'll have another bit. So I'll do is I'll press Shift. I'll bring this out
and I'll press and Z. I'll actually put this
onto object motor. I can actually see
what I'm doing. And then what I'm going to
do is I'm going to press and y and pull it in
a little bit more. And that should give
me then a good base to hang my cloth off off. All right, so now we'll
put another part in here. So what I'm going
to do is I'm going to come to this part here. So I'll grab, yeah, I'll grab just this
edge going on here. Shift S, Coaster selected. And then what we'll
do is press Tab, and this time we'll
bring in a cylinder. Let's put the cylinder
on 20, should be okay. So we'll spin it
round so our x 90. Let's make it a little
bit smaller like so. And let's pull it up
where I want it to go, which I think somewhere
around there should be fine. And then what I'll do is
I'll grab the front of here, let's take off. Is that even on? Nope, it's not.
Let's go to face, select, grab this face
and let's pull it out. And then what we can
do is we can drape something from
here over to here. Now I do think at the moment
this is a little bit thin, so I'm going to press
Alt Shift click, going around the side,
and then I'm going to press Alton S and bring it in. And the reason I'm
doing that is because I don't want to scale it all down because I've
pretty much got it in the place where
I actually want it. All right. So now
I've done that, let's just put an end on this. So what I'll do is I'll
grab the end enter S and then what I'll do is
I'll just pull out the end. So like so. And finally then what I'll do
is I'll bevel this end off, so I'm just going to
grab it. Control B. And then bring a couple, maybe three edge loops in. Left click and there we go. Let's right click
and shade smooth. All right, so now
let's think about, I'm just wondering, is
that shaded smooth? I hope so. We'll see when we've brought
the rest of it in. So now what I'm
going to do is I'm actually going to
bring in a plane. So I'll press, I'll grab this
one and this one actually. So now I've got them both and I'm going just put
it in the middle. So shift S kirst is selected. And we can see for some reason it's put it over
there, I'm not sure why. So what I'll do is I'll grab this one control all transforms. Right click, set
origin to geometry, right click, shade auto smooth. It's just because I
shaded smooth on that, not shaded auto smooth. Then what I'll do
is I'll grab this point and this point now. And hopefully if I press
shift S, cust is selected. It should put it more or
less where I want it. Shift. Then let's
bring in a plane. Let's pull our plane over. And then what I'm going
to do now is I'm going to pull my plane up to here. Something like that. And
then I'm going to grab, in fact, I'll measure
it out first. I'll put it to the ends of here. First I'm going
to press S and Y. Let's pull it out. And then what we'll do is we'll
pull this down now. So I'm going to grab this end and then I'm going to pull it
down into where I want it, which will be somewhere
roughly around here. Then what we'll do is we'll
pull this part out a bit. While I've got this edge and Y, let's pull it out a
little bit and we'll just put it over to
that place like so. All right, so now
what we want to do is we want to basically
hang this on here. First of all, as we did
with the other cloth, what we're going to do
is we'll just save out our work just so we
don't lose anything. And then what we'll do
now is we'll right click. In fact, we'll reset
the transformation first before bringing
in our subdivision. So it's set origins geometry, and then what we'll
do is we'll grab it with a right click. Subdivide 345 and maybe six. So we'll subdivide it six times. Then what I'm going to
do is I'm going to come in and I'll press double tap the E. And then
what I'll do is I'll come to face Lt. And I'm just going
to grab the edges on here. So if I press C, I
can come in and just grab some of them like so because I wanted to
be a little bit. Look a little bit more organic, so I'm going to grab it
from there and there. And then what I'm
going to do now is come in and I'll grab, let's say let's just hide this out the way for now
so we can come in. And then what I'll do
is with these points, I'm going to maybe this one I'm thinking to
grab two at a time. Actually. Instead we'll
do it a different way. What we'll do is we'll just
come in and we'll grab two, and we'll just grab two or
three randomly instead. And then we'll fit our change, just make sure they're kind
of either two or three. If you've gone too
many, don't worry, we'll just come in and
minus some of those off. So I'm just going
to press again. I bring in three and
then another three. So then what I'll do is I'll minus and just tie them up a little bit
where I need them. So you can see here, you can
see they're randomly spaced. Anyway, this one's probably
a little bit too close. Something like that, I think is going to be absolutely fine. Now, the other
thing is I've lost those now because I
put it on face leg, so I've got to come
in and redo them. But anyway, let's come
to the little triangle. Click plus and then
we'll put pin again. And then what we'll
do is click a sign. And then what we'll do now is come to these ones at the top. Come to at the top. I'm going to grab this
side, on this side like so. And then what we'll
do is click a sign. All right, so our cloth sh, should be nearly ready.
So let's come over then. And what we'll do is we'll
come to our physics tab. We're going to put cloth on. You'll see it drops
through the floor. And that is because we know that our timeline is probably
going to be set for. Click on it all the
way over to one side. So let it load up our
timeline and then we'll see how far
up we are on that. We won't need as many as long as the timeline
on this one, it's much, much easier. So you can see we're at 231. Let's put it back to zero.
And there is our cloth. In fact, we'll leave them
there. No, we won't. We'll press voltage,
bring back this pole, and then I'll come
to my actual cloth. All right, so now what I want
to do is I actually want to open what's going on. Yes, that's it. This one here. And then what I want
to do is I want to come down and set my pin. So pin group, let's
set it to the pin. And now in a press space bar, we'll see that that happens. And that actually looks
quite good already, but we wanted to look a
little bit better than that. So the way that you can make
it look a little bit better, the easy way is just to
increase this vertex mass. If you put this on four
or something like that, you're going to get a lot
more bend now as you can see. And it looks a lot more
actually realistic. So I think that's how
I'm going to have it. We could also put it colliding
on this if you want to, but I think for me, I
think that's looking okay. The one thing I think
I would like is maybe, let me just move this pole out. So shift space poll, Let's bring the move,
let's pause that. I'm just looking
at this part here. If I need to, maybe
think about giving it a little bit more mass just to get these parts looking
a little bit better. Mm, no, actually
that should be okay. Let's just give it a little
bit more a look actually. So we'll come in back to our
cloth and then what we'll do is we'll put this on
maybe, let's try five. So let's try five. Let's see what happens when that finishes. And maybe that's going to
look a little bit there. Actually, yeah, that
there when you could see. What I tend to do now is
I put it on object mode and we can see now just how
nice that's actually looking. I'll press Space Bar, and then what I'm going to do is
I'm just going to pull it back to see if I can get it looking a little bit
nicer. So you can see there. This is looking actually really, really nice as you can see. You can see though, that
we do have some problems. It doesn't quite go
in and we've got a little bit of a kind
of indentation there, but it doesn't look amazing. Let's right click
and shade, auto, smooth, and there we go,
that's what we're left with. So now I think that's good
enough to actually use. And what we'll do
now is we'll go in and actually mess
around with this. Because I do recommend when
you actually do cloth, once you've actually done
it through the simulation, just apply that and then go
in and actually use maybe a little bit of sculpting
or moving around the edges. That's what I highly recommend. So what I'm going to do
is I'm just going to come over this side, Press control A. Where is it on here? Press control A, and apply that. And now we have our mesh. Let's come on over then reset
our transformations again. And then what we'll do is add modifier and we'll
go to generate, and we're going to generate
a subdivision surface. And there we go, that's
nice and smoothed out now. And then I'll just
apply this now. Then what we'll do
on the next lesson is we'll give this a
little bit of smoothing, I think, to smooth out
this just a little bit. And then what we'll do is we'll pull these back in a little bit. All right everyone. So I
hope you enjoyed that. And I'll see on the next one. Thanks a lot. Bye bye.
66. Sculpting Additional Details Using Sculpt Mode: Welcome back everyone to the
blender for ultimate guide, and this is where
we left it off. Okay, so the first thing
I'm going to do then is just see if I can smooth
this out a little bit. We don't want to smooth
out too much because we have some beautiful
folds in here. So what I'm going to do is
have modifier generate. And we're going to where is it deform and then
come to smooth. So let's smooth it
out and see if we can get any more
smoothness on there. And let's turn this up
maybe a couple of times. And there we go, I think
that's now smooth enough. And then what I'll do is
I'll just press control. Now if you want to smooth it out smoother or add in
some more folds, what you can do is you can
come over to the sculp mode. We're not really going
to be going in this, but I will show you, you have one over here which says smooth. And then what you
can actually do is you can come on and you can see you can actually smooth that out if you really want it. I'm not going to
smooth mine now. But you can also come
over here and just quickly add in some
folds if you want, you can turn down
the strength on here so that it's
not quite as brutal. And then let's bring
it down and then we can add some folds like this. And then what you can
do is you can smooth out those folds holding
the shift button. So I'm holding shift and
smooth them out and just make them a little bit bigger
like so if you need to, you could also then
come down here as well and you can actually
bring it in as well. So I press control that can actually bring it
in as you can see there. So what you can do
with then is you can come here and kind of help bring these parts in like so which
is kind of handy. And then I can
smooth that out with holding or is it that's going to smooth and let's
smooth that out like so. And just make sure that
you don't go too far. Whatever you're doing
on this because it's you can't
really mess it up, especially with the lighting,
you will be able to see if you go too crazy on this. I'm just going to smooth mine out a little bit more generally. Generally you can get away with a fair amount,
but just be careful. You can also, one of the
handiest ones is where is it? I think it's called crease. I think this is the crease ones. Have a look. Yeah, that's
the one. This is the one. So you can actually use the crease button jaws to highlight these parts a little bit more like so and really
bring them out. So I did say I'm not
going to use this, but actually I'm quite happy
with how that's turning out, so I think I'm going to use this like this and then I'll
use the move tool. We should have one which is
grab, which is this one here. I'll go over the top with seven. And then all I'm going to do is just pull these out like so. And then what I can do is
I can make a ring there. I'm going to pull this one out, and then I'll pull the middle
of this one out like so. And then let's grab
this. I'll make it a little bit bigger. It's
a little bit too small. A moment. Then on each of these, I'm just wondering if I
should put the ring in here. If I pull them back, let
me just have a look. If I pull them back, just want to see what that's
going to look like. Obviously, I need to smooth them off again, As you can see, I'm just wondering
if I can pull them out and put my rings
there instead? Yeah. And I think
actually that's going to probably look a bit. What do I mean by the rings
where we're going to make some actual little
links that are going to go on these to make it look as though it's actually hanging with something. So we can see here,
let's pull these back. I think actually if
I smooth those off, so I'm just going to move
them off a little bit. They're going to
look quite nice. It's a maybe I need to bring this up a little bit
where you can see. Now we've got a lot
more definition of where we actually
want these to be. All right, lastly then, I want to make sure that
these are in place. So what I'm going to do is
just pull that down like so. And then grab this
one and pull it down so it looks as though it's hanging a little
bit better than what it was. Let's do the same
on this one also. Let's pull this one over. Just a little bit like so and smooth it off just to
get that smoothness back. And then this one
to pull it off. Let's smooth it off again. I'm thinking that
is pretty nice. What it'll be is
I'll have to pull this up a little
bit as you can see, but I think the rest of that
is looking pretty good. Now I'm going to do is
I'm just going to come out of the sculpting
so as to say, and we're not really going to go into sculpting that
much in this course, It's not something that we need, but it is handy to have just the ability to go into the tools and alter
them a little bit. So I would highly recommend
playing around with these. There are some cloth ones, as you can see here we
have got a cloth one, which as you can see, if I pull that over, we can actually make some
cloth details like so. So you can actually pull it
down as you can see and make a bit more realism to your cloth if you
actually wanted to. I would actually turn down
the strength a lot on there. And then you can see
if I pull this down, I can actually start
to get a little bit of ripples as you
can see. So like so. And I'm just going
to smooth those off now like so just so I've got a little bit
more of definition on there. All right. So I'm
happy with that. Let's now come back
to object mode. And then what we'll
do now is we'll think about moving this
down a little bit. So now I'm going to do
is I've done all that, so I'm going to first
of all bring up this kind of pole to here.
Something like that. Just a little bit high,
so it actually looks as though there's something
going to be hanging there. And then what I want
to do now is 12. Kind of pull this a
little bit together. So I'm first of all going
to try pressing and X and seeing if I can pull
it a little bit like so. And then I can pull this out. Now it's going to look as
though it's hanging much, much better, much more freely. And then what I'm going to do now is I'm going to come in, I'm going to grab these edges. I'm just going to grab one
of them to start with. I'll leave it on sharp and
let's see what happens. So I'm just going to press
G and move my mouse in, and then just move it
into place a little bit, hang something on there, and then I'll do the
same thing in here. I'm just making sure they're
close enough to here, so I'm going to pull
it out a little bit. And there we go. I think
that's going to be fine. Okay, so now let's bring
in our first chain. So what I'm going to do is I could steal a chain off of here. We might as well use these
or we could make our own. I'm just thinking that
if I steal it off here, then we're going to
keep the same size. So what I'm going to do is
I'm just going to come in, I'm going to grab this
piece of chain like so. And then what I'm going
to do is I'm going to press Shift and bring it out without proportional
editing on, of course. So let's bring it out. Let's press P, then
selection. Let's grab it. Let's press control
all transforms and then right click and set
origin to geometry like so. And now's the time just to kind of get it into the
place that we want it. So first of all, let's
rotate it on the Y, Y 90, and then what we'll do is press R
and Z and rotate it around. Just get it into
some kind of audit. It doesn't need to be perfect, but you can see
it's more elongated on this side and
that's what we want. So what we're going to do
then is put this into place. Now we can see that may
be it needs rotating. So RY let's rotate it down. Let's make it a
little bit bigger then and let's put
it into place. So now what I tend
to do is I will come and put all of
these going along. So I'm going to press shift D. Bring them a long shift D.
Just put them in place first. And then what we'll do is
we'll rotate them shift D because we don't want
them all looking the same. We can see here just just, we might need to pull that
one back a little bit. Shift and then shift D, and then finally shift on these. And there we go. Now let's
think about this part here. I'm just going to pull this
one back just a tiny bit. So there we go.
Now let's actually come in and press
seven again and actually go in and
rotate them around. We've got this one,
let's just press R and's and move it around. Just spend a little bit of
time just rotating them, making them fit where they need. So you can see some
of these are okay. This one might need
rotating around a little bit and pulling
back. This one's okay. And then we've got
this final one here, which should be Nor lonsd. Looking more like this. Okay, so they're looking good. Now we'll get another one. So I'm going to
grab this one here. I'm going to press Shift
D and bring it up. And then we'll put it
into this wall over here. Let's put it in to the
wall or into here. And then and Y, see if I rotate it round and
then pull it down. Then R and Z. There we go. That's that one. Then shift, let's bring it over
the other side now. And then R. Let's
put it into there. Okay, let's double tap the I think are
looking pretty good. Now I'm going to do
is I'm going to join all of these just to each other. I'm not going to join
them to the cloth yet. I just want them
joined to each other so I can actually
make them usable. And make it easy to use them so I can actually
add a material. And then what I'm going to
do now on the next lesson, is we're going to add a
little bit of depth to this cloth because it's
actually got no depth. It's just a simple
plane at the moment. And then what we'll do is
we'll bring in the materials, then we'll start building
around this part on here. And finally, then then
we'll take a render, and we'll go into the
compositor as well, just so you can see how that actually works. All
right everyone. So I hope you
enjoyed that. I hope you're really, really
enjoying the course, and I hope it's
really motivating you to actually
finish this model. Thanks everyone. Bye bye.
67. Texturing Cloth Shades for Realism: Welcome back everyone to the
blended for ultimate guide. And this is where
we left it off. All right, so now let's
come to our cloth and let's give
this thumb though. Generate solidify some depth. Now I recommend that you
only actually give it this. You don't need to
really give it anymore. I don't see the point in
making it any thicker. It looks actually nice enough. The one thing I'm
worried about is just this part here,
which are mine, come in and see if
I can just fix it a little bit with the
actual sculpting. So I'm just going
to come in and I'm going to put it onto smooth. I'm going to make my
brush a little bit smaller with a little brackets. And then what I'm
going to do is just press and hold the shift button. And just move it off
just a little bit more. I think it was a little
bit too sharp on there and maybe on this bit And just turn down your
strength if needed. I think I'm going to
go back actually. And what I'm going to
do is I'm going to drop that all the way down. And then I'm going
to press Shift and start smoothing that off. And there you go. Nigh can see now it's coming along much, much nicer and I'm
happy with it. It's a stylized scene, so we don't really want too
much sharpness in there. All right, so what we'll do is we should apply
this. So let's apply that. And then we'll come
to our materials, to our, sorry, our shader. And then what we'll
do is we'll put that on, we'll let it load up, and then we'll start bringing
in these shaders, everyone. It seems that the
recording software crashed during that
part, but basically, UV unwrapped it in the exact same way as curtains
on our window previously. So feel free just to check
back at it for referencing. Now, I will show you something else as well that you can do just in case you're struggling with the size of your file. What you can do is you can come over to the
right hand side, so where actual cycles is. And we can click this born here. Then what we can do is
we can come down and we can click one
that says simplify. And what we can do from there, we can change the
texture limit both in the viewport and
the actual render. So if you're struggling with the 2048 textures that we have, you can actually
bring this down. So you can see here,
we can put this on 1024 in the viewport. Now what will happen is
when I come to render, now you will see
that these images, now all of these textures on everything has been
brought down to 1024. If I bring these down,
let's say to 128, you'll see it loads up and then you just see
how blurry those are and now kind of rubbish,
all of these look. Well, we've brought
it down to 128. We can also then
bring it down on the actual texture limit
on the render as well, which will therefore
make it much, much easier to render
something out. So let's put mine back to 2048, But you might want to put
this down just so just in case you're having a problem
with the texture size. I'm going to put on no limit. Actually I've got
quite a good system, but sometimes it does
get a bit heavy, especially when we've got
a lot of things in there. Okay, so now we've done that, let's actually come
back then and that's actually give these
materials something. So I'm going to grab
this part here. I'm going to, I think
I'll grab this. We'll grab this and
this. And what we'll do is I think I've got most
of my materials on there. I'm going to press
control L link materials. And then what I'm going to
do is come back to this now. Go over to my materials and just take off
any I don't need. So I'm not going
to need curtains. I'm not going to
need the light wood. We're not going to be
using that wood props, we're not going to be
using, and we're certainly not going to be
using the windows. And then we just want
to add one more, which will be the gray stone. So let's use that. And
now what I can do is I can come into this and
I can bevel them first. So what I'll do
is I'll join this and this together, control J. Let's join them together. Let's come over then. And
what we'll do is add in a modifier and we'll
add in a bevel. And we can see there
the bevels kind of weird if I put this
onto object mode. And that's simply
because we just didn't reset our transforms
right click, set origin into geometry. Let's bring it all the way down. Bring it up one, let's
turn it down a little bit more, not 0.5 so. And there we go. That's
looking pretty nice. And finally, then
let's unwrap it so you not like pack Smart UV Project. Click okay. And there we go. Let's have a quick look at
what that looks like then. That's looking fine,
except this one here wants to be gray stone. So click a sign,
and there we go. And now let's come
to this part here, we'll join this and this. So I'm going to
join this and this control L link materials. And then what I'll do is I'll
actually unwrap this again. So smart UV project. Click Okay. And then let's put on the black
material, which it is. So just make sure
you're happy with that. This is looking pretty nice. I think he should be going
the other way though. So what I'm going
to do is press 890. Let's have a look. And I think that's looking a
little bit better now. And now we've got our actual chains which
are already done, because we've already stole
them from there, anyway. All right, so now what I can do is I can join all
of this together. So I'm going to grab this, this, this, this and this. And then we're going
to go to object convert mesh and then control
J, join it altogether. Control or transforms.
And there we go, there is our cloth
actually done. Okay? So I'm happy
with how that looks. That's another part
down on there. So what we'll do now is on the next lesson we'll actually
start on this wall here. We'll get these materials in, which means we're
probably going to have to come round and do this bit here. So in other words, fix this bit before we actually
give it a render, which shouldn't be
too hard actually, we should be able to create that block again and then we'll create this one going out. We'll probably create this. Yeah. I'll show you how to
create. We should be okay. We should be able to
recreate this part. I'm just thinking, I'm yeah, I'm going to have another
another block going over here. So over this bit. So it means
I can just take this bit separate out from the rest of it and work with it like that. I think it's going to be actually much easier
to work with. All right, but we'll do
that on the next lesson. We'll do is we'll save it out, we'll go back into
the into modeling. And then on the next lesson
we'll start work on that. Just before I go as well, just remember if you need to save out this in your Asset Manager,
keep on doing that. And then you're
going to have all of those parts ready to use. All right everyone.
So hope you enjoyed that, and I'll see
on the next one. Thanks a lot. Bye bye.
68. Adding Texture to Main Building Structures: Welcome back everyone
to the Blend, the four ultimate guide, and this is where
we left it off. Okay, so now let's come in and what we'll
do is we'll grab this. But you can see it's
already separated out, which is really handy for us. What we're going to
do is press shift H, hide everything else
out of the way. And then what we're going to do is basically rebuild this. So what I'm going
to do is I'm going to come in, I'm
going to grab this. I'm going to press shift
S Custer selected. And then what I'm going
to do is press shift. And do I want to press
shift? No, don't. I want to press Tab shift and
I want to bring in a cube. So I'm going to bring in a cube. I'm going to bring it out then to the size that I want it. So you can see roughly, roughly around this size
is where I want it. You can see it's a little
bit out on the side, so let's make it a
little bit bigger and we'll try and keep it square. It doesn't matter if it's
a little bit forward. Like you can see here. I think actually that's going to be fine if I bring it out
a little bit more. And I think that's
going to be fine. I'm going to actually bring
it back, the tiny, tiny bit. I know I'm messing around
with it a little bit, but I just want it like that. All right, let's
bring it down then. And you can see now
it's fit in nearly, Let's bring it just to
the bottom holding shift. And then what I'll do is I'll
just grab the top like so. And bring that up
holding shift as well, just so it pops in there nicely. Okay, so now what we'll do is we'll bring in an edge loop. So control, let's bring in an edge loop down
to here because we already measured this up. And then what we'll
do is we'll bring in another edge loop
going across this way. So left click, right
click. And then control B. So bevel, bring about the
bevels to nothing or just two. And then let's put it in holding shift right to these parts here. And now what we can do is we can actually bring these out. So what I'm going to do is
I'm going to put on my x ray. And then what I'm going to
do is go to face select. I'm going to select this
face and this face. And then what I'm going
to do is bring them out. So I'm going to
press E. I'm going to bring them out
to this point here. And then what I'm going to
do is I'm going to press E. I'm going to bring them out
to this point here like so. And then finally
what I'm going to do is I'm going
to join these up. Now I'm going to actually, at this point, delete
this out of the way. I'm not going to
need it anymore, so let's delete it
out of the way. And then finally I can
come in to this point. This point, press the bridge right click and we're going
to bridge faces like so. And then finally what we'll do is we'll bring in some Ge loops. Now control are along here. This point here, bring in a middle one.
Always a middle one. Whether it's seven or whether it's five, it needs
to be uneven. Left click, right click. And now finally
what we can do is just turn off our x ray. And then what we
can do now is we can try and bring this out. So we want to have a really,
really nice part coming up. So what I'm going to do is I'm going to grab the top of here, I'm going to press control one to go into
this kind of view. And I'm thinking, do I want to be very careful that I don't
move these bottom ones? So I could use
proportional editing, but may be better
off just using. Yeah, just not using it. So let's grab all
three of these. Let's press control one. And then what we'll do is
we'll bring that up like so, and make a nice kind
of slope on there. And then I'll bring this
one up and bring it up, jaws to tad like so. And then finally bring these two up and bring them up very, very gently like so. And you will end up with
something like this. Now let's right click and shade, auto, smooth, and that fill
up what that looks like. Now this might be, might be a little
bit too angular. You can see these parts here. So what you can do is you can actually come
in press control, control beyond this one. And then what we're
going to do is just sorry, not control. B shift, click, shift, click. Now, press control,
Be on both of those. And what we can
do is we can just level those off and make a much, much smoother kind of surface. And that I think
looks really nice. Now what we're going
to do is we're going to put a floor in just for now, just to be able to actually
create this stone. Because we're going to
create some stone there. So what I'm going
to do is I'm just going to join it up
with these three. I'm not going to join it up
with these because these have too many edge loops and
I don't really need them. So I'm going to press, and
then I'm going to press Y. And now we'll see that all we have here is just four sides. We haven't got all of
these little points. If we put this on verticlect, you'll see we have all
of these points here. But if I move this part up, you'll see there's
nothing on there. So it's nice clean finish
and that's what we want. And then finally what
I want to do is I want to probably level these off. So let's press control A or transforms right clicks,
origin geometry. And then let's come
in and first of all, what we'll do is
we'll get rid of the top because we're certainly
not going to need that. And we'll also get rid of the bottom because we're also
not going to need those. So I'm just going to control click going all the
way around like so. And then delete and faces like. So now let's see if we
can bevel this off. So I'm going to
add in a modifier. Generate in a bevel, I'm going to turn this
all the way down. Turn it up one and then we go. Now we've got a slight
bevel going across there. And finally now let's
bring in our wall. So I'm going to look for
wall, this one here. Let's get that on.
And then what I'm going to do is I'm
going to press A on everything and you and smart
UV project. Click okay. Now sometimes it's not
going to unwrap properly, and sometimes it will unwrap
the way that you want it. So just make sure that you check and make sure that
you're actually happy with how it's unwrapped. I think this bit here should
be more on the top here. Just this bit here, I
think I will turn around. I'll see if I can. So I'm
just going to grab all these. I'm going to go then to shading panel and I'm
going to press Tab, and I'm going to see if I
can 90 spin them around. Let's try spin
them around again. In fact, no, it's actually
at the top like that. So let's put them
in. There we go. Let's have a look
what that looks like. Unfortunately, I
didn't grab this one, so I'm going to grab all
three of them again. I'm going to press, I'm going
to just unwrap them like so you can see here, I didn't grab them all, so I'm going to press -90 and then put that in place and
then make them a bit smaller. In your view of V, I think that maybe look
a little bit bare. Okay, not so sure about this part on here yet.
Let's have a look. If I can come in and press a, spin it around, so r 90. Spin it around again, 180. We just want something that makes a little bit more sense, make it a little bit bigger. And there we go, A little
bit of dirt on the bottom, I think makes more sense. The same for this one as well, I'm not sure about these. On the wrap A -90
let's press then. I'll rotate it round again, so we've got a little
bit on top like this, 180 and then just put a slight bit of dirt
in there and make it a little bit smaller like, so there we go. Now I've got a slight
bit of dirt in there. I actually think that's
going to look good. Okay, so let's press Altge
and bring back everything. Hopefully, it should
fit in really nicely. Let's just wait again, if it has taken a long time, just reduce the textures. I think, you know what,
I'm going to reduce the textures in the
actual viewport. I think it's going to
speed up my blender. No end, there we go. So let's come in
and file and save. And then let's go over to
the simplify over here. Simplify and just
put texture limit in the viewport down to 1024. I think that's going
to speed it up, especially when we're
clicking on rendered view, we can still have a good
idea of what it looks like. So now we can see this is
what this part looks like. Come in round to this part. We have got our sun
a little bit high. Let's come in and put our,
put it down a little bit. Overlook where is it? Sun intensity, we have
great down, you know what, I'm going to leave
it on because at the moment, just turn it down. If you want to really see what it's actually
going to look like, let's put it on north 0.1
Actually, yeah, there we go. Now we have a much better idea what it's going to look like. Generally though,
for our render, we don't actually want to
turn this sundown so much. I don't think so. Okay, So I'm
happy with how that looks. Now what we want to
do is we want to actually come in and we want to actually give this some
wall texture as well, but we want to make sure
they split off from this part and just
going down here. And we want to make sure, yeah, this part is actually done. And then what we can do
is build across here and then we can take a quick render and see
what it looks like. All right, so let's come in and see if this bits split off. So I'm just going
to put it back on object mode and I'm just
seeing if this bit is split, which, yes, it looks
to me as though it is. We can see there
though. I've actually missed a part under there
because I didn't know about it. So what I'm gonna do
is I'm gonna come in, I'm gonna put it on Shader. I'm gonna grab this part
and this part and press. I'm not going to
worry about these. You can see here, we're going
to have an end on here. They're not actually
joined properly. Let's press and unwrap. Let's make it a
little bit smaller. And then what I'm going
to do is spin this round, so our hundred R's 180. Spin it round, G, Y,
and pull it back. And you can see
that's the wrong way. I don't actually
want it that way. I want it to be dirt
under this bit in here. So what I'm going to do
is 9,180 Nope, 180 again. And there we go. There it
should be. Let me see. Now I move this, there we go. There's our dirt that I'm
actually looking for. But it's right in the center. And the reason is,
of course it's because this is all
the way in there. So I'm going to
put it like that. I think that's
looking pretty nice. And finally, I can actually
come back to this one. So we'll do this on
the next lesson. Now all we'll do is
we'll press Shift Page, Hide everything else
out of the way. And then I'm sure on this one I can actually delete
the top and bottom. So we'll actually do that just before delete the
top and bottom, delete faces, and then
save out our work. So file and save,
and there we go. All right everyone. So I
hope you enjoyed that, and I'll see you
on the next one. Thanks a lot. Bye bye.
69. Wrapping Stone Supports Around Main Building Structures: Welcome back everyone
to the Blend, the four Ultimate guide. And this is where
we left. They are. All right, so now let's come in and let's actually
unwrap this. So what I'll do is I want to
keep all of this together, so all of these
going around here. So what I'm gonna
do is right click. And actually I'll put
it in this corner here. That's the least place. I
think we're going to see it. So right click, Mark, grab everything, and
then you and wrap. And there we go, Let's
put wall on there. So we're going to
click the down arrow, search for wall.
And there we go. And then what we're going
to do is we're going to press a R 90. And let's see where that's going to be. So it's
going to be at the top. I don't think I want
that. R hundred 80. Let's spin it around. And then we go a thing that's
looking there, all tag, bring everything back. Let's see then what all this
looks like once it's loaded up, there we go. And that's looking pretty nice. Okay, so now if I double tap the A, we've got
everything in there. Now all we need to do
is finish this bit. That's going to go around here. This bit going around the
front of the, under the wall. And then what we
can do is we can get this bit in as well. That's going to be going
around this piece up here, then going around to where
the arch is going to be. Now at the moment, I'm just
wondering whether yeah, I think I'm actually happy with the height. I think I'm
happy with the height. I'll just make this arch
a little bit bigger. Okay. So let's talk and let Neil and let's actually
get something in here. So what I'm going to do
is we grab this piece. I'm going to press, I'm
just wondering actually if which pieces do I want? I think I'll use these
pieces actually. So I'm going to do is
just going to grab three. I'm going to hide the
palms out the way. It's going to make
it easier. Grab all three of these Shift D, and let's bring them over. And then let's press our Z -90 And I'm not going to do
it that way because it's going to be easier
to put it onto medium point Z -90
And there we go. All right, let's get
these going into place. So I'm going to put this one into here and let's
pull it over into here. Let's then pull this into
round about the center, which is probably going
to be round about there. I'm going to press and
X and just shrink that in. Yeah, I can
actually do that. And then what I'll do
is I'll press Shift. Bring out another one. And then I'll press alternSI'll. That's not actually
going to work. Let's delete it, and I'll
do it a different way. Control, before I
shrink this in, let's now press control
transforms, right? So origin to geometry. No, let's press shift, pull that one over there, and let's shrink this
one in S and X, shrink it in like so. And then this one
is the normal size. Now this one, if you then
want to pull it out, so shift D and you press Olds, you can see now we can get the normal size if
we wanted it to be. Okay, So now we've got that. What I want to do is
I want to actually bring this over to this side and I want
to put this corner in. Now, being as my corner is here, I might as well put this into place and it should be the
same as the other one. And then what I'll do now is
I'll grab this one and shift D and bring it over and put
this one then into place. And just make sure
they actually fit so we can see here that
this is a little bit out. So what I'm going to do
is I'm just going to move it roughly into the place
where it's going to be. Somewhere around there is
where it's going to be. And then what I'm
going to do now is I'm going to go into this one. And I will come down and
I will cut it from here. Alt shift click,
Alt shift click, and delete and faces like so. And then we've just
got these bits here. So L if I can grab it. And then L and L and
delete vertices. And there we go, that's
that bit sorted. Now we just have
this side to do. So I'm going to do is I'm
going to press old shifting click and then delete faces. And then just make sure that we've not got any
parts in there, we haven't grow a part in
this side L. Delete that. Delete vertices. There we go. Now let's see if that is fitting in the wall
the way that I want it. So we can see it's poking
out of this part here, which we don't really want, so I need to pull it
out a little bit. There we go. And what
I'm wondering is, I'm wondering if this window needs to come this
way a little bit. Which it does, and there we go. Okay, I think I'll pull it
down a little bit as well. And now let's follow this round. So what I'm going to do
now is I'm just going to follow this round
into this part here. I'm going to, I think, grab
this part again, so shifty. Then I'm going to press
ours and -90 in fact, Oz 180 as well. Spin it around the whole way. Let's bring this into
place into here. We can see it's not
going to go in fully. So all I'm going to do, I'm
just going to set it there. And then what I'm going
to do now is I'm going to bring in this part and Z -90 And then I'll set this into the halfway point
or somewhere around there. I'll set this to. Here. And then what I'll do now, I think I'll take on and
I can take this part. I can press Shift D. I can bring it then all
the way to the end, nearly all the way to the end. And then hide it out the way. And then with this part now I can actually cut
it from there. If I press Tab, I can come
in and Facelift, click, Delete and Face, and
then come in and grab each of these L and then
delete and vertices. And then press tab ul tag,
bring back the other part. And now let's fit that into
place. And there we go. Okay, so that's
looking good there. Now we've got all of
this going across here. Now what we need is
just the top bit, so I'm going to put something under this wall, actually here. And for that one
I'm thinking I will use this here that
I've got here. So I'm going to be
using this one. And we can see at the moment
all of this is put together. All of these are put together. And these are very, you know, they're a little
bit too short anyway, so what I think I'm
going to do is I'm going to go to my asset manager, close that off, and
then I'm going to go to sides and the ones are one is going to
be the blue and red. So the blue and red, this one. So look, yeah, you can
see what's happened there is it's actually
closed those off, which is not actually great. Now, how do we get these back? If we come over to our
actual asset manager, what we can do is we can
actually bring in this one. So you can see now it's
actually the full one, it's not actually split in half. We can press control
C and then we can go back to our build and then just come in
and press control V. And let's have a look. And there, there it is. It's in there again.
So now what I can do is I can actually
delete these out the way because that has not been updated and I don't
want to update it yet. So it's just that take into mind whenever you're
doing anything like this. And then what we'll do
is we'll press one and we're going to put
those into there. Now. I'm not sure whether that's going to
fit properly yet, and I don't think it should be, maybe it should be that
thick. Let's have a look. If we put it in place, I'm thinking it's probably a
little bit too thick on there. And I'm thinking
I'm gonna have it just all the way under there. So I'm going to press
the S board and shrink it down a little bit into
the size that I want it. I think that size there
is actually much better. And then what I'm
going to do is I'm going to grab this one. And this one, I'm going to press shift and I'm going to
bring them up into place. And I want to keep
those just under there. I think just under there.
Let's have a look. Yeah, let's pull
them down to there, and then let's pull
this down like so. And then what we'll
do is we'll bring this one over shift D, we'll bring it over
and then zed 180. Spin it round, maybe too far, so Z -90 there we go. Put that into place there, just making sure it's
not poking out so far. And then what I'm
going to do now is I'm going to put this into
place where I want it. If I pull it back
to there like so, that's fitting in
beautifully now, except I need to
move these forward. So let's move them forward a
little bit. And there we go. That's fitting in very nicely. Now I can do is I can
bring this out first. So I'm going to press shift
and I'm going to bring it out like so I'm going to
press ours head at 90. And then what I'm going to do is I'm just going to
leave that there. And I'm going to come in now and hopefully get rid of the. So I come in and
then I'm going to press Face Slate, shift, click, delete, pass, and
then come in L, L, L, L, L delete vertices. So now let's grab this one, shift D and see if that
one's going to fit in place. Yes, it is. That's
fit in. Very nice. That's that part done. And
now we can actually come in with the rest of it and
fit this part into place, lead into hopefully over there. It would be nice to think, actually if I put
another one on here, like a little bit off
from this one here, I think that's actually
looking quite nice. Shift D, spin it around, so I'll say 90. Let's put this one in place, we'll try and line it
up to where it needs to be, nearly like this. And then finally world
is, I'll grab this shift, move it over right to the start. If you can't see
what you're doing, just hide the
building out the way. It's going to make it
much easier for you. And let's put it into here. Now, this arch,
what I'm going to do is I'm just going
to grab the top of it. I'm going all the
way down to here. I'm going to pull
it up into place. I think actually this going into there is going to
look pretty nice. Now, just finally back to this, then all I'm going to
do is O shift click, grabbing all this, delete
faces and then vert select. And then what I'm going to
do is just grab each one of these and then
delete the vertices. And then finally this one here, I'm just going to make a
little bit longer S and Y. Let's pull it out like so. And let's put it into
place then S and Y, bring it in a little bit
into place and there we go. All right, so that's good. Now then we've got an idea of how far this is going to go. And I think on the next lesson now what we
can do is we can actually, we can actually give
this a quick render. So let's press al
tag, Bring it back. Al, take, bring it
back. There we go. Double tap the file. Save. All right. Okay everyone. So I hope you're looking
forward to the next lesson. We finally get to
render something out and I'll see
on the next one. Thanks a lot. Bye bye.
70. Setting Up Main Composition for Camera Framing and Rendering: Welcome back everyone
to the blender for ultimate guide and this
where we left off. All right, so what I
want to do is I want to take a view from here. The other thing
is I don't really want to render my guy out. So I'll want him there,
but I don't want him being able to be rendered
out. So just hit this on. So what this does over
the left hand side, this will make sure
that if I click it off, we won't be able to see him. If I click this off though, it means it won't
feature in the render. So really, really
handy if you want to render things out in layers. So we'll talk about
that a little bit more once we've
got our actual floor. But for now what we're
going to do is we're going to come in and we're going to set up
our camera first. So we're gonna press shift A. We're going to
come down to where the camera is, so cameras here. And when you bring
in the camera, it's gonna come in again,
wherever the cursor is. Now let's just go
into modeling so I can make it a little bit
easier for you to visualize. So what I'm going to do is
I'm going to set myself roundabout here
because this looks kind of a nice for
you to actually have. And then what I'm going
to do is I'm going to press control shift and zero control and zero.
I'm not going to do that. Just give me a second.
Let's go back ground. Okay, so I'm going to
press control alton zero, not control shift and zero. That's then going
to set my camera near enough to where
the view actually was. So what I'm going to do
then is I'm going to come to view Camera to view. And then what I'm going to do
is, so if this is not open, just press the end
button to open that. Click on Camera to View. And now wherever you
move your mouse, the camera is going to move to, so you can see who can move
all the way around here. Now the thing is get
yourself set up and then what you want
to do is you're on a hold shift to pan. It's the same as basically
moving around the viewport, but with one
exception where we've got control shift and
then middle mouse, and you can actually
zoom in much, much slower so you
can get a really, really nice view,
whatever you want. So I'm going to zoom
it in something like here and just get a nice
view of what I'm looking at. And I think I put
it round there, that's going to be
a really nice view that we can use to
actually render it out. Okay, so one shifts
out the camera. What you want to do is
you want to come over, turn the camera to view off so we don't have to worry
about that anymore. And then you can
actually just middle mouse and there's your
camera actually set. Now I recommend if we go back to our camera if you want
to zoom into a part. I do recommend that instead
of zooming your camera in, so instead of pressing
control shift and moving, I recommend just changing the focal length to
actually zoom in. I think this looks a much better shot when you
do it like this. The only thing is you
can't go too far. If you go really, really far, you'll see sometimes it
starts as you can see there, it starts actually bringing
it out in a weird way. So just be careful, you don't
want to go too far with it. All right, so we're
going to leave that. The other thing is you can
change the perspective to alto graphic as you can see
if I zoom this out now. So let's zoom out a little bit. Oops, let's put it
camera to view, then zoom out a little bit. You'll see I can't
actually zoom out. And the reason is because I need to use this
to actually zoom out so you can see now the different shots you
can actually get. You can see how it's
kind of funky on here. And it's changed, completely changed the angle of
what we're looking at. And sometimes this actually
makes for a good render. Now we're going to put
it in perspective. You can also use panoramic as
you've seen there as well. Let's then zoom this
out a little bit. So I'm just going to hold shift, bring it out a
little bit like so. Okay, so now that's
actually sorted. We're actually going to go into, you know, you know, a lot of the other features
on there because I want to keep it quite basic
for the actual camera. Now. The main thing is
that we're going to be rendering out in cycles. You can render out
in V if you want to. We will discuss V a
little bit later on. There are a lot
of differences in V and basically
you really want to decide whether you want
to render it out in V or whether you want to
render it out in cycles. I think with cycles you're going to get a much, much
better render. Especially for
something like this, it's much harder to
actually get the EV to match the cycles because EV is basically a real time render engine like you would
have in real or something. So it's never going
to be as good as something that's traced
or something like that. What does that mean
based in basic terms? It means that basically when
you render it out in cycles, you're actually rendering it out all of the shadows, all
of the light bouncers. You can control all of those. Whereas when you're rendering
it out in real time, you've not got as many light bouncers coming
off there, of course, because it has to
calculate in real time, which means that it can
only calculate so much. That's basically what it does, dumbing it down
as much as I can. So things like shadows,
things like textures, things like light bounces,
things like sunshine. All of those things have to be rendered out instantaneously. Which of course, if
you render it out in cycles and you've got a long
time to actually do that, it's going to give you
a much better result. Okay, so saying
that then now what you want to decide is
I would first of all come down to simplify and just set the render just for now. Let's set the texture
limits to 1024. We will come back and change that once we have
finished this render, but it's going to make it quick, but it's not going to
be as good a render as what we could possibly have. The next thing I want
you to do then is I want you to come
down to where is it? Let's have a look.
Performance. This is one that we do need
to talk about. So first of all we want to have, if you've got a
high end machine, then you can turn
this used tiling off. It will be quicker to
actually render out. So we'll turn that off
and then what it'll do is it'll just actually
render the whole thing. So if you tick this on, it means basically you need to tick which actual tile
size you want to do. So generally speaking, if you're using your
graphics card to render, which we're going to
show you in a minute, you want to have this
higher, so 2048, If you're using
your CPU to render, then you want to have
this lower and I recommend putting it
on something like 64. It did used to be the other way round and now it's changed. And still there's a
lot of data out there depending on what graphics code you're using and all
kinds of things. But generally, if you
follow that rule, you should be absolutely fine. Next of all, we want to
look at spatial splits, you can see it says longer
build times faster render. I recommend taking this on. I always find it speeds
up the actual render. Next of all you can
see the next one is use less Ram, but
renders slower. If you've got a
problem with Ram, of course turn this actually on. And the last one is you
want this ticked on because it does increase
the memory usage, but it just keep
the renders around. So the first time you
render something out, it's going to be much slower, but the second time it's
really actually going to speed up how fast it
actually renders out. Okay, so that's all of those done and now we
need to come up and we need to make sure that we
change this device onto GPU. Now there's a few
things to remember. First of all, let's
go over to Edit, come down to Preferences, and what we're going to
do is go over to system. Now on the system, you will have all of these
options on here. Some of them you will
be able to tick on, and others you won't
be able to use. And it's simply down to what graphics code and what
CPU you're actually using. So you can see here I've
got an optics, X optics. X is basically cycles X. So previously in blender, previous versions use cycles, Now we have cycles X. And this is the
new render engine. So this should be much, much faster than the old one if you've got this available. If not, you'll have
to put it on cuter or even none if you're
using a laptop or something or a
lower end machine. But generally put
it on optics x. If you find that available, then all you want
to do is just tick on which graphics card you're actually using and which
process you're using as well. So you can see these
are the ones I'm using. I think actually
this graphics card is actually an amazing graphics
card for doing rendering. Actually, it does
seem, I do also have a 30 60 and this actually
seems faster than the 30 60. So just that to bear in mind. All right, so now
we've got those on. What you want to do
is close that down. And then what you want to do
is come over here and you can see at the moment
I'm using my CPU. I don't want to be using my CPU, I want to be using my GPU lip. So Okay. So now working our
way down then, before we actually
give this surrender, you can see at the moment that
we have a noise threshold. Let me just take my camera view off for the moment and we put the noise threshold so
you can see we've got noise ticked on hear
noise ticked on here. We already saw that when you
don't have these ticked on, it's very, very noisy. And what this does is
it tries to work out as quickly as possible to get rid of all that noise.
So it basically cheats. It basically takes a
noisy image and it gets rid of all the grain
and things like that, Saving us a lot of time
when it comes to rendering. We used to have to
bring in a noise node, but now we can
actually tick this on. Not only do you want this
ticked on in the viewport, you also want it ticked
on in the render. Now we've got here
a maximum samples. Now, honestly it
doesn't matter what you put this at if
you've got noise on, because it only goes
to a certain level. If you put this at 100, of course it's not going to have time to really do anything, but it will only go up to a certain level before
the denoising kicks in, and then it'll just
render it out. So if you really want
a true 4,096 samples, you need to click off denoising or reduce the
denoising threshold, Probably better off
reducing this threshold. And then what'll happen
is it'll be much later on in the render before
this actually kicks in. So what we're going to do
then on the next lesson, we're still not going
to render it out. In fact, yes, we will,
We'll render it out. And then after that we'll
go through a few I think we'll build a bit more and
then we'll split it up. So after that we'll go through things like Larry
and the comps here. But for now we just want to get a nice image of our actual
scene out. All right everyone. So I hope you enjoyed that
and I hope you're looking forward to rendering
out your first render. It's gonna be nowhere near as good as what
it's going to look, you know, later
on in the course. But for now, let's just actually get something
rendered out. Alright everyone. So I hope
you enjoyed that and I'll see on the next one.
Thanks a lot. Bye bye.
71. Resolving Texturing Issues in Rendered Material Shaders: Welcome back everyone
to the blend of four Ultimate guide and
this where we left off. Alright, so we've got
all of this set up now. Now what you can do is you
can actually come round. I would always save out your
work before doing anything. So save out our work and let's also, before
we do anything, let's put the maximum samples to something like 1,000
We don't want to have it high because the thing is we want
it to render out fast. We want it to render out
fast so that we've just got an idea of what it's
actually going to look like. The other thing is I
recommend before doing that, we come to our floor and
what we do is we give this a material and it's the floor is actually so
important for the light, the floor bounces
off a lot of light. Now, if you've got the
floor as you know, this whiteness we've got here, it's not going to
really, it's going to bounce probably too
much light off. So I don't want to
do that. So what I'm going to do is click new. And then what I'm going
to do is I'm just going to pick ground plane. And the reason I'm
not going to call it floor is because I'm going
to bring in a floor after. And then what I'm going to
do is I'm just going to put this to something
darker and then I'm going to change the
roughness down a little bit and then put the metallic up a little bit so we get
a nice shine on there. As you can see up to you
whether you want to make, this may be a little
bit darker, right? So double tap the, and I think
that's going to be a very, very nice flaw just to
render this out with. All right, finally then, before we hit that render, boom, very important if you want
to save on, you know, your GPU, you don't want to have this in
the shade of view, you certainly don't want to
have it in the render view. What you want to have
in is the lowest possible one which is going
to be our wire frame. So put it in wire frame
and then go over to the left hand side
and hit Render Image. And now it'll start
calculating everything, and now it'll start
rendering it all out. And you'll see it won't
actually get to 1,000 or as it gets close to 1,000 you'll just
start speeding up. I think I'm hoping
it will be that way. We've got 1,000
samples at the moment, so let's just see how
long this actually takes. And if it actually
goes to 1,000 if it'll start speeding up when
that noise kicks in. So let's see what it gets to. All right, it looks
with a new blender, like it's going to pretty
much try and get to 1,000 Maybe we had
it set too low, so maybe if we say to 4,000 or something like that
in mind to kick in, then maybe this is set
too low for the samples. Yeah, it looks
that way. Let this finish and let's see
what we actually get. But you can see already, Dad is looking pretty nice. You can see we've got
beautiful shadows on here. You can see that
we've gotten some nice reflections down here. We can actually zoom in as well. We can see the
plants look amazing. Everything looks
really, really nice. The only thing it's missing, as you can see, we don't
have any ambient occlusion. We don't have any real light coming off the windows
or anything like that. We do have some beautiful
light coming off of here, hitting this top
here as you can see. But you can see,
it's already looking to be a really,
really nice building. The one thing I do notice, actually, is this in here. I don't think I've
actually set this on the right
material in my door. So I'm going to have to
go in and change that. It's always good when you're
taking a render and you're seeing things that you've
messed up a little bit on. You can also see on here that
this is way, way too high. You can see the
stone from this to this looks completely different. So I'm going to make
that stone smaller. So there are a couple of
things that I'm going to change now before I
actually carry on. So let's actually
close that out now. So let's close that down, let's put it onto shade of mode. And then what I'm
going to do is, and I'm just going to
come in now remember as well because we turned
our textures down, in other words because
we use simplify and we turn them down
text limit to 1024. It also means they will kind of look a little bit
bleary on the texture, so you just got to
bear that in mind. So what I'm going to
do with this is I'm just going to press
A to grab it thin, go into my shading where I'll
have to press Tab again. And then I'm going
to press A and S and bring it out like so. And then what I'm going to
do is I'm just going to look at this door
and I'm wondering, it must have been the light that's going on there
because you see that I have got my textures on there. I'm just going to
look if I move that. Yes, there's nothing behind
it or anything like that, so I'm wondering why
that looks like that. So what I'm going to
do is I'm going to now put this on a
little bit lower, so we're going to
put this on 500. I'm going to then go
back to modeling. And then what I'm going to
do is I'm going to come to my camera and I'm going
to set my camera again. So I'm going to tab
out of that door, double tap the camera to view. And I'm going to
set it lower just so it's going to be a
little bit quicker. And then what I'm going
to do now is just going to put it here, and what I'm looking
for is this door. And I'm also looking for this top here just to make
sure it looks right now. Let's actually turn this off and then we'll
put it on wire frame. And then what we'll
do is we'll come to render and render image. And this time, of course,
it's not going to take too long and
I'm just wondering. If those are going to
be the right color. I'm not sure why they're
actually like that, I think. I'm not 100% sure why they
actually look that way. Now, let's let it
finish rendering. We'll look at this part on
here that looks much better. We've got, I'm just wondering why these
aren't looking right. We might have to come in and we can see we've got some
wood grain on there, just the colors aren't
coming through. For some reason,
it looks as though it's got a different
color on there. We can see the colors are
coming out here really nicely. It's just these ones on here. So we'll have a
look. What I'll do is I'll just to try this out, I'll put this on a
lower sample level to make sure it
renders that faster. But I want to make
sure that my doors are okay because you
can see over here. These are also not right. So we'll have to go in and
check that. Check this though. Just make sure that's
looking right. Make sure all the
wood is looking okay. Which it is. Everything's
looking really nice on there. It just looks to me like
it's just this door here. I'm just checking on the
rest of it and making sure I'm happy with
it. All right. You can see as well
that these here yeah, that's coming off the
shine off the metal. That's just all that is. You're just checking
the rest of it. All right, let's go
to actually have a look at those doors and see
what's going on with those. Let's put it onto shade mode. We'll also set this
sample down to 100, and let's see what is
going on with these. So if I come in
and I grab these, I'm going to grab
this one, press G just to make sure
there's nothing behind it. And then I'm going
to come over to my material and we can see at the moment it's
on light wood. We haven't got red paint
or blue paint. Let's see. Yes, red painted wood. Blue painted wood. So what I'm going to
do is I'm just going to bring in another cylinder. So cylinder, I'll bring in a cube because I want to
see what's wrong with it. So I'm going to press G
Once I brought in that, in fact, I brought in a circle. That's not very helpful, is it? Let's circle in, press
Shift S goes to selected. Now what I'll do is
we'll bring in a cube. Then what we'll do is
make the cube smaller. And I just want to
put the cube in front of it and
give it a material. So I'm going to look for
painted wood painted, painted wood load paint. Where's the blue red painted
wood? This one here. Let's give it this and let's
put a camera right here. And we'll see straight away if it's actually working or not. So I'm want to do is press
control Alt and zero, put my camera there,
put it onto wireframe. And let's go to Render Image. Let's see what's actually
happened with that. And there we go, we can see
that's actually working. So for this, we
might need to just, I think, remake them again. So I'll close that down because I don't need
to see anymore. And then what we'll do is now
I'll bring in another one. Not that I want to come
into. Shade panel. So shade in, let it load up, move that, my camera away. What I'll do now is I'll
make another one shift. Let's make a cylinder. We'll keep it on 20. That should be absolutely fine. So R x 90. Make it a little bit smaller. And then what we'll do is we'll make it the same size as
this one that we had. And then I'm just going to
press S and Y and bring it in. And then what I'll do is
I'll just put it over here. So for now I think I'll
pull out the top of it. And then I'm going to press, I bring it into
something like that. Then we're going to
press E and then I, and then and just bring it out and maybe round it off a
little bit on this one. All right, so
something like that. That's right Click,
shade, auto, smooth. And then what we'll do is we'll now join it with this one. So this and this contro
Lel link materials. And now we'll see if
actually that renders out. Let's come up, put it on
white frame once more. Now finally let's
come up to render and render image and let's see
if now that turns out. So there we go. Now
it's actually there. I don't know why it
didn't work on that one, but now we can see
it's actually working. So now let's just replace that. We can see we have
some problems. It could be down to the UV map, actually, that's what
could be causing this. So what we'll do is
we'll first of all, go back to our part. I don't know why it
looks so red on there. Actually, it doesn't
look right anyway. So let's come in and what we'll do is we'll
just come into this one. I'm going to press tab
a smart UV project. Let's try that first. Let's
see what that's like. That looks fine. And
then what we'll do is we'll come into this
one press control. And then blue what we're looking for is blue
painted wood clicker sign. And then what we're going to
do is we're just going to give it one more final
render, make sure it works. And then we'll just
replace these doors. So we'll just come in to
put it on wire frame. And let's go to render image. There we go. Now it's
actually working. What I need to do now is
I can close that down and then I can come
back and replace this. I'm going to do is
just press one. I'm going to bring it up first of all and put it in place. I'll just delete both
of these if I can, so you can see this
is on my door. And then what I'm
going to do is just delete all of these. I'm going to come into
edge, slip L and L, delete vertices, press Altge to bring back
the rest of the wall. And then what I'm
going to do now is I'm going to put
these into place. I'm going to delete this cube,
don't need that anymore. And then grab this one here. And I'm going to press Shift and bring it over to
where I want it. I want them
roundabout like that. Let's pull them back
a little bit like so double tap the
A and there we go. Now let's join these
to these doors. So I'm going to press control
J. Join it altogether. Like so press control
all transforms, right? Clicks at origins, geometry. And now I'm just going
to make sure you can see it might have updated those
doors. I'm not actually sure. So what we'll do then
on the next lesson is we'll actually bring this
over and swap the doors. One final render then just to make sure they're
both looking good. And then we can actually carry
on with the actual built. I think when we carry on we'll actually make this arch over here and then we
can actually work our way round to this
part round here. Alright everyone, hope
you enjoyed that and I'll see on the next one.
Thanks a lot. Bye bye.
72. Modeling a Stylized Archway: Welcome back everyone to the
Blender Four Ultimate Guide, And this where we left off. So what I'm going to do is
I'm going to grab my door. I'm going to press shift
D. And then what I'm going to do is I'm going
to bring this over here. Delete this door out of the way. Pull this door down
so I can press one. Pull it down into the place
where I want it to be, which is just a thing
at the top up here. And then let's pull
them back into place. So then what I'm going to do is I think I've got another door. I've got another door. Actually they're
the only two doors, so that makes it easy if
they're the only two. So what I'm going to do now, I'm going to come to my palms. And what I'm going to do is I'm going to press the
little dot bomb. I'm gonna hide them out the
way on this rendered view. And then what I'm going to
do is I'm just going to go into my camera and I'm going to come and move my camera to here so I can
actually see them both. Now the render obviously of the palms won't
be in the way, so we should have a good view of what that's
going to look like. Let's say that I'll work then and then what I'll
do is put this on wire frame and then finally we'll come to render
and render image. You may not have had the
issue, by the way I had. I'm not sure why I had it, but you can see now it's
actually working as intended. All right, So again though, don't worry about the render. It's gonna look so much
better when we actually get all of the layers in
and things like that. So at the moment though, you can see it's looking
pretty nice. Okay, so let's
close that down and then what we'll do is we'll
come to shading panel. And then what I'm
going to do is I'm going to take this
off camera view. I'm going to come round
now and I'm going to start on double tap the on this arch around here and then carry
on building brown. So I want it to be
an arch in here. Now we could use
this actual piece of mesh because we know it's
going to be the right height. So let me see if I
can just come in. First of all, reset
all the transforms. So control all transforms, right click, set
origin to geometry. And what I'll try and
do is come in and I'll try and press control
B, control B. Let's arch that over. So what we're going
to do is increase those like so, and there we go. We've got an arch
just like that. Let's shade auto, smooth. And then what I'm going to do is I'm going to grab my guy, just make sure he's still
going to fit there. So I'm just going to press G and then just bring him over, press control one, just so I can see where he's going to go. Press G again and
put him on top, hopefully, of this step. And there we go, is easily,
easily going to go in there. So now let's put a
top on this arch, because I want it to come
probably down through here. So I'm going to bring it down, just touching those
parts on there. And then what I'm
going to do is no, I'm going to I'm going to bring it up
actually I'm going to press and bring it up
to where I want it. Something like that
is where I want it. Then what I'm going to do
is now I'm thinking I'll bring a little bit on the front
out and then the top out. I'm going to grab this one. And this one, I want to make it look a little bit different
is what I'm saying. And then this one and this one. Then what I'm going to
do is going to press I again just to make
sure they all come in. And then and X, then enter, and then and
Y and pull them out both. Then what I'm going to
do is just grab the top. For the top, all I'm
going to do is enter, I'm going to bring it
out and then pull it up. And that's how I
actually want it. That is looking pretty nice. Now what we can do is we
can just press control or transforms right clicks
the origin to geometry. What I want on this
is brownstone, so I'm going to grab it all. First of all, And Smart
UV. Not like Matt. Smart UV. Okay. And then what we'll do is we'll change
this from stone to sand. I think it's called
sand. Is it called sand? Let's have a look. Brown
stone, there we go. This is the one brown
stone, there we go. And then we'll just come to the front of this and
we'll change the front. So I'll grab all these three. Come around the
back shift control and then I'll press
control plus. Click new down
arrow and then red. So all I want is red, I think it's red paint. Click a sign. Yes, and there we go. And then
finally the top. So I'm going to grab
this one control. Click this one
control plus control plus red paint. Click a sign. There we go. Yes, that's
looking really nice. That's exactly what I want. Now the one thing
I'm wondering is, if I need to pull this back
just a tad just into there, like I actually think, that's probably going to
look a little bit bare. Now, what I just need
to make sure of is that these bottom parts on here
come all the way down. We don't want stuck
in the air like that. So I'm going to grab
this one and this one and just pull them
down into the floor. And you can see
now that's really, really a nice walkway up there. Okay. So that's looking good. Now what we want to do is I'm thinking that we just
want to level this off, so I'm going to press control
again just to make sure. Then add modifier,
generate and bevel, and we can see that
it's not working out. And the reason it's
not working out is because this has got
an arch on here. In other words,
sometimes when you've got a lot of triangles
or engons in there, it's going to really
struggle using the bevel. You can sometimes come in
and fix that by right click, triangulate faces,
sometimes that fixes it. But you do end up
with some issues like what you can see here, generally I don't do that. And what I do
instead is I'll come in and come down to geometry, Click a clamp, overlap off, drop it all the way down,
and then bring it up. We've still got some issues. I'm wondering why
we've got issues. Let's see if we can actually fix these issues because that's not something that we want.
I'm just looking. The issues seem to be caused
because it's devil in them. I'm just going to
check and make sure. Yes, it's just because
they're a little bit too close to the edges
as you can see here, this is what's
actually causing it. I'm wondering if I
can probably come in. I'm going to just
actually, before do that, I'm just going to take this
off a minute, this bevel. And what I'm going
to do now is we're just going to press A and I'm going to
retrangulate the edges. I'm going to triangulate
faces like so. And then we're going to
do is press control all transforms and then one going to do is add
in the bevel again. Now what I'm going
to do is turn off the clamp overlap and see
if that's going to help. Let's turn it all the way down. Turn it up, one that might
actually help set auto smooth. We can see we do have
some issues around me. I'm just looking if I can
turn it down a little bit, n 0.5 We've still got
some issues on this side. That's not what I want. We can see that this side
seems to be okay. It's just this side. Let's
put it on object mode. Oh yes, we have got an
issue on both sides. All right, so it looks like I'm going to actually
have to fix this. So what I'm going to do is I'm just going to press shift H. I didn't want to come
in and fix this, but ah, we're going
to have to fix this. Let's think the easiest way
we're going to fix this is probably delete fact, we'll try first of all, right, Click tries to quads
and there we go. That's fixed it.
Okay. As it fixed it, we've got another
break in there. I have no idea. Well, I do know why, what's
causing the break. All right, instead
of that, let's come in and grab each
of these like so. And then what we'll do is we'll just pull these out slightly. And then and X, let's try just pulling them out very slightly. And there we go. Now
we fix the brakes. So that was quite an easy fix. So at least for a great fix. The reason is that this
for the bevel was coming into three points and causing a bit of an
artifact to long gear. So to fix it, all we did
was we pulled it out. So the edge of the bevel now is not right next to
those three points. So that's what we actually
did to actually fix that. All right, so let's press
Alt, Bring back everything. Let's then go to our shading and have a look at
what that looks like. Now let's double tap the, and let's just make sure I'm happy with the
bevel on there. Can I turn it Let's
turn it down to zero. Turn it up one, and there we go. I think that actually
looks a little bit better than what
I had it before. Okay. So I'm happy with that. And now what I
might as well do is work my way round
to this part here. So what I'm going to do
is I'm looking to see, yes, this is the pillow, so I'm going to use
this pillar here. So I'm going to press shifty. I'm going to bring
this pillar over, and then I'm going to
put it over there. And what I want to do is
obviously make it much, much smaller than where it is. So I'm going to press S, I'm going to press
En's head then and I'm going to put it
under this door here. So light so and
then essence head. Let's get it to the right scale. Press control one so
I can see what I'm doing like so and then essens D, let's pull it out, pull it up. I'm wondering if I
want it any thicker. If you want it any thicker,
just press the Sp and then essens ed and squish
it in that way, and that might be a
better way of doing it. Let's put this in, we'll get rid of this and
this. So we delete. Then what we'll do
is we'll pull this into place under here, and then we'll put it into
place over the other side. So then what we'll do then
is we'll actually use this. All I'm going to do with this
is press tab face select, grab the top face, press the bond to bring it in. And then along is press. And then we're going to
press, then we're going to press and a little bit thinner on the top. Just
something like that. Simple but effective. Now let's press control
all transforms, right? Click, set origin to geometry. Now the one thing
I'm going to do, I think I'm going to
actually pick this up. I'm going to pick
it up to there. Because I want these parts
here to actually cover this, these parts here as you can see. In other words, I
want this part five, press shifty and bring it round, so I'll ed 90. Let's put this into here. You can see now that if I
put that just slightly up, that then is going to look
very nicely in there. And then we can
have a corner piece and we can see how nice that's
actually going to look. Can I get away with pulling it down and putting a
centerpiece on there? Is it going to look
better like that? I actually don't think it does, so I'm just going to leave
it like that, I think. And then I'll just make
these a little bit bigger and I'll put
one in the other side. Let's grab this shift and
put it into the other side. So going into there. And then what we'll do is
we'll just lift this up very slightly just to
make it all fit. Have double tap the
and there we go. All right, so we made
a start on that then. So what we'll do
then on the next lesson is we'll actually go in, we'll fix this part. And then what I think
we'll do is we'll start building this part out, ready to actually put on
our marble floor over here. All right everyone.
So I hope you enjoyed that and I'll
see in the next one. Thanks a lot. Bye bye.
73. Creating Fancy Stylized Balcony Railings: Welcome back everyone to the
Blender Four Ultimate Guide. And this is where
we're left the off. All right, so what I'm
going to do is I'm going to come into
each of these, I'm going to make sure that
I'm on individual origins, and then I'm just going to
pull them out a little bit, and then I'm going
to pull them up and see if I can get
those to fit into place very nicely,
just under there. Now I can see that I'm
going to have to pull these back and back
this way a little bit, which means probably
easier to delete this one, grab this one shift, and then bring it over
into place like so. Okay, so I think that part
is looking pretty nice. And now what I want
to do is I want to bring in the other part now. So I'm looking at
this part down here, so I think I'll use these parts in here or I
could make a new part. I'm just wondering what I'll do. First of all, I think
I'll bring in a corner. So I'm going to bring in
one of these corners. I'll grab this one. In fact, the mirror is still on there,
so I'll use this corner. Hopefully this one,
I've got one shift, bring it over and we'll
put this in the corner, just just under, and we'll make sure that it's not too big because
it may be too big. So I'm going to put it just in the corner here,
something like this. Making sure as well that it's around the
same as you can see. If we go over the top, you can see that it's the
same gap there to there. And I'm just going to
think, I'll put it just under I'm just making sure as well that this bit
here as you can see, it's going all the way
back to there into here. I don't think I want
it going lightly. So back I'm actually
going to leave that. I think that's going
to be fine actually. So what I'm going
to do is now I'm going to actually bring in a, another piece, which
should be this one here. I want to make sure though
it's the right size for here. So what I'm going to do is
I'm going to grab this piece. So shifty, pull it over. Then what I'm going to
do, spin it around, so sad, hundred 80,
press control one. And then I'll just measure
these up to see if the right size and
you can see there the right size. That's good. But then what I'll do
is I'll pull it back. I'm going to put them in
line just with these two. So I'm going to
grab this one and then grab this one shift. I'm thinking the one, I'll use this corner, I'll grab this corner shift,
bring it over. And then odds 90 and put
this one in this corner. Like maybe because I'm not, not so happy about this one, I'll just pull them all out a little bit
just to leave them, you get that little
bit of stone in there. All right, so now we've done that, let's bring out this part. So I'm going to press Shifty, and I'm going to
bring it out like so. And then what I'm going to do is I'm going to spin it around, so sorry y, We'll get there. 93. And let's put
this into place. So I'm just going to bring it down to there. Going
to shrink it in. And Y shrink it in just enough where I'm probably not going
to affect the UV map. And then what I'm going
to do is just put it in. Now it's up to you
whether you want to pull it out a
little bit further, A bit too far there
as you can see. Because I'm actually clipping
near enough. Clipping this. Yeah, something like
that. Thinks good then what we'll do
is press shift D, bring it around,
and then odds 90. Let's press control one then we'll keep in
the same level. And then all we want
to do is press and X, then shift D, bring it in again. And then let's pull these out, S and X, pull it
out a little bit. And then shift D,
final one, then X. Okay, let's grab all three then. And then what we'll do
is pull these back into place just in front of these, double tap the A and then
we go, that's that bit in. Now with the next bit, let's
come in and first of all, control a all transforms. Just want to make sure
that the bevels on there and what we'll do is we'll come in
generate in a bevel, let's bring it in a bevel. Turn it down. Turn
it up, maybe one. That's just so we
get this bit in here and this bit on top of it. It's quite important
actually to get that we are going to be
replacing this floor. I think what we'll do now is we'll put this
down a little bit. What I mean by that is
I'm going to press Tab. I'm going to come
to the top of it. I'm going to press
the eye button. I'm hoping this bit here, this is the bit that I
actually want to bring down. I'm probably better off just
putting edge loop this way. In an edge loop this way, and using that then
for this banister, because the bannister is
going to come down here. What do mean? It's the marble
effect that we've got here. So what I'm going to do
is I'm going to press control. Bring in an edge loop. Bring it over to
something around there. And then do the
same thing now with the gap we've got
on here, control. And bring it over to
something like that. And I think that will be enough. Now what I want to do, before I actually do anything else, I just want to obviously
give it a test to see if it's actually going
to fit in place properly. Because we don't really want to start building on here if
it's not going to fit in. So what I'm going to do is
I'm going to come into here, I'm going to grab this bit. I'm going to press
Shift cursor selected. And then what I'm going to
do now is press shift A. And let's bring in a cube. Let's make the cube a
little bit smaller like so I want it that size.
Let's pull it up then. And then what I'm going to do is I'm going to grab the top of it and pull it all
the way up like so now I do want to
bring out my guy to see how high this
is going to be. Remember this is going
to be dropping down. So he's going to be probably
down to that level there. And then some stones
over the top. Just remember, it's going to be a little bit lower than this. As I said, you want to spin him round When you're thinking
about a banister, you always want to imagine him pointing his hands on there. So in other words, if
I put a top on here, if I press shift A, bring in another cube,
press the S bond, make it a little bit thinner, and then let's
bring it out here. What I'm going to
do is I'm going to press and X and pull
it all the way out, going all the way over to here and X like so and
fit in that wall there. You can see first of
all, this is way, way too thick and it is about
the right height though. Let's make it thinner. So S and then what we'll
do is we'll press S and Y. There we go. Now we can
see that's about right. So you can see him pointing
his hands on these, hands just on each one
of these and looking over and I think that's going to be about the right height. Okay. So what I'm
going to do now is let's first of
all grab this top, because we know
this is right now, and let's actually
make these posts. So what I'm going
to do is I'm going to come to this part, I'm going to press control, bring it up, do something like, yeah, so quite chunky. And then what I'm going
to do is going to press Alt Shift and click Enter, Alter Ns and bring
that out like so. And then what I'm going
to do is make sure that we've got offset even on. And then again, we need to make it smaller now, or if
you're happy with it. I think actually I'm
happy with that. One thing I do need to do, I think is just drop this
down slightly because I'm going to put a little bit of a bevel on here, I think. So what I'm going
to do is actually I think I'll pull out
two of these sides. We're dealing with
models, so we just have to remember how that is. Control, bring in an edge loop and then what I'll do
is I'll pull these out, so I'm going to grab
this side and this side. And then I'm going to
press Enter AlternS and pull these out
very slightly. And then what I'm going to
do is I'm just going to make this a little bit
thinner and y pull it in. And then finally I'll put a little bit of
an edge on there, so I'm going to grab
just these two tops. Before I do anything, I'm
going to press control, lay all transforms just to
reset the transformations. And then I'll press control, level this off like
so now I probably do want it straight or
probably something like that. Let's see what that looks like. Let's write click sheet
or to smooth a thing. That's going to be about right. I can also now because
I've got that, just move that up very slightly like so we can see now that
this is fitting into place. And what we want to do now
is we want to make sure that this is looking a
little bit different. We want it to look
in that kind of style that we've actually,
that we're looking for. So what we're going
to do is we're going to come to this post. We're going to press control. Bring in some edge loops again. You want one right,
probably in the center. We've got at the
moment, left click, right click. We've got seven. So you can see now 123123.
So grab the center on. Let's try it on shot first I'm jaws going to press control one. And then what I'm going to
do is press with this on, that's probably going to
be a little bit too sharp. So let's come in and
use inverse square. There we go. But what
we don't want to do is we don't want
to affect the top. So you can see how
far it's pull that, even though I'm pulling
this all the way out, it's not affecting this, this or this down the bottom. So now you can see
it's jaws the right side where we can actually
get it to actually work. Okay, so that's
looking pretty nice. So what we'll do now
on the next lesson, is we'll put these posts
going all the way over. We want to split this up. We don't want to be using
this as a full length. And the reason for that is because it's going
to make it much, much harder to
actually unwrap it. What we'll do is
we'll make this thing and then put it into parts, and then we'll put
this post over. And then finally we'll
make some struts that actually go down here, and then we'll actually
texture this with the marble. And then finally we'll
bring in the floor here. Yeah, that's
what we'll do. All right everyone. I
hope you enjoyed that. I hope you're looking
forward to the next one, and I'll see you on the next
one. Thanks a lot. Bye bye.
74. Adding Materials to Marble Railings: Welcome back everyone to the
Blend Four Ultimate Guide, and this where we're
left the R. All right, so now then these posts, let's actually come in and what we'll do is we'll unwrap
one of them first. We'll also unwrap this floor. And we'll split these
off because I think it's going to make it a
little bit easier. So what I'm going to
do is I'm going to press L. I'm going to press P and Selection and just make sure that
you're actually happy. You might want to
put another band on here or something like that. I definitely think on the top of it we're going
to actually put, you know, a kind of egg
shape or something. So let's deal one thing
at a time though. Let's first of all come
into this part here. And what we'll do is
we'll press And U, and then Smart UV
project. Click Okay. And then what I'm going
to do is I'm going to go over two man materials
and I'm going to put this onto wool like so. And there we go. That's really, really
brought that to life. Now as you can see, I
think I'm happy actually with this bit of dirt being over there. I'm quite
happy with that. And now we'll come to this part. We'll press U Smart UV Project. And then what we'll
do with this one, we've already got beveled
off as you can see. Maybe though that bevel is a
little bit too much on this, it's okay on the wall, but on this maybe it's a
little bit too much. So what we'll do is we'll go
over it and we'll turn it down to 0.5, like so. And I think that
looks much better. Now what we'll do is we'll
come in and we need a marble. I don't think at this point we actually brought in our marble. So let's have a look.
No marble in there. So what we'll do is we'll
come to our asset manager, then we'll go to our materials, and we're looking for marble. There's this one here. And
then what we'll do is we'll just bring that in
like once it's in, I can delete it out of the way, and then I can come
and bring in marble. There we go. Let's have a
look what that looks like. You can see it's
looking pretty nice. Let's put our Renderview on. Let's have a look at
what that looks like. And there we go,
really, really nice. Okay, so let's go back
to shade a panel, and then not shade a panel, let's put it back on shade. Let's hide these
palms out the way They're always getting in
the way of these palms. Sometimes I wish not
put them in there, but if you really want
to hide them out, what you can do is
you can press Oltage. And then you can hide
them in that way. And what that means is if
we hide out this part, for instance, press Oltage. You'll see, yeah, the
palms still come in, so I'm going to
hide out the palms. What I need to do is actually
hide out the collection. So if I hide this collection, now you'll see if I press Altage, nothing
actually happens. So what I could do
instead is I could grab these palms and what I can do is put them
in a new collection. So I'm going to press the
M Key New collection. We'll put palms, and we'll
do it that way instead. So palms click, Okay. And now they're in
their own collection. If I close up these, we can
see now collection is palms. Let's hide them out of the way. Ol tag, nothing happens, so now they're actually
gone for a bit. All right, so now let's
think about this part. So this part, first of all, we need to make
it a lot thinner, so S and X bring
it down to there. And what we need to
think about is if we're going to have
another post over here, so let's press shift
and then our 90. And we'll just bring
it in an overlook if it's going to look okay. Let's press seven to go over the top so I can actually
see what I'm doing. I'm just going to put that in the middle there as you can see. And then what I'm going to do is I'm just going
to pull it this way and in mine just okay that. What I'll do now
is I'll come in, grab all this, and I want to basically bevel it the
same as this as well. So I'll just put an object mode, turn off my x ray. And what I'll do now is
I'll come grab this one. I'll press control L,
We'll link materials. We'll press control L, and we'll also copy modifiers. And there we go, that's
beveled off now. Now what I'll do is
come to this one, we'll press a smart UV project. Click Okay. And now we'll just take a quick look at
what that looks like. I'm thinking that this is probably going the wrong
way round, actually. So what I'm going to do
is I'm going to come to my shading press tab
and then I'm going to just spin it around R 90
without portion non R 90. Let's put it back in place. Let's go round now and never look if that
looks any better. No, I don't think it
does look any better. I think the reason is because it's not looking like one piece. All we'll do is
we'll press shift H to hide all out the way. Then what I'm going to
do is I'm going to, I think, delete the back edges. These here, no one's
ever going to see them. Have we got a back
edge in there? Let's come in and delete these. Let's come round the other
side and delete these ones. Delete bass and then what we'll do is we'll
come on the underneath now and we'll basically grab the underneath here
and here or outside. Can I grab that right
click mark seen? I've marked a seam on top of
here and I don't want that. I'm going to come
in this 01:00 P.M. The other thing is
it's rounded down the N. I want an actual
shop in there. Keep that at straightness there, so I'm going to right
click mark a shop. There we go. And then what
I'll do is I'll press A now. And instead of that,
just click on Wrap. Then what we'll do is
we'll spin it round 90. Let's see if that's
going to look any nicer. Yes, I think it does. Let's see if I stretch it out
a bit, so S and Y. And there we go. I think that's looking much better actually. What we'll do now is we can use that now on our other part. So if I press Lth now
bring everything back. There we go. That's
what it looks like. Let's delete this
part of the way then. Now let's bring
in our next part. I'll actually, yeah, I think I'll put a
top on this first, so we'll do that first.
I'll come to this part. I'll press Shift Date, and we'll bring in a UV Sphere. 32 is a little bit too high, so I'll put this on 20, and we'll keep this
on 16 because it is they are focal points. So what I'll do is
then I'll come in and make this a little
bit smaller like so. And then what I'll do
is I'll bring it up to there, elongate it out. So S's elongate it like so. And then what I'll
do is I'll press S, make it a little bit smaller. Now what I want to do
is I want to bring it down right click, shade, auto, smooth come in, and then we'll take
off the x ray. Then what I'll do is I'll bring
it probably down to here. Shift and click round. This one there, it's third one, delete faces, L deletes. And then what we'll
do is we'll come in, Shift click, press control one. And then what I want to do now is I want to bring it down, bring it down then along
that axis and then S following that along and
then bring it down and then, and then to bring
it slightly out. So then what we're going to do is we're going
to put a band on here. Now I'm going to press E, Z and bring it down to there. Then what I'm going to do
is I'm going to press Ali. Click along here, press
the on to zoom in. So I'm moving around
the orientation. And then what I'm going
to do is press Enter, alternS, pull that out. Finally, let's put
an edge on here. I'm going to grab this. Edge control B. So there we go. That's looking pretty nice. Now, finally I want to
actually not have this. So you can see it's very sharp there. Do I
actually want there? Don't think so.
I'm going to do is shift and click control. Bring it out to make
it nice and smooth. And then finally I think I want the blue band going across here. So what I'm going to do is I
will come and grab this one. Shift click control, mouse, scroll back so we have it quite thin, something like that. And then what I'll do is
I'll press Enter, alter Ns, bring it out just
a slight one and then offset even on.
And there we go. I think that's perfect. Now we want to sharp
just on this bit on the bott so it doesn't
get beveled off or anything. So this along here, right click, mark
sharp. And there we go. And we probably also want to
shop at the bottom of here, so ol shift can
click right click, mark sharp. There we go. And I'm just wondering because
we've got a little bit of, we could put in a sharp
here and a sharp here. Let's have a look, Mark sharp. And I think actually that looks bare rather than being
fully rounded off. All right, let's put
this into place then. So we'll put it just
on top of here. Now we just need to decide, is it too big so we can make
it a little bit smaller. So there we go. I'm thinking that
looks pretty good. Now I'm going to do is I'm
going to grab the whole thing. And we have to be careful here
because it's an egg shape. And egg shapes are very, very
hard to unwrap normally. So we just have to be careful of how we actually unwrap this. Let's see. At the moment we
can see it's wrap like this, which is not going to
be good, trust me. It's not going to be the
way that we want it. So what we want to do is we
want to come to the back. And what I'm going to
do is I'm going to, because I know I will show
you. Actually, let's see. So we'll Smart UV
Project. Click Okay. And then we'll grab this
part and this part, and we'll press control out. And what we'll do is link
materials. And there you go. That's the mess
that you can see. So you've got all of
this mess like this. And that's not
something we want. So what we want to
do instead is we want to make sure this is
done, wrapped properly. So shift H, let's just
make sure that we don't have this bottom on there because we're really
not going to need that. And then delete and faces and
then what I'm going to do is I'm going to actually unwrap this
bottom part separate, so we'll mark a scene
going around there. And then what we'll
do is we'll come to the back and shift click, right click, mark scene. Now what I can do
is I can come in and at least unwrap this part L U and unwrap.
And there you go. You can see now that it's unwrapped pretty
nicely actually, So now we just need to do
the same thing with here. Now this bit here, so let's have a look. This bit on here is
going to be a gold trim, so we don't have to worry
about that so much. So what I'm going to do is
o shift click control plus. And what I need actually
is I need to bring in. So let's go back
to asset manager. Let's bring in
that gold, because we haven't brought it in yet. So gold, there we are, gold material, bring it in. Delete it out of the way. And then what we'll do
now is zoom into this. Then we're going to go back to shading panel, press
the tab button. And then we're just going
to bring in the gold. So plus down arrow
gold, bring it in. Click a sign. All
right, so there we go. Okay, so there's the golden. Now we want to make sure that
this is actually unwrapped. Okay, now we will be able
to unwrap this one really, really nicely as you'll see. Because this one, now
if you look here, is just basically round here. So if I press L, in fact I want press L. What I'll do
is I'll mark a seam here and a seam in the
top right Click Sam. And then finally, before
the end of the lesson, we'll just unwrap this part now. So if I press you
wrap and you can see now that's unwrap
really, really nicely. You will always see
a seam on here, but it still looks at a ton better than
where it was before. So now all we need to
do is unwrap this part, which we'll do on the next
lesson. All right everyone. So I hope you enjoyed
that, and I'll see on the next one.
Thanks a lot. Bye bye.
75. Creating Stylized Décor for Railings: Welcome back if you want to blender for the ultimate guide, and this is where
we left it off. All right, so let's
come now to our egg. I'm going to press seven
to go over the top you. And I'm going to
press where is it? Sphere projection. And let's have a look at that's
some wrap like. And there you go. That's rap pretty nicely as you can see. So there are ways to do things, there's many ways
actually to wrap this. You will see that we have
got a, a line on here. So what we could
have done instead is we could have just pressed L U and you can see there's
many ways of doing it. And it's all about figuring
out which is the best way. And actually I think that
way actually looks better. So there is that, let's press Celtics then
bring back everything. And that's looking pretty nice. Now what we can do
is we can actually create these little parts that I'm going to
go across here. So what I'm going to do is I need a top and I need a bottom. I'll first of all use this. So I'll use this to
actually create it cube. Let's press bring it in. I want it pretty much to be slightly thinner than
this, which that one is. And then I'll pull it out and Y, So then what I'll
do is I'll pull it in and Z, pull it in. All right, so now
we've got a top, and we've got a bottom. So we might as well pull
this up a little bit. And then what I'll do
is I'll press shift, I'll bring that up to
the top here like so. And then what I'll do now is put something in between them. So if I grab both of these, I can press Shift Us to
Selected, and then shift A. Let's bring in a cube. Let's
make the cube smaller. And you know what, that might not actually be the
best way to do this. What I'll do is instead of doing that, I'll grab this one. And what I'll do is I'll press shift D, and I'll bring it down. And then instead what I'll do is I'll just make this a
little bit smaller. So make it a little bit smaller, bring it into place. First of all, we'll
delete the bottom. So delete faces. So we're going to pull this
down now into place like so. And then what I'm going to do is I'm going to pull this up, so I'm going to grab
this top of it and I'm going to pull it up into place. So now I want to do is I want to bring
some edge loops in. So I'm going to press control, bring in some edge loops. Again, we want an uneven amount, so let's put it there. Left click, right click on
five old shift and click. And then what I
want to do is put my proportional editing
on this one here. And then I want to
bring these in, so I'm going to
pull it all down. Then eight, grab it all, pull it all down without
proportional editing on. So pull it all down. And then what I want to do is I want to put a nice kind of
in the center of it. So what I'm going to do is
we're going to press control. Bring in one edge loop, left click, right click. And then what I'm going to
do is we're going to press control B and bring in, let's say two like this. You want them
basically like this. Now we're going to do is we're going to give
something to try. So what I'm going to do
is I'm going to come in, I'm going to grab
all four of these. I'm going to go
around this side. All four. Then what I'm going
to do is we're right click. I need to put back on because
I've not grew on here. Let's have a look. Right click. I need the Loop tool. So let me go to
Edit Preferences, Add ons Loop Tools. For some reason it's
been taken off. And then what I'll do
is close that down. And then is now loop tools
are here and I can put it on circle and you'll see that we don't want
anything like that. So what we want to do now is
bring down the influence, Bring it down, bring it
down, bring it down. Keep going all the way down. As you get closer to the bottom, you should start to see what we're actually
trying to do here. Now you can see we've
got this in here. What I want still, not
exactly what I want. So I'm going to change
it a little bit. What I'll do is I'll
bring it in myself and y, let's bring it in just
a little bit, then. What I'll do is I'll come in, I'll grab this one and this one. And we can see
also, it's took off the back for some reason.
I don't know why that is. You know what? Instead
of trying this out, then what we'll do is we'll
do this a different way. So I'm going to come in with, it should make a
circle on there. Boy, it doesn't seem to
be wanting to do that. Let's come in, grab
both of these. And then what we'll
do is I'll press S and D and pull those out on medium point and like so. And then we'll press Is
Control and shift and B. And just level those
off a little bit. So now we've got that
nice roundness on there. And then finally what I'll
do is I'll pull these out. I'm going to pull these out
on this one and this one. So I'm going to press S and Y. Let's pull them out a
little bit like so. And then this one.
This one. This one. This one, and the same
round the other side. Let's pull those out as well. In fact, you know what, it might be better if we
pull all these in. Actually, let's
pull them all in. I think it's going
to bear all in. So let's press S and Y and pull them in like that,
and then grab these two. And then pull these in as well. So S and Y like that. I think that's looking
much, much bare. Like this. Much bare. Okay. Now let's see if
it's going to look bare. What we're going to do
is we're going to press C. And then just left click, middle mouse if you
click the wrong ones. So we're going to
press C like so. And then I'm going
to come round here, I'm going to press C
again on this side, going all the way down here. And then we're going
to do is right click, Loop Tools, bridge. There we go. That's
looking exactly as the ones right click,
shade, auto, smooth. Yeah, I'm really happy
with that actually. I didn't think it would
come out like that. Okay. The next thing I
want to do is make them then just in the middle,
slightly like this. And then what I'm going
to do is just put on my functional editing, and then I'm just
going to press and X, bring it in and make them
thinner like. So there we go. That's exactly what
I'm looking for. All right, so now what we can do is we can put these
on the next one, join them all together, and then we can actually
bring in on material. Let's first of all check out what this looks
like when it's wrap, because we're going
to have to do a little bit of work
on this shift age because we know already that with the marble it
doesn't wrap very well. Let's come in and grab all
of these going on the top, and we'll just delete
those out the way. So delete bases, then we'll
come down to one side. So right click, mark scene. And then we'll come to
the front shift, click, shift click and just go
all the way around it. So right click, mark scene,
then come up to the top. In here you're going to
right click mark seen. Then we've not grown infinite
loop going down there. It's going to wrap,
then it'll open up like a present and just have
these holes in it. So then we'll come to this one and then all the way up to here. Right plate maxine,
and there we go. Now let's try unwrapping it. So you unwrap and there you go. It should have unwrapped like
that, which is not right, because we need to set
all the transforms. And now we'll try that
again. And there we go. Now it's unwrapped nicely. Now let's press al tag, Let's join this and this control
L, let's link materials. And there we go. It's
open beautifully. Let's grab both of these then, And we'll link
materials as well. So I'm going to
grab this one last control L link materials. And then what I'll
do with each of these is I'll just
unwrap these now. Smart UV Project. Click okay. Let's see what the wrap like and they're okay. And then what we
can do is we can join these. In fact,
you know what? Let's share a look at
that. It's not on wrap y. Well, and the reason is is because we need to
join these together. Control all transforms
and then origin geometry. And then Tab smart
UV projectickay. Now they're going to wrap much, much barriers you can see. All right, let's join
them all up then. Then what we can do is
bl these up as well. So I'm going to join all
these together like so. And then what I'm going
to do is going to select this part control l, and we're going to
copy modifiers. Let's put on object mode
just so we can see. And that's come in, that's
coming in pretty nice. We've got some artifacts on there and it's
probably because we just need to write click
mark a shots. Have a look. I'm just wondering if I can
actually fix those parts. It's because this part on here should be a little bit flatter is
where it should be. That's the reason
it's doing that. You can come in, grab this face. Then what we can do is we
can shade flat instead. And you'll see now
that, that fixes it, it's just because it's
slightly bent there. If we really want to go
in and fix this by just beveling it off
so you could come in and bevel off
these ones here. If I click control
now pull it out, you will see that actually
starts to fix it, albeit it's not done
as well as I thought. So let's try that again.
What I'll do is I'll press control and pull them
out all the way. There you go. Now you can see, but we've actually starting
to break the mesh on here. That is, because we probably
need to reapply it. Let's come in and
modifier, in fact, I'll reset transformations
first and then we'll do is add modifier
and we'll do a devil. And then what we'll do
is turn this down zero, turn it up to naught 0.3
like so. There we go. Still breaking those. And the reason we know is if we come in now
and right click. In fact we'll just grab this. Let's just grab this
one L, right click. And what we'll do is
need to be on face. Let right click. And
we'll triangulate faces. And then we'll come
to tries to quads. And there we go,
we fix that issue. And it actually looks tons bare. It looks nice and crisp. And that's what
we're looking for. Okay, so now let's have a
look at what that looks like. Double tap the A
and there we go. Now the last thing is
now we need to make sure that I'm thinking that we might be better off
putting a bottom on here. Just a bottom on this part. So what I'm going to
do is I'm going to grab all of these
before finishing. And I'm going to lift
them up slightly. And then I think I'll
press shift on this one. Curses selected. And then what we'll
do is I'll bring in another cube cube. Make it a little bit
smaller like so. And then we'll just bring
it down to here and Ed. And then what I'll do is I'll put it right on the edge there. And I'm just checking if this is going to look nice
or not. I'll see. So I'm going to grab this face, pull it all the way
over without a portion. It's non pull it all the way
over this edge, along here. And then what I'll do
is I'll pull it all the way towards the edge of here. And then let's pull it back towards the edge of here,
just in front of it. And then finally what I'll
do is I'll press control. Bring in another edge
loop right next to it. So finally what we'll
do is we'll bring another one going all
the way over to here. Pull it all the way over. All right, now I want to do is I want to actually unwrap that. So I'm going to press Smart
UV Project. Click Okay. And then I'll join it to this
control L link materials. Gobble, tap the A. Yeah, I think if I now bring
this up a little bit, so if I grab this one
going round to here and then just pull it
up into place now, I think that's going
to look pretty good. Okay, so finally then what we'll do then on the next
lesson is we'll actually, you can see here, this line
that was talking about, I need to bring this
in a little bit. This line going along here, I need to pull it
in a little bit. And then this one
here, basically. And then what I can do
is I can drop this down, ready for the stone that
I'm going to put in there. All right everyone. So
that's looking pretty nice. I hope you're really
enjoying the course and I'll see on the next one.
Thanks a lot. Bye bye.
76. Working on Balcony Flooring Designs: Welcome back everyone
to the Blend, the four ultimate guide, and this is where
we left it off. All right, so now we've
got in this part here. So what I want to do with that, absolutely fine as well. So what I want to
do now is I want to grab this one and this one, and I basically want
to put it over here. So what I'm going to do is
I'm just going to press, actually let's press control one and let's join
these together. There's no point in actually
keeping them separate. So all I want to do is
join these together. But before we do that,
obviously we want to come down, convert mesh control J,
join them all together. And then what I can do now
is I can just press shift D, bring them over, and
then I can press shift D and bring it
over. There we go. And I don't think I want
another one on there. And then what I can do now
is I can grab this one, shift 97 to go over the top. And then what window
is just press and drop it right in
the center of there. Then just zoom in a little bit, just make sure it's centered. Have a look round, make sure that one is okay. Which it is. Control one, Shift D, make it a little bit
bigger and X, pull it out. And then shift, bring
it into the wall there. Now with these, it'll be
a little bit different. What I'm going to do is I'm probably going to bring
it over here first. And then what I'm going
to do is I'm going to add in this bevel. So what I'm going to do is
adding another modifier. Bring in an array, Turn down the x to zero and turn up the Y. And then place them
wherever I want them. Let's see if I can get them just about right
where I want them. I'm holding the shift born,
double tap the eight. It could be too many, it could be too many. Let's try three. Let's then move them
up. I'm just wondering, that might be we're stuck
between too many and too few. The thing is we can
actually come in though and press S and Y and just make it a little bit thinner and then pull this one, put it onto four and then
pull it back a little bit. I think actually that's
actually about right. I think that they look
in actually a bit. What I can do now is
I can press shift, bring them over said 90. Just make sure that these now
fit into place into here. Obviously these will need, I think we basically want to have this same gap
here as you can see. It needs to be a little
bit more that way. We also want to make sure
that they actually go under, not poking out the back there. We definitely don't want them poking out the back. I'm
just looking at these. You can see that these are
also poking out the back. They're messed up there. So what I'll do
is I'll press and X pull them in a little bit. Then let's move them over. Let's move them over. I'm just going to
come underneath just so I can see
where they are holding shift and I'm
looking at this side still a little bit too
much S and X pull them in, let's pull them over again. And there they go. Now
they're fitting in place, which means now I'll
just delete these ones. Grab these ones again,
shift D, R, zed 90. The reason why we're spending so much time on this
part, by the way, is because it really
is a focal point of the whole building. We want to make sure
it looks right. We don't want to half past
this bit then we've got that. Then what we'll do is we'll
pull them forward then. I think they're actually fitting into place absolutely fine. So then we'll bring them
over to this one like so. And then I'm just
going to put in another one and we can see
they're not fitting properly, so we should be able to pull
them back just very slightly and they should then
fit into place like so. Now let's bring them
to the next one shift, put them into place like so. And here they're actually fitting absolutely fine.
Okay, there you go. Now the one thing you can see, the problem we've
got is all of these are exactly the
same on the UV map. So all I'm going to do
is just grab all of these first press tab
to grab them all. And then Waldo,
I'll come over to the left hand side and I'll
go to my little three dots, UV and Waldo's pack islands. We don't want to scale on,
make sure that's ticked off. Then what we can
do now is see that they all should be very
different from each other. Now we need to do the same thing with these parts as well. So all I'm going to do is tab A, make sure I've
grabbed everything A to grab them over this side. Three dots, UV pack islands. Click Okay. Then what I just want to do is
make sure that these, just figuring out why
this one is like that. I'm not happy with
how that one looks. I'm just looking at the others. I'm wondering. It seems to try to re unwrap
them. Let's have a look. Let's have a look.
This one looked like. Before doing that, that one
actually looks quite nice. Let's have a look. Yeah,
this is this one instead. All I'm going to do instead
is I'll just move this. If I move this this way, and then I'll grab this one. Do the same thing,
move this this way. And then that one then
should look different. Then all I need to
change is the eggs. If I come in like this, I can grab this egg and
just move it like so. And then grab this egg
with L and move it. So that's the other
way you can fix it. If that happens, then
finally we're onto these. Now these have got the array on, so we need to apply
the array first, so I'm just going
to grab them all. Then object, where is
it convert to mesh. And then press control J,
join them all together. And then one way
is grab them all. They're all in the
same UV at the moment. Let's see if it works. If a Pac island,
UV pack islands. Click okay. Let's
see if that works. Now I'm going to press
A to grab them all. Pull them out, let's have
a low what they look like. And there we go. Actually
they've ended up a mess as well because
of this over here. All right, so let's put
them back like this. And then all we're going
to do is we'll just go in to everyone and just move them a little bit
and then just make sure that they all look okay. Now we're going to have to
as well go into the tops, but the tops are going to be
much easier to deal with. You can see now they're
looking really nice. The tops are going to
be much easier to deal with because we can just grab them all at the same
time because there's no complexity to them
or anything like that. So they're going to be easy, but let's just make
short work of these. I'm going to do
them one at a time. I don't want to risk doing two at a time or
anything like that. All it needs really is
a slight just movement over from where they are because it will change the
whole of the way it looks. Anyway, no two will
be exactly the same. The mind look similar, but you won't be able
to see the pattern. That's the main thing
we're going for. We just want to break
up this pattern. We don't want to look in the
same. Now we've done that. All we can do now is just come
in and grab all of these. Just the sensors we're grabbing. So we're just going
to grab all of these. Hide them out the
way with H press. And now you should end
up with these parts. We've got this part in there, actually let's hide this one out the way as well.
And then press A. What we can do now,
hopefully be able to UV and pack islands then make
these much, much bigger. So now we should end up with double tap with
something like that. All right, that is looking pretty good. I'm
happy with that. Now what we want to do is we want to come in and
move that edge, which is what we talked
about, old shift and click. Now the thing that
you've got to remember is when you're bringing in
an edge loop, it's fine. But when you're
moving it, what will happen is you'll move the UV, so you have to be
careful about that. So what I'm going to do instead is I'll dissolve the edges. Press control and
bring in another UV. And then what I'll do is I'll try and line it
up with this one. As you can see there, I got pretty lucky actually
with that one, it's a little bit out control. Let's bring it in to be round
about the same as that one. And then finally what
I'm going to do is I'm just going to grab
the inside of here. I'm going to pull it back down. Now if I press, should be
able to pull it back down to, then I'm going to
go a little bit lower than what I
really should be. Then I'm going to actually
use this on the next one. If I press now shift, I should be able to
then bring this up. This is what I'm going to use to make my really,
really nice towel. I'm going to press P selection. Split that off control Yl transforms right click
the origins geometry, and now on the next less. And then what we'll do
is we'll actually make the tiles at, out of there. Let's first of all though, take a look at what it looks
like. And there we go. That's really coming
together now. I'm really happy with that, and I think after we've
done the tiles, we'll carry on
working on this part. And then we'll work our
way up to this part here. But it's really, really
coming together now. We have lots of the
parts already built, which makes it
really, really easy. I also, we'll come
around and fix this. In fact, once we've done
this, I think we'll fix this bit here because it's the only bit over
here which we've not actually done anything with. All right everyone.
So I hope you enjoyed that and I'll
see on the next one. Thanks a lot. Bye bye.
77. Creating Stylized Tiles Using a Material Atlas: Welcome back everyone to the
Blender ful ultimate Guide. In this way, left
off, all right. Just make sure you save out your work, just
so you don't forget. Then we're going to
come back to modeling. And now what we're going to
do is I'm going to come in and I'm going to press Alt H. I'm going to bring
that floor in. I want to really
leave my floor here because I know this is
going to fit exactly. So what I'm going to do then
is press shift H. And now I can actually come in and
mark some edge loop. So I'm going to press left click and I'm going to
mark some this way like so now I want to make them pretty much a
square, kind of look. So I'm going to
press controller. And we can see there
if I do it that way, they're pretty much square. So I'm going to be
happy with those now. What I should have done is I should go in now
and mark the seams. So I'm going to press control. I'm going to mark
some seams like so. And then what I'm going to do is now I want to split them off so in fact I can grab them all, can't tie, and then
just go to mesh. Where is it split faces by edges and A should have
them all split off. That's great. That's done. And now I'm going to do is I'm going to unwrap one of them. So I'm just going to grab,
in fact, what I'll do is, first of all, I'll grab them all and then we'll
unwrap one of them. And hopefully we should be
able to then unwrap them all. So if I press control E sorry. And bring them down getting the right size that I need
them. So something like that. And then what I'll do is now I'll grab all of these edges. So I want to grab
all of these edges. So the easiest way to actually do this is to double tap the. Let's see if I can come in
then and select Select here. And we want to
select sharp edges. And you can see it's
selected the edges going all the way around
there, which is great. So what I can do then
is I can write click. I can actually come into this. Sorry, I can write click then. And Mark seems like so now what I should
be able to do is I should be able to
come into one of them, pressure you and unwrap. Also, I don't need the bombs, so I did forget about that. So what I'm going to
do is I'm going to see if I can select
just the bombs. Let's see if I can do that.
Select similar bi normal. There we go. We've
selected all those bombs. Let's press Delete and Faces, so we don't need
to have those now. I should be able to unwrap them. So what I'm going
to do though, I'll unwrap them all first. But before I do that I'll resell the
transformation control. All transforms right
Click says in geometry. And then what I'll do is
now I'll come to one of them and unwrap it. So
make sure you're an edge. Select Unwrap one of them, so L, then what you're going to
do is press U and unwrap. Okay. Now what we want
to do is we want to copy basically how this is unwrapped
into the rest of them. So what I'm going to do is
I'm actually going to come over to UV editing for this. It's going to make it
a little bit easier. The other thing is,
before I do that, I need to go to Asset
Manager because what I want to
bring in is tiles. So we can see here Point tile. I want to bring this
in called Fancy tile. Let's press Tab and bring it in. And there we go. This
is what they look like. Don't worry about
that at the moment. So let's come over
now to this one. And then what we're going
to do is we're going to assign just this one. So we're going to click
plus down narrow. And we're going to
go for fancy tiles like so. And click assign. All right, now what we can do is we can go over to our UV. And what I'm going to do is I'm going to Jaws come
over to this one. So press the dot bomb. Then what we're going to
do is I'm going to press A and I'm going to put
it onto material, just so you can see
what I'm doing. Pull this all the way
out and put it on, and then I'm going
to pull this all the way across like soap. Now what we want
to do is we want to measure up and we want to get this square part to
be the same size as this. If I press, I'm going to press G. And then what I can do now is I need to grab
these edges going around. So you can see, I need
to grab them all. But the problem is
I'm not going to be able to grab all those
because of the moment. These are blue on here, but they're not going
to be blue once we've brought some other stuff
in. So we don't want that. So what I'm going to do is I want to press Alt Shift click, and now I should be
able to put those much smaller in the blue place where they're going to
go, something like that. As you can see, now they're
looking much, much better. All right, the next thing
then I want to do is I want to copy now this
to the rest of them. I'm going to do is I'm
going to grab all of this. I'm going to press L.
Now when you press, you're not going to have
the thing that we need. So what we're going to do
is instead we're going to go to Edit Preferences. I'm going to put magic, and hopefully UV magic is here, and that's the one we want. Then we're going to press
you and we're going to go to copy, Copy, and default. So let's copy all those and then we're going
to do is press A. And then, and we're
going to go to where it says copy paste default. Now what's happened is all of these tiles are actually
the same as this one. We're just going
to make it really easy to move all of
these tiles around, but we're going to have to
spend a little bit of time doing the work, but what
we're going to do is We're going to go over and we're going to
decide which ones we want with the gold on there and which ones we
don't want on there. So you can see, I'm
actually hoping. I'm hoping this has
actually moved. Actually, I'm just
wondering why I look, why does that one
moved? There it is. It's over there.
It's actually moved. And that's not what I wanted.
That is not what I wanted. It should, I think, let me just see if the rest
of them have gone right. So we'll do this again. We'll put this one on
fancy tiles as well. It is a bit iffy, to be
honest, the UV magic. So let's just try material. Click a sign. There we go. That's one's actually
work, so that's good. Let's try this one sign. Yeah, as you can see,
some of them will work. Some answer, let's
try this again. A U. Let's go to unwrap, and then let's go to U. And let's go to tan,
Transfer, Paste default. We can see we still have
a problem with these, why the wrap like that? So I'm going to do
this a different way. I'm going to select this one. And then what I'm going to do
is I'm going to press you, I'm going to copy and default. And then what I'm
going to do now is I'm going to select
all of the others. So I'm going to
come in to select, I'm going to go to select
similar by normal. That then is going
to select all these. I'm going to press
you and then I'm going to try Paste in
just the top of here. Paste in in those, and
now it actually works. What was happening
is it was just making it too complex the way that we was actually trying
to unwrap all these. Now what I'm going to
do is I'm going to, I think, grab all of these. I'll just grab four of these. So then what I'll do is
I'll press you and unwrap. And then I'll put these
back into the place. And hopefully now I'm
hoping this will work. So I'm going to put these
into the blue area, like so. And then what I'm going
to do is I'm going to press you and I'm going to click a Copy,
Copy, and Default. And then I'm going to press A on everything you paste, Default. Now I want to see, is all of these looking exactly
the same as they are? That is perfect. That
is what we want. Exactly what we want. Okay, so now we can
go over the top. Now we've done that. And what we can do now in each one of these is place them
all as fancy tiles. So I'm going to
press minus here, and there we are, all the same. That is exactly what we want. Now what we want to
do is we want to decide where we want
our blue tiles. Where we want these other tiles. So what I'm going to do
is I'm going to come press voltage and I'm
going to grab this one. This one, and this
one, and this one. What I'm going to do
is I'm going to press and Y and move
those up to there, thinking I might as well do
these all at the same time. I'm going to do them all at the same time. So
I'll put them back. I'm going to grab this one. This one. And then we'll
go everyone in between. It's the checker, what
we're actually doing here and everyone in between. And making sure we
don't miss this one. Now we should be
able to move all of these up and Y, move all up. So now we still don't want
it completely like this. What we want to do now is
come to our other ones. So I'm going to do now is I'm
going to grab all of these. And then what I'm going to
do is I'm going to press and x x, move those over. And that is what we're actually looking for,
something like that. Now this looks a good in that, but you can see there's
a lot of repeating on here and we actually
need to fix that. The gold ones, we can actually
spin those round as well. So what I can do is I can
come in now to this gold one, press 180, and you'll see
now it spins it round, makes it look different
from this one. We can come to this one as
well and we can press R 90, spin that one round
and then 270, spin that one round and then 90 and then come to this
one Re hundred and 80. Spin that one round and then I'm just making sure
these are different. Then R 270 and then R -90 and we just
spun those all around. So now you can see
all of these ones at least look different
from each other. Now, pretty much all of these ones here
at least are done. We can press control and we
can hide those out the way. Now we need to do is
work on the next one. So all I'm going to do is I'm
going to pick a few random. So I'll pick this one, this one over here,
this one here, and maybe this one here. And what I'll do is
I'll press R 90, and then I can hide
those out the way. And then we'll go to
this one. This one. This one. This one and this one. And I'll press R 180 and
then hide those out the way. And then we'll pick this one. This one, this one, this one. And I'll press R 270 and then hide those out the
way these now are all done. Now what we need to do is we
need to separate these out. What I'll do with these ones is I'm going to grab this one. This one, this one, not that
one. Just split them up. And then what we'll do is
we'll press A and then X, move over and then 90 like so. And then hide those
out of the way. Then we'll come
to our next ones. We'll actually do that on the
next lesson because you can see it's going to
take a little bit of time just to get these right. Alright everyone. So I
hope you enjoy that we only have to do this once so we don't have
to do it anymore. So once we've done
it, it's fine. It's done and we're good
to go. Alright everyone. I hope you enjoyed that
and I'll see on the next one. Thanks a lot. Bye bye.
78. Applying Fancy Tiles to Marble Balconies and Reusing in Other Spaces: Welcome back everyone, to the
Blender Ful Ultimate Guide, and this is where we left off. Okay, so now let's
grab this one. Let's grab this one. This one. This one and this one. And then what we'll
do is Guineas, we'll press and X, move it over, but this time we'll
spin them around 180. So spin those round and then press hide those
out of the way. Now we'll grab this one. This one? No, we won't. We'll grab this
one. Yes, this one. This one. This one. And then all they'll
do is press 90. Spin those round, hide
them out the way. Now I'm going to grab this one. This one, this one and this one, and then 270, and spin those out the
way, and there we go. We're basically done with those. Now apart from these, we
can see they're the same. But that's okay,
because we're going to have some of them
looking the same. And now we should have a
little bit of difference, as you can see in the
variations of how these look. Now the next thing we need
to do is we need to come in and we need to change the
ones going around here. In other words, I need
to come in and I have to hide these ones out of the way, because these blue
ones, that is, I need to come in and try
and hide these blue ones. These are the ones that
I want. You can see at the moment I'm not
doing a good job. So what I'll do is
instead I'll just come in and select all
of the blue ones. The reason I'm going to slate them is because the other ones, the white ones like this,
so you can see control. Plus hide them out of the way. All of the white ones have
blue things going around them. And we don't really want that. I want to do, if I press A now I can just come
in and grab just the, grab just these
and then press and put them up and now they're
all white as you can see. They're done. Okay,
well, nearly done. Let's now go back to modeling. They're looking really nice. Now what I need to do is
I need to level them off. So let's do that first. Control Yll transform,
click Origins, geometry, let's say.
That will work. And then what we'll do is
we'll come over to here. And then what I'm going
to do is I'm just going to turn this segment up. Let's just turn it up
one, and there we go, they're looking a little
bit more now, like stone. Then finally what we'll
do is we'll press Alt, bring back everything. What I want to do now is come to mesh, transform, randomize. And turn this all the
way down to maybe not 0.1 and then we're getting a little bit of randomization
in there, as you can see. Now, honestly with these tiles, on my old one, I did go a
little bit overboard on this. I don't think it should
be like that, actually. I think this should be
fairly flat to the ground. You might end up
with a little bit of variation as you
can see in there, but I honestly think
this is enough. Really don't go
overboard with those. Let's press holtates, then
bring everything back. And here we are. It's loaded up. Let's save that
our work as well. And then what we'll
do is now we can put that into place
where it's going to go. And what we wanted to do
is we want it to drop down just below this part. So we can see if we zoom in this wall that
we actually made. So at the moment you
can see it's not behind there and there it
is, dropping down. So we've got a little bit
of an arch going up there. And then it all
fits under nicely. We're making sure our
door fits nicely. Double tap the, and there we go. Now we can see these pillars, probably not quite
down on there. So let's pull them
down into place. You can see moving
just one of them. Double tap the A,
and then this part. Let's make sure that's
also down enough. Double tap the A
and there we go. All right, let's take a
look on our rendered view. There you go. You can see
that looks really nice. You can see that gold is
really shining through there and it's really
coming together now. All right, now let's think
about this part here. I don't think I'm actually going to do too much with this. All I think I'm
going to do is I'm going to press control all transforms the origin
geometry of course. And then bring in a bevel,
turn the bevel down, turn it up one and then
just copy this material. Control L link materials. And then finally
let's come to this, a smart UV project. Click okay. Then let's just make sure that we're happy
with how that looks. I'm making sure it's not too chunky or anything
like that one, and I think that
actually looks okay. Now we need to put in this
corner as you can see. So what I'm going to do is I'll steal this corner over here. I'm going to press
shift, bring it over. And then what I'm going to
do is I'm going to spin it around, dead 90. Let's drop that into place in that corner there just
so it fits in nicely. And then what we'll
also do is pull this up so it's fitting in. I think what I might do is I
could either pull this up. I'll make this a
little bit smaller. I'll try making this
a little bit smaller. First, let's pull it down. Or I'll make it, I'll make
it smaller with the S, so it's making it all
a little bit smaller. Will tap the eight and then
I think I will pull this up, so I'm just going to grab
it from there to there. Control plus. Control plus. And then I'm hoping
that I will be able to pull this up inplace. So I'm also hoping that
that goes in there nicely. So we've got a little bit
of a red part on there. I'm looking on the other side and we don't seem to have that. Let's actually look
water actually grab. Can I press control?
Plus again, No, I can't. What I want to do
is I want to make sure that this part in here, let's just hide this part. And then what I want to
do is I just want to, first of all, you can see
this is the wrong color. And then let's just
pull this part, just this part in here, just out the line up
like, so there we go. Now press Alt H, double
tap the, and there we go. Everything's fitting
in perfectly now. Okay, so that's all that done Now let's actually move up
to the top of here then. Before I do anything, we can see that we
need a floor in here. We might as well just
grab this floor. And what we'll do is
we'll put that in first. I'm going to press shift, like I'm going to bring it up. Then what I'm going to do is
try and fit this in here. It's nearly fitting,
nearly not quite right. We can see it just needs
to go a little bit smaller to fit in there. I'll hide this part
out of the way, so I can actually go
over the top of it. Seven, go over the top. And
then what we'll do now, we can see how far I
need to pull it back. If I pull it back, let's
hide this as well. And then I can really
see where I need to pull it back to see it needs to
be pulled back to there. We're going to press S,
bring it out a little bit. So bring it over a little
bit and now you can see it's fitting in perfectly. Okay, That's looking
really good. Now what we can do is we can actually delete
most of this off. So I'm going to
press seven to go over the top durable tap the. Then I'll press,
grab all of these. Press, grab all of the
press control plus. And then you should be
able to press Delete. And there we go. Now we just want to see how high up this is because
it looks a little bit high. So I'm going to jaw drop
it down, holding shift, then bring it up, bringing
it up to that point there. And then I can press ol tag and bring back the rest of it. There we go. That's
looking perfect. Now let's look at
this part here. I might as well use this part seen as I've actually got it. It's out far enough. All I want to do is make it a little bit taller, so
I'm going to pull it up. And then what I'm
going to do is I'm going to pull it
in a little bit. So, and then I'm going
to press and bring it in and then I'm going to
press and drop it down. So that's all I'm really
going to do with this. Then I'm going to do is
I'm going to press a, I think I will just
press U UV project. I'm hoping actually,
I should have reset the transforms first.
Now I can pressure you. Uv project. Click okay. And then what I can do is I
can change this to my stone, I think it is.
Yeah, brown stone. There we go. We can see
it's way, way too big. We need it more like that. All we'll do is we'll
just go to shade in. Let this load up. Let's
put it onto shader. Let's press Zoom in,
and let's press a, pull these out, and that's
looking much, much better. Now, just this top part, what I'll do is
I'll press Shift S. I'll bring in then a UV Sphere. Then what I'll do, 2016, I'm thinking that's
probably going to be fine. We'll actually have a look
at, see what that looks like. What I'm going to do though,
first of all is I'll just delete the bottom. Going across here, the
delete faces and then the bot L delete and then
L. Let's put it in place. So if we go over the top seven, let's press to make
it the same size. And then let's bring
it down like so. The other thing is on this one, I want to get rid of this. First of all, we're
not going to need it. I also want to
smooth this off just so we can see what we're
doing on this one. What we want to do is I want to put a band on the bottom of it. What I'm going to do is I'm
going to come in control, drag it up a little bit and then shift, click,
enter, alternate. Then we're going to bring it out just before it touches
these walls like so. And then I'm just
going to make it a little bit smaller, I think. And pull it back
into place like so. And I think then I'll make
these a little bit bigger so all tests bring them out
just a little bit more like. So now with the top of this, let's come in and
what I'll do is I'll just grab the top.
Just these on here. I want to press one to
go into front view. And then what I want
to do is I just want to shape this a
little bit different. So let's come in first of
all, and try this shape. At the moment you
can see I've got all of this selected and I
don't really want that. So I'll come in again,
grab one of them, press select it. Press one. And now I should
be able to come in and shape this, whatever I want. Do I want it like that? I don't actually think
so. Let's try the shop. And I think actually that mind that might actually look bare. Now what I'll do is I'll come in because I don't really
want to point like that. So what I want to do
is bring it down. Something like that I think is going to
look much, much bare. Then what we need to do is
we need to probably think about Beverly in this part of how will it bevel this part. Let's press control off. First of all, we can't actually bring in an edge loop as
you can see on there. Let's press control be on here and see how far we
can bring that out. You can see if I do that, it's going to bring
in a nice smooth edge on there, which is what we want. Then what I can do
is I can come in and actually grab all of these going around there with select them all and then delete bases, then I'll just grab the top. Now what would be
really nice press F, to put that on there
is you could come in and put a top on here, like with a flag or
something like that. That would also
look pretty nice. What I'm going to do
though is on this bit, I'm going to press Fall. Click AlternS without portion
ling alternS bringing out. And you can see that's
not coming out properly. So just press if that's actually not working, there we go. That's how we want it now. Then what we'll do now
on the next lesson is we'll actually get
our textures on there. And then I think we'll
come over to this balcony. We'll finally get around
to fixing this balcony, and then we're onto this
wooden slats along here. I'm just wondering if we should do some more cloth as well. I think what we'll
do after we've put our materials on there
is do this balcony. And we'll do the other cloth that we've got there and we'll
get those out of the way. All right, everyone, hope you enjoyed that and I'll
see on the next one. Thanks a lot. Bye bye.
79. Creating a Stylized Rounded Roof: Welcome back everyone to the
blender for ultimate guide, and this is where
we left the art. All right, so now let's actually come in
and what we'll do is I think we'll put
some materials on here. So what I'm going to
do is I'm going to come in and grab this one. In fact, we'll just
actually join it to this control L link
materials like so. And I think the only one we
needed on now is blue paint. So let's come in and look for
blue paint, this one here. And then what we'll
do is we'll press and smart UV project. I'm just wondering if that's
going to be the best option, especially being as
it's kind of a dome. So let's have smart UV
project. I don't think so. As you can see that it's made a little bit of a mess of it. So what we'll do is
we'll do this separate. So what I'm going to do is
I'm in fact I'll come in, we'll mark a same along here. We'll mark a seam along here. And then we'll mark
a seam along here. We'll right click mark seam. Then what we'll do is
we'll come to the back or the front and we'll
mark a seam along here. And then we'll, I'll
unwrap these parts first. If I unwrap this
part, this part, press you unwrap and we can see, let's see what they
actually look like. First, I'll come
in the blue paint. For some reason, he is not
on here. I think I did it. Yeah, I added it to this one. So let's just press control L link materials
and there we go. All right, so let's come in now. Will do is the red
paint to the bottom. So let's press L
red paint a sign. And let's come up to the
top L blue paint a sign. And then I'll just grab them
both and will do is I'll press and make them
a little bit bigger, especially on this
one suppress like so. And that's looking
much, much better. All right, so now we need to do is we need to
unwrap this one. So if I press L on this, I should be able to
just click on Wrap. Let's see if I spin this round. So let's spin it round R 90. Let's see what this is
going to look like if we put that there. There we go. We can barely see a seam there. We're going to see some seam. We just have to
be careful if you press and Y and just move
it up a little bit more. Yeah, now that's too far Y. I'm just wondering if instead of doing that I should map pack. What I'll do is I'll
grab this part here, I'll press L. What I'll do
is I'll press U and Pac. Click Okay. And then you
follow active quads. Click Okay, and then 90. Spin it round, and
then there we go. Now we can barely
see that seam there. That is absolutely fine then we've just got this
part here now, and I could probably get away with this one just pressing U, where is it projection from view. Let's have a look at that. And there we go. Now you can see that's looking pretty nice. Let's actually just
have a look in our rendered view
before we carry on. There we go. You can hardly see any
seam on there whatsoever. And the top looks, looks really
nice. Okay, that's that. Now we can see from here,
this is what it looks like. I'm happy with how that looks. Now what we can do is we can
move on to this part here. I think actually with
this part of balcony, I will take some of the towels. I'll actually I think use some of these towels and
actually put those over there, but just make them a
little bit smaller. First of all though, let's
make this part here. What we'll do is we'll
just move our door up a little bit just to have a
bit more room to work with. And then what I'll do is
I'll grab the top of here, if I grab the top of this one, and I'll pull it up just
to be under there like so. And then what I'll do
is I'll press the, I bring it in and then
what I'm going to do is I'm just going to pull
it back into place like so. And then press and X
and pull it into place. Now while I'm hoping from
this I can pull this in now, I'm not going to
do that right now, but I'm hoping I can take
this part here and use it on the other side rather than actually
making a brand new one. So what I'm going to do is
I'm just going to come in, I'm going to press L, L, L and just grab these parts. I'm going to have
to make it a little bit smaller, I do know that. I think instead of doing that, I'll just take these parts. Just these parts here. Yeah, we'll use it like that. And then we'll do is
I'll press Shift. I'll pull it over and then we'll do is I'll
press Selection, just to separate it out. And then I'll press
Control all transforms, right Click origin geometry, spin it around our 187
to go over the top. And then, and let's put it into place or see if it fits in
place. What about that? Actually, near enough fits in
place, That's pretty handy. Let's put it into place
where it's going to go. Then let's just make
sure it's high enough. I think actually,
if I pull this up, that's going to be
relatively high enough. The only thing I'm checking now is if it needs to
come out a little bit further and I'm thinking
maybe a little bit further. All I'm going to do
is I'm just going to grab this and this and I'm
just going to pull it out, maybe just to level with that. And then let's pull
this back and see. Yeah, that's going to
look a bit better. I think that'll be Look better. Okay. So now what we'll do is we'll grab this inside. Now. We can see now this
is the inside. So what I can do is I
can press and pull it in like so ready
for that flooring. The other thing is, do I need this on the back?
I don't think so. Delete faces, And then I've got another top in here,
which I'll delete. Delete faces, I don't need that. Then finally what I want to
do is I want to come in, press control R on this, left click, right click, control B. Scroll my mouse wheel in a little bit and then
just put it like that. And then finally
what I'm going to do then is just bring
this out a little bit. So I'll come in face
L, click Enter, alterns, pull this out. I don't know why that came up, but alters some Windows thing. There we go. And then let's just make sure
offset is even. Then it goes right up to there, which is really nice.
Let's press control. What I'll do is I'll
change this to stone, I think it is brown stone. There we go. And then
I'll change this to red. If I put in the
down on point red, I should be able to bring
in red paint and then I should be able to assign
that to there like so. And then be able to unwrap
all of this smart UV project. Okay, there we go. That's looking pretty good. Then finally, the last thing is of course we need to just add in a nod geometry. No, add in a Generate and
a bevel. Drop that down. Turn it up maybe one
or a little bit less. Not 0.5. There we go. That's that. Okay. Now, because we need
our stone floor, we need the piece of
wood that are going to come each on here. We could have to these
pieces of wood here. I'm just wondering whether it's whether it's worth
taking those and putting them in those sides probably is probably going
to make it easier for us. So what I'll do is we'll come in because they're already
unwrapped in everything. I don't really want to create myself too much work
if I can help it. I do want them to
look a bit different, which I can make them look
if I grab these anyway. So I'm just going to grab those. I'm going to press
Shift, bring them out, and then press and selection because it
nearly fit anyway. So then I can press as Ed
180, I can pull them over. Well I can first of all press Concholell transforms, right? Orogen geometry. And now I can actually
put them into place. If I press, I should be able to get them roughly if zooming, once I've got there into
place right in the center, like so let's have a look. Once I've pulled these down, then if they're going to
all go into place now, you can see they're
not quite long enough, so I'm going to press En's
Ed and pull them out. We can also see,
do we want that? Yeah, actually,
yeah. This last one. Yeah. They actually look good. I mean, if I put my guy there, I think actually
he's got enough room to just come out there
because they're going to open on the inwards and stand on a little tiny
balcony that he has. Maybe this is for people
is not as important. Maybe let's put him over there. And then what we'll do now
is we'll grab these tiles. I'm thinking I'll grab
this tile set up here. And then what I'll do
is I'll press Shift D, Steven, to go over the top. And then what I'm going to
do is I'm going to press control all transforms, right? Place the origins geometry. And then what I'm going to
do is I'm going to make it smaller and I'm going to try
and fit those into place. I'm going to bring
it down and just see how it's going to fit in. First of all, before
I do anything else, let's shift drop
them in so you can see I must be getting lucky because they
fitted in really nicely. The one thing is I
need to pull them out. Of course you can see
they're a little bit, not quite long enough and X
pull them out. There we go. Then all I'll do now is
just grab, go over the top. I'll just grab these
ones if I can. These ones both for
these, not this one. It would be grabbing one
of those, wouldn't it? Let's come in, grab this one. This one control plus, then all I'll do is
I'll move them over. Well, I'll move these over. If I grab these, I'm going
to press NX. Move them over. Because I don't want
those gold leaves on this part here
looking like that. We can't see the gold
leaf under there. Anyway, then here's
the next balcony. Done. All right, so
that's looking good. Now our thing we should
do is we should work on a little canopy that's
going to go over here. We'll actually create that, Let's actually make
a style on that. So I'll do is I'll grab my door. I'll press shift desk to
selected, press shift A, Bring in a cube, make the cube smaller, and then bring that up. In fact, do I need that cube? No, I'll use this. I'll use this rock here. You can see this rock here. Let's split it off, L selection, then control all transforms. Right click the
origin, geometry shift D. Then yeah, we'll
use this rock. That'll make it a
little bit time saving. Control one, let's
put it into place, let's squish the rock
in a little bit. And X, let's put it into
place where it's going to go either side of
this top part here. And then I can
just press Shift D and move it over and
then spin it round, so 180 control one again. What I'm looking for is where
does this line come up? And they look about even
to me that I'll do. Then what we'll do is well on the center of these
shifts selected, we'll bring in now a
cylinder mesh cylinder 20 is absolutely fine x 90. We're going to make this
a little bit smaller. What I'm going to do
is pull this out. I want it round about in the center of the. I
want it in the center. If I can, I'll press
Shift Us selected. Grab this one, then Shift
S. Selection. Cursor. Now it's in the center. And then what I can do is I can
just pull it back now. And then what I can
do is I can press I and then bring this out. Bring this out just
probably in front of there. Then on the end of it
now I can press Enter, pull this out, and then
pull it out again. And then finally I'll just make this a little bit smaller. Finally, I'll just level
this control B, like so. And then right click. And where is it? Shade, auto, smooth. Now I just want to put
it on the other side. I'll just press control one. What I'll do is I'll
press control or transforms right click,
origin to geometry. Then what I can do now is I
can put it over this side. So I'm just going
to press shift, grab this one, shift the
selected, grab this one. And then shift and selection
to cursor. And there we go. Now the boat in the middle, apart from it, is pulling
out a little bit. Let's pull it out a little bit. Lining it up with this one
here, Roughly lining it up. Doble, tap the, and there we go. So now we've got that.
What we want to do then on the next lesson
is we'll actually bring in some more cloth here. And this will be near
enough to fight. I think this will
be the last piece of cloth we have to make. So that will be good because you making cloth is not easy. All right everyone. So I
hope you enjoyed that. And I'll see on the
next one. Thanks a lot. Bye bye.
80. Adding Roof Attachments to Stylized Balconies: Welcome back everyone to the
Blenderful Ultimate Guide, and this is where we left off. All right, so now
let's think about our actual cloth that's
going to go on here. So all I'm going to do is
grab both of these shift S Ursa selected and then I'm
going to bring in a plane. So shift A, bring in a plane, I'm going to make
it smaller them. And what I'm going to
do is I'm already going to do a little bit
of the work on this actual plane before I
actually put it into place. So I'm just going to put it
round about there like so. And then what I'm going
to do is now I'm going to bring in some edge loops. So let's come in, and instead of just
bringing in edge loops, let's just first of all,
control or transforms. And then what we'll do
is tab, right click, subdivide, subdivide,
subdivide, subdivide. And maybe one more
subdivision like so then what we'll do is
we'll go up to over the top. And I'm going to come in
with proportional editing, which I've forgot my
proportional editing on. You know what, Here
it is. There we go. All right, let's come in, grab the center here, and then let's pull it back. And you can see we don't really want it like that.
Absolutely not. Let's come in and
let's try the sphere, see if that does a better job. The problem is the drop off on the sphere is probably
a little bit too harsh. You can see it's dropping off
like this. It might work. It might work out,
let's pull it all over. Or it might not. I
think that's too much. So what I'll do is
I'll come to smooth. And you can see how the
smooth is the way to go. All right, then what we'll
do is we'll do this side. And then what we'll do
finally is this side. There we go. We've
got it pretty much. Let's do the back as well,
actually, while we're here. Then we've got it pretty much in the way that we
actually want it. All right, so now we need to do is pin them as
we normally do. But before we pin them, let's
pull them out a little bit. So all I'm going to
do, I'm just going to really bring in my smooth. So I'm just going to bring it in there and I'm going to let the cloth do most of the work anyway as you know. We're just helping it along
really is all we're doing. All right, that's
absolutely fine. Now let's come into
each of these corners. So let's press control
plus just once. And then what we'll do is we'll come hit a sign and we'll
just call this pin. Let's go then over
to our layout, which we'll have our timeline, and let's set the
timeline to zero. Let's press dot
to go over there. Then let's come in now. Let's press Tab. Now what we're going to do now is to
do the same thing as what we normally do shape.
Let's click on Pin. Now the other thing about the actual cloth is that we've only just scratched
the surface on the cloth. There's so much more
you can do with it. For instance, you can even
change what the preset is. So you can see you've got
all of these as well. They do interact really differently with how the
cloth actually falls. So I recommend really
playing around with this. Of course, you know,
this course can only be so long and there is only
so much we can point in it. So we're just basically
covering the basics of how to get some
decent cloth in there. All right, so let's come
down and we've got a pin on. So now we need to do is just
change the vertex mass. And we'll change this to
something like three. And then we'll do this press
space bar. There we go. That's probably all we're
going to need for something like this is a very
small piece of cloth. Even saying this higher up, it's probably not going to
make so much difference. So we can try though, let's
put it onto six and you'll say it makes it more
droopy, just like this. Do you want it like that or
do you want it actually, I think actually that looks a bit better, maybe
not quite as much. So operation five and
operate back, there we go. I think that's looking
absolutely fine. All right then what we'll
do is we'll come in, we'll apply this on there. So I'll come to our modifiers, press control late
and apply that. Now what I'll do is I'll go
over to, it says object. I'm going to go to sculpt, I'm going to make sure
I'm on my smooth. And all I'm going
to do then is just smooth out these
just a little bit, making them a little
bit more smoother than what there was like. So. And there we go. Now finally, then let's come over and put it
on object mode again. And then what we'll
do is we'll add in a modifier and this time
it's going to be a solidify. Again, don't add a
lot of thickness even this might be a
little bit too much. Let's turn it down to
not 0.5 Let's try that. And I think that's looking
a little bit better. And then what we can do is
we can actually apply that. Finally, then what I
need to do is I need to bring in some materials
and my chain. To bring in a chain Again, I'm going to come over and just steal a piece
of chain over here. So what I'm going to do is just going to press shift. And D. And bring it over. Not with
proportional editing on, let's just bring
it over to here. And then what I'm going to
do is just go over the top. First of all, I'm going to press R X and just straighten this up. And then I'm just going
to put it in place, so I'm going to
rotate it around, so I'm going to make it
a little bit bigger. Then let's just put
it in place there. Then what I'm going to
do is I'm going to press shift, bring it over, rotate it z hundred 80, 90, and then get it into the
right shape that I want it. Then what I'll do is I'll
grab both of these and I'll just bring them over and
then rotate them around. Hopefully it will. If I put this onto median
point Z hundred and 80, then I should be able to
drop those in place like so. Now finally let's actually put them into place
because they're not in a very good place there. What we'll do is we'll bring
them down in place like so. Then finally what I'm thinking is I'm going to just come
then to these edges. Just to these edges. I'm going to isolate this out. Shift H, isolate it out. Press a little question mark, so it can actually
go around there. Right click, shade, auto smooth. And then all I'm
going to do then is just want to come to
these edges here. Just these edges around here, here, here, and the other one. Finally here, I'm just going to be level them
off because they're way, way too sharp control
B, bevel them off. Just make them a little bit
more rounded. There we go. Now we can see that's
looking pretty good. Now, while I've got this here, I may as well go over the top. And then what I'll
do is I'll press A and I'll project from view.
I'll bring in my cloth. I'll level lot what that looks
like and actually that's probably going to
look okay as it is. If you don't, then just go
in, move your cloth around. Let's press all tapes then
bring back everything then. All I'm going to do now is
I need some metal on these. I'll do is I'll grab them
both, press Conchal J. Then I'll grab my
metal. Which is this? It's black metal. Let's come in black metal. And there we go. And let's wrap these properly. A smart UV project. Click Okay, there we go. Then what we'll finally do is we'll join all
this together, I think. Let's join all of these together with my cloth object,
convert to mesh. Then what we'll do now is I've joined all of those
because they're the chains. So I need to split
the chains up. Yeah, the chains are over here and I really
don't want that. So what I'm going
to do is I'm just going to grab all of my chains. So these four press P selection. And now I should be able
to join all of these up. Let's hopefully make sure I've got nothing else
joined to there. Then I should be able
to press control J. Join all of those up.
Right click, shade, auto, smooth, double tap, the Then let's just have a quick look at what
that looks like. Yeah, and that's looking
really nice as we can see. All right. So that's
that bit done. That is the last bit of cloth that we're
going to be doing, and basically we're
going to put some cloth. In fact, is it the last bit
of cloth? No, it's not. We have one more bit of cloth
left, a trick to you guys. It's going to be
this one down here. Luckily though, for
us, we can actually use a lot of parts we've
already used on there. So I totally forgot about this part, so I'
sorry about that. All right, so what
we'll do now is on the next lesson is I think before actually
coming to this part, what I want to do is I'm going to put in a plant pot down here. And we'll put in, yeah, we're putting a
plant pot down here, I'm thinking we'll also make
a vase for this part here. We'll make some barrels as well, just before starting this, just to kind of, you know, bring it out a little bit. So we'll just make a couple of props because I don't want to come to the end and have
to make a ton of props. That's not going to be
fun. All right everyone. So I hope you enjoyed that.
And I'll see on the next one. Thanks a lot. Bye bye.
81. Modeling Plant Vases for Enhanced Aesthetics: Look back everyone to the
blend for ultimate guide. And this is where
we left, there are. All right, so let's now put
this back onto our shade it. And then what we're going to
do is we're going to take the same plant pot which
we have around here. And all I'm going to
do is just press shift D. I'm going to
bring it over here. We might as well use this again. And what we'll do is we'll just make it a
little bit bigger, it's a little bit too small. And then all I'm
going to do is put it down and put it down near the entrance around
here to this part here. Then what we're going
to do is going to go to Asset Manager and we're going to show you the
other plant, some foliage. Let's turn that off. The
other plants we've got here, we've got these four
plants in here. So let's have a look at
what they look like. We've got this one more. Let's do this a
little bit slower. This one, this one, this one. These again were all
made by three D tutor. You are free to use these
in your own projects. What we'll do is I'm
going to use this one. I'm going to delete this one,
and this one, and this one. And then I'm going to
bring this one over, make it a little bit smaller, and put it into this
corner around here. I don't want too much of
it going in the wall. I'm just going to press
arms, just move it out. I'm going to pull it
up. Let's pull it up. And then pull the plant part across and have it sat in there. That's look in, Is
it fitting in there? Yes. Go this way a
little bit. There we go. Now it's more
centered. One problem of God is this leaf here. I'll just come in and
I'll just move that leaf other way. Let's pull it out. If it's not going to move, don't worry, you can
just grab it all. Take off this and then press, move it into the place
where you want it, then G. So there we go. All right, that's looking good. Everything's in
fact, you know what? It's actually moved
away from there. Shouldn't have done that. I'm going to actually
put it back. Let's put it back. Let's press Alt tag so I can actually
see what I'm doing. And then what we'll do is we'll put it back to where it was, then L. Now what I can do is
I can grab this and this. Then what I can do is I can move it now properly, there we go. And then move it into place. So, there we go, much, much better.
Let's do it properly. All right, so that's
looking great. Now let's, let's
make another one, so we'll make another
pot over here. So what I'm going to
do is just shift right click, drop my cursor there. I'm going to then press Shift, and I'm going to start
with a cylinder. I'm going to make it a
little bit smaller then. And then what I'm going
to do is a little bit smaller because I want it
to go roundabout there. So then what I'm going
to do is press and bring it in and that looks
a fairly nice side base. And then we'll do is press Tab. And I'll press, I bring it
in and then we'll do it is, I'll press E, press the
Born to pull it out. Now we just want to get a
nice, beautiful shape to this. All we going to do is
just press controller. Always a center one in there, unless you really
want to bend it out. Left click, right click. And then I'll grab
this center one. And then press then, let's see what, what style do you actually want it to have? You can have something
like this, for instance. Let's right click and
shade. Auto, smooth. Actually, that might be okay. What I'll do then
is I'll come in, I'll press the eyeball. So then we do. I'll press E, and then
without proportionality non, then do is I'll press E.
And then again, and then, and then, and then, and then finally pull
it up a little bit. And then I then, and then finally
to bring that in. Now I do, once I've got the
actual shape that one is, I come in, I actually bevel
off the edges myself. Now, before you do that, just press control
and all transforms. So press control,
level those off, and then let's come down and we'll leave this shop on here. I think we'll level
this one off, just very slightly like so. And then we'll level this one off and maybe the inside of this off so we can press control
B and level them off, so. Okay, that's looking
pretty nice. Let's just now, do want a little band on
this part, I think I do. So I'm going to do is press
control, bring it in. One, like so. And then what
I'll do is I'll come in, shift click, alternS,
pull out a little bit. There we go. I think
I'm happy with that. I'm just going to
check now the size of it so we can get into place. It's just going to go here. Feel free, by the way, to really go nuts and put in
lots of your own foliage. Just be careful you don't make something too ridiculously
big or small. So you can see here, it's probably a little
bit too big, this, so I'm going to shrink
it down a little bit so, and I think that's looking
much, much better. Now let's look at
what clay we have. So I'm going to click new.
I shouldn't have done that. I should click down Clay. And we've got clay,
blue and clay. Let's bring clay in first. Let's press Tab
Smart UV Project. Click Okay. As far as I know, the clay hasn't
grown material on. If we go to our shading panel, you will see that if I
zoom into it and zoom out, you can see it's just basically a principled with
a color change. And I think that's all there is, there's nothing else to there. And then what we'll do is we'll just come
in with the blue. I mean, you can just
make that yourself very, very easily. And blue, blue. Let's bring clay actually, because then we'll
be able to find it. Blue clay. Click a
sign. There we go. Now I'm thinking, let's
bring in another plant. Do I want to plant
this big? Maybe. Let's go to our asset manager. We've got a fern we
can bring in there, so we can bring in an I've turned that fern
wrong way around. Let's spin it around. X -90
and then X -180 There we go. We could have a fern in there. We'll just have a look at
what the fern looks like. Let's put them in burns, though normally are
going to be used more throughout the
scene as plants. You're going to see
what that looks like. Actually, you know what? I
think that looks pretty good. I'm just going to rotate
it a little bit though. Why rotate it? I think because
we've got that in there. We should put in another
loop, control law. And then put in some soil. So I'm just going
to press F and then I'm just going to
click plus down arrow soil and then
a sign, There we go. Yeah, that's looking qua, I'm not even going
to worry about what the others
are going to look like because I'm pretty
happy with how that looks. Let's just put on, let's move our guy out of the way and there we go.
All right. Happy with that. Now what we'll do is we'll
actually create a barrel. And the barrel we can use, always keep your barrels. Just always keep them
in the asset manager. You'll use them time
and time again, if not in every scene, depending on what
you're building. But even if you're
working in sci fi, you want some type of barrels. They just all look different. So you're going to end up in your journey in
three D modeling. I've probably created
maybe 300 barrels in the whole time I've
been three D modeling 300 of them,
something like that. Most of them I've not got, I do have a fair amount
of them and you know, they're all slightly,
slightly different. So we're going to create a small simple barrel and
I'll show you a really, really easy way of
actually doing that. All right everyone, So I
hope you enjoyed that. And I'll see on the next
one. Thanks a lot. Bye bye.
82. Creating a Stylized Barrel: Welcome back everyone to the
Blend Four Ultimate Guide. And this where left
off, so what I'm going to do now is
start with my barrel. I'm first of all'm going
to put this on shader. I'm going to press shift S, and Custer selected
just on my guy. And then what I can do is
I can bring in a plane. So not plane, sorry. A cylinder won't be very
good starting with a plane. Now remember when you're
creating a barrel, you need to think about how big each of these
is going to be. So if you have
three, you've got to make sure that it's
divided by three. In other words, if you
want ten of these, you need to have it 30
vertices and not 20. Generally, 20 is
good for two because obviously two divides
into 20 rather easily. So you've just got to
make sure if it's four, you've got to make
sure it's times of four that will work out in
whatever you're trying to do. So what we'll do
is, first of all, we'll work out the
size of the barrel. I'm thinking probably a
little bit higher than that. This is the first thing you
should always do when you're actually developing your barrel, is look at the size of it. We want a fairly,
fairly hefty barrel. Next of all then
you want to work out how thin the
barrel is going to be. So what I'm going to do is
I'm going to come in with Olt shifting click and then
I'm going to press alternS. That then will allow me then to keep the height but develop how actual thin the actual
top of this barrel is. I'll think with this
because we're going for a stylized Arabian theme look, I'm going to keep it relatively thin and then what I'm
going to do is I'm going to press
controller and we're going to bring in
three edge loops. So three edge loops. Mind do it. Let's try five edge loops. Actually five edge loops.
Left click, right click. And then what I'm going
to do is old shift and click around
the center of it, put on proportional editing. And I think the root is
probably going to be the best one if I bring
it out with the root, we can see now we can actually get a nice barrel shape like so. And you can see already just
how easy that is to do. Let's right click then.
And what we're going to do now is shade auto smooth. Just make sure it's
all nice and smooth, which it looks like it is. The next thing now you
want to plan out is you want to plan out
these edges here, this one and this bottom one. Where do you want
the actual bars that are going to hold the
barrel come in together. In other words, hand, Do
you want, do you want one, do you want three in there? Let's, let's make three. What I'll do is I'll grab
the top and the bottom. And then what I'm going
to do is press control. And I'm just going to pull those out into the where
I want them now. You can see do I want them, these parts here or do
I want them lower down? I think actually I'm
happy with how these are. All I'm going to do now
is come to the bottom. I'm going to press control B and bring this one now and
make it a little bit thicker, just so it's looking a little
bit different from these. Now what you need to do
is you need to come in, shift, click, shift,
click on these parts. And then what you're
going to do is you're just going to duplicate them. Shift D, press the
end to button, and then we're going to press selection and
separate those off. Why we're doing
that is it's just going to make things
so much easier for us when we come to creating
the rest of this barrel. If you just think a
little bit of head now, what you can do is
you can actually select these parts
on the inside. Well, if you can't select them, just press shift H and then
isolate everything out. And then you'll be able
to select the top, and you'll be able to
select the bottom. Now what you want to do is
you want to split these off. So you want to press Y,
and then you want to press without proportional
to N. Split these off. But we don't want them going in, we only want them on
the individual origin. Bring them in next of all. Then what we want to do is we want to now
separate this off. So we want to separate
these by two. On every one we
should be able to press control shift and plus, nope, that's not going to work. So I'm just going to go to the next one round like so
and we should get back round. Nice even to because we gave
it 20. Now we've got that. What we want to do is
we're going to right click and we want to come
in and mark a scene. Then what we can do is we
can now split these off. Now you can either split
them off, first of all, you can split them
off like this and then you can be level them
and you'll end up with, sometimes it makes it easier. The problem is once you
start giving this depth, it's going to really pull
out the sides of it. These sides, I let me
show you what I mean. I'll quickly try and
show you what I mean. If I select all of these,
we are going to go back. Just let's save that
our work before just watch Y. I actually mean
if I select all of these, press Y, and then what I'm
going to do is I'm going to come in and bring in a solidify. Let's bring in a solidify,
let's bring them out. So you can see already, the problem is that we've already got a massive
gap down there. And then what we
have to do, we've this as we're not leveling
up and things like that. So I don't recommend
actually doing that way. What I recommend doing instead is keeping it all
together for now. Just separating out
these two though, because we don't actually
want those in there. So P selection, hide those out the way. Hide them
out of the way. And then we've just
got our barrel, now I recommend that you
bring this barrel in. Instead we're going to press
control all transforms. And then I'm going
to press Add and I'm going to bring
in a solidifying. And then what I'm going
to do is bring it in. We want to make sure,
Not how bring it in. Something like
that. And then how thick do you want these parts? Then what I recommend
we do is we actually apply this solidify.
Apply the solidify. And only now we need
to just go in and we need to these seams
again, mark the seams. So going all the way around. So then what you're going to do is you're going
to right click and mark scene now is where you
should be splitting them off. L, L, L, L and L, split them off like so. And then what you want
to do is now you want to press A and then you want
to make sure on individual, and you want to bring them in. Just a little bit like that. And the reason we want
to do that is just so we can actually
fill all these in. Now unfortunately,
unfortunately there's not an easy way
to fill these in. So what we need to do
is we need to come in with Alt Shift and click. And then what we're going
to do is right click. And we're not going
to bridge edge loops, we're going to use Alt, and Alt and F will
join those altogether. So now what I can do
is I can come in, I don't think we can do
two at the same time. So Alt, no, we can't do
two at the same time. As you can see what we
might be able to do, the let's press on them. Yes, we can press F, and
then what we can do is instead is can we
do two at time? Yes, we can. So what
we can do is we can go like this, grab them all, going all the way around like so all the way around here,
all the way up to there. In fact, those two have
already been done. I don't want to do those again. And then what we can do
is press and there we go. Now I can grab them all. And what I can do now is I
can right click and put, where is it? Faces, right click. Triangulate faces, right
click. There we go. Now we've got nice going
all the way down there. And it's filled them
in really nicely. The reason I want to
do that is now because now I can actually bring
them back together. I can come in now and
give them a nice bevel. So add modifier, generate bevel. Let's turn it all
the way down then. Then turn it up maybe
naught point naught three. So then what we can do
is now we've just got the inside which we
don't want to see the inside, we really
don't want to see this. So what I'm going to do is I'm going to press Alt Shift click, and just mark a seam on
just all of these parts. Like this then is going to make it really easy to actually finish this barrel because we want to see some
gaps on the outside, but we don't want to
see through the barrel. That's the problem we've got. We're going to finish
this mark seam. So then what we can do now is we can come in to the
inside of the barrel. All you're going
to do is press L, and what they'll do
is select all of those islands coming
all the way around. Press seven to go over the top. And now we just want to
bring all of these in. The way to do that is you're
going to put it on normal, you're going to make sure
it's on individual origins. And then when you press and Y, you'll see that you can
actually bring them together. Hopefully, let's press and X. Y and X. Is that
going to work? I'm hoping instead
of doing that, if I can't do that, I'm
just going to press S and bring them all
together, like so. All right, normally
S and Y works. Maybe it's because I got
an even number on these. But either way, let's bring
them in a little bit more. And the other thing is,
because we've done that, now you can see
that we've actually flattened this up on the
top and on the bottom. Which makes it really, really easy now to
actually deal with. Now what we'll do on the next lesson is you can see we've already got a
really nice barrel. We'll actually come in
and just randomize these now on the actual side of here. So we can randomize just
these sides because we're going to put in another
seam going down here, which means that we'll leave the back parts alone.
All right everyone. So hope you enjoyed that, and I hope you take this
forward when you're actually creating
barrels once you've actually learnt how to do
it and use it in your own, you know, your own projects
and things like that. Alright everyone,
hope you enjoyed that and I'll see
on the next one. Thanks a lot. Bye bye.
83. Finalizing and Texturing the Stylized Barrel: Welcome back everyone to the
Blender Four Ultimate Guide. And this where we left off. All right, so let's come in now and we'll go old ship click. And just pretty much do the same thing as what
we did with the inside. So we're going to grab
the outside now on the top and the
bott, let's come in. That one going around there
and then right click and Mac. Okay, so now what
we'll do is we'll come in and we'll
grab all of these. L just going all the way around. Just the outside. I don't know how I've
managed to do that. I'm just looking before I
actually grab them all, I'm just going to come in
and take away these seams. I think what it did
was, but you know what? I don't know what it did there. Right click. Let's
clear that scene now. We'll try that
again. As long as we can grab them Going all the way around the outside,
we're going to be fine. Let's bring them all. So then what we want to do is
now we're going to go to mesh transform. Where is it there
it is, randomized. Let's turn it all
the way down then 0.3 maybe 0.3 Try that
tab, there we go. And let's do that again. We'll do a little bit more now. Mesh transform, randomize. Turn it down, and this time we'll turn it to not 0.1
And then what I'll do is I'll mess around
with a couple of these. Maybe not so much. I'm going to have to
turn it down to not 0.5 Still think that's too much. Let's bring it down n
0.3 And there we go. Let's try that. That's
looking much, much better, we can see now we've got a
bit of variation in those. All right, so far so good. Now we want to do
is want to press Altag. Bring back everything. What we're going to find is when we brought back everything, we've actually got
those bars that we need to use to create
the outside of the barrel. And they're going to
be the perfect size because that's the thing that
we fought ahead of doing. Here you are, here's
the actual bars. Now you want to do is
with these bars is you want to press
control or transforms, bring in a solidify. And then what we're
going to do is pull that out a little bit. Pull it out, out, Pull it out to
wherever you want it. And there we go, there
are those barrels. Now the thing is, let's see if we can make
them a little bit smaller because making them a little bit small is
normally what's needed. And we can see that's
looking pretty nice. Then what we're going
to do is we need to bevel these off as well. Controltrolll transforms
right click, surgen geometry. And then we're going
to do is we'll apply the bevel add modifier. Let's bring in where is it a bevel we want on
this to probably have 22 also we can see probably say a
little bit too high on this. I'm going to turn it down. I'm going to turn
this up to two, and then I'm going to turn
that up a little bit. Double tap the eight. Let's
look in the object mode, just so I get a good idea. Let's turn the two down to just one and see what they're
actually looking at. This is not working on this, so I'm just going to come
off and add it again, so I don't know why
did I reset and more. Let's sevel up, there we go. I might be beveling off
something else, so I'm not sure. Let's generate a bevel
there we go now. That's what I'm
looking for. Turn it all the way down. Turn it up. Turn it onto two. Yeah, I think two is not going
to do what I want. So I'm going to turn
it down to Nor. 0.3 Let's try a bit higher, 0.05 Yeah, there we go. Yeah, that's what
I'm looking for. Something like that. All right, now we've got this part here. What we want to do finally then, is we also want to come up to
mesh, transform, randomize. And turn that down a little bit. We can see maybe
that's too much, 0.05 Let's try that. Let's try pressing
Tab. There we go. Now it's a little
bit uneven, okay, so the last thing
then you want to do is before finishing this bit, you want to come to
these parts and you want to grab maybe
this one and this one. And then what you want
to do is you want to go to your proportional editing
and put it on random. And then all you
want to do is you just want to pull these up. When I pull those up, you can see it
actually bends in, in a really, really nice
way, as you can see. All right, so that's
looking pretty good. Now let's think about
our bottom now. The bottom on the top,
you might as well get rid of the bomb because you're
not going to need the bomb. We're only going to do this
on one of them because you're only going to see one
of the barrel at one time. Let's come to our top
then and go over the top. What I'm going to
do is I'm going to come in, put this on vertex, and then I'm going to grab
this one and this one, press J, and then I'm going to grab this
one and this one. And then maybe this
one and this one might have gone a
little bit too thin. We might be dealing. I'm just thinking, is that
too thin for the top? We could have it 121.1
We could do it that way. I'm thinking whether that would be the best
way to do that. I think we'll actually go
with a little bit thinner. So I'm just going to
grab all of these. Then I'm going to
do is right click and I'm going to mark scene. Then what I'm going to do, I don't really want to randomize. You could also randomize this, putting some more edge
loops going across there. I don't think I want to do that. What I'm going to do is instead I'm just going to
split these off like, so I'm going to
make the top of it just simple and see that I've got to randomize
on. I don't really want that. I do want it on in a
minute, but not quite yet. So I'm going to
pull it up like so. And then what I'm
going to do is I'm just going to
select this middle, put it back on, and then just randomize them like so
making them uneven. Finally, then control
A all transforms. I didn't modify, let's generate
a bevel, turn it down, turn it up, 1.3, Try that, and there we go. There is your barrel finished. Now, let's put, if I grab this
and this and this shift H, isolate everything.
Let's grab the top. And what I tend to do with the
top is I'll bring it down, I'll spin it round
to Y hundred 80. And then what I'll do
is I'll rotate it, I'll put it there and then
just rotate it on the Z, just round so it's faced in a different way that
way then if we, you know, roll the barrel over, you'll see it's a
different top and bottom. And I think now that is looking pretty much
like it's finished. So what I'm going to do
now is just select it all. We're going to come to
object, convert to curve. Nope, don't want to
convert it to a curve, object convert mesh,
adjoin it altogether. And now what we
should be able to do is bring in some materials. First of all though,
let's come in and UV, Smart UV on wrap. And then let's come
in, add in wood. Let's add in the wood first. I think we have one that says wood and props.
Let's bring that in. Let's put it on shade in and let's have a look
what that looks like. Let's also come in
to our UV editing. Let's zoom to our barrel. Let's press a, let's press without
proportional editing on. Let's press S and pull
it out. And let's look. Well that's looking
like. Then let's come into this one, and this one, and this one plus down narrow
black metal. Click a sign. There you go. How
nice does that look? How easy was that? Maybe this is a bit, maybe these are a little bit too high. Actually. I think it's okay. You could just grab
these and drop them down a little
bit, but there you go. That's a really nice, easy way to create
realistic, stylized barrels. I don't know if realistic
and stylized go together, but you get row,
meaning it looks like a barrel and it looks
highly stylized. So let's go back to modeling. What I'm going to
do is press all Tage, bring back everything. What we'll do is we'll put
these barrels into place, so we'll let it load up. And then once it's loaded up, we should always save our
work before doing that, actually, but I always forget. So let's go to file, Steve. And then also what
I'll do is I'll press control on my barrel, right click origin geometry. And don't forget,
if you want to put this in your asset
manager, then please do. I'm going to put one
barrel over here. I'm going to make sure
it's on the floor, so control one not floating
on the floor like so. And then we'll do is
I'll press shift D and I'll bring this barrel
over here and then of course I'll press
RNs are just so it looks completely
different from this one and you might want to make a different size or
something like that. All right, so there
are two barrels done. What we'll do on the next one, then here we'll create
our little basket. So, we have some
baskets around here, so we create the little basket. We also have some
crates around here, and we also have some Saxon
grain and things like that. So I think pretty much though, for the back of it, I'm just checking my reference actually. Pretty much for the
back. We're actually done. Pretty much for here. We're actually done. I
think we'll create that, you know, the wicker basket. And then we'll actually move on to creating this bit up here. And then finally, I think we'll move on round to this
part of the building. I don't know why I've been
pointing that one off, but it seems like that. But I'm not trying to do that on purpose. Alright everyone. So I hope you enjoy that and I'll see
you in the next one. Thanks a lot. Bye bye.
84. Crafting a Woven Basket for Scene Detailing: Welcome back everyone to the
Blender Four Ultimate Guide, And this is where we left off. All right, Just a
couple of things before we start that though. We'll grab this brick and what we'll do is
we'll just bring it over and what I'm going
to do is just spin it around so Y 90. Just to tidy things
up a little bit. And I'm going to
just put it over here just so it looks
like this thing is actually being held
by something so essen and doesn't work. Because I need to
be global essensed. And there we go,
that's looking better. I just want to make sure
that that chain is not stuck in there or anything
like that, which it's not. Now what we'll do is
we'll bring these two, actually we'll bring
these three over. And what I'm going to
do is I'm going to bring them over here. So I'm just going
to duplicate them. And I'm going to bring
them over to this part. And I want to put them
into this part here, like so I want them on
top of the wall there. Let's have a look if they need to come out a little bit more. So then I want to put
this one over here. It is a long distance
that I just need to be sure that I can actually
pull this out so much. Let's press S and X,
let's pull it out. What I'm looking at is
a stretching on there, but it looks absolutely fine. Apart from, I think I
need to pull it out more, Not quite that far.
Something like that. Okay. So that's, that part finished off and that
looks very nice now. Now all we can do is we can make a start on
our wicker basket. So let's bring our little guy over very simple wicker basket. When you've got the texture, all of the work will be
done with the texture. Let's press shift selected. Let's save that,
our work as well. And then what I'll do
is I'll press shift, I'll bring in a cylinder. We'll keep it on 20.
That's absolutely fine. Let's make it smaller. Let's
pull it down into place, let's move it to the side. And then what we'll do
is we'll pull it up. You could create pretty much
anything at this point. I think with all the vases and things that
I've been creating, I'm going to make it
something like that size. Then what I'm going to do is I'm going to come under the bomb. If I can't grab the bomb, all I'm going to do is press shift, Hide everything
else out the way. We've got the right size in
Now let's grab the bomb. Press control B, maybe bring
in two edge loops like so. Then what we'll do is
we'll devil off the top, control B, bevel off this top. And then all I'll
do is I'll press, I just to come in a
little bit more like so. And then pull it down and
then bring it in slightly. So now finally just make sure when we go to shade auto smooth, we haven't got this really
sharp edge on here. And also make sure that
it's not too wide. At the moment this might
be a little bit too wide and I don't think
that's going to work. So what I'm going to do is shift click control plus delete bases. And then we'll try that again. So I'm going to o shift click, bring it down and
then bring it in. And then to put that
bottom on there. And then finally grab this one. Press control B, just
a round that off. And that's what we
should be looking for, something like that. Now again, you might want
to, because of the scene, you might want to come in
left click, right click. Grab the center one,
Then put this onto root. And then press and just
bring it in a little bit, making it look a little bit more suitable for the theme rather
than just straight up. Then what we'll do is
we'll make the top. Now all I'm going to do to make the top is I'm just going to grab these going
on around there, press the press Y like, so pick it up without this on. And then when we do
press, pull it up. So we should be able to come in now and grab the
top and bomb face, press control and
just bevel it off. So there you go. You can see that's going
to be a very nice top. Okay, Now let's just split this up a minute
and what we'll do is, well, we'll actually
put a top on this. Did a split it off
selection. There we go. Split it off, Now we just want to a little bit
of a handle on there. The easiest way, honestly, to do a handle like this is just to use probably a Taurus
or something like that. Or you could use a curve board. You're making it
a little bit more complicated than
where it needs to be. If you're going to do it
that way, what I'll do is I'll just bring in a Taurus. Now the thing with Taurus
is when you use them, you need to make sure
that you really, really bring down the
segments as you can see here, really, really high amount
of polygons on those. And it's only a tiny handle, so we don't want that at all. So what we want to
do is want to bring this down to something like, I don't know, 18 maybe. And then what we'll do is we'll bring this down
something like eight. And we should be able to get away with actually using that. It's a very small handle, it's got a very dense
kind of texture on it, so we shouldn't need it. So what I'm going to do is
I'm just going to pull it in, pull it up, and just
put it into place. R Y, 90. Let's drop that into place then. That's making it
much, much smaller. And you can see now
how easy that was. Just to make that, of course, you can press sensed and
pull it down a little bit. Now let's hide out
the rest of it. So we can see round from here, if we press Alt Shift
and click just on these top bits here we
press Delete and Faces. And then we can hide
this out the way with H. Grab this then and delete, test, bring back everything. And then that's just finally
drop it into place like so. Now if you want some handles
on the bottom of there, something to actually looks as though it's actually
strapped onto. You can just make an edge
loop in there and then select it going around and for extrude and then I'll test. You can do it that
way if you want. I think though,
for mine I'm just going to leave it like it is. All I'm going to do now, controla or transforms
that origins geometry and then just
rotate it that way. Rotate it on the X. Just
make sure that it looks. I think I've gone a bit
too crazy on the rotation. So I'll just rotate it one
way, which will be the X. Then what I'll do is I'll
make it a bit bigger. So there we go. Now one
thing I do want to do actually is I'm just
going to pull this in. So I'm going to press
and bring it in and then what I'm going to do
is just lift it up because I think that
makes it look much. And then control B bevel off. Then finally I'll make sure normal when I'm
pulling this up. So there we go, That's looking good now. Right. Plate shade, auto smooth. Now the thing is about this, because of the texture
we're going to be using, we'll probably have
to be marking a scam. We're not going to
be able to get away with what's it called. Let's pressure you and
find out if I grab this smart UV project, we're not going to
be able to do that. All we'll do is we'll
come in and we'll grab the edges of this going all the way around
onto the inside probably. We'll definitely be able to get away with doing
it on the bottom. And then what we can do is
we can come to the back of it and mark a seam
there as well. Mark seam. And then what I can
do is I can press L, and then I can press U, and then I can press Wrap. Now let's see if we
bring in our texture. We haven't actually
got our texture here. So what I'll do
is I'll just come over to my asset manager and I'm going to go to materials.
I think it's on the weave. Yes there is weave material. Let's drop that in. Let's
actually delete the other way. Now let's come back
to our basket. Press dot and let's also go
back to our shading panel. So I'm going to press dot, I'm going to press, here it is. This, it's unwrapped, that
hasn't wrapped very well. And the reason is
because they didn't pour seam on the inside. Right click mark.
Grab it all again, wrap. And there we go. Now let's bring in the
material which will be we. So there you go. You can see Jaws down nicely.
That's unwrapped. We can see where we actually, yes, we can see where
we marked our scam. Now, if you want to make
this look a bit better, what you can do is try
and line these up. If you get the one that's going on the outside,
I think it's this one. I can press and Y, and you can see I
can line them up. If that doesn't work, what
you can do instead is you can press and Y and
pull them together. And now you can see
we've nearly lined them up and Y hold in the shift and just
try and line them up just a little bit bare,
something like that. And you can see they do
line up a little bit bare. They're never going
to be perfect though. It's a very dense
kind of, you know, texture this, the other thing
you could do of course, is you can grab them all and
pull them all the way up. And then what's going to happen
is you're going to end up with a less obvious
seam on there. So it's up to you
which way you do it. Actually, I think for me I'm
just going to put it back a minute and I'm going
to check with old tage, bringing everything back just
to see what it looks like, if it's all going to
go together properly. In other words, does
it look too stylized? Is the texture too big
and things like that? So I'm just going
to bring it back, everything, check that first. And then once I've done that, then I can actually proceed with the handle
on the top of it. Okay, so it's loaded up. Let's now, I think
it's a little bit, a little bit too big. So I'm just going to
come in, grab it all, press the S, there we go. I think that's a little
bit better actually. All right, so now
then what we'll do on the next lesson
is we'll get this finished off and we'll create these two little sacks that are going to go in here. And from there then
we can come round and actually make a start on this
part of the building here. All right everyone. So I hope you enjoyed that and I'll
see on the next one. Thanks a lot. Bye bye.
85. Modeling Fabric Bags for Scene Enhancement: Welcome back everyone to the
blender for Ultimate Guide, and this is where we left off. All right, so now
let's do this bit. So what I'm going to do is
I'm going to try and unwrap this from the bottom. So let's come in and
we'll grab the edge here. Right click Mark Scene, and we'll do this one first, or press L. Unwrap. And let's actually grab this and press control L. And what
we'll do is the link materials like so now we just
have to kind of grab these and bring them down to make them the same
size as the other ones. So if something like that looks fine and you can see now
that that's actually, it's actually not too bad. I mean, there's a little bit of stretching on there as
you can see around here, but not too bad at all. The one thing I would
do is probably put this on normal art and Z and
just rotate it then, so it's not so obvious on that
bit. Something like that. All right, so now let's
come in and do the handle. So if graba handle I
should be able to, you can see already actually
we've got these on, you're going to have
an infinite loop. So what I'm going to do is I'm
just going to shift click, right click and Marco Sam. And then what I'm going
to do is L U and unwrap. And then what I'm
going to do is make it smaller, smaller,
smaller, smaller. Now there's no way it would be the same weave as
this on the outside, so it would be slightly
smaller anyway, that would be the way it is. All right, so that's that done. Let's press control J then
and join it altogether. And then we'll press control
or transforms right click, set origin to geometry. Now the thing is with the
basket is you can add it into, into your asset manager
if you want to. Okay, so now let's actually
start work on our sacks. So we're just going to make
some very simple sacks. All I'm going to do then
is just grab my guy, press shift A. I'm going to
come in and bring in a cube. And then all I'm going
to do is press and z and then sorry x and pull it out to the size that I want it, something like that. You know what I'm thinking?
Yeah, I'm thinking I'll just use all transforms
set origin to geometry. I'm the best thing to probably use here will
be my cloth generator. So what I'll do is I'll come in, I'll add one, go in
across this way, so left click, right click. I'll add four or five
going across this way. Left click, right
click. And I'll add a few going across this way. Left click, right click. And then what I'll
do is I'll come in, I'll press control lay,
you'll transforms, right click, sell
origin geometry. And then what I'll do is
I'll come to my cloth, which is this one
here. Add in cloth. It'll disappear because we
need to be in layout and put it down to the
bottom. Zoom in like so. And then all we're going to
do is we're going to come back to our cloth and
I'm going to come down. And what I want to
do is I want to make the vertex mass probably
one. Let's try that. I want to also come
in and put pressure and we'll put that
on 20 like so. And then what I'll do
is I'll come down and turn my gravity down to zero. Now let's press Space
Bar and have a look. And there we go, We're
starting to get something, not exactly what we want. And the reason is we
need to give this a little bit of a hand
with subdivision surface. There we go. Now
we've got something, so let's put this back to zero. And there we go. That's looking
a nice cloth bag already. Okay, so now we've got that. Let's actually apply all this. I'll go to object, I'll
come down to convert mesh, right click shade or to smooth. Now obviously it's not actually got that
many polygons in, so that's actually okay. What I'll do is then I'll
just flatten this bit out. The way I'll do that, I'm
thinking I'll just grab this and I could use the sculpting tools as well
on here to do a little bit. Yeah, I think I'll use that. I'll come to object and
we'll go to sculpt mode. And we have got one in here, which is where is it? Could be called flat, inflate, blob, crease.
Flatten. There we go. That's what I want the plan and then what I'm going to do
is just pull that out. I'm hopefully going
to flan that off. I'm going to put it on much
higher. And there we go. Let's see if we can
flatten this off. I think fling it. I'm going to actually press shift H and try and
hide everything else. I'm going to go to object mode, shift H, hide everything
else out of the way. Now I can go back
to sculpting mode. Now I should be able to come
in and press, there we go. Let's fly it off. Just
keep flying it off. Turn up your strength
if you want to. A look at what we've got here. Maybe I'll have to move
it in first because it doesn't seem to be doing a
good job of planning it. So what I'll do
is I'll just grab it and just move it in place, don't worry, because I'm going to smooth it up as where you can press the ship key,
just to smove it off. And now we're starting
to get somewhere. Let's just basically
just want this to look like like
some sort of sack. So all I'm doing is just
Sv in and just bend it in so you can see already
now it's looking that way. And then all I'm going to do
is just going to pull these in like you'd see on the sacks. Then now we'll just have
some little parts going down there I could probably use
where is it clay strips. Let's turn it down a little bit. Let's, let's put it on object. Going to actually
see what I'm doing. Put that on too low, let's say a bit higher probably. If I want to bring
it in as well, I'll use control and then
control and control. And then finally, let's just
so it off a little bit more, getting rid of those bits. Let's go around this way
and make sure, there we go, that's looking pretty good. Just any other bits
that you want smoving off? Yeah, I'm happy with that. Now I've got that. What
I'm going to do is I'm going to come in
and go to object mode, and then I'm going
to press search D. What I'm going to do
is I'm just going to pull this up and
you can see I've still got some bits that
I need to smooth off. Let's go into this part
first and what we'll do. Yeah, I've still got a few bits that I
need to smooth off, so we'll smooth
those off as well. What I'm going to do
in the meantime though is I'm just going to
grab the middle of it. I'm going to come on to smooth. And then what I'm
going to do is I'm just going to put
this on global. And then finally I'm
just going to move it up to make it look as though
it's just sat on there. So now let's join them
together. So control J. And then what we can do is
adding another modifier, and this time we'll add in a deform and we're
looking for smooth. And let's turn it up
your sister tad like so. And let's also then
turn up the repeat. What we don't want
to do is make these so smooth that we can't see
any definition anymore. We have to be careful with that. I'm going to actually
turn that off. What I'm going to do instead is I'm going to try
a different method, which is vertex and
smooth vertices. Now what you can do
is you can actually open this up and now you can turn this up or
repeat the process again. We might end up with the
same thing on there, but we can actually turn
it off now on the Z, for instance, and have it just smooth off
these parts again. Now you can see that
it's still not works. So what I'm going to do
instead is I'm going to come in again with
my sculp mode. The problem you have with the
scop mode, as you can see, it doesn't really
show you all the time where the parts
are you need to smooth, you just have to just
pop in and out of it. Just make sure you can see. Now this is looking bare. Let's come in back
to sculpt mode, let's move off these edges. The other thing is not great enough
subdivisions in there. All I'm going to do
is add modifier, generate subdivision,
and there we go, It's smooth that off,
probably too much. What I'll do probably a little bit messing around
just on this little thing, but I'm going to probably
come in actually. I'm going to turn that up again. Look if we can
actually get something that we actually
want. Let's try. I think what's happening here is I'm not actually
smoothing it off, so I'm going to turn
that off a minute. I'm going to come in
adding a modifier, and this time we're going
to use a multi resolution. We're going to subdivide. Subdivide, subdivide. And then what are
we going to do now? As should, as you can see,
drawing in much bear. All right, so let's come in and what we'll do is
we'll operate like that. We'll turn this down a
little bit and then what we'll do is we'll press
control and bring it in. And then I'm going
to smooth that off as well, so smooth it off. So I reckon now once I've done this once I've planned it
off a little bit, you'll see that this will look much better than it did before. So I'm jos going to come in, it's moving these parts off like so then on the edges, on here, on these edges, again, probably
spending too long on the sculpting, but
it's enjoyable. Sometimes I'm doing
it with a mouse. Generally, you
should be doing this with a tablet or something, and then all I'm
going to do is just come in and smooth them off. And I'm hoping once
they've done this, they're going to keep
their shape a lot more. And the reason is obviously because we've got that
multi resolution on, once we apply that, we go back in and you can see it can really start to make these look
like something really nice. If you want to take your time
and make these look really amazing and you can
do think for now, pretty happy with how they look. All right, let's come over now and see if I can apply that. I can't apply that, so I'm
going to do his object. And there we go. We should
be able to now apply this. And that's not worked, let's
turn it up in Viewport. And then three.
And there you go. Now we should be able to
press control and apply that. And there we go. Now
they're looking tons bare. Only problem is we've got a ton of polygons which we
don't actually want. What we'll do is
we'll just come to, sorry, add to modify it, Decime. We've got 69,000
polygons on these. We don't want that
many 0.1 Turn it down. Let's press control. And I think we'll do that again. Decime, let's put it
onto 0.3 Let's try that. We lost a lot of the
depth and things there. How far do you want
to go with it? Probably something like that, 7,000 Alright everyone
on the next one, what we'll do is we'll actually
get the linen into these. And then finally, I think if I press old tag and
bring back everything, we should be able to put these in place and I think we all do. Then we're going to
start over here. Rather than making the
crates and the carpets, we'll actually make a start
on this building over here. All right everyone. So
hope you enjoyed that. I'll see on the next one.
Thanks a lot. Bye bye.
86. Unwrapping Decimated Mesh with the Bisect Tool: Welcome back if you want to blend the four ultimate guide, and that's where we left it off. All right, let's put it then on shade in and then we'll do, I think we'll go over to our Asset Manager once
this actually loads up. And then what we'll
do is we'll grab the linen for these sacks, we'll get that on
there and then I'll think we'll start
work along this side. Let's go to Asset Manager now let's come round
and then what we'll do is we'll grab these
and we're going to look for linen linen. And let's bring that
in. Drop that in, and then I can
delete it other way. Delete. Then what I can do
is I can come to these. Now I can press a, I think I'll probably
have to unwrap these, but we'll see how it turns out. Because normally when
you try and do these, they're going to
unwrap very well. I'm absolutely certain
that won't unwrap. Well, let's click
on the Wrap then. What we'll do is we'll
go and give them Len. Len. They're not unwrapped. As bad as the thought, but still they're not
very well unwrapped. So what I'm going to do
is I'm just going to, I've got another little trick
on my sleeve which I'll do, it's L and what I'm going to do is just separate these
out just for now. And then what you're going
to do is just going to press Tab and Front View. And then I'm going to press A. And what I'm going to do is I'm going to, we'll bring in a Bs. What we'll do is we'll
bsraightw something like that. You can also press the Spacebar and actually move the
bisect round as well, which is really, really handy. So once we've got that there, what we can do now is we can
right click and mark a sine. And then what I can
do is I can come to this one and I can basically
do the same thing. So a mesh ***** cut it straight across like so I'm
not going to worry about gaining a
level or anything like that. I don't
need to do that. All I need to do is
right click and mark. Same. Now I can join
these both together. So control J, tab A
and a compress wrap. And there we go. Now you can see how well they've
actually unwrapped. And I actually think that
is pretty much how I actually imagine these to look. Now we could turn them
around the other way. So let's just see if they look pair that way
while we're here. So all I'm going to do
is press tab A, R 90. I think they low.
Let's have a low. Let's just press control said. Which way do we think
control shift said? Which doesn't work
for some reason. Let's press tab 90. Spin them around. I think you're going to
leave them that way. I think they low bear that way. All right, so now
we've got those, let's put them in
the floor then. We're just going to place them near here, somewhere like that. Of course, if you need to
make some more of those, then you can easily do that. Now, I'm just going to
place one there over here. Then we're going to have,
we've got a palm here, we're going to have some, what they called some crates
over here as well, and then some
carpets around here. But now let's actually come
round then to this part here. Let's go over to modeling. All I'm going to do
for this one here, I just want a piece of wall that's going
to come out here. So I'm going to grab my steps. Press Shift As Krista
selected shift, let's bring in a cube. In fact, can I? Yes, shift?
Let's bring in a cube. Mesh cube. Let's make it smaller. We'll bring it up in height. I'm just going to press
and's head now and bring it up to something like that. I'm going to press
and X, bring it in. And then what I'm going to
do is just pull it back. I'm going to think,
bring it down to, I'm going to take off
portional editing, don't need something like that. And then all I'm going
to do is I'm going to probably bend this as well. So I'm just going to make sure though that you can see here, it's a little bit
further than that wall. We don't really want that, we want to pull this
out a little bit. So then what I want to do is I just want to have this
bend round a little bit. All I'm going to do,
I'm just going to make sure it's in
the wall control. Bring in a few edge loops, left click, right click control. Then all transforms. Right
clicks, origins, geometry. I think the height
of the wall is going to be fine.
I'm okay with that. All I'm going to do, I'll just
bring in a simple deform, deform, simple deform, bend. Let's put it on the Y or the Z. It's not going to work
with either of those. Put this on, but anyway,
let's put it back on the X. And all I'm going
to do then it's A, and I'll rotate it on the Z. So let's try zed 90 and then Z -90 And let's see if
any of these work now. Yes, that's the
one that we want. So all I'm going to do now is bend it back
into place like so. And then let's get it into the place where I want
it, somewhere around there. Spend it back. And then and said just a slight bend on it and
then pull it out like so. And then finally
pull this one over. So I think that
looks pretty good. All right, now what we'll do is we'll just apply
that with contro. Then we'll bring in
another modifier which will just be the bevel, we'll turn that all
the way down to one and then we'll go a
little bevel on there. And finally then we'll just give this the material which will be the wall like so. And then finally we'll wrap it. So smart UV project. Okay, there we go. There's that part on. All right, so now I want to work
my way round here, so all I'm going to do is I think this one's out a little
bit too far as we can see. So let's pull that
one back then. What we'll do is we'll
grab another one of these. I'm looking at the longest
piece I've probably got, which probably going to be one of these pieces
here, I'm not sure. Yeah, this one here is probably going to
be the longest one. What I'm going to do is I'm
going to grab this one. And this one I'm going to press shift D and just
drag them over them. And we'll start putting
these into place. I'm basically going to put this one into the
door with the corner. I'll put it going into here the same height as what these
are as well. That's fine. Let's put it going into the door into this bit
here just so it's in. We'll put it right away and
then then we'll use that. I'm going to pull this one out and we'll put this into there. And then what I'll do is I'm going to press Dart
just to zooming. It's getting a little bit hard to see what
I'm doing there. Let's zoom in, make sure
this is in far enough. And then we'll pull this one in a little bit more,
all the way to the end. So I'm not going to cut
that down or anything. I'm going to keep that
in. Not only that, I can actually see what
I'm going to do as well. So I'm going to bring
this one out, shift D, and then I'll 180, and then I'll 90.
Let's pull it out. And then what we'll do now
is grab this one shift. Hopefully we'll
nearly fit in place. -90 Control control 11,
will it fit in place? Yes, it's going to fit in
place. So that's good. We just need to pull
it out a little bit. All I'm going to do is I'm just going to put
it back into place. First, little bit
further like so. And then make sure that this one and this one a seam,
so that's good. And then what I'm
going to do is just work my way around this wall. So I'm going to
spin this ramp fer, so zed 90 and then 90. I think if I press
three, no control three, I'm going to need
this probably one there and then another
one something there. I think what I'll do with this is we'll have the
balcony. Round balcony. And then we'll have these parts where it'll be
actually holding in place because actually
I think round here, let's just have a look.
Yeah, round here. I actually forgot to put some parts that are going
to hold that in place. We'll make those in
a minute anyway, we'll just carry on
working round first. So what I'll do is I'll just
grab this shift and then R, Z -90 control three, and let's see if it
will go into place. So I'm going to put
that into there and it does near enough fit perfectly. Then what I'll do is I'll
bring this one over shifty, then Z -90 -90 So put
that in the corner. Then we can see like
literally the corner. You can see this angle here. That's where we want this one. So we can see now
to pull this over, that's where that angle is. What I'll do is before
putting this one, I'll just put this one
back into the wall first, put it back into
the wall, and then put this one back into the wall. Then what I'll do is
I'll just move this over and then I'll
move this one over, both of them together.
So there you go. You can see what I'm going to do then now is
delete this one out the way. Delete, grab both of these then. Press Shift and
press controls it. And I'm hoping that this might work for
what I actually needed. I'm thinking that realistically if I can get another
one in here, I press Shift and bring another one in without
this or delete this one. Put this one in like so. Then I'm hoping that
I could just put one in this part here and then the other one in this part here. Now what I need to do is I just need to find the center of this. All I'm going to do is I need to grab this one
and this one and shift S cursor to selected that, then we'll grab Willie,
grab the center. Yeah, that doesn't look
like the center to me. I don't think that's the center. Let's have another
look if we can find the center of this. I'm not sure why it's actually done that I'll do is I'll just press Shift D. I'll
do a different way. And then what we'll
do is I'll press Delete and Limited Dissolve. Then now we can see that
the center is here. Now if we press Shift
selected, there we go. There is the center
that is bang on. You can see just about there. Now we know that this is
roughly in the center. So what I can do
is I can grab this now and pull it into place, press sex Y sorry. I bring it in jars, fit it in nicely in
between those like. So I'm going to do it
a little bit more and y holding shift and there
we go. That's that one. Now let's fix this one so we can see it needs
taken away here. We'll put our little x ray on. And then what we'll do is
we'll actually do this on the next lesson because
we're running out of time. We've also got our
well to fit as well, which I completely forgot about. All right everyone. So
I hope you enjoyed that and I'll see you on the next
one. Thanks a lot. Bye bye.
87. Recentering Structural Decorations for Symmetry: Welcome back everyone to the
Blend Four Ultimate Guide. And this is where we left the. All right, so what
I'm going to do now is I'm going to just come into this and I'll come
in with base select, Lt shifting click, and
then delete faces. And then verticl,
basically the same thing as what we've done probably
hundreds of times right now. So then just make sure this fits in. Pull it out if needed. So S and Y, pull it out a
little bit if we need to. Just making sure
that it's in there. And then we'll do this one. And this one is nearly
right as you can see, so I can just process and Y bring it in to
where I need it, Js going to hold the ship. Bun down like so then I'll
just delete this out the way. Just this one in
here. This one here. Delete versus the way
double tap and then Sure, be able to just move it
over very slightly like so. All right, so that's
looking good. Now we can work our way round. And what we can do
is we can just work our way underneath here,
all the way to this one. And then it'll
look like actually this is being supported
a little bit by that. The only thing that we
actually might need to do, I'm just wondering if we need
to move this up a little bit or if we can somehow
make these meat maybe. Or if we can do something else. That's the only
thing I'm thinking. So let's have a look.
Let's get in first. So what we'll do is
put pressure sift D, bring it over and then Nz
-90 Let's put it into place. I'm thinking it
might actually be better if we move them all up, but we will see how
we're going to do that. We can see we've got
one missing out there. I'm going to bring
this one here and then shift then Nz -90 This
is the hardest bit, actually, because you're
trying to get everything into place from all of
these different parts. I'm going to put this here, so then what I'll do
is I'll bring out this one shift,
bring out this one. And mind then pull them all up. But the first thing
I want to do, let's fix this one first. So if we go in and we
press old shifting click, going all the way
through, delete faces, and then come in and we're
going to delete L, L, L delete versus then now we'll pull this
one into place along. Now if we pick them all up, you can see if swap this
out for one of these, they're going to fit
actually quite nicely. Let's see if we grab this one. We grab all of these,
including this. We'll just give it
a try and see if we can lift them all up lightly. We can see this one
never got finished, but we'll come around and
finish that one anyway. So what I'm going to
do is I'm going to come in and lift them all up onto there like so. And I'm looking, the
most important thing I'm looking at how much room
I actually have on here. And I'm also looking see how
much room I've got below. Actually, I don't
think that looks bad. I think that's actually
looking quite good. The one problem we might have is where we're going to put
our supports under here. We may need to just get
rid of this, I think. But we can do that no
problem. All right. We'll leave that
as it is. So I'll do now is fix all these. I'm going to delete that
one out of the way. Bring out this one shift, bring it over and put that
one into place like so. You can see now it's a
nice flow double tap. The A going from one to the other round,
that's looking good. Now I need to do is let's
come in and fix this then. We're going to be, not
that one, a shift click, delete faces and
then L and L delete. L delete. All
right, there we go. Okay, now all that's left is to come in and first
of all, delete this. Delete T. Then what
we need to do is now we need to think that
we need to unwrap this. So what I'm going to do is
I'm going to come shift, click, shift, click, going down. In fact, is this two parts
or is this two parts? In fact, I'll just
do it there and then I'll go shift click, right click, mark seen. Then I'll mark a seam. This
one right click mark seen. I'm going to take
this one off as well. Just this one here. You can see here. I was hoping they would go down to there, but it doesn't seem to. What I'm going to
do though is I'm going to right click and clear Now I've got basically
see a seam coming down here. I'm hoping that if I grab the top and just
mark same on there, I'll see going all
the way around here. I think this is in two parts. It doesn't look like a two
parts, but I think it is. I'm just wondering
if it'll be easier actually to just take
the top of this. Take the top like so we can
see we've got a top there. Shift. I'm going to actually just make sure
that's all together. Mesh, where is it? Let's see, mesh. Cleanup and measure by
distance nor vertices to move. It looks like it's all there. Let's press then
separate it out. What we'll do is we'll just
make this a different color. So I'll put this on wall. And the reason I'm doing
this is just to make sure that all of this is
going to be one piece. If I come in and I grab all of this and pull
it down to there, just to the top of this roof. And then what we can do
is press, pull it down. So now I can do is I can
just minus this one off. And then I can press
and pull it down again, all the way down to the floor. So now I can do is I can
come in, hide the other way, and then delete this one
Tate to bring back this one. And then I can grab
it. Press Shift, And now I'm going to do is
just delete the bottom of it. We're not going to
need the delete faces. So now actually I
should be able to come in and I should be able to mark the seams
where I want them. So you can see now I can mark these seams and now it's a
better mesh than what it was. Right click, mark, Same. Now I can come on
on the top as well. And let's go Olf click, Olshift. Click going all the way around. Right click, and
mark scene, finally. Then let's come in and
press a smart UV Project. Click okay. And there we go. Now I'm not sure whether I
want the dirt at the top here. I'm not sure about that.
I don't think I do. I think I just want
to come in and go to my UV editing and
one we're going to do is just spin them
all around our 180, spin them all around,
press to zoom into it, and then we've got the
dirt at the bottom. Okay, so let's press all
tag, bring everything back. Double tap the A, and let's have a look at
what that looks like. Now. We can see we've
here, we've got dirt here. Let's make sure this one is
a little bit dirty, I think. I don't think I
want it that dirty, so I'm going to just
move it up, so G Y. And then I'm going to check
this one and this one. And what I'm going to
do is I'm going to bring this down a little
bit so you can see. If I bring this down,
where's the dirt? There it is. That's what I want. I want this to be more dirty because we've got
well there as well. Don't forget. Okay, so
that's that bit done. Now if we go back to modeling, we've actually nearly
completed the actual building. The only thing is, I don't think I want this one
like that either, so I'm just going
to take that off. I'm going to grab
all three of these. And what I'm doing, I'm going to make them into a clean zone. So I'm just going to put them
over there and have that, maybe I'll make it a
little bit bigger like, so we'll have a little bit
of variation on there. Yes, I think that is
looking pretty good. Okay, now what we
want to do is we want to create a round part for this and some bits that
are going to go underneath. So we'll do that now.
I'll come into this bit. I'll press Shift
S Ursa selected. And then I'll press shift. And let's have a look. Let's bring in a cylinder. And I think this cylinder
will come in at 32, so let's put it on 20. That seems to be a good number. Then what we'll do is I'll press and Z and squeeze it down, shift space bar, move
something around there. Let's put it around there. And then what I'm
going to do now is I want it in the halfway point, so we have to imagine it's going to have to come to there, and it's also going to
have to come out of there. I'm going to press and X, pull it out a bit, and then
and Y pull it out a bit. I'm thinking that, that is probably going to be okay because I then
want to just a small, small balcony on
here going round. I want to keep it
rounded as well, and I don't want to go
too far over those. I think I'm going
to wit with this, I'm going to delete
this one out the way now I think I'll make it
a little bit thinner. So what I'm going to do is
I'm just going to press Shift space part move. Then what I'm going
to do is going to press the band and then
finally I'm going to press, and then again, just
down to the top of the. Yeah, that's looking
much better. Maybe going a bit
too much there. And then I'll come
to this part shift click and then enter Alan S, I don't think I
press then Enter Ol, there we go in shift. Something like that.
Okay, now I've got that. What I can actually do is I
can actually cut this away. If I go back to modeling and then we
go over the top seven. To go over the top, I
basically want to cut it down. So I want to cut past
past this point here. So what I'm going to do
is I'm going to come in, put it on next ray so I can
actually see what I'm doing. And then mesh bisect and
I want to cut it right across here like so make
sure this is set to zero. And then what we're going
to do is we're going to clear the inner or the outer. I'm not going to
fill it in because we really don't
need to fill it in. And there we go,
something like that. Right click, shade,
auto, smooth. There we go, that's ready. Then for the next lesson. On the next lesson,
we should be able to get this mostly finished. And then after
that, we'll put on the blocks that are going to come underneath each of these. Then what we're going to do, we still haven't done
this bit up here. I'll, I'll also use
a canopy over here, so I'll get all that done first. And I think then what we'll
do is we'll make the crates, then we'll do the top of here. And then finally the carpets. Well, actually come
to do the carpets. All right everyone. So I hope you enjoyed that
and I'll see on the next one. Thanks a lot. Bye bye.
88. Adding Structural Supports to Balconies: Welcome back everyone to the
Blender Pre Ultimate Guide. Now let's think about making
these parts go under here. So what I'm going to do is
I'm going to come to this, I'm going to press shift
S, coast to selected. And then what I'm going to
do is I'm just going to press shift, bring in a cube. Make this cube
much, much smaller. And basically we want
to make sure that these are going to be thick
enough to hold all this. If I press S and and
then put that in place, is that going to be
too wide, maybe? I think I'm going to
put it from there. And then what I'm
going to do is just put it next to the wall like so as we build out this, we'll see if it's too big. Then what I'm going to do is I'm going to come in, pull this out. I'm going to turn my x ray off. I'm going to press control and just bring it up to
something like that. And then I'm going
to grab this edge. Press control B, Bevel it off to something like that because I actually put that
edge in there. You can see I will be able to keep this flat part on that. And that's exactly what I'm
trying to do. All right. Already I can see this is
looking a little bit too wide, so I'm just going to
squishy down on the slide. And then I'm thinking
that it's probably also a little bit too
thick because we have grow another beard that's
going to come off. And then finally let's
have a little bit of control over this as well so
I can bring that forward. Now we'll bring
in another block. What I'll do is I won't
bring in the new primitive. I'll just press Shift
D and then I'll press and X and then and Y like so. And then E probably down,
something like that. And then what I'll do is I'm thinking I'll
come in and I'll press control B and just
level that one off then. I'm just wondering if I
need one more part in here. One more part over
here, I think I will. All I'll do is I'll
grab this bomb shift, let's squeeze in and X, then we'll pull it
back towards the wall, grab this edge, pull that back. And then grab it all
and press like so. And then L on everything
and then pull it into place like so is that too much or
did I just need one of those? Actually, I think
that might look okay. So I'm thinking it
looks a little bit, might need to be a
bit wider and ex I just want to make
sure it looks as though it's actually
holding up something. If I put that in there, what I can do now is I can
actually grab it all. Smart UV Project. Click okay. And then I can press control,
transforms, right click, origins, geometry, right click, and shade, auto, smooth. Then what we'll do is we'll grab this press control and
we'll link materials. Double tap the aid,
and let's have a look. And that looks absolutely fine now let's now bring
it over here. So shifty, we'll
bring it over here. So you can see now that, that's looking a
much better support. Now I'm going to do, I'm just going to move this over here. So I'm going to grab
this, duplicate it. I'm going to put this over here. That this post is actually
stood on something. I need to put it over here. Can I fit the windows in
now that is the question, or is this going to
be a little bit? You can see my post
is fitting there. Let's see if I can actually
get all this to fit in place. I'm going to pull it out now. It's actually stood on there. Now what I'll do is I'll make this sole window a
little bit smaller. And then finally what I
want to try and do is if I can actually
put this under here, will it look there? Let's give it a try. I'm going to press our sad 90 control. And one, let's see if I put
this in place behind this. In other words,
will it look good? Fit in behind. There you
can see I need to pull it forward so that it
comes in properly. Yes, I need to pull this out. Now, as you can see, how far forward do we
actually need that? Probably going to
be around there. So I'm going to bring
both of these out. Now I'm jaws going to move
this over very slightly, and I'll have to make
this a little bit bigger. And y, there we go. And I'm going to have
to pull this out because it's not in the
position that we want it. And then that means I'm also going to have to pull
both of these out, like this one here as
well as in the wall. As you can see, I don't know why I left them all in the wall, but let's pull them out
and make them right. So let's pull this one
out like so there we go. Now they're looking tons, tons there and working
our way around. And then we've got this
part here which is going to have to be a
little bit smaller even. Let's put it more in place. Let's lift it up a little bit, and let's pull this out now, just a little bit, because it's just a sliver out then. We
don't really want that. Like double tap the A. I might have to just
pull these up or down. Can I make them a little
bit thinner as well? I don't want to lose too
much of the sizing on them. That's the thing
I'm worried about. So I'm going to press and X. We could bring in another
couple of windows instead or we could just
deal with it like that. Actually, Yeah, thing
that looks just tons. Tons bare. Yeah. Okay. That's looking
pretty nice now. Okay. So we've got a line
going down here as well. I'm thinking that we're
probably going to have to come in and grab all
of these like so. And then all I'm going
to do is press Shift and I'm going to
then drop them down. I'm going to actually
join all these up. I don't think I need
to do anything else. Control J. Join them all up. Press control. And
one at first of all, we need to just put them
in place so they're going to be roughly here. You can see I got lucky. They all in place really, really beautifully double the A. And there we go. I don't think I need to do
anymore with that. I think now that looks great. If I come under here, can see we've got a beautiful
arch going over. Yeah, I think that
looks really nice. I think this bit really
has come on now. We don't need to
do anything else. The one thing we do need to do though is we need to
grab both of these. Press control J control or
transforms, origins, geometry, add modifier, Bring
in a Generate, and bring in a bevel, just to bevel those off. Bring it down. Put
it up to maybe one like this. Let's
just have a look. Maybe that's a little
bit too high, so No, 0.5 Yeah, and a thing
that looks bare, like so. And then I'm just wondering, because I feel like this maybe
needs some wrapping again. So smart UV project. Click Okay. I think that actually
looks better like that. And let's just take a stock
step back and there we go. All right, so that's
looking good. Now I think we'll do is
bring that round to here. I'm going to grab this
shifty, Let's bring it round. Let's put it over here. 90 control three. Let's put this under
this one then. And fit it into place. Then we just need to decide whether we need to make
this a little bit bigger. It's fitting in really
nicely on there, but you can see it's
not quite fit in this. I think what we'll do is, well, in fact, we'll get rid of this first because we're not
going to need that. Then what we'll do is we'll make this a little bit bigger. There we go. They're
still looking as though they fit it then. I'm just wondering,
can I actually bring this in back in,
Let's have a look. Shifting if it actually
should fit in there. I really don't know
whether we should put that there
still out the way. I'm just wondering. Let's
press controls, Ed. And bring back the
other one that we had in before we
made this bigger. There we go. Let's make
it bigger now then. And then what we'll do is we'll see if we need
to make that a bit bigger. We can, actually, I think that if I pull this two to this
side, put it in there. And then put this
one more over here. Let's put this one more
over here like so. And then press tab,
double tap the A. I actually think that
looks bad, Like that. All right, so that's
looking good now. Then let's think about
this round part here. Let's, first of all,
before we do anything, let's get some
materials in here. So I'm going to press control a al transform Rilke
origin to geometry. And we'll also bring in a Bevel. Generate a Bevel,
let's turn it down. Turn up one, turn it up to 0.5 and then what we'll do is we'll grab
these parts here. So we're going to grab this
one. In fact, no we won't. We'll grab this one here. This control L link materials. There we go. And then we'll
do is our long wrap it, a smart UV project. And then what we'll
do is we'll go around here and we'll make these blue grab those going around. The control, double tap the A. Yes, that's looking good. All right, so what we need
to do now on the next lesson is we'll first of all put
this in some other places. And then we've also got a bit of cloth that's going to have
to come down here as well. What comes down here, we're near enough
finished with this. Now we've got this little
bit to do up here. It's just basically
tiding up the things. So let's just carry on, we'll just carry on seeing if we can get all these parts in. But we're nearly actually
done with the main building, and we've also made also a
lot of props as well already. All right everyone, So
I hope you're looking forward to the next one,
and I'll see you then. Thanks a lot. Bye bye.
89. Creating Radial Balcony Railings for Unique Designs: Welcome back everyone to the
Blend Full Ultimate Guide. And this is where we left off. All right, so let's come round first and we'll
just grab this one. And what I'm gonna do is
I'm just gonna press shift. I'm gonna bring it
around here then. And then what we'd do is
I'm gonna press said 180. And we can see didn't
really spin around the right place because the
orientation isn't set right. I don't know why I didn't
set that right body way. We can get that in no problem. We're j gonna then
put it in here. Now what you best stop doing as an artist when you're
creating buildings like this, is really thinking about space. And when you think about space, what you're doing
is you're breaking down each of these spaces. So whether it's, you know, some kind of rocks down here, whether it's the space here
or any of these spaces, you want to basically break them down and put things in it. So in other words, around
here for instance, it would be better if I put
another plant pot maybe. So another plant pot over here
would probably look good. But the one thing
that we do need to remember is we do
have palm trees. So you can see that
there's already a palm tree going
to be in there. And this is what I've done when I've actually built
things like this. All of these spaces, as you can see, are
taken up by something. And that's what
really, really brings life to your scene
and things like that. Now what I'm also going to do is I'm going to grab
this plant pot. I'm going to press shift Y them. I'm also going to put it over here. I'm
going to press seven. I'm going to press
and I'm going to drop this one over here
into this area. Again, filling up a little
bit more of that space. Now one thing I just have to be careful of is that it's not going to be in any
of those parts. You can see like this part here. I'm going to come in with L
and L and grab this stalk, and then Z. I'm going to rotate them round
on medium point. That's where I'm going to
put it, maybe the other way, I think this way here, let's put it in to
that plump part. Let's double tap the A. There we go. You see now
we've filled up that space. You can see all of this as space which has
been filled up. You can just see
how nice that all looks because of
this reason up here. You'll see that they'll be
vines and grapes and things. Basically, what I'm saying
is, take every single part, make sure there's not
anything really like this. You can see even
down on this bit. At the back, I'm going to put a light here so that
I'll fill up that space. I'm going to have a canopy
coming down this bit. And then of course,
going around here, we've got a, we're going
to have some foliage here. We're going to have a well here. And it's really important
that you learn to do that. The other thing is on
the top of this roof, instead of it being flat, we're not going to
just have it flat. I just forgot to do it. Or what we're going to do
is we're gonna grab all of these and I'm going to press
the Eban to bring it in. And if it's not
coming in properly, as you can see, not to worry. What we can do with the
top is you can just press Delete and we can
limit it. Dissolve. And then we've got this here, and it means that this come into here
isn't actually joined. So all I'm going to do
is I'm going to come in, grab both of these. Then one way to do
is I'm going to right click and I'm
going to merge. Let's merge at
center. There we go. Now we just need to
merge the bone ones. Grab this one and this one
and I'll merge them at last. Let's merge them at last. There we go. Now all I
need to do is delete. Delete. I'll delete vertices. I should be able to
come in and then press the Eyborn to bring
this in like so. And then what I should
be able to do now, just make sure it's
coming enough that might be a little bit too less,
so something like that. And then what I can
do is now I can come in old shift and click. And then what I can do is press and just pull that up like soap. Now, I was hoping that I
wouldn't have to re unwrap this, but it seems like I'm going to, So I'm going to have to
re unwrap all of this. Not to worry, we'll just
get this done really fast. Let's press U and Smart
UV project. Click Okay. And then what we'll
do is we'll turn this around like we did before. Now we can see that we do
have a problem in that it's basically unwrapping all of this and we don't
really want that. What we want to do
is press control, going all the way
around to here. Then what we're going to do
is we're going to right click or control and clear seam. And then I'm going to do
the same thing again. So Smart UV Project. Click Okay. And there you go. Now you can see some
much, much nicer. Albeit it's got like this dirt on here, which
I don't really want. So what I'm going to do is I'm going to come over
to UV editing, press the tap on our 180, spin it all round and let's
see what effect we get now. And now we've got
some dirt down here. We've got some dirt
going around here now. I'm just going to grab
all of these and see where they are and I'm
going to spin them around. In fact no, I'm not. I'm going to just
press there they are. There's where the dirt should
be, somewhere around there. Let's look at this one. We press L and G. Press Tab, there we go, that's
looking really nice. And then round here
that's looking good. And then I'm looking at
the room around here. This top bit shouldn't
be any dirt on there. So I'll just make sure
there's no dirt on this. It's going to be
fairly clean up there. There might be some
dirt on this bit. So I'm going to press
G, bring all that in, and then this bit here, 90. And we'll just put it in place. And there we go, that's probably going to be some
dirt from the vines. And then as you can see now all of this has got
something going on. And that's exactly
what you want to think of when you're building
these buildings out. That will help you more
than anything else. Because you don't have to fill the buildings with just junk. You don't have to create
loads and loads of things. Although this course
has took a long time, we've not actually
created that much really. We're not creating
hundreds of parts here, we're just creating a few parts. And you can see that
the actual, you know, the, this palace or whatever you want to call it is looking
like it's full of life. And that's the idea of what
you're trying to do here. All right, so now we've
gone through all that. Speel, let's actually come round and what I
think we'll do is we'll actually start now creating this out so we're
still not finish this. So what I'm going to do is
just create a balcony on here. I don't think I'll bobble with any stones or
anything like that. I think I'm just
going to come in and create pretty much
a simple balcony. So I'm going to do, I'm wondering just the
best way to do this. Yeah. I'll come in and I'll I'll bring a piece
of wood in first. So what I'm going to do is I'm going to come
in and grab it, going all the way around here. So control, click,
control, click, And then control,
click, shift the. Let's bring it up then
to where we need. We're going to
need our guy here. Actually, let's bring our guy over to here. Let's
bring him up. We'll grab this and just
press Shift cursor selected. Grab our guy. Shift selections. Cursor. Then I'm going to bring him again to see
where I need this. 90, 90, 90. There we go. So you can see that,
well, that would have been way, way too low. Let's bring it up to
where it needs to be, which is going to be
roundabout there. Then we press and
pull it down like so. Now I'm going to show
you another little trick that you can actually use. Maybe this is a little
bit too thick for now, so let's press and pull it down. And then I'll show you another little trick
which you can use when you're using the
Solidify Add modifier. And what we'll do is we've got a devil on here at the moment. I will leave that on.
I'll just add in fact. No I won't. I'll just
press P selection. And the only reason
I'm doing that is because I want to
minus this off, because I want to bring
in a solidify control. Yl transforms right
click Srogen geometry, add modifier, generate and solidify seven to
go over the top. And then what I want to do
is give this some thickness like So what I'm going to do is I'm going
to change the offset. And what I was going
to do is it's going to make a nice distance
between each of these. If I put this, let's say no 0.5 it's then going to
put it halfway between. So we can see, now if
I bring that down, you can see now it's brought to two for press seven
to go over the top. It's brought it in
halfway in between. I can even move it in now, so that is halfway. And then I can pull
this out and you can see exactly the effect
we actually get there. So that's a nice easy
way to actually do that. Now of course, the only
problem we're going to have is if I bring that up, I'm going to make it
a little bit thinner because it's supposed to
be an actual banister. The problem we're going to have is once we bring this wood, and then we'll be able to see where we actually
need to put that. So I think what we'll do is on the next lesson is we'll start bringing these
wooden slats in, and then we'll see where
we actually need to put this banister going around. All right everyone. So not too much more to go as
far as building goes. We're on the home
straight for sure. And I'll see on the next one. Thanks a lot. Bye bye.
90. Adding Support Elements to Railings for Stability: Welcome back everyone to the
Blender Four Ultimate Guide, and this is where
we left it off. All right, so now
let's press Shift. In fact, let's go to modeling because it's very hard
to work with in there. Let's have some space so
we can actually work. Let's press Shift S, Usa
selected. Let's press shift A. And then what we'll do
is bring in a cube, make it smaller, pull it out, and then we're all to see if this balcony needs
a little bit wider. So what I'm going to
do is I'm going to fit this into place. I'm just going to put it
in there and I think it's definitely going to need to be a little bit wider for sure. I'm going to pull this
down then we can see, do we really want it out here? That's the question.
I don't think so. I think we need it more in, I think it needs to
be roundabout there. The other thing is,
I think it needs to be roundabout here. Something like that.
And you can see we've already got a
bit of a bend there. Let's now bring this
out a little bit. All we'll do is we'll
go to a modifier. Turn it up a little bit to
make it a little bit thicker. And then we'll press
to bring it in. And then I'm just going to
grab this then and press and, and spin it round and then pull it out a little bit like so. Then what I'm going to do is I'm going to use this center point. Now hopefully I should be able
to use this center point. And I'm going to
move this round. So I'm going to press Shift D, and then R and Z, and bring it round from here. So I'm going to press a
little sideways V3d cursor, and then R and Z. I was hoping that it would move
around there, I don't think. Yeah, it's moving to that point, but it's because I'm
going to delete that. Come back control. Al transforms right click
to origin to geometry. In fact, I'll reset the origin three D cursor and now
let's press Shift. And then R and Z, it's still
not actually coming out. Let's have a look, see if it's because of
where I've got this. Yeah, it's because
it needs setting in the halfway point over
here, not over here. Unfortunately, that's not going to be the right place to put. I'm just going to
have to figure out now better way of doing this. And I'm thinking I'll put it, I'll just delete that
one out that I did. I'll grab this, press shift H, And then what I'll do is I'll
come to the back of this. Maybe if I put it right in
the center. So shift this. Custer selected. Now
hopefully if I press Altage, bring back and forth
in, grab this. And then I'm going
to press R and Z. We're still a little bit
short as you can see. It's because we've elongated
this a little bit. I think that's what
it is. I think I can work with it though.
We'll work with this. What I'm going to do
then is press shift Z. Just bring that to the next
one there so we can bring it to this one there and
then work our way around. Then we'll do is
I'll press Shift and then and bring it
to the next one. And then shift and bring
it to the next one. And then finally shift and all dead and bring that
one then to their like. So. All right, now
what I'm going to do is I'm going to press
seven to two over the top. And I'm actually going to move these then along this axis. So it should be able to
bring on the normal. And you can see it's going in the right way if I press
a little side rays V, come to individual
origins instead. Yeah, I'm wondering
if I can do that. I said, look, let's pull it out. Let's pull this one out. This one here,
let's pull it out. Let's pull this one out. And what we're
doing is we're just putting them all in the middle. All in the middle of there. Let's pull this one out into the middle so we can see we've
got a little bit too far. I'm just going to
come to this one, pull it back a little
bit, holding the shift, come to this one, pull
it back at all, right. That is what we've got so far. Now what I'm wondering is, if I need more in, that's maybe a little
bit of a problem. Do I need to put more in here or is it going to
be okay with these? I actually think it's
going to be okay. The one thing I think is that this is definitely
not far enough back. What I'm going to do is I don't
want to make any thicker, so I'm just going to pull
it back a little bit. There we go, thinking
that looks pretty nice. Okay, so what I'll do now
is I will come to the, I'm going to join them
altogether. Control J. Then control all transforms, right? Clicks, origin, geometry. You know what, actually, I
think that's going to be okay. Just wondering if I
need more in there. That's the thing I'm wondering. I think that will be okay. Maybe we could come in and
join some of these up. Maybe a little slat over
there, we could put those in. Let's have a look.
One great lin. So what I'm going to do
is I'm going to press control layer transforms right click origin to three
decursorn'n do is add in, generate a mirror and click on the y. Click the
x, double the I. Actually that's
going to be okay. There's a little bit of gap
there but it's going to be made of wood M. Like so. And I'm just
wondering whether as well, whether I want these wooden
slots to be like this. Just wondering, I think I need to put more
in there as well. Because the thing, if you
really know what you're doing, you can actually do pretty
much what you want. What we'll do is
we'll grab this one. I'm going to press
the little sideways V to put it at the three D cursor. I'm going to press shift then. And then Z, and Z with Global. And then what I'll do
is pull it out and then shift and then and pull it out, the shift D and then
Art and pull it out. And I'm going to put them this close together
and then shift, pull it out like so. And then I think shift, I'm thinking, I'll put
that one roundabout then. I think that will be fine. Okay. Now we've actually
moved all of these in one go. What I can do now is can I
actually bring them out now? I'm going to do is
I'm going to grab the front and this side. Can I bring those out now? That's the question. I'm just wondering because I didn't actually split them up now
I did it in edit mode. You know what, I'm going to
have to go back and what I'm going to do is I'm going
to do them in object mode. I'm going to delete them all, delete verts, and I'm
going to do them again. I'm going to do an object mode. So what I'm going to
do is I'm going to press seven to go over the top. And then we're going to
press Shift D and then and Z and move them round. We've got two in there now. And I'm hoping if I put
this on normal yes, it will pull them out
now let's have a look. Then shift, then pull
them out, may be there. And then pull it
out. And then shift. Let's do them a little
bit, just making sure. And then shift D, and then, and then let's pull
this one out and then shift and then and
pull them out. Now, of course, there
is another way now. We could have done this
using this balcony. We could have done
it that way instead. And that might have made
it easier just making some cuts along here and
then pulling them down. But I actually think that's
looking pretty nice now. Now let's join
them all together, and again, we'll try our mirror. Because I think now that
they're closer together, they just look a
ton Better control. Join them all together
and then add in a mirror. Generate a mirror, let's
put it on the other side, like so we can see. They all probably
need moving around a little bit. Let's
move them around. In fact, we'll go a Z on global
and on the medium point. We're still not going from
there a little sideways. V3d cursor. Now let's see if they move. Yes, they move now. All right. Logs. Okay. Finally, I'm happy
with all those. All right. Let's apply
this with control. And then what we'll
do now is I think, I think we'll leave
them as just wood. So what I'm going to
do now is I'm going to grab this control. These control J,
little V, again. Individual Origins tab
to grab everything. Smart UV Project. Click Okay And now
we're just going to put the material on which
will be the wood. It's going to be wood. So let's have a look
what that looks like. And there we go. That
looks absolutely fine. One thing is when I
come on the next, next lesson we'll
make this straight. I don't like it being like that. I don't think it looks good. We'll make this straight, and
then what we'll do is we'll actually put some canopies
over the top here. And then finally we'll
move on to probably this canopy over here
and we'll get that in. All right, everyone, a bit
of fiddling around there. Sometimes that
happens as you know, and I hope to see
on the next one. Thanks a lot. Bye bye.
91. Creating Balcony Shade Decorations for Visual Appeal: Welcome back everyone
to the blender for the ultimate Guide. Now let's come in
and fix this one. First, I'm going to
grab this top one going all the way
around to here. And then also going to grab this one going all the
way around to here. And then what I'm going to
do is just go to UV editing. And I can see that
I've got them here and all I'm going to do is
align. Let's align them. I need to grab one of
these first coming in and then right click and
a line vertically. And then Y and X move them over. And I think then it's just the one going all
the way around. So I'll grab this and
this right click a line, let's have a look
underneath there. And then it is okay. And then we'll do this one
going all the way around here, right click a line and X. Then we'll do the same here. So we'll go to this one. This one, This one. This one. Right click a line. So all right, let's have a
look what they look like. A little bit stretched out. And the reason is
because we need to make sure that we bring
them in like so. And am I happy with that? Am I happy with how they look? Not actually sure.
I don't think so. I don't think so.
Let's come in then. And what we'll do
instead is we'll grab this one going
all the way to there. And what I'll do
is instead is I'll click line map,
pipe click. Okay. And then you follow
active quads. Click. Okay. Spin
it around to r 90. And there we go.
Now they look bare. Let's do it that way instead, let's press S. So yeah, and that's looking
just a ton bear. I don't think I'll bother
with the underneath because we're never
really going to see that. But the top now looks fantastic. Back to modeling then.
And then what we can do is now let's grab
this canopy here. And we're going to press Shifty. I'm going to pull it over. I'm going to press 90. I'm
going to press control. Lal transforms, right
click Rogen geometry, and just put that in the middle. I'm just looking to see if
we've got a bevel on those, which I have not, so I
need to fix that as well. Just going to put
that there for now. I'm going to come in
adding the bevel to these. Let's generate a bevel, let's turn it all the way down. Turn one and then we
go there looking much. Bare, right click
shade or to smooth. Now let's come to this.
We'll press control three. And what we're going
to do is going to have one in the center. So then I'm just going
to shift D and bring it over and put it over right in the same
place as where it is. And then what I'm going
to do is I'm just going to come in to this one. I'll come in and press L, L. I think this side is
going to be the side to say, look, nope, not that one. We need to keep that. All it's going to be is this here thing. This will be it. Press let
vertices. There we go. We've got two together now. Then I can join control
J. Join them both up. Just make sure it's not
altered anything over there. And then let's
bring them in, put them in place so
it's a double one. Then what I can do is of
course come into this one, go to U V, just move them somewhere else
so they look a little bit different
as you can see now. And that looks
fantastic. All right. I'm happy with that. Maybe
I'll pull them down a little bit just so they
are sitting on there. Then I'm thinking we pretty
much all of that done. We've got our
window in here now. It's time, I think, to work on this part out here. So what I'm going
to do is I'll come in and I'll steal this one here. I'm going to steal all of this shifty, let's
spin it around. So -90 Let's press so one. And then on' going to do is
I'm just going to press, and I know it's not
going to fit in place. Of course it's not
going to fit in place, but it's more about getting it into the place where I want it and using some of these parts to make it a little bit
easier for myself. What I'm going to do is I'm
going to come to my palms. Let's find my palms.
Here they are. Let's hide these out of the way. Again, we don't want
them in the way. Then what we'll do is now we'll
come to this part and I'm basically going to come in with my cloth and press
delete vertices. Just make sure this nod lead, I'm always concerned
about that now. And then what I'm
going to do is I'm going to split this
off at the moment. I'm going to grab this and this. I'm going to press Selection. And then I'm going to
grab this one control or transforms right, set origin to geometry. Now I want to do is I want to put this where it's going to go. I'm thinking probably something like that is going
to go somewhere, just right on the edge like so. And then this probably going
to be a little bit lower. I'm just going to pull it down. The other thing is it's probably going to be pulled
out a little bit. I'll do is I'll grab all this. I'll press and X and pull it
out a little bit like so. And then grab each of these. Then this one, pull
it into place. Okay, now we know the
score with the next part. We've actually got things here which will help us
tell us what we actually need to do.
I'm just wondering. If I want to make
this a little bit thinner because I've got
the opportunity just to pull it down a little bit
so that it comes this way a little bit and make
it a little bit different. I can do it that way.
So let's do that. Let's pull it into there, let's see for them
we can do this. What I'm going to do is
I'm going to grab this and this press shift S as to selected shift and
let's bring in a plane. Let's pull the plane up then and get it into the place
where I want it. And then I think
like there, there. And then what we'll
do is we'll come in and grab this, pull it out. And then what I'll do is
grab the end up here, pull it down, pull
it down to there. I'm thinking I'll
pull it a little bit. In fact, I'm not going
to actually alter this. Yes, I will. I'll
pull it this way. So I'll go into there, and then I'm going to pull
it back there like that. Perfect. I think now I want
to do is just pull this. I'm going to pull this to there. I think that's about right. Now I can do is I can come in and I can press
control transforms, right, It's origin geometry and let's come in and
generate a subdivision. We'll put it on Simple
turning up to five or six. And let's see what happens
when we do this now. Now the thing is if I come
in now and press Tab, we won't be see anything we can only see, we can't even see. Even if I put that
wire frame on. What I'm going to do, I'm
going to come back to layout because that's
what we're going to be using. Press the dove on. What I'm going to do
is I'm going to come over and apply that control. And there we are,
that's what we've got. Now let's come in
and make some pins. So I'll grab this pin, press C, grab these two like so. And then what I'll do is I'll do the same thing down here. We don't need to
take so much time now because we really
know what we're doing. We've done this quite
a few times now, so we understand
what we're doing. All right, like that. And then what I'll do is
I'll coming over, put it on pin, make sure you assign them
before doing anything. Then we'll, we'll
set this to zero. Come to our cloth then,
which is this here. And then what we'll
do is we'll put this on something like four. And then we'll come on down
and put the shape onto pin. And then we'll just press Space Bar and see what happens with that and let it finish. I think something like that actually is looking about right. That's looking good. All right. I'm not even going to
mess around with it. All I'm going to do
now is go to modify press control and then
what I'm going to do is I'm just going to now come in to sculp mode and I'm going
to smooth these out. If I smooth this out like so, just a little bit more and then smooth this
one out as well, just to make it so it's not
as rounded on those parts. I'm also going to probably
round these parts off, see if I can actually do
it with this. Maybe I can. Then what I'm going
to do now is just add in some more creases on there. So we'll come in to draw. Then what I'll do is I'll go to object mode so I
can see what I'm doing. We'll do it the other
way this time control, bring it out, bring,
bring it out. And then what I'm going to
do is just smooth that off. I'm thinking as well
that probably I will bring in another subdivision in a minute just to
finish this off. Now I'm going to smooth out this as you can see,
holding the shift bomb. Then I'm going to do now, you can see it's a little
bit low, but that's okay. And then what I'll do
now is I'll come to, I think everyone that says
case crease, there it is. I can just come in then
and just case this like in between the middle of
these as you can see. Now we've just advanced here a little bit of what
we're doing on these. As you can see now, it's actually starting to come together Generate
subdivision, and there we go. Now we can see that's
looking a little bit better. Now we need to do
is just pull them out a little bit, so
we've got a grab here. Let's pull this one out in. Let's move these, let's smooth that one off a little
bit, pull it into place. Then all we need to do
now is pull this up. So I'm just going to now just look and see if I've got these. I need to smooth these off. As you can see, let's
move these spit off then. Let's come in. We've still got our crease on, so we could actually,
our case, this one here, crease, we could actually come in and bring in some more. Here. There we go. It's looking
a little bit bare now and I think actually
I'm nearly done. We'll just go to our
grab tool again. And all I'm going to do then
is just make sure that I'm pulling that one and
this one into place. Okay, let's supply
that, then apply. Let's go on to object mode. So that basically is
near enough done. The only thing is now we need to lift this
up a little bit. Lift it up, you say it looks as though it's actually
hanging on there. And then what we'll do then on the next lesson
is we'll come in, we'll get some material. Yeah, some shader on there. And then what we'll do is we'll just make sure it looks right and then we can
actually move on. Because I think you might
need something else. But we'll see on the next
lesson. All right everyone. So I hope you enjoyed
that and I'll see on the next one.
Thanks a lot. Bye bye.
92. Crafting a Wood Frame for Grape Foliage Sections: Welcome back everyone to the
Blender Ful Ultimate Guide, and this is where we left off. All right then. So
what I want to do now is I've already got a thing, pretty much of a go to shader. I've got everything on here. I just need to
actually unwrap this. But before doing
that, of course, I need to actually
come in and add in, let's actually have a
look before we do that, so it's quite heavy on the mesh. Let's even bring that down a little bit before
we do anything. Actually, you know what, it's
better actually to add in the solidify first from
past experience really, really bad to do that first. I'm going to just bring that in. Just set it at whatever it
comes in at press control A. And then what we'll
do is we'll press seven to 12 at the top. I'm just going to bend my
mouse then in a little bit. And then I'm going
to press a and, and I'm going to Project from
view. Project from view. And then one going to
do is I'm going to come in and add cloth. Then what I'm going to
do is I'm going to go to UV editing and I'm going to press a A and
then pull it out. And let's have a look where
that's going to look like. Back to modeling, I guess. Let's come around
and find where we are and it's definitely the
wrong way round. It would be. Let's go back to,
you'll be editing 180. Let's see if that's the right way round
nine, you know what? I'm just going to pull this out and have a look like that. No, it's not, It's definitely
the wrong way round now. Hundred 80. Let's pull it down, let's pull it into
a better place. I think what's happening here is it doesn't seem to
be unwrapping properly. So let's press and
smart UV projectlic. Okay, let's then press R and 90. Let's have all that looks like. Let's press, get those in place. Let's press 180 and then G. Put them in
place. There we go. I think that's
looking better now. Let's press or the other
way, bring it down. No, that's still
not looking good. Look still not looking good. We've got some dark
patches on there which I don't want, definitely
don't want that. All we can do is just
press controls head and we're going to put
it back to what it was. I should be able
to bring it back. Come on, where is it? Maybe we'll get
there. Maybe we'll have to unwrap it. There we go. All right, Let's have a
look at that. Looked like? Yeah, I think that's
probably going to be the best I'm going
to get the material. Let's actually have a
look on the shader. It doesn't look too bad. I think what I've done is I just need to try
and wrap it again. Smart UV project. Where is it? No, we'll go to
Project from View and then let's have a
look at that now. Yes, now it's starting
to come a little bit. Be not quite there. I'm going to rotate it. There we go now.
That's what I want. That's exactly what we want. All right. That's
look in tons now. Tons bad. Okay. So we've
got that in place. All of that is done now. Now, let me just take a quick look around my scene
with what else I need to do. We go this in here, we've got this on
here, that looks good. I'm wondering, actually, the one thing I could
do with this now is coming in at a modifier
and we can decimate it. Let's come to decimate,
it's at 33,000 polygons, let's put it a 0.2 There we go, 11,000 let's put it a 0.1 And then we go,
let's press control A. And then we go. That's
all decimated now. And then we've got this
going around here. My steps. I'm just checking my building actually
against my reference. I'm thinking, where is my palm? Let's see where my palms are. Let's put it on. We've
got a window here. I'm just wondering if that
should be more there. I think it should because I'm going to have some foliage here, and then I'm going
to move them around. Then got two windows
here, a door here. With that, I think what we're
going to start on now is definitely going to
be this one up here. I think we'll start with this.
What are we going to do? First of all, I know our party
needs to come out really. I don't really need
that. What're we going to do then is just
to leave that up. And now what I need
is I need to go to my resource pack
because I want to have my planks of wood in. But I don't really need to go to my resource pack
because what I can actually do is I
can save it out. So save just in case you've
closed your resource pack, Mrs. And then what
you can do is you can come to final and you
can go to append. So we can go to append, and the one we're looking for
is the resource pack. And in there is the
resource pack here. And then all I want to do
is let's see if I've got on my node tree and I've got
one that says, where is it? Palm tree node, planks, geometry node. There we go. Now I've brought that in, We can see if I bring this over, it should be here. But there's nothing
there at the moment if I press shift though
and bring in a cube. And now I can do is I
should be able to add in the modifier geometry node. Click the down arrow, click
this little down arrow. And we've got one here
that says planks. And there we go, we
can bring it in. All right, that's pretty cool. I'm just wondering
what this one is here. It doesn't seem like it
is ever been anything, so I'm just going to delete it. All right, so now let's get this into the right
size first of all. So what I'm going to do is
I'm going to pull this up. I'm going to go into
modeling because we're going to need to really see what we're doing here and then we're going
to pull it into place. So what I want to do is I want to change
the width of these. Actually, before we start, I want to change the gap over here, in between
each of these. So as you can see, if I
paste them out and then what I'll do is I'll make the
plank width thinner, something like that, I think, let's have a look, let's
pull it back into place. Then what I'll do is I'll
reduce the amount of planks. Then what is I'll
pull these out now. We're going to make
more, much longer. So we've got the plank
length, let's pull them out. And then what is I'll
rotate them round. Now I'm going to just press
and X rotate them round. This is the beauty of having
these geometry nodes. You can really do
some nice stuff and just keep adding
to it if you want to. So I'm going to pull
them out. They're past here. Just past here. So if I go to plank length, I can pull them out even more. So the jaws past there where
I want them. There we go. I think that is going
to be about right, mind. Bring them in. Bring the plank or is it plank with in? What I mean is the gap actually, I want to bring the gap in
and maybe add one more. There we go. Yes, I
think that's right now. Then let's come to
the plank thickness. So let's increase the
thickness a little bit like. So let's then come, and I don't think we want to mess around
with the rotation. Yes, we do, actually. That will make it a
little bit better, so we'll have a little, tiny bit of a different
rotation on them. And then what we'll do is we'll also increase the random width, jaws to tad so we can
see for bring this sad. So then the random length will bring that down just
a very small amount. So that's looking really,
really nice like that. I think it may be a
little bit too thick, plant thickness, Let's bring
them down just a little bit. So I actually think
that is perfect. Okay, so now we've got that. What we'll do now is we'll
apply this. So control. And there is one thing
about these nodes which I kind of find a
little bit of noise. So what I'm going to do is
I'm going to fix that now. So what I'm going
to do is I just want to hide one of
these and just show you. We can see in each of these. Now we've actually got this
in the middle of them. It's something I've just
got to fix on this node, which I've not got
around to doing. But we're just going
to have to go in and fix those because on
something big like this, it will be noticeable
without the bevel works on the actual material. And I'll show you what I mean. If we come over to
this side one here, you will see if I put
this on rendered view. When it renders out, you can see the little marks on there. This is something that
we need to fix if we're taking some decent screenshots
and things like that. So we have to go
in and fix those. Luckily, there
isn't many of them, but now I've showed
you can go in and fix yours if you want to. All right, so what I'm going to do then is I'm just going to grab all of these going
all the way down. Unfortunately, I
don't think there's a way of grabbing all of
them at the same time. You might melt to grab
it with the normals. But I think what I'll do is I'll grab the end of them as well. The end up here. I mean, delete basis. And there we go. Let's press Altage, bring
it back, everything. And now we should
be able to come in and grab just
the ends of them. Grab these ends on here. What we're going to do
is just press control and bevel these off slightly. Press control, you can see they're not beveling
off well at all. Control or transform,
right origin to geometry and then
control control. No control in edit mode. And then why aren't
these beveling off? I know why they're not
beveling off because we have to fix the normals shift, Then let's fix the normals. And now I'm not even going to look to see if the
normals need fixing. What I'm going to do
now is grab them all. And I'm going to hope they work and I think
they will control. And there we go. There
we go, Now they work. Let's pull it back a
little bit like so we don't want anything
two beveled like that. We just want a simple
bevel like that. Okay, so that's looking good. Now what we can do is
we can grab them all. We can press Smart UV
Project. Click Okay. And then we can come over to our material and we can see we've got plank
base in the moment. Let's minus that
off in object mode, and minus this one off. Click the down. Now I'm
going to click wood. And I'm just wondering
if I want to have a different wood
wood props for instance. Do I want them like this? In lightness, let's put
it on. Let's have a look. In rendered view, double tap. The you know what, It
wouldn't be like that. So I'm going to go
back to my wood. It would definitely be so definitely for sure
because it's going to have the vines and things
like that over the top. So we're definitely
going to have those on. And now what we'll do
is on the next lesson, we'll start building
all of this out. And then finally we can
get those vines in place. And really then we need to
find what we need to do next. All right everyone.
So hope you enjoyed that and I'll see
on the next one. Thanks a lot. Bye bye.
93. Adding Grape Berries for Realistic Detail: Welcome back everyone to the Blended Four Ultimate Guide. And this where we left off. All right, let's put it back on shader and then what we'll
do is we'll grab these. Press Shift S cost
to selected shift. Let's bring in a cube. Let's press the S. And
we're going to press control one just so I can
see where it needs to be. And then we're gonna press
and X and pull it out. And then what I want to do is I want to check and make sure that's not too big
so we can see at the moment that's
probably going to be a little bit too thick. What I'm going to do
is I'm going to grab the center rather
than shrink it in shift and click
and then alter Ns and bring it in to make
it fit a little bit. So then what we'll do is we'll have a plank of wood
right on the end. I'm also thinking it might be better if we
actually rotate this a little bit X and
rotate it around. I think that's going
to look better. Is it going to look
better? And let's put it onto normal double tap. The I think actually that will look bear Then all I'll
do is I'll press shift D, and hopefully we should be able to near enough
follow this down. I'm just going to place this
then just under there like. So there we go. And now I can put this
back onto Global, and then I can press Shift,
and we can bring in another. Then I can press, and I'm going to have to make
this one longer for sure. I'm going to press, I'm
going to put this down then into place so we can see
I need to put it on here, which means once I've
got this in place, I should be able to see, because I'm going to
grab a brick as well. Let's grab a brick first. We'll come to this one here. And I'll come to this one. I'll press L. I'll press Shift D. Pull it over. Pull it up. Press selection Control all
transforms the origins, geometry. Grab this part here. Shift cursor selected.
Grab this part. Y no, RX 90. Shift S selections cursor. All right, so we're
going to put that in. We're going to spin it
round. So I said 90. Let's make it then a little bit thinner and let's put
it into our wall. So, and then let's
pick up our wood. And then let's grab the top of the wood and pull
it up into place. Now we can see, because
that's going to be there, first of all, we need to pull
both of these parts back. So we're going to grab
both of these P to here. So then what I'm going to do now is I'm going
to grab this. I'm going to press and X and just pull it in past
the piece of wood, like, because we want
that piece of wood there. Now the only thing
that you might be able to do is you might be able to grab this side of it and pull it back a
little bit like so. And then grab this one and
pull it back a little bit. But you need to have it looking as though it's going
to be supporting it. Something like that
thing looks pretty good. And now we can press and X, just pull it up to
the side of it like so now what we can
do is we can grab this shift D and then just make sure
you're on medium point. Medium point. And then R D hundred
80, spin it around. Then you're just
going to put it on the other wall over here. So now we want to make sure that this really
does fit in place. Seven, you can see here we've
got this gap either side. So we're going to press and X, pull it out, holding
shift, and there we go. That's fitting into
place beautifully. Now finally we can actually
come in, grab all of these. What I can do is I can press control J. I can then
grab these as well. I can press control, in
fact, I won't do that yet. What they'll do, first of all, I will grab this and press control L link materials
and then I'll grab these. Press a smart UV project. Click. Okay. Now, is
that wood looking okay? No, it's not, because
I need to press control or transforms
its origin, geometry and smart UV project. Click. Okay. Now
it's looking good. Then finally, now I want to
join all of this together, including this,
just these for now. And then I can come in
and add in my Bevel, of course. Let's add. Not a geometry,
no, let's a bevel, let's turn that
all the way down. Turn one, There we
go. Let's apply that. And then we can join it to these stones like
pressing control J. There we go. That's
that part done. Let's have a quick look then on our render so we can see
it's looking very nice. Let's we'll save that, our work first and then we'll actually put
it on rendered view. There we go. Now it's
going to look even better. First of all, what I
recommend you do is I think you should put
in your grapes first. Before you do anything,
what I'm going to do is I just put some
grapes around here. First, let's go
to Asset Manager. Let's find some grapes, and then what we'll
do is drop them in. We might be able to
put them on top, but it might make them
a little bit uneven, so I don't really
want to do that. Let's just close this down
and these are the grapes. Now, it's up to you
whether you want, you know, red or green grapes, it's completely up to you. What I'll do is I'll just put some on here and you can see already we're going to need
to spin them all round. So I'm just going to put
them on here just for now. Then what we're going to do
is I'm just going to lift them up and then we're
going to rotate them. This one is rotated
-90 This one. This one and this one. Put them on individual and
then rotate them Y 90. And there you go. In fact, that's not gone very well. So y, there we go,
That's better. Now let's grab them all and then what we'll do is we'll make
them a little bit smaller, I think, and we'll
put them into place. Like what we'll do is
we'll bring this one out, we'll put it on the
on the front here. I'll hang it on there. I'm going to put it over here maybe. And then this one will
more towards the back. Let's hang on here then what we'll do is
we'll come to this one, we'll hang it here maybe a
little bit to the front. And then we've got this one which I need to still rotate X. Then what I'll do is
I'll bring this one out. We've got a couple of the
front, which is great. Then what we'll have is
a few more at the back. I'll just grab this one. For instance, press shift D, Rotate it, Just
rotate it around. And then you can
just pull it over here and then up into place. And then grab this one shift, rotate it around 90, then we'll put this
one into place here. And then we've got
this one shift. And then it doesn't
really matter, actually, where you're rotating it around, we'll just put it in the center and a little bit at the back. Then finally we'll
have some on the side. So I'm going to grab this one. I'm going to press
shift, and I'll put this one on the other
side around here. And then double the A. And there we go.
And I think that's enough on there now
for the grapes. What we can do now is we
can just grab this one. And let's say we can
also pull them down on the ax. All right, these grapes. They're a little bit too big, I would say, but
they are stylized. But the more apples at the moment, I don't
want them that big. So what I'm going to do is I'm just going to grab them all now. And I'm going to come up, put
it onto individual origins, press the S born and just shrink them down now into the
place that they need to be. And that's looking now a little bit bare
than what it was. Okay, so if you're
looking from here, then you can see there's a lot of grapes
going to be underneath. Bring my camera back. There we go. That's
what we're looking for. Okay, so now let's come
in and grab this again. Let's press Shift S A Selected. And what we're
going to do now is we're going to bring in a plane. So shift bring in a plane. And then we're going to
rotate it just so it's level with these X. We're going to rotate it, it's level with this. I'm going to bring it up then. And then what I'm
going to do is just make it a little bit bigger. So just so it comes on there. And the reason we're
doing that is, is because we're going
to be using the Iv, we want to be using the V.
What I'm going to do is I'm going to draw on top of this, just a few of them just
to get it started. And then after that I can
pull them down into place. We could probably get away
with drawing on top of here. We'll give a try.
We'll give a try. What I'm going to do is
then I'm going to bring in my V. I'm thinking
what I'll do, I've already got some V in, so if I just press shift, bring in a curve, a bezier. So here's my bezier curve. And then what I'll do
is now I'll come over to my modifier adding modify it, and we'll bring in
a geometry node. Click the down now,
and the one we're looking for is not there. So what we're going to do is
going to go to file a pend. It should open
this one ivy node. This is the one that we want
when we've brought it in. Now you'll see that we've actually got this
little leaf in there. Now it's important that we put this leaf out of
the way somewhere. We don't want to have it anywhere in the scene
or anything like that. So what I'm going to do
is I'm just going to hide this leaf in there.
We can just hide it. Just hide it on there, but it
just cause a few problems. All we'll do is just
put it under my mesh. Then what I'm going to do is I'm going to click the down arrow, and I should be able
to bring in the ivy. And there we go. This is what it should
actually look like. Now you can see straight
away it's massive. We don't want it massive, but what we can do
is make it smaller. And then what we
can do is we can press seven square over the top. And we're just going to put it in place, it's over the top, so I can basically pull it down now into the size
that I want it. So if I put it there, you can see that's a
nice size for the scene. So I'm thinking
that's pretty nice. Now what we want
to do is you want to press seven to
go over the top. You want to press
Tab, and then A, and you're going to
press Delete and Verts. Now when we actually, we're not going to do
that. You know what? We're going to actually
end it here because it's quite a complex thing
dealing with this IV. And I need to explain it a
little bit more than just, hey, hold this, how we do it. And I'll see on the
next lesson we need to. A little bit bad than
that. All right everyone. So I hope you enjoyed
that. And I'll see on the next one. Thanks
a lot. Bye bye.
94. Utilizing Ivy Geometry Nodes for Dynamic Foliage: Welcome back everyone, to
the Blendful Ultimate Guide, and this is where we left off. Now what we want to do is
we want to first of all, go to the right hand
side and you'll see that we've got a Bezier curve here. This is the Bezier curve, but if I come in and I
grab it all, press a, you'll grab all of
the nodes within the actual curve
and then you can just press delete vertices. You will notice, however, that the Bezier curve
is still there, which is exactly what we want. Now, we now come over
to the left hand side, because we're in
curve, curve mode, we're in the actual curve. We can now come over and
get one that says draw. And you'll notice now if I draw, we have our actual V. Now, We don't want it there
because what we also want to do is come to tool and we just want to make sure
this is on surface. Now this is on surface, What I want to do is
I want to actually draw down some IV going
down these parts, like just to help us get in some parts before
we actually move. You can see what I'm doing here. I'm just giving us some V before we actually come
to the other parts. Now we've got some V in there. What I can do is press Tab and come now to this plane and
delete out of the way. And you'll see now just
how nice that looks. Now what we can do
is finally we can come here and we
should be able to, if we press Tab in some V now going down here
and off onto the side. This is the problem why I didn't want to do it all in one go. I'm going to draw some V
coming down here like so. And you can see it
went way, way too far. Just down here.
Way, way too far. Again, as you can see, we
don't really want that. We have to be very careful
when we make our ivy. So I'm just going
to come to the end. And then what I'm going
to do then is just tidy these parts up
once I've got them on. So now I'm going to come
in with some ivy on here, and then I'm going to
draw some ivy on here. So, and then some
down this side. So then let's have a bit
hanging off if I can, so you can see it's
stick into there now. We don't really want
that. So what we're going to do is just
turn surface off. And then I'm just going
to draw it coming down, there we go. And maybe just some
coming down here and then just some more along here that actually
needs to be on surface. I think some more
going down here, so and then finally some more coming down
here. All right. Now I'm going to use just a
little piece underneath like, so maybe a little bit, Randy. There we go. All right. I think we've got enough
IV there for now. Now we'll do is we'll go
in and we'll clip these. All I'm going to
do is I'm going to come in to select
first this one here. And then I'm just going to
grab this part control. And then I'm going
to press Delete and Vertices and
see what that does. And then I'm going
to grab this one. I'm going to press Delete. And this one, because we don't want
to go in over the door, delete and then this one delete. That is looking quite good. Instead of doing that with this, all I'm going to do is R is going to move out way like so. And then I'll grab, actually
that's looking quite good. What I'll do then is
I'll grab this one. This one here, for instance. Let's try and get from one. This one here. I'll press E, and then I should be able
to pull some down like so. And move it to the side, so
it growing out of there. Let's grab another one here. Pull it down. There we go. That's the easy
way of doing this. Grab this one, pull it down. Double tap the A, there we go. There is your IV actually done. And the one I need to get rid
of is just this one here. I'm going to press
delete T, not that one. Look, this one here. This one going around here. I think I need to
lift this one up. This one where, it's pretty hard to see as you can
see this one here. Where is this one going?
I'm going to press control and it goes all the
way up there. As you can see. Actually I'm just wondering if I'm going to write click
and subdivide the Go. Now I can lift it up and
that's looking double tap the. Let's save that. Our work then let's save. And then what we'll do is
we'll come to rendered view. There is that beautiful ivy part that we wanted to create. I'm very happy with
how that looks. I'm sure you are as well. Okay, so what we need though now is we need a little
bit more of this. Just to finish, what
I'm going to do is I'm going to come
to my plant pot, so I've got my plant pot here, I'm going to press shift and then what I'm going to do
is I'm going to come up, that's not my plant,
that's my actual plant. I don't want my plant,
I want my plant. This press shift and
then bring it up. And what we're going
to do is we're going to put this in the corner here again to fill out spaces. Make it a little bit bigger
like so pull it up like, so pull it into the corner, right into that corner, just so it fits in there
really, really nicely. Not through the wall though. And then what we're going to
do now is bring where is it? So look, I'm getting
a little bit lost. Let's press sir dot
just to zoom in, I can go round where
is it? There it is. All right, now I want to
do is be very careful. I want to come to this one
and all I want to do is press and drop that then
into this plant pot. I'm going to move it into place like then what I'm going
to do is at the bottom of here I'm going to press
Lns and I can actually make that root look a little
bit thicker as you can see. Now you can see it looks
as though view was planted in here and then
it grew out of this part. Let's move this back
onto the wall like so. And then we'll add one more being just to make it
look a little bit bare. So we'll come to our
draw tool again, make sure on surface. And then what we'll do is
we'll draw out of here, going up into here like so. And then what we'll
do finally then is come to this bit
right down here, Alternn, the next Aln, then the next B,
up O, and mop in. I'm actually making
this thicker. Where is this
thickness? All ness. There we go. There we go. Now you can see it's got
a little bit thicker. And then double tap
the A, there we go. Now it looks as though
the Iv is coming out here and yeah, that's pretty nice. Okay, we've got our
plant round there, we've got a plant up
here on top of here, We've got our barrels in place. I think what we should do now is look at replacing these parts here. I
think we should look. This tree, these palm trees, and we don't really want these parts in here
with this palm tree. You can actually come
in and you can actually start changing how
these actually work. In other words, all
these parts here. We're going to come in and we'll change how this palm tree looks. And we'll also change the top, so you can draw
these palm trees out and you can also
change how they look. That's the good thing about the versatility of
go nodes as well. So what I'm going to
do now is going to file file and save that out. And I'll see her on
the next on everyone. And I hope we're nearly there and I hope you're
really enjoying it. Thanks a lot. Bye bye.
95. Replacing Palm Tree Mesh for Improved Quality: Welcome back everyone
to the blend of four ultimate guide and this
is where we left it up. All right, so what I
want to do now is I want to actually swap
these chunks out. So all I'm going to do is
I'm going to come over, let's go in modeling
just to make it a little bit easier so we
can see what we're doing. And then what I'm going to do
is I'm going to press Tab. First of all, I'm gonna
look where my cursor is, so I'm gonna shift right click. And just put my cursor there. Then I'm going to
press shift and we'll bring in a cylinder to start. So let's bring in a cylinder, let's leave it on 20. In fact, no one, we'll bring
it down a little bit lower. Let's put it on something
like 16, like so. And then what I'll
do is I'll make it a little bit smaller. I'm
going to bring it up. And then what I'm going
to do is I'm going to isolate this away
from everything else. So shift H, I'm going to come under the
bottom of it then. And then what I'm going to
do is I'm going to just, I think actually before
we make that smaller, yeah, we'll make
that smaller first, So let's make it a little
bit smaller like so. Then we'll bring in
three edge loops. Left click, right click, and then Olt shifting click,
going all the way around. Make sure that we've
got it onto sharp. Let's try Sharp. And
then let's press S. And that might actually be
a little bit too sharp. So let's try the inverse.
And there we go. That's looking very palm, she, palm tree trunk shape. Okay. Olt shifting. Click. And let's
bring in a bevel. So I'm just going to
be level that off. And then I'm thinking I'm going
to test these out anyway. I'm going to press Control
all transforms, right? Click the origin to geometry and then I'm going
to come to the top. So I'm going to press
dot, come to the top, and then Alt shift
and click control B, and then maybe two bevels
on the top, like so. Then finally what
do is I'll press I. Yes, I on the top. So just this face here.
Let's grab this face. Press the Eyebn, and then all I want to
do is just drop that down a little bit
in there like so. So something like that.
Let's right click and shade. Auto, smooth. And then what I'm going to do
is I'm going to press Shift D and see
what it looks like when they're stacked
on top of each other. Now bearing in mind
that these will get smaller as they go up, so actually I think that's
going to look pretty nice. I'm just wondering
whether I want to bring in this bottom just in a little bit more.
I think it will. So I'll come into this bottom press control and then all I'm going to do is press the S B with proportional editing on. I'll have it on
smooth this time. Press the S, be, bring
it all out like so. And now let's give
it another try. So shift D, bring it
up and there we go, a thing that looks a little bit better than
what it did before. Okay, so what we
want to do now is we want to bring some
materials in here. We do have a material which is, let's go to our asset manager. Let's go to our materials and the one we want to
search for, his trunk. So let's bring this one
in, then just drop it in. And then we can
actually, when it loads up, delete it out. And now what we can do is we can zoom into our actual trunk. And let's actually unwrap this. So what I'm going to
do is I'm going to unwrap it probably from around this center here
and then from around here, right click and mark a seam. And then of course
we're going to need one seam on the bike. Right click and mark seam. And then just minus the seams off on the front and
bottom if you have any. So right click, clear seam, and it should look
something like this. Now let's see if we can
actually unwrap this. So I'm going to
press L U Unwrap. And then what I'm going to do
is go over to my materials, click the down arrow, and
we're looking for trunk. Here's the trunk
material like swing, you can see wrong way round. So let's turn it the
right way round. So we're going to go over
to the shading panel. I'm going to zoom in again
with the little dot born. I'm going to press
the Tabbton A, and we can see that this
is the problem here, that it's got really
dark round there. We really don't want that.
So let's press A -90 and let's do that without
fortunate entity on again A -90 like so. And let's have a look where
we're going to be with this. And we can see that it's
getting darker as it gets, as it gets up to the top. Now I think it should actually
be the other way round, R hundred and 80.
Let's spin it around. Let's press the G board
and bring that into place. Let's press Tab.
And there we go. That's looking much, much
better as you can see. Now, I don't think we need to
really straighten this up, but I do think we need to
sort this kind of top out. So what I'm going to
do is I'm going to grab my top like so. And then what I'm going to
do is I'm going to put it more in line like so because you're never
going to see in that bit. So actually I think I'm going
to have that little bit darker and I'm going to make it a little
bit bigger maybe, And then G. Just
fit it into place. Do want it? So it's like that. Not really. Let's have a look. Even make it a
little bit better. Something like that, I think is absolutely fine.
Just the bottom. Then let's fix the
bottom as well, so I'll grab the
bottom with baylate. There it is. And then let's
bring it up like that. And that looks now,
much, much better. Now the moment of true. First of all though, let's
write, Click and shade. Auto, smooth. Make
sure that's on. Now let's come over
to our geometry node. And we want to press Altage
now. Bring back everything. And we want to click
on this geometry node. So it's a palm tree
geometry node. And what we're looking
for is we're going to go in 21 here. What says one named attribute? You can see it says tree bit. So it's just in here
when you click on this, the way that we group this,
once you click on it, it takes you into a new group. This is what actually makes
this part of the palm tree. So you can see this
is the cylinder here. We don't want that. What
we want is an object. Let's go a search. And let's
click Object, Object Info. And then what we're
going to do is we're going to plug in this to the geometry and you'll notice
your palm tree disappears. Now if you come in
reset, first of all, control all transforms,
right click, set origin to geometry. And then what I want
to do is I want to go back to my geometry node now, not that one. Where has it gone? Let's find geometry
node on here. Let's go into palm tree node. I'm hoping this will be it. Let's try and find it now. I might have to actually
go back before I did that, before I reset that and find it, because I'm going to struggle
without redrawing it round. So let's see if this
is it. Here we are. Okay. Let's go back into it
now and see where we're now. Let's click this on like so. And then we, now
we've got something. Now we can actually reset our transform control
all transforms, right clicks to
origin, to geometry. And now what we want to do is we want to make these a
little bit bigger. So let's go back
now into modeling. Let it load up and then what we'll do is
we'll come in and make these a little bit bigger
using the geometry node. Of course, we could
go in and use them. We could use the transform node within the geometry nodes. But because I don't
really want to aim this course around geomet nodes, I just want to show you how you can actually change those. Let's come in now and
then what we'll do is we'll come to
these parts here. Let me actually see if
I can actually go in. You can also see that I need to change my trunk material
so you can see trunk here. Let's change it then. What
we're going to do is put trunk and it's going to be this trunk here.
And there we go. Now we can see that spits done. Now let's bring up
the base scale. Let's even scale the maximum, the size of the trunk. You can see I'm not getting
anywhere with that. I need to bring them back. Now, let's have a
look how I can bring these back base scale, I don't think I'm actually going to be able to bring
them back with that. So what I'm going to do is I'm going to make this
a little bit bigger. I think I should be
able to make it bigger. Control or transforms
right clicks origin to geometry. And there we go. That is looking much nicer now. Okay, I think I'm really, really happy with how
that's actually gone now. I'm just going to check around
the other side as well, making sure all of
those are fine. And then what I'm
going to do is I'm just going to come in and now just mess
around where is it? I think it's the base scale. Let's mess around
with the base scale. I'm just wondering,
size of trunk. Let's make that a little
bit bigger as well because some of these trees are
quite high as you can see. Let's make it even higher then. It's also just bring them a little bit of touch
out of the ground. I can see this one's
a little bit Ben, because this is the stage
now where we can actually go in and fix any issues that
we've actually got with them. We want to keep them stylized. You can see as they
get to the top as well that the base scale minimum, let's see if we turn that
up a little bit like so. And I think that looks
much, much better. Now. I'm just looking to
see if it's fitting them. We might as well take
our time with these as well and make sure we're
really, really happy with them. I'm thinking of maybe
a little bit too much on the actual base scale. I'm just going to turn
that up a little bit. I think now they are about right where I'm
actually happy with them. I'm just wondering about
the size of the trunk. I might still turn
that up a little bit. I think that is
looking a bit bare. Then the random rotation, of course, we can turn this. It's near enough on
zero to bring it down. Make that look a
little bit Barea, still wondering whether I need to make them a
little bit thicker. Minimum scale. Maximum.
Let's bring that up. So then on the next lesson
is we'll actually get these. So we focus on the
bottom of them. So they're coming out
of the ground properly. Let's just have a quick look what they like in rendered view, and eventually we'll get these leaves in as well.
We'll do those next. Actually, yeah, I think
that it looks really nice. I think, actually, yeah,
that's looking good. Much better than what
they did before. Just going to have one quick
look around on this one. Much better than what
they did before. So I think on the next lesson, and then we'll sort out
these roots and then we'll actually get these
leaves sorted as well. Because then we'll actually
start bringing it to life. All right everyone. So
hope you enjoyed that. I'll see on the next one.
Thanks a lot. Bye bye.
96. Altering Palm Tree Leaf Textures for a More Stylized Look: Welcome back everyone to the
Blend Four Ultimate Guide, And this is where we left off. All right, let's put it back on material now so at least we
can see what we're doing. And let's come into
this first one here. And let's see, I can
grab these handles here and just rotate
them a little bit. Now the one thing I want to be careful of, as you can see, we've got one point here
and the next point here for a press control is
all the way up here, probably too far distance. So what I'm going to
do is we're going to right click, subdivide,
right click. And I'm going to
subdivide these two here. So right click and subdivide. And the reason I'm doing that is because then
when I move this, it's not going to have so
much influence over the top. So if I now press G, I can actually move
this as you can see, and then grab this and put
it into the ground properly. So it actually
looks a little bit more realistic than
what it did from there. Then I can probably rotate
it a little bit more. I could probably also as
well come into this one, grab this one, let's even
actually grab them both. So this one and this one.
This one and this one. And then And just rotate it. Nope, not going to
get away with that. So let's rotate this one and then we'll come in
and rotate this one. And there we go. All right, so that's that one done. Now let's come to
this one and what we'll do is just press
L. First of all, I'll pull them all up then, and then that one's absolutely
fine, as you can see now. And now finally this one. And what we'll do with this one is right click, subdivide, grab these two right
click and subdivide, and then grab this bottom one. We're going to rotate
that one round. Then what we'll do is we'll
rotate this one round. So and we can also pull
it out a little bit, but just be very, very careful. Pull up the handle a
little bit like so. And you should be able to move it into the place
that you want, like so. So it's just really, really
just playing around with it. Just getting it the way
that you want it to be. All right. I think
I'm happy with those. I'm just wondering
about this one here. If I'm happy. Yeah,
I think I am. I don't think I want
to bend it any more than that. All right. So now then what we want to do is we want to come
in and we want to change these leaves over for the leaves
that we actually want. So at the moment as
you can see this is they are set as
geometry nodes. So actually I'm thinking if we're probably better off
doing all these together, so what I'm going to do is I'm
going to actually save out my work before I do anything.
So let's save it out. And then what I'm going to
do is I'm just going to hop on over press control. And it said it can't
because it's a curve. So let's go to object convert
to mesh. And there we go. And now you can see
that all these are done and all we need to change
is these leaves on here. So let's come in
then to one leaf, So I'm going to grab this leaf. In fact, what I'll
do, first of all, I need to actually
split these off. What I need to do, I need
to come to all of these, grab all of the leaves like. So I'm going to make this really easy for myself
actually just to make sure I don't need to go
in and grab them all again. I'm going to grab all these. I'll show you. The
easiest way to do this is to grab them all,
or as many as you can. Come over to the right hand side and what you're going to
do is you're just going to put palm leaves, leaves like so. And then I'm going
to click a sign. And then all I'm going to do
is hide these out the way. And then I'm just
going to go in and select any that I've missed. And I've just missed
two as you can see. Click a sign and then l
the double tap, the eight. And what you should be able
to do then is click select. And there we go. That's
what we're looking for. Now let's come in for
just one of them. So what I'm going
to do is just grab this one and then what I'll do is I'll head on over there
and give them a material. So what I'm going to do is I'm going to click Select First, come down to Material, and
it says Leave Material Here. And what I want to do is I want to come over
to Asset Manager, and what I'm looking
for is leaves. Let's see if I've
got one that says leaves and here it
is, my palm leaves. So let's drag this
in, press Tab. If you can't drig it in like so, let the shader do its magic and then let's delete
that out of the way. And then what we're
going to do now is come back to our leaves.
So any of these. And we're going to click
the down arrow and we're going to look for
palm and palm leaves. Let's click palm leaves on. And you're going to end up
with something like this, which is not much at the moment. Let's
grab this one then. And all I'm going to do now
is go up to UV editing. I'm going to press just
to zoom into it like so. And then we're going
to press U and unwrap. And then what I'm going
to do is you can see now already that this one
needs spinning round. So I'm going to spin it round, so our hundred and 80. Spin it round. I'm going to then press and X and put
that one in place. And then what I'm going to
do is I'm going to press and X and pull this out like so. And then I'm going to press and Y and just make it a
little bit thinner. Just so as you can see
now it's fitting all into place like so now I'm going to do is I'm going to come
into my actual viewport. I'm going to click.
And then what I'm going to do is I'm going
to click copy and paste. Copy and default. Then what I'm going to come
over now to grab them all. So what I want to do is
I want to slick them all and then I want
to go into you and then come over and
what I'm going to do is copy copy paste default. And there we go. Real
easy way to actually go, the leaves going in
the right place. Now we do have a
problem. However, we don't want all the
leaves to be like this, so now we want to do is
we want to come on over. What I'm going to
do is I'm going to grab any of them. It
doesn't really matter. I'm going to press A and then, and then X, and move
this one over to here. And then we're going to have
this one as a different one. That means we've got
basically two of the leaves which are
different to the other ones. Now finally, I
want one more leaf on here which is going to
be a little bit different. We know that this one
is a different leaf. So what I'm going
to do is again, I'm going to grab this leaf, I'm going to press
copy default like so. And then I'm just going to
hide that one out the way. Then all I'm going to do now is just select some
leaves at random. So let's select some of
these leaves just at random, and we'll do some of
these leaves again. You're selecting them at random, some round here, some
underneath like so. And then someone here again
at maybe this one down here. And then, and then
paste, and deep bolt. And there we go, we've
pasted those all in and now we hide
those out the way. Then what we do is we come
around to the next lot. So I'm going to
grab this one here, and then I'm going to press a X, pull it over into place. And then what I'm going to
do is press S and X and pull it out so that we've got
a different leaf there. Now what I can do is I can
press U, copy, copy, default. Hide that one out of the way, and then pick another
couple of random leaves, Maybe this one and this one. Let's pick this
one and this one, and maybe this one in here. And then let's go to
this one and this one, and maybe this one here. And then what we'll do
is, and we'll go to Paste and Default. There we go. Now if we press Alt,
bring them all back. Now we can see we've got
many, many different leaves. And the best part is if I
press Tab and come into rendered view, There we go. There is our palm trees
and you can see just how different they look and just how nice this all looks now. All right, so that's
looking really nice. So what we're going
to do now is we're just going to put
this onto shader. We're then going
to go to modeling. And then what we're
going to do is just save our whole hick before we do anything else so we
don't lose anything. And then what I'm
going to do is, before I actually
forget, I'm going to put one of these canopies. So I'm just going to grab
this canopy round here. And then I'm going to do
is just press shift and I'm going to spin this
round so ours head 180. And then I'm going to
press one and I'm going to press and I'm going to put
this one at the top of there. Because I know that will leave this one looking a
little bit better, not so bare than what it was. And there we go.
And you can make it a little bit bigger
if you want to. Just be careful you
don't go too crazy. So all transforms right click, set origin to geometry, and then press the
S button like so. And then let's pull it out
into place. Double tap the A. And there we go.
That's looking much, much better now from the front. And then what we need to do now, so we've basically, we've
not got a lot left. We've actually, I've
got my notes on here and we need to do some rocks. We need the floor. We need a couple of crates, we need the lights
in, of course, we need the carpets
and we need the, well, that is what we've
actually got left to finish now. So this one here though, you must make sure if you
actually delete this. If I press delete on this, you'll see that actually they didn't actually disappear. But you might want to keep that. Normally, if you press
delete on there, all of these are going
to disappear because they're in the geometry node. But happily for us, we actually changed it from
a geometrode into measure, so we don't need to worry
about that anymore. So that's good. All right, so all I need to
do then on the next lesson is I think we'll make a start
on our actual crates. Let's get the crates
out of the way, and from there then we
can make a start on our maybe on our rocks because that's
something easy as well. All right everyone.
So I hope you enjoyed that and I'll see on the
next one. Thanks a lot. Bye bye.
97. Modeling Crate Props Using the Solidify Modifier: Welcome back everyone to the Blend of Four
Ultimate Guide. And this is where
we're left, they are. All right, so let's come around the back and what I'll do
is just shift right click. And I'll drop my cursor there. Then what I'll do is I'm
going to press Shift, and I'll bring in the cube. And the cube I'm going to
make a little bit smaller. I'm going to make it
a little bit wider. Then on the X S, x a
little bit smaller again. And I think something like this sort of size
is going to do it. I think this will
be perfect size for what we're
trying to do here. So I'm just wondering
whether it's wide enough, maybe a little bit wider, that sort of size of the thing. And the reason I'm making it a little bit wider by the way, is just so I can get enough actual planks of wood in here. So let's now come in
and what we'll do is, well, first of all
press control a, reset all our transforms and then what we'll
do is we'll press control two and then
control and two like so. Okay, so good so far.
I'm just thinking. Yeah, so we'll have three planks going down here and then we'll have three planks going this way and then three
planks going that way. All right, so now what
it's time to do is we'll, yeah, we'll make all
different planks. Actually, let's just split them all off first and we'll
make them bigger. Before we do anything, actually, let's actually bring in some
moral edge loop control. Our left click, right click. And now we've got plenty
of edge loops on here. So what that means is now I can come in and I can
split these off. So I'm going to come round
the top of it first. So I'm going to come
round the top and what I'm going to do is then
right click and mark Seem. I'm also going to come in another moment
and press shift age. Just isolate everything out. Then what I'm going
to do is I'm going to come down to the next one. So old shift click,
old shift click. And then just keep working
all the way around just so I can kind of
split it into four blocks. And then is going
to make it really, really easy then to
work with this mark. Seem like so. And now what we're doing is
we'll Alt shift click, old shift click, going
all the way around there. Old shift click,
old shift click. That then is going to be going all the way around here like so. And then what I'm going
to do is I'm going to write click and mark scene. All right, so that's the
first bit of this done. Now what I'm also
going to do as well is I'm going to steal
this part here. So I'm going to press
shift, bring it out, because I'm always
trying to think ahead of making things
easy for myself. And then what I'm
going to do then is also bring this one here. I'm going to here shift, bring that up like so. And then what I think I'll do
is I'll grab both of these. Oli click, shift, click and then press and X and
just pull them out. So these basically are going to be some more actual
wood going over there. Let's now split these off. So I'm going to
grab both of these, selection, split them off. Now the last bit I need to do is I'll need another piece
of wood coming out here. So I'm going to grab this,
going down to here, shift D, and then this time I'm going to press and Y and pull
it out that way. So I think from there I'm pretty much ready to rock
and roll with that. Let's now press and
on these as well. So now we should have this, these two, and then
all of these here. All right, now let's
split everything off. If we come out, what we
can do now is we can come in and I'm thinking we'll
split this one off from here. So all these are already split. Remember, each one of these
islands is already split up. So that's great. So
all we need to do now is just split them
away from each other. As you can see that we've
got all of these split here. We don't really want
that, so I'm just going to come in soap. So I'm going to split those off. I'm going to split
these bare ones off. I'm going to split
these side ones off. And I'm going to split
these off as well. So we should have splitting
like there now for press Y and let's see if
everything's split off. All I'm going to do,
I'm going to come in and make sure I'm on
the individual gins, press the S button and let's see if
everything's split off. So we can see, first of all, these ones here
are all split off. So we're going to
have to go in and make sure everything is split. So I'm going to come
back and what I'm going to do is now I'm
going to grab this one, and this one, and this one, and this one, and press Y, And then I'm going
to grab this one and this one and press H to
hide those out of the way. And then what I'll do is I'll do the same
thing on this one. This one, This one.
This one and this one. Y, h, and then L, L, Y, and H, and then
finally these Now, So all I'm going to do is just
grab all of these like so. Well, you could grab
the middle one. That's probably going
to be easier actually. And then press Alth, bring everything back
A to grab everything. And hopefully now we should
have it looking like that. That's exactly what I want. All right, so I made a little
bit of a meal of that. But anyway, Okay, so what I want to do now is I
want to press al tag. First of all, Altagr
controls head. Bring those back if we can. Let's see if I can. Can I press Controls Head? There we go. Controls Head. And then
what I want to do is control all transform
set origin to geometry. And then we're going to
add in a new modifier. And this time we're going
to add in a solidify. And then with my solidify, I'm going to bring it out a little bit this way
or can I bring it in? Either way, let's try bringing
it in a little bit first. And what we'll do is we'll
add in another modifier. And this time we'll
bring in a bevel, so it should look
something like this. Then what we'll do is
we'll just press A, then we'll grab the planks. Press the tab, and then press A. And what we're going to do
is we're going to go down to mesh, transform, randomize. And turn that all the way down maybe to not 0.1 Let's have a look what
that's looking to look like. And we can see we have got
some slight breaking on there. As you can see that's probably caused by
the fact that we're trying to randomize it before using our solidify. Let's
do it the other way then. So what we'll do is we'll
just press controls head. And what we'll do is we'll
look at the thinking, maybe these ones should be going the other way to do that. What we can actually
do is we can come in and we can turn them around. So we can press shift,
spin them around, and then you'll see that
they go at the top like, so that actually might
be a little bit bare. Let's also then come
into the bottom, we'll do the same
thing on there. L, L and L shift inside. Then what we'll do is we'll also do the same on these
sides as well. We'll go L, we'll do
the other side as well. All we're doing basically
is spinning around the normals just so we can
change how it solidifies. If I press Shift and now spin
around the normals like so. Now I can do is can put it on object mode just so I can see a little bit about
what I'm doing. And now that's
looking much better. Now what we can do is we
can turn down the bevel, just up one or maybe naught point naught three. There we go. Now we can see what we're doing and then what we'll
do is we'll just change up the thickness
of these parts here. And that is looking
much, much better, much more like what I actually
want to see actually. And now we've actually got
something to work with. What I can actually do then now is I can pull
these parts out. Once I've actually
applied the solidify, let's go in and press
control. Apply the solidify. Then what going do is I'm going to go into
each of these with edge slick L and L and then L, L, L, L like so. And then what I'm going to
do is press S and X and pull those out like
so. And there you go. That's already looking like
a pretty decent crate. And I'm thinking, yeah, I'm thinking that's looking
pretty good already. So now I'm going to do is then
I'm going to press control all transforms and then
what I'm going to do now, now I'm going to turn those
round because I've added in the solidify and the thing is we've still got this
on the wrong way round. As you can see. No,
we haven't actually, because I reset transform
is just reset them. So forget about that,
it doesn't matter. Let's come in, put it back. What we'll do now is go to mesh transform and now
random. Let's turn it down. And we should end up with
a really nice random look that's still too high, 0.5 Let's try that.
And there we go. And as you can see, that's
looking pretty good now now. Okay, let's bring
these out then. So what I'm going to
do, as you can see, we've got some
randomization on here, but we end up with a few, you know, kind of flat areas. So all I want to
do is just shade, auto, smooth that, fixes that. And then finally
all I'm going to do is come in with face legs. I'm going to actually
come in to where it says random and then all I'm going to do is just pull
them out slightly, and then pull this
one out slightly. And then this middle
one out slightly. And then pull this one out, maybe this middle one out
slightly as well, like so. And now you can see it's
looking much, much better. Okay, so now let's actually
work on these parts here. So I'm going to join these, maybe not, maybe I'll just
come into this one first. I'll just press L and
then and pull it out. And then all I'm going
to do is press L again and put it into place, so I'm going to move
it to the side. Then what I'm going to do is
I'm going to press shift D, get another one, and then press and Y, make
it a bit thinner. So then what I'm going to do is I'm just going
to grab this one. And this one I'm going to
press shift D, bring them out. Then what I'm going to
do is just make sure I'm on medium point and then 180, spin them around, put
them back in place. And then finally all I'm
going to do now with these is I'm going to make sure, first of all that I've
just got the selected A. And then I'm going to come to
mesh transform, randomize. Again, turn them all
the way down to not, not 0.3 I think it will be
0.3 0.3 And there we go. And then finally
what I'll do with those is add modifier and I'll bring in a bevel turn, maybe not 0.3 So
look, there we go. And then what we'll do
now on the next lesson is we'll just get these parts in and then we've
finished those off. And it's as quick
and easy as that. We really know what
we're doing now. So everything's pretty simple. And you can see it
already looks great. Just from one lesson, 10 minutes didn't take any time. All right everyone. So I
hope you enjoyed that, and I'll see on the next one. Thanks a lot. Bye bye.
98. Sculpting Rocks with the 'Extra Object' Add On: Welcome back everyone to the
Blend Four Ultimate Guide, and this is where we left off. All right, so now let's
deal with these parts here. So what I'm going to do is
I'm going to grab this one. I'm going to press E, then
just to pull it down like, so I'm going to press L again. Seven to go over the top. And then let's put
this one over here. Let's press shift D then. And we'll put this
one over here. We'll press and X and maybe, and just to rotate
it and then and Y, and we're just trying to
give it some randomness. So then let's come
to this one here. And then and Y. So then let's put them onto the top of here, bring
them down like so. And then what we'll
do is we'll press Shift D and bring them
down to the bottom. Now we can't see
the bomb on top, so we can just probably
press Oz hundred 80, spin them around like so. And there we go. Now
finally let's come in. In fact, we'll do them
all at the same time. Actually, we'll do
this one first. So I'm going to press L, I'm going to press
one, I'm going to bring it over just into place. I think what we'll do
is I'll press and Z, pull it up into place,
pull it into here. Press the button to pull it
out. Something like that. And then what I'm
going to do is I'm going to make it a
little bit thinner, L and then X and X and
then shift, duplicate it. Y, rotate it little bit,
holding the shift born. Then what we'll do is we'll
grab both of them now, L and then shift, and D, bring them over
to the other side. And then let's just
grab this one, L, R, Y, rotate it around
a little bit like so. All right, that's looking fine. Now what we'll do is we'll
be vel these off control or transforms right click
the origin is geometry, adding the bevel, not 0.3 and then finally
grab them all mesh. And then where is it
transform, randomize. And turn it all the way down to not point nut
naught three like so. There we go. Perfect. All right, now what we can do is we
can grab all of these. We can go to object, come down to convert, and mesh. And then what we'll do
is press control J, right click, shade, auto,
smooth. Very important. Now we check our
face orientation on these because we've been messing around a lot
with that a shift. Spin them all
round, turn it off. And then finally what we'll
do is we'll come round. So we'll press and
what we'll do is we'll grab our crates and
we'll grab our barrels. And then we'll
just correct press control L link materials. Come back round, let's
put it onto material, let it load up with
all our shaders and let's see exactly what this
is going to turn out like. The other thing you can do is as well to speed up the draw calls. So basically at the
moment, you've got so many objects in here that
it's called the draw call. And what it's doing is it's
doing one call per object or one call even per texture. If you've got a lot
of objects in here, it's more than likely that
it's doing a draw call for every single one
of those objects and every single one
of those textures. If you really want
to speed things up, what you can actually
do is you can come in and join certain
parts together. Just be careful when you join
them together that you're not altering any of the asset manager or anything like that. But you should be able to
join most of it together. So for instance, all the
doors and things like that. And then that should
speed up your blender. And don't forget as
well with the simplify. If you're really struggling, come down to the simplifiers we spoke about and just turn
down the text limit. The text limit of the
moment and mine is 1024. But if I put this onto
128, for instance, where is it on the viewport? Let's put it on 128. It load up on the viewport and you will see now
it loads up tons, tons faster because we've got
it really set really low. All right, so what I'm
going to do is I'm just going to put that in 1024. And I think if you turn those down as well, you'll
end up with a much, much faster low
time on, you know, between object mode and
material mode as well. All right, so let's
come in now to this. And then what we're
going to do is press U Smart UV Project. Click okay. And there we go. Let's have a look what
this looks like on the actual render then,
just to make sure. And then what we
should be able to do now is put these in place. I think they look really nice. And the good thing about
these things is that I can now bring this in again, put it in your Asset Manager
if you want it in there. And then what I'll do
is I'll press shift. I'll bring it round
to the other side. I'll press old tar
just to put it back. And then Y hundred
80, spin it around. And then I'm just going to put it near
the back of this tree. Like. So something like that. And I'm just wondering whether I need to spin the
whole thing round, but I don't think so. I think it looks absolutely
fine there. All right then. So what we'll do
now is we'll make a start on our actual rock. So there's a really easy way
to actually bring in rock. So at the moment if you
go to shift a mesh, you will see we
don't have anything here to bring in rock,
but we can change that. So what we can do
is we can go up to Edit preferences and
we can come and put in mesh, not nh mesh. And you should have
one that says extras. Let's put it, it says there, add mesh, extra objects. This is the one we
want. Let's click this on. I'll click it on. Refresh, close it down. Let's press Shift Day. And now you should have
rock generator really, really easy to
actually use this. You can see I brought
in at the moment, one rock, we can
bring in more rocks. Let's bring in 234.
Doesn't really matter. And the other thing
you can do is you can set the scale
of these rocks. We're not going to do
anything like that. We can set how deformed
these rocks are. But the best thing of all these, we can also set what
kind of rocks these are. Whether they're rhyther rocks,
for instance, like this, whether they are ice, so you can see something
more like that. Or we can even have sandstone, which looks pretty good. So you can see the
sandstone rocks like this. You might want to
actually have within your scene some sandstone
rocks, basically. As soon as you click
on them though, they are going to disappear. But you can end up
with some rocks like this within the scene that we're actually
working on here now. You might want some
rocks in there like this being eroded with
the wind or something. And you can see
look pretty nice. I don't think I'm going
to bring those rocks in. What I think I'm going to do is I'm going to delete
those out of the way. I'm going to press shift day and bring in some rocks again. I'm going to bring in maybe 67 rocks, something like that. And I'm going to put this
onto default like so. And then what I'm
going to do is I'm going to move my
rocks over here. Now I'm going to pick
which rocks I want. So what I'm going to do is
just going to grab one, grab one, grab
one, and grab one. This is how I basically
pick the rocks that I want. I'm not going to worry
about the size of them or anything like that because
we can make them bigger. What I'm going to do though, is I'm actually going to come in and give them a material. Because giving the
material makes them, you know, you can see what they look like better than
what you could before. So all I'm going to do is
I'm going to come over to my asset manager and
let's put in rock. And hopefully we
should have one. There we go, Rock material, let's drag that in, drop it in, let the shader load
up and do its work. And then in fact,
before I do that, all I'll do is I'll
just grab all my rocks, grab my material control L, and we're going
to link material. Then what we're
going to do is just leak the rock out the way. And now decide which
rocks you want. I think this one is a pretty
nice rock. Very nice. I think this one, this one here is also an
interesting rock. And I think this
one here is also, these ones to me look a little
bit flat as you can see. So what I'm going to do is I'm only going to have
three rocks in place. I'm going to get rid of these. So press Delete. And you will notice as well that when
you click on the rocks, if you come over to
where the modifiers is, you'll notice that you've got
all of these modifiers on. First of all, what
you need to do is just don't worry about
adding all those on, just grab them all,
come up to object and then all we're going
to do is go down to convert and mesh. Now I'm going to
do is right click and shade auto, smooth. Now you can see
that these rocks, they've kind of not smoothed over very
well as you can see. So when I've got my rock
now done, if you press Tab, you'll see it's got a few, as you can see,
fair few topology. Now you can do this
one or two ways. You can either
come in and add in a subdivision surface
which is going to smooth it all off
here very nicely. You can then turn it up like so. Or we can, well, we can actually do it that way. We can press control A then
and then you'll see we end up with something
like that which we're going to sort
out by the way, or you can come in,
add in instead. Generate. And what
we'll do is we'll add in this time, where is it? We'll go to deform
and we're going to bring in a simple form. We're going to bring
in a smooth like so. And we're going to
smooth that off. And repeat that process. And repeat it maybe again again. And let's even get a bit
more smoothing on there. So you can do it that way
if you want the final way. If I apply that, the final
way you can actually smooth these off is if you call them and you
add a modifier. And you go to and then decimate. Let's decimate this down at the moment it's 3,000 polygons. Let's bring it down to
0.5 And you'll see that there's a natural tendency
then to smooth it off. I don't like using this way. First of all, I like using the one that
I've just gave you. So I like doing them
with the subdivision. I'm going to do
is I'm just going to press control Z. I'm just going to go back to this
one before I moved it off. Take that off, and then
what are we going to do? Should have a
subdivision on these. I'm going to put a
subdivision on both of these. So let's come in, add money, Fire subdivision, Surface and
then we'll do is our copy. This one here hasn't got one on, so let's grab this one, grab this one control L, and then all we're going
to do is copy modifiers. And there we go. Now let's
apply these modifiers. So let's grab this
one press control. And then what we're
going to do now is going to bring in a decimate. Generate and decimate. And you can see at the moment, 12,000 polygons really
high. So let's put this on. Not 0.3 and you'll see it makes
it actually a lot better. I think it makes
it a lot smoother. Don't forget as well, We've not unwrapped these or
anything like that. We can see now it's
6,000 polygons. Let's even bring it
down to not 0.1 maybe. And you can see now it's
smoothed it, 2000 polygons. Let's do the same
with this addie, not 0.1 And there we go. And then the final one,
let's do the same with this add modifier decime, not 0.1 like so. Now you might want your
rocks to be really, really high poly, but I think for this scene we
really don't need that. I think though, this one's
breaking a little bit, as you can see, there's a
little bit of breaking. We can fix those things. But let's just put this on. Not 0.2 so we have
less breaking. Let's go to this one.
Not 0.2 less breaking. And then let's go to this one. Not 0.2 so a little bit higher
than what they all were. And finally, now let's
join them altogether. We're not join them altogether, but select them all.
Convert and mesh. And there we go. Let's
save out our work. And then on the next lesson, what we'll do is we'll
actually get some materials on here and then we'll get
these rocks into place. All right everyone. So
hope you enjoyed that. And I'll see on the next one. Thanks a lot. Bye bye.
99. Techniques for UV Unwrapping Rocks: Welcome back everyone
to the Blend, the four Ultimate Guide, and this is where we left off. All right, so now let's
have a look at our rocks. And what we want to
do is obviously we've got the material on, so
we've got the material on. I'm just going to
press dot to zoom in. Now you can see it doesn't
look very good at the moment, obviously, because
it's not unwrapped. So let's come in and
actually unwrap it. Actually, I'm not sure
if that's an actual, Let's have a look
on the other one. I'm just wondering why there's
an actual seam in there. What I'll do is I'll
just grab them all first and then I'll press Tab. And you can see there's
a seam on there as well. I think actually
the rock generator actually unwrap
them in some way, but we don't really
want to wrap that way. So what I'll do is I'll
press control, Clear seam. Apparently, they're not a seam, not actually sure what this
little pink line is anyway. Let's see if they unwrap one. I'm going to do is I'm going to go ahead
and grab this one, press and I'm going unwrap. And of course it's not
going to unwrap like that, so smart UV project. Click okay. And there we go. We can see though, kind of bitty as you can
see all around here. We don't really want to
unwrap it like that. So let's try a couple
of different ways. Basically, we'll be coming from a certain angle to look at this or the
bottom of the rock, it's going to be in
the ground anyway. So I think the first
thing to do is let's put these into place where we're
going to have them. So I'm going to have
one round the back, so I think I'll have this one coming around the back here. Oh, and the other thing
is, just so you know, the reason why I've left the
floor to the last is because that is pretty heavy on the
blend file when we do that. So I'm kind of
putting that off just till the last part just then. So you'll be able to
actually get that in and turn it down if needed. That's why we're leaving that
bit to the last. All right. Now we'll bring the other
rock round and what I'll do is I'll have
this little rock, you think over here somewhere. Again, it's filling out spaces, trying to make things
look realistic. I'm going to turn this around. So I'll said like so. And then I'm just going
to move it next to here because I'm actually
going to put some actual flowers there. So I'm going to put it right
next to this palm tree, and then I'm going
to put over here. And then what I'll do is I'll
make this one a little bit bigger and put it in the ground. Let me have a look at
what that looks like. Maybe move this a little
bit further this way. So. All right, that's looking good Now let's see if I can actually unwrap these
in a better way. At the moment, we've
actually we have got some seams on here or marks where we might
be able to put them, but I don't think I'm
going to use them. What I think I'm going to do is I'm going to just come in, what I'll do is I'll try a few other techniques
of unwrapping it. So the first one I'll try
is sphere projection. Let's see what that
comes out like. So there we go. You
can see it's better. But you can see
we've got a lot of stretching on the back here. What I'll do is I'll just
come in now and I'll use my mesh and bisect. So let's bisect it.
Just under there. Just under the actual ground plane where
it's going to go. I'm obviously not going
to clear the outer, but what I'm going to do is
I'm going to right click or control if we're in face select
and mark a scene like so. Then what I'm going to do now, I'm going to think about, see if I can actually
unwrap this now. So let's press and
wrap. There we go. Now we can see
that it's actually unwrapped a little bit there. I'm going to try that again. I'm just going to grab the
top of it and then wrap. And we can see that it's
kind of splitting up here. We can see it's kind
of good round here, but this bit not so good. So let's go over the
top and let's try. Rocks, by the way, are one
of the hardest things that you're going to have
to rap in anything. They're just really,
really difficult. And let's actually come
from project front view, let's try that again. We still getting a fair amount of stretching coming down here. What I'm going to do finally
is then I'm going to bring in another mesh bisect. And let's cut it
going across here. So I'm going to write
Click where is it, Mark, Seem control
face, let mark. And then I'll do the
same thing again but going across this way, mesh bisect and cut
it across this way, right click, control mark
scene and there we go. Now let's try that once more. So what I'm going to do is
I'm going to grab all of it and then press you and wrap. And let's see now what
that's un wrap like, it's unwrapping
much, much better, can see it's a much
more even consistency. But we've got a problem
with this part on here. So what I tend to do
then when I've got that, is I will come in
and grab the line. So I'm going to grab this line, let's say, and go all
the way up to the top. Like so. And then
come all the way down to the bottom like so. And then I'll do the
same thing on the, I'll grab this one and this one. And then I'll go all the way
down to, let's say here. And then I'll grab
the top here like so. And then I'll come
all the way down to maybe here. And
then right click. And what I'm going to do is
I'm going to clear the seam. And then let's try that again. So L U unwrap and let's
see if that's any better. Now what I'm going to do is
I'm just going to come down. In fact, I'm going to reset
all the transforms first. I'm not even sure if
I actually did that. And let's try that
again on the rap, and then let's go over to UV editing. We'll
go over to there. And we can see this is what
it's on wrap now, like now, actually this is going
to be this part here. I'm hoping the top in here, I press G, this is
the top in here. As you can see, everything is moving and I just
want to see if I can actually get it so it's not actually stretching
quite so much. So what I'm going to
do is I'm going to press S and pull it out so we've still got too much in there. I'm
not really happy with that. So what I'm going to do
is I'm just going to go back to where I actually
cleared those seams. Let's go on actually
clear those seams again. I'm going to put
those seams back on. So right click mark seen.
Let's try it once more. So you on the wrap
these lines here, these are what I'm
worried about. I really don't want these lines. I'm still not happy
with how that looks. So what I'm going to do
is I'm going to go even further back to where I
actually started this. I'm hoping that I should
be able to take those off. You know what, I'm just
going to do it again. I'm going to press
one, I'm going to press control and clear seam. And then what I'm going
to do is come to mesh. I'm going to go down to
where it says bisect. Let's wrap on the bottom
just underneath there, right click and
we'll mark a seam. And then we're just going
to grab it all and see now if I can get a better
run wrap on there. Yeah, and I think that's the best we're probably going
to be able to get that. Let's make it a little
bit bigger then. I'm just going to look
under the underneath Y 180. I'm just just want to look
under the underneath as well. And then I'm going to put it
back. So let's put it back. Let's finally then
before let's have a look what it looks like on our
actual rendered view. Because after all, that's going to be the most
important thing. And we can see, now we've got, it's probably because we've got a big line
along there anyway. In other words,
we've got a really, really sharp edge on here. So you know what
I'm going to do. I'm going to just come back
and I'm going to see if I come add modifier
and we'll deform. And we're going to go with
a smooth there we go. Now that's looking better. Let's turn that up.
One, maybe three. Let's also see if we can
actually increase that, Yours like so now it's
look in tons better. Now let's press
and unwrap again. And let's press S and
bring those out like so. And we're still getting
some problems with that. So let's press Tab again. Smart UV project. Click Okay. Let's also
apply that control. Control all transforms. Let's try that one more. So on the rap,
let's try that one first. Let's bring them out. Bring them out. There we go. That is about as good as we're going to get. Took
a lot of work. But in the end you can see it
was work that you can see. Now it looks pretty
nice that rock. And now what we need to do
on the next lesson is we'll do the same things for these
try and error with rocks, honestly, they really hard
to undo, unwrap, sorry. And generally, you are going to get some seams along
somewhere because you're basically trying to unwrap
something that bends all over the place and
you're looking like from all angles of it. So you can't really, you know, you can't really
put a seam in here. It's not like you can put a seam behind these where no
one's going to see it. So they are one of the
hardest things to unwrap. So don't worry if you
failed on the first time. We'll do the same thing
now on the next one, and let's see how
that 100 wraps. Hopefully I'll unwrap
better than this one. All right everyone. Thanks a lot and I'll see
on the next one. Bye bye.
100. Modeling Carpet Assets with Curve Spirals: Welcome back everyone to the Blend Four Ultimate Guide
and this where we left off. All right, so now let's come in and we'll do basically
the same thing with this. So what I'm going to do
is I'm going to press a, I'm going to come into mesh and I'm going to
go down to bisect. And then Joe's gonna cut it over here like so. Right
click and mark. Let's press you then wrap
and see what the some wraps we can get away with
this on the first attempt. You know what? That's not unwrapped badly at
all. That is. Okay. All right. We can
go with that one. So that one was much
cheesier than the other one. And finally, this one, which
may be a little bit harder, it's got a lot of sharp
edges as you can see. So let's just do the
same thing on this. So I'm going to press one,
I can see it through there. Anyway, so what I'm going to
do is press A and then I'm going to come in to mesh bisect. And my line is going to be
round about there like so. And then what I'm going
to do is grab it again, So L U Smart UV
Project. Click Okay. And as I said, this
one might be a little bit more of a
pain, but you know what? It doesn't look that bad. Let's have a look,
let's pull it out. And that's some wrap
the best one out of a more. That was
the easiest one. I wasn't expecting
that actually. I thought that would be
much harder than that. All right, so now then
let's go back to modeling. Let's save out our work. So let's save it out, let's go to file
and save it out. And then what I want
to do is I just want to now I've got my rocks in, bring in those final
plants that I have. So you can see I've
got my or ferns or fonds or whatever you
want to call them here. Let's quickly just
go to Tasset manager and let's go to where is it, our plants and foliage. Let's take off our rock. And then all I'm going
to do now is just going to bring out
some more plants. So I'm going to go round
the back here first. And then what I'll
do is I'll bring in one of these fern clusters. So let's spin it round. So R x -90 No, R x 90, let's spin it round. And then what I'm
going to do is make this one a little bit bigger. And I'm just going to
drop it into place, ready when my floor comes in. So let's drop it
right next to there. Let's spin it round
a little bit with R X double tap the and
that's that one in. Let's put in another one. So I've used this one here, so let's put in another
small one around here. Let's spin it around,
x minus x 90. And I'll make this one
a little bit smaller and then drop this
one into there. And a lot of this now is
basically just tiding up. I'm going to press R and X. Just rotate it
around and then and Z and rotate it around just so it's not
stuck in the wall like so. Just make sure it's not
floating on the floor. We are going to sort the
floor out as well so we can actually pull up the floor
probably around there anyway. And then we'll just move round, we've got one in here,
let's move around then to, to the other side. So round here we're
going to have one. And I think then that's it. We're pretty much
done for those, so let's bring it
in and then x 90. And this one looks a pretty nice one that's
going to go in there. So let's drop it down
into, into the floor. Let's make sure it's not quite sticking into the floor like so. And roundabout here I
think looks pretty nice. I'm just wondering
whether this is a little bit too close because you're going to have
to walk past there. So all I'm going to do
is just grab all three of these and I'm just
going to pull them out. Now you can see that I
grabbed this and this. I don't really want to do that. What I'm going to do is come in, I'm going to press on this. Let's press B to
grab everything. Control, just to make sure
I've grabbed them all. And then what I want
to check is I've just not grabbed the last part. Now I have grabbed this,
I'm going to press is, and I think we can hold down shift and we should be
able to deselect them. That's not going to work
because then I can press, you know what, we'll
do it a different way. What we'll do is we'll press
one on the number pad. We'll press Z to go
into wire frame. We'll grab one of these and
then all I'm going to do is just press box
select all of that. And then we know
because we're in actual wire frame,
we go back to solid. We can see now it's gone
all the way through, now I can just
press P selection. And now I can actually
grab this, this, and this, and just move them
slightly this way, just so they can
walk around there. It was a little bit
too tight there. All right, double
tap the A. Let's put this back on the material and now let's actually come round and fix another part
that's bugging me. Fix that. You can see in here, we don't actually have
a floor here at all. What I'm going to do is I think I'll just take
one of these parts. So what I'm going to do
is just going to come in and grab this and
then just press shift, pull it out, rotate it around R x 90 and then Y pull it in. And then let's just
pull it into place and drop that in there
into the floor, making sure that
nothing is obviously poking through like
this. But you see here. And then down a little
bit, so it's under there. Double tap the E, and there
we go. That's that flaw. I'm actually taking
off a list of what actually parts need fixing,
and that's one of them. The next thing I think
we'll actually look at is going to be the carpets. Let's have a look at
these carpets here. Really, really nice
technique of actually making things like
they're same as scrolls. For those of you taking
the other courses, you probably know I'm
going to do this. Let's go into modeling first. And then what I'll do is
I'm going to first of all, come over preferences and
we're going to go to extra. And the one we want is
curves. Extra curves. Let's take that on and then
refresh and close it down. And then what I'm going to do is I'm going to press shift A, go to my curves and
you'll see now we've got holy mole loads and loads
of different curves. Some of these are
just so, so handy. Let's go with the one we want. It's going to be the spiral. And the one we want to
pick is our comedian. And we're going to
pick that like so. And you'll notice at the moment it just looks like a curve. But you will see as we come and radius growth,
bring that up. Now we've actually got
the ability to bring in something that's akin to an actual carpet or
the carpet stock. Now what I tend to do
now, I've got this. I'll bring up the
height, so this height, let's bring it up, Not that way, bring it
up the other way. So like the end of the
carpet is coming out. So you can see now the end
of the carpet is coming out. So it's spiraling up that way. That's what we're
actually looking for. Don't worry about the size
or anything like that. We'll worry about that as
we actually work on this. And you can also use this, by the way, for your cameras. You can use it for that. And you can also use it for
a raise as well. So it's really, really handy
to actually have this. Now, the other thing you
might want to turn down then, is just the amount of steps you will see when I turn this down. Let's say we turn
this down to ten. You'll see now it becomes
a lot more blocky. We don't think we quite
want it on the 24, but I think, yeah, ten is a little bit low, so let's put it on
something like 16. And I think that's
going to look much, much better. All right. Now we've got that.
All I'm going to do is I'm going to pull
it up a little bit. I'm going to press the
S, be shrink it down. And you can see already it looks like the end of a
carpet. So that's perfect. And now I'm going to
do is I'm going to press and Z and pull it down. You can see that that's
not what I want to do. What I want to do
is I want to grab the whole thing Yes. In this. And then what I want
to do is press and for some reason the ends of it. Why are they not grumming?
Let's have a look. I'm just going to make
sure that I've not. I'm going to go to where
is it curve clean up. I don't want to
actually do that. I just want to make sure that I've not giving it
too many edges. Let's just grab this edge. And you can see here
that when I grab this edge, there's
more in there. That's the problem that I'm
looking for at the moment. So let me just have a look. See if I can clean it up. And it doesn't look
like I can clean up. So you know what I'm going
to do. I'm just going to delete it out of the way.
Bring in another one. Just if you make that
mistake that I have, bring another one in and it should come in exactly the same. There we go. Now it
has, now it's come in. Now, I'm instead of
trying to do it that way, we're trying to extrude it,
I'm not going to do that. What I'm going to do
is I'm going to come over to my curve and instead I'll come to geometry and
we'll extrude it this way, like so you can now also see that it's coming in a
very, very weird angle. We don't want that. So
what I'm going to do is I'm just going
to press control all transforms and write
clicks the origin to geometry. And I don't really want it
coming down like that as well. So you know what
I'm going to do. I'm going to turn this off. It's turn off the
extrude like so. And I'm actually going
to come to object, I'm going to come to convert
and convert to mesh. And the thing is once you get very proficient
in three D modeling, you'll know exactly
what's going wrong and you'll also know
exactly numerous, and we're talking numerous
ways of fixing things. If you have problems
like you've just seen what I did with
this actual curve. And now what I can do
is I can actually come in and grab my curve, and I can press E and Z. And hopefully, sorry and Z. And I'm hoping that if
I put this on E and Z, finally I can pull
it down like so. And you can see now that's
looking pretty nice. Now all we're going
to do is we're going to bring this
down a little bit further like so we're not going to worry so much
about the size of it. Then what we're going
to do is we're going to press S and bring that down. Now you can see now
it's starting to be the right size for
our actual carpet. And now finally what
we're going to do is we're going to bring it
down a little bit further. And then I've got this
bit already right near. So I'm going to press
shift S cursor, selected tab control
layer or transforms, set origin to three D cursor, right click, shade,
auto, smooth. And then all we're going to
do is bring in a mirror. So add modifier, generate, bring in a mirror and
let's put it on the Z. Turn those off and there we go. We already have our carpet
now pretty much ready to go. Okay. So if for instance
you want though, your carpet a little
bit closer together, you can of course, go in
and let's just show you. So we can of course,
bring in another curve. So we're going to
bring in our curve, another one like so. And you can see
this radius growth. You can see how you
can bring it in much, much tighter if you
really want to. So that's one way of doing that, in case you're happy with
how this has turned out. Let's leave the
old the way then. And on the next lesson what
we'll do then is we'll turn this into a
beautiful carpet. Alright everyone, so
hope you enjoyed that. I'll see you on the next
one. Thanks a lot. Bye bye.
101. Applying Textures to Carpet for Realism: Welcome back everyone to the
Blend Ball Ultimate Guide, and this is where
we left it off. All right, so now what we
want to do is we want to come in and we want to
apply this mirror. You have got a choice. So you could at the moment, you can still grab it and press, and you can actually
pull it all up. And then what you can
do is you can come in and grab the
bottom of it like so. And then just make
sure clipping is on. And then what you
can do is you can drop it together like so. And if you try and
pull it apart, you'll secos clipping on, it won't pull apart
and if you mess up, just take the clipping off and then you'll be
able to pull it apart. Like so I want to put clipping on and just join them
together and I think actually that's
about the right size for my actual carpet. All right. So now I want to do is I want to apply the mirror like so. And then what I want
to do before doing anything is I just
want to delete this. Going around here,
you can see we've got an edge loop
going around there. And it's not really something we need right in the center. So I'm going to do is I'm
just going to delete edges. So dissolve edges. And
what you could do here is you could actually bring in like five of them, for instance. Drop them right in the center and then grab the center one, come up and put this onto
let's say inverse square. And then press the S button and just shrink
them in like that. And I think that
actually makes them look a little bit
more realistic, although maybe a little bit
too much like a scroll. But anyway, I'm going to
leave mine like that. Now what I'm going
to do now is I want to actually unwrap these. First of all, so
what I'm going to do is old shift and click and grab. I'm going all the
way around there. Old shift click and right click. And what I'm going to
do is mark a scene. It's going to make it
much easier for us in the long run, a unwrap. And then what we'll do
is we'll now bring in a material and we need to go to asset Manager to
find our carpets. So what I'm going to do
is we're going to come down to where it says material, let's put in carpet and there
we go, let's bring that in. Then let's bring it in
in object mode like so. And there we go,
let's leap that other way and let's come
to our carpet and let's put it onto carpet
like so. There you go. You can see we've already got
a beautiful carpet there. And then we're just
going to go to shading. I'm going to press dot to zoom in tab button, and here we are. Here are all our carpets. As you can see, what we
want to do is we want to spin this round, so our 90. And then what I want to do is I want to kind of
put it into place like something like this and then stretch it
out a little bit. So S and X. Stretch
it out a little bit just so it fits because we're going to have three
of these carpets. And then what I'm going
to do it I think I'll probably I think I'll
probably copy this over then. I think that might be easier. I'm just wondering if it will. Now, let's see, first of all, if we can bring in a modifier. So what I'm going to
do is I'm going to press control or transforms, right click, set origin
geometry, Add modifier. And let's bring in a solidify. It's bringing a
solidify like that. And you can see then it's got
the back of this on there. So that's perfect. That's
exactly what I want. So you know what
I'm going to do. I'm going to press shift, I'm going to duplicate this one. In fact No, I'm not.
Because we have forgot one little tiny thing. We forgot the top of the carpet. So let's actually fix the top before we actually do anything. So yeah, I'm thinking
we'll make the top first. So what we'll do is
we'll press shift. We'll bring in a cylinder. We'll put the cylinder
on, let's say 20. And then what we'll do is
we'll press the S button. Bring it in, and
I just want it to pop out of that end
right on there. So I'm pressing S, and that is where I want
it to pop out on here. So then what I'm
going to do is, okay, now what we'll do
is will actually come and we'll bring this in, I'm thinking to bring
this in a little bit, Bring it in,
something like that. Let's press Ed and make
it a little bit longer, just so in the bottom of there. And then what I'll do
is I'll grab the top, pull it out without
proportional editing, and then pull it up, and then I pull it in, and then again, and
then pull it up. And finally, let's
even bevel this off. So control B, bring
in a few edge loops. Right click and
shade, auto, smooth. Now what I want to do is I
want to see the size of this, because I think this is
going to be pretty huge. I'm looking for where's
my human? There he is. Let's bring him over. Let's put him near where it's going to go. So let's put him on the floor. Let's zoom in with the
dot born onto the floor. And then let's look at how
big this actual carpet is. I don't think it's actually
as big as I thought it was. Yeah, That's actually
not bad size. All right. So what we can do, see I'm going to actually
go to modeling now. Just a minute, then I can actually work
a little bit easier. I think actually everything on there then is
looking pretty nice. As you can see, what
we need to do now is we need to grab
this part here. And I'm going to put the
center of it in here. Shift selected, grab it again. Shift, right click, and
then set origin two. Pred cursor. So finally then what I'm also going
to do is I'm going to press Tab and Smart UV
Project. Click Okay. And then what I'll do is
I'll put in the material. So I'll go for wood and
we've got light wood. Let's put that on. Double
tap the press tab. Let's have a look what that
looks like that's unwrapped. Really not nice. It's this top bit that
I'm thinking about. I think what I'll do instead, I'm going to come in and
mark a seam on there. And then I'll mark
a seam along here, right click, mark seam. And then I'll just grab it all. Actually, I won't
grab it all, in fact. Yes, I will. What I'll do though is I'll press shift H and just mark a seam on
the inside of here. We'll just do it properly. This one like so. And then we'll just
call the back. So going all that way and
then what I'll do is I'll take it off of these flat areas because we won't need
a seam on there. And I'm hoping from there
we should be able to then press a Unwrap. There we go. Now that's unwrapped,
much nicer, albeit I think then I
just need to go to V, press the little tab A, Let's make it a
little bit bigger. So, and there we go. Now
one thing that hasn't unwrapped properly
is this one in here. It's like bending, don't really want that. Let's
have a look at it. What I'll do instead is
I'll press Matt Pac click. Okay. And then you
follow it to Flods. Click Okay. And then
spin it round R 90, then bring it more
into place and then just make it a
little bit smaller. Hopefully that's looking
much better as you can see. All right, so the rest of that, he's looking really nice. I'm happy with that while
doing no press al tag. And then all we'll do now, we've got this onto here now. Do I want to pull it down
a little bit like so? And then right click origin three D cursor and now
we can bring in mirror. Turn off the X. There we go. We can now proceed with
actually applying the mirror. First of all, I can grab
this carpet press shift, grab the carpet,
press shift again. What I can actually
do is come to, let's say this one, and
we can move this over. Now if I press and Y, I operate on the next one, so making sure that's
fitting in nicely. And then move to this one and Y, and let's pull it
down to this one. There you go, three
actual carpets. Now what we'll do is we'll grab all three of these
and we're going to go to object and we'll go
to convert and mesh. And then we'll just
join each of these up. Now we control J
and then control J, and then finally control J. And then let's grab all three. Control L transforms
right click, set origin to
geometry. There we go. We've got R three carpets in now let's put these against
this wall somewhere, so I'm going to bring them
over again if you want to add the minty asset manager. So what I'm going to do now, I'm just going to grab this one. I'm going to press X
and just put it against this wall around there. And we also lean over here, Y next to this. Then this one, I'm also
going to lean next to Wool. Put this one over here. And then finally this one
I'll maybe on the floor, I'll press Y 90. Let's
put it on the floor. Let's press Z on the floor. Let's pull it out a little bit. We could lean it up
against this part here, but I don't think we're
going to do that. I think we're going to leave it. So Yeah, they're
looking really cool. I just want to make sure
that they're not flying in the air. There
won't be anyway. Because we're going to bring in the sand and the sand will be lifted slightly
higher anyway. So we might have to pull
these up a little bit. All right, then on
the next lesson, I think we've done the carpet. Let's actually
come and fix this. Well, it's basically
the last real part that we need to
actually put in there. And then once we've done that, we're on to light and then I think we've only
got the floor left to do. And then we can finally set up the composite. All
right everyone. So let's go out and
save out our work. And I hope you're
really enjoying it. We're nearly there now, guys. We're nearly at
the end of it and I'll see you in the
next one. Thanks a lot. Bye bye.
102. Modeling a Bucket for the Well: Welcome back everyone to the
Blender Four Ultimate Guide, and this is where we left off. All right, let's go
now to modeling. And I think the first thing
we'll do before doing anything is we'll actually
bring in or create a bucket. So I'm just going to shift right click and then what I'm going to do is bring in a
cylinder like so, and I think 20 should be
absolutely fine for that. Now we're going to make
this similar to how we did our barrel, but first of all, let's get
this to be a realistic size. So we can see here that's
probably going to be a more realistic size than where it wasn't going to
pull it out a little bit. Obviously, it's not
the right dimensions or anything like that yet. But it does give me an idea how big the bucket
is going to be. Also, let's bring over our guy, because he has to be able to
actually carry this bucket. So we just need to make
sure that he can carry it. At the moment you can see
it's bigger than him. So that's not a good idea. I think something like this. And what we'll do is
we'll put it through so he can actually use a big stick. And then he'll be able
to put it in his back, so I think a little bit smaller and then maybe a
little bit longer, something like this, I think
he would be able to put on his back with a stick and
actually carry it around. So that's what we're
actually going to go for. So the first thing then is
what I'll do is I'll zoom in. I'll press Tab, bend the top in. Press the S button, so
just very slightly. And then we'll do is I'll
bring in three edge loops. And we'll actually bring
in this part here. So what I'll do is I'll put
this onto inverse square. And then I'm going to
press the S button, bring it in, and I think that's a really,
really nice shape. And then what I'll
do is I'll grab each of these and I'm
going to press Shift D. Make them a little bit bigger without
proportion aliting on. So then what I'm just going
to do is press P selection. And just separate those out. Now we're just left with this. Now we've got the right sizing
and everything like that. Let's press Shift and then what we'll do is we'll
come in first of all, and we'll separate these off. We're not going to
need a top on this, so we might as well delete that. We delete faces, we are going
to have a bottom in there. So I'll, I'll just press P and Selection And hide
that out the way, because we're not going to need to work on that at the moment. And then now let's just work
on our actual y bucket. We will want two of them if
we can opposite each other. So in other words,
if I press three, I will want two
which are like this. And then if I poke it up, I should be able to
get these two like. So now let's just see if I can actually work round
and yes I can. So I am going to get
them opposite as you can see because we did
put 20 in there. So right click a mark scene, then I'm going to do, now, I'm going to
press three again. I'm going to come to these two. So what I'm going to
do is I'm going to come to these two here,
just grab the top. And then I'm going
to press in sad, and just pull them up a
little bit and these will be what this actual
handles going to be in. Then' going to do is I'm going to pull them
out a little bit, and next just pull them out. And I think that's actually
looking pretty nice. Now what I can do is I can
actually split these off. If I come in, I can go to L, L and every other one. Like every other one. And then I can press Y. Now finally what I can do is
I can bring in my solidify. I'm thinking if I should
bring my solidify in now, because I want to put a
hole in these as well and also I want to level
them off probably. Let's go on to object mode. Let's right click and
shade Auto, smooth. Then what I'll do
is I'll see if I can put a hole in
those straightaway. So what I'll do is
I'll press shift A. I'll bring in a cylinder. I'll press S, and we can
see it's gone over there. I don't really want that, so I'm going to grab
the whole thing. Shift S, cursor selected.
Grab my cylinder. Shift selections? Cursor. Let's pull it up,
make it much thinner. And you know the other
thing, before I do this, I'm probably not
going to need it 20. It's going to be way, way too many polygons
going around here. So, you know what,
let's leave that off. Let's press shift. We'll
bring in a cylinder. And then what we'll do
is we'll put this on something like 12.
Let's try that. And then I'll make it smaller. I'll bring it up, make
it smaller still, Y, 90 S and X.
Let's pull it out. And there we go. Now we can
see where that's going to go. Something like that I think
is going to be great. And then what I'll do
is I'll grab this. I'll come to modifier, add modifier,
generate a Boolean. And let's grab this
for our Boolean. And let's always put it on fast. See what that looks
like? Let's see, actually, does it want
to be on fast or exact? Yeah, I think fast
is going to do it. And then what I'm going to
do, you can see though, sometimes this happens
when you put them on. You'll see now we've got a
kind of flashing on there. Generally, what that means is
when I apply this control, you will see that if
I delete this out the way that we do actually have another one
attached to there. I don't know why it
does that sometimes. But it does, it could be that I didn't reset
my transformation. So let's just press
controls head. Just go back a minute and then what I'll do
is I'll grab this. Press control all transforms. And I'm just checking
to see if it's that and it doesn't even
look like it's that. Let's have a look on exact. I'm going to put
this on exact this time to see if that
actually fixes that issue. Let's press control then, and let's delete
this out the way. And there we go. It seems
to have actually done it. Now let's come in
and what we'll do is we'll fix these before
doing anything else. So I'm going to come
into each of these, I'm going, let's have a look, Let's press hell on all this. And then what we'll
do is we'll make sure in face right click, triangulate faces, right click. Tries to quads and there. Now let's fix that. Now
finally let's circle in. And what we'll do is we'll
again all transforms. Right click the origins
geometry, add, modify it, and we're going to bring in
a solidify. And there we go. Now that's really,
really coming along, let's bring it in a little bit. And there we go. We're starting to really, really get somewhere. Now with our bucket, let's
actually apply that now. So that's actually done. Now what we can finally do
is we should be able to now right click and
shade auto smooth. So that's about as smooth
as we're going to get. We should be able
to now make these a little bit smaller by
beveling them off. So what I'm going to do
is I'm going to come to ad modifier generate
and bring in a bevel. And what I'm wondering
is it doesn't, I don't think I
split them all off, so I'm just going to look. Yeah, they're not all split off. So let's go back before
we actually do that, before we actually
apply this solidify, because that's not what we want. Let's come in now and
split each of these off. I thought I did, but
clearly I didn't. So let's come in and
split each off with Y. And there we go. Now
they're split off, now that's looking
better. There we go. Let's press control a, let's add modifier and we'll
generate a devil. And there we go, Really, really cool. Let's
bring that down. Bring it up one or
not 0.3 like so. I'm just going to make this
a very, very simple bucket. I'm not even going to point any randomness or
anything like that in. What I'm finally
going to do now is I'm just going to be level
off each of these edges. So I'm going to
come to this edge, this edge, this
edge, and this edge. And I'm just going
to press control bet and just be level those
off very slightly. I might be able to get
away with maybe three. Left click tab. There we go. That is the first
part of our bucket. All right, so I'm
really happy with that. I've got enough room in each of these now to put some rope in. What I'm going to
do now is press al tage, bring back everything. And now let's actually
start work on these. What I think I'll
do with these is I'll turn them into a curve first. Let's see
if I can do that. I'll come to mesh convert. Let's have a luck and convert. Actually I'm going to do this object convert
curve. And there we go. Now we have a curve. Now what we should be able
to do is extrude. Let's see if we can extrude. And they're going to
extrude from the center. And that's why I actually
want to do that. And then what I'm
going to do now is I'm going to solidify
these as well. I'm going to come
in add modifier and bring in a solidify like so. And then what I'm going to
do is I'm going to increase the thickness into the bucket. So let's also see if you can right click and
shade auto smooth. Yeah, it's not going to
work because it's a curve. But what I'm going to do now, I've got those in
the right place. I'm happy with
those straightaway. So all I'm going to do then
is object convert mesh. And now I should be able
to also smooth those like. So finally then with those,
let's press control, lay or transforms right
clicks a origin geometry. And what I'm finally
going to do with those now is when added
modifier generate, bring in a bevel and just smooth those off
and perhaps perhaps make them a little
bit smaller just so they're sitting
in there like so. And I might even
come in, grab them, make sure I'm onto
individual origins and then press essence head and just make them a little bit thicker. Keeping in with
the stylized look, there we go, a beautiful bucket. Now the one thing
obviously we haven't got is we don't have
the bottom yet, so let's pull the bottom up. And we should be good at
making bottoms by now. I'm going to press this
seven to go over the top. And I'm going to come
in and grab this one. And let's say this one, press J, then I'm going
to grab this one. And this one J, I think. I'm just going to make them slightly thinner
than what we did with the actual barrel,
something like this. And I'll just work
my way along like so going from this
one to this one. And then all we'll do on the next one is just
split them off. So we'll just quickly split them off and then why.
And there we go. And then on the next
one we'll do this on the next list and then
we'll just extrude them up, bevel them, put them in
place and there we go. We've got a bucket and
then we can actually make a start on our actual well, all right everyone, to
hope you enjoyed that. And you can see now just how fast you should
be able to create things. You've done this so
many times now with all of these things we've
been creating that, creating a bucket like
this should be easy, even if you were a beginner in the beginning.
Alright everyone. So I'll see on the next
one. Thanks a lot. Bye bye.
103. Crafting a Stylized Well: Welcome back everyone to the
Blender Four Ultimate Guide, and this is where we
left Your Alright then what we're going to do is we're
going to press A to grab, hopefully, did us
split them off first? Press Y just to make sure
the split, there we go. Then we can just press
and pull those out. And then what we can
do finally is we can just press control
A or transforms. Right click the origin geometry, Adn modifier,
Generate, and a bevel. Let's turn that
bevel down to one. Maybe put it on nought point, not three like we've
done every time before. And then what we can do is
we can bring it into place. Into the bottom of our
bucket, just about there. Press the S one and drop
it into place like so. All right, I probably
made those a little bit too small
actually on there, but it doesn't matter. If you want to go
in and actually create another one, then
you're free to do that. But I think we're not
really going to see in the bottom of
that bucket anyway. Let's then apply everything. So I'm just going to
grab everything like so object convert mesh. Let's join it all together. And finally, right click
shade, auto, smooth, and let's reset all of
our transforms like so. All right, so that's our bucket. Add it into your asset
manager if you want to. And then what we'll do is
we'll come into this part now. Now what we'll do is I think we'll make
a start on this again, because at the moment it's a
bit hard to judge, you know, we'd have to break
up little parts and things. I don't
really want to do that. But what I'll do is
I'll come in and I'll grab this one and this one. And then what we'll do is
I'll press shift desk. Kura selected. And
now bring in another. So let's bring in a cylinder. And I think I'll
turn this up to, let's turn it up to 20 like so. And I'm thinking, can I
use each one of these? Maybe that might be a little bit too high because
we want to keep with, you know, that stylized look. So I think 16 is actually
going to be better. And what I'm also looking
for is just making sure that these wooden parts that will be going in
there will look okay. And I think that's
going to be fine. All right, so let's press
essens head and let's bring it down and let's make it somewhere around that sort of thickness I
think will be fine. And then what I'll do is I'll actually hide my other
well out of the way. And what I'll do is
I'll bring this in. So I'm going to bring this in
on the top and the bottom. So I'm going to press
the eye button. And then what we're going to do is we're going to right click and loop tools and we're
going to come to bridge. So finally what
I'm also going to do is I'm just going to
go Alt Shift and click. And then I'm going to press, and I'm going to pull it down, holding the z on the z axis. So now the thing is
about the inside, we're probably going to need
to give it some thickness. What I'll do is
I'll come in lift, click. I'll press Y. And just to separate it. And then I'm going to press
control or transforms, right click origin geometry, add in a Generate, and bring in a solidify. And then I'm just going
to pull that out. And I'm also going to bring back the offset to try and get
it halfway in between. So there we just want a
little bit of an edge there. And then what we're going
to do is we're going to bring these over a
little bit more. Okay, so that's that part done. Now what we'll do is we'll just come round to these blocks then. So I'm going to bring these in, I'm just clicking
on my block, sorry. Alt shift and click and then alternates and bring them in just slightly
over like so. And basically we've
done that just to make sure that you know, that we can see an inside of it. Because obviously
if you've taken this through to a Games engine, you need to have
it double sided. And that's the reason
we've done that. Let's also press Alt tag and
we'll bring back our floor. I think at this point, honestly, we can get rid of
the rest of the, well, we're not
going to need that. So let's delete that out
the way and let's have a look now at our guy,
how he's actually there. I think it's a
little bit too high. So what I'm going to do
is I'm going to pull it down into the floor
a little bit. I think the actual bucket, let's put that over there. So I just drag this over here and then we'll
do is a zed 90. Just spin it round like so. And now I'm just making sure that one the guy can reach it. How big is the bucket is this? Well, a little bit too
big, I think it is. So what I'll do is just
grab both of these. Press the S button, make sure
that we're on medium point. So press the S button and just bring it
down a little bit. And now we'll just check
the actual height. So let's look at the height
with him stood on the floor. So let's put him into
the floor like so. And I think now that's
about the right height. Okay, so now what we'll do
is we'll bring in a cube. So let's press shift date, bring in a cube, press the bot, and all I'm going to do is
just set this to the side, then just to make sure that everything's
going to fit in place, Let's press S and Y then, and shrink it in a little bit. And then I'm just
going to press S and X and pull it in there like so. And we need to make sure that
they don't look too thick, but they look as though they can actually be. So
you can see here. Again, I think it's
still a little bit high. So you can see once I pull
this up, if I come in, grab the top of there
and pull it up, he's going to be turning it from here with a
little handle here. Is this too high?
Actually, you know what? I think that actually looks
fine. I think it looks fine. So what I'll do is I'll
just pull it up a little bit and then what I'll do is
I'll just level off the top. We may need to reset
transformations. That's look, no, we can actually get away with it.
So there we go. That's that part done.
Now what we want to do is we want to actually
split all of these up. I want to come in
and what I want to do is I want to
press Oli Click and going around each
of these like so, and then Y and
split them all off. And then A, and
we'll come in and go to clean up and we're
going to fill holes. So now I'm hoping that I can write click Shade auto, Smooth. And then I'm hoping I can come in and generate a
bevel on these. Let's press Control
All transforms. There we go, Origin to geometry. Turn it down, turn
it up one or two. And turn the segments up because
it is going to be stone. And I think they just
looks so much better. When you actually
turn the segments up, four stone, it just
looks tons, tons better. Let's come in now and what
we'll do is right click and we will shade auto,
smooth on that as well. And then I think we're really
going somewhere on this. Now what we want to
do is I also want to come in and what I want to
do is I want to go to mesh. And we're going to transform and randomize it
just to just a tiny, tiny bit like so. And there we go with a little bit uneven now, and
that's what we want. And finally then what we can do now is we can bring
this part over. So if I go over the top seven, I can hide this part out the
way. I can also hide this. Let's hide this out the way, just so we can see
what we're doing. And then shifty, let's
bring it over like so. And drop it just into a
place where we want it. Something like that. And now we'll bring in the actual wheel. So I'm going to
grab both of these. I'm going to press shift
S Custer selected. And then I'm going to
press shift I'm going to bring in a cylinder. I'm going to rotate this round, so R x 90. I'm going to make
it smaller like so. And then all I'm going
to do is I'm going to pull it on the sides now, so and Y pull it into place. And just make sure then
that is going to be thick enough and I think that's
going to be perfect. All right, now let's right click and shade,
auto, smooth on this. Let's grab both of these. And then what I can
do is I can join both of these
together. Control J. Let's right click and shade, auto, smooth on those. Everything is really
coming together now. Now let's think about
the actual wheel. So what I'm going to
do, I'm going to press control, click, click, control. Bring in the mouse, bring them
into something like that. And then what do is on
each of these old ship, click and then control B, bring them out like so. And then enter alternates
and then just pull them out the metal parts
that are going to be there holding the
rope in case it goes, slides over each side. Finally I'll also
come in an old ship click on the inside of each
and the outside of each, and then we're going
to do is right click and mark a scene. Now finally we can actually
bring in some rope. I need some rope that's
going to go around here. I think I'll do that part first. What I'll do is
I've got my cursor. Where is my cursor?
In the center. What I'll do is I'll bring in, let's think, we'll bring in, first of all, a curve. And we'll bring in a path. I think that will be
easier to work with. We'll press and 90. We'll press S then and
bring it into place like so I think I'll leave my
bucket flat like this way. I don't want to alter it at all. What I'm just going
to do though, I'll grab my bucket and just
pull it up a little bit. So then what I'll
do is come back to my curve and I'm just going to pull it a
little bit more in place, like pull it over a little
bit and then we'll go to my curve and I'm going to come in and change
the depth of it. Change the depth
holding shift borne if you need to like so. And let's just make
sure that it's in place so you can see it's just
overtaking those places. Then what we'll do is
we'll grab both of these sides and we'll press control and three and then
and Z and pull those up. So now you can see that
we do have a problem in that these need actually pulling up to here and
they need going together. I'm going to press
and Y, let's see. And bring those in like so, and then and Z,
and bring them up. So now I want to bring these in. Can I actually bring
them in with S and Y? You can see there, we're
missing just this one. I'm j bring that one to
here and then I'll grab this one and bring it in to
here like so there we go. It looks as though it's
now held with some rope. The one thing that we might
need to do is this rope, at the moment, is
incredibly thick. Do we actually want
it that thick? If we don't, we'll just
turn down our debt for a little bit and just make sure it's all going
to fit in properly. I'm also as well going to
turn down the resolution. It's way, way, probably
too high for this. And then finally, I'm just
going to bring this one in just a little bit. And I'll also grab both
of these and bring them in just so they cross
over there like so. And then finally I'm going to take this one and I'm going
to press control plus, and then I'm going to
minus this one off. So shift click this one, and then I'm just
going to press Shift D. And hopefully I should be able to bring
up that piece like so. Meaning I can actually
carry this on from there. And then I'll grab this piece and I'll pull it up to the back. So you can see now it's going near enough to the
back of there. And that then is perfect
for what I want. I'm going to save
out my work now, so file and save then. What I'm going to do now is on the next lesson I'll
actually create the rope that's going
to go around here. And then we can finally get
all of this together and get some water in this well
as well from the bottom. We also want to make the well actually drop down a little bit. What that means
is we need to cut a boole in through our floor. We know our floor is
going to be set out okay. In other words, we know
we've got enough room, so we just need to make sure
of that before we carry on. All right everyone.
So I hope you enjoyed that and I'll
see on the next one. Thanks a lot. Bye bye.
104. Creating a Rope Using Curve Nurbs: Welcome back everyone to the Blender, full Ultimate guide. And this where we left off. All right, so what
we're going to do now is we're going to come
to this part here. We're going to press Shift
S, cursor to selected. And then what we're
going to do now is we're going to bring in our
rest of our rope. So shift, let's bring
in another curve, but this time we'll
bring in a circle. We'll turn this down. Let's have a look up
what these are on. We should be able to,
let's see if we can, actually let's bring this
down to here like so. And let me see if I can
join this with this. So I'm going to
join this to this. Let's press control J. And there we go. Now
we see we've got exactly the same length of this. Now the one thing I want to make sure is that if I
spin this round, so r x 90 and then
make this smaller, I'm still going to
keep the actual depth, as you can see, of what I
had here, which is perfect. So that means now no
matter how big I make it, we're still going to keep
the same depth as this one. And that is why we want
to use curves for this. So let's bring this one over. And then what we'll
do is we'll press shift D. We'll bring
over another one. We'll press R and X, rotate it and then shift
D. Bring this one over. And then what we'll do is
we'll bring this one over L, shift D. So then
finally we'll bring one more over shift and then
we'll rotate this on the X. So now let's bring in a couple more shift D.
We'll bring in one here, we'll rotate it, so X. And then what we'll do is we'll make it a little bit bigger. Shift D, bring it over
then to the center. So just make sure it's
rotated a little bit. And then last one shift, bring it over and then rotate
it the other way round. So and you can see now just how easy that was to do
that. All right. So now what we have to
do though is go in and do the hard thing of actually marking all
of the seams on these. Because if you don't
do that, they're not actually going
to unwrap properly. So what I'm going to do is
I'm going to first of all, save up my work and then
I'm going to come to object convert to mesh
because we turn it down, you can see now they're not actually that much
on the resolution. Maybe it's a little bit
too high for these parts. We could split them off
and then reduce it. I think actually we'll do that. I'll show you how
to do that as well. So what I'm going to do is I'm just going to come
to this part first. So I'm going to grab all of this part selection and then I'm going to
come to this part and just reduce the amount of polygons so they're not
quite as high like so. And there we go, that then we should reduce it a
little bit more. And now I can grab them both. And what I can do
is going to go to object convert to mesh, and now you can see
that they've been reduced down. All
right, so that's that. Now let's come in
and bring in a seam. So what I'm going to do is I'm just going to come behind
it where no one can see Alt Shift and click
going all the way up there. Right click, and
we'll mark a scene. And then we'll do another
scene right behind it. So Alt Shift click,
right click, mark scene. And then what we'll do
now is work on these. So I'm just going to
grab the whole thing. Press shift H to hide
everything else out of the way. And I'm going to work
down all of these. First I'm going to come in, Old shift click,
shift click out, shift click always on
the inside, if you can. We're just going to
work our way over. I've got one on
the inside there, one on the inside here, here, here, and here. And I'm just looking now. I've got one on there,
haven't got one on this one. Yes I have right
click mark seen. Now all we need is another seam going through
the sides of these things. Ol shift click, so we
don't have infinite loops. Basically we're going to go
down all of these like so. And then I'm going to come
to the back. O shift click. Ok, shift click,
right click and mark. Seen. Now these ones. Of course we don't
need to do that because they're not an
infinite loop anyway. In other words, they
have an ending point on each of them,
so they're fine. Finally, then let's join them all together
with control J. And then what we can
do is we can press control or transforms,
set origins, geometry. And I'm going to go over
to my asset manager now, and the one I'm
looking for is rope. Where is my rope? Hopefully,
I've got a rope on there. If not, I'll have to
quickly go and put that in. So I'm just looking, do I have some rope
on here? No, I don't. Let me go and get some
rope with the power of editing and you will find
that in your resource pack. Now, I should be
able to bring in a rope material, which
is this one here. Let's now go back to our
actual material here. Let's bring this in,
then drop that in, let the shader just load up, and there we are,
some beautiful rope. Let's now delete
that out of the way. And then what we can do
now is we can come to this part and then
click the down arrow, Look for rope, and bring it in. Now you can see straight away that's not looking like rope. But the reason is because
we've not unwrapped this yet, so a U unwrap. And now what we need to do
is just make this much, much bigger on the UV map. So let's go to the UV. And sometimes with rope, you're better off
actually, just. You know, rotating it round
depending on how it comes in. So S bringing out and let's look at this
first bit of rote. We can see they're not
looking quite right, so we might have to just go
in and rotate them round. Now these ones here,
as you can see, they look really nice.
Just this one here. So let's come in, here it is. Let's rotate it, so 90.
Let's try that first. Let's put it into place, let's make it bigger. So there we go. That ropes looking
pretty nice like so. And then let's come
to this one here, exactly the same
thing, bring it out. We want to match it up
with this rope if we can. Then let's come to this one
here. All of these here. Let's come in and just
hide these out of the way. And we'll show you
another way as well, which you can do
this without making everything huge like
we're doing here. Let's press the B and bring
it up, and there we go. There is our beautiful rope. Now of course, we could
come over to our shader, make sure you've
got rope selected. And then what you can do instead is if I come and zoom into it, what I can do, instead of
increasing the UV map, I can actually change
the scale of this. If I put all of these
on five or something, then it will increase
the scale of the rope. So if I go in and
put them on five, you can see it
increases that scale. Let's put it on something
where you can see, so something like two, you
can see it increases it, you can do it that way as well. Let's just prum back on one. I'm happy with what they're at. All right, so now let's
go back to modeling. Let's press Altg, bring
them back, and then Tab. Let's then press Ltag and
bring everything else back. Let's put it onto material just so we can actually
see what we're doing. And the thing, all
that's left on this now is when this loads up, is just to put this
little piece on here that's going to kind
of hold it all together. Just a simple cylinder
which we're going to, you know, pull out a little
bit and something like that. So let's just wait for
this to load up again. We've got a lot of materials
and textures in here now, so it will take quite
a bit longer to actually load everything
up. Okay, so here we are. Everything's loaded up now. And then what we want to
do now is, as I said, let's bring in this part
that's going to come on here. We'll grab this shift
desk, cuts to selected, then we'll bring in a cylinder. We'll leave it on
16, that's fine. And then what we'll
do is just put this into place so we're going
to bring it down to here. Make sure it fits in, it
doesn't need to be perfect. Just make sure it's
roughly in the center. Press the S ball,
make it smaller. And then finally, what
we can do now is press S. And then what I can do is I can bring out
the top and the bottom. So I'm going to press, I
just to bring it in and then enter and pull it out. Then all I'm going to
do is just lift it up just a tiny bit. And just drop it and make
sure that it's into place. None of that ropes going
through there. There we go. Let's right click,
shade, auto, smooth. I don't even think with
such a small part. I'm even going to be
level that off actually. I think I'm just going
to leave it as is now. Then what run to is
the actual wheel. So what I'm going to do is I'm going to come over to this side, I'm going to grab
this part shift desk because the selected tab. And then what I'm going to do is I'm going to press shift, I'm going to bring
in another cylinder. This time I am going to put
I'm thinking to put it on 20. I should be able to
get away with that. To between Yeah,
we'll do that 20. And then what I'll do is
I'll make it smaller. I'm going to rotate it
then on the x x 90. And then what I'm going to
do is I'm going to press and Y and shrink that in like so, maybe a little bit more. Let's actually have a look at how big this is going to be. Now imagine our guy is
going to come there, is going to be pulling
it with the handle. I think this is a
good size actually. What I'll do now is I'll
bring in the center of it. I bring it in and
then bring it out. I'm also then going to
add in a edge loop. Right click, mark seen. Now let's bring in
the front of this I and then E, and then control. And we'll mark a.
Same as we go along. Okay, on the next list. And then what we'll get
in is these handles. And then we should be able to start actually
texturing all of this. All right everyone. So I
hope you enjoyed that. And I'll see on the
next one. Thanks a lot. Bye bye.
105. Texturing the Stylized Well for Realism: Welcome back everyone
to the Blend of Four Ultimate Guide and this
is where we left the art. All right, so let's now come
in and sort out our handles. I'm just wondering if
And grab two, miss two, grab two and then correct press
control shifting plus no, it's not actually gonna
work. It never does work. So what we'll do is
we'll just go round miss two and grab two. So grab two like so. All right, so we've got this. Now what we want to do is
just make some simple handle. So all I'm going to do is
I'm just going to press I. You can see that they
don't come in properly, so let's reset all
of our transforms. Let's also right click
and shade auto smooth. And now let's try
that again with I. And now they come in
much, much better. Let's press E then. And then what we're
going to do is press alternS and
bring those out. And we can see as
well that they're not exactly the shape that
we actually want them. But we're going to
fix that now with individual origins and
put this on normal. And then what we'll do is
we'll press and Y and you'll see now that we can actually
bring them all in together. So that's looking more
like those handles. Now if you're not happy
with the length of them, if you want to make them
a little bit longer, just press alter Ns and
we can pull them out even more and then and Y
again and pull them in. So All right, I'm
happy with those. I think I want one more
piece of metal on here. So I'm going to press control. Click, right click, control
B then and pull it out. And then all I'm going
to do is press E, then just pull it out
a little bit like so. And then shift, click, shift click, right
click, maxing. Okay, So we're pretty much
done with all of this now. All we need to do now
is bring in our bevel. All I'm going to do is I think I can join all of this
up together, actually. So I'll join it all up
together with control J. I'm going to press
control or transforms. Reset them. Right
click, shade to smooth. And then what we'll do is
we'll generate a bevel. And there we go,
there's our bevel. Let's turn it all the way down. Turn it up one still too high, so let's put it on. Not point. Not three, maybe? Yeah, I think that's going to
look much, much better. Now, let's come in and
think about our materials. So first of all, let's
bring in some wood. So I'm going to grab
everything at the moment. I'm going to press
you Smart UV project. Let's bring in our
wood, wood, wood. So let's then come in to the metal parts.
So we'll grab these. We didn't actually make
this part metal yet, so I'm just going
to grab this one. Go in there and then this
one round the inside of there plus down
arrow, black metal. Click a sign and there we go. And then I want these to
actually be metal as well. All I'm going to do, I think the easiest way can
I actually come in and hide my belt then, will it allow me to do old shift click
around all of these? Yes, it will. That is perfect. Going around there, There, right click, mark a scene, and then we should be
able to come in now. L, L, L, L and L. And then we go to materials
and we'll assign those. So now the one thing
I do want to do a thing is just to level
these little edges off. I don't think I
particularly like those. I'm just wondering if
I grab one of them. Press control, how
they're going to look. Look, do they look any good
like that? I don't think so. Let's go back and what I'll
do instead is just grab this top press control B that I think is
looking much better. So what I'll do is
then is I'll grab the other ones and
we'll just bevel, the more we actually
see that one. There we go, level the
off, very, very slightly. So fine press control B. Now pull it out. There we go. They look much better
than those sharp edges that we actually had really, really happy with,
how this looks. I don't think I'm going to do anything with the metal or wood. It looks good enough. You can see here, we do
have a seam on this part. I'm just going to come in and what I'll do
is I'll just grab this part Smart UV project and just see if I can
make it a little bit better. And there we go. Now that's looking better. Then I'll think,
I'll grab this one. Smart UV Project. Click Okay. And then
I'll grab this one. I'm just grabbing them separate. And the reason I'm
doing that is because I know they'll appear
on the UV map, a little bit smaller
within the UV map, giving us a better or
higher resolution. There we go. Now we can see that's looking
much, much better. All right, now
let's do our stone. So what I'm going to do
is I've got this here. So this one is
called Gray Stone. Let's come in and
we'll look for Gray. Then what I'll do is we'll
press a smart UV Project. There we go. There's the stone. And then now come into this and we're going to make
this the wall color. I'm going to just grab this one. I'm going to press control L and I'll copy link materials. And then what I'll do is
I'll come into this one, press tab and smart UV project. Click okay. And there we go. But we definitely don't
want it like that. We're going to go over then to, you'll be editing and what
I'm going to do is R 90. Let's spin it round so
it's going the right way. And now we can see we
do have a problem. It's the inside and the outside. So what I'm going to do is
I'm just going to grab these. Now I'm going to press, and I'm just going
to bring that down, and we can see that
this and this, these should be together. So what I'm going to do instead, is I'm just going to press
shift H just for 1 second. I'm going to go around the back. And for something like that, you can see here
what the problem is. I think we've still
got on our solidifies, Let's press control
A, and there we go. Now let's try it grabbing
everything you V project. Now let's have a look at what
that's going to look like. We might have to
do this on our own actually rather than
this because it might make it ship click
much easier and now grab it all and
then press you wrap. That's not worked. Why
has that not worked? Because we need one
more right click, then we'll also a
seam on the bottom. And then we'll grab all of it and we should be
able to unwrap this. Now let's have a look.
Yeah, it's unwrap there, but let's pour a seam on the top because we can't
see those anyway. And then we'll grab
it. You on the P, and there we go,
nice and straight. That's what we want.
90. Let's bring these then into place. If I put those there,
let's have a look. You can see we've got
dirt on the inside of here that looks
absolutely fine. It's just this one
on the outside, which I think will
be this one and y. Then what I'll do is I'll turn that round O hundred and 80. Spin that round, there we go. Let's press, bring back everything now that's
looking tons bare. All right, so the last
thing then we need to do is we need to just
go into this part. And part of the,
well, we need to grab this part here and all I'm going to do is
just press Shift D, Bring it down, and then I'm
going to press P selection. Separate it out, grab
it now and press A. And then you're just going
to press E to pull it up. Make sure you press Z just
to attach it to that. And then what we're
going to do is we're going to press to fill that in. And then to fill it in, and then you're going to make
it a little bit smaller. So you're just
going to press Tab. You're going to make it
a little bit bigger. Sorry, not smaller. And then now we're going to
come to our floor. So we're going to grab our floor and what we want to
do is we want to add I'm just wondering the easiest way to
do this because this floor it will need, you know what, we're
going to leave it there. We're going to leave it
there and we're going to actually put in that boolean. I'm just going to
pull it down to here. We're going to put
in that Boolean when we've actually
done our floor. I think it's going
to make it much, much easier for us rather than doing it now
because we've got a lot of adding in different
things to our floor. Now let's come into this
bucket and what I'm going to do is Smart UV
Project. Click Okay. And I think I'll grab, I'll just put it the
same material as this. I'll grab this one. Press
control L link materials. There we go. And then also do is come into this
and I'll change the materials over
to be black metal. Then what is I'll
grab the whole thing, not all of the whole
of the bucket that is. So let's just grab
our bucket a, a, and then S. Let's have a look
at that. And there we go. That's a really,
really nice bucket. You might want to
make it a little bit uneven on these parts here. I think if we going, yeah, we've applied our bevel, but you could still pull them up and add a bit of randomization. But I don't think I want to
do it in such a small object. Last of all, then,
what I need to do is I need to come in and I need to
grab just the top of here. So grab just the top of there. I'm going to press Shift and I'm going to pull
it up very slightly, just before it reaches the
bottom of that bucket. I'm going to press Selection
and just split it off because this is not
going to be part of the Boolean that
we're going to use. And then all we want to do is we're going to change
this for water. So we'll come to Asset Manager and we'll have a
look for one that says water and areas
are water material. So let's bring that in.
Drop that in there. Let it just load up. There is our beautiful water. Let's delete that. And then
what we'll do is we'll come to the top of here and
put this onto water. There we go. We've got
our well all done. All right, so if we
finally got that done, what we'll do then
on the next lesson is we're going to actually work. I think actually on
the next lesson we'll start on our compositing.
We'll start on there. You can see we've
got a little bit of metal also missing there. So we'll work on
our compositing on the next lesson just so
we can get a nice image. What to expect and all
that sort of good stuff. And I'll see on the
next on everyone. Thanks a lot. Bye bye.
106. Setting Up Render Compositor Layers for Enhanced Visuals: Welcome back everyone to the
Blender Pot Ultimate Guide, and this is where
we left it off. All right, so we've got that now Let's grab this
one and this one. And what we'll do
is we'll just press control L and we'll
link materials. And then finally on this one here we'll just
minus off this wood. And finally we'll
just grab it and, and Smart UV project. Click Okay. And there we go. There is that little
piece of metal in Now let's join this together
because of the moment, we've kind of got
a lot of pieces all separated and I
don't really want that. So I'm going to join
all this together. But first of all, I'm
going to go to object, I'm going to convert to mesh, and then I'm going
to press control J. And again, this is something that you could
add to your stone once we've finished it and put
it in your asset manager. All right, so now let's come around to where
our camera was. So our camera is here. And what we're going to do is we're going to first of all, move this camera to a
bit of a better shot. So if I come to view, I'm going to get
camera to view then. And what I'm going to
do is I'm going to set my camera up round
here somewhere. I'm also going to go
and pull it back, so I'm tilting it up as you
can see something like this. I can see from here that my floor probably has to
come out a little bit more. So all I'm going to do is
I'm just going to press S and pull it out a
little bit more like so. And then with my
camera, not my floor, so I'm just going to press control shift and
yours pull it out, like getting the
whole scene in there. All right. So that
looks perfect to me. I can click this off now
and my cameras all set up. And now what we need to do is just check our sky just to make sure our sky is all
set up, ready to go. So let's first of all
save out our scene. Then what we'll do now
is come to our sky. Let's come over to
our shading panel. We're going to put
this onto a world, we're going to
zoom a little bit, and here is our actual sky. I'm, first of all, I'm going to put this
to my camera view, so I'm going to press zero and then we're going to put
it on rendered view. So let this load up and then what I'm going
to do now is I'm going to put the sun intensity
probably a lot higher than this. Because we have to
take into account, once we in fact, you know what, we'll leave the sun
intensity at 0.1 for now. And then what we'll do is we'll actually 2.97 we'll just change the air to 2.97 so make a much more
yellow, vibrant color. And the other parts on here, we're going to keep the same. Then what we're going to
do is now we're going to come over to modeling again because we don't
need to actually mess around with the
sky at the moment. Then what we're
going to do is we're going to come over to our options on the right
hand side, under cycles. We're going to render this
out at the moment in cycles. And what I want you to
do is I want you to make sure that your
maximum samples are on 100 or something like that just to get
our first image. I also what I want you
to do is just make sure as we went through all
of these points before, just make sure that you've
got all of these set in, the ones we set before. So basically copy what
I'm copying for now. And then also make sure
that your color management, you've got it a
medium high contrast. And finally then
what we can do is we can save out our work
before we do anything. Because sometimes, you know, Blender can crash when
you actually rendering. And then what I want you to
do is put this on wire frame. And now finally, let's
hit that render bond. So let's render image and let it wait to load
everything up like so. Again, if it ever comes up with out of memory or
something like that, go over to the
simplified burn reduce the textures and then you shouldn't have a
problem from there. All right, so we
can see that we've got this many samples to go, I'm hoping I'll left noise on. And then once this has finished, then we're going
to hop in over to our compositing and we're going to see what we can really, really do with this and
really bring this to life. I'm hoping that you've got this far and you
take this image and then you'll see in the compositing exactly the difference
that it's going to make. All right, I'll be back when
this finishes rendering. Okay, everyone, so we've
got our actual image. This is the Famot
image that we've got. But one thing we forgot
is I forgot to come over to the right hand side
over here on these three. And we actually need
to tick some of these passes on because if
we don't take passes on, we can't actually bring
in our ambient occlusion. So the passers we're
going to tick on. We're going to have
a lot of lights in this scene coming
from the windows, coming from the lights that
we haven't created yet. So we need to make
sure that we've got the ability to mess
around with our emission. So you will see here we've
got one that says emission. We also want to make
sure that we can mess around with our
ambient occlusion. That is all the shadows
and things like that. And I think for this scene. Honestly, you can really
go overboard on this. You don't really want
to go overboard. You don't want to be
messing around with things, for instance of the normals. But what I do recommend doing is when you
finish this course, go away, go into the
compositor and turn these on, and then mess around
with them once I've showed you how to
use it in each of these things and you'll
get a really good idea of just how and what you can
actually do with things. Like for instance, if you've
got some volume in there, We do have a course
on lighting where we go a lot more into depth
on this sort of thing. And I recommend if you've not seen that one, check it out. All right, so now unfortunately we're
going to have to go back and render it because if you
go to compositing right now, you'll see that
there's nothing there. And the reason there's
nothing there, even if I use nodes, you'll see that
I've got these on, but they won't
actually work unless I actually re render this out. So that's why I actually
need to re render it. So let's go to render and
what we'll do is render image and again we'll just
wait till this finishes. It should be faster this time. And the reason is
because we've got persistent data ticked on,
so it should be faster. And once this has finished, we'll go into the comes
here and get that set up. Okay, so now you can
see it's finished. It took 1 minute, 21 seconds, which is pretty fast. And now we can see
that we've got a really, really
nice image here. Let's close this down then, and we're in the compositor. And what I want to do
first when you hit in the compositor is let's
set this up properly. So let's first of all
press the end button. And then we can just
hide this out the way. And then all I'm going to do is going to come down to here, left click, drag down, just so we've got all
of that room there. And then finally what I
want to do is want to come to the left hand side
and drag this across. This then wants to be
set to image editor, and you want to click the little down arrow, click Render. And the one you're looking
for is Render Result. And now because we've got
this here, we can really, really see what these different
things are going to do. So at the moment you can see that we've got our
main image here and we've got all of these
rendered layers or passes. And what we want to do is this, at the moment is the one
where the output goes. If I unplug this, you'll see
it disappears because it doesn't have any
output at the moment. Now let's come in
and first of all, the first one I
always mess around with is going to be
the ambient occlusion. So what I'll do is I'll come in and if you plug the
ambient occlusion in, you'll notice straight
away that you're going to get a really,
really grainy image. So you can see here we've got
a lot of grain over there. So the first thing we're
going to do is I'm going to wear press shift
date and I'm going to bring in a D Noise Let's
drop that in there. And then it's going
to have to think about it before it
actually does it. But now you can see it's
actually cleaned up, all of that noise and you're going to see a huge
difference just from this ambient
occlusion. Huge difference. Let's first of all
though, have some control over our ambient
occlusion shift date. Let's bring in a color
ramp, color ramp. Let's drop that in there. And then what we'll do is
we'll drop in another node. Because at the moment we
haven't got so much control, we've only got two nodes. If I bring in then one more
node and drop that in there, like now we'll see is as I
move this up, you know what? As I move this up, you'll
see it has to think about it every single time before
it actually loads up. So you'll see when it loads
up things get darker. Now, I recommend before doing that just plugging your
ambient occlusion, bypassing your D noise, And now you should get it near enough in real time
as you can see. So now we can really play
around with this like. So let's bring this one
then just to the side of this little downwards
V. And then let's bring this one just below
where it says linear. And we should end up with
something like that. We've got some really
nice beautiful shadows here, you know, going down here, which you
can really play around with, but especially on the top, it's really nice and bright. And that's exactly what
we're looking for. Now we've got that.
What we can actually do is now we can plug this in to our actual image and
kind of put it underneath it. So we're going to overlay kind of our main image over the top. So what I'm going
to do is I'm just going to put this over here. I'm then going to
bring in a mix. So you're going to
bring in a mix color. And what you're going to do is you're going to put that there and you're going to set
the mix to multiply. So let's set this to
multiply like so. And then what I'm going to
do is I'm just going to put this on naught 0.9 for now. And I'm going to plug
in my ambient occlusion into the bottom of here. And then I'm going to
plug my main image into the top of here. And then finally,
let's plug it all in. And there we go.
What a difference. That makes what a difference. And from here now we haven't got our de noising,
just remember that. But from here you can really
turn up your shadows. Turn down your shadows. And you've got so much control over there. What am I doing? I just need to press
control shifts head. No, I went back, there we
go, control shifts head. And what I'm going to do is I'm going to just pull this up, just that minus there,
and there we go. Now let's plug in
our D noise as well. So if you're plugging
in our D noise, you'll see we'll
get rid of all of this grain once it's
actually thought about it and now it's a
beautiful clean image. All right, so that's
looking pretty nice. Now what we're going to do next is we're going to mess around now and on the next lesson
with our actual emission. So this thing coming
out of these windows, we want to make sure
these are looking really, really nice and have the ability to actually
control them as well. All right everyone. Basically
what we're looking for in this one is we're going
for a kind of sun rise, a sunrise where the
lights are still on. From the referencing that we discussed in the
start of the course, we want a sunrise where the
lights can still be seen on. Because I think,
you know, we could, it's much easier to take a day, you know, image of this. But I think to make it
a little bit harder, let's go for a sunrise. All right everyone.
So I hope you enjoyed that and I'll
see on the next one. Thanks a lot. Bye bye.
107. Adjusting Compositor Layers for Optimal Results: Welcome back everyone
to the blend of four Ultimate guide and this
is where we left off now. I'm just going to quickly save out my work that
I've got for now. And then what I'm going
to do is I'm going to bring in now a hue
and saturation. So let's press shift
and we're going to just type in U and saturation. Let's bring that in now. And then what I'm going to
do is bring in a glare. But I think you can
actually bring in a glare. Let's have a look. Yes, we can. So let's bring in a glare. And then what we're going
to do is we're just going to alter a few
of these and then we can alter them back once
we've actually finished. So let's put the U
first of all on No. 0.567 Let's put
the saturation on, not 0.9 let's put the value on 1.85 And finally let's put
the Ac on 0.825 Now again, copy what I'm actually
doing with this. And then once you, once
we've actually finished, we can go through
and look at what these options do next of all, then let's plug in the emission. So let's plug in the
emission into there. Let's then plug the image from the emission into the
image of the glare. And finally then I want
to plug in this glare. You can actually come in and
I think it's shift control. There we go. Shift control. And then you can actually see what you're actually doing here. As soon as I though,
delete that. As soon as I plug this in, you'll see that we'll actually have this on there as well. So it's up to you which
way you actually do it. So what I'm going to do is I'm just going to plug this in. I'm going to work from
this that I can see. I'm going to lay it
load up. There we go. Then what I'm going to do
now is work from here. I can see these are here Now, the other thing is you might not want to turn off the backdrop. You can just come up to here like so. Or you can turn it on. And the other thing
is you might want to make it a little bit smaller. So to make it a
little bit smaller, just open up this and
it's on the view. And then we can actually
zoom it in or zoom it out. So making it really, really easy to actually
work with this then. Okay, so now I'm going to do
is I'm just going to come in and instead of it
being on streaks, what I'm going to put
it on is fog glow. So let's put it on fog glow. And now we can see that's
looking better already. This is basically
how realistic it is. Let's say we can have it really
low as you can see there, or we can have it
on high quality. Let's put it on high quality. Let's put the threshold on one. Let's put the other thresholds, or this threshold here, on zero. Let it load up. And there we go. And let's keep the
size on eight. Now if we come
over to this size, now you can see that I can
actually change the hue. So if I bring this up, you can see we can change
completely what the hue is. And the reason it's set on 0.567 is because we're giving it a little bit of that orange hue. The other thing is if you
turn up the saturation, you'll see it gets much
more of an orange color. So I've tried to
actually put it on something as realistic
as possible. Now these two here
basically accentuate these. So if I bring this
down, for instance, you can see that I can take
that glow a little bit down. So I'll think what I'll
do is I'll keep it on 1.85 and then finally the fact I think the Ac actually messes around with all of them together, actually, so I can really, really
bring it up like, so I'm going to
leave the fact on, not Er 0.825 so let's put
it back on Er 0.825 like so now at the moment
we have this image, we've got our ambient
occlusion on. What we want to do now
is we want to actually turn off this backdrop and
we want to get rid of this. We want to actually
join them all together. The easiest way to join them all together is to take
this multiply shift D, instead of it being on
multiply, let's put it on. Come down to where
it sees light. Then what we'll do is
we'll put this on naught 0.867 And I'm going to
plug in this to the top. And we're going to plug
in this to the bottom. And then finally I'm going
to plug in this to my image. And let's have a look at what we get now with our lights.
And there we go. Now we've actually got some
really, really nice lights. All right, So you can see once we've got our lamps
and things like that, these are really going to stand out much more than what you know than
these are the mumps. Once we've got some
lamps in there, they're really, really
going to have a glow. So from now you can actually come in and mess around with
this a little bit more. These are what I'm
going to set mine out. The one thing I think
I need to do is I think before I do any
more on the comps in, we're going to finish
that off in the end. This is good enough
now to actually work in and get an idea of
what you're working with. I think what we'll do is
I'll come to just my shader, so come to shading. Let that load up. There we go. And then what I'm going
to do is I'm going to now change the actual light and I'm going to make it 3.45 You can see here that
it says out of memory, I'm simply just
going to put it on, so I'm going to put it on 3.45 Where is the Sun intensity? 3.45 Let's see if it
actually works now. We'll put it on shader. And sometimes this is where
Blender fall will crash. And you can see now though it's actually done that for us. All right, finally then let's
put it onto wire frame. Normally it won't crash when
you put it on wire frame. And what we're going to do
now is one final render. So we're going to go to render image and what you're going to see now at the end of here, it's going to actually
render this out. Normally you can see it's very, very bright at the moment. But then what it's
going to do is it's actually going
to bring in all of that composite that
we've just been working on. He always does that. It'll render out 200 and then at the end
he'll actually do all the computerization of
actually the compositor. So that's what we're just
going to wait for now. Wait for it to do that. And then what we're going to do then is, I think on the let's have a look how much time we've got left. We've
still got time. So I think what we'll do then is we've got the lights to do. I think the best thing we
can do is do the lights. Then we can do our normals, we can clean up the seam, and then finally we
can do our floor. And then we can get
our final compositor, because we can still
do some more work on the compositor as well. We can do things like, you know, make the scene a
little bit sharper. We can change the actual hue of the seam and things like that to get a really,
really nice image. Okay, so let's now
wait for this to finish and you'll see now
it's nearly finished. You should now go to Composite. And there we go, Composite. And there we go,
There is your scene. And you can see now we've got that real sunrise that
we're actually looking for. You can see the sun's
coming down here. Really beautiful scene. All right everyone. Let's now come in and close that down. And as I said, we're
going to go over to modeling and let's put this
on object mode at the moment. And what we want to do now
is create some lights. Now the thing is about lights. They are expensive if you start putting a load of
actual lights in there. So you do need to take that into account when you're actually
building your lights. The first thing is
though, I want to create a light that actually
suits the scene. So what I'm going
to do is I'm just going to shift right
click over here. I think I'll start
with a cube, actually. So let's press Shift. We're going to bring in a cube. I'm going to bring it up. And then what we're
going to do is I'll make the cube a little
bit longer, so said. And then I'm going
to come in and grab each of these sides. So, and I'm going to press control B and bring
those in like so. And I think that's going to
be a good start to my light. And then what we'll do is
we'll press Essence ad, put it onto Global and
Ed and bring those up. Then what I'll do is I'll
bring in three edge loops. So I'll grab this one
all shift and click. I'll make sure I've got
this inverse square on. And then press and
bring it out a little bit and just
make it a little bit F. All right, so think that there I think what I need now
is to bring these parts in. What I'm going to do, I'm just going to see if I can come to these parts and I'm going to
press control Shift and B. And I should be able
to bring them in like, so now that is what I want to do all the way around
each of these. So I'm going to come in
a shift, click, shift, click, come back, put
it onto my verses. And then what I'm going to
do is I'm going to press control shift and
then turn it up, maybe one like so something like that I think is
going to be perfect. Left click. And there we go. Now we've got some really, really nice perhaps
lights in there. The one thing is I need
to, before doing that, because I forgot is
bringing some edges along. Ears Alt shift, click,
going all the way around. Let's pebble these out. So we've actually got something that the actual glass is actually held in,
something like that. Let's then press control B, bring it back one
and pull it back to maybe something like that I think is going to
be about right now. I want to do is I want
to grab each of these so I can grab this
one and this one. And then what I'm going to
do is I'm going to press and without proportion editing on and I can't pull them up, which means that I need it
on medium point and like so. And then what I'm
going to do is I'm going to pull these
in a little bit. If I now put this back, individual Origins press
the S born assured, be able to just bend
those in a little bit. Like so that is exactly what
I'm looking for, Al right, on the next lesson then
we'll start actually making these kind of
round bits for the light. And you'll see just how easy this is to do.
Alright everyone. So I hope you enjoyed that. And I'll see on the next one. Thanks a lot. Bye bye.
108. Modeling Additional Light Sources for Scene Illumination: Welcome back everyone
to the blend of four Ultimate guide and
this is where we left off. All right, so now
I'm going to do is I'm just going to
come in and what I'm going to do is I'm going
to see if and grab these two and then press
control shift and plus, and I'm just seeing
if I can go around. In fact, I don't need to do
that because what I can do instead is I can just grab
them going all the way around. So all the way
around like so and then just put this back onto Ti. Now I should be able to
press control Shift and B. And then let's pull them out. Not, try not to go over. As you can see, I'm going to turn it up. Left
click, right click. And we should end up with
something like this now, which is pretty nice
as you can see. Right click, shade,
auto, smooth. And what you can see is I just was very careful at not going over this point
here on these parts here because we need to
actually use this part. I'm just actually wondering
if instead of doing that, what I should do is I should just come back
without doing that. So let's press controls head. Because these bits I'm unsure. I think I want them straight
is what I'm saying. What I'm going to do instead of doing that is I'm just going to come in and I'll grab
them coming from here, we'll grab the one. This one. This one. This one. This one. Let's go round then. What we'll do is
we'll just press Shift de, like selection. And now let's
separate those off. Let's press Tab. Grab
just these parts. Press control or transforms
the origins, geometry. And now I'll do is we'll add
in a solidify, pull it out. And that is what I want to have then now what I can do is I can come in to these
parts on the inside. So I'm going to hide
these out the way. So I'll hide them out of the
way. Come to these parts. Now what I'm going
to do is again, I'm going to Alt shift, click, shift, click, Put it on vertex. And then what I'm going to do is press control Shift and
B and bring them out. Now you've got to be careful that you don't split them over. As you can see, we really
don't want to split them over, so we just have to
be very careful that we bring these up to near
enough where they can go, left leg. And there we go. Now if I press Alt H, bring back those parts. I should then be able to come to this part now and bring it in. So I'm going to
come into like so. And then all the way around. And then what I'm going to
do is I'm going to press tests and bring those
in a little bit. And I've made those
for some reason, a little bit smaller. Let's press al tests now. Bring them in very
slightly. There we go. That's what I'm looking
for. All right, so now we can see we're actually getting
somewhere with that. Now what I want to do, I want to actually make
the top for this. So what I'm going to do
with the top and bottom, I will grab this top here. I'm going to press shift, I'm going to bring it
down a little bit. I'm going to press the
S bond to bring it out. And just put it over
the top of this. But I want it to come
probably around here. So what that means is I need to make these a little bit bigger. So I'm going to press and, and just pull them
up very slightly. Come back then to this part. This part in here,
hopefully this part here. And then my canoes,
I can press and pull that up maybe here. And then what I'll
do is I'll press, I bring that in and
then pull it up, maybe something like that. And then finally what I'll
do is I'll press control. And hopefully I should be able to bend that, not going too far. You can see I can just
get it around there. What that means is, first
of all, I'll pull it in, then I'll press control, and then we should be able
to bend it in that way. And you can see now
that's looking. Nice lamp. We'll just grab all of this and wonder why my floor
keeps getting selected. Yes, that's why, because
it's part of the floor. So what I'll do
is I'll just grab my floor. Let's grab it. Let's press P selection. No idea, I'll made
it part of my floor. But anyway, let's
grab both of those. Shift H, hide everything
else out of the way. And then what we'll
do now is we'll come to the center part of this and I'm going to press the
Eban, not going too far. If that happens, what we're
going to do is I'm thinking, I'll just, yeah,
I'll split this off. So I'll press Y. I'll
press S. And then I should be able to bring it in now
with no problems like so. And then what I'll
do is I'll press E, something like that. And now finally I can come in. Old shift, click Alt, shift, click Olf, and just join
that in. There we go. Right click, shade,
auto, smooth. There we go. That's
a really nice line. Now we need to think about
the bottom of the line. Of course, same thing again. Let's grab the bottom of it. And then what we'll
do is press Shift and then pull it out. And then I'm going to
pull it up into place. And then pull it out
a little bit more. And then I'm going to pull it down to maybe
there press the born. Then what I'm going to do
is I'm going to press, I think actually that's
looking pretty nice already. So what I'll do is I'll
press and bring it in. And then, and then then, then I'll now bring this out a little bit. I'll
bring it to there. And then bring it out like so. And then then finally the last bit I want to
bring it down to, all the way down to
here, press the S board, so and then bring in
a few edge loops. One in the center. Of course like normal click
put proportionality on, press the S board and bring
it in and tape that in. And that is beautiful light. All right, so now
we've got our light. This bit might be is it
a little bit too big? We could make it smaller, we could come in and
grab the top of it. Control plus just go
all the way down. And then what we can
do is we can press alterns without proportional
editing on Of course, Alan, let's try that again. Over here. Alan, is it going
to work holding shift? Can I bring it in?
Not quite so much. Yeah, I don't think
actually that's going to work because we have a
lot of edges in here. We could instead join
these up. We'll try that. We'll come to clean up and
then we'll merge by distance. And then if I just turn
this up one, maybe two. Let's try not 0.5 No, not 0.5 0.5 There we go. Then we can join
them in like that. I still don't think
that's going to work. You know what, We're
going to leave here. We can split it off. Actually,
we can do it that way. We'll press Y,
we'll split it off, We'll make it smaller, and
then we'll pull it up. Let's just look. Yeah, that's looking bed, that's what I want. We can see that this face, we actually have a face here. So we just then need to make sure that this part
here as you can see, is actually in our
light like so. And there we go. I'm just making sure everything is
fitting together. Then, there we go. All right, let's
now think about, we'll give this some
materials first. We'll also come to
the top of it, press. And what I'm going to do is you can see again
with the top of it, I'm just going to press
Y. I'm going to press, make it smaller and I'm
going to pull it up. This is where my chain is
going to go on this bit here. So I'm then going to do is I'm going to come
in a shift click, shift, click Alt and F
and join that altogether. And then I've got a
little point where where I want my chain to be. All right, so now
we've done that. Then what we'll do on the next lesson is we'll
get this all unwrapped. And then finally
what we can do is we can actually make a start on the actual the chain that's going to hold it and the part that's going
to go into the wall. And we can also make
sure that we've got some nice glass on here. All right everyone. So I
hope you enjoyed that. I'll see on the next one.
Thanks a lot. Bye bye.
109. Adjusting the Lantern Asset and Adding Textures: Welcome back everyone
to the blender for ultimate guide and this
is where we left it off. All right, let's come
then to our light. And what I'm going to do, I think it will be
easier actually, if we just come in and
old shift click and try and joy grab all of
this going around here. I'm hoping that I can grab it going all the way,
just on the inside. I'm just going to
press the dot just to center myself
and then all I'm going to do is just
grab it going all the way around the inside of here. Unfortunately, there won't be an easier way of
grabbing all this. We have to do this, the
hard way of grabbing the all going round like, so grab this top light, right sew and let's grub this one normally I would say as well as
on the inside of here. You know that there is some mesh that we're
not really using. We could go in there
and clean that up. I'm sure by now though, you have the skill to actually go in there and
clean that all up. Right, click, mark scene. Then what we'll do is now
we'll grab the whole thing. I'm going to press yeah, I need to also join
these as well. Let's apply that then. What we'll do is
we'll join all this together with control J, right click, shade,
auto, smooth. And then tab a smart UV
project. Click okay. And then what we're going
to do is adding a material, and we're not ground plane, we're actually looking
for metal, black metal. Let's put it on. There we go. Now let's come in
with each of these. What I'm going to
do is I'm going to unwrap this one first
and put in the light. So I'm going to quick
plus down arrow. Glass or window. I think it's on the
window. Actually window. Have a look window. Let's try two. And let's click a
sign. Let's wrap this. And that's not the right one. We want window three. That's the one that
I'm looking for. All right. So this is
the one I'm looking for. Obviously, this is not the
size that I'm looking for. So I'm just going to pick
dot to zoom into it. And then what I'm going
to do is press A, And I'm going to bring
that down to here. So I'm going to press and Y. Then then let's get a little bit of dirt
into the sides there. And there we go. All right, that's looking nice, apart
from it's not centered, So I'm just going to press and x and pull it
into the center. There we go. That's
looking very nice Now now I can simply do is, I'm just wondering if
I can actually copy this. We'll give it a try. Let's go over to Copy Default. And then what we'll do is
we'll click on all these. Hopefully, I might be able to Paste to be exactly the same. I'm hoping so because it'll
save me a lot of work. Nope, they're not going to wrap. What do to do on this one? I'm thinking whether
I can copy the UV's instead. Let's try that. We're going to do
is UV transfer. I'm just wondering if
I can transfer copy. Can I actually paste
it now? So let's try. No, I can't paste it. I'm thinking if I had
those all split off, could I do it that way?
Let's give that try. I've not give this
in the try before. I'm going to grab them
all and then I'm going to split them all by
islands like this. Then what we should be able
to do is let's go to Select. We're going to not split them, so we need to mesh. Split separate by loose
parts. There we go. Now these should be separated. Let's see, are they separated? Nope, that's not worked either.
So let's try that again. So we'll just go back where
we've got them all selected. There we go, they're
all selected. Let's go that one and
then let's try again, mesh separate by selection. And there we go now. No, they're
still not separated off. All right, let's
separate them off Selection and let's
come into these now. Lp selection. Lp selection. I'm not sure why that's not
working on this occasion, but it normally does work
by separating islands off, just not this time,
separate them off light. Now what I want to do
is I want to see if I can transfer all of
them from this one. So what I'm going to
do is, first of all I'll try it in tab you transfer copy and then what I'll do is I'll try and transfer it to all of these. So let's see if we
can actually do that. So like so. And then
Tab and then transfer, paste is not on there, so you transfer and paste
still not on there. All right, so this
is not working. So what I'm going to do
is I'm just going to make sure that all of these
are unwrapped correctly. You can see this one here
as well isn't wrapped. So what I'm going to do
is grab all of these. We messed around with this a little bit too long actually, and we could have done it
a really, really easy way. And what I'm going to do
now is just press and wrap. Then what I'm going
to do is I'm going to grab this one last. So we can see this is the one
that we need to replicate. All I'm going to do then
is click on all of these. In fact, we're going to have
to do it a different way. So we're just going to
click L on all of these. I'm going to click, get them
into being the right size. And then and y,
squash them down. And then let's just get one
of them in there, like so. And then S and Y bring it up. So S, Y, bring it up
into place roughly. And now what we'll
do is we'll just G, x, bring them all over. A little bit of a long
winded one there, a few problems,
but you'll always have problems in modeling. Again, it's more about can
you fix those problems? So S and X, let's pull it out, rather than never
coming across problems. Because no matter
how good you are, you will always
have some problems. You'll never get over that, especially when they bring out new versions because there's
always a new way of doing something or something ends up broken and you
have to find a way out around of making
that work before, which is what you had
worked really easily. All right, so there we go.
Now what we want to do is just apply a sign like so. And there we go, There
is our beautiful light. Alright, happy with that. Now what we'll do then on this lesson still is
we'll bring in our chain. So hopefully if I press
shift day in fact. Yeah, compress shift
day and I'll bring in, let's go to curves and
let's bring in a path. If you can't see
them by the way, just scroll up and there's
a little arrow there. You can see here a little
arrow there and you'll be able to see them because
you've got so many on there. Now let's press Y and
90, bring them up. And I also want to put
this on Global instead. And what I want to do
now is add modifier. We want to bring in
a geometry node. I'm hoping that my
chain is still on here. So where is it blend
origin geometry nodes. And I don't think
there's a chain on there which means
that I need to go to my asset manager and we're
going to go to our nodes. And then the one I'm
going to bring in, take that off, it's
going to be the chain. So I'm going to
bring the chain in. And then finally what I'm
going to do is grab this here, grab this one, control L, and we're going to
copy modifiers. And there we go. Let's leave
our chain out the way. Now let's press control. All transforms right clicks
at origins, geometry. Now let's make these chains
on our geometry node. Let's change up the
resolution first, let's make them a
little bit bigger, chain radius, Let's make
them a little bit bigger. Let's change then the distance so they actually
fit on properly. So let's make them probably a little bit chunkier as well. Let's make them a
little bit chunkier. Yeah, I think that's
going to go in fine. Now, I'm just looking at
how that's going to go in there to bring it
down a little bit. I think I'll also change
the chain stretch and then bring down the
distance. And there we go. I think that's going to
work out absolutely fine. Now we've got our
cursor in the center, So I can press shift day. I can bring in then a cube. Let's bring it up and let's
put it where we want him. So something like that.
Let's pull it out then. So I'm going to grab
the back of this cube. Pull it out into the wall. And then what I'm going
to do is I'm going to squish this cube
down a little bit. So I said pull it
out a little bit. And then what I'm going to
do is I'm going to grab each of these edges and
just level them off. So there we go. Now we just need to decide how far this is
going to come down. I'm going to grab
the back of this, so I'm going to press
Shift, bring it down. So something maybe like
there, here's this too long. I think at the moment
this is too long. So what I'm going to
do is I'm going to grab my light, pull it up. Grab these as well. Pull it up. Yeah, I forgot we
split all those off. Never mind. Okay, let's see. I think there's two
more left. There we go. Okay. Now, hopefully,
let's pull it up, so we'll pull it up into place. Ran about there. I think
that looks much better. And now I'll do is I'll
just grab all of these, press control J and join them altogether. And there we go. Now what we'll do is
finally we'll come in and I'll see if I can get rid
of a couple of these. Can I do that? Delete
vertices and Yeah, actually that might
work. That might work. So let's just grab all of this, let's put it into place like so. And I think that's going
to be absolutely fine. All right, on the next lesson, and then we'll just
get this light finished off those
problems there. And then we'll get this put into the places around
our actual build. And I'll show you what
I mean by the lights. And as I said, they're
pretty expensive in terms of how much computer power or draw calls and things
like that I actually take. So we might actually
not actually give these lights like I did
on my initial scene. We might see if we can get away with using just the
emission from these lights. All right everyone.
So I hope you enjoyed that and I'll
see on the next one. Thanks a lot. Bye bye.
110. Tweaking Light Strength for Scene Balance: Welcome back everyone to the
Blended Four Ultimate Guide, and this where we left off. All right, so now
let's finish this bit. So what I'm going
to do is I'm going to press pull this out. And then what I'm
gonna do is just stick that into place there. I'm then I'm going to press L, come round and press
and X and pull that in. And then finally I
just want to make sure that that's not
poking out of there. So it's just, and
maybe if it is, let's just pull this down
or pull it up a little bit just so it fits into
place a little bit like so. All right, now I'm going to
do is I'm just going to press all Tage and I'm going to bring back the rest of my build. And then I'm just going to
steal a couple of bricks. And we're going to use those
for the edges of these. So let this load up at the moment and then
what we'll do is we'll get these lights in
and see how they look around the rest
of the scene as well. Here we are. Then
what we'll do is we will get our bricks. First of all, though, it is a little bit too
big at the moment. Let's actually grab
both of these. An object convert
to mesh because we, all we need to do now is basically bring in
some materials. Then what we'll do is I will bring in the materials
first of these, so grab this one and
press a SmartV Project. Click. Then what we'll
do is we'll grab the smart UV
Project. Click okay. Now with these ones, I'm
going to just look for chain. So let's bring in chain
like so chain material. And then this one
we're going to bring in the metal, so black metal. And now we should
be able to join all of these together
with control J, right click, shade, auto, smooth. And there we go. Now we should be able to
press control all transforms, right click, origins,
geometry just for now. And then we should
be able to make them the right size to where
we actually need them. So we're going to put one of
these over on here first. So as I bring it over, I'm going to put
it over on here, check out the sizing. And then from there I can decide how big the
bricks are going to be. So I, if I pull
this over this way, I can get a good idea now
of the scale of this. So you can see
something like that. Looks a nice scale. And what I need to
do is I need to pull it back into the wall. And you can see straight away, this bit here is way,
way, not thick enough. So what I'm going to do,
I'm going to grab this, put it on normal, and then I'm just going to pull
this out like so. And then what I'm going to do
is I'm going to pull it up. So pull it into place like so I'm just going
to make it a lot, much, much thicker and play
around with it a little bit. So something like this
thickness should be fine. As you can see though now it's starting to poke
out the bottom of the. And I don't really
want that. So what I'm going to do now is
put this on global, grab the top of here, and let's pull it up and
make it much, much thicker. And now you can see it's
looking much better. Now let's come in
and grab this brick. So what I'll do is I'll press
Shift D, bring it over. I'm going to make it a
little bit smaller than this brick and we're
going to put it like so. And then in the middle. And then shift and we'll
spin it round now. So R is dead 180.
Spin it around. And then what we can do now is join all of this up together. So press control J, like so. And then what we can do, I think actually I'll keep where the orientation
is in the center. All I'm doing now is just
checking to make sure that this is going to be lit
enough and that's the thing. So we need to really think about taking another image just to see how well these
are actually lit, rather than adding in a
light or anything like that. So what I think
I'll do now is I'll come to file, I'll come to save. And what I'm going to do now is I'm going to put this onto wire frame and then I'm going to go for render and just
render the image. And what we're basically
looking for here is to see if this light is enough because I
think we'll have to, you can see straight
away at the moment, it's not really
going any light on there and that's the
problem that we might have. So we might have to come
in and basically work on how lit this part is
because I think it's going to be nowhere near
enough lit. All right. I'll be back after this
actually renders out. Okay. So now you can see
this is what we've got. And you can see that this is
going to have to be much, much brighter than what it is. So let's come in and
bring in a light. So what I'm going to do is I'm going to put this onto here. I'm going to press shift
desk, Urs selected. And the light I'm
going to bring in. Let's have a look at what lights we've
got to choose from. I think it's going
to be a point light. So let's bring in a point light. What we'll do is we'll make
it bigger, this point light. So I'm going to
click on the radius. So there we go. And then what we'll do is
we'll put this on render. And what I'm going to
do now is I'm going to, I think once I've
got this on render, I'll turn the sky down
just so I can actually, you can see it's
system out of memory. What we need to do now
is we need to come back to modeling now.
We'll try it in there. Let's actually put this on, it's not loading up. So what we can do is we can hide a few of these
things out the way. Let's just hide some
things out the way. So then what I'll do
is I'll try it again. Instead of doing that, I'll
put it onto object mode. From object mode,
I'll then try again. If that doesn't work,
the final thing we can do is we can actually put it on V because that's
in real time, which means that
will render it out. So you can see, I'm still
getting this out of memory problem and
this sometimes does work when
we're dealing with lights and we've got a lot
of things in the scene. We just have to be a little bit careful what we're doing here. Let's at the moment
put this on processor. We know we'll probably
work on that, so let's put it on
and there we go. So now we've got around that by just putting
it on the process. And I'm just going to zoom in a little bit to it,
let this load up. It's going to be much, much
slower as you can see. And then what I'll do
is I'll get my light and then what I'm going
to do is put this on. Let's try 300 instead. There we go. That's probably
going to be a bit too light. Also, I'm thinking
at the moment that this color needs to be a little bit on the
more yellow side being as it is a yellow light. So something like that.
And then what we'll do is we'll turn this down, maybe 200. Let's try 100 and see
how bright that is. We'll just lay it load up. I think that's still a
little bit too bright. So what we'll do is
we'll put it on 50. There we go. That might
actually be okay. Now, let's pull it
down a little bit, put it into place, let's make it a little
bit more yellowish. Let it load up. Yeah, and I think that's going to load much better. Now we've got that. What we need to do is again, we'll put this onto wireframe. We'll make sure
that where is it? We'll make sure we're on GPU, so when we come
to render it out. And then what we'll
do now is we'll save our work once more
and then we'll come and we'll render the image once more
and see what we get. Now we can see now already that we've actually
got some light there. It's actually looking
much better already now. It's just really up to,
we want to use light, we want to use the
emission that is going to come out of
these lights instead. Let this finish and then
once it's finished, we'll have a much better idea of how we're actually
going to do this. This is another
reason why I left the floor till last because I know that it's going to have problems with
actually rendering it out. The other thing
is, at the moment, we haven't joined our scene up. You can see now that's
looking quite nice. That light is
shining onto there. And that's looking quite good. I think we might have to go
up just to touch maybe 275. I think also we need to turn up this light on here to make that a little bit
brighter as well. So what I'm going to do
is a couple of things. First of all, we're going to come back to put
it on object mode. So now I think because we are having
problems with our scene, it's really, really time that we actually cleaned
up the scene. So in other words,
we need to kind of not have everything in
the scene at the same time. Even if you're on a
high end machine, it is going to be very
costly to actually be rendering everything out
at the same time always. So I'll think for something like this now let's
clean up our scene. Let's get it all cleaned
up on the next one. And then it's going to
make it much easier. I'm just going to press all tag and bring everything back. And then what I'm
gonna do is just let those shades compile. I'm going to double tap the. And then what I'm gonna
do now is go to file. And on the next one it'll basically cleaning
up the whole scene. All right everyone. So
hope you enjoyed that. I'll see you on the
next one. Thanks a lot. Bye bye.
111. Cleaning Up the Scene to Enhance Performance: Welcome back everyone to the
Blender for Ultimate Guide, and this is where
we left it off. So now we've still got
it on GPU at the moment. And now we're going to do is just clean up the whole scene. Let's put it on object
mode before we begin. And what we're going to do is
I'm just thinking whether I don't think I need my human
reference in here anymore. So let's have a look.
Is he's still here? We can bring him in if
we need, if we need to. So what I'm going to do is just delete him out of the way. And we delete the
human reference. And I'm going to pull this down. I'm going to have a look,
what is this gray box? So we've got three things on here that are part
of the gray box, one of them being the
floor. What is this one? This other one, let's press dot and let's have
a look at that, is let's just press G
and see what that is. And it's nothing, it's an empty. So all we can do is
just delete that out. And this one here is also
part of the gray box, which is our actual life. No idea why that's there. What I'm going to do
though is I'm just going to come in
and delete that. And then what I'm
going to do now is I've got palm trees
in here as well, which I can delete out. And now I've got
pretty much all of this stuff with only
one collection, which is the gray box, which I'm also going to delete out.
I don't need that either. So now we've got
all of this mess on the right hand side and we want to put it into some kind
of consistent audit. First of all, let's
come to our light, and all I'm going
to do is just press M. We're going to
click New Collection, and we'll call it a
camera camera like so. And then we're going
to do is click okay. And now we've got our
camera in our scene. Next of all, then let's
hide the other way. So I'm just going to work my way along and hide things
out of the way. I'm not going to go in
and rename everything, although I will show
you how to do that. So if I come to my floor, I can press F two
on the keyboard. And then what we can
do is we can call this ground like so. And then you can press and
then what you can do is New collection and we'll
call this terrain like so. And then press okay.
And there we go. We've got our terrain
in. You can see really, really quick how we
can actually do this. Now instead of hiding
things out like this, what I'm going to
do is I'm going to hide them out like this instead. Now let's grab our rocks. We might as well split
those up as well and make as easy for
ourselves as we can. Again, new collection rocks. Click Okay and let's close that up. Hide
them out the way. And while this is going to
enable you to do then is basically turn off and on all
of your different layers, making it really, really easy to put everything in
the kind of order. Make it really easy
then to render it out. Because what you're
going to do is in your viewport you'll
still be able, you won't be able to
see most of this. But what you can actually
do then is still render it out so you shouldn't
have a problem there. All right, so what
we'll do as well as others have showed you where
the simplify you can also drop down your textures
and that's also going to speed up the speed
of the actual seam. So now we've got our palm trees, So let's grab all
of our palm trees. We're going to press the little
M again, new collection. Let's call it palms
or palm brees. So click Okay. Put that up, hide
them out of the way. Now let's think about
the rest of it. On these, we'll
call these plants. We'll get all of the plants in. We've got some plants here, we'll put those all together. We've got one here and one here. Then we'll call
these plants like. So then what we'll do is
we'll hide those out the way. Now what we'll do is
we'll come to props. We'll just grab all of these. We'll put those in props.
All of these here. These beautiful props we made. Let's grab all of these. You'll find more as you're working your way
around, don't worry. And there's one in here and
there's also one in here. Then what we can do is
new collection props. So then what we'll do is
we'll hide those out the way. Now we're onto things
like balconies. All these balconies we can actually come in and
what we'll do is we'll grab all of all
of these balconies. Even the bottom part
of this balcony, this one here and
the bottom part of this then M new collection. They're not props balconies is, I think it should be
an there balconies. Okay, let's write those out. The way we can see we're
making short work of these. We'll call this, I'm thinking what we'll call these actually
canopies. There we go. We'll grab all of the
canopies and we'll press New collection keys, then put that up. Hide them out of the way.
Now let's do the windows. That will then make it
easier for when we come. You can see here we've got
some flashing as well. We'll fix that. Just 1 second. Once we've done that's
a door actually. So we'll grab this
one and this one, and then this one,
then this one here. This one here. And then we'll press M and
we'll come to new collection. Call this Windows, because we're going to need the
Windows split up anyway. It's going to make
it very easy work for us Windows, let's say. That'll work so we don't
have to do all that again. Then we'll come round here, We've got some flashing on here. Let's have a look if hide
that then out the way, this is why the flashing here, because we've got
this part here. I'm just wondering if I just move this,
then press voltage. I should just be able
then to bring that bag. I'm going to just delete
that out of the way. I'm going to put it onto material mode just so I can actually see what
this looks like. It once that loads up be quicker
than what it was anyway. Let's just hopefully
see it there. Okay. And I'm
thinking that's okay. So that's gone on. All right. Now let's actually carry on. We'll do the doors next. We'll grab all of the doors. We've got a window there. We'll do that one in a minute. Let's do our doors first. All of these doors, we've got a door here,
we've got a door in here. Then we'll just press is new
collection doors like so. And then we're going to have
another door over there. So let's click okay. Let's put that up,
hide that other way. And then we've got a door here. So let's just press M
and put it into doors. And then let's go to where
was the other window? Sure. I had another window somewhere. There it is. Put it into windows and there
we go. All right. Now let's put in the
well in its own, so we're going to
grab all of this. I'm going to press just to make sure I've got it off,
we've got more water. And then I'll just press new
collection, we'll call it, well that's side,
those out the way. Then we'll come two. I'm just looking now
what we've got left. All right, so we've got our
ivy and grapes on our canopy. We've called it
canopy. So we'll just call this grapes up here. What I'll do is I'll just
grab these three for now, new collection grapes. So then what we'll do is we'll
hide this out of the way. And then we can grab all
of these grapes here. We can press M, and we can put it into grapes,
which is down here. And this one is
going to be props. Let's put it into props. And now we're really
starting to get somewhere. Now we've this one
which is the balcony. We're going to put
that one in and we'll also put that
in the balcony. Balconies, There we go. Then we've got this, which will be also I would say,
balconies as well. Let's go in, put this into
balconies, and there we go. Then I think we can actually, or should be able to now, this then will go
into the canopies. Just make sure that's there. Canopies, I'm thinking. Now let's put it
onto rendered view. Again, let's say about our work. We have got the rest of it. We will put all this in as well into a layer if I come in. Now, let's see, it should be much easier to render it out, which
you can see much, much faster now rendering
everything out, and now we have a
really good idea of what this is actually
going to look like. This. First of all,
we're going to put this into its own separate ones, so I'm going to grab both of these M new collection
lights and then click Okay. Then I'm going to do
is close that up. You can see now even though I've got all
this in the scene, I can still work
with all this now. I've actually hid
all of this away. What I'm going to do now is
I'll still separate them out. I'm going to grab,
let's put these in, we'll put those into the Ron. What I'm going to do is
I'm going to press M, I'm going to call it steps, case you need to
go even further. Steps, those, what
have we got left? We've pretty much got the whole rest of the building left. And you could still even
separate it out even further. So what we could do is
we could also put walls. We'll actually put it back on material just so
you can see a bit bad. You can see how quick it is. Now what we'll do is we'll
just call these walls. So new walls, I basically want to get everything in now,
the collection. So we'll also then grab
all of these things, then we'll call it
sides and floors. I think this, this
will be a wall. Let's press M and put it
into walls. There we go. Then we've, this is
the ivy by the way, so this can go in
with the grapes. I think the rest of it
now can pre into sides. We'll just call it
new collection sides. So pull that up, hide
it out of the way. And we should now be left with
a cube. What is this cube? Let's have a look. It's nothing, so it can leap out of the way. Okay, so there you go. Now if you were
click it on Render, we shouldn't have any
problems. And there we go. Rendering done as quick as that, so you can see now
really, really easy. Now let's bring in this one. This one, and let's
bring in our steps. And finally, let's
bring in our lights. And now we should be
able to work with this. Now the thing about
this light is I'm not happy with how this looks. So if I come to my light though, I should be able to now
pull this up a little bit, come to my light, and I should now be able to
change the radius. So you can see now
just how easy that is. Now to get a good idea of what this is
going to look like, you can see as well that this light isn't working
that well with this. So what I'm going to
do is I'm going to change this light to
maybe an area light. And I find sometimes when we're dealing
with the lights that area lights probably
are going to do a bit better of a job. What I'm going to do is
I'm going to rotate it, so x, just rotate it
around a little bit. I'm also as well going to change the, yeah, not like that. I want it to be a
circle instead, instead of it being square, I'm going to change
it to a disc. And I'm just going to
see if that's going to be any better than this one. And I'm also going to
change the spread of it. Let's bring it
down a little bit. Is that going to look
better than what I had it? I think something
like that actually. It does look a lot better. Now what we're going to
do is we're just going to make it probably a
little bit more yellow. And so as well going to
go in to my actual light, just this slide, I'm going
to go over to my materials. And what I'm going to do is
on the next lesson is I'm going to change this
material for light. I'm going to call it
actually light and anything then with
this material. And it's just going
to be much brighter. But we'll do that
on the next lesson. So this has actually been really productive because
now we've actually seen how we can really drop down those draw calls if needed. All right everyone. So
hope you enjoyed that. And I'll see on the next one. Thanks a lot. Bye bye.
112. Attaching Additional Lanterns for Ambient Lighting: Welcome back everyone to the
Blended Fall Ultimate Guide, And this where we left it off. All right, what
we're going to do then with this one here is we're going to actually
copy copy material. I'm going to then
click the plus B and I'm going to call it light so. And then what I'm going to do
is paste that material In. Paste the material, and hopefully I'll turn the same as that which it has done now. And now what I want
to do is I'm just going to put this on
material just so I can actually work with this
a little bit hard to work with still
in rendered view. And then what I'm
going to do now is I want to grab all of these. So if I grab one of them, I can actually
come to select and I'm going to select
similar by material. And then what I'm going to do
is I'm going to assign them to this one and then
minus this one off. And you need to minus
it off in object mode, so let's minus it off. Now we should be able to come in and increase the
actual lights on here. So if I come over to
my shading panel, what I'll do is I'll
put this onto object. And then what I'll do is I'll
put this onto Render View. Let it load up. And let's
zoom to where it is, so let's zoom to where
it is and let's come out and what we're looking
for now is this emission. So I want to open
up this emission and I want to increase
this strength. So now you can see
much, much brighter. Now what I'm going to do
now is I'm going to come to my light, I'm
going to press Dot. And what I'm going to do is I'm going to just turn it
off on the render. So turn this off and then
what we're going to do is we're going to put
this onto wire frame. We're then going to go save and we're going to give
this surrender and we're going to give it a render
without the light and with the light and see
which one looks best. So let's come over to
render Render Image. Even though all that
stuff is hidden away, it will still load
up in the scene because obviously it's only
hidden away in the render. The one problem is with
lighting lights like this, you need to make it pretty
bright to actually have some impact on the wall and
things like that around it. That's why I'm not
particularly a fan of just turning up the emission. Because the other
thing is you'll see we lose a lot of the detail. You can see the detail in here, we're losing a lot
of that detail. So it's a very, very fine line in how we actually do this. Let this load up, and
then once it's finished, when it's got all the, you know, ambient occlusion and
everything else in there, let's see if this is
going to look good with just the emission or if we're going to need to
use the light as well. I think we'll probably have
to do a mixture of both. Now, bearing in mind
when it comes to lights, I do think aerial
lights are not as intensive on your
computer as point lights. I think they're more intensive
actually, point lights. So I prefer to use the
area lights if I can. So let's see now what we've got once we finish that,
and there we go, you can see it's way, way too bright to start with. So let's come in and
what we'll do is we'll reduce it to half. So if I come in to the strength, I've got it down 46.4 Let's
reduce it down to ten. And let's have a look at that. This is like, these
parts that we're doing now is really all about refining what we're
actually doing, which is what you're going
to have to do in any scene. So now you can see, I've
brought it down to ten, You can see that pretty
much the light though, going around it because there's a lot of light in
the scene as well. It's not going to be really that bright against the
wall or anything, so we're going to
have to probably fake a little bit of it. We can see though we have got a little bit of
definition in there. So I think what we'll do is we'll see what this
turns out like. I think I'm going to have
to use both the lights, which is it's not so much of
a problem, we can use them, we'll see what it
looks like once we've got this kind
of nailed down, if it's bright enough.
So let's have a look. Let it finish rendering out, and then we'll try it with the actual area light
that we've put in. Then once we've done
that, we can put them together and finally then we can actually put
these lights around the scene and that's
another job down. All right, so there's
the actual light. Is that doing enough work? I still feel like probably we need it brought down
a little bit, I think. Yeah, I do think so. Let's close that out. Let's put this on
something like five. And what we will also do now is bring in that
light that we had on. And then we'll give
you one more render and I'll be back when this
has finished everyone. And there we go. We can see, it looks much, much better. Now with that
light, I'm thinking maybe drop this down
just a tad more, maybe on this light, so maybe put it on
four just so we can get a little bit more
detail in there. Don't forget though, it
is a low render as well. We've not got a high
render on here yet, but I think as far as that goes, I think I'm fine with that. So what I'm going to
do is close that down. And now what I'm going
to do is I'm going to go back to modeling. We've got our lights,
so what I can do now is I can press Tab first of all, and then what I can do
is I can grab this. Light, I can grab this, then the main light and
I can press control. And what I'm going to do
is set parent to object. That means then whenever
I move this around, the light is going
to move with it. Now unfortunately, it doesn't mean that when you
duplicate this, everything's going to
move along with it, because that's not how it works. So for instance, if I just
duplicate my light now, you'll see nothing happens. It doesn't bring
the light with it. So we don't want to do that. What we want to do is
grab both of these, and I'm going to press shift. And what I'm going to do is
I'm going to bring this light out and I'm going to stick
it at the side of here. Now I'm going to have
to put my windows in just to see where I want it, so let's load in those
windows like so. And then what I'm
going to do now, I can grab just
the light now, 90. Spin that light
round, press three. And then what I can do is I can press and put it
where I want it. So think with this one
and we're going to actually have it low down
somewhere like that. And then I'm going to
put it in the wall. So there we go. I'm hoping that light then
is going to look okay. Then let's put in
a few more lights. We'll grab this light again. And then what I'm
going to do is I'm going to put one over here, so I'm going to press shift D. I'm going to put it in
the wall over here. So then what I'm going to do is I'm
going to press shift D, and I'm going to put
one near the well, so I'm going to press shift D, bring it over, and then -90 And we can see that light didn't
actually move around with it, so let's try that again. Let's make sure we're on
medium point And then -90 then what I can do is
I can bring this over now. I just want to check to see. Yeah, that lights actually fine. I'm going to put this I
think in the bottom of here. I might have to
bring my well in, make sure everything is working. So let's bring it over. Let's bring it up into there. Let's bring my well in just to see where it's
going to light that. There we go. Let's now work all way around
the other side. I think we've just got maybe
two lights left to go. I don't want to go completely. And we've got a few more lights. Let's actually press shift and what we'll do is
we'll bring this out. I'll press zed and -90 So Z
-90 I'll press control three. Not I'll press control
one to go to the back. And then what I'm
going to do now is I'm going to bring
in my doors again. So let's bring in where is it our doors, let them load in. And then what I'm going to do
is I'm going to put one of these lights above each door. Once these have loaded in again. Now you can see just
how much longer it's taking because we're
starting to load things in. Let's put this one in
here, let's bring it back. I can see that we pulled
that out a little bit. I didn't mean to do that.
Let's pull it back into place. Over here. Over here on
going do is I messed up. Let's pull it out first. Let's just grab our
light. There we go. Now I can press control one
and now I can work out where I'm going to go right in the
middle of this Do thing. And then put it up, it's
above it into here. Maybe into there. Or maybe
we could put it into here. No, actually that's
not going to work. I think instead of that, what I'm going to do
is I'm just going to put one light in the
center there, actually, thing that looks
nicer and then let's just put it back
into place then. What I'm going to do now is I'm going to grab this light again. This one and this one. I'm going to press shift B. I'm going to pull it out and up. And then what I'm going to
do is rotate it around now, 180, spin it around,
grab just the light. And then what I'm going
to do is I'm going to put this back into here like so maybe
yours down into there. And then finally I'll
have one more light, which I think I'll
grab both of these. I'm going to press
shift, pull it out. I'm going to press control one. Yeah, it's right on the edge of that wall.
That's where I want it. Then we're going to all it over into place and it's
going to light up that down there, hopefully. All right, now the
moments of truth. Again, we'll save our work
now. Let's have a look. Have we got enough
lights in here? Let's put it on rendered view. We're out of memory. Let's
come in and turn off the doors and the windows and let's put it on rendered
view, We're out of memory. Let's put it onto wire frame. And then onto and we
still out of memory. So what we'll do finally
is put it onto EPU. Now let's put it on. Now, of course this will be slower but
then we can probably swap. Just cut that out. Please look. Here we go now.
Let's have a look. We're not seeing a
huge difference when. I think what we'll do now is we'll take a quick
render of this. I'm going to leave it with
the lights being like that, As I said, unfortunately, lights are very, very expensive. I'm just wondering if
let's come to our lights. I might turn off multiple
importance on them, and I think that should then lower how much they're
actually using. Let me just go around, turn off this multiple importance more, just lower them down, I think then we'll be much
better off using these lights. Let's bring this one in finally, this one, I think we've
done this one at the top. Look. Yes we have. All right, let's also then see now if I can put on D Noise. No available device for
D noise as you can see. Let's try putting it on
GPU now and wish a lot of memory so you can see all of those lights are causing
us huge problems. I'm going to be happy
with those lights. I'm going to leave them in. And what I'm going to
do instead now is I'm going to come to my
lights and turn them off, and then put it onto GPU. And if this happens,
we can see down the bomb right hand side exactly
how much you V Ramasing. What I find actually
the best thing to do is save out your
work and then we'll go to file and
open re let's just open it back up and I think then it will be absolutely fine. So let's put it on render, let's see if it renders out now. And there we go. That's
what sometimes happened. You can see that V
Rams come right down now and we should be
okay now as you can see. All right, so now what
we need to do is we've tided up our scene,
we've done our lights. Now what we need to do is we
need to check our normal. So what I'm going
to do to do this, and I'm going to put
it on an object mode, I'm going to come,
then I'm going to turn off everything
and work my way down. So the first of all, I'm going
to come onto my terrain. We haven't done
it yet, but let's just check the face
orientation first. That one's fine. Let's come
to rocks, they're fine. Let's come to palm trees. Now, palm trees are a funny one because they're only going
to be one sided anyway, So we don't really
need to worry about the underside and
we're not really going to give them any
thickness or anything. Then we come to plants. Plants are the same thing, let's not worry too much about those. The ones we're really
looking at are going to be the props and all of the buildings and
things like that. So let's come to
balconies and here we go. Nothing wrong with
those. Just make sure. Oh, is that one wrong? No, it's not. That one's
facing the right way. Let's come to the canopies. They're all okay, and I won't believe this if we
get all the way down. Yes, we haven't. Okay, Let's
actually grab them all. Press A to grab them
all shift and let's see if these are spin round
a shift and there we go. These are some of the
problems we're going to face. Let's come in and what we'll do is we'll just grab
all of these for now. We'll press Shift, and inside we'll spin the rest
round on the next list. And then what we need
to do is we need to spin all of these round, get them all nice and fixed. And then finally we're onto the final bit which is
going to be the floor. And we're going to be doing
a lot of work on the floor. And then we can have our final render with the compositor and finishing
off the composting. And then finally we're actually
finished with everything. Alright everyone, so
hope you enjoyed that. I'll see on the next one.
Thanks a lot. Bye bye.
113. Adding Detail to Terrain for Realism: Welcome back everyone to the
blender full Ultimate guide. And now we're just
going to fix the. So all I'm going to do is come round to the front ones first. So this one here we can see
is the wrong way round shift, let's spin it around and let's just work our
way around these. So let's come to this one. A shift, spin it around, grab these center points, and then shift, spin
them around like, So let's come to this one, same sort of thing
across all of them. Hopefully there won't be too many of these two
actually fixed. So shift in, spin
them round like so. And then let's come
round to this one. And this window is
on the outside. So we'll come to this one. I'm just making sure this window is on the outside.
I think it is. So I'm just going
to spin that round, so shift in inside like So we'll check them
anyway to make sure. All right, so now
we've got doors. Let's go to doors and Yeah, it's gonna be a little bit
hard if I don't do my walls. So you know what, I'm
gonna do my walls first. So I'm going to press Tab, So let's grab my walls. So let's just grab them all. So press a shift, spin them all around,
and there we go. All the walls are done. And
let's also do our sides now. And all the sides from this one, which no one can see anyway or already done. So that's fine. Now we can put those on, and then what we can do is we
can come to our doors now. And we can see which doors are the problem. So
we can see that. This one. This one. This one. This one. This one. This one. A lot of them, a lot
of them are a problem. So something like that.
Let's have a look. Let's press tab a shift. Spin them all round and yeah, this one's going to be a
bit of a pain, I think. Let's have a look. So let's
have a look in there. First of all, we'll grab each of these and we'll pray shift
and spin them around. There we go. Actually,
it might not be that bad, it's just a few. Okay. Shift, spin the
round and none in there. And this one shift spin
the round, round to here. It's just basically
the same door that's causing the same issues, but again it does
affect the light. So it's very important not only for if we send
it through somewhere, but actually fixing these
problems. That's the door. Let's come to the well,
well if I grab it all, let's press V, and then
we'll press tab A, shift the Spin it all round. There we go. That's sorted out. Let's hide these. Let's come to our grapes. The IV doesn't really matter because it's facing
the other way anyway. But we can see that these
two things do shift, then spin those round. Let's come to our lights. We don't need to
worry about those. Let's come to our steps. All the steps are good. That's basically it.
Let's turn them all on. So let's come in
then and turn off face orientation. There we go. All right, so that's
all the normals done. We've got our
lights done and now what we need to make a
start on is our floor. So what we'll do is we'll split this up because I'd
sooner be a clean start. As I said, it's kind of difficult getting the
actual floor done, but what we will do
is we'll come to our asset manager and we should
have one that says floor. So I'm just looking.
This one here. So let's click on this one, wait for everything to load up, and then what we should
be able to do is click on the sand displacement. And
we're going to bring that in. And the reason we're going
to bring that in is because we're just going to have a look at how the displacement
is actually put on there from the sand that
I've already created. So we can actually copy from
the sand onto this one. That's why I've actually
put it in there. And then finally,
you're going to learn how to actually bring in three textures and do a bit of vertex painting on
top of the actual floor. So you can see now this is the actual sand and all I can actually do is I
can copy this over. If I go to here
control and L and we're going to copy
modifiers and there we go. Now you will see
nothing's happened. And the reason nothing happened
is because we don't have, we've got our display on here, you can see that all
this is settled. So what we did was we're just going to add a
modifier Generate, and we're going to
have a not on here. Deform, of course,
it'll be on deform. And then we're going
to have a look for display, so it's this one here. Once you brought that one in, then you're going to
have this kind of more. We're going to set our strength and they'll mid level
down to these points. And then what we're going
to do is we're going to come over to this
little tap here, which is the actual texture
that we're going to use, and this is going to
be the one we use. So first of all, we're
going to click on Veroni and then what we're
going to do is just mess around
with a few of these, basically, We'll go into
this a little bit more. First of all though, what we're going to
do is going to add in the modifier and
we're going to bring in a subdivision surface, because without a
subdivision surface, we won't actually be able to get anything looking like this. So let's then turn this up and you'll see the
more I turn it up, let's press control
on there and then we'll do adding another
one, so adding modifier. Generate subdivision surface. And let's turn it up
a little bit more. Let's press control.
There we go. That's not what I'm looking
for. Let's have a look then. That is definitely not
what I'm looking for. What I'm going to do, I think
on the next one is I'll actually have a look at how
you put this on object, how this is going
to convert to that. Because I think at the moment the sizing of this
is way, way too big. Let me just try and
turn that down. Or up even a look. Let's also turn down, you know what I'm going
to do on the next one. I think what we'll do is we'll
actually start this again. So what I'm going to do is I'm going to take this off of here, take off the
displacement like so. And then what I'm going
to do on the next lesson is I'll also put
in a new texture. So we'll do this flow
from scratch with something to actually
look at at the same time. Alright everyone, I'm sorry that didn't work the
way I wanted it to, but we'll be able
to copy that onto here once you've
actually got it. The one thing I do want to
check is you just want to make sure that you're going to end
up with a lot of polygons, but maybe this is too many. So what I'm going to do
before we actually finish, I'm going to grab all of these. Press Delete, and then what I'm gonna do is
limit or dissolve. Take all of those
polygons off and let's restart that
again because it's way, way too many polygons
at the moment. Let it think about, well,
so many polygons there. It's probably going
to take a little bit of time to actually fix that, but hopefully we
should have a clean. This is why we say that
all the time as well, just in case we do
silly things like this. And hopefully when
this is finished, then I'll be able to
come in and I'll be able to get the same subdivision
as what we've got there. All right. So I'll be honest, my actual blend, the crash. But luckily I managed to actually bring in
the file against. I'm just going to go up to
file and save that out. And then what I can
do is now I can actually try and bring it in
to be the same as that one. So add modifier, Let's take off this display
to start with. And then what we'll do now is bring in a subdivision,
Subdivision Surface. Let's turn it down on Simple. And what I'm going to do is
I'm just going to put up three or four press control
hovering over there. And then press Tab. And then we can see what this
is looking like. If I grab this one and this
one then and press Tab. What I can do now is I can
actually grab all of this one. So L right click and subdivide,
right click, subdivide. And I can actually
get a real feel for how this one's divided up. So subdivide and maybe
one more like so. And I think that
then is going to be enough to actually work with. So we'll save this in here
though, for the next lesson. And on the next lesson
we'll actually get in this, hopefully, looking
a bit more like sand and not like
what we had before. All right everyone. So I
hope you enjoyed that. I'll see on the next one.
Thanks a lot. Bye bye.
114. Applying Terrain Texture Using Vertex Painting: Welcome back everyone
to the blend of four Ultimate guide and
this is where we left off. Now before we go on, I actually think before bringing in this actual displacement, what we'll do is I think
we should actually paint the floor first,
thinking about it. So what we'll do
is we'll come to floor and we'll bring this one in and drop
that one there. And then what I'm going
to do is I'll just let it load up and you lend it
with something like this. And then what I'm going to do is just delete that out of the way. And then I'm going to
go to modeling now, I'm going to come in and put
it onto material for now. And then I'm going
to do, I think, let's just hide that out the way we're not going to need
that at the moment. And we'll also our lights out the way we got
our lights here. Let's hide those out the way They're going to make
it a little bit harder. And I'm just looking at
what else we'll need on here really to
make our floor. I think actually
everything else can pretty much stay the same. All
right, so we've got that. So what we'll do then is
we'll come now to our floor. And then what we'll do
is we'll go to Material. And we're going to
click the down arrow and we're going to
look for floor. Click that on like so, and we will end up with
something like this. Let's also come up on the right hand side and turn off these
interlocking links. Now we've got our
floor ready to go. So how do we actually
paint our floor? What we're going to
do, first of all, is go to the shader, and we should see if
I pull this out, that this shader is built
up of 12 actual textures, texture maps, one of
them being the stone. So this one's the stone. All of this really
is just down to the actual stone which is
plugged into a principle. So same as you've done
before, same as this one. This one is going
to be the sand, and again, it is plugged
into a principle. From there, we have
three other principles. Sorry, not three other. We have 12.3 so we have
one extra principle. Basically, this
principle here is just basically
controlling the alpha. So we've got an Alpha plugged
in then to this mix shaded. But before that we have
both of the principles for the sand and the actual stone
plugged into a mix shader. And from there, what we're
basically doing is we're separating out the RGB. So we're basically
using the red, green, and blue channels to
actually draw on our mesh. Now this is the way that you can separate out three
actual textures, but what we actually
do when we're actually drawing is we'll use one green, we'll use the blue, and
we'll use white or black. You can use either basically. And then what we do
from there is we have to plug them in three times. So we've got 1.2 which is
the sand and the stone, and then we've got both of
those coming into here. And then finally the
Alpha coming in, and finally to the
material output. So let's actually see what
that looks like in practice. So let's go to modeling. And what we'll do is we'll
come up two our vertex paint, so this one here,
and then we'll see that it turns to
the actual stone. Now at the moment,
I think that stone is probably going
to be a little bit, Is it going to be too big?
I don't actually think so. I think the stone, maybe we'll make the stone a little bit smaller
before we start. So let's go over to
our shading panel. And what I'll do is
I'll just put this on material so I can
actually see what I'm doing. I'll zoom out a little bit, and what I want to
do is make sure that this stone is about
the right size. I think they're a little bit
too chunky at the moment. So we're going to go over
to where it says stone. So this one's sand
as you can see. So this one then is the stone. And what I'm going to do is at the moment you can see
I've got this on eight, let's put it on ten, like, so let's have a look
where that looks like. So let's put this one on ten. And there we go, the
little bit smaller. Now as you can see,
and I actually think that looks a
little bit bare. Okay, so let's now
go back to modeling. You can change the sand
as well on there as well. Let's go back to modeling now. And what we'll do is we'll
put it onto vertex paint, So onto vertex paint. And then what we can
do is we can press the T button just to open
up this panel over here. Now I'm going to do is if I come in with my drawer and
I click on there, you'll see nothing
actually happens. But if I come on here and
let's say put this to green. So let's put it to green. You'll see now, actually
start to draw with sand. And if I put, let's say blue. Let's draw it with
sand first, 1 second. Let's now put it to white. We can draw back from
the sand back to, you can see we try getting halfway in between there,
because we're growing white. Let's put it on black.
And there we go. Now we can draw in
our transparency. So you can see mixing up the colors might be a little
bit different from you, for you, but you can see now this is
exactly what it does. So let's now put it
onto white again. And then what we'll do is
we'll put it onto green. And then all I'm going to
do is I'm going to come around all of these corners
and show you what I mean. Once I've actually
got this on here, I'll make my brush a
little bit bigger. I'm going to draw
these in. This is based on the vertexes. Remember we've put
a lot of vertexes into this actual ground already. Now let's come up and just
put it onto object mode. And then what I'm going
to do now is show you what it looks like
on the rendered view. So let's load up
the rendered view. Let it load up there. You can see now exactly, you can't actually
see the floor. What we want to do now
is we want to change pretty much all of
this to the sand. And then we want to bring
in the transparency. Let's put it back
onto this view. Let's go back to vertex paint. And then let's come in, not
weight paint, vertex paint. There we go. Now let's
put it back on blue. There we go. What
I'm going to do is just draw in my
sand to start with. Because I find this much, much easier to do it this way and just draw my sand
all the way over. I know I'm going to
cut those corners, but I just want sand in
here and things like that. And then I have, I
can actually come in and draw in my tails. Now that's the next one
I'm going to draw in. If I put this, I think it's going to be either
green or white. I think, let me make
this a little bit smaller. It's not that one. Let's come out, let's put it on blue minute, it's not that one. Let's finally put it onto white. And then we go there,
it's the white one. What we're going to do
is just draw in here, just very gently where you actually want your
sand to come up to. Maybe up to here, have
the sand coming up. And maybe then a
bit around here. Don't worry, this is
not the final version. We're just kind of building something up
where we want our sand. So maybe something out here. What we're looking for is
to make it look as though the sand has actually been
sweeping through here. Where would this
sand actually go? Again, down here, we want
a little bit of sand coming out here,
especially around here. So they just add a sandstorm or something, basically like so. And then maybe around here, yours on the bottom of here, so, and then maybe a
little bit more going out and then coming round here. So I'm thinking that
looking pretty nice. Okay, so now we've done that. What I want to do is I want to actually blur them
out. Now a little bit. If you see, if I come in now, I can actually blur back
this as you can see. And it makes it look just a
ton better as you can see. Just back a little bit. You can turn down the strength of the blur as well
if you want to. You want to make it a little
bit less. There we go. And then this one over
here, there we go. Especially over here and then like so and I'm
just making sure. I'm happy with that. Yeah, I think that's actually looking pretty nice already. All right. Now let's come in. It'll
be either blue or green. Let's try the green
first. That's sand. Let's try the blue. That's still sand. So
let's try the white. We'll get there. It'll
either be white or black. So let's try the black. Actually, we've got it on blur, that's why, let's try
it without the blur on. So we'll put it on the black. Let's try, there we go. All right, on the
black, it works. Now what I want to do is want to decide where we're going to have this actual
transparency coming up to. So I'm going to make my,
this is a little bit bigger. And then what I'm going to do is some jaws going to come in. And to start with, just get rid of these
sides pretty much. And then what I'll
do from there is I'll work my way in
jaws around all of these sides and you'll be able to see the result
you get looks amazing. Once we've actually done this, I'm fairly sure once you've seen this you'll be using it a lot because it's
so nice actually, it gives such a good result. All right. Something like that. And now what we'll do is
we'll go back to our blurt. And I'm hoping that I can come in and put this
down a little bit. Just blur these lines
just a little bit, going round as you can see. And once I've done this, I can actually go back and
take away a few. So now I'm going to
do is I'm actually, we'll do this on
the next lesson. Actually just make sure that
you save out your work. And then on the next lesson
we'll actually carry on with this and make it a little bit more rugged than what it is. It's a little bit too straight along this bit and
things like that. All right everyone.
So I hope you enjoyed that and I'll
see on the next one. Thanks a lot. Bye bye.
115. Creating Opacity Masks for Refined Edges: Welcome back everyone
to the blended poor ultimate guide and this
is where we left are. All right, so now what we'll
do is we'll actually put it onto on our viewport, so we'll be able to see
what we're doing here. And now you can see this
is what it looks like. And now I'm going to do
is I'm just going to put my draw back on and as sued, be able to come in as you
can see and just have a much better of how everything's
going to look. So now we can really see
what we're actually doing. Let's cut it round here. So just to take off a few of these if it's not
actually loading up, let's cut it round here. Let's go in, because we don't want these actual
pieces to sound like so. And then what we're going to do is I'm going to make this
a little bit bigger. And then we'll come
in and do this bit. Maybe then it's a little bit big and I'll put a little
bit going in like so. And then come in
round this rock. Then finally what
I'll do is we'll actually cut this away as well, and I think that is
looking pretty nice. All right. Now I'm going to do, what I'm going to do
is now I've done that, I'm actually going to go in
and just clean up all these, let the thing load up and then you'll be able to see the
point, what you need to erase. Like this one here, let's
actually have a look round. This one on here, you can see. And then we've got a little bit coming round here
as you can see. So let's erase that as well. Then finally, what I'm going to do now is I'm going to put it on blue and I'm going
to go round the edges. So you can see now as I
come around these edges, we can actually get something like this effect and that's
what we're looking for. Let's get some of
this effect coming on where it just tapers
off and ends it, rather than just abruptly, that's what I want to achieve. And around here as well like so. And then let's come
round to the front. I think this actually
really starts to end it really nicely and give you a
really nice finish. I would just be gentle with it on this final
bit and go round. And then what I tend to do is just come right to
the edges of it and just finish it off with just like one sweeping stroke. And then you'll end up
with just that sand just disappearing like
so as you can see. Then let's just finish this off. And then finally what
we can do then is come, once we've done this and work
on the actual ground now, because at the moment it's
looking a little bit flat. All right, so that's
looking fantastic. So now what we can
do is we can go up, let's put it onto Material mode. Let's save that our work, so let it load back once
it actually finishes. Hopefully it doesn't crash. There we go. And you can see, look, this is the difference
that I'm talking about. So we've got these little bits, actually we'll just come in
before finishing and we'll just get rid of just these tiny bits that
we've actually missed. So we don't want
these on. Let's get rid of these, this round here. I'm not going to touch too
much of these round here. I'm going to leave just
these bits in here because they might be part of what I've actually done and
I'm happy with that. Now I'm going to do is I'm
just going to save it out. And then what we're going
to do now is we can go back into object mode like so. And there we go,
that is our scene. And now what we can
actually work on is the actual displacement
of this part here. What I'm going to
do is I'm going to come over then to the right and side where the
little spanner is, I'm going to add in a modifier. And it's going to
be under deform and it's going to be displace. And there we go. I'm going to
put the strength on No 0.35 and I'm going to
put the mid level onto zero and you'll see
that it's still way, way too high. Don't
worry about that. What we're going to do then
is come down to the texture. So this texture is basically what it's going
to be displaced again. So if we come to this
texture and click new, you'll see now it actually
drops down into that place. And then what we're
going to pick is going to be the Veroni. We're going to pick the Veroni. And you can see
this is the image that we're actually looking at. And you can see that it's way, way too strong at the moment,
so we don't want that. What we want to do then is
bring the intense down. Something like, let's try 0.1 We can also see if we
put this on object mode, this is what it
actually looks like. But it's the massive of these
look like pits on the moon. Not something akin to sand. So what we can do then is
we can turn this down, holding the shift Bob, we
can bring it down like so. And we can actually start
to get something that looks more or resembles more like
sand. So something like this. And then what we
can do is we can also come down to
where it says color. And you've got one that
should say color ramp. So if you click this on, then
you can actually undo it. Now you'll see if
I bring this down, you can see I have a lot more control over
what I'm doing. Also with the color Am, I'd like to just
press control and click and bring in another node. And then what it gives me is more control over the
sand as you can see. Now I can bring this
one as you can see. And I have lots and lots of control over it
as you can see. Let's bring it a little
bit more back and let's bring this one this way. I think what I'll
do with this one as well is this one here. I'll actually make
it a little bit darker the more
darkness I give it. You can see I can
flatten it down now. Now you can see we're really
starting to get somewhere. Let's right click and
shade, auto, smooth. And there we go. Now think I'm actually
happy with how that looks. Let's see what it
actually looks like. So we can see, now this is
what it's going to look like. We can see this is what
it's going to look like on our rendered view. So let's have a look
on our rendered view. And you can see now much different to how
it looked before. Now, don't worry,
because we're not actually going to, you know, leave it with this
because we need to come in now and flatten
off these pieces. We can also, from here as well, decide if you turn this off. Look if you want them a little
bit bigger, for instance. So if you want these little
pits a little bit bigger, I don't think I want
mine any bigger. I think I'm really happy
with how that looks. So I think what I'm
going to do now, he's just put it on object mode. And then what I'm going
to do is apply this. So I'm going to come
in to my spanner, I'm going to press
control and apply that. And why have I applied it? Because it means now I can
actually work on this. If I didn't apply, it means I wouldn't be
able to work on it. The other thing is as
well is you might not need all of this mesh basically, so you might actually
want to get rid of it. So what I'm going
to do is I'm just going to go over the top minute. I'm going to come back and
put it onto Material mode. I'm going to click on it, put this on, and then press Tab. And if I double tap the, I might be able to
come in with a knife. So if I press K and
just come and cut, I should be able to, if I come down here, hopefully
if I press Enter now. Yeah, sometimes it
does, that you can see. Now press Enter on there. But it didn't actually come in and kind of give me a line. So in other words, it's
not a yellow line. So that's not the way to do it if I can do it a
different way as well. So what I can do
instead is I can come in and bring, let's
think about this. So what we'll do is
instead of doing that, we'll press shift and
we'll bring in a. So let's bring in a plane. So let's bring in this plane and I'll show you a
different way of doing it. And then what we'll
do is we'll x 90. And then we'll press just to
make it a little bit bigger. And then what I'm
going to do from this is I'm going to
rotate this round, so R Z. And basically what we're
doing this for is to reduce the amount of polygons
and clean all of this up. It's a little bit
messy at the moment. What I'm going to do
then is I'm going to grab this edge on here. I'm going to press seven
to go over the top. I'm going to make
sure on object mode so I can actually
see what I'm doing. So now I can see this edge. And then what I'm going
to do is I'm going to press E. Actually, that might be the wrong one. Yeah, there we go. I can press
now and just pull it out. I'm just struggling to
see where I am on it. I thought it would actually be easier to see, but it's not, so I'm going to just do a little bit of guesswork
actually and bring it down because I only want to get rid of
some of them anyway. And I'm wondering, can
I press a Yes, I can. All right, that's
going to make it easier. Oops. Not that one. Let's press tab. Yeah. Yeah, I can't actually press
on that. All right. I'll come back to it seven to go over the top
I'm going to press. And then what I want to do now is just put it back on this. And then hopefully I should
be able to join this to this. I'm going to press
going one more. And then let's join
these two together. And then let's pull
this in. Let's just check before we've
actually finished. You can see here, these two here shouldn't be like this.
So let's join these up. We'll join these right click and we're going to
merge at the last, and then the same on these
shift merge at the last. There we go. Now let's
bring in a solidify. What I'm going to do is
I'm going to add modifier. Bring in a solidify. Let's bring it out. If
it's going like that, just make sure to turn
around your normal. So I'm just going
to grab it all. Press Shift, let's have a
look at what mess this is. What I'll do is I'll put
it onto base orientation. Let's just hide this out the way that we've got many
different colors here. And I'm going to
press control all transforms and then what I'll do is make sure they're
all facing the correct way. Now let's see. Now
if I turn this on, there we go, part from
this side for some reason. This one here. Let's press
Shift, Spin it around. What is wrong with this side? I think there's an issue
with this part here. All I'm going to do is
I'm just going to grab it all, mesh, clean up, merge by distance and let's see now to put
even thickness on. Can I bring it out?
And we've still got some issues with that and I don't actually know why
there's an issue with that. Let me come in and
just tie this off. I'm just going to take this
off again. And there we go. This is the issue. So let's
come in with face select. We'll grab all of these. Going all the way around here, all the way around, all
the way around here. We're going to press
shift in, then spin those round,
and there we go. Now that's looking
better now let's press control your transoms.
And we'll try that again. So let's generate a solidify and let's see now if
that comes out and yes, now it's coming
out the route way. So what I want to do
is I want to bring you all the way out to
there as you can see, all the way out to
this open space. And then what I'm gonna do is
just put even thickness on. And then finally on I'm
going to do is control. Now what we'll do
on the next lesson is we'll turn this
face orientation off. And then we'll just cut away all of this part that
we've actually cut out, leaving us with the bulk of the, you know, the main
kind of island. Alright everyone, so I hope you enjoyed that and I'll
see on the next one. Thanks a lot. Bye bye.
116. Cleaning Up Tiles on Terrain for Consistency: Welcome back everyone to the
Blender Four Ultimate Guide, and this is where
we're left off. All right, so now let's
come to our ground. And what we're going to
do is we're going to add in a modifier. And the one we're
looking for is boolean. And then we're going to
click this lit up Pet. Click on it and click fast. And there we go. Let's
press control A. Now let's actually
delete our bullion now. And we should be left
with something like this. Now if we come in and
put it on material, we can see we've not
caught anything else away. Let's have a look on
our rendered view, what it actually looks like. And then let's turn those off. And then we go, let's
looking pretty beautiful. All right, so now what
I'll do is we'll come back to this view here. And what we're going to
do now is we're going to actually come in and get rid of these parts here where they're pretty high
up, where it should be flat. So I'm going to do is I'm
going to come to Sculps. I'm going to click on this
part, let's put this back on. Click on this part and
then come to Sculp mode. I'm also going to save it out
before I do anything else. And we've got a number
of ways of doing this. We can either come in and old the shift button and
flatten it out that way. Or we actually have a
button which is flat, let me just find
flatten, there we go. We can come in then
and flatten this out a long here. Now
we've got this on. At the moment you
can see though, it's quite hard to
flatten things out, so just be careful,
better off probably smoothing it rather
than flattening it. Or a mixture of both,
if you can do that. So what I'm going
to do is I'm just going to put this
on material mode, and you can see I've got
loads to flatten out, so I'm going to make
it a little bit bigger and I'm going to
flatten these parts out. And then I'm going to hold
the shift and just make sure this is nice and smooth. Let's flatten this
out if you need to go back into object mode to
see what's going on there, you can see now it's not really flattening
out at the moment. Let's just try and flatten
it out a little bit more. It's going to take a
little bit of work, so just be prepared for that. Let's actually, don't actually need my driver
updated right now. Let's just move it out.
This is the main part. Just make sure you
get this part right. So smooth it out. Just looking out, the
more you work on this, the smoother it's
going to obviously be. I'm just moving it out. Let's put it on now and see what we're actually looking at. If we have a problem,
what we can do as well is we can come in and
just put in some clay. So we've got sculpt draw. We can actually come
in, as you can see, put in a little bit of
clay and then smooth it off again where the
really big lumps are. And then you'll find that
actually helps a ton on there. So let's bring in some
clay, smooth it off. So I think actually
you can also come in and you can press control
and pull it down as well. But just be careful
when you're using that, because obviously you
don't want to go too far. So everything wants
to be as delicate as possible to get this
nice and smooth. I'm also going to
bring the strength down a little bit from
when I'm using that. And then I'm also going to
press control on that bit. Now you can see now we're really starting
to get somewhere. Let's bring it
back down a little bit. Let's smooth this off. Bring this up tiny bit. I'm going to smooth
all of this off. And then what I'm
going to do is I'm going to make my thing a lot bigger and I'm going to
smooth it all off together. Now the final stages at
the moment, now control, bring it down and then smooth, bring it up on that last bit, bring it up here as well. And then smooth. Now you
can see how easy that is. All right, we are
just about there. With that As you can see, I'm smoothing it off now,
a little bit more. Now what I'm going to do is jaws come around to these other parts of making sure none of
them are way too far out. So you can see some of
these, like this one here. Let's smooth it off. Let's
smooth this one off. And then let's come
round to the well, and of course we'll
smooth this off like so. And we'll definitely
smooth this one off here. All right, we're
looking good on there. Now the next thing
I want to do is we want to actually
bring in some draw. What I want to do is I
want to bring in some bits of sand which are going to
be higher than the rest. So you can see here,
we want some sand up here raising up against
this rock here. This is where I'll
come in and I'll turn my strength
a little bit up. And then what I'll
do is start raising that up. The same for on here. Look, just giving it
a bit of realism. Now the thing is, what
I would do here for sure is I would make
sure, first of all, that I'm not going into this
bit here where the stone is. The other thing is I would make sure I choose a direction, whether it be this direction, and make sure I come
from that angle. I wouldn't be going around
all of it and trying to, well, not on the rocks I want, on the actual palms,
I probably would. Then what I'll do
is I'll come down now and just bring in
some more sand on here. Just adding a little bit
more before we finish. And then again on here again, I'm not going to go
to the back of it, I'm going to come to
the front of it and lift it up like so,
as you can see. Then let's put some more sand in here. Let's smooth this off. The round here, around here
may be a bit around here. I'm going to leave
this bit in here. I'm going to smooth that off. As you can see,
it's a little bit higher than the rest
of it. Same as this. Let's smooth those off. Let's heighten this
up a little bit. Smooth that bit off. All right, we're nearly done now. Let's do the same on this bit. Let's smooth this bit
off. There we go. Now the final thing I
would do is I would come in and use my grab, I'll probably make this
a little bit bigger. And then what I'm going to do
is just bring up this now, just making it little bit uneven because at the moment
the ground is very even. We don't really want that,
We want to make it a bit, even in places you can see it's making such a huge difference now and not having our ground. Let's bring it
round. We're nearly on the home stretch of the
actual, this being done. Okay, so finally then let's
put it into object mode. Let's save ou our work. And then what we'll do
is we'll just press the, the rendering, the Viewport key. You'll tap the turn off this and then let's have a look what
we've actually got. There you go. A fantastic image. Okay, now what we'll do
is we'll actually come in and we'll take
our final render. And then what we can do
from that final render is I'll show you
just how to tweak the actual the parts in the compositing so we can actually change the mood
and things like that. All right everyone.
We'll do that on the next lesson and I'll
see on the next one. Thanks a lot. Bye bye.
117. Finalizing the Composition and Preparing for Rendering: Welcome back everyone
to the blend of bot Ultimate guide and this
is where we left off. So now what I'm
going to do is I'm actually going to put this on. I'm going to put it on
material mode again. I want to press
zero to see where my actual cameras and this
is the image I'm going to take because this is
the image that I've been taken pretty much
all the way through. And then what I'm going
to do is camera to view. And I'm just going to turn
it just so we can get a better view of those steps. And what you always
want to do, you don't want to cut
off this part here. So what I'm going
to do now is I'm going to cut it
out a little bit. Pull it out a little bit, sorry. And then just get
it into the center. And then push it in and
just make sure that I've got it on the drop off
around here as you can see. And that this bit is still in and that now is a
pretty nicest image, giving us lots of
things like oh, I wonder what's
around that corner. You know, making people wonder while still showing a
really nice part of it. You can also maybe, maybe just get away. We've turned it so you can
see a grape or two in there. So if you look, I can see
a grape or two in there. Now what you don't want to do is you don't have many
cutoff points. So you don't want the palm to be kind of hidden around
here, if you can help it. So in other words, I want my
palm to come up to there, so you can see how
it's cutting off here. You can see there's still there. So maybe zoom out
a little bit more. All right, so that's
a nice image. And then I'm going to save out. And then what I'm
going to do is I'm just gonna put on wire frame. And then what we're
going to do is we're going to make sure
at the moment we're on 100 samples and then
we're going to go to render, and we're going to render
image and we're going to let that do its magic and see
what we actually end up with. And then from there what we're going to do
is we're going to, we're going to the compositor. I'm just waiting
for this to start now and seeing what
we actually get. But you can see
already that we've got an issue down here. Let's come into that first. Before we do anything, let's
turn our camera to view off. And then what I'll do is I'll just come down and
press or tage, and I'll actually come in and actually delete
that out the way. Finally, I forgot actually to say one thing you could
do as well is you could actually come in and
come in and add in a modifier and
generate a decimate. So decimate this
down a little bit. If you're struggling, I don't
think I need to do that. I think it's absolutely
fine at the moment. It's not too high poly. You know, if I
press tab on this, let's press a tab on it. Yeah, that's the
actual thing we can see actually here,
how many is it? Let's actually add a decimate
and then we'll find out. So generate decime, and at the moment
it's 41,000 polygons, so not too high for
a ground actually. So now what I'll
do is I'll come in and try and re, render that out. There we go. And you can see what a beautiful
image already. You can see that maybe we should have rounded
this off a little bit. It's looking a bit
square from this angle. These are the times now as well where you're
looking and thinking, what could you do better, or what could you have done better? You know, you should
probably go in and unlike some of these
windows as well. So just make sure
that you do that. You can just click on
the other material that I showed you
actually how to create. So that should be quite
easy for you to do that. I'm just looking
at other things. You maybe want to come in and put some door
handles on there. As I said, we want to
round this part off. I think actually
though, the rest of it is looking pretty nice. So what we'll do now is
we'll just wait for this to render out and then we'll get
a beautiful image of this. The other thing of
course, you can do, is you can change the
lighting on here, so there's always that to do. But you can see we've not
even brought a sun in, we've just used a sky
texture within blender. And we've done, you know, it's been pretty good I think
with this render actually, it's a little bit too
close to the top, so I would pull it back. Once I've actually then
finished with the compositor, what you would do is you
would turn up the amount of samples to get a really,
really nice sample. And that's something
that we'll do once we've actually finished. So we can see now
we've got our image. We can see now the
composite has kicked in. And we can see now just
how beautiful that is. So what I'm going to do is
I'm just going to come now, close this down, go
over to my compositor. And then what I'm
going to do now is do a little bit more with this. So I'm going to
pull this over and the first thing
I'm going to bring in is hue and saturation. So search, hue and saturation. And then what I can see here
is if I drop this in here, what I can actually do
is I can come to select this node and then come to
where it says Node Wrangler. And then what we can do
is we can frame selected. So if you frame selected now you can see
we've got this here. And now if I come to the node, I can put a label on it. Let's say main hue like so. And then what you can
actually do is have this, knowing what this is, if
it now come to color, we can change that and put
it on something like red. And now this is the main
hue for the whole scene. So if I come and
change this now, you'll see when it loads up, it's going to give
it a weird kind of color. We don't want that. What we want to do is we
want to come in and whether we desaturate or bring down
the values a little bit. So bring down the
values slightly and let this load up again. And there you go. Now what I'll do is I'll show you the next things that I tend to do. So the next one I tend to
bring in is a color balance. So shift a color. Balance. So we're looking
for this one here. And this one is
the overall feel. If you've probably seen
something like World of Warcraft Raf of the Lichkingct. Whole cinematic had a blue
tinge to it. That's in gaming. And if you've seen the Matrix that has an overall feel
of a green kind of color, this is where you
can actually do it with the actual color balance. If turn up this over here, you'll see that the whole scene starts to change
the way it looks. Let's put it on
something a little bit like so. And there we go. And let's put this on a
little bit of orange maybe. And there we go, you can
see it's very, very slight, but you can see now it's
actually started to change how hot the
actual scene looks. So I tend to mess around with the blues and oranges
on something like this. If it was a forest, I'd be messing around
with the greens and blues, for instance. But this one is a desert. If it's medieval, again, I would be messing
around with probably the heat off of the lamps
and things like that. And the blue from the actual, because it's a
medieval type scene. It's okay. So now I've done that, what I'm going to do is I'm
going to pull this over to the side
and I'm going to bring in a diamond sharpen. So I'm just going
to pull this over shift and then we'll
put in filter. So I think it's the filter
that we have to put in. Yes it is. This one here. And then what I'll
do is I'll put this onto diamond sharpen, and I'm going to put the
diamond sharpen onto note 0.2 Now you can see already
it started to really, really sharpen up
all of those edges. As you can see, let's not
turn it up, the hide, let's put it on
something like note 0.2 Let that think about
it, and there we go. Now you can see it's
really started to bring out all of
these parts here. As you can see, that's
looking pretty nice. And then what we'll
do is we'll come in and we'll put it on a soften. I tend to know it
seems back to front, putting on a diamond
sharp and then a soften. But I actually think
that the diamond sharp really brings out all of the kind of textures and the bump on the
textures and things. And then what I want to do is soften them out
just a little bit. So what I'm going to
do is search filter. And I'm going to bring
in a soften and what I'm going to do is going
to put this on not 0.5 So we can see up here, once this is loaded
in, let's drop this then on not 0.5 like so. And you'll see, then I'll just bring these back up
here. There you go. So now you can see it's
looking a little bit sharper, but it's still giving us
that soft image, of course. Okay, so now we've got two
more notes to bring in. The first one is going to be
the overall brightness and contrast shift a search
brightness and contrast. What this is going to
do is it's just going to give you the ability
then just to lighten up certain parts of the
overall scene basically. So if I put this on, let's say not 0.2 you'll see that it
needs to be altering. Finally, you can see finally
how it actually altered it. If I put this on minus
not 0.5 for instance, -0.5 like so, let it load up. And you can see that
brought it all back down. It's really up to you what
you actually do this. I think I'm going to
put this on minus not 0.3 As far as the contrast goes, I think I'm going to try
minus not 0.4 Let's try that. Let it load up. Let it think
about it. There we go. Then the final one
that we're going to be doing is going to be
RGB curve search. Rgb and curves. And let's drop that
one in this base is going to alter the
whole feel of the thing. It's basically going
to alter all of the overall feel of it. If I bring this up, wait for
it to load up. There we go. You can see really, really drastic how that
actually changes it. Let's bring it up
slightly, very slightly. The further you actually
go along the compositor, the more you're going
to see that it's very, very fine tuning
as you work along. I think with this, I'm really
happy with how that looks. I don't think I need to play
around with this anymore. And what we're going to do now, and then we'll come back on the next lesson and go through
what we've actually done. But what we're going to
do now is we're going to go back to modeling. We're going to make sure
we're on wire frame. And we're going to
come over now and we'll do a mid level sample. So I'm going to put
this on 1,000 like so. And again, you
might want to turn your noise threshold down if you want it higher than this. But then after that, I
would probably put in around four K samples or something just to get
that really nice image. So what I'm going to
do now is I'm going to click the render button
and render this out. And I'll be back on the
next lesson to finish up. All right everyone.
So I hope you enjoyed that and I'll see
on the next one. Thanks a lot. Bye bye.
118. Final Thoughts and Reviewing Our Completed Work: Welcome back if you want to the Blender four ultimate Guide, and this is where
we left it off, so this is my final
render at 1,000 samples. As I said, I would turn this up a little bit if I was doing a, you know, really, really
good portfolio image. But I think this looks
really professional and I think it would stand out
in any portfolio actually. Now what I do tend
to do now is I would go around and take probably four images from
different angles. And then you can add that
to your portfolio as well. And what I would also
do is I would check then what actually could I
do better in the future? And for instance, we can see
we do have one problem here. The palm trees aren't in
here for some reason. So I'm going to just quickly
go away now and actually render the palm trees out
as well. So here we go. I actually re rendered
it with the palm trees. I also zoomed it out a
little bit as you can see. So now you can see
just how nice it is. So what could we do
different on this scene? I think the scene
looks really nice. Let's look at the positives. I think the sand looks
really great at the moment. The palms look really good. The actual view,
what we've got here, also looks really nice. The one thing I would say is we've got a little bit of a palm poking through here and
we're not sure what that is. In other words, we can't
work out quite what that is. That's something I
might actually change, so just change the
angle slightly. I would probably come
in and make this a little bit more
round over here. I'm just looking at
the other things now. I would probably
make the overall, these bits here just
a little bit lighter, just with that RGB curves, just to bring out that
lightness a little bit. And I would probably turn
off one of these windows, probably this one, because
this one's already turned off on this
part of the scene. From there, then I'll
probably go round and take a scene of this side. And I think what
I'll do is I'll do that now and I'll come back, saving you the job of
actually doing that. So let's actually
close that down. I'll go and rerender one out and I'll be back when it's done. Here is the front view of
our actual Arabian building, and you can see it's
looking really nice. It's actually really getting
that theme of a, you know, sunrise in the morning coming up and still
having the lights on. I think actually this
part of the scene looks better than the
other side, actually. So I'm really, really happy with what we came out with here. Again, I would switch off
some of these windows, I wouldn't have them all lit, and maybe it would
turn off one of these windows over
here, for instance. And maybe just putting
a few more rocks, let's say over here somewhere. But apart from that, looks
really, really great. So that brings us to the end
of the course, everyone. I hope you really enjoyed that. Drop us a review if you did. And make sure that you put
a comment in the review about what you like most
or what we could improve, that would be great as well. Until next time guys. Happy modeling everyone. Cheers.
 3D Tudor, Bestselling Blender Author & 3D Educator