Transcripts
1. Blender 3D Modelling Bootcamp Intro: Welcome everyone to the
blender beginners boot camp. My name is Neil, and I'm not only the developer
of this course, but also the creator
behind its conception. I've spent eight
years in the field of three D modeling for both
courses and the industry. And I am also the founder
of Three D Tudor, a platform that has seen immense success in course
development and reviews. With my firsthand experience of starting in the field
of three D modeling, I do understand the
challenges you may face, and I'm here to help
you overcome them. At Three D Tudor, we
currently offer 27 courses, thousands of models, as well as texture and material packs. And with the following of
over 200,000 students, we know what it takes to
build an amazing course that not only educates
but also inspires. This blender beginners
boot camp has been meticulously
designed to cater to both complete beginners and those with some experience
in three D modeling. Ensuring that you
leave this course with a wealth of knowledge and the confidence to tackle the world of three
D modeling head on. Our comprehensive and hands on approach will
guide you through over 20 projects spanning
a wide range of topics. Allowing you to explore various techniques and tools while creating stunning three D assets that you can be proud of. This course includes a
comprehensive download pack and blender files enabling you to dive right into the
learning experience. Everything is meticulously
organized on platforms, allowing you the
flexibility to choose specific projects or work your way through all of
the project sequentially. As you progress through
this in depth course, you'll build your
confidence and experience, gradually becoming
more proficient in three D modeling
with blender. So without further
ado, let's dive into what this course
has to offer and why it's a perfect choice
for anyone looking to master the art of three
D modeling with blender. Getting started, we kick off the course by covering
the basics of modeling. Starting with a simple
bridge project, you'll learn essential modeling techniques such as extrusion, loop cuts, and
proportional editing. And get an introduction to blender modifiers like the
powerful wire frame modifier. Next we have Japanese
stylized roof curve rays and traditional architecture. Discover the power
of the array system as you create intricate
curved roofs. Next we're onto door creation, wooden panels,
hinges and handles. You'll discover various
techniques of how to create the wood and the stone that actually goes
around the door, as well as things like making our doors look rough and uneven. Next run to spiral staircase, and you can amp up
your complexity with the array
modifier building, elegant stairs, banisters, and light in a
stylized staircase. Project five will be all
about creating a camper van, delve into the subdivision surfaces and their applications, setting the foundation
for creating realistic cars in the future. Next run to brick and mortar, where you master
the art of creating different shapes and sizes of brick and block
walls with these. Next run to boat creation. This is something that a lot of the art there actually
want to build, but I have no idea
where to get started. Moving on to our Harry
Potter theme broom. You'll learn how to
create an intricate, organic looking broom handle, as well as the broom using
displacement modifiers. Project nine will be covering palm trees with a
reusable trunk, allowing you to easily
design a variety of trees. Next, run to the bay window, which is actually a
very complex model. You'll learn how
to think through the actual modeling process
to bring everything together. Alize Rocks is next
on the agenda. And with this one, we'll be using a lot of
modifier stacking. As you realize, you can create complex geometry with
these using modifiers. Project 12 will be
covering pillows and beds. We will be using the cloth
simulator as well as taking a quick look at the
scoping tools available. Next on to logo design, this will be your
introduction into fonts and how they
work within blender, as well as various
other techniques to easily put logos together. Project 14 is a bit of a big
one and this will provide you the basics of
creating per, and hair. It will also be
your introduction into Blender's Particle System. Project 15 is all
about innate models, and on this one we'll be
looking at ornate mirrors. We'll be using curves
and beveling to create intricate details with
these on our models. Project 16 is the classic
creates and barrels. This is where you'll be honing your skills and seeing just how far you've come and how easily you can
put these together. Couldn't have a
blended boot camp without including
stylized plants. And this leads us
on to Project 17. We'll show you easy ways to
create lush, vibrant foliage. Moving on to one that a lot
of people struggle with. And this is that leather
chesterfield couch. I'll be showing you
simple techniques to create tufted quilted
designs with ease. Project 19 is the all new
geometry nodes to blender. And in this one, we'll be covering rope and vine creation. And give you a good
introduction into just how powerful geometry
nodes have become. And the final project is
hard surface modeling. We will be using blenders
in built Boolean tools, create hard surfaces with ease. By the end of this blender
beginners boot camp, you'll have gained a
deep understanding of the software and its various
tools and techniques. We're confident
that the knowledge and skills you acquire will set you on the path to becoming a proficient three D modeler. Whether you're looking to
pursue a career in the field or simply want to create stunning
three D assets as a hobby, this course is the
perfect starting point. We invite you to join us on this exciting journey into the
world of three D modeling, or using the amazing
blender software. Together we'll tackle
a diverse range of projects covering a wide array
of techniques and tools. As you progress
through the course, you'll find yourself
more and more confident in your abilities, ready to take on any
challenge the world of three D modeling
may throw at you. So don't hesitate. Join us today and start your
journey towards mastering blender and realizing
your full potential as a three D artist.
2. Resource Pack & Course Overview: Welcome everyone to the
blender beginners boot camp. And before we begin, there are a few things we need to go over. First of all, before
we do anything, I'll quickly explain
that this course is intended for beginners
or people who have used blender before and really want to speed
up their workflow or find out how to use blender
to its true potential. This course is not intended for any blender
gurus out there or people who have been modeling in the gaming industry
for the last 20 years. However, if you
are transitioning over from a three D software
like Meyer for instance, then this course will be a quick help to get you up
to speed within Blender. So with all that
said, let's first of all talk about the
download pack. This is the first
thing you should do, should head over to the
resource download pack, get it downloaded, and
then you'll be able to see exactly what's
on my screen now. Now everything in
the download pack is right here ready
for you to use, including the actual blend file that we're
going to be using, which will go over
in a few minutes. We also have all the
textures in here, so if you double click
all these textures, you'll see when we open them up, there's a God 20 odd textures. And in there you'll find
all of the actual colors, the actual normal maps, everything that you're
actually going to need to use in case you want to actually create your own models and use
them in your own projects, you will be able to
do that as well. Now the textures
that we've actually created are actually
all in blender already. So this actual course is
basically about modeling. We will have to do a few things like marking seams and
unwrapping meshes. But apart from that, all of the materials will actually
be created already, allowing you just
to put them on and actually concentrate on the
actual modeling skills. With that said, let's go
back to the download pack. And what I want you
to do, first of all, is actually check
out the references. So this is something that
you should do in case you're building a
bridge or a camper van, for instance, that
we've got here. You can also see I've put some references in here
where it shows you a few different types of
barrels just in case you want to go away and create your
own barrels and crates. I've also got in here something which will help us
create the bridge. It's actually really, really
easy then to break it down, get the actual sizing
that you want. Now, I should mention
something else. Normally in my
courses, we normally focus on bringing
our little guy in. And we use it to actually scale up everything within the scene. However, on this course, we're not actually going
to be doing that. And that is just to
allow you, again, to focus on your
modeling skills. And not so much trying to
get everything to scale. Things will look to
scale, but they actually, if you're trying to
send them through to Unreal Engine or
something like that, you're going to probably
have to scale them much, much bigger or much smaller.
We've kept them like that. So that when you actually go in to your actual blender file, you'll see that everything
is nicely laid out, making it really, really easy to actually see
what we're doing. The other ones we've got
here is a cat silhouette. We've also got a cat SVG, which is the same
as the silhouette, just in case you want
to import that SVG, which you're going
to learn about as we progress
through the course. You can see we've even
got here a actual font, which we're going to
use when we come to our actual logo design. And then this will
give you an idea how to create your own logos. Let's put that down
and let's actually have a look at the
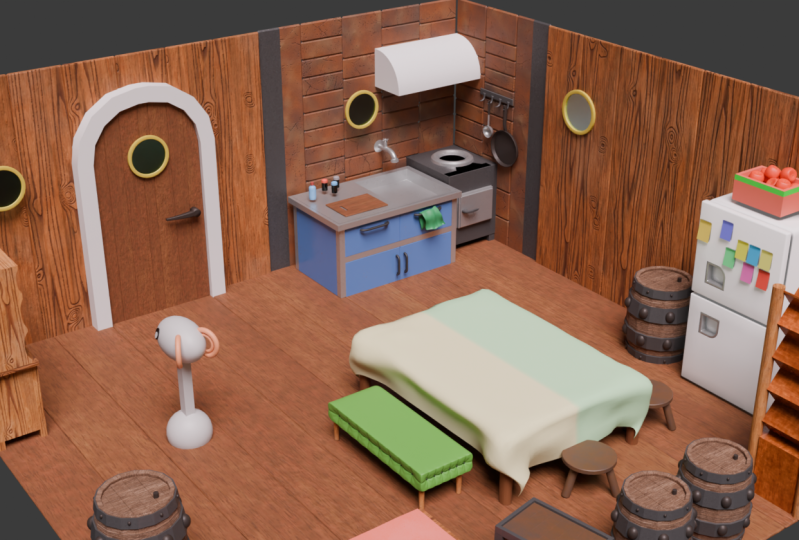
actual blend file. So this is what you'll
be greeted with when you actually open up
your own blend file. And if you click on Lighting, you'll see that it comes up with an actual plane here and with
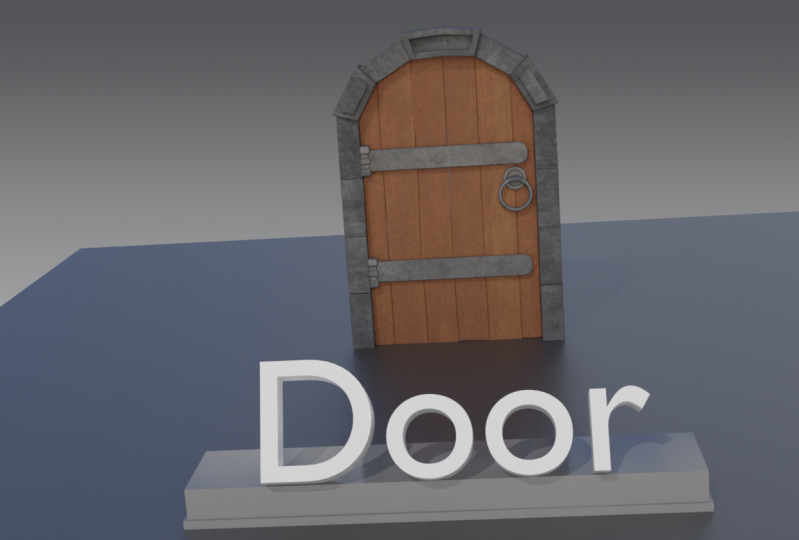
an actual stand on here. If we go down then and click the next one,
which is the door, you can see that we actually have the name of the
actual project appearing. And we have what I've
actually previously built. And this is what
we'll actually be building in this
part of the course. So if we close that one down
and we click on brick wall, for instance, you will
see a brick wall appears. And then this is what we'll be creating in this
part of the course. But we're basically going
to be going down all of these and going
through each of these. So just go down and have a look actually what
we're creating. And you'll see that I've
tried to put them in the best order possible to give you the best
learning experience. So in other words, we're
starting off pretty simply. And as we get further up, you can see we've got something like the spiral staircase, which is a lot more sophisticated when it
comes to modeling. And you can also see as we
move down past the camper van, so we do the camper van
as we move past there. It's more about working with techniques to speed up
your modeling workflow. So working with things like modifiers with curves
and things like that. As we get all the way
down to the bottom, you will see that we actually do some hard surface modeling. We also make some geometry
nodes like ropes and vines and something like a stylized plant using
particle system. So you can see we're going to be going pretty much
through the whole range of what's available within
Blender for actually modeling. Now the other thing
that you need to know is if I put my door on again and I come up to
the top right hand side, you will see that on the
top right hand side, we have these little
four balls here. Now these are basically whether you want to see
it in wire frame. So if we click on the
wire frame, you can see, you can see straight through
the actual door here. If you click on the object view, it's basically just
a great view of it. Now the other thing you should
know is in object view, so if you open up
your own blend file, just make sure that you
come down and you tick cavity on, on this blend file. Cavity should already
be ticked on, which allows you to actually see it in a much,
much better light. So if I click cavity off, as you can see, now it's
looking a bit plain looking. If you click cavity on, you can see a lot more of the topology and
things like that. So most of the time I work
with cavity clicked on. Now the next one is going
to be our material. So I'm going to click
on the material panel. And you can see now all
of the materials load up. Now you can also see that they don't look too great
at the moment. And the reason is, at the
moment we're still in the material preview of this
actual on the viewport. Now if we come over
though and click on our V rendered settings. So let's click on the V
rendered settings like so. I think it's on V. Yes it is, it's on V. And now you can see
it looks much, much nicer. Now, when you open
up your blend file, all of these options, so the ambient occlusion and bloom should already
be ticked on, and that means then you've got a real nice visual of what
you're actually creating. Again, within this course, we're not actually going
to be going through rendering and lighting
and things like that. We have everything set
up ready for you so you can focus just on
your modeling skills. Now, you'll also see down on
the bottom left hand side, we also have a keycasting on, so any buttons I press. So if I grab this and I press G, you can see that
pops up down here. And you can see
also the clicks of the mouse all also
pop up down there, allowing you then to follow along following the
actual keycasting, just in case I'm speaking too fast or you don't
understand my accent. Now the next thing
we want to do is we want to actually go up
and save out the file. So I recommend doing
this as soon as you load up and as soon as
you get to this part. So if we come over to file and we're going to go down
to it says save us. And we can see
here, we've already got the one called
Blender Boot Camp. I wouldn't actually save
it over this because that is kind of your download and you might want to keep that. So what I would do is I'm
just going to call it Blender Bootcamp course, like. So press the Enter button
and press Enter again. And now what that
means is now this is actually saved out as
you can see on the top. I don't actually know if you can see my top white part here. I think I've actually
put that a little bit up because it gets annoying
with that white bar. But you should be able to see it says Blender Boot Camp cost now. Now this is important
because you should be saving
out quite often. But it's also important because
once you've saved it out, you can actually
recover your work. So I'll just quickly go
over how you recover your work before we do anything else because I think
that's very important. So for go to file, if you come over to where
it says recover, you can recover blender
work from the last session, but it doesn't always work. But the best one to recover work is going to be
where you auto save. And when I click on auto Save, it's going to show
Blender boot camp. So it's going to periodically
save out every, you know, 10 minutes or even five
sometimes when Blender crashes actually does save out and it saves you then losing
a ton of work. So just in case that happens, this is how you're
going to recover it. You can also see today the time and stamp
and things like that, which really helps
you then to get to a point where you
last finished off. All right, so let's
close that down. Now I recommend when
you're actually working, what you do is, so
let's say the door, this will be the first
one we start on. We're going to
click on the door. Now if you haven't got
your little gizmo here, just press the Shift and the Space button and
bring in your move tool. It should be available to you. And if it's not, it's up here on the left
hand side as well. You can also see
we have a rotate as well and a scale
and things like that. But I tend to just
use this move tool, so it should look
something like that. What I'm going to
do then is pull it over to the left hand side. And that then is going
to give me a really, really nice starting
place to actually start creating this actual mesh. Now, the other
thing at the moment is you can see that the plane, it might be a little
bit in the way and certainly the door and the stand is definitely in the way. So what you can
actually do is you can come over to the
right hand side, open up your door, and you will see that we've
got text here. So if I click this text off, that can just hide
that out the way. Then if I come to lighting, I can actually click off
my base, for instance. And I can click off my
platform if I want to. Now if we put this
back on object mode, this now is what's available. So this might be a little bit easier for you to
create something, so you can just see
the topology of the mesh and how we
actually created it. Then once you're done,
you can actually see by bringing these back in. So clicking these
back on an envelope, what your actual
creation looks like. Now we will be going over
a lot of these things, you know, as we move
on through the course. But the next thing
I want to look at is actually the
materials and textures. Now, because if
you've got to file, and you can see that default, sorry, external data, it says automatically
pack resources. What that means is
when you actually bring in this blend file, everything is already
packed in there. This includes all the textures, all the materials and
things like that. So if we go to our door, let's put it onto material view. You can see that we've already
got our stone in there, we've already got our wood
in there and our metal. Now when you create
your own door, of course it's not going to have these textures on there,
but what you can simply do, if we come over to
the right hand side to our materials tab, which is this little
ball on here, you can see that we have all of these materials
already laid out. Now if I bring in,
let's say a cube. So I'm just going
to bring in a cube. So I'm going to press Shift A to my premis menu mesh.
Bring in a cube. And now you can
see at the moment this doesn't have
any materials on. But because we've
already brought in all of our materials
and set them up, you should be able
to click this little down arrow and find
the material you want. So if I point in Door, you should see I've got
one called Door Wood. And if I click that, we get them exactly the same
material as this. Which is going to save us
a lot of time rather than, you know, setting up all
the textures and materials. Now we will, as I say, have to mark some
seems on some of the occasions and we will
also have to unwrap them, but it just cuts down that time. Literally probably
three quarters. So we can focus, as I said, mostly
on the modeling. So now let's actually
delete that. And what we're gonna do
is we're gonna leave it here for now and move
on to the next lesson. And in the next lesson,
you're going to learn how to actually navigate
around blender. All right everyone.
So I hope you enjoyed that and I'll
see you in the next one. Thanks a lot. Bye bye.
3. Blender Fundamentals: Welcome back everyone to
blender beginners boot camp. And this is where we left off, Absolutely nowhere, because we just went through everything. So now what I want to do
is I want to give you a short introduction to
actually moving around blender. So how do we actually navigate, how do we move the mouse
and things like that? Now if you've already
know all that, then suggest that you
move on to lesson three, where we'll actually be
starting on the actual course. Hello everyone and welcome to the basics of blender
part of the course. I recommend grabbing
a pen and paper or a word document and joining down these
keyboard short course. He will be going through
the very basics of blender and the keyboard
shortcuts you will need. So with all that said,
let's get started. So on the left hand
side your kit, see I have keycasting on. This will show the keys
I'm pressing in real time. And this will be on pretty much, if not all, of the
entire course. The next thing I'd like to show you is any new keys we use. There will be a
small animation that will appear down at the
bottom right hand corner. This will only appear
the first time we use that particular new key. And I think it really helps keep the flow of the lessons
to a decent rate, both for beginners and those
more familiar with blender, because they only appear once, they won't plow up the screen. And there's always screen
casting to rely on. Also down the bottom
right hand side, you'll see a detailed animation of anything that
needs more context. This is useful if you neuter three D model in particular
because there's a lot of jargon and technical
terms that need a decent explanation or more context of why we
are doing something. I recommend then if you need more information jumping
onto the blender website and checking out their
detailed explanations of pretty much anything
blender related. So now when we mention
blender viewport, this is actually viewpoint. You can see it. All of this gray area here
is actually viewport. Now if we go to the UV
editing bar up here, you'll see that on
the left hand side, it's now in two screens. And if I say the UV
editing viewport, all that means is just
this gray box over here. So now let's go back to
modeling and let's go a little bit further into how to move around in actual blender. So the first thing I will discuss is that the middle
mouse born, actually, if you hold it down, you can rotate anywhere within
the blender viewport. And then if you want to zoom, it's just scrolling in
and scrolling back. Now you can also press control shift and
the middle mouse, hold it down and then just push it forward or push it back. And you can scroll in
very, very slowly. Now to pan, all you need
to do is you need to hold shift button and
the middle mouse. And then you can
pan from left to right to zoom to the object,
which is very handy. Let's say you're really far out and you really need
to zoom to it. All you need to do is press the dot on the actual
number pad and that will zoom you right in to the object you want to zoom to. So for instance, if I'm zoomed out and I want to
zoom to my light, for instance, it's very easy then to come across
the sen collection. Click on your light, press
the dot on the number pad, and that will zoom you right in. Now the next thing we need to discuss is just
deleting objects. To click on an object
is just left click. And then what you
can press is you can press the delete key, and that will just delete
it out of the way. So I've just lead to my light there and
now I'm going to come across to my camera and actually delete that
out of the way as well. The next thing I want
to discuss is if we click on this cube
and we press shift D, what you'll notice if
you move the mouse now, it's actually going
to make a duplication of my actual cube. If I don't actually
click anything on my mouse and I just click
the right click button, it will drop that back in place. Now you can't see there's actually two cubes
either at the moment. We there actually is we
need to bring in the gizmo. And the gizmo is facing
something that we can move things left and right, up and down,
things like that. So if I press shift space bar, come down and you'll see
we've got one that says, and now we actually
have our gizmo. And if I pull this to
the right hand side, you can see now we
can pull this away, and now we're able
to move this around. You can also freely
move this as well. If you press the G key, you'll notice if you've got
it selected now you can move it basically anywhere
around the viewport. You can drop it back with the right click or you can
put it wherever you want it. So and then it click left click, and it will put it
wherever I wanted it. Now also why the dot born, the zoom tube born is important
If I press the dot born, Now you will see
that if I just zoom mou and hold the middle
mouse and rotate around, you'll see that I
actually rotate around the origin of this actual cue. Now if I click on the other
cue and I press the dot born, you can see now
that I'm actually rotating around the
origin of this cue. Now the next thing
we want to discuss is object mode and edit mode. At the moment we
are in object mode, we can't really do a lot with this cube except move it around. Now if I press the tab, we
will then go into edit mode. And in edit mode
we can actually do a lot more things
with this cube. Up on the top left
hand side here, you will see that we've
got three different icons. One of them, this one
here is vertices, the next one across is edges, and the next one across is face. Now if we're on vertices and we come over to this
vertices, for instance I, then if I press shift space part to bring in my gizmo again, I then can move this around. Now if I come into edge select, I can grab the whole edge and
move this around like so. Finally, if I come
into face select, I can now grab a whole face
and move it around like so. Now the other thing is if we
come to our verte select, I can select a vertices, you can also select another vertex or another object or something else like that. Just by holding the Shift
button and actually clicking on the other
vertice or the other object. Or if we come to face
select, for instance, we can grab this phase, shift, select the second phase. This is how we can
select multiple objects. Now the next thing we need
to discuss is the axis. So we can see here we have a
red axis and a green axis. Now just to show you what
this actually relates to, if we come up on the top
right hand side here, where you've got these
two interlocking balls, and you click this
little down arrow, you will see that we
can turn on the z axis. Now we're just going
to turn this on just to show you what I mean
if we turn that on. Now you'll see another
axis appears here. Now the green axis is
representation of the Y. So if I want to scale
this out on the y, all I would have
to press is and Y. And now you can see I can
scale it out along that axis. Now if I want to
scale out on the X, so that's the red axis, I'll press S and X, and I can scale it out along the axis again, the same thing. And z, the up and down axis
is z, and it's S and z. And then you can scale it up
and down finally as well. This is also important if we
actually want to rotate it, because we'll rotate
it on an actual axis. So what I'm going to do
is I'm going to grab the whole of this by
pressing the button. And then I'm going
to rotate it around. So I want to rotate it on
the Y axis, so it's Y. And then you can see it will
only rotate on the Y axis. And no matter where
put on the mouse, it will always rotate
on that axis to click it back to where it was just again, the right click. And if you want to turn it, all you need to press
is and Y again. And then let's
give it a degrees. So all we're going to do
is we're going to press 90 on the actual number pad, so nine zero enter button. And now you'll see it's
rotated by 90 degrees. So just to summarize
that is scale. And R is rotate normally when we scale something
or we rotate something, it's followed by the actual axis and then it's
followed by a number. Specifically when we
rotate something, normally when we
scale something, we just hit scale, pull them outside and
we'll scale it up. When we rotate something, it's normally R
followed by the axis, followed by a number
on the number part. So now the last thing I want to discuss is if we
go to object mode. Now we need a way
to actually view this a little bit easier than the way
it is at the moment. Let's first of all
turn off the z axis. And what we'll do now is we'll use the number pad to
actually view this. So if I press one
on the number pad, that will go actually into the front view of our viewport. If I press three
on the number pad, that will go into the side view. And if I press seven
on the number pad, that will go into the top
view of our viewport. Now the opposite. To
get to the opposite, all you need to do is you
need to hold control. On this occasion we'll
press control and seven, and that will bring
us to the bottom of this object in the
Viewport control one is the rear of the object and control three is the
opposite side of the object. So now before we finish
this section of the course, I need to show you something
that's also very important. So if we come up to the
top left hand side, you'll see you've got a
button here that says edit. And if we come down
to Preferences, one thing that you
should always do, that when you first
download a blender, you should always put
on the Status Bar, which is this button here. And if I click all of these on, you will see now if
I click them all on, and I close that down down at the bottom right
hand side here, you have all the
details that you need. So for instance, we've
got how many faces and how many triangles
are actually in the scene and the objects
are in the scene. And the memory and V Ram
that it's actually taken up. This is really important if you want to get a good idea of how much power your
computer is actually using and how many polygons and
triangles are in the scene. Polygons and triangles
you'll learn more about as we progress
through the course. And that pretty much covers
the basic of blender. And hope you'll found that
both helpful and informative, but more importantly,
easy to understand. So now as they say
on with the show. All right everyone. So I
hope you enjoyed that and I'll see you on the next
one. Thanks a lot. Bye bye.
4. Door Base Shape & Silhouette Creation: Welcome back everyone to
Blender Beginners Boot Camp. And this is where
we left it off. And you should have now watched the actual navigation and
the UI and things like that, so you should have
a good idea now of how to actually get
around Blender. Now, before we actually begin, I will tell you we will be going through pretty much all
of these options up here. All of these little
tabs over here, we'll be using most of them. Now the thing is you might
get annoyed by seeing this bar on the left hand side when you're not using it
for most of the time. So to actually hide
that other way, all you're gonna press is T, and to hide this
one out the way, or bring it back, you just
press the end button. And again to bring
it back like so. And then that just puts it out the way so you've got
a clear space to work. Now if you want even more
clear space to work, all you need to do is
press control spacebar. And that then will give you a complete actual viewpoint view without any of this down
the right hand side. Some people prefer
working in that way. All right, so I'm going to press control space bar because I don't actually mind
that being there. And now let's make a
start on our actual door. So the first thing we want to do is we want to bring in a plane. So if I press Shift, I'm
going to come to mesh. This is the Primitives menu. And I'm going to
bring in a plane. And a plane might
seem a bit weird to creating a rounded door, but this is actually one of the quickest ways you can
do to create in that door. So what I'm going to do now
is I'm going to rotate it. So to rotate it, I'm just
going to press the R button. And you can see we've got
this rotation button up here. And what we want to do is we
want to lock it to an axis. So we've got axis this way, and this way we've
also got an up axis, but it's not
actually shown here. But this is the Z axis, this is the Y axis, and this is the X axis. So if I press press R and Y, you can see now that we're
locking it to that axis. If I press R and Z, you can see I'm locking
it to the Z axis. What I'm going to do is
I'm going to press R and Y and 90 to spin
it round like so. Now what I'm going to do
is, as you should have learned in the blender
navigation part, if you press one
on your number pad or three on your number pad, you should be able to go into either side view or front view. Now, this makes it pretty easy to actually get it to the
scale that you want here. So what I'm going to
do is I'm going to move it over to my door. I'm going to pull it out a little bit so I can
see in front of it. I'm going to press three
to go into the front view. And then what I'm going to do
is I'm just going to press, so get it to the
size that I want it. And then I'm just going to drag this center bit up to
the center of my door. So now I want to do is I want to actually
make this rounded. Now, I used to do it where
actually bringing a cylinder, and you can do it that way, but I found that
the easiest way to do this is just
simply to press Tab. And what that'll do is it'll
take us into edit mode. As you can see now, now there is a difference between
object and edit. Object mode, I can't do anything with it apart from
move it and rotate it, but if I'm going to edit mode, then I have the option to mess around with the actual
topology of the mesh. So you can see here,
if I hover over, you can see vertex, we have
edges and then we have faces. Now we want the one that says edges because what that's
going to allow me to do is it's going to allow
me to select both of these vertex on here. Sorry, we need to have it on vertex select both
of these vertex. I'm going to select this
vertex and I'm then going to hold the shift bottom
and select this vertex. Which means that I've
just selected both of them without selecting
the bottom ones. Then what I'm going to
do is I'm going to press control shift and B. Now if I pull that out, you'll see that we start to
actually round this off. Now if I scroll my mouse
wheel up as I'm doing this, you can see that we
can actually get more actual bevels in there. Now, I think for me I'm going to put this
on, Let me over, look, one, two, I think I'm actually going
to put it on two. So I'm just going
to scroll it up two like so left click, right click. And there you go, there's
your actual bevel. Now the best thing about this
is when you do it this way, you actually have
a lot of control of how much bevel you've
actually got in there. So for instance, now if
you've not got this open, it should be a little menu down the left hand side which
is called the bevel. Open it up and now you should be able to increase
your selections. Or even better, we can actually change the shape of our
actual door like so, making it more rounded
if we need to. I think something like this
is looking pretty nice. Now what I'm going to
show you is how do we get these little planks of wood in here going down and
looking like this? But what we're going
to do is we're going to go to the edge select. We're going to come to
our door, select it. Click the little
down arrow like so. And drag all the
way down like so. Now we need these
to each planks. And the easiest way to do
that is if you press three. So you're in front view. So make sure you're in front view. If you're not in front view, it's not going to work this. And then what you
want to do is you want to come to your vertex. Select, select this vertex. And what I want to
do is I want to actually cut down here. So I'm going straight down. And then I want to cut this one, and this one, and this one. And this is the quickest way found to actually cut
these planks into place. So what I'm going to do is I'm
going to press K. And what that's going to do
is it's going to bring in my knife tool. Now you can see that
this knife torl gets like magnetized towards
each of these vertices. Then what I can do is I can
actually cut down like so. And when I reach the
bottom and press Enter, and there you go,
you can see we've got a cut going across. Now of course, this is not useful in creating actual doors. So I'm just going to press
controls, edges go back. And what I'm going to do is I'm going to press the button. I'm going to come to
this actual vertex here, and I'm going to go down. Now you can see
again, it's going to be pretty hard to
make that straight. However, if we hold the button, then it's going to
cut it straight down to where we need it. We click on there, and then we just press
the Enter button, and there is our first cut. Now let's come over and
cut it on this one. So I'm going to come
down, press the button, cut it straight down
to there like so. And now what I want
to do is I'm probably going to need a couple in here, because this is probably going
to be too big, this one. So I'm going to actually come in and make another
cut here first. So I'm going to press K.
Come onto this vertex, hold the button to
go straight down. Press the Enter button and then we'll come to the next one. Down to the bottom,
press the end to bot. And you should end up
with something like this. You can see we've got one
massive plank there over here. So what we want to
do is we want to insert another edge there. Now, I could use K again, but the problem is how am I going to know where
the halfway point is? The easiest way to do that
is to press controller. And then you'll see
that if I left click, I've got a nice edge
going all the way down. Now the thing is
if I left click, I'm going to put
my edge over here. And it's not really
balanced out, so I don't really
want to do that. So I'm just going
to do that again. I'm going to press
control law, left click. And instead of doing that, all I'm going to do is right click. And that then is going to drop it right in place
where I need it. It's basically right
in the center. Then find the one near,
I'm just gonna grab the top of here and I'm just
going to pull it up a bit. And there we go. Now we've got our actual
start of our door. So find our press tab
and pull this out. You can see we've got the very, very beginnings of
our actual door. Now, we might as well at this point put this
back in the center, because we can actually
see what we're actually doing now and where we're
actually working again. So at the moment you can
see I've got my cursor now. The cursor is really, really handy for placing objects where you actually want them. If I shift right click, you can see I can put
my cursor anywhere I want in the actual
scene or the viewport. And then what I can
do is I can use the cursor to place this
mesh where I want it. So if I press shift S
cursor to World Origin, or you can put Curse
selection to cursor, You can see you've got all
this menu here just with Shift F. So if I press
Selections cursor, it's going to put my door exactly where the cursor is now. I don't really want
it down there. What I want it, he's
right in the center. So the easiest way to do this is shift S cursor to world origin. Grab your door and then
shift S selections cursor. And there you go,
right in the center. Now if I press three, all I need to do now
is just drag it up. Put it on my ground plane, which is basically
the little line here. So it's basically
the ground plane is this one following here. You can see where it's
kind of flat on there. So you're basically
placing it right on top. So if ever referred
to the ground plane, it just means that
I'm placing it right on top of this
green or red line. All right, so we've
got this so far Now, a lot of times when
you're modeling, it's mostly about thinking
through the entire process. Thinking how you're
going to do something. So in other words,
trying to break it down. A model to make it
easy for yourself. So I know that if I use this door to create this
stone going round it, it's going to make it much, much easier than if, first of all, I
create the planks. So let's actually do that and explain as I
actually go along. But obviously we'll do that on the next lesson
because I try and keep every lesson below
the ten minute mark. Sometimes we go a
little bit over. Sometimes though, we
will finish up where, you know, we're halfway
through doing something. But if we carried on doing it, it could come to a 17 minute lesson or something like that. And I don't think that's
actually very good to do that. So whenever we have a break, you can go and save out
your work, first of all. And then go ahead and get a
drink or something like that. And then when you
come back, you'll be fresh, ready to go again. All right everyone. So I
hope you enjoy that and I'll see on the next one.
Thanks a lot. Bye Bye.
5. Stylized Door Border Modeling: Welcome back everyone to blend the beginner's boot camp
in this where we left off. All right, so now then, let's think about creating
our actual stone. So what I'm going to
do is I'm going to come into edit mode. I'm going to come
now to Edge select. And what I'm going to do
is I'm going to select this edge now to make this easy. You can see that if I
press Olt Shift and click, you can see that I grab them
going all the way around. But sometimes it
doesn't always work. So just be aware that sometimes it's not actually going
to work correctly. So what I want to do then, instead of doing that, is I
want to grab one of these. And if I press Control, click on one of the edges, you can see that it follows
it going all the way around. Now sometimes it will try
and take the shortest route. Just be aware and
make sure that you've grabbed all the ones
you want to grab. Now, you can also
use a shift click, but it does take
much, much longer. So what I tend to
do is just grab one control click the other
one, and there we go. We've got our actual edge now. We don't need to
grab the edge on the bottom because this is
the actual stone going. Now, again, this is
forward planning. So what I'm going to do
now is I'm going to press shift D and I'm going
to duplicate it. So now you can see
it's duplicated with shift D. And if I
bring it out now, you can see that's
what we end up with. Now at the moment,
we can see that we've got actual
nothing to this. It's just basically a few edges put together so it's not
actually going to look right. So what we need to
do is first of all, we need to turn it into a solid three D mass.
So how do we do that? So the easiest way
to do that is to press to extrude and then X. And what we're going
to do is we're going to extrude it along that, sorry, that x axis. So now just make sure that you don't press too many times. So it's basically, let's do that again just
so I can show you. So I'm just going
to press control shift alton Z just
to bring it back. We can also come up
and you've got here, redo and undo on here as well. So just make use of whatever
it's actually listed here. I think from the
Windows update control. Z doesn't actually
work for me anymore, so I just had to re put that in. All right. Now, once
we've done that, then we're gonna
press the button. And you can see when
I press the bon, you can see it pulls it out. Now again, it's
important that we lock it to the x axis like so. So just pull it out like so. All right, so now
we've got this. What we want to do is we want to split this away from this mesh. And the reason we
want to do that is because we want to
do some things to this actual stone that we may not not want to
do to this part here. So what I'm going to do is
I'm going to grab it all. So I'm going to press the L
button in Edge select that then is going to make sure that all of the mesh is
actually grabbed. And now we need to split
it off from this one, making it into two objects. So if I press P, and then you can see you've got
a separate menu. And what you want to
do is you want to separate it by selection. So separated by selection. And now if you press Tab, you'll see that we can
click on each of these, thereby they're
actually separated. Now what I'm going to do is I'm going to put this
on Object mode. I've been working
in Material mode and it's going to
make it a little bit heavier on the actual
computer using. So I'm just going to then go into object mode and now you can see we've actually got no materials or lighting
or anything like that. Al right, so what I want
to do now is first of all I need to think about these little stones
going down here. You can see that we've got
some stones going down here. And at the moment this would
be a whole block of stone. And that's also
what I don't want. So what I'm going to do
is I'm gonna press Tab. And then I'm going to come in, I'm gonna press control Ar. I'm gonna scroll up my
mouse wheel three times. Left click, right click. Just to drop them
right in the center. And then I'm going to do
the same thing over here. So control Ar 123. Left click, right
click. And there we go. All right, so now we
need to actually turn this into some
kind of stonework. So how I'm going to
do that? So what I'm going to do is I'm
going to press Tab. I'm going to press Control
all transforms right click, set origin to geometry. And now I'm going to
explain what I just did. So at the moment, if I bring in a que, so don't actually do this,
but look what I'm doing. If I bring in a que, and we open up this panel on
the right hand side, you can see that
at the moment it says dimensions
two, two and two. If I come in and I pull
the top of the cube out, you'll see that if a press tab, it comes in and
says 5.562 and two, which is exactly
where it should be. Now if I change the
sides of this like this, you'll see that everything changes over on the dimensions. But blender still
believes that this is an actual cube,
even though it's not. So what we need to do is we
need to tell Blender that we actually now have
this new shape. And the way to do that is you reset all of your
transformations. So if a press control come down to all transformations
and click Reset, then it will tell Blender that everything has been reset now, and these are the dimensions
that it needs to follow. This is important if you're doing pretty much
anything within Blender. If you're adding modifiers
and things like that, they won't work
properly if you don't actually reset your
transformations. The other thing is why then
you always go right click, set origin to geometry is because if my geometry
is over here, you can see when I'm scaling, I'm actually scaling
from over here. If I'm rotating, I'm rotating from over where the
geometry got put. Because when you set
reset transformations, it puts your transformation right back in the
center of the world. And that's not
something we want. So if I press control,
all transforms, right? Click, set origin to geometry
that, then make sure that One, blender knows
that it's, you know, the transformations have been reset, this is in the new shape. And two, the actual orientation is put in the center
of the geometry. Now, of course, you
don't always want the orientation right in
the center, but for now, before we move on, this is what you should be
doing when you want to add anything new or when you
actually finish a object. All right, so let's
leap that out the way. And then what we'll
do is we'll come back to our actual stone. Now the press tab,
we should have now these parts of the
stone going down like so. So what we want to do
now is we want to turn this into a three D object. So we've reset our
transformations, we've reset our orientation. Let's now go over and bring in our first modifier which
is going to be a solidify. So add modifier, come
down to it, say solidify. And you'll notice straightaway, something actually happens. We've actually got
some thickness there. Now what we want to do is we need to bring out the thickness. So if I bring this out, you can see we're
bringing that in. We don't want to bring it
in. What we want to do is go the other way and
bring it out like so. Now bring it out
to the thickness that you want the
actual stone to be. You can see here, it's
quite thin on these parts. I'm probably going to have
it a little bit thicker. Now, you can move this round even though the modifier is on, so I can move this into
place and actually have a look what would my
wood actually look like. And yeah, I think I'm
actually happy with that now. At the moment, you can
also see that it's quite chunky along here and a lot of the time you will see people's renders with a lot
of chunkiness in there. And all you simply have to do to get rid of that is
just right click, shade, auto smooth, and then that actually gets
rid of that for you. Now we will be talking
more about shading smooth in the seams and sharp
section of this course, which will be probably towards, near where we finish
this actual door. So you will learn a lot
more about it there. All right, for now
though, what we want to do is we actually
want to apply this modifier and then create this kind of look that
we've got going on here. All right, so what we'll
do is we'll go over to the right hand side
and what we'll do is we'll press control A. Now this is the
simplest way to do it. If I press control is though, you will see that
you can also click this little down arrow
and click Apply. So there's many ways
to apply modifiers. These are the most simple. Now we'll show you
as we go on with the course more complex
ways of doing things. But for now we'll keep
it relatively simple. All right, so now
if I press Tab, we have a full mesh,
as you can see, of all of our blocks
and things like that. So now let's
actually think about creating these actual blocks the way that we see them here. First of all, we can see
that these need pulling out. So I'm going to show
you how to do that. And also we can see that at the moment
they're not split up. So let's go and split them up. So what I tend to do to split
anything up is I'll come in and then mark seams
'cause I find that marking seams is the easiest
way to split things up. So if I come to this one and
I press Olt shifting click, we can see that we get an actual line going all
the way around, like so. And then we'll come to this
one Oltshifting click. We get a line going
all the way around. And then what I'm
doing now is I'm just going to split the rest
of them up because we can see we've got one chunky one and then a few smaller ones, so Olt shift click. I'm just going to go
all the way around like so all the way down. Right click, mark seen. Now, did we actually do that? We did that because it
makes it really easy. Then if we come to face select, and now if I press L, hovering over here,
you'll see that it only grabs it going all the
way up to where the seam is. And that's really, really
handy to split things up. If I come to edge
select however, and I press L over here, you'll see it literally
goes through all of it because the seams only work with face select. Let's go back. We'll select one, we'll
press L on the top. And then going all
the way down like so. Now what we can do is we can
actually split this mesh away from the other
parts of the mesh. Now before we pressed and
we went to selection, but that actually doesn't work so well because what
it does is it actually splits it into a
separate object and we still want this to be
within the same object. So the way to do it
is you just press Y, and now it actually
is split off. To check that what you can
do is you can press the G, which is kind of like a
free movement button. And then you don't actually
want to place anywhere. All you want to do is just right click and it'll just
drop it back in place. It will though,
show you however, that actually it's all
split off and ready to go. All right, so let's drop
that back in place. And then what we'll do on
the next lesson is we'll start actually turning
these into stone blocks. The other thing is on the
next lesson, actually, and we'll actually go through marking seams and sharps and how they're actually going to be used with smooth shading
and things like that. All right everyone. So
hope you enjoyed that. I know it's a bit slow
going in the beginning, but as we move on
through the course, it'll definitely pick up pace. Okay. Thanks a lot. Bye bye.
6. Blender Seams & Sharps Introduction: Welcome back everyone to
blend of beginners boot camp. And this is where we left off. Now what I'm going to do is I'm going to give you a
short introduction on seams and sharps and
why they're so important. And then what I'll
do is I'll see you on the next lesson where we'll actually start creating
these actual stone parts. Welcome everyone to the
short introduction to marking seams and sharps
part of the course. So before I give you examples of what I'm actually
talking about, let me just briefly
explain what they are. Seams, you can think of like seams on a piece of clothing, like a shirt or a
pair of trousers. The main job of seams
is to make sure the texture that
you're trying to place on your mesh
goes on correctly, but more importantly, gives you control of how that
texture will look. Sharps are marked like seams, but serve an entirely
different purpose. We use sharps to
give us control of how sharp and soft angles
are on our measures. This makes them look realistic. It is also important
that we do this not only for rendering in Blender,
but also sharps. Carry on through to other software or games
engines were on to use like Substance Painter or Unreal
Engine as an example. So with all that said,
let's get started. So here we are in Blender
with our starting Cube. Now if I click on my Cube
and go to my UV editing, you'll see that the Cube is basically unwrapped
in this actual way. So basically it unwrapped
like a present. Now if I come across
and I grab this cube, and I press Shift D, and then we press Shift Spacebar
to bring in our gizmo. And we move it across. And now let's say I want to
alter this cube a little bit. So what I'm going to do is I'm going to press the Tab button. I'm going to go
Interface select Click the top face shift Spacebar to bring in the move
tool. Bring it up. So now let's say I
want to unwrap this. Now if I grab this
with L just to grab everything and I press
the U button for unwrap, you'll see that it unwraps
exactly the same way. Even if I reset the
transformations of this, it will still unwrap
exactly the same way. Now let's mark some
seams and see how that has an actual effect
on our actual unwrap. So let's grab the top and
we'll come down to the bottom. And what we're going to do
is we're going to press control A and then come down
to where it says Mark Seems. Now it's important to
remember that it's control leap to mark
seams in face lect. But if for instance
we're in edgeelx, so if we come to this edge, if we press control leap, you will get this
option up as well, mark seams, but you can also
right click in edge slect. And you can also see we can
mark Sem this way as well. So for now though, I'm not going to actually
mark this scene. What I'm going to do
is I'm going to grab the whole thing with L, like so. And now I'm going
to press Unwrap. And you can see it Unwraps
completely different. Now let's bring in
some textures so you can see what exactly
I'm talking about. So if I press Tab, I'll come up to my
materials panel up here. And I'm going to
give this material. So I'm going to come across
to the right hand side, click on my Material button. So let's now bring the material
I've already prepared. So if I come across this little
down arrow, come on down. You can see I've got
one here called Wood. And let's click that on now
you can see what's happened. We've actually applied
our material to this object where you can
see it's pretty much a mess. The top of it looks fine, but the bit going around the
side is all bent and skewed. So if I zoom out and I press
Tab now you can see that the reason is that it's not actually you've
unwrapped correctly. So how do we fix
that? If we come up to edgelt and
we grab this edge. And now what I'm going to do
is I'm going to right click, come down to mark seams. And now I grab the
whole thing again. I'm going to press you unwrap, and now you'll see it. Unwraps absolutely fine. You can see that
wood's looking really, really nice, actually,
on this mesh now. So what this does the seams do is actually gives you control of how this actual texture
is placed on this mesh. You also need to take
into account that this is basically
an infinite loop. So if I come round and I look
at this face and this face, you can see that they're going
around if we have no seam. When I talk about
infinite loops, it's basically going
around and around. And blender doesn't actually
understand how to unwrap it, so you'll end up with
that mess we had before. Now the other thing
to take into account is if I turn this wood
around, for instance. I'm going to do,
I'm going to come over to the left hand side, the viewport of my UV editing, press A to grab everything, R 90, spin it round. Now the other thing I
want to show you is that where we join these
actual seams up is also really important because
you'll never ever get it perfect on here where
there's an actual seam. So let me exaggerate
this a little bit. So what I'm going to do is
I'm going to press Tab. I'm going to make this a lot
smaller and I'm going to move it into the
center of my UV map. And then I'm going to press Tap. Now you can see that
these edges don't line up whatsoever against
this other side. So this texture here doesn't
line up with this texture. And the reason is because
we've got a seam down there. And that is the actual break in the texture yet if we
come round to this side. And I spin this round, so if I grab it or Z 90 and now go to this
one where we can see, you can see that these
line up perfectly. And the reason is
because obviously there's no seam there.
The seam is here. So you need to take
that into account on your own measures and
objects that when you're applying textures and materials that try and put seams where you're not
going to see them. So if it's on a door
handle, for instance, try and put them on the inside where no one's actually
going to see them. So always bear that in mind when you're actually
marking your seams. So now let's discuss sharps. So if I bring in
a new primitive, so if I press shift A, I'm going to go across the mesh. I'm going to bring
in a cylinder. Now you'll notice
that this cylinder has all these little
edges around there. And let's say you want to
make a cup or something. The last thing that you want is all these hard edged
faces in there. Now there are things we
can do to sort this out. So the first one we can do is we'll bring in another cylinder. So I'm just going to move
this one out of the way. So shift space part, bring in Magizmo. Move
it out of the way. Shift A, bring in
another cylinder. And this time I'm going to
come down to where it sits, add cylinder, and turn
up the vertices to 100. And now you'll notice that
we do have a round edge, but the problem is
that we've brought in 100 vertices to
actually achieve that. And that's not
something we want. We want to use as
few polygons as possible while still getting
a really good looking mesh. So how do we achieve that? Well, there are a number
of things we can do. First of all, we can come
across to this right hand side. And what we can do now
is come to where it says Normals and
click on Auto Smooth. Then we can right click on the viewport and
click Shade Smooth. And now you'll notice it's
actually been smoothed off. But the problem with this is
if I turn up my auto smooth, you can see if I turn
it up all the way, it goes really, really funky. And that is because
at 170 degrees, Blender decides that these edges along here need moving off. So it doesn't give us a lot of control if we do this
on the other one. Sura grab this one.
Right click shapes, move autos, move on. You can see, again, even with
lower amounts of polygants, we're still able
to smooth it off. But if we turn this off, we're still going to end up with the same problem as
what we had before. So how do we solve that? Well, if we come in now
press a tab button, come to the top, grab the top shifts like the bottom press control
because we are in face select and we'll
come in and mark a shot. And now you'll notice
if I press tab that now has got
hard edges on there, this gives us control. So this is why we
actually use shops. No matter what, I turn
this up to 180 degrees, which is the highest it goes, it will not get rid of
those shops that we mark. We can also mark shops
around the edges as well. Sever, grab this
one and this one. And now because we're in
Edge select, we can write, click, come down and mark
a shop, press the tabbon. And now you'll see you've
got hard edges on there. So it's very important
that you mark sharps where you're going to
actually want hard edges. It's also important that
you get into the habit of marking sharps when you're
actually marking seams. And then what happens is
when you join two objects together and you turn up
the auto smooth if needed, you're not going to end up
with some measures like this. Okay everyone. So
I hope you enjoyed that introduction to
marking seams and sharps and as they say on with the show. All right everyone. So I'll see on the next
one. Thanks lot. Bye bye.
7. 3D Door Mesh Detailing: Welcome back everyone to
Blender Beginner's boot camp. And this is where
we left off now. Let's come up to file,
let's save it out. And then what I'm going to do
now isn't going to come in, I'm going to grab everything. So I'm going to press that then should select everything
at the same time. And what we want to do now
is we want to make these smaller and fill in
each of these faces. Though at the moment if I press, you'll see that it scales pretty much all
at the same time. But if I come up to
this little icon here which says
transform pivot point, at the moment, it's
on medium point. Now if I put this on
individual origins, you can see now when I press S, it actually scales
them all individually, which is really,
really handy for us. Now I'm going to scale them
to something like that. Just so I can show you
what's actually happening. You don't actually have to scale these down to actually use this, So I'm just going to left click, drop them in place there. And what I'm going to do is
I'm going to come to mesh. I'm going to go to
where it says clean up. And then what I'm going to do is I'm going to click this one that says fill holes.
And there you go. It's actually filled in
all of those holes for us, making it look
really, really nice. Now, another reason why
we need to fill holes in is because we want
to be level these off. And we can't level them off if we don't have
any faces in there. What I'm going to do now
is I'm going to press control A to reset all
my transforms Again, right clicks at
origin to geometry. And then what I'm
going to do is we're gonna come over to add modifier. And this time we're going to
bring in a Bevel modifier. Now at the moment it looks kind of crazy and we don't
really want that. So what we want to
do is we want to put this down all the
way down to zero. And then click it up
one. And there you go. Now you'll end up
with a nice bevel on your actual stonework. Now let's come in
and press Tab Agam. Let's now scale them up. So I'm going to press S
and scale them up like so. And there we go.
Now we do, however, have a problem in that maybe I need to scale them
up a little bit more because we can
see a gap down there. So I'm just going to press S and I'm going to bring it up. Now, sometimes you
won't be able to have too much control over bringing them up and you'll
be going over or, you know, not far enough
away and things like that. But if you hold
the shift button, you'll see then that
you can actually have a lot more finesse
over controlling that. So hold the shift button, left click, and there we go. Now they're actually put into
place like we want them. Now while we're
here, we might as well create these stones
that actually come out. Because you can see here we've got some stones that come out. So let's do these too first. So at the moment I'm going
to go ahead and press Tab. I'm going to come
to face select. I'm going to select this face, and shift select this face. And I want to bring these out. Now the way to bring them
out is I want to move them on the G. But
if I press G and Y, you can see that I'm going
to move them both that way. And that's not something I want. So what I want to do
is I want to come up, I want to make sure that I'm on individual origins
because I want them to move individually. And then what I want to
do is I want to place them not on global,
but on normal. And now if I press
and Y or and X, you can see that they're
moving in the same direction. So let's press and Z. I
think it'll be on this one. And now we should
be able to actually pull those out a little bit, allowing us to make those
little stone parts that, you know, come a little bit out. So if I now press Tab, we can see now we've got those two little extending
parts like on here. Now with this one,
we need to bring it out a little bit more
I think as well. On this one, what I'll do is
I'll bring it out this way, this way, and up the top. So if I come in now
and I grab both of these and I press G and Z, we should then be able
to bring it out like so. Now the problem is
that if I press Tab, now you can see we've
got a little bit of a gap in each of these. You can see we've got a tiny, tiny bit more gap than
what we've got down here. And that's also not okay, So what I'm going to
do is I'm going to grab both of these and I
want to pull them out. So X and X, let's pull them out a
little bit like so. Hold the shift button
if you need to. And there we go. Now you can
see that looks much better. Now let's do the same on these. What I'm going to do is
I'm going to press and Z. Let's try that. Not and Z, and X, No, and Y. There we go. And Y. Let's pull them out very
slightly. And there we go. That's exactly what we want. Now finally, let's pull
these out a little bit. So what I'm going to do
is I'm going to turn off now my normal and put
it back on global. And then what I'm
going to do is I'm going to grab all of these on the front and I'm going
to pull them out very, very slightly like so. And now you can see we get the real beginnings
of an actual door. Now if we look at
these, we've got one lot that comes out and
then one lot that goes in. So let's do the one
that goes in first. So what I'm going
to do is, again, before I do anything, I'm going to reset my
transformation. So control all
transforms, right? Clicks, origins, geometry, cab. Let's come to these two first. And then what I'm going
to do is I'm gonna press the eye button for insert. And then I can
insert it in like, so I'm going to insert it and then what I'm going to do is I'm gonna pull it back now. So if I grab these, I'm going to press
and pull them back. Like. So now don't worry if your door isn't
looking the same way. These are just practice. So we're not trying to copy something exactly or
anything like that. I'm showing you the
techniques which you can use to create a door, or a bridge, or
something like that. And the thing is, when
we create the next one, it should be better than what
this one looks like anyway. Hopefully thereby making
sure that, you know, you've kept you increased your skill levels based
on what I'm saying. Now the other thing, I'm
not quite happy about this because it's
quite a stylized door. And the thing is this looks
a little bit thin to me. So I'm just going to
press control's head. Just go back a bit. And then what I'm
going to do press control's head once
more and now I'm going to press eye and bring
it in a lot more like so. And then I'm going to
press E and pull it back, thereby making it a
little bit chunky. And I think I'm a
lot happy with that. Now, let's use the same
technique for these ones. So I'm going to
grab both of these. I'm want to press
the eye button. And then what I'm going
to do is I'm going to extrude but outwards. So I'm going to press, pull
it out so. And there we go. All right, so now let's
actually move onto the door. Now you'll notice
that I've still got my bevel modifier on. I'm gonna leave that on. I don't need to worry about
that right now. I'm then going to
come to my door. What I want to do is
I want to work on this door on its own. I don't want anything
else in the scene. So what I'm going to
do is I'm going to press Shift in H and that then we'll hide everything else out the way apart from the door. And then I'm free
to work on this. Now we want to have this
door, first of all, split up, but we
also want to make sure that it's looking
like the woods. Looking a little bit
warped, you know, So we've got some
control over how warped it is or if it's even
a straight door. Now the way to do that is
what we want to do is you want to first of all
come in with edge slick, grab each of these edges. You want to right click then
and you want to mark a seam. And then again that allow us to actually pick
between each of these and it makes
it really easy for when you want
to split it up. Now I'm going to do is I'm
going to press control. I want to, let's add
in four edge loops, five edge loops,
something like that. Left click, right click.
Just add those in. Now, at the moment, these
aren't very straight, but for what we're
actually doing, we don't need to worry
about straighten them up. All we need to do is make sure that we've got
some edge loops in. Because what that allows
you to do is it allows you to bend where each
of these points are. So I'll show you
what I mean by that. First of all, let's come in and split off each
of these planks. If I come in and press L, L, and L on all of
the opposite ones, again like we did
with the stone, It means now when I press Y and these are split
off from each other. Now that allows me to do, because I've put
these edge loops in, is I can come in now and grab, let's say one of these. And if I press now, you can see that I can move
it from each of these points. Which makes it
really, really easy now to actually bend
my wood a little bit. However, we don't want
to actually go in and move every single piece
of wood like this, you know, and go
on all the way up. We want to make it really
easy for ourselves. So the easiest way to do it is if you press three
to go straight on. You're going to use
proportional, edited. Now if we click this
on at the moment, if I grab this point and press, you'll see that I have a
kind of a little circle. And if I press G and
move my mouse wheel out, you can see now that I'm actually moving this
piece of wood like so. Now you can see that the
problem is that it's not affecting the other
piece of wood around it. And that is because if I
click this little down arrow, you can see that
we've got connected only on if we click this off, however, and now press G, we can see we can
move the whole door. Now the problem is we don't
really want a door like this. So this is way, way too
much to start with. So I'm just right click
in just to drop it back. But what we have is we
have all of these options. And one of the best options
on here is called random. If I pick the middle of
the door now click you can see that we can actually get some randomness to
our actual door. Now I'm not going
to have it that random because the
thing is I need to bring this in a little
bit because it's going to kind of move
the door out of place. So what I'm going to
do is I'm just going to grab each one and very, very slightly move it, either right, left, up, or down. It doesn't
really matter. Like, so then finally
what I'm going to do now is I'm going to come
to the bottom of my door. And I'm going to click
on the bottom edge. And again I'm going
to pull the up arrow. And you can see now how
it's bending that door. So you can just spend
a little bit of time moving it out like so. Now the last thing, let's
do the top as well. So we'll just move the door
a little bit out like so, like so now we can see we've got a pretty random
door however, it's okay being
random, you know, in the creases and
things like that, but we've not actually
pulled them out. Also, I'm going to grab an edge. I'm going to pull it
out very slightly. I'm going to grab this edge, pull it out very slightly. Grab this edge, pull
it out very slightly. And now we can see we've got a door that looks to be
very warped and you know, kind of medieval looking. Now one thing you can see is that we've got
some edges on here. And that's simply
because we need to right click and
shade auto smooth. Now the thing is if you are using an older
version of blender, you should be able to
click Shade Smooth. And then what you're
going to do is Dan the bottom right hand side. You just want to
click on Auto Smooth. For those using new
versions of blenders, just right click,
shade, auto, smooth. All right, so there
we go. That is the beginning of our door. And all I want to do now is control all transforms, right? Click the origin to geometry. Now on the next lesson, what
we'll do is we'll turn this actually into planks rather
than just two D objects. And then hopefully
we'll be able to get our bars in our
door done as well. All right everyone.
So I hope you enjoyed that and I'll
see on the next one. Thanks a lot. Bye bye.
8. Stylized Hinges Creation In Blender: Welcome back everyone to blend
and beginners boot camp. And this is where we left off. Now what I want to do is I
want to bring everything back so I can see how far I
want to bring this door out. So if I press ol tag, bring back everything
we can see. Now we've got everything
brought back, including all the things
that we actually hid. But what I want to do is I
want to hide these again. So I'm just going
to hide my base, my platform and my
roof text. Roof text. Yeah, I don't know why it should say door text, not roof text. Double tap the just to
deselect everything, I'm actually even gonna
hide this out the way. I'm gonna select
the light, press the H one, hide the other way. And then it should be left
for something like this. Alright, so let's
grab the wood now. And what I want to do is you
want to grab everything. Now, I could come in and
actually use a modifier. So I could actually select the, you know, modifiers over
here and add in a solidify. But I don't really
want to do that. All I need to do is
actually extrude it out. So I'm just going
to grab my wood, I'm going to press and pull it out like so to the
thickness that I want it. And you can see
now that it's got a relatively nice thickness
to it for our actual door. Now the next thing
I want to do is I do want to bevel
it off a little bit, because I do really want to
see that kind of, you know, these edges going
in there to make it look kind of broken
and things like that. So what I'm going to do
is I'm going to press control A all transforms, right click that origin
geometry Add modifier. And then I'm going to
click on the Bevel button. I'm going to turn my
Bevel all the way down. Bring it up by one,
and there we go. A really, really nice, easy way to make an actual door, but we're not finished there. What we want to do
now is we want to create the bars that
go across here. So let's actually use the orientation of the
wood to create our bar. So if I press shift S,
cursor is selected, what that's going to do is
going to move the cursor to the orientation
of the actual door. And now I can do is I can
simply bring in a plane. First of all, I'm going to press three to go into front view. I'm want to press shift
A, bring in a plane. I'm going to rotate the
plane round on the y axis, so R Y 90. Spin it round, press the S bone to make it
a little bit smaller. And we can see now
that it's round about here where
the actual bars is. You can also see for some
reason these hinges, they should be on
the actual bars, but they're not, but well fixed though, so don't
worry about that. So what I'm going to do is I'm
gonna pull it across like, so I'm gonna pull
it out slightly, just so it's in front
of my actual wood. And then what I'm going to do
is I'm going to press Tab. I'm going to grab
the edge of here. I'm going to pull that
out to where I want it. Now you'll notice when
I pulled that out, I've still got my
proportional editing on, so let's turn that off. Let's pull it out to
where you want it now. You'll also notice it's probably a little bit
too thick on here. And also you can see we've got some wood actually
creeping through there. Now let's not worry
about that actually, because we're going
to make this a three dimensional object anyway. But the main thing we want
to do is just round off these edges and make sure that
we're happy with the size. Now I think it wants to
be a little bit thinner. So what I'm going to do is
I'm going to grab it all with L. I'm going
to press S and's D, make it a little bit
thinner like so. And then what I'm going to
do is I'm going to come to my little vertex
button over here. Let come both of these vertexes, Press control shift and B. And then we're going
to be vel it off. I'm actually going
to leave it on the bevel that we already
had it for the door, because I think that
looks nice anyway. And now basically it's just
repeating the processes, you know, using the same
techniques as before. But if I come in and press L, grab my actual bar
that's going across, press the Born to add
some chunkiness to it. And then what I can
do is now I can press L to grab it all. So L hovering over there, make sure it's all selected. And now let's lift it up. Do this part here. Now you can also see that we're
going to need two of these. So if I press three
with it all selected, let's actually duplicate it. So shift D enter to make sure
it stays in the same place. And then just pull it down
like so. And there we go. There's our bars on our doors really easy and
quick to do that. And now let's actually
create our actual hinges. So again, I'm going
to press Tab. I'm going to press
Control A all transforms. I'm going to write click
and shade auto, smooth. And what I tend to
do is I tend to, as I'm creating something, then I'll bevel it off, then I'll join them altogether. So if I come over now,
add modifier bevel. Bring down the bevel amount, pick it up one and there we go. We've got a nice bevel on there. Now what I tend to do is I'll
tend to leave it like this, so all these, as you can
see, have got bevels on. We'll join them all
together at the end and make sure that
we apply all those. And now what I'm going
to do is I'm going to bring in this actual hinge. Now at the moment, if I
click on either of these, you can see my
orientations down there. What I really want
to do is I want to start my hinge in the
corner over here. So what I'm going to
do is I'm going to actually select one
of these edges. Now, I do have a problem in
that when I actually come in, I can't actually
see through there, But there is a new little born that's
really, really handy. So this one here, if you over
over it says toggle x ray. Now I can see the
actual inside of there. What I can do is I can come
to face select, select, this face first shift
S first selected, and then can turn it off. Like. So now what I can do is I can press Tab to
make sure that I'm an object mode because
I don't want to join it to these that I've
already created. And then what I want
to do is press Shift, a primitives menu,
bring in a cube. And that then cube will come
exactly where I want it, right there where I
actually want it. So I'm just going to scale it with scale it all the way down. Then what we're going
to do is we're going to press and's Ed and bring it out because
that's where we actually want our hinges. Now you'll notice here
how these hinges look. So we've got pretty much
two, two inwards parts. So let's actually create those. What I'm going to do is I'm going to pull it
out a little bit. So then I'm going to press Tab. I'm going to press Control. I'm going to press two,
so one and two like so. And then what I'm going to do is now I've got these
edges selected. I'm going to press control
B to bring in a bevel. Now you will notice
because when we were doing the door and these actual bars that we had it on,
a number of cuts. Two, I'm just going to scroll
my mouse wheel backwards. Just one, just so we have
one cut, left click. And there we go. There is the beginnings of
our actual hinges. Now let's come in.
And what we want to do now is we want to
be vel off the top and bottom to create that kind of indentation part
of the actual hinge. Now before we do
that, again we're going to have to
press Tab control. All transforms, right click,
set, origins, geometry. And now I can come in and press control and just
bevel it off like so. And there you go, Easy as that. Now let's create
these inside hinges. So I'm going to press
Olt Shift and click just to make sure that I'm grabbing it all the way around. If you need help, just make sure you
click this button on. Then you can see going
all the way around. So olt shifting click
going all the way around. Thin it off. Now what we want to do is we
want to extrude. But the thing is if I press, you can see it kind of
goes all over the place. Now, the other thing is
because I've pressed, I've actually got
those still sat there. If I press, you can see they're
still actually sat there. So if you're having
problems with the mesh because of extrusion, the best thing to do is press a, come up to where it says mesh and then come down to
where it says clean up. And what you want to do is you
want to merge by distance. And what that's going to do is it's actually going to get rid of any overlapping faces
or edges or vertex. And if I click this on
down at the bottom, now you can see 16
vertices removed. That means that it's cleaned
up all of those extrusions. So I'm just going to
show you that once more. So if I press Enter,
Enter like so. Now I've got two extrusions
on there and a lot of the time people will
come and they'll say my UV is not unwrapping, probably I've got problems
with the mesh and things like that and this
is mainly the reason. So if I press a mesh clean up, Merge by distance, 32 verts removed and now these are
nice and clean again. All right, so let's now go in and press Olt shifting Click. And what we're gonna do
is we're gonna press Extrusion Enter without
moving anything. And then what I'm going to
do is I'm going to press, if I press the Be, you'll C.
It brings them in like this. Now unfortunately that's not what we want to do
because you can see there brought in at an angle because it's just
basically scale them in. But what we want to do
is press control D, and then we want
to press Olt and S. And now bring them in
hold in the ship bottom. And what you'll find that
it does is it brings them in nice and
straight like so. And now you can
see already we've got a pretty nice
hinge going on there. Alright? So now that
we've done our hinge, let's keep this
hinge pretty simple. Let's press control
or transforms, right click, origins,
geometry, right in the center. And then what I want to
do is I just want to come over adding a bevel like so. And there we go,
one actual hinge, now let's press shift
and bring that down. Then I'm going to bring
it down to this one. So I'm just going
to make sure that it actually lines
up with this one. So I can see pretty much
not lining up there. I'm looking at this line. And this line just
to line them up. And there we go, that's
looking pretty nice. All right, so the last thing then we want to do is we want to actually create this
actual door handle. Which actually isn't that hard once you know how to do it. But we'll do is we'll come up and we'll save out our work. And we'll actually do that on the next lesson.
All right everyone. So I hope you enjoyed
that. And I'll see on the next one. Thanks
a lot. Bye bye.
9. 3D Door Handle Modeling: Welcome back everyone. To blend
the beginner's boot camp, and this is where we left off. All right, so now
we need to make this actual small
handle on here. So the easiest way, actually, is to either bring in a Taurus or to make it itself
through an actual curve. And I find actually if you're doing something like
this, to use a curve. So I'll show you
what the difference is if I press shift S, cursor to world origin, and then we went through
this, press shift A, And you'll notice that if I come over to where it says Mesh, I've actually got one
that says Taurus. Now the problem with
Tauruses is yes, they look nice, but they
also have a lot of polygons. And this leads me into a talk
on polygons at the moment. You down at the right
hand side here, we just have the version of
Blender we're actually using. However, if we go to edit and go to Preferences, go to interface, and you'll see one that
says Status bar and under Status bar you'll have one that says scene statistics, system memory, video memory. If we tick all these
on, close that down. Now, down at the bottom
right hand side, we will see how many actually
polygons this actually has. So if I press Tab, you can
see at the moment this has 1,152 triangles or polygons,
if you want to call it that. Now, in gaming or in movies
or anything like that, if you're using any
kind of CGI or assets, you want to keep
that polygon count relatively low unless
you're working on a really, really high budget and
you don't mind really, really high render times because the more
polygons you have, the more difficult the machine
has to actually render it. Of course, this is a
simplified actual explanation that does come lighting, and materials, and textures
and things like that. But polygons actually play quite a significant part in how fast things can be rendered. Now this is why N real engine brought out something
that's called Nani where you can basically render billions and billions of polygons in the
scene at one time. However, there are
still drawbacks with that and you can render
out all those polygons, but you can't render out loads and loads of
materials and textures. So there is a drawback to this, which hopefully will be
fixed in the future. However, getting
back to the point, the polygons still play
a significant part when it comes to blender because we don't have
nanite in blender. So it basically goes
on how many polygons, how many textures and
things like that. So to run it on your machine, you want to make sure
that you've not got millions and millions of
polygons in the scene, or it simply won't be
able to be rendered out. So when we build things, we want to keep things relatively low on
the polygon side. And this brings me to
our actual Taurus. And we can see,
again, as I said, 1,152 polygons at the moment. Now we can see when
we shade this move, that we still have some
hard edges on here, even though the actual circle
looks relatively nice. So I'm just going to put that
over to the left hand side. And then I'll show you
the difference between this and using an actual curve. So if I press shift A,
come down to curve, and what we want to do is you
want to bring in a circle. So here comes the circle. Now the best thing about this, as you've noticed when
we bring in our Taurus. So we're just bringing
in our Taurus. Again, you will notice all of the precepts come up
on the left hand side. But the moment I move
this, that all disappears. And I'm unable then
to go back to it. So let's delete that
out of the way. Now with the circle though, I don't have anything that comes up on the left hand side. Really, what I do have is everything over here on
the right hand side, which is a load of options
for me to actually work with. Now this is why it's so
easy to use circles curves, or nerves curves rather than an actual taurus because you
have a lot more control. If I come in and turn down
the resolution to one, you can see that I
can actually change how much resolution is actually
in the curve being it, how round it actually looks. Now what we can actually do is, as well as I can come in and
change the depth of this. So I can change the depth up to something that
I actually want. And then I can
come in and change the resolution up to as
high as I actually want. Now, it doesn't tell me really how many actual polygons I'm going to be using on this, but it does give me an idea of how round I actually want it. So let's turn this up to something like nine,
something like. All right. You can see it's
nice and rounded there. Now you can also see
if I scroll down here, that I've got a resolution, which is the actual edge loops
going around each of here. If I turn this up, you'll see that it actually
gets more rounded round here. This top one is how
rounded it is, round here. All right, I'm just going
to put that back to, let's put it on five,
something like that. All right, So we can
see that they look identical apart from this
one is a lot more rounded, which is actually
what we really want. We don't really want it
looking so blocky looking. Laban we've got here. I think actually I'm
happy with that. I don't know if I'm happy
with the size as well. The other thing is if I
come and spin this round, so r and y and 93 on the number
pad and make it smaller. You can see now I've made
it smaller, it's really, really chunky, which makes
it really hard to work with. Because how do I make this now less chunky than what it is? It's very hard to actually do that with the circle though. If I spin this round, so R Y
90 and I do the same thing, So three, bring it over to
here, put it into place. So roughly into place like so S make it a little bit smaller and
let's bring this out. Now over here now you can see that it's still pretty chunky, but I actually have control of how chunky I want it to be. I can order shift
button down and make it less chunky
if I want to, thereby making it a much, much better way to create
handles like this. Now what I'm going to do
now is I'm actually going to convert this to mesh. I'm also going to
show you something else that you'll probably
want to be using as well, because you're going
to be using it a lot. So let's now say we're
happy with how this looks. Let's go over to object
and you'll see now we can convert this actual curve to
mesh. We've got one here. Now the other thing that this
does is it actually also applies all of our modifiers. So if you come over
here and click on the modifier, we've
got a bevel here. Now if I grab all of these
and join them together, it will try and add on all of the actual modifiers together or it will take them
off because it all depends on which one that
you're adding them to. For instance, you can
see this yellow line, the other ones are orange. What it'll do is it'll apply all of the modifiers the
same as this one. In other words, a bevel,
if I put on a mirror, if I put a mirror on this
and I put my mirror, let's look on the
z axis like so. If I now apply these altogether. So if I press control J, you will see that
it actually applies both the bevel and the
mirror to everything. And we don't want that
when we join something up. We don't actually want it to apply the last
modifier on this one. So the last one selected, we actually want it to apply
each modifier individually. So the way that we do that
is we can come up to object, go down to where
it says Convert, and then click on Mesh. And what they'll do
is it allow all of the modifiers in separately, so mesh like so. You can see now no
modifier, No modifier. However, we've still
got our bevel on, so it's a really good idea to
use this instead of apply, modify it, rather just call
to object convert and mesh. Now what you can also do, which I find is the easiest way, is just to right
click where it says that and say a sign short cut, and then press D or
something like that. And now you'll see that we
can apply it in this way. So now what we can do is
we can actually come to my actual curve and
instead of going to object and down to
convert and to mesh, all we need to do now as you can see we've
got a curve here, is just press D, and then what that'll do is
that will actually convert it into mesh like so now we can see at the moment that this curve is 1008 triangles and this one is 1,152 And yet this one looks
tons better than this one. This is why we're using curves. We also, if we wanted to, let's go back and bring
back the actual curve. So controls control
z, Here is my curve. We can also bring this
down a little bit. So if I bring it down,
let's say one more. Let's actually press D again. And now if I press
tab 896 polygons, and you know what, it still
looks better than this one. This is why we're
actually using curves, and this is also
why we're using D. Instead of keep coming up
to this menu over here. All right, so now let's
bring this over and we'll finish actually making our actual handle
on the next lesson. What I'm going to do
is, and I'm going to put it into place
somewhere like that. And then what we'll
do on the next lesson is we'll start actually creating this part that's actually going to hold this handle into place. I just think it's very, very
important that you find out how to actually speed up
your workflow significantly. And I think this is a
really important thing, as well as understanding that you can be as fast
as you want to be, but if the topology
is not right, or if you've got massive amounts of topology when
it's not needed, that's also not a good thing. So it's basically working
in a really fast way, but in an effective way
as well at the same time. And that is what we're hopefully trying to teach you
on this course. Alright everyone. So hope you enjoyed that and I'll
see on the next one. Thanks a lot. Bye bye.
10. Door Texturing Techniques: Welcome back everyone to
blend of beginners boot camp. And this is where we left off. All right, so now what we're
going to do is we're going to create this part here, and then we'll create
this little insert here just to make the
door handle look right. So what I'm going
to do is I'm going to press Tab. Come up. I'm going to press Alt
Shift and click Alt Shift. Click. And then what I'm gonna do is rather than
grabbing the others, I'm gonna show you a quick techniqu where
you can just press control and that then we'll grab them going all
the way around there. Now I want to do is I
want to press shift D and then duplicate it and
then actually bring it out. So if I press shift D like, so we can see now if
I press the S born, now we've actually
got that like so. And all I want to do now is basically make it into
a three D object. The easiest way to do that
is if you press P selection. Separate it out from the rest. So you should be able to
now click on this bit. If you can't, click on this bit, just press the H b and then
you can bring it out like so. Now you want to do
is you want to press control all transforms, right? Clicks at origins, geometry. And now we'll add in
another Solidify. Add modifier. Bring
in a solidify, bring it out the other way. Hold the shift, bun, just so
it's not going out too much. Right click, shade, auto, smooth, and we should
look something like that. Press all teach then just to bring back your handle again, You will bring back
everything again. Don't worry about that. I'm just gonna hide
this floor out the way because it
makes it a little bit easier for me to work. And there we go, We can see it's already looking pretty nice. Now if you're not happy and you want it going further round, you will have to go back
and select more of them. But you've got the technique
already nailed down now. And then all I'm gonna
do is I'm gonna press D and that then we'll
apply that modifier. Now I can come to
the back of it and what I can do is I can
select some of these. So if I come in, let's say I'll select going
all the way down here. So I select this one. Control
select. Shift select. Control select. And then what I want to do is I want
to extrude them out. So if I press and X, extrude them out along
here, and there we go. Now we've got pretty much the
handle for our actual door. Now one thing I'm not
happy about is these. They look a little bit
rounded and I want them flat, so all I'm going to do is
I'm going to press and X. I can actually straight
them up like so. So S and X straighten
them up and there we go. Now let's make the
other part of this. So the inside of it what I'm going to do is
while I've got these here, I might as well press
shift S cursor selected. And what that's
going to do is going to make sure that when
I bring something in, it's going to be right
in the center of there. Now we're going to do is
I'm going to press shift a mesh and this time we're
going to bring in a cylinder. Now cylinder is really important when you
first bring them in, that we turn down the
number of verts because it's simply simply too many
verts for what we need. It's a tiny, tiny part. So let's put the verses
on, let's say 24. The other thing is, when we turn down the depth
and the radius, whenever we bring in
another cylinder, it will come in with
these options that we've actually changed until we
actually reload blender. If I turn down the radius like so and I turn
down the depth, so when I bring this
cylinder back in, it should come in like so. If I now press shift A, bring in a new cylinder, you will see that it comes
in exactly like that. Which is what we want
because we don't want cylinders coming in
which are so huge. All right, so now
let's spin this round. So I've got this, let's
press and Y and 90, let's put it in some sort of place. So
something like that. And then what I want
to do is I want to press scale it down. So, and then finally I just
want to squish it on the Z. So if I press and z, pull it down, just give
it that kind of overlook. Now let's make the
insert on here. So again, control all
transforms right click. It's the origin of geometry. And then what I want to
do is I want to come in now, grab the center of it, so just the center of this one, press the eyeborn and
bring it down like so. And then extrude it back. So pull it back like so. And now, fine, we can just
pull this into place like so. Now let's right click
and shade, auto, smooth. And there we go,
a beautiful door. Now the thing is we want to
be level this off as well. But when there are
small parts like this, I prefer not to use the
I'd modify a bevel and the reason is sometimes
it's going to be vel off everything and we don't really want that with such small parts. So what I tend to
do is I'll come in and I'll grab the edge. So Olt shift and click like so. And then what I'll do
is I'll just press control B and pull it out very, very gradually to where
I actually want it. So something like that.
Left click and there we go. You've got a nice bevel, let's do the same then
on this part as well. So old shift click, old shift click control B
and just bevel the morph, very, very slightly like
so. And there we go. You might also want
to come in and old shift click on
the inside as well. So old shift click control just to make it look like it's actually going
into something. As you can see, it's
quite a nice thing to do. And then what we're
going to do is we're going to join all of these. Now get into the habit of win before you join
everything up. Pressing D, just to make sure all the modifiers and things
like that are applied, then press control J. Right click, shade,
auto, smooth, and then everything
should be done correctly. Now what we can do is
we can put that into place on our actual door. And there we go,
you can see that this door perhaps looks
better than this door. All right, so now let's hide the door out the way.
Let's hide the base. Let's hide the
light out the way. Let's delete this Taurus, because we're not going
to need it anymore. But you can see the
difference now of these two. So I'm going to delete
that out of the way. And now I want to do is
we basically want to put the same materials as what we've got over here on this one. So in other words,
we can see if we go to our materials,
doors, stone door, wood, and bridge, Mel, we basically want the
same materials now. Rather than going and searching for all these materials
to put them on. I would soon to do
it an easy way. So what I'm going to do
is I'm gonna press B, and this is box select. That means I can grab everything
with inside that box. I'm want to press D just to make sure that everything
has been applied. I want to press control J. Join it all together, Right
click, shade, auto, smooth. And now you can see
that we've got a door that is completely done
and joined together. Now let's press control
or transforms, right? Click the origin to
geometry, and there we go. Our door is ready to go. Now, how do we get the materials from this one to this one? All we're going to do is we're
going to go to material. I'm going to grab my door. Grab this door second. So whatever's highlighted
in the yellow, not the orange, that'll be
what it actually inherits. Now if you press control L, you'll get a new actual menu. And this one is
link transfer data. Now you can see all
of these things. We can copy modifiers, we can transfer UV measures
and things like that. As long as they're the same, you won't be able to do
that if they're not. And what we want is
to link materials. And there we go. All of the materials on
the right hand side now on this one are exactly the same as
the one on this one, making it much, much easier
for us to work with. Now the thing is that
I've said in this, this course is not really about materials and textures
or anything like that. Well, I think on the next
lesson it'll be a good idea to actually show you how you can bring your own materials
and textures in. I definitely think that
will be a good idea. All right, so what we'll do now is we'll actually come in. We've got doors, stone door
wood, and bridge metal. So let's do our stone first. So what I'm going to do is I'm going to come to edge select, I'm going to select
one of these. And then what I'm going
to do is I'm going to slect them, going
all the way around. So, and because it's stone, generally you can get away
with simply pressing, coming down, and clicking
Smart UV Project. Look okay, and
there's your stone. You can see just how
easy that actually was. Now let's come to our wood and what we'll
do is the same thing. Now sometimes with wood, you will end up where the planks are pointing in the wrong
way for the wood grain. And that sometimes needs
going in and fixing. So if I press U Smart
UV Project, click okay. You can see at the moment
this is still stone. So what I need to do is that
I need to come to door wood, click on it, and
then click a sign. And there is your door wood. And you can see it looks
really, really nice. Finally, then let's
do the metal. So we're going to
come in L, L, L, L and just click all the
parts. Bridge metal. Click a sign, press U. And you can see, because
we've clicked a sign, you can see how
bleary this metal is. Now the reason fly is because we haven't
unwrapped it yet. So now if we press U, U
V Project, click okay. And there we go. There is that nice shine from
our actual door metal. And if we put on back on our EV press Altage to
bring everything back. And there you go, There is
our door actually finished. You can see we've
got some really, really nice planks
of wood that look, you know, bent and
things like that. And it's a really, really nice
technique to make indoors. All right, so let's go up
now to file and save it out. And what we'll do then on
the next lesson is I'll show you about textures
and materials. And then after
that we'll move on to creating a brick wall. All right everyone, so I hope
you learnt a lot from that. I hope you've enjoyed
the course so far. And I'll see on the next one. Thanks a lot. Bye bye.
11. Material & Texturing Essentials: Welcome back everyone to
Blender Beginner's boot camp. Now I'm going to do is
I'm going to give you a short introduction on
materials and textures. And now to actually
bring them in and put them together for
your own projects. As I think it's quite
an important thing even though this is a blender
modeling boot camp. So if you're not
interested in that, just move on to the next lesson. Welcome everyone to this short
introduction on importing texture maps and creating
materials within blender. Here we'll be going through
basic material set ups and easy ways to import your texture
maps all within blender. Then we'll be moving
on to an explanation of what maps do and
why they're important. So with all that said,
let's get started. So in this basic scene
that I've set up, you will see that I've got these three objects and
they're all UV unwrapped. So now let's succumb
to our first object, and let's say we've already marked our seams as you can see. Now let's come up to
edit first of all, and what we're going to bring in is a add on called
Node Wrangler. And this is going to
make it very easy to set up materials
within your scene. So let's come to edit,
come down to Preferences, come over to where
it says Add ons, and then we're going to
search for node N, O, D, E, and you'll see one
called Node Wrangler. Make sure that's
ticked on. And then let's close this down. Now what I want to do is
actually create our material. So if you come over to
the right hand side, you'll see this little
football kind of icon. Let's click on the Plus. And then what that actually does is create a new material, and let's click New
and give it a name. So let's call this Wood because I've already
created a ward. It will come up as wood 001. If you've got 001, it will come up as
wood 002 and so on. You'll notice as
well that this has come in as a principle SDF. This basically is the
magical node shader within blender that makes
it easy to import all your maps and things like that. So now we've got this. What we need to do now
is we need to head on over to our shading panel, which is this button here. Once in the shading panel
you'll see basic set up, Same as what we had in
the modeling panel. And now if I zoom out
of here a little bit, you'll see that we've actually got a basic
set up already. So we've got our
material output. And of course, this is where all the nodes end up in the end. Then we've got our principled, which is what I
told you about is the magic kind of blender node. And if we zoom in a little bit, you'll see we've got all of these things where we
can plug things in or we can mess around
with these without actually a map plugged in. So now let's come and click
on our principal BSDF. And what we're going to
press is Control shift. And, and that then we'll open up the file of where you want
to actually find your map. So make sure you store them in a place where you know where
they are, go and find them. And then you should
end up with five maps. Normally it's five maps that
actually you can download. One is the base color, the next one down is metallic, the next one down is roughness, the next one down is height, and then you've
got normal there, normally the basic five maps. So now what we need to do is you need to come to the first one and shift select the bottom one and then that'll
select the mall. And then come over to say it's principal texture set
up and click that on. There you go. They've all
actually come in and you'll notice Blender has automatically set everything up for us. And this is part of what the
Node Wrangler actually does. Now if we zoom in a little bit so we can see what
we're doing and now we can actually go through
some of these nodes over here. Let's zoom into here as well. The first one we've got
is texture coordinates. Now basically this node tells blender whereabouts to place
this texture on this object. So you notice at the moment it's basically plugged
in from the UV. Now, if we quickly
just go over to the UV and I grab everything, you can see this is our UV map, and this is how basically this
texture is placed on this. So for instance, you can see that this one has
been turned round, so it's going the correct way. Now let's go back over
to our shading panel, and if we plug in the generator instead to the vector,
let it load up. And you'll see now that
blender is trying to generate how this texture
is actually going to go onto this object. This is useful when you're creating textures
within blender itself without maps but useless if you're actually
bringing in your own map. So let's put it back on UV. Next one macros is
called mapping and this basically is how this texture
is mapped onto this object. You can see here that
we can actually move the location of our
actual texture, and this basically is
moving the UV map. Now if we come, we can also scale this up as
well as you can see. So you can scale it
smaller and bigger. And it gives you a lot of
control within actually the shader to mess around with the scale
and things like that. Normally, I would actually
do this in the UV map, but if there's any small details that I want
to make, you know, a little bit smaller or
something like that, I will do it within the shade. Moving across, you can see that all of these nodes over here, which are our maps, are
plugged into our mapping node. So let's come to the first one. The first one is color and basically down on the
right hand side here, I'm going to be showing you
exactly what they mean. And then if you want
more information, you can go onto the blender
website and find all of the rest of the information out about all of these maps
that we're talking about. So as I say, the first
one is the color, and if we unplug that, it's basically
what we can see is it's just the base color. Now sometimes you'll get colors where they come in with
ambient occlusion. And I'm going to talk about ambient inclusion just
in a few minutes. So if we plug this in, we can actually
alter the color with other nodes that we can
kind of slide into here. So I'm quickly going
to show you that. So if we press
Shift, do a search, and we'll just bring in a gamma, which is just going
to lighten or darken our actual color. Now I've put that in there, you can see if I bring
that down or bring it up, I can make it much
darker or much lighter. So that's something that we can actually do and
the Node Wrangler enables us to bring in a new node and just
drop it in there. So what I'm going to do
now, I'm just going to delete that and I'm
going to plug that in now to go onto the
next map is metallic. So I'm just going to head on
over where we've actually brought in a metallic texture. So here we are in
our set up now with our actual metal
texture and material. So if we zoom in now, we can see that we have the next one down which is metallic. And we can see that if we come
and actually unplug that, you'll see that
not a lot happens. And this is because
this metallic is very closely based on the metallic that's already there,
which is zero. It's quite a dull metal. Now if we come in and we
turn up our metallic, you can see that it goes really, really, really metallic like so. And you don't have
to actually use a map to make
something metallic, all you need to do is
turn up this metallic. Now normally when
we're doing things like using this slider
here and no map, either something is metallic, so if I turn this down
or it isn't like, so we don't really
have anything in between when we're not
actually using a map. So if we plug this
back in now to our metallic and let it
load up and there you go. Now the next one
down is roughness. And roughness is basically if you think of a
sheet of glass, when you look at it, it's
not completely see through. You might have certain
scratches on there. You might have
things like smears, hand marks, things like that. And basically that is what
the roughness map does. Basically, the roughness
is determined by this map. So if I unplug this map, you can see we've got
a lot of the kind of shinier parts and
duller parts on here. So let's unplug this
and then you'll see that it's all
one kind of shine. You can also see if I
come in and actually turn the roughness
up or turn it down, I can make something like ice or I can make something
very, very dumb. And this is why we use
this map because it gives us a lot of control of how much smearing and things like that and makes it
look a lot more realistic. So now let's move over
back to our wood. And what we'll do
is now we'll come down and look at our normal map. So if I double tap
the a quickly, that'll just unhighlight this. And then we can just zoom in a little bit and look what
this normal map does. As you can see, the
normal map always plugs into a normal map node. And then we can mess
around with the strength. So if I turn this
strength right up, you can see now
we've got a lot more pushing through of that
actual texture now. Just be very careful
when using this node. You can't turn it up
too high and it will, it won't look very
real in other words. So try and just get
it somewhere where you're really happy with it
and it still looks realistic. For instance, you do get some
wood which looks like this, where it's really kind of
elevated from the base, but I wouldn't go, again
too high with this. Okay. So that's the normal map. And now let's move to
the displacement map. For the displacement map, I'm actually going to bring
in a new material now, so I'll head on
over to that one. So here we are with our
cobblestone texture, which we're going to use for
our displacement example. So what displacement does is it basically gives this texture. It basically pushes it out. It's like using tesselation, as you'll see shortly. Well, the one thing is if you're using the
displacement map, well, you really need
to know two things. First of all, it doesn't
work in V. Second of all, it really needs a
lot more geometry than what you would
normally have. So here we've got a flat plane, and we can see that they're
slightly pushed up, and you can still see that this is basically a three D texture. So, how do we create
displacement on this? First of all, what we're
going to do is we're going to come over to our little spanner. So first of all, what
we're going to do, we're actually going
to subdivide this a couple of times.
So let's press Tab. And what we're going to
do is right click and subdivide, right
click, subdivide. And now what we're going to do is we're going to press Tab, and we're going to
bring in a modifier. And what we've done
now is basically increase the geometry a lot. So let's come over
to add modifier. We're going to
come down to where it says multi resolution, and we're going to
subdivide. Subdivide. And again, and again four times. And if you press Tab, you'll see that it still actually
looks like this. So you can't really see all
the subdivisions on here. But when we finish this I'll actually apply it and then
you'll be able to see them. Next of all, what we
need to do now is we need to put this on cycles. So if we come over
here and we change it from V and we
put it on cycles. And then what we can
do is we can come down now to our material, which is this bottom here. Scroll down and you'll see
one where it says settings. And under settings you'll
have one that says Surface. And what you need to
do now is change this, it should say bump only. Change this to
displacement and bump. Once you've done that,
then all you need to do is go to your Cycles shader, which is this put in
here, and there we go. You can see now how actually
realistic that looks, and now you can actually
mess around with these. So we can really, really bump up the scale as you can see. We can also change
the mid level, like so it really push it out or you can really
pull it in as well. Okay, so that's a bit of
an explanation on there. Now as I said, I will move over now to the actual spanner. We're a modifiers
on, I want to press control A to apply that,
I want to press Tab. And now you can
see just how much geometry that actually took. Now you can get away with a
little bit less geometry. So if I press control Z
and just bring it back. And just bring it down one. So if I bring this
down one like so, and you can see that it's
still looking quite good. But if we put the viewport
level up a little bit, it's nowhere near
the level of this. So if we put it on three, press control, press the tabled. And you can see now there's
not so much geometry, but we're still getting
a pretty decent effect. Okay, so the last
thing I want to show you is if we come back to our material shader
and we put this back on V. So we've come
to our computer icon, put it back on V, and
now we'll just scroll around and zoom in to this wood. Now, what does
ambient occlusion do? So I'll put a brief
explanation down the right hand side
of what actually ambient inclusion is. But we can actually enable it by coming over to our computer, putting this on V, and you'll have one that says
ambient occlusion. When you click this on, you can see already that we really, really get much more
shading on here, much more realism and
things like that. Now as I said, you can get textures where they have ambient inclusion
already built in. But I find actually
doing it this way generally gives
you a better result. Now the other thing you can do is you can mess around with the ambient occlusion and
really bring it up or down, mess around with factors
and things like that, and really get kind of
the shadows that you really want on the surface
of the actual object. So that concludes
the material and texture introduction
part of the course. And I hope you all got a
lot out of it and have a much better understanding of maps and materials
within blender. So with that said, let's
get on with the show. All right everyone.
So I hope you enjoy it and I'll
see on the next one. Thanks a lot. Bye bye.
12. Blender Asset Manager Fundamentals: Welcome back everyone to
blender beginners boot camp. And I think one of the main things that
we should actually go through now we've
actually completed our door, is actually how to use the
new Blender Asset Manager. This is available for
anything above 3.0 I believe. And it's really handy
to actually have all of your assets put in one place when you've actually
created them. And you're able to move them between one blendophile
and another blendophile, with these including all of the textures and materials
and things like that. So I'm going to give
you a short video now of how to actually do that. And then once we return, we can move on to the next
part of the modeling part, which is the brick wall. Welcome everyone to
the short introduction on the asset manager
within Blender. Now, before we get started, let's take a quick look at what we're actually
trying to achieve here. If you see on the top
left hand side here, I have actually
one called Assets, which we're actually
going to create. If we actually click on that, you'll see it opens
up a new window. And within that window, we have assets on the left
hand side grouped together. Not only do we have assets, we also have actually a
material library as well. So we're going to
learn actually how to actually put these
into this group, and now Blender can
actually find them. But before we do that, let me just show you how
they actually work. So within my stylized assets, I have all of these assets which are from multiple courses. And I can simply drag and drop my asset
actually into place. Now the asset doesn't just
come in with the actual model, it also comes in if I click on my Materials tab with
the actual materials, so I can bring any asset in. And they should come
in nice and flat view into any scene that
you want to create. Now with the actual materials, if I actually just
bring in a cube, so I'm just going
to bring in a cube. I'm going to move it over to the left hand side and
I'm going to come over to my stylized materials
and I'm simply going to drag and drop onto
my actual cube. And there you go. You can
see this one is glass. I've only got on
materials at the moment, so you won't actually see through it or
anything like that. But you can see that we
can just drag and drop materials onto our actual
cube and things like that. You can see that
this one is water. And you can see how easy it is just to drag
and drop them on. Now, some of them, depending on how complex they
are going to take, a little bit longer actually, to place on your cube. But apart from that,
they work really, really well now,
enough for all that. Let's go back now to a
brand new blender foil. And I'll show you exactly
how we're going to set this up so where we are in our
blender actual default view. And what I'm going to
do is I'm first of all going to come up to
the right hand side. I'm going to come
across and you'll notice if you come
across the general, we have one that says asset. Now some of you might
not actually have asset. And if you haven't got asset, just click on something like modeling or
click on modeling. And you'll notice
now that we've got another one called Modeling One. And the reason is
of course, because we already have one
called modeling. Now if I come and let click, so double left click on here. Let's call this asset like so. And then what I'm going to do is I'm going to right click, I'm going to pre order
this to the actual front. So we now have asset
layout and modeling. Now at the moment, this is just a copy of my modeling
and I don't really want that. So what I want to
do is I want to come down to the left hand side. As I come to this corner, you'll see this little
kind of cursor appear. And if I left click and drag. So from the corner left
click and drag up, you'll now have
actual two windows. Now what you want to
do is you want to come over to where
this actual icon, you see it, left click it. And over on the right
hand side you'll have one that says
Asset Browser. And there we go. So now we actually have our asset browser. And now you can click on
this anytime that you want. Now it's important for this
to actually work that. First I'm going
to press Tab just to get out of my edit view. If I come over to
file and I come down and what I want to do is
I want to come to defaults. I don't want to save
it as a start up file, but you don't probably
want it here, like looking here in the assets when you first open up blender. So if you don't want that,
just come to modeling. And then what you're going
to do is you're going to go to file default, save start up file, and now every time
you load Blender, you're also going to have
this asset manager in place. Now, how do we make groups? So the way we make new
groups, as you can see here, we can change this
from all you can see, it's on current file and you can see there's also an
unassigned button. Now it's important that we keep that unassigned button there, because many times I've created assets and
I can't find them. And of course they'll
be in the unassigned. Now let's create a new group. So if we create one called
Material Materials like so, and then we know we can place all of our materials
in this one. It's just a little plus to
create a subgroup under all, if you want to subgroups
with under Materials, you just click the plus on the actual materials
and then it'll create a subgroup under this actual materials
as you can see there. All right, you can see there's
also a little star there. That just means that we need
to save this blend file out. Just save your blend file out. If you actually want to save out these materials once you've
actually got them in place. Now, how does blend
know where to actually look for these assets? Well, what you need to do is
you need to come up to Edit, go down to Preferences. And then what you need
to do is you can see over here where it
says use a library. This is where Blender
needs to actually know where to actually look.
You can see mine. At the moment, I've
created a desktop icon that's called Blend Assets, and that's where I'm
actually a time blender to actually go and look. Now the thing is any blend
file that you create, just create a copy of
it and actually put it into this new desktop. Blend file doesn't have
to be a new desktop, but it needs to all be in the
same file to actually work. Once you've actually done that, then we can close that
down or save Preferences, you can also do it that way. Close it down, and now you'll see if I come down
to use the library, you will have a
problem here that we haven't actually got
anything in there. So if we go to Open Preferences, and now we click on this. And now I'm going to
go to my Desktop. And now I'm going to find
my Blender Asset Library, which is this one here. And you can see I've got all of these blend files in there. If I click except
now, close that down. And now when I come and
actually click on my catalog, you can see that I've got all of these actual materials
and things in place. This is why it's
really important that you actually make sure that you actually put
in your Blend Pals into that directory. Now the next thing we
need to discuss is how to actually create
our actual assets. So for instance, let's
create a material. So if I come over to
the right hand side, I'm just going to create
a cube material like so. And then what we're
going to do is I'm going to make a base color. So let's just change the
base color to a red. Let's put it on material
so we can see it. And there we go, we
got our cube material. Now what I want to do is
I want to write Click. I want to come down
and mark as asset. And you'll notice
now that it's got these kind of books
stacked together. And that basically means
that this has been saved out now as an
actual material. Now of course, this blend file hasn't been saved
out into my assets. So all I need to do now
is go to File Save As. And then I'm going to
go to my desktop and come to my Blender asset
library, which is this one. And now I need to save this out as a blend file within here. Then what blender will do is
it will pick up that this is a blend file within
that actual file, so this one here. And then you'll actually have
access to this material. Now the next thing you need to do is you need to actually, let's save a Cuba for instance, instead of an actual material,
let's save out an object. So all you do is
you write, click, come down to Market's Asset. And again, you'll see
now that we've got those three actual
stat book now, because you have actually
saved this blend file out into your asset library every single time now that
we open blender. So if I close this down
and reopen blender, you'll see you can
go to your assets. And now we can see
that we can go to our user library,
Open Preferences. And let's find our actual
Blender Asset library. Click except close that
down, and there we go. You can see I've got
all of my assets in. You can even see the ones that
aren't actually assigned. Where you can see
I've got all of these assets in place already. Now, just before we finish up, a couple of things to remember. First of all, when you go
to Edit and Preferences, you will see that this
is normally read, you just have to name it
something so it's not actually red and then you won't have any problems with it. Second thing is that once you've taken the time to
actually create all of your assets and all of the
materials and things like that by right clicking
them and markets Asset, just remember to save that file out in the actual place
where you save them out. So for me it's my
Blender asset library. If you don't save out
a separate version of Blender in there and you
end up overwriting it, then you will lose
all of those assets. Of course, basically it's a blend file just with all
of your assets in there. That's all that
should be in there. All right everyone. So I
hope you enjoyed that. A few troubleshooting
problems at the end as well. And as they say on with the show, I hope
you enjoyed that. And I'll see you on the next
one. Thanks lot. Bye bye.
13. 3D Brick Wall Modeling: Welcome back everyone to
Blender beginner's boot camp, and this is where
we left it off. Alright, so now we've done that. We can actually check it out
and see what it looks like. And then what we can do is we
can actually close this up now and just make
sure that your door, if you click on it, you will
see in your collections. If I open up lighting
that where is my door? I can't actually see. Here
is my door at the moment. Just make sure that you name it. We'll call it door and we'll
always call it course after. And then we have a good
idea of which one it is. And what we need to do now is just pull it all the way up. And what we're gonna do is
just drop it into our door. And now when we close
actually our door down, all of those should disappear. All right, so let's
close up our lighting. We'll leave it there
for the time being. And then what we'll
do is we'll click on our wall and have
those loaded up. Now we can see on the actual
wall, if I click on it, that at the moment you can see one of them
is normal bricks, albeit it's got a
nice curve to it. And the other one is kind of these blocky
bricks like this. And it's also got some cement actually in
there as you can see. So you can see this cement
in structure behind it. So these are what we're actually
going to be replicating. So I think the best thing
to do is start with perhaps the more difficult
one, which is this one here. This wall, this blocky wall. Let's move them over
to the left hand side. And then what we've got is
plenty of space to start now. I'm going to just move them
over a little bit more. And then what I'm going
to do now is I'm going to turn off my Luton again, I'm going to actually put
this onto object mode and then what I'm
going to do is I'm just going to open
up my brick wall. I'm going to turn off
the text as well, and then I'm going to double tap the A just to unselect those. Sure. You should be left
with something like this. All right, let's
press shift and, and let's bring in our
cursor to world origin. And let's bring in a plane. So shift A, let's
bring in a plane, let's spin the plane
round so Y 90. Let's press three
on the number pad. And let's just bring
you up a little bit. So just so it's run about
the right size of our wall, it doesn't have to be perfect
or anything like that. All right, so what
we're going to do now is we're going to press Tab. And what we're going
to do is we're going to subdivide this up. So I'm going to write,
click and subdivide. And then what we're going
to do is I'm going to come down to where this
little menu is, open it up, and then just
increase your selection. Now the more you increase
the selection there, the easier it's going to be
to create the actual block. So the easier it's going
to be to create them, but the more time consuming
it's going to be. So if I get to nine, you'll see that you can't
go any higher than ten. So what you need
to do now is you need to write click Subdivide, and then it'll
subdivide it again. All right, so now what we can do is we can actually make a
start on creating our block. So what I tend to do now is I'll slick on one edge control slate, the other control
slate, the other like. So right click and mark seam. And then what I'll do is I'll
create some more blocks. I'll be going all the
way over here like so. And then I'll probably bring
one into here like so. And then right click and mark. Same. Now, it's
just a question now of trying to make sure
these all balance up because you can't have a
little sliver of a rock or something like
that and you don't also want it
repeating like this. So what I tend to do is I'll come in and I'll grab this one. I'll right click, mark a seam. And then on the next
one I'll make a much, much bigger brick just to
make sure that they're not too square going down
there as you can see. All right, so now it's
just basically going in and making some
actual bricks. And all I'm doing to actually do this is I'm shift
selecting one of them, control selecting the next one. Control selecting,
control selecting right click and
mark. Seem like so. And then what I'll do is I'll
bring one in here like so. Control select. But I'm not going to control
select that one. What I'm going to do
is I'll come down. So right click and mark scene. And what this does
is it actually gets you pretty quick selection, the selection process
within blender, because there are a lot
of bricks to select, we have actually an L shaped
one in there as well. And the other thing
is to remember is that there's a lot
of bricks here. We could have made this much, much simpler for ourselves and maybe I should
have done that. But I did actually want
to show you just how good it will actually look if you select a fair amount of bricks. So you can see here, I've
got a tiny brick in there, but I'm going to make
it a little bit bigger, so I'm going to come round
and just select it in there. And again, of course, the bigger I select
my actual bricks, the quicker this is going to be. So I'm just going to actually not worry
too much on my own, on my own brick wall about how much I'm
actually selecting here. So I'm just going to come in, select those mark seem, I basically just want to
get this done relatively quick and I'm going to bring it up to there and I'm
going to select this one. This one right click mark Seem. And then I'm going
to do is I'm going to select these two down here. Maxime. All right, so now let's come over and select all these, then we'll come
over to this one. I think this will be
the last flat one we do down at the bottom because
we do want some variations. What I'll do is now
I'll come to this one, I'll go up to here. We'll select that
one, right click, and then we'll probably go up to this one going
all the way over, right click, mark seam. Now let's think about
filling in these parts. You can also use this
actually if you're wanting to create any
kind of patterns. So you could also
make this seamless. If you wanted to, we're
actually going to go into that, but you can see just how
powerful this can be. Now be aware as well when
you're doing L shapes that it's going to be a little bit harder for blender to
be level them as well, so I wouldn't put too many
weird, awkward sizes. If you can help it in there, just try and keep
them relatively down to just a few of
the weird shaped ones. And then what we'll do is we'll
go all the way over here. Right click mark, Seem we're
nearly at the top now, so I'm thinking probably
come to this one here. So you can see I've got
weird shape one in there. And then what I'll
do is I'll have one like this mark seem. All right. There we go. Now what I tend to
do is I'll come in, I'll go on to face select. And what I'll do is I'll
select this face, this face. I want them far apart from each other because I don't want
them actually touching. Because what I'm going to do
is actually split them up. So you can say,
I've grabbed these, press Y to split them, H to hide them, and then
work your way down. Just make sure none of the
edges are actually touching, so you can see like this, like this, Y, H, And then let's do this one now. So I'm going to grab this one. This one, this one,
this one, this one. And then y and H. And then you can see if
I grab all of these, press y al th, ring
everything back. Now you can check to see
if everything's split up. And the easiest way
to do that is if you come to the two
interlocking links, come to individual origins, press the S bond,
just make everything tiny and you can see how
everything is split up, which is exactly what you want. All right, so now
I want to do is I want to pull all
of my bricks back. So if I press E, I'm going to
pull them all back like so. And then what I
want to do is now is I want to actually
be level them off. So control all transforms right? Clicks the origin to geometry. And then we're going to
go over to our modifier. Come to bevel. And bevel them off
like so turn our bevel right down and then
what you're going to do is just turn it up one like. So now I think
with these bricks, because we want a little bit
of cement in between them, we're going to have to go in now and make them a
little bit smaller. So if I've grabbed them,
I'm going to press a, make them a tiny bit smaller. And now we can actually see that slight gap
going through there. And that's what
we want. Now it's time to bring in our cement. So what I'm going to do is I'm
going to press shift that. Then we'll put my cursor
right in the center of there. So shift S, cursor
selected and then shift. And we'll bring in a plane. We'll rotate our
plane round so Y 90. Rotate it round three on the number pad and then
just make it so it nearly nearly comes
up to the outside. So you can see it's
nearly up to the outside. I might need to Jaws pull
it over a little bit, just so it's more
centered like so. And then our jaws pull it
forward just a little bit. So al right now with my plane, I'm
going to press control. All transforms right? Clicks
the origin into geometry. And then what we'll do on the
next lesson is we'll turn this plane into
our actual cement. And I'll show you
how that actually works. All right everyone. So I hope you enjoyed that. And I'll see on the
next one. Thanks a lot. Bye bye.
14. Detailing Brick Wall with Noise Displacement: Welcome back everyone, to blend
the beginner's boot camp. And this is where we left
off now with the cement. The best way to do
this is first of all, bring in a modifier. So what I'm going
to do is I'm just going to hide my brick
wall out of the way. So press H on it to hide it. Come back then to the plane. And then what you're going
to do is you're going to come in and add a modifier. And what we want to bring
in is a multi resolution. Now the reason we're using
multi resolution is we can turn it up pretty high
or low. Very, very easily. It's the main one that
you should be using if you sculpt him because
you can add in large details and then bring those details down smaller
and smaller and smaller. Now you can use a subdivision, but I find on
something like this, multi resolution is probably going to work much, much better. So let's bring that in now. Once I bring it in, you'll see nothing
actually happens. What we want to do is
if we press Simple, it's going to
actually bring it up one and keep the
sides the same side. So if I go back and press control and what we're
going to do is if we press subdivide like so you will see that it
actually divides it up. But it actually brings it all in because
what it's actually doing is it's
trying to squish it all in on a subdivision. Now, instead of doing that, if we just come in
and press simple. Simple. Simple again. Simple again. What it's actually doing is
it's dividing it up. So it's doing what we
did with the bricks, but in a way where it's actually using a
modifier to do it. Now what we want to do
is you want to come in and you want to
bring in a displace because then it's
all going to make sense once we bring
in the next part. What we also want to do is we
want to bring that strength down to not 0.1 And then what we also want to
do is we want to bring the mid level down a
little bit as well, so not 0.2 something like that. What that's actually going
to do is it's going to pull the vertices out in certain ways depending on what actual noise we're
actually going to use. So if you think about like photo sharp or
substance bench or something like that
and you use noise to create roughness or you know, it's just a random black and white image
is basically what it is now once I actually bring in this actual
displacement. So once I bring in this new one, then you'll see what it's
actually going to be. So if I click new like so. And then I come to my textures
panel and you'll see at the moment that
we've got a texture and then we have image on movie. So let's first of all name it. What we'll call it is
grout because that's what the actual cement is called in between
the bricks, like so. And then we'll go to where
you say it's image on movie and the one
that we'll bring in, you can mess around with these. So you can bring in a
muskrat for instance, and you can see what
that's going to look like. Now I recommend once
you brought it in, right click and shade, auto, smooth like so. And then what you want to
do is you want to come back now to your modifiers tab. And what you want to do is
you want to turn this up. So if I subdivide it now again, and subdivide again, now you can actually
see this really, really starting
to come together. Let's subdivide it
once more like so. And then what we'll
do now is we'll go back to our texture. And now orders will mess around. So we can see here we can
actually make it much, much smaller like so. We can also turn up the luminosity to
make it a little bit, you know, more blocky
and things like that. And the thing is, at the moment, as you can see, it's
quite actual chunky. Now what we can
do is we can come back now to our modifier. And then what we can
do is we can actually turn up our mid level, or turn up our strength
like so. Or turn it down. So let's turn the
strength down to n 0.1 But what I'm going
to do is I'm going to hold the shift board
as I turn those down. And then what I should
be able to do now is get that nice look that we're
actually looking for now. You can see at the moment,
obviously it's not quite right because it should be blocky all the way over here. And this is where you
should be, you know, playing around with
different noise types. So you can see that we've
got intensity on here. So we can turn that up like, so now you can see
really starting to actually look kind
of nice. All right. So now we've done that, what we want to do is we want
to actually apply that. So again, go away and play with, you know, all of these noise
textures that are on there. We've got wooden
things like that, really, really handy
things to use. But go back now to
your displacement. And what you want
to do is actually, you don't actually
have to apply this to put the material on
this particular one, because we have a multi
resolution on here. So what that means
is if I now come in and I'm going
to press ol tag, I'm going to bring
back my materials. So I'm going to come in then and just hide the
block out the way. Grab this and I'm going
to grab this one here. And then what I'm going to do is I'm going to press control L and I'm going to
link materials. And there you go. You can see just how nice that
actually looks. All right, let's press al tag
and bring back our blocks. And now we should
be able to see, once I bring in my
material for my bricks, how this is going to look. And then we can
actually go in and mess around with it even more.
So what I'm going to do is I'm going to come
into my bricks. I'm going to press the
Tabb, A U Smart UV Project. Click Okay. And then I'm
going to grab my bricks. Grab these bricks, press
control L link materials. And there we go.
There are our bricks and there is the grout
in between them. Now the first thing
that stands out to me is that these look a little bit realistic and you might
not want that One I'm going to do is
I'm going to make them a little bit smaller. So just so you can see
that grout even more. And now you can see that grout really, really coming
through there. It's looking really,
really nice. Now if you want them to look
a little bit more stylized, all you need to do is turn
up the amount of segments, not the amount of segments,
sorry, turn up the amount. And we'll just turn
these up one like so. And now you can see they're
looking a lot more stylized. If you double tap the, you can see exactly what they're
going to look like. All right, so the next
thing I want to show you is if you are not happy
with the material, if you come to your
bricks and you come to you editing over here. What this is, if
I press Tab now, is all of these bricks
that blender has laid out. If we just pull this over
to the right hand side, you'll see that we
can just put this on material and then we'll have a good idea where it's
going to look like. I'm just going to pull
that back. Now if I come over now,
press the button. I can actually make these
bigger if I wanted to like so. And now you can see we get a much different look
and feel to our bricks. Let's pull them back in now. All the way, and now
you can see we get a much harder look
to our bricks. Now I'm not happy with that. If you're not happy and you want to put them
where they were, just go to UV and what you're going to do
is pack islands. And that then is going to put them right back
where you started. Now if you want one brick
changing but not the, all you can actually
come over and click on these two little
arrows like so. And then I can hover over
here in the actual UV map. And I can actually
move these now and change just one of the
bricks if I wanted to. So that's a really, really
handy thing that is new to, I think Blender 3.3 or 3.4 So before we had to guess kind of which one of these
were on the UV map, because what it means is
I can actually go over and select a load of
them as you can see, and it shows it up over here. So really, really handy
to work that way. All right, again, we're
not actually going to discuss much of
materials and textures. I just think it's a
handy thing to know. Let's go back to modeling now. So you should end up with
something like this now, which actually I think looks better than this one
that I already created. It looks a little
bit more realistic. So now let's move on
to our next brick. So what I'm going to
do is I'm going to put that over here like so. And while I'm actually at it, I might as well show you what happens if we bring the
multi resolution down. So if I come to my bricks,
click on my bricks. But what I can do now is I can hide my bricks out the way. So jaws come to this and we can see that we've got this
really nice flow on here. Now what we can do though is we can actually bring this down, as you can see, all
the way down to zero, and get that flatteness
back if we wanted to. Now what I'm going to do is I'm going to put this on seven. And again, I've got a
displacement on here and I've got a multi
resolution on here. And what I'm going
to press is D, just to add all of those
in at the same time, press the Taboid,
and now you can see this is how the
mesh actually looks. It's a lot of polygons. Again, you can see polygons 32,000 or something
like that. It's a lot. So what we want to
do is we want to bring this down before
doing anything, while still trying to
keep all of this on here. So all of this
displacement on here. What I'm going to
do to do that is I'm going to come
over to my modifiers, add modifier, and I'm going
to bring in a decimate. Now what you can see
is at the moment, 16,384 polygons are in
here at the moment. As I bring this down though, you can see that
that number drops significantly all the way
down to zero if I wanted it, although I won't
have any mesh left. So this is how many
polygons you actually want. If I turn this up to 0.1
something like that, we can see now we can
get it down to 3,181 polygons while still keeping the majority of this
displacement on there. So now if I press
D and apply that, press the Tabor, and now you'll see that
when they're going it, 3,276 polygons, which is
still a little bit too high, but it's certainly better than
34,000 or whatever we had. Now if I press Al Tate, you can see because it's
the grout behind it, it's not really gonna
have much effect on how it looks anyway. All right, so on the
next lesson then, what we'll do is we'll
actually do this wall. So I'll show you how to create this wall and how to
actually curve it. You can actually curve it going all the way around to even make an actual cylinder
or something like that. Really, really handy to know when you're creating bridges
and things like that. Alright everyone. So hope you enjoyed that and I'll
see on the next one. Thanks lot. Bye bye.
15. Bend Mesh for Wall Deformation: Welcome back everyone to
Blender Beginner's Boot camp. And this is where we left off. Alright, let's put our cursor right back in the center again. So shift S, let a
cursor to world origin. Let's hide this wall out of the way because it's
kind of annoying for me. And then what we'll do
is we'll press Shift, and we'll bring in a cube. Let's make the cube a
little bit smaller. So I'm going to base it around
this kind of wall here. So I have, I press three, I'm
going to go over to here. And basically what I
want is one of these, I could have stole
one of these bricks. But I think we'll
start from scratch. So I'm just going to
base it around this. I'm just pressing S, and then
I'm going to press S and Y and pull it out just to
get a nice size or a brick. All right, so that's
looking pretty nice. Now let's bring in another
modifier which is an array. So an array is really
good if you're making in posts or bricks
or things like that, where you can actually
one after the other, perfectly aligned
with each other. So add modifier, bring in an array now the moment
you don't see anything. And the reason is because it's a raid at the back and we
don't really want that. So all we want to do is we want to come down to where it says, turn that down to zero and
then turn this y up to one. Now the only problem you'll have here is when you
turn it onto one, it's actually going to be
right at the side of it. And that's not something
that you always want. So the best way to
deal with that is either move this up
and you can see again, big gap, which means
that it needs to be 1.01, something like that. And now you'll see you
have a nice small gap, or what you can do,
you can just put it on one and then come in
and add another modifier. And this time we'll add
in a bevel modifier. Now the moment you
can see that it's beveled off doesn't
really look right. And the reason for that is
again because we need to reset our
transformations like so. And you can see straight away now it looks much, much better. Now if we bring this up, let's put it on object
mode instead of a material mode because we can't really see
what we're doing. Now if we turn this down, it's turning it up one, now you can see it's looking
really red in the night. We could also turn
up the segments on here and make
them look really, really, actually more
realistic than what they were. Now what we can do
is we can actually bring up this actual count. So if I bring this count up, let's say we'll bring you
up all the way up to, let's try 12,
something like that. And what we can also
do is on top of this you can also add
another modifier. So if I come in to
add modifier array, you'll see it puts
it to the back. And we don't really
want that. What we want to do is come all the
way down to the botto, I'm just going to move
this up just so you can see all the way
down to the bottom. And instead of it
being on the X, we'll turn that to zero. And then what we'll do is we'll
put the Z on one like so. Now you can see that it puts it up. That's not what we want. So minus one instead, like so. And now these are actually
aligned perfectly. Now what we can do is we can
actually offset this though. So we want a constant
offset to offset this, rather than it being, you know, in line with these bricks. Because that doesn't look
right at all the way that we're going to offset This is come down to where it
says Constant offset. Click that on, open
it up another moment. It's soft setting by 1 meter. Suppose 1 meter. I don't
think it is a meter. Maybe it is actually, it's
in line with these cubes, so it probably is
put it on zero. And then what I want
to do is move the Y. Now if I comm three, if I come a bit closer, I can then move this Y up to kind of the halfway point
of this center brick, which then gives me an idea of where I actually
need to place this. Now, could it be on
Naut 0.3 Let's try. If it's on nut 0.3
that's probably going to be perfectly in line now
with the actual brick. Now the best thing
we can do now is we can actually come in
and turn this up. So every time I turn this up, you can see I get a
constant offset like so. But I don't actually
want it to be like that. What I want to do is now I want to actually create
another array. So what I'm going to
do is I'm going to actually grab both of these now and basically
array them again. So what we're going to
do is I'm gonna come in to add modifier array. And then what we're
going to do is I'm going to come all the way down. Then this down to zero, put this ad on minus one. And now you can
see that we've got array of our bricks
going all the way down. So now I can just
turn this up and we can array them as
much as we want, really, really easy to get them the way that we wanted to. So I'm just going to turn it up, I think one more and
then I'm going to lift them up to the ground
plane like so. All right, so this is
looking really cool now, can we actually bend them
at the same time as well? Can we actually use another modifier and bend
them at the same time? I actually don't know that
because normally what I do is I apply all these modifiers
and then I actually bend it. But let's have a
look. Let's see if we can though, add modifier. And we're going to come down
to where it says simple. Where is it? Simple deform. This one here. And then what I'm going to do is
scroll all the way down. I'm going to put it
on Bend, put it on Y. And yes, I think actually we will be able to
get away with it. So what we want to do is
we want to put it on Y. And you can see at the moment it's bending this way, and that's
not what we want. So what I want to do is
I want to grab my brick and I want to rotate
it in edit mode. I'm going to rotate
and you'll see what actually happens if I press tab, press our Zed 90. And you can see that
every brick rotated. Now if I put it on medium, can we get away with that zed? Now you can see this
is the problem I'm going to have when
I rotate this. If I rotate it on the Y as well, you can see it's
rotating everything. And this is why I couldn't
use simple deform before. It's a good lesson learned. Actually what I'll do
is I'll come over, I'll click my Simple Deform off. And now I'm
going to do this. I'm going to press D. Now the thing is when
you arrange something, it's always the best idea. If you want to unwrap something, now's the time to do it. Because once you unwrap, so let's say I put
a seam on here, so right click, mark seam. Now once I press D
and apply all these, so I have a press D like
so which by the way, if you didn't have it done
it's convert to mesh. So if you miss that one that's how
we're actually doing it. Now you can see that all of these now have
that marked on them, which makes it a ton
easier if you want to apply materials and
textures properly. Now what I want to do
is I want to press Control A all transform. I click Set Origin Geometry, and now we're going to try
that simple deform again, bend on the y axis. Now you can see it's bent the same way as what you did before. But if I come in
now and press A, making sure I'm on medium point, press R Z 90 tab, and then Z -90 rotate it back. Now you'll see that we should
have a different bend on Z, which we have now. We're actually free
to come in and bend this going all the way around nearly to the point where we can actually create
our actual cylinder. Now you will see that we do
have them poking our lot. And the reason for that is, is because if we come back to, let's say this brick here, and we come to
this, when we press control, let's
actually come to it, Where's the brick to this
one press control law. You can see now I'm adding
in a load of edge loops. The moment I add
those in, left click, now you can see what's
happened there. It's based on how many
edge loops you actually add in as to how rounded
your bricks are going to be. Also when a right click
shade auto smooth. Now you can see
that those bricks instead of being
block you like this, they would all be rounded off. It's important if you're really going to
round something off. I'm just going to go
back now that you remember to actually
add an edge loops, so that might be some
wood or something like that before you
actually round it off. So what I'm going to do is
I'm just going to pull this out and then once
you've actually got it, you don't actually
have to apply this. So I could move this over here and it will still
keep this simple. Deform, as you can see. All right, so the last thing I guess I need to do is
I need to come in now, grab everything with
a smart UV project. Click Okay. Let's put
this on material. And then what we'll do
is we'll press Tab, grab this one over here. Press control A, and we'll
link materials again. So there you have
your brick walls. Now you can see as well that on this one they are
quite close together. So if I come to this one, what I can do now
is I can grab them all and come to
individual origins. And then what I can do
is I can press the S born and shrink them
all in like so, even while they're actually being curved at the same time. But another really,
really handy thing to know now what we'll
do is we'll press Alt. We'll bring back our
bricks. So we need this on. So then what I want to do is I want to grab both of these. And then what, what I'm going
to do is I'm going to press the little dot on the
actual number pad. And that then will show me where my actual brick walls
are that I've created. And then what I can do is
I can simply drag them up and drop them
in my brick walls. And then click this on and off just to make sure it works. Now you can see I've
forgot my grout. Then I'm going to grab my grout, press the little dot one, and then drag it all the way up into my brick walls like so. And now I'm going
to click it on. Everything should be there. So let's now put those in place. You can see I've not
grabbed everything. So what I'm going to
do is I'm going to hide my light out of
the way at the moment. I'm then going to press B box, select everything like so. And now I should be able to
put everything together. Now lastly, before we
finish this lesson, there is a problem
where you can see where the kind of grout isn't
coming with my wall. It's very hard to click
and things like that. So let's actually fix that. We'll fix it on this one. So if I come in, grab
my grout like so. And then what I'm
going to do is I'm going to shift select
my actual wall. I'm going to press control P, and I'm going to set the
parent to the actual object. So if I set the
parent to the object, now I'm going to grab my
brick wall press and move it, the actual grout
moves along with it because it's
parented to the wall. So let's say you've
got a bicycle and you've got some
wheels on the bicycle. You want to make sure when
you move the bicycle that the wheels move along with it without joining
it altogether. So for some reason you might not want to
join it altogether. It could be a flame
and a, you know, a torch holder or
something like that, and you made an asset for
a flame and an asset for the torch holder and you don't really want
to combine them. Well, this is a way
round that you can actually pairing
them up in this way. Alright, so low, Let's actually go and actually
save our fire out. And I'll see on the
next one, everyone. Thanks a lot and I hope
you're really enjoying it. See on the next one, bye bye.
16. 3D Crate Modeling: Welcome back everyone, to blend
the beginner's boot camp. And this is where
we left it off, Al. Right now it's up to you
whether you actually want to combine your bevels
and things like that. We've parented this one
up on the wall, I think. Yes, I've got my
simple deform on. I think for me what I'm
going to do is I'm actually just going to press D
just to combine those. I'll also do it on
this one as well. And I think I can
go into my gut, and that's already
been combined anyway. All right, so now
I've done that. I might as well
join these two up because there's
no reason not to. They've got the
modifiers applied now, so I can just join them
up with control J. And there we go. So two
walls actually done. All right, so now
let's close that down and let's come
to our crates. Now as I said, I've tried to put these in order
of difficulty, so the more that we move along, the harder they're going to get. But not only that, it's not
just about the difficulty, it's about learning new
things within blender. So at the moment we've
learned how to do a door, and we've learned how
to do a brick wall, and a lot of those skills we're going to keep taking
forward then into creating the next
part as we move down. The thing is I don't
want to actually come to a part
where we've got to use ten different modifiers when you've never used
a modifier before. So that's why we're
doing it in that way. All right, so now you
can see that we've got crates and bevels. I'm just looking if my
text Yes, it says mirror. For some reason it's
definitely not a mirror. It is crate and barrel. So I'll get that changed. I think ready when you actually come to
download your own pack. All right, so let's move
these both over this side. And then what we'll
do is we've got our cursor right in the center. Again, I'm just going to
move this out of the way. And I think also I'll move my text and I'll just turn
off my lighting and that. All right, let's
go to object mode. And let's first of
all start with, I think we'll start
with the crate. I think the crates actually, believe it or not, easier
than the actual barrel. So let's first of all make sure you cursor is
in the center with shift S. Cursor to
world origin shift. Let's bring in a cube. And let's make the cube a little bit bigger just
to be roundabout. The same size as this crate
that I've already created. So something, something
around that size. It doesn't need to be exact
or anything like that. And then what we're going to do now is we're going to press, well before we press Tab, we're going to press
Control all transforms. Right Click the
origins geometry. Just let blender n hat, we've changed the size
of the actual crate. Alright, next of all we're going to actually come into face Lt and basically you're going to make sure that
everything's grabbed. So you're going to press L just to make sure
everything's grabbed. And now I'm going
to do is I need to make these parts of
the actual crate. So what I'm going to
do is I'm going to press I and bring in the insert. Now you'll see at the moment
nothing actually happens, but if I press I again, now you can see that we can actually bring these inserts in. Now, I'm not sure why
it's actually doing that. Let me just have a look why
it's actually doing that. I think we have a problem
with the actual insert. Let me just press, there we go. Let's come to this one
first and see what happens. All right, that one's working. Let's grab them all again. Press I, and I'm not sure. Shouldn't, There we go. I've just pulled it in too far. That's where it was.
All right. There we go. So don't push it in too far. If that happens to
you, then you can see exactly what the issue is. All right, so we're going to
pull them all in like so. And then what we're
going to do is these are obviously the
sides of our crate. Now when you're working
with barrels and crates, the easiest thing to do is
actually to break it down into parts and then hide those parts away and come back to
them and use them later. It makes it very,
very easy to do that. All right, so what I'm
going to do is I'm going to press Y just to split it up. Then I'm going to press the
H to hide it out of the way, and you should be left
with something like this. Now I want to do is I
actually want to split these parts up because
we actually want it to look like our
crate over here. So you can see that
these parts here will be split up and then we've got a little chunky bit in here. So let's actually
fix that. So what I'm going to do is
we're gonna press oltshifting click and just
grab it going round like so. Do the same on this one, same on this one, like so. And then what we're going
to do is we're gonna press Y to split those up. Now we're going to come
round to this part here. So Alt shift click, Alt
shift click, I can. By the way, if Alt shift
click doesn't work, what you need to do is
just click on it again and move like kind
of round like this. So press Y, and then we're
going to come to this one. Alt shift click, Oltshift click, Oltshift click, and finally, Olt shift and click,
and why again. And now what happens is these actually should be split off. So if you come up to
our individual origins, press the S one, now
you'll see they're all split off and that
is exactly what we want. All right, so now if
we look at this crate, we've got some little
blocks here and then we've got these parts
going across like so. So what I want to do first
is I basically want to probably give these
some kind of depth. So to do that, what I'm going to do is I'm going to press now Selection and then split them
off from these parts here. And then what I'm going
to do now is I'm going to press Control all transforms, right click, set
origin to geometry. And now I'm going to
come to my ad modifier and let's bring in a solidify. Let's then bring the solidify
out a little bit like so. As you can see, now we've
actually got some depth. So there's some depth to this. Now these corners are
actually going to be hidden. And what you can also do is
just put even thickness on, and that's just going to
even them out a little bit. Now if you do want to pull these corners into each
other, you can do. But I don't think I'm going
to do that because honestly, the amount of things
that you can do to cut corners and really
try and cut corners, no one's going to
see these parts. So there's no point
actually trying to do that. It will take a little
bit of extra time. So if you want to build
fast barrels like this, then try and cut some corners. All right, so that's done. Now let's put in
these parts here. So what I'm first
of all going to do is I'm just gonna
turn this off. So if you come over
here, you've got a little button and it
looks like a monitor. And then you can turn that off, and then you can press Tab. And what we're gonna
do is we're just going to pick one of
these points here. So any one of them,
I know there's probably three sat there because these are
actually split up. But just pick one
of them to now. Then press Shift S
cursor is selected, and then I'm going to press Tab. I'm going to turn
this back on now. And what that enables me to do now is I'm going to
bring in a cube. So I'm going to
press shift a mesh. Bring in a cube. And the
cube is going to come. Of course, where my
actual cursor is, then what I'm going
to do is I'm going to make this cube a lot smaller. And I'm going to try and
pull this into place. Now we can see at the moment, maybe this cube isn't
in the best place. So what I'm going to
do is I'm going to pull it out like so, and then I'm going to
pull it back like so. And then finally what I'm going to do is I'm going to pull it down and make sure that it's actually
fitting into place. So now you can see that it's pretty much in
the right place. I'm just going to make it a
little bit bigger like so. And just make sure then that you're happy with where it is. All right, so now what
we want to do is we basically want to mirror this
over here and over here. So the way I'm going to
do that is I'm going to come to my actual cube like so. And what I'm gonna
do is I'm going to grab the actual planes. I'm going to press Tap old th, bring them back and
then I'm going to grab the top and the bottom plane. Then I'm going to press
shift S, cursor selected. And that then is going to put my cursor bang in the
center of the actual crate. Now I can come back to this
little cube and then what I can do is I can press
control all transforms. And then right click
and set origin not to geometry 23d cursor, meaning that now my origin of my cube is right
in the center. And this is important
if you're going to bring in the next modifier, which will be a mirror modifier. And now because
it's in the center, and you can see that it's
placed my cube both over here, and if I click on the Y,
it's placed it over there. And if I click on the Z, it's also placed it at the bottom. Making it really, really easy to make these actual cubes
go all the way around. All right, so let's
now apply that because I don't need to actually do anything
else with it. And then what I'm
going to do now is come back to these planes. I'm going to press Shift H to hide everything
else out the way. And then all we're
going to do now is we want to actually
divide these. Now the thing is, because
we split them up, we probably could have got away with making this a
little bit easier on ourselves by bringing
in a cube and then, you know, subdividing it
and then splitting it up. But hey, ho, we didn't do that. So what I'm going to do now
is going to press four. So control law, left
click, right click. And then let's come
to the next one. So control law, left
click, right click. I'm just spin it up three
times, I think it is. Yeah, three times. And
then I'm just going round adding four or
three. Is it three? No, it's four edge loops
to each one of these. And you can see it didn't
actually take that long to do. All right, so the next
thing now is we want to go in and we want to
grab each one of these. And what we're going
to do is we're going to mark a seam on each of these like we did
with the actual door. So once I've grabbed all these, like so I'm actually there, going to go right
click and mark a seam. Okay, So now we've got these. Now it's up to you
whether you want to make them wavy and things like that
like we did with the door, or you can just split them up. So the way that we
can split them up, I'll try this if I grab them
all and then come to select. And then what we're
going to do is click on checker D select. And it's only done it
on one, unfortunately. So we're gonna have to do
this manual, I'm afraid. So we're just going to have
to select every other one. I'm going to select
these because then it's only two like so. So two here and then two here. Then press the Y button, and then grab them all with A. And finally then we're going to press and shrink them down, just making sure
that they're all split up, which they are. All right, so on the
next lesson what we're going to do is we're going
to actually solidify these. We'll get actually
some materials on. And then finally,
if I press ol tag, we'll actually get
this little icon here as well, put on them. And then finally we can
move on to our barrel. Now don't forget,
after every lesson, make sure you save out your work and I'll
see you on the next. And everyone, thanks
a lot. Bye bye.
17. Crate Decoration Techniques: Welcome back everyone to blend
the beginner's boot camp. And this is where we left off. All right, so now let's come
in to these actual parts. And what we want
to do is we want to add two modifiers on. The first one is going
to be a solidify. So again, if I press control,
all transforms right, clicks the origin to geometry, add in a modifier and we're
going to bring in a solidify. And then what I'm
going to do is, before I do anything with that, I'm just going to make
sure even thickness is on and add in a, let's have a look, a
bevel and a bevel. Modify it and there we go. Now we've actually got the
beginnings of our crate. I'm going to turn
this up a little bit. So turn up the amount on
my bevel. Where is it? Let's evel up and
I'll turn it up. Yeah, sometimes this
actually happens. It generally means that we've
not pulled it out enough, so let's pull it out
enough, and there we go. And now what I can do
is I can turn this down instead of up like so. And get that nice bevel
that I'm looking for. Now you will notice that on these ones they're
actually right up to them. We probably need them in there. So what I'm going to
do is actually want to increase the size of
these a little, tiny bit. So I'm going to come in and I'm going to grab these
parts of wood. And I'm going to press
S and just bring them out very, very gently. And then I'm going
to grab my crate and bring that in very, very gently. And then I'm going to
bring these in as well, the little cubes on
top, very, very gently. In just to make sure
that they're all now nice and even up
to the actual side. Now there's another problem
that we're going to have in is in that we need to
actually bring all of these out. So what I'm going to
do is I'm going to come to these parts of the wood, I'm going to grab,
let's say this one. Where is the one that we need? So I'm just looking for the one which is the actual
should be all these. So I'm just going to turn these off And then what I'm
going to do is I'm going to grab all of these. What I'm going to do is
I'm going to pull them up. So if I pull up, say, can I grab this
one and this one? Yes, we'll grab this one. This one. This one and this one. We've turned that off. We've
grabbed all of the top ones. And then we want to
do is turn it on. And then I'm going
to press S and Z and pull them up a
little bit like so. Because at the moment, they're too far away from
this part here. Now we need to do the same
on each of these sides. So we're going to start again, turn it off, grab this one. This one, this one, and this one, and then this one. So it's just opposing sides. So then what we're
going to do is turn it on and now pull it out very, very slightly because it's
too close to that edge. So if I press and Y, I can pull them out very
slightly, holding the shift on. And finally then I can
actually turn it off, and then I can grab this one, all these sides, and do exactly
the same thing like so. And we don't care
if they're a little bit uneven, to be honest. There are ways to make them more even and I'll show you that in one of the other
builds, maybe the barrel, actually, and I'm just pulling
it out with the S and X, making sure I'm on medium
point. And now, there you go. It looks tons, tons better. And the other reason why I
want to do that is because now when I come in and I
grab this part on here, I'm going to bring in a bevel. So let's bring in a bevel like so let's turn our bevel
down a little bit. And then turn it
up one, maybe two, and now you can see that it comes to the edge
and then it goes in. And that's exactly what I
want because I don't want it where it comes to the edge and that's actually hidden in there. So I'm just looking
around now and I can see all my edges
are coming in. And then there's another
little piece of wood, finally. Then let's come to these parts and we'll do exactly the same. So let's bring in a bevel, let's pull our bevel
all the way down. And then up one, maybe two. I think I'll have
it on one actually on these corners.
Something like that. All right, So I'm pretty happy
with how this looks now. The last thing I want to do is I want to grab the all now. So all I'm going to do,
before I do anything else, I'm going to press
B to grab the mall. And then what I'm going to do is I'm going to press control A all transforms right click
to origin, to geometry. And then I'm going to
press the D button just to make sure that I
convert to mesh. So it's D. I set this
as D. If you missed it, it's just right click, change, short cut, and then put it as D. And then what I'm going to
do is I'm gonna press D now and then control J and
join it altogether. And this is what you
should end up with. Now the reason I did that
is because I want to show you one more little trick
that you can actually do. If you come over now and come down to where it says
Subdivision Surface, and let's put it onto Simple. And let's turn it up too. And then what we'll do is
we'll apply that with control. And now we can go in
and see that we've got all of these subdivisions on. Now, why did we do that? Well, the reason we did that is because now we can grab it all, come to where it says
mesh come to transform. And then what you're going
to do is you're going to go down to where
it says randomize. And you'll end up
with something like this and then just
start turning it down just a little bit like
so I'll put it on not 0.5 so not 0.5 like so. And now on the press tab, you'll see if a right
click shade autos move, that we've got a lot
of unevenness now. And that is basically
what we're looking for. Now, we do have a problem
in that if we come down to our geometry, so where it says normal here, we have got a
little bit of shine on here that we
don't really want. Now to get rid of
that, all we can do is we can actually turn down. This. So turn down your
auto smooth a little bit. Maybe a little bit more like so. And then just get it
the right balance. So we're just going to turn it up and have a look at that. Maybe something like that. Double tap the A,
and there we go. And now you can see
we've got a lot of unevenness with very, very little work, and
it's looking pretty nice. All right, so now
we want to do is we want to put on these parts, on the actual barrel,
so this part here. So the way I'm going to do
that is I'm going to move this barrel over just so I've got
something to actually copy. And then what I'm going to do
is I'm going to press shift A. I think I'll start
with an actual plane. I think that I'll make it
easy and y spin it round, pull it out like so. And I'm thinking that,
yeah, I'll add in, I think this has 12345, so I think five. Let's try that. So control 1, 2, 3, 4, 5, 1, 2, 3, 4, and 1, 2, 3. I think it's that left
click, right click. And then what I'll do
is I'll press control. So, and we should end up
with something like this. And then what I'm
going to do now is I'm going to bring these in. So if I spin this round and bring them in, I
should be able to do that. So how do I do that?
Well, first of all, I'm going to come
in, I'm going to grab each of these
points like so. And then what I'm going
to do is I'm going to put my proportional editing on. And let's put, it might be on. Let's try sharp press three
now I should be able to press the S button and
bring them in like so. As you can see
though, they're going the wrong way round because I need to spin this round first. So I'm going to spin this
round first, so x 45. Let's put it like
that. And now if I press the S borne,
can I bring these in? There we go. Let's bring
them in like so now they're not quite right as you can see because I've actually
got the wrong one on. So I'll do is I'll try the
root instead. And there we go. Now we can see that's
looking pretty nice. Okay, so something like
that's looking nice. Now let's get it to
be the right side. So if I press three on the number pad,
press the S button. Let's bring it in.
Something like that. Now we can see on
this one that it comes out and then it comes
in and then out again. So what we're going to
do is we'll actually, I think we'll just
extrude it back. That will make it easy for us. So if I come into it, in fact before I do anything, I'll press control A Al transforms right click
the origin geometry, have a and then I'm just going to extrude it
back with the born. So if I press extrude it back like so making it quite
chunky, something like that. Then what I'm going
to do is I'm going to bring in now a seam. And I'm just going to bring
in a seam all the way around. So Alt Shift and click just
because it's going to make it a little bit easier then
just to grab this part. Only this part here. So right click, mark them. In other words, now I
can go in with my face select and I can actually press L and it'll only
take it up to that. It's rather than grabbing
each one of these individual, you know, these
individual faces. All right, so let's press Tab. Let's save out our work. And then on the next
one we should get this. Well we certainly get this crate finished and then we'll
move on to the barrel. Alright everyone, so
I hope you've enjoyed it so far and I'll
see on the next one. Thanks a lot. Bye bye.
18. N gons & Barrel Base Modeling: Welcome back everyone to
Blender's Beginner's Boot Camp, and this is where we left off. All right, so now let's pull this back into place like so. And then what I'm
going to do now is I'm going to actually
make this insert. So I'm going to
basically come in, I've already got this selected. I'm going to press
the eye button. And when I press the eye button, it will actually
bring each one in. But if I press it again, then we can actually
bring it in. Now, you must be careful when you're dealing
with any edges. That you don't bring it in
too far or she will have a problem with these overlapping and we
don't really want that. So now I'm going to
do is I'm going to press and pull it back like so. And then you can see
that this is straight, but you might want to
give it a little bit of a bevel and the
way we do that is just press the S button
and then you can bring it in without
proportion editing on. So you can see you can
bring it in that way. I don't think I'm going
to do that on mine now. What I've got to
be careful of now is when I press the
eye button again, you can see if I go too far, I actually cross them over. So I've got to be careful that
I don't cross these over. So I'm going to bring
it in so far like so. And then I'm going to press
the button to pull it out. And then finally
now I'm going to press S and bring it in. So, all right, and you should be left with
something like that. Now let's right click
and shade auto, smooth. And we should end up with a
nice smooth edging on there. And then finally, we want
to bevel this off as well. So control all transforms. Now the thing is I want to put my transforms
right in the center. So you can see we've already got a cursor in the center
of this actual crate. Or you should have it in there. So what you want to do is
you want to grab it again. Right click and set
origin 23d cursor. Now let's be level these off. So if you come over to my
modifiers tab, I'd modify it. Bring in a bevel,
and there we go. You can see that's beveled
pretty nicely off as it is. I don't think I need to
mess around with these. Now, the problem is with
anything like this, with a lot of geometry, you will come across the problem where you simply can't
give it more bevels. And the reason for that is, is because it's
got a lot of like crossing over if
it bevels it more. In other words, now you
can get around this. If you come down to geometry, you can turn off
this clamp overlap. Basically, it's stopping
the geometry overlapping. Once you turn that
off though, ah, it's game on and it
will just overlap. But then you've got to
just be careful that you turn this very,
very slightly down. As you can see, now we're getting a lot more bend on this, but we're starting to
have some problems. So what I'm going to do
is going to put this on not point, not not three. And then it should bevel off a little bit more
without those issues. Now to also get rid
of this issues, what you might
want to do is just basically refill
this in with a face. In other words, if I come in and I delete this
out of the way. So if I press Delete and Faces, and then what I can do
is I can come in now, press Olt shift and click, and just press the F Born. And then it'll fill
it in like so. Now the issue here is
you've got engons. In other words,
what is an Eng on? I'll put down the bottom
right hand side or the bottom left hand
side, what an end on is, but it basically means
that you've got topology, which has more than four sides, more than a face, basically. You don't want that.
You don't want that because it causes
problems with lighting, it causes problems
with animation. You basically want to
stick as much as you can to quads and triangles. Now when you're doing animation, the more quads you
have, the better it is. It's just a much
smoother topology to move arms and
things like that. So basically, try and stick to either quads or triangles and try and have no end
goons in your scene. Now of course, a lot of the times when you
send it through to something like Unreal Engine
or even substance painter, it will actually get
triangulated anyway. So it doesn't really cause that many problems when
you send them through. But however, it does cause problems if
you're dealing with a pipeline and
you're sending this through to someone
else in that pipeline. So try and avoid it at all costs really now to actually fix this, what I want to do is I
just want to come in and I want to right click,
and I'm going to come down. First of all, make sure you're
on face Lk, right click. Come down and what you want
to do is triangulate faces. And then I find the
best way to do this is right click and come
down and try to quads. And then what I'll do
is I'll make a nice, nice even mesh for you like so. And you can see how it
looks really, really nice. All right, so now what
I want to do is I want to apply this
bevel with controle. And then I'm going
to add in another modifier which of course will be the mirror
modifier x and y. And is it going to actually
put it over there? No, it's not, so we're just
going to get away with X. However, what we can do is we can just duplicate this
and spin it around. So shift D enter, don't move it anywhere yet. And then R z 90, and they should fit
in absolutely fine. And now what we can do is we can actually come in and
grab the whole thing. So grab the whole thing. And then what we're going to
do is we're going to press the D button and then control
J, join it all together. And then right click
shade, auto smooth. And then just turn up
your smoothing again. Because the thing is it took
the smoothing from these, they'll just turn it
down a little bit. But you've got it nice and smooth as you
wanted it like, so. All right, so that's
the actual crate done. Let's actually move the
crate then, over here. And now we can start
on is the barrel. And the barrel is, you know, one of those which everybody tries to make when they
first start modeling. So here is my barrel. So what I'm going to do first of all is I'm going to press shift S cursor to world origin and then I'm going to bring in
now a cylinder. So shift, let's bring
in a cylinder like so. And you can see that
on this occasion the cylinders come in
like we had before. So I did say make it smaller. However, this is not what I
actually want at the moment. So what I'm going to do is I'm going to turn up the radius, I'm going to turn up
the depth like so. And then I think from there I can actually work with this. So now what I can do is I can
press S and bring it out. Now it's important when
you actually bring in the cylinder that you do account for how many
sides this has. In other words, you want it to be an even number because you want to be able to split your
barrel into even chunks. So very important to do that. So what I'm going to do is
I'm going to press three. I'm going to bring it
up a little bit and I want it to be round about
the same size here. So S said, let's squish it down maybe
something like that. I'm just going to pull it
into place just to get it round about the same size as my barrel that I've
already created. So something,
something like that. And what I'm going to do now is I'm going to pull
out these ends. So what I've looked at
is these ends on here. As you can see, the nearly
the same as this barrel. I just need to pull out
these ends on here. So what I'm going to do is I'm going to press the Tab button. I can't actually see
anything at the moment, but if I put this on, then
I can see straight through. And then what I'm
going to do is I'm going to press the controller. And then at one is
three bands on there, so three edge loops,
left click, right click. And then I'm going to grab
this center edge loop. So Olt shift and click. So we can see I've got that one grabbed all the way around. And then I'm going to use
my proportional editing now. Let's try it on this one. I don't think it is this one, so let's try pulling it out. So S, and actually, yes, that might actually do it. Yeah, that's going to
actually work very well. So you can see now
I've pulled it out and I've got that nice slope
for my actual barrel, which makes it
really, really easy. All right, so with that then, I've basically got the
scaling that I need. I don't need this other barrel only for reference to
actually having a look, I don't need to scale barrel anymore to it or
anything like that. So what I'm gonna do now
is I'm gonna turn off my actual x ray and
then I'm going to press Shift S and selection to Cursor. I'm going to then press three
and three. There we go. Pull it up to the
ground plane like so. All right, so now let's
get this barrel split off. So the first thing I tend to do is I come to the
top and the bottom, but I grab the top and the bottom and I basically
press P selection, split those off because I'm going to need those for later. Hide those out the way.
Then what I tend to do is I tend to now
build my bands up. So these bands on the barrel. This is what I'm saying,
when you're muddling, it's always a good idea to preempt everything that
you're going to do. So take an object and then C, break it down into the little parts that you need to create. And then the more you do it, the better you're actually
going to get with it. So if I come now and I
grab these parts here, so Alt shift click,
Alt shift click. So, and then what I'm going
to do is I'm going to press control B
and pull them out like so hereby creating the actual bands that are going to go across
here like this. That's looking pretty nice. Now what I'm going to do
is I'm going to press Shift D to duplicate them. I'm going to turn off my
proportional editing. And then what I'm going to
do is I'm going to pull them out slightly like so. Now I know that once
I pull these back in, they should fit in line with everything that
I've been doing. So that should be fine. Now I'm going to press P selection. Split them off tab, grab them again, hide
them out of the way. And now finally
we're actually onto these actual barrel
chunky parts. Now let's come in and see
how big we can get away. I think on this one,
if a press tab, we can see it's one
and two, every one. Which is good for us
because if we press three, now come to our
barrel press tab. We can now come in
and grab Alt shift, click one and two and
then miss one and just grab one every
other time like so. And then this will
form our actual planks for our wood, making
it very easy. Now of course, you could
have it on 262830. It could be something like that. All you'll end up doing is creating thinner
and thinner planks. Right click and mark
scene. And there we go. All right, so now let's come in and what we'll do is
we'll split these off now. So L, L, L, L, L, and L. Now, there is a problem when
you split these off, and you'll find that
it will actually pull them out slightly when
you come to solidify it. So, there is that to
take into account. But first of all, let's actually get on with
splitting them off. So I'm going to press Y
just to split them off, just to make sure
that they're all split off in the right
place, which they are. Right click to drop them back. And then what we'll do now
on the next one is we'll actually get these
planks for the barrel. You looking chunky
and things like that. Let's save out our work. And I'll see on the
next one everyone. Thanks a lo bye bye.
19. Barrel Mesh Imperfections Addition: Welcome back everyone. To
blend, to beginners boot camp. And this is where we left off. All right, so now what I
tend to do is I attend to right click and
shade, auto, smooth. And that then gives
me an idea of what these actual planks are
actually going to look like. Now I'm going to
do is I'm going to press Control all transforms, right click, set
origin to geometry. And let's bring in one of our favorite modifiers
which is the solidify. Now let's bring it
up a little bit. And sometimes it causes issues When you go
inwards though, I do recommend that
probably it's better to go outwards just a tad like so. Because I find that that's a
little bit easier actually. Plus, when I've come to
bring those metal parts, I can just bring them out then a little bit because
I've already done that. If I press Alt H, now you will see that these
are disappeared. But if I come in
and I grab those, so just try and grab those
like so press the S burn. Then I should be able to
bring them out like so. And now you can see once I've
added chunkiness to those, it's gonna make
it pretty easy to put them against these planks
that I've already created. Now, as I said, the one problem you're going to have
is when you do this, is you can see we've got
a big gap down here. And that's not really
something we, however, the best thing to do
before actually doing anything is actually to
start work on the bevel. So if I come in and add a
modifier, bring in a bevel. Turn the bevel, not the solidify the bevel all
the way down. Turn it on. One then maybe two. Yeah, I'm going to keep
it on one actually. I think it's going to be
a bit better like so. And now I want to do
is as you can see, I've got these gaps down here, and that's not something I want. What I'm going to
do is I'm going to hide the top and
bottom out the way. And then I'm going to
come into each of these. The problem we have is
at the moment though, is that we can't actually
grab them properly. Because if we come in with L, you can see that it
doesn't actually follow it going all
the way around because we've not actually
applied our solidify yet. So now it's probably a good
time to apply our solidify. But before we do that, what we want to do is we
want to actually mark a seam going over
the tops of them. So what I'm going
to do is I'm going to come down to
where it's bevel, I'm going to turn
it off a minute. And then what I'm going
to do is I'm going to come in old shift click and I'm going to try and grab
them going all the way over. Because this then will not
only make it easier for probably bringing in our
textures and things like that, but it'll also make it easier. But when we come to actually bring these ends of these barrels
in a little bit, if I come in and
grab all of these like like like so
so you can grab it. As I said, if you can't
actually press Alt Shift click, I think it's a little
bug within Blender. Just move your rotation around a little bit of your camera and then you should
be able to do that. So let's right click
and mark a seam. And then what I want to
do is I want to come in now and apply that
actual solidify. So I'm going to hover over
my Solidify press control, lay and apply that. And now I should
end up where I can actually grab them on the back, like I said because we've
actually marked a seam. So now what I can do is
I can come in with face lit and grab just
the back like so. And what I'm going to do
then is pull these together. So if I grab all of
these going around here, let's put it on
individual origins. Because we want to pull
them individually. Let's put this on normal, because we want to pull them
based on a certain angle. And then if you press
and let's try X or Z. Will it be Z? Let's go and X. Let's try S and X. There we go. So it's S and X. Let's
pull them together now. And you can see that they all get pulled slightly together. Now, if I put my bevel back on, we can see that they are
looking much, much nicer. Now we just need to do
the same for the inside. So all I'm going to do is again, I'm going to come in with L, L like so and pull them
in so it doesn't look as though they're going
to leak a lot of whatever liquid or alcohol
is in these things. And X pull them in a little
bit like so. And there we go. All right, so now you can
see you've got a really, really nice barrel going on. All right, so let's
press in fact. No, we won't actually
bevel it yet. Because what we want
to do now is we want to make it a
little bit uneven. Now, when you're
doing barrels a ten to on the bottom section,
leave it quite flat. Because when it's, you know, being moved around and stood up, it's always banging
the bottom part, so you wouldn't have it
very uneven on the bottom. It tends to be maybe
a slight bit uneven, but most of the time it tends
to be pretty flat on there. So what I'm going to
do is I'm just going to grab one of these
edges like so. And then I'm just going
to come up to where my proportional editing
is come to random. And then what I want
to do is I just want to pull it down very, very slightly like so. And the same on this one, just to make it a
little bit uneven. And one of the things
about three D modeling is the more attention to
detail that you give, the better your models
are going to turn out. So if I pull this
down like so if you're looking for hyper
realism and things, you really want to focus on the little tiny details
though, for instance, if it's, you know, something like a
hospital corridor, it could be some little Bumps in the actual floor. You know, where the trolley
has gone over and made a little kind of gouge in the floor or
something like that. And then someone's come and, you know, re cemented over it. If you look at a hospital floor, they're not perfectly flat. They have little bumps
and grooves in them. And this is something
that will make your image when you render
it look that more realistic. All right, so now
let's come in and what we'll do with these is
we're going to pull these. You can see we're
growing normal. So it's pulling in the
direction that we want. And now we can pull these up a lot more than what we
did with the other one. So you can see now
if I'm pulling these up like so, like so. So let's grab this one and just work your
way around like so. And now let's have
a look at that. And now you can see that's
looking pretty nice. Now, one problem we have
got is that you can see that because
we've done that, it's actually made them a
little bit uneven in a way, and we don't
particularly want that. So what I'm going to do is
I'm going to come and grab, I'm thinking, can
I grab the tops? It's taking it all
the way around there. So I think what I'll do is I'll just give it a try on these two. I'm just going to press S
and's Ed and see if I can just even those up a little
bit like so. Yeah. And I think that's looking
much, much better like that. So I'm just going to go in
and grab all the tops of these because I want them to be a little bit more
even than what they are. So I'm going to
press S and's Ed, even them up. Yours little bit. That's looking much,
much nicer now. All right. I'm happy with that. Now what we want to do is
we want to actually apply this bevel because we don't actually need to do anything
else with this bowl. We're pretty happy
with it. So if I press control to apply it, and then what I can do is
I can press Alt and bring back these actual balls that
are going to form on here. All right, so now
what I want to do is I want to solidify these. I want to right click
and shade auto smooth. I want to press control or transforms right clicks
at origin to geometry. Added, modify it and it's
going to be a solidify. Let's put the solidify up just to make sure it's
actually touching that bottle. I'm holding the shift button
as they come in like so. And that's looking
pretty nice already. And then what we'll do is
we'll apply that already. So control a add in
a modifier and it's going to be a Bevel
modifier. And there we go. It's looking pretty nice. We
just need to turn it down. Now turn it up maybe one, maybe two, and I think that is looking
pretty much perfect. All right, so let's
apply that with control. And now let's think about
the top and the bottom. Now, I tend to do
only one of these. So what I'll do is I'll press, I'll press L. I'll
pull that into place. I'm going to turn off
my randomness on here, so I'll pull it
into place like so. And now what I want
to do is I want to split this away from
everything else. So I don't actually
want the bottom because I'm going to use the top
as the bottom as well. So let's come into
the bottom first, Delete bass, and then
let's come into the top. Now if we go over the top, we can see if we come in
and put it onto vertelect. If we put this on this x ray on, we can now see that if we make, let's say a chunk from here
to here, so let's try that. If I grab one vertex
and then the other, and then press J, and then I do the same
on the other side, so I'll grab this one and this
one J, and then this one, and this one J, and then this one,
and this one J. And you can see that we've
actually kept pretty much to the right side of
this actual barrel. So that's looking
pretty good already. Let's turn off our x ray off. And then what we'll do now, he will come in and split these up. So I'm just going
to grab these two. I'm going to press Y.
I'm going to press A. And then what I'm going to
do is I'm going to press, so bring them up
where I want them. And then finally
what I'm going to do now is I'm going to
actually bevel them off. So control A all
transforms right click, set origin to geometry,
adding modifier, Bring in a bevel, bring
down my bevel a little bit and then turn it up maybe
to something like that. And now what you
might want to do is just spin it around so our head, turn it round like so
maybe maybe pull it down a little bit and then press the born just to
pull it out a little bit. Double tap the and just
have a look at that. And that is looking pretty nice. I'm very happy with that. Now,
one thing that you should also know is you don't always need the
underneath of these. So in other words, if I come in, I can get rid of the underneath. So if I grab this,
I press Shift H, Hide everything else out of the way I can come
underneath now. And what I can do
is I can actually grab each one of these. Press Delete and faces and then press tab old tag,
bring back my barrel. And you would never see that. There's nothing under
there or in there. And the reason we do that
is to save on space. It's not just about
polygons because the polygon space
probably ain't that much, it's more about UV space. So in other words, when
you're using textures, normally you'll have
a certain amount of space for the UV map, and by deleting those backsides, it means that you're going to
cut down on that UV space, meaning that you've
actually got more space for more detail on the
rest of your model, you'll only get
so much UV space. Generally, it'll be 1024, 2048. And that's how many pixels you've actually
got to work with. So you can imagine if you know, a quarter of the
pixels are taken up by the backside of
this top of the barrel, then then they're never
going to be seen. It's simply not worth it. The same goes for the inside
of these planks as well. So you can go as far
as to delete any of the faces on the inside which no one's going
to see as well. All right, so now what I tend to do is I tend to grab this. I'll press Shift D
to bring it down. I'm going to actually
put this back on Global. And then what I'm
going to do is I'm going to rotate this round so R Y 180, spin it round, come to the bottom,
and then all I'm going to do is just
pull it up a little bit like so double tap the A and there is the bottom
and the top Dom. All right, So now what I can
do is I can actually come in and I can press
B to grab it all. And then what I can do is
just press D and that then we'll apply all of those
modifiers onto that. I can press control J. Now in fact, I don't actually want to
press control J yet, because I want to
actually put some of these little things here. I'm just going to actually
have a look and see. Yeah, okay, they're remain
with just a UV sphere. So we'll do that on
the next lesson. Anyway, as far as it
goes, I'm very happy. I think this barrel actually looks better than
that one as well. All right, let's go to
file, Let's save it out. And I'll see on the
next one, everyone. Thanks a lot. Bye bye.
20. Barrel & Crate Texturing: Welcome back everyone to
Blender beginner's boot camp. And this is where
we're left the art. Let's grab now these
three parts here. Let's press shift A, and what we're going to
bring in is a mesh. And we're gonna bring
in a UV sphere. And you can see UV spheres come right in the center,
which is absolutely fine. I'm gonna pull it
up a little bit. And then the thing is,
before I did that, what I should have
done is I should have actually brought
these down a little bit. So you can see I've got way, way too many polygons in here and I kind of
don't need that many, so I'm going to leap
that other way. And what I'm gonna do is instead of bringing it right
in the center, I'm just going to position my
cursor over here somewhere. And then we're going
to press shift a mesh. Bring in a UV sphere. And now I can actually go
into it and turn these down. So what I'm going to do
is I'm going to put this, I think on something like 16. And then what I'm going to do is I'm going to put
this second one, which is the rings on 12. So, all right, so you should end up with
something like that. Now what you want to do is you want to squish it together. So, and squish it
together like so. And then what we're going to
do is we're going to delete, now probably this one from here. So if I press Tab, come down
to face select Lt shifting click delete faces L to grab the rest of
it, delete vertices. And we should end up with
something like that. Now what we're going
to do is just take a quick look at this. You can see this is what
the actual rings look like. I don't think I'm
going to do anything too fancy with these at all. What I'm going to do is I'm
going to press Alt Shift and click, and then Enter. And now I'm going to press
Alt S. Because if I press S, it's just going to
bring it out like that. I want to press Alt S and bring
it out more actual level. And I'm just wondering
actually, is that level? I'm just going to
look through it and you can see that
it's not quite level. So what I'm going
to do is I'm just going to pull it down just to make it a little bit more level so I can see that line there. And I'm going to turn that off. And now it's looking a little bit more like
something that I like. All right, So I'm
happy with that now if I right click and shade auto, smooth, you should end up
with something like this. And what I'm going to
do is I'm just going to then bevel this top part. Now I'm not going
to use a modifier again because I don't want
to bevel the whole thing. Other one is a tiny
bevel on here, so control bevel it off hold
in the shift button like so. And you should end up
with something like this. Now let's say press control eight or transforms right click, set origin to geometry. And then what I'm going to do
now is I'm going to rotate it round, so Y 90. And then what I'm
going to do is I'm going to put it in place now. So if I basically want it
in the center first of all. So what I should really do
is I should grab my rings. I should press shift curse, selected, grab, then
my little bolt. I think we would be called
something like that. Shift S, and then
selection cursor. Now I can actually pull it out. I can press the S
button to pull it in. I can press three. I can make it a little bit smaller so
it's going to fit on there. And then what I can do is I
can actually pull it back into the place that I
actually want it, so. Alright. I'm happy
with that one. Now, before we
actually carry on, let's put them up
here and up here. So what I'm going
to do is shift D, bring it up, put it into place, and of course I'm going to
have to rotate that one. So I'm going to press R and Y. Just rotate it a little
bit and then pull it out, just make sure that
it's sat on there. Okay. And then all I'm going to do is the same
with the bottom one. So I'm going to press
shift D, bring it down, and then let's drop it into
place and rotate it round. Let's just make sure
it's into place. Y, rotate round. I think that's
looking pretty good. I think it just needs
pulling down a little bit. Yeah, and I'm happy with that. All right, so now let's join all of these together. So control J. Now let's go back to our rings. And what I want to
do is I want to put the orientation of these right in the center where
these rings are. So if I grab these,
press control all transforms right clicks
at origin three cursor. And now what I can do is it
can actually grab these, duplicate them, and
rotate them round. If I press seven to
go over the top, what I want to do is press
Shift and then Art and Z. And I want to basically put
them in the center of there. So if I rotate them to there, you can see that I've
actually got it nearly right, so it's 58.5 now, 360/66 So we know that you can have
six times around 123456 going all the way around. So let's put this on 60. And I recommend using a calculator if you're
not actually sure. Now what you can do is you can actually press
shift and then zed 60 and then shift D z 60. Shift R z 60, shift D R z 60. Now one thing to note before
you actually would do this, normally if you're
going to put, you know, any kind of UV maps or
anything like that, I recommend UV unwrapping
it first, of course, because then you're
going to actually have that UV done across all of these bolts rather
than having to do each one individually. Also, you might want to have the same UV space
for every bolt. And that's another thing that you need to take into account. Now the thing is that if you
want more bolts as well, you're going to have to actually
divide that 60 into two, which means it would
be 30 degrees each. So just use a calculator
again if you're not sure. Now these are
looking pretty good. So I might as well join
all of this together. I think I'll join all of
these together first. Because what I want to do is I don't want them the
same material though. I'm going to join all
of these together. So control J, and now I should
have is this the barrel. So the top and the bottom and
this one can all be joined, so control J, because they
are all going to be wood. So right click,
shade, auto smooth. And then we've got the rings. And then finally
we've got these parts the same it goes for this part. I'm just going to move these two out of the way 'cause they, again a little bit in the way. Let's have a look at this now. So everything on here is joined, but this one's quite
easy to actually, you know, add materials
and things like that. Okay, so now we're on to
just adding some material, so let's put it onto material. And then we can see this is
what it should look like. So what I'm going to do is I'm going to grab all of these, First of all, and then I'm
going to grab this one last. And then what I'm going to
do is I'm going to press control L and link materials. And it should link materials for every single one of these
parts which it has. So now let's come
to this one first. And what I'm going to do is I've already got everything
grabbed round here, except these parts, which
is really, really handy. Actually, what I'm
going to do then is press U T UV Project. Click Okay. Let
it think about it because it's actually
quite a lot of parts now. And we can see we
end up like this, where every single board basically is going
the wrong way. So let's go to our UV editing. Let's come back to
it and press Tab, and we'll see that they're
all going this way. So what I'm going to do is I'm going to grab all of these. So I'm going to hover over here, press the button, I'm going
to rotate them around. And you can see that I also grab these parts
as well over here, because I've still got this on. So if I press controls, turn this off now you'll see that we only grab
these parts here. So if I press A now R 90, that's what they're
going to look like. Let's bring them
out a little bit. So what I'm going to do
is I'm going to press S, pull them out like so
making them much bigger. And now you can see that's
looking pretty nice. All right, so now let's come into each of these and
we'll do the same thing. Make sure you grab
them on edge select, not on face select like so. And then what you're going
to do is you're going to press some UV project. And now what you're going to
do is you're going to add in the barrel metal. Which metal do we want? You can see on this one we've actually got two
different tabs of metal. Might as well do that. So
let's bring in the barrel. Um, in fact we'll bring
in the stairs metal. So click a sign, end up
with something like this. And now I want to do is
just go to the inside. So I'm going to press L, L, L and L on there. And then I want it actually
coming down to here. So all I'm going to
press is control plus control plus again. And then where it's
done is it's brought it down all the way down there. I can click barrel metal. Click sign. Here we go. We've got two different
types of metal on there now,
really, really nice. All right, now onto our barrels. So let's do this part first. So we're going to grab
everything on here again. Uv, smart, UV
project. Click, okay. Spin them round. So over here, press R 90 to spin them around. Press the S button
to bring them out. A little bit like so.
And there is those. They're looking really
cool as you can see. And then what I'm going to
do now is come to my rings, I'm going to press tab
to grab everything. Barrel metal, click sign. Let's unwrap these as well. So Smart UV project. Okay. So, and then finally
we'll do these parts. So if I come to these parts now, press tab U, Smart UV
project, click Okay. And then I'm going to
assign the stair metal like so double tap the
eight and there you go. All right, let's go
back to modeling now and this is what
you should end up with. Let's put on our lighting. Now you can see
beautiful barrels. And that is the easiest way I found to make
barrels and crates. Now of course, you
can go a lot more sophisticated, but
as you can see, we've got a pretty
decent looking barrel in a very small amount of work. And I tend to use this pretty much all the time when I'm
actually building out. All right, so now what
we'll do is we'll actually close that up. Close that down. And then what I'll do
is I need to put these, because they're all in here,
into my barrel section. So it's going to be
create some barrels. Let's drop those in there. And let's now click
on our bridge. So I'm just going
to click that on. I'm going to click
on my lighting. And there we go. This is what
we're going to build next. Now it seems because
of the scale of it, that it's a completely
different level to what we built before. But don't worry, because a
lot of the things that we've already used are actually
used to actually build this. We've also as well got some
references to it with on the next one that will make
this much, much easier. All right everyone. So I
hope you enjoyed that and I'll see you on the next
one. Thanks a lot. Bye bye.
21. 2D Reference Bridge Modeling: Welcome back everyone to
Blender beginner's boot camp. And this is where we left off. Not with a file in front of the screen but
with the bridge. But I'm bringing this
file in front of the screen just to
show you that in your download pack
you should have something which is
a bridge reference. And if you can, when you're
building anything to do with like bridges or gears
or anything like that, try and grab yourself
some schematics. The same thing goes for cars. If you want to build
something, you know, an accurate Mclaren or
something like that, make sure that you've
got a decent schematic of the front and side
now on this bridge, because it's quite simple. We've only gone with
a side view of this and a front view of
this because we can basically work out what size of width we're actually
going to need. All right, so let's put that down and now what
I'll do is I'll show you how to actually bring
in our actual reference. So first of all though,
I'm going to actually hide this out the way I'm also, again, going to
hide my lighting. I'm going to put it
onto object mode, and now I just should
have a bridge like this. Now what I'm going to do
is I'm first of all going to bring in an actual add on. It's a built in add
on within blender and it's basically images to planes. So if I bring type in image, you can see import export image as planes tick that
on and there we go. Now what has that actually done? Well, if I press three now
you must be in front view. So if you're in any kind
of side view like this, it will make the
image come in skewed. And that's not what
you want. So if you press three and
then press shift A and you'll come down and
you'll see one which says image images, planes. This is the one you
want to bring in. Now what you're going
to do is you're going to go to your references. And if you can't see which
one of these there is, just click this on, and now you'll be able to
see them as actual images. And you can also
make it show that the size of them
is large as well, just in case you're
having a bit of trouble seeing which ones which. If I click this one now
click images planes. And now you can see it
brings it in if I press R and x, sorry, Y 90. And let's have a look if we
put it onto material mode. And there we go,
Here is our image. All right, so now let's
press arc x and 90. Let's spin it the
right way round. And the first thing I want
to do is scale it up to be round about the same
scale as my actual bridge. So what I'm going
to do is some jaws, I'm going to pull it in front, so I want to press three. And then what I'm going
to do is now scale it up. So scale up all the way. I'm going to pull it up to the top where it
should be sat like so. And I'm actually going
to pull it back a little bit just to make sure that I've got it in the right scale. And now you can see that if I press three, it's
a little bit out. So I'm just going
to pull it over. And we can see that
I nearly actually pulled that nearly perfectly, just holding the
shift on down near about the right size as
what bridge I already had. All right, so now you
can see that we've pretty much got our
scale of our bridge. We've got this part here
that's going to be really handy when we come to
actually put that part on. Okay, so let's make a
start on this part here. Now, bearing in mind this
is probably not centered, It's probably not
centered enough. So I'm just going to pull it
a little bit to the left. It doesn't matter if
it's not centered, don't worry too much about it. All right, so now
let's start actually creating these parts here. So why I'm going to
do is first of all, I will press three again. I'm going to make sure that
my cursor is in the center. And then what I'm going to
do is I'm just going to pull this down so that when
I bring in these parts, they're going to be nearer to the part that I'm
actually working on. Then what I'm going to do
is I'm going to press shift A. I'm going to bring in a cube. I'm going to make
my cube smaller. And then what I'm
going to do now is I'm going to pull it over
to the left hand side. Now the best thing
to do with this when you pull it over is to actually pull it
over with in edit mode. And the reason you're
going to do that is if I bring in a mirror, it's going to make
sure that that orientation stays in the center. So in other words, if I press
Tab now and I move it over, you can see that the orientation of the cube
has stayed in the center. Whereas if I move
it over like this, the orientation moves with it. So it's just a little
quick workaround. If you're going to use a mirror, which we are, move it
over to that side, press the add modifier, bring in a mirror,
put it on the Y. X is turn off the
X. And there we go. Now we can actually
start working on our bridge and
everything's already in. Let's press, let's pull
it out a little bit. So something like that. Then let's come round
to the top of it. So we're going to
come into face Slate, press one, sorry, three. And then what we're going
to do now is pull it up. So we're going to pull it
all the way up through here. So then what we're
going to do now is I'm going to press
and bring it in. So I'm going to press, I
bring it in three again. And then we're going to
extrude it up, pull it up. And you can see I got very lucky there in the fact that it went on pretty much perfectly
in the right sort of size. Now, if you don't do that, don't worry. Just start it again. Oh, I'll show you another
way how to fix that. So I'm going to
bring this one in, hopefully on the next one. It's not going to be
perfectly accurate. So if I press it, pretty much is, but I'll show
you how to fix that anyway. So if you come in with
face let and you press old shift click going all the way round, just make sure
you've grabbed them. Are going all the way around. And then what you're
going to do is just press old
tests and you'll be able to bring them in and
make them the right scale. All right, so let's now
bring in the next one. So we're going to
come to the top, press the eye, but
bring it in three. And let's bring it up two, top of here like so. All right, I think I'm pretty
happy with how that looks. Now let's take a look at our actual bridge
we've already built. So we can see that though, these bits here, if I press dot and then I should
be able to zoom in. Let's go to these. These are just cubes
as you can see. And then basically
we've got these bits, and inside those bits you can see we've just got
these parts in here. So basically what
we want to create is we want to create
a part like this. So we want it going
round like this. These bits coming out a little bit and then these little
bits going in like, so let's try and do that. Now what I'm going to do is I'm going to bring in another cube. I'm going to make sure though
that I'm in object mode. So just make sure that
you're in object mode, press Shift, bring in a cube. Let's now bring it
up, make it smaller. And then what I'm going to do
is I'm going to bring it up to something,
something like that. Maybe I'm going to press
S and it and pull it out. And then the one thing I
want to make sure is that it's in side here. So before I do anything, I've got to decide do I
want these actually square? You can see on these,
they're actually square. Do I actually want these square? I think on this actually I do. So once I've decided
I want these square, and I don't want
to, you know, pull them out on the x axis. I don't want to pull
them out like this. I want them square, then I
can actually fit this in. So I'm just going to
press and X and fit this into place where it's going to go,
something like that. Now what I want to do is I
want to come in back to it. I'm going to click
this on object mode, because I can actually see
that on it. No, I can. I think actually
I might bring in, let's just have a look shift. I might just bring in
a reference instead. I think that's going to be a bit better than
this images plane. It's okay with images plane, but you've got to constantly
work in material mode. And I don't really want
that. So what I'm going to do is I'm going to bring
in another reference. So I'm going to press Shift A, bring in a image reference. And I'm going to go to my
references, pick my bridge. And now if I put
this on object mode, I should have this
exactly as I want it. So I'm going to press S, bring it up, bring
it into place. And I think actually this
is going to be much, much better to
actually wit with. I'm just going to bring it
out a little bit like so. And then I'm going
to move my reference just over a little bit. All right? I think actually
I'm happy with this now. The one thing I can see is
that it's the scale of it. So we might as well bring
this back to scale. So I'm just going to press S on it and bring it back down. Something like that.
And now I can see the scales fitting
much, much nicer. Now, do I need to bring
it down a little bit? Yes, I do. And I think that's
fitting it even better. Alright, that will do so now what I want to do
is I want to come to this part and I can see that it goes up here and
then down here. So what I'm going to
do is I'm going to bring in two edge loops. So control two, left click, right click, and then
let's pull them out. And y, let's pull them out. If they don't pull
out, just make sure that you put
this on medium point. And then and y pull them out like so I'm just going
to pull them out to here. And then what I'm going to
do is I'm going to press control B and bevel it. And what that allowed me to do then is squish this bit bit in. So I can now come in
out shift and click, and then press S and Z. And I should be able to bring this bit in a
little bit like so. And you can see on this bridge that we've already built,
this is how it is. It's been brought in a
little bit as you can see. And then we've got all of
these little kind of grooves. This little bit here is
actually coming out as well, but let's actually do that now. So what I'm going
to do is I'm going to come to these parts now. So ol shift click
on both of these. And then what I'm
going to do is we're going to press E and then alterns and bring
them out like so. Now you can see that they
didn't come out properly. You can see that this has come out a lot further than these. I'm going to press
control z twice to make sure I haven't
got that extrusion. And then what I'm going
to do is press control A all transforms right click, set origin to geometry. And then I'm going
to try that again. So I'm going to
press Enter AlternS, and now bring them out. And now you can see
they're looking much, much better like. So now the next thing I want to do is I want
to actually bend this. I want to actually have a bit better bend
than what I've got. So what I'm going
to do is I'm gonna press control left
click, right click. Control left click, right click. And then what I'm going to
do is grab both of these, Press Son's ad and just give it a little bit more of a
round of bend on it. Now what I want to do
is I need to think about creating these bits
that go in the inside. We'll do these on
the next lesson. They're quite easy
to do those parts. And let's say that he'll work
and I'll see on the next. And everyone. Alright,
thanks a lot. Bye bye.
22. Bridge Detailing Techniques: Welcome back everyone to
Blend a beginner's boot camp, and this is where
we left the art. All right, so what
I'm going to do now is I'm going to press Tab. I'm going to bring in another
couple of edge loops. So control two, left
click, right click. And then what I want to
do is pull these out. So if I press Sen's Ed, I should be able to then
pull them all to there. And what I want to do
is I want to leave a big enough gap in between each of these to make
those little indentations. So I'm going to do
is press control and then bring in
some edge loops. Maybe let's have
look right click, maybe eight.
Something like that. And then what I can do it now is I can grab each of these. So click the first one, click the last one, and then go around the back and do
the same thing on there. If you've got a problem with Ing because of this other
reference in there, just grab it, press Delete. And now we should be able
to go around the back. And I'm going to
grab this and this. Now we should have
both of them selected. And now what we should be
able to do is press I twice, and then just bring
them in like, so now I'm going to
do is I'm going to press E and then and X. And then I should be able to
pull them back like that. And there we go. That is
the easiest way to do this. Now what we can do is we
can actually pull this up and put it into the place of the other parts
of the bridge. If I press three, I'm going
to press Shift D. And then what I'm going to do is I'm
going to bring it up like so. And then I'm going to
bring the next one up. And then bearing in mind that we are going to have to make
these a little bit thinner, also not going to fit properly. And then shift D, bring it up. All right, so now it's just a question of fitting them in. So all I'm going to do is I'm
going to grab my reference. I'm going to press H to hide it, and now I'm going to fit these in like you see
with the first one. I'm going to grab
this in object mode. I'm going to press and
X and pull it back. Then the next one,
and X pull it back. Then the final one and
X pull it back like so. Now I want to do is
I need to pull these out a little bit as
well as you can see. And y, let's pull
it out into place. Something like this, and let's make it even thinner and X. And then let's do the next one. So what I'm trying to do is
you can see the gap here on this is like this
kind of length. So you can see here,
it's a lot less. So if I press and Y, I can keep pulling and keep pulling to get it
about the right side. Same again with this
one. Let's pull it out and then this one is okay. Let's look in. This
one looks okay. This one needs pulling
out a little bit like so. All right, and now
let's just make sure we're happy with each of
these out farther in. And I think I am. So I think, actually I'm very happy
with that so far. If I press Al Tage,
bring everything back. Now what I need to do is
you just need to make the top parts on
these so you can see the top parts on this bridge look
something like this. So I'm thinking
rather than do that, maybe it's time to
spin this around, put this into place, and then what we can do
from there is we can probably start making
these other parts. Or we can start
making this kind of, you know, the wire supports
and things like that. Not wires, the cables, but I think actually
we'll do that next. So I'm going to first of all, come in and grab all of this, so I'm going to hide my
reference out just once more. And then what' going to do is I'm going to grab all of this. It's got a mirror
run at the moment. So I might as well apply my mirror 'cause I'm
happy without that look. So I'm just going
to press control. And then what I'm going
to do is I'm going to grab all of this like so, and I'm going to press control
J. Join it altogether. Then what I'm going to
do is I'm going to press Art and turn it around. I'm going to press seven
to go over the top. And then now is it in the center? I think
it's in the center. So I'm just going to pull it out to where I want it to be, is the bridge in the center. Let's hide this out the way. Let's look at our bridge. So the center of the bridge actually looks like it's
banging in the center. Which is really great,
because it gives us a cheat to
actually work again. So if I pull this down
to here somewhere, something like that, and I think we can actually
pull this down now. So if I pull this into place. Sure. Nearly line up. We don't want it to
be exact anyway. It doesn't matter if
it isn't. All right. So now what I want to
do is I want to put the orientation of this
in the center of here. So if I press control
all transforms. Right click the origin
three de cursor. And now what we can do is
we can add in a mirror. So let's bring in a mirror. Let's put it over there. Take
off the X. And there we go. So now I have hide my
bridge out the way we should end up with
something like this. Now I want to do is bring
back our reference. We'll hide our bridge, so I'm going to grab
our bridge again. This one here. Hide it out of the way. Here
is the reference. Let's hide this
out of the way as well. Let's press three. Now what we can see now is we need to pull
this out a little bit because you can see that this reference isn't
going to fit properly. Because it probably probably needs pulling out just a tad. So I'm just going to press
the S bone holding shift just to get it right in
the middle like that. And I think that is
looking pretty nice. Now what I need to
do is I need to bring the reference up. So let's pull it up
where it's going to go. Let's press Lth. Bring
back our bridge. And now we can see that the
reference is pretty much in line with these parts here. I'm just trying to
make sure before I do anything that I'm happy with how this reference is actually going to look. So if I press three. Yeah, I think that's going
to be perfectly aligned. Pretty much with this. All
right, so I'm happy with that. Let's now grab our bridge. Let's hide it out the way. Let's hide this big
bridge out of the way. And now we can actually
work on this part here. All right, so the way we're going to bring our reference in, I'm going to hide this bridge, is we're going to actually
bring in a plane. So shift eight, let's
bring in a plane like so. Spin the plane round, so R Y 90. Let's press three again. We will go into tab
mode, edit mode, basically because
we actually want to put this over the
other side as well. And what I'm going to do is now I should have brought
my reference back in. I think my reference is
this one here. Yes, it is. And what I'm going to do now is I'm going
to first of all, pull this out the
roundabout there. Pull it up just so it's
down on there, like so. And then what I'm
going to do now is I'm going to grab this. I'm going to pull it near
enough to the center. The center one as you can
see is roundabout there. And then what I'm going
to do now is pull the top part up like so. All right. Now let's press this button here so we
can actually see through it. And let's line it up
a little bit more. Line it up a little
bit more with this side now I want to do is I want to
bring in some edge loops. So I want to press control, bring in loads of
edge loops though. I'm looking to line
this up again. They don't have to
line up perfectly. We are making our
own edge loops here. So something like that.
You can see actually they line up near enough per,
but they don't have to. So left click, right click like. So now I'm going to do is
I'm going to actually use my knife tool and I'm
actually going to cut along all the
way up to here. And I think we're actually adding another edge
loop here as well. Because we know that this
part here, as you can see, is where the actual, you know, these supports, these huge columns are
actually going to be. So if I come in and I press control bringing another
edge loop there, then that's those done now. And then over the
other side as well, when we mirror it, they
should also be done. All right, so now let's
actually cut this way. So what I'm going to
do is I'm going to come in with my knife tool. So I'm going to press, I'm going to come down to this point here. And then all I'm
going to do is I'm going to bring my knife up. Now I want to actually
make this kind of rounded. So the way I'm going to do it, I'm just going to press
escape just to take that off. I'm actually going to
just come down to here. And what I want to
do is I want to kind of make sure that I have
a nice slope on there. So you can see that I'm sloping as I'm clicking
on the second one. So you can see I'm sloping. I'm going to have a nice slope. I'm going to press, shift
the middle mouse just to move a nice slope like so. And then up to this one
here. Cross to this one. And then again, a
nice slope down. And then just back now to the
endpoint on the other side. We've just got to
get to this one. I recommend that this one should actually be relatively flat. Actually, if I press the button, it should make it
flat. Perfectly flat. Present, there we go. All right, so now
we've done that. What we need to do
now is we need to get rid of these top parts. But while we've got
this actually selected, we might as well press
right click mark Sem. There we go. Now I should be able to also
mark a same on here. So right click mark Sm. And now I should be able to come in and grab just these faces. So L and L. And then
press Delete and Faces, and you should end up
with something like this. Now let's come in and
turn off our x ray. And then what we want to do
is now we want to actually, on the next lesson,
come in and turn this into these little girders
that you see here or cables. And I'm going to show you how to do that really nice technique, you're going to
actually learn to actually do that,
which makes it really, really easy to create things
like this or for things like for lamps or any kind of wires that you've
got round things, so All right everyone. So I hope you enjoyed that.
I'm going to save out my work and I'll see you on the next
one. Thanks a lot. Bye bye.
23. Bridge Support Modeling: Welcome back everyone. To
blend the beginners boot camp. And this is where
we left the art. All right, so what we
want to do now is, first of all, I think we should move this
out a little bit. So let's get it into
a nice position like so basically you want to
gave it so it's halfway. Now if you can't actually
move it down there, just press and X and then you can move it with the shift born and get it
into a nice place. All right, the next
thing we're going to do then is I can see at the moment, if I press three, that these
are kind of not lined up. So we can see these
are not lined up properly and we really
want to line them up. So all I'm going to do is
just grab both of these. And I think, yeah, I think I'm just going to move them over slightly like so. And then I'm going to
pull them together. So I'm just going to press
S and Y, I think it is. And just bring them
together like so. And then what I'm going
to do now is I'm going to bring in another modifier. So I'm going to bring
in, let's have a look. In fact, before I do
that, I'm just making sure that this is
nice and smooth. I'm just going to come
in all shift and click. I'm going to press
Control all Transforms. And then I'm going to come
and add in a wire frame. So wire frame modifier. So, and then what I'm
going to do is I'm going to put boundaries on. I'm going to hide
this out the way, just so you can see what
I'm actually doing. But you can see we've got
this nice bridge effect here. Come back to this,
put boundaries on, that's gonna put a top
on for me and then I'm just going to turn up
the thickness of this. And finally then let's come
in and bring in a Bevel. So bevel modifier, turn
up the segments to something like three
right click shade smooth. And now you should end up
with something like this. Then we can see that's
looking really, really nice. Now the one issue I have is, as you can see, that this
is not quite straight. So I'm just going to pull
this one down a little bit. Just straighten it
up just a little bit just to make it a little
bit nicer on the floor. And this one here, I
can see holding shift. Just straighten it up and this is like your
kind of last chance saloon before you actually
change this into actual mesh. But now I'm looking and seeing if I'm happy
with this part. Now we can see that this is
going to look good on here, but it's probably a little bit too close to
these parts here. I'm just going to
grab each of these. Like if I'll grab this one first and then what I'll
do is I'll just pull it out just a
little bit and then I'll grab this one and pull this one out just a little bit. Yeah. And I think I'm much, much happier with how that looks. All right, so now
what I want to do is we want to
actually apply this. And then we want to join these middle sections
into each other. So just make sure that you're happy with how this is looking. And the other thing
is we need to get rid of this bottom as well, because I'm not happy
with the actual bottom. So make sure you're
basically happy with the thickness of
the actual cables. Now once we've done
that, let's come in and press D. And then what we can do now is we can come
in and actually grab all of these parts here. I'll basic want to
delete all of these. So this one here for instance, O shift and click. I'm just going to go
all the way across. Just selecting them with old
shifting click and it should make short work of
actually selecting them. I can't see that in
there, but I just knew from experience that I'm
grabbing the right ones. You might want to go
and use your x ray. Just just to make sure you're grabbing
all those properly. All right, so like this, this, this. All right. Let's press Delete and
Faces, And there we go. That's what we
should end up with. And that's exactly
what I'm looking for. Now let's come in and we should, if we press three, have this right down here. And
that's not what we want. This is not ideal.
We want this to be over the other side of where we're going
to mirror it from. What I'm going to do is
I'm going to come in, I'm going to add an edge loop. So control left
click, right click. And then what I'm going
to do now is I'm going to actually mark a seam on here. Mark like so. And then we can come in
with face let and grab just this side and just
pull it over this way. And now what we can do is being, as we've got our orientation
right in the center, we can press control
or transforms. Bring in a mirror,
put it on the Y. And now we should be
able to pull this across while using clipping. And will happen is while
we pull this across now it should start merging
in with each other, near enough as we want it now it has gone
a little bit small. As you can see.
Let's press dot and actually zoom in to see
what we're actually doing. So maybe we don't actually
want to bring it in that much. I'm going to pull it here
where it just comes there. That is the point where I
want to pull it in and now really I want to
bring these parts in. What I'm going to do
instead is I'm going to, I think, grab this, this, and pull those in. So you can see that now he's
looking tons, tons better. Then what I'm going to
do is, before I do that, actually I need to come round to the back and I'll do
the same thing on here. These two, Pull them in. There we go, Perfect. You can see that we've got
a middle section on them. We're not going to want
the middle section in there, but we're
going to sort that out. Once we've actually
done this part, then we'll do the same
thing on this section here. This one and this one. Maybe the middle one on
there. Let's pull them in. Let's see what that looks like. We go then let's also lift these up just to
straighten it up a little bit. So there we go. That's looking much, much nicer. Then what we'll also do is
we'll grab both of these. Basically, tag it
up a little bit. Just pulling them in, I'm thinking now what else I can
do to straighten this up. Think what I'll do is just
try grabbing this one and this one opposite
and pulling them out and x them out a little bit. Just look, you can see there as well that we do
have some problems. I think the best thing to do
now, now we've joined that, I think the best thing
we can do is get rid of that middle section and then
we can clean all of this up. All right, so let's apply our
mirror. Let's come in then. And he in fact what we'll do is we'll hide these going all the
way around there. If I press Ol shift and click, and Ol shift and click, hide them all the way, then you can see this middle section, and that is what we
want to get rid of. Now, how do we get rid
of this middle section? Let's go in with control, clicking, control
clicking round, and then we'll come
down to the bottom. Hopefully we can do pretty much the same thing on the bottom just to
get rid of that mess. All right, let's press
Delete and faces, let's press all tag now. Bring everything back.
Press the taboon. There we go. Now we can see we're actually
getting somewhere. Now one thing I do want to do
is pick up these two parts. So these points here, because we can see they're
a little bit bent. If we pick those up now we can see we're starting to
actually straighten that out. Maybe if I pull this
down a little bit, holding shift and then do the
same on this one, like so. And do the same on this one, then we'll pull the rest
of them down as well. I think if I pull this down, then pull both of
these in a little bit, as you can see the probably. And just this one.
And there we go. All right. That is fixed. Nice. Okay, so now
we want to do, I want to come and actually
bring both of these up. I want to, first of all, before I actually do
anything with this, we can see that this has
still got a mirror on it. What we want to do is really
we want to create a part of this cable to
actually go around this. Now, the other thing is that we want to make sure we do
it both at the same time. So what I want to really do is probably mirror this
over to the other side. So what I'm going to do is I'm going to add in the mirror. So let's come in and bring
in a mirror and we can see. The problem we have is, is that these don't exactly line up. So I'm going to actually, probably, let's see if
I can bring these in. So I'm going to press a and
then try and bring this in. As I bring this one in, you can see that both of them
start moving now. And then what I can do is I
can bring these out like so, and put them more in the middle. Now let's just have a look. And what I also need to
do is make sure that this is also in the
middle of these. So at the moment as we can see, if I press seven and
go over the top, we can see that this is not really in the middle
at the moment. So that's what's caused me
a little bit of an issue. And we really want to make sure that these are
perfectly aligned. So what I'm going to do is
I'm going to grab this, I'm going to press Shift
cursor to World Origin. And then what I'm going
to do is I'm going to press Shift and Selections. Cursor. That then is going
to bang in the center. Now now what I need to do
is move them into place, but not move them left or right. So what I want to do is I want to bring them up to
where they're going to go. So something like this. And then I want to
press three and move them into place
so we can see they're, they're enough in place now, so they're actually
looking pretty good. And then what we want
to do is we're going to have a little bit
of a top on these. So what I'm going
to do is I'm going to pull these down
very slightly. So there we go. Now they're more
or less in line. All I need to do
now is just make sure that this one
is also in line. Because I move them
out a little bit if I press shift S election
to keep offset. So and then what
I'm going to do is pull this one over now your tad, now they should be in
line, which they are. All right, now let's
come to this one and what we're going to do is we're going to
actually grab this, this one over here,
Shift and click. Then what we're
going to do is we're going to come to this one. I'm going to press
Enter AlternS and pull it out a little bit like so. And then what I want
to do is fix this. Now into the top of there, if I come to this one, first of all, if I grab one
of these, press the dot one. That should allow
me then to zoom in. And now I should be able to
grab this one and this one. Press the bond to bring them in. And then to bring them out, I might as well
bring it in like so. And then copy the
thickness over here. So copy this control C. And then what we can do
now is we can bring them out. So if I press now, just bring it out into there. Now one side will be done, which is this side, but
the other side won't be. And that's why we copied
that insert just then. So now if I come to this one, press the dot on to zoom to it, come round to the back of it, and then press Enter. Come down to thicknesses, press control V to
copy that back in. And now what we can do is
press and pull this down. And now you'll see they are exactly the
same as each other. Al right, we finally
got there with the actual table on the bridge. So what we'll do now on
the next lesson is we'll probably start to make the
actual bottom part of this. But you can see it's already really starting
to come together. Alright everyone. So I
hope you enjoyed that. And I'll see on the next one. Thanks a lot. Bye bye.
24. 3D Bridge & Base Modeling: Welcome back everyone to blend
the beginners boot camp. Now we can see that we're going to have one
problem, of course. And the main problem
we're going to have is that our road, well our bridge at the moment, is not going to let cars in. So we need to actually
fix how high this is. In other words, these
need coming down a little bit to actually
allow our road in. But the first thing I
want to do is I want to bring over this part here. So just this part here. I want to put it so that it basically comes
where this ends here. And then we have another one
to actually support that. So let's actually get
on with that now. So what I'll do is I'll come
in and I'll press Lt Shift, and click out Shift Click, You can grab it like so. And then what we're going to
do, I'm going to press shift D. And I'm hoping that
as I pull those out, yes, the other ones are
actually coming out as well. So I'm going to put those
into something like that. And then what we're
going to do is press Shift D. I'm going to bring another one in for the actual other supports as
well, like this. And now for a press
tab, press al Tage. Let's bring back our bridge. And you can see
I've near enough, put them in the correct
place where they need to go. I'm thinking that I just need now just to make these
actual supports. You can also see
that on the bridge I built that these are
a little bit higher, but we're not going
to worry about that. It's not going to be identical
or anything like that. We just need to make sure we get all these supports in now. So let's press control and just hide that out
of the way again. And then what we'll
do now is we'll make this support
come down here. If I use this part here, it means that I'll be
mirrored over the other side. So that'll make it a
little bit easier. Let's say grab this
one and this one. Press to make a new face. And then what I
can do is press Y. Split that off. And then I can press and Y and pull
this out like so. And then and X, pull that out like so. And then what I can
do is I can press E, and then I can press
again and pull it out. So if I press and pull it out, you can see that it's not
pulling out that well. But on this occasion, however, we don't need to worry about the actual pulling
out perfectly, because all I can do now is just pull it out a little bit. And I want this to
be a little bit thinner on this side rather
than the edges as well. Let's press then pull that
down, and there we go. Now what I'll do
is we'll grab it, we'll press Shift D. And
then we going to do is I'm just going to move it over
all these plants as well. And then I'm going
to press seven, go over the top and just
make sure that they kind of level and they
look kind of level to me. But then what I'll do is
I'll do the next one. So shift D, bring it
over, put it into place. So all right, so now it's
time for the actual road. So the way I'm going
to do the road actually is I'll just
bring in a plane. First of all, I'm going to
press tab, Bring in a plane. So plane, I'm going to press
seven to go over the top. And then we going to
do is I'm going to press and X, bring it in. So I want these to actually
sit on top of you. The way I'm going to do is just going to pull it this
way a little bit. I'm going to press tab
control two, left click, right click, and then
and X pull them out. So press seven to go
over the top again. And I can see that
I'm probably going to need these edges coming
out a little bit more. So I'm going to
grab this edge and this edge and X hold them out
a little bit more like so. And then what I'm going to do is I'm going to grab
the whole thing. And then I'm going to
press to pull it up, or this is going to be my road. And then I'm just going
to grab these faces here, press, hold them up. And then these will be
the barriers for my road. Now, as I said, we need to reduce the, pull these down a
little bit if I press three and then what I can
do is I can press tab, pull this down to
where I want it, which will be probably better
off, something like that. And then I can come back now to my cable press in
three press tab. And then what I want
to do is now I want to grab all of these parts here. So the way I'm going to
do is I'm going to put it onto wireframe, wire frame. And then I'm hopefully going to try and grab all of these. If I press box select, should be able to grab this. Going all the way over to
here. I'm not sure actually. Yeah, it's going all the
way over to here now. Should be able to pull
this down into my road. If I bring it down to here, press the Z, Born, go to solid. Now we can see that
they are near enough, fitting in place perfectly. I pull it down a
little bit more, that is looking better. All right, so now what we can
do is we can grab this one. This one. This one.
This one and this one. And we can pull them out
going all the way at the end of our road and
sit in there like so. All right, pretty nice. Now let's actually mirror this
then over the other side. So if I press control
all transforms, it's automatically going to put that in the middle for me. Add modifier and then I'm
going to bring in a mirror. So where's my mirror
which is here. Put it on the Y, X, turn it off. And then what I want
to do is just grab this one and this one. This one. This one and this one I
want clipping on, I think. Yeah, I'll just
bring them in now. I'll bring them in
together and you should end up with a nice
nice road like that. All right, now let's think
about our top parts on here. Again, I'm probably going
to come just to these. I'm going to then grab
this one and this one. Press the one, and then what I'm going to do
is press Y again. And then I'm going
to split these off. So they're already split off. All I need to do now
is go over the top. X, pull them out, and
Y, pull them out. This way I'll drop them down. Just a little bit like press
the Born to bring them up. Then now I want to platform sat on top of this
one with a gap. Because a gap will allow it then to look a little
bit similar to this one. And that's exactly what I want. What I'll do is I'll
press control two. Left click, right click. Let's pull them out now. And X, then let's
press control B. Then what we can do is now
we can grab both of these. We can press the
ebone to insert, press the Born, bring them up. Now what I can do is
I can actually use probably this bottom part of
this, on the top of this. All I'm going to do is shifts like this, controls like this, shift D, bring it up basically. I don't want all of these parts in there so you can see
all of these lines. So I'm going to press
Delete Limited Dissolve, just to get rid of
all of those parts. And then I'm going
to press and y, pull it out a little bit, and then and x, pull it out a little bit this
way and then pull it up. And there we go.
As simple as that. All right, so now we just
want to pull it over to the other side, L, L seven. Go over the top shift D, bring it over to the
place I want it to be, which will be roundabout
there like so. And that is looking really nice. Okay. So we've nearly nearly
got everything that we need apart from the
bit that's going to run underneath
our actual bridge. Let's make a start on that. Now, if I come to this part, we can see we've already got the parts that are actually
going to do the work for us, which is this part here. So we can actually use this
to make a girder that comes down here and then join it all together with another
part in there. What exactly do I mean by that? What I'm going to
do is I'm going to grab this whole piece. I think I'm yeah, I'm going to do this
a different way. So what I'm going to do is
I'm going to press shift. First of all, I'm going
to pull it down then. So then what I'm going to do is I'm
going to pull this up. So I'm going to press
and pull it back up. So because then I've
split it away from there. And then from here now I can actually put
in an edge loop. What I'm going to do is I'm
just going to put x ray on. I'm going to put an
edge loop down here. So control left
click, right click. And then what I'm going
to do now is I'm going to grab just this top part, Turn off my x ray, and then what I'm going to do is
I'm going to lift this up. So I'm going to
press, pull it up. So back into place. Now, when I grab this, I should be able to split this away
from everything else. If I press now, there we go. Now it should be split
off between all these. Now what I want to
do is I want to bring some edge loops into here. I'm going to press control
on this inside bit. Now sometimes because
I'm working on this, you can see I can't
really get to it. So better off pressing shift H, I'd know everything else out of the way then pressing control, if you can't actually see it, it's probably somewhere
over here or something. So just press control,
bring in a load of edge loops, keep going. Scrolling, scrolling,
scrolling, something like that. Left click, right click.
And that is how you should have it looking
at the moment. Now, how do we get this to
be exactly where we want? So how do we get
this into looking like those little kind
of girder things? Well, what we're going to do
is we're going to press tab I actually I need
to split this off. First of I'm going to grab it, press selection, Split
it off, grab it again. And then what I want to
do is I want to make sure that it's in the center. So I'm going to press
Control all transforms. And then we're going
to add in a modifier. And this time we're
going to use a detime. Seems a bit strange,
why would you be using the decime if we come and click on un subdivide and then
click it on up by one. You will see if I go into it. So even if I put Z wire frame on now you can see what's
actually happened. It's actually turned
it into this. If I turn this up again, it'll just normally
doesn't do anything else. But if you turn it
on, subdivide on one, you end up basically
crossing those actual edge loops over. So now what I can do
is I can press Tab, I can press Control
A, Apply that. And there we go. If I press
Z going solid, there it is. That's exactly what we wanted. All right, so I'm
happy with that. And what we'll do and
the next lesson is we'll turn this actually into mesh. Alright everyone, so hope you enjoyed that and I'll
see on the next one. Thanks a lot. Bye bye.
25. PBR Textures for Bridge: Welcome back everyone to
Blender Beginner's boot camp. And this where we left off. So how we're going to
turn this into intermesh, we're gonna use exactly the
same thing as we did before, add modifier, bring in a
wireframe, and there we go. Now let's turn this wire
frame down on this one. We're not actually going
to need any boundaries. We're not going to need
the top and bottom of it. You can see already that
is fitting in pretty much perfectly apart
from this bit here. But it's the center, so probably it's
going to look good. We could delete it
out of the way, but actually I think I'm actually happy with
how that looks, but I'm just going
to double tap the have a look at how
this is looking. And I think the one
thing that I do want to do is bring
this down a little bit. In other words, we can see that the top of it isn't quite there. So all I'm going to
do is just press and Z and bring this
down a little bit, and then and Z and
just raise it up a little bit so
I'm hoping that I can get the just this little bit in so we can see a little bit of the gird there and
it's still not enough. I think actually
what I'm going to do, I'm just going to go back. So before I squished it up like, so what I'm going to do
is I'm going to press and Z and just pull it down
so that it's sticking out. And then I'm going to
grab the bottom part of my platform, Lt, grab this
bottom part with L, and then there's press and Z. And pull this down that's
fitting on there really, really nicely like so. All right, really,
really happy with that. Now we need to get this
over to the other side. So we've got a mirror
on there anyway, but it's not mirroring over to the other side because this
is kind of part of this. What I'm going to do is I'm
going to grab this part. Press P selection. Now grab this press
control or transforms. And then what I'm
going to do is I'm going to mirror it
over the other side. Now let's try x. There we go. Let's see if that's falling in place. Yes, it is. And now we can grab
this part as well, and we can mirror it on
the X as well like so. And yeah, that is
looking pretty nice. I'm just having one
more last check, just making sure I've
not made any mistakes. There we go. Now let's just have a look and
see our other bridge. I don't think I
need this anymore, so I can delete it
out of the way. Let's actually bring
in our old bridge. So I think it's this one. I'm going to move it over here. No, that's the other one. Let's try grabbing this one. There we go. That's
our other bridge. The bridge that we built. The one thing I
would say is that probably these need making
a little bit thicker. Let's bring them
out a little bit. Double tap the A. I'm just making sure that we've still got these
platforms in there. Yeah, actually I think this bridge looks
better than that one. That's always good. Now, let's actually apply everything now. So I'm going to go over the top. I'm going to basically
grab everything. I'm going to press D and just in case you
missed it again, it's convert and mesh. I've just assigned that to D with right click,
change, short cut. That will be the last
time I say that. So hopefully if
anybody's doing this, you know, out of order, hopefully you'll see
that, hopefully. All right, so now what we've done is we've applied all that. We can grab one of these, press control J, and then
we'll apply everything. Press G just to make sure
you've got everything. Press control or
transforms, right click. So origin to geometry. Now we need to copy the
materials from here. So at the moment we can see
if I click my materials on, I've got no materials on here. So I'm going to grab
this one. Grab this one. I'm going to press
control link materials. And there we go. All right, so now let's break
this down now into little parts so we can actually do these materials properly. So we can see we've
got our road. Our road is basically
just a road, so we might as well
grab both of these. And then what I can do is
I can go over the top. I can I can probably get away with pressing you
and project from view. And then what I can do is I can go to my road and click that on. So click a sign and we'll see we end up with
something like this. Now what project from view does is it simply projects this like UV onto the UV map based on the view
that I'm looking at. So if I went like this and
did project from view, it would be projecting in
this awkward kind of angle. That is why I went
straight over the top. Now if I got to UV editing, and we need to go
now to our road, at the moment we've
got all of these, but if we put in road, we'll see that we have one
that says Bridge, Matt Road. What I need to do now
is grab all of these, Press the S bond
to make it much, much bigger, like so. And then put it
more in the middle. So and x or in the middle, like so. And there we go. Now you can see
you've got a really, really nice road
running down there. Okay, so the road is done. We might as well keeping our UV editor and I'm also going to press T just to hide this
out of the way, I'm also going to pull this
across a little bit more because I need to see more of the model so I can
see what I'm doing. And the other thing is
I might as well hide this road out of the way now and focus on
everything else. So what I'm going to do is
I'm going to grab everything. In fact, I'm not going to grab
everything because I just want this one selected,
grab all of this. And then what I'm
going to do is now. In fact. Yeah, I'm probably going to split this
down actually. So let's come in and
grab just our cables. L grab both of your cables. Hide them out of the
way, and then you can press A and grab
everything else. And now you can
basically press U, Smart UV Project Lek. We can see we've got this long part here that's
really taking up the UV space. Sometimes that happens,
and the easiest way to deal with that is just
to grab all of this. Move it out of the way,
grab this one behind it. So L, L, L, and L, press G, Move that
one out the way. And I'm going to basically grab this B control to
grab everything. Move out of the
way. And then what I can do is I can
grab all of this. Now, So all of this is kind
of the rest of all of this. And then what I can
do is I can press control plus just to
make sure I've got everything and then U V and then what we're going
to do is pack islands. And it's just going to
pack the islands to make sure they're round
about the same scale. And then I compress a and then pull them out who as
large as I want them, making sure the
metal looks okay. Which I can see,
it actually does. All right, so finally
now just a cable. So if I press Tab,
press al tage. Come back into my
cables, both of them. And then what I'm going
to do is press U, Smart UV Project. It might take a little bit
of time on your machine. And then what we're going to do now is then we're going to assign my bridge metal. I think it's this one, like so. So assign that,
look, there we go. And then we're going to
press a scale them right up just so we can actually see some actual metal work in there. And now finally we
just come down two. Let's have a look at
this. I'm thinking that these actual girders on here are going to be a
bit darker, I think. I think that's what
I did with it. So if I come now and hide
the cables out the way, I can actually come in
and grab all of these. And what we'll do is
I'll assign those bridge doc and now they're a little
bit darker as you can see. Now finally let's come in to these parts here
and what we're going to do is just
assign to bridge. Concrete click sign. There we go, Beautiful bridge.
That is how you do it. And obviously you can
see that these girders on this one are a little
bit bigger than this one. But you know, now
you've got the skills now to actually change
them however you want to. All right, so I'm
happy with that. Let's now save out our work. So file, let's go
back to modeling. Let's bring everything
back with ol tag. And we'll also grab my bridge. And I'm just going to throw
it in my bridge there. Pull that up, close it down. Bring back line lighting. And the next one that
we're going to be working on is our actual broom. And you can see that, this
looks really, really nice. You can see where the
inspirations from. I can see, actually I've got a little bit of a glow around
there that's not intended, so we will saw that out. But on the next lesson, you'll learn all
about how to create this kind of iconic little prop. All right everyone, so
hope you enjoyed that, and I'll see on the next
one. Thanks a lot. Bye bye.
26. Broom 3D Modeling Displacement & Sculpting: Welcome back everyone to blend the beginners
at boot camp. And this is where we left off. All right, so now
let's come and move our broom just over
to the side again. I'm going to hide out my plane. I'm going to hide this
broom and the platform, and I'll also hide
the actual light. Okay, so let's start then
with the top of the broom. Now, with brooms, you can actually make it with bristles
and things like that. And we're going to go into the particle system a little
bit later on in the course, but for now we're going
to actually create a very stylized type
look for our own broom. Now let's first of
all to do this, what we're going to do is
we're going to press Shift, and we're going to
bring in a UV sphere. And this might seem a bit
weird that we're bringing in the UV sphere for a broom, but you can't see anything
round on this broom, but we are, So let's come in now and what we're
going to do is we're going to come right to the
top of our actual UV sphere. And what we're going to
do is we're going to set our proportional editing on, and then we're going to set
this proportional editing onto this one here shop. Then what I'm going
to do is I'm going to press three on
the number pad. And I'm going to bring this
up and I want to give you a nice kind of broom end shape. So you can see now if
I bring this up like so that there looks
actually quite nice. So we're basically going
for this end here. I'm going to right click
auto smooth as well. And the next thing I
want to do is just make sure I'm going to put this
on object mode as well. Is that the broom end
isn't sort of this pointy. So what I'm going to do is
I'm going to grab the point. I'm going to press
control Shift and B. And what I'm going to do
is just level that off, increase the levels up like so. And just make it a lot more rounded rather than that really, really big point
on the end like. So next one I'm
going to do now is going to go over
to my modifiers. And I'm just going
to pull this up a little bit 'n adding a modifier. And the one I want to
bring in is a displace. And we're going to
use this actually to kind of get some
animation out of it. So we want to wave in animation. And then we want to
actually set that animation and then turn it into the kind of end of our broom. That's
where we're going with this. What we want to do now is
come over to our textures, the one we're going to pick,
so I'm going to click New, and the one we're going to
pick is going to be marble. So we're going to
click marble and you'll end up with
something like this. And then what you want
to do is you want to probably leave
everything as it is. You'll see at the
moment it looks a real mess, but don't worry. And now we're going to do
is we're going to head back over to our
modifiers panel. And the one we want to bring
down is this strength. So we're going to put
the strength on No 0.20, something like that. And we can see, hey, presto, something's actually happening. If I now bring this strength
down a little bit more, you can see if we hold
the shift button, we can actually get some, something actually going
on there at the moment. I'm going to leave it like this. Then what I'm going to do, I'm just going to come
back to my texture and now we can actually
mess around with turning this around
and making it a little bit more lumpy
as you can see there. All right, so the next
thing then we want to do to actually get
this animated, is we want to bring in
something called an empty. If I press shift A, so if I press shift A, and then what I'll do is I'll
come down to where empty is and I'll bring
in a plane axis. Now the moment I can't
see my plane axis, so what I'm going to
do is I'm going to press scalely up straight away. Now what is this
that brought in? This is basically
called an empty. And what it is, is it
something that you can attach either animations or you're comparing things to it. And then you can move
it around the screen without anybody seeing
the actual empty. In other words, this
will be invisible in the actual render. So really, really handy if you want to make
flames, effects, and things like that,
or have an animation, you know, like this broom actually flying
around in a circle. We can use empties to
actually achieve that. But now what I want
to do is I want to go back to the end of my broom. I want to come over to
my modifiers panel. And what I want to put this on this corners is onto an object. And the object that
I want to pick with the little pipette is
going to be my empty. And you'll see this
happens at the moment. Now if we click on our empty and we go over to
our item over here. And then what we're
going to do is where the location of the empty is, you're just simply
going to put in hash tag this one frame. What that does is now
once I press Enter, is if I press Space bar, you can see that this now
is moving up and down, and this actual MT is moving this along with
the displacement. And now we can actually
go in and what we can do is we can come back to our broom and we can
increase this to, let's say no 0.15 and then we can have a look at
what that actually looks like. Now, the other thing about this Is that when I first
brought this in, I actually brought it
in as a UV sphere. But the problem is when I
brought in the UV sphere, as you can see, it
comes in at 32 and 16. I'm probably going to need a
little bit more subdivision. So if I come over to this now, add it to modify it, and let's bring in
a subdivision like, so let's pull this
up onto the top. So what I'm going to do is I'm just going to grab it over here, pull it up onto the top like so now let's see what
that's looking like. And now I'm going
to do this, I'm going to come back
to my strength now on my displacement. And let's turn that
up a little bit. And now we can see we're
getting a lot more wobble. Now, the other thing is
I want to bring that right the way down. There we go. And then let's turn
it down a little bit, and it's all just about
now fiddling around, trying to get the right
look or our actual broom. Now let's go back
to our textures. And what we can do now is we can actually really
start to bring this down to 0.25 maybe
something like that, maybe something like this. And now you'll see
as we bring that up, now we're actually getting
a very, very nice effect. I'm just going to go
over and see if I can actually take
off my subdivision. Yeah. And I think it
actually looks better with the subdivision
of All right. So this is what we're
actually looking for. Now what we need to
do is we need to go back to our empty. So once we bring in R empty, so as soon as it's there
as you can see if I click on this and then
go over to lay out. What I can do is as I move this, you'll see now I'll
be able to get the right one that
I actually want. So as I'm moving that, you can see that it's
moving this around. And now all I need to do is pick the one that
I actually want, so the site kind of style that I actually
want with my broom. So it could be something
like this one. I think that looks pretty nice. And now all I need to
do is I can actually go and apply that to my
actual end of my broom. But what we'll do is
we'll click on it, and all I need to
click is D. And then what it'll do is it'll
apply all those modifiers. And even if I press
Space part now you'll see that nothing actually
happens as well. I can actually get rid now of my actual empty get out of the way and we should be left
with something like this, which is pretty nice now, you can already as well, you can go in to this and still alter it with your
proportional editing, which you might want to do. So in other words, you can
pull it out or bend it around a little bit like so at
the end of the broom. And I think I need to
pull it up a little bit, so I'm going to press
the eyeburn again. Bring it in, pull it out, yours to get it looking
a little bit better. And yes, I think we're
nearly there though. Old shift and click. Turn this off control, turn it down one, don't go too far and
see I've got a lot of broken mesh now that sometimes
does happen as I told you. So I'm just wondering,
I need to fix this. What I'm going to do to fix
that is I'm going to go to vertex, move vertices. And then I'm also going to use a smooth modifier just
to smooth that off a little bit. Add modifier. Let's come and
bring in a smooth, let's turn it up a bit. We don't want to smooth
it off too much, we just want to smooth out
that little bit so we can turn this up and down and then turn it up one. And there we go. I think that's going
to be the best I can get with the end of it. And we're never going to see
that little point anyway. It will always end in a
point, is what I'm saying. All right, so I'm
happy with that. Now I'm going to apply
the actual smoothing. And then what I'm going to do is now I'm going to
spin this round. So if I press and x, let's spin it round so
it's going the right way. Let's pull it up so we can
see what we're looking at. And you can see as well
that my broom, on this one, it's quite chunky, so
I might just actually spend a little bit of time now just pulling it
in a little bit. So what I'll do is
I'll come over, I'll put this on smooth instead. Now. And then what I
can do is I can hold, pull it out like so. And then we can kind of bring
it in, bring the boom in. That's looking pretty nice. Okay, let's make it a
little bit smaller with, and there we go. Okay.
I'm happy with that. Now what we need to do
is we need to actually create this bit going down here. So what I'm going to do first is I'm going to come to my end. So this is the end here. And what I'm going to do is I'm actually going to delete this. So I'm going to come
in, press the Born, just to select all of those
going all the way around. And then I'm going
to press Delete, Delete and Faces, and that is what you should
actually be left with. Now you can also see
that if you wanted to, you could add in
more subdivisions and then you could come over to your sculpting and kind of sculpt some nice lines in there and
things like that. We're not going to do that
on this part of the course. I think we do a little bit more sculpting a little bit later on, but for now I think
I'm going to leave my broom like this.
All right, everyone. So I hope you enjoyed that
and I'll see on the next one. Thanks a lot. Bye bye.
27. Broom Base & Stick Attachment: Welcome back everyone to blend
the beginner's boot camp. And this is where we left off. All right, so now
let's actually create, let's put it into the front view and let's
think about rotating around. So one just going
to rotate it on the X just a little bit just to get more of the kind of angle that I'm
actually looking for. And then what I'm going to
do is I'm going to press shift S because there's
a selected shift. And this time we're actually
going to bring in a curve. And the curve that we're
going to bring in is a path. So as you remember with the
actual handle on the door, curves are very, very powerful and you can
adapt them very easily. So ours head 90, let's pull it out, let's
get it the right length. I actually want it, so he pulling out until he's
got the right length. If you need an idea on length, you can see how wide
this one actually is. And then what we're going to
do now is if we press Tab, we can actually move it across without proportional
editing on like so. And then we can shrink
it in a little bit and Y drink it in. And then what we can do
is we can pull it up with proportion editing
on now from here. So let's have a good look at it. And then we want,
we want to come in straight and then up actually
have gone the wrong way. So let's go back this
way. Let's grab this one. We'll grab this one. Pull it up, bring it in like so. And then let's bring this
one up a little bit. And there we go. I think that's actually going to
look pretty good. I'm just going to
pull it up like so. And then I'm also going
to pull this end down. Let's pull this end down, and then let's put
it into place. So just make sure that you're happy with how your
brooms looking. I think I need to bring this up. Yeah. That's looking a much, much bare angle like, so. All right. I'm happy with that. Now what I want to do is I want to actually come in and
give this some depth. So I'm going to come
over to my options for my actual curve and I'm
going to bring up the depth. I'm going to bring up the depth, the kind of the
depth I want it to start from from this point here. So this probably, yeah, it's probably gonna be okay. Now, this, now what I also
can do is I can then come in, grab the end of it with
proportionality on press Ot S. And you'll notice I can actually
start to shrink this down. So now we've got a nice kind
of blow going along there. Now the next thing I want to
do is obviously I want to put this kind of cut in
there and shrink that in, or pull the rest of it out. So I think what I'll do at
this stage is we'll come down, we'll turn our resolution
down a little bit, and then turn it up to
something like five. And then what we'll
do is we'll press D, and then we'll convert it
into mesh as you see there. Now let's bring in that part. So this part over here, and probably the easiest way to do this is with
the bisect too. What I'll do is I'll press A and then I'm going
to go over to mesh. I'm going to come down
to where it says bisect. And then nothing really happens, but if you click left, click and drag, you will see an actual line appears like so. And then where you
can press Space Bar and you can actually put this
line wherever you want it. So let's say I want it,
something like that. Let go of it, and
then what you'll have is this kind of
line going around here. But more than that,
the Bicect tool also has a lot more
functionality. For instance, we
can actually clear either side of them and we can actually
fill it in as well. So it makes it
really, really handy. Talk now on this occasion, all I want to do is basically
grab it and make a cut. And making a cut like that with the knife is a lot harder
than the bicect tool. Then why are we going
to do a right click? And because I'm in face let I can't write click
and make mark a Sam. So what I'm going to do is
control and mark a same. Now what I can do is I can
come and pull this out. So I'm going to come
in, I'm going to press L and then we I'm going to press is Olt and without
proportional editing on. And I should be able to
pull that out a little bit. Now you can see that it's
coming out in this way. And that's not something I want. So what I'm going to do is
I'm just going to press shift H just to hide everything
else out of the way. I'm just making sure I've gotten no end on there. And
that's why I'm doing that. And then what I'm going to do instead is I'm
going to press Tab. I'm going to press Enter. And then old S. And now should, if I actually go back to
it all test, there we go. Bring it out. And then
what I can do is I can actually put on offset even. And now we should end up
with something like this. Now, at the moment, we aren't shade smooth or
anything like that. It's looking a
little bit rugged. And the other thing is that I think I need to pull
out some of these. So I'm actually going to go in and we're going to
grab these three. Make sure proportion
editing is not on. Just pull them out to straighten
them up a little bit, we can actually start
to get rid, hopefully. All those actual ledgers
that we've gone there. Let me see how far I
need to pull that down. Braten, all these out
just a little bit, just making it a
little bit cleaner. I'm just looking
how I can actually straighten them up a little bit better than
while I've got it. I'm going to pull
them out like so. And then I'm going
to pull this one out like so. And
then pull it up. I think what I'm going to
do is mark a bevel on here, so let's press control B. And then what I can
do is I can come in and I think I
should be able to adding a subdivision
surface. There we go. All right. That's looking much, much better than why I had it and I'm very happy with that. Now we do need an
end for our broom, so let's just grab this
end, press the F one, you will end up with that
because obviously you've got a subdivision
surface on now. But just to get rid
of that, all you need to do is just
press control. Bring in another edge loop. And as you can see,
as you bring it up, you can actually bring that
in to get rid of the top bit. With this problem on
here, we can just grab this face and
press the eyeburn. Then we can bring
it in and really make it a nice end
for our broom. Now the inside of this broom
we don't need to worry about too much or we need to worry about now is pressing oltage, bringing back everything,
and just seeing how that actually fits in
to our actual broom. And you can see that that's
looking pretty nice. The only thing I would say
is maybe we should have a little bit more
of a bend on here, which we can actually
go in and fix now. So if I grab this, just
this one here going round, I can actually put
proportional editing on. I can press Tab, Hide these out of the way so I can
see what I'm doing. Press three, grab
the broom again. Now what I can do is I
can just bring this in just a little bit down, and now you can see it's
looking much better. And the last thing I think
I want to do is I think I want to make this a little
bit smaller on this end. So I'm just going
to grab this end. I'm going to press S, bring
it out a little bit and yeah, I think I'm much, much happier. I think I just need to
bend a little bit more. Yeah, there we go. All right. Now let's focus
then on our actual broom end. So what I'm going to
do is I'm going to come and fix this. First of all, let's try
and get more in center. Let's pull it just over to the side like so. Then
let's come to this. And then what we're
going to do is we're going to pull this out, pull this out a little bit,
and we're going to hide it. As you can see on this one, it's hit a little bit
around the actual broom. So all we need to do is we
need to just pull it out. So if I press, I can
pull it out to the. Then what I want to do
is just fit it into place now with
proportional editing on. And then what I'm going
to do is I'm going to press pull it out, pull it up, just making sure that it's
actually inside there. As you can see this bit, isn't Sanders going
to pull this down, making sure it's all
filling in a Yeah. Can I actually grab
that? I think I can. There we go. Got
there in the end. So let's press bring it in. Bring it out. Let's
turn off the x ray. Yes, and I think I'm
happy with that. All right, so now
it's just a question of coming in and playing
around with this. If I press control, bring
in a few more edge loops. And then what I can do
now, I can actually tailor this off a little bit. In fact, it could probably have gone away with actually adding a bevel on it if
I press control. Once I've grabbed all these, now that's probably a
better way of doing it. And then what I want to do is probably flare out
this little end. I'm going to grab this end. I'm going to press S
with proportional, let's just flare it out
a little bit like so. Then what I want to do is I
want to move these down now. So if I grab all these
as grab them more, pull them down a
little bit and now it's looking a little
bit more realistic. Albeit we need to
just still play around just a little bit with these just to get the look
what we're going for. If you're not happy
with the bevel, just go in, pick on them, delete and dissolve edges, and then you'll just get
rid of them for you. Straighten it out a
little bit more for you, and I think that's
actually looking better. All right, so the
last thing then is I want to come in,
I want to grab them. I want to press Enter, Bring it in without
proportion editing on. So then what I want to
do is just bevel off this edge control
B. Bevel it off. Yes. Now looks
really, really nice. All right, let's save our, our work and then
on the next one what we'll do is we should be able to get our handles and
everything like that done. And hopefully we should get around to actually
adding in our textures. Alright everyone, so
hope you enjoyed that. I'll see on the next one.
Thanks a lot. Bye bye.
28. Broom Decoration Techniques: Welcome back everyone to
blender beginners boot camp. And this is where we left off. All right, so now
let's think about creating a little
circle on here, and then one probably
around here, what's actually going to hold the feet and things
like that on. So let's come in and what
I'll do is I'll come in first of all and I'll grab this one edge going
around there. Shift S curse, it is selected. And then what I can do
is now I can bring in let's let's bring in a cylinder,
cylinder. Should do it. Let's put it on something like 2042 is too much as
we've discussed. And then R X ninth,
spin it around, press the S born and then
and Y bring it together. Now the one thing
that you need to do now to actually make
this into a really, really nice kind of edgine that's going around is you
need to come up to Edit, go to Preferences,
and what we're going to look for is something
called Loophols. Loop Tools. This one here, click on it, Click, Refresh, close it down.
What is Loopholes? Well, if we come in now
and we grab in our faces, so grab both of these faces,
press the eye bottom. And then what you want to do
is you want to right click, and you'll have a new button
which says Loop Tools. If you come down and
click on Bridge, you'll see that it actually
bridges everything for you, really, really handy
tool to know about. So if I grab this now, press R and X, and what I can do now
is put this into place. So three, let's
move it into place, make sure it's
actually in there. So let's pull it in a little bit with let's make sure it's up
on top of there, like so. And none of it's being
clipped or anything, which it is a little bit,
so let's pull it out. Yeah, something
like that. Now I'm I'll use the same idea, but what I'll do is I'll make
the actual platform where, where they're going to put
the feet on somewhere else. So I'm going to do is press Tab, and then I'm going to press
Shift to World Origin Shift. Let's bring in another cylinder. Let's spin the slender
round so R x 90. Let's make it thinner so and then and Y so and then what we'll
do now is we'll grab it. Same thing again. We'll
grab these sides. Press the eyeball for insert. And then what you're going
to do is loop tools, bridge. So now what we can do is if I press one and hide this
broom out of the way, I can actually use this now
to create those kind of foot anchors where they
put their feet on. What I'm going to do is
I'm going to come in and bring in a curve, but we're going to do it a little bit different this time. So you can see I've
brought my curve in. I'm going to make my curve Uch much smaller now,
Something like that. I'm going to put it
into place though, just so the edge rust in there. So you can see if I pull
it out a little bit more. If you want to see
the edge, by the way, just click on your actual x ray and then you'll be
able to see through the mesh. And it'll
be really easy. Once you've got it set,
something like that, click it off and
now we're going to do is you're going to
use another technique. If you come over to
your actual curve, what you want to do, instead
of going to depth this time, you're gonna go extrude. And you're gonna
extrude it out like so. Then what you're going to do
is you're gonna come over to your Add modifier and you're
gonna add in a solidify. Then you're going to actually
increase the thickness. And now you'll see now
once I press Shade, that we've actually got something that resembles
these footholes. Now I can do is if I press one and come in now and
actually alter this. So you can see now I can
actually alter this, do my heart's content now, it's probably better off if you use proportion editing on this. It does make it easier. And the other thing to make sure is that you
are in front view. If you're not in front view, you're going to
end up with these twisted and things like that. And that's not actually
something you want. Now, the other thing is I think I actually hit
the other broom weight. So let's just wing it. What we'll do is we'll
actually create more. So I'm going to
press E, E, E, E, E, E and something like that
I think's looking good. And then what we'll do is
we'll come to the end. And what we can also do with proportionality non
press the alter Ns and you can also bring it in
right at the end like so. And you can see that's
looking pretty nice. Now if I come to
this one and I don't press al S and I just press S, you can see it doesn't
really do anything. So what we need to do is
we need to now apply this. So if I press Tab and then D, you'll see that we've
got all of these. So I'm just going to go
back before I do that. And instead of doing that,
what I'm going to do is I'm going to come down
through my resolution. Turn this all the way down. Turn it up to four or
five as we spoke about. And then what we
want to do now is just make sure we apply this. So if I press D now you'll notice that there's nowhere
near as many edge loops. Now the thing why we did
that is because now we can go old shift and clip
just on this one. And then we can press and Y and really bring it out
to make it actually fit. Now if you want it coming out a little bit more, just go back. And press S and Y and just
increase the actual circle. And now it'll pull
it out like so. And you can see
you've got a really nice, beautiful curve now. Now right click and shade Altos move will work now
because we've applied on modifier and we've
actually applied our curve. And now we want to do is we need the center of here
which is already there. Right click, set origin to
three cursor add modifier. And then all we're going to
do now is we're going to add in a mirror like so.
And there we go. All right, let's right
click and shade, auto, smooth on this as well. And let's now see what
this is actually going to look like before
we do anything else. So if I press seven
to go over the top, I want it kind of
in that part there. I'm going to make it
a little bit smaller, so seven again over the top. Let's actually have a look
how this is going to go in. It's dropping down a lot.
Something like that. Let's rotate as well, R and X. Let's rotate it round. Let's double tap the A. There
we go. Very nice broom. Now, the one thing we
could also do as well, we can also pull these out. No problem to pull them out. While we've still
got everything here, I can grab this one, press one. And then what I can do is with, I can actually pull these out. You can see now
it's not affected really anything made them
a little bit bigger. Now if we press ol tag and
bring back our old broom, now you'll see that this
was the design on that one. This is the design. This actually, I like this look a little bit
better than this one. But you can see now
just how easy it is to put together a simple
broom like this. Now the one thing I think is that I'm going to need to make these much thicker actually. So I'm going to bring
it out like so. And then what I'm going to do
now is bring back this in. So I've got this bit selected, but I've also got
these selected. So what I'm going to do is just grab all of this
on the inside with Olt shifting click
and then Ol Ts and I should be able to bring
those in now like so. All right. Now I think
what else I'll do because it's such a big chunky part, this probably shouldn't
be that chunky. So what I'm going to do
is Olt shifting, click Ts and bring it in a little bit. And then what I can
do it is because I've still got my mirror on. So my mirror still on, I can just grab
this side and then just pull it back in like so. And now it should look
much, much better. And it does, It really,
really fits now. All right. Really,
really happy with that. Now what I want to
do is I want to come in and grab this one. Right click, shade,
auto, smooth. And now let's just
join it all together. Well, let's come in,
grab our platform. Hide out the way with H, idllight out the way. And then what we're going
to do is just grab it all. Now remember, the first thing
you should always do is always object convert and mesh. If it doesn't work, make sure
that one of them is yellow. So now if it's
yellow, we can go to object convert mesh or D, which is what we set it to. And then what we can do is
we can join it all together. So okay, so now finally what we're going to
do is get the materials on. I'm going to put this
on Material mode, and then what I'm
going to do is I'm going to click on my broom. I'm going to click on
this last of course, control L link materials. And now we can see we've
got our materials in here. So let's now go in to our broom and our
materials and what we'll do is we'll grab all of
this first with like so. And then what we'll
do is we'll make sure we unwrap it all at the same time so you
smart UV project. Okay? And then what we'll do is we'll come to the other part of it. So this part here. And I can see that I need to
grab this part as well. And then what I'm going to
do is broom, dark wood. I'm going to click a sign
like so. There we go. Now we should go in,
grab all of this again, and then just go
to our UV editing. Uv editing. And let's
make it either a little bit bigger or a little bit smaller. Let's see
what it looks like. So S bring it out. Yeah, probably looks
better like that. Now let's come to the next bit. So let's grab all of these. Let's put broom
metal, so a sign. And let's also press Smart UV project L. Okay, There we go. And now finally onto the
broom bristles though. If I come to my broom bristles, I can press L U Smart
UV Project. Click Okay. Now the problem is,
as you can see, we have a huge problem now
with it looking like this. This is really not what we want. The other problem we've got is if we actually have it like that when we come to putting our fire and things,
that's not going to work. So what I'm going to do is I'm just going to grab
this part shift H, control seven to go
on the underneath. And I'm going to mark a seam
going all the way down here. And then carrying
up control click, control click and control click then right
click, mark a seam. Then all we want to do
now is want to mark one more seams in
this part here. Grab this markem, U, sorry, control and Mocasine. Now we should be
able to undo this. So if I press L U and instead of smart UV project,
just click and wrap. And we should end up with
something like this. Which means it's
going to be much, much easier now for us to use
if I come in now and grab this and spin it around like so. Now finally, let's put
on our broom bristles. Let's click a sign. And
now let's go to broom. Hopefully, we'll be able to find the broom bristles
which is this, this broom red emission is the one we want because
what we want to do is we want to make
sure the end of our broom and only the end of our broom is lit up like this. What we're going to
do is now if I press G and just put it into place, you can see that the
problem we've got is that the whole thing is actually lining up at the back as well. And we don't want that.
And the reason is because this actual texture
is being repeated, repeated, repeated. And
we don't want that. So what we're going to press
is S and Y bring it down, and then G and Y bring it down. Now you can see we've got the effect that
we actually want. All right, so there we go. We've not got any burning on
here or anything like that. Really, really nice. Let's
now go back to modeling. Let's press LtH. Bring
everything back, let's put it on material
so we can see our work. And there we go, everyone. There is our broom, but let's close that down. And then we'll actually put
the broom in there as well. So I'm going to grab
this, I'm going to put it into my broom
right out of the way. And then the next one
we're going to click on is the bridge. No, it's not a bridge. It should be, I don't know, we messed up on the name. It should be a roof. But anyway, you
know it's a roof. So what we're going to do
on the next on everyone is we're going to create
this Japanese roof. There's a lot of
intricacies when we're creating roofs,
and you're really, really going to find
some nice techniques to actually do that.
All right everyone. Let's save that our work and I'll see you
on the next one. Thanks a lot. Bye bye.
29. Japanese Roof Modeling with Array: Welcome back everyone, to blend
the beginner's boot camp, and this is where
we left it off. All right, then
what I want to do now is create this
Japanese roof. So if I grab my roof and
move it over to the side, what we'll start with again, we'll hide these out
the way the bridge, even though it's not a bridge. And then what we'll do
is we'll also put it onto object mode so I can
actually see what I'm doing. I'm gonna hide this
light source out so there's nothing
actually in the scene. And then what I'm going
to do now is create, first of all, all
of these towels. So again, when we're
doing anything like this, it's better to preplan exactly
how you're going to do it. So the way we're going to
attack this is we're going to actually create
these main tiles, then these little round tiles. And then kind of put it all together and bend in the
way that we'll want it. All right, so let's come in
and make the first tile. So what I'll do is
I'll bring in a cube. I'll make the cube smaller. Again, we're not
going to worry about scale or anything like that. We're going to scale
it in on the z axis. So scale it in, and then what I'm going
to do now is I'm just going to come in and
level these edges. Now, it's important that when we've grabbed these edges again, press control A in object mode, reset your transformations and now come in and level them off. So control B, level them off. And you can see there,
beveled them off. I think it's let's have
a luck four times now. The thing is, you might not
want to have it that high. Because the thing is
you're going to be actually be repeating
this a lot. So it means the more polygons
you have in the first one, the more polygons you're
gonna have in the next one. So I might just turn that
down, just one like so. Also we can actually
change the shape as well if we want to to something, you know, a little
bit more ornate. But I think for me we're going to keep it pretty standard, so we'll keep it like this. Now the main thing to do once you've actually
created your roof tile is to actually come
in and fix the mesh. So what I'm going
to do is I'm just going to delete both
of these faces. So fire press delete and faces. And then what I'm
going to do now is join them back up
but in a neat way, so ult shift click
around the bottom. And then what I'm going to
do is I'm going to remove, I think I'll remove
this one and this one. And then what that allows
me to do is bridge this. Now you can't bridge if
you've got it all selected. So you need to remove two, so there has to be
a gap between them. And then for right
click, come down and it says bridge edge loops. And there you go, a nice
clean edge, anthropology. Okay, so let's turn these both
off again, the same thing. So bridge, or was it bridge
edge loops. There we go. And now we want
to do is we might as well actually mark our seams. So if we come in an
Olt shift and click Olt shift click just going
all the way around it, like so stay on the bottom then. So if you can't actually
select it, just come in, rotate your camera, and then you should be
able to select it. Right click, mark, Seem. Now, just so there's
no infinite loop, I'm just going to select
them at the back as well. Right click and mark,
seem not sharp. Mark, seam and clear, sharp. We don't need a sharp. Okay, now the next
thing we want to do is we want to actually make
sure that this is unwrapped. So I'm going to
press L U on wrap. And then what I would do is, if I was doing this for a
really, really nice model, is I would just go then to
UV editing and just make sure that it's rap really
nicely which mine actually is. But now we're doing that, we
can come back to modeling. And now we want to do is
I actually want to create this into the actual tiles. So I'm going to do first voice, right click, Je, auto, smooth. And then I'm going to
bring in an array. So control all transforms
and then bring in an array. So add modifier,
bring in an array. And then what I want to do is I want to rotate this round now. So if I press one and
go into side view, then what I can do
is I can actually rotate it on the Y axis. Now it's important that we
rotate it in edit mode. So A to grab everything, art and Y rotate it round like. So I'm going to move
them up as well, so it's actually on
the ground plane. And then finally
what I'm going to do is I'm going to
move this X factor, holding the shift button
just a little bit back to make sure that it's
actually going underneath. Now if you want it a bit closer, all you've got to do is then R and Y rotate it
around a little bit, and then you can move it
back even more like so. And then we can pick them up though they're on
the ground plane. Now what we can do is if we actually increase
the actual count, as you can see, they all rest on the ground plane and they're
all in line with each other. But let's go something
like nine for now. I think that's gonna
be a long enough. If we look on this one,
we've got 12345678, maybe nine, something like that. Now the other thing is on
this one, I don't think, if I go in there, you can
see that these are flat. It is much better if you
have them like we've done here where we've got a
few actual edge loops. It's probably going to
be a little bit handier as well if you make
another edge loop in here. So if I press control are
left click, right click. And then what that's going
to do is as we bend it, it's going to allow
it for more bend because we have
actually more topology. Now there is that to
take into account. All right, so now
we've done that. What we want to do is we
want to array it across. So we're going to bring in
another array to add an array. We're going to turn
this down to zero. And then what we're going
to do is turn the Y up to maybe one or minus one, whichever way it's going to go. And you can see now this
is how it's going to look. Now the next thing we
want to do is probably Be level these off. But
I'm going to come in add, modify it, And let's
actually bring in a bevel. Let's actually bring down this bevel then, so
it's not too high. So set it up to maybe
maybe something like this. And then what I'm going to
do now is actually increase the amount of a race on this one so that they
go across a few more. Can see on mine I've got
12345, something around there. So let's put that in. If bring it down, I think it's this one. Yes, it is. Five like so. And now we've got basically
the start of our actual roof. Now what I want to do is want to create the next
part of the roof. So what I'm going to do is I'm going to bring in a cylinder. So shift, let's
bring in a cylinder. Now remember this wants to
be pretty low because again, you're going to be
using this a lot of times and repeating it a lot. So try and get it down
to something like 16. Which means that
when I write Click, I should be able to
put auto smooth on and actually have no jagged
edges or anything like that, so don't go too low. Don't go to something
like ten or something like that because
it simply won't work. Next thing I'm going to do is
I'm going to squish it in. So, and then and Z, pull it up like so. And now I'm going
to rotate it round, so R, Y 90. Let's rotate it round and let's make sure that that
is going to fit in. Now when I'm fitting
this tile in, I want it to fit to the
halfway point as you can see, so it's nearly in
the halfway point. Now what I want to do is I want to make sure that it
comes to the end. At the moment you can
see it's probably a little bit actually that's okay. What I want it to do, I
basically want it to come the cylinder to be two tiles
and then a little bit extra. And the reason I want a little bit extra is because I want it to come to the end and just kind of hang over the end light. So what I'm going to do
is I'm going to come in, first of all, I'm going
to press controller. And let's bring in three edge
loops, something like that. And then what I can do
now is I can come to the edge of it and I want to
pull this out a little bit. So what I'm going to do
is I'm going to put it on maybe on route, let's try route to see if
that actually works so we can see now we've got a nice
flow of it going out. Now maybe that is a bit harsh. So what I tend to do is I
tend to play around with these parts and see which one's
given me the best result. And you can see
there that this one, which is the sharp, is definitely giving me
the best results. Now what I want to do
is I want to insert. So I want to press and insert. And then what I want
to do finally is eat and pull it back like so. All right, so now we
need to make sure that these actually fit together
in line with each other. I'm just looking at
the scale and making sure I'm happy with
it, and I think I am. But once you are happy with it, again before you do anything important that you
actually fix any measures. We have got an Eng on
in the front and back. I'm not going to worry
about engons at the moment. You know what they are and
you know how to fix them. All we would do is literally right click, triangulate faces. Let's press control
then and mark a seam. And then what we're
going to do now is actually mark our other seams. So all around here, all around here,
all around here, right click and mark seam. And then what we're
going to do is we're just going to come underneath. If we press control seven, we can see the line is
straight from there to there. So I'm going to
click on this one. And then I'm going
to come all the way to the back control Click, right click and Marco scene. And there we go.
Now again grab it. L U unwrap and let's
see what happened. It said object as
non uniform scale. And the reason for
that is simply this. We didn't actually reset
our transformations, both. You press control or transforms right clicks
at origin to geometry. And then what we can do,
do press try that again, wrap, and there we go.
No problem this time. Let's again go to
our UV editing. So we can see now this
is unwrapped really, really nicely for what we need. And now finally
back to modeling. And what I'm going to
do is I'm just going to save out the work
before I do anything else because sometimes blender can crash and we don't
exactly want that. All right, so now
we've got that. Let's bring in another modifier. And again it's going
to be an array. And you can see now that it's
put it right around there. Now from this point
we can actually move these in and out
because we can see that this is probably going to be a little bit too
close to my tile. So I'm just going to bring
it out a little bit. So, and then what I'm
going to do now is I'm going to pull this
back just the tad, so if I pull this down
a layer a bit back, holding the shift button
again into there like so. And then what I'll do is
I'll increase the count. So if I increase the
count, let's say that. You can see here,
this is the issue that I didn't want it to have. I don't want it to be
overhanging by so much. But what I can do is I can come now before doing anything, press and X without
proportional editing on. And then just pull
it back a little bit just so it's hanging just
over the end of the roof. And now you can see it's
looking pretty nice. So let's pull it
up a little bit. We want it, remember we're going to have
some wood in there, so we do want it far enough
in to cover that wood. So once we've got it there, I can then actually pull it out a little bit more by either increasing my X factor or I can actually
pull it out again. So what I'm going to do
is I'm just going to increase this just a
little bit like so. And now you can see that's
looking really, really good. The reason why I want this
circle as well is at the end, normally on ornate
Japanese roofs, things like that,
to normally have some gold or something
inlaid in there. And that's exactly what
we're going to go for, Al right Then with that done, then on the next one what
we'll do is we'll get this over here and then
we'll get it repeating. And then obviously we'll have it all coming together
to create this roof. And then we can start work
from there. Alright everyone. So I hope you
enjoyed that. I hope you learned a lot and I'll
see you on the next one. Thanks a lot. Bye bye.
30. Roof Top Shaping with Lattice Deformer: Welcome back everyone to blend
the beginners boot camp. And this is where
we left it off. All right, so what we
want to do now is we want to array this over
to this part here. So if I come in, I'd modify it and I'm going to
add in another array. I'm going to set
the x down to zero. And then what I'm going to do is'm going to move this wire up to six point.
Something like that. So let's have a look. Six
point, let's have a look. So what we're looking for is to get it round about the same. So we can see if
we go to this one, that it's just in this
bit as it goes round. So I think this is a
little bit too far, so I'm going to pull it
back just a little bit. So I'm thinking that that
is probably about right. All right. Something like that. And then what we can do is
we can turn this up before, something like that.
I think that's okay. And then what we'll do
now is we'll come to this one and we'll
actually convert this now. So I'll convert it and then I'll ray this over
to the other side. Because I think I actually, I can use this all the other parts that
I'm going to meet. So what I'm going to
do is I'm going to press on the
keyboard, convert it, and then I'm going to
press Add modifier, add an array, turn
this down to zero, and again with the Y factor. Now if I put this Y
factor up to the same, I'm wondering 6.55 I'm just wondering if it'll
actually be the same. So if we put this up to
6.55 let's have a look. I'm wondering why that's
not done anything, and I think it's because
it's over there. So it definitely
doesn't work like that. So let's bring this down. So we'll bring this all the way down to where I
need to fit it in. Alright, let's bring it
down to here somewhere. I'm just looking and I think that maybe needs just pulling
over yours the slight bit. Look at that and that's
go over the top. I can see where the
line is in here. And that looks about right. That's looking absolutely fine. There is the first part
of our Japanese roof. Now what we need to do is
obviously we need to rotate it round and actually get it
into looking like a roof. The other thing is it's way,
way too big at the moment, but we really don't need
to worry about that right at the moment now. Basically, I want to
make a roof out of this. So the way I'm going
to do it is I'm going to grab everything. In fact, first of
all, what I'll do is I'll grab this towel
because I'm actually going to want one of
these actual chunks of tiles. I'm going
to press Shift D. And then what I'm going to do is I'm just going to move that over here and I'm going
to turn the array off. But I've got this
kind of, you know, ready to go when I
need to put it in. Then what I'm going to do
is I'm going to grab all of this like so we're not going
to need to array it anymore. All I need to do now is just select one, just so
it turns yellow. Press the D button or
object convert mesh. And then what I'm going
to do is I'm going to join all of
this together now. So if press control J, join it all together,
and there we go. Now let's press control
All transforms, right? Collects origin, geometry. And then what I'm going
to do now is I'm just going to move this roof
out a little bit more. And I'm going to position this now right in the
center of the world. So I'm going to press Shift
Colect Cursor like so. And then what we're
going to do is we're going to rotate this round. Now if I press R Y 90, I'm going to rotate it so it's
vertical to the actual z. Now I'm going to do is I'm going to pull it out
a little bit like so I want to set the orientation
right in the center. So right click, set
origin to three decursor. Then what I want to do is I want to mirror it over
the other side. Now, mirror on the z, is it? Yeah, there we go.
Mirror on the z. And now what we can do is we can actually bring in
this other part. Again, I'm going to press
control all transforms, right click, set
origin to geometry. Rotate it round so R Y 90. Rotate it again, so R zed 90. And then put it in the
center of the world. So shift S selections
cursor right in the center. Now what we can do
is we can actually pull this into place. Just making sure that it's in the same
place as these are. You can see this is how this
side is looking though. Is it in far enough? I'm thinking that
probably it's not though. I'm just going to pull it back just a little bit to get
it a little bit more even. And actually I've
done a good job there because I think I've pretty much nailed it and may need to pull this
one out a little bit. So what I'm going to do is
I'm going to grab this one, press the button just to make sure everything
is selected. And then of course
as I move this one, the other side is going to
move as well. All right. Something like that I
think's absolutely fine. Now what we'll do is we'll
actually come to this part and I'm going to mirror it
again over to the other side. Then I'm going to right click, set origin to three D cursor
and then add in a modifier. And let's bring in a mirror. Let's put it on the Z again. Turn these two off,
and now there we go. There is the beginning
of our actual roof. Now what we can
do is we can grab everything with box select. And then what we're going
to do now is press D. And then control J, join it altogether
and there we go. It's looking really,
really nice already. All right, so now what we need to do is reset the
transformation. So control A all
transforms, right? Clicks origin to geometry. And now what we need to do is, I'm thinking that
we'll probably use, so shift a, let's come down, and we'll start
with our lattice. So bring in our lattice, Let's make it a little
bit bigger, this lattice. Because again, it's way, way
too small at the moment. And basically what you want
to do is with the lattices, you want it to be
fitting near enough, perfectly on all sides. So if I press seven, we can see it's way
out at the moment. So I'm going to press
S and Y and pull it out out to there S
and X to pull it in. And then I'm going to go into the front view now,
which is three. And I can see that it's
near enough, actually. Right? So I'm just
going to press S and, and bring it
in a little bit. And let's go to the other
view, which is 173. And there we go, you can
see it's now fitting. Now because we use the lattice, what that means is we
can actually bring in some more kind of dge
loops within the lattice. What they're able to let
you do though is actually create a bend in the mesh. And because we've
gave our mesh lots and lots of topology, it should make this quite easy. What I'm going to do now is I'm going to come to my lattice, come over to the
right hand side, we'll have a new option. And then as you turn this up, you will see that
we actually get more kind of edge loops
going down there. Now the thing is
we don't actually need edge loops going this way. You might need it in
some circumstances, but in this we don't
actually need it. So what I'm going to do is
I'm going to turn up the W, and this is the one
that we do need. Now, it's important that you
don't turn it up, you know, crazy amounts like so you will get more finesse out of it, but it does make it harder
to actually start, you know, bringing it in So I wouldn't put too many in there, is what I'm
trying to say. So I'm going to
turn mine, I think, let's try ten. Let's
have a look at ten. I think ten is going to
be a good number to use. All right, so now
we've got that. What we can actually do now is come over to our actual roof, come onto our little
spanner, add modifier. And then what we're going to do now is we're going to come down to where it says lattice,
which is this one here. And then all we
need to do is pick the object or the lattice, which if we grab this pipette, our lattice is here.
We can click on this. Now if we go back
to our lattice, rest three on the number
pad, press the tab button. And what we're going to do is we're actually going
to bring it in. So if I press B like so, I can actually then come in with my proportional
editing on, press the S button,
bring it out, and now you'll see that we can
actually bend in our roof. Now what is very
important here is that you don't bend
it in too much. Also, what's
important is that you make sure that you
bend it one at a time, basically until you've
got the right shape. So it might take a bit of practice to get
the right shape. So what I'm going to do
is I'm going to grab just the bottom one and then
I'm going to put this on. Maybe we can get away with
sharp on this bottom. Let's just have a look if I can. I'm thinking, yes, I can probably pull it out
a little bit like so. And then what I want
to do is lift it up just a little bit
just to get that bend. Something like
that. And then I'm going to go down now and I'm probably going to use a different
proportional editing, so let's try the root, see if we can get more out of the root. So again, what I'm
going to do is I'm just going to
select a vertex. Grab all of them like so. Press the S button, bring
it in a little bit, and now we can see we're
actually getting somewhere. Now you can see as I've
brought that in that far, that the bottom part, now this is out of line
as you can see. And that's what we
want to be careful of. Again, I'm going to come in now, box select and then bring it in. And I'm doing it
very, very slowly. A little bit of time as
you can see though, again, bring it in because
what we don't want to do is get too much
of a bend though. I'm going to come in now, grab the top and then bring it in. Yours a little bit like, so. Now what I tend to do is I
tend to line all of these up. So I'll come in and line them up once I'm actually happy
with my roof now. I don't think actually at the moment I'm happy completely. So I'm just going to work
on it a little bit more. I'm going to come to the
bottom and I'm going to press, pull them out a little bit, like lift them up. And you can see there
that we're actually getting some breaking
on the mesh, but we need to be very, very careful that we don't do too much damage on our mesh
because this is a sign that actually we're bending
it probably a little bit too far so we don't
want to squish this in, so it's just completely flat. So just be aware of that. I'm thinking that that's
looking pretty nice. I think I need to bring the
top in a little bit more. So I'm going to
press three again. I'm going to grab, let's
say this one here. Press B, just on this one. And then press the S
button, bring it in. And now I can start actually
bringing this top bit in. So let's see if we can bring
the top bit in as well. And we press S, so
something like that. And then I'll grab just
this top, there we go. And then let's
bring it in again. So, all right, so now
what I want to do, the last thing I want to do is I want to straighten these up
because I don't want to, you know, jag it or
anything like that. Now this is what
I'm talking about. We can see this line
is all ben like. So now on the next lesson, what we'll do is
we'll straighten all this up so that
it looks much, much better than what
it does at the moment. It's kind of a
little bit jagged. Alright everyone, So I hope you enjoyed that and I'll
see on the next one. Thanks a lot. Bye bye.
31. 3D Roof Support Creation: Welcome back everyone to blend
the beginner's boot camp. And this is where we left off. All right, so now let's try and go in and straighten
all those up to, to do that I'm going to turn
proportional editing off. And then what I'm going
to do is I'm just going to come in and grab
each of these bands. I'm going to press and what I'm looking for is a
nice gradual slope. So if I grab this one, I'm
going to press like so, and then I'm going
to grab this one. I'm going to press B
then and bend it in. Then this one you can see is probably a little bit too far. I'm going to grab
this one. Bend it in. Now we can see we're getting
that nice, gradual slope. Now we can also see
that on this one, it's probably too close to this, so I need to pull
it up a little bit. I'm going to come in as B, and then bring it up and then
bring it in a little bit. So now we've got near enough, a beautiful, gradual slope. I'm going to press S, bring it in a
little bit like so. All right, so there we go, A really, really nice slope. Now let's come in and
turn off our x ray. And that is what you
should be left with, a really, really
nice actual roof. What we can do is we can
actually apply this lattice now. And then what we
can do is we can get to work on our wood. What I'm going to do is
I'm going to come in, press the button
just to apply that. And I can delete my
lattice out of the way. Now go delete lattice like so. And then what I'm going to
do now is let's think about, you know, our parts for our
wood and things like that. So let's first of all come in and what we'll do
is we'll bring in, I think we'll bring in
a plane for this one. I think I'll make it easier. The thing is normally
when we've been creating crates and
things, we've got away. We've actually just
pressing the insert, but the problem is that
you're going to get like cuts away on
the actual wood, and that's not something that we actually want on this one. What I'm going to
do is I'm going to bring my plane to
the right size. I'm going to press S
and Y and bring it out, just making sure it's the
same all the way around. And then what I'm going
to do is I'm going to press Tab Control Er, and then control going this way. Now I'm going to
do is I'm going to press control B and pull it out. Turn down the amount
of Pethls to one, and then one going to do is I'm just going to pull it out to get some nice thick
wood like so. And then one going to do is I'm going to do the
same on this one. So control pull it out. So now what I'm going to do is I'm going to split
all of these off. So I'm going to grab these two. I'm going to grab this
one and this one. I'm going to press
Y and split it off. Then I'm going to grab
this one and this one, I'm going to press
Y and split it off. And then finally one do is
I'm going to press control. And I want to go
down this one here. So this main one
here as you can see. So what I'm going to do is just hide those out of the way. Then press control and bring in some boards, left
click, right click. All right, so let's press O. Now that's pretty much
done for the top of it, apart from extruding in all of these parts out and
splitting them up. And now what we need
to do is we need to do the same thing for
the actual bottom. So what I'm gonna
do is I'm gonna come in, hide that out the way. And then I'm going to bring
in now another actual plane. So I'm going to press
shift A, bring in a plane. I'm going to press
S, I'm going to put it on x ray mold again, just so I can see
where the edges are, which is around here. So bring it out just so
it's under the actual roof. And you can actually check
that if you pull it down, you will see turn
this off a minute. That it should be just under the roof there
as you can see that. We just want it right up. And maybe that's a
little bit too much. I'm going to press S just to
bring it in a little bit, so the actual roof tiles are
actually sat on something. Now if I press S and Y, I'm going to do the same
thing on these edges. So the roof tiles press control seven to go over the top and look to see there actually
sats on something which it looks like
the nearly are, S, Y. Bring it up a little bit like so and that looks
absolutely perfect. Control seven, then
to 12 at the top. Same thing again. So control
left click, right click. Control left click, right click. And then control B and pull
it out to where you want it. So this will be the size
of those wooden pieces. And then what I'll do is I'll do the same thing again
with this one here. Control, pull it out like so. And then now what I'll do
is I'll split, in fact, I'll go back and I'll just
hide these out the way. So just select this shift select means it will be deselected. Press the H one to hide control. Now bring in some
planks of wood. Left click, right
click. And there we go. Now the one thing that we didn't think about is it's okay. These parts are going to need a few more edge loops because we really want to
bend this again. So we're going to go in
now and press voltage, bring back all of these parts. And then what I want to do
is I just want to press control on this part
here, this part here. And just make some
more edge loops. So I'm going to go
in, I'm going to. First of all, split
off these parts. I'm going to press Y, I'm
going to grab this one. Controls like this one. Grab this one controls
like this one. Press Y, And now what I'm going to do is I'm
going to grab this one. I'm gonna hide it out the way because we have
enough edge loops. I think in there we might need, actually for bring it back, we might need some
more going down here, I think we will actually. So we'll put in a
couple of edge loops. So left click, right click. And now what we can do
is we can hide this bit. Now let's come to this one,
because we actually made, you can see we've got all of
these subdivisions on here. We don't want those, what
we want to do is grab them, press delete, and
limit and dissolve, and then that'll get rid
of all those subdivisions. Alright, so now
let's press control. And now we should be
able to bring some in. So I'm going to bring
in eight control, press eight on the
number pad and then left click and right click
to drop them in place. And then we'll do the
same on here as well. So let's bring in two,
left click, right click, control two, left click, right click. All right. Now let's go to the top. Now press tab ol tag and do pretty much the same
thing on here side, these out the way so. And then what we'll do
is will come to the top now and pretty much
the same thing. So I'm going to grab all these. I'm going to hide them out the way I'm probably
going to have. Nope, I've not got a
problem with those. So again, I'm going to do eight, control eight, left
click, right click. Control eight, left
click, right click. And then control two, and then the same on this one. So control two. So all right, so now
let's press Holt. And then finally
now all we need to do is split these
little planks up now. So all I'm going to do, in fact, I'll give another
edge loop down here. So control do left
click, right clip. Now let's split these up. So what we're going
to do is just grab each one down here. So, and then what we're
going to do is Mark, smell, mark a sem. Now I'm going to come in and
grab each one of these like, so press Y and then
they're split. Now everything on here
should be split off. So if I grab everything
I should be able to. In fact, I won't
grab everything. What I'll do is I'll grab all of these and then I'm just going
to press and pull them up. And then what I'll do
now is I'll grab all of these and pull those up, but not as high as
the other ones. So I'm going to
press, pull them up. And also what I can do
is I can grab this one. This one. This one and this one because they're
split away from these ends. I'm going to press, sorry, just pull them down a
little bit just so they look a little bit off center
from these ones on the edge. Now, finally, I'm not happy with how sharp these edges are, so I'm just going to bevel
these off a little bit. I think I know the devil
will do some of the work, but I think they're a
little bit too sharp, so I'm just going
to press control B. Now you can see that
when they come in, they're coming in
at a weird angle. Let's actually reset
our transformations. So reset transformations, and now we can
come in control B. And there we are. That's
looking much, much better. All right, there we go.
I'm happy with that. One thing I don't know if I'm happy with is how
thick this wood is. I think it's not
quite thick enough. So what I'm going
to do is I'm going to make this much, much thicker. Actually come in.
Control, click, shift, click, control, click. And now let's pull
that up. There we go. And then let's come in now
and grab each of these. Though I should be able to come in now and grab each of these. And just pull them
up because I've got a bottom underneath anyway,
so if I pulled them up. Right, So All right,
something like that. Now let's bring in a bevel. So I'm going to reset my
transformations once more. And then bring in a Bevel
modifier. There we go. It's looking really, really
nice as you can see. Let's turn it down a little bit, though I feel it's a
little bit too high. Yeah, something
like that. I think is looking pretty nice. Right. Plate shade, auto smooth. And now let's come and
do the same thing, pretty much with the bottom. What I'm going to do is again, I'm going to come in
and split these off. So I'm going to come
in and grab each of these bit longer on
this one of course, and then right click marking
and now let's split the max. So if we come in L,
work your way down. So press the Y button. And now what I want
to do is I want to make sure these are
split, which they are. Now what I can do is I
can press A and then I can bring these out. So if I press pull
them out like so. And we can see we
have definitely got a little bit of
a problem in that we need this wood
to be relatively thick but not poking
out the bottom. So I'm going to press Tab. I'm
going to bring it up then. And then what I'm
going to do now is I'm going to shrink it
in if I need to. Is that fitting
in? No, it's not. So let's press the S button
and bring it in now. What we need to make sure
is that all of these Yeah, I think actually
that's going to work. That's going to work for us. I think I just need to pull
it down a little bit because what we want to be
able to do is see something under there like that. I think I'm going to actually
bring it in a little bit. And X, let's bring it in. Yeah, that's looking
much, much better now. Now what we can do is we can
actually grab all of these. So what I'm going to
do is I'm just going to press L on each of these, but I'm going to make
sure I'm in edge select. Just so I am selecting the mull. Go all the way down and
then we're just going to squish these in on the Z and Z. Now finally, let's
pull these ends down. Grab each of these.
Let's pull them down. All right, so, all right now, moment of truth, let's
bring in a bevel. So control all transforms. Add in a modifier, bring in a bevel, turn it down. Turn it up too. There we go. A Japanese roof, nearly done, not quite on the next list. And then what we're going
to do is we're actually going to bend this a
little bit because at the moment it's still a little bit straight
for a Japanese roof. Alright everyone, So I
hope you enjoyed that and I'll see on the next one.
Thanks a lot. Bye bye.
32. Roof Texture Pattern with UV Unwrapping: Welcome back everyone to blend
the beginner's boot camp. And this is where we left off. All right, so now
we've got our right. So word in what
we need to do now is join all of this together. So all I'm going to do
is I'm going to come in, I'm just making
sure I'm happy with everything before I
continue. I think I am. I'm just going to
press B, grab it all, and then I'm going to select
one of them and then press D and then press control
J to join it all up. Now I'm going to
do is I'm going to press Control all transforms. Right click, start
origin to geometry, and then right click
shade, autos, move. And there we go, our
Japanese roofs nearly done. Now let's actually bend it, but what I'm gonna do
is I'm going to press, I'm actually not gonna press anything because I've
reset my transformations. And I'm gonna come
over to add modifier. I'm gonna bring in
a simple deform. I'm gonna put it on bend, and then I'm just
going to see if we've actually got a
bend in place already, which it doesn't
look like we have. So what I'm going to do is if it's not actually
bending the right way, it's simple trick to do is make sure that you're
on a medium point, press the tab button,
you're gonna press A, then to grab
everything and you're going to rotate it in edit mode. So zed 90, rotate
it in edit mode. And then what you're going
to do is you're going to go back to object mode. And you're going to
rotate it back the way. So zed -90 rotate it back. Now you should be able to see that we do have other options. So you can see it's kind
of bending this way, which still isn't the right way. So what I'm going
to do is I'm going to actually rotate it again, Pab again, and then
rotate it on the Y axis, so R Y 90, and then back again, so R Y -90 And now you can see we're
actually getting somewhere. So what it's doing now is it's bending it in this way now, don't worry, because we're going to bend it the
other way as well. But at the moment, that's
the way that I want it. I just don't want it that much. So I'm just going to pull
it down just so it's not breaking any of my mesh
or anything like that. And there we go, we can see we've got a
beautiful sloping roof. Now let's come in, apply
that with control. Let's add nothing, modify it, and this time we'll bring
in a simple deform. Again, we'll put it on bend. And we can see already on the X, it's now bending the other way. So it's now bending this way. Again, probably too much. So let's bring it down
a little bit just so it doesn't look too crazy.
Something like that. And there we go. That
is the Japanese roof. That is how you
do it. All right. So control a, let's apply that. Let's now make it smaller. There will be more akin to this one and actually
it's looking much, much better as always, than the original one
I actually created. So I'm just going
to bring it up, make it a little bit
bigger in line with it. And there we go. Now you can see that, however, we do have one issue in that
sometimes this happens, that this has been
a little bit too much and you might need
to fix just the tiny, tiny little parts of it. So I'm going to fix this.
Now the way to fix this, I'm probably just going to go in and let's have the thing, let's just, let's bring all
of this in a little bit. I think I'll make
it the easiest way, so I just don't want to leave it where it's not quite right. So what I'm going to
do is I'm going to press three and then I'm going to just put on my X ray. And then I'm just
going to pull it in. So S and Y just pull
it in a little bit, put on turnoff x ray. And then S and Y pull it in a little bit more. There we go. Now it's hidden out of the way, and now it's looking
absolutely fine. Okay, so the next thing
you want to do now is actually bring
in some materials. So let's put it
on material mode. And then what we'll do is
we'll come to the top first. So I'm going to grab all
of the top parts like so. And we're just going
to unwrap these with the standard UV project. And hopefully we might just
need to turn them around and they should be done as long as we make them a
little bit bigger. Okay, so let's
first of all apply. Let's first of all see what materials are on
here so we can see. We've got roof wood, roof tile, roof symbols, which are these gold
symbols at the bottom. And then roof tiles red. So in other words, we've got
two separate roof tiles. Now, because the majority
of this roof is roof tiles, we might as well come into this one first and
just move it up one. So if I click and
move this up one, you can see nothing actually
happens to the roof. But what does happen now if we select this roof
and select this one, press control L link materials, you'll see the first one, that material goes on is always going to be
these roof tiles. And that's important because that means then that
we haven't got to go in and apply this to all of
these roof tiles. All right. Now with that done, what
we want to do is we want to come now we've
got our wood selected. Let's actually give it the roof ward red. So let's assign. And then what we're
going to do is press U Mart UV project. Click okay. And there we go. Now we need to do is
just make these bigger. So let's go to our UV editing. Let's go to our roof. Let's press a, bring them
out much, much bigger. Let's see if that's enough. And there we go, that's
looking beautiful. Just make sure the actual grain
is going the correct way. Now, once we've done
that, we can come in, we can hide those
out of the way. And now what we can do is we can actually select all of these. So if I come in, what I want to do is just
select each of these. Now, again, as I said, it's easier to select
each of these parts rather than selecting
the whole of the tile. That's why, again, I put it on the material
as being the first one. It's all, as I say, with everything in modeling, it's all about forward planning. That's the main
thing that you need to kind of get nailed down. And then what I'm going
to do is I'm going to press smart UV project. In fact, we might not actually
need smart UV project. I might be able to get away
with just you and wrap. Yes, I think I
have. And then what I'll do is I'll roof tiles. Red liquor sine? Yes, and there we go. All right. Hide those out the way
onto the roof tiles. Let's press a rap. Roof tiles sine. Let's grab them all. Press
the bot, pull them out. Still need pulling out
a lot more as I can see. Pull them all the way out. Let's have a look.
And there we go. Beautiful roof tiles. They're looking really nice. Now we can see the
woods looking good. The one thing we're missing
is these parts down here. So what I'm going to do is
I'm going to press ul tag, bring everything back
and then we're going to come do each of these parts like so then what I'm going to do is I'm
going to assign it to the roof symbols. Like so click a sign
and then what I want to do now is come
to my roof symbols. I'm hoping if I put in roof, I don't think it's
actually going to be, oh yes, there it is. So here is my roof symbols. We can see our
little circles here. We can see they're not
in the right place and also they're not that big. So what I'm going to do
is I'm going to press S, bring them out and then I'm
going to press UV Islands. And now we can see that
they're nearly the right size, not quite the neath, going
a little bit bigger. What I'm going to do
is I'm going to press S just to make them
a little bit bigger, and I want it to kind
of fit into place. Now you will see that
they're kind of bent. And the reason is
because obviously we used our lattice
and things like that. So what you can do is
you can press S and X and pull them out a little bit and make
them more straight, and then just make sure
they all fit in place. Now what I'm going to
do is I'm going to grab this one and I'm just
going to fit this one into place like so I'm going
to grab this one and then fit it into place and then just do the same thing
with the others. Fit into place. Of course, if you really, really
take your time with this, it's going to look pretty good. Now what you can also do, once I've done this
I'll show you, is you could also
use this trim sheet, because that's what it is to actually create more
variations on the roof. In other words,
round this bit here, you could also have
some gold trim. You could also have
some gold trim running down this
part here as well. In other words, I can come in, I can grab this part here, can press you on wrap. And then what I can
do is I can actually turn this into gold as well. All right, so what I'm
going to do is actually, I'm thinking, could I
actually straighten that up? Let's have a look. So if
I press three UV Project, let's see what that
comes out like. That's not coming out right. So let's have a look at cylinder projection that's
a lot more straighter. Now if I press A and G, let's put that on there, let's put the roof symbols on. And there we go. That is
what it would look like, really, really nice,
as you can see. All right? But I'm
not going to do that. What I'm going to do is I'm just going to put it on roof tiles. I'm going to click a sign. I'm going to keep that as is. And I'm just going
to have a quick look around making sure
I'm happy with it. And I'm thinking that's
looking really, really nice. All right, let's go
back to modeling. And that guys, is the
roof Japanese roof done? And what we'll do
now is put this into our Japanese roof so, and now we'll hide
that out the way and then we'll look at
our actual boat. So everyone's dream, when
they first start modeling in, it comes up at some point
you want to make a boat. So I'm going to show
you the easiest way to actually make a boat, and it really, really is easy, so you don't even
need a reference. But I do recommend, if you
are going to create a boat, try and get some schematics of how the actual
shape of the boat is, because it does take
a little bit of practice to get that
kind of boat shape. All right everyone. So I'll save it out and I'll see
you on the next one. Thanks a lot. Bye bye.
33. Boat Base Modeling: Welcome back everyone to blend
the beginner's boot camp. And this is where
we left it off. All right, so now
what we want to do is we actually want
to create this boat. So what I'm going to
do is I'm going to just move these to the side. I'm going to hide the water out of the way so
we can actually see something kind of
the shape of the boat. So you're welcome to actually
use that as a reference. And then what we
can do is just hide this boat text out of the way. Now what we're going to start
with is an actual cylinder. So shift, let's bring in
a mesh and a cylinder. Let's put it on
something like 24. Let's try that. And then what I'm going to do
now is I'm going to put this on object mode so I can actually see
what I'm doing now. I'm going to press S and y. Let's pull it out just
to give us a really, really nice start
to our actual boat. All right, then what I'm gonna do is I'm going to press three. I'm going to bring
it up a little bit. And then what I'm
going to do is I'm going to add in some
edge loops now. So I'm going to
press Tab Control. Let's bring in five edge loops. Left click, right click. And the amount of edge lops
you're bring in here is actually quite important
because as you can see, we've got a few planks of wood in here and we
actually want to use these edge loops to
replicate those planks of wood. Alright, so once
you've done that, then now it's time to get rid
of the top and the bottom. We're simply not
going to need them, so delete and faces like so. And then what I tend to
do is I'll start from the bottom because the bottom wants to be relatively thin, so if I grab it going
all the way down there, press control seven. And then what I'm
going to do is I'm going to bring in
proportional editing. And then I want
to bring this in, so if I press and X, I want to bring this
in a little bit, so to make it pretty thin. Now what I need to make
sure I'm doing when I bring that in is as
you can see there, it's probably
coming in too much. So I need to press control head. I need to press S and X again. And then what I
need to do is just zoom this in a little bit. So I'm going to bring it in, I think a little bit at a time. So something,
something like that. And then what I'll do is I'll
bring this bit out, so X. So then what we'll
do now is we'll bring the other parts out, x. And then finally this part. Let's bring this part
out and x one and x. All right, at the moment I
think it's looking good. The first part of the shape is at least one problem I have is it's a little bit too wide. At the moment, it might
be okay down here, but I think we have to
bring it in at the top. I'll think, well, I'll do now. I'll actually, I'll
have this as the front. But now if I press and X, bring that out a little bit. Be able to now start
working, going around here. If I press X, W, how wide do we actually want it? Bring this one in
as well, and X. Now let's focus
on the back part. So I'm going to
grab these parts. Same thing again, and X bring
it in. And then this one. This one and X bring it in, and we're trying to get a
smooth flow as you can see. Then this one here, and x, let's bring it in a
little bit. All right? I think, I'm pretty
happy with that. Now. The next thing we
need to do now is bring it in from this edge here. One going to do is I'm going to grab the actual front of it. I'm going to press three
on the number pad. And then one going to do is I'm just going to pull this out, bring it in, and then I'm
going to bring it down. Then again, then finally again bring it down
like so. Okay. I think I'm happy
with the front of it. Now what I also tend
to do, I'll be honest, is if I've got the
nice shape up here, I will actually lead the bottom. I'm also going to look at the
one I've actually created. As you can see, it's coming a
lot further down into here. I might actually replicate that. What I'm going to do now
is do the bottom part. I'll do it on this one as well. And Y, I wanted to do is get this nice
curve going up here now. So S and Y. I'm curving
it up and Y like so. And then and Y, and we're going to pull
this one out a little bit, and then and Y pull it out. So All right, I'm happy
with this part at least. And now what I need to do is think about the back end of it. So I think I'm going a little bit too far in the
back at the moment. I think this is a really, really nice flow going up here. As you can see, we've
got a nice flow as well coming up this one. And what I need to do now is I need also a nice
flow on the back. So I think what I'm
going to do now, I'm going to come to this back, I'm going to grab one of them
and I'm going to pull it out altogether, like so. And There we go. Okay. So I'm happy with everything on here
except maybe this bit. Let's look, let's pull
it out a little bit. Got a nice flow on there. Now let's finally pull this
bit out because I have gone, as I said, a little
bit too much. So what I'm going
to do now is S and x makes it a little bit wider. There we go. All right, this is looking pretty nice. Now what I need to do
is I need to think about the actual top part. Now normally what I tend to
do on the top part is I don't tend to actually have it like where these
boards going across. I don't actually know why
I've left it like that, but it doesn't look
too good in that way. But what I tend to do
now is I'll grab it all and I'll just squish
it down a little bit. It tends to make it look
a little bit better. And then also what I'll
do is I'll come in and go to vertex and we'll
smooth vertices out. And now you can see
that smoothed it out really, really
nicely forwards. Once you've done
that, just right click and shade auto smooth and you'll be able to see any parts that haven't really
been smoothed out. And then what you can do
again is you can come in vertex and smooth vertices. And again now we can
actually check it again and now you can see it's
near enough smoothed out. Now the last thing we want to do is bring these
in a little bit so you can see we've still got some problems with
this not being in, because you don't
want, you know, the edging of the
boat to be really, really chunky down here. So I'm going to grab
probably three of them. And then what I'm going to
do is I'm going to press S and X like so then just bring them in so you can see I've
got some bend on there. So if you bring it
down a little bit, just so you're not
gained so much of that, then you should be able to
get it nice and smooth. Now sometimes you'll
also need to come in and actually use the
vertices instead. S and X bring it in, and then S and X bring it in. And then we'll just
match all this up. And then finally what you need
to do is you just need to check to see how smooth
the boat is looking. But that, to me, is looking pretty nice so far for our boat. Now just press tab. Let's have
a look at the smoothness. Now we have got an issue with this part down here and I
don't really want that. What it means is I just need to pull these out
probably a little bit. So I'm just going to
press pull them out. Let's see how far we can
actually pull them out. Or pull them in. Yeah, there we go. We'll just pull them in. It seems to actually
be a little bit, I'm just going to
turn proportionality of x, pull them in. And then we go a
little bit more. Maybe, there we go. And we don't need to worry
about that bit actually, because that bit is
going to be covered up. All right, so let's have
a look at our boat. And I think that boat is
coming along pretty nicely. All right, let's go to file. Let's save it out.
Save out our work. Now, as I said, it does take a lot of practice to actually get this kind of nailed down. I have been making boats
for a long, long time, so don't worry if your
boat doesn't look, you know, as good as mine does, or it might even look better. Let's hope so. But
if it doesn't, don't worry too much about it. All right, so now we
want to do is we want to create this part along here. So this going up here, Soap. So that's the next
part we'll create. What we'll do to create
that is we'll just come in, we'll grab this part going
all the way down here. Shift control, and then we're going
to go to the back now, and we're going to go shift control Then what we're
going to do is we're going to press shift D and then selection and
just take that way. So now if I had my boat, we should end up
with these two parts here and that's
exactly what we want. All right, so on the next
lesson what we'll do is we'll create this kind of
wooden part that goes there. I don't actually
know the name of it, I should really look up and
find out what it's called. But we will create this
bit going across. See it. All right everyone. So I
hope you enjoyed that. And I'll see in the next one. Thanks a lot. Bye bye.
34. Boat Support Frames Addition: Welcome back everyone to Blend
the Beginners Boot Camp. And this is where we left off. All right, so now if we
come in and we press Tab, what we're going to do is
we're going to come to vertex. Click on Vertex, and
then click on this. And then what we're going
to do is we're going to press and I'm going
to come into edge. And then what I'm going
to do is we're gonna right click and subdivide, and subdivide and
subdivide once more. What that does is it
gives us an even amount of splits between
them, as you can see. Now what we can do is
we can actually use this to create the
bottom of the boat. So what I'm going to do
is I'm going to press control all transforms
right click, set origin to geometry. And then what I'm going to
do is I'm going to come down to this because I'm going
to come down to my curve. What I'm going to
do is I'm going to object, convert to curve. Now you'll see that when I
come in and tube this out, we actually get the first
part of our actual boat. Now, it doesn't look
like much at the moment and we also need to do a
little bit work on it. What I'm going to do now
is adding a solidify. So let's come in, we'll
add in a Solidify. Let's pull it out. Then
pull it out like so. And then what we're going to
do is going to press Lth. Bring back our boat
and everything else, hide them out the way. Now what we need to do is,
first of all is we need to actually make sure that this is, first of all, even thickness. And second of all, we
need to move the offset. Because at the moment
it's actually more or less in our boat and we
don't really want that. So what we're going to
do is we're going to pull down the offset. I'm hoping that it's going
to pull it downwards over. Look, not to the side,
I'm just looking. Yeah, it's actually
pulling it to the side, so we don't
actually want that. Instead of doing that, I'm going to actually
go over the top. First of all because we do
need to use this offset. What we want to do
is you want to place the offset in the middle. They can see at the moment
this is where the line is. What I want to do
is I want to place it in the middle
roundabout there, so we've got the same
gap on either side. And we can line this up
perfectly if you want to. It's completely up to you. And what you want to do
is you want to take off your x ray and we want to make sure that it's now fitting
in place so it looks at the moment like it's
fitting in place much, much better than what
we had it before. Now the other thing is I tend to make this a little bit
thinner than what it is. So if I press and X, we can actually make it thinner
or we can make it bigger. So it just all depends. And what we need to do now
is we need to make sure that all of this bottom part of here is actually
fitting in there. So sometimes you might go in and let's say you'll
grab this part here. And what you want to
do then is you want to add proportional editing on, press the S and X, and then you should, sorry, old S, and then you should
be able to pull it out. Now at the moment, I think we're going
to have to actually pull the wooden parts in
instead of doing that. So if I come to my wood, let's have a look if I can
actually pull those in. What I'm going to do is
I'm going to grab them going all the way
around, put x ray on. And now you can see I've
brought those all in. And then what I can
simply do is S and X, bring those in just a little
bit, don't want to break it. Here you can see it started to actually bend a
little bit too much. As you can see, we
don't really want that, so I want to fix
that straight away The way I'm going to
fix that X ray again. And I'll come in and I'll grab, I think it's this
two verts here. Have a look for. Take X ray off tab and yeah, it
looks like those. Let's see if I can
actually fix those. X and X. There we go. That's actually
fix the other way. Now I might be able to get away with actually making
it a little bit wider. Now what I'll do is
I'll come back to this part here and then we'll
go to the actual curve, turn up the Xu because that is actually going to make it a
little bit thinner for us, which makes it look
a little bit bare. And then finally,
turn up the solidify. If I turn up the thickness of
the solidify, there we go. All right, that's looking
much, much better. Now, we need a part on here, so we can see that
this part in here. Again, the wood on here. So the boat is a little bit out. So let's go and grab
this side and this side. And then what I'll do
is I'll press and X, bring those in as well, the nearly in just
a little bit out. So let's press X
again. There we go. Bring them in and
still looking smooth. So that is really nice. Okay, so the next bit. Let's first of all
pull this bit up. So if I press three
on the number pad, what I can do is I can
actually press tab, grab this vertex here, press the Born,
and then just pull it up like then on the front. I can actually make this
a little bit more ornate, so I can press E and
then just bend it round however you
actually want it. Maybe something like
that. Maybe I've gone a little bit
too crazy with it, but hey, ho, it
looks pretty nice. It look good with a dragon on
it or something like that. All right, so now
we've got that. Let's now think about right clicking and
shading auto smooth. And it's not going
to look right at the moment simply because at the moment we've actually got our solidify and our curve on. So what I tend to do instead
is I'll shave flat on it. Now let's come to this part. And what I want to do is I want to make this a
little bit bigger, so I'm going to
press alternates. Pull it out a little bit. In fact, do I want the
proportionality on Lns? Let's see. I actually
don't want it like that. I actually want it to be wider, so alts and actually pull it on the Y or
anything like that? No, I don't think so. I
think it's just going to make the whole thing
a little bit bigger. So what I'm going
to do is I'm going to put it onto smooth. Instead, I'm going to grab
the center of it. Alts. Then just pull that out just
to make that little bit, a little bit chunkier
stain on this one as well, so Alt and pull that out
like so. And there you go. You can see that that's
looking tons, tons, bet. Now let's convert
this with the D. So let's convert
it to actual mesh. And now we can actually come in and actually pull this out. So if I grab this part here, I can then press S and X
and pull this out like so. And then I can do the same
thing on this as well. Now I'm going to pull
the front of it in, so S and X pull that in. And then what I'm going to
do is I'm going to think, I'm going to pull it out
on the bottom down here. So S and X, let's pull
it out a little bit, making this bit a bit
chunkier. Right click. And now we can actually
shade autos move because obviously we've
not got any curving it. Now one thing you might
notice in that it's looking a little bit chunky
on these parts and maybe you don't
want that to fix that. It's just Ol shift click. Ol shift click on
all those parts. And then all you're going
to do is control B and just be level those off maybe
with a couple of bevels. There you go. Now that's fixed. Okay, that's looking very nice. Now let's actually come
to the actual boat. So what I'm going to do
first of all is I'll make the actual rim of the boat. So I'm going to press
Lt shifting, click. And then what I'm
going to do is I'm going to press Shift. I'm going to bring it up without
proportional editing on. And then what I'm going
to do is I'm going to press and Z and pull that down. And now we can actually
split this off. So if I split this off with
LP selection, grab it again. Control or transforms. And now what we can
do is we can actually bring in a solidify. So bring in a solidify like so. Let's turn it up a
little bit then. Now what we want to do is
you want to offset it. Pull it out a little bit, and then what you're going to
do is you're going to pull it down like so. And there is the rim
of your actual boat. Now, of course, it's
not perfect yet. We do need to do a
little bit of work on it and we will do
a little bit of work. For instance, we might
need to pull this a little bit out a little bit. At the moment it might
not be chunky enough. Let's actually do that now. So we'll come in and what I'll do is I'll
grab this part here. I'm going to just pull it out because what I want is these parts
actually fit in in there. I don't actually maybe
this on here now. I can go back to this, I
can grab that center one. And now I sold, I've not grabbed it
properly, I don't think. Let's put on x ray. Yeah, I've grabbed
the wrong one. As you can see, the x ray off. Now you can see I can
actually put those into place and they
look a little bit bare. All right, that's
looking pretty good. I think I'll leave
these bits as they are. I just want to pull this back
a little bit again, X ray. Grab this one X ray off. Let's just pull them back. So, and I think that looks
much, much better now. Then let's think about
our actual wood. With the wood, it's easier to actually do
this in two parts. So in other words, we want to split this off and mirror it, shift H, just to hide that. And then what I'm going to
do is I'm just going to put a seam straight down
the front and the back. Right click and mark. And then all I'm
going to do is just come to the left hand
side and then just delete and faces now the orientation should
already be in the middle. So now all we need to do is add, modify, Bring in a mirror. And there we go,
there is our boat. And then on the next lesson, what we'll do is we'll start to actually get these
planks into place. All right everyone. So save out your work, and I
hope you enjoyed that. I hope you learned a lot,
and I'll see you on the next one. Thanks a lot. Bye bye.
35. Boat Texturing Techniques: Welcome back everyone to blend
the beginner's boot camp. And this is where we left off. All right, so let's now come and think about our actual
planks of wood. Now what we want to do is
you want to split like kind of these into lots and
lots of different parts. And sometimes you might not have enough edge loops on there. So what I tend to
do is anywhere, there's not many edge loops. I'll come in and
actually press control and add in edge loops like so. So then what I'm going to do is I'm going to actually
split these off. So like so and then right
click and Marco sine. Now I'm actually going to put my actual planks in so I'm
going to grab this one. This one, this one. This one, right click, maxine. And basically what
I'm doing here is I'm actually creating planks. It might not look like it, but that's what I'm actually doing. So I'm creating planks like so. And then I'm moving
down to the next one. And I'm just trying to make them halfway between or
something like that. And I'm just looking
if that plank might be a little bit too
small, this one. So what I'm going to do is
right click, oxene control, left click, right click,
and then grab this one. Right click, oxene. You can see now it's actually a little bit better
than where it was. All right, so now I'm going
to, I'll put one here. I don't exactly want to follow
this all the way though, I'm just going to
make them a little bit more random like so. And then what I'm
going to do is I'm going to come to this one. This one depending on
what type of ship. So let's say it was an
Egyptian ship or something. The planks are
much, much longer. If you look at a Viking ship, they don't actually
look like these planks. They're actually the
same all the way along. And that's something that
you might want to do. Now, before I
actually do anything, what I want to do is I
actually want to take this press shift and
just bring it up. And the reason I want to do that is because I want to fill that section in to make
my other planks of wood. All right, so now
we've got this. What we want to do is we
want to separate this off. So I'm going to
press P selection. Separate that off,
grab this bit. Press control all transforms. And then what we're
going to do is we're just going to apply that mirror. So control now I want to just, sorry, bridge this part, but I want to grab
all of the parts. Take off these two parts. And then what we're going
to do is we're going to write click and
bridge edge loops. And you can see basically
that I've already got. Now my planks of wood
actually formed, which makes this really,
really easy task to create. The planks control all
transforms, right? Clicks a origins
geometry, pull it down. So wherever we want it, don't worry about the
scale at the moment. We're going to shrink
it in any way with, so now let's actually create
those planks of wood. We want them actually
going inwards. So what I'm going to do is
now split them off L, L, L, split these off, Y, H, and then just do
the same thing on these. I tend to just skip one. If you skip one,
it makes it much, much quicker, Y, H, and then skip them again. You'll see. Now
come to this one, I can skip it. Same as this one. Y, how you can
just go like this, like this, like this Y in heat. And then basically you've
got everything split off, ultach, bring it all back. Now you can see instead of splitting them into
little planks, we can just split them
into lines instead. And that is how you would
have those long beams running down the actual boat. Now let's so right click,
shade, auto, smooth. Let's come in and add in. Then a, a solidify, let's solidify them inwards. We definitely want them going
inwards and not outwards. So something,
something like that. And then what we're
going to do now is we're going to bring
in another modifier. We're gonna bring in a
bevel, and there you go. That is the actual look
of the actual boat. Let's actually turn
this down and just put it on maybe one, something like that, maybe
even less than that. Let's press control. All
transforms and there you go. That was the issue, you just needed the transforms setting. It was a little bit
too much on the bevel, and I could see
that straight away. Let's press Altatee and bring
back the rest of the boat. We'll hide the plane
away, and there we go. We can see already now, it's looking pretty
nice now with the boat. What we need to do now
is we need to come to the plants that
we actually created. And let's actually pull them up with proportional editing on, and we'll put it onto root. And let's just pull this up. So if I grab this, that's
actually the wrong one. I don't want to pull
it up like that. I actually want to pull it
up maybe with the shop. Yeah, that's much more like it. So you can see I can
pull it up to there. Then I can also pull
the back up as well, just a little bit, giving us a nice actual slope
in the actual boat. So I'm just going to pull
it down a little bit, then I'm going to grab this one, pull this one down a little bit, giving it a nice nice slope. Now you'll notice at
the front of the boats generally tend to be a
lot more sloped on there. So something like that. Let's right click, shade smooth and have a
quick look at that. I can see I've probably going
a bit too much on this. So what I'm going to
do is zoom it in. All right, so now what we can do is we can just
split these off. Now before we split them off, just make sure you're happy
with the size of wood. You can see here. Probably
need another plank in there. And same again on
this one control, I'll put it in another plank. And then what we can do is
we can just literally come in and just grab
every other one. You can also do
check Del as well. If you select everything, come down and select that. Then we'll select every
other one for you. Now if you want to
have your boards and things a little
bit bent and stuff, make sure that you
add in edge loops like this in there before
you actually do this. And then you'll actually be able to bend them and
things like that. I'm not going to do that,
I'm going to press Y. And then what I'm going
to do is I'm going to press Tab Controla. Or transforms right clicks,
origin to geometry. And now what we're
going to do is we're actually going to solidify it. So solidify, and we're going to turn it up a
little bit like so. And then we're going to add in a modifier which is the bevel, and hey, ho, there we go, there is the actual boat. Near enough, finished.
Simple as that. Now, of course you can
get a lot more ornate. We do have some issues in that, this front of the boat
shouldn't be like that. So let's come in
and fix that first. And it's because actually we've
got our Slidify still on. What I'm gonna do is I'm
going to press D, like so. And then I'm just
going to check if I can now pull this
back a little bit. Now the problem you're going to have is when you pull this back, as you can see, it's going to
bend it slightly like that. You don't actually
have to do that. What you could do instead
is just press control B and just bevel it into place and then you're not going
to get that problem. Now you can see though that I haven't gone
back far enough, so I'm just going
to press control B. Pull it all the way
back into there. And there we go. It's
looking much, much nicer. So with the boat done now what we can do is when
we can actually put our materials on and it's pretty much all
the same materials. It's just basically
two materials, one boat light and
one boat dock. What I'm going to do is
I'm going to grab it, I'm going to press
B for box select. Grab it all. And then
what I'm going to do is just press D and then control G. Join it
all together like so. Then what I'm going
to do is I'm going to now select my old boat, so I'm going to press control
L and link materials. And now let's see, So the whole boat
is pretty much the same except this part
and the actual plank. So let's sort the
out. So what I'm going to do is I'm going
to select my boat, press Tab to grab everything. Smart UV Project. Click Okay. And now let's first of all
go in and add all these. So I'm going to
comb two my planks. I'm going to press L, going
on all my planks like. So just make sure you've
got more selected. Then what we're going
to do is we're going to select boat dock. So click sign. Then we'll also select
this part nine. Then finally I think
I'll select this part L, a sign and we should end up
with something like that. Now let's come in
to our UV editing, and then what we're going
to do is we're going to O, and then I'm going to press
A and then pull them out. And it's just going
to make that wood look that much nicer
as you can see. All right, now let's
go back to modeling. Let's duplicate our ocean shift. Duplicate across. There we go,
everyone. That is how you create an actual boat. All right, so let's come
up and save it out. And then what we'll do is we'll hide this one out the way. I'll make sure first of all, that boat needs to go in there. So I'm just going to drag it up, put it into my boat,
click the clothes, and then we're go
on to the next one, which is a spiral staircase. Let's actually put
everything back, and this actually is a really, really nice way of
doing things like this, and it looks really, really complex when you first look at it, But don't
be scared of it. I'm going to show you
every single part of it. And it's going to
turn out really, really nice as you can see. All right everyone. So I
hope you enjoyed that. And I'll see you on the
next one. Thanks a lot. Bye bye.
36. Spiral Staircase Modeling: Welcome back everyone to blend
the beginners boot camp. And this is where
we left it off. All right, so now
let's actually make start on our actual staircase. Now with the staircase, I am going to have to move it over here because we
are going to need this center point for sure. So let's hide the light, hide the ground plane. Not
the ground plane, sorry. The actual plane. And hide
everything else basically. All right, so let's
press shift desk. First of all, make sure our cursor is to
the world origin, very important that we do that. And then what we're
going to do is we're going to bring in a cylinder. And the cylinder, I'm
gonna leave it on 24, I think that's going
to be absolutely fine. And then what I'm
gonna do is I'm, Jaws going to pull
it out like so. And we're going to
basically use this as the beginning of
our actual step. Let's now come in.
So if I go over the top and I press Tab, and then what I'm going
to do is I'm going to go into face, select this face. And then I'm going to press I, because we've put it on 24. You will see that our steps actually come
in with this line here. Which is great for us because this is what we're
actually looking for. Now if you can
imagine that this one of these is actually
going to be our step. So that's how big you're
actually going to make it. So the further you pull this in, the thinner it's going
to be towards that end. The next thing you're
going to do is you're just going to press Selection. And then you're going
to grab the whole of the actual cylinder
and delete it off. You should just be
left with this. Now what we want to
do is we want to actually extrude
it out and give us the right length for our
actual, for our step. So if I come in and I
grab it and oppress a, and then oppress,
I can then pull it down and make,
don't worry about it. You can change the
size of it as well. As you can see here, this is the size that we've
got at the moment, and this is the size that
we've got, this one. The other thing you
can do as well is you can actually pull this out
if you actually want to. So let's say you step, you're not happy with the
lengthen it just pull it out as long as you've got
portion of it and turned off. Because what you'll
be able to do then is just keep it so that
it's along this line. So let's make it a little
bit longer like so. And we are going to
have some lights in there and we're also going
to have a top in there. So maybe maybe I've
brought this down a little bit too much and I'm just
going to put it back like so. Now the next thing I'm going to do is I'm going to press Tab. And what I'm going to
do is I'm going to put this right now down on the
bottom of the ground plane. So the first thing I'm going
to do is I'm going to press control or transforms
right click, set origin to geometry. And then just bring it down and rest it on top of
that red line there. And it should look
something like that. Has it rested on top
of it? No, it's not. Let's bring it down a little
bit further, like so. Now the next thing we're
going to do is we're going to bring in an actual empty Now, whereabouts do you
actually want to place your step is
also pretty important. I think actually this is okay, so I'll just flow
around like so. So we have used an empty in the past in this actual course, and that time we used
it for animation. But you can also use it as a reference point to actually
rotate objects around. So if we press Shift,
well, first of all, let's write clicks,
the origins through the cursor or reset
the transformations. And then we'll make
sure we've done everything that
we need to shift. And let's come down and
bring in a plane axis empty. So now let's go
back to our step. And what we want to do now
is bring in a modifier. So we're going to
bring in an array modifier like we've done before, but this time we're
actually going to turn off relative offset and we're going
to turn on object offset. And the object
offset is going to be our actual empty like so. And you'll see at the
moment nothing happens. But if we turn up the
count of our step, and then what we should
do is we should grab our empty press
art and Z and hey, presto, now we've actually
got some really nice steps. And what we can also
do now from this is we can actually
pull this up like so. And then we end up with
a spiral staircase. So I'm just going to
put it down just so we can't see any gaps
in there. All right. So I'm pretty happy with
how that looks already. I'm just going to
make sure if I press seven that I want one more
on there as you can see. Because I want it to
come back on itself. So one more like so. And then I think that'll make a nice ending
to the top of it. Now let's work on our steps. So let's make them look
a little bit different. So what I'm going to do is I'm gonna put it on object mode. I'm going to come
to my main step, which is this one here. And what I'm going to do is I'm going to bring in a edge loop. So I'm going to press control
left click, bring it up. And this then is
just going to make the actual step that's
going to go in here. So if I come in now
and I grab this one, I can press and pull
it out like so. Now the thing is, is it pulling out in the
right direction? Actually, we're going to have
some glass around there. So I think I'm going
to stick with that. Well, now let's think about creating the glass before
we go any further. So what I'm going to do
is I'm going to come in and I'm going to be
on vertex select, select this vertice and then
press shift D. Duplicate it, and then what I'm
going to do is just bring it up right to the top of this vertice like so. Then what I'm going to do is I'm actually going to
separate it off. So I'm going to press
Selection. Separate it off. And you can see it's just there, just that
tiny thing there. Can I actually select it? Yes, I can press Tab again. Press A just to make
sure Selected it. And then what I'm going to
do is I'm going to press E and Z and pull it up like so this is basically
going to form the glass, so don't worry if you've
not pulled your pie eng. Something like that. I
think should be fine. Now what I want to do
is I want to press Tab. And then what I want to
do is I want to come across and turn off the array. So I'm going to
turn off the array, and instead of having an array, I'm actually going
to use a screw. So come down, click on screw. And you should end up
with something like this. Now I want to do is
we actually want to go in and bring this, so this part here, down a little bit to
the bottom like so. And then what we can do is
we can actually come in now and turn our screw
up a little bit, and you'll see that it starts to follow all
the way up here. Now what we really
want to do is we want it to come to here. So if I press three,
we can see that we want it to kind of
follow this all the way up. I'm just going to
hold mine down, holding the shift bond down. Something like that. And then it should follow it
going all the way up. As you can see, it's not getting any higher or
anything like that. That's what we're looking
for, just this high, just to make sure it's okay. So what I'm going
to do is I'm just, I'm thinking, wait
two iterations. We don't want two
iterations. Turn that down. Let's actually look
where it's coming, where it needs sloping
down or up, yours perhaps. A little bit. There we go. Now it's actually looking
better all the way up. And I'm just going to
come down to here. Yeah. And that's perfect now. So what I'm looking
at is the line here. And as it follows it up, it's keeping in that line there. As you can see, that is
what I'm looking for. The other thing I want
to do is I actually want to pull this
out a little bit. So what I can do is I can come again to this,
I can press L, and what I can do is I can just then pull it out a little bit, just so it's a little bit
away from my actual wall. As you can see, we've got a
little bit there and this is the reason why we didn't probably want to
point this there. So what I'll do is
I'll go back to my step and I'm just
going to grab this. And then what I'm
going to do is I'm just going to pull it very, very slightly this way, just to stop it actually
going through there. And now you can see
that's looking much, much better al right
now at the moment, you can see that this is quite chunky and we don't
particularly want that. So what we can do is we
can actually turn up the steps and actually make
it much, much smoother. So let's put it on
something like 24 instead. And now it's much, much
smoother as you can see. And we'll also pray and
render view on 24 as well. That's not actually
going to do something that's just in case you
actually want to render it. All I want to do is want to duplicate this over
to the other side. Just make sure you're happy
with the actual height. I think for me I'm going to make it a little tiny bit higher. And then what I'm going to
do now is I'm going to press L and I'm going to duplicate
it over to the other side. I think I'll do this
with it separate, in other words, two
separate objects. Because then I can alter the screw distance based
on each of these objects. So if I press shift
D now, for instance, and I come in and I grab
this one and bring it in, you will see that
when I bring it in, I might have to alter
the actual screw. I'm just just looking around, making sure that actually
actually that's going, it's going actually quite well. Actually. I'm actually quite happy with how that's
actually gone. I wasn't expecting it
to go so well. Okay. So that's actually that
bit on the inside as well. So now you can see
we've got near enough a spiral staircase with an actual banister which
is looking really nice. But what we'll do
on the next lesson is we'll actually give this actually some solidify to it to make it so it's not
just a two D plane. And then from there
what we can do is actually strap it into a center point and put a
banister on top of it as well. All right everyone. So I
hope you enjoyed that one. I hope you learned
a lot and I'll see on the next one.
Thanks a lot. Bye bye.
37. Staircase Modern Detailing: Welcome back everyone to
Blender beginners boot camp. And this is where we left off. All right, so now let's come
in and add in a solidify. So what I'm gonna
do is I'm going to come over to my Ad modifier. Bring in a solidifier, which I'm bringing at the
same time, Shade flat. Can I actually shade that flat? Nope, I don't think I can. Let's bring it out
a little bit and maybe it'll shave
flat on its own. Let's try shading or too smooth. There we go, that's better. Okay, now I can
actually see something. Now at this point, we can see that if we need to bring it in. So you can see if
I go over the top, that this is kind of a little bit too far
away from the stairs. So I'm going to press and
just bring it in like, so just making it touch a
little bit more like so. And now you can see that's
looking much, much nicer. Now, I want to do the same
thing for this one as well. So I'm going to hide this one. I'm actually going
to hide this one. But before I do that, I'm just going to make
sure I'm happy with the chunkiness of
my actual glass now. Maybe, maybe it's a little bit, Yeah, it's a little
bit too chunky, so let's bring it
in just a tad then. What I'm gonna do is
I'm going to grab the thickness. I'm
going to copy that. Click anywhere on the
viewport and come over to the other side adding a
modifier and again a solidify. This time we're going to go to thickness control
V. Click that on, and then what I'm
going to do is come over and shade auto, smooth. And of course now
you can see that I've actually got to move
this out a little bit. So what I'm going to do
is I'm going to press tab A to make sure
I've grabbed it, and then I'm just going
to pull it out like so just so it goes right at the
side of the stairs, like so. And then I'm just going to check making sure I'm happy with
it going all the way up. I think I am. I think
that looks really, really beautiful. All right, so now we actually need to create our
actual banister. Well, before I do
that, I think it's actually a good idea if we just shut these up a minute and then I'm going to do
the same on this one. And what I'm going to do is I'm actually going to
then create a bevel. So I'm going to come to
this, I'm going to add in a modifier, bring in a bevel, turn it all the way down, and then turn it up, maybe
one, something like that. I'm going to then do the
same thing on here though, Bevel, then all the
way down, turn one. Now what we can do is we can actually create our banister. So what I'm going to
do is I'm going to come and grab them
both at the same time, and then I'm going to
grab each one of these. Then we introduce, I'm going
to press shift D and then press Shift And then went, we're going to press
dead, all the mop. And we end up then
with the banister pretty much the same as our, well, the same on each side. All right, so now what we
can do is with the banister, we can actually come in now and solidify this one
a little bit more. In other words, I can split
these off and then solidify them a little bit more to actually make them
stand out a little bit. So I'm going to do
that is I'm first of all going to press
Tab On this one, I'm going to press L, just
to grab it, Selection. And then come to this, grab this one again with selection. So now I can come to this one, go back to my solidify and
just turn it up a little bit. So then what we can
do is we can bring the offset in or out, whichever is the case like so. And there we go, there
is our banister. And now we can do the
same for this one. So what I'm going to do
is I'm going to come to my thickness and offset. So I'm going to click
control C on to this one. Now, come to solidify control V and then do
the same on the offset. So offset control C,
offset on this one. Control V, Enter, there we go. Alright, look in really cool. Now, before we carry on, let's think about creating our lights. And the easiest way
to create lights being as we've got
all of our steps, we might as well go in and
use the steps to create them. So I'm going to show you another technique of how
you can actually create holes in mesh
using loopholes. What we're gonna do is
we're gonna press Tab. I'm going to come
in, I think I'm going to press control
or left click? Right click. And then what I'm going
to do is I'm going to press control B, bring that out. And that then is
going to give me three basic lights
evenly separated. And that's basically what I'm looking for now
on each of these. What I want to do now
is I want to come in and grab them with
edge select like so. And then I'm going to pull
these out again like so. And then what I'm going to do
is now I need to basically give them something to
actually work with. So if I bring in two edge loops, so control two, left
click, right click. And then what I'm
going to do is I'm going to spread these
apart a little bit. So I'm going to press S and's Ed and pull them apart like so. And then I'm going
to press control B. Do it down once, you've
only got let's say. This thinness,
something like that. And basically now what we're looking for is we're looking to grab each of these ones here. So we needed a gap between
the top and the side. So now if I come in and I
grab each of these like, so now what I can do is I
can come in right click, loop tools and come to circle, and you'll see
that this happens. Now at the moment,
obviously we need to bring them down a little bit because they're a
little bit too big. So let's bring them
in a little bit. Let's have a look at
individual origins. I'm going to make them as well, a bit more of a circle. So I want to make
them a little bit more of a circle, like so. And now I can press S and
bring them in like so. And there we go. We've got the beginning of
our actual lights, which is really, really
cool technique to do. Now, before you carry on, just make sure you're
happy with the size. I think I need mine
a little bit bigger. And the reason I need
them a little bit bigger is because I'm
going to extrude them out. Now if I extrude
them out like so, And then what I can do now
is press I and bring it in. And then I can actually take
that in very small amount, with the very small amount. And then what I want to do is I want to bring these out now. And these are actually going
to be my actual light. So if I bring them out, so then what I want to do is I want to
level these off now. Now to stop them overlapping
or anything like that, the best way of
doing this is if you press delete and delete faces. And then what you should do
is just go and fill them in. Just to fill them in with an end on absolutely fine on this one. It's just going to make
it a little bit easier so we're not actually crossing
them over like so. And then I'll grab my faces, then finally what
I'm going to do is I'm going to press control B. Hold them out and turn
them up a little bit like, so there we go, right click, shade, autos, move,
and there are our lights in our actual steps, they're looking a
little bit too big. So what I'm going to do is
I'm just going to press control plus control
plus control, plus going all the
way back to here. And then what I'm going to do
is I'm just going to press S and just make them
a little bit smaller. And I think now
they're looking much, much better than what
they were before. Now what I want to do is
I want to grab my steps. So I'm going to grab my steps and one' going to
do is I'm going to press shift D and
just duplicate them. And then what I'm going to do is I'm going to pull them over. If I press A on them
and pull them over like so we should end up with
something like this. Then what we can
do is we can use this to actually turn this. So I can now turn it. The
only problem is I'm going to start turning my other
step as you can see. And that's not something
really I want, what I want to do is I
want to actually rotate these round so that the ends of them are going in
the right place. What I'm going to do is I'm
going to come to my steps. So this step here, I'm
going to then come in and grab all of these, Going all the way down to there. And then what I'm
going to do is I'm going to press Selection. And then I'm going to press Tab. And delete these other steps. The ones that I
don't need like so. And we should end up with
something like this. And now what we can do is
we can actually come in, grab this, make it a
little bit smaller. And then what we can
do is we can now pull this out, pull it out. And then what I'm going to
do now is I'm going to pull it to the side, pull
it to the side. And now you can see
all the way up, we've actually got something that's going to connect
them all the way up. Now we can see, unfortunately, that it is a little
bit too chunky. Let's actually bring that down. First of all, the
first thing I'm going to do is I'm
going to grab it all. I'm going to press Delete. And I'm going to
limit dissolve it just to get it back
to an actual cube. Then what I'm going
to do is I'm going it going all the way
around the outside. I'm going to press alternates. And then what I can do
is I can shrink those in now to the way I want them now. They've shrunk in a
little bit weird. I'm not really happy about that. So if I shrink them in, the problem is you can see
they get shrunk in like this. And I don't really
actually want that. Do I want that? Maybe
maybe I could use that. Yeah, maybe I could
use it like that. I'll do it like that, actually. Then we'll come to this end. We'll pull them
out, and then we'll come to the center, and
we'll pull them out. And we should end up with
something like that. This end, as you can see, it's still in the wrong place. So I'm just going
to pull it over. And then what we're going to do is I'm going to pull it round. And now it should be
just under there exactly where we now the other thing
is if you look on mine, you can see that these
are actually in rounded. Let's actually round
those off as well. So the way we're
going to do that is obviously through a bevel. So if I grab all of these edges like so press
the little dot bun, just to zoom in, make sure
orientating around it. Press control B, level them off like so hold
the shift bon if you need to and
just make sure that you're not breaking this
edge or anything like that. Alright, so that's looking pretty nice now what
we can do when, once we finish is we
can take out some of these so we don't have to worry about how many of there
is or anything like that. Alright everyone. So, I hope you enjoyed that and I'll
see on the next one. Thanks a lot. Bye bye.
38. Stair Texturing Techniques: Welcome back everyone to
blenders Beginner's boot camp. And this is where we left off. All right, so one of the
last things now we need to do is bring in our center pole, which is going to
be this thing here. So let's bring that in. So we've got our cursor already
in the center. It's just a matter
now of pressing shift, coming to the mesh, Going down to cylinder
and right clicking, Shade auto, smooth
pressing the S board, and then just pulling it up. So let's go in now. Let's decide how
thick we want this. So let's start with it. Something around there maybe. And let's come to the center
and all I'm going to do, pull it all the way up. So I'll pull it to the
last one over there, because I think it
actually looks bare. And there you go. All right,
so now we've done that. What we need to do is now
we need to actually apply all this again with your steps. The best thing is you should probably go in and
mark all the seams. But what we could
do, we can turn this off at the moment,
as you can see. And then what I can do is
I can just press Shift, and then I can go in and mark all these seams because it is going to save a lot of time
in the long run basically. So what I'm going to do
is I'm going to come, I'm going to all of these, going all the way around, right click, mark scene. And then what I'm going to
do now is try and go in. I'm going to come in
to here, into there, I'm hoping it's Select
to go in all the way around and then I'm going
to select the inner side. So this one here,
Right click Marine. And I'm hoping yes it has, it's selected them going
all the way around. That's exactly what I wanted. Let's do now the
same thing on here and we're going to actually
come to the inside. It's a little bit tricky just
to see what we're doing, but now we can see that
we've got this though. I just want the inside
of there like so. Right click oxene, now we're
going to old shift click. Old shift click, right click and oxine. All
right, there we go. Now, why did I do that? Well,
the reason I did that is because now I can actually
select all of these. So I can come over to
my little triangle and you'll notice you've got something called vertex group. If we click plus on there. And then click a sign with this. And then we select De Select, and then click on Select. You'll see that we've actually
selected those though. These can be called lights, so I can then hide them out of the way and
come to the next part, which is the metal
part of the lights plus new metal lights. So click a sign, hide
those out of the way. And then the rest
of it, of course, is going to be the actual wood. If I come in, click wood
and then click sign. All right, so that's
looking pretty good. Now the one thing
we haven't done is we haven't actually
leveled this off. We'll do that in a minute. Actually, The first
thing is I think we'll actually mark our seams
on this woodlhift click. Just a quick mark seams
because once we've done this, it's going to be the
same for the mall, which is really good because
that's exactly what I want. And went all the way around. Then just on this
one, right click. Then we'll go from here. Here. So shift clicking, control
clicking and mark in seams, and then finally
we'll do the bottom. So old shift click going
all the way around. Right click, mark scene. All right, so you should end
up with something like that. And the one thing we forgot
is of course we need these edges also marking so
they unwraps really nicely. Mark. Okay, I'm just checking. Yep, I've missed a bit
On the right click mark. Same. So basically
just marked the same around every single face. And then that should be fine. Now if I press ole,
bring everything back. Let's put on material. And what we're going to do
now, I'm going to press ol tag yours to bring
everything back. I'm gonna hide my plane again. I want to hide
these two as well. And then what I'm
going to do now is you can see my steps here. What I want to do is I want
to grab all of this now. And I'm thinking, should
I join it together yet? I'm just wondering
whether I should. I pretty much I don't actually think I'm going to need to do anything else. I've done pretty
much on the steps. They're the hardest thing. The other stuff is
glass, and we've got a banister and
things like that. So what I'll do is
I'll actually come in, do my step, put it back on. And then I can click B, grab everything except
the actual empty. And then what I'm going
to do is going to click D and then control J, join
everything together. And then finally I can
delete this empty. Delete the empty out the
way. And there we go. Now what I want to do
is I want to come in, first of all and
remove some of these. So if I come in, I
can come in and grab, let's say we grab. Every three, three, miss one and then
three and then miss one. We'll do it that way, so 12313 and then miss 123 and then miss one and one. I think we're going to
do it like that and delete, just delete vertices. We should end up
with something like this which is
looking really nice. And now what we can do is we can grab this, grab my stairs, breast control L, and then we can link materials. There we go. And unfortunately, it's
this me but never mind. Okay, so now let's call them and actually
unwrap all this. First of all, I'm going
to come to my banisters, and this should be metal anyway, so I'm going to click Smart
UV Project. Click Okay. And there is my banister. And then what we'll do is
we'll come to the glass now. So select this, this, then we'll go over to
our materials and I'm going to put it on
glass. So click a sign. There we go. I think I'll also unwrap the
Smart UV project. Shouldn't make any
difference on the glass, to be honest, but we'll
unwrap it anyway. Now we've got the
metal on these parts, but we need to unwrap them. So I'm going to
grab all of these. So like so and then press
you wrap, fail to solve. And the reason it
failed to solve is because it needs to
be smart UV project. There we go. And that's
what we're looking at now. And then what we want
to do is we need to do our wood now
with the wood, as we said, we've
got stairs, wood. We've got our metal stairs, metal light, which is
these little things. And then we've got our light. So let's come to our wood first. So the way I'm going
to do, I'm going to press double tap. The just to deselect everything coming over
there. And the lights. I'm going to select these. So select all the lights. So come to the material, I'm going to press
you smart UV project. Okay, Let on stair
lights, click a sign. And then what we're
going to do is we're just going to hide
those out the way. The next one I'm going
to then select is going to be metal
round the lights. I'm going to click select
and we can see we have a little bit of a problem and
I don't know why did that. Well, what we're
going to do instead, we're going to press C.
We're going to make sure, Face select, right
click, face select. Once you press C, by the way, you can select left click. You can de select with
middle mouse like so. And then you can right
click to take that off. So we'll use this circle select And all I'm
going to do is a bit of work in just going up
and deslecting all these. But anyway, it's
not going to take too long just to
deselect all these. Just a little bit of
extra work on top. I think still using the
vertex groups is really, really important in
your own workflow. I think it speeds
up dramatically. All right, so the last
one and then what we're going to do is
we're going to go back to our materials now and I'm
going to go to my stairs. Metal light click sign, hide those out the way. And then finally
what I'm going to do is I'm going to select my wood, Let's form and
select Wood select. And then we're going to
go back to Materials. Click on our wood, click a sign. I'm going to then press, in fact, I don't need to use Smart. You'll be project
because actually all I need to use is on
wrap. And there we go. All right, so with this one, let's actually
have a look on EV, let's press all tape, bring everything back,
and there you go. That is what you should have a beautiful staircase and you can see how easy
it is to do now. The other thing I would do
is I would just go in and probably increase the UV
map size for the banister. And this part here because it's looking maybe a little bit too chunky on there on the actual resolution
or. Right, everyone. So now let's actually put
it back on object mode. Let's actually move
our stairs then up into the place where
it is, spiral staircase. And then let's
save out our work. So file Dave, and then we'll close that down and then we'll open up the next one. So on the next one we're
on their camper van. So this is something that's actually going to be a
little bit fun to make. This is the basis of
creating anything like cars. You know, if you want to
create a really realistic car, I will show you here the
basics of actually doing it. All right everyone, So
hope you enjoyed that. And I'll see on the next one. Thanks a lot. Bye bye.
39. 3D Van Vehicle Modeling: Welcome back everyone to
Blenda beginners boot camp. And this is where we left
it off, on our camper van. All right, so let's move
our campervan over there, let's hide everything
else out of the way. And basically this is the foundation to build
in kind of stylized, you know, assets and
things like that. Or if you want to build like realistic Astin
Martins and things, then this is the
actual technique you're going to use or be, you're going to be
using it to a much, much higher level
when you do that and you're going to get a lot
better to actually do it. So this is just a simple
basic introduction to modeling something
like a campervan. All right, so first
of all what we'll do is we'll bring in a plane. So shift a, bring in a plane. I'm just gonna rotate my
plane round so L Y 90. I'm then going to press three. We're going to bring
it up and make it just the right size to be
an actual campervan. And y, let's pull it out. And then what we're
going to do is going to reset the
transformation. So control all transforms
and then we're going to go in and what we
want to form first of all is the actual
wheel archer. So if I press control are
we have two wheel archers. So we're going to put
two edge loops in. Left click, right click. And then let's pull those apart. So if I press S and Y, if they don't pull apart, just make sure you're
on medium point. So S and Y them and then
we can pull them out. And then what we're
going to do is we're going to press control B. And I'm going to push up my
middle mouse button until we have something like one in the middle and to
each side like so. So left click, right
click, and there we go. All right, so now what
we want to do is we actually want to make
these wheel larchers. What I'm going to
do is I'm going to grab the center
of each of these. I'm going to press three
on the number pad. And then I'm going
to do nice work on making these wheel archers. So I'm going to pull
them up to there. Then I'm going to
grab the next two on each of the sides
and then pull them up, and then the next two on each of the sides and pull them up like so now what I want to do is I want to make sure
that these are going to be rounded off enough
so you can see at the moment there quite
jagged going up. So let's grab the
middle on each one of these and round
them off like so. All right. I'm pretty
happy with that. Okay, so what I want to do now is bring in an edge
loop in the center. So if I press control and then
what I want to do instead, because I don't want them
actually rounded like this, not on this part anyway.
I want to left click. And then to make this straight, what I'm going to do
is I'm going to press G twice like so. And then press the button. And what that's
going to do is it's going to straighten
it out for me. And then I can put it right
in the center like so. Now if you right click, you will end up with it still doing that. So I don't really
want to do that, so I'm just going to do
that again with control. And then left click
twice and then E. And then it'll straighten
it up and I can put it in the middle like so. All right, so now I'm
actually happy with that. Let's actually bring
this out a little bit. So I want to bring
it out over here. We've still got our
actual orientation in the center, which is great. And now I want to
do is I want to bring in my first modifier. So I'm going to bring
in a mirror modifier. And then what I'm
going to do is I'm going to make sure
clipping is on, because I'm going to
then join these two up. So if I now press for extrude, pull them to each other, and then when I try
and pull them apart, you'll see they don't pull
apart because clipping is on. Now what I'm looking for on
here is the actual width. So this width on
here is what I'm looking for on my
actual camper van. Because I want my
camper van kind of looking something like this. All right? So I'm
happy with that. Now the next thing
I want to do is I just want to pull
out the top of this. So I'm just going to
grab this edge and this edge and we're
just going to pull it out very
slightly like so. Because I think that just adds a little bit more character
to my own camper van. And then what I'm going to
do is I'm going to just come in and I'm just going to
pull these in a little bit. Just a tiny bit like, so. All right. I think I've
got the right shape. Now what we'll do is we'll
bring in the secret. And that is a
subdivision surface. So if I bring in subdivision
surface like so we'll see we end up with something like this. Not great
at the moment. And the reason is because
we don't really have any, you know, kind of supporting those links or
anything like that. So we need to support
all of this, basically. So what I'm going to do is
I'm going to press control. I'm going to bring
in an edge loop. And the moment I bring it
in now you can see we're actually starting to get some
actual supports on there. Let's also bring in an
edge loop over here. So left click, bring
it over here like so. And let's bring one
in the back as well. So left click, bring
it in the back. Now you can see it's
actually starting to look a little bit more
like a camper van. Let's also bring in
another edge loop. So control left click. Bring it up like so. And there we go. Now
we've got a nice, actual smooth edge to
actually do something with. Now I need one on here as well. Here, here and here. Because these are two rounded. I mean, you want to have it like the wheel larch is
going up like this. So what I need to
do is press control left click and bring
it into place. And then control left click, bring it into place. And then control left
click, bring it into place. And finally the last one,
bring it into place. Now I do want another actual
edge loop going around here. Because as you can see, if I write click and shade
smooth at the moment, we haven't really got
lots of whip with there because we've only
got this part here. So we need to bring in one
more edge loop, left click, bring it down to the thickness
that you actually want, your rear wheel archers. All right, so now
we've got that. What we need to do
now is actually make those wheel archers. So what I'm going to
do is I'm going to grab it going all the
way round to here, all the way round back to here. And then do the same on here. So I'm shift clicking
control clicking. Shift clicking control clicking. So now what we can do is we can press shift D, all these out. Along this axis. And then
what I can do is I can press and pull them back in like
so. And there you go. You can see already we've got some really nice wheel
archers, albeit, But we actually need to, you know, make these ends
a little bit better. So if I go in and I grab
both of these and what I'm going to do is to press and
bring it in a little bit. In fact, I'm just
going to actually, I'm thinking whether
to do it that way or bring in an
edge loop on here. If I bring another edge loop, you'll see that it actually
straightens it up anyway. So I think I'm actually
going to do it that way. But you can see I've got
a problem with this one. I'm going to press control
left click, right click. Let's do the same on this one. Control left click, right click. And now the same on
which one is it? This one here. So control
left click, right click. And again, all it's about when we're doing
this is actually adding supports to
our actual hamper. So that's what it's
really all about, just making sure that you've got the right supports in place. What you can do now
is as well we can actually lift those
up if we need to, 'cause I think actually I
do want to lift these up. So I'm going to come
to this first one. I'm going to come all the way around to this
second one like so. And then I'm going to do
the same on this one. So I'm going to come
to this one here, all the way around,
then to this one here. And then one going to
do is I'm just going to pick them up slightly and I think actually far don't
want to pick them up, maybe something like that. And then what I want
to do is press S and D. Pull them back
in a little bit, pull them down a little bit. I think I'm happy
with how those look. All right, so let's do
now this center bar. So I'm going to do the
pretty much the same thing. So I'm going to grab this one. And this one I'm going to
press Shift D, pull them out. And then ' do, then I'm going to press and pull them back in. So, and then we're going
to press control two, left click, right click. And now let's press and Y and really pull those out into
the place that I want them. As you can see, we might need some more actual
supporting links there. You can also press control B, and that'll actually bring
in some bevels and that also is sometimes a little bit easier to actually do
this as you can see. Now that's looking pretty nice. All right, so let's now
pull this up a little bit. So I'm going to grab all
the way over to here. And I think I'm
going to grab this one and maybe this one as well. And then what I'm going to
do is I'm just going to pull them up and see what that
actually looks like. If I'm actually
happier with that, and I think I'm happy with that. Does it look better for me? I'm just looking on
my old camper van, actually, probably
a bit smaller. I'm just going to actually
leave it as it was. Yeah, I think I'm going
to leave it like that. The other thing of course,
is as well that you can actually bring in your levels. So you can bring your
levels up a little bit and that will smooth
everything off for you. All right, I'm going to bring
it down a little bit more. And then what I'm
going to do is I'm just going to check now and make sure I don't need to
round these off as well. So if I press I like so I
can bring in fact not I, I need to level
this off, I think. So I'm going to
come in out shift and click and just
level this part off. So level it off. We'll do these on
the next lesson. They're quite easy
to do those parts. And let's say that our work
and I'll see on the next. And everyone, all right,
thanks a lot. Bye bye.
40. Car Bumper Addition: Welcome back everyone to blend
the beginner's boot camp. And this is where we left off. So the next part,
before we carry on, we're just going to fix these
wheel arches a little bit. Again, most of this is
about trial and error, so it's just about
testing things out, realizing we have not put
too many supports in. So for instance, we can see
when I come to this wheel, it's kind of rounded on there. And the reason it's
rounded on there is because we haven't actually
got another edge loop in. So if I press control, er, bring in another edge loop. As you can see now that actually straightens
that up a lot. Control, bring in
another edge loop, and there we go.
Pretty much fixed. Now what we can do
is we can actually bring one more edge loop in. So control R, bring
it up. We want it. And now you can see it's
looking a ton bare, albeit they've got
these little curves on the front. And I don't
really want though. So what I'm going to do
is I'm gonna come in, grab this edge loop here, press delete and dissolve edges. And now you can see it's
flatten that all out. You can see that we're
probably going to need another edge loop in the
bottom part as well. So let's press control. Are going around here
and then let's bring it. Maybe I look, maybe down to, I'm just wondering if
I actually need that in or if it's going
to do too much. Yeah, actually I think that
looks much, much better. All right, so now let's do
the same with this one. So I'm going to
come in, dissolve, dissolve edges, And there we go. That's looking much,
much better now. And now I can do the
same with this one. So again, I'll come
in, press control, bring it over like so
control, bring it over. And then what I'll do
is I'll come around the inside now or was
it around the outside? I think it was actually round
here. Let's have a look. Control, bring it down. And then what we'll
do is we'll just come in and dissolve this. Delete, dissolve edges. Okay, We'll just do the same, I think, with this one as well. So delete dissolve edges. I'm just going to hide this
part out of the way a minute. So hide this out of the way. And then what I'm going to
do is I'm just going to grab all this and the bomb. And then what we're going
to do is just press and extrude it out and have a
look at what that looks like. We can see that we might have a problem on the inside
of this control law. Let's pull it over.
So not too far. Okay, I'm going
to leave that one then I'm going to
come now to this one. I'm just going to grab all of these control slick, this one. So if I pull this out, we can see it's missing
another edge loop in there. I'm not sure why we
put another one in. Let's click, there we go. All right, let's fix that. Now let's come to
this one I'll teach, and I think I nearly really need an edge loop
coming in up to here. So control, there we go. And then let's have
another one up here. Control, I'm going to put it actually with a little
bend on there, I think. I'm actually happy with
that. There we go now. I'm actually happy with
how that looks now. Do I want to pulling in
a little bit or do I want it hanging out
here a little bit? I think I need now to just
pull this out a little bit. I'm going to pull this
actual wheel larch out, so I'm just going to come in, I'm actually probably
just going to turn off my subdivision and then I can actually select
them much, much easier. So I'm going to put x ray on. Actually see through there. Think that one? Yes it is. Let's turn x ray off. And now I should be able to select it going
all the way over. Put it back on now. I should be able to pull
that out a little bit. All right, so let's have a
look at that. All right. That looks better to me.
Okay, finally we got there. All right, so now
let's think about a top and then we'll kind of work down into the middle part. So what I'll do is I'll
come in and I'll press Tab. And I think, let's
have a look at. I think what I'll
do is I'll start from here, so I'm
going to come in, I'll go all the way around
here. All the way around here. Now also it's important that we actually reset
our transformation. So I'm just going to press
control, reset our transforms. And now I'm going
to do is I'm going to press Enter Alternates. And then let's pull those
out a little bit like so. And then what we'll do now
is add in some more go loop. So if I come in and press
control left click, I'm going to bring it
in something like that. And then what I'll do is I'm not sure whether I want
to leave the top. It's not quite right. It should be up a
little bit, I think so. I'm just going to press control, bring in another one and I'll put it to
something like that. I think I'm much, much
happier with now. You can see we've got a
problem in the inside of here. So if I press control, just going to then bring
that in and then control law and there we go. All right. Much, much happier with how that's looking now. Okay, so let's
work our way down. Icreateing the middle part now. It's this part here. So
what I'm going to do is I'm going to grab it all,
going all the way around. I'm thinking probably on this, I want it actually going
all the way around because the back bit is going to be a little
bit different. So what I'm going to do
is I'm going to press control, Pull that out. So then I just want to
make sure I'm happy with the height probably it needs pulling down a little bit, so. And then what I'm
going to do is I'm going to press Enter, AlternS, pull that out. A little bit. So now we need the support edge
loops in control. Bring them in where I
want them, like so. And then we'll do the next one. So control. So yes, I think, I'm actually
happy with that. Now before I go any further, I do want to round
these bits off. So what I'm going to do
is out shift and click. And I'm going to press control and pull that out a little bit. I'm going to put
two bevels on it. Left click then. And let's
have a look at that. And now. Yeah, that's looking
much better. I'm just wondering if I can actually do the same
on this one as well. Let's see. So control, pull it out a little bit. Yes, and we can round
that off as well. So that's looking
much, much nicer. Now. Now, I'm just going to look at my reference and we can see that it needs this bit pulling
out a little bit. So I'm going to pull that out. I'm just trying to get it
into the shape I want. I'm also looking to make sure that I'm happy
with this roof. Is it actually tall enough? I think actually we've got
the right height on here. I think this is perfect. It's just the roof is a
little bit too short. So what I'm going to do
is I'm going to come in, I'm going to actually
mark a seam on this because it's going to make
it much, much easier for me. So I'm going to right
click mark a seam, right click mark, Seem. And then what I can do
now is I can come in, I'm going to press oultshifting, click Go all the way around. I'm going to press Control, and we can see now it started selecting that, and
I don't want that. I'm going to press
Oltshift Click. And now hopefully will
it pull all the way up. We can see we've still
got one selected there. And that is what that
is, It's the inside, but let's hide this.
Yeah, and there we go. This is what's causing the
issue. It's the inside. So let's press oltshift click
and just take that off. And now finally,
when I pull it up, is it actually going
to work or do I need to press
control plus again? Yes, I do. So ol shift
click. Let's see. Yes, and we've got
an issue with this, so what I'm going to
do is I'm going to mark another edge loop going
all the way around here. And that then should make it
much, much easier for me. So let's press control. Bring up another edge loop like so. Let's right click
and mark a seam. And then what we'll do
is we'll come in now and we should be able
to grab this now, going all the way down to there. And when I pull this
up, hopefully, yes. Now finally it actually came up. All right, let's
turn that on then, and then we can actually
see what we're doing. So let's pull it up to the
height that we want it. I'm thinking that this height at the moment is probably good. And then what I want to do now is I want to pull this out. So I want to basically
pull out everything. Let's say from here, from here, going downwards. In other words, probably
from this mark here. I'm going to mark in another
scene the right click mark. I'm going to mark
another scene in here. The right click and mark. Sm. Grab this right click, make right click, mark, Seem. And then we'll pull it
out from this window. So this one here. Let's see
now, is it going to do? Maybe it's because it's going
through the actual mirror. So I'm going to
turn off my mirror as well And yeah,
there is the problem. It's because we're using
clipping by the way. It just causes a
few issues though. Sometimes you just have to go in and turn off your modifiers, but you will get
much, much better. We're actually doing
this as you can see. But let's right click and. And now finally I
should be able to come in and pull that out. I'm going to actually
press control plus once can actually
pull it out now. And yes, I can. Let's
now turn these back on. There we go, and let's
pull it out where we actually want it.
And there we go. Now you can see
we've got a very, very nice shape going al right. It took a little bit
of time to get there. I know it was a
little bit messy, but sometimes when you're
working with this, you can't have everything
just planned out. You know? It's not
planned out from A to B. So sometimes it's actually going through the process of actually
trying to get this right. You have seen the
mistakes I've made, and now I've actually
got around fixing them. So when you come
to actually do it, when you do those things, you'll be able to
see what I did. All right everyone. So hope you enjoyed that and I'll
see you on the next one. Thanks a lot. Bye bye.
41. Van Subdivision Fix with Edge Loops: Welcome back everyone to
Blender Beginner's boot camp. And this is where we left
off at our camper van. So the camper van,
it's going to be pretty difficult if you've
not done this before, we're going to be using a lot of subdivision And these
techniques is basically, if you want to create something stylized like this campervan, right up to if you want
to create something like a realistic
looking Astin Martin, they're all basically
using the same techniques. Now, I'll probably make some mistakes when I'm
actually doing this because it's not that easy to actually work everything
out what you need to do. So just bear with me
if I actually do that. And if I do that, then you'll
actually see the mistakes. And now to actually fix them, a lot of this is trial and error because obviously
you're having to actually use subdivision
and actually put in edge loops and things
like that supporting, so sometimes you might put a wrong edge loop in or
you might do a wrong part or you might need
to separate apart and you didn't do that or
something along those lines. But you're going to see
all that, hopefully. So let's get started with it. So the first thing
I'm going to do, move my campavan over here. I'm going to press
B. I just want to de select my campavan,
hide everything else. I accept my camper van, pull it to the side, and so I can just see this
way if I need to. And then what I'm going to do is I'm going to bring in a plane, so shift eight, let's
bring in a plane. Y 90. Let's press three on the number pad And let's
bring it up into play. So I'm going to pull it
out. Something like that. And then what I'm going to do
is I'm gonna press S and Y pull it out to be the kind of
scale that I actually want. All right, so the
first thing we want to do then is get the actual shape. So the first thing is let's actually bring in one
edge loop in the center. So control left
click, right click. And now let's think
about our wear archers. I always think the
first thing you should do with cars is
create the archers. Because that, for me, actually sets up the whole of, you know, the subdivision
and things like that. So let's press control two, left click, right click. And then what we're going to do now is just pull these apart. So if I press three, I want to pull these
apart a little bit. So S and Y pull them apart. And then control, just
to level them off, I'm going to turn up my bevel to something like, I
think that's five. So I've got two each
side of the center, so maybe something like that. Then what I'm going to do now is create these actual
wheel arches. So I'm going to grab the middle, one of each of these, pull
it up, come to the side, then pull it up, come to the other side, and
then pull it up like so. And then just round them out, making sure that they're
nice and rounded. Maybe pull that one up a
little bit. All right. So something like this. Now just make sure
that you're happy where they are because
you can see this one. Maybe it's not far enough back, maybe it's actually
too far back. It's just up to you how your
preference you want it. Now, the next thing
you can see is that the camper van has a
front that comes out. So we might as well do
that while at the start, if I grab this, I can actually pull that out now, like so Now, the other thing with
the camper van, if we look at the front
of this side of it, you can see that
this middle bit and then this top bit kind
of come out as well. So let's actually put that
in place before we begin. So what I'll do is I'll
grab both of these. Just pull them out
to the side like so. And now we can see we've
got that nice shape now let's grab everything and
just pull it out into place. And then what we want
to do now is we want to bring in a mirror modifier. So what I'm going to
do is I'm going to grab my actual plane. And then what we're going
to do is I'm going to right click shade or too smooth. And then I'm going
to press control and reset all the transforms, which will put it right
back in the center. Now let's come in and
bring in a mirror. So a mirror modifier. And now what we're going to
do is we're going to extrude. So I'm going to come
in, I'm going to press once I've selected
everything and pull it out. Now I can see that this
is looking at the moment. Way, way too big at the moment. So I think I'm going to have to actually
come in and grab it all. So grab it all and then
pull it all together like, so now I want to be careful here because I'm
going to be using clipping. In other words, I
want it to come to the center and then be able to pull it all out at the same time. So I'm
actually going to do that. So I'm going to do is
I'm going to pull it in, I'm going to make
sure, Clippings on. Grab it all, pull it together, make sure it all clips together. So as you can see,
it clips together. Now when I try and pull it out, you can see I can pull it out, but it's actually
stuck in the middle. And that's exactly what I want. I'm already happy
now with everything. I've got the size and
everything like that. I think the one thing I
need to do is just come in and pull this top
part out a little bit. Have a look. It look
right like that. Yeah. Maybe that's a
little bit too much. Let's pull it in. Yeah. And
that looks much better. Okay. Just trying to nail
that shape down. All right? I'm happy with the size of
it and everything like that. Let's try just pulling
that down a little bit. Maybe that actually
will look nice as well. Maybe not quite so much. Something like that, I think. Okay, now before we begin, let's actually level these
off because these are, obviously, they're not going
to be square like that. So let's press control,
bevel them off, take the bevels down
and let's have some. Yeah, something like that on. I think that looks pretty good. Now let's bring in
our subdivision. Let's also turn off clipping
now since it is joined. Because if we don't,
we're going to end up with a face down there, which will affect
our actual mesh. You can see at the
moment, you can't actually see anything in there, but we're going to turn it off. And when I go in, I think
you can actually see this. So let me just hide this
out the way we can see now, this actual plane in here. This is what I'm talking about. I don't actually want this plane in here because the
clipping has caused that. So what I'm going to do
is I'm going to come in and delete that. So I'm going to delete faces.
Delete that out of the way. All tag, bring everything back. And now you can see we've not got that nasty line down there. All right, Let's
come in and add in then a subdivision surface. And we can see straight away we end up with this monstrosity. And that's not exactly
something we want. But what I want to
do now is I need to bring in some edge loops to
straighten all this out. So let's start with the top. So if I press control
are left click, all we're going to do is put in some supporting loops like so. And we can see straight away
as well that we do have a problem in this part here and we don't
really want that. So what I'm going
to do, I'm going to come in, grab the top. So I'm going to press
the eye button. And we can see now that
either bring that in, I can actually fix that problem. As you can see now,
it's looking much, much better now, don't worry, because we are going
to put a top on this, so we will hide
this little part. And the reason that's actually
done is because I turned off my clipping and we've not got that face down
there anymore. So, but you can see the top
of it is looking much nicer. Now, let's move down
to the bottom then. So what I'm going to do is
I'm going to press Tab again. I'm going to press controller and I'm going to
bring this down now, like so relatively
close to the bottom. Now you'll also see
that we do have another problem
in that the wheel archers are going like this. And that's not what
we actually want because no wheel archers
really go like that. The other thing is, is you
can see that we've got a problem in this where we've actually
created that devel. So what I want to do is I
want to bring this in again. So I'm going to come all
the way down to here. So I'm going to control click. And then what I'm
going to do is I'm going to press the eye button And just bring it in
very slowly like so. And now you can see that is
looking much, much nicer. Now the next thing I want to do is I actually want to create this part here to make sure that these wheel larches are not looking like they're kind
of floating or something. So what I'm going to do is I'm going to bring in
another edge loop. So control going up this time. And as a bring it
over now we can see we're actually
straightening those out really, really nicely. We'll do the same thing on here as well. So we'll
bring them over. And there we go. Now we can see that's looking really nice. Now let's do the same
thing on this one. So bring it over. And then
the same thing on this one. Controlar bring it over like so. All right, now I'm going to
bring one more edge loop in. And the reason I'm going
to do that is because I want to actually create some
wheel archers from this. So if I press control, er, I'm going to bring it down
to something like that. And I think from
that I can actually create a wheel arch from this. All right, so now
we've got that. Let's think about then, the
wheel archers basically. Let's do the actual
wheel archers. So what I'm going
to do is I think I will take it from here, going all the way up here. And then what we're going
to do, and I'm going to press shift D and
just bring that over. Then going to do, we're going to press and X, pull that out. So I'm going to pull
that into place. So now I'm going to do is I'm
going to separate this off. So I'm going to press
L and and selection. And then I'm going
to come back to it, press control A to reset
all the transforms. Right click, shade,
auto, smooth. And now finally, let's
actually bring in a solidify. We'll bring in a solidify, we'll pull the solidify down. So if this is happening where it's going
skewed like that, it basically means
that your normals are not facing the right way. If I come up and I put this
onto face orientation, we'll see that the normals on the bottom of these are actually red and
they shouldn't be. So now if I come in and press
L and then press Shift, you can see that that
actually straightens it all up and they look
much, much better. All right, so now
we've done that, let's actually come
in and turn that off. It basically means I'll go into a little bit
more detail on this. Anything that's red is
actually facing the wrong way. So you can see most
of my camper van there was facing the wrong way. So when we take this into games, engines, and
things like that, the material that's on them, they have a set face, which is the one
face in outside. And then they have
the same phase and it's going to obviously be
facing the inside as well. So it can only render either
the front or the back. And this is to save
on computer power. Because if you think
about a window, if you're rendering both sides of the in and out of the window, that's actually costing
more in computer power. So what Games engines do is they reduce that by only
rendering one side. Now when you send this
through to a Games Engine, if it's red, it will
just be see through. Because the Games engine
will take that as that is the inside though. It's important that
before sending it through to a Games engine, that we check our face
orientation like this. And what we do is we go into it, we grab it, and then
we press Shift, And then we'll spin
it all the way around and make sure it's
facing the correct way. Alright, so let's take that off. And then what I'm going to do is on the next lesson I'm going to actually fix these
wheel archers so they look much better than
what they do now. And then we can get those in
place. All right everyone. So hope you enjoyed
that and I'll see on the next
one. Thanks a lot. Bye bye.
42. Wheel Location Modeling: Welcome back everyone to blend
the beginner's boot camp. And this is where
we left it off. All right, so let's come in
now and actually apply this. Solidify Soap control,
Let's apply it. And now you can see we do
have some problems now. Not to worry, we can
actually fix these. We've also got some problems
in the front of this. As you can see that this is one of the reasons that
was causing the problems. This face, as you can see, is bent over there on
both of the sides. So what I'm going to do is
I'm just going to press delete faces and just
delete those off. Actually, probably thinking that because I'm going to
delete actually that edge, I'm going to delete that edge. I'll dissolve edges. Dissolve edges. There we go. I'm just looking now.
If that's actually fix that, I don't think it has. But what I'm going
to do instead is I'm just going to go back just before I applied my solidify. What I want to do is
before I apply it, I want to come to my mesh. So I'm just going to
turn off my solidify. And I can see the
problem is this. So I'm just going to
actually take those off. Take those parts of
press delete and faces. And now I should be able to press control R and bring
in a new phase like so. And press control R, bring in a new phase like so. And now let's see, We can
actually bring in our solidify. And if that's actually
going to fix the problem, which it has, so that's
now fix the problem. So again, like I said, this is a simple fix normally, and we'll be making
a few mistakes in this, so don't
worry about it. Okay, so now let's
actually increase the actual range
of the solidify. So let's turn it up there then. What I want to do
now is I want to press three and I want
to bring this into play. So if I press A, I should
be able to then bring it down to actually cover
that actual wheel arch up. And then I can actually decide if I'm happy with
the size of this. I think I need it a
little bit bigger. Let's increase it a little bit. Yeah, something like
that. Let's also see if I can actually bring
that across while I'm here. So if I can bring this, do this part here. So I'm
going to press three. I'm going to press and
Y and pull it out. And then just pull
it all the way over. So yes, and I think I'll
get away with that. Now what I'll do is
I'll apply my solidify, so control, let's apply
it in object mode. And now what we can do is
we need to come in and actually fix all of these
issues that we see here. First issue is this.
So press control law. Let's bring in a
supporting loop around. And then what we'll
do is we'll bring in another supporting loop. So control law around the
top, then another one. So control law
around the bottom. So now I can just move this
loop up a little bit like so. Now if you're having problems with the loops
going around there, you just need to put some more supporting links in control. Another one, spring that
over, and then another one. So now let's see if we
actually have a issue. So we can see we've got some
problems with crossovers, mesh, and this can
sometimes happen. What we need to do is we
need to join these up. So we need to join
this one and this one. So we can see it needs
joining up here. What I'm going to do is
I'm going to press Shift H. Just hide everything
else out of the way. And then I'm going to
join these at the center. So we're going to come
to merge at the center, and then we're going to
do this one as well. Merge, is it center? I'm just wondering, this might not be the best
way to go about it. So I'm going to press Tab. I think what I'm
going to do instead is I'm going to actually
just pull these back. Let's see if I can pull them
back. Then pull these back. Yeah. And I think
that's going to be the best way to fix this because they're actually crossed over and I don't really want that. In fact, what I'm going to do, I'm thinking, where
is that one going? Look, we can see
that the problems are that they need
straightening up to get them into be a
much smoother place. As you can see, let's
actually go back again before we brought
in those edge loops. So I'm just looking now so we can see before
this was the issue, I need to go back and
actually fix this. If I grab these two, I need to actually join
them at the center. Merge at the center, and then we'll do. These two need merging. Yes. So merge at center. Let's have a look. Merge
vertices at the center. And then what I
should be able to do is bring in another edge loop. So yes, and that's going
to work out like that. Let's actually fix these. So I'm going to press shift H. Go round to the other side now. And I'll merge these
at the center. Merge, merge at center. And the other thing
you can do is as well, you can grab both
of them like so. And what you can do
is just press shift R and that'll just
repeat that process. All right, so now what
I can do is I can finally now try and
fix these parts. So I can press control are bring in an edge
loop here like so. And now you can see that's
looking tons, tons, bare. Bring in another edge loop
then just to fix that bit. And there we go. Now let's
have a look at that. So I'm going to press Altage,
Bring back everything. And there we go. Now you can see that looks tons, tons bare. Alright. So let's hide
everything out the way again. So now let's come in and fix
the rest of this because I'm still not happy
with how this looks. But what I'm also going to do is I'm going to bring in
another edge loop. So control pull that
over to this side. And then I'm thinking that I will actually pull this down. So before I do anything, I'm going to grab this one. And this one I'm going
to pull it down. And I'm also thinking I'm probably going to have
to grab this one, three. Sometimes it's easier as
well, just so you know, turn off your
subdivision and then you can actually have a better idea what it's going to look like. So you can see here that I
need to flatten this out. Now once flatten it out, and I turn that
back on, you'll see now just how nice
that actually looks. All right, so now let's come in and add in
some more edge loops. But first of all, I'm
actually happy with this. I think actually I'm probably just going to pull
this one down a little bit. So I'm going to press
three, I'm going to pull it down there. So it's important when
you build this actually, that you really take your time
and really understand how this is all coming together
the more time you spend it. Obviously the bet
it's going to look. Now let's come in and bring
in some more age loops. So if I press control law, bring that out like so. And then control law
bring it out to here. And then what I'll do is I'll do the same thing on
the top and bomb. So we can see going across here, this is why this
is bent down here. The control, you can actually just left
click and right click. We could also bevel
it off as well. That's also an option. So I'm just going to bring
it out to here. And there we go, you
can just see how clean that topology
actually looks now. All right, so now
let's come in now. We've done that one and we'll do the same thing on this one. So what I'm going to do
is I'm going to grab it, go in I think probably probably, let's grab it from
here actually. So we'll grab this bit here. Then what we're going to
do is just the same thing, so shift D and then
and X pull it out. And we're going to have
these a little bit wider, so something like that. And what I'm also going to do is I'm going to
split this off now. Lp split it off like so. And then what I'm
going to do now is reset the transformations. Adding a solidify, let's actually bring
that solidify out now. And basically the
solidify is just there just to give us something
to actually work with. All right, so now
we've done that. What we can do is we
can apply the solidify. And then what we can do
is we can pull this down. Now Sando is going
to pull this down. This one here, I'm
going to press three. I'm going to press then
and pull it along like so. And then one as I'm going to do is I'm going
to grab this one, then I'm going to press three. I'm going to press,
pull it along like so. And then just bend it into
the place that I want it, which is probably going to
be something like that. Now you can see that we do
have another problem in that this is not touching there. So I'm just going to try
and bring it all down. So if I press
three, bring it all down just so it's
covering that part there. You can see as well that
rather than use face select, sometimes it's a little bit
easier use it like this. But you can see that
the control we've got, because we're doing it like
this, is much, much higher. If I press three,
now I can actually. Now let's give this
some supporting loop. So first of all we'll
give it one round, this side control there. Let's also right click and shade smooth so we can really
see what we're doing. Control law, bringing another
loop down to the control, then control law, then finally
we need one around here. Control, then control from one. There we go. Dad is
looking pretty nice. Now the one problem
we've got is we need to pull this back a little
bit, as we can see. So let's grab all of
this going around. Let's press three. Let's
just pull it back. Let's actually, I think I'll come from this actual
side control control. Plus I'm going to try and
move it then from here. Can I move it from here? Yes, we can. Dad's
looking much better. All right. There we go. That's the first part of
our actual camper van done. But now what I'll do
is we'll actually on the next lesson is
we'll start work. I think we'll start work on the middle and the
actual top of this. Alright everyone, So I
hope you enjoyed that. And I'll see on the next
one. Thanks a lot. Bye Bye.
43. Van Window Addition: Welcome back everyone to Blend
and Beginner's boot camp. And this is where we left off. All right, so I've decided that actually I'm not happy
with this back bit. I need it coming round to there. So I'm just going
to press control. Delete it off. So delete faces. Now when I come in,
I should be able to pull it out
going around there. So what I'm going to do is
I'm going to press three. I'm going to press then and
pull it out to maybe here I'm going to rotate it
and X rotate it round so, and then pull it out. And then let's rotate it again. So R and X. Let's rotate it, it's
pretty much straight on. Pull it out a little bit. What I'm going to do is
I'm going to press and y and let's pull it out there. And that is looking much better. All right, so now I
just need an edge loop. So control then we'll
pull that up to there. Then we've got a
problem with this bit. And the reason is we've
got a problem with that bit is because this
end isn't done properly. So if I grab this end, what
I'm going to do is I'll right click and I'll try just
triangulating faces instead. That's not going to work. So
let's try something else. So we're going to press
I wins, and there we go. Now we've actually fixed that. All right, that's
looking much better. Now I've got one little problem,
which is this bit here. So all I'm going to do
is I'm going to come in, I'm going to press three, and then I might even expand it. Let's have a look.
If I expand it. Yeah, the problem
is it's going to expand up there as well, though. Instead, I can press and
though and expand it that way. Let's have a look
what that looks like. And that's probably going to
be a better way to do it. And then I can come in now
and grab just this one s three and then just pull
it down a little bit. I'm happy with how
that looks. Yes, I am. Okay. Much, much better. Now, let's think about starting work on the
top of this camper van. So what I want to do is probably I want to split
off this top bit. So I want another part, another edge loop basically
going around the top. So control, let's bring in
another edge loop around here. And I'm just looking at how big my windows are going to be. I'll think, yeah, that sort of size looks absolutely fine. So then what I'll do is I'll
come in and we'll grab this. So Alt shift click,
Ol shift click. Now sometimes it's easier to work while you're actually
working on the mesh. In other words, if I press now
Enter and then press Alts, sometimes as you can see it actually looks bare if
you're working on the mesh. Now you can see that we do
have a problem with this part. I'm going to see if
I put clipping on, is that going to fix
it? No, it's not. So sometimes we need
to actually come in and actually fix these parts. And the way to do
that, let's have a look, see if can
actually do it. So if I grab both of these,
let's put clipping on. And then if I bring
them this way, you'll see it actually. So we'll do it
like that as well. You can see as well the center. I need to pull it this way. Let's turn clipping
off a minute. Let's pull it out.
Let's come back on. Let's pull it back together. Now, let's have a look at that. And I think I've
got this part here. It's just this point here. I also need to pull in, I'm going to take off, pull it out in on, let's see if that F let's have a look if I can bring in
another edge loop control. So let's have a look at that. Does, and then
control, there we go. That's looking much,
much better now. Yes, that's looking much nicer. Now, the one thing is I do need to pull this down a little bit because I'm
not happy with it. So I'll do is just turn off my subdivision and
then I'll come in and I'll press Alt Shift and click and Ot shift and click. I cant Shift, click and
then I'm just going to, yeah, you can see it's going round all the way around there. Don't really want that, I just want it coming from this end. So I'm just going to go
all the way around to the back control click and
then all the way back round. Let's control click over here. Just making sure I've
not missed any like so all the way back round here. Now, can I pull this down
a little bit from here? I need to slick this one. I think I can pull it down very slightly and you can see
that I can pull it down. But I do have a problem
in the mesh in there. I need to actually get
rid of that edge loop. I'm just looking basically
for it being a little bit chunkier than what it
is like the other one. If I hide this out the way now, I can actually
should be able to. Yeah, I don't really
want to do that. As you can see, this
needs deleting first. So I'm just going to come in and I'm going to press Delete
and dissolve edges. And now I'm going to do is
I'm going to pull it down. And then I'll bring
my edge loop back in if I come in and again, we'll make sure
this is turned off. I'll go all the
way round to here. Just control selecting and
then the same round here. Then control select and
then round to here. Then what we'll do is
we'll pull this down. Now pull it down to
where I want it. Then put this back on. And now we'll bring in an edge loop. So I'll control bring it up. There we go. Now that's
looking much, much better. Okay. I'm happy with that. Now I'm thinking, do I actually want the top of it
pulling out as well? Maybe I do. So what I'm going to do is
I'm going to grab this. We're going to go all
the way over to there with Control select, select. Control select. And then let's
go all the way up to here. Yeah, that's not going to do it. Control select. I'm going to go over the top and make
this easy for myself. See and select. Going all the way down here, like so all the way
back down to here. Then I should be able to
pull this up then and get it into the kind of size
that I actually want. All right, let's have
a look at that now. Let's see if then pull it up. Yes, there we go. That's better. All right, that took
a little bit of time, and as you can see,
it's very, very fiddly. But you can also see
that it's worth taking the time to actually
do this right now. Let's think about
making the center part. I'm, if I should just turn
clipping off a second, let's see if I can actually
get away with doing that. What I'm going to
do then is grab this part here, Alt
Shift and click. I'm going to press control B, so I'm going to also turn it down maybe to zero or
one I think it will be. So then what I'm
going to do now, I'm wondering whether I
should pull it out with extrude or duplicate it.
That's the question. Let's try extrude first. Enter Aln, let's pull it out, and let's see what that actually looks like if we do it that way. So now let's bring in
another edge loop. So control, let's bring it down, let's do the same
thing on the bomb. So control, bring it up. I'm actually
thinking that that's looking us better like that. So Yeah, I think I'm
going to go with that. Yeah, I'm going to go
with it like that. All right, so now
we've got that bit. You can see it's really
starting to come together now. So let's think now about
our actual windows. Now with the windows, again, it will be the same question. Should we actually extrude it
out or should we actually, you know, duplicate
it and then actually working it like we
did with the wheels, I think, on the windows. Let's just try extruding it out. Let's see if we can actually
put an edge loop in there. Now, control, so we can see that the problem is going to be that
we're going to need another edge loop in here.
Do we want to do that? Let's press control,
bring it out and just have a look.
Something like that. And then control the control. I think actually probably going to look probably better
like this, I'm thinking. Yeah, I think it's going
to look better like that. All right. That's
the window done. Okay. So what do we do next? Let's do the side windows so we can see we've got a
big chunky bit down here. So let's actually
fix that first. So if I come in control, let's bring in an edge loop. And as well, because
we split these away, you can see that we're
not interfere in that as we actually build
this mesh out. I think as well that we've got, you know, our kind
of window seams around here, which is good. So if we think about we'll
have it, let's have a look. We might need to put
in another one because I think this one's a
little bit thin here. But what I'm going
to do is I'm going to put in another edge loop. I'm going to bring
that there just to make it a little bit thicker. And then I think
I've actually got enough there to work with, except maybe the back,
I'll just bring in another edge loop and I'll
put the back around there. And then I'm thinking
I've got enough now. All right, let's have a look. So let's come in and
we'll grab this one. And this one here,
and also this one. Have a look, do we need that thinner?
That's the question. Or am I happy with that? Probably, yeah, I'll
do it with this. What I'm going to
do is basically I'm going to extrude
it in this time. So if I press E, I can
extrude in like so. Now the problem obviously is we can't really see in
there at the moment. I might need to pull it
back a little bit further. And now let's bring in
a couple of edge loops. So I'm going to press
control, bring it in. And then control
R, bring it out. And now let's actually have a look at what that looks like. So if I put this back on now, we can see that's
what it looks like. Now we just need to strengthen these sides, as you can see. Also we need to, let me
think, going around here, let's press control, bring it up, probably
something like that. And then control R, bring it up. And because we've done the
work now with this one, you're going to see it's going to be very easy
with the other one. So control, bring it down.
Let's have a look at that. There we go. All right, so now let's think
about this next window. So we'll put the
next window here. We'll leave a bit of a gap
and we'll do the same thing. So what we'll do is, well, let's think, in fact, we'll just use it up to there. So we'll do the same
thing. So what we're going to do is I want
to select this one. This one, and I want
to turn it off again. And then we're just
going to pull it back. So I'm also going to
save about my work, but don't mess this up. And then what I'm
going to do now is on the next lesson is we'll actually strengthen
these sides as well, but we've already started
to strengthen them, so actually it's a
little bit easier. All right everyone. So I
hope you enjoyed that. And I'll see on the next one. Thanks a lot. Bye bye.
44. Side Decoration Creation: Welcome back everyone to
Blender Beginners Boot Camp, and this is where
we left it off. But now let's come
in and what we'll do is we'll actually press Tab. And in fact we won't press
tab, we'll be in eddy mode. And we'll press control
and just bring in some edge loops on here like so. And then we're just
going to have a couple more edge loops to put in, which will be these
ones going on here. So control lot, bring it out. And then the third, you can see that because we've already done the groundwork does make
it much, much easier. All right. With this window, I think I'm actually
going to pull it out a little bit and then pull it in. So we'll try it on there. Being a bit more sophisticated, what we'll do is we'll come and we'll grab it
going round to, let's say round here. So we'll grab it from here. Grab this one and this one. And you can see, I don't
want this one actually, because this will
make it too thin. This window will be
way, way too thin. So I need to put another
edge loop in first. So I'm just going to
put it through there. And now I'll grab it
going round here, here, and then from
here to here to here. Is that going to be wide enough? Let's put another
one in just here. I'm just thinking maybe
another one in here. I know we've made it a
little bit different. Yeah, I'm going to
make it like that. We'll have it like this. Now what we'll do is we'll
press and pull it out like so. And then we'll just add
another supporting edge loop. Bring that in. Yes, that's looking
much better now. We could put another
window in there, but do we really want that? The one thing we do need is though a supporting
edge loop in here. We've already got one in there. There we go. All right, that's looking pretty nice. Now let's pull out this
back just a little bit. So what I'm going to do is I'm going to see if I can grab it because we've got to
be careful because of the edge loops
that we've got. So can I actually pull this
out by just grabbing those? Just going to see if I can. As you can see because
we've done that, this supporting edge
loop around here actually gets thrown
off a little bit. We're probably going to need
to bring in another one. Just pull that out then. And then that should
fix that for us. And that's looking
much, much better. And we've managed to pull
it out a little bit now. Now let's do the most
sophisticated part, which is this part here. As you can see, this is what we're actually going
for, this part here. So let's actually see
though if we can do a better job than
what I did before. So what I'm going to
do is I'm going to, first of all, make sure
there's an edge loop in there. So we can see we've already
got an edge loop in there. We can see what we need to do
is we can use this as well. And then what we can
do is we can bring it out and round, and round and up. Let's see if we can
actually do that. So here we go. So let's come in. First of all, what we'll
do is we'll press K, and then I'll come in and
bring it out like so. And then I'm going
to turn it round. I'm going to bring it. And remember if you want
to hold it there, you can. In fact, we need to
be in straight view. So what I'll do
is I'll just come round and I'll put it
to, let's say there. I'm going to press
the Enter button. And then what I'm going to do
now is I'm going to go back round to the side so I
can see it just there. And then I'm going
to grab this and I'm going to do is I'm going
to hold the born down. And then that'll straighten
that up for me like so. And the other thing is as well, I'm thinking that I want to come probably to here and then
I'll go round to there. Now you can see the moment it's straight on, I
don't really want that. Just press again and then
you'll be able to get that off. So thinking probably down
to here, don't worry. We're going to straighten
this up around to here. Then I'm going to bring
it all the way to here. Maybe I'm going to
make a small one. Actually you can see as well that sometimes happens where it's actually
snapped that off. Sometimes, I don't
know why that happens, but just trying to follow it and keep it
the same kind of width. Then what I'm going
to do is I'm going to go straight up up. Don't worry, we're going to
straighten this up anyway. If you make a mess of it, don't worry too much. Then we'll come back
to in back to here. So I'm just wondering
whether I'm actually happy with this bit going
so much like that. I'm thinking that this bit here that I'm not
quite happy with, I'm just going to pull
these up a little bit. There we go, That's looking
better then I can pull this. Then what I can do is
whether I want it like that, whether I want to
bring these two up, bend them a little bit, I'm thinking I'm going to
bend them a little bit. And then I'm thinking,
what about this part here? Do we actually want
that like that? Do we need another edge
loop in, for instance, over look, I'm thinking that's looking pretty nice
because I wanted it to be a little bit different from this one that I've
already created. Just this bit that I'm a
little bit unsure about. Let's actually look all this up. Pull that to the
side as you can. And we don't really
want to do that. Bring this one down like
so when I'm thinking, yes, that's looking a bit
better now. There we go. That's looking bare. Okay.
I'm happy with that. So what I'm going
to do now is I'm going to actually
split this off. So I'm going to grab this going
all the way over to here. And then what I'm going to do is I'm just going to press Shift D, and I'm actually just going
to pull it out a bit. Press P selection, and then
I'm going to grab it again, and I'm going to hide it out the way. Now let's
come back to this. And what I want to
do is I want to actually delete these loops. Now you can see they're going
all the way down there. We don't really want that, we're going to actually grab this, we're going to grab
it the other way. So I'm going to
press shift control, then control click Going
all the way down to here. And then all I'm going to
do is deletelve edges. There we go. Here's our van. Actually, back now, I want to
think about this part here. I'm going to have another one. I think coming
just down to here. If I press Tabolt tag, I
can see where that is. I want another one probably coming down to here,
something like that. I think that's going
to work out best. Let's tie this out
the way again. Let's come back to it now
and we'll have it coming in, I think to roundabout here. We'll go he, I'm thinking from here then
we'll bring it up here. And then finally what
we'll do now is we'll take this bit out. Fi pressift D,
bring that bit out, Selection, split it off. Now we can actually come to this and we can actually get rid of this part that we've actually cut all the way up to there. And then dissolve edges like so. All right, now let's actually
work on these parts. We'll do this part first. I think what we'll do is I'll
first of all press control. Yl transforms and then
I'll bring in a solidify. And then we'll pull that
solidify either back or out, it doesn't even
matter which one. And then what we'll
do now is we'll strengthen up the control. And we can see that we
do have a problem in that when we're working
with things like this, it doesn't always work well because of the fact that we've not actually got any
real edge loops in here. So that's one of the
problems. So what you can do instead of that is you can actually either use
the knife tool or we can use the actual bisect
tool to actually do it. Now the one thing we have
got is as well that I might as well come in and
actually solidify this. I think I can also as well come in and triangulate
faces like so. And now let's see, If I come
in and apply my solidify, that's what it's
going to look like. Now let's bring in
supporting edges. So control, la, pull
it back through here. And then control, or let's
pull it back to here. So we're going to end up
with something like that. Now, I've got to actually fix these parts
going around here. And I'm just wondering, yeah, I think I might come in, grab this, going all the
way down to here like that. Grab each one of these,
then just press, I bring them in. I'm just wondering,
now I want it, now I'm going to do
is I'm just going to press Tab to grab everything. I'm just going to
pull that back on. I'm also wondering if I
should pull it up past here. So actually, I think that's
maybe going to look okay. Maybe it's just the actual work I've done on there that I'm not sure if I'm happy
with, by the way. So now let's come
to where this part and what I'm going to do is I'm going to grab all of this. And I'm just going to grab it going all the
way around to here. And I'm actually just
going to pull it out because I actually
want this in front. And then what I want
to do now is I want to bring in some edge loops
before I actually start. So control, you can see that I'm not going to
be able to follow it all the way down there. Simply down to the
fact that this doesn't have any bridged edge loops or anything like that. So what I can do is when
you triangulate things as well as you can't actually
bring in edge loops though, that's a problem that
you will have though. Instead of that, what you
can do is you can just pre dissolve only faces. Now you can actually come
in and actually bridge it. So if I come in, press old
shifting click going around, take off this one right click
and then bridge edge loops. You can see now that
even when I come to try and put that in,
I still can't do it. That should have made it
actually easier to do that. What I'm going to do is I'm going to actually delete this. So I'm going to
actually delete that. And what I'm going to do
instead is I'm just going to press F and fill it in that way. I'm hoping I can do that. Is that going to be able
to do that? Yes, it is. That looks absolutely fine. And then what I'm
gonna do is instead I'm going to bring in
an edge loop this way. I'm going to bring in
an edge loop this way. And then what I'm
going to do instead is I'm gonna follow that along. Now once I've actually solidified this with K and
bring that to the end, now I'll think I'll do
it that way as well. And I can't even bring
in an edge loop here. So that's leaving
me a little bit of a problem now on the next list. And what we'll do then is
we'll get this solidified off, and then we'll actually
try and make it nice and smooth so it fits the rest
of the actual camper van. All right everyone. So a little
bit of a long one there. Hope you enjoyed
it. And I'll see on the next one.
Thanks a lot. Bye bye.
45. Front Area Modeling: Welcome back everyone to
Blenda beginners boot camp. And this is where we left off. All right, let's bring
in our solidify. So I'm going to
add in a modifier, bring in a solidify press
control all transforms and what I'm going to do is
then pull this out like so. And then let's see how that's
actually going to look. And I'm thinking that is
going to look pretty nice, apart from the fact I
think I'm going to have to pull it back to there like so. Yes, something like that. Now, we have got some problems
here, as you can see. And that's probably down to, let's press shift, sorry. Shift, see if
that's the problem. No, it's not. It looks like
it's a problem with the mesh. So I'm going to have
to come in, hide my solidify out of the way and what is actually
causing that. Let's also hide this
out of the way. And then what we'll
do is we'll come now and see what the issue is. So I'm just going to
grab both of these. Join them together. Grab both of these. Join them
together with J. Now let's see if we bring
on subdivision, Bring on. There we go. Now we
fix that. All right. So that's looking
much, much better now. I'm just looking
round to make sure I've not got any other problems. Now I can see that I'm probably going to want
to join these two up. So G join them both up. And then also I'm
going to want to make a new court going
along here somewhere. So now because I've
joined those up, I should be able to
come in and press control and then join
them up like so. Now that's looking much better. Now, I'm just looking
now at the back of this. I'm, I actually happy with how that's looking and actually, yes, I think I am. So the main thing now before we actually complete
this is to make sure that if you turn
your solidify off, that you're happy with this
angle that you've got. If you're not, just come in and actually start turn this off. Bringing these
down a little bit, you can see a broad
edge loop in there. You can see that's
where it comes down to. I'm wondering if I can actually, can I bring in an
edge loop here? Only to here. Because you
can see that I've got a problem in that these
aren't actually joined up. I'm just wondering whether to
get rid of this edge loop. I'm going to do it, I'm going to actually
get rid of this one. And this one I'm going to press delete and dissolve edges. And then instead of doing that, what I'm going to
do is I'm going to actually fix these edges. Now I'm going to
come in, press J. It should go all the
way up now to here. You can see we have a problem here and here because we haven't got any kind of the ports there. So I'm going to grab this one. And this one right
click subdivide, And then I can actually
join these up with J. Then join this up with J. Then what you'll find is
when you press control, you'll be able to pretty much
go all the way through and actually support
it like control, bring in the supports. Then what I want
to do is I want to now join this to this. All I'm going to do is
I'm going to press, I'm come to here, press the end. Now we should have that now. Fully near enough support it. Let's just hide this out of
the way and come back in. I'm going to actually, yeah, I'm going to actually also cut round here because I'm
not happy with this Eva. So what I'm going to do
is I'm going to come in, subdivide it, right click, and then I'm going to
do is I'm going to come join this one up with J. Then this one up with J. So now I can come to this and you'll be able
to up through there. Why I'm doing that is
just so it's going to be nice and clean mesh rather
than all over the place. I'm just going to join
up this press center, and then I'm just going
to move this and this, making it a little
bit smoother like so. And then finally
this. Join them up. Now let's the moment of truth. Let's try turning back
on our subdivision. Let's try turning
on our solidify. And there you go, now you can see it's looking
really, really nice. Let's now apply our solidify. And there you go, it
looks even better. Let's now come in and see if it can actually
bring in a support. So if I bring in a
support, bring it over. So there it is. Let's press Alt H,
bring back everything. Let's hide these out the way. And the one thing
I'm thinking is, is this going to be okay? Is this one going to be okay? Because I'm not sure if I'm happy with this, what
I'm going to do, I'm going to
actually come in and I'm actually going to let that, and I'm going to actually
retry this again because that is the only
bit I'm not happy with. Now you can see this bit here, it kind comes out like that. I like the flow of this better. It's just kind of getting
this part in here properly. So what I'm going to do is
I'm going to press one. I'm going to have a
go at doing this. Instead of doing it that way, what I'm going to
do is I'm going to actually pull this out. Instead I'm going
to press Shift. And then what I'm going
to do now is I'm going to shape this by bringing
in some edge loops. So three, four edge loops and then four edge loops.
Something like that. And now what we can do,
we can actually shape this into the positions
that we want. So I'm going to grab grab this. Then I'm going to also
put this on connected only just so I'm not messing
around with any of the mesh. And now when I pull this out. You'll be able to shape this into something
much better Now. Just be careful that you
don't actually push over, you know, too far on this
measure or anything like that. I think I'm going to keep
it in the top there. I think what I'm going to do is I'm going to
actually bring it up it a little bit. I'm still making a mess of that. I don't want it like that. I'm actually going to
maybe from this way. Let's try pulling it
from that way first. The problem I've got
is that as well. Because I've put on connected only it doesn't actually pull
it as well as you need to. What I'm going to do
instead is I'll just split it off because it
will make it easier. Split off Selection. Let's
actually try that again. I'm thinking instead and should come up to
here. Up to here. I'm going to actually
use the Kia. I'm going to try
the knife again. Hopefully we should get a
better result than before. So I'm just going
to come round here. All right, let's
try that once more. So I'm going to grab
all of this now. Going to do is I'm going
to screen the press shift, pull it away without
portion of editing on. Then I'm going to come back
to this part selection and then we're just going to
delete that out of the way. That is looking much better. Can see straight away
it's looking much better. Let's resell transforms and then all we'll do is we'll add a Solidify, press
the Tab button. A just to grab everything. And then we're just
going to pull it into place where I
actually want it. I want it probably stuck out. Let's have a look
up a little bit. And stuck out, maybe maybe
I should pull it back. So yes, like that, That's looking
really, really nice. Because then we can have
an actual, you know, bottom part of this going around here and holding
everything together. Yes, that's looking
much, much better. All right, so let's supply our solidify and then what we'll do is we'll bring
in a supporting loop now. So if I pull this out, I can bring in control, bring in a supporting
loop and then control bring in a supporting
loop for that side. Yes, that's looking
much, much better. Now what we need to do is
we need to bring this in. So I need to grab it all. All I'm going to do is press the eyeball and
just bring it in. Then let's press E. There we go. All right, the one problem we've got is this
part in the center. Let's fix that. Now the way we'll do that is we'll come in, we'll just hide two of
these out of the way. And we'll see straight away the problem is the
inside of there, we just want to delete
those out of the way. You can see these in here. This is what we want, deleted. We want to delete all
of these out the way. Delete and faces Alt. Bring everything
back. Now you'll see that line down
there is gone. All right, now let's think
about pulling it back. Let's pull it back into place. So I'm going to
grab it all with a, let's pull it into place,
have a look at it. I think. There we go. All right. Now, I
think we're spend enough time on this.
Let's double tap the A. Let's come in and now
actually create our bumper. So what I'm going to do is I'm going to grab this
going all the way, let's see, let's bring it
all the way around to here. And then all the way
going round to here. And then shift D
and then selection. Then what we'll do now is to
create this bumper control all transforms and then
bring in a solidify. Pretty much the same thing
as what we've been doing. I'm going to pull this
back a little bit. So then finally what we're going to do is
we're actually going to pull this out
because we want it to be a little bit
closer to there. I can pull this out. So now let's actually make
it into a bumper. So what I'm going to do
is I'm going to come, I'm solidify now, let's bring
another edge loop in here. Bring it out then. What we'll do now is
we need to bring in another edge loop control to the back and then one
at the front control. And that is looking
really, really nice. All right, so now
let's think about, on the next lesson, let's think about what else
we're going to do. So we just, we actually haven't got that much more to do now. We've got this back to do, which will do the same thing
with the bumper. And we've also, you can
see we've got a line in there as well that is caused
again, by the mirror. So we've just got to be careful. We might as well go in
and fix that as well. And then we've
just might as well finish this front
of this. All right. So I'm happy with this so far and we've also got
the underneath to do. All right everyone,
So I hope you enjoyed that and I'll see on the next one. Thanks a lot. Bye bye.
46. Wheel Modeling Techniques: Welcome back everyone to
blender beginners boot camp. And this is where we left off. All right, so let's now
come in and what I'm going to do is I'm going to
bring in a cylinder first. So I'm going to
bring in a cylinder, I'm going to put my cylinder
onto something like, let's say 18,
something like that. And then what I'm going
to do is I'm going to bring my cylinder out. So at the moment we can see because
we've got clipping on, it's kind of messed
it up a little bit. Now if I pull it out, you can see it
actually fixes that. And if I pull it in
something like that, you can see that's what
happens at the moment. I don't think I need clipping on and they also don't think
for this one I need mirror. So what I'm going
to do is I'm just going to turn it
around, selection. And then I'm going to grab
it, turn off my mirror. And then what I'm
going to do now is bring in some supporting loops. Then I'm going to press tab
control, bring them up. And then control bring them up. And then we'll
bring them in. So I on both of these parts. So I bring them in now
let's grab the whole thing. So S and Z squish it in. Let's spin it round now, so Y sorry, X 90.
Let's press one. We'll get it roughly
in the right place by pressing shift
S. Election cursor. And now we're going
to bring it out, and this obviously
is just going to be that higher on the actual front, so let's put this in
place where we want it. Something, something like that. Now the thing is it's a tire, but it's also a logo, but we might as well use
this tire in there as well. So I will make it a little
bit thicker, so S and y, let's make it a
little bit thicker, let's put it into place like so. And then what I'll do is I'll
grab the center of this. I'll press and pull
it out a little bit. But what I want to do is I
want to pull them all out a little bit because it's a
little bit thick on this. So what I'll do is
I'll press shift H, and then what I'll do is
I'll grab both of these, pull them out a
little bit like so. And then we'll grab the front. In fact, I might as well grab the front and the back and make this actually into a tire
to save myself some work. I'm also thinking,
do actually need some extra edge loops in here? Probably. So let's
bring some in. So we'll bring in
an edge loop here, bring in an edge
loop here, like so. And there we go, that's
looking much better. And then what we'll do is we'll grab the front and the back. And I'm going to right click edge loop tools and
bridge like so. And now let's bring in
some more supports. So control law,
bring it in like so. Then do the same on the back. So control law and you should really be able to
get the hang of this now. So control, let's scroll one. So left click, right click. And then let's pull these
apart with S and Y. Pull them apart like so. And there should be our tire. So I'm really happy with
how that tire looks. Now I want to do is I
just want to make it so press salt H so that we can actually have
these bits on as well. So we'll have two tires
basically at the moment. This one here, which
is then going to be on the front of here and it
needs a logo on here. And now we've done that,
we can actually grab this. I can press Shift D, I
can pull it out like so. And I can just pull this
around to the side. I'm actually going
to press right click the origin to geometry. Now let's go back to this one. I'm going to make it
a little bit thinner, and Y and Y a little
bit thinner like so. And this then will be
our logo on the front. Now we've got that, we can
press control left click, right click, and then
fill in that phase. There we go. We should end
up with something like that. All right, let's hide these
parts out of the way. And then what we'll do is now
create this into a wheel, so our dead 90. And then what we're
going to do now is we're going to actually
pull these in. So I'm going to press, I think I'll grab it
from this one here. So if I grab, let's
say this here. Should be able to
then press like so. And now I can press I
and bring that out. So if I press I now like so. And then what I'll do
is I'll bring this out. Now what we want to do is
create this kind of effect. A moment you can see probably brought in a little bit too far. So I'm just going
to press let out a little bit and then we're going to do is I'm
going to press, pull them out, bring in some
support, control like so. And then support on
the back as well. Control, in fact, do we
need a support on the back? I'm just going to write click
and shade auto, smooth. Actually, I think
that looks okay. I'm thinking that looks
really nice as it is. All right, so now let's
put these wheels in place. So make sure that
they're the right size. Then I'm going to put like so and then we're going
to press Shift D, bring it over like so. And we can see this wheels
kind of a little bit too big. Should I make it smaller? I think I should, so I'll make it a little bit smaller like so. And then what I'll do is I'll join both of these together. So control J, let the origin to three D cursor and then
let's add in a mirror, mirror on the X. So let's turn off the Y. And then what I can
do is I can press tab A to grab them both. Then let's pull them
into place like so. And we can see they're
looking pretty good. All right. Now let's fix this, the inside of these. So it's way to do that. Probably should have
done this before, But anyway, let's press control
left click, pull it out. And then control
law on this one. Left click, pull it out. Now I'm going to do is I'm
gonna grab both of these. Press the button that
will fill them both in. Press the button to
bring them in like so. And now I should
be able to extrude them out with clipping on. So if I come in,
I'm going to press, pull them out like so. Then I'm going to not
clip it because you can see at the moment they
won't actually go together. I'm going to press
control. Bring that out like so let's see if I can actually bring in
another edge loop. So control, let's click, let's stay clipping off. I'm wondering if we should
fill them in at the end. I think maybe that's
going to be bare. You can see we have a problem
with this one as well. First of all, what we'll do
is we'll actually come in, press control left click,
pull that out there. And then control pull
that one out to there. So control law. Let's make this up a little bit. So now we just want
two ends on here. So control left
click, right click. Control left click, right click. Grab them both. Control B. So now we just want
them going actually into the actual bottom. So I'm going to press Enter
AlternS, bring it out. So now we need some supports. So what we're going to do
is we're going to press control La, going around here. So theme on this one, then control La, left
click, right click. Theme on this one, and then
the same on this side. And then you're just
going to grab them both with the wheel shift, hide everything else
out of the way. You can see that we've
not gone anything else. So we can just press
shift H like so. Right click shades move. Now finally let's
come into the top. So if we go over the top view and what
we're going to do is we're just going to
grab let's say 1234. And then we'll do the
same on this 11234. And then what we'll
do is we'll press and Z and pull them
up. So then what'? Just going to bring
in a support control. Bring in your control for the top one and do the
same on this one. Then control. All right. So, all right, let's press all Tate, bring
everything back. Let's hide all of
this out the way by just grabbing it
and there we go. That's looking pretty nice. All right, so now let's think about the back of the
bumper, basically. Let's think about the bumper. So pretty much we're going
to do what we did before. The thing I'll do is I'll
bring it from here. From here. Then what we're going
to do is press Shift D, Pull it out, and then
we'll put that bumper on. I'll do is I'll press P
selection, split it off, and then adding a Validifyn.
We'll pull that out. Then we're going to do is
we're just going to push the bumper back, pull it back. And we can see that
the problem we've got is we need to pull this out. What I'm going to do then
just grab both of these. We're going to pull
them out like, so there we go. That's looking pretty good. And now let's bring in
a, another edge loop. So now let's apply the solidify. So control and now finally
bring in all of our support. So control R, two left click, right click, and Y. So two more. So control, bring it up. Control, bring it down. There we go. There's our actual
bumper. Alright everyone. So what we'll do now then is we'll finish this
lesson here and on the next one we should be able to get this back window part on. And I'm thinking that
pretty much then we just need to put the roof on
and then we're finally done. All right everyone, hope you enjoyed that and I'll
see on the next one. Thanks a lot. Bye bye.
47. Top Decoration Addition: We welcome back. If you want to blend the
beginners boot camp, I'm actually going
to save out my work because I've not
done that for a bit, and I don't actually
want to lose it. So let's come in and
now what I'll do is we'll do this part over
here as you can see. So what I'm going to do
is I'm going to grab, I think I'll grab it
coming from here to here. And then round here, and then up to here,
and then round to here. And then I'll just
press and just grab the remaining ones like so. All right, so I'm just a bit worried,
actually, about this. I think it's a little
bit too close. So I'm just going
to press control. I'm going to bring in
another edge loop actually. Because a bit too close, I know it's a bit
time consuming, I'm doing it again,
but I think it will look better
doing it that way. And then what I'm going to
do is going to press at enter alternates, pull that out. And then what I'm
going to do is I need some supporting edge
loops in of course. So control pull that up. So let's also think about the supporting
edge loop on here. So control law going to cross? Yes, and that looks pretty good. Now we just need the
edges coming out of here. So what I'm going to do
is I'm just going to grab these three and I'm
just simply going to pull them out so you can see the coming
down in a weird angle. Don't really want
that, so I'm just going to lock them to the X and then I'm going to press and X and just straighten those up. Then what I'm going to
do is now supporting edge loops again out. And then supporting edge lops going around the other side. Control, pull it out. Then finally supporting edge
loops going down this side. Now I'm thinking,
do I need any more? Yes, probably want
one round here. Control, bring it out. So now let's do
the final window. So what I'm going to do
is I'm going to come in, I think I'll come in
from here down to here. And then what I'm going to
do is I'm going to press, I bring that in. And then I'm going to
press bring it in. Then what we'll do is we'll
also just turn off this. Then we can bring in our
supporting edge loops, the control. Let's press Tab. Look at what that looks like. There we go. That's
looking pretty nice. Think I'm happy with
the back of it and I think pretty much we're done. Apart from the top bit. Let's think about this top bit. So what I'm going to do is maybe I should create
a new part on this. I think what we'll do is
I'll press Shift Day. We'll bring in a cube. I'm going to bring my cube up, then I'm going to bring
it out to the front. I'm going to press S and's
and just bring it down. So now I can pull this out. Who will want it,
let's say out there. And then what I can do
is now I can bring in a supporting edge
loop in the center. And then I can bring
them round to here. Control to left
click, right click. There we go. That's actually
what we're looking for. Control, Bring another
one. There we go. Now we just want something
to actually support it. What I'll do is I'll grab
both of these underneath. I'm going to press
the eye button. Then on I'm going to
do is I'm going to press bring that out. I can see that it probably
needs going back. So I'm going to
press control plus, and then I'm just
going to pull it back. Then support edge loop control. Another supporting
edge loop control. Now we can actually,
should be able to fit that play if I pulled this
down, should fit into place. Move, there we go.
Simple as that part. Now let's think about this bit. This needs pulling
out a little bit, because at the moment, as you can see, it's not as
rounded as I wanted it to be. So what I'll do instead
is I think I might be able to get away with
just beveling it off. So if I bevel this, let's
try control B. There we go. That's looking
much, much better. All right, so now just
this top bit again, we'll use a cube, that we'll bring in a cube. In fact, we won't
do it that way. We'll actually come
select our van, then press Shift,
Bring in a cube. We'll pull it up into place. And then what I'll do is I'll
pull it out a little bit. So I need to really
join this up together. So if I pull it
over here like so. And then just get
rid of this end. So if I just get rid of
this delete and faces now, when I grab this,
pull it together with clipping on to be able
to clip those in place. Can. Brilliant. All right, let's press S and
y, pull this out. So now let's bring
in some support. I want it kind of
rounded like that, so we just bear that in mind. What I'm going to do is I'm
going to press control law, Bring it out like so. And then we'll bring
this down now. So if I bring this down, that's kind of the way
I want it to look. And then control law, and then we'll bring in one
more edge loop. Bring it out. And then I'm just
worried about the bomb now I'm just looking
at the bomb. Yeah, that's why I'm worried about it because I wanted
it to look like that. So it's move, I'm thinking, do I want any more
edge loops in there? I'm going to round
this off a little bit. So I'm going to be level
this and try that control B. Then up one, maybe two.
Left click, right click. Yeah, I'm thinking that's
looking much, much better. I just want to put
a top on it now. First of all though,
I'm going to pull this down a little bit more because this needs
pulling down just a tad. And then we can grab all of
these, pull it all down. So now let's bring in the
supporting edge loop again, that makes that look better. Now what we'll do is
we'll come to the top. I'm just going to pull
this out a little bit. So I'm just going to press
Extrude Control left click. Drop that into place,
something like that. And then supporting
the edges again. Control back. And then look at that. I think I can pull this
up a little bit more. Yeah, I'm thinking that's
looking pretty nice. A little bit different
from the other one. But I think it act I think
it actually looks better. All right. So the last
few things to do, so we just need the lights. So let's get those in though. I'm going to press
tab shift eight. Let's bring in a cylinder. Let's pull the cylinder out. Let's split these
up from each other. Let's take off clipping, so we can actually do that. Let's spin them
around, so Y, n, x 90. Let's make them smaller, let's
then squish them in and Y. So let's bring in a couple
of supporting loops. So control two, left click, right click, pull them out S Y. So now let's bring these in. So to make the lights, we're
just going to bring them in. I bring them in like so and
then pull them back and then I bring it in and
then E. Then again, now you're going to
do is you're going to be level that control, bevel it off and then
just pull them back. You might need
squish them as well. Just pull them
back. Right click, shade, auto, smooth.
There we go. A couple of lights Now I'm going to do is I'm just going
to grab the whole thing. I'm going to press S and in. Just really squish them in a lot more than what
they were now. We're just going to
put them in place. I'm going to press one and make sure that
they fit in place. Something like that. May be. Let's pull them
back into up some. Yeah, like that. All right,
that's looking cool. Now, let's think about
these wing mirrors. So shift eight, let's
bring in another, let's bring in a cylinder again
so I can try it this way. I'm looking at
these wing mirrors and I'm very happy with
how they actually look. But what I'm going to do is I've actually I'm going
to bring it in. I'm wondering whether
to just do this without the subdivision probably going to
be better actually. So I'm going to do is I'm just
going to press their head. Spin it round so x 90. Make it smaller. Of course. Let's bring it out now. We'll just get this into place. So I'm just going
to put it around. There's going to be too
big a thing like that. So I'm just going to make
it a little bit smaller, bring it into place like so then what I'm going to
do is I'm going to come in and I'm going to press
pull it out, control B. And you can see that's
not actually working, so I'm going to press Control
and then right click, Set origin to geometry
and then have control. And now you can see I can
actually level that as I want. Right click, shade smooth. Okay. And then what
we'll do is we'll right click and we'll set
origin three decursor, add in a mirror and then we'll add in a subdivision
surface. There we go. Now we're starting to get the
look we're going for now. We'll click the inner part, I, E, and then just one supporting
loop may be in the middle. If I come to the middle now, I should be able to
press and bring that in. There we go. Now that looks like a really,
really nice mirror. What we'll do then on
the next lesson is we'll actually get
this into place. Then finally what
we can do is we can actually get
the rest of this actually with materials on the guys, it's
actually finished. We actually learn
how to actually use subdivisions and create
vehicles, alight one. So I hope you enjoyed that.
I'll see in the next one. Thanks a lot. Bye bye.
48. Vehicle Texturing Techniques: Welcome back everyone to blend
the beginner's boot camp. And this is where we left off. All right, so now let's
come in and first of all, what we'll do is we'll just spin this round and make
it a little bit thinner and Y make it
a little bit thinner, art and Z, spin
it round like so. And then what we're going to do is now we're going to bring in a curve and we're
going to bring in a path, pull it up, make it
smaller, press one. And then what we're going to do is going to fit this into place. I'm going to come in and
I'm going to bring in some. Where is it my depth? I want actually depth. There we go. It's
turn the depth up. Let's put it into place wherever I'm going
to start it from, probably somewhere around here. Then what I'm going to do now is I'm just going to bring this in. So I'm going to pull it
up into and just make whether I want it something like that actually
looks pretty nice. Then I'm going to do is I'm
just going to grab this end. I'm going to press all tests, pull it out a
little bit like so. Then I'm just going to grab
them both, pull them over. I'm going to make the
mirror a little bit thinner, all the way. Actually bring it down. Yeah, that looks bare. Then I'm going to
do is I'm going to press D just to turn
that into mesh. Actually, before I do that,
let's just go back a second. Before press control. That doesn't work,
let's bring it down. And then what we're going
to do instead is I'll come and drop the resolution
because it was too high. So now I can press tab D. And then I can join it
with this mirror control J, that then is going to put
it on the other side. Now finally, the
last little bit, I'll yeah, well,
I grab my mirror. Look, yeah, we'll grab
a subdivision on there, so I can grab my mirror. I can press Shift, and what we're going to
bring in is just a cube. We're going to
bring the cube out, bring it, make it smaller, and X push it in. And then let's bring in
some supporting loop. Control to left click, right click, and y, pull them out to
more edge loops. Control to left click, right click, pull them out. And then let's make it a lot. Thy th. Then one more edge loop control. Left click, pull it
out. There we go. Now let's put this into place. We'll put this into place
somewhere like this. Then what I'm going to do is I'm just going to
make it smaller. Finally, I'm going
to turn it around, z 90, zed 90. Spin it all the way around. Let's just fit. It looks as though the mirrors are actually
placed into something. Right click, shade,
auto, smooth. All right. There we go everyone.
It's actually finished. So that's looking pretty nice. I'm just looking around just making sure I've not
missed anything. I do know something that
the second time was a charm and it was much
easier to do the second time. One thing I'm
probably, you know, not happy about is
maybe the back of it it wants coming
down a little bit. Do I go in and fix that? Maybe let's get a look. Control. We don't actually, let's see if we can
pull it down from here. I don't want to actually cost
me too much work on this. I'm going to see if
I can pull it down. You can see I need to
grab this bit as well. Let's grab that bit. Let's
grab all of these as well and see if it's too much
trouble to pull it down. You can see I've not
got one selected here. I'm going to grab that as well. And then I'm going
to pull it down. And there we go. That's
looking much better. All right, so now
let's grab everything. So B, to grab everything,
press D and that. Then we'll apply
everything on there. I probably shouldn't have
done what I just did there. So I'm actually going to go back because I'm not going
to apply everything. And the reason I'm
not going to apply everything is because
if I apply everything, it's going to mean that
all of these, you know, mirrors and things like that, I can apply the subdivision,
it's just the mirrors. I'm just going to see if
actualy it's easier not to. So what I'm going to do is I'm going to grab this part here. I'm going to grab
this part here. Press control L, And
then let's link, let's link materials, then let's put it onto material mode. Wait for it to load up. Now, is this going to load up? Let's go to materials. Here is all the manned material. So we've got the white on
already, which is really great. Now what we want to do is
we want to come and put on our black for our windows. Now if I come in, can I come
in and actually turn off my subdivision so if I turn
it off as you can see. Let's turn it back
on. Yes, we can actually go in then and apply our window glass to all this. If I come in another words and grab all of these
going around here, right, Click, mark scene. Let's see if that
actually works. So L no, it's not. So let's just add that
other wait a minute. Yeah, we can see this
is the reason why. This is why I want
to actually come in and do my windows in this way. Because it means that I
can actually come in now and select press
really, really easily. So you can see now
and come in like so. And whoops. And select them. Right click, Maxine. Now let's see if
we come in hell. There we go. We can
actually select it. Let's put it onto
camper van mirror. Camper van glass. Camper van metal. Let's assign, let's have a look. There we go. You can see
just how easy that is. And if I go back now, we should be able to turn this on and it should look
absolutely fine. All right, so that's the
way we're going to rock. We can also come around and see, because we've got our mirror
on it makes it really easy. Let's hide this out the way. And then what we'll
do is now we'll come in to this part here. This part here. So in fact, we'll come to the
part, I think I'll make it easier.
Right click, mark. Seem go in now and grab that and put it onto
camper van glass. Let's sign now. Let's come to these parts and we're going to do
exactly the same thing. Lick, going all the way around. I think we'll also
do this one as well. Going all the way around
like so mark seam, well come in with L and
L Glassmight as well. Actually hide those out the way because then I can
actually be what I've got left round to this one. Let's select and Mao and Maxine. Then we'll come in, have
this one and we're going to click on glass. We'll hide those out of the way. All right. Now let's have a look at
all the colors we had. All this is blue, this
looks like camper van Blue. We click Assign Idea
out of the way. This is camper, we'll assign
that idea out of the way. Then we'll come
down to the parts, all this bottom part
with the looks of it. Apart from this, so this is going to be the metal come in. I can go and grab it. Going all the way around
there. Right click. Then we can camper van, there is the metal click
sine, that's that. Now we can come, just
have a look at the rest. So we've got a mirror, we've got some more metal parts. You can see maybe a Mr.
part there, I'm not sure. But we'll come to this part. What we'll do is we'll grab
this one and this one, press control, l link materials. And then what we'll
do is we'll grab this part and this part. And then what we'll do is
we'll point as Amptallke, and then we'll come
into the mirror and we'll click mirror. Click a sign. There we go. All right. We'll leave
that as the white. So what I can do now is I can grab those because
those are dumb. Let's come to our tires now. So we need Camp Metal. Let's see if I grab everything. Yeah, it's going to grab
everything around there. That's not really what we want. So what we'll do
instead, we'll come and we'll turn off our subdivision. Turn that off Click. And now we're going
to go to the outside. Right click oxime. Now what we'll do is we'll
put the subdivision back on. Now we'll come in and we'll give those the metal that they need, the inside of these all the way. So let's come in again. We'll just grab this one and
this one con link materials. Now we'll come in
and add is iterant. Let's do the actual tires. I'm just going to grab
both of these tires and we've black tires. And you can see they're
going the wrong way. We're not going to
worry about those yet. What we need to worry about them is just gaining
the materials on. Now let's come two. If we look, this is white, or we can keep these as white
going all the way around. This part of the
bottom is all blue. Can we come in now, grab
just the bottom like so. Now finally, let's
grab these parts here. What we're going to
do is going to link material control L materials. So now we'll come
in and grab these. Hopefully we'll be able to
add these camper metal. So I'm just going to
grab the middle one. Control going all the way back. Pro camper mirror. All right everyone. Let's send it there and on
the next one then. And we should be actually
able to move on to something a little bit different which
will be creating leather. All right everyone,
hope you enjoyed that. I'll see on the next one.
Thanks a lot. Bye bye.
49. Van Finalization: Welcome back everyone to
Blenda Beginners Boot camp. And this is where we left off. Now let's come to
the back of here. So we've got silver
on these parts. So what I want to do
is I want to come in and Marco, same. Go in probably all the
way around here and press Do in and we're
going to go all the way around here and
round here like so. And then we can mark a same. All right, now we've got
this bit we need to, actually, if we look at the back of this one,
we can see it's red. So we need to mark a same going
all the way around there. Around the inside, the inside
of here, Right click, mark. Okay. So now let's come in and actually add the materials. So this one is going
to be glass metal. And then we've got this one which will be Camper
Van Red, like so. Now let's come to
this part here. We're going to have
this part in here, we'll have it as
Camper Van Tire. Now obviously this part
is going to be the logo, so we can grab this part, but this is logo, like a sign, hoping that
sign it, there we go. Now we've got these parts now should we have
this part blue? Maybe we should have
this part blue. So I'm going to come
in, I'm going to select this Tampa van Blue. Actually, I think
that looks better. Now, we'll come to these parts. We haven't got any
materials on these, so I'm just going to grab all of these Then I'm going
to grab this one here. Press control, L link materials. And now we can go to
each one of these. What we can do is we
can actually come in and add in the metal, let's a nine, then the
theme on this one tab, a metal, then finally this one
tab and metal click. All right, there we go. Now this is pretty
much all of it done apart from the
white walls actually. So I need to come into my tires. And I'm also thinking
I'm just going to put on my subdivision back
on subdivisions on, on this one what I'm going
to do is I'm going to press control click, right click. And then control left
click, right click. Grab the one you just did. And then just press
control and pull those out and bring it
back to just one like so. And then what you
want to do is now you want to actually
mark a scene. So first of all, mark a scene and then what you want
to do now is come to material and you're going to
put campervan white tires, so click a sign like so. And that's basically then
making those really stand. Now why we did that as well, it's because we've
got our tire tracks here and we don't actually
want to interfere with that. But let's actually sort out our tire tracks now and then
we'll apply it on this one. If I come in and grab this tire going all
the way around there, you can see that
that's not right. We don't really want
it going around there. So what I want to do
is I want to mark a seam on each of these. So on the inside of
here, not here, sorry. Just the outside of here, yes. So mark seam and then
right underneath we'll mark another seam
like mark seam. Then I'm just going
all the way around now what I want to do
is mark another seam on here and then going into there. Not that one. This
one. Here we go. Right click max. Now, just make sure
the next one is okay. And why we did that is because
now I want to actually go in and actually
unwrap just these parts. Unwrap. Let's go to UV editing. And the one we want on is
the tire Y, E, and pull. And now you can see that these haven't unwrapped
especially well, in fact, it's absolutely
useless for what we need. What we need to do
is we need to just come to this one click, this ball one press L, L, M, P click okay. Ends up a mess. But
then if you press U, follow active quads,
they're okay. Now you'll actually
get somewhere. So now we can actually press, bring it all the way down. Press bring it into place, press the S and X, pull it out. So now you should end
up with some really, really nice tire tracks. All right, so now we'll do
the same thing on this one. So I'm just going to
come to this one. Same thing but we'll come from the bottom because it
is follow active quads. So it follows from this
quad UV smart light map. Click, okay. And then
you follow two quads. Click okay. And then A, bring it down then. And then and X pull
it out. All right. There we go. That
I'm happy with. Okay, so now let's just change
these over because these are obviously all
in the wrong place and we don't want
them like that. What I'm going to
do is just go round each of these and then
I'm going to press a, make them smaller and just put them then somewhere else
so they're not actually, you know, tire tracks or
anything like that on there. And then you can see
it looks just tons, tons there. All right. Now, the logo, so if I come in, in fact this tire as well, we have to do this
tire, of course. So what I'll do is I'll do the same thing as
what I just did. Then I'm going to come to
the back ol shift click, come front O Rabbit.
Not let me grab it. So right click, mark seam. And then I'll go underneath and I'll rub it all. It
doesn't really matter. Right click, mark, Seem. And then come in,
have the bomb here. L, right pipe click. Okay. And then you follow, you follow Active
Gods click then A, put it into place
then and Y or X, actually, here you go, in place, there's a
tie tracks on there. And then finally now
we can just come in a move these out the way. Now finally, just this one
here, where is my logo? Let's have a look,
if we have a logo, we're looking for van
logo, which is this here. The moment I've got this, let's show it on here.
Where is this one? The reason why it's not
showing up is first of all, let's have a look. Apply this. So let's press Conto. Now
it's going to show up. This off thing. And I'm going to press you wrap. Here we go. Let's press S, make it smaller. There's our logo on there. We got everything on there. Now I think we have. Let's press all tage. Bring back everything. I'll just hide these out of the
way just for now. Then what we'll do is
now we'll actually just go around and put on
all of our parts. You can see we've
hidden them all. I'm just going to
put them on first. I'm going to hide
them out of the way. Come to the next part, make
sure both of them are on. For this, you can see
that both of those are on. Both those are on. Nothing's on there, so we
can hide that other way. Both these are on. Everything else is on. Let's press Alt once more. Hide everything out the way. And now finally we
can join it all together, what we've done. So for press control J, you'll have to select
one, select one D, and then control J,
join it altogether. Right click, shade, auto, smooth Alta, bring
everything back. Let's go back to modeling. Let's pull this up off the
floor so it's sat properly. Now let's put it onto
V. We go really nice. You might want to go in and
just unwrap these parts here, but you can see just down
nice, that actually looks. And what a good job I think
we've done with that. It looks much, much better
than the actual first one, so I'm really, really
happy. All right everyone. Okay, so what we'll do is
we'll put it back onto here. We'll go to file,
we'll go to save. And then what we'll do now on the next one is going to
be learning about leather. Let me just put that camper
van in place as well. All right. So we're going to be learning how to
create leather. It's something that
you're probably going to be making a lot of actually. So it's a really good idea, if you learn a good technique
to actually do that. Alright everyone. So I
hope you enjoyed that. And I'll see on the next
one. Thanks a lot. Bye bye.
50. Leather Cushion Modeling: Sorry, Tom. Welcome back everyone to blend the
beginner's boot camp, and this is where we
left it off. All right. So now we've done the
actual camper van, it's time to move on
something much, much easier. And that is these leather actual couches or
things like that. You just have to be
careful that you put the leather where you
actually want it to go. In other words, it
doesn't work too well if you're trying to put this
over the entire couch. So what I recommend
you do is you create your couch and then you
make these kind of pillows. And then you do the pillows, you know, separately
away from your couch. All right, so let's move these over to the
left hand side. And then what I'm
going to do is I'm just going to hide all of this. And I'll hide all of this
just so I can make a start. All right, the first one
we're going to do is going to be this
square kind of one. And what we're
going to do is I'm just going to press shift A, make sure my curse
is incense first. So shift S cursor to
world origin shift. Let's bring in a plane. And then with the my plane, I'm just going to scale it up a little, reset the
transformations. And then what I'm going
to do now is I'm going to right click and subdivide. And then I'm just
going to put this up. I'm thinking actually eight
going across the top. So 1238, something like that, 368 going across the top. I think that then he's going
to give me enough room to actually create this effect that we're actually looking for. And now we're going to do is we're just going
to go up to face. And what you're going to
do is you're going to come down to where it
says poke faces. And what you're going to do
is you're going up to face again and you're
going to poke faces. Now you can actually
right click, I think, And poke faces is
on here as long as you're actually in select. All right, so we should end
up with something like this. I'm going to do, it's going
to come to verte select, I'm going to select one vertex, and I'm then going
to come to select. And because I don't
want to bother going around and
selecting them all, I want to go to select, I want to come down
to where it says Select similar amount of connecting edges
and then it will just select them
all going round. Now again, when you're
doing this on your own, just make sure that
some of these you might not actually
want to pull in. So just make sure
that you take off the ones which you
don't want to pull in. Now I'm going to do this, I'm basically going
to pull these down. If I pull these down like so, and then what you're
going to do is you can see that now if I press Tab, this is what they look like. And then if I press control
shift and B to pull them out very slowly. There we go. We're already starting to
get somewhere with this. Now while we've got
all these grabbed, we might as well press
and pull them down. So now what we want
to do is we want to make those pincushions, I think they're
called type effect on them, look together. All we want to do is while we've also got them all selected, I just want to press the born. Insert them just very slightly. Then press the Born and
bring them up like so. Then what I want to do is now I want to
straighten them up. As you can see we've got a bit of jaggedness to these and
we don't really want that. So I'm just going to press
S and Z and pull it in. And straighten them up like so. And there you go. Now
you can see the much, much straighter than
what they were. Now finally what
you can do is you can come in, press control, all transforms come in and add
in a subdivision modifier. Let's bring that in.
And there we go. Now that is looking much, much nicer than
what it was before. All right, so you can see how
easy it is to do that one. Now let's come in and
actually make this a cushion. So all I'm going to
do to do that is I'm just going to come
in Alt Shift and click, grab it all the way
around the outside, press E and then just Z just
to pin it down to there. And then finally I just want
to fill in this back bit. So what I'm going to do
is just press AltonF, fill it in like so. And we shouldn't end up with
something like that now, that's not filled in very well. So what I'm going to do is I'm just going to press Control Z, and then I'm just going to
fill it in the other way. So controls it again. Press the button, fill it in. And then what I'm
going to do is I'm going to insert it a thing. So I'm just going
to press Insert. So now you can see that's looking much, much
better than where it was. The other thing is you
might want to come in and just bevel
off these edges. So you might want to come
in and be level these off. So let's actually come out
level this one and this one. Press control B, let's
pull it out very slowly, scrolly, maybe two times. Something like that. And
then Tab, and there we go. Okay, so that's the
actual first question, done as you can see,
really, really simple. Now let's do the other one, because the other one is
a little bit different. What I'm first of
all going to do is I'm going to bring
in another plane. So shift a, let's
bring in a plane. I'm going to make it a little
bit bigger as I did before, control all transforms and
then what we're going to do is instead of
making this round, you know, bringing these
edges in because I want to keep them
relatively the same. So if I come in, add monifier
subdivision surface, turn it up, turn it three times, maybe
something like that. Make it a little bit bigger. And there you go. I think we
can actually work with this. Now what we can do is
the same thing again. So if I press control eight, go in and then what
I want to do is I want to select one
of them like so. And then I'm going to come
in and go to select again, select similar amount
of connecting edges. So now I'm going to do is
I'm going to poke the faces. So I'm going to select
right click and poke faces. Right click and poke faces. And now we should be left
with something like this. Now you can see that it's not quite gone the whole way
round the outside here. Which means that what's
going to happen is it's only going to leave the
ones on the inside here. That might be
something you want. I think actually I'm
going to change that, and instead one interiors. I'm just going to
grab everything. And then I'm going to do
face select, right click. Pope faces, right click. And Pope faces. And now I'm going
to do is I want to select the ones that
I want to select. So I'm going to come in and
I'm going to select one of these like so, and
then one interiors. I'm going to select similar. And then like so and now you
can see that's looking much, much better than
way it was before. All right, so now
it's pretty much the same thing as what we
did with the square one. Let's just pull them down. So then what we going to do
is the same thing again, so it's control shift and V. And then what I'm going to do is just pull
down the amount segments. So you can see I've got way, way too many segments there. I'm going to press
controls head. Actually, I'm going to press
control shift and again, and then I'm going
to pull them out. So then what I'm going to do
is I'm going to press for extrusion and then I'm going to straighten them up before I actually bring them in. So I'm going to press and head this time just
straighten them like so. And then press. I hold
in the shift born. And then hold them out like I think I'll put them
just just roundabout there. And then finally
what I'm going to do is going to write
click Shade Smooth. And then we're going
to go in Add Modifier. And we're going to pick
Subdivision modifier. And there we go, they're
looking pretty nice. Now, of course, if you want some more roundness on top of these, you can actually go in and press and bring them in like so. Or you can, instead
of doing that, you can just grab them again. So let's go in again.
Press controls Head. And all I'm going to
do is press control B. Pull them out very slightly. You're going to have to hold the shift born to
actually do that, just to make sure that
they don't go in. That's enough like
so. And there you go. Now you can see the rounded
off a little bit more. All right. So that's
looking really nice. Now the next thing we need to do is bringing some
actual leather. So all we're going to
do is we're going to come over to the
right hand side. I'm going to apply this control. Apply this one with control. And then let's come
in Add Material. And let's click the down arrow. And let's look for leather. And we should have one that says lever red and leaver Green. Let's give this one to Green. And then let's come to this one. And what we'll do is we'll
give this a red like so. And finally then what we'll
do is we'll come in now. And you can see we've got
some kind of lever there. But let's just come in and what we'll do is we'll
grab the whole thing. Press you, press Wrap, and let's see if you'll
actually unwrap like that. Maybe it will. We'll have luck. And then we now we can see it's looking much, much better. And now let's do the
same thing for this one. And you can see the reason
why we want to actually use leather as a material is
because we get this really, really nice effect with
the actual shading. As you can see this lever, I recommend that you keep it and use it in your future projects
because it is a very, very nice PBR texture. So let's now go to this
one and what we'll do is we'll press Tab.
I'm going to grab it. In fact, I can't
actually do it like that because I won't
melt. Unwrap it properly. So what I'm going to
do instead is I'm just going to grab this going
all the way around here and then I'm just going to grab every two on the corners. And I'm doing that just so
this thing will unwrap. Much, much easier, like an
actual parcel or something. So right click.
Let's mark scene. Let's grab it now with
L, press U, unwrap. And let's think about
it. And there we go. Now you can see that's
looking really, really nice. All right, so that is the
leather actual couches, if you want to call
them there, or leather pillows. Actually done. So what we're going
to do now is press the, bring everything back. And then what we going to
do is I'm just going to put these again in
the right place. I'm going to grab them.
Grab both of these. Let's put them into lever like. So let's close that down. And let's open up the next one, which is going to be palm trees. And palm trees are a lot
of fun to actually create, so you're gonna have a lot
of fun creating these. And once you know how
to create palm trees, you know the main
boggles are what you can create once you know
actually how to do them. Alright, everyone. So I hope you enjoyed that and I'll
see on the next one. Thanks a lot. Bye bye.
51. Palm Tree Modeling: Welcome back everyone to
Blenda Beginners Boot Camp. And this is where
we're left off. All right, so what
I'm gonna do is I'm gonna grab my palm, move it over to the
left hand side, and then I'm gonna
grab all of these. I'm gonna press H. I don't
want the palm included, so I'm just going to
Shift select that. Hate to hide everything else. Shift S just make sure you
curse us to the world origin. Then what we're gonna do
is press Shift and I'm gonna bring in a
actual cylinder. I'm going to make sure that my cylinders on something like 14 because that enables it then to have
smooth shading on. So if a right click I
can shade or to smooth, and you can see it looks
relatively smooth around there. And then I'm going to
put on an object mode. I'm going to make sure that
my cavity is on which it is. And now I'm going to do is shape this to be the actual trunk. So if I bring my palm over here, you can see that
they kind of go out bend at the top and
go a little bit in. So what I'm going to do
is I'm going to come to my cylinder press control. Let's bring in a few
edge loops like so. And then what we'll do is
we'll come in and we'll grab first of all this bottom one and I'll put
proportionality on. I'm going to press the
S B and just bring it in very slowly like, so just a little bit of bend. Then what I'm going to do
now is come to the top. I'm going to press the S B, and I'm going to pull this one out just a little bit like so. And then we're going to do is I'm going to be
level the top now. So I'm going to press control
B to bevel the top like so. And that's looking pretty nice. And then also we'll
come bevel the bomb. Yours the tad like, so. All right, so I think we've got something we can
actually work with. Let's make it a
little bit smaller, just so it's similar
size to this, so we can see what
we're actually doing. Let's press this ad
and make it a little bit longer as well.
And there we go. All right, control
all transforms, right click, set
origin geometry. And now what we're
going to do is we're going to bring in an array. So let's come over to
add modifier like so, bring in an array, let's set the array to the z axis because that's where
it's going to go. So it should, when you put
it in, be looking like this. Now this is where you
can come in obviously, and make anything
amends that you want. So, you know, if you want to a bit stood out here,
then you can do that. So just make sure you're
happy with how it's joined. Let's actually give it
a few more as well. So a few more like so. And I've decided that it's
still a little bit too big. So let's press the S board and let's shrink it down even more. Alright, so that's looking
about the right size now. Now let's think first of
all about the bend of it. Then we can think about making
it smaller as it goes up. So the first one we're
going to do is bring in a curve and it's
going to be a path. And this path we're
going to use to actually bend the actual pump. So if I press R Y 90, bring it up,
something like that. Let's put on x ray
so it can actually see through this.
Press the S porn. And then I'm just going
to bring it, you know, down to the bottom and up to the top of the palm,
something like that. I think it's absolutely fine. Turn off the x ray. Now we
want to do is we want to bend this from the actual curve. So what I'm going to
do, first of all, I'm going to bring my curve
just to the side just so I can make sure
that it's actually bending with the curve. Then I'm going to come back
to my actual arm trunk. And then what I'm
going to do now is I'm going to bring
in another modifier. Bring this down. We'll
bring in a curve. And then the curve, of course, is going to be on the actual, on the curve that we've
actually created. Now what we want to do is
we want to pull this down. So if I pull this down like so I'm just going to pull
it back to the bottom. So now when I bring up my count, you'll see it actually follows
the curve really great. And wherever I move this curve, now this palm is going
to move with it. So let's say I move it
from here, like so. And then let's say
we want a bit of a bend on the top
of it, like so. And then finally a bit
of a bend on the top. And there we go. That's
looking pretty nice. All right, so now
what we need to do is we need to make
it so that it actually, it starts large and it goes smaller as it goes
up to the top. What I'm going to do to
do that is I'm going to bring in an actual empty. So if I press shift A, come down to where
it says empty, and I'm going to
press pull it out. And then what I'm going
to do now is I need to attach this
empty to my array. So I'm going to
come to my curve, I'm going to come
over to where it says object offset. And
I'm going to take that on. I'm going to open it up and you'll see that one of
the options we've got here is to pick the object and the object is going
to be the empty. Now it will always be the case where it goes absolutely
huge like this. All you want to do is
you want to grab your empty and you want
to press the yes, but to bring it back down
into size as you can see, now you can see it's
all the way up there. We don't really
want that either, so now it's just a
little bit of finesse. So if you come back to our palm, we can then bring this back down so you can see
it's a little bit, a little bit too
small at the moment. So let's come back to our empty. Let's press the S one, So back to our palm, bring the z down. Now one problem you can see
it's the wrong way round. Let's see if I can actually
bring it the other way round. So I'm going to do is I'm going to shrink it all the way down. I'm going to try and
bring it back up. I'm hoping it would
have done that, but it doesn't seem
to have done that. So what I'm going to
do is I'm going to use the Z and just go the other way. And then pull it up so
I come to my trunk, I can bring the
all the way down. Press Tab and then I'm
going to press a and then just pull it up with that for
it in on let's pull it up. Press the tab, and there we go. Now it's going the right way. So now I can pull it
down with the shift bon. And there we go. Just a
little bit of messing around, but you can see now what
we're actually trying to do. So now if we come in, we
should be able to come down, grab our curve,
press the tab on. And now you should be
able to still bend it around and it'll still get
smaller at the actual top. If you do want any small, all you need to do
is you need to just come into empty press, the S born again or outwards. Whichever way you
want it like so. And then just come to your palm and then just bring
it back down. So I'm just going to bring
it back down like so just to make it even more
accentuated as you can see. Alright, so once
you've done that, what you can do is
you can actually grab everything and then press
shift, bring them over. And then what you want
to do is you want to come to your second nerve curve, which will be this one
here and a fire press tab. Now I can basically
come in and have two different looking palms. So I can just turn it
around a little bit. So this one now
looks a little bit different from the one
that we've just made. So we'll make this one a
little bit straighter like so. All right, finally then, what
we're going to do is we're going to press B,
grab everything, and then I'm going to
press control D or D, just to actually apply all of the modifiers
and everything. Now I'm just going to come
in and just move them to the tide slightly
because I want to come in and actually delete
all of these because I'm simply not going
to need them now. I'm just going to
pull them over and I'm first of all going to
resell the transforms right, plates of origin to geometry. And now let's pull them over
over here, grub, everything. And then just pull
them over to the side, because the next thing
we're going to work on is our actual palms. Let's double up the A and
let's start on our palms. Let's first of all
bring in a plane, shift A, let's bring
in a plane plane, let's make it a
little bit bigger. Let's pull it out a little bit. And x pull it out just to
make it longer like so. And then what we'll do is
we'll now start shaping it. Control, first of all we want on going straight down the center,
Left click, right click. And then control, Let's
bring in a few edge loops, maybe five, something like that. And now let's try and shape it. If I grab the top of it, put proportion it in on
seven square over the top. And then and y. And we can start
bringing this in now. The palms, they have quite a
pointy end as you can see. And then the other end slopes in a little bit,
nowhere near as much. If I press and y,
let's bring it in. And you can see now
that, that already is really looking like
an actual palm leaf. The one thing that I can see is that it's
not long enough. So what I'm going to do is
I'm just going to grab it, pull this out like,
so there you go. That's looking
pretty nice already. All right, so now let's actually bring out
the end of this. So all I'm going to do is
I'm just going to press without portion editing on and X just to pull it out like
so just so I've got something to put into
my actual palm tree. And the next thing
then I'm going to do is just give it
a center point. So I'm going to grab this
one controls like this one. Press control B, and
just pull them out. Scroll down, so it's just
one on the bevel, like so. And now finally let's
bring this part out. So what I'm going
to do is I'm going to grab this end of it, pull it out like so, just to make it a little bit
more spiky as you can see. Alright, that's looking a really good start for actual palm. I'm just wondering, is
this far enough out? You can see that
they're quite long, those things that are
going to be pulled out. So I think I need to just pull these out a little bit more. So I'm jaws going to pull
them out a little bit more. And we're going to also add
in some edge loops here. So control law, add in plenty
of edge loops just to get your nice bend that you'll want when you actually come
to put this into place. All right, so on the
next lesson then, what we'll start
doing is we'll start cutting out all of
these parts here. Then we'll get into looking like a three
D object or a two D. And finally then
we can actually put them into our
actual palm trees. All right everyone, so
hope you enjoyed that. I'll see on the next one.
Thanks a lot. Bye bye.
52. Palm Tree Leaf Creation: Welcome back everyone to blend
the beginner's boot camp. And this is where
we left it off. All right, so now let's start the process of actually
cutting it out. So the way that we're going
to do it is we're just going to come over
the top of it. So I'm going to press seven.
I'm actually going to, I'm going to probably give
it three different types. So what I'll do is
I'll press a shift D, It's going to move
this one over. And then shift D, I'm going
to move this one over. And I find this is
easier to work. The other thing I find
easier to work is if I press R Z -90 So that the
point in this way, when I'm actually over the top, make them smaller like so. And now I find this much, much easier to work in this way because I can see
it much better. Now if I press Tab, I'll
go to the first one. So I'm just going
to press K like so. And just if you're struggling, by the way it's magnetizing, just hold control button and then you'll
be able to do it. Let's double tap the, just so we can see where
we're cutting. All right, so now what
I'm going to do is I'm just going to
be cutting like so like so enter and then
just work your way down. So just work your
way down like so. And you'll find the
bigger you do them, the easier it is to
actually work with. So I'm going to cut
one like that and then I'll cut one like this. And I tend to interweave
them as well. So what do I mean by that
is I'll have one here, one little bit further down
and just interweave them. Mostly, Not always, but most
of the time I'll try and interweave them a
little bit and I'll also try and make them not just, you know, all kind of
spiky like give it a little bit of variation
just see if they're messed up a little
bit, then all control. So we go as far down as like the second part down
here, something like that. And then maybe a broken one. All right, so let's
come to the next one. Same thing again, then
we'll go to this one. It is just a tedious process of putting all the
brakes in the leaves. Actually, it's probably
my favorite type of tree because I grew up in the UK where we didn't have
any palm trees whatsoever. So yeah, palm trees, it seems quite exotic. Just a few more and
you'll notice as well. I'm not concerned at the moment with engonsor
anything like that. All I want to do
is just first of all get these into place. I'm probably not going to, you have to subdivide it basically if you're
going to do guns. Now the other thing
is I can right click here and just mark a same. Now you can see I've
only got one missing, so I might as well go in, mark a seam on this one as well. Because what that means
is it's going to stop me from having to worry
about all these little gaps. So I'm going to do is I'm
going to come in now, grab everything, hide out of
the way A and then delete. I want to delete faces. So delete faces, bring everything
back, and there we go. All right, so they're looking
pretty nice as you can see. So now what we're going to do is we're actually going
to grab them all. So I'm going to press extrude
them up with like so. And now I'm hoping
if a press control A all transforms right
click origin geometry, will I be able to come in
and add in a subdivision? And the answer is yes, probably. But they're a little bit, as you can see, they're a
little bit bent out of place. What I tend to do is
I'll put it on Simple. You can see that we do have
some breaking in the mesh, and that's simply because we haven't actually
triangulated them. So if I come in right
click, triangulate faces, right click, and tries to quads, and now you'll see that
they're absolutely fine. Now if you apply the
subdivision with control, come in again and bring in
another subdivision surface. Now you'll see that
you've got a much, much nicer kind of
smooth palm leaf. Now if you're still
not happy with this right click,
let's auto smooth. I suggest going in,
put it on Simple, and then coming back
in and putting it on. Yeah, let's actually do that. So we'll put it on
Simple once more, then we'll press control A, add another modifier
subdivision. And there we go. You can see that
they're looking much, much nicer than
they were before. All right, so now let's come in, let's press control A
and actually apply that. Okay, so let's actually
separate these. So I'm going to go to mesh and separate by loose parts and there we go, that
separate some more. Now now let's resell
the transform. So Controla all
transforms right? Clip origin to geometry. Now what we need to do is
we need to bend these. So we might as well bend
them all at the same time. So I'm just going to grab
them in the middle, like so. And then I want to actually
pull them out like so. And actually have them bend. I can see because this is like a shop, we
don't really want that. What we want it to be more
like is kind of smooth. So probably this one. So if I now pull them out, we can see now it's
getting much, much better. Now I'm going to pull
them all the way up like so. And there we go. We can see that's kind of
the luck I'm going for now. I want to do is I
want to come to each of these ends and I
want to pull these in. So if I pull these in, like so bring them down. I don't want to break
the mesh though. I want to be very careful. I don't break any mesh. So I'm going to actually put it on to smooth
instead and try that. Yeah, that's bad. There we go. Now we can bend them
down much, much bare. I can pull them in slightly, like pull them out. There we go. All right, so they're looking about right now, the
way that I've got them. So now what I want to
do is they want to pull just the bombs
of them down. So you can see them
pulling the whole thing. I want to pull jaws the
bombs and then let go. And then bring it again
and then pull it up. So just have a little bit of the nest with it and
you should be fine. Now let's put these into place and make them
bigger and smaller. So the first thing I tend
to do is go over the top. And what I'm going to
do is I'm going to put this one right in the center, right here, as you can see. And I'm going to go in and
actually set the orientation. So this one here, I'm
going to set it to here. So shifts to selected. Right clicks the origin
to three D cursor. Now I'm going to
grab the next one and I'm going to do
exactly the same thing. So I'm going to bring
it in, put it in here, the actual cursor or
somewhere around the cursor. Let's press shift
curse to World Origin. And then what I'll do
is I'll grab this one. Press Shift cursor selected, right click to origin
to three D cursor. We've got both of
these now set and we'll do the same
with the next one. Seven over the top,
put it into place. Grab now the bottom of it. Shift S cursor selected, right click origin 23d cursor. All right, so now why
have we done that? Well now if I press and I can actually rotate them around
really, really easily. So R and rotate this
one round here. And then what I can do
now, I can grab these, actually we'll do this
on the next list and I'll show you this because
we are running out of time. All right everyone.
So I hope you enjoyed that and I'll
see you on the next one. Thanks a lot. Bye bye.
53. Palm Foliage Texturing: Welcome back everyone to
Blender Beginner's Boot Camp, And this is where we left
off now let's grab this one. And what we're gonna do is
we're gonna press shift D, Z. I'm going to pull
it round to here. I'm going to make it
much, much smaller now. And then I'm going to
grab this one, shift D, Z. I'm going to pull it round to probably somewhere like
here, make it smaller. And then shift D,
let's grab this one. And then and Z, bring it round to here like so. And let's make this one a little bit smaller as well.
Something like that. And now what I tend
to do is I'll grab, let's say I'll grab these three. I'll press Shift D.
I'll press R, Z. Bring them round to here. And then what I'm going
to do is we're going to make them much, much smaller. And they also want to rotate
these down a little bit. Well I'll grab this one on smooth and then what
I'll do is I'll press and just bring it down. The same with these, because
I want them come underneath, so don't be worried about
moving them too much at all. If you need to move
them a little bit more, just use the rotate on,
something like that. And then what I'll do is
I'll grab these three again. I'm going to press shift D and then Art and Z and move
them around like so. And there you go.
I'm going to leave those ones as they are. I don't really need
to mess with those. And now what we can do is we
can grab the whole thing. Press control J, Join them
all together like so. Press control all transforms, right Click the origin. Two, three de cursor. Now we can actually
put them in place. So if I press three on
the number pad I can press and I can drop
these into place. So R and X. Let's bend them the way, try and follow the trunk the way that you're
trying to bend it. And then all we need to do
is just make sure that they are hopping into place and
also there the right scale. So I'm going to make
them a little bit bigger because our chunk seems to
be a little bit bigger. And then what we'll do is
we'll do the same in this one. So I'm going to move
this one over here. I'm going to grab these shift D. And then what
I'm going to do, the first thing is I'm going
to rotate it, so R, S, let's rotate it round and
now let's work with this. No R and X. There we go. Let's put it into
place. You can see I need to bend it
a little bit more, so R and X like so. And now let's put it into place like so double tap the and
there we go, two palm trees. Now this one's
probably a little bit, you know, tilted up too much. We could probably go in, press R and X and just rotate it, not quite so much because it, it seems a little
bit crazy too much. So yeah, that seems much better
than where it was before. All right, so now, before we
actually do anything else, let's first of all put
it on material mode. Now, the palms, you'll
see when you go into it. Again, this circusse is not about materials and
textures so much, but you will see
that these textures are done completely in blender, so it means that
they are procedural. So you'll see how these are put together and then
you can actually go away and put your own
together as well. So let's come to this one first. And what we'll do is
we'll come to material, pick the down arrow,
we're going to pick palm leaves, like so. And then I'm going to
go to the next one. And you can see I've
not even got to wrap it because they're done
in a certain way. So let's collect the down
arrow palm and leaves. So let's come now to the
trunk and we're going to go palm and bark like so. And let's now come to this
trunk and we're going to do the same thing down
arrow, arm and bark. All right, now let's
join them together. So control J, control
J, join them together. And control J, like so. And then let's just grab
them both and press the S pawn just to shrink them down because they're
way, way too big. Let's pull them
down to the floor, make sure they're
into the floor. So there you go, everyone. That is how we
create palm trees. Sorry, stylized palm trees. Not realistic palm trees. Although you could
do it the same way with realism as well. All right, so now
we've done that. Let's grab our palms and let's put them into
our tree area. Let's actually close that down. No, I'm going to open
up the bay window. I'm going to press Alt. Double tap the A,
and here we go. Now the thing is
with the bay window, you might think on
first glance that, hey, this looks simple, but actually it has a lot of different things
and also a lot of skills that you've already learned that we're going to kind of combine together to
create something like this. Now because it does actually
have a lot of complexity, it needs to be actually thought through in how we actually
are going to do it. There's a lot of
different things in here. You can see here, this
should be led by the way. It shouldn't be wood like that. I think it should be Led.
But you can see that they're going in a
directional way. On top of the fact that this is also going in a
directional way as well, which is something that
you have to consider. You can also see that
the actual textures are also going in a
diagonal way as well. I think those textures actually, are these ones just turned
around or something like that. You can also see we've got
some wooden planks in the top, wooden planks in the bottom. Basically, what I'm saying is, once you've actually learned
how to create bay windows, you pretty much should be set to create pretty much
any window you want. So let's go up and
save this out. So file and save, and then what we'll do is we'll move our bay window
over to here. And then we're just
going to come in and I'm going to hide all of
these out the way. And then what I'm
going to do, because we actually finished, it's kind of like three quarters of the way through the lesson. So what I'm going to do
is I'm going to save it. And then I'm going to actually carry on on the next
lesson. All right everyone. So I hope you enjoyed that. I hope you learned
a lot, and I'll see on the next one.
Thanks a lot. Bye bye.
54. Bay Window Modeling: Welcome back everyone to blend
the beginner's boot camp. And this is where we left off. All right, let's bring
in an actual plane. So I'm going to
bring in a plane. I'm going to spin
it round so R Y 90. I'm going to press three
on the number pad and all I'm going to do is just make sure that it's
the right height. So you can see here
that my windows a roundabout from there
to this one here, so maybe this is
the right height. This does look a bit taller, but of course we've
got the top and we've got the bottom
part on there as well. Next of all, what
I'm going to do, I'm just going to pull
it out a little bit. And now I'm going to
create these side windows. So I'm going to press
Control our left click, right click, and then
come to the side. And all I'm going
to do then is E and X. I'm going to pull
it out on the x axis, like so I'm not going to do the other side, don't
worry about that. And then I'm just going to, without proportion editing on, I'm just going to
pull it out like, so I'm going to go
over the top seven just to make sure it's nice
and straight, which it is. And I think I need to pull it
a little bit more this way. Now what I'm going to do, I
didn't do it on that side, because I'm actually
going to come in, delete this one out the way, and I'm going to come in and actually add in a
mirror modifier. Now just make sure you
curse is to the center. And then all we can
do is we can come in, bring in and modify it. And we're going to
bring in a mirror, put it on the Y,
and turn off the X. All right, so now this
window here, it might be, if I press Tab, you can
see it's probably a little bit too thin in
comparison with this one here. So all I'm going to do
is I'm just going to pull it back and then I'm
going to pull it out. And then I'm just going
to make sure that I'm happy with the
size of it like. So it's gonna go
over the top again. Yeah, that's fine.
Alright, let's come in and what we'll do is now we'll use the Insert to
actually create our windows. So if I press press again, then I can actually
bring it in like so. And one thing I'm making
sure of is that it's all the same kind of
chunkiness around there. And I think it is what I'm going to do before
actually doing that, I think is I'll press control. Just reset all my transforms and now I can come in and
press the eye button. And then I'm just absolutely certain that they look
kind of the same. If you're not happy
with the size or chunkiness, just redo it. Just press again. It's
not like extrude. You don't need to worry
about inserts the same way. All right, now I've done that.
I need to pull these out. So what I'm going to do is
I'm going to go to normal. We're then going to go
to individual origins. And what I'm going to do is
I'm going to press Y just to split them up and then and Z. And that will then enable
me to pull them out going along the axis
of the actual windows. And that's really, really handy. Next thing I want
to do is I want to split this off from
the rest of them. So if I press Selection, split it off, and
now come back to it. You'll see when I get it, I'm still able to
press G and Z and pull it right back into the perfect place
where I'll want it, which is really,
really important. Now what we're going to do
is we're going to press control R. I'm going to press, let's think 123 like so. And then control R. And I'm
going to think put 12345, left click, right click like so now these windows on the side as you
can see on this one, they're actually going sideways. And that's what we're
trying to replicate here. So what I'm going to do is I'm going to come to this one now, add in a modifier, and this time we're going
to bring in a decime. We're going to actually turn
the decime onto unsubdivide. Turn up the iterations by one, and then let's
apply that decime. And you should end
up with something like this where it's a really, really nice formed window. Now what I want to
do is I want to make these little kind of
as you can see here, these wooden parts in here. And the way I'm
going to do it, I think this should
be lead by the way. And we might put them lead
or we might keep them wood. We'll see What I'm
going to do to do that is I'm going
to press L on this. And then what I'm
going to do is I'm going to use insert again, press it twice,
and then bring it in and just make
those parts like so. And you can see, now that's
looking pretty nice. Maybe they are a bit chunky, maybe we should go for
a more stylized look. Maybe that actually is a little bit too much.
So let's go back. Let's press and just bring them in just a little bit
less than what we had. It, is that okay? I'm just wondering if that's a
little bit too less now. I'll have another go. Let's
get it right in the middle. There we go. Something
like that, I think. Looks much, much better. All right, so now
what we want to do is hide the
glass out the way. So if I grab all of these, which should already be grabbed, press the H one to nope,
I'm not going to do that. I'm actually going
to come in and see if I can actually
do it a different way. I'm gonna hide all
of these, hopefully. Yes, that's the way I want it. So I'm just grabbing them all, pressing H when I've got the. All right, so and then
hide them out the way. And then what we'll
do is we'll press, sorry to select them all. And then it's going to move
along the Z axis anyway, which is perfect
for what we need. And now if you press Al Tage, you'll see you've actually
got those windows in place. Now if I grab one of these, you'll see that
actually it's tied to the back of here though. I'm actually hoping that
I can come in now and actually pull these
forward a little bit, or split them off and
then pull them forward. I think that will be the
best way because it's actually easier when
you come to actually, you know, potting
materials and things like that if they're
actually split off. So if I press Y now, I should be able
then just to pull them a little bit
in front like that. And I think that looks
much, much better. All right, and
we've obviously got the window on the other side. So actually, believe it or not, that is one of the hardest
parts to actually do. Alright, so now let's
come to the second part. Which will be to bevel
these windows off. Let's put it on
object mode like so. And then one going
to do to do that is then we're going to
go to add, modify it. Let's bring in a bevel. And you can see now already
that's looking pretty nice. Let's turn it up one, Maybe you don't like these
little bits near, you can actually turn this
down a little bit more. So 0.3 something like that. Maybe that's a bit too high. 0.05 Let's just play around with it a little
bit. And there we go. That's probably going to look better than what it did before. You can see now it looks actually like it's
actually lead. The other thing to do as well if you have an actual
problems with this, is if you go to profile, not profile geometry, turn
off the clamp overlap. And then what you can do
is you can actually turn this up or turn it
down much, much more. And you can also turn
the segments up. And then you'll end up
with less of this and more of it being rounded on
the top of it like that. So if I really ramp this up a
little bit, as you can see, just just make sure you don't actually get that
splitting of the mesh. Yeah, we've got a little
bit of break in there as you can see these
bits on the back. I don't actually like
those if I go into that, you can see, yeah, I've got some non manifolds on there and I really,
really don't want that. So what I'm going to do is
I'm just going to go to my bevel and I'm
just going to mess around with it a little
bit and just see if I can actually not
have those brakes. I don't really want
those brakes in, so the bevel on here is
not actually working. So what we're going to do is
we're just going to do this. We'll try it going round here, round here, round here, and just keep going round it. And then what we're
going to do is just bevel it off manually because I don't want those
broken edges in there. So let's see if
this actually way works instead of actually
using that modifier. So let's bring them in like, so I'm going to press, I've still got my
bevel on as well. I'm gonna take that off.
That's making it a mess. So control, be, let's
bevel it off. There we go. Now let's turn it up. Yeah,
I'm gonna turn it up. Actually, I'm gonna
leave it on one. So left click. Yeah, that's
exactly what I want. All right, so a bit of work
but we actually got there. All right, so now
we're going to do is I'm going to grab
the whole thing. I'm going to press G and Z and just pull that
now back into place. Just there. And then the window, you know, this would admit is actually
going to go round it. All right, so let's come
now to these parts here. So what I'm first
of all going to do, I'm just going to bring in one
edge loop down the center. So left click, right click. And then we're going to
bring in three edge loop. So control 123, left
click, right click. And then we're going to
use the insert again. So you might as well just grab the whole
thing on this one, press the eye button
and then just bring them in to the size
that you want. The windows, now being as I've made this one a
little bit chunky, I might as well carry on
that process and actually make this one also a little
bit chunky as you can see. A little bit chunky on
the actual window frames. So basically the same process as the other one
one going to do. They're gonna press Y,
just to split those off. Press the H, be
press A, not eight. I'm going to grab it with L and then I'm going
to pull these out. So I'm going to press E.
Just pull them out like so. And then ultate, bring
back your windows, and then all we're going
to do is just pull these windows a
little bit forward. So grab all your windows, pull them forward a little bit. So, and now you can see that's
looking much, much nicer. Alright. Then what we'll
do then on the next one is hopefully we'll get most of
this actual bay window done. I think pretty much the
hardest parts already done. It's just bringing these out, extruding and things like that. Alright everyone. So, I hope you enjoyed that and I'll
see on the next one. Thanks a lot. Bye bye.
55. Wood Frame Addition: Welcome back everyone to
Blender's Beginner's boot camp, And this is where we left off. All right, so let's come in
and put these back in place. I'm just going to
grab all of that. I'm going to put it
back into place. You can see there, it's not
quite going back in place. Luckily though,
we don't actually need this on normal anymore. Can just put it back
to Global and then I can put them all
in place like so. All right, so the
next thing then we want to do is we
actually want to bring this part of the
window out and we also want to make a
top and the bottom. So what I'm going
to do is I'm gonna grab this going around here, I'm going to press and Z and
just pull it up like so. And then what I'm going
to do is I'm going to split this off from the
rest of the window, so I'm going to grab
this, press the P, bottom selection like. So now let's think about, we'll do this part first. So what I'm going to do is, first of all, what I would like to do is extrude this out. So I just want to make sure
that if I grab it that this is not with this
because then we'll be extruding those as well, and
we don't really want that. So what I'm going
to do is press P. So now what I'm going to do is I think I'll come in and
add in a solidify. And then I'll pull
my solidify out. So if I bring this out like
so do something like that. Yeah, I'm thinking that's
looking pretty nice like that. And then what I'll do now is I don't need to worry
actually about the thickness too
much because we're going to have this
part on there anyway. Now, the one thing we do
need to worry about though, however, is the fact that
we want these splitting up. The way that we're
going to do that now is we're going to actually
apply our modifier. So control A and then what
I'm going to do is I'm going to grab all of these
ol shift click, O, shift click, like so. And then what we're
going to do is we're actually going to split
these off with Y. And then what we're going to do is we're going to press A, we're going to
come over to mesh, and we're going to
go to clean up, and we're going
to fill in holes. Now I'm hoping that that
filled in the hole. Now the problem I've
got is as you can see, these two are still joined
and I don't really want that. So Alt shift click Ol shift
click Y, and now try A. And let's try again
to fill in holes. So can we fill in holes? So mesh, clean up,
fill in holes. And it's not saying any holes have been filled, so I'm
just going to check this. I'm going to grab this
one. Let's have a look. So, and it actually looks, yeah, we've got actual
filled in holes there. Now we will know if these
have all been filled in. Because the next
actual modifier we're going to bring in is
a Bevel modifier. I'm going to then
turn this down, turn it up one, and there we go. There is our actual
bevel in place. Now the one thing I'm also going to do before doing this is I'm going to just press control
all transforms right. Click the origin
to three D cursor. There we go. Or so we'd end up with a mirror going
on the other side. And what I'm going
to do as well, I'm going to actually turn down this bevel 'cause it's looking, it's looking a
little bit too much. And I think I think actually, let's just have a
look at this one. I'm just looking to see Yeah, this one hasn't got this
one hasn't been filled in. As you can see though, we're having a few problems with the fact that we can't
actually split this off. And it's probably due to
the fact that we used the extrusion in the way we did. So let's in fact, just go back and what we're going to do
is we're just going to go back before we
use that extrusion. So you can see if I keep
pressing the controls head, hopefully I should be able
to go back far enough. And I go back far
enough, I'm hoping. So there we go. There's this actual solidify. I'm just going to save
out my work as well, and if you made that mistake,
I'm very sorry about that. I'm hoping that you'll
be able to fix it. I'm hoping you'll be able
to go back far enough. In fact, I think at this point what I'll do is I'll actually show you if we go to the undo. So what we want to do is go
to system and you want to turn up your undo steps to whatever your
computer is capable of. So I think normally it's on 32, but you can turn this up as
high as you want, really. As long as it's
capable of doing it. All right, let's
close that down. Let's hopefully you didn't make too much of a mess of that. Now what we're going to do is we're just going to close this. And then what we're
going to do is I'm just going to split these up. So I'm going to
grab both of these. I'm going to press Y, H, and then grab this one. And this one, and this one. I'm going to press Y and H. And now we're
gonna press Lth. And then what we're
going to do is we're just going to turn this back on. And you can see the reason
why I was worried about doing it this way
is because we've actually caused
another problem here. In that we've actually
created this part here. Now you're probably
going to have to go back again and actually before we did that and
keep those two together. Or I'm thinking, can we
do this a little bit of a different way because it is
causing us a lot of issues. I'm thinking that or probably actually solidify it without
splitting anything up. If it's solid now we can see that nothing's
split up and then I'll have to go in and
actually split it up between them both
and fix them that way. It's a bit of a long way round, but we're going to
do it that way. So if I press control now on my solidified,
just apply that. And then I can go in Olshift. Click now these ones
are absolutely fine. In fact, I can only grab
two of them though, can't. So I'm going to have a look. So I'm going to press Y, H, hide them out the way.
Same on this one. Then again, these ones are easy, so Y, H, hide them out the way. And now this is the one that's causing me the most problems. What I'm going to do is
I'm just going to grab this one. Yeah, like so. And then I'm going to press Y and H. Hide that
one out of the way. And then I'm going
to come to this one and just join these up. So let's join them up like so. And put on all the bombs. We don't have to actually put on the bottom ones because we could actually do that
a different way. I'm going to press l, the
bring everything back. And then what I'm
going to do is I'm just going to hide this one. And hide this one out the way. And this one in fact, we'll just join
the back and then I'll show you a
better technique. So we'll just join
the back up here. So press Olah, bring
everything back. And now what you
should be able to do, you should be able to press
A to grab everything, Mesh, cleanup, fill
holes like so. Now if you come in and you put this onto individual origins, you press the S bone, you should end up with
a mole split off. So which is what
we actually want. Now let's press control
all transforms. And then we'll come
in and we'll add in, where is it a Bevel modifier? So let's bring in a bevel. So now you can see much, much better if I turn that up, one that's looking how
we actually wanted it. Probably a little bit
too much on here. So we'll just turn
it down to not 0.03 maybe a little bit higher. Not 0.05 There we go. That's perfect. That's
exactly what I want now, that little kind
of groove there. All right, we finally
got there on that bit. Now what I'll do is
with this top bit, I'm going to first
of all come in. And I think at this stage I'm pretty much ready
to add in my mirror. So I can actually come in and
press control on my mirror. And then what I can do is I
can actually just fix this. Because you can see we've got
a little line down there, so let's just grab it all. And I'm hoping as you can see, that these, I don't think
they're actually touching. If I press Delete and let's
put limited dissolve. Yeah. You can see we
have a problem there. So how we're going
to fix that is you can see that we've got one, two, but we're
just going to grab these top two vert, right click. And where is it merge vertices
and we're just going to merge them at the
center like so. And then we'll grab these
two and we'll merge them as well at the
center, like so. And now we should
be able to come in, grab this part, and just press
delete and dissolve edges. And there we go, we've got
a nice mesh there again. All right, so now let's come
in and what I want to do is, again, I want to actually
bring this out now. So if I come in
and add modifier, we'll bring in a solidify. Let's bring the
solidify out like so. You can see that it's
not even at the moment. If you go over the top, you can see it's a
little bit uneven. So let's put even thickness on and that's going
to make it all nice. And even the other
thing is we've brought it out and it's
right at the edge. We don't really want that, so let's bring this offset back a little bit like so
that's looking perfect. And now finally, I'm just
going to turn this off. And what I'm going to do is I'm going to join this and this up. So I'm going to
press to join it up, and then Y, because I want to split it off from
the rest of this. And then finally selection. And now I'm going to
hide this out the way. Turn back my slide. If I
hopefully on here, there we go. And then what we can do now is we can bring this
down to the bottom. So if I press Sir, shift D, I can drag this then
down to the bott. I can actually put my
orientation there as well, so I can write clicks
at origin to geometry. Let's bring it down to bottom
hold shift a little bit, just make sure it's in place. That's looking really nice. Let's just make sure it's
a little bit further down just to where those parts
actually go in like so. And also with this what
we'll do is we'll apply it. So control A, and then we'll just add a little bit
more on the bottom of it. So I'm going to press
Tab control lot, left click, right click. And then we're going to come in, grab all of these. And we'll just put a
little bit of a sill on so ans pull it out like so. And just make sure
offset is even, is on. And there we go, we're
looking really nice now. Then there what we'll do
then on the next lesson is we've pretty much
got all of this sorted. We'll get the wooden tops
and wooden bottoms in here, and then it's time to actually
put on our materials. All right everyone, So I
hope you enjoyed that and I'll see on the next one.
Thanks lot. Bye bye.
56. Window Detail Texture Projection: Welcome back everyone to
Blenders Beginners Boot camp. And this is where
we left it off. All right, so with
this top then, we've got this top
we can actually apply or solidify and
come to the bottom. I've already applied
that and now I'm going to do is
press Lth and come back to hiding all of
these parts first. So let's hide these out the way. Hide the sun out the way. And then we'll come to the
top which has a solidify on. I don't need that, so I
might as well minus it off. All right, so now I'm going to do is I'm going to press Tab. I'm going to press control. Bring in a few edge loops. So I'm going to bring in
three edge loops like so. And then I'm going
to press control, put in some more edge
loops going that way and I'm going
to then grab these. I should have done this before, but I'm going to right
click and mark a same. Now let's press Tab. Let's
press Control all trans tract. Click that origin to geometry, pull it down a little bit. And now what we're going
to do is we're going to actually split these
up a little bit. I'm going to come in and
I'm going to split them up. Sorry L and L, each other on Y. Split them up. And then
what we're going to do now is move these
away from each other. So I'm just going to come
in and I'm going to put this onto random
proportional editing. And then I'm going
to pull these over, bring in proportional
editing in. So then what we'll do is
we'll also pull them up. And you can see there, I do have a problem in that
it's connected only on. Let's now try pulling
that up again. There we go. And
now you can see it. It's very gradual. You don't really need to do
a lot with it. All right? Something like that. Now, let's actually turn these into planks. And I'm going to press, and then we're going to do
is I'm going to press E, pull them down like so. And there we go. You can see they're looking
really, really nice. Now we want the backs of the planks though to
actually be touching. So let's turn
proportion editing off. And then what I do
is and x and just pull them together so like
the nearly overlapping. And what that does is
it looks as though then you can't actually
see through the mesh. So it looks as though they're
really uneven on there, but you can't see through it. Now what we want to do is we just want to
bring these down. So if I press shift
D, there we go. And then let's bring it down. And then what we'll do
is just spin it around. So our x 180. Spin it around. Let's put this back into
place then, like so. And then what we'll
do now is, well, I think actually if I
was having a wall here, would have some wooden struts
probably coming from here. But as far as it goes, we're pretty much done. So let's grab the whole thing. Let's press D to convert
to mesh. It's up here. If you need to convert
it, where is it? Sorry. Let's join
it all together. First D and then we'll do is control J and converting is convert and mesh,
it's over here. Now one thing I did forget, I think if I put on shade
auto smooth is the fact that I probably should have leveled off these two top parts. But I'm going to go in actually. And I'll fix that just to make sure it's all looking the same. So I'm just going to grab
all of these, like so. And then I'm going to
grab all of these. So I'm going to press
selection, grab them. Control all transforms, right clicks at
origins, geometry. And now finally add modifier. Bring in a bevel.
Then the bevel down, put it up to 0.1 Maybe that's a little bit too much, Maybe five. Let's try that. Yeah,
that looks bare. Control A, and finally, then we can join it altogether. So control J, join
it altogether. And there we go. One bay
window actually finished. All right? I'm really
happy with that now. You might be aware as well
when you put your walls in. You might want to pull
these back a little bit. Just use it on
normal to pull these back just to make sure
they're going in the walls. So the wall should be up
to here, as you can see. Now let's grab our bay window. We can see materials on here, wooden frame and glass. So what you might as
well do is we might as well grab this one,
grab this one, and then press control L. And we're just going
to link materials, let's put it onto material now. And then what I'll do is I'll come in, I'll grab everything. Because it's going
to make it much, much easier I think
rather than yeah, still going to have to
grab all these windows. So let's come in and just
grab everything and all we're going to do is press
and smart UV project. Click okay. And we should end up with most of
it going the right way. Now we can see, of course, that we're going to have
some problems here. And the reason is,
is because we really need an edge loop
going, you know, in this one and this one, and then underneath like, so we'll just try it again
once we've done that. So we just need edge loops
going in here, here, and here, and here, and then
underneath here, and here, and here, and here. Let's right click
and mark a seam. And the thing is we're
probably going to have to go all the way around or we can actually just come in and just grab these ones. I
think actually we'll do that. We'll just come in
and grab these ones. We'd have to mark seam all
the way around, If not, so we'll just come in and
grab just all of these ones. Going to make it
pretty easy for us. Now, the only other problem is that we've obviously leveled it, which makes it a little
bit more tricky, but you shouldn't be
able to notice it. And of course, as I said. We're not actually focusing on materials and textures here. All right, so let's try
and Smart UV Project. Click Okay and there you go. Now you can see that's
looking tons, tons, bare. All right, finally then
let's come to the glass. So if I grab all of these
won't take too long. You can see on
some of these that the textures looking a
little bit low resolution. You want to fix that.
All you need to do just go in and pull
out your texture. You can see it's looking much, much nicer on that part there. So we're just going to go
in, grab these last windows, and then we're just
going to assign now the actual window glass. So click a sign and there we go. Now one thing I didn't know is that I need to go
to my material. Where is it? So my UV editing and we're going to go to wood. So let's put new wood like so. And I'm looking, it's
not barrel wood, it should be a window wood. I'm going to go
down wooden door. Maybe it's the wooden door. I'm just going to
keep scrolling. Down stairs, wood.
It's not that one. Stair. Wood rough, I think
it's actually that one. Now what I'm going to do is
I'm just going to check, first of all, to see
which one's in it. So if I come to this one, go to shading, let's have
a look weights called. So this is window glass and
this one is window frame. So we've got a
window frame book. It's also called
window frame on here. So let's go to UV editing. And we're going to, we're
going to put in frame, actually, if we put in frame
now we've got the right one. But we're not looking
for that one, we're looking for glass. There we are. Window glass. So this is what we've
actually got on this one. So we just have to be careful
when we're unwrapping them. Let's just go back
and what we'll do is we'll just have them where
they're all selected. Because that will make it easier for me before actually
unwrapping them. So I'm just trying to go back. I'm actually
selecting them there, I think over look,
it's on the other one. Here we go. All right, let's just deselect all these.
And now we've got these. What we can do is we
can press you wrap, and they're gonna
unwrap like that. And that is not what we want. This is a little bit of a
problem that you might have. So you want to unwrap them
so you actually straight on. So the best way to do this
is if I press a like this. And then what I'm going
to do is I'm going to press U Project from View. Now you'll see that
they're going to unwrap. Much, much nicer. So if
I first of all though, actually give them the assigned with the glass and then we're
going to grab them. I'm going to pull
them out now and I'm going to look how they're
actually looking. So let's put them in place and then let's try
and rotate them round. Now that they're actually going into something of
the right place. Now you won't be able to get it perfect because we
actually projected it. But you can see there, it's
already looking better. And now if I pull that
out, there you go. That's looking
pretty nice like so. All right, so now let's come
in and grab these ones. And we're just going to
actually give them the glass, but we need to make
these smaller. So if we give these
all the glass like so, and then a sign. And then what we'll do is
we'll make these a little bit smaller or we can just
put them into place now. So if I grab, let's
say this one, I can just drag it and drop it. These two are okay.
Maybe this one is a little bit out
as you can see. So we're just going to
work our way round now. Let's drag in and drop in. We can put them in other ones
as well, that's no problem. So, L, G, L, E, L, so like so and so last two. There we go. That's one and two. All right. And I've
still got two. Why are those? I
don't actually know. What are these two? Let's go back and we'll have a look which ones are
causing the issue. I'm just looking. This one. Which one's causing the
issue? Let's have a look. Oh, we've got two over there
as well that I didn't see. Okay, so let's go to,
let's turn this off. And now we can see
these are the problem. Whoops. Let's grab it. G and L and so. Alright, that's
looking much better. And now if we turn on V, we'll press Oltch, bring
back our lighting as well. And there we go. One
beautiful bay window. Alright everyone, So now
let's go back to modeling. And then what we'll do is we'll actually put these into place. So I'm just going
to grab this one, I'm gonna put it
into my bay windows. And then what we're going
to do is we're just going to cab and hide that, bring in our stylized rocks and this is what we're actually
going to be doing next. Alright everyone, So I
hope you enjoyed that and I'll see on the next
one. Thanks a lot. Bye bye.
57. Rock Mesh Generation with Modifier Nodes: Welcome back everyone to blend
the beginners boot camp. And this is where we left off. All right, so let's just grab our rocks and move
them over here. Now what we're going to
be doing in this one is we're actually going to be
doing some modifier stacking. And modifier stacking is
really, really useful. It's like another feather
in your cap basically, that you can use if
you want to create interesting things the
same as geometry nodes. And the same goes for materials when you know about the
nodes and things like that. So what I'm going
to introduce you to is some geometry stacking. Now, you might have
seen this on, you know, some of our other courses or, you know, on our
Youtube we show this. But I thought were you going
to include it in this, because some of you
may not be aware. So if you have seen
it, just click on to the next one which
is pillows and beds. And hopefully most
of you haven't. All right, so let's come in and the first thing we're going
to do is bring in a cube. So mesh, bring in a cube. Now let's keep the
cube the same size. Let's not move the cube at all. For now, we can actually
reset our transformations, and then it actually will reset how these actual rocks
look a little bit, but we'll go into that more
once we actually start. So the first modifier
we're going to bring in is going to be a
subdivision surface. So let's bring it in.
Let's put this on five. Now if your computers
run a bit slow, just put it down a little bit, it will make a little bit of
difference in the details. Normally, you could
put this on six as well and you'll make
even more difference. You'll just bring out how the
actual rocks actually look. So put this on five and
then click on Simple. Now rather than
actually apply this, all we're going to do is
tick this little box. Put that up. And then to
bring in our next modifier, which will be a displacement. And I'm going to click New, and I'm going to name this text. I'm going to call it
Stylized Rock like. So let's change the strength to North 0.2 let's change
the mid level then to zero. And then what we're going to
do is we're going to hop on over now to our actual texture, click on your texture and
you'll see of course, it's called Stylized Rock. The one we want to pick
is called Musgrave. I'm going to click on here. I'm going to go down to
where it says Musgrave. So then what we're going to
do is we're going to pick this on on two and F one, you should end up with
something like this. Let's right click and
shade. Auto, smooth. And now let's go in and mess around with a few
of these options. What I'm going to do
is, first of all, I'm going to change
the size to one like, so I'm going to leave pretty
much everything else. I'm also going to put
this in an object mode because I really can't
see anything like that. So it's looking like
this in the moment. A little bit of a mess. All of these options
pretty much stay the same. Now, the most important thing
that you're going to do here is based on
the actual color. And the one we're going to
click on is actual color ramp. We're going to then
take this little down arrow and open that up. Then what we're going
to do is going to hover over anywhere on here
on this little bar. Press the control, but
press the left click. And then what you'll actually do is put in another pointer. And basically it's
just like a gradient. This is working
like a gradient in Photoshop or
something like that. That, so what position
we put this in. So make sure it's clicked on. And then all you're going to do is you're going to put not 0.234 So basically if we
move this up and down, you can see how much
we actually get. So I'm just going to
put that back actually, not 0.234 Now find
that what we're gonna do is we're
going to click on this gray Now because of
the moment, this is great. So it's alpha gray
and then white. And what we're gonna do
is I'm just going to set the value to 0.867 like so. And now there you
go. You can already see Stylize rocks, but
we're not finished yet. We're a long way off yet. But you can already see
the startings come out. Let's also, while we're here, click on this again and
we'll put the alpha on not 0.5 just to make it
that little bit stronger. Now what we'll do is
we'll head on back over to my modifiers tab. And then what we're going
to do is withdraws, going to close this
up and we're going to add in another modifier. And now it's time
for a decimate. So let's bring in a decimate. We're going to put
this on collapse, we're going to put
it onto 0.1 like so. And you can see now
it gets rid of a lot. You can actually
see this decimate. It's actually brought
down the count, so you can see that
we're on 6,000 polygons. We're going to bring
that down a lot and also smooth off a lot of those edges
to make it more stylized. Now let's close that up, and what we're going to
do is we're going to bring in another decimate. And this time we're going
to put it onto planer. And we're going to
set the angle to something like 15, 15. Like so smooth in those edges. Off a little bit more. And now what we can do
is we can close that up. And in fact, one thing I forgot, before we close up, let's put
on all boundaries like so. Next of all, let's
bring in another one. And this one we're going
to bring in a smooth. And let's put the smooth
on four iterations. So let's close that up. And now let's bring
in a Bevel modifier. Now let's change the
width type to percentage. Let's put it on percentage. Let's then put it on 10%
So let's come down then and change the angle to
20% And last of all, then let's come to geometry and just make sure clamp
overlap is ticked off. If you don't tick this off, obviously you're going
to have problems where you can't actually bevel
it as much as you want to, like what we have in, when we actually beveling
wood and things like that. And by the way, the
thing that this does is it stops the actual, um, you know, the points
are the T is overlapping. And you don't really
want that because you end up with broken mesh. But as long as you're careful, you should be able
to turn this off. And then just very gradually
just move it over. Now let's bring in another one, which will be the
weighted normals. So bring in weighted normals. And you can see now that's
looking pretty nice. So let's keep the shops and what we're also going
to do is I'm just going to put that down and then
I'm going to bring in the final one which
is a triangulate. So we just want to
triangulate the mesh, making sure that it's
all looking really nice. Now any of these, you
can actually go back. So for instance, with
the weighted normals, we can go in and change
those a little bit like so you can change any
of these on the flight. The most important one is
of course this one here. If you change this, it's going
to change the whole rock. So for instance,
I can make much, much smaller rocks
and things like that, so it's very, very
adaptable on the flight. But the best thing
about this is, is if I come in, let's say I want to bring
in another one. I can actually, so let's bring in another
cube for instance. So I can bring in a
cube, let's pull it up. Let's now grab this one. And this one control L. And what we're
going to do is we're going to link or copy
modifiers like so. And there you go, right click, shade, or to smooth. And there we go, if I now
press control or transforms, you'll see that
actually resets this right click and set
origin to geometry. Now the other good thing
is that I can come in now, grab this because it's still basically a cube,
and pull it out. Now when I pull it out, you'll see that ends up
really stretched. But as long as you reset
all the transforms, it should actually
go back in to, you know, smaller rocks
and things like that. The last thing I would do
of course on this one, is I would come in and just
change up these rocks, making them a little
bit smaller or bigger. Now you will notice
that obviously it changes the
other one as well. That might not be something that you actually want or
you might want to bring out these
rocks a little bit further than what they're
actually brought out. And the way to do that is to actually make them
look like these ones. Is to go in and
just press control. Left click, right click.
And there you go. Now you can see that it actually
looks much, much better. Alright, so finally then let's bring in a cylinder as well. So we're gonna bring
mesh and bring in a cylinder and it's on 32. Let's turn that down a bit, it's probably going to be too high. Let's put it on 20. Same thing then we'll just
pull it up, grab this rock. Those shifts like
this one, control L, copy modifiers, and there we go, right click, shade,
auto, smooth. And that everyone is
how we actually do modifier stacking
with stylized rocks. Now let's look at the
actual material on here. So you can see it's
just stylized rock. So all I can do is
I can just grab all of these, grab this one, and then I can actually press control L and we're going to link actual materials like so, and there's your stylized
actual rock material. Now just to unwrap these, you probably don't
actually think. I think if I grab one Press
U and Smart UV project, you can see it doesn't wrap. Actually, that's done a
pretty good job of that. You can see where
it's blurry here. I'm actually going
to just grab these. Press U, Smart UV Project. Click Okay. And there we go. Yeah, that was really
easy. I didn't realize we could actually unwrap
them at the same time. All right everyone,
So let's actually save that out and
then what we'll do now is we'll actually
pull these back into place. So I'm just going to
pull them back into place just to keep
it nice and neat. And then what I'm going to do is I'm going to close that down. I'm going to open
up the next one and I'm going to put these obviously into the place where they go which
are stylized rocks. And the next one
we're going to be covering is things like pillows, beds, sheets, things like that. So this is another part of
the blender that you really want to learn because
it's going to make things like flags
and pillows much, much easier to do if you know actually how to do these
things, aren't everyone. So I hope you enjoyed that and I'll see you on the next one. Thanks a lot. Bye bye.
58. Bed Cloth Simulation: Welcome back everyone to blend
and beginner's boot camp. And this is where
we're left off. All right, so again, let's come and just hide
this out of the way. We'll grab, in fact,
we'll grab our light. Hide that out of the
way. Grab our bed. Move that to the left
hand side. Grab this. Move it again. Alright,
let's first of all bring in the circle
part of our bed. So what I'm gonna do is
I'm going to press shift A. I'm going to
bring in a cylinder. I'm going to make sure
probably be on 24 on this just to make sure
it's a little bit rounder for these parts and
things like that. And then what I'm going
to do is I'm going to pull it out to make it
a little bit bigger, press en's ed to squish
it in a little bit. And this then will be the
basis for our actual bed. Now if I come over and just
put this onto object mode, what I want to do now is cut this straight down here because I don't want the whole sheet. The other thing, again,
it's about pre planning. So what I'm going to
do is I'm going to come and grab this. Coming all the way from here, all the way round to
here, I think it is. If I press seven to
go over the top, you can see it actually comes down the opposite one
comes down to there. So let's pull it down there. And then all I'm going
to do is shift D, I'm going to pull that out. And that then is going to
be for my actual headboard. Now the next thing is I also
want a bit that comes off. So you can see we've got a
bit that comes off here, a bit that comes off here. So the easiest way to do that actually is just to
pull it down once, extrude, and then control
left click, right click. And then all we're going to
do is we're going to come in Alt shift and click
going round like so. Old shift click and then enter Lns and then just
pull it out like so. And then same again.
Old shift click, Enter alternS, pull
it out like so. And there we go. All right, so now let's think if
we go over the top. So we want to go in this way. So let's think the sheets
will probably come from here. So if I've got it from
here through here, if I press J, then now I've got actually a
sheet that I can work with. So this part here, what
I'm going to do is, and then we're going
to pull this up, so shift D, like so. And I'm actually going to split this off from
the rest of it. So selection. Split that off. Okay. So now let's grab this and let's actually bring in
a subdivision surface. So if we come in and
add in a subdivision, so add modifier
subdivision surface. Let's turn it up a few times like so just to
give it enough to actually work with press control to actually apply
that press tab. And you can say probably not going to have
enough with this. Now the other thing I like to
do is I like to actually re mesh these sometimes because it makes the mesh much,
much easier to use. Now however, before we do that, let's go to file
and save it out. And then what I'll do is I'll
show you how to do that. Because re meshing you
can only actually re mesh full you know,
three D objects. It doesn't work very
well with two D objects. What I'm gonna do
is just control click going all the
way around like so. And I'm hoping that
I should now be able to press right
click and mark a. Same. Now I'm going
to grab it all. I'm going to press A, I'm going to go back
first. There we go. I'm going to right
click Mark Sam A to extrude it. And now
I'm going to do this. I'm gonna come in and adding another modifier which is
going to be my remesh. So where is my remash?
This one here. And you can see now that
it's looking not very good. But if I turn this down, we'll actually bring in
a lot more edge loops, a lot more topology. Now, if I come in
and press control A, now, now I should
be able to go in. And I was hoping that it
would keep that kind of, you know, this edge in
there. But it hasn't. So what I'm going to have
to do, I'm going to have to select to go
another way round. Right click mark, Seem. Come in with face select now. And now I can come in, press L and I can delete that other way. So delete and faces like so. And we should now end up
with something like this. And this now is going to be
the base for my actual bed. So if I go over the
top, now what I can do is I can actually
pull this out so I can make it press and
pull it out because it's obviously going
to be a sheet. So we have to remember that. So we want it draping
over the side. The other thing is we might as well reset the transformation. So all transforms, right? Click to origin geometry and
let's bring it down now. Last of all, because
we're going to be using kind of a
simulation, with this, it's a good idea
to go to layout, because on your layout, if I just put it
onto object mode, we can see we actually
have a timeline. And most simulations
are based on this. So if I turn this down now, we've got a timeline down there, which we can use to make this cloth basically
fall onto the bed. So I'm going to
actually bring it down just a little
bit more like so. And then what I'm going
to do now is I'm going to grab this right click,
shade, auto, smooth. Coming over then
to this one here, which is this, I don't even know that you'd
call this icon. It's like a circle and something going around outside of it. What we're going to do is we're going to put this on collisions. So now we want to do is we
actually want to come to this one and we want
to put it onto cloth. All right, so the
moment of truth, let's press the Space bar. Now we've put the
actual cloth on, so if I press Space Bar, now you'll see it
drops down like so. Now that's looking pretty
nice and all that, but it's probably a
little bit too small. So I'm just going to pull it up. I'm going to press S
and pull it out like, so I'm going to press
space bar now again. And there you go.
Now you can see that's looking much,
much better like. So let's write click
and shade auto, smooth. Now you can see we do
have some problems. First of all, it's really
broken mesh like that. And we don't really want that. So what I'm going to do is
I'm just gonna put it back. I'm going to come
over and I'm going to go down to where
it says collisions. And I'm gonna put the quality
on something like five. Normally, it cleans it up a lot. Now also we've got object
collision on at the moment. We should also have
self collision on. Now let's give that, I try
to see what happens here. Now you can see this always
happens. I don't know why. But the self collision always seems to mess
it up a little bit. You can see we end up with
a kind of smoother mesh, but the collisions is
really messing it up. It's as though it
sticks together or something, so we
don't really want that. Let's turn that off. Let's
try it again without that. And it should work better now. All right, so now you can see it's working
much, much better. Okay, So I'm actually
happy with how that looks. Now the one thing I want
to make sure of though, is that this is really
nice and smooth. So I'm going to come
over to my ad modifiers and we're going to bring
in a smooth modifier. And I'm going to try and see if we can actually turn that up enough to actually smooth
it out a little bit. Let's turn up the iterations. So let's mess around
now with the smoothing. And there we go. I think we've got enough
smoothness there. All right, so that's
looking pretty nice now. I'm also happy with the
place that it's in. Now, the last thing we want
to do is obviously we need, this is a three D mesh, not just a two D. So we
might as well come in. First of all though, we might as well apply everything
that we've got on. Because if we don't,
it's going to be not applying it properly because we've still got
that simulation on. So you could come up
and just hover over the cloth press control late and apply that. And now
we go to move this. Nothing's going to happen. And now we can actually still do something with this if I come
in and add in a solidify. Let's turn the solidify
up a little bit. So let's turn it up
maybe this way, like so. And that's looking, yeah, that's looking pretty
nice like that. What I'm looking for
is any broken parts in my actual mesh like you see
here, these broken parts. Now the best thing you can do actually instead of, you know, before applying any of this, is actually grab your mesh, Save it out again, just
so nothing crashes. Come to object mode and what we're going to do is
go to Scalp mode. Now in Scalp mode, you can
actually use your mouse, and all you want to
do is hover over it, press the shift button and just try and smooth it off
a little bit like so. So you shift left click and all we're doing is just
smoothing these parts out. And actually does
a pretty good job at smoothing it all out before we actually apply
that actual slidify. Just move it out,
especially on this. But as you can
see, there's a lot of bumps and things like that in this and I
don't really like them. Just keep going over it until
it's actually smoothed out. Move your angle as well. Sometimes that works to actually smooth it out
a little bit more. And there you go,
that's that one. And just work your
way round moving out the parts that you're
not happy with like so. And then when you're
happy with it, what you can do now
is you can actually go in back to object mode. Where is it? Object mode. And then what we can
actually do is we can now go over and apply all these. So I'm just going to press D, sorry, control D, just
to apply all those. Why isn't that working?
D. There we go. D to apply all those or object and where is it convert
to actual mesh. Alright, so that's
that part done. Now what we'll do
then on the next one is we'll actually
pull these up a little bit because we're
actually going to be putting some pillars in
place and things like that. You can see on the top of it, it's maybe a little bit
flat view, I don't know. But what we'll do is we'll
get some pillars in place and then we'll get this bed
finished. All right everyone. So I hope you enjoyed
that. And I'll see on the next one.
Thanks a lot. Bye bye.
59. Pillow Inflation with Simulations: Welcome back everyone to
blender beginners boot camp. And this is where we
left it off, right? Let's think about actually doing our pillows and things like
that and also the back part. I'm thinking that I'll
probably actually do the back part first because
that's kind of the easiest. So I've grab this part.
I'm going to press LP selection. Split it off. Control all transforms, right clicks at
origin to geometry. And I'm just going to pull this into place where I want it now. You can see at the
moment probably going to be better off if
we use a mirror on here. So I'll grab this one, grab
this one, press delete faces. And then what I
can do is, because this is already in the center, I should just be able to, you can see we as well
we've got a collision on. Might as well actually
apply that same for this as well because we don't need the collision on anymore. And then what we'll
do is add modifier, bring in a mirror, put
it on the y or the z. Which way is it going
to go? At sever, look, let's just press control all transforms now let's
try the white. And there we go. Now let's bring these into
the center first. So let's put clipping on. So we're just going to
grab these two here. Put clipping on. And then
I'm just going to pull them into the center
just so they meet. And there we go. Now let's think about bringing
this side down. So I'm going to bring
this side down. And we just want to make
it a little bit or net. So I'm going to bring
it down to there. And then all I'm going to
do is I'm going to bring this part up and
then bring this part up and then bring
this part up like so. And then finally this part like so I'm going
to press control. Then left click, right click. And then just have
a little bit of fun making it the
way that I'd want. It may be a little bit
different from this one. Is it high enough and probably needs to go in a
little bit higher. So let's just grab all of these. So let's pull them all
up at the same time. And I think actually
that's looking kind of Faris type thing. All right, so let's come in
now and add in a solidify. So let's pull this
solidify out a little bit. And I've just got to be careful that we don't actually want it. We need this pulling
forward, in other words. So if I pull this forward
just so it's over matul bed, as you can see, now
it's looking better. However, we can see, we have some problems with the
mesh here. Not a problem. So let's first of all
just leave it like that. And we'll just bring
in a bevel just to finish it off. Okay.
I'm happy with that. And then all I'll
do is I'll make it probably a little bit
on the thicker side, so pull it out a little
bit more like so. And I'll come down and
turn my bevel down and then just turn it up maybe two. All right, so I'm
happy with that. Let's press D just
to apply everything, and now back to our sheet. And what I'm going
to do with my sheet is I'm going to grab
a little bit of it. Let's say here I'm going to make sure proportional
editing is on. I'm going to put it on smooth. And then what I'm
going to do is I'm going to press pull it out and just make sure
that it's over this part. So just work your way around it. Just making sure it's over
the parts that you want. And I would do this
a little bit of a time when you try and
do it all in one go, doesn't tend to work so well. So just try and do
it a little bit of a time like so.
And there you go. All right, so now let's think
about our actual pillow. So what I'm going to do is
I'm going to press shift. I'm going to bring
in then a cube. I'm going to pull
up my cube like so. And we want to make this
a little bit thinner, so I'm going to press S and Z. I want it to be basically
a pillar shape. And Y, sorry, S and X, let's make it a
pillar shape like, so let's make it a
little bit smaller. So something like that. And also I think we'll make
some square ones as well. I'll just make it a little
bit thinner for now, like so. And then what we want
to do is now want to give this some actual edge loop. So right click, subdivide, turn up your subdivisions. So turn them all
the way up like so. And the one thing is
you don't probably want as many going around the
side. We'll give it a try. Normally though, it's better
to take these down also. This is kind of in my way,
so I don't want that. So I'm just going to press
T just to hide that. And now what we're going to
do is we're going to add in another cloth
modifier. So cloth. And this time all we're going to do is go down to pressure. We're going to put
it on one like so, and we're going to turn
the gravity down to zero, just making sure it's not going to fall through the floor. Now I'm going to
press space bar, you'll see we end up with a
really, really nice hello. Now the one thing is I can see, probably didn't have enough
edge loops in there, or we've got too many
on here as you can see, and not enough this way.
That could be something. Let's give it one
more edge loop. Press Tab, and let's put
it back to the beginning. And now press Space Bar, And is that going
to look better? I think actually that's
going to look pretty nice. All right, so now what I want to do is I want to press shift D. I'm going to bring it over. I'm going to actually
put this on zero again. And then what I'm going
to do with this is I'm going to shape it a
little bit different. So and Y, and then
and Z like so. And now let's try that
again. So press Space Bar. And there we go.
That's a square pill. I think I might reset the
actual transformations on this, so I'm going to pull it back. Control transforms right clicks at origin to geometry space bar. Now at over look, I'm not sure whether I'm happy
with this, how it is. So what I'm going to do
is I'm going to come in with our subdivision. Let's give it a
subdivision modifier. So we'll bring in a
subdivision Yeah, that's probably
going to be bare. Turn it up twice,
and what we'll do is we'll grab it
again. Dissolve. Limited Dissolve Tab. Okay. Now, let's come in
with subdivision modifier. Let's turn it up a few times. Let's put it on Simple
though, a three. So we'll do it like that. And then what we'll
do is we'll press control a add in another
one. So subdivision. I'm still not happy
with this shape, so what I'm going to do
is I'm going to put this down to one control, Adding a modifier
subdivision. Yeah. And that's what I'm looking for, so now I'm going to
turn it up a few times. Three control and
let's have a look. Let's try that. Is that
looking any better? Probably. I think I
can work with that. Sometimes it just
doesn't want to go your way and sometimes you
need to add more pressure. So just bear that in
mind if I like come into this and bring in a
lot more pressure. So if I put the
pressure on three, you'll see what happens
if I come in now. You'll see how much
that one's blown up. A lot more though. It's just about how
much pressure you want to put on there. I'm going to put
the pressure scale up and see what
happens with that. We're gonna have a little
play around with it. Yeah. And I think that's the most I'm going to
get out of that one. So I'm going to write click
and shade, auto, smooth. All right, so now
I'm going to do is I'm going to grab them both. I'm going to press D just to apply all the modifiers
and things like that. And then what we're going
to do is we're going to add in another modifier. And of course we're going to
add in a smooth modifier. Let's write click
Shade Auto Smooth. So let's now turn up this. So I'm just going to
turn up the iterations. So, and then I'm going to
see if I can actually make it a little bit smoother so, and I'm happy with that pillow. And then what I'm
going to do now, rather than do anything
else with them, all I'm going to
do is I'm going to go back to my scalp mode. And I'm going to make sure, first of all that this is just moved off a little bit
like so just go around it, make sure it's smoothed off, especially on the
corners like so. So. All right, now let's come to this.
We'll smooth it off. Or hopefully we'll try
and smooth it off. This one here, we might actually need to
pull out a little bit. I'm just going to
actually look over here. So we're having a few
problems with this one. I wish actually had done
the square and just kept to ket to these,
but it's no problem. So what we'll do with
this one, first of all, I'm just going to go in
and I'm going to go back to my remesh and I'm just
going to re mesh that again. So I'm going to see if I
turn this down a little bit, how smooth can
actually get that. That's looking a lot
smoother now as you can see. Now let's go to this one and we'll do a remesh on this one. And we'll turn this
down a little bit. And you'll see as we
turn it down further, going to look a bit nicer. And then what I'll do
is I'll apply that. And I'll come in
and apply this one. Now you can see that if I'm going to this one at the moment, this is 40,000 polygons and it's probably a
little high for a pillow. And this one is 6,000 polygons, so also probably a
little bit high. But the first thing we want
to do is add modifier. Let's bring in a smooth
and see if we can actually smooth it off a
little bit from what it was. I should turn that upright. Click, Shade auto, smooth.
Yes, and there we go. Shade auto smooth. Let's bring in a smooth
on this one, like so. And the iterations
of it get as smooth as we can without going too
far. Something like that. And now finally, let's
supply both of those. And we'll also then come
in and apply a decimate. So at the moment, 20,000 polygons, that's
not what we want. Let's put it on not 0.1 and never look at
that. There we go. And let's put this one a decimate on this one's
not so high, so we can, might be able to get away
with not 0.2 Let's bring it down a little bit
actually and see what we can actually
really get away with. 428. Let's bring
this one down as well without breaking
the mesh too much. There we go, 1,583 Okay, that'll do contro and controla. And what we'll do now on the next lesson is we'll get
all these pillars in place. And then finally we'll get
some actual materials on here. All right everyone. So I
hope you enjoyed that. And I'll see in the next
one. Thanks a lot. Bye bye.
60. 3D Bed Texturing Techniques: Welcome back everyone to
blender beginners boot camp. And this is where
we left it off. All right, so now let's put
our pillars into place. So I'm going to press three. I'm going to rotate this
one round, so R, Y. And let's just put this one, let's say here.
Something like that. And of course when
you're doing yours, just make sure you take probably a little bit more
time than I'm doing. So shift, D, z, rotate it round, and then
let's put it into place. Maybe that one's a little
bit too far that way. And then I'm going, I'm
going to grab this one. Actually make it a
little bit different. So shift D, bring
it round, R, Z. Rotate it, put it into place. And then the square pillow that caused me a
lot of problems. Let's rotate it round, so R, Y. Let's press and Y and
pull it out a little bit, making it a little bit squarer. And then let's put it
into place like so. And then shift D and then
pull it over like so. And I think actually I'm
much, much happier in this. Now you can see that we need to pick this sheet up a little bit. We can also see that probably we need another pillow on here. So I'm just going to grab
these two, hold them forward, grab this one shift D, and then just pull it
forward. And there we go. I think that bed actually
looks a little bit bare, albeit I think these
pillows need to be probably a little bit bigger now in
comparison to the bed. So I'm going to do is
we're going to make sure press hold them out. Yeah, and that's
looking much better. All right, back to
our sheet then. Now let's come in, make
sure proportionality again, make sure you're working
very slowly with this. A little bit of a time. Just move them out and get them into the place
where you want them. And you're probably
going to have to go pull that out again. Let's pull it back. And
then this one back. This one I'm going to pull it
back a little bit further. Then this one, finally. This one then I'm
going to do is I'm going to bring up this, making it a little
bit more and even so, it looks a little
bit more realistic. And there we go, finally
our bed is done. Okay, let's grab everything. Let's go up to object
convert and mesh. Let's go back to modeling. Instead of being layout, let's finally then join it
altogether with control J, Right click, auto, smooth. And there we go. There's
the bed actually finished. Let's grab our other bed then. So we're gonna grab this bed. I'm going to press control L. I'm going to then link
materials like so I'm going to go to my materials section and then one
I'm going to do, I'm going to come and look
what materials we've got. So we've got bed cloth, bed
sheets and leather red. Now the leather one is easy. It's going to be this one here. It's going to also be probably
the underside of the bed. So what I'll do is I'll
grab the underside as well. So this part here, control
plus going all the way up to the inside,
something like that. Pressing then and smart UV
project clicking, okay. And then what we're going
to do, put the lever on, click a sign, and there we go. And then finally what I'm
going to do is the sheets. The sheets. And the actual
I'm going to actually, I think I'll come in and just hide the bed sheet
at the moment. So H and then what I'll do is
now I'll do this part here. Because you can see this
part here is not right. So wrap Smart UV project, click okay, Red leather. And then what we can do
is Ok shift and click. Shift, click, shift, click, and then Smart UV project. Okay, Bed sheet clicker
sign. There we go. Yes, that's looking pretty nice. And now the actual pillow. So let's do the pillows first. So we're going to
click all of them. Smart UV check. Click. Okay. And we're going to put
them on bed cloth. So let's click a sign. The one thing I'm not
happy with the pillows because they've not
come out too well, which means I'm probably
going to have to unwrap these properly or at
least partly properly. Can I actually do that? Let
me just have a look first. Before we actually do this,
I think I'll make these pink and then what I'll do is I'll do the
bedsheet properly. Because I think on the bedsheet, actually we already have. If I come here, I can just
click on the top of it, Click wrap, because I actually
marked a seam on there. And there we go, the
bedsheets looking fantastic. It's just these parts.
So all I'm going to do, I'm going to cheat a little bit. I'm just go into my UV editing, and instead of unwrapping
them all like that, I'm just going to grab
them, press the S, but bring them in and look
where the actual color is. Now, if you can't see it, just
come up and put it in bed. And you should
have one that says bed sheet, this one here. And then all I can
do is I can just press the S bot and even more, bring them in smaller
and then just put them into place like
so there we go. All right, so now a
bit of cheating there, but ah, okay, so now
we've done that. Let's actually bring
everything back. So I'll teach bring
everything back. And then what I'm going to do is I'm going to grab my bed. I'm going to actually lift it up off the floor so it looks right. And then what' going to do
is I'm just going to put it into my pillows and bed. And then I'm going to
close this one down. I'm going to bring
in now my logos. So this one here and this is the next one that
we're going to be attempting. Now for this one, we
have actually got a reference, which is this. Here. Now I have put a
cat silhouette in here, because we're going
to actually be making a cat, as you can see. I've also put the pores in here because we're going
to be doing that as well. And I have a point.
Anything else? I've also put a cat SVG in there just in case you want
to take that into Photoshop. Now, you can bring
SVGs into Blender. There is if you
just put an edit, I will just quickly
show you that. So edit preferences. If we go to add ons and
you just put an SVG, there is one that says, import, export
scalable graphics. Be war though when
you bring these in, sometimes they don't
always work properly. So just be aware of that. Alright, let's close that down. Let's now save our, our work. And what we'll do
then is we'll make a start of this on
the next lesson. Alright everyone. So I
hope you enjoyed that. And I'll see on the next one. Thanks a lot. Bye bye.
61. Cat Paw Symbol Creation: Welcome back everyone to
blender beginners boot camp. And this is where
we left it off. All right, so let's actually hide all of this out the way. So I'm just going
to grab it all. Press H to hide it
all out of the way. Grab my logo and then what I'm going to do is just pull
it over to the side. Now the first thing I
want to do with the logo, if you're creating a logo, is just break it down,
first of all. So what I'm going to
do is I'm gonna break it down to pause the cats, the actual fonts that
we're gonna be using. And then the outside
of the logo. Now you can see
here that my logo, it's looking a little bit jagged on the actual
circle part of it. And that's not
something I really want when I actually recreate this, what we'll do is
we'll start with the outside of it first. So let's serve,
bringing a cylinder, So we can bring in a cylinder. And then what we're going to do is we're going to put this, let's put it on
something like 50 to make it nice and smooth
going around the outside. I'm also going to put
it onto object mode. And then what I'm
going to do is I'm going to right click
and shade smooth. And you should end up
with something that looks nowhere near as jaggy
as what this one does. Now let's spin it around, so R Y 90. Let's make it a little
bit bigger then. And let's pull it in so and x, let's pull it in like so. Now the first part of this is obviously going to
be pretty simple. All we're going to do
is bring in an insert. I'm going to go to Face
Select, Select this face, press the Born to
bring it in like so. And then what I'm going to
do is I'm going to pull it back with E, like so. And that's making the first
part of our actual logo. And then I'm going
to come in and bevel the edges off here. So I'm going to grab
this edge and this edge, I'm going to press control B. And if they're not beveling
off properly, again, just make sure you
press control, reset all your transforms and
now try beveling them off. And this should be much bear now you might as well
because you've took the time to actually give this a lot of edge
loops on the cylinder. Give it a lot of bevels as well to make sure it's nice and
rounded. So left click. Let's check that out.
And there we go, that's looking pretty nice. All right, let's press three. Let's pull it up now. Just make sure it's
the right size. And now we'll actually focus our attention on the actual por. So what I'm going to
do is I'm going to bring in, I'll press three. First of all, just to make
sure I'm straight on, then I'll press shift
A and I'll think, I'll bring in, let me
over look an image and we'll bring in a reference. So let's bring in a reference. I'm going to go to my references and the one I'm looking for, let's put it onto a little
icons here is the poor, so this one here, I'm going
to double click that. I'm going to pull it up.
Then I'm going to then pull it into place
like press three. And what I'm going
to do is I'm just going to get this to
be the right size now. So if I press S and then pull it up and
that's going to be, yeah, cut another right size,
maybe a little bit bigger. Let's pull it out a little bit. So let's pull it down. If I can actually click off
that, click on it again. Now I can pull it down.
Let's press three. Now we've got this in,
let's actually go in, press three on the number pad. And what we're actually going to do is actually cut this out. So I'm thinking I'm probably
better off pressing shift S, first selected, shift A, then bringing in a plane. Now let's spin the
plane round so R Y 90. Let's make it bigger. And
then what I'm going to do is I'm just going to press
Z, go into Y frame. And now I can actually
see through there, so let's actually start
cutting this out. So I'm going to press Tab, I'm going to press A just to make sure it's
all highlighted. I find it much easier
to work like that. And then I'm just
going to press, and I'm just then simply
going to cut these out. Now just bear in mind the more actual edges you
actually give this, the smoother it's
actually going to look. So you can see
here and you don't actually need to keep it really, you know, right next to the actual lines or
anything like that. You're just going to quickly
go round it like so. All right, so let's now
come to the actual feet. Just quickly go around these. While we're actually trying
to add in a few vertices, it's not only to follow the actual contours of the shape that we're
trying to create, but it's also because when we come to actually try
and smooth this off or, you know, adding a subdivision, maybe it's actually going to make it look much, much better. We're basically company
doing this for pretty much the whole of the
logo that includes the cat and also in your
reference pack is also, I think the actual fun
that we've used for this. You can see creating
logos is pretty easy. All right, so we've got this, now let's come in and what we'll do is we'll grab this one. This one and this one.
Then what I'm going to do, I'm going to pull them out, so I'm going to press shift D. Just duplicate them without proportionally and on of course. And then what we're
going to do is we're just going to delete
that out the way. So delete vertices, let's
put it into object mode. And I can actually
get rid of this now. All right, so we've got our P, now we want to actually
round these off. So what I'm going to do is
I'm just going to press Tab. I'm going to press A. And
then what I'm going to do is I'm probably just going to pull them out and see
what they look like. When I actually use the
subdivision on these, we can see here we've got actually a little line
that's going across the, I actually might come in
before I actually do that. And what I'm going to do is I'm just going to delete that. So this edge, so delete
dissolve edges and there we go. Now it's nice and
clean for me to use, so now I can come in, grab
them all, extrude them out. And then what I use is
I'll use a subdivision, I'll reset the transformations. First of course, right click to the origin geometry,
add modifier. Bring in a subdivision
surface. And there we go. You can see it's already
starting to look quite nice then up to two maybe. And then all I want
to do is I want to put some supporting
edge loops in. So what I'm going to do is
I'm going to grab this one. This one, this one and this one. I'm going to press the
Eburn then just bring them in without don't let
it cross over though, so just make sure it's
not crossing over next. Let's check if we auto smooth what it's actually
going to look like. And you can see now that's
looking pretty nice. Now what we're going to do
with these is pull them out very slightly and then grab this one and actually pull
it out a little bit more. And then we're going to
do is I'm going to press, and you can see there,
I'm actually having a few problems with
it crossing over. So I've just got to be careful
that none of these kind of intersections actually cross
over anything like that. Now, we can probably stop
this though if we press I. We try and bring it
in a little bit. I think I can get
away with just that. And then I can just pull
this out a little bit more. There we go. Now let's
come to the Backs. So with the Backs,
all I'm going to do is I'm just going to extrude them
out a little bit more. So if I press, just pull
them out just a tad. You can see now looking
really, really nice. Let's try and turn
this up to three to see if you'll
smooth it off anymore. I don't actually think it's
going to smooth that off. Right click, shade smooth. Let's come down
to our smoothness actually and see if
we ramp this up. If we can actually get rid of these parts here, probably not. The reason is is because we have a lot of the
actual ledge loops in there. So what do is I'll come
over and we'll actually apply our subdivision and then we'll do is I'll
try and bring in, let's even bring in a smooth. Is that actually
going to do anything? I don't actually think it's
going to relax them enough, I'm just going to
try and relax them a little bit more if I can get that smoothed off and it doesn't seem
like it's working. So we have a number of things in our kind of tool kit that
we can actually use. The first one, obviously,
is the remash. Just make sure if you're
using the remash as always, save out your work before you use it and then we can come in. And it all really depends on how much computer power
you've actually got to, how low this you can
actually go down. So you can see if I bring it down to here,
something like that. Now for right click
shade smooth, actually apply that right
click shade smooth. Now you can see that is pretty smooth. I'm
quite happy with that. The other way we,
of course we would do it is going into scalp mode. And we would actually use
scalp mode to do this. I actually think now that this looks better than
the original I made, which is this one
here now my cat, see it should be a
little bit flow there. But I'm going to position him, I'm going to make this
probably a little bit smaller. So I'm just going to make
it a little bit different. So a little bit
smaller, pull it up, and then I'll have my cat
actually kind of over here. So let's actually bring in the cat now. So
we'll do that now. So first of all, we're
going to go down to image and reference. And we're looking for a cat. So let's bring our cat in, doesn't matter what size it is. And then what we'll do
is we'll just quickly bring in a plane. So a plane. And then what we're
going to do, we're going to bring the plane up, spin it around, so R Y 90. So pull it out a little bit. D going to frame tab, and now we're ready to actually for the next lesson
where we cut this out. All right everyone. So we enjoyed that and I'll
see on the next one. Thanks a lot. Bye bye.
62. Cat Illustration Conversion to 3D: Welcome back everyone to
blender beginners boot camp. And this is where we left off. All right, so now let's come
in and we'll grab our knife. I'm going to grab
my knife like this. Then again, I'm just going to
put around all of this cat. As I said, there's an SG
actually in the download pack. If you want to give that try, just have to employ
in as an SPG. As I said, it does
take a little bit of time to actually fix the problems with the SPG on this occasion because it's
actually a very simple shape. It's actually
probably easier just to put around your cat
like I'm doing here. Also, when you're cutting out, just don't forget that there is also the inside of
the legs on this cat, which we're going
to do after here. Now, if you actually
make a mistake, don't worry because you
can come back to it. Once you finish, you'll just actually come back
and then you'll be able to move the T
into the correct way. All right, so there's the cat. Let's come in now and
not forget this part. Okay? Now what we need to do is we just
need to come in now and grab this part
and this part, and I should the outspread shift Now let's come
in with edge select. Let's see if I can just
delete dissolve edges. Work in, sometimes we have
to go in and delete edges. Then what we need to do is now we need to go in and
fill that back in. You can see here that I need to get rid of
this one as well. Dissolve edges. Can
we dissolve it? Let's, sorry, let's press the head
and go into solid mode. Let's now delete
edges. There we go. Now let's fill this in. Now, this is going to be hard because you've got all of this. And if I press,
you'll see it just goes over the top of it.
That's what we want. So what we want to
do is press old F and then we'll still
have that gap there. Then what I can do is I
can pull it out like so. Then what you can do is
you can just change this. Let's try changing into quads. Let's put it on
face select first and right click
and try to quads. I'll actually bring
it down a little bit. The thing is you want to be careful with how many triangles
you have around the edges because that will impact how you're actually
going to be able to level the edges off
and things like that. So you can see here
that the edges here, it's going to be pretty
hard to level them off. Now we could come in
and grab the edge of this and then extrude it out a little bit and then bevel it in. That's something
else you can do. I think that's what we're
actually going to do. So I'm going to do is I'm
going to press shift. I'm going to bring it out again. And then what I'm going
to do is I'm going to come to the outside
Alt shift click. Let's see if we can
actually grab it. Going all the way around. Alt shift click,
Going all the way around and all the way up open. Grab, just pressing old chip. Click and control click. You can see it's trying
to all the time. Yeah. Away from that. Now, I'm going
to do the outside first. What I'm going to do is I'm
going to press E and then, and then just pull
it out a little bit. Now you can see there, that's
what I'm talking about. So if I press and I
pull it out this way, then what I can do is I can press and pull it out
from medium point. So let's go to medium point. Let's press three
again. And let's actually see, we
can pull it out. So you can see there,
we only want to pull it out very gradually. Now you can see that in some
parts of it it comes out, and some parts of it it doesn't. And there are points where
we have to actually pull it across and actually
fix it a little bit. So it's up to you kind of what angle you're
actually going to go for. You can see I'm going to have to pull it this way a little bit like a mine. Actually pull it out
a little bit more. I'm just looking if I'm
actually happy with that. Yeah, I'm thinking probably probably the other
way we can do this. I'll show you the
other way that we can actually do this
is we can actually come grab, grab the edge again. We're going to go back
and just grab the edge. Like I'm going to also
grab the inside edge. I'm just going to come in and grab this inside edge like that. Then what I'm going to do is
I'm going to press shift. I'm going to come in and
delete both of these. Delete the vertices. Then what I'm going to do now is I'm going
to fill this in. First of all, before do that, I'm going to make this easy for myself if I join this and this. Not J, Sorry. Join
the more up like so. And then what we
want to do is now we want to join this one, Maybe this one here, so
we're just going to press F. And then what I'm going to do is I'm
going to join this one. And maybe this one here,
we're going to press like so. And we may be able to just
put a face on this now. So what do I mean by that, if I come in now and
go all the way around? So let's just say
if I press F now, you can see that's what happens. That's not what we want, what we want to do is go
all the way around. So I'm just going
to hit control, Going all the way
around back to here. Now press F, we can
fill that part in. Now if we come to this
part here, for instance, and go all the way around, because there's no actual
triangles on here. Now it's going to make it much, much easier to actually do this. If I come down all
the way around here, back to here, back to here
on here, press the F born. Now you can see that we can actually fill it in like that. Now what that enables us to do now is actually level it off. So if I come in, I
press and pull it out. And you'll have a problem
with this, by the way, when you're doing
anything to do with like, you know, letters and
things like that. So this is the actual way that you can actually
get around it. So you can see now
I can come in, rub it all going
around there like. So I'm going to do
the outside first. Now if I press Tab, control all transforms right
clicks, origin to geometry. And now if I press
Tab again, control B. And now you can actually see that I can actually
level that off. So that is the way that
you get around it. Now you will see that
there was some breaking of the mesh there and you just have to be careful of those points. So it's basically those
real points over there. Let's try it on this as well. So I'm just going to grab this
going all the way around. Control and let's see if I'm actually going to
break the mesh there. No, I'm not. There you go. You've got a slight
bevel on there now. Right click, shade, auto
smooth. There is our cap. All right, so let's
come to this one. Let's delete these out the way. So delete vertices. Let's then come to this and
delete that out of the way. And now let's get
our cat in place. So control all transforms, right? Clicks, origin geometry. Let's press through
on the number pad, press the S burn,
and then let's put our cat where we
actually want him. Which I think something, something like that
looks pretty nice. I need to have a little bit of room where it's
going to say pause, so I might have to make the cat actually a
little bit smaller. But the composition tells
me that I should have just poking over
the actual poll. But what I'm going to
do is I'm going to put him there and then
I'm going to pull him out and X let's pull it out. And remember, the
more you pull it out, the more that Bevel is
going to get extruded. That's not something we want. So what I'm going to do
is I'm just going to pull him out, let's say to here. And then I want to
go round to the back of the cat. Old shift click. Grabbing the cat, going all the way around the back of it. Hopefully I should be
able to get it like. So going all the way around, where is it coming over to? Here. And then the inside
of here, in this part here. Make sure you've grabbed it all and then what you can do is just pull it back without
affecting that bevel. And there you go. You can see
that's looking pretty nice. It's a logo from the
front view anyway. I mean, you're not
really going to see it from the side view. If I was seeing it
from the side view, I wouldn't actually
create it in this way. All right, so what we'll do
on the next lesson is then we'll actually start
working with fonts. I'll show you how to bring those in and make them kind
of look like this. All right everyone.
So I'm going to say about my work and I'll
see you on the next one. Thanks a lot. Bye bye.
63. Teddy Bear Modeling Start: Welcome back everyone to blend the beginner's boot camp. And
this is where we left the. All right, so let's actually
bring in these letters. So what I'm going
to do is I'm going to first of all press three. And then I'm going
to press, actually I'm going to leave
my cursor there. Just put yours in the middle
if you need to shift. And if you come down,
you will have one that says text. Let's
bring in the text. Let's spin it around so r x 90. And I spin round the wrong way, so Y 90 and then x 90. There we go. And these are
non destructive though. It means that you can alter
them without having to worry about destroying the
mesh or anything like that. Let's right click and
set origin to geometry. And then what we'll
do is now we'll come over to the new little
barn over here, which is the fonts menu. Now what we need
to do is we've got one that says, where is it? Should be fonts. Here we go. One more we need to do is
go and find our fonts. Now, put your font in
the boot camp reference. So here's the
reference. And you'll see here we've got one
that's called yikes. Let's bring that
in. There we go. There is our actual font. Now fonts are pretty
much as curves, so what we can do is now we
can actually pull this out. If I go to the extrusion
and then pull it out like so that's way too
much out like that. Let's make it a little bit smaller and let's call it Paul. Let's in, I think I'll
capitalize actually. Pauls like. So I'm going to press Tab, then I'm going to press three. And just look where
I am with it. Now what we're going to do is we're just going to actually move these into place because they're a little bit
out at the moment. So I'm just going
to put this here and then what I'm going
to do is I'm actually going to apply this
actual curve, basically. That's what it is.
So if I press D, it should actually apply that. And then what I can do
is I can come in now actually grab this
bearing in mind, actually one thing
I should say is that all of these are actually split. They're always split. So you'll see when I
grab the front of it, you'll see when I press G, it's always split away from it. If I press A then
and go to mesh and we're going to
clean up and we're going to merge by distance, you can see 1902 verts
actually merged. That saves us a lot
of actual verts. Now I'm going to do is I'm
going to grab this one, because I can actually grab it all. I'm going
to press three. I'm actually just
going to move it over now into a better place like so. And then what I'm gonna
do is I'm gonna put it back into place like so. Now if you want to pull
it out of it, you can. You can just press Etanx
and just make it a little bit bigger if you need
to. So something like that. And I think actually that's
looking pretty nice. Now, the other thing
you can do, as we did with the Japanese roof, is you could actually bend
this if you really want to. So you could have it bend around there or something like that. Basically, you've got the skills now to go away and
actually fix that. Just going to actually
save that out. And then what I'm
gonna do is I'm gonna grab all of this.
Now grab it all. Press D just to make sure
everything's applied. Press control J, join
it all together. Right click, shade,
auto, smooth. Now you'll notice with the cat, it's actually not flat on there. What I need to do is I
need to come over to here and normally it's clear. I'm going to add
custom split normals. Clear custom split normals. Sometimes it actually happens,
I'm not actually sure. So what I'm going
to do is I'm going to actually check, this is why, it's because I need
to go in and grab all of my cat and then
one interiors and I'm going to come down and
shade flat instead. So, there you go. That's
actually fix that for us. All right, so that's
looking really nice. Now if we grab our rubber
logo press control L, what we're going to
do is link materials. We're then going to
put it onto materials. And now we've actually got pretty much the sale
that we actually need. So I'm just going
to go in and it should be pretty easy actually, to put the materials on this. So you can see it's
actually an atlas, which means that we
need to move them over. So if we go to your UV editing and then one interior we're
going to look for logo, so you can see that
there's logo atlas here. And then you can see this is where this part is, let's
put it on material. Again, this is this part. Now I want this
part to be silver. So I'm going to grab
this over this side, press the G board
and move it over. And then I'm just looking at the other color,
so black, silver. So let's grab the cat like so make sure we
grab it in edge select. I know there's no seams on
there or anything like that, but just get used to actually
grabbing it in that way. Now because this is metal
and things like that, you really can't get away. You can see it at
the moment. Our UV is right down near this
little tiny thing. And that's because simply
we haven't unwrapped it. So if I come in, smart
UV project, unwrap it, press S, shrink it down G, let's put it into place. There we go. All right,
so the pores part. Let's come into those now. So I'm going to make sure I
grab everything you can see. Again, these aren't
unwrapped very well at all. Smart UV project, they're okay. And the pores, we
want to have gold. So I'm just going to press S, shrink it down, move it
into my gold like so. And then finally these pores. So I'm just going to come in. Grab all my paws
Smart UV project, bring them down and then G. Let's put them in
place. There we go. As simple as that, and
that looks really nice. All right, so let's
go back to modeling. Let's press Alt tag. Let's bring our other logo just
into place like. So let's grab this logo and what we'll do
is we'll pull it up into our logos like so I'm going to close
that down then. And then we're going to
open up the next one, which is going to be our bear. So this is the one we're
going to make next. And this is a really good one, if you're interested in
putting fur on animals. And this is kind of a beginner's boot
camp as it's called. So we're not actually going
to go into character hair, but we will be going
into animal and, you know, kind of furry toy hair and things like
that. All right. So with that said, now let's
actually grab our bear. In your notice, this bear
is actually still split up. And the reason for that is, is because we want to
separate out the materials. Now in blender, it's
actually hard to separate materials when they're
actually applied as hair. So what I'm going to
do is I'm just going to hide all of these. Hide this. And then finally I can grab
my bear and just pull, hopefully pull him to the side. Now you notice it also put it a little bit there
and the reason is because this has still got all
of the hair showing and we can actually turn the hair off and not
actually show it. We can also operate an
object mode and then you'll notice that or not
an object mode, sorry, wire fray mode,
should be easier to pull. No, it's not, It's
still the same so I thought it would
be easier to pull. But the other thing
is as well with hair, we can actually turn down how much hair it's
actually showing. And for instance, if
we come over here, you can see our particle system. And you can see at the
moment that we've got the number of hair
particles in there, which is 3,000 which
is pretty high. But if I go down
and I put it onto display A and we
can just put none, then you can see now
when I come to press B, I should be able to pull
it across much easier, albeit it still stores a little bit, but we're not
going to worry about that. I'm going to turn it off
for now though because it's actually easier to
work without that on. Okay, so let's first of all
make a start on the arms. So what I'm going to do is I'm going to bring in
a cube for this. And I'm going to press Shift
and we'll bring in a cube. And then what I'm going
to do is I'm going to press and X, And I'm just going to
pull that out a bit. And then what we're going to do is I'm going to come over, I'd modify it and
we're going to bring in a subdivision surface. I'm thinking whether I can
get away with it on one, maybe I have to turn
it up one more. I think we'll actually
put it on two. And I think that's just going to make it that a little bit easier now for breast control.
Left click, right click. You can see we're already
starting to get the kind of shape of these arms and
then control R again. And we're just going to bring
it up, something like this. And I'm hoping, actually, if I can press now, I can actually pull it in. And then press and pull
it back a little bit. And make kind of these
bits that actually poke out there should be a
little bit rounded actually. So do a want me in? I'll do want rounded. I'm actually
going to go back. And I think instead
of doing that, what I'll do is I'll
press I again and then I'll press and
there they are. I think that's going to look, I think that's going to
look much, much better. All right, so we've got that now that we need to actually make the actual end of
it smaller as well. So what I'm going to
do is we're going to come in proportional editing. And I've got mine just set
on smooth and if I press S now I should be able
to bring it in like, so it's going to be a very, very basic bear by the way. We're not going to go too crazy with this or anything like that. I'm just giving the idea of how we can
actually create it. All right, so now
I'm going to do is I'm just going
to save my work out and I'll see you on the next on everyone. Thanks
a lot. Bye bye.
64. 3D Teddy Shaping: Welcome back everyone
to Blender's boot camp. And this is where
we left it off. All right, so what I'm
going to do is I'm going to press seven
to go over the top. I'm going to just
drag it over here. And then what I'm going to do is now I'm going to press Shift as to World Origin and we're going to mirror
this over the other side. So a breast control, a resell, the transforms, that's
going to do that for me. And then I can come over
and bring in a mirror, put it onto the Y, turn off the X, and there we go. Now let's rotate this
round a little bit. So we're going to have to
rotate it though in edit mode, or it will rotate the
mirror all around. In other words, if I
press R and you can see we rotating
the whole mirror, we don't really want that. What we want to do is go over the top and z and rotate it out. It doesn't matter
about proportion in being on this bit, actually. Now let's just turn
it off 1 second, let's pull it down to the
actual ground plane like so. And now let's actually start
constructing his arms. So we might as well use
what we've already got. So shift D, let's
bring it up like so. And then one' going to do
is I'm going to press R and Y and just point them down
a little bit like so. And then what we're going
to do is I think I'll just rotate them around a
little bit more like, so hold them out a
little bit and then what I'm going to do is I'm just going to make the ends of them. So just the ends with proportional editing on
just a little bit smaller. And you'll notice at the moment it's actually interacting
with the feet. I don't really want
that connected. Only on, there we go, is a distinction now between
his arms and his legs. All right, so now let's come
in with the center part. And what we're going to do is, again, we'll bring in a cube. So shift and basically
all this is about now. He's basically trying to fit the body onto the actual leg. So if I pull this up, I might make some mistakes,
don't worry about it. And then add, modify
subdivision surface, turn it up to two. And then I think I can actually
work with that control. Left click, let's pull it down. And then what we'll do is
we'll pull this bit up. So if I grab this bit, I'm going to pull it up again. We've got portionediting on. I think I'll just turn that off. Just now, I'm thinking, okay, let's bring
another edge loop. Control one in the
middle, pull it down, and then we're going to pull
this back a little bit, just to give them a little
bit of an arching back. And then I'll actually
think about the top of it. I think what I'll do is
I'll press control R again. I'll pull it up to here. And I basically want to
pull out the top bit. So I'm just going to grab
this one and this one and y, let's pull it out
a little bit like so I think actually that's look in for right
click and auto smooth. Not too bad at all. All right, so now let's think about I need to bring
in some shoulders, so probably pull it up
a little bit too high, but I can always come in and
pull it down a little bit. We're going to need to
probably smooth that off. I'm going to press, I
move it off a little bit, pull it up a little
bit, and there you go. That's actually smoothed it off. Then what we need to
do is we need to have a little bit of a neck on here. I'm going to press,
just pull it up. And then what I'm
also going to do is I'm just going
to bring it in now. And y, let's bring
it in a little bit. There we go. Now we've still
got an issue with this, so I'm going to try
and smooth that out. So Alt Shift and click, Let's either pull it
up or pull it down. And if you can't,
just press control B. And we should be able
to move it out that way as well. All right, perfect. Now let's make a
start on the head. The way we'll do
this, we'll bring in another cube, like so. And then I'll bring it up,
I'll put it into place. I'll add it in a
modifier subdivision. Put on two again.
Now let's actually see if we can actually do
this self control left click. Let's pull it down,
something like that. Let's pull out the top of it. S pull out the top. Let's lift it up a bit
because his head is going to look tiny. Let's also make it a little
bit larger, like so. And then I think we've got him around about the
right sort of size. And then what I'm
going to do is I'm going to pull it
down a little bit, getting that kind of bear shape that we're actually
looking for now. Do I need to squish it in
on the X a little bit? So bring it in the tad. So I'm thinking I'll probably
bring in another edge loop. Let's see, bring in one more edge loop then bring
it in a little bit like, so let's right click and shade auto smooth so we can see what we're
actually working with. And now let's actually
bring in the years. Because the years
then will give us a really great idea what the rest of it's
going to look like. If I press shift day, bring in another cube, let's pull it up then. What I want to do now is again bring in a subdivision surface. Then all I'm going to do is
I'm going to now squish it in and X bring it in. And then control left
click, pull it out. So then what we'll do is
we'll keep them rounded. Actually, I'll
bring this in now. So I'm going to press bring it in and then I'm
going to press, bring it in, There is. Ears, they're
looking pretty nice. All right, so let's
actually bring this down and put those into place. I'm just going to put
something maybe like that. I'm going to rotate it around Z. Rotate it around
a little bit. Let's pull it up a little bit. Let's also maybe a edge loop on the inside
of hear control. Can I get on the
inside of there? Let's just turn
this up a minute. I want one edge loop
going around here. Control, Let's drop that in. Let's turn it back on. There we go. That's what I'm looking for. Now if I join this up to the actual arms, so
if I select this, then select the arms,
press control J, then it will put it on the
other side for a easy Pz. All right, so let's
now work our way down to maybe the nose and then we'll actually work more
on the actual face again. Let's press shift date. We'll bring in another cube. We'll add in a subdivision. We'll bring it up, we'll put it on two, we'll bring it out. And then what we'll do
is now we'll press Tab. We'll press control.
Bring in a Yeah. Something. I think that's
already looking pretty good. I'm going to pull this
back a little bit. I'm just wondering
whether we yeah, I think we'll bring it like this and then what
we'll do is we'll press S and Y, push
it in a little bit. So again, we don't want
anything too sophisticated, it's just getting the
hang of doing this. I'll also come in, I
think, and bevel off. I'll try beveling
off this first. I'll press control to there. I think that's
looking quite nice. And then what I'll do is
I'll just drop the front of it down to grab all of this. The front down, I'll pull
the back of this out. If I go in with x ray
and come in control, click all the way
down and then Y and pull it out a little
bit. There we go. I think that looks pretty nice. Now, I think we'll pull the bottom part in
this part in here. And x and y, sorry. Let's pull it in a
little bit, like so. And let's lift it up a little
bit because we're going to want some kind of
mouth in there. All right? So let's see now
if we can make this mouth. So what I'm going to do is I think come in and can
I just press on that? So if I press, there we go. And then let's
press pull it back. And then what we'll do is
we'll bevel round this side. So I'm going to come
in a Shift and click. If that doesn't
work, just shift, select them like press
control B. Let's bring in. And if I can actually get away with that, I don't think I can. And the reason I think is
because I need to pull this out or bring
this in a little bit. So what I'm going to do
is I'm going to make his face a little
bit fast and Y. There you go. You can see
now we've got rid of those. And then what we're
also going to do, because he's looking a
bit weird at the moment, we're going to come in
and grab this Bompart. I'm also thinking, should I, let me just try bringing
in one edge loop in, then let's bring in
another edge loop. Another edge loop like. So then what we'll try is just bring it up if we
can. Make smart. Let's put it onto not
this one on text, right? And just see if I grab those. Pick them up and if I do grab those and pick them
up. Yeah, there we go. He's got a bit of a
smile now. All right. But we have got some
breakage in the actual mesh. And that's because when I
actually brought this up, as you can see, I
brought it all up. And really what I should have
done is just turn this off a minute and I should be
bringing it all of this up. So now you can see when
I bring it up like so it's bringing it actually all up and when I put it back on, you can see that
breaking the mesh isn't so much al right now. Then let's think about the ice. So again, we might
as well use a cube. We'll bring it up,
we'll press this. Is he's looking a
little bit freaky. I think I need to do
some work on the face, but we'll do that in a minute. After doing the actual nose and mouth and
everything like that, let's do the add modifier
subdivision surface. Let's put it on two and
let's squish it together. First of all, and X, let's write click shades, move, they're going
to look okay. Let's actually pull
them to the side. Let's join them to the ears. Control J. Let's actually go in now and push those back
into where they need to go. Now, this bear is looking a little bit creepy
at the moment. I definitely need to do
some work on the face, and I'm happy with that. But you can get
the general idea. I need to pully his
head in and just make it a lot more
like this one. All right everyone. So
I hope you enjoyed that and I'll see in the next
one. Thanks a lot. Bye bye.
65. Teddy Fur Hair Addition: Welcome back everyone to Blenda beginners boot camp. And
this is where we left off. All right, let's fix this head. So let's come in and first
of all bring all of this in. So I'm going to press S like so we can see already it's
starting to look better. And then we'll bring
all of this out. So what I'm going
to do is I'll grab the bottom control plus
all the way up to here. And then I'm hoping
if I turn this off, I'm hoping I can grab it going
all the way around here, like so then grab it
going all the way around. I've pretty much grabbed that. Now I can turn this on, and then what I can do is I can
actually pull this out. So I'm just going
to press S and y. Let's pull it out a little bit, then what we'll do is then
we'll come into the bottom. Now, just this Bob bit, I'm thinking, can
I pull this in? So I'm going to press S and y. And there we go. You can see
it's a lot more rounded. Now what we need to do is
we need to pull this out because it's still looking
a little bit freaky. I'm going to grab
the mouth control. Control control plus,
and now I'm going to do some jaws going to pull that mouth a little
bit out like so. And then I'm going to pull the nose out back to
where it needs to go. And then finally I'm
just going to rotate these eyes around a
little bit and Y, and you can see I've
got the bombs of those. I don't want those, so I'm just going to
grab the eyes and then R and Y rotate
them. Ran a little bit. And what I think the heads
looking a little bit, still a little bit creepy. I think I need to pull out
the lines over here as well. So I'm going to maybe bring
in another edge loop. So let's see if we can
bring in another edge loop. And then what I can do
is I can grab this one. This one. And then let's press and Y, pull them
out a little bit. And now find that we'll
just make the head smaller. So if I grab all of these, then what I can do is
I can grab the eyes, the ears, and the head, And the nose actually
will grab that as well. We should then be able to
make it all a lot smaller. So let's press three. Put
his head back in place. Let's press tab, there we go. It's looking much better
except the shoulders. We'll fix those as well. I think probably let's try and Y and just bring it
in a little bit like Yeah. And I think I think
that's looking. I think that's looking
Okay, actually. All right. We'll go with that. We could have done
better with the bear, but I after doing
the camper van, I think you've got a good idea of how to actually do this. It's basically just pulling them around and making them,
you know, look right. I think before I finish though, I will pull this a bit in, its bugging me a little bit, so and I'll also
pull his bum down, obviously it needs to be sat on the floor and yeah, I
think, there we go. Alright, so now what we need
to do is we need to think about bringing in
our actual hair. But the one thing we want to
do before doing that is we want to come in and we want to just turn this off a minute. And the reason is
because we want to mark some actual seams in here. I don't actually
like how that is. So what I'm going to
do is I'm just gonna grab this middle press control, press Delete and faces. And then what I'm going
to do is I'm going to pull this bit,
that's the bat bit. As you see, what I'm gonna do is I'm gonna
grab all of these. Now, put this on normal. Yeah, it's not going to go on
normal, so let's try local. Let's try pulling that
out a little bit. So let's press fill that in. Now, I'm going to do
with this inside, is going to press controle
and I'm going to mark same. I'm going to turn
this back on just to check it and it seems okay. And then I'm just
going to turn it off. Now I'm thinking of the other
parts that I need to do, which will be the
inside of the mouth. Again, what we'll do is
we'll just turn this off. Olt shifting click, going
around this round markem. Now let's come to the arms.
Same thing with the arms. So Olt shifting click. And again, we do have
an issue with the arms. I'm not sure what's actually
caused this. To be honest. I must have moved
it in a weird way. You can see when I bring that in now it's actually looking
better like that. But then what I'll do is I'll just pull it
up a little bit. Press control Mark, and
then finally to this part. Again, I'm going to go around the outside of here and this basically is to split it off between the various materials. So right click mark seem like. So now if I put
all of these back on head on,
everything's back on. Now all I need to do is just apply all of these subdivisions. So if I grab the whole thing, press D or we can go to object
and just convert to mesh. And now I'm going to do is
just join up control J. Actually, can we join it all up? No, we can't, but let's
keep it separate for now. We might have to actually
split these off because we're working with
the hair particles. What we'll do now is let's bring in our first
hair particle. But what we'll also do before
doing that is look at this. You can see that this one here and these ears
are all the same. Let's come into the arms. And you can see, because
we mark those teams, we're actually going to get some teams already marked for us, which makes it really,
really easy on both sides. Then what we do is we're
going to split them off. Selection. So I've
split those off, and then I'm also going to split the ears off as well,
so I'm going to grab. This here, and this here. That one, the inside of them. I'm going to press
selection like so, and I think, I think
a pot from the mouth. We'll also do the mouth. I'm going to press
L P selection. Now that's all split off. Now what we can do is if we comb to the mouth so the
mouth is all one bit. I didn't realize that,
but it doesn't matter. Let's join. Let's grab both of these and then
we'll grab the head. And we'll do is I'll
press control L, and I'm going to link
materials like so. All right, so now let's come and think about putting
our head particle on. So it's going to
be here particle new, let's put it on here. And we'll end up with
something crazy like this. Now let's come in
and put the number, I think it's on 3,000
on here. Yes it is. So it's on 3,000 You can see hair length is not 0.28
so we can come here and we can put this
on 3,000 and then Nor 0.28 and we can
leave this on five. And one of the last
things I want to do, if I scroll down here, I want to put the
Ameterroot on two. Now let's actually have a look at what we're
looking at here. Not really looking like here. The reason is for that
because we need to put children onto interlopered. Let's double tap
the A. There we go. We're finally starting
to get somewhere. Now think on this
one, I've actually used some clump in
on the actual hair, I think under clump in. These are the numbers
that I've got. 1.22 530. If we go to clump in, we put it on 1.22 0.122
So press the tab, but no, 0.530 And there we go. Now we're actually
starting to get somewhere now. It's
looking better. Still not done though, So
we need to do something else and let's really see how it's actually
going to look. So what I'm going to do is
going to put this on 100. And there we go. Now we've
started to get somewhere. Now let's think
about coming in and actually I'm showing
you the materials now. Let's come here. You can see we've
got material here, so it's going to put
it on this material, which is of course,
this material here. Now, we can go in now
and do the actual mouth. If I come in and add
the mouth to this, so if I grab it as a click, a sign, there's mouth. And we can also do,
let's have a look if the eyes are
the same material, F, let's grab the eyes. And I'm going to split
these off as well, so I'm going to press P
selection. Split those off. And then what I'm going to
do is I'm going to come over and grab the eyes.
Hide the head. Grab the eyes, there we
go. Grab these eyes. Breast control L
and link materials. And then we're gonna grab
his nose. Grab this nose. Brest control L, link materials. If we go back to our
particle system, we might be able to get away with using the same
particle system. So let's actually have a look. So if I press plus and then the down arrow here,
let's have a look. If I can use that one. There we go. That's
what I'm looking for. Now let's do the body
as well, So again, particle system plus, and here I have to pick plus
before you can do anything. And then we'll just
come in and we'll grab the hands and it should be the inside
of the ears maybe. Now, the inside of the ears, are those all the
years actually though. So actually for some reason
I didn't split them up. But anyway, let's come in, pick the plus button, down arrow particle system, and finally let's
come into the years and actually have a look
why those are not split up. All I'm going to do is
I'm going to grab this, I grab this, let's back on up. Actually grab it
for some reason, not let me actually grab it. There we go. It grabs
everything except that. And the reason is, of course, because it's actually
not God modifier on. So let's have a look why I
can't actually grab that. I think actually there's one, maybe one behind it, so I'm just grabbing it there. So it looks as though this doesn't seem to
have a face on it. For some reason, I think. Let's just press Altationse
if we can bring them back. I think actually I deleted them, that's why that is.
Let's go back in. Let's come to edge, select, grab these edges.
Let's press now. We might have got somewhere
I grab this election, Split them off, and there we go. Now they're actually split off, and now it's actually
put the hair on there. Now it looks to me
like this double hair going on there, for some reason, I'm not sure what actually
happened with these is I'm going to actually fix that before we
actually finish. So what I'm going to
do is I'm going to grab both of these ears. I'm want to press selection. Just split them off.
And there we go. Now we should be able to come
in and grab both of these. Let's actually put this
on and there we go. Now it's time to really come together. All
right everyone. So a bit of work there. Hope you enjoyed it, and I'll
see you on the next one. Thanks a lot. Bye bye.
66. Mirror Modeling Techniques: Welcome back everyone to blend the beginner's boot camp, and
this is where we left off. All right, I would
suggest actually going in at the moment going to your particle system
and let's just put this on something like 50 on these, because at the moment
these are a little high, so let's just put it on 50
and we'll do the same thing. And you can see my
computer is really, really slowing down
and this is one of the major problems
with particle systems. You just have to be really
careful at the moment, what we've done is
we've put it on 3,000 on the number and we've also then
put it on interlo, on the children which is
basically near enough, quadrupled the amount
of hairs in there, so you might have an
issue with your computer. You know, really,
really stuttering. I'm actually going
to go to file, I'm going to put you on save, I'm going to come
back to this one. What I'm going to do
instead is I'm going to go down to where my children is. I'm just going to put
it on non like so. And then we going to do is
I'm gonna now come put it onto material and we can see the colors there
it's going to be. And then finally,
once we've done this, we'll actually do
the same thing. You can see, putting it on none really, really makes it easy. You can see this one's on non, but it's not got the right
particle on it as you can. But let's see if this one here is causing me a lot of issues and
I'm not happy with it. So I'm just going
to press Delete. I'm going to go
now to these ears. And then we go in to do
is gonna click plus. Now you can see
there was one behind it and that's what was
causing me some issues. So there we go now, the particle systems done. Now what we need to
do is we need to come and give this
the right material. So if I grab this and
this press control L, and then link materials. And then what I'll do is
I'll grab these ears, this head control
L link materials. And now finally I'll
go to the ears. So these ears
inside, there we go. Grab the inside of these
control L link materials. And now I'm going to do is
I'm going to grab the inside. And then I'm going to grab the inside of these
press control J. And then join everything up now, then let's see if everything's
got particles on. So we can see we've got the
right materials on now. We've got the bear there, we've got all of the
hair there, I think. And now what we're going to
do, the moment of truth, where I can actually
show you something else. So what I'm going to
do is I'm going to go back to my particle system now. And I'm actually going to
put this onto interlopered. So and I'm also going to turn
this up not quite as high. Let's try 500 for now and
see what that looks like. I'm going to put it on 500. I think that's a lot more workable than what
we had it before. Let's come to the face then
and what we'll do is we'll put this also on
particle system like so. And there we go, there's
our actual bear. Now think the first bear actually looks a bit better than this one, but here you go, you get the idea of how to do this with the
particle system now. Now the best thing is about this is once you grab like the head, you can see that the eyes have got a little bit
of hair in there. All we can do then is
come to particle edit. And now we can actually come and you've got a
brush and you can actually brush these
out of the way like so. Now unfortunately
you can't actually do this in real time when
you go back to object. Now you'll see that it's
looking a bit better. We can also come in and let's go to where is it,
particle mode? Let's brush them out the way. So we'd probably
be easier if I had a few more particles to
actually see to work with, that might make it a
little bit easier. I think there we go. We've
still got a bit of a tash, but I think my bears looking
pretty nice. All right. I think you've got
the idea behind that. Anyway, there's a lot to learn actually with particle
system like that, but this is just the
beginning set up for them, so now you should have the hang of actually
how to bring them in. And if you want to actually
go and learn more about it, then I suggest that you would, you dedicate a lot of time to
actually learn about these. All right, so now
we've done that. What I want to do is I
want to bring my cubes. All these cubes. And I want to drop them into my bearing hair. And then blows that up and now we're onto our
actual mirror. And you can see when
we open up the mirror, what we're going to be
working on on this one is these kind of ornate
kind of parts of it. If I put it on object mode, you should be able
to see a lot more. You can just see
how nice these are. Actually, these aren't
actually that hard to do, so I'm going to show
you how to do that. So the first thing
we're going to do is just as we always do, hide everything out the way. Then what I'm going to
do is we're going to grab my mirror and
the first thing we're going to do is make this
kind of oval shape. What I'm going to do is
we're gonna press shift a, bring in a cylinder. I'm going to rotate
my cylinder round. But before I do
that I don't really want it on 50 way way too high. So what I'm going to
do is going to pro on 32 and then I'm going to rotate it so Y 90, I'm
going to squish it in. Then Y, no, because local
global, there we go. And X, let's pull it in. I'm going to then press
three to go in side view. And I want this obviously to be a oval mirror,
something like this. Make it a little bit bigger than and y and just pull
it out a little bit. Yeah, I think I'm happy
with how that looks. Yes, I'm happy with
how that looks. Let's press S and X and
bring it in a little bit. And then what we're
going to do is we'll make the inside of it first. So if I come in, grab
the inside of it, press the bond just
to bring it in. And then what I'll do now, I'm going to pull this
back a little bit. I'm going to press
control in the middle. Left click, right click
control, bring it out. And then what I'm going to
do is I'm going to press to alternates and just bring
that a little bit like so. And then what I'm
going to do is now I'm thinking I'll probably bring
another part out to you. Control R, left click, right click the control B, bring it out a
little bit and then press to pull it out like so. And now finally I'll
grab the sent part. And then what're going to do is I'm going to pull it back. As you can see with this one. Pull it back. There we go. There is the beginning
of our mirror now, I think as we start now, I'll just pull it
up a little bit. Now the thing is with the
mirror we're going to write, click on Auto Smooth. You can see that a lot of the beveling has
gone in onto this. You can see all of this beveling on these and things like that. And on the next lesson I'll be showing you actually how
to bevel all this off. All right, I'm going
to save my work out and I'll see on
the next one everyone. Thanks a lot. Bye bye.
67. Ornament Addition: Welcome back everyone to
Blender's beginners boot camp. And this is where we left off. So the reason why
we made this is to show you that when
we bring this in, it's hard to actually
work with an actual mesh. Now it's much easier
actually to work with curve. So if you're doing
anything on or like this, for instance, you really want to
think about instead of bringing in
this kind of mesh, actually bringing in a curve. And starting there, I am
going to show you though, if you did bring in this mesh, how you can actually
mess around with it. And then after that,
we'll actually bring in an actual curve and show you it's much easier to actually
do it the other way. So what I'm going to
do is I'm going to grab my actual mirror. I'm going to press P, just to, I want to basically
separate these off. So I'm going to press Y on this one and Y on the back of them. I'm going to actually
hide them out the way. So, and then what I want to do is I want to join
these together. So all I'm going to
do is I'm going to come in Alt Shift and click. Going all the way around this
side. Alt Shift and click. Then on the inner and
then right click. And I'm going to be, is it
bevel bridge, bridge edges. So now what that
enables me to do is if I press control
A all transforms. I should now be able to come in and bring in an actual bevel. So you can see now I've
brought in a bevel. Now the thing is with
my bevel at the moment, you can see if I go
down to profile, it's on suplus at the moment. Now if we put this on custom, that then gives us control
if we turn the amount of segments up of how our curve
is actually going to look. And you can see now that we can actually pull it
round and change it into different kind of
bevels and things like that. Now that's one way of doing it. And you can see we've got
quite a nice resort there. What I'm going to
do is I'm going to show you a better way
of actually doing it. So what I'm going to do is I'm going to pull this to the side, I'm going to pull
this one to the side. And then what we're
going to do now is we're going to bring in
an actual curve. So if I bring in a curve, I'm going to go up and
bring in a curve circle. I'm going to press R and
Y on the number pad 90. And then what we're
going to do is make it a little bit bigger and then pull it out
with and like so, so we're going to pull it
up like so Now the other thing I want to show you is when you first bring these curves in, they're not actually going
to look right when we bring in some actual thickness. So if I come over to
my thickness tab, which is the geometry and it's going to be the depth,
let's bring the depth ful. Now when I bring this up, you can see that
we have a problem. We have a thicker
part on the top and bottom and a thinner
part on the side. And this is simply all we
need to do is press control A all transforms and then it's kind of going to even
all that up for us. Other thing with curve is we
have a lot more control over once we've actually placed our mirror in how we
actually move it. We also have controls, if I press a right
click subdivide, we can see now that
we've got like we can control little parts of it and really shape
it really nicely. And the last thing I
want to show you is now we can actually come in and come to our profile and we can actually bevel it
from this part here. So if I scroll down, you can see that
we've got a bevel now and we've also got preset. So if I come down and
put crown molding on, for instance, we can see that we get this result like this. And all of these are over here. Now, the more we turn this up, the more we're actually going to get this shape actually there. Because this is based on how much resolution each
of these parts have. But now if I start pulling
this back like so, now you can see
that I can actually start shaping my mirror much, much nicer as you can see. So I'm just going to mess
around with these a little bit till I get something that
I'm actually happy with, which probably is going to
be something like that. Now what I'm going to do is
I'm actually going to think about creating these parts here. So the way that I'm going to do this is I'm not going to bring in a path
or anything like that. I'm going to show you
another way of doing it. So if I press Tab, I'm going to object mode, I'm going to bring
in an actual cube. So mesh, bring in a cube. And then what I'm going to
do is I'm just going to move this cube
over to this side. Now I'm going to do
is I'm going to press Tab Aid to make sure
I've grabbed everything. I'm going to make sure
I'm on verticlect. And then I'm going
to do is going to write, click Come down, Merge Vertices and
click on Collapse. You can't really
see anything there, but there is something there. Now if I pull this
down and then go in and if I control
and write click, you can actually see that I can actually start
creating mesh. Now what I'm going to
do is I'm just going to move it this way and
I'm going to create my first piece of
mesh that's going to some something like this. So it's like a little curve. Now what I want to do
is actually want to turn this into actual curve. So I'm going to press
Control all transforms, right click, set
origin to geometry. And then let's come in
now to object mode. Let's come down to
where it says convert, and let's change it
into an actual curve. Now the problem we
have with this curve is it's going to
be quite chunky. So in other words,
when I actually start and bring out
the depth on here, you can see that it's
quite chunky already now. So this is the way we
can get away with. If a shade smooth, you'll see exactly
what it means. So where is it? Shade smooth? And then what we can do is we can
come and put in. Are fill caps on the
end of it, like so. Now if I press Tab, I can
actually come to this end, press all tests, and I can
actually shrink that in. Let's also the one problem
we have with this of course, is that even if we bring
up our resolution, it's not really going
to change anything. Because we started off
with our curve like this. The only thing we can
actually do to increase that, it's probably bring
in a subdivision which is then going to make
that roundness for us. So you can see it's quite
easy to get curves like this. So let's say you're doing a horror gate or
something like that. You might want to
curve in it like this. Now, the other way of doing
it, so that's that way. I'm going to put that over
with our other mirror. And then the other way of
doing it is to press three. And then what I'm going
to press is shift A, and we're going to
bring in a curve and we're going to bring
in a path instead. Now I'm going to pull
my path up and at the moment we can't see anything because my path
is the wrong way round. So I'm going to spin
it round so r z 90. I'm going to then press three. The reason why I
want to do it this way is because it's
going to give me a lot more control
now if I press R and X and just
rotate it around. And then what I'm going to do is I'm going to grab this end. I'm going to make sure
I'm in the front view of it and I'm going to
bring in my smooth tool. And then what I'm going to do
is I'm going to press and I should be able to curve like so. As you can see, then what I can do is I can bring
this one up and make a beautiful curve from
this, as you can see. Now the other thing we
can do is we can come to the end of it,
press the button, and I can actually bring
in more of a N shape. You can play around with this. Really get the shape that
you're actually looking for if you need more of a curve, let's say in this part here. So grab both of these. I can write click Subdivide, and then I can mess
around with this one and actually make
more of a curve. So you can see now it's a
lot more nice on the flow. Now the other thing
we can actually do with this is we can actually come over and bring
up our depth. Where's our depth? There's
our depth. Bring that up. And now you can see how actually smooth and nice that
actually that curve is. And you can see it's
a lot more powerful than this one here because
we have a lot more control. The knife, I come in
and grab this end. I'm going to press old test and I'm going to
leave proportion added on because that means it's going to influence
the rest of it. So old tes bring it in and
the more I'll bring it in, you can see the more
it actually shapes it. Now. Then now we've
got the beginnings of our actual curve. Let's actually think about bringing our depth out
maybe a little bit. We're bringing our depth out, Let's come to at
the bottom of it, let's press old tests and
bring it out like so. And now you can see we're
starting to really get there. All right, so the next thing
then we want to do is we actually want to end up with an ornate, kind of look like this. So how do we do that?
Again, I'm going to be in three so I can actually really get a good visual on there. Now, of course, one
other problem we've got is that we don't want the
end looking like this. So what I'm going to do is
I'm going to grab this point, and I'm going to press Alt
S and zero, and Enter. So all Tess zero
and enter like so. And then we're going
to really, really get that nice point that we're
actually looking for. And now finally, to
get this started, what I want to do
is I want to come over and pick profile. And the moment I pick profile
now you can actually see, oh wow, we're actually
getting somewhere. You can see this ornate kind
of look is actually really starting to take place now
as you can see on mine. I've actually done a few of
these and we're going to push this a little bit
further on the next lesson. So don't worry about, you know, how to get all of these in and
things like that. So what we're going
to do is we're just going to leave it
like that for now. And on the next lesson we're
going to mess around with this profile and actually get this into a really
beautiful shape. All right everyone,
So I hope you enjoyed that and I'll
see on the next one. Thanks a lot. Bye bye.
68. Bevel Profiles for Ornaments: I'll come back everyone to blend the beginner's boot camp. And this is where we left off. Now I want to do is we actually
want to shape this curve. What I'm going to do
is I'm going to come over to the right hand side. I'm going to press
Tab. I'm going to come over to this
right hand side. And what I'm going to do
is you'll see one that says Goggle Profile Clipping. The reason we're
going to use this, if I bring in, let's
say one curve. So if I click on this
and then bring this up, you'll see that I won't be
able to see past there. If I come in and
bring another one in and bring this one out, you'll see I won't be able to see anything that side either. So what I want to do
is I want toggle on profile clipping and then I actually want
to zoom out like, so now we can actually
move it a little bit more past those
of parts like. So the other thing is when
you're working with this, I recommend that you put the
resolution up quite high. So I'm going to put mine on 32. And now you can actually see something is actually happening. And the reason that's actually doing that is because now we've got a lot more edges
going down this way, which will mean it's
much, much easier to get a really nice curve that
you're actually looking for. Let's once again, well actually we can keep
it in this view. Now I want to do is just
mess around with this curve. So if I come in and
pull this in like so we can now really start to
pull this out a little bit. So we're really happy with our actual custom ornate curve. I'm going to just pull that one out a little bit
because I was very happy with how that
looks back down. Yeah, and there we
go. Something like that's looking
pretty nice again, once you've done this,
you can also come in, you can put proportional
editing on, You can press old test, and you can still able
to bring them out. So you can able to
bring them out like so. Yeah, that's looking quite nice. All right. So I'm
happy with that. Now what I'm going to do
is I'm going to come in and what I really want to do is I want to put a back on this. I'm quite happy with this shape. What I'm going to do is
I'm going to press deep just to actually
add in my curve. So you notice now there's
no curve on there. And then what I'm going to do is I'm just going to put a back on this and then I can
actually lay this in. So if I come into this edge ulch control and
shift and click, and then what I'm going
to do is I'm just going to press and drop that in. I'm going to press Tab now
and bring in my curve. So I'm just going to press
three on the number pad. Make this curve
much, much smaller. And then bring it in and put
it where I actually want it. So I'm going to put
it roundabout here. And I'm going to start with
this first curve being really small and really kind of in,
you know, this part here. Just pull it back a little
bit if it's stuck out of there some or's gonna
pull it back like so, so it's actually in
the actual mirror. And then what I'm
going to do is I really want to mirror on here. But as you can see, the halfway point nearly nearly touching. So we'll check to see
if it actually touches. What I'm gonna do is control
a reset or transforms. That's gonna put it
right in the middle. Add in a mirror, add modifier. And then what I'm going to
do now is bring in mirror, put it on the Y like so turn
off the X. There we go. Now let's actually
not make a new one. All I'm going to do
is I'm gonna go in, I'm gonna grab all of this one. I'm gonna press Shift D, bring it out like, so take off proportion editing. So bring it out like so. And now let's come in
and start shaping this. To do this, I recommend that you actually split them up so
they're not the same ones, so I'm just going to
press P election like so and then go back into it and now I can actually
grab this curve. So now I'm going to do
portion editing on, and then I'm going
to press G. I'm going to push my curve
right in like so. And now I'm going
to start moving this around as you can see. So let's move it around. And
the good thing about this actually is we can reset
the shape whenever we want, which makes it really easy
to actually work with. You can see this has been
pulled out a little bit. I'm going to put it in
and make it a really, really nice move curve,
something like that. We can also as well
take a part of this. Again, I'm going to press
three on the number pad. I'm going to press shift D. I'm going to
bring it up like so. And then what I'm going
to do now is I'm going to reset the actual transformation. Again, I'm going to actually
control A all transforms. That's then going to put
that part over there. I think what I'm going
to do is I'm just going to put another curve in here and then we'll just have a flow actually
going the other way. What I'm going to do is
I'm going to come in now I'm going to grab
this part here. I'm going to bend it in
place where I want it. Maybe something like that. Yours poking out of here. And I'm going to
grab all of this. So I'm going to grab
this little bit, push it all the way
in, pull it out. And then it nice
and bent like so. Now let's actually have
one going this way. What I'm going to do is I'm
going to press Tab again. I'm going to press Shift
just to duplicate it. And then I'm going
to pull it up. Now I want to put
this one in place, find the other way. What I'm going to do then
is I'm going to press A and I can move it along
now as you can see. And then I'm going to
make this part smaller, Al bring it out. So now let's bend it round with. Now the thing is I'm
in front view there. I don't think so. So what I'm going
to do is I'm just going to press three
on my number pad. And then I'm going to
press, now bring it in, just rotate it out now, line it up to where I
actually want it up. Let's add in maybe
another one as well. So I'm going to
grab both of these. Right click, subdivide. Then what I'm going to
do is pull these two up, pull them up. And then this one,
let's bring it in, send it around there. It's all about now shaping it the way that you
want it, as you can see. So I'm going to pull
this think into here. And you can see that I should always be
in the front view. So if you change your angle, make sure you go back to it. I'm going to press pull it in. And then what I'm
going to do now is I'm going to
work on this bit. So I'm going to bring this bit
down at the moment as well as I've got way too
much mesh around here. So all I'm going
to do is I'm just going to grab all
of these points. I'm actually going to
press Delete and Vertices. And that then is going
to make it much, much easier for me to work with. All right, so what
we also want to do now is probably bring it
this way a little bit, but at the moment as you can see my curve is kind of breaking at the moment it's going in there. Don't
really want that. I'm going to grab both of those. Right click subdivide,
and now I've actually got something to work with that's going to make it a
little bit easier. Follow the curve going around
here so I can bring it in. And then what I'm going
to do is I'm going to press, bring another one out. And then then bring it over
to be touching bit here. So like so and
something like that. And then what I'm going to do is going to make this beer a little bit, fatter alternS. Then I'm going to put an end
to this alto and then so. All right. Yes, I think that
looks really, really nice. Okay. I'm really, really happy with that, and as you can see, we've got a lot of
actual power of creating different leaves
and things like that. All right everyone. So I
hope you enjoyed that, and I'll see on the next
one. Thanks a lot. Bye bye.
69. Mirror Decoration Polishing: Welcome back everyone to blend
the beginner's boot camp, and this is where we left off. All right, so actually the last thing I want to show you on these curves is we can actually do something else with them. If we actually come to this
curve and press the tab, you'll also notice
we've actually got one that says hilt to here. Now I can come to
this end of it, I can click the tilt
bon and what you'll see is it actually
starts to turn it. Now if I come in and
grab a few of these, so let's say we grab
three of these. Come to the tilt, we can
see that we can actually start twisting it round really, really nicely, as you can see. And that's looking really nice, and it gives it a really,
really nice effect. Now, let's not go
overboard with this. What I want to do is I just
want to leave it like that, just to give you an idea, you're actually able to do that. And then the final one
I want to bring in now is a kind of leaf. Okay, so let's now bring in that little leaf that I
want to bring in here. So to do that, what I'm
going to do is again, I'm going to bring in a path. So I'm going to press shift, Let's bring in a path. I'll bring in a path. I'm
going to spin it around. First of all, on the Z, sorry, the x x 90.
Spin it around. It should now be faced up. Let's just pull it out a little bit so we can actually
see something. And no, it's not tilting up, so R Y 90. So let's make it smaller then. What I'm going to do is we're
going to press three again. I'm going to bring
this then into place. I'm going to spin
it round, so R and X make it a little bit smaller. Now let's put it back into the place where I'm going to
actually want it, like so. And then press three. Now let's actually put
it in place first. I'm just going to grab
this top part of it. I'm going to press, I'm going to put it
something like this. This, I want my leaf
coming out of here. All right. Now let's go in and change the actual
depth of this. We'll come in,
pull up the depth. So then what we're
going to do now is going to actually
go to the profile. So click on the profile, make sure your resolutions
are turned up, maybe it needs to be
higher than that. Before doing that though, what I want to do is I
want to bring this out. So I'm going to press Alt
and bring it out like, so. Now what I want to
do is I actually want to bring this in again. But instead of pressing
Alt S and zero, what I can also do with
the actual radiuses, I can come in and also put
this on zero, like so. Now you can see we
can end up with this little kind of shaped leaf. Let's actually pull
this out a little bit. Let's pull this in. So I'm going to
want it into there. Now, before I actually push that back or anything like that, I'm actually going to use my profile now to shape this
in the way that I want it. I'm also as well going to press control Al transforms and then put it over
to the other side. So add modifier and bring in
a mirror on the other side. So like so we go, I think also what
I'll do is I'll come in and grab this part here. I'm going to press alterns. Bring it in a little bit, just so it actually
looks like a leaf. I'm going to grab this
one altern, bring it in. And then grab, maybe
this one alternans. Bring it out to get
that nice look. And then we're
going to just mess around just a little bit more. Get that right in the middle
as you can see there. Now that's looking quite
nice to start with. What we're now going to
do is we're going to come to this actual curve here. And I'm going to
go to the profile. So scroll down, hover over it, and all we need to
do is press control C. And then we can
come to this one, come over to our profile
and press control V. And that then is going to give us that same kind of look. Now, we're not going
to get it exactly the same because we haven't
got as much resolution. So let's put the
resolution on 32. And there you can see that's how we can actually get that. Now the other thing
is with this, we can actually mess
around with it and make it look a little
bit different. We just have to be careful how
we're actually doing that. But before I do that,
I just want to make sure that it's actually
in place So you can say, I'm gonna have to pull
it back a little bit, so I'm just going to pull it back just till it's
more in place. And then what I'm going to do is I'm going to press three. I'm gonna mess around
with this very, very gradually then just to shape it the way
that I want it. So very, very fine tuning now. So I'm going to bring
this down a little bit. Yeah, maybe something like that. And I'm also thinking
I'm going to make the whole thing probably
a little bit smaller. So I'm going to bring
out the whole thing. Right. And, there we go. All right. Now I'm pretty
happy with how that looks. The one thing I'm not
happy with is this. I need to bring this forward. So all I'm going to do is
grab this and I'm going to pull it forward without
proportionality on. So bring it forward where
I actually want it. I'm just looking maybe
something like this. I'm going to press Tab.
Have a look at that. Yeah. And I think
I'm really happy with how that ornate looks. All right, so I think also we just need to put
this middle part in now. And basically this middle part, I've not actually done
anything special in there. All I've done is actually
shape this to how I actually want it to create
the bottom of the curve. Now, don't think
I'm going to bother with this part because I think, you know by now, in fact, we will, we will, we will
actually do it just to make sure this mirror is
actually finished off. All right, so what
I'm going to do is I'm going to press shift eight. I'm going to bring
in an actual cube. So mesh cube. What I'm going to
do is I'm going to bring in a subdivision, so add modifier
subdivision surface. So let's maybe turn it up
one, something like that. And now let's shape it into kind of this shape
that we've got here. So let's press and X, bring it back a little bit,
make it a little bit flatter. Let's press three,
and let's come in, add in a few edge loops. So control lot, left click, right click, and y.
Let's bring it in. Let's bring in another
edge loop now. So control. So let's, let's actually have a look
at the shape that I've got. I've got in a key shapes, I'm going to bring it up a
little bit and then I'm going to think control
another edge loop. Then let's bring
in the bottom now. So control R, pull it down. Then let's bring in another
supporting edge loop on the bottom control. So then let's bring
this part in. To bring this part
in, of course, I'm going to use the
technique similar to what we used on the Campa van. So I'm going to press I, then I'm going to grab this part. Hopefully start
bringing this in, bringing it in, bring
this bit out and Z, lock it to that axis. And Y, there we go. Yes, it's a little bit pig. So let's make it a
little bit smaller. Let's drop it down and see where we're actually
going to put it. Something like this then
and then and X pull it out, I think something like that. You're going to look
absolutely fine. Now let's bring in the spin edge loop control then control. So now let's thinking, let's push it back a little bit. So I'm just going to
turn this off a minute. Ten, this up now, because you can see it's like bent down. We don't really want
that. Grab the top one. Grab the bottom one and X line it up. Pull
it out a little bit. Just making sure that we've
got those edge loops in now. Press control, and we should now be able to pull it
back a little bit. Turn it back on. There we go. We're actually starting
to get somewhere. All right, so now we need some supporting edge loops
going around the side. Control, move it to the side. And then control, let's
move it to this side then. What we're going to do now is I'm going to bring
these parts in. I think I'll bring up
the middle part as well. So control, left
click, right click. Let's now grab this top. Pull it up a little bit. I think we'll bring
in this part here. So maybe this part down here. So I'll do is come in, I'll click all these parts. Press the Eyburn to bring it in. Then I can just drop it back with not too far,
so go past there. And then finally let's bring in some
supporting edge loops. Again, what we could
do is we could level this or we can bring with supporting edge loops in
so I can grab that edge. I'm just going to press
control la think, and just bring it back to there. Bring another one in then. So control, bring it
up to there, a button. Have a quick look at
that. Yeah, there we go. We're starting to
actually get somewhere. Now, these edges around here, I'm thinking, I'm
probably going to want them a little bit
sharper than this. So control then probably, let's think, probably
going around here. Control so, and then control. Now the bottom part
obviously needs doing, I can actually bring in
another edge loop there. There we go. Now
the bottom part, I really want to bring in one
edge loop going down here. Or I can actually use
the Insert button. Grab this bottom part here, Press the Insert it up. Now again, the top with the top. I'm actually going to
turn this off again. We can see we've got a lot of bend here and
things like that. So what I'm going to
do is I think I'll grab all of the top
now to do this. I'll just isolate it out. Just to make it a
little bit easier. I might actually work on this. I could delete it and then
just add in the face. But I think what I'll do
is I'll press Control. Click. And just go
all the way around. So put it back on and then
what I can do is just press, I bring it in just to
get that nice move edge. So All right, so now let's think about if I'm happy with this. So what I'm going to do is I'm just going to bring
all of these, I think up a little
bit, bring them up. But I'm happy with the
actual shape also. Yeah, actually, yeah, I think, I'm actually happy
with that shape. We're going to do is press al tage, bring everything back. I'm going to hide out
all of these parts now. And then I'm going
to do is squish this down a little bit and
then pull it back. If I press, grab it, press and X, push it down, then pull it back like so. And then I think I'm going to
pull it back over to here. And the other thing
is I'm probably a little bit too
far out with this. I'm going to pull them back just so I can actually
get past this point here. And then what I'll
do is I'll pull this part of the mirror, this see where it's
poking through there. Come in, I want
to press control. Plus I think what I'll do is I'll just pull that
forward just a little bit. Maybe pull these back
a little bit more. So at least I think it's
this one here actually that's causing me a little
bit of issue. There it is. Put that on back,
double tap the A, and there we go,
an ornate mirror. All right, so what we'll
do then on the next one is we'll finish this kind of edge going around
here on here. We'll get this top
bit on there and then what we'll do is we'll
actually get the materials in. All right everyone. I
know there's a bit of a long one, but I'm
sure it's worth it. All right. Thanks
a lot. Bye bye.
70. Tree Trunk Modeling: Welcome back everyone to blender beginners boot camp in
this where we left off. Now what I'm going to do is I'm just going to save
out my work light. So now what I'm going to do is I'm going to actually
finish this off. So the first thing I
going to do is make this kind of key pop
out a little bit, so we'll make it pop out here. So to do that what I'm
going to do is I'm just going to grab all of
this edge bone around here. I'm going to press Shift
D and pull it out. And then what I'm going
to do is I'm going to press and X and just extrude it. Selection all transforms, right. Click the origin into geometry, then adding a modifier
and solidify. And then also you can see
we've got a bit of bend there. We talked about that
in another lesson, where if you grab it,
then grab it all. Press shift in it
round, there you go. Now let's pull this
out a little bit more. Going the other way. Let's
bring it in with the offset. Then bring it in, let's pull it back into
the place where it's going to go like that. There we go. Now let's come
in and do this part here. So what I'm going to do
is I think I will grab, I think I'll grab all of
those going around there. I think I'm not too
happy with this. So what I'm going to do
is I'm just going to go turn this off. And you can see why
I'm not happy with it. It just doesn't look
right on there to me. What I'm going to do is
instead of doing that, it's going to come in
old shifting click, right click, mark a Sam, and basically going to delete
this top part other way. So L delete bases. You can see this is what's
causing me the issue not flat. So basically I want to
flatten it out first. So and's let's
flatten it out now. Let's have a look back on now. I should be able to just
put a top on there. I'm hoping though,
I'm just going to press and we can see
also it's because of, you know, these edge loops that we've actually
got in there. And then shift click. Let's remove this edge loop. Dissolve edges. And I'm just looking at
any other edges I've got. I don't think I've got any
apart from this middle one. Delete and dissolve edges. Now we should be able
to make this much, much better once
add in this top. Let's see now if we can add in the top Alt shift click,
going all the way around. Remove these two right click. Actually, yes, there's still that edge loop
in there, as you can see. Yes, there's still one there. Delete edges now, but these. Okay, that's what I wanted
out. Shift and click. Move this one and this one. Right click, and let's say bridge edge loops. There we go. Finally we got there. All right, Now we can actually come in and probably bring this
part up a little bit. So I'm just going to raise
it up just a little bit. So now what we need is
supporting edge loops. So if I press control now you'll see I can actually bring
in supporting edge loops. This side control supporting
edge loops this side. So now you can see that looks thumb better than
the way it looked before. All right, finally now we can actually put this
center part in. If I come into these parts here, I'm going to press the eye
button and bring it in. And then I'm going
to pull it down a little bit and pull it out. Pull it out. So now let's
strengthen the sides again. So control and then control R, and then actually, yeah, I think I'm happy
with how that looks. All right, we've
finally got there, now let's delete
these out the way. So delete both of these. And then what we'll do is
we'll grab all of this. We'll press D just, well you have to
actually click on, we'll make some one's
yellow press D, and then we should be able
to put them all together. Now to your control J,
joining them all up. And then finally we'll
grab our old mirror, press control L. And
we're just going to copy, where is it link materials? There we go. Now let's
put it onto material mode and we can see already
a really nice mirror. I mean, mine went pretty well. Let's see if, yeah, mirror's edge and camp
of our mirror, I think. I'm not sure this has actually gone on
the camp of mirror. Let's have a look.
Come in, grab this. Yeah, there, look, there we go. Now it looks better.
Alright, so now if we're put on EV, there you go. There is your ordinate mirror. Actually, I think it looks better than the
original that I did. Okay, finally done
with that one. All right, let's press Lt.
Bring everything back, and then what we'll
do is we'll drop this mirror into
my mirror like so. Now what I can do is I
can just pull this over. All right, so I can
hide that other way. And now I can bring
in stylized plant. Now we have touched
upon palm trees, so that's one way of doing it. But there is actually a, another way of
actually creating, you know, trees and plants
and things like that, which I'm going to
show you on this one. Because sometimes
you don't want to be going in if it's, you know, a bush or something and putting in all these leaves. You
really don't want to do that. So what I'm going to
do it, I'm just going to move that over to
the left hand side. I'm going to come in, then hide all this out of the way
like we normally do. And then we'll make sure that
our curse is in the center. So cursor to world origin, but we'll start with actually
is I'll press three. I'll bring in a cube, so mesh and cube. I'm going to press
Tab. I'm going to do the same thing we did
with the actual mirror. So I'm going to
right click and come down to where it says
never on right click, come down to where it says merge vertices and we're
going to collapse them in. And then what we're going to do is we're going to
make sure we've grabbed it control
and right click, and then we can start
actually creating our tree. Now the best thing about this is we can actually come back, select one and make
another part of it. And then we can come even to the bottom if we want to two. I'm going to actually
make one more down here. So control, right click, and then grab this one. Now I can make
another part of it, so grab this one like so, and then we'll grab this one. This one basically all I'm
creating here as you can see, just to kind of bush or
something like that. Now what I need to do is I need to move these
out a little bit because we don't want to hold flat on there or
anything like that. So I'm just going to
pull this up like so and then let's
pull them that way, that way and like so, and just make them uneven like, so now what we're going to do is we're going to use the modifier that
we've not used before, which is called
the skin modifier. Before we do it, let's
press control or transform. Right click origin geometry. Let's add in the modifier, and the one we're
looking for is skin. And we can see now that
actually brings out a lot of topology based
on our actual curve. Let's go into y frames. Nava, press all tests on here, You'll see what happens is it
actually pulls it out so it doesn't work the same way that
circles actually do that. Instead I have to do something
a little bit different. So let's put it on object
mode now I've grabbed it. Instead what I'll do is I'll put my x ray on and then I
can see it much bear. And to shrink these in, what
you need to do is control A. And then you can actually
shrink all of these down. As you can see,
what I'm going to do is just grab one
of them at a time, Control A, then I can
shrink them all down. So just be careful
when you're using it. We actually start shrinking
them down properly. The thing is my actual
canva isn't working. So I'll actually
put that back on. There we go. It wasn't working. It was on the bomb
left hand side for some reason. All
right. It's fixed now. Let's now go in and actually fix these ones control and
just bring them in. Just shape this tree into
a way that we want it control a down a
little bit control. The other thing I should
at this stage as well, if I turn this off, bring
in a subdivision modifier. So add in a
subdivision modifier, and now actually that's
going to give me a much better view of what my actual tree is
going to look like. Let's also shade smooth. It's not going to shade smooth. With this on, I thought
it would actually say shade smooth, smooth, shading. Let's see if that
does it. There we go. There we go, we
got it. All right. Let's now come back and put our X ray on and
then we can grab this one alternate control,
Let's bring it up, drink it all the way down the control and then
control out a little bit. I think we're nearly there. So control, last one, control in this one
here, there we go. All right, so you can
see how easy it is to make branches that
parts really easy. Now let's move on to the tops of these branches where we'll
actually create our leaves. We're going to actually, of course, do that
on the next list. And I recommend that we save out our file and I'll
see on the next. And everyone, thanks
a lot. Bye bye.
71. Tree Leaf Addition: Welcome back everyone to blend
the beginner's boot camp. And this is where
we left it off. Okay, so we left it off
where we've actually made the branches and now
what we want to do is actually create
these actual leaves. I think I'm just going to
go in and just fix this one 'cause it's annoying me a little bit because
it's not quite right. And now I'm just
having a quick look round before I
actually carry on. Yeah, and I think I'm
actually happy with that. What I'm going to do to start
with to create the leaves, I'm going to bring in a mesh and I'm going to go to UV
sphere and then go to Do. I'm going to leave it on
32, that will be fine. I'm going to bring it up.
I'm going to turn x ray off. I don't really need that. I'm going to then go into it and what I'm going to do
is I'm just going to randomize these a little bit. So I'm going to come to mesh, I'm going to go to transform, and I'm going to come
down to randomize. And you've got control of it over down the
bottom left hand side. I'm just going to pull
it down a little bit. Then what we're
going to do is we're going to squish it together now. So if I press Tab, let's
press and Ed pull it in. And then all I'm going to
do now is pull out the top, so I'm going to come
in, grab the top of it. And then with smooth
portion editing on, I'm going to press G
and Z, pull it up, then I'm going to
grab the bottom, and then Z, pull
it down like so. Now what we're going
to use this for is basically for actual leaves. If I bring it in a little bit, just to make it a
little bit smaller, I'm going to start placing
this then over my actual tree. Before I actually
do that though, I need a few more edge loops
to actually work with. Because if I shade to smooth, although you're not
going to see this part, this is how the leaves
actually come out of it. So we need to be an
actual nice topology. So what I'm going to do
in steadies, I'm going to press Control all transforms, right clicks at origin geometry. Then I'm going to
do is add modifier. And the one we're
going to bring in, where is it a remesh? We're looking for remesh,
which is one here. I'm going to turn this
down there if slightly, just to get that same shape like now. I think
I'm happy with that. Now what I'm going to do
is I'm going to press now and just move it on to
the parts there I want it. If I press, put it over
here, bring it down. We've also got it in front which is not well, want
I need to turn that. I got it in front. There we go. So then in fact, I'll put this one
to this one here. If I press, I can bring this
one actually, all of it. This is basically where the
leaves are going to be. That's where you're
actually placing R X. Place it, so that
will be a big bush. And then what I'll do
is I'll press shift, I'll bring in a couple
of smaller bus', going to rotate this
one round and X, it doesn't matter if
they're touching either. Don't worry too much about that. I'm going to make this
one a little bit bigger. Then I'm going to do is I'm
going to grab this one sift, let's pull it out a
little bit, and Y, R, and give it a bit
of a nicer shape. And then art and x. Let's rotate it around, let's put it into place
a little bit more. Something like that.
And then finally I probably want a
little smaller one down here, then R X. Then let's just put that one near enough in there
until you've got the idea, because you can
actually play around with these once you've
actually made them, let's now come in and
actually make our leaf. So I'm going to press
shift a, bring in a plane. I'm just going to
make a simple leaf, so I'm just going to
go over the top of it. I'm going to bring in a
couple of edge loops, so three maybe,
something like that. Let's bring it in now. So I'm going to grab the top with proportional editing on, let's make it easy
for ourselves. Let's make a sharp on there, S and X, bring it in. Let's bring this
one in. But bring it can of the other way. Five. Now press this x, you can see, bring it in. And of course it's
up to you how you actually want your
leaves to actually look and x, something like that. All right? Just a simple,
simple leaf like. So let's rotate it round, so -90 so z -90 -90 There we go. Let's now come back to our actual bush, which
is this part here. And what we're going to
do is we're going to click on all of these
and join them all together because we
want the same kind of particle system on the mall. Or emitter you could call it because it's emitting
leaves out of it. Control, Jade, Let's
join them all together. Let's press control. Ole transforms and you can see now they've joined
them altogether like that. Because we actually have them, which is the rem here. And we might as well
actually apply this as well. So control hovering over it. Right click, Shade,
auto, smooth. Just make sure it's a little bit smoother than
why it should be. Now let's come in and add in
a new particle system plus. And what we're going
to do is put on hair, and last of all, we're going to actually
scroll down to change the actual
meter from being this kind of hair
to my actual leaf. I think the best thing we can also do is come in and rename this two leaf so
we know which one it is. Well, that's correct. So leave and then what I'll do is I'll come
back to this part here. I'm going to scroll
down to where there's Viewport display render as we want to render
as this one Here. What we want to do is
change that object and the object is going
to be my actual leaf. So you can grab this
pipette, grab it there. And there we go, we actually have leaves upping out of here. Now we want to hide
this mirror because we don't actually want
to see this though. We can actually
go down Viewport, show Emitter, or hide
it out of the way. Now of course, one problem
we've got is all of these leaves are very uniform and we don't
really want that. So we can actually come in
and rotate them around. So let me go to my particles
actually, which is this one. Yeah, And now what
we're looking for is the one which enables us emission number
of leaves change, which we already spoke about. We can change the
object randomness size. If we change this up, you can see holding the shift
and then bring this up. What will happen
is we can actually distribute these leaves then in a kind of non uniform scale. And then we can bring
this down and you can see some of them bigger, some
of them are smaller. We don't actually
need that much, really for this actually, because leaves, leaves are pretty much all
of the same size. We can also change the
randomness on these as well. If we come up and put advanced, then we'll have one
that says rotation. And now we can actually
randomize the rotation. Once we start turning
up a little bit, double tap the eight to see what we're actually looking at. Also, we can actually still come in and grab each
of the emitters, So I can actually bring
them down if I need to. So you can see here, come in, bring them a little
bit further down. Make them a little bit closer to the actual box if you're
not happy with them. And the other thing is
I recommend that you go actually into here
and then come in, put it onto Smooth. And then what you want to
do is you can actually start bringing these
out a little bit. And when we press Tab,
now you'll see now we can actually start shaping our
leaves a little bit better. So now I can start
bringing these down, covering this actual branch a little bit more
than where it is. I'm actually going to just bring out proportional
editing a little bit. Now you can see
that's looking fair. If you've got gaps
in your leaves and things like that, good idea. You can turn it up so you can
actually have more of them. Now, we have got a lot
of crossover as you see. And that is because we
just need to make them a little bit more non uniform. And the way we're going
to fix that is if we come down we've got
one under velocity. And if we just turn that
up just very slightly, we're going to pop them to make them a little bit non uniform. Now from there, I
recommend that you do mess around with the size. Again, if we go into the size, not so much uniformed, bring this yours, a very
small amount like, so. All right, there we go. And you can see that's
looking really nice. Now let's go in and just
fix these little pots. So I'm just going to come in and just fix the little pots
that I'm not happy with. So just making them a
little bit more random. Again, pulling them out like so. So look at that. Yeah.
And I think I'm really, really happy with how
that's turned out. Which leads me to my next point, which is the leaf. The leaf. If we come in and
we change this, we can actually change all
of the leaves in here. So you're still free
to actually work on this actual bush and
leaves and things like that. And it's nondestructive. In other words, you
can change it and it's not going to really
change anything else. Alright so I'm happy
with how they, we could give this
some thickness. So even if we come
in and we press, we can actually bring
out some thickness like so you can make them
a little bit chunky. We can also as well come in, grab this leaf and just
bring it up a little bit. Just give it a little
bit of a bend like so. Let's put a halfway
point in as well. Control, left
click, right click. And let's just pull it
down very slightly. And now you can see my leaves
are looking even better. And now finally what
we can do is we can come to this leaf
we can look for. I think it'll be under leaves,
so you can see leaves. And the moment I click
that on, there you go. There are your actual leaves. Now for the bark itself, we can see we've got tree bark. So let's come over here, look
for tree bark, tree bark. This one here. And there you go. All we want to do is we just want to actually unwrap this. Now to unwrap this,
obviously we need to apply our skin modifier. So let's just press D,
press the tab button, and U, and then what we can
do is Smart UV project. Click Okay. And now
you can see we've got that actual bark
appearance on there. All right, so now let's press ol tag, bring everything back. And then what we're
going to do now is we're going to actually put the into my actual
stylized plant. And then finally we're
onto the geo nodes, which is something that I'm sure a lot of you're
looking forward to. I'm going to show you how
to create rope and vine. So a little bit different to things that
park there before. We have created rope before, but we haven't actually
done the vine. So I'm going to show you
how to set that up as well. All right everyone,
So I hope you enjoyed that and I'll
see on the next one. Thanks a lot. Bye bye.
72. Rope Creation with Geometry Nodes: Welcome back everyone to blend
the beginner's boot camp. And this is where
we left it off, so we're at our geometry nodes. Now what I want to do
with geometry nodes, the rope and the actual vine, is just move them over
to the left hand side. And since we're actually
just going to be working with geometry nodes
and not actually mesh, we might as well leave
all of this here, except this, I might as well
just leave this part here. I'll just remove that just so we can have a bit of a better view. Now, the geometry
nodes basically is capable of creating
mesh from actual nodes. Which means that you
don't actually have to do any modeling, it's all node based. And then what you can do
is you can then convert that node system
into actual mesh. So really, really great if
you want to create trees, ropes, chains, and you can even push it further with
animations as well. So this is just a
basic introduction. So we'll be creating a rope and then what we'll be doing is we'll be adding onto our
rope to create actual vines, just to give you a feel of
how they actually work. So the first thing I'm going
to do now, you can normally, with nodes, bring in a cube, you could bring in a cylinder. Just depends really what
you're actually doing. Now, if you're doing
something like rope, it's always best off to
probably bring in a curve. And a lot of times actually
a curve makes it very easy because we can actually
put points along the curve. It's the one of the most
simple node systems actually. Normally, when you're
working with a cube, you would actually
bring the cube in within the node system itself rather than bringing in a cube and then adding a
geometry node on top of it. All right, with that said, then let's first of all
bring in our curve. So what we're going
to do is just gonna zoom up a little bit. Bring in a path. So I'm going to bring in a path. I'm just going to
pull it up like so. Alright, then I'm going
to head on over to this little tap here which
is called geometry nodes. Now what we're going
to do is we're going to bring in these nodes. First I'm going to
explain what they do, and then what I'm going to do
is I'm going to go through the nodes and just explain
to you what they are. And then finally
we're going to input all the values and
then join them all up. I think that's going to be the easiest way to actually do this. All right, so the first
node you're going to do, so when you're adding
a new geometry node, you are going to get a group
input and a group output. Now what I'm also
going to show you is how we can actually
have a system where on the right hand side
we will actually have values available to us where
this group input is. So group output, you can see there's nothing
there at the moment. There will be a group input in a minute and it'll
tell you exactly, you know, where
you can change it. So we'll be able to have
a lot of control on the fly of this
geometry node system. The other thing is make sure
that you probably want to save this out in a
separate file as well. So what you want
to do is come up and append this file
to another file. So I recommend keeping all your node systems
in one place. So you go to append and then
what you're going to do is you're going to find the
one that we're working on, for instance, like
this one here. You're going to then go down
to where it says no tree. And you're going to
find you nodes in here. So you can see I've already
got some nodes in here. And then you're going
to double click it. What they'll do is then
it will actually bring that geometry node
into your blend file. And then you're free to
have all of your geometry nodes in one file and
append them at any time. So I hope that made sense. Now what we're first going
to do is just unplug this. So we always need
a group input and a group output from
the group input. This is where we get
all of the controls on the right hand side and
from the group output, this is where basically it finalizes what we're
actually doing. All right, so the first
one we're going to bring in is a resample curve, so I'm going to do
search resample, you've got a resample curve. The second one I'm going to
bring in is a set radius. I'm just going to move my
group output over here. So we're going to press shift
A Search set curve radius. Then what we're going to
do is bring in an index, shift, day index. Then we're going to bring
in a math, node math. As I said, we'll be going
through all of these, we'll be telling you
what we're doing. I'm just going to zoom in. So you can see on here. If we come down to the
one that says divide, then what we're
going to bring in is a couple of curve circles. If I come over here now shift curve and the one we want is curve
circle, this one here. And then one I'm going to
do is I'm just going to press shift D just
to duplicate it. Then what we want is a
transform, shift transform. And then we want
a joint geometry. Join geometry like so. And I think with this I'll
just put it down here. I'll put my joint geometry here. And then we'll go a
little bit further over. I'll pull my group
output over here. Now what we're going to do is
bring in a set curve tilt. Shift, set curve tilt. Then we want another transform. So I might as well copy this one shift deep,
bring it over. Then finally, we want
a curve to mesh. Basically this, well I'll explain actually
once I've finished this curve to mesh
that one there. And then I'll pull this
over a little bit and I'll realize instances shift, realize instances like so. All right, so now we've
got the more lin, let's actually go through
what these actually do. Let's talk about the
curve circle first. In blend of the geometry
nodes curve circle, It's used to create a
circular curve shape within the geometry
nodes editor. And the node generates a circular curve with
customizable perimeters. And it makes it
really easy then to create and manipulate
circular shapes. In three D projects, we have things like on here, you can see we've got a radius,
which is the perimeter. Allows to set the size of
the circle by adjusting the distance from the center
of the edge of the circle. And it means basically,
a larger radius will create a bigger circle, while a smaller one
is a smaller one. Of course, the resolution, this setting
controls a number of points that make
up the cir circle. A higher resolution
will create a smoother, more random circle, like you've seen
when we brought in our actual cylinders
aligned axis. And this option lets you
choose the orientation of the circle in relation to
the axis of x, y, and z. By default, the circle
is aligned to xy plane, but you can change this
to suit your needs. In other words, it can be
moved around basically based on which axis or axis
you actually pick. All right, moving on
then to the next one, which will be the
resample curve. So this one here and this geometry node
basically is used to alter the number of points along a curve while
maintaining its shape. When we first bring it in, we might want more
points along there. Let's say we've got a stem and we want some
leaves coming off it. We might want to increase the
number of actual counts and we're basically using
this with our rope to actually twist it
at certain points. It can also be used
for optimizing refining like the
geometry of a curve. And it makes it much
easier to work with by reducing the computation
load on your computer. The count is
basically the number of points along
your actual curve. And then you've got something,
if you actually click on here, it's called length. And this mode resamples
the curve based on a specific segment length
of your actual curve. Next we've got the curve
radius, which is quite simple. Once we've actually
turned it to, you know, a three D object, we can then have control over how big the actual radius is. Now the index, the index
in general refers to a numerical value
or position that helps identify or locate
an element within a list, an array, or other
data structures. For example, consider an array, a sequential collection of elements containing the
indexes starting from zero. So could be 04172 to two. For instance, we use the index combined with the actual divide. So what the divide actually
will do in this case, it will take the first
input and divide it by the actual second import and then give you
an output result. That's basically what
it's going to do. So set the set curve tilt will enable us to create that rope where it's
actually curving round. Now, transform, you've probably aware of transform basically. We can change sizes, we
can change locations, rotations, and these are handy, you know, if you want to know pull your rope out or
anything like that. Now, in general, I'm
not going to mess around too much
with the transform. It's basically there just in case we want to actually use it. Now, join geometries, we can actually join nodes together. And you can use these in
conjunction with each other. For instance, we could join these two to another transform, join those together, and
then join them to another, you know, transform with
a joint geometry as well. All right, curve to
mesh based on what that does is it basically takes
it from a two D object, turns it into a three D object, and finally realize instances, this is a node that
you will need. Don't forget to
put this in any of your geometry nodes
if you intend on converting it from
a geometry node to actual mesh that you
can actually work with. If you haven't got
this in there, you won't be able to do that. All right, so that's the
explanation about those nodes. Now what we're going
to do is we're actually going to
save out our work. And then what we'll
do is we'll actually carry on with this
in the next lesson. All right everyone. So I
hope you enjoyed everything. Sorry if it's a bit technical, but some people might
appreciate that. And I'll see on the next
one. Thanks a lot. Bye bye.
73. Vine Modeling Techniques: Welcome back everyone to blend
the beginners boot camp. And this is where we left off. Now let's turn over to
the re sample curve. And what we're going to
do is we're going to turn this to the curve length. So I want points along
the curve length. So the longer basically
we make our curve, the more points they are
actually going to be included. So what we're going
to do is change it from count to length. So count base would just be a standard number
based on the length. Now it causes problems if you're doing
anything like rope, what it means is it'll
actually stretch out that rope and it'll
look really weird. So that's why I want it to
actually be based on length. Now I'm going to change
my actual length, 2.1 All right, so now let's come over to set the radius curve being as
this one's next to it. And basically what we're going to do is I'm
going to set this to naught 0.2 like so. Now let's head over to our
first of our curved circles. And based on what we're
going to do with this one, we're going to make
sure, first of all, that both of these
are on radius, both of them are on 32, and both of them are on 1 meter. So they should all
stay the same. Now over to, where is
it? Our transform? Our transform? All
we want to do in our transform is just change the x on this top one to one.
This is the translation. Just just change the x to one. Now the other thing is we
need to cam two or divide. And what we're going to do
there is we're going to change the top value. Well, it can stay at 0.5
The bottom value, sorry, is going to change
to 2.2 All right, so the final one, the tilt can stay
at actual zero. And then what we want to
do is we want to come over to this final transform. And what we want to do is
we want to set the x value two minus n 0.5 like so. Okay, so that's
basically everything. Now it's all a case of just
plugging everything in. And then you'll see all of these outputs appear over here. Ones who've actually
come in and name them. So let's come in and
plug the first one in. The first one that I'm
going to plug in is going to be this one, and that's going to
be the curve radius. Now you'll notice
that when I plug in, so let's say I pull
this up here and I plug the next one in to radius. It's actually going to
come up as radius on here. And then you've got
a radius over here. Now we want to change the name of this because we want it a little bit more identifiable
than just radius. So if I come in and I
double tap this and I go to the start of it and
put in rote radius, press center, you'll see. Then it changes on
our group output and it changes
over here as well, letting you know that hey, this is the rope radius. And it's then really
easy just to, you know, go in and see how you
want to actually change your rope whereas omer up's disappeared because
I've got a jump, you know, without
anything finished on it. All right, so the next one we're going to put in is a twist. So I'm going to grab this
and I'm going to drop it into the bottom
value of my divide. I'm going to just move
this up a little bit. And then what I'm going to
do is put my index up there. And plug my index in to my
value of not 0.5 Now again, I want to go in and change
this from value to twist. So all right, so we've got
two more left, basically. One is the second rope radius. So we've got rope radius, but we also have a
second rope radius that we can change to make
it look a little bit. Some rope, even across the same, some rope, some rope isn't. So that then gives you a choice if you actually
want to change it. So what I'm going to do
is I'm going to come down and my rope radius, so this one here into my
radius of my curved circle. And then I'm going to call
this second rope rope radius like so now we need to
plug in the bottom one. The bottom one, I'm
going to plug into my resolution and then
I'm also going to plug it into the resolution
down here as well like so. And it's already
called resolution and it can actually
stay as that. All right, so now let's try and get all of these joined up. So the first one I'm
going to join is the curve to the actual curve, so we've re sampled it, then we're going to
set the curve radius on each of those points. And then what we're
going to do is we're going to
come to our curve, sorry, our set curve tilt. And then what we're
going to do is plug in the curve to the curve again. Now let's plug in our
math node to our tilt. So remember we're dividing
it up based on that index. And then finally we're
going to come down, I'm going to plug in my
transform to the top here. Generally, you'll know if they can't plug into each other, they've generally
got the same color. You can see here, if I just pull this out of left click and try and
put it in there, you can see it's not
actually going to work. So generally, you know
green goes with green, pink with pink,
white with white. Quite easy to actually follow. All right, now the
join geometry. So I'm going to join both
the curves together. So we have two basically ropes. So we're going to join
them both together. One of them is a
little bit offset, so we're offsetting it
from the other curve. And then what we're going to do now is we're going to go in. And join those to
the other transform. So basically what we've done is we've got two curves here, we've moved one over, and then we've brought it
back a little bit, is what we've actually
done with that. All right, so now let's come in and we've got our
set curve tilt. Let's plug this one
in to the curve, on our curve to mesh. Let's plug then the
transform in over here to which was it profile
curve, this one here. And then finally what we'll
do is we'll come to our mesh realize instances
and join this up. Now you should see what happens. Now we've got actual rope and the best thing
is about this rope. So let's go back to
our modeling now. We've got that, and what
we're going to do is we're going to put this on object mode so we can see what we do. We can actually then
come over to our spanner and what I can do
is I can change the rope radius if I wanted to, so I can make it much chunkier. What I can then do is bring
this twist up or down, depending on how
thick my rope radius. So this could be
something that's holding ships and
things like that. Then what I can do is I can also change the value
of the small rope. And finally, I can
make it really, really, you know, blocky. Or I can make it a
higher resolution, meaning it will look
a lot more realistic. So everything is set up
on there for you now. Now to realize this, because we do have a realized instances, all I need to do is press D, and that basically will
realize the instance. If D doesn't work because
you missed, you know, the other lesson, then all you need to do is convert to mesh. And the reason that works now
is basically because we u, we put in that node which
has realized instances. And now you can see
we've got mesh. Now if I went back for instance and just
before I did that, turn down this resolution
something like ten. And then actually press D, you will see now
that we've got way, way less geometry on there. All right, so that's
actually how we do the rope. Now what we'll do is
we'll actually move on and actually
look at the vines. It's only a quick difference
between them both. Now what I want to do is I
want to bring in one curve. So I'm just going to
bring in a curve half. I'm going to move that over, then I'm going to pick it up just so we can see
what we're doing. And then what I'm going to do is I'm going to duplicate it. So I'm going to duplicate that. Now with this one,
what I want to do is I want to come to
my geometry node. You always have to click
New for some reason. When I click the down
arrow and click in this, it's basically because we
need to add in a modifier, which should be.
Let's have a look. Oh, we have got geometry nodes. There we go, Geometry nodes. Let's see if we can
actually bring it in. Yeah, we will be able to do now. We've got one that's called,
I think it was this one. Yeah, that's it.
So this one here. Let's rename it as well, so we'll call it rope like so. And then what I'm
going to do now is I'm basically
going to copy this. So I'm going to copy this
onto a new geometry node, control C. Go back to my
geometry node, let's click New. Let's delete that other way. And then let's press control V. And just drop them all in there. Now let's go and rename it. So what we'll call
this is vines. So now let's just add, in fact, we'll do this on
the next lesson, because actually it'll give us a fresh start just to
actually start our vines. It's not that complicated. And then by that lesson, we should have in the materials and everything
like that as well. All right everyone.
So I hope you enjoyed that and I'll
see on the next one. Thanks a lot. Bye bye.
74. Vines & Ropes Finishing Touches: Welcome back everyone to
Blender Beginner's boot camp, and this is where
we left off now. Then one thing is when
you bring them all in, your outputs won't
actually get joined up. So you will actually have
to go in and join those up. Now, first of all, for this one, let's bring in
another curve circle. And the reason, obviously I want to do that is
because I'm going to have three actual pieces
of rope on this one. So I'm going to do
is I'm just going to press Shift D and
drop that down. Now the rope is actually
going to be the same on the resolution
because there's no point in having one high
resolution and one low. So we're going to
keep those the same. Next thing I'm
going to do is I'm going to bring in a transform. So search, bring in
a transform like so. And then what we're going
to do then is come and change the x value to one. Let's change that
to one. Let me save about my work just
so I don't lose it. And then what we'll do is we'll actually bring in
another transform. So I'm going to press Shift, bring in another transform, so I'm going to drop
that down there. And then what we're going to
do is I'm going to now come in to the transform. So the x value, I'm going to change to -1.73 And I know these values because I've actually been
testing this of course, making sure everything works. Next of all, I'm
going to come in and change the
rotation on the vine, because I want it kind of
longer, is why I'm doing this. I want the third vine
to be really long, just so it looks like a jungle vine or something like that. So I want it to rotate
slightly differently, you know, as it's pulled out. And that's why I'm putting
one at -1.73 and one at 3,080.1 Now all we need
now is just another geometry. As I told you, we can now join. You use two joins. So what I'm going to do
is just drop that there. And then I'm going to
press Shift A Search, and then join Geometry. I'm going to drop that in there. And then what I'm going
to do is I'm going to plug in now my transform. So I'm going to plug my
transform into there like so. And then what I'm going
to do is I'm gonna plug this transform then
into this one. And now let's actually plug in, let's plug in this curve first before we plug
in everything else. So if I just plug this then
into the geometry like so. Alright, so now you can see something a bit
weird has happened. You can see though that we've actually got three
vines on there. It's just that we don't
have any outputs and nothing's actually
plugged in at the moment. So let's then put
our radius back in, our radius again like so. And then what we do, yeah,
we've also got another one. What I'll do is I'll
set this now in fact, I'll call it vine radius. Actually, we'll do
what we did before, radius because this is
the overall radius. Then what we'll do is
we'll plug the next one in which let's overlook. This is going to be plugged
into the value here. This, of course the twist. If I come down
here in the twist, all right, so now we want
to plug in the radius. The radius is going to be
the same on both of these. So let's just pull that up there just so we can see it
a little bit more. So the radius is going to be
plugged into the resolution? No, the actual radius, we're plugging into the radius first. So it's going to be the
radius on the second one, because we're going
to keep the first one always the same there, so we can only change
the second and third one, the radius there. And then what I'm going
to do now is I'm going to come in and we'll
do the resolution. So the resolution, we
need to plug that into number one and we need to
plug it into number two. So now if I change
the vine radius, so we can change
the rhyme radius, we can change the actual
twist to pull it out. And then what we can do
is we can have the radius of this change in and making
it bigger and smaller. And you can also, of course, control the actual
resolution on the last one. I think I just forgot
to plug that in. Let's plug that in and
now if I bring them down. Yep, that's all working
out correctly now. And now you can see the difference between
this one and this one. We've actually got vines now, obviously we could take
this a lot further. We could, for instance, have it, um, twisting a lot
different on here. We could actually set that up. We could set up a fourth one on here, maybe for something. I don't know what
you'd use that for, but it could be used for a string or something
like that, I'm not sure. But you could make this vastly, vastly more complicated than this set up that we've got here. Just remember, this is for beginners, beginners,
introduction. And it just gives you an idea of what it's
actually capable of. One of the, you know,
as you actually learn more and more
about geometry nodes, you can actually build
procedurally generated cities, entire cities going
back a little bit. You could create
things like walls. You can create things
like roof tiles, which you've
actually had to play with really, really powerful. Once you've actually
set them up, it's a big time investment
setting them up, but once it's set up,
they are amazing. Okay, so now let's
go back to modeling. And then what I'll do
now is I'll just put my material on my material view. And then what I'm going to
do is I'm just going to now convert this from my
actual curve to mesh. So I'm just going to press D and then one'm going to do is I'm going to join this
one and this one. So if I grab this
one and this one, press control L, and let's
link materials like so. And then grab this one and this one and link
materials like so. And again, if you
want to go in and see what the
materials look like, they're just basically
two as you can see. I've got a different material
on here. Let's have a Ok. So I'm going to
go in Do my mine. Let's go to Materials. And what I'm going
to do is you should be able to grab this one here, for instance, click a sign
and then grab another one. So let's say let's
grab this one, and then let's go to the
three and click a sign. And there you go, Really, really easy to do that
now with the rope. I just kept it the
same color I think. I think with a rope. Yeah, I just kept it as a rope color, so you should end
up with something like this at the
end of this one. All right. So I hope you
actually enjoy that. I hope you learned a lot from
the actual vines and rope. I'm just going to pull them over there And let's actually, now first of all, let's put them in where
they need to go, like so. And then what we'll do
is we'll close that up, we'll open the next one. And here we are. So the last actual
demonstration, everyone. We'll press all Tate as well, which is a sci fi barrel. Basically what we're going to be doing with this one is we're going to be learning
all about Booleans, how to use them,
what's the easiest way to use them, and
things like that. You can have some
problems with Booleans. A lot of people, once they
actually start, you know, messing around with Booleans and realize the power of them, then they'll go away
and they'll get, you know, some paid
blender add ons. But we're actually
going to bring in an add on that's
actually built in with blender that does make Boolean operations
really, really easy. At the moment, we have to
actually use a modifier. So you come over
to the modifier, you'll see we've got one that's
called the boolean here, but actually we are
going to be using that, but not in the way where
we're just going to be adding it through
the modifiers tab. So what I'm gonna
do is I'm going to actually hide my floor. So I'm gonna hide my floor.
Hide this bar again. Hide my son. And then
I'm just going to grab my barrel, move it over. And then finally I'm going
to save out my work. All right everyone,
So I hope you enjoyed that and I'll
see you on the next one. Thanks a lot. Bye bye.
75. 3D Modeling Lantern: Welcome back everyone to blend
the beginners boot camp. And this where left
off the final one. Then let's start
with an actual cube. What we'll do is
we'll press shift A. We'll bring in, not a plane, we'll bring in a
cube, mesh and cube. Well then what we'll
do is we'll go to Edit Preferences and
we'll go to Add ons. And the one we're looking
for is object ball tool. Just make sure that is ticked on and then you can
just close it down. Now for now let's put
it onto object mode. And let's press S and's ed
and just pull it up so it's a nice size as a, I don't know what you call
this, I don't know if you call it a health
pack or a barrel, or a med, something like that. Anyway, all right, let's now
reset the transformation. Reset all transforms, right? Click, set origin to geometry. Now what I'm going to do
is I'm actually going to come in, select everything, so make sure everything is
selected with L. I'm going to press shift D. And then
what I'm going to do is, in fact I'm not
going to do that. I'm going to move
this to the side with that proportion editing on, and then I'm going
to delete that. And instead what I'm going
to do is I'm just going to select all of the sides, actually around the outside. And then if I press three,
I'm going to press shift D. So duplicate and then essence
Ed and bring it down. That is what I want.
Something like that. It's basically a duplication
of this because we're going to use this part to actually
do the first bullion. What I'm going to
do is I'm going to split this away
from the rest, so pat selection and
then let's regrab it. If you can't regrab it, just hide the other one. I'm
going to press control. Lal transforms right click, set origin geometry, all teach
to bring everything back. And then I'm just going
to hide my floor. I'm going to grab
this center part now. And what I'm going
to do now is come in and add in a solidify. I'm going to pull my
solidify just out. I'm going to bring
it out. And then what I'm going to do now is I'm going to actually
bring it in. So if I bring it in, that means it's going to make a cut in. They're
going to make this. Now what I want to do is
I want to come in and I want to press
control left click, right click, control
left click, right click. And we're just going
around each side now. Left click, right click, control left click, right click. Now I want to do is
I just want to put my x ray on just so
I can see these. And then what I'm
going to do is I'm just going to click all of these edges and then I'm
going to press control and B. And just pull them out like so. Now I'm going to do is
I'm going to press S and Z and pull them up so we
end up with a really nice, you know, kind of look
that's going to be indented into the actual cubes. So let's see how this turns out. So what I'm going to do now is I'm going to
actually come in, turn this off the X ray. And then what I'm going to do is just make sure this is on even thickness so it's even
going all the way around. And now I'm going to actually
apply this, solidify. So let's press tab, press
control over there. Now what you want to do is
you want to grab your cube. Grab this other part here. Press control plus
on the number pad. And what they'll do is it'll
actually bring in a bullion. And then you can just
click Intersect. Let me just see if I've
done that correct. Let's press control minus. No, it's not control minus. I think I've got it
the wrong way round. Control. No, look, no, I've got it the right way round. So it was this one
then this one. Control plus, let's
put the Intersect. Is it the Intersect
union difference? I think I've gone
the wrong way round. Let's just go back a minute. Let's grab this one
for some reason now, going to go all the way back. So let's grab this one and
this one control intersect. That's not the way
that I wanted. I want to grab this one
and this one control. And then I think
I've got it here. There we go. It's
on differences, because I'm clicking on
Intersect Differences. All right, there we go. So
that's the way I did it. So just grab this one,
then the other one, and then control plus, and then you will get the
difference in between them. Now the best thing about doing
it this way is that we can actually see our cube,
the actual bolling. Which means actually we can move this up and down to
our heart's content. Make it bigger, smaller,
and things like that. So you can see already,
it's pretty powerful. Now you can also, you can also press
control minus, and then you can actually
pull it the other way, this part going out. So we can cut away a part
of this inner one here. Instead of that, you can see already that we can do a
lot of things with this. We can let our imagination run wild as you can see. Now,
I have messed that up. What I'm going to do is
I'm going to actually go back now and show you the other thing that
you can also do. So we're going to go all the way back before we actually added in our solidify up to here. All right, let's put
on even thickness. Now all do is we'll press tab. We'll then apply the
actual solidify control A. And then what we're going to
do is going to grab this, grab the actual cube and you're going to press control minus. You can press control
minus or control plus. And that will take it
basically the other way. If you click on then difference. Now you'll see that
we've actually got something happening here. Now if we press Tab, you can see that if we come to our cube, our cube is still
actually available. If I come to my cube
now and press Tab, you can see it's actually
still available. Which means that
now I can actually come in, grab these edges. Press control B,
pulled them out, press Tab, and now you can see that it's actually
cut into that as well. Let's go a bit further
though than that. Let's press control head again. Control B. Let's go back. There we go. Controls Ad. Before we just made
the bevel control B, let's pull it in. Press the tab button
and there we go. Really, really nice technique
of actually doing it. All right, so now let's actually carry this on
a little bit further. It's probably going to turn out a little bit different
from the one I had here. Although I am making these
a little bit bigger. As you can see,
they're a little bit on the small side
on this other one. Now let's bring in a cylinder. So I'm going to
bring in a cylinder, I'm going to put it
onto something like 20, and then I'm going to pull it up a little bit, shrink it in, press S and Z, pull
it in like so. Then what I'm going to
do is I'm going to grab now my actual cube, although it's not
a cube anymore. And press control minus. And we'll end up with
something like this. We can see now we've got
actually two of them on, and now we can actually
come in and work on this once we've
actually applied those. Or we can actually move this up and down however we see fit. So you can see now
not the actual cube, this cylinder can
move it up or down, or left or right, wherever
you want to put it. Now, I don't think I want
to difference on here. What I want on with this one is let's have a look at
union or intersect. I think I want it on union because what I want to do
is I want to bring this up. So I think I'm going to
actually have it like that. Next of all what I'm going
to do is I'm going to press D and actually
apply both of those. Now I can come in and actually delete those
out of the way, and you'll see now that
this is one object. If I try and grab this
now press control. Plus, you'll see
that it actually pulls away with the actual mesh, which is really great for making things like this bit here. So now I'm going to do this,
I'm gonna shrink it in. I'm going to press
and pull it out. And just kind of try and
make this actual part here. So I'm going to put it
something like that. And then you can get carried
away with using booleans, so it's important to only use them when you
really need to. What I'm gonna do is
then going to grab this press control and
just pull it out like so. And now I just want a loop
in here as you can see. So if I press control, left click, right
click, control again. And then I'm going
to do no fret. Enter Olt and, and then
I'm going to pull it in, right click and
shade, auto, smooth. And there you go, really, really quick and easy to actually do. Now we might as well do the same thing for the top so we could
make a hole in the top. I'm thinking I'll probably pull this out a
little bit first. So I'm going to come
grab my face with three. And then I'm going
to do is I'm just going to pull it
up a little bit. And then I'm going
to press and then, and like I said, we could
use another Boolean in here, but I don't actually
want to do that. I'm going to then press I, and then I'm going
to pull it in. Stop. All right, so that's
looking pretty nice. Now, we will use a Boolean
for this bit here. I'm just making sure
I'm happy with it. So for this bit on here, let's actually first of all
be level these edges off. So we'll do the edges on this top bit before we actually come to
these parts here. So what I'm going to
do is I'm going to come in, I'm going to grab it, going all the way around here, grab it going all
the way around here. And you'll see as well. That's something I
should actually say, sometimes booleans
in particular. It does cause a lot of
issues with the mesh. And you can see here
that a lot of the times it's because it's not actually joining the mesh
together properly. So you will actually probably
have to go in if you want to actually export this out
for a game or something. You will have to go
in and make sure that it's all kind
of cleaned up. So if it comes to face
select to clean it up. We're going to come down triangulate faces and
then right click. And where is it? Tries to quad. Now, I recommend not
doing anything like this until you've actually
finished actually creating it. Then what we'll do is we'll
fix all of these edges up because there are other ways of fixing up measures
you can come to the, you can make plan of
faces for instance, and make sure that
there's no manifold faces and things like that in there. Which is basically
a face that it hasn't got enough
geometry on it and it's bending in a particular way that wouldn't be realistic without
geometry being there. That's basically what
it is. All right, so what we'll do on the next lesson is we'll get
these two sides leveled off. I'm just going to
go back and not actually fix that yet because
I don't want it fixed yet. I want to actually
carry on. And then on the next lesson, as I said, we'll actually start creating the bottoms and these
inserts in here. Alright everyone. So I
hope you enjoyed that. And I'll see on the next one. Thanks a lot. Bye bye.
76. Adding Detail to 3D Lantern: Welcome back everyone to blend
and beginner's boot camp. And this is where
we left it off. All right, so now let's come
in and actually bevel off. We'll bevel off the top first. I'm going to grab it going
all the way around there. I'm going to press control
B and bevel it off. Probably something like that. And then I'll come and
do the bottom bit again. We'll select it all going up, but we can easily fix that. We can actually come in and
just grab this bottom face, press control B and we should
get the same actual effect. Okay, So I'm happy with that. Now what I want to do
is I want to come in and I want to insert and
pull these out a bit. So I'm just going to come
in and grab them all. And then what I'm going to
do is I'm going to press Enter and then alternate,
see if I can bring them in. I can bring them in like so. But that's not
exactly what I want. So what I'm going to do
is instead of pressing, so I've just pressed
controls head to go back, I'm going to press and insert them first,
holding the shift born. Now you can see this is what the issues are that was
talking about that we do have issues on the mesh where
it's actually overlapping. We can see we've got
issues down here. We can see we've got issues here and we really don't
actually want that. So what I'm going
to do is I'm going to fix that by going in, grabbing this one and this one. So this one first then this one. Now I'm thinking that
if I right click and merge vertices at last
because it was the last one, that, that then
should make it nice. If a double tap the A nice and straight going
down there for us, which it does now luckily for us we don't actually
have to do that. As long as we grab the first
one and the second one, we can just press
shift. Should work. Does it work shift? Nope, it's not actually working. Let's try that
again. Right click and merge vertices at last. Okay, I'm hoping that I don't have to do
that in everyone. Let's grab this one and this one shift off and for some
reason might oh it does. There we are. It's
actually we just took a bit of time
to think about it. I don't know why shift
off and then just keep going around and just merge all these because you want
to clean up this mesh. Anyway, the thing is you'll
have to do one at a time. You can't unfortunately do
a load because it will try and join it at the last Rt is
that you actually selected. So it doesn't take
long though to fix it. And as I said when, you know, this type of non, it's called non destructive because you're not
actually changing anything on the mesh when you're actually working on it
using the Booleans. But then when you
come to actually apply those billions,
it's quite destructive. So let's now come in
though and grab these. So now we should have a nice
clean mesh first to grab. And then what I'm going to
do is I'm going to press Enter alternates and
pull those out like so. All right, that's
looking pretty nice. Now let's think about
this part here. So what I'm going
to do is I'm going, it's all about basically
pre planning again. So what I'm going to do is
I'm going to grab this part. I'm going to press shift D, and then what I want to do
is just pull it out like, so I'm going to shrink that
down then so and's zed. And then what I'm
going to do now, I want to kind of
make this shape. So I'm going to pull
it out a little bit. So and X, let's
pull it out like, so let's press control and bring herself a couple of
edge loops in like so. And then what we'll do is
we'll grab this edge and this edge I'll press three
or one maybe. Control one. Yeah, control one on the number pad and's Ed
and just pull them up. Now what I want to
do is I want to make it a lied, a bit
smaller than this. So I'm going to press
L, squish it down then. And then I'm just going to grab these sens Ed and pull them out. Now what I'm going to do is I'm actually going to duplicate this and use this as a Boolean. So the first thing
I'm going to do is I'm going to press L. And then what I'm going to do
is, let's think about this. So what I'm going to
do is I'm going to press and extrude it out. And then what we're
going to do is I'm going to split this
off away from it, so L P selection and then
I'm going to grab it. Control all transforms and then right click set
origin to geometry. In fact, we'll leave the
actual transform there. And there's a reason
I want to do that, and I'll show you
that in a minute. So what I'm going to do now,
I'm going to press Tab. I'm going to press A
to grab everything, Shift D, and I'm
going to move it out. And what that's going
to do is it's going to actually keep my
transformation there. Then I'm going to it,
because I've done this in edit mode,
not object mode. I'm going to press P selection, and then I'm going to come
back to this one LP selection. Now why I've done all that, that seems a bit crazy. I'm going to grab both of these. First control a reset
all the transforms. I've done that to actually
use one of them as a bullion. And the second one is the kind of outer part along
here as you can see. So that's exactly why I've
done the way I've done it. Okay, so let's
grab this one now. And what I'm going to do
is I'm going to press L in edit mode and pull
it back into here. I want some actual
depth to this part. I don't just want it sat
on the front of here. That's why I've
actually done it. So I've got my part here, and what I'm going to do
is I'm going to grab this, I'm going to grab
this part here. And then what I'm
going to do is I'm basically going to
press Control plus, and I'm going to click on Where Is It Difference
difference. There we go. And now we can see we've got that nice kind of
insert into there. Now what I'm going to do
is I'm going to grab this, I'm going to press
Shift D, Enter R 90. And I'm hoping that
once I've done that shift Z 90 shift R zed 90, I'm hoping now I can grab all of these and just link the actual, In fact, yes, I'm going to
have to do it a different way. I'm going to have to
actually join these all up. So what I'll do is I'll
grab all three of these. Join them up to this one last. So control J, and there we go. Now we actually have
all of our inserts. Now we can come in
and actually put this on the outside of this. And the way I'm
going to do it is I'm going to shrink
this a little bit. So S and Y shrink it down. You can see I don't really
want to shrink it like that, because I might move
this from that point. I don't really want
to do that. So I'm going to come in and edit mode, and Y shrink it down. And then what I'm
going to do now is I'm going to get
rid of the front, the front and the back. Delete bases, and then
Alt shift and click. And then what I'm
going to do now is I'm going to pull it out. I think we'll actually
use a modifier on this. I'm going to press
control all transforms, add modifier, solidify. Let's pull it out. Let's
put even thickness on. And now we'll press Tab. And we'll bring this
back into place. And you can see that we've
got a lot of kind of flashing on here that basically
means that the faces, the kind of intersecting
and crossing over, that's not something we want. So to actually get rid of that, all we need to do is just move the offset down a
little bit like so. And then we got it like kind of in the halfway point
as you can see. And now there's
actually no flashing. Now the one thing
I do want to do, I actually want it probably
coming all the way back. Do I want to come
all the way back or do I want to leave a little
bit of gap in there? Actually, I think that
gap actually looks nicer, So we'll actually
leave that there. Now what I'm going to
do is I've grabbed it. I'm going to press
shift D z Ed 90 shift D z 90, shift D 90. And you can probably see
why we left this till last. Now, as far as modeling goes, it's probably the most complex
piece of modeling because we're using all of those skills
that we actually learned. Now I'm going to do is I'm
going to press control J. Join them all
together, and finally, let's supply that modifier. Now let's look at
our actual barrel. So you can see we've got a lot of different things
going on here. What we could do is we could add a few more parts to this. You can see we've got a
little bit of a top bit here. I put that in, Yeah, I've put that in on this one. But we could have
some more parts. For instance, you could add a
part on the inside of here, on the inside of here, instead of the outside
like grad here. That might be a nice idea or
we might just add a part on sometimes because
we're using Boolean we can really overcomplicate
something. And it's not always the
best way of doing things. So what I'll do now,
it's all press shift. I'm going to bring in a cube. I'm going to bring my cube up. I'm going to press
the tab button, just to keep it in the
center of this orientation. Press S, bring it down. And I'm just going to fit
this then in the side. So I'm going to press S and S, and let's get it into
the side like so. And Y, sorry. S and X. There we go. Let's pull
it back now into place. Yeah, and I think that actually, it's going to I think
that's going to fit nice. I'm going to grab
this bottom once, so I'm just going
to put my x ray on. Pull this out just at the edge. Pull that back a little bit, and let's check out what
that's actually looking like. All right, that's
looking pretty good. Now let's think about getting this part maybe a
little bit longer. So let's grab it and, and sorry. And Y, there we go. And let's actually vel, maybe just these edges off. So we'll press control
B. Bevel them off. Okay, now what I want to
do is I want to come in, I want to insert, so I, then what I want
to do is pull it back with E and you'll notice it follows the actual curve
of this actual face. So that's great. And now I want to put it
on the other side. So I'm just going to
press shift D, odds head. Not 90 this time, just 180 just to put it
on the other side, so All right, and there we go. Now let's actually
save out our work. And what we'll do then is we'll carry on with this
on the next one. All right everyone.
So I hope you enjoyed that and I'll
see you on the next one. Thanks a lot. Bye bye.
77. Creating Sci Fi Handles: Welcome back everyone to blend
the beginner's boot camp. And this is where we left off. All right, so what
we'll do now is we'll come in and we'll make
these parts here. So what I'm going
to do to do those, I can see there's a little part in here, big part in here. So we can create those
probably altogether. So I'll actually come in, I'll yeah, I'll
just press shift. I'll I think I'll
bring in a path. I think they'll make it easy for me. I'll shrink this down. And then what I want
to do is I want to put this path into the top of here. So seven over the top, put it to the left
hand side like so. And then I want it kind of as you can see
on the other one, it comes down to
just under here. So it comes down to here. So I think we'll
actually replicate that. So what I'm going
to do is I'm going to put this on to smooth. I'm going to press control one so I can actually
see what I'm doing. And then all I'm
going to do is I'm going to bring it down
to there and then press E and bring it
round like stove. Then I can see that I've
nearly got it there, so I'm just going to pull
it back and pull it up. And then what I'll do
is I'll just fiddle around and just move this
to the way that I want it. So you can see I've got a lot of control over this as well. I'm going to just zoom
that in a little bit, making it look as though it's actually actually
bending around on there. So I'm going to pull this
one down, and there we go. I might need to move them up, but we will see if
that's the case. The other thing is I want to move them to the side as well. So I'm going to bring
out my mouse lock, and then I'm just
going to bring them to the side and pull
them up like so. All right, so that's that. Now let's come in and actually give this
then some depth to it. So if we come over to our curve, let's add in some depth and then we can see actually
where we need to move them. Okay, so I think, I'm
happy with this one. This one, it needs to go
up a little bit, I think. So I'm just going to bring it up and then on I'm going to do is
we're just going to see if I can actually delete
this one out of the way. So delete vertices and it
will pull it obviously, but I just want
to then make sure that I'm not wasting all
that a mesh that's in there. This one's absolutely
fine as you can see. All right, so the
next thing then we want to look at is just make sure that you're happy
with the roundness on these. As you can see, these are very close together and you might
not actually want that. So what I'm going
to do is I think I will bring in two
extra edge lots. I'm going to grab this
one. Sorry, two verts. Yeah, this one and this one. And then what I'll do is I'll
delete these three here. So right click
subdivide, and then 123. Let's see if I delete
those vertices. And then I'm just going
to put one in here. And I'm just cleaning it up and making it a little
bit more even. And now I'm going to do
is I'm just going to come in and just pull it out a little bit more if you want to flatten them out once you've got it
as you want it. I'm just going to move this
one round a little bit. Once you've got it
as you want it, just come into the center one, delete vertices and then
add in another vert. Right click, subdivide. Now you should be able to
get a nicer curve like so. All right, that is,
that's looking good. We can mess around with
that all day as well. It's one of those things. So
let's put it to that then. What I'll do is the next
thing is I'll come on, I'll bring down a resolution always to one and
then probably four, five, I think five on this just to make it a
little bit smooth. And then what I'm going to
do now is I'm going to press D. I think I'll actually press D because I'll mirror
it over anyway, so D just to
actually apply that. And then what I'm going to do is now I'm going to come in, I can see we do have
a slight problem in that these aren't so uniform. If you like, let's
actually come in and add in a edge loop. Let's bring this edge loop
down to something like that. I think from that I
can actually build. So what I'm going
to do is Alt Shift and click Enter Alter. Pull it out with that
portion added to non altern. And then I just want to twist
this round a little bit. So I'm just going to see if with proportion
editing on pressing, I can just twist this
round just a little bit. So I'm just going to
rotate it on the y axis. So just to straighten
that up a little bit. And then what I'm going
to do is I'm just going to now straighten
all of this up. So I'm going to come
to the next one. I'm going to press, I'm
going to bring it in a little bit and just
start straighten it up. All right, that's looking good. Okay, so let's add in a few sharp old
shifting click just to make sure that we are
not going to mark shop. Mark shop, So that we can actually make
sure this is correct. So now for coming
down auto smooth, you can see that we
get our smoothing in. But the problem is that
it's not high enough, so we can actually turn it up now because we've
got these sharps in, So if I turn it up, you
can see we've still got those shops in and it's
still pretty smooth. So it's important if
you need to do that, just to make sure
you add some shops. All right, let's
press control here. Control R here, like so. And then I'm just going
to fill this bit in. So control here, and then I'm going to
make one more here. Control. And then what we'll do is we'll come in with face leg, we'll grab all of these. And then what we're going
to do is enter alternates. Bring them out without
portion editing on. So just turn that off.
Alterns. Let's try that again. I don't even know actually if we've actually extruded that. So if you're not sure, just come in, grab the whole thing. Go to, sorry, go to mesh. And we're going to
go to clean up. And then what we're
going to do is merge by distance 24 vert removed, which means everything
has been removed now including these extrusions
here that I had eat, enter and then alternates
and pull it out like so. You can see with this one as
well, it's a little bit out. So what I'm going to do is I'm just going to press control, plus I'm going to
come with proportion, edited on again, art and Y. And I'm just going to spin
it around very slightly. Yours to tidy it up that little bit like so maybe
pull it in now. I need to fix this part now because you can see
it's a little bit out. So all I'm going to do is
grab this one, press G, and then I'm just
going to pull it in and just make that
nice and straight for me. All right, so I want a little
bit of a bumpiness on this, so what I'm going to do then
is I'm going to come in, in fact, we'll mark a sharp on here as well because you'll see actually that doesn't
actually need one, but I'm going to mark one
anyway just to be sure. So right click and mark sharp. And then what we'll
do now is we'll come in Osit click going
all the way around. So and then just keep following it round all
the way back to here. And then what we're
going to do is I'm going to press Enter Alterns. With that portion,
editing on again. Alterns, bring them
out and there we go. I think I'm actually happier with how this looks
than that way because I add them that way and I think I actually
smooth them off a little bit and I think it's just looking a bit
better like that. Okay, so now let's actually
put this over the other side. So what I tend to do is now I'll put my cursor to the center, so control all transform
set origin 23d cursor. And then what we'll do now is
we'll bring in a modifier. Modifier. Bring in a mirror. And then what we'll
do is we'll put it also on the wire as well, like so now what I'll do is
I'll actually apply that. And then I'll come in and put my proportional editing
on in edit mode. And then just make sure that
we've got connected only on. Because what I want
to do is now I want to grab one going
all the way around here, press G, pull it
all the way out. And all I want to do is
just move it very slightly, just so they don't
look the same. So again, I'll do it on this one old shift
click and then G, pull them out like so. And I'm also going to think, pull this one in a little bit just to make it look a
little bit different. Aim on this one, then I'll
pull it in from here. Maybe just a bit of
different angle like so. And now you'll see
they look actually different from each other and that's what
we're looking for. Okay, so that's
looking pretty good. So now what I'll do is we'll
just do this top part, and I think we're
near enough done. So let's come in and actually delete this out the way We
don't need that anymore. Actually, we do
need that because I need to come in
and apply that. So let's apply it then
let's delete it out the way like so now all we
need to do is the handle, so what I'm going to do
is save my work out. And then what we'll do on the next one is hopefully we'll get this handle on and the
actual materials in place. All right everyone. So I
hope you enjoyed that. And I'll see on the next
one. Thanks a lot. Bye bye.
78. Adding Texture to Lantern: Welcome back everyone to blend
the beginner's boot camp. And this is where
we left it off. All right, so let's
put in this handle. So the first thing we'll do is we'll press sur shift date. We'll bring in a cube. So let's bring in a cube. Let's make it smaller. And we'll put the
handle the same way as the other one's
gone. So that's fine. So, and's Ed pull it down and then and Y,
let's pull it out. And finally S and X, let's push it in a little bit, let's put it into place then. And then all I'm
going to do is just bring in a couple of edge loops. So tab control two, left
click, right click. And then I'm just going
to push those in with S and X without proportion
that it's a non. So just push them in like so. And then all we'll
do is we'll just round off these edges. So tab control lay all transforms and then
we'll just round these off. Then finally we will bring in our handle control,
round those off. Now let's press shift
S. Ursa selected, just to put it on there, but I want to set the origin to geometry first, then shift S. Now what we can do is
we can bring in a cube, bring in another cube,
make it smaller. Let's pull it out to the
size that we want it. And y, let's pull it out. Let's now pull it up. So I want it
starting from there. And we'll say it's going to go. Let's have a look. Let's say yeah,
round about there. Just do for someone to
get their hand in there. And then what we'll
do is we control Lal transforms tab again
and then we'll come in, grab these edges, control B and then round them
off as though it's going to be a handle,
something like that. I think it looks
absolutely fine. Now what we'll do
is we'll come in, we'll grab the
front and the back, press the Eban to bring it in. And then right click
using your loop tools, click on Bridge,
and there we go. There's the handle
in place as well. All right, so we've pretty
much finished on this, so what we'll do is we'll
hide our son out of the way. We'll actually grab it all now. And what I'm going to
do is just press D just to make sure everything's
applied like so. And then what we're going
to do is I'm going to press control J and join
it altogether. Actually, I need to
grab this one first. Press D and then control
J, join it altogether. And you can see we do have
those smoothing issues again, and we need to fix those. What we can do is we can come over and hopefully
if we turn this up, we shouldn't end up with too
many issues because we did actually sharpen these edges on these, and that's
why I did that. I'm just going to turn
it up a little bit more. Now, you can see that we do have some problems on this bit, mainly, and I'm looking at maybe on the bottom
as well to fix that. All we'll do now is
bring in our sharps. We're just going
to grab a sharp. Going all the way around
here with control click all the way around to
the right click sharp. And there we go, that's
that bit sorted. Now let's come to
this piece here. So we'll grab all of
these going round. So control clicking,
Going all the way around. I'll do the bottom first, and then we'll do the top sofa. Grab this one, going all
the way around to here. Right click and mark a sharp. There we go. Now
let's fix this bit. So I'm going to grab it
going all the way around. Mark a sharp there. Let's do the bottom bit as well. Right click, mark a sharp. And there we go. I think
I'm happy with that, apart from these parts on here. So let's shade or to
smooth. There we go. I don't actually know why
they didn't get shade smooth, but anyway, there we go. All right, so now at
the moment of truth, what we need to do now is
connect it with this one. So control L link materials and now we'll come
back to this one, put on our materials
and let's have a look at what is on this one. So first of all, we need to come to this part and this part. And what I'll do is I'll come to my materials and I'm
going to give it the scifi black.
So click a sign. These parts here. I'm
going to grab them all. I'm going to click,
let's have a look. Camper Van Tires, let's have
a look what they look like. Yeah, they might
need some, a little bit of refining on those parts. We'll sort those parts out.
I only want some rubber. Actually, I don't want
to many other colors. So I'm going to do is old ship click now on the inside of here. And then I'm just going
to turn these maybe into a different color Shift
click control plus. And let's have a
look what we've got. We've got stairs, metal. Let's have a look at
what that looks like. Yeah, and I think
that's going to look a little bit better. Now, let's work on
the top of here. If I grab ol shift
click control control. Plus I should then
be able to come in and make these,
the fi barrel. And then we'll come
to this part shift click control control. And you can see I've
grabbed the top there, don't really want that. So all I'm going to do
is just minus those off. And then what I'm
going to do is I got one selected
there. No, I've not. All right. Cipi, barrel, click. Okay, And there we go. Now let's do these parts. So all I'll do with these is I'll come in
and grab them all. Click a sign, and then
this one and this one, I think I'll put back to the
actual yellow click a sign. Okay, so that's looking good. Now let's come in and
grab these parts. I think I'm just going to grab
all these and I'm going to click Sipi barrel metal,
Cipi, barrel black. And then I'll come
in and do these and then control plus
just to get them all. And then finally now we should
be down to the bottom bit. Now I think on this one all I'll do is I'll grab these
going all the way around. So now these parts here I think I'll bring
metal in for these. Let's just grab
all these stairs. Metal, click a sign
and now the inner. I can't actually grab
all of the inner parts. All I'll do is just grab
one control, click, shift, shift control, and
shift and control, and then the barrel liquid. And there we go, we can actually come in and
actually should be able to unwrap those and make them a little bit
bare As you can see, you can also place
them where you want. All right, let's press Tab.
Let's have a look at that. And let's put our
EV light on just to have a look at how
nice that actually looks. And there we go, there is our sci fi barrel or whatever
you want to call it. Now let's go back
into material mode. Let's press l tage,
bring everything back. And what we'll do now is
we'll drop these back into my hard surface like so. Let's pull this one
back into place. And there we go, the final part. So I hope you actually
made it this part. If you did, I congratulate you
because you've got to have learned a lot of stuff in a pretty short amount
of time actually. This course, I think is really, really good for people
wanting to brush up on their, you know, the modeling skills. And I hope we've
actually achieved that, especially if you're
actually new. We did go a little bit fast, you know, from halfway point, but I think you gathered the skills
enough to actually keep up without actually having to repeat processes
many, many times. All right everyone. So we do have a lot of
courses out there. We have something like
26 or 27 other courses, a lot of them really good
stepping stone Actually, from this course going onwards, we also have courses that
cover Unreal Engine five. So if you want to actually
get into both parts of it, so that is actually
creating the measures. And then to send them through to Unreal Engine five,
we have that. And if you're actually
interested in actually texturing as well to
a professional level. We also have courses that cover the blender to substance
painter process, where you can learn all
about how to actually then make a full actual game prop. All right everyone, so I hope
you really enjoyed that. Thanks a lot. Happy
modeling, everyone. Bye bye.
 3D Tudor, Bestselling Blender Author & 3D Educator