Transcripts
1. Blender 4 The Environment Artists Guide Introduction: Welcome everyone to Blender
for the Environment. Artists guide the most ambitious
and comprehensive course ever crafted by three D tutor. If you ever dream of bringing
the elegance and intricacy of the Victorian era to life in your own
three D projects, this journey is for you, designed for both beginners
and seasoned artists. This course will guide
you through the creation of an entire Victorian
town environment. From a quaint coffee shop, to a detailed perfume store, from a traditional butcher's, to an inviting bookstore, and even a vintage truck and
a classic subway entrance. We've covered it
all. Led by myself, Neil, the founder
of Three D tutor, and your guide with
over a decade of experience in the industry
of three D modeling, this course is set to transform your understanding
of three D art. Join us as we embark on this monumental journey
through time and creativity. Mastering the art of
stylized three D models in the captivating world
of the Victorian area. We start by delving into
the critical process of gathering and
utilizing references like a true professional. In this essential
part of our course, we unlock the secrets to create a massive
referencing guide, ensuring your Victorian
era town scene is authentic and
detailed as possible. As we embark on this
detailed journey of creating a Victorian
era town scene, an essential tool kit awaits. The course comes equipped
with a resource pack, features nearly 50 shaders, a host of geometry nodes, and as with all three
D toed courses, our trusty human
reference model. Moving forward in our journey, we approach of gray boxing. This crucial step is where your project begins
to take shape, transforming from a
collection of references and ideas into a tangible
three D space. You will learn how to block out the major components
of our town scene. From the sprawling layouts of streets to the imposing
structures of buildings. Each element is
carefully positioned to capture the essence
of the Victorian Era, establishing the spatial
relationships and proportions that are key to a believable and
immersive scene. In our first section
on modeling, we dive into the heart
of any three D scene. We'll start by creating four massive buildings
and a subway entrance. Along with various assets
like street signs, lamps, and even a new stand, all while maintaining the
authentic Victorian aesthetic. This section is designed
to take you from the basics to professional
level modeling techniques, including using curves to create amazing geometry and modifiers
to elevate our models. Whether you're just starting out or looking to
enhance your skills. This course will provide a comprehensive understanding of what blender has to offer. Crafting, not just three D art, but your very own
complete town scene. Next we turn our
focus to shaders, a pivotal aspect of bringing
the Victorian area to life. In your three D scene, we'll guide you through
the process of quickly and easily changing shaders to
suit your scenes needs, ensuring you can
adapt and refine your materials without hassle. A highlight of our
exploration will be achieving the worn
edge effect on wood. A detail that really
brings the scene to light. Through practical examples,
you'll learn how to use Blender's powerful node system to simulate years
of wear and tear. Given your models a lived in realistic look that resonates with the historical accuracy. Our shader training
part of the course equips you with both ready
made Victorian shaders and the know how to
craft your own focusing on efficiency over
starting from scratch, you'll learn to quickly
modify and create shaders, saving time for the more
creative endeavors. This method not only boosts your technical skills
but also empowers you to produce distinctive high
quality three D art with ease. Moving forward, we'll
delve into rendering and compositing with
an in depth guide on both cycles and V. Our focus will primarily
be on cycles as it offers superior results
and greater control over compositing for
our Victorian scene. You'll learn how to
work with layers, including ambient
occlusion and the mission. Mastering the techniques to blend these elements
themelessly. We'll guide you through the
process of transforming your project into a
polished portfolio piece, equipping you with the skills
to realize your dreams. Whether you're a hobbyist or aspiring to work in
a triple A studio, this section is designed to
elevate your art showing. You have the
experience to create stunning visuals that can help you stand out
in the industry. In wrapping up
this introduction, let's emphasize the breadth and depth of this journey
we're about to embark on with 40 hours of
meticulously crafted content. This course stands as
a comprehensive guide to environmental modeling
in Blender Four, tailored to breathe life into the intricate details
of the Victorian era. It's structured to equip
you with the skills and insight necessary
to transform any space into an historically rich visually
stunning environment. This isn't just another
step in learning blender. It's a leap forward. Mastering the art
of three D modeling with a range of
techniques and insights. It's designed to be an
important part of your journey, helping to expand your portfolio and improve your
creative abilities. As we conclude this preview, remember the scope of
what we've covered is just a glimpse into the transformative
experience awaiting you. The real journey unfolds as
you dive into the course, with each module
crafted to guide you closer to realizing your
artistic ambitions. This is your chance to blend historical elegance with
contemporary technology, mastering environmental
modeling in the process. All of this in blender
for now is the time to take that step and make
your dreams a reality. Happy modeling everyone.
2. Getting Started Resource Pack and Project Overview: Welcome everyone to Blender for the Environment
Artists Guide. And this is the
complete course on creating your very own
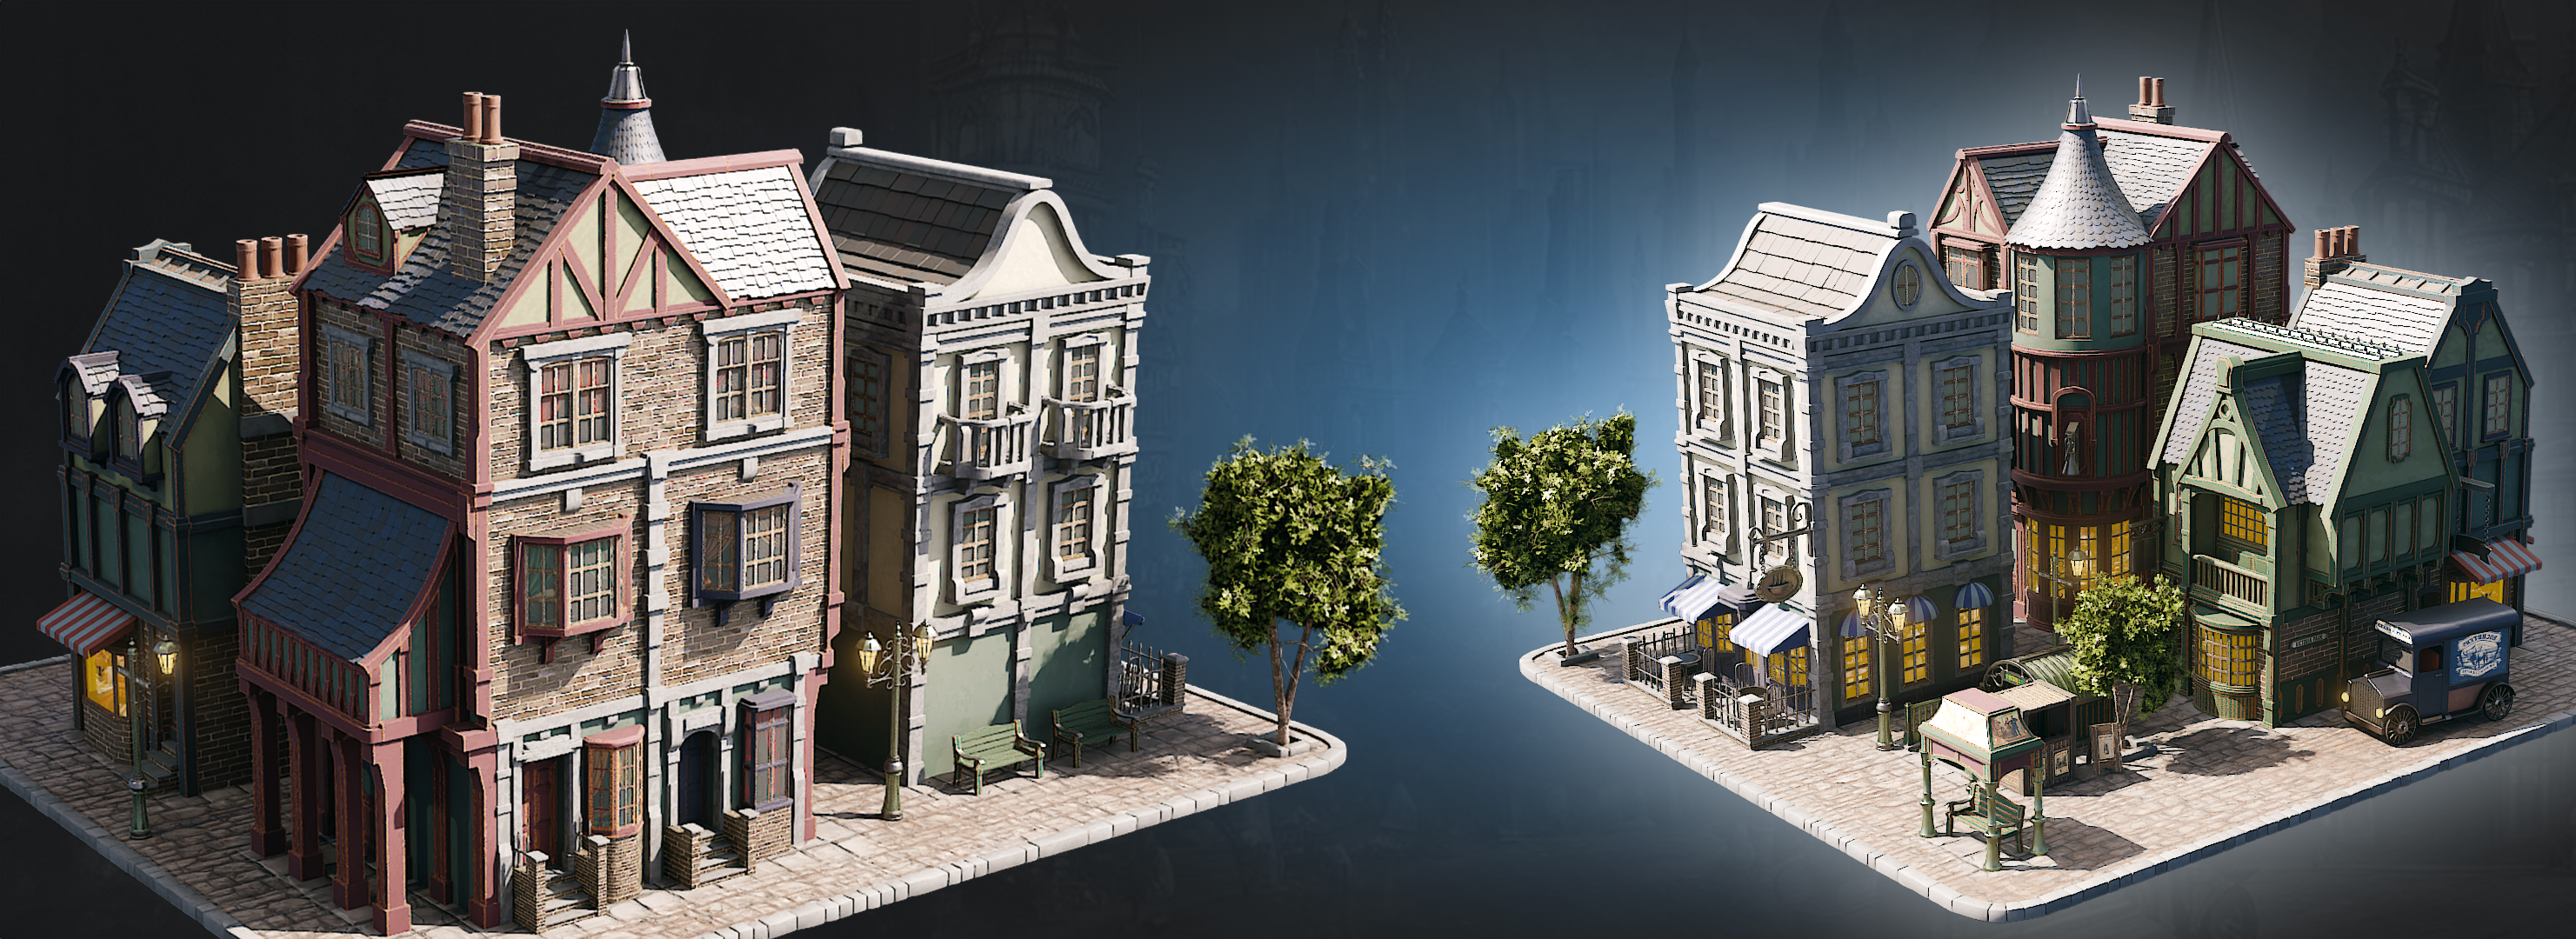
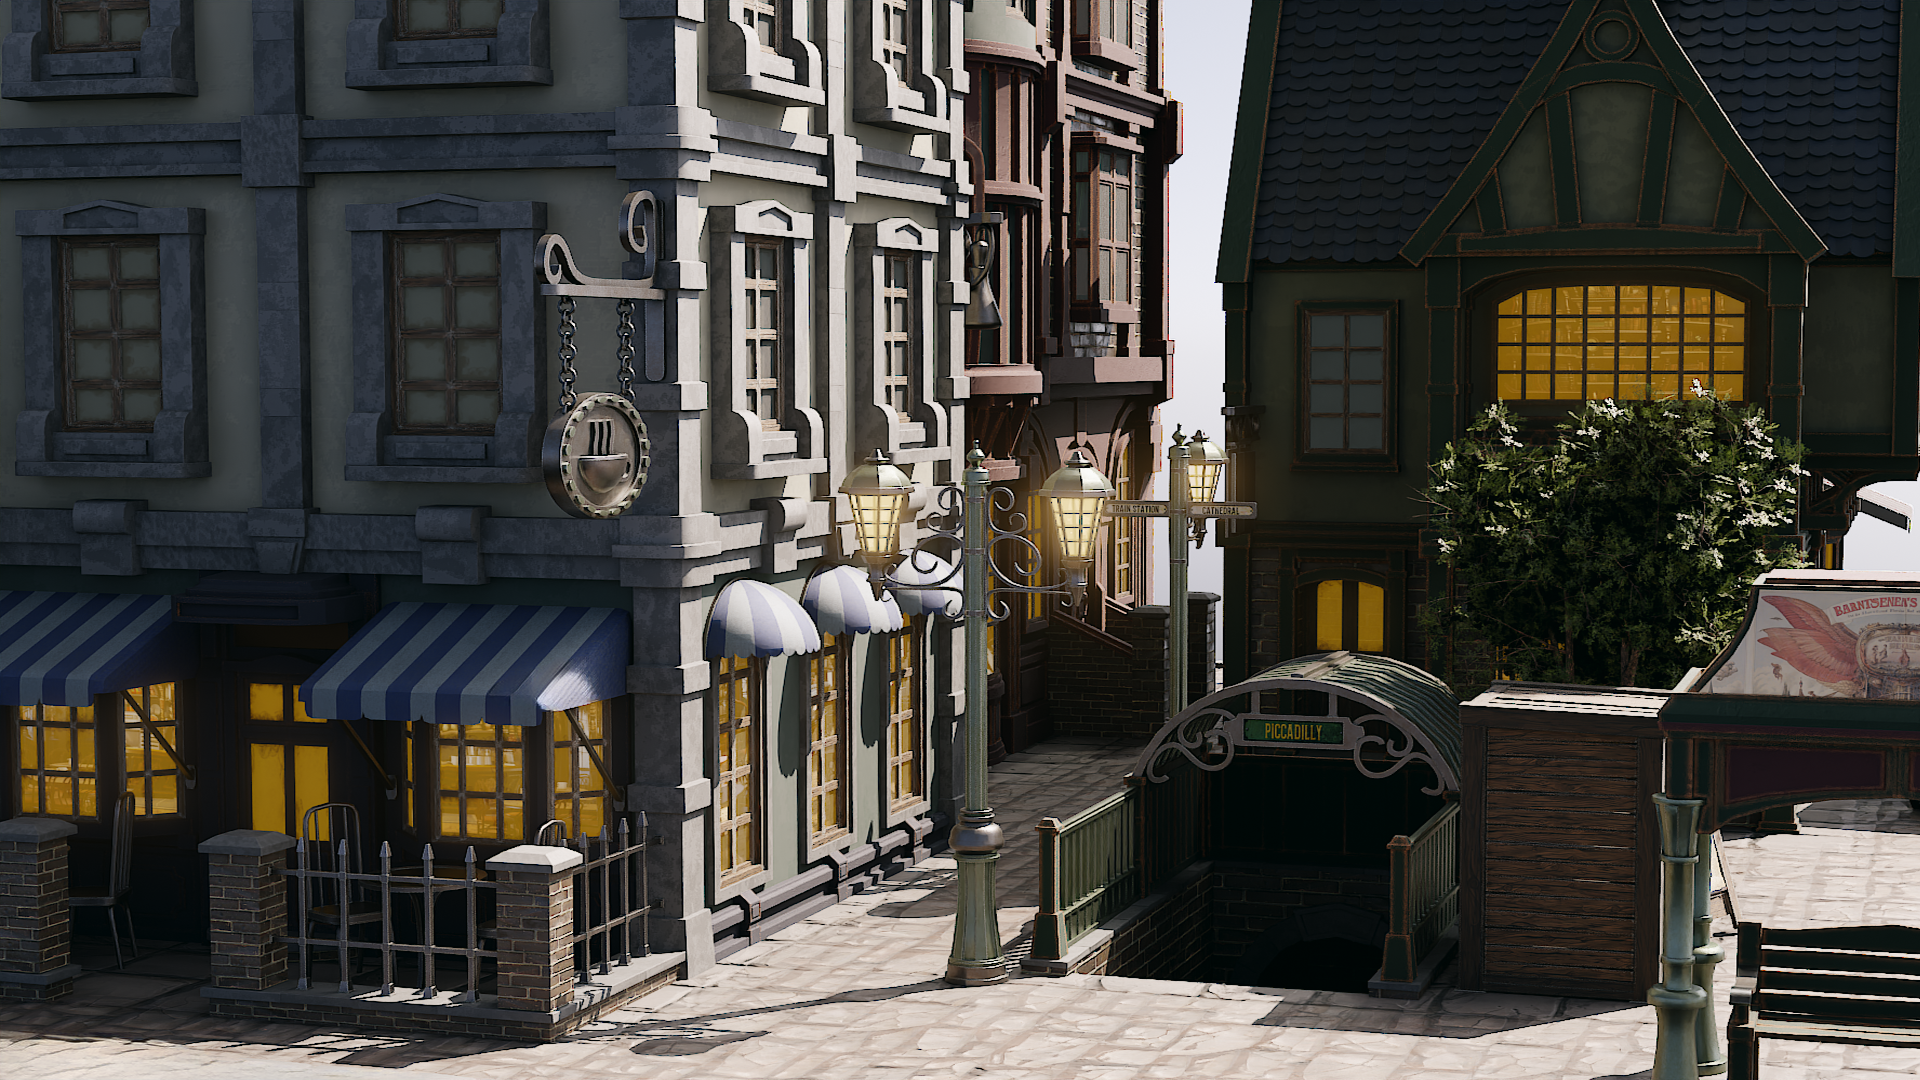
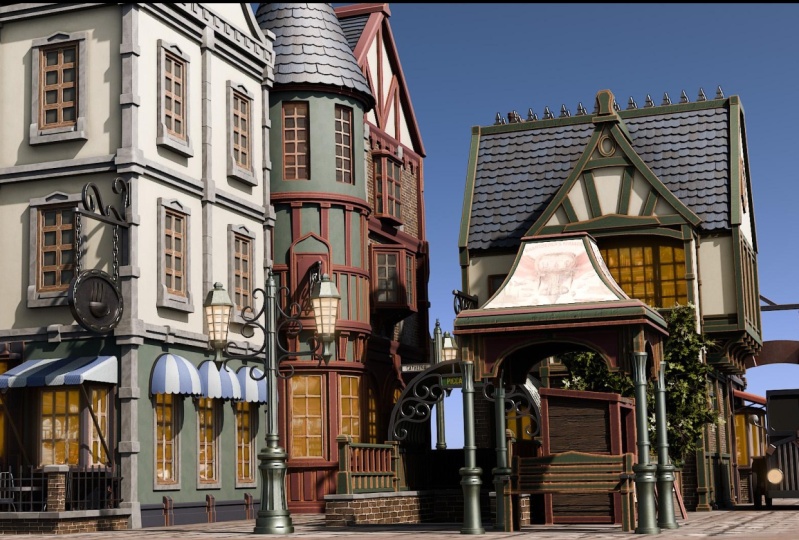
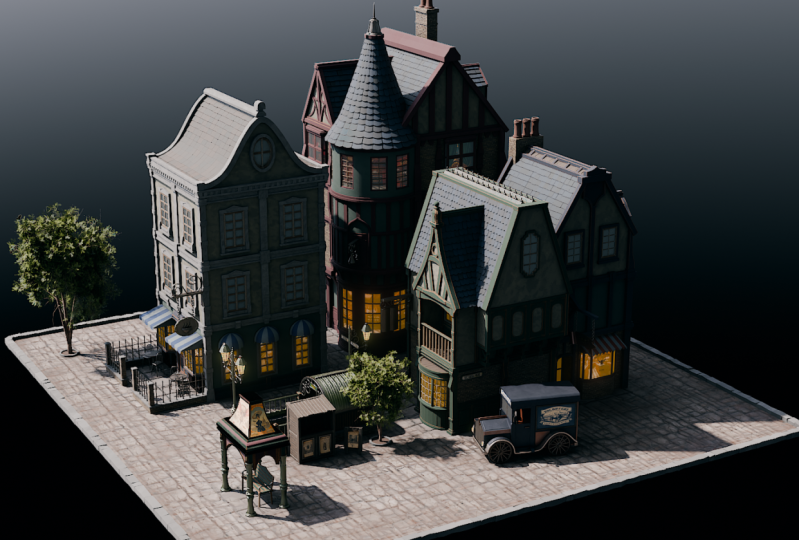
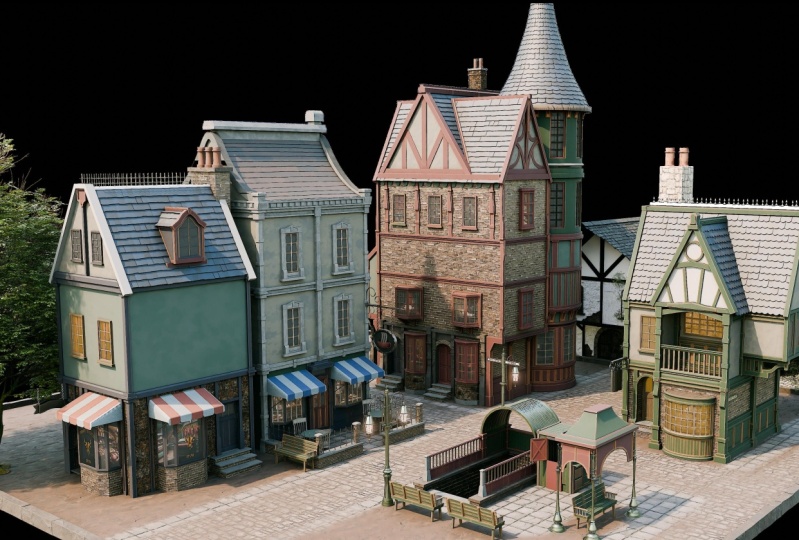
professional environments. In blender for and beyond. This scene is set in
the Victorian Era, but with the knowledge you
learned from this course, it could be set in
any historic era or world for that matter, whether that be a fancy world of your own making or some future dystopian reality
with a little help from some of our geometry
nodes and shaders. Please though, bear in mind, building this scene will take
a lot of time and effort. And some of it, for sure, will be tedious, but by the end, you'll have the skills to
model and render any of your own scenes to this professional level
that you see here. So before we begin, we'll be taking a quick look
at the scene and then we're looking at the resource pack that comes
free with this course. The main thing about the
scene is because we've actually set it in
a Victorian era, we had to think long
and hard and grab many references to how we're actually going
to build this. Now the moment you can see
this is in rendered view, what I'm going to first
of all do is just put a material view
because that then will help us look
around the scene. Now bear in mind you're
not going to have your own scene to
actually look around, but I'm going to show you
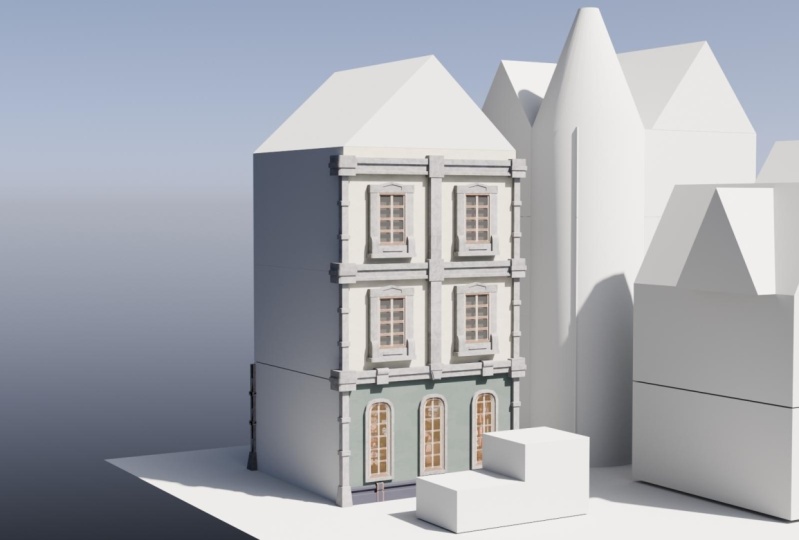
how to build up a gray box. First of all, how to
do the referencing. Basically how to get started in building something like this, because it's all easy building something and just watching
me build something. But you need to know the basis of where you get
your ideas from, how you're going to
set out the scene, how we're going to build the buildings next
to each other, what's gonna look right for that area and so on and so on. So you can see we've got
actually a cafe here. We're going to build
this building actually. First we're going to build the windows as well that
actually go in there. We've got some
trees as well that come with the actual
resource pack, so we're going to
be using those, All of the shades
and materials here, which we're going to
talk about in a bit, do come free with
the resource pack. And we'll be going
in as well and explaining how they
actually work. But basically you
can grab any of your free textures
and materials, pretty much so many
places online. So we're not
actually going to be building shaders in this course, but I will show you
how they work also, We've got things like the car. This is something that
I'll teach you how to put together really
easily and quickly. And then of course we've got
the rest of the buildings, how we put them all together. The floor, as you can see, is made up of three
different textures. You're going to actually
find out how to do that. So when you come to building
your own scenes out, one of the most important things is the actual floor
or the ground plane. So I'm going to teach
you how to do that. And then finally we're going to be going into the composite to make this look a really,
really beautiful scene. So basically the
whole shebang from eight to will be
covered in this course. And in the end, you will end up with something very similar to what we have here with
nothing actually missed out. All right, so now let's move on over then to our resource pack, and I'll go through
that with you. So here is our resource pack. I've set this out so it makes it really easy for when
you first load it up. There is a lot of data in
this actual blend file, so at the moment,
everything is turned off. But you can see
everything is named. Even when you open them up, you'll see everything
is named correctly. So you'll never struggle
to find anything. If you do want to
find something, just do a quick search and
you'll be able to find it. But generally, I'll be showing
you where they are anyway. So first of all,
we've got our floor. Now, within here,
we've actually got our shader that I'm going
to show you how to build. Next of all, we've
got our trees. Trees within blender can be
used with the IV generator. There's plenty of resources out there showing you
how to create trees. So rather than go through the hassle of
creating this tree, all I've done is supplied that for you so you can
actually use that. Next of all we've got our cloth. So these now what we're
going through are going to be our actual materials. So at the moment you can
see we've got cloth, then we've got truck,
and we're going all the way down to glass. To our human reference. The human reference obviously is very important because
we're going to be using this guy to actually base the scale of all
of our buildings, our trucks, our lights
and things like that. So we really need
something to base that on. Next of all, then
we've got metal, all the different metals
that are going in the scene. As you can appreciate
with such a huge scene, there is a lot of actual materials that are
going to go into it. We want to make it look as realistic and
stylized as possible, and we can only do
that through many, many materials and many, many different types of models. Next of all, then we've
got our curtains. And these curtains are actually going to be behind our windows. So you might look
here and think, oh, wow, this looks a bit funky. But trust me, when
we've got this in, because it has some
transparency in it, they're going to come
together really, really nice. So moving down then,
we've just got stone and wood, more materials. And then finally, the
most interesting one is our geometry nodes. And these are really,
really important because these are going to
speed up the whole process. Now along the way, you're
going to learn not only how to use geometry nodes, but also you can actually create your own geometry nodes
or even find many, many of these online. So what I've done
is I've supplied one that is the planks, I've supplied one that is
the actual roof tiles. And this then is going
to make it really, really easy to create
things within your scene, especially when it
comes to roof tiles. All right, so then we've
got the actual backdrops. And these backdrops
are basically the things behind the windows, so a lot of them are going
to be things like bedrooms, living rooms, in the
butchers for instance. Or we also have a cafe
there or a perfume shop. And I'm going to show you
actually how to use these. They're basically just images, but we're going to set
them in a way which is going to make them look
really, really realistic. Set behind the window next of all. Then
we've got our walls. We've got our roof material, clay material, our
signs, and our posters. As a final touch, so you can see with our signs and posters
within the scene. We've actually got
these and we've laid them out so they have a
transparent background. And then we're going to
put them over the top of our signs, the
posters as well. We tried to get posters
from that kind of era, especially when it comes to the news articles
from the newsstand. All right everyone.
So I hope you enjoyed this first introductory
lesson to what you're actually going to
learn on the next lesson. Then we're going to
look at referencing. And finally, after that, we're going to look at actually
the basics of blender. So even if you knew to blender, absolutely knew to blender, you will be able
to follow along. It will be very difficult
in the beginning for sure, but please bear with
the actual course and you'll find that
you soon pick it up. All right everyone.
So I hope you enjoyed that and I'll
see on the next one. Thanks lot. Bye bye.
3. Mastering Blender with a Referencing Guide: Welcome back everyone
to Blender Four, The Environment Artists Guide. And this is not where
we left it off, but we left it off
of our resource pack where we've now
finished with that. So as you can see here, I've got the standard
blender build I'm using, as you can see down here
on the right hand side, Blender 4.0 0.1 And so
I recommend if you're using anything below Blender 2.8 then it's going
to make it much, much harder to follow along. But anything really
after three would be the best way because
then you can actually take advantage of
your asset manager. Now within my actual build, I'm not really going to be using a lot of the
asset manager, but don't worry because you're
going to learn all about it and how to put your own
models in there as well. So we are going to cover that in detail. All right though. For now though, what I'm going to do is I'm
now going to play a short introduction
to referencing within Blender or three
D modeling in general, even if you're any
sort of three DRs, whether that be in
environments in Unreal Engine or whether that be in blender or three DS max, it
doesn't really matter. The referencing guide
will be really, really handy for
you are everyone. So I'll see you on
the next lesson. If you already know all of this, just skip to the next lesson. Thanks a lot. Bye bye. Welcome everyone to our in
depth referencing guide. And it's very important that we actually use references
in pretty much any kind of modeling or
environments that we're actually going to be work on before we actually
do anything, before we put any cubes
down or anything like that. It's really important
that we have some really, really decent references
to actually work with. The first thing I want to
recommend is that you can use to actually put all
your references on like Photoshop or even Word. But what I'm going
to recommend is that you use something called Pure. So if you go to the
site that's called Pureref.com you will
actually open this. And from there you can
actually click Get Purerev. And that then will take you
to this download screen. And you will see at
the moment you've got 157 or custom amount. You can actually put this on zero and actually
get this for free. So it's completely
free and you can come back and make a
donation if you like. And then all you need to
do is click download. So the only things we're
going to talk about, pretty much for reference
in here are going to be free except our
mid journey part. But there are other
alternatives like Darley and a load of others
out there that you can use instead of mid journey. Once you open up Pura, then this is what you will
be greeted by this screen. And if you want to right click, you can actually
drag this around to any of your other screens, or you can actually make
it smaller like so. And it's a really,
really good program, this really, really handy, highly recommend getting this. So now let's actually think
about getting our references. And there are a few
sources that we use to actually grab
references from. But generally what you
want to do is you want to build up a kind of
reference pack if you're going to be
a hobbyist or a professional in three D modeling or environments where
you're going to see things perhaps on
Pinterest or sketch up. And actually you want to save them in a file so I know people with thousands and thousands of images that they've
saved over the years. And whenever they're
coming two way project, they'll then dive in
and actually find all of the images that they've
got on that particular thing. This could be a samurai
warrior or a Chinese bell. Also a lot of people
I know as well, who are working
professionally at this will go around museums. They will take their
own actual images and then they'll also upload
those to the file as well. So the first point of call
if you've not actually got your own database yet is probably going to
be actually Google. So let's open up Google. And you can see here
that at the moment I'm looking for a Victorian
delivery truck. Now I'm going to do is I'm just going to go
through these and get some nice references
like this one for instance. And then I'm simply
going to write Click and I'm going
to copy Image. Then what I'm going
to do is I'm going to go over to Pureref. So I'm just going to open it
by cup press control V. And you'll see now that I've
got my nice image in here. What we're also able
to do with PurereVs, we're able to also pull it out and make it bigger if needed, which is really, really
handy when we're putting in lots and lots
of actual images. Now the next thing
I recommend you do, once you've actually
got an image in there, here's what you can
do, is you can left click and drag it
over somewhere. And then what you can
do is you can press control and you can
actually make a note. So let's call this Victorian,
let's put it trucks. Now, within my scene,
I might actually want a Victorian lamppost as well as part of the scene
or something like that. So, let's actually
look at the next one. So, the next point of call is actually going
to be Pinterest. And let's actually put in Victorian lamppost,
so let's try that. So let's see what we get. And we can see we've got many, many styles,
especially this one. This one's actually really nice. This one's also really nice. So what I'm going to do is I'm going to actually take this one, I'm going to write click copy, image, go back to my Purev and then drop the
images in there. So maybe make this one
a little bit bigger. What I tend to do is gather a load of images for
each of these things. When we're actually
building a scene, or even just the model, you want to grab as many
images as possible. I'm talking hundreds
of images here. And especially if
you're doing a scene, you want all of
the little parts. You want everything
down to the lighting, the environment, the trees. You want to grab references
for absolutely everything. Because it will make
your scenes just really, really look so much
better if you've got some really good references.
So now let me show you. This is one that I'm actually
working on at the moment. So I have to come over and load recent and I'm just going
to load this one here. And you'll see at the moment
I have all of my props. I have all of my main
buildings that I'm going to be looking out
to us as references. I have a ton of doors. I even have a load of foliage. I have all my windows. I have my lights over here, and also have, more importantly,
all of the lighting. In other words, it's a scene. So what time of day
is it going to be? Is it going to be
early in the morning or is it going to be a dusk? Is it going to be a night
scene or is it going to be midday with that sun
beating down on my scene? Just make sure that it
actually matches the scene. There's no point in having a scene like this, for instance. So this one here, if you've got a log cabin out in the snow, you really want it to
match your actual scene. Now, before moving on,
there are a couple of other places that we do go
to use for referencing. Especially something like
sketch up, which is really, really great because you can actually come into
an actual scene and then what you can
do is you can actually rotate around it and really, really check out how a model is put together like
something like this, which is one of our actual own. But you can see here how
easy it is then to get a good idea of what actually
incorporated in this scene. And what you can
actually do from there then is we can actually
come down and we can actually get some
screenshots of this or even click and copy image. There's also, let's
say if we wanted to do a Victorian truck, for instance, to keep it the same theme as
what we've been doing, you can see that
there's no end of actual Victorian or Vintage
type vehicles on here, not as many as what there
is on Arts Station, but still a very, very good place to start
looking for reference in. That leads me onto my next one, which of course is Artstation. This simply is one of
the biggest resources for referencing or for looking
up artists in the world. Let's put in a
reference of Victorian, for instance, and let's
see what we actually get. Let's search artwork. So we're going to
search artwork and let's see what it
actually comes up with. Should be lots and lots of
things to work with here. Especially good if you're
looking for actual lighting. So you're looking for lighting effects
like this one here. Again, we can take these andan actual use them for references. And the best thing is
about Art Station is we can also come down and look at things that may be our concept
to two D or actual three D. And we can also come down as well and look at what
subject matter it is. So it could be automotives,
so Victorian automotives. Or it could be architecture
or something like that. So the possibilities with Art Station are
pretty much endless, and you're able to grab
tons and tons of really, really high quality references. There are of course,
hundreds and hundreds of other places you could probably
go to grab references. But I'm showing
you these because as far as references go, these are some of the
best places to go. Now let's move on then to one of the things that we
really use a lot of now, which you wouldn't have
thought actually would come into it as far as
referencing goes, but it actually is
really, really handy. So let me introduce
to you now chat GPT. So here is chat GPT. You can see that we
have chat GPT four, but we also have 3.53 0.5 is actually free and it is actually good enough to
do whatever you want. You really don't need to pay
for this. It's also free. So what I'm going to
do is I'm going to go to message and I'm
going to type in, give me ten different
buildings for a Victorian town scene,
something like that. Let's click Enter, and
let's see what it gives me. You can see now, it's given me a lot of things to
actually work with here. The best thing about this
is you can also say, give me ten more. You will just then go ahead
and give you ten more. Now, these things
are really handy to use because then I can simply take these ideas and it'll
also bounce other ideas to me. And I can then go
into Pinterest. Or Google Search and actually look them up or try and find
something like this. And I can get ideas and design my scene around there
using all of those things. And especially
Pureref, we can also take them in to our
actual mid journey. Now again, our mid
journey is paid for. I think the lowest amount is
$20 or something like that, but there are many, many free things out there. But I will still show you
what we actually do with our AI based image generator. So you can see at the moment this is the image
that we've actually, I know we've called it is Victorian era delivery van and this is what
we actually get. If we go to my images, you will see that
we've generated a ton of images about
all of the things, especially we use this as
well to generate textures. It's not just there to actually generate images and ideas
and things like that. You can actually use it to generate transfers
that are going to go on windows or adverts,
or actual textures. And we do use this especially
for things like curtains, because it's really,
really easy to get that look that you're
actually looking for. So you can see here
we've got a lot of ideas for living rooms, we've got a lot of ideas for bedrooms and
things like that. What we can also do
in mid journeys, we can also go and explore. What you could do is
you could look up with a search prom Victorian, let's put in carriage. Then we can also get
ideas from this. If I put in Victorian carriage, you can see this
as what comes up. Now if we come over to here, we can also say, if we click on here, this is the actual prompt
that somebody put in. So you can actually
take that prompt, maybe change it around a bit, and then get your own images. Rather than just simply
copying other people's images, it's a great place to start to actually gather
your own images. The other thing is
about mid journeys, I can come in, for instance, let's just go back. And then what I can do is I
can hold the shift bone down. I can grab all of
these for instance. And then what I can do is click the download bond and
download all of those images. And the best thing is
about pure is you can bring in multiple images
at the same time. So you can just drag
drop them and then they'll all appear actually
next to each other. So really, really
handy things to have. So lastly then, to
somewhat don't do what I did a few years
ago where I just dive straight into blender
and not even think about references and just find
references if I had to, while I'm actually building something, don't do it that way. It leads directly into building a beautiful
gray box as well. All this, because first of all, you grab all of your references. You make sure
everything's set out. You can go and find some more references if you need to know. If you suddenly have a
spark of inspiration, you want to make
something on the fly, then grab some more
references for it. But to start with, grab all of the references,
have them really, really nicely laid out
and spend, you know, even half a day to a day
grabbing all those references. You can then save the value as well into individual files. And then you'll have all
the other references around that particular build in there ready to use maybe on another
project in the future. All right everyone. So
I hope you found this useful and I'll hope you'll
take my advice going forward. Thanks everyone. See on
the next one. Cheers.
4. Blender Basic Navigation: Welcome back everyone to Blender for the Environment
Artists Guide. And this is where we left off, so I hope you really enjoyed
that referencing guide. And we really tried to put
it together to make it as comprehensive and easy
to understand as possible. Now if you are new to blender, you'll definitely want to
check out our next guide, which is the Blender
basic navigation. So how do we get around the
viewport is something you're actually going to really need to know to actually do
anything in blender. So before we go any further
and start on our grade box, we're really going
to have to show anyone out there that's not familiar with the blender navigation,
how to get around. So I'm going to play
that now for you. Please watch it if you're
new to blender and if not, move on to the next lesson, which will be starting
our grade box. All right everyone. Thanks for that and I'll see
you in the next one. Bye bye. Welcome everyone to the basics of
blender navigation. Now before we begin, it's
important to understand how the axises work
within blender. So we can see at the
moment we've got a green line going this way and a red line
going this way. This is called the Y axis, and this one is
called the X axis. We also have one
that is the Z axis, which we can't see right now. It doesn't actually come in with Blender Viewport as default, but if you want to
actually set it on, you just come up to the
top right hand side where these two interlocking balls are and just click the z axis. And now we can
actually see that. So how do we actually move
around the blended viewport? There's a number of
ways of doing this. One of them is over on
the right hand side here. You can see if over over here, it's the zoom in and zoom out. I can actually left click
and move these up and down. Then to zoom in and zoom out, or I can use the actual
mouse to actually zoom in and zoom out using
the actual scroll wheel. There's also another thing
you can do with zoom, which is holding control shift and pressing the middle mouse. And you'll see you have
a lot more control over zooming in and zooming out. Now the next thing I
want to discuss is actually rotating
around an object. So how to do that? First of
all, we'll bring in a cube. We shift a, bring in a cube. Now if I press the
middle mouse button and move my mouse left or right, you can see we can
actually rotate around. Unfortunate though,
we're not actually rotating around this cube. So to actually fix that, we need to center our view
onto the actual cube. We basically want to focus our view onto this actual cube. So to do that, we're
just going to press the little T button on
the actual number pad, and then you'll see that we
actually zoom in to the cube. Now if I scroll my
mouse wheel out, you will see now if I hold the middle mouse button
and turn left and right, we're actually rotating
then around the cube. And this is important because if you're actually bring
in another cube, so if duplicate this cube
with shift D, move it over. So bring in my move gizmo. And now you'll see if I
rotate around this cube. I'm not rotating
around this one. So let's fix that. I just
press the B button again. Zoom out, and now
it can actually rotate around this cube as well. Now let's look at
something called panning, which means that we're actually going to move left and right. And we do this by holding the shift button, holding
the middle mouse. And then we can actually
scroll left and right around our
actual viewport. So now we've actually
discovered how to zoom in and the different
ways we can actually do that, how to rotate around an object
and how to actually pan. We can also come up to
the top right hand side here and use these buttons. See it again. We remember
we're looking at the y axis, the x axis, and the z axis. If we come to our Y
axis and click that on, you will see now that you've got a front view of the Y axis. If you click the X axis, then we can change it
to that red x axis, and finally the z axis as well. Now there are other ways as well that we can
actually look around the viewport and these involve using the
actual number pad. So if I press one
on the number pad, it's going to tap me into
that y axis or front view. If I press two, it's going to actually rotate
that slightly. And if I press two again, it's going to rotate
it slightly more. Now if I press the eight, it will rotate it the
other way as well. Now to go into the side
view or the x axis, we can also press three
on the number pad, and that will give
us that effect. We can also press seven to
go over the top as well. Now what about if we actually
want to go to the opposite? So instead of going from
the bird side view, we want to come to the
underside of our model. Well, that's actually
quite easy as well. All you need to do is
press control seven, and that then will take you to the bottom view of
our actual model. We can also do the
same inside view and on the X axis and Y axis. So for instance, if I press one, I'm going to be going
into the Y axis. If I press control one, I'm going to be going into the opposite side on
the actual Y axis. Now you can also find
these options just in case you forget at the top left
hand side of it under view. So if I go down to View
and go across to Viewport, you can see here that this actually tells
me exactly what I need to press to get the viewpoint that I've
just actually explained. Now we also have the button on the number pad, which
is number five. And number five button
in Blender toggles between perspective and
orthographic views. Perspective view offers a more natural and
realistic viewpoint with objects appearing smaller
as they get further away. Mimicking human vision, orthographic view removes
perspective distortion, making all objects appear
at their true size, regardless of distance, useful for precision
modeling and technical work. The other thing that number
five does, for instance, if I come to my cube, at the moment I am able to
actually zoom into the cube. However, if I press number five, I will not be able to
actually zoom into this cube. No matter how far I zoom in, I'll still be able
to move around it by pressing the little
dot button like so. But if I actually
want to actually work on the inside of an object, I can quickly press number five. And then I can
actually go in and work around the inside as well. Now if you're working on a
laptop or something like that, or a tablet, and it doesn't
actually have a number pad, you can also use,
if I press five, the actual squiggle key, which is under the escape board on the left hand side
of your keyboard. And that then will
give you pretty much the same options
as we had before. So we can click the right view, we can actually
click the back view, and we can click the
left view, for instance. The opposite to
what we had before. So instead of pressing
1.3 we just press the little squiggle
line and then we can actually view whichever
side we need to. Now we're nearly at the end
of this short introduction. There are a couple more things
that you can actually do. If you come over to
the right hand side and you see here where we've actually got the name of the actual parts
within our scene. We can also grab them from here. And then press the
little dot born to zoom in so I
can grab this one. Press the little dot, dot born and that then
we'll zoom is in. The other great thing
about this is we can also come in shift
select them both, press the little dot button, and then we're able
to actually rotate around both of these
cubes. All right everyone. So I hope you enjoyed the short introduction to the
navigation within Blender. And I hope from
now on it won't be a struggle navigating
around the viewport. Thanks a lot, everyone. Cheers.
5. Blender Modeling Basics: Welcome back everyone to Blender for the Environment
Artists Guide. And this is where we left
it off the last time. All right, so now you've
got the blender basics, navigation hopefully
nailed down. What we're going to do is then
come in and first of all, I'm going to delete this camera. So we're going to
left click, delete the camera down the
bottom left hand side, you will see that I
have screen casting on. This should be on all the
way through the course, so if you ever miss anything, it should be down
here at the bottom. You can see as well,
my mouse clicks are also actually down there. So let's come in and actually select our cube and
delete the other way. And let's come in and
select our light, and delete the other way. Now the first thing I want to do is just save out the scene. So I'm going to
come up to final. I'm going to save As. I'm going to save this
out then in where all my resources and turntables and things like
that are for this scene, I'm going to call it
Victorian course seen, so enter twice and then
we can save that out. Now, whenever you
want to save it, I recommend you do this
after every single lesson, you just come up to file
and you go to Save. Now at the moment,
you can see if I go to Edit and go to Preferences
down the Bombrat. And side here you can
see it says Blender 4.0 0.1 If you want
to actually see that, all you need to do is
come to interface, come down to where
it says Status part, and this is where the blender version is actually turned on. I recommend actually turning all of these on because
it's going to give you a lot of data down there as to how many faces and things
like that you seem. How much V Ram using, how much Ram using, really, really important as we get further on into
the actual course. The next thing that you want
to set up is just for now, which is really,
really important. If you come to system, you can see at the moment
that we are undo steps 32. If you're running a
much lower end machine, you might want to turn
these down a little bit. But just remember that
if you turn these down, you won't actually
be able to press controls head as many
times obviously. So, but I recommend don't turn this up because
we've really, really got a big scene
here and we want to make sure that most of you are able to actually
render this out. So be very, very
careful with that. A little bit later
on in the course, I will be going through
how you can set up your blender for better
performance and optimization. Especially when we get to
the stage where it might be your machine might actually be struggling
along. All right then. So finally then what I also
want to talk about is how to get your work back if you
actually blender crashes. So all you're going to do is
you're going to go to file. And you can see here
where it says Recover. And then all you want to
do is go to Auto Save. And what it should have done is you will see here that I have my Victorian Cor scene saved out at 1 minute ago,
something like that. But what will happen is
Blender should also have a cup plus saved here as you get
further on into the course, and then you can go back
to that actual last save. What that means is you normally will end up losing around ten, maybe possibly 20
minutes worth of work, but that should be the maximum. Normally, I've found
minutes myself, it's normally just three to 5 minutes or
something like that. I also recommend, if you're
trying something out new, save it in another blend file. So save it in another blend
file and then that will enable you to actually
go back to that part. So whenever you come in, let's say to a new part
that you've not done before and you know you're not sure about this
modeling part, just save it out as a new file. So it could be Victorian course seen working or something
like that for instance. And then once you've actually done whatever you need to do, then you can save it back as
this hope that makes sense. All right then. So
let's close that down. They're the first things
that we want to do. Now At the moment, what
we're going to do is we're going to actually be
building out our gray box. So to do that, what I'm first of all going to do is
bringing a ground plane. And it's called a ground
plane just because it sits on these axis
going over here. Now, before we go any further,
it's important that we understand the very basics
of blender modeling. So we're going to be
going through that now. This will tell you all about the object and edit
view modes and all about the faces and
verts and all of that great stuff that you're actually going
to need to know. And then after that,
we can actually start building out this
actual gray box. Alright everyone, see
here on the next one. After this, if you already
know all this again, move on to the next lesson. We'll be starting our great box. Thanks a lot. Bye bye. Welcome everyone to the basics
of modeling in Blender. And this is a short
introduction just to get you started on a few of the
basics in modeling. So the first thing I want to
do is bring in a primitive. The way that we're
going to bring into primitive is press Shift in A. And then what we're going
to do is open up a menu. And you can see that
we've got all of these things along this
actual primitive menu. But the one we want to focus
on is the actual mesh. From here you can see
we can bring in many, many things like
cylinders, cubes, planes. And the one we want
to bring in just now is going to be our cube. Now that we've
brought our cub in, the next thing I want to discuss
is object and edit mode. And you can see at the moment
over on the left hand side, we're actually in something
called object mode. And this means basically we can manipulate this whole object. So if I press, I can actually
move it around my Viewport, so if I press S the scale, I can actually scale the
whole of the object in. But the thing is, we
don't really want to work in object mode necessarily, and a lot of the
time we're actually going to be working
in edit mode. So we can come up to
the top left hand side and put this in edit mode, or we can actually
press the tab button and jump into edit
mode. That way you will notice once we've
actually gone into edit mode, we have a lot more options
to use and more importantly, we have a lot of the topology
now to play around with. So the first thing you'll
notice, the difference being, is that we have now
these three options up at the top left hand side. And if you have over them, it will say vertex
edges and faces. Now vertex is going to be
these little points here. The edges is going to be these edges of my cubes
or any of the edges. And finally, we've
got the faces, which is actually the
whole polygon face. Now you can also, instead
of clicking on these, press one on the keyboard. And that then will jump
you into vertex select. If you press two, you
can go into edges and three is going to
take you into faces. From here, we can actually
manipulate any of these parts. You will notice at the
moment, I've got gizmo here. Now, if you don't have
the gizmo available, come over to the
left hand side and you'll have this little
born here that says move. Or you can press shift space bar and bring in your
move tool like so. Now because I'm on faces, I can actually pull
out this face like so if I go to edges I
can actually grab one of the edges and pull this out like so if we're on
vertexes I can grab this vertex or grab
the second vertex with shift select and then pull
this out like so really, really easy to actually
manipulate things once you know how to select
each of these parts. Now before we go too
much in the weeds with actually modeling in
this actual edit mode, let's just jump back into
object mode. For now. What I want to show
you is how we can actually move this
actual cube around. So as well as moving it
with the actual gizmo here, we can also press and actually freemove this object
around. Or we can press G and Y two. Let's put it along
the y axis. Move it around. Or the x axis for instance. And move it this way.
Or even the dead axis. And move it up and down. To drop it back
where we started, let's just right click like so that's actually moving
the location of, it's not a cube anymore, but let's just say it's a cube. We can also scale this
in as well with the S B. So we can scale it in or
scale it out like so. Now we can also
press the S button, hold the Shift button. And then we have a lot more
finesse on actual scaling. We can also scale this up by, let's say a factor of two. So two enter and there we go. And of course we can scale it
down pretty small as well. Now the next thing I want
to discuss is rotating. Because if we rotate it with
R and just rotate it around, we haven't got a lot of
control over how this rotates. So what I want to do instead
is I always want to press R, then attach it to an axis, which might be the
It, so the green one. And then rotate it
either by freehand or by actually inputting the
value under our number pad. So if I want to rotate it, let's say by 90 degrees,
press the Born. And now rotated this
round by 90 degrees. Now if I want to rotate it back, I can press Y, the little minus born
on the number pad 90, and then we can rotate it back. Now there is something else
that you need to know. We also want to reset
our transformations. And this is one of the most
important things within Blender because if you don't
reset your transformations, blender still considers this a cube even though it's
not really a cube anymore. So what we want to do to
reset the transformations is press control. All transforms. And then you'll notice that the orientation has
moved over here, because it will always move
to the center of the world From there, then we
want to actually reset our orientation as well. So we want to right click
Set Origin to geometry. And then it's going to
put the origin right back in the center
of this object. Now it's also important to know resetting the
transformations will also impact things like UV mapping, things
like modifiers. Basically, if you ever
have a problem in Blender, always make sure that you reset the transformations
and then most of those problems will
definitely go away. All right, the next thing about resetting our transformations, it makes it really
easy then to get something back to how
we add it before. In other words, if I press
S and scale this down and then let's
press art and zed. And rotate it around this way. Because before this, I
actually reset my rotations. What I can now do is
press alternS and put it back to the scale that it was before I did anything, and then alternate and actually reset that rotation as well. So really, really handy
once you've actually reset your transformations
in what you can actually do. Now moving on, we're
actually going to be looking now at duplication. So if I come round here, I'm able to actually
duplicate this. If I press shift D and
then press the Enter Born, it's now a duplication. And I can move this over
to the right hand side. So now we have
actually two objects. Now what if you want
these two objects actually combined and you didn't mean to actually duplicate it in object mode for instance.
Well, that's easy. We can just shift
select the other one and press control J. And now they're both actually join together
as you can see. So if I press Tab, now
we're able to come in and actually work on them
both at the same time. Now what happens if we want to actually split them
off so we don't want the objects to actually be together? That's also easy. Just make sure that you
select one of them first, and then all you're
going to do is press L, just to select everything, so all of these faces. Then you're going to press P. Come down to where
it says selection. And now if I press tab, they're both actually split off. Now, of course, using
the same command. If I press tab, I can
actually come in, grab a face, for instance, press Shift D. I
can actually also duplicate things with
inside edit mode as well. So we might want to duplicate
all three of these. Shift D, I can
actually come in then and actually duplicate
them like so. What it also means
though is that these, when you duplicate them in edit mode will be part
of the same object. Of course, because in edit mode they're not actually
classed as an object, they're classed as
the same actual part. Now for the next
part, I'm going to bring in a brand new cube. And I'm just going
to show you some of the basic modeling
techniques within blender and go through
a few of the options. So here we have a
brand new cube. And the first one
I'm going to show you is if we come
into edit mode, we'll always be working in edit mode to show
you these things. Just make sure
you're in edit mode. I'm going to grab the top face and what
I'm going to do is press and that then is
going to extrude this out. Now sometimes you will
need to extrude something out and it will need to be
a long axis, for instance. So all I'm going to
do is go to edge, select, grab this edge. And then what I'm
going to do is press. And you can see, because
it's not tied to an axis, it's floating around everywhere. However, if I press the x born, you can see now it extrudes out following along
that actual axis. Which then makes it really, really easy to manipulate it where I actually
need it to go. The next one we're going to look at is something called beveling. And then all I need to do is come in and I'm going
to grab my edge. So I'm going to press two on the keyboard, grab
an edge like so. And then I'm just going to
press control B, like so. And you'll notice now it's actually beveled off that side. You'll also notice down on the left hand side here we have something called
an operator panel. It will be closed.
Just open it up. And from here then
with the actual bevel, we're able then to
turn the bevels down. For instance, turn them up, move how the shape of the actual bevel is going to be and all that
other good stuff. Now pretty much
anything you do in blender is going to give you
an operator panel like this. We're not going to go
too much into this, but basically the
moment that you press Tab button to
come out of edit mode, this is going to disappear. And then you're locked in
with the actual shape that you've chosen or the
insert or the extrusion. So just bear that in mind. So the moment I press Tab,
that actually disappears. Now what about if
we want to bevel off vertices and not edges? So for instance, if I come to a vertice like this and
vertices like this, press control B, you'll see
that it bevels off like this. But if I come to one that are the opposites
of each other, press control B, you'll see
nothing actually happens. However, if I press control
shift and then we're actually able to bevel off the
actual vertices like so. So that's another handy
tip for actually beveling. Now the next modeling
technique we want to discuss is
actually edge loops. So how do we get more
geometry onto this? So for instance, I want to
bring some edges on here. I can press control, and that then will bring me
one edge in here. If I left click, then
you can see that I can put this either
this side or this side. But let's say I want it
right in the center. I'm just going to right
click on the mouse. And that then is going to
put it right in the center. Now the other thing
I can do with the operator panel
again is then come in and turn all of these up to give me
more actual edge loops. And I can even move
them to the left and the right. Now I can also, if I press control Ed
come in press control, I can actually scroll up on the mouse wheel to give me as many edge loops
as I actually want. Or if I want a little
bit more finesse, I can actually type it out
on the actual number part. So I can type out
120 for instance, and at 120 edge loops to
cancel it at any time, just press the Escpeboard and then that will cancel it out. Now the next modeling
technique I wants to show you requires two actual blocks
or two cubes like this. And all I'm going to do is
I'm going to come in and I'm going to select
opposing faces like so. And then I want to actually join these together,
for instance. So all I'm going to do,
I've selected them both. I'm going to right
click and come down to what it
says, bridge faces. And now you can see I can
actually join those together. Now if I press Controls that
and just go back a minute. You can also do this by coming in and let's say
grabbing this edge. And this edge. And
what I'm going to do instead is I'm going
to press the Born. So, and come down to
the bottom as well. And then grab both of
these and press the Born. So sometimes bridge
will not work, because bridge has to work with two edges and
nothing in between. In other words, nothing
selected there. If I come into this one
now and try right click and come down to where it
says bridge edge loops, you will see select at
least two edge loops. So we can't actually
join it off from there. And that is when
it's a good idea to use the borne instead. And now the final
modeling technique I actually want to show you
is something called Insert. So what I'm going to do is I'm going to grab this face here. I'm going to press the Eyburn. And then you can see you can actually insert this face in. And from there you can actually extrude it out if you want to. You can also then
press control B and bevel it off if you want to. And you can see now
it's really easy to use all of those techniques that have actually showed you. Now lastly, the
last thing I want to show you is the insert again, but this time we're
going to grab this base and this base. And if I press I,
it's true you can actually insert them
both at the same time. Now the best thing
though about insert is if I press the I and
then press I again, we can actually insert them separately from each
other. Like so. Now I see a lot of
renders on Facebook and other social media that kind of look really,
really blocky. And for instance, if I press Tab now and go into object mode, you will see this actually
looks pretty blocky. But there's a real
easy fix for this, so it doesn't actually
have to look like that. All you need to do is once
you've actually finished, right click, come up and where
it says Shade auto smooth. And that then will shade it off based on the actual angle. So really, really easy
to either shade flat, shade completely smooth like so, or shade auto smooth like so if you actually are struggling
and you actually want it to shade it a little bit
smoother than what it is, you can come over to
the right hand side where this little triangle is. Go down and open up the normal. And from there you can
actually increase this and shade it even more smooth
based on a higher angle. The default is always set to 30. Just make sure you set it to 30 in case you
actually overdo it. Now, the last thing I
want to show you in this introduction is the actual cursor because
I think it's very, very important to
actually modeling. So what I'm going to
do with the more is I'm going to make
another cube with shift D. And then I want this cube on top of this
cube, for instance. Now if I move my
cursor over here, so shift right click. And then what I can do is
I can press shift desk. And I'm going to go selection
to cursor, keep offset. And that then is going to move the exact center of this cube, or the orientation
to my actual cursor. Now how would I get this then? On top of this cube, I would
literally grab this cube. I would first of all right,
click and set the origin to geometry just to make sure that origin is right
in the center. So I would then press
Shift Cursor to Selected. And that then is going to put my cursor right in the center. And then I would grab this cube. And from there I'm
able to go shift S selections cursor Key pot set. And now that cube is right
next to this actual cube here. From here, then I can actually
bring this up and let's actually just have a quick play around of everything
that we've learned. So you can see now
if I pulled this up, I'm going to join them both
together then with control J. And then the first thing
I'm going to do is come in, grab this face and this face,
I'm going to right click. Then I'm going to come
down to bridge faces. And then I'm going to
bring in some edge loops. So let's bring in two
or three edge loops. Left click, right click. And then what I'm going to do
is I'm going to press Alt. Shifting, click just to select all of this edge
going around here. And press the S born
and pull it out like so from there then what
I'm going to do is I'm going to level off
both of these tops. So I'm going to grab this
top shifts like this top, I'm going to press control
B and actually level them off like so from there then I'm going
to bring in an insert. So I'm going to grab
the front top here. I'm going to insert this
with the eye button like so. And then from there I'm
actually going to extrude out. So I'm going to extrude
this out like so. Now let's say I
want a bigger piece on the next bit. I'm
going to press Shift D, Pull it out, so this is a
duplicate of this face. I want to press the S bond to make it a little bit bigger, and then I'm going to press and pull that out along that axis. Finally, then what I'm going
to do is grab this one. And this one, I'm
going to right click then and bridge faces like so. And you can see just
how easy this really is now to actually start
building out some really, really complex models with everything that
you've just learned. All right everyone. So I
hope you enjoyed that. And I'll see on the
next one. Cheers.
6. Modeling Greybox Using Human Scale Referencing: Welcome back everyone to Blender for the Environment
Artists Guide. And this is where we left off. All right, so now let's
start with our gray box. So first of all,
what I'm going to do is I'm going to
bring in a plane. So shift, let's go
in, bring in a plane. And then what I'm going to do is actually I'm not going to scale this up based
on the object mode. So what I'm going to do is I'm going to go into edit mode. And then we're going
to come over here where this little boxes. And what I'm gonna do is I'm going to click this
little down arrow. And what I'm gonna do is I'm
going to put edge length on. So just click this
edge length on and now you'll see it actually
gives you an edge. Now the reason I
want to do this in edit mode if we do
this in object mode, so if I bring this out like so, you can see that
this isn't right. So you can see at the
moment it's been scaled up. And each one of these
represents 1 meter. So this is realistically
around 6 meters, but it's still saying 2 meters. So what I'm going to do is
press controls a couple of times and then we're going
to bring it to 2 meters. And then now if I has
press seven on the number, had to go over the top
and bring this out. You can see now it actually scales up the way
that I want it. So the way that I want
to scale this up is I want this to be around 27. So if I bring this up
on going this way, so around 20.7 meters. So let's scale it down. You can also hold the
shift on to slow it down. So 20.7 going that way and
then 23.3 going this way. So the other great
thing we can do is we can press two and actually grab the edge like so
press shift space bar to bring in you move tool. And then all I'm going
to do is pull it out. And as you pull it out, you can see down on the right hand side. This actually starts scaling up. So we want this on the right hand side and left hand side. In other words, the length
of it to be 23.3 meters. So again, I'm going to
start pulling it up, holding the shift button
down, bring it up, bring it up, bring it
up 23.3 meters like so. And I've measured this
out so that we get a really accurate representation
of what actually, or what I've built before. So that you can actually
follow along really easily without worrying too much about scale and
things like that. All right, so the
next thing then we want to do is we want to then hop on over to our
actual resource pack. And what we want to
do is we want to bring in some of
those resources. Now now in a little bit, I will be going through
the asset manager and showing you how
you can actually bring things in from the actual resource pack
using the asset manager, which is going to make
it much, much easier. So for now what I'm going
to do is though I'm going to bring over
my asset manager, which I've got to open
here. Let's open it up. And the one that we want is the human reference.
So this one here. And all I'm going to do
is I'm just going to press control C just to copy it. And the great thing about
blender is if I put this down then and press
control V, There we go. Now my man is
actually brought in. Your man should be facing
this way at the moment. So if you press one
on the number pad, it should be facing this way. And because I'm in
object mode as well, I need to press Shift Spacebar. So in other words,
to bring in a gizmo, I need to press Shift space bar in edit mode and in object mode. Or you can just come up to the left hand side
and click this on. And here's our little
guy over here. All right, so the
next thing then, if you press seven
on your number pad, what we want to do is we want to place him roundabout here. So just a little bit
from the center. The other thing is
we want to move this now to the actual center. So the easiest way to do this, as you can see at
the moment we've got the cursor right smack
bang in the center. If you haven't just press shift
S cursor to world origin, that's going to
pray in the center. And from there now you
can grab your plane. You can press control
all transforms, right click, set
origin to geometry. And what that's going to
do is it's going to put that origin right in the
center of our plane. And from there then
we can press Shift. And so shift S selection
to cursor keep offset. And it's going to move our
plane right into the center. So now we've got our
plane bang in the center. Which means that when
we're building things out, we know when we're taking
a render or, you know, going around our
scene like this, it's right in the center and not lopsided over this side
or something like that. All right, so now
then let's actually bring in our first building. And it will be the first
building we actually build, which will be the actual cafe. We will be bouncing between
these buildings because it gets very tedious if we're
just focusing on one building. So in other words, we
build one whole building. Can we do all of the furniture, all of the windows and things? It does get very
tedious like that. So the easiest way to do it is to bounce between
things and keep it, you know, exciting
and things like that. We'll also be adding
materials and textures as we go along just to keep you really invested
in the project. All right, so now then let's
come to our first building, which we're going to
put roundabout here. Let's first of all
bring in a actual cube. So what I'm going to do is
I'm going to bring in a cube. So let's bring in a cube. What I'm also going
to do is I'm just going to pull it up
like so I'm going to press the tap button and
immediately you can see the best thing is that we've actually got this
scale on here again. So we've got all of
our sizes on here. Now what I want to
do is I want to focus on this line
going down here first. So I'm going to come to face, select, grab this face. And what I'm going to do
is I'm going to pull this out so that this one down here. Comes to 5.96 So 5.96
something around there. And then what I'm going
to do is I'm going to go round this side now
and grab this face. And what I'm looking for
is this one down here. So in other words,
we've got the length. So this is the length. That's
the width I've just done. And what I want to do is
I want to pull this out then to 5.81 I'm going
to bring it along. 5.81 holding the
shipborne, there we go. So now what we need is
of course is the height. So the height on this is
going to be 3.42 meters. So I'm going to grab
the top of this. And then what I want
to do is lift this up. And you can see at the moment
it's 2.5 Let's keep going. So 3.42 meters. So now you can obviously
see that we've got a little bit stuck in the floor and we really, really
don't want that. So all I'm going to do is
I'm just going to grab this and pull it up
just a little bit. So now we need to
put this in place. Now the other thing
is you will notice if I put my guy next to here, you will see that this is
quite a tall building. What we're trying
to do here is get the gray box for the individual
levels of the building. Now, some of the buildings are going to be short
and some of them are going to be high because
you want a lot of variation, especially in a scene like this. Because after all, it's
a Victorian era scene, they weren't built like today, where you have just levels going up and they're
all exactly the same. That's not how they were built. They were built on
different levels and all of the buildings
at different levels. But we need to make sure that
whatever we're building, that we can put doors or levels in there which are
obviously taller than our guy, because he's not
going to be stooping down to get in a door. So we need to think
through this process when you're building your
own projects out there. All right, so the next
thing we need to do is let's put this in
some sort of place. So what I'm going to
do is I'm going to come over the top and
I'm going to grab it. I'm going to press seven
to go over the top. And what I want to do now is
press, and when you press, when you're in this
top kind of view, it's not actually going to
move it from the floor. In other words, wherever
I put it around here, you see you can press now, I can put it somewhere
and all it's going to do is move it on the
Y and the X axis. It's not going to change
where it is on the floor. If I press one and I press now, I can move it around here, but it's not going to put
it down along the Y axis. All right. Also
remember if you're pressing G and you move it somewhere that you
don't want to, just right click and it'll drop it right back
in the same place. Well, let's press seven
now and go over the top. And what I'm going to
do is I'm going to put it roughly around here. Because I've got to think what I actually want in this scene. So at the back here,
I'm going to put some benches in
the front of here. I'm going to have some
tables and chairs, because it is a
coffeehouse after all. All right, So now
we've got that, Now we can actually
focus on our next floor. So the next floor all we're going to do is I'm
going to come round, I'm going to grab
this part here, I'm going to press Shift D. I'm going to drag it
up because what I don't want to do here is I don't want to actually alter
the size of this, at least not at the moment. All I want to do is alter the height of this
actual building. So the height of this
building is going to be 3.05 meters. So all I'm going to do is
we're gonna press Tab. I'm going to grab this top
and as I pull it down, you can see now that that
starts to come down. I'm going to hold the shift
button down and bring it to 3.05 meters. So you can see 3.05
meters like so. All right, so now let's
come to the next building. And what I want to do
now with this one is I want this on 3.47 meters, so L shift D. We can also grab
it in edit mode. Bring it up like so grab the top of it
and then we're going to pull it up and we're
going to bring that then to 3.47 meters, like. So there is basically our first building or our
first grade box all there. Now you will notice,
because the way I did it, that these two are actually
split from each other. That's because we actually duplicated this
part in edit mode. And this part was
duplicated in object mode. Now let's join these together because we've pretty much
got what we need here. So all I'm gonna do is I'm
just going to join these gaps. I'm gonna press on
this one, left click, shift select on this one, and then press Control and J. And that then is going
to join them together. Next of all, I'm
going to come in, save out my file. And I'll see on the
next one everyone. And by the end of the next one, we should have the
gray box laid out. Then what we'll
do is we'll think about looking at
our asset manager. And finally after that, we'll
bring in some lighting. All right everyone. I'll
see on the next one. Thanks lot. Bye bye.
7. Greyboxing Buildings Crafting the Foundation of Your Victorian Scene: Welcome back everyone
to Blend the Fall, The Environment Artists Guide, and this is where we left there. Alright, so what we're
going to do now is we're going to do the
actual next building. So what I'm going to do is
I'm going to come over to this side now and I'm going
to bring in another cube. And then we'll set
that out over here. This will be the
actual perfume shop. So what I'm gonna do is
I'm going to press shift A. I'm gonna bring in a cube. And then all I'm gonna do is I'm gonna drag my cube over here, press seven to go
over the top again. We can press G. And
then what we can do is we can actually
go into edit mode. So tab A to grab everything. Just make sure you do, press A, so you've grabbed everything and then all we're
going to do is we're just going to pull it out just
to get some sort of scale. Now I'm going to do is
I'm just going to pick this up above the ground
plane to make sure that it sat just above
the ground plane like So now let's get some
right scaling on this. So what I want to do is I
want to make sure first of all that this going from here to here is going to be around
6 meters or 6.01 meters. So if I pull this out, I'm going to pull it
back a little bit. I'm going to keep
pulling it back, so to 6.01 So then the next one is I'm
going to pull this one out. And what I want this
to be is 7.8 1 meter. So let's pull it
out. 7.81 meters. And now we've got just the, and the height on this
one will be 4.55 so keep dragging it down to 4.55
Again, holding the shift B. Now we've got the right size. Let's actually put this into
the place where we want it. So all I'm going to do is
I'm just going to press tab seven to go over the top. And what I want to
make sure is that it's a little bit of a line of
difference from here to here. Because we're going to actually put another building here. And we want to make it
look as though, you know, somebody is going to be
walking down this road. Now the other thing is
we also have to think about steps and back doors
and things like that. We don't want to allay too
tight or anything like that. What I also want to do is I want to move this down a little bit, maybe a little bit more like. So now I'm just going to put my man here and just make sure he can walk down this alleyway
and he looks pretty nice. Now again, remember once we've
actually built buildings, we can move those round
to our heart's content. All this is doing is
just getting things in place so we can actually
start building upon them. A lot of times you're
going to build this out and you are actually going
to have to change things. But the main point
of actually building a gray box is the
fact that you can get lighting in and you can have a good look round at how
it's actually going to look. And that's the main point of an actual gray box checking out how the environment's
going to look. All right, so the next
thing then what we're going to do is we've got
the first level on here. So what I'm going to
do is I'm going to grab this actual box. I'm going to press
Shift D. I'm going to drag it up then to
the top like so. And what we're going to do
now is do the second floor because we know they're going to be the same kind
of length here. So what I'm going to do then,
I'm going to press Tab. I'm going to grab the top of
here and 'n drag it down. And I want this to
be 3.34 meters. So pull it up, pull it up. 3.34 meters, going
along this edge here. So this one here, you
can see is 3.34 meters. Same for this one as well. All right, so now let's come in and actually do the next one. So what I'm going to do is
I'm going to grab this again. Shift D, bring it up and you can see it's already taller
than our last one. We only want it a
slight bit taller. So what I'm going to do
is I'm going to come in three to grab my face. So press three, grab my face, and then just drag this
down to 2.87 meters. So 2.87 meters. So. So you can see it's
slightly taller than this one. It is a different shape and that's the most
important thing. We want each of these buildings
to be a different shape, so they really
starts to look nice and not too much the same, too similar, because this is not how this era built buildings. All right, so now
we're going to do is we're going to bring
in another one. So we're going to
bring in another cube. Before we do that though, let's join all these
together with control J. So shift select them
all, press control J. And now we can do is
bring in another cube. So I'm going to bring
in another cube. And now what I'm going to
do is build the bookshop. So what I'm going
to do is I'm going to set it slightly back from this one so you can
see it slightly set back from this one. And then what I'm going to
do is I'm going to press Tab again to go into edit mode. I'm going to pull it up to
my ground plane like so. And then what we're
going to do is we're going to pull
it out this way, pull it out this
way, and finally get the actual right height. You'll notice that I'm clicking on my other screen as well. And obviously that's because I've got a gray box over there, which I'm using to actually help me set this
out for you guys. All right, so with this then, what I'm going to do
is it's going to be 6.3 meters this way. So if I pull it out to
6.32 meters this way, so going back a little bit, holding the shift bun down
6.32 meters that way. And then what I'm
going to do now is I'm going to pull
it the other way, and it's going to be 4.06 So
pull it out, pull it out, pull it out to 4.06 like so. And then what I'm
going to do now is I'm going to pull it up to 2.94 so we can see
at the moment, 2.94 Around there. The height
is 2.94 The width is 4.06 and the length
of this building is 6.32 Now I'm going to do is
I'm going to press Tab again, press Shift D, Drag this up, then put it on top
of this building. And the height of my
next building then is going to be 2.94 meters. So let's just check that
whether it's already there, 2.94 meters, like
so. And there we go. All right, so now then
we've done the bookshop. We just need now the butchers. So let's come to the
butchers. So we'll do that. Now what we'll do is again, we'll bring in another cube. I find it easier
to do it that way. The one thing is with this one, we want it set back a
little bit on here. But we do want it level along here because we're going
to put a chimney on there. Now again, it's important when
you're building this out, imagine what each of these
buildings is going to be. And with the references you've already got of what you're
actually going to put in them. And you'll find as
you work through, you'll start building the base. And then you'll start adding
more and more things, which is really important. All right, so shift A, let's
bring in another cube. Let's pull it over again. Let's just get it, first
of all in the right place. So I'm just going to press G. I'm going to push it
back against there. And then what I'm going to do
is I'm going to pull it up just so it sat on top
of that ground plane. So then what I'm going to do now is I'm going to
get the right size. So first of all, I'm going
to pull it out this way. So I'm going to grab
it this way and it wants to be 5.19 meters, so pull it out 5.19 meters. So then what we're going to do is we're going to pull
it the other way. And it's going to
be 4.47 meters. So pull it out 4.47
meters like so. And you can see as
well that this, it's actually probably
in the good place. It probably needs to all
go this way a little bit. This building and this building, but we'll saw that
out in a minute. But you can see now it's
laid out really nicely. I also think that it needs
to probably come this way, but we'll deal with
that in a minute. Now let's get the height. So
what we're going to do is we're going to bring this
to a height of 3.6 meters. So let's bring it, bring it up, bring it up 3.6 meters. There we go. And then all I'm going to do now is
come to the next one. And the next one, we're going
to make it 2.12 meters. And it should be around
the same height as here. What I'm going to
do is I'm going to press L to grab it all. Shift D, bring it up. And then what I'm going to do
is I'm going to bring this down to 2.12 meters. I actually don't think
that's the right height. What I'm going to do is
I'm just going to bring it down to just the top
of there, actually. And then what I'm going to
do now is I'm just going to check that this building
is the right height. I think that this I'm
not sure actually, if it's a little bit too small. I'm just wondering, actually, you know what, We're going
to leave it that high. I'm going to come
back to this one now. And then what we're going
to do is the last one, which is going to
be 1.68 meters. And the reason this one is
smaller than what I said before is because the roof actually is going to
intersect with this one, giving it that Victorian field. But we'll go through
that obviously, as we come to that part. So, what I'm going to
do with this one is I'm going to press L again, shift D, just to drag it up. And then what we're
going to do now is we're going to
come to the top of here and we're going to pull
it down to 1.68 meters. So pull it down, pull
this one up now, 1.68 meters like so. And we should end up with
something like that. Now finally, what we're
going to do before we finish this is we're
going to go over the top. We're going to make
sure, first of all that all these
are joined together. So join them together
with control J. Make sure these are
joined together. Make sure these are
joined together. And then what you can do is
you can go over the top now. Now what I'm going
to do with this one is I'm going to
grab both of these. I'm going to pull them
a little bit this way, and then I'm going to
pull them a little bit this way as well,
just like that. And then I think the gap
here is looking pretty nice. And the last part we're
going to put in here, then on the next lesson
is going to be the roofs. And it's going to be the subway, which is going to be here. And we're just going to create a block for the subway just so we can get an idea of where everything's going to
go. All right everyone. So I hope you enjoyed that and I'll see
you on the next one. Thanks a lot. Bye bye.
8. Sculpting Victorian Rooftops with Greyboxing: Welcome back everyone.
To blend, The Fall, The Environment Artists Guide, and this is where we left here. All right, so now let's
come to our actual subway. So what we're going
to do is again, we'll bring in a cube. So I'm going to press
Shift A, bring in a cube. And then all I'm going to do
is press to go over the top. And I'm just going to put this somewhere around
here just for now. And we'll move it out in a
bit. Let's then pull it up. And then what we
can do now is we can get the actual length. So the length is going to
be 2.13 meters times two, which will be 4.26 meters. So let's pull it
out to 4.26 meters. So something around.
Let's have a look. 4.26 Let's pull it down
there. There we go. And then what we'll do
now, the height is going to be 1.08 meters. So bring it down, bring it
down 1.08 meters, like so. And then what we're
going to do is we're just going to bring
in an edge loop. So control right in the
center, Left click. And then what you're going to do is you're just going to right click and that will drop
it right in the center. And then finally what
you're going to do is you're going to
pull up this next bit. So if you come to face select, grab this face and
all I'm going to do is press and just extrude it up. And you'll see as you start to extrude the right hand side, you'll see also has
to lengthen it. And we want to
bring this to 0.991 0.99 not 0.99 wants,
bring it up a little bit. Not 0.991 around there. It doesn't have to be
absolutely perfect. There's something around there. And you can see now this is going to be the
top of our subway. This is going to be the
walkway and the little, you know, kind of barriers that are on the side of here as well. Now we're going to do is we're going to go over the top soon. Just going to press seven
just to go over the top. And all I'm going to do is just make sure this is
in the right place. I'm going to pull it this
way a little bit of like, so pull it this
way a little bit, and then we've got
enough room for the bandstand over here
and things like that. Now again, these are just, I think I'll pull it
this way a little bit. These are just placements,
so just remember that. And we can, you
know, change them at any point or make them
a little bit bigger, a little bit smaller
depending on how we feel. For instance, on
this one, I feel like maybe if I put my guy here, it is a little bit
too long on here. I think I'm going to
leave it for now. And when we come to it, we can make it a little bit bigger. Now, the other stuff like the benches that you
see in the scene, or this U bus stop over here, or the little newspaper stand, or even the car, we're not going to worry
about at the moment. We're going to do
those, you know, as we actually start to
build the buildings. This is, as I say,
just a grade box. The next important
thing though with the grade box is to bring
in the actual roofs, just to have an idea of
how the roofs are going to look and especially which direction they're
going to go in. So to do that, I'm not now going to worry about any sizing or scaling or anything like that because we don't
need that anymore. We've pretty much got everything laid out that we
need laying out. So what I'm going to do now
is I'm going to come up, I'm going to grab one of them. I'm going to come
up and turn off, let's turn off this, so
we'll come in edge length. Let's turn it off. And now
what we can do is we can come in and let's say we
grab the top of this one. I can now duplicate it. So shift D, duplicate it. Bring it up a little bit, and then all I'm going to do
is press control to bring in another edge loop.
Left click, right click. And then all I'm
going to do is just pull it up a little bit and this will be the way
that this building is facing as you can see. And now what I'm going to do
is I'm just going to grab this one and this one
press and then come round, grab this one and this one
press. And there we go. Now all I can do is I can
just grab the whole thing with L and just bring
it down into place. And that is then going
to be my coffee shop, or roughly my coffee shop. We're obviously going
to build it out. Now let's come to
our next building. This one is a lot
more complicated. First of all, it's got a
round part in here as well. We'll put that in
in just 1 minute. Let's first of all deal with
this roof going up here. So all I'm going to do
is I'm going to come in, I'm going to grab
this roof here. I'm going to press shift
again, bring it up. I'm going to press control
left click, right click. Pull it up then. And
then obviously what we need to do now is making
it much, much thinner. Because this roof is going
to come to round about here. If I grab this with L, I'm going to scale
it on the Y and Y, bring it in, so bring
it to the side. So, and let's just
put that in place, roundabout there, right
to the edge like so. All right, so that's
looking pretty nice so far. Now let's think about this bit because it is a
little bit rounded. So the way that
we're going to put that in is I'm
going to press tab. I'm going to press shift and I'm just going to
bring in a cylinder. I'm not going to worry about how many verts or anything
like that at the moment. I'm just going to
bring in a cylinder. And what I'm going to do
then is just scale it up. So I'm going to
scale it up like so, and then I'm just
going to put it into some sort of place like so where I know it's
going to roughly go. And then what I'm
going to do is I'm just going to pull it up. Now the thing is about
this cylinder is it's going to be the
same height as these. Now we don't need
to worry about that because we're definitely
going to be replacing this. All we want to do is get
this in place so we can see how the rest of the
building is going to be. So that's what I'm going to do. So at the moment, if
I go over the top, I can see this is kind of
the scale it's going to be. Is this a little bit too small? I think so. So I'm just going to scale it
up a little bit. And then I'm going to
put it back into place. So pull it back
into place like so. And it's nearly nearly
touching this roof here. And I think that
looks about right. Okay. So what I'm going to do now is I'm going to come in, press tab face, select,
grab the top face. And then all I'm
going to do is I'm Jaws going to bring
it up to here. And then finally what
I'm going to do is I'm going to extrude it up. So I'm going to press, pull it up and I want it
to be quite high, so a little bit higher
than this roof here. And then I'm going to press
and scale it in like so. And I think that's looking about the
right height as well. Now I'm going to
do is I'm going to come in back to my building. I'm going to grab
this building here, so L to grab it. I'm going to press Shift D
Enter, so it doesn't move. So the moment if I press, you can see we've got
another duplication. Right click to drop
it back in place. Then all I'm going
to do is press R D 90 to rotate it round. And then I'm going
to go over the top with seven, go over the top. And then I'm going to press
G and move it into place. Now we can see straightaway
that it's way, way too big. But if we scale this down, it means that it's going
to scale all of it down. And we want this to
come round about. Down, down to round about here. So in other words, just
into this building. Now the other thing is this roof wants to be a little bit
smaller than this one. So first of all,
I'm going to press S and's head and pull it down, and then we're going to
fit it to top of the roof. And then finally when
I'm going to do it, I'm going to press and Y, is it Yes, and it no S and X. Let's pull it in, let's
move it over like so. And we want it basically come
in to round about there. So you can see it needs to
be a bit pulled out a little bit more like so
roundabout there. And that then is going
to be this roof. Now, last of all, what
I'm going to do is I am going to fill in this
one and this one. So I'm going to grab
this one and this one, press the button to fill it in, and then I'm also going to grab this one and this
one to fill it in. And finally this one and
this one to fill it in. And I'm doing that for a reason. It basically means
that when the light, so when I bring me in, my light, I've actually got
some understanding of how the light is
going to work on here. If you've got a hole in there, it's going to make it much, much harder now as well. I'm going to come to
my actual cylinder. I'm going to right click,
and I'm going to shade auto, smooth so I have a good visual on how that's going to look. And then finally, let's
come to these two. So I'm going to grab
this one and this one, I'm going to pull them
down a little bit, just so they're
actually interacting with that bottom part
there. All right? So that's that part. Now let's come to this building here then. So this building here, I
want to go straight up, it is going to have a flat roof. Same as this one. And
then I'm going to have a little bit of an
outcrop over here. So let's do that next.
So what I'm going to do is I'll come to this
roof. Same thing again. I'm going to grab
it. This part here, I'm going to press Shift D. And then what I'm going to do
is pull it up slightly. Press control, left
click, right click. Just drop it right
in the center. And then what I'm going
to do is I'm going to pull it up like so. And this one is going to
be quite a tall roof, but again, it's going to
have a flat bit on the top. I'm going to make the
flat bit straight away. And the way I'm
going to do that is I'm just going to
bevel off the top. All I've going to do is I'm just going to
select this edge. I'm going to press
control B, pull it out. And then I can actually flatten that off really,
really nicely for me. Then what I'm going
to do now is I also need one going this way, so maybe, maybe a little
bit too hasty there. And what I should have actually
done is press control. Ed, just to go back, I should
have grabbed this roof. Press shift D, R D
90 to spin it round. Let's put this in place then. Where I want it to
go, I want it to be a little bit thinner
than what this is. So I'm going to press
S to shrink it down. And the other thing
is I want it going a little bit to this
side at the moment, it's right in the center. Let's pull it a little
bit over to this side. And I think that actually
is a good scale. It's about the right height. And now I can actually come
in and level this off, and then I can make
this a little bit smaller depending
on how this looks. So what I'm going to do
is I'm going to press control like we did
before, pull it down. And then what I'm going to do is I'm going to come to this roof. I'm going to press the S button, like so I'm going
to drag it down to the actual top of this
building as you can see there. And then I've got it in the
right place because they already put it to this side. And what I'm going to do
then is grab this building, press L, and I'm going to also
press one on a number pad. And just bring it down
then to the top of there. So now you can see this is
how it's going to look. You can see that
this one is way, way too far out. We need to really,
really bring that back. So to do that, all I'm going to do is I'm going to
press L on this. I'm going to drag
it this way first, just so it's intersecting
into that roof. And then I'm going to
come grab this edge, shift select this edge, and then I'm going to bring
it back to where I want it, which will be something
around there. I think that's looking
pretty nice now, again, because of lighting. And we're going to see the
bottom of this building. So let's come in, press the
button on both of those, and then we'll grab this edge. And this edge, we'll
press on those like so. And then finally we'll grab
this one and this one, press the button and
then round the back. This one and this one. Press the F button,
and there we go. All right, so on
the next lesson, then we'll get the
final building, actually, sorry, the
final roof in place. And then what we'll do is
we'll think about bringing in some lighting just so we have a good visual and how
it's going to look. All right, everyone. So
I hope you enjoyed that. And I'll see on the next one. Thanks a lot. Bye bye.
9. Organizing Your Scene Collections and Layers in Blender: Welcome back everyone.
To Blend The Fall, The Environment Artists Guide, and this is where
we left it off. All right, so what
I'm going to do then, I'm going to come to
this building now, let's actually pull
this up a little bit. So this one's a little
bit of a weird one because the actual roof is
going to start from here. In other words, the
windows are going to come in partly into the roof. So let's come in then. And what we'll do is we'll
grab the top of here, we'll press Shift D. We'll pull it up like
we've done before. We'll press control R,
left click, right click. And then what we're going
to do is we're going to pull this up higher
than this one. And then I'm going to bevel off the top of this one
like we did with this. So let's press control B. Let's pull it out like so. And then what I'm
going to do is now I'm going to drop these down. So if I bring these
down to here like so. And then what I'll do
is I'll press S and why pull them out a
little bit like so. And I think that's going
to be about right for now. Then what are we going
to do is we're going to press F. While I've
got these two edges, just press F. And
then what we can do now is we can come
in, grab this one, and this one, press
the F button, come round to the back,
this one and this one. Press the F button,
and there we go. All right, so that's
that building done a little bit
higher than this one. The only thing I think that we need to do is just come in, grab the top of this one, and we're just going to
pull it out a little bit. So I'm going to press and y, and pull it out
just to make it a little bit larger
than the other one. Okay, so we've got
our butcher shop, we've got our bookshop. We've got our perfume shop, and we've got our cafe. And finally we've got the
makings of our subway. So everything's sort of
in place at the moment. Now, one thing that's
probably not right is just the alleyways
and things like that. We're not going to worry about those at the moment, as I said. Now the next thing
we want to do then, before we do anything else, is we want to join
all of these up. If I join these together, control J, right click, shade, auto, smooth, and then make sure that these
are all joined together. You can press right click, drop them in place again, and then finally this, all
of it is joined together. Now I want to do is I'm
going to actually show you how to actually do
collections properly. It's very, very interesting. We're going to use it
on the next lesson and go through it and actually
put these in some sort of collections because
it's going to make it much easier as we start
building in the future. All right everyone.
So I hope you enjoy this collections tutorial. I hope you find it useful. And if you already know
all about collections, move on to the next lesson. Alright everyone. I'll see on
the next one, thanks a lot. Bye bye. Welcome everyone
to our collections guide. And you'll notice over the
right hand side in blender, you will have something that's called theme
collections over here. And this is basically how the old blender used to
actually handle laying. So with different
layers you would have different scenes or
different objects in place. It's changed a little bit now, and in the new
Blender 2.8 onwards, we're now dealing with
scenes and collections. So the first thing
you'll notice is over here that we've got one
that says collection. Let's call this
collection plane. And then what we'll
do is we'll actually put our plane into
that collection. Now at the moment you can
see within this collection, our plane is actually here. And we don't actually
want the other three, we want them basically into
a different collection. So all I'm going to do is
I'm going to right click, I'm going to go and
click New Collection. And then what I can do is I
can call this cube like so. And then what I can do is I
can left click and drag and drop my cube into
the new collection. And then what you
can actually do is you can actually close these up and you can
see how neat that is. Now what we're
going to do is I'm going to show you the
other way of doing this. Now if we come to
our actual sphere, what I'm going to do is I'm
going to press the button. I'm going to click
New Collection, and I'm going to click Sphere. So press Enter or
hit the okay B. And there we go. Now
we've actually got a new collection with
our Sphere in there. The other thing is
you can also come, you can press the N button. And then what you
can do from there is you can actually
click on one of these. So let's say we wanted
this cylinder in the cube, and it will automatically put
the cylinder in the cube. Now if you don't want
that, you can press the Enb again. New collection. And let's put cylinder like so. And then click Okay. And then we go. Now
we've actually got a really nice collection
sorted out really fast. Now what about the
objects in there? Then what you can do as well is let's say we want to change
the name of this cube. We can come on over to it. And instead of actually going
in here and renaming it, what we can actually do
then is press F two, and there you go, the
object name comes up. And if we change this to
cube 33, press Enter. You will see. Now if we go
to the right hand side, this cube is called 33. Now, it's important in large scenes to actually
put things into collections because
that way you can actually increase the
performance of blender. Or you can hide certain
things out of the way. Because what you
can also do is you can grab multiple objects. Press the button again, drop them in a new scene. So press M New Collection, and let's call this
one objects like so. And there we go, we
have our new one with all of the objects
actually in there. Now you can see as well that because nothing
is left in there, we've not got this
little arrow there. So all of these are now empty. But it's quickly and
easily able to just press M and put them in their
own collections once more. The other reason why
this is actually important is because many of the displacements
or particle systems and lots of other things within blender or even geometdes, you can actually use
collections to do certain things to a certain
bunch of collections. Okay, so the next thing
we're going to look at is over on the
right hand side. We're also able then to hide
any of the collections. So if we click the
little on here, that will mean that this
collection has been hidden away from
the Viewport view. Now it's important
to distinguish between Viewport and Cam review. So the Cam review basically means that if I click this off, when I actually come
to render this scene, everything within
this collection will be hidden out of the way. It won't cast any shadows
or anything like that. It will all be hidden
out of the way. Now the other one we've got
is this little tick born. If I select this, you will see that it just
turns both of them off, so it won't be visible in the
viewport nor in the render. Now the other thing to look at is if we click this
little down arrow. We also have a few
interesting ones here. So we have one that
says indirect only. We have one that says hold out. But the ones we're most interested in is
actually this one here. So if I click this
little arrow here, you can see now we
get a new option. And if I come and
click it on here, you will see now that
if I come across, these will still be
rendered in the Viewport. Still rendered in the render, but I'm not able to
actually click on them. Which makes this really
handy if you're trying to grab a load of actual
assets or objects, that you won't
actually be actually selecting this collection
on top of that. Now the other thing
is if I turn this on, I can also do a search
here for, let's say cube. So if I'm typing cube, so I'm able now to
quickly and easily find it within my actual scene. The other thing is over on
the right hand side as well, the double tap, the Able. And to deselect everything
also actually works. So let's turn this off now. So now let's have a quick look
at this in actual action, in a real scene. So you can see here we have
a scene here with many, many, many parts
which aren't named. And we need to basically put these into their own collection. Because you can
imagine a scene like this with thousands
of parts all in the same collection
is obviously having an impact on the
blender performance. So what I'm going to do is I'm just going to hide the floor, hide this part of the
floor, hide maybe this car. And then what I'm
going to do is I'm going to go over the top. And all I want to do now is just make sure that I'm
not going to select anything else apart from
this actual building here. And then all I'm
going to do is I'm just going to press B and just try and select everything on
that actual building like. So just make sure I've not got my camera selected or
anything like that. And then what I'm going to
do is I'm going to press the Born New Collection, and let's call it Butchers shop. And then press Enter
and click, Okay. And now what I'm able
to do is I'm able to now come all the way
to the top of here. So I have to go all
the way to the top. And then let's start closing up these collections like so. So we've got square
building there, we've got bookshop and butchers, And now we've got
the butcher shop, which is the one that
we've just made. And now you can see just how quickly I can actually
clean all that up. So now I've come along
and I double tap the A so I've not got
anything selected. I bring back my floor like
so I double tap the A again. And then what I'm going
to do is just close the hide the butcher
shop out the way. And you can see this is the parts that I've actually missed. And then all I can
do is I can select these three parts
or four parts like so press M and let's drop
them into our butcher's shop. And then they'll be
hidden out of the way, leaving the other parts that are left which I actually missed. So butcher's shop
again. And there we go. So now we're able to hide the butcher's shop or we're able to bring it
back into the scene. So from there, going a little
bit more advanced now, what we're also able to do is hide all of our
collections in one go. We just need our mouse
in the viewport. And then all you need
to press is number one. And what that'll
do is hide all of these collections
from there were you can actually do is you
can press number two. And what that'll do
is actually bring in the gray box or the second
collection on there. Number three then brings in the third actual collection and so on and so on and so on. As you can see upturn maximum I think of even nine or zero. So you can see very, very easy once
you've put them in collections to rename them, to actually increase the
performance within blender, to hide them in the actual viewport or
hide them in the render. And then also once you've
done that to select, they'd have to be a very, very big scene to have more than take collections within
the collections as well. You can also add
in a collection, so I put new here and
you'll see if I open that. Now we've actually got
a new butcher shop one. So within the collections, you can also have collections
within themselves. And you can build a really, really large
hierarchy from there. All right everyone. So I
hope you enjoyed that. I hope you found it useful. Thanks everyone. Cheers.
10. Enhancing Atmosphere with Blender's Sky Texture Node: Welcome back everyone to Blender for the Environment
Artists Guide, And this is where we left off. All right then. So what we're
going to do now is we're actually going to put
these in collections. So I'm going to
come, first of all, to my ground plane. I'm going to press the
button New Collection. And I'll call this ground plane. And then I'll come to my Subway. I'm going to press collect. Subway press. Okay. Or twice. You can
also press twice. We'll come then to
our coffee shop, and then we'll come
to our bookshop, New collection book shop. Enter, Enter, and then butchers M. And then finally
our perfume shop. Perfume shop. Not like that. Without the. Okay, there we go. Now you can see we've got all
of these into a collection. Now last of all, what
I want to do is I want to write Click
New Collection. And what I want to
do is I want to call this gray box or
gray boxes like so. And then what I can do is
I can drag all of these, so all of these ones
we've just made. And drop them into our gray
box. And close that up. And now anytime I want to
close down my gray box, I'm free to actually do that, making it much, much easier
to work with. All right. So now what I want
to do is we want to bring in some lighting before we do anything else and check out how that's
going to look. Now over here on the
right hand side, you will see that you've got some options
where it says world. And at the moment we've
just got a background. If I click this
on at the moment, you won't really see anything. And the reason is
because first of all, we've got no light in
here and second of all, it's on actual V. Now
I recommend for this, you can use V to basically check how
the scenes coming on, and for those of you
with a quicker computer, you can actually use cycles. So if we switch this
over to cycles, you'll see this happens. And what we'll also do is we'll put de noising on for now, this actually uses a lot of actual power from your computer. We will talk about this in the future under performance
and optimization, but for now just click it on. Now the next thing
we want to do, we're not going to go
into too much details about V and cycles right now, because we're going to discuss that again a little
bit later on. For now, all we want
to do is getting some basic lighting to see what the scene is actually
going to look like. And this is what I always
do, basic lighting first. And from there as we
build the scene out, then we can bring more and
more lighting options in and get a really
good visual then on what things are going to
look like at the moment. All we want to do is get an idea of how this
scene is set out, if the lighting is
going to look good. So what we're going to do
now is we're going to go up to Edit Preferences. And then what we're going to do is we're going to put this on either non cutter or optic X. The higher you go up here
basically towards optics X, the better it's
going to actually look and the quicker
it's going to render. So I recommend if you can put it on optic X. Click that on, and then click on both of these, because then it gives
you the option of using your GPU or your CPU. Now, some of you out
there might have a much faster graphics cards and some of you might have
a much better processor. It just all depends. I'm going to click
both of mine on, so just click on
whichever one you can. And basically if you can't have any using a low end machine, then you're probably going
to have to use V instead. Alright. Once you've done that, then close that down and what we're gonna do is we're
going to actually, as you can see
here, the samples, they're very slow going
up before it says done. If I move this over and see very slow before
it says done, what I'm gonna do is I'm
gonna put this on my GPU and now you'll see just how much quicker that is every
time I move around. It's done near enough,
straight away. So that's what we want,
that's why we put it on our graphics cards rather
than our process it. Because the graphics
card is much, much better actually rendering
it out whether it be in the viewport or whether it
be in actual raytracing. Render the graphics
cards normally better. All right, so once
we've done that, then what we want to do now
is bring in some lighting. So what I'm going to
do is I'm going to come over to my shader. And then what I'm
going to do is it's gonna load up like so. And at the moment
you can see that my shader is going
to be on object. We don't really want that on. What we want our shader to
be on is to be on the world. Now, first of all,
before we do anything, what I always like to
do is just drag this across because we're not going to need really any of these. So I'm just going to come down to the bottom left hand side. You'll see if Garlille crosst, left click hold, and just drag it across to
the left hand side. And then you're going to end
up with a bit more room. I do want to keep my UV map on here because sometimes that's really handy actually to have. But the rest of it we're
not actually going to need. The only other thing we're
going to need really, is to be able to click
on our materials. We're going to definitely
need to do that. So we're going to leave
this side over here on next of all then at the moment this is on each of the objects, they've got no
materials on them, so there's nothing
showing up here. We're not interested though
right now in materials. What we're interested in is
coming over and putting this onto world so we can actually mess around with
our world Lighting. As I say, at the moment we can't see anything because we've
got this on material mode. If we put this on shade mode, it will take us into
blend the cycles. If a double tap, the, this is what it's going to look like. Now at the moment, the world, if a zoom out of a little bit, only has a background on this. If I bring this up, we'll
bring the lighting in and we can change the background to be a blue or
something like that. We don't actually want this. I recommend honestly when you
build in things like this, trying to get away
with as much world lighting without light
sources as possible. Because it's going to speed
up the whole process. So instead of this
we're going to be using a sky in built sky
texture world. So I'll show you
how that works now. So what we're first of
going to do is we're just going to select our
background press, Delete and delete out
the way in your notes. Straightaway, everything
goes black because there now isn't any
lighting whatsoever, no light sources at all. So now what I'm going to do
is I'm just going to come in, I'm going to press Shift
Day to bring in a new node. And I'm going to click
on where it says Search. And the one I'm going to look for is the one right at the top. Or you can put in sky
texture and click that on. And now when I plug
this in to my surface, you will see we actually
get some really, really nice lighting
straight off the bat. And that's why I
always use this. It's much better than the sun, and generally it's much
better than a HDRI. Because with a HDRI, although it is realistic, lighting is based on real world lighting and
that depends where you are. So you have to make sure with
HDRI lighting that you're really going to sue the lighting for the project
you're working on. So I tend to always
use the sky texture because it's much much bear
on performance as well. All right, so what
we're going to do is now we're
going to come in, we, we're going to
leave the sun size, in fact, no we want, we'll
change the sun size to zero. We'll put the sun intensity
on 0.5 And then what we'll do is we'll come now and look at the elevation
and things like that. So the sun size
basically is how big the sun is in the sky and
we can't see our sun. If we make this massive, then you'll be able
to see some type of sun as you can see there. If I make it a
little bit smaller, as you can see now, we can
just see our sun there. The sun intensity obviously turns down how bright
the sun's going to be. So I'm going to leave
that on. No, 0.5 It has a very small
impact actually. If I put this to note 0.1 you'll see it's kind of tiny
on much impact it has. If I put it to one,
you can see not really much difference between one and not 0.5 as you can see, a little tiny bit of difference. The elevation is basically what the lighting
would look like. So let's say we're 10,000
feet above sea level. Put it on there, you'll see
that we can't see anything. Because up there, I don't think this is
10,000 feet, by the way. I think it's 10,000 miles or something.
I'm not even sure. But if I put this on
1,000 for instance, and let's bring
it down actually, let's try 500. There we go. Now you can see the
actual lighting is changing because
of the elevation. So if I, let's carry on
bringing this slowly, slowly, slowly as you can see. Now as we get higher
and higher and higher, you can see exactly what's
happening with the sun all the way down past sea
level under the water, basically. So that's
what that does. Let's set this to
something like 50 then. What I'm going to do now
is the sun rotation. Obviously wherever I move this, you can see the
shadows changing. And this is really,
really handy, actually, to do this on the fly. It doesn't mean
you have to go in, mess around with the sun.
You've already go in the scene. It can all be done
from here. All right. The next thing then
we want to do, sorry, explain that
a little bit wrong. The sun elevation is
how high the sun is, so the altitude is how hi, we are in the air. So if I come in and I actually
set this to 10,000 feet, you will see it's
very, very blue. If I set this to 50,000 feet, we should get to a point where
it's really, really dark. And you can imagine in space, this is actually
what it's going to look like. So that
is what that deals. So generally, for now, I always set this down
to zero just to get some basic altitude in which is a roundabout
sea level, All right. The air is basically,
as you bring this down, you can see it actually has an impact on how the sun
is actually going to look. So we're going to set this to 0.05 Then we're going to come to how much
dust is in the air, as you can see how that interacts with the sun
and things like that. We're going to set this to 1.769 and then finally
we've got the ozone. And you can see how blue
that's actually going to look. And what we're going to do is
we're going to set this to 6.923 and there we
go now pretty much, I'm going to set the sun
side to zero by the way. Like so it's just maybe
a little bit higher axially just to kind of soften
those shadows off a bit. But now you can see already
what we've got here. And we can see the one that
we really want to mess around with is our
actual sun rotation. But we can see now just what
this is going to look like. Now, one thing I do recommend
before going any further. So we'll do this on the
next lesson before we do anything is actually
with the gray box. Give it some actual material, just a very, very
basic material. And you'll be able to see much, much better than just
this white box here. So we'll do that
on the next lesson anyway. All right everyone. So I hope you enjoyed
that. And I'll see on the next one.
Thanks a lot. Bye bye.
11. Streamlining Workflow Introduction to Blender's Asset Manager: Welcome back everyone
to Blend, the Fall, the Environment Artists Guide, and this is where we left off. All right, so now let's come
into the material here, Let's come in and
put this on object. And then what we're
going to do now is we're just going to give
this a new material. So I'm going to click New.
And I'm going to call this gray box box. Instead of it being white, we will actually make
it a little bit darker. And you can see straight
away now what's happening, you can also see
that it's got way, way too much shine on here. So what we're going to do
is we're going to turn that roughness this way, to turn it down a little bit, and now you can see it's
looking much, much better. Now, we do want this to be on all of these
including my ma'am. So all I'm going to do is I'm
going to be for box select, select everything like so. And then shift select this house last because that one
already has the material. And then all we're going
to do is press control L, And we're going to
come down to where it says Link Materials. And now we can see exactly what this is going to look like,
really, really nice. Now the other thing is
we can come over and we can also click on our
little computer here. Let's put this on V so we
can have a good look with V. Now we'll tell you
that the lighting, so the sky texture doesn't work nowhere near as well with
V. But if you are using V, I recommend turning
ambient occlusion on. Let's turn on a little
bit of Bloom and let's also turn on screen
space reflections. I find that helps a lot if
I'm actually working in V, now I'm not going
to be working in V, but you can, you know, choose whichever
one you want to. A bit later on in the course, you might want to swap too easy because it's getting a little
bit heavy on your computer. But at the moment,
I'm going to be working in cycles and have a really nice look of what everything looks
like now from here. Because we've done that, What we really want to do now is go over to our resource pack to start looking
at our materials. And get that resource
pack set up ready to use. So that when we start
building really, really easy then to bring in materials and
things like that. All right, so let's move over
then to our resource pack. First of all, though,
before do that, let's save this out and let's also put it
on an object mode, saving us some performance
on our computer. Now here we are in
our resource pack. So just have this open ready
and what I'm going to play now is our Blender Asset
Manager complete guide. We're going to go
through that first, and then when you return
on the next lesson, we'll actually start
incorporating what we learned into that into our
actual asset manager. Alright everyone, So I
hope you enjoyed that and I'll see you on the next one if you already know all that again, move on to the next lesson. I'll see on the next
one. Thanks a lot. Bye bye. Welcome
everyone to the Blend, that asset manager guide. And basically what we're
going to do in this one is just go through the asset
manager, show you how it works. It does seem fairly complex
when you first start this, but actually is quite simple once you get your
head around it. So here you can see I've got a standard scene here and
I've actually brought in some actual assets
and they're named, this is important actually, that just make sure you
name the assets before you actually put them
into the asset manager. Now you will notice when you
first come into blender, whether that be blender three or blender four at the top here, it doesn't actually
say asset manager, so that's the first
thing we want to do. So to do that, all we need to do is come to a little plus Bd. We're going to come across
to where it says General. And then we're
going to go down to where it says Asset Manager. And once you click that
on, you'll actually be taken into the asset manager. And this is the easiest way
to actually work with this. And the thing is now you'll
see at the moment we have our asset manager down here with all of the files on
the left hand side. And in this, this as we'll be populating all of our assets, let's actually just pick
this up a little bit then. And then what we're going to do is you can see at the moment we have current file
and we have essentials. And under essentials is
basically all of the assets that Blender has decided to
put into the asset manager. As default, what
we want to do is we want it to be
on current file. So now I'm going to do
is I'm going to come to my first asset which
is going to be my tree. And now what we're going to
do is we're going to add this into our current
file asset manager. So with this selected typical mover to the right hand side, you can see here it says three. If the right click,
you'll see here it says one that says marks asset. The moment we
actually marks asset, you will see now that actually appears in this space down here. You will also see that if we
put this onto material mode, and now if I come in and
actually drag this out, you will see that it
actually comes out with materials
actually attached, which is really, really handy. So now let's delete
this out the way. And what I'm going to
show you is now if we focus on our actual car, let's press Shift in Space Bar, just to move it over here. And then what I'm going
to do is I'm going to come over right click, and I'm going to Markets Asset. And you'll see now our
car appears there. Now if I come up and right
click and put clear Asset. And then spin this
round R -90 like so. Right click markers asset, you'll see it appears
exactly the same way. So to actually change the rotation in the
asset manager itself, what you need to
do is you need to now reset all of the transforms. So what I'm going
to do is I'm just going to clear the
asset and then we're going to put
control all transforms, right click, set
origin to geometry and then right click
and I'm going to come down markers asset. And now you'll see it's actually rotated that round for you. You will also see as well. Now if I pull this out, it comes in with
all the materials. We can actually do some
other things as well. We can actually also
save out materials. What I'm going to do
first of all though, is I'm going to come down and click the Little Plus button. And what I'm going to
do is I'm going to call this Assets like, so I'm going to call the
next one materials, like. So now I'm going to do is
I'm just going to save out my work and then I'm going
to go to unassigned. And you'll see at
the moment we have these two assets that
we put in there, we can simply shift
select them both, or shift select them all
if you've got a lot and drop them then into
our actual assets, and now they're going to
appear in our assets. Now let's move on, and if
we click on this bench, what we'll do is we'll
come over to our material. And we can see we've got
two materials in here. So let's right click this one. Marker's asset, the same thing. And then what we'll
also do is come to this one and we'll right
click and marker's asset. Now you will see when
you've marked them as asset that we've got
this little book here, the same as we've got up here. And now you'll see we haven't got any assets in
there at the moment. So these two materials
didn't go in there. And that is because they
will be in unassigned. Now let's grab both of
these materials now, drop them into our
materials, and there we go. We've got materials
and we've got assets. Now the best thing
about asset manager, what you can also
do is you can also use this for things
like geometry nodes. The only thing that
you can't use it for at the moment is animations, but pretty much everything else, you can use it with
the asset manager. Now, the next thing
we want to look at is actually doing that then with
an actual geometry node. So I'm going to do
is press control V, and here is a geometry node
that I've actually created. You can see here that if I pull this up over on the
right hand side, you can see it's actually
a geometry node. And at the moment
if I press Tab, you'll see it has actually no mesh or any kind of topology, because it's obviously
a geometry node. Now what I want to do is I
want to come up right click markers asset and now you'll see that I've got something
that says unassigned. So let's make one more now
and what we'll call this is geometry or geo node like so. And then I'm going to
come to it on a sign and put it into my
geometry node there. You will see now if
I bring this in, it actually comes in as a
geometry node, which is really, really handy if
you've got loads of geometry notes and
you want to bring them and drop them
in your scene. Now let's first of all
come up to file and save, because this is
all great in that. But actually, how do we
use this in other files? The way that we can
do that is we can come to a new blend file. Let's open up a new blend file. So here is our new blend file. And what I want to
do, first of all, I want to come up and
add in my Asset Manager, so plus Asset Manager. And at the moment you'll see
there's nothing in there. And what I want to do now
is I want to go up to Edit. I want to come to Preferences. And within Preferences you will have one that
says File Path. And this is basically
going to tell Blender where it needs to go to look for Asset Manager. So let's actually
come in and what we'll do is we'll
click the plus. And then all I'm
going to do now is find where I've
actually saved out that previous file
and has saved it in something called Blender
Asset Manager, which is here. So this is the one that
I'm going to add it to. You'll see here that
it doesn't show any blend files or
anything like that. And then all you need to do
is add asset library like so. And then we can actually
close that down. Now what I can do is I
can come down and you'll see that I've got one that
says Blend Asset Manager, and here are all of those actual files that
I actually put in there. As well as where it says assets
go, nodes and materials. So now I can simply come in, drag and drop my
actual truck in there. I can actually turn
on the materials. And now you can see once again, it actually comes in
with all the material. Now the best thing is
if I actually bring in a cube now and
just drop that there, shift space bar,
just to move it. And then what I can also do is I can come to where
my materials are, drag and drop, straight
on to my actual cube. Let the actual shader compile and load up. And there we go. Now we can actually drag
and drop materials as well. Let's come to our
geometry node then, and I'll show you
that that also works. So now we can see we've got a geometry node that
we can actually use, which is really, really handy. And now you can see just how useful the actual asset
manager really is. Now the other thing, if we go up to Edit and go to Preferences, you will see that we
are able as well to add many, many asset libraries. Just make sure that you
save your blend file. So if I bring this over
here just to show you, just make sure you make a file. And then within
there you're going to actually save
your asset manager. Because the most
important thing actually is when you're actually
saving it in here, you will see that what else comes in is an actual text file. This text file gives
Blender all of the data that it needs to
actually set up these groups. So very important if you're moving your asset manager
to a different file, make sure you move this
text file as well. All right everyone. So
let's close that down. And lastly, before I finish, what I will show
you is if you come to current file where
we don't have anything, you can also select all of
the things in your scene, right click, go down
and mark as asset. And then you'll see
that they all get poured into the Asset manager. Alright everyone. So hope you enjoyed that and I'll
see you in the next one. Thanks a lot. Cheers.
12. Setting Up Your Asset Manager with the Victorian Resource Pack: Welcome back everyone to Blender for the Environment
Artists Guide. And this is where we left off. Now, I don't really
need to explain much of the asset manager
because hopefully you watch that short tutorial. So what we'll do now
is we'll first of all come up and bring in
our asset manager, so asset manager space. And then what I'm going to do is at the moment it's
on current file, that's exactly
what I want it on. And what I'm going
to do is I'm just going to click on my human. So I've got my human here. Go over to the right hand side. We might as well
pull this down a little bit for this part here. And then all I'm going to
do is press the dot button. And that then will
take me straight to human 1.8 meters from there. Then I can right click
and I can mark as asset. And there we go. Here
is my actual human. Now you'll notice it
comes in like that. As we discussed, if a press
control is just a game off, let's press control all
transforms right click, set origin to geometry and let's see if it comes
in any better now. So markers asset
and there we go, he's in, looking
much, much better. Now from here, what
we want to do, we want to come to our tree. Same thing again. Right click Markers Asset,
bring in our tree. There's our tree. And then the final two ones we want
to do are these two here. So I'm going to
grab both of them. So one is the roof geometry node and the other one is the planks. And what I'm going to do
is press a little dot B, right click markers asset. And there is our roof and
there is our plants planks. Sorry. Now let's come in and
make some actual names here. So what 'n to do
is where it says plus, I'm going
to click on this, I'm going to call this,
let's call it human. Let's give it another one. Then click and we'll call
this one Geometry Nodes. I'm going to save
this out as well. Save, and this is
the resource Pac. I'm also going to save it here. I'm going to call it
Victorian course. I'll just call it resource
pack so we know where we are like so. And there we go.
We're saved out. Now we can come in. We've
got geometry nodes. We just need our tree
now. So click it again. I'm going to put tree like so. And then what I'm going to do now is I'm going to go back to where it says all and you
can see them in here. I'm going to grab my guy,
drop him in the human one. And then I'm going to
grab my geometry nodes. I'm gonna drop those into
the geometry nodes like so. And then I'm going
to grab my tree and I'm going to put
my tree in there. Now, I don't think that we actually need this
tree bark here. I'm not even sure
why that's there. I think it's just the material
that's been put in there, but we're going to put it
in somewhere good anyway, after this, I don't
actually think we need it. So what I'm going
to do is just clear that asset. All right? So neither come to geometry
nodes, we have them there. Human we have there, and
tree we have in there. So they're all looking good. Now let's create one
more and we'll call this materials within here. Then we want to have all of
our materials like our roofs, backdrops, metals,
things like that. So we need to make sure now that we're putting
these in the right one. So we'll do this a
little step at a time. First of all though,
I want to come in and get some names of these. So what I want to do
is I want to call this floor and then want
to name another one. So I'm clicking the plus
where the materials is because that means then
I can open and close this. So the next one I'm
going to do is going to be truck like so. And then I'm going to do another
plus and we'll do cloth. Let's go back to that.
The asset manager, It's called assets. There we go. Source list.
I clicked that off. I didn't even know I did that.
But we'll double click it. And then what we'll put
in is cloth like so. And then we'll come and
click the little plus again. And this time we'll have glass. We basically need to
make all of these. I'm going to go ahead and
I'm going to actually come back once I've
created all of these, I'm going to create all of
these ones going around here. And I want you to do
the same, please. All right, so now they're all named. Should have
them all on here. It means that you can
close that up if you want to or open it
up if you need to. So now you can see has got a little star here telling us that we need to
save out this file. So what I'm going to
do is I'm going to go to file and save. Last of all, then I'm
actually going to move this file now
into its own file. So now you can see our
resource pack is here. So what I'm going to
do is I'm just going to make a new folder
and I'll call it course resource pack. And I'm going to do this
because it's going to make it much easier for us to use
this within our scene. Now what I'm going to
do is I'm going to grab this one and this one and I'm going to drop those into
my course resource pack. Now I can delete all of these, why it means it's just
a temporary save. So you can actually delete those out the way
if you want to. Leaving in there this actual
TXT file, which is very, very important because all
that data then will be used by Blender to set out these
what we've actually made. So now when I save it, I
can go to file, Save Os. And I just want to make sure
then Court resource pack, I'm saving it in here. Now every time I save
it, it's all in there. All right, so now we
can actually move on. And what we want to
do is we want to pull this up now because
we're not going to need this. We want to click on my floor. I'm actually gonna
put my materials on. It's going to take a
little bit of time to load them up because it's
a lot of shaders. But it's going to make it
much easier to actually distinguish between the
actual shaders if we do this. So here we are,
they're all loaded up. Now if we come over to
the right hand side, over to our materials
panel over here, we can see we've got our
first one which is Flow. If we come up and come down
and click to unassigned, you can see nothing in
there at the moment. But if I come right click and what I'm going to do
is mark as asset, you can see that we end up
with our floor in there. Now this is not this object
or anything like that, it's just a material meaning. Now I can come and drag and drop this onto something
which is really, really great because in our own scene that we're
going to be creating, we can just drag and drop
all of these materials. Now of course, within
the actual course, you will find out how we put
these materials together. That will be something
that we will go through, but for now, let's just get the
basics of getting the materials in there, Okay. So the next two, then we
need to get our rubber so markers asset and our
leather markers asset. And now I'm going to do
is I'm going to drag my floor over to
where it says floor. So let's drag and drop
in, drag both of these. And we're going to put
them into our truck. So they're going to
come over to our truck. Now we're going to
go to our cloth. So I'm going to right
click marker's asset. Right click markers asset. And then all I'm going to do
is drag both of these now over to my cloth
which is up here. So I'm just going to drag
and drop them in there. Then I'm going to come
over to the glass. Now the bad thing is that
we just can't come in. We have to come in individually. So marker's asset.
Markers, asset. And just quickly
do that, like so. And then we have more in here. Now these are going to be glass. So all I'm going to do is
grab all of my glass and I'm going to drag and drop
them in there like so. And there they all are not
sure about some of these. If yeah, it does, it actually works why they aren't
loaded up yet. Maybe it's just taking a
little bit of time to do that. All right, so the next
one we've got is metal. And what I'm going
to do from now, I'm going to just select all of these and drop them
into all of these. So I think you've
got the idea now, so I'll be back when
I've actually done that. So here we are guys. I've got everything in here now. Backdrops, clay cloth curtains. I'm just going to quickly go down and making sure that I've got all of these in here
on every single one. And that then should be done. So now we can actually
close that up. We've got materials, this
is on materials now. We've got our tree, we've got our human, and we've got geometry nodes. And now we can
actually go over and file and save that
out of the way. Now I don't think we'll actually have to come back
to this anymore. So we can actually
close that down now and everything can be done
from our actual scene now. So let's just come in, make
sure it's saved out first. Close it down. All right,
so within our scene, what we want to do now
is we want to go to, plus we want to
go to General and bring in Asset Manager.
So here it is. And then what we're
going to do now is at the moment you can see
it's on current file, which is what we don't need. What we want to have it on is to go to that file
where we actually put it. So all we're going to do
that is we're going to go to Edit Preferences, file paths. And now you can see
asset library library. We don't really want
to user library, so we can minus that off and then what we can
pick on is the plus. And now we just need to find course resource pack I
think. Is it under there? Yes, it's Sunday
here. So I'm going to click is Add Asset Library. And let's click this off. And now we can come to
Course Resource Pack. And here we are. Here
is all our materials. Now the great thing
is now I can come in, select this on, let's say I
want blue cloth on there. I can actually drop the
blue cloth on there. Let's say I want my wood floor on there.
Something like that. I can bring, drag and drop
them in really, really handy. It's set up really,
really nicely now. So again, let's just go through
that just one more time because I know people sometimes get a bit muddled up about this. All we want to do
is we just want to select our course resource pack. So we're just going to
click the minus button. I'm going to bring
it in again now. So I'm going to click the plus. And then what I'm going
to do is I'm going to go back and you can see our
course resource pack is here. You're just going
to click that on. And then you're going to
click Add Asset Library. Add Asset library. And there we go, Now it's there. You can close that down then. And from there then
all you want to do is put it on course
resource pack. And now you've actually
got all of those in now, every single time we come. Now back to our asset manager, this is going to be open for us. The other great
thing is as well, you can see that we've
got geomegenodes here. Whenever we need to
bring a roof in, we can just bring that in now. So I'm just going to press
Tab just 'cause I had it on edit mode and I
can bring in my roof. And from there now I can actually bring it in
and actually move it around so and come in then and mess around
with Matt house. Now, obviously at the
moment this looks a bit funky because
of the light. Don't worry about that,
we'll sort that out. But at the moment it's
just showing you what we can do if we want
to bring planks in. We can also bring those
in really, really easily. Same for our human as well. We can bring them in like so. Alright everyone. So I hope we found that really, really handy. And on the next lesson, we can finally actually start creating our actual building. The first one we're
going to start creating is going to
be the coffee shop, because that one is actually the most simple out of them all. Alright everyone. So I'll
see on the next one. Thanks a lot. Bye bye.
13. Perfecting Details Seams and Sharps in Blender: Welcome back everyone to Blender for the Environment
Artists Guide, and this is where we left off. All right, so now what
I recommend we do is we go to modeling. It's
the easiest way. It's the best one
to actually click on because it has this
wonderful viewport. If we click on any
of the others, it's not really going to show
us as much as the viewport. So that's why I really
like having it on there. If you've got it on layout, it has this little
timeline on there which you might need if you're going
to be animating something. So that's why I tend to
use the modeling one. All right, so now
we've got that on. What we want to do is then we
want to start on this here. But what we want to do is we want to hide out some of these. So the moment you
can see we've got these all open of the moments. So let's just close
each one of these up, going to make it
much easier for us. And the one I want, I want to
leave the ground plane on, I want to close the subway, keep the coffee shop on, and close the other
ones as well. And then I've just got
something like this. Now at the moment you can
see Gizmo is not there. So I'm just going to left
click over on here on magismo. And then I can just
move it out over here. Now I'm going to do is
I'm going to start, I always tend to
start with corners. I think that makes it
much, much easier. So what I'm going
to do is I'm going to start with this corner here. And to do that, all I'm going to do is I'm
going to come in. First of all, I'm going to
come in with edge select, select this edge shift
S cursor selected. And that's going to
bring my cursor there. From there, then I
can press Shift and we can start with a cube. So let's bring the cube in and drop it down to where
I actually want it. You can see, because
I've put it right there, it's actually when
I scale it in. So I just scaled that in. You can see it scales in
from the actual edge, which makes it really, really
handy to do it that way. Now from there, I want to
actually bring my guy over a little bit because I
want to see how big, so how big this actual block is. You can see at the
moment it's fairly, fairly chunky, we don't
want it that big. So I'm going to
press the S one and scale it in a little
bit more from there. Then I'm just going to press one to go into front view and pull it down to my
actual ground plane. And now what I can do is I can make this a little bit
thinner, I think at the top. So what I'm going to do is
I'm just going to come in, face select, grab
it, pull it up. So shift space bar again, just to bring in that move tool. You won't have to bring
it in anymore, I promise. Unless you reload your blender and let's bring it up like so. And then from there then we can actually scale this in like so, so that I think is a good
start for our building. So I just think that it needs to probably be in a little bit. So what I'm first of
all going to do though, before doing that, I'm actually going to bring this up
to where I want it. So it will be just below here. So we can put this
corner in. All right. Next of all, then let's press the board and bring
in an insert. So if I press, I'm going
to bring in an insert. Hold in the shift
board if you need to. And then from there
what you can do is you can bring it right up to, we'll want it, which is
going to be around here. So if I press now, I can bring it up
just below there. Now we want to give
a little bit of room for the corner
that's gonna be in here. And then what we want
to do is we want to bring in now a
couple of kind of, you know, bits
actually on there. Because whenever we're
building this out, we want to always think about the architecture and
how it actually looked. They never really had
anything straight. It was very ornamental
type stuff. It was very blocky in
some parts as well. And we really, really need
to take that into account. All right, so what I'm
going to do is I'm going to press controller two, left click, right click. And then from there what
I'm going to do is I think I'll keep them right where
they actually put them. And I'm going to press
control B and pull them out a little bit just to get those little reliefs
going on there. So I've pulled
them out that far. Now if you want to mess
around with these, go over to this operator panel
down the left hand side. And from there then you can actually change the width
of these if you need to. Don't worry at the moment about the shape or
anything like that. We don't want to mess
around with that. So just the actual
width at the moment. Now what we're going
to do is we're going to extrude them out, but we want to extrude
them out from each other. Individually. In other words, not from a center of origin
or anything like that. So what we're going to do
is we're going to press, just press it once and then
press the Enter button. And then what you're
going to do is you're going to press old test, not for scale O test. Now you will find
a five presses. You can see the come out
very, very strangely. This is because at the moment we've got
it on medium point, we really want this set on individual origins
at the moment. So set that on, if you presses, you can pull them out like so. Still not right though. They're still not
coming out right. But if you press test, they come out at a very, very nice angle like so you only want to
pull them out so far. Now, once your left click, you will end up with the
operator panel down here again. And what you really want
to do from there is always tick on, offset, even on. And what it will
do is it'll make them a little bit wider. Now these are a little
bit wide for me now. So what I want to do is
press controls and go back. I'm going to press alternates. Bring them out again. Offset
even on, and there we go. They're looking much,
much better now as well. Also, once you press
the tab button or you click on another part, the operator panel
will disappear. So just bear that in mind. Okay, so this is the
first part of the stone. Just make sure that it's
looking really, really nice. And now what you should really do is as we're working along, we create something and we bring in a material or texture
or something like that. So what I'm now going
to introduce you to is sharps and seams. And this is really
important because a lot of the times on certain
things we are going to actually have
to use seams and sharps to actually get
what we actually want. So I'm going to introduce
you to seams and sharps now, and if you already know all that again, move on to the next one. And if not, I hope you enjoy it and I'll
see on the next one. Thanks a lot. Bye bye. Welcome everyone to the
short introduction to marking seams and sharps
part of the course. So before I give you examples of what I'm actually
talking about, let me just briefly
explain what they are. Seams, you can think of like seams on a piece of clothing, like a shirt or
pair of trousers. The main job of seams
is to make sure the texture that
you're trying to place on your mesh
goes on correctly, but more importantly, gives you control of how that
texture will look. Sharps are marked like seams, but serve an entirely
different purpose. We use sharps to
give us control of how sharp and soft angles
are on our measures. This makes them look realistic. It is also important
that we do this not only for rendering in Blender,
but also sharps. Carry on through to other software or games
engines wearing one to use like Substance Painter or Unreal
Engine as an example. So with all that said,
let's get started. Here we are in Blender
with our starting cue. Now if I click on my Cube
and go to my UV editing, you'll see that the cue is basically unwrapped
in this actual way. Basically, it unwrapped
like a present. Now if I come across
and I grab this cube, and I press Shift D, and then we press Shift Spacebar
to bring in our gizmo, and we move it across. Now let's say I want to alter
this cube a little bit. So what I'm going to do is I'm going to press the Tab button. I'm going to go
Interface select Click the top face shift Spacebar
to bring in the move tool. Bring it up. So now let's
say I want to unwrap this. Now if I grab this
with L just to grab everything and I press
the U button for unwrap, you'll see that it unwraps
exactly the same way. Even if I reset the
transformations of this, it will still unwrap
exactly the same way. Now let's mark some
seams and see how that has an actual effect
on our actual unwrap. So let's grab the top and
we'll come down to the bottom. And what we're gonna do
is we're going to press control and then come down
to where it says Mark Seems. Now it's important to
remember that it's control leap to mark
seams in face select. But if for instance
we're in edge select, so if we come to this edge, if we press control leap, you will get this
option up as well, mark seams, but you can also
right click in edge select. And you can also see we can
mark Sem this way as well. So for now though, I'm not going to actually
mark this scene. What I'm going to do
is I'm going to grab the whole thing with L like so. And now I'm going
to press Unwrap. And you can see it Unwraps
completely different. Now let's bring in
some textures so you can see what exactly
I'm talking about. So if I press Tab, I'll come up to my
materials panel up here. And I'm going to
give this material. So I'm going to come across
to the right hand side, click on my Material button. So let's now bring the material
I've already prepared. So if I come across this little
down arrow, come on down. You can see I've got
one here called Wood. And let's click that on now
you can see what's happened. We've actually applied our
material to this object, but you can see it's
pretty much a mess. The top of it looks fine, but the bit going around the
side is all bent and skewed. So if I zoom out and I press Tab now you can see
that the reason is that it's not actually be unwrapped correctly.
So how do we fix that? If we come up to edge Slate,
Let me grab this edge. And now I'm going to do is
I'm going to right click, come down to mark seams, and now I grab the
whole thing again. I'm going to press you unwrap, and now you'll see it unwrapped. Absolutely fine. You can see
that wood's looking really, really nice, actually,
on this mesh now. So what this does the seams do is actually gives you control of how this actual texture
is placed on this mesh. You also need to take
into account that this is basically
an infinite loop. If I come round and I look
at this face and this face, you can see that they're going
around if we have no seam. When I talk about
infinite loops, it's basically going
around and around. And blender doesn't actually
understand how to unwrap it, so you'll end up with
that mess we had before. Now the other thing
to take into account is if I turn this wood
around, for instance. I'm going to do, I'm
going to come over to the left hand side the
viewport of my UV editing, press A to grab everything, R 90, spin it round. Now the other thing I
want to show you is that where we join these
actual seams up is also really important
because you'll never ever get it perfect on here where
there's an actual sea. So let me exaggerate
this a little bit. So what I'm going do is
I'm going to press Tab. I'm going to make this a lot
smaller and I'm going to move it into the
center of my UV map. And then I'm going to press Tab. Now you can see that
these edges don't line up whatsoever against
this other side. So this texture here doesn't
line up with this texture. And the reason is because
we've got a seam down there. And that is the actual break in the texture yet if we
come round to this side. And I spin this round, so if I grab it or Z 90 and now go to this
one where we can see, you can see that these
line up perfectly. And the reason is
because obviously there's no seam there.
The seam is here. So you need to take
that into account on your own measures and
objects that when you're applying textures and materials that try and put seams where you're not
going to see them. So if it's on a door
handle, for instance, try and put them on the inside where no one's actually
going to see them. So always bear that in mind when you're actually
marking your seams. So now let's discuss sharps. So if I bring in
a new primitive, so if I press shift A, I'm going to go across the mesh. I'm going to bring
in a cylinder. Now you'll notice
that this cylinder has all these little
edges around there. And let's say you want to
make a cup or something. The last thing that you want is all these hard edged
faces in there. Now there are things we
can do, Sort this out. So the first one we can do is we'll bring in another cylinder. So I'm just going to move
this one out of the way. So shift space part, bring in ma gizmo. Move
it out of the way. Shift a, bring in
another cylinder. And this time I'm going to
come down to where it sits, add cylinder, and turn
up the vertices to 100. And now you'll notice that
we do have a round edge, but the problem is
that we've brought in 100 vertices to
actually achieve that. And that's not
something we want. We want to use as
few polygons as possible while still getting
a really good looking mesh. So how do we achieve that? Well, there are a number
of things we can do. First of all, we can come
across to this right hand side. What we can do now
is come to where it says normals and
click on auto smooth. Then we can right click on the viewport and
click Shad smooth. And now you'll notice it's
actually been smoothed off. But the problem with this is
if I turn up my auto smooth, you can see if I turn
it up all the way, it goes really, really funky. And that is because
at 170 degrees, Blender decides that these edges along here need moving off. So it doesn't give us a lot of control if we do this
on the other one. Sura grab this one.
Right click shapes, move autos, move on. You can see, again, even with
lower amounts of polygons, we're still able
to smooth it off. But if we turn this off, we're still going to end up with the same problem as
what we had before. So how do we solve that? Well, if we come in now
press a tab button, come to the top, grab the top shifts like the bottom press control
because we are in face Slate and we'll
come in and mark a shot. And now you'll notice
if I press tab that now it's got
hard edges on there. This gives us control. So this is why we
actually use shops. No matter what, I turn
this up to 180 degrees, which is the highest it goes, it will not get rid of
those shops that we mark. We can also mark shops
around the edges as well. Sea grab this one and this one. And now because we're
in edge select, we can write Click, come down, mark a sharp, press the tab. And now you'll see you've
got hard edges on there. So it's very important
that you mark sharps where you're going to
actually want hard edges. It's also important that
you get into the habit of marking sharps when you're
actually marking seams. And then what happens is
when you join two objects together and you turn up
the auto smooth if needed, you're not going to end up with some measures like
this. Okay. For one. So I hope you enjoyed that
introduction to marking seams and sharps and as they
say on with the show.
14. Material Nodes Introduction: Welcome Crib on to Blender for the Environment
Artists Guide, and that's where we left it off. Now that we've got this on, what we really want to do
then is actually unwrap this. So what I'm going to do
is I'm going to come in and we don't actually need to add any seams or
any sharps on this, because we don't need to have any sharp bits because
they've already got a very nice angle
on them anyway. And because we're
using stone generally, we can get away with using
blenders, smart UV projects. So what I'm going
to do is, and first of all, before I do anything, make sure that you always
reset your transformations. If you don't reset your transformations,
nothing will work. Your modifiers won't
work properly, your textures won't
go on properly, it won't UV unwrap properly. So just always when
you've created something, press control all
transforms right click, set origin to geometry. Basically what it is is if
I bring in a cube like so, if I alter this cube. So in other words, if I pull
this edge out, like this, blender still
considers this to be a cube even though it's
not a cube anymore. So when you come in to add
modifiers or unwrap it, it tries to unwrap it
as though it's a cube, or add a modifier on
it as though it's a cube and it doesn't work. Any problems you ever
have is normally always down to one
of two things. And this is the first
one of those things. All right, so let's lead
that out of the way. What we're going to
do now is come to my actual post press control
all transforms right click, set origin to geometry. And now what we're going
to do is we're actually going to bring in a material. But first of all,
let's unwrap it. So I'm going to press Tab. I'm going to press A
to select all of it, I'm going to press and
then Smart UV Project. And click Okay. Now this leads me
to my next point. It's un wrapped, but we
can't really see anything. But if we head on over
to the UV editor, we can see this is how Blender
has actually unwrapped it, which is actually really, really nice from there. Now let's bring
in a material and we'll see just how nice
that actually looks. So let's press Tab. Let's go to Asset Manager. Now let's press dot on the actual number pad to
zoom to our actual post. And what we're going to do
now is come to material. And the material we want
is going to be understone. And we have stone flags. And stone, the stone
flags are basically going to be this material going around the
outside of here. It's more like a
path type material, a little bit darker
than this one, but this is the one
we're going to use now. So let's come to our stone, and we're going to click
and drop that on there. And there we go, you
can see it's all ready, looking really, really nice in that nice light from there. Then let's actually go over to our actual shading panel just to see I can show you
how this is set out. So let's go over to
the shading panel now. Let's actually put this
onto our cycles render. And then what we're
going to do is we're just going to zoom
out of here now. And you'll see this
is the layout. Now before I go
through all this, what I want to show you is
short tutorial for a while. There won't be any more
for a while to come yet. And this one is about
shaders and textures, just to give you the
low down of how you can actually start bringing in your own textures and
things like that, really, really important
if you've not done it before or if you're
actually a beginner. And I promise once this
one's out the way, you've pretty much
got the backbone of the basics of what you
need to learn from blender. And from there on
out, we can actually focus on modeling and
things like that. There are a couple
more in the future, but they are, you know, at
the higher end of modeling. All right everyone.
So I'll play this for you now and I'll see
you after this is done. Thanks a lot. Bye bye. Welcome everyone to
the blender shading and texturing introduction. And you can see here within my scene have
actually brought in a few shaders just to kind of explain how they
actually work. So first of all, what
is an actual shader? A blender shader is a type of material that can be
applied to three D models. Within blender shaders
define the way surface of objects appear under various
lighting conditions. Simulating a wide range
of materials and effects, such as metals, glass, plastics, wood, and more. Essentially, shaders tell
blender how to render the surface of an object based on its
properties like color, transparency, shyness,
texture, and reflection. So within Blender
we use actually a node based system for creating
and customizing shaders. Particularly within its
powerful rendering engines like Cycles and the newer
EV render engine. Now it's important to note
that the actual shaders within blender react differently to each of those shaders. So at the moment you can see that I've actually
got this on V, but the moment I
put this to cycles, these actual shaders, some of them at least will
react differently. So now you can see that our
emission here that we had, that was glowing,
doesn't glow anymore. And that's what happens
in typically in blender cycles. Also the glass. Now we can actually see
through the glass and see this is actually
a glass shader. So it's important
to know straight off the get go that some shades will work in V and
some in cycles. Now next of all,
we need to look at the different types of
shades within blender. So some are created entirely in blender
through node systems, which we're going to look
at in just 1 minute. And the others are
created through textures. Generally, these will
be PBR textures. Now a PBR texture is a physically based,
rendered texture. And it's a texture
map designed to mimic the way light interacts with surfaces in the real world Based on physically
accurate models. These textures ensure
that materials reck to lighting conditions in
a realistic manner, making them essential
for creating life like three D models and
environments within blender. So now enough of all the
back story on textures. Let's actually go up then. And first of all, we want
to bring in an add on. Now this add on is in
Bill within blender. In other words, it
comes with blender. I wish they would actually
turn this on a standard, but so far you have to
actually enable it. But trust me, want to say, it's one of the best add ons
that blender ever produced. So let's go up to Edit. And what we're going to do
is come to Preferences, we're going to go
over to Add ons. And the add on we want is called the Node Wrangler type in node. Make sure the Node
Wrangler is turned on and then all you need to do
is just close this down. Next of all, we're going to
go over to our shading panel, which is this one over here. And then what we're going to do, we're going to
click on this cube, which at the moment
doesn't actually have a shader on it or any
material. We know that. Because if we come over
to the right hand side where our material
panel is here, you can see this is
completely empty. Also in the shader panel, you can also see if I zoom out, this is also completely empty. If you do happen
to have a shader in here and then there's
nothing in here, just zoom out as far as you can and then you'll
find all of the nodes. Now what I'm going
to do first of all is adding a new shader. And what we'll do is
we'll double click it and we'll call it wood like. So now you can see here is actually set something
up within Blender, just a basic principle BSDF. Now this basically
is the super node, it's where all of the
texture maps will plug into. This is the main node
that you will be using. All right, so now what
I want to do is I just want to click on this node. And what I'm going
to do is I'm going to press control Shift. And and what then that
will enable me to do is open up my actual
computer file. And from there I just
want to find my textures. So here are my textures that I'm going to use as an example. And you can see here
we've got wood grain. And you can also check out
what these actually look like by coming over to
the right hand side here and clicking this on. And now you have a good idea of what these are actually
going to look like. We can also make them larger
as well if we need to. So you can see here
at the moment, the size is 128. And we can just bring that
up to actually make them bigger and see exactly
what textures they are. Now to bring them
in, all I need to do is select the
first one, shift, select the last one,
so we've got a more selected and click
principle texture. And what blender is
going to do from there is is actually going to bring them all in and set
them up for us like so. So you can see now because
of the node Wrangler, everything is set up for us. Now within our actual
shade in panel, you will see over
the left hand side we actually have a UV map here. And it's not actually showing
anything at the moment. But if we come on
over and we select one of these actual
textures, like so, you will see if I zoom out, we've actually selected this
actual metallic shader. I can also come down and select the roughness, for instance. I can select normal or I can select the actual
image texture like so. So just remember if
it's on the wrong one, it's probably because
you've got one of the textures or the wrong
texture actually selected, and I generally want to
have it on the base color. Now with Blender four comes
a new principled BSDF. Now a lot of the options are actually hidden behind
these little tabs here. So Emission, for instance, is now hidden behind here. So I can turn this
up, as you can see, bring it down and change the
color of it if I sell one. So just remember that some of them might actually be hidden. Now, because this
is a basic video, we're just going to
go through a few of the actual options
that we normally get within our actual textures. So a PBR set up
normally consists of a base color
known as the albedo, or cut just a color map, a metallic map, a roughness
map, and a normal map. There are more maps, but they take a
little bit of work to actually set them
up within blender. And this is a basic video. So we won't be going into those, but we will be going into
those later on in the course. So the first one, which
is the albedo map, it just defines
the basic color of the material without any
lighting or shading effects. It represents how the material looks under natural lighting. If we go to the next
one, we've got metallic. And this map defines which
parts of the texture are metallic and which are not influencing how the
material reflects. Light metals have a
high reflectivity and distinct coloration
in their reflections. Now you will notice if
I click on this one, it's completely black because this wood has
absolutely no metallic. If this was completely white, all of this wood would
be completely metallic. And if it has kind
of graze in there, that then is defined the roughness of the
actual metallic. In other words, those
little spots that you see when you shine
light on something. The next one is roughness. And this isn't to
be confused with metallic because
roughness is how shiny something is and
metallic is obviously how metallic something
is generally as well. With metallic, either something's
metallic or it isn't. You don't really get in the
real world half and half. So the roughness
map controls how rough or smooth the surface
of the material appears, affecting how sharp or
blurred the reflections are. A lower value results in a smoother surface with
sharp reflections. Why a higher value leads to rough surface with
diffused reflections? Now when I'm talking
about values, I'm talking about
these values here. So the more sharp this is, or the more blurred this is, or the more darker
these little spots are, that will give you the result that you actually
are looking for. And finally, we're going
to go now to the normal, perhaps one of the
most important maps. And the normal map simulates
small surface details and textures without
actually changing the geometry of
the three D model. It affects the way light
bounces off the surface, creating the illusion
of depth and detail. And this is used
a lot in games to actually look as though there's more geometry than
what there is. Now let me show you
how that works then. So if come down to this
strength at the moment, you can see that
we've got our wood here and it's kind of defined. So if we look from here, it kind of looks like it's you know, three D and these little
grooves are going in. But if we turn this
all the way up now you can see that's the
effect we actually get. So you can see now
it looks as though it's much more ripply
along the edges. We can see big grooves
going down there. And this is what the
normal map actually does. Now at the moment with
our actual up here, you can see we've only got
one actual material on there. And what about if
you want to put multiple materials
onto an actual object? So what I'm going
to do is I'm just going to click the plus button. I'm going to click
the down arrow, and I'm just going to
choose one like glass. I want to click the
plus button again. Click the down
arrow, and this time I'll choose one that says Stone. Now if I go into my cube and press the tab button
in actual edit mode, come over, select
one of these faces. It only works on
faces, by the way. You can't select an edge and
apply a material on there. You have to select a
face or multiple faces. So what I'm going to do
then is come down to glass. And finally then I'll
click a sign like soap. Then I'll come round
to the other side. I'll click this
face and this face. And what I'll do
is I'll come down, click the stone,
and click a sign. And there we go. Now
we've actually got stone, we've got wood, and
we've got glass. And if we put this on
our rendered view now, you can see exactly how
that's going to look. And you can see how the lie is interacting with all
of these surfaces. If I come over just
to the right and side quickly and turn around
my sun rotation, we can get a clearer view of
what we're talking about. If I come even further down and bring it to the
front light so you can actually see that glass then is actually starting
to be see through. And you can also see that actual normal map working on the
inside of this cube. Now let's quickly go
back to our wood. So to do that, what I'm
going to do at the moment, you can see that we're probably
on the stone in this one, in this shade of view here, it says actually stone here. I can actually come down and click on my wood for instance. And then it will take me and put the wood on there as well. So that's another way
to actually apply them. Instead of the stone,
it's actually just put on wood instead,
as you can see. Now what I do want
to do is I want to come in to my actual wood. So that's the one that
we actually brought in, this one here and just
show you for instance, we can actually interact with
all of these texture maps. Now there's thousands
of nodes available in Blender and the way that
you put them all together, it can become
extremely complex with huge hundred node
maps and shaders. So I'm just going to
show you something of the basics just
to get you started. And that will be an RGB curve. So an RGB curve, as those of you may
know who use Photoshop, changes basically how the
actual image is actually lit, darker spots, lighter
spots, things like this. So if I come in and press
shift day Search RGB, and you can see I've got
an RGB curve here now. Just before we do
that, if you do press shift day,
you can come down, you can just see, get a flavor of how many nodes there are
actually within blender. And you can see also how many shaders there
are within blender. Let's discuss that after. But first of all, we're
going to go with RGB curves. Bring that in and
drop that down like so from here now
you can see that I can actually affect the color of this actual wood on the
fly in real time like so. We can also put this
onto the metallic, onto the roughness and even
onto the normal to get different effects and
different ways that the metallic or
roughness actually work. Now the next thing is we want
to discuss is just shaders. So as I said, this is the
main shade within blender. This is like the one ring of shaders and basically this will be the main one
that you actually use. But of course, there's
plenty of shades, so depending on what
you want to do, if you come down, you can
see we've got diffuse, we've got emission shades, we've got glass glossy, and a whole range
of other shades that you can actually
try out and use. Now that we've discussed that, let's actually come over. Two are actual shaders that
have got to set up here. Now you can see with
this glass one, it's just a very simple
shader of glass and got some roughness on and of course
an IOR value next of all, then we've got an
emission shader. And you can see
now this is using texture maps and it's
slightly more complex, and you can see how all
of these things plug in. In other words, what
I'm showing you is that shaders can be very, very simple or get
to be very complex. So the next one is the metal, and you can see this gets even more complex
the next 1 stone. And you can see again, this
is slightly more complex. And the final one is wood. And you can see
things like this. So we can see that
we've actually got some edgeware on this wood. And all of this is actually
done within blender, again with quite a big
set up for the nodes. But it's unbelievable,
really what you can actually do with these shaders once you've
actually got your head around how to set up
the node systems, now we really are just
scratching the surface in this blender shaders and
texturing introduction. And even on the right
hand side here, you can see you've got all of these options as well
to play around with, as well as the fact
that you can actually put these into your
asset manager as well. But this is just a
basic introduction just to get you started.
All right everyone. So I hope you learned
a lot from that. And I'll see you
on the next one. Thanks a lot. Cheers.
15. Architectural Details Modeling Cafe Supports with Bevel Modifier: Welcome back everyone to Blender for the
Environment Artist guy, and I hope you
really enjoyed that. Textures and Shaders
Shot Tutorial. And now we can jump
right into this. So you will know already
then from watching that that shaders can be
very simple or very complex. For instance, with
this shader here, we have a, some textures,
which are these here. So we have a roughness, we have metallic, we have
a normal map from there. Then what we've
done is we've added a little bit of noise on top. We've used a color ramp to
actually bring out that noise, so difference between the
grays and the blacks. And then finally we've
got an RGB curve, which you'll see if
I turn that down, highlights them or
brings them down. So we've got a lot of
control over here. Next of all, what
we've also done with this particular shader is we've also set up a geometry node, and we've used the
random per island. And then a difference in colors. In other words, basically
every time I duplicate this. So if I press shift
D, duplicate it over. You will see there's a
slight difference in color as we actually
duplicate them out. So you can see
slight difference in color because we want a
little bit of variation. This is really good for planks as well and things like that. All right, so let's
delete those out the way. This is the one that I
actually want if I click on this one now moving
onto an RGB curve, then this then will highlight even more
of this color ramp. An RGB curve basically makes it either lighter or darker based
on the actual color ramp. Moving in then to a
principled, and finally, we join in both of
these principles together with an
actual mix shader. And then based on what we get
is the best of both worlds, so we get a really nice texture coming from our
actual texture maps. Then we actually do the noise, so we can bring out all of
the noise on this texture. Finally, then we can
make difference in color variations from
the actual post. So every post will be a
slight different color. And then we join
both of those up, and that then is basically
it for this shader. So as we get further
into the course, the shades are going to get
much, much more complex. But this then is a relatively
simple shader set up. All right, so what we want
to do from here is and we want to bring in a modifier. So first of all we're going
to bring in a Bevel modifier. And the reason we
want to bring in a modifier and not bevel this, so if we come in and grab all of this going around
there, press control B, like we've already done, and
bevel them off is the fact that not only is it quicker
to use the bevel modifier, but also it's non destructive. In other words, we can change
it on the fly and we've not actually created something where we can't go back and
change it anymore. So that's why we
want to do that. It's called non destructive
workflow and we're going to be using a lot of
that within this scene. So let's come up
and add modifier. And the one we're going
to do is come down to generate and the one we
want to put on is bevel. And now you can see that's
exactly what it's done. Now if we come in and
put this on object mode, we get a much, much clearer
view of what that's done. It's basically rounded
off the edges. Now nothing in life is like a razor sharp edge
except a razor. But everything else,
whether it be stone, whether it be wood, always has a slight bevel on the edges. So what we want to do
now is come in and put this down to not
point n naught three, something like that because
it is stone after all. It's not going to be, you know, perfectly razor sharp, but it
is going to have a slight, slight bevelon, but it's
also not going to have a bevelon which is huge like
this or anything like that. So that's why I've put on
not point nought three, let's try n point
naught naught five. Slightly more maybe that's
the way to go with stone. And I think that's
going to look good. We're not going to
mess around with any of these other
options right now. Instead what we're going to
do now is we're going to bring this round to
the actual post. So we're going to have
one post here and start actually creating this out.
So now we've got this. What we can do is we can
go back to modeling. And then what I can
do is I can come in and I want to join
all of these up, so I'll show you why I'm going to do that as well in a minute. So first of all,
let's press shift D, and what we'll do is we'll
drag this over to this side. Now the thing is I want to get
these into a better place, so I'm now going to
mess around with these and actually bring them closer into
the wall so you can see that the wall here, I'm going to pull it out
a little bit so we've got a little bit of room to
put things against this, and we're going to
have to mess around with these as we're
building now. But you can see this one here, probably a little bit too far out, so I'm
going to pull it in. And again, when we're building
things like this as well, don't worry too much about
getting everything exactly, it's actually the opposite. You want to really work making things as different
as you possibly can. Now what we're going
to do is if I put this back now onto our rendered view, you can see that these
are exactly the same. The texture, texture here
look exactly the same. So all I'm going to do is
I'm just going to grab this, press our 90, and
just spin it around, and now it's actually different. All right, from there
then, what we're going to do is we're
going to come round. I'm going to press shift D. I'm going to
drag it then this way I'm going to drop it in something somewhere
around there. I'm going to put it on to material view because it
makes it much easier. You will have to load up
your shades to start with, but once they're loaded
up, it's going to be much easier to work in
this sort of view. You can also come in and put on your scene
wheel, for instance, if you want a bit more
light there as well, which I find actually
pretty handy. Be warned though, it does use a little bit more computer power to actually do that.
All right then. So from there then, I'm
going to come round now and I want one right
in the center of here. Now to find the center
of is pretty easy. All I can do is I can click on my actual gray
box, Press the tab button. And then I'm just going to press controller left
click, right click. And that then is going to
drop it right in the middle. From there, then I need to
actually grab this and this. So I'm going to grab this, I'm going to grab this, I'm
going to press Tab them. And then what I'm going to do is I'm going to come over to this, select it with left click, press the L button, and then I'm going
to press three on the number pad or control three, which you'll give
me the other side minus the other side from there. Then if I move this now, it's just going to
put it over here. So what I really need
to do is I need to press shift D to
duplicate it like so. And then I can bring it
right in the center. There doesn't need to
be absolutely exact. And then from there I can press 90 and spin it around slightly, just so it doesn't look the
same as this one from there. Then what I can do is
I can press Shift D. I can bring it over to
this side like so. And then 90 again. And now they all look
slightly different. All right, what you
should have now, if I press tab double tap, the A is you should have
four. Is there four? No five posts that
look like this. Okay, so let's
come round then to the other side of
our actual cafe. And what we'll start work
on is the bottom section. So this section
going across here. So all we're going to do
is we're just going to create a simple piece of wood. So we're going to create
a simple piece of wood that's gonna go down at
the bottom, over here. All right, so let's do that now. So all I'm going to do
is I'm going to shift. I'm thinking whether
I should use, yeah, I'll probably
start with a cube. So let's press shift date. Let's bring in a cube. Let's press the S bot. Don't worry about scale or
anything like that right now. All we want to do is just get this into some sort of place. If I bring this down here, it's going to probably come
up to round about here. Something round about
there. So if I come in and bring it up like so then what I can do now, I can actually bring this
out to where I want it. So I'm going to do is
I'm going to bring it out your roundabout there. All I'm doing is just creating
one piece because from this piece I can actually use
this over and over again. Now I want to do is I want
to create a little bit of a edge on here. Control, bring in an edge loop. Bring it back just in
front of the wall like so. Then what I'm going to do now, I'm going to bring up this part, so I'm going to come
to the back of it, select that face, and then
I'm going to press and bring that up to roundabout
here, something like that. From there then
what I want to do is I want to press control R, bring in another edge loop. And this time I'm
going to bring it up to maybe roundabout here. And then from there then
what I'm going to do is I'm going to grab this face,
I'm going to press E, and I'm going to
pull it out like so now I do want to bevel off this top of it without the modifier just to get it the way that
I actually want it. So what I'm going to do
is I'm going to come in, grab this edge. First of all though,
before I do anything, is press tab control. R all transforms right
click origin to geometry. And then what I'm going to do is I'm going to grab this edge. Now press control
B and just bevel it off to where we actually want it, which is
something like that. From there then what we
do is I'm going to come in with the operator panel
and change the segment. If I click this up now, we can see that we have a
bevel, which is being rounded. We want to actually have it
going the other way though. So what I'm going to do
is I'm going to pull this down to have it going
the other way like so. And you can see just
how easy that is. You can see as well,
if we turn this up, we actually get a
nicer bevel as well. From there. Then we can
actually press Tab. And this is what we actually
end up with a for me. Actually. I'm going to
turn off my scene lights just so I think
you'll be able to see a little bit easier
what they'm doing. And also for now
I'll just put it on object mode and then I think you can see
much, much better. All right, from here
then we've basically got this piece of wood ready to go. I think one thing I'll
do is I'll just come in, grab this bomb face, and just pull it
out a little bit. Now, as we move on, as we
move on within the course, we're going to be moving much, much faster as we get, you know, more accustomed to the way
that we actually work. So this will be slow in the beginning but
it will speed up. So if you're a blend and
injure or anything like that, just bear with the process and
you'll see it'll speed up. All right then. So
we've got this now. So what we want to do
now is we really don't need a lot of this mesh that
we've already gotten here. So all I'm going to do is I'm going to isolate this
out the way first. So I'm going to press shift H just to isolate everything
out of the way. And then what I'm
going to do now is I'm going to grab
the back off here. So I'm going to select this, we've left click shift, select this one.
Shifts like this one. And then all I'm
going to do is just pull them back into place. Like so we're not going to need this back and we're not
going to need these sides. So we might as well delete
them all the way now. So what I'm going to press
is delete and faces. And then what I'm going to do is I'm going to shift
select this one, shifts like this one. Control select this, which
will mean it'll select them going all the way
down and shifts like this. Now we're also going to
need the bottom either. So I might as well
shift select shifts. And then this side,
same thing again. Shift selecting,
delete and faces. And we should end up with
a piece of mesh like this, which is exactly what
I want from there. Then I'm going to
right click and we're going to
shade auto smoove. Because that then is
going to make sure that this bevel isn't looking
so beveled like this. So right click,
shade, auto, smoove. And there we go. That's
what we're left with. Now let's press control. All transforms, right click, set origin to geometry. And now what we can do
is we can actually bring in the same modifiers
what we bring in before. So generate, let's
bring in a bevel. And then let's also
turn the bevel down to naught point
naught three like so. And now you can see what a beautiful bevel
we have on there. Now on the next lesson, what we're going to
do then is we're going to get some
material on this. And then we can actually
start moving this and using it in a
really, really nice way. Now remember as well, from what you've learned from
the asset manager, you're free to actually
come in, rename these. I'll show you the next lesson, how to rename things fast, and then you can
actually put them in your own asset manager. So I'll quickly show you how
to do that on the next one, just in case you want
them for yourself. All right everyone, So I'll
see you on the next one. Thanks a lot. Bye bye.
16. Crafting Decorative Pillars with Extrusion and Inset Techniques: Welcome back everyone to Blender for the Environment
Artists Guide. And this is where we left off. All right, so we've
pretty much got this all set up with our bevel. All we need to do now
is we need to come in and we need to give a texture. So the texture we're going
to give this is blue paint. And you'll see this
texture is really, really nice, how
it actually works. So what we're going to
do is, first of all, again because it's
wood, we can really, really get away with just
pressing a, grabbing it all, pressing Smart UV project
and clicking, okay. And you'll see now
that can actually come in and with materials. So let's go to Asset
Manager and what we'll do is now we'll go down to our wood. So where is wood? And then what I'm going to
do is I'm going to drag and drop my wood on
there, first of all. So let's drag and drop that on. Let's double tap
the, and let's see. Now, I can't really see what this is going to
look like right now, but if I zoom in, you
should be able to see, if I come into my world, I'm going to turn my
sun rotation around a little bit now,
just like this. And you'll actually get an idea of what this wood is
actually going to look like. So there's what it's
going to look like. Now you should, you
might be able to see, or we might be able to see when we actually render it out that it has a slight
relief along here. In other words,
wherever the edges are, it actually has a
whiter paint on there. And the way we do that is if we quickly go to our shading panel, we can see that this one is a little bit
different of a set up. In other words,
we've got basically two lots of maps going on here which you can
have as long as you plug them both into
your actual principle. As you've seen on the
tutorial I showed you, it's four maps plugged into the principled messed
around with everyone, whether that be roughness
or whether it be metallic. We've messed around with
those just a little bit. And from there then we've actually got another
set and we've plugged basically both of these into each other,
into our shader. From there what we've done is we've actually used two bevels, so one bevel for the inside, one bevel for the
outside from there. Then what we've done
is we've changed the actual color and
made it slightly lighter or slightly
darker depending on if it's the inside of
the mesh or the outside. This is really great
because what it does is it enables you to actually have edgewaar without actually taking into substance
painter and that's why you renders
will look really, really professional
even though you've done it all completely
in blender, which is what we're
trying to do here. I recommend what you do is
if you have any shaders, you just basically take this all of this part
and you copy it. And then what you do is you
add that to your own shader. So in other words, you
bring the onward shader, add this to it, and then plug this into
the fact down here. Now at the moment, this
might be a little bit complex for where you actually
are in learning blender. So I don't want to
dwell on this too long. But what I'm going
to do is when we come to actually
rendering out the scene, we'll actually look
exactly what this does. And we'll go a little
bit more into how to get this to work correctly
and you'll see how it works. But for now, put this on our actual wood,
which we have done. And now let's go over
to our modeling. And now what we'll do
is we'll press Tab. We'll press Alt H to bring
everything back this time. And now if I double
tap the just to deselect everything and finally
come to my rendered view. You should see now this is
what we've actually got. So it's a really, really nice start to our actual coffee shop. Again, don't worry
about the pacing. We'll pick up the
pacing as we move on. All of this stuff needs
to be front ended, though, so it needs to be
explained before moving on. Now the next thing is we want
to go to our asset manager. And what we want to do is
we want to come down to it. It says course resource pack. Click that on, and then
go to current file. And nothing will be in there. And what we want to do
is we want to call, let's start with this,
we'll call this one post. So if I come in and I press
F two and first of all come in and call this post
or stone post for instance. Like so. And then what
I can do is I can come over and find it
on the right hand side. And the way I'm going
to do that is I'm just going to come over
to the right hand side, press the little dot
board on the number pad. And there you can see
post stone is here. From there, then I
can right click, come down and Market as Asset. And now you'll see if I come over here to
where current file is, click on a sign, There
is Marc Short post. So you could now build up your own asset manager with
all of these little parts. We're not going
to do that within this course simply because
of time constraints. But we already know how
to use the asset manager, we already know how
to set up the files, we already know how
to do the materials. Now the great thing is
when you're actually saving out things
like posts where they've already
got a material on blender will actually save
out the materials as well. So if you want to use
these in other files, you can just drag and drop them and it'll have the
same materials in. All right then.
So what I'm going to do is I'm just
going to clear that. Because I'm not going
to do that in mine. And then what I'm going to do is I'm going to put it back on resource pack just so I've got all my materials
that I want to use. Okay, so now let's move
on to the next part. So what I'm going
to do is I'm going to move my little guy over here. I'm going to put this
onto object mode again. I'm going to save
out my file then. And then from now I'm going to actually build that
in the next part. So let's come in and
what we'll do is we'll shift at the moment. We've got a cursor here,
let's put our cursor on this. So all I'm going to
do is press shift S cursor selected shift. Let's bring in a cube. Let's make the cube a little bit smaller with the S button. And then what we're going
to do is we're going to put this round here somewhere. Make it a little bit smaller. Bring it down to where I actually want it.
Something like that. I'm going to squish it
in a bit on the X, X. Bring it in like so, making sure it's still
going in the wall. And then from there what I'm going to do is I'm
going to come in, I need to reset now,
my transformations. And the reason is if
I come in, let's say, and grab this face,
press the eyeball, and you'll see it comes
in really weirdly. We don't want it
coming in like that. So what we're going to
do is we're going to press control all transforms, right click its origin geometry. And now I'm going to bring it
in with the eyeball and you can see it comes
in much more even. And that's exactly what I want, so I'm going to
bring it to there. And now what I'm going
to do is I'm going to press to extrude, and you will see
that a line appears moving along the z
axis as I pull it up. That's okay to follow that. If yours isn't, just press the Z again and it
will follow that. Or press it a
couple of times and it will follow that axis for me. Then I'm just going to left
click to drop that in place. And now I'm going
to do is I want to pull this out round here. So the way I'm going to do
that is I'm going to press E S to pull it out. And you can see, again,
we've got an issue here. The issue is that it's not
being pulled out level, it's being pulled out farther on the sides than the
back and the front. So I'm just going to
press controls at once. Tab control, reset
all the transforms, right click Rogen geometry. And now what we're going
to do is we're going to press S to pull it out. Now if you've still
got the same problem where it's not coming out, it could be to do with
the actual shape. So all we're going to
do in that situation is I'm going to press
shift spacebar move. And instead of
doing it that way, all I'm going to do then
is just pull it up. So I'm going to pull
it up to where I actually want it now. From there, I'm going to do something a little bit
different instead, because it wasn't coming
out the way I wanted it. What I'm going to do though
first is go over to modeling, because it's easier for
everyone to see what I'm doing. And then I'm just going to
put this on object mode. And then finally now make
sure I'm on face select. And then Olt shifting click. And what they'll do is it'll select them going
all the way around. And now I can press again
Enter and then alternS. And now I can pull it out nice, and even you can see
much, much more even. Let's set the offset too, even. And there we go. That's looking
much, much better. Now I will say that this is looking a little bit
chunky at the moment. So all I'm going to do
is I'm going to press L to bring that, select it all. And then and Y, I'm going to bring
it in a little bit like so now that's looking
much, much better. Now what I want to
do from there is I want to bring this
up one more time. I'm going to bring
all of this up. And what I want to do is
I want to level this off. The way I'm going to do that is actually I'm going to
delete this top bit. I don't need this on here, you can see it's a
face that we really, really don't need this one. The way I'm going to do that is I'm going to grab this face, press control, press
delete and click Faces. That then deletes
all of that off. Then all I'm going to
do is select this edge, this edge, press and join
that back in from there. Then what I can do
is I can press, now bring that up, we extrude, grab this edge, press control, and pull it out. Now you will notice
when a press control, the same thing is going to
happen of what I did here. Because Blender remembers it. I don't really want that. So all I'm going to
do instead is I'm just going to turn down
the amount of segments. And that is the kind of look
that I'm actually going for. All right, so now what we're going to do is we're going
to bring this part in now. So I'm going to come
back to this again. I'm going to grab this part here and I'm just making sure. Yeah, it's just that part there. What I'm going to do now
is I'm going to press I to bring it in like so. And then what I'm going to
do is I'm going to press E, and I'm just going to pull it
back a little bit like so. And then what I'm going to
do is I'm going to press I again, jaws to tad. So you just want to
press, bring it in a tad. If you're not got it
right, just press the button and
hold the shift on. At the same time,
Jaws to tad, like so. And then from there now what I can do is I can
bring it back out, bring it back out to here maybe. And then finally once more
and bring it back out. If I hide this out,
the way you can see that what I did
was to hide this one. I pressed and brought it out
and then I pressed again. I'm just going to actually go
back and do that just once more from here. You can
see it at the moment. If I bring this out, it's
bending it, which I don't want. So you can see it
slightly bent there and that's because I
didn't extrude it. So what I'm going to
do is I'm going to press, bring it out. And then what I'm going
to do now is I'm going to press again again. So from here now what I
can do is I can come in, put this onto medium point, press the S button and
bring it in like so. And you can see now got a
really, really nice mesh. And it's looking the part now. It still might be a
little bit too chunky, so I'm going to press and Y make it a little bit
less chunky like so. And let's put that in plate now. I'm not sure where these
posts are going to be yet. I do know that they're
gonna be under each window. So that's what we're
actually gonna make next. The actual windows
to go above these. And then I can actually work out where actually want these. Alright everyone. So I
hope you enjoyed that. I hope you're really
enjoying the course so far, and I'll see on the next one. Thanks lot. Bye bye.
17. Window Framing Mastery Using Seams and Face Split Techniques: Welcome back
everyone to Blender. Fold the Environment
Artists guide, and this is where
we left it off. All right, so we
said we're going to start with our windows now. So one thing before
I do that though, just to actually bring us up to speed on what this
actual shader is. So you remember we went into the wood shader and
have a look at it. So here we are. I've
actually pulled this up just to show
you what happens, so we now have control of
how this actual wood looks, especially on the edges
and on the inside of them. So you can see here, we've done exactly the same thing
with the wood on here. Exactly the same.
And on this one, it's a little bit hard to see, but you can just see it
around these edges here. It all depends what the
angle of the wood is, and we have full
control of doing that. We've also put it on the inside of the wood here as
well as you can see. So that is exactly what we,
what we're doing with it. We've also put it as well on the metalwork and things like
that so that you actually, your scene basically
comes to life. It looks just so
much better than just flat shaders on top
of them and better than that actually you can bring
in your own texture maps and add this to any of them once you actually look at
how the set up is done. So you're free to
actually take this shade, just replace the actual maps, and then you'll have a beautiful shader to actually do many, many things looking
like actually that you've took it into substance painter or something like that. But of course all
done completely in blender so because we haven't got a light actually
set up in this scene, I thought I'd just show you that just so you know what
we're trying to do. So now let's actually move
on with our actual window. And we are going to
be building a lot of windows and a lot of
doors in this project. So by the end of it you
should have a really, really good idea of how to
actually create windows. All right, so let's actually get cracking on with the window. So first of all, what
we're going to do is Shift S cursed to selected. And then what I'm going to
do is a thing to start with. What we'll do is we'll
bring in a cube. So let's bring in a
mesh, bring in a cube. And then let's make it the
size that we actually want it. So if I bring it something
just above this point is, so I want my window
basically to start here. And how I up do I want
my actual window to go? Well, we can see the top of here on this window
is going to be, has to come round about here. So this is the very,
very top of it, because this is where
our next level comes. Now remember the level
is also going to be across here and a
little bit down here. So we have to take
that into account. So what I'm going
to do is I'm going to go into edit mode. Grab the top of it
and face select. And then I'm just going to press three and then pull it up to
where we actually want it. Now. As far as the window goes, at the moment, I'm pretty happy with the
actual size of it. So this looks a good size for a nice thin coffee shop window. Then what I'm going
to do from there is I'm going to round
off this top now. So if I grab this edge and this edge and what we'll
do is we'll press control and we'll round it
off like so from there then what
I'm going to do is I'm just going to left click. And I'm going to come
down to my operator panel now and let that do
the rest of the work. So I'm thinking I'm
going to give it kind of three segments and just round off
that edge like so. Now from there what
we can do is we can actually take
the front of it, so this front here, we can
duplicate it with shifty. And then what we can do is we
can pull that out like so. Then I can come to
the back part of it. And what I'm going to
do is I'm actually going to use that as a Boolean, so I'm just going to
keep that there for now. And I'm just going
to separate it away from the other
part of the mesh by pressing selection and
separating it away like so. Now if I press Tab,
what I can do is I can press Control all transforms, right click, set
origin to geometry. And now that's ready
to actually go into my wall and
create my Boolean. What I'm also going to
do, what I tend to do, is I'm going to put all of my Booleans into
kind of one place. So what I'm going
to do is I'm going to press New Collection. And let's put it down
as Boolean like so. Click okay and OOklay again. And then also I'm going to press f1f2 and actually rename it. So call it coffee shop window. And then we should know
which one this is now it's named and it's in its
own actual part. From there. Then I'm just going to
pull this up there and I'm going to drop it right at
the very top over there. Because then I've always
got access to it. I've not got to scroll
down here to find it. Now I'm going to do is just
hide that out of the way. Finally, then what I can do
is start work on this window. First of all, let's
reset all to transform. So all transforms right click, set origin to geometry. And then from there then, now we can actually
start working it. So if I press three to go
into the kind of side view, what I'm going to do is press I. What I'm going to
do is press Tab. And then when we come to face, select, select the whole face. And I'm just going to press, and this will be the kind of
first part of the window. So this is going to
be the stone part that's going around here. With this part, we don't need to worry about edging
or anything like that, it's just going to be
some simple stone. All right, from there
then. What I'm going to do now is I'm going
to press I again. From there, then what
I'm going to do is press I again and bring that in. And then this is going to be the first wooden slats going round. And from there I'm going to
make a much thinner one. So I again, bring it in, hold the shift button
if you need to. And a kind of thin bit that's
going to go into there. You can see it's much, much
thinner than these parts. All right, so now what I want to do is I want to split these off because I find it much easier to work with them once
they're split off. So what I'm going
to do is I want to keep my selection here, Press the Y button, and that then is going to select it
away from all of these. So you'll notice now if I press, it's actually split off
from the rest of the mesh. Now if I press three again, and what I can do
is I can come in now and separate
these parts off. So ult shift click y and then ult shift click and Y
and now everything. So if I grab this one, should all be split
off from each other. If I grab this one, you
can see if I press L, everything is split off. All right, from now then let's have a look at our
stone first of all. So all I'm going to do
is I'm going to press L on just this top one, so just this one going
around the outside. And then we're gonna
press and pull that out. Now I'm going to pull this out a little bit further because this part here is going to
be into the actual wall. So you always want to make
sure that part there is always a little bit chunkier than what it's actually going to be. So now if I come in and I grab just this part and bring it back and sit it
against my wall. You can see that can sit
nicely in there like so. And we can, you know,
pull it out or in. Now let's think about this
bit 'cause this bit is going to be the first
wooden kind of bit. Now you've got to think in wood, you're actually, you're going to have some breaks in the wood. You're going to have one
down here, down here, and probably one down here
and over here as well. So what we'll do is we'll press control R. Left
click, right click. So that's got the bottom one. Control R again, and we
want to get this top one. It can be a little
bit iffy sometimes, so just hide one of them out the way if you
need to from here. Then let's focus
on this one here. All I'm going to do is I'm
going to select this one here, select this one, this one. And then come down and
select my edges like so. And what I'm going to do then is right click and mark a seam. And this is so we can
select those islands. Now I'm going to do
is the next one I'm going to do exactly
the same thing like, so come down right
click, mark scene. Now all I need to do
is split these off. So I'm going to start
with the outside and the inside them together, so L, L, Y. And what I tend to do
is once I've hit the Y, which means that the split
off is hide them out the way with H. And then I know that they've
actually been done. So L, and L, Y, and H. And then come down
to the bottom ones. So select both of these, Y, H, and now we can see all
of those are split off, alternH and bring
everything back. Now I want to do is we're going to actually extrude these out. So if I press L, L, L and L, we're just going to
do this wooden one first. And then what I'm going to
do is I'm going to pull it back into place like so. And then I'm going
to press two extrude and pull it back just just before that actual
stone wall there. Now I'm thinking that I probably need to go a little bit
further back with this. So all I'm going
to do is press L, L and just grab it all like so. And then what I'm going to do
is I'm just going to press and X on the x axis And pull it out so that now I
can put this kind of in just into my wall
as you can see there. And bearing in mind, we're
taking our time with this because it is the first window that we're going to be doing. But later on we'll be whizzing through
this, so don't worry. Now, let's think about our
next part of our window. So all I'm going
to do is L, L, L, and L and grab it all like so. And then I'm going to
pull this one back to roundabout here
because you would be able to see inside
the window, the sill. And then I'm going to
press and pull it out slightly slightly back against
that wooden part there. All right. So far so good. Now let's come to the last part, the most difficult part to do, and this is basically going
to be the actual windows. So what I'm going to
do is, first of all, I'm going to split this
off away from everything. So all that, I'm
going to select it, I'm going to press P
selection, Split it off. And if you're worried about
my voice being a bit croaky, by the way, it's because I've
got a bit of a sore throat. But I'm going to battle through this and hopefully you
won't mind too much. Then what I'm going
to do is I'm going to press three to go
into front view. So three on my number pad like. So I'm also going to just hide these out of the way because I managed to
bring them are back. So let's just hide all of these and bring back
my coffee shop like. So that's going to make
it much, much easier. We've also hidden our man out the way, so let's
bring him back. That'll make it easier as well. Now we can press three,
going to front view. And now what I want to
do is create my windows. Now you will notice if I try
and bringing it in an edge, we can't actually bring
in any edge loops. And the reason is
because it's an end on, in other words it's got
more than four sides. You can't put edge loops
through triangles or engons. You can only put them
through polygons. But luckily for us,
we have a simple fix. What I'm going to do is
I'm going to come up, hit the verte button, select this verts, this vertise. Press the J button, and
now you'll find that because we've joined those
up, we can actually bring in. Some actual edge loops like. So making it really,
really easy to do that. Left click, right click.
Now we are going to have the same problem going down
here. Exactly the same thing. So to actually combat
this one going down, rather than actually
join something up, you can see we haven't
got to join here anyway. All I'm going to do is I'm
just going to come in, I'm going to select this edge. Select this edge, right
click, subdivide. And now what happens if I
come to my vertex select, We've got one in
the center of each, and I can simply press
the J button like so. All right, so now let's
actually create our Windows. So what I'm going
to do first of all, is I'm going to come
in to these parts. So basically select everything with L and then you're going
to hit the eye button. And hopefully if you hit
the ye button again, you should be able
to bring those in and create some nice windows. Now from there, we need to
actually split these up. So what I'm going to do is
I'm going to press Selection. And then what I'm going to do is going to grab everything, all the windows going down, press the H Burton just to
hide those out of the way. And now what I can do is I
can bring just these in. So what I can do now
is I need to come in and need to select
all of these edges now, rather than, you know, go in and select them all. What I want to do
is I want to press A. I want to then press control. Come down and click Mark. Same. Now, there are some seams here that we don't want
to actually select. So what I'm going to do is
I'm just going to select these three, and these three. And then what I'm
going to do is going to right click, clear. Same. Now you can see
what we've got here. Now the reason
we've done that is because we want to
separate all of these. It's a little bit tedious, but it's well worth the time of actually taking the
time to do that. So we want to separate
all of these islands. Luckily for us, there is actually a quick
way of doing that. So what I'm going to
do is I'm going to press A to select everything, mesh, come over to split. And what we want to
do is faces by edges. Once we select this one, now there will be split up. So if I come in now
and select this one, let's say press the G key, you'll see it's
actually split up. However, we do actually
have a problem. If we come to this
one, for instance, you'll see this
one's also split up. That's not something
that we want. So what I'm going
to do is I'm going to grab all of these now. It's much quicker though, doing this way like so. And then we're going
to press shift in age, hide the rest of
it out of the way. And then I'm going
to come up to mesh. Come down to clean up, and what I want to do
is merge by distance. Once you do that,
it says removed 13 vertices and now you
should be able to come in, select them all like so. Now you can see we
do have a problem with these two
being overlapping. But all we have
to do is press Y. And now we can press, and now everything on here
should be split up. If I select any one of these, it should all be
split up like so. And that is a really, really
easy technique to do this. Now the next lesson
what we'll do is we'll pull it out and
then we'll get them beveled off and
you'll see exactly why I wanted these all split up. All right everyone, So hope you enjoyed that and I'll
see on the next one. Thanks a lot. Bye bye.
18. UV Unwrapping and Texturing Window Frames: Welcome back everyone to Blender for the Environment
Artists Guide, And this is where we left off. All right, so let
me show you them, why exactly did we do that? So now what I want to do is
I'm going to grab everything. I'm going to pull it
back over to here. Then just just in front
of that window there. And then I'm just
going to press like so to bring it out like
so. And there we go. We've got a beautiful window. But it gets better than that
because now what we can do is we can press
control on everything. So let's just select
everything now. We can even pull them out a little bit if it makes
it easier for you. And then what you can do is you can join everything together. So control J, control or
transforms right click, set origin to geometry. And now what we're going
to do is we're going to right click shade or too smooth. And then what we're going
to do is add in a modifier. And we're going to bring
in our Bevel modifier, not a geometry node. We're going to add in
a Generate and bevel. And there we go. You can
see the all split up. And if I pull this down now
to naught point naught three, you can see now
everything split up and we've got some
beautiful wood in there. All right? So really,
really easy to do that now if we press all tach and
bring back our window, now we can actually
put these into place, so let's put them into place
kind of halfway there, so maybe around here,
something like that. Let's have a look at
maybe these parts here. Maybe they want to be a little bit bigger
than what they are. Because the windows,
if I pull them back, as you can see, let's
just grab those windows. Pull them back a little bit. Pull them back to the
let's have a look. Yeah, there's no gaps there. So luckily, I think I've
got away with that. Now if you haven't, all you can do is you can
grab the whole thing. You can press S and X
and pull them out a little bit like so stretch
them out if you need to, or you can go in and
actually grab all of these being as these are
already selected for me. Another little trick I can
do is control plus and just select everything like so you can see everything
selected now. And then from there
I can press S and X and pull them out like so. And then pull them back into the place that I want them
or something like that. And then grab my windows and pull those back to
where I want them. And you can see now that's
looking really, really nice. All right. So now I'm going to leave them
split up at the moment. The windows and the actual wood, and the stone, and
things like that. And the reason is
because I actually want to unwrap these separately. So what I'm going to do is I'm just going to select all these. I'm not going to mess
around with the modify, I'm going to leave it on there because this is non
destructive workflow. And then what I can do
is I can press Tab, Smart UV Project, click Okay. And then finally, what I
can do is now press Tab. And I can come on over now
and bring in some materials now rather than just bringing
in materials willy nilly. The easiest way to actually
do this is if I put it onto material view,
let it load up. We can actually
select this and apply those materials from the stone
to get that first bit in. So it's going to be
much easier to do that. So what I'm going to do is
once we've got like loads of wood and loads of different
materials in there really, really quick then to
actually apply materials. So what I'm going to do is
I'm going to select this one. And this one I'm going
to press control L, and what I'm going to
do is copy materials. And now you'll see it's
all being put to stone. From there, what we can do
is we can actually grab just the stonework going around here, hide
it out the way. And now what I can do is I can
bring in another material. So the material we're going to bring in is going
to be some wood. And the one it's going to
be called is lightwood. If I go over to mass manager,
let's come down then. So we've got materials
here. Let's have a look. We need it onto current file, I think it is materials. Let's go to metal. Need to reload that back up. So let's see if I've
actually got that in there. Now if this ever happens to you where it's not
working correctly, all you need to do
instead is just go up to your edit preferences. Let's come down to file paths. And I'm just going to
minus off that plus. And then I'm just going to find where my actual
resource pack is. So we can see we've got
Court Resource pack here. If I click on this,
click Add Asset Library, close that down, and
now it should be able to come to
Course Resource pack. And there they all are again. Now unfortunately for me, all of mine have
disappeared in here. In other words, this is all not. In fact, yes it has. I thought it had, I'd
saved that text file out. So it's very important
as you can see, saving that text file
out and now I'm gonna do is I'm going to go down to
wood. And here's all my wood. The one that I want is
gonna be light wood. So let's put this on material. And then what I can do is I
can grab just this part here, put lightwood on like so
you'll see it will change. And now all I need to do is just come over to the
right hand side. Now, I did think that the
stone would stay there, but it hasn't unfortunately. So what I've got to
do is I've got to late plus down arrow. And the one I'm
looking for is stone. And from there then
what I can do is press Oltage and now
assign this stone. So I've only got these
selected, as you can see. And I want to assign
stone to them. And there we go. Now you can see that's looking pretty nice. Now you can also see. Because our blender
unwrapped it, that it's all going
really nicely. In other words, the wood grain is going all the right way. And that is exactly
what we want. Now in the future, we might have some where the wood grain
is going the wrong way. So I will show you how to deal with that if I just
select this one, come over to UV editing, You can see at the moment the
wood is pointing this way. If I undo this and just put
this onto Material mode, press the little doll born
and then on we're going to do is press R 90. You can see now this is
going the wrong way, so we need it to
go the right way, else they're not
going to look right. So all I'm going to do now is press controls head
and put them back. Now you'll also see that
these ones up here, they look a bit iffy. And the reason is for that is because all of these
are actually faced. And as you can see, these ones here aren't actually
going the right, you know, they're
kind of bent round. So to easily fix that, what we want to do is
we want to come over over and select this one here. And you will see
that this one is a face edges and virtus. So let's select this one here. Now, depending on
which face you select, all the rest of the UV's will
follow that active quad. So if I select this one and then press
L on the rest of it, this is the one
that's highlighted. And then I can right click
follow active quads. And now you'll see that it
actually looks much better. If I rotate this now you can see just how much better that
actually looks, for instance. And what we can also do as well as we can select this one, we can press L on each of these, then right click,
follow active quads. And I thought it would work
on the rest of bout A. So what we'll do is we'll follow active quads and then we'll select the rest of it with
L, follow active quads. And from there then
all we need to do is select them and
rotate them round. The same for this one.
Rotate them round, and the same for this one. And rotate them round. Now there is a
free add on that I should tell you about
called UV squares. So if I just come in now and just turn those
back to how they was, so let's use this
one as an example. I can come in to edit,
so it is a free, you can get off Github and
it's called UV squares. So if I come in to Edit
Preferences and look for UV, you'll see one that
says UV squares. Just install it and then have it ticked on. Close that down. And now I can come to
this one, for instance, select the all press alter, and that then straightens the mall up really,
really nicely. Same for this one as well, Lt. And you can see just
how easy that is. Much easier than messing around. I've just done that. And you can see now
these look really nice. Now, I'm going to be using this to speed up the
process of the course, but you're of course,
free to use either of the methods or get the free out on that
I'm talking about. All right, so let's now come in with all these and the God, the good thing about
the UV add on is I can come in and select
them all at the same time. Like so press T and it
straightens them all up really, really nicely, really,
really easily. Now, the other thing
that you should know is depending on, so let's select all of these. You can see at the moment
this is the UV map. If I come in and
make these much, much smaller, you'll see that they all end up really,
really blurred. And if I come in and pull
these all the way out, you'll see that it makes the
wood look much, much nicer. And same for the stone, and basically this
is because your UV's are based on this UV map. And the smaller they
are, the more blockier, the lower resolution the
actual shades are going to be. And it's the same, if
you make them bigger, they're going to be a much more, a much better shader. So what I would say
is bring them out to the size I've got them so you can see something like that. The other thing is at
the moment as well, we're using a seamless
texture here, so it doesn't matter, you know, if I go over the edges because it's completely
seamless each side. And it would say if
you're going to grab textures online or
anything like that, just make sure that you're
grabbing seamless textures. You can of course, use
non seamless textures. It just means you can't go
outside of the UV space, which is this block here. All right everyone. So I hope you learn to learn this one. And on the next one, then
we'll get these windows in, and then of course we'll get this window going over again. I will reiterate this
is going to be much, much faster when we do
new windows from now, as we've pretty much learned the basics of creating windows. Alright everyone.
Thanks a lot. Bye bye.
19. Streamlining Texturing Copying Window UVs with Magic UV Addon: Welcome back everyone. To blend the Fall The Environment
Artists Guide, and this is where
we left the art. All right, so now let's
look at our actual glass. So what I'm going to do is I'm going to come to my windows, first of all, and then I'm
going to press control. First of all,
resetting transforms always do that before
doing anything else. And then what we're going to do now is bring in that material. So I'm going to go over to my asset manager,
which is over here. And then what we're going to do, we're going to look for glass. Now this is my glass.
Glass lit windows. If you can't see it, just come down to where
it says glass. And then we're going
to drop this one onto there like so.
And there we go. Doesn't look like
much at the moment, but let's actually unwrap it first and then I'll
show exactly what it does. So first of all, we're going
to go over to UV editing. It's going to make
it much easier from here to actually
do something with it. And then what I'm
going to do is just put this on material and then I'm going to come
to my actual window. So I'm going to select
my window press tab. Select this one first. And as soon as you select it, because we've actually got
this material on there, it will open in your UV map. Now to open that on. What I'm then going to do is I'm
just going to press wrap that then is
going to get it the right scale that
I'll want it press a. And then and then I'm going
to bring it down like so from there then
what I'm gonna do is I'm gonna put it
into place in here. As you can see, now it's
looking fairly nice. Okay, so now we're
gonna wrap it. What we want to do now is
bring in a new actual add on. So I'm gonna go up
to Edit Preferences, and the one I'm going to
bring in is called UV magic. So you're going to type in
UV and it's called magic. Uv or UV magic. This is the one that
you actually won. Then what I'm going
to do from there is I'm going to close this down. I'm going to press the U button. And now what you're going to
see is you're going to have all of these other
options on here. And the one we won is
going to be to copy. So we're going to copy and
you're going to click Default. And what that's
going to do is it's Basic. Going to copy this UV. And now what I can do is I
can select all of these. So and then what
I can do is I can press U and we're
instead of copy, what we're going to do is
paste UV's. And there we go. Now I recommend, first of all going over to the left
hand side on UV map, pressing the button, and then coming back over
and selecting one. Now you can see all of these
UV's are now the same, but the best thing is
they're now the same size. Which means now I can just press G and then go to the next one. Press go to the next one. And because we selected them already, they're
already selected. So it's just a question
of G, move, move, move. And you can see just
out quickly and easily, we can actually work
with these now. So it's a really, really
handy little tip to get. Uv's done really,
really fast because we want a little bit of variation
in our actual Windows. We don't want them
all looking the same. All right, so now there's that. Now let's sort these out. Now what I'm going
to do with these is I'm going to grab both of these. I'm going to press three, I think it is, on my number path just
to be in straight view. And then I'm going to press
U. I'm going to come down to where it says Project
from View. So this one here. And it's basically
going to project it from the view of
where I'm looking. Hence why I want
to be straight on. So at the moment you can see I don't want to be an
angle like this. I want to press
three straight on. And then I can press U
and Project from View. And we're going to end up with something like this from there. Then I can press A over
on the left hand side, press the S bottom, and
I can make them bigger. So I'm going to put this one, this one here over there. Then what I'm going to
do is grab this one. I'm going to press
G and actually put this one over there.
And there you go. You can see just how short
work we made of that. All right, let's go
back over to modeling, and now let's actually look at this shader that
we've actually got. So if I come in to Mirnda View, you will see that
actually it's glass, but we can actually
see through it now. At the moment,
we've not actually worked on the emission
or anything like that. But you can see if
I change this wall, so if I just come to this wall and change the gray box to red, you'll see now that you can
actually see through there. And it brings out that light because it's got a
little bit of light. Let's just change that back with controls Sd and now what
we'll do is we'll just go into the shader so I can show you how that's
actually set up. So basically, if I
put this on material, pull this up a little bit, you will see that this
is just a basic shader. So what it has is
it has some maps. So basically some glass
maps to give us all this. And then what's actually
plugged in here, as you can see, we actually, if I open this up,
was the emission. We have an emission
here with a color, which is the emission from
here going into here. And then we can turn the
strength up or down. If I put this down here
to our rendered view, I can turn this up
and you can see it gets a much bigger
glow on there. I'm going to press Controls head and put that back
to what I had it. And then finally we've
jet's got another texture where this is the
actual window texture as you can see the emission. And from there what
I'm trying to do is I'm trying to bring out
these dark parts on here so you can see
these dark parts or lessen them with this
actual color Ram. And then finally I'm just
mixing the shades up. Now. Now what you can do
if I bring this down, as you'll see, we can actually bring it back or bring it up. So you've got an option
there of bringing this down. This is because when
I finish the scene, I know then I can go in, I can alter this shader and put it the way that
I actually want it. All right, so now
we're going to do is we're just going to
go back to modeling. Now we can actually join
all of this together. So I'm going to grab my window. I'm going to be on material view just so I can see
what I'm doing. I'm going to grab the
rest of my window. Then I'm going to press control
J and join it altogether. Now you will notice as I did, that things actually changed
a little bit if you notice. So if I press control D, you can see it just
changes slightly. And what I want to do is shade auto smooth just to make sure everything
is shaded smooth. And then finally what
I'm going to do is again reset all of my
transforms. You know what? In fact, before doing that, I know what actually happened. So what happened is we've actually got a bevel on here and when I joined
it to my windows, it's going to take
that bevel off there. That's what actually happened.
We don't want to do that. So what I'm going to
do first of all, is, and I think I will
join my windows. So grab my windows and join them to my actual round window. So press control J,
join it altogether. And then it's gonna
keep on that bevel, it's not going to bevel
off these windows or anything because it
has no edges or anything, so we don't need to
worry about that. But what it is going to do is
it's gonna put a nice bevel on here for us and round our
wood that we actually want. All right, so remember though we also have our boolean
behind here as well. Now what I'm going to
do is I'm going to grab my boole and I'm going
to move it back, just a tad like so. And also you can see
that if I move my window back now they're
exactly the same size. We don't actually want that. What we want to do is make this boolean a little bit smaller. So what I'm going to
do is I'm going to press three and I'm going to put my ghost or my
x ray on as you can see. Let's see if that goes through. Now let's put it on an
object. And here we are. Now we can see the size. So we can see here, this
is it going around. If I press the S put in now
we can see it get smaller. But what we can see
also is that this bit here maybe needs bringing
down a little bit like so. And then let's also press and y and bring it in a
little bit like so. And now you can see it's fitting much, much
nicer basically. As long as this stone,
this is the outside, the stone is covering the
boole in, we should be fine. So something like that
looks absolutely fine. Here's our stone
around the outside. And in future, obviously,
I'm not going to go into so much explanation about why we're actually
doing it this way, we're just going to be doing it. All right, let's
turn that off them. And now I want to do
is I want to actually, maybe I'm thinking, grab both of these and put them
over the window. Now we have a few options of what we can actually do here. I'm just thinking the
easiest way to do this is probably probably, yeah, what we'll do is
we'll grab this one. Yeah, what we'll do
is we'll array it. I think we'll array
it. So what we'll do is we'll reset both
of these transforms. Let's grab them both. Control
or transforms, right? Clip set, origins, geometry. And then what I'll do is
I'll array it in across. So I'm going to come
to this one first. Let's add in another modifier. So we'll add in a array. And then what we'll
do is we'll turn this down here down to zero. Because at the
moment it's trying to ray this way and
we don't want that, we want to ray it along the X and we also
want it three times. Now if I press three now, I can see that I really, really want this one to be kind of the same length
from here to here. So what I'm going to do is
I'm just going to move it over on the Y and hold
the shift button. So I'm going to hold the
shift burn to get it a little bit tinier
difference and something like that looks about
right from there. Then what I can do is I can
actually grab my Boolean, grab my window, press control L, And what we're gonna do is
we're going to copy modifiers. And now you can see that we've got the modifiers over there. Unfortunately, this
does sometimes happen where they
don't seem to line up. Sometimes it goes right,
sometimes it doesn't. So all I'm going to do is I'm
going to come over to my Y, and I'm going to
move them over very slightly just to get them
all into the right place. So you can see here now, they're all lined up really, really nicely and
that's looking really, really good Now on
this actual building, there is no other need for
any billions like this. So in other words, we don't need any more rounded
booleions for this. So all we're going to do is we're going to
bouillon them into the wall and then we can put our windows back on
The actual next one. The one thing we want to do
though before doing anything is we want to actually come
in and split this wall up. At the moment you can see it's attached to
the whole object. So all I'm going to
do is just come in, grab both of these parts. Press selection, and then
I'm going to grab it. Control all transformed dry
clicks at origins, geometry. And the reason I've
done that is because a lot of the times when
you're bullying something, if you've just got a plane, it's much easier for
Blender to deal with it than dealing with all
of this, for instance. That's why I've
done that as well. When we come to unwrap
this part here as well, it's also easier to unwrap
if it's just a plane. So that's the reason
we've done that, and you'll find
out more as we go on why that is. All
right, everyone. So I hope you enjoyed that.
And I'll see on the next one. Thanks a lot. Bye bye.
20. Background Details Creating 2D Planes for Window Backgrounds: Welcome back if you
want to blend it for the environment Artists guide and this is where
we left the art. All right, so now let's
come and actually bullion this off so
I've got my plain wall. I'm going to put it on
material mode jaw so I can see some kind of you
know, materials on there. I'm going to go to
this now my bull, I'm going to apply my array. So control, let's
apply that array. Let's take the bevel off. We don't need the
bevel on the bullion, so let's take that off. And then all I'm going to do now is come back to this wall. I'm going to add in
fact, before we do that, we'll reset all the transforms
origin to geometry. Come back to my wall
now adding a modifier. And we're looking for boolean. And the boolean is going to
be this object here, like so. And you can already see it looks as though it split them all off. And now all we need
to do is apply that. So we don't need to do
anything else. Just hit Apply. So control to apply, or you can actually come up to here and click Apply like so. So just control a apply, And then what I'm going to
do is I'm going to come now to my Boolean, delete
them out the way. And we should end up with
something like this. Now we're going to need
something on the back of ear. So we need to put, you know, some parts in the back of ear to actually make
this look as though, you know, there's
something behind there. So for now what
I'm going to do is I'm just going to hide
these out the way. And then I'm going to come
in and grab all of these. So lt shifting click, Ol shift click, just going
all the way around like so. And then what I'm
going to do is just pull these back a
very slight bit. So I'm going to press two
extrude and pull them back. I'm going to press X so
they follow that x axis. And then all I'm going to do
is just pull them back very, very slightly,
something like there. And finally then I just
want to fill them in. Now sometimes it doesn't work. We can press and sometimes it does work where it actually
fills them in for you. And now we've got a nice piece of wool with a Boolean in there. Now from here then,
what I want to do is I basically want to give
this a certain color. And the way I'm going
to do that is we're going to give it a
greenish tone to this. So let's come over back to our asset manager as well
that we want to unwrap it. Now if we want to unwrap it, it just means that
we're going to have to reset all the transforms. So control all transforms
set origin to geometry. And now what we can
do as asset manager, and let's find our walls. So we can see our walls here and let's drop on our
green onto this. And there we go, a beautiful
wall now from here. Then let's think about
these backdrops here. So what I want to
do is I want to first of all press
the tab button. And I'm going to
come in and just make sure that all of
these are grabbed. So basically all of
these ones are grabbed. And now what we're
going to do is we're going to press three. And I'm going to press and we're going to
project from view. And the reason we're
going to do that on these parts is that we want to put a backdrop in there
of our actual restaurant. So now let's come in and what we're gonna do is we've got one that says backdrops and the one we won is going
to be one of these. I'm not sure if it's
shops one or shops two. I think it shops two because this one actually looks
like a restaurant. So I'm going to click that on and drop it on there like so. Now you will notice that it's not actually
coming on here. So what we need to do
instead is I think we can press Plus and then can
we drop it in there? Let's see if we can
drop it in there. And there we go, we can
drop it in there like so. And from there then I
can just hit a sign. And there we go. We've actually got the start of our restaurant. Now before we carry on, let's again go to the shading. And again, we're not going to keep going through
these shaders. Once we've been
through them once, then we're not going to
go through them anymore. But you can see on
here, all it is, is just a simple texture that we got from somewhere,
I'm not even sure where. And it's just a restaurant as
you can see, or a bookshop, I think actually we made these
with mid journey, I think. And then what you can
do is you can just drag the color to the emission, turn it up very slightly, and then it'll just
give it that kind of, you know, a bit of
a glow behind it. All right. So now what
we can do from here as well is if I come
in and I'm hoping, yeah, it's not actually
coming out here, so look, they're not
actually coming out here. Let's put this on UV Editor
instead. And there we go. Now we've got what we want, so we can see how
these are laid out. And from here I can actually
put these into place then. So what I can do is I can grab this one and I can press
G. And as we move it, as you can see, we can actually start to move this into place. The other good thing about
doing it, not doing it here, is if I go to UV editing, you will see I have
more options up here. So for instance,
with this one here, I can actually come
in UV mirror on the x axis and
turn that round so it looks a little bit
nicer as you can see. All right, so now let's
think about the other side. So I'm going to
come to this side, I'm going to move over slightly. And then what I'm going
to do is I'm going to press, I'm not
going to press you, I'm going to press a and then and move this one
into place as well. So I'm thinking, should I put it something over here like so? And then again, I'll go
to U V mirror on the x. And then finally this one here, let's have it more
of a centered piece. So let's put it
right in the center. So something like that, I think looks pretty nice. Now let's come in and
what we're going to do is we're going to just give
these a little bit of a test. But before we do that,
what we want to do is we actually want to bring
these in a little bit. So if I press eye now, you can see I can
bring it in like so. And that's exactly
what I want to do. Because what I want to do is I just want to pull them
out a little bit. So I'm going to do these
all at the same time. So I'm going to grab them all. We're going to press the
eye button, bring them in. So, and then what I'm going
to do now is control R, maybe three, left
click, right click. Control 123, left
click, right click. And then control 123, left click, right click. And now from here what I can do is I can come to face click, grab each of these faces. Make sure that I've got proportional editing on.
So this button here. And then what I want to do is
I want to pull these back. Now you can see at the
moment I've got no gizmo, so I need to press
shift space part to bring in my move tool. And what this does is basically this proportional editing
is if I pull this back, you'll see that we've got
a little circle here. And basically we can make
that circle bigger to have more effect or less
to have less effect. The other thing is we've
got a lot of options here that we're going to be going
through when we do this. But the main thing is we want to have it connected
only I think, let's see if it
actually moves it. Yeah, it moves the whole
wall, unfortunately. So what we're going to have
to do is we're going to have to come in and split these off. So I'm going to
grab all of these. Press the button to
split them off like so. And then hopefully now I should be able to
come in grabbing all of these like so and
then pull them back. No, can see we're
actually going somewhere. So you can see now I
can pull them back slightly like so, like so. And there you go. Now you can see just how nice they look. Now from there, if we
go to object mode, you'll see they're very blocky. So let's right click shade auto, smooth. Let's smooth those out. And now let's put it back on, and you'll see this is the
effect we end up with. Let's now finally go
back to modeling. And then what we're
going to do is we're going to press Lth. Bring back everything. So
bring back our windows. Double tap the A, grab our windows and let's drop
those into place like so. And finally now let's put
on our rendered view. And hopefully we
should be able to see through our restaurant like so. And it's looking pretty nice. And it gives it
that three D effect because we actually
pulled it back. So you can see how quickly and
easily really we did this. If you think about me
not explaining this, it would be done pretty fast. All right, so now from here, let's actually come in then
to this part down here. And what we're going
to do is, first of all, we'll unwrap it. So I'm going to press Control A, all transforms right Click, set origin to geometry, press the Tab button and then U, and then Smart UV project. Click okay. Now, rather than going and
searching my material, I've already got a lot
of materials on here. So all I'm able to do is
if we select this one, you can see we've got a bevel on it and we've got the
material that we want. So what I'm going to do is
select this one, shift, select this one,
press control L, and we're going to
link materials. And then we're going to do is
press control L. And we're also going to copy modifiers
like so. And there we go. Now we've actually
got a bevel on here, so let's just check
our bevel out. Let's see how that's working. So you can see we've
got a slight bevel on here as you can see. If I take this, hide this with
this little computer box. There's our bevel on there. And we've also got a
material on here as well, which really, really handy. All right, so now what we can do is we can move our guy to the side and we can actually start putting in the
bottom part of here. So all I'm going to do is I'm
going to do this roughly. I don't need to, you know, place them exactly like
I did with my windows. So what I'm going to do
is just press three. I'm going to press Shift D, bring it over, put
it in the middle. Shift D, bring it over, put it in the middle, like so. And now this other bit, I'm
going to press shift D, bring it over, and then all I'm going to do
is press S and Y. Pull it out to where
it needs to be. I'm not going to worry about
the stretching of the, you know, of the material
or anything like that. Shift D, then bring it over, put it into place that can overlap a little bit as well,
that doesn't really matter. And finally, grab
this one, shifty, and bring it over and put it in place like so
quickly and easily. Now let's grab this one. Press the Tab button
A just to make sure it's all selected and
all you're going to do. Smart UV Project, click okay.
Move on to the next one. Exactly the same thing, Smart UV project, click okay. And finally, this one, Smart
UV project, click okay. And there we go. Let's have a look what that
looks like then. So double tap the
A, and there is the beginning of our
actual coffee shop. So really, really
nice, really easily. And what we'll do then
on the next one is we'll work on this top bit here. And I think we'll start working round the back
and round the sides and things like that before
coming to the front because the front is a little bit more complex than
the rest of it. Alright everyone, So
I hope you enjoyed that and I'll see on the
next one. Thanks a lot. Oh, don't forget to say about your work every
single time as well. I'll see on the next on
everyone. Thanks a lot. Bye bye.
21. Creating Decorative Stone Blocks for Cafe Frame Support: Welcome back everyone
to Blend the Fall, The Environment Artists Guide, and this is where we left off. All right, let's put
this on object mode now. And what I'm going to do is I'm just going to bring in a cube. So it doesn't matter
where my cursor is, as long as it's
somewhere around here. You can shift right click and just put your cursor
wherever you want. And then I'm going to press
shift A, bring in a cube. I'm going to make this
much, much smaller. And what this is going to be
is this corner section here. So I want it to be, if I press and's and
just squish it up, I think that's about
the right size. Again, I'm not going to worry
about placing it exactly. That's not how things
like this worked. What I'm going to worry though
is actually making this a little bit or more
ornate than what it is. So to do that, I'm just
going to press Tab. I'm going to press control R, left click, right click. Just to drop that right
in the center there. And then from there
I'm going to press control B and bevel it out. Now from there I'm just
going to hold it there, Drag my mouse button all
the way back just to bring in one of the actual U bevels, left click and then just
drop it in place like so. And now from there what I'm
going to do is I'm going to use this part to pull it out. So while I've got it selected, I'm going to press E and then Enter and then alternS
and bring it out. Now we don't want
proportion editing on, so alternate bring it out, bring it out to less
than you think. Always bring it out to
less than you think. Because when you come
down and click offset, even it will pull it out
a little bit like so. Now already that's
looking pretty nice, but I want to have it a little bit rounded on these edges. So what I'm going to do
is I'm going to first of all reset all my transforms. So control all transforms, right click, set
origin to geometry. And then from there all I'm
going to do is I'm just going to grab this corner here, press control select
on this corner. And then what we're
going to do is just level this off very slightly. So control B, bevel
it off like, so. Let's bring in one more thing.
Let's have a look at that. Left click, and there we go, beveled off nicely now. Right click, shade, auto, smooth, and that's what
you should end up with. Now it's up to you whether
you want to bevel it off a little bit more so we don't
get these kind of hard edges. So let's just go back before we finish and instead
of doing that, we'll press control B. We'll bevel it off three,
left click, right click. And now let's see if we've
got a better version. So shade auto smooth. And the other thing is if
you shade an auto smooth, you can come down to the
right hand side here, come to where it says normals
and turn this up slightly. And what that'll do is it'll just bevel it off
that little bit, that little bit more
for you. All right? I'm not going to worry
too much about this one. What I'm going to do now
is bring in my next part. So my next part is
going to be along here. So I'm going to press
shift S, Kurt to selected. Just to drop that in
there. Shift. Then let's bring in another cube. Let's make the cube a
little bit smaller. And what I want to
do is I want to fit this cube right in here, so just below here and here. That looks near enough, perfect. And from there then,
what I'm going to do is I'm gonna press Tab. I'm going to pull it out. So
grab this side, pull it out. So, and then what I'm
gonna do is I'm going to press control and bring
in another edge loop. So controlar left
click, right click. And then finally what we're going to do is
we're going to grab the top of here and just
pull it out a little bit. Now as we work more
and more through this, we are going to make more
and more complex parts, more ornate parts. But you can see you
can get away with relatively simple
parts really easily. Now, from here with this corner, we might use this
in other parts. So in other words,
I want to keep, so if I grab this
corner, press shift H. I want to keep most
of it because I might have a part or I might
put it in my asset manager. And I might want to
keep this edge here. So I don't really want
to delete any of this, not to mention the fact that we can also
see the edge here. We can see the edge here. So which edge are we actually
going to get rid of? We can't actually get rid
of one, unlike this one. We can actually get
rid of these sides and we can get rid of the back because we don't
really need them. So what I'm going to
do is I'm going to first of all come round
to the back of it, grab both for these faces
and just pull them back a little bit just so I'm not
wasting so much UV space. Because the more UV space
you're actually using, the more optimization you're going to need and
the more performance heavy it's going to
be on your computer because it's just
more to render. So we don't really
want that from here. Then what I'm going to do is
I'm going to grab it again, shift H to hide everything else, and then I'm going to come
in now and just get rid of these sides and the back of this because we're really
not going to need that. So I'm just going to press
Delete and faces like so. And we should be left
with something like that. Now when I do is press ol
tag, bring back everything. Now what I tend to do is
attempt to do bulk building. In other words, I'll build quite a few things and
then I'll go back in, add my materials and textures
and use my beveling, and that's what I'm
going to do with these. Okay, so now let's
come to the next part. So we want another
block in here, so let's bring in another cube. Let's make this cube a
little bit smaller like so. And let's put it into place. So obviously I want this to come a little bit out like so. And I also don't want
so far in the back, so rather than going to go to the back and pull it
back and things like that, I'm just going to press
S and X and pull it back to the size that I
want it from there. Then what I'm going
to do is I'm going to come and press control. Bringing an edge loop, bring it up slightly to
somewhere like that. And then what I'm going
to do is I'm going to come in and extrude this out. So I'm going to press
extrude it out. Now I'm going to
be level this bit. But before I do that, what
I really want to do is I want to make sure I've
reset my transforms. Because bevels are really upset if you don't reset
the transforms and just make sure you do that. So I'm going to press
control all transforms, right click, set
origin to geometry. And then what I'm going
to do is I'm going to come in, grab this edge, and this edge, I'm
going to press control and level
that off like so. And we should end up with
something like this now. I'm fairly fairly
happy with that. If you're not happy,
or if you want to make this a little bit longer, all you need to do is just press Sen's head and you
can pull it out. Then what you need to do is
just pull it down slightly. And finally then what you
can do is you can come into the bottom of
it with face select, grab the bottom and pull it
up to where you want to it now the other thing is I'm happy with the thickness of the, I think it's a little
bit too thick actually. So all I'm going to do is
go into object mode tab and then press and Y and just make it just
a slight bit thinner. Now from there let's come in. We can't get rid of the sides. We're going to need the
sides unlike this one. But what we can get rid
of is the actual back. So I'm going to come in and
get rid of the back press. Delete and faces by the way. If you can't go in the
building for whatever reason, all it is is you need to
press five on the number pad. And then that will
either stop you going in the building or
allow you to go in it. Just change the perspective. So there is that you should
be able to go in it just in case you hit something
and you can no longer in it. All right, so now what
we want is one more. So I'm going to
come to this one, I'm going to write click Shade, Auto, Smooth like so. And then what I'm
going to do is press shift S, Ursa selected. And now let's bring
in another cube. So I'm going to press shift A shift shift. Let's
bring in a cube. Let's make it smaller. I'm going to want it to be round about the same size of this one. So I'm just going to line it up to be round about
the same size. Now before we do that, there's
one more thing I want to do is if you have it on
object mode like this, I prefer to come
up to the top here and just make sure
that this cavity is ticked on from there. Then I get a much
better visualization of what everything's
going to look like. I could see there for
this one for instance, I couldn't really see, you know, this part here when you go like here, you
can't really see it. Bit easier to visualize
once this is on. All right, so let's
carry on with this part. So from here then, what I'm
going to do is I'm going to just grab this and
move it over here, just to put it next
to it, just so I get a good idea of scaling
and things like that. And then what I'm going
to do is I'm just going to grab my block, pull it out a little bit, come to the front of
it, so grab the face like so bring it just
to roundabout there. And then bring up the bottom. And the bottom wants
to be about heart, you know, two thirds of the
way down from this one. And then what I'm going
to do now is just reset. Because I need to bring
this in with insert. And so I'm going to reset
all the transforms. So all transforms, we don't
need to keep clicking. Set origin to geometry. It's just a habit
that I actually have, but you can do that after then. What I'm gonna do is I'm gonna press now and bring this in. Now, I don't want to go
past this point because obviously I want it to be
stuck out further than this. So I'm just going to
bring it down to there. And then from there
I'm going to do is I'm gonna drop it down. Past, so past this part here. And then finally what
I'm going to do is press and Y and bring it in like so. And there we go. That's
that part nearly done. All we need now is just to
bring out this center part. So I'm going to
grab the face here, press the eye button. And then what I'm
gonna do is I'm going to bring it out with E, like so. And there we go. All right, so we're nearly done then with this
next part, believe it or not. And the next part up actually is going to use
a lot of parts that we've already created and we can just reform them
and things like that. And then we've nearly got
the entirety of the base of this actual building
nailed basically. Let's come in then, and what we'll do is
we'll put this on material mode to let it load up. Come on, there we go. And then what we'll
do is we'll grab each of these now, Press control. All transforms. All
transforms, right? Click, set origin to geometry. Now all of these materials
are going to be the same, so all I'm going to do now
is control all transforms. Right click to origin geometry. Come over to my stone
wall over here. Control L and we're going
to link materials and then control L. And we're going to
lit copy modifiers like so. Now from here what
I want to do is I want to grab each of these. You can see here it's
not unwrapped properly. I'm going to press press
A to grab everything, and then you smart UV
project. Click Okay. And everything then is going
to be unwrapped beautifully. Now the next thing you always want to do is you
just want to check, now your modifiers
have gone on properly, in other words, have
the devils gone on. You can see on here,
they've gone on pretty nicely on here, the bevels are not
really showing, and that's what
I'm talking about on here they are, and
on here they are. On this one, why aren't
they showing up as much? And the reason is,
sometimes when you've got curves and
things like that, it doesn't always
bevel them perfectly. So I'm going to
come to this one, come over to where
it says bevel, open up geometry,
clamp overlap off. And now you can see
it's starting to bevel a little bit
better from there. Then I tend to just
bring it up or down, holding the shift bottom
very, very slightly. And you can see
the reason is that it's this point on here
that's causing the issue. So you can see now
we've got a slight, slight bevel on there. Maybe not as much as I
actually wanted it actually. In fact, you know what, It's actually good enough
so you can see I had to bring that down all the way to not
point Norton nut one. If I put this on Naut point
north two for instance, you can see slight, slight difference on here. You know what, I think I'm going to leave it on not point North, not two, I think
that looks fine. And from there now we can
put this back on material. And now we can start creating
our next kind of block up. And then we can start the thing. What we'll do first is we'll
create all of this for card, I think it's called
all of this bit. And then what we'll do is we'll get the new windows put in. All right everyone.
So hope you enjoyed that and I'll see on the
next one. Thanks a lot. Bye bye.
22. Multi Story Building Modeling Cafe Floors: Welcome back everyone.
To Blend for the Environment Artists Guide, And this where we left off. All right, so now let's start
getting these in place. Now in the original, I didn't actually put these in
the center over here. Put them a little bit
to the left and right, So I think I'm going
to do that on here. So what I'm going to do is I'm going to put this
over this side, and then I'm going to press
three on the number pad. I do want this one lined up
with this one going down, so I'm going to line it up
with that one down there. And from there then
what I'm going to do is I'm just going
to press shift S, cursor selected,
grab this one then. And then all I'm
going to do instead of the orientation being here, I'm just going to place the orientation at
the actual cursor. So right click set origin to three cursor and
now I'm going to do is I'm just going to
mirror that over there. So add modifier generate, bring in a mirror and what we want to do
is put it on the Y, turn off the X,
and it's basically going to mirror it
from the origin. Always mirrors from
the origin of things. Always important to remember
that wherever the origin is, that's where it's going
to mirror it over. And now you can see this
looking pretty nice. Now I'm going to actually apply that now because I
don't need to really keep, you know, this mirror on,
it's non destructive. But mirrors and things
like that, you know, they're not really going to
make any difference, really. It's only the bevels that are, when you apply the bevel, it's going to be much
harder to V on, wrap it, for instance, and
you're going to end up with lots of edging problems. And that's why I
leave the bevels on, so let's come over
them and let's press control to apply that. And now what I'm going to do
is put this bit into place. So on this bit here, you
can see it fits in nicely. We don't need to
shrink it or anything. What I'm going to do then
is shift, bring it over. And again, all of these
parts that you see here, you can come in and put
them in your asset manager. So shift D, again, we're not going to
do that because we want to save some time. And now I want to
do is I want to bring both of these parts over. So shift D, bring them over and then pull
this one over here. Now of course we do have a problem Once I
put this part in, in that this is not
the corner of it. So all I'm going to do is grab this one object mirror and it's going to be
mirrored on the y. So you can see this green
is the y, the red is the x. So we're going to
mirror on the y. So object mirror y. Put it into place and
there we go there. Is that part actually done? Now let's work our way up. So at the bottom you
can see this post. It has a bit of an outcrop
in, so it's coming out. I'm going to say a
animal work as well. And the reason for
that is obviously it's got a weight of all
of this going up. Now, on the next one up,
we don't really need that. So what I'm going to do is
I'm going to grab this one, press shift, and bring it
up, put it into place. And now what I
want to do is just find where the
center of here is. Now, again, sometimes
it's really hard to find, you know, where the
actual center line is. And we can see it is here. So we just have to
be a little bit careful of where we're
bringing this up to because we want this corner
point to be against here. So what I'm going to
do is grab this one, press Shift D, and then
I'm going to drag it up. I'm going to put on
my little ghost. Can I see from there if I put
it an object? Yes, I can. I can just see it now
here as you can see. And this actually has
been put Near enough. Near enough in the right place. So if I press three, you can see I can bring
it up a little bit. Put it in the right
place. And from there, what I can do is I
can bring this down. Now put it just under there. And what I want to do
is get rid of this bit. So all I'm going to do
is I'm going to come in, press tab, grab the face there. Press control control, press Delete and faces and
delete that out the way. Now if I take my ghosting
off, there we go. Nice and easy to do that bit. Now obviously we want it
going over to the other side. So all I'm going to do is I'm going to grab both of these, press shift, drag them over
and put them on top of there. And then what I'm going
to do is go to objects. And I'm going to have
to go to mirror. I'm going to mirror
on the Y again, and then pull those into place. So there we go. As
simple as that. All right, so now let's think about this bit going over here, this bit coming up here, and this center part in here. So what I'm going to do is I've got my one in the
center, so that's handy. So what I'm going to do is
I'm going to press shift A, bring in a cube. I'm going to bring my cube up, so I'm going to bring it over. Then I want to make
something from here to here. What I'm going to do is I'm
going to press and Y, and X. Let's pull it back like
so pull it into the wall. And then I'm going
to press S and Y. Pull it all the way
out and make sure that it's just level
so you can see here, it's a little bit, not
even at the moment. So what I want to do is I want to pull it up a little bit. So pull it up and the other thing is I
think I need to make these a little bit
higher height. So let's come in, grab all
of these press sens head. Now if we press Essence Head, we don't want to move
them from this point. So what we want to do is
we want to move them by individual origins,
pressins, head. And then we can pull them out and make them a
little bit bigger. And from there then
I also want to make sure that this here, so all of these here is a
little bit above there. So I'm just going
to grab them all in and you're going
to find you're going to do a lot of
this where you're just trying to make sure
everything fits in. Definitely. You're going
to be doing a lot of that. All right, so that's
looking good. We've got enough room now for these kind of umbrellas that
are going to go over here. And I think it's all
looking pretty nice. Now, the other thing about
this is you can see, I don't think with these two. I auto smooth them so they're looking a
little bit better now. And now from here then, this is fitting in
much, much nicer. And what I want to do with this is I want to come
into it and I want to press control or left
click, right click. And from here then
I want to bevel it, control B, let's bevel it out. So we're going to pull it
out, we're going to drag the mouse down just so we
have one bevel in there, so. And then what I'm going
to do is I'm going to just drag it down just a tad. So pull it down just
a little bit like so. And then what we can do now
is we can extrude this back. If I press, I can
extrude it back. You can see at the moment
it's going along that z axis. We don't want that, we want
it to go along the x axis. And now I'm going to extrude it back to something like that. And there we go. You
can see we've got another nice bit of stone. If you've gone back too far, you can still pull
it forward like so. And finally, now we
need to fix this, because at the moment it's
going to be way too long. We actually don't
want it that long, I don't think so. What I'm going to do is
I'm just going to press Tab and Y pull it together. And the other thing about
this is you can see we've got a lot of parts here that we're
simply not going to need. So I need to fix that as well. So to fix that,
I'm going to press Shift H. Hide everything
else out the way. And then what I'm going to
do is I'm going to come in now and fix all of these parts. Now the thing is at the moment, as you can see, I could go round and try and
select all of these parts. That will make you
a bit of a mess. So what I'm going to do
is just press control, left click, right
click, control. Pull it out to something
around about here. Come in with your edge, select old shifting, click, old shift, click, right
click, mark scene. Then all we're going to
do is go to face select, select this face on the
outside, press the L button. And because we've already
selected all of that, going all the way around there, I'll just select the M for you. Come in and do the
same thing over here, so L delete faces. And there we go, really, really easy way to
do that from there. Then we can just come in,
select the top, Control select. Control select. And
then we can just press Delete and Faces.
And there we go. Really, really
simple to do that. Now let's put this
into place now. So I'm going to press his tab, old tag and put it into place and just keep an eye on what
you're actually building. Just so you can keep on top of what you've actually built, what you need to
come in and actually add bevels to, and materials. Generally, I don't add
materials to anything. I come in and do
that all at the end, so I can remember
which ones which. Now let's come in and put this
over to this side for now. Let's then bring in
a new cube shift. Let's bring in a
mesh and a cube. Let's bring this cube up. Let's press, bring it down, Put it into place, Press
and X, let's squish it in. Maybe that's a little bit
too much and X, pull it out. And then and's, let's
pull it up a little bit. And finally then I'm
just going to grab this one and y and pull
it into place like so. And then finally I just need to pull this
out because it's a little bit too big, so, and I think something
like that's going to be fine. Let's
grab this one then. Shift D, pull it over
to the other side. Double tap the A,
and there we go. That's looking pretty nice. Now the bit on top as well, it's going to be pretty similar. So all we need to do
is grab all of these. So we're going to grab
all of these parts. We're going to grab this part,
this part and this part. And then all I'm going to
do is press Shift and D and bring that up and
put it into place. Now I can see from
here that this is pretty much the right place
where I actually want it. So that's looking pretty good until I build this
top part on here, and then we can actually
base things around there. Now from here then we need one more kind of
post coming up here. So what I'm going to do
is I'm going to press shift A. I'm going
to bring in a cube. I'm going to press and I want it to sit on top
of this one here. So I want it to sit on here. So I'm going to make it a
little bit smaller like so pull it up a
little bit like so. And then from there what
I want to do is I want to split this off just to make it a nice kind of pillar going up. So all I'm going to do is I'm just going to grab
the top of it. I'm going to pull it up into place or wherever I need to go. You can see that I need to
pull it all the way back. So I'm just going to pull it
back a little bit like so. And then I'm thinking, do I need to make it a
little bit wider? I'm happy with it
being as you know, a square or pillow.
I think I am. So what I'm going to do
now is on the next lesson is I'm going to split this into. And then what I'm going
to do is I'm going to use the technique
which will bevel it offers and make it look like stones stacked on
top of each other. That's what we're going
to do. All right. I'm going to save my
work out like so. And I'll see you on the
next. And everyone, I hope you're really
enjoying the course so far. Thanks a lot. Bye bye.
23. Advanced Beveling Techniques for 3D Window Bases: Welcome back. Everyone's Blend for the Environment
Artists Guide. And that's where we left off. All right, so let's come
into this one and what we'll do is we'll press
Tab. We'll press Control. We'll press two, left
click, right click. And from there then,
while they're still selected and going
to press control B, bring them out to give us a
couple of stones in there. And from there then all I'm going to do is split them off. So I'm going to press Y. And that then is going to
make sure if I press that, they're both split off. Now I've got a really, really interesting technique
to actually show you how to actually do this
really simply and easily. So if I press a to
slick the whole thing, if I come up to mesh, come down to clean up, what you want to do
is fill holes like so now when I come in and
grab, let's say this one here. So press L, pull it
out and you'll see we've got faces on each of
these now on the inside, even though there
weren't any before. So I'm press control
D now and come back. Press control, all transforms. Come over it, add, modify it, and generate a bevel. And you'll see now that it's already started to
bevel them off. So now I can do is put this
on naught point naught three. And there we go, Really, really easy technique
to actually do that. All right, so from here
then what I want to do is I want to now
drag this part up. So I'm going to press, in fact, Before I do that, let me just make sure I'm
happy with the sizing. Because at the moment I could, if I wanted to, let's just write click Set
Origin to geometry. I could if I wanted
to pull it out on the Y to make it a
little bit more blocky, which I think that's
what I'm going to do. Then all I'm going to
do next is shifty, bring it up and put
it into place on this one like so double tap
the A and there you go. That's what you
should be left with. Now let's come over
to our materials and we should be able to see, hopefully all of the ones which
we haven't worked on yet. So all of these, you can
see these here are all ones that we need
to add materials to and more importantly,
modifiers as well. So what I'm going to do is
you can also see we do have a problem in that all
of these look the same. We don't really want
that. What you can do is you can grab
all of these blocks. So press Tab, Smart UV Project. Click Okay. And then
that's going to make them all different. We
can grab these two. Next, press tab, a Smart
UV Project. Click okay. And now these are going
to look different. And we can do the same
thing on these as well. So Smart UV Project,
Click. Okay. Now I wouldn't do it
on the little ones, I wouldn't do it on everything. You can get away with
the little ones, you're not going to
see them as well, but especially the
big ones or what's obviously the same
UV for instance. Just make sure you do that. Now we're going to
do is we're going to grab the whole of these
shift, selecting all of these. We're going to press
control all transforms, right click, set
origin geometry. It's going to reset them all. And then what we're going to do is we're going to come over to this one, press control L, and we're going to copy
modifiers first of all, then control L and we're going
to copy materials like so. Then what we're
going to do is we're going to deselect this one. Shift, select this one. We're going to press Tab. You can see it's still selected. So what I'm going to do is I'm going to do them
separately actually, because it might be a little bit easier. Let's grab these two. Press Tab Smart UV
Project, click okay. And then let's
come to these two. So tab A, U Smart UV
project, click okay. And then let's come to
these two, like that. And then finally these two here. Tab Smart UV
Project, click okay. Finally, let's go
to object mode. And what I want to check now is make sure all the bevels are on so you can see all the bevels looking really nice on those. And then finally,
we can go back to material and envelope what
that actually looks like. And that is looking
really, really cool. Now the one thing is
the windows in here, we're not going to actually
put a bull in in there. I just left those because I put actually a different
material on those. But what we do want to do is
we definitely want to make sure that these two parts
here have an actual material. So what I'm going to
do is I'm going to come in and I'm going
to split this off. So I'm going to press P, Selection, split it off, and then we're going
to come to this one and then Selection, split it off again. I think it's always a good
idea to split off your walls. It does make things
much easier from there. Then let's grab them both.
Shift, select them both. Contro all transforms
right click, set origin to geometry. And now let's go back
to our asset manager. Come to our walls,
So this one here. And what we want
is the wall gray that we're going
to drop on here. So, and then the wall gray
we're going to drop on here. So back to them modeling. You can see how quickly this
is to build things now. And let's come in and grab
this one smart UV project. Click okay on these. Actually you can probably
get away with just hitting on rap because
it's just a plane. So you can just hit on Wrap
if you really want to. Makes no real
difference apart from the will look a bit
different from each other. All right, so they're
looking pretty cool. And now let's go onto
our rendered view. Have a quick look at
that and there's what you've actually got and
what you've made so far, which is looking really
cool. All right, so now. Let's think about our windows. I think what we'll do is we will do our top right at the end. So I think the easiest
way to do this, because I'm trying to think
of an easy way to do this, is to build out this
side next and then fill in the actual other sides. I tend to, when I'm building, bounce around, I think you
should do that as well. Bounce around between little
parts of the same building. And what that does is it just
keeps you more interesting. You don't want to be building the same things over
and over again. You want to kind
of bounce around. So for instance, doing the front of the coffee
shop is going to be a lot more interesting than just keep remaking these blocks. Albeit they're a
little bit different, but you get the point
that I'm saying. All right, so now
let's think about doing our next actual windows. So first of all,
with these windows, the easiest thing to
do is get the scale. So all I'm going to do,
I've got my cursor here. I'm going to come in, bring in a plane, turn the plane round, so Y 90, press three
on the number pad, and let's get in the
scale that we want it. First of all, you
can see this is round about the right height. So you can see the heights
right. It's just the width. So if I bring this in on the
Y and Y, let's bring it in. And this is probably the kind of width that
I'm going to want. Now, the thing is about
this window then, is they're a little
bit different in that they've got
an outside to them, so they've got a stone outside. So let's start with that first and then we can kind
of work from there. So what I'm going to do
is I'm going to press shift S, Kurt to selected. Because then that means I can work from this actual window. I can then press shift H to hide everything
else out of the way. Give me complete
control of this. What I'm actually building here, not having to be looking
at other things. Press the little dot button
on the actual number pad. And then what they'll
do is allow me to move around it as
well from here. Then now I can start
building out my window. So what I'm going to do
is in a press shift day, bring in a cube and I'm going to actually build
out the top first. So if I build, come to here,
I'm going to build it. You don't have to
keep exactly to this as long as it's
roughly around there. So and's Ed, let's pull it down. Let's pull this up and
then let's pull it out. So S Y, pull it out to just
pass the edges of here. And then and X, pull it in to
something like that. Now from here, let me
build out the side, where is it going
to come down to? All I'm going to do is pressure
shift D and then R x 90. Rotate it round and
then I'm going to put this into place over here, if I pull this
over here like so. And then all I'm going
to do is pull it back a little bit, finally. I'm just going to pull
it in a little bit, that's what we should be left
with, something like that. And then from there then I can
bring it all the way down. So I'm going to press
Tab, Grab this face, I'm going to pull it down
to roughly down to here. Now from here I want to bit
that comes out of here. So what I'm going to do is I'm going to press the controller to bring in an edge
loop, left click. Let's bring it down
to roundabout here. Now I want to have a
beveled round bit on here. So the easiest way to do that actually is to come
in to face select, grab this face press
to extrude it out. The thing is now, if I
come and level this off, it'll be level all
the way down to there if I want it. But I
don't really want that. I want to have some control of it if I bring in
another edge loop. So now wherever I
put this edge loop, I'm going to have control over how far this gets beveled down. So now put it right
in the middle with right click
and can come in. Now press control B, and you'll see we
have control of where that comes down to now. It's not beveling off
properly at the moment. And the reason for that is, is because I didn't
reset the transforms, so I'm going to press tab
control or transforms. Come back into it,
Press control, and now you can see it's beveling off really,
really nicely. Let's turn up the bevel
then with the middle mouse. So we'll turn it up
something like five. And there we go, right
click shade to smooth. And there we go.
There is the start of our beautiful window, al
right on the next one. Then we'll carry on
with our window. We should get this finished
and we should be able to place them where we need them. I think we're going to use
these windows a fair amount And it's the next window down saw different style
of window as well. All right everyone. Sobi enjoyed that and I'll see
on the next one. Thanks a lot. Bye bye.
24. Efficient Workflow Copying Modifiers and Using Shade Flat: Welcome back everyone to Blender for the Environment
Artists Guide. And this is where
we left it off. All right, so now let's
grab this top part here. And what I'm going to do is
press Shift D. I'm going to bring it down just to
the bottom off here. And of course, I want this to be further out than this bit here, so all I'm going to
do is press Tab. Grab the Bom bit
with face Select. Pull it out like so. Now the other thing is I do want to round it off
on here as well. So I'm going to grab
the whole thing with L. I'm going to press and y, pull it out a
little bit like so. Then what we're going
to do is pull it out a little bit more this way. And finally then I'm going
to reset the transform. So control or transforms tab. Let's come up and grab
each of these sides. Press control B and
just be level them off very slightly like so. And I think five actually
will be fine on here as well. And there we go, we've got
our actual ledge down there. From there we can write
click, shade, autos, move. And that's looking pretty nice. The one thing is, I would
say it's way, way too thick. So let's come in, face, select, grab the bottom, pull it up
like so. And there we go. Now let's think about
this part in here. So let's come in,
grab this top part, Shift D, bring it down
to where we want it. I think actually
we'll pull it out a little bit more and
then all we'll do is we'll press S and y and bring
it in a little bit like so. And that's already looking
pretty good for I want it, it just obviously needs
picking up a little bit. So I'm going to pick it up just to put it just
on top of there. And I think I'm
going to leave it. So from there then let's press control or transforms
right click, set origin to geometry. And now I can bring this in. So I'm going to grab this face, press the eye button and
bring it all the way in. Now for me that's a little
bit too long still, so all I'm going
to do is press and Y and bring it in like so. And, and then let's pull it out, pull it out a little bit, and then let's press
S and Y again. And pull it in just
very slightly. I think that's
looking pretty nice. All right, this one here then we also want on the other side. So what I'm going to do is
press control all transforms. Right. Click, set
origin 23d cursor because it's right
in the center. Add modifier, generate mirror, put it on the y, turn
off the x that side. Let's actually apply that
then with control A. And finally, let's deal
with this part here. All they want to do in this
one then is bringing in fact, don't want to bring
in an edge loop first or do you want
to bring it in? Just wondering the
easiest way to do this. Yes, I think I'll
do it that way. So all I'm going to do is I'm
going to press tab control, left click, right
click, control B. Score your mouse wheel back because you don't
want that many, You only want
something something like two and bring it in
to somewhere like here. So if I press three, you can
see it's about round here. And from there, then
we're just going to bring in one more edge loop. So control, left click, right click, put it
right in the center. And I'm just going to
move around to the top. Then grab the top of
here. Press three again. And I just then want
to pull it up like so. Now from here what I
can do is I can come in now and I can drag these out. So in other words, Ol
shift and click Olshift. Click. You can see
I've grab them all around there.
Press three again. And then what you can do
is you can press S and Y. And you can pull these
out if you want to, as long as we have it on
medium point S and Y. And you'll see then it just flattens off this bit
a little bit more. I think it's a little
bit too spiky. And then what I can do is pull
it down just a little bit. Like finally we can come
in, grab both of these. Press the eye button
again, just once. Now you can see the knot
coming in very well. And that's because we need to reset all of our transforms. Some control, all transforms. Srogens, geometry tab. And now I again, and now we can bring
it in very nicely. Hold the shift on as
well if you need to. And finally, then
let's pull it back. So let's pull it back like so. And if you have some
motive or something, you can put it on there as well. Now, we've done all that.
What about our window? So we've got our
window still here. We just need to
put it into place. So what I'm going to do is
I'm going to press three. I'm going to put, not that on. I'm going to put my x
ray or ghosting on. I'm going to press the Born. And what I want to do
is I want to get it to the scale where it's all
going to fit nicely. So you can see the edge of the windows there
are fitting nicely. The bottoms fitting nicely. It's just this top bit here. So I'm going to press tab, I'm going to make sure
one edge, select, grab this edge,
pull it up like so. And then I'm going
to turn off x ray. And there we go.
There's our window, now let's pull it out a little
bit, something like here. Now let's actually
create this window. So first of all, we'll do it pretty much the same way
as we did the last one. So one window is, I'm
going to press Tab. Come into it, I'm going to press the Eban to bring it in like so. Now again, I'm going to reset my transforms before doing that. So all transforms, then
press the eban, bring it in. The frame is going to
be roundabout here. And what I'm going
to do is now I'm going to split this
off away from this. I'm going to press Y, and then I'm going to come in again. So now it's split
off. Let's come in, grab all of this one, and press Selection. And then let's
hide them out of the way. So grab this, hide
it out the way. And now free to
work on this one. All right, so what
I'm going to do, I'm going to press three.
I'm going to press Tab. I'm going to press Control Law. Let's bring in 33 edge loops, left click, right click. Come to this one control,
left click, right click. Let's just bring in
one edge loop there. And then from there what
we want to do is now we want to come in,
grab the whole thing. Press the eye button
and that eye again, and let's make our
actual windows hold in the shift button again
to make those frames. Once you've done that, press P selection to just separate all those come to your windows, then press H to hide them out of the way back to
your frame then. And all you're going
to do is you're basically go to select everything and then
you're going to come to select and we're going to go, sorry, not so we want split
split faces by edges like so. And now it should be all
split off as you can see. All right, so now
let's press tab, press Oltage to bring
back everything. And now we've got our windows. We've got our frames,
sorry, our windows. Our frame. And our
large frame as well. Now the one thing
we didn't do on this one is again,
we need to press A, we need to mesh, and we need
to split faces by edges. That then we'll make sure
all of these are split off. Now let's grab these and
put these into place. All I'm going to
do is I'm going to press A, I'm going
to pull it back, I'm going to press E,
Then pull it forward to where I actually want
it, something around there. Let's have a look how
big that frame is. Maybe I'll pull these
back a little bit. Maybe it's not going
to be big enough. Let's grab the back of them. Pull it back a little bit. So now let's come to
the second frame. And now from here can right
click Set Origin to Geometry. Let's pull it back
to where I want it. So something like here, let's press tab A
to grab it all. Let's pull it out.
We can move that in place as well once we've
actually finished this. And now finally the windows. Let's press right Click,
Origins, Geometry. And move those back
in place as well. If we pull those back here, let's say now I can
see that I need to pull all of this back
a little bit like so. And maybe even the window. So what I'm going to do
is I'm just going to grab this X, stretch it out. And then we're windows
looking a little bit better there and that's
looking pretty nice. All right, so you can see how quickly and easily we
made short work of that. And now comes the
actual beveling part. I'm going to separate these out, so I'm going to put
my stone together, then my wood, and
finally then my window. I'm going to grab all
of these parts first. So these all the stone. If I press G, you
can see I've got all my stone press control
jades join it all together. Control then all
transforms, right? Click the origin to geometry and now let's actually
grab this stone. So I'm going to shift
like this stone, press control L.
I'm going to link materials control L. I'm going to also copy
modifiers like. So again, you can see we do have a little
bit of a problem here. The modifiers aren't working. And generally it's
either because of the bevel here or because
of this part here. Either way I can come in though, and if I turn it up, you
can see nothing's working. If that's the case, that's
the wrong one, actually. This one here. If
I turn this up, you can see nothing's working. If that is the case,
geometry clamp overlap off, turn it down very, very slowly. And you should be able to get away with having some
kind of bevel on. So let's try naught point
naught naught three. And there we go, there is
the bevel actually on there. And it's looking really nice. Now let's right click,
shade, auto, smooth. And if you've got a
problem with these not looking so smooth, you can actually come in, grab the faces on here
and here, click. And what you can do is shade. And there you go. I'll shade
those flat few as well. I think I'll do the same on these parts here, right click. And where is it? Shade
flat and there we go. Now you can see it's
looking, Tom's bare. All right, So on
the next one then what we'll do is we've
got these beveled, There is some materials on here, but we'll actually get
the materials on here and the glass and we'll get
these windows finished. All right everyone. So I
hope you enjoyed that. And I'll see on the next
one. Thanks lot. Bye bye.
25. Mastering Window Overhangs with the Solidify Modifier: Welcome back everyone to Blender Fall The Environment
Artists Guide. And this were left
off. All right, let's come in now and
bevel these parts off. So if I grab both of
these, I'm not going to. I think, yeah, let's try. First of all, so we'll grab this one control copy modifiers and actually that's done nicely. All right, so from there then, let's have a look
at our materials. So if I go in, let it load up, we can see we've got
those materials on. I think I'm going to use
these materials down here. Just so I think we'll actually use these
materials down here. The only one we'll change
is the actual glass. So what I'm going to
do is I'm going to grab these two here, like, so grab this part here, press control L. I'm going
to copy or link materials. There we go. Now let's
come in and what we'll do is we'll come over to
the right hand side. I'll make sure I'm
clicked on Shall Windows. I'm going to join both of
these together, actually. So control J. Join
them both together. And then what I'm going
to do is I'm going to press tab A to grab everything. Smart UV project. Click Okay. And there we go. Now they're
all going the right way. And the other thing
is I don't need the stone and glass on here, So I'm going to Minus this off. Minus this off. Let's
come to this part now. Then press a Smart UV
Project. Click. Okay. There we go. And then what
I'm going to do now is come over to my asset manager and I want to bring
in the glass. So we want the glass not lit. So this one here, we've got many glasses. This
is the one we want. So all I'm going
to do is drag and drop it onto my window like so. Now, pretty much the same thing
as what we did down here. We will make it very easily. We'll go over to UV editing. We'll press the little
dot one to zoom in. I'll come to my glass then, and all I'm going to do
is grab one of them. I'm going to press and unwrap. I'm going to press S and
bring it into place like so. Then let's make it a
little bit wider and X, let's pull it out a little
bit. And there we go. Now let's press, come
down to where it says copy, copy default. Select all the rest of them. So the copy paste default. And there we go, press A. Remember to do that, or
she'll have to go in and select one every single
time you select these A. And then let's come
in and just press G and move them across and
just work your way down, putting them in
different ones like so. But you can see nice and easy, nice and quick to
actually do that. And I'll leave
that one as it is. All right, so all of
this is done now. All we can do is we can join
everything up together. So join these, press control J, Join everything up.
Control or transforms. Right clicks at
origin to geometry, right click and
shade, autos, move. And there we go. All right, so now let's come back to modeling and we'll get
this into place now. So what I'm going to do is I'm just going to pull this back into my wall like so let's
put it where we want it. So something roundabout here. And then all I'll do is I'll press three on the number pad. I'll press shift
D to bring it up. Put this one into place, grab them both, press
shift D, drag them over. Put them into the
middle of this one. Double tap the A
and there we go. All right, so now let's
put it on render. Let's have a quick
look. And there we go. How easy was that to
actually do that? First bit. Really,
really easy to do that. Now what we want
to do is I want to actually come in and
I think what we'll do is we'll make these kind of banners that are
going to go round there. And from there then
we can actually work our way round to this side. We're moving along now. Let's
actually save that out. Come to save, let's put it onto object mode and let's make
a start on these then. First of all, what I'm going to do is I'm going to bring in, I think we'll use a
sphere to do this. I think they'll make it easier. So what I'll do is
I'll press Shift, bring in UV Sphere. Do I want all of those? I think actually
we'll leave it on. I'm thinking 32 segments. It might be a little
bit too high. Let's bring this down to 18. And what they'll do
is it'll turn down these segments
going around here. I think actually
that's too little. Let's try 24. And I think 24 is going to just about do it. Yes, I think we'll
use 24 from there. Then I want to
actually split this up so I don't really need
this bottom section. So all I tend to do with a
sphere is out shift and click, delete faces, and then come
round to the side view. So if I press one to
go round to the side, I want to come in
Out shift and click, going all the way up
there as you can see. Out Shift click and then go
round to the other side. Control three, what we'll
do is we'll press Tab. We'll press Shift Hide the Other Way, and
now I can come in. And it's Where is it?
One control, one. There we go. There we go. Now you can see
it's selected here. So I'm going to press
Alt shift click, Alt Shift click, Delete
and faces like so. Now, last of all, we're not going to need
this top part now. It doesn't go all the way
up there as you can see. So all I'm going to do is press C. Come in, select all of those, going around to there,
press Delete and Faces, then come down to the bottom. Same sort of thing. C.
Select all of these, delete and basis
with the C. You can actually select things
so you can make it bigger and smaller
with the mouse. You then come in left
click to select things, middle mouse to
de select things. That's exactly how it works, just in case you lost me there. All right, so what I'm
going to do then is come in now and grab this one. And this one with L delete and we're going to
delete vertices. We might as well
they're not touching anything just to make
sure nothing's left over. Finally then we also need
to delete this one L, delete vertices like so. Finally then we can press Ltage and bring everything back. This is what we
should be left with. Now I'm going to do is
I'm going to press three. I'm going to press to
bring this into place. And then we're going
to make it much, much smaller to where
I actually want it. So it just wants to go
over the top of here. Let's pull it back
into place then, and see how it's going to
look once it's over the top. So something like that you can see is looking pretty nice. The one thing I would
say is it maybe wants to be a little bit wider. So I'm just going to press S and Y pull it out a
little bit like so. And I think then that
is looking pretty nice. Now before we carry
on with this, what we want to do is we want to have something that's
going to support it. So all I'll do is I'll
come into the back of it. I'll grab this back. So out shifting. Click. So it grabs this, going
all the way around. I'll press shift D. Then to
duplicate it, bring it out. And then what I'm
going to do is I'm going to press and I'm going to make it follow
the X and X like. So from there then what I can do is I can pull
this down very slightly. So I'm going to grab both of these and I'm going
to press and Z, pull them down very
slightly like so. Now what I'm going to
do is split this off. So I'm going to
press L P selection. Split it off, come back to it. Then control or transforms. And now I can do is then come over and adding a new modifier. And this time we're
going to be adding in a solidify to turn a two D object into
something three D. You can see now the further
I move up my thickness, the more thickness it
is going to give it. I can also change this offset. If I put this on
one, for instance, you can see it brings it
all the way back to here. But if I put it on
something like not 0.5 it will put it
halfway between, which is what we actually want. So halfway between
there, like so. All right, so I think
I'm actually happy with how that looks and
then I can use that. I'm going to write click
shade, auto, smooth. And then what I'm
going to do is I'm going to put on even thickness. I always like to tick that on even if it's not
going to do anything, just a, just to get into
the habit of doing it. And finally then
all I'm going to do is apply my modifier, the solidify control A. And then let's come down to
the bottom of these two. So I'm going to press three and put it on face
Select Althift, click O shift click. Make sure we're on
individual origins for extruded Enter alternates, pull it out a little bit. So something like
that. Make sure offsets even is on. That's
a little bit too much. I'm going to press control
Z to go back alternate, pull it out a tad, just like this, small
amount, press offset even. And then you should end up
with something like this. And from there then,
just probably, I'm just wondering
whether I need to pull them down a
little bit more. I think actually I'm
going to leave them. All I'm going to do then is
just come to the bottom now. And I think I'm going to bevel, bevel, the bottom of it off. Now, we will have
a problem beveling this bottom off at the moment, because we've got this on here. In other words, it's two
kind of faces on here. So let's come in
and grab this face. This face. Let's press
control And plus, and then what we'll do is
just press Delete and Faces. Now let's fill in these faces. We'll grab the whole thing, L grab the whole thing. Mesh. Come down to
clean up, fill holes, and that'll fill those
infrasallyow. Let's grab this one. This one and this one. Then all we're going
to do is press control and pull those out. Maybe two. Left click. Yes, like that. That's perfect. Finally, let's come in and
grab both of these faces. Let's press the eye button, and then let's press
and pull them back. And we should end up with
something like that. And it looks as
though it's actually been placed into the wall now. Now let's come to our umbrella. And what we'll do on
the next one then, is we'll first of all pull these parts down to get
those umbrella parts in. And then what we'll do
is we'll bevel them off. And, you know, this
will be really, really short work
of this, actually. All right everyone. So
I hope you enjoy that. And I'll see on the next one. Thanks lot. Bye bye.
26. Advanced UV Mapping Unwrapping Window Overhangs: Welcome back everyone to Blend The Fall The Environment
Artists Guide, and this is where
we left the art. All right, so now
let's come in and we're going to have
our edge select. So let's select all
these going around Old shift and click it'll select them going
all the way around. And from there what
we want to do is we want to go to Select
and we want to select Checker D. Select that then is just going to
select every other one, all the way around to here. And then what we're going
to do is just press three and you're going to press and Z, and you're just going to
extrude them down a little bit. So then what you're going
to do now is you're going to come and you're going
to grab the next lot. So we're going to
have to come in and select the next lot, like so three then. And then all you want to do is pull them down to
the same length, pull them down to the
roundabout, the same length. Then from there then what we
want to do is we want to put this onto verte select. And I want to come in,
put this on wire frame. From there, then I'm
going to press B, give me box select. Then I'm going to select
all of these bottom ones. Then what I'm going
to do is put it back onto object mode. Turn I haven't great on, so I don't need to
turn X ray off. And from there then
what I want to do is I want to level these off. Now remember we can't
just press control B. To level these, we need to
press control Shift and B. And then we can level
those off like so. And they're looking
pretty nice already. So happy with those. Now let's come in and right
click and shade auto smooth. And that's what we
should be left with. Now we need to give
these obviously a color, so we'll give them
the blue color. And to do that,
we'll just quickly go over to our asset manager, let it load up, and then we'll look for cloth and
bring that in. So cloths here, let's come
in and bring the cloth, let's drop that on there. You can see it's
going the wrong way. You can also see it's not
on route very well as well. Also, while we're here,
we're going to need a metal to go round here, so we might as well bring
that in at the same time. So what we're going
to use is we'll use this black metal here. You could use the metal light or any of these really
that you want to. You could even use
the blue metal. I think for me I'm going
to use the black metal. So I'm going to drop
that in on there. And there we go. Now let's
go back to modeling. Let's put this onto
material mode. Let's deal with this one first. So this one first,
I'm going to press a Smart UV Project. Click okay. Now you can see all of that
nice metal work on there. You can see that it's slightly
hidden from this bit here. Which tells me that maybe we need to just pull
this out a little bit. So double tap. It's have a
look, is that too far out? I think it is. And I think
what we need to do is instead I need to pull
these down a little bit. Just again, below
there. Because at the moment it
doesn't look right. So I'm just going to put
it back into place again. And then all I'm going to do
now is come to these parts. Now to grab all of these were
probably going to have to, let's think how we'll do this. I think I'll grab
this middle one on each of them. Grab
the middle one. Press control control. Actually, I got away with it. I just need to select the
front now of each of these. So now I should be
able to pull these down further than
these parts like so. And there we go. Now
it's looking good. All right, from there
then what I can do now, I can come back to my cloth, press the Born,
and let's unwrap. And we can see it's some
wrapping at a really, really weird angle and we
don't really want that. Let's try going over
the top and let's press and project
from, let's try that. Let's go to UV editing, where we can actually really start to mess around with this. I can go over the top. Now
what I can do is I can press S and bring
it out like so, but we can see it's not
really working out for us, so Well, let's have
a look at Unwrap. Let's try how that's
going to work. Let's try bringing it out. Is that going to
look any better? That doesn't look
any better either. Well, it might do
for you, but I'm not actually happy
without that look. Instead of that what
I'm going to do, I think I'll come in and
I'll press Alt Shift click. And I'll just go down each of
these, I'll split them up. Basically a shift
click as you can see, and then a shift click, and then shift
click, shift click. Then what I want to do is I
want to also click on these. Remember there's two in there. We're going to
probably have to go in and fix those as well. Right click, Marco scene. Now if I come in, can I come
in now and select these? So I want to base to be
able to split them up. As you can see. Yes I can. I can select all of
those, which is great. Now let's come to this middle one first,
we'll have this one blue. So I'm basically going
to grab it, wrap. And then what I'm
going to do is I'm going to unwrap
them all separate. Now if I select them all
I can press and wrap, they're all split up. Now let's turn this one round because it's the wrong way round Re hundred 80 then
what we'll do is we'll press A and spin them
all round so r 90. From here. Now I can
actually split them up. So I can come to this
one for instance. And this one is where I want it. I can just press, then I
can come to these two. These two here. And I
can put these in place. So I'm just going to
press drop this one here. L drop this one here. Luckily for us, we ain't
got to do this again. That's the best thing. So now I'm going to
grab both of these. I'm going to press, put
them in the blue one. Grab this one with L, put this one in the blue one, like so then finally we've just got this
one here, I think. Drop that one in place. And then L drop that one
in place. And there we go. Now we can see that's
looking much, much nicer. All right, so now
we've done that. What we can do is
we can go back to modeling and then I
can join these two up. I'm not going to put a bevel on here, there's
no point in that. But I can join both of
these up with control J, right click, shade autos, move control or transforms, right click, set
origin to geometry. And now I can do is I can
put this into the wall. So I'm going to bring
it all the way back. Holding shift born, then
to pull it back out. So let's pull it out a
little bit more like so. And then what we'll do
is we'll press three. And I'm happy where
the position is now. I could array this over, but I know it's probably
not going to be correct. So all I'm going to do is
just press Shift D again. If you want to put this in your Asset Manager,
please do that. And then Shift D,
bring it over like so. All right, let's have a look
then what that looks like. So if I come in, put it on render view. This is
what you should have. And you can see now really, really starting to come
together really nicely. Now we're going to
do is we're going to move on round to this side. We'll start building
out this bottom. It's going to be a
little bit of a step up in terms of modeling
this bottom pit, but it's definitely going to make it much easier
for when we go along and we're building much more complex models
and things like that. So let's make a start on that. So what we'll do is put
this back on object mode. I'll come around to this
side, make sure that my man, if I press one, is actually feet on the
floor there. Not really. So let's put him on
the floor like so. And then what we'll do
now is we'll start to work out where we're going
to have these parts. So what I'm going to do
first of all is I think we'll start work on the door. I think that's going to
make it much, much easier. So what I'm going
to do is I'm going to start with the post going up this side and heading
towards the top. We definitely need to think about the top
up here going around. So I think actually
first of all, what we'll do is we'll
grab this shifty, we'll drag this over to here. And then what we'll do
is we'll mirror it. And we can see if
we mirror on the x, it's this one here.
Object mirror x. And then we can drop
that part in place. So just make sure it's
in the right place. Then what I can do is I can
grab these three parts. So what I'll do is
I'll grab this one. This one, this one, this one. This one, and this one. And then what I can do is I
can press shift, drag it out. And then let's rotate it, let's make sure that we're
on a medium point instead, so R Z -91 And then
let's put it into place. So I'm not going to move
it down or anything, I'm just going to put
it into place like so. And then let's pull it
back where it needs to be. Something like that
I think is looking good and I think
I'm going to leave. I'm wondering whether
to move these either side or leave them there. I'm not so sure yet. But from here the
main point is I've got room now to build
where my actual door is. Now to think about
the scale of doors, you want to make sure
you guy can actually walk in it, so R 90. And then if I press one, we can see if I put
them in the center, the door is going to have to be round about this sort of scale. So something around
there and then he'll actually be
able to walk inside. That's the main thing that
we want to do also as well. We want a little step up here, so let's think about the
step before we do anything, Shift S Ursa selected. And then what we'll do is, well, I think we'll bring
in a cylinder shift. Let's bring in a cylinder. Let's turn these vertes down. There's too many vertes on
the Europe at the moment. Let's put it on something
like, let's try 20. Then what we'll do is we'll
make this a little bit smaller and then
we'll pull it down. How I tend to do with
steps is by press sensed. I tend to do it so that
where his shins are. So if I come round here, you can see that
this is a pretty tall step already because he's got to really step up there where this actual shin is, that's where your step
should actually be. And then on top of
there you can actually put your stones that
are going to go on top. So that's what I tend to
aim for, so essens head. Let's bring it down.
Let's press one again. We're going to put it then
where it's going to be. So you can see now it's level, near enough with his shins. And from there then I can
put a little bit more of a step on top of here and
we can get that in place. Once we've got that in place and we've got it the
right actual size. Because you can see it
at the moment as well. It's a little bit too
small for press one. You can see that I need to probably pull it
out a little bit. So before we end, all we're
going to do is press S and X and just pull it out
a little bit like so. And I think now that's
looking about right. All right, let's
say about our work. And then on the next
one we'll get this step finished and then from there
we can build the door. It's very, very hard. Sometimes when you're
building things like this, you've got to pre
plan and you've got to try and then fit
everything into place. And you need to change things probably on the fly just to
make sure everything fits. So we need to take
that into account. It's okay when you're following me, building things like this. But remember, I already
built this scene. And it took hours though to actually come up and put
all the little parts in, make sure everything fits. So just remember
that when you're building out your own scenes. All right everyone. So I
hope you enjoyed that. I'll see on the next one.
Thanks a lot. Bye bye.
27. Crafting Stepping Stones for Door Entrances: Welcome back everyone. To blend the four the Environment
Artists Guide, and this is where
we're left the art. All right, so now
I'm going to do is let's actually get this set up. So I'm going to grab this
one so it's at the side. So if I press three, you
can see basically I'm grabbing it going all the
way round to the side, so this is like in the middle. And then the back bit start. So all I'm going to do is
press select, grab that. And then all I'm going to
do is delete this part. So delete that part other way. And then from there
then I can actually pull this into the place
where it's going to start. So somewhere around
that. And you can see if I put it on here. Now this is the test. So is it going to be
able to step up there? Is it going to be big enough? I think it needs
to be pulled out a little bit just to give
him a bit more of a step. So I'm going to do
is press and Y, bring it out just a
little bit more like so. And I think that then
is round about perfect. And now from here, let's build out this top
part of the step. So all I'm gonna do
is I'm going to press Control all transforms, right? Click, set origin geometry. And now what I'm going to
do is I'm going to come in and grab all of
the top of here. So old shift click
and then enter S, pull it out like so. And from there then
I can actually make this top part of the step. Now how am I actually
going to do that? Well, we're not going to be using this part that we've
just made, actually. So all this part here, we're
not going to be using it. What we're going to do
is press P selection. Split that off, and now I'm
going to do is come back to my step tab and then I'm
going to delete this one. Going around here, leaving
this edge that I had, Control, click control, click, control, click, delete, and faces. And there we go. Now what is the point of doing
all of that exactly? Well, it means now
I can come in, grab this bit control, or transforms right clicks
at origin geometry. It seems a lot of work this, but you'll soon find
out why I did it. So shift H, let's hide
everything else out of the way. Seven square over the top. What I want to do
is just make these some kind of stone slabs. And the way I'm going to
do that now is come on in and first of all, give this a face, so let's
give it a face shift click. Give it a face. And now
I'm going to do is I'm going to use my
actual knife tool. So I'm going to
use a knife tool. If I press K, you'll
see that you get a little knife that comes
up and from there we can actually click on one
of the vertices and we can actually cut it across
wherever we want, like. So if you get too close, it will be magnetized to there. To stop that happening,
you can just press control and then
you can get really, really close to the edge
if you need to like so. And finally, when you
get to the end of it, you click on it, press
the end to button, and you'll end up with a
nice cut going across. Now of course we
don't want this cut. We want a better cut than that. So what we want to do
is we want to press K again, this one. And we want it going
straight along here. Now the way to do
that is just hold, press the button and that
then will straighten it up, Click on there, press
the Enter button, and now do the same
thing on the other side. Over here came over here,
Where do we want it? Let's say over this bit here, and then this bit over here. K. Hey, enter. And there we go. Now you've end up with
something like that. Now before we go
on, is it right? Are you happy with
it? Let's bring everything back before we
do anything else then. So all I'm going to
do is press Tab. All tag, bring back everything, and this is what we
should be left with. And from there,
before bring it up, one we do is split it off. So select this one, middle one, this one. Press the Y button, press A to select everything. And then all you're
going to do is press extrude it up like
so. And there we go. There is our stone slabs
don't look like slabs yet, but that's because
we need to press control A all transforms, add modifier, bevel, turn
it all the way down. Naught point naught three. Something like that.
And there we go. As simple as that. Now let's right click and
shade auto smooth. Let's come then to the
bottom part of the steps, right click, shade auto, smooth. And now what we can do is
I'm not going to bring in the material yet because I know what that's
actually going to be. But I'm just looking to make sure that I'm actually
happy with it. And I think that's
going to be fine, except the fact it might be a little bit far out on
the sides as you can see. So I'm going to grab
it, I'm going to press S. And you can see there, tried to go from there,
that's because we didn't set the origin to geometry. And now I can press
S and X and just bring it in a
little bit like so. And now it looks as
though those slabs are actually into something which
is what we actually wanted. All right, so that's that bit. Now we want to do is we
want to create the post. So first of all, I
need to see if my guy, when it's stood on here, is this door going
to be big enough? And it looks as though it is. Now what we want to
do is we want to put some supporting posts in here and then have the door
mainly in this bit here, so on top of this bit here. So what I'm going to do
is then I'm going to create my post from here, so I'm going to use my guy. I'm going to press
shift S. So shift Custer selected shift,
bring the cube. Let's make it smaller
with S. And let's pull it down into place where it's
going to go, I'm thinking. Somewhere like there. And then what I'm
going to do is I'm going to pull it a little
bit back, I think. So I'll pull it forward
this time a little bit. And then what I'll do is I'll
pull it back a little bit. Just a tiny bit. So then what I'm going to
do is I'll pull it up to where I
want my door to go. My door obviously
needs to be probably around here a bit higher
than the guy, basically. So what I'm going
to do is then grab the top of it and pull it up to round about here. And then we'll have
the top of the door coming round about
here somewhere. So what I'm going to do now
is pull it again again. And then what I'm going to do
is I'm going to come edge, select, pull this part back
to maybe something like that. Grab the top of it
and then press and pull it up into place
just under there. That's my first actual post. I think actually that's
going to look fine. We just need to make it
maybe a little bit wider. So I'm just going
to grab each of these sides and pull
them out a little bit. Now I'm going to do
is I'm going to use this guy to put it
on the other side. In fact, I won't do that.
I will use this part here. So I'm going to press
shift S cursor selected, grab my post control
transforms right click, set origin 23d cursor. So it's going to go
right there because I'm going to mirror it
over the other side now. All right, so let's
do that next. So what I'm going to
do is add modifier, generate mirror,
And there we go. Now we've got a definite size of how big this door
is going to be, and we can see, yeah, it's probably going to be
a little door on here, and I think that's
actually going to fit in. Okay. So we always have
to make sure of that. Also we have to
take into account, we're going to have
windows on here as well. We need some paneling down here and all kinds
of things like that. So we really need to
make sure that he will be able to walk through here if he walks in the door. No one of course walks
with their arms out here, except maybe a body
builder or something. So I think it's going to
be fine if his arms are, you know, down by the side. So I think that's
fine. So let's work a little bit more on
the actual paneling. So what I tend to
do is now I'll come in and just make it
up as I go along. So I'll come into
this part here. I'll bring in an edge loop. I'll press control B, scroll my mouse wheel back once, just to bring in one
edge loop like so. And then what I'm going to do is press Enter alternates and
just bring it out very, very slightly like so offset
even on, and there we go. That's the first
panel. Now let's make a couple more panels. Control, left
click, right click. Let's press one so we can
see what we're doing. And I think I want to
have two panels in here, but one a little bit
smaller than the other. So all I'm going to do
then is come in now, I'm going to grab this and this. I'm going to press
the eye button. And then you can see now we can bring in some more panels. And then what I'm going to do is I'm going to pull them out, pull them out like so. And maybe maybe this panel
out a little bit further, just a tad, so holding shift a little bit
further than that one. And there we go. And let's make one more panel at the top. What I'll do is I'll press
Tab Control left click, and I'll pull it up a
little bit like so. And then what I'll do is
I'll come in, grab this one, press the eye
button, and finally, do I want this to go in or out? I think we'll have it out again. So I'm just going to press,
pull it out a little bit so you can see because we've garden
miron makes it really, really easy to do
that, especially going over the other side. All right. So now I want to
do then is bring in our door. So what I'm going to do
is I'm going to press shift A. I'm going
to bring in a plane. I'm going to spin
it around our x 90. I'm then going to line it up,
so I'm going to press one. Let's line it up to
where it wants to go. Right down here is
where it wants to go. And X bring it in just so it's going to
fit in there like so. And then just make sure that you're happy
with the height. I think the actual height needs to be a little bit higher. So I'm just going to pull
it up just a little bit, so something round there. And then what I'm going
to do is I'm going to press and Z, pull it up a little
bit, and that is going to be then the top of my door. All right, so we've got
the top of our door. Now what I want to
do is I want to make the actual door frame. To do that, I'm going to make the large door frame going around here and then
an inner door frame. So I'm going to press control
left click, right click. And then control B
and pull it out. And then we'll have
our door frame here. So this will be the main
door frame going around. This will be also the
main door frame up here. And from here then now I can actually work on this part here. I'm going to have two
windows in the top, larger windows here, and then
some paneling down here. So what I'll do is
I'll now come in, grab this part here. And I'm just gonna
press selection and pull that out
because I want this separated away from there. I can actually pull it
all out now as well, so I can actually see
really what I'm doing. Alright, that's
looking good so far. So in the next lesson, hopefully we'll manage to get this door actually finished. All right everyone, So hope
you enjoyed that and I'll see in the next one.
Thanks lot. Bye bye.
28. Modeling Detailed 3D Doors with Multiple Materials: Welcome E everyone to Blend for the Environment
Artists Guide. And this is where we left off. All right, so now
what we want to do is we want to put in
our actual window. So what I'm going to do is, first of all, I'll come
in to my actual door. I'm going to press Tab.
And what gonna do is I'm going to press
controller left click. I'm gonna bring that
up, so we're gonna have some top
windows around here. And then we're going to
press control left click. And I'm going to
have some windows in here and some panels
in the bottom. So I'm just going to leave
this one in the center. So going left click and then right click and
drop it into place. Next of all I need a
center part of here, so I'm going to press
control left click, right click to bring
me a center part. And now finally, I
need to actually make sure that I'm
splitting these off. Because these down here, I want to be a little
bit different, but I don't want to split
them off quite yet. I want to split them
off in a minute. So what I'm going to do is I'm going to come into these parts here and grab all of
this. So grab it all. And then what I'm going
to do is I'm going to press the eye button
and bring it in. Now you can see it's not
coming in again properly. As you can see, the bottom and tops are different
from the sides. So first of all, let's reset
all the transforms like so. And now let's try that again. And now they're coming
in really nicely, so we want a nice thick edge
going around there like so. And then what I
want to do now is come to the bottom part. So this part here, I think I will have a little bit coming in
from there as well. So in other words, let's come to these ones first. I want to split all
of these off now. So all of these, So I'm
going to press selection, Split those off, and then I'm going to come
back to these parts. Now these are going
to be the Windows, so these two are going
to be the windows. So let's bring those
in a little bit more. So we'll bring those in a
little bit more like so. And then finally
what I'm going to do is come down to
the bottom parts. And these then are going
to be my paneling. So if these are one of them
a little bit different, so I'm going to press
to bring them in. And then what I'm going to do
is I'm going to bring them, bring them back a little bit. So if we come in
now and we press, bring them back just
a tiny bit like so. And then what you're going
to do is you're going to press the button again. So bring them in very slowly. So then what you're going
to do is you're going to press and pull
them out this way. And then finally, to get
this panel in effect, you're going to press
again to bring them out. You want to make sure that
you're on individual origins. And then what you want
to do is you want to press now to bring
them in like so. And you can see
now we've got some really, really nice paneling. Now the thing is on these
ones, we basically, I'm thinking that probably
I'm just looking, I'm wondering whether to
keep these two together or not and have these separated and a
thinker will do that. What I'm going to do, we've
got all of these now, We've got basically this part, we've got this part, let's give this door some
actual shape first. So what I'll do is I'll
come into this part. I'm going to split off these. Shift select and
control select Y. And then what I'm
going to do is I'm going to press control Er, left click, right click,
and bring in a bevel. So control up one and maybe
to something around here. And then what we'll do is
we'll come in and grab our vertice and then just
pull this up like so. And finally, let us
just pull these up. So shift, select each of these, pull them up a little bit, and I think that's an
actual better shape. Now from there then what we
can do is we can come in, we can grab this, we can press
and pull it out like so. And then we can
come in, you know, before we do that, let's
actually take it all back. So we're going to put it back into place where
it's going to go, just in front of here like so. And then what we
can do now is we can come grab all of this, press the button, pull
it all the way out, just to there as you can see. Then what I can do now is I can come into these parts here. So all of these parts
going all the way down. And I can pull those out. Now if I press, I
can pull them out. But what I want to
do is I want to make sure they're just below here. In other words, I
don't want them coming out further than
this part of the top. In fact, the top, I might
even pull out further. Let's pull them just out to
where this section is here. Let's come then to
the top. So I'll grab this one and this one, and I'm going to pull it
out a little bit further, maybe even something like that. I think that's actually
looking quite nice. Now what we can do is
we can fix our actual do the first thing with
our door, we've frames. The first frame is this one. So let's actually fix
this first frame. So what I'm going to do is I'm just going to grab
the whole frame. I'm going to go up to mesh, split by faces by edges. And then what I'm going to do is I'm going to pull it out, pull it out like so tab. And let's pull it
back into place then. So where it's going
to go, something around there looks pretty good. Then what we'll do
is we'll do now the panels and these bits here. We can see we've got more
frames here. Let's split off. These ones. Like. So, yeah, we'll split those off first because they're going
to be the windows. So let's press P selection. And then we can hide those
out the way quickly. H for Hyde. And then what we can do is we can come
to this part here. I'm wanting to split
these panels off as well. So what I'm going to
do is grab one panel, grab the second panel, control all the way back just before we get to here
where this split is. We don't want to select
this on the inside, we want to not have
that selected. So control minus,
and you can see now we've just got
this panel selected. Separate that off, hide
those out the way. And then finally what we can do is we can come to
this part of here, press tab and then mesh. And we're going to split
face us back edges. And then what we're
going to do is we're going to pull these back. Let's pull them back this time
because they'll make it a little bit easier
on the paneling. So fire press, pull them back. Now you can see when
I'm pulling these back, I've got something
else selected here. I don't really want
that. So let's press controls like so I'm hoping. Let's see if this split off. No, I didn't. So I
need to press again. Mesh, split faces, back edges. Let's just make sure
this is split off. Oh, that's the reason why. It's because it's split
off all of these. Let me just see if I
press L so you can see that this here is
split off from this. That's the problem.
It's no problem because all we can do now is ol, shift and click or shift. Click and select
the inside of here. So you can see I got
these split off and I don't really want these
on the inside of here. When it extruded, it
extruded these as well. Delete faces. All
right, finally. And then what I can do is
now press A. I can press, pull them back like
so I can press Tab. And then what I can do
is press Lth like so. And now finally let's
pull back my windows. So I'm going to pull back my
windows into place like so. And then let's pull
back our panels. So let's pull back our
panels into place like so. And let's press Ltage.
Bring back everything. And now what we should be
able to do is grab everything now and pull those into place as well. So
I'm going to pull them. Let's move our goal the way, 'cause he's getting a bit
of annoying in there. Let's pull these back
into place as well. So I'm just going to
press controls there twice before I pull those back. I'm going to come in now,
pull my guy out of the way. And now I can actually
see what I'm doing. So I'm going to grab my windows, my panels, press G just to make sure I've
grabbed them all. And then let's pull
them back into place like so there's
something roundabout there. Looks absolutely fine. Now, you might have
a problem in that your windows might not
be in front of the wall, but we're going to
check that in a minute. First of all though, let's
put it on materials. Now look what this looks like, Let it load up, and
then what we'll do first of all, is
bevel everything off. So we'll start with our bevels and then we'll do our materials. So, I'm going to
grab in fact Yeah, we'll do the materials first. So what I'm gonna
do is I'm gonna come over to my asset Manager. I'm going to go over to my wood, and we're looking for
this blue painted wood. Now, we could have
took it off there, but I forgot we had that on, So let's drop that
on there, like, So let's go back
to modeling then. And then from here we've
got pretty much all of the things we need except
the bricks down here. We need some bricks. So what we'll do now is we'll
grab all of this one. We'll press U, Smart UV Project. Click okay, like so. And then what we'll do is now we'll bevel this off as well. So add modifier, generate bevel, we'll put it onto something
like naught point, naught naught three. Let's
have a look at that. Is that going to be enough? Yes, that's going to be enough. And now from here
we need more blue. So what I'm going to
do is I'm going to grab this one here, I'm going to grab this one. Press control L, and we're going to come down and copy modifiers. Let's see now what
that looks like. Let's put it onto object mode. Right click, shade,
auto, smooth. It's copied the mirror.
We don't want that. Let's turn that off.
And there we go, now our bevels on there. Let's come now to the next part. I'm going to press
control or transforms, right clicks origin to
geometry, copy modifier. So grab this one control
L copy modifiers. And there we go. And
now the inside one. Let's press control
or transforms. Grab the outside control L copy modifiers.
And there we go. And then now the final bit, This one here again
control or transforms grab any of these really
control L copy modifiers. That's looking pretty nice. Now what we can do is we can
grab all of these and the inside grab this
outside control L, and we're going to
link materials. Let's put it on materials now. And this is what we
should be left with. One thing is, yeah, I think actually we'll leave
them all blue on here. We'll keep them all blue. The one thing is though,
we need to grab them now. Grab them all. Smart UV
project and unwrap them all. So I'm going to probably
unwrap these two together. Tab A, Grab them all. Smart UV project. Click Okay. And then these two. Look. Okay, now we've
just got the glass. Now the glass on this is going to be the same glass as here. So all I'm going to do is
grab these, grab these. And I'm going to press control L. I'm going to link materials. And you can see this
is the wrong material. So come over to your materials
just minus off light wood, minus off stone, and you
should be left with glass. And now let's unwrap these. So the way I'm going
to unwrap these, then I'll press one
on the number pad. I'll move my guy, in fact, I'll hide my guy with H.
That'll make it easier. Come to my glass and
let's grab all of these. Let's press U, and what we'll
do is project from view. And then I can go
over to UV editing. And from there then you
can see that these are way not scaled at all. But what you can do is
if you press press one, I can grab both of these L L, I can put them in some
sort of place like so. And then all I can do is
press S and X, pull them out. And I should be able to get them in a relatively good space, even though they're a
little bit stretched. Should be able to
get away with it. Let's also grab these two them and we're going to
do the same thing. So put them into
some sort of place, press the borne and
then and grab this one L. And so now I'm just going to grab them all and
I'm just going to press the S borne and
make them smaller. But I want to make sure that I, I'm hoping if I
put this on Yeah, it's already on
individual origins over here, It's not over here. I think it's this
one. There we go. Bounding box,
individual origins. There we go. Now we
can bring them in. All right, perfect. That's exactly what I want.
Let's put our rendered on. Have a quick look at
what that looks like. And we can see we've not got
a lot of light around here. And sometimes, you know, this will affect how
things are going to look. So what I'm going to do to fix that is just open
this up a little bit. Let's come round two. Now, before you do this,
actually before we do this, let's just say about our
work before we do it. Because if you're on cycles, there's a chance in
mind crusher system. We don't want that. So let's come over
to our world and then all we're going to
do is move this rotation. So let's put it on 90. Something like that. And
there we go, let it load up. And there is our door to our actual coffee shop
looking pretty nice. Let's bring back our guy. We and there we go.
Now our guys there. And I just want to make sure then that it's the right size now before we do anything else. And then of course we
can get a top on here. So let's press Shift space bar. Move, bring our guy back. There we go. That's looking
perfect so far, so. All right everyone. I
hope you enjoyed that. Let's get this paneling on the top of the door done now and then we can really
start cracking on it won't be long before
we've actually finished, you know, the main
part of this building. So I hope you're really enjoying it and I'll see you
on the next one. Thanks lot. Bye bye.
29. Adding Decorative Details to Cafe Entrances: Welcome back everyone to Blender for the Environment
Artists Guide, and this is where
we left the art. All right, so now let's
go back to modeling, and let's now attack this top
part of this coffee shop. So what I'll do first of all, is I'll make an actual, just a round a bit
going off here. So we've still got our
guy in the middle, we've still got our cursor in the center. Let's press shift. Let's bring in a cube. And then we'll bring it up and put that into place
where we want it. So we want it right
at the top here. Just probably into
the wall, even there. And then what we'll do
is we'll swish it up. So I'm going to press Tab, make sure I'm in Face Select. Bring up this part to
where I actually want it, so something around there. And then what I'm going to do is I'm going to pull it back. So I want it basically starting from there and coming all the way down here and then probably bevel it in a
little bit from the inside, which I'm going to show you
how to do just in a minute. So I'm going to bring it
up to roundabout there. What I'm going to do
then is press control. All transforms rightly
origin geometry. Now let's just make
sure actually that I'm pulling it back far enough because it's a little
bit out there. I don't need it so far back. And then what I can do is
now I can bring it down. So I'm going to press and
then pull it out like so. And then what I'm going
to do is press like so. And then I need a
bottom bit on this. This is just the top
bit at the moment. I'm wondering though
whether I want this to come further out or to be
beveled off in a certain way. I don't think that
actually looks too bad. I think I just need
to bevel off the top. All I'll do is just grab
the top press control and just bevel it off like so. Yeah, and that's looking
pretty nice. All right. So now let's get this other part in this bottom part of hearing. So to do that actually
let's just grab this top part shift
and we'll bring that down and we use that piece
to make this bottom part. I'm going to press bring it out, keep going with the S. And then I'm going to pull
it up into place. And then finally what I'm
going to do is I'm going to press and pull that down. There's something
like there. Then what I'm going to do is I'm going to pull it out a
little bit as well. Let's pull it out
something like here. And then I'm just making sure the thickness maybe it's
a little bit too thick, so I'm going to pull it up. Yeah, I think that's
looking much now I want to do is I want to
round this off a little bit. I'm going to come in,
grab each of these. Press control B, bring the
round, something like that. I'm thinking that looking pretty nice the way that is now. I did want another
window in here. I'm looking at my door now and thinking maybe I should make it a little bit
taller than what it is. So I'm going to
grab my door again. It's all about trying to get everything to
fit into place. I'm going to press Gene. You can see I've
missed some of it. So I need to make sure
I'm grabbing it all. Like, so again, there we go. Now you can see I've
grabbed it all. Now what I want to
make sure is that there's no bevels or
anything like that. So what I'm going
to do is, well, not that there's no bevels on, I don't want to put my
bevels in the wrong place, so I don't think there's any mirrors or
anything like that. So what I'm going to try
and do, I'm just going to try and join it together
with control J, right click, shade,
auto, smooth. And I'm just making sure that my bevels are all still
on as I want them. Now you can see
that the paneling on here doesn't
look right anymore. So what I'm going to do
is I'm going to grab these two panels right click, and just shade flat. And now you can see they're
looking tarns tons better. Now you can also see
if I move my guy out, that also these panels going around the side
don't look right. So what I'm going to do is
come back to my panels. Old shift click,
old shift click, right click, shade
flat, and there you go. Now you can see the
look just tones better. So now we've got
all that in there. Now if I press G, you can see I can
move the whole thing. And finally then if I press one, what I can actually do is
make it a little bit taller. So essence, head, make it a
little bit taller like so. Now let's see if it's way
too tall because if it is, the other thing we
can do is we can put a bottom on the door as well. So we can put like a kind of a, you know, kind of kick part
on this bottom as well. We could also do that, and I'm thinking that's probably
what we should do. So let's come back to our
dove, pick it up a little bit. Now I'm wondering, is
it a bit too tall? It might be a little bit
too tall at the moment, no. Actually, you know what?
I think it looks good. I think it looks good. We just need this
kick on the bomb. So all go and do shift, bring in a cube, press the S, P, let's bring it back into
place like so pull it up. Then let's pull it out so it
sits on this bottom here. And X pull it out into place. And then let's pull it
forward a little bit. Let's pull it forward
a little bit. So let's now bring
in an edge loop. So control left click, pull it up a little bit, just so it's past
this point here. And then all we can do
is come to the front, press the born to
pull it out like so. And that then is looking
much, much better. Now from here, what we can
do is I can grab my door, I can press control
L link materials, control L copy modifiers. Come back to this one control all transforms and there we go. Now let's finally
grab all of this. And I know we can't see it, but let's just press Smart
UV Project. Click Okay. Now let's go to our material, and that is what we
should end up with. Now that's looking pretty good. Again, the only
thing I'm worried about is the door being
a little bit too high. Let's press Sins head and just squish it down a little bit more like so We're just basically trying to get everything to fit into place. I'm just looking at this door, making sure it's
a little bit too. As you can see, it's just
going through that wood there. So I just want to pull my guy forward and then come
back to my door. Now, there is a way where
you can see at the moment, I'm trying to zoom out to grab this thing. I
don't really want that. So what I'm going to
do instead is I'm going to press the
little sideways V. And I can now put
that three decursor. And I can now move
this from here, which makes it
much, much easier. The other thing is, as you
can see that these panels, they're not in place anymore, so I need to come in
and fix those as well. First of all though,
let's get this in place. So you can see here you
sat on top of there. Now that looks good. The door looks a better size. Now, I would say as well that maybe if we just bring this
up a little bit like so. And then we bring all of
this up a little bit. I think that's going to
make it look a little bit bare. Yes, there we go. That is much better.
Now if I bring my guy and just stand
him on top of there. Now, yours on top of there.
That is about right. That is what I'm looking for. All right, let's move
the guy to the side. Let's come in and fix
the panels first. Let's also put this gizmo
back to where I want it. So little sideways V again, individual origins this time. And then let's come
back to my door. L and L on the panels, one and next press, and
bring those in place. Now you can see they're coming out really the way I want them. Let's see, we are in
individual origins, which means we need to do
this a little bit different. And Z, pull them up first, and then and X pull
them out next, like so. And there we go. And you can
see still a little bit out. We don't want this white bit round here or
anything like that. So I'm just going to press S, pull them out with the shift
burn, and there we go. Now they look perfect. That
looks really nice now. Now let's think
about the next part, which is going to be our
cursor needs to be here. And then what we'll
do is we'll put another piece of glass in here. Just a small piece of glass. And then we'll also, I think, pull this out a little bit so you
can see this bit here. Let's pull it out so it's a
little more over the edges. So S and X, let's pull it out all
the way over like so. And now it's really
starting to come together. Let's press shift
S, cursor selected. And then what we'll
do is we'll press Shift and bring in another cube. Let's press the bottom. Bring it down. And I'm just going to sit behind
this part here, this front here, and Y. Let's sit behind here. Let's press S. And
when we've done this, I would take stock if you
are intending to put them in your asset manager and
Y, I would take stock. And what you just want to put in there and do it that way. So once you've finished it, so S and X, that's
what I tend to do. I'll tend to finish
something and then what I'll tend to do is I'll tend to
work out what I actually want. I'll tend to go in and name
everything once I've created a building and work
from there and I find that much, much
easier to work with. All right, so we've
got this now. Now let's put a piece
of glass in here. So all I'm going
to do is I'm going to press to bring this in. Sort of select to this face, press the button, bring it in, press S, and then just to squish it and then pull it up
a little bit like so. And finally then let's press
and pull it back like so. And there we go. So now we'll put another piece
of glass in here. The rest of this then
will be this blue. So let's press control. All transforms set origin
to geometry. Grab this one. Control, copy
modifiers control L, and then we're going
to link materials. Now you will see on
here here, sorry, we've got a mirror, we
don't want that one here, so let's just take off
the mirror like so. And let's come in a smart
UV project. Click okay. This is basically
what we're going to be doing throughout
the course. It's adding materials,
unwrapping, adding a bevel. All right, so now let's
come to this part. And what I want to
do is unwrap it. So smart UV project. And then what I also
want to do is I want to click my
door press control, L link materials
just to make sure that on this one we also
have our glass lit. So now let's come to our
glass lit and click a sign. And there we go. Now let's come finally to our UV editing. And let's press A and make
it much, much smaller. And you should be
able to get away with putting it just
between those parts. There S like so, and it should look
something like that. That's basically look
we're going for on here. Now finally, let's
come to this bit. Right click, shade,
auto, smooth. Let's also then come to my door control L link
materials control L, copy modifiers like so. Now finally, let's
come to this bit A and smart UV project. Click okay, this is what
we should be left with. And that's looking
pretty nice. All right. The one thing I'm looking
at is this part here. I think I need to
put a sharp on here. If you remember, you can see it looks a little
bit too smooth off. I don't really like it, so
let's come in and add a sharp. Now the thing is over
on the right hand side. We can see we need to just hide out our bevel.
And now I can come in. Olf, click shift, click,
shift, click shift, click, right click, and shot. Then let's turn it back on. Press the tab button,
and there you go. Now you can see it
looks so much better. Okay, on the next one, then we'll just make a little
bit of an ingrain here. And then from there we can actually decide where
our windows gonna go, how big they're going to be, and really start planning
out this front of this cafe. Alright everyone, So I hope you enjoyed that and I'll
see you on the next one. Thanks a lot. Bye bye.
30. Modeling Symmetrical Borders and Applying Directional Lighting: Welcome back everyone to Blender for the Environment
Artists Guide. And this is where we left off. All right, so now let's
finish this door quickly. So what we'll do
is we'll come in and we'll grab this
middle section here. I'm just going to press the
Eyeborne jaws to bring it in. And then I'm going
to press to bring it out or inwards like so. And then all I'm
going to do is just look to make sure it still
looks okay, which it does. So that's great. And now let's come down to
this bottom bit. I think this bottom bit needs
to come out a little bit. So these stones, I think I need to pull them this
way a little bit. So all I'm going to do
is make it a little bit bigger and then and x and pull it out just to make sure that it's fit in
a little bit nicer. We can see that it's
probably these parts here. Maybe we want it fit in there. Actually, I'm not going to
worry about that too much. You know, some of the other problems you're
going to have is you can spend all day worrying
about little things like that. So try not to do that. All right, One thing we do
want to do though is make this a little bit bigger
because you can see it's not quite fitting
down to the floor. So what I'm going to do
is I'm going to grab this bit and pull it down and then Essen's ad and pull
it up just to make sure that it's gonna fit
in the floor like so. All right, with that done then, what we want to
do now is we want to work out where our
windows are going to go, and then we can actually get the panels in and things like that. So let's go to modeling. Let's bring our little guy over. And then what I'll
do from here is I'll first of all
bring in a plane. So shift bringing a plane, let's spin this plane
round so R x 90. And then what I'm gonna
do is I'm gonna put that into the place where I
actually want my windows. Now remember we're going to have some panels each side
of here or some posts. So you've got to take those into account when
you're doing that. We also need to figure out how high these windows
are going to be. So I'm going to press S and's Ed and just bring
it down slightly. And then I'm going to press and X and bring them in slightly. And from there now I
can see that's probably going to be a good size
for my actual windows. The other thing about the windows is we're
going to have some, you know, kind of covers that are going to go
over them as well. So we need to take
that into account. And finally, we don't just
want flat windows on here. We actually want to bring
in some depth to these. So what I'm going to
do is I'm going to press tab control off, left click, right
click, control B. Then just to level it
off, turn your mouse, putting down one just so
it's a standard bevel. And then from here then we
can actually pull these out. So if I pull this out like so, now you'll see that they're looking pretty nice
windows, All right? So I think I'm going to
fit them in like that. The one thing is
I think the sides of the windows, it's all even. So these are the same as these. We don't
really want that. So what I'm going to do is
we're going to press S and X and pull them
out a little bit. So this big window is much bigger than these
little side windows. And that's exactly what I'm looking for whenever
I'm doing this. And more is imagining
putting an edge loop down here to figure out how big
these windows are going to be. And that then we'll
determine how big these windows are if you're gonna have two edge
loops going down here. So you're gonna have three
panes here, two panes in here. These panes are going to be much thinner than these panes. And that's why I'm
actually figuring out when I'm doing
something like this. All right, from
there, let's say that I'll work before
we go any further. Now something else I
tend to do as well is I will bring in a
sun at this point. So shift, let's
bring in a light. So a sun, let's
pull our sun back. Lift it up a little
bit and let's point it actually at our door. So our point it at the door. And why I do that
is if I come over now to the right hand side,
click this little down. Now we can also
bring in seen lights and you see it just brightens
it up a little bit. Gives me a little bit
better idea once I've got materials on what it's
actually going to look like, if it's going to look too flat or if it's
going to look fine. Then from there I can
actually pull my sun. I can put it wherever I want, all the way out of the way, because it is an
infinite light source. So it's not like, you know, it only lasts so
long, like a candle. And then it, you know, kind
of diminishes with the light. It's the sunshine, so that's
why we're using that. And now from here then,
what I can do is I can work out where my
paneling is going to be. Now you will see my guy, he needs to come down
the floor again. And you can see that the window is going to
be this high now. Is that a little bit too high? Maybe, maybe it is. So what I'm going to do
is I'm going to come in, grab my window, and let's lower it down just a
little bit like so. And I think that then look in round about the
right height now. And now we can actually work out where our actual
paneling is going to go. So let's come in
first, and let's bring in two panels down here. So I'm going to still
keep my cursor. In fact, I'll move my
cursor down to here. So I'm going to press
shift S, cursor selected. Let's bring in our
first panel then. Now the other thing you can
do is if you press Shift, you can bring in a cube. And what you can do from there, you can come down to
the left hand side and you can bring it
right down in scale, which is going to make it easier because we
don't want to keep bringing cubes in and
really having to, you know, drag them and
bring them down in scale. We don't really want to do that. So what we want to do then
is just bring it down a little bit to make it a
little bit more usable. When we first bring
them in around about the size of this
is absolutely fine. From there, then we
can now move it over. Now we'll tell you as well because we've put scene
lights on in our scene. It will make it a little bit heavier on the viewport
just so you know. So if it is storing
a little bit, just turn your scene
lights off and you'll have to make do with
how we had it before. All right, so let's
now fix this bit. So what I'm going to do, I'm going to put a bottom panel in, so I'm going to press S and
Y, just squish it back. I'm going to put
that in place and I think at the moment this is
still a little bit too big. So I'm going to press S
and's head and pull it down. And then what I'm going
to do now, I'm going to pull it to this side here. Now we can see that this
realistically these parts here, they need to go
all the way down. So what I'm going to do
is I'm just going to come to this one here, grab the side here, and just
pull it down into the floor. That then is going
to make it easier for me to work this out. Now let's grab this one again. Let's press S and
X and pull it out. And we can see
that it's going to fit in really nicely there. Is it too far forward? I think it is, a little bit. So all I'm going to do is just
pull it back a little bit. And then what I'm going
to do is I'm going to grab this press control Los. So I get an edge loop
going across there. And then in the
middle, right click. Come down now and
grab this face here. Press the Born and
pull it out like so. All right, that's the
initial start then of this. Now what I need to do
is I need something that's going to come round about here to
support the window. So all I'm going to
do, I'm going to grab this one shift y, bring it up to round about here so we can have a piece of wood
that's going to go under here. And then I'm just going
to press and pull it down just to give me a
little piece of wood there. And that's looking pretty nice. Now we need to think
about is I need a panel going this way or
a post going this way. A post in the middle, and a post going this way. So what I'm going to
do is now I'm going to press shift Ursa selected, soon as that's right
in the middle. And then what I'm going to do is I'm going to press shift A. I'm going to bring in a cube. I'm going to make my cube a
little bit smaller like so. And then what I'm going to do
is I'm going to move my guy out the way now, over here. And then I'm going to
bring this cube down. So I'm going to grab the bottom
of it face, pull it down. So then obviously I need to
pull this out a little bit. So I'm going to press L and X. Let's pull it out a little bit. So I can imagine a panel
here and a panel here. Now what I need is just another
piece of wood each side. But first of all, let's
deal with this part first. What I'm going to do is
I'm going to come in, I'm going to press control
left click, right click. And then we're going
to press control, level that out up to here. And then let's bring in
maybe maybe four edge loops. And I've got one in the
center there as you can see. So left click and there
we go. We've got four. We can move these
around obviously with the operator panel, but
I'm not going to do that. And all I'm going to do
is make sure I'm on edge. Select, grab this edge, I'm going to come in,
then keep this on smooth. And I'm just going to press
and X and just pull it in. So I'm just going to bring
it out and pull it in slightly just to get that
nice sloping effect like. So now from there what I'm going to do is I'm just
going to turn this off. I'm going to press A and X and just pull it
all out like so. And I think now
that's a good size. One thing I'm looking
at is making sure that it's fitting in
the front of here. So behind each part of these, I'm making sure it's fitting in. And I think, yeah, that's
looking pretty nice like. So now from here what I'm
going to do is I'm going to use this to put over here
and over this side as well. So if I press control, left click, right click. And then what I'm going
to do is I'm going to right click Markosm. Now what I can do
is I can come in, press L to grab just that side. Let's press shift D,
Bring it over then. And now I can spin it round, so R z 180. Spin it round like so. And let's put it to
roughly where we want it, which will be somewhere
around there. And then what I'm
going to do is I need to grab the back of it. So Olt shift and click,
grab the back of it. Now we don't know if we've
grabbed all the back of it. So let's just go under
and you'll see that we can come round the inside and we've grabbed all
the back of it. And from there then we
can just pull it back like so into place now. Just make sure you're happy
with the size of that. Maybe it's a little
bit too far out. So I'm just going to pull
this back a little bit. Then grab the whole
thing with L and then finally pull
it back from there. Then I can press
shift, drag it over, and then press 180 and put it into the other
way. Now, over here. So there we go. We've got
some beautiful panels. And lastly, just to bring
down the draw calls, we don't want as many
polygons on this one, so I'm just going to press Alt, Shift click, right click, and I'm going to clear that
seam, that point there. And then what I can
do is I can delete. So dissolve edges like so. And that's going to get
rid of that for me. And there we go, we've got half of the amount of polygons
that we had before. All right, so on the next list, and then what we'll do is
we'll get these panels in. You can see here that
this might not be level. It looks a little bit unlevel. So I might need to
move this one over. I will know as soon as
I create a panel in here whether this is going
to be the right size or not. So we'll have a look at that. And the panels actually
are going to be really interesting how we
actually do those. I'm going to show you how
to use customized bevels. So that's gonna be really
interesting. Alright everyone. So I hope you enjoyed that. And I'll see on the next one. Thanks a lot. Bye bye.
31. Creating Wooden Decorative Panels Using Boolean Techniques: Welcome back everyone to Blender for the Environment
Artist Guide. And this is where we left off. All right, let's bring
in another cube then. So all I'm going to do
is press shift day. I'm going to bring in a cube. I don't want to
bring it in, well, I'm an edit mode because
then it means it'll be part of these measures.
We don't want to do that. So we're just going
to press Shift Day. Bring in a cube. Let's make the cube the size
that we want it. So if I press one, I'm just
going to bring it down here. And I want it to be
more like a rectangle. So S and X pull it out more like this sort of shape than the
shape that we had from there. Then what I'm going to do is I'm just going to pull it out. I'm going to press S and Y and make it the
size that I want it, so something around
this sort of size. And then from there now we're going to try
out the bevel in. Let's first of all reset
all the transforms like so let's also put it on an object mode so we can actually see really
what we're doing. And then from there
let's come in now and grab each
of these edges. Going around each of
these edges like so. And then what I'm going
to do now is I'm going to press control B and
bring it in like, so now I'm not going
to worry about the scared size or anything
like that at the moment. What I'm now going to do is
I'm going to come over to my operating panel
and go to custom. And then what I'm
going to do is I'm going to click on here. And you'll see once
I click on here, then it'll give
me another bevel. And from there I'm actually able to control how this
is actually going to look. I can also click on the next one and control how that
one's gonna look. We can also bring it up and you can see it or make it much sharper or we can bring
it down, bring it back. And we can see now
we've got a lot of control over how the
shape is going to be. So you can see I'm messing
around with the shape. Just trying to get
it. I'll want it. Like I think now
we're nearly there. Let's bring it back a
little bit like so. And I think that is a very, very nice shape
from there as well. You can also come in and take down the bevels
if you want to, and you'll end up with
some of the shape, or you can turn it up to a little bit higher
if you want to. I think we're going to
leave mine on four. I think I'm happy
with how that looks. All right, so that's
the first one. Now if I come in and
grab this and I press I, this will be then the
first panel here. And then if I press again, this then will be
the second panel. Now whenever you're
doing the insert, just be careful you
don't go too far. Because if you go too far, what'll happen is
you'll actually start to cross it over
and break the mesh. So just be careful
you don't do that. All we want from this is this
panel and this panel here, that's all we want from this. So what I'm going to do, the easiest way to do this is
shift click and then shift click And then all
we're going to do is press shift D and
bring it out like so. Then what we can do is
we can get rid of this. So L delete vertices like so. And now we should be left
with something like this. And from there then we actually
have a lot of control. So what I'm going to do
is I'm going to pull this out as very, very
slightly like so. And then I'm going to grab
the whole thing with a and then pull it back like so. And there is my panel now, I'm not going to need
the back of this, so I might as well delete it. So delete and faces like so. And now from here let's bring in the actual wooden
part of the panel. So all I'm going to do is going
to grab this shift S Ursa selected and then I'm going
to bring in now a plane. So what I'm going to do
is I'm going to press shift A in object mode,
bring in a plane. And then I'm going to
shrink my plane down exactly the same
way as I did with a cube. So let's bring it down. Bear in mind though,
when you reopen blender, this will reset. So it won't stay there the moment you blend the crashes
or you reopen it again, it's going to just come back
to the same size it was. So let's rotate it
round so R x 90. And let's put it into
place where I want it. So just round about here, let's press S, and
then shrink it down. And now finally
what I want to do is I just want to
put this into place. So I'm going to grab
all of this now and I'm going to drag it into the
place where I want it. And we can see now sort of
the scale that we've got. So we need to scale it
up a lot to fit in here. So all I'm going to do is press, grab all of them. Scale them up. And then I'm going to pull
them back into place like so. And from there then, I can actually imagine how
far I need these out. They're a little bit too
far out, as you can see. Also, this plane needs to
be a lot bigger on here, so all I'm going
to do is press S, and so pull it into place. And then what I'm
going to do is I'm going to come to
these parts now. Pull them back to where I want
them. Something like that. And now you can see that's
looking pretty nice. Now let's join all
of these together. So if I join this and
the plane together, press control J, like so. And there you go. That's
what you're left with. Now if I bring it over here, is it going to fit in here?
That's the main point. So shift D, let's bring it over. And I don't think it
will, so you can see we're a little bit
out, which means We need to move this,
Post this one here. So let's come in,
press LP selection, And then what I'm
going to do is just move this more to the center, so we can see this is nearly
here. This is nearly here. Let's press one and put
it more into the center. Let's put x ray on, and then we can really see
what we're doing. And we'll put it right
about in the center there. Now we can see that these
are a little bit small, so I'm going to grab
this one and this one. And then what I'm going to do is I'm going to make them
a little bit smaller, so I'm going to make sure I'm
on the individual origins, press the S born and then
just bring them in like so. And now I can see that this one needs to go this
way a little bit, so pull it away this way, and then this one needs
to go this way a little bit like so. And
now we've got that. We need to just make sure
that these parts here, so both of these need making a little bit bigger so the planes behind
them basically. So let's shift, click them both tab and let's come in and
grab just the planes. So can I grab the plane here? So L and L and then son's pull them up
into place like so. Finally then let's press tab. Let's turn off our x ray
and let's have a look at what we've got.
Let's decide now. Do I want to pull them a
little bit further back? Which I do. And then also I want to right click
and shade auto, smooth. And there we go. All right,
that's that bit dumb. Now let's get in some material. So if we're going to our
material panel shader, sorry, you'll see when it loads up that we need to
do beveling on here. We've done the beveling on here, but we need materials on here. So let's focus on
this part first. So what I'm going to do
is I'm going to come in and I might as well
join this all up together, because I'm just going to put it over the other side anyway. You might want to
have it split up because you might want
to actually be using it in your asset manager
completely up to you if you keep it as a whole panel
or if you split it up. So control J, control or
transforms right click, set origin to geometry. And then what we'll do is
we'll join it to this. So I'm going to
grab me panel here. So grab this control L and
then what we're done to do is copy modifiers and then control L and link material from there. Then let's come back to it. Let's press Tab, Not light pack, nope, Smart UV
project. Click Okay. And here we go, there is our panels actually
done. All right. So now what I want to do is
I just want to make sure, first of all that
our bevel is on the bevels looking good
all the way around it, which it really, really is. And that is done. Now
you might want to go in and delete some of
the backs of these, honestly, the size
of the course, you should really be
cleaning these up. But I'm not going
to be doing that on every single one because it's just going to take
way, way too long. But you should be doing
that just to cut down your polygons and things
like that just so you know. Because the more
polygons in the scene, the more optimized everything's going to need to be at
this point as well. You know, if you've got
a lower end machine, you might be struggling jumping between rendering and materials. So that's something that you
need to take into account. A little bit later
on, I will be going through performance and
otonization in blender, but we're not quite there yet. There's still a few
things to learn just to get you
comfortable with blender. All right, so now we've
got this, let's press one. And what I want to do now is
put it over the other side. So Shift, let's bring it
over to the other side. Let's put it in. So something,
something like that. And then what we can
do is we can just put it on material. And there we go. Now what we'll do is we'll
make a start on this window. I think the first thing we'll do these windows, by the way, they Windows, they're
the hardest windows to do, there's no
doubt about that. They're pretty hard to do,
so you have to really think through everything in advance when you're actually doing them. So try and copy what I do. And then from there you'll
be able to create your room. Now before we do that though, let's actually come in, these two here materials. So let's just move our
guy out of the way. Let's come into this first, and we'll go over
to Asset Manager, and then we'll go over to Stone. We actually want to give
this a different one. We don't want to have
the same stone in here, we want it to have stone flags.
Let's drop that on there. And then what we also
want to do is we've got one here that should say brick. Let's have a look,
where's my brick? So metal truck
walls, there it is. So it's under walls. Let's
drop that one on there. And there we go. Now let's
just quickly unwrap this, so the stone flags
really easy to unwrap. Let's press U Smart UV Project. Click Okay, and there
we go. That's those. Let's also make sure you've
got a bevel on which we, we don't need a bevel on
here. So that one's fine. All we want to do then
is press a U and unwrap. Now the thing is
about the bricks. You can see it said object
has non uniform scale. What that means is that I
need to press control a or transforms right clicks
at origin to geometry. And now let's try
unwrapping that again. Now the thing is about
the bricks is you want to make sure whatever
size these bricks are, it keeps consistent across. You see, you don't want
little tiny bricks there. You want them to look realistic. So let's come over
to UV editing. And what I'm going
to do first of all is you can see here
my bricks are tiny. Let's spin this round. First of all, get in the
right direction, so R 90. Spin it round, then let's press the S button and shrink
them in like so. And I'm going to make it
two, possibly three bricks. I think we'll have two bricks. And what I look for when I do this is to make sure
that the grout, which is this bit
between the bricks, is at the bottom and the top. Now the floor is going
to be here as well. As long as you've got
a bit of grout there, it's going to make them look
a little bit more realistic. And that's what we're
actually looking for. All right, then what we'll do now is we'll go back
over to modeling. We'll save out our scene, and then on the next one
we'll actually start work on these
actual bay windows. I'll show you how
to get those done. And from there then, this rest of this going round
here is pretty easy. We've got a couple more
windows I think to create, but it's actually
really easy just putting the rest of
the building together. All right, everyone. So
I hope you enjoyed that. I'll see on the next one.
Thanks a lot. Bye bye.
32. Extending Windows Modeling Techniques for Additional Detail: Welcome back everyone to Blender Fall The Environment
Artists Guide. And this is where
we're left, the off. All right, What I want
to do then is I want to come into my bay window. I want to press the tapon. And what I want to
do is press control. Er, bring in one edge loop
going across the middle. And then what I
want to do is press control and pull it out, scroll back my mouse
wheel just to get the actual top and the bottom
of my actual bay window. So something like
that looks about right and I think I can
actually work with that. All right, from there then, what we're going to do is we're
going to split this off. So I'm going to grab this one. This one Shift select.
Control select. And then we're
going to press and split those off like so. And now I'm going
to do from here is I'm going to come in, I'm going to bring
these parts in. So I'm going to grab all
of these before Yes, I think I will do that actually, because we'll make the
frame going around them. We've also got the post that we need to actually bring up here. And I'm just trying to think how I'm actually going
to do the post here. All right, what we'll do is, first of all, we'll
insert these. So if I press, I will bring
an Insert in just to get the main frame going
around our actual windows. So something like that I
think is going to look good. And then what we'll
do is we'll press P again and separate
everything off. Now let's actually bring
something out so we can actually get an understanding of how this is actually
going to look. So what I'm going to
do is grab these, press control all transforms. Right click Srogen,
geometry, add modifier. We're going to bring
in a solidify. Let's do that again.
Solidify is here. And then what we'll do is we'll add some thickness to this. So, and then of course
we'll change the offset down a little bit just
so we can pull it out. So now from here, what I really want to
do is I need a post going up here,
from here to here. So what I'm going to
do, I think I can use this part here to do that. In other words, if I come in, I just turn this off
and then what I'll do is press control over here, like so press control, pull it out and I'm going
to pull it to there. And then same on here, control
left click, right click. Control, pull it out. And then I think I'll use
this as my actual post. What I'll do then is
I'll grab this and this and I'll press
shift D like so. And I'll pull it down
just there like, so turn this back on and now you'll see we end up
with something like that. And that is looking actually pretty much the way
that I'll want it. So now I can bring this down if I just grab the bottom of it. So if I grab this
one and this one, I should be able then to
pull it down into place. Now you will see it's a
little bit far out on here. But if we split off this part, so if press P selection,
split it off. And then what I can do then is bring back this a little bit. So if I bring back
that a little bit, you can see now that's
looking much nicer. Albeit you can see
it's past this point. All going to do is change
the thickness as well. Let's bring back thickness, something like
there, there we go. That's looking pretty nice. Now, the other thing is
let's bring it out a little bit more. So
something like that. Let's have a look at
how that's fitting in. And also let's pull it up
a little bit into place. All right, so all
that is looking good. Now the main thing
is as we can see, we are going to have
a little bit of a problem in that
the fact that this, as you can see now,
doesn't look right. In other words, these parts
here, once I've put this in, it needs to come in a little
bit because we've got this huge post now
and we need to take that into account because
you can see it goes back here and it goes back here, and now we've not actually got this in frame kind of thing. So what I'm going to do
is I'm going to come in and I think I'll
fill this part back in. So I'm going to take this away. So press Delete and Faces. And then what we're
going to do now is we're going to grab this,
we're going to press a, I'm going to come in Mesh, Cleanup, and fill
holes. There we go. And then we're going
to press Delete. And we're going to
click Limited Dissolve. And we should now end up with
that back how we had it. Now I'm going to do is
going to press control A, all transforms right,
clicks the origin to geometry and now should
be able to come in. Let's do both of these. Actually we'll do them
all at the same time. I'm going to press one to
go into the right view. I'm going to press
and bring them down. So we're going to have it
this sort of thickness. Now this parts here are
where we're going to kind of get a bit messed up because
we need to bring this part, so this part, this way
a bit and this part. So let's do the
middle part first. So all I'm going to
do is I'm going to press and X and pull it in. And if I pull them into there, then it should give us a nice
frame going around here. And that is exactly
what we want. And then from there,
what I want to do is I want to come
now to this one, and I want to pull this
across this way a bit. So to do that, what
I'm going to do is I'm going to put my x ray on. I'm going to come in
and select this edge. And then what I'm going to
do is I'm going to make sure that this is on normal. And if I click it on normal, I should then be able
to pull it across. Now if I pull this across to where I actually want it, so. Probably something around there. So you can see I've got
a nice edge down here. And then what I can
do is I can get this naught point naught
4187. And I can copy it. Copy. And then what I can
do it is I can come around this side and I can pull
this this way, like so. And then I can come here
and click control V, but take off the minus, press Enter, and there we go. Now those are the same
actual length from there. Then what I can do
is I can turn this off and come back then
to this part here. And what I can do
is add modifier, generate a mirror, put
that over the other side. And now I should have,
if I click on here, a nice edge going
around these parts. And that's exactly what
I want, as you can see. All right, so that's that bit. Now what we can do is we can
actually come in and we can split these off from
these parts here. So press Selection.
Split them off. Now let's come to them,
press the Tab button. And what we're going to do now is bring in our window pane. So control two, left
click, right click. Control two, do you want
two or maybe three? Let's just have two
on this one actually, left click, right click, and then we're going to
come to the side now. So control one, left
click, right click. Control two, left
click, right click. And the same on
this side now, so. All right, so now let's
create our frames. So a ' gonna do is press, and
then we're going to press the eye button and bring them
in all at the same time. Like so something like that
looks pretty good selection. Separate them all off and then let's hide
them out the way. Now let's work our way round
now in what we're doing. So first of all
we'll do this one. So we're going to press A
and then what I'm going to press is come down to mesh. We're going to split
by faces and edges. And then what I'm going
to do is now we're just going to use
solidify to bring them out because extruding
these all out is going to cause us some problems.
Better to use solidify. So all I'm going to
do is control a all transforms the right
clicks at origin geometry. First of all we'll bring
in a solidifying and then we'll second of
all bring in a bevel, bevel at the same time. And now I can do
is I can come to my solidify and bring them out. Now you can see
on some of these, let's see if we've got
any problems first, we want to bring these out. So you can see them
coming out here. You can see them
coming out here. Let's bring them
out. And you can see that the bevel is
a little bit too high, so let's turn the bevel down to 0.3 or not point nuh three, so. And there we go. Now
that's looking good. Now if I put this
on object mode, you can see exactly what
that's going to look like. If I double tap the, that
is looking pretty nice. Albeit they're probably a
little bit too far out. So what I'm going to do
is just pull them back, holding the shift born
just a little bit. Something like that. Now
let's come to these parts. We're going to do
exactly the same thing. A mesh split faces by edges. And then all we're going to
do is exactly the same thing. We're going to press control
all transforms, right? Click the urgent geometry, grab these over here. Press control L, and what we're going to do is copy
modifiers. And there we go. Now from here we can
just come to these now and bring back this, so it's nowhere near
as big as that one. There you go. Now let's press Alt tage and bring back
these window panes. So there is our
window panes as well. And you can see now just how easy it is to do
something like that. All right, so now let's come in and think about
the rest of this. So what I'm going to
do before I finish, you can see I've
got solidify on, let's actually get rid of
these points here first. So you can see this is causing issues and we don't
need these anymore. So what I'm going to do
is hide out the way, grab this, this, this one. And then we're just going
to press Delete and dissolve edges like so more. So then, and now you can see
it just looks so much nicer. Click it on, and there we go. Let's put even
thickness on so it evens all of that
outgoing across those. Finally, let's supply that. And then what we can do
is press Add Modifier. And this time we'll
bring in a bevel, we'll set this down to naught
point, naught naught three. And then finally what we'll
do is we'll grab this, we'll apply our
actual mirror first. Then we'll apply our
solidify with control A. Finally, then we'll click on
this one, press control L, and we'll copy modifiers, double tap the A. There we go. A beautiful bay window, and we've made pretty
short work of it. All right, so on the
next lesson then, what we'll do is we'll get the rest of this bay
window into place. We'll get the supports here, we'll get the supports
on the bottom. And then what we'll do
is we'll actually put in a boolean going back here. And then you'll be able to see inside our restaurant as well. All right everyone. So I
hope you enjoyed that. I'll see on the next one.
Thanks a lot. Bye bye.
33. Utilizing Wood Geometry Nodes for Window Extensions: Welcome back everyone to Blender for the Environment
Artists Guide. And this is where we left off. All right, so now let's
bring in the post. So I've got my cursor. If it's not in the
center, just grab this shift S cursor
selected shift. And let's bring in a cube. Let's bring the cube
then over to this side. So I'm going to press the Born. I'm going to bring you
down over to here. I'm going to put it into place. I want it just just
at the side of this, so you can see here
just at the side. I want it just slightly
above it as well. And from there then I can
actually start working it. Now at the moment, I really
don't need the back of this. So I'm actually going
to delete the back. So delete faces, not edges. Delete face like so. And from there then,
I can actually pull this back to
where I want it. So I want it roughly just
there as you can see. And then what I can do is
I can pull this this way, so it's just in to there like, so don't worry about this bit. We can fix that bit with
probably extruding these out. And then what I can do
is now I can pull this down all the way down and then decide how far
it needs to come out. You can see at the
moment it's way, way too thick as you can see. I'm going to put it just to
the bottom of there, like so. And then I'm going to
grab the front of it and start pulling it back
a little bit too, just so it's in
this corner here. Now from there, I want to make sure that I can pull
these out so you can see. At the moment, I want to
pull these out into place. If I pull this, pull this, pull this, you can see now
I've pulled it into place. But I might as well do this
both together so I can pull them both out just so
they're into place, into that wall like so. And then all I'm
going to do is mirror this over and do it on
the other side as well. I could have mirrored
this over as well, but I don't actually
want to do that. And make it a little bit, a little bit more harder
doing it this way. All right, so let's press, pull it down to just so
it sat on top of here. And you will notice
the zed is going down. That's because I've
still got a normal. I'm just going to
leave that on for now. What I'm going to do is now
mirror over the other side. So I'm going to
press control A all transforms rightly
origin three D cursor, add modifier mirror, let's put it over the
other side like so. Now what I can do is I
can come to this again, grab this one, grab this one. And because they're
deviled, but non, destructively, no
problems there. Now let's put it into place, so make sure everything's
into place, and there we go. And then finally now what I can do is can come back to this, I can put this back onto Global. And then what I can do is
I can extrude this out. So I'm just going to press
and extrude it out like so. Now finally I'm going to want just one that's going to
come across here now. So what I'll do is I think
I'll just use this actually. So all I'm going
to do is I'm just going to press shift D like. So I'm going to shrink
it down a little bit, so just a tiny bit. And then what I'm going
to do is I'm going to press and pull it this way. Now you will see as I'm pressing that this
is also coming out. That's exactly what
we all we want to do is just make sure this is a
little bit closer to there. And then I also want to do is with the mirror, make
sure clippings on. If clipping is not
on, you'll see you bring them and they just
go past each other. But the moment you
put clipping on, you'll see that you
bring them together. You can bring them out,
but the moment you let go, now they're actually
joined together. And that's exactly
why you can also turn clipping off and split
them back up again. So just put clipping on, join them together and
now we're going to do, I think we'll apply this mirror. So let's apply the mirror because the one thing
I always like to do once I've brought
in the mirror is just get rid of this edge here, because we don't really need it. So all I'm going to
do is just come to edge, select, press, delete, and dissolve edges if
you can't get rid of it. It's another reason I like to make sure the mirror
in the center is done is because if I hide this face out the way
you can see here, there's a face in there and
we don't want that face. So delete and delete faces and then ultate,
bring back this part. And now you can come in
and dissolve that edge. And the reason we want to
dissolve that is because, one, it's adding more
polygons, and two, it's going to mess
around with our UV when we come to unwrap it. So let's press Delete
and Dissolve edges. And there we go,
a nice flat edge. All right, so that's
that bit done. Now it's time to make the
top and the bottom of this. So what I'm going to do is I'm going to bring in
a geometry node. So let's go over to Asset
Manager, let it load up, and this will be the first
geometry node we use, which is our plank
geometry node. Really, really handy
this geometry node to make in any sort of planks. So let's bring in this one here. So I'm jaw going to drag and drop it in here
is our planks. Now let's put these in
place first of all, so what I'm going to do is you can see the way way too big. I recommend shrinking it down. Actually, on these,
you can shrink them down over here on the
geometry node tab. But what I'll do is
I'll shrink it down. Now we've brought it in, so this is our first geometry node. Let's pull it out a little bit. Now geometry nodes are
things that we can build in Blender
using node systems. So if we quickly just go
over to geometry nodes, you'll see that this is the geometry node that
we've actually created. Pretty complex things. These, you can pick
them up or you can actually learn to actually
start to create them. We do have a course on this, how to create geometry nodes, so you might want
to check that out. But if not, if you have
no interest in this, you might want to go and either pick up free
ones when you can, or you can actually
purchase many, many different types
of geometry nodes. I think we actually have
20 different types of geometry nodes that
we've actually created. And then from there, once
you've actually created or bought or downloaded
a geometry note, you'll have over here
like an operator panel. Now let's just go back to modeling and I'll show
you what this does. Now generally with
geometry nodes, you will see if I
come to modeling, that we've got all of
these options over here. I recommend messing around with these just so you get an
idea of what this does. But for the most part,
if we put this in place, let's put it into place
where we want it. So it's going to
be over here now. You will see, unfortunately, we can't actually
bend that bit round, but we're going to sort that
out in a bit basically. Let's just put it into place so there's a little bit
of an edge there. And then what we'll do is we'll increase the count
as you can see. We can increase it
going all the way down. And let's then just
put it and make sure that there's no gaps
in there like so. Now from here what we want to do is we want to make sure
that the gaps are right. First of all, we can see
we've got these gaps. They need to probably be a
little bit closer together. So if I can hold the shift
and I can bring them down just so they're a
little bit closer together. So from there then, I can also change the
thickness of my planks. I don't really want to mess
around with that because we're not going to see the
inside of them anyway. What I can also do is
change the width of them. And more importantly, I can
change the width randomness. So if I bring this down, you can see I can
change the width then. So they are much more random. And then from there
I can increase the gap, sorry, the count. And from there I can actually change the seed if I
want a different seed. And now you can
see that's fitting in pretty nicely from there. Then let's make it a little
bit smaller, so S and X. Let's bring it
back a little bit, just so we can see
this last plank here. And now we'll actually
come to the other part. So we don't need to
mess around with the length at random because
it's actually in the wall. But what we do want to do is shorten the length a little bit, just so there's not so
much of it in the wall. And then let's pull it out, and then let's mess around
with it a little bit more. So pull it back just so everything's
there, nice and neat. And now what we can do is we can actually come and mess
around with the bending. So you can see if I
click this bending, I can turn them up, I
can turn them down. I can also come and
turn the rotation, so I can turn them up and
down, things like that. And the one we really want
is going to be the rotation. So we're just going
to rotate them, holding the ship bun,
very, very slightly. So now we've got different
widths on there and we've also got random
rotation on there. And you can see it makes them
look completely organic. And that's exactly the
look we're going for. All right, so now
what we want to do is we want to
go over the top. We want to apply this
actual Umich note. And then what we
want to do is get rid of these corners that are, you know, kind of in way we
don't really want those. So what I'm going to do also, sorry I forgot there's also a material option on here now. We want it to be the same material as may be the windows or a
little bit different. We could actually change
this material here, but what we will do is we'll change it as we've
actually applied these. First of all, let's come
in to object and what we're going to do
is we're going to convert and convert it to mesh. And that then is going
to convert this from a geometry node
into actual mesh. And we need to do
that, in this case, we can't actually keep
the geometry node. And the reason is because we need to actually
cut away those parts. So let's convert it like so
now if we go over the top, if we press A, you can see
that's what we've got. Now, one thing I
did forget to do, so let's actually go
and fix that first. You can see at the
moment the resolution is 20. We don't need that. Let's put it on two. You saw there when I actually
converted it. So let's convert once
more that we had all of those lines going across there. We
really don't need those. So now you can see we've
reduced the polygons. It's really handy
that resolution if you're bending something, you need a lot more edge
loops in there, for instance. All right, let's press
seven and go over the top. Let's press a,
Let's come in now. And the one we want
to bring in is called the bisect tool. Bisect. And then what you
want to do is just cut it straight across here. So if I grab this part here and cut it across,
nothing happens, but over on your operator panel, you can see we can clear the inner or we can clear the outer. We can also move this as well, this way or that way
and just cut that away. I'm just making sure
that it's cut away. We can't see anything in
there which we can't now. We just need to do it once more. So what we're going to do is a, I'm going to come up again. There is no short
cut for the bisect, by the way, you just have to
keep clicking it every time. And then we just want
to clear this round. We can also fill it in, but we don't need to fill in
the ends of these. Now all we need to
do is just grab this and I'm just going
to press shift D and then just bring it down
to the underside of here like so and
drop it into place. There we go, right the way down. Double tap the A. There we go. That is our bay window.
Just about done. We just need to make
the bevel now, sorry, the boolean on the inside
so we can see in there. And then finally we
can actually put our tapestry that's gonna
go over the top of here, over the top of
our window block. You can see they're
fairly complex, but once you know the
right way of doing them, really, really easy. Alright, so on the
next lesson then, what we'll do is we'll
get the bevels done, we'll get the materials on, and we'll get the
Boolean in here as well. All right everyone.
So, I hope you enjoyed that and I'll
see on the next one. Thanks a lot. Bye bye.
34. Advanced Texturing for Window Extensions: We welcome back
everyone to Blend the For the Environment
Artists guide, and this is where we left off. All right, first of
all, then let's come in and make sure that all
of these are beveled, so they all look beveled. These don't look beveled. So let's do the bevel
on both of these. So I'm just going
to join both of these together with control J. And then all I'm going to do
is if I click on this one, you can see it's just a bevel, so I should be able to reset
all my transforms like so. And then join it with this. So shift select this one, control L and we're
going to copy modifiers. And there we go, there's
our bevel on there. All right, from there then what we can do is we can make sure first of all that
we've got no mirrors left on here or
anything like that. We can see we've still
got a solidify on here. We want to actually put
this on even thickness. We also want to make
sure we apply that, but not the actual bevel.
So what are we going to do? Well, what I tend to do
is just wear my way down. So I'm hiding that
one out of the way. I'll check that one. Hide it. Check this one. Hide it. Check this one. Then
hide it out of the way. Check these and you can
see solidify on there. Control a. Hide them out
the way. And there we go. All right, so all
of that is done. Now what we can do is
this one here as well. We've got nothing on there. So the mirror has
already been applied and we haven't got a
bevel on there either, so we need to apply
that as well. So all I'm going to do
is I'm just going to press ol tag, bring
back everything. And then I'm going
to select this one. Select this one, control L, and I'm going to copy
modifiers like so now we've basically got everything
with a modifier on it. What I want to do now
then is select all of this and I want to
press control J. Join it all together. Press
the G B, see one missing? So I've got these missing, and these, join them
all to this one. Again, to make sure
those modifiers get applied control J. Join them all up. Now press the G B and make sure
that you've got it all. The reason we're doing
that is, by the way, it's so that we can make
sure a double tap the, that when this is going over the other side,
it's all joined up. Meaning it's much easier to
put over this side because we're going to do one and then we're going to do
the second one. All right, so we've
got our bevels on now. We want to do, we want
to basically copy, I think we'll copy
this, this here. And then add in
another material which will be dark wood and lightwood. Let's put it onto
material mode now. And why it should be all wood, because I know it's not
actually there we go. All right, so what
we'll do is we'll grab this, we'll grab our door, we'll press control L, and we'll copy or link
materials like so. All right, that's what
we've ended up with. Now let's come in and also
bring in some more materials. So the moment we've
got two materials, we want more than two
materials though, because we want this wood. So we want light
wood. If you click on here, you can see light wood. So let's come in,
Let's click plus down arrow and light wood. And the other one we
want is dark wood. Let me see if I've actually got a dark wood at the moment. So I'm just going
to scroll down. There's no dark wood on here, which means I need to,
first of all, bring it in. Now what I tend to do,
the easiest way to bring it in is because I don't, I want to add it onto here. So what I'm going
to do is I'm going to go to my asset manager. I'm going to go over
to my materials. I'm going to look for my wood. And here we go, we've
got dark wood here. So then I'm going to go back
over to Materials plus, And then I'm just going to
drop this into here like so. All right, all the
materials on there. Now, the painful task of actually giving these old
materials and unwrapping them. So let's do this a bit of time. So what I'm going to do is
I'm going to grab this one. And this one they've
got the right material on which is blue painted wood. I'm going to press
you Smart UV Project. Click Okay. Hide
them out the way. Then what we're going to
do is we're gonna come to these parts exactly the same. These parts are going
to be exactly the same. So I'm going to
grab all of these. I'm going to press
Smart UV Project. Click Okay. Hide
them out the way. Next of all, then
let's do these planks. So these planks are
going to be dark wood, so I'm going to press L. Just keep pressing
L, going over them, make sure you grab them
all you'll see anyway, because the ones that
aren't hidden out the way they were be the
ones that you need to do. We'll just select them like so. And then what we're
going to do is going to press Smart UV Project. Click Okay and then assign dark wood like
so. There you go. They're looking
quite nice already. Let's hide them out of the way. Now we're onto
these bits in here. Now the one thing is, did
we actually split them up? Yes, they're all split up,
so they're all looking nice. Now what we can do
is we can come in, grab everything, because that
will be much, much easier. Press Smart UV Project. Click Okay. Click
the light wood. Click a sign. There we go. There is all the light wood. Unfortunately, it's
on our glass as well. But that now is an easy fix, because all we need to do now is select all of these
glass panels, which is going to be
much, much easier than try and select all
the wooden parts for sure. So then what we can do is
now we can press Shift H. Hide everything else
out of the way. Come to glass, click a sign. Now what we did before, we're going to
grab one of these. We're going to unwrap it. Unwrap, Then what I'm going to do is go over to my UV editing. I'm going to press
a, I'm going to drag it into the place where
I want it like so. Now I'm wondering on this, where do I actually want it? So do I actually, this did a lot of dirt round this side,
maybe, something like that. I'm going to press S and Y just shrink it down a little
bit, something like that. And from there then
what I'm going to do, I'm going to press you
copy, copy, default copy. And then A to select everything. And then, and then copy paste. This time default.
And there we go. Now let's press A. Always press A over here. And now let's just come
and work our way down. In moving them over, move it
over and then move it over. And just work your way
down. Move them over. Making them all look a
little bit different. So I'm going to use
the entirety of the UV map just to move
them over like so, and then work my way round here. We'll leave that one there.
We don't need to move them all because if you have
them all looking the same, you will notice even
on the glass window. So you definitely
don't want to do that. You want to avoid that if
you can, and it's very, very easy with the tools that blender has to
not actually do that. So you can see just
how quick it is. It only takes a
little bit of time. And I'm showing you the fastest way of actually doing this, which I have found in all
my years of experience. So I would take this and use it in everything
that you're doing. Because until there is a quicker way, this
is the easiest. All right, so let's press
Holtage, Bring back everything. And let's press Tab over. Tap the A, and there we go. That's what we've got so
far, looking really nice. Let's then put it
on rendered view. Have a look at what that
looks like. Let it load up. There you go. Really, really
beautiful as you can see. All right, this is looking
really nice as you can see. What we need to
do now then is we need to think then about
the inside of here. Because we've done
basically all of it. We just need a canopy. But let's do the inside first. So let's come up back
to material mode. In fact, we'll put it, we'll
put it on object mode. Let's go back to modeling. Let's put it on object mode. What I want to do now
is create a cube, which is going to be
from here to here, and then to the tops of here
to make that hole in there. So I'm going to press Shift D. I'm going to bring in a cube. I'm going to press
S. First of all, I'm going to bring
it up just so it's touching these ends as
you can see up here. And then what I'm going to
do is I'm going to press and X. I'm thinking this might
be a little bit out. Let's pull it over this side and see where it's going to go. So you can see there
it's going in. Let's pull it up. So it's actually going in
there as you can see. Now what we'll do is we'll
work on the bottom first. So we'll pull the bottom down, so it's going into there. And then what we'll do is we'll pull this bit out into place. So it's going in. So Yeah, and I think that looks good now. We've got it there, let's
pull it a little bit further. Because I think actually it'll look a bit better
if it's going into these parts rather than
those and then pull it out. All right, now let's see
how far back it's going. Let's pull it a little
bit further back like so. All right, that's
looking pretty good. Now what we want to
do is we want to put this on the
other side as well. So what I'm going to do is
I'm going to grab this one. In fact, I'll grab my door. Actually shift desk
cursor selected. And then what I'll do is
I'll grab this control all transforms right
click set origin 23d, cursor And then I'm
not going to put in bullion because I'm not going
to keep it at the moment. You know, I'm doing
it straight away, so I might as well not do that. So all I can do then
is add modifier, Bring in a mirror. So let's bring in a
mirror. And there we go. That is where it's going to
go, so that it should be exactly the right place
of where this window is. I just want to make sure. Yeah, I think there's going
to be enough gap down there. I'm just making sure.
And then what we want to do is we want to
grab our actual building. And as I said, we want to grab this wall and we want to split it away from
everything else. So all I'm going to
do is just going to press selection, grab it again. Control all transforms,
right click origin geometry. And now finally what
we're going to do is adding a boolean on here. So add modifier,
generate boolean, and the boolean is of
course going to be these. And there we go. Now I
can do is I can come in, I can press control
and apply those. And from there I can actually delete these Booleans
out the way, and this is what
we're left with. Now we can do is we can just hide this window out
the way for the now. And then I can come in and
grab these going around there. So old shift and click like, so grab them going all
the way around there. Instead of just
pulling them back, all I'm going to do is
just to fill them in. Now you can see there
what I was saying. Sometimes they fill in
and sometimes they don't. So I'm going to just grab
this one on its own, I'm going to press the F. B, grab this one on its own, press the F. So finally then I'm just
going to split these up. So I'm going to
grab both of these, press selection
and split them up. So control layer transforms, right click, set
origin geometry. Now these on the next lesson
now are ready to actually be brought in a little bit and then we'll actually get that background
on these as well. All right everyone, So hope you enjoyed that. I'll see
you on the next one. Thanks a lot. Bye bye.
35. Designing Larger Cloth Overhangs: Welcome back everyone to Blender for the Environment
Artists Guide. And this is where we left off. All right, so let's
bring these in. So what I'm going
to do is I'm gonna grab both of them
at the same time. I'm going to press the Eban
to bring this in like so. And then what I'm gonna do is I'm going to come
to this one first, control law and
let's bring in four, I think it is, is it four? Right click four and
then control law four, left click, right click,
just make sure they're four. And then finally
what we can do is we can grab both of these like so I can bring in proportional editing and then
I can pull them out like, so let's pull them out making sure that they stick
to the actual wall. So we need them going
in a little bit more. You can see they're not
quite bending from here, so let's press controls head. Let's pull them back
a little bit more. So there we go. So there's a little, tiny
bit of a sliver down here, but that is looking
pretty good actually. All right, so from there then what we can do is we
can grab both of these, press one on the number pad. And then what we're going to do is let's have a look smart. Where is it? Project From View. So we're going to hit
Project From View. Now I'm going to do is I'm going to go round to this side, I'm going to hide these
windows out of the way, and these ones here
are the materials. What I'm going to do is I'm
going to grab this one. This one. And then
I'm going to press control L and link materials. And finally I'm going
to come back to here, right click, shade
auto smooth like. So you can even shade
smooth on these, probably going to
be a bit directly. We don't want any edges in there as you saw, so we
don't want those. Now finally, let's go
over to our UV editing, and then what we're going
to do is we're going to actually bring in these to where we
actually want them. So you can see at
the moment I've got that on for some reason,
don't want that. What I want to do
is minus this off. The moment I press
tab, there we go. We can see actually
what we're doing. All right, so now
I'm just wondering. I think this actually needs
a different material. I don't think this
is the right one. I think it's the shop two. Yeah, I think it's the shop two. So what we'll do is we'll
go to Asset Manager, we'll go to Backdrop. Is this shop one or shop
two? There we go, Shop two. Let's drop this on there
instead. There we go. Let's go back to UV editing. Yes, this is the one I want. These are the ones
that I actually want. First of all, is it this
one? Let's grab this one. It's here, look, let's
press and let's, let's, let's move it up to here, maybe something like that. And then what we'll do is
we'll make it a little bit bigger without
proportional editing on, let's make it a
little bit bigger and then put it into place. Then the other thing
is you've got to imagine this should be down, this floor should be down here. So we've got to really think how this floor is
actually going to look. The other thing is, in
fact, first of all, let's pull it up so you get the idea the floor
would be down to here, so you'd just be
able to see some chairs and things
like that there. We don't want the
floor, you know, way up here somewhere.
We don't want that. Now let's come to
the next one and what we're going to do is
we're going to press S, make this a little bit bigger. And I'm just wondering whether
to use that one actually. I'm wondering whether to
use that or this one. Let's move just to the side so we can see what we're doing. Let's press the S born like let's press and y. I'm thinking, let's put this roundabout here. Something like that.
So look at the floor. The floors looking maybe
a little bit too high. I think this floor looks good. This floor is a
little bit too high. So let's move it
up a little bit. There we go. That's
bare. All right. Something like I
think looks good. Let's press Alt tags then. And bring back our window. Now from here, let's
go and actually check out what that looks like
before doing anything else. So let's put it on our
render, let it load up. Remember you can put
it on V as well. Remember also it's an illusion, You're actually going
to be walking up here, but you can see that's
actually looking pretty nice. So you can really, really see in there all the way around. And it's already looking three dimensional and that
is what we're looking for. All right, so now what we
need to think about is bringing in our kind of tapestry that's going
to go over the top. And then what we
can do is we can get this on the other side. Now there is this door. You can see it's flashing. And what that means is
generally is that this on here. Five, zoom out. You
can see that flashing. That's because it's too close to the plane from behind it. So what I'm going to do is
just pull it out a slight bit. And now you can
see that flashing is not happening anymore. And it's important
we do, because a lot of the time if
you don't do that, you'll end up with
taking a render and you might be able
to see through it. I'm also going to pull this
out a little bit as well. So what I'm going to
do is press control. Light all transforms,
right click, set origin into geometry. And just make sure that
this is pulled out just there like so now I'm not happy with it going
in front of there, so I'm just going to pull it back a little bit
and then what I'm going to do is pull my door back a tiny bit and making sure. And I've not got
that flash in there. So I'm going to zoom out. No
flashing, that looks good. All right, so now
let's think about bringing in our actual canopy. That's going to go
over the top of here. So what we'll do is we'll
come to this part here. Press shift S cuts
to selected shift. Let's bring in a plane. And from there
then what I can do is I can bring my plane up, press the S button
just to bring it out. I'm going to pull
it out just so it's at that part of the wall there. I'm also going to
pull it up a little bit and then going to
make it a little bit wider because
obviously the canopy needs to go slightly
past here actually, to make sure that it's
going to work properly. So, and X, let's
pull it out to here. So then what I'm going
to do now is grab the front of it
with edge select. So make sure you've
got edge select on. And then what we're
going to do is pull it down in front of it. So I think that looks
about right now. From there, we actually need
to pull this down as well. What I'm going to
do is I'm going to press and pull it
down and press Z, so it follows that along just to make it a little
bit flatter along there. Now the thing is with blender, it's actually quite hard to, to make a corner. So make this part in
and then go round. It's actually quite
hard to do that, but I'm going to show you a really easy
technique to do it. So what I'm going to
do is press shift H just to hide everything
else out the way. And then what you
can do instead is you can grab the back of it. You can press three to go in
side view, bring it down. And then from there what you can do is you can join this up. But we want to make sure that
this is further down first. And then what I'm going
to do is I'm going to join this up, press the F B, and then I'm
going to join this and this. Press the button, so we've
got the side on now, and then this and this and this, press the F B, and there we go. Now from here what
we're going to do, we're going to press
a come up mesh sect, cut it across like so obviously we need to clear the
inner, not the outer. And of course we want to
make sure this is flat. To make sure it's flat,
just make sure this y, so this y here is going
to be on zero, like so. And now it's beautiful and flat. Now you can see it's just
cut that hole in there. Everything that we
need. The one thing we don't need is just this back. So delete faces, tab Ltg. Bring back everything.
And there we go. Now we do need to
round these bits off, these bits on here. So what I'm going to do is
I'm just going to come to it, I'm going to come
with edge, select, grab this bit and this bit, press control, and I just
want to round it off. Now you can see when
I'm rounding that off, what happens is
because I brought in a bevel with control, it's automatically come
in and put it on custom. I don't want that, but I
still want to keep my custom. So all I'm going to
do is super lips click that on and there we go. Now we've rounded
it off and we've still managed to
keep our custom. Right click and shade auto, smooth. And there we go. Now we need is just this bit coming down here.
So let's come in. And I'm wondering if I can
actually bring that in. Yes, I should have
done it the other way. So what I want to do is
just press control head again. Just go back. And now going to press
control and bring in maybe we'll have four.
So something like that. Left click, right
clicks are 12345. Yeah, we can get away with
five. That should be fine. And from here now I can actually come and
level that off again. So control, let's level it off again like so tab right click, shade or to smooth.
And now let's come in. Just pull these
down. So I'm just going to grab every other one. Like so Z, pull them down. Same for this one. These two, sorry E, Z pulled them down. And now we're going
to do is what we did on the other side. If I press one now, I'm going to make
sure that they're just down a little
bit more like. So make sure we're on verte
select, press the B Born. We're just going to grab
all of these like so. And finally then I'm
just going to press control shift and B
and pull them out. You can see I've got
two missing here. Sometimes this happens, make sure if that happens
you're on wire frame. And then you should
be able to come in and select them all. And now you can see they're all selected control shift and B. And there we go. We can
pull them out like so. Now let's have a look.
See what they look like. So what I'm going to do
is just put it back on object mode and there we go. I think that's actually
looking absolutely fine. Now, you might want to
have left the gap here. I'm not sure if you
want to do that, but I think for me that's
looking pretty good. All right, finally then, probably want to level this off. Let's see if we can
level this off as well. So control B, once we've
got this selected, some jaws going to select
it all the way around here. And then what I'm
going to do is press control, level that off. So I think that's actually looking a
little bit better, so. All right, from there
then on the next lesson we'll actually get some
materials on here. We can use what we've
already got here. So in other words, we
can use this line going up here and we can bring it to here or
something like that. I'm wondering, first of all, whether I should
actually be level it off or not bevel it off yet. There's also other things
we can do with it. I think I'll bevel it off after because it'll be easier maybe. I'm just wondering
whether to bevel it off now or pull it back. Let me just check, see if we
can actually pull this back. Let's have a look what
damage that does. Yeah, it's a little
bit to extreme that. I'll think on the next lesson, then we'll try and just make this a little
bit more rounded. I'm not happy with that.
Yeah, we'll do that. In fact, what we'll do is
we'll leave it as it was. So if I go back, hopefully, let's have a
look before the bevel. Yeah, I'll try and bevel it now. Let's come in slick shift click. Let's try control B now. I don't want to break it, so I'm just going
to have a very, very slight bevel like so. Yeah. Okay. Alright. That's
going to be absolutely fine. Alright everyone,
So let's save that our work and I'll
see on the next one, and we'll get the
material on there. Thanks a lot. Bye bye.
36. Implementing Coffee Store Windows with Texture Planes: Welcome back everyone to Blender for the Environment
Artists Guide. And this where left the art. All right, so now let's come in, put this on material, and
we want the blue cloth. So we've got the blue cloth
already around there. Let the material load up. By the way, it will take
longer and longer to do that, but once we've actually
finished this building, we are going to be putting
it into collection. So don't worry. All right, so now let's grab this one. And this one we're
going to press control L and we're
going to link materials. And we need to come in and just remove that
material for now. So black metal,
let's take that off. And then what we're going
to do is we're going to go and we're probably easier. We definitely want them
coming down this way. So I just need to think, yeah, what we'll do is we want this part here to be a
different color to this part. The easiest way to
do that is if I come in and I press
K to bring them, nor grab this one, press A and then I can cut it straight down to their light. So then what I can do is do
the same thing on this one, K A, bring it all the
way down to their like. So All right, looking good. Now we want to do is we want
to bring in some seams. Old shift click, old shift
click, Alt shift click, and old shift click,
Alt shift click, shift click, right
click, and mark. Same. Now what we can do is we
can grab the whole thing with a U on wrap. And now let's go to UV editing. And now from here,
hopefully I should be able to pull these down now. I don't want it onto
individual origins, I want it on medium point. And then what I want to do is
this starts with the white. I might start with
the white as well. What I'll do is I'll
grab both my edges. In fact, we'll grab more. First, rotate around both of these edges. Let's
put them in place. I'm going to press,
put that one here. L put that one here. Then with these ones, let's
see which one this one is. First. This, this
one's to be blue, and then we've got this one. This one also wants to be blue. You can see there that
it's grabbing all of that. We don't really want that. Now I want is white, blue and white. So let's come to
these two first. I'm going to grab this
one and this one. Let's put them in the white. This one, L, G, put
them in the blue. There we go. That's
exactly what we want. All right, then let's
go back to modeling. And now from here then, we need to make something that looks as though they're being there, being held up in some way. So all I want to do
is I want to press Shift, the selected shift. And let's just bring
in a quick cube. We'll make that smaller. Then what I'll do
is I'll bring it, put it into the top of here. It's the things, the
little details that are really going to make a huge difference to things like this. Then what we're going to do
is we're going to pull it up. And finally then
what I'm going to do is I'm going to
grab the back of it, pull it down, pull
it into place. And you can see it's way, way too big at the moment. No problem. We're going to
make it a little bit smaller. So what I'm going to do
is I'm going to press S, make it a little bit smaller into the place that I want it. Let's say, let's pull
it out a little bit. Like, so let's put it into place like the I want it
Jews to fit into there, and I do not want it poking
out, so let's have it, so it's not poking out, let's pull it down into place. Now, finally, also, because
we don't want an angle, let's have a look how far down. Yeah, we're never going to take an angle like that anyway. So I'll think that's
going to be fine. Let's just make it a little
bit thinner to do that, I'm just going to
press old shift click. And what that's
going to do is not going to select
the top of bottom. And if I press old test, now you can see I can
actually make it thinner, which is much, much easier
than doing it the other way. Now, the last thing is I think it doesn't look very
supportive at the moment. It's a bit too high up this. So what I want to do is I want to come and pull this bit down. Now to pull that bit down,
I'm just going to go in, press the tab
button, put this on, and then grab the
back of it like so. And from there then, I should be able to now pull that
down to where I want to. All right. Something like that. Let's turn it off and make sure everything's
looking good, which it is from here. Then I'm just going
to press Shift S, cursor to select Hood Shift. Let's bring in a cube again. Let's press like so. And then what I'm
going to do is I'm going to press S and y. Pull it back, pull it out.
Let's pull it up then. So now I'm going to make it a little bit thinner, just
so it's a little bit, not so close to this edge
S and X, and then Ans. So finally I'll make
this a little bit more, not so what I'm
going to do is just select all of these
edges like so. And then I'm going
to press control. Now you can see there,
we selected that edge, we didn't mean to control. Like so. And then
also just come down, put it on custom.
And there you go. Just simple as that to
do something like that. All right, so let's press
control or transforms. Right click, set
origin geometry tab, A smart UV project. Click, okay. And then the one
we want is black metal tab. Double tap the A. There we go. It's as simple as
that to put that in. Now let's think about putting
this on the other side. So if I grab this ago, press shift S, cursor
selected, grab this one. Then right click set
origin to three D cursor. And what we're going to
do now is just adding a modifier and
bring in a mirror. There we go, double tap the A. There is our actual
canopy on there. So we've nearly
actually finished this. Now let's come to our wall. And all I want to do with
my wall is I want to come and bring in
a new material. So let's just have a look at the moment we've got gray box, let's change it to wall green. So all I'm going to do
is click the down arrow, type in wall wall and then
you can see wall green. And then just make sure
that it's unwrapped A. I think we don't want to do that because that might
select all of that and then you unwrap,
and there we go. Now finally what we can do is we don't really want
to join this with this, but we do want to also make this a little bit thicker than where
it is at the moment. It's just a plane and we
really don't want that. We want to give it a
little bit of thickness. Let's just put an object most so we can see what
we're doing here. Let's press control, lay
all transforms right click, set origin to geometry. Let's come in then add modifier. And the one we want to do is
generate a solidify like so. Basically as soon as
you've hit that solidify, you can put it on
even thickness, press control Y,
and there we go. You'll also notice as well that inherits all of the
actual UVs as well, which is really, really handy
for what we want to do now. Finally, let's grab
this, apply the mirror. So control. Join it
then to the canopy. So control J. And there we go. Now we need to do is
mirror it over to the other side.
Let's grab our door. Shift S. Kirsta selected. Let's grab our bay window. Let's press Add
Modifier Generate. And first of all though, we need to move the origin, right clicks the origin to
three cursor, which is here, Add modifier, generate
mirror, and there we go. That is looking pretty good. Now the one thing I'm a bit concerned with is the fact that this is near enough as you
can see, touching this. We have to figure
out why that is. And I think this is
a little bit out. Either the door is a little bit out or this is a little bit out. So let's see if I
pull these out, how far can I pull them out or how far do I need
to pull them out? So look at this one. It's just near enough
touching on that. Yeah. And we can get away with pulling them out a
little bit like so. The other thing is of
course we can also as well, because we're in the middle
of building this out, we can also just pull this out a little
slight bit like so. And there we go. That's
probably going to be the best way of doing that. And that's looking much, much better now, as you can see. And we can probably
even get away with pulling this out
a little bit more. But hey, ho, let's move
on to the next part then. So what I'm going to do now is write clicks a origin
three, the cursor, adding a modifier, generate and we're going to
add in a mirror. And there we go, double
tap the, there it is. All right, let's actually have look on our
rendered view then. What this is going
to look like really, really nice, as you can see. All right, so this
is our coffee shop. Now what we're going to
do is from here we're going to start building
this up all the way around. And then what we'll do is
we'll put the roof on. And finally then we can put
in all of the front of this. But you can see really, really starting to come together now. All right everyone. So what we'll do is we'll save this out. Then on the next one, as I
said, we'll start doing that. Alright everyone.
Thanks a lot. Bye bye.
37. Mastering Linked Duplicates in Blender for Efficient Modeling: Welcome back. Ever
on to Blender Fall, the Environment Artists Guide, and this is where we left off. All right, so now what we're
going to do is you can either use your asset manager to bring parts in if
you've done that, or you can do what I'm
doing where I'm just basically going to be
copying this round. So I'm going to grab, I think
I'll grab all of these. I'm going to do them
separately actually. So grab all of these parts and I'm basically going to take
them round to the other side. You can see we've got these
parts in here anyway, so all I'm going to do is
just grab all of these. Shift D, bring it over and then R Z -90 Now if
it turns like that, just make sure that
they're on medium point R Z -90 Let's press one
them and then what I'm going to do is
just put them into place like so line
them up with here and then pull them back into place like so just
a little bit out. So everything lines in. Now the main thing is
just make sure all of these line up as you can see, so they all line up properly. You know, they're not in front of there or anything like that. Now what we're going to do is
we're going to grab these, so all of these on this side. I'm going to then press shift, we're going to pull
them over to this side. And then of course the corners
on these aren't right, so all I'm going to do
is go up to object, and this time it's
going to be on the x because you can see
this x going over here. So object mirror
on the x like so. And now let's just put
them into place like so. And there we go. All
right, so that's that bit. Now what we want to do is we want to bring these
windows over. But first of all, let's just bring in some materials on here. So what I'm going to do
is I'm going to grab this one and this one I'm
going to split them up, so selection and then grab them. And then control all
transforms, right? Click Origins, Geometry tab again. Let's grab the top one. We're going to press the
Y button just to make sure that this is split
off from the other one. And then finally what I can do is I can change this now for wall grade, wall gray. This one here, like so. And now I can unwrap them. So you unwrap and you unwrap, and there we go.
There is our wall. And now finally what we can do is we can grab all of these. If I grab all of these
windows like so Shift D, bring them over and
then Z -90 press one. And then what we can
do is we can put these into place like so. Now we can see on this side, especially the N lining up here. And this is why I'm saying
you might want to move these over just to make them
line up a little bit bare. Do think it will make it
look a little bit bare? First of all, the
one I'm going to do is I'm just
going to line the, the more in the
sense you can see it's an even distance
here in here. And then what we'll do is we'll pull them back into the wall. So, and then finally what
we'll do is we'll grab this. So I'm not sure, we want to got a bevel on there we might want
to pour a mirror on. I'll do is I'll just come
in L, delete vertices, and then what I'll
do is add modifier, generate mirror on the
Y, turn off the X. And then what I can
do is I can go into eddy mode A. And
now I can move in. And as I move that
one, obviously the other one is going to move. Now you can also see that we
need to move these as well. So all I'm going to do
is come to this one, I'm going to grab, these
two are different actually, So all I'm going to do
is just pull it out. I'm not going to mess
around with a mirror, I'm just going to press S and X, pull it out, bring
this one into place. And then S and X
pull it out like so. Now one thing is that this
one is a little bit out. As we can see, this one's
near enough in the center. This one seems to be
a little bit out. So I'm just going to grab these two and just pull them this way. Tad, Just a tad like. So double tap the
and there we go. All right, that's
looking pretty nice. Now we've got the tops
going up to there. What we'll do now
is the other side, so if we come around
to this side, this back side, and what I'm going to do is I'm going
to put these on here now. And then we'll go round
to the other side because that has
different windows on. Just to make it a little
bit more difficult. I don't know why did that, but I think actually
looks quite nice. First of all, let's come in
and grab all of these again, all of these here like so we'll grab the top
and these ones here. The other thing you
can do is you can also press alt D.
What alt D does, it's not actually a duplicate. It's actually more
like it's just a copy. But what it does is it saves
a lot on optimization. One of them is called
a duplicate basically, and the other one is
called a linked duplicate. Now because I've
linked this duplicate, if I come in to, let's say this one and I grab
the top of it, press G. You will notice now, because this is a
linked duplicate, it means anything I
do on this one will be also duplicated to this one. So there is that
to bear in mind. But it does actually
cut down on how many draw calls and
optimization on blender. I recommend if you can
use it when you can. And the reason why we
bring that up now is, by the way, is because there's so many things in blender that We need to show you, you know, to get you up to speed, we can't bombard you with everything
from the beginning. So I'm trying to kind of drip feed everything in
as we move along. All right, so what I'm going
to do is I'm just going to delete all of these
because I missed some out. And then I'm going
to re select them. And then we're going to
press all D. So delete what we're going to
do is we're going to grab basal on all of these, maybe even these
side parts as well. So we'll grab all of these. This side part, this
side, this side, this side, and then
all of this as well. We're going to
grab all of these. We'll also grab all of
these parts as well. So a lot of parts here. And then what we're going
to do is we're going to press Alt Enter. Move it over. And then said 90. From there we can press control. And one that will take
us round to the rear. And then I can
bring it over here. Now we can see that we need
to line it up with this, which means that these parts, are they going to fit in there? Let's have a look. So we'll
just pull them back now, pull them into place where
they need to go, hold in ship. Let's pull them
out just a little bit so they can go
into place like so. And that's looking pretty good. I think I've missed one here. As you can see,
that's no problem. We can put that one in. I'm just if we're far enough out so we can see this is a little bit far out. So let's put it in. Let's
go over the top actually. And now we can see the
difference between those. Actually, that's looking
pretty good, I think. I'm happy with
that. Let's double tap the and have a look at that. All right? Everything's good, except obviously we need
this here old again. Bring it over and then let's
obviously mirror it on. This time it will also
be on the X object, mirror on the X like so. And let's put that in
place. And there we go. And again, we don't
want to make sure everything's like just
exactly the same. That's not what we're
actually wanting to do now. The other thing is I want to put these also in the middle. So what I'm going
to do is hopefully if I grab one of these, press L, Can I bring it over? Yeah, you can see it's
moving over there. That's one of the things that we need to be careful of when we're doing this because these need to be more in the middle. So what I'm going to do is
I'm going to press Shift D, bring it over like so. And you can see
it's also gone over there like so. And we
don't really want that. So I'm then going
to press Selection. And now it's actually going
to break that from there. Then I'm just going to
delete these out of the way. And now I can put
this one back in. So control all transforms, right click to
origin to geometry. Let's put it back into place. Round about in the center. So control one again, it needs to be
round about there. Shifty roundabout there,
something like that. Is that in the middle?
That's more in the middle. Then what I'll do with
this is just pull it out a little bit,
get it into place. And then same for this one. I'll stretch it out
and X pull it out. And then what I'll do is
I'll grab this and this, press Shift D, bring it over. And then shift D and
bring this one over. Now, are they going
to fit into that? I think they need to be
a little bit thinner. Let's grab all of
these press and X on individual origins and X, bring them in a little bit, so now they are fitting
in very nicely. All right, from there, then let's take one of these Windows. Let's press Alt D again, and then Zed 90, control one. And then let's put this
in the center of here. Let's pull it back into place. And then from there we
can just press old. So there we go, double tap the, and there is the back of our actual coffeehouse or cafe or whatever
you want it to be. Now we need a sign on here. We'll leave that
though till later. And what we're going to do
now on the next lesson, is we're going to move
around to this side. Now we do have a couple of different windows in this part, so we need to fix those. And we also have a little
bit of a balcony in here. Try to make every place as different as possible whenever you're building
anything like this. Try and make sure that
every single face in the build is covered by something or something
interesting is happening there. Just make sure you
try and do that. And also make sure
that you know, all of the windows and things are not all
going to be the same. It's not going to look a
very interesting scene. All right, so on the
next lesson then, we'll start creating
these new windows. And this balcony, interesting
to create this balcony. It's a little bit different
than what we've done before, so that will be interesting,
al right everyone. I'll see you on the next
one. Thanks a lot. Bye bye.
38. Balcony Modeling Detailing with Face Normals: Welcome back to
everyone's Blenderful, the Environment Artists Guide, and this is where we left off. All right, so the
first thing I want to do is I want to bring, I think all of this round. So these ones here.
This one here. Let's bring these round as well. And I think this
one and this one. And I'm also
thinking that I will bring all of this round as well. So all of these like so, so basically I've just
missed out these two. These are the only ones. So what I'm going
to do is press, I can press Alt D as well. We can do it that way.
We can bring them round. We can press Rzed 90. Again, we want to make sure
that we're on a medium point. So zed 90, like so. And then what we'll
do is press control three to go to the back. And let's put those
into place like so. All right, let's drag them so they're in there
nice and neatly. So pull them back
and there we go. All right, that's
looking pretty good. Now what we want to
do is we want to think about these windows here, because these are
going to be a little bit different from
these ones down below. So let's actually
make a start on that. So what we'll do first is we'll work on our actual balcony. So all I'm going to
do first of all, I think I'll select this
one shift A selected. And then what I'm
going to do is I'm in, I think I'll bring in a cube. So let's bring in a cube. Let's pull it up to
where we want it. Let's make it a little
bit bigger like, so let's press S and's d,
just to bring it down. And then let's press and X and just square
it up a little bit. Just trying to, first of all, get this to the kind of scale
that I actually want it. So something like that. I want it to sit right on top of here. But of course when I
bring in my window, window, it's going to be probably a little bit
thinner from these ones. Yeah, it's going to be a
little bit thinner from these. I'm just actually going
to grab this one shift, R z 90, control three. And let's just put
it in place so you can see it's going to be
a little bit thinner. So this is way, way too
thin at the moment. So let's press S and Y and bring it out pumping like there. Let's also just put this
window back in place a minute so I can see how
much depth I need to have. You can see as well the
depth is not there, so let's pull it out a
little bit more so S and Y. And let's also then go in, grab this face and pull it
out to where I want it. So I'm thinking
something that far out. Maybe we need to have our guy. He needs to be able to really stand on here. So
let's have a look. See if I can put him in place. So I'm going to
press control three. Put him into place,
standing on here like so. And then what I'm going to do
is move him out and then R, Z -90 Spin him round
and there you go. Now he can actually come out and he could stand on
here if he wanted to. And that's exactly what
we're actually trying to do. All right, so we've got that, let's now I think, is that out far enough? I think when I've got my
post here, maybe not. So we'll bring out just
a tad further like so. And now I'm going to do is
I'm going to bevel this off, so I'm going to come in, I'm going to first of all,
reset the transformations. So all transforms, right? Clicks, origins, geometry, grab each of these edges. Control B. And you can see at the
moment this is kind of what we had on here. But we don't really
want this on here now. Unfortunately, I don't actually know how to save this out. I don't know how
to save these out. I've tried, I don't
think you can. So what I'm going to do is
I'm just going to mess around with these and get them
to how I want them. So I want a nice kind of bend. Let's put this
down a little bit. A nice bend in there. And then this one, I think
needs going back a little bit. And then let's
bring this one up. And then we also
want another one on. There we go. And then I can put this one on and bend it out, pull it over, and I think, let's pull this one
out a little bit. Something like that maybe
is looking pretty nice. I've just got to make sure that my posts are going to be
okay going into these, which I think they will. If I've got one post
here, one post here, I think I need to just round
off this a little bit more. So I'm going to bring
this up and round. And then this one here
is the one that I want to just round
off a little bit. Not quite that much.
Something like that. All right, that's
looking pretty nice. Now from here I need to
o C create a hand rail. So what we're going to
do is we're going to come in, grab this one. Control select. Control select. Control select. And
then I can press shift D and I can bring this
up then to where I want it. Always when you're
thinking about hand rails are the belly board
is near enough, always where the belly
board is just below it. Let's squish it in a little bit. And there we go. That will
be a beautiful hand rail. And then obviously
it needs to be much, much thinner than
this, so that's still a little bit too wide. So something like that I
think makes a lot more sense. And then what we'll do
is we'll split this off. So P selection, split that off. Control all transforms right
click orogen geometry. And then let's
generate a solidify, make sure even thickness is on. And then we can actually
pull it out like so. And you can see now
that's pretty good. Now we're not going to mess
around with this anymore. What we're going to do the
moment is bring in the post. So I'm going to press shift
S Kurt to selected shift. And then what we're going
to bring in is a cube. I'm going to make the
cube much, much smaller. And then what I'm going to do is just put this into place. So I'm going to want my
cube just into here, maybe just there.
Something like that. And then from there what I
can do is I can grab it, pull it up into where
I actually want it. Now you can see this
is the issue here. That this obviously is not thick enough and it's
not going back far enough. So that's why I left it.
So if now bring it down. So bring it down,
pull it back in. And you can see now it's
not actually pulling in. So what we need to
do is we need to go the other way, like so. And now we can actually
start bringing this in. As you can see now, is that going to be
bringing it in enough? I don't think so actually. So what I'm going
to do is I'm just going to go back and
instead of doing that, what I'm going to do is
I'm going to select this. So I think it's time actually, we talked about normals. So if I come up to here, come down face orientation, you can see most of
my mesh is blue. Anything that's red
basically means that the normals are
facing the wrong way. So we have an inside and
an outside of a face. Now generally, if I took this
through to a Games Engine, anything in red would
just be seen through. And the reason is because any Games Engine wants to actually only render
out one face. And the reason is
because obviously it limits the amount of processing power that's
needed if you're rendering out double
faces all the time, you can imagine how
much that adds up. It's basically like doubling up a seam, so we don't
want to do that. So in three D modeling we
have outside and an inside, and generally the red
is the wrong way. Now on this though, we
can come in and you'll notice if I grab all of this and then to
change them round, I can press Shift, Come down and you'll see
Recalculate Normals, turn it round and now you'll see that actually turns it
round the other way. Now from there I can
actually bring it in, for instance, like this, or I can bring it down
or out or whatever. That then will make
it easier to do that. The other thing is, on this one, on this occasion, it's not
actually going to work. Although it doesn't work,
you've got an explanation of why we have an inside and an outside and how
to turn them around. Generally, you can come into something like
this, for instance. So these you can press tab, press a press shift and it'll blender or do the work for
you or spin them all around. Now we are going to
actually come in, change all the normals
round at the end. They always do that at the
end because then you can do them all together,
saving on time. And if you want to do
them individually, you can just press Shift and then that will spin
them around as well. All right, so now
that's explained, let's go back to this then. Take off the face orientation. And what I want to do is
I want to bring this in. So you can see I want to
bring it in maybe to there, just so it's in front. If you press a little dot, one of this post, now you can see this post is probably a little bit too
big. So let's bring it in. Let's pull that out, then
let's bring it in even more. And now we need to bring
it in a little bit more. Now, We can probably get
away with turning this down, holding the shift burn
just a little bit. Now you can see that's all
starting to come together. And you can see
we've also got the same as this bottom part. And that's exactly what
we're going for now. One of the things is
this is probably still a little bit too thick sensed. Let's bring it down a
little bit. All right. So I'm pretty happy
with how that looks. Now I want to do is think where my other post
is going to do. Go to do that, all
I'm going to do is just press control
A or transforms right clicks origin
through the decursor. Add in a modifier and we're
going to generate a mirror, put it over the other
side, turn off the X. And then all I'm going to
do now is press tab a, Shift D. And then we're
just going to bring in another post now where I'm
going to put this other post. Probably something around here. I just want to make sure that
it's going to fit no edges. I don't want any
edges coming out. Now I can see one problem, that these posts are probably a little bit
too thick for this. Let's make them a
little bit thinner. Ol shift click, going all the way around. Alt shift click. And then what that
means is now I can OltS just on the
thinness of the scale, which is what I actually want. Something like that is
looking pretty good. Now what I want to
do is fix this post. I can see probably going to have to come out
round to there. And now you can see that post is fitting in much, much nicer. Now, I'm going to need
one more post here. I think so shifted. Let's bring in another post
like so let's pull it over, let's make sure it
can go into place. Let's pull it back like
so, and there we go. Just making sure
everything is fin you can see it's a little bit
out on the back here. I don't really want that. So can I pull it forward
a little bit like so pull it this way a little bit
like so. And there we go. Now that's looking perfect. And now what we'd want is
maybe one or two posts. So shift D, let's
bring in another post. And then maybe we just need one more post and then
that should be okay. And that's looking pretty good. All right, so let's apply our mirror in object
mode control. And then let's come to my post. And then all I'm going to do is press shift D control three. And I'm just going to move that then into the center up here. All right, so there we go. There is that part. Now,
we're not done yet. We want to do a little
bit more with this. And on the next
lesson, what we'll do is we'll just
make it a little bit more or it's a little bit
not net enough right now. Plus we need to give
it some support. I mean, it's never just
gonna hang there like that. And then finally we can
get this back door done. And then near enough, this is most of the
coffee shop finished. And then we can work on the roof and finally the outside up here. Alright, everyone,
hope you enjoyed that. And I'll see on the next
one. Thanks a lot. Bye bye.
39. Decorating Balconies Using the Mirror Modifier: Welcome microphone to blend, fall the environment
artists guide. And this is where
we left it off. All right, so first of all, let's come in and do
the front off here. So what I'm going to
do is just grab this. I'll first of all press control. Layol transforms, set origin
to geometry, grab this one. Press the eye button then. And then what I can do is
I can pull this out now. So press pull it out
a little bit like so. Now let's think
about the top of it. So what I'm going
to do with the top, I'm going to do the
same thing with eye. And then what I'm going
to do is just pull it up, just making sure that everything is still
fitting in there. As you can see, you
can see on this one, we're a little bit too far out. This also needs to probably
be pulled back a little bit. So what I'm going to do
is just pull it back tad, and then I'm going
to grab these and this and pull those
back as well. Just making sure that
everything's fitting in. So now we need to
do this part here. So what I'm going to do,
I've got my solidify on. I'm going to press
control to apply that. And then what we're going
to do is press control, left click, right click. And finally now I can press
control B, pull it out, scroll my mouse wheel back, so there's just one
there, left click. And then what I can do is I can press and pull those
up a little bit, making it a little bit more
annoyed, as you can see. All right, so now let's put
a middle section in here, or two sections in because
we've got one in the middle. So let's put
something like that. So shift, let's bring in a cube. Let's pull it over
properly with the X. Let's press and then
let's put it into place. So we'll put it right
in the center of these. I'm going to press then and y pull it in, it's
just in there. And then what I'll
do is I've got the outside and the
inside, they look great. It's just the top
and the bottom. So I'm going to
bring the top down. Bring the bottom
up. And then all I'm going to do now
is level that off. If I come grab the, this one and then press
control should be able to, if I bring it up, bevel it off like so it's using basically the same
as what we did with this. It's using this one
here on here and you can see just how nice
effect it actually gets. Let's press control three. Let's make sure
it's in the center. And then all I can do once
it's in the center is write, click the Origin to
Geometry, Adding a modifier. Bring in a mirror,
put it on the Y. Turn off the X. Right click, Origins three D cursor
and there we go. There we go. It's in now. Now we can see that this one
here is a little bit out. So what I'm gonna do is going, it's gonna come in L move it over just so it's more
centered. And there we go. Alright, that's
looking good now, what do we need to do now? We need the actual,
this door on the back. I'm just going to move
my guy at the way now because I know,
actually, no, I'm not. I'm going to get this to
be the right scale first. So and's Ed, let's pull it
up to something like that. I think I'm happy with that. It's just this bit needs to
be a little bit thinner. I think I'm going to
use this as a base. So what I'm going to do is
I'm going to come in to this control three said
squish it down a little bit. Let's put it up just so
it's just under there. And then with these
two parts here, let's pull them up so they're
under the stonework now. So under there. And then we can see that they
go down to there. We can see that it drops
all the way down to here. We're not going to need this
bomb section on here at all. So let's just press shift
H. And what we can do now is we can actually
get rid of all of this, including maybe as
well this part here. So I'm just going to come in, we'll have to select
everything, you know? What I'll do is
I'll just press L, L and L, P selection. Separate it out, and then I should be able to
delete this off. Now, the other thing
is, at the moment, if I press all tage and
bring everything back, I am I happy with
how wide these are? I don't think so. I think they need to be a
little bit thinner. So what I'm going to do is
I'm going to delete this one. So L delete vertices and I'm also going to come jaws to the back of
here and select it. Control plus. Control plus. Control plus. And
you can see I'm not selecting the inside of there so that
one didn't work. So what I'm going
to do in steadies, I'm going to come
to face select, make sure I've got
it onto wireframe. And I'm just then going to come down and select all of those. Now I'm going to take
it off wireframe. And you'll see that now if
for press delete faces. Now I've deleted that off. And the reason I'm
doing that, of course, is because I want to
mirror this over. It's a little bit too big. I need to make it a
little bit thinner. So what I'm going to do is
I'm going to grab this, L pull it over to here, grab this, pull it over to here. And then what I'm going
to do is now grab this part here so I can
come in, grab this part. Shift cursor selected tab control L
transforms right click. So origins three D cursor. Add modifier, generate a
mirror, put it on the Y. Turn off the X, and there we go. Now we've got a little
bit of a thinner door. And the other thing
is now I want to build out the window. So at this point I definitely can move my gun out the way. I can also join all of this up. It's got a miron. So let's
actually apply that. So control, Let's press H to hide it again,
Nothing on there. H to hide, nothing on
here and nothing on here. Olah, Bring it all back. And now, from there,
I can actually Sure. Be able to join it altogether. Control J. Let's
join it altogether. Let's just make sure that the, the bevels aren't on yet. So what I'm going to
do is right click, shade, auto, smooth. And then what I'm
going to do is add modifier generate in a bevel. I'm going to turn the
bevel down to not 0.3 And there we go there. Is that done now
with the bevel on? And when we come back to it,
we can add in our material. Let's hide that other way. And now we're going to do is we're going to bring in a plane. So let's bring in a plane, rotate it around Y 90. Let's bring it into
where we want it, so we can see if I
press control three, I want it coming right
to the top of here. I want to make it a little
bit wider on the Y. So S and Y come in then, and let's grab the bottom of it, and let's pull it
all the way down. So here now on this bit, I actually want
to be have a foot on here and then the
window up there. So all I'm going to do is I'm just going to press control. Bring it down and I'll have
a foot coming from there. So in other words, a bit of
wood coming off of here. Now the rest of this I
actually want to be my window. All I'm going to do is I'm going to pull this out to here. I'm then going to press control
left click, right click. Grab it again,
Extrude it out again. And there we go. That's
the start of it. And now I can do is I can
separate this from this part. So if I press Y, separate
out control three. Now I want to do
is, first of all, let's bring it in first. If I grab it, press the Born. So then I can press Y, and then what I can do
is I can separate this. So I'm just going to press shift H just to separate it out. And then control left click,
right click, control. Let's bring in some edge loops, maybe four edge loops,
something like that. Could even get away
with five, totally. Up to you where many you want. I think I'm going to
go with left click, right click, and then
Lt, bring it back. Finally then what we can
do is we can come in, grab all of these points, press the button
to bring them in, and then all I'm going to do is selection and separate those. Now it's just exactly
the same thing as what we've been doing. As you can see, now what I'm going to do is
just pull them back. So I just want to
separate these out now. I'm going to hide
my windows out of the way just so I can
see what I'm doing. All I'm going to do now
is come to these parts. I'm going to press the
button and then mesh. And we're going to
split faces by edges. So I'm hoping that we
split all these up. That's all split of. All right. Now let's grab all of these, these four going around here. And what we're going to
do is we're going to press to pull them out and X pull them out. And then we can hide
those out the way. And then I can press A on these ones and pull
those out as well. Now you can see, actually we have a little bit of a
problem there because I've just hit those
after student out. So what I'm going to do
is just select all of these to make it a
little bit easier. I'm just selecting more
with L P selection. And now I can come back to these and hopefully
this will work. Now A pulled them out like so. And then my windows now
just pull these forward. Not that my windows. I'm going to hide the wall. Where's my windows gone? Let's press controls head. There's my windows. All right. Let's pull them into place now. All the way back maybe to here. Something like that. All right, we're looking good so far. Now let's come to
these and these. Let's join them together
with control J. Control then all transforms, right clicks at
origin to geometry. Adding a modifier, not point
naught three. There we go. That's pretty good. Now we need to basically
join all of these together. They've already got bevels
on and things like that. I think, I think we can
join them all together. We've just got this
Bob bit to do, so let's actually do
the bottom piece first, and we'll do that
on the next lesson. Before we go, let's actually
just flatten these off. So I'm just going
to grab this one. And this one I'm going
to right click and I'm just going to
shade flat like so. And then they look
tons better, Al right, on the next lesson then we
should get this finished. In fact, we should get all of this actually finished
by the next lesson. And then that means then we can make a start on our actual roof. Al right everyone, so hope you enjoyed that and I'll
see on the next one. Thanks a lot. Bye bye.
40. Resolving 3D Balcony Symmetry Challenges: Welcome back everyone to Blender for the Environment
Artists Guide, and this is where we left off. All right, so now let's do
the supports under here. And these supports
need to be quite chunky because this is
quite a heavy thing. So what we're going to
do is press Shift Day. Going to bring in a cube. And I need to press
Tap Shift day. Let's bring in a cube,
let's bring it down. And then what I'm going
to do is I'm going to put it a little bit over this side. So now what I'm going to do is I'm going to make
it a little bit thinner and let's make
it a little bit thinner. So, and then let's pull it out just so just
in front of the, and then let's pull it out to
where we actually want it. So if it comes out, let's say roundabout here, I think it would be
absolutely fine from there. Then what I think we
should do is just level this edge off and then extrude a part that
comes out here. And I think that'll make
a good ornate support. So if I press control, so even if it's like that, I think that still
looks pretty nice. But if you want to,
instead of doing that, obviously you can go
control B instead of that. Just put it on suplise and
then we'll make it like that, or we can use the custom one
that we already created, which actually I
think is better. All right, so now what we
can do is we can come in, we can grab this plane here, We can press Shift D, We can make it a little
bit smaller like so. And from there then
what we can do is press and pull it down. And there we go. One support
really, really easy to do. Now let's press control.
All transforms, right click, set origin to
geometry, not geometry, sorry. Let's set the origin
to three D cursor, add modifier and
bring in a mirror. Let's put it on the Y, turn
off the X, and there we go. Finally let's apply the mirror. Let's join it all together. So let's join into
this control J. And there we go, they're
all leveled off. Right click, shade, auto, smooth. And there we go. There is our actual
balcony finish. So now what we want to do is we want to bring in our materials. So let's actually check
then, this one here, once this loads up really, really easy, it's all
pretty much stone. So what we'll do is
we'll come in and we'll press control
L on this one. So control L, link
materials and then come back to this A to grab
everything, smart UV project. Click okay. And there we go. As simple as that for that part. Now with the door, that's
a little bit different. So all we want to do is we want to link materials from here. This time these
are already done, so that's absolutely fine. We can see we've got a
mirror on there as well. Let's just apply that. So that's done as well. So control. And then what I can do is
then come back to my door. I can join it to my
windows as well, so grab my windows first. Grab my door Second,
press control J. Just so we keep that
bevel on there. All right, press G just to make sure it's all
joined like so. And now finally we
can come over and press control L and we'll
link materials like so. Now let's grab our
door once more. Come over to materials minus
our stone. And there we go. Now let's come in A
to grab everything. Smart UVP J click. Okay. Now all the wood is going the right
way, as you can see. Finally now let's
come into our glass. Pretty much the same thing. Might actually even be able
to get away with pressing. And let's see if we can,
if it comes down to copy paste default from before. Let's apply this then. And there we go. It actually did that as well.
That's really handy. Now all we need to do is
just move these around. Of course, let's come in, let's press dot to zoom to it. And then what we'll do is
we'll grab one of these. In fact, that's the one
problem we will have. As you can see, none
of them are selected. I'm just going to grab them all. Makes it way, way easier. Come over to the left hand side, press A, make sure
they're all selected. And now we can come
in and move them. Every time we click on one, it's going to be selected. And that's the easiest
way to do this. Okay, let's move these down and like so. All right, there we
go. All done, okay, so now let's go back to modeling and we should be able to join all
of this together. Now, I'm just going to see if we've got anything
on there that we don't. So we've got a bevel, we
can put these up as well. By the way, we've
got a bevel on here, a bevel on here, and a bevel on here, so
they're all fine. So what I can do is
I can join all of this press control J, join it all together
and there we go. Now last of all, I did forget we do need something
to hold these into place. We can't have them just
going into the wall. What we'll do is we'll come in, press shift day, and we'll
just make a quick cube. Do we make it more or we could
do that if we wanted to. Let's grab it first,
press and X, bring it in. Let's put it into
place where it's going to go, press the Born. Just in something like there's
put it into the middle. And that's looking about right now can we do what
we've talked about? So grab both of these
prayers control. B. Maybe I have
something like that. I think that looks
pretty nice. All right. Control or transforms
right click, Set origin to geometry. Maybe actually set origin
to three D cursor quickly, then we can mirror it
over the other side. So why like so? And you can see, yeah, it's not quite in the
right place, is it? Maybe this is also not
in the right place. That I'm not sure about that. I think this part here is a little bit out
from this part here. We can see here, this is here. What I'm going to do
is I'm going to press Shift S Ursa Selected. Now this may be,
let's have a look. Press control three. This
looks now in the center, but we can see that our
door is not in the center. What I'm going to
do is first of all, come in and I'm going to hide
all of this out of the way because I can then grab my
door and everything on there. So I'm going to hide
this out the way and then just grab
my door with a. And then what I can do
is I can press Shift and Selection to cursor
keep offset like. So now it's going to move everything
forward, I know that. But what I want to do now
is pull it up into place. So I'm going to pull it back, pull it up into place just
so it's supported like so now I just need to see is
if I press control three, we can see now that these are
still not in the right way. So I need to just check
now where this is. So you can see now this is where this one is, this
is where this one is. If I come back to this, I can write clicks origin
three, cursor. And now hopefully they
are in the right place. Now all I need to do is just
make sure that these parts, so all of this is
in the right place. And you can see it's
not at the moment. Now I want to make sure that
I can grab all of this. The easiest way to do that is to come over to Little triangle, click the plus button, and then what I want to do
is just to quickly assign a group to these to make sure that I can
actually select them. So if I select a sign
like so now, this group, if I deselect it or select it, I can actually come in
now and select them. Why am I doing that?
Because if I press Alt tag, everything comes back. I've got to go and re
select everything again. And I don't really
want to do that. Double tap the A now
come over, click select. And there you go. Easy
as that, to select them. Now let's pull this up
into place like so. And there we go.
Now everything is leveled up and that's
exactly what we want. Now what we can do
is we can come in, grab these, grab my
balcony, press control J. Join it all together,
and let's just make sure we've got a bevel
on there, which we have. I'm just looking why
this is not beveled off. It's probably because it
needs all the transforms. Resetting. I think it's over. Look, is it beveled off? Let's just have a quick look. Yes, it doesn't actually, all of the bevel is gone. So let me just check now,
what's going on there? Why has all the bevels gone? All of the bevels
have gone off there. This bevel is not
working properly. Let's minus that off. Adding a modifier.
Bring in a bevel. Let's have a look at the mesh. Yes, the bevels not working
properly on all of this. All I want to do is
come down to geometry. Clamp overlap of naught
point n naught three. Put that on, and there we go. Now the bevels actually
working and maybe, maybe it's a little
bit too high, so naught point naught naught
two. Let's turn it down. And there we go, a thing
that's looking much better. And finally now we can
join this with this. So control J, and finally now that gets
actually beveled off as well. All right, so everything
is done there. I'm just checking my bevels, making sure it's all okay and
that's looking pretty good. Let's put it on
material mode and make sure that it's looking
nice, which it is. And finally, now finally we can press Shift D and bring it over, or we can delete it
and press Old D. Old D. Enter and bring it over. Press control three. Let's
see where we're going to put this. Somewhere like there. Let's move our guy out
the way. There we go. All right, now let's
press old D on this one. We'll bring that down,
then we'll spin it around. So as 90 we'll bring it out. We'll press control three. Then all we want to do is
just line it up with this. Line it up in the
middle like so. And then let's pull
it into place. And then bring it
down a little bit. And then all I'll do is
press control three and old the again and bring it out and put it into place
like double tap the A. And there we go. All right. I think then on the next one we will separate these
out, these floors here. We'll actually put
the material on these and then we'll start
on this part of the roof. I think probably the easiest
thing on this is if we actually make the roof
first and then actually put the bits round it. I think that's going to
be much, much easier. All right everyone. So I
hope you enjoyed that. I hope you're really, really
learning tons and tons. Don't forget to always save out your work at the end
of every lesson, and I'll see on the next
one. Thanks a lot. Bye bye.
41. Creating Stone Frame Supports for Victorian Roofs in Blender: Welcome back everyone.
To blend forward, the environment, artists guide, and this is where we left off. All right, so what I
think we should do now then is make a start
on our actual roof. And what we need
to do on a roof, you can't just have a roof
basically on top of here. You really need to do or put
something on top of there. Now the other thing is
you don't want to create something where it's going to be all the way around like this. You want to create
this kind of block. So a block going across here, the same block going
across the back of here, and then another block into
weaving into this part here. From there then
you would probably put the roof on top of there. And then you would
have some posts or something on either side of here just to make it as part
of this actual building. All right, so let's
just get rid of that. And then what we'll
do is we'll put this back onto our movement tool. And then what I'll
do is I'll come first of all to this block here. I'll press shift
desk us to selected. And then what I'll do is
I'll bring in a cube. Now you can see I'm still
not open my blender again and it's still
the same size, so just in case you're n is just make it a
little bit smaller. All right, so let's press S and y and pull this out into
the size that we want it. And what we want to
do with this is we want it to be slightly bigger
than these corner bits. So if I pull it up and
put it on top of there, so you can see now
it's slightly over. It needs to be a little
bit further over though, to actually encompass
these as well. So I'm going to pull it
out to roundabout there. And then finally
what I'm going to do is I'm going to
bring it back now. So I just need to see how far this block in
the middle is out. Because you can see it's a
huge chunk, this piece here. It also needs to be a little bit wider as well.
So let's do that. So press L to grab
it all S and y, and pull it out a little bit, a little bit more
than that, just so it's coming over
that as you can see. So something like
that. And now you can see just how big that
actually needs to be. Now I think this is a
little bit too chunky. I'm thinking if I
could pull it back a little bit and then pull
this bit back a little bit, maybe it's going to fit
in a little bit better. Let me just see if I can
pull this back a little bit. So what I'm going to do is I'm
going to grab this one and this one and just pull
them back a little bit. And then what I'm going to do,
I'm going to come to this, grab this face in edit mode, and then I can pull it
back very slightly. And I think that's a little
bit better than where it was. All right, so now
that's done and what we need to do is we need to
make this kind of all net. So what I'm going to do is I'm
going to I think bring in, I'll pull it up a little
tiny bit higher like so. And then what I'll
do is I'll bring in a couple of edge loops. So first of all though,
control our left click, right click, and then control B. That's the way I
always like to do it. Now from, you know, I learned this probably about a
couple of years ago. So much easier to work
with bevel in actually. Alright, So I
brought my Bevel in with control B. I'm
just going to make sure this is on super
lips 'cause I don't really want it on my
custom at the moment. And then from there
what I'm going to do is now I can pull this out. So I'm going to come to
this one and this one. And then what I'm going to
do is I'm just going to press and y and
just pull them out. Just a little bit like that so it's got a little
bit of an angle. And then finally now we need to reset all of the transform. So control A all
transforms right click, set origin to geometry. And now what I need
to do is I need to bring a edge loop over. So I press control
or left click, right click, control B then, and let's be level those out. What that'll do is it'll
keep them straight. In other words, I'll
show you one other way that most people do it. So control are two, left click, right click. And now you can see they'll
pull it out, so S and Y, and they'll pull
them out like so the problem there
is that you've got, you can see they're
actually at an angle. So rather than do that, another reason why we use
pebbles instead. So left click, right click is because when I
press control B, it's going to keep them based on the one that I've already
actually put in the center. So from here now, now we can actually pull this
out if we want to. So what I can actually do,
and in fact, I'll bring them. Yeah, Maybe they're okay there. I think they'll
actually be okay. So what I'll do is
we'll just come in now, grab this face and all we're
going to do is pull it back. So pull it back like so. And just make enough room
so we can put some kind of points going
along here like so. The other thing is
as well, we might as well put a pillar in
here while we're here. So all I'll do is
I'll press Shift a Cube. Bring in my cube. And then all I'm going
to do is I'm going to place it on top of here. So finish in this part of, if I bring it to there, press the S button. And then what I'll do is I'll bring this down a little bit, bring it down, and then what we'll do is we can do
this number of Y ways. You can either press
and S and pull it out, or you can just
press, pull it up. And I feel this has a little bit more control
doing it this way. So if I come in now Ol shift and click and then enter alton. I feel like we have more
control doing it that way. Than what we have
in the other ways. You can also offset even. And from there you don't have to press controls head even. You can press alternates
and you can bring it back hold in the
S button like so. So we're learning new techniques
as we go along and I'm trying to add to things as we carry on
through the course. So you can see all the
way through the course, you're going to be
learning new things because we'll just ramp up that complexity and not
even just complexity, just better ways
of doing things or easier ways or quicker ways
or more professional ways. All right, so now
we've got that. Let's think about this
part then in the middle. So what I'm going to
do is we're going to bring in another cube. So let's bring in a cube,
let's put it on there. And then what I want
to do is I want to press the S button and bring it down like so. And of course they're
not going to look exactly the same as
the original as well. Just remember that I wouldn't want them to anyway
because, you know, it's based on fancy,
it's not based on, you know, something realism
that we're actually copying. So what we're going
to do is just bring it out just to there. And then what I'm going to
do is I'm going to come in, press control or trans trite. Click urgent geometry, grab the center of it,
press the eye button. And then what we're going to do from there is just bring it out. So to bring it out like so now let's bring it
over to this side. So roundabout here and whatever gap you have coming
from in between them, try to have the same gap on
the left and right hand side. What we're going to do
now then is go to add modifier and we're going
to generate an array. And we're going to make the
array go along the y axis. So let's pull it along
this way, like so. And again, we want to make it
around about the same gap, so you can see round
about the same. And let's see if we press control three to go
round to the back. And let's turn that up and hopefully it'll go
nearly where we want it. Now you can see it's a
little tiny, tiny bit out. Now what you can do there,
you can either drag this back or you can move it to the left hand side. Either way. So I'm going to
draw, drag it back, jaws to tad, not that one. So let's get this one on. Drag it back just a
little bit like so. Just to get kind of even, maybe even one more, I think. There we go. And that looks
about right now. All right. So that looks about right. That's looking really nice. And now what we need to do is we need to put this
over the other side. But before we do that,
we might as well actually bring in some
textures and things like that, because then that'll
make it easier. Now there is something
else you can do. What you can also do is you
can grab all three of these. And you'll notice at the
moment we've got a array on. And what you can do
is you can come to object convert and
convert to mesh. And what that'll do is it'll
apply all the arrays on. Now this is really, really handy if you've got a
ton of arrays down here. And you don't want to apply
them all on individually. Or if you're not
sure whichever parts you know you've selected. Some of them might have
modifiers on, some not. And we'll go a little bit
more into this as we go on. But using object convert
and mesh is a much, actually better way than
applying your modifiers. I also put that under as well
a shortcut key generally. But obviously I can't
do that in this because no one would be able to see
what I'm actually doing. Okay, so let's do what we've been doing all
the time before. So we'll come into
this one first. We'll press A, we'll press
Smart UV Project, click okay. Then we'll come to this
one, we'll press a, we'll press Smart UV
Project. Click okay. And finally, then this one, Smart UV Project,
and click okay. Now what we'll do is we'll
come to this one first. Add in a modifier. So we'll generate a bevel, we'll put it down to naught
point, naught naught three. I think it'll be
something like that. Looks absolutely
fine. Grab these two, then select this one. Press control L,
and we're going to link or copy modifiers like so. All right, so that's that done. Now what we need is our stone. So if I grab this one last, so shifts like this
one last control L link materials
and there we go. There is our stone work in there and looking
really, really nice. Okay, so now what
I need to do is I need to join these two together. So if I join these two
together with control J, then what I can do is now I can bring it over to the other side. So rather than mirror it
over something like that, because it's not gonna
be exact or anything, I might as well
just press Shift D, bring it over, and
then what I'll do is spin it round, so sad, 180. Let's spin it round and let's get it into
some sort of place. So we can see we've got a lot of gaps on this side,
which is really nice. We can pull this back if we want to, or we can
leave it there. I think actually it
looks good there. And now what we need to do
is just bring in this stone. Now this stone might as well
be mirrored over this part. So if I come in, grab this, press shift S cursor
selected, grab this one. Right click, set
origin 23d, cursor. And then what I can do
is add in the modifier, bring in a mirror
and put it on the Y. Turn off the X. And there we go. Now what I can do is I
can go over the top. I can press Shift D and then
just drag it over like so. And then let's just make sure that they're sat on there very, very nicely, which they are. And from there then, I'm just
going to press control A, Apply my mirror, and then
I'll grab both of these sets. Press the tab button, press
A to grab everything. Is that one not grabbed? Nope, that's still
got a mirror on, so let's apply the
mirror on this one. And then press Tab. And
then you Smart UV Project. Click Okay just to make
them look a little bit different 'cause we
don't want to look in the same 'cause
we can see them. We can't see this
one and this one, so it makes no difference. All right, on the next one,
then all we want to do is want to put another
one going across here. And then finally we
can actually make a start on our actual roof. Let's save it out. And
I'll see on the next one. Everyone, thanks a lot. Bye bye.
42. Decorative Roof Supports with Blender's Curve Tool: Welcome back everyone
to the blender for the environment
artists guide, and this is where
we left it out. All right, so let's now shift our focus to this part here. So again, all I'll
do is I'll keep the cursor there. No
point moving that. And then what I'll
do is I'll press shift A, bring in a cube. And let's bring it
over to this side. Now we want it to copy, so we want it to
basically copy this, but be a little bit thinner
than what this one is. So all I'm going to do is I'm just going to put it into here, so making sure that it
fits in there very nicely. I've also got to make sure that it's kind of going to
come back to my roof, so into here basically. So all I'm going to do
to do that is just grab this back face and pull
it back into there. Now again, back faces and things like that,
they're all great. If you're building
this scene you should really be
getting rid of them. But if you're going
to be putting them into your asset manager
or something like that, probably better
off keeping them. So get rid of them
if you're just keeping the scene and if not asset manager keep them because then you can use them in other scenes and
you might want to, you know, see that back
or rotate them around. All right, so let's come in and pull this over
this side like so. And then what I think I'll do is I think actually I'll keep, maybe drop the height down, tiny bit, like so. And then what I'll
do is I'll press control left click, right click. And then control B, pull it out. And then all I'm
going to do is press, in fact, yes, I'll need
to bring this one in. So I'm going to press and
X, let's bring it in. You can see here I need
to bring in a bevel, so control le, left
click, right click. Control B. Pull it out
to where I want it, somewhere around
there, thinks good. And then grab this face in, face select, and then press and pull it
back a little bit. Now we might as well use this.
We've already created it. So what I'll do is I'll
just come in for this one. Press D, bring it over, press the button to separate
it, come back to it. Control late or
transforms right click, set origin to geometry, spin it around then
with odds and 90. And then all we're
going to do is press one and bring it into place now. No, it's probably not
going to fit the same, so I might need to make
it a little bit smaller. So let's press the
little dot born on the number pad because I'm
losing where it actually is and let's pull it
back into place like so actually we might need
to just make it a tiny, tiny bit smaller like so. And that's looking pretty nice. All right, so now what
we can do is we can do pretty much the same thing as what we did on the other one. We can array it over
the other side. So add modifier, generate array, and then all I'm going to do is I think it is, no
it's not the X. Let's turn the X down. Let's pull the y up like so. And let's then increase the
count going all the way over. I'm thinking probably need
a bigger gap in here. I can either bring it back. Let's actually put
this onto object mode. We still can't see anything, so let's put this on as well. And now we can see
where the lines are. So you can see one line
here, one line here. What I tend to do
in that situation is I'll just extend it. So I've brought it down
one and then I'll just extend it out like so
holding the shift button, and now we've got the even side and there's hardly any
difference in between them. All right, let's put it
back onto material then. And then what I want to
do is just make sure that they're pulled back enough,
which I think they are. And finally now all I can do
is I can grab this one here. Press control all transforms. And then what I can do
is I can join it to now. So press control J, and finally then in fact,
no, I can't do that. I've still got my bevel on
and I've still got my ray. I need to apply my ray
first. So control. And now I can actually
press control J. Join it altogether. Now of course we do need
to unwrap this part. So I'm going to press
L Smart UV Project. Click Okay. And there we go. All right, so that's that one. And now what I can do is I can bring that now to
the other side. So all I'm going to do is
press Shift D, bring it over. And what I want to do is I want it to rotate around the middle. At the moment it's
not going to be cause the orientation
is over here. So control all transforms
and set origin to geometry. And now press ours head 180 and then we can
rotate and gain in place. Now if I come out,
I can see that this is how far
this one is back. So let's try and put that
one round about the same. So if I pull it back to round about there
and there we go, double tap the A,
and there we go, it looks fantastic.
The top up there. All right, so now
what we're going to do is we're going to
introduce something new, which is going to be
our actual curve. So what I'm going to do
is going to bring in a nice sloping curve along here. Now to do that, the easiest
way is to bring in a curve, not a piece of mesh. So why? Because then when we're
bringing a curve, it's non destructive workflow. Again, it means that
you can mess around with it until you've got
it absolutely perfect. Which really, really like that
sort of three D modeling. So let's come in and
what we'll do is, because we want to get right
in the center of here, we'll come in and just
grab the top of here. So shift S, Custer
selected like so. And then what we're going
to do is going to press shift and bring in the curve. So I always like paths and the reason is if
you use a bezier curve, you'll see it comes in
already bent like this. The good thing
about bezier curves is that you will
see if I press it, we've got a lot of handles
on here, so it's really, really great when we're dealing
with things like pipes, taps, things like this. It's really handy.
You'll see me use bezier curves a lot when we're actually
creating ornate things. So ornate, you know,
style, you know, the coffee shop hanging, coffee shop sign and
things like that, then it's a good idea
to use the bezier. But for something
like this roof, which I'll show you in a minute, it's much better off to
actually use the path. You'll see when I
bring the path in and I click on
each one of these, there are no handles
to mess around with, which in one way is good and
another way it's not good. All right, so what we're
going to do in then, we're going to spin this round, so Rz and 90, and we've got one right
in the center here. Now the good thing about these
is you can also as well, let's say we want to
get rid of these two, so delete Virtus,
get rid of those. Leave those three. What I can do now is because my orientation
is in the center, we can also bring in a mirror. So generate bring in a mirror
and put that on that side. And now when I mess around
with these shift space bar, you can see it also does it that side which makes
this really handy. Now, I always recommend when you're
doing things like this, especially things
like this actually, that let's also put clipping on. Actually it's way, way easier if you have
something to work with. So what you always do is you come down to where the
little tab is here. This is our curves tab. And then what you want
to do is you want to go down to where
it says geometry. And under geometry, we have
one that says extrude. Now we can bring the
depth out and make it fatter like a
pipe or something. But that's not what we
want to do with this. What we want to do is we
want to just extrude it, get the thickness of our actual, you know, this part that's
going to come around here. And then what we want
to do is we're going to go and add in
another modifier. And this time it's going to
be a solidify from there. Then what I want
to do is I want to press Tab right click, and I want to shade flat. That makes it much,
much easier to see. Let's put it onto object mode. And from there then I can actually bring out the thickness of this actual roof to something that I'm happy
to actually work with. So I think something like
this is going to be, it's going to need to be much, much thicker because
it's going to be going against these things here. So let's first of all though,
put it against those. So what I want to do is I
want to bring it down first, like so, and I want to
bring this one down. And you can see that these
two here are not clipped. Well, they are clipped,
but not really. So what I want to do is turn off my clipping, pull them out. And then what I want
to do is put clipping on and pull them in and let go. And I was hoping that they would do a
better job than that, but clearly I'm going to
have to fix that part. So what I'm going to do is I'm going to grab all of these. I'm going to pull
them up, that's where I actually want them. I can join those as well. By the way, I'm just seeing I thought they had
actually clip. So what I'm going
to do is I'm just going I'll leave it there, but I'm going to split it. And then what I'll
do is I'll mirror it after I think and
pull them together. Or we can do this? Yeah.
Or we can do this as one. I thought actually we would they would actually merge
together on there. But apparently, apparently
they're not going to do that. So what we'll do is
instead of that, we'll bring in another path. So shift, let's bring in a path, we're not wasting
any time really. Z nine, put the path there. And then all we're going to
do now is we're going to grab this path and this
path, press control L. And then what we're
going to do is copy modifiers like so. And I'm hoping we did
it their own way. Ran, so this one
and then this one. So control l, copy modifiers and I'm hoping that
that will be okay. Now let's come in
to this one here. Let's go down and
look at extrude. And the extrude is not 0.143 so control C,
just to copy it. Come back then to this one, and hopefully when I put this
in to extrude control V, it should look the same, okay? Right click, shade
flat and there we go, It's the same. All right. The reason why I
did that then is because I'm gonna have to
break right in the middle. And we don't really
want that and the reason is because it might not actually come together well. So
we don't want that. Let's just do it
at the same time. So what I'm going to
do is instead of being all fancy and using a mirror
and things like that, I'm actually now going to
work just on this one. If I come in and bring these down to roundabout
here and then what I'll do is I'll press Enter and Y and pull
those out like so. And if they're not
pulling out, by the way, just make sure you're
on medium point. And then finally what we'll
do is we'll grab this one. This one, this one and this one. And lets them pull
those down into place. Now we can see
straight away, one, this is not thick enough, and two, it needs to
go back a lot further. So what I'm going to do is
now I'm going to pull it back into like so. And then what I'm going
to do is I'm going to bring the solidify. I think it's the
solidify. Yes, it's the solidify out a little bit. Bring them back in like
so. And there we go. Now that's coming along
really nicely. All right. Now you can see here, it's a little bit too high, so let's pull it
down a little bit. And then what we can
do is we can start now bringing these three down. Let's bring these three
down a little bit. So, and then finally what I'll do is I'm going
to add an edge, not an edge loop a
point in here and here. So the way we're
going to do that is grab this one, grab this one. This one and this one. Right click and subdivide.
And there we go. And what we can do now with these is we can
grab both of these. Press essen y and
now we can start to pull those in to shape this
that way that we want it. Now I want to pull this
up because I want it to be a little bit more
annoy than what it was. And I think now we're finally
starting to get somewhere. So this one and this one,
and y bring them in. And I think that's the kind of scale that I'm going to want. The only thing yeah, I think actually that's
looking pretty nice. You'll notice as well, I'm kind of not following
this roof really. I'm just using it as
a scale to give me an idea of how tall
it needs to be. Let's pull this down
a little bit more, and then let's pull these
two down a little bit more. And there we go. I think that's
going to be about right, because I don't want a beautiful
window on here as well. All right, so that's
looking good. So what we'll do then
on the next lesson, is we'll actually start creating our actual roof that's
going to follow this. And I'm hoping I
should be able to use this curve to
actually do that. So we'll see if that works out. But it should do. I think it
will. All right everyone. So I hope you enjoyed that
and I'll see on the next one. Thanks a lot. Bye bye.
43. Integrating Roof Tiles with Geometry Nodes and Curve Modifiers: Welcome back everyone to Blender for the Environment
Artists Guide, and this is where we left art. All right, so what I want
to do now, first of all, I'm going to take this
curve that we have here. I'm going to press
shifty. I'm going to move it over to here like so. And then what I'm going to do, I first of all, I'll
take off my mirror. I don't need that on.
I'm going to also take off solidify, I
don't need that on. And finally, I'm
going to put down the extrude to zero as well, leaving me just my curve again. All right, next of
all, then let's bring in a new geometry node. And the one we're going to bring in is going to be the roof. So let's come over to
our asset manager. Let's open that up,
let it load up, and then let's come in
and put the materials up. Come down to where
our geomet nodes are. And you'll also notice
in the beginning I didn't actually add in
the chain geomet node. I completely forgot
about the chain, so I've added that in there now. But when you come
to your own course, you will have already
added that in there. Okay, so let's
bring in our roof. So I'm going to zoom out a
little bit and then what I'm going to do is I'm going
to pull in my roof like so. And then what I'm going to do is I'm going to rotate this round. First of all, zed 180,
let's rotate it round. Let's also put it on object
mode because I find, especially with
something like this, is much easier to work with. And the other thing I
want to do is I want to rotate this down now. I
don't want to rotate it. I could rotate it like this, for instance, but I don't
really want to do that. What I want to do is go
over to my geometry node. Now again, you can see on here, we've got all of these options. This is the one that
we're looking for. So I can rotate it up or down. So I'm just going to rotate it so it's a little bit flatter. So now the important thing, what to do with the jut node is make it probably a
little bit smaller. First of all, just a tiny bit. And then what we'll do then
from there is we'll come down and see where it
says bottom bending. Let's turn that all the way down, so we don't want that on. What we want to do is
create some really, really big kind
of tiles on this. So what I'm going to do
then, I'm going to come to my tile length, I'm
going to increase that. I'm going to increase
my tile width like so. And then we've got some
bigger chunky ones. Now what we want to
do is we want to come down and I'm looking
at random tile size. We'll come to that in a bit. What I first of all
want to do though is look for, let's have a look. I'm looking for where is
it the gap between them? So tile width, here we
are. Let's turn this down. But you can see this is
the actual random one. Let's treat and
turn it down here. You can see that's
not actually turning the gap down. So
where is the gap? So the one we're going
to turn down is going to be randomized width
if we turn this down, if we put this on not
0.99 we can see now we get a slight break in between each of these and that
is what we want to get. Now the thing is I want these
a little bit more uniform. So what I want to do is
tie length randomize, let's just turn that down. And now we can see they're
a little bit more uniform. That's exactly what
I'm looking for. And what else I'm looking
for is probably going to be, let's have a look, let's
turn it up a slight bit, so just a very slight bit like. So let's also look at the width. So I'm going to turn this
one down at a little bit, a little bit more holding
the shift bottom like so. And I'm thinking we're nearly
actually there with this. Let's have a look at the length. Let's turn that down a bit just to make them a little
bit more square. And yeah, I think
that's actually looking pretty good now. The thing is, as you can see, we're going to need a lot more. So what I'm going
to do first of all, is I'm just going
to go over the top. I'm going to then just put
it into place like so. And we can see here, if we
make it a little bit bigger, they're actually going
to fit into place. The one thing we
haven't done is count horizontal and count vertical.
So let's turn this up. Let's have a look, actually,
is that the one we want? Count horizontal.
Yes, there we go. Count horizontal is
the one we want. Let's go over the top,
then put it into place, and we can see we're a
little bit out there. So count horizontal, turn
it down, and there we go. Now we can actually get those into place, fitted in there. All right, so I'm also
thinking that I want my tiles to basically come
as well and fit into there. So I've just got to make sure when I've got rid of this roof that they're
going to fit in there. First of all though,
let's come in and actually see if I can move
them along this curve. So what I'm going to do is I'm going to press Circ control A all transforms right clicks
at origin to geometry. And now what I'm going to do is I'm going to need
to spin it around. So R hundred and
80 spin it around. Let's now make it a little
bit smaller so it fits again. I didn't know it would
do this actually, So I'm just going to make
it a little bit small with S G to move
it back in place. Make it smaller again like so. And let's put it into place, and then let's press S and
make it a little bit bigger. And hopefully then it's going to realistically fit into
there. Something like that. All right, so now what I'm
going to do is I'm going to first of all bring it over here because I know it's
about the right size. And then what I'm
going to do is drag it hopefully along this curve, so I'm going to set
my rotation to zero. Like so. And then
I'm going to come down and set my roof angle, as you can see, to zero like so. And that is going
to make it flat, but I don't want it too flat, so I'm just going to put on one. And there we go,
that's what I want. Now let's see if we can actually use this along this curve. So what I'm going
to do is I'm going to add in another modifier. So let's put this
up adding modifier. And the one we want is a deform. And we want to deform
on a curve like so. The curve object is going to
be this curve here, like so. And you can see now what this actually has
done from there. Then we should be able
to move our curve down. You can see now if I move it down to there and pull it over, hopefully this for them
will start to follow there. Now what we have
to be careful of here that we don't end
up with any breaking. We don't actually want breaking. So what I'm going to do
is just pull it up a little bit and
making sure that it doesn't actually break
like so you can see it's nearly following that
perfectly, all right. If I grab now my
roof and my curve, I should be able to
bring them over and put them into place and see
how they're going to fit. If I put them into
place along here, as you can see, you can see
that we're going to have to probably bring in
a few more tiles. I'm also, at this point,
going to get rid of my roof. So what I'm going to do
is I'm going to come in, grab this part here, this part here, this
part, and this part. And what I'm going to
do is I'm going to press Y to split it off first. And then I'll press,
I'll press P. Actually, let's separate it
off completely. And then what we can
do is we can hide it out the way H. Hide
it out the way. Now we can see if this is
going to fit in place. I come in now put this into place like you can see
I'm just moving it. And now you can see
our actual tiles are fitting into place. Now all I can do is
I can come in now, grab both of these,
press shift space bar. And then what I can do
is I can move them up slightly and put them
into place like so. Now finally what I want
to do is, as I said, I want to make sure
that my tiles, I'm going to come
to the sides here. So this part here needs a
little bit of a top on it. But before we do
that, let's actually increase the vertical count. So if I increase this by one, you'll see it goes up
there, goes up there. And now what we can do is we can actually pull this across. So if I press shift
space bar again, I should be able to
move this across. So let's see if I
can, and there we go, can move it across like so. And now we can actually
get it fitting in place. Now, that is a lot to take
in. I understand that. And it's not so easy. It's going to take
a bit of practice. You're probably
going to want to go back and watch that again, because first time I did this, oh, it was a nightmare,
to be honest. All right, let's come in then
and grab the middle one. And we're going to
pull that down like, so get it into place, we're going to have a top
on here anyway. But now everything is in place, so all we did,
basically, first of all, is we got the geometry node to the actual size
that we wanted it, we've got the towels to the
look that we actually wanted. And from there then what
we did is we brought in a curve or copied
this curve in this case. And from there then, what I
did was I think what I'll do is I'll just grab both of these just to show you,
just so you understand. So shifty, let's bring
them over from there then. What it did was very
carefully brought in my roof. So if I bring my roof out, you can see that it follows that curve going all
the way along like so. And it will follow it going
all the way along like so you can see I've got to pull it over here, sometimes
that happens. But you can see I've lined
it up with the curve, I've put on a modifier. So modifier, this curve, the group is going to be, so the curve object
is going to be this. And from there then you can bring it over once
you've brought it over, then onto your curve,
you can then go into your curve then and
actually mess around with it. So if I'm moving this up, you can see the actual roof
also starts to move up, so you can put it in a
really, really nice shape. Just be careful that you
don't go too far with this. As you can see, sometimes you'll end up with brakes
if you go too far. All right, with that,
explain then what I'm going to do is just
delete this one out the way. And what we'll do then on
the next lesson is we'll bring up this part because it needs to come up to
where this roof is, up to round about here. And then what we'll do is
we've got our front on here and we'll put the
front on the back so you can see it comes really, really nicely into here. Once we've got this
on the other side, then we can squeeze this short, this actual tiles on here, and put a top on our building. And it's gonna look near enough, finished with the roof. Alright everyone, So I
hope you enjoyed that. And I'll see on the next one.
Wait a minute before I go. Actually you can see
the flashing on here. I'm jaws gonna pull
those out a little bit. I'm just going to
have a quick check of my building to make sure
none of them are like that. I'm going to also safeguard my work and I'll see on
the next on everyone. Thanks a lot. Bye bye.
44. Overcoming Mesh Bugs in Roof Tile Overlays: Welcome back everyone to Blender for the Environment
Artists Guide. And this is where
we left it off. All right, so what I
want to do first of all, is I'm going to come
in and I'm going to apply that actual
learning curve. Because I think everything on here looks absolutely right. I don't think I
need to do anything else actually, you know what? Before we do that, let's
actually put a top on here. So we'll come in and we'll make a nice top
for this part of here. So I'll do is I'll come into this part here,
I'll grab this top. So just this part,
not these two edges here. I'll press Shift. And then what I'll do is I'll pull this up a
little bit like so press the button
so and selection. And you know what,
Let's also going over to modeling because it's getting a bit
hard to see there. And then I'll come
back to it like so. And then from there will press this control all
transforms, right? Clicks the origin to geometry. And now let's pull it up. So what I'm going
to do is come in, I'm going to press the button
to pull it up like so I'm going to press L to select
it all and go over the top. And what I wanted to do is I definitely want it to
fit within this part. So what I'm going to do is
I'm going to press S not with proportion edited on and Y, squeeze it in a
little bit like so. And then let's pull it
out so it actually fits. So S and X, let's
pull it out like so. And there we go. That's starting
to look very, very nice. Let's pull it down a
little bit into place, and then what we'll
do is we'll bring it up just one tad like so. And then what I'm
going to do now is extrude it out this
way and pull it up. So I might need to go this way a little bit,
as you can see. So what I'll do is I'll
grab this part here. Basically what I want though
is just these two edges. Let's come in actually and grab these two edges, this
edge and this edge. E, enter and Y, pull them out like so. And then what we'll do is
we'll grab the whole thing. These, these and these, and then and pull
them up like so. And there we go. Dad's looking pretty good, All right?
I'm happy with that. The only thing I'm not
happy with is the fact that they're a little
bit too close to this. It's overlapping a little bit. So let's pull it over
slightly this way. Pull it over this
way very slightly, just so it fits in
there. Double tap the A. Just having a look
now. Yeah, I might need to make it a little
bit thinner, no problem. So we'll just grab
the whole thing. And Y make it a little
bit thinner like, so double tap the A and now you can see it's fitting
in perfectly. All right? I'm happy with that. Now all I need to do is
I need to grab this one. Now before I bring it
over to the other side, I will tell you something
else about curves. You can see at the moment we have all of these
vertices on here. If I actually put
this into x ray, you can see or wire frame, sorry, you can see
all of these verts. The moment I start though,
turning these down, you can see we can
get rid of all these. We really, really
don't need that many. What you want to do is
you just want to give enough to make sure that you've actually
got a nice curve. So round about five or six
is normally about right. Now What we'll do is
now we've got that, is we'll bring it over
to the other side. So I'm going to press Shift D, bring it over to the other side like so let's slot
it into place. So we can see this one's halfway in here, go over the top. And this one is
also halfway now. And we can see we
have a problem with the actual roof in that
there's too many actual tiles. Now what we can do from
there is we can come over to our geometry
node, reopen it. Let's turn down then
the horizontal count. So turn it down one, and then let's move
this into place now. So I'm just going to come out, move it over into place and maybe I can get away with
getting rid of one more. So let's bring it
down. There we go. It pops out, put it into
place, holding shift button. And there we go. You can see it's right right at the edge. And that is perfectly
what we want. And now, if we need to make
it any bigger than we can do, but you can see now
perfectly in the edge, perfectly going under everything is done well for that Now. Then the one thing
that we want to do now is let's think about
bringing in material. We could bring in the
material now if we want to, but I don't think
we want to do that. And this one final
check of it just to make sure I'm happy
with it, and I think I am. The other thing is we can have a randomized shape as well. So you can randomize the
shape which will pull them out in randomized areas. As you can see, some of
these tiles are pulled up. Adding a little bit
more to the realism. Once we've done that,
then let's come over object convert to mesh. And you can see now we
apply our geometry node. And we apply our actual
bend as well on there. From there then I can get rid of this. We don't need that. And now what I can do is I can put this over
the other side. But before doing
that, I might as well at least add in a material. So let's come in and just make sure that
things like this one, for instance, you can see that we've got a problem in here. The other thing is sorry, let's go let's go back. Before we did that,
the subdivisions. We really don't want this on 18. Let's put it on
something like two. We can probably get
away with that. And you can see even when we put it on two, it's still okay. So yeah, let's not put it on 18. It's adding way, way too many
polygons to that before, you know, before we do anything. So let's come in now
object convert and mesh. And now let's press Tab. And you can see now just how much bare that
looks with way, way too many polygons there. Let's get rid of this curve now. And now we'll do is
we'll go over to our asset manager and we're
looking for material. And this time we're
looking for roof. And we're looking
for this roof here. So this kind of black roof. And what I'm going to
do is just put this on material mode like, so let it load up and then
I'm just going to drop that onto my roof and have a look what that
actually looks like. So you can see we've already
got this material on. Let's come over to our material. Let's minus this one off. Minus this one off.
And drop this on, and have a look what
that looks like. All right, so that's looking
pretty good already. Let's see what it looks like when we go into rendered view. And there we go. Don't even
need to do anything to it. I won't even actually
unwrap this because I can see it's already
looking pretty nice. Now we can see for
some reason we've got a lot of issues
with these parts. Not sure why that
is, but we'll have a look at that in a minute
and see if that gets fixed. There's no material
on it. I think it's just bugged or something. Let's put it back on. Let's come on to file and save. Save that out. And now
what we can do from here is we can fix these parts. So let's do these
and just make sure it isn't anything serious. So what we'll do is we'll
grab both of these. I'm going to press Object, come down to convert, and mesh. As I told you, we're
going to apply the curve, the solidify everything, and we're going to do it
to both at the same time. So that's why we're
doing this. There we go. And then now what
we can do is we can come in and as you can see, they're looking pretty nice. We need a bevel
on these as well. So what I'm going to do is
I'll come to this one first. In fact, we're doing
both at the same time. So both of these control or
transforms, right click, set origin geometry, add in a modifier and we'll
bring in a bevel. So a bevel on there,
naught point naught, naught, three like so. And then what we'll do now
is we'll bring in a stone. So if I grab this
one, grab this one, press control L, and we're
going to copy link materials. And now I want to do is
I want to grab this one, then this one control L, I'm going to copy modifiers so that one has the
bevel on as well. And then finally, we'll come to this one smart UV
project, click okay, and then come to this
one smart UV project, click okay, And there we
go. Now that's looking. Now the thing is we've actually
got the part behind here. And this might be why
the renders look so bad, because this was
actually on here. Now what I want to
do first of all is just come in,
press tab on this. And I want to first of
all actually delete. Delete this face and this face. So delete faces. And then what I
want to do is I'm also going to delete
this face here. So delete faces. And now I'm going
to come round this side and I'm going
to press control er, and bring in an edge loop. Now at the moment you can see it's not bringing in
any edge loop on here. So control, you can see no edge loop is
being put in there. So what I'm going
to do instead is I'll just press three
on the number pad. I'll press K to
bring my knife tool. And then what I'll do is I'll press to make sure it follows that line
going straight over. So then what I'm
going to do is I'm going to press again and I'll do exactly the same thing
around here, pressing Enter. Now I want to do is I want to
push this back into place. So let's pull it back into
place, round about here. And from there then,
what I can do is now I come into edge select. And I can make this
edge a little bit smaller with S and
Y, So pull it in. And then this edge
and Y, pull it in. And there we go, That's fit
in really, really nicely. Now the next thing then
is let's unwrap this. So you unwrap, and let's
now give it this material. So control and L and
link materials like so. Now then let's grab this and pull it all the
way to the back. So shift D, let's write
clicks at origin to geometry. Pull it all the way
over to the back. And there we go. We're really
getting somewhere now. Okay, let's put it a
little bit further over like so now finally
we've got our roof. Let's put this roof over
the other side as well. So we've got this right
in the center here. So let's sur, just
press control A, all transforms right
click set origins, three decursor, add modifier, generate, bring in a mirror.
Let's put it on the Y. Turn off the x, double tap
the a, and there we go. All right, so now let's come round and actually have
a look at our rendered view. So let's put it
on rendered view. And here we go. Now
I'm still not sure of why these parts are on here. We can see on here, this is not rendering
out correctly. It's maybe it's because it's, Let me just try turning
this off and see if that fixes it
doesn't seem to fix it. Let's go to Material, turn that off and
see if that fixes it doesn't seem to fix it. What I'm going to do is I'm
just going to press Shift and see if I can recalculate the normals and see
if that fixes it. I've had this happen
before, by the way. I'm not sure what causes it. But sometimes when I've actually
got something like this, the easiest way to deal with it is just actually
either to remake it, which I don't really want to do, or duplicate it, or
something like that. I think it might have
a mirror behind here. Something's definitely
going wrong with it. So what we'll do on the next
lesson is first of all, we'll go back quickly
because we don't want it looking like that before
we actually fix this. So you can see this one here. We've done the wall as well. All right, so what
we'll do is on the next lesson, we'll
go forward again. I won't actually do
that. Let's see if we can go forward. Nope,
I don't think we can. So what I'll do on
the next lesson is I'll get this fixed. I don't know what this bug is, but I will show you
actually how to fix it just in case you come
across that in your own work. All right everyone. So
hope you enjoyed that and I'll see on the next
one. Thanks a lot. Bye bye.
45. Modeling an Oval Window for Victorian Buildings: Welcome back everyone to Blender for the
Environment Artists Guide. And I did find what
the issue was on this. For some reason it had
got a mirror on there, I'd left the mirror, and that
was what the problem was. So if we come in and you will see I'll put this
on render view. If I come to this, the easiest way to
check this, by the way, in to get rid of any points is I'll show you first of all, the one technique
which you can use, but you shot, you should
do it the other way. So what I'll do is I'll come in, grab one of these, and then press Delete vertices. And you can see now
that cleans it up because there's some vertices
on top of each other. Now the easiest way
to do this is just to grab everything with a
coming over to mesh, clean up and merge by distance. And that's then going to fix it because what it's going
to do is it's going to take any vertices that
are touching each other and actually
merge them together. So that's the easiest
way to do it. Let's also then
come to this one, press A, and then what we'll
do is we'll come to Mesh. Cleanup, Merge by distance, and there we go, fix
those two parts. Now what I'll do is I'll come in and redo this roof again. So all I'm going to
do is right click the origin three cursor
and then let's come in, add in a modifier and
bring in a mirror. So generate a mirror, put it over on the Y, turn off the X, and let's actually apply
that with control. A double tap the eight, and now we should be right where we should
have ended before. All right, We can see though that we've got this block here. It needs putting
over the other side. But you can see
before doing that, just how nice that building
actually looks now. And it's the main bit of the
building is nearly complete, we just have to do
the front of it. But you can see how quickly, actually, and easy we did that. It's only took a few short lessons to actually create that. And of course, now we can get that finished
in the front of it. But it looks really, really
beautiful as you can see. All right everyone, So now let's go back to material mode. And what I'm going to do is I'm going to grab this part here. I'm going to press control or transforms right clicks
at origin three decursor. Add in another
modifier, generate. And we want to
bring in a mirror. And I'm gonna put it on
the Y, turn off the X. And then what I'm going
to do is straightaway apply that mirror like so. And there we go.
That's that part done. Now, before I forget, we
actually want to put a window, so a beautiful window
on here, for instance. And we'll just make
this a little bit easy. What we'll do is
we'll press shift day and we'll bring in a cylinder. Now the cylinder at
the moment is on 20. I think that will
be absolutely fine. The other thing is I'll
go over to modeling. And what I'll do it
from here 'cause it'll make it way, way easier. And now what I want to do is
I just want to press Tab. I want to write, click
Shade, auto, Smooth, just to make sure
I've got that nice smooth edge that
I'm looking for. Let's spin it round
then. So L Y 90. Let's press S and X
and squish it in. Let's get it then to the
scale that we want it. So first of all, let's press the S button. Let's
bring it down. Then let's press S and's D. Let's press S,
And there you go. Now you can see really, really easy to get
that in and it really, really fits the part. All right, then from here
then let's pull it out. And then what I want to do
now is I'm going to show you another little trick that
you can actually use. So first of all, yeah, I'll show you the
little trick first. So let's go into
Edit Preferences, And the one you want to put on is something called Loop Tools. So Loop Tools bring that one in. And then what you want to
do is you can now come in, grab this face and this face. And then what you're
going to do is press the eye button to bring them in like so, something like that. Right click and
you'll have a new one that says loopholes here. And all you want to do is come to bridge and there you go. You can see how easy it
is to actually do that. Now generally I wouldn't
actually do this like this because you've still got
other parts to put in here. But I think on this part it was a good chance to
actually show you that. So control left click, right click to add an edge
loop to fill that in. And then all I'm going to
do is split this off now. So why to split it off now from here what I'm going
to do is I'm going to bring in another insert. So I to bring in
an insert like so. And then what I'm
going to do now, I'm going to press Y again. Or actually let's press
selection. Separate that out. And then from here,
let's come now. And what we want to do now
is bring in a knife tool. So we're going to bring in, or I'll do it a different way. I'll show a different
way as well. So I'm going to press three
to go into front view. I'm going to grab
this vert here. This vert here,
press the J button, and that then is going
to create a line for us. Now this one here,
and this one here, press the J button, and that then is going to
create a line for us there. Now from here then, let's
create our window pane. So I'm going to grab
all four of these. Press the eye button
twice if you have to, to bring in then the
glass that you want. And then from here then,
all I want to do is I need to now split
this window off. So selection, split it off. And now it should be left if press H with just
this part here. Now with this part here. We want to split off
all of these parts. So what I'm going to do
is I'm going to come in and I'll do it the easy way. Control this one
here, control select. And then all you're
going to do is press Y and hide it out the way. You're then going to
come the same way here with this one. Instead of coming up
to mesh and, you know, splitting faces by edges, I'm just going to show
you the other way. So it's a little bit longer. Sometimes though, you'll
need to use it that way. Why? And hate to split them. And then all you're
going to do now, you can see that all
of these are joining. Now what I want to do is I
just want to select a mesh, split faces by edges. And then we can press Ol tag. Now all of these, if I grab this one for
instance, should be split. If I grab this one should be a split and that is what
we're actually looking for. All right, so now what
we can do is we can come in and we can think about if I come to this part
here, I can pull this out. But before I do that,
I definitely want to split it on
these points here. So what I'm going to do
is I'm going to come and put in a seam, right click and mark seam. And then what I can
do is I can come in with L and L over this side, Y, and then they're split off. And then from there
I can press L, L, L and L. And then I can pull them out, pull them out, and this will
be my first bit of wood. This bit will be stone, and then the inner bit
will also be wood. So now if I come to the
inner bit and press A, I'm going to pull those out with like I'm wondering if I press A, I'm actually, before
I pull it out, what I'm going to do is
I'm just going to press A and I'm going to pull
this back a little bit. So back to here. And
then I'm going to press and pull it out
to where I want it. And then finally I'm just
going to go back to this part. Now. This one on here,
press the L button, and I'm going to press and X and pull it out a little bit. And you can see here,
I need to select it allectually. Let's
select them all. I want to pull them out just so it's gone to
the back of there. Now, I could also come in
and do it the other way, but S and X, let's pull them
back, pull them into place. And then S and X.
So there we go. Now that's all
fitting into place. Finally, then let's
press tab tage. Bring back our windows and just make sure that they
sat where you want them to, so we've got all that
space this time. Stick them on there and
let's sit just there. I think that's looking
absolutely fine. All right, so now let's come in and we can probably
join them all together. Yeah, we'll join them all
together, We'll make it easier. So let's join them all together. Control J. So press G just to
make sure it's all joined. Control or transforms. Right Clip set
origin to geometry. Let's come in and
add in a modifier. And we'll bring in a
bevel nought point N naught three like so. And there we go. Now
we see wood split. Wood split along here. So it's looking
really, really nice. Now let's come in
and what we'll do is we'll grab this
and we'll grab this control and we're
going to link materials. Let's now come into
material view. Let's look at the materials once it loads up, and there we go. Let's now come over
to our materials. Now we've got this
all needs unwrapping, so let's press a not this
one down here, by the way. We don't want to do
that, so just make sure we've got
this one selected. Smart UV project. Click Okay. All right. So the stone
is absolutely fine. We can hide that out of the way. Now these two pieces
need to be wood. So what I'm going to do is
I'm going to grab my window. So just the windows glass. Not click a sign. Hide them out the way. Now let's come to all the rest of it. Light, wood, click a sign. Now we can see on this that we do have the same problems
with what we had before. And I've showed you actually
how to straighten those up, and I've showed you
the free thing as well to use UV squares to actually
straighten up as well. So what I'm going to do now,
I'm going to come over to my UV map and any that are
like this, you can see them. Then I'm just going
to press L on them like so I'm also going to do it on
these because I don't know which one is the front
and the rear ones are. And then I'm going
to press this Alt and straighten them all up. Now you can see we do have
a problem on one of them. Let's have a look if that's
one that can be seen. So what I'm going to
do, I'm going to go to mesh now and have a look, it's this one here so
I can grab this one. As you can see it is this one. And then all I can do,
press Smart UV Project. Click okay. And then finally can just grab, maybe, let's see, can grab them Ale and then
grab this one L Alt like so. And now straighten all that
one up as you can see. Now you can see we do
have a problem though, in the fact that there are different size
on the mesh now. So you can see this one's a lot higher resolution or lower resolution
than this one. We don't want that. So what
I'm going to do now is come over to the left hand
side A and then UV. And what we can do now
is Average island scale. Let's click that on, and
now you'll see they go back to all being
the average island, so based on the size, it will make them all the
same size as you can see. Now they're all based
around the same way. All right, that's
looking pretty good. So what we'll do then on
the next lesson is then we'll actually come in and get these windows
looking right. And then from there
we'll actually just need to do the top
of this building. Alright everyone, so
hope you enjoyed that. I'll see on the next one.
Thanks a lot. Bye bye.
46. Texturing and 3D Modeling Street Signs: We welcome back everyone to Blend For the Environment
Artists Guide, And this is where we left off. All right, so let's come in and what we'll do is we'll
sort out our windows. So I'm going to press voltage,
bring back everything. Let's bring in each
of these windows. Now luckily for us, you can see that we've
only got four ear, so it's really
easy to deal with. But what we can see is we've
got circles on here as well. Making it really, really easy to put these into place as well. So what I'm going to
do is I'm just gonna grab one of them and we're, you're just going to
put it into place like, so grab the next one
L put it into place. And then put this one into
place round about here. And then put this
one into place. Run about here. All right. Now if a press
tab, let's pull it back into where we're
going to put it, so you're just about there, making sure it's in front of there that's looking
really nice. And I think, yeah,
you might want to, you know, make something
that comes kind of out here. If you really want to do that,
that might be a good idea. But for now, let's have a
look where it looks like a rendered view and
that looks perfect. All right, so now we just need to just have one
more check round. So I think we need definitely
a green wall down here. Definitely a green wall on here. And we also need a
little sign in here. So I think we'll actually
work on the sign. We might as well
do that as well. So what we'll do though first
is come back to modeling. I'll just make sure you
can see here as well. These walls are the gray
box, they're still gray box. The walls, these
are still gray box. So let's fix the walls first. So what I'm going
to do is again, I will come into this one, press the Y button, come to this one Y, this one Y. And then work my way around. As I said, I like
splitting up these walls. So these two are going
to be Y. I'm going to also get rid of the
bottom, so delete faces. And then you should be left
with just inside of there. You can also see that we've
got an inner part here. We really don't
want that either, so delete faces and
then the top part, we don't need that
either, so delete faces. And we should end up then with an eight empty kind of husk. And that's exactly what we want. All right, so now I
want to do is we want these to be the same
material as this. So all I'm going to do is
just grab, grab these, grab both of these.
Grab this one. In fact, I can just click
the down arrow now, I think. And put it onto gray
wall, wall gray. And then I can just come into
each of them individually. You wrap and then you wrap. And the same for these as well. And the same for this one here. So now with these two, I'm not sure why they split, but I might as well
merge them together. Let's just grab them both. First of all, let's
press shift H just to grab them both,
and let's come in. They've got an
edge loop in here, we don't actually
need that edge loop, so we might as well
actually get rid of that. Easiest way to do that is mesh, clean up, merge by distance. And then what I can do is I
can just come in, come down, press delete, and
dissolve edges. So now from there I can come in, I can press on the wrap like so. And then with this
one, what I can do is I can add in a new one, a material, and we're
going to put green. And more green is what we want. Then all I'm going to do
is click a sign on that one and click a sign
on the bottom one. And just make sure
now if I go back, so if I press tab Old Tate,
bring back everything. Double tap the you can see here, it's not been
assigned on this one. A sign, here we go. And then just make sure it's green going all the way around. Perfect. That looks
really, really nice. Now let's think about
our little street sign. So I'll bring down my guy and put him
on the ground plane. So I have press one, just make sure he's on
the ground plane. And then what I'll do is I'll
bring him out over here. And you can see sometimes this sun is really
nice over here, but sometimes we need
one over here as well. So depending on where
I'm working on, I'll bring it over, press ours, 180, spin it around, and now you can see we've got a little bit of sunshine on there. And that, for me, makes it a little bit
easier to work with. All right, so what I'm going to do is I'm going to grab my guy, press shift Urs selected. And then what I'm going to
do is I'm going to press shift and I think I'll
bring in a plane. Let's spin the plane round then, so our x 90. Let's
spin it round. Let's bring it up then to
the size that we want it. So I'm going to
press to bring it down and then and
X and pull it out. Now I'm thinking that's probably still a little bit too big. So press the S one, and that then will be more
the right size from there. Then we want an inside and
we want the outside of this. So what I'm going to do is I think we'll do the inside first. What I'll do is I'll first
of all press the eye button. So I'm going to press Tab. In fact, we'll reset
a transformation. So all transforms, right click, original geometry, and now the
inside will do that first. Bring it in where
you want it like. So then what we'll do
now is the outside, if I come in, grab
the outside like so. And then what I'm going to do is press control, shift and B. And bring that in. Now
let's see if I can come operate on custom and then turn up the
amount of segments. Will it actually work and
no, it's not working. So let's do this a
different way then. What I'm going to do is I think the easiest way to do this is probably to
bring this out first. So what I'm going to
do is I'm going to bring this out with, so I'm going to extrude
it out like so. And then what I'll do is I think I will get rid of this bit here. So this middle bit here
I'm going to get rid of. Yeah, we'll do it that way and then we'll
join it together. So we're going to come in and
delete this front bit here. So I'm going to press
Delete and Faces, and you should end up
with something like that. And then what we can do now, we should be able to come round now and add in that bevel because there's nothing
stopping us now. So control B, bring
it in like so. And we can see that if I bring them in just
a little bit like that, that's looking a bit bare. Albeit I don't actually like
the shape of this for these. So what I'm going to
do is just put it back and then what I'm going to do is bring
down this like so. And I think now
that's looking much, much nicer now for the inside we might as well
do that at the same time. So what I'm going to
do is I'm going to grab the inside of these parts, so just the inner corners. And we're going to
do the same thing, but we're going to
make them round. So control B, bring
them in like so, and instead of them
being like that, we're just going to bring up this shape and make them
nice and round like, so looking really
good right now. What we want to do is we
want to bring this forward. So this sign part, we want to just bring it forward like so. And there we go. Now I'm thinking if I
bring that forward, we can see we're losing
the back of that. But I think we don't
need to worry about it. I think what we can do is
just work on the front. We don't need to have a back
on this, in other words. So let's bring it forward
a little bit like so. And finally, now let's come in and what we'll do
is old shift click, grab all that way, going
all the way around there. Old shift click, grab this one, going all
the way around there. And then right click.
And we're going to bridge edge loops. So bridge edge loops. And there we go.
A beautiful sign really, really easily to me. Now let's bring in some
materials and beverly it off. So what I'm going to do
is press control late or transforms right clicks
the origin to geometry. And now we've took a little bit of time core in that as well. We can use that in our
other street signs so it's not like it's
wasted time or anything. Right click, shade,
auto, smooth. And now let's bring in,
I think on this one we'll use green, green metal. I'm thinking for the
actual street sign. So let me just yeah, I think we'll just
use green metal and then the street
sign. All right. Let's bring in then
the green metal first. So again, back to
our asset manager. Let's look then for
our metal metal is here and the one we
want is the green metal. So I'm just going to zoom into this with
the little dot Bob. I'm going to drag and
drop it on there. And then what I'm going
to do is now press Tab Smart UV Project. Click Okay. And now finally, let's bevel it off before
we go any further. So add modifier generate bevel, not 0.3 like so, and now just this
bit on the inside. So I'm just going to
come in face select. And what I want to drop on
there is another material. So click the plus and what we're looking for is going to be, let's have a look.
Signs, there we go. Let's drop signs on there. So let's click a sign. And finally then let's
press three or one. Control one, there we go. Control one on the number part. Let's press U, and where
is it project from View? There we go. Now let's go
over to your UV editing. Here is our little sign, it's gonna fit in
there perfectly. And the one we want
to put it on is probably going to be this
one here, Park Avenue. So let's grab it. Let's
press, put it in place. Let's press a little dot one to zoom in way, way too
big at the moment. Let's press S scaly up like so. And finally then let's press
and X And just move it a little bit to the side so
it draws lines up like so. And finally then and X, and just pull it out until we get it into
a nice nice place. Now we can see a little bit further on this side
than this side. So what I'm going to
do is just press and X holding the shift
button just to get them into place a little
bit more like so. And then and X and pull them
out a little bit like so. And that then, for me, is looking very nice,
very happy with that. All right, so let's
press control one. Let's press G then, just to put it into the
place where we want it, which is going to be
somewhere around here. And then all we need
to do is pull it back. You can see him
in rendered view. Yeah, I don't really want
to be in there doing that. Let's put it back into place. Little dot board, see
where we've got it. And I think we can
pull it out there. And that is that part done. Now let's bring our
little guy to the front. We basically have everything
done on this building except now the actual front part where all the chairs and
things like that are. So on the next lesson,
then we'll make a start on creating
those things. Al right everyone, let's
go and save out our work. Let's put ourselves
back on modeling. Ready to begin? Let's
press the little dot, Born to zoom to our guy. And then hopefully in the
next few short lessons, we should have actually have our first building done dusted. Alright everyone, hope
you enjoyed that. I hope you really enjoyed
the course and I'll see on the next one.
Thanks lot. Bye bye.
47. Crafting 3D Chair Assets for Victorian Scenes: Welcome back everyone to Blender for the Environment
Artists Guide. And this where we left off. All right, first of all, let's bring in our sun and
turn it around again, just so we have a little
bit more light on there. So ours 180, Let's
turn it round. And there we go. Now let's
start with our chairs. I think that'll be a
good place to start. So what I'm going to
do is grab my guy shift S Ursa selected shift. And what we'll do is
we'll bring in a cube. We'll press S then. And all I want to do, really when you think about a chair, have a look at a
chair next to you. And you'll see that the chair is roughly around this
part of the leg, So where someone's
going to sit down, it's normally a little tiny
bit higher than there. So if I put it there S sad. Bring it up a little bit,
something like that. That looks about
the right height, former chair, and we can
lower it down a little bit. Sometimes some chairs
are a little bit, you know, like a settee, Something where the actual bend is at the back of the kneecap. All right, So what
we'll do then is press S and Y, pull it out. And then S and X and pull it
out this way a little bit. And that looks about the
right size for a chair. You can imagine
him sitting down. How much room is are
going to be there that looks about the
right height essence. Then let's squish it in
just a little bit more. So now let's shape this chair,
the front of the chair. I want to be a bit
more rounded off than the back of the
chair, as is the case. So let's press control.
All transforms, right? Set origin to geometry. Let's then come to the
front of the chair. So I'm going to grab these
two edges here and here. And what I'm going to do then
is just be level those off. So I'm going to press control
B and bevel those off like, so I might want them a
little bit more rounded. So if I do want that, I can change the actual width
so I can bring the width up like to there and then
bring down this bevel to here. And we have a lot
of control over it. As you can see, I'm thinking
that's looking pretty nice. Now let's come to the back
of the chair, control B, pull it out and all
we want to do is just round off the bag just
a little bit like so. All right, from there
then what I want to do is now I want to bring
the top of the chair, so I'm going to come
in, grab the top, this face here, press
the eye button. And then what I'm
going to do is just bring it up now with E. So extrude it up and we should end up with
something like this. Right click, shade,
auto, smooth. And we can see already this
is looking pretty nice. Okay, so now let's think about
the bottom of the chest. What I'm going to do with
the bottom is I'll come to just in the bottom here. I'm going to press the
eye button like so. And then what I'm
going to do now, I'm going to press the eye
button once more like so. And then I've got two edge
loops in here from here. Then I'm going to
press old shift and click, going this way round, so I'm going all
that way round and then E and just pull it out. Now remember this chair, I want to basically make
sure that anything you ran, you can use in your other
projects and things like that. So we want to make sure that although it's just a
very simple chair, it's done to a relatively
good level of design. So what I want to
do now is I want to bring in the bottom
of the chair. So the way I'm
going to do that is I think we'll use a curve again. So what we'll do is we'll
press Shift S, Ursa selected. Let's put it on
object mode as well, so we can actually see a little bit easier what we're doing. And then what we'll do is
we'll bring in a curve. So shift, let's
bring in a curve. And again, I'm going
to bring in a path. I'm going to spin it
round. So I said 90. I'm going to make it
much, much smaller. So let's bring it all the way in and let's pull it
down a little bit. And I think from here we can
actually work with this. Basically what we're
going to do is we want to make a round bit that's going to come down on each side and
put it to the actual floor. Now on this, all we need
to do is just come over. We don't need to bring
any solidify in or anything like that because we're not going to
have it kind of, you know, a hard
edge or anything, it is going to be round it. So all we can do is we
can come down to where it says depth and turn
up the depth of this. Now I want to do it with
the curve because they have a lot of control now
over how I'm going to, you know, create this chair. What I'm also going to do is I'm also gonna turn down
the resolutions. We don't need them so high, maybe even four we
could get away with. Let's just see were
I can get away with. Now let's go round to the back. So if I press three, we can see now on the number pad we've gone round to the back. And let's pull down
these two parts first. So if I pull these
two parts down, the need to be roundabout here. Now what I'm going to do is pull these two parts out so and y, pull them out a
little bit like so. And finally, let's add in
a few more edge loops. So I'm going to grab all
three of these right click subdivide and
they go simple as that. Really, really easy
to actually do that. Now we need to do is we
just need to pull these up a little bit and put
them in place like so. And finally then we
just need to make sure that the legs on here
are going to look nice. At the moment, I feel like they're a little
bit too far out, so we just need
to bring them in. So I'm going to
press three again on the number pad, and X, sorry. And Y, bring them in like so. And I think now they're
looking better. And now finally let's
pull them out like so let's grab all of them,
Pull them to the front. Then yours under there. There we go. Now, do we
want the any thicker? So let's have a look at the thickness now
of these chairs. I think they're a
little bit too thin, but because we've actually done it in a non destructive way, it means we can also
pull them out like so and make them a little
bit thicker if we need to. So a little bit thicker. So I'm thinking, yeah, that's looking pretty good now. As well as that, what we
can also do is we can grab this press shift and
bring it to the back. And then press R 180. Spin it round and put it on the back of the
chair like so. So now we've got our
front and the back. Let's just have a quick look
at what that looks like. You can see already that's
looking pretty nice, pretty ornate for what
we're actually looking for. And also now we can actually
grab the back of this, press Shift D and bring it up. Rotate it, so R and Y
rotate it round like so. And let's just see if we
can put it into place. Now what I'm going to do with
the back is I'm going to make it much, much thinner. At the moment, it's
a depth of this. Let's pull that depth down then. So make it a little
bit thinner like so. And also let's make sure that
it's going to fit in place. So if I grab this one and
this one for instance, press S and Y. I can
bring it in like so. And you can see
now we can get it all fitted in really nice. The other thing you can do
with something like this, because it is a curvus press, alternates and what you
can do is you can make the back of it a little
bit thicker like so. And I think that then is
looking really nice now. What else do we
need to do? We need some little points that
are going to come up here. I'm simply going to use
just a cylinder for that. I don't think I need
to use anything else. So what I'll do is
I'll press Shift S, cursor selected, and then
what I'll do is press Tab. Let's bring in a mesh. We'll bring in a cylinder and we'll put this
on something like 16 because we don't need a
lot of vertices on this. Let's press right click
and shade auto, smooth. Let's press S then
and bring it down. And then all I'm going to do
is just put this into place. Now of course, it needs to match the thickness of
these parts here. So first of all, I'm
just going to make sure that it's matching
the thickness. So something like this. And then let's just pull it up. Let's then come in,
grab the top of it, pull it all the way up. And then all we're
going to do is pull it all the way back into place. Let's just get it into
place where it's going to go. There we go. Now last of all, let's make sure that we can make it a
little bit more neat as well. What we can do is we
can press control. Bring in a few edge loops. So I would say five,
left click, right click. And this edge loop is
the one that we want. This one here, old ship click. And then let's bring in
proportion edit in and put it on something like
maybe Sharp might do it. Let's see if Sharp will do it. So there we go, Easy as that. Now what we need to do is
just bring one either side. So all I'm going to do is
I'm just going to press shift D. I'm going to
move it to the side, so making sure that it's in the right place.
Something like that. I need to pull it up a little
bit more as you can see. Also, I'm just
wondering if I want to bend it like round here or something,
I might do that as well. So all I'm going to do is
I'm going to press and X and just rotate it
just a little bit round, pull it over, so I
think that's perfect. And then all I can do is
I can grab the top now, make sure I'm onto normal, so it's following
that line up and then just pull it up into
place without proportion. It's in on, pull it up. And then finally let's
pull it back a little bit just so it fits in
there really nicely. All right, that chair
is looking really nice, but obviously we need
it on the other side. So let's press control. Lal transforms right click, Origins three D cursor. Let's add in then a mirror. So let's bring in a mirror. Let's put it on the Y. Let's
turn off the X. There we go. A chair done. Simple as that. All right, finally, then let's come and grab the whole thing. I'm just making sure that
I'm happy with these. Do I want these bits a little
bit thinner coming down? Let's actually test
that. So if I grab both of these alter nests,
let's pull them in. Does it look bare like that, or are they a little
bit too thick? Maybe they're a
little bit too thick. So let's come in
and turn them down. 0.29 Yeah, not 0.159 I'm going to copy that control C. Come
to my other one, control V, and there we go. Yeah, they look perfect. All right, now I'll
do is I'll use the box select with
select everything. So object, come up to where
it says convert mesh. And then we can press control J, Join everything together, right click, shade,
auto, smooth, and there is a really,
really nice chair. All right, really, really
happy with how that looks. All we need to do then
on the next lesson is we'll come in and we'll
bring in some metal. For this, some metal material, I think we hadn't
used it before. We'll bring in a blue metal. And then from there, what
we can do is we can make a start on our actual
table. We can get that in. And then finally we
can start building out this wall. All
right everyone. So I hope you enjoyed that.
Let's save out our project, and I'll see you
on the next one. Thanks a lot. Bye bye.
48. Designing a Victorian Coffee Table in Blender: Welcome back everyone to Blender for the Environment
Artists Guide. And this is where
we left the art. All right, so let's make
a start on our table. So the first thing
we'll do is we will bring in a cylinder. So shift a cylinder, let's put it on something like 24 because we don't want any, you know, rough edges around
there or anything like that. Let's right click then
and shade auto, smooth. And you can see now it's
really smooth going around. And we'll actually show
you if you bring in something like a cylinder again, let's put this on something
like ten for instance. Right click, shade,
auto, smooth. And you'll see now
nothing really happens. And that's because it's
really hard for blend to smooth this off when we have so little vertices to work with. Now we can of course, come in and turn this up
and smooth it off, but you'll see that we still end up with this kind of
blocky look going round. So that's why we have
to be careful when we choose between
how many polygons or vertices we're going
to have in a cylinder and how round we actually
want the object. We could actually
make this really, really like super smooth, but it's the price of adding
tons and tons of vertices. All right, so now
we've done that. Let's come in, make this
a little bit smaller. Said make it a
little bit thinner and now we want to
good size for a table. Obviously it's a coffee shop, so they tend to be a
little bit smaller. So something like this. All we want to make sure is that they can put their tea and coffee or whatever they're
doing on there. And that it's the
right height for them. So you can see here, if
my guy sat down here, this would be probably
a little bit too small. So let's make it a little
bit big. Earth bigger. Let's press this in Z then. And make it a little bit thinner as it would be made of metal. And you don't want a real
big block of metal actually. So we'll do it like this. Next of all, then what we'll do is we'll make
the inside of it. So all I'm gonna do is
I'm gonna come face, let grab this top face. This bottom face. I'm going to press the eye button
to bring it in. And then what I'm gonna do
is I'm gonna ride click. And I'm going to
bring in a bridge. So I'm going to bridge those. And finally then
I'm going to press controller left
click, right click. And then press, just
to add in a top. This of course, is
going to be the glass. Or let's pull it
up a little bit, so now you can see it's looking really,
really nice already. Now, of course, we
can come in and make this as ate as we want to, but I don't really
want to do that. What I want to do now is
just put some legs on there because I want it to be
a simple, simple table. By the way, all
the things you're going to be learning
throughout this course will enable you to make this
whatever you want it to be. You'll learn so
much information. So let's press Shift
S Ursa selected. And then what we're
going to do now is we'll bring in another. I think we'll bring
in a path again, so curve, bring in a path. Let's rotate it round so Y 90. Let's press the bottom. And then what we
want to do is we can press one now and go
into the front view. I'm going to, at this
stage just grab my guy, grab my table, grab my
chair and grab my path. And press shift H just to hide everything else
out of the way. And then we can
actually work on this. All right, with this then
we don't want it so random, we do want it to be a little bit more square on the square look. So all I'm going to do
is gonna hit Extrude, pull it out a little bit, get the size that I want or
something like that. And then what I'm
going to do is come in adding a generate, bring in a solidify,
right click, shade flat and then let's pull the thickness
out a little bit. So something like this I think
will be absolutely fine. And from there we can
actually press one and go in side view and I can actually
pull this down, so. All right, so let's get this into the right space
where we want it. So first of all, I'm going
to touch the top one. I'm going to bring it out, then I'm going to bring
the bottom one. It's still on normal. This,
I don't really want that, so I'm going to
put it on global. Let's pull it up like so, now it's nice and flat. Let's also pull this
one up as well, because then that'll
make it a little bit more of an ornate
look as you can see. And finally, then we want to
bring out this bottom one. So I want to bring
out the bottom one. And generally, you don't want it going past the
edge of the table. Generally it comes
kind of two thirds of the way up if you look at a table, especially
one like this. So if we bring it out, you can see that's round about
two thirds of the way up. And then obviously we need to make sure that it's supported. So something like that
is looking pretty nice. Now, the other thing is we need some kind of
ends on here as well. So what I'm going to do is I'm just going to grab
this center one. So if I've not got center
one, let's make one. So you can see I've
grabbed these two. Right click subdivide and
now I've got a center one. Now of course when you do that, it does skew around the
rest of the things. So I'm going to pull them out a little bit, including this. So let's pull them
all out like so. And the reason we want
to pull them all out as well is because
this center line, we want a little bit of
a gap going down here. Now from there, what
I can do is I can start shaping this to
the way that I want. So something like
that. And I can also bring this out and flatten
this down a little bit now. So you can see we can
flatten this down like so. And then I can come in, grab all three of these and
just pull them out. Maybe not this one, So
just these two here. Let's see if I can do
it. Pull them out. Is that going to look good?
No, I don't think so. I'm going to pull them
all out actually. Including this one here. So let's pull them all across. All right. Last of all then, I need to make sure that
this is flat on the ground. You can see at the moment
it's actually turned up. Do we actually want it turned up or do we actually want it
being flat to the ground? Probably flat to the ground. The other thing is, is this
too thick at the moment? If it is, we can come
in and we can press Alt on and we can
squeeze that down. As you can see, let's
put that down now. Let's come in and do
the same thing on here, then al, let's
squeeze that down. Let's make sure then this is actually into the top.
So you can see here. I need to pull it up, I need
to pull it out a little bit, and then I need to pull
this one up and just get it so it's sat
into that glass. And finally then I can bring them both down now.
And there you go. Now you can see
just sat in there. Now these ones on here are also, I think, a little bit thick. So what I'm going
to do is I'm going to grab all of these. I'm going to press alternates and just bring them in then, just a little bit like so. And you should end up with something that looks a
little bit like this. Now of course we
can see as well, we've got way too many
polygons going up there. So I'm going to come
over, turn this down, and then put it on
something like maybe five. I think five should do it. And I think that
is looking pretty nice Now to test this out
before we actually use it, what we can do is we can
just come in and just rotate it on this cursor here. So what I'm going to do is I'm
going to press control all transforms and you can
see we messed up there. Maybe I'm not going to do that. I'm going to press control. Not do that yet. Right
clicks at origin 23d, cursor and then what I can
do is I can just press shift D and then R z 90. And that then is going to put it right next to it,
as you can see. And now we can get an idea what this is going to look like. And from here, I think that's looking pretty
nice actually. So what I'm going to do now
is just press shift again. Red 90, shift D. Where is it? I put that one in
the wrong place. There we go, shift D and then
red 90, and there we go. All right, let's have a look round there and let's make sure. Now I can see that this
is a little bit out, but I've got an idea of
what this looks like, and I also know why
it's a little bit out. And I'll fix that
in just 1 second. All right, so that's
looking good. I'm happy with how that look. So what I'm going
to do now is just get rid of these like so. And then I'm going to
actually apply everything. So I'm going to grab my
actual object object, convert mesh and then all I'm going to do is
control or transforms. Right click, set
origin to geometry. Set origin to three cursor. That should hopefully
be the center of there, which will be great. Now add in a modifier, Generate, bring in a mirror. And now you can see
the line up perfectly. And from there then,
what we can do is we can press shift D, right? Clk, drop in place, R z 90. And you can see they're still not lining up for
whatever reason. And I think it's because this is putting us a little
bit out where that is. So I'm going to delete
that a minute and just have a look what's
actually going on here. Come back to these, get
rid of them. A mirror. And then I'm going
to come to my table. Let's have a look. See if it's in the
center. So I'm going to grab the center of here. Press Shift S, cursor selected. And yes, it is in the center. I'm just wondering why this
seems to be a little bit out. I'm going to grab it again and instead
what I'm going to do, I'm going to try something else. Now I'm going to press a little sideways V and put
that on three D cursor. Now if I press shift
D now and Enter, and then press R and Z. It should rotate around
there and then it should rotate and all become
even. So I'm just looking. Yes, I can see why that is. Now it's actually,
we're not putting them next to each
other as you can see. Because it needs to be a
halfway point in there. So what I'm going to do
is I'm going to press zed 90 and then I'm going
to move it halfway in. And then I'm going to come
back to this one shift 180. So, and then finally with this one shift 180.
So there we go. Now we've actually got it. What we need to do is just pull this one out a little bit. I'm going to pull this one out
just so it's all in place. So now we can see
that we've still got some issues with how
it's working on there. I'm not very happy with
how this is actually. So what I'm going to do is I'm
actually going to come in, I'm going to leak this off. And instead of
doing it like that, I'm going to do it
a different way. So what I'm going to
do is I'm going to hit this one halfway there. Shift S, cursor selected,
and then press Tab. And then what I'm going to do is right clicks at origin
three D cursor, bring in a mirror, so
I'll bring in a mirror. That then is going to put
it perfectly on there. And now I should be able
to press Shifty and then R z 90. And there we go. Alright, that's done perfectly.
A lot of problems there. I shouldn't have had that
many problems with that, but it was causing a few areas. Now what I'll do is I'll
come in and join them. I won't join them all together. I'll come into
object convert mesh and then control J and then
right click and shade auto, smooth. Finally we got there. All right, last of all then
let's lift the table up a little bit because obviously it's going through the glass. And then on the next one, then we can get our materials in and finally we've got this chair and tables done from there. Then we can just create now
our wall that's gonna go round our cafe and then
we're actually done with it. Alright everyone, So I
hope you enjoyed that. Sorry about the little
problems we had there and I'll see on the next one.
Thanks lot. Bye bye.
49. Modeling a Victorian Cafe's Concrete Entrance: Welcome back everyone to Blend for the Environment
Artist Guide. And this is where we left off. All right, let's now
bring everything back. So let's bring everything back. Let's then join these up. So I'm going to join this
and this up, control J. This is going to be
my table, of course. And then what I'm going to do is I'm going to grab my chair, make sure that's all joined up. Alright, from there then, what we want to do
is want to bring in some new material. So I'm going to go
to my asset manager, even if we just have
to be careful that we not keep creating more
and more material. So let that load up
the asset manager. I'm sure we haven't
brought the glass in, but let's just have a lot. Is it press dot to zoom in. I think we've already
got the blue metal. So if I come over to this
side click a little down now, we should have blue.
Let's put in blue. And you can see here
we've got not got any blue metal, which is good. I'm also looking as
you can see here, we've got roof shot one and we've got a lot
of materials in here. I just don't want to double
up any of these materials. That's the thing
I'm worried about. So what I'm going to do
is I'm going to bring in, I'm going to test this actually. So let's see if we
bring in a black metal. So I'm just going to bring
in black metal like so. And now we can see that we should only have
one black metal. So let's have a look. Yeah, and black metals come in and that's fine. That's
what I wanted. I don't want it
to be black metal one or something and end up with thousands of
materials in here. I do want it to, you
know, be cohesive. All right, so let's instead
of the black metal, we'll bring in the blue metal. So this one here, blue metal.
Let's bring that one in. Drop that on there. Let's also bring it into our table.
Drop that on there. Let's click the plus button. And what we're going to do
now is go over to glass. And the one we want
is this glass here. So this beautiful glass
here. Let's drop that on. And then we're going to
come to the center of this. So these two center parts. We're going to click a sign. Wait a minute, where's
the metal gone? Oh, I put it on the wrong
one. Let's go to the table. Let's click the plus, dropping
the metal and there we go. All right, let's click a sign. And there we go. Now let's have a quick look at
the Renderview of that. It should look really
nice. There we go. We can actually see
in there as well. That's looking really good. Last of all though,
what we need to do is of course unwrap these. So the moment I click a smart
UV project, click okay. You'll see now that it
looks so much better. It's got some edging on
there and everything. The glass looks bare and
it just looks really nice. Now let's come to
this one, same thing. Smart UV click, okay.
And there we go. Now they are looking
really good. All right, so that's good. Let's go back now to modeling. And then what we'll
do is we'll just put these in over here for now. So we're just going
to drop these where someone's going to sit. So let's bring them over here. Let's also change where our actual orientation is coming from with a little sideways V. Let's put it on
individual origins. That then is going to
make it much easier. Now let's, we're
going to have the a little bit away from the walls
or something around there. Let's build out this bit here, this bit coming over here. So what I'm going to do is
I'm going to grab a plane. First, I'll press Shift. Let's bring in a plane. Now the thing is
we want the plane to come into the center here. I'm going to grab this
shift S. Kirsta selected. Let's bring in a plane. Let's press S and bring it out. And what I want to do now is work out the scaling of this. So we can see that
the wall should be, if I pull this this way, it should be coming
round about here. So it should be coming
from kind of here. So kind of here. A little
bit further in maybe. So S and X pull it a
little bit further in because we are
going to have a top for our wall as well. And let's put it down to where it's going
to come down to. If I press one, I can
see I want it really, really just just below
that ground plane. So just below that
red line there. And then from there,
what I can do is now I can press Tab. And I also want a
center point in here, so if I press control, left click, right click. And then what I want to
do is level this out now. So I want to turn my guy round, so R Z -90 And I want him to be able
to walk through here. So you can see
walking through here, how big do we need it? We probably, if we come
back to this press control, scroll it down,
so it's just one. And I'm thinking probably the size of the
actual steps here. Probably something like
that, I think is fine. And then from there,
what we can do is we can now come into
the back off here. So I need the back off here
like so all three of these. And pull them all the way back, just so they're actually
in that point there. From here, what
we're going to do is use this for our
wall. Shift select. Shift select, shift select. And then all I'm going to
do is press shift Enter. Don't do anything else, so
you've just duplicated it, and then E and Z and just pull it up to
where you actually want it. I'm thinking something like
that will be the wall. And then on top of there we can have the little
part that comes on. Now, I'm going to do, now
I've got that. It's press L. Delete that other way with delete vertices and you should be left with
something like this. Now from here what you can do is press control A all
transforms right click, set origin to geometry, add in a solidify and let's
put even thickness on. Pull it out then. And you can see now why we did it that way, because now we also have control over the thickness
of the actual wall. In other words, I can
actually pull this back to here wherever I want, my wall, increase my
thickness. There we go. Now you can see that's why
we did that as well as that. What we can also do now is
put the top on this wall. So how I'm going
to do that is I'm just going to turn the
little computer off. And then what I'm going to do is I'm going to bring this up, so I'm going to press Shift,
duplicate it, pull it up. And then what I'm going
to do is press Sens head, pull it down like so. And now I'm going to
have a top for my wall. If I put my little computer on now, we'll see
we've got that. Put the little computer on here and we'll see,
we've got that. Now what I can do is I can increase the thickness of this, come back to this one, increase the thickness. And there we go. We've got the edging now
of the actual wall going round and it's all nice and even and that's
exactly what we want. All right. So I'm
happy with that. What I'm wondering though
is if this is probably, yeah, I think actually we can get away with a post on there. They're just going to
be a little bit thin. I'm just wondering
if I want to make the post on here a
little bit fatter. I think what I'm going
to do is just increase this a little bit and increase
the offset back down. So something around there. And I think now posts can
go on there a bit easier. Then what I'm going to do now, I'm going to actually
copy where it is. If I grab this one, you
can see the offset. No, 0.3 605 copy. Come back to this one,
control V. There we go. Now they're lining
up much better. I think that is
enough to work with actually now we just need
to increase the thickness. If increase the thickness. So I'm just looking here. I think I need to pull this
back still a little bit. So then last of all, we want an edge on here. What I want to do is if
I turn this off again, what I want to do is I
want to come in to each of these and press and X
and just bring them in. So I want to bring them
in on Medium Point and X bring them in a little bit
and now turn it back on. And now they actually
go over there. Last of all, do I
want them so thick? Are they a little bit too
thick? I think they are. All I'm going to do is
press and if I can, so let's press, make
them a little bit thinner and just make sure then they're still
sat on top of the wall. Which they are. There we go. All right, so that is
looking pretty good. Now what we'll do is we'll think about adding in our post
before we do anything else. So what I'll do is I'll press
shift A, bring in a cube. I'm going to save
out my work as well, just so I don't lose
what I've actually done. And then what I'll
do is I'll bring it over here and I'll put it into place so we can see probably going to
fit on top of there, like so something like that. And actually, I think that's
looking pretty good already. Now, let's move it
this way a little bit so we don't need it
exact or anything like that. I think I'll make
it a little bit smaller, pull it into place. Now what we want to do
is measure the height. So the height up here, we could, yeah, let's have
a look at the height. Actually, let's bring
it up a little bit. I think something like
that is a good height. And then we've got enough
room to have 1 bar going across here and 1 bar
a little bit lower down. So let's put a top on this part. So what I'll do to put
a top on it is I'll press E Jaws to extrude it up to the
thickness that I want it. And then what I'll
do is I'll come in with Face Select,
Alt Shift and click, and then Enter AlternS and pull it out to
where I want it. So I think something like that actually is going
to be about right. Make sure offset even is on. And then finally what we can
do is we can pull this up. So if I grab the middle, I can pull it up like so. And I'm thinking that's
looking about right. One thing, I think it's a little bit too thick
at the moment, so what I'm going to
do is I'm just going to shrink it down to like there, pull it up a little bit
and then come to the, underneath, grab the bottom
and just pull it into place. And I think actually pull it over just to where the start
of this wall is down here. That is looking a
little bit bad. And I think that's the
right height as well. All right, from there then, I'm going to bring
it over to here. So if I press shift,
bring it over, Put it into the center
or go over the top. We can see it needs
to be in the center. So run about there. There we go. All right, so on the next
one then what we'll do is we'll get the fence, the metal fence done. We'll get that into place, and then we'll
actually have a look at what this is
going to look like. But I think it's really, really starting to come along now, especially when we
turn on our render and you'll see it's
near enough done. All right everyone. So I
hope you enjoyed that. I hope you're really learning a lot and finding new ways
to actually do things because we're using pretty much professional modeling
techniques here to do things. Cutting out a lot of the hassle that you
might going to have, and really, really optimizing the way that we
build structures. All right everyone, I
hope you enjoyed that. See on the next
one. Thanks a lot.
50. Adding Victorian Fence Posts to Cafe Scenes: Welcome back everyone
to Blender for the Environment Artists Guide. And this is where we left off. Now I want to get the
center of this point. So what I'm going to do is I'm, that's not quite the center. So what I'll do is I'll actually come to these two
posts or this post, we'll use this post
shift to selected. And then we can make our
actual fence from this. So if I press shift now
I can bring in a cube. And then from there
I can make my cube smaller and put it into
the place where I want it. So let's move it along. Let's put it down here. And the first thing
I want to do is I want to make my cube
a little bit bigger, so it's looking as
though it's actually going and being held
into something. And's let's pull it down
into place from there. Then what I can
do is I can bring it in, grab the top of it. Let's press the button. Bring it in slightly.
Let's press E. And then from there we can press so, all right, from that then
we can press I once more. Bring it in, and then we can go all the way to the top
now to where you want it. So let's bring it all
the way up like so. And now let's bring it out. So we're going to press to bring it out and
then to the top. And then, and let's have
a point on it like so. And you can see already that
is looking pretty nice. Now, I would say try and get your little spiky bit
like level with this. So if you press
control plus control, plus you will have selected it going all the way down there. From there, then
you can press one. And what you can do
then is just bring it up kind of level with
the bottom of here. All right, so now what I want
to do is we want to bring in a piece that's going to go across
here to the other end. So all I'm going to
do, I think I'll press control along here. Scroll it up once, twice, left click, right click. And then all I'm going to do, I think is move this one up. So I'll press control.
Move this one up to here. And then I think I'll
leave this one down here. Then what I'm going to do is I'm going to grab both of these. Soul shift click, Lt shift
click and press control B, bring those out like so. And then enter alternates
and pull those out, giving us a kind of
thing like this. And then from there
what we can do is we can come to offset even on. So now what we can do is we
can come to the first one. I'm coming in base Alt shift and click shift S and
cursor selected. And then I can
press Tab shift A, bring in another cube. Make the cube much,
much smaller, just so it goes past that point. And then what I can
do is I can put it to this side before operating this side just to make
things a little easier. And I'll show you why that is. I'm also going to
come and get rid of this front and this
bag delete basis. Now I can, I can
put this in place. L put it in place and then
come to this part here. If it comes to edges, old shift click and now we're going to do is just pull it
all the way over. And the reason I did
that, by the way, is because now I have control of how thick I want this to be. In other words, if I want
to make this thinner, I can come in with Alt Shift and click or just select
it all alters. And now you can see I can scale
it really, really easily. Not that I need to scale it. I think it's actually a little
bit too thick actually. So I'm just going to scale it
back a little bit like so. And you can see just
how easy that was. Now we've got rid
of the two ends, because we don't
have to go in here clicking on the ends
and things like that. And now what I want to do
is I want to copy this. So I'm just going to press shift once of Great,
All selected. And bring it down and just
drop it into place like so. All right, is that in
the right place or do I need to bring it
down a little bit? Nope, it looks about right. So now what I can do is I can
come in to this part here, control or transforms rightly
set origin to geometry, add in a modifier, and the one I want to
bring in is an array. And then all I'm going
to do is move it down. Click it up a few times and see where
it actually takes us. How many do we need in? I think
that's way, way too many. Actually, what
I'll do is turn it down and then move
it up a little bit. Hold in the shift button to
where we actually want it. And I think something like that actually looks pretty nice. All right, so now
we've got that. What we can do is now we
can grab both of these. We can press Shift
D, enter R, z 90. Spin it around seven
to go over the top. And then all I'm going to do
is bring it into the center, so roughly the center
of here. Pull it over. And then just make sure
that that is in the wall, which it is now, because I've got Ray on, I can actually mess
around with these. I can pull them out if I
want to, or spread them out. But first of all,
obviously we need to make these bits a
little bit bigger. So what I'm going to do then,
I'm going to press and Y, and you'll see the
pull from here, which is really handy because
the origin is from here. And Y pull them
over into my wall. And now with this,
if I press three, do I want them a little
bit closer to the wall? Well, I've got that option now. I can actually use this and pull them a little bit like so. Double tap, the and there we go. All right. Really,
really nicely done. That really, really easy to do. So now let's actually come in and bring in some materials. So what we'll do is we can see that we've got
bricks on here, we've got our blue
metal on here, and we've got our
stone on here as well. So I think this one here, if I come to material, it's going to be stone flags. So let's come in
and first of all, we'll add in stone flags. So what I'll do is I'll
come in and look for stone and we want
stone flags like so. And then what I'm going
to do is we're going to put this on material
mode just for now. Let it load up and then
we'll actually unwrap this. Oh, there we go. Let's come in, then grab it all. Smart UV Project. Click Okay. So there's our stone.
Let's actually join these two up as well, because it will make it easier. So if I join both of
these with control J, join them both up, and now I can unwrap them all
at the same time. Whoops, let's not do that. Let's just grab both of
these smart UV project. Click Okay. So that's just for the stone. Now
we've done that. Now what I want to do is
come to the actual bricks. Now the bricks are going to be a little bit more of a problem. So what I want to
do is I want to first of all want
to press shift H, and I want to make sure that
I've got no bottoms on here. So I'm going to delete the
bottom. Delete and faces. And now it's going to be much
easier if we add in a seam. So what I'm going to do is I'm
going to put one seam here and one seam probably here. Right click and mark a seam. And then what I'm
also going to do is I'm going to come to the top. So old shift click should
go all the way around. Olshft, click right click, mark a seam from here. Then what I'm going to
do is now I'm going to come in with L and L, I'm going to click
unwrap, like so. Now what's happened there is
because we've marked seams, now we can see it's
unwrapped really nicely. If we go to our UV editing, you'll see just how
nicely they've unwrapped, and now it's time to make sure that they're the
right scale for bricks. So in other words, let's press Oltge. Bring back everything. What we want to do is we
want to get it to be round about this scale or something
that looks about right? So what I'm going to do
is now I'm going to click the plus down arrow brick. And then what we'll
do is we'll grab both of these and click a sign. Now we can see they're going the wrong way. They're way too big. So what we're going
to do now over to the UV map are 90 and then get them to
be the right size. Let's have a look. Something
like this looks pretty nice. I think that's going
to be a good size. Let's press tab. Yeah, I think that's going to be
a good size for them. So all I'll do then from
there is I want to line these up to make sure the
grout is where it's said. So underneath here
and at the bottom. So to do that we're just
going to press and y and pull them up and get that
grout to be in the right way. I'm going to pull it up a little bit higher and then I'm going to press and Y and holding
the shift born on jaws, going to put them or
click them into place. The most important one here is probably going
to be the bottom. So if I now can bring it down, so S and y, let's pull it up. So now you can see that
part is pulled up. And I think this part under here needs to go a little
bit higher if we can. Can we actually move them up? Let's move it up to think. We're going to have to
make them a little bit, a little bit longer. S and Y, bring it down
to there. All right? Perfect. Now you can see they're lining up absolutely Perfect. Same on this one,
lining up, perfect. Okay, so now we've got that. Let's come in then and do our metal so we can
come in to these two. They're not mirrored or
anything, so these two here. And what I can do is I
can press control J. Join them all up. Press
control all transforms, right click that
origin to geometry. And now I can actually press
a unwrap. Unwrap them. And then what I can do is I
can just grab this chair, press control L, and
link materials like so. All right, let's actually
have a look at those. I haven't wrapped properly. Have a look at them. A. Yeah. For some reason I
click the wrap. Not smart UV project.
There we go. That looks better.
Al right, perfect. Now let's come into
these parts then. What I'll do is I want to
apply my actual array. And the reason is I want
these to look different. If I don't apply it, they're all going to look exactly the same. So all I'll do is
grab both of them. Come to object, convert to
mesh. Join them both up. Control J, press the tab, press A also, let's reset
all the transforms as well. Right click the origin geometry. And then what we'll do
is we'll press tab A. Make sure I've grabbed
everything. Smart UV Project. Click okay. And from
there then I can grab this one control
l link materials and there we are.
Jobs a good one. Now let's come to these parts. Now these parts are going to be a little bit different
because these are the actual walls are going to be sat on some
kind of blocks on here. So we do need to create these
a little bit different, so we need to think about
how we're going to do that. And I recommend
probably bringing in edge loops before we
actually apply or solidify. So before we do that though, this bottom one here is
going to be absolutely fine. All we need to do with that
is apply the modifier. So control. And now we need
to come in and unwrap it. Now you can see we
really don't need them and top on here, so all I'm gonna
do is just press shift H. And just
before we finish, we're just going to delete
these tops and bottoms. And we're also going to delete
this one in the inside. So delete faces and you should be left with
something like that. And on the next one then we can actually get
these finished off. All right everyone.
So hope you're enjoying it and I'll
see on the next one. Thanks a lot. Bye bye.
51. Crafting Stone Tiles with Blender for Victorian Walkways: Welcome back if we want to blend for the environment, artists. Beginner's Guide, and this
is where we left off. All right, so now what we
want to do is the brick. So what I'm going to do is I'm going to press Alt H first, and I'm just going
to bring that back. And what I'm going to
do is I'm going to mark a seam just
on this edge here, like, so let's mark a seam
in there. So mark Sam. Then what I'm going to do
is I'm going to press L, and let's try unwrapping that. And then what we'll do
is we'll grab this and these brick posts
and press control L, and we'll link materials. And then finally what we'll
do is we'll come over to our materials and just
take off the stone flags. And what I'm also want to do, I also want to get the same
kind of scale as these. What I'm going to do is I'm
just going to press tab, I'm going to come in then 90. And then what I'm going
to do is I'm going to grab this one and these bricks. And I'm just going to check out the scale you can see here. Now this is the kind
scale that we want. It's a little bit hard to see. Let's grab all of these. First of all, let's
pull them over. And what I tend to do is
at tend to do this by I. But if you can't do
that, just try and get them to be the
same sort of scale. As you can see, that's looking round about the
same scale as these. And that is what I
suggest you do, G, Y, let's pull it down just so it's going to
go into the floor. So, something around there. I think it's going to
be absolutely fine. Now you can see we've got a
little bit of a gap on here. So what I'm going to do
is I'm going to press En's ad and just pull
it out a little bit, just so it's got
rid of that gap. And now let's have a look around here and see what we're
actually working with. And I think that is
looking pretty nice. You can see where they
join, which is here. All of this has come
together really nice. But this sides not
level with this. So I'm going to fix that next. So all I'm going to do is
I'm going to come in with this one and this one in face select. So
this one and this one. And then all I'm
going to do is press and y and just move it up a little bit just so it's
more level as you can see. Now that's looking
tons stones better. And from a distance you
won't even be able to know that they're not
actually the same. All right, so that's
looking really great. Now what I want to do
is I've done that. So now I want to work
on is these parts here. So I'm just going to
press shift H again. And I think the easiest
way to do this is actually to go into modeling. And then from there what we'll
do is we can work on this. So what I'm going to
do is at the moment I'm going to come
over to my modifier, turn off the little,
I call it computer, but it's actually
a monitor I think. And then what we'll do is
we'll add in some edge loops. So I'll also, before doing
that, let's press Saltage. Bring back everything. And now I can see exactly where I
want these edge loops. So what I'm going to do is
going to press control. Bring up my edge loop here, because this then is going to be one kind of one of these slabs. And then what I want
to do is control R, bring it up to
something like here. And then control, let's bring in maybe maybe four
slabs on there, so four along there. And then let's bring
in another one. So control bring it over to
here and then this side, let's even get away with
either three or four. So four in there, left click, right click, drop
those in place. All right, so now we can do
is we can turn this back on. And from there,
what I can do now is I can actually apply that. So control apply that. Let's put it on object mode. And what you should see
now is if a press tab, we've got all of these
placed really nicely. Now you'll also see
that we do have a problem in the corner here. Now this sometimes happens where these have kind of
been out of place. We need to actually fix that. Now if we go over the top, we can see that we kind
of need to move these up. Move these all up over there. So what I'm going to do
is I'm going to come in with Alt shift click. Alt shift click
going around all of this one control control control plus seven to go over the top. And now what I should be able
to do is pull that back. And you can see now if I
pull it back in place, you can see we can
actually line that up perfect against there. And we can see that
we've draw a line going down here as well. And that's exactly what we want. So I think now that is actually
going to work out for us. Now if I pull it
really far over here, you can see there is
actually a join there. And that's the other
problem we've got. So what we actually want
to do as well is we want to join these actual edges here. So we want to join them and then we can have
this block here. All right, I know it
seems a little bit messy, but sometimes this can happen. So what we'll do is
we'll grab this one. And this one, right click, come down and what you can
do is merge sorry at center. And then we can
do the same thing with this one and this one. Now if you can't see the, just go underneath and
you'll be able to see it. So this one and this one,
right click, merge at center. All right, so now
they're merged now we should be able to split
all of these up now. So what I'm going
to do is I'm going to come round to here. Shlift, click, shift, click, and just go down
the male like. So. Then all I'm going to do, I'm going to go down
this one as well. Old shift, click, shift click, shift click, shift click. And then just make sure this
corner which is probably missing has also
got one on shift. Click on there, right
click, mark, seam. All right, so we should
end up with something like this where every seam
is marked like this. And now I want to do
is I just want to go in and make sure if
I select this one, this one, this one for
instance, this one. And this one basically should
be able to split them up. Now if I press Y and then H, I can hide them out the way. And now what we can do is
we can fill in these faces, so you can see, Let's fill
in these faces first. So let's press a,
come over to mesh. And then what we're going
to do is go down to where it says clean
up, fill holes. And there we go,
they're all filled in. Okay, So now let's do the
same with the others. So I'm going to press a alternH, select everything, mesh and
clean up and fill holes. Now what should happen is if I press control all transforms, which you'll get rid of my
mirror and then right click, I actually want to
put it back here. Oh, did we? Actually, yeah,
we applied the mirror. Okay, we applied the mirror. We ain't got to
worry about that. So they're exactly the same. Now, I need to mirror it across the other side.
Again, resolved. So all I'm gonna do
is I'm gonna come in, I'm going to delete that one out of the way, delete votes. And then I've got these left. Now from here where I can do is that I can add a modifier. Let's bring in a bevel, let's put it on naught point
naught three, like so. And then you should end up
with something like this. All right, so now let's
think about ones. I need to move a little bit because at the
moment as you can see, some of them need to be
a little bit smaller, some a little bit bigger. There's not much randomness
to them, is my point. So what I'm going to do is I'm going to come into this one, let's say I'm going to come in and actually grab
it with edge select. Make sure you grab
it with edge select. And then what I'm going
to do is I'm going to press and X and make it
a little bit smaller. And move it up to place like, so let's put it in place. Same with this one
then I'm going to move this one over and
put it in place. And what I'm trying to
do is get them just to be a little bit more
random as you can see. Put that one in place,
let's move this one over. And also, I don't want
any halfway points where these are going
to be sat on S and X. Put it in place like so. And then this one we should be able to make
a little bit bigger. So S and X, let's make this one a little bit bigger like so. All right, now you can see that all of these are
sat on top of them, None are in the halfway points. That's what we don't want. All right, let's
do this one then. So L, S, and Y this time, move it over so and Y, like so. And then what I'll
do with this one is I'll make it a bit bigger, so I'm going to put
it in the middle. And Y, let's make it a
little bit bigger like so. And now they're looking perfectly fine and
they're all randomized. Now the next thing I
want to do is to show you how do we randomize
them even more. So what I can do is I can
come in and grab them all. Come up to mesh. Come over
to where it says Transform. Come down to randomize. And you'll end up with
a mess like this. Now we don't want
to mess like that. What we want to do is
drop down the amount now. So if I click this
down to all the way down to nut 0.1
you'll see we end up with something like that
where they're a bit more uneven and that is what
we're looking for now. Tend to put this on 0.5
just for the first one. And you'll see now
they're slightly, slightly uneven as you can see because we don't
want them too crazy. And then finally what
I want to do is now I'll come into one of
them, let's say this one. And what I'll do is I'll put
my proportional editing on. And I'll come down
and put it on random. And then what I'll do
is I'll press one. And all I'm going to do is just bring this one up
and you'll see if I bring this out all the way
you can see now what it does. It doesn't do it because
we've got connected only one. Now you'll see if I bring
this up that we can actually make these
very, very uneven. Same for this side, then
if I come to this side, I'll come in and I'll pull it
up or down, whichever one. And let's do the same with this one over here
is the last one. Like so. And there we go. Now that's looking
much, much better. All right, so now then we've pretty much got
all of these done. All we need to do now is
bring in our material, of course, and we also need
to mirror on the other side. That's the other
thing we need to do. So first of all, let's
put our material on. We should see this mirrored on the other side.
Which is fine. No, it's not. So now we'll mirror it all over
the other side. A minute. Let's first of all come in, Where is my? Oh yeah. Well, it's not mirrored, it's
actually just put on this. All I'll do is press
L, delete vertices. All right, let's work
on this one then. We'll come to this one first. We'll press, we'll
press Smart UV Project. Click Okay. And the one
we're looking for is the same material as
these parts here. It's all I'm gonna do. Select this one,
select this one. Press control L link materials. And then I'm going to
come back to these ones and I'm just going to minus
off my bricks for now. And finally then let's
come in Smart UV Project. Click Okay. All right,
and there you go. As easy as that. Now, before we put it over the other side, let's just have a quick look at what this is
going to look like. So let's put it on rendered
view. There we go. Looks really, really nice. The one thing I would say is maybe you want to come in and make these a
little bit more spiky. Let's actually do that
before we finish. All I'll do is I'll
just come in and grab each of the tops of these. Now easy way to do
that is you can just press one, put wire frame on. And then all you want
to do is just B and just go down to the
top of them like so. And then what we
can do is we can put it back onto object mode. And from here then make sure that you're on
individual origins, press the S, but without
proportional editing on. And then you should be
able to bring them in and make them a little
bit more spiky. All right, one final test then let's have a look at
what that looks like. And there we go. Now you can see they look so much better. Let's do them out a
little bit as well. See what the whole
thing looks like, and it's really, really
starting to come together. If you want to have a
better view as well, just turn off these two
interlocking circles. And there you go. And you should be very
proud if you've got to this point here looks
anything like this. Now, we just need
to make sure we do the top of the building. And then pretty much you're going to mirror this over there and it's pretty much
done. All right everyone. So let's say that our work, I'll put it onto object mode, ready for the next lesson, and I'll see on the next one. Thanks lot. Bye bye.
52. Texturing Techniques for Victorian Fencing: Welcome back. You
want to blender for the Environment
Artists Guide, and this is where we left off. All right, then what
I'm going to do is put my interlocking links on. And then what we'll do is
we'll actually come in and we will put these tables
and chairs out first. So what I'm going to
do, I'm going to grab this table, sorry, this chair, press shift D, move it
over, spin it round, so R 180 and then R and Z. And just turn it around and
put it into place like that. And then what I'll
do is I'll bring all three of these over, press shift D, just
drop them over here. Let's move them
out a little bit. So I'm going to move
more out a little bit. Move this one back and Z. And then move this one
to the side as well. And make them all look a little bit
different from each other. Let's pull that one out
a little bit as well. Okay, so now what we want
to do is you want to grab this step on here,
shift as selected. And what we really want to do now is join all of
these together, but without applying everything. So we don't really
want to apply. Bevels are okay, it's any array. So I'm just looking now if
I've got any array on or anything like that and actually
it doesn't look right. One thing though, I have missed. I've got a bevel on here. No bevels on here. So what
I'm going to do is I'm just going to grab
all of these parts. So all of these and
the inside like, so I'm going to press control G, then control or transforms. And then right click, set origin to three
decursor over here. And finally then add in a bevel, let's put it on naught
point naught naught three like so. And there we go. Now let's have a quick look
at that before finishing. And we should have a bevel going on here for double tap, the A. So I'm looking for
my bevel along here. And that's looking
just about perfect. I just want to see if
it's on there. Yes it is. That's looking really nice. All right, so lastly then
we want to also grab this. These. Then what I want to
do is I want to right click and set origin 23d cursor. Now I'm going to do,
let's do this part first. So we're going to add in a
modifier and go to mirror, that's going to mirror over
the other side, like so. Just making sure everything's
fitting in there. And finally then this one
add modifier, a mirror. Put that over the
other side as well. Now from here what I want to do is I want to
apply my mirrors. So control A, come
to this one as well. Control. And then for this one then what I want
to do is I want to come in. So let's come to this
one. This part first. So these first and
all I'm going to do, you can see that they're
all joined together. Sometimes that happens, it's
annoying how you can't have anything where it
doesn't actually have them all selected or
joins them together. For instance, I don't want to join them
together all the time. It would make it easy
if we didn't have that. So what I'm going to
do is I'm just going to come into these like, so all I'm going to do with these ones is
go over to my UV map, make sure materials is on, and we're just
going to slide them over just to make them
different from these ones. In other words, if
I grab the press a slide them over like so. Now they're going
to look different from these. Same
with the bricks. Then let's hide these out
the way we'll come to our bricks and what
I'm going to do is just select all of my bricks. So then all I'm going to do now, we'll grab, I think, yeah, let's have a look
at which ones we need. Unfortunately, we'll have
to do them separate. I'll grab these two first, and all I'm going to
do is press A and Y, not Y and X and X, and move them over, and then they'll make them look
different to these ones. Then what we're going to do is come down to the bottom one. And we're going to press
exactly the same thing, so and X. Let's see if we can move
those over like so. And there we go, alternate
bring back everything. Now the one thing we don't
need to do is mess around, you know, with the fence
or anything like that. No one's going to
see the little tiny details look the
same over there. We just want to move around
the other things, all right. All good there, I'm
thinking as well. Let's do the tops off
here while we're here. So we'll just come in L and L, and then move them over. And there we go, We're
just about done. Okay, Back over
then to modeling. And the last thing then, not actually the
last thing we have one more thing to do after the rooftop and
that is the sign. We're going to leave the sign to less last because that is actually the most fun
part of the built. So what we'll do now is just create this bit that's
going to go along here. So I'm going to come in
and I'm going to grab, I think also we can see
here, I did forget on this. We have a bevel, but we
need to shade auto smooth. Same on this one.
Shade auto smooth. What I'm going to do is I'm
going to grab both of these. I'm going to press Shift S, curs selected, and then I'm
going to bring in a cube. So bring in a cube, let's
bring it up, put it on top. And then what I'm going to
do is I'm going to work out if that's actually too
big, which I think it is. So we'll press S and then
we'll press S and's head. And then what we'll
do is we'll press and X and we'll bring it
all the way to the end. So all the way to
the end of here. So I don't really want
it poking in there. I would assume it's
just sat away from it. So S and X old the
shift be like. So and then what I'm
going to do is I'm going to extrude it out. So
I'm going to come in. With face select,
grab this face, press the button, pull it up. So then what I'm going to do is I'm going to reset
the transformations. So control R all
transformations. And then what we're going to
do is Alt shift and click. So we're just going to grab this part round and we're going to press to extrude Enter,
and then alternates. And then we can pull that out. I'm thinking that I'll
probably pull it out that width arm on
the top of here, Maybe that's too wide, so alternS bring it back in
a little bit like so. And then what I'm going
to do is I'm going to come and grab these two ends. I'm going to press and
X and pull those out. If they're not pulling
out, make sure medium point is on
and X pull them out. Now from here, what
I'm going to do is I'm going to bring them up now. So I'm going to grab this one. This one. This one. This one and this one. So all of it basically, I'm going to pull
them up like so. And then from there
what I'm going to do is just bring them in now and y bring it in like so. And there we go,
something like that. I think it's looking
really nice Now finally, let's just put a top on here. Real simple top,
all do is shift a, bring in a cube, bring it
up, bring it to the end. And then we'll put
it on this end here. So I'm going to press S
and's Ed, bring it down. Put it in place. Do I need it to be a little bit smaller?
I don't actually think so. I think that looks I'll make it a little bit smaller,
something like that. Let's put it in
place and then what we'll do is now
we'll bring it out. So I'm going to press,
grab the top of it, Enter, bring it out. And then E, bring it up into
place. Something like that. And then finally, let's
bevel off these edges. So this edge and this edge press control and bevel it off. Now you can see they're not
beveling off correctly. And that's just
because I need to reset all my transforms. Try that again, and there we go. Let's bring in more bevels. So I've brought in three. Maybe we'll put it on a
few more, so maybe five. And the reason is for that
I want it to shade auto, smooth off nicely.
And there we go. There is the top of that.
That was really easy to do. So now what we can do is
we can grab all of these. Press control J, join
them all together. Control all transforms,
right click, set, origins, geometry.
Join it up with this one. Then pressing control L, link materials and control L. And we'll also copy modifiers. Now let's go over
to our materials panel and what we'll do is, well, material shader,
we'll come to this one, then we'll grab it all. We'll press Smart UV Project. Click Okay. And there we go. There is our building. Now all we need to do is put it on the actual sign or
the coffee shop sign. It could be could, once I've showed you
how to do a sign, it could be any sign really that you want
to put on there. It could be a restaurant sign. It could be a
tavern. I don't know what you want it to
be, where you can see. Now this is what
it's looking like. So on the next lesson,
what we're going to do is we're going to build
out our signpost. And then after that,
the next lessons will basically be dedicated to rendering cycles EV and
camera and turntables, just in case you want to set
up a camera and turntable. Now once we've been
through those lessons, what we'll do is we'll
go through and set up a compositor in our own
scene. So in my own scene. And then from there what we
can do is we can render it out and then we'll restart
on the other buildings. It's just so we have a nice base to start from when we
start rendering this out. And not only that,
you might want to render out your
building, you know, and give you that bit
of push to carry on with the scene and build out
the rest of the buildings. All right everyone. So I hope
you really enjoyed that. I hope you've enjoyed it so far. And the next couple of lessons, we should have this
cafe actually finished. Alright, thanks a lot. Bye bye.
53. Dynamic Subdivision for Creating Cafe Signs: Welcome everyone to Blender for the Environment
Artists Guide. And this is where we left off. So first of all, let's come in and put this
on Material Mode. And from there,
what we'll do is we can bring, where is my cursor? My cursor is all
the way up there. Let's just shift right
click and put it here. And then what I can do is
I compress shift date and we're going to bring
in a cylinder. Now to start with this, then there's going to be
pretty heavy duty, but let's put it on
something like 16. And I know it seems a bit
low for what we're doing, but you will see there's method
to madness because we're actually going to
be subdividing this with a modifier just to
show you how to use that. So what I'm going to do is
I'm going to press R Y 90. I'm going to press the S button. And then what I'm going to
do is I'm going to bring it in and X bring it in. And finally then
I'm going to press S and's Ed and squish it down. So something like this is kind
of what we're looking for. And I think at the moment it's probably still a
little bit wide. So SX, bring it in a little
bit more and then what I'm going to do is I'm just
going to put it around here. So it's going to go,
if I put it in here, that's roughly the height. It's going to go
somewhere around there. And then it's probably
going to go this far out. Now you can see just how
big it's going to be. Is that too small or too big? I would say it's
probably needs to be a little, tiny bit bigger. Something like that, I
think is absolutely fine. Okay. Next of all then what
we want to do is we want to come in and bring in a insert. So what I'm going to do is
I'm going to grab this and press to bring in
an insert like so. Then what I'm going to do
is I'm going to now reset my transformation control A
all transforms right click, Let's set origin to geometry. And finally then let's
bring this back. So I'm going to press to
bring it back like so. Then what we're going
to do is we're going to come round to each of these. So I'm going to press Old
shift click on each of these, what I'm going to
do is press the eye button and bring them in, holding the shift button like so finally then what
I'm going to do is I'm going to
extrude these out. So if I press now, I can extrude them out like so. Now let's reset all
the transforms again. Right click the origins
geometry and let's come in and add in a subdivision
surface modifier. And you'll see once
we bring that in, this is what actually happens. Now you can see at the moment it looks a little bit of a mess. And this always happens
when you first bring in your subdivision
surface modifier. But what it actually
does is if I press Tab, you won't be able
to see anything. But if I think put
it on wire frame, you should be able to see
what it's actually done. So what it's done is it's kind
of subdivided or mess up. If I increase this again to two, you can see has it
actually done that. Yes, it does. It does show that. So that's good. It
just increases. Now, the subdivisions, now you can't see the
subdivisions in there. If though I come over
and put this back on, you should be able to see what the actual topology of the
mesh actually looks like. You can also see if
I turn this down, that's what it's
going to look like. So what I'm going to do is I'm
going to turn it onto two. There's also one other
thing you need to know. If you put this on simple, it will subdivide it
without actually, you know, bending
the actual mesh and trying to round
everything off. So let's put it
onto that though, because that's what
we actually want. And then what I'm going
to do now is thinking the easiest way to do this is probably to remake
these parts again. So what I'm going to do is
I'm just going to come in, I've got them already selected, so all I'm going to do is I'm going to press control plus. And then what I'm
going to do is I'm going to delete faces. That then should leave
me those gaps in there. Now I want to select
all of these faces. Now going around there, I might do it a
different way instead. Instead of doing that, I'm just thinking what
we'll do is we'll pull them all the way back to nearly where
they actually start. So you can see where
they actually come out. Pull them all the
way back to there. And then what you're
going to do is you're gonna pull them out. So pull them out so far and then press again and you'll pull them out a
little bit further. And now you'll see
they come out much, much more solid and much more the way we
want them as well. We need to fix the
sides going around, so I'm going to press
Control left click. Bring it out. And you
can see now we've got a nice nice straight
rounded edge. Controlar, bring this one out, then to over here, and a nice nice straight
rounded edge on there. As you can see, let's right
click and shade auto, smooth. And now we can see
just what we've got. It's really, really
coming together now. Now I'm going to
do is the inside. So all I'm going to do
is control bring in an edge loop going all the way around here as you can see. Pull it out nearly to the
edges, you can see like. So I'm just going to now turn off my little monitor and what I'm going
to do is I'm going to press control Er again. And bring it all the way
down to here like so. And now if I turn
it on, you can see that's what we've
done and there we go. That is looking really nice now. I think I'm happy with
how far that's gone back. The one thing I want to do is just bring in this part here. So what I'm going to do is,
or we can actually pull it out a little bit and make it a little bit rounded
on the back. I think that's going
to be the best way. So what I'm going to do
is I'm going to press the Born to bring it in like so. And then what I'm going
to do is I just want to make sure that none of
these are crossing over. So let's not cross those over. Let's pull it out then, like so. And there we go. It's nice, rounded off at the back. And I think that looks
really, really cool. Okay, so now what we need to
think of is the coffee mug. So what I'm going
to do for that, I'll press shift S
Ursa selected shift, and what we'll bring in this
time is a UV sphere like so. And I just want to
take half of this and use that from my
bottom of my coffee mug. So what I'm going to do
is I'm going to come in, I'm going to, I think
I'll go over the top. I'll press the Z button to bring in my wire frame like so. And then I'm just going to
select one of the faces. And then I'm going
to press B and select all of the faces
up to that point. You should just be able to see them going up to that point. And also then I'm going to
come in, select, select those. And those right click
Delete and Faces, and we should be left
with something like that. Now that is two
coffee mugs really. So what I want to do now is just delete one of these lines. So I'm going to come in with
face, select all shift, and click the faces, select the top face
and the le vertices, and that's what we
should end up with. That's looking pretty cool. Now let's come in and make
this a little bit smaller. So a long going to do is press S. Let's bring it in
to where we want it. Let's also press and
X and squish it in. And now let's make this
into an actual coffee mug. So I'm going to bring it in. First of all, I'll put a
nice round band on it, so right click,
shade, auto, smooth. Let's first of all, yeah, let's first of all
give it some actual depth. So all I'm going to
do is I'm going to press control or
transforms, right click, set origin to geometry, add modifier,
generate, solidify. And yeah, I think that
should be enough. Maybe a add more so maybe
something like that. Alright, let's apply
that straight away with even thickness on then let's come in and make a
little band around here. So all I'm going to do is a
Shift and click control B. Turn these down,
these segments down. And then already select
and press Enter AlternS, bring it out a
little bit like so. And there we go.
That's that part done. We want to actually have
some liquid in there. What I'll do is I'll press
control going around here. And then all I'm
going to do now, I'm actually going
to isolate this out just to make it a
little bit easier for me. So shift H and then I can come in and I can see I can
join this and this. I'm going to grab all
the way from here. Control select, Control select, press the button
and fill that in. And there we go. Now let's make these little things
that come up here. So all I'm going to do is
shift, bring in a cube, press the button
press and X and Y. Let's put one there.
Work out where they're going to go so I can bring everything back now with ol tag. Let's pull it up to here. Something round about there. Let's bring in some edge loops. Six edge loops. Then what I'll do is I'll route,
bring this over. So I'm going to turn this
on, let's put it on smooth, press one or three
on the number pad. Let's bring it all the way
in like, so there we go. Now we need three of these, so I'm going to press
Shift D12 shifty. And three, there's that. Then finally what
we want to do is we want a little bit
of a handle here. And I think that then
I'll finish this off. A little bit of handle,
let's just bring in a curve. So we'll bring in a path. And then I'll just
spin this round 90, make it much smaller.
Let's put it in place. So all I'm going to do is I'm just going to rotate it round by 90 x 90. Let's put it there from here. Then I can either make
it a square handle, which I think will maybe fit better with the, with the sign. Or we can come in and
make it Where is it? Depth. Depth. We can
make it a round one. Let's try the round one first. So let's see how
that's going to go in. So all I'm going to
do is just grab this. I've still got proportional
editing on, as you can see, you might be able
to get away with having that on or I
might be able to. Let's put it in
to place like so. Let's bring this one round in. Let's bring it down,
let's bring it up and let's pull this
one out a little bit. All right, that's looking good. Let's turn proportional
editing off. And then what I can do is bring this right where I want it, which will be round about there. Let's pull this out,
pull it up a little bit. There we go. That is
looking really nice. I don't think I'm going
to make it square. I could turn down the radius all the way down. Turn
it up a little bit. A double tap, the
but I honestly think that's looking good
enough as it is now. We've got a little
bit of practice there with our curves as well. And what we're going to do
on the next one is actually create some ornate features
on the top of the hear, which are going to make it
really, really stand out. All right. So I'm
happy with that. Let's save out our work. And then on the next one
what we'll do is we'll get this ornate feature and the curves on there
and things like that. All right everyone. So
hope you enjoyed that. I'll see on the next one.
Thanks a lot. Bye bye.
54. Crafting Sign Supports with Curve Draw in Blender: Welcome back everyone
to Blend The Fall, The Environment Artists Guide, And this is where we left off. All right, now we've got
this, we're happy with this. I don't think we need to
do anything else with it. One thing I'm just wondering whether now I think
we'll leave you lather. I don't think we'll mark
any seems or anything. So what we'll do
is we'll just box select it all,
come up to object. And what we're gonna
do is we're going to convert to mesh like so. And now what we can
do is we can press control J and join
it altogether. And finally, right click, shade, auto, smooth.
And there we go. Now because we've
done that, we can move this around to
wherever we want it. So I think I'm going
to bring it in just a little bit
like so now let's think about this ornate piece that's going to be
going on top of here. So what I'll do is it's
going to be made of metal. That's the first
thing to decide, because from there you
can actually decide what sort of shape it's
actually going to be. So let's first of all
bring in a piece of metal. So I'm going to press
shift and bring in a cube. And then what I'll
do is I'll make my cube much, much smaller. And I'll bring it in
and it's going to be at the top of
here, basically. So it's going to be at
the top of here, like so. Now, best of all, I might as
well come in to this part. Grab the center of
here, press shift S, cursor selected back to my cube, then shift S, and this
time selection to cursor. And then why can is from
there can bring you essensed, make it the size that I want. It, it's going to have to be pretty robust because
it is, after all, carrying a sign for many, many years, we do need to
take that into account. Now I'm going to do is
grab this part here. Pull it out to
wherever I want it. And then I'm just
going to think, make it a little tiny
bit thicker like so now I'll come in and
just bevel off these edges. Now again, before
you use the bevel, it's always important to
really reset your transforms. And then you should be able
to come in and bevel it off, round it off like so. And there we go, right
click, shade, auto, smooth, and there is
our bevel on there. Now we do have the option of
pulling this out if needed, I think let's try and
line it up first. So we're going to, I think
we'll probably bring in the chain first because
then we'll have an idea of where we
want to put this. So let's do that now before
we do anything else. So what we'll do is
we'll come over to our asset manager and what I'm going to
do is I'm going to come in and bring in my chain. So I'm just going
to put these up, come to my geometry node, and this is the one that
I'm going to bring in. So I'm just going
to drop it here. It doesn't really matter
where you drop it. Let's then go back to modeling. Now what I can do is come out
and I can reset my chain. First of all, in
fact, you know what? I'm not going to reset my chain. What I'm going to do is
I'm going to bring in a curve, curve path. Because I do know that
if I bring in a path, it's going to make it
way, way easier or Y 90. Delete my chain,
I don't need that anymore. Come to my curve. And then what I want
to do is now go in and add in a geometry node, a little spanner, add
modifier geometry node. And the one we want is
going to be the chain. So this one here, click it on, and you will end up with
something like this. Now let's, first of all, before we do anything for reset all the transforms, right click, set origin geometry and then
the next thing we want to do is of course make it smaller. We don't need so many of these. I'm going to just get rid of
let's say three of these. Select three of these
delete vertices. And we should end up with
something like this from here. Then we can actually use this to create more chain if needed. Now what I'm going to
do is I'm going to reset the origin
origin geometry. And let's put it into
place roughly where we want, somewhere around there. You can see at the moment it's still a little bit
too big this chain. But before I do that, I want to show you the options now
on the right hand side, you can see at the moment
the resolution is three. This just decides how much
resolution is going around it. If I turn this up, you'll see it now becomes much more rounded. The next one then is the
chain link distance. If we want these closer together or further
apart, we can do that. But we have to remember
that we just need to change the chain stretch to make
them all fit together. And I think something like
that is going to look bare, because I feel like it just
resonates a little bit bare with the actual scene or the coffee shop we're
trying to do from there. Then I'm going to Melvis to make these a little bit smaller, so I'm going to
bring them in, make them a little bit
smaller like so. And I'm also as well going to change the thickness
of the chain. So here we can see we've
also got chain radius, so we can change that
to make them bigger. Or we've got chain not chain
radius, chain thickness, we can make them a little bit
more chunky and from there then we can change this
stretch even more like so. Okay, so they look about right. I'm still thinking maybe, maybe they're a little
bit too big still. What I'm going to do now
is rotate it around. So ours edge 90, put it into place
where I want it. What I want to do is put
it like the halfway point, so I want it around there. And what I also want to do is come right to the outside
because I want to make sure that it
looks as though it's actually being hung properly. And from there then, what
I'm going to do now is I'm going to press three
on the number pad, and then I'm going
to come in and I'm going to grab this top one. So just this top one I'm
going to press and Z. And what I can do
is I can actually pop it onto the next one. So you can see there ping. And there we go perfectly now, one this way and
one going this way. We don't want this chain
to be going the other way, but you can see just how
easily that is to use. That is why we use
geometry nodes. It just makes
everything much easier. It's obviously non destructive
as well on top of that. And you can see
nondestructive workflows is definitely the way that
we should be working. All right, let's press shift D, and then what we'll do is we'll bring it over to this side. And I'm just going to
look at this one and this one and place my chain
roundabout in the same place. It doesn't need to be perfect, but I think I can
move it a little bit over and now it's
about in the middle. All right, from there
then we need to decide, double tap the is that
where you want your chain? Is this coming out enough? Are you happy with that? Do you want to move this
back a little bit? I think looking at this, we should move this all
back just a little bit. So just a little
bit this way like, so double tap the
and there we go. All right, so now we've
got everything in place. We can do our supports in a bit. But the main thing is
now we want to bring in another ornate piece. So what I'm going to do is I'm going to first of all
bring in a bezier curve. So I'm going to press
shift a curve bezier. Now we can actually use this, and I'll show you how to
use this now if I press R z 90 and then Y 90, and we can put it like
that to start with, I think that will
be the best way. And then what we'll do is we're going to come in and actually
delete this as well. So I'm just going to put it
like that just to show you. Now if I come in, I can
actually move this around. I can use the little handles, especially if I press three. So I'm in this view, I
can move them around, I can shorten them up. And it's just a real joy to work with something like this
because you can really, really get some nice ornate
things going on in there. But there is a better way of
using this if I press Tab. And what I'm going to do,
bring in a plane shift, Let's bring in a plane, let's spin it around, so R Y 90. Let's press the S button. And then what we'll
do now is we'll just set this into place. All I'm going to do now
is just basically try and make something that's ornate and it's going to fit or sign, and it's also going to
fit around these parts. I'm going to come back
to my Bezier curve, press the tab, press A and
then press delete vertices. Now you will notice it's disappeared over on the
right hand side though. The Bezier curve is still there. And what we can do now,
because we've done that, is if we press three to
go straight on view, we can actually come
out now and draw in, there's your curves like so. So it makes it
really, really easy. Just make sure that
you have surface on. So make sure surface is
on. Then delete it again. So delete vertices.
And now what it'll do, it'll actually draw on top of our actual surface of our plane, which is exactly what we want. Now what I'm going
to do is I'm just going to delete that
out the way again. So delete vertices, press three. And what I'm going
to do now is try and draw something in that's
going to look really nice. So I'm going to start from here, draw it going around here. And don't worry if
it's not perfect, it doesn't need to be perfect. And then come down to here
and follow this around. And then at the end,
let's lift it up, and then let's curve it
in something like that. All right, so now we've got something roughly that we
can actually work with. We can actually come in now and delete our plane.
Delete your plane out. The way you can see here
is a little bit of a mess. Sometimes this happens. And what we're going to
do is we're just going to come in before we do anything else and just delete though. So we're going to
delete vertices so and then more
going to come in. I'm going to press shift
H and all I want to do is just make sure
that this is straight. You can see at the moment
it's very, very unstraight. I'm going to delete this one. This one and this one. Press delete vertices.
And there we go. Now it's straightened it up. And from there then
we can also come in and add in more subdivisions. So subdivide and subdivide.
And there we go. Now you can see that
it's perfectly straight, and we can see that we just need to pull it out over there. Now from here, what I want to
do is I want to come over. I want to, first of all,
bring on our extrude. Let's extrude it out very small, maybe even a little
bit less than that. Something like
this. And then what we'll do is we'll come adding to modify it and we're
going to generate a solidify right click. And what we're going to
do in fact we'll tab right click and we'll
come down and shade flat. We'll also come in
back to our curve, turn this down something
like six or seven like so. Then what we'll do now is
we'll come back to our solidify even thickness on and let's turn it
up a little bit. So al right, that is what
we've got to work with. I think actually on this
we'll turn it up a little bit higher 'cause it's looking a little bit too low resolution. And on the next one now, what we'll do is we'll
get this all fixed. You can see we've got
many, many issues with it. But I'm going to show
you how to actually get it all looking really,
really beautiful. Alright everyone. So
hope you enjoyed that. And I'll see on the next one. Thanks a lot. Bye bye.
55. Manipulating Bezier Curves for Elegant Cafe Signage: Welcome back everyone
to Blender Poll the Environment Artists Guide. And this where we left off. All right, if we press lag now, just to bring everything back, not that one lag, bring everything back three, and then we have
a really, really good view of what
we're doing here. Now what I'm going to do is I tend to start with
the top of it. So what I'm going to do is I'm just going to pull this back. Now remember the middle part of it is what actually moves it, and this part is what actually kind of shapes it, if you like. So I'm going to try
and pull all of this back into the place
where I want it. It's coming all the
way back to this wall. When I first do
this, by the way, because we're in the side
view where I've put it, I tend to make big
sweeping movements. I also tend to put
on smooth on here. Now I can come in, I can press and I can really
pull this out and get it into the place
that I want it before worrying about getting the
curves and everything. I'm going to put it into
place so I can see as well. Probably going to have to move all of this to make
it look a little bit nicer. All right? Something like that. To start with, I'm
thinking I need to come in and bring up my solidify just a little bit
to make it a little bit thicker is a little bit
too thin on at the moment. Now I'm going to do is I'm just going to come
into this one, I'm going to delete
it out of the way. So delete vertices and now I'm going to come
into this handle, so you can see this handle here. And pull it out and try
it is out the handle. So have a look and try and
get it to actually stop. Yeah, I'm going to take off
portion editing, There we go. And stretch it out
again like so. And then we can
actually pick that up and start putting
it into place. Now you will see with
Bezier curves especially, they are harder to live with certainly the paths for sure, but if you actually
get the hang of it. So in other words, if you get the hang of these
handles, for instance, they are actually very
nice to work with because you have a lot more
control with them. It's just figuring out how these pesky handles
actually work. So you can see on this one here, it looks a mess until I
actually straighten it out. We can see on this one as well. I just need to come in and
straighten it all out like so. And it does take practice, guys. It does take practice for sure. So don't worry if you're not
getting it straight away. Once we've got this one,
let's bend it in a little. Let's come in with this one. Bend it in a little, make
it nice and round there. And then you can
see this one is a little bit out, so
let's bend it round. So, all right, the
other thing you can also do is let's say
you grab both of these. What you can also
do is come up to control points and you can
actually smooth them out. That also really,
really helps as well. Now let's figure what we're
going to do with this. I'm going to pull this one out, so I'm going to
pull it down into place like so I would also
pull this one into place like, so I'm going to grab this
one and this one pull it up. Then what do we have? Boxlect, all of this. And I'm going to
pull them across. So I'm going to pull
them across slightly, just to put them in front
of that wall there. Then finally, I don't want
it obviously going in here. I want to do something where I actually make
it come in front. Now I don't have actually
a control there. What I want to do
is grab both of these right click subdivide. Now from here what I can
do is I can pull it out, so I can bring it out. And then what I can do is I can bring this handle
up a little bit, bring it back,
let's have a look. And bring it this way. And then I'm just wondering
if I can bring this one up so you can see
here I'm working my way along and then I'm
going to come back to here. This one here, we can see we definitely need to bend
it, but not that much. So we need to bend it
and then bring it in, or bring it out, like
let's pull it up. And hopefully now, yes, I should be able to bend it a little bit better
than where it was. Something like that,
I think looks good. And I'm actually happy with
how this one's turning out. I think this looks
really, really cool. It's just I need to
figure out a way just to make it look nice
like this and this, actually, that's looking good. I'm actually happy with
how this is coming along. All right, let's go press three. Always be in the side view. It just makes things
much easier, so. All right, I think
I'm happy with that. I actually like this
more than my other one, even though my
other one was flat. I think this one actually
looks a little bit better, Might look a little bit modern. That's the only thing
I'm worried about. Three. In other words, what I might need to do
is just have it where it comes just to here
instead of having it. So modern. That, bring it in like so. And then let's have a look. Does he look too modern?
That's the question. I'm going to come
in and just delete this vertice and then
let's have this flat. You can also as well press Ss and's ad and flatten
it all out like so. I think as well I'll put
another vertice in here. This one, this one right click, subdivide That then is going to give me ability
to flatten this off. And I can actually pull
this up, not just that one. Pull both of these up
just a little bit, just to flatten those off
as you can see along here, because that's why I actually
want to do three again. Let's come in then and let's see if we can actually
flatten this off. So then move it down like so. And then let's drop
this one down like so. And this one down, So All
right, that's looking good. And now what I need to do
is just make sure that this bit I'm just wondering
whether yeah, like this more of a slope. A beautiful slope. Like. So let's press G, slope it out a little bit more. All right, that is looking
good. I'm happy with that. Hopefully you've got
yours right as well. Remember, it's going to
take a little bit of time to get the hang of
this, it's not easy to do. Finally, then the last
thing I want to show you, if you come to this end, make sure you've
got proportionality on press the old S, not just. And what you can do is you
should be able to press S. Let's just take that half a
minute Ts and there we go. All right, let's put it onto proportional editing alternS. You can see now I
can actually bring it in and make it much,
much smaller on there. Can do the same thing
with this as well. Alterns, let's make it thinner. And then what I tend to do is once I've actually done this, I will actually
apply all of this. I'll press Tab
Object Convert Mesh. And then what I'll
do is I'll come to the front of here,
this one here. And I'll press S
and scale this in. As you can see, we
can scale that in. You can do the same
one with this as well. So let's start scaling
it in. So there we go. Now that's looking really nice. We can write click shade, auto smooth. There we go. There is our first ornate
part on our actual sign. Now from here, we need just
a couple of pieces more. All I'm going to do is shift
a cube, bring that in, make it a little bit smaller, and y, make it a
little bit thinner. Pull it up then to
where it's going to go. Because it needs to hold this part of the sign on
there and we can see, maybe I'm a little
bit too much on here. Maybe I need to pull this out. We can do that as
well, no problem. And Y bring it in
a little bit more. And then all I'll
do is I'll grab the bottom of it and pull it down without proportion
editing on like so. And then what I'll
do is I'll bevel off these edges as well just
to make it look very nice. In fact, should I won't do that. What I'll do is instead is
I'll come to this part o shifting click going around this side portion,
editing on three. And then what I
want to do is pull this out a little
bit, so if I press, I can grab the whole thing
and just pull it out so it's just sat on
there nicely like, so. All right, perfect. Now, the last bit is I
want to grab this. I want to pull it down, shift
all the way down to here. I'm basically using this
then to support the sign. So what I'm going to do
is pull this down again without portion of
everything down to there. And then let's pull it
out a little bit and make it a little
bit thicker like So maybe we should go
down to the actual stone. It looks a bit bit more secure. Down to the back a little bit. There we go. All right. Yeah, that's looking good. All right, so on the
next lesson then, we should have this finished. And from there we're going to actually be going
into, as I say, rendering cycles and V. And
then I'm going to show you as well how to set up a camera turn table on
the lesson after that. And from there then what we're going to do is then we're going to set up our own
composite in here. So we're going to get
the render set up just so you can take a
nice clean image, if you want to, of the scene
that you've already got. And then we can start
on the next buildings. Alright everyone, so hope you enjoyed that and I'll
see on the next one. Thanks lot. Bye bye.
56. Applying Materials for Realistic Cafe Signs: Welcome back everyone to Blender for the Environment
Artists Guide. And this is where
we left, they are. All right. So let's
grab these three. First of all, and what we're going to do is
we're going to go over to material and we'll
click the down arrow. And these are definitely
going to be black metal. So black metal, it's only
going to go on one of them. So all I need to do now is press control L and link materials. Let's put this on materials
while we're here. And then what we'll also
do is once that loads up, we'll unwrap them and then we'll see what
those look like. Let's wait for Blender
to work this out. Then we'll press Tab
Smart UV Project. Click Okay. There we go. And then we'll come to
this part and we'll grab this one control link materials. And then what we'll
do is with this one, is we'll press tab
A Smart UV project. Click okay and there's that one. Now with the chain, we want something called
light metal on here. So we'll have to go over
to our asset manager. And then what we're going to
do, we'll come to our chain. Click New new, sorry. Minus that off. I'm
just wondering. Yeah, we'll probably press dot
and just drop it on there. Let's come to materials Metal and we're looking for
metal light, there we go. This one here, drop it on there. And there we go. And then we can just grab this one,
grab this one. Control L link materials. So all right, we've
got this so far. Now let's go back
over to modeling. It does make it easier. Then what we can do now is
we can have our blue metal, metal blue, and metal black. So I think this part of the signs all going
to be metal blue, this part is going
to be metal black. And then we'll have metal green on these little parts here. Not sure actually. I've got metal green. Let's sell up metal. So we've got blue
metal, green metal. So we've got everything
there that we need. So that's one good
thing. So then what we'll do is
we'll come to here and we'll add in black metal
first. In fact, no we won't. We'll add in blue metal. Blue metal. There
we go. Blue metal. Let's press tab a
smart UV project. Okay. And there we go. Now let's come to this
part here. This part. This part. This part. This part and this
part, like so. And then I'm going to
click plus down arrow, black metal, click a sign. Now finally these parts here. Now these parts here are
going to be a bit of a pain because I wasn't
thinking about it before. Let's see if I can. Let's think about how the easiest way to do this is going to be to hide this out. They hide this one out the way press seven
to go over the top. I think also I'm going
to to go over the top. I think also I'm going to hide that the way. Hide
this out the way. Hide the chains out of the
way. Go over the top now. And there we go.
I've got access now. So I can see what
I'm doing. Perfect. That is what I want. Now what I'm going to do is
I'm going to come back to this and I'm going
to put it onto wire frame. And then what I'm going to
do is I'm going to press B and just come in and select
all of those lights. So then from there what I can do is put it on object mode. And now you can see I've
got all of those selects. Now I can press Control Control. And go all the way back
to where I want it, which is round about here. Click the little Do plus
button, down arrow, and we want this to be
green, so green metal. Click a sign. Let's look
at what that looks like. Tap and there we go. Really, really easy to
do that as you can see. All right, so we've
got blue metal, we've got our green metal, we've got our black,
Let's press L tates, then bring back our chain. And finally, now if you're putting this in
your asset manager, you want to join all of
this together for sure. So to join it all together just means that
you're going to have to come in with object and
then you're going to have to come in to convert
and mesh like so. And then we can join
all of these up. Control J, Join the more. Look now for this bit here we want to
actually pour bevel on. So we're going to join all
of this up together first. Just make sure we don't
know what's on there. There could be
something on there. So we'll convert it to mesh. And then what we'll do
is press control J, right click, shade,
auto, smooth. And from there then what
we can do is adding a modifier Generate and a bevel. And there we go, we
got a slight bevel on there which makes it
look tons, tons better. Now, we don't really want to put a bevel on this part here, on this one, On this one, we want to actually
apply that bevel. So I'm going to press
control and apply that bevel and then join
it to this control J. Join everything together. And there we go. Everything's
joined together. And now you should be
able to just come over, rename it to coffee shop sign. Right, Click it. And you're going to market as assets for, in your asset library. All right, so that's
looking really nice. Okay, so now let's actually have a look at what
all this looks like, so we'll have a
quick render of what that looks like and whoa, it looks really nice. What you can also do as well, you can also come over to your sky texture and let's just change the sun
rotation down to 180. Let's have a look at that.
Looks like and yeah, you can see it's
looking really nice. Let's also turn the sun
intensity down to No 0.3 We just have a look
all the way around at what we've actually achieved.
All right everyone. So we're going to cut
this lesson short and on the next lesson we'll be looking at how to render out in EV and cycles ready
for the next stage. Alright everyone, So save out your work and I'll
see on the next one. Thanks a lot. Bye bye.
57. Basics of CYCLES and EEVEE Rendering for Victorian Scenes: Welcome back everyone to Blender for the Environment
Artists Guide. And this is where
we left it off. Now what we're going to do
is I'm going to introduce you to rendering
in cycles and EV. And when we come back
on the next lesson, we'll just be setting up our actual options in the
way that I thinks best. But it's really, really
handy if you already have a background on how
to set things up, whether you're rendering
out in EV or cycles. You might really
want to know because we're going to be mainly using cycles because it's
going to be giving us a much, much better actual render
straight off the bat. Alright everyone. So I'll
play that for you now and I'll see on the next lesson.
Thanks a lot. Bye bye. Welcome everyone to the V in
Cycles part of the course. And this is a full guide on both the V and the
cycles renderer. So the first one we're going to approach is the actual EV. And you can see at the
moment I have a scene set up like this and
I'll be using this to go through the
various options and after which you can
give it a try yourself. So the first thing at
the moment is we're on actual Shading object mode and we want to be on
the EV renderer. So I'm going to
click that on now. You will notice at the moment
I have a son and I have a real light over here as well for the
other demonstration. So first of all, let's come
to this actual object here. And what I want to do is I want to first of all go over to the right hand side where
the render options are and you'll see this
is actually on V. Now the first thing I want to discuss is not the sampling, we'll come back to
that in a minute. It's actually the
ambient occlusion. If we turn our
ambient occlusion on, you will see that we're able
then to actually make much, much bear shadows within
our actual scene. So for instance,
this actual E here, if I turn it off, you'll see that all of those
shadows disappear. And if I turn it on,
enhances the shadows. We're also able to go in as
well and we're able to come over to where the distances
and turn that down zero, and you'll see that makes
them all disappear. And as we turn it up, we end up with more and
more actual shadows on there up to a certain
point as you can see. But you can see now turning
it off and on makes a real difference to how your scenes are
actually going to look. So basically what I'm discussing
here is the set up of V and then we're
actually going to go over and actually
render that out. Now let's move on to the next
part of this demonstration, and what we're
going to talk about now is the actual samples. So if I come up and
open this menu up, you can see at the moment
that we have render on 64 samples and
the Viewport on 16. Now not only does this give you a better quality of image, but also the main reason is
that we can actually get a lot more definition on
these actual shadows. You can see if I zoom in here, these shadows are
kind of pixelated. But if I come in and let's
say put this to 300, you will see now it makes a real difference in
how the shadows look. It makes them much more
realistic and much better when you actually
come to render this. So now we're actually going to discuss the other
powerful thing with V, which is screen
space reflections. So at the moment, if I turn that on and I come to my
ground plane here, let's actually mess around
with the actual roughness. If I turn this down, you can see we end up with
loads of reflection on here. If I come then over and turn off screen
space reflections, you can see that all of those reflections don't actually reflect on this
ground plane anymore. So this is why this
is so powerful, especially if you're
doing things like really, really shiny objects or metal you really want on screen
space reflections. Now let's just go back to my ground plane
now and just turn it back down on the
actual roughness, or let's turn it up a
little bit like so. And then we've got
some reflections, and let's move over
to the next part. So we can see at the
moment we have this light, but it doesn't look very
good at the moment. We can see it has got a bluish
tinge reflection to it. But if we come back
over to V now, and what we can do is we
can actually turn on bloom. And now you can see that
we've got some really, really nice light, and also the reflections
enhanced as well. We can also open up the bloom. And the best thing about the
bloom is we can actually control how much this is
going to actually bloom, how much fogginess is
going to have to it. You can see the range that
we can put on there as well. And you can also see
that we can turn up this intensity all from
within the actual V options. There are a load of
options within V, and to go through all of them, honestly would be like
doing another course. But what I want to show you
is just one more thing, within V, which is
where we have shadows. If we open this up,
we will see that these shadows actually come with their own resolution map. And at the moment
they're on 512, the higher turn this up, the better the actual
shadows are going to be. So if I put both of these on 4,096 you will see now that when I actually
come to render this out, these shadows are going
to look even better. They even look bare in
the actual viewport. So now all I've done is brought an actual
camera in place. And I just want to show
you one more thing before we hit that
Render button. If we come back to our monkey
and we click on our light, so let's click on
our lights here. You can also come over to the right hand side and you'll have something
that says Shadows. Just open that up and
click on Contact Shadows. And you will see now
just how much nicer, especially around these
eyelids, how that looks. So you can see the difference
in how that looks. So all these things together, including the ambient occlusion, the bloom and the screen
space reflections can make for a really,
really nice render. Now it's important to
remember though that EV is designed as a
real time renderer. So something like in a game
like Real Engine or Unity, that is where a real time
renderer will be used. Whereas Cycle, on
the other hand, is not actually meant for that. It's meant for getting really, really high quality
images or animations. It's not meant for
actual real time. So now what we can do
is we can actually go over and hit
that render button. So it's just render image
and with V it's not like cycles where it builds
up and up and up and then it actually you
actually get your final render. It actually is just there. So 1 minute, it's not, the next minute is now, depending on how many samples
you actually ask V to actually render out is how long it's actually
going to take. So you can see at
the moment this has took around 3 seconds. And this is another
reason why you might want to use V
because it's very, very fast at
rendering things out. So let's close this
down now and let's move on over to our cycles
render engine. Now the first thing
to note is when I actually turn this
over to cycles, it's going to be
much higher demand on your actual system, especially when we're
in the viewport view. You'll also notice as well that it's pretty grainy
at the moment and this is because we
just need to turn on the viewport de noising, although this requires a lot of performance
from your machine. But you can see straight
off the bat that this is looking really,
really nice already. The only thing is
whenever we turn around, because it's not a
real time render it, it's going to take a little
bit of work to get to a certain level of samples
that you might be happy with. Now the other thing is at the moment you can
see the cycles. We also have a device, and this is basically telling
Blender what device to use so it can be your
CPU or your GPU. I do recommend that you use
your GPU rather than CPU if available because your GPU is much better at
handling rendering. So now, before we go into any of the options in the
cycles render engine, what we first need to do
is come over to Edit, go down to Preferences, and what we first need to do is go up to where
it says system. And from there we can actually change the options for cycles. So what I'm going to do
is I'm going to come over to where it says optics X. You might not be able to
actually click this on, it might be down to Cuba. This optics X is the
Cycles X render engine. So we do have a new version of Cycles in blender for onwards
and it's called Cycles X, as well as coming in with a
host of different features which will increase the
quality of your renders. It's also much, much faster
than the old cycles. Now if these options are
actually graded out for you, that means that you
just haven't got a graphics cord that
actually supports it. I do know that Cuda, I think is anything from
Invidia second series, and the optic X is anything
from the high end of the second series and certainly on the third
series of Envidia. I'm not sure about the
other graphics cards, so you just have to pick whichever one you can,
the highest one you can. And unfortunately if
you can't pick any, then you'll just have to
have the basic cycles. Now all you need to do to
enable that is again just put it on optics x and take
both for these on. I'd like to take both of
these on just in case Blender can use both of them together to
speed up performance. Once you've got those ticked on, all you've got your
Cuba ticked on, then what you can
do is close that down and then you
can come over to where it says CPU and
put it onto GPU compute. And you'll see just how much
faster that actually is. If I now move around, you can see how fast
this actually speeds up. And that is because
we're now using our GPU. All right, so now let's go
through a few of the options. So you will see
under light paths, we've got a lot of
options here now. All of these options will change the way that your
scene actually looks like. We won't go through these, but these are where all of the light options
will actually be, from the transparency to the glossiness of
the actual scene. So you're free to mess
around with these. Just be aware the
higher you put these, the more performance is
actually going to take. Now the other thing
you need to know is that sometimes when we're dealing with certain
shaders within Blender, they won't be able
to be rendered out in V. And it's normally down to the ray tracing power of cycles that will actually
be able to render them out. A lot of the times
when we're dealing with something that has
a transparency in it, for instance, or
something that has displacement and it's built
through the actual shader. So it's a material built
through the shader. You will have to actually
use blender cycles. So now what we're going
to do is I'm going to come down and just go through the performance options because performance on actual
cycles is very important. Now depending on if
you're using your CPU or your GPU is how important it is to get
the right tile size. The higher the tile size it is, the better it is for
your graphics card. The lower the tile size, the better it is for your CPU
or your computer processor. So whichever one
you're using to render out whether it be
your CPU or GPU, just take these into account. So again, CPU, lower tile size, so something like 64 and Gpu, higher tile size,
something like 2048. The next thing we
want to look at is this used spatial splits and
you can see what it says, longer build times
faster render. So just make sure that
you tick this on, because what we're
also going to tick on is persistent data. Once we've ticked these two on, what it basically means is
it's going to take longer to actually build out the scene
than it is to render it. If you don't tick this
on, it's going to take a certain length
for each one to do. Finally, the next thing we want to discuss now we've
gone through that, is the actual color management, and you will have this
within V as well. I've just saved it two cycles. Now if you use in blender full, you will have a view
transform that says Gx. And this is the new
actual view transform. This one is supposed to
be the most realistic, if you're using older
versions of blender. We'll have something
called Fil mix, but I recommend with
the new one using GX. Now you've also got a look
which you can actually change, which is really
handy, especially if you're doing stylized scenes. And you can change this look to something like very
high contrast, or you can change it
anything in between. So you can have base
contrast or let's actually, let's put it back on GX. Let's put it on
something like a medium. Where's medium? So
medium, high contrast. And you can see, now this scene is looking really, really nice. Now, you can also see a few other problems
with blender cycles. One of them being, we don't actually have any
ambient occlusion, we don't actually
have any bloom. So although everything looks
better in blender cycles, not only are you going to lose all that
straight off the bat, but also you have to then come in and set it up
in the composite. So this is why you
really need to think when you're
rendering out a scene, whether you want to render
it out in V or cycles. Ev is much, much faster and everything is there
straight off the get go. Cycles is much, much slower, needs a lot more performance
from your machine. And on the back end,
we also have to go into the compositor
to get a really, really nice image Now before we finish and actually
render this out. It's also very important with blender cycles how many samples you're actually
going to work with. So you can see here
where it says Render, not the viewpoint on
where the render one is. You want to set this
pretty low to start with. It is set as default of 4,096 I recommend
saying this at 200. What'll happen is then it's got a noise threshold on there. It'll hit near that 200, and then the noise
threshold will kick in and basically denoise
your actual image. In other words, get rid of all those fireflies
and things like that. Now if we come up and
what we're going to do before hitting
the render born, I also recommend if
you're working in cycles that you put
this onto wire frame because then it's
going to save on performance and it's not
going to be rendering it out in the Viewport
as well as trying to rendering it in
the actual render. Let's put this on wire frame. What we're going to do
then is come over to render render image.
And here we go. Now you can see it's very
different from how V works. You can see it builds up,
builds up, builds up. You can see on here
the samples going up. And then you'll see
it actually finishes. And we can see it
took 12 seconds, which is around six times
longer than what V took. But you can see it's a really,
really beautiful image. There's just no
ambient occlusion or contact shadows and
things like that on here. That's the difference, everyone. Now the final thing
before I finishes, I want to show you just one
more thing that's important, that you can do with both
V or blender cycles. And if I come to
my camera and all I want to do is just
hit camera to view. And I just want to put my actual camera in this position just so I can
see the background here. And then all I'm going to
do is I'm just going to come down to where it says Film. Open that up and you will see one that you've got here
that says transparent. And this is how you create an image with a
transparent background. If I now go to
render out my image, you can see now it comes with
a transparent background. You can also see, because we've got that persistent data on now, it's a little bit faster
than what it was before, and it's just under 8 seconds
instead of 12.5 seconds. Alright everyone, So I
hope you enjoyed that. I hope you learned
a lot from it. We will go into a
lot more detail about this as we're working
through the course, whether we're working
in V or blender cycles. And we will be discussing
as well, of course, the composite in blender cycles. Thanks everyone. Cheers.
58. Camera Setup and Turntable Animation for Victorian Environments: Welcome back everyone to Blender for the Environment
Artists Guide, And this is where
we left it off. All right, so what we're
going to do now is we're just going to turn this
onto Material. And what we're going to do is we're going
to, first of all, come up to Edit Preferences. And what we want to
go is to system. We want to make sure that
we've got our both of these. T we want to make sure
Tik X is ticked on. And once that's done, let's close that down from there then. I'm just going to make
sure it's on cycles. I'm going to make
sure I'm on GPU. I'm also going to make
sure denoising is on on them both and then I'm going to come right
down to the bottom. We're performances. I'm going to make sure first of
all, use tiling. I'm using my GPU, so let's set it at 20:48 use spatial splits,
let's tick that on. And then what we're going
to do is we're going to keep persistent data. All right, then from there then what we're going
to do is we're going to now set up a camera and
let's have our first render. So what I'm going to do is
I'm going to press shift Day, bringing a camera
camera like so. And then what I'm
going to do is press control Olt and zero now, Don't worry if you're
not following along because now I'm
going to play you the next actual
tutorial which is going to be based on camera
and turntable. So when you come
back after that, you should really know how
to set up your camera. And from there then we're
going to start taking our first renders of
our actual scene. We're not going to be creating a turntable just
for this building, we'll probably do that later on. But for now, it's good knowledge
if you want to learn it. All right everyone, So I'll
see on the next lesson, and then we'll take
our first render. Thanks a lot. Bye bye. Welcome everyone to our
camera setup complete guide. And as you can see here, we've got a fairly,
fairly large scene. And we actually need
to bring a camera in to actually render it. So what I'm first of all going to do to bring a camera in, I'm going to press Shift A. And within our primitive menu, you will see one
that says Camera. Now, normally the camera
will always come in whereabouts you've
actually got your cursor. So if I delete that
camera out the way now, shift right click and
put my cursor over here, Press Shift A, bring in my camera and you'll
see there it is now. Rather than go into my camera, so to go to our camera, we're going to press
zero on the number pad. That then is going to
zoom into our camera. And from there then
we're able to actually come over and open this
little panel here. To do that, we just press
the end button to open it. And then what we
can do is we can click this camera to view, and you'll notice
that it goes fairly red around the outside
of the camera. And from there
then we're able to scroll our mouse we allow, and put our camera where
we actually want it. We can also hold control
shift, middle mouse. And what you can actually
do then is really, really get a nice smooth zoom in and zoom out of our
actual camera as well. So all of the basic
functions of moving around the actual viewport work exactly the same way
with the camera, as long as we've got
camera to view turned on. Now what if I told you though, there's an easier way of
actually doing this as well. So all I'm going
to do is I'm just going to delete my
camera out the way. And then what I'm going to
do is I'm going to press shift A and I'm going to
bring in another camera. I'm going to position myself in the viewport of where I want
my camera roughly to be. And instead of zooming
to the camera with zero, what I'm going to do
is I'm going to press control Alt and zero. And then what it's going
to do is it's going to put the camera in the middle
of the viewport for me. And from there I normally
zoom in 23 times. And then what I do is I
click camera to view on. And now I'm able to position my camera where I
actually want it, which is a little bit
easier than actually going to the camera and
moving it into plate. Now from here, I want
to discuss a few of the camera options that you can actually do with
the camera as well. So all we need to do with
the camera selected, so just make sure that
your actual camera is selected so you can see
mine is selected there. Press zero on the
number pad to zoom back into your camera and get the view that
you're looking for. Let's press camera to View, Although you don't
need to take this on to do these options. And if we come down to
the right hand side, now we have one that
is the actual camera. Now if we're going over to
the right hand side you, we'll see we have a type
called perspective. And if I click this little down, you'll see that I also have orthographic on here as
well. And panoramic. Now, we're not really
going to discuss panoramic 'cause that is really taking it up a notch when it
comes to actually rendering. So we're going to keep this
pretty simple for now. So we do have perspective
and orthographic. And basically perspective, it's basically as though you're
viewing this yourself. An orthographic,
to keep it simple, basically means it
has no depth to the actual scene that you're
actually trying to render. Now, as well as that,
we can actually, at the moment, zoom in and zoom out with our actual mouse. But I recommend,
instead of doing that, just change the focal length slightly and then that
we'll be able to zoom you're in and zoom you're
out and get probably a better perspective on what
you're actually rendering. We also want to talk
about the shift X and Y. If you want to move your
camera left and right, that what you can do
is you can come up to item and instead of moving this around left and right with
your actual mouse, what we can actually
do now is move the location of our
camera like so. And I find this sometimes a
little bit easier to use, especially when we're
going on the z axis. Rather than moving my mouse, we shift and middle mouse, I find it a little bit easier because it will be more exact. In other words, if I actually take off
the camera to view, you will see if I
come to my camera now and I go to the item
and I'm moving this up, you'll see it moves
out perfectly. All right, so going back now, let's go back to the
camera and let's now discuss our clip start
and the clip end. Basically, if you want
to have a lot of things outside of the scene and you don't want to actually
have those rendered, what you can do is you can
actually change the clip end. This is the most important one, and let's put it to
something like 20. And what you'll see is
everything disappears. Now if I start turning that up, you will see that the camera clipping actually
starts to increase, which then shows you the
actual buildings of our scene. And if I turn it up so far, what I can do is I can actually start rendering
the entire scene. But anything in the background here won't be actually rendered. So it's extremely handy when you've got a load of
assets over here, you've got a scene,
and you don't actually want to
render those parts. Okay, So the next
thing we want to discuss is actually
coming in and naming our cameras because if we
have multiple cameras in a scene and we want to take
different renders of them, let's say we're doing
shots and we want one shot to be coming out
of this corridor somewhere. We another shot going around the roof or
something like that. It's important to know
how to actually change the view to render these parts. So what I'm first of all
going to do is I'm going to come to my camera, make
sure it's selected. Go over to the right hand side where all my collections are. Press the little dot button, which is on your number pad, and that then will
take me to my camera. Now let's add another
camera after this, but the first thing I
want to do is just rename this camera to Camera Long Shot. And then what we're
going to do now is bring in another camera. So I'm going to press
shift, bring in a camera. It's going to come
over there and let's say I want the shot
to be down here. So going down through
this alleyway like so. I'm going to press control Alt and zero to bring
my camera there. And then going to draw
zoom in a little bit. Go to view, I'm going
to camera to view. And then what I'm going
to do is just set my camera up where
I actually want it. Next of all I'm going
to put it close up. So camera up shots like so. And now I'm going
to turn this off. So now we have two
cameras in the scene, one short range and
one long range. And at the moment you can see the local camera
over here, it's set. If I click on this
two long range, the moment I click on
this and press zero, you will see it takes me
to my long range camera. Now if I click on it again
and click to short range, it will take me to my short range camera or
any other cameras, you can have as many cameras
you want in the scene. Now, what about rendering? So if I set this to camera short range and
I've got my camera here, the moment I go to
render out image, you will see that it won't be rendering out the camera
short range image. What it will be doing
is rendering out the camera long range image. Why is that? That's
because we also need to change the camera
in the actual scene. So you can see here we have camera long range and
if we click this, we also have camera short range. And now basically I can render out this actual
short range like so. So they've come to
render, render image, let it start up and there we go, now it starts rendering out this actual part of the scene. Now the thing is you've got to remember that when you've got loads of cameras
in your scene, this part here
controls the viewport. So where you're looking
in the viewport, which camera actually
looking through. And this part here controls
the actual render, so just be sure to
switch them over. And just be sure also to rename your cameras when you've got lots of cameras
in your scene. Now finally, the next
thing we want to discuss is how to actually make
a quick turntable. And the reason we're doing
that is because many, many times people want a
turntable of where they're actually going to
be going around the scene or their
actual assets. The way we're going to
do that is first of all, make sure your asset or your
scene is in the center of the viewport so you can see where these crossing lines are. And then all you want to do
is press shift S and you want to put cursor to
world origin that. Then we'll set you
cursor to the center. And what I'm going to do from
there is I'm going to press shift and I'm going to
bring in an actual curve, and the one I'm going to
bring in is a circle. From there, then I'm going
to press the S button and just pull the circle out
to where I actually want it. And now what I want
to do is I want to tie my camera to
my actual circle. Because I'm going
to use my circle to actually animate the camera. So the way I'm
going to do that is I'm going to grab my camera, grab my circle press control. And then I'm going
to go down to where it says follow path. And you will notice
now you've got a little bit of a line where the actual camera is
to the actual circle. Now it's important wherever you want your camera to start. So you can see at the moment
this is on actual zero. So we want our camera probably to start
somewhere around here. So the first thing
I'm going to do. Is grab, adjust my circle
and rotate it round, so sad. Rotate it around.
And then my camera is going to start
roughly over here. But what I need to do first
of all is move the camera to this point here rather than it rotating away from
the actual circle. So the way I'm
going to do that is just press tab on my circle
to go into edit mode. And then I'm going to grab
this little point here, because this is where the
camera is attached to, it will always be attached
to a point on here. And then I'm going to
press Shift S, and then cursors are selected. Next one I'm going
to do is press Tab. And then I'm going
to go to my camera, and what I'm going to
do is press Shift S and Selection to cursor keypop. Set that then is going
to put my camera there. Now you will see if I press the Space part now because
it is following this path, my camera actually shoots
around there like so, before it begins again at frame 200 or 800 or
whatever you set it to. So let's now set
this back at zero, and the camera should be
exactly where to put it. And now what we need to
do is if we press zero, you can see it's not actually looking at the building
or anything like that. So the next thing we
need to do is make sure this camera is looking
at our actual scene. So the way we're going to do
that is pressure shift day. And you're going to bring
in an empty and plain axis. And at the moment you
can see I've put this in the wrong place because
it came where my cursor was. So what I want to
do is delete that. And then what I want to do is press shift S and cursor
to world origin shift, bring in an empty
plane axis, like so. And the reason we're using a plane axis is because it won't be rendered out at all
within the render, but it is something which our
camera can actually follow. So now I've got my
plane axis in there. I recommend that
you pull it out. So keep pulling out so
it's pretty big like so. And then what we're
going to do is we're going to come to our camera. Come down to where it
says constraints just above the camera
image add constraint. And the one you
want is track two. And then all you want to do is click this little pipette here. Click on your actual empty, and now you'll see
that your camera is pointing at the actual empty. Now still, this isn't
very good because we have a problem in the cameras looking completely in
the wrong direction. But if you zoom out enough, what you can actually
do is you can select your empty and you can
pull it up like so. You can select your circle then. And you can also
lift it up like so. So you can actually
really start to mess around with this and
get that perfect viewpoint, what you're looking for,
something like this. And then all I'm going to do
is I'm just going to press the S board to
expand the circle. Pull it out, and now you'll see we've got the perfect
place where we need it. Just need to pull it up a
little bit more, maybe. Let's pull up the empty a
little bit. There we go. Now if we press space bar, you can see that we've
got a term table. One more thing before we
actually finish this. We obviously need to
control how fast, how fast the actual camera
is going around the circle. All we need to do to do that is we will select our circle. So if I come out and
select my circle, go over then to the
right hand side where you've got
your circle options. And then what you want
to do is come down to where it says Path Animation. And then you can turn this down or up to whatever you like. So let's put this on 800, let's put the
evaluation time on 800. And then if I go to my
camera now press the zero, but press Space Bar. You can see now that we
have a render which is going to last 0-800 frames. Or we can change this to 600, let's say 600, 600 like
so. And there we go. Now it's gone to 600 frames. Then when it gets to 600 here, it'll just carry on over the 800 because we obviously
have 800 frames here. So last of all, just
change the amount of frames to match the amount of frames in your
path animation. And what will happen
is it will get to 600 and that then should
restart the camera. So you can see there's
no break in it. It just actually carries
on in a circle or a turntable around your scene or asset. All right everyone. So I hope that's a lot
of information for you. I hope it made sense, and I hope it gave
you a good rundown of how cameras actually
work. Thanks a lot. See on the next one. Cheers.
59. First Render and Compositor Setup for Enhanced Visuals: Welcome back everyone to Blender for the Environment
Artists Guide. And this is where we left off. So the first thing I'm
going to do is just set my camera up into
a nice position. So I'm going to press
the end button jaws to open up this panel over here. And then I'm going to go
to view Camera to view. And I'm Js going to
zoom it out now. Alton shift, middle
mouse just to say op, a nice, really, really
nice image for us. Once I've done that, I'm
going to turn it off. Forget about my camera now. I don't need to worry about it. And then I'm just
going to go over to the right hand side and just make sure that my samples
are on something low. Now when I'm rendering
out, I tend to do this, I'll put it on 200 just to get an idea of what
everything looks like. Then I'll go to 500, then 1,000 and then something like four K
if I want to really, really high resolution image. Now the other thing
is we've also got a light source in here, so we need to actually
probably think about coming in and just hiding that from
the rendered view. So if I click on my light
source and come over to the right hand side and I can hide it out in
rendered view like so. Now I'm going to do
it, I'm actually going to put it onto wire frame. It's important if you're
ever rendering something, don't have it in the
viewport where you've even got it on materials. Certainly don't have it
when you've go on render. So let's not have it on,
you know, rendered view. And then going to hit Render, that's probably going
to crash your system. So best of all, put it
on wireframe view and then going over save out your work before
you do anything, just so nothing crashes. And then go to render
and render image. And now let's see what
we end up with now. At the moment you can
see it's still saying 4,096 There's no roof on here, there's all of these
problems in here. And that is why I actually
do render out on 200 before doing anything
else because you end up with a lot of issues
like this. All right? But we can stop it
at any time anyway. So what I can do is can
come over, close that down, and stop it Now what I can do is I can come over now
and set my samples. 2500 no, to 200, sorry. And then what I
can do is now and come over to my gray box. The other thing is, before
we actually do this as well, we're better off putting this
into its own actual scene. So what I'm going to do is I'm just going to move
my guy out of the way. I'm going to hide my
son out of the way. I'm going to put it
back on object mode just so I can see
what I'm doing. And then what I'm going to do
is I'm going to grab all of this box, grab it all. You're going to press
M. And then what you're going to do is
you're going to put it in its own collection. So we'll put it down
as coffee shop. So now when I click okay, everything has
been put in there. From there, then I can actually
start closing these up. So collection is
going to be my human. I've got my Boolean,
I've got my gray box. I've got my coffee shop.
We've closed that up. And now you can see
everything is nice and neat. Now with the gray
box, the only thing that we want on is
the ground plane. So what I'm going to
do is I'm going to grab this ground
plane, turn it on, and then I'm going to
grab my ground plane and put it in its
own collection. M, put it in its own collection. And let's call it ground. So enter twice, and there we go. Now from here, what I
can do is I can close up all of the gray box
so I can come in, turn all of these
on a minute and then close that up and
then turn this off. And more importantly, make sure it's off when we come to render. Now what we'll do is we'll
do a quick render again and see if we've only got a coffee shop and a
bit of a ground plane. Now, before we do that
with the ground plane, when we've not got
anything on here, what I always recommend to do is come to your ground plane, come over to where
it says gray box. And what you want to do is
just change this material. So I'm going to
minus this off like, so click new and I'll just
call it ground ground plane. So then what I'm going to do is I'm going to set
this a little dark, so turn up the metallic and then also turn down the
roughness a little bit, so we end up with this effect. And it just makes
everything look much, much nicer just when
you render it out, because you have
a real good idea then of how shadows
are going to look. For instance, I can see now that my shadows
for this render, they're not gonna
look really great where it's like down
here somewhere. So what I'm gonna do
is I'm gonna come over to my world and
I'm going to grab my sun rotation and just start rotating it around a
little bit more like that. Makes it much more interesting or even the other
way you can go. But I'm just going to rotate it around a little
bit more like so. And now you can see that's
much, much more interesting. Now again, we'll
go to wire frame. We'll save out our
work, so file and save, and then we're going to go
to render and render image. There we go. We've still
not got our roof on, so we need to check why that is. So let me just come back and
I'll check where that is. So I'm going to close that
down. The roof is there. It just means that
it's not being for whatever reason
rendered out. So let's press the
little dot born. Let's see. It's because for some reason
this is ticked off. So let's tick that on.
And now that's fixed. Nothing too bad there.
So that's good. And then what we'll do now
is we'll go wireframe again. And then we'll go to
render and render image. Hopefully, that roof is there. There we go, the
roof is there now. Now all we need to do is wait
now for it to get to 200. It's going to be a
very fast render. But with this render, what we're going to do next is actually start going into our composite
to get that all set up, ready to go for
whenever you want to render things out as well. Obviously, we've got the
rest of the course to do, but I generally do this around
this stage just so then they have a really good idea of what everything's
going to look like. So it's rendered out
now as you can see. So all I can do
now is close that down if you want to save
our image, it's just here. I don't recommend
you do it though, because it's going
to look so much better once have showed you what we're going
to be doing with it. So let's now close that down. And then what we're going
to do now is we're going to go into our compositor. Now, I recommend when you
first go into your compositor that you get everything set up. So in other words,
the window set up first before you
do anything now. And then we'll show
you some other things. So let's come in. First of all, we can see the compositor. Let's just click Use Nodes, and now we have our actual
rendered scene and an output. So we have basically the
rendered layers and an output. What I want to first
of all do though, is press, because I don't want this panel over here,
I don't need it. And then what I want
to do is come down and drop this down
into here like so. And then from there
what I want to do is I want to move
this over as well. So I'm going to come up where my little arrow is over here, pull it over like so. And then come to the little
down arrow down here. And pull it down like so. And then what I'm
going to do is now I'm going to move this over. So I'm going to move
this over like so. And we should end up with
something like this. Tons and tons of room. Now, what about this side? On this side, what I
want to do is I want to come in to where it
says Image Editor. And the one that I want
is the rendered view. So let's click the
little down arrow, R E Render Result. And there we go. Now this is sell perfectly for
what you want to do. It's got rid of all the
floor for all the bump that you don't really need
and it's sell perfectly. The one problem we have is we can't really do
anything from this. We can only alter the image. And the reason is if
we go back over to modeling and we come over
to this button here, you will see this
is the view layers. And it's also the
rendered layers. We need a little
bit more things. So what we want to put this
on is we definitely going to want to come down and we're going to want to add a gloss. So I'm going to come down and you will see that
we've got glossy here. Let's add a gloss. So this is basically how
glossy the metal is. We want to control
how that looks like. We want to also control
the transmission, not the transmission, sorry. We want to also control the emission because
we're going to have lights in the scene
and we've got some lights in the background
here behind the glass. We also want to control
the environment. And finally, the
main important one we want to control is
the ambient occlusion. So let's also tick that on. Now what we're going to do
is we're going to go over back to render and
render the image. And now you'll see once
this renders out at 200, then we can actually go into the compositor and
start working there. Because we're going
to have all of these options
available for us now. We'll wait for it to
finish. And there we go. It's finished now.
Let's close that down. Come to our compositing,
and here we are. Here we've got all
of these options now that we can actually
work with, like I said. All right, so now let's first
of all think about our AO. So this is the first one that
I always work on, the AO. Now when you plug the AO, which is ambient occlusion, it just means all the shadows, all the contact shadows
and things like that. When I first plug this in, you will notice
something in that, it's really, really pretty grainy and we don't really
want that actually. This doesn't look that bad, but you can see some
grain round here. The first thing you want
to do is put in a D noise. So search noise, so shift noise, drop that in, let it load up, and then you'll see all of these disappears and just how
much cleaner it is. Now the thing is,
with the noise, it does have a cost
and it will take a long time to actually
work out what it's doing. Generally what I'll do is
I'll put my noise down here and then what
I'll do is I'll bring in a color ramp shift day. Let's bring in a
color color ramp, drop that in now. From here I'll just drop my
noise into my color ramp. What this enables us to
do now is have a lot of control over how it's going
to look in real time. For instance, if I come
in and I put my black. If I move my black up to maybe
something just below here, you can see the change that's actually happening
within the scene. Now if I come to my gray and
bring this down on my white, I can bring my white down here. I can also bring in another
one by hitting control, pressing control, the
left clicking on the bar. And then you'll have the ability
to bring in another one. Which then we can also
refine this a little bit. As you can see, I'm going to
bring it up to roundabout here now you can see we've got a lot more darkness
on our green. We've got some really, really
nice shadows in there. And now if we plug
in this noise, you'll see it also
gets all cleaned up. Now that is the first
one we need to do. A little bit more than that, but we're going to focus on
that on the next lesson. But you can see already just how much nicer this
actually looks. And when we start plugging our actual imaging and you start seeing the difference in
the shadows and things, it's going to blow
your mind really, because it's taking it to such a much more
professional level than even what you
actually created. Alright everyone,
so I'll see on the next one. Thanks a lot. Bye bye.
60. Integrating AO, Glare, and Gloss in Renders: Welcome. Con to blend the fold the environment
artists guide, and this is where
we left the art. Now what I want to
do is I want to basically plug in my image, so my main image to my
actual my ambient occlusion. So let's just move
this over here. And the way we're
going to do that is we're going to go for a color. So I think it's
called mixed color. Mixed color, there we
go, This one here. And then what I'm
going to do is I'm going to come down and put this onto multiply. So
put that on multiply. And then what we can
do is we can plug in our ambient occlusion
down at the bottom, and then we can plug in our
image at the top, like so. Finally then what
we can do is we can plug all of these in, wait and see the magic,
and there we go. Now, not too great right now, but that's because we
need to bring down this. The further we bring down this, the more or less
ambient occlusion it's going to be adding in, wait for it to load up,
and now you can see it's starting to look
really, really nice. And it's really brought
out that realism, let's put this on
something like no 0.55 and you'll see then
it looks pretty nice. Now again, from here as well, if you unplug your noise,
unplug your noise, you're now able to
work more or less, as you can see in real
time with these things. I'm not going to
really mess around with this much
because I'm pretty happy with how this looks. Plus remember, we've got a
whole seam to build out here, so we go in and mess with
these right at the end. But we do want a nice image
to take home with, you know, part way through the
course to keep us engaged, to keep us focused on making
more of these buildings. Alright, so what I want to
do now is we're going to discuss the actual emission. So let's do the emission first. So for the emission,
what I'm going to do is, again, I tend to bring
things over here. I tend to plug them back in. So I'm going to
plug this back in. And then what I'm going to do is I'm going to leave myself some room so the emission
is this one here. And what I'm going
to do first of all is bring in a glare. Bring in a glare like so drop it there and then the emission is
going to go in here. And then we're just going
to plug in the glare to our image on compositing and you'll see that
is what happens. And that's what we expect to happen because basically
it's just took everything in the image that has emission and that's
the only thing you're going to be
working on now, which makes it really,
really handy to use. Now from here then
instead of streaks, let's put this on fog glow. And let's also then
come in and turn up the mix to one like so. And let's turn down the
threshold to zero like so. And let's also put the
size of the up to nine. Now you can see
already now we've got a lot more glow
there going off. And that's exactly what
we're looking for. Now bear in mind the emission coming out of these things
isn't going to be that high. It's more to do with the
street lamps and things like that and it's more to just show you what you
can actually do. We don't want it
to be that high. Now, the other thing is
we could plug in, sorry, five press shift day,
bring in a RGB curves. So RGB curves, drop
that in there. And then what I
can do now is have a lot more control
over how this looks. As you can see. Now, we don't really want to make
this really bright, so I'm just going to
set this down here for now because I really don't want to mess around with this too much while I've really
not got any light in there. We just want it set up ready. Let's move this
across over here. And what I want to do now is
bring in a U and saturation. So over press
shift, hey, search, I'm going to bring in a
U saturation like so. And what this can do is
this can change the color. So if I come back and I just put this on
really bright like. So I can also change the hue, let it load up like so not that I want to change the
hue, I don't want to do that. But what I do want to do is
desaturate a little bit. So I can actually
turn this right down to like a gray white color. I do want to desaturate
that yellow a little bit, so I'm going to put it
on not 0.8 like so. And that then is going
to be about right now. Of course we can't, there's
no point in doing all of this if we can't join
everything together. So we really, we want
to join our image and our ambient occlusion
up with our actual glare. With the glare, because we
can't have an image like this, it doesn't look
very good at all. So what we're going to do
is we're going to bring in another mixed color. So I'm going to copy
this one shift, and then we're going
to drop this in here. Now, my glare needs to
go in the bottom one, so we need to go
in the bottom one. So grab it, drop it
in the bottom one. And then from there then what we want to do is we want to put this not a multiply but on Ad. So let's come down,
put it on Ad, because when you're doing glare, you want to add it to the image. You're not trying to
multiply something. Let's put this then
on. Not 0.6 like so. And then finally what
we'll do is we'll plug in our image or ambient occlusion and let's get it more
plugged in, let it load up. There's a lot more
going off now, so it's going to
take a bit longer. And now you can see exactly
how that started to pop out, all of that, you know. That glow from the windows and
we can turn it up or down. Just remember, because
we've got denoising, it's actually going to make a little bit difference on there. So I'm going to set this to
0.6 and leave it like that. All right, so finally
then to set up, well we've got our gloss and
we've got our environment. I think we'll do our
gloss first so that is N of the metal and things
like that on the scene. So let's actually do that first. Let's bring our gloss and
if we plug in our gloss, you'll see this is what the
actual gloss looks like. So you can see really, really high gloss around these
metal parts and a little bit of bouncing light
from the other parts. But you can see where the gloss really is, it's
always on the metal. And what I want to do now,
because I plugged that in, I'm just going to bring in, first of all the noise. So I'll bring in a D Noise just to plug it into something. So. Noise And I'll
drop that in there, then I'll drop my gloss in where it says Image.
Plug it into here. And now it should be really,
really nice and smooth. Let's move that down
there a little bit. Now you can see it's looking pretty nice already from here. Then what I want to do is I
want to bring in a RGB curve. Let's bring in RGB curve. So search RGB curves, This one here, drop
that in with a gloss. Now what we'll have
is a lot of control. Now if I just take
this out of the noise, drop it into my gloss, and now we can see
if I bring this up, how much control I've
got over that gloss now, making that Mel really, really shiny if I need it. Now what I'm going to
do with my glosses, I'm just going to bring it
down, something like that. And finally then
I'm just going to replug this noise in now, so the noise back into rage, let it load up, and there we go. Now you can see these little shiny points on all of these. Now this is what we're actually
looking for to control. All right, so now what
we want to do is we want to plug that in. I'm just thinking
though, before we plug that into something, we just want to fix the
environment as well. So I'm going to pull
this over here, so I'm going to pull this
one over here like so. And then what I'm going to
do is I'm going to grab shift select and just
drop these all down here. And then from there then
I want my environment. So with my environment,
I'm thinking, let's bring in a
RGB curves first. So what we'll do
is shift a search, RGB, bring in a curves. And then what I'm going
to do in my environment, I'm going to plug that
in where it says image. And then from there I'm
going to plug it straight in two here, over here. And now you'll see
here's the environment. We have some control over that. Now if I come in and
bring this down, you can see what we
can do with that. So we can make it darker,
we can make it lighter. We can even change the color
if we actually want to. I'm just going to put it round about here, something like that. And I think that's going
to look absolutely fine. Now from here then,
we want to come in and go to where the ad is. We've got our multiply, we've got our ad over
here. So here's our ad. Then what I want to do is I
want to add in another ad. So I'm going to press Shift D, Bring D over there. And this one I'm going
to also keep on, not 0.6 Now I'm going
to grab my environment. We've got Gloss and we've
got our environment. This one here, basically
environment at the moment is going all the way over to this. We don't want that.
I'm going to plug it and drop it into
the bottom of here. And then finally, I
should be able to now drop this into
the top of there. And then I should
be able to drop these into here like so. And hopefully, if everything goes right, everything
should work. And now we should have a bit
of gloss on there as well. Like we can see a bit of
gloss on here really nice. Finally, then, we just need
to plug in the environment. And the way we're
going to plug in the environment is going
to be with a multiply. So again, I'm just going
to grab this one shift D, I'm going to drop this here. And then what I'm
going to do is I need the ad coming from here, because it's in front
of the environment. So I'm going to put it in front, I'm going to put this
very, very low down. Then not point naught,
0.042 like so. And finally then
I'm going to plug in my environment,
which is this one here. Now when we finish this, we are going to frame everything so you
can see everything. Make it all nice and neat, so let's drop that in there. And then finally, let's
plug everything in, so let it all load up. And there we go. Now
let's see if we turn this up, and there we go. We can change our
environment from behind. And that's exactly what we want. Let's press control zed, put it back where it is now. A few other things we won't be doing that though
on this lesson. We'll leave it till
the next lesson. We've got things like sharpen, we've got things like, you know, in saturation and brightness, all of that good stuff, which we also need to add in
before we do anything else. But what we're going
to do on the next lesson is first of all, we're going to start framing
all this at the moment. It's, it's not framed. We don't really know
what anything is. We can't really see from this
distance what anything is. So it's a good idea
to frame all of this stuff and then you
can work from there. All right everyone. So I'm
going to save out my work now. Save it out, and I'll
see you on the next one. Thanks a lot. Bye bye.
61. Enhancing Renders with Compositor for Antialiasing and Contrast: We welcome back. Everyone's
blender for the environment, artists kind, and this
is where we left it off. All right, so let's
come to our first one. We're going to grab
select, left select. And then we're going to press to open up that panel again. And we've got something
called Node Wrangler here. Now if you don't have
Node Wrangler on, it is in built blender, Add on. It's one of the best in blender. Actually, I don't know
why they don't have it. So it's just on
automatically, but it isn't. So let's come over
to Edit Preferences. Let's go over to Add Ons, and we're going to put in Node. And here it is,
the Node Wrangler. So make sure that it's
turned on before you do anything and then we can
close that down from there. Then what you can
do is you can come over to the Node
Wrangler and you can see now you've got loads and loads of things that
you can select, the one we're looking
for, frame selected. And now we can come
over to our node, and then you can see it's got a frame and we're going
to call this gloss. It will give it the name. And what we can also do is we
can open up the properties, make it a little bit bigger so we can see what we're doing. And also change the
color of it gloss. Let's keep it on white because that to me is what gloss is. Now the next one we're
going to do is image. So I'm just going
to grab this one. I'm going to hit the
Node Wrangler and I'm going to then come
to frame selected. And then what I'm going to
do is no call it image, let's make it a little
bit bigger as well. And what I'm also
going to do then, I want this to be the main one. So what I'm going to
do is put this on a color and we'll
put it on a red. All right, so now we've got over here, this is
the environment. So let's put that on green. That's kind of
makes sense to me. Node Wrangler frame selected. Let's come on node, and we'll put this
on environment. An environment, so let's
make it a different color, so we'll have it a green. Let's also then make
the environment a little bit bigger like so. And now let's come over to our next one which is going
to be, this is the emission. So I'm going to grab
all these three frame selected node emission. And emission to me
will always be yellow. So let's put it on yellow, so let's also make
that bit bigger. So then finally this one here, which is our ambient occlusion. So I'm going to bring
this down to here. I'm also going to move
all of these down here. You can actually grab
the frame and you can move more with the frame
which makes it really handy. Let's grab all of these. Node
Wrangler Frame selected. Let's call this, this is
going to be a Ambient or AO. We'll just call it AO for now. And what I'll do is
I'll put a color, not sure, it should
be black, really? I don't think it's a good
idea to print it on black. Actually, Yeah, let's
put it on black. And then what we'll do
is we'll just bring out the size Al.
Right, there we go. So that is all of those. Now let's just put this down
here. Now let's carry on. We can do even more with this and then every
time we render it, we're going to have
these render results. So first of all, let's put in a, let's find a way to sharpen
the image up a little. So filter, let's drop
a filter in there. And the one we want is
going to be box sharpen. So now we can see once it
actually starts activating, once it goes up to here, you'll see exactly what it does. There we go. It's sharpen up the image way, way
too much, of course. So we need to pull that down. I tend to just put it
on something very low, so not a 0.1 depending on how high the
render samples are. This will change how the
scene is going to look. You can see if you go too far, you end up with a lot
of sharp points and things like that on there.
We don't really want that. Next of all, we want the
overall color of the image. How bright is the overall image between the dark spots
and the light spots? For that, we're going
to use an RGB curve. So RGB curve, drop that in, and then all I'm
going to do is very, very slightly move
this because it will have a big impact
on the actual scene. Now the other thing
is it's really hard to actually see what we're doing at this stage
in real time. So what you might want to do is just think about
wear your images, just plug your image into here. And then what will
happen is it'll just take away everything. And now when I come to
change this, for instance, so if it come to
change this, it's going to be a lot
more in real time. Now we have got a box sharpen, which means it's going to actually take a little bit of time to put that
on what I tend to do. Instead of that, I'll leave my box shopping there and just
plug it straight into RGB. And now I should be able to change this much, much quicker. Well, I change
this much quicker. Yeah. It's still going through all of this, so I've
just plugged it. I need to go basically
from my image. So Yeah, we'll do that. We'll go from image
to box sharpen to. Image down here. All
right, there we go. Now we can see it's quicker. Don't worry. Once
we've done this, we'll plug everything back in and I'll show you
how to plug them in. All I've done now is just gone straight from my image
on my Rendolair. So you can see image
here straight plugged in to my box sharpen box sharpen
Goes into the RGB curves, we make this then a
little bit lighter or a little bit darker like so. And there we go. All right, from there, then we
need an anti helicine. So shift a anti
helicine, this one here. And the reason we're using this is we don't really like all of these kind of blocky bits going around the
edges and things. So what we're going
to do is we're going to put this on No, 0.24 0.653 and let's
put this on one. And there you go.
You can see now it's smoothed off those
parts a little bit. All right? If you want to change that and mess around
with that as well, do that to your arts content. It's actually quite hard to get that exactly
where you want it. So now let's think about
our U and saturation. So what we're going to do is
we're going to press Shift a search hue and saturation. And this then will enable us to actually control the
colors within the scene. So for instance, if we bring up this
saturation pretty high, you will see that all of the colors either get washed
out or become really bright. Anything that we do
past this point, so past this point here
where the box sharpens, the very minor changes. Very minor changes. You don't want to go completely
overboard with it. So what I'm going to
do is I'm going to put this on, sorry, 1.05 and just bring
out the colors, just that, a little bit more. From there, I'm going
to turn the value up to 1.2 and then you'll see
like it brings it out, makes everything a
little bit brighter. All right, now we want
brightness and contrast. So let's move this over, shift A, brightness
and contrast. Let's drop that
in. And from there then we'll just turn
this up very slightly, so the brightness up
not 0.1 very slightly. And the contrast, we're
going to turn that down minus not 0.1 hit the er, burn, and there we go now, barely, barely visible that
we're doing things here. As I said, if you
turn this way up, you can see it makes
a huge difference. If you turn this way down again, you can see it makes tiny, tiny bit of difference. It's also adding a
little bit of fog. Tiny, tiny bit, making it a little bit hazy as well as to see which I actually like. All right, so now we're going
to go over to color bars. My favorite node, what you can do with this node
is absolutely amazing. So search color and then we're going to
go to color balance. I like this node because we can really set the tone
for the actual image. In other words, if I want
this to be really blue, you can see we can
go really crazy. Really warm things that
are really set that image. Now the important
thing with this is we don't go too far with it. So what I'm going to do
is just set this first one just a little
bit over there. And then the second one, I'm going to make a little bit of warm so I'm adding a little
bit of warmth to the scene. And finally, the third one, I'm also going to add a little bit more warmth to the scene. Now you can see if I just
plug this directly into here, now you will be able to
see the color difference. It's very slight,
so press control Z, very much, a little bit warmer. Control, shift ad
cooler, warmer. And the idea is to
make people feel warm, especially in a scene
like this towards it. If you're doing a scene, this
is like a stylized scene, so you want people
to be warm more or less if you're doing
something like if you ever played World of
Warcraft and you know the Lich King is in a very
cold place called Ice Crown. And you really want to then
make it really, really cold. So depending on
what you're doing, let's say you're doing the
blacksmiths for instance. You might want a bit of cold and a bit of warmth
in there as well. Just depending on
what you're doing. Basically, the more
evil the place is, the more cold it's going to be. And the more warm and happy
like, you know, the shyer, our Lord of the Rings, the more warmth you're just
gonna want to need it. And they do do that, by the way. So, color grading, you know, within the moving
industry especially, is used all of the time. So, you know, in the Shire things weren't as
green as what they appeared, it's because of a color
grade going on top of a bit, and then obviously it was made warmer as well on top of that. So that's what we're
trying to do here. Now what we're going to do
is we've got this one here, so we've got our image here
that we need to plug back in. We're going to plug in
our image back into here. If I come in and unplug this, I'm just going to then plug it back into my image like so. And then my image is all
going to be plugged in. Everything's plugged in
down here as you can see. And finally then we're just
going to plug this back into the box Sharping,
Hopefully, hey, presto, it should
come up and there is our final image and what
a difference it makes. I will now show you how we can, let's say plug this in. This is my original image. Let's plug this in and I'll
show you the difference. There is the first render, if I press control and Z, let it load up and
you'll see the second render more or less
night and day. There's the difference
in the image. All right. So
really, really nice. The one thing I'm
a little worried about is these windows here, there might be a little
bit too close to the wall. I think they are going into
the wall and each gone. Pull them out a little bit. We'll do that on
the next lesson. We'll pull them out, make sure the render is
okay from there, and then we'll move
on to the next part. All right everyone.
Let's save that our work before we do anything
so we don't lose that. And I'll see you
on the next one. And I hope you're really
enjoyed it so far. Please bear with the course, carry on creating your own
models because you're going to learn a ton more yet in how
we create different things. And I'll see you on the next
one. Thanks a lot. Bye bye.
62. Beginning Bookstore Building Modeling: Welcome microphone to Blender for the Environment
Artists Guide. And this is where
we left it off. Now the thing is, I just want to say is that after we've
done the composition, which we've just
done, it's really, really all about the modeling now that's all
it's really about. Modeling as much as we can, getting as much as
that in there and rendering out now is
all basically set up. It's just moving the
camera around basically. So pretty much everything
now is from modeling. You're going to learn so
much in this next part. And let's go over to
our modeling now. And well, first of all I want to do is just make
sure these windows, so if I press Tab, let's
come to this window. I just want to make sure they're not too
close to that wall. So what I'm going
to do is I'm just gonna grab all four of them. I'm going to pull them
out a little bit like so. And what I'm going to do is just hit that render born once more. So put it on wire frame. Let's go to render,
surrender it out. I just want to see
if those windows are going to look
any better now. I don't want them looking white like they did
behind there because that tells me then I might need to
go in and actually change, you know, the windows to make them a little
bit more blue. Because at the moment they
are a little bit white. So let it finish up,
and there we go. That is the image, and they still look a little bit white. Which tells me in the future I'm just going to
have to come in and make those actual windows
a little bit more blue so, but we'll do that as we work
through the actual course. All right, let's
close that down. And what we'll do now is
we'll come to our shader, and this is what we've got. Now let's come in and
just put our gray box on. I think the one we
probably want to do next is I'm thinking that we could either start work on something a little
bit different, like the bookshop over here. It's very, very different to, you know, creating this. Or we could start work on
something completely new. I think what we're
going to do is we'll start work on the bookshop, and then from there we can work on this Subway or something like that,
something vastly different. All right, so what we'll do is, first of all, we'll come in. We've got our Brock
Gray box at the moment. Where is it? Coffee shop. We've still got that on there. Is the coffee shop on there?
Let me just have a look. Yeah, there's
nothing in there now as you can see. So that's good. So what we want to do is
we want to come down. We want to close our ground
plane, close our subway, close our butcher's shop, close our perfume shop, and then we just left with this. Now I also think it would be
a good idea at this point to coffee shop as well and
just kind of work from this. All right, so that's everything. Close everything up. I always find it
needed to work with. And let's make a start
on our bookstore Now, the one thing I did forget
to bring in is my human. So where is my human?
Let's put him on. Where has he gone? There he is. He's over here. Let's
bring him into place. Now the thing with
the books story is we do want to step up. So we want to actually
have a step up and then going into
an actual door. So I'll think something like two steps will be
absolutely fine, so maybe something like that. So what I'll do is
first of all is work out where my
steps are going to be. So let's press shift
S Cs to Selected. And then what we'll do is
we'll make the actual steps. So I'm going to press shift A, bring in a cube. Let's bring it down like so. And let's put it round about
where it's going to go. So something like this. And then let's make it
a little bit wider. So S and X make it a
little bit wider like so. And then what I did want to do is I want to put it
down to the floor. So I'm going to put
it down to the floor. And I've seen where
he's going to be. So what I'm going to do
then is come in and bring it up a little bit like
so, to where his legs are. And then finally I want
to split this in half. So control left
click, right click. And now let's pull this out. I'm not too concerned if these are the same
length of the moment. All I'm going to do is put
that into place like so. And from there what
I want to do is, and the reason I've done that is because this is
actually going to be in slightly inside here
because we're going to have a little bit of a walkway
where people can walk in. Which means there's
probably probably needs to be a little bit wider than where it
is at the moment. Let's make it a little bit
wider because actually there's going to be a few
things on the side. And then what we can start doing now is getting the post in, get the other post
in, and just start building out this
part from there. Then we can start building
it round like here, and then putting in the
bay window over here. All right, so now let's bring
in our first post then. So what I'm going to do
is I'm going to press shift A, bring in a cube. Let's bring in the cube
and put it over here. Now this actual building is
a little bit more ornate, I would say, than the last one. Let's press, It's a
little bit more finicky, I would say it suits a
books place a lot more. Let's come in, grab
the top of this, let's pull it down just to get something in there, I guess. And then what we'll
do is we'll pull it up a little bit like that. I think that'll
make a good start. And then once we've done this, we'll see if we need to make it a little bit bigger or smaller, because at the moment this is about the
right size, I think. Let's press I, then bring
it in a little bit, then what we'll do
is we'll press E. Like so. And then we're
going to press like so. And finally then let's
press and bring it up just about here, right? Let's bring this in first. So what I'm going to do,
I want to bend this in, and I want to bend it
in a really nice way. So what I'm going to
do is press control. Bring in three edge loops. So left click, right click, grab this middle edge loop. Put proportion editing on. And the one we want I
think is going to be root. Let's just try root. I'm going to bring
it in. And you can see now that's the
one I'm looking for. If you bring it in slightly, you see now we've got a really, really nice slope on there
that's looking really cool. Now what we're going to do
is come back to the top, then press bring it up. And then from there I'm going to grab all of this Alt shift and click and then
enter alternates, but I want to turn off
proportion editing first, so alterns and now I
can bring it out like so make sure offset even
is on And there we go. That looks a good first step
to our actual bookshop. Now from there what
I'll do is I'll grab this and I'm going to
pull it all the way up. So I'm going to press, pull
it up to where I want it, which will be
somewhere like here. And remember that this
also needs a top on it. So I'll need to pull
it down a little bit, because my top really
wants to come around here. So what I'm going to do
then is press enter, pull it out, and then and pull it up into
where I need it. So something like that I
think is going to look good. And now all I'm going to do, I need to work out like where is my door going to go and
where is this part? So I can see my roof here, but I can obviously change my roof and where
is it going to end? So if I bring this post, now if I press old, it means that when I come in and change the post if I need to, then I also am going to change
this post here as well. All right, from there then, what I want to do now is set out where my
door is going to be. So I can see straightway. Probably this step needs moving a little
bit more this way. I'm going to move my guy a
little bit more this way. And let's start
first of all with, with this main bit that's
going to go up here. So the top part of it, it's going to be a little
bit more complex as the said than the other bit
that we've just created. What I'm going to do is now I'm going to grab both of these. Press shift cursor selected press shift a mesh
cube. Bring it in. And then what I'm
going to do is put this into place where I want it, so I'm going to make it
a little bit smaller. And then what I'm
going to do is pull it out and x pull it out. And then what I want
to do is just fit it. Just fit it just
above there like so. Now from there then
what I want to do is I want to give
this an insert. So I'm going to
press tab control left click, right click. And then control B
and pull that out, scrolling the mouse
wheel back like so. And then from there then
I want to pull it inside, so I'm going to press E
once I've grabbed this one. So pull it back a
little bit like so. All right, now let's work on
the actual top bit of this. So I'm thinking the easiest way to do this is to come
to the top here, let's pull it back a little bit. What we'll do is we'll
lead in another edge loop. So control left click, Bring it out to around there. And then what we'll do
is we'll pull it up. Now if we come to this one dose, this top bit here, I'm going
to press and pull it up. So in fact, we'll pull it
up a little, tiny bit. Now, the other thing
is, at the moment, this is not pulled
out far enough. So we're going to pull it
out a little bit further. And then what I'm
going to do now is I'm going to
pull it up again. So pull it up again. And we can see we're running out a little bit of space
here. That's fine. Don't worry about
that. Let's come in now with edge select, grab this edge and we're just going to pull
it back like so. And then finally we'll
give a top on it. So let's come in, grab the top, press E, and put a
top on it like so. And you can see much more ornate than the other one
was the other building, so let's put it
onto object mode. You can really see what
I've actually done there. Now we need to make
sure that these parts here are large enough
to accommodate this. You can see at the
moment they' re not. So all I'm going to
do is come into this one and I'm going
to pull up the top. And of course, when
I pull up this top, the other top will also pull
up because we've pressed old D to actually duplicate it. All right, They're basically
linked like we know. All right, from there
I'm not going to add in, I'm going to write click
and shade auto, smooth. But I'm not going to
add in any bevels or anything like that yet. What I first of all
want to do before doing any of that is just
get this door in place. Once I've got that
door in place, you can kind of work
from off of that. I know it seems
such a small part to work from, but honestly, once you get something
kind of in place, I find I can work from that and basically lay out
the rest of the building. If I haven't got that in
place, I find it really, really hard to work on
something now before we end. The reason as well why
I actually kept this, so why I pressed old is
because I can see that this is probably probably going to need to come out
a little bit more. So what I'm going to
do is I'm gonna come in Alt shift click,
Alt shift click. And then I'm going to
press alternates and just bring them out a
little bit more like so. And now I can see
they're a little bit thicker and I think they
look much, much better. All right everyone. So
let's save out our work. So let's save, and I'll
see on the next one. Thanks a lot. Bye bye.
63. Decorative Pillar Techniques for Victorian Entrances: Welcome back and on to Blender for the Environment
Artists Guide, and this is where we left off. All right, I think what we
should do now is we should start bringing in this part
here to get this part in, and then we can actually
realize how far this is going to come out and where it's going to come to. So I think we'll do that first. So what I'll do is I will, first of all, I want a
bigger version of this post. I'm thinking it needs
to be a little bit wider than the one that
we've got at the moment. So what I'll do is I'll
create another one of these. I'm just wondering
if I can use this to actually create the outside
post, so I think I can. So what I'll do is
I'll press shift and what I'll do is
I'll bring this out. So what I can do is I can
grab the top and the bottom, So if I come underneath, I can't actually
see underneath yet. And I don't really want to Yeah, I can I can hide my floor. So let's just hide my floor. Let's come in and
we'll grab the top. So this one and the bottom delete faces.
And then I can press A. And what I can do
now is press Test. And it should pull
it out like so, making it a little
bit bigger, like so. And I'm just wondering if that's how I actually envisioned
it. No, it's not. It's not how we
envisioned it at all. So what I'll do is I think, you know what, Let's just
start this one again. So all we'll do is we'll
come in with this one. So shift, click, shift
D, bring it over. So let's press P, then selection, And then
we'll split it off. Control l transforms
right click, set origin to geometry. Okay, now we can
start with this. Now let's make this a little
bit bigger to start with. S will make it a
little bit bigger. And then what we'll do is
we'll bring it in again. So it'll make it very
similar to this, albeit a little bit different. So I'll shift click and let's press because then we'll
make it a little bit easier. Because what we can
do now is we can just press the button to bring it in. So let's press and
then I like so. And then, and we've also
got on our bevel as well, which is making it a little bit easier for us. Let's
bring it up to there. Let's then press
Enter, Bring it out. And then what we can do is we
can press and bring it up. And then finally I, and
then bring it up as a pole. So if I press now, I can bring it up to where
we actually need it, which is going to be round
about the same as here. So do want to keep kind of the same height
as this one here. So all I'm going to do is press serve three on the number pad. And then I can bring it up to, you can see it's level
with this roughly enter, bring it out and finally
bring it up like, so jaws to the top of there, so it kind of matches there. And I think that's
looking pretty good. And now we'll make
it a little bit, or on this part, just looking here, is
this thick enough? This part I think it is. I think it's going to be
better straight as well. I think that looks actually better than what
I had it before. And now I'll do is I'll
press control left click. And we'll add that there
like so face slick. Then grab this face, press the eye button and
then all I'm going to do is press and pull it
out like so. Okay. Happy with that. Now let's
make the underside of here. What I'll do is I'll first of all press shift S curse to select just so
I grab that there. Shift. Then let's
bring in a cube. Let's pull the cube up, let's make it a little
bit smaller, this cube. So it just goes back into there. And finally then I'm just
going to bring my cube forward so it sits in here, just under past here,
jawed in there. And then what I'm going
to do is come to face, select this bottom face. And then what I'm going to
do is I'm going to pull it up like so roundabout to there. Then press E, just
to extrude it down. And then what I'm going to do is I'm going to press E again. Then let's have a look how
far that's going to go down. Somewhere down to
probably around there. And then what I'm
going to do is just pull that back a little bit. I'm just wondering if, yeah, let's try pulling that back. There we go. That's exactly
what I'm looking for. Now what I want to
do is I want to come grab the bottom of here, pull it out like so. And finally then we're
going to level this off. If I press tab control all transforms and then
come back into it, control B, and then
increase them a few. I've got it on here six, but I want to put
it onto super lips. That is what I'm looking
for. Something like that. You can see it's
looking really, really, or neat and really nice. Right click, shade, auto, smooth, and there we go. All right, so last of all, I'm wondering whether I need to have this a
little bit thicker. I'm happy with that.
You know what, I think I'm going to
keep that as it is. I think I'm going to
be happy with that. Now, let's think about
this part in here. First of all, I'm going to come in bringing a plane.
Bringing a plane. Let's spin the plane
round so Y 90. Let's press three
on the number pad. And what we'll do is we'll
get this then in place. I'm going to sit it
round about there. I'm going to make it
a little bit bigger. So bring it out just so it's. I'm thinking just above
these bottom ones here. Something like that. I think
is going to be a nice panel. And then what I can
do now is again, control all transforms and then come in and I'll
grab the face of it, press the eye
button, bring it in. So now let's split
all these off. So I'll grab this one
and this one, press Y to split them off. This one and this one
press to split them off. And then I'll grab them all. And what I'm going to
do is pull them out. So I'm going to press to
pull them out to there. And then finally this
fit will make my panel. I'll grab this phase, press
the eye button press, and then again and finally, just make sure you're
on a medium point. And now you can press the
S and bring it in like so. And that's looking pretty nice. Now, is that panel a
little bit too far? I actually think on these,
it's going to look absolutely fine now to actually
bring this all together, then let's bring
in another cube. So I'm going to bring in a cube, I'm going to pull it to
where I actually want it. And we want it come in round
about there, the top of it. So the bottom needs to come up. So if I press three, we can
see the bottom is going to come up just into the
floor round about there. And now we just need to kind
of fit it all together, which is the most fiddly bit. So if I press L,
let's pull it out on and y into place
wherever it's going to go. Now we can see that it's
good where this is. So this part here,
if I pull it back, you can see now
this part's good. But we need to pull it down now and just have it
going up to there. So I'm going to pull
it down into place. So it's going to go into there. And then what I'm going to do is bring in an edge loop, I think. So I'll press control. I
have it going this way. And then I'm going
to bring it out to where I need it,
which will be there. And now finally I
can press and pull this bit up into place like so. And I think I've got
that bit into place now What I'll do is I'll
bevel it off as well, so I'll grab this
hedge, press control B, pull them all the way back. So we've just got, you know, one kind of bevel there like so. And then from there then what
we can do is we can pull this up again and we can
make it pretty ornate, which is what we're
actually going for if I press like so. And then pull it up, and then finally I can
pull this bit out. So if I press now and
pull it out a little bit, and there we go, that's
looking pretty nice and it's all fitting really
nicely together. Now let's think about
this top bit as well. So what I tend to do
is, first of all, I'll make sure
that all of these, so control select them all, are going all the way back
to something like that. Just so we're not using
as much UV space. We can delete the backs
as well if you want to. And then what I'm going
to do now is grab it all. So L shift D, Let's bring it up
onto the top of here. Now, of course, I
don't want to use this the same as this one. I don't want to do that. What I want to do is just
make a top for them. So what I'm going
to do is just grab this top and I'm going
to press selection. And then I can come to
this one and you can see that it's still
joined with this one. So all I'm going to do
is L delete vertices. Now I can come to this top bomb and then what I can
do is I can grab it, press the borne, and I can pull it down to whereabouts
I want it to go. So something like that is
where I want it to go. We obviously just need to make it a little bit more ornate now. So what I'm going to do
to do that is I'll press control and have
it going this way. Pull it up like so. And then what I'll do now is I will bring in
another edge loop. Actually control left click maybe to there and then
come in, grab this face. I'm going to press
pull it back like so. And then what I'll
do is I'll just be level off this one here. So control B, bevel it
off and there we go, that's looking nice as well. So you can see by
building this way, we're starting to, you know, really, really build it up. You can also see that because
I've already done this now, I've already got this one
that can come here and I've got these that can go
around this side as well, so really, really easy
to start building it up. I've also now got an area that
I can actually work with, which is going to be here, which I can use as
my actual wall here. So what I'm going to do
before finishing shift desks, selected shift, let's
bring in a plane. And then R, Y 90, bring it up. And then all I'm going to do with this plane is
put it in place. So I'm going to
press the S button, put it into place like so and then and's Ed
and pull it up, make sure that it's in place. And make sure that you're happy with how far back it goes. Double tap the and let's
finally save out our work. So now we can see this is how
far this needs to come out. So we'll bring that out on the next lesson to
where it needs to be. Now bear in mind that this
is going to have a balcony. So there's going to be a
balcony in here as well. Because on this building we're actually ramping up
the complexity of it. And we're actually making
it more intricate. The other building,
the coffee shop, was basically stick
windows on the side. This one, we want to
ramp up that difficulty. And we're going to
keep ramping it up until we get to
the perfume shop. Which is going to
be really, really difficult because
as you've seen, it's got a round
bit on it as well, which makes it just that, a little bit harder.
All right then. So on the next lesson
we'll get these parts in, We'll get this part in, and then we'll work on this
door here because we've nearly got everything there
that we need to use for that. Al right everyone, so
I hope you enjoyed that and I'll see
on the next one. Thanks a lot. Bye bye.
64. Framework Modeling for Structural Integrity: Welcome back everyone to Blend for the Environment
Artists Guide. And this is where we left off. All right, now let's work on this bit first before we
actually do anything else. So I'm just going to use just a single post
now to do that. I'll just come in and start with this because it is in
the right place anyway. So all I'm going to do is just press Shift Enter Selection, and just split that
off away from it. So now I should be able to grab, if I can't grab it, just add the post and then you
should be able to grab it. Control transforms, and now I should be able to come
in and bring this up. So first of all though,
let's shrink it down. Let's press tab then. And in fact, no, we won't. We'll press Tab first. We'll extrude it out
to where we want it, so maybe something like that. Now you can see this
is going to be way, way too thick at the moment, and hence why I want to press Alt H and bring back
everything including my floor. And now I can come into my post. And then again, Alt shift click, going all the way around. And then press AlternS and bring it in to
where I want it. So something much, much
thinner like this. Let's then bring it up to
where it wants to come up. So I'm thinking somewhere
it needs to come up to something just
around here, like so. And then what I'll
do is I'll press controller left click and
bring up another one. And then from there
what we'll do is we'll press Lt Shift and click. And then we'll press Enter and then AlternS and
bring it out like so. And we'll also make
sure that offset even is on. And there we go. That's looking pretty nice. And now finally
we'll have a couple of like these things on here. So what I'll do is I'll
press control R two, left click, right
click, control B, level them out, and then Enter, and then alternates and bring those out not as wide as those. So something like that I
think will look perfect. All right, that's that bit. Now what we can do is we can start filling out
this bit over here. So what I can do is
I can press Shift D. I'm going to bring it all
the way over to this side. You can press old D as
well if you want to, or you can use
your asset manager if you've got the
parts in there. We don't need to worry about
this bit on the inside, because on the inside here it's going to be the butcher's
shop, of course. So I can pull it out a
little bit further like so. And then what I'll do is
I'll grab another one, so shift D and then
pull it out to here, so it's roundabout
in the middle. And then what we can do now,
we can grab this part now, we'll just press Alt D on this one just in case I
want to change this one. So I want to bring it roundly, Z -90 Let's press
control three on the number pad and let's
put it into place like so. And y, let's squish
it up a little bit, put it into place, and let's
also then pull it back. So there we go. That's pretty nice. Now let's surpress shift D, pull it over into place like, So there we go, a thing that's looking pretty
good all the way around. Now let's think about bringing them over
this way as well. What we'll do is we'll
put them on top of here. Old or shift again. This one if it's not got
your orientation there, better off just deleting
the one you created. And then right click and
set origin to geometry. And then we can press Alt D and bring it over, put
it into place. And then a D and bring
it over and put it into place so you can see how quickly and easily
once you've got them, it is to build those out. Now for these, let's now go in. Before we do anything, let's bring this one in first and put this one along here, so all I'm going
to do is old D, R, Z -90 Spin it round, Maybe we can get away
with going over the top. So I'll just press seven, go over the top, put it into
place where it wants to go. So I'm going to put it roughly, so we've got the same
amount each side, and then and Y, and then pull it in and
then fit it in like so. So there's very little
UV wasted space. And I'm just looking now, does this want to come
out a little bit? I think it does to
somewhere like there. There we go. All right. So now what I want
to do is I want to basically bevel all these off, get the materials on there. Get the materials on
this part here as well. So just this block,
especially here. So it's just going on here. It's going to have some
bricks on this part here, sorry, on this part here, I think, and some wall
on the other parts. So let's actually do that now. What we'll do is we'll put it on material so we can
see what we're doing. Now, because I'm a bit silly, and I did forget that. It's always better to actually
not put these in yet. So we're going to have to just rewind a little bit
because what I've actually done is Old D. Now if I come in, I'll
just delete these. So I recommend we do the same. So let's just delete these off, all of these ones that
were correctly created. So let's delete
them off like so. And now what I should be
able to do is come into the. And press control
all transforms. And you can see there we've got two measures that are
basically the same. And I think that
these ones here, so what I'm going to
do is you can see I've got a bevel on there,
not one on there. So let's delete that off, and then I'll just
put that one back. I'm just going to see if I can reset the transforms
on this one. Yes, I can. So now I should be able to
reset the transforms. And this one, yes I can, I can reset is this one as well. Control all transforms. So now I should be
able to grab them all and I should be able to
reset all the transform. So control all transforms, write clicks at origin geometry. And what happened there
is just so you know, because we pressed old and
we did it a duplication that way because we didn't
actually come in and, you know, bevel, them put on the materials and
things like that. It made it really, really hard work for what we're
actually doing next. So basically before old, what we want to make sure
is that we've beveled it and we've got the
actual materials on. So let's do that now before
we do anything else. So let's grab this one here. And you can see I've
got a bevel on there at 0.3 This one, this one has, so let's grab
this one and this one. Press control L, and
let's copy modifiers. Let's just make sure
that they're on. So you can see now we've got
our bevels on this one here, you can see hasn't got one on, so I'm just going to
grab this one and this one control
L copy modifiers and then let's
come to these now. So no bevel, no
bevel, and no bevel. Let's copy this. So
control L copy modifiers. And there we go, finally them. Before we do anything
else, let's come in and bring in our
material and unwrap them. So I'm going to grab this
one smart UV project. Click okay, let's put
it back onto material. And then what we're
going to do now is bring in the material
and it's the blue painted, blue painted wood. Let's bring that in. And
now what I can do is from now I can actually grab both of these or
all three of these. Tab U, Smart UV Project. Click okay. Like so. And now I can do the
same thing on these. So I'm just going to grab this
one tab, Smart UV Project. Click Okay. And you might wonder why I'm actually
unwrapping them separately. And it's because if I
unwrap them all together, it's going to use
up more UV space. So that's why I'm wrapping them separate
because it's easier than going in then to UV map
and scaling them all up. So what I'm going to do is
smart UV project click okay, And the same for this one, so smart UV Project click okay. And now from here I can
just grab them all like, so grab this one, control L and we're going to link materials. And there we go. Now if I come in and I put
this onto my rendered view, you should be able to see
now this is what we've got and it's looking beautiful. Now what we can do is we
can go back to material, and now if you want to, you
can Alt D on these parts. Now what I'm going to do is I think I'll grab both of these. I'm going to shift
Alt D if you want to, or even use your asset manager if you want to do that as well. Now you've got them because you can add them in there and then shift and that's drop them
in the middle as well. So, there we go. Now let's think
about this one here. I'm going to have to grab
both of these again. I'm going to press Shift
D. I'm going to drag them over into place
wherever I want them. I'm going to also
put an object mode. I do find it easier
to work just to line them up a little bit
better than what they are. Line them up with this one here. So, and then finally, let's bring in this part now, shift D, R -90 Let's put
it in then into place. I'm going to pull
it back into place. You can see it's way, way too big at the moment.
Let's pull it out. And then what we'll do is
press and Y and pull it into place like so. And there we go. Now let's
come to this one here. I'm going to press
shift D and then R 90 or R Z -90 Let's press control and
three to go into that view. And let's pull this
one into place, make it a little bit
thinner and y like so. And then I can
finally pull this one back into place
wherever I want it, which will be get
somewhere around there. And then finally shift, bring it over there. All right, so that's
pretty much built out. Now I want to do is
think about our walls. So I do want to split those up. I'm going to do that
before finishing this. So I'm going to come in,
grab this wall selection. Grab this wall selection. And then what I'm
going to do is I'm going to split this wall off. So you can see we've
got this wall, This is split off, but I
also want this split off. If yours is not split off down, just do what I'm
doing on the top one. So control, bring in
an edge loop and just bring it down to the post.
Do the same on here. And then what you
can do is you can come in with face select, grab this one selection. Grab this one selection. And now all of
those are split up. Now, I don't want to put
any materials on this one. And the reason is
because I'm still going to be booleing
this one in, so I've just got
to leave that one. So on the next lesson then, what we'll do is we'll get
our wall material on here, brick material on here. And then we should start
be able to build this out. But it's looking really,
really nice and really starting to come together
now. All right everyone. Let's save it out
before we continue, and I'll see you on the next
one. Thanks a lot. Bye bye.
65. Applying Consistent Brick Patterns for Authentic Walls: Welcome back everyone to Blender for the
Environment Artists Guide. And that's where we left off. Now let's come to this one, and what I want to
do is I want to change this to my brick. So if I put in brick like
so let's change it to that. Let's then come to
this one and we'll put this one as wall like so, so wall gray. Let's
put that one on. And I think for now that's
all I'm going to need. So all I'm going to
do now is come to, this is going to be bricks. So we might as well
give it bricks or grab this and this,
grab this one. Press control l link materials and then what I'll do is I'll grab this one and this one
control link materials. Now what I want to do is
I want to come to this, I want to go over to my UV
and of course I want to make sure that these bricks are the same as what
I've already been using. So what I'm going to do is just pull this down a minute and I want to put those up like so. And this one. And this one. Now, the one I want
on its coffee shop. And I want to place that on, because I'm going to use that then to basically make sure that these are
scaled the same way. So let my coffee shop load up, and here's my coffee shop. And what I want to
do is I want to base it on these bricks here. So you can see
these bricks here. If I come to this part here, you can see this is the sort of scale that we're
actually looking at. Now, let's see if we can get
these to be the right scale. So all I'm going to do is
I'm going to grab this one. I'm going to come to the UV. So press tab A. Let's first of all
spin it round. So A over the other side, R 90. Let's spin it round. And then what we
should be able to do, I'm hoping is if I
come grab this part, press shift D like. So bring it all
the way over here. And now I've actually got
that piece to work with. So now I can
actually have a look and make sure that
these are okay. Now I can see that
these are a little bit stretched or they do
look like that to me. So all I'm going to
do is press control, lay all transforms, right. Click, Set Origin Geometry tab, Unwrap, and now let's
spin it around, so R 90 and then
let's make it much smaller on the UV and let's get them to be around
about the same size as these. You can see the steel
a little bit big. So if I make it a little
bit smaller, keep going. Sorry. Pull it out a little
bit, and there we go. Now they look about the
right size as those. They don't need to be perfect, but they do need
to be relatively, you know, same as
the right size. Now if I come in and
delete those out the way, and what I can do now is I can grab this one and this one. And then what I'm going to do
is press tab wrap like so. And from there then
what I can do is I can now get these to
be the right size. So you can see at
the moment they're all coming in kind
of the wrong size. Now what I would normally
do is bring them all together and unwrap
them all together, and then go up to UV. And what I'm going to do
is average island scale. But on this occasion I don't
really want to do that, so all I'm going
to do, I'm going to do it basically by y. You can see pretty
much this one they need to be if I
unwrap these now, so on wrap you can see
now if I bring this in, spin it round to 190
and now I can bring it in more and more and more and make sure that
they're the right size. You can see I can
also then come in G, Y and then just place those into where
they're going to be. So we've got that little bit there and a little bit
on top that's perfect. That want, maybe
you can see that we need a little bit of
this grout on there. So all I'll do is
press tab S and Y and just shrink it
back a little bit. And then you can see now we've got that little bit of grout, a little bit of bricks
poking through there. Don't really want
those, so very finesse. Let's pull it down.
Something like that. Still got a little
bit of difference. So S and y pull it out and
it is a little bit fiddly. But you'd be surprised. It looks so much better if
you get it right. And once you get it
right, it's done. So there we go. That's
looking so much bare. And on this one I
haven't really got to worry about this one
so much because we are going to come in
and bring in billion. And you'll notice as
well that I don't even need to really worry
about lining these up. We will line them
up a little bit better once we've
brought our billion in. Now let's come to our other
wall. This one's really easy. We can grab all of these
press tab press and unwrap. And then just make them a
little bit bigger, like so. Because the thing or smaller, let's make them a
little bit smaller. Because the thing is
about the walls is they've got no brick texture
or anything like that, which makes it
really, really easy to work with. Now
we've done that. What I think we should do now is actually work on
bringing this part out. So let's go back to modeling. And then what I'll do is I'll hide my coffee shop out the way. So let's hide that out the way. And now we can come to this bit. So what I want to do
is I want to pull this out enough so
that it comes down. So the easiest way to do that is just to grab
the bottom of it. To grab the bottom,
press the born and pull it down like
so, into the floor. And then we can see how far
we need to pull it out. So this is going to
have to come out now. Probably to weigh this
point on this is. And then from there
what we can do is we can actually build this across. Now put in our window, that's going to come out here and all that other good stuff. Now we've got that in though, let's come back now. To this part here. Because
what I want to do is I want to make a start
on this actual door. And now I should have
enough actual parts in here to actually do that. So what I'm going to do is I'll come and put the post in first. So I'm going to sit my post on this bottom step and have
another step going up. Again, we're increasing
that intricacy of the actual built. So let's come to our steps. Let's make sure we've
got our step selected. So select your steps,
shift as custom selected. And then let's also
put an object mode. And then what I'm going to do is I'm going to press Shift A, bring in a cube. So let's bring in
a cube like so. And again, what I
want to do is I want it to be sat just
on top of this. Now, I'm not sure where
it's going to go yet, but what I want it to definitely do is be sat on top of my step. So something like that and
then bring it into here. And I think also it needs
to be much, much smaller. I'm thinking, actually, yeah, maybe thinner. Let's
make it thinner. So and X, let's make it
a little bit thinner. Pull it into place
somewhere like there. And then what I'll do is
I'll come around the back, put on my ghost or x ray. And then I should be
able to come in and grab that face and pull
it all the way back. So if I turn it off
now, I've still got it grabbed just into
the wall like so. All right, so we've got this
so far that's looking good. And now I want to do is
want to make sure that this is actually sat
on this top step. So the way that I'm
going to do it is I'm just going to grab all of this press and X and just
sit it onto that top step. Because then it's
going to be a bit easier to understand how
it's going to go now. You can see this is way,
way too thin at the moment. So what we need to
do now is come in to this bottom step like so grabbing this
side and this side, then all I'm going
to do is press Enter and X and pull
those out like so. And this then is going to
sit right on top of there. Now the thing is, what
we need to be careful of here now is that we've
measured it out properly. So is our guy going to be
able to walk into this shop, or is it going to look
a little bit too thin? I'm going to say at the moment it's probably
a little bit too thin. So what I'm going to do
is I'm going to grab my steps and X pull it out, grab my post, pull
it out to there. And then finally, let's pull out this bottom step so
we can grab both of these like so S and X
and let's pull them out. And don't worry if
we get this wrong, because we can just
recreate our steps again. Anyway, that's no problem. It's a simple cube at
the end of the day. All right, from there then let's now think about
these actual steps. So what I'm going to do is
I'm going to bring this down, so I'm going to
grab the top of it, bring it down roughly
to roundabout there. Then I'm going to
press and pull it up. And then finally what I'll do is I'll pull this bit back now. So if I come in, grab this top, pull it back like so. And now let's think about
bring in just a couple of, you know, intricacies
to this part here. So I'm going to
press control two, left click, right click. And then control B and
pull it out like so. And then from there
then I'm just going to reset the transforms now. So tab control lay
or transforms, right click the origin geometry and now come into these parts. So I'm just going to
grab this one and this one press the eye button to bring them in hold in shift, and then pull them
both out like so. And that's looking
absolutely fine. And now let's bring them
all the way up into here, so then we'll see how far
they need to be out or in. So I think they're a little bit too far out at the moment. So if I come in now
and I'll grab the top, top of the press the bond, bring it in very slightly. And then press and bring it
all the way up to the top. And you can see this is
how far it stuck out. So this needs to go
back a little bit. So all I'm going to
do is press Tab. I'm going to pull it
back then into there. So it's just going
under there like so. And now what I can do is I can pull these steps back as well. Because at the moment, I think these are a little
bit too far out. So if I pull this bag into place now, can
he stand on there? You know what, I'm
going to actually, I think it's going
to stand on there, This is going to be disappeared. So I think I'm going
to pull it back just so it's just in
there past that point, and I think that's perfect. So now we've got the right
dimensions for here. What I want to do is
now just add one more. Little bit of intricacy here. So control law, bring
it up and I want it, Jaws to be roundabout there. Control B and then alternates like we've been
doing all the way along. Let's have
a look at that. Let's put offset even
on and then alternates, bring it in a little bit, so it gives it
that little bit of a bevel there. All right. Now, on the next one, then what we'll do is we'll
actually bring in bevel, we'll start being bullying. We'll start bullying
this in I think as well. Before we finish,
I'm just looking, is that out wide enough? I think I'll make this come
out a little bit more, just a little bit more
of an edge on there. So all I'm going to do is just grab in this one and this one, and then next, pull it out, holding the shift just
a little bit more. There we go, that looks better. Alright, so on the
next one I was saying, what we'll do is we'll
bring in then our Boolean. We'll bring our
Boolean round to here. We'll get this set back. And then we can
actually start creating this door in here, let's say. That will work and
I'll see on the next. And everyone, all right,
thanks a lot. Bye bye.
66. Modeling a Detailed Victorian Bookstore Door: Welcome back everyone. To blend for the Environment
Artists Guide. Now let's bring in our door. Now with this door, what
I'm going to start with actually is a cylinder. And the cylinder I'm
going to leave, in fact, I'll put this on 20, I think it'll be
easier to manage. And then what we'll do is
we'll rotate it round, so R x 90. Rotate it around, make
it a little bit smaller. Because obviously
it needs to come at the side near enough
where these posts are, In other words, this bit here. So this bit, as
you can see here, is the bit where
the actual door end is going to come. So I
need it before there. So I'm going to press S
just in front of there. And what that means
is then I can actually put a post
going around here, so maybe even a little bit smaller or
something like that. Next of all, I want to put
it where I actually want it. So it's a little bit hard
to judge at the moment. If I press one to go
into front of view, you can see this is roughly
where it's going to go. I think what I'm going
to do certainly is press essence Ad and
just squish it down. So this door then is going to be this kind of shape and
that's going to look good. I think from here what we
should do is we should make it, first of all, a
little bit thinner because I find it easier
to work with that. Pull it out then. And then
what I'm going to do is I'm going to come in and delete
the front and the back. So shift select each one, delete faces like so. And then I'm going
to come to the side. And just where this
point is going down, I'm going to come in, Control
select. Control selects. And I can see it's
basically going to split this in half, delete faces. And from there now
I should be able to come in and grab
each one of these. So this one and this one. And then if I press sorry, one on the number pad, now I should be able
to pull this down. So if I press E and Z, I should be able to
pull it down to there. And that's making
my actual door. Now from there we
can see our guy, if we grab and putting
more in the center. Now it's a nice door. Now we should be able to walk in there. But what I'm actually
going to use this door for as well, before
actually, you know, creating the door is to actually create my Boolean as well
to our far back of one. So what I definitely
want to make sure is that if I press one, that this for press tab, these two bottom
parts are coming down further than
my actual step. Because I want to make sure that I've got my step going
all the way back here. And I'll show you exactly
what I mean with that. So first of all, I'm
going to make it so it just comes down, just
below this step. Then I'm going to press
just to fill that face in. And we should end up with
something like this. And now let's fill
the rest of it in. Alt shift click and then
Alt shift click and, and then what I'm going
to do is press Tab, and then and Y, and let's pull it back like so. And then let's pull
it into place. So I'm going to
go that far back, I think, but we're probably not going to go that
far back with our door. But we've still got
the bolling in place just in case we need
to do that now. The other thing is, yeah, I think this actually be okay. It's just the height
I'm concerned with because the door
obviously is in there. I think what I'm going to do is make it a little bit higher, so I'm going to pull
it up to there. And then what that means
is they'll have to come down now and grab this face. So three, grab the
face and let's pull it down once again like so let's
get into the perfect place. So that's looking
about right now. Let's press control
A all transforms right clicks at origin geometry. Now let's come to this wall
and we'll do the same thing. So control all transforms, right clicks at origin geometry. And now let's come
in add modifier, and we want to
generate a Boolean. And the Boolean of course, is going to be this one here. So once you've clicked that, you should see a little
yellow outline going around. That's perfect. So let's
come in and press control A. And now what I can
do is I can come in and I can hide
this out the way. I don't actually want to
delete it out the way. And the reason is I don't
want to delete it out the way is because I
can use it for my door. As we build further, what I'm going to do now
is come to this wall, I'm going to grab it
going all the way around. So Alt Shift and click like so. And then what I can
do is press E and Y and just pull it back then
wherever I want it to go, because it's made a hole as
far as I need it anyway. So that's absolutely fine. Now let's press tab Ltg. Bring back the actual door. And from here now let's
actually create the door. So what I'm going to
do, the easiest way to do this is first of all, create the pot that's going
to go around the door, so in other words, the
wooden frame to it. So what I'm going to do is
just grab the front of it, press Shift D and duplicate it. And then I can come
to the back of it, L delete and vertices. And now I've got my
door first of all. Then let's press control. All transforms, right?
Clicks at origins geometry. Let's then press one. And
then what I'm going to do now is create this bottom
section of the door first. So I'm going to come in and press one. I'm
going to press Tab. I'm going to press and
bring it in like so. And now we've got
a bottom section and we've got this
bit going around. So that's looking pretty fine. Now I'm going to do
is press P selection. Split it off like we've
done before many times. And now we have to think about how we're actually going
to create this door. So I think I'm going to
create some windows in here, so in this bit here. So I think I'll focus
on that bit first. So all I'm going
to do to do that is I'll come in first of all. Grab. I use my knife
actually it'll be easier. So if I press K,
I'm going to come in to round about here. And then pull it across,
make sure it's straight by pressing A just to
make sure it's straight. And then press Enter, and
there's the first bit. Now from here, what I want to do is I want to split this off. So I want to come in,
grab this bottom face, and press P selection.
Split it off. Now let's focus on the
top part of the door. So if I press Tab, what I
can do is I can come in, press K, grab this top bit
A, right in the center. Bring it down, Enter.
And there we go. Now we're actually getting somewhere with our actual door. So what I'm going to
do from here then is I'm going to grab
both of these faces. I'm going to come in there
and press and bring them in. So like so I'm going to make
them a little bit chunkier. And then what I'm going to do
is now I'm going to press, in fact, yell, I'll
split these off as well. So Selection. Come
to them again, so select them,
grab them both with a and then I again.
And there we go. Now you can see that we've got a nice kind of rim
going around here. And we've got one going
around here as well. So that's perfect. I'm
thinking yet. That's okay. Now let's come to this bit. You can see how I'm basically
breaking down my door, and it does make it really, really easy doing it that way. Now this door, it's going to be, it doesn't really need
a middle section. And the reason is it's going to open one
way or the other, albeit is a big door, it's still not going
to open in the middle, so we don't really need
a middle on there. So what I'm going to do
from there then is I'm going to come to this
section controlar, bring in one edge loop,
left click, right click. I'll put that there.
And then what do is I'll come to
the bottom control, bring it down like so. And then from there then what I can do now is
separate this part off. So if I grab this
part selection, separate it off,
come back to it. And now I can do is
bring in some edge loop. So control, let's bring
in some edge loops. Left click, right click. So now what have you
just done there? It looks an absolute mess. I hope we managed
to follow along. But you will see
if I come in now, it's going to make
perfect sense. So let's come to the outer
part of the door first. And what we'll do is
we'll just split off. So I'll want to split off this, this and of course the center. So right click, mark
scene from there. Then what I can do is I can
come in with L, L, and Y. Split those off, and then
let's split this one off. So L, Y, now let's
grab them all. So A to grab them all. Pull them out with so
extrude and there we go. That's the first bit. Now
this is basically like, this won't open, this is the door jar, what
holds the door in. So from here then I
can press control A, all transforms right click,
shade, auto, smooth. And then let's come in, bring in a modifier and we'll bring in a bevel naught point naught
naught three, like so. And there we go.
That's the first part. Now let's think about the
top part of the door, which is like this wooden
part going out of it. Again, I'm going to split this
probably down the middle. I'll split it down the middle. So I'm going to grab this here and I'm going to grab this one. This one. This one. This one. This one and this one. I'm going to right
click and I'm going to mark a seam from there. Then I'm going to grab this one and this one, right click. Now let's split it off. If I come in, I
can grab this one, I can grab this one again. If you're not sure which
ones you split off, always go Y and H and
hide them out of the way. Then this one and this one Y and heat
hide them out the way. And then this one Y and you know, everything
is split off. Now from there, then
let's press oltatee. Bring back everything
to grab everything. And then let's pull
those out into place. So randabout there.
And then from there I can do the same thing
as what I did to this one. So control all
transforms right click. So origins, geometry,
shift, select this one. Then control L, and we're
going to copy modifiers. And there we go, that's
the next part of the door. Now let's come to the
last part of the window. And these are going to
be glass, obviously. So we want to split those off. So let's split them off, let's pull them
out a little bit. So something like that. And then let's hide those out the way. Now let's come in and
add in these parts here. So I want to split them here, here, and here, and here. Here, and then here,
here, and here. Right click mark scene. Now let's split them off. So all I'm going to do is just going to come in now with L, and L, and L and L, Y. Split them off. And then
I'm going to press A. Pulled them out like so. And finally, now
let's press Sir. Control all transforms, right
click origin to geometry. And now let's join
them with this. So control L link
copy modifiers. And let's now finally come
back to these windows. So all tach, grab both
of these windows and let's just pull them back a
little bit like so really, really easily as you can see. And now what you
can see is we've got this bit and this bit left. These are going to be
wooden parts going down, but you can see just how easy it is now to build this
actual door and how easy it will
be to put it into place and build around
it. All right everyone. So let's save that out
and the more we do this, the better you're
going to get it. And honestly, if you
messed up the coffee shop, your actual bookstore is
going to look better. And if you mess
up the bookstore, you can guarantee your butchers
is going to look better. Because the way we're
working along these, we're breaking them
down intersections and you'll get better with
everyone that you do. So don't give up. Don't give up. Just keep going with it,
even if it's a mess, you can come back to them later. Just carry on building these things as we
get more intricate. All right everyone.
So I hope you enjoyed that and I'll
see on the next one. Thanks a lot. Bye bye.
67. Crafting an Entrance Archway for Victorian Libraries: We'll come back to Blender for the Environment
Artists Guide, and this is where
we left it off. All right, so let's work more on our door then and
get that actually finished. So the first thing
I'm going to do is grab these two parts, and then I'm going
to press a and all I'm going to do is just extrude them past this
actual window frame there. Then what we'll do is
we'll come to this part here and all we're going
to do is first of all, make sure the split up so I'm going to come to each other one. So shift select each other one, press the Y button A
to select them all. And then pull them out like so, holding the shift bone,
just making sure that they're further back than
the front and the bottom. All right, so this is
pretty much the door done. So what we need to
do now is I can join it all together
and then level it off. So let's join all
of these parts. You can see here, we've already leveled
these parts South, we've already leveled
this part off. So all I can do is I can grab it all and then grab
these parts last. So grab this part. Last, press the G button just to make sure it's all coming with
it, which it's not. So I'll grab the
window, grab this, grab this part last G again, and I will grab these parts. So let's press again. There we go. Grab them all. Alright, this part last
then let's press control J. Join it all together.
Right click and let's shade auto Smoove. And we should end up with
something like that. The devil, for some reason
has been taken off, and that's because
we selected it last, which was the wrong way round. So I'll select this part last, press control J, and there
we go. Now right click. Let's shade auto, smoove. And there is our beautiful door. Alright, let's press control. Or transforms, right clicks
the origin to geometry. And now it'll do is we'll just heading over to our material. And then what I want to
do is I want to bring in, I think we'll bring in
dark wood on this one. So let's do that first. I'll
come on over to material. We'll bring in some dark
wood, so let's search for it. So dark wood. Let's also come in and
unwrap everything. So I'm going to press
tab A to select it all Smart UV
project. Click okay. And then the one that I want to change is obviously
this window here. So all I'm going to
do is click plus down arrow and we'll
look for glass. And it's the one that
says glass lit windows. Let's click that on. And
then finally come in, select these two faces. Click a sign, and there we go. And all we need to do
now is unwrap these. So I'm just going
to head on over and not just make sure I've
gone both selected, so both selected head and
over and now to UV editing. And then all I'm going to
do is grab one of them, press and I'm just going
to move it there slightly. Grab the other one L, and then and move
it over this side, slightly like so.
And there we go. Let's have a look at that. And I'm still not
happy with that bit, so what I'll do
is I'll grab them both and Y and bring
them down a little bit. And there we go there
looking much better. A little bit of dirt
on top of there, and that's looking
absolutely fine. All right. So now, last thing to
do is this part here, this is going to
be painted green. So let's click the down
arrow, look for green. And what we're looking for is wood painted green. So
that's the one we need. We've got it at
the moment on blue this and I think blue painted. Yeah, We definitely
don't want it blue. I think we've done
the the cafe blue. So a little mistake on my part. What I'm going to
do is I'm going to, first of all, I'll
unwrap this part. This part's unwrapped, I think. Let me just have a
look, make sure it's unwrapped. Yes, it is. The one thing that we do need to do is I need to grab these. So L, L, L, and L, and either straighten them
up the way I showed you, or Alt to actually straighten
them. And there we go. And now what I can do
is I can come back to modeling now and I can
come to these parts. Now I need to bring
in another material. I think because I don't
think I've got this on here. So I actually will
go to Asset Manager and we'll go to our wood. So where is our wood? Here it is, and this is the one we want,
Green painted wood. So let's zoom out.
Let's come to this one. Press the little dot
ban on the number pad, and then just drag
and drop it on there. And there we go. That is the
wood that we actually want. We also want the wood
on here as well. So all I'm going
to do is click on this one, click the down arrow, Click green, tight, green,
green painted wood. And then what we're
going to do is we should have all these
selected already. Just click a sign,
and there we go. That's exactly what
we're looking for. All right, so I'm just
wondering about this bottom. Do I actually want this
bottom to be green as well? Maybe with the bottom. So maybe with this bottom. Because generally
generally the bottom of it would open with the door. So it might go into
this jar like so, but it would probably
be made of this wood. So just click a sign
with the wood like so. And I think that's actually
looking better now. All right, so now let's come in and just grab each of these. So I'm going to
grab all of these, like so quick and
easy to fix anyway, even though I made that mistake. Let's grab all of these like, so finally grab this one, press control L, and we're going to link materials like so. And there we go. And now it's
looking tons, tons bare. All right, So now
what I can do is I can take my door back. To here. So something
round about there, maybe. I think that looks
actually fine. Maybe needs to be pulled
out a little bit. We'll find that out in a minute. At the moment, you can
see I double tap the, we've got a nice, you know, arch going around there. And what we need to do now
is bring in this next one. Now we do need these
to be kind up here. So these parts need to
be kind of up here. You can see is walking in there. And I need one on each side, which means that we might need
to move this a little bit, but that's fine, we'll
actually do some work on that. And then finally,
we'll put actually a part in here, get
this other side on. And then we should be nearly
finished with this doorway, which means we can move on
round to the other side. So let's go back to modeling, and then what I'll do is
I'll come to this one. I'm going to move it
over a little bit. So let's move it over just to the inside of there so you
can see it meets here. And then what I'll do is
before doing anything else, I've got my center point here. So all I'm going to do
then is bring in, in fact, I will use this, so I'm going to use
this part here. So we'll use that. I think it'll make it a
little bit easier. So select this one. Control Sl, Control select. Control select. Maybe not this one here,
just here like so. And then I'll do, we'll press
Shift D and bring this out. Then what I'm going to
do is press P selection. Tab, select it again. Control or transforms,
right click, set origin to geometry. Finally, then let's press A. We're going into edit mode, and then and y and
pull this out like so. And now we need to do is
give this some depth. And the easiest way to
do that, as you know, is come in to add modifier, generate, and a solidify. And then what I'm going
to do is even thickness. Now we can see on this one that it's not working properly. And the reason that's
not working properly is because the normals won't
be facing the right way. So again, it's either down to
transformations or normals. They're normally
the main things. That means that
any modifier won't work or any UV's
for that matter. Pretty much anything in blend. If it's not working properly, make sure that
you've checked your transformations
and your normals. So what I'm going to do is
I'm going to come over to this little down scale here. And then I'm going to
put face orientation on. And here we can see our problem. So if I come in and press
tab A to grab everything, press Shift, you can see now it turns around and it's
all really, really nice. Let's go in then and
just turn that off. And then what I can
do is now I can pull this out a little bit
this way, I think. And let's pull it
back into place. We're gonna pull
it back into place into here. Just into the wall. And I just want to make sure that wherever I'm putting it, you can see that it's
right into the wall there. We really, really
don't want. That's all we're going to do
is turn the offset, bring it in a
little bit like so. And then what I'll
do is I'll make it a little bit thicker,
going this way. Something holding the shift. But so now you can see we do have a little bit of a problem
here in the fact that, first of all, this is going back further than this, and I
don't really want that. So what it means is I need to pull this back a little bit. So let's pull this back
before we do anything. So let's pull it back
into the wall like so. And there we go. Now we can
see that it's in there. So you can see this part
here is actually in there. We've got a little bit
more room for maneuver if we need to pull
it out a little bit, which I think we will. So now we can also see the next problem we've got is they're not actually
into the wall, so this isn't coming down. There's a number
of ways of fixing this, but you could fix it. Why? You've actually
got this solidify on. I'll grab both of these. I'm going to press E and Z, pulled them down like so. And then what I'm
going to do is press and X and pull them out. So now we can see that
they're not quite bending, So just make sure
that the bending nicely following this along. And there we go. That's
looking pretty nice now. Now what I can do is I can use this and I can come
in and first of all, let's actually give
it some colors. I'm going to press
Tab Smart UV Project. Click Okay. The one thing that I need to do is
also level this off. There's a bevel
should be on here. So what I'll do is
I'll grab this, grab this one, control L, link materials control L. And then we'll copy
modifiers as well. And that should level that off. Now what we can do is we
can add in the mirror onto this one, a
mirror from here. Add modifier, generate mirror, let's put it on the Y. And let's also make
that the orientation is where the cursor is. So right click, set
origin 23d, cursor. And now we just need
to turn off the Y. So turn off the Y,
and there we go. Now you can see it's really
starting to come together. Now we need to do is
fix this part here. So all I'm going to
do is grab my steps. I'm going to press and X
and pull them in like so. And they should, by the time I've finished,
just fit there. And I just need to
pull this one out now. So I've already got the
selector which is really handy. So all I'll do is press S and X. Pull those out, pass there. All right. Looking really good. Now what we need to do
is we need to think about how far this step
is going to go back. So that's one thing that
we do need to think about. So if I come round, I should be able to then grab the
backs of these steps. So I'm going to grab
this one in face select. So this one, this
one and this one. And then come round
here and grab this one. And I'm just going to see
where they come back to now. So if I pull these back, they're coming right down
to the bottom of that door. Now let's just make sure that everything's come
along which it has, so everything's
looking good there. And then what I can
do is now I can see that they'll need probably pulling out a little bit or we'll need something
in place here. What I tend to do with
something like this is I'll just put a stone slab
over the top, maybe. So yeah, I'll put
a stone slab going over here and then
over the front. And I'll show you how we do
that on the next lesson. Alright everyone. So I hope you enjoyed that and I'll
see you on the next one. Thanks a lot. Bye bye.
68. Adding Texture Details to Enhance Entrance Realism: Welcome back everyone
to Blender for the Environment Artists Guide, And this is where we left off. All right, so now let's do a
little bit of work on here. So let's come in and what
we'll do is we'll grab this, we'll press Shift D.
And then what I'll do is I'll press P selection
and just split that off. Now I'm going to do is I'm just going to work
on this part first, so I'll just hide this part of the way because I can't
select it the moment. And what I'll do
is I'll come into it and I'm just going to
pull it out slightly. So if I grab this edge, I'm going to pull it
out very slightly. And now if I press salt, I should be able
to get into there. All right, so we've
got the top slab now. We do need it going this side. So what I need to do is I need to put an edge loop
going down there. So I'm going to press
control, er, left click, and just bring it to the back of this part here like
so. And there we go. And now we'll do the
bottom part as well. So if I come to the bottom part, all I'm going to do then is I'll probably need
another edge loop, so the stone slab
comes up to here. So yeah, let's do that. Let's bring in control our
left click and bring it along. So I'm going to bring it holding shift right to the front
of there, like so. And now what I'm going
to do is I'm gonna come in and grab this face, this face, this face, this face, and this face. I'm going to press Shift D, and then I'm going
to press Selection. And finally, what I'm
going to do then is I'm going to grab this one
if I can, which I can't. Again, sometimes
you can grab it. If you put it in wire frame, you might be able to
grab it that way. You can see I can grab a
little bit more there. And there we go,
I've grabbed it, let's put it back
in object mode. And then what we'll do is
we'll grab this edge now. And we're just going to pull it out like so. So
grab these three. Pull them out like so. All right, so now we need to
do is we now to fix these. So what I'm going to do is
I'm gonna join them together. So I'll want this
one and this one. So just these two top ones
control J, Join them together. And then you can also press
the little question mark. And what that'll do is that
I'll isolate everything. Once you press it again,
it'll bring back everything. Sometimes I like using
that rather than shift H and lth so or hiding it even. So this is just isolating it with the little
question mark. Sometimes it makes
it much easier. All right, from here then let me bring in some stone slabs. So I'm going to
press control two. Yeah, maybe four. Left click. Right click, like so. And then
I'll work on this one now. Now you can see at the
moment on this one, we definitely want to get
rid of this edge here. But it's going to be a little bit hard to
get rid of that. Because if I come in dissolve, let's see if dissolve
works first. So dissolve edges, Yes it has, it's worked. And
then I can do it. So I can go over the top. I can hide this part out of the way, because you can also
hide things as well, even though you're
isolating him. So if I press H, I can
hide that out of the way. And then what I'll do is
I'll come in with my knife, come down, press the B
to straighten that up. And then just cut a part there. And same for this, so
click Enter like so. Now let's press controller, Bring in maybe two
stone slabs like so. And then alternate H and it'll
just bring back that part. And that's exactly what we want. Now what I want to do is I want to actually split these off. So the easiest way is just
to grab these two first. Grab this one and this one, Y H. This one. This one, y h. This one. This one. Not this one. This one. This one. This one. Y and H. And now we can
grab this one and this one, and then Y, because we know
everything's split off now. So AlternH. And the good way to test this actually,
is if you grab them all. Now come up to where it says Individual Origins,
Press the S button, you'll see that
they're all, you know, split up. All right,
so that's good. Now I want to do is I
want to extrude them up. So I'm going to press,
extrude them up like so. And get a nice stone slab that might be a
little bit too thin. Let's bring them up a
little bit more like so. And then what I'll do
is I'm going to press the little question mark
and bring back everything. So a little question
mark and there we go. That's what we're looking
like at the moment. They're looking pretty good. The one thing I would say
with these bottom ones is maybe I want to pull
them out a little bit more. So if I grab them
here and here and come around this side
and try and get in here. So shift and shift, and then all I'm going to do is press and X and
just pull them out. Now if they don't pull out, you need to be on medium point. So and X pull them out
just very slightly, just so they overhang there. So all right, this is
looking good so far. Now what I can do is I can
press control all transforms, right click, set
origin geometry, and then add, modify it. And we're going to
bring in a bevel naught point, naught
naught three. And now what we need
to do is first of all bring these up to make
them a little bit uneven. So all I'm going
to do to do that is I'll come into this one, I'll put proportional
editing on, put it onto a random, and then all I'm going to
do is pull it up like so, and extend that out all the way. And now you can
see it. Just pull some of them up and keep some of them down like so now
they're looking a bit uneven. And now I'll just
come to the back ones and do the same
thing there like so. And then finally what
I'll do is I'll come in and select everything with a and just give them a
slight randomize on there. So transform come down to where it says randomize and then let's put it on nought
point nut five like so. And there we go. So
have a look at that. That's looking pretty nice. I like that how that's come
along. Double tap the. And finally, now let's
come in and unwrap them. So I'll select them again. Tab U, Smart UV Project. Click Okay. And the one we
want, let's have a look. We want the stone, so
let's have a look. We've got stone, stone flags. This is the one we want.
Let's select those on there. Let's put it on material mode, and let's have a good
look at what we've done. And there we go.
There is our door. Now we can see that this one
here, this is not finished. So let's actually finish that. I'm also thinking about the top, so I'll put a top
on here as well. Let's actually do that first. I'm going to grab
this, I'm going to press Shift S, us to Selected. And then Shift, we'll
bring in a Cube. Let's pull it up now into place. Press the S button, make
it a little bit smaller, pull it into place, so
just under this part here. And then all I'm going to do is press S and X, pull it out. And I want to make
sure that it's first of all, behind
these pillars. And then what I'll do is I'll
pull it up a little bit, so I'll grab the
underneath, pull it up. And then control our
left click, right click. Pull it along a little bit. You can see here, it's
not quite working. So what I'll do is I'll go
back control left click, and then I'll just pull it along a little bit like so finally, then grab my bottom face and I'm just going to pull
that down like so. And there we go. All right. All looking good. Let's
then grab them both. And instead of I could
press control here, but what I tend to do as I said, is go to object convert mesh. And then what I'll do is
now you can see as well for some reason we have
bricks on there. We don't really want that. So what we'll do
is we'll come in now minus that off. And what I'll do is I'll go
to green and painted wood. And there we go. And
then what we'll do is we'll also come in and
add in a modifier. So generate a bevel, we'll put this at naught point naught three as we've
done with everything. Then we'll press
control or transforms, right click, set
origin to geometry. And finally, let's
press control L, copy materials and control
L and copy modifiers. And then finally, we'll press tab A to grab everything
smart UV project. Click okay. Now this is
all looking good on that. But we do have one
more problem in that this inner wall
isn't looking right. So we need to fix
that. We've got a black part here as well. Don't know how that's happened. But what I'm going
to do is I'm gonna come in now to this inner wall. I'm probably going
to separate it now. We can also see
that I didn't bring out that tile enough.
I don't know why. But what I'm gonna do
is I'm going to go in, I'm going to grab this tile
then and I'm going to put it against the wall without
portion and on take that off, I'm going to put this
against the wall like so. And then what I'm gonna do
now is just pull this out. So just basically
tidying up a little bit. So let's pull it out into there. Not so far that it's overlapping and then what we'll do is
we'll come now to this one. So I'm going to hopefully grab the inner part
of here like so. And if I can't
grab it, I'll just put this on and then
grab the inside like so. And then what I'm going
to do is just pull it out like so. And that's another easy way of actually doing that.
Double tap the A. Okay, that's looking good. Now let's just hide our guy out the way a bit.
So let's press H. Hide them out the
way. And then what I want to do now is select this, going all the way
around here, like so. And then I'm going to press
Y and just split it off. And then and unwrap.
Let's unwrap that. And now we can go
to the UV editing, and all I've got to
do is shrink this in now to be the same size
as these bricks here. So if I press S, you
can see we can get them roughly so roughly to the same size as these
bricks on the outside. They're looking about right. And there you go.
You can see whoa. That looks really,
really nice now. All right, so that's that bit. Now what we'll do then,
we'll go to modeling. We'll double tap the, and what we'll do is
we'll save it out. So save it out, and on
the next lesson now what we'll do is we'll actually finally start work
on this part here, so we can start
working our way round. We've already got
this block here, so I can just start, keep
working my way round. This is the hardest
part, of course, this part of the
building, this front, especially especially
how this part goes back, especially up near the top here. It's pretty complex stuff. I think what we'll do is
we'll work our way round. First, create this
actual window, and then I'm just looking how far this needs to
come across because I think at the moment
this needs to come. Yeah, I'm thinking that this
part will come out and then this part is going to
go back straight down. So this is Yeah, I think we'll sort
that out first. So I'll show you exactly
what I mean. All right. It's easy to show you
rather than explain it. Thanks everyone and I'll see on the next one. Thank
you. Bye bye.
69. Brick Detailing for Entrance Steps: Welcome back everyone
to Blend the Fall, The Environment Artists Guide, and this is where we left off. All right, so now let's
think about this part here. So as we go round, it's going to go round and it's going to follow this wall
straight down there. However, this is not
just gonna end here. So the first thing I want to do is just come into this part, grab this face and just pull
it back into the wall there. So this is going
to be going along here and it's going to
have a post in here. I'm going to straighten
all this up. Don't worry. Then
what I'm gonna do is I'm gonna put an edge
loop along here now. So I'm going to press controller,
bring in an edge loop. And then what we're going to
do is we're going to realize that the bottom off here is going to have
a post coming over, which means that this piece here is not going to be there. We're basically going to
build out apart from here. So what I'm going to do
is I'm going to come in, I'm going to grab this
piece, this piece. And this piece, you can see
it goes all the way back. And this bottom piece as well, I'm going to press Delete
and faces like so. And then what I'm
going to do is I think I'm going to bring in
an edge loop. So control. And I'm going to bring
it all the way up to roughly where this starts. You can see here's
where it starts. And now what I can do is I can fill in this part and this part. So shift, select
them, press the F, but, and we should end up
with something like this. Now of course, we can see that
this is not looking right. We need to bring in this part and this part, we need
to bring them down. Now generally when
I'm doing this, I don't worry about, you know, how it's going
to all go together. So in other words, I'm not going to try
and fill anything in. I'm going to put these
walls in separate anyway, so I'm just going to press and Z and bring it down
as you can see. And then finally just come in face select and bring it out. All that I'm doing here really is just getting it
set out to the way that I actually want it so we
can see now it's got a beautiful kind of look to this now how it's
actually all going to work. And that is what
I'm looking for. Not only that
though, it gives me the dimensions to put the balcony in and
put the window in. And that's what's
important to me. Now, the one thing we did forget before going on is
this part here. We need to actually come
in and give this some, you know, bricks or
something like that. What I'm going to do
is I'm going to press the question mark and
isolate it out again. I'm going to come round
to them, to the back. I really don't need the back, and I also don't
need this bottom. So I'm just going to
select all of these. Now if you put it in
your Asset Manager, maybe you want to
keep these bottoms. That's completely up to
you elite and faces. It just makes it a little bit easier to actually unwrap these. Now the tops of these, obviously you're not really
going to be able to see them, but you don't want a see
through gap behind them. Because you might actually
be able to see through the steps and that's
not something we want. So what I'm going to do
is I'm going to control slick going all the way
around the outside first, so all the way around here. So I'm going to right click then and I'm going
to mark a seam. And then what I'm going to do is come all the way around here. Here, right click then and
mark a seam from there. Then I'm just going to
split off this middle part, so L and then y, split it off. And now finally, let's do
the same thing of this one. So control select,
control select, right click, mark seam. And then finally we'll
come in and we'll just separate this off. So if I press L on this, I can press Y, and then
it's all separated off. Now let's come in and
bring in some material. So I'm going to grab it all. Smart UV Project. Click Okay. And then let's
come in with materials, and we're looking for brick. So just type in brick, this is the one that we want. And now we can go
over, first of all, press tab question mark
to bring back everything. And now we just need
to make sure that it's all lining up with
these bricks here. So I'm going to go
over to UV editing. Here we are. Let's press
the little dot button, and then what I'll
do is press tab 90. Spin it round first of all, and then press the S button, make it smaller like so. And I'm just wondering,
these bricks, they look a little
bit long actually. So all I'm going to do first control all transforms, right? Clicks at origin geometry. And now let's try
unwrapping those again. So smart UV project. Click okay, or 90. And then let's bring
it in, so the S one. And now you can see
there, looking much, much better, the size
that we want it. Now, the size I'm
going to bring it to is going to be
roundabout there. And again, I want
to make sure that, you know, the tops and bottoms
of these are right size. So in other words,
if I press S and Y, let's deal with the
bottom one first. So S and Y like so and then
and Y a little bit more. And then and y, Let's pull it up very
slowly, like so. Now we can see they're looking
good, except this one. Let's come into this one now. Long in the press is,
let's have a look. Y a little bit smaller,
maybe too big. That one now there, think roundabout there
and then and y there. I think that's about right. All right, so that's
looking pretty good. Now you can see all of that
is level except this one. Let's deal with
that again and y, let's move it up a bit. Like, so. And there we go. All right, that's
looking perfect now. So now finally we can
actually work our way over. So let's first of
all go to modeling. And what we'll do then is we'll get in this top bit first. So I'm going to grab
this post here, I'm going to press Shift D, bring it over to the other side, and let's drop it in place
somewhere like that. And then what I'm going
to do is I'm going to use these parts next. Come to these parts and
I'll bring those over. So let's bring this over. I'm just making sure that
this is in the corner. You can see here. It's not really in the corner
of this part, which means I have
a choice to make. I either move this down, so I could move these
down, for instance. Let's see if we should
move these down. So I'm just looking at this, Where is it coming out to? Or we could move it over. It's not in there
properly, as you can see. So actually, I think
the best way to do this is to grab
this one. This one. This one. This one. This
top one. This bottom one. And then this panel. And
if I press Gene out, does it all come with
it? Yes, it does. Which means now I can pull it back into place a little
bit and get that this part, especially in that corner,
that's what I'm looking for. Making sure if I
double tap the A, that the wall then
is just there. I can also pull this
wall back if needed, which is really, really
handy as you can see. Because it means now I can line it up with this wall as well. So double tap the A,
then there we go. And now what we can do is we can grab this post and press shift D. And I can bring it over and place it on top
of there, like so. And then what I can do is I can bring it over
and out to here. So shift D, let's
bring it over to here. So just make sure
that it's actually, you know, poking out
of this edge here. Let's bring it over a
little bit more like so. And then what I can
do now is I can come and put this one on. So I'm going to press Shift D, bring it over and this
one I'll have to re wrap because I am going to be stretching it out a little bit. I could either do that or delete that one and
grab this one instead. So shift D, let's pull
it into place like so. And then what we'll do
is we'll pull it out. So I'm going to press
and X pull it out, get it into place like so. And finally a U
smart UV project. Click Okay. And
that's that one done. All right, so I think
then what we'll do now is we'll actually
bring back this part. So I'll decide where I'm
going to bring it back from. I think I'll bring it back from roundabout here and
then the floor. Then we're going to
have another part on here so maybe level with this. So what I'll do is I'll
come to this part now. I'm going to press
control and it should follow it going
all the way along. So what I'm going
to do is I'm going to bring it back from, let's say round about there. And then what I'm
going to do is I'm going to press control again. Bring in another edge loop. And this time I'll want it just just level with the top of here. So left click, right click. And now finally I
want to bring in another edge loop
going up this way. So I'm going to press, yeah, I'm thinking probably
easier actually with this now if we get rid
of that back bit, because we're not going
to need it in there. So let's come in, grab
this back. Where is it? Have we got a back on this? We actually got a back bit and that's what
we'll do instead. We'll grab all of these,
and then we're going to just press Y just
to separate it out. And now if I turn this off, I should be able to
just work on this part. So if I press control
left click, right click. And now I'm going to do
is then we're going to level them out just
to the edges of here. So control B, because
it will give it a little bit of depth
hold the shift board. Now you can see we're a
little bit out on there. We're nearly to
the edge as well. So we can see now
where the edges are. So I've got this much
thickness of the wall. It's kind of an illusion. You know, there's not much
thickness on that wall, but we need something there
to just give that illusion. So what I'm now going to do, I think I'll bring them
in a little bit actually. So I'm going to press S and X, bring them in to
somewhere like that. Now this one's
fine, you can see, but this one needs
bringing in a little bit. So what I'm going to do
is I'm just gonna grab this one and I'm going to grab
this one and bring it in. And then from there
then it's obvious I'm gonna need to bring this
in a little bit as well. Now, again, don't
worry so much about, you know, whether
everything lines up right now, it's not that important. What I need to do though is just make sure that
I bring these back. So where's mine, Gist? There it is. And make sure that these line
up with this post. So I'm just going to come around here and
making sure that all of those you can see
here, it's not quite in. So I'm going to pull them back
a little bit more like so. And then why can pull
this wall back a little bit more like so. And you can see as long as you're fiddling
around with it, you can get everything
to line up really nice. And now that is in there
really, really nice. Now what I can do is
I can come in and I can grab this face and
I'm going to pull it back. And then you'll
see I can have to pull this over a
little bit more. So I'm going to do
is I'm going to pull this all the way back now. So I'm going to press, pull it back all the way
to there like so. And now finally
let's come in and just grab this post and
just make sure that it's in place covering
this actual wall on the inside. So
this wall on here. All right, that's
looking pretty good. And now that means
we can actually start work on the next lesson. I think we'll actually start on this balcony and maybe
even start on the roof. Start heading up to the
roof mainly though. Let's come out and save it out. All right everyone. So I
hope you enjoyed that. I hope you're having a
lot of fun creating this. I know I am. And I'll
see you on the next one. Thanks a lot. Bye. Bye.
70. Wall Detailing with Wooden Panels: Welcome back everyone to Blender for the Environment
Artists Guide. And this is where
we left the art. All right, so what I'm
going to do first, I'm going to grab just this part in here. So this part in here. I'm going to press
Shift cursor selected, just to give me
something to actually work with on my center point. And then what I'm
going to do is I'm going to bring in a plane. So let's bring in a plane, let's make it a little
bit thinner so, and y make it a
little bit thinner. And then what I'm going to
do is pull it out and X, let's pull it out into place
or wherever we want it. And then finally from there, then let's pull it
down so we're going to have it all the way
down roughly to there'. Then press tab control, bring in maybe, let's have a look how
many you've brought in. So left click, right
click, seven edge loop. So just put it to seven. And then what we're going
to do is we're going to put proportional editing
on and grab it. And I want to make
a kind of either, I would say it's one of these, so let's try the sphere first. If I press one, I can
go to front view, and then what I can do is I can pull it out and bring it in. Now it's definitely probably
not going to be that one. So I'm just going
to press control. Let's try the other ones. Let's try root, Not
that one either. Let's try in verse,
see if it's that one. Yeah. And that
one's probably more or less if it won't go
the way that you want it, just come in and very, very gently just
put it on smooth. And instead of doing it, that
what you can do is you can just pull it up and
then just bring it in. In fact, I know
what the reason is, it's not working because I've
got all of these selectors. So let's just select
the center one. And now let's try. There
we go. There we go. That's exactly what we want. Something like that, to make
it nice and round it off. All right, now on the original, I actually add these, coming
out a little bit more. But actually I think
this is probably gonna look a little
bit nicer than that. So I'm going to grab
it now with L. And then what I'm going
to do is press and pull that up like so now we will need a center
point on this bottom. So all I'm going to
do, I'm gonna pull it up roughly to roundabout there. And then I'm going
to put another post that's going to come kind
of on the top of here. So is this up far enough? We will see when we get the next posting,
we'll actually see. So what I'm going to do
is I'm just going to press shift, in fact, I've got it to the center,
so all I can do is press shift, bring in the cube. Let's pull the cube a
little bit smaller. So pull it up a
little bit like so. And then what I'm
going to do is pull it out and X pull it out. And we want this to basically be near enough to the
edges of here. We are going to make it
a little bit smaller. And from there what I
want to do is I want to make sure that it's
covering all of this, so it's going to be
quite a big block. So in other words, and y. So if I grab this and Y pull it out just so it's in
front of the so, so just probably a little
bit more actually. So let's bring it
out. And this is a question of trying to
get everything fitting in. So fitting in, so
it's really nice. Let's take proportion editing
off. Don't need that. All right, finally then
let's bring it up so it's sat on top of the. So now what we'll do is I think I can bring
this up a little bit more. Maybe maybe bend it in a little bit as well.
So I will do that. So I'll come back to
here and it might come in and old shift
click, ol shift click. And just bend it up
a little bit more. Old shift click,
old shift click. And bend it up
just to make sure. So old shift click,
old shift click, bend it up, then it's going to fit into place very nicely. Old shift click, bring it up. Something like that.
So a look at that. Yeah, and I think
that's actually going to look pretty nice. The one problem I've got
is, is the back of here, I think actually I'll
put a piece that's going to go around the
back there in the middle. Yeah, let's think
about doing that now. All I'll do is
I'll just bring in an edge loop control lot. Bring in an edge loop, bring it forward a little bit like so. And then all I want to do
is I want to grab this one. This one and the inside of here. Then this one and
the inside of here. Now if you're going to put
this in the asset manager, just make sure to put
a plane behind here. I think it'll be cleaner. Ansad, pull them up like
so. And there we go. We'll fill that in and we'll see what that
actually looks like. Let's get some materials in now. So what I'll do is
I'll grab them both. Press control or transoms. Right clicks the
origins geometry. And then what we'll do is
press Tab, Smart UV Project. Click Okay, Tab again. And then we'll grab
this one control L, and we'll link materials
control L. And we'll also copy modifiers and that is
what it should look like. Let's have a quick look
then at the rendered view. So we're just going to have
it on render view now. Yeah, and I think that's going
to look absolutely fine. All right. I'm happy with that. Now what we need to
do is we need to make sure that we've got a post on the inside of here without
overlapping over here. So what I'm going to do is
I'm going to grab this one. I'm going to press
shift and I'm going to bring it back into
place. Not like that. I'm going to put it onto other, shade it back into
place like so. And we can see that it's kind of overlapping there.
We don't want that. So what we're going
to do is pull it out, make sure that it's
not overlapping. And we're also going
to make sure that it's probably dropped
down into the floor. Actually, won't drop it down the floor because
what we'll do is we'll use this wood that's
going to go across here. All right, that's
looking good, like that. Now what I want to do is I want to put that
over the other side. Just make sure it's not
overlapping over here. So we're going to press shift, bring it over to
the other side and put it in place, so
into the wall like. So make sure that no
part is poking out. So we don't want
that poking out, we want it right there like so. And then what we can do
is we can grab this part now and we can pull this back. So shift, let's
grab it and let's pull it back into
place like so we see, you can see it's
coming down to there. And it might actually
just with this bag bit, just drop it down
a little bit just so we've got a little bit
more wood there like. So that's looking very
nice. I'm happy with that. Of course, as we're
going along with this, we can alter things
and change them, you know, on the
fly a little bit. Which I think is
always a good idea. But I think for this part now, what we'll do is we'll actually
steal the idea of this. So I'm going to grab this
one. This one and this one. First of all though, let's
change the materials. So I'm gonna grab all
these press control L, I'm going to link materials like so just
change them to green. And then what I'll do is
I'll grab these three. I'm going to press Shift, bring them over R z 90. And I'm also going to
right click and set origin to geometry just to
make sure it's in there. And then I'm going to pull them up to here. So I'm
going to press one. I'm going to bring them up into the place where I want them, which is going to be
right along here. So let's put them into place. So pull them out, and
now it's a question of, don't be scared about making these a little bit
smaller if you need to. We need a window going in here, so we just need to work out where we're
going to put these. But if you need to make
them a little bit smaller, especially these parts
just so they fit in, because you're probably going to want a few more of these. So if I put this here, you can see if I bring in
another one, another one. There's not going to be
room for four on there. So I'm just going to
press S, bring it down. And then what I'm going to do is instead of just
shifting them across, I'll just bring in an array. An array. And then
let's move it over. Not that way. So let's put that one on zero, let's put it on Y. And the other way I'm
just going to put it an array over to the center. And what I want to do is
make sure there's a tiny, tiny gap along here
so you can see I can click it one and that
is way, way too high. If I click it back, it's -9.7
Let's -0.98 let's try that. And then -0.99 and finally, let's try -0.995 Let's try that. And we're nearly
there, Nearly there, you can see a
little tiny sliver. So let's try -0.997 And there we go. That's
what I'm looking for. That little tiny gap, there
is what I'm looking for. All right, so now we might
need to do that again, because we might need to make
these a little bit smaller. Let's try 234. And you can see we need to make them a little, tiny bit smaller. So what I'm going
to do then is come in and I'll grab them all. So I'm going to press S, bring
them in a little bit like so bring them over a little bit and then I'll
just see if they fit now. So double tap the, you can see it doesn't
quite fit in here. So let's bring them
over a sliver. Double tap the and now you can see they're fitting
into place from here. Then I can grab them all. I can pull them
down a little bit into place so they
fit along here. I can grab this one. Press S
and X and pull that one out. And don't worry about
the bottom here, this is going to be planks
of wood anywhere along here. And then finally I
can bring this part down into place there. And then press S and X
and pull that one out. And finally, then let's
just grab this one. So make sure you've
grabbed it all. U, Smart UV Project. Click okay. Grab this one, then. Tab, Smart UV Project, click okay. And there we go. Now we can actually put in
a beautiful window along here and go in
around here like so. And I'm just wondering if I
want to stretch these out, but if this window
will be a little bit too big for my liking, what I'll do is
I'll pull this up a little bit, grab these, and then what I'm going
to do is press sens head, pull them up into place. Like actually if I grab
this top part now, just put it on the
very top of there. There we go. That's the
way that I want it. This is a nice window size now. Okay. On the next one then, we'll actually get
this balcony in, because we need a floor on here. We'll get in our panels that are going to
come across here. And I think then we can make a start on our actual window, then this window, and finally
we'll actually make start, I think on this actual roof. All right everyone.
Let's say that our work, and I'll see on the next one. Thanks a lot. Bye bye.
71. Large Window Frame Modeling for Victorian Libraries: Welcome back everyone to blend the fourth empa,
an artist's guide. And this is where we
left off. All right, let's fix then, first of
all, these parts in here. So what I'm going to do is I'm
going to actually come in, I'm going to grab
the top of here, so I'm going to press selection. And then what I'm going to do is I'm going to grab this one, and this one, and this one. I'm going to press selection. And now I want to do is I want to grab this whole thing here. And the reason I want to split
these off is it's going to make it easier not only
to work with them, but also to boole
in this one off. So if I press P selection
on this one here, you can see it comes
down to this part here. Now what I want to do is I want to hide those out the way. So if I come in, press the tab button, and
I'll select this one. This one where I eat, let's hide those out the way and see what
we're left with. So we're left with
this. And you can see that this is part of here. You can see that this
side is this side here. So they're okay. It's
just this part here. This is what I mean. So what I want to do is if
I now select this, I can actually press
Delete and Faces. And delete that out of the way, leaving me with this empty
horse kind of inside. Now if I press Tire,
press Alt tag, I can bring back everything. And from there then
I can actually work out the size of my window. Now the other thing
is also I'm not particularly happy
without this part look. So you can see it's kind of Ben. Yeah, let's fix
that's all we'll do is we'll just delete
that out of the way. I'll bring in then a
plane, so shift date, let's bring in a plane plane
or come here r and x and 90. Spin it around, press one
to go into front view. And then all I'm
going to do is just get my plane to be
the right scale. So I want it to be
above these, of course. And then I want it to go back. So I'm going to
put it into play. Going back into my wall. So how far back do we want
it still in the wood there? I want it going a little
bit further back. I don't want it going past
this point as you can see. So I'm just going
to make sure that it's coming out a little
bit more like so. And then what I'll do
is I'll bring it out, so S and X pull it out just so it's going
in that bit there. And there we go, a thing
that's going to look good. And now I can actually
work with this part. So what I'm going to
do is I'm going to, first of all, I think I'll
create my window first. I think that's going
to be the easiest way. Now, I do want my window to
follow the contours of this. So what I'm going to do is I'm going to come to this part, I'm going to grab all of these, So this from here to here. So control select. And then what I'm going to
do is I'm just going to press Shift, Duplicate it. So shift duplicate it. And then what I'll do
is I'll pull it down. And from there then what I'll
do is I'll press one again. And I'm going to
press E and then Z, and pull it down like so. And then all you can do
is you can just press S and Z to straighten that out. So and Z a couple
of times and you'll see that it actually straightens it out
that bottom for you. Now we've got our
actual window in. What we need to do now
is create a Boolean. First of all, what I'll do is I'll use this
as my Booleion. So I'm going to
press P selection, Grabmbolian control
or transforms, right click, set
origin geometry. Let's go into object
mode because it's going to give us a better
visual on it as well. Let's also hide these
parts out the way now. So just this side I'm going to hide out the way, these parts. And from there then I'll also hide these parts out
the way as well. And then all I'm going
to do is just grab this part and L and
then just pull it out. So pull it back like so. And now finally we'll
come to this part here, make sure your
transformations are reset. So all transforms right. Click Rogen geometry, add in a modifier and we're going
to generate a Boolean. And the Boolean of course,
is going to be this. And sometimes sometimes
it won't actually work. Now to see if it's
actually worked, just press control A and then
hide this one out the way. So let's hide that
out of the way. And you can see here,
it's not worked. Sometimes though,
when you go into it, you will see you've actually
got your Boolean there. It just doesn't look
like it worked. Now there's another way as well. What you can do is instead of having it on the
exact, put it on fast. And you will see now that it actually seems to work
much, much better. And now you can
just press control. And there we go from there. Then what I can do is I
can pull this out now, and there is my actual Boolean. Now what I want to do
is I actually want to actually fill this part in. Because this boolean is
actually going to be like the coffee shop with
the background in it. This is actually going
to be a bookstore. So all we're going
to do then is we're going to come in and
we're going to press Lt, shifting, click, going all
the way round here, like so. And then all I'm going to do
is press F to fill that in. Finally, then let's bring it in. So we're going to
grab this face again. Press the eye button, and
you can see we've got major, major problems in here. And this is probably
because we've got so many, you know, different
parts in here, all of these edge loops
and things like that. So let's actually think about how we can
actually fix that. So we need to be able to
bring this in basically. So the way that we could
do it is I'm thinking, let's first of all pull
it out a little bit so you can see there it
actually does pull out, which makes it
actually handy for us. So if I pull it out, I
can pull it out to here. And then what I can do is I
can bring in some edge loops. So controller bring in maybe
four edge loops like so. And from there then
what I can actually do, I can come to the back of it. Put proportional editing on
and should, if I'm careful, be able to then pull it in
like so and we've still got that same actual
shape now if we turn off proportional editing now
and then pull it in again. So pull it in, you'll end up with
something like this. And then you can right click
and shade auto, smooth. And there we go, we've got
the same actual idea as what we had before but doing it
basically a different way. Now the other thing is if it's too lumpy around this edge, all you can do is
you can come in and you can grab the
inside. So control. And then once you've
grabbed it and you can bevel it off a couple
of times like so, you will end up with
a bit of a mess in there because we've got
some crossover on here, but we want to really fix that. So I know it's a
little bit fiddly, but let's come in and
actually fix that. So all I'm going to do,
I'm going to come in, grab this one and this one, right click, and then
merge at center. And then I'm going to
come to the next one. So if we come up here,
this one and this one. Instead of pressing
right click, Merge, just press Shift, we'll do
exactly the same thing. And then this one,
and this one shift. And it's basically
just repeating that process that
you did before. So shift and there we go. Now we've got a
beautiful backdrop to it. Let's turn that off. And that's another way
of getting things done. All right, so now let's
come to our actual window. Now if I'm starting a window, what I want to do is the
same as what I normally do. I want to plane. Not a plane. I actually want this to be
separated from everything. So I'm just going to
grab this one and this one and press
Pat Selection. And then just grab the back
of it and press Delete. And now I can actually start pressing OltaHe, bring
back everything. And now this is going
to be my actual window. Now, we do have
one problem here, in that this needs to be a tiny, tiny bit bigger
just to cover this. So let's make a tiny, tiny bit bigger light so, and then we can make it
bigger as we go along. But it's better to just start
with a tiny bit bigger. So what I'm gonna do now is I'm gonna come in, I'm
going to first of all, reset all my transforms like
so set origin to geometry. And then what I'm
going to do now is I'm going to come in, grab all this, press the Y button, press I again, and
bring it in like so. And this is going
to be obviously the outskirts of
my actual window. From there then I
want to make this then into my actual window. So what I'm going to do is come in and I think
I'll split this off. This, I think that's
going to be much, much easier to split that off. So let's come in and press
the P. We'll do it that way. We'll press P selection
and split that off. And now let's create
this into a window. And with this window,
I want it a little bit different to the other
windows have been creating. So all I'm going to do, I'm going to just pull it forward. I'm going to press one. Then on the number pad, I'm
going to press Tab. And what I'm going to do is
I think I'll first of all bring in one kind of edge loop. And to do that I'll
have to use my knife. So I'm going to put my
knife round about here. Press eight to make sure it's going straight over
to the other side. Press the Enter button, and now I can bring
in some more. So let's bring in two. Left click, right click like so. Now let's think about creating the parts that are
going to be fill the window. I'm going to do this a
little bit different, so instead what I'm
going to do is I'm just going to grab all
of these like so, so old shift click. And then all I'm going to
do is press control B. And I'm actually going
to Pevl those off like so from there then I've
already got them all. Nearly what I want to do is come in Fa select and just
de select these faces. And then all I'm
going to do is I'm going to split these
off from my window. So I'm going to
press P selection. Split them off then,
because it's a, a smaller window, I just want
to bring these all out now. You'll see what I'll
mean in a minute. First of all, let's grab these
tab to select everything, and then E pull
them out like so. And finally then what I'll do is I'll just grab each of these. Now you can grab
each one of these, but what you can also
have a fast selection, but it'll probably select the back ones as well because it's going to
be based on normal. So I'm not actually
going to use that. I'm just going to
select them like so. And from there then,
all I'm going to do is press E and pull them out. And there we go. And I think
that's looking pretty nice. All right, so now
we've got our windows, we've got this part here, let's pull this part out now. So let's pull this
into place like so. And from there then, what I
can do is now split this off. So same as we've done before with all of the other windows. Let's split it off. Right
click, mark a seam. Let's then come in, grab
the top L, the bottom L, Y, A to grab everything, and then pull it out like so. And there you go, you
can see a really, really nice window and it's looking a little
bit different. All right, so on the next
lesson what we'll do is we'll actually
get this into place. We'll actually get this
actually fixed as well. So the background to it, how's that actually
going to work? Make sure that actually works. And then finally, we'll
get some materials on here and then we can
actually start making a start on the underside of here and this part here just to
bring it kind of all together. All right everyone.
So I hope you enjoyed that and I'll
see on the next one. Thanks a lot. Bye bye.
72. Polishing the Library Extension for Enhanced Realism: Welcome back. Every on to blend for the environment
artist guide, and this is where
we left it off. Alright, we've got our bevel
in and everything like that. Let's put this back on material. And then what I want to
do is now copy the wood. So let this load up. And all I'm going
to do is I'm going to join all of this together. First of all, in fact,
should I join it altogether? I think what I'll do is I'll first of all bring
in the materials. So I'm going to grab this, I'm going to go to my materials and instead of
green painted wood, I'm going to click
the little down glass lit windows or
on that on there. And then the rest of it is fine. So now what I can do
is I can come in. I can, I think, yes, we'll just grab
this one and this one. For now, press control J, and then what we'll do
is press Tab and U, and Smart UV Project. Click Okay. So that's the
window part, hopefully done. We'll check that in a minute. And now if I come to my Windows, let's come in and what I'll do is I'll unwrap
this one first. So if I go to UV editing, I'll press dot just to zoom in. And then what I'll do is
I'll press U and unwrap. I'll press S and make it
a little bit smaller. And what I want to
do is I want to get this into the right
size that I want it, so like so a little bit of
dirt around it from there. Then what I can do is I can
press U, copy, copy, default. And then I can
grab all of these. Now I'm hoping these ones
already will unwrap as well. Normally when you paste in it, if it's got the same
number of sides, it would normally copy it.
Just be careful about that. So what I'll do is I'll
press a copy paste default. And there we go. Hopefully
they've all unwrapped. Okay. As you can
see. Now what we've got to do is just go over
to the left hand side. You'll see a little
black dot there. Just make sure if you press
A, everything is selected. And then from there,
what we can do is we can come in now and
move these around. So as we've done many
times before now, we just need to move these
around a little bit, making them look a
little bit different, like so, like so. And it does take a
little bit of time, but it's really worth it. Now, any like this
one here I recommend, don't have a big black
splotch in there. We don't really want that,
just put them somewhere else. So even there is okay. Even there is okay. And we just want them
looking very different. And again, if they're looking, you know, kind of similar, just like this one and
this one, as you can see, we've put them in
the same place, just make sure they're
looking different. This one and this one
looking the same. Then it's just
important that we take a little bit of time
just to make them, if they look like that,
just press the S board and bring it in to make them
look a little bit different. Okay, and then let's
put this one over here. And then, and then
bring that one in. And then let's
pull it down here. And then bring it in like so. And yours, making sure I'm going to spin this
one round as well. So r 90 so you can spin
them round as well. And then r 90, just the ones just to make sure that they're all
looking different. And then finally, let's put that one there and
you can see now they're all looking very different. Now we've got them
are we can join them all to this one.
Press control J. Join them all together. And then press G. And there you go. There is your actual window. Now let's put the
window into place. So let's go to front view. Let's come to modeling again, and let's put it into place. So let's press dot and zoom in, and let's get it right into
place where it's going to go. So you can see back, back, back forward, forward,
forward and to there. Something like that. And I'm just looking at how
much room I've got. You can see fairly amount
of room from there, this part of wood
to the actual wall. So that's looking fine. Now let's come into
this wall and what I'm first of all going to do is I'm going to reset
the transformation. So control l transforms
right clicks at origin, geometry, tab, then a to
grab everything and unwrap. And what I want to do now
is grab this one here. So control L grab my
wall link materials. And there we go,
That's the materials. And now let's hide
this out the way. So hide this out the way. And now we're going to
come is to this part here. So select it, come in to make it a little
bit easier for ourselves. So Alt Shift and click Ol Shift click, going
all the way around. Right click, and we're
going to mark a seam. And from there then
all I'm going to do is grab this part in here. So L press one to make sure that we're straight
on, on the number pad. And then, and we're going
to Project from View. Where is it Project from View? And then we go and we're
going to click plus. Now what I want to see is if I've actually got
the material for this, so what I want to do is
want to put in backdrop. I think it's on the backdrop. Avelook backdrop. Nope, it's not on the backdrop. Let's go to asset manager and
overlook which one it is. So we'll come down
and what we're looking for is our backdrops. So we have bedrooms, living room shops and shops two, I think it's under shops one. Let's just see if we've
got shops one on there, so shops one, we have
got that on there. Let's go now to UV editing and just make sure that
this is going to be assigned to there and as soon
as that opens up you can see so definitely not shops one, so it's going to be
probably shops two. So let's click the
little down arrow. Where is it? Yeah, here
it is. Can I click it? There we go. Shops to. All right, there we go. That's the one that we want. Okay. So the one that
we want then is going to be either this
one or this one. I would say I'm
probably going to go, I'm just checking on
my actual reference. I'm thinking it's probably going to be this one, actually. All right, so let's
grab this with a, let's move it over
then let's make it a little bit smaller
then so it fits in. So let's press and get it
all the way in from there. Then what we can do
is we can move it up, y and then and y, and just stretch it out
a little bit like so. And there we go. Now let's press salt and bring
back our window. And finally let's have a look. See what this actually looks
like in our rendered view. It's going to take a
little bit of time. We've got a lot more
things in the scene now. There we go. That's
looking pretty nice. Okay. I'm happy with
that. We actually look like we've got a piece of
wall down there as well. Let's move it around,
let it load up. I also think, yeah,
that's looking perfect. I'm happy with how this looks. This is exactly how
I wanted it to look. All right, so let's go
back to modeling now. That's that part done. We're now moving along pretty fast. Let this load up
and there we go. Now let's get some
more wooden parts in here just to bring
this out a little bit. So what I'm going to
do is I'm going to use my cursor in the center. I'm going to press shift
A, bringing a cube. From there, I'm going to make my cube a little bit smaller. I'm going to pull it all
the way back to here. All the way back. Pull
it down a little bit, making sure it's coming
out of the wall, like so pull it over
to this side then. And then what I'm going to do
is pull it all the way out. So I'm going to pull
it out a little bit, grab the back of it and
pull it up to here. So All right, that's
looking good. Now let's bring in another one. So what I'm going to do
is I'm going to press L, shifting D, bring it over and I want it
round about there. And then shift and
D, bring it over it. Is it going to fit? It's
gonna fit just you can see, but it's sticking out of here. Which we don't want that at all. So what I want to do is
I want to press L, L, and can I then pull
them up into place? And you can see that we're
struggling a little bit, which means probably better off grabbing the top of here and
lifting it up a little bit. So if I press right click, set origin to geometry, now what I should
be able to do is lift it up a little bit. Now we should be able
to grab these tab. This one's already fine.
It's just this one now. And bring it up. There we go. All right, that's looking good. Now let's press control. Lay or transforms right click
origin to three decursor. Come to your
modifiers, ad modifier and we're going to
generate a mirror. And there we go, that's
over the other side. Now let's have a look what
that's going to look like. Yeah, I think that's
going to look good. So then what we can do is now
we can grab all of these. Apply our mirror control. Tab U, Smart UV
Project. Click okay. And finally then
Tab, grab this here. It's got the bevel on and it's got the
material on we need. So control L, link materials. Control L, and we're going
to link or copy modifiers. Al right, there we go. That's looking pretty good. Now for the last bit we want, obviously our banister
coming over here. That we'll do on
the next lesson. But for now, we'll
come in and bring in our geometry notes. So we're going to look
for geometry notes, which if we close that
up, they're on here. This is the one we
want, Our planks. Let's bring in our planks. We're just going to
sit it there for now. And then what I'll
do is I'll come back to modeling, let it load up. It's going to be a little
bit slower now because we're working with
a lot more parts. I think actually on
the next lesson we're going to go through
performance and optimization. Just so your, your actual models aren't being slowed
down too much. I was going to wait till
we built this model, but I think it's important
that we actually go through that on
the next lesson. So we'll do that
on the next one. Now let's bring this into place. So we're going to bring
it in two places. Like you can see there's pretty
big planks at the moment. So what I'm going to do
is shrink them down. I'm going to pull it out then to where I actually want it. So something like this
is where I want it. And then what I'm going to do is obviously increase
the amount of them. So if I come down, first of all, I'll turn down my
resolution to maybe three, maybe even two I
can get away with. And then what I'll do is
I'll bring up my count. So let's increase the count
all the way up to here. And then and X, let's pull it out a
little bit more just so no and X not can actually x. There we go. There we go, pull it into the side like so. And then what I'll
do is I'm thinking, should I make them a
little bit thinner? Let's first of all
deal with the width. With, we'll bring them
in a little bit like so. And then what I'll
do is width random, so I'm going to bring
them out like so. And then S and X pull it in. And then we can see that's
looking much, much nicer now. And then finally the length. We don't need to do
that, and we'll just bend them out a
little bit like so. And there we go. They're going to look
a little bit uneven. Maybe that's a
little bit too much, maybe a little bit too much. So let's pull it
back a little bit. So, and I think that's perfect. All right, now we need to
bring in the material. So the material is,
let's have a look. If I click this, we should have a few different
types of wood. We've got dark wood,
we've got light wood. Let's do it the same color as the door, so
that'll be dark wood. Let's bring in
dark wood like so. And there we go,
That looks cool. All right, on the
next lesson then, what we're gonna do
is we're going to go through performance
and optimization. And I'll see here after
that one. Thanks lot. Everyone, make sure you save
out your coal files first. Alright, thanks lot. Bye bye.
73. Performance Optimization for Blender Scenes: Welcome back everyone to Blender for the Environment
Artists Guide. And now I'm going to do
is I'm going to play you a quick tutorial about performance and
optimization in Blender. It's really, really important when we're actually creating really large scenes like this. So I'm going to
play that for you now and I'll see you after that. I recommend everybody,
by the way, watches this one. It's
really important. I learned a lot of new things when I was putting
that together as well. All right. I'll see you on the next lesson,
everyone. Thanks a lot. Bye bye. Welcome everyone to our performance and
optimization guide. And a lot of times when
you're dealing with really, really complex scenes
or even simple scenes, if you've got a low end machine, you will come across
things like or out of memory or blender
actually crashing. And there are lots and lots of ways we can actually
deal with that. And I think it's important for all of you guys to actually know what things we can actually do to stop
this happening. We probably won't able to
get rid of it altogether. There'll still be times
when Blender crashes, but we can do a lot
to actually increase that performance
to get our scenes where we want them to be
and more importantly, render out beautiful images. So the first thing we're
going to discuss is Ram. And now if you look down
at the boat inside here, you will see one
that says memory and you will see one that says Ram. Now the most important
thing is that first of all, you understand now
to bring these on. So what we're going
to do is we're going to go up to Preferences, we're going to go down
then to Interface, and under interface
you'll have a Status Bar. And you can actually
click all of these on. So we've got system
memory and video memory, and these are some of the
most important things. So let's just close that down a minute and let's
actually go through these. So basically you can see
here that down the we've got how many triangles we've got in the scene, and how many objects. These directly correlate
most of the time, to how much performance your computer will need to actually run this blender scene. So the more faces, which are polygons you have in your scene, the more performance
you're going to need. Same thing goes for
the amount of objects. If you've got a ton of
objects in your scene, then it's going to
come at the cost of actual performance. So now let's move on
to the actual Ram, which is how much Ram your
actual computer actually has. And I recommend a
minimum, a bare minimum. You need 8 gigabytes
of Ram to run Blender. And it comes down to the more, the better the performance
from your machine. So I would say aim
for 16 gigabytes. Now also we have something
that's also very important, which is called V Ram. And this is normally
the Ram that comes with your
actual graphics card. And basically, the higher
this is on the graphics card, the much smoother time
you're going to have. So where I tend to see problems myself is with the actual
memory on your computer. If it's too low, you have
problems in the viewport. And where I see the problems
arise with the V Ram is normally when
you actually come to render out complex scenes. The next thing we
can do to actually limit the amount of
performance needed is actually put everything
in a nice neat order in collections and make sure everything's
just named correctly. What we can do from
there, then we can close certain parts
of our scene down, which means that we can
either render them out a little bit at a time and then lay them on
top of each other. Or especially in the viewport. What we can actually
do is close parts that we're not working
on at the time, especially in large scenes. And then this then again, will limit the
actual performance. Also it comes down to your
CPU as well, your CPU, the better it is, you know, the better time you're going
to have with all of this. Let's now say we've
got all of that sorted and we're still
having some problems. Let's now go into a few of the options that we can
actually mess around with. So what we're going to do is
we're going to go to Edit, go down to Preferences, and the first thing I want
you to look at is system. And on the system, just make sure that you've
got this set to whichever you can so it can be cuter optics, X or one of these. Just make sure it's not none. And then once you've got the one selected which you want to use, just make sure both of
these are ticked on and blender them will
take advantage of those. Also, make sure that
you haven't got undue step set at
250 or something. This has a huge actual
impact on performance. So if you're really,
really struggling, I recommend turning
these undue steps down to five or ten. But the problem obviously is that you're not going
to be able to press control head and go back very
far if it's set too low. So I recommend all of these things I'm
actually showing you. Try and play a memorandum with bit till you've got, you know, that kind of perfect set
up and then you shouldn't have or you should have less
problems in the future. All of these other things we can mess around with as well. I don't recommend these unless you're absolutely,
really struggling. I think you should keep
these, what they're set to. This is the only one and
this Tikton is the only one, as far as I would go on here
messing around with those. All right, so let's
close that down. And let's now come over
to the right hand side. And you can see here at
the moment if a scroll up, a non blender render
engine cycles. And it's important to know that to have an easier
time, it's much, much easier to put this onto V, which is basically a
real time render engine like Unreal or Unity or
something like that. And that then makes
it much easier if I come to render
this or click on my render view to
actually move around the scene while it's
actually being rendered. The thing is if
you're on V as well, there also are some
things that you can actually turn off to
increase performance again. But normally with EV, unless you've got a
very low end machine, you shouldn't have any problems. If you are having
problems however, just make sure that viewport denoising is
actually turned off. This is one of the
heaviest things actually denoising both on blender and cycles that actually really increase
that performance needed. So you can turn the
viewport denoising off. You can also turn the
ambient occlusion of and you can also turn the blue off and especially screen
space reflections, make sure that is
also turned off. Now pretty much everything in EV you shouldn't need to mess
around with anything else. Once you've turned these off, you should have a
much easier time. Now, let's move on
over then to cycles, which is a little bit different. So if we come over to cycles, you will see even my machine, it's quite a high end machine, or it was maybe two
years ago or something. Sometimes struggle, especially
with large scenes like this with a lot of textures and a lot of sand
and things like that. So if you look over
here at the moment I actually have in my
Viewport denoids on. The first thing I recommend
doing is turning this off. This then will increase
performance, no end. So once you've turned that off, it's going to take
a little bit of time to actually apply
that as you can see here. And then you can also turn
the noise off in the redeve, but I don't recommend
that because then you're going to end up
with a very grainy render, and that's maybe something
that you don't want. Now, you can see already that I'm really, really
struggling here, even with the noise turned off because this
is quite a large scene, it's got a lot of
displacement on there. So I'm just showing
you just how pixelated that is and just how
long we need to wait. So what am I going
to do now while I actually fix a few things? I'm just going to put
this onto material mode. And that leads me on
to my next point. So when you're working in
blender, it's important, even though it looks really, really nice to be working
in blender cycles, it actually comes
at a huge cost. You can see already working in material mode over here
is actually really, really helping me
navigate around my scene. Now if you're
struggling even more, what you can do is
you can come and put this just on object mode and then you shouldn't actually have any problems whatsoever. It's also important to note before you click
this render bond, so the render image board, make sure that
you're on wireframe. And the reason is
because you don't want to be rendering
out the scene, you know, in cycles on Viewport shaded and then
render it out again. That is more than likely
going to lead to a crash. So what I always do
before I actually hit that render board is
put it on wire frame. This is the lowest
amount that blender needs to use in the
actual viewport. Now it's also
important to remember that everything comes at a cost that you
put into blender. This could be things
like geometrdes, particle systems, simulations. Some of them have larger
costs than others, but everything down to the smallest object
has some kind of cost. So when you've got a scene that's just crashing
all the time, it's generally down to something that's quite a large
cost on performance. Now, the other thing to note
is when you're actually bringing in textures to your scene, it's
important to know. So if we go to this
one, for instance, and we go to our shading panel, this is quite a complex shader. The more complex
the shaders are, the much higher performance
it's going to need. The other thing is, when you're actually bringing in textures, be very careful that
you're not bringing in really, really
large textures. So I recommend four
K be the maximum. But honestly, if
you can stick to two K textures or one K
textures or much better, it's going to make a
much easier time for you making large scenes. This is why a lot of game
companies, especially mobile, use only like 512
or one K textures so they can handle the
performance and keep that optimization pretty high. The other thing is
about textures, if you're using
seamless textures, that is better than
using something that you've gone out and you've painted in substance painter. So it's just much easier to use seamless textures
because they can be used over and over again and limit
that performance. Also make sure on
the right hand side, if you come up to
this Lal arrow, you can see that light in our seen lights
and seen will make sure they are turned off as well because they will also
cost you performance. And last of all, before we move on to the
cycles part of it. If you come over to
your actual world, if you're using a HDRI within, we're not on this one,
we're using a sky texture. If you're using a HDRI, that's also going to
come at a cost of performance and it's quite
a large cost in comparison, something like the sky texture. So if you can make sure that you're using something
like the sky texture, as you can see, it's
just one node here. And I know it's very
nice to use HDRI, but if you need to
control optimization, try and learn how to use
the sky texture instead. All right, so
finally then moving over then to our cycles, we can see, first of all that the device I'm using is my GPU. It's always fair to use
your GPU over your CPU. It will make it much, much faster because
it's relying on a lot of V Ram from your
actual graphics card. And as we discussed moving down, we can also turn
off the D Noise. This is one of the
best things you can do to actually
increase performance. The next thing usually you can do is you can come
down to where it says light paths and all of
these come at a cost as well. The lower you set these, the better it's going to be. I recommend messing
around with these. Last so last of all, after you've done
everything else, this is why I would be clicking off or turning down
especially care sticks. They are also quite high
on the performance. Last of all, let me show you one of the best things
you can also do, which is if we've
got a rendered mode, we're on actually cycles. We turned on Noise Again, you can see how nice
this actual sand looks, but it comes at a huge cost. So just remember this
comes at a huge cost. Now if I come over and down
and just scroll down here, we have one that says simplify. Click that on, and
then what you'll have access to is all of
these options here. Now one of the main
things we can do here is the texture limit and the
maximum subdivisions. The maximum
subdivisions, if you go over that subdivisions
in your modifiers, you can actually reduce
that or override that over here and simplify and turn them down
to one or something. That then will reduce the polygon count right
across your scene, wherever it's over six
or five or whatever. You set this to increase
in performance. And one of the
last things we can do is we can turn
down this text limit. If I turn down the text
limit something like 256, you'll see after a
while what it'll do is it'll turn down all of those textures right across
your scene down to 256. So even if they're four K or eight K, if you turn this on, you can turn them all
down and then you'll see, look how greeny now
this actual sand looks. Look how bleary these looks. And the reason is because
we've turned down our texture limits all
the way down to 256. The other thing
is if you haven't problems rendering
out your seam, you can also come
in and turn them down in the actual
render as well, which really
significantly helps with crashes cuter out of memory
and things like that. All right, the last
thing then we can do is, especially when we come to
actually rendering now, is you can see here that
if you hover over here, it says use compact
deviate structures. It uses less Ram
but renders slower. So if you are having
problems with crashing, I recommend turning this one on. And if you go to the next one, you'll see it for hover
over this it says special type BV H,
optimized for curves. It uses more Ram
but renders faster. Turn that one of also turn persistent data off if
you need to as well. Because what it means is
that blender is caching all of that data of the
scene to save on, basically having to redo it all. So if you turn this
off, what it's going to do is a fresh start every time. And it's not saving so
much in the memory. I don't actually know whether this one is bad to
turn on and off again. I would ever play
around with it. Now, something that is a
little bit more sophisticated, so we're not going
to go into it here. But you do have the option
that you might want to look into of baking
out your scene. So in other words,
you can actually bake all of your scene out onto a UV map for all the lighting and all the textures
and things like that. But mainly for lighting to make sure when you
come to render it, everything is already
rendered out. And then all it's going to do
is render out the objects, all the textures, and
without the lighting. So that then makes it much, much easier on your machine to have a fast render
without crashes. Last of all, what I
want to say is if you're building large
scenes within Blender, try and use the shader
panel more than actually bringing
in actual textures. That also is going
to save you a lot of performance and optimize
things really nicely. The only problem you're
going to have, obviously, is if you're sending
things out into Unreal or Unity or
another Games engine, you obviously won't be able
to use those materials, so you will need
textures for those. So this primarily is based on rendering and
building large scenes within Blender.
Alright everyone. So I hope you found that handy. I know if I was
just starting out, I'd really want to know
this stuff because it would have made my life so
much easier in the beginning. Alright everyone, Thanks a lot. Cheers.
74. Adding Final Details to Library Balconies: We'll come back
around to Blender for the Environment
Artists Guide, and this is where we left off. All right, so now let's
first of all think about, let's hide this out of the way. And then what we'll
do is we'll actually come in and fix these parts. So I'm just going to come
in a to grab them all. Smart UV project. Click Okay. And then we're gonna grab
this wall, press control L, and we're just going to
link materials like so. All right, from
there then, what I think we should do now is we should actually work
on this banister here. Also, we've got this floor. Let's make sure that's
not actually there. So yeah, we can
see through there. That looks perfect.
So let's come in. Now what I'll do is I'm
thinking, is that in the center? Probably not going
to be in the center. So what I'll do is I'll
grab this part here. I'll press Shift S Cyst
selected, hopefully. Yeah, it's going to put
it right over there. So let's press
Origin to Geometry, Shift S Ursa selected. And now hopefully
that's going to be in the center from there. Then let's press shift date.
Let's bring in a cube. Let's bring the cube down. Then over to here. Let's press the Born to make
it a little bit smaller. Pull it down into place. Now I want it just in
front of this part here, so Jawt in front of
that as you can see. And then all I'm going to
do is pull it out so and X, let's pull it all the way out. And what I want to
make sure that it's also in or behind
these actual posts. So we can see these posts here. They might need pulling
down a little bit. You can see they're
not quite on there, so let's grab them both and
pull them down, jaws to Tad. Let's pull them
down just in place. And I'm also thinking that this also can now
be pulled down, jaws to Tad holding
shift. And there we go. All right, now let's
come in with this part. So what I'm going to
do is I'm going to first of all come
to the top of here. I'm going to pull
it down like so. And then what I'm gonna
do is I'm going to press and pull it up. And finally then
I'm just going to pull this bit back a little bit. So if I grab the top
of this part here, I can then pull it back
just a little bit like so. And from there then I can put my wooden slats going across here and then
put a top on it. So let's first of all
bring in our wooden slats. And also I recommend on this, we'll actually unwrap
this part first, so Smart UV Project. Click Okay. And then all I'll
do is I'll grab this one. Control L, link
materials control L, and I'll also copy modifiers. Let's just make sure
that the modifier has gone on just to make sure
I had one on which it has, let's put it back
on the material and now let's come back and
bring in another part. So all I'm going to do, I'm
just checking if I double tap the just to make sure that's all going in
fine, Which it is. Let's press shift A then
and we'll bring in a cube. We'll make my cube smaller first and then get
to the right scale. So wherever I want it, so
I'm going to bring it over. I'm going to drop it then into place where it's going to go. So roughly around here.
Let's pull it back. Let's also then press and
Y and bring it into place. And let's pull it over. And what I'm going to do
for this actually is grab my man shift S and selection
to cursor keep offset. And then I'm going to put
it down into place like so. And the reason I want my guy here is I just want to make sure this banister is
going to be in place. And we haven't got a door or
anything like that on here. And honestly, I think they
just built this bit after, so they just didn't
want anything there. I don't know why they
built it like that. So if anybody picks up on
that, I know about that. Maybe they fell in
from the top or maybe they come up from a
trap door in the bottom. Not really sure, but this
is the way that I built it. All right, so now let's come in and what we'll do is
we'll grab the top of here, so the top of here, pull
it up a little bit. And again, what I want to
make sure is when I actually, the guy comes to the balcony, it should always be around
this sort of height here. So it means I need to come in and pull this up a
little bit more. And this is going to be round about the right height
as you can see. Also, this size of this
looks quite nice as well, which means now we can come in, add in the modifier, and we'll generate an array. And then what we'll
do is we'll move the array out like so. And then click up the count, and then press control, sorry. One. So press one. We can also close
this out the way. I'll just press N just to close that, it's a
little bit in the way. Let's turn it down to nine. Let's also put this
on to object Moas. At the moment I'm
struggling to see. So you can see this one
should really be over here. So what I'll do is I'll
just pull it over, holding the shift
bond very slightly, so roughly where that one is. So you can see now we've
got the same gap each side. And that's looking
pretty fine from there. Then let's put a top on here. So I'm going to press
Shift A, bring in a cube. Bring it over, then
press the S one. So again, because this
is non destructive, if it is a little bit tall, we can make it a
little bit smaller once it's got this top on. So I'm just going to
pull that into place, sit it on top of there. And then all I'm going to do is press and X and pull
it all the way out, making sure that
it's into the post. You can see it's a
little bit too far back. So what I can do is I
can come round the back, grab this back here, and
then pull it into place. So from there then
what I'll do is I'll bring it down a little bit like so I'll bring it down and then what I'll do is I'll
pull the front of it out. So let's pull the front
of it out here. So. Grab the top of it now, press the button like so. Again to bring it back. And then finally
what I'll do is I'll just bring it, this
part back now. So bring this part back like so. And now that's looking just
about how I actually want it. All right. So now I'm happy
with the height of this. I think it's a
little bit too high, so I'm just going to
pull it down to there. And I think now that's
looking pretty good. All right, so now let's
apply this modifier. So hove and over control, Let's then grab this one and this one and all I'm
going to do is press control L. And I'm going to
link materials control L. And I'm also going
to copy modifiers. Let's put it back
on material now. And then let's grab this
one tab Smart UV Project. Click Okay. And then these tab
Smart UV Project. And click okay. And there
we go, double tap the A. And this is what we
should be left with now. We've pretty much, if we put on our endeviw,
finish with this now. So let it load up and you can see how nice that
actually looks. Everything's come together
pretty much how we wanted it. So now let's work, I think on our roof. So this first part of the roof, because I think it's
a little bit of a break from making
windows and things like this and jaws gonna hover around and I'm just looking on
the outside of this wall. Maybe maybe we should fix those first with our window.
Yeah, we'll do that first. So let's come on in and what I'll do is
I'll grab this one. So this one and this one. And I also want to come around and grab this one and this one. And you can see this goes
all the way out to here. That's not, do I actually
want to use that? I think it will actually, I'll
press Y just to split them off or actually to
select them like so. So now we've got
these two parts here. Let's press A on them. Let's press Delete
and Limited Dissolve. And just get rid of any
parts that we don't want. Something like that,
I think's fine. And then what I'll do
is I'll unwrap them. So you unwrap because they're
just a plane basically. And then we can grab
this wall here, control lel, and we'll
just link materials. And there we go. Now they
should look so much better, which it actually does. All right, so now
we need to think about our actual roof on here. So I think with
the roof on here, I do want it slanting
in a little bit, so we have to take
that into account. Lots of things to take into
account with this roof, but it's very interesting
to actually create it. So what I'm going to do
is I'm gonna come in, I'm going to grab
this part here. So this should be
hopefully the center here. Press shift desk,
Custer selected. And then what we'll
do is we'll first of all bring in now a cube. I'll put it on
object mode as well, because I feel that's
much easier to build this out with shift A. Let's bring in a cube, make the cube a little
bit smaller, like so. And then all I'm going
to do is I'm going to pull it out to here. I'm going to rotate it round
R Y, rotate it around. The first thing I want to
make sure is that I've got it coming all the way out to here. So it's going to be
in front of here, and then my roof's
going to hang over, which means that this bit might need to be a little
bit shrunk in. Let's see, first
of all, what we're going to do with this R and Y. Pull it out like so. And
where's it going to go now? So if I press one, I can then press and put it to
where it's going to go. So I'm thinking probably
roundabout there, so you can see just how
far this is out now. So what I'm going to do is
I'm going to grab this now, I'm going to come to normal. And then what I'm going
to do is I'm going to pull it out like so, to where I actually want it. So I'm thinking
something like that. And then I also want
to bend it as well. So if I press controller, bring in a few edge loops. Left click, right click. And now she'll be able
to out shift and click. And you can see the
problem is here. When I out shift click,
it actually moves like where the normal is,
sometimes that happens. What I tend to do
when that happens is I'll just come in
with proportioning. Instead of using these,
I'm just going to press and bring it out
a little bit like so. And then you can
see I can actually bend this in to how
I actually want it. We want it bending in slightly. Maybe we'll just change this and put it on
sphere and bring it in. There we go. That's perfect.
That's how I want it. Something like that.
Now from there we can see that we want to maybe pull these down just a little bit so I can
grab this one on the face. Take off proportional editing, and we should be able to just pull it down a little
bit past there. From there, then what I'm
going to do is I'm just going to shrink this in S and X, pull it in right to
the edge of there. And then finally what
I'm going to do is I'm going to move this up, let's move it up into the front. So we want it into like, so then what we can do is
finally, is it in front enough? Let's have a look. Yes, it is. Then finally, what
we can do is we can come now to the bottom of this. So I can grab this bottom. Let's put it onto Global. And then let's pull it out
into place underneath there. So now the problem is, of course we need
to grab them both. Let's press and Y, and X. X, there we go. Pull in place too far and X, bring it back your in
place. Double tap the. And I'm thinking
that I need to move this just a little
bit further forward. Just a little bit
further forward, yes, that is what I want. All right, so we've got
the first part of this. You can see it's coming
along really, really nicely. Don't worry about
the top of here. We are going to move
it a little bit over, so we're going to
get another one in. Move them a little bit over to get this perfectly
what we want. And we'll also, before we
finish, shade auto, smooth. And now we can see exactly
where we want this part as well and where we
want the actual roof. I hear about everyone, so this part is going to
be quite difficult, it's going to be
quite technical. We're going to save that our work before
doing anything else. But trust me, by the end, you will have learned a lot and it'll be really,
really worth it. Alright everyone. So I
hope you enjoyed that. And I'll see on the next one. Thanks a lot. Bye bye.
75. Detailed Roof Modeling for Victorian Libraries: Welcome back everyone to Blender for the Environment
Artists Guide. And this is where
we're left off. All right, I think
the first thing we should do is right click and set origin to our three
D cursor adding a modifier. And let's bring in a mirror. So let's bring in the mirror, let's press it on the
Y. It's not working. As I said, control
all transforms. Right? Click the
origin three de cursor and now you'll see
it actually works. So let's just turn off the y. And we should end up with
something like this, which is near enough about
perfect for what I want. Now what I want to do
is I want to create a top for this first
before doing anything. So I'm going to press Shift. Let's bring in a cube. And we'll bring that up to here. We want to bring it
over there just to make sure that it's
actually in front of there. And then what I want to
do is make sure that it's wide enough to cover
both of these parts. I'm going to press Esen's Ed. First of all, put it up
to round about there. Let's pull it down a little bit. And then what I'm going
to do is just going to go in with face leg, Alt shift click and then alter n S and just pull it
out a little bit, just making sure that it's
going over those parts. Finally then let's just
bring it in as well. So we'll press, I bring it in just so it's covering
these parts as well. And then what we can
do is we can press, pull it up to
something like here. Bring in a few edge loops. So control maybe five, left click, right click. Grab this center edge loop then. And then what we'll do is we'll put it on proportional lead. And maybe let's try
root, see if that works. And x, let's bring it in. So I think something
like that is going to be about right
for what I'm looking for. And then let's press
on the top of it, bring it up, and then
and X bring it in, but without proportion
editing on this time. So S and X bring
it in like yeah, and I think that's what
I'm actually looking for. Maybe it's a little bit too big. I think also this bottom bit has come out a little bit old. Shifting click and then S
and X pull it out like so. And then what I'm going to do is now I'll grab all of this. So control plus going all the way down to
maybe this part. Press S and's head, squish it down a
little bit and then pull it down. There we go. I think that looks perfect
what I'm looking for. All right, let's right click
and shade auto, smooth. Let's also make sure because at the moment I feel it's going
out way too far past these. So I'm just going to press and Y and bring it in and
then pull it into place. So jawed in front
of there like so now we can think about I'm thinking these are still touching a little bit and I don't think I actually
want them touching. So what I'm going to
do is I think I'll come to the top of each
of these, the mirrors on. So I should be able to come in and just grab that top face. If I press Tab,
grab that top face. And then I should
be able to press and X and bring
them in just very, very slightly like so. So I'll bring them in and then what I'll do is
I'll pull them up, Jased a little bit, just
so they're going in there. And then finally as well,
I'll also come in and just bring this bit here back
a little bit as well, just to kind of smooth them
out a little bit like so. And now I can see
just smooth them out, they get a little bit
thinner as they go up. All right, let's
turn off our x ray, double tap the eight
and just make sure that you're actually happy
with that, which I am. And I think now we can
have a little bit of fun. So if we come into
the bottom off here, what I'll do is I'll bring
in a few edge loops. So let's bring in, let's say five, left
click, right click. And then what I'll do is I'll
pull this up a little bit, pull these two up a
little bit like so. And then we go have that nice sloping appearance on there. And then I'll also
come in and I'll grab, in fact, I'll reset the
transformations first. So control or transforms
right click, origin geometry. And then what we'll do is
we'll come from here to here. I'll press the eye button, bring it in a little bit, and then I'll press and
pull it out a little bit. And then I'll come to this top on and do pretty much
the same thing there. So I'm going to grab
this one and this one, press the eye
button, bring it in. Now I'm thinking I need to reset the transformations
on this because it hasn't come in the
way you wanted. So controls, head tab control or transforms right click
origin to geometry, press the eyeball and now
you can see it's coming in so much bear and now you can just pull it out a
little bit like so. All right, so now you can see that we do have a problem
with this part here. Let's deal with that now. So I'm just going to grab the front of here,
just this part here. I'm going to press P selection
and separate that out. And then I'm going to come
back to it Control A or transforms right clicks
at origin geometry. And now I want to do is bring in some actual edge
loops into here. Now if I press control art, you can see I can't
bring in an edge loop. And the reason is
because the top of here, so if I come in and just press that little question
mark to isolate it, it won't let me do it
because it's a triangle. So what I need to do
first is just come in with my knife to press a, just to get a nice straight
line going across enter. And now I'll be able to bring
in some edge loops like so, which will make it easier
if I now press tab. And the question mark
to bring it across. So you can see now I've got something to actually war with. So first of all, I'll
grab the bottom one. I've selected it because I
know I can select it through there and X and pull
it out into place, and then and X out into place. What I want to do is follow that line going all the
way up there like so, especially this one, S
and X. And there we go. Now you can see we do have a problem in that this
now is not level. You can see that if I
press one, it is level. It actually is. You just
looked a little bit out. Okay, that's great. Let's
grab the top of it then. And we should be able to pull
that into place like so. All right, let's see what that looks like then.
And there we go. We can see we need to pull
it forward to pull it forward to where you want
it round about there. And now what we can do
is we can actually start working on the bits that
are going to go up here. So first of all, I'm going
to want to round bit a thing that's going
to go into here. So what I'll do is
I'll press Shift. I'll bring in a cube and Z, make it a little bit smaller, and then and X pull it out. And the next thing I
want to do is I want to shrink it down because you can see it sticking through there. But instead of pressing and it let's just come
to the back of it, grab the back and pull
it into place like so. Just make sure it's not poking
through the other side. Now I can do with this, I can press controller, bring in maybe three edge
loops, left click, right click. And then all I'm going to do now is bring up the middle part. Bring it up, and then bring
up each of these sides. Bring these up and
it's going to make a nice slope like so. And then I'm just
going to think, drop it down a little bit because I want to
circle it in there, maybe even a little bit more. And then I'll press
and X and pull it out. So let's have a look at that. Looks like, yeah. And a thing
that looks pretty good. All right, so now let's make the parts that
are going to go up here so I can use this part because it's
already got a mirror on. So if I press Tab now shift A, and I can bring in another cube. And if I move that cube over, you can see now we've got
what I actually need. Let's press S then,
and bring it down. So something like this size. Let's also bring it out here. So and Y, bring it in and then pull it out.
Something like that. And then finally I can
grab the top of you. And then what I can do
is I can press one, pull it up, and then put it
into place where I want it, which will be round about there. I'm also going to grab the bomb, pull it down like so. And I'm thinking that's
looking pretty nice. And now we'll just
grab one more. So I'm going to press L shifty, bring it over, put it into place in there, and
then bring it down. Of course, it's up
to you how you want your own structure to look. But I think something like this looks pretty
nice as you can see. All right, now just the little circle bit that's
going to go on there. So what I'll do to do that
is I'll press one shift, and this time we'll
bring in a circle. So I'll bring in a circle. Make sure that with the circle we turn down the
virtus, first of all. So we're going to put it
on something like 16. I'll then rotate it round, so R x 90. Rotate it round. And then what I'm
going to do is first of all add in a modifier and we're going to bring in a
solidify, Where is it gone? Let's pull it out. We're going
to bring in a solidifying. A or straight away the solidify is not working and that's
because it had no, it wasn't a two D
object to start with. It was just like a
curve or something. So what we want to do
is we want to press a E. Why pull it out? Or let's try that again. So we're going to
grab all of this. Let's try, see if
we can grab it. So L, there we go, and y, and now we should be
able to pull it out like so. Now let's make it smaller just so it's going
to fit in there. So we press one, I'm going
to press Tab, bring it down. Bring it out now like so. Then we should be able
to fit it into place. Let's put it into the place
where it's going to go, which will be round about there. We can make it a little
bit thicker if we want to. We can also pull it
out on the Y, S, Y, pull it out, let's put it into place and see if we're happy with
the thickness. We'll put it in place
just around there, right. Click, shade, auto, smooth. You know, I think I'm
happy with how that looks. All right, so what we'll
do then on the next lesson is we'll get this top of the roof in. That's
very important. And then from there then we
can start actually bringing in our geometry node for
this part of the roof. And then we can kind
of probably come back to this window again when you're doing
something like this. Just bounce around a little bit just to make it more
interesting all the time. But what we'll do, first of all, when we come back is just
get the materials on here. I think that's important
because then we'll have a good view of what this is
actually going to look like. All right everyone, So I
hope you enjoyed that. I'll see on the next one.
Thanks a lot. Bye bye.
76. Tile Detailing on Library Roofs with Tile Generator: Welcome back everyone to Blend for the Environment
Artists Guide, and this is where we left off. Now, before we go any further, let's actually come in and put our material on to see what
we've actually got here. Let this load up. We can see
we've got materials on here. I got my bevel on
here if I press tab. Yes, I've got my bevel on here. I've got my bevel on this bit now, have unwrapped that bit. I'm not actually so sure, I've definitely got
no material on here. So let's actually
fix this first. So what I'm going to do is I'm
going to come to this one. I will grab this one, press control L, and
I'll link materials. And then I'll come back
to this U and wrap. So let's get that one wrapped. And then what I'm
going to do is now, I think I will come in
to these parts here, you can see there
has got a miron. Let's apply that first. So control a, let's then
grab all of these parts. There's another mir, oh, this has got solidify on. We know it's got solidify on. So we'll go to convert Mesh. And then what I'll do
is I'll press Control. I'll transform. Dry, click, Set origin to geometry. Then I want to unwrap them. Let's smart UV Project. Click okay, like so. And then what we'll do is
we'll join them all to this with their bevel and
with their materials. So control L, link materials, control L, and then
link or copy modifiers. Now are those modifiers
actually working? We can see them
working on there. We can see them working
around here and around here. And we can also see them working for an object
mode on here as well. All right, so that's
looking good. Now let's come in and
just go to file and Save. Last of all, I'm just looking to see these have got
the modifiers on as well. I'm just looking to
see if everything's leveled off before
going any further. What I'm last of all going to do is I'm just going to pray on render review and make sure
everything's looking good. Yeah, that's looking
really nice. Double tap the A. Yeah. I'm really happy
with how that looks. Now let's carry on to this roof. The thing is about the
roof at the moment, you can see that this roof is
definitely not high enough. So I'm going to
have to make sure the roof is a little bit higher. So I'm just going to grab this and I'm just going to
pull it up to there. And now I've got a
good idea of where my actual roof wants
to come down to. So in other words, when
I create this roof, it needs to come all the
way probably out to here, which means I'm probably
going to have to split this roof off and then
pull it out a little bit. So I'm going to do that first. So what I'll do is I'll
grab both of these. I'm going to press the board just to split them
off from there. And also as well, because I'm going to need
kind of top to this. I will put that in first
and then it'll give me an idea of how high
I need this root. So let's come in then
and do that first. I'm going to grab this
one and what I'm going to do is Shift S Ursa selected. You can see that it
goes down there. I don't really want that, so I'm going to
grab the top of it with edge select and then
shift S, Ursa selected. And now I can actually
bring in a cube shift, bring in a cube, let's make
it a little bit thinner. And Z, let's make it
a little bit thinner. Let's bring it into the place then where we roughly want it, which will be
somewhere around here. And I'm thinking probably
should be above there. And in S and X,
let's bring it in. So something like
that. I think jawed above this part here
looks kind of good. And then what I'll
do is I'll pull it out into place over here. So it's going to go into there. And now we have a
good idea that we can see this roof is definitely
not going to be tall enough. Before we fix that though, let's do the rest of this first. So we'll pull it
down first of all. So we'll put it round
about down to there. And then we'll do is, rather than create it from this part, I'll just create a new part. So all I'm going
to do is I'm going to come to this part here. I'm going to press
shift D. And then what I'm going to do is press
S and X and pull it in. And then from there I'm
going to press, pull it up, and then again pull it up, and then S and X pull it
in and finally pull it up. So I'm just wondering. Yeah, I think that's
looking good. Now I can come to
my main roof and what I can do is I
can come in face, grab the top of it, and then just pull it up to where
I actually want it. I think something like
there, just above here. And then I've got enough
room to actually put a kind of block on this part. Don't worry too much
about this roof, because we can actually
come in and fix any issues that we've
got with it now. The main thing we need
to do now is bring in our roof and make
it sit in here. So this is probably one
of the hardest parts to actually do just to get
it to come altogether. So I recommend pressing tab. First of all, save
now all of your work. So save. And then
what we'll do is now we'll bring in our
geometry node. I think we can press Shift
and bring in a cube. Let's bring that
up, and let's see, I can add modifier
geometry node. Click the down arrow,
and the one we won is going to be roof. And there we go. There is
the start of our roof. Now let's make it smaller
like so. And let's also Spin it round, so R Z -90 Let's
spin it round into place. And what I also
want to do is just put it in somewhere
into place like. So just to kind of
get a scale of this. Now I can see at the moment these are looking a
little bit too big, so I'm going to make them
a little bit smaller. And then what I'm going
to do is I'm first of all going to shape this
the way they'll want it. So I want to come down
and bottom bend in. I want to pull out like so. And then what I'm
going to do is change the horizontal count ring
that up to where I want it, and I think that's going
to be about right. And then I'm going to come
down and rotate it on the Yth. No, not the Y, the X. There we go. Let's
rotate it on the X. And now let's increase the
vertex count vertical. So let's increase that.
Unfortunately, it's going the other way
to what I wanted it. But anyway, I will pull it down to the bottom
where I want it. So I want it right around here. Now I can see that even though I've
made these smaller, they're still too big. So I'm going to make them
a little bit smaller. So I'm going to
press S, and that looks to me to be more
about the right size. So let's put them into place
where they're going to go. If I pull them across here, we've got a better idea. So I can see we need a piece
of wood underneath here. So there's a piece of wood
gonna be underneath here. And the other thing is, when you're creating
something like this, just make sure that they're
coming past this post here. So if I kind of bring it down, the best way to do this is just make sure
that you've pulled it out enough to go past that post there.
That's what we want. Now you can see as we go up, it's starting to actually bend. That's what we actually want, because not bend, so it's
starting to stick out here. We want to know where
that is because from there it will enable
us to bend this roof. So what I'm going to do now
is I'm going to increase the vertical count
like so, like so. And then we're going to
increase the horizontal and then I'm going to
pull it back and just making sure it all
fits in place. Now I'm not going to worry
about being perfectly in place in probably needs to pull it out a
little bit there. As long as it's like this,
that's absolutely fine. Now, next of all,
we want to come down and change
the subdivisions. Can we get away with less
subdivisions? We go up. Maybe like that thing
we can get away with. And then what we need to do
is we can come down now and change the tile length
and all that other stuff. Now, I think the
tile length, for me, honestly, is about right. If I turn this down a little bit or up, let's have a look. Yeah, I'm going to turn it down. We can go down lower
if we need to, but I think on this,
I don't want to. I think the width
is perfectly fine. What I'm going to do
is now random size, Let's just turn that
up a little bit. So, and then random length, we'll also turn that up a little bit or down turn it
up a little bit, so I'm thinking that's really coming together
really nicely. And then randomized width,
let's turn it down. I always turn this down a little bit just so we have
more of a gap in here. So if I double tap
the eight now you can see we've got more
of a gap in there. And I think that actually makes it look a little bit bare. And I'm thinking actually
that this, at the moment, is about ram jaws
going to pull it across a little bit
and then pull it out. So S and Y, let's just stretch it out a
little bit, like so. All right, that is looking good. I'm happy with that.
I think I am now. The one thing I need to do
is obviously bend this in. So if I come now down to
where it says roof angle, you will see that if
I bring this out, I should be able to bend it in. Now at the moment it's
got lock center on. If I click this off, you can see now it actually bends
from the bottom of here. And from there what you can
do is if you select it, you can press Art and Y and
kind of put it into place. And now you can see that it's actually bending with
this actual wood. And that is exactly
what we want. I think we have to bend it a little bit more, to be honest. So let's come down, where is it? And bend it a little
bit more like so. And then r and y and bend
it back a little bit. And finally then let's just
pull it out a little bit. So pull it out like so. And now you can see it's nicely bending with this
piece of wood on here. Now I'm just wondering if I should pull it
out a little bit. In other words, should
it be out there? You can see we've got
too much space here. Definitely not that far. I think I have to pull
it in a little bit. So let's pull it into place. Let's then bend it again, so Y hold in shift, bun, bend it again, and we'll
put it round about there. Let's have a look.
Something like that. Maybe it's a bit fiddly. This, we need to make
sure it's right. I'm just wondering whether to pull these in a little
bit, these parts here. Whether to pull them
in a little bit. I'm just wondering,
let's come in and just grab just these two. Can I just pull these two in? What I'm going to do is I'm
going to grab both of those. I'm going to press one. I'm going to put it onto a ghost so I can
actually see through it. I call it X ray is what I mean. Let's then put
proportionality on. Let's also make
sure connected only is so it doesn't affect
these other pieces of wood. And then let's come in
and put it on smooth, and then, and let's pull
it all the way out. What I want to do
is just pull them in to this post here
as you can see. And now you can see that's fitting so much better
than where it was. All right, so what
was that worth doing? I think it was and
now I'm going to do is I'm just going to come
in and grab both of these. I'm going to press one
again and then and X pull those in a
little bit like so, making sure they fit in. And now finally, we
just need to make sure that if I take this off, that this bit here
as you can see, is not in place properly. So I'll just press
and X and bring it in like so just so we've
got a bit of a gap there. All right, there we go. Finally we've got that done. Okay, so now we've got our roof. Now you can see the
inside of the roof. So this bit in here definitely definitely isn't working for us. So what I'm going to do
is I'm going to come to the inside these parts here and I'm going to come in
and just delete this one. Delete faces. And now I can do is I can come to this one and I can come in, I can press control,
bring in some edge loops, left click, right click. And now finally I can
come in with edge select, making sure selected this one. And now I can just pull
it in a little bit. So you can see here, if I
press one on the number pad, I should be able to
see where this is. You can see here, it comes
all the way down to here. It's not bending out
or anything like that. So what I need to do
is straighten this up. So I'm going to pull this out like so it's jaws behind there. And then I'll come to
the next one and I'm hoping I should be able to grab this one through one
and then pull it out. I've still got portion editing on. That's what's messing it up. Take portion editing
of pull it out. There we go. Now we can
pull it into place. I'll come to this one
very fiddly again, then come to the side one, pull it into place and now
we'll make our way down. So you can see here one, let's pull it all the way over. And then this last 11, let's pull it all the way
over into place there. All right, so now if we
come in, take this off. We should be able to see,
we can't see through there. Everything's lining
up perfectly. And we should be able
to put a piece of wood under here now and
line everything up. That's looking really good. Now, one problem we
do have is we've got a lot of kind of mesh in here. We'll sort that out,
don't worry about that. And the other problem is we've not got side of roof on here, we'll also sort that
out, no problem. All right. One, so
save out your work. This is the most
technical roof I think. I think pretty much in maybe the circle one is
also quite technical, but this is one of the hardest. So once you've
mastered this one, you should be okay
with other roofs. All right. One. So hope
you enjoy that and I'll see on the next one.
Thanks a lot. Bye bye.
77. Advanced Roof Cutting Techniques with Blender's Bisect Tool: Welcome back everyone
to Blender for the Environment Artists Guide.
And this is where we left. All right, so we've
pretty much got roof now, before putting it
over the other side, let's make sure that you can see on these
little bits here. There's still a little bit out. So what I'm going to
do, Jaws going to pull it out, grab this one. Pull it out, and there we go. Now it's set behind the roof. Pretty much how we want it. Now let's come in and
give this some material. So I'll do first of all, I'll I'll let it load up first. I'll come to this
one, so L. And then what I'll do is I
will come over. In fact, we'll right
click, first of all, shade to smooth grab my planks. Press control L and
we'll link materials. Let it load up. Let's
go and have look. So minus off this one. For some reason that one's
on and then we'll come up. Yes, I did. That's
this one here. Minus it off. There we go. All right, let's unwrap it. So you unwrap and there we go. Now that is just going
to hide the fact of anything behind there.
That's why I'm doing that. Also on here you can
see 'cause I minus off the material by mistake.
That's fine though. Let's first of all get
the material on here. Now, what I'm going to
do with this as well, I'm going to duplicate this
once I've got the material, sorry, with the geometry node. And the reason I want to
duplicate this and put it in my Boolean to hide it is because I want to use it
on this roof as well. In other words, I want
to have the towels being exactly the same. So what I'm going to do is
I'm going to press shift D. I'm going to drop it down
here, so underneath. And then what I'm going to do is I'm going to move this now by pressing M to my Boolean. Then I'm going to hide
booleans out of the way. Now I've got that four later, so just make sure you do that. Now we can come to this. And the reason we
did this, that is, is because now I can come in and actually change this
from a geometry note. So I'm going to go to object. I want to come down
to convert to mesh. And then what I'm going
to do is just minus off these two so we
don't need these. I do want to roof material, but it's going to be a blue
roof material. There you go. Now let's write click
shade or to smooth, let's bring in, let's see if
we've got our roof material. So it's going to be, I think
this is the roof material. Let's put that on.
Let's put it on to render view just
to have a quick look. And yes, that is
our roof material. Now if your roof material
doesn't look right, all you're going to
do is you're just going to press Tab to grab everything and
you Smart UV project. Click okay. And there we go. All right, that's
looking pretty good. Now we have got a problem
in that we really, really don't want all
of this part here. We really want to cut
some of that way. So what I'm going to do is
just go to object mode. I'm thinking the
easiest way to cut this away is probably
if I go to three, you can see that I can probably get away with
cutting it up here. So let's do that.
So I'm going to press A. I'm then going to come and put it onto x ray
so I can see through it. I can see this line down here. And what I want to do
that for is just to get rid of most of this mesh
that we're not using. So I'm going to come
to mesh bisect. What I'm going to do
is just bisect it down roundabout there,
pressing space far. Then I can actually
move the bicect tool as well and just making
sure it's before there. And then what I can do is
clear the outer tick off. Clear in. And there we go. I don't want to fill
them in to create more mesh because they're
already inside there. Now let's have a look and
make sure that's worked. So let's turn that
off. And there we go. That's all perfectly good. All right, so now we've
got our material on here, let's put our material
on this as well. Because you can see we've
got no material on here. So all I'm going to do is
we're gonna grab it all. Smart UV project. Click Okay. Grab this one. Press control L. Link materials. Press control
L. And now we're going to link copy modifiers
just to level that off. Let's make sure then it's
leveled off. Yes it is. If we go into object mode, we can see it's leveled off. And now we're going to do
is we're going to come to the inside of our wall first. Press control all
transforms right click, set origin to three D cursor. And then all I'm going to
do is we're going to come down now and add in a mirror. So generate mirror
and there we go. And let's now come
to our actual roof. And because we can't
see our roof, you know, both places at the same time, we can keep the actual UV's. In other words, we can keep exactly the same roof on here. So what I'm going to do
is I'm going to press control A or transforms
right click Orogen, three decursor add modifier. I'm going to bring in a mirror. And there we go. Let's
double tap the A, making sure that's working. And it looks as though it's
working absolutely fine. I'm just wondering about
where this is coming to. If I press one, I'm just
making sure that this, this side, as you can see, is a little, tiny
little bit out. It should be a little
bit over to this side. Let's come in and
move both of these. So we'll just move them
very, very, slightly over. Double tap the E, making sure everything is
fitting in there. There we go. I think
that's looking good. Now let's bring in a
piece of wood under here. So there should be
a piece of wood sat on here. So
we'll do that now. Just a simple, you know, we can make it a
little bit ordinate, but just something simple. So all I'm going to do
is press shift day, bring in a cube. And then what I'm going to do is just bring it to this side. Whatever I, you know, create, I can use that underneath
all of the roofs. So I'm just going
to bring it up. First of all, I'm going to create which way it needs to go. I'm going to press essence Head. I think it should go
round about there. And Y and X, bring it in. Let's pull it out
where it needs to go. So something like there. And then under making
sure it's in that post then so you can
see it's going in that post. And
let's bring it out. First of all, bring
it out over here. And you can see it's a little
bit in front of this post. Where am I going to bring it to? I need to make sure that
it's going to fit in there. Now. I think it should come to there. Now I've got a choice. Do I pull this out more or
do I put this further back? If I put this further back, you can see I've got to make
it a little bit taller. So if I grab this now, I can make it a
little bit taller, just before it pokes into there. And then what I can do is I can pull this down a little bit. So then what I'm going to do, I'm just making sure all of this is fitting in
place now, which it is. All right from there
then what I can do is I can pull
this all the way up. I can press control. I can
bring it out a little bit. And then from there
what I can do is I can press pull it down to here. And then I can press
control left click, bring it down.
Something like that. And then I'm just going
to press and pull it out to something like
that. And there we go. Now you can see that's
fitting in pretty nicely. Now, the one thing
is I'm wondering, it should have probably
another ledge that comes up here that comes out
on top of here. In other words, I think
I will put that in. I'll come in, grab
that one, this one. Grab the top of it. So if I grab both of these,
just the top. And then what I should be
able to do is pull that down to where I want it now. I should be able to pull this
out and then pull it up. What I'm going to do, let's see if I can pull
it out from there. So I'm going to come
in, grab this top, and then press and
X and pull it out. Now I'll take this
off Rs to check it. Yeah, and I think that now
is lining imperfect like. So now what I can do
is I can come in with face Lt and grab the
top faces of here. This one. This one, and finally this one. And then I can just press
and pull it up a little bit. Now I've grabbed them,
so I can just turn that off now and see where
I need to pull it up to. Let's have a look. We can see we've got a little
bit of a gap there. I'm just going to put it
to the top of here first. So it goes under there. And then now I'll fill it in. So you can see here
we've got a gap here, and here we need to fill
these in with double tap, the A, there we go. So if we look from here,
it's completely covered. Now that's looking pretty good. All right, last of them, control all transforms, right click origin three D cursor because it is right
in the center. Press. Tab. Smart UV project. Okay, tab. Grab this one, press control
L. We're going to link materials control L and we're
going to copy modifiers. And now finally, we'll
add in one more. Generate mirror and hopefully
we can put it over. Not that one, let's
take that off. Let's come to this one
and hopefully add mirror, generate mirror over
the other side, making sure that's fitting
in place dur, but tap the. And there we go. What
we should do now is we should bring these over now
to fill in this side bit. I'm thinking though,
this side bit is going to be a
little bit different. I think what we'll
do is I'll bring in one post, one of these posts, or grab this one shift, let's bring it, put
it in place like so. And I think that's going to
be absolutely fine there. It's all fitting in place. I'm just wondering if I need to stretch this a little bit. Again, I'm never afraid
of stretching things out. So don't ever be afraid of that, stretch it out if you need to, just to make it look
that a little bit bear. Same with this side
if you need to, but I think actually that's
looking pretty nice. Now what we'll do
is we'll come in and we'll bring this part here. So we'll bring this round. So shifty, let's bring it out. And then what I'll do
is I'll spin it around. So Azad 90. And what I'm going to
do is just pull it out and put it into the
place where I want it. So I'm going to pull it
out maybe a little bit more or I'll put it
back to this one, pull it over across
to maybe there. And then what I
want to do is make sure this is fitting in place. Now I have to be very careful
how far, push this back. So I'm going to pull
it back to there. If it's actually
poking through there, you don't want to poke
in through there. Just make sure it's not, it
doesn't look like it is. But you can see we're a little
bit out on this top bit. I don't really want to,
how do we fix that? A thing we'll do is I'll
pull this out just to, it's just in line there. Then what I'll do is I'll
pull this out till it's in line till this is actually
going on top of the. Pull it out with shift like. So then what I'll finally
do is pull these out now, making sure the line up, all this one, I can
just pull this out a little bit and there we go. Everything is lining
up perfectly. All right, so let's have a
look on that rendered view. And it's really starting to come together
now as you can see. So I think what we'll do on the next lesson is we'll
finish this actual front. So we'll not finish, but we'll start
trying to finish it. So all we'll do is we've got a small window here and
a major window here. We'll get those in place. And from there then
we'll have a really, really great idea of what
it's all going to look like. And also from there
we should start be able to start bringing
it all together. All right everyone. So I hope
you enjoyed that and I'll see on the next one.
Thanks lot. Bye bye.
78. Modeling Victorian Library Windows Above Entrance: Welcome back everyone. To Blend for the Environment
Artists Guide. And this is where
we left it off. Now let's put it onto
material mode just so I can actually do something rather than the render view. Let it load up. And what I'm going to do is I'm
going to grab these. First of all, I'm going
to apply that mirror because I only want
to grab one of these. So let's press control a. Grab one of these then.
So let's grab this one. Let's press selection and
just separate it out. Let's grab it now and press
control or transform. Right click origin to geometry. And now I'm going to
do is we're going to press Shift and bring it out. Rotate it round so ours head 90. I'm going to then press one. I'm going to put it into
place so I want it in wide enough to go in this post and this post and X,
let's pull it out. Something like that, and
then let's pull it back. Now we know already we're not going to get the right
height at the moment. We can see as well
that we need our roof, so the other roof basically
to come down to here. And we don't know where
that's going to come yet. All I'm using this for
basically is a template to show me whereabouts my window
needs to go from there. Now what I can do is
I can grab this part. Press control all
transforms right Click, say origin geometry, press
Shift S, Custer selected. Now I'm going to do is I'm
going to bring in a plane, spin it round so R x 90. Press the S. Be just to
get it the right scale. I want it so I'll think
something like that level with near enough the door press Essen's head and
let's pull it up. And I think that should
be the size of my window. Maybe that's a
little bit too big. So Essen's head. Bring
it back a little bit and let's pull it up like so. And I think there, yeah, I think that's going to be
about right. All right. So we should be really, really good at making windows. So let's have a go at this window and see
what we can do within. I'll show you a little bit of a different technique
for creating, you know, a different
style of window. Only a little tiny bit of
difference, but you will see. All right, so what we'll
do is first of all, reset all the transforms. Press the tabb,
come into face leg, press one on the number pad so we can see what we're doing. Let's make the actual
support first, let's bring it out
roundabout to there. Let's then split this bit off. So I'm going to press Y, and then I'm going to press again, bring in this part here. So then I'm going to press Y, and then I'm going
to press Control left click, right click. And then control going up. I think we'll have four here. Left click, right click. And now let's come in
and grab all of these. I've grabbed all of
these. I'm going to then press control and pull
it out a little bit. So then from there
what I'm going to do is I'm going to pull
all of this out. So I'm going to press, in fact, first of all, let's split
it from the actual window. So selection and
then let's grab it. And then tab A, and then E, pull it out like so. And then what I'm going to
do is I'm going to grab the top and the bottom
with control select and press and pull that out
like so it just makes it a little bit different
from the rest of the windows that we've
actually been creating. Now let's come in
and what we'll do is we'll grab this side first. Now remember, we need to, first of all, split this off. Actually, we need to
split both of these off. Another word, split this off. And split this off,
we're going to press Y, and then I'm going to grab
this one and this one. And then I'm going
to press, pull them out so they go past
this part here. Same on this one.
Then select top one. Select the bottom one. Press Y, select this
one and this one. Then we're going to
press and pull it out. That will be the actual support. Then from there, then I'll grab the bottom part of the window. So this part here.
Now I can see that this window is looking a
little bit, a little bit thin. So what I'm going to do
is I'm just going to grab the whole window and y
and just pull it out. So don't worry about where
these are, anything like that, because now I can
actually come in, grab this part first, L let's select it all. Let's pull this out just a bit. And then what we'll do is
we'll come to this bit now, pull it out to where
I want it to go. And finally the windows. Let's come in and select each
of these windows like so. And then we're going
to pull this out into place where I
want them to go. And I think that's
looking about right. I'm just wondering, put this on object mode. Is
this thick enough? These parts here, are
they thick enough? Mine actually just come around the back and grab all of these. I'm just going to control
select and then just shift select each one and I'm just going to pull them
back a little bit. So if I pull them
back now like so, and now what I can do
is I can come back to my windows and pull those
back just a little bit. All right, that's looking good. Now let's make the
bomb of the window. So I'm just going
to press shift, I'm going to press
and X pull it out. Just a little bit.
Z. Pull it down, so make sure it's on the Z. And then just grab the front of it and
all you're going to do is just pull it out
to make a window sill. And there we go. Alright,
let's join it all together. So let's join this
is, it all joins. Suppress. Yep,
just a center bit. Have I got two in there? So have a look. Do you
just need to check? No, I've not got two in
there, so that's good. Press control J, join
it all together. Control or transforms right
clicks at origin to geometry. All right, so now let's come
in and bevel it all off. So add modifier bevel. And it goes straight
away like that, which is really, really nice. Not point N n
three. There we go. Now let's bring
in some material. So this will be
round the outside. First of all, we'll bring in, put it on material first. Let's grab the
whole thing first. So grab it all. Smart
UV project. Click Okay. And then we'll have it lightwod. I don't think we'll use
the dogwood on here. I think we'll use the
actual lightwood. I'm also wondering as well, should this part on
here actually painted? I'm thinking should
it be painted? I think actually it should
be probably wood on here. Can I come in and actually
select just these parts? Let's see, I'm going
to select all of this, but it is selected
in the window. So just in fact, you know, I'm thinking the easiest way to do
this, You know what, I'll just change the material So where it says
green painted wood, I'm just going to change
that for light wood. Let's just change
it to light wood. So let's click the
plus board now. And then we're looking for the green green painted
wood, this one here. And what I can do
now is come in, and that was a much
quicker way, actually. L, L, L, and L. And then
click a sign on here. And there we go. Now let's just see if that
looks a little bit bare. Yeah, actually I think
it does look bare. I'm going to leave
that as it is now. I'm going to pretty much do
the same thing on this one. Then what I can
do is I can grab, grab this press control L and I'm going to link
materials like so. And then what I'm
going to do is I'm going to come to
the outside first. I'll grab all of this going around the outside
and the bottom. And then what we'll do
is we'll assign this. And then I'm going
to grab the windows now and I'm going to
assign them to the glass, but I'm going to
change the glass. So I'm going to
assign them to this. But then I'm going to
click the down arrow and I want the glass not lit windows. This one here, like finally. Now let's go to UV editing and let me have a
look at my glass. If press on these ones, I'm going to actually press Tab to grab these. Then
come to these. Now where do I want these? Let's first of all grab this one and what
we'll do is we'll put this one in place and then
all I'll do is press copy, copy, defolt, and then paste
it onto each one of these. Like we've done many
times, the report. So you copy paste. Default to grab everything and now we're just
coming into each one. And just move them into
place wherever I want them. So let's put that
one over there. All right. That's that done. Now we can do finally is
I can pull this window back into place like
so into the wall. Pull it out a little bit, double tap the A
and there we go. That's that window done. All right. That window took a little bit longer
than what I thought. What we'll do then on the
next lesson is we'll make a start on perhaps the
most difficult window, which is like this kind of massive bay window like this Harry Potter
type window on here. We'll do that.
We'll also as well split off this wall
here as you can see. And we'll get the right
material on there. I think on this it'll be brick
to follow on round here. So we'll do that first.
All right everyone. Let's save that our work and I'll see you
on the next one. Thanks a lot. Bye bye.
79. Crafting a Bay Window for Victorian Libraries: Welcome back everyone to Blender for the Environment
Artists Guide. And this is where
we left it off. Now let's come to
this bit first. And what we'll do is we'll
grab this, press the Y button. No, in fact, we'll
press selection. We'll grab it. Press control. Or transforms Se
origin geometry. Grab this wall. Then
press control L, and we're going to
link materials. And then what I'm going to
do is grab this one again, press U and unwrap. Now I'm going to press
one, going to Front View, and then I'm going to
come over to my UV map, Press A and then make
it much, much smaller. Lining it up with these walls
over here as you can see. So I'm going to try
and line this up, press in G and Y. Move it up a little bit or down. Just try and get them lined up like so they don't
need to be perfect. Again, what we're looking for is we're going to have some
path of the bottom of here. So just make sure they're lining up the way
that you want them. And I think actually
with this wall, I don't really need to
worry too much about here. I've got my mortar down here, so that looks absolutely fine. Press the tab, double
tap the and there we go. Now we can use, we
can use this wall to press Shift S, Ursa selected. Go back to modeling
because we're going to really need to be in
modeling on this one. Let it load up and
now also let's put it on object mode so we can really see
what we're doing. All right, so now let's
think about our bay window. How big is it going to be? Well, it's going
to be near enough all the way up to
the top of here. So near enough all the way
to the top roundabout here. And it's going to cover
most of it around here. So let's press Sir, shift date. And what we'll
bring in, first of all is we'll bring
in a cylinder. We'll make this cylinder,
I'm thinking 24. So let's put this on 24 like so. And let's get this into the size first of all that we
want it so we know it's going to have to be
and's put it down to the floor roundabout there
is where the floor is. I think actually where
we've got this to at the moment is probably
round about the right size, Maybe a little bit
more for sure. It's coming way too far out. So what I'm going to do
first of all is press S and Y and squish it in a
little bit like so. And I'm thinking that's
going to be about the right size of what I
want my actual window to be. We know we should be able to come in and grab this
one and this one. And this is what we're
going to use for our actual wall,
so these two here. And then we're going
to press selection, separate it off,
and then come back. And what I'm going to
do is press delete. And just delete the
other way from there. Then I'm going to write a
click shade auto, smooth. And I'm just going to have one
final check of it before I finish just to make sure that I'm actually happy
with how that is. So this is how far it's
going to be out and Yeah, a thing that's going to
be just about right. So what I can do now is
from there I can start deciding where where's the
windows going to come up to. And I'm thinking the
windows will probably come. If I bring my guy
down, actually, that'll be the easiest way
to actually check this. So what I'll do is pull him out, pull him down to
the floor like so let's make sure
he's on the floor making sure his feet aren't
disappearing in there. So where is the ground plane? Let's bring him down
somewhere like this. Which means that he wants to be able to look into the window. The window is going to be a
little bit lower than that, so I'm going to grab this now, press control and
then bring it down. And I'm thinking
somewhere like that. And then I'm going
to bring it up. So control law again. And I'm going to bring it
to something like that. All right. So that's all the
pre planning out of the way. Now the part, the hardest part is to actually start creating what we actually
want out of this. So what I'm going to do first, I'll come in with the first bit. I'll press control, come
down to the bottom, and I'll bring it out, I
think this far. This far out. And then I'll come
in and I'll grab this one and this one. I don't now manage
to grab that one, but let's grab it again. This one And control
select this one. And control selecting
is not working, so let's grab this
one and this one. And then what I'm
going to do is going to press Enter alternates and hopefully bring that
out a little bit like so. Yeah, that looks pretty good. Okay, so now what I
want to do is I want to bring this part down. So I'm going to come in control, select this one, bring it down. So something like that. And then I think I
want a little bit of a lip on maybe on here. I'm just wondering the
easiest way to do that. You know what, I'm going to just press control head and put that back and instead of coming out all of that weight I'm
going to come back. So control select them
and then I'm going to press alternates and I'm
going to bring it back in. So I'm going to bring
it back to there. Control left click. Bring it up a little bit to there and then I'll come in now. And I should be able
to pull this out. So if I can grab all
of this going round, I'm going to press
Enter alternates, bring it out to where I want it. And finally then I can
actually bring this part down. So if I come in now, grab
this part, control slate, this part, and I
should be able to just drop it down that
little bit like so. All right, that
looks a good start. Now where is my
window coming up to? So if I'm come in and grab this, I can see my window is going
to come up to about here. In between here I'm going
to one plank of wood. You know, these little
planks going down here. So what I'm going to do
is I'm going to press controller and bring
this up to here. And then I'm going to make a
little bit of a lip on this. So I'm going to come to here. And come to here, not
to there, to here. And then what I'm going to
do is press Enter Alternates and bring that out a little bit. Now these are going
to be then map planks of wood that are
going to go down here. We also need support
in here as well. I think we'll actually put in
our support on here after. I think we'll basically
take this apart first. So let's come in, grab this one. And this one, it's extremely
complex, this one. So trying to work through
and work out which way we're going to do it is not
an easy task at all. So what we'll do is we'll
just split this off. Now, press Y, and then that should be split off like it is. And then what I can
do now, in fact, we'll press selection.
Split it off that way. Now I can come in and what
I'll do is I'll press control all transforms rightly
set origin geometry. And the first thing I'll do
is I'll come to this side. So control one edge
loop in there. Control one edge loop
in there, like so. And then what I'll do is split
these off so I'm going to come to this one and this one. And then what I'll do
is I'll pull these out. So I'm going to press Enter and X and pull them
out just so there. Just out. Still going
under there, so. All right, so good so far. Now let's again split this off so you can see
if I grab all this, it's grabbing those as well.
I don't really want that. So what I'm going
to do is control select all the way to there, press P selection, Split it off. And now I'm going to do
is I'm going to actually subdivide this one to get more planks of
wood based in there, because these planks are a little bit thick at the moment. So the easiest way
to do that is just to come over adding a modifier. In fact, no, we won't do that, we won't add any modify. What we'll do is we'll
just grab the whole thing. Right click, subdivide. Now we can see that we
have subdivided it here. We don't really want that, so
we want to get rid of that. So this one here, this one going across here,
we don't want that. And this one here. So
what we're going to do is delete and dissolve edges. And it should be left
with something like this. Which is pretty much planks
going all the way around, which, which is perfect
for what we need. We could have used the geometry, no planks for this, honestly. It would have also
worked because you can actually
bend that as well. But, you know, on
this one I want them to be a little
bit straighter. I don't want them so,
you know, randomized. So what I want to do now
is come in and I want to select all of these
and split them off. So the easiest way, rather than selecting them all
and, you know, giving them a seam and then do it that way,
let's do it this way. So Alt Shift click come up to select and we're going to come
down to check a D select. And from there just press Y
and separate those all off. Now you will end up with
something like this. And from here now what
we can actually do is press control ul transdrclic
surrogen geometry. Now let's come in,
bring in a modifier and one to generate an
actual solidify. You won't be able to see
anything at the moment, but if we come in now and add, modify and generate a bevel now you'll see exactly
what we're trying to do. And we'll turn that bevel down to naught point,
naught naught three. Let's turn it down a
little bit like so. You can see now pretty
easily now if we come in, we can actually increase this and pull it back a little bit, which I think will
be a good idea, gives a little bit
more to work with. And now what we can
do is we can come in and I'm thinking, let's just double tap the
let's come in, grab it with a. So grab everything and
let's just have a look what transformation
randomize actually does. Let's put it onto
nought point, not five. So, and there we go. That's
looking a little bit better. If I press Tab now we can see they're a little
bit more misshaped. And that's exactly what we want. All right, so we've got
some of the window done, let's pull him over this way. Now what we want to do
is work on the next bit. So the next bit, it's going
to be the actual sell. The sill is going to be
quite a chunky sell, but you can see how we're
actually breaking this down and trying to
make it fit in place. I think that before
we actually do that, what we'll do is we'll
pull this up a little bit. It's looking a little
bit weak there. A little bit thin
for what we need. I know it's going to be
going underneath here, but still it's a
little bit thin. So we will increase
the size on that. Let's save about our work and I'll see on the
next On everyone. Thanks a lot. Bye bye.
80. Adding Wood Frame Details to Bay Windows: Welcome back everyone
to Blend The Fall, The Environment Artists Guide, And this is where
we left it off. All right, first of all, then let's come in
then to this bit here. Now we can see if I grab this, it's going to grab
the whole thing, which means that
it's not split off. But the easiest way to do
it is to press controller, bring in another edge
loop down to here. And then this is where I
think the sill will come to, so we've got a good view
of our window sill. And I think this is about the right thickness
to where we want to. All right, so let's
see if this works. So we'll do this bit first
and then we'll decide if we want to make this a
little bit more chunky. So what I'm going to do is
I'm going to grab this part, this part going all
the way over to here. I'm going to press P selection
and just split that off. Press control all transforms, right click, set
origin to geometry. And then what I'm going
to do now is come in, add a modifier, generate, and we want to solidify. And then I'm going
to pull it out. So pull it out to where
I actually want it. So something like that doesn't like anything
at the moment. I know, but we're going
to fix that. Don't worry. We're going to actually
use bevel hopefully and give that try
and see if that's actually going to
do the job for us. I think at the moment
we'll put even thickness on and then what we'll do is we'll come in,
apply or solidify. So control, and even if
we make a mistake here, we can still actually
join this bag together and get that mesh back. So we're not
concerned about that. What we do want to do though is come in and we want to press Olt Shift and click just around the top of there
and level this off. So I'm going to level
it off all the way down to pretty much
the halfway point. And then what I'm going to
do is I'm going to come in now and increase my
segments like so. And then what I'm going
to do is I'm going to come in and put on a custom. And now we can see why
we're actually doing that. Now for some reason I actually have a problem
with it beveling it all off, which is because it's
the inside beveling off. So I'm not going
to go quite that far and I'm going to
bring it down to there. And now you can see what
we're actually doing. You can see already that's
looking pretty nice. Now you can see over here, this is how I've
got mine set out. Now how am I going to mess
around with them anymore? You know, for me I've
got pretty lucky and I think it's actually looking
pretty nice for me, so I'm going to
leave that on there. What I'm going to do
though is I'm going to come in Alt Shift and click. I'm going to press control B
and bevel it off this way. And now I'm going to
mess around with these. So first of all
I'm going to bring this one up or out a little. Let's bring it out
maybe a little. And if I want to delete it, I should be able to come in
and just delete that once. I'm just going to grab this one. In fact, you know what, I'm just going to reset the curve. So I reset it and
now I can bring it out if I want to or bring it in. I'm just wondering where
I'm going to put that. I'm going to bring this one up and then this one
going to move this one. I'm going to bring this
one out a little bit. There we go. That's
looking pretty nice. It's just this Bom part that
I'm not actually happy with. Let's see, pull this in, increase it to one more, be able to add one onto there, and then just bring that out. All right, let's
have a look at that. Looks like, there we go. Double tap the yeah, nice. Okay, so Jaws fiddle
around with yours. Get them into the way
that you want them, but you can see how
easily that was. To actually get those in place, I would probably grab a cube, get them to how you
want them work out, how to fiddle around with that. Because it does take
a little bit of work. If I go back, so let's go back and press
control. There we go. Let's press control them and
bring it to where I want it. And now you can see this is the way that I've
got mine set out. You can come up and reset
the curve if you want to. And there we go. All right.
I'm happy with that. Now let's think about our top. So where is our window
going to come up to, and where is the top
going to come out? I think our top should come out. I think we've got enough
gap between there. So what I need to do now is come into here, press the tab bottom. You can see here's where
I've got my actual top. I actually think that
will be good enough. So what I'm going to do now
is I'll fix the top first. So I'm going to come
in, grab this one. And this one I'm going to
press then enter alterns. Bring that out to where we actually want
it, something like that. It's thick enough you can
see it's nice and thick. And I think that's
how I want it. I'm going to mess around
with this a little bit more. Before I do that though,
I'm actually going to bring in a support on this
side to do that. We'll split this bit off now. We'll grab this bit. We'll press this time selection because
it is our window after all. We'll press control
or transforms, right click, set
origin geometry. And now I'll come
into these side, so I'm going to grab
this side, this side, I'm going to press
and then and x, I'm going to bring them
out to roundabout there. And then what I'm going to
do now is split these off. So I'm going to grab this one. And this one, I'm
going to press Y. And then what I'm going
to do is pull them out, pull them out. And then now we should be able to grab the bottom of them. So grab the bottom
of each like so. And let's pull them
down into place. That's a bit of a support
on the sides of there. That's exactly what I'm
looking for inside here. We're also going to have a
little bit of a sill now. Run to the hardest spirit. The hardest spirit. So
it's this bit here. I'm going to press P again. Selection control, all transform dry clicks,
origin to geometry. And I'm hoping that
this bit goes right. First of all though,
I think I'm going to need another support. So a little bit like this, but in here I'm going to do that first
before I do anything. Yeah, let's see if
that actually works. So what I'm going to do, I think it needs to be here. And we've got one too in
here, so roundabout here. I'm going to press control B, bring it back to one, so something roundabout there. And then what I want to do is I want to bring these out now. But I want to bring them
out in the right way. So in other words, I want
them to come out this way. So all I'm going to do is hit P selection, grab them again. Control A or transforms
set origin geometry, add modifier,
generate, solidify. And let's now bring them out. So the other way, bring them
out and then what I want to do is press and's Ed and just pull them down so
they're going into place. Now you can see that they're not quite coming to
where I want them. I do want them past there, so I'm jaws going to pull them out just so they go past there. So. Alright, that's the main
part of the window done now. Now what I want to
do is come back to my window and I want to
bring in some edge loops. I should have probably
brought those in before, but heh, so control law, let's bring in perhaps three, left click, right click.
Same on this one. Control law three, left click, right click. Same on this one. Then control law three, left click, right click. All right, so now I think with this one we
probably could get away. First of all, I think I need
a frame in each of these. I don't think they
should be like that, but I'm thinking should they
be individually framed? In other words, if I
press, press the Eban, press the Eyebane again, Can I get away with
just having a very, very thin frame like this? It's this part here,
you can see we really, really want to frame in here. So this is the part that
I need to do first. Let's do that first. So what
I'm going to do is control. And I'm going to put in
an edge loop along here. Control, left
click, right click. It's going to make a very, very small window in the side, but I think that will be fine. Left click, right
click. You can see where the actual frame
is going to begin here. Do I actually want
that first of all, or can I get away with a really, really tiny frame on this bit and then a
small window on this? I'm just wondering if I
can get away with that. All right, let's
make a decision. So we'll come to this
one and this one. This one and this one. And then what we'll
do is we'll press Y first of all, and then Enter, and then and X, pull it out perhaps there. And then what we can
do is grab them both. Grab this one and this one. And then press S and's
pull them down into place. All right, so far, so good. Now let's think about
this part here. So we can see at the
moment this is going to be pretty small window in this part and I think that's
still going to be okay. So what I'm going
to do is I'm going to grab all of these again. Selection control
transforms right click, Orogen geometry, grab them all. And then what we'll
do is press and bring them in like so a very, very thin window as you can
see. So something like that. Now being as we've
got all of these selected and we know these
are going to be the glass, this is going to
take a little bit of work actually,
to do this glass. But what we're going
to do is we're going to press selection and just separate it out and
then hide it out of the way. Now before I solidify these, I'd really need to
split them off. So the easiest way to
do that, hopefully, is if I come in and
I can mark a seam. Yeah, let's come into mesh and split and face us by edges. Let's see if we can actually
split all these off. So I'm going to press G, and I'm hoping that they've all
split off, which they have. So that's one good part. Now let's pull them out. So all I'm going to do is
control a or transforms, add modifier, bring
in a solidify. Let's have the solidify
going the other way. So if we put it this way, this time like so. And you can see
now it's starting to bevel them off kind
of the wrong way. So you can see here we've got a few issues and that's
not what I want. So what I want to do is I want
to press controls head and just go back the
other way I think. So let's add it again.
Generate, solidify that way is what I want. Let's put it out a little
bit. So something like that. And then what I want
to do is offset. So if I'm bringing this offset down now, let me
be level them off. Add modifier,
generate bevel point N N three naught three. There we go. Is that looking nice or what? Yes,
I think it is. That's looking better
than my other window. Sure. All right. Let's press and bring
back my windows. Double tap the there we go. That is looking pretty good, I think. I'm happy with that. I think breaking these off, maybe it's a little bit too
much there as you can see. So let's try not point n one. Yeah, I think that
looks even better. That looks really, really nice. All right, so what we'll do
is we'll save out our work. And on the next lesson
then what we'll do is we'll get our windows
are already in. It's just the top bit
now that we need to do. So the top bit and this top bit on here that we need to fix. But we'll definitely
get that fixed on the next lesson.
All right everyone. So I hope you enjoyed that. I hope you managed
to follow along. It's a very, very
difficult part of this, and I'll see you
on the next one. Thanks lot. Bye bye.
81. Boolean Techniques for Shaping Wood Planks in Blender: Welcome back everyone to Blender for the Environment
Artists Guide. And this is where we left off. All right, so let's get
this final part done. So what I'm going to do is, and first of all I'm going
to bring in an edge loop. So control law, I'm going to bring it down
to perhaps there, bring in another edge loop. So control, I'm going to
leave that one there, so left click, drop it in place. And then what I'm
going to do is I'm going to come to
these parts here. So control select, enter alternates and
let's bring it in now. You will see when
I bring that in, we are going to
have some problems with this part here
as you can see. And we're also going
to have some problems with these back pieces, but don't worry about
those at the moment. We can fix all of
those problems. Let's first of all though, think about the top of here. I think the top of here should
be beveled a little bit. So all I'm going to do, come
round to it and pull it up. So bevel it a little bit. And now you can see we,
again, that really, really nice look that
we're actually looking for finally I think I'm going to
bring it up jat a tiny bit. So I'm going to grab
all of this and bring it up just a
tiny bit like so. And I think now that is
looking about right. And finally then let's
come in, grab this, going all the way around here, let's pull it up a bit to
hide that out the way. And yes, that's
looking really good. Now let's fix those parts. I'm going to press shift H just to hide everything
out of the way. And now I should be able
to come in and get rid of all of these parts that are
causing me these problems. So these parts, these parts, these parts and Elite and
bases. And there we go. That's that fixed Lth,
bring back everything. Or tab Lth, bring
back everything. And there we go. Now let's
fix the back of this first. So I'm going to just grab this. I'm going to isolate
it this time. Come around the back. What
I want to do is fix this. So I'm going to grab
old shift, click, shift click, right click, bridge edge loops.
And there we go. Right click, shade, auto, smooth, there we go. And then what I'll do is
now bring in some planks. Now the little question mark. Let's grab these
planks over here. Let's press shift D, and
we'll bring them over. We've still got a
geometry node on. As you can see, I'm thinking
I'll bring them into place, so let's bring them into place. So we also probably need to
bullion these in some way. I'm thinking the best way
to do this is probably to bring in a bullion that's
going to match this here, which is easy enough to do. Yeah, I think we'll cut them. I think the planks are
looking good, like this. I think what I'll do is rotate them round so
they're not looking the same as this Y 180. Then what I'll do
is pull it back and I'll pick my spot
where I want it. So I'm thinking this here is going to look
about right now. I'll do is to create my bullion. So to create my bullion, easy enough to do, we'll
just create it from here. So I'll grab it going
all the way around here. Shift D, bring it up, and then E and Z pull it
down all the way there. And then I'll put it back on it. So if I grab this bullion
that I've just created, so make sure I'm
grabbing it from here, Press selection, separate
it off, grab it again. Control or transforms right click cell origin to geometry. And then what I'll
do is I'll grab this and my planks award, press the question mark. We should end up with
something like this. Now we can see it's a
little bit out over here. So let's move the
planks over first just to get them into place like so. And then what I'll do
now is come back to my Boolean. I'll grab this edge. And this edge, I'm going
to press the button. And then what I'm going to
do is just pull this out. So I'm going to grab this one. Pull it out with all
the way over there. Finally, then I need
to actually delete this bottom and the
top delete faces. Now let's fill it all
in. Alt Shift and click F a shift and click. Now what I can do is I can
actually booleion this off. I'm going to come now and I'm going to grab this part here. I'm going to turn this
into mesh object, come down to convert mesh control or transforms right clicks origin to geometry. Add in a modifier and
let's generate a bullion. I want to click on this here, so I'm thinking I want
to intersect it instead. So I want the inside of it. Let's click fast and make
sure it's done right. And let's press control. And then delete
this out the way. Delete all tag Moment of truth for question
mark. Double tap the a. And you can see we have a
little bit of a problem in that boolean was
made for this part. So all I'm going to
do, bring it up, put it into place
and make it a tiny, tiny bit smaller, able
tap the And there we go. How easy was that to do? All right. Not easy at all. Not at all. All right. So we'll do is we'll
grab all of this now. And now I need to start actually coming in except the windows, I think we'll do those separate. Also we need to
bevel these as well. So I'm thinking we'll have
to work our way down. So let's come to
these parts first. And we can base it on
nought point N n three. So if I had a modifier
generate bevel, let's put in not
point N naught three. And then what I can do now,
I can work my way down. So if I grab this part,
grab these parts, grab this part, grab
the inner part, and then I can grab
this part finally. And then control L. And
what we're going to do is link or copy modifiers.
You can see there. First of all, before I do that, I don't want to grab this. I'm going to do this
again at the moment. I need to make sure that all of this has everything on it. In other words,
some of these have got solidifies on and
we don't want that. Grab this one, grab
this one. This one. And you can see solidify
the grab these going down, you can see that this
one is okay to grab it. Well, this one we
don't want to grab because I think we've already
put a bevel on there. Now I'll go up to object, I'll come down to
convert and mesh, and then finally I can grab my wood control L. And what we can do now
is copy modifiers. And there we go. Now
we've got our bevels on. Now let's see if
this got a bevel on. It's got to solidify
on and the bevel, so let's press control on that. And now we've got
a bevel on this. So we've basically got a
bevel on everything now. Which means we can now
join it all together. So we'll join this, this, this, the inside here,
the outside here, this top bit, and these parts. Let's press control J. And hopefully the
old joins together. Right click, shade,
auto, smooth. And now if I press G, everything should
come away with it. And now we've got, and we can actually get the materials
on now that we want. Now at the moment, if we put this on material, it should all be wood, which of course we don't really want. So let it load up. It's not so it hasn't gone
on wood. So that's okay. So what we'll do now is we'll start with
these parts here. Let's come in Smart UV project. Okay, Let's come in then
and bring in the material. And what we'll do is we'll just click the down
R on here and we're going to want it green painted
wood. Let's put that on. And we can see straight away just down that's going to look. And then what we
can do is now we can come down to the
different points, L, L, L, L and L. U. Smart UV Project. Click Okay. Work our way down now. L, again, I'm
splitting these up and I'm wrapping them like this just to make
it easier for me. L, L and L, because it will make sure
that I'm not going to go in and mess around
with the resolutions. So this one now L U, Smart UV Project. Click Okay. Now finally, just all of these. I'm going to grab one of
them and then just go round. So grabbing them all, not that one being face select, that'll make it a little easier. I'm trying to grab
all of those edges all the way around to here. And I'm going to press
Smart UV Project. Click Okay. All right,
so that's that bit. Now let's come to this bit. I'm going to grab this, we've
already got on a Solidify, let's actually apply
that solidify control A. And then while there is a
smart UV project, click Okay. Bring in then my wood. It wants to be the light wood. So we've got one
here, light wood. Drop that on. We can see
we've got a few problems on here in that some of the
wood is going the wrong way. And the reason that's
happened, by the way, is that I forgot to add
a same to all of these. What we can do
instead of that is we can just grab the whole
thing. Right click. And what we're going
to do is mark a. Same. I can't right click
because I'm in face sex. So what I need to do
is press control A, mark, Sem, A. Then
grab everything. Smart UV Project. Click okay and it's fixed. M, most of them apart from now, they're all going the wrong way. Pretty much. I'm
going to have to go in now to the UV editing. I'm going to have to press Tab. This is a little bit of a
pain, I didn't want this. And then what I'm going
to do is I'm going to spin all of them round that
are going the wrong way. Which ones are going
the wrong way? I think they're all
these going here. So what I'm going to do
is I'm going to press B. Grab all of these
going along here. And let's see if it is though. So what I'm going to do is I
can see these are the ones. Let's put it on material so
I can see what I'm doing. I'm going to come back.
I'm going to press R 90. And you can see now
it's spun those. So these are the ones
going the wrong way round, which is what we
actually wanted. So now I can just put this over here and now I can
just work my way down. So I've got all of these
just to spin around now. Sometimes with UV's, they
are a bit of a pain can be. Generally it's because of making a little mistake
like what you saw me do, Control plus R 90. Spin them around. Now
let's go to these ones. Let's grab this one B, and then grab that
one and that one, and then R 90. Spin them around. Now
let's have a look. It should all be going
pretty much the right way, which it looks like the wood grain is going
the right way. And all of those, let's
put it onto render view. Have a good look at
that. There we go. That is looking pretty
nice. All right. So we can see the actual wood long is not going
perfectly right. And the reason for that
is if I select this, we can see that these
parts here aren't right. If I press L, L and
L and then alter, straighten those all up and I'm going to
rotate this one round. So R 9070. Is that looking bare? I don't think that's I should
looking any better. I think it's the devil
actually that's doing that. I think if I brought
this one out, so I would bring it
out from here to here. Bring it out there. You can see the difference. That is what we actually want. So it's just to do with
the fact that it's not quite beveling out enough. So let's bring it out
very, very slightly. And there we go, that's
looking perfect now. All right, so what
we'll do then on the next lesson is we've got
all these windows to do, and then finally we
can put this to bed, and we can finally start
moving round to this side, because honestly, this
backside is nothing really. This side is a
little bit of work, but nowhere near as
complex as this. So we're actually pretty much on the home street of
getting this building, you know, done and dusted
and out of the way. Alright everyone,
let's say about our work and I'll see
you on the next one. I hope you really,
really enjoying the course so far and I
hope you're learning tons. Thanks a lot. Bye bye.
82. Finalizing Texture Details for Bay Window Backdrops: Welcome back everyone.
To Blend the for the Environment
Artists Guide. And this is where we
left off. All right, so let's get these windows done. So what I'm going to do is
just go into Material View, Select my windows, and
what I'm going to do is press U and unwrap them. And I'm going to then just grab one window once I
put my material on. So let's click the down arrow. We're looking for glass and the glass lit
is the one we want. And then select, just
select any of them. It doesn't really matter
what I'm going to do. I think with these,
we could also, instead of doing that,
we could actually just make them smaller and
put them in like that. I think I'm going to put it
at the side here like so. And I know it's a little bit of, but I think it's worth it. So let's go to copy,
copy, and default. And then we'll grab them all. And then, and then copy
paste and default again, we're going to
press A over here. And then we're just going
to work our way along. So press a little Darvon so
we can see what we're doing. We've got mold the
same at the moment. We don't want that. Now there is a way
that I actually did this a little bit different. I actually grabbed
like two of them. So in other words, what I did was I'm going to
select this one. I will share a little
bit of an easier way. I'll select this one down here. I'll select this one over here. I'll select this one down here. And I'll select this one here, and this one here. And what I'm going to do
is hide them out the way. And it's hid everything
else out of the way. Why did they do
that? I'm going to press H. Hide them out the way. Why is it hiding everything else out the way it
shouldn't be doing that. Let's put it on object mode.
See what that's going on. Oh, that's why I
de selected them. There we go. Now we can see what we're doing. So
let's like this one. This one, like this
one over here. This one here, like
this one here. And maybe this one over
here, and this one. And this 1.1 over here. Maybe this bottom one here. Let's hide them out of the way. Now what we'll do is
we will this one, we'll pour it over here, let's say like so. And then all I'll do
is press U and copy. And sorry, copy default. And then what I'll do is
I'll select this one. I'll select this one. I'll select this one. I'll select this one over here, this one here, and
finally this one here. And now all we'll do is U and Paste Default and
pour all those there H, hide them out of the way.
Work on the next one. So we're going to
put it over here. Let's move out our UV a little bit so I can
see what I'm doing. Let's put it over here.
And then what we'll do is you copy, copy default. And then we'll just
select this one. This one down here, select this one here, this
one over here. Let's select this one here, this one down here,
and then u and Paste. And where is it? Paste Default. And then hide them out the way. And just keep working
your way along there. You might actually find
that an easier way. So all I'll do is
grab the next one, let's put it over here. And then all I'll do
is copy, copy default. And then let's select this one. We'll select this one, and this one, and this one here. We've got one there.
Look, no done that one. Let's select this one.
This one, this one. And then and copy paste. Default. Hide them
out of the way. And let's look how many we've gotten now. So
we've got this one. I'm just going to move this one out here. I'm going
to hide it then. So H this one, put it over here. Hide
it out of the way. And then this one, we'll put this one maybe over
here, like so. And then I'll just select
you, copy, copy, default. And let's now select
this one as this one. Once over, look this one, this one, this one. And then you and paste, like hide them out of the way. Now which ones have got left? Very hard to see.
Let's move this one over here, out of the way. The two got three in here. Let's hide out the
way, scrub this one. Put it over here the way. This one over here, out the way. And now we've a few in here. This one. It's a little
bit time consuming this. I know, but as I've said, I feel it's very much
worth the effort to do it. So we've got a few left now. As you can see, it
does go pretty quick. Then this one, then finally this one old,
bring back everything. Let's put it on rendered view. Have a quick look at
what that looks like. We can't see really
them in the moment. But that's because we haven't
got anything behind there, which is what we're
going to do next. So what I'm going to do now
is we'll go back to modeling. So let's click on
there. Let's save our work so we don't
lose anything. So file and save. And then what I'll do is I'll
start with a actual plane. So what I'm going to do is
I'm going to bring a plane, so shift bringing a plane, Rotate it round, so r x 90. Let's bring it then into place. So I'll want it coming all
the way from roundabout here, it needs to be in a little bit. If I press one, you can see it's bigger than the window.
We don't want that. Let's press as the next. We want it coming right
to the edge of here. And then let's grab
the bottom of it. Let's put it in. Grab the
bottom. This bottom here. Now let's pull that
down a little bit, round about to there. Okay, there we go. Now what we can do
is we can grab this, we can pull it out to here, press A, and let's just pull it back into
our actual wall. Now finally, let's
come to our wall, resell the transforms like. So come over to our modifier, add modifier, and we'll
bring in a bullion. And from there we're
going to select this, put it on fast, and
then press control. Then what we're going to do
is delete the other way. And now we can hide our window. We might as well join all
of this window up as well, because there's no reason why we shouldn't do so grab my window. In fact, there is a little bit of reason in the fact that we, we've got this on a bevel, so we'll do is I don't really
want to bevel this again. On this occasion we might
just apply all of our bevels. I think we'll grab our
window, grab everything, object convert, mesh, join
all together, control J. And then what we'll
do is we'll just make sure everything's working now. So all transforms right. Click origin geometry,
pull it out, and this is what we
should be left with. Now, let's just put it
back on to rendered view, making sure everything's
looking right on them. Just looking at the ward
and everything else. Yeah, I think that that's
looking pretty cool actually. So nothing's wrong with that. I'm just wondering
if I should have this piece of wood coming
down in here as well. I think so. I think
we'll do that. Maybe I should have
done that before. But what I can do is I can
come into my mesh select. And I'm just going
to go in and select, not that select L and L on
the inside as you can see. Keep going across all the way. And then all I'm
going to do is press Shift D and bring it down into place to here. I'm probably going
to have to make it a little bit smaller
as you can see. Let's put it on tab
and there we go. That is what I'm
looking for. So now we can have the background. You can see that the actual
things here which is, well, one thing we'll do is I'll make them a
little bit thinner, and Y make them a
little bit thinner. And then S and X make them
a little bit thinner, that way like so. And now I can put something
on that background. All right, let's
do that next then. So all I want to do now
is hide this out the way I want to put it
back onto material view. I want to grab the backup here. So let's grab this one. This one and this one. I'm going to press E. In fact, I'm going to press, is it easier to do that? No, it's not. It's easier to press. And then I bring it in all the
way into the center. And then control few edge loops, left click, right
click, grab the center. In fact, we'll grab it
going all the way out now. So control plus,
split it off with Y. Grab the center
portional editing on. Let's put it on. Smooth
connected only on. And now we should be able to, if we bring this in, all right, now what we need
to do is just make sure it's connected
to this wall. So turn it off L
bring it forward. Just a little bit like so now
let's bring in a backdrop. And the backdrop we
want is going to be the same as this
one behind here. Let's see. First of
all, if we come in a, a modifier plus backdrop, let's put shop, I think it's
on the shop there it is. Shop one or shop two. Let's see, let's assign it. Let's come then to
where you be editing, and let's see which one it is. So is it going to be,
it's none of these. So it's going to be the
shop, the other shop. So let's click down shop
two and there we are. That is the one. The one I'm
wanting is one of these. I'm not sure which
one did I put in? I think, yes, it's this
one here. This one here. I'm going to put this in place. I'm going to make it a
little bit bigger, like so. And I think that is going
to look about right. Okay. So now let's press Alt and bring back
that window durable. Tap the and there we go. As you can see, now that's
looking pretty nice, especially with that
wooden being there. And we can see it looks like there's actual
books in there. All right, so that's
pretty much done on this. Now what we want to
do is we want to think about this
side round here. Because the front is done. We've still got a sign. It's point in there.
You know what? We'll actually start the
sign on the next lesson. We'll start this sign to give us a little bit of respite
from building this house. Let's go to file and save. And the sign is quite a nice
thing to create as well. All right everyone. So I
hope you enjoyed that. And I'll see on the next one. Thanks a lot. Bye bye.
83. Modeling an Authentic Victorian Bookstore Sign: Welcome back everyone to Blender for the Environment
Artists Guide. And this where we left it off. All right, let's bring in then, first of all, a plane. So let's bring in the
plane, let's pull it out. And then, oh, y, 90. Let's see how big
we need this first. So how big is this sign
actually going to be? So if I put it into place, so it's going to be going
roughly around here, of course. It's going to be
out a little bit, so somewhere around there. Is that going to be big enough? And I think looking at guy
here, I would say it is. So I would say this is also
the right size for a book. Maybe maybe a little bit longer. So said a little bit
longer from there, then we can actually
isolate this out. So I'm going to press the
little question mark. And there we go. And then what we'll
do is we'll press control one edge loop. And then what we'll do is
press control two edge loops, maybe three, left
click, right click, Control three edge loops,
left click, right click. And now what I want to do
is just bring these out. So I'm going to grab these two and I'm going to try and
pull them out a little bit. Now let's see if I can do it with proportional editing on. So I'm going to bring it in
and then bring these out. And there we go. It's
nearly perfect already. All right, so that's looking pretty much like an open book. Let's pull these
bites back as well. So let's pull these bits back. The only problem is I've
got to make sure that, you know, it all kind of comes together. So
that's the main thing. I've also got to make
sure that these, when I pull them out, if I
pulled them out a little bit, are going to be a
little bit rounded. Because at the moment they're
not something like that. Right click, shade auto, smooth. And you can see when
a shade autos move, these are too jagged, so all I'll do is
I'll just come in control B and just bevel them
slightly and there we go. Alright, that's that bit. Now let's come in and
actually solidify this. So we'll come in
adding a modifier. Bring in a solidify. So solidify, make
it a little bit thicker like so holding
the shift bomb, something like that, I
think looks pretty good. And from there as well, I might as well use this to
create the outside as well. In other words, if
I press shift D, I can then pull it back. I can then make it a
little bit bigger. So S make it a
little bit bigger. And then this will be
the back of the book. From there as well, I
can actually decrease the thickness so the page are obviously much thicker
than the actual book. And there we go, that's
looking pretty cool. Let's put it on object mode so we can actually
see what we're doing. Let's turn off the x ray. And that's looking
pretty nice so far. Now let's think about our pages. So if we come to this, we'll press control
A to apply that. And then what we're
going to do is bring in some edge loop control. Let's bring in three, left click, right click. And then we'll do is we'll
come into these two parts. So L shift click, olthift click, and then control
B, bring them out. So, and then all I'm going
to do is I'm going to press Enter Lns without
portional ting on alters. Now bring them in
very, very carefully. Just a little bit you want like. So there we go. That's looking pretty cool. Now let's think about how this is going to
be all held together. First of all though,
we've got solidifi on this, so let's
press control A, join it all together
because there's no kind of complex materials in this
or anything like that. It's literally just Mel. So control J. And now what
I'll do is think about these bits that are actually going pull
all this together. So what I'm going to do
is I'm going to first of all press shift curse
to selected shift. And let's bring in a cube. So let's bring in a cube. We'll put it this side, we'll do this side first. We'll make it much thinner
and X make it thinner. And then what we'll
do is we'll just have this holding onto the back, just onto the back here. You can see we're
a little bit out, so let's pull it over
here, let's make it. Yeah, that's actually
going to be okay. And then what we'll
do is we'll just bevel off these bottom parts. So if I come in, grab both
of these, press control B. So control B, bevel them off so I don't really
want them like that'll increase the
amount of bevel and now we're actually
going somewhere. I'll put it on custom. And then what I'll do
is I'll bring this in a little bit like so and I
think that looks pretty nice. And then all I'll do is just
bevel off these two edges. So control B, so maybe three.
Left click, right click. And let's just go the other
way now, never let off. So right click,
shade, auto, smooth. All right, that's looking good. Now we just need another
bar to hold these all on. First of all, let's mirror
this over the other side. So all I'll do is
I'll add modifier. In fact, we right
click Set Origin to three de cursor add modifier, generate mirror on the
Y, turn off the X. And there we go. Now let's
bring in another part. So I'm going to bring in a cube. Let's pull this cube up. Let's press the born press S, Y. Let's press, and pull
it down into place. So let's pull it back.
And there we go. And I think that's thick enough because
we're going to have something else that's going to be attached to this as well. All I'll do now is I'll
come in, grab these edges. Just to make it a
bit more fairy tale, let's press control
B, level that off. You can see it's not beveling off properly because we need to reset the transforms And
then press control B. There you go. Now it's
beveling off beautifully. Right click, shade or to smooth. Now let's think about
the top part of this. What I'll do is I'll
press Shift S, Coaster, selected shift, and
I'll bring in a cube. I'm going to put my
cube up, pull it up. And then one we do is
scare over the top seven. And then and Y, sorry. And X, bring it in. I want it slightly,
slightly bigger than this part here because
it needs to look as though it's actually
going to hold something, S and Z, make it a
little bit thicker. And now let's pull
it out on this end. We'll pull it out on this
end all the way out to here. And then this end can come
all the way out to here, wherever far it's going
to go into the wall. Probably somewhere around there, maybe a little bit more. Then what we'll do is
we'll come to this end, grab this end control, increase the amount of levels. Left click, right click. First we'll just press
control Ad before we do that. And then what we'll do
is press control all transforms and then tab. And then let's bevel it, but let's not Beverly
it like that. Let's actually bevel it inwards. I think it's going to
look much, much bare. Yes, that looks much bare. Let's pull it out this way, a little bit more jaw, so
it's fin, a little bit. Be going to this point,
just pull this out. And I'm also going to pull
this up a little bit. And from there as well,
what I'm also going to do, I think is press the eye
button. Bring it in. Just be careful that it doesn't, as you can see, go over there. If it does, all we want to do is we want to come
in and we want to make sure that all of these they joined
together in the center. If I join these two right click, I'm going to go down to
merge vertices at center. And then I'm going to merge
these two at center as well. So now we'll just pull this up. Let's press, pull it up like so. And now we're going to create
these ornamental swirls. But first of all, let's just
press the question mark. Bring back everything and see where this is
actually going to fit. Before doing anything else, I can come in now and join
pretty much these together. So let's actually check and
we've got a solidify on, we've got a mirror on this.
Let's just press control. Let's join it all together
with control J then. And then let's grab them both. And all we're going to do is
just put them into place. So where is it going to go? How far out is it going to be
before we do anything else? So we can see here,
it needs to be, I always like to support
things or have it supported. Is it to be? Let's move it over. The never look. I think
actually it's the right size. Let's see if I bring it down just under that one
there, just under there. And you can see if I move
it to the side slightly, I can slightly
support it then on here like so I think that's actually looking pretty nice. That's got the eight? Yeah, I think I'm
just wondering, is it a little bit too big? Yeah, I think I'm actually
going to keep it. I think the size actually is. Okay. So what we'll
do now is I can grab both of these and
press the question mark. And I need to know actually, where is it going to come up to, where is my actual, if I grab this part
here, press Shift age. Yeah, that's the
best way to do it. Now I can see exactly
what I'm going to do now. I'll do is I'll just
grab this one here. Shift, select shift. Let's bring in a plane, R, Y 90. And then press bring
it all the way out. And yeah, I'm going to
leave it like that. And then what I'll be able
to do, we'll get set up. First of all, before
we do anything, so what I'll do is
press shift eight. We'll bring in a curve, we'll bring in a path. And then from the path, what
we'll do is we'll press Tab. Delete it out the way,
so delete vertices. We'll still have our path there. And now on the next lesson, we'll be ready with
our little draw tool. On the next lesson,
what we'll do then is we'll draw this in. So we'll draw a large one, kind of coming from here and have that coming up and
then swirling around. All right everyone. So
first of all though, let's say about our work and I'll see you
on the next one. Thanks a lot. Bye bye.
84. Adding Ornamental Swirls to Metal Signs with Curves: Welcome back Von to Blender, fold the Environment Artists Guide and this
where we left off. All right, so now
let's have a piece coming from here and
then we'll go up, so I'll try swell coming from here and then slowly
going up and then coming round to here
and then swirling round maybe to
something like there, and then what we'll
do is another swell. Now generally when you
had another swell, sometimes they don't work, so hopefully we'll get this right. So I'll bring this round
to here now support it going along there and
then we're going to go up to here like so. And then support it coming
where this part is here. Round to here. So all right, they look really nice. Try and do something like that or do it however
you want to do it. And then what we're going
to do now is we'll come in, well hopefully this will work. So first of all though, let's put it on to move tool. Let's also delete this
plane off the bike. We don't want that. And
then let's come back to it and what we'll do is
we'll put our extrude first. And we can see sometimes, as I said, the extrude comes
out a bit of a weird way. Now just let's extrude
back a little bit. So I'm going to hold
the shift bun down, get it to the actual
thickness that I want. So I think this thickness is
going to be absolutely fine. And then finally, let's come
in and add in a solidify. So I'm just going to
add in a solidify, add modifier,
generate a solidify. Let's pull it out a little bit. So the thickness I want, it's going to be
roundabout there. And you can see here, we've
got a problem in here. I think it's because
I drew on here. But we can fix that, no problem. Let's just right
click and shade flat. All right, let's fix that first. So what I'm going to do
first of all is come in, press delete and vertices, and fix that out the way. Now I can press three again. And now let me fix all of
these problems that we have. Let's put connected
on, smooth on. And let's actually start moving these and getting
them into place, into a nice place. We need to have this kind of support in that some jaw
is going to bring it in. And what I also
need to do is make sure that it's going to be nice and smooth
as you can see. So I'm trying to smooth this out now as best I can,
pull that out. If it's not going to pull out,
just turn it off and then you should be able to
pull it out from there. You can grab both of these
pressing and pulling it down. Now by the end of
this, you should be pretty good doing these things. So you can see here, I'm going to pull it in a little bit, or maybe out there we
go, that's looking bare. Now this one, let's bring it
in to tighten that curve up. Let's put it there,
tighten this curve up then like bring it
down a little bit. Now let's work our way around. Let's pull it up first,
let's pull it out. Let's then pull this round. Maybe we want to tighten
this up. There we go. Then let's bring it in and
that's looking very nice. Curve all the way down here. That's looking all nice. This bit here we can see we're going to have to bring them both
down a little bit. Bring them down, the
jaws touching here. And then what we'll do is now
we'll make sure This part, first of all, is going to be at the right height,
right about there. Then it's coming round. This bit already is quite nice. Let's just tie it up a little
bit and move it around. There we go. There we go. All right, so you can
see that the outsides of them tighten or relax the curve. And the middle one
actually moves the curve. So you have a lot of
control over these. Now the next thing I want to do is I want to grab this one here. I'm just going to
move around here. I'm going to press alterns
then and just bring it in. I'm going to do the same
thing with this one. Alternates, bring it in and then the same thing
with this one here, Alton, bring it in. Now you can see we
do have a problem here in that these
are in the wall. We don't really want that. So what I'm going
to do is I'm going to press three again and
I'm going to grab jaws. This one, this one and this one. And then move
around to the side. And now I can move over slightly to make sure that
they're popping into the wall. And you can see we've still got that beautiful curve there. And finally, I think we need
a bit of a metal in here. So I'll move it over a
little bit more and I'll drop a little bit of metal in here just to support it more. Because at the moment it doesn't look like it's being
supported by much. Also, let's have a look
at the in the middle. We can see that
some of the curve is in the middle and
some of it isn't. I'm not going to worry
about that right now. What I'm going to do first
of all is come in and just reduce my resolutions
to something like seven. And then what I'm going to
do is I'm going to come to object and then I'm
going to convert it. So I'm going to convert to mesh. And then right click,
shade, auto, smooth. And let's see what
that looks like now. Have gone a little bit too
far on the resolution. I think so. So I'm just
going to go back, put it to. Nine. And then I'll go
to object convert mesh. And there we go. Now let's
come in and what we'll do is we'll grab this one first and we're going to put it
more in the middle. So let's put it in the
center for press one. I can see it's near
enough in the center. Let's grab the next
one, L. Let's put this one near enough in
the center, like so. Then let's now think about this bit of Mel that we're
going to put on there. Shift. In fact, let's just
grab this one here. This is a good starting one. So we'll grab this shift D, bring it to the bag, and then R x -90 No, R x 180. Spin it around, and then we've got a nice round bit on there. Now I'm going to pull this
out and you can see that this is a little bit too much in here and I don't
really want that. So what I'm going to do is I'm going to come back to this. I'm going to grab
this point here. I'm going to press
one or three on the number pad and
I'm going to come in proportional editing G, and bring it out and then
move it to the side, hopefully just to bring
it out that little bit. So there we go. Now I do want to come in
with my proportion, let it in and grab
each of these ones. And then one going to
do is press and X, bring it in a little bit and then just slope them in like so. And you can see now that's
looking really nice. Right click shade or to smooth. There we go. Now, is
that in the wall? Yes it is. I think that
is looking pretty good. Let's press question mark, old tag to bring
back everything. Double tap the A,
then, there we go. Now let's give these material
and join them altogether. So I'm going to join this one. This one. Let's grab it all. This one. This one. And let's just go to
object and convert mesh and press control
J, join it altogether. Right click, shade,
auto, smooth. And finally, let's
bring in a bevel. So I'd modifier
generate, bring in a, let's put it on naught point N three. Let's put it on that. And there we go. That
is the sign done. Now if I come down and
we'll just bring in, let's have a look
at black metal. We'll see what that looks like. Let's put it on rendered
view, durable tap. The the one thing we haven't
done is unwrapped it. We're just looking
what it looks like. I think we'll unwrap it now. So Smart UV Project. Click Okay. There we go. Now let's have a look at the other
mels we've got. So we have got
some other metals, so we might as well
have a look at those. We've got green Mel, I think it clashes too much with
this, definitely. So what other metal
have we got? Put metal. I think we have blue. So we've got green metal.
Light. Let's try that. You know what? I think the
black metal is the best one. Put that on. Yeah,
the black Mel, I think is the best one. So we're going to go
with that, I think. So hopefully your sign has turned out as well as that. We're going
to end it here. On this one, actually,
on the next one, then we'll actually make a
start on this wall round here. And then, yeah, we
should be able to get our roof on and get this finished and out the
way. All right everyone. So I hope you enjoy that and I'll see you
on the next one. Thanks a lot. Bye bye.
85. Integrating Street and Wall Textures for Realism: Welcome back everyone to Blender for the Environment
Artists Guide. And this is where we left off. Now, before we do
anything, let's put it on object mode so we can actually
see what we're doing. And then what we're going to
do now, we'll grab this one. And I want this to be round
about the center of here. So what I'm going
to do is I'm gonna press shift D. I'm
going to move it over to roughly the center, 90. Spin it round, and obviously we're going to have to pull
that out a little bit. So pull it out so
it fits into place. Now I do want the center of
here, so let's actually see. If I grab, you can
see that this is a little bit of a mess here and we really
don't want that. So what I'm going to do is
I'm just going to press Y just to split those off
and then bring them out. And you can see I
brought them out with posture editing on.
Don't really want that. You can also see that I
brought them out, yeah, you can see that
they're not level or anything and we really, really don't want that. So all I'm going to do is I'm going to grab one
of these parts. So I'll grab this
part. I'm going to press Shift D to duplicate it, pull it over this side. And then I'm going
to press E and Y and pull it all the way
over to this part here. Then that means I can get rid
of this back part L and L. Delete the other way,
Delete vertices, and now we're left
with just this, which means I can
press L selection, split it off from all of that, press the tab control or transforms set
origin to geometry. And then let's pull it back into place where
I want it to go, which will be roughly
around that point there. I think you can see as well it goes slightly above this and we don't really
want that either. Some jos going to press
and's head. Bring it down. There we go. Now let's
find the center, the center of this as
you can see in here. Let's bring in this part first. So shifty, bring
it over, R z 180. Spin it round, put
it into place, so it's going to go roughly
in, somewhere like that. And now we can see that
the center is here, so let's pull it over. And there we go. It's
nearly in the center. And there we go a little
bit over the other way. Let's grab this one
and then this one. Now, I should be
able to not do it. Can I actually grab
it? Yes, I can. So now I can actually move
it into place. There we go. All right, there we go, finally. Now let's grab this one and press and Y, pull it into place. And then what I can do
is I can press Shift and D and bring this one
over and it should fit. Hopefully, there we go. That's fitting nicely. And now we want this
paneling down here, which I'm going to grab
these ones over here. I'm going to press Shift
and D, bring them over. Then I'm also going to write clicks the
origins to geometry, make it easier for myself. I'm going to then
spin them round, so zed 180. Spin them round. I'm going to put these
then into place. And what I want
to do is I really want three of these on
each of these things. So I'm going to work out. First of all, if I come to this, you can see it's
not into place at the mom, so let's
put it into place. Let's come over and go
to adding a modifier. And we'll add in a array. So generate an array, let's turn it on zero on the X, we want it on the Y, of course. And if I put the Y going minus, minus one, then we get
that little edge in there. And from there now what I want
to do is squeeze them in. So if I put it onto three, so let's put it on three first, and then let's press
A on this bit, and then and y and
squeeze it in like so. And I'm also going
to make them a little bit smaller, like so. And then I'm going to pull
them into place and then and y pull them out and then
let's put them into place. So All right, that's
looking pretty good. Now what I want to do
is I want to make sure that this is going to
go across the bottom. So what I'm going to
do now is come in, and I can probably
stretch this out instead. So if I put it in the middle
and then press S and Y, it's going to make it a
little bit easier trying to grab those edges like so. And then I'll come to
this one same thing, put it in the middle
and then tab and y, pull it out into place like so. All right, that's looking great. Now let's grab all of this. So grab these, grab these,
and then bring them over. So shift D, pull them over
and hopefully should all fit into place beautifully and done really easily.
We've got the top them. What that enables us
to do now then is work on this part over here. Now, before we do anything, let's actually come into these and we'll just
apply our array. So I'm just going to
select this one control. Select this one control. And now I'm going to do is I'm going to come to both of these. Press the tab on
Smart UV Project. Click Okay. And this is
because we stretch these out, so I'm just basically
re unwrapping them. Smart UV Project. Click Okay. Now let's think about
this post here. So we are going to need a
post going over and up here. So all I'm going to
do is stress, shifty. Now, this one hasn't got
any front or back on it. So you can see here we've
got a side view on there. This one hasn't got
that. So we can just basically stick in
place like so probably going to need a little
bit of extra room just to get a bit of
post down here as well. But I think now that is
looking absolutely fine like, so now we've got a
center point on here, so let's fix this wall as well before we
actually carry on. So all I'm going to do is I'm
just going to grab my wall. This one here, press
selection like so. And then I'm going
to grab this wall. So this one here, delete faces. Delete that off. Come
back to this wall then. And then all I'm going to
do is grab the bottom of this wall and pull it
out into place like so. Now, everything should be beveled on the things
that we've made here. All the material should be on. The one thing we need
to put materials on, if we put it onto material view, is going to be this and
this face here, I think. So let's just see when it's
loaded up. There we go. So we've already got this wall on here, so I can use that. So let's come into this one. What we'll do is just re unwrap it and there's that wall done. And now we'll come to this one, grab this wall,
press U and unwrap. And you can see objects
as a non uniform scale, meaning I just need to
resell the transforms. Now I should be able to
go in and press wrap. And finally let's join
it to this wall here. So control L link
materials. And there we go. Now let's come in
and go to our UV. So I'm just going
to grab this one. I'm going to go to UV editing. I'm going to come to
my wall pressing the 190 and now just make sure that it's the
right scale to this. So I'm going to press S,
bring it all the way down, so maybe something like that. Double tap the there we go. All right. Now we're
cooking on fire. Now we need to
basically get our sign, let's put our sign in
the way. We'll do that. Before we do anything else,
let's go back to modeling. What we'll do is we'll just
bring in our coffee shop. For now, bring in your coffee
shop. Let that load up. Hopefully it will
load. There we go. Now I'm just going
to steal this sign. We're going to press Shift D, Bring it over through here. And then R, Z -90 I'm
going to press three. And then what I'm going to do is I'm going to put it into place. I'll want it rouly around there. Let's put it back into place. And of course this one needs
to be a different sign. All I'll do is I'll put
this under Victorian Park, so I'm going to come in,
grab the face UV editing, and then let's move it, I just need to move
it up basically G, Y, move it up into place,
holding the shift on. There we go. Now let's have
a look what that looks like. Double tap the A and
there we go. That's on. All right, so now let's think
about this part under here. I think I'll first of
all make the structure that's going to
hold this together. I'm also thinking, does
this come out enough? Maybe because we've
got the option to pull it out further
if we want to. So I think we will.
So I'll come in to model in again and
I'll zoom out. And then what I'll do is
I'll grab both of these. I'm not going to worry about
the walls at the moment. All I want to do
is just pull them out a little bit more like so. All right, now let's
come in and make the under part of here and see if it's actually all going
to come and fit together. Because we can lower this
down at this point anyway. So what I'm going
to do is I'm going to come first of
all to the bott, I'll grab this bomb shift S Ursa selected and then tab shift. And let's bring
in, first of all, a cube. Let's bring in a cube. And then we'll put the cube in. So I'm going to press S, make it smaller, bring it down. It needs to be fairly chunky. This support, it's quite
a heavy load on this, so we need to take
that into account. Let's pull it back to here. First, I'm going to pull
it back to the wall. Then what I'm going to do
is I'm going to come in, don't worry about
where it's going to be positioned here or
anything like that. Let's grab the front
of it and let's just pull it out onto here. Let's then pull it down
so fits under there. And then what we'll do is we'll think about the next part. So I'm going to grab
this with L shift D, then R, Y 90, press the B just
to slim it down. And then what we're going to
do is put it back to here. I'm going to press S and's Ed. Then where I want it, because I'm going
to want another piece coming out of here. So I'm going to press
shift D, and then R, Y, 90. Pull it back to here. And then I'm going to make
this a little bit wider, S and Y, pull it out like so. And then finally now I want to probably pull it
all out a little bit. Pull it all out so it
goes into the wall. Now that is a good start
for what we actually need. And on the next lesson, what we'll do is we'll make
this kind of Ben that's going to go out towards
the end of here. And we can do that many,
many number of ways. It might be easier to just use a curve or a
path to do that. I think we'll do
that and then we can just finish this off and
then get the supports in. I'm just looking at the moment. Is it supported enough? I think it is, when we've
got a few of those on there and so we can
get on with that. Alright everyone. So, I
hope you enjoyed this one, and I'll see you in the
next one. Thanks a lot. Bye bye.
86. Modeling Supports for Second Floor Extensions: Welcome back everyone to Blender for the Environment
Artists Guide. And if you actually bring in your coffee shop and
your what's it called, bookstore, you can really
see now it's really, really starting to come
together and already is turning into quite
a beautiful scene. What I'm going to do
though is actually hide my coffee shop out the way, so I'm gonna hide
that out the way. And then we'll come back now and actually work on this part. So all I'm going to
do, I'm just going to put this onto object mode. Let's come in then.
And what we want to make sure is with this is that it looks like it's actually
supported at the moment, you can see that this is probably not going to
be far enough out. So all I'm going to do is just pull that out a little bit. Now what I'll do
is I want to bring in probably easiest
to bring in a curve. And I know it seems a lot of
work to bring in a curve, but sometimes it just
makes it that much easier. So what I'm going to do
is just press shift day. I'll come in, I'll
bring in a path. I always find paths easier
to work with as you know. I'm going to bring it down then. And then what I'm going
to do is extrude it out so you can also as well. A good idea for this, and I'll
show you that in a minute, is just keep the curve active. In other words, come in,
bring in your extrute. So bring it out like so. And then what
you'll do is you'll come in and you'll
add a modifier. So add modifier and
then we'll bring in a Generate, bring
in a solidify, right click, shade flat, and then just bring that
out a little bit like so. Now what you can do is
you can just copy this. So all I'm going to
do is I'm going to press Shift D. I'm
going to copy it. Bring it down and put it
next to my geometry node. And I think I've already got the geometry node in my
Boolean. I think so. I think it's in here.
This is the cube. Look there. Let's just call
that roof geometry node. It's all about just
trying to work as fast as possible to
get things done. Now with this, I'm
going to call it, let's call it a curve set up. So, and then what we'll do is
we'll just come over here, press the N button, and we'll put it in our
bullion as well. Now when we need a new curve, we can just go
straight back to that rather than keep having
to set it up like this. All right, now let's come in and actually bring
this in place then. So what I want to do is I want to just bring it into here. I'm going to make it a
little bit smaller so, and then what I'm going
to do is just grab this top and what I want
to do is curve it round. Obviously I want it to be nice and curved round
going into here. And I think actually on my
old one I didn't make it. So, you know, kind of, I didn't really
make it like this, but on this one actually, I think it's going
to look a little bit nicer if I curve it in
something like this. So let's put it, first
of all in the middle. Let's also make sure that
it's actually pulled out, so at the moment you can see
it's pulled out like this. Let's increase the thickness, let's bring the offset
back a little bit, so let's put it right
in the center like so. And there we go, thinking that's looking a little bit bare. Let's also then bring this out. So if I come and press
three now or one, let's go into side view. And let's press and actually just pull
this out over here. And then what we'll
do is pull this down and we'll get it
all nice and flat then, so it looks like
it's in place like so let's then bring these down. So we'll bring these down, let's bring them back a little bit like so. And there we go. Now you can see
it's really action starting to look very
nice in that way. I'm just wondering whether to
bring the whole thing down just because I want it a
little bit flatter on there. Yeah, something like that, I think looks pretty nice. And from there then
we can actually put some support going into, especially this corner, you definitely would have a support
going into this corner. That's going to be
the main support, and then maybe a
couple either side. Now for now though,
let's go over, we'll bring this down
all the way to one, bring it up a few, So I'd say four on this one
should be enough. And there we go, that's
the support Now, just make sure it's
roughly in the middle. You can see a little
bit out there. Let's put it to that side and
let's actually come in now. And what we'll also do is
we'll just apply that object, convert mesh and apply that. And then what we'll
do is control or transforms right click
origin to geometry, right click, shade,
auto, smooth. And there we go, we've got
a beautiful part on there. Now I'm going to do is I'm just going to bring in a
couple of supports. It will look a little bit
different to the original, but I do think it actually
looks better like this. So what I'm going to do is
I'm going to grab this part. Press Shift S Coaster,
Selected Shift. Then let's bring in a cube. So I'm going to bring in a cube, Let's make the cube smaller. And also with this cube, let's just delete
the top and back. We're not going to need
them, these two parts here. So let's delete them
out the way with faces. And then what we'll
do is we'll make it a little bit smaller. So let's then scale it up. So, and scale it up. And then what we'll
do is now we'll press R and Y and rotate
that into place. So let's get it into place.
Something like this. And as you can see, hopefully, hopefully it's come to the
right place obviously as well. It's a little bit thin as well, so let's just grab
the whole thing and because we've got
no top and bottom, all we can just
press is alter S, and that then we'll
stretch it out for us the way that we want it. All right, so I think that
then is a good support there. So what I'll do now is
just pull this back. So I'm going to press
Alt Shift and click, I'm going to put this on Normal. And then hopefully you can
see it hasn't actually, it isn't aiming up that way. It does that with the edges. If you fill this in though, then you'll see that it is able. Now to do that, I
can just fill it in. And then press the lit and faces another little tip there
that you can actually do. All right, so let's now, we'll use this one as well. So Shift, let's use this one. Let's press Olt and R, and that actually didn't work. Now I will show you actually what L and R does and
things like that. So if we bring in a cube,
let's bring in a cube. And what we can do
is we can scale it. We can rotate it, so R and Y, let's rotate it now. As long as we don't reset
the transformations on here, we can actually come back and reset them back
to the original. So in other words, the
original scale on here, if I press Alt and you'll see it takes it straight
back to the scale there was, if I press Olt and R, it will actually
take it as well back to the actual rotation. It was a really, really
handy thing to know that. Now let's come and
bring it into place. So what I'm going to do
is just bring it down. I'm going to bring it down possibly to here
I think as well. What I'll do is
I'll pull this out. So I'm going to press and X, let's pull it in like, so let's pull this bit
out a little bit. So I'm going to
come in, pull this bit out just a tad like so. And then we're
going to come into the top of here, grab the top, and then just pull it up
like so. And there we go. That's looking a little
bit more support now, and I think that is all we
need to do with that, really. All right, so now what we
can do is we can come in, we can grab all of this. So all of these parts we can press control J to join
them all together. Right click, shade, auto, smooth control all transoms, right click, set
origin to geometry. And now finally what we can do is we can actually come in. I don't think I'm going
to paint this yet. And the reason being that I need to move it over here
and I want them to look a little bit
different from each other. So I'm just going to go
into each one and do that. Now I do need it to come
over to roundabout here, but before I do that,
what I need to do is make sure I've got
enough support in here. One of the things I don't
have is my planks of wood. I'm just wondering if, if I've got these
planks of wood in here. So you can see these ones here. You can see that
we've still got, should have the
geometry node on them. So what I'm going to do
is I'm going to use that. So I'm going to press Shift, I'm going to bring it over, then I'm going to press 90. I'm then going to
bring it into place. So you can see now
I should be able to put this into there, basically. So what I'm going to do
is I'm going to pull it up into place. So I'm just going to sit it
on top of there like so. And then I'm jaws going to
pull it back into the wall. So I want it into the wall. I'm not going to worry
about the front because the front is going to be
covered by something else. But what I certainly want to
make sure is that this part inside here is definitely
set a little bit further up. So what I'm going to do is
I'm just going to press ye, and then I'm going
to grab it and jaws pull it up a little bit. And while I'm here,
I might as well just add a material on here. So I'll just press selection. Just take it out of the way. Control A or transforms right
click, set origin geometry. And now let's just go into
shady mode just a minute and what I'll do is I'll
actually give this a material, so let that load up. Obviously, the more actual
shades you've got and seen, the longer it's going to take. So what I'm going to
do on this one is we'll just come down and
instead of it being gray box, let's put it on some wood. And the wood we'll
pick is dark wood. So we don't, we'll
unwrap it quickly. So let's unwrap you, wrap. And there we go. Now we've
got wood under there, we're not able to see in there. And that is exactly
what we want. Unfortunately, we're not able
to see this wood either, but we can just see it. So let's increase
then the count. So if you increase the
count all the way up to something like that and then finally con
jaws move it over. Just a little bit like so. All right, so that's
looking pretty good. Now what I want to
do is I want to build around this part. So first of all, let's press shift date and bring
in another cube. So let's bring in a cube. Let's put this then
in this corner. So we're going to put
it right in the corner. Press the S button
in this corner here, so make it a little bit smaller. We don't want it too thick. It wants to be thick, but not
thick enough to look silly. So I'm saying a little, probably a bit smaller
than this part here. It's holding up this part, which is still a heavy part, but most of the work is being done by these
supports and things. So let's come in and we'll
pull that down like, so maybe down to here. So I'm thinking, do I
want to support on there? I'm actually thinking that's probably going to be fine there. Then let's come in
and pull it up. So I'm going to
pull it up to here. So then what I need to do
is I need to grab this. Show shift D and then R Y 90 control or transforms right clicks
at origin to geometry. So and then make it a
little bit smaller. And then x, let's pull
it back a little bit. And it's going to be
going into there, hopefully just above
this point here. All right everyone
on the next lesson, then we'll actually
carry on with this. We'll actually get all
of these parts in here. And then finally we'll
get this roof done, and then it's pretty much done. We just have to do
the back of it. We've already done this side,
so I'll see on the next. And everyone thanks
a lot. Bye bye.
87. Techniques for Modeling Second Floor Extensions on Bookstores: Welcome back in front to Blend. The four, the
Environment Artists guide and this
where we left off. All right, so we've
put this here. Let's make it a little
bit smaller so S next, let's pull it out a
little bit and Joe, want to make sure
everything's gonna fit into place now like so. Okay, so we've got this
here, we've got this here. We're going to want
one that's going to go across straight
across these as well. So let's get that in. And we're also going to
want this part on here, so all I can do is press 50. I can bring this out.
Let's write clicks at origin two geometry. Let's press Oz -90 and let's put this into place
of where it's going to go. Now I do want to
keep this height, but we have to
remember that also. We're going to have the roof part coming down here as well. So let's just press S and Y, bring it in and then
marking is just put it into place right on this part there like so if it's going to cover this part so we don't
need to worry about that. What we need to worry about is just this one going
across here for now. So along with the
presses shift eight, I'll bring in a no, won't. Actually. I'll use
this one. So all I'll do with this
is press shift and then Y 90 and then
Z 90. Nope, not z. And the reason is,
let's put that back. The reason is a
great are normal. So then x 90, there we go. Zed hundred 80 and then we go, now we've got that in
some kind of place. Now let's grab this part, put this back onto global, and then we'll do shift and D X -90 Let's
rotate it that way. And then what I'm going
to do is some J going to press the S bone just
to shrink that in. So I want it coming. Yeah, it's probably going
to be fine like that. I just want it
coming across here. So I'm going to move that across a little bit and have
them then going across, let's put this, I want it
right in the center here. First of all, let's
bring this part out, press shift D, duplicate it, bring it over the other side. And now we have a length of where I can
actually put this. Now you can see I'm
just wondering whether, yeah, I think I'll just put
it going straight over. So let's grab this face, put it straight over like so. And then what we'll do is, well, I think we'll grab this and
put it just underneath here. So if I grab this, then I can press L Shift D. Let's bring it up and we'll put it
just underneath there because we'll have one sat
on top of here anyway. So I'm going to put it
just there like so. And now let's think I'll make
this a little bit thinner. Well, let's come in, make
this a little bit thinner. So now what I'll do is I'll
just grab this once more. I'll press L shift D, and then what I'm
going to do is I'm just going to bring it down, make it a little bit smaller, and Y bring it in. And what I want to
do is I want to work out like where is
this going to go? The easiest way to do
that is just to put some wooden parts in here first. Let's do that first. So what
I'm going to do is I'm just going to press Tab.
I'll grab this part. I'll press Shift D.
I'll bring it over. I'll reset the transformations because it'll make
it easier to work. I'll press the button, and let's bring it back, so making sure that
it's actually in here. And x bring it back
back back like so. And then let's just
pull it out into place. Let's put it on object mode. I can really then see
what I'm actually doing, something like this. We can see now we
want to split this, then we need three of these. So let's add in a modifier
geometry. Sorry, not geometry. Adding a modifier,
Generate an array, Let's turn this down to zero. And then let's move
this y this way. Let's increase it,
and there we go. We've got three in there. Now we can see if I
have got this this big, it's not really going
to go in there. So what I'm going
to do is I'm just going to move this over and then increase this slightly
more like so. And now all I want to do
is just grab this part. So L, let's press P selection. And what I want to do now is press control all transforms, right click to
origins, geometry. And then let's press
Shift D and move it over. So I'm going to
move it over here. And what I'm actually looking for is if it's in
the same amount, so you can see it, these are a little bit
too tight to this. So if I move this this
way, for instance, now you can see that they're
a lining much, much better. Now if I grab this one and press Shift D and bring it over here, you can see now it's aligning around the same as this one. So that's exactly what we want. So now we've got that in there. What we can actually
do now is start work on this part on the inside. So what I'm going to do is
I'm going to grab this part. I'm going to press and Y, sorry, S and X and pull it back. And then what I'm going to
do is I'm just going to pull it up so it just
goes under here. And now let's shape this into something a
little bit different. So let's press Tab, Press control two, left
click, right click. And then what we'll do
is we'll pull this out. So if I grab this center part, I'll pull it out like so. Not going past that point. Of course. Alright,
so that's that bit. Now let's bring it down to
the bottom bit as well. So shift D, let's bring it down. Sit it on there like so. And now let's bring in
this main part on here. So to do that I'll just
grab both of these. Press shift S, Ursa
selected shift then. And then what I'm going to
do is I'm going to bring in a plane. We'll
work with a plane. We'll press R and Y and 90. And then what I'll do
is if I press three, I can get this plane
to be that size. So first of all, I want it
to be jost here, like so. And now I need it to
fit in this wall. So S and X or S and Y, bring it in like so. And then just move
it to the side like so now I'm hoping
if I grab this, press shift D, that these over
here should fit in there. Which it is, it should fit into the next one and the N one. So I'm just going
to try the N one, making sure it fits
in which it does. So that's great. So we've
pretty much got that. Now if I press
controls are just to go back before I
actually duplicate that, and now we can actually
start work on this. So what I'm going to do
is I'm going to press, I'm going to pull it out first, actually make it
easier for myself. And then what I'm going
to do is I'm going to press Tab, select the face. And then what I'm going
to do is I'm going to press and bring it in. Now it's not coming in properly. You can see there
from pressing much, much bigger gap
here to the sides. We don't really
want that, so let's actually reset the
transformations. So come in, press the eye button and now
you can see the nice. And even I want it to be round about this sort of scale going all
the way around. And from there what I'm going to do is I'm
going to come in, grab each of these points here. So press control shift
and this time and bevel those out like create in that nice round
finish that we want. We can also come in and
shape these as you know. So we can shape them like that. And we can also
change the length of these if we really need to. So we can really change
the length of these. We have a lot of control
because we're using this bevel. Now from there what I can
do is I can actually come in and just delete this
center out of the way. So grab this center, press delete and faces, delete
it out of the way. And then press L on the whole
thing, just to pull it out. And there you go, You've got a beautiful part
that we can fit in there. So right click, shade, auto, smooth, and let's
bring it into place. So we're going to
put it just there. And then what I want
to do is I want to probably bring these
out a little bit. You can see here, not really
going to fit in like that. So let's bring these out
just a little bit on the bottom and probably just a little bit
on the top like, so maybe a little bit
more, something like this. And then what I'm going to
do is bring these out now. So I'm going to grab all these, they've already gone away on. And I'm going to
bring them out just to the cover this
you can see here, this one's not
covered, so let's hold shift, let's bring
them out first. Not all shifts, so
let's bring them out, bring them back a
little bit like so. Now they're still
under there and everything's fitting in
really, really nicely. Now what I can do is I can
join all of these together. So let's join all of these. Control J, join
them all together. Right click, shade, auto, smooth control all transforms right clicks at
origin to geometry. And finally, now
let's press shift D, bring it over, drop
this one into place. So let's press Shift again. Bring it over, drop it
into place like so. And finally the last one, shift, bring it over and
drop it into place. So now we can see that we're a little tiny bit out
on this bottom one. We can probably get away, actually, with moving
this a little bit out. So if I grab this, let's
move it out a little tad, then let's come to this. And I'm looking at that's
fitting in much, much better. All right, let's save that our
work then on the next one, what we can do is we can really start putting this together. These parts are
going along here, We can bring this
to the other side, get that in, and then
we can actually start work on the actual
roof coming up here. And the rest of it
is pretty easy. I think with this one we've
done the hardest part anyway. We've got a window as
well as put in there, but we're really,
really hum the home straight with this
one for sure now. Alright everyone. So I
hope you enjoyed that and I'll see you in the next
one. Thanks a lot. Bye bye.
88. Optimizing Library Mesh for Improved Performance: We welcome croon to Blender for the
Environment Artists Guide, and this is where we left off. All right, so let's
come to this part now. Actually, no, we won't. We'll come to this part and we'll get this into
place over here. So I'm going to press shift, I'm going to bring it over
here, put it into place, hopefully, hopefully it's going to fit in nicely
against that post. You can see that this post
is a little bit too high. We can see here, this one
seems to be sitting there. Instead of moving
these parts around, you know what I'm going
to do, I'm just going to grab this one and
this one press Tab. I'm going to grab the
face. Then on each one and all I'm going
to do is pull it up. I think this one's dropped
down a little bit. So what I'll do is
I'll just pull it up a little bit just so
it's sitting on there. And then I'll delete
this one out the way. So I'm going to delete
this one out of the way. So delete, and for some
reason it's moved, so shift, let's bring it over and make sure that that
is set in place, which it is now. Okay, so that's
looking better now. All we need is this
part over there. So I'm going to press shift, we're going to bring it over. We're going to rotate
it around ours. Ed 90, in fact. Zed 90 again, so it
should have been 180. And let's bring it out put into place so it
just sits in there. Don't worry if it's a little
bit higher than that. We spoke about that before. Let's put it into place like so. And as we move on here, obviously we'll able
to work a little bit more on these parts round here, This part round
here, by the way, we're not really
going to see that. So the most important thing
is just this bit here. From here we're
actually going to build the butcher's shop. So all I need to do is just make sure I've kind of got
something in there, so just a wall or something just so we can't
see this part also. We've got this part down here. The butchers is going
to come from here, so we don't even have to
worry about that here. Now, from here, let's come in. Before we start anything else, let's get everything tidied up, let's get this moved over, and let's get some materials in. Because you can see it's not quite looking
right at the moment. We need a lot of
materials in here. But first of all, now
we've got that in. Let's come into this part and
what we'll do is generate, add an array and we're going to turn this
down to zero and we'll increase the y value
up and then increase it. So it hopefully finishes
right at this end. Now I can see that this probably at the moment
it's got way too many. It's a little bit
too supportive. So let's bring it down
to let's say five. And then from there let's
increase this y value. So let's increase the Y value. Just so it goes right next day you can see
it a little bit too much, So let's bring it back
a little bit like so. And I want it not quite there. So 44.3 Let's try that. Let's try 4.295 and there we go. Perfect. All right,
that's fitting lovely. Let's now come in. And the last thing I think is these need to really come down
to this bottom part here. So can I actually move them down a little
bit? I think I can. So what I'll do is
I'll just move them down just so they sat
on the top of there. And that then looks a little bit better
than what they did. And I also just want to make sure that everything's in there, everything's supported, which
it looks like it is now. Okay, now what we can do is been come in, apply this array. I can then come in and
grab all of these parts. Now, so all of these parts I've created, I'll do these a lot. First I'll press
Control all transforms, right clicks the
origin to geometry. And then what we'll
do is we'll come in and unwrap these ones first. So we'll do just these. Press tab, Smart UV
Project. Click okay. And now we'll come to this one. So we'll grab all of
these smart UV project. Click okay. And then
what I'm going to do is I'm going to
grab this part here. Press control L link materials
control L copy modifiers. We just need to go in now
and just make sure that the modifiers are on so we can see now they're all
nice and beveled. And then what we'll do is
we'll come to these parts, grab them all, grab this part. Last, control L, link materials, control L and copy modifiers. And now we can see we've got
a little bit of flashing here which tells me that there's something
behind this one. So if I move that out, you can see that this
is the one behind it. I'm going to delete
that out of the way. And there we go. Now let's
come into these top parts. So we'll grab these ones first, and then we're going to
press Smart UV Project. Click Okay. And then we'll
come to these parts here. So if we grab each
of these parts, I think we'll do it in
two just to make sure we're not stretching
the UV's too much. So what we're going to do
is a smart UV project, and then these two,
a smart UV project. And you can see the way
that we're working now is making things so
fast and so easy to do, because we've got
a really, really good way of doing this now. If I come in, Apply this array, tab A U smart UV
project, click okay. And I know it might
seem a little bit fast, but you really will if
you just keep doing this, get up to speed and
you'll find that this kind of workflow
non destructive. And the way that we're
applying everything, just building things
such a breeze and so easy and by the end you'll be able
to build anything. In this way. And it
really will, you know, take you from an absolute
beginner all the way up to, you know, becoming on
your way to become. I'm not saying you will
be a professional, but certainly on your
way to becoming one. All right, so now we've got all these, let's grab everything. So all of these parts, press G, just to make sure
I've not Mr. any which I have. So these two here.
Select this one. We're going to press control
L. We're going to press, then link materials
and then control L. And we're also then
going to copy modifiers. And again, I'm just
going to go in now. Just put an object
Mel quickly and just make sure that they're
beveled along here, which these are,
everything is beveled off. And finally, now let's come and put this
back on material, and now let's come
to these parts. You can see I really
need to split these off. So I'm going to split
these off together with Y. In fact, we'll split them
off from everything. And then what we'll do is
we'll come to this part here. So we want to split this
part off with selection. And now we'll come
to this part first. And what we'll do is we fat. Before we do that, we'll
resettle the transforms. All transforms set
origin and geometry. And then what we'll do
is we'll press a just on this one first wrap and
then on these two wrap. And we can click
on wrap on these because they're
simply just planes, so we ain't got to
worry about that. Then what we can do is we
can grab all of these. Grab this wall last, press control L, and what we're going to do
is link materials. There we go. There we go. Now we have got a
problem with this. It's not far enough out, so let's pull that out a little
bit where it needs to be. Let's also then pull
this part out so you can see this part needs to come out a lot more
than where it was. There we go, and that
is that bit done. All right, now let's actually
have a look at our work. Let's put it on Render
View. There we go. It's really coming together. Now you can see we've got
a lot of support in there. Looks really, really different
and nice down there. I'm just making sure
that I'm happy with everything and I'm just making sure as you
can see on these, we do have a little
bit of a problem in that these panels, we can see the brick
wall through them, and that's not
something we want. For some reason, those panels ended up a little bit
smaller so we can fix those. Let's come in then
and fix these panels. As you can see, grab them both. We just one of the
inside panels. So I'm just going to
press L on all of those. I'm going to make sure that
run individual origins. And then all I'm
going to do is press the S button and hopefully pull them out enough to hide
that wall out the way. Yeah, And there we go,
Now they're fixed. All right, so now what we
need to do is we need to make a start on the top up here. So we're going to have going all the way up here and
along the top it's going to be flat and
it's going to have some kind of spikes going
along the top here. So what we'll do
is we'll come in, we actually, we'll
press tab on this. Now what I'm looking for
around here as you can see, where is the walls
that I actually need. So you can see on this, we only need realistically from this
part, this part of the roof. In other words, if I press Tab, I'm going to grab this
part of the roof like so. And then I'm going
to press Selection. And then what I'm
going to do is then we're going to
come to this part. And I need, from this
part, as you can see, I need these parts here
and these parts here. I don't really need
anything else. It's all got a wall on there. Anyway, let's press selection. Now, let's come
back to the parts. I ain't got, you can see
I've got two parts here. One part very hard to see, so let's just hide
that other way. This part here, these are the parts that I'm
actually talking about. Do I actually need
these parts if I press G as you can see, and bring that all away. Do I actually need
any of these parts? You can see there's
a gap in there. We've got flaws in here
which we don't need. We've got all of these blocks that we really,
really don't need. And I think we can actually get rid of this at this stage. All right, let's press Delete. Let's press Altage,
bring everything back. And now I'm just going
to check this bit, making sure that it's okay. You can see that's
altogether well, and you can see now it's pretty clean actually, so
that's really good. Now, back then to our roof, what I'm going to do
before carrying on is I'll just set up my cursor. So my cursor is
gonna be right here. I'm going to press Shift
S cursor selected. And then what I'm gonna do
on the next lesson is I'll bring my first piece
of wooden down here. I'm looking to make it run about the same
thickness as this. It's not going to be sloping. You see how this roof sloping,
We don't really want that, but the good thing is we've already got our roof
set up over here, so that's really, really handy. Alright everyone.
So let's save about our work and I'll
see on the next one. Thanks a lot. Bye bye.
89. Detailed Roofing for Large Library Sections: Welcome back everyone to Blender for the Environment
Artists Guide. And this is where we left off. All right, so now
let's bring in a cube. So shift bring in a cube, let's make it smaller. And then I want it to be roughly the same
thickness as this, so all I'm going to do is press shift D. I'm going to
then go over the top, press G, just to
move it over here. And I can see now that this, if I bring it down like so is
a roundabout the same size. If I pull it over as this one
it's a little bit thicker. So let's grab them both, making sure that you're
on individual origins. And now make them both
a little bit smaller. And there you go. You've got the same
size thickness on both. All right, let's grab this one. Delete it out of the way.
We can bring this one over. Now we want it right
in the corner there. And then what we want to do is want to grab the bottom of it. So ba select ground the bottom, pull it down, making
sure it's coming down. So down like so. And then all I'm going
to do is pull it out like so where
it's going to go now. I'm thinking it's probably, it needs to be, you know, kind of the same length of here. So you can see here, it's
a little bit out here, but what we need to
make sure is that it's actually going
past this part. So in other words, if I pull it out just so it's
going past there, that is perfect how that is. Which means then I
can level it up by bringing this part out
just a little bit as well. Leveling that up against this plane here
that you can see. All right, so that's pretty much perfect the
way that I want it. And now what I need to
do is I need to think about how far this is
going to come down. I actually think coming down
to here is about right. So something like that. We're
going to have another piece of wood in this part here, so don't worry about that. And what I want to do now
is just press control all transforms and I need to
basically put it in the center. So what I'm going to do
is I'm going to come to my roof here, press tab, grab the center shift desk, cursor selected, and then
come back to this part here. And what I want to do
now is right click set origin 23d,
cursor from here. Then I can come in
Add in a mirror. And that then is
going to go over the other side as you can see. And that's perfectly
in line with what a one put the Y on the, that's going to put it that side as well. And there you go. It's as simple as
that. Alright, so now what we can do from here, we can actually bring in the
next parts of this roof. So I'm going to
press Shift, bring in a cube, make it smaller. And what I'm going to do is
bring it out to here first. So I'm going to grab this bit. I'm going to slot
it just on top. I'm going to make it probably
a little bit thinner, so S and Z. So let's press three on the number pad. Let's
bring it out then. So S and Y, pull it out
just past this point. And then let's put it on
top, right, on top of there. And then S and why do I need
to bring it in anymore? But I definitely need
to bring it this way. So I'm going to bring it
just past there like so. And that is exactly what I want. Now control all transforms, right click, set origin
to three decursor. Add it in another modifier, and this time will be a mirror
going over the other side. Now let's bring in
the next part then. So I can probably use this in
a good way if I grab this. A, press Shift D, press R, Z 90. Now what I can do
is I can come in, so I can grab this one
here and bring it in. And you can see now
we can actually use that to bring this out. Now if I come in and
I grab this face, let's say bring it
out into place, you can see it's exactly the
right, same height as this. Which we don't really
want, but we'll saw that in a minute. Let's
bring this one out. And then what we can do is
we can pull this part down. Just a little bit like so. And then I'm thinking
what I can do is I can pull this part up just
a little bit like, so now I'm looking if
that's going to be okay. I'm thinking maybe
to pull it out Jawt a little bit like so, so I can get my roof in there. And I'm thinking that's
looking pretty good. All right, so let's actually apply the mirror on this one. And the reason is because
I want one in the center. So I'm going to grab this one. I'm going to press Shift so
I can put it there if I need to shift S then and
selections curkeep offset. And from there all I can do is lift it up, put it into place. And now I'm going to have
these little spikes, long ears of said. So I can press and Y
and pull it in like so. And that is looking pretty good. Now the one thing I want to do is I don't want
these so thick, so I'm just going to
pull this one back. And I'm hoping, yeah, it didn't pull the
other one back because I applied that mirror. So all I'm going to do
then is put this on medium point and then and Y. And now I can pull
them both back, leaving enough room
then for my spikes. All right, let's
save out our work. So we'll save it out. And
then all I'm going to do now is I'm first
of all going to, you can see here on this one, it's a little bit out. They are the things
I'm checking. Now, all these parts
a little bit out. I don't want that
poking through there, and I certainly want it
pulling back a little bit. Can I pull this
one back a little, tiny bit? Let's have a look. So we'll pull it
back a little bit and we'll pull it this
way a little bit. And there we go, that's in place also then going to
check for double tap, the A and make sure this
is not in the wall, which it is, let's pull it
out to the side a little bit. Double tap, and there we go. Let's then come to this one. It's certainly out too much,
so we'll pull it back. So then what we'll do
is we'll pull it in. And you can see that because
this one has gone that far, we need to pull this
one back as well. Let's pull that back and it's just a case of fitting
everything in place. All right? That's
looking really good. Now, what we need to do
before we do anything else, we will need to I'm not going to worry about this bit
going over here, but I do. I'm just looking to making sure that all of the parts
that I actually need, so you see this here,
this part underneath. I don't need it going along here because I'm going to
have my butchers there, and I don't need it going along there because
I'm going to have another part into this to
actually bring it all together. And I've got my part
in there already, so everything is
ready to go on there. Now we need to do
is we need to reset all of the transforms
on these and basically get some paint on there or some shader on there. All right, so to
do that what we'll do is we'll first of
all come to object, we'll come down to
convert and mesh. And what I'm going to do then is control all transforms, right? Clicks to origin geometry. Now I do want to unwrap these. I'm thinking probably
separate from each other. So I'm just going to grab,
I'll grab all these. I think I can get
away with unwrapping all those smart UV project. Click okay. Let's come
to these ones now. A smart UV project. Click okay. And then
these two here. Tab, Smart UV Project. Click okay. Now what we can do is we can come in,
grab all of these. Grab just this one here. I can press control L, link materials, control L, and then copy modifiers like so double tap the eight and now just have a quick check to see what all
that's looking like. There we go. That's, that's
looking pretty good. So everything on there
is looking nice now. And now let's think about these two parts here before
we carry on with the roof. So let's come in and what we'll do is we'll grab our roof. We'll grab these two parts. We'll split them
off with selection, grab them all, transforms
origin to geometry. And then what we'll do
is we'll press tab A, unwrap, and then grab
this wall control L, and we're going to
link materials. Double tap the, just make sure you're
happy with all that. All right. Now finally we're going to be onto this roof now. Before that Yeah, I think we'll put something
underneath this roof, so we'll put some wood
going underneath it. So all I'm going to do,
I'm just going to grab, I think actually
we'll use all three. So we'll just press control L all transforms. We
won't split it up. Origin geometry, bring in a material and the
material one is wood. And we'll just use the
dark wood like so. Al right, that's good
enough for what we need. And now let's come in with
our roof that we made. We're gonna press shift just
in case we want to reuse that roof for anything else because it is the right scale. The most important
thing why I want that roof is because of
the scale of the tiles. We've got them perfect. We know what they want
them to look like. So when we come to
do our perfume shop, for instance, we already
know this is what we want. All right, so let's first
of all come over to geometry and at the moment we can see the roof
angle is on 16. Just put this to one and what they'll do is
straighten it alpha and that's exactly
what you want, R z 90. And I recommend, first of all, just getting it lined up. So making sure that it's lined up first is the most
important thing. So you can see I need
to line it all up, so R X, let's line it
up so it's into place. And you can see even now, if I pull this bit back, it's stuck out right there.
So we don't want that. So R X, let's then pull it down. So we're going to pull it into some sort of place,
so roundabout. You can see here, are we going to manage to
get this into place? You can see I need
to pull that back, which means I need to
pull this part down. So I'm just going to
slot it into there. And then you can
see that this part of here, I'll have to come back. Now I'm looking at where
that is coming down to. You can see the roof is coming all the way
down to here now. Is that far enough down or do you want it to
come further down? I think possibly
level or a little bit lower or a little bit
higher than that. I think there look
roundabout there thing. I think now this needs to
go back just a little bit. And from there now can
I actually level it up? So you can see here, this one
here going all the way up. I need to bring it
out very slightly. So if I press R and X
holding the Shift button, now you can see
that's leveled up. Now, can I increase
the vertical? Counts 1.2 That is
looking pretty good, albeit I think it needs to
go back a small amount. Yes, I think that's
looking good. Now, before we finish, let's bring this bit back
then to where it needs to go. Can I actually get away with
bringing it back that far? You can see probably not in something like
this as I've said. Don't be afraid to mess
around with it a little bit. So I'm going to bring
it out to there. And then what I'm
going to do is just grab this top and
I'm just going to pull it back just so it's
behind there like so. And we'll do the same thing
on the other side as well. You can't see any
difference really. So it makes no difference
now before we finish, in fact, we will finish,
we'll finish here. And then what we'll do is we'll
get this over to the top, this side, get it
over the other side, then make sure this
part's correct. And then from there,
just looking from there, what we should be able to
do then is actually get this main part
finished hopefully. And then we've just got
this part to do and then the spikes and then we're
done. All right everyone. I'll see on the next one. Thanks a lot. Bye bye.
90. Optimizing Roof Tiles with Face Normal Selection: Welcome back everyone. To blend for the Environment
Artists Guide, And this is where we left off. All right, so let's
grab our roof. Let's then increase
the horizontal. So we'll just increase that
to where it needs to go. Let's put it back into place. And then we did it perfectly.
Hopefully you'll do that. And then what we'll
do is we'll just squeeze it in a little bit more. So if I press and X squeeze
them in just a little bit, just so we've got not got those tiles sticking
through all of those. Double tap the. And
here we can see we've got no other problem
with this part here. So let's come into this part. Grab the front of
it and just pull it back just so it's behind
those tiles like so. And there we go, that's
looking pretty good. And now all do is we
will first of all apply this geometry node and get on this nice tile material, make sure that's correct. And then from there
then we should be able to mirror it
over the other side. Let's come into object
convert and go to Mesh. And then what we'll do is we'll
now press the tab bottom, press a smart UV
Project. Click Okay. And from there I want to
actually copy this material. So right click, shade, auto, smooth, and then
copy this material. You've got a mirror
on here, that's fine. So control L copy material. Let's come back to this,
have a look at the material and we've got this roof
base on for some reason. Don't need that on now. Double tap the just
to have a quick look before doing anything else at what the actual
roof looks like. And you can see it's looking
pretty nice like this. Now, the other thing I've not
explained is that you might want to delete the
back of these tiles. You might not want
them on some of them, you might
want to keep them. So something like this on
the underneath of here, you might want to keep them
and you might want to come to the back of them and actually
delete all of those off. There is actually a
good way of doing that, Fire pressure shift
H. And what I can do is I can
come into my tiles, let's say I want to
grab these four. All I can do then is
I can come to mesh. I can go where is it? No select, and I can
select by similar normal. And then what I'll
do is I'll select the front and the back. And from there it is
a little bit tedious, but what you can
actually do is you can come in and you can select, let's say these four here. Then we can go to select. And the one we want is
select similar by normal. And then what it'll
do is it'll select all of the front,
and all of the back. You've got some
options down here where you can actually
put this down, put your normal down
like so, or increase it. You've also got some
other types so you can compare equal greater or less. And you've got, you
know, co planer, aerial or material, but I'm
going to keep it on normal. And what I want to
do then is press a Shift H and then I'm
going to go into side view. As I said, it is a little bit tedious but I will show
you actually how to do it. Once I'm inside view, I'm
going to double tap the, I'm going to come up to where
my wire frame is and then what I'm going to
do is I'm going to hold control and right click. And what you'll get
is the last select. So what you want to
do now is you see these ones going each down here. You want to come down and
select those like so, like so. And now what you've
done is you've selected just the back of those. So in other words, if I come in, put this back on material, you can see now we're just
selecting the back of those. If I delete those faces now, so if I delete
faces, press Altage. Bring back everything,
double tap. The you can see now that we've got rid of all of
the backs off here. So if you want to tie this up, not of as many polygons, that's what we can actually do. Unfortunately, the reason
why I'm not doing that is because the course is
already monumental as it is. And I don't really have time to go in and actually
clean everything up, but I'm going to show you how to clean things up as we go along. All right, let's
press all teach and bring back everything.
Let it load up. Take a little bit of time. Maybe I should have
pressed all teaching in object mode or
something, but there we go. All right, so now
I'm going to do is I've got my cursor
in the center. So what I want to do now
is I'm going to come in and I'm thinking I'll just mirror it
over the other side. So if I press control or
transforms right click, set origin three D cursor. I should now be able to come in, add, modify it, generate, and bring in a mirror on the Y, turn off the X. And there we go. Now we can see it's not mirrored perfectly over this side because I'm not sure
why it's not done that. Let me just think why it's
not actually gone over there. I mean, I can't put it in place. I'm thinking, yes, the cursor is not in
the center, that's why. So let's come and put the
cursor into the center. So shift S cursor selected. And now what I'll do is
I'll come back to this one. Right clicks at origin 23d, cursor and there we go a few. I was wondering why
I've done wrong. All right, let's put
it on object mode. Let's have a look. We can see that this part
here is definitely out. This part here is
definitely out. So we'll come to this
part here first, and we'll pull that back just as we did with everything else, so pull it back into place and then we'll come
to this post here. I've got a few options. We could lower this part down or we
could pull it back into place. Let's see if we can pull
it back a little bit. The problem we've got
with if we pull it back, we just have to be careful, we don't pull it back too far. Just enough so it
actually goes into there. If it's, you know, still stuck out a little
bit, I might just come in, grab the top of it because
no one's gonna see that, and then just pull it
down into place like so. All right. I think
that'll do actually. I don't need to do anything
more with that. Okay. So now let's actually come and work on the back here because we've pretty
much got this bit done. This bit is going to be
hit by the butchers. And this bit's already done. And this bit's
looking very nice. Now we're onto this bit here. First of all, let's
bring in a cube. We'll bring in a cube,
let's bring it out. Let's bring it out. Not
those. Let's press control. Put it back to where
it was. There we go. Let's press. And then what I'm going to do is
bring it down to here. I'm going to press
and Y pull it out. You can see that
this is going to be way too smart, big, this cube. So I'm going to pull
it back into place. Into my wall, down onto here, making sure that it's jaw
in front of here, like so. And then I'm going
to press S and Y, pull it out and into place. Now the one thing I
want to make sure is that this is not in
front of there for sure. I want to pull it
back, so I want to pull it back into place. Just here now I can see
that this roof here, probably a little bit out. So I'm going to
grab both of those. I'm going to pull them out,
just a very small amount, making sure my roof is still
in there as you can see. And that's fine. Also looking
at this top bit up here. So I'm going to pull
this bit out as well. L this is always the
most fiddle bit, just getting everything
to line up and fit in. And then from here then,
now I can make sure that I can pull this bit out
just a little bit more. Double tap the and
now let's come in and pull this bit
back a little bit. And there we go. Now you can
see everything's lining up. Now we want a few
piece of wood in here. Luckily for us, we actually saved out
this, this part here. So all I'm going to
do is press shift. I'm going to bring it up. I'm going to rotate
it round so R Y 90. I'm going to press control And three just to
go into back view. And then what I'm going
to do is I'm going to put this this side first. So we'll put this in here. I'll press, just scale
it up a little bit. And then what I'm going to
do is slot that into place. Just slot it back
into place there, make sure it's past
the middle bit. We don't actually
want these touching. And the other thing is also my orientation is already here. Now if yours isn't, just
come in, grab this face, Press Shift S, Costa selected,
grab your wood again. And then what you're going
to do is right click to Origin 23, cursor from there. Then you can add in a mirror, bring in a mirror,
let's put it on the Y. Turn off the X. And
there we go from here. Then what we can
do is we can now come in with our actual path. And I can just pull
it out very slightly because I just want those to
actually fit in from there. Then let's press control three. And now what I can do is I
can bring this up five press. And then, and then, and I want it actually
to go into this corner. So let's pull it into
that corner like so. And then let's
straighten this up. Let's straighten this
up. Straighten this part up like so. And there we go. Now let's work on
the next bit then. So we'll pull this over. So what I'm going to do is
I'll just press A on this, press shift D, drag it over. And from here, then
let's have it coming from round all the
way around here. So I'm going to grab this part, put proportional editing on, and then what I'm
going to do is pull this out into place. I want it going
something like that, and then I want all of
these parts coming out. So I'm going to grab this one, pull it out like so. And then we're
going to pull these out or delete them. We
can delete them as well. So delete vertices,
and now let's pull this one into place
where I want it to go. Now obviously I want it a
little bit better than this. It's not done very well, so let's just take off
proportion editing, and now let's work on this bit. So we'll have it
coming out from there, coming all the way
around to here. All the way round, all
the way into there. And then this bit coming
down and round like so. And let's have it
bending at the end, pull it up into place really
easy stuff as you can see. Now we've got that. All right, that's looking pretty good. Now what we'll do
is we'll just come in to our curve. Turn this down. We don't want that.
Let's turn it up then to maybe six, something like that. I think that's
looking really nice. Yeah, I think that's
looking absolutely fine. So what we can do now is
we can come in object, come down to where it says convert and mesh.
And there we go. Now let's have a,
if I grab these actually right click
shade or to smooth, let's have a look what
we've got left to actually bring in materials on. It's just this roof's got it. And then we just need
to do these kind of spikes going across here. And once we've got those in, pretty much done on this one, which is really great and we can move on to something else, something smaller, not
something so huge. We have actually only
got one building though, after this, which is
really nice to know. The rest of the
stuff we've got is kind of lamp posts and
we've got a subway. There are a lot more intricate, smaller things, which is
really nice actually. So we're going well.
All right everyone. So I hope you enjoyed that.
And I'll see on the next one. Thanks a lot. Bye bye.
91. Modeling Decorative Roof Spikes with Modifiers: Welcome back everyone to Blender for the Environment
Artists Guide, And this is where
we left it off. All right, with
all these though, let's make sure that they're
unwrapped separately. So all I'm going to do
is just grab these two. In fact, before we
do that, let me just resell the transforms, right click the origin geometry. Let's press Tab.
We'll grab these two. Smart UV project. And then what I'll do
is I'll grab these two. Is it working Smart UV
project? Click Okay. Come to this one tab,
Smart UV Project. Click okay. And then
from there then, what I can do now
is I can grab them all. Grab this part here. Press control L, link materials, press control L,
and copy modifiers. And I'm hoping now they're all got a bevel on
them, which they have. So they look absolutely fine. Let's have a look
at the back now, because the back is
basically finished. So we can have a look at
the back. There we go. That's looking pretty nice. Just wondering if they're
a little bit too far out. I think not. I think
we'll leave those now. We've got this part here. And then finally the roofs. Let's do the roofs
first and then do this window finally last. All is we'll come
to object mode. What I'll do is I've
got my cursor there, but I really want it in the
center shift or selected. And then we'll shift A, and I'll bring in a cube. I'll make the cube
much, much smaller. I want it to fit in
this gap in here. So what I'm going to
do is I'm going to press and Z, pull it down. And then and Y pull it
out a little bit like so. And I want to fit in just
just below this part here. I'm going to bring it over now like so all the
way over to here. Grab this face then, and bring the face over
all the way over to there. And then what I'm
going to do now is bring in one edge loop. So control, bring in an edge
loop right in the center, going down there, press
seven to go over the top. And I just want to grab
just this top part here. And then I'm going
to press control B, Bring it back a little bit, so we've only got one kind of bevel and we'll pull
it out to there, leaving this much of
a gap from there. Then what we'll do is we'll
pull this up and then in, so I'm going to press,
pull it up like so. And then finally we're
going to press and y, and pull it in like, so now think that this, first of all, it's a little bit too big. It's going over those. And second of all,
I've just got to make sure that it is going
in the right place. I want it coming out
probably round to there. And then we're going to
make it a little bit wider, so S and Y a little
bit wider, like so. And finally then I can
grab the whole thing, press and X and just pull it back so
it's fitting in there. Not you can see it's
still not fitting in there, right ex, pull it out and then just make sure that this bits
in place as well. This is a bit of a pain. You can see it's not quite
going where I want it. I'm going to press S and X, hold in shift, bring it back. And then probably pull this
a little bit this way. So pull it a little
bit this way. So double tap the
and there we go. All right, so now
we need the spike. So I'm going to come
in, I'm going to grab this part in the center here. And then we're going to press
shift S. Custer selected, grab this here shift. Let's bring in a plane that
will then make it really easy to work with for bringing
my plane all the way down. And then we're going to
press S and Y and bring it in from there. Then what I'm going to do
is I'm going to press, I think I'll bring
them out first. So what I'll do is I'll
press just to get that on there and then I'm
going to press Tab. In fact, I really need to
make sure this is split off. So I'm going to press
LP selection control all transforms right click, set origin to geometry.
Bring it in now. So I'm going to press
the bond to bring it in. I'm also, yeah, I think I'll
make my spikes like this. I think we'll do is
I'll just bring it in a little bit next. Bring it in. And then from there what
we'll do is we'll bring it up and then let's Yeah, the next let's
bring it in there. All right, from there then let's bring in a few edge loops. So control, let's bring in five. I think we might
actually be able to get away with three.
Let's bring in three. Left click, right click,
old shift click portion editing on, bring in the. So I think that's going to work. Actually press the button, bring it all the way down. Yeah, and it's not going
to be the shop root. Let's try root. There we go. That's
the one that I want. That's bringing it in. Yes. I think that's going to
be what we actually want. The one thing is the top of it. I don't really want the top
looking like that and Y. There we go. I think that
now is looking better. The one problem we've got is let's take proportional
editing off. I just want to line these
up better as you can see. If I press three on the number pad, these
aren't lined up, so I'm going to press S
and Y and bring them in, and now it's got that nice curve that I'm actually looking for. All right, from there I want to probably shrink this
down a little bit. So I'm going to grab control. Control. Control control. Then I'm going to press and Z. Shrink it down a little bit. Now let's put them
down into place. So grab the top then then
you're going to press Enter. Pull it out like so. And then pull it up and then pull it together and you're going to end up with
a beautiful spike on there. Now let's see how big
those actual spikes are. Thing actually that's lock
in about the right size. Let's right click though
and shade auto, smooth. And then what we'll do is we'll bring this then into play. So if I go over the top now, I'm going to pull it all
the way along to here. So, And let's have a
look from back here. Yes, and I think that
spikes looking really good. That's exactly what I
want back to the spike. Then add modifier,
bring in an array. And what we want to do
is want to go the other way on the x. Let's
pull it the other way. And now you're going to do is
increase the count like so. And I think they're a little bit too close together actually. So what I'll do is I'll
just increase this, bring them all out
to where I want it. And I think what I'll do is I'll bring this
one up to the end. If I turn this down to bring it all the way
up, right to the end. So that looks about
what I'm looking for. All right, so that's
looking pretty good. Now we need to obviously
put this over here as well. This part needs to go over here. So I can do is I
can use this again. Shift desks to selected, I can grab, then this and this. I can press object convert mesh. Join them. We won't
join them together. What we'll do is we'll
come to this one first. Add modifier, generate mirror
on the Y or the Z. Nope, because not move
my proportionality in origin three cursor. Let's see. There we go. And now they're mirrored over. And now we'll do the same
thing. So I'll grab this one. Right clicks, origin
three cursor, grab this one, press control
L and copy modifiers. There we go, we're done. All right, so now let's come in, apply these modifiers so we
can join both of these up. Now let's join them
both up like so, object convert, mesh control J. Join them all up. And now
let's grab all of these. First, I'm just going to
come in and grab this side. I don't want this side grabbing, I just want all of these ones. And what I want to do
is I want to make sure that they've got the unwrap on. So if I press Smart UV
Project, click Okay. And then what I'll
do is I'll hide. And then a Smart UV
Project click Okay. Ol tag, bring back everything. And now what I should
be able to do, I don't think I'll put
a bevel on the here. I don't think it's
going to be worth it. If if I generate a bevel, is it going to really
add a lot to it? Maybe it is. Maybe there
looks so much better with it. So I think I'll
leave the bevel on. Actually, what I'll do now
is bringing a material. If I come to a material,
we'll just add it in. Black metal actually
is the top one. Let's add that in.
Let's have a look. Making sure when this loads up that they've got the right material on
double tap, the A. There we go. Let's
have a look with our rendered view just
making sure it looks right. There we go. Okay,
that's looking cool. Now, the last thing then
is the actual window. And a thing from there, we're actually done
with this building. A little small window. Now let's come in then
we'll grab this part. Shift, selected shift. Let's bring in the plane. Let's rotate the
plane round, so Y 90. Let's make this a little
bit smaller like so. And let's certainly make it
a little bit thinner so, and y make it a
little bit thinner, a little bit longer now. So S and z. And that then looks about the right length that I'm actually going to need. Now from here what we'll
do is we'll first of all resell the transforms
like so origin geometry. And then what we'll do is now we'll actually bring
in these parts. So I'm going to grab
each of the corners here like so I'm going to press
three on the number pad. And then what I'm going to
do is I'm going to press control shift and B
and bring those in. Now for me, I don't really
want it looking like that. I want it to look a little
bit nicer than that. So I'm going to turn
up the segments, first of all, and then I'm going to come down and
put it on custom. And this is more like what
I'm actually looking for. Of course, it's not
exactly like this, but from here I can
actually come in and shape, this is the shape from here. So you can see this
point is this point, and then this point
is this point. So you can see, I can bring in this point now and shape
it the way I want. Do I want it like
that or do I want it, you know, more like this? Bring this in. I want it to
be a little bit different. As you can see, I'm Jaws
trying to shape this part, so. So let's put in one more. There we go. There we go. That is what I'm looking
for, something like this. We can lift this
up a little bit, we'll get there, and we can play around with this
all day, really. It's so much fun to
play around with. I think it's just
this bit now there. Alright? Not quite right. What I need, I'm
going to actually add in another one.
I'm going to another. I know it's hidden
around with this, so I'm just going to wait. You can see now I've
added in another one just to get it to
where I want it. Not lying. That's it. I'm spring that one now. This one here has not
moved, doing anything. The reason is, we haven't, uh, fun if you bring it in now. You'll see, there we
go. That's the sum. Look, I'm going for, I think, try and get something like that. Don't worry if it's
not exactly like that, they're never going
to be the same. But something like that I
think, you know, really, really suits the
actual overall look. What I'm looking at
though is the bottom here is not the same as the top. I don't know why that happened, but what I'll do is
now I've seen that, is I can split this in half and on the next one we can
mirror it over it. All right everyone.
So I hope you enjoyed that and I'll
see on the next one. Thanks a lot. Bye bye.
92. Creating yet another victorian stylized window: Welcome back everyone to Blender for the Environment
Artists Guide. And this is where
we left off now. First of all, let's
do what we said then. So if I press three
a grab everything, let's come down to
where he says bisect. Let's cut this in half then. Like so let's put this on zero just to make
sure it's leveled up. And then let's clear
either the outer which we don't want or the
inner which we do want. Shift desk then selected. And now I can do is I can come in control or transforms
right clicks at origin, then to three decursor. And then we'll add in a modifier
which will be of course a mirror and it should be
on the Z, turn off the X. And there we go from there. Then I can press control A, and now I can press Tab. And I've got this line here. Don't particularly want
this line at the moment. So I can just press delete
and dissolve edges. And there we go. All right, that's looking perfect.
Really happy with that. Now I can do is I can
either, you know, use something like a solidify or I might be able to just bring it in. So let's
even bring it in. And you can see we're
getting a lot of crossover. And that's the thing
that always worries me when dealing with
things like this. I do want it a little
bit thicker than this. So I think what we'll do is instead is I'll just
press and pull this out. And then from there,
what I'll do is I will keep this part here. All I'm going to do is
just grab the front of it. I'm going to press P
and separate that off. I'm going to hide
that other way. And then I'm going
to come to the back of it and delete it off. Delete faces. Now from here, let's
create how we want it. So I'm going to
press control again. Right click Srogen geometry, add in and modify it, and this time it
will be a solidify. Now let's increase the solidify. If increase it,
you can see we are gaining a little bit
of crossover on here. So we just have to be careful. We're probably in the end going to point even
thickness on for one thing, let's bring it in
to where I want it. So I do want it somewhere
around here as you can see. But I'm probably
going to have to merge some of these.
Let's try the offset. If I can bring it
back a little bit, and that's why I wanted
to use the solidify. Because you can see
we can actually shape it now without actually
messing around with that. All right, that's looking good. I'm happy with how that looks. One thing I just need
to make sure is, is the thickness
looking about right? I think, you know, the thickness in
comparison to the rest of this looks absolutely fine. Now we'll do is we'll
actually apply that. So control a Ol tag then. And we'll bring back
this front part here. And from there then now we can actually shape the inside of it. So all I'm going to do
is we're just going to press S and bring it down. I'm going to try and line it up. So you can see at the moment
this part's lining up here. I need to bring it in so, and y, let's bring it in
a little bit like so. And the reason I want
to do that, by the way, is if I now come into
this and grab it, press the Eyebon and bring
it in very, very slowly. I should be able to create a slight kind of
frame around it. So if I press now S and Y, I can create a slight
frame going around it. And there we go. All right, so now we can grab
the whole thing. I can pull it back to where
I want the actual frame, which will be somewhere
around there. And then I can grab
this part here, and I can press P selection
and separate that off. Now, grab this part here. And what we want to do, because this is the frame
going around it, we need it to be broken
in a little bit. I'm going to grab this one. This one, this one. This one. And the same on
this one, then this one. This one. This
one, and this one. And I'm going to have the frame going around these
parts here like so. Right click and mark a seam. And then from there then
let's split these off now. So I'm going to press L, L, L, and L, Y. Split them off. Tab, now we should be able to
grab this tab again. A, and now I should be
able to pull it out. If I press now, let's pull that out
just a little bit, making room then form
my actual window. That's going to go
in here finally. Then let's come to our window. So I'm going to have
one strip going down here and maybe
three going down here. Now, the problem as you know
is with things like this, you're not going to, you're not going to melt to
bring in an edge loop. You can't bring an
edge loop at all. But one thing we can do
if we press control law, we can bring in
it in the middle. So let's left click and
let's press control law. No, we're not going
to put it like that. Let's press control ad,
put it onto Verts mode. And you can see now I've
actually insertd that. So let's do that again, just
so you can see what I did. So I'm going to come
and press control. And you can see
if I aim it here, I can put it right
in the center there. And then I can come vertex. And now I've got that there. This one here is what
I'm looking for. And from there what I can do
is I can bring in my knife, tool press a, bring
it down, drop it in. So now I'm still not
going to be able to bring in a vertex along this way, But what I can do is I can bring it in the
middle, left click. And then what I can do is I
can come now with my knife, tool press K, and go to this
side first, and then K. And then A and Enter.
And there we go. We've got one in there,
perfectly level. Now, we're still going to
have the same problem though, in that we won't be able to
bring in another one in here. So we're just going to come in and I'll show you
a different way. Grab this one and this edge, right click, and we're going
to subdivide from there. We should be able
to now have 1.2 in, which means now we can
put a window in here. Now they're not level. In other words, this window is going to be huge and
these will be small. But what we can do is
we can grab them both, Make sure that we're
on medium point, press S and Z, and pull them up into
where we want them. So something like that I
think looks much better. And from there then
what we can do is we can press K, grab this one. A go all the way over, Enter, and then come
down to this one. And then A all the
way over and enter. And there we go, we've
got our actual window. All right, so now
let's come in and what we'll do is we'll
grab all of these. All of these. And all of these. We're then going
to press control and actually pull those out, bring back the actual bevel, so something like there. And then from there
then what we can do is we can now pull
these out a little bit. So if I press, I can
pull them out into place like so a
bit too far there. Then I can separate
these windows out. So if I grab this one, this one, this one,
this one, this one. So selection, separate them out. Now finally, let's
grab this part. This part and this part. Let's make sure that we've
got nothing on there. So convert and mesh. No modifiers or
anything like that. Let's press control J. Let's ride. Click and
shade. Auto, smooth. And let's also then press tab, a smart UV Pj. Click Ok. Let's now come in and bring in a
Bevel. Add modifier. Generate Bevel, let's
put it on ninth three, finally, then let's come
in and bring in materials. And you'll also notice
because we split them up, we've also got a
break in the frame. That's exactly what we wanted. Now let's come in
with the material. And the material is going to be the same as this one here. If grab this one,
grab this window, press control L. And what
we'll do is link materials, let's put it onto material mode, Let it load up, and then
we'll make sure that, I don't know if we unwrapped
it, I don't think we did. So let's just grab it all again. So a smart UV project. Click Okay. And it
looks like we did. And now I'm just looking to make sure that I'm
happy with this. Now, of course, this material on here needs to
be green painted. So if I come in, I'll
grab all of this, go around green painted, Click a sign, and there we go. That's exactly what I'm
looking for, the word. To be honest, it's so small, you probably won't even notice. The one things we do notice
are these parts here. So we already know if we can go in and we'll just
select all of this. And sometimes sometimes if
we go in now and UV editing, you'll see that they look like this and they're actually
joined together, which sometimes causes us
a little bit of a pain. Now just to fix that, we'll just press Alt shift
click. Alt shift click. Alt shift click. Going
around here, R 90. Spin them around and let's have a look what that looks
like now. And there we go. Now they're going the right way. Now I'm looking on
the inside of these. I'm still happy with the inside. So all I'm going to do
is come to these parts. I don't know why
they're actually twisted around, but they are. Might as well fix that
press dot while we're here. It's a little things
that are really going to make the difference
in this scene. Anyway, a 90, spin them
round and there we go. Now everything's
going the right way. Now finally just the windows. So I'm going to grab my windows, now I'm going join
them to the rest of the actual build
press control J. And then what I'm
going to do now is come in to the window, select them all, and then
click glass, Click a sign. And then what I can do now
is I can work on these now. Again, you won't be able
to copy these Windows. You'll end up with
something like this, but you won't be able
to copy them like we did before, only these four. Let's press on the wrap. Let's then press A. In
some windows like this, I will just do them manually. Just grab them because it's just not worth my time
to mess around with them. And then with
something like this, I'll just grab them like this, like this. There we go. All right, let's put
this window back in place where I want it to go. Let's double tap
the A. There we go. Now let's go back to
modeling, finally. Now let's have a
look at what this actually looks like and make sure we've actually finished it. There is our actual bookstore. Now on the next lesson, just before finishing this, we'll just make sure we've got the right materials on here. And we'll make sure
that we put it into, you know, some sort
of order them on. We've got a coffee shop, we really need to put all of this into bookshop so that it's easy to differentiate and
pick them out if we need to. I'm just having a good look round and making sure
that I'm happy with it. Making sure that I don't
need to add anything. Making sure that everything's, you know, kind of looking
the way that it should do. And I recommend
you always do this once you finish one
of these and just go around it and just have a good look around and
make sure you know, everything's kind of good and
in place and I think it is. Alright. So what I'll
do is I'll save out my work and I'll see you
on the next one, everyone. Thanks a lot. Bye Bye.
93. Improving Wall Textures with Material Nodes: Welcome back everyone.
To Blend the Fall, The Environment, Artists Guide, and this is where we left off. Now there's a couple of things
that we need to finish. First of all, you can see
that indirect sunlight, we're not really getting a
lot of detail out of this. In other words,
it's not looking, you know, kind of green enough. It just looks like
a white wash wall. It's fine when we're
in like shadows, like over here or around
here, it looks okay. We can just pick them out, but really it's looking
a bit too white. So what we want to do
is we want to come in. First of all, let's make sure that this has got
the right material on. So all I'm gonna do is we're
gonna press tab A, U unwrap. And again, this is going to be, you're not going to
really see this. So it's just merely
there just in case you can see through
any of it basically, let's click the down arrow, then click wall and wall gray. Let's put that on.
Double tap the eight. And then what we'll do now is just work a little
bit on this shades. So you've not really
done a lot with the shaders because they're all pretty much built for you. But on this one, I think we
should actually work on it. The other thing that
was, well, I'm noticing this one is a little bit too big as you can
see this wall. It's a little bit
bigger than these. So what I'm going
to do before doing anything is go to UV map, press the dot Born,
go round and what I'm gonna do is I'm going to press Tab and then come into it. And all I'm going to do
is just bring it out. Just one, I think holding
the shift burn like so. And I think now it just
fits a little bit bad. Now let's go round
to our actual shade. So open up your
shade, make sure that you're on rendered view because then you can really
see what you're doing. Make sure also that
you've clicked on a wall. You can then double tap the
to deselect everything. And now what we can do is we
can mess around with this. Now the moment this is made
up by a basic texture, this is the brightness or
darkness of the texture. And then we've got a Musgrave, which has given us
all of that kind of, you know, those little
black spots in there. So what I'm going to do
is I'm going to come in, what I'm going to do is I'm going to click the little down now I'm going to reset
the color ramp like so. And then from here
then, what I'm going to do is going
to bring this up. Now you can see the moment
I start bringing it up, that is what we're looking for. This actual dirt is
what we're looking for. Now if I'm bringing that down, I can actually start
to bring it back. And the other thing I can do
is I can bring it to here, let's say, and make this
a little bit yellow. So I can come in and put this more on a yellow
Y, kind of tinge. And you can see now that, that
is starting to look much, much better than what it is. And from there what I'm
going to do is I'm just going to then tone this
one down a little bit. So if I click on this one,
I can come and bring this down and just tone it back a
little bit, as you can see. Now let's come in and work on this bit here and tone it
all back a little bit. So how do I want it? I think something like that's
looking much, much better. What I think now I need to do is just tone these
back a little bit. And I can do that
one of two ways. I can either bring this up and tone it more of that yellow
can bring it down and make it more gray like So I can also drop this down and
basically turn it off. So I've got a lot
of control over this now and we want it looking. So it's just there as
you can see, I think. Now if you look at that,
that looks tones better. Also, if we come down
and bring this down, we should also be able
to bring in where is it, our coffee shop.
Let's click that on. And I'm hoping we can see
now that this is also much, much bear color as you can see. So that's looking much
better, much dirtier. And that is what we want.
We don't want to really, really bright like
we had it before. All right, if we have any
problems then we can come in and we can mess around
with that a little bit more. Because, you know, as,
you know, if I press say, zero, we've got our
camera in here. So I think before we go on, let's actually take
one image of this. So all I'm going to do, I'm
going to go back to modeling. We're just going to do a
quick render. Let's zoom out. I'm going to press zero
to bring in my camera. I'm going to press n, I'm
going to go to camera to view. And then what I'm going to
do is I'm just going to get all of this in and see
what it actually looks like. Something like that I think
is going to be a good view. Let's turn off camera to view. Let's then move around,
press the tab on, double tap the A just to make sure you've not got
everything there. Make sure. Then we put
it onto wire frame. Let's come up to file
and save our file. And finally then let's come in and render and render image, Let this load up and let's
see what we've actually got. Yeah, let's fix that first. So I thought something
like that might happen. You can see, we can't
see any walls anyway. So that's no good
to us. So what I want to do is just
close that down. And let's actually come first of all to where's
our coffee shop? Let's put these up so we can actually see
all we're doing. Let's hide our coffee shop, let's hide our ground
plane out the way. And then what we
should be able to do, let's hide our gun
out of the way. Let's hide the geometry
mode out of the way. And let's hide this little, you know, wooden
part out of the way. Let's press object mode. Let's hide our sun
out of the way. And let's finally press
B to grab everything. Always press just to make
sure you've got everything. And now all we're going
to do is we're going to press New Collection, and we'll call this book store. So click okay and there we go. Now we can put that P. All right, so all of
those parts are in there. Which means now we've
got if I press Saltg, we can bring back everything. We can also then come in
and put the coffee shop on. We can put a ground plane on. And also what I like to do is I always like
to make sure that my human here is always make
sure that the render is off. Just so we don't render him out. Let's put it on wire frame, then let's save the
whole thing out. And the one thing I want to do, actually just before doing it, is just come to your
bookstore and just make sure all of these
are rendered view. So you can see if a scroll down, we had some problems
before where they weren't being rendered out and
this is the reason why. So what I want to do
is just make sure that all of these are actually
going to be rendered okay. Let's hit that Render button, and hopefully now it should all come into
place, which it does. So that's exactly
what you wanted. Alright, so let this render out, let's have a good look at
what it's going to look like and then we can
actually carry on. Actually, this I think it looks better than the first one I
built is always the case. It does look really nice. Let it finish rendering,
let it finish compositing, and then we're going to
get a really good idea of how this is
going to turn out. All right, so that's
looking pretty good. Let's also then you can
see the lights coming out, all of the, you know, the ambient occlusion
is coming out. I just want to make sure
that the compositor yes, this is with the compositor, everything's working correctly. And that's the view
that we've got so far. Now as we go further on,
obviously we're going to work a little bit more with the
render and things like that, but I think for now it's
looking amazing actually. So let's come on and put
it on material mode. And I think what we'll do now, now that one's
finished, is we'll start work on some of
the more little things. In other words, the benches we'll actually get
some benches in. We'll also get this little
advertisement thing over here. And I think after that, what we're going to do is
we're going to work, oh, the lampposts as well. We'll do the lamppost, so
we'll do the small things. Next, we'll do the lampposts with the signs and
the normal lamppost, we'll do the advertisement, which is gonna be over here. And we'll do the
benches as well. And we'll get those
ones out of the way. Because I'd like to
split it up a little bit into sections 'cause
I think that is much, much healthier, you know, for your mind when you're working on a huge
scene like this. Alright everyone, So I hope you enjoyed that and I'll
see on the next one. Thanks a lot. Bye bye.
94. Mastering 3D Modeling of Lamp Post Bases: Welcome back everyone. To blend the Fall The Environment
Artists Guide. Now something that's going to be test your
skills basically, which is going to be
the actual lamppost. It's basically taking
everything we've pretty much learned and putting it
all in to a lampost, because we want it to be
fairly or neat, this lamppost. So let's bring our guy over. I'm going to actually
put him near the middle. I'm going to press shift H then just to hide everything
else out of the way, and I'm going to make sure he
stood on the ground plane, which is from there
we're going to press shift S cursor selected, sorry, Shift cursor
to world origin. And then let's bring in a, let's first of all
bring in a cylinder. Let's bring the cylinder
down something like 16. I think we can work with 16. And then let's make it
a little bit smaller. So we want it to be, first
of all, the lamppost. So the lamppost
realistically wants to be the same kind of
width as his legs apart. So I'm going to press, bring it down a little bit more.
Press and's head. And then what I'm
going to do is make a start on the bottom of it. So I'm going to put
this on the bottom. And then what I'm
going to do now is press dot to zoom into it. Which means I can orientate
myself around it. And that is exactly what I want. And then I'll start
pulling this down. So pull it down like so. And then what I'll do is now
I'll put an insert in here. So if that's my ground
part of my lamppost, press the eye button. And let's bring an insert. And then what we'll do is
we'll press one again. And then we'll press
and pull it up like so this is the first part
of the actual lamppost. And from here now what we
can do is we can kind of, you know, shape this
into whatever we want. So let's first of all press the eye button, bring it down. And then what we're going to
do is we're going to press, and it's important you can have some fun with this, really. You can. Let's pull
it over to there. Let's press control.
Bring in an edge of loop, left click, right
click control then. And then what we'll do is
we'll press Enter Alternates, and bring that out like so. So you can see we've already
got a nice shape to it. Let's write click and shade
auto, smooth as well. So that's looking pretty nice. Let's also be an object
mode because then you'll really be able to see what
you're actually doing. Now let's actually start
with the actual lamppost. I think if we aim to
bring our lamppost up, let's say if I come here, we're going to bring it up
to just round about here, just in the middle
of these two lines. Let's come in. Bring the
center of it in again. So I'm going to press,
I bring that center in. And then what I'm going to do is I'm going to bring it up now. So if I press one, I'm going to bring it up to this part here. So I'm going to press, pull
it up. Something like that. Now at the moment, this
might not look much. And the reason is
because we need to bring all of this in. So what I'm going to do is
we're going to press control are bring in a few edge loops. So maybe seven, left click, right click, seven edge loops. I'll come to the center, then shift and click, going
all the way round. I'm going to put
proportional editing on and I think root might do it. Let's just see if root can do
it. So let's bring it out. And I want to bring
it in like so. And you can see we're
getting some nice bending there and that is exactly
what we're looking for. Something that's
bending in like that. I nobody actually
brought this down, but, you know, moved
all of this up. That's absolutely fine. As long as we've got
something like this, I think looks pretty
good from there, then what I want
to do is I want to separate this bottom out or
not to really separate out, but I want to make sure that I'm able to grab the
bits that I want. So I'm going to make an
edge loop around here, right click, and I'm
going to mark a seam. And from there then what I'm
going to do is I'm going to go probably every one, so if I come every other one. So what I'll do is
we'll just mark a seam going all the
way around on every one of these like so
all the way round, right click Marco
scene from there. Then what we can
do is we can now come in and we can grab the top. I need a top control
Marco. There we go. Now I can grab
each one of these. All I'm trying to grab is
each one of these like so, so, like so, like so. And so. And from there then
I'm just going to press Enter alternates without
proportioning on alternates. And bring them out like so. And that is the start
of our actual lamppost. Now, it might be a
little bit too big, I'm not sure if it
is at the moment. The one thing I do know is it might need pulling
out a little bit. In other words, we want
to get this shape right. So at the moment, let's
put proportionality on, and let's bring it
out a little bit and just make it less rounded. And let's use one
of the other ones. So let's come in, let's
try inverse square. Is that going to do
a better job of it? Jr is going to look
how that looks. All I want to do is get
this roundness on the Bob. I'm just going to press controls again and just get to add it. I think what I'll do is I'll
come to this bottom one. I'll press, so I
think that's better. A little bit more like so. And then bring it up. Then this one actually, that is looking much better. That is exactly what I'm
looking for. All right. Now what we'll do is we'll
grab this part here, so we'll come to the underneath. I'm going to grab this part,
I'm going to press Shift. What I'm going to do is
I'm going to bring that up then without proportion
of litton on, we really don't want
that on. Bring it up. Press the S one to bring it in. And we're just going to
use this part then just to create the top of P. So what I'm going to
do is I'm going to press, bring it up like so. And then I'm going to
press, I bring it in and then then bring it in. So we've got
something like this. Then from there then we want a little bit of a bulge
going around here. So what I'm going to do
is I'm going to press to bring it in like so, and then bring it up. Now I want a little bit of
a bevel on here as well. So what I'm going to do is
I think I'll press again. And then what I'll do is I'll press and bring it out like so. And then bring it up and I'm
looking where my guy is. Basically I want this part, this bulge coming into
jaws around here. So I'm just going to shape
it, going around here. Now the shape of this
at the moment needs to come out a lot more than
where it is at the moment. It's a little bit too small, so I'm going to pull it
out to where I want it, which will be roundabout here. And then from there,
what I can do is now I can bring this
down a little bit. And finally, let's bevel this. If I grab this edge, press control B. R is
going to be vel it out. And that is exactly
what I'm looking for. All right, now let's come
in, grab the top of it. We're going to press the Born to bring it in and then pull it up. There we go. That is
looking very nice. Finally, let's bring it
up to here up again. And then the born
to bring it in. Now, again with
something like this, it's gonna take practice. You're never going
to get this right on the first time. Don't expect to. Don't get frustrated,
just practice it again, because even when you
finish this course, you're not gonna get that right. It takes a lot of
dedication to actually, if you do get this
right, that's amazing. Because I know I wouldn't have great right in the first time. So just remember you just
got to practice this. It's like modeling a human head. You know, when you first
come into sculptor, you can follow
someone's instructions. You're not gonna
get that human head looking, you know, perfect. It's not gonna look realistic. And so the closer you can
get to it, the better it is. But it does take a
lot of practice. So with things like this,
just keep practicing. And the more you practice, the better and easier it'll get. By the end, you won't even
need to watch what I'm doing. You'll just be able to
create it on your own. All right, so we've got
that. Let's come in then. And I think what we'll do is
we'll bring it in one more. So E bring it in one more. And then we're going to do
is press I bring it in and then we're going to do is press
bring it up a little bit. And then I'll bring
it in a little bit. And then bring it up a little
bit, something like this. And I think now we're near
in where we need to be now. All I want to put a
couple of rings on here, so I'm going to press
Enter, bring it out. And then pull it up like, so. What I'm got to be careful of here is that don't
make this too thin, it's, it's got to look as though it's actually going
to be supporting something. So that's the thing that
we need to make sure of. Now if it does look a bit thin, all we can do is
we can just press control and plus and then
we can press alternates. And we can bring it out
a little bit if needed. We can also as well pull
it up if needed, like so. And there we go. The other
thing we can make use of as well when we're doing
anything like this is the shops. I don't think I'm going
to use the sharp. I think I'm just going to bring it down and have it like that. But if we need to come in and let's say want to
line along here. Old shifting click, right
click, mark a sharp. And there you go,
you can see we've got a beautiful sharp there. Old shift click,
old shift click, right click, mark A sharp. And there we go, You
can see just how much better that
actually looks now. All right, so what we'll do is finally we'll finish this bit. So I'm just going to press, I bring it in and
then bring it up. And finally control left
click, right click. Control, bring in
a bevel and then enter Alt at an S and bring
it out. Bring it out. Or we could bring it in
actually now. I don't think so. I think we'll bring it
out a little bit like so. And there we go. Now
from here you can see this is roughly
so let's press one. It might be a little
bit too tall. This, I'm not so sure, it might need squishing
in just this little bit. I'm thinking that I'm
going to go with it, so I'm thinking it's over there. And then what we'll do now is
create the top bit of this. And to create the top bit,
I'm actually going to cheat a little bit and take this because it's really nice. We'll work what we actually
did on this and then we can put that straight
to the top from there. Then we can actually
start with, you know, the delicate part,
the ornamental finish on this working around there. Once we've got this though, it's like it's one of the
main parts in the scene. And from there we can use
it for the directions one. And we can also use this post as well for other parts
in the scene as well. All right everyone.
So I hope you enjoyed that and I'll
see on the next one. Thanks a lot. Bye bye.
95. Crafting Elegant Victorian Lamp Posts: Welcome back everyone to Blender for the Environmental
Artists Guide, and this is where we left off. All right, so from here what I'm going to do is I'm
gonna grab my guy. I'm going to press shift
and I'm going to drag him up and I'm gonna put him
on top of the other guy. Now this is going to be roughly where the end
of the lamppost is. And from there we're just going to put a little top on it. But that's to give you some
idea where we want it. Now I'm going to do is I'm
going to grab this part here. So if I come round, I want to grab just
one of these parts. Now the thing is I don't want to grab it where it's
actually bending because I want it
to be straight. So the easiest way to
do that is to come in and just press out shift
and click shift and D, and then you've got just this. And from there then you should, if you press dot, be able
to press and fill it in. And that is what we
want from there. Then what we want to do is we
obviously want to make this thin enough to actually
fit into this part. So if I bring this down here, you can see now I
press and pull it up. Now we can actually
start our lamppost again from that part there. And that's looking
pretty nice now. Is it thick enough
or is it too thin? That's the next question you
need to ask yourself now. We're not going to
worry about that now because we do know
how to squish it in. So all I'm going to do is
I'm just going to bring this all the way up to where
the top of his head is. So round about here and now we can have a
good look round. And I think actually
that is going to be about the right
scale from there. Then what we're going
to do is we need to think of the intricacy, so the parts that are
going to come out first. Now what I recommend doing before you do that is
putting a top on here, building out your actual light. And then from there working on, you know, kind of the swells
and things like that. So what I'm going to do is I'm going to come to the top of it, I'm going to press
shift S Ursa selected. And then shift I'm
going to bring in another cylinder,
press the S bone. We're going to keep it at 16,
which is what we had it on. And from there let's
put our top on. So I'm going to press essens D, let's put our top on,
so we'll have it, something like that, making
sure that it's in there. And then what I'll do is
I'll come to the top now. So I'll grab the top,
and I'm going to press I and bring that in. And then I'm going to
press E and bring it up. So bring it up and then I'm going to be
level the top of this. So if I come in now grab
these ol shift and click, press control B
and bring it back. Now you can see it's not
be level of properly. So what we're going
to do is just reset all the transforms. It's our origin of geometry. And while we're here, let's write click and
shade auto, smooth. And then let's come
to the top now that we had press control B, and now you'll see
it levels off. Let's add in a couple
of bevels and let's also make sure that they're going the right
way at the moment. You can see this one here, so have a look. There we go. Let's also make sure they're going out enough.
I'm just wondering. Yeah, you can see here,
this is not going out enough and the reason
is, it's on the wrong one. Let's turn it down one now. It should work. So let's
bring it down. There we go. That is what we want.
Something like that. All right, now let's come in
and finish the top off then. So all I'll do is I'll come
in face, let grab the top, press the eye
button, bring it in, press bring it up. And then we'll do is I'll press, now what I want to do is I want to kind of give it
a nice top on here. So what I'm going to do is
I think I will use bevel, I think to actually get that
top that I'm looking for. There's many ways we
could actually do this. Let's come in first of all, and bring it here. Then we'll bring it
up a little bit more. Here and then here. So now let's see if I can
actually level that off now, because I want to make
a nice top for it. So what I'm going to do
is I'm going to come to this part first
here, press control. And I should be able to
bevel it off like that. That's that bit dumb,
that bits looking nice. It's just this
inside And I don't think unless I bring it in
that I can be level that off. So what I'm going to do
is I'm going to press alternates and just
bring it in like so. And I think that's going
to be the easiest way to actually bevel it off. Now, of course, that's a
little bit too much I think. So something like
that. Press Sen's ed, then squish it down and
let's put it into place. And then what we'll do is now we'll bring the
whole thing down. So if I n press the
tab, drop into here. Control plus, down to this part. Press one again and then
let's bring it all down like, so let's have a quick look
at what we've done here. Yeah, and I think that's
looking pretty nice. And then I just want a little
bit of a top on it as well. So what I'm going to
do is I'm jaws going to bring this in. Do I want to bring
it in slightly. I still feel like this. It's not coming out enough for my liking. So I'm going to press Alt
Shift and click control bus. And then I want to do
is press alternates. Just bring it out a
little bit like so. And I think that'll
looking much, much better. And now we can actually
come to the top. So I come to the top and then
bring it all the way up. Control to bevel it
off like control, left click, right click. Control B, Bring back
just one bevel, like so. Let's bring it up a
little bit and then enter alternS and bring
it out like so. And that's what we
should be left with. Let's press one
good look at that. Yeah, and I think that's
pretty much what we want, just having a quick look around, making sure I'm happy with it, making sure everything's
been in place. Yes, and I think that's
nice. Now we've got that. What we can actually do
now is actually start work on our actual lights. So I'm thinking
the best way to do the lights is probably
going to be in stages. I'll start work on the lights. Now what I'll do is, first of all, let's bring in, we'll bring another cylinder, but this time we'll press a ship date mesh
bringing a cylinder. But let's set this down to
eight and that'll give us a good starting place for
what we actually want to do. From there. Then let's
press the S bourn. And what I want to do is these are going to be quite large now. We're not going
to worry too much about the size of the moment. What we are going to worry about is just getting
the actual shape. So what I'm going to do is
we're going to bring this in. I'm going to grab
the top of here, pull it down, and then I'm
going to bring it in now. So bring it in. And then I'm going
to press like so. And then bring it in again. And that will be the very
foundations of my actual light. And then from here then
let's pull this down. So I'm going to pull this down. So, and then all I'm going to do is just grab the
outside of here, Press E to extrude alternS
and then bring that out. So this is again the start
of our actual light. And now let's come in,
grab the top of it, press the eye button. And then what I'm going to
do is I'm going to press E, And then I'll press again. And then to bring
in the top like so. And now I'm going to
do is press control. Left click, right click. And I just want to bring
out bevel now, so all I'm going to do
is just grab this one. Going around there,
Alt Shift and click Enter AlternS and bring it out. And there we go,
that is the top. Let's right click and shade. Auto smooth. You're not going to get a lot of
smoothing in there. Anyway, the one thing
I think is that it's probably not flat
enough at the moment. So all we can do is
we can just press S and's head and just
squeeze it in a little bit. And now you can
see that's looking pretty nice already now. Then let's think about the
actual bit coming down here. So this is going to be tricky because what
we have to think about is the actual
lights in here, so in other words,
the little bits of glass that are going
to be going in here. So what I'm going
to do is I'm going to bring back this part first. Come in, I'll grab this part. And then what I'm going
to do is I'm going to press E to extrude it up. And then I extrude it in, and finally extrude it up again. And from there now I can press and bring it in a
little bit more. And then finally I'm
going to bring it down. So I'm going to bring it down with so and then to bring it in, and you can see now we're
already starting to get somewhere that's looking
pretty good now. The one thing is, how big
is the light need to be? I think these lights, it's a little bit
bigger the moment. So all I'm going to do is I'm
just going to come to it, press tab, press the board, and just bring it
in a little bit. So because I think,
you know the lights, they have to be quite big,
but they can't be way, way too, over the top. And I think also the
light needs to be, if I press one on
the number pad, I'm thinking that it
needs to come probably around here and a little bit
lower than this point here, so maybe even a little
bit lower like so. And now I'm looking at this
guy, the size comparison. At this point I think I
can probably get rid of my guy and now I can work
on the rest of this. So before we do this
bit of glass in there, we've pretty much got
that bit nailed down. So all we need to do now
is think about the bott, let's fix the bottom first. So all I'm going to do is I'm going to come to the bottom. I'm going to press
to pull it out. Now pull it out like so. And then bring it down. And then, so
something like that. And then what I'll do is I'll
now make the bottom bit. So I'm going to press
to bring it in, and then I'm going to press E, bring it down like so. And now before we carry on, what I'm going to do is I'm now going to work on this bit here. So our press control law
bring in five edge loops. And then what I'll do is
I'll grab the middle of it, portion editing on press the B. And I should be able to
bring that down like so. And that's looking pretty good. And now we just need
to fix the end. So what I'll do
is, first of all, I'll bring in another
kind of part on here. So bring it down slightly, and then old shift click, enter, alter ans bring it out
without portion editing on a S. And then let's
bring this part in. Bring it in and then bring it down and then
bring it all together. And I'm hoping a right click
shade ought to smooth that. Is looking pretty good, and that's pretty much what
I'm actually looking for. So you can see it's got that
really nice feel about, especially when we're
going to have, you know, all of these swells
and things like that. The one thing I'm
worried about is that it needs probably to come out
this way a little bit. And also the whole thing might
be a little bit too big, going to make it a
little bit smaller. Now that is about put up a little bit
about the right scale. So I'm looking at one
here and one this side. Yeah. And I'm thinking
that's looking pretty good. So now, before we actually, you know, on the
next lesson, sorry, what we'll be doing
is we'll be creating the actual glass that's
going to go in here. And then we should be
able to start putting these swells in and making those look really nice and beautiful. And then we should be able to pretty much
nearly finish this. We just need one for
a sign post as well, which is much easier than this. All right everyone, let's save our wig and I'll see you on
the next one. Thanks a lot. Bye bye.
96. Decorating Victorian Lamp Posts with Ornamental Curves: Welcome back everyone to Blend for the Environment
Artists Guide. And this is where we left off. All right, so let's come
in, and first of all, before we do
anything, let's come in and just bring
in one edge loop. So control left
click, right click. And let's press control B. And I just want to pull
that out because I want the top and the bottom, so the top and the
bottom of here to be a little bit thicker
than the main bit. So in other words,
this is going to be metal and the glass is
going to be in here. Now what I want to do is
bring in three edge loops. So control 123, left
click, right click. And this, then
these little points here are going to be my glass. Now the thing is about this, we want to bring all of these in now to create the
actual glass look. But we don't, it's a
bit harder than that. Because what we want to
do is, first of all, we want to level these off, so these parts off first, to actually give us the
ability then to make this band here be a little bit thinner and actually
go in from these parts. So it's hard to explain, but it will be easier once
I've actually got in. So I think the first thing we'll do is we'll split it off. So if I press Lt shift and click Control plus.
Control plus. And then just grab this
bottom part round here. And what I'm going to do
then is split it off, so P selection, Split it off. And now I'm only
working with this which is going to make
it so much easier. So control A or transforms right click, set
origin geometry. Now I'm going to do, well, first of all work on these
bars coming down here. So what I'm going to do
is I'm going to come in and then old ship
click on each of these. Going down, going round like so and so and then all I'm going to
do is I'm going to press control B and
level those off. Control B, let's be
level those off like, so something around
that thickness. Now what I want to do
is I want to actually extrude these parts out. So I'm thinking, I'm just trying to figure out the
easiest way to do this. I'll think I'll come
in to Baselt Ol shift and click shift click, old shift, click O shift, click. All right, we've got
all of that now. The one thing we need to
work on is these parts here. As you can see, what I'll do is, yeah, I think I can separate these out.
That's not so hard. So what we'll do is first of all enter Olt and and
just bring them out. Bring them out a
little bit like so you can see already that's
looking pretty nice. Now the bit that I'm worried
about is these parts here. So what I'm going to do is
now I'm going to come in and what I want to do
is select all these. I'm not sure if we
can come to select and select all Where. Is it similar by length? Nope, that's not going to work. Let's select similar
by direction. Is that going to work?
Only on this one? You know what? We're going
to do it the hard way. We're just going to
select all these. I'm probably going to
actually spend longer trying to figure out a way to select
them and then find out, even if it worked, it's
still going to take longer. So you know what, I'm just
going to select them all, so didn't take that long. All right, let's press
control and level these out. Now what we want
to do is we want to press control and minus. Because we only want
these parts here, Control minus, not
going to work. So what we'll do is
we'll select it by area. So I'll select this one. Let's come to select,
and we'll select similar by area,
not going to work. Can we actually pull this down? That's also not going
to work greater. Let's put it equal. There we go. Let's bring that
up, bring it down. That's not going to work. So what we're going to do
is we're going to come in and we're just going to select all
three of these again. Then we're going to
extrude these out, but not as far as
the other ones. And that then should give us that perfect look which
we're actually looking for. We're going to
select all of these. All of these. Now we've
got more selected. Let's press Enter, alter Ns, and bring the mow into place, not a wide as these
parts here now, don't worry, we're going to
stretch them out as well. So now what we can
do is we can come in Global, put it on normal. And then all you're going
to do is you're going to press and no we're not. We're going to put this first
of all, individual origins. This on individual
origins and then and Y. And you should now be
able to pull those out into place as you
can see from there. Then what you can do is
you can press alton S and you can bring them out a
little bit further like so. And then and Y if you want to bring them out a
little bit further. And there you can see
we've got a really, really nice, beautiful light. Now from here, we want to really come in and
select all of these, because it's going to
make it easier for us when we actually come
to adding the material. So we're going to select all of these like so. And
just two more. I think there is, yes there is all of these then
we're just going to go over it and we're just
going to go over to vertex plus and we're just going to put
that down as glass. And then we're going
to click a sign. And now if I
deselect and select, we should be able
to easily select all those ready for when
we actually come to, you know, adding
on our materials. All right, so now
we've got that. We've got our light,
we've got our lamppost. What we need to do
now is these swells. So let's first of all save
out our work with our swills. I recommend what we do
is we bring in a plane. First of all, just
make sure that your light is perfectly in
line with this, which ours is. Press shift and we'll
bring in a plane. We'll rotate that plane round, so our x 90. And then I can press one, and I can just put my plane
anywhere down here from here. Then what I can do now is I
can bring in a bezier curve, so I can press Shift, bring in a curve and a
bezier curve from there. Then I can press tab A to grab all of them and
delete and vertices. Now we're going to do is
just come and draw those in. I recommend working
on this in stages. The first thing is let's think about the bomb and
how that's going to go. So I'm going to come
to the bomb and draw a line round roughly, and then bring it down
to something like this. Then from here I want it
coming from this part here, we're looking at where
we're going to be supporting it. That's
the main thing. If I bring a little
swell round round to here and then bring it down all the way
around here to here. Finally, then the last what
we'll do with the last sell, I'll come from here. Bring it all the way
round, bring it down. I'm hoping that that's not too close to
there probably is. Then bring it round
to here like so. And as you can see,
if I move around, maybe that was too close. I'm not actually sure
if it is or not. All right, now we can press Tab, We can get rid of this plane, and this is what we
should be left with. Obviously, if I
press Tab on here, there's going to be a lot of work on each of these things. Let's put it onto our
movement tool though instead. Now I want to do is we just
want to get ourselves set up. So this is actually
going to look right. So what I'm going to do
is I'm going to come in and we'll give it
some extrusion first. So let's extrude it out and we'll see what we're
actually working with. So something, something like that's probably going to be
about the right thickness. And then what we're going
to do is add modifier. We're going to bring in
a Generate and solidify. We're then going to right
click and shave flat. And from there then
we're going to pull these out a little bit. Now remember these are
not in the halfway point, so you can see at the moment
they're slightly out. What we want to do is we
want to put this on 0.5, put it right in the center. And from there then
we can control the thickness out
from the center. Albeit some of these, as you can see, you
know, aren't right. So what I'm going to
do is I'm just going to set myself up
because that won't work right in the center
of here, like so. All right, next of all, then let's come in and just
turn down the resolution. We don't want it so high, so I think it is quite neat, so we need to keep
it relatively high. But I'm thinking something like nine or ten should
actually do it. All right, so what I'll do
then is I'll press Sir One. And we'll leave this to
the next lesson because it is a lot of work to get
this all into play. Also, we need to make
sure that we've got, you know, kind of
support going down here, so we don't want this too far in like this one here
or this one here, and we really want to control how this is actually
going to look. I find honestly the easiest
way is to work from down and just work your
way up all the other way. It's completely up to you. Maybe it's about working
our way down on this one. All right everyone.
So I hope you enjoyed that and I'll
see on the next one. Thanks a lot. Bye bye.
97. Attaching Ornaments to Lamp Post Bases: Welcome microphone to blend for the environment
Artists guide. And this is where we left off. All right, so now let's
come in and actually start making these swirls
so they look actually good. So what I'm going to do is
I'll come to this part first. I think I'll grab this one. I don't even think
I've got one in here which might
make it a bit hard. Also, putting it on normal, we'll put it on global, that'll make it a little bit
easier for sure. Let's grab all these
three then first. And what we'll do
is we'll pull them out and get that
into a nice place. And then what we'll
do is this swirl actually is nearly right, It's just this bit
here as you can see. So I'm going to use G and
just bring it out like so. And then grab all of
these and pull them out. And that then is looking much, much bearer as we can see. Now do we want to
tighten up this swill? So in other words, do we want
to tighten it up a little bit and tighten up
this a little bit? If I press, pull it down slowly, it's a little bit tighter as you can see. And that's
looking good. And then this swill here
obviously is not right, because that needs
tightening up. So I'm just going to press,
tighten this one up, press G. It's just a case now
of fiddling around with it. Maybe let's tighten it up. Bring it in, let's
bring this one out. There we go, Let's
tighten this up. You can see now that it is going to have to
balance on there. This bar I'm not
happy with though. You can see it's going round, I think coming down to here, it looks much, much better
than where it did before. I'm also thinking
that it's probably, it's a little bit hard
to move this all over. What I'm going to do
is grab this one and this one right click, subdivide. That's then going to put one
right in the center for me. Which means now we've got
the ability to move that. Now you can see it's
a nice curving swirl, and that's exactly what we want. Now let's move down
to the next bit, and we'll focus on this
bit first in this part, even moving it just like
that, looks so much better. As you can see,
it's a nice swill. Now this part, as you can see, is really not what we want. Let's bring it first of
all into where we want it, and then make it turn like so. And now you can see
it's a really nice flowing swill going
all the way around. Now you can see, do we want to extend this out a little
bit? We can extend this. We just press and we can
just bring it round. So now let's fiddle
around with it. So, and then let's
fiddle around with this. There we go. That's
a nice swill. Now look, now that's
all coming along, then what we're going to
do is this part here, this part here is a
little bit harder. We need to make sure
that this part here really has got that swirl look. If I make that a little bit
tighter as you can see. And then touch the
actual part here, making sure it's following it. And then let's fix this
bit because this bits not good, make it swirl. So again, this is going
to take some practice. So don't worry if
you don't get it right the first time like so. And then a little
bit out, as you can see on the top of the, and now it's a nice
beautiful swill. And then what we'll do is
we'll come to this part, this part here,
let's move them out. First of all, we can see that we've definitely not
got this bit right, A real bit of a mess here. This bit isn't straight,
as you can see. Sometimes. If it's not straight, what I tend to do is
I'll grab this one. And this one right click, subdivide and then come in and just delete
this one out the way. Delete vertices. And now you can see that's
made it nice and flat for us. Now this bit here is definitely
definitely not right. So let's make it
really nice now. And this swill, you can see now, it's looking so much bare. So even if it's just to at
least it's touching something, let's grab all
three of these now. Just move them over. So now
let's finish with this one. Do we want it more of
a swill? I think so. On this bottom one, pressed it twice, then delete vertices. Grab this one. Let's
spin it round. First of all, let's
put it into place. Let's press G. Bring
it up a little bit. You can see here, can
I get it to go in the swell that I want it
and is that too much? Is that last swell too much? Possibly. We don't want them too
much, that's the thing. We want them more neat, but just be careful how far you go. I think actually it's not
bad. I don't think it's bad. Let's move this one then to
the side to get into here. Let's move it up a little bit. Now we can see that we
do have a problem in that we even move
all of this up, which I think will
probably be the case. So let's move all
of this up now. It's just touching,
all looking nice. It's just this bit here
that we need to fix. Now let's fix this world. There might not be enough
parts on this one. I might need to bring
one more part in. So let's press and
then bring it round. And then middle bow. Let's tighten that up. Tighten it up, then let's
tighten this one up. There we go. That's now
really nice and tight. I want to make sure
that it's on that part. You can see here, not
quite on that part. You can see here, This bit is going to need to
be a bit thinner, but I'm thinking it's
looking pretty nice. I'm just going to
go over the top and make sure it's all in line. You can see it's not in line.
None of this is in line. I'm just going to press a, I'm just going to pull it
into place now, like so. And then I'm just going to
look at these parts here. These are the parts
now looking at, we can see that this is
going to need to be thinner. This is touching this,
this one's really nice. Let's work on now and
scaling on the ends of it. So what I'm going to do
is I'll grab this one, put proportion editing on, let's put it on to smooth, and let's press alterns. Really start scaling that in. So I'm going to scale it
into here as you can see. So now it's looking tons bare. You can see now some of the
problems that we've got, like this one here, quite, let's take off portion editing. Not quite the curve that I'm
looking for. There we go. That's looking quite good. And now let's come
into this one here. Portion editing back on, and then alterns, bring
it in if you need to. That just dictates how
thin it's going to get. Let's come to this one as well, alterns, and then this one, Alan Stow, and then this one alter ans
and then finally this one. Alan. There we go. All right, that's looking cool. Now, all we need to do
is we need to work on the actual width going this way. Now unfortunately we
can't actually do that, so in other words,
we can't press S and Y and bring it in. It's just not going to work. So what we have to do
is we have to convert this to an actual mesh first. Now before we do that, we don't quite want
to do that first, because what we want to do is, first of all, we need
a bar coming down this side to show us where this is going
to actually hang from. So I'm going to press
Tab. I'm going to save up my work just so I don't
have to do that again. I'm going to press
Shift, and then what I'm going to do is I'm just
going to bring in a mesh. Bring in a cube,
make it smaller, and let's pull it
out into place. So we're going to pull it
down into this place here. And then I'm going
to press S and Y. Sorry, S and X, pull it back, pull it into my actual lamppost. And then S and Y now
pull into place. That's good because
it also tells us how far this needs to go. So you can see here, this
is not the right length. If I put it onto wire frame, you can see here, this has got a lot more gap this
way than this way. Which means I can pull
it now more into center. All right, let's go
back to this now. Go back to object mode. And now I can do is I can
start, let's say here, and then I can pull
this all the way down to the bottom of here. If I pulled this down with
that portion editing on, pull it all the way down
somewhere like that. All right, that's
looking pretty good. And you can see why
I did that now. Because from here you can see
that I might need to pull these out a little bit
because this might not be where I need it. The other thing is as well, this should be more
in the center. This part what I can do, I can come to my lamppost and what I can do
is I can put it on, let's say if I do
it on wire frame, I can't really do on wireframe. So I'm going to leave it
on object mode instead. All I'm going to do
then is rotate it. If I press RN's head, I should then be
able to rotate it around more into the center. Now you can see that's
fitting just so much. Be now from there, let's actually fix
this last bit. So what I can do is I
can come to these edges, this edge and this edge. And what I can do is I
can press control B, like so where do I want it to
come? Something like that. But what I really need
to do first before doing that is I'm going to
press controls head tab. Control all transforms,
reset all of my transforms. And now let's try that again. So control B, bring it to there. And then what I'm going to
do is turn this up like so. And then let's turn
it up to four. And then let's finally
increase the actual width. Just be careful though,
how far you go. You can see probably
something like there. And then let's bring it inwards. So let's bring it
inwards, and there we go. That is looking much, much better now as you can see now all we can do is we can go to the bottom one and
do exactly the same thing. So grab this one and this
one because blender, remember what the bevel was on, Just press control
be and then you should be able to
do that finally. Then let's just pull
it out a little bit. Let's pull it out. So let's press Tab, grab this bit, let's pull
it out a little bit. And now it looks as though those things are actually
fitting into place, and I don't think I actually
need to move those now. Then finally, on
the next lesson, what we'll do is we'll
put a little band or three bands going into
this, just holding this on. And then finally what we can
do is we can start bringing these in because at
the moment they're all the same width and we
don't really want that. So we can do that next as well. All right, but apart from that, as you can see now if I
press tab double tap, the, it's looking really, really nice and it's really
coming together well. All right, so let's do
that on the next lesson. Let's save our work and I'll
see you on the next one. Everyone. Thanks a lot. Bye bye.
98. Applying Materials for Realistic Victorian Lamp Posts: Welcome back everyone
to Blend the for the Environmentalist guide. And that's where we left it off. All right, so let's come to
our lamppost and what I'm going to do is I'm going
to grab this part here. So old shift and click. I'm going to press Shift and D, and just bring it down
into the place there. And then what I'm
going to do is press P selection tab, grab it again. Control all transforms,
right click, set origin to geometry. Finally, then what
I'm going to do is I'm gonna grab it all again. I'm going to press Enter alternS and just bring it in then, and it looks like it's
actually supporting it. Now you can see that it's going
a little bit out of here. Let's see if we can bring
it in a little bit. So all I'm going to do is I'm just going to press the S P, bring it in a little bit like so double tap the E and
there we go, Easy as that. Now let's come in and we'll have one support here,
one support here. So what I'm going to do
is I'm going to grab it, we're going to press
Shift D. Bring it down into this part here, Shift D, bring it down
into this part here. Run about the center of
each of these, like so. And that's looking pretty good. Now let's come to our curve. Let's fix that. We're
happy with the curve. I don't want to do
anything else with it. What I want to do now
is object convert mesh. And there we go.
And what I want to do now is come into
each of these. So each of these points
I'm going to grab, so like proportional editing. And then what I'm going
to do is I'm going to press and Y and bring them in. I'm going to pull this out
a little bit and bring them in. So there you go. Now you can see just how
nice that actually looks, and that's pretty much perfect. Now from there we
can write, click and shade, auto, smooth. And there we go. All right, that's looking pretty
good. Pretty much. Now we've got all
of this finished, so what I might as well do now is mirror over
the other side. So I've got this and
we've got a light. Let's mirror it over
the other side. I'm just wondering
about this light. No, I'm just making sure that everything's in there and I'm happy with how it's
stuck on then, You know What I think is
I think it looks good. Yeah, I think I'm
finished with this. What I'll do is I've got
my cursor in the center. I'm going to grab this. And what we're going to do is press
control all transforms, right click origin three, cursor and then let's
bring in a mirror. So add modifier,
generate mirror. And let's grab this one. This, yeah, we've got
all these parts first. Let's grab both of these first. And what we'll do is we'll control a transforms
right click, origins three de cursor. And then what we're
going to do is grab this and finally this. And what we're going
to do is press control and copy modifiers.
And there we go. All right, that's
looking very nice. Now what we can do is we can
apply everything to this. We don't need that anymore. The one thing is we just need
to make our little sign. And we can make
that from this once we've actually
finished it anyway. So what I'm going to do is the one thing I'm worried about, I'm not going to join
it altogether yet. And the reason is
because this has the glass on there and I don't want to mess
around with that yet. So what I'm going to do is I'm just going to break it down inters stages and the first part I'm going to do
is the green met. So I'll put the
green meal on here. So let's come in and what we'll do is we'll grab
all of this part. We'll press Tab on, so let's press Tab
A Smart UV Project. Click okay. And then let's see if we've actually
got our green mouse. So click the little down arrow. Green green metal.
Let's grab that. Put it onto material. There we go. And then what we'll do is we'll work on
our black metal. Now I'm going to grab
these parts here. And these parts
here, I'm going to press Tab to grab everything. Now we can see that we've
still got the mirror on here. Let's come in Object
convert and mesh. And then what we can do
is now we can press Tab, grab them Smart UV
Project. Click Okay. And what we're going
to put on this one is we're going to
be the black metal, I think. Black metal. Let's drop that on and then
we'll copy it onto here. So I'll press control
L and link materials. And there we go. Now this part here. Let's
press Tab to grab everything. Again, we've got the mirror
on here. We can just come in. Object convert mesh tab
now Smart UV project. Click Okay. And luckily
for us it's made of metal. If it wasn't made of metal, we'd have to go in and add in tons and tons of
seams and things. So luckily we don't
have to do that. It's a little down arrow, black metal and there we
go, that's that part. And now onto the light. So the top of the light here, I'm going to have green and everything else is going
to be a black color. So let's come in and what
we'll do is we'll first of all mark a seam on here
before applying that mirror. So what I'm going to
do is Alt shift click, and then I'll come down
to this part here. Alt shift click, right click, and mark a seam. Now the one thing I'm not
happy about is this here, it's too sharp, so let's
come in and fix that first. And I'm going to grab all
that. Press control B. Bevel it off. Let's have a look. And actually, that
looks it looks I got lucky with that because I used the same one as
what was on here. So Yeah, we'll keep that. That wasn't a mistake guys. It just just
happened. All right. So then what we're
going to do is we're going to actually come in, we've got a mirror on here, so object convert, mesh. And then Tab, Smart UV
Project. Click Okay. And now what I'm going
to do is I'm going to grab in fact, you know what,
I'll just come in, we'll look for the green first. No, we'll look for black first. It'll make it easier.
So black metal. And then you'll come in and grab all of this. So this one here. So L and L plus down
arrow, green, green metal. Click a sign, and now
finally the lights. So what I'm going to do is
I'm going to grab both of these and I'm going to
hide those out the way. I'm going to press a down arrow, black metal, Smart UV Project. Click. Okay. Like so now I'm going to do is I'm
going to press Tab again. Ola, double tap the A. Come over to your little
glass where it says glass. And then what we're
going to do is C, select select all these and then we'll go
back to material. And from there we can
hit lamp post material. Now, I don't think that's it. So what we'll have to do is save how you work before
doing anything, go over to your
asset manager and the one we want is
where it says glass. So we're looking
for where is it? I think because my
blender crashed. It's not on here.
Let's have a look. Current file materials.
There we go. Glass. Nothing in
there as you can see. So I'm just going to have
to go to Edit Preferences, File Paths minus that, off plus. And the one we want is
going to be resource pack, I think it's the course
resource pack in here. So I'm going to click
sign, Close that down. And now let's see if
we've got that in. Let's close that one down. Let's come now current file all. I'm just looking to
see if it's in here. It's not in there. All right, so let's go over to Edit
References and File paths plus, and we want the course resource. Click Add, and then that do, we should now be
able to find that. So if I scroll up the
file, let's click all. And here it is. All right, so now I've found it glass. Now the one I want is
street light glass, so I'm going to put that
on to there like so. And then I'll go
back to modeling. And now what I'll
do is I'll click a sign and there we go. That's looking pretty cool. I'm just wondering if I should even bother
on wrapping those. I think I will wrap like, so let's have a look in rendered view what
they actually look like. There we go. I don't think I need to do anything
else with that. I think I'm happy with
it now from here, what I can do is I can now
come in and I think I'll keep it split off because I want to actually create one where
it's actually the time post. So I'm just going to
double tap the eight and I'm just going to make sure that I'm actually happy with it. We can also turn
this off to have a good look at what we've
actually done here. I think it's looking
really good. Let's put it back on material, let's turn our little
interlocking balls back on. And now what we'll do is we'll
come over the top of this, we'll press B to
grab everything. And then I'm going
to press Shift D, and just drag it
over here like so. Now this side of it we
don't actually need, so we need to come in, put in, it's not going to modifier
on. Let's press the tab. So what I can do is I can come in and delete off this side. So L L delete vertices, come to the next part,
then grab all of this. You can see this has
still got the mirror on. Let's just apply the mirror. So if I press Tab, come over press control and now you should be able to
come to this part. So L delete vertices. So work my way around then. So I'm going to come
to this part now. I'm going to grab each
of these just from one side, delete verts. Okay, and finally now I'm just going to come in
to this part here. I don't need both of
these on the heaver. So I'm going to grab
this one L delete versus now what I'm going to do is I'm going
to come to this one. Now the origin is
already in the center, which is really handy for us. Because what we can do
now is we can press shift and then z 90, and then we can press
shift D and then z 180. And now we've got one each side. Now from here, what we
can do is we can actually put our sign in the
center of this one here. So put my sign post
going out of here. So we'll do that actually
on the next lesson, because obviously we're
running out of time. But you can see now we've
nearly nearly finished these. And these can go into their
own collection as well. All right everyone. So I
hope you enjoyed that. I'm going to save our, my work and I'll see you
on the next one. Thanks a lot. Bye bye.
99. Integrating Street Signs onto Victorian Lamp Posts: Welcome Mcroyone to Blender for the Environment
Artists Guide, and this is where we left off. All right, now we've got
these. Let's come to this. And what we'll do is we'll put a cursor in the center,
so cursor selected. Let's then bring in a cube. Let's bring in a cube. And then what we'll do
is we'll bring it up, we'll press the bone and
bring it into place. What I want to do
is make it thin enough and X make it thin
enough to go on there. Then let's pull it
out into place. We want it, if you
look at this here, you can see press one
actually will be easier. We want it halfway
between there, like so. And then from there then what we can do is we can pull this out. If I grab this edge, I can then pull it out without portion editing on, pull it out. So do we want it so is that going to be far enough out,
maybe a little bit further? Something like that,
I think looks great. And then what we'll
do is we'll come now and bevel off this edge. So if I come in bevel off this control, do we
want it like that? You mind want yours like that? I'm thinking, does that
look good? It's pointing. So maybe that's actually bad. Maybe we'll leave it
like that. All right. If you want to leave it
like that, that's fine. But we need to still
make the inside of this. I'll do the beveling technique
that we've done before. So first of all, we'll have the sign facing this way, that's the
most important thing. In the back of the
sign will be black. So what I'll do is I'll come in, I'll grab this here, I'll grab this bot one and I'll press J just to join that in. And from there then what
I should be able to do is now if I resell
the transforms, so come back in, grab this face, press the eye button,
I'll bring it in. And then I'm just
wondering is is there going to be
enough room on there? I could move it across
a little bit like so. And then what I'll do is now I'll come to each
of these corners. So each of these. So I'll press control shift and
B and vel those off. Obviously they're not beveled
the way that I'll want it. I don't want them
like that. So what they'll do now is come
down to my bevelin. I'll turn it down maybe one, and then I'll pull this out
and make it rounded like. So from there then I can come
in and grab this face now, and I can actually pull
this back into place. I'll want it. So now I've grow a pointing sign and we've got some roundness on there as well. And that thing, that looks
pretty nice now from there, we want one on the
other side as well. So all we want to do
really is mirror it. And we want to mirror it
from this point here. So what I'm going to
do is press control A, all transforms right click. So origin three cursor,
adding a modifier. Bring in a mirror, let's put it on the y,
let's turn off the X. And then we go, we've mirrored it over the other side now. And now we can actually
apply that mirror. A, apply the mirror. All right, from here then let's first of all bring
in some materials. So what I'll do is I'll
just bring in black metal. I'll unwrap them as well. So I'm going to press U on Wrap. And then you can see
Wrap solved two islands. Reason being is that we need to first of all reset
the transformations. And then we can come
in Smart UV project. Click okay, and there we go. All right, now the
inside of these, we need to select each of these. And we need to press one or
three, or control three. And then we can press
U and we can go to Where is It,
Project From View. Now what we can
do is we can come in and we need our signs. Should be able to
press plus down arrow. And let's see if I've
got one that says signs, street signs, this one
here, click a sign. And now I'm going to
go to each of these. So if I go to UV editing now I'm going to have
one that's going to say cathedral and one that's
going to say train station. So, if I grab both of these,
I want to grab them both. I want to bring them down and I want to kind of
make them the same. So, in fact, you know, it'll be easier just
to work on one. So I'll grab this
one, I'll press Surg and let's bring
that into place. And we're going to have
this saying train station. So I'm going to break it
bigger S bring it out. And then I just want to get this black parts
in here as well. If I zoom into here, we've got a lot of
control then over it. So then what I'm going to do is press S and
X, pull it out. So I've got those
little bumps on here. And then and Y pull
it up like so. And if you press
Tab now you'll see that looks really nice, except this is way too far. Press tab again, you can
see it's gone all that way. So let's press and X and then X and bring it over
to where it's going to go. And that's about the
furthest it's going to go over where you can see
it's looking pretty nice. Now I want to do is
I want to copy this. If I grab this one,
I might be able to press copy, copy default. And then this one,
copy paste default. And there we go. It's
actually works, cool. Now what we can do is
where I can grab this one. So let's come to this,
spin it around or 180. Because remember, the problem is that this was mirrored
over this side. So I'm just wondering, it still seems a little
bit out this one. Let's press sir one or
control three, sorry. And let's just re unwrap this. So you, we're going to
project from view now. Can I paste that on? It's sometimes a bit iffy. If I go to copy paste default, you can see it's
turning it around, it's messing around with it. Sometimes it's not
worth doing that, the best thing to do is just grab it and go to
wherever you want it. So I'm going to put
around Cathedral. And I'm just going to create
this a little bit bigger. So I'm going to press Y, and then and X get a little bit bigger and X pull it over so you can see
it didn't take long. I'm going to press S
and X a little bit more just to bring it in. And there we go. All right, that's looking pretty
good. I'm happy with that. Now, finally, before
we finish this, before we finish these parts, I mean, what we need to do now
is join them all together. So what I'm going to do is
I'm going to go over the top, I'm going to press
B, grab them all. So, and then what
I'm going to do is object convert to mesh. And then what I'm going
to do is press control J, right click, shade,
auto, smooth. And that's what we
should be left with. Now let's come to the next
ones and do the same thing. So I'm going to press B. Grab it all. I don't
want all this one grab, so I'm just going to
grab one of those. Then grab it all with
B for box select, object convert, mesh control J, right click, shade,
auto, smooth. And there we go. Both of these now should all be
done. So G and G. And now finally let's
actually think about a bevel. So what I'm going to do is
control all transforms. Right click, set
origin geometry. And let's bring in
a Bevel modifier. We know will it work? That's the thing. Let's
put it on object mode. And actually you know what,
the bevel has actually worked perfectly first
time, which is surprising. But it actually looks so
much better as you can see. All right, that's one. Let's come to this one now.
We do the same thing on the control transforms
right click, set origin geometry, adding a modifier and bring in the
bevel. And there we go. And let's again just make sure the bevel is on
here, which it is. Everything is beveled off
and everything is beautiful. All right, so we've got our street light and
street light sign. So that's what we're
going to call them. If I come into this
one and press two, I can call this street
light sign like so. And then I can come to
this one, press two, and then street
light, and that's it. And then what you can do now
is you can put those into your asset manager or would save them out for
another scene there. Too beautiful not to.
And with this one, what I'm going to do is I'm
going to make a new one with M. So I'm going to
press M New Collection. And we'll call it, what
should we call it now? Assets. We'll just call
it Assets actually. And we'll drop it in there. And then we'll come to this one, press the bot, and we
want to put in assets. And there we go, there is our
street signs actually done. Now if we scroll all the way up to here, we've
got our bookstore. Let's close that up. We've got our assets. Let's close that up. And now what we'll
do is we'll just bring in everything else. So if I press ol tag,
will everything come in? Yes, it will. I think
it just needs to load up. Lad it, load up. I did do it again
in material mode, which is not the
best way to do it. And there we go now
our street lights, I'm just going to, for
now put them over here. In fact, you know
what, we'll just give it a quick render
while we've got time. So we'll just put
it on to there, make sure they're in the floor, which they look like they are. And then all I can do is now
I can just hit that render. I'm going to save out my work. I'm going to put it onto
wire frame and I just want to see what they look
like if they look nice. So let's render it out. There you go. There are
your street lights. Let it load up, let it
do all its compositing. I'm just making sure
that the composite is actually going to
work because I might have set the things for
the composite compositing. There we go. So have a
look then. There we go. All right, everything's
working now. We can see what our
street lights looks like. Remember though as
well, this is a very, very low render, so
you're not going to get a tons of detail. It needs to be set a lot higher to actually bring out
all of this detail. But you can see these lampposts
look really, really nice. And it really, really
adds to the scene, fitting in with the
scene perfectly as well. And that's the main
point of all of this. All right, let's
close that down then. And then what I'm going to
do is I'm just going to grab my street lights and
I'm going to adjust, I'm going to put them
over here because on the next lessons what we're going to do is we're
actually going to, I'm going to put
this onto object. We're actually going to
create a couple more things. So we're hoping to
create like the benches for one and also the sign
with the adverts on. I'm hoping to get that created. And that's one of
the reasons why I created these first
because part of that actual advert is also going to have a couple of these lamppost parts
in there as well. All right everyone. So I
hope you enjoyed that. I hope you managed to get some street lights
that look like my own. And remember if you didn't
just keep practicing, you're never going to
get it first time. Alright everyone.
Thanks a lot. Bye bye.
100. Modeling Public Benches for Victorian Scenes: Welcome back everyone to Blender for the Environment
Artists Guide. And this is where we
left it off, Judge. All right, so now let's
bring in our guy over here, because we just want to make
something very simple now. Well, simple in comparison to what we've actually
been creating. So let's create a actual bench. So with our bench there,
quite easy to create. Just make sure that
they're the right high, and they look the right size. That's the hardest thing to
get. Right, Judge. So shift. Let's bring in a plane. Let's
pull our plane over here. I could have put
my cursor there, but I'll just bring my
plane over here now. And what I'll do is
I'll bring it down, first of all, to the
height of my bench. So you can see now
that it's coming, just just where
the kneecaps are, so you can imagine
him sat on there. You kneecaps kind of come out. They come to the top here, which is kind of level with
this kind of on the bench. And then your legs bend over, so as long as they're at top of the kneecaps, you
should be fine. And then S and Y
and bring it in. And now, when you think
about him sat down, how far is he going
to be sat back? You can see if he sat
down on this part, he's going to be quite far back. So let's press S Y again. Bring it in a little bit more, and I think that's about
perfect for him sitting down. The thing is the body
does tend to seem to stretch out when it
actually moves in that way. So just take that into
account, Judge. All right. As far as the actual
length of the bench goes, if you'd imagine a
guy sat over here, he's going to be
sitting on here, his arm's going to be on here. You can see then,
if I press shift D, what sort of gap is going
to be between them? I would say that
it's probably better off being this sort
of gap between them. And then what I can do
is now I can press and X and bring it in a little
bit like so pull it out. And that I would say is about the right
length for a bench. All right, with that said, let's get rid of one of our guys. We don't need them both.
Let's move to the side. And then what I'm
gonna do now is create the planks for the first
part of the bench. So if I come in and
press control lot, we'll bring in two edge loops. Control lot and then just
control B, bring them out. Make sure you bring it
down just so you've got just one bevel in there and then delete and faces and there's the
first part of the bench. Now what we can do from
here is we can grab it all. Press E, just extrude
them up and get them the right thickness
of what we actually want. Which I think something like that is about right from now. Then what we can do is we can actually start with
the side of the bench. So all I'm going to
do is I'm going to press Shift S, Ursa selected. And then I'm going to
bring in a Cube now. So I'm bring in a cube,
bring it over to this side, make it smaller
with the S button. And then all I'm
going to do is make it the right size
to fit in there, which it needs to be a little bit thinner because benches
on the sides of them, it's always thinner on
the z axis anyway, Judge. And then what I'm going to
do is just bring it out like so all the way back
to something like that. And finally then I
can grab the front of it and bring it out over here. Now I'm just going to check
the actual thickness. I still think it is
a little bit thick, so all I'm going to do is press and Z and make it a
little bit thinner. Put it down a little bit and then just make sure it's not popping out too
far in this edge. It doesn't matter
about the back, but the front matters a bit more. All right, from there then
I can do is press control. Right click, set origin
three de cursor. Bring in and modify
it and we're going to generate a mirror. So let's go on
grabbing a mirror. And now from here let's
go back into edit mode. And what I'm going
to do is I'm just going to grab this
front off here. I'm going to press shift D. And then all I'm going to
do is just pull it out. Press just pull
it along like so. And then L, and then and X
and pull it in a little bit. Now I'm going to bring
it to here and I'm just going to put it
in the front like so. And then the next
thing I'm going to do is just press and y, squish it in a little bit more and then grab
the front of it. And we want to bring this down then to the actual ground plane. So down to here like so. Alright, The first part of
our bench is nearly done now. You might want to. On
the front, I would. On the front by the way, just
pull it out a little bit. So just pull it out. So it's
like this a little bit. Then what we can do
now is we can press L shift D and then bring
this one to the back. And instead of
obviously pulling out, we need to spin it
round so R S 180, spin it around and
then we can put this one on the back like so. All right, so now what we've
got is we need the top and we need it going over
to the actual middle. So what I'm going to do
is rather than bring, I think what we'll do is the
easiest way is first of all, we'll come in, press tab, press shift, bring in a plane. And then I'll rotate my
plane round, so Rx 90, press the S button
and we want it come in roundabout up
to this length here. Then all I'm going to do
is just put it in place. So I'm going to put it in place, so it goes just to
the top of there. So now, it depends what
kind of bench you build in, but generally maybe the back is stuck out a little
bit more, I would say. So what I'm going to do is
just come to these back parts. I'm going to grab this back, press L on this one, and then just pull it
out a little bit more. And that then will give
me a little bit more room to pull this down a little bit. So if I grab this, I can
then pull it down into place like so I'm just thinking. Yeah, that's about
right. I've just pulled it down a
little bit too much. I don't want it down too
much, I just want it sat on top of there with a little bit of a gap between here and here. So maybe up a little bit more. All right, from there
then let's grab the top. So we're going to
grab the top first. I'm going to pull it
down to where I want it. So I'm thinking maybe that's
about the right height, actually, something like that. Now, before I carry on, it's easier if you actually
bend it at this point. So if you bend it at this point, how you want your
bench to be bent? So something like that I
think is perfectly fine. And then what we'll do is we'll add in some edge loops now. So control, let's add
in three edge loops. Yeah, three I think will be absolutely fine. Left
click, right click. And then all I'm going to do is control B and again give
it a gap between them. Delete and faces. And there we go. Now the
thing is if you want your bench to be a lot
more weathered than this, you can put in some edge loops
and then use the random. So with mesh, you know,
transform and go to random, we could do that as well. But I think on this one
I'm not going to do that. All I'm going to do on this one, actually, if I grab
this at the moment, you can see even
if I put this on normal and will it actually
do it? Yes, it is. It's pointing up like
that. So which means I can actually shape this before
doing anything else. So I'm going to do is just
bring in some edge loops. I'm going to bring
in five edge loops. Right click five then. And then what I can do
is just grab this one. Actually I want to just
grab the top of this one. Let's see if I can actually
do it. Yes, I can. So I can grab that,
I can pull it up, so I need to pull it up the
other way, grab these two. And hopefully, I should
be able to pull those up. And sometimes when we're
dealing with normal, let's put it on local and see
if that makes any easier. Nope, so let's put
it back on normal. Sometimes it's weird when
you actually use it. You can see I can
pull this out and in, I can pull this up and
down going this way. For some reason
now, I don't know why that is, but either way, I've got it working, so you can see it's going that
way from there. Then what we can do is
we can put this back on Global, press the bottom. And then all I'm going to
do is I'm either going to pull them out or pull
them back this way. I think for me I'll just
pull them back this way. Trying to keep with
the same sort of scale as this plank down here. And there we go, that's
looking pretty good. Now let's go back to
this part over here. And what I'm going to
do now is I'm going to come and I think I'll
grab one of these legs. So I'll use one of these legs. So grab this one here I can. On edge select.
So grab this one. Shift deep, and then
let's bring it up. So let's bring it up, make
sure you're on Global. Let's bring it
into place. So I'm going to bring it all
the way back to here. And then what I'm going to
do is I'm just going to grab the top in face select, grab the top, pull
it back into place. Pull it up and then back. So let's make sure that
it's lined up along there. And there we go, that is. And also make sure if it's a little bit too high
for your liking, just put it on normal.
Can we pull that back? Nope, that's not
working. Let's try local. Nope, that's not working. So forget that. Just pull it down and then just line it up a little
bit. Bare like, so. All right, so that's that bit
and now we're nearly done. All we need is a little
bit of an arm rest. So to do that what I'm
going to do is I'm going to come to the part that I got set up, which
is this one here. I'm going to press shift and D, I'm going to bring it over. And then what I'm going
to do is pull it up. And then finally I'm just
going to turn it round. So 090, let's turn it round, let's bring it over this side. First of all, let's
make it the right side. So I just want to bring it
in and put it into place. So all the way back
in there as you can see, let's put
it into place. In fact, you know
what, we'll do it over the other side because then
we can mirror it over there. So let's put it over there. Let's then make it a
little bit thinner. Now this is a curve, so we can come in and we
can drop down the extrude. So let's drop down the extrude, get it to the thickness
that we want it, and then let's come
over to the solidify, and we'll drop down the
thickness of the solidify, finally, then let's
move the offset. So can we move it
in? No, we can't. So we'll just move it
over into place like so. And I'm just making sure,
is it thick enough? I think it needs to be
a little bit thicker, so jost a little bit thicker and line it up into place like so. And now what we can do
is we can actually make, you know, this kind of arm rest. So to do that, all
I'll do is press tab. Now bring these down. So bring these
points down like so. And then lift up
this point like so. And you can see just how
easy that was to do. And there you go. You've got
actual near enough a bench. Now, before we carry on, let's come in and just turn down this. So we'll operate on
six, let's try that, and I think that's going
to be easily adequate. And then finally finally
let's come in and add in one more of the block. So what I'm going to do,
I'm going to come in, I'll grab this point here. I'm going to press
Shift D, Enter. And then what I'm going
to do is press and X, pull it in, bring it over. Let's press then to pull it out. And then let's bring it up. We'll bring it up into place. You can see it's way,
way out of the moment. And then what we're going
to do is press L and X, pull it into place, and
then finally just drop this bit down so you can't
actually see it. All right, that's looking pretty nice. I'm just making sure. I'm happy with that. If
you were sat on there, would this be a little bit
too high? I think it is. So let me fix that
before I finish. So down to there maybe. And then grab this, drop
it down the Orbotap, the A, and there we go. Now finally, all we need
to do now is first of all come in and go
to convert a mesh, just to convert that
from our curve. And then press control
all transforms. And then just join it
to these control J, join it to these right click, shade auto, smooth.
And there we go. In a lesson we actually created a bench and it's actually
looking pretty nice. So on the next lesson
then, what we'll do is we'll get the
materials on here. And then I think we'll
actually start with something a little bit more difficult because this
was pretty simple. All right everyone,
So I hope you enjoyed this and I'll
see you on the next one. Thanks a lot. Bye bye.
101. Starting the Bus Stop Stand Project: Welcome back everyone to Blender for the Environment
Artists Guide, and this is where we left are. All right, so let's pop
this onto Materials. Let's come in then once it comes through and
what we'll do is we'll actually select this and we will apply our
mirror modifier. First of all, because this
bench is basically finished. Now, let it load up. There's a fair few
shaders on there. Let's grab it all.
So grab everything, press G just to make
sure you've grabbed it. Right click, drop
it back in place, and then object convert to mesh. Finally, now we can join it
all together with control J, right click, shade,
auto, smooth, just make sure everything
looks right on there. And then what we can do
is we can now come in, and I think we can probably get away with unwrapping this all. So Smart UV project. Click Okay. And then what we can do is we can come over
now to our material. We'll put on first green
green painted wood. And then what we'll do is now
we'll come into these arms, we'll add in a new material and it'll be the black
Mel. So black Mel. Click a sign and there we go. Let's just have a look
at what that looks like. And finally, let's
come in and add in a modifier and we're going
to generate a bevel. Let's press control
A first of all. Yeah, Right click, set
origin to geometry, not 0.3 and there we go. There is a beautiful bench. Double tap the eight
and just make sure that you're happy with
it, and I think I am. Let's have a look at that
rendered view then before we finish. And there we go. There is our bench. And now we've got a bench, and
we've got a lamppost. So we're really, really
getting on with this now let's put it
then on object mode. And let's also save out
our work, first of all. And then what we'll do is we'll move this now to our asset. So if I press M,
I'm going to move it to my assets,
and there we go. Now what I can do is I
can pull this over there. All right, so now
we're on to the. In fact, I'll just
actually duplicate this. Shifty, I'm going
to duplicate that. Pull it over there, because
I'm going to create now, you know, the part that comes actually over the top of here. So we've got on there, like it's supposed to be a bus stop, so I'm going to create a bus
stop over the top of here, because I know this is roughly where people
are going to sit, and I'm actually going to
use this for people to sit. So at the moment I'm just going
to pull it out over here. I'm not sure where
it's going to go yet, but over here is
absolutely fine. And what we're going to do
is we're going to actually repurpose some of these parts. So we can see here, we've got this part here,
for instance. Do I want to repurpose? Is it going to be
easier to repurpose this part? I think so. So what I'm going to do is
I'm going to first of all duplicate this, bring it over. And then what I'm going to do
is I'm going to make my bus stop kind of similar
to this part here. If I bring this, let's
say out to here, what we'll do is we'll just
create the top of this. We'll create it a
little bit different. We'll keep the same part here, but we'll have it coming
up to round about here. And we'll make this a
little bit different. So what I'm going to
do is to repurpose it. I'm going to press
one on my number pad. And then what I'm going
to do is press tab. I'm going to make sure
double tap the A. And then I'm going to
go into wireframe. And what I'm going to do
is I'm going to press B box select and come all
the way down to here. Press control, plus just to
make sure that you've got everything and then delete
and we can delete faces. So delete faces, let's put it back then
on an object mode, and this is what we
should be left with. Now I still think like we need
to come down a little bit, probably down to here on this. So all I'm going to do now
is grab the top control. Plus I'm going to
go all the way down then to this part here. So Jaws, this part here
is going to be left. And then I'm going to press
Delete and faces again. Now finally what I want
to do is I might be able to come in and
delete these out the way. So if I press L, L and L
and just go round it like so L L because we want to be, to look a little bit different. Control plus then,
and then we should be able to press Delete and Faces. And we're going to
end up with obviously a lot of gaps in there. Now what I want to do is I
want to fill these gaps in. So I'm going to press
out Shift Click. And you can see it goes
all the way around there. And then I can press
hopefully and join that in. Let's do the same
now with all of these and just keep
filling them in. And now I'm going to
show you a good way to actually get this measure. It doesn't look
so bad because at the moment it's an end one. But it's an end one that's
in the wrong place. We really don't want
that there because it might cause problems
with the lighting. So let's fix that. Well, first of all, let's fill them in. So fill them all in. So, and now what I can
actually do is I can come in, I can press L on
this right click. And what I can do
is in face Lex, or you need to be in
face Lex or right click. And you can see
that you've got one that says triangulate faces. So triangulate all the
faces first and then right click and you're going
to go, tries to quads. And then it's going
to fix all that for you as though we had never
actually took it away. All right, so this
is good so far. Now what I want to do
is I'm thinking I'll keep this the way it is. I'm just wondering
whether I should also delete probably this
bottom part as well. Yes, we'll do that as well. So what I'll do is I'll come in. I'll press out Shift, click control plus,
delete and faces. And then what I'll
do is just fill in this bottom just in case you want to put an
upside down one in there. I guess. Ol shift and click. I don't know, you might
want it in there. I just prefer to
fill in that face. All right, from here then we can press control or transforms, right click the
origin to geometry. And now I can see where
that's coming actually down now on here I want it to be probably at the top of
this actual alarm re, so if I press one I can then press S and's and pull it up. Pull it up so it's on
the ground plane again. Let's pull it up a
little bit more like so. And there we go. Now
we've repurposed that, and that's looking really nice. Now let's go to
the next bit then. So what I'm going to do
is I'm going to first of all come in Oak shift and click, press the F button. And then what I'm going to do is now bring it up to
where I want it. Now the height of
where I want it is probably going to be
two benches high. So in other words, if I come in grand a bench press
one press shift. So the underside of this, it is going to be round about where if I put this
right on top of it, round about this arm rest. So it needs to come
up round here. And then we can actually
make that top of there and lower it down
if we need to anyway. All right, so now
we've got that. Let's come in and what
we'll do first of all, is we'll come, we'll press the
eye button to bring it in. And then what we'll do
is we'll press and bring it up to the bottom
of this bench here. So if I press one again, we'll bring it up two, just under this bottom here. And then from there what we
can do is we can press again. And we're just going to bring it up then to where we want it. So something, something like
just at the top of there, I think is absolutely fine. And we can start our
wooden part on here. That's what we're
actually going to do. All right, then from here then, let's actually make some
more parts of this. What I'm gonna do, press
control art, left click. Bring it down to
here. And then all we're going to do is
grab both of these. So Alt shift and
click, press control, select them and then enter alternS and just
bring them outwards. You can see here we've
got some problems there. As I've said many times,
just press controls ad and just make sure that
your normals are okay. You don't even have to check it. All you need to do is press a to select every pin
and then shift, and then it should
spin them all around. Let's just have a check though, just in case. So
face orientation. Now you can see
they're all facing the right way and it
should now actually work. So if I now come in
and grab these faces, so Olt shift and
click Olt shift, click Enter Lns, and now you'll see they'll come out
properly for you like, so. All right, that's looking cool. Now let's come into the top. I'm going to, first of all, I'm going to bring
this out first of all, so I'm going to
press the S button, like so I'm going to press E
then and just bring it up. And then what I'm going to do is bringing some edge loops here. So control, bring in some
edge loops, maybe three, maybe 55 edge loops, left click, right
click, grab the middle. One old shift click, and now I just want
to bring that in. So I'm just going to bring in, maybe a shop will do it,
so let's have a look. So I just want to bring that in. Yeah, I don't think a
shop's going to do it, so let's try the root. And I think the route is actually going to
be better for us. So you can see this route now is bringing it in very nicely. And that's exactly what I want. So something like
that up to you, of course, how you want
to actually do this. Now what I'm going to do
is I'm going to come in, I'm going to grab
the top of this, I'm going to press
Enter alternates, and bring it out without
proportion editing on, so altern, bring it out like so. And there we go. And
then finally I'll probably want to come
in and just make this top hold them out a little
bit and make it a little bit like the lamppost that
we've already created. Bring it into here,
to here, to here. And then all I'm going
to do then is press to alternates and bring
it out very gently, like so now we can see they're
not quite joining there. It's up to you whether you
do want them joining there. If you do, you can
just press and Z and pull them into place like so you
can do it that way. I think actually that
looks pretty nice. I'm just checking my lamppost and seeing that it looks a little bit
different from there. And I think it looks different enough, though. I'm
happy with that. On the next lesson then, what we'll do is we'll actually start working on this
part going round here. So we'll go over
here to the back, and then we'll start
building this out. For now though, we
can actually delete the other bench out the way and come up to my work
and save it out, and I'll see on the next. And everyone, thanks a lot. Bye bye.
102. Designing Bus Stop Signage in Blender: Welcome back everyone to Blender for the Environment
Artists Guide. And this where we left it off. All right, let's
go over the top. And what we'll do
is grab this one. We'll press Shift, and we'll grab it and
pull it over here. So it's roughly about the
same length each side. We don't need to mirror
anything like that. And then what we'll do from there is grab them
both and we're gonna press shift and we're going to bring
them to the back. So now we've got a good
foundation to actually work from. So something like
that, as you can see, looks pretty nice. All right, so now
I'm going to do is I'm going to grab these two. I'm going to press Shift
S As to selected shift. And then what we're going
to bring in is a plane. Now we're going to rotate
the plane round, so RX 90. Now most of the time when
you're building things, basically it comes
down to looking at something and thinking how we're going to actually
build something. That's the hardest part
in three D modeling. The next hardest part is realizing how many things
are available to you. So which way you're
going to do something because there's 100 different
ways of doing everything. But the better you
get at realizing how many different
ways there are, actually makes you better
at three D modeling. So you noticed professionals, they do, you know kind of the
same things you're doing. But if anything goes wrong, they know how to fix it, then they have a lot more, just kind of overall
understanding of how everything works. So let's come in and
pull this up and what I'm going to do
is I'm going to press and head and pull
it down like so. So I just want to work out where my actual ridge
is going to come across. So I think if I pull this out a little bit more
on the S and X like, so from here then can be
where my ridge starts. It can come all the way
over, bend all the way over and come to
something like here. So how is it going to go up? It's probably going to be
it come to the top of this, pull it down a little bit. It's probably going to be
up to roundabout there, so not particularly high
or anything like that. Something like that I think. And then from there
then we're going to build out the top of this. So what I'm going to
do now is just bring in one edge loop in the center. So left click, right click. And from there, what
I'm going to do now is I'm going to bring
this round the other way. So I'm going to press shifty. All right, shift, let's
put that back shift. And then what I'm going
to do is press Art 90. And what I want to do now is put that in the center of these. So I'm going to
grab both of these. Press shift S, cursor selected, grab this one shift and
selection two. Cursor. Put that right in the center. And then I'm going to press one. And I'm going to pull it up just so it's at the right
level of here. I'm going to press three
to go over this side. And you can see
I've got a problem here in that I
can't see anything. If I put this wire frame on, then I can see where
it needs to come up. So I'm going to do
is just pull it up to the top of
this one like so. And now I'm going to
do is bend it in. So if I press S and Y, I'm going to bring it
in roughly, roughly. So it's got the same
kind of gap each side. And from there I can actually
start building this. Now let's put it
on an object mode. And what I want to do now is reset the
transformations of the. So control or
transforms right click, set origin to geometry. From there then let's see now if I can come in
and level this off. So if I can level this off
and level this one off cut. So control shift and
B, let's pull it out. Let's bring in a
couple of edge loops. So maybe three to start with
left click and now you can see we have to come in and
change the direction of these. At the moment, it's
on super lipse, which is what we need. But I actually want it going the other way, so round this way. And I also want to
stretch it out like so, so something like this
kind of roundness. Now, I do want it coming though. All the way over to
these parts here. So you can see here, it's right up to this edge. So I'm going to have to probably get away with doing
these separate. So what I'm going to do from
there is I'm going to press control D. And I'll
come to this one first, and I'll press
control shift and B. And then see if I can pull
that out where I want it. So once I've got this
where I want it, I'm going to press and X
and pull that out like so. And from there then,
do I actually want this to come a little bit
further down? I think I do. So I'll press and D. Now you can see the problem I've got
there is as it comes down, I'm actually bending it up
and I don't really want that. So what I'm going to do is just make sure it's back in place. Now we can make sure this is
perfectly straight as well, which I'll show you
with the bsector. But for now, let's do this one. So I'm going to press
control Shift and B and bring that up. And then what I'm
going to do is just I want it to be round about
the same height as this one. So you can see we're a
little bit out here, so let's come in and
not mess with that one. Sorry, let's do that again. So control shift and
let's pull it out. Let's bend it in
now. Where is it? This one? Like so. And then we can
actually bring it out where we actually want it. They'll think something like
that is going to be right. They don't need to be perfect
or anything like that. All right, so we've
got that now. I'm happy with how these
two are going to be. So now what I can do
is I can just come in and control select them all. So if I control select going
all the way around here. So I'll shift select, press Delete and Faces. So there you go. All right, let's come
in with this one. We'll just press on this one and just select them that way. And then I'll press Delete
and Faces. And there we go. I think they're
looking pretty good. Now I'm going to do is I'm
just going to come in. I've got them both grab, so I might as well join
them both together. Control all transforms and then what we'll do
is right click, set origin to geometry, and then we'll join
them together. Actually control G,
join them together. And finally what I'll do is
I'll just grab all of these. Press shift S, cursor selected, and just put the cursor right in the center From there.
Then I can grab these. Now I can write clicks at
origins three de cursor, adding a modifier and
we'll generate a solidify. Then what we'll do is we'll pull them out a little bit just to give them some thickness,
something like that. And from there then,
what I can also do is I can add in a modifier, and this time will be a mirror. And I'll see if I can
put it over there. So if I press the Y and the X, there might be a problem
here in that one of these is probably going to
be doubling up. If I apply this mirror,
it's probably going to be doubling up because I've
got an x and y axis on. I don't want that. What that means is then I'm
going to actually now have to come
in L P selection. And then what I'll do is now
add in a mirror to this one. So generate a
mirror, put it on Y. Turn that one off, and
then come to this one. Add in a mirror. So generate
a mirror, and there we go. Now they're separated off. That's okay. We can
actually work on these now. All right, so now let's
come in and what we'll do is we'll actually apply
our solidify on these two. So I'm going to come in and
I'll apply my solidify. So solidify control. And then what I'll do now is
work on these parts here. So all I'm going to do,
I'm going to come in, I'm going to grab
these two here. I'm going to press the eye
button and bring those in. Now you can see as
well that they're still joined in the center. But if I press Eye again, it will split those up. And I want it to be
something like that. And this will be exactly
the same from here. Then I can actually pull it
back now into place like so. And there we go, we should
have that both sides. And that's looking really
nice. All right then. So from these then, what I
want to do then is bring out a post next to here and then a post on the
other side as well. So let's actually do that now. Let's see. So what
I'll do is I'll press shift or should I press
shift, I'm thinking. Yeah, I, well, what
I'll do is I'll press shift and then and then and X. And hopefully should pull them out if a basis on medium point. So and X, there we go.
That's what I want. All right, so
that's brought them out both sides from there. Then I can come in now and I can pull these
out on the Y and Y. Let's pull them out like so. And then I can also maybe
drop these down a little bit, just so they look like
they're actually in place. So drop them down a tiny bit. All right, so good so far. Now we need the big post, which means I'm probably
going to have to pull these out a little
bit closer to this. I just want them
right on this X. So now let's get in
the post on here. I'm thinking, yeah, I'll have
a big post them from there. We can actually
support these on top of here. All right,
so let's do that. So what I'll do is I will
do the same thing again. Shift and then enter and X pull them out and
X pull them out. And we want these to be a little bit thicker than the other ones, and we also want
them to be up here. I'm going to grab
both for these, I'm going to pull
them up, pull them up straight, and then
let's pull them out. If I grab both for these, I'm going to press S and Y, pull them out into place. And then that makes it easy for these ones to
join in as well. You can see it's looking pretty
nice already from there. Then let's actually make, I think, one more point on here just to support
them a bit more. So what I'll do is I'll press control. Left
click, right click. And then what I'll do
is I'll press control. I'll bring it up a
little bit like so. And from there then
what I'll do is I'll press control and pull that out, bring it all the way back
so it just looks like this. And then what we'll do
is we'll bring it out. So if I grab this one, in fact, I need to do this one as
well at the same time. Let's just go back
and do that again. So control left
click, right click. Control law, left
click, right click. And now what I'll do is control
left click, right click. Control left click, right click. Grab them both, pull
them up a little bit. Grab both of these parts. We have shift select control. Let's pull them out
into place like so. Let's also move them over. In other words, I want
to pull them over and X pull them over just so
they're more in the center. And finally then just grab the faces on each of these and let's pull
them out this way. If I press, I can pull
them out this way. And then all I'm
going to do now is just bevel off the top of here. So if I come in, grab
this top press control B, and bevel them off like
so wherever I want them. All right, that's looking cool. So on the next one then what we'll do is
we'll get this part. Then actually in, so
you can see we need another plank of wood which is going to
come to this part. Probably going to have to
pull these parts out a little bit more just to make
sure they fit into place. But you can see really, really coming together nicely
now. All right everyone. So let's save out the work. So let's save it out and I'll
see you on the next one. Thanks a lot. Bye bye.
103. Finalizing the Bus Stop Stand Model: Welcome back if you
want to blender for the Environment
Artists Guide. And this is where we left off. All right, so now let's start work on these little parts here. So pretty much I'm going to do the kind of the same
thing with this one. Might make it look a little
bit different on this one. So it goes nicely into
this part, I guess. So let's circum in and
what we'll do is we'll come and we need to work
on either one of these. So I wont to do. Just
put this little triangle on and we should
now. I'm hoping. Nope, we can't, we still have
to come around to this one. I was hoping we could
work on both of those. So I'm going to grab
the face select. I'm going to make
sure where is it? Oh, it's the solidify
that I've put on. Let's try print it on here. There we go. Now I should
be able to work on this. Now we can see that
I've got a problem in that I need to apply
the solidify First, let's come in press control A, and then I'll show
you what I just did. So basically if you put this on, you'll be able to work
on the other mirror. So sometimes you want to work on this mirror and it's just on
this mirror for instance. So this is the main one.
It's mirrored over here. It doesn't let you work on
it, but if you take this on, it will actually
let you do that. So let's grab both
of these like so. And then what I can do now is I can start pulling this out. So if I press shift D
and then Enter and Y, I should be able to
start pulling these out into place like so. So I'm going to pull it
maybe a little bit further. S and Y pull it,
something like that. Then what I think I'll do is maybe add another one
that'll come over here. So first of all though,
let's pull this out. So I'm going to grab all of this Alt Shift and
click Alt Shift. Click. And then I need to put
them on individual origins, individual origins, and X. And then I should be
able to pull them out. And then what I'll
do is I'll drop these down a little bit as well. So I'll grab both of these, hold them down a little bit. So now let's think about
this final bit on here. And I'm thinking that maybe
I want a rounded bit. Coming down to here, What is the easiest,
easiest way to do this? I'm thinking prob probably
with a bevel on here. If I bring in a cube, I can then use it to bevel it. What I'll do is I'll bring
in this part, first of all, and then what I'll do
is I'll grab this one as well because we're dealing
with two of them here. Then what I'll do is I'll
press shift D again. I'll press and X, and I'll pull those out. And then what I want
to do is I want to put this on medium point. So let's put it on medium point. And then enter and Y. And then I should be able
to pull that into place. Now you can see that it's not
going to be how I want it. So first of all, I want to
pull this up a little bit, like so I want to pull
them both up, sorry. So pull them both up then what I want to do
is now pull them back. So I'm going to grab this one. This one and then pull them back and Y's pull
them back into place. Now I want to do is just
level this edge off, see if I can level it off. It gives me a nice
form on this part. What I'll do is I'll
come in on object and put this x ray on so
I can see through it. Grab this one and this one. And then I'll just press control B. Hopefully I pull them off. We should be able to,
if I pull that in, bevel them off a
little bit like so. All right, let's see
what we've done there. We can come back now and
alter the bevel anyway. I'm going to turn it up
a few more like so I'm going to then bring down this
bevel or bring it across. So I definitely want
to bring it across. Now the thing is if a
bevel won't come across, all it means is instead
of doing it like that, you can press controls head,
bring in an edge loop. So control bring in
edge loop on there. So you can see it's going
to be over the other side, unfortunately, let's
come over here. So control left
click, right click. And then control left
click, right click. Let's try that one again. Control law, left
click, right click. And then grab them
both. And then and y pull them towards here. And now we should be able to
come in and level them off. Much, much easier if I
come in now with my x ray. Grab this one and this
one and press control B. Should be able to,
as you can see, bevel it off with Ese now. Now if I come in
and turn that off, you can see just how easy that was because it only
comes to this point now. Now we do have a
problem in there. You can see it's gone slightly over there and
it's up to you now. I think what I'll
do is with this, I'll just pull these back now. So if I grab this one
and grab this one, and then I'll press and y
and pull it back like so. And there we go. Let's
have a look at that. Yeah. And I think that's
looking pretty good, so I think it hanging like that is a
bit better than this one. And I think it sets it
apart from the other side. All right, so now
we've done that. What we can do now
is think about putting our top on so
I can press Shift. Let's bring in a plane. Let's bring it up then. And let's put it
into place so it looks about right on
the front and back. Let's press and X, pull it out just so it's
going to go over there. And from there then I'm just going to place
it into place. So, and then I'm going
to press the Tab button. And press E, first of
all, just to bring it up. So, and then what I'll
do is I'll bring it in. So I'm going to press, I bring it in a little bit, hold
in the Shift button. And you can see if
I go over the top, it's not even so I
need to fix that. And the easiest way to fix that, control all transforms,
set origins, geometry. And now press the button. And now it comes in nice. And even now press the button, and let's pull it up like so. And then again, and then,
and let's pull it out. And then pull it up. And then pull it up. And then pull it in
with the button again. Something like that's looking
pretty nice and now we just need a really nice
blowing top on here. So to do that, first of all, I'll press I to bring it in, and then E, and then,
and there we go. All right, now with this bit, I'm going to separate it off because I don't want
to bend this in. And then what I'm going to do is I'm just going to press Y. And then I'm going
to press, bring it up to the height
that I want it. Something like that.
And then finally, let's bring this in
now with the button. Now let's actually
bend these in. Let's bring in an edge loop. Maybe five on here. Left click, right
click, and then shift and click
proportion editing on. And let's press the
button and bring it in. Bringing it out can pull
it out very slowly. So there we go. That's pretty nice. Now finally let's right
click shade to smooth. And there we go,
that's looking good. Now let's just put a little
bit of a top on here. What I'm going to
do is I'm going to press without portion. You can see it's not even again, so I'm just going to go back. I'm going to press Tab
Control or transforms, right click the origin geometry. Now hopefully if I
press I'm actually, you can see here,
what happened was basically brought
out an extrusion. So let's press control plus and then what I'll do is mesh. And I want to clean it up
because there's an extrusion on there and I want to
make a new extrusion. So rather than, you know, having two extrusions on there, messing around with UV maps and things like that, we
don't want to do that. Instead what we want
to do is fix it. So if I clean up and
then come down to merge by distance,
four vertices removed. And now if I grab this, you can see there's no
extrusion on there. So now what I should
be able to do is enter and pull it out. And it is coming
out a little bit, even not quite as
even as I want it to. So I'm just going
to press S and X and pull it in a
little bit like so. And then finally, let's bring
it up into place like so. And then finally, there we go. Dad is looking really nice. I'm happy with how that looks. I don't think I need to do
really anything else to it. All that's left to do now on the next lesson is to put the materials in
and bevel it all off. What I'm going to
do, first of all, we'll grab all of
the little parts. So all of these parts like, so press G just to make sure
you've grabbed them all. And I'm just going to do this separate from these,
just for now, what I'm going to do is I'm just going to come up to object, come down to convert mesh. And then I can press control
J, Join it all together. Right click, shade, auto, smooth control all transforms. Right click the origin geometry, Add in a modifier, and this time it's going to be a bevel. You can see that
the bevel doesn't seem to have gone on there. And all that means is
again, geometry clamp over, lap off and then mount
naught point naught three. Put that down and there we go. Now we've got a nice
bevel on there. Now I'm just looking to make sure if I right click
and shade or to smooth. You can see it's not smooth
on these parts here. So I really need to fix that. So all I'm going to do is
come in Oak Shift and click, going all the way
around, right click. And we want to shade
flat on that part there. And there we go,
you can see that it just looks so much better. Now, same on this part as well. You can see that
these parts here, they're actually
not shaded flat. So I need to come in, fix those. Right click, shade
flat, and there we go. It's just looking
so much better. And now what we'll do
is on the next lesson is we'll get all of this
actually joined up. So we can see here we've
got a bevel on here. It's got not 0.1 Let's put it down to no point
naught three like so. And you can see it's not
really going to do anything. Which means that now I should be able to come in and join
all of this together. So if I join this with this, now one problem
we're going to have is at the moment this
has got the metal on, probably better off not
quite joining it yet. If I put this on material, you will see when the
material shaders load up, you can see 27
shaders over here. When they load up, then you'll see that this has
got the metal on. And this of course,
needs to be wooden, so better off
splitting it up for now and joining it
together all at the end, because we do want this
green metal on here. But you can see already it's
coming together really, really nicely. All
right everyone. So I hope you enjoyed that one. I'm going to save out my work and then I'll see
you on the next one. Thanks a lot. Bye bye.
104. Texturing Techniques for Victorian Bus Stops: Welcome back everyone to Blender for the Environment
Artists Guide. And this is where
we left the art. All right, let's come into this. So we've got our bevel on,
everything's on there. Let's then bring in
our first material, which will be our
green painted wood. So let's bring that in. We also haven't
unwrapped this yet, so we're probably
going to be better off wrapping this in stages. So all I'll do, I'll grab
this smart UV project. Click okay, hide it out the way. Let's come to the next bit then. So L smart UV project, click okay, hide it out the way. Then we'll come to these bits. And we're just going to
break it up into sections. It just makes it
look much better. I'm thinking the one bit I've missed on here I
think is this bit. I think I actually, what I'll do is I'll fix
this bit first. So I did actually forget. So what we'll do is we'll
come into these bits. We'll press the eye button, bring it in like so. And then I'm going to press, so not Enter and X
and bring it back. So I'm just going to put an
object mode just to make sure that's back round about
the same as this. If not, I can bring it forward. So S and X bring it
forward a little bit like so. And there we go. That's looking much better now, I actually forgot to do that. And now we can actually go back to Material mode, press the tab. And then what I can
do is we can come into these parts here with L, and then I can press U and
Smart UV Project, finally. Then I can hide those
out of the way. Press the button to grab
everything. Smart UV Project. Click okay. And then finally, Lth, bring back everything. All right, now I want to
bring in another material, so I'm going to click
the plus button. And this time, I don't
think we brought this in, It's going to be
the painted one. So if I come down,
I'm looking for wood and the one I want here
is this red painted wood. So I'm going to drag and drop
that into place like so. And now I'll do is go back to modeling and let it load up. And what we're going
to do is we'll grab the top part first, I'm
going to grab this part. Control plus control. Plus, just to make
sure you've got it under there as well,
red painted wood. Click a sign. All right. Now let's have a look at that. It's looking pretty nice. And now let's come down to, I think we'll do this part here. So Alt shift click control plus making sure it's
going all the way around there, Red painted wood. Click a sign, and there we go. And then what I think
I'll do is we'll also have probably a little band on here just to split
this up a little bit. So if I press control
left click, right click, control B, pull this
out, bring it back. So it's just one or
something like that. And then press Enter
alternates and just bring it out a
little bit and you can see it sometimes
this happens. So what you want to do if
that happens is just press the S button instead and
bring it out like so. And then just make
sure that it's all kind of lined up
so you can see there. That's looking pretty nice. And from there then what you can do is you can press Control plus smart UV project, just to rewrap it because
it will be stretched. And then click a sign.
And there we go. That's looking really nice now. We just want the
inside of these. So I'm just going to
come in face select. I'm going to grab all of these. And again, it's more or
less trying to break up the surface like so. And then click a sign like so. All right, that's
looking really nice. Now what I want to
do is I want to actually think about
these adverts on here. So the way I'll do it is I think what I'll
do is I'll grab all of these and then
what I'll do is I'll press Shift like so. And then press the bon, I should be able
to shrink that in like so now the thing is I really want to
split these off, so I'm probably better off. I'll just go back.
And what I'll do instead is we'll come down, we'll grab this one and
this one for instance. And then what I'll
do is we'll press Shift, press the S button. Now they're
disappearing in there because we need it on
individual origins, press the S button, bring them down to where we want them. So something like that. And we can see that they then still stuck back against this, which is exactly what we want. What we're going to do and
then is press P selection. And then I'm going to
come round to these now. So control, click
shift, click, control, click shift D S, bring them in like so. And then selection and
split those off from there. Then I'm going to
grab these ones, and these ones join
them altogether. So control J, join
them altogether. And now I'm going to do
is I'm going to give these a different material
back to asset manager then. And what we're looking for now is let's have a look
backdrop. So they on there. So living room, bedroom, Let's scroll down and look. Posters, here we are, Posters. So the ones we want
are the adverts. So these ones here
is what I want. So click control, sorry. Plus, and then just drag my
adverts over there, like so. Now back to modeling once more, and then what I want
to do now is grab all these and click
a sign and more. So we're going to press
you and unwrap them. And then what we're
going to do now is go over to our UV editing. Now I'm going to come and
just do these in stages, so I'm going to
grab this one here, so L and then I can
see it's over here. I'm going to press a R 90 and just spin
it around like so. And then R 180 just to make sure it's
going the right way. And then finally I'll
just make it a little bit smaller and
bring it into place. I'm just pressing G now. I'm going to bring it into
place where I want it. And luckily for you will see, because these parts here, again, it's a seamless
texture on there. So now I just need
to try and fix all of this into here so we could unwrap this and make it a lot more
straighter, for instance. So we could straighten out these edges and that then
would bring this all together. Let's see if we can
do that. So if I grab this one going
down to here, so if I grab, just
come up to my edge. So if I grab my edge
going all the way down to ear press Alt and
I can straighten that out. And then what I'll do is I'll
grab this one going all the way down to here al, and
straighten that out. And let's see what
that looks like. It might not work out, Sometimes it does, sometimes it doesn't. Let's press and X and
pull it out a little bit, and then let's put
it into place. And then and X and pull it in. Now, is that going to work
out? Let's have a look. It looks too bent to me, so I don't think I'm going
to keep that like that. What I'm going to
do then instead, is I'll just go back to it. You unwrap it, spin it round, so O -90 Spin it round, and then let's put
it in place like so. And then and X pull
it into place. I'm just thinking, do I want it coming all the
way out to there? So from here sort of thing. Do I want it to look like that? I don't actually think
so. I think I need to make it a little
bit smaller like so to bring it all in and then just put it up into
place where I want it. And I think that is actually
going to look much, much bearer as you can see. All right, from
there then what I'm going to do is I'm
going to copy this one. So I'm going to press you, come down to copy,
copy and default, and then come over to these. Hopefully I might be
able to copy these all. So if I grab this one,
this one and this one, and then press you, let's
see if I can paste Default. And there we go. Let's
even paste them in. And actually that might
have worked out okay, except this one and this
one don't look right. So we'll do this one first. All right, so let's think
about this one on the back. You know what, I think, actually it's better if we
don't have one on the back. Yeah, I think we don't
need one on the back. I think it's too much, actually. So what I'll do is
I'll just come in and delete that one out of the
way. So delete vertices. Let's now come into this one, and instead of doing
that, we'll just press you on the wrap. And then what we'll do is
we'll stick this one in place. So R -90 Come on over here, R -90 And then we'll press and then bring it up in
some kind of place like so. And then press and X, stretch it out a little bit, and then and Y, bring
it up a little bit. And there we go. That's
the advert on here. You can see that top bit
on there. That's fine. Now from this I
can grab this one then copy, copy default. Come round to here, L u, copy paste default like so. Now let's put the other one on, which is going to
be this lady here. Bring it over and put it in
place like so. There we go. Double tap the, they're
looking pretty nice. All right, let's go
back to modeling them. Let's just make sure we're
happy with all of those. I think we are. Now what I can do is I should be able
to grab all of this, grab this, and then what I'm going to do
is grab the bottom, because it'll all
be the same now. So grab all of these
parts in the bottom and press control J and
join it altogether. And now let's just
give it a quick check. Then let's double tap the first. Let's give it a quick check
on our rendered view. Have a look what
that looks like. And there you go,
absolutely beautiful. And I'm just looking
around where the woodies just making sure that I'm mapped
with everything. I think that really,
really fits the scene. I'm looking at these posts down here making sure they look very different
from these ones. Which you can see. They do so still the same style but
looking a little bit different. All right, so what
we'll do now is we'll just put this
on object mode. I'll come over to this and
I'll call it a bus stop. So we'll put it, first
of all, into our assets. Then I'll press F two, I'll call it a bus stop. Now, I'm not going to set
these out at the moment, so I'm just going to
move it over here. I'm going to of course,
reset the transformation. So control, layo
transforms set origin to geometry like so I'm
going to let this, what's this bench, you couldn't get my words out
then out of the way. And I think what we're going to do now on the next lesson, is we'll build out
the newspaper stand. We'll get the little newspaper. You know, we're in placard
on here and I think from there then I'm just
looking around my scene. We've got basically
the car to do, but we're going to be doing
that a little bit later. We've pretty much built out then all of
the little assets. We've got the trees, and
a few things to put in. But apart from that,
I think after that, then we'll move onto our Subway, and then we'll move on to our butchers, and
then maybe the car, and then finally this top building here, and
then the floor. And then we're basically done. So lots and lots to do,
but we are getting there, so I think the next
one is definitely going to be the actual subway. Alright everyone, So I hope you enjoyed that and I'll
see on the next one. Thanks a lot. Bye bye.
105. Beginning the Newspaper Stand Project: Welcome back everyone
to Blender Fall, The Environment Artists Guide, And this is where we left off. All right. What I'm
going to do now is I'm going to go over
the top of here. So I want you to bring in your coffee shop and your bookstore, because that then
will help us line up where we're actually
going to put this Subway. And all we're going to do
really is just bring in our actual subway and just make a kind of
where is it going to go. And then from there we can actually start with
our bookstore. So I just want to make
my gap here first. I can see that probably this bookstore may
be a little bit too close to the subway or
this is too far this way. I'm thinking that
the subway should realistically come from
about here and round here. So let's actually enough
of me waffling on, let's just put this around here. Let's press Shift
S Ursa Selected. Let's bring in a cube then. So bring in a cube,
and then what we want to do is just get it to the size that it's
going to do it. So I'm going to press and y
first of all and pull it out. And then what I'm going to
do next is I'm just going to pull it down so I can
still see my guy there. I can still see myself
going over the top of it. And what I want to do now is
work on the actual width. So I can see here that if
he's walking down here, so if there's one person
walking down here, it's going to be like over here. If we've got a second
person walking down here, we can see that the one
probably about that far apart. So I'm going to say that this pretty much wants to
be tiny bit wider, so S and X tiny bit wider. And then what we want to imagine is where is it going
to come up to? So we can see now people will
easily easily be able to, you know, walk down
the street from here, down here, towards here. The one thing I'm
thinking is that maybe, maybe it wants to be a little bit further away from this part because we're
going to have a lamppost. You know what? I think
that's in the right place. Let's have a look
at that. Again, I think this is really
in the right place. Actually, we're going
to have a bus stop over here and yeah. I don't think I don't think I'm actually
going to alter it. The one thing we've
got to put in there is a butchers and then we've
got this big building here. Yeah. I think rather than mess
around with that anymore, I'm going to actually go for it. Let's delete one of the guys. Then let's actually come into
our floor and what we'll do is press control or transforms right click
surgins geometry. And now we'll go in
and add in a Boolean. So just add in a generate Boolean and then
what I'm going to do is just click
on this like so. And finally then I'll
apply that control. Let's apply that. We're going to delete the cube
out of the way. We're not going to
need that anymore. And what we can also do
is just make sure that these are in Boolean so I can hide those out
the way as well. All right, so there
we've got pretty much our subway
where it's going to go and now let's
come in and what we're going to build is
the newspaper stand. So it's just a very,
very simple building. We'll use a lot of the plant geometry note for
instance on this, I think that'll make
it much easier. So let's first of all, we'll start with the top
of the building, So if I bring my guy over, it's gonna be a
roundabout there. And then what I'll
do is I'll press shift day and I'll
bring in a plane. And I'm just going to put
the plane just above my guy, so I just want to
put it above him. I don't need to
do anything else. I just want it to the height where roughly it's going to be. So somewhere around that. And then what we'll do
is we'll just come in, add modify geometry,
node down arrow. And we want the plank, so bring in a plank and that's
what we'll end up with. Now this needs to be, you know, relatively, these will
be relatively thin. They're not gonna be that
thick, to be honest. They're just gonna be
simple planks of wood. First of all though,
let's turn the resolution all the way down two, because we're really not going to need a
lot of resolution. We're not bending this
or anything like that. Next of all, let's work
on the actual width. So the moment, if he
stood in the, you know, in the kind of
newspaper stand here, it's a little bit too wide. So let's come in and
bring the width down. Not the width,
sorry, the length. Let's bring the
length down like so. And then let's next bring the thickness down.
So thickness is here. Let's bring that
down a little bit, holding the ship to
something like that. And I think that is
about the right size. Let's move it over here then. And what we'll do then
is increase the count. So we'll increase
the count like, so I'm thinking that it's
probably looking about right. I'm thinking that these
are a little bit too wide. So what I'm going
to do is I'm going to bring the width down, holding shift like, so
increase the count. Maybe one more. Let's try ten. And I think actually
that's going to look pretty good now from here. I'm not going to do
anything with this yet. What I'm going to
do now is I'm going to bring in some
other piece of wood. So I'm going to grab
my guy press shift, Desk coaster, selected shift. Let's bring in a cube. And then what we'll do is we'll fit the cube on the
sides, first of all. And we'll get a good idea
then of how big we want this. So make it a little
bit smaller, like so. And then we're going
to fit it into place like so let's pull
it out like so. And then what we'll do
is we'll bring it over. So shift space bar move. To the back like so. And then let's bring
it to the front and just popping pass there. And finally what
I'm going to do is I'm also going to
squish this down. So essence, head squish
it down a little bit. Pull it down a little
bit, and there we go. All right, so now let's bring
this to the other side. So shift deep, bring
it to the other side. You're just out there now. Let's see how big this is. Now you can see I'm
going to have to, or it will be probably
better off if I bring in a couple more. And then what I'll do from
that is I'll get an idea of how big or small
this is going to be. Let's first of all we'll
come to this part. So what I'm going to do
is I'm going to press shift and I'm going
to pull this down. And then I'm going to
press, pull it out, press L. And then what we're going to do is bring
this down to the floor. All the way down to the floor. There we go. Just
there, grab it. And then let's pull it all
the way up into this place. And then what I'll
do is I'll press L and pull it back a little bit. And then I'll grab this one on this side and press and
X and pull those in. If they don't come in, make
sure it's on medium point. So S and X pull those in like, so now if I just grab this with L and then I'm just going
to bring it over shift D, bring it over into
place on here, making sure it's fitting
in there nicely. And it is. What can
I say from here? I can say this is probably
a little bit too wide. We want a very, very
small actually. So that now gives us a good idea of how big
this is going to be. And what I think with this is actually I want it probably, I'm going to split
this off first of all, so let's grab this one selection and now I can grab this one. So LP selection like so. And now I'm just going to press one to go into prompt you. And I'm going to actually
grab all of these. So all of these
including my guy. And just move them this way a little bit. So just
move them this way. Move your guy there. And what you want it to be
the size of it, you want it to be the
similar size, this side. So in other words,
if I grab this, now grab both of these
and just move them over. And I think that is the size
that I actually need it. And as far as the height goes, I think it also needs
to come down in height. So I for grab the height. So let's split this off as well. So LP selection. Now I've got both of
these split off and this, let's press one and let's bring it down a
little bit like so. And I think that is round
about the size that I want it. All right, from there then we can come back to our geometry. Know we can bring down
the comp of our boards. We can also decrease the gap. So you can see this gap is very wide at the moment.
Let's bring it down. Bring it down like so round
about, something like that. And then let's press and X
and pull that down to there. That then looks about right now, of course it's gonna
slope up the back, so just bear that in mind. But what I'm going to do now
is work on this front bit. So on this front counter
we'll work on that. So what I'm going
to do is I'm going to bring these down first. So we'll bring both
of these down. So let's bring them down
into place under there. And then what I'll
do while I've still got these grab they'll
press shift S, coast to selected
and then Shift. Let's bring in another cube. Let's separate the cube off. I don't want to joined to those. Selection control
y or transforms. Right click, set
origins, geometry. Press the S button, scale it down into
where I want it. I'm thinking it needs
to be fires one, it's going to be
too high up there. So I'm going to bring it down to roundabout here just so you can rest his hands on these
counters and then S and X, let's pull it out into the
place where you want it. At this stage, I'm thinking
that the counter that actually probably wants to
come round about there, but then these parts want
to come back a little bit. We'll do that now.
We'll grab both of these and then pull them back, they're into play,
something like that. And now finally we'll just
put a top on this counter. So what I'm going to do,
we just come back to here. Press control, left
click, right click. Grab just this top part control. And all we're going to
do is just pull it up. Needs to be something very simple as we've said, like, so. All right, that's looking
good. Quite a thick counter. Is it too thick? If it is, we can just come underneath, we can grab both of these parts. Then three, we're going to face both of these parts
and then just pull it up, making our stick.
And there we go. I think this is pretty good and building the
outside of this cabin, I'm thinking that I will have a little piece of
wood going in there, a bit of wood coming
on the bottom. And we also want
to put some metal, you know, bolts on the
bottom of here as well. But pretty much we've
got the basis in there. The one thing I want to do
I think before carrying on is make these a
little bit thinner, so the width, make them a
little bit thinner like so. And increase the actual,
not the resolution, increase the count, then
x, and there we go. And maybe a tad, just a tad bit thinner, so. All right, let's lift
them up and there we go. Alright, that's what I'm
going to build with. All right, I'm going
to save my work. Well, let's save it out and
on the next lesson then, I'm hoping, hoping we should be able to get
this actually finished. All right everyone. So hope you enjoyed that and I'll
see on the next one. Thanks a lot. Bye bye.
106. Implementing Geometry Nodes for Dynamic Newspaper Stands: We welcome back everyone to Blend for the Environment
Artists Guide. And this is where we left off. Now what I'm going to do
is I'm gonna grab this, I'm gonna press Shift, and I'm just going
to bring it down. And the reason I want to
bring it down like that is because I want to tilt
all of these one way. So if I grab all of these, I should then be able to
press RNX and just tilt them, because I actually
want this to be tilted down a little
bit like soap. So let's now put them
on top of there. And there we go. That's
looking much better. Now let's work round our back. So what I'm going to do is I'm
going to come to the side, I'm going to rotate it around, so our x 90. And let's rotate it around
the other way, Y and 90. And there we go. That is
the way that I want it now. I need a split coming down here. So what I'm going to do is
I'm going to make these a little bit smaller like so. And then let's pull them out. And the other thing that I
forgot to do is I forgot. We need to have a lot of
variations in this wood. I'm going to do
that in a minute. I don't think we've
actually done that so far. Yes, we did. Actually, we
did it for another part. So what I'm going to do
is I'm going to come to this wood and we're going to
make it a little bit uneven. And then I'm going to duplicate it and put it there because, yeah, at the moment, this
is not how I want it. If we come down random, obviously we need
a random length, so obviously we're going to
need random width as well. You can see when I make a
random width, was that width? Yeah, random width. There we go. Random width. Let's
bring it back. Let's add another
one in. So let's bring it back again
a little bit more. And don't go too far with it, just press and X and pull
it in if you need to, like. So there we go. That's looking tons better. And then I'm thinking,
can I bring that out? So shift D, let's bring it out. And then out and R. Can I
put that back? Yes, I can. That's perfect. And then
I want to spin it round, so Y 90 and then 90. Okay, So we know we can
get that into place. Now, before I do that though, I forgot what I want to do. I want to also bring in a
few resolutions actually. Because what I want to do
is let's bring in tiny, tiny bit of bend like. So I want to right click
and shade auto smooth. Which is not going to work
actually because we've got, it's not going to
work actually because we're still going geometry. So let's just change
the material though. And what we'll put the
material on is dark wood. Let's put that on.
And then finally, what we'll do now is the noise. So we need to turn up
this displacement. So if a turn up
the displacement, you'll see that happens. We don't really want
it to be like that. So what we want to do then
is turn up the noise. So just put that down
a little bit tiny, tiny bit, even
smaller than that. Turn up you noise
them and now you can actually get a lot of variations
in it like you can see. Now it's looking a
bit more broken. Let's turn up the resolution and then we'll get even
more broken parts. As you can see,
that's what I want, except where is it? The displacement is
maybe a little bit. Let's bring them up
a bit more like. So not the displacement,
the noise. And I think that is perfect. That is exactly what I want. Now from there what
I want to do it now, I can actually come
in, duplicate it. R, Y, 90, 90. In fact, we can't do
that. We'll get there. Let's pull it out, press Alton. Now, R Y, and 90, and then 90. There we go. Now the good thing about
this is now we've got this, is we can actually just turn up this seed completely
swapping over what we have. Now let's put it into place. So we're going to
put it into here and we want a halfway
point coming down here. So what I'm going to do is
press S and bring it in. And we're going to let
this one out the way, because that's the one
that I want in here. And then what I'm going to do now is bring another post in. So I'll grab this post. Should I do both? No,
I don't think so. I'll just do this one for now. So shift, let's bring it back. And what we'll do then
is put that in place. So I'm just going to come
in, I'll put a top on this, maybe should shift click, that'll make it a little bit
easier to come into place. So let's pull it this
way a little bit. And on the back we'll pull
it a little bit this way. So I'm going to grab the back and pull it that
way a little bit. So now let's get this
wood into place and we'll get the wood into
place going up. We'll also have, we need
a back on here as well. So let's put that in first. All I'll do with that is
I'll grab this one, Shift D, I'll bring it over to this one first, and then
I'll grab it again. So shift D, bring it over
to the middle roughly. And then let's reset the
transformations like so. And then R, Y, 90, and let's pull
it up into place. Now obviously we're
going to need to make it smaller. Let's make it smaller. Let's put it into place
just on the top of there. Let's press Y and bring it in, and Y and X, bring it in, and
then pull it down. Into where we're
going to have it now. The good thing is about
the geometry nodes. You can see there's a
couple poking out here. What we can do is we
can come down now and just bring down that
length a little bit like so. And we can pull those
back into place. Now we'll do is we'll
grab this one here. We're going to press shift D.
I'm going to bring it over. I'm going to reset the
transformations once more like so. And then what I'm going
to do is I'm going to make this a
little bit smaller. In fact, we won't
do it that way. What we'll do is we'll
make it smaller, first of all on the
Y and Y, like so. And then X and X. There we go. Now the thing is I
need to make sure that this is in the center of here, and it should be because
we grab this part here. So I think actually we'll see. So what I'll do is
I'll grab this one. I'm going to bring down
the length of the. Let's bring down the length
just so they fit into place. Let's increase down the count. So then we'll go all the
way down. All the way down. And we can see we do have
a problem in some of the lengths don't actually
fit plus the bottom one. We don't want it
like that, so I'm just going to turn
it down once more. And then what I'm
going to do is I'm going to turn up the length. So, and I'm going to turn
down the length randomness, just bring it down
a little bit so. Alright, that's
looking pretty good. Let's bring it up a little bit. We'll have a bottom
on here as well. Now I'm going to do is I'm
just going to press Shift. Bring it over to this
side, making sure it fits. Now you can see, as I said, I don't feel like this
is in the middle. So what I'm going to do
is grab both of these. Shift cursor selected,
grab this one. Then shift selections cursor. And now it's more in the center. It should be in the
center of both of those. Now I should be able to
put this into place. Let's put it into place like
so let's see how that looks. We can see that we're going
to have to move this to the side and then we're
going to have to move this one to the side as well. And there we go. All
right, so good so far. Now let's think about this part. I think I'll have a
halfway join in here, so I'm just going
to steal this bit. Shift D, bring it
over and then R, and X and 90, and then and Y, and just pull it in also, because we're not
going to need these in the view of the moment. Hide our coffee shop and our bookstore. Let's hide
them out of the way. And then let's pull
this into place, like pull it over here. And then what we'll do
is we'll just come in now and put this
bit back like so. All right, now we
need another one, so we're going to grab it again. So shift D, we're going to bring it over to
the center of here. Let's grab the center of this. We'll do the same
thing, because we know that this is
the center of it. All I'll do is I
will grab this part, shift selection to cursor and now we know
it's in the center. And then x 90. And let's drop that
down into place. So, and bring it forward
probably a little bit. And then let's drop it down. Let's hide our floor
out the way as well. Let's drop it down a little
bit more, just down to there. Now what we'll do is we'll
come and grab this one shift. What I'm also looking for, just to make sure
I've changed those. This is on seed one, this one's on seed one. Let's put this on S
two. There we go. Let's try another seed because it's dropped down a little bit. Three, looking a little bit B. Now let's come to these
and turn the count down. Turn the count down. Let's also change the seed
up to maybe five. Let's bring it into place. We just want it to fit in there, so that's looking good. Let's bring one more in like so and then express
Shift D. Shift D, bring it over, put it into
place, change the seed. There we go. And you
can see just how quickly and easily this is
really coming together now. All right. Really
happy with that. What we'll do then
on the next lesson is we'll get this part in. We have got a daughter
put in here as well, which will be around this side. And from there then
we'll start putting on, you know, these bottoms of here, which is pretty easy. And then from there
we should have it finished and we should be able to come in and texture it. Alright everyone. So, I'm
going to save out my work. I hope you're
enjoying the course. I really hope you learned
a lot and I really, really hope that people
have got this far. And just keep going. Like
I said, just keep going. You're going to learn more
and more and you've seen and really start coming together
soon. Alright everyone. So I hope you enjoyed
that seeing the next one. Thanks a lot. Bye bye.
107. Completing the Newspaper Stand Model: Welcome back everyone. To Blend for the Environment
Artists Guide. And this is where
we left off now. I'm just actually going
to take one of these. I'm going to press shift
D, I'm going to turn up the seed like so. And I'm just going
to keep that there. I'm going to do with that is
use it for my actual sign, you know, kind of with a newspaper clipping
on or something like that. Next of all, I'm going to grab this one and I'm going
to press shift deep. And what I'm going to do is
I'm going to bring it down. I'm going to press alton Ar
just to reset the resolution. I'm also going to turn
the seed up like so. And then I'm just going to fit that into place wherever
it's going to go, which will be just
above these parts here. Of course, this is way, way too wide at the moment,
so we need to pull it back. So all I'm going
to do is press S, and in this occasion I'm not
going to mess around with anything else because you won't really be able to
see in there anyway. It's gonna have a piece
of wood on here and then we'll actually
balance this all up. And what I'm going to do for
my piece of wood is I'll just bring in this part here. So I'm just going
to press Shift. I'll drop it all the way down. And then I'm just going to
steal the bottom of it. So if or this part here. I'll just steal this part here. Shift selection,
separate it off, grab this part, then delete it. Hopefully it's not deleted
that, which it didn't. Now what we can do is we can
press control or transforms, right clicks a origin geometry. Now just pull it out a, pull it out like so. And then let's get this into place and into wherever
it's going to go. And this bit maybe needs
going up a little bit, as you can see, it needs coming
out a little bit like so. And then we don't want this
being here because it's going to be supported
just on these edges here. Also, we need our floor a
little bit higher than this. So I'm going to
grab my floor now. Put it up into that place
and then grab this one. Pull it up into place like so. All right, so that's pretty
much most of it done. Now I'm Jaws making sure that my flaws you can see still
a little bit too low. Let's bring it up a little
bit or something's in there. Actually, it's these parts here. We don't want those bits just kind of peeking
through there. So what I'm going to do
is I'll just grab both of those S and Z and
just squeeze them up. Jaws a little bit like. So there we go. And then what I'll do is I'll come round and bring this part. So shift, bring it back over
here, put it into place. And now finally we just want to straighten up these
bottom parts. So I'm going to come to
these bottom parts now I'm going to come
and put the length, turn down the random length, turn up the length of them, and then just make
sure they're sat in place because someone
stood on there. You're not really going to
be able to see in there. You can see here, you can just see it if you get a really, really clever angle
of like that. But I mean, how
often are you gonna take an angle like
that, to be honest? All right, let's come
round now and drop this. We've got it on the back, we just need it
on the sides now. So I'm going to press
shift D and then R Z 90. And then all I'm going to do is put that into place in here, in here like so. And then all I'm going
to do is pull it back. So grab this one, pull
it back into place. Grab it again then. So L, and then press shift
D and pull it over. Now, to be honest, I'll be sick of working with
planks of wood. Once I've done this, I
did do the first time. So there we go. That's that. Now let's work on these parts. Coming down here. So
what I'm going to do is I'm going to
grab this part now. Shift and then we're just
going to bring it over. We're going to press R Z 90. And let's then get
it into place. If I press control three, I should be able
to see where it's going to start. So
let's put it there. What we'll do then is
turn down the length, randomness to zero,
turn up the length. And then let's put
it into place more. So let's get it into place. Like if I turn that, that length just far enough, we should be able to make sure it doesn't come
at the top of there. So let's turn down the
length a little bit more. Let's pull it back a little
bit, making sure it's in. Let's see if I can actually get away with that. Let's
put it into place. I'm just making sure it's
not poking up there, making sure there's the riggin there and that looks perfect. All right. That's looking
perfect. I'm happy with that. Now what I think is we'll
we'll create the bottom parts. Now, just for these metal parts that are going
to go on here, I should be able to come in
and grab all of these now. Press control J, just
to join them all up. I'll press control to reset
all the transformations. And then we'll come in, I'll save my work out
while I'm there, I'll make sure then to grab all of the bottom parts like so. And then all I'm going
to do is press Enter and then pull it out. You can see the
pulling out wrong and the reason is we need to
be on individual origins. So pull them out and then
pull them down like so. And I really don't think
these need anything else other than just those
metal parts like so now, before we start our door. Let's actually make these things that are going to
go on the front. So what I'm going
to do is I've got the front here and I've
got the front here. Let's start with this one. So I'm just going
to grab this one. Shift us to selected shift. Let's bring in a plane. Let's make it a
little bit smaller. Rotate it round so R x 90. Rotate it round. Let's
press one or in front view. And then all I'm
going to do is press squeeze it in a little bit.
And it is a newspaper. Just remember, so it needs
to come in a little bit more on the X just so it makes it a newspaper shape. So
something like that. And then what we can do from
there is we can pull it out like so Al right now what we
can do is we can actually make the
metal part where the newspaper is going to go in. So all I'll do is I'll
come in, grab this, I'll press and you'll see
it's not coming in properly. That's because we need to
reset our transformations. And now press and
bring it in like so. And then all I'll do
is I'll grab this, this, and press Y, just to separate them out. And then this and
this and press Y, And then I can grab
the whole thing, or all of these, sorry. And press pull them out. And finally all I'm going to do is just pull this bit forward. So just pull it
forward a little bit just so it can sit on
the back of there. Now let's put this into place. So let's put it so it's
jawed on there like so. And then all I'll do is I'll
pull it over the other side. So shift the, pull it over the other side so make
them a bit uneven. I think it looks a little
bit bad like that. Anyway, even if you
want to just rotate it a little bit like so I
think it just adds to it. And now what we'll
do is we'll bring in another plane which we'll
use for our newspaper. So shift S Ks to select it and then
let's bring in a plane. In fact, rather than
bringing in the plane, you know what, we'll
just use this one. So I'm going to press Shift
D. I'm going to pull it out. I'm going to press selection. I'm going to grab this one.
Control all transforms. And then what I'm going
to do, I need it to look a little bit like
a newspaper and I need it to be bent on the corners
and things like that. So the way I'll do
that is first of all, I'll press one, I'll press S, then one, let's put it set origin to
geometry. Bring it down. Yes, like so. And then what we'll do is we'll bring
in some edge loops. So control, left
click, right click. And then what I'm going to
do is I'm going to come in with my knit Al, so
I'm going to press one. I'm going to come
in with my knife. So I'm going to press K and
just come into the corners. And then I'm going to press
K, come into this corner. And then I'm going to press
K again and just come into all of the corners like so. And then K once
more near the top. Now we can actually
duplicate this. If I come over, press L shift and duplicate
it over there. And then what I'll
do is this one. First I'm going to
come in, first of all, grab the top of it. I'll grab all of it.
Shift and click. Grab these two parts
if you need to. And let's bring in, let's
try this one first. Is that going to be
the bend that I'm actually looking
for to have a look? Not too bad, but I need to
fold over. Let's try the shop. Yeah, that one's going
to be a bit better. Let's try bringing
it on the bottom. Now, let's fold it over. Bring it out a little bit. So now let's come in
with these parts. And all I'm going to do with
these parts is I'm just going to press G and
bring it in a bit. Fold it over like so. And there we go,
That's looking good. Now let's right click
and shade. Auto, smooth. And that's the first one done. Now let's come to the second
one then. Same thing again. So we'll just grab all of these. And I've just done
separately just so they're going to look
a little bit different. Let's grab them
all. First of all, let's bring them over, not quite as far on this one. Jaws a little bit less. And then let's bring
them over from here on this one as you can see now looking a
little bit different. Now let's come up and we'll bend this one back a little bit. And this one forward, jaws, to make them look a
little bit different. Bring this one out. There we go. Now they're looking very
different from each other. Now let's pull this
one back into place, just so it's on there like so. And then this one, now we
need to put also in place. So press one on the number
pad without proportionality. It's on. There we go. Let's rotate this one
round as well, so R, Y, and then let's also
grab this one, L, and then R and Y rotate it
around, maybe this way. So all right, that's
looking perfect. Okay, So all there is left to do now on this is the actual door. I do need a little thin one
coming across here, I think. Yeah, I think we'll put that on. And then just the door
and finally we can actually work on this part here with our other
newspaper parts. So not much to go on this one
now. All right, everyone. So I'm going to save out my work and I'll see you
on the next one. Thanks a lot. Bye bye.
108. Modeling Doors for Community Stands: Welcome back everyone to Blender for the Environment
Artists Guide. And this is where we left off. All right, so let's
grab this one here. We'll just actually
grab this one. So I'm just going
to grab this one. Press P selection, Split it off, so control y or transforms right click instead,
origin to geometry. And now what we'll
do is we'll bring in our door archers first. So we want some door
archers coming around here. And here we want to
keep the door straight. We don't want it going, you
know, kind of this way. So what I'm going to do,
I'm gonna press shift, bring in a que and
Cube came over there. I don't want that. I'm
going to come to this now. Shift S. Krista,
selected shift date. Let's bring in a cube then. I'm also tired of kind
of making this smaller. Sando is going to
bring it all the way down to bring in something
that I can actually use. And let's press and bring
that then over to here. And then X, bring
it in, pull it out. Let's pull it up now.
So we're going to pull it up with face select. Bring up the face. You can see it's all the way through
there. Don't really want that. So let's pull it up
first, Grab the top. Let's pull it up to the top. So let's bring it back a
tiny bit more like so. And then all we're
doing is we'll bring it over to this side, shifty, bring it over to this side
and we'll make our door. From there, we're going
to bring up the top now. Then what we'll do is
we'll use this part to make just that arch that's
going to go over there. So I'm just going to press
shift D. I'll bring it up and then what I'll do is I'll put it into place
so we can see here. It just needs to go
thicker, basically. Let's first of all press
S and Y, shrink it down. Maybe we're going a little
bit too far there, S and Y, bring it out. That
looks about right. I just need to bring
up the top now. There we go. Make
sure it's not poking through and that looks perfect. Now from here, we can actually create our plane for our door. So what I'm going to do is I'm just going to
grab these two. Grab this one and this one. Press the F one, and then
press P and Selection. And there we go,
that's split off. Now you can see we
do have a problem in that we really don't want
it to come kind like that. So all I'm going to
do is press tab. We're going to pol it over. I'm also going to make sure that it's right
down at the bottom. So this one here is
right down the bottom. Press control three, is it?
No, it's going to be three. We can work with that.
And what I want to do is I want to put my
door roundabout there. So what I'm going to do is
I'm going to press Tab. I'm going to press control
R. Bring in an edge loop, bring you up, and
if you press E, you can actually
straighten it out. So all I'm going to do is
press once I've got that, and then I'm just going to
press left click light. So finally then I can come in, grab the top part of the here, press Delete and faces. All right, so that's our door. Now let's come in and just hide the other way
so I can work with it like so I'm going to hide that other way as well.
Let's come to our door. So with our door, we probably want a little bit of a
frame going round it. We're going to have then a
window and a bit coming out. So first of all, let's
press tab control. And let's split this door
right in the center, I think. So drop it right click
right in the center. Let's now make the frame
that's gonna go round them. So if I grab this,
should then be able to press again and bring it in. So draws the small
frame like so. And then from there
then what I can do is I can grab this one
and bring it in. And that then is going to
create my window here. And from this part I'm
going to bring it in, but I also want to make sure that I'm going
to be going back. Now. First of, first of all, let's split off these two. I'm going to press Y, and then I'm going to split
off this one and this one, I'm going to press Y, and
then what I'm going to do is grab them both
and pull them out. I'm going to press to
pull them out just there. Then what I'm going to do now
is come into the next part. We'll do the window next. I'm going to grab this one. This one and this one press Y, and then this one and
this one press Y. Finally, grab both of these and then we're
going to pull them out. That is where our window is
going to go, right in there. This now should be separated. I should be able to pull
that back if I want to. Now you can see we've not
got a lot of room here to maneuver with on
the front or back. As you can see, my window
is right back here. This door is right back here. These probably won't come out a little bit more. I'm
just going to grab these. I'm going to pull them
out a little bit more. Give me a little bit
more room to work with. And from there then I'll also pull all of these
out just a tad more. So let's pull them out just a little bit more like so. All
right, that's bare. Now we can come into the window and we can pull the window into place holding
shift, so perfect. Now let's come to the
bottom part then. So we're going to grab
this one, and this one, press Y, and we already know
why we're separating these. We're separating them because
when we come to bevel them, they're going to look much,
much nicer. Let's press. So now with this part, what we're going to do is we're going to bring it in slightly, so I bring it in. And then, and then
again like so. And finally just
press the button and just make a door like that. Just a simple door like this. Finally just the bottom bit. Then I want the Bob bit to
come out a little bit more. So what I'm going to do is I'm thinking I'll just
pull this bit out. So I'm just going to press and pull this bit
out a little bit. So actually I don't like
these parts on here. Instead of that, I'm just
going to put it back. All I'm going to do is come in. First of all, I don't
know if there's still a extrusion on there. So what I'm going to do is mesh, clean up, merge by distance, and there
wasn't one on there. Now I can do is come in, press A just so it's going down. Now you can see at the moment, it's a very weird angle. The reason is for press escape, I need to be in
directly on three. Then I can press A, then I can do the same
one on this one A. And that one didn't work, so let's try that again O
Enter and still not work. Sometimes sometimes
this happens. If this happens,
just press shift H, Hide everything
else, and now you should be able to get
this to go right. It's just trying to
connect to something else. That's the reason
sometimes it doesn't work. So connect it, Enter,
and there you go. All right, from
there, then now I can pull this out. So pull this out. So let's press tab. There we go. All right. All right, we've got our door on now. The one thing we
can see with this door is it needs to go back. You can see it at the moment
it's in front of there. We don't want that, so let's
pull it back into place. The other thing is
that on our door, as you can see on the back here, we've got a lot of
the pack missing. So let's press shift age, hide everything else
out of the way, and let's have a look at why
these backs are missing. You can see we've got a lot
of crossover parts on here. First of all, before
we do anything, let's just reset
all our transforms. Let's come in then and add
in a, not a jumptodevel, generate bevel, nothing's actually happening
with that, have a look. I think what I have to
do is come in geometry, turn off clamp overlap. Put this on naught point,
naught naught three. Now, there we go. All
right, that's a good door. Now we've just got
the backs to fix. So you can see here, especially down here it is this part here, it's mainly this part down here. So what I'm going to do, I'm
going to grab everything. I'm going to make sure first of all that we're
going to clean it up. We're going to merge by
distance 56 vertices removed. And for some reason we had actually a really big
problem in there. I don't know what caused that. Either way though, now let's
actually get this fixed. So if I press L, it's going
to grab the whole thing. So you can see problem is when I joined those
vertices together, it actually joined the
back of here where this wooden kind of part
is going around here. We don't want that,
so let's come back before we do
that. And there we go. And let's come in and
grab all of these. And we're going to hide
those out of the way. So hide them out the way. And we should now
be left with this. Now you can see these just I've got a blank in them
and I need to first of all, separate them out
so you can see all of this isn't separated. This is probably what's
caused that problem. I didn't separate these out, and I really need
them separated out. So what I'm going to do is I'll grab the center press control, control control, why H to hide it out the way
and separate that out. Now let's deal with
these now because we can see we've got gaps all
the way down here. If I come in and I
grab each of these, let's first of all see if
you can come in and mesh, cleanup and fill
holes. There we go. Let's now bring the
other part back. So this part here. And I'm
going to do the same thing. So I'm going to press
L on this part, mesh, clean up L holes
and there we go. All right. The doors fixed? That's looking pretty cool. I'm just making sure
everything's right on there. I think I'm going to leave
it at that now. All right. All Tate, bring
everything back and then hopefully now on the next There's nothing
before doing this part. We'll get all of these materials on because this part
is pretty much done. The one thing you can see is I need to lift
it up a little bit. So if I come in,
grab everything, bring it up and then press ol
tag, bring everything back. Press one and then
grab it again. And then one we're
going to do is just put it on that ground plane. So let's bring it down now. Put it on the ground plane, so press old tag
and there we go. Alright, that's not
floating in there. That's looking pretty
nice, the guys in there, it's looking like a newspaper
stand and we're happy. So let's go up to file, save everything now and
I'll see on the next. And everyone, thanks
a lot. Bye bye.
109. Advanced Texturing for Newspaper Stands: Welcome back everyone.
To blend the ball, the environment, artists guide, and this where we left the art. All right, so now let's come in, let's put
in our material. I think we should have
material on these. Let's see. And there we go. And
we've got materials on all the way around there,
which is really good. You can see that
on some of these, the materials haven't
gone on properly. That sometimes happens
with the actual bend. So what I'm going to
do is, first of all, I'll turn my light round,
so 180, turn it round. Let's have a look
at these. So we can just see in here where
they've actually gone. If we come up here, let's
try and turn the seed first. And there we go.
Seeds done that. Let's come to this one,
turn the seed up to four, maybe five, and there we go. It's actually fixed it, apart from the fact we
need to make them, you know, a little bit longer. Let's just make them a
little bit longer like so double tap the eight
and they're fine. Work our way round. Let's have
a look at the other ones. Work our way round here, making sure they're all
going the right way. And I think everything on there now is pretty much hunky dory. So let's come in and
grab these ones now. We'll join all of
these posts together. We'll also, yeah, we'll
do these parts first. So I'll grab this
one. And this 11 part of Miss, by the
way, is under here. So let's quickly fix that
then, while we've got it. So all I'm going to do
is grab this one shift, we'll bring it over to here, and then we'll pull
it down to here. So let's pull it back into place into somewhere like
that I think is good. And then all I want to do
is just lower this down a little bit and make sure that
it's a little bit thinner. So in a lower it down.
And there we go. All right, now what we can do is we can join all of these. So we're going to join
all of these together. So I'm going to press control
J. Join them all together. Smart UV project. Okay, I'm hoping
they will unwrap. Okay, Then what I'm going
to do is I'm just going to come in and let's
come in and add in wood, dark wood, double tap
the and there we go. It's up to you. If you
want all to be dark wood, let's put it on to render. Or what you could
do instead is you could bring this down
to the light wood. We also have that, so
if we're in light, you might want to
have it like that. Instead of it's dark,
some of it's light. I think personally I like
the dark wood like so. And then what I'll do is now come to this part
because I'm also thinking they would have probably used the same
material all the way through. So I'm just going to grab
all of these parts now, and this part and this part. And then what I'm going
to do is grab this part, this part going all
the way around and maybe a bottom part
there, like so. Press control J, and then
control or transforms. And finally, tab U
and Smart UV project. Click okay. And then what we'll do is we'll join
it up to this wood, so control L and
we'll link materials. And there we go. Now let's think about these bottom
bits before we go on. So if I come over, just hide my floor out
of the way for now. And then what I'm
going to do is I'm going to come under the bottoms, grab each one of these like so. And this one press
control control plus. And then all I'm going to
do is click down arrow and black metal and click a
sign tab. Double tap the. All right. Now I'm
just wondering why this bit here looks like
that. Not even sure. So let's come in, separate
it out and there we go. I don't know why that did that. But anyway, I think it was
joined to this in some way. But ah, now let's
come to these parts. So I'm going to go out
both of these parts. Control A or transform, dry click Sogen's geometry. Bring in a black metal. And let's now press control
L and link materials. And then all longer
going to do is press Tab and smart UV
Project. Click okay. And there we go,
there's the metal. And on these actually
you can really, really see what we're talking about with
the metal edgewaar. This is why those shades
that we've created really, really make such a
huge difference. Now let's come to
the actual door. And I think the inside of the door should
basically be all green. So if I press control, Al transforms set origin
into geometry Tab, grab everything.
Smart UV Project. Click okay, down arrow. Let's find the green them. So green painted wood. And then let's come
to this part here. Now the green painted wood, as you can see is definitely definitely not looking
the way it should. So I'm going to come to this
part here first of all. And then one going
to do is going to click plus down arrow. And I'm looking for glass. And the glass I'm looking
for is a table glass. And let's click a sign. And now I'm going to do
is I'm going to come in and hopefully split
all of these off. So if I split these off, fair, press selection. Split them off. Now you can see it's actually looking a little
bit better, I think. I'm not happy with how
this wood is on here and I don't know really why
it's going lib that. So what I'm going to do is
I'm just going to grab them. Control or transforms right
clicks, the origin geometry. And what I'm going to do is
I'm going to get the light, so where is my light? And
I'm going to shine it. So zed 90 red hundred and 80. And shine it this way. So I can actually see a little bit better
while I'm looking at. Yeah, I definitely don't
want it looking like this. It doesn't look like it's
unwrapped as well to me. If I grab all of these, so if I come in, you can
see these are split off. Now let's grab this one. Press a smart UV
Project, Click Okay. I'm just looking to see,
definitely not like this. Let's actually try something. So what we'll do
is we'll come to this part and what we'll do
is we'll add in a modifier and we'll bring in a bevel.
Let's bring in a bevel. Let's put it on point
N naught three. Let's put that on
there. Let's just check to see if it's actually
beveled off, which it has. Now what we'll do is
we'll come to this door, we'll join it with this
control copy modifiers. Let's actually over look
what happened there. Oh, it's already got a bevel
on there, let's have a look. Yeah, it already has
a bevel on there that maybe Let's just
turn this bevel off. So I'm just going to
turn this bevel off. Put it back onto. Yeah, it's still the same. All right. We have a few
options what we can do here. Let's turn it back on, make sure everything's leveled off, so both of these parts
should be leveled off. Now let's join it all
together with control J. And then what we're
going to do is instead we'll come over now to our green painted wood. And what we'll do is we'll
click plus new green painted wooden door like so. And then what I'll do is
I'll come to this one, click the down arrow
to copy material, and then click the down arrow
to paste in the material. So now this material is
exactly the same as this one, but now I can alter
this one without altering this main one
right across our scene. So what we'll do is
click the minus B. Everything will go to glass, which of course we don't want. Press the tabon to
select everything. And then a sign. And then come to this part. Let's join it altogether, actually, because it's no
good as the way it is. So control G, join
it altogether. And then finally come
to this part here. Glass click a sign. Let's minus this
one off as well. So minus that off
in object mode. Now we need to just come
in and grab these parts here and click a sign on there. All right, now let's
leave that there. What we'll do is we'll
go over to shading. I'm going to press the
dot button to zoom in, and I'm going to
zoom out of this. And then what I'm going
to do is I'm just going to go onto
my rendered view. Let's have a look now and see if we can actually fix this. Basically, most of the time, these are where the devils are. This is what's
caused in the edge. This is like the
difference between them. If I come in here, I can come in and let's
see if I turn that down. There you go. That's
exactly what I want now it's looking there. Let's bring that
up a little bit. Let's bring it up even
more. There we go, a thing. Our looks tons, tons better. Yeah, that's looking much,
much better in there. And that's exactly
what I wanted. All right, so we got
there in the end. I'm just looking to make sure everything's
right while I'm here. I think this is
looking really good. So now what we'll do
then on the next lesson, is we'll get the newspapers in. I think we'll build this part out first
because then we can get the newspapers
in altogether. I think they'll be easier. I think for now though,
we'll just go back to modeling and we'll save it out. As this part took much longer
than I actually thought. To be honest, I thought it would be done and dusted within, you know, a few moves. All right, let's also
bring out our guy. What we'll do is now
join it all together. We'll join this all together. I just want to make sure, have I, these geometry nodes? Yeah, this could
cause a problem. We don't really
want that because we've leveled some of it off, some of it is beveled off,
and some of it isn't. So you can see the
bevel is here. I'm just going to
quickly do this, so this hasn't got a
bevel, this has a bevel. So let's hide that
out of the way. Hide. And then all of this now
shouldn't have a bevel, you can see it's
just geometry nodes. So what I'm going to do
from here is first of all, I'll come in and delete this out the way because
we don't need that. And then what there is, I'll
press Select, Dragon Select. And then what I'm going
to do is object come down, convert to mesh. Just make sure if it's gray
you select one like that, so it's a bit yellow.
Object convert mesh. So now we can press control
J, join it altogether. Lth, bring back everything. So now I can just join
these with these hopefully and inherit the bevel control
J. In fact, what would do? First control all
transform, right click, therogent geometry control
J, join it all together. And sometimes sometimes
that happens, I have no idea why that happens, but sometimes when you join these geometry nodes
with something, it minuses off the material or it just doesn't unwrap
them way round. That is, let's see, I'm thinking if I
come to my bevel, let's minus that off first and the door, let's
minus that off. And now let's join this
with this press control J. And there you go. You can
see how it minus it off. Really weird how it
works like that. Let's grab the door, press control J, join it all together. And finally finally
let's come in and just re unwrap all these points. I don't
know why that is. It's a little bug on blender that's
happened to me before. Luckily I do know how to fix it, so I'm going to do is
just grab this one and then and smart UV
project. Click Okay. So hide those out the
way. Let's come in now. L L your any parts that
I've actually missed, which is this one. This one. This one and this one. This one. My door again. I think I might need to
undo the door again. Smart UV project. Click. Okay. Now let's
look at the door. The doors, okay.
So that's lucky. Just looking around
now, making every sure everything is in
the parts I want. You can see again that this part here. Can I bring this out? Let's press Altage. Let's see. Just grab this part. Bring it out a little bit. Just wondering.
Yeah, there you go. That's causing the
problem there. Let's bring it
back a little bit. Causing a problem
in here as well, just because of how
close it is touching. So we've got another option,
We can grab this part and just pull it back a little bit. So there we go. Now
that's looking bare. Double tap the, there we go. Everything's looking
good on there. Now finally what we can do is we can grab the whole thing and five
press, it's all grabbed. Add, modify, generate, bevel, let's come in, bring in plant overlap off, and then
let's put this on. Not 0.3 there we go. Now it's all beveled off. Looking beautiful.
Now, finally on the next one we can
build out this part. And build, get our
newspaper on there as well. All right everyone. Sorry that took so long. A few
problems there. Hopefully though, it
won't give you, you know, the skills in the future to actually fix problems
that you might come across. All right everyone.
Thanks a lot. Seeing the next one, Bye bye.
110. Finalizing Scene Assets for Enhanced Realism: Welcome back everyone.
To Blend the Fall, The Environment Artists Guide, and this is where we left off. All right, let's start
work then on this. First of all, let's
bring down our length. The length randomness. Let's make them a little bit more just not as much
as the other one. So something like that turn up the seed if you want to like so. And the other thing
is we want to make this a little bit thinner
because at the moment, if I press three, you can see, right, it's right on
the ground plane. I don't really want that sell. I'm going to do is
press En's ad and bring it up just so it's
stuck away from there. The next thing then I want
to do is put on something on the front of this shift
S Kuster selected shift. Let's bring in a cube. Let's make the cube a
little bit smaller. And let's also bring
it to the front. And y bring it to
the front like so. And then what I'm going
to do is have a gap, this side and this side. So I'm just going to
put it onto there, so make sure it's stuck back and make sure it's wide enough. Is that too thick? I think
it's a little bit too thick at the moment. And
X, bring it back in. And Y bring it back a little
bit. And there we go. That looks about right now. Just bring this
down to the floor. If I bring this down to my ground plane,
if I press three, you can see ground plane is, I think round about there. So have a look on three now. Yeah, I press five by mistake
then on the number pad, so I couldn't see it properly. So let's bring it down
to the ground plane, so. Alright, we've got that one. Let's press tab A in edit mode, shift D, bring it over like so. And then what we'll do
now is we'll bring it, we'll actually put on the
paper now at the moment, because if we don't do
that when we rotate it, we'll have to rotate
the paper as well. So all I'll do is I'll
just press tab shift a, bring in a plane. In fact, no, we won't do that. We'll use one of
these. We'll just grab this. We
already created it. So we'll just press Shift and bring it over and
put it into place. And you can see here, it's
a little bit too big, so I can either
shrink it in or I can just grab these
parts and just pull them out a little bit like so they don't need
to be even anyway. So something like that I
think is actually there. Yeah, I think that looks good. Now what I can do is I can
join the whole thing together. So grab this, this, and this. You can see that this
part is part of here. So let's just press
tab LP selection. And now let's join them together. Join all
these together. First of all, though,
we've got a geometry node, we've got bevels on there.
We don't really want to. Yeah, let's have a look. Actually, this has not
got a bevelon and this has got a geomet node on
this has got a Bevlon. Let's turn off the
bevel on here. And now we can come to
the geomet node object and convert mesh. And now I can join this and this together control
join it altogether. Right click, shade auto, smooth. Finally, let's rotate this. So what I'm going to
do is, first of all, let's right click, set
origin to geometry. And then what I can do is
R and X rotate it round. So now let's bring in some little points
on the back shift. In fact, you know what,
let's use this part here rather than making
new parts shift, let's bring it to the back. Let's press and rotate it
round into place there. Then all I'm going to
do is I think I'll just all these
down a little bit. So I'm just going to
come to the front of here just so I can
see in there we go. Let's put it on normal, let's pull it down into place, and let's take that off. And there we go, let's pull
it up a little bit like so. All right, that looks nice. Let's now grab this
with L shift D, bring it over this way and it's needs to go over the other way because
I've got a normal on, let's bring it back in global, make it a little bit
easier for ourselves. And then we go, all right, control all transforms, right. Click the origins geometry. And now, yeah, we
need a bevel on, so generate a bevel nought
point n three. There we go. That's that done. And finally, now let's come in and
add in some material. So operate in material
mode, let it load up. There's a lot of shaders,
as they always say. Now let's come to
these parts here. So we're going to press L
L L U Smart UV Project. Click Okay. And now
what we can do is we can actually add
in that material. Because at the moment
we've got all of these materials on here, we
really don't need them on. The only one we
want is dark wood. We can minus off
the rest of them. We're going to add
another one in a minute, which will be for the newspaper. Let's first of all
though, do this one. So what I'm going to
do is I'm going to come to my newspaper here. I'm going to minus this off, because this one is from the geometry to just minus it off. So make sure you're in
object mode, minus it off. It won't change
anything. Click plus, and I'm looking to think. That we might need
to bring it in. So let's come to asset manager. We can see we've got
news headlines here, so just drag and drop
this into there, like so back then to modeling and then what I'm going to do is this
one and this one. And I'm going to grab, I think this one, yeah, we'll grab both of these.
All three of these. So we'll grab, we'll just
come in and grab this one. This one and this one. We'll press U and unwrap. So not smart UV
Unwrap. Just unwrap. Now let's go to UV editing. Let's first of all
come to these. So I come to this one, I can actually assign this, I can come to this
one, then assign this. And then finally, for this one, what I can do is I can come to this one here and I need
to bring in a new one. So let's actually press plus
down arrow and adverts. Is it under adverts or
is it something else? Sorry, I forgot.
Let's have a look. News headlines. There we go. News headlines. Okay.
News headlines like, so click a sign and there we go. All right, so now let's bring
in the news then, I guess. So the first one
is this one here. So let's grab this one. We'll grab this
here. Press dot just so I can come into it
and see what I'm doing. So L and what I'm going
to do is I'm going to basically move this one
a little bit smaller, move it across to here, and then just pull it
out a little bit and x pull it out a little bit like so. All right,
that's that one. Now let's come to this one L, and I'm going to put this one, so if I press A, I'm going to put it onto several.
Which one do you want? Let's pick this one over here, press bringing it down,
put it into place. And then and X, and X, pull it out then. And X, just line it
up a little bit more. G, X, line it up. There we go. That's that one. Then finally the other one. Let's have this lady on here. I'll come to this one then
then put it into place, make it a little bit bigger, and then and x and pull it out. And there we go. All right, that is pretty much done. All right, let's go to modeling. We'll save out our work. We'll have one more look round then to see
what this looks like. I'm going to put
these both together. So I'm just going to
put both together. But we are going to split
them up 'cause you might want this in something and
this in something else. I'm going to hide my
floor out of the way. Let's press the render Bun
just have a quick look round making sure we're
happy with them and yes, I'm very happy with how they
look. Hey, that's that done. Let's then go to object mode. And what I'll do
this, I'll call it a paper stand or
something like that. So let's grab this. Press F two stand, then we'll call this main
paper stand or something, paper, grab them both, Press the button
and we're going to put them again in our assets. So finally, now we can actually
drag those over there. All right, let's press a
tag, bring back everything. Now on the next lesson then
what we're going to do, we've basically
pretty much done all of our little assets
that we have here. What we're gonna do then is
work on the actual subway. So we're going to
get the subway done, and from there we
can actually put in even a couple of trees,
we can get those in. We can get in some
lamp posts from there. And then finally,
we'll start work on the actual butcher's house. All right everyone,
So I hope you enjoyed that and I'll
see on the next one. Thanks a lot. Bye bye.
111. Initiating the Subway Entrance Model: Welcome back everyone to Blender for the Environment
Artists Guide. And this is where we left off. All right, so now what I
recommend we do is we just hide these two buildings
out of the way just to make it a little
bit cleaner to wit. With we can also hide the
assets out of the way. The only thing I'm going to
need is this little guy here. And he's already in his own
group. So that's fair enough. So let's close out
each of these. You can see that
we hid the floor. Then I want to bring that back. I want to hide my bookstore, and this is what we
should be left with. Let's move our guy over
a little bit then. Now what we're going to
do is, first of all, we'll create the kind of
part that comes around here. So this part here, the bricks
that come around here. And from there then we
can build off of that. So what I'm going to do is
I'm just going to come in, I'm going to grab this one. This one and this
one, and again, three D modeling is all about
how we approach something. So we've got to figure out, you know, the best
way of doing this. So a lot of pre planning
in your own head or even writing out
a diagram of how you're going to do it
makes a lot of sense. Before you even start something, it will speed up the process. So what I'm going to do
is I tend now to look at something and I can understand the best way of
building something. It doesn't always work, but most of the time it's just,
it's planned out. All right, so let's grab these. Let's press shift D then. And then what I'm going
to do is we're gonna press E and Z. Let's bring it up like so. And then let's just
separate out from the rest of the
actual ground plane. So selection, so
let's press control. All transforms right plate
it's origin to John tree. And then what we'll
do is we'll come over to our little
spanner adding a modifier and we're going
to generate a solidify. Let's pull the
solidify out then. So let's pull it out and let's
bring it in a little bit. So what we're
looking for here is the thickness of
the actual walls. So the bricks, let's bring
it out a little bit more. Let's make sure we've
got even thickness on. You can see here, it
doesn't look quite even. So let's put that
on. And there we go. And then what we're
going to do now, we've got the right thickness for the bricks. I'm
happy with those. And what I'm going
to do now is I kind of need to pull it
down and bring it in, because at the moment
it's right next to this actual wall here. So this actual edge. So let's just bring it in. Jawt a little bit
like, so not much. Jaws, a tiny bit. So then what we're going
to do now is pull it down. So I'm going to come in,
grab the bottom of it. So I'm going to make sure if I turn this off a minute,
grab the bottom. So and then what I'm going
to do is pull it down. Now, I have no idea at the moment how far my steps
are going to come down. So that is the next thing
that we need to do. Now one thing we do need
to do to make sure that it comes right is if we
put our guy here, well, let's put our guy here. Remember that this is
going to be the top, so wherever he goes, he needs to be able to
walk underneath it. So in other words, if I put
him down here and press one, you can see if I put him
down to the floor there, this is how much room
he's going to have. But the thing is we've got above the ground
plane, we've got this. So it definitely
needs to be above it. So what I'm saying is the
arch needs to come roughly round the top of where this
actual ground plane is. So if I pull him down, we can see that if my
arch comes around here, that's going to be much better. So from here, what I'm
actually going to do now is bring in another object. And we'll use that to
actually create the Boolean. And from there then we
can actually create the stairs and make sure
it all fits in together. So what I'm going to do
is I'm going to grab my guy press cursor selected, press shift eight, and
we'll bring in a cylinder. Now let's turn the cylinder down because there's no way we want it on this many vertices. So let's put it on something
like, let's try 22. Let's then rotate it round, so r x and 90. Let's make it a little
bit smaller then. And this arch needs
to be big enough so that our guy can actually
walk underneath it. And he's got plenty
of room at each side. All right, So what I'm
going to do to actually do that is I'm just going
to come now to this. I'll press actually
question mark, just to isolate this out because it'll make it
easier to work with. And then what we'll
do is now we'll come to, let's have a look. We'll come to this
bottom part here. So let's select this one all the way around
to this one here. Select the front
and the back press. Delete and faces. And we should end up with
something like this, which is fairly flat from here. Now what I want to do is
I want to bring it down. So I'm just going to press E and Z and bring it down like so. And I'm actually going
to fill this in now. So grab all this, press and then the same
on the other side, and actually fill in
this bottom as well F. Now I know that this might not be the right
size at the moment, but I can just grab the
bottom and pull that down. So what I'm going to
do now is press Tab, Press a little question
mark, bring everything back. And this is what we should
be left with from here. Then we can actually
pull this into place. And I can see now
if I press one, this is above the ground plane. Our arch is going
to come over here. If I put my guy down, my guy down now down to here. We can see now
that it would have plenty of room to
come around it. The one thing we have to be
careful of is the fact that we want our arch to be
made of kind of stone. So I'm going to have to move
it down a little bit more so if I pull it down a
little bit more like so. And that now once I've
got those stone parts in, is going to be
much, much better. So I'm happy with how deep
this actual Subway goes now. And you can see now this is
what it's going to look like. So the arch is going
to go in there. And I think that is
going to be about right. All right, so from there what we want to do is we just want to make sure that this is poking
through so we can actually, you know, make our boolean and the next
thing we want to do, in fact, we'll pull it back a little bit more just to there. So that's where it's
going to be, roughly, maybe even a little bit more, just so it's poking in front. And the reason I'm
doing that is because obviously we need some
stairs going down here. Now, the other
thing is we want to make sure that this part here, so this part on the
bottom of here, can be pulled down all
the way down to here. Because our actual bricks are going to come all the
way down to here, of course. And the other thing is, if
we're bullying this in here, so if I pull it down
a little bit more, you can see now I'll
make a kind of nice gap. Now I am thinking that I
should pull it up to here. Because if not, I will
end up with like kind of a break in these steps and then a little tiny piece
going across there. Probably not the
best way to do that. So I'm just going to
leave it like that now. From there then I have to
figure out my steps now. So if I pull my guy just over
here in front of this arch, I want my steps to
end around here. So what I'm going
to do is I'm going to come to this part here. So grab this part here. Press Shift S, Ursa
selected press tab. And then what we're going
to do is bringing a cube. So shift A, bring in a cube. I'm going to make my cube wider, so S and X, bring it out to where these steps
want to go, like so. And then what I'm going
to do is just make sure I'm happy with
where this starts. Now at the moment, if I come into this and
turn it back on, you can see that is how the
steps are going to look. You can see that they're
probably going to be way, way too thin at the moment. So let's pull them
out with and y, let's pull them
out and let's make our starting step a
little bit lower. So something like this
looks pretty good. Now what we're going to
do is use the array. And we need to now array
it and make sure that it comes all the way down
to this part here. What I'm going to do
is I'm gonna come in, I'll press Control Layer
transforms origin to geometry, bring in an array. And then what I'm going
to do is turn this to zero. Turn the Y up then. So if I bring the Y up, if you just put it on one, it will just be
right next to it. And then the Z,
let's put the Z on. So let's bring it down the
zed to where I want it. And you can see,
put the Z on one, which means now it's right
at the bottom of there. That should be fine. Now the only thing
we're going to have, the only problem we're
going to have is how steep these steps
are going to be. And this will always
be the actual problem. So let's increase it and
you'll see what it means. So if we can get it
going all the way down, let's have a look now. You can see that if I
come in and put this on, you can see if I press three on the number pad.
These are our wide. So if I grab my guy here, you can see I can put him on
top of that stairs and I can just see this is fitting
actually really nice. The one problem we've got is, is the height of each step. You can see the height is
round about a halfway point. That's pretty steep for a step. So what I can do is I can
come into this one now, press Tab and Z. And what they'll do is
it will pull it up, pull me making them thinner. And now I should be able
to increase the count. And there we go. Now that's
looking pretty good now. The only thing is
you can see they're still a little bit too high, so I'm probably better
off the steps look about right for his
steps, for his feet. I can probably bring this back and then
add in another one. In other words, I want it just
to come a little bit down. Because if I grab my guy again, you can see on the last step, if I put him on there, so let's
put him on the last step. He's nearly going to
bang his head on there. We don't want that. So what we want to do is we're going to grab our steps again. I'm going to grab the
actual front of them, so grab the front, pull
them back like so. And then just bring
in one more count. So one more count,
and there you can see now that's
fitting pretty nice. Now I'm going to bring it
out a little bit more. I'm thinking actually,
you know what, if I bring him down now, Have a look. Bring him down to there. And that is pretty much perfect. That is the way that
I want it, actually. So, yeah, I'm going to
leave it like that. It's just poking through here
as well, so that's good. The one thing I would
say is from here now, I would probably pull this
down a little bit more. So I'm going to grab this, pull it down a little bit more. And from there then
I will also grab the bottom of here and pull
this down a little bit more. So it's just in there like so. And now I've pretty much got this and I think I
can work with it. So let's turn off this and
let's actually have a look. Yeah, if it's on there, I think that's going to
work out perfectly. All right, so that's basically
the groundwork laid out. What we'll do on the next lesson is then we'll boole in this out and then we'll have a really good idea of what
this is going to look like. We'll also create the
arch going around here. And then from there we'll
actually have it going into here and finishing off
somewhere around here. After that, we can actually
start building this out. This is the hardest
part of this. The one thing I think is I should bring this
out a little bit. In other words, before I finish, I let me overlook. Can I grab this one? I want to turn
this off a minute. I want to grab this. This
one here, and this one here. I'm just going to pull
them out to here. Let's have a look at that.
Actually looks like, yes, and that's what I want. Something like that, I
think looks really nice. All right, so there
we go everyone. So that, is that done? And
I'll see on the next one. I hope you enjoyed this, hope you'll be able to keep
up with this one. It's a little bit more technical than some of the other
stuff we've built, but I'm sure after all that
work that you've put in, you shouldn't have any problems. Thanks a lot. Bye bye.
112. Completing the Modeling of the Subway Entrance: Welcome back on to Blend Ford, The Environment, Artists Guide. And this is where we left off. All right, so the first
thing we'll do is we will come in and we
will boole in this out. So I'm happy with
the sizing on here. We need to put a bit of a top
on here when we finish it, but just make sure let's
actually come over, bring him up because we know
we've got that in place now. And let's just make
sure we've got the right height on here
so you can see here if this is going to be the
high and we're going to have things built
on top of here. So I'm thinking maybe we'll just bring him down
to the ground plane. Maybe we'll make this a little bit smaller down here because we are going
to have a top on it. So just a slight bit. So what I'm going to
do is just turn that off tab and I'm just
going to grab these. I'm just going to
pull them down very slightly like so
and put it back on. All right, from
there. Now what I'm going to do is I'm
going to come over to my solidify press
control. Just apply that. And then I'll come in now and reset all of the transforms. All transforms, right
click, set origin geometry. And now let's add in
the modifier generate. And the one we're going to
look at is the boolean. And now what we're
going to do is grab our Boolean over here,
and there we go. It looks like it's working fine, so I can press control on there. I'm going to come
then to this arch, hide it out of the way. And that's what we
should be left with. Now from here then
I'm going to come round and what I'm
going to do is I'm going to make sure that
I keep this kind of thickness because I want my
kind of arch to come there. But what I want to
do now is pull this out so it's got an actual
wall come in either side. So what I'll do is I'll
come to this part, I'm going to grab the back part. So old shift and click. And you can see it
normally grabs all those. So just shift, select
each of these off. We will need a floor
on here as well, but we're going to do the
floor in just a moment. The main thing that I'm going
to do is just pull this out now and y, let's pull it out. So make sure you pull it out far enough so that if you
are looking down there, you'll just see the
back of it like this. And then all I'm going
to do is press the F, and just to fill
it in from there. Then let's fill in now
this bottom part here. So what I'll do is I'll come in and I'll grab this one first. And this one I'm going
to press the button. And then this one, and this one press the button,
and there we go. That is filled in nicely. Now from now I can press ol tag and I can
bring back my arch. And what I'm going to do is I'm going to take this arch
that I've actually created, I'm going to pull it
forward a little bit. And then what I'm going to do
is I'm going to press and y and bring it kind of
into someplace like so. So something like that.
I think I can create the stone work that's going
to come off here from this. So what I'm going to do is,
again, I'll ilate it out, press the question mark. And then what I'm going to
do is just delete the front, the back on the bottom. We're not going to
need any of those. Press delete and Faces. And then what I'm going to do is now bring in some edge loops. So I'll bring in
this side first, maybe 1234, left
click, right click. And then control press
four on the number pad, press Enter, and there we go, and right click,
drop those in place. And from here, now we can
actually create our stonewall. Now there's a few ways that
we can create our stone. If you split them up first, then bring in the solidify. I think it doesn't work as well as doing it the
way that I'll show you. So in other words, if we
split every one of these, so if I come in and split
everyone, you know, press in Y and then
bring in the solidify, it's going to leave a
big gap at the top here. So at the edge here, it's
not going to look right. So the easiest way to do this is to press control all transforms, set origin geometry, adding a modifier we're
going to generate. Then where is it a solidify? Let's come down, bring it out then for the
size that I want it, make sure even thickness is on. And then what do we do is
just press question Mark. And I'm just going to
make sure it all fits. Now you can see here,
another reason we use solidify is the
fact that you can see we've got a lot of flash
in here. We don't want that. So let's turn this offset down a little bit and there we go, get to be the right thickness. And I think that's
looking absolutely fine. Now again, let's come in and do one final check with our
little guy down here. Let's put him on that top step. We can't see through this. Let's press three x ray on. We should just be able to then see this bottom step down here. Look at this bottom
step like so. And there you go.
That's absolutely fine. Now, I've got plenty
of room over there, so now we know everything in
place. Let's turn that off. Let's bring our guy back over here just so
we know where he is and then we can start work now on this part here. So
now I've brought it out. I'm happy with how
far out it is. I need to really think now about turning this into
actual stonework. So I'm going to do that.
I'm going to click on it. I'm going to come over
it, Press Control, And now I'm going to
isolate it out again. So press the question
mark. Isolate it out. And then what you're
going to do now is come in and I think
first of all, we'll split these off and then I'll split
this off, this off, and just work your way down Now, all the way down, same
on the other side. With old shifting clicks. Grab the bomb as well.
You might as well grab the bombs just so we don't
have those left over. Press the Y button
and you should end up with something like this now where everything's split off. Now from here, what
you can do is you can press a grab everything, mesh, clean up, fill holes. And now nothing seems
to have happened. What it's done is it's filled all of these holes in for us. And finally from this now what I can do is and come
in press control or transforms and then
add in a bevel modifier. And there we go, naught, point naught, naught three, and there is our stone. Now it's up to you on stone. Sometimes it does
look a bit better. If you turn up the
segments and turn this up, you will see that sometimes you can get it looking a
little bit more stone like. So you can see now it's
looking a bit more stone like Turn it up again.
And there we go. And I think that's looking
a bit better than where it term and then what I
had it before actually. Now from here what I
want to do is I want to come into this one and
I want to bring it in. So I'm going to bring it in
with I like so and then No, I'm going to do is
just bring it back with just to make it look
a little bit different. All right. That's
looking pretty cool now, I think pretty much we've nearly finished with the bottom. The one thing you might
want to do is you might, let's just press question mark and see where this
comes down to. So you can see my bottom is all the way through
the floor there. So the one thing I'm
thinking maybe want to pull this up a little bit just to give it a little
bit more of an edge there, or I want to pull it
down a little bit, whichever is the case you
might want to pull it down. Actually, I think
that looks better. Now, the one thing I might
want to do is then just come into each of
these shifting, click grading, going around
the edge alternates, and then just pull
them out like yeah. And I think that looks a
little bit better now. All right, that's
looking pretty good now. Let's come to the
top of here then. So let's save that
our work as well, just so we don't lose any work. And then we've got a floor in. We've got all of our bricks in. Let's start work on
the top of here then. So we've got each
of these and what I want to do is I want to
pull these out as well. So what I'm going to do is
I'm going to press Shift, and then I'm going to
press E to pull it up like so to get that
thickness of the top, you know, kind of parts on here. And then what I'm
going to do is now I'm going to grab it going
all the way around and I'm hoping I should be able to press alternates and bring it out a little bit like
so that is what I want. So something like that
is what I'm looking for. Make sure offset even is on, it's going to pull them
out a little bit more. And then just make
sure that you're happy with how that looks. I think I've come out
a little bit too much. So what I'm going to
do is press controls, head alternates
again, pull them out, not so much, so
something like that. Offset even on, and there we go. All right, that's looking
just about perfect now. Now the problem
we're going to have is we want to make
these into stone. And we've got
actually a turn here. And we don't really want
that turn to be in there. So what we're going to
do is we're going to come and we'll isolate
this part out now. So we want to just press
this top bit here. So what I want to do
is I want to grab it all with L. I want to press selection a control,
all transforms right. Click origin geometry. This one here all
transforms right. Click origins geometry.
Let question mark. And now what I want to
do is isolate this out. So the easiest thing to do
then on this is grab the top. So press P selection, grab the bottom and delete it. Just delete it out of
the way. And you're just going to end up with
something like this. Because now what we want to do is we want to make some
stonework on this. And trust me, it's going to be easier to delete it out the way. So I'm going to press
K, I'm going to press A to go over
the top like so. And then Enter, and then K, and then A to go over
the top like so. And then now this
side A and enter, and then K and A and enter. So now let's bring
in some more stones. So let's bring in maybe three.
Left click, right click. And now this side, what I tend to do on this
side is I'll bring in left click and move them up a little bit,
so that's seven. And then control seven, and let's bring in
eight. Let's try eight. Left click, right click. And
now you can see they're a little bit uneven from each other, and that is what we want. All right, from here then
let's split them all up. So what I'm gonna do is
I'm just gonna come in, I'm gonna grab each of these. I've got to be careful
because if I grab this one, it's still going to be
joined to this one. So I'm just going to press Y, H, hide them out the way. This one and this one, then Y, H, hide them out the way. And then every other
one on here, like so. And every other one on here, press Y and H, Hide
them out the way. Alternh, bring back everything. And finally, now let's put those back to where
they're gonna be. So if I press Tab, press a little question mark. Come back to it, press
Tab to grab everything. And then let's pull
them into place just to sit on top of there
as you can see like so. And finally, control or
transforms origin geometry. Adding a modifier, Bring in a bevel nought point,
n naught three. And there you go,
there's those parts. Now you can see that they're
not looking a lot like stone and I really don't want
them to I want them to look more like
more like ground, you know, when you have
the towels in there. But the one thing I don't
want is on the next one, they're too even and we want to make them a little
bit more uneven. So we will do that
on the next lesson. We'll make these a
little bit uneven. And from there then
we can actually start building out this
main part of the subway. But you can see it's looking
really, really nice already. And we're really starting to
move along now with this. Al right everyone, so I
hope you enjoyed that. And I'll see on the next
one. Thanks a lot. Bye bye.
113. Creating Subway Supports for Enhanced Realism: Welcome back. We want
to blend the fold, the environment artists guide, and this is where
we left the art. Alright, so what we're
going to do now, we really want to make
these a little bit uneven. So what I'm going
to do is I'm just going to come in, I'll
grab one of them. I'll come up put where is it randomize on, on
proportional editing. And then what I'm going to
do is just lift them up, bring it all the
way out like so. And you can see here,
it's only moving one. We don't want that, That's
because connected only is on. And now when I pull this up, it should move all of
them pretty much like so. And that's what we want,
but not quite so much, so, just a little tad like so. And you can see now we've
made them very uneven. Now the next thing is
we want to also come in and make them a little
bit uneven on the edge. So you can see the edge,
It's perfectly straight. We don't want that, so
all I'm going to do is grab the edge.
Same sort of thing. Then you can see, I can pull
them out like this way, so a little bit this way. And then what we'll
do is we'll come to this way and we'll do
the same sort of thing. So pull them out this way, then like so, and finally then let's pull
these out as well. So we'll bring it
down, pull them out like so. And there you go. All nice and uneven. That's
exactly what you want. Finally, what you could
also do is you can come in, you can press A and you can
come into mesh transform, come into randomize,
and then just turn this all the way down to zero
or not point naught, one. Press the tab and that's it. That's exactly what
I'm looking for. Nice and uneven on there. All right, so now what we're going to do is we're
going to think about creating the
top part on here. So I'll create the little post
first that come into here. So I'm just going to
look where my cursor is. Don't forget to save
about your work as well. You don't want to lose
anything at this stage. And what I'm going to
do is I'll just press Shift S cursor selected shift, bring in a cube. I'm going to bring my cube
then over to this side. I'm going to put it roundabout
in the center here. And you can see if I
put it around here, it should be able to go over
the other side as well. And that's what
we're looking for. So something like that
looks about right, giving us plenty of room
this side and this side. And then what I'll do is I'm
going to bring it up now. How high does it
want to come up? Well, if we come over and
we stand our guy on here, he wants to be able
to basically put his arms up onto here. So let's say if I press Sir
three, let's pull him up. So he's actually,
actually, he's on the ground plane
there, so that's fine. Let's grab the top of here. Let's press three
again, and let's pull it up without
proportion editing on. And he wants to be able to, this wants to be a
tiny, tiny bit higher. And then the bar going across here so he can actually rest his arms on and maybe look
over there if he wants to. That's what height
I'm going for. Then what I'll do is I'll look at the actual size of this. I think the size
of this is fine. I'm just looking haven't
pulled it off far enough, so maybe want to pull it
over a little bit more. And then what I'm going to
do is grab the top enter, pull it out like so. And then, and pull
it up like so. Now from there I'm going
to add in a couple more. So I'm going to add in
one right down the bomb. So control left click, bring it down to here like so. And then another one. Control left click and bring it up slightly like
so ol shifting click. Then control B to
be level those off. Enter alterns and just
bring them out very, very tiny amount like so make sure offset even it is
on and there we go. That's the first post on there. All right, that's
looking pretty good now. I should be able to mirror that then over to
the other side. So all I'm going to
do is press control. All transforms right
click origin to three D cursor adding a modifier And we're
going to mirror it. So mirror it over
the other side. Now we can see that this for some reason is
not right in the center. So what I'll do is I'll come
to my steps and I'll try. Let's have a look and make sure that everything
is fitting in. So if I press shift S cursor
selected, grab this one. Right clicks at origin three. D cursor. There we go. Now it's mirrored into place. That's locking much,
much better now. Now from there what
I can do is I can press a, grab this one. And I'm going to pull it
all the way to the back. So shift D, bring it all the way to the back into place like so. All right, so that's a
good start for this part. Now what I want to do is work on this part here,
coming down here, and I'm going to
actually make sure that this part going along here is
going to be actually wood. So let's do that now. So what I'm going
to do is I'll come to this part here because I
want to keep that mirror on, because it is mirroring
over the other side. And what I'm going to do
is I'm going to come in and grab this one, press shift. And then what I'll do
is I'll press S and Z. And then I'm going
to bring it, yeah, I think up to something
something like there, maybe a little bit thinner
so and's and then sorry. X, pull it in a little bit, and then from there I'm
going to pull it across. Pull it across like
so I'm Js thinking, I think that should be fine to get the wooden parts in there. I think it's wide
enough. Actually, I'm just wondering whether
it's high enough over. Look is our guy stood on the ground plane to pull
him down a little bit. There we go. So all right, now let's come in
and grab this again. We're going to press L. We're
going to press Shift D. We're going to bring it down
then to the bottom here. From there then I'm
going to actually put some planks on here. I'm also as well want to do exactly the same thing
going around the back here. I will do that separately
because I'll use these planks, what I make, and then put
them around the back. That's how we'll do
that. All right? Yes, we'll do the planks. Now what I'm going to do is I need to find where
I put my planks. I think they're under bullion or is there any planks in there? That's just that. So what I'll do is I'll just
bring in another plank. So let's just hide
our fulian out of the way. I want to press shift. Just bring in a
cube, pull it up, and then add modifier
geometry node down arrow. And the one we want is planks. So let's then spin
our planks around, so r x 90 and then R z 90. And let's get them into place. So we're going to
put them over here, and you can see just how handy
these geometry nodes are. They're amazing. Let's
press and bring them down. Put that in place. So, and then I just want to make sure that they're in
the halfway point. So something like that you
can see is in the halfway maybe a to tad this way
and maybe we'll make them a little bit
thicker so I'm just going to pull it
right into that edge there and then going to make them a little
bit thicker so to come down to my thickness,
something like that. From there then I will come
in and increase the account. Let's increase the count
all the way up to here. Don't worry about it lining up or anything like
that at the moment. And then what we're going
to do now is work our way down the gap at the moment probably is a
little bit too big. Let's bring it
down a little bit. So let's pull it up and down
to something like that. So n 0.6 Let's then
think about the width. So we want our width to be this, but we want to randomize
it a little bit. So I'm going to randomize
it a little bit. Then what I'm going to
do is I'm going to, so now I've got my
width, I might as well. In fact, you know
what, they're too thick that way. I'm
not happy with that. What I'm going to
do is I'm going to come and bring my width
the other way, I think. Yeah, that's looking better. And from there then
what I can do is I can increase it
just by one more. So like so and now
I've got my width. What I can do is and y
and just bring it back, yours to that point there
like so there we go. That's looking really good. And then we don't need to
mess around with the length. The length is absolutely fine. It's just, we need
to mess around with the noise and
the curvature maybe. Or with the bend. It's
one or the other really. So I can come in, I do
I want to rotate them. You can rotate them as well like so now you can see they're
a little bit even. We can also increase the bend. But do I want to increase that? Because you don't want to
increase that a little bit? Actually, I think
that looks good. It looks as though
there's been, you know, a little bit of weight put
on there or something. And then finally, let's
come in with our noise now. So we'll just increase the
curvature a slight bit. Curvature, where is it not
Curvature Displacement. Tiny bit, even less
than that, I think. Let's just bring it up.
Naught naught, three. Try that and then let's
increase the noise like so. And there we go. Now we've
got some unevenness on there. We don't need too
much of it on this. That would be kept in
fairly good condition. You can turn this up
to naught 0.5 maybe, and then make them a
little bit more uneven. And then finally, what I want to do now is the subdivision, so we can see our resolution
here, it's on 20. That means every single one of these is going to have a little, you know, kind of
edge loop down there. Can we turn this down a little
bit and have it so much and still keep that wobbleness
which we've gotten there. So I've turned it down to 12, which means now it's
got 12 edge loops in. All right, that is
looking pretty good. Now what I want to
do is I want to mirror this over
to the other side. And I'm just wondering,
can I actually mirror it? So if I right click, set origin three D cursor, you can see that it
moved it straight over. Which means I don't
really want to do that. Because that means
then I'm going to move the whole thing and
I don't want to do that. So what I'm going to do instead, I'm thinking, I'll think,
I'll just press shift. You know what? Let's
just press shift, let's get it going over the top. So if I press seven, I can
see it's in the center there. And then the last thing we'll do is we'll just change
the seed on this. So change the seed like
so different seed. I'm just going to go up then. Yeah, something like that. Look completely different to this one and fits into place. Double tap the eight
and there we go. All right, so what
we'll do then on the next lesson is we'll
get this in over this side. And then that bit
is just about done. Which means then we
can work on this part, coming out here towards the end. And finally, then we can
work on the top of the roof. Alright everyone. So I
hope you enjoyed that. I hope yours is really, really starting to come together now. And I'll see on the next one. Thanks a lot. Bye bye.
114. Designing Railings for Subway Entrances: Welcome back everyone to Blender for the Environment
Artists Guide. Now before putting this
bit on the back of here, I want to actually make sure that this is in the
right place first. In other words, I want to
build this bit out first. So let's do that now, actually. So what I'll do is I'll come in, I've got my cursor there,
so I'll press shift eight. I'll bring in a cube just
before we put on that back, because I just want to make sure that this is going
to be high enough. Because at the moment I'm thinking it's a
little bit too short. And if I need to make it longer, then I will have the
ability to do that. So what I'm going to do is just make this a little bit smaller. I'm going to press Sens head
and bring it down to there. And then what I'm going
to do is Jaws put that in to the bottom
of here, like so. And then I'm going
to pull it out something like over here. And then on here we're going
to have an actual post. So our post is going to be
sat on top of this part here. All right, so that's
the bottom part. Let's make it a little,
tiny bit thinner. So. And then what
I'm going to do now is I'll bring in an edge loop, or I'll start the top of it. You know what? I'll bring
in an edge loop first. So control left
click, right click. And then what I'll do is I'll
grab the whole thing now. So L I'll press Shift and then I'll bring it up into place of where it's
going to go now. I'm thinking that
we're going to have little ridges down here, but you can see that maybe they need
to go up a little bit. So which tells me
that I can actually probably get away with just
grabbing each of these. Come in O, shift click and
then shift click control plus, and then just bring
it up just so it sat on top of there instead. Just up a little bit, so. All right, so from this one then, I'm going to come in now, grab the top one and I'm going to come in
and bevel this now. So I'm going to press shift click and then I'm
going to press control and bring it out. And maybe bring in another
edge loop like so left click. And then what I'm going to
do now is pull this up, so I want it a little
bit round another width, So I'm just going to
pull this one up. And then I'm just going to come to the side and pull these two up like so making it a
nice rounded part like so. All right, from here
then what I can do is I come now I can grab
this one and this one, press the button
to fill those in. And then what I can do is
I can separate that out. Now, so selection,
separate that out. And then from here I can
press Control all transforms, right click, set
origin geometry. And now let's split these up. So what I'm going to
do is, first of all, I'm going to split
all of this up. So I'm going to
press control, er, bring in a few edge loops
like so left click, right click, and now
while I've actually got them selected,
press control, bring down the amount of
levels that you've gone there, just to one and then
just put the like this. Something like that
I think is perfect. All right, so now we've got
our little ridges going down. What we want to do
now is obviously create this to solidify this. So all' going to do is
press control light or transforms, set
origin geometry. Adding a generate and the one we're looking
for is solidify. Let's make it a
little bit thicker. Let's put this, I
think it'll be not 0.5 Let's put it on not 0.5 Let's increase the thickness
center where we want it. You can see it's going to have to come down a little bit more. It's not in the center there, so let's bring this down
into the center like, so that looks about to
be in the center there. I think that's actually
thick enough as well. And then what I'm looking at
is the thickness of these. You can also see that
these are not level. You can see that
this is not level. So let's pull it over.
Let's press one, and there we go. Now
it's more level. And I would say that this probably needs to be
a little bit thicker. Let's make it a little
bit thicker there. Let's go with that. All right, so what we'll do is we'll
apply the solidify, we'll come in, then we've
got them selected each side. Hopefully that happen with you. If not, you'll have to go
down and select each one. And then all I'm going to
do is going to press Enter, and then and X and
pull them out. And X pull them out like
so. And there we go. That is that bottom
part on there now. And that is looking
pretty nice from here. Then we can join
all of these up. So I can join this up with this. We know we've got to
solidify on there, or we might have
something else on there. So if we have, let's just go
to object convert and mesh. Press control J,
Join them all up. Press control all
transforms and we want to put the
orientation over here. Right click, set origin
to three D cursor. We're also going to
right click and shade auto smooth just to
make sure that's smoothed off. And
from here then. We can mirror them
over this side. So add modifier,
generate a mirror. And there they go,
that's over that side. Now let's create
the top of them. So this part here, we'll
actually create the bar, they're going on top of here. And then from there we can actually create a little
strips that go down. So what I'm going to do
to create that bar is I'll just come in and I'll
grab this whole part here. And then what I'll
do is I'll press shift deep and I'll bring it up. So I'm going to bring it up
into place round about here. And then what I want to do is I want to bring up the top part. So what I'm going to do, I'm going to grab this part here, press the born and
bring it up like so. And that is looking pretty nice. I'm just wondering if I
brought it up a little bit too much or if I need to bend
it down a little bit. Maybe it's a little
bit too much. So bring it down a little
bit and there we go, a thing that looks
much, much better. All right, so now we need all of our bars going across here. So what I'm going to
do is I'm going to first of all bring in a cube. And then what I'm going
to do is bring it over. I'm going to put it into place. And it's going to go
every other one of these. If I put it into place here, I'm going to press
the S. But what I want it is every
other one of these. If I can, what I'm going
to do is I'm going to pull it down to roundabout here, press S and's ed, squish it
down like so there we go. That's about the
right size, I think. And then what I'll do
is I'll just press control layer transforms
that origin to geometry. Come in, grab the top of
it, press the bottom. Now what I want to
do, before doing anything else, I
want to grab it. So L, and then what I'm
going to do is press 50, Bring it up, and then R, Y or X for that my
doesn't matter which 180, spin it round, put it in
place into here like so. And then what we're going to
do is we're going to grab this one and this one and
we're going to bridge, so we're going to bridge faces
like so. And there we go. You can see just how
easy that was to do. And now what we're
going to do is we're going to press three
to go into side view. And I want to bring
in, first of all, I'll bring this in because
what I'm looking for, actually, that's
not going to work on that soap and wire frame. What I'm looking for
now is to get this to go into each of
these ones here. So you can see I'll move
my guy out the way. I just want to
bring in an array. Now add modifier,
generate an array, and I want to put it on zero on the X and bring the Y over. So if I pulled the Y over, you can see that it's
going to go there. But the problem
we're going to have is maybe it's not going
to go on everyone. As you can see, we need
to pull them back a little bit or we
bring this over. So if I press A on this,
you can see if I bring this over, it's
more to the middle. Then what I can do is I
can come now and pull this back a little bit like
so hold in the shift button, pull it back a little bit. And now you can see they're all fitting in very, very nicely. Now let's see what that
actually looks like. So let's take the
wire frame off, let's put on an object, double tap the a, and there we go. That's looking
really, really nice. Now the final bit
is going to be then this little post that's
going to go into here. So what we'll do is
we'll press shift A, bring in a cube. And let's move it to the side. Let's bring it up then into the place where
it's going to go, which will be
roughly around here. Now, just make sure that you're happy with the scaling of this. I'm thinking this probably is the right kind of chunkiness. Let's pull it up so it sits
on top of those stones. Let's then grab the top of it, pull it up to here. Let's then press the S bon. And what I want to do
is bring it in like so. And I think that's
looking pretty nice. Drop it down a little
bit and then finally, while I'll do is I'll
press the button, bring it in like so. And then press and bring it up. Now we can see
that this top part isn't going to fit it properly. If that is the case, what we can do is we can just expand it out a little bit more. First of all though, let's
come in and grab this top. So I'm just going to
come in and grab all of the points on here like
so and around the side. And I'm going to pull
that into place. We can also see this part
here isn't into place and I'm going to pull
it into place like so. And then what I'm going to
do is I'm just going to hide my post out the
way I'm going to come down to this part and then basically going to
grab all of these, this, this, pull them over into
place like so alternate, bring it back and
now we can see, right, we need to make this bit a little bit thicker
to fit this. All I'm going to do then
is O shift click Ok, shift click altern, and pull it out very slightly so it fits in. So you could probably from here get away with moving it a
little bit further forward. Okay, so that's looking
pretty good now. We just want to top on here. So all I'm going to do is
just bring it right up to jawst under there, like so. And then what I'm going
to do is I'm going to press enter, pull it out. And then pull it up like so. And then I pull it in like so. And then finally bring it up, bring it up to here. And then bring it up, and then finally bring
it in. There we go. There is the actual post. All right, this is coming
along really nicely. Now on the next one, we can
actually mirror this over, and then we can get this
wooden part in here. And from there then
we can actually get this onto the top of
our, you know, our dome. This kind of dome
that's going to go over there and then we
can kind of bring it all together and finally get all those materials and textures
on. All right, everyone. So it's actually a lot of fun
actually creating this one. It's kind of, you know, got
that intricacy in there that keeps you really engaged and I hope you're having
a lot of fun with it. Thanks a lot. Bye bye.
115. Modeling Complex Roofs for Victorian Structures: Welcome back everyone to Blender for the Environment
Artists Guide. And this is where we left off. All right, so what
we're going to do, we need this going
over this side. First of all, we've
got a ray on here. Let's press control,
lay on that. Then we should, this
should have a mirror run, so we should be
able to join this, this, and this finally
to our mirror. So press control, Jake, join them all together,
and there we go. All right, so now let's
bring it round to the back. So what I'm going to do is
this has got a MirrunIant. First of all, I'm just
thinking these parts here. I need to probably duplicate
this one and this one, and then duplicate this
one. So we'll do that now. So the easiest way
to do that is to come in, grab this part. So L and L grab those selection, split them off, and then
grab this one and this one. And what we're going to
do is just press Shift D. Duplicate it, R, z 90. Spin it around, and I can see it's kind of a mess.
We don't want that. So what we want to do is
want to, first of all, I think we'll turn off
the mirror on these. I'm thinking we've
duplicated it. Let's just pull it out. So yeah, that's exactly what I want. Now what I want to do
is I want to come into this top one. Turn
the mirror off. Yes. And I should end up
with something like this. And now from there then I
need to put this in place. So it's going to
rotate around there, but we do want it rotating on a medium point, not
individual origins. So 90, I can't move
the orientation yet. The moment I move
the orientation, it's going to upset
the jumptionode. So all I'm going to
do is just pull it into some kind of
place where I want it, which will be over here. Because I know when I increase the count on
the geometry node, it's going to come this way. So if I now come in
and increase the count like so you can see now it
comes all the way over there. And finally then let's come in and all I want to do is
grab the bottom of it, pull it over, grab the
top of it, pull it over. And there you go. As simple
as that, to do that. All right, so that's looking really nice.
I'm happy with that. And now now we're onto kind of the main bit
of this actual built. What I'm gonna do is
I'm going to bring in, I need to first of all, work out where this
is going to be. So let's come in and we've already got
our cursor in here, so we might as well bring
in a cylinder from there. I think I'll put this on 24, so slightly higher 24 just to give us a
bit more resolution. In fact, you know
what, We'll put it on 26 a little bit more. And then what we'll do is
we'll rotate it round, so r X and 90 rotate it round and let's get it into
some sort of place. So it needs to come from
this post to this post. And obviously it
needs to be much, much wider so you can see. But what is the height of it? That's the thing
we're looking for. I think first of all,
we'll pull it up and we know where these
halfway points are. So these halfway
points are here. Let's pull it out.
First of all though, with S next, let's pull it out to where we think
it's going to go. So roughly gonna go
round about there. Now. I'm not too happy with it, you know, kind of coming down
and then bending around. So what I'm going to
do is pull it down. So pull it down like so. And now you can see
that's going to fit in much, much nicer. Now I would say, I would try and get it to where
this point is, where it goes all the way down. Just to be at the top of here, so just to be at the
top of there like so. Because we're
actually going to put in something else in here, another kind of metal part. Just make sure that it
is halfway in between. So you can see at the moment
it's a little bit out. Let's press S and X, bring it out a tiny
bit more like so. And I think if I come over, we don't want it to look, or the last thing we want
it to look is to modern. The more you create
like flatness on here, the more modern it's
actually going to look. So if I press now S and's
head and pull it up, you can see now
it's more rounded, which means it should
look less modern. And that's what
we're looking for. The other thing is we want the front and the back to
be halfway in between here. So you can see if I bring
this in at the moment, I'm going to have to press
S and Y to bring it in. And there we go now. So that'll be halfway in between because we'll have a big bar kind
of coming down this part. Now let's figure out then how we're going to actually do
this because it's not so easy. So what I'm going to do is I'm going to first of all come in, delete the front and the back. So delete faces. And then what we're going to do is we're going to come now to this part under here and
to this part under here. So control select them all, press Delete and Faces. Now from here we need to
create the actual bars. So these kind of
funny looking things, these round bits that
are going to go in here. So let me just look
on my reference. So I've got 3456788 of them, that's what we're
going to create. So what we'll do is we'll
bring in two edge loops. First of all, so control. In fact, we'll bring in 11, left click, right click. Drop it right in the
center control B. And then what we'll
do is we'll bring that out and what they'll do is just kind of separate from the edges so we can work
on the center part. And then what I want
to do is I want to now bring in a bottom of it. So control left
click, right click. And I want to bring
in another one. So this side control left click, right click. And
then both of these. I want to press ol shifting click just to make shots
slick to that one. I want to then just
bring them down so they just pop under there. So All right, so far so good. Now we need eight or yeah,
let's bring in eight. So control, let's
press eight and then right click to drop
them in the center. From here we should be able
to now work with these. What I'm thinking
I want my first, I think it should come to round about the top
of here, the roundness. What I'm going to do
is I'm going to press control B now and pull
that out like so. Yes, that's exactly
what then from here, now I can work with these
parts going in here. The one other thing is as well, I don't want them
coming all the way down to here because they're
going to be hidden there. So I don't want that.
But what I'm going to do is I'm just wondering whether I should
separate these out now. And instead of that, I think at this point I will
separate these out. But what I'll do first of all is get rid of these
on this side. So I'll come in,
face select out, shifting, click and
delete and faces. And then just press L,
delete faces like so. And now that gives me something
to actually work with. Now with this now what I'll do is I'll bring in
another edge loop. So control just above
this as you can see here. And then what I'll do is
I'll come to the top now. Control left click and
just above this again. Now from here I
should be able to work with these
parts in here now. So I can come in for
instance and I can bevel these parts
here, bring them in. But before I do that,
I want to actually split all of these off.
Old shift and click. Just go down and split
all of these off. So like so and I'm also going to split this
off and this off. So now the ones that
I don't want to actually bring in are going
to be these ones down here. I don't actually want to
split those off from here. So what I'm going to do is
it seems quite complex and it is what we want
to take off these. And then what I
want to do is press and selection and
separate those. So you should end up with
something like that. Now from here, you should be able to hide
those out the way. Now what we want to focus
on is these Bob bits here. So what I'm going to do
is I'm going to come in, I'm going to grab all of these. This one here first. And I think, I'm just thinking, yes, I'll separate those off. Selection, Separate those off,
hide them out of the way. And then let's come to
the bottom one now. Selection. Separate that
off, hide out of the way. All right, so we should be
left with just this now. Now I want to do, first of all
is we're going to come in, you want to press
the eye button. And then what you want to
do is you want to press, now as you can see,
we can bring them in. And from there then
what we're going to do is level these out. I'm going to come
in, grab the tops. So just working
all the way along, just grabbing all the tops. And then what we're going
to do is grab the bottoms, these ones in the corners here, because we're going
to actually round these off and create that corrugated metal look which is what they would have had
in this area from here. All right, so now what you want to do is you really want to actually press control
all transforms, right click, Rogen, jump tree. Come back to it then, and you're going to press
control shift and B. And hopefully level those off. Turn it up, one
maybe left click. And then all you
want to do is change the actual shape
of it to be round. So okay, so now this is
looking pretty good. And now the only
thing we need to do is select all of these. So if I come in now, I'm going to come to the top. Shift select. Control
select, sorry. Shift select, Control. Shift control, Shift control, Shift control. The way we're doing this
is going to give us a lot of control over what we're actually
doing with this. As you'll see, one shift slip these off shift control and then what you're going
to do is you're just going to press P selection. And there we go. Now let's
press all tag and bring back all these parts and this is what we should end up with. So the first thing now is let's first of all make this
part on the front of it. So I'm going to come to
this part and this part, these want to be a little bit thicker than the inner part. So all I'm going to do
is I'm going to come in, I'm going to grab this one and this one, press P Selection. Did I do that then? No, I
never go with that again. So L, and L, and then Selection. And there we go. Now
they're split off. All right, so with this one, let's pull it out a
little bit first. So I'm going to come
in oak shift click, pull it out a little bit
without portion editing on. Pull it out like so. And then I'm looking
at the back one, so old shift click, pull it
out a little bit like so. Then I'll press control. All transforms, right click, set origin into geometry. And now I need some
thickness on here. So what I'm going to do
is add in a modifier, generate and we're going to
bring in a solidify like so. And then I'm going
to bring it up like, so now I do want it poking
a little bit out of the top as well because we are going to have some
other parts in there. So I'm going to increase this or pre like so and now it's just a case of how thick
do you actually want it. I actually think that's about the right thickness, so
something like that. Now, now because we've
done it this way, we've split everything
up, we're going to add in modifiers as
are working along. It means that it's
non destructive, which means that we can
change things on the fly, which is the most
important thing. The other thing I
recommend is once you've actually got something
just right click, shade, auto, smooth,
and now you're going to see just
how smooth that is. Once we've got that in, then we can mirror it
over the other side. Put down a big middle bit, going down here,
down this bit here. And join it all together.
Alright everyone. So I hope you enjoyed
that. Let's save that our work and I'll
see on the next one. Thanks a lot. Bye bye.
116. Finalizing the Subway Model with Detailed Features: Welcome back on to Blend for the Environment
Artists Guide, and this is where
we left it off. All right, so what
we want to do now, first of all, just want
to pop in my reference. So I've got something
to work with and then we'll do is we'll come
into these parts here now. So these parts in here. Let's do these. So again,
control all transforms. Let's right click and set
origin to three D cursor, add in a modifier and we're going to bring in
another solidify. Let's now pull this
out a little bit. So we're going to bring
in the thickness, then change the offset. So we're going to bring it out just under those parts there. So right click and
shade, auto, smooth. And there we go. All
right, that's that bit. Now let's come to
the center bit. Now what we want to
make sure is why we're adding thickness
in here as well, is to make sure that it
looks the same underneath. So at the moment you can
see that these two here, so this bar as well here, we're going to pull
out a little bit, so make it nearly as this high, but this, we won't actually
give some thickness to. So what I'm going to do
with these center parts, first of all, I'm going to
press control all transforms. Right click, set origin
to three decursor, right click, shade,
auto, smooth. And then all I'm gonna do is gonna join it up with this one. Not join, but I'm going to press control L and I'm going to
copy modifiers like so. And it's gonna make it the same thickness as the other one. We don't want that, so
what we want to do is turn down this thickness
as you can see. So turn it down. Not that
one, Sorry, this one. Turn it down like so. And then you end up, if you go underneath now with something like this and that is looking what we're
actually looking for. All right, so now we've got
just these parts on here. So what I'm going to
do is going to right click, shade, auto, smooth. And then I'm going
to press control all transforms set origin
three D cursor. And now let's come in,
add in a modifier so we're going to
generate a solidify. Let's actually put
even thickness on. Let's bring it out the,
where's the thickness? Yeah, it's coming out that way. So let's bring it out that way. Let's move this offset then. Move the offset this way. Slightly lower than
this part here. We want to make sure that we can still see if I double tap the, that little ridge there, that
is what we're looking for. All right, that is
looking really nice. Now, we've just got
these parts here. So this part is going to be a little bit thinner, so it's
going to come to there. And this part is
going to be thicker. So let's grab this one
again. Same sort of thing. Reset it, transforms,
add in modifier, and this time we're going to
bring in a solidify again. And then what we'll do is we'll increase the thickness and we'll also bring it out like so just before
we're touching that. So now we want to
get it, it's coming all the way out a lot
more thickness on here. Let's bring it back then, just before it touches
that as you can see. And then we want it just
before it touches this one. So we're just going to
have to fiddle around with it and bring it back maybe maybe a
touch more thickness. Bring it back a little bit. Let's check what that looks like so I can do it
round here as well. It's in there and
it's, that is perfect. That is what we want to see. All of these now line
up. That is really good. Now, the bottom one, we want to be coming out thicker
than these ones. All I'm going to do now,
again, same sort of thing. Vlidify, then let's pull it out past that point
and past this point. Now this one here, you can see it's a
long way out here, so I need to mess
around with this now. Pull it all the way
out through here, and then pull it out,
making it thicker. Pull it back, there we go. I think that is what I'm
actually looking for. Double tap. The there
we go. All right. That this part now what I want to do is I want to obviously mirror it over the other side. What I'm going to
do is I'm going to grab every little piece on here. All of these pieces, including these parts down here. Just press just to see what
you've actually missed. You can see I've missed
these parts here. Press again, and there we go. And then what I'm going
to do is go up to object, convert to mesh. And finally then I can join it all together with control J. And then hopefully you can
see now it's already there. But right clicks the origin three D cursor if you need to, then what we're
going to do is add modifier, generate a mirror. And that then is going to
mirror over the other side. And you can see now
we're nearly there. All right, so now we
need a ridge down here, but the first thing is we've got a mirror and we need
to join these up. So what we can do is at the moment, we've
not got clipping on. So what I tend to do is
I'll grab the bomb of it. So just if you put
this x ray on, you can see grab the
bombs of each of these. And then what you're
going to do is you're just going to pull them back so they're
not touching anymore. And finally then you're just
going to put clipping on. So clipping or beyond now bring
them together and let go. And then you're going
to grab the top of these. The top of these. Yeah. And then you're
going to bring them together. Touch
them together. Press the tab button. Let's turn off the x
ray. And there they go. Now they're actually
touching there. Now we do want them a little bit smoother on the top as well. And to do that, all
I'm going to do now is just apply my mirror. So control they apply that. And then I'll grab these right click, shade, auto, smooth. And you can see it's still
not smoothing them out. Now to fix that, we can either come in and we can
drop these down. Ol shift click, Olthift,
click, press one. And then all you want to
do is drop them down, make it a little
bit more smooth. And now if it's still
not smooth them out, what that means is inside
there, there's an actual face. All I'm going to do is grab both of these. Hide
them out the way. Come in and grab
the inside face. And then just press
Delete Faces AlternH. And now you should
see it's smoothed it all off really,
really nicely for you. All right, so now
we want a kind of bar that's going to come
down underneath here. So what I'm going
to do is I'm going to use my cursor where it is. I'm going to press Shift Date, Bring in a cube. And from there I'm going to
bring my cube over here. Bring it up, make it
a little bit smaller. And then press, I need
it poking through there. Let's have a look at
how big it needs to be. Let's press S and Y then, and pull it out to
where it needs to be. Let's pull it over into here. And then what I'm going to do is I'm going to pull this down. Now I want to make
it slightly rounded, so what I'll do is I'll bring
in two or three edge loops. Let's first of all though, bring it down to the
point we need it. That'll be easier.
We'll bring it down through here like so. And then what we'll do is
we'll bring in a edge loop. Left click, right click. And finally then I'll bring
it up to where I want it. So something like that. And then what I want to do is now bring in a couple more edge loops. So left click, right click, control lot, left
click, right click. Grab them both then. And then
we should be able to bring them up like so that's
looking perfect. Now of course the
underneath isn't, So I'm going to come in
controls like this one. Pull them up into place, double tap the, and there we go. Now up to you if you want to
level those up a little bit. I think I'm happy with our mine. Look. I'm just going to, I think right click, shade, auto, smooth. There we go. Now let's work on the top then. I do want to top on
these. I'm going to press control, left
click, right click. Control, Pull it out all the way over to just the edge of here. You can see it's not
quite lining up. I can pull them across though, like so then all I'm going to do is just put a
ridge on top of here. I'll just grab these
two now and these two. And then I'll press, pull them up and finally then I'll
just bevel off this top. So grab this one. This one. This one. This one. I'll press
Tab Control or transforms, right clicks,
origin to geometry. And finally, then
let's bevel them off control B, bevel them off. Double tap the, and there we go. All right, that's looking good, except maybe we want to lift, you see these bits on here? Maybe we want to just lift
up those very slightly, just so they're a
little bit more, not quite flat against there. So let's lift them
up very slightly. You can see here
that the problem is that I've not
grabbed these here. So all I'm going to do
is I'm going to press out shift and click and then of click and then I'm going to lift them up very slightly. Even hold in the shift
borne if you need to. Just so they're slightly above there and that's
looking much better. Check the underneath and just make sure everything's
good in there. I think for me everything
is good on that. Now from here then
what we want to do, we want to bring in a sign now, so we're not bringing
a sign and we want to make it quite
ornate as well. And then once we
brought in our sign, we can actually create
those swirls that are going to go around here
and make it look really nice. So let's come in and
save out our work. So we'll save out our work. And then on the next one,
we'll start on our sign, everyone. All right everyone. So I hope you've got this far. I hope yours is looking
something like this. And yeah, I think it's
looking really, really nice. It's going to really fit
into the scene well. And especially when we've
got all of our, you know, textures and materials on, you'll really, really
see it come to life. Alright everyone, hope you enjoyed that and I'll
see on the next one. Thanks a lot. Bye bye.
117. Incorporating Swirls into Subway Decorations: Welcome microphone to Blender for the Environment
Artists Guide. And this is where
we left it off. Let's press Shift, then we've got a cursor
over here still. So shift mesh. Let's
bring in a plane. Let's rotate this plane on
the x axis, so our X 90. Let's make it a
little bit smaller. And what I'm going to
do is just press one. And I want to put this to
where it's going to go. So my sign basically, so I think my sign needs to
be a little bit smaller. Maybe that size essence
D, then bring it down. And I think something
like this kind of size is a really,
really nice size. What I want to do then is
just make sure that it's going to be popping down a little bit, so
something like that. And then we'll be able
to put these swirls and things like that along here. All right, so now I'm
happy with the size. What I'll do now
is bring this in. So first of all, control a l transforms right click
the origin geometry tab, Bring it in them
with the insert. So I bring it in like so. And then what I'm
going to do is now I'm going to pull
these parts out. So pull these parts
out a little bit. So this one and this one, and X pull them out a
little bit like so. And then from here now I'm hoping I can level
these off now. Because we've got a kind of edge loop there. Can
we actually do that? Let's give it a try. So I'm
going to grab this one. This one. This one and this one. I'm going to press
control Shift and B. And yes, it looks like it's actually might work mind I say, so let's bring it in,
let's put it on custom. And let's see Now if we can
get a shape that we need, you can see it's
slightly, slightly out. Now the one thing is if I
actually delete that though, you can see I'll probably end up with a really,
really nice shape. So if I come in and basically
press delete faces, that is actually what
I'm looking for. So if you haven't got that, just mess around
with the bomb left, you know, mess around
with your own custom. And then you can actually
lead to other way, just make it look
something like this. If you can't do that, I will show you one other
way what you can do. So controls head. You can use the knife tool
to cut around this. And then what you could do
is you could mirror it. You could put in an edge
loop, an edge loop here. Delete all of these corners off, just leaving yourself this, cut it away with the
actual knife tool. And then you'll be able
to actually actually create something really
nice control shift and Z. Then let's see if I
can go back like so. And there we go. That is
what I actually want. Now what I'm looking
for is just to make sure that the top and
bottom are the same. You can see here they're a little bit different
from each other. It normally happens
on the custom. And what you could do
is you could mirror, mirror it on the
top and the bottom. So cut it along here again with the knife to
and mirror it down. I'm going to leave
mine. Actually I think it looks pretty
good the way it is. And then what I'm
going to do now he is all I'm going to do is I'm going to press L. I'm
going to bring it out now. So I'm going to press to make it a little bit thicker like so. And then I'm going
to grab the center. I'm going to press
and pull it back. And there we go. Now
I'm going to do is just line it up underneath
here like so. And you can see it's gonna fit in beautifully like
that from here. Then what I'm going to do
is now I'm going to press Shift S Ursa selected.
Bring in a plane. So shift, let's
bring in a plane, let's rotate it round, so R x 90. Rotate it around.
And then what I'm going to do is make
it bigger like, So what I'm going to do with
this now if I press one, I'm basically going
to create some swell. So in other words,
I'm thinking I'm going to have a swell
coming from here, going round here, like so. And then what I'm going
to do is I'm going to have a swell
coming from here, going up, supporting this swill, and then coming down here, all the way down, near
enough to here like so. And that is what we're
actually trying to look for. Now if you want to
point you annotation so you get an idea
of drawing on there, you just click this button,
point you annotations, and to take them off,
all you're going to do is just click the minus. No, and then the minus. And there we go. All right, so let's actually
make that happen. So let's put ourselves back
on our move on our gizmo. And then what I'm
going to do now is I'm going to click
on my bullion. I'm going to grab my actual curve that I've already created. And then I'm going
to press Shift D and bring it up
into place like so. Now what I need to do now is I just need
to put that over there. I'm just going to keep
it there a minute because what I want
to do is I want to attach this onto my actual curve once I've actually drawn it out. So now I'm going to do is I'm
going to press Surf shift A. I'm going to
bring in a curve. So I'm going to bring in a path, I think we can do it with a path easier than a nerves curve. I'm going to press
Tab. I'm going to press Delete Vertices. And then I'm coming with
my little draw tool and making sure surface is on. And now let's come in and actually do what
we actually said. So first of all, I'm
going to come from here, go round here and swirl
it round like so. And then what I'm going to do is I'm going to come from here, I'm going to swirl
it round here, bring it all the way back round. And then what I want to do is support this going around here. Now I'm a little bit out
on this one, for sure. I'm going to bring it
all the way around. Do here. So, all right, now, before I give this
some thickness, let me just then come in and just tidy this up a little bit because it's a little bit out, as you can see, especially
around these parts. I want this to support in here and then I want
this to support in here. So I need to tidy this
bit up as you can see, making it a little
bit more rounded. And I want to make
this one nice, and slim over here,
going up to here. So let's bring this
one in when we can see we've got a few in here that we probably don't
need. Let's grab this one. Press delete this one. Delete this one.
Delete vertices, and this one delete vert. And we should be left with
that. And from there then, what I can do is I
can pull this out now, make a better swill. And then this one, let's see
how many we go in there, you can see got a few in here. And the reason is, is because
it's drawn on top of here, which is a little bit
of a problem for us. So let's move these
out. First of all, let's come in there and delete
this or delete vertices. Let's come in and
delete this vertice, or delete vertice,
and there you go. Now you can see that
ins come together. So let's bring it over now. Let's bring this part over
now to something like here. Let's make it a little bit
more of a curve like so. And there we go. And you can see that's
looking pretty nice. Except this bit, maybe, maybe we want to clean that
up a little bit, like so. And maybe we want to
move it up into place. All right, let's press Tab. It's looking pretty
nice. We can alter it a little bit more
as we move along, but I'm thinking that's
looking pretty good. Now from here, I'm going
to come back to this. What I'm going to do is I'm going to decrease the solidify. No, I'm not. Because that's
not decreasing the solidify. Let's bring it over here actually so we can
see what we're doing, but you can see it's way,
way too thick at the moment. Let's decrease the
solidify like so. And then we'll come over
to the actual curve. Let's bring down the extrude, but we've got something
to actually work with, and I think that is
much, much better. Now from here, what I can
do is I should be able to come back to this one here. Delete this plane out the way. Come back to my curve,
grab this curve, press control L. And what we're going to do
is copy modifiers. We can see it. Let's have a look what
modifiers are going there now. It's got to solidify on there, but we've not got any
extrusion on there. I think we have to reset it. Let's come in to this one again. Whoops. Let's come
into this one again. Take off this latifi
and then what we'll do is we'll press control A
all transforms rightly so. Origin three cursor. And what I'll do
first of all is I'll come in and look what this is. So it's extrude 0.14 click control C, come
back to this one, then come back, do this one P and then go to
extrude control V, like so. And we can see that's the reason why sometimes that happens. We don't want it this thick, Sometimes it's because we're resell transformations but we
definitely don't want that. So let's bring it down into play and we'll just scrap
using that actually. So we'll do it this way, we'll make it probably this
kind of thickness like. So delete this out the way. Let's get rid of it.
Let's come back. And it was a good
idea, it didn't work. Add modifier, Bring
in a solidify. Solidify now. And let's
right click and shade flat. And then what we'll do
is we'll pull it out. We can see we need to
line all of these up. A lot of work on this,
but let's line them all up so I'm happy then
with this thickness. And then what I'll
do is, first of all, I'll grab this one and
I'll line it all up. So I'm going to move
it over into place. I want it in the halfway
point of my actual sign. And then with this one,
I'm also going to come in, now press L and line this one up so it actually fits on the
bottom of this part here. And you can see already,
it's looking fantastic. We're nearly actually
there already. There's a bit of
work to do on this, and then we can mirror
it over the other side, but you can see just how
nice that actually is. All right everyone. So I
hope you enjoyed that. I hope you've managed
to follow along and I'll see you on the next
one. Thanks a lot. Bye bye.
118. Texturing Subway Surfaces for Authenticity: Welcome back everyone. To Blend for the Environment
Artists Guide, and this is where we left off. All right, so now let's do a little bit more work on here. So the easiest way I
find is if we press one, now we can actually go in there. And what I'm going to do is
first of all, bring this in. So I'm going to
bring it in to here. And then I'm going to straighten this up by bringing this out. And you can see we've got a
better curve on there now. And then what I want to
do is bring this over. I want to, realistically though, bring all of this over. So what I'm going to
do is just bring it over like so just so
it's touching there. And then what I want to do is
of course bring this back. So we can see here.
I've got this one here. I need to really think about
bringing it back like, so let's bring this one in, then let's pull it out just
to make it a better swill. And then what we'll do is
we'll move it all to the side. So, and that's
looking really nice. I'm happy with that.
And now finally we can come in and probably bring
this one down a little bit. So you can see there which one? I'm a grabbing, this is this. So I can either bring it up
or I can bring this one down. So I think I'll bring this one down rather than bring that up. And then we'll do is you can see it's got a little
bit of a bump there. I'm going to
straighten it out by pulling this out like so. And straightening all that up. And then finally just bring
it up, jaws to tad like. So now let's come and think
about these parts over here. So I'll move this over here and then we're going to pull it round or maybe
even pull this one down. Maybe pull this one
together like so. And then let's
bring these two up. This one, this one, pull them up just so they're
like landing on there. I'm thinking that's
probably bear off maybe pulling it over here and then
straightening this one up. So let's try and straighten this one up now.
Yeah, like that. That looks much bare.
Let's move it over then. Yes, that is what I want. I'm just wondering
whether I want it to go creeping into this part. I
don't actually think so. I'll just pull it up
a little bit just so it's sat on there nicely. And then I'm just wondering
if that looks right. The only thing I'm thinking is this one needs rotating
around a little bit. Maybe. I don't think I'm happy
with how this one looks, so I'm going to rotate it round then I'm going to
make it a little bit. Yeah, like this. I
think that looks bare. And I'm just wondering if I
should bring another one out. So if I press E can
actually go away. We're bringing this one out. Bringing it across to it. Yeah. And it doesn't look right. So let's leave that other way. So we'll leave that as it is. I think it looks good like
that. We'll make sure. Then if we go over, we'll go around
12 at the moment. We'll turn this down
very slowly to something like seven or even eight.
Let's have it on eight. I just want to make sure now that everything is
being in place, we can see this bit
is a little bit out if I grab these important that we get it right
before we actually finish. If I grab these, I
think I'll make this. Then we can see that this one maybe a little bit
too much in there. Again, go back to the drawing
board, grab all of these. Let's just pull them
down a little bit. They're actually just in
there. And there we go. I think that looks
much, much bare like. So I'm just wondering whether to pull this
bit down as well. So just make sure if
you're in this view, not straight on that, when you pull them down, you are a little bit
careful and you pull it down on the gizmo
and there we go. All right, that's looking good. I don't want to mess
around with it anymore. The thing we'll do now is
object convert and mesh. I'll then right click,
shade auto, smooth. And then what I'll do now is I'll mirror it over
to the other side. Control A or transforms
the origin three decursor. Then we'll add in a
modifier and a mirror. So let's mirror it
over the other side. Double tap the A,
and there we go. We've basically finished
our subway entrance. Apart from we need just a
couple of things on here. All right, so let's bring
in, let's bring in a mesh. We'll bring in a cube.
We'll make it smaller. We'll pull it over to this side. We'll pull it up into place. I'm going to pull it
up into place here. And it's up to you
whether you want it going over the top of here. So like this or inside. I think I want mine inside, so I'm going to press Essence Ed them like so I'm going
to make it a little, tiny bit smaller just so
it's fin on there like so. And then all I'm going
to do now is come in, press the born in and then
pull it up into place. Just make sure it's in there. And finally then I should be
able to now join it to this. So if I press control
J, join it over. Double tap the eight,
and there we go. We're basically done with it. I think, I'm hoping. I don't think there's any
more things we need to do. I'm just looking to make sure, you know, the post in
here for instance, they all line up making sure everything lines up now and
I think we're actually done. So what I'm going to do is now. I'm going to hide my
guy out of the way, hide my floor out the way. And we should be left with this. And we can see the
booleans on here. Let's hide those out
the way as well. And then what I can do now is I can hide these out the way, because we've already
leveled these off. We've already leveled
this off as well. So let's hide this
and this out the way. No, hide them out of the way. Let's then come to
the other parts. And nothing on here
should be beveled. That is what we're
looking for. Let's have a look and make sure
we've got a mirror. No bevels on here. No bevels on here.
No bevels on here. All right, so what we
should be able to do now is press box select. We can then come up to object. In fact, before we do that, just press just to make sure
everything's there. Come up to object convert mesh. And then what we can do now is press control all trans
fat, You know what? We'll press H to make this a little bit
easier because if not, we might be going in and selecting absolutely
everything on here. I think what we should do
is bevel it all off after. So what I'll do is
I'll press Altage. Bring back all these
but get rid of the floor and then we should have everything
back in here. From there. Then now
we'll save out our work. And what we'll do now is focus on bringing in all of our
materials and textures. And then what we'll do
from there is we can actually bevel everything off
and join it all together. All right, so let's do that.
So we'll grab these first. We've got bevel on,
we need this bevels. Fine, It's just this one. This one's going to be
a little bit different. So on this one what I'm
actually going to do is I'm going to apply our bevel, that's because when I
join this altogether, then it should make it
a little bit better. Yeah, I think we'll
do that. So what I'll do is I'll press control
A and join that. And then what I'll
do is come now, press a smart UV
project. Click Okay. And let's see what this is
actually going to look like. Sometimes they end up a
bit of a mess when you've joined all your bevels up
and sometimes they end up. Okay. So what I'll do now is
I'll bring in stone flags. So stone flags, let's bring
that in, let it load up. And let's press dot
to zoom into it. And let's have a look at that. And actually that's
come out pretty nice. Let's put our rendered view
on, see what that looks like. Yeah, and I think that's
come out pretty nice. So we're okay with that?
That's great news. All right, let's hide that
one out the way then. And let's come to our steps. We're going to just
grab our steps Smart UV project. Click Okay. And then what I'm going to do is I'm going to click down now, stone those stone flags. Join them all together,
and there we go. All right. Now let's
grab this one. This one's also
going to be stone, so we're going to make
sure, first of all, we've got a bevel on here, which is fine on this one to grab it all. Smart UV project. Click okay. And then grab
my steps control L and we're going to link materials
like so. And there we go. Now we can hide both
of these out the way because we don't actually
need anything else on here. Sorry, any other stone on
here. Hide those out the way. Next of all, let's think
what we're going to do next. So we're going to grab this. So this is all this makes it
a little bit more difficult. What we'll do though is we'll, we'll grab both of these, both of these parts. And I think also we'll
join it to this as well, making sure no modifies on press control J, we'll
join it altogether. Right click, shade,
auto, smooth. And then all I'll
do is I'll come in with these parts first. So these parts
first I'm going to press U Smart UV
Project, click Okay. And the first one I'm going
to bring in actually of the materials is going
to be my green metal. And the reason I
want to bring in green metal is because
when I bring it in, all of this is going to be colored which is
going to make it, it would be harder to do
it the other way round. Now let's click the
plus down arrow. Let's click the down
arrow, black metal. And what we're going to do
is click a sign on these. And you should end up
with something like that. And that's what we're
actually looking for. And now we're going
to do is hide those out the way.
And from here. Then now I can press A
to grab all of this. And I'm going to press
Smart UV Project. Click okay. And we are
already on Green Mal, so as you can see
now this is what it's going to look
like. All right. Now you can see
that probably this, if I go to the UV map, is probably going to be, I don't mind the
roundness because that's fine on things like metal. But the problem is, you can see it looks kind
of low resolution. To fix that, what we want to do is we want to bring it out. So bring it out like so. And then that then should fix that resolution problem
and we should be okay. Now the other problem
we might have is too much of copying. So what we're going to
do is, in other words, because we brought
it out so far, it's just repeating
the actual texture. So it's a tiled texture. So what we want to make sure of is if we come to
our render view, let's have a look what
render view looks like. And we can see, if we look around there, it's looking fine. You wouldn't even
be able to tell. Finally, then let's come back and what we want to do now is grab both of these,
both of these here. And what I'm going to
do is black metal, click a sign, and there
we go, double tap the A. And now you can see it's looking really nice Now,
did I unwrap those? Did I Smart UV project? Click. Okay. There we go. Now they're unwrapped. Now
they're looking better. And I'm just also wondering, Yeah, I think we've
reset the things. You know, I'm just
gonna go down over. Look. Yeah, they look absolutely
amazing as you can see. Al right, They're
looking really good. Now let's save out our work before we're doing
anything else. And then on the next one, then we should be able to get all of the textures and everything
on here ready to go. Alright everyone. So I hope you enjoyed that and I'll
see on the next one. Thanks a lot. Bye bye.
119. Mastering Texturing for Complex Walls: Welcome microphone to Blender for the Environment
Artists Guide. And this is where we left off. All right, so now
let's just put this on the shader a minute or Material
view and then world is, I'll come to these, I'm going to minus this off.
Minus this off. And the one we want is
going to be green wood. So green painted wood.
That is the one we want. Let that load up and then we'll do the same thing on
this one and this one. And I actually come in
and grab all of three of these control L and I'm
going to link materials. Nope, it's not going to work. But what it means is I
can minus this one off. So minus it off like so. And then come onto this one and minus this one off, like so. All right, that's done. Let's have a quick look
at what that looks like. Making sure that
wood looks good. Yes, and there we go.
It looks pretty good. And now what we'll
do is the wood, or go on these parts as well. So I'm going to do is I'm
going to grab them all. Press a Smart UV
Project. Click Okay. And then click the down arrow. Green painted wood. And then we'll do the
same thing on these now a U Smart UV
Project, click Okay. And the down arrow,
green painted wood. You can also, obviously
you apply them. So you can come in a Smart
UV project, click okay. Grab these ones
then and just press control L link materials. We can do it that way
as well if we want to. Now finally we're on to now we've got the inside of
here and we've got this, Mel, let's do all
the metal first. So we'll come to these
posts over here. We'll unwrap these because
these are going to be wood smart, UV project. Click Okay. And then what we'll do is we'll add in now the wood. So I'm looking for green wood. I'm just wondering.
Actually, no, we won't. We'll do the metal first or could we hide that
out of the way? Yes. Okay. We'll do it green
painted wood. So there we go. And now let's come in, hide
those both out the way. And then U smart UV project, click Coka plus green
metal this time. So green metal, click a
sine and there we go. That's looking cool. Now let's think about just
hiding these out of the way. Hiding out the way, this, not that one. We don't want to hide
the other way there. This and this. And this is what
we're left with. And now let's come into these. So I'm going to press a smart UV Project click,
and here we are. This is what this looks like. And because it's met again,
the swells don't make any difference Down
arrow, Black metal. Hide it out of the
way. So H to hide. Now finally the sign.
Let's do the sign. So we're going to press
a smart UV Project. Click Okay. And then finally what we'll
do is we'll come in, bring the down
arrow, black metal. And then all I want to
do is grab this one. So just this piece here. I'm going to press
a just click wrap and then spin it round, so R 90. And then what I want
to do now is plus and we're looking for the sign, if we're putting sign street
signs is the one we want. Click a sign and
then that'll pop in. And the one we want is the
Piccadilly one, of course. So if I now press the S bar
and I should be able to bring this into some sort
of place where I want it. So something like
that, wrong way round. So 180, spin it around. Let's then pull it out just so we've got a bit of edging on here and X, pull it out. Like maybe we've gone
a little bit too far. One way what we'll do
is we'll just press G, X, and move it over slightly. And there we go, I think we just need
to squeeze it down, or out and y, let's squeeze it out a bit and then let's move
it down a little bit. I guess. There we go, like, so now we've got that
little bit of edging going around here ors wondering
about this part now. So this part on this side seems a little bit
out as you can see. So maybe I will press SNX and just bring it
out very slightly. We can see we've got a bit
of metal this side now. I want this looking around
because it is a center point. So that's why I'm
spending a little bit of work making sure that
everything is good. And I think now
that is good to go. All right, that's good. Now let's hide the other way. And now we're on
two. This part here. Now this part here is a little bit more complex
because it is brick. So what we're going
to do, first of all, we will come in,
press Oltshifting, click and shift click, right click, and mark a seam. Then from there when
I'm going to do is I'm going to come to the top. I don't actually need the top and I don't
need the bottom. So I'm going to actually
delete those out of the way because it
will make it much easier in the long run to actually, you
know, fix this thing. The one thing we do need though, we do need this bottom here. So let's make sure
we've kept that. And then what we're going
to do is just delete these. So delete and faces. All right, now what we
want to have it doing is we want the bricks to
come all the way to here. So if I come to
here and then if I come to this part and then
right click and mark a scene. And I'm hoping that I
can line the bricks up. So they come now all the way to the back and then
line up to the back. So this is really hard to
do and line them all up, but it's worth doing it, because it's going to make it
just so much better. What I'm going to
do now is change this and we want it on bricks, so let's bring in
bricks like so. And now what I want to do
is come in and unwrap them. So I'm going to grab
this one, L, L, L. And you can see that I don't
want to do that one yet, so let's just take it off. So L, L, and L. And
then what we're going to do is U and unwrap like so. Now first of all, let's get our bricks to be the right side. So what we'll do is we'll
bring back our bookstore. So bring in our bookstore,
let it load up, and then what we can use that
for is the actual bricks. So you can see here, these are
the bricks if I press one, now I do have a good idea of what these are
going to look like. So I can see that these bricks are a little bit
smaller than these, which means what I can do is I can just grab the whole thing because they're all
unwrapped the same scale. And then what I can do is
I can bring it in and make sure my bricks are going
to be the right size. In other words, the right
size of these bricks on here. And these look about right. Now. From there, what
I can do is I can now make sure everything is
going the right way. So we can see here these bricks. These bricks, the bricks. Let's have a look.
And these bricks are all you pretty much
going the wrong way. The other thing is
as well, we will need to unwrap these
bricks as well. So I'm afraid, I
think I'm going to have to put in because we will be able to see
this at the top. And so I need to make sure that that is also going
to be the same. So control shift and click, right click, mark scene. And I'm hoping now I
should be able to select this L and U and unwrap. And that's what
we're going to get. And we've got our bricks. And now what I want
to do is I want to make sure they're
all the same scale. So let's come in now, grab them all like so
even if you know what, let's just do them all together. It's gonna make life so much
easier for us if we do that. So what I'm going to
do is I'm going to come all the way around here. Right click mark, same
old shift and click, right click mark Sem. And then what I'm going
to do is I'm going to grab everything except
these bomb parts. Because these bomb parts
aren't going to be bricks. So what we'll do is we'll just hide those out the way like so. And now we should be able
to grab everything like so. And then we can come
over and we can just press you and unwrap this time. Unwrap like so. And there we go. Now we can see everything's
unwrapping really nicely. We didn't have to use
Smart UV project. And the reason is, of course, is because we've actually
marked all the seams on them. So now we can press one, and now we can line
up our bricks, making sure they're
all the same. Now you can see these are a little bit smaller than these, so all I'm going to do is
press S, bring it down, and just get them to be
ran about the same size, which will be
something like that. Now, from here then
let's make sure these all line up
right rotation. Let's do the right rotation
first. So I can see this one. This one, this one, this one. This one looks absolutely fine. Like, I'm actually
happy with that. And then this one and
the back is also fine. So now I can come in
over on the UV side, R 90. Spin them round. Now we know they're
all the same size. We just make sure then that
the kind of line up nice. So you can see here, these ones aren't lining up very nice. We need to make sure
they line up well. Now there is another way
you can actually do this. You could come in and make sure these ones are unwrapped
against each other, so you can see we can
unwrap them like that, or what we can do is
we can line them up. So all I'm going to do is I'm going to try and line them up. So if I press G and Y, we should be able to
hold in the ship bun, line them up like so we
know they're the same size. And there you go, you wouldn't
be able to tell that. And then the same on
this side as well. So all I'm going to do is gos, grab this one and then
I'm going to press and Y and line them up
holding the ship bun, and there we go. All right. The back as well
looks like it's lined up near enough perfectly
with each other. And yours, looking at this
side and looking at this side. This side looks
lined up perfectly. And this side a
little bit outboard. I'm not going to
worry about that. I think with this now, everything is
pretty much done on the bricks and now all that's
left is the actual floor. So what I'm going to do is
I'm just going to come in, press tab ol, tag,
bring back everything. And now we've just
got the floor. I'm going to press you unwrap. And now let's come
in and change this. I'm going to click
plus down arrow. Let's go with the floor floor. We haven't got loss, so
let's go to Asset Manager. Let's see where our floor is. So here's our floor and let's
drop this into like so. And then what I'll do
will go back to modeling. Now let's come round
and assign our floor. Now your floor to start with
is going to look like that. And the reason is with this, we've actually got three
materials on there. Now, with this, I would say that we don't actually
need the three. So what I'm going to do
is I'm going to call it cobblestones. I'll do that. What I'll do is I'll click
plus I'll click New, and I'll click Floor
Cobbles. Let's call it that. From there then what I'll do
is I'll click on this floor. Click the little down
arrow, Copy Material. Click on this one down
arrow, Paste Material. And finally then I'm just
going to minus this off. I'll minus this off. And then come back to the
floor and click a sign. And there we go. All right. We can also see for
some reason that this also got assigned to our floor and I
don't want that. So all I'm going to do is come all the way around
because I want this to be brick bricks sign and
there we go, al right. So on the next
less and then what we'll do is we'll
work on this floor. We'll get that done. And
then I think we've pretty much got all of this
done. Alright everyone. So I hope you enjoyed that
and I'll see on the next one. Thanks a lot. Bye bye.
120. Completing the Subway Model with Final Enhancements: Welcome back everyone to Blender Fall The Environment
Artists Guide. Now what I want to do is I
want to go over to my shader. Now if we come over to shader, and you will see
this is the most complex shader in
the whole thing. So if I, Jaws pull out of here, you can see this is the shader. Now basically this shader
works via vertex painting. And you can see that we are basically basing it
on a color attribute. So you can see here, these
are the colors red, blue. You can also see one down here that plugs straight
into the other shade. So in other words,
we can use black, we can use white,
and we can use red. And we can use blue basically
to paint on two vertexes. All we've done here
is we've brought in three different textures, one being dirt, one
being cobblestones, and one being stone slabs. So we've got three
of those in here. So basically all I need
to do but this one, because this is a floor cobbles, is I just need to unplug one of these and plug it straight
into my material output. Just so I'm only using
that one for this, you know, Subway down here. Now, once we come
in to do the floor, you will see how
this works exactly. But we don't need to go in and show you how it
works right now, because we're going to save
that for a bit later on. But now though, let's find
the one that says cobble. So this one's dirt.
As you can see, if you have over
there, it says dirt. Let's go to this one then. This one says Stylized Tile. Let's go to this one. And
this one says bricks. So I'm fairly sure
it's this one. But let's see. So what I'm going to do is I'm
just going to take this and I'm going to plug it directly into my
material output. And there we go, there is our actual bricks and
that is what we want. Now of course you can see
that These don't look right. It's the UV map, I
think is massive. So let's come in,
grab both of these, and let's pull this out. And then what we're going to
do is we're gonna press A. Now if it's coming up with
this map, don't worry. Instead, just come in
and select this one. And then it'll change
it over for you. And then what we can do
is we can come in now. And I'm looking, I
don't think this is unwrapped at the moment
because it looks way, way too big on this scale, or the scale has been altered. So we can see, if we come back, this is the scale on this one, you can see that because
it's going on the floor. We alter the scale to make
sure that it fits that huge, huge part of the scene. So instead of making
this smaller, if it's ever that
UV map, by the way, where it looks tiny and
yet this is, you know, seems to fit properly, then just come in and
put these on one. Now there's an easy way
of doing that as well. We can come in and just
drag down, put it on one. And there you go. Now you can see that's exactly
what you want. You can also see on
here that the Z has been rotated round to 90. If I put this on zero, it's just going to rotate the UV map. So from there then I
can just press the S one and pull it out and get it to be the right
size that are one. And I think something like that actually is looking pretty nice, so I'm not going to mess
around with it anymore. What I'm going to do
now is go back to modeling and there we go. Now finally, let's press old H. Bring back
everything on here. Let's hide the floor out
the way at the moment. Let's hide our guy
out the way as well, and this is what we
should be left with. So now let's come in, join all of this together. Now the problem is, have we got any more bevels on
here? I'm fairly sure. Now, you know, we've pretty much
everything we've been through and we've
checked everything. All I'm going to do is
just remove this bevel off because I'm going
to bevel everything once I've joined it altogether. So remove that bevel off
and then come to this one. Just make sure
there's no bevels on. What I'm going to do to make
sure there's nothing else on there is go over the
top to grab everything. And now what I'm going to do
is I'm going to make sure grab this one because this
one has no modifiers on. Then I'm going to go to object, come down and convert a
mesh. Nothing should change. And then what we can
do is we can press control J and join it all
together. From there. Then we can press
control all transforms, right clicks to origin, to geometry, and then right
click and shade auto, smooth. And there we go, we should end up with
something like that. And finally, now we're just
going to bring in a bevel. So add modifier, generate bevel. And now what we need to do is just make sure this
devil's working. It probably won't work. It probably won't
work because of the fact we've got tons
of geometry in here. If you put it on, you'll
see it's very, very slight. So what we're going to
do is we're going to go down to what it says Geometry, turn the clamp overlap
off and then put this on. Naught point naught, naught three like so. And
hey, press do. Now we've got a bevel on
everything including the steps, all of the bricks,
everything like that. And now it should,
the moment of truth. Let's press Alt H,
bring back everything. And then we're just going to
put it onto rendered view. And let's have a
good look at what that looks like.
And there we go. You can see that
looks beautiful, really thin with the scene. If we bring back our
coffee shop as well. There we go. Really,
Really nice. All right. Really,
really happy with that. We've still got some
room, actually, if we need to know move our
bookstore a little bit. This way you can
see it's really, really coming together now. And I think, you know, having
them pretty close together, like this, is actually
the best way. Because I think this would be much more natural, you know, than having the bookstore all the way over here and a
huge empty space on here. Not only that, if you have huge empty spaces, you
need to fill them up. So just take that into account. Alright everyone. So what
we'll do now is we'll come in, we'll hide our bookstore, we'll hide our coffee shop. And also the coffee shop. It's annoying me, I'm
going to just call it coffee shop one like so. And then what we'll do now
is we'll hide our floor. And I'm going to
come over the top, I'll hide my little guy. I'm going to put it
back onto object view. I'm going to go
over the top now. I'm going to press
B, select it all. So I'm going to press F two, and I'm going to call it Subway. And then what I'm going to
do is I'm going to press M and I'm going to make a
new one, new collection. Let's call it Subway enter
twice. And there we go. Now we've got a Subway. I also as well, going to put my Subway near my coffee shop. So I'm going to drag
this up, put it there. And also you can see Subway
Don's can that bookstore. Let's drag it up. Put
my bookstore there. Let's rename this like so. And finally, now let's see if
we can bring everything in. So if I bring in my coffee shop, I can hide my Subway
out of the way. I can bring in my Boolean. So my Booleans are here. You can see that we've
got another part here. What is that to,
actually? Oh, that is. I think that's to the bookstore. Let's have a look. So
bring in my bookstore. Yeah, you can see
for some reason that's not on the bookstore. I think I'll just press M and put it into
bookstore. There we go. Now I should be able
to double tap the and now I should be able
to hide my Boolean. Hide my bookstore out
the way if I want to. My ground plane. Where
is my ground plane? Let's press all tage.
There's my ground plane. So let's hide that out
the way if we need to, my human, I can hide. And then we've got my assets. Now I think what we'll
do on the next lesson is we'll actually
start bringing in some of these assets to start filling out this
scene a little bit. Because we've got most
of the assets done, we can start placing
them in front of here. We can start with the, you know, actual bus stop, placing
that in front of here. And really get a feel of how
this is going to look like. Because I think at the
moment it's going to need to be maybe a little bit more this way once I've
got my tree in there. So maybe a little bit more this way and maybe a little
bit less this way. In other words, move it over a little bit is what I think. All right everyone. So
I'll leave it here. We'll save our work. And on the next one we'll
get started on that. Okay? Thanks everyone. Bye bye.
121. 3D Lesson 120 Incorporating Trees and Greenery into Victorian Scenes: Welcome back everyone to Blend for the Environment
Artists Guide. And this is where
we left the off. All right, I'm
just going to make sure I'm saving w my work. And then what we're going to
do is we're just going to go over to object view.
We'll go over to that. And what I'm first
of all going to do before bringing in any of these assets is I'm just going to pull
this out a little bit. So you can see
though, the problem I will have is if
I pull this out, I'm going to pull this out. And I don't really
want to do that. So what I'm going to do
is I'm just going to press, go over the top of it. And then I'll bring
in now where is it? We'll bring in mesh bisect. And we'll just cut
this over here, make sure that it's
set to zero like so. And now I should be able
to come down to this edge. So edge select, come down
to this edge and just pull it out a little bit like that without affecting
this part here. Because we've made a boot
lead in there, of course. All right, so that saves
a little bit of wick. It might be a little
bit too far out. I think though actually
this is about right now. All right, from
there then, let's come over to our asset manager. And what we want to do now is we want to close up the pillows and we want to
bring in our tree. So all I'm going
to do is just zoom out a little bit
and I'm going to set the tree on top
of here like so. And what I'm going to do
now is I'm just going to, in fact, we'll leave
that tree there. Just I'll move it
over here actually, and then I'll get a good idea
of the kind of scale of it. We don't want this
one over here, over here to be too big
or anything like that. Now, we brought in our tree. Let's go back now to modeling. And then what I'll
do is I'll grab my tree and what I'll
do is I'll press M, and I'm going to put
in my assets like so. And now let's think
about our actual lights. So what I'm going to do is
I'm going to bring my light, I'm going to press shift. I'm going to then move it to
the side, go over the top. Seven, go over the top.
And I'm going to put the light roundabout here,
something like that. Make sure that it's actually in the floor so you can
see is it in the floor, is it poking through?
No, it's not. Let's bring it
down a little bit, Make sure it's just poking through on the ground
plane like so. All right. One light in
and that's looking good. Make sure always that
your guy, you know, he's gonna walk
down, make sure of the view of where
the actual light is. And I think actually that light is in a really,
really nice place. Okay, so now let's bring
in our newspaper stand. So what I'm going to
do is I'm going to grab my newspaper stand again. I'm going to wear
press shift D. Then I'm going to press
shift, bring it over. And then I'm going to
rotate it around ours. 90, rotate it around. I'm going to put it
then next to my Subway. Something like that. Maybe
that's a little bit too close. Also, make sure that it's
jawed in the ground plane. You can see perhaps it's
not in there enough. Let's bring it down just in
the ground plane like so. And then let's grab
this part here. And what I'm going to
do is rotate it round. Said rotate it round. And that looks really nice. Now let's think
about our bus stop. So we'll bring our
bus stop again. We're going to press shift,
bring in our bus stop, and we'll put it round
about here, over here. And then I think
we've got a very, very nice view that
towns coming together. And then what we'll
do is we'll grab our bench shift again. Let's bring this Ram. And I imagine this is kind of a road,
but we just can't see it. So what I'm going to do is
just put my bench in here. If I press one, just want to make sure it's in
the center of there. I'll just grab this,
put it in the center, like so double tap the A.
Yeah, that's looking cool. And then what I'll do
is I'll come round to the back of this building. I'll put a couple
of benches in here, so we'll grab our bench again, shift D, brewing it over. And I can imagine this
part round here probably lead onto some small park
or something like that. So D -90 just to give you ideas in case you want to build this out
a little bit further. I mean, once you've
got a few buildings, it's not that hard
to build it out. Just make sure this is nearly
to the back of the wall. I did think of putting some plants here and
things like that, but honestly I built out so much on this course
that I really didn't want to do
any more on it. Now what we'll do is we'll
think about our tree. So I'm going to bring
first tree over to here. Actually, I'll put it back
in. I'll press shift. I'll bring my first tree
over to here like so. And of course I can
see that this is probably going to be
way, way too big. So I'm thinking probably
actually, you know what I think? Actually, that
looks pretty nice. As long as people can
they walk past it, that's the thing, they're going to be able
to walk past it. Look, maybe let's look. If we pull it up to there. Yeah, something like
that. Into the ground. You can have it a
little bit higher because you're going to
have some dirt here anyway. But I think something like
that looks pretty nice. All right, let's press shift, Let's bring it over then. I'm going to make it smaller
straight off the bat. And then what I'm going to do
is just pull it over here, and this tree is going to
go like it's hanging over. This part here. I'm also
going to rotate it round. Just rotate it around. So what I want to make sure is that it's not actually
touching there. I'm going to make it
a little bit smaller. Rotate it a little
bit more if I can. The thing is if it's actually
going really in there, we can actually delete
some of these off as well. So don't worry about that. Now
let's put it into the into the May think actually
that's looking good. I'm just going to press tab. Then what I'm going to do
is look at all of these. All I'm going to do
with pieces like this, I'm just going to
press, just grab them. All You can see even
these over here, Press control plus
right click control plus your keep pressing
it so we grow more. And then we're just
going to press Delete. And then just do the
next lot C all of these, then right click control
plus and then delete. And there we go one more bit, I think these parts
here and delete and us. All right, se look, make sure nothing's
coming in the top. And there we go.
We've cut all of those pieces away.
Let's look in. Pretty nice. All right, now we can still
walk down there. Then let's bring in one more, which will be this one here. Again, shift D,
let's bring it down. Let's put it in the center. In the center, near
here, I think. So let's pull it down. We'll line it up
actually with this other one, we put it that way. Spin it round, so ours 90 then I think I'll have
it in place like there. And then I'm just
going to put it, press seven to go over the top. I think I'm going to have
it lined up with this one, but just here like so maybe
pull it out a little bit. We'll tap the there we go. I'm thinking that's
looking pretty nice. I'm happy with the
bush in there. All of that is
looking pretty good. Now, what we need to do now
is first of all just make the block where this tree
is going to go into. I think I'll make a
round block for this. Actually, I'll grab my
tree, press shift desk. Custer selected shift day. And then what I'll do is
I'll bring in mesh cylinder. Let's put this on
something like 18, so something like 18. Let's make it the
size that we want it. First of all, let's
press Essence Head. Bring it down to the
size that I want it. Maybe something like this
I think will be fine. Yeah, something like that.
And then all I'm going to do is press the little
question mark, isolate it out. And we'll just make a
quick part on here. Now, I think I've showed you
how to put edge loops on. If not, it's called Loop Tools, it's on the add on. Edit Preferences, Add
Loop Tools, Loop Tools. This one here. Just make
sure you've got that on. Then all I'm going
to do is press, I bring it in and then I'm going to press right click,
Looptols and Bridge. And you should end up
with that from there. Then let's actually
split these off. Shift click, every other one. So you can see here, every other one isn't working, sometimes it doesn't,
don't worry about it. We can have it a little
bit different on them, it won't make any difference. It's just some stones that
have been put together. So it's perfectly
fine to do that. So let's press Y to
split them off, A to B. Select the mole mesh, clean up, and then fill holes. Finally, then let's come in, press control all transoms. Right click, shade,
auto, smooth. And let's come in,
add a modifier, Generate, and we're going
to generate a bevel, and we're going to
turn this up to 0.3 And we're also going to increase the
segments on these. Now you can see that when
I've increased them, they don't quite look right. So if that happens, you'll
bring them up like so. And now I can see they look
a lot more like stone. And that is pretty much
what we're looking for. Finally, then, even with
these, let's just come in, put it on random, pull
it up just a little bit. Bring in your mouse. If you can't see the circle, it's just because your
mouse is not there. Grab this one, pull it up like this one's probably a
little bit too high actually. So let's bring it down there. The other a bit uneven, and finally, now grab them all, and we're going to go to mesh
transform and randomize. And let's set this all
the way down then to 0.1 or not 0.2 so not
0.1 Have a look at that. Yeah, and the thing that
looks pretty cool Now, lastly then let's just bring
in a circle, mesh circle. And what I'm going to do
is I'm going to put this on something like 18. I'll bring it in, then
I'm going to press Tab. And now I'm in edit mode. So you can see I'm in edit mode. Press the button and now I can bring it up
to where I want it. Let's just turn that, bring
it up to where I want it. So now I'm going to do
is I'm going to press, I ring in the insert. And now you're going to
do is press control And bring in a few edge loops
like left click, right click. And now you can do is you
can grab the center of it, make sure you've got
proportion editing on, and then just pull it up. Maybe that's a
little bit too much. As you can see, it's probably
a little bit too much. Let's right click auto, smooth. Yeah, it's not going
to work like that. If that happens, just press
and line it out a little bit. And Z out, there we go. Now we can see that's
looking a little bit there. I'm not going to worry
about this in the middle. The tree is going
to be there anyway. But you can see it's
just a little bit of lumpiness and
that's what I want. Finally I'm just
going to put this on to smooth and then I'm just going to lift up
all the thing like. So there we go. So that's
going to be our dot. So on the next lesson
then what we'll do is we'll put these
where the trees are. We'll have a quick look
at what it looks like. And then then we can actually start on our butcher's
shop. Alright everyone. It's really, really
coming together now. I hope you're really
enjoying the course so far. I know it's long, I
know it's pretty hard. But by the end, you
will have learned so much about how to
create everything. Alright everyone. Thanks lot. Bye bye.
122. 3D Lesson 121 Updating Renders with New Environmental Elements: Welcome back. Around to Blender for the Environment
Artist Guide, and this is where we left off. All right, let's now come in and what we'll
do is we'll grab this press and unwrap.
We can just unwrap. It's just a simple face. Then we can come to these,
press a smart UV project play. Okay, and finally then
what I'm gonna do is I'm just going to press all
te, bring back everything. They'll let that load up or a question mark to bring back everything that might be easier. And then what I want to do is
I want to come to where it says my rock one on here calls floor cobbles.
That's the one that I want. So let's come to that one first and what I'll do
is then I'll come to this and I'll type
floor cobbles. That's the one I want
to put on there. If I put it on
their shade of you now, just want it's a load up. And at this point because we
have so much in the scene, it's just probably
better off that if your computer is slowing
down or something like that, that you just hide
some of this stuff. We don't actually need to see
all this stuff right now. We're going to look
at it in a bit, but not right now, just
in case that happens. Just, you know, hide
some of those things. So let's bring it up like, so what are we going to do now? Plus new for dirt like so. And I've got my caps
locks on for some reason, so floor dirt like so. And then come to this
one. Copy material, paste material like so. All right, let's hide this
one out of the way now. We should just be
left with that. Let's go over to
our shading panel. And then what I'm
going to do now is come and find my dirt. I think it was down
here. So look. So down here is dirt. And what I'm going to
do now is take this, this point here and just
plug that straight in. Press a little dot on to
zoom to it. And there we go. There is our
beautiful dirt there. And now what we'll do is
we'll come to this part. I'm going to come to my shader. And what I want to do now is stone and stone flags and put
that on. And there we go. Now all we should be able to do, we've got a bevel on here. Let's apply that bevel. So we're coming over control, Grab my dirt, grab my
bevel, Press control J. Then join them both together. And finally all I'm going to do now is go back to modeling. Let it load up they like. So press control or transforms, right clicks the
origins, geometry. And then I'll just press Shift
D. And I'm just going to bring one over here that you
can use for your assets. So I'm going to put that there. And then what I'm going
to do is I'm going to put M and put it in Assets. Now for these parts here, I'm actually going to
fix these in a minute. So I'm going to grab
this part here. I'm going to press Shift, bring it over then to my other tree. And then what I'm going
to do is I'm just going to zoom in with
a little dot born. And then let's just
put it into place where I want it or
something like that. Rotate it round as
well just to make it look a little bit
different. And there we go. That's that one in now
the things in the scene, so let's just put it
on object modem in it. At the moment, all of
these are in assets. And I want to have something
that says Scene Assets. You can see these
are in here as well. Let's come in and grab all the stuff that we want
to put in our scene assets. So if I come in, grab this, this, let's grab this, Bob one, let's grab
this, let's grab this. And then I'm just going
to keep working my way around grabbing all of
the stuff that I want. So all of these.
And then let's come to this and this
and this and this. And let's press M and what we're going to
do is going to make a new collection and we'll
call it scene assets, just to split them up
from my other assets. Like so, close that up and
there we go, double tap the A. And now we should
be able to come in, hide our scene assets
out of the way. And there we go, that's
looking pretty good. And what we'll do
now is we'll hide our assets out of
the way. Like so. I'm also going to make
sure with the assets I'm going to tick off rendering. We definitely don't
want this to be rendered with the actual scene. Now finally, let's save
out our work after this. We're going to be
starting on the butchers, but let's actually see what
we've actually done here. So the first time viewing this, we can see now what it
actually looks like. So you can see if I move
this out of the way. So shift right click just
to move that cursor. Let's turn off the
interlocking links. Let's press the end
Born as well to hide that panel out of the
way. And here we go. This is what you should
have at the moment. And you can see it's
looking really, really nice now, Do I want this pulled out a little
bit more? I think I do. So I'm just going to pull
that out a little bit. I don't want it too
close to there. I'm actually really,
really happy with that. Now the thing is let's
put it onto object mode. Let's turn on our
Interlock in links. And what we're going
to do now is just press zero and we're going to get an
actual view of this. I'm going to actually
take a render of this, so I'm going to
come in camera to view and just make sure I always do this kind of intermittently just to see
where we are with this. I'm going to make
sure that I've not got these parts in there. Just a view like this thing. Again, what I'll do is I'll
put it onto wire frame. Always save out your
work before doing that. So save it out and then now let's come over
to the render panel. Surrender render image. And let that render out, and let's see what we're
going to get. All right. So we can see I've still not
hidden these parts away. Oh, well, I forgot about
those. Never mind. What I don't want to do is make sure that that is not
in there for some reason. Hey, that's not very good. Let it render out, we'll
fix those problems. Not really any problems. But you can see once this is finished, it's taking longer to
actually render this out now. But you can see just
how nice this is now. I think obviously we
need a better render. We're kind of around
here, we can't really see our
subway or anything. I think I'll turn it
around in a minute. Just get a final look
on this. So initialize. And there we go. And
that's looking beautiful. All right, that's looking really nice. Let's close that down. Let's first of all turn
off camera to view. And then all I'm going to do is I'm just going to
have a look at why this looks as though the tree is stuck out and it's because the
tree is in the air. So let's pull it down.
And there we go. Double tap the. Now what we'll
do is we'll come back to my camera camera to view. All I'm going to do is I'm
going to turn it around. I've got a bit more of a
view of what things are, so I'm going to put it on
object mode just so I can see. Now I actually, you know what, I think this is a better
view like this, like this, I think we'll make bad view
in a little bit. There we go. So we'll take one more render, they're not in the view anyway. These Booleans, I'm
just going to turn that off as well so they're
not in the rendered view. And then finally
wire frame again, I always say out before
I hit that render board just in case render image, let this load up and then
we'll have a good idea. The trees in now you can
see that's looking really nice and it's going to look even better once
we've got this floor in, in you'll see it really
start coming together. Then let this load up. And then once we've
actually finished this, then we can make a
start on the butchers. The butcher's shop
honestly is really, really easy in comparison
to the perfume shop. We're going to leave
that one to last. So I think we'll do
the butcher shop, then the car, and finally
the perfume shop, and then the floor. And then we have a
completed scene. We've got pretty much
everything we need in this now. All right, so that's
what it looks like so far on a low setting render. And you can see it's
really, really nice. All right everyone, so
let's close that down. Let's then just take
off my camera view off. Let's come back over
to object mode. And then what we can do now is we can bring in our gray box. So let's have a look
at our gray box and the one we want to bring in. We've got a bookshop. Let's
bring in our butchers now. So this is where our
butchers is going to start. First thing I'm going to do is I'm going to close that up now. I'm going to hide my coffee
shop, hide my Subway. I'm going to keep my bookstore
on, and I'm going to hide. I think I'll hide
my scene assets. So we should be left with
something like this. And then we just
prepare and bring our little guy over to
our butchers like so. And there we go. All right, so from here then, what we'll do is we'll start
on the next lesson. We'll start bringing
in the doors. First of all, we'll
bring those in and then I think we'll
start on the windows. And we should make a
relatively short work of this because we already have a lot of the skills now to
actually create this. All right everyone, So I
hope you enjoyed that. And I'll see on the next
one. Thanks. Bye bye.
123. Initiating the Butcher's Building Project: Welcome back everyone to Blender Full the Environment
Artists Guide. And this is where
we left the art. So what we're going to do now is we'll put the first door in, and then we'll put the
second door in around here. And from there then
we can kind of build this actually around. The windows are
actually the same, it's just the inside
of the windows. So once we've got
the right scale and things like that
for the windows, then we can actually create the bullion that's going
to go behind them. So let's first of all
come to this door here. All I'll do first of all
is press Sir Shift Day. I'll bring in a cube. And my cube's gonna
come over here. I'm gonna move it over. Then I'm gonna shift right click just to put
my cursor there. It's gonna make it a
little bit easier to let the cube and then
press Shift Day. And I'll bring in a cube
again. And there we go. That's much easier to
actually work with. Alright, let's make it a
little bit bigger then. A bit higher to where
we actually want it. So what I'm going
to do is press one. I'm going to pull my cube
up to my ground plane. And then all I'm going to do is now come to the top of it. So I'm going to grab
the top of it like so, and actually pull it up
to the height that I actually want it without
proportional editing on. So something like that. And then what we'll do is we'll
get the right size now. So I can see it's
just a normal door, so we don't need it too wide. So, and X, let's pull it out
just a little bit like so. And even that might be
a little bit too much. So something like that thinks
about the right height. Now the next thing
I want to do is I just want to bevel off the end, which means I'm going to have to make it a little bit taller. I want this door to be
a little bit rounded. And they also want the gap going in as well to be a
little bit rounded. So what I'm going to do
is I'm going to come in, I'm going to grab both
the tops of these. And then I'm going
to press Tab Control or transforms right clicks
at origin geometry. Then I'm gonna press control
B and just bevel it off. I'm gonna turn up that bevel a little bit to
something like that. And then what I'm gonna
do is come over to the left hand side where
the bevel operator is, put it on super clips. And that's basically what I
want, something like that. Apart from the fact I want it
to come out not like this, a little bit more on
the actual width. So I'm going to pull this
first of all that way and then kind of mess
around with the width, and then turn this
down a little bit, maybe maybe to
something like this, sort of roundness and maybe
even that's not quite right. So let's get it a
little bit more. Turn it up one, maybe
let's mess around then. Bringing it over.
Something like that, I think is round about what I'm actually
looking for in this. All right, from there then
we've got the right height. What I also want to do
with this as well is if I press control A and
reset all my transforms, I'm going to spin it
round so ours head 90. And then what I also
want to do is I want to pull this into place like so. And I want to actually
bring it up on a step. So I want it not only to go back far into the actual building, but I also want to put a
little step underneath. So if I press three,
you can see here if my guys over here,
let's put him there. You can see he's
just got to step up a little bit to actually get into the actual
butcher shop. I'm going to pull it
down a little bit. I feel like that steps
a little bit too high. And from there then,
I'm going to measure how far back this is
actually going to go. I would say if you think about we're going to
have a board on here. And how far back do you
think it should go? Maybe a little bit further back. So S and X, let's pull it
back a little bit further. Like so, something like that I think's gonna be
absolutely fine. The other thing to
remember, if we press Tab, we can see this is where our
actual line is gonna go. And feel like this actual up here probably has to
go just above this part. In other words, when we
bring our piece of wood in, we need to sit them
on top of there. So just take that into account when we're actually
building this out. All right, so that's
the first door. Now what I'll do is
I'll grab this again. I'll press shift, and I'm now going to bring
in the second door. But the first thing
I'm going to do is just get the correct height. So I'm going to spin
it round, so zed 90. Let's spin it round. And
then what I'll do now is I'll come in and I think to make this a little bit
easier is I'll just yeah, I think I'll just take the
top of the bottom of here. So I'm just gonna if I can
come under the bottom. So I'll just grab the bottom. I'll press selection. Grab the top of
this, press Delete. And then I'm just left
with this bottom. And from there then,
all I'm going to do is just press and pull it up. Because this one wants to be just a kind of standard door, a cheap door,
actually, because it is the back entrance
for the butchers. But the other thing
is I want it to be the right height
first of all. So if I put this down, let's say to the ground plane, So part it down to
the ground plane, you can see that this is the height that
it's going to be. This is the width
it's going to be. So we know that that's correct. The next thing though
I want to do to prepare this is I want to bring my guy to the back here.
So something like that. And then what I'm going
to do is bring the door back to here and
jaws to have it. So it's jaws sticking out. Now what I want to
do is I want like a few steps actually,
leading into this. So I'm going to pull it up to maybe a little bit this
way, a little bit like, so. And then what I'll do is
now I'll press Control. Or transforms right? Clicks
at origin to geometry. And bear in mind that it
doesn't matter how far back it actually goes
because the thing is, the door is going to
cover it up anyway. So just take that into account. Now let's press shift
S cost selected. And then what we'll do is
we'll bring in a step cube. Let's pull it out to where
it's actually going to go. So something like here,
let's surpress and x just to pull it out to the width they actually want
it. So something like that. And let's also make it a
little bit thinner so and z and a little bit
wider this way so it can actually step on it.
So something like that. We'll put that in place and
then what we'll do is, well, I think we want three
or four steps on here, something that looks,
you know, reasonable. So what we'll do is
we'll grab that, we'll come in and we'll
add in another modifier. This time it'll be an array. And then what we'll do is
we'll set this to zero, set the z value to one like so, or minus one in this case. And then what we'll do is
we'll set the y value, so we'll pull it out
something like this. Now what I'm looking for here, if I bring in three or four like so you can see that they're going to come out
way, way too much. So these steps are
going to have to go in a lot more than what
they are at the moment. I'm not, I don't want them
popping out this much. They only want to be, you
know, very, very small. So what we can do to do that
is we can pull them back. So if I press tab press and Y and then I can pull them back to where
we actually want them. What we have to be
careful of though, is of course, is that you will still be able to
stand on them at the moment. You can see there will be very, very small steps like this. Now we are going
to have some steps kind of going over
the top of them, but we still don't want
them coming out too much. The other thing is, if
we're not happy, you know, with three, sorry, four steps, we can actually delete one and then make them
a little bit wider. And we can still get away with that, or we can pull them down. So in other words, if we
pull them down like so, or in fact, what we'll do is instead is we'll pull them back. So this top step is going
to be kind of in there like so just make sure as well that they're actually
on the ground plane. You can see at the
moment they're not on the ground plane like so. And then what we can
also do is we can press S Z and pull them down if needed as
well if we need to do that. So let's pull them down and
let's look at what that looks like and actually think that's going to be about right. I think I just need to
pull them out a tiny bit more so S and Y pull
them out a little bit, just so his feet balance on there a little bit
better than what they did. And yeah, I think
that's looking, I think that's looking good. The one thing I can say is they're probably a
little bit too wide. We don't want them wider in this case than
the actual door. So all I'm going to do
is press S and X and pull them in to
something like that. And there you go. You can see now when we've got
the posts up there, the steps are going to
be looking about, right. All right, from
there then what we can do now is we can make sure that our door then is
going to cut this part away. So we can pull it down
just a little bit, just so it's on top
of there, like so. And I think that is looking just about
right now from here. Before we do anything, the
best thing we can do to position our doors correctly is bring in our actual window. Because at the moment,
this one is way, way too, over here. But we need the
window to come in to tell us like this is the
size that we need it. So all I'm going to
do is move our guy over here. I'm gonna grab him. I'm gonna press shift
desk, Ursa selected. And what I'm gonna do is
I'm gonna make a window. But this time we're gonna make it a lot more simple than what we've actually done
before because it is a butcher's after all. So all I'm gonna do
is I'm just gonna press Shift Day.
Bring in a cube. And then what I'm going
to do is I'm going to make the window
part first of all. So what I'm going to do
is I'm going to press and y and pull it back
where I want it. And then I'm going
to put it into the place where I want it. And then what I'm going to
do is I'm going to bring it up slightly higher
than this window, so that's where
it's going to be, just slightly higher than that. And then we're going to
press and X and pull that out into place like so. And the thing roundabout
here should be about right. And then I'm going
to pull it down, so I'm going to come
to the bottom and measure out where we
actually want my window. So I imagine someone
looking into, you know, the butcher's window and
imagine it being fairly low, like you see at the butcher's. So let's pull it
down a little bit more. Something like that. And now I've got this.
What I should do. I should come in and just bring the top down
now because we know the height is just going to
be above the actual door. And I think something like this height looks about the right height that
I'm looking for. And from here then what I
need to do is level this out. So first of all,
let's press control, or transforms set
origin geometry. Press the tab button,
and then we're going to come in and we're
going to level these parts. So if I press control B now I should be able to
level those out now. Don't worry, this is
not what we look like, not what we want or
anything like that. All we're going to do is
turn this down to one, and now we've got control
over the actual width. Let's have a look. This one here, that's what
I'm looking for. And we should, if I
put this on once, have a look, Yeah,
that's not what we want. We're not after that. What we're after it is the actual width. So this one here, I'm going
to pull two, maybe two there. And then finally what I'll do is I'll pull this window back now. So if I pull this window back. So that is really what
I'm actually looking for. Just a very slight difference. And I'm looking
also at the side. I don't want it to be
that much at the side. I think it only needs to
really come out a little bit. The one thing I'm thinking
maybe a little bit more, so maybe jaw a little bit more
roundabout there like so. And finally then I've
got to remember that I need to boolean
inside of here as well. So what I'm going to do is
just press the x ray on. Now, grab this part here. This is the size of the window. That's exactly what I want. Shift D, pull it out. And then I'm going to
press P selection. And just leave that over there, just for now while I deal
with the rest of this window. And we'll do that on the next
lesson. All right everyone. So I hope you enjoyed that and I'll see you
in the next one. Thanks a lot. Bye bye.
124. Addressing Window Mesh Issues in Victorian Buildings: Welcome back everyone. To blend for the Environment
Artists guide. And this is where
we left it off. All right, so let's first
of all do our windows. So what I'm going to
do for our windows is I will come in face select. I'm just going to grab all
of these windows like so. And I'm going to press then
is the eye button eye again, just to bring those in to get the thickness of
these actual windows. Thinking something like that
is looking pretty nice. And then what I can do now, I'm thinking the easiest way to do this is probably to take these and maybe bring them out or we can bring
our windows in. The problem is if we
bring our windows in. So in other words, if
we go a alternates and bring our windows in like so it's much harder then to actually split
these off as you can see. So we're going to have to
split down here and then we have to go in and
fill all those holes in. That makes it a
little bit harder. So rather than do that,
what we can actually do is split these off from here. Split them off and
then pull them out. That makes it easier. So if I come in
and grab this one, let's grab this center one and let's grab
this outside one. So let's press Selection. And then what we'll do is we'll come in and grab this one. This one and this one,
And then selection. And then what we'll do is
grab this one, this one. Any others that
are not touching, for instance, selection. And then finally these
ones on the inside. This one and this one, and I think this one
and then selection. And then just hide the
rest of the window away. So if you hide all of that away, you should be left with
something like this. Just make sure
everything is there that you actually
need from there. Now I can come in
and join all of these together. So I
can join all of this. Press control J,
and there we go, that's what we're
left with, control a. Then all transforms, right
clicks at origin to geometry. And now from here we should
be able to bring these out. So if I come in adding
a modifier, generate, bring in, then a solidify, let's pull it out the other way. So bring it out and we can see that we've
got some splits there. Now, sometimes
sometimes that happens and we can get around
actually fixing that. You can either bring them back, so if you bring
them back instead, you'll see now that those
splits aren't as obvious. And then we can move
it out like so, where you can see
that we've still got a problem in the split
still being there. So how do we
actually solve that? Unfortunately, we're going to have to do this another way. Then we're going to
have to come in, grab everything, and
then go to Mesh. And then what we're going to do is we're going to come down to clean up, Merge by distance. And then we've joined
40 vertices together. And now what we'll see is
that when we bring these out, they're all going to be kind of, they'll come out together. Now, can we actually bring a seam in and split
them off that way? That's another thing
that we could do. So let's actually bring
in a solidify now. So all I'm going to do
is I'm going to come in, add modifier,
generate a solidify. Let's bring it out then. So bring it out, and you can see now there is no split on there. It just means I'm
going to have to split off all of
these from there. Let's bring in our window now
because we can bring that back and make sure that we're happy with the
thickness of this. You can see at the
moment this is way, way too thick and
we don't want that. So let's pull it
back a little bit. So back holding the shift
button, something like that, I think looks much, much better from there then
now we can split it off. And it's still easier than
joining it altogether. But before I split
off, what I'll do is I'll come to the
top of my building. And then what I'm going to do is I'm going to pull
out the top of it. So let's think about
doing it this way. So if I press and
pull it up like so, and then again pull it up. And now what I can
do is I can grab it going all the way from here. So not all the way around,
just all the way to here. And then I can press to alternS, and now I can pull out
that top bit like so. And you can see that's
looking really, really nice for the top of it. Now we can do the same with
the bottom part as well. So I'm jaws going to
come underneath and I'm going to press,
pull this out. And then what I'm going
to do is I'm going to press and pull it all the
way down to the floor. And this part is actually
going to be the brick. I'm not going to need this
bottom bit under this. I'm just going to pull it
up to the ground plane, press delete and faces
just to let that off. And now what it'll do is we'll add in this part under here. So I'm going to, again, I don't want to grab it
all the way around. So you can see I'm grabbing it all the way
around all the time. I might as well come in and just delete all of
this up to ear. So delete faces, we're
not going to need them. The other thing is
we're going to already put in a hole in this
part here anyway. So we're certainly not going
to need the back of this. And now I should be able
to press out shifting, click, and then
press to alternates. And now I should be
able to bring it out to my heart's content. Let's put offset even on, on this one like so. And also let's come in and
pull this down a little bit. So I think it needs to
be a little bit thicker. Or what we can do.
Instead of that, I think I'll do it
a different way. We'll press Controller,
Bring in an edge loop. Pull it out slightly. And then what we'll do is we'll come in now and grab this, going all the way round to here. And finally then just
press and pull it down. And I think that now looks yeah about the way that I
would actually want it. All right, so let's now move back onto this part
that we've got here. Let's first of all isolate it. So we'll just press
the question mark just to isolate it out. And then what we'll
do is we'll apply, so even thickness on, Let's apply the solidify. So control a. And now finally let's think about
actually splitting these up. So what I'm going to do is
we've got these holes here. We might as well come in and
just delete those for now. So just come in and
delete the faces. It will make it easier. And now finally what
we can do is we can old shift click and
just split these off. So all I'm going to do is I'm just going to come to some of these parts and
I'm going to press Y and H and hide
them out the way. And then old shift
click out, shift, click on two of these like
so Y hide them out the way. And then we're going
to be left with these. Now, I would like to
split these off as well, but these are a
little bit harder to fill in, to be honest. So what I'm going to
do with these is I'm just going to select
one side of them. So select one side. Now there is an
easier way, a cold. Just grab these here, these here, these
here. Press control. And we can do it
that way as well. And then we can just press Y. And then we don't need to
hide them out the way, because everything's split off. Now Holton H, bring
everything back. Now we all do this
one step at a time. So what I'm going to do is I'm just going to grab everything. I'm going to go to
mesh, clean up, and then we're going
to fill holes. That's going to be great
for these ones here because they're obviously quads that
they're going to fill. But the ones on the inside, if I hide these, you will see that it doesn't
fill them in. Has it filled them in?
Let's have a look. It might have actually filled them in. I'm not actually sure. I don't think it has.
Easiest way to see that. Let's have a look. Sometimes you can end up in a bit
of a mess with this. I'm going to press
control la now. Or transforms set
origin geometry. Now we'll see if we've
actually filled in these. These are the ones
I'm worried about. If I come in and go into
generate and bevel, you can see that
we've got bevels working all the way across here. It's these ones that
aren't filled in. This is what I was
worried about. So what I'm going to do is I'm just going to split
these off now. So if I come in and grab all of these and isolate
those out as well, so press a little question mark and let's isolate them out. In fact, we won't
do it that way. We'll just press shift H, then they'll isolate them out. Now you can see that these,
for whatever reason, the bevel is not
working on them, and the reason the
devil's not working on them is because they're
not actually together. These, you can see here, they're not actually joined together. So what you want
to do is you just want to grab one side of them. So let's always grab
the right hand side, come round, and then what you're going to do is just
hide those out the way. And then what we're going to do is we're going to fill these in. So we're going to come
in, we're going to grab this one and this
one and press the button. And then this one. Just
this one and this one. Press the F, and then
just work your way round. So face, and then this one here. This one and this one and, and face now press Oltates, you're going to bring
everything back. And you can see now we're
actually starting to get bevel on these parts
here, these ones. However, on the right hand side, they're not actually going
to be like that because we need to come in
now and grab the ones on the right hand side and do exactly the same thing
as what we've just done. So shift H, hide
everything else. And then all we're
going to do is come in, grab this one and this one. And now you can see
that the bevel in off because they've actually
got a full face on them. So, and then like so. And then what I'm going
to do is press Lth and then grab everything. And you'll see all we have to
do now is come up to mesh, clean up and fill holes. And there we go from there. Now you can see that's
looking pretty nice. And all I can do now is put this on naught point naught three. And now you can
see that this has turned out pretty
much perfectly. If I bring everything back
with a little question mark, double tap the and there we go. Just how easy was that to do? Now finally, for this one, just before we finish, all
I want to do is come in, grab the back of it, and just
pull it up slightly like so it is going to have a canopy
going over the top of it. And now what we'll do
is on the next lessons, we'll actually get
this imposition so we can actually
bevel it all off, join it all together, get the textures on and things like that and the actual glass. And then what we
can do is we can also put the front transparent, you know, this kind of bull butcher sign on the front of it. And then what we can do
is we can get it round to this side and place
it where we want it. Alright everyone song. I'm
going to save out my work and I'll see you on the next
one. Thanks a lot. Bye bye.
125. Adding Final Details to the Butcher's Shop: Welcome back everyone to Blender for the Environment
Artists Guide. And this is where
we left it off. All right, what I'm
gonna do is I'm just gonna pull out my
guy a little bit. And then what we're going
to do now is let's get some actual materials
on this building. So what I'm going
to do is put it on material and then what
I'm going to do is start to unwrap this the same way we've basically been doing
with everything else. So let it load up. There's
a lot of shaders in here. Now what I'm gonna do then
is come to this part first. I'll press L, and
you can see that it drops all the way through there. I don't really want that. So what I want to do
is I need this window. So if I come in, I can see
that this window here, you're starving to look around,
making sure that's right. And this window,
and this window, and this window,
and this window, I'm going to separate them off. So P selection,
separate those off. Hide this out the way. And then now what I
should have left is this. Now let's actually see. You can see here,
this is the issue that's joined on these party and we don't
really need that. So let's press a
little question mark. And what we'll do is we'll
just come in and actually delete these parts out of the way because we
shouldn't need them. So delete faces like so let's press a little
question mark again, then bring everything back. Press Altage, and we should, if we press Tab and Altag,
bring back the windows. We should be left with
something like this. Now we just need
to be very careful that these windows are
actually into the wall. I'm thinking that we might
want to think about, you know, having a
piece of wood there. Because at the
moment, there isn't anything supporting this window, They're just straight
into the wall. I'm not sure whether that's
the way that we want to go. So I think what we'll do is once we've got all
the materials in, we'll build a little part
on each side of these and that then we'll
support the canopy that's also coming down. All right, so let's come in.
We'll come to this part. First, press L and
then what we'll do is Smart UV project. Click Okay. And then what we'll do is
bring in a new material. And the material that we
want is blue painted wood. So if I bring in my
blue painted wood like so let that load
up. And there we go. Then we'll come to
these parts here. We'll press a Smart UV Project. Click Okay. And then again we'll add in the blue painted wood. And we also as well, I'm hoping blue painted
wood. There we go. Now what we'll do is
we'll also come into these parts and we'll come
in and add in a modifier. So I'd modifier generate bevel and let's put it on naught
point naught three. So, and there we go. Alright, so that's that bit. Now the other bit we need to think about is this
part round here. So if I come to this part and then what I'm going to
do is I'm going to come and just press you this
time on wrap, sorry. Material plus down arrow. And we're looking
for brick bricks. And let's have a look. And we'll click a sign. And there we go. And obviously we've got
to turn those round and get them the same size as
here. We'll do that now. If I press three, I
should be able to get clear enough view of what
these are going to look like. The only problem is, of course
I need to be in my UV map. So let's go over to UV map. Let's press three again. Go into the side view, and then we go to zoom
out a little bit. And now we've got both
of them in the way. And then what I
should be able to do now is press the Tab button. Just make sure I'm grab
them all, Press R 90. And then what I'm going
to do is pull these in to make them much,
much bigger like. So you can see we need to
make them much, much bigger. Something around about that
size looks about right. And now all I want to do
is just squish them up. So basically we want the mortar to be underneath
and at the bottom, so all I'm going to
do is press S and Y, and I'm going to pull
them back a little bit. And then I'm going
to press and Y, and try and line
these up best I can. And then finally S and Y again, pull them in and try and
get more lined up like so. And there we go. That
is looking pretty nice. I'm going to check
them next to these. And I think actually we've
got that roundabout, right? All right, from there
then what we want to do is we want to put
this on rendered view. Let's have a quick look at
the wood before we carry on, and then we go the woods
looking absolutely fine. I can see it's got some
nice detail on there. The wear on there
is pretty good. So now let's go back and
what we're going to do now is we're going to come
in to my actual Windows, press a Unwrap, because they're just
plain Windows, basically. Let's click the down arrow. We'll go to Glass Blast, Let windows, and here we are. Now let's come to
this one first. And what I'm going to do is just press S and shrink that down. And then I'm going to put
it right in the center. I don't want any
dirt around these, I don't think, because
they're too big actually. So we don't really want that.
So what I'll do is I'll grab all of these now and
do the same thing with the. So I'm just gonna grab them all. Press the S button and then I should be able
to just drop them in place like so we've got a little bit of dirt on
there as you can see. And maybe maybe even
that little bit of dirt. Let's try and get rid of that. So I'm just going to put them. Over here, shrink it down a little bit more.
And there we go. Now before we carry on, let's again once again go
over to rendered view, have a quick look at
what that looks like. And yeah, I think that that's going to be absolutely
fine for double tap. The I think I can actually
work with that again. Now. We just need to make
sure that we're going to bring this in with the boolean. But before we do that, what we're going to do is we're going to grab the front off here. Now I'm going to press Shift, just to bring it
on top of there. I'm going to pull it
out a little bit. And now I'm going to do is I'm going to click the plus arrow. And I need a new material. So I'm going to go over
to my asset manager. And I'm thinking that if I come over to where
my materials are, so let's have a look
for my materials. Here they are. Let's
click the down arrow. We've got backdrops we need, let's see if we've got one. I'm just looking what
it's called, actually. So I'm going to posters. Yes, this is the
one where it says posters and this is the one where I want
the butcher's sign. So let's click and drag, and drop that in place. Let's then zoom to my window
with the little dot born. Let's then go back
to modeling like so. And let's click a sign. And now I'm going to do is
go over to my UV editing. And what I'm going to do now
is pull this out, of course, so if I just press
you again and unwrap, I can pull that out like so you can see this is
what it looks like. We need to, of course,
spin it around, so our 180 spin it around. And then what I'm
going to do now is put into place and X, let's move it into place
like so. There we go. If I now press tab, double tap the you can
see we can actually already see through that
Now before carrying on, I'll just go quickly to my shading panel and
show you why that is. Let's head over to
the shading panel. Let's press dot on my window. So let's grab my window. Here it is. Press the dot born. Let's come over as well to this material which
is a butchers sign. If I come out, you will see that not only have we got all of the self
that we normally have, we also have an
alpha coming from our base color into the
alpha and the new blend. It used to be much more
complex than this, by the way, but the new alpha works just simply by plugging in your
base color into the alpha. And as long as the rest of
the, if I click on here, you'll see this comes in with either a PNG with just this
on so it has transparency. Or it's black one or the other. And then it will
pick up that alpha and give you
something like that. From there, then what we can do is we can actually grab this. Now press shift space bar, Bring in the move
tool, and then I can place it right on top
just before you go in. Hold the shift button down, bring it back, Double tap
the and there you go. You can see now that's exactly
what we're looking for. So that looks really nice
on the front of there. And now what we want
to do is we want to create all of the rest that's going to be
going around here before we create the
Boolean going in the back. So I think it's important
that we create the kind of wooden parts that
are going to come up here and support
this actual canopy. Also, we need to think that it's going to come up to this part
here with the wooden parts. And then the canopy
is going to be coming kind of from here
and dropping down. So let's go back
to modeling now. And then what we'll
do is, well, once again put this on object mode. And I think at this stage, actually we can probably get away with joining all
of this together, so we might as well do that. So press control J,
join it altogether. Right click, shade,
auto, smooth. And now let's just make sure
everything's still on there. You can see that this, when you click on it like
this, you'll always get this. It's just because within
the material view mode, you won't see the
actual transparency. So don't worry about it. As
long as you click Render, you will see as soon as it, there you go, it comes
actual back light. So all right, so let's
put that on there. One of the other things as well that I do recommend being
as we've bought trees in, and we didn't really
talk about that, is if you come over to
the right hand side, especially on cycles. If you come down to where
it says light pass, this transparency
wants turning up. I'm going to actually quickly
show you why that is. We did bring some trees in, let's bring in our assets, let this load up,
and then you'll see, okay, it's not on assets, it's on scene assets. There we go, Let those load up. Now what I'm going to
show you is if I put this camera view in
the viewport here, put on the render, you
can see we've got all of this darkness down
here and this is affected because of
this transparency here. If I turn this down to zero, you'll see that's what happens. And if I put it on something
like 25, you will see, you get a much, much better
visual on the trees. There's not so much darkness. So if you go back to eight, you'll see that huge difference. We've got all of this
darkness around there. We really don't want that. So I normally set this to around 25. It does also impact things
like the butcher's window. It makes them much clearer. There's not shadows on
them and things like that. So definitely, definitely
make sure you put that on. All right. So on the
next less and then we'll start building
the wood round here. We'll also save it out and I'll see you on
the next on everyone. Thanks a lot. Bye bye.
126. Modeling the Butcher's Canopy for Realistic Shadowing: Welcome back everyone to Blend for the Environment
Artists Guide, and this is where
we left it off. All right, let's go
to Material View. Let's actually center
our actual view by pressing the little dot. And then what we'll
do now is we'll hide this out the way
this is the Boolean. So let's just press M
and we'll just put it in our bullion just so it's out the way and we
know where it is. And then what we'll
do is we'll come in, grab this, press
shift desk selected. And then all I'm going to
do is bring in a cube. I'm going to bring over
the cube to this side. I'm going to bring it down then and pull it back over to here. I want it to be nowhere
near as thick as this. It wants to be a post,
but not as thick as that. So I'm just going to
pull it back like so. And then from here
then, what I'm going to do is I'm
going to pull it up now to something
maybe like there. And then what I'm also
going to do is I'm going to press on it and then pull
it back a little bit. So I think instead of
pulling it all back, all I'll do is just grab this
and pull it back like so. And I can see that it needs to be pulled up
before it comes back. So we can see here, if
we pull it to there, I think that's going to
look much, much better. And then what I'll do is
I'll grab the top of it. I'm going to press and pull it all the way up
now into place. And I'm also going to shape this a little bit from the top. The other thing is I can't really see where
the gap is on here. So what I'm going to do
is just come into here. I'm going to then go with
my x ray. So this one here. And then what I'm going
to do is just come under, grab either the top of this, so you can see if I
pull this up now, now we've got a
little gap and we can actually see what we're
doing from there. Then we know that
there's going to be a post going over here, which means that these
parts here now can come up to here and then we can shape them.
Now we want them. So what I'm going
to do is I'm just going to turn off my x ray again and then just
pull this up so it's going to be roundabout
there into place. And then from here
what I want to do is I want to shape this part. So what I'm going to
do is I'm going to press control left click. I'm going to bring
it in the center, so left click, right click. And then from there
then I'm going to reset transformation
control all transoms. Right click, set
origin to geometry. And then we'll come
to this top bit. And I'm going to
press control B to be level that off in the
way that I want it now. I'm going to pull
it down to there. To start with, I can
mess around with this with the operator
panel over here. I'm going to turn up
the amount then of bevels and then all
I'm going to do is I'm going to mess
around with the width now, and more importantly, mess around with the actual
bend so we can see. Now that's the bend that
we might be happy with. And I think actually, once
we've got our canopy on here, I'm just wondering if I
should drop this down a little bit before bending it in. Let me just have a look at
that, see if I can go back. So control Z, let's
go back and then what I'll do is I'll just
put one I think. I'm just wondering if I can start from here
and bend it round. So what I'll do is
I'll press control, bring it up to the top here. Press control, bring
this one up here. So basically what I want to do is I want to
devel off this part. So I'm going to press control again. Left click, right click. And then grab this part
and press control. And hopefully I should be
able to bend that in now. Or bend it out,
let's bring it in. You can see they're not actually playing ball
with what I wanted. So how I am going to level that off, I'll do
one more thing. I'll actually bring it back. So now we should be able
to bend that like so. And that to me, is looking
much, much better. I'm happy now with
how that looks and I think once we've got
our actual, you know, our canopy in there, it can
actually come like from the sides here to cover a
little bit more of this window. All right, so now let's think
about our actual canopy. But before we do that, let's just finish
this bit off here. So are we actually happy
with how this looks? And I think to be
honest, let's make it look a little bit
better than it is. So what I'm going to do
is I'm going to come in to this part here, ol shift and click, pull
it down a little bit. And then all I'm going to
do is press control B. Pull it down so we haven't
got as many edge loops. Put it to around there. And then we're going
to press alternS. Then what I'm going to
do is pull it out very slightly like so make
sure offset even is on. And let's have a look at
that. And I think that looks just that little bit better
than where it did before. All right, so happy with that. Now let's come in and what we'll do is then
we'll unwrap this. So let's press, let's
press Smart UV Project. Okay. And some of this is going to actually be
hidden by the actual, this kind of plank of wood
that's going to be in there. So we're not going to see all of that going up there anyway. And what I'm going to do now
is I for Smart UV project, click okay. Let's
come down then. Bring in our material and it'll be blue painted wood,
which is this one here. Which is the same
one as this one. And then we'll add
in a modifier, So geometry, not
a geometry node. Generate the bevel,
put that naught point, naught naught three like so. There we go. Make sure that our bevels on there so we can
see our bevel on there. We have got some
breaking on the mesh. And again, sometimes
this can happen, Joe's going to check out it's this bevel that's
causing this issue. So sometimes we
might want to bring it all the way back
just a tiny bit. And if we're still getting
broken mesh on there, it might be we have to
come in and fix that. So some occasions we have to actually come
in as I've said, press control a, just do apply that press a little question mark and then what we're
going to do is just fix that. Because you can see it's only this side really,
which is a shame. But we can come in and fix it by going in and grabbing,
let's say this one. And I'm looking now, where
is it going to go to? It's probably going to
go to this one here. So if we grab this
one and this one, right click, and we're
going to merge at last. Let's merge at last. And there
we go. That's fixed that. And we'll do the same thing on this one. So we'll
grab this one. This one last right click, You can press Shift R as well. Shift R will also work for you. All right, let's right
click Shade auto, Smooth. And then what I'll do
is now I'll just put it back onto Material View. Little question mark
to bring it back. And there we go.
That's all fixed now. All right, now
we've got all that. Let's actually mirror it over the other side so I
can grab it again. Right click, set origin three Dcursor and then add modifier generate and a mirror. Let's bring it over to
the other side like so. And now finally we can actually
put in our actual canopy. So all I'm going to do
is just press shift day. I'm going to bring
in a plane and then I'm going to bring up my
plane to where I want it. So probably you have to remember that it's going to go back to the wall and then it can
probably come out a little bit. But the main thing
is that it needs to be supported from here. It has to actually
go over there. If I pull it out,
let's say to here. And then what I'll do is I'll pull it back to where
I actually want it, so something like here. And then what I'll
do is I'll pull it down a little bit just to get that right size that I actually
want it at the moment. It's coming out this far, maybe a little bit further.
So something like that. Maybe the back of it wants
to come up a little bit. And then what we'll do is we'll just bring these parts in. So I'm going to press
and X bring them in. And then what I'm going
to do now is I will bring in a few edge loop control. Let's bring in a few
edge loops like this. So left click, right
click to drop in place. So I've got nine
edge loops on there. Then what I'm going to
do is press control and bring up this edge
loop all the way, probably up to here. And finally then let's
bring out these now. So I'm just going to grab
this edge, this edge. Press the born enter and X and I'm going to pull
those out into place. Just be careful that we're not actually going into
the wood there. So it's actually going over it. As you can see, I've gone probably a little
bit too far there. So I'm going to press S and X, pull them back a little bit. I also want to make sure
that there's a tiny, tiny gap on these parts. Now I might be able to come
in and put it on normal, and then I can follow
those that way, like, so finally then
let's come in and what we'll do is we'll
bring this edge down. So we'll bring this edge, so if I press E
and Z and Z again, because we're on normal. So just now put it back on Global and then pull
them down because we've already
extruded them and we should end up with something
like that, which is fine. And then finally what
we want to do is we want to bring these down now. So I'm just going to click
every other one, like so. And then we're going
to press and Z and bring them down and do exactly what we've
been doing before. So down, something like that. And then this one here, like so. And then E and Z and
bring them down. Now, we could have these ones a little bit different
from the other ones. We could make them
like you've seen in medieval type markets
and things like that. We could do that with
these, I think we will. Actually, what we'll do is
we'll grab this one and this one press H to
hide them out the way. Come to front view or the
other opposite view to front. And then what we'll do
is we'll make sure that we're on vertex select. And what I'm going to do as
well, I'm going to put on wire frame just to make
sure I can grab them all. I know where they're
coming from, so it's around about here. So what I can do
then is I can just drag with my box elect with B, put it back on object and I
should have more selected like so from there then let's
press control shift and B, and we should be able to
pull these up like so. And I think actually
that's probably going to look a little bit bare. If I turn this up now, I should now be able to mess
around with these like so. And I think that's looking
a little bit bare actually. Yeah, I'm kind of happy
with how that looks. All right, so let's
press ol tag. Bring back the other parts. Let's press Tab, and this is
what we should be left with. And I think it looks a little
bit more like a butcher's. So just make sure then that
you're happy with the height, how far it's actually
coming over the window, how far it's
actually coming out. And on the next one
then what we'll do is we'll get these sides on. And the other thing is we don't
really want these really, really hard angles on here. We definitely
don't want that. So we'll round those off a little bit as well.
All right everyone. So I hope you enjoyed
that, and I'll see on the next one. Thanks
a lot. Bye bye.
127. Finalizing the Butcher's Window with Advanced Techniques: Welcome Micron to Blender for the Environment
Artists Guide. And this is where we left off. All right, first of all,
then let's level this off. So I'm going to come in
with my edge, select. I'm going to select this
edge and this edge. And hopefully, let's
press control. We should be able
to level that off. Now, of course, it's
going the wrong way. We need to pull it
out a little bit. So let's bring it out. So let's have a look at
what that looks like. Right click, shade,
auto, smooth. Yeah. And that's going
to look absolutely fine. I mean, I know it's got a little bit of a
hard edge on there, but that's what
you'd expect anyway. So I think that that's
coming out fine. So now we need to think about is actually creating the poles that are going to
come down here. So what I'm going to
do, first of all, I'll bring in this start pole, so I'll use my center. So the moment I've got
this in the center, I'm going to press shift date
and I'll bring in a plane. I think they'll make it
a little bit easier, so R x 90. Let's spin it round so
we're going to bring it into place where we
actually want it. So it's just going to be
a simple pole structure. I'm going to put it
roundabout up to here, so we really want it into there. Let's bring it up a
little bit because that top pole is going to
be right right at the top. You can see it's not
fitting in at the moment. Let's bring it in a
little bit more and X, let's put it right here now we can see what
we're really doing. And then what we'll do
is we'll come down, grab the bottom of this, and
pull it all the way down. It fits nicely at the side
of there, as you can see. And that's looking good. Now let's come to the top part. First of all, control shift, and let's level that off. Then we'll come to
the bottom part, control shift and B,
and level this one off. Although I want
to level this one off a little bit different. So all I'm going to do
is bring it in like so. And there we go from there. Then what we can
do is we can press L and then and pull
it out a little bit, a little bit of
metal and then L, grab the whole thing like so. And then let's just put
it back into place. Alright, so far so good. Now we need our actual poles
that are going to come out. The thing is we could
make it so that it's all joined together or we could make it in two parts. But I always recommend just
going with something simple. I think simple is better option. So I'm going to grab this
and I'm going to press Shift S Custer selected. And then what I'm going to do
is I'm just going to press tab shift and we're going
to bring in a cylinder. And from there I think we'll
have this cylinder on 16, so very low on the
vertise count. Let's press the S then and bring it all the way down like so. And the top one is going
to be the main support, so that one needs to be
a little bit thicker, so something around
that thickness, maybe a little bit
smaller, might be okay. Let's bring it up then
spin it around so R, y or x 90 into place. So we want it right
at the top of there. And we need to make
sure that this is going to be supported. So first of all, we're probably going to have to pull
that up a little bit, and then from there I'm going to have to pull it along now. So I'm going to grab
the top of here, so the front face on here. And pull it all the
way out to where I need it and then drop it down. And then just keep
pulling it out until you're happy with
the way it wants to be. So maybe something,
something around here. And if it is too thick, just grab it going
all the way round. So Alt shift and click, and then you can just
press alternates and squeeze it in like so. And I think actually that's
looking pretty good. It doesn't have to actually
go onto the thing. You just got to make sure
it looks like it is. So I can see here.
It needs to be pulled down a little bit. And there we go. I'm just
wondering if I should pull it to the left a
little bit. I think so. Just to the left. And I'm wondering now whether
I should pull all of this up a little
bit, and I think I should. So I'm just going to
grab all of these, pull them all up,
and there we go, to think that's
absolutely perfect. Now finally the last one, then all I'm going to do is I'm just going to grab this one. I'm going to press Shift D. I'm going to bring it down. I'm going to press Tab. I'm going to select all these, going all the way around,
so Alt Shift and click. I'm going to press
alternates and make it a little bit thinner like so. And then all I'm going to do
is just put it into place, so maybe something around here. I can see this is probably
a little bit thin. Now, I'm going to pull it up. First of all though,
let's get it into place where you want it. Maybe something like that. A shift click again then, and then all I can
do is Alts and pull it out to the right
thickness that I want it. Then what I'm going to do
is grab both of these. Right click, shade,
auto, smooth, double tap the A. There we go. All right, that's
looking pretty good, I would say probably still needs to come down this
bit from the back. So I'm just going
to put x ray on. Come round to the back.
Then all I'll do, take it off and then
I should be a to now pull it down to where
I want it like. So. Okay. All right, so now what we can do is we can join
all of these together. So this one, this one
and this probably, this has got a Bevlon. So we're probably going
to be joining that last. So if I joined this up
last, press control J, join them together and then it's going to mirror over
the other side, so everything's going
to get mirrored. And finally I'm just looking around now making
sure everything's fine. And I think actually we're
nearly done with that. The one thing we need to make sure that we're
going to do before doing anything else is just give this a little
bit of thickness. But I recommend
before we do that, let's just unwrap this part first and get the
materials on properly. So on this part here, this wants to be
metal, so I'm going to let my shaders all
load up again. And then what we'll do is we'll
get the metal on here and get the actual red and
white canopy on here. We've got a red and white one, I'm not sure if we've
already used it yet. I think we've used a blue and
white on the coffee house. So let's come in,
grab this and this, and then what we'll do is
Smart UV Project. Click Okay. Material plus down
arrow and black metal. Click a sign. And there we go. There's the black
metal on there. And it's also over
the other side. Now let's come to this
and what I'm going to do is click New and
then going to Not New, sorry, we don't want
to actually click new. What we want to do
is first of all, come to Asset Manager,
That will be easier. And then we've got cloth
and all I'm going to do is just drag and
drop this onto there. Back to model in then. And now I should be able to unwrap this. Now we can see that's
not what we want really. It doesn't actually
look too bad, but I think we want them
going down this way. Actually what I'll do is now I'm going to bring
in some seams, so well, I think we'll
bring it up to here. We don't really want it
going across this part here, so we're going to just
grab it going to here. Just making sure to
where does it touch? Where does it touch?
It's probably going to be, I'll test it. I think it's right in there
where it needs to go. Right click Market. If I come in and face Select
L, that's actually fine. That's what I actually wanted. Then what we can do is
we can come to this one. Now what we're going
to do is grab it here. Alt shift and click, right click, and mark a scene. And then what we'll
do is Alt Shift click going all the
way along here, so we can unwrap them
independently of each other. Which actually will make
it much, much easier. Now we can see that
these parts in here, then we need to
select both of them. As you can see, I think
there's two edges on there. I'm not actually sure
if there is or not. Let's have a look. Right click, mark seam, and
then just grab each of these. I think there will be. I'm
just going to test it. I'm going to select
just one of them. Right click and mark a seam. And now I should be able
to come in hopefully and select each of these
independently, which I can. Now what I should be
able to do is select the whole thing, you unwrap. We'll end up with
something like that. Let's now go over
to my UV editing. This is what we're going
to end up with if I now. No, I won't. Actually,
I won't press seven, I will just go over to here. So what I'm going to
do is I'm going to press R 90 and spin those round. Now what I'm going to do
is just come to each one. So I'm going to grab
this one first. I'm going to press G, and I'm going to put
it in the white. Then this one will put in
the red, put it in the red. Then this one will put in white. Again, put in the white. This one should already be
fully in the red, which it is. This one's fully in the white, which is this one. Let's put in the red, then
just work your way along. So if it's not moving correctly, just press the dot on and then you're able
to move around it. This one I'll put in the white. We'll use that white just so it looks a little bit different. This one we'll put in the
red and just work your way around like so you
can see already. It's becoming very nice. All right, let's put
this in the white, this one in the red, and
this one in the white. And just see, and now it
comes along so you can see, not quite lined up,
which is a shame. Which is a shame. But that's
sometimes the way it works. I'm not going to
go back and build the whole thing because they
don't line up quite right. So let's put it on
there. And there we go. There is our actual
butchers finished. And I think not my butchers, my canopy butcher's
canopy finished. And I think that's looking
pretty good now from there. Then what we need to do
now is we can come in, add in a modifier, and it's going to be a solidify. Now you'll see
that makes a huge, huge difference on there. Let me go back to modeling now, just to check out
what we've got. Let's put it onto rendered view. So we've got a really good
view now of everything. And there we go, I think
that's absolutely fine. We're pretty much
finished with this. We can join it all
together on the next one. And then what we can
do is we can bring it, put it into place over here. And I think actually
that's going to be good. Yeah, we'll do that
on the next one, then we'll join it all together. Bring it over to this part
here, get this part in, and then we can build
around this bottom part, really these faces, by the
way, it's only two faces. The back one is just going
to have a chimney on it. So it's actually pretty simple. The butchers probably the
most simple one actually. All right everyone. So I
hope you enjoyed that. And I'll see on the next one. Thanks a lot. Bye bye.
128. Resolving Material Bugs in Blender: Welcome back everyone. To blend for the Environment
Artists guide, and this is where we left off. All right, now what I'm going to do is I'm just
going to put it on object mode and I'm going
to bring in my bullion. And then what I'm
going to do with my bullion is I'm
going to first of all press control all transforms
set origin to geometry. I'm going to press
tab A and then, and let's pull that back. And then what I'm going to
do is I'm going to pull this into place then where
we actually want it. Now I'm thinking that
for this we're going to make it a little bit smaller
than the sides of this, sorry if I press and X and
just pull it in a little bit. And then from there what
I'm going to do is I'm going to keep the
height that is here, albeit I'm just going to
pull it down a little bit. So if I come in and
put it on this x ray, then I should be able to pull it down a little bit like so. Now if I turn this off, what I'm going to do now is
I'm going to keep this as it is and I'm going to come in to this part here and I'm just
going to split it off. So I'm going to split this
one off with selection. And then I'm going
to grab this one. So this part here, selection. And now what I'm
going to do is I'm going to use that boolean. So let's come in and
grab my Boolean again. I think it's this one
here, which it is. So I've got this here, which
means I can now select it. So if I come to this one now let's come in, add, modify it, generate a Boolean and then the Boolean if I click on this cube now,
should be like there. And there you go. That's
what I'm looking for. All right, so now I'm
going to do is I'm just going to apply
that with control A. And finally now let's
come in and just make sure we can join
all of this together. So what I'm going to
do is just put it on material because
I just want to make sure that nothing changes once I actually
join it altogether. All right, so let's
press G. First of all, we can see we need
to join these parts, so let's join this all together. So all I'm going to
do is just press G. I'm just going to make
sure I've grabbed everything, which I have press control J, enjoying everything together. And that's one problem
that I forgot about. I need to actually apply that
mirror. So let's come up. We also need to think we've
also got a solidify on here. And I'm just wondering if
we've got a bevel on there. So we've also got
a bevel on there. I need to apply the solidify, so let's apply that
with control A. Let's come then to the
mirror and press control A. And then from there, let me
just check and see if we've got our bevel on which
you can see that we have. Which means that
we might as well apply this bevel
on here as well. So let's press control A, and finally now we can actually
join all that together. So again, just to make
sure we've got everything, press control J. Join
it all together. Right click, shade, auto, smooth. And there we go. And finally, now I
just want to make sure that if I hide
this out the way, so hide the cube, that this is still looking
the way it did. So let's go on to rendered
view and just have a quick look and
make sure that's all looking good, which it is. All right, so now what we'll
do is we'll grab this, we'll go back to Material View. And then what we'll
do is we'll press Shift D and we'll also, I think, grab the cube. So if I bring the cube back, then what I can do is I can grab the cube at the same time. And now I can drag them
out like so from there, then let's spin it round
so as head -90 let's press three so we can go
into the side view like so. And then let's think now where we're actually
going to put it. So I'm thinking something like that gives me enough room to actually put a post up here and I think that's
going to be the right place. So we've got a door here
and then we've got, you know, the window here. All right. So let's from there then pull it back into play. So jousted into
the wall like so. And then what we'll do
is now we'll come in, grab this wall, and then we'll
go to our Boolean again. So add modifier
generates a Boolean. And then from there we'll
click on our cube once more. And there we go. Now let's
apply that with control A. Let's actually delete
our Boolean now. So press Delete. And now
we should be able to come in and hide both of
these out of the way, and this is what we
should be left with. All right, so now
what we're going to do is we're going
to pull these back. So let's come in and grab
all of these like so. And then all I'm going to
do is I'm going to press F. So to fill those in, I'll do this one
at the same time. So I should be able to grab them both and do this one
at the same time. So if I press like so, and then what we'll do is we'll grab this one and this one. I'm going to press the eye
button to insert like so. And then what I'll do
is I'll press control. Bring in a few edge loops
like so same on this side, then control law like so. And then finally let's come
in and do this one first. I'm just going to
pull this into place, so let's put proportionality on and let's come in
and bring it out. So something like that I
think looks pretty good. And let's do the same
now on this one, so I don't want to
go back too far. And then finally, let's write
click shade auto smooth. Now I'm just wondering if I want to actually smooth
these parts off as well. Sometimes it's worth
actually doing that. So to do that, all we need to do is just press
Alt Shift Click. I think what we'll do is
with Shade Auto Smooth. I think instead of that, what
I'll do is I'll just press control and I'll
just see what it looks like if I go
to shade smooth. So let's shade it smooth. Yeah. And I think it's
still going to be a bit of a mess like that. So what I'll do instead
is I'm thinking I'll come in and I'll just grab
each of these. Come in. Shift selecting
control, selecting shift control and
then control B. And I'm just going to turn down the bevel. And there we go. That's look in bed,
you can see it. Not so hard edge and
that's what I want. Let's come to this one now then. So shift control. Shift control, like so, like so. And so let's press control, pull it out. And there we go. All right, so now from here then what we can actually
do is we can bring in, well, first of all, we need
our wall on here as well. So the best thing I
think to do is just to come in and actually we need to basically split this
off from this part. So if I come in, I'm going to come all
the way around here. So I'm just going
to click control, click, right click,
and mark a scene. And then it will make it
really easy to grab that. And we'll do the same
on this one as well. So if I come in control click, going all the way
around like so. Right click and Marcom
and there we go. And now what I'll do
is we'll first of all do these parts here. We've kept them joined. You
might want to split yours up. It might be easier that way, but I think actually this
will work okay for me. So what I'll do is
I'll come in now to my material and then what I'm going to do is just minus
that off in object mode. So minus it off. And
then what I'll do first of all is
bring in the brick. So bringing in bricks like so. And then with this bit now
I'll just come in and grab it. So L and then we're
going to press wrap. And then finally
now I want to bring in one of the others. So I'm just wondering,
have I actually got it? So let's first of all click
plus click the down arrow. We've got adverts, we're looking for butcher sign is one
we've got on there. So, I'm just wondering, do we have shops? Here we go. This is the one
that I want. Shops one. Let's go over now
to UV editing and we'll be able to see
exactly what this is. The moment I assign
this now to here, this UV map will
change as you can see. And this is the one that I want. The two that I want is this one here and
this one over here. Let's do this one here first. If I press A over this side A, and then shrink it down, let's put it into place, let's shrink it down a
little bit more so like so. And then I'm Jaws
thinking that this floor needs to probably be a little bit lower, so going down here. So to do that, all I'll do is just press and y and
go the other way. So there we go. I think that looks pretty good. And now we'll come to
the other side as well. So all I'm going to do now
is I'll grab this wall. And this wall, I'll
press control L, and then we'll link
materials like so now we'll come
into this part. And then I'm going to press L. I'm going to click on
Shops one, click a sign. And now let's grab this one. We'll unwrap it first. Unwrap, and then, and
then bring it down. Now because of the actual
way that this one is, so this series pointing this way doesn't
really look right. I'm going to turn
this round, I think I'm going to make it
a little bit smaller. And then all you can do,
you can come up to UV, you can go down to mirror, and we'll mirror on the X. And then we'll turn it
round the other way. All right, so from here then, let's actually think
now about our bricks. So what I'm going to do
is I'm going to grab, I think I can grab
both of them at the same time. I think I can. So we've unwrap them. Let's spin them around first, so R 90. Spin them round. Let's press three so we
can get a good size in. We've got them both together, which means we can actually
do them both together. And luckily for me, actually, these actually look
the right size. It's just that the
bottoms of them, I need to pull it
up a little bit. So all I'm going to
do is just press and Y and pull it up so that mortar is just sat on
the bottom of there like so. And then I'm going to squash
them in a little bit. You're just a little, tiny bit. And then and Y, and bring them down a
little bit further, holding the shift born like so. All right. They're
looking very nice now. Now, I'm just wondering
why that has gone black's. Look I'm not actually sure
why that's gone black. Let's look. This is
what it should be like. I've got something
in front of it. Let's see if I unwrap
this again. Click a sign. Look, I'm just going to put it onto my Material mode just to check why that is. So let it load up. There you go. Maybe it's a bug. I'm not actually
sure why that is. I'm going to save out my work. And then on the next one, what I'll do is I'll make sure this is actually working
because at the moment it's actually black when
we go into the render. I'll check that out while when I finish this actual lesson. And then on the next lesson, I'll have the answer
for you, no problem. So hopefully yours, not black, but if it is, I'll come
back with an answer. Thanks a lot. Bye bye.
129. Crafting the Main Door for Victorian Butchers in Blender: Welcome back everyone to Blender for the
Environment Artists Guide. And this is where we left off. Alright, so I've
done some checks and it doesn't seem
like there's any issue. If I press ol tag, bring back these parts. So ol tag, let's
bring them back. Double tap the A and let's
put it on rendered view. You will see now that it's
actually working perfectly. And you can see now just how
nice that butcher's looks. So now it's time actually to
think about these doors now, because we basically need to boole this one in and
boole in this one in. So let's go over
to modeling then. Let's work on this one here. I basically want a post. If I bring this over going
up the side of here, just next to this, then I want it going over here. I'm thinking I'm going to
bring my post in first. And then I can see how
far back this goes. We can see we've
got a post here. I need a post next to it. So all I'm going
to do is shift A. Let's see where that E came in, so it's coming over
there. Let's press three. And then what I can do
is put it into place, something round about there. And let's then pull it back, and then we'll have a good idea. If I put one post there
on one post here, this should actually fit into the actual
scene in a nice way. What I'm going to do now is I'm just going to hide this out the way for the moment just
while I build this post up. And then what I'll
do is I'll come in, we'll bring this up a little bit without
portion editing on, let's bring it up to
round about here. Then what we'll do is we'll
press Enter and pull it out then like so. And then I bring it in and then E. And I'm thinking of going all the way to the top or making it a little bit
thinner near the top. I could also do
that. Actually, I'll just bring it all the
way up to the top. I think this is
going to be fine. I'm just wondering how
far you stuck out. It is. But yeah, I think we'll bring it all the
way up to the top. Like So here's the but just
the butchers after all. We don't want to go too,
We're crazy with it. The other thing is I'm going to actually shrink this
down a little bit. So I want to press Alt. Shift, shift,
click, shift click, going around all of the sides. And then from there, and then from there,
compress a test. Bring it in, holding
the shift button. So from here then, I'm wondering if that's
going to be okay. I think it will be.
Let's then press al tag and bring back
the actual door. And then what I can do
is I can press Shift D, bring it over the other side
now, so roundabout here. And now you can see
that we've got our, you know, kind of
archway for our door. And from there then we can
put a piece going over there. I'm just looking to make sure
that's not touching there. And I think, yeah, I'm
actually happy with that. So let's come in then and
grab our wall once more. And I'll come over
to my modifiers, adding a modifier,
generate a bullion. Let's come in then and
grab my billion like so. And hopefully that will go
far enough back what I want. Yes, it should have
gone far enough back. Let's come in then and
actually press control. And then if I come in now,
hide that out of the way. That is what it
should look like. So that is exactly what I want. All right, so now what we
can do is we can come in, we can hide both of these
out of the way, like so. And then I can come
into this part. I can press Alt Shift and click, going
all the way around. Shift, click, shift, click. Just make sure you've
grabbed them all. And then and X, and then just pull
them out like so we'll have our door I
think round about there. I'm going to press just
to fill that in, like so. And finally as well,
I'm just going to unwrap these parts as well. So I'm going to come in
and I'll grab this one. Going all the way around here, I'm going to press and wrap. And then I'm going to grab
this one and press and wrap. All right, let's go quickly
over then to our UV editing. Let's make these the right size, so if I press dot to zoom
in and then what I'll do is I'll press the bond scale all
the way down. Look at that. That's not scaling. Why
is that not scaling? Let's press control A
all transforms right. Click origin to
geometry and let's see why this one isn't scaling. So we can see here by press G, I need to see why
that's not scaling. There we go now it's
scaling okay, that's good. And then R 90, spin it round,
something like that. And now I'll just come in
and grab all of these. I'll put it on material view because it's actually
a bit harder to see on the rendered view,
especially with the lighting. So then I can come all the
way down like so r 90. Spin it around, make
it much, much smaller. And I'm just wondering
if that's the right one. I think actually I'll
spin it back round. So R 90. Yeah, and that's looking
much, much bare. Now I can press G and Y and just line them
up a little bit bare. Now, of course, the post is
going to cover this anyway, so we don't need to worry
too much about that. All right, so we've pretty
much got everything there. If I press Tab now Tate, bring everything back then. What I can do now is I can
use this for my actual door. So I'm just going to create a pretty simple door for
the actual butchers. So all I'm going to do,
I'm just going to come in and I'll grab
this part first. So shift D and then I'll
get rid of this part. So L delete Ts and now let's think how we can
actually create this door. So what I'm going to do,
I think the top part, yeah, we'll do it in stages. So what I'll do, first of all, I'll get rid of
this bottom part. So in other words, what
do I mean by that? If I press three, I'll come in, grab a knife, bring it over, press a to straighten
it up, and then enter. And then from there
then what I'll do is I'll bring this part in now. So I'm going to grab this part, press the eye button
and bring it in. Actually, you know what,
we won't bring Yeah, we will we will
bring that bit in. So we'll bring it
in like this first, and then I'm wondering
whether to split this now. So I will do that. I'll come over and
we'll split it like so. And then what we'll do is we'll come and bring another one in. So right down the center. To come to the center again, all we're going to do, we're
just going to grab this one. Right click, subdivide,
grab this part K, and then all the way down to
the bottom. And then Enter. All right, so now
we've got this one. So let's bring in
these parts here. So all I'm going to do
is press I like so. And then I'm going to come to the bottom one then
and press the, but on this one I'm going to press again and just bring it in like so. And there we go. That's what I'm hoping for
with my butcher's door. Now let's think about
creating these parts in wood. The one thing is
if I press three, I want to split
this top off again. So all I'm going to do, I'm
going to press K and then A, going all the way
up, and then Enter. And from here then I
can split these off. So I'm going to grab
this one and this one, I'm going to press Y and H, and then this one, and this one, and then Y and H. Then we're going to go
all the way down to here. Now, all the way down
to here and here. So Y and H, and then
this part here, H, this part then is
already split off. So now it's just a
question of these parts. So we'll split these
parts off like so, so Y and H and then these two
Y and H. And then finally, now let's work on these parts. I'll come all the way over here like so Y and H and
then all the way this way, and then basically
split these two off. Once we split them off, then everything is
going to be very easy, just these parts to split off. And we could have
gone in and split it using what we did before. Where we go to the
actual split select and where is it mesh
and separate split. There we go, faces by edges, but I think on
this one actually, it would have messed it up,
so I didn't want to do that. All right. So now what we
can do is we can come out. First of all, we'll
bring all of these out. I'm going to bring all of these. One I'm going to do, just grab all those
press to bring them out. Then I'm going to
bring the bottom out. So I've got the bottom here. I'm going to press, pull it out slightly over where
the other part is. Finally, we'll bring
these parts out then if I press L on all of these parts. So let's press and
bring those parts out. Let's bring these parts out if I bring these
windows out to here and then this part
out to here, so. All right, that's looking
pretty cool Now from there, what we can do then is we can actually bring in
some materials. What I'm going to do, I'll
come over, I'll grab them all. First, press a Smart UV Project. Click Okay. Open this up, and then we'll do,
click the down arrow. We're going to go for
blue painted wood. Let's bring that in first. And then we'll go
for this wood here. We're going to grab all of these and we'll just give
it a different wood. On these parts, we'll look for different wood
plus down arrow wood. We'll go for light
wood. Let's try that. Click a sign, and there we go. And then we've just got windows. I'm going to grab each of
these and I'm going to click down arrow and I'm
going to look for glass. The one we want is
glass, not lit windows. Click a sign and there we go. Now let's just actually
fix these then. All I'm going to do
is just press S, make them a little bit smaller, put them into place, like I don't really want any
dirt on these anyway. I think they'll be
fine without it. And then what we'll do is now
we'll come to these parts, so you can see the parts
that are not right. So all I'm going to
do is just come in, grab all of these, press alternate and
straighten them all up. Sometimes that happens actually, it generally means that
these are actually joined. As you can see, if I come in and grab just this one
and then press Alt, you can see now it
straightens it up. Same for this one, like
so, and there we go. You can see now how
easy that actually was. Now I'm looking on the inside
and I'm actually thinking, yeah, that's looking
pretty nice. Now let's press control
all transforms, right? Click, set origin geometry. Let's now pull this door into place where
it's going to go, right in there. Is
that too far back? Actually think that's
going to be okay. The one thing is that we
do need a step on here. I think we'll do that now. All I'll do for the step is
I'll probably split this, fire pressure
shift, bring it up, and then press control
left click, right click. And then all we're going to do is just pull out these ends. If I grab both of these ends, pull them out a
little bit like so. And then we'll split them off. Now if I grab this one with Y, and then all I can do is
click plus down arrow. And what we're looking for
is flag or stone flag. So stone flags like
so click a sign and then click a sign
on the stone flag. So now finally, let's
actually pull these down. So I'm going to grab them both, pull them down into place, press E, and there we go. Now we'll unwrap them again. On the next lesson, we'll get everything on
here beveled off. And from there then we
should be able to start work on this part and actually
move on up to the top. We've still got this
door to do over here, but now it's all
really starting to come together for our butchers, and this actually is
the hardest part. All right, everyone, so
hope you enjoyed that. I'll see you on the next
one. Thanks a lot. Bye bye.
130. Modeling the Victorian Butcher's Shop Front: Welcome back everyone
to Blend the Fold, the Environment Artists guide, and this where we left off. All right, let's go back on
over to our modeling section. And what I'll do now is bring in the first part that's going
to come over this part here. So what I'm going to do is I'm just going to grab
this one here. I'll press Shift
S selected shift. Let's bring in a cube. Let's bring it up. And then what we'll do is we'll
put this into place. So first of all, I'm just going
to push it over to there. And then I'm going to
grab it in edit mode, grab that face, and then let's
pull it out over to here. And we're going to
have a post on here. So come in round to here. The main thing is
though, let's make sure, first of all, don't grow
at the right height. I think here maybe it's
a little bit too low. Let's pull it up
a little bit like so I think that looks
a little bit bare. And then what I'll do is I'll pull it up this way as well. So pull it up this way like so. And then finally
what I'll do is I'll press control all
transforms, right? Serogen geometry, because I want to
actually bevel this part. So control B, bevel this part. Not like that. I don't know
why beveled like that. Control, there we go. That's what I want.
Something like that. And then from there
then we can actually control this the way
that we want it. We have this one here. Oh, I think something like
this is going to look okay. I'm just wondering
whether I want to pull this bit out a
bit. I think I do. Let's pull this bit
out. Not that weight. Let's make sure
we're pulling it out the right way, like so. And then from there
then, I've actually got enough room now to actually put the posts
that are going to go up and over there. All right, so now let's actually finish
this part off then. So I want to have one part that's going to be
kind of rounded on here. So I think what I'll do is I'll actually use this that
I've already got. So what I can do
is I can come in, grab all of these for instance. And then what I can
do is I can press Shift D and then E pull it out. So just make sure that
it's following the x axis. So and x pull it out. And then from there
I can grab it all. Press LP selection, separate
it off, grab it again. Control all transforms. Right click, set
origin geometry. And then what we'll do is we'll
just bring in a solidify. You can see that the solidify
isn't working properly. And that's just because we
need to sort out the normal. So if I press a shift
and there we go, now we fix that problem. Now what I'll do is we'll
bring it out a little bit more like so I'll change
the offset a little bit, just put it into place like so. And finally then I'll also pull it out a little bit on the S and Y just to get that into
place like so let's write, Click and shade. Auto, smooth. And there we go. And now let's actually think about this top bit that's going to go on here. So what I'll do is
I'll press shift S, Costa selected, shift eight. Let's bring in another cube. Let's pull the cube back. So I'm going to
press pull it back into the waxual wall into there. And then all I'll do is
I'll pull it up with face elect and hopefully it should go under that
part, which it does. And then finally I'll just
bring out another part on here just so it looks like it's supported
a little bit better. So let's pull it back
a little bit like so press control left plate. Let's bring it up like so. And now I will bring it out. So let's pull it out with E. And then let's
also level this off. When we've leveled
it off, we might need to pull it down
a little bit more. So if I press control B, let's bring in a few more. Actually, you know
what? That's actually come out pretty nice. Let's right click,
shade, auto, smooth. Now finally, let's actually come into each of these
and level them off. I'll level this one off first
I'll come in add modifier. In fact, what we'll do is we'll just grab all of these first. It'll be easier
doing it that way. Press control all transforms, right click, set
origin to geometry. Let's apply that. Solidify,
we've got that now. And then we can add in a
modifier which will be a bevel, let's put it on naught
point naught three like so. Let's press control L then. And then what we'll do
is we'll copy modifiers. And then finally, let's just make sure all of
them have gone on. So we can see we've
got bevels on pretty much everything
on this one here, you can see that the
devil's not work too well. Sometimes that
happens as we know. So with this one here, I'm
just going to have to come in clamp overlap of like so. And there we go, That's
looking better now, right click shade or smooth. And now finally let's put
it back on. Shade in. And then what I'll do is
I'll first of all grab this one Smart UV
project. Click Okay. And then what I'll
do is come over, bring in a material
which will be my blue painted wood like So now let's unwrap
each of these individually. So a Smart UV project, and
then we'll do this one. At this point, you
really should have a really, really nice workflow. Now, as we've built so
much smart UV project, Click okay and then we'll
finish this bit off as well, because I actually
forgot about that bit. So let's grab all of these. Let's grab this one last
control link materials. Double tap the eight,
and there we go. All right, let's finish
this part off then. If I come in, I'm
going to grab both of these smart UV
project. Click okay. Now let's come in and
add in a Bevel two here. So add modifier generate bevel, let's put it at n
point normal three. So could we turn up the
segments a little bit? I don't think that's
actually going to help. I'm going to bring this down a little bit just to make them look a little bit
further apart like so. All right, let's
double tap the A. Let's have a quick look then on our rendered view of what that actually looks like.
And there we go. It's really, really starting now to really come together
on this butcher's shop. All right, so what
we'll do next is then we'll get this
bigger post in here. And from there we can
actually build it across. And then we can
actually start over on these steps over
this side as well. All right, first of all then let's actually
save out our work, let's put it back
onto object mode. And let's come in now
to this part here. I'm just making sure everything that's got a bevel on
and all that good stuff. So what we'll do is now we'll
bring a post into here. So I'm going to grab
the corner up here. So I'll grab this part, Shift S and Casa selected. And then what we'll do
is press shift cube. I'll make it a
little bit bigger, pull it down like so. And then we'll bring it
up now to that part. So I'm going to bring it up to this part just
above it, I think. Something like that. And then
what I'll do is I'll press control and bring
that just below it. And then what I'll do is
I'll press Alt Shift click. I'll press Enter, Alters
and bring this out. And you can see it's
all nice and even. And then finally what
we'll do is we'll press control, left click, right click, control, scroll it back just
so we've got a bit. Just one alterns. Let's bring it out slightly
on this one as well. And there we go. All right, so that's that post in now this post we can also
use over this side. First of all though, just
make sure that's in properly. As you can see, it's
a little bit out, making sure it's in like so. And then what I'll
do is I'll press a smart UV project. Click Okay. And then I'll just grab
this one, press control L, and we'll link materials
and control L. And we'll also copy
modifiers. And there we go. Now if I put this
on material mode, that's what we
should be left with. Now finally, let's
bring it over shift, bring it over to
this corner here. So making sure that then we've got enough room in
here for my door. And this is why I
always check it. You can see at the
moment, if I move this, we've still not done our bolling because it's always a good idea
to actually check. I can move this over slightly, and I think it actually
looks better there. Now let's circle in. What we'll do is we'll
grab this part pill, bring it over Z 97
to go over the top. And then what I'm going
to do is just press G and I'm going to fit it in some kind of place like so looking at how far
this one is out, that looks roundabout, wrong. We need to pull it
back a little bit, let's put it into place like so. And we can see now that's
fitting in very nicely. And then finally, let's
just grab this end in face lect and we'll pull that
out into place like so. All right, so what we'll do now, then on the next lesson is I think first of all we'll
build out this part. So we'll build out this part and see what we can
actually do with it. I think actually, you know what, we'll actually make
the door first. I think that'll be more
interesting actually. So we'll make this door out
of this one of these parts, and then we can
actually bully it in. And from there then we
can build out these steps and these two parts that
are going to go into here. And then I'm thinking if we
go round to the other side, we are gonna need a post
that's gonna come round here. I wouldn't actually,
you know what, we'll put the chimney
on last because we'll work on this
second floor after that. Because pulling
this all together, again, that is the hardest thing when you're creating
these buildings. You got to pull everything
together right at the end. And sometimes that can be
a little bit difficult. Alright everyone. So I
hope you enjoyed that, and I'll see you
on the next one. Thanks a lot. Bye bye.
131. Designing the Backdoor for Victorian Butcher's Shops: Welcome back everyone. To Blend for the Environment
Artists Guide. And this is where
we left it off. All right, so let's come in and let's grab this door first. What I'll do is I'll just put my interlocking links on so
I can see what I'm doing. And then what I'll do is I'll
just grab the front of it. Because what I want
to do, I want it this size and I just want to
create a door out of this. So what I'm going to
do is press Shift D. I'm going to bring this out. I'm actually going to press P. Then selection. Just
split it off from there. Control lay or
transforms right click, set origin two geometry. And then what we'll do
is we'll just create now a simple door. I think actually doors by this point should be pretty
easy for you to create. All right, what I'm
gonna do then is just, I'll bring my guy over, I'll pull him up a
little bit in level, in line with my door.
Let's have a look at that. So let's press control one. And let's put in to where
my door is at the moment. I can't see where
it is, so let's put an object mode
and there we go. Now I can see how the
door is and you can see it will be quite a small door, so, you know, not quite
high or anything like that. All right, from there
then we can grab our door and what I'm going to do
is just press control lot. And again, I'm
going to bring all of the parts that
they actually need. So if I press control art, I'll bring kind of the where they kick their
feet against the door. Sometimes I'll bring
that in and then what I'll do is I'll bring
in two edge loops now. So lets click right click, control be, let's
split them off then. So we've got the, the kind of
fixings on the actual door. And then I'll bring in a
center bit at the top. So control bring it up.
Something like that. And then I want the
window to be around here. So control bring up my window to be around
this point here. I think I also want,
with this one, you know, some parts inside the window. So let's first of all though, think we can use the
parts that go inside. And we can also use it for the actual planks that are actually put
in there as well. So what I'll do is control two, left click, right click. All right, from there I think actually I've got enough parts. Now when we're build indoors, obviously we visualize what we actually want
them to look like. So I think something like this actually looks pretty good. And from here then, what I can do is start to split this off. So if I press Y, split this off, and we can do it a little
bit of a different way. Instead, if I press dot as well, it means I'll orientate
myself around there. From there, then I can
pull this out like so. And then what I'll do is I'll
come to the front of it. So this part here,
control click control B, and just bevel that
off like so then from there then we can actually
have these planks of wood. But I'm thinking we also need another
part going down here. Another piece of wood.
Just coming down here. Just up to this point here. So if a press control
are left click, bring it down like so. And then what I can
do with this part now is this part here again. We'll split it off
with Y and then we'll press and pull it out. And then we'll come
to this part now, and we'll have it going
all the way up to the top. So this one and this one. We'll press Y and then
and pull it out to there. And then what we'll do now
is add these planks of wood. We also need probably another bit in here, another
piece of wood in here. So I'll do that as well.
So control left click. Bring it up and you'll see
once I've done it this way, how easy it is to actually
build doors like this. I'm going to grab this one. And this one, I'm going
to press press Y. Let's see if I press Y first. No, I didn't, I
didn't split it off. So y and then and pull it out. And actually as well, I'm going to pull these out a
little bit further actually because they're not
quite out far enough. I'm going to pull it, jaws
in front of there, like so. And then I'll grab this one, pull that one out,
jaws to there. And then finally this one.
And they'll grab here. This end here. Shift
select. Control select. And then I can pull that
out all the way like so. All right, now we
can do these parts. So what I'm going to
do with these parts, first of all, I'll split
them off from the main part. So I'll press Y, then I'll grab this one,
and I'll press Y. And then all of these
are split off now. And I can just extrude
them out like so. And now we've got
this actual top part. So let's grab this. Let's
press Y. Pull it out. So pull it out like so. Now the final bit,
which is the window. So all I'm going to do
with the windows first of all is press the eye
button and bring this in. So then what I'll do is I'll
split all of these off. Let's grab all of
these, pressing Y, this one and this
one, pressing Y. And then we can grab them all. Shift select, Control select. And then we can
press, pull that out. Now finally, the last
part of the window, I can select all of these. Press press I again and just
bring them in from there. Then now we can split
all of these off. I can press Y to
split those off, and then we can grab all
of these top and bottom, press Y and split those off. And then what we need to do now is split these off as well. So if I grab both of these, I can press Y, and now
I can grab everything. On here and press the
bon, and pull them out. And hopefully everything now should actually bevel off
if I press control a now. Or transforms set origin
to geometry, okay? And let's come in and
add in a bevel like so. And we can see straight away that we do have
some problems here. So these parts here
have some problems. And it's because I didn't
split them off shift. Click on each of these,
press the Y button, and now you'll see that
they're all fixed. The one problem
we've got is that we haven't actually
filled these in. So if I press A just
to grab everything, come to mesh, cleanup, fill holes, and there we go. Now they're all filled in. Now if I, let's try bringing
this down to nought point. No naught, three like. So there you go. Now they're actually fixed. And what happened there was when we actually split
these parts off, we still had them
joined at the corner, up at the top here on each one. So it meant that I messed
around with our bevel. Once we split them up, then we had a hole in each of the ends of these ones and
we needed to fill those in. So that's what we
basically just did there. And there we go,
we can see we've got a really, really nice door. Now from here, of
course, let's come in, put it on material mode.
Let's grab the whole thing. Once we actually
load that up again, the more shades you've
actually got in here, the longer it's going to
actually take to load. Let's press the Tapon, Press a smart UV Project. Click. Okay. Let's come in then and bring in
the material which is going to be blue painted wood. So now let's come in and do the light wood
on these bits here, we'll do the windows first. On these bits here, click
plus down arrow glass, it's going to be
the glass not lit. Click a sign, and then
these parts here. So we're just going to
select the inside of these, not that one. Let's select this one with L. And then all we're
going to do is click Plus, and we're going
to look for wood, and it's going to be light Wood. Click a sign, and there we go. Now let's finally come
into these parts here. Put these windows to the right, so you V editing, Let's press A and G and bring
them in some sort of place. I'm not too worried if there's a little bit
of dirt on there. So let's go round now and
there's our beautiful door. And you can see it really
fits the actual scene. All right, so now
we've got that. Let's come over
and what we'll do now is we'll actually
create our Boolean. So I'm going to come
to my brick wall. First of all, I'm
going to press control or transforms right clicks
at origin to geometry. And then I'm going to
bring in now a Boolean. I'm going to click on my
Boolean, which is this here. I'm going to click
fast. And there you go. Sometimes as I've said, it doesn't always work on exact, So just click fast
on press control, and now we can delete
our Boolean out the way. So delete your Boolean. And now we can actually start
to put our actual door in. So let's bring our door, and we'll bring
it in to probably something this far in,
maybe something like that. I think I think that's
going to be okay. And now what we can do is we
can actually come to our, you know, our hole in our wall. And I just need to
pull that back. So all I'm going to do is grab the bottom of here
and the sides of here. And then we're
going to press and Y and pull it back into place. And finally on the back,
I'll just press and fill that in and then pull
it back a little bit. So if I now show
you on the inside, you can see that's how
far back it's gone. And you can see these
bits are actually filled up now on the next list. And then what we'll do
is we'll get all of this steps into the
place that I want it, put the final parts of
the steps on top of them. And then what we'll do
is we'll just create some supports going up here
and on the side of here. That then is pretty
much the bottom floor of our actual butchers. Actually done. All right. Let me just double
tap the eight. There we go. And we'll do
that on the next lesson. Let's save that our work as
well. All right everyone. So I hope you enjoyed that and I hope you're loving
the course so far. And I'll see you on the next
one. Thanks a lot. Bye bye.
132. Finalizing the Rear of the Victorian Butcher's Shop: Welcome back everyone to Blender for the Environment
Artists Guide. And this is where we left off. All right, let's come
to our steps now. Now the thing is with the steps, when you put it as an ray, which is what we've got here, it doesn't always work
out the best way. So I'll show you the best
way to deal with steps, especially when you've used Ray. So what we're going to
do is just press shift, hide everything
else out the way. Let's apply control, apply Ray. And then all you're going to
do now is you're going to pick the top steps
and the side of it. So let's just take
off this a minute. So you're gonna grab this one like so, going all the way down. And you will notice that
when I take them off here, these won't actually be joined. So what I'm going to do,
I'm going to actually press shift H, sorry. H. Hide everything
out of the way. Then what I'm going
to do is I'm going to press A and delete. Delete face S.
Let's press Ltage. Bring back everything, and you should be left with this now. Now we can see that our steps, they're not joining
slightly, as you can see. If I go to the side view, you can see now these
aren't joining. So what we need to do is just
make sure, first of all, that these edges are
a little bit more in line with these parts here. So now if for bring
them this way, you can see now we can kind
of line them up like so. And from there we can press a mesh clean up
and let's merge by distance naught
vertices removed at the moment, let's increase this. So if I increase this,
six vertices removed now. So what's happened now is it's actually joined all of these up. If I come in now and try
and grab one of these, you'll see they're
all joined up now. How do we join or how do we make this an
actual block of steps? Very easily as actually. So what we're going
to do is we're just going to press sir three.
I've grabbed this edge. I'm going to press E and
Z and just pull it down. It doesn't matter where
you pull it down, two or how far you pull it two. We're gonna grab this one, then we're going to press the button. And then what I'm
going to do is I'm going to actually come
to the side view. So three, come to the side
view and I'm going to come up select it all
and then come to mesh, come to bisect, and then I'm just going to cut it
over this way like so. So just make sure first of all that it's actually high
enough. So, like that. And then just clear
the inner and now you can actually bring it
down wherever you want it. So something like that.
Now the other thing is you can see the y is not
point naught naught five, It's not set to zero, so let's
set this to zero like so. And from there then
you can see we've got a little bit of
a tail on there. Let's pull it up just
above there like so. And there we go. We can also then come in and
fill it in as well. And hopefully then, yeah,
it didn't fill it in. I think it's just because
it's a two D objects. So I'm just going
to click fill off. And now I'm going
to do is I'm just going to come to this
one and this one, press the F one, and we know now that's perfectly
flat from there. Then what we can do is we can
press Alt, Shift and click. And we could press F, and
that would fill it in. Or we can press Oltef
instead of that Oltef, and then you'll fill
it in in a much, much better way from there. Then we can go to
the other side, press Oltef and fill it in. And there is your
stairs. That is the easiest way that
you can do your stairs. And it does mean that, you know, creating the top of the
stairs as well with the little stones and
things is a lot easier. So now we've got that, We
know it's easy to unwrap. I can press Oltage,
bring back everything. So let all that stuff load up. And once that stuff's loaded up, then we can actually start putting these stairs into place. So you can see now it
looks much, much better. I think I'm happy actually, with where the stairs are. So what I'll do now is just
create the post quickly. So if I grab my stairs, press shift S, Ursa
selected shift. Let's bring in a cube. I'll move my cube
over to this side. And then what I'll
do is I'll put my cube into the floor like so. And then all I'm
going to do is make my cube a little bit bigger. So press the tab button and then I'm going to come
up with face Lex, so either three on
the number pad and I'm going to bring it up
to something like here. I'm not I'm so
happy with how far this is coming out into here.
I don't really want that. What I want it to do is come out maybe something like there. And then what I want to
do is I want to pull this bit probably up a
little bit to there. And then pull it up
and then pull it in a little bit and
then bring it down. I think something
like that looks good. And then let's pull
it up into place, into place where
we're going to go. And I think also at the moment, I can grab the whole
thing and just pull it out a little bit like so I'm
also going to squish it in. So S and Y squish
it in a little bit. And I'm just looking how
that's actually supported now. And yeah, I think
that's actually good. I'm just wondering
whether this angle yeah, I actually, you know
what, the angle is good. And all I'll do now
is I'll just press Shift and bring it over to the other side just
so it's stuck in the actual top step like this
as well. And there we go. All right, so now what
we need to do is we need to get our steps
on top of here. You can also see
that this top step, it's not quite level
with our ground up here. So we might as well fix that. So let's come to
our steps and all. We'll press this
essens ad bring it down and then let's pull
it down to the floor, just so it's actually level. Now You can see our floor
is a little Let's go back. Actually, before we
did that, I'm just looking if I can pull
it down instead. Yeah, it's just gonna be
easier just to pull it down. You can see there. That
just makes it easier. Just pull it up a little
bit and there we go. Alright, I'm not going to
mess with that anymore. Now, what I am going to do though is I think
I'm going to come. To this Pip. What
we'll do is, well, first of all, take
these four steps. I'll press shift
D, and I'll just bring them up a little bit just so I can see what I'm doing. And then I'm going to grab
this last actual step. And what I'm going to do
is just pull it that way a little bit just to make those
steps a little bit bigger. Finally, then I'll
press control. Bring in four, left click, right click, bring in three, left click, right
click, bring in four, left click, right click,
and bring in three. So we'll do it
something like that, I think from there then
let's split every other one. So we're going to level
everything off anyway. So we might as well just grab every other one
on here, like so. And I think on this one, yeah. Okay. We've got a few more
on that one, it'll be okay. All right. Let's
press y, like so. And then what we can do now, and I think actually
before we grab them all, let's just come in and what we'll do is we'll
grab each of these. I just want to pull them
out because I forgot. So let's pull them
out a little bit. You know, when we've
done this as well, I think it's gonna be easier to split them off
from the other ones. So if I pull them out
a little bit like so, and I think what I'll do is I'll just grab this bottom here. So let's just grab the steps. It's going to be much
easier if we split them off like so now I can
just grab these steps. And from there then now
they're all split off. What I can actually do is
press a to grab them all, put them into the bottom press to pull them up and
create my steps. And from there then what
I can actually do is I can come in and I'm
thinking, yeah, we'll probably be better off randomizing them a little bit, but we'll do it first with the random proportional editing. So we'll grab,
let's say this one. And then what we'll do is
just pull it up like so. And we'll do the
same on this one or pull it down even it's up to you which
way you pull it. So up and down like so. And I think that's looking
pretty good as it is. I don't actually think I need to do anything else on those. All right, so now what we can do is we can grab all of it. Join the C together
with control J, press control all transforms right click at
origins, geometry. Add in a, modify it and we're bring it in a bevel, we're
going to put this on. Not 0.3 And then what we're going to do now is I think we're pretty much
finished with that. The only thing we need is
another one going across here. So let's put that in fast. So shift S, Custer
selected shift, let's bring in a cube. Let's pull this cube up, then let's put it into place. So let's press and X and pull it out like so let's make
it a little bit smaller. And then and X, pull
it out like so. And I think that is in round about the
right place like so. All right, all of that is
looking really good now. Now what's left to do is we just need to bring all
of our materials in. So what I'm going to do is
I'll just grab this one. These two, I'll grab
this one as well. I'll press control L. I
will link materials control L. I will copy modifiers and then what I'll
do is just come to these. I'll press Tab and, and Smart UV Project. Click Okay. And there we go. All right, so now we've
got those, They're done. Now let's come to our steps. So what I'm going to do with
the steps is I'm going to press Smart UV project, Okay? And then what I'll
do is I'll come in and look for stone flags. So stone flags. Let's
bring those in. And then what we'll
do is we'll come to the actual stairs. And all I'm going
to do then is pick plus down arrow and
we're looking for brick. So bricks click a
sign and there we go. Now we know we're
going to have to do a little bit of work on these. We're also going to have to sort out the inside of here.
So let's do that first. I think we can get that
done in this lesson. So I'm just going to
grab all of those. I want to press you unwrap, and then what I'm
going to do is just go over to my UV editing. Let's spin them around
first of all, so R 90. Let's also zoom in with
a little dot born. Let's see, can I actually see
what I can't see in this? I'll put it on Material View. All right, now I can see, I think now they're going
the wrong way round. So 90, there we go. They're
going the right way round. Now press the S born and
just try and get them to round about the same size as
the bricks on the outside, which is something like
that. And there we go. Now let's do our stairs
while we're here because I think it'll
be easier to do those. We can see at the moment
it's pretty much a mess. So what I tend to do with
ones like this is I'll come, I'll grab these ones first. I'll press R 90. Spin them around the right way, press the S born, get them
down to be the right size. So maybe two on each one. As you can see now
going down two, grab the ones that
you're not happy with. So this top one's looking
okay. This second one. Now I can press and Y and
move it into place like so. And then this one, G and Y. Let's move it into
place like so. And then G and Y and move
this one into place like so. Now let's grab the
sides of them. So we can see. We can jaws
grab all of these going here. We can't see in there. So I'll just hide these out. The wait a minute, now
I shall be able to see the full extent of here. I'm also going to pull this out just a little bit
just to turn on this. And now I can actually
see in there. So I can grab all of these. And not the bottom but
the sides like so. And then this side will
do the same thing, so grab the inside like so. And then what I'm
going to do is I'm just going to go
to the side view. So if I press three,
I'm going to press U. And we're going to
Project from view. Project from view, like so. And now you can actually go in and what you're going
to do is press S, bring them down then to be the same size as the
ones on the outside. So something like
that. There you go. That's looking pretty nice. All right. I'm happy with those. Now finally, let's
have a quick look on our rendered view.
Let it load up. Double tap the,
let's press all Tate and bring back those two
posts. And there we go. There's the back
of our butchers. Perfect. Now on the next list, and then we can actually start
work on the second floor. We'll leave the chimney
till we get right to the top where
the actual roof is. But the second floor is much, much easier than this
first floor, of course. So let's put it
onto Material View. Let's come in then and save our work and I'll see on
the next on everyone. Thanks a lot. Bye bye.
133. Starting the Roof for Victorian Butcher's Buildings: Welcome back everyone to Blend for the Environment
Artists Guide. Now let's go over to modeling, so it can
actually come in. And what I'm going to do is just steal one of these windows. So I'm going to press Shift
D. Steal this window. I'm going to bring it
round to this side, so R S 90 also as well. Once I've put this in place. So I'm just going to press and
just put it there for now. I'm also going to press and what I'm going to do is
create a new collection. So new collection,
put it as butchers, because if not,
this will still be in with the actual bookstore. But how do I spell that? But there we go. So click Okay. And there we go. Now that's in butchers, and now it's not
going to be the same. Now what I can do is
I can pull this into place like so
wherever I want it. And the one thing
I would say is, does this need to
come out a bit more? I don't think so.
Let's press three. So we've got a side view. And where I want it to
come is I want it to come roughly roughly down to roundabout level with
this window here. If I pull it down to here and then what I'll do
is I'll press shift D, and I want to put another one this side just to get my
actual bearings of it. So I think something like
that is roundabout, perfect. And then what we can do is put a center point going
down from there. We can see where we
need to bring this up to or whether even this
is okay, where it is. Now let's make a start on
our actual roof because our roof doesn't actually
want to come out to there. What needs to come
out to there is just the little pieces of wood. So that's what
we're going to use. So let's first of all come in and what we'll do is we
will grab this part. I'm going to press Shift D, and then what I'll
do is press and X and pull that out a
little bit like so. And that is round about
where we want it to come. Maybe maybe up a little bit. So what I'll do first of
all is I'll just grab this, I'll pull it over without
portion editing on of course. And then what I'll do
is press P selection. And then I'll come
back to my roof now. And what I want to do is I want to get rid of these parts. We really don't
need these parts. You can see these parts
that are coming out here. So what I need to
do is I need to grab both for these parts of the roof press and Y
and bring them in. And then what I need to do is sit that right on the top there. So if I bring it up now, I can sit it on the top there. And that is exactly
what I'm looking for. Now what I can do is I can bring in this piece of wood press, right click, set
origin geometry. Let's then bring it back into place so we can see it's
into place like that. You can see it lines
up with it perfectly. That is exactly what we wanted. And now we need to do
is we need to think about giving this
some actual depth. So all we'll do is we'll
come in, add modifier, bring in a solidify, bring it out then to
bring some depth in. These want to be quite
thick of course, because this is obviously
supporting a roof. And then what I'm
going to do is just change the offset a little bit. So if I now bring
down this offset, we can see now if I do that, we'll have enough room
in there for the actual, the tiles that we're
going to put in there. So I think that probably
is a little bit too much, so let's bring it back just to tad like so. So
something like that. And then what we
need to think is how far this wants to come. I think at the moment this
is a little bit too far. So all I'm going to do
is I'll just come in, make sure I'm on edge.
Let's grab this edge. Put this onto normal, just so it's following
that line up. And then just bring it back
very slightly like so. All right, from there then
what I want to do is I want to grab now this center. So I'm going to come in,
grab this center with shift S. And then what I'm going
to do is grab this one. Right click, origin
three D cursor and then we'll add in a mirror
on top of that as well. We can actually have
it at the other end. That's actually perfect because we do need it at the other end, there is going to
be a chimney there, but we still need this piece
of wood coming down here. So what we can also do then is put it on
the wire as well. And there we go. That is
the first bit of the roof. So now what we can do
is we can now think about the top bit of this. So what I'm going
to do is I've got my cursor right here,
which is great. So I can press Shift,
bring in another cube. And let's work on
this part here. So what I'm going
to do is I'm just going to bring it
out a little bit, press S Y, and pull it out just so it's
going over the top. So I might need to just
pull it up and then pull it out a little bit more
with S Y like so. And in fact, for this I'm
just going to go into object mode because
I can see much, much better than what I could. All right, I'm happy with that. Now let's bring
in the next part. So I'm going to press
shift S Kirst to Selected. Now on this part, and then what I'm going to
do is press shift, I'm going to bring
in another cube. I'm going to bring it down. I'm going to pull it
out. First of all, and Y, let's pull it out. So let's put it into place, and I'm just going to
feed it into that place. They're just behind
everything else. And then what I want to do
now is grab the bottom of it. So let's grab the
bottom. Pull it down. So what I want to do is I actually want to
bevel this bottom off. So I'm going to pull it down
all the way to here a thing. And then what I'll do
now is grab the edges. So this edge and this edge. Before we bevel it, let's always reset the
transformations. So let's press Sir
control B then. And let's bevel it off.
Now I'm going to bevel it roundabout to there
because I do need. A post coming down here. I'm also looking at how far it's actually out of the wall. And I'm thinking that maybe I want to pull these out
a little bit more. So let's see if I can
actually do that. So if I come to this, press L on this one. And let's see then
if I can pull it out a little bit because everything
will move with it anyway. So if I pull it
out a little bit, we can see we can
get away with that. Anyway, it's a lot
further out now, which means then we
can come to the top, pull that one out a bit, come to this one and
pull this one out a bit, giving it a little
bit of thickness. That's exactly what we want. Now, what we need to do is we need to come back
now and fix this. Below the thing was I did bevel it and that wasn't the bevel I was
looking for at all. So what I'm going to do, I yeah, I've made a little
bit of a mess here. So you know what, this is how we'll fix it. Sometimes
that happens. So I'll press Shift,
Duplicate this part. And then what I'll do is I'll
come in, grab this part. Press K, sorry J, to
join it together. Let's delete this part then. So delete faces, and then all we'll do now
is pull it down five, press three now to the place
that this bottom came to. So down, pull it down to there like so let's delete
this one out the way. So L delete us. Let's now bring this
one back into play. Pull it back into
play behind those. And then let's press and
pull it back into the wall. All right, so we got back to where we did, where
we wanted it. Let's now grab each of these. I'm going to press
control B again. And then what I'm
going to do is I'm going to turn up the amount, first of all, and that is
basically what I'm looking for. So this nice kind of round part coming in like
this. Let's try another one. Yeah, I think it looks
a little bit bad, like. So from there then what I'm going to do is I'm
going to grab this, I'm going to press
the eye button, bring it all in, and then
what I'm going to do is press and pull it back like so. All right, so that's
looking really nice. Now let's think about these
parts going down here now. So we've got it in the center. Let's press shift day. And what we'll do is we'll
bring in a cube. So I'm going to bring in my cube just so it's poking
at the back of there. So and X pull it back. And then what I'll do is
I'll bring it down to the bottom of where I want
it straight down here. You can see my windows looking at this are a little bit out, so you can see that this window needs to come across
very slightly. Now, at this point,
it's up to you. Were you put your windows,
I actually think I'm probably going to put
my windows more closer, roundabout, in the
middle of each of these, which means that this one also needs to come out this way. And I think they look
much better like so. All right, now we just need
a bottom parts because from the bottom part we can form
the rest of it going around. I'll again, bring
down a cube shift. Let's bring in a cube,
let's pull it down. And then what I'll
do is I'll make this a little bit bigger. So, and then what I'll do
is I'll pull it out and y, let's pull it out a
little bit like so. And then what I'll do
on the bottom bit is I think I'll make just
an edge come out. So if I press
control left click, bring it up, grab
this part then. And then press E. I can pull it out just a little bit like so. All right, that's
looking very, very nice. One thing I want to do now then is think about the
top. I'm not sure. I think we'll actually
start with the top. I don't need to mirror this
over the other side again. We're going to have
a chimney there. So what we'll do now is
just put this top part on. So I'm going to press shift A. I'm going to bring in a cube. I'm going to bring
it up. And then what I'm going to do is I'm just going to sit it on there. I'm going to press
S and Y and pull it out just up to that
place like so. And then what I'll do is I think we will bring in
some measure loops. So control, let's bring in, you can either
bring in, I think, seven, because that one
gives us one in the middle. Left click, right click.
And then from there what I can do is I can
bring up this one. If I press three, I can bring up this one
where I want it to be. You can also go into wire frame. And then what you can do is
you can grab each of these. So let's say we grab
this one, press B, and then again now we can
actually just bring up, so we can do the same
here, B, B again. And bring up these
and we can make the slope ourselves
like so now Z, press Z and go back in solid. And that's what you
should be left with. Now, let's pull it forward
so it fixes in place. Now on the next lesson, I think we'll actually
start this actual roof. So we'll get the top on here, start the actual roof, and then from there
I think we'll build downwards over here. And then finally
we'll be able to get our chimney in. All
right everyone. So we're really starting
to pull all this together. Not many lessons
now till we finish this butchers and I'll see
on the next one, everyone. Thanks a lot. Bye bye.
134. Modeling and Texturing Victorian Chimneys: Welcome back everyone
to Blender Fall. The Environment Artists Guide, and this is where we
left off. All right. The first thing then I want to do is come in and just make sure that these lines here
are halfway on there, just to make sure everything
balances itself out. So what I'm going
to do, I'm going to come in with face let, I'm going to grab
one of these faces. I'm going to put this on Global. And I'm just going
to make sure that it actually gives
us that break that we're wanting for so you can see that now it's split
there and I'm just going to grab the
bottom of it and pull it up just underneath like so for take this
off now you'll see now that's roughly
halfway between. And there's also a
reason I want that as well is because to
bring in my chimney, which I'm going to
do now, actually. I think it's going to make
it a little bit easier. I need to know where the actual brakes are going down here. So what I'm going to do is I'm going to come to this edge, so I'm going to grab
this edge on here. Press Shift S Ursa selected. And then what I'm going
to do is press Tab. Go into object mode. Shift, bring in a cube. I'm going to make
the cube bigger, then I'm going to pull it out. So S and Y, let's pull it out into place, something like this. And then what we'll
do now is we'll bring this down and see
how wide this is. So if I come in, grab
the bottom of this, I'm going to pull it
all the way down. So just to the back of here. And I would say at this point, I don't think this is quite
wide enough at the moment. And also I don't think
it's high enough, so we're going to pull it up
a little bit higher like so. And then I'm going to
grab the whole thing. I'm going to press Send Y and pull it out a little
bit wider like so. And then I'm just making
sure it's out enough. I feel like it's out
enough along here. I feel like it's big enough
now to actually be a chimney. Yeah, I think I'm happy
with how that looks. Maybe let's just pull it out a little bit further along
here. Something like that. All right, that's looking cool. Now let's come in and
bring in some edge loop. Control, One edge loop here, around the center of here, one edge loop around here,
the center of this line. And that's what I
want my lines for, and one edge loop around here. So now I'm going to do is just make sure
the bottom of it, because the bottom isn't
touching the floor. So I'm jaws going to go in and try and see if I can
select that bottom. And then I'll just pull
it down into the floor. So now what I'll do is I'll grab each of these old
shift and click, going all the way up two here. So I'm going to press
control B, Pull them out, bring my mouse back so it's just one actual bevel like so. And then I'm going
to press Enter AlternS and pull those out. Now let's see if
they're actually even, and we can see they're not even. So we're just going to go back. Before we press, I'm
going to press Tab. Then, Control or transforms, set origin geometry.
Let's try that again. Then with alterns, let's
pull them out like so. And let's put offset even on. And there we go. That is what I'm looking for,
something like that. All right, so now at the
top of the actual chimney, let's make these
actual chimney pieces. So what I'm going to do
is I'm just going to bring in a cylinder. I'm going to put my cylinder on something like 20
because, you know, maybe even 22 because
the chimneys, you will be able to see them above a lot of the other things. So I need to make
sure they look right. So from there what I'm going to do is I'm going to grab them. So let's put it on 22. Enter. So let's press
the S board then. And we want three
of them on here. So let's get them into place. We can make them a
little bit smaller. Once everything's in place, some jaws gonna pull
them this way, like so. And then all I'm going to
do is pull it over here. And this will be kind of the
bottom of my chimney then. So I'll put this in,
I'll come to the top, then grab the top. I'm going to press one
on the number pad. Bring it down like so, so I need it a little
bit thicker than that, maybe something like
that thickness. Let's press, I then bring it in. And then what we'll
do is we'll press, pull it up like so. And then what I'll do is I'll
bring in some edge loops. Now five, maybe five edge loops. Left click, right
click, grab the center. One shift click. Let's put it onto sharp. Let's press the Born
then and bring it in. Maybe that's not right,
So let's try root. Maybe that one is going
to be better for us. Yes it is. The root one is definitely going
to be better for us. And then all we'll do,
we'll grab this top one, press control B, bring that out, and then we'll press
Enter alternS, bring that out without
proportional editing on. Bring that one out. There we go. We're nearly
actually done with this now. Let's bring the inside the top of it, let's
bring that in. So I and then bring it down. Then finally what
we'll do now is I'm thinking that that's
way too thick. We went in way too much there. So what I'm going to do
is I'll try that again. So I to there and then bring it down right
to the bottom of there. You want built in
there, obviously. Now the thing is let's come in now and level off these edges. L shift and click control B, and let's get those
beveled off like so. And finally, let's
right click shade, auto, smooth. And there we go. There is our chimney. And a thing that looks
pretty nice actually. All right, so let's
press Shift D, and what we'll do is we'll bring one over to the other side, and then we'll press shift D
and bring it over to here. Like, so. All right, so now we've got our chimney on. Let's actually, first of all, before doing anything else, let's get all of our UV maps, get all our materials on
and things like that. So let's come to
our chimneys first, I'll join these all
together with control J, control all transform
set origin geometry, adding a modifier,
generate a bevel, so let's bevel them off. 0.3 0.3 sorry. So everything should
have a bevel on it, really if you can
get away with it. Because it is going
to make it just that little bit softer and look
that little bit nicer. So that's why we're
actually doing that same thing for this then. So just grab this, grab this control L and
copy modifiers. And let's also reset then all the transformations on
this like so now for these, let's come in, press U, Smart UV project, click okay. So we'll do the chimneys first. So we'll go over to,
first of all though, let's go over to asset manager, because we definitely need
to bring in a new one. The one we're
looking for is clay. So if we come back
now to our chimneys, put it on material, and then all we'll do is we'll just
drop that clay on there. Once this loads up, there we go. Let's drop those on like
so. And there we are. And then what we'll do is
now we'll just have a look. I think these are a little
bit did wrap them actually. Smart UV project. Click. Okay. Yeah,
I think I did. I think I just need to
go now to UV editing. And then what I'll do is I'll zoom into them first of all, and then what I'll do
is I'll actually turn off this so I can actually
see them properly. And I'm just going to press a and pull them
out a little bit. Let's have a look at they
look like now. There you go. Now you can see the look
in tons, tons, bare. Yeah. There we go. So you can see, you can quite see a little
bit of like the UV's on M, just looking around
the other side. And what you have
to decide here, is it enough where you
need to go in here? Is that enough where you need to go in and actually unwrap them a little bit different or move them over in some way? I don't think so on these. I think actually we'll be
able to get away with it. Now, let's think about the
bottom part, this part here. Let's first of all
bring in bricks. Then what we'll do is
we'll bring in stone as well, down narrow stone. We'll bring in just
normal stone on this one. Now the stone on these parts
here is going to be easy. So you can see all these are
selected, select all yours, Press control, then
all you're going to do is press U, Smart UV Project. Click Okay, and then click
a sign with the stone. And there you go. You can see
just how easy that one was. Now from here, what we can
do is we can come in and, well, I should be able to
come in and hide those. Just trying to hide those other
way. Let's do that again. Oh, I think it's
because I'm Yeah, it's because I'm on edge. Slick. Alt shift click, old
shift click going round, and old shift click
going around. Control plus, hide, there we go. That's
what I'm looking for. Now what we can do
is we can come into the bottom of here. We're
not going to need this. So I can delete that other way. So delete and faces. And then what I can do is I can come to the backs of these. Now we can see only this one
is all we're going to need. So in other words, if I come in, I can grab this bag. So where is it? This one here, this one here, and
this one here. And I can actually delete
faces on those as well. I can also. Yeah, I think
that's it. Pretty much it. So now what that
means is these here, so this one, this
one, and this one. I should be able to just
press you and unwrap. And you'll see now that
they unwrap very nicely. Now this one here, we have
to actually put a seam on. So all I'm going to do is
I'm going to put seam here, here, here, on the
side here, round here. So we just unwrap that
top and round here. And then all I'm
going to do is right click and where is it mark seam. And then I should be able
to grab the whole thing, press L U and unwrap. All right, so now
if I turn this off, we should end up with
something like this. We can see pretty much
they're all the same size, which is great for us because it means we can do
them all in one go. So all we'll do now is
just grab all of these. I'm going to press UV map or 90, spin them around and then I'm going to make them
much, much smaller. You can see this one of
the bomb isn't right. And what I'm lining
them up with, if I press control three. Control three, I'm lining
them up with these. Now let's come to this one
first and spin it round. So L or 90. Let's spin that round. And then what I'll do is I'll
grab them all again. L L grab them all. And now we just want to
create them to be this size. You can see they're a
little bit too big here, so let's pull it out
a little bit like so. And I think now that is round about the right
size except this one. So let's just grab this 90. Spin it round, there we go. All right, that's
looking pretty cool. So we've got our chimney
done in that lesson. And now what we'll do
on the next lesson is we'll actually put in the top of here and then we'll
try and get this. I'm thinking we probably better off getting our windows in next. And the reason is because from there we can actually
build the rest of it. So we'll build this top part, then we'll get these windows in, and then we'll build around it probably with our actual roof. Alright everyone, So I hope you enjoyed that one and I'll
stay on the next one. Thanks a lot. Bye bye.
135. Butcher's Roof Modeling: Welcome back. En to blender, fold the Environment
Artists Guide. And this is where
we left it off. All right, so let's come
to the top of this. Now We've got our cursor there, so let's press shift A. We'll bring in a cube.
Let's bring it over. And what we'll do
is we'll put it into place roundabout here. So let's press the pour, make it a little bit smaller, then all I'm going to do is
just bring it down like so. And then what I want to
do is I basically want to bevel off these edges. I think what I'll do is I'll
press control B, sorry. Control left click, right click. Control. And just bring it
out a little bit, like so. And then I'm thinking that yeah, I actually, yeah, I'll
just bevel off this now. So I'll just come in bevel off these parts.
Press control B. Be level them down to there. Actually, you know what, I don't actually want it
to be like that. What I want to do is I want to actually come in Ok, Shift, click, control, level this off very
slightly, so like that. And then what they'll enable
me to do actually is come in and pull this down like so. Yeah, and I'm
thinking that looks actually better than
what I had it before. And now I can do is I'm
just wondering whether I need all of these edges in. Let me see if I can
just grab it now and press L and limit dissolve. Yeah, I can dissolve it like so. And I think that's
actually better for us. So what I'll do now is just pick it up a little bit and then I'll grab this edge and I'll
pull it over like so. And I'm just wondering whether at the
moment this is thick enough and I think it needs
to be a little bit thicker. So old shift and click just
to grab it going all the way around alternans and then we can make it a
little bit thicker. So yeah, and I think that's
looking much, much better. All right, and let's bring
in the next part now. So let's press shift
S, cursor selected. So we just got a cursor there. Shift and then we'll
bring in a cube. And we'll do this side. And then what we'll do is we'll mirror it over
the other side. So I'm just going
to bring this cube down into this part here. I'm going to press and Ed, then just make it a
little bit thinner. Pull it over a little bit just so it's in a better
place than where it was. So maybe maybe something like
just poking out of here. Come to the back of here,
Let's grab the back. Let's pull it this
way a little bit, let's grab this edge, and then I'll pull
this all the way over to my actual chimney like. So now what I want to do is I want to bring in
some planks on here. So I think I've ever still
got my planks in there. No, not so all I'll do is
I'll just bring in a plane. So shift a plane, I'll go into modeling as
well because it's really not helpful for you guys. See me build over in the UV. And then what we'll do is
add modifier geometry node and we'll bring in a planks. So let's bring in the planks and then what we'll do is
we'll, first of all, I think, turn down the
resolution to maybe top. And then what we'll
do is we'll make this smaller and put it into
place where I'm going to go. So I'm just going to
put it down here. I'm going to turn down
the length as well. So I'm going to come to
where it says length. Let's turn down the length. Let's also change the rotation. So we want to rotate this round. If I come down to here, rotation, where's the rotation? Let me just find the rotation. Just looking, is
it this one? Yes. There we go. I think
that's the one. Let me just see if that's
actually rotated it round. If now bring in a few. If I bring in a few, yeah, that's not what I want. That's definitely
not what I want. So let's put the rotation to zero. That's not what I want. I thought I had a
rotation on here. Definitely not that one,
but I haven't got rotation. So you know what I'm going to
do, I'm just going to come in and rotate it on the X
myself, no problem there. And then what I'll do is I'll
pull it all the way over to here as in there, like so. And then what I'll do
is I'll just pull them into place all the way down Just so the fitting under
there like I think actually that is Rs power want it
let's put it in a little bit. Let's then increase the count. So we'll increase the count. And then all we want to
do is just make these look a little bit more uneven. So all I'm want to do is I don't need to
alter the thickness, we don't need to alter
anything like that. The width, then we
can keep the width. We just want the
width randomness to be altered a little bit. And rather than
bringing in any more, just going to fit them
more into place like so. And then finally the bend, we'll just have them
bent a little bit differently from
each other like so. And then finally, I'm just going to pull them
down a little bit more and rotate them just
that tiny bit more like, so just so they're fitting
in a little bit nicer. All right, so that's
looking good for me. And now all I think I need is just some supporting
piece of wood in there. And then we pretty much
done with the top of it. So shift a, bring in a cube. And then all I'm going to
do is press the born press. And Y and X, sorry. Pull it out. And now let's put
that into place. So if we put it into here, let's grab the front of it, pull it out, pull it down. And I want it to
drop into there, as you can see into
there. Let's bring it up. Jaws under there like so now we can see that this
part here at the top is way, way too thick in comparison. So it means that jaws needs
dropping down a little bit. So something like that. I think it's looking
good. Let's actually go in and just move this one
up a little bit more. You have to get it a little
bit more even up on there. All right? Something like that
I think looks pretty good. Now what we'll do is we'll
make it a little bit thinner. I think I went a little
bit too crazy on that. And then what I'll
do is I'll put in one and then I'll just come
in and array it actually. Geometry geopoten
modifier generate array. Let's turn it this way, 12345. Let's move it down a
little bit, this way. And then we go, that's what
I want, something like this. And now I can just come
in, press control, lay on that, and fix that. Now before we do anything
else, let's mirror it. So what I'll do is
I'll grab this one. We can see we've got
the orientation here, so we want to mirror this over. Mirror these over. So
let's grab this one. Right click set
origin 23 cursor. I'm also going to do the
same with these two as well. So right click origin
three, D cursor. You can see that's
the problem on here. We don't want that to happen,
so I'm going to do it. Just press control
head. And then what I'm going to do is just
grab these right clicks, origin three decursor like so. Now for this one I can come
in now and mirror, mirror. And hopefully it will
go over the other side. Same for these little bars on here, we can do
the same thing. So add modifier, generate
or grab this one, press control L, and copy
modifiers. There we go. And then finally, this one, long enough to do with
this, I'm going to have to press shift like so. And then what I'm
going to have to do is just put that one in place. What I could also do is instead is I could just
apply this geometry. But I really don't
want to do that at the moment. I'm happy
with it in that. But I want to change
the seed at the moment, if you see have to
change the seed, and then I can press R and X, let's say -90 Will that do it? Let's have a look. I
don't think so, actually. All we'll do are X. We'll get that into place
where the other ones are think it needs to be bent a little bit more to make it a
little bit even. Yeah, there we go. Now that's looking much, much better like. So also now I see on this one I can actually
get away with. Now I can actually come in and
rotate these a little bit. So if I press R and X and rotate them just so
the halfway point and actually pull them
up and then going to be more in line with this
one over the other side. All right. A bit
rough and ready, but I think actually it turned out pretty well, so
I'm happy with that. Now we're pretty much
done with the top. So now what we need to
do is apply everything. We might as well do all
of these parts as well. I think like including
these parts because we've got these down to where
we want them to come. So what we'll do is
then we'll come in, we'll grab each of these. So we'll do the whole
top thing first. So we'll grab all of these. Press G, just to make sure
you've grabbed everything. You can see, I've
not grabbed this, and I've not grabbed this again. And there we go, we've grabbed
everything from there. Then what I'm going to do is I'm going to go to object and we're going to go down
to convert and mesh. I'm going to right click,
then shade auto, smooth. And then finally what
I'm going to do is I'll come to this one. Let's say in fact,
before we do that, let's just press
control all transforms, right click, set
origin to geometry. And then what we'll do is
we'll come now and add in. We'll select this one
first, so just select it. Add a modifier, generate bevel, put it on naught point, naught naught, three like so. And then because
we've done that, we can press control
L and we can copy modifiers and just copy those all the way
over from there. Then let's actually
bring in a material. But before we do that, obviously, yeah, we'll
do it on this one. So we'll bring in a material, we'll minus off the gray box, click the down arrow,
and we're looking for blue painted wood. Let's bring that in. Let's
put the shade onto material, let it load up, and
then what we'll do is we'll UV map these ones, and then we'll UV map these. We don't want to do it on
all of them unfortunately, because this bit of wood in here is going to be our
dark wood instead. So let this load up,
and there we go. Let's press Tab
Smart UV Project. Click okay. Like so. And now we'll just grab
the ones that we want. So if we grab these ones, a smart UV project, click okay. These ones smart UV
project, click okay. This one, Smart UV
project, click okay. And then finally, these here. So tab, smart UV
project, click okay. Now finally we can grab
all of these like, so grab this one, press control L, and
what we're going to do is link materials.
And there we go. Now finally, just
this one here now. So all I'm going to do is I'm just going to grab
this one here. I'm going to press Smart
UV Project. Click Okay. We're going to do the same
thing on this side now. A Smart UV Project. Click. Okay. And then what I'm going to do now
is with this one, I'm going to minus this off click the down arrow. And
we're looking for wood. And we're going to
give it the dark wood like so. Same for this one then. Minus these two off
down arrow wood and we're looking for dark wood. And there we go. All right, finally then before we
finish this lesson, let's have a look where that looks like on a rendered view. And there we go, it's
looking pretty nice. Okay, so what we'll do then
on the next lesson is we will get in these windows
to get these windows in because they are like
the final major bit. And once we've got those in, then we can actually
get our roof on. And then we can kind of pull
this all together because we're pretty much
done on this one now. It's just these actual
windows that need doing. That's the last
hard bit on them. Anyway. All right everyone. So I hope you enjoyed that.
And I'll see on the next one. Thanks a lot. Bye bye.
136. Creating Detailed Roof Windows for Victorian Buildings: Welcome back everyone to Blender for the Environment
Artists Guide. Now let's create these kind of, you know, pop out windows. I'm not sure what
they're actually called, but I always think
it's better if we, first of all go
into object mode, bring in a plane and get the actual shape and
the size correct first, or whatever you want it to be. And from there then you
can actually work on creating the Windows
control one. Let's bring it over
so it's going to be. You can see this is the
kind of halfway point. We need two of these in there. And we can see we need
to bring it in and X, let's bring it in a little bit. So I'm thinking something
like that is going to be popping back over here and this will be round
about the right size. Because then we can
have another one at the side of it from here. Then what we can do is we can actually build out the shape. So what I'm going to do is
I'm just going to come in, grab the top of these,
press control shift and B. And then brewing them
in like so left click. And then what I'm going to
do is change the shape. Now if I change the shape, I want them coming in
a little bit rounded. You know, I had the other
ones like rounded like this. And I'm just wondering if I want them rounded like this Instead, I actually think, let's have a look at what
we can do with this. Let's bring them in
a little bit more. Let's bring this in a little bit more. Let's bring this out. I'm thinking I'll
have it coming down, but what I'm going to do is I'm going to have it this shape. And then what I'll do is I'll come in and grab both of these. I'm going to grab both of these. Just bring it down and get that shape that I'm
actually looking for. I'm going to bring it up. Yeah, that's the shape
I'm looking for. It's like round then coming
down and then coming out. I actually, that's what
I'm actually looking for. Yeah. Something like that. I think it's perfect. All right, from there then we can literally build everything off of V now. So all we can do
is, first of all, we can think about
the top part and we can think about
pulling it back as well. So all I'm going to do is press
control A all transforms. Right click, set origin to geometry tab, and
let's pull it back. So let's pull it
back into place. And now let's think of how far we actually want
these stuck out. I actually think
this roundabout, this level is actually perfect. The one problem we will have is probably need to lift
this up a little bit, because we're going
to need to put some kind of supports
underneath so that we can press L and we can pick
it up a little bit like so, so something in that
sort of height. Just make sure it's still stuck in the wall, which mine is. And then from there then let's actually create the
side parts first. So all I'm going to do to do that is I'm going to come in, I'm going to press Shift
Cursor, Selected Tab Shift. And then what I'm going
to do is bring in a cube. I'm going to move my
cube over to here. Let's start with this
side point here first. Then if I press, bring it down, pull it out into place. And then what I can do is I
can grab the face of it and pull it out to here. And from there then I can
actually build this part here. So this part will all be wood. And then this bit
will slot into it. Also, we need a bottom one, so I might as well
use the same one. So I'm going to press L shift D, and then I can mirror those
over to that side as well. All right, I've got these bits. Let's actually bring
in another bit then. So all I'm going to
do is press shift D, and then I'm going to
rotate it with our Z 90. Let's pull it out into place. Let's press S and Z and just
make it a little bit wider. And let's pull it round
about, round to there. And then all I want to do is just pull it out
to the other side. So let's pull it
out to the other side just to there for now, because we're not going to
be sure how far we need to pull it out over here until
we've mirrored these over. So let's do that now. So all I'm going to do is split these off so L and L selection. And then what I'll do is I'll
right click on these ones. So grab these right click
origin to three cursor. Let's bring in then a mirror. So generate a mirror and that's put them
over the other side. And now I can see that
I need to pull this out a little bit further.
Not only that as well. Now I do have control of if I bring these
in for instance. So if I grab both of these, bring them in, the other
side will come in as well. So that gives me that
option from there. All right, so the next
thing then I want to do is create this
kind of top part. So this part come in here. I can also see that probably this part is going
to have to be, I'm thinking that I need to pull this bit up maybe to here. So maybe like down here
is not far enough. So what I'll do is I'll
come into this part here, Grab this one and this one. Not that one. This
one and this one. Press control one,
and then and X, just pull them out to get them a little bit
straighter like so. And from there then,
I'll just tidy this up. So control one
again, pull them up. All right. That's all
nice and straight. And from there then, I think
we'll pull these ones up. So L let's pull these
ones up to there. There we go. That's
looking bare. And from there, obviously, we
need to pull these all the way back into our roof. So now let's think about
the top part of here. So what I'll do for
that is I'll come in, I'll grab this going all
the way round to here. And then what I'll do is I'll
just press shift like so. And then I'll press,
and I want to pull it back on the Y and Y, like so. And then finally what
I want to do is I want to pull these out
a little bit as well. So I'm just going to
grab both of these. I'm want to press Enter and X, pull them out a
little bit like so. And then just pull
them down like so. Now what we can do
is we can come in, split this off L and P. Selection
control all transforms, right click a
origin to geometry, adding a modify generate
and a solidify. Let's pull the solidify out like let's also then come
in press control one. And what we want to do is of course change the
offset of this. So let's bring it down
a little bit now. We want to make sure that
when we pull this back, that all of this is in there. And we can see it's a little
bit out of the moment, so let's just increase the
thickness just a little bit, so I think that's a
little bit too much. So I'm just going
to bring it up. I'm just wondering once I've got my bit in
the front there, that then will fit
in much, much nicer. All right, so we've got that. Now I'm also thinking that maybe we should be
level these off a little bit just to make it a little bit more rounded.
So we'll do that next. So all do is I'll come in
control A, apply that. And then all we'll do is
we'll come into these. Ol shift and click Ol
shift and click control, bring it all the
way back like so. And then just bring in
something like that. Right click, shade,
auto, smooth. And there we go. You can see that's looking very nice now. Now what we can do is we can
pubble it back a little bit. Now let's think about these joints that are coming up here. Shift a, bring in a cube, let's pull it over
to this side so S make sure that
it's fully in there. And then we'll come
down to the bottom. And then we'll pull it down into like so we can see it's going through there. We don't
really want that. So what I want to do
is also I want to pull it back, pull
it back this way. Let's pull it back this way
now, just so it's in there. So I'm also thinking I'll probably pull it
back a little bit more just so it sits
on top of here. We've got a choice, either we pull this back or we
pull this one back. I think actually, it might be better if we pull this
one back a little bit. Yeah, I think that's been
in place a little bit nicer perhaps than the way
that we actually had it. All right, so now we can
actually grab this right click, the origin to three D cursor
and then grab this one. Press control L, and
we're just going to copy modifiers and then we'll
put it over that side. Now I'm just looking, I need to make sure
that the top of here is actually going
into there like so. And now finally we can
come in and actually think about our window because we've done all
that work already. So what I'm going to do is I'm going to grab the
front top here. I'm going to press Y
just to separate it off. I'm going to press and
bring it in a little bit, just so it's right
at the edge now. And finally then I can press the eye button and bring
this all the way in. Now from here I'm
going to create a frame that goes all
the way around here. And then from there I'm going to actually create an inner frame. So we're going to start
with this frame first. What I'm going to
do is I'm going to come in and grab this, going all the way around there, I'm going to press Y, and then I'm going
to come to this one. So this one and this one. Press Y, and then
this one and press Y. And then I'm going to grab all of these then with shift select and control select going
all the way along like so. And then we're going
to pull them out. So if I press, should
be able to pull those out into place like so. Alright, it's really starting
to come together now. Now the next one we need to
do is this one on the inside. So again, I'm going to press
and bring this in like so. And this then we'll
make our inner frame. Now from here we need
to actually create our window with the
frames going across. That we'll do in just 1 second. First of all, let's come in. I want a halfway point in here, I think, or do y? No, actually let's not
put a halfway point, let's just split it
off in the normal way. Y, just exactly the same as
we've done on the outside. So this one and this one Y and then the
bottom one, Y like. So let's then grab
them all again. So L, L and L. And
then we can press, pull them out like so. Now finally this inner one. Let's actually make
the window now. So to make the
window, I'm going to want a part that goes
up there and down here, and then two going
across to do that. I'm just going to
pull it out because I find it a little bit
easier to work with. And then what I'll
do is I'll come now, grab the top of this. So the top of this
right click subdivide. Bottom of this, right
click subdivide. And now you can see I can
actually join these up. This one and this
one join up like so. Now from there I want two
actual windows going in here. You can also see that these
two here don't really need if I press delete and
dissolve vertices. There we go, We've
got rid of those and now I can grab
this one and this one. Press the J button. And from there now
what I can do is I can press control two, left click, right click. Now, do I want the frame
to be all of these? I think actually I do. So what I'm going to do is
I'm going to come in, grab each one of these like so. And then we're going to press
control, bring them out. All right, finally let's press
L on this one selection. And then tab control
all transforms, right? Clicks at origins, geometry. And let's now bring that into place where we
actually want it, which will be jawed
along here. There we go. That is the window nearly done as easy as that, Of course. We need to put the
supports on there. We need to shade, auto, smooth where you can see. Now this is where our
roof is going to go on over the top of here. I'm just wondering if
the roof needs to be a little bit wider or if we're going to have
it going down to there. I think actually we might make the roof bit wider once I've
got my roof actually on. So we'll create this roof first once we've got
both of these in. And then from there
we'll be able to finish these off First though. When we come back,
what we'll do is finish this window and then from there we can do the roof.
All right everyone. Let's save that our work. And I'll see on the
next one, everyone. Thanks a lot. Bye Bye.
137. Completing the Victorian Butcher's Roof: Welcome back. Eye to Blender fo the Environment
Artists guide, and this is where we left off. All right everyone. So
what I'm going to do now from here is let's bring
in our roof first. I think that's going to
make it much easier. Again, I'm going
to grab this roof. I'm going to press shift
D just to duplicate it. And then what I'm going to do is just bring it up to there. Now we can see the moment itself for this
roof, which is fine. We can use that as
the base to start. The first thing I'm
going to do though is change where is it
the actual curve? I'm not sure if this is the curve or not. I don't
think that's the curve. Where's the actual curve? So bottom bending, not that one. Let's have a look at roof
angle. I think it's this one. Let's put that on
one. Yes, there we go. That's what
I'm looking for. All right, from there,
let's spin it around so ours head 90, let's get it in
some sort of place. And on these we want
them to be much, much squarer than what
the other ones are. We can see that the bending
needs to be something, albeit not quite that. So what I'm going to do
is I'm going to come back to my bending, we're
gonna bend it up. And we can also see actually that this is not what I want. I want this one
rotation. There we go. Let's bring that one up.
That's much, much better. Now, let's try and fit
it into place first. So what I want to do
is I want to bring it down to where it's
going to fit so we can see it's going to come to the bottom of here and
hang over these ones. So all the way over
here hanging over probably just just near
enough halfway point. And then from there
we can come and put in the rotation on there.
Let's bring it back. And there we go,
we've got it in place now let's pull these
back one I think it is. So tile length, vertical count. Let's pull it back one, let's pull it back another one. And from there, I think
actually I could fit these in. Now let's make these tiles
what we actually want. First of all, let's come to
tile width and expand those. So then what we'll do is we'll
change the bottom bending. So let's bring the bott bending
all the way down to zero. And now you can
see already we've actually got something
that is very nice. Albeit we can see
that it's actually stuck a little bit in
the actual roof here. So I'm just going to pull
them out a little bit. So then what I'm going to do is just pull that angle
back a little bit more. So let's bring it back
a little bit more. Double tap the A, there we go. A thing that's actually
looking exactly what we want. Now what I can do is I
can increase the whip. If I increase the actual
count horizontally, like let's bring it in, pull it over, let's increase
it a little bit more. There we go. Now I can
actually press and X and pull it in a little bit and
then just pull it into place. Now I want to keep this as well, and the reason I want to
keep it is because I'm going to be using this on the
top of these roofs as well. Hopefully, I can bend this
in the way that I want it. What I'm going to do now
is I'm just going to put this over the other side
because we can change. I don't actually think
we've got a seed on here to change the sule. Look, have we got a
seed? Yes, we have. So that's actually pretty good. So we've got a seed on there.
So what I can do now is press shift D. I
can bring it over, then I can rotate it around. So zed 180. Rotate it around. Let's then get it into
place so we can see. I think the height
has stayed the same. So look, if we go to the side. Yes, the height has
stayed the same. It just needs to be put in
where we actually need it. So let's put it into
something like here. Let's then drag it across into place and let's then
change the seed like so. And we can see the seed is not actually
changing anything. Instead of doing that,
let's come in and change the random size a
little bit or the width. Let's change the width
a little, tiny bit. I'm thinking on this one, it would be handy if
we had a seed on this, but I don't think we've got one. Let's also turn down the subdivisions because
I don't think we're going to need all of those because
they're pretty square. We'll also do the
same on this one. We'll turn them down to one, not 12, change to two. Then what we can do is we
can actually mirror this as well once we've
actually got this in place so it doesn't
actually look the same. I think we'll do that instead. But the good thing is
you're not going to see one side of the building, the roof on both sides, you probably won't
be able to see. Plus the texture is going to do a lot of that work for us. Yeah, I think we'll
actually go with this. All right, let's go with this. What we'll do is we'll come
in, I'll grab this then, and I'll try and create the
roof for this bit here. The first thing we'll
do is obviously turn the vertical count down
to something like four. Let's turn the horizontal
count down as well. Let's spin it round so as 90
and let's put it into place. Going along here, the first
thing we're going to do is just put it into
place and we can see. That it's going to be quite
hard to bend that into place. But we'll have a
good, we'll have a good go at this.
Let's put it over. Let's change the
horizontal count a little bit more because it's
still too many like. So let's put it into place. That's probably going to be
about right for us then. What we want to do is
want to change the angle. Now if I come down, I should be able to change
the angle of the roof. So let's keep changing
it a little bit more. If in fact, if I lock this, yes, that's going to make it
a little bit easier for me. And then I can press Y and
bend that into place like so. And then bend it a little
bit more this way. And there we go. You can see just how easy that
actually was to do. All right, now let's pull it a little bit
more into place. Let's pull it down a little bit. So I think that is going to
look pretty nice actually. I'm just wondering
if I wanted like these tiles hanging over here. But actually this
bit of wood I think actually makes it
look good enough. The one thing I do want to
look at is the halfway point. I think I'll have to make
them a little bit smaller. I'll do that now. Press S, make them a little bit
smaller, pull them out. Going along this way into place. Just up to the. Yeah, that
looks I think perfect. All right with this
one then let's see if we can actually
get over the other side. So all I'm going to do, I'm
going to come up to object, convert to mesh and then what I'll do is I will
control A all transforms. Right click, set
origin geometry, right click and set the origin. Three cursor add in a modifier
and we'll add in a mirror. And there we go, Perfect. And we're going to have a middle bit going
down there anyway. Actually, I think that
looks pretty good. All right, from here then let's come in and give
these a material. Let's do these ones first. We'll come in, we'll
come to the material. Once this is loaded up,
we'll take that off, and then we'll give
you our roof material and get these unwrapped, and actually see what
they actually look like. I think we've got
one in here as well, which is this one
down here where they've not actually
got a gap there. It doesn't seem like that.
So we'll fix that as well. So all I'm going to
do is I'm going to apply my mirror control. Let's come in then and
just minus this off like so let's also
come into this one. And we also, I'm just
looking, see if that's gone. It's not been applied yet, but it's causing a bit
of irritation for me. So all I'll do is I'll come in, turn off the roof
material like so, and then do the
same on this one. And there we go. Now I can
actually see what I'm doing. So let's come into
this one first. And what we'll do is we'll click the Material button,
down, arrow Roof. And we want it to
have this roof here. This roof here. Click that
on Tab Smart UV Project. Click Okay. And
now all I want to do is just see what that
looks like. So let's come in. There we go. I
think that's going to look absolutely fine. I just feel like this one here, this one in here, and grab it, not this one in here. Like I just feel like
we can just pull it out a little bit and we can do the same
on the other side. Just let's press ll on there just to make sure it
looks that little bit nicer. And there we go. All right, so that's the roof
done on that part. Now let's go and
unwrap this roof. We'll come to this one, we'll
apply the geometry nodes. Let's come to this
one and this one. Object convert mesh. Come to this one first A to grab everything, Smart UV Project. Click okay. And let's
click the down arrow. And we're looking
for roof again. This one here. And then
let's come to this one. Zach. Same thing. Down arrow. Roof. So let's grab this roof. Press a Smart UV
Project. Click. Okay. There we go. That's
looking really cool. This one here is
looking really cool. Now the one thing
is underneath here, we need to put some wood
because you can see there's some little
white marks down here. We really don't want those on. So what I'm going to do
is I'm just going to hide these out the
way at the moment. And then I'm just going
to grab this part here. Let's go back into
material mode. We'll grab this one, press Y, and this one press in fact, we'll press Selection and then we'll come to
this one, selection. All right, grab them both. Now, press control all
transforms, right? Clk, set origins, geometry. Grab this one then.
And then on Rap. And then come
around to this one. Same thing on rap. Now let's grab this one. And what we're
going to do, we'll come in, add a modifier, and we're going to add
in modifier, sorry, material down narrow wood. And the one we want is
the dark wood, like so. And then we'll do the
same on this one wood. Now, I don't think we'll even have to spin these
round or anything. We won't have to spin the
round if I press Altage. Now, bring this back, put this back then
onto rendered view. You'll see now it looks
different under there. And the reason is
of course because it's got actually
that wood in there, you can see no white
patches showing in there. All right. This is
looking pretty nice. Now, I'm just having a last look round before I finish this up. And what the thing we can do on the next lesson is we can
finish the top of here off, get the materials in here, move this over the other side, and then we can finish off this butchers. All
right everyone. So I hope you enjoyed that
and I'll see on the next one. Thanks a lot. Bye bye.
138. Designing Victorian Window Supports: Welcome back everyone to Blender for the Environment
Artists Guide. And this is where
we left it off. All right, so let's
put this top in shift. Let's bring in a cube.
Let's pull it up. And I'm going to want it stuck
out probably around there. And then what I'm going to
do is just grab the back of it and pull it
into place like so. And from there what I'm
going to do is just make sure first of all
that it's far enough down. So I'm actually going to
pull this down a little bit. I'm going to press and X and just pull it
in a little bit. And then we'll also
make a top on here, so I'm going to
grab the top of it. Press the Eyborn to
bring it in like so. And then press to
bring it up like so. Now just make sure that the back of it is in far enough so I'm just going to pull it back into my roof like so.
And there we go. Now before we do anything else, in other words,
before we duplicate this over the other side, let's actually bring in all
of our materials and actually make sure we've got bevels on these and all of that
other good stuff. The other thing is I
didn't finish the window, so let's actually finish that. Now I'm thinking
with this window, I'll make it a little
bit different. So what I'm going to
do is I'm going to grab all of this part first, I'm going to press Y, and then what I'm going to do
is pull this bit out first. So pull this bit out, and
then grab these bits. And then all I'm going
to do is pull those bits out just to make it a
little bit different. Finally, then I'm going to
grab each of these like so. And then what I'm going to do is press and pull
those out like so. And there we go. Now
I'm just wondering if I've gone a little bit too
far on these. I think I have. So all I'm going to do with
those is come in and grab all of the front of
them and just pull them back just so I don't go
too crazy with those. Making sure there's
a little bit of a ridge on there,
which there is now. Okay, some from there. I can split all of these off. I'm a Windows
selection and we can join them back together once we've actually done
everything else. Let's now come in and what
we'll do first of all, is grab all of this, all of these parts, all of these parts. Making sure when I press, I've grabbed everything,
can see the bottom. There we go. I
don't want to grab the roof because I want
to bevel these off. So all I'm going
to do is object, come down to convert
and mesh then. I'm just wondering
if you can get away with doing these all together. I think I probably can. What we'll do is
we'll do that now. So I'll press control J. Join them altogether.
Right click, shade, auto, smooth again, reset
all the transforms. And then from here, now let's add in a bevel first of all. So adding bevel like so that's one thing
that might happen. It might not work properly when you've actually joined
them altogether. But for us, we know
actually how to fix that. You can also see that we have a little bit of a gap in here. We need to fix that.
But first of all, let's sort out this, making sure everything is leveled off. So we'll just go to object. Actually, everything has
leveled off perfectly. Yes, it has, everything's
leveled off, okay. It's just the light in
that looked a bit off. All we'll do now is we'll
come to these parts. I'll grab this one and this one. I'll press Shift H, Hide
everything else out the way. And then all I'm
going to do is grab this one and this one, press S and X and just pull
them out slightly alternH, bring back everything
and there we go. That is looking really, really nice as you can see. Okay. From here, then let's
bring in our materials, then back onto Shady mode. Back to our shader. First of all, we'll actually, I think we could get away with
unwrapping it altogether. Actually wrap. Let's do that. We can see failed because clicked on wrap and not
smart UV. There we go. Then what we'll do is
we'll bring in a material. Let's bring in
blue painted wood. Let's bring that in. Now
we can see we've got some problems here
in these parts. This part. And we want to have the same material as this
one here on here, I think. Wall Gray. That's what we want. Let's go back to this now. And then what we can do
is click plus down arrow, wall and then Wall Gray. Click a sign. There we go. Am I happy with those? I
think they look a little bit. You can see the
reason for this is, by the way, is because
we join it all together. Which means that the UV's
might be a little bit small. If I come into each of these, press and unwrap, now you can see that they look a little
bit better on that UV map. Let's come in and hide
those out the way then. And now I can do is
work on the rest of it. If I come into
this, for instance, smart UV project, click
okay, hide it out the way. Just work my way down. Now, doing the same thing, just to make sure that
the UV's look okay. And also we can do a
few together as well. So we'll grab all of those. Smart UV Project. Click
okay, hide them out the way. Same for this one,
Smart UV Project. Click Okay, hide
them out the way. Now the last bit,
so we just want these going around here like so. And then Smart UV Project, click okay, hide
them out the way. And then this part here, all of this part going
down here on each of the sides is going to be a
different material as well. So we'll just grab them. Smart UV Project, click okay. And we want plus down arrow. Wood. I'm just wondering. I think
we'll do the light wood. Let's see what that looks like. Once it's on. Let's press
Tab and there we go. We can see we have
a problem with this part here as we
knew that we would. All of the other
wood grain though it is going the right
way, as you can see. Never have wood grain
going down this way. You really don't want that.
It just doesn't look right. And you can see the wood
grain going this way, doesn't look right either. So all I'm going to do is
I'll just grab all of this, go to UV editing. We'll grab then this
one straight up. This one, straighten it up. Now you'll see it does make a big difference as you can see now it looks so
much nicer going like that. Okay, so back to modeling now. We've pretty much got
all of this done. What we need now is
to duplicate this, join it all together, and
then duplicate it with this. If I press, we can see
we've got all of that. We need the windows to be done and we need to
join it with the roof. Let's do the windows first. Actually, all I'm going to do
is I'll press control one. I'll press tab A to grab
them all and we'll unwrap. Bring in then our glass. Our glass. And it'll
be the glass lit. So then all I'll do go to UV quickly a S and I'll just
shrink them all down. And then I'll just come
into each one individually. So I'll grab these. I don't need to have any because
they're not lit. You don't really need the dirt. You can put the dirt
around if you wanted to. You could just grab them
like I'm doing here, and you could also grab these. Make them a little bit bigger. And do what we've done before. Actually, you know what, We'll
just bring them all out. So I'll grab all three of these. I'll bring them out, make
them a little bit bigger, and then I'll come in
and put them in place, so make them a little bit
dirty as you can see. All right, finally we can come in now and join
everything together. So we shouldn't have a mirror on there,
let's have a look. No modifiers on there,
No modifiers on here. So I can join this one.
This one and this one. We've got a modifier on
there which is the bevel. And we need to apply that before join them altogether
because we really don't want to put a bevel
on these roof tiles. It's just too much. So just press control,
join them all together. And then press control
J to join everything together like so now
back over to modeling, and this is what
we're left with. And now I should
be able to press G. Everything moves together. Press control one. Let's
press right clicks, origin to geometry,
shift D then, and just bring it over like, so. There we go. Now we can see that's really
coming together. Now the last thing we need,
which I forgot about, is just the supports. Before I do that though, I'm actually going to bring
this one over as well. So shift D, let's press R z 90. Bring it over into place
where it's going to come, which is probably going to
be somewhere around here. And then I can bring
a corner in there, and then I can know where I can actually bring the
actual supports to. So now I can come in,
grab each of these, pull them out over here. Now this one as well here, we can also use this one and this one we can also use to go round that way to
finish that bit off. But for now, let's think
about these support. All I'm going to do, I'm going to create a
simple support here. I'm going to press Shift
A, bringing a cube. I'm going to bring it
down to where I need it, which will be under
here, Under here. Let's press and Y. Then what I want to do is press and X, Bring it in a little bit, pull it down right into
the actual joint there. And then what I'm
going to do is bring that up into place into there. And then from there I think
I'll have another one, L shift D and then R, Y or R X 90 and X, pull it in and let's
pull it out into here. If I pull it into here, you can see it's just
going under there. Don't really want
that. We want it coming just above there. Then we just need one more now, L shift D, I'll put it
down to the bottom first. So all the way in here,
pull it up then to the top. So it's actually going in there. Press L and X, and now we can pull
the bottom down. Hopefully we can get
this into some place. So we can see this is why. Because we need to pull this
out all the way to there, Bring it down into place. Then finally all I'm going
to do is just pull this out. I'm just going to take this off. I'm going to grab this face here and I'm going to
put it onto normal. And then just pull
it out to make it that a little
bit more chunky. Now I can see that
it's still under here. We don't really want that, so I'm just going
to have to come in now and grab the top of here. You can see again, the
reason is it's too high up. I'll pull it out a
little bit and then pull it into, and
then pull it up. And hopefully now it should all taking this off a
little bit further, go together like so. All right, that is looking pretty cool and I think
that's enough support. So now I can do finally before finishing then
is press control one. I'm going to press
shift D. Bring it over to this
side like so grab them both shift D and
then just bring them over and put them in the
center of this one as well. All right, on the next lesson
we will be able to then to get in the corner of these parts or the post
that's going to come up here. And then we'll give us a corner. And then I'll also
be able to finish with the actual posts that are going to go down
in the center here. I think we'll start with the center post
first, and finally, then once we've done all
that and got all that done, as well as the
materials on here, then we can actually create the sign that we're
going to create. All right everyone, So I
hope you enjoyed that. Nearly done with the butchers. So then we can move on
to the perfume shop, which is the most
difficult building. Or we might create
the car before then. Just to give us a
bit of respite, I think probably
we'll create the car. Alright everyone. So I
hope you enjoyed that. And I'll see on the next
one. Thanks a lot. Bye bye.
139. Completing the Main Structure of Victorian Butcher's Shop: Welcome back everyone to Blender for the Environment
Artists Guide. And this is where
we left it off. All right, let's come in and make a start then
on this part here. So I'm going to press
Shift S, Custer selected. I'm also going to put this on object molder so I can
see what I'm doing. Shift then let's
bring in a cube. And then what I
want to do is just shape this to the
way that I want it. So I'm going to pull it out just so it's far enough on there. I think actually that might
be a little bit too chunky. So what I'll do is I'll press S and Y, bring it in a little bit. And then what I'm going to
do is I'm going to bring it up just below this point here. And then I'm going to
press, bring it down. And then I'm going to press
S and X and Y, sorry. And bring it in and then
pull it up a little bit. I think something like
that looks pretty good. And now if press,
let's bring this in. And then I'm going to pull
it down into this point. So let's press, pull it
down. And there we go. You can see it's a
little bit in front of there, so we don't
really want that. So what we can do then is
press L and then pull it back a little bit so that fits
into place nicely like so. And we can see probably going to have to pull this
bit out a little bit. Actually pull it
out a little bit. Now it all fits in place, and that's looking pretty good. Then finally, the top bit. I want to put
something on here a little bit sticking
out. Let me think. I'll do this. If I press
control left click, right click, grab these two. Press control B,
then pull them out. And then from there
then what I'll do is I'll press the eye button, bring it in a
little bit and like so and then and Y
bring it in like, so now the one thing is I've messed up there because I didn't mean to
bring them all in. The other thing is I'm going to actually go back before that, Let's press control
and bring it out. Let's then come in
now and what we'll do is we'll reset
the transforms. So right click the origin
geometry and now I'll come in and I'll grab this
one and this one press, making sure that we're
not doubling up. So I again and now I
can bring them in. And you can see now if I
press and pull that out, now that's looking
much, much better. That's exactly what
I wanted from there. Then what I'm going
to do is I'm going to duplicate this shift D, bring it over, and
I'm going to put it more or less around
this point here. Now this point here is where
my sign is going to be. All of one is just
this part here, this part running down here. So all I'm going to do, I'm
just going to grab this. I'm going to press shift. So I've grabbed it, just
going around the side. In other words, I left
the top and bottom. I also want to come in and
press limited dissolve. Because I don't want that
center point down there. And then what I'm going to
do is I'm just going to grab the top of this
ol shift and click, Pull it up into place. And finally I'm going to
make this a little bit wider and Y make it
a little bit wider. And this then is going to be, so I can actually
put in my sign, which is going to support this
kind of bigger part here, Shifty, bring that over and then my sign is going to
go in there, roughly. All right, So now we
need to do is think about this top post here. So once we've got this in place, we can join it up
with this part here. I'm also, I'm thinking
actually this parts. Okay, I just need a bit that's
going to go up onto there. So we'll do that
there in a minute. Let's not get ahead
of ourselves. So let's come to this part. I'll grab this part
here, this part here. And I'll use this to
actually start the next bit. So I'm going to do
is press Shift D, bring it up a little
bit. Press Selection. And there we go.
Control a or transform, right click a origin geometry. Now all I want is this bit. Going up to here. I'll sit it on there first. A sit it on there like so. And then pull it up and
into place where I want it, something like that from here. Then what I'm going to do,
I want to extrude it out. First of all,
control, let's bring in an edge loop,
roundabout up to there. And then a shifting
click going around the outside of here, Lns. Let's pull it out, it's
further than that. Just a little bit further
than that, as we can see. And then finally we'll give in another edge loop
control, left click, right click, control B, like so. And then enter alternS and
bring that one out as well. So, all right, that's looking
at exactly as I wanted it, and now I'll need is
these top bits in. And then from there
we can actually start looking at what we had got leveled off
also from here as well, we can now bring in these parts. So if I grab this part, I should be able to
press Shift D. Bring it around, so 90. Let's press control one, so I'll get that good view
that I'm actually wanting. And what I want to do
now is put these in, each of these, Maybe shift
D, let's put it here. And then shift D, and let's have a look if
it looks right here, so I think it doesn't
look right there. What a thing. Actually, we
will, we will have it in here. So we'll have one in there, one right in the center there, one in the center of here. And I'm just wondering if we
can get away with one more. Let's have a look if
we need one more. So put one more in here. Let's try one more in here. Let's then pull all of
these back and we'll just see if we can get
away with so many. Let's put them into place. Double tap, the you know
what, I think it will be. Okay. Let's grab this one shift. We'll bring this one over. Put it into the top of there. That's pretty cool. Now we can grab this shift, bring it over 90. Let's put this into place. We want it back behind there. Pull it all the way
into the other wall. And you can see it's a
little bit going over there. We don't want that
really S and y, let's pull it back
into place like so. Then finally this one, it's a little bit different,
so we need to copy it. Shift D 90. Let's bring it into place again. Let's press and Y, let's also make sure then this
is going back into place. You can see pull
it back to there. Then it's just behind
there, which is good. The one thing is that this
is not fitting on here. These two, we need to move
them up or make them bigger. I think now we'll sort that out. This one here, Let's press
Alt and H. And then, well there is press control on here. Let's come round again. Alt, shift and click control S and make it
a little bit bigger, make them a little
bit more in place. Be very careful
when you move this, by the way, because you
will be moving UV's, put this onto material, you will be moving
UV's of the other one. We're just trying to fit
everything into place now, let that load up
and then not sure exactly what I mean.
And there we go. So when I'm moving
this up and down, can you see UV's moving, So you just have to be
a little bit careful. Same with this one, then
control plus and then S and Z. Make it a little bit
bigger and then move it up very slightly like so, just so everything
fits into place. Now we can see all
of the ones that we've not done
with the beveling. We can also see what's left. And all that is left is I think these parts going up here. And then we've pretty
much done for this. So what I'm going to do is
I'm going to now come in, I'm just wondering
about this part here. I need to pull this out a little bit. I'll do that bit first. I'll just pull it this way, and then press and Y and just
pull it out a little bit. So now let's think about
these parts going up here. Again, I'll come
to this part here, I'll grab this part in here. And then what I'm going to do
is I'm going to press Shift D. We're going to pull
it up a little bit. Press selection, grab it. Control all transforms, right? Clicks a, origins, geometry. And then while there is
now I'll bring it down. Press tab A, and
then and pull it up. And now we can get it into place where we actually want it. All the way up there, we
can see that we're way, way out on this part here. So let's pull this back. I'm just wondering about
this. Do we still? Yes, we have a bevel modifier
and we don't have our min, so I'm thinking we'll try and
get this then into place. So it's going to be a little bit thinner on
here just to get under there like so just making sure that we can still
see it through the wall. That's the main thing
that we're looking for. I'm thinking probably
we can bring it out a little bit
more. Just a tiny bit. Let's bring it out a
little bit more like so. All right, so I think
that looks okay. I'm just wondering if we should have a side point on here. Sometimes it would be
better if we had that. I think we will. So what I'll
do is press control law. I'll bring it down a little bit and then all I'll do is I'll press pull this out to here and then we'll come
into the top of here. Press control B. And I'm just
going to bevel that off. Yeah, and I think that
looks much, much nicer now. Now from there, what we want to do is we want to
unwrap this first, a smart UV project. Click Okay. Now the other
thing is, do we have a bevel? Yes, we've already
got a bevel on there. So from there then
what I can do, shift D, bring it over. I forgot to press control,
but I can do that now. So control all transforms, right Click origin to geometry. Let's rotate it around then. Soze hundred 80. Now you can see on this side, it's going to definitely
have to come down further just so it fits
in a little bit better. So I'm going to pull
it out first and then pull it down
just a little bit. Now you can see, because
I'm pulling that down, it's not quite fitting in there, so don't be scared again to make it a little bit
bigger if you need to. So something like that, double
tap the and there we go. That's looking pretty nice. And I'm just thinking that this bit here you're never
going to see it really. And so I wouldn't put anything in the now. I wouldn't
bother with that. But what I can do now is
grab this one and this one, and then all I'm going to
do is press shift D and bring those into place
up at the top of here. So just make sure
this one is in. So if I pull them out, just making sure this
one's in as you can see, it's just in there. And then you'll see that
this one's fitting in place, automatically double tap
the A and there we go. All right, so we're
actually nearly done now, so everything is in place now. All we need to do then
is just give these the bevels that they need,
give them the materials, put the materials on the walls, and which should be done by the next lesson for
the butcher's shop. Accept the sign.
The sign will be the lesson after.
Alright everyone. So I hope you enjoyed that.
And I'll see on the next one. Thanks a lot. Bye bye.
140. Detailed Finishing for the Victorian Butcher's Shop: Welcome back everyone to Blender for the Environment
Artists Guide. And this is where we left off. Okay, so what I want to do now, let's do the walls first. So I will come in and I always think it's a better
idea to split them off. So you can see at the moment,
this is how it looks. So we should have the
entire casing of this. You can see a lot of this, actually, we're
not going to need. So what I tend to do now is just press Shift just to hide everything
else out of the way. And then what I'm going
to do is I'm just going to get rid
of all of these. So delete and faces. Delete and faces. And finally, delete this and this and
probably one underneath as well. Delete and faces, not going
to need those at all. You can see I've got
another one there. Delete faces, this one here. Delete faces. Not going
to need those insides. All we're going to need
is the outside of these. Now what I'm also going to do is I'm going to
grab both of these. I'm going to press Selection, and then I'm going
to grab this one. I'm also going to
delete this face. I don't think I'm
going to need it. It's on material you can see. We're definitely going to
need that one. Delete faces. Then we're going to come into, I'm going to split them off. I think if I grab the two Y and then grab
these two selection, and then we'll do the
same thing on here. Y, grab the last one selection. I think this wall, it should have brick on there. I'm not sure if there is one. Let's just press selection and give you the
benefit of the doubt. Let's press Ltage.
Bring back everything. Yeah, and you can
see that should be brick down at the
bottom off here. Let's start with
this, then we'll just press a, unwrap it, and then all I'll do
is grab my chimney, press control L, and what
we'll do is link materials. And then what I'll do
is come back to it now and I'll press control. And three, just to
go round there. I'm also then going to just press and yeah, I
did unwrap that. So let's go to UV editing R 90 control three
again because I'm in my UV space and now all
we need to do is do what we've done loads of times before now.
Just make it smaller. Okay. So now working our way up, we've got all of
these three to do. We haven't got one round there. So just make sure though, that is in the roof
there, which it is. So then I can come
to these parts. I'm just going to
grab these parts. I'm going to press U and wrap. And then I'm going to give
these the wall texture, so this wall texture here. So if I grab this
one, I can press control L link materials.
No, it's not that one. It's actually going to be
the green one on these. So we'll come in and we'll
just change that material. So I'm looking for green walls. So if I pull this out, green, wall green, there
we go. Not that one. This one here. So wall
green, wall green. There we go. That's
what we want. All right, let's
look in call now. Now let's come into
the top part then. So we've got this
part and this part. Let's do this part first. We can see, is this all together?
Let's just have a look. So let's come to this
part. There we go. I think actually these
have been split off, so I didn't actually want that. I can't select this
as you can see. So I did split them
off by mistake. So let's come in and
join these altogether. So control J, join
them all together. And then what I'll do
is I'll just press a mesh clean up and
we'll merge by distance. And there we go, 12
verts joined back up. So we've joined these two up basically as
what we've done. So now let's come in and we'll just unwrap
these ones first. So unwrap both of these
sides, you unwrap. Then what we'll do
is we'll now come in and grab this one
press control level, and we're going to
link materials. Yep. And that's the
materials we want. We can also see our windows. For whatever reason,
they're not right there, so we'll have to
fix those as well. I'm actually not sure
how they got mixed up, but we'll fix them up. All right, let's
come into this one now and then what
we'll do is grab this one on rap and then
this one here on rap. All right, so that's done. That looks pretty cool. Now let's go in and fix
these windows before we do anything else being as we're already in our UV editing. So what I'm going to do is
I'm just going to grab, you know what, I'll actually
just grab one of them. I'll press on Rap and then what I'm going to do
is just press S and drop it into place like so from here then I'll just do what we've done
many times before. We'll copy copy default. And then what we'll
do is we'll grab all of these and we'll press and paste
Default. Press two. Once you over there, we're going to do the
same thing as well. So it's going to be a little bit tedious to do all of these, but at least they will hopefully look a little bit different
from each other. So there we go. Now let's come to these ones. I'm going to grab all of these. So I'm going to
press Copy default A again to grab them
all. Grab the top one. Let's just set them in
different places Now, rotate them round as
well if you need to. That makes it also makes
them look different. I'm just turning them round. Just putting in
any random place, really. There we go. Now let's do this one because I'm not sure
what happened here, but we'll grab all of these, then you copy paste default A, then we'll move this one first. We'll move this one. You could even put it up there
if you want to. So then this one,
we'll put it here. All right, there we go. Now,
all of those are different. Let's go finally
back to modeling, and we've just got
these parts to do now. So you can see this is
really looking nice. Now let's come in and what we'll do is we'll
grab all of these. First of all, we'll
grab all of these. We can see here we've got a little bit of
flashing on there. I think I just need
to pull this one back slightly and
then I can come in, grab all of this on all of these and these,
and finally this. Then what I can do is I
can control or transforms. Right click, set
origin geometry, right click, shade,
auto, smooth. And then what I can do is add
modifier, generate a bevel, put it on not 0.3 0.3
And then what I can do is press control L and copy
modifiers before I move on. Then I'll just go
into object mode. Just so I can see all
the bevels are working. So we can see here,
maybe they're, they're working
definitely on this, but it's these ones here
that they're not working on. You can see here, for some
reason this is not working. Let's come in and
change the geometry, clamp overlap off,
and there you go. You can see they're
actually working. Now what I'll do now is
just grab each of these. So grab this one last press control L copy modifiers
and there they go. Now they're all
working. All right, bag to then shader and
then all I'm going to do, I'm just going to make sure, has this got a bevel on as well? Yes, it has the bevels on there. Then all I want to do is press
Tab and Smart UV Project. Click Okay. Now all I'm going to do
is I'm just going to go down and unwrap them. Okay? This I think is the quickest way of doing
this smart UV project. Click okay. If you have a quicker way or you find a quicker way
to let me know. But I think or like
unwrapping them all in their own UV space
would also be handy, but I don't think that's
available. So I'll grab these. In other words,
making the unwrap separately on their own UV maps. Just making sure the
bevels on there. Grabbing both of these
smart UV project. Click Okay from there. Then I can just
grab all of all of these all the way along
and included in this. And finally, I can
grab this one, press control L and
link materials. And there we go. All right, so let's have a look around this and
see what it looks like. Let's first of all
save that our work. Let's then put it on
rendered view. There we go. That is looking pretty nice. Yeah, I'm happy with that. I'm
happy how it all came out. The one thing I would say
is possibly the windows, there might be a little
bit set too low on here. Also the not blue,
I don't think. I think we'll actually
fix those windows. We're bringing in the bevel, it looks a little bit more like this because I think
it's too much on there. It needs to be more
like this one. As you can see, there's
roughness and then there's roughness where
it's just too much. You can see on this
one, if I go to it, we actually this one has
green painted wood on. I'm just wondering about
these windows actually, let me just put it
on Material View. Yeah, they're green. And
actually the blue one, let's actually change
this green painted wood. Let's put it on
blue painted wood. Blue painted wood. Let's do the same for this
one blue painted wood. And let's have another look on there now and see
what they look like. Yeah, and you can
see the look bar because that blue
is coming through. But I still say that
this here isn't right. So we definitely want to
come in and change that. We'll do that on the
next lesson then. And also what we'll
do as well is we'll come in and
start this sign. It shouldn't take as
long for that sign. Actually, it's quite
a simple sign. And then actually the
butchers will be finished. Everything else on here
looks absolutely fine. Everything has really
come together. Now, I'm just
looking at the top, looking all the way around it. Yeah. It's just these windows
and then the sign to do. All right everyone. I hope you enjoyed that and I'll
see on the next one. Thanks a lot. Bye bye.
141. Modeling a Victorian Butcher's Shop Sign: Welcome back everyone to Blender for the Environment
Artists Guide. And that's where we left it off. All right, so let's come in and what we'll do is click plus. We'll click New. And then what we'll do
is we'll call this blue painted, not like that. We need to get rid of the cap. So blue painted wood
two, we'll call it that. And then what we'll do is
we'll copy this copy material. And then what we'll do is, well, first of all, minus this
one off for minus this off. Now we should be left
with something like this. And then what we're
going to do is paste it. Paste material like so now you can see what
happened there, is that material
dropped onto here. So this is basically the glass. We don't want that. So
what I'm going to do with this one is instead of it
being blue painted wood, we're going to have
blue painted wood. To now in this one, I need to come in
and just grab these. So grab all of these like so. And then what I'm going
to do is blue paint of wood to click a sign.
And there we go. Now from here, what we can
do is we can go down to our shading options and it's the devil that's
actually causing this. As long as we get set up
with the render view on, you can see here, this
is our render view. If I then come out
to this part here, we can see that if
we bring this down, look, we can actually
get rid of some of that. That's what we're trying to do. Bring this down, bring it down like so now
it looks better. As you can see, you can come in and mess around with
the radius on here. That will also do that for you. But I think the easiest one is just to bring
this down a little bit and I think nos
much nicer already. Now let's actually mess around with that a
little bit more. Let's come in and turn
down this radius. So let's be very slow
in turn this down, you can see as a
brother up and down, so 0.5 Let's try that. There you go. That's actually done a
better job than this, so we'll do it that way,
not 0.5 that's fine. I'm just wondering
about this one here. I think actually
that one looks okay, because I think
it's green as well. This is a little bit
darker. This blue? Yeah, that's looking fine. All right, finally then
let's come back to modeling and let's actually
start our butchers. So what do is operate
on an object mode? And then what I'm
going to do is, first of all, I'm not going to worry about
the size or anything. All I'm going to do is
just bring in a plane. So I'm going to
bring in a plane, I'm going to rotate it around, so our x 90. So I'm going to press S and's and just make it a
little bit smaller. Now before I do anything, what I'm going to do is I'm just going to create the sign. First of all, that's
all I'm going to worry about just
creating this sign. So I'm going to come out, bring these parts out. So I'm going to press and
y pull those out like so. And then what I'm going to
do is I'm going to pull them in and X pull them in. And then I'm going
to press Enter. And then and X
pull them out like so that's the kind
of the thing that we're actually looking
for at the moment, and X bring them out. Now finally what I
want to do is I, I basically want to cut
these the same way. So what I'm going to do
is I'm just going to come in and while I've got each
of these actually there, I'm going to press right
click and subdivide. And then from here I
can grab both of these. Press S and X and
pull them in like so. All right, so we can see we're getting somewhere
already with this. Now the one problem is that I probably need
a bend in here, and I forgot about that, so
we'll put that in a minute. First of all though, let's put some bends
going across here. So left click, right click. Let's then come in
and press the K Born. And what I'm going to do is I'm just going to put
a bend in here. So press A going down flat. And then let's put a bend
in this one here as well. So k a going down
flat. So Enter. And there we go. All right,
so we've got this so far. Now let's press control A, all transforms right click,
set origin geometry. And then from here let's
bring in a new modifier. And the one we want to
bring in is a deform. And we want to bring
in a simple deform like so let's put it onto bend. We want to actually be, let's see if it'll,
it's not on the Z. This is sometimes what
you'll find even on the X. If I put it on the X, you can see it's not bending, right? That's not what we want. What we want to do then is
put it on the Z. And it's not bend the right way, because at the
moment you can see it's bending this
way and this way, and that's not
really what we want. We could bend it
that way, it would look quite nice, but we
don't actually want that. So what we're going to do
instead is we're going to press tab A R and sorry oh, x 90. So we're going to bend it
that way on the edit mode. And then what we're going
to do is press Tab, and then R x -90 Bend it back. And now you can see it actually bends in the way that
we actually want it. That's exactly
what we 45 degrees seems to be about right as well. Everything is bend in with it. Perfect. Now the last thing
we want to do then before finishing here is let's actually
apply that with control. So let's apply that. And then what we can do is
we can come in now, grab this one and this one. And this one. And this one. And we want to round
them off a little bit. Control B, let's round them off. So let's increase the bevel like so I think that's going
to turn out pretty nice. Let's write Cliqchade
auto smooth. Finally then what
we can do is now we can add in another modifier. And this time we'll
bring in a solidify. Bring in a solidify,
let's pull it out. We can see we've
got some problems in these corner bits and we
need to go in and fix those. Now, this also can happen because we
leveled those parts off, So let's actually go back and before we
level those parts off, we'll just leave those
and we'll come in and we'll generate a solidify now. And now we bring it out
and you can see that we don't really have
those problems anymore. So what that means is we're probably going to
be better off in beveling this after let's put even thickness on to
straighten everything out. I think my sign being this
thick looks about right now. You can see it's even
all the way around like, so maybe even a
little bit thinner. So let's bring this
back just a tad. So let's then come in and
apply that with control. And finally now we've
already got all of these selected because
we haven't selected before. Let's press control B
and be level these off. And now you'll see right click, shade, auto, smooth,
just down, nice. That actually looks
all right from here then we need the
center point of the sign. So I'm just going to grab all
of these pressing control. And then what I'm going to
do is press the eyeball. Bring all of those in like so. And finally, let's pull it
back just a little bit. So holding shift just a
little bit and there we go. There is the butcher's sign. Now finally what we can do is we can get this to be
the right size. So if I press S, I
can bring it down. I want it in line with roundabout here so
people can actually see it. So if I press control one, I want it to be in
line with something around this here. You
can see this here. This is where I want
it. I obviously want it pulled back and I want it maybe a little bit higher, just so we can see it from
this side or this side. And maybe I want it a
little bit more in. I think that then can be seen
from pretty much anywhere. And yes, I think I'm
happy with that. All right, so now let's
put in some chains. First of all, what I'll
do is I'll shift day. I'll bring in a path like so. I'll pull my path out. I'll press R Y 90. I want it to be going, if I press control 33 or one
control one, there we go. It would be the last one. I want it to come from
the edges of here. You can see this will
be the first chain that goes in all the way up to the actual part that's
going to come out here. If I put this back here
and we have a part that comes out here that then is going to be
supported down here, and then the chain will be
held in the actual sign. What we'll do now now we've
got this, is we'll come in, add modified geometry
node this time, and we're looking
for our chain chain. There we go. Let's then make these chains a
better resolution. So let's turn that
up, double tap the A, and I think with the butchers, actually the round chain, they look much, much better
than the other type of chain, so we don't want to elongate
it or anything like that. So let's pull it into place
first where it's going to go, it needs to look as though it's actually holding something. So you can see here
at the moment, it looks as though
it's not holding it. So I'm going to
pull it down into place like so now we
just have to decide, is this chain too
big or too small? Let's actually have a
look. If we double tap the A. No, I don't think so. Actually. I think I
think it looks good. The one thing I do think it's going to be a little
bit too tall there. So what I'm going to do
is I'm just going to delete this one. Delete Vert. I think even deleting this Vert. Yeah, I'm going to
leave it like that because I can pull
that all paper. What we'll do then on the
next lesson is we'll get in the wooden part that's going
to hold this sign together. And then we'll see how it's
all going to come together. So let's do that on
the next lesson. Let's save that
our work like so. And I'll see on the next
one, Everyone. Thanks a lot. Bye bye.
142. Finalizing the Butcher's Shop Sign with Advanced Texturing: Welcome back everyone to Blender for the Environment
Artists Guide, And this is where we left off. All right, let's press shift, Let's bring in a cube. Let's bring the
cube up to place. So what I'm going to do is I'm just going to bring my cube out. I'll grab this shift
S cursor selected. Grab my cube shift S
selections cursor. And then from there I can
actually bring this up. Let's see, first of all, if this is going to fit into place. So if I pull it back, we can see that it's
not fitting into place. Which means we can grab the
sign and this and actually pull them into place more
just making sure they fit. So halfway between
as you can see. And then what I'll do is
come back to my cube now, press S and Y and squish
that down a little bit. And then what I'm
going to do is put that in the wall and then I'll grab this face and I'm
going to pull it out to here. From there I'm going to be
vel off this end first. I'll come in, bevel
off this end, grab in both of
these control and B and let's be level
them off like so now. Do I want it round? Do
I want it that far? Do I want to make it
a little bit further? Let's bring it back and
we've just got to be careful of the bevel here. I think this is not
beveling off properly. And the reason is I just need to reset all the
transforms on here. I reset origin geometry. Now let's try that again. Now what we'll do is we'll
actually bring this maybe in, maybe in like that,
and then mess around with this part,
holding the shift born. I'm just wondering if
I want it like that. I think actually that actually looks pretty
good like that. All right, now let's bring
in another point here. What I'll do is
I'll press shift A. In fact, we've moved
it now as you can see, I'll just press shift
and then what happen is the curse will go to the
shift A, bring in a cube. Let's pull this cube back. Let's make it a
little bit smaller. Let's pull it this way as well, so next, squish it in. Let's put it into the wall. Like, let's pull it
down. Let's press Tab. Grab the bottom of
it. Let's bring it down to this
point down there. Exactly. All right. Now we can grab this and
we can press shift D. We can pull that out. Now
if I press S and's head, pull it out, let's pull it out and make it a little
bit thigger as well. So grab this front, pull it out, and then let's grab it and Y, and then let's put
it into place. Now we can see it's
touching there, so we don't want that S and y. Then we can pull it into
the place where we want it, which will be jost
around about there. Then the one thing that we
just have to be careful of is when this chain comes,
for instance, this, at the moment, I need to come into this chain and
I need to pull it up a little bit to get
it into this part. And you can see it's not
quite fitting in there, it's fitting in there nearly,
Let's pull this back. There we go now it's
fitting in properly. And then what I want to
do is I want the chain obviously to be
over to this side. So all I'm going to
do, I'm going to press shift desk
cursor selected, grab my chain, add in a mirror. Can I actually write click Set Origin to three
D cursor? Yes, I can. That's good. So that
means I can bring in a mirror and we can put
it over the Y or the. Turn those off. There we go. Now this one I'm talking about, we don't want this
obviously to be into here. So what I want to
do is I want to grab all of this, move it over, and then pull this down to
make it look as though it's actually holding this sign. If you don't pull
it down further, it doesn't look like it's
got the strength to hold it. Now you can see that's
looking bare as well. For this, what I'll do
is I'll press shift D, bring it up, and we'll just have another one coming
in this way as well. I think actually that's
going to look really nice if I spin that round, double tap the A.
Let's have a look. There we go. I think actually
that's looking pretty nice. All right. We're
happy with that. Now let's come in
and first of all, we'll just grab all of these. We'll grab this and this. I'm not sure whether
we've beveled this off. All we'll do is we'll press
control or transforms. Right clicks,
origin to geometry, right click, shade,
auto, smooth. And then all we'll
do is we're adding a bevel. Generate a bevel. And then we'll press
control L and we'll link or modifiers and then we'll put this bevel on naught
point naught three. Then again control
copy modifiers. And now just copy
that all through. We don't need to do
anything with the chain. Now what I'll do is
before finishing this, we'll come to this
one press tab, Smart UV Project, Click Okay. Come over to our materials. And the material we
want is going to be Black metal, which
is this one here. Let's put it onto our material. Actually, we might even have
a look on rendered view. So we'll just let
that load up and then if it's not a good enough view, we might put on rendered
view just for this. Because I think we can get
away with that because we're only looking at this part here, not the whole scene. There we go. Let's press tab. Let's put it on the
render view now, just so we have a
very clear view of what that's going to
look like. Double tap. The Yeah, and I think
the actual sign, I'm just wondering
whether I want it to be a different color,
whether it should be red. Let's come in for
our wood first. So I'll just grab all of
our Wood Smart UV Project. Click Okay. Down arrow,
blue painted wood. And then what we'll do
is we'll just press control L and link materials. And there we go, That's those. Now with the chain, let's actually first of all come
up to object and convert it. And then we've got chain
metal already on there. Let's have a look at
that. Chain metal. Actually the chain,
Mel, looks pretty nice. I'm just wondering
about this metal here. So let's click the down arrow. We'll click metal and
see what metals we have. So we have blue metal, we have metal light as well. Let's have a look at
that. Not really. A lot of difference on there. Mainly down probably
to the actual light. Let's look at metal again.
What are the metals? Have we We've got green metal
that's too close to there. Do we have a different one
which is like a red metal? So let's go over to our asset
manager and have a look. So what we'll do is we'll
come down to our metal. So here's our metal. We do have a brass colored metal and we have a car
colored metal as well. Let's put this on
rendered view then from there what
we'll do is we'll put on the car metal blue. Let's try that. See
what that looks like? Nope. Brass metal. I think actually that
might be by double tap, the A, that might be
the color we go for. I think that looks just
a little bit better. The other thing as well is I
feel like with these chains, maybe they're a
little bit too light. Also, maybe they
need unwrapping, So I'm going to press a
smart UVP J click, Okay. And then what I'm going to
do is I think I'll go into shading panel and just have
a look at these chain Ls. And I want you to do
the same as well, if you come in
here and come out. Let's have a look.
If I double tap, the I'm looking at this, this is the base color. If we bring this down, it should make them darker. That's exactly what I wanted because we don't
want them too light. So I'm thinking
now that's looking a bit better than
what it did before. I'm not going to
alter anything else, but you can see I just
judged it from there. Looking at how this is set up, what's going into
the base color, and this RGB curve basically determines how
bright or dark something is. So I can see this is probably going to be
what I need to alter, so you can see, now that's
looking pretty nice. Finally, then let's go to our UV because it'll be
easier to do it from there. And then what we'll do is
we'll just come to our sign. We'll grab this
part going in here. And if I do it this way, if I press control
one and I press, and what I'm going to do is
project from view, like. So I'm going to press S and what I'm going to do now is I want it to be this one here. If I come to my butchers, I can see that
this butchers sign here is called butchers sign. That's what I'm going to put on. So I'm going to grab this again. I'm going to come to
this plus down arrow, but let's click, Did have it. Butcher's sign. There we go. All right. Click a
sign and there we go. Now what I want to do is I
want to fit this into here. So I'm going to press
the S born and just make sure I can get it fitting in to there like so now I'm wondering if I press
S and sorry and Y, can I Actually, no,
I can't do that. But what I can do probably
if I grab this and press and Y. I'm just wondering if I
can straighten it more out. So if I press this one and Y and then finally this one and Y like so in fact,
you know what? Instead of doing
that, let's just see if I can grab the whole
thing and then press Alt. Yeah, that's going to straighten it out
a little bit more. Let's even bring it out now. Yeah, I'm not actually
happy with how that looks. It's not really
done what I need, so you know what, I'm going
to leave it like that. We're going to
have a quick check now on our rendered view. So let's go to rendered view. Let's double tap the
A when it loads up. Let's press shift and right
click just to get off. And you know what, that's
actually looking fine. Yeah, I don't think I'm
going to change anything. It's just not got that
quite bend there, which I'm actually looking for. I'm just going to
try it once more. Actually, if I bring this down
and Y, let's have a look. I need to bring it down to
there. Let's do this as well. And Y, and then and Y. Then if I grab the whole
thing with L and then press and Y, now it's fitting. Yes, that's looking, that's
exactly what I wanted. All right, let's go back
to modeling. There we go. This is the butchers
actually finished. What you can do now is you can press zero on
the number pad. That then will bring
in your camera. Let's bring our
camera round to here. So we're just going
to have a quick look at what this
actually looks like. Now we've finished it and you know what else
I'm going to do? I'm just going to zoom
in a little bit like so I'm going to also save
it out, save out my work. And then finally what I'm going to do is I just want
to move my lighting around. So I would always come in, have it rendered view, if you can, to move
your lighting around. And then what I'm going to do is where the rotation is now. Sometimes honestly this
will crash blender, it does, sometimes just depends. I don't know what the
rule is on there, but I'm going to
just pull around the lighting to get a little bit of a better
lighting on there. As you can see, that looks
much, much nicer now. And then from there I'm
going to do is take a rendered view and let's see what actually
happens with that. First of all, let's
put it on wire frame. Let's actually save
our work and then what we'll do is we'll go to
render and render image. Let's see what this
comes out like so we can see lots of problems. Before we do that, let's actually turn off
our camera to view. And we'll do that
on the next lesson because we're
running out of time. So on the next lesson, what
we'll do is we'll get all of this into the
right collection. And then we'll do is we'll
take a quick render of this, see what it looks like
before moving on, and I think we're moving
on to the car next. We'll get that out of
the way and then find the last building which
is the most complex one, which is the perfume
shot from there. Then we just need
to do our floor. And once the floor is done, we've pretty much
done with the scene. All right everyone. So hope you enjoyed that and I'll
see on the next one. Thanks a lot. Bye bye.
143. Greyboxing a Vintage Truck for Victorian Scenes: Welcome Cabron to blend a Ford, the Environment Artists Guide. And this is where we left off. All right, so we did
mess up a little bit. We needed to hide
all of our things, so let's hide our bookstore, let's side all of
our scene assets. And then we should
just be left with the floor which is ground
plan over here, Look. And then we can hide
both of these which are in our Boolean so we can
just close it up as well. And then what I can do
is I can come in now and just make sure
I've got everything. So you can see here have
just that part missing, which is absolutely fine. The rest of it
seems to be intact. So if I press seven
and go over the top, I'm going to grab it
all with the select. Box select. I'm going
to press and we're going to do, we've
got a new collection. We've actually got one
here that says butchers. So let's put it in there. And then we should be able to hide that and bring it forward like so now if we
open that up now, we should be able to
see that everything is, nothing is hidden in there. And that's exactly what I want. So what I'm quickly going to do now is I'm just going to make sure on my render view
that that will be there. So to do that, let's actually just bring
everything back now. Just make sure that
the rendered is on. Let's bring back
our ground plane, the bookstore, the subway,
and even the coffee shop. So we're going to
bring back everything. Let's press zero then to go into our camera
view once more. And let's pull it over
to the left hand side, because at the moment it's not quite right as you can see. Let's pull it out a little bit. So something like this
angle looks pretty nice. Then what we'll do
is we'll just put it onto wire frame again. Before I always start my render, I always save up my work and then all I'm going to
do is come over to render and render image
and let's see what we get. So you can see now we've
changed our lighting round. It might be a little bit dark in these areas and there
are ways actually we can fix this without altering
the other light sources. It's called light linking, which will probably go into
a little bit later on. So what I'm looking
for is just to make sure that
everything is right, I'm looking at these tiles. You can see the shadows on here, Probably a little
bit too far down. In other words, my son might
be up a little bit too much. We can also see in here,
is this right as well. So we're going to check those things out
before we finish. But we can see at
the end of the day, this is what we've now got. And it is looking
really, really nice. I mean, it's gonna all come together right at
the end once you've got your actual texture on your floor and
things like that. But you can see already like, okay, this is what it's
really going to look like. All right, so with
all that done now, we can actually close that down. And then what we can
do is we can just remove our camera to view off. And then what we can
do is we can come in and we can hide these
parts out of the way. So all I'm gonna do
is I'm going to hide. I'm going to first of all,
put on an object mode. I think I'm just going to hide everything
out of the way for now except my, my
little guy here. And what I'm gonna do is I'm
just going to press Shift S, cursor selected, sorry, Shift S cursed world Origin
and move my guy over. Now what we're going
to do now is we're going to create the actual van. Now, because it is a
Victorian era van, it's actually not
that difficult to create if we're dealing
with something modern. You know, there are a lot
more smoother services, especially if they're, you know, a supercar or
something like that. And luckily for us, we haven't
actually got to do that. So something like this is
actually quite easy to do. Now what I would like
to do, first of all, as I do with everything, is create some kind of gray box. Because I feel it
gives me a good idea then of actual scale of things. And from there I can
actually work from it. So what I'm going
to do is I'm first of all going to create a cube. I'm going to bring
my cube out then. And what I'm looking to
create, first of all, is kind of the top
of the actual van. So let's move our guide
down to the ground plane and then let's pick this up to where it's
actually going to go. So if we say it's going to be probably this far off the floor, so this is going to
be the bottom where the actual ramp comes across. So something like that has
got to actually stand up. Maybe, maybe, maybe it should
be tiny, tiny bit higher. So something around there,
I think looks good. And then what we're going
to do now is bring it out. So we want to get a
good actual length for this because it is
an actual storage van. And the other thing
is we need to think about the height as well. Now, these are
typically going to be much higher than
the actual person, so I'd say at least probably
around this height. And then we also
have to think about our little guy
stepping into here. So we need to have
him stepping in. So once we've took all
that into account, if I press control
are left click, move it across now, so
move it across to here. And then control our left click. Move it across to here. So
we can see now if I put it like that and bring my guy
there and spin him round, so S D 90, we can see if I go back to
this, then press Tab. Now you can see that's about the right size for him
actually stepping in there. So in other words, the right
size for an actual doorway. If not, we can just
pull it back that little bit more now that
we're kind of dinky as well. If you think about it,
these actual vans. So I'm thinking
something like that. Looks about right. Maybe, maybe pull it out a little bit
more on the back end. So all I'll do is go to face, let grab this back end and just pull it out a little
bit more from there. Then all I want to
do now is work out. If the guy stood on here, you can see that he's jaws gonna be able to fit
his head in there. And the door would be down here, but there would be
something on the bottom. What I'm saying is it probably needs to be a little
bit higher than that. So all I'm going to do is
just grab this top and this top all the way along and just pull it up
slightly like so. And I think then that is
gonna fit pretty nicely. Now from here, let's actually
put on the front engine, So all I'm going to do for that is I'm going to first
of all put the top on. So what I'm going to do is I'm going to grab this top with shift D and then what I'm going to do is just
pick it up slightly, press delete, and let's do
limited dissolve like so. And now what I want
to do is I want to shape it so it's
actually going up. So all I'm going to do is just
bring it out a little bit. So bring it out a little bit, Press E, and then there we go. Let's press L, and then
we'll put that on top. So there we go. We've got
kind of the right scale in for what we actually want. Now let's come in and think
about the front of it. So now we've got this on. We
know that the windscreen is going to be roundabout
up to this point here, so I can press control Er, and just bring it up like so. And then we've got the seats in there and everything else. Now from here,
what I can do is I can actually grab this line. So this one here. And I'm going to make it so it
actually comes up to here. I want it sloping down and
then going to the side. So first of all,
let's fix the slope. So what I'm going to do
is I'm just going to grab this one, press Shift D, and then and Y, and pull it over to how
big I want, the front. So I imagine something like this looks an actual good size. And then all I'm going
to do is I'm going to press control our left click, right click, and put that
in place from there. Then I can actually
bring these down now. So if I bring these down to
roundabout here like so. And then all I want to do now is drop the
whole thing down. Because it's going to be
split into parts anyway, so it doesn't really matter. So let's press and Z and
pull these down into place. So let's line them up properly. If we put a wire frame on, we might be able to see where the art as
we can see there. And then I'll just press
the F B and fill that in. And that's what we
should be left with now. Now let's fill in the front. So Lt shift and click, press the F B, and there we go. This is what we're
left with right now. Now, as I said at the moment, we can see that I need to
pull my guy down again. So this is how tall
it's going to be. You're going to have him
stepping up there and you can see maybe it's
a little bit tall. And that's what
we're doing all of this work for, actually. Now, from here, let's
get on our wheels. And then we can see if it's
going to be a bit tall, which I think it
is to be honest. So what I'll do is
I'll actually create and probably create my
wheels properly on this. So all I'm going to do
is I'm going to bring in a cylinder and what
we'll do is we'll put the cylinder on
something like 26. We want it quite rounded,
so something like that. Let's press Y and 90 then. And then what we'll do now is we'll make it a
little bit smaller, so we need it to fit
the actual wagon. Let's press S and X and
bring it all the way in. So something like
this. And let's put these where they're
actually going to go. So in other words, these need to go right on the ground there. So you can see this is way,
way too big at the moment. I need to make it way smaller. So all I'm going to do is I'm just going to press the bottom. Bring it all the way down and then let's put
it into place. And it's going to be go just before the front of this because we are going
to have some lights there. So let's put it
down to there and let's have a look at that
scaling. So you can see there. That's what it's
going to look like. Now we can see from this, I'm probably going to want
it a little bit bigger. I think it needs to be a little bit bigger
than what it is. So I'm going to
press three again. I'm going to press S,
make it slightly bigger, pull it back a little bit, pull it up a little bit. So, and I think now
that's looking right now, we can see that this
obviously is too high. So what I'm going to do is I'm going to come in to the top. I'm going to press L.
And what I'm going to do is pull it down
and there we go. Now we can see it's getting that shape that we
actually want from there. Then what I'm going
to do is I'm just going to put this
now near the back. So if I press three again, I'm going to press shift D, pull it to the back like so. And we want it roundabout
there. And there we go. All right, so we've
got our actual shape and sizing to everything
that we want on here. And that is actually basically
all we need from there. We can actually create our
actual vintage van from that. All right everyone. So I hope you actually got
the sizing correct. I hope now it's to give you a good idea of how to
actually start this. And from here then we'll actually start
breaking this down into parts like the wheels and the engine and
all that other stuff. And it's up to you really how
far you want to push this, how much detail you
want to give it, because it is just
a prop, honestly, you can get away with very, very little detail on this. All right everyone. So
I hope you enjoyed that and I'll see on the
next one. Thanks a lot. Bye bye.
144. Modeling the Engine Bay of a Vintage Truck: Welcome back everyone to Blender for the Environment
Artists Guide. And this is where we left off. All right, let's start them with the actual engine. So
let's start with that. So what I'll do is I'll use
this that I've already got here and let's actually start shaping it to the
way that I want it. So first of all, I'm going to come in and split
this part off. So I'm going to press Selection and split it off from there. Then what I want to
do is I want to make a hole in here where the
actual wheel is going to go. What I want to do
is I want to take my wheel and then what I want to do is I want to press shift
and D, create another wheel. Press the Born and
bring it in like so. And then what I'm going
to do is I'm going to press and X and pull it
all the way out like so. And then pull it all the
way across into there. And that is where
it's going to go. So that is going to be a big enough gap for where
I want it to be. The only thing is that I
want it to be halfway down, so I don't actually
want it to be there. I want it to come halfway down, which is going to be roundabout if I pull this down
roundabout there, but you can see we do have a problem in that if we
bring it halfway down, where the halfway point is here, this wheel's probably
not going to be big enough to
actually go in there. So let's actually
test that out before we do that. So what
do I mean by that? Well, first of all,
I'm going to just pull it out and I'm going to come in, grab the front of my wheel. In fact, before I do
that, let's duplicate it. So shift, we'll
just duplicate it. And then what I can do with
this one is I can press the eye button and bring this in to roughly where
it's going to be. Then what I can
do is I can press and pull it out and just make sure how far there
is a gap over here. As you can see now I can see
it's not very big at all. So I have a couple
of choices here. What I can do is I can either create this or it's
actually bigger. Or I can press S and's head
and actually pull it up and then it'll fit into place a little bit better like so. So I think something like that, it's probably going to
be a little bit better. And then what I'll
do is I can put that then over the
other side as well. So what I'm going to do is
I'm going to grab this one. I'm going to then press Shift, And I'm going to move it over to round about the
center of this one. So something like this.
Let's press three, so I'm going side view. Just make sure and it's roundabout center with that and then we can move the
wheels into place, so don't worry too
much about it. And finally, now let's come
in to our engine part. Let's press control. All transforms, set origin to geometry,
adding a modifier. And the one we're going to
look for is the bullion. And then we're just going to
click this little part here. Let's put it on
fast just to make sure that it's going to
go through properly. Sometimes if you
have it on exact, you can see there's a
little bit of a difference there and it might mean that it's not actually
going through there. I'm just going to
try on fast first. And if it doesn't work on there, we can come back and
put it on exact. And then what I'm going
to do is press control A. And then finally I can come in, press Delete, And there we go. All right, so that looks good. We can see now the
wheels looking good in there.
Everything's good. So now what I can do is I can just now come into this part, press L, delete vertices, and now pull this
one back into place. All right, so we're ready with the wheel arch on the
front of the engine. So now let's deal with
the top of the engine. So what I'm going to do
is I'm gonna come in, I'm going to grab
the top of here, I'm going to press Shift
S, Custer selected. And then what I'm gonna do
is I'm going to press shift, I'm gonna bring in a cube. I'm gonna make the
cube a little bit smaller and then I'm
going to pull it out, jaws to the front like so,
just so it sticks out. And to be honest, what I was
going for here is a type of Rolls Royce type look
because they did have things like that in that
time. I'm sure they did. I'm sure Rolls Royce is a
very, very old company. So let's pull this
back a little bit, all the way over to here. And then what we'll
do now is we'll press control left click, right click. Grab the top of it. And then what I'm going to do, yeah, I'll just grab the top, press control B, and I'll
pull it down one like so. So I'll get something like that. And then what I'm going to
do now is pull this up. So I'm going to pull it up. So let's pull it up. So then what I'll do is I'll
put another break in here. Control, bring it along
maybe something like that. And then we're going to grab
this one now and pull it up. Just pull it up with a
little arrow like all right, something like that I
think looks pretty good. Now let's think about the
bits on the actual side. So what I'm going to do now is I'll grab both of these sides. So I'm going to grab
this one and this one, and then I'm going
to press control B. I'm just wondering, before that, yeah, this is all split off
at the moment thinking, yes, before that we
will level it off. So I'm going to press control B just to level it off like so. And then what I'm
going to do now is bring in the
Insert in the front. So I'll grab the
front. I'm going to press and bring that in. So then what I'm going to do
is press and pull it back. So now from here I know that I'm going to have a
bumper over here. I'm also going to have
a radiator in here and normally probably would have had a logo on the front of here, but we're not going to
actually do that now. What I'm going to do with this part now is
I'm going to grab both of these and I'm
going to press Shift D. Just to duplicate them, and then, and Y to pull them
out a little bit further. And then what I'll
do is I'll pull it out just in the front of there. So just so I've got actually
something to work with. Now from here, what we're
going to do is split them off. So selection, split them off.
Come in and grab it again. So control or transforms
right click, set, origins, geometry, add in a modifier and we're going to
generate a solidify. Let's bring the solidify
back the other way. This is the offset, So
let's bring the solidify back holding shift button. Let's make it a little
bit smaller like so. So I'm going to bring
it out a little bit further and then I'm going to
bring them back into place. And what I want to do is make sure that they're
covering this part here. Also, what I want to
make sure is that this part is not so stuck out like that because it looks
ridiculous at this point. So let's come in and
grab each of the edges. So that one, let's grab this
one and then pull them back. And that is what I'm looking for right in the corner there. Now we can see that they're
not quite in the corner. So let's actually either bring up the thickness
a little bit more, so let's bring it up, holding
the shift and there we go. Now we're starting to
get exactly what I want. All right, so that's that bit. Now what I'm also going to
do with this is I'm going to come in back to this top bit. I'm going to grab
each of these then. And then what I'm going to
do is we're going to press, and hopefully you can see
the both come in together. I don't want that suppress
the eye button again. And what I want to
do is I want to bring them in more natural, which means probably going to have to reset
all the transforms. So set origin to geometry.
Try that again then. So I'm going to press
again and there we go. You can see the quite coming
in the way that I wanted it, but I think actually
coming in to up to here, that's actually
going to be okay. I'm sure that's
going to be okay. So what I'm going to
do now is I'm going to press I once more. So let's bring them in
very slightly like so. And then what I'm going
to do is I'm going to press Enter an Altern. Let's even bring
them in backwards like that is what I'm looking
for, something like that. Or we can actually go
the other way with it. Alternate. Let's even go the other way and bring
it out very slightly. And you know what, I think
that actually looks better. Yeah, we'll go the outside. Think it looks better
than the inside. And then I'm just looking now at bringing this part out
a little bit as well. This part on here, maybe. Let's give it a try. We'll add a little bit more
complexity to this. If I grab this then and
I just press alternates, let's even bring it out like so. Alterna. Yeah, actually that's
looking pretty good now. The one thing we
need to do is this. So we need to alter
the thickness, So let's bring the thickness
just out a little bit. Alter this now to come back so we have got that
edge on there, maybe a bit more. Look something like that. And then just make sure
that the thickness is coming out to cover that little part there.
All right. There we go. Happy with that. Now
on the front of it, let's actually think about, first of all, this radiator. We'll think about
the radiator now, before we do that, we need
a little part in here. So what I'm going to do is
I'm just going to come in. I was going to actually,
yeah, I still can. I'll grab this
little point here. So I'll press Shift. I'll bring it down to this point here. I'm going to make it a
little bit bigger, like so. And then what I'm going
to do is pull it back. So let's put it back into place, so l pull it all back into place now, just
in front of there. And then all we're going
to do is lift it up. And then what I'll do is
I'll press and X and just pull it out a little bit
and maybe pull it down. Can I get away with put it down. You can see there. Not quite. So I'm just going to
pull it into place. And then and X and
pull it into place. So finally, let's put
an insert in here. So if I press, let's bring it in just under there like so. And then I'll pull it out, pull it out, and there we go. Now from here, then let's put the actual bars on there
on the next lesson. So we're going to get
those bars on there. And then from there
we can actually start working on the
actual bumper here, so this bumper down here. And then we'll just
work our way around. So you can see the
front actually didn't actually take
that long to do. It was relatively easy. And then what we'll do is we'll actually get on with
these wheels as well. All right everyone. So I
hope you enjoyed that. And I'll see on the next one, let's save that our
work and I hope you enjoyed making the car.
It's or the truck. It's a little bit different
to what we've been doing. A little bit of
respite before we move on to that final building. Alright, everyone. Thanks a lot. Cheers.
145. Adding Details to the Vintage Truck Model: Welcome back everyone to Blend for the Environment
Artists Guide. Now let's think about
our actual bumpers. What I'm going to do
is I'm going to come, I might as well actually
come to this part here. I'll press Shift S,
cursor selected. And then what I'll
do is I'll bring in, I'm just wondering whether to do this with this part,
but I don't think so. I think it's going to be easier
just to press Tab Shift. And let's bring in a cube. Let's make the cube a little
bit smaller, S and Y. Let's bring it over here. And I'm thinking because we're
this part go round here, we're certainly better
off working with a plane, I would say What
I'm going to do is just grab the front
of it control and plus on the number
pad delete faces like so. And then what we'll do is
we'll just reset this. So control Al transforms now if I come back now I'm going
to go to the front of it. And then what I'm going to
do, I'm just going to hide this part other way because
it's not very helpful. And then I'm going
to grab this part, I'm going to pull it out so, and y, x, sorry. And you can see
that it's pulling from this position. I
really don't want that. So set origin to geometry
and then S and X, let's pull it out like so. Now from here, let's
actually bring this back nearly to this
actual wheel part. So what I'm going to do, I'm
going to come in like so. And then I'm going to press E, and then pull them
back along the Y axis. So something like this. And now finally I want to actually
bevel off this part. So I'm going to come to
this part, press control. You can see it's not
beveling off properly, so I'm going to reset
all the transforms once more and then I'm going to press control and bevel
it off and round it off. Now obviously we don't
want it like that, we actually need it rounding
off but not too much. So we need it
rounding off like so. So look at that and yeah,
that's about right. While one now I'm still not
sure about how big this is, but at the moment I
think it's a little bit too big, so wide. So let's just press esens air and make it a
little bit smaller. And I think, yeah, that's
going to be about right now. We'll see once we have
these actual bars in here. So let's actually
put those in now. So we've got this in the center. Let's press shift Day, and then we'll bring
in another cube. And then what I'll
do is I'll make this cube a little
bit smaller like so. And we do want this to
be relatively simple, so just remember that
The other thing is I might need to pull
this back a little bit further just
to get those in. But we'll see. We'll see, Let's make it a
little bit smaller. Let's pull it out then just into place where it's going to go so I can pull it out a
little bit more like so. And then what I'm going to do is I'm going to grab the top of it, so grab the top here. And then I'm going to
pull it up into place. And you can see it
disappears in there. All right, so now let's actually be vel off the
front of these parts. So if I grab this part and
this part press control, I'm just going to bevel it off the right click
shade or to smooth. And that's what we
should be left with. Now if I bring it
over to just in front of their life so
I can press control a control shift head control A all transforms right
click origin to geometry. And I'm looking now
to make sure that I'm happy with how that
works and I think I am. So now what we need to do is
we need to, first of all, we'll have to make some of them taller to fit into
places you can see, because this one's come to here. But as they come further up, we need to actually change that. So what I'm going to do is we could just do this with an
array and just make it easy. So generate an array, let's move it over
then, like so. And then what we can do is
just increase the count, like, so going all the
way down to there. Now let's press one so we can go into the front view of it. Let's bring it down one. And now we can see
that this one, how close it is to this one, they look about the actual same. Let's look from
the side then now. So double tap the A
and you know what, I think, actually that's
going to be fine. All right, so now what we
can do is we can come in, we can apply this, so control and then find that we can come in
and just bring these up. So what I'm going to do is I'm just going to come down and I'm hoping that I should be able to just grab all the
tops of these now. All three of them like so. And then just pull
them up into place. Now you can see I'm
going to have to stop with these and
do these separately. So grab these two like
so pull them up into place a little bit
more and there we go. Double tap the eight, there is the front of
your actual truck. Okay. So I'm happy
with that from there. Then what I can do now is
I can come into this part. I can add in a modifier, Generate, and we'll
bring in a solidify. We'll make sure even
thickness is on. And then what we'll do
is we'll pull it out a little bit durable. Tap the, and there we
go. We have our bumper. Let's actually right
click, Shade auto, smooth. Yeah, I think maybe it's
a little bit too thin. Let's bring it out just
a slight bit more. Yeah, that's looking
really nice. Now let's think about
our actual wheel arch. So what I'm going
to do, I'm going to come in to my wheel larch,
so I'll want to grab it. Come in from here. Going
all the way round, all the way down to
this point here. And then what I'm going to
do is I'm just going to press Shift from there. Then I'm just going to pull
it out that little bit, heading up to the actual bumper. And then I'll press and pull
it over, Dosed into there. Something like that. And then
I'm going to split it off. So LP split it off.
Grab it again. Right click, shade, auto, smooth control or transforms
set origin geometry. And I'm sure you've
guessed by now, we're going to actually
be using a solidify. Let's bring the solidify out, let's put it on even thickness. And let's then bring it in like, so making sure
that it fits okay, like, so we don't actually
need this to be that thick. What we need to do though is
make sure that these bits here are a little bit more
rounded off than normal. So let's actually
bring in a bevel, well we're at its,
let's bring in a bevel. And there you go. You can
see, is that too much? Probably. So let's
actually bring in, where is it bring down this? So if we bring it down,
let's bring it up slowly. Then let's actually add in
another segment like so. And I think there
you go, That's what we're actually looking
for, something like that. From there as well,
we can increase the thickness as
well if we want to. So let's bring the thickness
up a little bit more. And I think that actually
is looking perfect now. All right, from there as well, we can write clicks a,
origins three de cursor. And then we can add
in another modifier. Now modifier stack in
really at this point, add in the mirror, put it
over on the other side. And that's looking pretty nice. Okay, so I'm happy with that. Let's now think about the front
of here, these side bits. So let's come in to this side. So if I grab this
side and this side and what we'll do
is we'll just press the eye button just to
bring it in like so. And you can see we've got
some crossover down here, so we just have to be careful of this crossover down here. We just need to actually fix that before
doing anything else. And one we're going
to do is also, I'm going now just hide the
bumper and then come back. So I'm looking at
these crossovers. So what I can do
is I can come in now I can grab this one. And this one I can right click. And what we're going
to do is merge at last, merge at last. And then that's
going to put them all up to there, which
is what we want. And now this one and this one. And just press shift R and
then it'll do the same thing. And then of course,
round the other side, let's come to this one and
this one shift, there we go. And then finally this one and this one shift R,
and there we go. Now from here now I can
actually pull this back. So all I'm going to do
is just grab both of these or pull them out actually. So let's try enter
and then and Y or X, and let's pull them
out a little bit. There we go. That's
looking pretty good. So now we can actually make
a start on our actual wheel. So we will start
them on this lesson. So what I'm going
to do first of all, is I'm going to
come to my wheel. This will be the
outside of the wheel, so the rubber, another word. So we might as well create
these in two stages. So to do that what I'm going to do is I'm
going to come in, I'm going to grab
both sides of it, I'm going to press
the eye button to bring them in like so. And this bit really wants
to be actually quite thin, so something like that. From there then what I'm
going to do is I'm going to press Shift D like so. And then hide those out the way. Hide them out of the
way. And then we can come back to these parts. And then what we can
do is we can right click loop tools and bridge. That is the actual
rubber part from there. Then what we can
do is now we can actually separate this part off. So I'm going to press L on them. Selection, separate it off, grab it again. Control
or transforms. Right click, set
origin to geometry, right click, shade,
auto, smooth. And now finally, let's
bring in and modify it. And we're going to
generate a bevel. And that's exactly
what I'm looking for, near enough if I turn
up the segments. Now that is what
I'm looking for. So it looks like it's actually made of really,
really thin rubber, which is what they
would have been made from in that time
period, from here as well. Because we've done
it in that way, what it means is
we can also come in and let's say we're
not happy with the size. We can press Alt
Shift and click, and then alternates and we
can make it a little bit thinner or a little bit thicker, depending on what
you actually want. All right, that's looking good. So let's press Ltage. Bring back these parts then. And what we can do
now with this part is if I press Altage,
bring it back. I can actually
bring this in now. So if I press S, you can see
I can bring it in like, so. Now what I want to
do first of all is now create the actual wheel. So to do that, what I'm
going to do is I'm going to grab the front
and back of it. I'm going to press
and bring it in. So this is going to be the
main part for the wheels, so we're going to need
it a little bit thicker probably than the other
part that we've done. And then what we're
going to do is right click Loop tools again. Click the bridge,
and there we go. Now from here we can see
that we've got a problem. It's a little bit
too wide for this, so all I'm going to
do is press L and X, Pull it in to place like so. And then what we can do, we
need the thickness down here, We just need it beveled
off on the edges. So let's quickly do
that to level this off. I'm not going to use,
actually we will. We'll give it a try. So
control all transforms, right? Click, set origin
geometry, grab this one. And we're just going
to click control L and copy modifiers like so. And there you go,
that's what you're actually going to be left with. Alright, so that's a
good start then for our actual wheels
on the next lesson. And then I'll show you
how to create, you know, the inner parts of the
wheels on the next lesson, then I'll show you how to create the inner
parts of the wheels. And then from there we
should be able to get these finished and into place. All right everyone
to. I hope you enjoyed that and I'll
see on the next one. Thanks a lot. Bye bye.
146. Modeling Realistic Wheels for Vintage Trucks: Welcome back everyone. To Blend the Ford the Environment
Artists Guide. And it is where we left it off. Now if we come to this part, just hide out our bevel
for the time being. And what I want to do is I
want to bring in an edge loop. So control or left
click? Right click. And then control and
just bring it out. Scroll it down so there's only one bevel on there
and just drop it there. Now if I come in,
turn this back on, you'll see now that we've still got the roundness
of there going in, but we've now actually got the ability to come in and
actually work with these. And that is what
we're looking for. What we want to do now
is we want to come in to probably every other one. In fact, we'll reset
all the transforms, or reset all the transforms. And then what we want
to do is we want to grab every other one. If I grab all of these
going around there, and then I'll come to
select check from there. Then what I want to do is
I want to bring these in. So I to bring them
in and then I also, I want to bring them in as well. On this angle now, we can't actually do that the way that we've
grow at the moment. What we need to do is
we need to put them on individual origins
and we need to put this on normal from there. Then what I can
do is I can press and Y and now you can see that I can actually bring all of these in in the way
that I want it like. So now we've actually got
our spokes pretty much done, ready to work with. Now these spokes might be
a little bit too small, so I'm just going
to press on them all and bring them all
the way out from here. Now what I can do is
I can press E Enter and then alternates and
bring them all in light. So and you can see just how beautiful that
actually looks. Now again, these might
be too thick from you, but you can see as
well because we've got that bevel on and we
did them all together. Just how nice it looks When you actually look
at these parts here. It looks like it's actually, you know, made of steel. So what we'll do now
is, first of all, we'll come in and I'm thinking we'll probably grab
all of them going around, so Alt shift click because
I'm going to make them a little bit thinner because I'm not happy with
the thickness. I feel like they're a
little bit too thick. So just grab them all alternates and now you should be able to make them thick or thicker
to your heart's desire. So I'm thinking
something like that for me looks much, much better. Now also think about
as well that these generally they came out a little bit or you know, like this way. So they came out
from this end here. I don't think we're
going to do that, but it might be something
that you actually want to do. All right. So these
are actually done now. Now, while I've got them grabbed all the way around the outside, I might as well see if I can be level them and see
what that looks like. So I'm gonna press control B and just level them off like so. And there we go. Now
I'm thinking that from there I might as well then press alternates and pull them
out a little bit more. Now let's have a look where
I've actually got there. Let's write, click and
shade, auto, smooth. Yeah, I'm happy with
how those looks. I'm even happy with how
this looks down here. And I'm just going to have
a look at the mesh now. Yeah, I'm going to
leave them like that. I'm happy with how they look. All right, from here
then let's press Shift S Ursa selected. Let's now bring in the
main part of the wheel, so you know the thing that
holds everything together. So what I'm going to do is
I'm going to press shift, I'm going to bring
in another cylinder and this time I'll put it on 20. We don't need it quite
so high on these parts. And then what I'll do
is I'll make it much smaller so and then
spin it round. Let's put it back on global. We're not going to need
it on normal anymore. Let's spin it round
then. So Y 90. Let's then get it into place. So first of all, press S and X, Let's put it into place. So something like this
is going to be the drum, maybe that's a little
bit too thick, so S and X, let's put
it in even further. So now let's think about
the outside of these. All I'm going to
do first of all, is I'm going to grab
the outside of it. And then I'm going to
press I to bring it in. And then what I'm going
to do is press E, And then just to make
it that nice slope. And then I to bring it into like that and then
bring it back. And then I to bring it
in. I to bring it in. And then finally
we'll pull it out, pull it out roundabout two here. And then what we'll do
finally is we'll bring this in and then bring it in. Now we just need one
more bevel on here, so all I'm going to
do is press control. Bring in one more bevel
just for this outer edge. And then Alt shifting. Click going all the way around. Enter alternS, pull it out
very slowly, like offset. Even on there we go. Now let's right click Shade. Auto, Smooth. And
that is what you should be left with. No. Let's actually join it
with this part here. So if I join it with
this press control J, you can see how it
gets leveled off automatically and now finally
we're onto the inside. So the inside probably, we can probably do it from here. Now what I tend to do with this is I will do it to
the halfway point, because then I'll
start mirroring this over the other side. So before that I might as well
mirror it over there now. It will make things easier. So all I'm going to do
is just drop that up. And I'm going to put my
cursor right in the center, so I know this is the center
shift as cursor selected, grab this one add modifier and we're going
to generate a mirror. And we need it to
come from this point. So right click, set
origin 23d, cursor. And there we go. Now we can see this part and this
part aren't the same. So all I'm going to do
now is grab this one, grab this one, Press control L, and we're going to
copy modifiers. And from this one then I'm
going to write click and set origin to three
decursor. There we go. All right, now one
thing we've not got is we need to actually
come into both of these parts. I'm going to grab this
one and this one, we can see that we're miles
away from the actual truck. And that's not what we want. So I'm going to news press tab. I'm going to then press
A to grab everything. And then I'm going to move them in like so. And there we go. That is the first stage
of our actual truck. And I think that
looks pretty nice. Maybe it's a little
bit too small. We have to allow for some sort of turning on here as well. We have to actually
think about that. Maybe something like
that will be yeah, enough That would that
be enough for turning? I'm not actually sure. Not sure if that would maybe
a little bit more. Maybe you had it right before,
so something like that. I think I think the back wheels though would certainly follow. So they can be in, you
know, a lot further in, but these ones on the outside, maybe they need to come out. I'm going to leave
them like that. I think that's say enough,
they might bang it on here depending on how the turn,
but I think this is fine. All right. Now let's come
into the inside then. So what I'm going to do
with the inside is I'm going to press and bring it in. And then what I'm
going to do is press and I'm going to pull
it all the way over. And what I want to do is I
want these to clip at the end. So if I come in, make sure clipping is on and
then I can just pull them over and join them together like so from there then let's
add in an edge loop. So control, bring
it over to here, so this one should
be able to be seen, you should be able
to see one there. And then the next one is going
to be on the inside here. So control bring
in the next one. And then from there, let's
come to this one first. So we're going to
come to this one, control pull it out. So let's come to this one then. Control, pull it out like so. Then what we'll do is
one more part now. So I'm going to
press controller. We bring in this part and
we'll bring it up to there. Something like that. All right, let's come to this part first. So Alt Shift and click, and then we'll press Enter Alts, and pull it out a
little bit like so, making sure that
offset even is on. Let's have a look at
what that looks like. And that's looking pretty good. Now let's come to this one. So we're going to press OlS. Bring this one out thicker than the other
one, so like that. And then offset even on again. And then finally
this bottom one, Alt Shift and click. And then we're going
to press this alternS. We're going to pull this one out further than that last one. We're also as well going
to pull these parts down. If I come in, grab this
part, grab this part, I'm going to pull them
down very slightly, like a nice looking, kind of realistic. From there. Then we just want to press shift H just to hide everything
else out of the way. Because what I'm
going to do is I'm going to come to the top now. So these top parts probably going all the way
over to this one here. This might go down a little bit. Yeah, actually that's fine. And then what we're
going to do is we're just going to press, pull them up and then and Z, just to straighten them out
like so. And there we go. If I press ol tag now you can see that if you're
taking an image from here, you can see it looks as though it's quite mechanical
under there, for one thing, and
everything's joined up. So that's what we're
actually looking for now. We can see at the moment we've got a big split down there. We'll saw that out in the end. It's just because
we've got a bevel on there and obviously
where the clipping is, you can see where
this clipping is. You can see where the Merge
button is. We could merge it. Can we merge it? There we go. We'll merge it a little
bit closer like so. And now we shouldn't get
that actual clipping there. All right, so that's that bit. The actual wheels now
are pretty much done. So what I can do is I just
want to make sure that they're going into my actual
place where I need them. And now finally what I'll do is I'll come to this back part. Did I actually do the Boolean? Let's pull it down. No, I didn't. So let's
press control z. And then what we'll
do is we'll come to this bit control
lot, all transforms. Right. Click agent geometry, add in a Boolean and the
Boolean is going to be this. Let's put it on fast and
let's press control like so. Now, before moving this, let's just grab this wheel. We've got all of these
wheels not joined. We've got all of this. And
then we've got this part here. Both of these are in the center. At the moment, what
I'm going to do, instead of just messing
around with them, I'm just going to press shift D. And then what I'll
do is I'll bring them over and we can see that they
are going to be the right. If I press three or
in the right place, I can see here where
this is pouring down. Needs to come over a
little bit more over here. Let's delete this out the way. Now delete this out the way. Then what I'm looking for is to delete this out
the way as well. And there you go.
That is looking good. It's in place. Now one thing I know is
I need to pull these in. So on the next list, and then we'll do make this
one a little bit different. We'll pull them all actually in together so we
can pull all of this down in together and make them a little bit
thinner in comparison to the. All right everyone. So I
hope you enjoyed that. And it's really, really
starting to come along now. And I'll see you on the next
one. Thanks a lot. Bye bye.
147. Creating the Interior of a Vintage Truck in Blender: Welcome back everyone
to the blender for the Environment
Artists Guide. And here we are. So welcome back everyone to blender for the
Environment Artists Guide. And this is where we left off. That sounds a little bit
better, I think. All right. So I was just checking
that out and that's why I got a little bit confused. All right, so let's
come in and what we'll do is we'll grab
this one and this one. And then we're just going
to press on everything. And I should now be
able to pull them all in without any
problems whatsoever. So I want to pull them all in
because these basically are going to follow these
wheels so we can get away. Maybe not that
close, but a little bit closer than these wheels. Here, let's press
tab, double tap the, and there we go, a thing
that's looking pretty good. Okay, from there then we can
come in and grab these two. And then what I can
do is I can go over the top and I can
press Shift D and I can bring these over into kind of the
halfway place like so. And let's see if they're being
completely covered then. So we can see now that's
all being covered, that's looking
pretty good as well. And then from there
then what we can do is probably now work
on this part here. I would soon work on this part here before we do this wheel large because I think once we've got the main kind
of cockpit in there, it's going to be
easier to work with. Now, before I do that though, let me actually
think about rounding this top off because I'm
not happy with how this is. So let's come in. Let's
first of all split this off. So LP Selection, split
it off, let's grab it. Then control or transform. Right click, orogen geometry, and then I'm just going
to grab these sides. I'm going to press control B. And then what I'm going to do
is bring them up like soap. All right? So that's that bit. We don't need
anything on the back. You might have some,
you know, red stop, you know, lights or something
like that on the back. We also have to put the
lights on the front. I hope I don't forget that What I'm going to
do is grab this. Then I'm going to press, I bring it in like so. And then bring it back like so. Alright, let's
write click shade, auto, smooth and that's what
we should be left with. Okay, so now we've got
our little tiny window here that's going to be here.
Coming down to this part. So let's think now about
creating the actual cockpit. So what I'm going to do
to do that is I'm going to basically take
probably all of this, so all of this part here. So I'm going to come in,
I'm going to press Alt, shift click, old shift click. And then what I want
to do now is make sure that this all the way down, so all the way down to the bottom of here is
actually selected. So if I come in now, I'm
just actually thinking, you know what, We'll just press shift H, it's going
to be easier. Then I'll grab these parts. Control plus, control plus. And there we go.
Now we can press P and separate them
off from there. Then let's hide this
part out of the way. So H to hide it. And
then what I'm going to do is just put a front
in here like so. So let's put this on here with, and then this on here with,
and fill all that in. So we should end up with a nice nice block
like so now we're going to build around
this block because obviously we want
an inside on here. So we're going to
use this block to actually build the parts
that we actually need. So first of all, let's think
about the front of here. So I'm going to press control. Bring it up to where I want it. So something like that. And
then you can see that this is going to be the size
of the actual window. So let's actually do that now. So what I'm going to
do is I'm going to press, grab this part. I'm going to press Shift D, so I'm going to bring it out. And then what I'm going
to do is I'm going to bring in another bevel, so control left
click, right click. First of all, the
edge loop control B, and let's bring it out
and turn it down like so. And then from there we can actually bring this
part down now. So if I grab this
one and this one, I can actually start
bringing it down like so. And then grab this
one and this one. Control shift and
B, and we're just going to be vel it
off just to make it a little bit rounder like so now what we want
is the next part, which is going to
be this part here. So let's do this part a
little bit different. I'm going to pull
this part out because this is where it actually
starts from, as you can see. So I'm going to press
shift D, pull it out. And then what I'm
going to do is I need now a bar on the bottom control. Bring this down like so. And from there then I
can press, pull it out. Now what I can do is
I can actually create this band going up here. Now to do that, I'm going
to split this part off, Y. Split it off control, left click, right click. Let's go to the front view so we can see what we're doing. So we really want it to come round about here that it
needs to be relatively thin. Control B, let's
pull it out all the way over to here like so. And then what I'll
do is I'll come in now and grab this corner. And this corner
I'm going to press control shift and B
and bevel those off, increase the bevel, so
it's nice and round. Maybe not that much, maybe
something like there. Left click. And there
we go from here. Then I can actually get
rid of this part now. So delete faces. All right, so we're
left with this. So now let's come in
and grab this part. And we're going to
extrude it out now. So extrude it out, and
then we're going to grab this part with L and L. So I'll grab this part,
and then we're going to extrude this part out like so. And there we go. And then
we'll bring this part over. So now I have to press L
bring this part over and just slot it over the top of
that one or behind it, whichever way you want to go. I think actually looks
better over the top, so I'm just going
to press S and Y, pull it out a little
bit and then just put it over the top like so. Okay, so that's the
actual window dump. Now we need the
actual arch that's going to come over this part. So we need something that's going to be the
actual door opening. So first of all, if I come in now and just grab this part, I'm going to press delete. In fact, just this part
actually delete and faces. And now what I can do is I
can put all these together, so not that one. L, L, L and L press P selection, so we should end
up with that now. And then what we're
going to do is control or transforms right clicks the origin to geometry and then just pull
it back into place. So that is the main part of
my actual window done now. Now let's think about this arch that's actually
going to come up here. So what I'm going to
do is I'm going to come first of all to this part. And I'm going to
use this part here, so this part heading
all the way down here. And then I can mirror
it over the other side. So first of all, let's actually shape this the
way that I want it. So I'm just going to press Y, and then from there I can
actually pull it out. We can see that it's
going to have to go a little bit
further this way. So I'm going to
bring both of these. I'm going to bring
them out like, so I'm just wondering
if I should pull it all out or
something like that. I think, you know what, I'll
pull them all out first. So let's bring them
all out first. And then what I'll do is
I'll pull this bit out now. So pull it out a little bit, follow in the Y like so. And then I'll just come in and bevel this bit off if I come in control shift B and just be level it off
just a little bit, just to make it that a
little bit more rounded, we can pull it in
or pull it out. I'm going to give it just two left click as
you can see here. Two, and then we need
the top of here. Now, now this part definitely needs to be rounded
from here, though. I'm going to actually pull it out so I can actually
see what I'm doing. So I'm going to pull it out
so I can see what I'm doing. Then what I'll do is now we'll pull it this way a little bit, make it a little bit
thicker, So this way. And now I'm going to
grab the top of it. I'm going to press,
pull it over on the Y. And I'm going to pull
it over to here. Because we're going to have
another part in here as well. We're also going to have a
door on here as we know. So we're going to
have to pull this bit out in a minute as well. Now from here I do want to
though, bevel this bit off, in other words,
give it the kind of illusion that it's
coming down into there. So what I'm going to do is
pull it back a little bit, and then I'm going to
press and Y, pull it over. And then and Z, and pull it down and
Z, pull it down. Now from here, then what I want to do is come into this part, control shift and B, and
that's what I'm talking about, that nice bevel then on there. But I'm going to do them
both at the same time. So this one and this
one. Control shift and B and bevel them off just to
get that roundness on there. All right. So this pretty much now is the main part
of the door done. So what I'm going to do now
with this is I'm going, I'm thinking, I'm thinking that I could probably
split this off. I'm just wondering
where to split it. I think I need to split
it here, actually, If I press three and then what I'll do is
I'll come in with K, grab this one, press the button, go across to here and enter. And there we go from there. Then I can just grab
this one that I've just created, right click mark. And now what I can
do is I can come in with L and pull this out. So if I press now, I can pull that out to
where I want it to be. And then what I can do now is
I can come to this part L, and then pull it out,
not quite as far. So you can see now,
not quite as far, and you can see that it's
looking quite beautiful. Okay, so we've got that. Now we need to think about
this part down here. So we can come in now and
we can grab this part. This part, we can even
grab the top part. And on this side as well. So come down all
of this part here, press Delete and Faces, and we should be left
with something like this. And from there then, now we have to split all of this off. So L and L and, and selection, and
then grab it again. So control all transforms. Right. Click, set
origin geometry. Now let's put this
bit back in place. Now we can see it's
not wide enough. I need to make it
much wider so and x, Let's put it all out
together like so. We can also see that it's not quite enough
in front of this one, it's not quite enough in front. I could pull all of this
forward a little bit, which is I think
that's what I'll do. Come in, I'll grab
all of this going all the way down so you can see
all the way down to there. And then I should be able
to pull all of this out. Now you can see
it's pulling it out from the back and I
don't really want that, so I'm just going to
take that one off. And then I should be able
to pull it all the way out. And I'm just wondering if because I don't want
to, you can see that. I don't really want to
pull this part out. So somewhere in there it's actually touching this part underneath and I
don't want that. So what're going
to do is come in and you can see that's
the issue there. So I'm going to turn both of those off, like I've done now. Turn that off and now
you'll see when to pull it. Hopefully it should
pull it all out like, so that is much better. Okay, so now just make
sure that it's in front. Now you can see that we
do have another problem in that the inside of
here is not filled in. Let's actually think about
filling that in first. I think I've gone a
little bit too far, to be honest with
this, so I'm going to pull it back a little bit. And that looks about right now. Let's tidy this up. Now what I'll do
is I'll just press Shift H, Hide everything else. And then let's just
fill this in before we carry on Alt Shift and click, let's press Alt NF. And then that should fill
all of that in like so. And then right click and shade. Auto, smooth Lth, bring back
everything. Double tap the. And you can see now just how clearly that actually looks
and how far we've come. Now you can see that we do
have one problem in here in that this part is all the way up here and this
parts on top of here. So we didn't really
account for that. So I'm going to
have to, I'm just going to look actually at
my guy by press three. Pull him and stand him up. Yeah, I'm going to
have to actually pull this down a little bit just
to make sure everything fits, but we can see how
nice it actually looks and how it's really
starting to come together. And more importantly, how we
actually put it together. How we actually created all these parts.
All right everyone. So on the next less, and
then what we should be able to do is we'll
bring this bit down. We've got a window in here. Then we'll put the
outside on here. We'll bring in our door. So we'll have a door
in here and a handle. And from there then
we should be able to start with the
back of the Wagner. I think we'll do
the inside last, actually. All right, everyone. So I hope you enjoyed that
and I'll see on the next one. Thanks a lot. Bye bye.
148. Modeling Vintage Truck Wheel Arches with Precision: Welcome back if you
want to Blender for the Environment
Artists Guide. And this is where we left off. All right, so now
let's come in and try and try and bring
all of these down. I think the easiest way
actually to do this, I'll show you a little
trick that we can do. We can grab everything
and what we'll do is we'll come in mesh bisect. And we're just going
to bis this part off here, so roundabout here. So let's pull it down, make sure it's on zero to make
sure all of these are out. That one they could
see wasn't quite zero. And then what we'll do is we'll clear the inner,
so take that off. And finally then what we
can do now is we can write, click and mark a seam from here. Then we can actually come press the El button and it should grab it going all the way over. And now we can simply pull it down to where we
actually want it, which is round about there. Let's have a look at that
then. And there we go. That's pretty much what
we're looking for. All right, so now let's first of all bring out this part here. So this part that's
going to be in here. So the way I'm going
to do that is I could, I think I'll come with this bit. So I'm just going to
grab the bottom up here. I'll press shift deep. And then what do is I'll make
this a little bit bigger, so make it a little
bit bigger, like so. And then we'll do
is I'll pull it down so it's been made
a little bit bigger. Let's move our guy just to the side just so I can
see what I'm doing. And then come back to
it and then wd is, I'll pull this down all the way, going down to here like so
just into the floor because that's going to be covered up by this arch that's going
to go over there anyway. And then what we want to do
now is we want to bring it out so it's a little bit
thicker on this side. So in other words, we
could use this bit here. So I will use this
bit here actually. So shift D just to duplicate it. And then I'm going to press
and X to pull it out. And then what I'm going to do
is pull it back into place like so just run about the
edge of there and then press, pull it back finally. Then grab the top of it.
And all I'm going to do is pull that
into place like so. And there we go. That's
that bit of the. And now we need to think
about the bottom part then. So the actual window is going
to be open all the time. It's only going to have
a front window on. I don't think we would
have bothered with side windows or
anything like that. So what we need now is a door. So how big is the door going to come and where is it
going to come up to? Exactly? Now, the bottom of the door is actually going
to be a little stand, so let's say the door
probably needs to come here. So let's first of all
make a filler for this. We'll use, I think
we'll use a plane, so let's bring in a plane. So what I'll do is I'll grab
this one and this one I'll press Shift S to Selected. And then I'll press tab
shift D. Bring in a plane, make it a little bit smaller, and then rotate it round Y, 90, press three, so I'm
going to side view. Let's make it the
right size then. So we're going to bring it up to round about here, I would say. And then let's pull it down. So we're going to pull it
down to round about here. And then I'd say from here
it's going to be where the step is going to be
from the next part down. So all I'll do is press eat
and zed and pull it down. And what that means is then
I can just split this off. So I'm just going
to split this off with Y and then pull
it out just to there. And from there then I can
put my actual step on. Now let's finish the door, so we know that we've
got you the right size. I just want to make
it a little bit rounded on these top parts. So if I grab this
one and this one, press control shift B, and that's what
I'm talking about, a little bit more
rounded on the tops. So now from there I can
actually pull this out, so I'm going to grab it with L. I'm going to press,
pull it out there. Not quite stretching past there, so a little bit in like so. But I will come to
the other side, so this side and here. And pull it in to make it look a little bit thicker
because at the moment it doesn't look thick enough. Let's bring it in a little
bit thicker like so. And there we go. Okay, so now let's think about
starting the band. That's going to go around here, and then we can actually
mirror it over the other side. Now to do that, we're going
to bring in our Boolean. If I bring in my Boolean, we can see we've
got it down here. This part ready. So if I press
Shift, it's not a Boolean, but you know what I mean,
It's the actual curve that we actually
got set up ready. If I press now 90 just to spin it round and then what I'll do is I'll move it into one. Do we have one that
says scene assets? I think we'll call this a
new one and we'll call it car, Not like that. We'll take off caps lock car. So then what I'll do is I'll hide this bullion
out of the way. I'll press three then
to go in side view. And then what I'm
going to do is get this into play. We
want it come in. All the way over
the actual wheels. Over both of the wheels. Now I find just to
bring it down to here. First, let's work with the
thickness first of all, and you can see this
thickness that I'm working with is the
other thickness. So in other words, this thickness is
working with this one. So let's get it the right size. First of all, let's go to where
the actual resolution is. And we'll put that on something like six for the time being. Then what we'll do
is we'll turn down the extrude to get it the
thickness that we want. Something, it doesn't want to be very, very
thick by the way. Just something relatively
thick. It'd be too heavy. So it wants to be able to support someone's weight
but not be too thick. So let's put it round
about there for now. And then what we'll do is
we'll just put it down to here and we'll
get it into place. So it's jaws gonna come into
place like so over here, right into the side of the car. Now let's bring it over. So what I'm going to do now is I'm going to press three again. I'm going to move my guy out the way and then
come back to it. And then what I'm going
to do is press Tab. And now I'm going to press
and start pulling it out. Now we want it to go
up and over there, but we don't want it to start
until round about here. So I'm going to press Y just to lock it into place
along that axis. And then, and now I can start actually developing
it going around here. So very slowly you might want to do this
just going around, fall in the wheel round. So pressing, let's
come a bit over, let's press and we can
move this of course, if we're not happy
with our works. And then, and then, and maybe like so. All right, so far so good. Now let's work on this part. This one's going to be
a little bit steeper. It's going to come from
here. So we're going to go, and you can see
now the steepness of what we've got to do here. Let's go round round
and round and round, and we're going to come
all the way over and down. Now, not too happy
about this one, so all I'm going to do is pull
this one out a little bit just to make it on the front of there. Now
I'm going to press Tab. And I'm going to have a look
at what that looks like. I also, I won't be able to shade smooth
or anything like that, but what I'm looking
for is just to see how smooth that actually is, you can see here, this one here isn't as
smooth as I'd like. Let's come in and let's
delete this one first. So delete t. Now you can see that's
actually smoothed out. Let's have another look at
that then. There we go. Now we can see on
the front of it, we do have an issue in that these aren't covering the wheel. Let's come in and
grab the front of it. In fact, we'll grab the
side of it, this one here. And then what I'll do is I'll
just put this on to smooth. Finally, then what
I'm going to do is I'm just going to
press alternates. That's not working.
Let's see if I can actually do that. Alters? Yeah, it's not actually
pulling it the right way. I don't want that, which
means I'm going to actually apply this before
actually trying that again. I'm just going to look to make sure I'm happy with
the rest of it. I think I am and I'm going to shape it
actually after this. Let's first of all
make sure there's plenty of edge loops on there. Just make sure
it's not too high, so you might be able
to get away with five. I wouldn't go lower than
that, to be honest. And from here then
let's shape this out. Let's come in to object,
convert to mesh. And then what we'll
do now is come into this part, this part here. We'll start stretching
it out here. So what I'm going to
do is I'm going to come to the front of
here, old shift click. I'm going to pull it back. Then all the way to
the top of this wheel, So all the way to
the top of there. And then what I'm going to
do is I'm going to press and X and start pulling it out. And now you can see that some of it it is going into
the side of there, which we don't actually
want. There we go. Now we can see
that's looking much, much nicer than
what it was before. Is it too wide though?
Is it too wide? That's the question. I'm happy with how
that's coming over. I just feel it's a little bit
too wide, Just on the end. Let's come in, we'll
press and Y and X, Bring it back just a slight bit. Pull it in, I think, actually, if I write
Plc shade or to smooth. Yeah, that's looking
pretty good. One thing I would say
is on the top of here, let's actually bring
some of these in. Let's make just a
top part on here. All I'm going to do is just
grab these, grab them. Going all the way over
to maybe this one here. And then I'll press
is the eye button. I don't want to bring them all in like that,
That's a bit silly. So let's press eye
and bring them in. Also, you can see that we've got breaking on here as well, which we don't really want. I'm just wondering if instead of doing that I just
press shift D. That will be easier then because I've
just duplicated it now. Just turn off your
proportion editing and x. Let's bring it in. And there
we go. That is what I want. And then enter alternS, bring it out like so. All right. Yeah, I think
that's looking better now. It's broken it up a little bit and that's what I'm
actually looking for. Okay, so we've got that bit now let's think about
this bottom bit. So this is where the door was, where we actually
left it, I think. Then what we'll do
on the next lesson is we'll start
work on this part. So we'll start bringing
this door out. Then what we should
do is we should get it mirrored over
to the other side. And then finally, we can
actually start work on this side part
coming down to here. And I'm thinking, actually
this is looking pretty good. And the back door, of course, will start on the
back door as well. All right. Yeah, I think
I'm happy with that. It is looking pretty nice. So it's looking better than I thought it would turn
out actually, this one. All right, everyone.
So I'll save out my work and I'll see you on the next one. Thanks a lot. Bye bye.
149. Finalizing the Sides of the Vintage Truck: Welcome back everyone to Blender for the Environment
Artists Guide. The thing is I know it's taking a lot longer to
actually create these. We could probably have created it much, much
quicker actually. But I want to get it right and I want it to look right and give you all of the process of actually creating something, how to add detail, how to go for all of the
different things. So I think it's well
worth the time. You know, it's a
very long course, but to learn something,
you've got to keep doing it over
and over again. That's the only way really
you're going to learn. You know, we do get some
people that say, oh, the course is taken too
long and things like that. But I feel like, you
know, blending is a very, very complex program and
it's better to spend your time in a course
learning everything, really to build something out. And then at the end,
you're going to have a lot more skills, I think, rather than just taking a
bit from here and here, and then trying to kind of
mingle them all together. So that's the thought
process behind this. So I hope you guys
are happy with that. All right, so with this bit
then let's press shift deep. And then what I'll do
is I'll pull it out, I'll make it a
little bit smaller. I'm going to pull it
out a bit more like so. And then what I'm going to
do is level off these edges. So I'm just going to grab
these edges. Press control B. So bring in a few
more edges like so. And then what I'm going to do is probably make this a
little bit thinner. So L, S, and's Edd. Let's make it a little
bit thinner and then let's pull it into
place like so. So that's kind of a
step, I'm thinking. Yeah, actually I'll pull
it out a little bit more. So S and next let's pull it
out a little bit more like. So finally I want
one more part then, So I'm going to right click on this first shade,
all too smooth. I want one more part
on this part here. So all I'm going to do, I'm going to come
to the bottom of here, this part on here. Then I need to think
about as well, the bottom of here, which we can sort out as we move along. I'm just going to put a metal
part going around there. I think just to tide
it all together, what I'll first of
all do though is press shift S first to
selected, shift eight. Let's bring in a cube. Let's also bring it up a little
bit, something like that. Let's then bring it
in, it's just in here. Then from there,
let's think about bringing it up a little
bit from the bottom. And then finally
let's bring it out. So we're going to bring it
out all the way over to here. Now I'm going to do is
bevel off the top first. So I'll press control.
Bevel off the top. And that actually is
looking very nice. I'm happy with how
that pebble came in. And then finally just
bevel off the bottom. Very slightly like, so it
all kind of fits together. Right click, shade,
auto, smooth. And there we go. That is exactly what
I'm looking for now. It all looks like it's
fitting in place. One thing, it's the door. Let's have a look
where the door, the door, as you can see,
it's just below there. So the door still
would be able to open. Now let's just give it
a very simple handle. We'll bring in actually
another cube, shift A, bring in a cube, bring it
up, let's make it thinner. And let's make it
thinner on this way and x pull it out so
it's the right size. If you need to
bring your guy over and make sure that the
handles big enough. But I feel like this, it's
pretty much the right size. What I'm going to do
is just pull it out and I want to bevel
this on the inside. Now if I can press control
left click, right click. And then what I'll do is
I'll bring this part in. Let's come in, bring it in, then Do is press control, make it a bit rounded. And then let's come
to the edges of here, the long do control
B, round them off. Now I'm not happy with
how that rounds off, so I'm just going
to press control A all transforms and then
let's try that again. And there we go, that's
beveling off much nicer. And I feel like all I need to do now is just
bring out these parts. So if I just grab this
part on this part, press the Bo, I should be
able to bring them out. I'm not happy with them coming, actually in that direction. So let's just go back a minute and this time when we press, so I'll just grab them both. We'll press X this time just
to make sure they're going to around the right
axis like so. And let's put that
into place like so. And it's a nice door
handles, you can see. Let's write cl and
shade auto, smooth. Let's bring them over them. Just make sure that that handle, it's probably a little bit
too big as you can see. A little bit too
big. Let's make it a little bit smaller.
And there we go. That's probably going to
be more like the size. There we go. Double
tap the Yeah, that looks absolutely
fine. Okay. So we've got that done,
we've got that done. Let's mirror them over
now to the other side. If I grab all of this, first of all, let's make sure I've got my mirror
in the center. So if I grab this one
shift, cursor to selected. So where is it
cursor to selected? I also want to make
sure, you know, all of these parts
have got Well, this part hasn't this part
has it got bevel Yeah. These have been
leveled off. I'm just looking at this part,
this got solidify. I'm just looking at what parts. I don't think really any of
it has been be veled off. So we'll do that as
well at the same time. So let's come to
this part first. We've got our cursing
out in the center. That's great. So add, modify it, generate a bevel, now you can see that's coming
in really, really nice. Let's put it on. No
point n n three though. Let's see what that looks like. Barely any change which
sometimes happens. I think it looks nice anyway, so we can hide that
out of the way. Now let's come to these parts. Now, these parts are
already beveled. We don't need to be
vel those again, so we can hide those out the way this part then we can
actually come in, we can apply that
solidify because that's done adding the
modifier and the bevel, put it on naught 0.3
and there we go. We can hide those out the way. Now let's come to this part. We've got a bevel on here, we've got a mirror
modifier on here. So what we can do is
we can come in and, yeah, we can actually
probably apply that, but for now we don't
need to do that. So we'll just hide
those out of the way. Now we'll come to this solidify, a bevel and a
mirror, that's fine. And a bevel and a mirror,
and that's also fine. Let's come to this
part. We've got a solidify on, let's apply that. Let's add in then a bevel, let's put it on naught
point, naught three. And then let's hide
the other way. Then we'll come
to this part now. So at the moment we haven't got anything on there,
let's come in then. This is the first one that's going to have to be
mirrored as well. So we're going to
press control or transforms right
clicks at origin 23, Cursor, add in a
point naught three. And let's then come in
and add in a mirror. So add in a mirror like
so. And there we go. Now what we'll do is we'll
work on this part as well, because all these are
going to be the same. So I can grab this,
I can grab this. And what I can do is I can press control L copy modifiers, then grab this one again. Right clicks a origin three de cursor and there
we go. That is all done. Now from there then
what we can do is we can hide this
part out the way. Hide it out the way. And
then what we're going to do is work on the door again. Right click, origin three, cursor, grab this part
that we've already done. And then press control
and L copy modifiers. Why is that doing that?
Let's have a look. I think with this
one we need to reset to control L all transforms. There we go, right
clicks origin to three. Cursor, there we go,
there's our door. Now you can come in, hide
this part because we know on here we got
our bevels on here. Yes, I don't think
this one either. The bevel, as you can see
it is not really there. So let's press control then. Right clicks the
origin three cursor and let's come in with this
one with just this one. And we'll come in and
where the bevel is, we'll just make
sure that geometry clamp overlap is turned off. And then there you go, That's exactly what we want. Then we can hide
it out of the way. Now let's come to
this. We know this has already got on, so that's good. I'm looking at the Bottm,
everything's in place. We need the handle adding on. Let's add the handle
to this control J. There we go. And now the
handles on that side. Now finally we've just
got this bit here, this bit, and the top. What I'll do is I don't need a mirror on here or anything, so I can hide this
one out the way. Then I can come back to this. And all I need to
do with this is press control or
transforms right clicks, the origins three cursor, adding a modifier
and we'll generate a bevel again with this one. As you can see, not really
generating a bevel. Let's turn this to not 0.3 turn the clamp
overlap and there we go. That's the bevel on there.
Hide it out of the way. Now we're onto the top part. Control transforms right clicks the origin to three de
cursor adding and modify it, generate a bevel, let's turn
it down to 0.3 like so. That is looking pretty good now. We've done everything on here, Everything else has been done. So what I want to do is I'm going to press ol
tag at this point, and I'm going to grab
just this part here. Press H and we
should be left with everything that we've actually just done all the parts for. You can see here as well.
We've got to make sure that this has an inside on there. So we'll sort that out. So there's a little
bit more to go. But for now what I'm going to do is I'm just going
to grab it all. I'm going to press M and we're going to put it
into car like so. All right, let's press al tag.
Bring back the other part. And now what we can do is we can actually start work
on this other part. Let's first of all work
on this part of here. What I'll do is I'll
come into this part. We can see we've got
a part down here, but I'll want that drop
in much, much lower down. So what I'm going to do
is out shift and click. Bring this down just
to the top of there. Then what I'm going to do
now is I'm going to come in, grab this part, and this part, and I'm going to
press the eye button. Let's bring it in. Bring
it in, bring it in. And you can see it's a long way off of bringing it
in at this point. I'm going to bring it
into this point here. And then what I'm going to do is press three just to go in side view and Y and bring it in. Line these up so you can see
going this way and this way. Then essens, line
them up this way, then I can pull it down. Now es ands even more.
Let's line them up. And there we go. That's
what I'm looking for. All right, let's press control. And what we'll do is we'll
just level this off slightly, bring it all the way down. And I just want
something like this. Now what we'll do on
the next one is we'll actually get this
straightened up. As you can see at the moment, it's not really very straight. We'll get all that
straightened up and this then will
be pulled out and ready for our poster is going
to be put in that side. Now what I'm hoping for is the other side has
already been done. So I just need to make sure
that I'm doing both sides at the same time or I could mirror it over
to the other side. Let's come up and save our work. And I'll see on the next. And everyone, thanks
a lot. Bye bye.
150. Crafting Detailed Back Doors for a Vintage Truck: Welcome everyone. Blender for the Environment Artists Guide. And this is where we left off. All right. Now let's come in and grab this side and this side. And we'll just work
on one side because I think that's going to
be a little bit easier. So if I pull this up now, the other side is
going to be moving. And then what I want to
do is just make sure that the kind of level going
around is about the same. I need to pull it this
way a bit as you can see. So holding the shift, get it roundabout into the
center from there. Then we can press Alt shift and click on either of the side. So Olt Shift and
click Enter Alt. And, and bring that out
a little bit like so. And that is what we're looking
for, something like this. All right, so that part is actually done now
and what I want to do now is the
actual the back part. So what I'm going
to do, I think I'll put a part coming down here, so a part of wood
coming down here. Which means then I can
split this off from here. So all I'm going to do,
I'm going to come in actually and I will
split these parts off. So if I come in, grab
both of these parts, press P Selection
and split them off, then what I'm going
to do as well, we'll keep actually
the bottoms on, but what we'll do
is we will split off all of these bottoms, so we can see that
this one is split off. Let's split off both
of these as well. So all I'm going to do
is selection like so. Okay, so from there let's
figure out now this part here. So what I'm going
to do is I'm just going to grab this
one over here. I'm going to press Sir
Delete and vertices. And then I'm going
to grab this one and I'm going to press
Control all transforms, right click, set origin
23 decursor like so. Now then what I'm looking for to do here is
just to make this, maybe bring in
something around here. What I'll do is I'll
just press Tab. I'm going to press K. And then all I'm going
to do is press A, bring it down to here, and then I'm just going
to follow this round. Just press A again if you
need to take that off. And then I'm just going
to follow it round, going around here like
so up to this part, press the button like so. And then I just want
to have it going straight over to
there as you can see. And then just join it in there, press the Enter button, and you can see sometimes, sometimes that doesn't work. You can see though, we've
got that nice line there, which is actually going to help. So now all I can do
is I can come in, press the button to
go across this way. And then bring it
down with the button all the way down to here. And press Enter.
And there we go. That is what we're looking for. So now what we can
do is we can come in and we can bring this
part out a little bit. So if I press, just
going to bring it out just to add another little
bit of flare to it there. All right, so now I've got that. What I want to do then is mirror this over the other side. First of all though,
let's bring in the bevel. So we're going to bring
in a bevel on here. If it doesn't work, let's
come in and press control. All transforms right
clicks the origins, three decursor geometry node. Let's come in and turn
clamp over our path and let's put it on 0.3
And there we go, our bevels on finally,
let's close that up. Add in another modifier. This clamp is going to
be a mirror and we're going to put that
over the other side. All right, now let's have the dit that's going
to come down here. I'm going to actually probably bring it so it
comes around here, a little piece of metal
and then I can actually build the bumper on the
back of it as well. Let's come in and
what I'll do is I'll come into this
part here first. And I'll grab this corner. So I'm going to
grab this corner, I'm going to press shift shift, there we go, cursor to selected. And then I'm going to press
shift A, bring in a cube. Let's make it a
little bit smaller. Let's bring it up, let's
bring it into place. Bring it into place like let's then bring
it to the bottom. So I'm going to bring it down all the way down to the bottom. Now, I don't actually want
it to come into this part, so I don't actually want
it to feed into there. I want it a little
bit further back, a little bit further back. And I'm looking as well to
bring it just in front of the. Then what I'm going to do is
to bring it down, let's say. Then what I'm going to
do is press control. Bring in my loop,
bring it all the way down to round about there. Then what I'll do is
now come in and I'm going to grab this part here
that I already created. Press the board. I'm
just going to pull it out the onto there. Now the thing is I
think that it needs coming in or out a
little bit this way. Do I want it all
the way up there? I think actually, you know what, I need to pull it up to there. So I need this trim to be
inside there, outside. What I'll do is I'll
just grab both of these, pull them out slightly
just over there like. So then what I'll do is I'll
come into the inside here and make it a little bit ther there we go,
something like that. And then finally what I'll do is I'll just bevel off
this bottom bit. So I'll come in and I'll
bevel off this bottom. And it might also, Should we bevel it off on the inside
as well. Let's have a look. So control B. So yeah, actually I think
that looks good. All right, so now, right click
the origin three decursor. Adding a modifier, generate a bevel point naught
naught three. Let's then bring in a mirror. So add modifier,
generate a mirror. Let's put it onto,
we can see there that we might put
our cursor there. We don't really want that. So let's press sirhift desk on this like we've done before. Grab this again. Right click origin three decursor
and there we go. Okay, so now let's actually think about our actual bumper. Before we think about
these other parts here that we're going to create. I think, you know what,
actually we won't do that. What we'll do is
we'll grab this part. So we're going to still work on this because we actually
have a mirror on. We're going to press
Shift D. We're going to bring it over to
the bottom of here, and then we're going to press E. I'm going to pull it all the way over, all the way over to here. It's not going to, actually, you can see it just goes
in front of there. But that's absolutely fine. All I want to do is just bring it over to this part here like, so finally on this one, I just want to pull it out very, very slightly or
pull it back a bit. It's up to you. You just need to make sure that we're
still in front of there. So we'll pull it out to round
about here. There we go. That is looking very nice and it's all
coming together now. Okay, so now we've got
the actual bumper. For the bumper, then
what I'll do is I'll grab this bit because I
think actually I could use this to actually go
around this bumper. What I'll do then I'll press Shift D and's Ed pull it out. Let's bring it closer together
and we'll put clipping on. Turn up the merging on a little
bit, something like that. Bring them together. Then what we'll do is we'll bring
them around here. And then what I'm going
to do is press L pull it out a little bit and then
I'm going to grab this one. I'm going to press and y would yours want it
coming just under there? So then what we'll do is
we'll make it a little bit. So if I grab the whole thing
and's Ed, there we go. Now we want the min, but we also want to,
to solidify this. At the same time,
what I'm going to do is just split it off
from the other part. Then what I'm going
to do is add in a, another modifier, and this
time it'll be solidify. Then what we'll do is we'll
pull it out that way, pull it out this way,
even thickness on. Then what we'll do
is that's actually looking pretty good
from there already. Yeah, that's looking nice. I'm just wondering
about this part. If I should bevel it
off a little bit more. This corner here, control, let's bevel it off a little
bit more. And there we go. All right, so now you can see we're actually nearly
done with the outside. All we need now is
the actual doors. So we've got the bevel on, let's write click shade
or to smooth on that. Let's then save out our work. So save it out, and now let's think about
these actual doors. So all I'm going to do
for the doors is I'll press shift eight.
I'll bring in a cube. Let's make it a
little bit smaller. Let's pull it back a little bit. I'm actually thinking
that might be bear just creating instead of the
cube just making it a plan. I think we will. So all we'll
do is we'll just come in, grab the front of it like
we've done many times before. Press control plus
delete and faces. And then what we'll do
is we'll grab this, we'll grab this here
because we've got a bevel and a
mirror modifier on. That's exactly what I want. We'll press control L
and copy modifiers. And then we'll grab this again. Right click, set origin two. In fact, you know
what, We'll press control first. There we go. Right click, set origin three, decursor, there we go. Now we can actually
start with that. If I press control one, I can go to the back of it now. Then what I can do
with this is I can press and Z and bring it up
to the height that I want it, which is going to be something around here so that it can
actually get ahold of them. And then and X, let's pull them out and
bring them into place. Something like that, although
they might need to be a little bit tighter on here. Let's bring them in
a little bit more. We join them actually up there. Yeah, let's take clipping
off, let's try that again. And X, I'm going to actually bring them in closer
together because I want to there something like that
because I actually want to put some bolts and things
like that on there. All right, on the next list. And then what we'll
do is we'll get these slightly rounded up, they look about in
the right place. We'll get the door
handles on these just so we can open them
and close them. Get the hinges on them. Finally, we need
to do the lights. We also need the inside
of the car finishing off. And then from there
we're actually done, but you can see just how nice
and how easy that looks. I think actually
I'm going to come in right click,
shade, auto smooth. Then right click shade,
auto, smooth. There we go. But you can see now we've
nearly got it done. It would be a little
bit of a pain putting all the materials on. That takes a little bit of work, but we're on the home straight
on this one for sure. All right everyone.
So hope you enjoyed that and I'll see
on the next one. Thanks a lot. Bye bye.
151. Completing the Vintage Truck Model with Advanced Techniques: Welcome back everyone to Blend The Fall The Environment
Artists Guide, and this is where we left off. All right, so let's come in
and round off these corners. So I'm going to grab this one and this one I'm going to press control shift and B and
just round them off like, so I think I'll round these off. Very, very slightly. Not
as much as the other ones. So control shift and
B, just like that. And I think that
looks pretty good. Okay, so now what we'll do is we'll grab the whole of these. We'll press and pull them out. We've already got a bevel
on there as you can see. And then from there we can right click, shade, auto, smooth. And then finally we
can press a and pull them back into place like so. So all the way back jus before they start sticking into
the back of the van. I'm thinking at this stage they might need to come a
little bit closer to do that. I'm just going to
grab the top of here. I'm going to come
all the way down to Boto of here. Press
control, click. And then what I'm
going to do is just bring them closer together. Now sometimes when you bring them closer
together like that, the mirror does want
to make them stick. If you don't want
that to happen, just come over to
the right hand side, press press control. And now you should be able
to bring them in by using X. So let's bring them in S and X. And you can see
it's not coming in. And the reason is it needs
to be on medium point x. And there we go.
Now we can bring them closer together
as you can see. And we want them
very, very close. Just a little split
down the back of the. All right, perfect. Now let's
come to the actual hinges. They just want to be
very, very simple hinges. These. So we'll
start with a cube. I'll actually press Tab, and then what I'll do is
I'll bring in a cube. So bring a cube, bring it over. And now we'll end up with, we've not actually got the
mirror on still. Never mind. Never mind. At least we've got the bevel on. So we'll actually split
these off in a minute. So all I'm going
to do is press S and's D pulled it up,
pull it into place. We want it in
something like that. We want it nice and rounded
off though in the corner. So there something
like that I think. Let's come in then
and bevel this off. So I'm going to grab this
one control B, bevel it off. And that's it, really,
that's all you really need. So right click,
shade, auto, smooth. Let's come in then and press
L. Shift D, bring it down. Press control one. So where
do we want this next one? Want it right in the middle? And then shift D, bring it down all the way
down to there like so. And then finally we want to
put these on the other side. So to do that, the
easiest way is just to press P selection,
split them off. We've already got
the orientation set, so we're just adding a
modifier and a mirror. And there we go.
That's that part done. Everything is done on there. Now all of the back
is pretty much done. You might want to
put a little bit on here just to pull that out. I actually think it looks okay. I don't think I need that. Now, let's come to
the front then. All we need in here is just
something very simple. First of all, though, we
want some glass in here for sure to actually
create the glass. We've still got our
bevel on as you can see, which is this round here. Which means though,
that does make it a little bit easier
for us because what it means is I can come in and grab this one going
all the way up there. I can also come in
there and grab it going all the way up here like so. And then I can simply press the button and
that doesn't work. So what we can do is
we can right click and try bridge
that doesn't work. So let's just grab this shift H and let's just separate it off and see what's actually
happening with that. Actually, I need it
really come in all the way around here and then all
the way up to this point. So you know what, Let's just
see if I can select all of this and you can see
that it's because these parts aren't
actually joined. So you know what, we're going
to do this another way, so we're just going
to grab all of these like so, like so. And then we're going to go up to here and then all I'm
going to do is just press shift D. I'm going to
bring it out and there we go. That's what we're left with. That's what we want
to be left with. Now, what we need to
do is just tidy it up so if I press and X, I can bring it in to where
I want it also as well. I'll just separate it
off while I've got them all because that'll make
it a bit easier for me. Selection separate it off. And now I can do and
come back to it, grab this one and X and
just bring them in and X, bring them in till the
near enough touching. And then the same
with these points. With these points, just
grab the, grab these. You're going to press one
to go into front view. And then what you want to
do is just bring them down. You can see that these are
a little bit over there. We don't really want that swell. I'm going to do is press S
and X and bring them in. Just the nearly touching like. So now all I can do is I can just come in,
grab everything, mesh, clean up, merge by distance, four
vertices attached. Which means that all that
now is attached together. Now we can come in, press
the born, and there we go. We've actually got a mirror. Now sometimes on
these, they actually add a break in the middle where the window wipers went either side rather than such
a large pane of glass. I think we'll actually
stick to that. So all we're going to do to do that is I'll grab this one and this one right click
subdivide and there we go, we've got one in the middle now. All right, so then
we've got a glass on each of the sides. Now let's make this middle then Control, make
the middle bit. Turn it down a little
bit and then just pull it out very slightly like. So finally, control or transforms right clicks
the origin to geometry, pull in the, what's it
called, the screen. There we go. All right,
that's in place now. Let's bring back the whole
of the car. There we go. Let's think about
now the inside, because we can see
here we've got a little bit of a mess here. Let's first of all
come in and we can see that what is causing
this, let's have a look. It's this part here.
So all I'm going to do is just grab that part, E and Z, pull it down to nearly the floor like so you can see it just
pokes through there. You don't need it to
poke through there. No one's going to see
underneath it, really, unless you're ever going to
have a toppled over car. So I'm just going to
pull it down to there. And from there then
I'll just come in, press control, bring
in one edge loop. And then control lar,
bring it in here. So left click, right click. And all I'm going to do then is bring this in a little bit, so press the eye button and then pull it
out a little bit. And all we're going
to do then is just set the steering wheel on there. Now, before we do
the steering wheel, let's think about
the back of this. So we're just going to make a quick bag that we're
going to put in there. So what I'm going
to do, I'm just going to grab my guy for now. Shift S, Krista, selected shift. Let's bring in a plane.
We'll start with the plane. I think I'll make it easier. R, Y, 90 S and Ed. And then we'll just
bring it up to here. We might need to make
it smaller or bigger. We can do that as we work along. And then all I'm going
to do is I'm just going to give it some
edge loop control. Make sure it's always
an odd number seven, left click, right click. And then all I'm going
to do is just pull up this center on with
proportional editing on. If I pull up this, we can see this as how
it's going to look. You can see at the
moment that it's way, way too big at the moment.
So let's grab it all. Let's press the S button. And I think that's more
or less the right size. Let's turn this off then. Now, finally we'll bring
this over, R z 90. Spin it around the right way. Now our cursor, the
moments over here. Let's put the cursor
back in here. Shift cursor selected, come
back then to this part. Shift and selection two cursor right click, origin geometry. And then shift
selections cursor. Now we can actually
put it into place. Now let's see if
it's sticking out, which it is a little bit. Let's pull it up to
where we want it. Let's pull it in then,
and X pull it in. It's actually got a
nice seat in there, so let's pull it
back into place. Let's press Tab. Let's
press, there we go. All right, now let's
just do the final bit, which will be the
bottom shift H. Let's come in and do the bottom. All I'm going to do
to do the bottom, I'm just going to grab
this one. Control select. And then I'm just going
to press Shift just to duplicate it, pull it down. Then grab this one and this one. And we're just going to
pull it out. Pull it out. Now let's press and see where
we actually are with that. And that's looking
absolutely fine. Okay, so that's looking good. The only thing I'm
worried about is that it might need picking up
a little bit control. Plus let's go all
the way back to it. And we can see we're
selecting that one. We don't want that,
so let's come in. Just press L, and then all we can do is we can pull
it up a little bit. And I think that
looks a little bit better now. All right. Now finally, let's come into this bit control all transforms right clicks
the origin to geometry. Let's add in a modifier and
we'll bring in a bevel, let's put it on
nought point n five. Let's also turn up the amount. I'm just going to turn them up. I'm also going to
increase it because I want to have this looking a
little bit more like leather. I think actually that looking
is looking about right now. Yeah, that's looking much, much better than it did before. Okay, finally the last thing we want to do now he's just
a quick steering wheel. We'll do that in
the next lesson. Before we do that though, let's actually bring in a
cylinder mesh cylinder. We'll put this on 22
and then what we'll do is we'll spin it round so x
90. We'll get it this way. We'll press the S
button and all I'm going to do is just get
it to be the right scale. At the moment we can see I
need to spin it round ours 90, How big is the steering wheel? This actually looks round about
the right size and x the, we're probably going to
be on the larger size, to be honest, back
in this period. So I'd say yeah,
something like that. If not a little bit bigger. So something like this
looks about the right size. All right, let's right
click shade to smooth. Let's save that our work. And on the next
lesson we should have this actual truck finished, ready to actually get
the shaders on there. Alright everyone, So
hope you enjoyed that. I'll see on the next one.
Thanks a lot. Bye bye.
152. Preparing the Vintage Truck Mesh for Texturing: Welcome Mc everyone to Blender for the Environment
Artists Guide. And this is where we left off. All right, what I'm
going to do then now is I'm going to start
my steering wheel. So jaws come in, grab this one. And this one press the eyeball. And then all I'm going to do is right click and I'm
going to bridge, bridge the loops like so. And from there what I want to do is I want to take this inside. So shift D, take the inside, make it a little bit
smaller, like so. And from there then
I'm going to come here now and reset the transforms. So L transforms right
click, Srog and geometry. And now let's come
into this part. Alt shift, click, shift click, shift click, Alt shift click. And we want to
bevel this off now, so control B, bevel it off. Turn the bevels up like so, left click and there we go. Now it's actually looking
like a steering wheel. Exactly what we wanted now
from here we just need to make sure that this now is going to line up with the inside
of the steering wheel. So S next, let's pull
it in a little bit, let's put it out now into place. And finally then what we want to do is every other one again, or even on the wheel,
you could get away with every other one. So in other words,
you might be able to even come in and go every, you know, second one like this. Let's see if we've got actually enough in here to do that. No, we've not quite. So
sometimes that happens, we can't do it because
we brought in, I think 2022 or 24. So we will be better off just going with everyone all
and we do all shift. Click. Let's go to select, check a D select like so. All right, we'll make do with that then What we can
do is we can just press Enter Alternates
and bring it in. And we can see these are way, way too big at the moment. We don't actually need
to worry too much about how big these are
because it's another part, this so we can get rid
of the rest of it. In other words, in fact, we could even do this a
different way. You know what? I'll show you a different way to do this. We'll get rid of that. Delete faces and then what we'll do is we'll
just grab the whole thing. Press shift S, cursor selected. And then all we'll
do then is just bring in another cylinder. And this cylinder we'll
put onto something like let's put it
on ten, on ten. And then all we'll
do is we'll make it much smaller, much smaller. And then what we'll do is
we'll put it into place, make it even smaller like so. And then we'll just
grab the bottom of it and pull it down into place. And you can see now already it's going to look much, much
nicer than the other one. Now, all you've got
to do now is just make sure however many you want, you're dividing it by 360. So let's say 60 degrees
because you know that you six sixes equal
360. So we know that. So basically we can use
that to our advantage. So what I mean by that is at the moment we've got
cursor in the middle. If I come now and grab this and press a
little sideways V, I can put it onto three
D. Cursor from there. Then can press shift
and then R x and 60. And then shift D R
x 60, shift x 60. And then just work my
way round like so shift x 60, shift x 60. And there we go, We've
got a steering wheel. Simple as that, and it's
looking pretty good. Okay, so now let's think about just the inside
of the steering wheel. So what I'm going to do is
bring in another cylinder. Let's put it on something
like 18 this time. Let's spin it around
so R x 90, 90. Let's make it a
little bit smaller. Let's press and X, bring it in. And let's put a front on this. Just a simple, I think on this stage we did have a horns back then we'll
just put it like that. And then I bring it all the way in and then all the way out. And that should be fine. Now, from there then let's just bevel off this front part. Shift, click, control it off. You can see it's not
beveling off properly. That's just because
we need to set all of the transforms and then we can come in now and
bevel it off correctly. Then I'll also bevel
off this one as well. So control B like
so now on this one we're not really
going to need to come in and, you know,
level everything. So I'm just going to shade
auto smooth on that. I'm going to shade auto smooth. You can see on these, sometimes this happens on these parts. If that doesn't, you still want them a little bit more rounded. The easiest thing to
do is just to come in, split them away from everything. So selection, split them off. And then what we'll
do is we'll just add in a mutifier and we'll generate this time a
subdivision surface. Generate a subdivision surface. Now this will
happen, always does, but all you need to do
is you just need to come in and press control law. And then what you can do is
you can just bring it up into place and then control
bring it down into place. And then you know
what I'm going to do, I'm just going to
grab these and just redo them rather than
going around everyone. So delete and vertices and
then we'll grab this one. So we'll grab this,
we'll press tab A. Press three to go inside View, Shifty and you know what? I think actually
there wasn't enough. So let's point out for
x 40. Let's try that. Shift x 40 and then shift x 40. Shift D x 40. Just work your way all around. So hopefully we should get back where we started
because we divided it up. There we go. All right, that's looking better. I'm
much happier with that. Let's press control on this and then we can join
it all together. Join all this. We've got
no modifiers on control J, and there we go. That's
what we end up with. Okay, now let's get that
steering wheel into place. So let's press 90.
We can't do that. We need to write clicks,
origin geometry. It's because we've got
that little sideways V on. Let's click it on
Individual Origins. And then 90. Let's put it into place, then let's pull it up. Let's press the little dot on just so I can see where
I'm doing with this. And let's pull it to
the side like so. All right, so we've done that. Now a couple more things we
need to do before we finish. So we've got that
int double tap, the we'll put in some
small wing mirrors. We'll put in the
lights. So let's do the lights first because
they're the easiest part. So what we're going to do with
the lights is we'll bring in a UV sphere. We'll bring that in.
We'll turn this down, something 18 before we move it. 60.18 should be fine. Let's then pull it out, and from there we can spin this round, so our x 90. Spin it round, right
leg, shade auto, smooth. Let's make it now much smaller
and let's get it to where they're going to be
of, of the truck. I'm just looking
where I put them on, my other one. Okay,
I put them on there. They should be bolted into here a little bit smaller like so. And then let's squish them in a little bit because
they don't need to be so round and
Y squish them in. And then we'll just get
rid of the back of them. If I come down to the
backlit delete bass, grab the back one
L delete vertices, then what we'll do is grab this one shift
click, then enter, pull it out very slightly just and then enter and
pull it out to here. And then all I want
you need to do now is just pull it back. So I'm going to press
Y, pull it back. And finally then let's
fill that in. Fill it in. And now what I
want to do is just pull these out a
little bit on here. So if you can see from
grab them here, all shift, click, pull it out like so. Okay, so now let's
do this middle bit. So I pull it in and
then pull it out. And that's all we need
for the lights really. So now let's put this
in place and just see if that actually
fits in there, which it nearly does. Let's put it into there, make
it a little bit smaller. Alt shift click going all
the way around there, Alter ness, pull it in, pull it in, and now let's
see if that fits in, which I think it will now. Yeah, that's actually
good enough. Let's make it a
little bit smaller like so. And there we go. Now let's grab this again. Shift this as to selected. Grab this then, and
we'll add in a bevel. So add modifier. In fact, we'll resell the transform. Transforms first. Right click the origin
three D cursor, add in a bevel, and then add in a mirror. Mirror is wrong. One generate mirror
and there we go. All right, so finally
then I'm just wondering whether
we actually need some wing mirrors on here up, whether you want to put
someone I actually think it would make it look better
if we just, you know, took the time just to add in a couple of wing mirrors,
finish those off, and then we can
get it, you know, fully textured and finished. All right everyone. So
I hope you enjoyed that and I'll see you on the
next one. Thanks a lot. Bye bye.
153. Creating New Shaders for Victorian Scenes in Blender: Welcome back everyone
to Blenderporl, the Environment Artists Guide. And this is where we left here. Alright, let's bring
in our bullion once more because I want
to borrow this pay again. So shift D, bring it up M, let's put it into car like so hide our bullion out the way. And what I want to do is
make this a little bit smaller and bring it into play. So all I want to do is just
have this hurt the side of here like so we're going
to bring it to the side. I'm going to spin
it round so R Y 90. And then what I'm
going to do is just put it into the side here. Obviously we want
to make this much, much smaller for one thing
it's got to solidify on. So we'll probably need to
round it once we've done that, But let's for now just get it into the right sort of space. So all I'm going to do
is make it smaller. I'm going to put it
into the side of here. And I'm thinking that's probably just about going to be right. Then what I'll do is I'll just
grab this, I'll press one, and then all I'm going to do is just press and just have
it coming out like so. And then I'm just going to
put an end on this now, so we're just going to
have a circle on here. We'll press shift day, Bring in a cylinder. Let's spin it around so R x 90. Let's make it much smaller. And let's bring it out
now to where we want it, like so and then and y, let's put it into place and
that's all we want on there. Really nothing else,
nothing too fancy. This mirror is probably going
to be a little bit too big. So let's press S, make
it a little bit smaller. And there we go. All
right. As simple as that. Now let's come in, we'll
bring this part in, so I and then pull it in. And finally, now let's just bring this bit out a little bit. Just probably to cover this
a little bit of this up, all I'm going to do is
I'm going to press I j. Bring it out just
so if bits a bit. Right click, shade, auto,
smooth, double tap. The I think I need to pull
it out a little bit more. Actually, Just, yeah, that
fits on there like so. And that looks
about right for me. All right, so finally then
let's grab both of these. What we'll do, we'll come
over object convert, mesh control J, join
them both together. And I'm thinking with this, do I make this a little
bit more rounded? Actually, you know what,
I will. I'll go back. Actually, I'll just go back
because one thing I did forget to do before I actually joined them together
is on this one, we won't join them together yet. What we'll do is we'll
come in to the curve, we'll turn this down all the way to something maybe
even lower than that. So yeah, maybe something
like that even. We'll turn it down to
two, we'll come up then object convert mesh, and then we'll add in one more. So add modifier, generate a subdivision
surface. There we go. And then what we'll
do is we'll just turn that 01, like so. And there you go. You can
see it looks so much better. Press control, just bring
it down just so it's flat. There we go. Let's write, click, shade, auto, smooth control. T's check. And you can see
that's what we've got. Now if you're worried
about this being a little bit too high on the
resolution, you can come in, generate a decimate, And then you can
just put this to not 0.5 and you can see that you
basically get no change. And now it's gone down not
0.2 Let's put it down there. You can see it's
starting to break there. We don't really want that,
so let's put it on n 0.3 and then we'll
keep it on that. Now it will triangulate
most of the time, it doesn't do a very
nice job of it. But sometimes if you
just want to reduce symmetry topology or how many polygons you
go on something, it's the easiest way to do it. Press Control, and you'll see now that's what
it looks like. It's not the cleanest mesh, but it is a good
way to reduce it. Now let's join this control J for such a small part anyway, it's not really going
to make any difference. All right, so now
we've got that. Let's then put the
orientation over here. So set origin three de cursor. And finally, now let's
bring in a mirror. Double tap the and there we go. That is our truck
actually finished hurry. That was a long journey. All right, let's move our When I was creating
that the first time, I didn't realize actually how long it would actually take. And I think actually though, this truck looks better than
the one I did initially. All right, so now let's grab
one of the parts, press B, and what we want to do is
we want to just make sure, in fact we don't
want to do that. You know what? We're not
going to do that yet. What we're going to do
is we're going to come in to each individual part now and just start putting
on the materials. So let's make sure, first of all that
we've got all of the right materials on, so I've got a list of all
the materials that I need. So what I'll do is
I'll come to this one first and I'm going to
click the down arrow. And then what I'll
do is I'll kick car and we've got
car metal blue. And then I'll click
plus down arrow. Car metal, light, so car metal. And you can see I've not
got that one on there. So I'm going to go over
to my asset manager. And the first thing before I do anything is I'm just
going to get all of the materials in
because it is going to make it so much easier. And then what I'm going
to do is I'm going to click Plus and I'm
going to look for car. So the one we want is car
and we want metal light, so let's drag and drop
that into place on there. Next one we want
street light glass. So let's click the down
arrow, street light glass. The next one we want
then is the black metal. So I'm going to click the
down arrow, black metal. And then the next one we want
is going to be truck glass. So I don't think we
have that one out yet. So I'm going to put truck
like truck glasses here. Let's drop that onto
there. All right. Now, going through
them, let's have a we need rubber.
Click the down arrow. I don't think we've
got rubber out yet, so I'm going to put
rubber. Here we go. Let's put rubber on then. We need dark wood. We've definitely got that.
Let's click plus down arrow. Do then we want brass
metal and leather. Let's see if we've got
brass already out, we mind. Brass metal. There we go. And then the plus,
and the last one is going to be leather which we definitely haven't got out. Let's search for leather
and here's our lever. Let's grab it and drop
it in place like so. All right. So, so far, so good. Now let's come. The only thing we
haven't done yet is the posters, but we'll
do those in a bit. I'm just going to press
dot just to zoom into it. I'm also going to go
over to UV editing. I think that's going to
be much easier to do this and then what
I'll do is I'll zoom into this once more like so I'll make sure that I'm on my
shader. And there we go. We'll get all these
materials in first. And then from there we can actually work on
the other stuff. So the first one
is the blue metal. So we're going to
grab this part here. We're going to press
L, we're going to press U Smart UV Project. Click Ok. And the one we want on here is going to
be Car metal, blue. Click a sign which you
already should be on like. So now what I'm
going to do is I'm going to press B and
grab the whole thing. And I'm going to
select this one now. So select this top one first, control L until it goes
yellow link materials. And now what we can do is we can hide this out the
way from there. Now we can actually work
on the rest of the part. So if I come to this
part, for instance, I can press a smart UV Project. Click, Okay, Car, Blue, Mel, which is already on, so we're already assigned to that anyway. And then I could do is
hide that out of the way. Now let's work our way down. So we've got our metal
obviously blue here. All we need to do with
this is Smart UV project. Click Okay And then hide it out the way Tab.
Hide it out of the way. Let's come then to our door. So the door is going to be the same except this part here. So these parts here.
Let's come in. And then what we'll do is
just grab all of these. Now we can see we've already
got a mirror on there. That's absolutely fine.
We can come in and add all that once we've
actually done it. This part what we're going
to do is cut metal light, let's see if that looks any
better. Let's press Tab. And that's what that's
going to look like, which is perfectly fine. Let's press Smart UV Project. Click Okay. And then what we'll do is we'll come to
each of these doors, so it's going to be mirrored
over the other side. Smart UV Project. Click Okay. And there we go. That's that part. Hide
it out of the way. Now let's come to these
parts. This part here. We're going to press a, It's mirrored over the other side. Smart UV Project. Click okay. Car metal, light. Click a sign. You know what? I think that one of these
should be a little bit, a little bit lighter on here. I'm just going to bring
one in that is going to be, I think a little bit. What I'm going to do is we've got a core metal light here. I'm going to call
it white metal. Let's do that, new light metal. What I'm also going to do is I'm going to bring
in another one and I'm going to call it mirror because I didn't do
this on my other one. But to create a
mirror one is fine. Mirror mirror. So, and then what
I'll do is I'll grab my car metal light,
click the down now. So copy material, come down
to this one, paste material. And then what we'll do
is we'll do this first. So I've got my light metal,
let's assign it first. So we'll click a sign on there. Not with light, yeah,
with light metal. So light, Mel Click a sign. And then what we'll do now is we'll just quickly go over to shading panel and we'll
get it loaded up. So do let's put it on. And there we go. In fact, we'll put it on Renderview for this. Once it loads up, I'll also
file save that, my work. And then finally
now what I'm going to do is I'm going to
make this a little bit lighter like so not
that light of course, but a little bit lighter
than what it was. I think something like that. Double tap the A. Yes, That
looks absolutely fine. Now all we'll do is we'll
come to our mirror. If I grab the inside of my
mirror like flick a sign. So all I want to do
now is first of all, turn the roughness up or down on this and
turn the metallic up. Turn the metallic up. Is that
actually doing anything? Let's put it onto a bit. Black tab, double tap the A. So let's have a look at the
roughness now. There we go. That is what we're
looking for now. We can see we've got
an actual mirror on there. All right. Maybe maybe we don't want
it to quiet like that, so what I mean is maybe
we want to turn down the metallic or we want to turn down the roughness or bring the roughness up a
little bit like so. Like this. All right,
that's looking bar, Okay, so now let's go back to UV editing and then what
we'll do is we'll grab these, we'll hide them out of the way. Finally, save that our work. And on the next one hopefully we should get this
whole thing done. All right everyone. So I
hope you enjoyed that. And I'll see on the next
one. Thanks a lot. Bye bye.
154. Finalizing Main Truck Textures for Authenticity: Welcome back on to Blend for the Environment
Artists Guide, and this is where
we left it off. Now let's come
then to our truck. Now what we'll do is we'll
get some materials on first, and then we'll see what
they actually look like. So first of all, I'm going to
grab this smart UV project. Let's put on the bottom
one, which we had, and unfortunately because we
put it onto the other one. So what I'm going to do
is I'm just going to press bring back everything
we know we've done these. So I can hide these out
the way. Hide this one. Hide this one out of the way.
We haven't done that yet. We've done the door.
So we can hide that. Now what we can do is we
can grab everything again. So to grab everything, grab this part last. And then what we can do is press control L link materials. Now let's hide those
out the way again. And now when I
come to my lights, I should be able to come
in and add in light metal. So light metal click a
sign and there we go. Now finally what I want to
do is I want to come in, grab the front of these. So see, just grab all of
those press control then going all the way
down and the one we want is going to be
street light glass. Click a sign and there we go. That's looking pretty cool. Now let's hide
those out the way. Let's come to this part then. So what I'm gonna do is I'm
gonna grab all of this part. Going down here and I'm going to press you Smart UV Project. Click Okay. And then what I'm gonna do is come
down light metal. Click a sign like
so I'm not sure whether I want it to be so white like
that. But we'll see. And then what we'll do is
we'll come to this part L and that'll do the
other part as well. And Smart UV project. Click okay. All right.
Hide those out the way. Now let's come to this
front grill here. This one. These here, tab,
Smart UV Project. Click Okay. And we'll
go down to light metal. Click a sign. Double
tap the A. Yeah, I think that's going to
actually come out pretty nice. Let's hide those out the way. Let's then come to our bumpers. So we've got this
bumper here, tab. Smart UV Project. Click Okay. Light metal, click a
sign. There we go. Let's now come to our wheels. The wheels should be the same,
Going all the way through. We'll do this part first. So this is the rubber,
a smart UV project. Find our rubber, which is here, click a sign, and that
should do them both. Now we should be able to press tab, Hide them out the way. We'll do the same thing on here as we're going along as well. So this one on here,
a smart UV Project. Click okay. And then
find our rubber again. Rubbers here, and then
hide them out the way. Now with this we need the metal. We could have some wood
coming around here. Sometimes they did have
wood on these inner parts. Up to you really
what you want to do. But I'm going to press the tablet and hide
them out the way. And then I'm coming to
come to this one and I'm going to basically
grab everything. Smart UV Project. Click okay. I'm looking for car metal light. I'm going to click
a sign like so. And there we go. And I'm
going to see if that's going to be right for
that, it might not be. If I put this on to render view, double tap, the A, we can see that's what it
looks like at the moment. So this is the one
that we've done, and I think actually
that's going to be about right. Yes, I do. Okay. So let's put it back onto material and then I'm going to hide that
one out of the way. So this was car metal
light as you can see. Come to this one, then
a smart U VJ click, okay, and then car metal light click a sign and there we go. Hide that out of
the way. Now let's come to these parts here. I'm just wondering
on these parts. I'm thinking these parts here. We could have brass,
all of these. For instance, I'm going to
press a smart UV project. Click. Okay. Let's look at,
do we have a brass here? Street lights, black metal? Brass, metal. There we go. Let's click a sign. Let's do the same on this
one. Hide those. The way we don't want
to look into crazy, we don't want to look like a circus event or
anything like that. I want to grab this now. Smart UV Project. Click Okay and then
go all the way down and we're looking
for brass metal click a sign like hide that. Other ways, not hide
that other way. We need to come into
this one as well. L Smart UV Project, click okay. And then brass
metal click a sign. And then finally
this outside bit. So all of this we just
want to unwrap it. Smart UV Project. Click okay, there we go. Hide the other way. Now these parts here again, will actually have still got
solidify on as you can see. So I need to come in, I
need to apply the solidify, the very least control because I can't unwrap them if I don't. Let's see about these as well. Yep, they've still grow
on hovering over it. Control. Join them both
together with control J tab, Smart UV Project. Click okay. Material is going to be metal. Light, not light. Metal. Click a sign and
there we go, hide the mount. The way Al right now
we're getting down them. This one here is, this part here is
going to be wood. We know that already. So
we can grab all of this. We can press Smart UV
Project, click Okay. And then what I can do is I
can come in now with Alt. Shift click and shift
click, press control, and what I'm looking for is the dark wood click
sign. And there we go. Now we can see we do have
some problems on these. Sometimes that happens, you can see these are
going the wrong way. So what I'm going to do
is just grab these two. I'm going to come round here, grab these two like so. And then we're going
to press R 90. Spin them around,
and now you can see they're going the right way. If they're going the wrong
way on the inside as well, just make sure you change those. Can't really see
my inside there, but I think they're
going the right way and I think they're
actually fine now. All right. So that's
that part done Now let's come to this part
and then what I'll do is I'll press a smart
UV project like so. And then I'll just
come to this part, grab this part control and we're going to go
down to our brass, where is our brass? Brass metal. Click a sign and then tab
H. Hide them out the way. All right, so now we're
onto these bottom parts. This part, first
of all, is easy. We can first of all
assign Solidify. So let's press control A, Assign that tab,
Smart UV project. Click Okay. Let's bring in
that metal that we had, metal and click Assign. And there we go.
Hide it out the way. Now let's come in to this part. If I press tab, this is all just wrapping smart UV project, click okay and hide it out of the way.
Now the bottom part. So let's come into
these parts that go up. If I grab all of these
smart UV Project, click okay and go
all the way down. And the one we want
is brass, Mel, click a sign, Hide
them out the way. Now these two bits here, these are quite easy as
well. Let's hide these. These are just going
to be grab them. Smart UV Project click okay. Hide these parts here. They're going to be unwrapped
first. All of them. So Smart UV Project click okay. Now the hinges are
something different, so we can hide those. We can come then
to the hinges tab, A smart UV Project click, okay. And these are going
to be light metal as well. And there we go. Hide them out of the way.
Now we really get into it. So this is going
to be the lever. So let's come down
line, there we go. That's what the lever looks
like. Hide it out of the way. Now we've got,
this is the glass. If I come in a smart UV
project, click okay. Apart from this center bit. So I'm going to press control
plus on the center bit. And then what I'm
going to do is come down a light metal click sign. And then I'm going
to grab both of these types and I'm going to put them onto truck
glass. Glass click. Okay. And then all I
need to do is make them a little bit smaller and
put these into place. I'm going to grab
this one first. Let's put it into place like so. And then grab this one, L, G. Let's put it into place
like so. And there we go. Hide them out of the way. Finally we're left with
the steering wheel. So the steering wheel,
let's come in first bit. This bit here will be rubber, so smart UV Project. Click Okay, let's go
and find the rubber. So rubbers here, click a
sign, hide it out of the way. Let's do this bit now because then will make it easy for us. So we'll just grab
this smart UV project. Click okay and I'm
going to put this on car metal light, just make sure. And then click and hide
it out of the way. And then finally these parts, generally with the
steering wheel. Probably going to be
wood to be honest. So smart UV Project. Click. Okay. Bring it down and we're going to have
wood click a sign. And there we go.
Alright, So that's that. Let's press old the and
the moment of truth, so double tap the A. Oh
boy, does that look nice? All right, so what
we'll do now is we'll just go to our
modeling just for now. And we're going to
save out my work. And then we're going to come
and put it on rendered view. And let's have a look at
what our car looks like. Or our truck, you know what? It looks so much better than
the first truck I've built. Just so much better.
It's actually very nice. Okay, so what we'll do now on the next lesson is we'll get
this little advert in here. We'll get the advert
on the front. And then everyone that
is actually done. All right. I'm actually
really happy with that. Okay, so let's just put
it onto our shader mode. Let's save that our work and
I'll see on the next one. Everyone, thanks a lot. Bye bye.
155. Enhancing Scene Performance in Blender: Welcome. Microprono blender for the Environment Artists Guide. And this is where we
left R. All right, so now let's come in and bring in our truck
sign first of all. So I'm going to come into these parts and all I'm
going to do is I'm just, you know, I could actually
attach it to this. There's no reason why not. It's not, you know, a transparent image or
anything like that. So all I'm going to do with
this is I'm just going to click and I'm going to click, in fact, I want
you to click New. What I'll do first of
all, is I'll go to Asset Manager and I'm
going to look for truck. And we can see this truck
advert is the one that we want, so I'm just going to
drag drop that in there. And then I'm going to
go over to UV Editing, where I can see what I'm doing. And finally then I'm
going to assign this. Let's click a sign.
Let's then unwrap. So Smart UV Project. Click Okay. And then all I'm going
to do now is fit this into place, a 90. And then let's fit it
into the place of here. And let's press and
Y and pull this out. And then and Y and
pull it into place. Just a little bit further down. So you can see now, oh boy, that looks pretty nice. Now, we could from
here come to the back, this side and put in, you know, this one here if you wanted
to. Completely up to you. We could also put one over on the side of the door
here if you wanted to. But I'm not going to do that
because I don't want to go too over the
top simply for me. All I'm going to do is
just grab this shift D. I don't even think there's a mirror on
here, which there isn't. So all I'm going to
do then is just, you know what, I'll
do the easier way. Sorry, delete vertices and
then I'll come into this, come copy, copy default. Come to this one and then
you copy paste default. And there we go, click
assign on there. And there we go. Simple as that. So much easier messed
around what I was doing. All right, let's come
into the middle part. Now. This one on here, what I'm going to do is
I'll just grab this. This one here, come down, put it onto, you can see
we've got the truck. So all I'm going to
do is click plus down Truck and we want truck advert. There we go. Click a sign. Now what we're going
to do is press a R 90. Let's get it in some place. Let's press then, there we go. And let's press
the, there we go. And let's have a look at one. If press one and let's
put it into some place. If we press S and X,
let's pull it out. So you know what, I actually might be good enough. I think I just need to
move it to the side, or make it a little bit smaller. So x, let's move it in to
the side slightly like so. And then and x, let's put out very slightly. So there we go. That's looking
fantastic. All right, now let's come over
to modeling again. And what I'm going to do now, I can finally come
in, grab everything, and then I can go to object, come down to convert a mesh. Just convert all that. I can finally then as well probably come in and
press control J. Join it all together,
right click, shade, auto, smooth, and there is our
truck looking fantastic. Okay, really happy
with how that looks. Now the moment of truth then is I guess we can press control A, all transform dry click, set origin to geometry. We can also as well press M, put it into the car collection. And then what I can also do is I can just move it
all the way out here. I can bring in then
my coffee shop, I can bring in my Subway. And I'll just let them load up a little bit because it's going to take a little bit of time. I would recommend as well,
saving out your work. So just save out your
work before doing this. And then we'll bring
in the subway, then we'll bring
in the bookstore, then the ground plane,
then my assets, I think it is. Or scene assets. I don't think it's
assets actually, it's the scene assets. So let's turn that off. Scene
asset and the butchers. Now the car is going
to be going right over here like so just
make sure it stood there. And also with the car, I
tend to rotate it around a little bit o just so it's
parked in there like so. And just make sure it's on
the floor, which it is. And there we go now
I think it's time. Then before we
finish this lesson, we'll just put that up
to grab our camera. Let's grab our camera
to view and let's actually have a nice
image of our actual car. I'm going to zoom it
in a little bit like so pull it out and there we go, we'll have a nice image of
see what that looks like. Let's make sure all of
this is on which it is. Let's also turn
camera to view off. Let's also save our work like
we do every single time. And finally, let's put
it onto wire frame. Then we can come to
render and render image. Okay, so let's see what we
did with all that work. Now we can see maybe not the best view here.
Let's actually go back. I'm just going to close
that down Before I begin, I'm going to put it on
to rendered view and I'm going to turn that lighting
round before I begin. Because, you know at
this stage you might have not be planning on making the perfume shop
or something like that. So it's important that
we get this right, everything looking
right at this point, You might be having
a lot of problems, you know, putting this
out in the viewport. There's a lot of
parts in here now. We've got over 1 million
polygons in here, for instance. A lot of them are to
do with the assets. So I recommend probably
turning off the assets, you know, the scene
assets for now. And the other thing
you can do, which is really going to make
a huge difference, is if you're coming
over to your cycles and just turn off the Viewport D
Noise If you turn that off, it's actually going to
make a massive difference. The other thing is
you can hide each of these just to get that view that you're actually
looking for. And now I'm going to do
is I'm just going to come to my world and
I'm going to move my sun rotation around
So you can see now I'm sure be able to move it
round to where I want it. Especially being as now
we've turned off, you know, that kind of what's
it called, the noise, and now you can see
we've got a much, much bear image of what our car should look
like from there. Then what I'm going
to do is you can see that Macene assets are still going to be
actually rendered out because this
render one is on, but they're just hidden
in the viewport. So from here now I should be able to put this
onto wire frame. Again, I always just get in the habit of
saving out before you actually it that
render born and then render and render image. And let's see now what this is actually
going to look like. So now we can see it's not
in darkness and we can see everything is really
starting to come together. We can see all of our
assets are there. And really all this needs at this point is a
beautiful floor, which we're going to finish off once we've actually finished
off the perfume shop. And the reason we're going to
do that after, by the way, is because we're actually painting on the texture
around our actual building. So we need the
perfume shop there, unfortunately, first before
we can actually carry on. So we're going to do
that on the next lesson. Start the perfume shop. And it's going to be a fair
few lessons to get that done, but that is the home straight. Once we've done that, we
just texture this floor. And once we've
textured this floor, that's basically
this scene is done, but you can see just
how beautiful this is. And if this is your
first time in blender or even if you've been messing around with
blender for a while, I'm sure this is one of the best images that
you've created so far. All right everyone. So I hope you enjoyed that
on the next one. Then we're onto the perfume shop and I'll see you
on the next one. Thanks a lot. Bye bye.
156. Starting the Victorian Perfume Shop Building in Blender: Welcome back everyone to Blender for the Environment
Artists Guide, And this is where
we left the art. All right, so you can
see now we've got pretty much everything done
except this perfume shop. So let's first of all bring
in our gray box that, then we'll bring in
our perfume shop. If yours doesn't
come in, by the way, just open it up and make sure
all of these are ticked on. The other thing as well
is we've got our son, wherever that is, our camera. Let's have a look
at where our son is. Our son's over here. Now we've got, this is not
being rendered out as well. Just remember that
we've got our plane, which is if I press G, So I've got a plane in here,
I don't know what it is. And you can see
sometimes this happens. When I remember when
I first started, actually I add tons
of these little dots. Probably if I zoom into that, is there going to be a dot
there? Let's press Tab. There's probably going to be a little dot there somewhere. And when I first started,
add those everywhere, and they're called
empties and it happens when you just
beginning basically. So let's delete the other
way, we don't need that. And then what I'll do is I'll grab both of these and then I'll just press M in the viewport and we'll
make a new collection. And we'll call it camera
and lighting like so. And there we go. All right, so that's sorted those out. So now let's have a look. Just making sure
everything's clean in here, which it looks like it is. So I'm pretty happy with
how the set up is now. Now what we want to
do is we want to basically come in and we want
to hide our coffee shop, we want to hide our subway, we want to hide our bookstore. And of course we want to hide our butchers and even our car. So let's hide all of
those out of the way. Now, what we're left
with, we're left with something like this.
Where is this? This is in my actual gray box. I don't actually
need that no more, so I might as well
clean up this as well. As you can see, my gray
box contains something here that's called a ground
plane with nothing in it. Let's delete that. So let's
clean up all of this stuff. So let's delete that
out of the way. The subway, if I close
that on and off, you can see is this one here. Let's delete that out
of the way as well. We've got a cube in there now, which is this one. So
we can delete that. We've got our butchers
as you can see, and within the butchers
there's a cube. Nothing in there as you can see. So we might as well delete that. Delete my butchers. Then
we've got the bookshop. Delete that out the way as well. And finally, all we're
left with then is just this perfume shop,
which is this one here. That is absolutely fine. Now let's just make sure that
everything's still there. I'm just going to make sure
everything still comes in. I've not deleted anything
that I shouldn't done. So I'm going to
look at my assets. I'm gonna look at
my scene assets. I'm going to look
at my butchers. And I'm going to look at my
car and everything is there. All right, so now let's
begin on the final part. So if I come in and hide
all of these out the way, so let's hide them
all out the way. Like so the car, the camera
enlighten. I'll leave in. I've got my little guy there,
I'll leave in in there. And also I've got
my ground plane, which I'll also leave in there. All right, so what I'm going to do is we need to
break this down. And the way we need to
break this down is to think that how are we
going to actually do this? So I recommend we
build this part first, then we build this part, and then we build this
part in, in other words, we just build this face, so just this face on here, just this face on here. And then we start actually
with the round bit. And I think then we can kind of pull it all together from there. All right, so what we'll do then is we will
start with this one. Now the thing is about this part here is we don't want it to come out really any further
than this part here. So you can see where this
comes out at the top. That is pretty much
where we want it. The one thing we don't want is we want actually
this bottom part. So this bottom section, we want to pull this
back a little bit. So we want to have it a
little bit back like so. Now when you're pulling it back, make sure that you've pulled it back far enough so you can
actually see there is, you know, some
kind of gap there. And also try and
line it up so you can see these lines
here, these lines here. Try and line it up
to one of those, because that's going to be
important as we work through. So I'm thinking that
probably if I line it up, you know what, I could
turn this round as well. So scrap what I just said. Actually, let's pull
it back a little bit. I'm going to line
it up halfway in because I'm going
to actually make this cylinder again anyway, I'm gonna make it fitting. I think we'll do it that way. So I'm thinking
something like that. Now what I'm going
to do is I'm going to bring in one actual piece. I'm gonna bring in
one piece along here. Put it out to there, and then
see what that looks like. So let's start with
that first of all, then let's press shift
as Coaster selected. Let's then press shift date. And what we'd do is
we'll bring in a cube. I'm gonna make my cube smaller again on here 'cause
my blender crashed. So let's make it smaller. Something something
like this sort of size when we
first bring it in. And I think that will be fine. Now let's bring our
little guy over. We can see this perfume shop is something else.
It's pretty big. And let's now bring this into place like so let's make
it a little bit smaller. And let's put it in
this corner here. So let's get it in the corner. And it needs to
be fairly chunky, it's going to support
a lot of weight. This thing, let's then
bring it up a little bit. So what I'll do is I'll
bring it up a tiny bit. So, and then from there
what we're going to do is I'm gonna press and bring it in. And then I'm going to press
and bring it up so we know it needs to come
all the way up to here. Now, I'm just wondering. Whether this top bit is
a little bit too high, and I believe it is, I
think it's too high. So I'm actually
going to pull this down because the
height of this side, so in other words,
if you come into it, you can see the height of
this side and the height of this side, they're different. And the reason is because on this side we're going to have some steps going up, a
little door on there. So that side is fine. This
side though, will be too high. So what we'll do is
we'll come in, we'll press Old Shift and click. I'm going to press Essence, just to bring that in then,
so I can see what I'm doing. And now I've got a
good distinction between this one and this one. The other thing then
is what I want to do is I probably want to come in and grab this and bring
it down a little bit. Now the problem is if I come
in and grab the bottom, you can see it's gonna grab the bottom going all
the way through. That's not something that
I particularly want. So what I'd need to
do is I need to bring in another edge loop
coming over here. So control, let's bring in an edge loop,
pull it over there. And then what that's going
to do is split this off. So now if I come in
and grab this side, I should be able
to pull it down. Now the problem you'll have
is when you pull this down, you're going to end up with
this going down here like so. And we don't want that either. So let's just press
controls head. And what we'll do
is we'll bring in another edge loop control. Bring it, pull it over right
next to the other one. Something like that. And
from there then now we can actually come in and
bring this part down. Now let's bring it
down to, you know, something more reasonable of a height and something
where we can actually put, you know, kind of our steps and our other stuff on
the back side of here. So I'm going to say for
the right height here. Let's turn this
off. It's going to be two of my guys heights. So if I press Sir shift, it's going to be two of him, so stack him on
top of each other. And that I would say is
going to be round about the height of this top
ball that comes on here. So I need this kind
of where his head is. Let's think about this. The top of this,
what I'm actually putting up here is going to be roundabout where
his shoulder height is and then the top of this will be where his
head height is. So I'm hoping I'm
explaining that well, so what I'm going to do
is I'm going to come into this part and what I'm
going to do is I'm just going to press one and
I'm going to bring it down then to his shoulder height,
somewhere like that. And then from there that
I can actually work. So you can see now we've brought all of this down and we should, should be able to
work from that now. So if I come in,
grab my guy now, and come to the front,
there's going to be a few steps going up and then
there's going to be a door. But you can see if I come
back to this, this is how, you know, high this
is going to be, so it might be a
little bit too low. I'm thinking what I'll do is I'll put the door in
there with some steps. And then what I'll do is
I'll get the right high. And I know it seems a lot of
planning and faffing around, but it's really important
that we actually get, you know, the right
dimensions from the offset. So what I'm going to do is
I'm just gonna grab this one, pull it back a little bit, just so I've got something
to work with. And then from there now I can delete this guy out the way. And now let's just bring in
just a standard Do shift. Custer selected shift. Let's bring in a cube. And then all we'll do
is we'll just make it a standard door and Y S. And bring it up and then bring it up to
where it's going to be. And then all I'm going
to do now is press three or control three
to go on the back end, put it on, and then
I can see, look, this is how big
it's going to be, so it needs to come down a lot. Actually, maybe up
a fraction like, so the actual door width, probably a little bit too wide. So S and Y bring it in and that then looks the standard
size for a door. Let's then press S and X and
pull it all the way in then. And then let's turn this off. Now what we need to
do is we need to put this into place. So
where is it going to go? So if we imagine it around here, If I come to the back here,
I'm going to pull it up. Then pull it up to where it's going to go, somewhere in there. And then what I want on each one of these is three or four steps. Three or four steps,
it can walk up. Let's again then press
Shift, Bring in a cube. And what I'm going to do is
make the be smaller and Y, make it a little bit wider. And's let's pull it together. And then all I'm going to do
is just put that into there. So I want, you know, 1234 steps. So let's see now how high these steps are
before we go on, because we know already
how high they should be. They should be up to
shin kind of height. So let me sit him on there and I can see that
they would be perfect. So let's now come to my steps and what I'm going
to do is bring an array. So bring in a not juma note. I wish to move it down. Actually, I'd like the jug note to be a little
bit further down. But anyway, an array. So let's bring in array, Let's press the Sad button. And what we'll do is
put it on one like so. And then increase
123.4 And there we go. We can see now they're going to be pretty nice steps like so, which means then I can
bring my door down. Now one thing I'm looking at
is how far these come out. And you know what, I
think these are actually coming out the right
place as well. So the doors going into there, maybe we can get away with
pulling them out a little bit more and door then will
sit on top of there. And then we've got room
at the top of the door. So that's what I'm looking at. So the doors going to be here, we've got a little bit of
room on the top of the door, and we've got a window that's
going to be over here. From there. Then we
can actually grab both of these and we can press Shift. And then what I'm going
to do is just drag it over to this end like so. So then I'm going to have
a window here in this end, it's probably a little bit too close a window around here. And then another door over
here, a window around here. So now I can see that
pretty much this high on here is going to be round
about the right high. I know it was long winded and I know it took a
little bit of working out, but I'm happy now
that I've got that. Because that means then I
can build off of there, knowing that
actually this height is round about the right height. Nothing is going to
be set in stone. You're probably not gonna
look the same as mine. Don't worry about that.
The main thing is though, getting it actually all into something reasonable
is what we're looking for. We don't want it way up here or something
or way down here. We need to look reasonable.
Alright everyone. So, I'm sure, I hope
you enjoyed that. I hope you enjoyed my thought process of going through it. And I'll see you on the next
one. Thanks a lot. Bye bye.
157. Laying the Foundations for the Perfume Shop: Welcome back everyone.
To blend the ball, the environment, artists guide, and this is where
we left the art. So now let's press one. And what I want to do is
I want to bring this up. So this up probably a
little bit too high there. We can see it start here. I want it to probably be
around here. This post. So what I'm going
to do is just drop it down. So I want
to press control. I'll drop it down. Pressing one on the number pad
to roundabout here. And I think that's
going to be fine. Now, from there then what
I want to do is I want to bring this up
now and into place, going over this bit here. So basically this part
is going to come out, it's going to actually come,
so let's think about this. It's gonna come
up, it's going to go out and it's
basically going to be sitting more or less
under this part here. So let's try that. Let me try that and
show you what it means. So first of all, I'm
going to bring it up. So I'm going to bring it up
to something around there. Maybe a little bit out. Yeah, something around here. And then what I'm going to do
is I'm going to bring it up again, something around there. And then I'm going
to pull this out. So I'm going to pull this
out to actually give it the illusion of it actually
holding something in place. And then from there then I'm going to take the top of this, so jaws the top of it. And I'm going to actually create a another bit on top of here. And then they can
actually go under. Let's bring in one more part. So what I'll do is
I'll press Shift D. I'll press the button. So shift and let me make sure that I've
not got one under there. No, I've not. So that's good. So I've moved it up,
Let's press S in fact, let's just put it back so we're controls there.
Let's put it back. This one here. There we go. Alright, so we've got one on
there, that's what we want. Let's press the
Spe then And pull it out a little bit like so. And then let's press and pull it up into this place here
and on top of this place. Don't worry, we're going to
have another part on here. Then what I'm going to do is I'm just going to pull this out like so all the way probably out
something roundabout there. Alright, So that then
might actually support it. So what I need to do now
is I need a part that's gonna come underneath here
and go into the place here. So I'm going to use this
part I've already got. So shift D, let's bring it over, make it a little bit
smaller like so. And then what I'm going
to do is just pull it back maybe to
something like that. Press the button then and
pull it back like so. And then all I'm going
to do is pull it across. So I want to pull it across to here into my actual window
that's going to be in there. So something like, this
is what I'm looking for. I'm going to press L again. I'm going to pull it up a little bit more just so
it sits on there. Now, we're all going
to have something else that's going to be
on here covering it. Now the main thing
is that I do want to make sure that
both of these are, you know, pulled out enough so they can
actually be supported. So in other words, I'm going to pull this out a little
bit more like so. And then I'm going
to grab this one, pull this one out a
little bit more like so. All right. So that's
looking good. I'm just wondering if we might need kind of another
support in there. I actually don't think
so at the moment. What I think though
is we'll just pull this up a little bit. Now what I want to do now is make another one at
the back of here. So what I'm going to
do is press shift D. I'm going to bring this
one then to the back. Jaust into the wall like so. And then I'm going to press
and bring it forward. And there we go. Now
we look as though we've actually got
some support on there. From there, then
I'm going to use this pot once I've
actually created it. So let's move our guy a
little bit to the side. And then what I want to do now, this is where it's
actually going up if we pull this down. So in other words, if we come in and grab this part
and pull it down, you'll see that it actually changes the way it looks
as though it's supported. So you can see there,
it changes that way. So if we pull it down a little bit and then
pull this one out, so if we can come in
and grab this part here and then turn it off and then pull this
out a little bit. You can see now that
it actually looks as though it's being
supported a lot more. All right, so once we've got that and we're
happy with it, what we're going to
do now is we're going to come in and we're
going to bring in, I think we'll bring in
an edge loop on there. Think it's going
to make it easier. So control left
click, right click. And then what I'm
going to do is just reset all the transforms. So all transforms, right
click, set, origins, geometry. And then I'm going to come
in, grab both of these. And then what I'm going to do is just press the eye button. Press the eye button again, and jaws bring those in, hold in the shift button. And finally then
let's pull them back. So we're going to press, pull them back into place like so. All right, so now what
we can do is we can grab this one all
the way up here so I can come in L. And then what I can do is
I can press Shift D, enter and bring it back. So I'm going to put
probably two in here, so one around here, one right in the corner. So shift D, bring in another
one, put it around there. So that is basically the
layout of what I want. Now you can see that
this part here, so this bottom part here, they're not coming
down far enough. So what I'll do on these parts
is I'll put a top on them, so I'm going to come in,
I'll grab this part here. And then what I'll do
is I'll press shift D. Enter and then I'm
going to pull it out. So first of all, let me
just pull it up there. I'm going to then press
delete and limit it. Dissolve. And I'm doing
that to get rid of that, you know, this line that
was in there like so. And finally let's pull it out. So let's grab it like, so let's pull it out just so
it's under there like so. And then press L on this part. So L, and then and pull it up into the
place that you want it, which will be
somewhere around here. Again, it's gone too far up. So all I'm going to do is
grab this phase and then I'm just going to
pull it down like so. Am I happy with how that's
sitting? Not at the moment. I don't think it's actually
thick enough so I can come in then and grab both of these
and then pull them both up. And then again, I'll come in, make sure that this is
sat on the top of there. I'm also going to make it
a little bit wider so. And Y, no, and X, sorry. Pull it out a little bit and
then go to the top of it. So grab the top like so. And now pull it up into place 'cause we wanted to
look chunky enough, like it's actually going
to be holding something. And at the moment, the way we had it, it didn't
look like that. Now what I'll do is
just grab the front, pull it out, and you
cut it up to you. Whether you pull it out
right under there, like so. And yeah, that's exactly
what I'm looking for. Al right now, we look as though we've actually
supporting something. So now I can come
in, grab this one, and then I can press Shift D, bring it over and put
that into place like so. Now from here we can
actually start now, because we've done
that bit in building this part out once we've
actually got the other parts in. But you can see now we can
kind of tie it all together. The one thing is we
need to keep it there. And the reason we need
to keep it there is because this part here, going down here, we don't
really want to have that, you know, kind of into the wall. We want it actually on
the outside of the wall. Now from here then
let's actually come in and make
some other parts. So if we come in and what we'll do is
we'll grab this one. And this one we'll press
shift S, so Ursa selected. And then what we'll do is we'll start now on the bottom of here. So if I press shift,
we'll bring in a cube. And then what we'll do is we'll start with the bottom part. So I'm going to pull it back, so I'm going to put it
down to the floor like so. And then what I'm going
to do is press S and Y, make it a little bit thinner. So I'm looking now where I actually need
to bring that out. So I'm going to bring it down. Then I'm going to grab the
whole thing with L, S, and X and pull it
out into place. All right, so now
we've got that. Let's have a look then how
far we need to bring it out. Now the other thing, remember, is this wall can also come
out a little bit further. So we need to split
that off now. So I'm going to
come in to my wall. So press tab, Come to your wall, grab this wall, and
all you're going to do is press selection like. So now you can see the wall
comes all the way up to here. We really don't need
it up to there. So let's actually fix that now. So all I'm going
to do to fix that is I'm going to grab this. I'm going to press one
on the number pad, and then I want to
cut it around here. So if I press A, now come in, put it onto see through. And then what we'll do is
we'll come to mesh bisect. And I'll cut it roundabout here. And then we'll, there is a mesh bisect and I'm going to cut it, I think on this I'll cut
it round about here. Something like that. All right. We don't even need to make
sure that it's zeroed out. We can do if we want
to, but I think that's going to be absolutely fine.
So let's grab all these. Press Delete, and let's
get rid of the faces. Let's finally turn this off now. And now we're left with
one wall where I can actually move it out
if I need to like so. And I do want to move it
out a little bit because I want to pull this out
just a little bit, so it's actually sat, you know, kind of roundabout here. So from there then
now, and pull this out a little bit
and there we go. All right, now it's really
starting to come together. And now what I'll
do is on this part here will actually make
it going up a little bit. So in other words, I'll
come in now to this. I'll press control left click. I'll bring it forward. Just just the titled
in the shift born. And then I'll grab the
bottom part of here. And I'm going to bring
that up then with just below this
part here, like so. Now what we'll do
then on the next one is we'll start putting
the panel in here. And then we can move
it over across, and then we'll put
another part in the top, and then we can start actually
working our way up here. There's not much to this one, it only has one window. So once we've actually
got most of it in place, it's pretty easy actually. So anyway, I hope
you enjoyed that. I know it's a, again, a bit fiddly when we
always start with a building till we get
in the flow with it. It's the same with anything really when you
start building it. And being as we're
like, you know, building this building and then we're building
this building. It does take a little bit
of time. Alright everyone. So I'll see you on the next
one. Thanks a lot. Bye bye.
158. Designing the Perfume Shop's Exterior Style: Welcome back everyone to Blender for the Environment
Artists Guide. And this is where we left off. All right, so now
let's come in and what we'll do is we'll bring
in another cube now. So let's press shift. We'll bring in, in
fact, you know what? We'll bring in a plane.
I think it'll be easier. So Y sorry, x 90. Let's make it a
little bit smaller, just so it's going
to fit in there. Let's press essens
ed and squish it up. And then what I want to do is put this in some sort of place. So essen, bring it in to
some sort of place like so. And I'm looking now, if
I put a top on there, I think that's going
to be absolutely fine. All right, so we've got
the right scale in there, now let's press control or
transforms right click, set origin to geometry. And then what I want
to do is press Tab. And I want to grab my
plane with face select. It's actually behind there,
so let's bring it in front. So just up to the wall. Don't worry. We'll
move it forwards and backwards when we need to. And then what I'm going
to do is I'm just going to press I and bring it in. So I want to bring it in to this sort of, you
know, kind of depth. I also want to bring
it in a little bit more so it's a little
bit square as well. At the moment, you can see it's not quite fitting in there and
I do want to fit in there. The problem I've
got is though I'm going to have to move
it this side as well. So if I come in and
what I'll do is I'll just go back before
I actually inserted it. So let's go back. There we go. Let's press tab, press one, and then what I want
to do is press and X and bring it in to
something like that, just so it fits in there. And then finally I can press
I and bring it all in like, so that is what I want. Now from here what I want to do is I want to grab the outside. So ult shift and click. And then what I'm going to do
is press and pull that out. So, and there we go. And then the inside I'm going
to press and bring it in. And then what I'm going to
do is press and then again. So you've pressed once again, and from there you can
actually bring that in now. So press the button
and bring it in like, so that is the kind of panel that we're
actually looking for. Now let's think about
the panel that's going to go over the top shift. Let's bring in a cube. And then what we'll do is
we'll make the cube smaller. And what we want to do is
make sure that this cube is poking just out above the
top of this one here. So something like that. And then we'll press S and
X, pull it out. So from there then
let's pull it up. So I'm going to grab the
top of it and I'm going to pull it up like so. And then I'm going to
bring in an edge loop. So control left
click, right click. And then control B, and let's be level that off. So something like
that sort of gap. And then what we'll
do is we'll just pull it up a tiny bit. Now we've got this gap here, so let's grab the front of it. So we're going to grab
the front of this. Now always, when you
extrude inwards, you're always going to
end up with side parts. And I'll show you
what I mean by that. So I press and bring this in. I'm going to sort
out the front of it first before I actually
deal with the side parts. And then the front of this, I'm just going to pull
out a little bit. Now if I press shift H on this, you can come in now and see
the problems that we've got. You can see now we've got
these little parts in here. Like so again, we've
done this before. But what I want to
do is just delete all of these parts when
you grab them all. First of all, you
will be left with, I think, one left over. No, not actually, so
I'll got away with that. That's quite nice
just to let them all, you're not going to
need them press sir, tab Lth. Bring back everything. So all right, so now
we've got these parts. We should be able to grab these, press Shift D and
then drag them over. And hopefully they're going
to fit in relatively well. Now you can see that
they're not actually fitting in as well as
we wanted them to. So what we can do is
we can grab all of them and then press S and X. Just pull them in
slightly like so. And then what I'll do
is I'll grab all of these and I'll just pull
them over to the side. Then we go just in and then
I'll grab this one here. So what I'll do is
I'll come in L, L. And then selection like
control all transforms. Right click, say
origin geometry. And then what we'll
do is we'll press one and pull this
over to the side. Now if I start
pulling this over, we should be able to pull this
over to the side like so. Now you can see that they're
fitting in much, much nicer. Now it is a little bit in
there, just a tiny bit. So let's come in and let's
move it slightly over, or that they, they don't
need to be perfect. But there we go. That is
what we're looking for. That is looking
very, very nice now. Now, before we go
on, let's actually get some materials in here
and things like that. We also need to be level them off and think about any other
things that you might want. You might want to
put some blocks in here to actually
further support this part. You might want to
put a little bit of ornate things going
along here or something. That's something that
you might want to do for me because the course
is so long already. We're just going to come
in and we're going to make sure that we grab this one. I'm going to split this off, so L and L, P just split it off. And then what I'm going to
do now is come to this one. Press control or transforms
set origin to geometry. And this will be the first
one that I'll work on. So U Smart UV
project. Click okay. And the one you want is going
to be red painted wood. So I'm going to
grab this and I'm going to come to my materials. First of all, type in red. Red painted wood. And that's what I'm
going to give it. Then what I'm going
to do is I'm going to come add, modify it, generate and a bevel, I'm going to put this
on naught point naught, naught, three like so. And pretty much that
one is done then. So now I'm going to do is I'm going to come in
and I'm going to split these off because it's easier just to unwrap
them as we know. So selection, split it off. And from there then
what I'm going to do is I'm going to grab
each of these now. And the bottoms of these, and these press control
all transforms. Right click, set
origin to geometry. Now let's come in and
unwrap each of these. So a smart UV project. Click okay, and just do
the same thing again. So I'm wondering
if I can actually press Shift R and if
that'll actually work. So I'm going to
actually see if that actually works because
that would be great. Let's go over to UV editing. And what I'm going to do is
I'm going to grab this one. I'm going to zoom
into my UV map. I'm going to press
Smart UV Project. Click Okay. And there we go. That one's unwrapped. Now let's come to this one, press Tab, and then let's press
Shift R. Yeah, it's not going to
work as you can see. So anyway, let's come
in Smart UV Project. Click okay, and we'll
just work our way down. We can unwrap these swans
together, for instance. So a Smart UV
Project, click okay. And then these ones here, tab, Smart UV
Project, click okay. Now from there, let's
grab all of these. So all of these parts like so. And then what we'll do is
grab this one last control L, we're going to link
materials and control L, and we're going to link
or copy modifiers. Now just make sure that
the actual modifiers have worked on the inside of these and the inside of
these which they have, all looking really, really
nice as you can see. And now finally, we just
want to do this back wall, so we're going to use the green. So if I come to this one, click the down, Now I'm
going to go for green. And it's going to be
green painted wood. Wall green, it's going
to be wall green. Click that on and then Tab, grab it and then you unwrap. And there we go. All right. I think on this one the walls looking, it's a
little bit too big. On the unwrap, I'm
going to bring it in a little bit like so
just to get rid of, you know, tons of this, you know, these little
indents and things. And from here then let's
actually now save out our work. So let's save it out. And then what we'll do is we'll just put it on rendered view. And there we go. That is what
we've got to start with. Looking very nice now from here. Then what we can do is we
can work our way up now. Because now we have this part that's going
to come out here, and now we can
actually work our way up to the next level. So this level on here, very simple level this. And we'll, we'll put a little
band going across here, and then we'll work our
way up to the actual top. We might as well just
keep working our way up on this one and
getting everything in, because I think it's
going to make it way easier for putting in
this round circle. So as I said, we'll get
this part done first and then we'll get this
part done on the next part. All right everyone. So we'll
do that on the next lesson. I hope you enjoyed
that and I'll see you on the next one.
Thanks a lot. Bye bye.
159. Modeling the Second Floor of the Perfume Shop: Mice, we want to blend the for the Environment Artists guide, and this is where
we left it off. All right, let's put
it back onto modeling. Actually let's go
back onto there. And then what we'll
do now, we start on these parts going up here. So what I'll do is I'll
bring in another cube. So mesh, bring in a cube. Let's pull it up. There is
another thing we could do. We could actually just
copy the cube every time, but have the cube already have the Bevlon. That
actually might work. I've not actually
tried that before, so you could actually try that. I think what I'll do is
I'll pull it up to here. First of all, I want to
give it a good base. What I'll do is I'll press Sens. Then I'll just see.
I'll press control or transpondrite clicks
the origin geometry. Let's see if we add a modifier. Generate, bring in a bevel. And then what I'll do is
put it on naught point, naught, naught, three like so. And we'll try
building from here. Okay. So from here
then what we'll do is we'll bring this in slightly. So what I'm going to do is I'm going to grab the top of it. I'm going to press
and bring it in. And then I'm going to
press, and what I want to do now is bring it
to something like here, and then I'm going to
bring it up again. And then what I'm going to
do is pull this out now. So if I grab the front of here, I'm going to pull this out like so making it a
little bit thicker. And then from there
then what I'll do is I'll pull this up once more. Now this is going to go
all the way up to here. So we're basically
going to have to build something in this
as we build it up. So I'm going to press, pull
it up to round about here. It's quite an actual
long section. This, this part here, it's one of the
longest sections. So we've got to make
sure that it looks like it's actually supported
by something. A lot of something. All
right, so we've got that. So what we're going to do, the easiest way to
do that, by the way, is to put in kind of the
bars like we've done before. So in other words it's
five press control law. Bring it down to here. And then what I'll do
is bring this out. So Alt shifting, click
Enter, alternates like so. And there you go. Now you can
see it's actually looking as though it's got a
lot more support now. We're also going to have
a part that's going to bridge kind of
the gap over here. So over this bit.
So what I'm going to do is I'm going to bring
in another edge loop. I'm going to bring it
up to roundabout here, Press control B, pull it out. And then we're going
to press Enter alternates and
pull that one out. And there we go. All right, we're actually going somewhere. Now, let's think about
the top of here. First of all, we
need a top on here. So I'm going to grab this
top on the top of here. I'm going to press
Enter, pull it out, press the E. Then
to pull it up and just get that little
chunky part in there. And then from there then what
I want to do is I want to bring in another part
coming down here. So what I'm going
to do is I'm going to grab the front of here. I'm going to press Shift, and then I'm going
to press and X, just to bring it in slightly. And then I'm going to pull
it out. Grab the bottom. Pull that down. Yeah,
something like that. And then I'm going to
pull it down again. So E and pull it down again. And then what I'm going to
do now is bring it out, so extrude it this way, so like so and then L. And then I'm just going to fit this into place just in
the front of here. And finally, I need to pull down this part because it
doesn't look right like so. So I'm going to pull
it down just to there. And then this bottom part
I'm simply going to pull in. So if I pull this in, like, so press the tab button
and there we go. All right, that's starting
to really come together now. Now we need to move
this over to this side. Just make sure you're happy
with how yours looks. You might want one more
bit on here, for instance, just to make sure
it's, you know, looks a little bit better than, you know,
what it did before. I think we will actually,
to keep in with this, what we'll do is we'll
come to this part here. So this part here, I'm going to press the eyeburn,
bring it in, and then I'll press E. Just pull it back slightly,
and there we go. I think actually that keeps with this part here a
little bit more. And finally, then
I'll press shift D, and I'll bring it over to
this part over here like so. Again, making sure that I can move it so we can
move this window. Once we've got it in place, this window is going
to be set inwards. So it's going to go
in on this part here, and then as it comes up, it's going to go further out. So that's the idea behind this, and this is why
we're building all of this work beforehand. All right, so now let's think about the top. So
we'll come to the top. I'm going to grab though for these control all
transforms right click, set origin to
geometry on each one, shift S, then ursa select is going to put
it right in the center. And from there, shift a, let's bring in another cube. And then what we'll do
is we'll bring that up to this part here. I'm going to press Essence
Ed, get really thin. Pull it up and then X and X, let's pull it out
and into place. And then what we'll
do is S and Y now and Y pull it into place. So what I'm going to
do with this one is I'm going to have
it all the way out. And as we work our
way down in it again, then I'll make it thinner, so we'll pull it up to
something like that. And then what I'll do is
I'll press control R, bring in another
edge loop like so. And then from there I'll
grab the bottom of this now. So I'm going to grab
the bottom up here. I'm going to pull
it down slightly. So as you can see,
let's pull it down. And then what I'm
going to do now is probably pull it
out a little bit. So grab the front of it, pull it out another
edge loop control, going across left click, right click, drop it in place. And finally then let's have one more which will be a bit longer. Pull it down so it's just
below that over there. And then pull it out like so. All right, that's looking good. Now let's probably use this
on the next part down. So if I press shift
D, let me bring it down and see how that
fits in there as well, Just below this part
here as you can see. And actually I think
that's going to fit in there very nicely. All right, so now we need just one more block that's going to go
on the bottom here. I'm just wondering whether I need, I don't
actually think so. I don't think I need
one more part here. What I do think I need is just one more part
down here also. I'm thinking that this is not quite out enough on this part. As you can see, this part here, I think needs to be
brought out a little bit. You can see we're trying
to fit it on here and that's causing issue because we probably need
another block on here. Actually what we'll do is
we'll actually come in, we've got all of that now done. What we can do is probably
easier to grab both of these, grab these parts
because they're not actually joined to that
part of the moment. And then what I can do is I can just bring those
down just for now. So I'm going to bring them down further than I actually want to. And then I'm going to come
into the top of these. Control plus, and
control plus once more. And then what I'll do is
I'll bring these down like, so I'm going to press
A then just to grab everything and what I'm going to do is I'm just going
to pick them up. So I'm going to put something
else under these parts on the bottom and I'm going to pick them up and try and
put them into place. Now you can see
at the moment, we don't really know where
we actually want them. So what they'll do
now is what it is, is it looks too
thin on the bottom. We really don't
want that, so I'm going to put another block in here and then another big
block going across here. So why I'm going
to do that is I'm going to come now to my corner. So I'm going to grab
this corner here. I'm going to press shift
S, so cursor selected. And then what I'm going
to do is I'm going to press Tab Shift. Did I actually bring
my cursor there? Shift S, Ursa selected. Oh, it's actually going
into the middle of there. Yeah, that's okay. That's fine. Shift a cube. Let's bring it down.
And we want it much, much lower than that sensed. Let's bring it down
onto the top of here. As you can see, let's press the S button to
pull it into place. Let's pull it down. Let's now look at how far it's
going to come out. So I think it comes out to there and I think it
should come out to there. I think that should
be fine. And then what I'll do is
I'll pull this part over over to there,
and then pull it up. So now finally let's come
in and just bevel off this. So I'm going to grab
this edge control B. Give me a few more
edge loops like. So now let's come in
and bring these down. I'm going to bring these
down now to where I want it. So if I sit them on
top of there like so. And then I can have a
piece coming across here and making this look nice. Exactly what we want. All
right, so we've got that, Let's pull this down a little bit further,
which is what it is. That's fine. And let's get
these parts now into place. If I grab this top and
this one, and this one. Control control plus, and pull it up just into place,
grab both of these, then L, and L, and finally now
we can pull these up into the place
we're having before. And there we go. All right, finally then let's come in
and make this part here. If I come in, grab
this part here, what I can do is I
can press Shift, and then I can
pull this slightly over and then pull it all
the way over to here. And now you can see the other
one is going to fit on. Then we've got a
little bit more of a relief on here
and I think it just adds to the actual weight
of the building like. So I think with this part
actually, I'll grab it. Alt Shift and click, and then just press
AlternS and just make it a little bit,
actually bigger. A little bit bigger than
that. And there we go. And I also think, I'm just wondering whether we
should have this rounded out. I don't actually think
so. You know what? I'm not going to do that,
but what I will do is I'll press control transoms, right clicks at
origins, geometry. And then I'll grab
the inside of here. I'm going to press the eye
button to bring it in like so. And then I'll leave it I think I'll bring it out on this one. Actually, bring it
out and there we go. All right, so we're pretty much finished with
this part now. And so now what we can do is on the next lesson is we can
get all the materials in. And then we'll actually move
on up to the next part. And as we keep on moving up, we actually gain more parts of the building
are being done and more parts we can
actually bring together. And I think this is the best
way we can actually do it. You know, instead of
actually coming around here, we could actually come
around this side as well. We have many options
actually working like this. And I know it's all to
get this center part in, but we might need leave
that to the last. We'll see. Actually let's
actually think about this side. It's a little bit
more exciting than just going and
building this side. I think this side is a
little bit more technical. This part's a little bit easier. So I think we'll get
the easiest part done actually first.
Alright everyone. So, I hope you enjoyed
that and I'll see on the next one. Thanks
a lot. Bye bye.
160. Designing the Perfume Shop Roof with Ornate Features: Welcome Microbe to Blender for the Environment
Artists guide. And this is where we left off. All right, so most of this
already has a bevel on there. So what I can do is,
and now I can come in, grab all of these parts,
not actually that many. For this one press control all transforms right
clicks the origin to geometry of each one. And then what I can
do is I can press control L and we
can copy modifiers. Then what we can
do is we can come in each individual one tab, smart V Project, Click Okay. I'm just wondering if
we can actually set up a kind of keybind for that. No, After a quick pause, I can't find how to
actually create that. I think we need someone
to create a button up here is something that we can just click on these and they'll, you know, smart UV unpack them, but that's a bit of scripting and I don't really want
to do that at the moment. All right, so let's go over
to our UV editing first. Let's just make sure that this
one's unwrap, which it is, and then what we'll do is
we'll come to this one, a smart UV project, and then we'll just
work our way down. Same for this one smart
UV project. Click okay. And then this one
smart UV project. And we just just
work our way along. I think it's just this one left. And then all we'll do
now is we'll come in and grab all of these that were Jaws done wrapped,
same for this one. Grab this, then press control L, and we're going to link
materials. And there we go. All right, so the
next thing we need to do is bring in
this actual wall. So what I'm going to do is
I'm just gonna press one. I will bring in then my
Where is it? My bookstore. Let's bring in the bookstore. And from here, I'm hoping to get the actual size of the
bricks that I can see here. So that's what I want to use, this size of the bricks. So I'm going to come in,
I'll grab this part. I'm hoping that this part here, so if I grab all of this, you can see it's
still attached to all of this. We don't
really want that. So what I want to do
is just grab this bit. I want to press P selection, Split it off now press
control or transforms. Right click, Set
origin to geometry. Tab A wrap. And there we go. Now let's put in our bricks. So if we look for bricks like
so let's bring in bricks. And now what I'll do
is press A and then I'm just going to make
it much, much smaller, much smaller till
the kind of line up with the bricks
over this side. So these bricks and
these bricks now look round about the
same size from here. Then we can always use this. In other words, I can hide
my bookstore out the way. And now I can always use
these bricks to get, you know, the right
scale of what I need. So double tap the
A and there we go. That's really coming together. Nice. Just having
one final look. And I think with this one here, maybe we just need to pull it out a little bit more,
is what I think. I'm just wondering. Yes, I've got some room to pull that out, so I'm just going to
pull it out slightly. I'm not happy with
where that is. And I'm just wondering, actually now I've
got this bit on. Should I pull them
all out a little bit so you can see with this
one on the inside here? Yeah. I'm going to pull
it out a little bit. I think it's just too
close to that wall, so let's pull it out to there. Yeah. And I think
that looks way, way better now. All right. So now let's work our way
up then to the top part. I think with the top
part, what we'll do is we'll do this kind of bit on here and then work
our way down because it'll just be easier to
pull it all together. So let's go back
over to modeling and then what we'll do is we'll
come now to this top bit. Don't forget to
save out your work. And then what we'll do
over here, grab this face, pull it back a little
bit like so into place. And you could really, really go to town with this
and have it, you know, kind of leaning over and some
beautiful work coming over. There's lots of things you
can do with this, but for us, what we'll do is
we'll actually bring in just some simple
wood on here. So all I'm going to
do is I'm going to come I'll come to the center. I think I'll find that
a little bit easier. So shift S Kurt to
selected tab shift. And let's bring in
a cube from there. Then let's make the cube
a little bit smaller. Let's pull it out into place. So I'll make it, I'll probably actually make it, maybe I want to keep the actual
square so you know what, I'll give it a try with this
that we've already got. So I'm just going to
grab this. Pull it down. That wasn't pulling it down.
That's pulling it down. There we go, let's pull it over then into
where we want it. So something right at the
side of here like so. And always as well on, you
know, things like this. It's always easier
if you come in afterwards with the bicect tool. I find it easier at least. So if I press L now
I can pull this down into the kind of place where I want it to, something like that. And then what I'm going
to do is I'm going to cut it going round about that way, and I think it's going to
look better like that. I'm just going to pull it down a little bit more and
then pull it across. And what I'm also going to
do then is just make sure that all of my roof is
going to fit in there. So I've probably got a little
bit more room to work with, to be honest, coming down. I think I wouldn't be
happy with how that is. All right, let's press one. And then what we'll do is we'll press a Now the good thing is about that roof is I'm going to hide it in the center so I can get rid of
kind of some of this. So all I'm going to do then, I'm just going to press a one. I'm going to come in then
with mesh and bicect. And the best thing
is about the bicect once you cut it across this way. So if I cut across this way, I can then come up
to a clear in it. I can also fill
in the end of it. And the best thing is I can
actually work now with the X. So I can bring it in
or I can bring it out. I can also pull it up or down to wherever
I wanted a thing. I'm going to be happy
with it being like that. All right. Now I'm going to use the
bisect toll once more. So I'm going to come
into mesh bisect. I'm going to bisect
it across this way. I'm going to obviously
turn around the clear and the inner
and outer like so. And from there then
I think we can actually work with that. I think actually
I'm going to pull it a little bit more that way. I'm also going to rotate it
round a little bit more. So I'm going to rotate it
round maybe a little bit more. I'm just looking at
the Z. There we go. That's what I want. Let's
pull it up. There you go. You can see how we can
straighten that up. All right. Something like that I think
is going to be near enough. Perfect. Now, let's
press one then. Just get a view on that. I
think actually I can pull, can I pull it round
a little bit more? Let's have a look. See
if you can bring that down. Yeah, like this. And then pull it
this way, like so. And then I can put a top on
there, perfectly all right. That's looking pretty nice. Now what I can do is now I can come in and create the bottom. I'm thinking I'm going
to cut it again. I'm going to cut it
once more because it will make it easier for me. So if I grab it again A and then this time we'll just
cut it straight down. So bisect all again. Cut it straight down. So make sure this
is set to zero. This is, and there we go. And then just make
sure it's right in the middle and they're
going to be touching. Now the thing is we can
move these together a little bit like so just make sure it's
right in the center. Now the center actually as you can see is
roundabout here, so kind of messed up
a little bit there. Yeah, it's round about here. You know what I'm
going to do, I'm going to actually
grab both of these. I'm just going to pull it
into place a little bit more because I think that's
going to be easier rather than messing
around like this. And I just want to make
sure that it's the same. You can see it's a
little bit in on here. So let's pull it up and you
can see it's about the same. And then what I can do
now is press one again, A and the Bicyc tool. And cut it straight down
where this dot is here. So select sorry, mesh
bsect straight down there. We go straight into
the middle like so. And then we go all
right, done with that, finally now, now
we've got this here. Let's bring in another modifier. So we'll bring in a mirror, put it over the other side, and it's going to come
down to roundabout, into the wall roundabout there. But we're going to
actually put a bit on this part which
is going to go, if it double tap the,
you can see it's pretty well hidden
in there anyway. Now let's think about the bottom part that's going
to come down here. So I'm going to
press shift again. Cube. Let's bring it down. Press the bottom, and
let's pull it out. And X, let's pull it out all the way over to
here. Let's press. And I want it to be roundabout, actually,
where I've got it. So now if I pull it back
a little bit there, and then what I'll do now is I'm just wondering where the
top of it wants to be. So maybe up a little bit there. Okay. From there then
I can actually get this post in here underneath. All right, so we've got that. Let's actually come in though and actually get
rid of this bit. So in other words,
let's pull it back a little bit because
it's way too thick. And then from there what
I'll do is I'll press control left click, right click. Bring in another edge loop. I'm just going to
pull it out to there. And then I'm going to
grab the top of here. I'm going to press
and pull it up. It looks pretty nice. Now, the last of all you can
see we're way out over here. So let's press S and X. Bring it in your back in
place, and there we go. All right, now on
the next lesson, we'll actually put in
the center part of here, put the top on the roof, because we might as
well do that anyway. I'm not sure where this
is going to come to yet. This roof, it maybe wants to come this way a
little bit, is what I think. So in other words,
this whole roof comes across this way and this
middle part comes over here. Yeah. Because we've got a chimney
to get in there as well. You know what, We'll do
that before we finish. So what I'm going to
do, just put my X ray on, grab my edge. So it's this edge here, you can see that's moving the roof over. I'm going to move the roof
then over the roundabout, if I say near enough,
the center of this. And then what I'll do is
pull this part over again. Control three. Move it over. And we can see I've not
grabbed it all there because I grabbed the wrong
bit, Control three. And now what I'll
do is just move that over and get it more into place like so that I
think actually looks better. Now. I'll just grab
both of these. I'm going to pull them back just into there. And there we go. It just looks so much better
the way that it's now poking over rather than this roof being all the
way over there. Yeah, I think I'm much
happier with that. Also, on this bit, we're going to have another bit
that comes out. But I like the slant over
here which is it's not level. In other words is
what I'm saying, we don't really need
it to be on this part. We can make it a little bit
different. Let's have a look. Actually pull it a
little bit further over press control three. We could level it up a
little bit more now. Does it look a little
bit better like that? Have a look. Still got
a slope on this side. Let's come in and pull
it over a little bit more. Not too far? Yeah. It's not quite so much of a slope now. That's
what I'm looking for. There's still a
slope there, as you can see if I press three, but it's nowhere near the steepness of what
we had it before. All right. It seems,
again, a lot of messing around but getting, you know, the whole of how this actually looks. So
if you look from here. From here, you can see what the look we're
actually going for here. We don't want to
looking too similar, we want it looking different. You know, in Victorian England, they would take over a building and be just sticking
parts on everywhere. You know, building wood parts, brick parts, and then some modernization coming
in on top of that. And that's the kind
of look that we're actually trying to achieve here. Okay? So I'm happy with that and I'll
see you on the next. And everyone, thanks
a lot. Bye Bye.
161. Crafting Ornate Wooden Details for the Perfume Shop Roof: Welcome back everyone to blend for the Environment
Artists Guide. This is where we left it off. And now let's bring in a cube. So just make sure
your cursory is where mine is right
in the center. Let's bring it down then.
And what I'm going to do is bring this in first. I'm then going to just put it up to where
I actually want it. So just there like so. And then what I'm
going to do is I'm going to bring it down
now to the bottom. I'm going to turn off
my ghost or x ray. Bring this down all
the way down to here. Now we can see
we're way, way out. But I'm not going to worry
about that at the moment. Because what I'm actually going to do is just
slot that in there, press control lot, and bring in some edge loops like so
left click, right click. And then what I'm going to
do now before move this is I'm going to create
this kind of top bit. So if I press one, what I'm
going to do is I'm going to grab this going all
the way down to here. And then what I'm going to do is press press I again
and bring it in. So I want it bringing
in something like that. Then from there what I'm
going to do is I'm going to press shift D and pull it out like so now I just want to bevel off the top just so
they match these parts here. If I come in, grab
this one and this one, Control shift, and bring
it down just to there. And from there then I
can turn this down. So now I just want
to match them up. So I want to match them up against here
without going too far. So we can see I can
put them to there, grab these two parts, pull them down there, and now it's matching
a little bit better. All right, from
there then what I can do is I can press L, E, pull it back into place. And that is what
I'm looking for. Now the last thing
I'm looking for, actually, is to bend this in. Now if I come down to this part, just grab this part here, and what I'm going to do is
just put proportionality on. And then all I'm going to do
is pull it back into place. And that is what I'm looking for except do I want
it at the moment, it might be not round enough. I want it, I think, a
little bit more rounded. Let's pull it back, and
let's have a look if we can do that with root.
Let's try the root. Let's pull it in.
Yes, and there we go. You can see now
it's more rounded. That's what I'm looking for.
And it's more square on the top of it as you
can see. Yeah. Okay. All right, now we've
got that. Let's put it on object mode
for the time being. And what I want to do
is put in my billions, because I want to come in and
grab this one here again, the one that we
actually created. The funny thing
is that these are under the bullions
at the moment. If I come to these,
these should actually, I think be under. Let's
have a look at that. So why are they like that? Yes, it should be
under the butchers. I don't know why they're there. I'm going to grab both
of those, press M, and I'm going to put them
under, where is it butchers? Like so. All right, so now I can come back,
grab this part, shift D, and then bring it
up and let's bring this into place where
I actually want it, one G. Put it into place, so now we just have to make sure that we've got
the right thickness. I actually think for this
one say look, bring it in. It's way, way too
thick as we can see. If we turn down the thickness, that's what we want to
turn down, that's cool. And then what we can
do, that, I think it's the right thickness though for
the wood. So that is good. So what I'm going to do is
just going to press one and what I'll do is I'll
start with the inside. So what I'm going to
pull this one down, so I come here,
I'm going to pull this one down into place. I'll put on proportionality
on smooth, but turn it off. Turn it off, and then I can
pull this down into place. So we're going to
go down to there. And then we're going
to go up to here like so pull it over and
there we go. That's that one. Just make sure that it's
slotting in place at the moment. You can see this is not I'm jaws going to slot into
place like so what I'm also going to do with
this as well as I'm going to come over and
turn down all of these. Turn them maybe three because
they're made of wood, so they're going to
have a little bit of chunkiness to them anyway. And then what I'm
going to do now is I'm going to press one again. I'm going to press Shift
D to duplicate it. And now I'm going
to spin it round, so R and X and Y. There we go. Spin
it around to there. To start with, I'll
put it into here. Then I'll bring
this bit up first, and I want to get it right
into this part here. Let's bring this bit in next. We can see we want to
actually round this up, then let's bring this part in then let's bring it down here. Let's bring this part
down now with the blue. Pull it over, There we go. Now I do want
something like this. I obviously want to pull
it out a little bit, and I want it slotting
right into there. And then all I want to do
is just make sure that these are not touching so much. So in other words, the jaws want them touching as
they go in there. So okay, that's that bit. Now one more bit, so
I'll use this bit again. So shift D and then I'm
going to press R and X, spin R and Y spin it round. And then what we'll
do is we'll get this into this corner in here, I'm going to come in into the
corner, pull it all down. And then finally I'm
going to grab this one. This one and this one here. I'm going to see, actually
if I press alternS, yes, that's what
I want to make it a little bit thinner
going into there. There we go. That's
looking pretty good. Now, one thing we can see is this is poking out a little bit. Sometimes it's better
if you delete it and then just bring it in now. Let's try that. You can also
press and Y and rotate it. Altar, I think it is. That look. Nope, that's not going
to work out either. So let's just press
one and do that again. And the problem is here,
actually, you know what, I'm going to go back actually, we could have extruded it. The problem we've got is
that if you can't rotate it, and this is why I was
saying one of the things about using a path instead of a nerves curve
is that you can't do that. All right, so now
I'll do is I'll join all these together with
control J. I'm then going to press control
and all transforms. No I'm not. I'm going
to write clicks at origin three D cursor and then what I'm going to
do is bring in a mirror. So generate and mirror and we're going to mirror
on the Y or X. You know what, This
is not working. So I'm just simply
going to go in now and I'm going
to press control. You know what, this
is not working, so all I'm going to
do is object convert a mesh and then I'm going to now press control all transforms, set origin three, de cursor, add modifier, generate a mirror. And there we go,
finally that's working. Now I'm going to also write
click Shade Auto Smooth. And then what I'm also going to do is I'm going to
come into this one, bring it out a little
bit and the main one is going to be this coming to
this one, so this one here. And I'm going to bring this one out more than the other one. So something like that. So now we have gold problem in
this has gone out too far. So I'm thinking I'll
probably come in, grab the bottom with
proportional editing on, and then just come in pulling
like so. And there we go. That's exactly what
I'm looking for. That is looking very nice. That's right click,
shade, auto, smooth, making sure it's
smoothed everything off. And there we go. All right, that's pretty
much the top of here done. Now what we want to do
is we want to go in and actually add all bevels
and things like that. So what I'm going to do is I'm just going to
grab all of this. I'm going to press control, lay or transforms. No I'm not. I'm going to come
in object convert to mesh and then I'm going to press control lay or transforms. Right click, set origin to
geometry, adding a bevel. So generate a bevel naught point naught naught
three like so. And then I'll press control
L and I will copy modifiers. Finally, then we've missed out this bit as well,
so let's do that. Next control, lay, join it up with this control
L, copy modifiers. And there we go. Now
let's unwrap everything. So tab A, U, smart UV project. Click okay. And then let's grab these two smart UV project. Okay? And then we'll
do, just going through the same thing on
all of these parts. And the thing is, we're
building parts fairly fast now. So it might seem
like we're going over these parts over and
over again, but we're not. Then let's grab this one
here, Press control L, and finally link materials, and let's put it onto material, making sure we've
got them all on. There we go. Now the thing
is the backdrop for here, if I click on this, I just. This one here. Just this
part here. Selection. Tab again. A, and then you unwrap. And the one we, we is
going to be white. Where is it? Wall. Let's put
in there it is. Wall gray. Let's put that in. Double
tap, the A finally, it's part of render view
on and I have a quick look at what we've done
here. And there we go. All right, so really, really coming together now. Now what we'll do
is on the next one, then we'll get the posting, and then we'll get one of many windows that's
going to come onto here. So I'm just wondering, Yeah, this window actually, I'm looking on my own reference, we do use a fair amount of times it is a very
different window. It's more shaped in line with what this building
actually does, which is a perfume shop. So yeah, I think it looks nice. So we'll get that into here. And then we nearly
have one of the parts, or one side of the
building done, which means that it's
another part down. All right, everyone.
So I hope you enjoyed that. I'll
see on the next one. Thanks a lot. Bye bye.
162. Creating Authentic Victorian Windows for the Perfume Shop: Welcome back everyone to Blender for the Environment
Artists Guide. And this is where we left off. All right, let's put it
on object mode for now. And then what we're
going to do now is start with this window. So I'm going to come in, I'll grab this part here. I want it splitting off anyway. And then what I'll do
is you can see it's all the way over here. I
really don't want that. And I'm hoping that
I can come in and grab maybe let's see
how much it is first. So you can see probably goes all the way down
to there as well. Let's just grab this tab
and now we should be able to bring it over without portion editing on
into where I want it, which will be into the wall round about where that post is. All right, so we've got that. Now what we want to do is press control all
transforms right. Click, set origin to geometry
shift as cusa selected. And that then will
be a good place to start with our actual cube. Let's then press one. What we're going to
do is bring it up. It's a fairly, fairly
big window this. So we'll press S and's ad, let's get it into the
right sort of scale first. So something around there
thing and then and Y, sorry, S and X pull it out. Something around that size. And finally then let's pull it out to how far you want it. So it's also a very thin window, so it's going to be
very thin around here. So maybe pull it out to here first and then
grab the front of it. And then what I'm going
to do is just pull it back into play. So something like that, I think. Yeah, something like that.
Should be absolutely fine. And then what we'll do is
we'll come in now and grab this part and this
part, press control B. And we can see they're not
beveling off properly, so we know we need to reset
all of our transforms. Then we're going
to press control B and just be level
off those parts. Now I'm not going to level
them off completely on here because I do want to put in something that's going to
be round this side as well. So in other words, something that's going to go around here. I probably actually going to
be better off if I go back Press control law and bring these back first of all
to where I want them. Something like that. Then I
can grab the front of them. Press control now. And now you can see just
how much easier that is. So I'm going to bevel
it to there like so then what I'm going to do is now bring in
a top and bomb. I'm going to press control
left click, right click, control B, and then spring up
the top and bottom like so. And then I'm
thinking, now I will, I think we'll have 21 here. Five press control are two, left click, right click. We're also going to
need one in the middle. Now the thing is about
the middle at the moment. As you can see, we're only going to be
able to put that there. So left click, right click
is still able to do that. It just won't go
all the way around because obviously
this is an end goon. I'm thinking something like
that's looking pretty good. And then what we can do is
now we can bring all of the parts out that we
need to bring out. So what I'm going to do
is I'm going to come in, I'm going to grab this, going all the way around here like so. And it went around
the wrong way. So I'm just going to hit the
front of it with control. And then we're going
to click control. And now I'm going to come
control and control. Click, and finally then
just these bits as well. So, alright, that is what
we're starting with. Now from here I can actually come in and make the
actual edging of this, but I'm probably better
off splitting it off. So I'm going to split it off. So I'm going to press Control.
All transforms, right? Clicks the origin to geometry. And from there then what
I'll do is I'll come in now adding to modify it and
we'll generate a solidify. Let's then pull it
out the right way. Not that way. Let's
pull it out this way, let's make sure even
thickness is on. All right. I think that's a good
start for this window. Now what I want to do is the
top as well on this top. In fact, I'll do the top after. Yeah, we'll do this a little
bit of the top after. What I'll do now though, is come in and bring
in this center point. And these points,
all I'm going to do, I'm going to come in,
grab each of these then. Then I'm going to press control control and bring them out. Now I'm thinking maybe to put in now a center part on the center
part on each one of them. I think we'll do that next and
then we'll level that out. But first of all, I'm just
wondering why we've got it, which way is easier to do it? I think we'll do control law. Left click, right
click. Control law. We just want to center
point in each of these like so and then control, so on these two as well. All right, now let's
grab them all. So all of these new
ones that we just made. And then what I'm going to do is press control B, pull them out. So, and that is
exactly what we want. Now the thing is here, we want to make sure that
we're able to select these. What I'm going to
do is I'll come over and make a vertex group. Click a sign, and then I can deselect and select
those. That's good. And now what I want to
do is these windows are going to come all
the way up to there. So we need the
panels in as well. So all I'm going
to do is I'm just going to come to
these windows first, like these windows here. And I'm going to separate
these off as well. So I'm going to press P
selection, separate those off, which should then leave me with these parts on
here, which is what I want. A, you can see I've got
those top bits on there. Don't really want those,
don't want the bottom bits. So I'm going to separate
those off as well and then come back now and
assured if I grab them all, have something like that, that's what I'm looking for now. From here, let's
just press Enter, alter Ns, let's pull them out. So we can see, especially with these ones, they're not actually
fitting in place. We can fix those in a minute. I'm just making sure I'm happy with everything
else on them. Now what I'll do is I
need to bring these over. I'll start with these ones here. Let's do these ones here first. Now remember we've still got solidify on this part as well. Which means that
I can still come in and alter that if I need to. But at the moment what I'm going to do is just
bring them all down to here. And then I'm going to press
and X and pull them out. Now I'm going to do
it via medium point. This one medium point and X pull them out into
place like so. Then what I'll do is
I'll do these ones now. And all I need to do with
these really is just grab them all both sides and then
I can pull them forward. I'll grab this one and
this one, and this one. This one. And then all
I'm going to do is just pull them forward like so. All right, so we've got that bit now we want the inside of these. Now let's see if
I double tap the. Come over and click select. There we go. I've
managed to select them. We're going to probably have the same problem as
what we had before. Hopefully we won't. So
let's bring them out now and see if we don't
have that alternates. Bring them out, jaws to tard
in front of those, like. So there we go,
Ads looking good. Now finally we want a little bit on the inside of these windows. Not these ones going down
here, just these ones. All I'm going to do is
just grab all of these. Then I'm going to press
the eye button and bring them in like so. And then from there then I can hide these windows out the way. So let's press Y, H. Hide them out the way. And then finally A,
Do we want all these? No, we don't want all these. So let's hide these
windows as well. So hide them out
the way, press A. So now, before I
do anything else, I really need to
split these off. Actually, I wasn't
thinking about that. But the easiest way, obviously, is to split them off
is just to select. And we're going to select, where is it select more or less. Which one is it under mesh? There we go, faces by
edges. There we go. All right. Now we can pull
them out a little bit, pull them out a tiny bit. And we could even
pull them back if we wanted to as well. I
might actually do that. So I'm just going to press a Y. Pull them out a little bit. Pull them back a little bit so they're into place like so. Now let's bring
back our windows. So all tag, grab these windows first and we're going to pull those ones back. The other one should be fine. Let's pull them back like so. All right, there we go. There is first part of our actual window. Now with this part, let's come in and what we'll do is
we'll pull this out. First of all, I'm going
to press, pull it out. Now you can see on this, it's not actually pulling
out properly. So the easiest way is just
to press E, bring it up. Then a shift click alternS. We should be able to then
bring it out offset, even on there we go. It's come out perfectly now. Now from there, then
let's bring it up again. What I'm going to
do is bring it up, bring it up to be a
bigger chunk. This time. O shift click
OllternS, there we go. That's better offset
even on there we go. Now let's do this very small
part on the inside again. We're just going to
press Jaws to bring it up maybe a little bit higher. And then I'm going to press Alt Shift and click Alter Ness. And I'm going to bring it in, so that looks very nice. Now let's think
about the Bom part. Exactly the same thing.
I'm going to press, first of all, grab it. Going around the outside,
alters, bring it out there. We've window pretty much done. All right. I'm happy with that. Now. I'm thinking that
the bevel on here, so it doesn't need a
nice bevel on here. Hopefully we can do that if this bit needs a
little bit more work. In other words, I might come in and just pull this out
a little bit more. Let me have a look if
I can do that first. So I'm going to grab
this at the moment. I've got to solidify on. Let's come over, grab that press control and
let's supply the solidify, Sorry, if I press the table,
let's apply the solidify. And then let's come
down to this bit here. And I just want to see what it's going to look like
if I grab all of these Press Enter alternates and then just pull them
out a little bit like so. And yeah, you know
what, I think that actually looks better like that. All right, double tap the A. Yes, it does. The
one thing it also needs is these ones
here doing the same. So I'm going to
grab both of these. I'm going to press Enter, and this time I'll
just press S and X and pull those
out a little bit. Okay, that window now is pretty much finished
on the next lesson, then what we'll do is we'll
get these posts into place. So both of these
posts into place. And from there then we can actually start painting
all this one up. And that's the first, in fact, we just need a top
on the roof as well. And then that is the first part of this building actually done. All right everyone. So I
hope you enjoyed that. And I'll see on the next one. Thanks a lot. Bye bye.
163. Completing the First Side of the Perfume Shop: Welcome Macron's Blend for the
Environment Artists Guide. And this is where
we left it off. All right, so let's
come in now and actually put in a top
on each of these. So what I'm going to do is I'm
just going to press Shift. They bring in a cube. Let's bring it over, let's put it on top of there like so. Let's see how that's
going to fit. We can see we're a little bit
out on both of the sides, so we want to fit in
something like that. And maybe it'll go just
over the front of here. I think something like this
actually looks about right. I'm going to grab the
front of it then, like so. And then what I'm going to do
is I'm just going to press, I bring it in and
then I'm going to press E and pull it up
to somewhere like there. And then finally I'm
going to press E again. So, and then pull it
back a little bit. So let's grab this front.
Let's pull it back. And then we can see we need
to pull this down now. So pull it down with the
blue, maybe not that far. Something like that, I
think. And I'm looking now, you can see it's
a little bit out. I don't know how I managed to do that, but let's
try that again. So instead of the blue, I think I pulled it
with the wrong one. There we go. And then
I'll shift click. Let's pull it down. There
we go. I press one now. Yeah, now I can see it's
looking much, much better. Okay, so now we need this
coming up to the top. And the other thing is,
is this too far this way? I think it actually
is, so I think I'll come down
control select it, going all the way down
there and just pull it over into place like so. And I think actually, yeah, that's looking
much, much better. And then and what we're going to do is just pull it
into place now. Now from here we can see how far back we need
to go with this. So certainly
certainly we need to come back behind this part. So let's come back behind
that part like so. And then this part on here, we can see it's a little bit too tall where we're going to
get to roundabout there. And now we can see
that we can put something in here that will go along here and then we'll be, should all fit into place. Okay, So I'm happy
with how that looks. Let's put a little
bit more on this. So all I'll do is press I.
I'm going to press And Z, and then I'll pull
this out with like so. And then we got a
thing that finishes it off very nicely from here. Then let's put it
over the other side. So shift D, put it over the other side on top
of this one like so. And then everything should
fit in there very nicely now. But we'll see once
we get this part in, okay, let's put it on material. Let's see where we are
with the material. Let's see where we
are with the window. The window, I think is
about the right height. We'll soon know once we get
all these materials in, let's start on the
actual window first. All I'm going to do is I'll
grab all of these parts, all of these on the
inside as well. I'm just going to
press just to see which ones have
not grabbed again. Then again, there we go.
I've grabbed it all. I'm going to press object
and convert to mesh. First of all, I'm going to
press control all transforms. Right click, set
origin geometry. We're going to add in our
bevel first bevel naught, point naught three. And then what we're going
to do now is going to press control L link or
copy modifiers. And now right click,
shade, auto, smooth. And then finally, let's think
about our materials now. So the first material
we want to bring in is going to be is the red, obviously the red painted wood. And the other thing is we
also need to unwrap these, but let's get the
material on first. So control L link materials and then all we'll
do now is come in. If I press control,
actually, no it's not. So we'll just give
these another material, just the windows
plus down arrow. Let's look for glass
on these ones. I'm not actually going to
be doing the backs of them. In other words, you know, on the butcher's shop as well, we're actually going
to be doing a backs. In other words, we're
not going to pull it down now with these, we are going to be putting
it back in them and we're also going to be putting
a curtain over the front. So once we've got
that, all that set up, then basically we can
set it up for them all. So what I'm going
to do first of all, is I'm going to just sort
out my UVmwrapping first. So I'm going to
grab all of these. So these two at the bottom. Smart UV Pj. Click Okay. Hide them out the way.
And then we'll just work our way down like we've
done many times before. And then we'll do this
one on the inside here. So L U Smart UV Project. Click okay. Hide
them out of the way. And then a smart UV
project, click okay. All right, so now
we've done that. Let's press all, take,
bring back everything. And then all I'm going to do is, I'm just going to grab one, I'm going to go over
to my UV editing. Let's get it unwrapped. Let's also safeguard our works just so we don't lose anything. Let's press the Dot button then. And then what we're going
to do is press one. I'm going to bring
it over to here, so a G, bring it over to here. I'm going to press the S button, bring it out into place like so. And then what I'm
going to do now is press U. I'm going to
come down to copy. And why can't copy that
transfer? Let's have a look. Is that not? Let me copy it. Let's put this onto
material view so I can actually see what
we're doing like so. And I think actually it's because we've not just
grabbed our windows now. Let's try you.
Yeah, there we go. That's why the reason was, So copy that. Let's come in then. And then what we'll do is we'll
paste it on all of these. Because these are square, we should be able to get
away with pasting it. So copy paste
default. There we go. A, as we normally do, press one on the number pad. Let's sort out the
front ones first. So if bring this down to here, bring this one over to here. And luckily for us on this, there's not actually
that many windows. Bring this one over to here and then bring
this over to here. And finally this over here. And that's work
around the sides. The sides actually aren't as important because you won't
be able to tell us much, but we'll still make sure
that we put them in some sort of difference so they look a little bit
different like so. And finally this one. So okay, so we've done all that. Now, before we put
the back in on this, let's finish up what
we're actually doing. So these two here, let's grab each one
smart Uv project. In fact, you know
what, We'll just make sure that
they've first of all, got all the transforms done. And then we'll come
back to this one, a smart UV project. Click okay, like so now
we'll grab both of these. Grab this, we'll
press control L, Link materials control L, and then we'll copy modifiers. Let's just make sure
they're on the modifiers. As we know sometimes
don't go on very well. Let's also write click
shade auto smooth. And sometimes they end up being smoothed out a
little bit too much. So this part here for instance. So this here, we might actually want to make a sharp
on out shifting. Click on both of these. Right click and
one marker sharp. And there we go thing
that looks a little bit better rather than being a
little bit more rounded off. So right click, mark sharp. Okay, there we go. Now let's have a look at what
that looks like. So double tap the
once we've got it up. Okay, they're looking
very, very nice. Now all we need is
our actual brick, so all I'm going to do with
this is I'm going to come in, I'm going to grab it, I'm
going to press you wrap. And then we're going to
come in and put this on brick so I can also come
in and grab this one. And this one, press the tab. And now I can see,
actually, if I grab this, how big it's supposed to be, if I grab all of these so I can come in and I
think it's this one. Let's press L. Let's
rotate it around R 90. And there we go. And let's then make it the same
size as this one. Roughly not really work, so let's bring it
down a little bit. We want it to be near enough, the right side scale
as these bricks. So a bit smaller, I think something like that looks much better
As you can see, now everything's
fitting in all right. You can see behind
there as well, which is what I'm talking
about, this kind of gap. And then we can see
bricks behind there. We don't actually want that. So on the next lesson, we're going to
bully in this bag. And then we're going to
put a curtain in front and then a living room behind it. That's what we're going to
do next. All right everyone. So I hope you enjoyed
that and I'll see on the next one. Thanks
a lot. Bye bye.
164. Adding Interior Backdrops and Curtains to the Perfume Shop: Welcome back everyone to blend, fold the environment
artists guide. Let's go over to modeling now. And what we're going to do is we're going to come to here, let's bring in a cube. So we're going to bring
in a cube like so. And then I'm going to make
this cube the same size as my window. Bring it up. And then, and's
let's bring it up into place, something like this. It's that kind of size. And then what I'm going to
do is now I'm going to make sure it's into my brick
wall, which it is. I'm going to come to
my brick wall now, add in a modifier and we're
going to bring in a boolean. And the booleon is
going to be this. You can put it on
fast if you want to make sure it's working properly. Control a Let's then keep this. I'm going to put
this into Booleans, so into Booleans like so. And I'm also going to hide
Maboleans out the way. I'm just wondering for some reason they're
also in Booleans. We don't want that
M and we'll put it into do we actually have
one yet? No, we don't. So let's make a new one that
says perfume shop like so. And now if I come in and
close that hide my Boolean, Yes, that's what we want. All right, so let's
come in now and what we'll do is we'll join
all this window together. Because we're
definitely going to need it all to join together. So let's just press G. Make sure we've got everything
which we haven't. G again can see we need
the front of it, G again. And there we go. Let's
press control J. Join everything together, and now when we move that,
it should be fine. Now we should be able
to hide that all the way and come to our brick wall. And all I'm going to do
now is pull this back. No, I'm not. I'm going to
actually, first of all, join it altogether with F.
And then what I'm going to do is press the I bring it
in, bring it in, bring it in. Don't let it break
on these parts. You can see it's
starting to break. We don't want that. So let's
have another go at that. So what we'll do is
we'll press I again. We don't want to get
to the breaking point. You can see there, that's
where it's breaking. The reason, by the
way, is why it's breaking is because we've
got a little point on here. So what we'll do is
we'll just press Y and then we'll press
Delete and limit it. Dissolve. Now, when I bring this in now, shouldn't
have any breaking. That's exactly what we want. Let's then press control. Bring in some edge loops. Left click, right click, and now let's start
pulling this back. I think with this, because
we've got a curtain in here, it's going to be
easier to pull back Anyway, let's come
to this point. I'll put on proportion editing. I'll start pulling it back. Now I only want to
select connected only. So what I'm going to do
is just pull it back like so just to this point here. So it just starts
actually bending. And then what I'm
going to do now is I want to pull the
whole thing back. So I'm going to click control. Plus we want to really
give this some depth. So I'm going to turn this off, pull it all the way back
then the roundabout here. And then what I'm going to do
is fill in this space here. So if I come in, I should
be able to grab it. Old shift click. Old shift click going all the way around here. And finally then right click. And we're going to bridge
edge loops like so. All right, so you should end
up with something like that. That's exactly what you want. And finally, you want one
more in the front of here. So again, old shift click
going all the way around like, so not this part
in here of course, but we just want it like that. Not this one in
here. There we go. And I've got that
selected and I'm going to press, I'm going to press Y. And then what I'm going to do is press Delete Limited Dissolve. And now we should have a
plane like that as well. I'm going to pull the
plane back very slightly. Let's deal with the
plane first then. What we want on this
plane is curtains. So if I come over to here, what I want to do is
click the plus arrow and then come to asset manager. And let's bring in our curtain. Where is it going to be? Let's go to
Materials, Materials. I need to actually
reload this again. Or it could be in. Yeah, it's not going
to be on there. So I just need to
reload that again. And now reload it again. I can open it up and I
should or it should. Let's have a lot of
us turn this off. There we go. All right, So Curtains, this is
the one that I want. I'm going to drop
that on there then. And I also want another one, so I'm going to click on Plus. And then what I'm going
to look for is backdrops. And the backdrops we want are
living rooms and bedrooms. So I'm going to bring in two of them actually, so
they're both done. So plus living
room plus bedroom. All right, so now
we've got that. We can actually minus off
the living room on here. We've already got
those of a press tab. Minus them off, We'll, we'll go to UV editing. Actually, it's going
to make it very, very easy from there. And then what we'll
do is this one first, this is curtain, we need to
assign that two curtains. And there we go.
We're then going to press and unwrap.
And there we go. And then what we're
going to do is press on here, Face, select. Select the face. And now
we've got our curtains. So let's come in and select
a curtain that we want. We'll come in, we'll spin
it around hundred 80, the right way that we want it. Let's select these
curtains here, let's press and Y then G. Put it into place and then finally pull them
out a little bit. Now we can have them
actually like that. You really don't need to
worry so much about these. Now, what I'm going to do now is now I've got the curtains in. I can come into
the back of this, so I can come into my curtains, hide them out of the way.
And I can't do that. So what I'm going to do is
I'm going to come back, hide my window out of the way, come to this, grab the face,
hide that out of the way. And I should be left
now with this here. If I press L on here, you'll see it selects
the whole thing. We don't want that. What I'm gonna do is want
to press control plus going all the way
up to this part. So we're still going to leave our bricks going around there. And then what we're going
to do is we're going to come in, assign the bedroom. Then what I'm going
to do is finally, I'm going to press and unwrap. And now finally, let's put it
into some sort of bedroom. So if I grab, let's
say this one here. So I'm going to press and X, pull it out like so. And then and X like so. And there we go. Now, what
does that actually look like? Let's have a look
though. 'cause I've got this black line on there.
I don't want that. So S and y, let's bring it down so we don't
have the black line. No black lines on
there. There we go. Well, let's find out alternH,
bring back everything. We really can't see
actually in the window. We will be able to
see in the window when the sun is probably not
shining so much on there. I also think that we can also come in and
actually with the bedroom, we've got one that
is the emission. Here's the emission strength.
If I start turning that up, let's turn it up and see if you can actually
see something now. Or we can turn down the
windows. Let me have lope. I've got my curtains on here. I'm going to turn
that back down. So press Controls Head. Let's turn it back down to 0.7
Let's go over to modeling. I just want to make sure that we're going to see
in this properly. I'm also going to save it out. And then what I'm
going to do just put this on rendered view and have a look over
my shading panel. Let's put it back on. Material moment, let's go
back to our shading panel, make sure that we're on
glass, not lit windows. Let's press the little dot on. And what I want to do
now is put this on rendered view and just see if I can actually
see in there. So the reason I can't
see in there is because the strength of my
alpha as you can see here. If I turn this all the way
down now what I'm looking for here is I'm looking
for my backdrop. Now, the backdrop
here, as you can see, if I put the Alpha back, you can see if I hide
this here, that's there. But the thing is the window
actually has a back on it. That's why we're not
seeing anything. So if we come in and
we press shift H, let's go round to the
back, here is the problem. All right, So that's a
bit silly on my end. I forgot to actually
take that away. So I'm just going to
grab all of that. Press Delete and Faces, and let's just put it onto
object mode, just make sure. And then I'm going to come
in, grab all of it again. So Delete and faces,
and there we go. Now let's see, let's see. Kowi've got rendered view. Let's see if we can
actually see in there. So first of all, Renderview, Yes, I can see through there. Alternate, bring back
everything and there we go. Okay. Oh, it's being
very silly there, but at least we got
to the bottom of it. So that's what you want to have. You want to have a little
bit of a curtain in there. You can see the bedroom in there if we're really
going up to it. And you can also make out
that this has a lot of depth. You can see how it looks. It looks as though
it's actually got the right depth and this
is what we're looking for. So that is really nice. Now now what we can
do is finally we can actually move on and just quickly create this
top part on here, because that took way too long. I shouldn't have done
that, but never mind. You know what, We'll put this lesson to bed and I'll
see here on the next one. And we'll get the top of
the roof actually in there. And then we'll
start work on here. And hopefully with the windows from now and we'll
have that problem. All right, everyone. So I'll see her on the next
one. Thanks a lot. Bye bye.
165. Modeling Victorian Townhouses for Scene Expansion: Welcome microphone to Blender for the Environment
Artists Guide. And oh boy, am I glad
that lessons behind us. Let's now come to this one. So all I'll do is we'll
grab the top of here. So I'll grab the top of here. Shift S, Ursa selected shift. Let's bring in a cube. Let's split the cube off
because I brought that in actually together with that, and I didn't
mean to do that. And then when I'll do
is I'll press the S B, so right click, Set origin
to geometry first of all. Be and now let's pull
it out, so S and Y. Let's pull it out into
place wherever we want it. Just in front of this part here, we need to make sure that this actually sits on top of here. On top of here,
Press the Sens head, pull it down a little bit, so let's make it a little
bit wider as well, so S and next, pull
it out a little bit. And I'm thinking that
still the front of here is a little bit too
far forward, so and Y. So. All right, from there
then let's bring it up. So control left
click, right click. Control B, let's pull it out. So grab the top of here, press the button, so now
it's covering it up. And then finally what
I'll do is I think I will level off this part here. We're just going to
come in to this part, press control B, And you can see it's not
beveling off very well. And again, it's just because
Controll transforms, set origins, geometry, control. And now you can see we've
got it as we want it. All right. Something like that. Now, do I want this part just to come out a
little bit on top maybe, or this part here to
come out a little bit. I'm going to press the button. Bring it in, press bring it out. There we go. Let's press control or transform set
origin geometry. And I'll grab this one. I'll grab this, I'll
press control L, link materials control L. And I'll copy modifiers as well. Then I'll do finally is a
U and smart Uv project. Okay, so that's that bit. Now let's come in and
separate these two parts out. So this part and this part, we can see where
they come back to. And then what we'll do
is press selection tab, Grab them both a U
unwrap, like so. And then what we'll
do is we'll change the gray box to wood. And these are just going to sit again underneath our actual, what they're called, the tiles that are going
to go on there. So they're just there just in case so we can't see underneath. Now let's come down here
and what we're going to do is we're going to use
this part for the door. I'm going to pretty much
use the same doors on here, so both of them are
going to be the same doors, just different colors. So if I press
control three, now, I should be able to come
to this part here like, so press shift D, and what we'll do
is we'll just bring it out, separate this then. So I'm just going to delete it. I don't need anymore. And now we should have this
one and this one. Now let's press control A. All transforms set
origin to geometry. And now let's work on
our actual door here. So what I want to do first
of all I think is I'll do a top on each of
them that looks a little bit different and
that's how we'll do this. What I'll do is I'll
come in, first of all, press the burn, bring it in. And that then will
give us our kind of, you know, basis for
going around here. And then on the inside, then I'll separate
this out once more. So I'm going to press Y, and then what I'll do is I'll
separate these parts out. So Y, and then grab this one. This one, and this
one, and this one. Let's pull them out then to give some thickness to
the actual door. Now let's come in and think
about the center point. So I'm going to come
into the center. I'm going to press control.
You can see at the moment that I can't do it because I'm trying to
grab all of these. So you know what, Let's come in, grab this one, Press
P selection tab. Grab it again. Tab.
And there we go. Now I'm going to do
is I'm going to press control left click, right click. I'm going to press
control three. I'm going to press
control Er, again, going this way and I'm
going to pull it up to something like that,
control again. And I want that one right in the center, so
something like that. And from there now I'm going to build out these parts here. So what I'm going to do is I'm going to separate them off. First of all, so I'm going
to grab this, press Y, y, y, and just work
your way down like so. And from there then,
what we can do is we can bring each of these
individually in now. So if I press I, I should be able to
bring them in like so. And then again, I'm going
to separate these off. So selection separate them off. Grab them, these ones here
that we've just created. Let's press the little dot one. And then what we're going
to do is press tab A. Pull them out. So all right, that's looking pretty good. And then from there then,
what I'm going to do now is grab these ones,
these inner ones here. I'm going to press
A to grab them all. I'm going to press I
and just bring them in very slightly like so. And then what you're going to do is you're going to press, to pull them out, pull them out. And then again to pull them out. And then finally and we're
going to bring them in. Now you can see they're
coming in very weirdly and that's just because we need
it on individual origins, bring them in and you
could also get away with probably pressing I
again, I once more. Like so. And then
all you're going to do is old shift click
on each of these. Let's see what that actually looks like once
we've got them all. So we're just going
to bring these in here, these parts here. Just in a little bit more, just to add that a little bit more like ornamental type feel. Let's bring it back to them. There we go. All right,
that's looking nice. I'm happy with those doors. Now what we can do
is we can actually probably come in and
do the bottom part. So I'm going to press shift
S, Ursa selected shift. Then let's bring
in another cube. Let's bring it down
then to the bottom, press S, make it
much, much smaller. And we'll just have like that kickstand that
comes, you know, at the bottom of the
doors where people kick their feet when they're
wet or things like that. Let's press and y
and pull it out. So I'm going to pull
it out to there. And then what I'm
going to do then is just pull it back a little bit. So grab the front, pull it back. Press control left click. Bring it up a little bit, bring it out now,
pull it out finally. I'm just thinking, I'll
just pull down the front. Now if I grab the front of it, we're going to pull it down. There we go. So easy
now to create doors. I'm sure you've got a
real hang of this now. Okay, so we've got this
door now we can join all of this together like so. Just press control, J control. Then all transforms, right, clicks the origin geometry. Let's come in adding a modifier. So we're going to
generate a bevel, we're going to make
sure that it's all leveled off as
you can see here. I just want to make sure that
if I put this on not point, not three dot A, is it all leveled up? That's what I'm checking. In other words, all of these parts in here
can see it's better. It's going down here. This is actually perfectly well. I wanted, you know, these panels, they need
to be like that. They didn't want to be beveled
with a little gap in them. So it's actually turned out
perfectly, this door for me. Okay, Hopefully yours as. Alright, so now we've
got the first door. Let's come in and what
we'll do is we'll create a top for this door
with this one, all I'm going to do
is I'm going to have a window coming up and then
this part coming up here. I think the easiest way for
me to do this actually, is just to grab the back of it. Press E and Z, just to keep it going along,
and something like this. Now, before I do this part, what I'm going to do is I'm
going to duplicate this. So I'm going to press shift,
I'm going to duplicate it. And the reason I'm
going to do that is just now I've got the same door, but they're going
to be different on the top with this one. What I'm going to do this one
here, I'm going to come in, I'm going to press control Er, and bring in a
point here like so. And then hopefully,
is this separated? No, it's not, it's
still selected. So, and we're just going
to separate it off with Y. And then what I'm
going to do, press control and bring
in five edge loops. Left click, right click. And then what I'm going to
do is bring up this part. So if I grab this part, I'm going to bring
it up like so. And then bring up these
two parts like so. And that then is going to be
that top part of the door. From there I'm going to put
a little window in here, so if I press control lot, press the button twice and you might be able to
straighten it out. If not, press E and G. Nope,
that's not going to do it. Nope, I'm messing this up. 1 second. Let's press control. Let's press control three
on the number pad First, let's press control now. Left click, and now press and Z. Let's see if we can
do it like that. It should be pressing again and it should
actually strain out. Now, it doesn't strain out for
that, for whatever reason. So what I'm going to do
instead is I'll just press a come into mesh. Bring in my trusty bisect
and cut it across. Let's take out clear,
outer clear fill. Let's set this then
to zero like so. And there we go. We
got there in the end. So the little window is
going to be in here. Now what I'm going to do
is I'm going to come in, I'm going to grab
all of this part. And what I'm gonna
do is press Y, and then I'm going to pull
it slightly over, like so. And then I'm going
to grab these parts. I'm going to press Y,
E, pull it to the side. Just a little bit like so. And then finally this part Y, and pull it slightly over. And there we go. Now we've
got our actual window. So if I grabbed my window, I should be able to put it out. And then probably some
nice stained glass would actually look
nice on there. Okay. Now we'll move on
to the next one then. So with the next one, all I'm going to do is I'm going to bring in
some edge loops. So let's split it off first, and then I'll bring
in some edge loops. So let's think
1234 window panes, maybe something like that.
Left click, right click. And we'll make this one
rather simple actually. So just control select them all. Press the eye button, eye again to bring them in. And just something like this I imagine would
look quite nice. All right, from there then let's just hide
these out the way. And then we'll select
each of these. And then all I'm going to
do now is come to mesh. I'm going to split
sorry faces by edges And then what I'm going to do is just press,
pull those out. Then you can see
they didn't pull out properly and I'm
not sure why that is. I'm going to try that again. What I'm going to do is press
E. I think it's actually, I'm just going to take off. I'm going to come up and I'm going to put it onto
medium point instead. If I grab one of these now I just want to make
sure the split off. If not, I'm just going
to grab them all again, Mesh, split, faceless by
ages, grab one of them. Now the split off, now I should be able to
come in and grab them all when Abl
pull these out, this should work perfectly. So let's press E. Then pull them out just behind that door. And then we'll do
is press old tag. And I'll get my glass parts and pull those out into place. All right, so that's
the second door. So now we have two doors. We'll save out our
work on the next one. Then we'll get in our textures and shaders and
things like that. And then what we'll
do is we'll get the Booleans into here
and get the stairs done, because the stairs
and the booleans and everything else for these
is exactly the same. Anyway. All right everyone. So I'll see on the next one. Thanks a lot. Bye bye.
166. Detailing Townhouse Entrances with Historical Accuracy: Loco cover? Want to blender for the Environment
Artists Guide. And this is where we left off. Let's just move this over
this side because I'm going to put this one over
here and this one over here. And then what I'm
going to do now is I'll come to my first window, Smart V Project. Click Okay. And then what I'm going to do
this one, same thing again. Smart UV Project, Click Okay. Now let's come to the first one. And what I'm going to
do is I'll bring in, I've already got
a bevel on them, I already got a
bevel on this one. So that's fine. Let's come then to our material and
we're looking for, with this one blue painted, blue painted wood.
Let that load up. Let's come to this one then.
And we're looking for red painted like Now finally we
need just our window glass. So I'm just going to grab these. I'm going to click
down arrow glass. It's up to you whether you
want to put it probably. Actually, Yeah, we'll put on just to give a little
bit of light there, I'm going to grab that one and then I'll come to this one. Do the same thing here in here. Click the plus glass
and glass lit windows. Click a sign. Now let's
come back then to this one. I'm going to go over
to UV editing and just get these done pretty
fast hopefully. So I'll come round,
press dot zoom in, and then what I'm going to
do is just grab this 1.90 G, Let's put it in
some sort of place. And let's do the same
thing with these now. So come to this one, and then I'll just press A and I'll put them more
in line with here. And then grab these two because
they are little windows, you're never going to
see really anything. So we don't need to worry
too much about them. Now let's come back to modeling. And then what I want to do
is I want to grab this one. First, I'm going to press
Shift A, bring in the cube. This time the cube wants to be pretty much the same
size as the door, so I'm going to pull
it down to here. So I'm going to press
and y and pull it out. And it wants to be just before where the actual
supports are of the door. And then finally we want to
come in, grab the top of it. And again, with the
top, we want it to be just before the
very top of the door. So something like
that. There we go. Now from here then
I can actually come in and make it
a little bit wider. S and X make it a little
bit wider. Control y. Then all transforms set
origin to geometry. Now let's come in and what we'll do is we'll keep this door. I'm just wondering, I
need a post in this door. I'm going to move it a
little bit closer this way. And then I need a
window with this door. So I'm going to
pull this a little bit closer this way, like so. And I'm thinking I'll
bring in my first window. And from there I
can work out where my posts and everything
else is going to go. Now to bring in my first window, all I'm going to do is
bring this one down, shift D. Let's bring it down. Let's bring it where
we actually want it. I'm going to press R
Z -90 Spin it around, and then we're going to
press control three. Again, the place that I want it is going
to be round here, but I want it to be a
little bit thinner. So I'm going to
press S and Y and just squish it in a
little bit like so. And I also want to make sure
that when I pull this in, so it's going to
be back to here. I've got enough
room then to put in some brickwork underneath this, underneath this actual window. So I'm going to press
Essen's head and just squish it down a
little bit more like so. And now I've got enough
room for the top. I've got a little bit of room for brickwork underneath here. And I'm thinking that
is looking pretty nice. I also need to think, I've
got a post coming in here. I know my door is going to
be in here like so now, I'm just going to move this over very slightly because
I might have another point. You know what, I'll put it
near the window. All right. Then what I'll do
is grab this window and I'm going to
pull it over here. Now, this is just
a filler window. It's not going to be the actual, you know, the actual shape
and things like that. I just need a filler window in there just to see where
this part is going to come. So again, now I can move
this over just a little bit. We're going to have some
posts in here and I'm thinking they are
looking pretty good. So now I can go ahead and
actually use my booleon. And that was the
whole point of that. So what I'm going
to do is I'm going to grab this booleon, I'm going to press Shift, Move it over to this side, then onto this door, making
sure that it's the same. So if you press
Sir control three, you can see it's not quite
in. We move it this way. There you go. Now I
can see those are in. And then from there then what I'm going to do is I'm going to come and delete both
of these out the way. So in fact, don't want to delete them out
the way, not yet. Just let's wait first. So what we'll do is
we'll grab our Booleans, we'll move them back like so. And then what we'll do is
we'll grab this door and this Boolean and we'll
put those into place. We already know that these ones are pretty much in
the right place. Are they in the right
place? No they're not. We need to move them
over here like so. Don't worry about the fact
that the door is much higher because on the front
we're actually going to put a front on this anyway. So I'm going to put that
like that. You know what? Yeah, I'll do the same thing. I just need to make
sure that this one, if I press control three, it's the right height,
so that's good. All I need to do
now is just pull it over onto the top
of those steps. And then let's just
pull it back into roughly the same place as the other one or
something like that. And there we go. All right, so now what we can do
is we can come in, we can grab all of this because it's the wall where we're
going to be using the Boolean. We can press selection, and then we can come
back to this wall now. So this wall, for some reason, goes all the way up there.
We don't want that. So all we're going to
do is we're going to come in, grab the top, and we're just going to pull it down to where it needs to go, which will be somewhere
roughly around there. And then finally we can
grab it, press unwrap, And then finally I can turn
this gray box into the green. So green where is it? Wall gray, green painted
Ward Walgreen. There we go. We'll put that on
there like so now on the next part we'll just
actually boole in this off now. Now if I grab this wall and what I'm going
to do is come over, add in a modifier. So add, generate, and we're
going to generate 1 billion. And the first billion is
going to be this one. And let's see if we
can actually generate another billion, so
another billion. And the second billion
is going to be this one. And there we go, we can generate both of those at the same time. What that means is now I
can come up to object, I can come down to
convert to mesh. And now I should be
able to hide this out the way it out the way
and delete both of these. And there we go, that's exactly
what we're looking for. Now next of all,
let's just press ol tag and we can
delete these bullions. Delete them both. Let's grab
both of the doors then. So they're going to be
pulled back the same, and let's pull them back to
where we actually want them. I'm thinking
something like that, giving a little bit
of room over here, maybe a little bit further back. Something like that looks
absolutely perfect. Now one thing you
want to take into account is on the back of here, you've actually got
a perfume shop. So you will need to make sure they're not all the way back here because the perfume
shop is here as well. So just take that into account.
They did build like this. You'd have very, very thin corridors and things like that. So just yeah. All right. I'm going to move it
a little bit further forward. Okay. Now
we've got that. What we can do is we can come in Alt shift click,
grabbing all of these. So Alt shift click,
Alt shift click. And then we're
going to press and X pull them out just
where my door is. So you can see now those
doors are feeling very nice. Press the one then to
fill them both in. And I'm hoping if I
come to this one, yeah, you can see they've
been filled in properly. And finally now this door. I don't know why that's
happened, but this door, for some reason, hasn't
gone as far forward. I don't know why, but I'm
going to pull it forward. I think I just pulled the
actual blue door forward, so maybe it was that
either way they look good. So I'm going to hide
both of these now. And then what I'm going to do is I'm just going to come back to my green press control
just so we've got those. Turn this off, we don't
need it on anymore. And then just re unwrap them. So, smart UV project this time 'cause it's
not a standard shape. Let's press Saltage.
Bring back everything. And there we go. That is
what we're looking at. Now remember, this window
is going to be changed. This window is going to be blue. So let's sort out that first. This window, I'm
going to come in and instead of red painted
wood, click the down out. We're looking for blue, so blue painted wood.
And there we go. We've changed that
over. So now we have one blue door and one red door. But now what I
think we should do on the next lesson is we should make a start with
where the steps are. So we'll make these steps first. We'll bring out, you know, some walls or something
and they come out, they can come out the
same length as well. They come out a little
bit onto the streets. As you can see, we'll make them look a little bit different
from each other as well. We'll make sure we do
that. All right everyone. So I'm going to
save out my work. I hope you enjoyed that. And
I'll see on the next one. Thanks a lot. Bye bye.
167. Modeling Staircase Walls for Victorian Townhouses: Welcome back everyone.
To blend the fall, the environment artists guide, and this is where
we left it off. All right, so what I want to
do now is I want to actually start with my stone
steps over here. So what I want to
make sure though, first of all, you can
see that these steps, if I bring my guy over, they're a little bit
on the wide side. So if I pull him over here, you can see even if
it's stood on here, it's a little bit wide this way. So what I'm going to do is I'm
going to come to my steps. I'm going to grab the first one. I'm going to press
and X and jars. Pull them back a
little bit like so. And now you can see if I
pull it back to there, it looks much, much better still coming
out the right length. And so I think that's fine now. All right, so now what
we're going to do is we're going to create
our actual steps. So what I'll first of all do, I'll do what I've
taught you before. So I'll come in,
let's apply that. And then what I'm
going to do is just grab them going down to here. So you can see I can't grab
it going down to here, because we need to select
them individually. So let's do that now. And then what we'll do
is press selection, grab the other
side, press delete. Delete that off. And then from there what we can do is
we can press Shift H, Hide everything else
out of the way. And now I can actually
come and join these in. First a mesh cleanup. Merge by distance, 66 vertices
actually attached there. And then what I'm going
to do is I'm just going to press one Z. Pull it down to where
it needs to go, somewhere, down where that
little spice is just there. And then all I'm going to
do is join it to this one. So of course this is not
going to be level at all. So I'm just going to press a. And then I think what I'll do is I'll actually come in
and pull this all down. Pull this all down one, and now we've got a good place where it can actually
cut it across. So mesh come in with bisect. Then we're just going to cut it across just there like so. Press zero to zero out. Let's clear the
outer or the inner, whichever one it is,
let's fill it in as well. And there we go. That
then should be perfect. Now if I press to fill it in, and now I'll come in, grab the edge going all
the way around. Alt shift click, come, ran to this side ol shift click. And now finally I want to make the stone steps that
are going to be on here. So all I'm going to do is
I'll do these separate. Actually I think it'll be easy. Sorry for press shift D.
I'll pull them up like, so I'll come to the
first one and all I'll do is press
control left click, right click two, control
two, left click. Just pull them across like so. And then the next
one, control three. And then the Nast
one, control two. And we'll just pull them
a little bit that way. Just wondering about this one, I think I'll Jaws pull it out a little bit to make them
a little bit more even. Yeah, and then we go
something like that. Things looks absolutely fine. And now what we'll do is
we'll just grab them. In fact, you know what, We'll
separate them out first. So I'll just grab the center
one on each of these. So I'm jaws going to separate them out and then I'll
come in, grab them all. So I'm going to put
them into place. So wherever they're going to go. And then what I'm going to do is just press and pull them up. Now, bearing in mind
we're going to have some, you know, a brick kind
of coming in this way. I've done this as well,
this bit on the stairs, just in case you actually
want to, you know, not have the
supporting wall there, so you might not want that. And now I'm going to do is I'm going to pull these bits out. I think honestly at this point it's probably going to be easier if we just separate
by selection, like. So then I'll come back to
these and what I'm going to do just grab the
front of one of these. I'm going to come in, then
I'll bring them all out. First of all, I'm jaws
going to pull them all out. We can't pull them all
out because we've got connected on now we
can pull them all out. They're not really pulling
out the way I want. You know what I'm going to do, I'm actually going to come in, pull them out separately first, just to get them over the
edge of our actual steps. Like pull them out, there we go. Now I'll come in randomize. Now, pull them out on
each one, there we go. Same on these, same
on this one here. All right, And then finally what we'll do is we'll
just come in now pull some of them down
or pull some of them up. So I'll pull these
up, pull these down. So there we go,
uneven steps again. Now let's come in and
add in some bricks. So we'll bring in
our bricks first. We don't need the back of it, we don't need the
underneath of it. We can delete those
out of the way. So delete faces. You could if you wanted to get rid
of this part as well, because I'm not going
to see that on line. If you want to leave
your steps like this or you want to
put it as an asset, then actually put the bricks in. But I think for me I'm
actually going to delete those out because
it's just going to make it easier to
do the front of it. And then what I'm
going to do is I'm going to come to
these parts first. I'm going to press control. All transforms, right click, set origin to geometry. Add in the modifier and
we'll bring in a bevel, turn it down to Not 0.3 like so. And then we'll bring
in a material which will be our flag stones. So stone, flag this one here. And then we'll press A
and U Smart Uv Project. Click Okay. Finally, then
let's come to the bricks. So we're going to
click the down arrow. I'm going to click on Bricks. And then all I'm going to do
now is press Tab and Wrap. And then what you can
see non uniform scale. Let's see if it works better. If I reset the transforms
on there probably is going to a unwrap. And there we go. Now if I press alternH, bring back everything, I'll
wait for it to load up. And then what I'm
going to do is get these to be the right scale. We want them in that scale, even though it's a much
bigger flight than that, we still want to get them
run about the same scale. So I'm going to go
to UV editing and then what I'm going
to do is comb to my bricks. So
these bricks here. And I'm going to, first
of all, I think, yeah, the right size, the right scale, actually, sorry,
the right rotation. So what I'm going to do is
just bring them down and I think if I go round to here now have a look,
Let's press Tab. Tab. Yeah, there's still
two small, those bricks, so let's make them even smaller, which means that basically we just want two lines
of bricks on each one. So I'm going to bring them
in even more like that. That's around two
lines of brick. Now what I can do is I can press and Y, and bring them up, it's just one line
bit further and Y till they line up there. Okay, let's do this one. That one's actually okay, this one needs bring it up
a little bit and Y there. Okay, perfect. All right,
that's the bricks done. Then again, we can
see on the blue, not quite looking right. We did have another one,
I think with the blue. So let's just have
a look at that, see if we've still got
that onto material. Let's come to the blue
and click the down arrow, and we're looking for
blue painted wood two. And there you go. You
can see it leaks. They look at tiny,
tiny bit bare. We might go in and
actually fix that because it's a little bit
too much on those again. Now what I'll do is we'll
come back to modeling. What we want to do now is we've already got this part here, so we can move this over to here as well. So I'm
going to delete that. Grab both of these
also finish with this, which means I can actually
apply the modifier, the bevel, so I can press control and then join
it all together. Control J, join it all together. Control or transforms
set origin to geometry, shift D. Then and bring
it over to my other one, which will be round about here. Now let's think about
our brick walls. So on this one it's
going to be much lower. Let's build it out first. So I'll come to this one,
shift desks to selected shift, let's bring in a cube. Let's press the bottom like so. And what we want with this
one is we want it coming in jaws above here. So jaws above where
our steps is. So I'll pull it,
let's come in over. Let's actually,
let's grab it and just press esens head
with that portion. Editing on for sure.
So essens head, it's into the floor now. And then we'll do is
just press S and Y, pull it in a little bit. So something around
that sort of scale. And then I'll do is
I'll pull this one out, so just to the front of
here, just to the front. And then finally we'll do
is I'll press control. And I'll bring up
the front of here, so I'm going to come in
and I'm going to press E and pull it up slightly, so press the L button. And now all I want to do is
put it over the other side. So shift D, put it
over the other side. Now I'm conscious of where
I'm putting this too. We can see on this
one we're going to have some stonework on
this part hidden here. So what I want to
do is just make sure that this one
is around the same. I can see it needs
probably pulling this way a little
bit to the right. Just a little bit, so. All right, so now
what I'll do is I'll bring this one over
to this side shift D, bring it over to this side, put it into the
same place like so. And I do want this one to
be a little bit different. First of all I'm going to
do is I'm going to pull this up a little bit like so. And then what I'm
going to do is grab the top and pull
the top up higher because I'm going to
have a little bit of a railing on there,
something like this. And then L shift D and then
bring this over slightly, so. All right, that's looking good. Now, on the next lesson, what we'll do is we'll
get in these railings. We'll get the tops on
these brick walls, and then we'll also
bring in the materials. And then that's another
job actually done. Then we can actually
move on to the top. Get the pillars in. Yeah.
Lots of work to do. Alright everyone, So I
hope you enjoyed that. I'll see the next one.
Thanks a lot. Bye bye.
168. Creating Detailed Windows for Victorian Townhouses: Welcome back
everyone, to Blandon for the Environment
Artists Guide, and this is where
we left it off. All right. First of all, let's actually move this
summer a little bit, just so I can see a little
bit more of what I'm doing. So zed 180. And there we go. That's going to brighten
up that just a little bit. So all right, from now then, let's actually think
about this window. We also need to change and
we're going to do that after What all first
of all do though, is we'll get in these bars first so we can see how high
they're going to be. So what I'm going to do is
just bring in my coffee shop. So let's bring that back
in, let it load up. And then I should
be able to zoom out and grab these parts here. So all I'm going to
grab is this part. You can see they're
all together now. All we want to do is just
grab maybe three of them. I think that should be fine.
Like, so just like that. And then what we'll do is press shift and then
pull them over. And you can see I've
also grabbed that. I'm just going to pull that all the way across because I did press Fif D P selection just to separate them and
then come back into them and I'll just delete this wall. So delete and vertices, and then I should be
left with just these. Now hopefully I should be
able to press control. They all transforms right, set origin to geometry. I'm also, then I'm going
to press M and I'm going to put it into my
perfume shop like so. And that means then I can hide my coffee shop
out of the way. Now let's bring this over and what we'll do
then is spin it round. So R S -90 we'll spin it round. And then what I'm going
to do is get it in place. Now of course it's not
going to be this big, it's just going to
be one of them. So we're going to
just make it fit. So let's put it halfway in. I think actually three is
look in a good number, so we're going to
put it up to there. And then what I'm
going to do is you can see these are part of these, so I'm going to need to get rid of one of the parts, I think. So what I'll do is
I will come in, I'm thinking the
best way to do this. So what I'll do is I'll
come in these here, we will move down, first of all, Olshift click, old shift
click control plus. And then what we'll
do is just move these down into the halfway place. And then I'll press
L on this one. And I'm going to pull this down into place then. So
something like that. And then finally
what I want to do is I want to delete this
one out the way. So L delete vertices and
then the same thing. We'll delete these
now. So old shift click Ol shift
click control plus. And then we're just going
to press Delete and faces now let's
join these up now. So Lt shift click, Lt shift click
just to grab them. Top and bott right click then. And we're going to
bridge edge loops. And then we're going
to do the same thing on each of these. So
bridge edge loops. You can press shift R as well. That'll also, or
should also work. So shift R. No it doesn't. So right click,
bridge edge loops. And then what we'll
do is shift click. And we'll just come in and delete these now because
we don't need these edges. So delete dissolve
edges, and there we go. Now you can see we will
need to unwrap them again. We're not going to
do that quite yet, because we need to
pull these down first. So all I'm going to do
now is just come to the top and grab the
top of each of these. We have shift click like so. And then I'm going to press
control control like so. And then finally, let's bring it down into the place
where we want them, which should be something
like this I think. Okay, So now we can actually come in and just re unwrap them. So L L U Smart UV project. Click okay. And there we go. Just one thing left. We need to bring this
all the way back. So let's come in and then old shift click just
to tidy it up a little bit. Bring that back
into place like so. Just have a looky metal. Make sure that
you're still happy with it. And I think I am. So now I'm going to do is I'm just going to bring
this over now. The halfway point or similar to where these ones are,
so something like this. That looks fine. And now I'll think about is the
tops on each of these. So we'll come in,
we'll grab this one. And then all I'm going to
do is I'll grab this one. And this one I'm going
to press Shift D. I'm going to make sure that
I'm onto individual origins. And then I'm going to press
the S B to pull it out. And finally then I'm
just going to press, to pull it up to
put a top on there like so now I'm going to do the same thing
on this one as well. So I'm going to
grab this one and this one shift D, pull it out. And then, and we'll make these ones a tiny,
tiny bit different. So again, like so. And then bring them
in and there we go. Now they're looking a little bit different from these ones. All right, so now let's come in and what we'll
do is we'll grab these and these are
actually altogether, so yeah, what we'll
do is we'll just grab these steps and I'll press control L and I'll
link materials. And I'll also, in fact, I'll press control
all transforms. Let's just reset all of
our transforms over here. And then control
L. And I should be able to copy modifiers. I'm just wondering
this hasn't actually gone a modifier on.
Because we joined it. And we joined it
because there was steps on here together with, you know, kind of the
raising up of them. So what I'll do is add
modifier and we'll bring in a bevel and
we'll put that on. Not point, not three. And there we go,
that should be fine. Now, last of all, we're probably going to need to make sure that these parts here, they might need a
sharp along here. But for now let's just come in and we'll just grab them all. So L, L and L go to
the materials panel, stone flag, click a sign, and finally Smart UV Project. Click okay. And there we go. So we have managed to keep. The kind of. Yeah,
have we really should, I think we might need a
sharp going around here. So let's do that actually. So old shift, click
out, shift click, jos going all the
way around like so. And then right click and mark
a sharp. And there we go. Alright, now let's come in
and do the actual bricks. So what I'm going to
do with the bricks is I'm going to grab all of these 'cause I want
them to be all the same size. I'm going to press you then
Smart UV Project. Click Okay. And we should end up with
something like this. And I'm just wondering if
I need to unwrap them. You can see here that these ones actually have come out
very, very nicely. These, on the other hand, you can see both of these sides. So this one here is the only one that's
going the right way. So if I come in, let's try this. They're all the same size now, so let's come in first
of all with these, so I'm just going to
grab all of these sides, like so, and this one. And then I'll just spin them around and see how
they actually go in. So I'll come over to the
editing now and then press a 90. Spin them around. Let's put this then
onto our Material View, or shape, material
shade of view. And there we go. Now we can see they're all the right
size at the moment. And while they're
all the right size, let's grab them all. And what I want to
do is I want them to be this sort of size. So you can see all this size. You can see here, this
is the size of a brick. So if I come on for a press, a press the S be,
let's bring them down. And I think if I bring
them roundabout here, we can see that's just
about the right size. Now what I can do
is I can come in, you can see this one here. I need to kind of line them up. So if I press and y, let's see if I can line them up. So you can see there. I can
line them up pretty well. I can do the same with
this one as well. So I'm just going to
line them up a little bit bare of something like that. And there we go.
They're looking good. Everything is looking good, the ones on the tops. I'm happy with them
going that way. Let's try them going the other
way and see what we think. So we'll grab all of these, our 90, spin them around. And you know what, I
don't like them that way. I think they look
bad the other way, so I'm going to leave
them the other way. And I think they're
pretty much done now. So that's that done
now What we can think about now is our
actual window here, so we'll do the window next. So what I'm going to do is I'm going to go back to modeling. And we want to change this to be a little bit of
a different window, but we don't want to
spend a long time in it. That's the thing.
So all I'm want to do is just grab this window, press shift desk as to selected. Delete it out of the way.
Bring in a cube then. So I'll bring in a cube. I'll get it to be
the right side. So fire press control three. I should be able to get
this into the right size, so I'm going to have it a little bit wider than this window. And then I'm going
to press S and Ed. So bring it up to where I want it, so
something like this. And then I'll press
and X and pull it out. And just as a Ed, a little bit wider than this
one from there, then I'm going to actually
level this off now. So I'm going to first of all, reset all of my
transforms like so. And then I'm going to
come in, grab the edges, and then press control
B and level it off. So I think, yeah, something like that is the
way that I actually want it. I'm just wondering about
the back end of here. I don't think I want
this to go into it. So look this going
all the way there. In other words, what
do I mean by that? I want to pull it
out because I want my window to be here,
here, and here. And then this to be
the actual wood. So now if I grab it,
I should be able to pull it back into the place
that I actually want it. Now I'm just looking. It is kind of the same
distance as there. I don't really want that either. So all I'm going to do is
just grab the three and then I'll pull them out
just a little bit. In fact, you know
what, I'll grab the one and pull that bit out like so just so it sticks
out that a little bit more. Yeah, and I think
that is what I want. Something like this. All right, then from there then,
we can actually now start and create our window. So we're going to press control. We're going to
bring up one piece of wood going over
there, control law. Bring up a second piece of
wood going around there. And from there then
we'll pull these out. So I'm just going
to split it off, just like we've done many
times before actually. So let's come in
and what we'll do is we'll split this one off. So if I grab all of these and I'm just
wondering about the sides, actually, I'm going to
minus off that side. I'm going to keep it separate. So I'm going to split this. Come into here, so shift
click, control, click. And then I'll just press P
selection. Split that off. And then now I'll
come to my sides. Same thing, so I'll grab
this side and this one. And then I'll press P
election, split those off. And then finally now I've
got my actual main windows. So first of all, I actually
want to bring them in. So what I'll do is I'll
grab all of these. I'm going to press the eye
button, press I again, and bring them into the
scale that I want, um, which will be probably
something around there. And then what I'm going to do is press P again and
split those off. All right, so we've got
these parts split off. Now you can see that this
and this are all together, so let's split those off. So P selection, split those off. Now finally we've got
these parts in here. Now on the next one, what we'll
do then is we'll bring in some edge loops for these
going down and across. And then we'll start creating
our windows for those. But I think pretty
much we've got, you know, the basis of what
we're going to be doing here. All right everyone. So I
hope you enjoyed that. And I'll see on the next one, Don't forget to save about
your work after each lesson. And I'll see you on the
next one. Thanks lot. Bye bye.
169. Final Touches on the Bay Window Design: Welcome. Microphone
on to blender for the environment
artists guide. And this is where we left off. All right, so let's carry
on with our window. So what we're first
of all going to do, let's come to these parts
here and first of all, I'll reset all the transforms and then set origin to geometry. And then what we'll do
is I'll come in now to my modifier and we'll
bring in a solidify. Let's bring those out
a little bit then. So let's pull them out, not that way, let's
pull them out this way. And then we'll come
to these parts here. So both of these, reset all the transforms. And then what we'll
do is the same thing. Again, generate a solidify, let's bring it out
the other way. So that way, something like that way we can see that we've
got a little bit of a gap, which we're going to sort
out as we work along this. Now what we'll do is we'll
come to the top part. We'll sort the top
part out first. Let's just press,
pull it up like so. And then ol shift and click. I don't really want to grab the back of it. I don't think. I just the sides of
it, just these sides. I'm going to press alternS and
pull those out over there. So then what I'm also going to do is just give it one more top. Just a slight top on here. So I'll do the same thing again. I'm going to press E and
then come from here, Control select, so I'm
not grabbing that back. And then Lns to Alts and pull it out
a slight bit like so. And there we go. Okay,
that's that bit. And now let's come
to the bottom bit. So this is going to be
where the actual wall is going to come to. This bit has got to
solidify on already. So it's just underneath there, so I'm going to grab
underneath here. So grab this one. And then what I'm
going to do is just press and pull that down. And jaws want this
coming out then. So I'm going to grab it from here, going all the way around. So control, click, grabbing
it to here, pressing enter, and then alternates and just pulling that out
to where I want it. So something like
that. That's all we want on the bottom one. Now let's come back
then to this part here. So we can see that we need
our windows in first of all. So all I'm going to do, I
need to split these all off. So I need to grab
all of these first, I think, and then all of these. And then what I'll
do is I'll press Y. And then from there
I should be able to grab just the tops and
bottoms of each one. And from that then if
I split those off, like so I'm going to press Y. And then what I can do is I can grab them all I can press, I should be able to
then pull them out. Now the problem I've got is this is what I was
worried about. Sometimes when you pull
them out like that, you are going to end up with a split straight
down the middle. As you can see, it's not always the best way to
pull them that way. Sometimes it's better
to bring them the other way and then pull
everything out. And I'm just wondering
if I pull them that way and then press A
and press the S button. As you can see, if I put
this on medium point, so now if I press S, I can
pull them out in that way. Unfortunately, you can
see what happens is that everything kind of gets broken from the top
and the bottom. If I press S and's head though, I should be able to pull
them all back into place. The one problem I've got is
that the windows, of course, are a little bit smaller now, and I need to kind of make
those back into place. You can also see we do have a problem in
that all of these, I brought them all out with me and I didn't mean to do that. You know what, let's just go back before we split
all of these off. So I'm hoping that,
yes, there we go. Al right before we
split them off, let's actually do this a
little bit of a different way. So it's a little bit
harder way to be honest. But what I'm going to do is I'm going to grab all of these. I'm going to press Enter
and then alter Ns. And now you can
see I can actually bring them out the
way that I want them. So the problem there is though, that you're not going
to get your little splits on these parts, so you're not going to
get a split in here. So what I'm actually
going to do is I'm just gonna press
Alt Shift click, and do it this way instead. So I'll just split these up. So if I grab all those,
press the Y button, press A, and then what I'll do is I'll fill
in these faces. So now if I come to mesh, clean up and fill holes. And now I'll do is just to test that to see if it
actually works. I'll press control
all transforms, origin geometry,
adding the modifier. And we'll bring in a
bevel. And there we go, we can see we've got some
problems around here. You can see we've got
a split here and here, but not around here,
for whatever reason. So let's go in, not point N n three and actually fix that. So what I'm going to do is
I'm just going to press the little question mark.
Just isolate it out. And the other thing I'm going to do is get rid of the back. I'm really not going
to need the back. Some windows, not like
what we did before. Delete vertices. And
now let's come in and Alt shift and click,
press the Y button. Old shift click, press Y, and then Old shift click, press Y, and then the same. Now on here, old
shift click, press Y, and then Old shift
click, press Y, and then old shift
click and press Y. Now we are going to end up
with some problems here. So if I come in and
grab just all of these, you will see if I press A
little question, sorry, not a little question,
mark shift H. You will see now that we should be able to
fill all of these gaps in. Because each of these,
if I press L on here, you can see now it's split off. So let's see if that
actually works. So. Let's grab all of these. Let's then come in to mesh. Let's come down to clean up. And what we're gonna do is fill holes and then we filled all of the horse holes in and
they're also still split off. That's exactly what we wanted. If we press hol tag, now press the tab on, now we can see we've
got those there. However, there is one problem. We're probably going to
end up behind there with some parts where we filled them in before and then
we split them off. So what we're going to do
is go to mesh. Clean up. Merge by distance,
64 vertices removed. Now, I'm hoping, yeah, you can see that's what it
did. It's not what we want. So let's go back because you can see it actually joined
all of those in. So what I'm going to do is
I'm just going to come in and I'm going to see if
there's any parts there first. So if I hide these out
the way we can see that we have these have no faces
on them as you can see. Let's come to our bottom ones and we'll tidy these all up. So if I grab all of these, hide them out the
way you can see, there is no problems actually with face extra
faces being there. At least I don't think there is. Let me just grab this one. Yes, there is. There we go. That is what I'm talking about. So now instead, now I
can actually come in, press a mesh clean up, merge by distance 16
vertices removed. And now all of those should be fixed except for some reason. Let's have a look, this one
here, what is going on? Let's press the Lee faces. Yeah, these are
not what I wanted, so I'm going to do
the same thing. I'm just gonna come in, delete
the faces. Delete faces. All right, now let's come
in and reapply those faces. Let's see if we can
do that. So mesh, clean up, fill holes
and there we go. Alright, we're nearly there now. The one thing we need to do is obviously fill these
holes in as well. So I'm just going to come in. We can't fill them in,
unfortunately, with clean up. So we have to just come
in and do them manually. And it's just because
clean up only works when there's,
you know, four sides. If there's any more than that,
it doesn't fill them in. Even if it's a triangle,
it doesn't fill it in. So I wish it did, it would make things
easier, but it doesn't. So let's just fill these
in with F like so. And one thing I
forgot is I forgot to put my key commands down the bottom left hand
side. So I'm sorry about that. I'll put them on now and you should be able to follow along. All right everyone,
So now they're back on and now we should be
able to rock and roll. Okay, so there we go. Let's press the
little question mark. Bring back everything and this is what we
should be left with. Pretty much we're done
except these parts now, which we said we need
to actually pull out. So what I'm going to do
is I'm going to come to this one in here and
this one in here. And then what I'm going to do
is just pull them that way. So I want to come to normal, so let's put it on normal and
let's pull them out like, so don't worry about
I'm crossing over this part because we're going
to pull these parts out, but I'm just going to
pull them into place. I'm going to do the same
thing then on this one. So grab this one
and grab this one. And then just pull those
out into place as well. And now finally let's come in, grab each of these
sides, so this one here. And as you can see we've
got a solidify on, so all we need to do is
just bring out the solidify Ja T a little bit and that
should all fit in place. Okay, let's apply
that in object mode. So let's apply that in object
mode. And there we go. Now last of all,
let's put this on object mode so we can really
see what we're doing here. So actually the windows now
are fitting in pretty nicely. All that we need to do
is come to our Windows. Then we need to press control
left click, right click. Control left click, right click. And then come round to this one. Control left click, right click. Now I imagine that
we're probably gonna need at least three. So control 123, left
click, right click. And then just the same on this one and the shuttle
line up anyway, so All right, nearly there now. So what we need now is an
edge in each of these. So let's come in,
grab everything. We're going to press the eye
button and bring those in. So press P, selection.
Hide those, that the way. So hide those. And then
we'll come back to these. Now what we want
to do is press A. We want to come to select and I think I'm in fact not select. We're going to go to mesh
and we're going to go to split by faces, by edges. I'm hoping that each
of these edges, now if I press L on this one, you can see now
they're all split off. So that makes it really easy. Now I can do is I can press control all transforms,
right click, set origin to geometry, add in the modifier,
so we're going to generate a solidify. And then what I'm going
to do is I'm going to bring it out slightly, so I'm going to put
even thickness on. And then what I'm
going to do is add another modifier and
we'll bring in a bevel. And we'll turn the
bevel down to naught 0.3 So there we go. Now press Lth. Bring
back your windows. Double tap the, and
that is a very, very nice window looking very
different from this one. That is exactly what we want. All right, so what we'll
do then on the next lesson is we'll get in our
walls on each of these. We'll get this one obviously with materials and shaders on. And then what we can
do is we can start actually building
around each of these. You know, the rest of
the build on this one, it's not actually
that difficult. We just need to create
maybe a couple of windows, but we've created so
many windows now. And also those windows, we're actually creating
some of them we can actually use
around the other side. So it is cutting
down the work around the other side as well.
All right everyone. So I hope you enjoyed that
and I'll see on the next one. Thanks a lot. Bye bye.
170. Texturing Bay Windows for Authenticity: Welcome microphone to Blender. Fall the Environment
Artists Guide, And this is where we left off. All right, before
we finish this, then let's come to this
inner part in here. This inner part in here. All I'm going to do is press shift D, and then we're going to press
and Jaws, bring it out. Jaws the tiny bit so. And then we're
going to press and bring it down to the floor. Let's put this on to Global, so just bring it
down to the floor. And let's press control. Bring in another edge
loop, roundabout there. And then what we'll do
is we'll press Alt Shift and click and then
enter Alterns. And just pull that
out a slight bit, maybe a little bit more alterns, 'cause this is actually going
to be some bricks like so. And then all they'll do finally
is just split that off. So I'm going to press
peat selection. Split that off. All right. Now, let's come to this one. We're going to do pretty
much the same thing, so I'm going to grab
the bottom of here, I'm going to press shift D, so I'm going to pull
it in a little bit. So I'm going to press the Born, bring it in like so. And then I'm going to
press and pull it down to the floor like so jaws
just above the floor. And I'm also wondering if, yeah, you know what
that's going to be, maybe a little bit too big. So I'm just going
to grab it going all the way around, alternate, bring it back just a
little bit more like so. And I'm also going to come in and put in a sharp
on each of these, so each of these
right click and we'll mark in a shop because
it is brick after all. Okay. From there then let's
go to our UV editing now. And we'll also from
here as well bring in what else we're
going to bring in. I'm thinking we'll bring in. I'm just looking at how which
ones I'm going to be using. Okay, so we'll come to this
one first and what we'll do is we'll put it onto
object mode at the moment. I'm going to open this up
and then what I'm going to do is I'm just
going to make sure I've got all of my bevels on, so that's something that
I want on At the moment. We can see we have
no bevels on here, we have a bevel on here. So I'm going to come to
each of these parts. We've got a solidify
on here as well. Let's press control,
lay on the solidify. We know that's okay now. And
I'm just going to go through now and just make sure which ones have got bevels,
the solidifiers. I'm gonna apply this
solidifiers well like so. And then we're going
to come to this one. This one, this
one. And just make sure everything is
okay from there. Then I'm going to
grab all of these. Grabbing the inside as well. And then what I'm going to
do, even this one here, I'm going to grab this one last because I know
it's got the bevel on. I'm going to press control L.
And then what I'm going to do is copy modifiers
like so more. So I'm going to press
control all transforms, right click the
origin geometry and then now those bevels should
be on all of these parts. Which if I press tab, sorry, not tab. If
a double tap the a. Now we should be able
to see is on all of these parts going
down. Just making sure. And there we go. All right, so there are on all
of those now we can put it back onto our shading. One other thing is I
should be able to grab this one as it go bevlon. That's the question that I want to ask about this part now. So if I go into this part, as it go Bevlon yes, it does. So that's good as well. So now let's go back to this one and then what we're going to do is bring
in the material. So I'm going to come in and this material is
going to be the red, sorry, if I put in
red, red painted wood. Let's actually give it
the material first. So we'll do the same thing. So I'm going to grab
all of these parts. Grab this one, press
control L, link materials. Grab this one here.
Same thing again. Control L. We can see, actually, yeah, it hasn't. Okay. So control
L, link materials. Let's then come
down to this one. And I want this to be brick, so I'm going to click
the down arrow. Go to brick bricks, There we go. And then I'll come to this one. And I'm going to
grab just this part here. So just this part. And what I'll do is click
plus down arrow and brick so and click a sign. And there we go. All right, let's go back to this one first. So we'll do all of
this one first. I'll grab my bottom off here. Press Smart UV Project. Click Okay. And let's
see if now if I can, I've got them the right way
apart from these bottom ones. And I'm going to scale them down to be round about the
same size as this. Now you can see on here, it doesn't actually look
right because we've got many, many breaks in here and
we don't want that. So what we're going to do
instead is we're going to come in and we're just going
to re unwrap this. I'm going to grab all of
this. Coming round to here. I'm going to press U
and unwrap like so. And then R 90. I'm going to press control three to go into the front view. And then what I'm
going to do is make these march much smaller in line or in scale of the
same as this like, so. All right, from there then
I'm going to press and y and just bring them
a little bit more. So we've got a
little bit of the, you know, the inner
part of the brick, the mortar at the
top and the bottom. And now finally I can
come into the bottom one. So if I'm coming
into this one now I'm going to press
old shift click plus. And then what I'm going to do, I need to spin these rounds. So if I press R 90, I'm going to spin
it round like so. I'm also then going
to come in and unwrap just that
like we did before. So Jaws come in and
unwrap the bottom part, just so we can make
that look right. So if I now press U, unwrap, Spin it round, so r 90 so and then
press the S button. And all we want is really
one actual brick there, so if I press and Y, bring it up, so
press the S button. So maybe a little bit more. And then and Y. And there we go. I think
we've got it there. All right, that's looking good. Now let's come over
to this part here. So I'm just going to unwrap. So if I unwrap it, and let's see if now if
I can spin it around. So 90 we can see it's not
unwrapping correctly. So let's first of all press control all
transforms right Click, set origin to geometry. And now let's come in and
just grab the front of this. So from here, going all
the way around to here, press U wrap, and
there we go, 90. Spin it round and then
bring it all the way down to make it the same size as those other bricks like so. And I think they're
about right finally, then we can actually come back now and grab these parts here. Can press A, I can press U, Smart UV Project. Click okay. And then I can hide
them out the way, and then move down
to the next one. So a U Smart UV Project. Click okay. Hide
them out the way. And then come to this
one. Same thing again. Let's press all tag though, because on this one you can
see there was some missing. So a now to grab everything, Smart U project, click okay
and hide them out the way. And final ones then. So a smart UV project,
hide them out the way. And then just these ones, a smart UV project, click okay, hide
them out the way. Now with these then let's
sir, think about the window. We might as well use this. So all I'm going to do is
I'll come to this one first. I'll grab this one here, and we're going to
copy copy and default. So default is here, and then what we'll do
is come back to these, grab them all, and then
you copy paste default. And there we go.
Now we just need to add the glass on glass. And the one we're looking for is glass not lit, of course. And then if I come in now, we can see here the L
press a on this one then. And then the final part, which is basically
grabbing each of these and just moving them into
place like we've done many, many times before. So let's just keep
moving them into place, into different places
like so. And over there. And now we'll do the
same with this side. We'll leave that one
actually we'll grab this one and moving it into place like so. And there we go. Now we'll come to this side, exactly the same thing. And you can see really, really fast Now to
do this doesn't take long once you know
what you're doing. Okay, that's that done as well. All right. Old Tate,
bring back everything. Double tap the let's go
back now to modeling. And they're no longer
going to do now is just save out my work. So save up my work and let's have a quick
look at what this is going to look like now 'cause we've pretty much
finished these windows. We've just got to put, you know, the backgrounds in there. We're not going to do that yet. We're going to, first of
all, bring in all of the, you know, the stone
and things like that before doing that. And then once we've
brought all that in, then we can actually
make a boolean to put the inner part
of the wall in. Alright everyone, so hope
you enjoyed that and I'll see on the next one.
Thanks a lot. Bye bye.
171. Modeling Decorative Door Arches for Townhouses: Welcome back everyone to Blender for the
Environment Artists Guide. Now the first thing I want to do is they want to come
in and grab this one. And instead of it being
blue painted wood, I'm just going to go down
to blue painted wood too. And I'm just going to have a look at what that looks like. And we can see that it's not really doing the
job that I want. So what I'm going
to do is I'm going to go over to my shading panel. I'm going to put it
onto rendered view. I'm going to let this load up. And then what I'm going to
do is go back to my window. And I don't really want
it looking like this. It looks a little bit weird because of the
fact that we've got lots of lots of wear on that part and not so
much on this part. So let's come in, do
our actual bevel, and we can see at the moment
it's on not 0.5 let's put it on naught
0.3 Let's try that. And then we go, it's starting to look
a little bit better. Let's put this on,
not 0.3 Now I'm just wondering if I put this
on 0.6 Let's try that there. What I want this on is
not point naught 35. Let's try that. There we go. That's the bit of war that
I'm actually looking for now. The other thing is can
I actually come in now and alter this a
little bit more on here? So we've got a little bit of, the other thing I'm worried
about is I'm just going to come in and let's see if
I can pull this up or down. You can see I've also got some control over there as well. And then I'm also going to come in and just have a look at this. If this will actually
change anything, which not really going
to change anything, I'm looking at thinking,
how else can I change this? Can change this in any other
way. Let's come to this. There you can see this is now
altering that a little bit. A little bit too
much, to be honest. So let's bring it down
just a little bit more. We have a little bit of wear now on these parts as well.
I don't actually think. Yes, there we go. Now, let's
cut it down a little bit. Let's bring this over now. Bring it down or
bring it up a look. I'm not sure whether I'm happy
with this at the moment, so I'm just going to go
back. Yes, and there we go. That's what I'm looking
for, a little bit of war on my actual wood there. And I think that actually
looks bad because it looks as though the
wood is coming off. Let's try it on
the door as well. So if I come to the door, this is blue painted wood too. We can see our door looks
much, much better the moment. And now what I'm going
to do is I'm going to kind of do the same thing
with the red painted wood. So I'm going to come to my red, I'm going to go to
red painted wood. And then what I'm going to
do is click the down arrow. We're going to click New. And we're going to call
this red painted wood two. So we're going to
copy that then. So down now, copy material, paste material like so. And then all I'm going to do now is just minus this one off. Minus this off like so. And now what we'll
do is we'll come in and copy these on this one, n 0.035 0.03 So let's
do them the same thing. So no 0.035 no 0.3 So let's also give it a
test on here. So you can see. Let's go to red
painted wood to like. So let's come to
the door as well. And what we'll do is
we'll click on this one. Red painted wood two. And there we go. I don't think I need to alter anything
else actually on this one. I think because
it being the red, it actually looks good
the way that it looks. So I think I'm actually
going to leave that. So now we can see they look. I'm also looking at
this one because I think this is red painted wood. Let's try on red
painted wood to yes. And I think that just
looks so much better. Okay, so now we've
sorted that out. What we can do is now
go back to modeling. So let this load up. We can also now come back
and put it onto object mode. And now what we'll
do is we'll start building these parts out. So the first part
I'll start with is going to be this kind
of stone bit over here. So I'm going to come in, just
grab this edge over here, so just this edge here, Press shift desk has selected. And I'm also going to come in and actually save out my work. And from there then I'm just
going to bring in a block. So bring in a cube. Let's bring the cube down
because my blender restarted, so let's make it a little bit smaller when we bring them in. And then what I'm
going to do is just bring it down into place. I'm going to make it a little bit smaller than this still. So something like that
is made out of stone. So I've just got to make sure that I've got the right size. And I'm then going to
pull it out a little bit. So we'll pull it out
into place because I'm going to have another
wooden block kind of here. I'm also going to pull it over. And then what I'm going to do
now is I'm going to pull it up probably two roundabout. Let's pull it up to here. And then what we'll do is
we'll press and pull it up. And then I'll grab the front of this, just this line here. And then pull it back like so. And then what we'll do
is pull it up again. So pull it up all the way
up nearly to the top. And then from there,
what I'm going to do is going to press Enter. Pull it out a little bit, pull it out a little bit, and then pull it up into place. So then what I'm going
to do is press and Y, because I want to
pull it out a little bit on this angle like so. All right, that's looking good. Now let's put another
couple of Gg loops on here. So control two, left
click, right click. Control, pull them out. And then enter Lns and pull
those out a little bit. So offset even on. Yeah, and a thing
that looks good. All right, so now
what I'll do is I'll grab this and put it
over this side as well. So I'm going to press control or transforms set
origin to geometry. And before we do anything, I'm going to actually unwrap it. So smart UV project, I'm going to then
bring in the stone. So I'm looking for stone
and we've got stone here. And also they're
going to come in adding the modifier geometry and bevel, and
we'll put this on. Not 0.3 like we normally do. Let's have a look.
And there we go. Now let's just put it
onto our shaded panel. All that looks like
double tap the. Yeah, that's looking fine. Now, I'll just bring it over. So I'm just going to
press shift D. I'm going to bring it
then over to here. Put it in right next to just this one that's
coming out here. In other words, let's
just pull it over. What? I'll just pull
it over to there. I'm also going to
pull it in front on this one. Let's
pull it in front. So now the one thing I'm not very happy with
is this part here. I think I need to pull
it a little bit down just so the shape fits
a little bit bare. I'm also concerned that it's not quite ting
off on each of these. So I'm just going to grab them both because
I want them down to the floor and I'm
going to pull them down. So I'm going to pull them
down to the floor like so. And doing that means
that this one now fits much better in place. Double tap the and there we go. All right, from here now we can actually start putting one. I think we'll put one
in the middle as well. So I'm just going to grab this. I'm going to press Shift D, and I'm going to
bring it over right to the middle or
around here like. So from here now I can actually start
building these parts out. We'll start with this one here. I'm going to press Shift
Scuse of Selected. And then I'm going
to press Shift and we'll bring in a cube. I'm going to bring
my cube down here. It wants to be smaller
than this, of course. And just inside the wall, just inside each
one of these parts, maybe even smaller than that. And then going down to the floor like so, and then coming back. So it's actually in there
popping out like so. All right, that looks
good. Now let's think about creating
this bit then. So I've got an idea of
how I want to create it. First of all, though,
if we pull it up to, let's say here, this is really where I
want it coming into. What I need to make
sure though is if I pull my guy into place, that my guy is still going
to be able to fit in there. So if I pull him up into there, we can see now if we get
an arch going over there, he will fit in very nicely. So that's good. So
what I'm going to do is just pull my guy
back a little bit. I'll put him over this side, and then I'll just work
on this part here. So first of all, I'll bring in the arch that
I'm going to bring in. So to do that, all I'm going
to do is just bring in, I think I can actually, you know what, I'll
do it with a slender, let's do it properly. So what we'll do is we'll set
this to something like 20, and then I'll spin
it round so L Y 90. And then I'll make it a
little bit smaller like so. And from there then, I'm just
going to take the front, delete the front,
so delete faces. And then we'll delete the
back. So delete faces. And then finally
we're just going to come down to the
halfway point again. So that's up to there. Press Delete and Faces. And we should be left with
something like this from here. Then we can press and X and squeeze it in to where
we actually want it. We're going to make it a
little bit smaller like so. And then we're going to
fit in to here like so. And then finally we're going to pull it up. Now we
need one of these. The other side,
we're just trying to get the right
dimensions on this. So if I press control three, you can see at the moment
it needs to come over, so it needs to fit in like, so we're going to
then press and Y, pull it in, and then
and Z, pull it down. There we go. I think that looks round about the right size. Now let's just give
this a little bit of solidify make into
three D objects so I can actually see what
I'm doing like so. So now what I can do is now
I've got that in place, we know where it's going to
go, it's the right height. What I want to do now
is work on this part. So I'm going to come in,
press tab, grab this part. And then what I'll do now is, first of all, I'll
bring in one edge loop. So control art, bring in an edge loop and I'm going to bring it around about to there. And then I'm going
to press control B, pull it out, Enter alternS and pull that
out a little bit more. So make sure that
offset even is on. And then I can rest
this then on there. If I come back now
and grab this, I can rest this right on there. So if I press and
Y and pull it in, and then and Z, and Z pull it down, you can see it's
pulling it from there. I don't really want
that set origin, set origin to geometry and
then and Z. There we go. All right. Now I'm happy with that where
it's going to go. I just need to finish
off this part then. So all I'm going to do, I'm
going to press control, bring in another part which is going to be roundabout there, and then I'm going to
come to the front now. So just this part here. I'm going to press the eye
button and bring that in. So I don't want to bring
it in where it's going, you know, up past this step. And from there I just
want to pull it out. So there we go. And what we'll do then
on the next one is then I'll pull this
up a little bit more. Actually we'll do that
before we finish in. We'll pull this up just
to roundabout here and then what we'll do is we'll get another piece of stone going
across this middle part. Because we might need to
pull these up a little bit, I think so. We can
do that as well. Yeah, we're really starting to get there. All
right everyone. Let's let's save that
our work and I'll see on the next one.
Thanks a lot. Bye bye.
172. Completing the Ground Floor of Victorian Townhouses: Welcome back everyone to Blender for the Environment
Artists Guide. And this is where we left off, so now I'm going
to do is I'm just going to bring in another block. So shift a, bring in a cube,
let's make it smaller. And then what I'm going to do is I'm going to put
this into place. Now you can see that this block, it needs to be kind of strong
because it's going to be holding up a fair
amount of parts. So what I want to do is really, I want to bring it up
above this part here, because this is going to
be, you know, another part. Let's make it a tiny,
tiny bit smaller. And now we can see where
these need to come up to. So if I pull this over to here and then pull it
back a little bit, and then what I'm going to do is pull it over to this side. So if I grab this, pull
it over to this side, I really want this block
to come round about there. And then what I also
want to do is I want to pull it back
just a tiny bit, so I'm going to grab it, pull
it back just a tiny bit, just so it's kind of
sat on top of here. And then finally
what I'm going to do now is grab each of these. I'm going to pull
them up a little bit, so I'm going to grab
just the tops of them because they're all
the same at the moment. And let's pull them
up a little bit, just so they're
over there, like. So just make sure there's not so much stretching
on each of these, which I don't think
there is on these. And then finally, what I can do is I can bring this out now. So if I come into this now, I should be able to
bring it up into place, making sure that it sat
under there like so. And then for the outside
bit, I'm going to come in, so control law, bring it
up to round about here. And then what I'm going
to do is I'm going to bring in another edge loop. So control just just
above this part here. And then from there I'm
going to bring this out. So I'm going to press,
pull it out like so. And then what I'm
going to do is press Tab Control all
transforms right. Click, set origin to geometry. Come in then, and we're going
to grab this bottom part. We're then going to
press control B. Add in a few more bevels, like so there we go. That is what we want, right? Click, shade, auto, smooth. Yeah, that's pretty much what
we want now for this part. Now we just need to
bring this part over if I press shift like so. And then just bring it over to the same sort of distance
of this one and this one. And you can see now why
we're actually doing that. And you can see just how beautiful that's
actually forming. And then from there,
what we'll do is we've got a few choices here. We can either use solidify
to kind of bring this up, which it brings
its own problems. If I bring this up, you
can see it makes it very, very large to do that. What we're trying to
do, the other way of doing it is just
removing the Slidify, And instead of that just
coming in and grabbing this. So Alt Shift, click on
both of these sides. And then pressing E and Z
and pulling it up like so. And then what you're going
to do is press S and Z, And then you should be
able to flatten it out. You can also use, of
course, the Bicic took, but what I tend to do is if
I press S and Z a few times, I should be able to bring it in and
flatten it out like so. Now we can see we do have a little problem in that
this doesn't fit properly. So all I'm going to do is
just pull it this way. And hopefully if I
then press and Y, I should be able to
pull it out just a slight bit like soap.
And there we go. Let's right click,
shade, auto, smooth. And that's exactly
what I'm looking for. Now let's put a top on this. So to go for the top, let's actually come
in and grab this one. You know what, we could do
this a different way as well. So all I'll do is I'll
just press shift, click, shift,
click, right click. And we'll bridge edge loops. There we go. And then
what we'll do now is, well, you know what, it
is going to make it hard. If I press shift D, now we can see we've got all of these
edge loops on there. We don't really
want that, so I'm going to come in
limited dissolve. And that then is going to
make it much, much easier. Let's pull it back into place. Let's press and x and
pull it out a little bit. Let's press E then.
So let's pull it up with just below
these parts here. Now we can see that
we're going to need a little bit
of a wall on here. So this part here I'm
going to have to pull down just so we can hide. This part of the back, I think I'm going to
leave it just there, maybe a little bit lower. And then from here then what I'm going to do is I'm
just going to come in, grab the front of it,
press the eye button, and then press and
pull that out. And there we go. And now
let's come back to the wall. So the wall is here for simple. All you can do with this, you're never going to see in there. So you can just press
and Z and pull that down into place like so.
And there we go. All right, so now let's bring in a little part
under each of these. So all I'll do is I'll
do this one first. So I'm going to press
shift A, bring in a cube. I'm going to bring it over here, up into place like so round about the halfway point of the window, press the S button. And then all I'm going to
do is just pull it back while I'm going to try
pull it back into place. So then what I'm going to do is I'm going
to grab this side of it, so underneath of it, and
then and y bring it in. And then finally control
art bring it up. Like so. And I'll bring in
one edge loop at the top. So if I press Alt Shift
and click Enter AlternS, let's bring it out a little bit. So let's put offset even on. And then let's finally
pull in the back of it. So let's pull in the back. And that's exactly what I want. All right, so now let's get
in all of the parts on here. So in other words, let's get in the shades and
everything like that. So what we'll do first of all is we'll grab all
of these parts. We're going to press control all transforms, set
origins, geometry. We're going to add in a bevel, not one of those,
that's a bullion. Add in a bevel naught
point naught naught three. And then press control L
and control L now and link. So copy modifiers. And then what we'll do is we'll grab this one last
and then we'll press control L and we'll link
materials from there. Then we'll just come
into each of these, so a smart UV project. Click Okay. And then just work your way down.
We'll grab these two. Actually do them both
at the same time. And then what we'll
do is grab these two. A smart UV project click, okay. Double tap the A, and there we go. That's
what we're left with. And I think actually that
is looking pretty good. Yeah, I'm happy with
how that looks. One thing I'm looking
at is this part here, this doesn't look
to be unwrapped. I'm looking to make sure
that this one is unwrapped. This one looks to be unwrapped. I'm just going to
go back down here, and I'm just looking at
the other side as well. The other side is
unwrapped properly. It just seems to be this one. So let's have a
look by grab all of this smart UV
project. Click Okay. Yeah. I just think that this part here just isn't
unwrapped properly. You know what, I'm not
going to worry about. I'm not going to worry about
it such a small detail. I'm not going to worry about it. I think it's gonna
be okay. All right. Yeah, let's now
bring in this part. So what I'm going to
do is I'm gonna press shift D. We'll bring it over. I don't want to look
in the same as this, so I'm just going to
spin it round, so y 180. Let's just spin it
around that way. Let's get it into place then, like, so let's bring
in this part as well. So let's press shift D.
Bring it over into place, so just at the top
of this window. And now what I want
to do is I want to bring in another one of these. So the way that
we've done this, we need to do it on
this side as well. We'll make this one
look a little bit different because we've got another piece of stone in there. So let's press shift,
Bring in a cube. And then what I'm going to do is bring it over and
I'm going to press S bring it into the same place like I did
before with the other one. So let's bring it all
the way down into place. Let's pull it back a little bit, let's make it even smaller. And then we'll grab
the top of it. So let's grab the top
face, select top. And then what I'm going to
do is pull it up like so. And we can see that this one is still probably a
little bit too big. So I'm going to
pull it that way. I'm also going to pull it
this way a little bit like, so yeah, that is, this is probably going to be the way that I want this one. All right, so let's
now come to the top. So control R, bring it up. So where do we want this
top part of this one? Probably somewhere
around around there. I'm going to press
control B, pull this out, drop back my bevels, and then enter alternates. Pull this one out offsite, even on and from there I think we can
actually bring this over. So it's just going to
be very, very simple. You might want to
actually come in press control law once more
and just bring it to here. And then just bring
out this part. So Alt shifting, click
enter, alternate, just so it looks like it's got
something a little better, you know, a little bit more
supporting it like, so. All right, let's press
shift D. We'll bring it now over to the other side. So let's have a
look where it is. So you can see it's right on
the edge here on this one. Let's bring it right on
the edge on this one. And there we go. Now let's
think about this front bit. So I'm going to
grab both of these. Shift S, Ursa selected
and then Shift. Let's bring in a cube. Let's bring the cube up then to where we
actually want it. Let's make it thinner as well. So let's press and
y, and X, sorry. And bring it in and then bring
it across now, so and y. Let's pull it out.
Let's get it into play. I'm going to put it in this one right about in the middle. In the middle of both of these. The front of this, I'm
going to bevel it off. So first of all,
control left click, right click, and then control B. Let's bevel it out a little bit. Then let's press control. Bring in a few edge loops. 123456 may be maybe seven. Left click, right
click. And then what we'll do now is bring
out this front. If I come into this part, grab this part with control click, I'm going to pull it out. Pull it out into place now. Was going to bend this out, which I think I can still do if I come in to the center of this. And what I want to
do is pull it out. Unfortunately though,
if I pull this out, it's going to pull
the back of it out. So you'll see if I come in and
pull this out with smooth, you will see that it pulls
the whole thing out like so. I don't really
actually want that. All I want to do is
just pull out this bit. So the way to get
around that is we'll just grab this and this, and we'll press Shift H. Hide everything else out of the
way. Grab the front of it. And now we should be able to
just pull it out like so, press Holt, he, bring
back everything. And now you'll see we can
pull that out perfectly. Now the one thing we do need
to do first is actually make sure that this is
in the middle, like so. And there we go. Now it's
fitting in very nicely. All right, so on the next lesson we'll put a little
bit of a top on here. Again, we'll pull
down the actual, this part of the wall there. And then this one is
finished as well. And pretty much we've nearly got the front of this part
actually finished. And we can start work on, you know, the second
floor on this one. So we've got two more
floors to go and a little bit of the roof here. And then we're pretty much
done with this one as well. And again, as we work
around the other side, things do get easier because
we've got more parts to actually work with
Al right everyone. So hope you enjoyed that. And one other thing,
don't forget, if you're using
your asset manager, make sure to put these things in your asset
manager so you know you can use them
on different parts or create different
buildings with these. Alright, everyone,
hope you enjoyed that. See on the next one.
Thanks a lot. Bye bye.
173. Starting on the Second Floor and Roof of Townhouses: Welcome, cap on to Blender for the Environment
Artists Guide. And this is where
we left it off. So now let's come
into this part here. We're going to do the same
thing with this part. So all I'm going to do
is just grab this dead, pull it down into place like so. And I think with this
one I'm actually, we're going to put a little
bit of a top on here, but, but I think because it's
a little bit bigger, I'm just going to grab
all of this again. I'm going to grab
it all actually. And I'm just going
to re unwrap it. So I'm just making sure
I've grabbed it all. You wrap and there we go. Now it should all join together. All right, so now let's put a little bit of a
top on this part. So all I'm going to do, I'm
going to grab this part here. I'm going to press Shift D. I'm going to drag it up first
without portion editing on. So like so I think I'd in put it back in
place. There we go. Now I can drag it up like so
delete and limited dissolve. Let's put it back in place. And let's put it, pull
it back a little bit, so x like so. And then press and pull it up into place where
we want it, like so. And then we're going to
press I on the front of it. So let's bring it in. Let's press And's Ed and
bring it down a little bit. And then finally what
we'll do is we'll just pull it back a
little bit like so. And there we go. Alright,
that's looking fine. Now from here then, what we can do is we can grab all of these. We can press control
all transforms, right clicks at
origin to geometry, Grab this one because we
know our bevels on there. Control L, link materials, control L, and we'll also
copy modifiers like so. All right, let's
just make sure the devil's on each of
these, which it is. And now finally we can come
in a smart UV project. And just like we've done perhaps hundreds of times
before, at this point, I don't think you'll
need to be told that anymore. Al
right, there we go. So that is the front of
this done now from here, let's just pull our guy
over here a minute. Let's put our rendered view on. And there we go. That
is looking really nice, really starting to come
together. Now as you can see. And yeah, now what
we need to do is we need these windows and
we need the top windows. And then we can
actually, I think billion mall out from there. So I'm just wondering if I've actually got a window that I
can actually use for this. If I put it onto Material View. Let's bring in our bookstore. I just want to see
if I've actually got a window that I can
actually use on there. I'm just going to go round
and there's not one on there, so let's go then. Two are butchers. Let's
put our butchers on. I'll never look at that
when it loads up. Okay. Not really a window I can
use from there either. I think unfortunately
with this one, what we'll do is we'll just hide those two
out of the way. We will create a new window. So all I'm going to do,
first of all though, I'll get in the point where
I actually want, you know, this to be also need to probably create a new
one of these to go up. But first of all what I'll do is I'll bring both of these up. So I'm going to press Shift D, bring them up into place where I'll want them.
So something like that. I'm also on these parts as well, going to stretch them
out a little bit. Probably going to
bring this part over and this top
part over as well. First of all though,
let's stretch these out essence there, pull them out a little bit, make sure they fit in place. And then what we'll do
is we'll grab each of these and we'll press shift D, And we'll bring them over
to where I want them, which will be right about
in this corner here. And then we'll just
mirror them so we can rotate the mound or we can
actually mirror them, I think. So if it comes to object mirror and it's going to
be on the X, I think. Nope, not on the X. So
we'll try that again. So object mirror on
the Y and there we go. And now let's just put those into place
where we want them, making sure that this one here, for instance, it sat on there. So I'm going to pull
this out just a little bit and sit that on there. So I'm not going to worry
about this side yet because I know already what I'm actually going to be doing
with this side. It could be the
case, you know what, we'll actually put this side in. So I'm going to grab
this part here. I'm going to bring it over
shift, bring it over. I'm going to also
come in now and also do object mirror
on the Y, like so. And then what I'm
going to do is put this into place where
I actually want it. It's going to be
somewhere around here. And I'm going to move
this over slightly. So then I'm looking at this one. I'm thinking this
is out pass there. So I'm going to
have to probably, if I press pull this out pass there as well.
So let's pull it out. Yes, like that. And now
it's fitting into place and we're also thinking about
this part here at the moment, you can see that. This part and this part. So this has another part
that's going over there. So we need another
part in there. For now though, what I'll
do is to remind myself, I'll just grab this and
pull it back into place. So we've got that little corner that's going to feed
round into there. So we've pretty
much got everything now sorted for how
this is going to look. Now what I want to do is I
want to bring this post out. So I'm going to bring this up. So I'm going to press shift he and I'm going to bring it up. This is not going to be it. I'm just getting it where
it actually needs to be. And then what I'll do,
so it's the right size. In other words, what I'll do
is I'll just grab this one. I'll press P selection. And then I'll grab this
one. I'll press Delete. And now I've got this
little post here. And I'm just wondering if
this post is too far forward. So maybe that was
a waste of time. But anyway, let's have a look. So what we'll do is we'll bring, we'll bring this up to
where I want it to go. So all the way up here, I do want it to go in front, but what I want it to do
is also go behind here. We've got a number of
ways of doing this. Let's press control,
bring in an edge loop. First of all, let's
press control H again and just bring in
another age loop near it. And then we'll grab the front of here and then pull
it back into place. So I think as well on this we'll press control left
click, bring it down. And then I'll bring in
another little bit on here. If I press Enter
alternates, pull that out. So there we go. Let's press control
and then just pull it down into place. Now we can see it's
a little bit out, so I'm going to
pull it back just a tiny bit. There we go. That's looking much better
than where it was now. Let's think about this top part. So what I'm going to do
is I'm going to bring in another edge loop control. Let's bring in an edge
loop to round about here. And then what we'll do
is press shift click, going around here,
Altern, pull this out. So then what we'll do
is we'll grab the top, the top control plus, and then I'm going to
press and y pull that out. So then what I'm going to
do is grab this center bit. I'm going to press
the bond to bring it in and then pull it out. So now finally we'll have, I think three going
along here near the top actually control
left click, bring it up. And then control two, left click, and then just bring those up as well, grab them all. And then I'm going
to press control, pull them out, alternates
and then pull them out. So now the good thing is we've still got
our bevel on here. So what that means is I can just press a smart UV Project. Click Okay. And there we go. That part, if I double tap, the A should be in place now. Now let's think about these
windows that we spoke about. So I'm thinking, so what
I'm going to do is I'll first of all split this
off so you can see if I come in and grab this,
I'm going to split it off. Selection, and then I'm
going to come back to it. Control or transforms. Right click, set
origin geometry. Set origin to geometry. And then I'll just
split it in control, left click, pull
it over like so. Now that's split off and that's ready to actually be unwrapped. All my actual brick wall. Now from here then let's
bring in our window. I'm going to come
into this part. I'll come into this part,
grab this face shift, cust the selected tab. And then shift. And
let's bring in a cube. And what I'll do is make the
cube a little bit bigger. So get it to be the right
scale that actually want it. It's going to have some
supports on this window so it can be stuck out a little bit further
than these windows. Because these are, this one's
supported by brick anyway, but these are going to be
supported by some wood. So let's press and X, make it a little bit thinner, so maybe even a little bit more. It still stuck out a
little bit too much. Then what I'll do is
pull it into place, so if I put it in the middle, let's make it the right scale. So Sen's and then, and in something like
that I think is a good, good size for a window. Now let's come in and bevel off. I think we'll be level
off these edges. So what I'm going to do
is I'm going to come in, bring in two edge loops. So two left click, right click. And then what I can do is
I can level these off. So if I come in control B, I should be able to level those off now to where I
actually want them. Now you can see that
it's not quite right. So what I'm going
to do is I'm just going to pull these
out a little bit more. So if I grab these two and Y and pull them out like
so and now level them off, let's see if they look any
control B, level them off. And now you can see they
just look so much better. Bare beveled off like so you can even pull them all the way back because we're
going to put something, you know, on the
back of them anyway. But I think something like
that looks absolutely fine. And I'm thinking, yeah,
they're stuck out enough that should
be good to go. Now what I'll do is I'll
bring in the supports there, so we'll do that now. So what I'm going to do
is I'm going to grab each of these parts here and then I'm going to press to
split them off like so. And then I'm just going to
press control or transforms, right click Origin geometry. Let's bring in then a Solidify, let's pull them
out a little bit. And I'm also gonna put an object mode ready
for the next one. And then all these is going
to be is some support. I'm going to put another
support going in there because these are fairly,
fairly hefty window. So something like that I
think is good for support. Alright, so on the
next one then, what we'll do is we'll get
our bottom support in here. And then we'll
actually start work on our window. Another window. I know, but I think we should make short work of
how this sexual window is. All right, everyone. So
I hope you enjoyed that. I'll see you on the next
one. Thanks lot. Bye bye.
174. Addressing Mesh Issues for Optimized Modeling: Welcome back everyone to Blender for the Environment
Artists Guide. And this is where
we left the art. All right, let's come to our
window. Let's press control. And we can see we want
it round about there. Now if I just hide these out the way we can see that
it's from there anyway. So actually we don't need to
put in an edge loop there. What I'm going to do then is I do want an edge loop
on each of these. Not an edge loop,
sorry. A bevel. So a bevel on each of these. So all I'm going to do is press control and I want to pull it out from here as you can see. And then that then can
make I'm just wondering if I can pull, you
know what I'll do. I'll press control, we'll pull it out to
something like that. Then we'll press control, and what we'll do is
bring in an edge loop. Why did it do that? Actually, let's come
to this part then. Control, there we go,
That's what we want. And then what we'll do is
we'll grab this one control, pull this one out to
there, there we go. That's what I want because
then I can make these into an actual edge and
then an edge on the bottom. All right, so let's
do the bottom. So control bring it down. And then we'll, there is
one on the top as well. So control bring it up. And I'm also going to bring
in another one on the top. So control bring it up to there. Something like this I
think is a good start. Tab ol tag, bring back
the other things. Now I'm thinking, let's
bring them up a little bit. What I'll do is I'll grab
this one and this one, and then we'll just
bring them up. So now let's start work
on this part on here. So what we'll do is
we'll grab all of this. Going across, all of this
going across like so. And then I'm just going to press Enter alternates and pull those
out a little bit like so. And we definitely definitely
want offset even on. And just look in what
that looks like. I can see that I'm
going to have to pull these out a
little bit as well. We can do that,
that's no problem. Now we'll do the underneath, so I'll grab this one going
all the way around to the ear alternates and pull them out a little bit
just so they're under there. And let's put offset
even on like so. And that's looking
pretty good for now. Okay, Now let's think about these parts here
that we actually created. We might need to pull these all out a little bit, I think. But let's first of all
do the bottom as well. So we'll just grab it
going all the way around, alternates and pull
these out like so. And then we can offset even. Now let's do these bits, then we're going to come in, we'll grab both of these. So we're going to
press Serve selection. And then control all transforms,
set origin geometry. Adding the modifier, bring in a solidify, then pull this out. Pull this out in the
ship bun like so. And we can see for some reason
these are actually split. And I'm just looking
and wondering why they're split because I don't actually think I
split those off. Let me actually come
in and press A, and what I'm going
to do is press Delete and limited dissolve. That's not going to help it.
I'm just going to put them, I'm just going to, for now, put them like that
because they're definitely coming
out enough this way. And sometimes you'll end
up with these problems, That's just the way it is. But I think actually
that's looking good there. It's just this top
one that I need to actually pull out
a little bit more. But I think as far
as the support's going in, it looks fine. So what I'm going to
do then from there is I'm going to press Tab, and I'm going to come in control
and actually apply that. Then I'm going to press
shift H and actually have a look about coming in
and fixing these parts. If I grab this part
and this part, press this part, and this
part, this part and this part. Press the F B, I think. Yeah, that's going
to look better. I've just got the
inside that I really, really don't need now. I can just come in
and fix these parts. I'm going to get rid of the
whole top and the insides, So I'm going to do the
same on this one as well. Bottom first, then the inside of here. And then
we'll do the top. We're going to press
Delete and Faces. All right, now let's
press tab Oltage. Bring back everything.
Double tap the, let's have a look at
that. Looks like. And that's looking now
much, much better. Now what we need to do is bring out this
front a little bit. So what I'm going to do
is I'm going to come, I think from probably
here and here, and then also here and here. And let's see if I can actually pull this
out a little bit. So if I pull this out, you can see that it's
actually starting to stretch this bit here,
which we don't really want. So now we can press and Y and pull it in very
slightly like soap. And there we go. That is
looking the way that I want it. Yeah, and that's looking good. Now, before we carry on,
let's save that our work. So save, and then what we'll do is split
off these windows. Split off all of these windows. Let's press P selection. Split them off. And now let's think about the
bottom part first. So I'm going to
grab each of these. I'm going to press shift
S, Custer selected. And then I'm going to press
shift, bring in another cube. And this cube, then it's going to be the
support under here. So if I press scale
it down a little bit, then press S and Y, and we're just going to pull
it out past each of these. And then I'm also going to
pull it out just past here. Just so we can see that that all is going to rest
on this part here. And from that then,
I can use that as the support to go
into this part here. Because at the moment, we
need an part going in here which we're going to make with some planks of wood, actually. All right. So we'll
do that first then. So what I'm going to
do, I'm just going to grab all of these and
then I'm going to press, and I'm going to pull it
up into place like so, so my planks of wood over there. And then what I'm going to
do is I'm going to press control on this part here. So I want to come
into this part. Control, left
click, right click. And then what I'll
do is I'll press control to bevel it out. And then I'm just going to then grab the top of here if I can. I'm trying to look to see if I can grab the
top. And there we go. Then what I'm going to do
is I'm just going to press shift D and then and pull it up. And that is because
if we bevel it, we're still going
to get that gap down there, which
is what I want. My planks of wood now are
going to go in there. The supports are going to
come from here to here. Now, the one thing I would say is that the inside of here, the inside of here isn't
very thick at the moment. I'm thinking I'm going to
come in and grab this. Going all the way
around here like so, all the way around to here. And then all I'm going
to do is press alternS and hopefully make it
a little bit thicker. Now you can see we do end
up with some broken parts. This obviously has
happened in the past, and we know how to fix this. If I press L and then shift H, shift H or little
question mark to lay out the way this is
what we're left with. And I'm just wondering if
I should do it that way. I'm going to press controls, Ed. Just to go back before I brought that out and you know
what I'm going to do instead is I'm going to come and separate the
back of this off. You can in fact the front, we'll separate the front off. So if I come in, grab it
all the way around here, press the button selection, and then what I'm
going to do now is separate all of this off. If I come into this bit now,
I'm going to delete this. Delete faces, and this is
what we should end up with. Now we do also to
bring this one down, so I'm going to
press control Click. And then what I'm
going to do is press and pull this down like so. We also don't need
the back of this. Let's come in control, Click, delete and Faces. Let's also delete this
out the way as well. Delete and faces also, probably. I'm just wondering
if we need those. I don't think we need
these parts either. So all I'm going to
do is press Delete, and we're going to
dissolve edges. Sometimes that doesn't work, sometimes you have
to do it twice. And sometimes you
can just come here and dissolve edges like
this. There we go. Now what we can do is we've got this bit right,
this bits correct. We don't need the back of it, all the sides for that mask. So we're going to come
a bit like we did with the top and then delete
faces. Delete faces? Yeah, that's not what we wanted. Let's delete only faces. Yeah, that's not
going to work either. I'm just wondering why if I
come on there, delete faces. There we go. I must have pressed the wrong one.
That's what I'm looking for. All right, so now we
should be able to come in, press L on all of this. And you can see that we've
still got the front. That is what we want, but we
don't want this part joined. So I'm just going
to select all this. I'm going to press Y, and
then all I'm going to do is press L and delete
and face like so. And that's what I
want to be left with. Because now this bit here, I press it, Press Selection. I can press ol tag, Bring back everything, All
the little question mark. And what I want to do now
is solidify this part. So I'm going to grab it control a right clicks the
origin geometry, add in a modifier and
we're going to generate a solidify offset even on. And then let's bring it out
this way into place like so. And there we go, That's
what I'm looking for now. You can see that's looking much, much nicer than
what it was before. You'll tap the A and there
we go on the next lesson. Then I think we've
pretty much got this now done for the most part
on the pots that we want. What I want to do now
is just bring out these bits a little bit
down near the bottom. And I'm sure you, I'll do that
because in this part here, they're actually in very nicely. Down near the bottom
though, they're not actually fit into nicely. So we'll sort those out. All right, everyone,
hope you enjoyed that. And I'll see on the next
one. Thanks a lot. Bye bye.
175. Finalizing the Second Floor Window Design: Welcome back everyone to Blender for the Environment
Artists Guide. Now let's sort these
two points out. So what I'm going to
do is at the moment we've got to solidify on these. Let's press control
and apply that. And then what I'm going to
do is press control law. Left click, right click, because we want it
right in the center. Control law. Left
click, right click. Grab them both at the same time. And from then then we can
pull them down like so. And then what I'm going to do is I'm going to pull them out. So I'm going to grab this one. And this one I'm
going to pull them out just so the go past here. So if I press E, you can see now the go past
there like so. And that's why one, which means I'm going to have
to pull this out. But for now all
I'm going to do is just come in and drop
this bit down a bit. So I'm going to grab this bit, pull it down a
little bit like so. Now let's come into
this part here. Let's pull it out a little bit. So I'm going to come
in, grab this part, control, select this part. And then I can pull it out like so just so it's over
the top of there. And then pretty much we're near enough done with that part now. All right, so now let's think
about our actual window. So what I'm going to do is
we've got three windows here. Let's press control law,
left click, right click. Control law then,
and let's bring in, I'm thinking maybe
four on this one. Left click, right click. Control law, left
click, right click. Control law four, left
click, right click. And now the same one here. So control, left
click, right click. Control four, left
click, right click. I'm also thinking on these, maybe we want another
frame on these as well, but we just have
to be careful that everything kind
of fits in there. So what I'm going to do now
is I'm going to come in, I'm going to press A to
grab all of these parts. I'm going to press the
eyeborn, press the eye again. Just so bring in
all of these parts. So I don't think they're coming in
properly at the moment. So what I'm going to
do is just reset all of my transforms like so. And now press the eyeball, press the eye again.
And there we go. Now they're coming in better. And I think that's
exactly what we want. Something like this.
Now, from here, let's split these off then. So all I'm going to do
is press P selection. Split them off like so. Now let's go back to these parts in here.
These parts in here. Let's press A, and let's see if I can actually come in and
limit or dissolve them. And you can see sometimes
we end up with a problem. Now when we end up
with a problem that what I tend to do is
you can see it's like it's put a part in here and we really don't
want that actually. So what I'm going to do is
I'm going to press control Z. And I think what
I'll do is instead I'll just come in and I'll just delete these because I really don't need these.
It's actually wasted. You can see I've
grabbed it in there, don't mean to do that. So I'm just going to
have to do it a little bit of the hard way of doing it. So just make sure I'm
grabbing all of these, it won't take too long. And then what we'll do is
we'll dissolve that one. Dissolve these edges because we really don't
need it like that. Maybe I should have done this first and it would have
saved me some time. So let's press the let and
dissolve edges like so. All right, so now we can do
is we can split these off. Now, why once? So grab them all. So y and then what I can
do is now I can press, you know what, I'm going
to hide these first. I'm going to hide these
windows out the way first. And then we're going to
come to the, I'm going to press a E, and I want to pull them back. Enter and then alternates and let's pull them back
into place like so. All right, now let's press al tag and bring
back our windows. Now the problem we've got
with the windows of course, is they're not actually
going the right way. So what I'm going to do
is I'm going to press a, grab them all, and I'm hoping I can move them
all back the right way. So let's put this
on normal, like so. And then let's press G, and let's put it onto
Y. Press Y again. And the reason
that's not working is because we need this
onto individual origins. And now if we press and Y, we can pull them this
way, for instance. Or we can press X or Z. If you press, you
can see now we can pull them all back into
the right position, which is going to be just
in front of these like so. All right, that's looking good. Now from here then
let's just set ourselves back up on Global. And then what we'll do is
we'll press the eye button. And I again, and now we should
be able to bring those in. So again, we'll press selection. Separate those off tab, and then just grab
the outside of here A to grab everything. And then we're going to come to mesh and we're going to go to split faces by edges. So now from here then let's
bring in a solidify on these. So first of all,
control or transforms, set origins, geometry,
adding a modifier, generate a solidify and
let's pull them out, not inwards like so. And then finally we'll
add in a bevel as well. So generate a bevel like so. And then let's put the
bevel on nought point. Not three. And there we
go. This is our windows. Near enough done? I think I'm actually
really happy with that. What we need now is our planks, so let's bring in our planks. I'm just wondering if on our Boolean do I have my
planks there? No, I don't. So all I'll do is I'll
just come in and grab the top of this. I'll
press Shift Day. I'll bring in a cube. We don't need to worry
about the cube shape or anything like that.
Add in a modifier. Let's bring in a geometry node. Click the down out, and
the 11 is planks like, so let's spin it round. So ursad 90. Let's change the length. Or let's bring the
length all the way down, making sure it fits into place. And we're just going
to do the top. And from there we'll duplicate it then over to the bottom, because we know
already that we need to kind of bring it all
the way and cut it along. So all I'm going to do is
just bring it to there. I'm going to make them
a little bit thinner. I really don't need
this thickness. Let's bring the
thickness down like, so let's increase
the count then. Okay, we're going the wrong way. So let's put it over this side. Let's bring down the whips, and I'm going to
bring down the width, so increase the count. And then what I'm also going
to do is with the gaps here, we don't want these
gaps like this. So if you come down
the gaps here, so let's try bringing
this down a little bit. Yeah, something like that. And
then the width randomness. Let's bring it up a little
bit. And there we go. And then finally, let's
bring up some bend on here. Let's turn down the resolution to three or something like that. You can see when I've turned
it down now to three, there's only three edge
loops going across there. It doesn't look right because it hasn't got enough
edge loops to use. So let's increase it a
little bit like so and, and see if that's looking fine. And we can't auto shade on here. We can shade smooth, but that's not going
to look right, so we need to just
leave it and we'll shade it to auto smooth after. But I think actually there
now that's looking good. That's the way that we want it. So now all I need to
do is just bring it down the bottom once I've
actually sorted this out. So let's come in and what
we'll do is we'll apply that with the control A and then I'll go
over the top now. And hopefully, hopefully I shall be able to cut this away. So A, let's grab it. Mesh bisect. Let's cut it away. Over here, hold the space bar, Let's clear the outer. We don't need to
fill them in either. And then I'm going to
go onto the next one, mesh bisect, pull it over, press the space bar just to get it in the
right direction. And there we go, That's
done. Simple as that. Now we can right click,
shade, auto, smooth. Then we can also then
bring this down. So if I press, I'm
going to just bring it down into place on here now that you need to be a little
bit smaller on this part. So first of all, right, clicks that are
adjoined to geometry, press the S born to bring it in, maybe even a little bit more. And then what we'll
do is bring it up into place above that one
that we put in there. That's why we put it in there. So you can see if I
put it, where is it? Let's look where it is. Where is that one gone? Have
we still got it? Yes, it's there. Just,
you know what I'll do. I'll first of all go press
control Ad and bring it back. Then I'll grab these control yl transforms and I'll
add in a bevel. Then we should be
able to see it. No, 0.3 and then we now
we can see where it is. So I can see it's here. So let's bring it down a little bit. We'll bring it down
just to there. I think that's going to be fine. Double tap the A maybe a little
bit higher. There we go. Because we're going to have
a support in here as well. All right, so that's
looking pretty good. We near enough done with this. I think we joust on the next
less and then we'll get in the supports for the
bottom up here on these bits. Then we'll get the materials
and everything like that on and finally then we can get this over
to the other side. But I'm looking now here if I'm happy with
the scale of this, so if I just put my shader on, we'll let it load
up, and then we'll just make sure we're
happy with the scale. Which I think, yes, it looks a good scale. We can join it all
together then. And then finally get
over the other side. And then we're on
to the next part. Alright everyone, hope
you enjoyed that. I'll see you on the next
one. Thanks a lot. Bye bye.
176. Applying Textures to Second Floor Windows: Welcome back everyone to Blender for the Environment
Artists Guide. And this is where we left off. All right, what
I'm going to do is press Shift S curse to selected on this part and then shift and I'm going
to bring in a cube. And then what I'm going to do is bring in my cube down here. I'm going to pull it
over just into the wall. And then what I'm gonna do
is grab the front of it, pull it back to where
I actually want it. So now I'm going to
grab the whole thing, press and y, and pull it in. And from here, this then
will be my actual support. I think I'll pull it down
a little bit more like so. And the other thing is
I want to bevel it, but kind of all of this, so what I want to do is pull
it back to, let's say here. And then press, pull it out to where I actually want
it. Something like that. And then what I'll
do is I'll come in control all transforms right click the origin to three cursor and then
I'll bevel it from here. Let's say bevel it from here, control B and there we go. Now from here then
what I can do is I can actually put in now a support. So what I'm going to
do is I'll press, I think actually I'll grab this one here will make it a
little bit easier, I think. I'm just wondering.
Yeah, I think actually those supports are about
the right chunky size. So what I'll do is
I'll press Tab. I'm going to press I then and
just bring it in like so. And then from there
I'll press Shift D, and then pull it out like so. And then pull it up into
place wherever I want it, which will be under
here like so. And I also, I'll pull
it over a little bit, so I'm going to press L, and L, pull it over like so. And then also I need
to make this obviously a little bit thinner because at the moment it's
way, way too thick. So what I'll do is Lt shift
and click and pull it down. And then we'll pull it
into place and then we'll pull it up again into place. Now you can see that it's going through
there at the moment, so I'm going to pull
it back into place. So I'm just wondering now if that is looking about
right, Which I think it is. Yeah, that looks a good
support from here. Then I should be able
to add in a modifier and we'll generate
a mirror on the Y, turn that off, double tap the A. And then just to make
sure that you're actually happy with
how that looks. I think I am. I think
that looks good. Now what we can do is
finally just apply the mirror and now we
can work our way round. Now we can see we
have some problems in our wood is sticking
through there a little bit. So all I'm going to do is just
press S. In fact, no, not. I'm going to press control A or transforms it's
orogens, geometry. Press the S board then just
bring it back just a tad. Just making sure that
it's surf fitting in. You can see that this side
is coming out a little bit. Can I get to pull it across a little bit without
anything sticking out? Whoops, Let's put that back. Double tap the A, there we go. Yeah. And that's
looking fine now. Okay, so now what
we want to do is we want to basically join all
of these parts together. So I'm just going to
grab all of these parts. Like I've got a bevel
on these actually, so I just need to be careful
that I'm not applying that. So I'm going to
press control and what I'm going to do now
is just grab everything. So I'm going to grab all of
the wood, everything else. And I'm going to grab
these parts last. Now, before I grab those parts, I'm just going to press and envelok what else I've got left. So I've got this one here. And then what I'm going to
do now is come up to object, clean up, convert to mesh. Now if I press G, I can see
this is what I've got left. And now we're going
to join them to this, join them to this press
control L and copy modifiers. From there let's
press control all transform set
origin to geometry. And now hopefully they've got the devils on some jaw
is going to go in making sure that these have the devils on which it doesn't look like they have
at the moment. Which means I need to
now come into these. So you can see,
this doesn't look like it's got the bevel on
this one doesn't either. This one doesn't. Let's
have a look them. So let's put it on object motor
and see what we're doing. This has the devils are fine. This one hasn't for some reason you can see
the devil's not working. So let's go to geometry, clamp overlap off and now
it's actually working. Hide out of the way. These have got them on. This
has got them on. Let's have a look of these. Got them on, doesn't
look like they have, so we'll come in geometry clamp overlap off, and there they go. And now let's look
at this one here. I'm looking now. We can see on these
where the bevel is, we've also got a bevel going down the center of
these. We don't want that. Let's come back to those
last first of all though, let's come in turn the clamp
overlap off on this one and this one over lap off.
What have we got left? So we've got this on now. This doesn't have a bevel on it, so let's put a
bevel on generate, let's put it on not 0.3
so let's hide it out the way these fine hide those out the way then it's
just this one actually. Bevel is going the wrong way. So let's just turn that off
a minute and let's have a look at what's going
on with these Let's, I'm just wondering if
it's something to do with face orientation.
Yes, and there we go. That is exactly what
it is, A shift, spin everything round and now let's try that again.
So let's turn it off. So let's press
Tab, Add modifier, generate a bevel, let's put
it on naught point n three. So there we go. Now we've got that bevel on.
Let's press Alt. Bring back everything now
everything is perfect on there. Now let's first of all come in and add in
all of the material. Let's put it on material
mode first with this one, let's come in and what we'll
do is we'll just minus off both of these,
like this one. And then we'll click
the down arrow. We'll click Wood. The one we want is going
to be light wood. I'm also going to grab
this one as well, so I'm going to grab
this one, then this one, press control L, and we're
going to copy materials. Now if you grab this one, you'll see you've got
lightwood on there, just minus off the wood. Two, grab them both. Press tab a Smart
UV project. Click. Okay. There we go.
There's the wood. All right, so that's
the wood done on those. Let's hide those out the way. And now we'll work our way
round on this one top of here, it'll be blue painted wood, but blue painted wood to. So let's play blue
painted wood to. Let's now grab everything, literally everything
on this one. So I'm going to grab
them all like this, like this, like this. I'm going to press
G just to make sure I need this one again. You can see I need the outside. So this one here again. And there we go. Now
we might as well, at this point, join
all these together. Because after we've
unwrap them, that is. So first of all what I'm going to do is I'm
just going to press control L. I'm going to
link materials to this one, control L, link
materials like so. And then what I'm going to
do is unwrap them all first. So we'll just come
into each one first. So a U Smart UV project, click okay, press the H
borne, hide them out the way. And then this one tab, just
go through them all like we've done many times before
and hide them out the way. And the same for these,
a smart UV project. Click okay and just work
your way around them all. So hide them out the way. And then these ones here probably go away with
doing both of these together. Then finally the ones
project. Click Okay. Then let's press Tab. Let's press bring
back everything. Double tap the now we'll have a look at
those in a minute. Now, first of all, we'll
just join everything up, so I'm going to
grab all of these. Now, one of the problems
we might have is the bevels might not
actually work properly, because some of them might be, in fact this one here as well. They're not actually
going the right way. So you know what, I'm going
to have to fix these first. So they're definitely definitely not going the right
way, these ones here. So Alt shifting click.
Alt shift click. You know what? I'm
going to grab them all. I'm just going to grab them all. I'm going to go
over to UVediting. I'm going to press
at zoom into them. And let's rotate them. R ninety's lot, what they look like now. Yeah, there they go. Now they're going the right way. They're looking much
much better as you can see these ones on here as well. You know what, I'm just going to come to
these and I'm just going to put them on
the blue painted wood. Yeah. That's the reason I'm going to put these
on blue painted wood and see what
they look like. Because what it's
done is it's turned the round the other one for us. So all I'm going to do is
just grab all of these. Grab this one, press control L, and I'm going to link materials. And then I'm just going
to go back and just make sure they're on
the same as this one. Like so and I'm just going
to see if I've got any. Yeah, like this
blue painted wood. Let's look at this one. Blue painted wood. The outside of here, blue painted wood. And now it looks like
they're all right. Okay, now from here what we should be able to do is
join them all together. I'm going to grab all of these. Press and this hopefully
if I press object mode, press control and J, I'm going to join
them all together. But you can see what happened. That's exactly what
I'm talking about. It got rid of all of those
bevels that are on there. So instead of doing that
object convert mesh control j, and there we go, Right
click, shade, auto, smooth. And finally, there we go. Alright, that's
looking much better. Now if I press G, we should
end up with something like this and double tap the,
put it onto material. And finally, let's come in now
and actually unwrap these. So what I'm going to
do is just press you, I'm going to come
in there and go to, in fact, you know what, I
will grab them all first. I will come in, put
it onto glass, glass. And it's going to be the
glass not lit like so. And then I'm going
to press, you come down to Paste Default. And this should all
be on the one that we're having before. All
right, quickly then. Let's come in on
the next lesson. We'll change all of these around and we're
just going to have a quick look before doing that
on our rendered view Jaws, to see what it looks like,
we'll let it load up. Double tap the eight, and this is what we look
like at the moment. And actually I think
that looks okay. I think that looks good. I think I'm happy with
that. You can see I've got my bill in there
because I've put the bull on. But we'll sort that out on
the next lesson anyway, we'll finish this off, we'll
get it over the other side. And then what we'll
do from there is, well then we'll do
the top of here, so basic, we'll finish
the whole of this side. And then from there
what we'll do is we'll actually get
the booleans in. So we can actually see something like we can
in this one here. You can see that this here. I don't think I really
need this anymore. You know what I'll do? I'll
just pull it out of the way. I can see, you know what,
We're going to get rid of it, we're not going to
need that anymore. It looks fantastic
looking in there anyway, so I think I can do
the same with these. So that's what we'll
do. That's the plan of action for the next lesson. All right everyone. So I
hope you enjoyed that. And I'll see on the
next one. Thanks a lot. Bye bye.
177. Initiating Main Roof Construction for Townhouses: Welcome back everyone to Blender for the Environment
Artists Guide. And this is where we left off. Okay, so let's come in and we'll just put this
on the material view. And then what I'm going to
do is just come into these, so we know already all
of these are wrapped. So all I need to do now is
just do what we've done many, many times before At this point, let's just go down,
put them in place, and you will be pleased to know, actually this is one
of the last windows, major windows like this sort of style that we're
going to have to do. I think we just have
one more major window, these big bay windows
that we need to do. And then from there
we've pretty much got most of the things we
need for the other side. Now there will be some more
windows on the round part, and there will be one type
of window up above here, but they're not going
to be bay windows, they're just going to
be normal flat windows, which as you know, is a
lot easier to do actually. Then from there,
like for instance, over this side is
going to be much, much easier to do
because we've got near enough everything
that we need over there. Actually, the rest of this, apart from the round bit, is pretty straightforward
except as well, maybe just this front on here. But again, those windows are not bay windows or
anything like that. Because by windows they
are time consuming. They take a much, much longer
time than the flat windows. So we're nearly there, guys. All right, so that's done. Now I should be
able to join all of this together with control J. Let's join it all together. Double out the and there we go. All right, so that's that one. Now all I want to do is
I've got this one now. I want to just make
sure if I pull this out that there's nothing
on the back, first of all. So I can press control
Z to drop it back in. And then what I can do is I
can pull each of these out. So I'm just going to grab
each of these because I just want to if there's anything
on the back of them, which there's not,
so also nothing on the back of the
press control Z. That means then when I come
to bring in my bullions, they should work perfectly. Now I'm going to do
is I'm just gonna grab this window,
Press control three. I'm going to press G just to
make sure it's all together, which is shift D. Then and bring it all over
to the other side, like so open this
up a little bit. So open this up and just change the blue
painted for the red, so red painted
wood. There we go. That's that. Now let's come
in and bring in the bricks. So all I'm going to do is
just grab both of these. I'm going to press U and unwrap. And then I'm going to click
this down and I'm going to look for brick bricks. I'm then going to press A Or 90. Spin it round, press the S bond, making it much, much
smaller. Control three. And what I want to do
is get the bricks to be similar sized to these here. So you can see it at the moment, there needs to be something,
something like that. So size there might even
be a little bit big. Well, let's have a
look at this tab and then just go round Vlog, you can see they're a
little bit smaller. And the. So let's come in, press the S born jaws to get
them to be the right size. There we go. That looking perfect. All right, there we go. Now we just need to work on
this part of section up here. I think the first thing
I'll do is I'll bring a piece of wood from here, up from this part here,
this part going around. And then we can think
about, not our tiles yet, we won't think about
those, but we'll think about our next windows in here. We'll bring a piece
of wood here. We'll bring in like a
little ornamental piece going underneath each of these. And then from there, actually, you know what, we'll have
some respite from that. And what we'll do instead is we'll build up this part here. We'll do that bit next. I think that'll be the best way. Let's go over to modeling them. Let's make sure our
work is saved out. Let's press Shift, and
let's bring in a cube. And what we'll do
is we'll bring that over to here in place. Probably going to be a bit
small this at the moment. We'll just bring it
into some place though. We'll bring it over into
where I actually want it, so we can see it needs
to come back like so. Now with this, I want
to split this in half. So control, left
click, right click. And then what I'm going
to do is pull this out. So if I press E, I'm going
to pull it out like so. And then from there I'm
just going to grab all of this and then just pull it
over to the other side. So now I'm not going to worry about it going over
there the moment because I'm going to have a
piece of wood that's going to come from here,
obviously, down now. The next thing I want
to put in here is just a simple alcove bit. I've got this here, I
might as well use it. So shift S cursor to
selected, and then shift add. Let's bring in another cube, make it a little bit smaller. Let's just pull it into place, something like this.
Let's pull it down. Then it's jawed under there, and Y, or S and X to
pull it in that way. And then we'll pull it out. And that is what I want,
something like this. Then from there, what I want
to do is I want to pull it up. Let's pull it up. And then what I'll do is press, pull it down and then
and Y pull it in. And there you go. Now for these, I'm just going to
have these going all the way under here. I'm basically going to
grab this one control, right click the origin
geometry lead side in a bevel. So we'll generate a bevel. Put it on naught
point naught three. Make sure that we've still got that nice edge there which
it's slightly missing. So all we'll do is we'll
just bring in an edge, a sharp Alt shift click, bring in a sharp.
And there we go. And then what we'll do is bring in an array, generate a ray. We'll turn this down to zero. We'll turn the Y then
over this way, like so. And the gaps probably going
to be something like that. And bring it all the way
over to the other end. Let's bring it back
maybe a tad this way. There we go, Double tap the and that is
what we're looking for. This is basically
going to be most of the way round the building. I think it looks pretty good, especially on the back here. So now what we'll do is we'll work on the actual main part. So this part going up here,
we'll get that part in. All right, let's
press shift day. Then we'll bring in another
cube. We'll bring it over. And then what I want to do is I want to make this a
little bit smaller. So round about the same
thickness as this. I'm not sure about the
depth of this yet, but I do know that I
need to pull it out. So what I'm going to do is
I'm going to pull it up a little bit and then I'm
going to grab the top. So grab the top of here. And then what I'm going to
do is press control three, Bring it up and
then pull it over, like bring it up. And making sure then that it's
level so we can see here, it's not level at the moment. Let's bring it over like so and now it's a
lot more level. And then what I'm
thinking is I want to cut it going this way. I want to cut it in
the halfway point and I also want to
cut it this way. We might as well use bisect. Let's bisect this, go
in this way like so. What we'll do is though we'll
go the other way like so. And we'll also fill it
in something like that. Actually you can see it probably needs to come a little bit
further down as we can see. Let's bring it down slightly, even if it's got around a
bit on there. That's fine. I'm happy with that. And now we want to do is this part here, we'll cut it straight
down the middle here. So we'll go to mess. Straight down here,
right at the top here, like just past the
halfway point. Let's set this to zero on the Z, like we should end up
with something like that. Which means we can put a
beautiful top on there as well. Now what we'll do is
we'll grab this part. So we'll press control
all transforms. We want to put it right
in the center here. So all I'm going to
do is come to the top of my roof like so. And then what I'm going to
do is grab the top of it in edge select and press
Shift cursor selected. Grab this bit of my roof. Right clicks the
origin Three cursor, add in a modifier
and we'll bring in a mirror and we'll
put it on the Y. Maybe we'll even do
it on the X as well. Yes. Because I think it's
going to make it much easier. Now you can see that this side of the roof
isn't actually right, so we're going to have
to move these down because it's actually a
longer slope on here. And we did that on
purpose as you remember. So we'll put it
like that for now. And what I'm going
to do is just press control A on my mirror. And then I'll come
in now to this part. So I'm going to come
in to this part, I'm going to put it
on normal like so. And then I'm going to
grab this part and this part and hopefully I should be able to move
this now into place. So I'm going to pull it
down into place like so. And we can see that it's
fitting very nicely. It's all level on here. The one problem we have is now we need to pull them
out a little bit. In other words, five
press con, control three, you can see I'm going to
have to pull them with the G out a little bit into
place where I want them. So I think something
like that I think looks pretty good the kind
of level going up there. Yeah. So I'm happy with that. It's smaller on this side
and that's absolutely fine. All right, so now
on the next list, and then what we'll
do is we'll get the top of here on
and then what we'll do is we'll get this part on so you know the wooden
parts that go up here. And then from there then
what we can do is we can bring in all of
the textures for this. And then we can finish these
two windows off on here. And then this side of the
building will be done. All right everyone, So I
hope you enjoyed that. I'll see on the next one.
Thanks a lot. Bye bye.
178. Adding Final Details to Complete the Townhouse Roof: Welcome back everyone to Blender for the Environment
Artists Guide. And this is where
we left it off now. Let's fix this part of the roof. So all I'm going to
do, I'm going to put this back onto Global. And then what I'll do is I
think I'll do the top first. We'll do the top first. And the way we'll do
that is we've already got cursor in here.
We'll press shift date. We'll bring in a cube.
We'll pull the cube out, sorry if I press and
X, let's pull it out. Get it into some sort of place. So how thick do we
actually want it? Probably around that thickness. You can see here, The
problem we've got is it's not going
to cover the tiles. So we're going to have to
pull it out a little bit. And Y, let's pull it
out a little bit, and then let's drop
down the top of it. So we'll grab the
top. We'll pull it all the way down
to there, like so. And then what we'll
do is we'll press, pull it up and
then and X, sorry. And Y, pull it in
and then pull it up. And I'm just wondering
whether I want it to be square or I can press and
y and bring it in again. And I think actually that looks bare. Yeah, we'll
have it like that. Now let's work from
this side again. We've grow our cube
in the middle. Let's press shift shift, bring in a cube. Let's pull the cube over. And we'll work on
this one first. So we're going to
press, make it smaller, let's pull it into place. Let's also press and
X and bring it in. And then put it
right in the center, making sure that it's back far enough so
you can see here. It's a little bit
further back into there. And then what I'm going to
do is grab the bottom of it and pull it down into place. Now the thing is the bottom. I want it right on
the front of there, so I'm going to grab it,
pull it back a little bit. Not like that. Pull
it back. There we go. Now it's sat on
the top of there. And that's exactly
what I wanted. Now let's make that
kind of shape. So what I'm going to do,
I'm going to press Shift D, and I'm going to
rotate it round X's, rotate it around over here, put it into the corner, always into the corner as you
can see into this corner. And then what we'll do
is we'll pull actually, we only grab the front of it. I'll I'll wait with no problem. I'll pull it back
just into place. I'll press E, then pull
it back into place. Then what I'll do
is grab the top, put this on normal like so. And then we'll pull this into, hopefully it's not sticking
out, which it's not. All right, so now we need
this going on the other side. So all I'm going to
do is grab this. I'm going to put
this back on Global. I'm going to press shift
D. And then I want to mirror this mesh
mirror on the wire. I think it is. Yes it is. And let's put it into place. So it's going to go into place there and then grab
the top of this. Because it's not the same. The roof isn't the same but
we're working with it is normal and then pull it back
like so. And there we go. And now we need one more bit. So one more beach side. It's just going to be straight, so we might as well
grab this with L. And then we'll
put this on Global. And then I'll press Shift
D, Bring it over to here. And I just want to make sure that this is a
little bit further. Either forward or
back. It's up to you. I think forward is
probably the way to go because then it
seems to line up there. So what I'll do is
I'll grab this, pull it down into place. And we don't want to
poking through there. So what we want to make sure is nothing's poking
through here. As you can see, it's nearly poking through and we
don't really want that. So what we'll do is we'll
just pull it to there. In fact, we'll pull
it up above there. And then what I'll do is
I'll grab this front, so doors, this one
this bit here. Pull it down a little
bit into place. And now I'll do is I'll grab the whole of this
press shift deep. And I'm going to mirror it now. So I'm going to pull it to here. And then we're going to go
to mesh mirror on the Y. And now let's pull it
into place like so tab, double tap the, and there we go. All right, so this is
looking really, really nice. Now let's get all of
the materials on. We haven't got our mirror
modifier on anymore. Let's break this down.
Then swallow and do. I'm first of all going
to grab everything. All of this, all of this. I've got a bevel
on here already, but I can apply my array. So I'll apply my array. And then what I'll do is I'll press control all transforms, right clicks to
origin, to geometry. And then I'll press control L, and we will copy
modifiers first. So once you've copied modifiers, if I go into object mode, now we've got a bevel on all of these parts and
that's what we want. And now finally what we can do is we can actually
unwrap them all. So all I'm going to do is
I'm just going to press Tab. I'm just going to come
in and I'll unwrap them separately because they're
quite large pieces of these. Now sometimes when they're
such large pieces, I tend to split them up. So I'll tend to something
like this part here. I'll come in control and
I'll split up control. Split it up because I think it actually makes it look
a little bit realistic. So what I'll do then is
come into this side, come into this side, press control plus
Y. Split it off. And then what I'll do is
I'll grab these parts. Press Shift H, just to hide everything else
out of the way. And I'm going to fill these in. So I'm going to come
in ol shift click, press same for this one, like H, grab this sense part. Now L shift h,
fill this part in. Shift click, then the Lth,
bring back everything. Press Tab and there we go. Now you can see this
splits off a little bit. I think that's going to look a little bit better from there. Then I can come in now, grab all three of these smart UV project. Click okay, hide
them out the way. And we're just going to
work our way down now. So I'm just going
to grab both of these like we've done many times before.
Hide them out the way. Same for this side. Them
Smart UV Project. Click Okay. Hide them out the way. And
then we'll do two of these, and then the three in
fact, you know what? We'll do all these together, I think we can get away with
that. Smart UV project. Click. Okay, hide
them out the way. This one smart UV project click. Okay, hide them out the way. And then a finally
on these, okay. All tate bring back everything. And now what we're
going to do is we're going to bring in a material. So we'll bring in the red
painted wood, like so. And then what I'll
do is I'll press control L and link materials. And I reckon that should have
put them on all of that. All right, so that's that part. Now let's do the wall here. If I come into this part here, first of all, I'm going to
split off these two parts. So I'm going to press
selection, split them off. Then I'm going to come to
this part and I'm going to press Selection, Split it off. Then I'm going to come to this part and I'm going to press P selection and
split that one off. Now for this part
here, we're going to just press tab on wrap. And then what I'm going
to do is put it on wall wall gray like so. And there we go,
that's what I want. And then for these two parts, we're going to use
the dark wood. So I'm going to
press down arrow, dark wood like so. And double tap the.
Now you can see on this how big they are
in comparison to there. But it really doesn't
matter because we're using the tiles over
the top of here. So we really don't need to
worry about that actually. So we're looking at
the rest of it though. What we're looking at is, hey, does this look good? Let's put it on
our rendered view. I think that looks near enough. Perfect. Now what we need to
do is we just need to finish up with these windows on here which are going
to be slightly thin. The other thing is if we put
this back onto material, we also want to grab
each one of these. And then what I'm going to
do is I'm going to press shift and I'm going
to bring them up. And what I'm going to
do is just put them into place underneath there. I'm going to move it across. Press control three,
I want this one to be roundabout in the center
of my window here. And I'm also going to make
these a little bit bigger, so individual origins,
press the S bar. Just make them a little
bit bigger, like so. And then move this one
across into the center. Now I just want
to make sure that they're not popping
through the front here. So I'm going to pull them
back just behind there. Double tap the A and there
we go. All right everyone. Now what we'll do is
we'll make a start then on the tops of these windows, and these will kind of be the last difficult
windows to do. The other ones, they're not
actually that difficult and they kind of the last
frame windows as well. We have one more, I think, frame window over here, but these ones down here, they're all following the round curve so they're not too hard. And these are flat on here. So these are the last kind of ornamental flat windows
is what I'm saying. So just so you know in case you're tired
of doing windows. All right, so what we'll do is we'll come to this part here. We'll press control or
transforms, right click, set origin to geometry, press shift S, and we'll bring our cursor to
selected from here. Then what we'll do is we'll bring in a cube
on the next list. And we'll give them a
start Then, because we're running out of
time for this one, we'll save that our work and I'll see you on the
next one, everyone. Thanks a lot. Bye bye.
179. Crafting Authentic Stone Windows for Townhouses: Welcome back everyone to Blender for the Environment
Artists Guide. And this is where
we left off now, because these are going to be made out of stone lease windows, they're going to be built
a little bit different. So if I press Shift D, and what I'll do is
I'll bring in a cube. I'm going to bring over my
cube down to the bottom. Then where I'm going
to actually start the window and then press S, bring my cube over there. And then from there what
I'm going to do is I'm going to press shift, and I'm going to pull
it over to this side, so something around there. And then what I'm
going to do is I'm going to grab both of these. I'm going to press shift
desk cursor selected. I'm going to come them
back to this one. Right click, set origin
to three D cursor. I'm going to let this
one out of the way then. And then what I'm going to
do now is I can work on this one in real time
with a mirror on instead. So it come over,
bring in a mirror. So generate mirror like, so let's put it on the
Y, turn off the X. And now we can
actually work on this. So I'm going to come in
first of all and press the L S. Shrink them
in a little bit, move them over a little
bit, something like this. From there. Then
just make sure that they're actually in
the wall properly. So you can see these are
not quite in the wall. Something like this,
I think is fine. And then what we'll do
is we'll press shift. We'll bring in another cube. Bring it over. And then what I'm going to do
is bring this up. So I'm going to
bring it into place. Pull it up above this
one, press the S one, Pull it out a little bit, so a little bit more, maybe I think I can
actually work with this. And then what I'm going
to do is pull this up, so I'm going to
grab the top of it. I'm going to pull it
up like so now from here what I want
to do is I want to make another part on the top. I'm going to press Shift, and then we're going to pull
this out very slightly. Pull it out. So then what I'm going to do is
press, pull it up. Then from there, let's actually pull this
out a little bit. We'll pull this bit out, pull it out, make sure you're following the green like so. And then grab the
top of it again. We can level this off as well, but we can also do
this ourselves. If I pull it out to there, then pull this part out, maybe, maybe not so much. So just like that, and I'm wondering
actually whether I want to pull this part out
a little bit more. So I'm just going to pull
it out. There we go. That's what I'm looking
for. Then the final bit, so if I grab the top now, press to pull it up and then
just pull this bit out. Something like that. And then we just want one more
part on the top. If I press, pull it up, something like that, I think
looks pretty ornamental. And then what we'll do
is we'll grab the top. Now what I'm going to do is
I'm going to press Shift D, press the bond, pull it out. And then I'll press, pull it up. And I want it jawed under there, so now I can come in, I can make sure I've
got clipping on. I can also turn up
my clipping and then bring it over and
pull it into place. And there we go. That is
the start of our windows. That's exactly what
I'm looking for. Now what I want to do
is we want to think about before we bring in our
ward or anything like that, we want to think about just creating the bottom part of it. So let's start with that now. So again, we'll come in and what we'll do is we'll come
to this part this time. And what I'm going to do
is I'm just going to press shift D and then make it
a little bit smaller, so to make it a
little bit smaller. And then, and we're
going to pull it out to something like that. And then what we're
going to do is we're going to pull
this bit out now. So fire press control, bring in a couple of edge loops. Left click, right
click, grab this side. And all I want to do now is
pull it out with proportion, letting on like we just to make it a nice
and roundish part. And there we go. Now let's think about this part going across
here and going up to here. And then finally this
part going over here. What I'm going to do is
I'm going to come in, press shift A, bring
in another cube. Let's pull this cube over to here without
proportionality non supposal. Let's make it a
little bit smaller. Let's pull it up into place, and let's pull it over like so. And we'll just get it into
where we actually want it. Let's pull it this way,
a little bit like so. And then let's make it the thickness that we
actually want it. So I think this is a little bit too high. Let's pull it down. So let's press control then. And just bring it over to here. And then what we'll do is
we'll make the next bit. So all I'm going to do, we're
going to preshhiftD'cause we're going to be beveling
things off remember. So I'm going to press
shift D and then, and then from there I'm
gonna pull it all the way up up to in there. All right, now I'm just
thinking from here as well, I'll pull this
back a little bit, giving it a little bit of
a relief on this bit here. Now we just want this top bit to come up to here and
be slightly rounded. So the way I'm
going to do that is working with this,
again, shift D. Bring it up to the
top like so in fact, we'll bring it up to
round about here. I think that'll be easier. And then what we'll do is we'll
pull it out a little bit. It should already
actually be pulled out, so if I pull this over, you can see that I can pull
it into place from there. Then I can press L and then press and extrude it up into
the place where I want it. And now I want to make sure this is rounded
off a little bit. So all I'm going to do is
I'm going to press control. Bring in some edge loops. So left click, right click, grab the whole thing
and just press the little question mark, not
the little question mark. If that doesn't
work, press shift H, just to hide everything
out the way. And now the other thing is we only want to work
on this part here. So what I'm going to do
is I'm going to come in, I'm going to grab the
top control click control shift H. Not shift H. Hide H to hide
everything out of the way. And now I want to do is I
want to round this off. So I'm just going to
come to this edge. I'm going to press
control three. I'm going to bring in
my proportionality in. Let's try it on route and
see if I can actually, that's the wrong bend, so let's try it on sharp. There we go. That's what I want. So
I want to round that off a little bit like so. So you can say it's
nice and round and nine for press Alt tage,
bring back everything. There we go. That is
what we're looking for. That is looking very, very nice. And now we want to sent bit. So I'm just going
to press shift A, bring in another cube. Bring it up without
portioning on. Let's press S and make
it a little bit smaller, just in front of that,
maybe a little bit more. So let's pull it
out a little bit like so grab the bottom bit. So let's come in, grab
the bottom bit like so. And you know what I'm going to do with this bit, actually. I'm going to press LP selection, and I'm going to grab this, then apply the modifier,
mirror modifier control. And the reason I'm going to
do that is because I want to, and you can see here
we've got two of them on here because it's basically, you know, mirrored
them over each side. So what I want to
do is before I do any impress a come
down to where it says mesh clean up and we're going to merge by distance
and there we go. Now from here what I can do
is I can press the Born, bring it in, press the born. And then I'm going to press and Y and bring it in like so. And there we go. That is looking a very,
very nice window. Now from here we can actually
start with our wooden part. So I'm going to come in,
I'm going to press shift. And I'm thinking that,
do I want to keep this kind of nice slope on here? And if we do, we can
actually use this. So I can come in, I can grab
all of this for instance. So just put on x ray on and control click
all down to there. And then what you're going
to do is you're going to press shift D. First of all, you're going to
then press and Z, just to keep it
locked onto there, so all the way down to here. And then you're
going to press S and Z and bring it down S, and just to fly it out. And then finally you're
going to come in and put it on right the
bottom of there, like so from there let's
press LP selection. And there's our mirror on there. Now let's come and hide this wall out the way so
we can actually get to it. So this is the
part that we want. We're going to apply our
mirror control and then control or transform
set origin to geometry. And now we're going to
do is bring it forward. Now when we create our
beautiful bit on the inside, it means that we can actually
keep that round a bit. So what I'm going
to do now is I'm going to first of all get
rid of all these edge loops. So L and then limited dissolve and we
should end up with this. Now actually we've got
a problem here where limited dissolve gets rid
of all these as well. So we might not be able
to do it like that. So instead let's press and
see if we can bring it in. So I think that's actually going to work much
better for us. So if I bring it in like that, then I'll press selection.
Split that off. And now what I should
be able to do is come into this and
split these off. So I'm going to grab
this one and this one. This one and this one. And I'm going to press Y, and then I'm going to press
A to grab everything. And to pull these out
there is our wooden frame. Now the inside of
the wooden frame is actually going to be square. So now I've got this part here. What I'm going to do then is I want to straighten this up. So I'm going to, if
I press control R, you can see that if I click it and then try and bring it up. If I press E, it's not really
going to straighten it up, so I really don't
actually want that. Instead what I'll do is I'll
press Circ control three. I'll delete it out of the way, so dissolve edges just to
leave that out the way. And then instead I'll just use either I can use
my knife actually, So I'll come in with my
knife for my window frame. Bring it over. So a bring it over nice and straight.
And there we go. So that's that part at the top. This part going to the bottom. We just need another part now. So if a press control R, bring it down and there we go, there is our window
frame going round. And now I can do
is I can come in, control select control,
select Y, and then these two. So I'll select this
one and this one Y. And then what I'll
do is I'll come in and grab all of these. So all of these up to here. And then just press
Selection. And there we go. Now let's finally
just come back to this part and let's pull
it out a little bit more. So pull it out and there we go. And now this is going to be our actual windows
with this part. Now I can come in and
actually limited dissolve. And now the next lesson
what we'll do is then just create this window. So with this window, we're going to have the top part coming out a little bit further
than the actual bottom part, but you can see just how
beautiful that window is and using all of those
skills that we learned before, how easy it was to actually
put this together. All right, everyone.
So I hope you enjoyed that and I'll
see you on the next one. Thanks a lot. Bye bye.
180. Finalizing the Exterior of Victorian Townhouses: Welcome back everyone. To plan for the environment
artists guide, and this where we
left are now let's come in and actually
create our windows then. So first of all, I'm going to put one
straight up the middle, so left click, right click. And I'm then going to
put one roundabout here, so control bring it up a little bit and we'll put
it roundabout there. And what we want that
for is basically to bring this top section out. Now, before we do that, let's
bring in another maybe. Yeah, we'll split
this off actually. So we'll split
both of these off. So Y and then what
that means is I can press control left click, right click, control
left click, right click. And finally control left
click, right click. All right, so that is the split of these windows at the top. And now what I can do is I can actually bring those
out a little bit. So if I press L,
I should be able to bring those out like so. And there we go, that's W one. And then what I'll do is now
I'll think about these ones. So first of all, I will want a piece of wood
going across here. So I'm going to press control, Bring it up to
something like that. And then what I'll do now is
think about these Windows. So I'm going to
press control two, left click, right click. And then control left
click, right click. And control left click, right click. All
right, so that's that. Now let's actually
create these Windows. So all I'm going to do, I'm
going to do these ones first. What I'm going to do is press I, and then I again
and bring them in. So what I want to do now
is actually split these, first of all, and
then pull them back. Let's pull them back into place. All right, now let's press P
selection, split those off. Let's now come back
to these parts. I think the easiest way to do this is just to
split this off. Now from there,
selection, split it off. So then what I'll do now
is come to these ones. I'm going to split these
off from each other. So go to mesh, we're going to
go to split faces by edges. Then all I'm going
to do is press and pull them back into the
place where I want them, which will be like that. Now let's think about
the bottom window. The bottom window is here. I'm going to do pretty
much the same thing, but first of all, I'm going
to pull this part out. I'm going to pull this
part out further. Let's take that off so
we can actually see what we're doing a
little bit further. Then this part, so we can
see that they're stuck out. And then what we'll do is
we'll come now to these ones. Control, click, shift, click. Just grab them all like so and press Y just to split
them off away from here. And then finally I'll
press and bring these in. These ones, well maybe
a little bit thinner. And then I'm going to
press Y and pull them back again like so. And then press and selection. Now we can come back
to all of these. If I grab all of these, now I can come in, I can go to mesh and
split faces by edges, and now I can pull all
of these back as well, like so into place. All right, so there you go. There is the actual
windows of this one. Done. Now what I want to do is I don't want to join
it altogether yet. But what I want to
do is I want to set all of the transformations. So I'm just going to see
them grab it all like so. And we're going to press, got the outside there to grab again. And then we're
going to just press Shift H. Hide everything
else out the way. It's going to be much
easier to work with this. And then what we'll do is we'll come to this top part first. In fact, what we'll
do is we'll grab it all because we've
got a mirror on there. We don't really want
that. Then I'll come to object convert to mesh. So then what we'll do
is I'll this part here, I'll reset all the
transforms firms, there we go, adding a
modifier, generate a bevel. And there we go, we can
see the bevels working, not point n n three. And there we go, control
L. Let's copy modifiers. And there we go. All of
that now is done for us. You can see it's
looking so much better. And now finally, let's
bring in our materials. So the first material we'll bring in is going
to be our stone. Stone. Let's bring that
in, this one here. So I'll come in, I'll
grab all of that. I think I'll have to come in
and grab this part first. So I'm just going
to grab this part. Smart UV Project. Click Okay. And there's the stone that's
looking very nice now. And let's come in now to each of these parts that are
actually going to be stone. It's going to be
this part on here, basically all of this
is going to be stone. Grab this one control
link materials and then come back to it
and then just unwrap it. Smart UV Project, click okay. And then this one, Smart
UV project, click Okay. And then finally, this one, and not like map, smart
UV project, click Okay. There we go. Now let's
think about our wood. I'm going to come
to each of these, what I'm going to do
is grab them all. Smart UV Project. Click okay And then the wood. Let's have a look at
what we've got here. We can either use the dark
wood or the light wood. Let's try the light wood and
see what that looks like. Let's also apply it to this. So we'll press control
L Link Materials. Let's have a look what
that looks like quickly. So we'll put our Renderview
on. Double tap the A. I'm actually going
to change that then for dark wood wood. Let's have a look
at the dark wood. Yeah. And I'm thinking probably the dark wood is
going to be bare. Let's put it on dark wood. Remember this is also in
direct sunlight as well, but I think actually
looks bare like that. Okay, so finally then let's
put it back onto material. And now we'll do is we'll
come to both of these. We might as well join them
both together with control J. And then what we'll
do is press tab U. And we're going to
go down to sorry, copy and paste, Paste Default. And we should have come over
to UV editing all of those. Now select them all. Given the material which will be our glass and it'll be
the glass not lit like. So now if I come in, there we go. It's loaded up. Okay. So now, same thing
as what we did before. The only thing I'm
thinking is this part round here should
be wood. This part here. Let's change that for wood. And we're going to
go with dark wood. There we go. That's
what I'm looking for. Okay, So let's come in now to these windows and let's
start moving them over. Let's move it over and then your move them over
to their separate parts. And then we'll just
be able to duplicate this window over
to the other part. I'm not sure if that one's
actually on properly. I'll check that one in a
minute. Same as that one? I think actually they look okay. I think actually they're
going to look okay. All right, now we've done that, let's go back to modeling. And then what we'll
do is we'll grab the whole thing with this. I'm just going to
join it altogether. I think it's going to
make it easily easier. Convert to mesh control
J. Join it all together. Right click, shade, auto,
smooth, double the. The one thing I want to
make sure of is this. You can see it's que, going back far enough. If I come in, I'm just wondering which bit I need
to pull back this bit here. If I grab all of these, this is the frame
that I'm going to pull back a little bit. All I'm going to
do with the frame, I'm going to press and X pull it out a
little bit like so, and then just pull it
back a little bit. So there we go. Now we can see it's fitting
in much, much nicer. Tap the, and there we go. Let's press Ltage. Bring back everything, well,
let it load up. And then once we brought
everything back, we should now be able to duplicate that
over the other side. I also think that it's
probably a little bit too big, so I'm just going to make
it just a tad smaller like control three
and then shift, bring it over to the
other side, the BitatA. There we go. Now let's get
in our bricks on here. Again, it's going to
be the same as here, so I'm going to press tab on the wrap and then we're going
to put on bricks, brick. So let's go over
then to UV editing. And now it's easy
because we have something directly to work with. If we press control three, we can see we've got these
bricks directly to work with, which means we can make
it smaller, smaller, and they look about the same size as those
bricks underneath. Yeah, they look
about the same size. Double tap the A. Let's
go back to modeling now. There we go. Let's have a look. All right, there is the other
side of the building done. Now what we can do now on the next lesson is
we can actually come in and start putting in the billions on the
backs of these. And finally then we
can get the roof on, and then we can move
around to this side. And this side is much, much easier than this one for sure. This one took so long just
because of all the windows, all the Booleans,
everything like that. I actually think
that's the longest side that's going to be taken. I even think this side and even the round bit might
be quicker than this, so yeah. All right everyone. So let's make sure
that we save out our work and I'll see
you on the next one. Thanks a lot. Bye bye.
181. Creating Backdrops for Townhouse Interiors: Welcome back everyone.
To blend the four, the environment artists
guide and this where left. All right, let's put this on
object mode just for now. And then what we'll do is we've got our cursor in the center, so we'll bring in a
cube first of all. So bringing in a cube, let's make it a
little bit bigger. Let's press control three just to make sure we're getting
the size and right, And we have to
think now where are the curtains going to
come from on this one? So I'm thinking probably
around this size. Let's press S and's ad and
pull it up into place. So something like that. And then make it a little bit bigger. So I'm going to press, make it a little
bit bigger like so. And I'm thinking that's about the right scale
that I want it now. I can already see that this is in far enough back because it doesn't really
matter because this is a plane. So if I now press control three, and all I want to
do is just press shift D and bring it over and just put it really around in the place
where this one is. It doesn't even
need to be exact. Now what we'll do is we'll
come in, we'll grab this one, we'll press shift
D, and we'll bring this one down to this part here. So the curtains on
here are probably going to be from
the tops of here, so I'm going to
make this a little bit taller on the Z like so. And then I'm going to
pull it out and Y, let's pull it out to the sides, and then just make sure
that this is in line. And then finally S
and Y pull it out a little bit more like so. And then just pull it over that it's covering
both of these sides, like so there we go. That's going to be
far enough in now what we'll do is just pull
it over to the other side. So we're going to
press Shift D. Pull it over to the other side again. Just make sure that it's the
same gap here as it is here. Now let's pull this one down. So we're going to press
shift D. Let's pull it down into place, I think. Let's press S and Y and
bring it all the way in. We really want this to
be on the sides of here. We can see here these two
parts that have a look. Yeah, these two parts
that are coming down. I'll press S and Y, pull it out and then just
pull it across. And then what I'll do
is I'll pull it up to where I want my
curtains to come from. It doesn't even
matter. Way we go down to maybe around,
there'll be absolutely. Find that one's fitting
in place and then find the last one shift.
Bring it over. Let's press control three. And then what I'm
going to do is I want them to come to
these sides here. So I'm going to press and Y, bring it in and
bring it in there. Let's level it up a
little bit more like, so we're definitely going to have to pull the
bomb off a year down. So I'm just going
to grab the bomb, pull it all the way down to
here. Something like that. And there we go. All right, for this one, then I'm going to join both of these together, so control J, I'm going to also reset all of the transforms once
I've done it as well. So control J, and
then this one here, and this one here, control
J. Now grab them all. Control all transforms,
set origin to geometry. And now let's do these first. So we'll come to these,
we'll add in 1 billion. Again, if you're doing billions, I always recommend
saving out your work. Add modifier generate
billion is going to be here. And there we go, that looks
like it's actually done. So let's press control and
delete those out the way. Hide our windows
just to make sure. And there we go,
outside this window. And there we go. Okay, let's work our way down
now to this one. And what I'm going to do is add modifier Boolean
and my bullions, of course are going to be these. So it looks like it's
done it control. And let's delete
these at my windows. There we go. That's our bullion. Now let's come to the final one. This one here, let's
generate a bull. It's going to be the.
Let's press control. Let's delete these
out of the way. And let's hide our
window and window. Let's hide this window. Like this one's taking a little bit longer because
I didn't join it together. Never mind. All right, so there's all our billions in. Now let's come in and we
will create our curtains. First of all, what
we'll do is we'll come in and we'll go
for this one first. The easiest way is just
to grab both of these. Press the button, same for this, press the F button,
and then all you're going to do is you're just
going to grab both of these. Then you're going to press
Shift D and bring them out. Okay, let's hide those
out the way for now. And then with this one,
all we're going to do now is we want to split
them off away from this. If I press Y, split them off. And then what we
want to do is press the burn and bring them in. Bring them in like so.
And then press control. Bring in a few edge loops
like we've done before. Control, bring in
a few edge loops. Left click, right click. Grab the center, make sure proportionating
is on, on smooth. And then we just want to pull
them out. Pull them back. So let's just check
what they look like. We also, with these, especially if we press
L on each of these, we just want to press right click and we're going
to shade smooth. And let's have a look now, again, if you've got too
many lines there, as I say, you can come in
and grab the line here and just press control B if you want to
level that off a little bit. Sometimes it actually
works out where it makes it look a
little bit better. I think what we'll do, we don't need to
worry too much about the topology on the
bits behind here. To be honest, let's
come in all of these press control holding the shift bone and
just level them off very slightly so that
might not actually be enough. Let's go a little bit more. Look at that. Yeah, and I think that's going to
do it double tap. The I'm just wondering actually, I'm just going to look
at this one because I think let's hide
the curtain hide. Yeah, we can see we've gone
back a little bit first. What I'm going to do that first, what I'm going to do is
going to come again, so we'll just
actually come back to them before we actually
did the bevel, there we go, just before that. And then what I'm
going to do just take portion editing
off a minute. I'm going to come back then and pull these back because I
think it actually looks bare. And then what I'm
going to do is I'm going to bridge shift, click shift click, right
click, bridge edge loops. We'll do the same
now with this one, the right click rejudge
loops. And there we go. All right thing, that's
going to look fine. Now, the other thing
we could do is we could really smooth
them off as well. That's another thing we can
do by spliting them off, but we'll see what
they look like first because it's easy
to do that anyway. Now let's come to these
ones. Same thing again. We need our curtains on, so I'm just going to
join all of these. Press the F button.
Join these two. Press the button. Grab
both of these then. And then what I'm
going to do is press Y. I'm going to pull
them out of the way, and they're going to
be my first curtains. And then what we're going to
do, the same thing again. Grab, grab this one and
then split them off. Grab this one and
this one facet. And then press Y. Then what we're going to do
is we're going to bring them back. We'll
bridge them again. In fact, we'll do
that first because it'll be easier.
I'll shift click. In fact we won't do that yet. What we'll do is
we'll do that after. And the reason is
because we're going to be pulling them back again. We'll hide though these
so we can actually see what I'm doing.
Hide them all the way. Then we'll come in,
grab both of these. Press the eborn, bring
them in control. Bring in a few edge loops. Control La five, left
click, right click. That one's got six, but
never mind, never mind. Let's just pull these back
with portional editing on. Let's pull it out a
little bit like so. And then we go, and then what
we'll do is now come in, shift click, shift click, right click, rear edge loops. Same for this. There we go. That's that one. Now let's
think about these bottom ones. We'll do exactly the
same thing first of all, and then grab them both. Pull them out y, pull them out, like
hide them out the way. And then we'll do this bit. Now, we're going to grab
all of these again, then we'll grab them now. And we're just going
to pull them back. Y first pull them back and then let's press because we can
do them all together. Both together. And then control bring in some edge
loops. And same for this one. Then what we can do is
bring back both of these, hopefully with portions. Then finally, finally we can come in and again bridge these, click shift, click, right
click, bridge edge loops. And same for this one, and bridge edge loops.
And there we go. All right, so these
all should be ready. So on the next slide, and what we'll do is we'll get, we'll do the curtains first. I think we can probably
get away with joining. I'm not even sure we can get away with join them altogether. But either way, we'll
do the curtains first, we'll get those in, and
then we'll hide those, and then we'll do the bikes. Alright, everyone.
So, I hope you enjoyed that and it's
exciting because we've nearly done this and
we'll be able to see exactly where it looks like and then we can move
on to the other side. In fact, not the other
side. We'll move onto the roof, we'll
get the roof in. That'll be a good point to do. All right everyone. I'll speak to you next one. Thanks a lot. Cheers.
182. Designing Window Backdrops for Apartments: Welcome back everyone to blend for the Environment
Artists Guide, and this is where we left off. Okay, so what I think I'll
do at the moment is I will come in and just
grab all of these. I'll press L tag, and then what I'm going to do is come in with Face Select. And I just want to
split all of these off. So I'm going to
grab all of these. Press selection,
split them all off. And then from there I'm
going to grab each of these, press control J and then
just join them all together. And then I think
it'll be a little bit easier to unwrap them all. So let's come in
and what we'll do is we'll unwrap
each one of these. But before we do that,
let's actually come in and actually give
those materials I can minus off this first
material and turn this one into, let's see, we've got
it called Curtains. Yes, we have. Let's come
over then to UV editing, and then what we'll do is
we'll let that load up. Hopefully it won't crash or anything like that,
which it hasn't. Okay. And let's come
to this one first. We'll unwrap this, so
we'll press you wrap, and then what we'll do
is we'll pick a curtain. And I think I'll pick
these curtains here. I'm going to spin it round, so our 180. Let's
spin it around. Let's press and X, pull it out a
little bit like so. And then, and sorry. And it's pull it
down a little bit, just sort it fit into place. It doesn't matter out too much about these gaps on this side. Let's now come to
this one again, we'll press you on wrap, and I think this time we'll
pick some red curtains. Maybe these ones
here. I've got them in the right scale
as you can see, S and Y pull them down like so. And then these ones
that's press you on wrap and we'll pick some
green ones for these ones, I think we'll pick
these ones here maybe. And then I'll press S and Y. Pull them down. You can see, actually I don't
want to do that. I want to rotate it
first. There we go. Now I can press S
and X, pull them in, put them into place, let's
put them into place like so. Now let's come to these
ones on the wrap. Let's pick these
ones maybe here. Let's first of all
shrink it down. And then R -90 No, 180. There we go. Let's put them into place here. Let's make it smaller again, let's put them into place here. And then S and Y pull it
out and Y pull it down. And there we go. That's those, I don't really want these bits
of the bot, these tassels. So I'm going to press S and Y. Bring it down a little
bit more like so. I'm also going to bring it in and X bring it
in a little bit. I think that looks better than. All right, now
we've got this one. Let's pick the yellow. Let's wrap it first. Let's then press A,
make it smaller. And then 90, and then 90. Get it the right way. Let's pick these nice yellow ones here. Let's press the S burn, let's put it into place. Then S and X, pull them out. Then finally this one. Let's unwrap it. Rap they're going the right way. Let's call then we'll
maybe maybe this one here. I don't think we've
used this one yet. And Y, and then and
X, let's pull it out. So I'm going to bring them in together a
little bit more like so. And then and X, J, move them to the side. And then and X, bring them
in a little bit more. There we go. All right
there. The curtains done. Now let's pull the
curtains into place. Right click, set
origin to geometry. And let's pull them
all into place. What we want to do
is we want to pull the in front of their like so we can see that these ones are going to
have to be done separately. So we'll just grab both of
those and we'll pull them back without proportioning
on jawed into there. And then we'll do
these two as well, pull them back, Jed. All right. Now we've done the curtains, let's hide those out of the way, and now we're on to our
actual living rooms and our bedrooms. Now what we'll do
is we'll come in, I think we'll grab this
one from the center. We might need to do
these separately. Unfortunately, let's
just come in and grab this one and this one. Let's press control plus. And this is what I'm afraid of, is that it comes all
the way out to there. I just need to grab this
one old shift click like. So now I'm going to do
is I'm going to click the plus arrow down. And what I'm looking
for is we've got butcher sign and I'm
looking for bedrooms. Let's see if we've got bedrooms. Yes, I have. So we've
only got one bedroom. Let's come to the next one,
then, Zacla. Same thing. So grab both of these
control plus keep going. And then just come in
and grab this one. And click the down arrow, and we're looking
for bedrooms again. So click a sign. And I messed up there actually. Because I need to put
this back on bricks. I need to click the
button instead. So you can see there, I
didn't do that one either. So let's do this properly. Okay, So plus down
arrow bedrooms like. So click a sign,
and there we go. All right, there we go. Now let's come back to this one. I've still got selected,
so I can click a sign. And there we go. Now let's come down to this one and do
exactly the same thing. So control plus, let's
grab this one here. So Alt Shift and click, and the one we're
looking for this time is going to
be living rooms. Let's see if I've got one
that is living rooms. And actually I don't think we've got the living
rooms out yet. So you know what,
We'll go over to our asset manager and Joe is
going to zoom around here. And then we're going to go
down and the one we're looking for is going to be under, let's have a look
under materials. And the one we're looking
for is living room. So living rooms, there we go. Let's bring that, drop
it in there like so. And let's click a sign. All right, back to UV editing, and now let's do
our living rooms first seen as we've got them, so we can see we've got
both of them over here. Let's press control. And three, just so I've
got a clear view of it and what I'm going to do is
you unwrap them both. Now I'm going to do is press S, make them a little bit smaller. And then what I'll do is
I'll grab this one first. Maybe then I'm going to press, move that one into place. You can see that I'm
going to have to pull it up a little bit because
the floor starting there, it shouldn't really start, there should be much,
much lower down. So if you want to do
that, just press S and Y, and then and Y. And now it looks as if
the floor is over there, like so I can also make it a little bit
bigger if I want now. So something like that, I
think looks quite nice. I also think that I need to move this around
to the other side, so it looks as though, you know, the door is over the other side. So to do that we'll just
go to UV mirror on the X. Just spin it around
and there we go. Now let's come to this one. So I'm going to come to
this one and we'll put this one over to here maybe. So I'm going to press
shrink it down. And then and X, I'm
going to pull it out. So just make sure that
it's not so thin. So something like this. And then what we'll
do is we'll move up now to, you know what? Yeah, we'll move up to these. We'll just get more
done in one go. I think it's just
going to be easier. So you can see these
are unwrapped already. These are the little bedrooms. So, we'll come to
this one first. I'm going to press L, and
I'll put this one in. I think you can see it's
the wrong way round, so 180, Spin it the
right way round. Press the S one to bring
it out. There we go. Now let's grab this one L, we'll put the one, maybe
this 180, spin it around. Bring it out for this one. I'm going to spin it
around the other way, just so it's not the
same way as the one that I've already got
something like this. Then UV mirror on
the X. There we go. Now let's come to these ones. We'll come to these ones, same thing as what
we've been doing. We'll try and pick
different ones. I'll come to this one first. L, G, S like that. What? I'm going to leave
that one the way it is, and then I'll come
to this final one. I'm going to pick this one here. We haven't got this one.
We'll pick this one. We'll press the S P
and bring it out. And let's have a look at that. I'm going
to bring it down. We've got a bit of a black edge there. We don't
really want that. S and Y, let's pull it down. And then and Y,
let's pull it up. So, all right, those
are all thinning, fine Now, now all we need to do is press the, bring
back everything. Double tap the, and I'm
going to go to modeling. I'm just going to make
sure everything is right again before hitting
that render view. Let's save out our work. Let's load it up. Let's
see what we've got. As we can see curtains, we can see our backdrop there. We're just going to
go down each one. See, we've got curtains
in the bedroom, so we can see our curtains
there looking very nice. As we can see curtains in this one leading
to a background. Curtains in this one lead
into our living room. And then the same for this one. And these look really
nice. All right. I'm really, really happy
with how those turn out. That's really great. What we'll do now is we'll just put this on
object mode a minute. What we'll do then on
the next lesson is we'll start with our roofs. So we'll get our roofing, and then finally we can start
working on this side bit, which is going to be much, much quicker than this bit
here. This bit here. Who boy, this be, took
a long time, a lot of, but now I think every single one of these parts
is going to be much, much quicker than that part
there. All right everyone. So we're on the final straight. We really are on
the final straight. Not too many lessons left now,
but once we've done that, then we can get our
texturing on our floor and then we're pretty much
done. All right everyone. Thanks a lot. Cheers. Bye bye.
183. Completing the Roofing Detail for a Cohesive Look: Welcome C. Everyone to Blender for the Environment
Artists Guide. And this is where
we're left here. All right. Let's grab this roof. This should be, yeah,
this is the final roof. We do have a little bit
of a roof that comes down here and we do have
the roof arts on here. So what I'm going to
do is I'll just press shift and I will bring it over. And what I want to do is I
want to replace this roof now. So I'm just going to
actually delete that one. And I'm going to
bring it up because I know that all of my roofs on this bay and this say are
going to be the same. So what I'm going to do is
I'm going to come in with my geometry node and the
first thing I'm going to do is I will change the
bottom bending down to zero. So something like this.
I'm also going to make them til width
a little bit wider, more square,
basically the oblong. And then I'm just going
to also come down and where is it
where this bend is? Just put that on one, so you can see roof angle. Put it on one. Just for now, we are going
to need to bend one. But at the moment, everything
on here looks perfect. So we don't need to do
anything else with that. So what I'm going to do
then is pull it over. Let's pull it up into like, so we can see that
it's not quite right. So let's pull it
into place in place and we can see the
problem is that it's not bending properly, the angle of the
roof is not right. All I'm going to do is
just press Art and Y. And from there should
be able to put it into much easier as I'm going to lift it up and pull it back
into something like that. And as well, I've got to
think of like my tiles. I actually want my tiles to
come over the edge as well. So can I actually bring
them over the edge? This is the problem
that you might have where it's very, very
close as you can see. So I'm going to pull it
all the way back for now and just put it into there. And then we can see how
far I can pull this back. So how far can I pull that back? And you can see that I'm
probably going to have to lower this part down a bit just
so the towels come over. The other thing is
as well that we've got towels sticking
out of the top. And this is why I've
not duplicate it yet because I need to see
if it's going to work. So in other words, if I bring down now my vertical counts. Let's bring it down to 15. Now they fit in very nicely. So now I've got it into place. I just need to come
into this bit, which I've not used on
the other side yet. And I'm going to bring it
down just very slightly, so grabbing the top, I'm going to bring it down so
you can see it's probably, they probably just need going back a little
bit, actually. So what I'm going to do
is I'm just going to grab the top of here
and I'm going to pull it back very slightly.
And there we go. Now we can see they're fitting
in place much, much nicer. Now remember that there's
not going to be towels here. We shouldn't have
towels here anyway. But what I'm going
to do from now is I'm going to actually press shift D, bring it down. And that then will
go into my Boolean. So M put it into you Boolean and now we can actually
hide the other way. Now you can see, actually let's not hide the
other way yet. Let's come to this one first, press M and put it
into our perfume shop. Now we should be able to hide
my Boolean And there we go. All right, so we've got
our first tiles here. Now let's come in
and actually bring them to this size side. So what I'm going
to do horizontally, let's increase them
until it fits in place. Near, nearly fit in, in place. Maybe one more. There we go. Pop that over. Pop into place. Double tap the A, just make sure there's a little
bit of a gap there. A tiny, tiny gap. I
don't really want that. So I'm going to increase it
once more just so it pops on. And then grab it and then
pull it into place like so. And I think that looks
much, much better. Now, we can come in and actually get rid
of most of these, So we can come in with
the bisect in a minute and get rid of most of them because we're not
going to need them. It's a lot of wasted mesh. But before we do that, let's put it over the
other side first. If I grab this, I can actually what do is I'll just press
shift, I'll bring it over. And then what I'll
do is I'll grab this because I'm
actually happy with it. Press control all transforms. In fact, no, we can't do that. We need to go to object, first
of all, convert to mesh. There we go. And now I can press control or transforms
right click, set origin to geometry. And then what I'm going to
do now is I want to put the geometry right in the center of here. So let's
see if that'll work. So what I'm going to do is
I'm going to grab this. Shift S cursor selected, grab this, then shift, sorry. Right click, set origin three D, cursor add modifier, bring in
a mirror. And there we go. Now what I'm looking for is that following the
same as this one, double tap the A,
and yes, it is. That's looking pretty nice. Okay, from here then what we can do is now we can
go over the top. I can apply, first
of all, my mirror. So control, let's apply that. And now let's come in and actually if we put on our x ray, can we see anything in there? It's actually very hard to see. Instead of doing that,
what I'm going to do is I'm just going
to grab them all. Even if I put wire frame on, you can see if I
put wire frame on, I'm not going to be
able to see clearly. Like if I press double tap, the A, I can't see
anything as you can see. So let's put it on object
mode and we're going to do is press a mesh bisect. And I'm going to have to
bring it down to here, down to roundabout
here, I think. Let's clear the
inner, not the outer. And I'm hoping now
as I move around, I should be able to see
that all those tiles, especially around
here, have all gone. That is what I'm looking for. And from there then
what I'm going to do is I'm going
to press A again. I'm going to come in
with my mesh bisect. I'm going to cut the
other way this time. So going down to here, all the way down
to here like so. And there we go now I'm
hoping you can see it's cut all the way down there and it's caught all the
way down there. And that is exactly what I want. Now from here then, let's actually get this roof
on the other bit. Now all I need to do
is press our head 90. Let's get it into place
and we're going to need a few more
roof parts on here. First of all though,
just make sure it's down roughly to the
bottom, which it is now. Let's press R and X and rotate it down into
place, not too far. So let's then pull
it up like so. And then and X, rotate it holding the
shift burn like so. And that looks into
being a good place now. I'll just increase
the vertical count. It's going to go under there. And then I increase
the horizontal. Increase the horizontal. Let's move it over.
Let's increase the horizontal a
little bit more. One more I think
should do it like, so it's not quite right. So all I'm going to do is
press and X and pull it in. Double tap the there we
go, That's following that. It's nearly right. You can see it's just poking out of the top. I'm going to grab it, I'm going to press and X and jaws tilt it down
a little bit more. There we go. That's
just about perfect. Now what I'm going to do
is I'm going to press Tab. I'm going to grab it,
I'm going to press Shift D. I'm going to pull it
over the other side. Hopefully we do have a seed, but I don't think, actually, yeah, the seeds. Not for that. So I don't think we
have a seed on here. Unfortunately. Instead
of using the seed, all I'm going to do is
just rotate it around. Rs 180, rotate it around. I'm hoping that I should be
able to put this in place. Now you can see it's a
little bit out on here. It should be the
right width though, at least, So that's good. All right, let's pull
it down to where it needs to go,
somewhere like here. Let's then rotate it up X, let's hold the shipborne, rotate it up to where
it needs to go, like so, and they're just
poking out the bottom. And that then the double tap, the A looks perfect. All right, that really
is looking nice. Now from here then let's
come in to both of these. Let's go to object
convert and mesh. Now let's come into these parts. First, I'm going to press
a put on my shader. What we want is blue roof tiles. So we can say at the moment
this is what we've got. We don't really want
either of those. Let's minus these off. And then we're going to
click the down arrow roof. And the one we want is
this roof here. Like so. Press Tab Smart UV Project. Click Okay. Move on to the
next one then minus them off. Same for this one. Minus off, and then let's come back
to this one down roof. You know what, We'll
just grab both, grab this one control link
materials. Back to this one. Tab Smart UV Project, click Okay. Back
to this one then. Tab Smart UV
Project, click okay. All right, there we go. Double tap the A. Let's have a look then what we've got here. So we're going to go
to rendered view. And there we go. Now they're
looking pretty nice. Now I'm just looking
at this bit, you can see we've got
a little bit of a line there and we don't
really want that, which means that
we have a choice. We can just lift it up very slightly like
so double tap there. We've got the wood
behind there anyway, so that should be fine. All right, so there we
go. That is our roof on. We can see it's really
starting to come together now. And now what we
need to do is build out this section over here. To be honest, most
of this section we've actually got already. It's just a question of, you know, fitting
it all into place. Alright everyone, So I
hope you enjoyed that. I'm just wondering what
that bit is there. I think it's just a
crossover from another part. We'll get rid of that as
well. All right everyone. So I hope you enjoyed
that. I'll see on the next one. Thanks a lot. Bye bye.
184. Integrating the Rear of the Perfume Shop into the Scene: Welcome microphone to blend the for the environment
artists guide. And this is where
we left the art. All right, let's first
of all fix these walls because these are a little bit of a mess and we don't
really want that. Also, the inside of
it is also a mess. So what we'll do is we'll
just grab this wall. We're gonna press Y, And
then what I'm going to do is I'm just going
to press shift. I'm going to bring
it down to here. And then what I'm going to do is come to the bottom part of it. And we're going to bring
it down to there like so now you can see that a lot
of this is still wrong. So what I'm going
to do is I'm just going to grab this one here, and this one here, I'm
going to press Selection. Separate it off. Now
finally what I'm going to do is I'm going to come
back now to this main wall. I'm going to grab this one.
I'm going to press shift D, bring you down again to here. And then what I'm going to
do is going to come in, grab the bottom of it like so, and pull it down into
the floor like so. All right, so now
we've got those three. I can hide those other way. And then what I can do is I
can come now to this part. Now we can see we might as well come in and grab
all of these parts. Delete them out of the way, so delete faces and
then come in and grab basically all of these parts because we're
not going to need them. Delete bass and just
basically clean it all up. Deletes clean it all up. And we should be left
with something like this. Now we have to ask ourselves, are we going to need the
tops of this part here? I don't actually think so. I think we'll be
covering that up anyway. So delete faces and that's
what we should be left with. That looks about right. Yeah, that should be fine. And a thing we can
work from that. And we've still got these, what we can split off as
well. So there we go. Let's press Tap. There we go. There's another
one at the bottom. So let's delete that as well. Delete faces. Now if I press
Thurbletap, there we go. All right, so now let's first of all start
with this part. So I'm going to bring this
part over to the other side. So I'm going to press shift D. I'm going to bring it over. I'm going to rotate it, so Z -90 So I'm going to
rotate it that way round. And then I'm going to fit this into place roundabout here. And from there I just
want to make sure there's enough room to put a panel
in or something like this. Yeah, I think that's fine. I think all I need
to do now is just come to the front of
it and on this one, just pull it back a little bit. All right, so with that
now I can actually start putting another
piece in here. So what I'm going to do is I'm going to come to this part. I'm going to press
Shift S As to Selected, and then Tab shift. And we're going to
bring in a cube. This cube then is going
to come all the way over to the front of here. If I pull this over, I'm going to sit this
in here near enough, I think, actually, as well. Also on this one, I think I'm going to pull this one
back a little bit. So I'm going to grab
the front of it, pull it back a little bit
and now grab the cube. I'm going to press S and's ad and pull that into
place into my wall. We can see it's really into the wall, so we
don't really want that. I'm going to just
pull it that way. So I'm thinking, is that out a little bit
too far probably. And then what I'm going to
do is pull this over now. So I'm going to pull
this over to this point here and have it staking out of there,
probably like that. And then lift it up a little bit and then a
little bit on top. So from here then I
can actually make another part that
I'm going to have, probably being a
little bit rounded. I'm coming round through here
to fill this section in. So yeah, that's looking good. Now with this, I want to
actually bring in this one now. And what I'm going to
do is press shift, and I'm going to bring it over to maybe
something like this. And what I definitely want
to do with this is make it a little bit smaller
on this bit here. So another way might even
be worth, let's have a try. So what we're going
to do is just grab the top and pull it down. And you can see there, it
looks a little bit too thin. And that's the problem
that I'm worried about. I don't want it
looking too thin. So what I'm going to
do is press control. Control. And hopefully then
can I bring that down? Yes, you can see there. It's
near enough supporting it. So I might as well do is just think about getting rid
of this altogether. So delete T and then what we'll do is just grab this
and I think we'll make it, if I press control one, I'll make it just
a tiny bit bigger. So essens head. Just pull it up, holding the shift born and then pull it down a little bit. And there we go. That is
going to support that. The one thing I think is this now is going to have to come out a little bit further. So we'll pull it out a little
bit further. All right. That is what I want now I'll do is I'll make
another one of these. I'll pull it over shift, pull it over to here. Something like that there. We might need to move
them over the other side. What I'm going to do now is
come round to this part here. I'm going to steal
all of this part. I'm going to press G just to
make sure I've got them all. And then press shift
D, bring them over. And now we want to
spin them around. So 180, spin them around,
Press control one. And now we want to put one
in there and one next to it. So then we'll have a good idea of how this is going to be in. So let's put them
there, let's drag them back into place like so let's press the dots
so we can zoom into them. Let's also as well
at the moment, let's spin this sun round, so R z, Z -90 Spin it around. Now I can actually see
these a little bit better than what I could
before, and that's what I want. All right, so now
I'm going to do, I need to fit these into place
now, next to each other. So I'm going to grab
this part shift D, pull it next to each other. I don't really want
it overlapping, I just want them
next to each other. Shift D, let's pull this
one over into place, it will tap the A,
something like this. And then let's pull
this one over, shift D and into place, like double tap the A. There we go. Now we've got a
little bit of a gap there. So all I'm going
to do is just grab maybe in both press and X, pull them over, pull this one over. Then
double tap the A. Just make sure there's
no split down there. All right, that's looking, God, that is what I want
for this part. Now let's think about
this part on top of here. What I'm going to do is I'm
going to bring up this one. I want it to be a little
bit bigger than this, coming out a little bit more. I mean, shift D, let's
bring it up and put it into place so it's bit
just under there. So I'm going to press essens, squish it in. Squish it in. Just so this has
actually sat on top of there maybe a little
bit more essens ed. So then what I'll do is I'll
come with this part first. We really want this to be
coming back past this part, so I'm going to grab the back
of it, pull it like here. And then what I'm going
to do, grab this part, I'm going to pull it, it's just just in front of that part. And then I want to
round this off. Now if I come grab this part, press control and bring in a few more devils like left click Now we'll just
move it a tiny, tiny bit more just so
it's in front of there. All right, that's looking good. Now let's think about
the other side. I think on the other side, let's pull it out first of all and see what it looks like. I want it just just on
top of there and you can see it actually for me
at least all came together. It all came together. And it's actually looking
pretty nice in that bit. All right, so now
let me think about, you can see as well that this and this wall,
they're like different. And we don't really want that, we want them to be the same. So what we'll do, first of all, before doing anything else, is we'll come in,
we'll grab this wall, and we're just going to pull
it down into place and then grab this wall and pull
that one down into place. All right, so on the next
lesson then what we'll do is we'll build out this part, probably a little bit
more going this way. And from there then we can
actually start creating that, you know, kind of roof that's
going to come from here. All right everyone. So
I hope you enjoyed that and I'll see on the next
one. Thanks a lot. Bye bye.
185. Deciding on the Rear Roof Slant for Historical Accuracy: Welcome back everyone
to Blender Fall, The Environment Artists Guide, and this is where
we left it off. All right, so first of all, let's come in and
just grab this PCs. So all I'm going to
do is press Shift, and I'm going to bring it over. And then what I'm going
to do is press Art 180 and I'm gonna
spin that round. And then what I'm going
to do is put that into place around here. And from here I'm going to build another part that's
going to go down because that then is going to support this a little bit
more than where it is. So all I'm going to do on this one is I'm going to
actually bring it over. So I'm going to come in and hopefully I should be able
to grab all of those parts. If ever you are struggling, by the way to grab
all the parts, just go to the view
that you want. So this one will be control one press sad wire
frame and then just make sure that
you're on facet press B and you should be able to
then just grab them all. So go back to solid
and there you go. Now we've actually
grabbed them all. Now, I'm not sure if I want
to actually put something, you know, in the
center of here or not. Right now, we'll have a look at what it
actually looks like. First of all though, let's
actually bring this over. So I think I am safe to bring
this one and this one over. So if I press ser shift D, let's pull them over then
to the other side like so. And just make sure
the roundabout in the place that I need them. So I want them stalk out
a little bit like that. Don't worry about any of
the other parts right now. We can actually deal those as we carry on working through. So you know, like this one
is stuck out a little bit, we're going to pull those
down at the moment, we're squarely focused
on this part here. All right, So what
I'm going to do now is I'm just going to put this on material use just so I can see
what I'm doing. And then what I'm
going to do is I'm going to put another part into this bottom part which
is going to help support that actual roof.
All right, so let's do that. So let's come to this
part and what we'll do is press control A all
transforms right click, set origin to geometry, go into it, press A, and we're going to
unwrap it again. And the reason is, obviously
we stretch this out. And then what we're
going to do is Shift S, Ursa selected Shift A. Let's bring in a Q, and then we're
going to bring this down underneath to
the bottom of here. So if I press S now I'm
going to bring it down to something roundabout
there, pull it out. And then what we're going to
do is this bit is going to be coming out probably to roundabout here,
something like that. Let's then press L, and then what we'll do is
we'll pull it out on the X. And X, pull it out all
the way to the side. And then I'll have
a good idea of how far can actually pull
this out from there. Then what I'm going to do is I'm going to pull this top part out. So five, press control,
left click, right click. And then what I'm going to
do is grab this bottom part. I'm going to press and
pull it out like so. And there we go. And we could come in and just bevel
this part off as well. So five, press control B, we can have a nice round bevel like so that actually
might look pretty nice. And then finally, let's go
to the underneath of it. We'll grab this and this. I'm going to press and pull it down and make it
a little bit thicker. All right, from there then we also need a little sign on here, let's not actually
forget about that. And then what we'll
do is we'll actually start work on
bringing this around. So bringing it round,
getting that shape that we want for our actual part,
that's going to go in here. And the easiest way
to actually do that is let's bring in the
little sign first. So all I'm going to do
is go to my coffee shop. I'm gonna put it on. Once I've done that, I'm going to actually save out my work. So file save out my work. And then jaw is going to come round and grab this part here. I'm going to press
shift D. And then what I'm going to do is
just drag it over here. I'm going to press control one. And then I'm going
to press G, And I'm going to put it where
I actually want it. So something like that. And
then from there I can press the dot board so I can orientate myself around, put
it into place. And then all I'm
going to do is press, and we want to put this
obviously in our perfume shop. And finally, we can close
off our coffee shop. Now from here, what
I can do is I can just come in and change
this quickly now. So I'm just going to
go over to my UV, I'm going to press
the little dot baron again, and then I'm
going to come in, grab the front of here and
I want to put it under this packer's row instead of the one that was
on before like so. Alright, that's that bit done so easy is that, to do that bit. Now let's think about our
actual roof where we want it to come down to all good
stuff like that. So what I'm going to do is
I'm going to, first of all, I'll come in and I
will bring in a plane. So I'm going to
bring in the plane, so let's bring in
a plane like so. Then let's pull it out a
little bit and we'll get it round jaws going
to the top of here. So this is where basically where my towels are going to go. Right underneath there. And then what I'm going to
do is come to the front of it and I'm going
to pull this down. So I'm going to pull
this down like so. And what I'm looking
for is to get a nice kind of root
going under here. So in other words, if
I pull it out to here, we need to make sure that it's going to come down to
this point as well. So you can see here, I need to bring it down probably
a little bit. And then we're going to have a front on here and then a back. Now the main thing is about this is my coffee
shop's back on tire. The other way is my little guy. Just make sure
he's on the floor. So if I press control three, just make sure he's on
the ground plane and then what I want to do is
pull him over to this side. And I want him to be
able to walk under here. So you can see if I walk him
under here, have pillars. So how we're going
to do that is if I come in and bring
out just one pillar. So I'm going to press shift, I'm gonna bring out this pillar like so if I put
this pillar here, you can see that he's got a little bit of room to
actually walk down there. And that is what
we're looking for, maybe maybe a little bit more. Because then they
can walk down this, you know, this back part here. All right, so once
we've got that now, once we've got the
actual distance of it, what we need to do now
is pull this bit down. So if I press and Z and
pull it down like so. And now I can see just how big that front's actually
going to be on there. And then finally what I'm
going to do is I'm going to press and y and pull it back. And now what I'm
trying to do now is just make sure this is
going to fit on top. Making sure that I'm
happy with my roof. Because from here we can
actually pull this down. So I can actually come in, pull this down a little
bit like you see. And you can see that I'm going
to have to make these bits a little bit taller,
that's no problem. But the main thing is how far is this going to be coming out? I think it should come
out roundabout to there. So what I'm going to do now
is come to my actual post, I'm going to press S and
us make it a little bit bigger and then pull it
up into place like so. And in fact, you know what, I'm not going to
do it like that. I'm going to press S and and make it a little
bit bigger like, so not the whole
thing, so I'm going to pull it up into
place like so. And then what I'm going to do is I'm going to grab this part. I'm going to press S and X and pull it out to where
we actually want it. So I'm thinking something like
that looks actually good. And I'm thinking, if I
put this roundabout, let's say this end here, round about there, nearly
at the edge of it. And then we put
another one over here. Then from here, what
we can do is now we can actually put another
couple in there, which we will do in
a minute basically. Now what I'm going to
do is I'm going to now grab this one. I'm going to right click
and set origin 23 cursor. And then what I'm
going to do is press, then what I want to do is press Shift and bring in another one. Bring in another one like so. Now finally come in and
just add in a modifier. If I had delete this
one out of the way, let's add in a modifier.
So come back to here. So add modifier and we're
going to bring in a mirror. And there we go, that's
what we're looking for. Now if I press control one, I can see now the gap
between them isn't correct. So I can move this one over now and just bring it a
little bit closer to now. Don't worry, we're going to come back and actually measure these out properly just to make sure that they're all
fitting in place. But we jawed at the moment, getting the outline for this. Now with my actual roof, I'm going to want it to
be bent in a little bit. So the way that I'm
going to do that is I'm going to come in and
bring in some edge loops. So let's bring in, you know, something like how many is this? Let's right click and open
it up. Seven edge loops. And then what I can
do now is I can come to my center one, which
is this one here. And I want to bend these back.
So I want to bend these. If I press three, I should be able to see
where I'm bending them. So now if I come in with portional editing and
bring these back. So pull it out
like so I can then bring it out and that's the kind of angle that I'm
going to go for. Yeah. And a thing that looks, I think that looks pretty nice. It's not too steep. It
looks as though it's, you know, bent in
with the weather. And from here then I can
actually build this up. So what we're going to do
then on the next lesson, is we're actually going
to start building this up all the way down here. We could also make this a
little bit more rounded. Let's just see if we can make it a little
bit more rounded. Yeah, not too much. I'm going
to grab this one as well. I'm just pull it up into place. Let's have a look at
that. Let's right click, shade, auto, smooth. It might be a little
bit too rounded, so jaws going to come in. And don't be worried about
playing around with it. You want it to look right? Let's put it like that.
Something like this. I think it's okay. And what
we'll do from here actually, is we'll bring in our curve. So we'll make sure that
we've got, you know, the angle that we want because
all that's going to be on behind here is going
to be wood anyway. So on the next lesson,
that's what we'll do. First we'll bring in our curve. We'll create this wooden look
that's going to go here. Then what we'll do
is we'll create the sides of it and you know, these little pillars going down. And from there then we're
going to create the front of it and get that
all working as well. All right everyone. So I hope
you enjoyed that and I'll see you on the next one.
Thanks a lot. Bye bye.
186. Building Out Slanted Roofs for Visual Interest: Welcome back everyone. To Blend for the Environment
Artists Guide. Now let's go over to modeling, because it's a bit hard
to see everything. So let's put our
Boolean back on. And the one we want is
going to be this one. I'm going to press Shift D, and then I'm going
to bring it up. I'm going to press, put
it in my perfume shop. And there we go. Now let's
bring it to the side, so ours head 90. Let's press seven
to go over the top. And all I'm going to do is just position it in the place
that I actually want it, which will be
roundabout in here. Now we've also got the
option as well of making this bigger and smaller and
all that good sort of stuff. Now at the moment, it's probably worth just bringing it out
just so it's right in there. And then what we can do is, I would say probably better
off deleting all of these. So delete vertices and you should end up with just
this vertices here. From there, then let's
actually pull it out so and y, let's pull it out like so. And then let's put
it into place. So I always find it
easier to work like this. So if we put it into place, we're not going to
lose any of the, you know, dimensions
or anything. And then all I want to
do is put it into place. Now from there I can
actually grab them both. Right click subdivide,
right click subdivide. And now we can actually mess around with this till
our heart's content. So we can get a really,
really nice curve on this. So I can actually start
bringing this down like so bringing it down and
bringing it up like so. And I'm also thinking, do I actually need any
more resolution on this? Maybe I need to come in a right click and subdivide a
little bit more from there. Then what I'm going to do
now is try and get this bent into the kind of shape that I want without it dropping down. So if I put this on object mode without it dropping
down too far, so now you can see
I've got a much, much better angle to
actually give me my curve. So I'm going to
follow this curve slightly as you can see, and that's why we put it there. Let's bring this part up, let's bring this part down
a little bit. There we go. And maybe that is about we want, so I'm going to
press control three. I'm going to go to
the side of you again and just make sure that it's a nice smooth
curve going along like. So I also want to make sure that actually
I'm going to come in, bring up this bit like
so that is what I want. Something like that.
And you can see now it's a little bit out,
but we knew it would be. And that's basically
what I want to do. So now I can come in
and I can drag this up. So what I'm going to
do is I'm going to make sure I've not got
proportion, it's on. I'm going to pull it
up then into place. And then what I'm
going to do is just go down and just now, you know, bring this bit up and down because this is
going to be my wood. And I just want to
make sure that it's going to be level with
this other part like so. And you can see it's really easy when you do it
actually this way. All right. So there we go. Now the last thing is I want to make sure
that this is actually thick enough because it needs to be a fairly hefty piece of wood. And I think it's a little
bit lacking at the moment. Let's right click and
shade auto smooth. You can see that's
not going to work, so I'll have to shade
it flat for now. And then shade auto smooth after let's come in then
and what we'll do, we'll come over to
our thickness first. I'm going to turn up that, so that thickness is bringing it out this
way, which is fine. We want it fairly thick
this way as well. And then we can come to our
curve and all I'm going to do is I'm going to go
where the extrusion is, go to the side. And I'm just looking now how
thick I actually want it. And I think something
like this is about right. So something like that is
quite a thick piece of wood. All right, so that's
looking good. Now from here then we can actually start
building out on this. The underneath, for instance, is going to have a lot of planks of wood
going under there. So we have to think
about that as well. All right, but let's start
building this part out first. So what I'm going to
do, I'm going to press shift A. I'm going
to bring in a cube. I'm going to bring
my cube down and I'm going to then put it
roundabout onto here, make it a little bit smaller. I'm going to sit it
on top of there. And then finally I'm
going to pull it out nearly nearly to
the edge of here. So I'm going to pull it,
jaws to the edge of here. And let's fit it into the
place a little bit like so. Now we're going to
work on the front now. So I'm going to
grab this Shift D, and I'm going to spin
it round, so ours 90. And I'm going to put
this into the front, so I'll want it on the front. And then from there we'll get a better idea of how all of this is going
to come together. So something like here. And then what I'll do is
I will be level it off. So I'm going to
come in, you know, I'll split them up as well. Selection, split them up. Grab this one, control A, and then come in and we'll
be level this part off. Just this part
here. Level it off, so it's a little
bit rounded like. So we'll also make it
a little bit smaller, so I'm going to make
it a little bit smaller because we're going
to pull all this together, so don't worry. So
something like this. And then finally
what I'll do is I'll probably also put an
indentation in this, so I'm going to mirror
it over the other side. So let's not worry about that. In fact, we'll do that first. I think it's going to make
it a little bit easier. So all I'm going to do is
write click origin three D, cursor, add in the modifier
and we'll bring in a mirror. Bring in a mirror,
and there we go. Clipping on. Turn
it up a little bit, just so they clip
together properly. Grab this middle part and
bring them together like, so let's press control then. On there, and there we
go, That's that part. And now we'll bring that indentation in
that I'm on about. So if I press
control and you can see we've got a problem and it's not going all the way over. First of all, let's
actually delete this edge. So I'm going to come in,
hide it out of the way. Delete this face here,
we're not going to need it. And then ultg, bring it back. And then Alt shift and click. And then what we're
going to do is just dissolve edges like so. Now, can I bring in a
edge loop? Yes, I can. Left click, right click, control B, turn it down. And then all we're
going to do is press Enter Alterns and just bring it in just a
tad. And there we go. All right, that's
looking good so far. Now we should be able
to shade auto, smooth. And now we'll start
work on the next part, which will be these
parts around here. So also we've got this one here which is
obviously the ceiling. Now to do the ceiling, let's just come in and do
that the easy way. All I'm going to do is just grab it going all
the way up to there. And then we're going
to pull it down. So Z, pull it down all this way. And then all we're
going to do is straighten it up. So and's Ed. Straighten it up So and's Ed. And just get it nice
and straight as you can like so and's and there we go. And then when you've done
that, just pull it up like so. Okay. So now we can
see that it still stuck out a lot further
than where it should be. But all I'm going to do
is just split it off. So I'm going to grab this all the way over to
there. With control. Click, press the
button selection, grab it again.
Control or transoms. Right click, set
origin 23 decursor. Then what I can do
is now pull it over. And that then of course is
there for my actual mirror. I want to pull it
over. Perhaps you can see here the top and bomb. They're not really
in line, so all I'm going to do is I'm going
to pull it over to there and then pull this top bit over to something like there. And from now then I can actually start working on this part. So what I'm going to do, I'm going to probably come
to the front part first, so let's do that part first. I'll press shift eight. Let's bring in another cube, and let's bring it over. So when we're thinking
about doing this bit, we have to really think about how is it actually going
to look on the sides. We want it to have that look that we're
actually going for, that Victorian Es look. So all I'm going to do
is we're going to press, shrink it down and X pull it in. And let's get it
into place first. So we're going to get it into
place wherever we want it. So let's put it right
in this corner like so, making sure it's not, you
know, popping through there. Let's decide on the size. Now I think it's a little
bit too wide, so S and Y. And let's get it right
into that corner. So round about there. And from there then
I can actually pull it down into place, hopefully. All right, so what I'm
going to do is I'm just going to grab
the bottom of it. I'm going to pull it down into place where I actually want it, so there's something
round about there. And then what I'm going to
do is I'm going to press controller and bring up
an actual edge loop. And then what I'm going to
do is pull out this edge. So if I pull out this edge, in fact, you know what, I'm
not going to do it like that. Because what that means is it'll pull the whole thing out. And I don't really want that. So what I'm going to
do is press control. Bring in another edge loop. And from now I shall be
able to pull this out. So I'm going to pull this
out a little bit like so. From there I can also
see it's a little bit too wide and I don't
really want that either, so I'm going to press L and
X and pull it in like so. And now that's looking
much, much better. And then what I'm going to
do is pull this bit in. So, all right, let's
have a look at that. That actually is
looking pretty nice. The one thing I would like to do is maybe pull this
out a little bit more. So I'm going to pull it out
a little bit more like so. And I think now everything will fit in place a
little bit better. I'm going to pull
it out a little, tiny bit more like so. Alright, that's looking good. Now what we'll do is we'll
have of these going over, so I'm going to press shift D, bring one over to here. Shift D, bring one over to
here. Something like this. And then we need an inner
part on here as well. So I'm going to create that
probably separately actually. So all I'll do is
I'll grab the top of this shift D because
it's in the right area. I'm going to pull it
down then into place. I'm going to make sure
actually that it's just outside of there like so so
if I pull it down night, it's going to look
something like this. And from the bottom of
here then I'm going to press and pull it up like so. And then finally I'm going
to press the eye button. Bring it in a
little bit like so. And then, and I'm going to pull this up to this point up here. Now it's up to you if you
want it to actually be, you know, in there or not.
I think I probably do. So I'm just thinking, yeah, we'll just pull
it over a little bit. So if I press L not too much, we don't want it too much over. We want it just like this. And then what I'll do then is pull this part
over a little bit. So again, it's all about just fitting everything in place now. Yeah, Like that.
Perfectly like that. That's what I wanted.
Okay. So from there then I can come
back to this part, grab the top of it,
and just pull it down into place.
And there we go. Now from here then let's line these up a
little bit better. So if I pull this one over
here and then pull this one. So let's grab this one. Pull this one over
here a little bit. Let's come into this one again. I'm going to split this
one off as well because it's making it
hard work like so. All right, from there
then let's come in control plus control plus. And then what we'll do is
we'll pull this up into place, into place like so
you can see we're going to have to pull up this side. We'll
do that as well. So we'll just pull it into there and then we'll
go to this one. Same thing, So control plus. Control plus. And then pull it up into place just underneath. And then what we'll do is now we'll come to this side first. So I'm going to go as grab
this side and pull it up. And then I'll come to this one, grab this side and pull
it up into place like so. And there we go. Simple as that. Al right, that is
looking pretty nice. Now, on the next lesson, we'll get this mirrored
over the other side. And from there then
we can actually start building the front
of our actual, I don't know what
you would call this, like a veranda or, you know, an extension. I don't know what you would
call it, but you know, we'll start building the
front of it out regardless. Alright everyone. So I
hope you enjoyed that. I'll see on the next
one. Thanks a lot. Bye bye.
187. Crafting Wooden Arches for Exterior Detailing: Welcome back. Even
to Blender four, the Environment Artists Guide, and this is where we left off. All right, from here then we can actually come in and we
can apply all of that. So all I'm going
to do is object. I'm gonna go down to convert and mesh and then I'm
going to right click. And I should be able
to shade auto, smooth. Now maybe it's got too
many, maybe, maybe. Let's go back a minute. So before we do that, let's
go back, there we go. And let's turn down this to
something like maybe three. And then what we'll do is
we'll apply everything now. So I'm going to go to
Object convert to mesh. And now I'll right click
Shade Auto, smooth. And there we go,
That's looking much, much better like that anyway. All right, so from
here then let's actually make sure
that all of these, all of these including
this as well, have their orientation
to set origin to three de cursor
over there also. Before we do that, let's press control layer
transforms and then set origin to three
cursor. And there we go. All right, so now let's come in, add modifier, generate a mirror, let's put the mirror over the Y. Let's turn off the, where's it going to be?
Maybe it's on the X. All right. It's on the
X with the looks of it. And now what we'll do
is we'll grab this, one's the last one
we've grabbing. Let's press control L. And what we'll do is copy modifiers. And there we go. And we'll also get this side right click, the origins already there. So let's just grab
this one control L and what copy modifiers
of that as well. And there we go. So I'm just looking now to make sure you can
see the gap here. And the gap here is not right. So I'm also looking at this. How far this comes
out? That is right. So the thing is, why
isn't this one correct? It looks right. Clicks the origin to three
decursor. There we go. Now that's working properly. All right, that's looking good. Now I'm thinking, let's think about this part down here first. So we'll do these parts here. So what I'm going
to do is I'm just going to press control one. I'm going to grab
all of these shift, S, let's curse the selected.
Where's that going to be? It's going to be up
there in the center again. So we'll
just work with it. Bring in a cube,
let's bring it down. You know what? Let's
not bring in a cube. Let's bring in the
plane, 'cause I think it's going to
make it much easier. So we're gonna bring in a plane. Y 90, 90. Let's bring in that plane. Let's put the plane in place. So I'm going to press S, let's get it into place
where we want it. And then and's
let's pull it down. So, so something like there,
let's get it in place. And then what I'm going to
do is I'm gonna press Tab. In fact, you know what, I need
to pull it forward first, so wherever it's going to be. So it looks as though
it's going to be on here. So just maybe back a little bit. So round about there, I think. Yeah, that should be
perfect around there. Okay, so something
round about there. Then what we'll do is
we'll press control, Bring in an edge loop. Come in with our bevel then. So grab this end control, shift B and pull it out. Increase the amount. You can see it's going way,
way, the wrong way. We don't want that,
so let's turn it going the other way round. Yes, like this. And let's bring it down to where
we want it like. So that is what I'm looking for. That is looking very nice. Exactly what I'm
looking for. All right, from there we want to
actually delete this off. So delete and bases. And then what we'll do is now
we'll come into this part. So I'm going to grab all of this part going all
the way along to here. And then what I'm going to do is I'm going to press shift D, and then I'm going to pull it
back this way a little bit. And then I'm going
to press and X or Y, whichever one it is,
that's going to pull it back to that
point. From there. Then I also want to make sure that this is up
into the ceiling, so I'm gonna pull that like so. And I also want to make sure that I've not got this
edge on there anymore. So dissolve edges. And then I can grab the
front of this and I can pull it out and actually
give it some actual depth. So pull it out, give it some actual
depth round to there. And then L, let's grab the whole thing and pull
it back into place. So now with this part here, let's come back to this part. So I'm going to grab
this part here, L I'm going to press
selection. Grab it again. And then what I'm going to
do is I'm just wondering, oh, that's what's happened. He needed an edge on there. I might have to come in control. Left click and just bring
that up. There we go. Now I can put that into place. All right. I wonder
what happened there. Okay, let's come back to this. Let's actually come in
and what we're doing is generate a solidify,
even thickness on. And then let's just
turn it up like so. And let's pull it up and I'm just looking at
the even thickness, I think I need to press
control all transforms. There we go. There we go. All right, so let's
pull it back. Like. So let's also make it a little bit,
actually, you know what? I think it's wide enough. Yeah, it's definitely
wide enough. Let's double tap the we've
got there and there we go. That's looking pretty good. Then all I'll do is I'll come in now and I'll grab the inside. This one here. This here. I'm going to press the eyebone, see if I was seeing if I
could actually bring it in. You can see there probably. I said, let's bring it up and
let's pull it up so I can. Now you might want to
join these parts up. In other words, this
might have two here. Right click, merge at, Let's merge at center, and let's come to this side, grab both of those
shift merge at center. Finally we should be
able to come in now, pull these out with, then we go. That's what I'm looking for. That's exactly what
I'm looking for. Now, if I press control one, I should now be able
to press shift, bring these over into place and hopefully they should
really be able to fit. If I bring it over
to the other one, shift D, let's see if
they actually fit. You can see here, it's
nearly fit on here. And this one, possibly a
little bit out, I think. Now the other thing is I didn't grab them all, so I'm
going to do that. I'm going to grab them all, I'm going to grab this one. And this one s in fact, you know what, We'll make them a little bit bigger before we go. And X, let's put them onto
they're on medium point, let's put them on medium point. And x, and they're coming from there. I
don't really want that. So let's write
clicks of origin to geometry and then and x. And there we go, that's
exactly what I want. And then shift D, let's
bring them over now, and hopefully they'll fit
in place a little bit bare, which they do. And then shift D, pull them
over and put them into place. All right, let's double tap
the eight, and there we go. That's that bit done.
Finally, I think we just need a top that's going
to go under here because you can see how
this is working out. Which means that I'm
going to have to pull all of these
forward a little bit. All I'm going to do before finishing this is
just grab them all. Pull them forward just so
they sit right on there. And then I'll just
put one more beam into here, underneath here. All I'll do is pressure
deselected shift. Let's bring in Q. Let's pull the cube
down and into place. And it's going to go just
under there, squeeze it in. We want it just
sitting there and Y. And then we'll just
press S and X or and Y. Let's pull it out
into place like so now we'll just pull
it back a little bit, just so it's past
that point there. Then I also want
to make sure that this part you can
see we've got a gap. It, we really don't want that. What I'm going to do
is grab all of these. I'm going to try and pull
them up a little bit. If I press control one, I'm going to press a little
sideways V three De cursor now should be able to
pull them up into place. Double tap, just make sure
they're on the floor, which they are now we can see that's fitting
in much, much better. All right, from
here then I'm just going to now bring that
over to this side. So shift D, bring it over so we can put the little
sideways V back as well, so we can put it back
to individual origins. And then let's grab this one shift and let's pull it over. There we go. All right, double tap the eight,
and there we go. You can see now that's really
starting to come together. You can also see
that the way that we're actually
building these up is just slowly bit by bit and actually looking what
things look like, making them fit
in a certain way. Before I finish, I'm just going to pull this out
a little bit more, S and X, Let's pull it out
just to add more like so. So it's just in front, maybe that's a little bit too much. I want this bit here to
be just in front of this. So if I press control all
transform set origin to geometry and x hold
the shift born. And there you go,
that's what you want. This part here, just
in front of there. There we go. That's looking
much, much better now. All right, so on the
next lesson then, we'll actually make a
start on these parts here. So this part going across here, I've got a good idea of
what I want to do with this in my head already. So we're going to start, you know, building up
like we did before. We'll put a top on here and then what we'll
do is we'll put some slats going down here and then a little circular
bit in each one, but we'll see how it turns out. All right everyone.
So I hope you enjoyed that and I'll see
on the next one. Thanks a lot. Bye bye.
188. Finalizing the Model of the Perfume Shop's Lower Floors: Welcome back everyone to Blender for the Environment
Artists Guide, And this is where we left off. All right, so now let's start with just a simple base on here. So do express shift date,
we'll bring in a cube. Let's bring in the cubes
to roundabout here, pull it out, and let's
put it into place. Now the one thing we
need to make sure is the roof tiles are
going to fit on properly. So I think we'll
actually do those next. So all I'm going to
do is just bring this in to something like that. And then from there then
I'm thinking, yeah, let's bring in our roof
tiles now and make sure that this is not going to
hinder where they actually are. Now, our roof tiles, we
already know these are the ones that we've actually been using. So these are these. That's exactly what we want. So all I'm going to do is press shift D. I'm going
to bring them up, I'm going to pull them
out a little bit. I'm going to press M and put them into my
perfume shop like so. And from there then I can
actually close down this boolean and then
we'll spin the round. So was -90 like so. And then let's pull them over into the place
that we want them. And then what we're going
to do is we'll give them a slight bend on
the ends of them. So if I come down and come to this part here that then
should be able to bend. You can also as well,
if I press controls, put those back lock at center and actually
bend them as well. And you'll see it gives you
a completely different bend. So it actually bends from the center rather from
the point of origin. I think though, for me I'm actually going to
bend them from there. And then all I'm going to do, I can also rotate them on
the X as well from here. And what I can also do
then is pull them up. Now the thing is, where am
I going to pull them up to? I'm just making sure
that the ends of them, so if I come to the ends, that is exactly where I
want it actually. So if I've got it there, what I want to do then is
increase my horizontal. So let's keep going. So let's pull them over and the jaws nearly in line there. And all I'm going to do
is just press S and X, And I'm actually just
going to pull them out. Double tap the and now just
make sure everything's fit. You can see the bends
not quite right, it's not quite fitting in there. So what I'm going to do
is the jaws going to come down to my bend and bend
them a little bit more. And then press R X jaws
rotate them a little bit. So I'm probably going to have to bend them a little
bit more, I would say. I'm also going to
pull them down a little bit into place like so. And let's come in and rotate them a little bit more like so. All right, now we
can see that we've got the ends of
them and not right. If that happens, I
just tend to just press Sen's ad and just
pull them up very, very gradually like so. And then R and X and
jaws rotate them, holding the shift borne, getting
them into place like so. And there we go. That's
looking pretty good. And you know what, this is not being hindered by this part. The one thing I
would say is that these parts here probably going to have to come out
a little bit further. So. And we're, jaws gonna
grab both of these parts. Pull them out a
little bit further, which means I might need to pull this down a
little bit as well. But you can see I've got
them in front of there now. It's just these parts here. So do I want to pull these down a little
bit? I think I do. So all I'm going to do, just grab one of these 'cause
we've got a mirror on there, put it onto normal. And then all I should be
able to do is just pull it down very slightly,
just beyond that point. And there we go, That's looking pretty perfect,
everything that I want. All right, so now let's
bring in another cube. So I'm going to bring in a cube. I'm going to make it
a little bit smaller. So let's pull it out then
to where we want it. So we're going to sit
it on top of here. Of course it's going to be back probably a little
bit further as well. So all I'm going to
do is press S and Y and pull it back a
little bit like so. And I think with this
one what I'm going to do is I'm going to
bring it up to the top, fit it into place,
and then have it kind of bowed out at the bottom. So let's put it into place like so let's make sure
we're happy with the size. This is right in the middle,
which is what we want. So then what I'm going to
do is we're going to pull it down like so. And then we want it
coming out a little bit. Whoops, coming out a little bit. So let's put this on Global, it's going to make it a
little bit easier for us. And then we'll bring
in a edge loop down to wherever you want it,
maybe something like that. And then I'm just
going to press, pull mine out a little bit, grab the top of it, make sure to reset all
the transforms. So reset all your transforms, come back into it, press
control, and there you go. You can see, now you can
have that nice devil that we actually
are looking for. Right click, shade,
auto, smooth. I think you know
what, with this, I'll just go back a minute
and instead of doing that, I'll press control Now. Bring it down to
where I want it. And then what I'll do is
I'll increase the segments. And the reason I'm
doing that is because we can get a smoother edge. So right click,
shade, auto, smooth. You can see now it's
much, much smoother. All right, that's looking good. I'm just wondering if I want another part
on the front of here, another part on the front,
probably, probably. So let's do that
now. So all I'll do is shift a, bring in a cube. Bring it out. Press the button. Let's press and pull it back. Let's press and X Joe is going to pull it into
the place roundabout there. And then we're going to
pull it back a little bit by then what I'm going to do is grab this part and this
part, press control B. And I'm going to have to reset all the transforms
as you can see. Now let's try that again. Control B, you know what? Let's right click, shade, auto, smooth. That
actually looks bare. So sometimes you get a bit
lucky because you know, the bevels, we've
got a different way. But yeah, I think that
actually looks better. The one thing I would
say is let's just go back and let's do it once more
so we'll come back again. So we've greater get here. Let's press control,
pull it back. And just pull it back
to roundabout here. So you can see it's
just behind there. Right Click, shade autism. And actually think that
looks a little bit bare. Okay, so that's looking good now let's bring this over then. So if I bring this over, I should be able to
make another part that's going to go in here
and then array it over. I'm also thinking it's maybe
a little bit too wide this, so let's just press S and X and just bring it
in a little bit. And now let's think
about the bit that's going to go inside here. So if I come to this part, let's press shift S,
Ursa selected shift. And then what we'll do is
we'll bring in a plane. I'm going to spin my
plane round so our x 90. Spin it round, let's press the S board and get it into
the place where we want it. So something like
this and then X. So let's get it in. There we go. And then we'll just grab
the topps top part. So pull it up like so. All right, that's looking good. Now from here we want
to create a bevel, let's see if we can
do it this way. Bring in an edge loop, bring in another edge loop.
Left click, right click. And then what we'll
do is we'll come to the center of this
control shift B. And we should be able to pull it out like so how easy is that? Now let's come in and work
on the kind of size first. So we can have it
coming in like this or we can have it
more like that. We can even increase the size of it and then bring
it back a little bit. So I'm thinking something
like that. Like that. We also, if you really want to, you can also press and X
and bring it in as well, which makes it even easier. All right, so now we've
got that I think I'll lock in about what
I actually wanted. I think I'll just press S and though and pull it up
a little bit like so. And then what I'll
do is I'll press Delete and Faces and delete
that off from there. Then I can press L
on the whole thing. And then I'm just
going to pull it back with just to give
it some sort of, you know, depth to it. All right, so, and yeah, I'm happy with how that looks. Now let's surpress
control or transform. Right click the
origin to geometry. And then the last
thing is I need to put this halfway in like so, and also pull this over. So what I want to do now is
join both of these together. So I'm just making sure
that it's in place. Right click, shade, auto, smooth, auto,
smooth, there we go. And just make sure it's
on the bottom as well. And then what we'll do is
we'll press control J. And then we're coming over
and bring in a array. So let's bring in an array. Let's put it on minus one. So minus one so, and let's increase this then. So now I'm hoping I should be able to now
bring in another one. So in other words,
if I grab this, I'm going to press Shift D, and then I'm going to press P selection to split that off. And then what I'm going to
do is just go to this one. So you can see here if
grab this one here, let's just turn
this off a minute. You can see that is
the one you can see. Grab this part as well, I think. Yeah, let's turn that on, let's hide it out of the way. Let's come to this part
and let's actually delete this L delete vertices. Let's also come in and
just delete the array. And now what I want to
do is just pull it over. So pull it over into
place over here. Now let's bring the
other part back with or tage and double tap the A. And finally, then let's see if I can actually
get this into place. So you can see it's
a little bit out. Just a tiny bit out. So what I'm going to do is
I'm going to grab this part, I'm going to pull
it over this way into place so it's all
fitting in nicely. Double tap the A.
And there you go. Now you can see it's all
fitting in to place. And that's looking really, really nice. All right? I'm happy with how that looks and pretty much
now we're done with this part except the
piece underneath. So we're going to have
to put, you know, you know what, we
won't actually, we'll just put some
green wall under there. I think it will suffice. Before I go though, let's
just make sure that we do have just this
part split off. So what I'm going to do is
I'm just going to pull it up. So if I press, I should
just be able to pull it up like so there we go. That then is going
to fit much better, except this bit down here. I'm going to finish this off.
I'm going to press control. I'm going to pull
it over to here. And then what I'm going to
do is grab the back of this, now this part here, press and just pull
it down into place. And there we go, finally. Then let's come to
these parts here. It's got a mirrorun let's
go over the other side. Just looking at this part, I just need to pull it
down very slightly, like tap the A. I'm still going to
mess around with it a little bit more because I
need to pull this bit down. Double tap the A,
and there we go. Now it's all fitting into
place except these bits. So again, we've got a mirrorun. So let's come to the
bottom into place, Then double tap the
a. And there we go. We managed to bring it
all together in the end. All right, just this
part here, right click, shade, auto, smooth,
and then we go. This is pretty much done, okay. Now what we'll do is on
the next lesson is we'll get all of the materials in
and everything like that. Get them all beveled off, all the pots that we've not
got beveled off, that is. And then find that we can
actually get the windows in. We've got a chimney on here, we've got a slight window on
here, nothing too serious. And then we can actually move
around to the front here, which this bits a
little bit complex. The other bits though,
are pretty simple. All right everyone,
hope you enjoyed that. See on the next one.
Thanks a lot. Bye bye.
189. Texturing the Rear of the Perfume Shop for Realism: Welcome back everyone to Blender for the Environment
Artists Guide. And this is where
we left it off. Now let's work our way down. So what we're looking
for here is we're looking for if the parts
have bevels on them, so you can see that this
one here has the bevel, we already know that those parts are going to have bevels anyway, so all I'm going to do is just
hide them out of the way. And then what I'm going to
do is work my way down. Now we know all of
these parts as well. These have bevels on as well, so we can actually hide those. We can hide this part,
we can hide these. And then we can come in and
hide these parts because we know they also
have a bevlontmu. We're left with what doesn't have a Bevon that has a Bevlon. This then all the stuff
that we actually built out. Now let's come in and
add in our bevels first. I'm going to actually
come in first of all and grab everything. All of these parts,
all of these. Then what I'm going to
do is these as well. And then I'm going
to press the born and just see which
parts I've missed. So we can see I've
missed these at the top, so all of these have missed. I've also missed,
if I press again, this part on here, I'm just looking now. What else have I
missed? There seems to be another part in there. This part in here.
This part here. I don't think I'm actually
going to worry about that. Rest of it. Yeah,
just wooden parts. I think I'll deal
with those actually, After I've done all these parts, let's deal with all these. First, we'll go to object, we'll go down to
convert and to mesh. Now we can actually start
bringing in our bevel, so I can press control or
transoms, right click, set origin to
geometry of them all. And then what we can
do is add modifier, bring in a bevel. So we're bringing a bevel on this naught point
naught naught three. So and then what we'll do
is we'll press control and L and we'll copy
modifiers. And there we go. Now just to make sure that we've got a bevel
going on all of these, I'm just going to
come down making sure that geometry clamp
overlap is off. And then control L again copy modifiers and there you go,
sometimes that happens. Now we can also see
that we need to write click and
shade auto smooth. And we can see on these ones, for whatever reason, they're
not really shading smooth. Sometimes that happens, what we'll do is we'll come
in though, first of all, and bring in a painted
wood, red paint wood. Bring that in, and then
that's on all of them, if we press control L
and link materials. Now from here what
we'll do is we'll come to these parts first. So let's come to these parts and let's come in and just split these parts off because the causing is a bit of a
problem with the shade in. So P selection, and let's
press control all transforms, right clicks the origin to geometry. And let's now come in. Right click, shade, autos, move. And you can see there, what
is the problem with these? I think it's something to
do with this bevel on here, which means I can probably come in and
just put the smoothness. So if I turn this up or down, you can see it's probably being caused by a little line that
we've actually going there. Let's press shift H. Let's
have a look what that line is. It's probably
something to do with this bevel having
two lines in there, or there's a face in
there. Let's press H. There's no face in there. We can see that
there's a break here. Let's try this. If we come in and see if we can
fix it this way. Shift and click, going
all the way around. Let's press a little dot button. Let's try and get this fixed. If I dissolve edges, let's see what happens there. There you go. Now it's actually fixed, so let's do that again. A shift and click
and we'll grab. In fact, we're just going
to hit shift click, because shift click doesn't
seem to work on these. What we'll do is
we'll Jaws come in, around here, here, round
here, around here. And then around the sides,
the dissolve edges. There we go. Let's see if we've done it on this
one. No we didn't. We missed this one. We missed this side. Let's dissolve edges. Dissolve edges. There we go. Now let's put this up to 30, or a little bit further down, 26.3 You can see, now that's looking fine. I'm just wondering
about this one. I'll also dissolve edges on
this one. And there we go. All right, if I put
this up to 30 though, you will see that it
doesn't work properly all. Actually, it does
work properly now. Yeah, that's fine. Because that means it can be joined
with the rest of it. All right, ol tag,
bring back everything. Let's now put this
onto material mode. We've still got the roof
to do and we've still got all of the flaws and things like that.
So let it load up. Let's come in though and
deal with these parts first. So we know that we've
got these parts. So all I'm going to do is grab this one smart UV project click. Okay, hide it out of the way, and just work your way down. A smart UV project click. Okay, hide it out of the way. Work your way down
to these then. Thank God for smart UV
project because it does make a world of difference in how quick
we can actually do this, especially on things like this. Okay, let's try that again, not smart UV project. Click okay and hide
it out of the way. And then let's just
keep working our way down because if we
didn't have that, we'd have to actually go in and unwrap every single thing. That would honestly take
a serious amount of time, at least probably
another 5 hours, on top of what we've
been doing for sure because it is a
big job doing that. But using this, as
long as the wood looks good and you can't see because wood has
a lot of seams on it, anyway, it's fine to use. But if you're doing a
character, as I said, we have gone through and looked at how we can actually mark seams
and how we can hide seams as well,
which is important. You should be fine, even if
you are doing a character as well. Hide those out the way. Work all the way down
at them out the way. Smart UV project, so. And
hide them out the way. All right. I think we've
pretty much got it. Let's try these ones. We
haven't done these yet. Tab, Smart UV Project. Click okay. Hide
them out the way. And then these parts,
Smart UV Project, click okay, hide
them out of the way. And then these, we'll
do it together as well. Not that one. These here. So smart UV Project, click okay, hide
them out of the way. And now finally, I'm not sure if I've actually
done this or not. Bit hard to tell as well. So all we'll do we just
grab it. Smart UV project. Click Okay, hide
it out of the way. And finally then we'll
also do this one, just in case we didn't do it. Okay, there we go.
Pretty much done. Now this bit is
going to be read, so this bit down here, which means that this bit
here is going to be split. So all I'm going to do is
just come in, split this off. So I'll just press P
selection, split it off. Then I'll come back to this
part and I'm going to get rid of these parts because we really don't need them like, so Delete and Faces. All right, so that's that.
Now I can come in and hopefully unwrap this
smart UV project. Click Okay. And for this one, you can see that these
are two adjoined. We don't want that
either, so I'm going to press selection. Split that off. Come back to this one, and
let's bring in a material. And the material is going
to be the red painted wood. Bring that in. And
you can also see that the red painted wood
has been put on there. We don't want that either,
so I'm going to press LP selection. Split that off. Now I'm going to hide
this one out the way. Now what we should have
is these two wall, this wall at the bottom and
then this one behind B. Now before we do anything, let's come in first
of all though, and go to object and then
convert this to mesh. So we're going to convert
this minus these off. And then all I'm
going to do is press U, Smart UV Project. Click Okay. And the one we're looking for is
obviously the roof. So roof, there we go.
And there's our roof. Let's hide that out the way. Now this one here is
going to be our wood. So let's click the down arrow. We're going to go for wood. And we're looking for dark wood. Bring that in. And there we go. Hide that out of the way. Now
we're on the last few bits. So what we're going to do
is grab both of these. Does this have a
miron? Yes, it does. So let's just come
over control A, just to apply that A then Smart. In fact, we don't
even need to use Smart UV unwrap. We
can just unwrap it. Come to our material
and we're looking for green wall green like so.
And then the same on this. So I'm just going to
grab both of these, grab this control L link
materials and then come back to these U and
then come to this one. You can see there that I
didn't unwrap properly, so I'm just going
to grab both of these control all transoms. Right click, set
origin, geometry tab. And now should be
able to press wrap. And there you go.
No problems now. So let's come to this one. A rap, and there we go, old tag, bring back
everything, double tap the A. And finally, now all we need
to do is these two here. So we can see we've got
three parts here, these two. So let's come in, you wrap, and then this unwrap. And let's come to
this one first. Instead of a green gray box, we'll put it onto
green wall wall green. There we go. Let's
unwrap this one. So you unwrap, and let's
finally unwrap this one. This is going to be our brick, so all I'm going to do is
click plus down arrow brick. So click a sign. And then what I'm going to
do is I'm just going to now press U and unwrap. And then we go, let's
come over to UV editing. Let's spin it around 90. Spin it around, make
it much, much smaller. And what we want to do is
get it to be the same size. I press tab as these ones here. Now we can see actually that's
maybe a little bit big, so let's pull them back
a little bit like so. And that then is
looking roundabout, the right size as these. Okay, now on the next lesson, then we'll have a quick look and just make sure what
the render looks like. But then we should be able to bring these windows over here. Put those in because they are the same windows
as the other ones. Maybe these should be
a little bit smaller. We'll put the top in here. And then we can start with our chimney and
things like that. Let's go out and save our wig, and I'll see you
on the next one. Everyone. Thanks a lot. Bye bye.
190. Completing the Second Floor and Roof of the Perfume Shop: Welcome back everyone to Blend for the Environment
Artists Guide, and this is where we left off. Now let's go back to modeling and let's have a quick look
at what we've got here. So let's put rendered view on, let it load up, and there we go. Absolutely beautiful that part. All right, you
might want to come in and put in some
more of these parts. Going over here, you
might want to do that. I think actually I'm
happy with how it looks. It looks very
different in parts. So now we've done that. The roof looks beautiful. As you can see. This all
looks very, very nice. So now what we can do
is we can carry on and put in the windows over here. So let's do that now. So all I'm going to do is I'm going to come
into this window, I'm going to press shift D.
I'm going to drag it over R D -90 Press control one. And then I'm going to
pull it over to here. I'm going to make this
window a little bit smaller, pull it up more into
the middle like so. And then what I want to
do is put another window, so shift D over to
the other side, roundabout, in the same
distance as there. And finally grab both
of these windows then and pull them
back into place. Now of course we're going
to be boolean these again, like we do with all
of our windows. But let's actually finish
off this part first. So what I'm going to do is I'm going to come to this part, I'm going to grab all of
these parts here as well. I'm going to press Shift D, and then what I'm gonna
do is pull this over. I'm probably, at this
point I'm thinking, yeah, I'm not gonna
join them together yet. So zed -90 let's spin
them around. Control one. And the reason I'm not
going to join them together yet is because I
need to fit them into place. So you can see here, they're
gonna fit nicely into place, but it just means that I need
to get rid of some part. So I'm just gonna come in, I'll grab this part, this
part and this part. I'll delete them off.
So delete vertices and then I'll come
to this part now. Grab the edges of it. So this one, this
one and this one. Press control one again, and then just pull
it into the place where we're actually
going to have it. So something like that. And then finally I can press Tab and I can pull all of
this into place now. So let's keep pulling it back, see if we can actually
get it into place, into place, into place. And sometimes, honestly,
they're not going to fit the same way as
the other ones if they don't just pull
them down a little bit. So now you can see they're
fitting into place. Now we can see that we do have a problem in this part here. I think if I bring this down so we can see that
this is all fine here. If I bring these
windows down first, let's bring the windows down. So then what we'll do is
we'll come to this part. I'll see if we can
grab the top of it. Let's grab the top and see if I can actually pull that down to, it's just under there like so. And let's see if it's
actually come down. So it has come down, but we do have a problem in
this bit, but again, we don't want to worry about this bit yet because we're
going to have a piece that's probably going to
go across there anyway. So something that's going
to go across there. So let's not worry about that. The one thing I do want
to do though before doing that is I want to
pull them both down. So what I'm going to do is grab this one and this
one, press the tab. Grab the top of here. And then what I
want to do is pull them down perhaps under, just under there like so. All right, double tap the and let's have a
look at this side. And you know what, I'm
happy with how this one is. So let's come in and
let's do this one first. So let's see if we can actually pull this
up a little bit. So I'm going to pull
it up into place. Can I pull it up and Yes, I can. You know what? I'm
going to leave it like that because I think
that looks good. I'm also then going
to come to this side. I'm going to do exactly
the same thing. I can pull this one down
if I need to anyway, but I think actually that's
looking pretty good. And again, let's have a
look on our rendered view. Just making sure we're
happy with it all. And there we go, that is
looking very, very nice. Now what we'll do is we'll
put a centerpiece in here. And then we'll start with
our chimney up here. So let's go back to object mode. Let's save out our work. So save out your work and
then we'll create a new part. So what I'm going to do, I'm
going to grab this part, Shift S Kuster selected shift, let's bring in a cube.
Let's bring it in. First of all, we'll just bring it to the top of here
where it's going to go. And Y's make it a
little bit thinner. And then I'm wanting this to be quite wide. A little bit wider. And then let's bring it down, we'll bring it down
into place and that'll be the place where
it actually starts from. Then what I'm going
to do is just reset my transformers again. So now let's start actually
working on this part. So what I'm going to do is
I'm going to bring it up. First of all, once I've
actually brought it in, so I to bring it in
E, to bring it up. Remember what I'm going to do is bring in a few edge loops. So control law, maybe five, left click, right click,
grab the center one. And then all I want to
do now is put this onto something like sharp and x. And that is too sharp as you can see, so we
don't really want that. So let's try root next. So S and X and there we go. That is what I want.
Nice and smooth like so, and that is exactly what I want. Something like this.
Now the only problem is I want it pulled
in a little bit more. So Alt Shift and click. S N X. So that is
the one up from it. And I want it pulled in like so from here what
I'm going to do is actually I'm now I think you know what I think actually I'm
happy with how that looks. Yes, I am happy
with how that look. What I'm going to do now
is I'll come to the top. This part here,
I'm going to press Enter without portion on. Pull it out. Let's also pull it out this way
a little bit and Y. So let's press, pull it
up into place like so. Let's then press the
button to bring it in. And then let's press
to pull it up. There we go, and this is what
we're actually looking for. Then pull it out
again on the Y and Y. And then we'll press, pull
it up to this place here. Now, we don't actually
need this one in here, we're just going to delete
this one L delete vertices and then we'll come in and work a little bit more on this one. I want a nice top, and I want it played out a little bit
at the top as well. So what I'm going to do is
I'm going to come to my top. Now let's press S and X. Yeah, I don't think that's
going to look right, so I'll bring in
some edge loops. So I'll come back to the top, then let's put
proportionality on S and X. So we'll bring it out as well, this way once we've
brought it up. Let's first of all though, bring it out a little
bit and then up. So I'm going to press Enter
again without that on the, pull it up and then I and
then pull it up into place. All right, now what
we'll do is we'll bring in a few edge loops. Left click, right click.
Grab the top of it. Proportional editing on again. S and X, not there. Let's try it here. And
X, we'll bring it in. I'm, it's bringing in this part. I don't really want
that. You know what? We'll just go ol shift
and click control. Hide it all the way and then we'll just hide the
rest of it all the way. So hell hid it out of the way. Now we'll come in with the center Alt Shift
and click S and X. And now we should be
able to bring it in. I press Tab without actually moving that
part. And there you go. It's as simple as that. Now what we'll do is we'll come
it into this part, so lth and we'll
bring this part out. If I grab both of these, let's reset all
the transforms in. So all transforms, right
click, set origin geometry. And then what we'll do
is press the eye button, press again, bring it in. And then pull it out like so. Right click, shade,
auto, smooth. And finally I just want
to pull this top bit out. So I'm just going to come
in, grab the top bit. I've got my proportional editing on and I'm just going to. Yeah, you can see I don't want
it pulling out like that. Let's try the sharp instead. See if that's any bear. And there we go.
That's what I want. I want it pulling out like that. Now you can see it's
pulling the back bit there. I don't really want that.
So what I'm going to do, I'll just press Shift H. Hide everything else
out of the way. And then all I'll do is
I'll come in and just hide the sides and the back. So hide and the
top for that man. And then what I'll
do is I'll come to the top now and then
I'll pull it out. And you'll notice that
when I pull this out, press voltage now it all
stays in place beautifully. All right. So I'm thinking, is there anything
else I want to do? Maybe this point here, we could come in and
pull this bit in. Let's see, even bring
in an edge loop. I can bring an edge
loop, it's gonna add a lot more to it.
So let's come in. First of all, bring this in so and then maybe pull it in
just a little bit, Al right. I think that's enough. It's
enough flamboyanty on there. I think we can go too far
if we're not careful. Let's press control. Or
transforms, set origin geometry. Let's add in a bevel. So generate a bevel, let's put the bevel on
naught point n n three. And finally, then
let's unwrap it all. So smart UV project. Click Okay. And let's
then bring a material which will be the
red painted wood. And there we go. Let's press all tage. Bring back everything. Double tap the And now also we can see that
these here are flashing. And the reason the flashing is because they're pulled
way, way too, back. So let's pull those
forward so they fit into place
properly, like so. All right, Dad is looking
pretty night now, last of all. Then let's save out our work and let's come in and
actually render this out. Have a look at that. Yeah,
that's looking perfect. That's exactly what we want. And now what we'll do then is on the next lesson is chimney
and a little window on here. And then that is this
side actually finished, but you can see just how
much work we've done. You can see where we left
this one to last as well. It was a lot of parts and
you did need to learn everything that
you've learned up to that point to actually
achieve this one. So you can see where we broke it down in the way that we did. And you can see now, although it seems like we've got a lot
left, we really haven't. Once we get round to here, a lot of these parts
are already gonna be made and this is
just the main part. This is probably the
hardest part on here. That's why we've left
it till the last. But I think now with
everything that you know, it should actually be a little bit of a breeze to be honest. Alright everyone, So I
hope you enjoyed that. Thanks a lot. Bye bye.
191. Modeling Intricate Chimneys for Victorian Perfume Shops: Welcome back everyone to Blender for the Environment
Artists Guide. And this is where
we left it off, just admiring our way. So let's come over now to the object mode
and let's get in. I think we'll get in
our chimney first. So if I grab this part, press Shift desk,
Kirsta selected. Just give me something
to work with. Shift then let's
bring in a cube. Let's pull this then up
to where we want it. It's going to be something
in the roof over this side. Let's pull out this part here. So we'll grab this
part, pull it out. Don't need proportionality. And you can see that it's
wobbling all around the place. Sometimes that happens,
just pull it like this. There we go. Let's
then pull it down so it's actually into
the actual roof. Let's also pull it this
way, a little bit like so. And from there then let's
pull it up and just make sure we've got it to be the
right size that we want it. Now this, I would say,
needs to be probably going above just the
line of the roof. And the reason is because if you look and you're taking
an image from here, you want to be able
to see this chimney sticking up a little bit. So even something like
that is still good now. Don't worry, they did
have quite thin chimneys back in this period, so I think something like that is actually
going to be good. And let's now come in and what we'll do is we'll
add in another part. So I think we'll come
in press control, we'll bring it down to here. And then what we'll do is
we'll come in now Alt Shift and click Enter Alternates. And then what we'll do is just
pull it out a little bit, making sure offset,
offset even is on. And then I'll put a
top in here as well. So I'm going to press
control, bring it up. Press control B, bring it down. And we want this
to be roundabout, the same size as a brick. So in other words,
let's put material on and I want to make sure it's roughly going to
be round about that size, so it's one brick size. Let it all load up a lot of
parts in the now as we know. And there we go. So let's
press one or control one. And now we can see the
size of the brick. So you can see this would
be basically two bricks. We don't really want that,
we want it to be one brick. So I'm just going to
press essence head. Bring it down to the right
size like soap. From there. Then I'm going to press
Enter alternate and bring it out not as far out as
this bottom one offset. Even on again, if you need to bring it in,
just press Alters, you know what, we're just
going to put it back and then press Alan S. We'll
bring it out. Holding the shift born there, offset even on there we go. That's looking much better. Now, finally just the top part. So all I'm going to do control, I'm going to bring
it up then to there. And then I'm going to come
in a shift and click again, alternS and bring
it out a little bit further than the
one that we had here. Let's put offset even
on. And there we go. I think that's absolutely fine. Now let's think about the chimneys that are
going to go on top. So I'm just going to press
shift desks to selected. And then what I'm going to
do is now press the tabb. Press shift and we'll
bring in a cylinder. Let's keep it on 20. I think they'll be
absolutely fine. And then we'll yours
bring it into place. So Sens head bring
it into place. And now just decide on how big
it's actually going to be. So these can be quite
big, these parts on here. I think something like
this may maybe a little bit bigger essensed, like so. And then all I'm going to
do is come in, bring it in. I bring it in and then what
we'll do is press pull it up. I'm just going to make this
a very simple chimney, pull it up. Something like that. Control, bring in
some edge loops, left click, right
click, grab the center. One shift click,
proportional editing on. Let's bring it in.
Not with that, let's put on root. There we go. And I think
that's going to be fine. Right click, shade,
auto, smooth. There we go. Now let's
think about the actual top. We'll bring the top in and then pull it down
with E. And then finally, let's come in and
bevel off these two. Now before we bevel off, let's just reset
all our transforms. Shift click, shift
click control, maybe two left click. You know what, That
action might look better. I'm getting lucky
with the bevel, sometimes that actually
looks a bit better, I think. I think I'll keep that actually. Now what I'll do is
I'll come to this part. Let's not do, let's
press control, bring it back one and then enter alternS
with that portion. Let once more, bring it
out and there we go. There is my chimney. So let's now come over
and duplicate this. So shift, let's bring
it over like so. And I think before we start, I think what we'll do
is we'll just bring in this actual window that
we're going to have in here. Before that though,
let's just make sure this is level so if I press one, I'm just going to
make sure there's the same distance
you can see there. Not quite the same
distance. I think I'm going to pull it
out just to there. And then I'm also going to
pull this one out to there. I think they look a
little bit better. I'm also going to just come
down here and have look. So if we're looking
from here actually, that looks pretty nice. And now let's just put in this actual window that we're
going to have here. So. I don't know actually
know what they're called, but they're like a
roof sort of window. So let's bring that in. So what I'm going
to do is just by shift A, bring in a cube. I'm going to pull it over here. I'm going to pull it
down. I'm going to make it much, much
bigger, of course. And then what I'm going to
do is pull it back into the roof and then pull
it forward and down. So I'm going to pull
it forward like so. And then let's put it
down a little bit. Actually, it's probably going
to be a little bit too big. So what I'm going to do this is why I want to actually test it. Where do we actually want it coming from? Don't
forget as well. We need to put the roof on
here, so let's do that first. I think it needs to be
a little bit wider. First of all, control,
left click, right click. Now let's come in and bring this down for
our actual roof. Now you can see it actually
looks much, much nicer. And now I'm just wondering if I should stretch it
out a little bit, so make it a little
bit longer and y pull it out
there. There we go. Let's double tap
the A. Let's put it more entered with
this one control one, center it up like so. And I think that
actually looks bare, so. All right, that's looking good. Now what we'll do is we'll
come in, we've got that now. We can do that on
the next lesson. For now though, this lesson, we can come in,
grab both of these. In fact, we'll grab it all. Actually press control or transforms right click
to origins geometry. Let's add in the modifier then. So we'll bring in a bevel, let's put it on
naught point n three. Let's press control L.
And we're going to, what we're gonna do, we're
going to link copy modifiers. There we go. Couldn't
think for a second. All right, so let's think now we're not going to
need the bottom of this. So we can press shift
H and what we can do is we can come in, we
can get rid of the bomb. So control plus delete
and faces like so. And then we can actually
come in and also if we grab both of
these and shift H, we can also come in and
delete these Bottms as well. So delete faces Lth,
bring back everything. All right, let's come
in with these first. So what I'm going to do
is Smart UV project. Click Okay. And then we're
going to come into material. I'm going to bring in my
clay because we've already created some chimneys
already. Let's bring that in. Let's assign it
onto both of these. And I'm just wondering, yes, this one's a different one. So I'll join this one.
This one and this one. We'll join them that
way. Press control J, and there we go, double tap the And now finally
let's come in. I think with this, honestly, it's going to be easier if we actually split it up ourselves. So we're going to bring
in our own edge loop. So I'm going to come
down like so bringing in our own edge loops like so right click
and mark a same. All right, so we've
got bricks there. Now what we need to
do is we need to make sure that the edge is going to come from probably here
all the way up to here. So right click Marco Sam. And the one thing you don't want is you don't want seams on these parts because these are flat and these will unwrap flat. But if you had a seam a lot of the time they
don't want wrap flat. So just make sure
you take those off. So right click, clear seam. All right, let's grab
the whole thing then. Let's also reset
all the transforms. Right clicks, origin geometry. Let's come in then
and press and unwrap. Now let's come over
to UV editing. And before we begin, what we're going to do is just
come over to material. I'm going to search for
brick or bricks like. So I'm going to zoom in then. And then all I'm going to
do now is spin it around. So 90 now let's, first of all we know that
this should be one bricks, which means I can
actually bring this in to be roundabout one brick. So maybe a bit
more bit more hold in the shift born like so. And there we go,
that's our one brick. Now we should theoretically, now if I press l tage, bring back everything it should
fit these, which it does. And you can see already, I don't actually have a lot
of work to do on those. It's actually looking pretty
good the way it is now. Let's just put it
on rendered view, have a quick look at
what that looks like. And there we go again. If
I'm looking from back here, that's exactly the
view that I wanted. And you can see a shift right click that is
looking really nice. All right, so that's
that chimney done. And now the next lesson, then we'll start
with this window, and then we just need to
bully in these windows off. And then pretty much we've
done with this side. Let's save out our work and
I'll see on the next one. Everyone. Thanks a lot. Bye bye.
192. Designing Functional Roof Windows for Enhanced Lighting: Welcome back everyone to Blender for the Environment
Artists Guide, And this is where we left off. All right, let's go
back to modeling, and now let's come round and let's start with
our actual roof. So first of all we'll come in, we'll grab the top of here, shift S, cursor selected. And what we'll do
is we'll bring in, first of all, the top. So let's bring in a cube. Let's put the cube a
little bit smaller. Let's bring it all the
way back into the roof. So, and then what we'll do is we'll pull
it out into place. So just on the front like so. And then what I'm going to do is I'm going to pull that down. So I'm going to press control, left click, right click. Control, pull it out. And then I'm just going to bring up some relief on the top. And then and X, so All right, that's that bit. Now let's think
about this bit here. You can see at the moment this might need to come
out a little bit. You can see it's a little
bit too thin on each side. So let's go to each
side, press and X, And pull it out with
medium point on S and X. So we might need to pull out the top a little bit as
well. But we'll see. We'll see once we get the
wooden parts in here. Now let's bring in
another wooden part. So Shift, I'm also going
to put an object mode. Just find that
easier to work with. I'm going to press
S and then what I'm going to do is just pull it into place wherever I want it. So something like there for now. And then I'm going to grab
the bottom, pull it out, pull it down into with this, I'm actually probably
going to cut it as well because at the moment it
doesn't really look right. But I'm just, first of all,
going to get it into place. We can see here it's a little bit too thin
going down here, I think. I'm just wondering once I got my towels in there, I'm going to be happy with that. I'm probably going
to need to pull it out a little bit more like so it can go in where it's actually
slotted on there. That actually looks fine. What I need to do
though is pull it out a little bit downwards. So let's pull it down and
let's then pull it out, giving myself enough room
where I can actually cut it off. I'll do
that in a minute. Actually, I'll cut
it off in a minute. I'm just making sure
I've got the right size. One thing I am aware of is that it's not actually
thick enough at the moment. So I'm just going
to grab this end and I'm going to pull it
out and make it thicker. Now you can see we have got a problem if we make it thicker. That way we've also got to make sure that it comes
in the center. And at the moment it's not
going to come in the center. We can of course, cut this
straight down the center. We can do that as well. And I think on this occasion, that's
what we'll actually do. So just make sure then you're
happy with the thickness. And then finally, we
want to make sure that this bit is going
to be cut over here. So if it's cut over
here, you can see it needs to come out much, much
further than where it is. So let's just pull it
out quite a long way. Let's get it lined up
again with our roof. So let's pull it down like so. And there we go. Now let's
bring in another one. So we're just going to
bring in another cube. And we're just going
to keep building this round until we actually get what we're
actually looking for. So we'll bring this down
into place like so. And then what we'll
do is we'll grab the bottom of it and pull it up. Now what I'm looking for
is how thick that is. It looks about the right
thickness, actually. Yeah, I think I'm
happy with that. What I'll do then is
I'll pull it back into pull this one then
into place as well. So finally, just make sure
that the front of here, I'm going to have to
pull it out a little bit because we need
something to work with, which means I'm going to need a lot more actually
to wear with. So I'm going to pull
it out there and then what I'm going to
do is grab the front now and get that out a little
bit further beyond there. Yeah, that's looking
much, much better, suiting the scene, much nicer. And then what I'm going to do now is I'm just going to grab this because I can see it's not really down to the bottom. I'm going to pull it in then. So just pull it down
into place like so. And also you can see it's just in the wrong part where the tiles are just poking through. We don't want that, so let them poke through a little
bit more than that. And then now you can see we have somehow
pulled it the wrong side. So let's actually,
you know what, we'll just go back because
I've pulled it the wrong way. You can see here,
I'm going to press shift Des Custer selected, delete vertices and then we'll just start that
again because that's obviously not what we wanted. So let's pull it into place now. Let's pull it into the roof where I want it slightly
further forward. Let's pull it up into
place. And there we go. Dad's looking much
better now. Much better. Let's pull it back a
little bit. There we go. All right. So it
took a little bit of work to do that bit
of messing around, but we got there in the end. Okay, so now let's
come in with this part and what I'm going to do is I'm just going to press control one. Just going to front
view. I'm going to cut straight down the middle. So I'm going to go
to mesh bisect. Cut straight down the middle. So make sure we've
got Phil on that. Looks good there. And then now we'll come to
the other part. So we're going to go mesh. We're cut in this way so
we can have that selected as well, mesh bisect. And we're going to cut
it straight down here. Let's turn it the
other way round. So. And what we'll do is we
can also move it up, and we want it also to
be set on zero on the Z. There we go. All right, so now we can actually
mirror it over. So if I grab this
one shift shift, there we go. Cursor selected. I just saved down my work by
anyway, adding a modifier. And we're going to
bring in a mirror. Mirror it on the other
side right clicks a origin three D cursor
and there we go. That's that bit done. Now finally, let's
just make sure that this is out far enough,
which is not at the moment. So let's bring it out further, just so it's peeping
over the top. And then what we can do is now, I'm happy with all of that. Looks what I want to do now is have a little bit
of a front on here. So I'll put a front
on this part. So I'll pull it out a little
bit more like so shift S cost to selected and then
tab Shift bring in a cube. Make the cube smaller,
let's pull it into place. So it's going to go
just just under here, maybe just above it, actually. So S and Y pull it back. So then what I'll do is
I'll just pull it back into a little bit more place.
So it's actually in there. And I think actually just
underneath looks bare. And then what I'm going
to do is just pull it down then let's see what
happens when we level this off. Can we make this look nice? Control, bring in a few more. Bring it back a little
bit. There we go. That's looking fine. Now we can think about this
part coming around here. Again, ship date. Let's bring in another cube. Let's bring it down, let's
make it a little bit smaller. Let's pull it out
and X pull it out. Let's pull it down
into the actual roof. Maybe it's a little bit far out. We'll make it a little bit
different in a minute. First of all though,
let's pull it back. Let's bring in an edge loop now. Control, Click, right click. Control. Let's level them off all the way up
to roundabout there. And then finally let's
come into these parts. Press control, and I
want to level them off, so I'm just going to reset
the transforms control. Increase them. There we go. I think that looks pretty good. That's exactly what
I'm looking for. Maybe I want to lift that
up so it's on top of those. And I also want to
make sure now that this is going into
the side of these, I'm going to pull it this way. Double tap the A shift. Shade auto smooth. So let's try that again.
Shade auto smooth. I'm just thinking, am I
happy with how that looks? Let's double tap
the you know what? I don't really like
them going that way, so I'm just going
to press control. Just go back a minute. I want them rounded, I think,
rather than that. So all I'm going to do
is press control B, and then instead
of going that way, I'm going to round
them off this way. Now I'll bring them in S and X, bring it in and bring it down. Yeah, I think that looks
bar rounded off like that. Yes, I do. All right. So now we need to get
our roof tiles in. I'm also going to make this
a little bit different. So what I'm going to do is
I'm just going to grab this. I'm going to press shift,
I'm going to bring it over. Then just so this one
sight in the top of the. Then I'm going to press
shift D. What I'm going to do is I'm going
to pull this just to here. I'm going to rotate it,
X, rotate it round. Let's pull it into
place, here we go. And R and X rotate it round. So then what I'm going to do
now is grab the top of it. So let's put it onto normal. We'll grab the top in
face select, face select, pull it up, and
then we're going to pull this one down into place. So then finally all
I'm going to do is just pull it this way
a little bit like, so let's have a look at that. Yeah, that's what
I'm looking for now. On the next lesson then
what we'll do is we'll get the actual,
this part finished. We'll get our window
in, Very simple window. And then from there then
we can get our roof on booleans on the window. This side is done.
All right everyone. So I hope you enjoyed
that. I'll see you on the next one. Thanks a lot. Bye bye.
193. Crafting Realistic Glass Frames for Roof Windows: Welcome back everyone to Blender for the Environment
Artists Guide. And this is where we left off. Now let's quickly get this
window in that we want. So I'm going to come in, I'm going to split off this selection and then
these two here as well. I'll split these off together, Selection and then split
this off selection. Now from here, let's come in
and actually hide out these. If I hide, hide this and hide
this, if I hide my roof. Now I should be left with these parts here,
which I don't want. All I'm going to do is
just come into these, press delete, and delete
those out of the way. All right, everything's
cleaned up on there. And now we can come to this one. Press control A, all
transforms right click, set origin to geometry shift and then we'll bring our
cursor two there. From there. Then I'm going to press shift A. I'm going to bring in a cube. I'm going to make my cube a
little bit larger like so. And I want some kind of
side edges going down here. Maybe what I'm going to
do first of all though, is I'm going to reset my cube. Now all the transforms. And then I'll come into
the side with edge select. So each of these edges
press control one. And then I just want
to round these off. And probably as well going
to pull it up a little bit. So control, Let's first
of all round these off. Let's bring in more edge loops. So like so and that doesn't
seem to be working. What is going on
there, that's not beveling it off because I
need to put it in like, so. All right, there we go.
Something like that. Maybe that's way too
many edge loops, maybe something like that. A little bit of a more
rounded as you can see. Window. I'm just wondering
if I should come in, grab the top of it,
proportionality on, and just lift it up like so, anything that
actually looks bare, grab the whole thing and then I'm just going to pick it up. All right, so now
let's think about the little side bits that
we can actually put in. All I'll do is I'll just
grab the wall behind. So this one here, I'll
delete one side of it. No, won't, actually. I'll
just duplicate it first. So I'm just going to press
Shift D. Duplicate it out like Jaws, it's
just in front of that. And then I'm going to
press P selection. And then just grab the
front of it again. Press control one. And then what I'm going to
do is press tab A. And I'm going to press
K and just bring in, I'm just wondering if I put
on this X, is going that way. I've never tried this actually. Let's put on the X,
let's see if I come in and press K. If I
start cutting down here, will it actually go
on the other side? No, it doesn't, doesn't it
doesn't work like that. Let's enable mesh
symmetry in the x axis. Doesn't seem to work.
Let's turn that off. Let's come in and
do it the hard way. Then all we'll do is
we'll come in here, we'll press the born just
to get it straightened up. And then from there I'm
going to come into here, I'm going to press a
again to turn it off. Then from there I'm
going to bring it down. Just make it a little bit more. Great, Let's go down now
in something like that, I think looks absolutely fine then while
there is with this, I'll actually pull it out now, give it some depth then
I can get rid of this. Delete, delete faces. And then this part here. Now compress control A all transforms right click
origin to geometry. Let's pull that then into place. So we've actually got some
wood that's actually in the. Let's pull it this
way a little bit. And then let's also come over, I'll make it a little bit
thinner so and like so, right click origin
three D cursor add in the modifier and
let's bring in a mirror. And there we go, it's
over the other side. Double tap the A and that's
where it should be left with. Now one thing is I'm not happy. I think it needs to be
a little bit thicker. So in other words,
I'm going to pull it out, double tap the A. And I'm thinking that it's not actually touching
the wall now. I don't think
that's in the wall. So I'm going to press S and
Y and just extend it out. And then what I'm going to do is just pull it back. There it is. Now it's in the wall. Double
tap the A and there we go. All right, that's looking good. Now let's come to our window. If I put this onto Global, and then what I'll do
is I'll just press Shift and I'll make a
very, very simple window. So I'm just going to get
rid of the back of it now. Delete vertices, and then I'll
come into this part again. Let's reset all of our
transforms like we normally do. Let's press control
one and let's just make sure we're happy with this window where it's going to go. Let's press Essence are to make it just a little
bit longer like so. And then what I'm going
to do is I'm going to press the E burn to bring it in. And that then will be my
first part of the wood. Then I'll probably split these off before doing anything
else. I'll bring it up. What we'll do is actually I'm thinking that this
bit here will split off and make it a little
bit bigger y and then make it a little
bit bigger like so. Now let's split these off. Going up to here, coming down
to here, and then press Y. Then what we're going to do now is we're going to grab all of these and we're going to
press, pull them out. And then this one
we're going to pull it out a little bit
further forward. So now then let's go
to this part here. Pretty much the
same thing again. So I'm going to press
and bring it in like so. And then this will
be the inner part. And again what we'll do is
we'll come up to this part. Now this time I'm going to
actually split this off, so I'm going to grab
all of these parts. And this part for some reason, isn't split off from there. So I'll have to do
this separately, even if we have to do that. You can see it's because
it's got back on it. What I'll do is
press P selection. You can see just how
easily though now we can actually fix like issues
and things like that. Let's come in and what we'll
do is we'll grab this one, press L shift H, and then now I'm going to
fill this in, this edge here. You can see I can't
grab this edge here. Which is a bit weird because I think it's actually
by press L shift H, I should be able to hide that part all the
way, but I can't. So let's actually have a
look at what's going on here and let's first of all,
we split it off now. So let's bring in a bevel, I was just saying how easy it is and what we can do
and all that stuff. So not 0.3 and we come across the problem 0.3 There we go. All right, so that's, that's
actually looking, right. So now let's come
into this part. Same thing again then, but in this one I'm actually going to bring in one more edge loop. So control left
click, right click. And then what I'm going
to do now is come in, I'm going to split this one off. Why split this one off? Why? And then what
I'm going to do is grab all of these
with old shift, click this bottom one and
then we're just going to pull it out into
place like so. Now if I now split this off selection and
then I join this with this, we should get in those
bevels that we're looking for control and J, join them all up,
And there you go. And now we'll work
on this part here. So this part is going to be
where my actual windows are, so I'm jaws going to pull
it out like so in fact, you know what, I'll pull it
out a little bit further. And what I want to do now
is definitely put in, grab this one and have it going all the way
down to the bottom. So that's the first
thing I want to do. So to do that I'm just going
to press Sir control one and then I'm going
to press K my knife, tool press to go all the
way down to the bottom. And then press Enter
like so now let's grab this one and this one
and press the J button, like, so that's our next window, and then this one and this one. Press J, and that
is our next window. And I think we'll have
one more window in here. If I come from there, press
and put it across like so. And press Enter. All right, so those windows looking good. Now let's do this a
little bit different. So what we'll do is we'll
come into this main one. We're going to press control B, Drop back all of the bevels and we can see now we've
got it going like this. So I'm wondering, I like the way that I
actually did that, I think I'm going to
put it like that. And then what I'm going
to do is I'm going to come in and grab each of these and then press and
X and pull those out. Then what I'm going to do is
now come into each of these, each of these ones,
I'm going to press control B and pull those out. So now let's actually, before we split these off, what we're going to do then
is we'll come to these. I'm going to click
control Click. And then just select
each of these, and we're going to
extrude these out. Now let's come round,
let's extrude them out, and then we'll come
to these parts and we'll extrude
these out next. Extrude them out
just a little bit. Set back away from that. Okay, very nice. Now,
let's split these off. These are going to
be our windows, so we're going to
press P selection. And now we'll just grab both
of them and we're just going to pull them back into place
holding the ship born. And there we go. Now
finally, finally, let's join these with
these control J, join them up and
that's what we should be left with. You know what? I think that looks pretty good. Now one thing is that
we need to just make sure this top bit here, this bit here, is
going all the way back a little bit
further into the wall. So I'm going to press
Alt shift, click, shift click, O shift click.
Let's grab the bottom. Let's also grab this bottom. I'm not actually sure which ones I'm actually grabbing here, so I'm just going
to grab them all. I'm then going to pull them out. And there we go, That is enough. Okay. So now I can actually pull all the whole thing back, including the windows
into where I want it, which will be maybe even a little bit
further out than that. Something like that. All
right, that's looking good. Now, on the next lesson, then what we'll do is
we'll get in our roof in. And then we should be ready
then to get our materials on and put our bollings in and all that sort of
other good stuff. All right everyone.
So I hope you enjoyed that. I'll see on the next one. Thanks a lot. Bye bye.
194. Finalizing Roof Window Designs with Advanced Detailing: Welcome back everyone to Blender for the Environment
Artists Guide. And this is where
we left the off. All right, so now
let's come in and give it all the in fact,
you know what? No, we don't. We
need to bring in the roof first.
Let's do that first. So what I'll do is I'm
wondering if yeah, I'll bring in the
Boolean so it'll be so much easier rather
than trying to grab a load of tiles from here. So all I'll do is I'll press D, and it should be the last roof that we actually need to create. So let's press M. Let's put
it into our perfume shop. Let's come in then
and hide our Boolean. Let's bring it over and let's put it into place where
we actually want it. So let's bring it in
something like that. Let's make it much,
much smaller. So we'll bring it up
to, Let's have a look. We've got three on
the vertex count. Let's try four. Yeah, and I think that's
going to be enough. Let's also bring the
horizontal down then. So we'll bring that down. Let's pull it into place. And there we go. That
looks about perfect. Let's pull it into place.
And I think I might need one more or make
it a little bit bigger. At least I'm going
to press R and Y. Just rotate it around
and then pull it up. And then R and Y rotate
it around a little bit more and then pull
it up a little bit. Now let's see if we can
actually get to fit in place. You can see here, it's nice, but on the bottom around this
bit, it's a little bit out. So it's only such a small piece. Honestly, I wouldn't
worry too much about it getting it perfect
or anything like that. I think actually that is
pretty much what we want. All right, from there then,
if I bring this round, if I press shift and I just
rotate it R hundred 80, that then should make it
actually pretty easy for me because it'll be a little
bit different on this side. So let's pull it out. So double tap the A and there
we go. All right. What I'm looking for is making sure they're different
now, which they are. Okay, so that's that done
now let's grab them both. Let's come in object
convert and mesh. And then what we'll do is
we'll press control J. We might as well join
the move Together tab and we'll press Smart
UV Project. Click Okay. Let's also then bring in the
material minus these two off in object mode
down narrow roof. There we go. Let's put it
onto material as well. Let it load up. And then
what we'll do is now we'll actually start
hiding these parts out. We'll start beveling them off, smoothing them off as well, and we should get this
finished pretty fast. All right, so let's hide
that part out of the way. Let's come to this part. Now,
I'm going to press a wrap. And let's bring in our wood. So dark wood. Let's
bring that in. And there we go. Hide
that out of the way. Let's come now to these walls. I'm going to press a unwrap. And what I'm going to
do with these ones is we'll bring in the wall. So it'll be the gray wall. Wall and gray like. So hide them out of the way. Let's come to the front
of here. Same thing. Again, not smart UV. Well, I can it doesn't
really matter actually. And let's bring
in wall. It might just split them up,
that's the problem. So it might split up
this one and this one, which it hasn't done actually. So that's good. So now we can
hide that out of the way, and now let's come
to the rest of it. So what I'm going to do,
I'm going to you know what, I'll grab this one first. Yeah, I'll grab them all.
Let's grab them all. It's going to make it easy. We've already got
a bevel on here. These have actually
got bevels on here, so we just have to be
a little bit careful. So we'll just grab all of these, not the actual window. I'll press control
lay or transforms. And there we go,
that's what happened. So I want to come
in object cleanup, convert and mesh, and
then origins geometry, adding a bevel point 0.3 And then what I'll do
is I'll press control L, We're going to copy modifiers. And there we go, Okay,
we've got a bevel on everything and then what
we'll do is we'll press Tab. And I think we might
be able to get away with roll wrapping
all of this together like so let's bring in our red red painted wood and let's press tab control L. And what we're going to
do is link materials. There we go. Now let's
come to this part. And I'm going to
grab all of this. So I'll just grab it
all. Smart UV Project. Click Okay. And then I'll
bring in the material. So we'll bring in
the red material first, red painted wood. And then we'll bring
in a new material and we'll look for wood, and the one we're looking
for is lightwood. Then let's come in to this part. This part and this part. And I'm going to press U, and I'm going to actually
just click a sign. And let's have a look
what that looks like. Now you can see here that we do have a problem
in these parts. We really don't
want these parts. I don't know why they.
They're actually, I'm going to press shift H, and then what I'm going to do is just delete these
out of the way. So this one here, this one here, press Delete And faces,
let's press Altag. Bring it back. And there we go. Now we should be looking good. And now we need to do is we just need to
straighten these up. So control, click,
shift, click, control. Click over to the UV map, and then we're just going
to press alternate. Let's grab this one, and this one alter,
straighten them up. And let's have a look. If
I press all Tate in here, so let's press tab. All Tate, Bring back everything. Dover. Tap the, there we go. Okay. So now let's
come over to modeling. Let's now come to our windows. And you know what, I should
have stayed in in my UV, but anyway, never mind.
I'm going to wrap. You can see that
it's non manifold, which means we just need
to reset all transforms, set origin to geometry. Tab then and wrap, and there we go, UV editing. Then let's go over it and we also need to bring
in our material, which is going to be the glass. It's going to be the glass
not, let's bring it in. And there we go. Now
everything is in. Now I can do is prey and
bring it down a little bit. Now let's see if we can actually make these all fit into place. So I'm going to grab
this one first, and I'm going to
put it over here. I'm going to grab this
one, put it over here. I'm going to grab this one next. And I'm going to press a and I'm going to put it over
there. Same for this one then. Okay, then these smaller ones we're going
to put into place. So like so and so. All right, there we go.
They're looking pretty good. Now let's go back to modeling. And now finally what
we're going to do is we've got all of that on
now. That's all done. Well, let's have
one last check with our rendered view just to make sure we're
happy with it all. And there we go. I'm very,
very happy with how that is. I'm just wondering if I need another piece of wood
coming under here. And actually on
this, I think it's so small that probably
don't need that. So now what we'll do is we'll
go back to object mode. We'll come to this
window, we'll press shift Sa, selected shift. And we're going to
do pretty much what we've done on the
other part now. So we're going to bring
it up into the side. Press control one, we want to just come in past these
sides a little bit. Son's pull it up
and then a long, going to do press shift D
and bring it over this side. So I'm going to join
those together. Control J, And then
finally what we're going to do is we're going to
come up now grab this one. I might as well use this shift
D. Bring it up into place. I'm going to press
selection. Grab it again. Control or transforms
right, origin to geometry. Press the S born your
bring it into like. So just make sure
it's level as well. So I'm going to bring
it into place like so then what I'm going to do is I'm just going to press SNX. Pull it out a little bit, and now I'm going to bring it up. If I grab the top of it,
bring it up to there. And then finally, now I should be able to just level this off. If A, press control one, press control B, increase
the amount of levels. So then what I'm going to
do is just pull them down. You can see nearly got that. All I need to do is
just pull up the top. I'm going to come
in, grab the top, make sure you've got
portion it's in on. Just pull it up very, very slightly into place. So just to make that
bevel All right, that boolean, sorry, let's
pull it into place like so. All right, let's do
this one first then. So we've got this wall here. Let's come in, add
modifier, generate boolean. Boolean is going to be
this. Let's apply that. Let's delete those
out of the way, and let's come to this now. So this wall here, Add boolean. Click on here, press control A, Delete
them out of the way. Okay, so now let's
hide each of these. So hide them out of the way. Let's come now to our window and what we'll do is hide
that out of the way. And now we're going to do pretty much what we did
on the other side. So we'll come to
these ones first and what I'll do is I'll
grab the inside of here. O shift click, shift,
click, shift, click. So I could do this
one at the same time. No, we'll just do these then
first and Y pull it back. And then press the F
bottom, fill them in. And then what I'm going to do is press to bring them in like so. And then press control
going a few edge loops. Left click, right click, four. So control four, left
click, right click. Now let's come to this one. Zacher, the same thing. Lt shift click,
Ol shift click Y, pull it back a little bit. And then, and then I like, so with this one we've got a problem in that
it's actually going, you know, they're crossing over. Let's press dot and have a look at the problems,
what we've got here. Lots and lots of problems here. We don't want any
of those really. So we're going to
grab all of these. And then what I'm
going to do is I'm going to center them. So right click mirror, sorry. Merge vertices at the center. So merge them at the
center. And there we go. Now we should be able to bring this in a little bit more fires. I should be able to bring
it in a little bit more. And then control, let's bring in maybe two edge loops,
something like that. All right then. So
on the next lesson then we'll actually
come to each of these. We'll start pulling them back. We'll make the actual
curtains for these as well. And then we should actually have this finished
on the next lesson. Thanks, live one. And I'll
see on the next one. Cheers.
195. Initiating the Front Façade of the Perfume Shop Building: Welcome C everyone to Blend the pull the Environment
Artists guide, and this is where
we left it off. Now let's come in and we'll
pull these back first. So I'm just going to grab each
of these and then all I'm going to do is put this onto smooth and I'm going
to pull them back. So let's increase,
not pulling the wall, we definitely won't want
to pull the wall back, so we're going to increase
it to something like that. Then we'll come to
this one clear, the same thing again, we don't want to
pull the wall back. That's the last
thing we want to do, so we want to pull it back. So all right, let's them right
click, shade, auto smooth. These look like they've already
been shaded auto smooth. So that's fine. And now
let's make our curtains. So let's do our curtains first. So all I'm going to do is
just out shift and click, and then O shift click. And then all I'm
going to do is just grab both of these and press Y. And then the same for
this 10 shift click, shift click and, and
then Y and split it off. Now let's do this one
first seems we've got it. So all I'm going to
do is just grab this. I'm going to press on wrap. And then what I'm going to
do is bring in my curtains. Let's put it onto material just so we can see
what we're doing. We're going to have to
bring in another material as well on top of this one, because some of this
is the actual wall. So let this load up
and there we go. Let's click down arrow curtains, click curtains on, click a sign. Now let's do the same thing for these as well
while we're here. We've got both of these
down arrow curtains, like a sign. And there we go. Now let's unwrap these. Unwrap. And now we've
got everything in place, and now we can go over to
our UV editing from here. Let's press control on
one. And there we go. Let's do these ones first then. So, I'm going to grab this one, I'm going to press the S, make them smaller, no
proportion editor needed. Let's pull it over
to this one here. For instance, let's
press the bottom press. And Z, or X and Y, actually Js to bring it down. There we go. That's that one. Let's come to this one now, and G, and we'll put
it on the yellow one. The put it into place
and then and X, pull it out and
there's that one. And then let's finally
come to this one here, exactly the same
thing with this one. I think I will have this here, because this one really,
really suits it. I think as you can see now, it actually really does suit it. And then and x,
let's pull it out. And then and Y, and there we go, that
really suits it actually. Okay, very happy with that. I'm going to hide
this out the way now. And then what I'm going to do
is come to this part here, all the way up to where
it starts to go out. So you can see here
maybe one more. If I press one more, it
actually jumps to the next one, which I don't really want that, so I'm just going to put it on Material mode
instead of rendered. And then we're going
to come in, and you can see I need to
select all of this, Going around here,
press U and Wrap. And now let's put this, this one will be on bedroom. So if I click the
plus, the down arrow, put in bedroom, there's
bedrooms and there we go. Let's click a sign.
And here we are. So now let's press a,
let's press the S button. And we'll put it, I think,
something like that. Okay, we'll give
that try and see if that works. Let's
come to these now. So we'll hide both of
these out the way. Select them both
like so Control plus going all the way up to
there, press and unwrap. Let's then come in plus
down arrow bedroom, and this one here. Click a sign and there we go. So now let's make them both smaller and let's
pull them into place. So I'm going to
pull, let's hold. I press H, and I've
grabbed the whole lot. I don't mean to do that, so
I'll have to do them again. You know what, I'll
do this one first, so we'll pull this one down, we'll put this one
into place like so. And then I'll come to this
one control plus there. And then what I'll do
is I'll put this one into place over here. So all right, let's press all tag and bring
everything back. Able tap the. Let's go to modeling and let's
save out our work. Now I think, I'm
not sure if it's too dark over this side,
but we'll have a good luck. Yeah, actually
because it's dark, it actually has a
bigger effect on there. So you can see now I
put that over there, this is what we're looking at
as we work our way around. We can see more into the window. So all of these houses now look as though they've
actually got bedrooms, curtains, you know, and
full bedroom in there. And I think that looks
really, really nice. That looks like it's
three dimensional, especially when we bring
back everything else. I think at this point as
well, let's actually do that. So let's first of all just
make sure you work safe out. Let's bring in the coffee shop, bring in the subway,
bring in the bookstore. Bring in the scene assets, bringing in the
butchers and the car. And we should, at
this stage is what I'm saying is we should
be able to have a really, really good idea of what
it's going to look like. I know this major
bit isn't done yet, but you can certainly see
now if I come to this way, how at least the back is
all going to come together. And you can see, it
looks absolutely beautiful as you can see. So we still have a few
other things to put in here and we still have
to decide whether this, for instance, needs a
little bit more room here. It might need a bit
more room on the back. But I think looking at it, yeah, if you've got this
far, you should be really proud of
what you've done, and I'm sure it's
going to look amazing. Okay, so we've got
that bit done now. So what I'm going to do is
just go back to object mode. And then I'm going
to hide out my, I'm going to keep
my grade boxes. Hide my coffee shop, hide
by subway bookstore. We need my ground
playing scene assets, butchers and cart, and this is what we
should be left with. All right, so now let's think. Then we should now start
working our way around to here. Now luckily for us, a lot of these parts are actually
already done for us. I think the first
thing we'll do is get this part in
so you know what, I'm going to take it
from here though. I think that'll be much easier. So I'll press Shift D,
bring it from here. And then what I'm going
to do is spin this round. So I said 180, spin it round, press three. And then we should be able
to get this into place. So if I pull this back into
place and there we go, we can see it's not
quite fitting in. Sometimes things don't
always fit in as we know. So let's pull it back though, just a little bit
into place like so. And then what I'm going
to do is I'm going, I'm going to pull it out a
little bit more like so. And then that enables
me then to grab this bit and just pull it
out into place like so. And there we go, not too bad. Now what I also need to
do, if I come into here, I can also come in then and just delete these
out the way we're never going to need them
delete and vertices. And then what I'll
do is I'll press control three or
three. Yeah, three. And then B, grab this and then what I'm going to do
is just pull it over there, Take back off my x ray and
then I can pull it over there. So finally then I'll
just grab each of these. So I think actually I'm going to delete some of
these out the way anyway, but I'm just going to
pull them over into some place. All right. And now I'm looking for is I'm
looking at this part here, but I'm thinking I'm
probably going to need a little bit
more on this part. So I'll think what I'll do is
I'll steal this part here, maybe even Yeah, I'll take, you know what, I'm not sure yet. So I'll just grab
them both shifty. Bring them over -93
to go into side view. And then let's just see what they're actually
going to look like. If for Paul both of
those into place. We can see probably this part
here and this part here. It might need to come
out a little bit further because we're actually
working against them on this. In fact, you know what, We'll
come to this part here, this part here, we'll
pull it out a little bit. You know what, that
actually is going to fit. Let's double tap the
A and have a look. Yeah. And actually think
that's going to look okay. What I'm going to do is I'm going to just grab my
window around here. I'm going to make sure that
I've got it also like so. And then I'm going to press 50. I'm going to bring it
round to this side. I'm going to press R, Z 90. I'm going to press
three. And then what I'm going to do is
put this into place. So I'm going to make it a little bit smaller maybe,
or can I get it in there? You know what? I'm
going to put it just there in the center, but I'm going to
delete each of these. I'm going to pull
it back. I'm going to delete each of these first L, L, L, and L, delete vertices, grab my window, pull it back into place
where it's going to go, which will be roughly
around there. So then what I'm going to do is I'll
probably delete each one of these because I'm going to
bring in another support, bring this over T -93 Let's sit that you can see it's a
little bit too short. All we'll do is
we'll just make it a little bit bigger with S and Z. And then we'll put it
into place like so. We'll come in once more and just delete these two L and L, delete vertices,
come back to this, drop it into place
on top of there. Just make sure that it's
actually in on top of there. Double tap the you can
see just on there. So then what we'll
do is press shift D, Bring it over to the other
side roundabout there. Maybe maybe a touch more
Lo tap the. There we go. Now let's see what
that looks like. Before we actually
do anything more, I know we haven't got a bricks
in or anything like that. And I think also
we'll move our son. If I bring my son over, I'm going to spin
it round, so sad. -90 there we go. We have a better idea now what
that's going to look like. And yeah, I think that's
actually going to fit. We can see we do have a
problem in this part. Let's pull this part, I think it is, out
a little bit more. You can see none
of this is really fitting and that's the problem
that I was worried about. So you know what, I'm going
to pull those bits out, then what I'm going to
do is just going to go back over to Material view. So let this load up and I'm going to pull
these out a little bit more I think
because I think at the moment they're not
quite out far enough. So these two here,
we're going to pull them out a little bit more. Now, they're fitting in
really, really nicely. But it does mean that
I'm going to have to probably pull out
these a little bit. So I'm just going
to grab both of these and I'm going to
see if I can get away. We're just pull them
out a little bit without losing any
of that there. Like double tap, the ma, maybe a little bit more, the jaws to tad there. So, look, I just want a
little edge there. That's it. That's exactly what
I want and yes, I think I can get
away with that. Actually, I think that
still looks good. I'm looking now at the sides of my wall making sure
everything lines up. Yeah, these look so
much better now. Like this, it even
means that I can come in before finishing and
pull this out a little bit. So I can pull this out like so. Which then means I can come in and pull these
out a little bit, making sure it's still
on top of there. If I put on an object mode, it's look like so double
tap the and there we go. That's looking so much pair. All right, so on the
next list and then what we'll do is we'll get
this next window in. We'll start building up there, we'll get all of this built out. And then finally we can make a good start on the
bottom of here, this complex bit down here. So we're basically
ready, as I said, near enough, to start
this part here. And we're going to really
go to town when it comes to this bit and this
bit here to really, really make it, you
know, fit the scene. So these are the most
complex bits coming up. But as I said many,
many times before, we now know exactly
what we need to do, so there should be a breeze. Alright everyone, hope
you enjoyed that. I'll see you on the next
one. Thanks a lot. Bye bye.
196. Finalizing the Upper Floors of the Perfume Shop: Welcome back everyone to Blender for the Environment
Artists Guide. And this is where
we left it off. All right, so let's start
then on the top of here. So let's bring in. So what I'll do is I'll grab my I think I'll grab the wall. Actually, can I grab the wall? Yeah. It's going to be a
little bit out as you can see. So instead of grabbing the wall, I'll just grab this
shift S Krista selected. And then all we're going
to do is we're just gonna put a few strips
going across here. So all' going to do is
we'll just press Shift. I'll bring in a cube. I'll press the S button. And basically we're
going to work our way down to this bit. And then once we've
done this bit, we're going to actually
get our door in here. And this then is going to be a relatively hard bit to create. And then we'll move on round
to this part over here, so that's the actual target. All right, so let's make
this a little bit smaller. Let's pull it into place,
then let's pull it down. And then I can really
pull it into place. So into there like. So let's press S and Z, and then I'll have
a good idea of how actually big I want this
piece of wood. So S and Z. Pull it out into
this place here. I need to pull it back a
lot, lot further than that. I also think that probably
I'm going to pull it down to here jaw so
it fits into there. And then what I'm going to do is press and Y and pull it out. So we need it to
look fairly chunky, probably a little bit more
chunky than what it is. So look, maybe a little
bit more S and y. Let's pull it out
a little bit more. So let's then press shift D and bring it
over to this side. And then shift D again, and bring it over to
this side like so. And then what I'll do
is bring this one down. So I'm going to grab
the top of here. I'm going to pull
it down into place. I'm going to grab then
the top of this one. And I'm going to pull it
down into place like so. And then I'm jaws going
to now come into edge, select, grab this edge
and pull it down. And then this one, grab
this edge and pull it down. All right, so let's press
three on the number pad. Let's have a look at
what we've got here. Yeah, and I think that's
going to look good. So what I'll do is I'll
join these two together. So control J, control
layer transforms and right click and set origin 23
decursor from there. Then I'll come in
and add in a mirror. So add mirror, generate mirror. Let's put it on the Y, turn
off the X, and there we go. Let's apply that mirror then. And then what I'll do is
I'll join all of these together with control
J. Control again. Old transforms, so
Origins Geometry, Tab U, Smart Uv project. Click Okay. And then what we'll do is add in another modifier. And of course it'll be a bull, not point nut three. Same as we've done
all the way along. And finally, let's bring in
our red red painted wood. Let's bring that in like so, so double tap the A now let's
work our way down then. So we want this
part and this part, I'm thinking we'll put those underneath with the
window as well. So if I press three again, I'm going to press shift
D. I'm going to bring them down then into
place like so. So jaws, the fitting
in there may be a little bit lower like
so double tap the A. And I don't think on this one
I'll have these two because they tend to be under
the roof like so. And now what I'll do is I'll actually start with this bit. So I want it fairly fairly
chunky, this part here. So this part going
in here, I also, before I forget, want to bring these over to the
other side as well. So I'll basically want to come
down and grab all of these pretty much so this one included here. And
bring them over. We can see we're going to have a little bit of a gap there, so I'm going to have
to fill that in. All I'm going to do then
this press shift D, I'm going to bring
them over then to this side and fit those in to my actual wall like so now I'm jaws looking
at this part here. So this part here
we can see should really be over here because of, you know how the woods
actually into this part here. Now, we've not done
this part yet, so at the moment I'm jaws going to do this part on
here as you can see. So at the moment you
can see this part here. Five press shift
H, it's actually dropped it down and I
don't really want that. So what I'm going to do is
just come in and I'll pull this bit back up in
some sort of place. If I press serve three, I can get a good view then
of if it's level or not. So hold it up, we don't need it perfect
or anything like. So let's press all tags
then bring everything back, and this is what we
should be left with. Now, I'm not really happy with this part on
here at the moment, but as I said, I'm going
to leave it for now. I'm just focusing mainly on
this bit coming down here and especially this bit
coming out of this part. So this part is going to be
a little bit further back. So again, let's not worry
too much about that. The one thing I do want though, he is definitely definitely
want a bottom under here. So I'll just actually come in and what I'll do is
I'll grab the top of here, I'll press shift
S Ursa selected. And then I'll press
Shift, and they'll bring in another
cube, not a curve. Let's delete that.
Let's bring in a cube. So mesh cube. Let's make it a
little bit smaller. And we just want something to
really have this Sat onto. Just so it comes out a little bit, nothing too sophisticated. Just a little bit of
a more piece of wood. And I think also I'll
pull it over like so. And then that will
give me enough now to bring in another piece
of wood on here. So I'm just wondering whether I need to pull
these out a little bit. So you can see here whether
I need to pull these out. Can I get away with pulling
them out a little bit more? Let's have a look.
So we'll pull them out to this point here. Yeah, something like
that, I think looks good. And then what I'll
do is I'll grab this. Let's have a look. See if we've already got our
modifiers on which we have. Which means that I can simply
come in all transforms. I can unwrap it with a
so a smart UV project. And then I can join it with
this one with control L, link materials and control L. And I can copy
modifiers as well. All right, that's that
bit, pretty much done. Now let's think about the
bottom bit of here then now. So what I'll do is I'll come in, I'll grab both of these actually,
or make it easy for me. So this one and this one. I'm going to press
Shift S Ursa Selected. I'm going to press
Shift. And then what I'll do is I'll bring in a cube. I'm going to bring it
down. You know what? I'm going to make
my cube a little bit smaller as we can see. Again, because I
turned off my blender. We have to come in and
actually fix that. Now let's bring it down then let's pull it
out with S and Y. So we'll pull it out to here. And then we just want to make it so that these things
can be sat on it. So S and X bring it in. So I'm going to
bring it in that far in there on this bit. And then on the bottom bit, I'm actually going to pull
it back a little bit. In other words, I'll press and X pull it out a little bit more. So then what I'll do is I'll come now, grab the bottom of it. Grab the bottom. I'll bring in an edge loop control,
left click, right click. Move it slightly forward. I'm thinking that I want
it to come roughly. I'm just wondering about these bits where I actually
want it to come down to. It's probably going
to be around here, actually, Just near
the bottom of there. It's going to be
quite a thick piece. So let's see. What
I'll do is I'll press, pull it down to
the top of there. And then what I'll do
again is control or transom Rite clicks at
Origin to geometry tab, Smart UV project, click Okay. And then finally I'll grab this one because I know this had the materials and I know
it also as the modifiers. And there we go.
Now let's just make sure that this modifier
is on which it is. Now finally, let's come in and what we'll do is we'll give
these back pieces something. So I'm going to come in, I'm
going to grab this piece. I'm going to press P
selection, grab this piece. You can see it's all
the way over there. So we can press selection. And then grab this piece. Selection. And finally, this
piece down here, selection. Now from here then,
what I want to do is I'm just going to hide
this part out of the way. So hide it out the way. And let's come in now
and fix these parts. So I'm going to come
into this part, I'm going to pull it into place, and then we're going
to come to this part, pull it into place, and
then finally this part, and let's pull it into place. All right, so far so good. Now if we come to this part, what we'll do is
we'll press a unwrap. And then what we'll
do is, you know what? Before we do that, let's
just grab them all. Control all transforms,
right click, set origin to geometry
just in case. And then we can unwrap this one. So the material is
going to be our wall. So it's going to
be the wall gray. So let's put it on
the bottom one. I meant to put it on that one, so we'll do that
again. Wall and gray. Wall gray. So now this bottom wall is
actually going to be green. I'll actually bring
it in at the moment. Wall green, like so. And then we'll come
to these parts. Now these parts are
both going to be brick. I'll do this one first. I'll press U on Rap, and then this one on rap. And then what I'll do is I'll actually put the
bricks on first, so we'll come brick like so. And then we'll come to this one and it'll be exactly the same. Anyway, bricks and now
I'll just grab them both. Press tab Now I
just want to make sure that the right size so
if I go over to UV editing, let's press a 90. Let's make sure that the brick now let's make sure that these
bricks are this size. So all I'm going to do
is press the button. Keep bringing them down until
I'm happy with the size, which that looks
about right old. Let's bring everything back. We will bullion these windows once we've actually
got this part in, you can see we have got a
little bit of a gap in there. We're going to actually fix
that. Don't worry about it. First of all though, what we're gonna do is
we're going to bring our little guy
over over to here. And then what we're going to
do is we're gonna work out, it's going to be four steps. So we'll work on
our steps first. And then what we can
do is we can get our actual dog in here. And from there we
can build around it, you know, the little windows
and things like that. Let's come up then
and save our work. And I'll see on the
next one everyone. So I hope you're really
enjoying the course. We're nearly at the end.
Thanks to everyone. Bye bye.
197. Greyboxing the Main Entrance of the Perfume Shop: Welcome back everyone.
To blend the fo the environment artists guide, and this is where we left off. Let's go into modeling now. Just so we can see
what we're doing. And the first thing
I think we should do is just grab our guy. You know what, we want it really in the center
of here actually. So what I'm going to do
is shift S Ursa selected. And then what I'm going
to do is bring in a cube. I'm going to pull
this down then, and this is going to be
the start of our step. So if I make this a
little bit smaller again, we're trying to remember
what we've learned so far. So if I press three, we can see that these steps
would be very, very steep if they
were like that. So I'm going to press S and, and bring them down like so, and they look about right. The other thing is we
need to make sure that they're wide enough
to support our guy. And as I've said, you want them slightly wider
than his feet. So if I press S and
X pull them out, that should be about right. Now, We want them quite wide, so all I'm going
to do is S and Y. And before we do anything, because we're actually building, you know, this out, the
first thing we need to do is just get all
of this built out. And then we can alter
it if we need to. So I'm going to pull it
back into place like so. And then what I'm going to
do is bring in a modifier. So add modifier. Let's first of all actually
reset all the transforms. So set origin to
geometry, add modifier, and we're going to
generate a array like so. Let's set the factor
to minus one. Should be, there we go. And then let's turn
it up to four. And now we've got a good idea of where we actually
want this because we're obviously
going to bring it down to the ground like so. Now one thing is
we've got a thing, are these steps, you know, are they, first of
all, too steep? Are they, you know, in the right position? Actually, I think
they look good. But what I'm going to do is I'm going to check my bookstore. So if I bring in
my bookstore now, we should then be able to see how much gap is
going to be on here. Now, it's not that I'm going to, you know, measure
these against this. In other words, I
just want to see if someone can walk down
there and actually, you know, walk into
the actual steps. So in other words, if I grabbed my guy spinning round
so I was at 90, press one and let's
put him in place and you can see if he's
walking down this alley. He's actually should have. If I bring him over here, will he have enough room to
actually walk into here? Let's bring in our
butchers as well. So we put our butchers
on and there we go. And actually you, it would be quite quite a small amount of room in the back
alleys of these things. So I'm actually thinking that's going to be looking all right. Just make sure yours
looks all right. Now, from there
then let's come in then and actually
hide out again, our bookstore and our butchers. Let's save that our
work while we're here. And then what we can do now is we can actually
work on the door. So if I press -90 let's press three so we can get him up onto
the top of there. And let's actually think how big we're going
to have this door. So what I'm going to
do is I'm going to, again, I'm also looking. You can see here that
we've moved these, I think we've moved
these slightly over. I'm not sure whether
they're in the middle. They don't look in
the middle to me. So I'm just going to
move them slightly over. And then from there I'm going to put them into
place, actually. So I need to really find the center of here,
which will be this. So what we'll do instead
is all we'll do, we'll press Shift S
Selections cursor. And then what we'll do is we'll drop them down from there, like so. And then pull them out. And I'll also do the
same with my guy. So shift S selections, cursor. Bring him then down like so. And put him into place, making sure that he's actually
stood on those steps. So it's a little bit into
him like so. All right. So this looks actually a good size for my door, but
of course we're going to, it's going to be a
fairly large door and we've got to give
way as well for, you know, some side
windows on here. Lots to do on this one actually. So what I'm going
to do now is I'm going to press Sir shift S, cursor selected shift, and
let's bring in a cylinder. Let's put the
cylinder on something like 24. Let's put it on 24. Let's rotate it round then x, y. Let's try that again, Y, 90. There we go. Let's make
it a little bit smaller. Let's pull it into place then for how big our door
is going to be. And X, let's pull it
into place like so. And the height of this
is going to probably be, so this will be like
the top of the door. You can see as well that this
needs pulling out and y. Let's pull it out a little bit. So think I'll make it a
little bit smaller and Y, but it's more of
an oblong shape. And then what we'll do now is we'll just delete the front. So I'm going to come in,
delete the front of it. So delete faces. Delete the back of
it. Delete faces. And then I'm just going
to come into the sides. So I'm just going to grab it. Going all the
way up the sides. Delete and faces. All right, that's looking quite nice. Now what I want to do is now actually have something
to create my door with. So I'm just going to
grab this one here. This one here, press F. Like so. And then from there then I'm going
to pull this down. So I'm going to grab this one. I'm going to press and pull it down into place like so
I'm going to then press L, and I'm just going to put it back because I want to actually get the right scale in
before doing anything else. We can see this will be
the size of the door. The thing is, it will
have a bit above it. So we just have to be a little
bit careful here in that, for instance, if I join
these back together, let's just join these back. So I'm just going to
grab both of those. Now you can see that he's
going to walk in here, but this part will be on top. In other words,
this part shouldn't actually open with the door, and we have to take
that into account. So what I'm going to do
is I'm going to come in, I'm going to grab it going all the way around here, like so. And then I'm going to
go all the way up here. And I should, now if I
pull that up, there we go. It should all pull up together. Now if I press
three, I should have a good idea of where I
want to put my door. So you can see it's
on top of there. This will be the top
jar of the door and he should be able to walk
in absolutely fine. All right, from there then
let's fill this part in. Again, we're just building
everything out and this is how we should be doing it before actually carrying on. We're just putting, you know, some rough work in to what
we're actually doing. So this is going to be the
main part of the door then. So what we'll do now is
work on these parts. So I'm going to come in, I'm
going to press Shift day. I'm going to bring in a cube. And then I'm going to
bring my cube to the side. I'm going to press and make it thick enough
for an actual wall. And the other thing
is I want it probably coming up to something
roundabout there. And then I'm going to
grab the bottom of it. Just grab the bottom
of it with face Lt And then what we're going
to do is pull it down. And then what I'm going to
do is pull this out now. So if I grab this, I'm
going to pull it out slightly past my steps like so. And from there then I'm going
to also pull this down. So I'm going to
pull this down into place like so now I'm going to do is I'm just
going to grab this part. I'm going to press shift S,
Coast to selected tab shift. And then let's bring
in another part. So let's bring in a cube, let's make it smaller. And then this bit is going
to be sat within here. You can see probably a little
bit too thick now this, because we're going to put
a top on there as well. So I'm going to press and Y.
I'm also going to put this on object mode as
well because you can see a lot bet what you're
actually doing with that. And then from there then
what we're going to do, we're going to come
back to this cue. We're going to grab
the top. So three on the number pad, grab the top. And then what I'm going
to do is pull it up and have a look at how
thick that actually is. Still. Yeah, actually it might actually work
that thickness. It's a fairly, you know, big entrance to this. I'm thinking it's a
little bit too big. So I'm just going to grab it going all the way
around the sides. And then'm going
to press Alt Ness and just bring it in
that a little bit more. And then what I'm going
to do, I'm going to come to this part and this
part and then I'm going to press and y and
bring that in a little bit. We're going to have a top
going along here as well, so we need to take
that into account. And the other thing is we now want the edging of our door. So this might need to actually
be a little bit bigger. Now, before I do that though, I want to put in my windows. So I want to have some kind of how is my windows
actually going to, you know, on each side. So we're going to
work on that next. So I'll do again,
I'll grab my guy shift Ursa selected shift A. Let's, let's bring
in a cylinder again. Let's spin it round so our Y and 90 and let's
put it into place. So first of all I'm
going to press and X, make it much, much thinner. And then I'm going to pull
it over to this side. So we want our window, so if I put it like this, you can see we want our
window kind of like this and going down to
near this floor part here. So what I'm first of
all going to do is I'm going to come in and
just delete the front. So delete faces and the
back, delete faces. And then I'm just
going to take this going all the way around
to here, Delete faces, and then going all
the way up to here, Delete faces like soap. That is what I'm talking about. All right, from here then, I can actually use this
then to work out, you know, how my windows
are going to look. But before doing that, I think what we'll do is we'll
bring in this part now. So I want one of these
panels from round here. So this panel, this top, this one, and this bottom. So let's press Shift D. And what we'll do is we'll bring
these round to the side. So R said 90. We're going to press three on the number pad and
then let's move them over into place so you
can see if I put one here, we've got a lot of gaps on here. And that's telling
me that I need to probably pull these
out a little bit. So what I'm going
to do is I'm just going to put this
into place for now. So I'm going to put it
into place like so. And this is the
point where you need to try and fit everything in. So if we pull this over here, fit all of that in, going a little bit too
far, maybe there. So something like
that. And there we go. And then if I pull this out now, can do I want to stretch this out a little
bit, in other words. So if I pull it out to there, that means then I can put a part around my door and that's exactly
what I want to do. So let's now come in and we'll put this part
around the door. And then from there we can work out how far we're
going to put this. Now it seems really, really
complex at the moment, like how do we fit all of these parts in and
things like that. But it's really important
that we get all laid out, especially with something this complicated before
we do anything. And that's what we're trying to do here. All right everyone. So I'm going to save out my work and I'll see you
on the next one. Thanks a lot. Bye bye.
198. Detailing Windows and Ornate Styling for the Perfume Shop: Welcome back everyone to Blender for the Environment
Artists Guide. And this is where we left off. All right, so what
we'll do is we'll use the top here to actually
create another part. So all I'm going
to do, I'm going to select one of
them, Select the top. Go around to the side. And then what I'm going
to do is're just going to press shift D, like so. And from there then I'm
going to press Selection. Just separate it
off, grab it again, So make sure that we've
got the actual top. If you can't, there we go.
We've grabbed the top there. Right click, shade, auto smooth. And that's not working, so let's press control or transforms. Set origin geometry,
right click, shade auto smooth. I'm
not actually sure. Oh, it's because we
had that one in there. Okay. No problem.
So there we go. Now let's come in and
what we want to do then is create the door
arch on here, first of all. So let's come in
adding a modifier. And we'll bring in a solidify, will bring out our
solidify like so. And we'll make sure
even thickness is on. Now, straight away you
can see that we do have a problem in that it's not
straight at these bottoms. Don't worry about that, we're
not worried about that. What we want to do first of
all is get this arch in to see within where we can build everything
else around this. Now you can see that our window on this side
really where it can be, so it can actually come to roundabout there because then it's kind of level with this. And I think actually if we move it just across
a little bit more, I think there we're
going to have a good idea of how this
is all going to go. You can also see that
where's my window going to come down to probably a
little bit more over. And then I would
say that my window, if I grab this again, this is just temporary. So if I grab this
and I press three, and then I press E and Z and
pull it down to roundabout, the top of here, So
roundabout there. Now we can see where my window is going to go. Let's
come in as well. And because this is temporary, we'll pull this down as well. So, and said pull
it down like so. And then we'll just join
these together now. So press F and there we go. Now the thing is, even
though it's temporary, we still need to, you know, work out whereabouts
it's going to go. And I think it's still probably a little
bit too far over, so I'm going to put it
round about there like, so. Okay, so now let's fill this
in. So we'll fill this in. So we'll just press
F to fill it in. And then what we'll do
now is come back to our door arch and what I'll do is I think I'm happy with that, the
thickness of these. So what I'm going to do
is just come in control. And then I'm going to press
tab 13 on the number pad. And what I'm going to do now, I need to pull these sides down. I need to flatten
them up. The best way to do this is grab
both other sides. Press three again,
pull them down to make them relatively level and
then grab everything. And then we'll go
to mesh bisect. And we're just going
to bisect these over like so make sure that
the Y is set to zero. So and then we're just
going to clear the inner and we're going to
fill them in, of course. And now we should end up
with something like this. Now from here then, let's make our first kind of a platform that's going
to come down here. So what I'm going to do is
I'm going to come grab this. And then what I'm going to do
is I'm going to press Shift D. I'm going to pull
it down a little bit, press P selection like so. And then I'm going
to come back to it Control or Transform, Set Origin to Geometry tab. And let's pull it
out a little bit. Now we do need to
be careful because our door is actually going
to be going into here, so we've just got to be careful that we pull it out far enough. In other words, we
need to pull it out just to the side like so. And then pull it up.
And then from there then we're going to pull
it down into place. So I'm going to
pull it down into place like so now we don't need to worry too much about this because our steps are actually going to be
a little bit further. But what I'm going to do is
I'm going to press control. Bring in an edge loop. And
we'll bring it down to here. And then what I'll do is
I'll come in and I'll grab, I think what we'll do is we'll actually point
another edge loop. So control, left
click, right click. And then from there what I'll do is I'll come to
this bottom part. I'm going to press control, Bring it out like so. And then from there
what I'm going to do is I'm going to grab
this part here. I'm going to press, pull it out. And then I'm just going to
grab the top and I'm going to pull it down a
little bit like so. And there we go. We're pretty
much done with that part. Now, from here, let's pull
our steps out a little bit more so and y, let's
pull them out. I want them just
going past here, so just past here. And now I can actually fit this into place where I
actually want it. So before I do that though, I need to grab them both and
then let's pull them into place like so I'm thinking also, we might need to pull our steps
a little bit further out. What we'll do, actually
we'll do this part here, we'll get this part on first. I'm going to come in, I'm
going to grab this part here. And then what I'm going
to do is press shift D. I'm going to press and Y. And just pull that out a little bit to where I actually want it. Maybe a little bit more
and y pull it out. Then what I'm going to do now
is separate off selection. Separate off, grab it again. Tab. And then let's
press pull it up. And then let's bring in
an edge loop control. One. Left click, right click, control. Pull it out. Just before I do that, I
just want to make sure that this bit is up far enough. I'm going to pull it
up a little bit more, make it a little bit thicker so then grab the
top of this one. I'm going to press then and Z just to make sure
it's nice and straight. And there we go,
That is what I want. Now we can see that
it's a little bit wider than these parts
going down the bottom. So what that means is we
can actually come in, make this a little bit wider
shift and click alternates, pull it out and there we go, that's in really nicely
there. From there. Then we, we now think about
bringing this part up. So this is the part now
where it gets even more complicated because we need to pull up a certain
part on here. In other words, we need a
part going around here, coming down into this part. So let's actually do that next. So I'm just thinking the easiest way to do
that is to come in, grab this part, press Shift S, Ursa selected, like so. And then what I'm going to do is I'm going to bring in a plane. So shift, bring in a plane, spin it round so R Y 90. And then what we'll
do is we'll put this into place where
it's going to go. So I'm thinking it needs to
be caught going around there. And then a bottom
bit around here. So let's pull it
all the way out. So we'll press S and Y, we'll pull it all the way out
to where we want it to go. And I'm thinking that it should realistically come to the top of here before it
starts going down. So let me actually
show you what I mean, rather than just waffling on. So here I'll put it
down to here like so. And then what we want is we want this oval bit, kind
of following this. Let's see if we can do
that with the devil. First of all then. So if I press control and
so control left click, right click, and there we go. And then what we'll do is
we'll just put our x ray on. We'll come in then and
grab this part here. And before we do that,
we'll just press control. All transforms, right? Clicks to origins, geometry. And we can do this
a number of ways. We can either do this with a bullion or we can try
doing it with a bevel. Let's try the bevel first. So if I press control shift
and B, let's bring it out. Let's bring a few more
bevels in left click, and then what we'll do
is we'll turn it the other way now like so. And you can see now I should
be able to drop that back. I should be able to
increase this then like so let's see if I can bring
this into where I want it. So it's nearly
nearly right there. I actually think
that's not bad at all. And what I can do now
is press S and Y. And I can pull all
these out like so. And I'm going to
pull it out a little bit further like so. All right, so I think actually
that might actually work. So once I've got that on, I can pull this out
and then I can start putting in the other
parts of this. What do I mean by
that? First of all, let's come in and do this part. Now I need this
coming over to here. I'm going to come to this part, I'm going to press
control Shift and B. And you can see now how I can actually get that
into place as well. And messing around with this, actually we should
be able to do this. So what I'm going to do is
I'm going to grab them both, shift select control,
shift and B. And let's pull them out
in then from there, let's try and alter this a little bit so you can see here, let's pull it back a little bit, let's alter it a little bit, and we can see we're
nearly nearly there. I think actually with that, we can actually get this as
long as I can bring the top down a little bit more and
bring this out a little bit. I'm just wondering now if I can bring both of these down and make this a little bit closer along here.
Let's have a try. So what we'll do
is we'll come in, we'll grab the top here, we'll grab them going all
the way down to here. Can I bring this
down a little bit? So, yes, I think that's
actually going to work. Now, let's pull this over a
little bit, and there we go. That looks about right now. The other thing is
we didn't bring them down on this side. We
need to remember that. So what it means is
now we can come in, we can delete all of these. So let's come in. So select Select all of these, and then what we'll
do is delete those. So delete and faces. And then we'll just
come in and delete the side of this one.
So delete faces. And then what we'll
do is we'll come in now and just
bring in a mirror. So I'm going to select
this shift S cursor. Selected tab control transforms right clicks origin three, D cursor and then add in a mirror on the y,
turn off the x. And there we go.
That's what we should be left with. All
right everyone. So let's say that I'll work and I'll see on the next
one. Thanks everyone. Bye bye.
199. Modeling the Main Steps and Entranceway of the Perfume Shop: Welcome back everyone.
To blend the Ford, the Environment Artists Guide. And this is where we left off. Let's turn off our x ray then, then let's have a
look what we've got. So we've got something
like this from here. Then we can build all of these parts of wood that are going to come from
here and here. However, we do need the inside of here because I want to put a nice part of like a
relief going all of these. So let's see if we
can do that now. So what I'm going to
do is I'm going to apply my mirror. So control. And then what I'm going to
do is I think it will be easier just to get
rid of this part. So what I'm going to do is also, before I do that, you know what? We'll also bring up this
a little bit because at the moment you can
see not quite right. So let's try and get it, Jaws, to be a little bit
better than where it is. So bring up that one, grab these two and bring
them up. And there we go. We've got a much, much nicer round edge. Now let's grab this. And then what we'll do
is we'll dissolve edges. And you can see that
the problem is there. If we dissolve the edge, we've got a problem and
it takes this away. So let's not actually
mess with that right now. So what we'll do is we'll grab
all of this and then what we'll do is I'll
press shift D, like. So I'll press P selection. And just separate that off, grab either one of them,
it doesn't really matter. And then what we're going
to do is we're going to press on one of them, press the eye button, and we're going to
bring them in like so. And you can see just how beautifully they are
actually coming in. So let's bring them in
to something like that. And then you can
see as well that this one over this
side, not quite right. I think I'm going to actually
spin this one around. I don't think I
want to move them. You know what I'm going to
check though before I actually do that is I'm going
to come to this one, I'm going to control or transforms right clicks
at origin three, cursor add in a modifier and we're going to
generate a mirror. And let's put it on the
Y over the other side. And this is what
I'm looking for. How close is this to this side? So you can see, are my steps
really in the center here? Or does everything
need moving over? Or is it just
because of how were, you know, how we've
actually built it? Either way though, we need to move this over a
little bit, I think. So what I'm going to do is I'm going to grab both of those. I'm going to move them over a
little bit and just give us a little bit more room
over this side like. So now remember this part here, it's going to be set
in a little bit. So what we're most
interested in is just making sure that the gap here and
here are round about the same. I think this is
round about center. If I grab this and
just pull it up, we can see it's pretty
much in the center. It's a little bit out from them. So what I'm thinking is
either the windows will move. I think at the moment, you know what, we'll
keep it as it is. I think we're worrying about that a little
bit too much probably, or I'm worrying about it
a little bit too much. All right. So what I'll do now
is I'll come back to this part and what I'll do is I'll just
pull this part out. Now, we should have
one part behind there and one part in
front, as you can see. So what that means now is
let's come to this part first. And what I'm going to
do is select this. So I'm going to press a E, and I'm going to pull it out
just to give it some depth. And then L to grab it all. And I'm going to actually
put it into the wall now, so you can see now
it's into the wall. Next of all, I'm going to come
to this part then and what I'm going to do is
separate this selection, come to the backside
then of this press. Delete. And we should then
be left with that press. And pull that out
as well like so. And now I should be able
to pull this back into place like so. And there we go. You can see just how nice this is actually
coming along now. Now from here, let's think about these parts first before
we do anything else. So these parts need to come out. We could, I'm just
wondering if we could do it all the way
at the same time. Yeah, let's give that a
go. So what I'm going to do is I'm going to
come into these parts. I'm going to grab it coming
from here down to here. And then from here going all the way down
to this part here. And then finally from here
going all the way up to here. Now you can see I've
missed out the bot parts. And the reason I've done that is because I actually
want to put my post, that's going to
be a post in here coming down to this part here. So what I'm going to
do is I'm going to press Shift D. I'm going to
pull them out a little bit. I'm going to press P
selection like so. And then what I'm going
to do is grab them all. You know what? We'll reset
all the transforms first. So set origins, geometry. I'm going to save out my work as well because this
is fairly complex. Press S and X, let's pull them out a
little bit like so. And now let's give
them some depth. So add modifier,
generate solidify. And then what I'm going
to do now is I can pull them all back into place
where they're going to go. So roughly around there. And what I want to do then
is give them some thickness. So even thickness on right
click shade, auto smooth. Let's increase then
the thickness. And you can see that's what
it's going to look like. You can see at the moment probably a little bit too thick. So let's bring it
back a little bit and we'll work on then
bringing this offsetting. So you can see at the moment the offset is going that way. So let's try bringing the
thickness this way and then bringing the offset back
the other way. There we go. That's looking better. So
now I can bring it back, bring it back like so. All right, that's
looking pretty cool. Now we can see they're probably a little bit
too far out these, so what I'll do is I'll press S and X and just pull
them back a little bit. So now we can see we've got this amount of
thickness of our wood. Is that looking about right? Are these thick enough for
what we're looking for? You know what? I think
they actually are now. I'm not going to worry
about flattening these parts off at the moment. What I'm now going to do is get in this post over here again. I'm going to press Shift a cube. And then let's bring it down. And what I want to
do is I want to put this cube right in
the center here. I'm just going to bring it down and get in the right thickness. First of all, if
something like this, and then essence, let's bring
it down a little bit more. Now, finally let's
come in and what I want to do is I want to
put it right around here, so I'm going to come
in, grab this one. Shift S, cursor selected,
and then come back to this. And then I'll press shift
S and selection to cursor. And then that'll put it
right in the center for me. All right, from there
then let's press S and Y and pull this out. And that's why I'm
not worrying too much about these being
level as you can see. And then from there then,
what I'm going to do is now bring this
part down to here. So I'm going to come
in and grab this part. So the bottom part, let's
reset again, the transform. So right clicks the
origin to geometry. Let's press the eye
button now to insert it. So we're going to bring it
down, something like this. And then what I'm going
to do is now I'm going to bring it down to here. And what I want to
do is press control. Er, bring in a few edge loop. So five, left
click, right click. I'm going to grab the bottom. And what I want
to do now is make sure that this is brought in. So if I come in put
proportion editing on, let's put it on shot,
we'll try that. If I press three
now, press and y. That's not the way I
want, so let's put it onto root instead, and Y. And there we go. That might
be what I'm looking for, like this. There we go. That is exactly what I'm looking for.
Something like that. And then from there,
then, what we'll do is we'll bring this down now. So if I press E, then I should be
able to bring it down into place, into
the top of here. Which means I need to move this slightly over, as you can see. So if I grab all of this now, I should be able to move
it over into place, right into the middle
of there, like. So that is what I'm looking for, except I've not moved my wall. So let's move my wall as well. Let's put it right
into the middle there. And there we go. All right, we're really actually getting
somewhere with this now. Now finally what we can do is we can actually
pull these out. So I'm going to
grab both of these. I'm going to press S and Y
and pull them out into place. Just get them leveled
into place and Y, pull them out into
place like so. And then finally this bit, let's pull it over
and then and Y, and we're should be able to get away with a little
bit of stretching on there so we can barely
barely notice it. And actually think that is
looking pretty cool now. Now we've got every
bit of these in all. Want is just one more
relief on this part. So control, let's bring
it up and then out Shift and click Enter Alterns without portion
editing on Alternans. Let's bring it out, Let's
put it offset even on Yes, and I think that's
looking perfect now. All right, so one last bit
then is we're going to have a little bit that's
going to come down just over this part here. So what we'll do is we'll come to this part.
You know what? We'll grab it here because then we know we've got
it in the center. So shift desks,
selected Shift aid, let's bring in a cube. Let's pull it up,
then into place, we're going to make it a
little bit smaller like so and X, let's pull it back. And then we'll try and put it into maybe even the top part. So I would like it
to go back there, but you can see if I
pull it back to there, it's going to be not
in front of there. So what I'm going to do
is pull it out a little bit and pull it into place here. If I put it into place there and then what I'll
do is I'll bring it down, if I bring it down now,
just around there. And then what I'll
do is I'll press L, I'll press and y pull
it out a little bit. So then I just want
to now bend this. Yeah, bend it a little bit. It's out in North.
I'm just thinking, can I bend it on the bottom? What I'll do is I'll press
control or transforms, set origin to geometry. And now let's come
into the bottom. We're going to press
control, Bend it in. So I'm wondering if that
is looking what I want. You know what I think
it actually is. I'm just going to
pull them down. Now. Finally, let's
bring it out. A bit of a relief.
So I'll press, I bring it in now. Wherever you've got
this broken mesh, again, we should go in
and really fix that. So all I'm going to do,
grab both of these right click merge verses at the last. At last. This one here. Again on this one, shift R, and then we'll do this one, and we'll grab this one here. This one here, shift R, and then this one here. And this one here, shift
R, and there we go. All right, that's
pretty much that fixed. And now finally we
can come in and bring this out a
little bit like so. Okay, double tap the eight, and that's what we
should be left with. And that's looking very nice. I think we're pretty much
done with that part. So now what we can do
is we can come now to this center shift S cost to selected and then
now we can come to this part. In
fact, you know what? We'll grab all of these. So we'll press control
or transforms. Right click origin 23, cursor. And then finally we
can add in a mirror. So let's mirror it on
the y, press the x born. Then what can do is I can press control L and copy modifiers. That's then going to link
them all over that side. Now with the steps,
let's make them a little bit wider and y, let's pull them out into place. Double tap the A,
and there we go. This is coming along fantastic. Let's do the same now for these. So what I'm going to do
is grab all of these. I'm going to right click origin to three cursor
and then I'm going to grab this one because
it's got the miron control L copy modifiers. And we can see they're not going over the other side. So
let's try that again. Controla all transforms
right clicks origin three, D cursor and there we go. Now they're going
over the other side. Okay? So we've pretty much got everything that
we want in this now. So now it's just a
question of actually doing the windows and finally
doing the doors. And then we can actually move these a little bit
over if we need to, but for now, this is
looking pretty good. It's just this little piece
here that I'm not happy with and I'm just wondering whether I should
spin this round. So art Z -90 Let's
spin it around a little bit and put
it into place and we can see it's not
really fitting in place. So you know what, I will just I'm just going to
pull it over for now. It should be over
here somewhere, fit in place like this
one as you can see. And I'm also going to grab
this one while I'm here. Just pull them both
forward a little bit. Double tap the A, and
I'm going to fix this. But I'm just going to
leave it there for now. What we'll do is we'll
get all of this in, all of this fixed and done. And from there then
we can actually come in and actually start
with this part. And then we can
kind of, you know, pull it all together like we always do. All right everyone. So I hope you enjoyed that one. I hope you learned a
lot and I hope yours has turned out as well as mine. Did you know so far, so good. And on the next one,
then we'll start getting these windows done, the door done, and
pulling it all together. Alright everyone. I'll speak to you on the next
one. Thanks a lot. Bye bye.
200. Creating the Perfume Shop's Main Door with Historical Details: Welcome back everyone to Blender for the Environment
Artists Guide. And this is where
we left it off. So now let's make a start
on our actual door. So all I'm going to do
to start my door is I'm going to come in
and grab this bit. Let's pull it out. So let's
pull it out a little bit. And what we need to
do with this door is we need a bottom part. And then basically we
need to do the part round here which is going
to be the cannon window. So let's break it down. Actually what we'll do is we'll come in and we'll
grab this top part. And then what I'll do is I'll
press Shift, bring it out. And then what I'll
do is I'll press the Ebone, bring it in. And that then will be, this part here will be the actual window, this will be the actual
frame that goes around it. So what I want then is probably another little small
frame in there. So I'm going to press Y, and then I'm going to
press, I bring it in, so a little small
frame on there. Now the thing is, with
this part of the frame, I do actually want
another part in here. So what I'm going to do
is I'm going to come in, I'm going to grab
this part here. I'm going to press three
on the number pad. And I'm going to press
K, grab this one, and then press A and go down to the bottom of this part here. So click it, Enter like so. And then from there
I'm going to come across to this part. I'm going to press
K, grab it to here, and then this part over
here. So it's two up. So Enter. And now let's come in, grab all three of
these, Press control B. And we should be able
to bring those in. Now you can see that we do have a problem in the bottom one, you can see it bending. So now I don't really
actually want that. What I'm going to do is think I'll separate this part off. I'm going to separate
this part off here. So I'm going to press Y, and then what I'll do is
I'll come in now, grab these parts, and
then I'll press control, bring it back like so on. I'm wondering why it's
actually pulling in there. Sometimes that happens. What I'll do instead
is let's have a look at this so we can
see if I press L, it's selecting all of
those around there. It's just pulling
this part down. What I'm going to do instead is I'll just grab each of these. Then what I'll do is
I'll press shift, bring them out, and then I'll
press and X pull them out. Like probably it's because they're all actually
joined together. Now from here, I
should be able to actually come in,
separate these out. So LP selection, control
layer or transforms, set, origins,
geometry, generate, and we'll generate a solidify. And there we go, that's what
I'm actually looking for. Let's increase the
thickness like so. And you can see the middle one is causing me a
little bit of grief. Let's put it on even thickness. There we go. That's
looking better now. Now you can see this is
actually leveled up. So now let's come in first
of all and come to this. And what I'll do now
is come to the window. So if I come in and
grab my window, and what I'll do is
press Y and then I'll pull that out
into place like so. And then what I'll
do is I'll come round now to this part here, which will be the first frame. And then what I'll do
is I'll press shift D, bring that out into place. And I'll split this off now. So I'm going to
split it off here, so Y and I'll also split
it off at the top, down to here y. And that means then that
this one is also split off. So now we can come in,
grab each of these. And then what I'm going
to do is press and pull those out to give
me my actual frame. And then what we'll
do is now come to the next part which
is the wider frame. So again, I'll split this off, so Y and then split it off. In fact, you know what, we'll
have it going all the way around there because I think
this bit will be the main, you know, red, so it'll
be the red painted wood. So now if I grab this one, you can see it's split
off from the bottom. So now if I press L on
that, bring it out. And then what I can
do is I can press now and pull it out like so. And there you go.
You can see now we've actually got
that beautiful frame, which is what we're
looking for now. Let's come in and work
on artictual door. So first of all, if I press shift D, I
can bring that out. Then I can bring it out
just so it's under there. So I think we'll
actually bring it back. We'll bring it back to here and we'll create our
frame, first of all. So what I'm going to do
is I'm going to bring it in and then that will be the
main frame before my door. So I'm going to press Y, and then I'm going to press
I again and bring it in. And then we're going to press now finally
we're going to do is I'm going to press
control left click. And then control 12345. I think we'll have
four left click, right click, four
on them like so. All right, so now
before we do this, let's grab the
bottom and the top, this outside bottom like so press Y and then we'll
grab these two sides. And we'll press Y, And then
we'll regrab these two. And these will be the main
frame for the actual door. So I'm going to press just
so it fits just under there, so we don't want it in front, we want it going
underneath there. And then what we'll
do is we'll come into this one and this one. Y, and then this one. And this one. And this
one, and this one. And I should be able
to pull these out, pull them out a little bit further back than the
main actual door. Now we'll actually come in and actually create
these panels. So what I'm going
to do is I'm just going to grab all of these. I'm going to press the button, pull them in like press I again. And there we go. So
we're going to pull them in, something like that. And then what I'm
going to do now is I'm going to pull it back. So we're going to pull
them back just a tad, press the born again, bring them in and
then pull them out. And then again pull them out. And then finally we
are going to press S, but just make sure that
run in individual origins. And there we go. That is
our door just about done. Now the one thing
I think is that these should be maybe
set back a little bit. So I think I'm going a little
bit too far with them, so all I'm going to do
is just pull them back in a little bit like so. And I think that looks
just about right now. Let's come back to the back part and this part here and
they're all I'm going to do. We're going to select
it. Delete and verts. Now let's come into this part. Now we can see that still
it's not very thick. We don't actually need it
that thick, to be honest. So what I'll do is I'll just
press control or transforms. Right click the origin geometry, right click, shade,
auto, smoove. And the other thing is I
just need to make sure I'm applying that
solidify with control. And now what I
should be able to do is join all of this
together with control. A control J, sorry. Right click, shade,
auto, smoove. Now I'm also going to come
in, grab all of these. Press control, right click, and we're going to shade flat. There we go. All right, that looks like the door
is pretty much done. Now, the last thing
I'm going to do is I'm going to pull out
the backs of these. I'm going to come in,
I'll do this one first. I'll grab all of this. Coming in around all the way
around here like so. And then I'm just going
to pull that back. And then I'm just going
to do the same as well, with this one going all
the way around here. So I'm going to grab
it here on the back. So on the bottom, if we can grab it, there we go. And then let's pull them back
the same as the other one. Okay, so that looks pretty
much like the door has done and now let's just make sure we're going
to add in a modify, generate a devil and
we'll put it on n three. So, and then finally
just make sure everything is going into
place like we wanted. Now, I'm just wondering
about this part here. I'm just wondering if I'm
happy with the bevel on here. You can see it's
a little bit out. I think actually it's going
to be okay on this one. You can see it's got a
little bit of a mess there. Let's grab this front bit. Let's actually extrude it out. Let's extrude it
out. There we go. You can see it's just
not coming right. Let's go back and what we'll do is we'll separate
this selection. Separate out, and we can
see it's a bit of a mess. This one, to be honest.
Let's actually delete it. Let's delete it. Let's go
back now to these parts. And instead of
doing it like that, let's make it a little
bit easier for myself. So I'm just going to
grab all of these. I'm going to press the
bone, and there we go. I'm going to bring
it in that way. And I think it's just
going to be so much easier than the messing around that we've
got at the moment. So now I'm going to do is I
think I'll grab all of this. So I'm going to
press P selection. And then I'll come
back to this part. I'll grab all of these parts. So L grab them all
and then press, pull them out like so. There we go. Right click,
shade, auto, smooth. And we can see, no, we
don't want to do that. We just want to make sure that it's all joined together. Yes. Now we'll join these
windows together. So grab the windows,
grab the door, press control J, double
tap the, and there we go. Now it's looking nice now. It's looking very nice. That's what we want. All right. A bit of messing about
there. Sorry about that. Now, let's pull it back into place then to
where we want it. So make sure that it's not
in the wall, for instance. We can pull it forward as well. Now let's think about
this top part here. So what I'm first of all
going to do before doing anything on this top
part is O shift click. I'm going to bevel
it off a little bit. So I'm going to
bring back my bevel, jaws, bevel it off to there. And then what I'm going to
do is change the scale. Bring the scale up
and there we go. So we've got a nice
bevel in there. From there then let's press
control A Al transoms, right click Sagen geometry, Add in modifier
and let's bring in a bevel. Let's put it on. Not 0.3 then what we'll do is, I'm just wondering whether
we need a sharp in there. I actually don't think we do. Let's come in and see if a
sharp makes any difference. Alt shift click,
right click, sharp. Oh, Mark Sharp. And there we go. Actually, it does make
a huge difference and it does look much better. Now we're moving down, we
can apply this mirror. We can come in and
add in a modifier, a bevel and no, 0.3 like so. And there we go,
that's that bit done. And then we're moving down
to the next parts now. So let's first of all
though, come to our steps. Because obviously on our steps, we're going to have to probably pull them down a little bit. We've still got this array on, but we need a top part
on our steps as well. So I think with our
steps, actually, we'll come in and we'll
grab this top part. So we're going to pull
it down a little bit. So then what I'm going to do is I'm going to press and pull it up into place like so I'm
going to grab this top one, then I'm going to
press and pull it out. And we can see now we're getting a little bit away from there. You know what? We'll do
this a different way. I'll tell you what we'll do, we'll pull it down a little bit, and then what we'll do
is we'll press shift D, and then let's pull
it up from there. Then I should be able to
pull this out like so. And now that should
be separated off, which is what we actually want. So now what we can do is
we can press controller, bring in a few H loops. Left click, right
click, right click. And we're going to mark a seam. And then finally we'll come
in and we'll split these off. So I'm going to grab
this one with L, L, L, and L. And then I'll press
Y and then A, grab it all. And then what we'll do is mesh. Come down to clean up and
we're going to fill holes. So now to test that out, let's just add in a bevel
now and there we go. That's what we want. And
then we'll put it on naught point naught
three like so. And there is our steps. Now of course we can see that they're disappearing
a little bit in the floor. And this simply means
that we need to bring back this Z like so. And there they go. Now
they're actually in place. Are they in place?
No, they're not. So let's bring it back
another little bit more. Yeah, now they're
in place. They just need making it a
little bit wider. So all I'm going to
do to do that is, and I'm going to pull
it down to here. I'm going to press
En's D then and pull them out just so
they're fitting better. Those parts are
actually fitting on top of there. All right,
so that's that bit. Now what I'm going to
do is apply my array. So let's, you know what, we've still got a gap in there. I need to pull them
back a little bit. So what I'm going to do is the x, I'm going
to pull it back. So maybe that's a little
bit too far forward. Well, let's have a look
where the actual gap is. So if we pull it forward,
there's the gap. So I need to pull it all
the way back to knock 0.9 to make them fit in place. Making sure everything's
in place now. Yeah, and I think that
looks pretty good. Alright, so on the
next one then, what we'll do is we'll actually get the bevels on these parts. Here, on all of these parts. And then we'll get these
actual windows done, and finally then we can actually
get some color on this. Alright everyone, So I hope
you enjoyed that and I'll see on the next one.
Thanks lot. Bye bye.
201. Completing the Model of Window Displays and Doors: Welcome back everyone to Blender for the Environment
Artists Guide. And this is where
we left it off. Okay, so now let's
come to these parts. We'll add in a bevel, we'll put it onto Not Point, not three like we normally do. We'll also then
apply the mirror. I think I applied my mirror
on here. Yes, I have. And then we'll come to this
part exactly the same thing. So let's apply the
mirror. Let's grab this. And let's press control L and copy modifiers. And there we go. Now this part here,
we need a top on it. Let's come in and
is that too high? You know what it
looks about, right? So all we'll do is
press, pull it out. And then pull it up. Let's bring it in. And then pull it up. And then pull it up again. And then pull it in like that. And then what we'll
do with this now is we'll apply the mirror
and then we'll add in a bevel again and
not naught three. So now we don't need
a bevel on here because you can't see
anything in there anyway. So they're absolutely fine. The one thing we
just want to make sure is that the
mirror is attached. And now let's work our way up. So these ones here we've already done. Let's work on these ones. We might as well apply the
solidify, adding a modifier. Bring in a bevel
naught 0.3 like so. And those are those done? Let's work on here
then the same thing. So apply modifier, generate
bevel 0.03 like so. Now this one here
hasn't got a bevel on. So we're going to write click Shade Auto Smooth first
adding the modifier a bevel 0.3 And there we go. All right, so that's that done. And this Scar Bevel on here, everything else
is Scar Bevel on. Now the only thing that we need to do now is these windows. So these windows you can see this is where they're going
to go in at the moment. I've got like two
windows on here. We're not going to
worry about that. What I'm going to do is though, I'm going to start with the front and get rid of the back. So I'm going to
basically pull this out, so shift D because we know
where it needs to be. And then what I'm
going to do now is I'm going to press P selection. And then I'm going to come
in and grab all of these. Now you can see that the
reason why this is happening is at the moment we
have got X and Y on. We really don't want the X on, so we'll turn that off, then we'll come to these
parts and press Delete. And now we should just be left
with something like this. Now let's come in and
actually make our windows. So first of all,
we'll make our frame. So if I press,
can't press three, what we'll do is
we'll make our frame. So I'll press the Born, bring this in and that'll
be the main frame, then for the window. And then I want a frame
going right down the center. So to do that what
I'll do is I'll just press Y. I'll pull
it out a little bit. And then what I'm going to
do is press three again. I'm going to now come in
to the bottom of this. So the bottom of this here. I'm going to right
click, subdivide that, then is going to put it
right in the center for me. Now, I can't join it
up there like so. So what I'm going to do instead
is I'm going to press K, bring in a knife tool and
then bring it up to the top. So A, bring it up
to where I want it, press the enter born
and there we go. Now the other thing is
we're not even able to, you know, bring in a
window that way either. So we really want to bring in some straights
going over here. The only way that we're going to do that is we're going to have to go across here then
bring in some other parts. So what do I mean by
that? I mean that if I come in and press K,
we can grab it here. Press A, bring it across, put it in there like so. And then one more window
is going to go in here. Okay, from here, press a, go across like so. And then finally now we want
a part coming down here. Control, bring in three parts, something like that.
Left click, right click. And this is what we should
be left with from here. Then we should be able
to grab the whole thing, press the eye button, and then bring each one of
those in as you can see. Now what I want to do
is I actually want to split these off, but
it's not so simple. Splitting all of these off,
unlike the other window, we need to first of
all, grab our windows, press P selection, grab those, hide them out the way, like so. Now we've got this part here, let's split it all off. First of all, press P
selection, Split it off. Now all do is all press
control, all transforms, set origin geometry and set
origin three de cursor, set origin to three cursor. There we go. Now we want to
make our actual windows. So what I'm going to do is
think I will split them off. First of all, the
problem is if we split them off the old
way that we did, it's going to split
these parts off and then we just have to
join these all together. So what I'm going to do is
I'm going to grab it all. I'm going to go to mesh, we're going to go to
split faces by edges, and then that's going to
split all of these up for us. But it's also going to split
these up for what I want to do now is I want to come
into each of these parts. So this part first, and I'm
going to go to mesh. Cleanup. Merge by distance two verts. Which means that now this one, for instance, is
joined back together. Now let's come to this one.
This one and this one. And what I'm going to
do is I'm going to go to mesh, clean up. Merge by distance,
four verts merged. Now I'm just thinking
that there's just this one left now. So mesh, clean up. Merge by distance,
and there we go. And now these should
be absolutely fine. So if I now press a, and I press and pull
those out like so. And then if I come in
and bring in a bevel, so generate a bevel, put it onto naught point, naught, naught, three like. So we should end up with
something like that. Which shows us now we've
got our perfect windows in now let's press ol tag and
we'll bring back the windows. So there's the
windows. Let's move them a little bit
further forward. So I'm going to pull them out
just a little bit like so. And then what I'm
going to do now is the main actual frame. I'm going to come to it and I'm going to split
it off from here, grab it here, going all
the way down to here. And we're going to press Y, and then we're going to
grab this bottom one. Press Y, and now finally
we can grab it all. Bring it forwardsn. What you're going to
do is press bring it into place like so. And now finally we can
also be level this off. Add modifier generator. Bevel naught, point naught
naught three. And there we go. That is our frame
now. Now right click. Shade auto smooth, and
shade auto smooth. Grab all three of these. Let's now pull these.
This one as well. Let's now pull them into
place where we want them. Is that into the actual wall. A. Look. Then we are into the world
there, double tap the A. Finally, that bit is
near enough done. All right, now let's
finally go to our material. Let's see all the
work that we need to actually do. We'll
let this load up. It will take some time. We'll also save out our work. Save it out. Now let's actually start bringing
in some material. We'll come to this one
first, and we're just going to Smart UV Project. Click Okay. And then what I'm going
to do is material. We're looking for the
red painted wood, which is this one here. And then what we're
going to do is we're going to grab all of this. I'm just going to
go quickly down them and just unwrap them. So I'm just going to
hide them out the way. And then Tab, Smart UV Project, click okay, hide
them out the way. Same thing for all of these. Then Smart UV Project, click okay, hide
them out the way. Smart UV Project click
okay, them out the way. And we'll do the same
on these bits as well. The reason I'm doing
this is because I need to split it up slightly. Because I would like
to do the door, the windows a little
bit different. Also, these steps as well, they're also going to be
a little bit different. So we're going to just break it up into little pieces tag. Now what we can do is finally
we can grab this one here. And then what I can do
is I can press control L and we can link
materials like so. All right, so that's what
we should be left with. Now what we'll do on the next
lesson, we'll, actually, we'll do the window,
actually we'll start on the window and then we should be able to work our
way across to all this. And it shouldn't
actually be long before we've actually
got all of this done. And from there then
we can actually work on putting our Booleans in. And after that, we're
on the final bit. The final bit, accept the floor. That's the only bit we have
left to do after that. All right everyone. I'll see you on the next one.
Thanks a lot. Bye bye.
202. Finishing the Main Building of the Perfume Shop: Welcome Mc. Everyone to Blend for the Environment
Artists Guide. And this is where we left off. Let's come to our
door then first. So what I'm going to do
is just grab everything. Smart UV Project. Click Okay. And then what I'm going
to do is come down red painted wood,
red painted wood. Bring that in. And
then what I'm going to do is I'm going to come
to these parts now. So L grabbing all
of those parts. I'm thinking as well,
maybe maybe even the inner part on here or should I
just make this bit wood? I'll bring it in. Let's click the down arrow. Wood. And so we've got wood light is the
one we're looking for. So wood dark, wood light, wood flick a sign. You can see they're definitely
not going the right way. So let's try grabbing
all of these again. And you can see the reason they're not going the right way, by the way, is because they're
not unwrapping properly. So Alt shift click,
Alt shift click, Alt shift click, and try and unwrap them that
way that's not working. So again, we'll go
Smart UV Project. Click okay, and we'll
come back to those. Now let's come to this part. You can see that this
is all joined together, and that's what's making
it very difficult. So what I'm going to do,
Shift and click Olthift, Click Smart UV
Project, click Okay. Hide them out the way. And
then finally this one. Now I can grab all of
this going up here. And then Smart UV
Project, click okay. Now let's see. Now
if I press Alt, if I go over to my UV editing, what rights are left with? Because it could end up a little bit of a mess
as you can see here. So first of all, let's
come to these parts. Just this part here.
So I'm just going to, you know what, I'll come
to these parts here first. So you can see that they're
going kind of the wrong way. So 90, let's spin them around. You can see they're still
going the wrong way, so all I'm going to do is just
rotate them round like so. And now they're looking much
better again with this. So a rotate them round, so they're going the right way. And then this one here, so a rotate them, so they're going roughly
the right way, like so. Okay, so those ones are perfect. Hide them out the
way this one's next. They are going the right
way already, like so. And now run to this one here
so L we can see actually. So look, you know what, they're actually looking good, so I'm going to
leave those alone. What I'm gonna do now then, is come into these ones. I'm going to press you unwrap. And what I'm now going
to do is press a S, make them a little bit smaller. Plus let's bring the glass now. So glass and we want the
lit glass this time. So lit glass, click a sign and now let's
put them into place. So I'm, jaws going to put
them in the middle here. They're only small parts so we don't really need
to see any kind of, you know, dirt on them
or anything like that. I think we'll be able
to get away with Jaws putting them
into place like so. All right, let's press Tab old age, bring back everything. Double tap the and this is
what we should be left with. Now let's, let's work
on the bricks here. So what I'm going to do is I'm going to first
of all press shift. He just isolate everything. I'm not going to need the top, the backs or the bottom. So I'm just going to delete
them out of the way. It's going to make
my life much easier. So delete faces like so. And then a U and unwrap. Now let's bring in the bricks. So click the down arrow brick. Let's press A, Let's
rotate them, round are 90. Then what we'll do is
now we'll press tab tag. Bring back everything. And now we'll get these bricks
to be the right size. If I grab these, we're looking
at them being this size. What I'm going to do
is press the bond, bring them all the way in. Let's make sure that they look the same size as these ones
up here, which they look now. Bring back everything
and there we go. All right, that's looking good. So I'm just looking at
the rest of them now. Just making sure they're
fitting in place. Yeah, and I think they
look pretty cool. Now let's come to
these parts then. Again, we can isolate these off. So I press shift H and what I'm going to do is I'm
going to come to these, in fact, you know what, we'll get rid of
the bottoms first. So delete and faces. And then what we'll
do is we'll press, we'll actually mark
a same on these. I think it's going
to make it easier. So if I come into the backs
off here where no one's going to see right
click mark seam. And then what I'll do is I'll
come in old shift click, old shift click and unwrap. Now let's bring the bricks in old age, bring
everything back. Come back to these then. And then we're just going
to grab the top of them. So we're going to grab
the top of here control, plus going all the way down. We don't want to go down to these parts here, so
let's do that again. And what we want to
do is just come to the underside control to there. And then what we want to do
is smart UV project click. Okay. And then we'll
bring in stone. If I come in now plus
down arrow stone. And the one we want
is stone like so. And then we'll come in old
shift click, Shift click. We know we've already got
these wrapped so we can click plus down arrow bricks. Like. So click a sign and now what we can do is we can make
these march much smaller, in line with the ones that
we've already created. So you can see if I bring
them down to there, that is roughly about
the right size. Now let's think about
these parts here. First of all, not my guy. This one here. Now you can see I've still got
the modifier on, so I need to apply that with control and now we can
actually grab them all. So first of all, I'm going
to press Smart UV project. And then what I'm
going to do now isn't going to just
give them stone. So if we come in, we'll
put the stone on stone. So, and then I'm just going
to grab the front of these, I'm going to press
you and unwrap. I think we'll probably
have to turn them around, but we'll see click
down arrow bricks. This one here, click a sign. Yes, we do, 90. And we can probably
get one brick in each one of these one brick. So this top one is fine. Let's move this one
up a little bit. So holding shift, so, and then this one and
then finally this one. Like so. And there we go. All right, there's the
bricks under there. And now we can actually
come to our actual windows. So what we'll do, we could
do these altogether. Let's grab these first. And then what we'll do
is Smart UV Project. Click okay. Down arrow,
red painted wood. Let's come to the
next parts now. Then a smart UV
Project click okay. And the one we'll do is wood light this one
down here, Click Okay. You can see they're all going
pretty much the right way. All of them look good.
And now what we'll do is we'll come to our windows. So with the windows, we can make sure that
we grab them all. First of all, so you wrap. We can also make sure then
that we've got the glass on, so glass lit like so. And what I'm also going to
do is I can also come in, this one here is unwrap pretty
well, you can see that. But what I'm going to do is just make it a little bit smaller. Then what I'm going to do
is press and I'm going to copy copy default. And then we'll grab
each of these and we'll paste those in all
the way down here. Copy paste default. There we go. Let's press a now, and then we'll just
work our way down. Then we'll do these bits after. I'm just going to press and just move them into
the next ones. All right, there we go. Now
let's come to this one. And then what I can do is I can press and bring that one down, and then bring that one down. And then finally this
little one here, let's put it in the
corner there, like so. And the other one
should be copied the other side as well. All right, let's go
back to modeling now. Let's have a look
at the moment of, let's come in, let's
save our work. Just looking to make sure
that everything is done. I think it is. Let's put it on rendered view. Let's double tap
the A. Let's have a look where we've got now. The only thing I'm
worried about is this wood here
doesn't look right. Let's even put it on dark
wood instead. Dark wood. Let's also do the same on this one where it
says lightwood. Change that to dark would like. So double tap the Yeah. I'm thinking that
looks really nice. All right. So that's near
enough, the front of it done. What we need to do
now is of course, is bully in these parts and
bully in these windows. We'll leave the center when
we don't want to do that. And then finally, we're on to this tower. Alright everyone. So I hope you enjoyed that or nearly on the
final stage now. And I'll see you on the next
one. Thanks a lot. Bye bye.
203. Finalizing Interiors and Exterior Details of the Perfume Shop: Welcome back everyone
to Blender, Ford, The Environment Artists Guide, And this where we left off. So now what we're
going to do is we're first of all going to
put it onto material. And then what we're
going to do is start with our booleans again. So we're going to have, I think here we'll have
a couple of bedrooms. And then down here we need,
obviously, our perfume shop. So let's get this part in first. So I'm going to press
shift a selected press three on the number
pad. Press shift. And then what we're
going to do is bring in a cube, press the S board. You should be pretty
well versed in this now, everything that we're doing. So we're going to put something
roughly around there. And then what we're going
to do is press shift D, Bring it down to
something like here. Let's pull these
back into place. They're both actually in
place, so that's good. So we'll leave them as is. And then what we're going
to do now is I need one for here now to do this one, probably going to
be better off just to grab this part
that we've got here. And then what I'll
do is I'll grab this one going all the way around here and then down to the bottom like so I'm
going to press Shift D, bring them out, I'm going to press and F and
join them together. Now that's made it really,
really handy for me. So then what I can do is I can press selection,
grab both of these. Control A all
transforms right click, set origin 23 cursor, is
that going to be right? Let's see. I think it's going to be a little bit out
actually. Yes it is. It's a little, tiny bit out. So one can do is grab
this shift S cursor selected, grab this. Then again, right click
origin to three cursor. Now they're perfectly
in place, you can see. Now let's come back to them. And what I'm going
to do is press, pull them all the way. Now you can see what's
happening here. It's not actually
been joined together, So let's press control
zed before we press. And what I'm going to do now
is go to Mesh. Clean up. Merge by distance,
three vertices removed. Now for press, it should go
back into place into my wall. All right, so I've got these. Now what I want to do is first
of all come to this one. I'm going to go in,
then add modifier. We're going to
generate a bullion and the billion of course
is going to be this. And then we'll come
to the next one. Same thing, generate
billion, this one. And then finally these. So I'm going to grab
this wall here. Add modifier,
generate a Boolean, and the Boolean is
going to be these. All right, so now
let's press control, come to the next one control, come to the next one control. And finally, now let's get
rid of all of our Booleans. So delete and delete. Now we should be able
to do is come to our window, hide
it out of the way. Hide it out of the way like so. And let's come to
these windows and just hide them out the way like so. And we should be left with this. Now, let's come in
to this one first. Again, it's basically the same thing as
what we did before. On these ones, we are actually
going to need a curtain, so I'm going to grab this one, and then what I'm
going to do is press Y and pull it out the way.
That'll be that curtain. Then we'll do this
one for this curtain. So press y, pull it out the way, like, so now what I'll do
is we'll cam into this one. So I'm going to press out shift and click,
grab the bottom one. I'm going to press E and X. Pull it back, jaws to there, and then pull it in. Now let's circumb to this one. We could have done them both,
I guess at the same time, but it doesn't really matter. So all shift, click,
shift, click. And then pull it back with X, and then press, and now we will do them
both at the same time. So I'm just going to
grab both of these. I'm going to grab
then make sure that I've got both of
these selected like, so I'm going to press the Eban and then what I'm going to do is
going to press control Er, maybe four, left
click, right click, and then control left click, right click, and
then bring these in. Now I'm going to use
proportional editing smooth. And then what I'm going
to do is pull them back, increase it a little bit. I don't want to move my wall. You can see that
was moving my wall. Just increase it a
little bit like so. All right, that's that bit. Now we'll come to
these ones then. So what I'm going
to do is come in, shift, click, shift,
click, click. And then you can
see it didn't work. Sometimes you can get
away with doing both. Sometimes, not like. So let's go into this
one then and then. So now the thing is with these, we don't actually want
curtains in them, so all I'm going to do is
just grab both of these. Now I'm going to press and
pull them back a little bit, and then what I'm going to do
is press and bring them in. Now you can see sometimes again, this will happen where? It's for a perfume shop, this. So we might be able to do
this a little bit different. So what I'm going to do
is I'm just going to press and bring them in. And then what I'm going
to do in steadies, I'm going to press the S, but I want to make sure I've not got proportion editing on, so I'm going to press the S one and I'm going to bring
them in like that. And then probably is going to make it a
little bit easier. And then what I'm going to
do is I'm going to press and's and just pull them up. Like, so, so now
they've come in and they've gone up and that's
what we should be left with. Okay, so now let's come in and do these
perfume ones first. So I'm just going
to press control. Plus, just so we've got that little bit of a
gap going around there. And then what I'm going to
do is press U and unwrap. Now if we go over
to our UV editing, we should end up with
something like this. And from here then
let's come in and click the plus button and we're
looking for perfume. So let's see if we actually
have one that says perfume. No, we don't. So let's see if we've got one that says shop. So we've got shop
one and shop two. Let's see if it's this shop. So if we click a
sign, let's have a look that is not
the perfume shop. So let's try shop two. So we're going to go
down to shop two. There we go. That is
not the one ever, which means that we need to
go over to asset manager. I'm going to press the dot
Born to zoom into them. And then what we're going
to do now is we're going to come and look for our materials. And as you can see,
mine are on here again. So I'm just going to
bring them in here it is. My perfume shop. Two. This one here. So let's drop that
one over there. Let's then go back to UV
editing, and here we are. This is what we're
actually looking at. Now, what I want to do with
this then is first of all, I want to probably make
them a little bit smaller. I don't want so much of
the floor down there. You can see we want
it kind of like this. Let's put one of them. So I think it's this one here. Yeah. Over to this side like so. So if I put it up like that, it looks like we've got
a bit of a wall there. And then some perfume
choices over here. And let's do the same thing, pretty much with this. Let's lift it up, pull it
over to place like so. All right, now let's
press salt age. Bring back those parts
and there we go. Now let's come to
these parts then. So first of all, we in fact we'll
do both of these, so I'm going to grab, you
know, we can't do that. So I'm just wondering, let's hide the windows
out of the way again. So, and let's join both of
these together, Concho J. And then what we can do now, we can do them at the same time. So I'm gonna click
plus down arrow. And we want bedrooms. And then we want
to click a sign. And then all I'm going
to do now is a thing, we have to unwrap these again. So let's press Wrap
From, there we go. Let's press S, let's grab
this one first with G, and then what we'll do is press
the Born, shrink it down. And then and X. Let's pull it out a little bit. So I'm also going to press and Y and just bring that
down a little bit more. And then and Y, I'm also
going to shrink it down, so I'm going to do
the same thing now, let's do this one L, and then let's put
it into place. And then and Y, pull
it all the way down. So you know what, these are actually the curtains. So I've missed up there. So let's put it on
curtains first. I don't know why I did that. Let's put it on curtains. There we go. All right. So now let's do that again. So let's put this over
here. Let's grab this one. At least this is
fast to it this way. So let's put this one with
maybe the orange, like so. And now finally, let's come in and grab each of
these. Press control. So let's come in, click the plus down
arrow, bedrooms. So let's click a sign. Now let's press U and Wrap. And let's press S, make
them a little bit smaller. Now we'll grab this one first, then we'll put this
one into place. I'm going to press S and Y, pull it down like so. And then I'll do this one now, L, B, let's put it into place. And Y, let's pull
it down, finally. Then let's bring
in these curtains. So we're going to pull these
curtains back now into place like so let's press tab all
tape, bring back everything. And there we go. Let's
now have a look. The moment of truth, Let's save that our work and let's
put it up Rendered View. And hopefully everything
should be working okay. So these windows are
working, as we can see. They're working very nicely. And let's come down
to the Bob windows. So the Bob windows
now, as you can see, look like they've actually
got something in them. So some actual perfumes
in there to choose from. You can see it looks as though there's
actually some there. So I'm happy with
that, I'm happy with how all of this
has turned out. On the next lesson, then
what we're going to do is the final stage
of this building. And then once we've
got that done, we should just be
doing the floor. We need one sign in here and
then pretty much we're done. All right everyone, so
hope you enjoyed that. I'll see on the next one.
Thanks a lot. Bye bye.
204. Essential Greyboxing Techniques for Victorian Towers: Welcome back everyone to Blender for the Environment
Artist Guide. And this is where
we left it off. All right, so what we want to do now is we want to come to this part and we want to put an edge loop in round
about where it's going to go. So it's going to go round
about up to this point here. And below there, then it's
going to be a window. And then there's going to be
some other bits along here. But first of all, we
need to bring this in. So what I'm going to do is I'm
going to press controller, bring in an edge loop to where
roughly where I want it, which will be somewhere
around there. And then what I'm going to do is now I can split this off. So if I come in out
shift and click, and then if I press Y,
I can split that off. I'm also going to come in
and delete the bottom. I'm not going to need that. Also delete faces. I know what I can do
is I can come in, press the L button and
then press out and, and bring it in to where
we actually want it. Now you can see here for bring
it into round about here, I'm going to have to do a
little bit of work on here, but this is actually
what I'm looking for. Then this part here, as you can see it, is going to go up a
little bit and then come out round about to
this part here. So let's actually do that now. So what I'm going to do is
I'm going to grab this part. I'm going to pull it up
to where it wants to go. And then what I'm going
to do is grab this part. I'm going to press and Z and just pull that up to
where that needs to go. So now you can see this
is Rowhy how we want it. You can see I'm going to have
to move these to the side, but you can also see
it's going to look much, much better like this now. All right, so now
we've got that. We need to make sure that this has got enough room
in it for our window. So let's actually test that out. So if I come in, this
is just to test it. So we want a window right
in this corner here. And let's say the
window was three. And then we'll have
a split there, so 123 and then a split 123 and then a split 12.3 And then you can see they
actually fit around there. And we've got some edging
in this part here. You can see as well
that this part here, so this edging and this edging,
they're not quite level. So what I would suggest is
you grab this part now. So we come in and
we grab this part. We press selection, and
then we come back to it, press control A, all transforms
set origin to geometry. And then I'm going
to press tab A. And what I'm going to do is
I'm going to spin it around, so R, z, spin it around. And what we want to do
is try and get this line even both sides so you
can see at the moment, not quite even, Let's just
hide our floor just for now. And then what I'll do
is I can press Tab now. And I can see this
one's right back here. This one's back here.
So if I press art and zed and bring it
in a little bit, now you can see these
are about even. So I'm looking at this one
here and this one here, making sure those are even. All right, from
there then let's now bring in another edge loop. So what I'm going to do is I'm going to bring in an edge loop. I'm going to pull it down,
and I roughly want this one to be round about the top of
here. So round about here. And then that
defines them where I want to bring this part out to. All right, from there then
what I want to do is I'm really not going to
need this part here. So the back of this I'm
really not going to need. So I might as well
actually delete it off because it's going to make
it much, much easier for me. So what I'm going to do is I'm going to come to the side here. So roughly around here. Ok. Shifting, click, Going
all the way up there. Just that back one, you
can see I've missed it. I need to go up this
one. There we go. And then I'll come
to this one now. So on the inside,
if I grab this one, this one, this one
going up, there you go. Now you can see I've
grabbed all that one. There's a little bit of a
gap there, but that's fine. And then what I'm going to do
is press Delete and faces, and then come to this part
and then delete and vertices. All right, so that
is the first part that rec you're looking for. Now from here then
let's actually make a start with our windows. So what I'm going to do again
is I'm going to come in, I'm going to make
sure grab three, and then grab three,
and then grab three, and finally grab three like so. And these then will be
my actual window parts. Now at the moment,
I think it will be easier to keep all
of this together. So keep it all together. And then from there then we
can build from this part. So what I'm going to do is I'm going to press the eye button. I'm going to press eye again. And I'm just going to bring
them in then like so. And there we go. Now we can see these are our actual
window frames. Now from here I'm just going
to press control plus, and then I'm going to
press the Y button, just to split those off. Then let's work on
this bottom part then, before we
do anything else. So what I'm going to do, I'll
come to the bottom part. I'm gonna press
control left click. And what I'm gonna do is I'm
going to bring it down like, so I'm going to
pull this bit out. So I'm going to press
Alt Shift and click, I'm going to press the
button, Enter AlternS. And then let's bring that bit
out a little bit like so. Now let's come to the next bit. Now for the next bit, I'm
thinking I'll bring out a, another piece. So to do that. There's a few ways of
doing this, by the way. So I think, you know, because we're dealing
with this part here, we can press control plus and press Y and actually
just split it off. I think that's going
to make things much, much easier doing it that way. I also think that now we should
put another band on here, so let's press control, bring it up, and then we'll have another band coming
out round about here. So then I'll come in,
I'll grab it from here all the way to here. Press Enter alternates
and pull that bit out. So then from here, now let's finish
this bottom part. And then we can
actually work out where all these little squares are going to go. Let's come in then. And we've already
split this off, so that means I can press
control going this way, and I'll put it
round about here. Something like
that. And then what I'll do is I'll grab it
coming in from here, so from here to here. And then we'll just
press and bring that up. So All right, so now I think then that we've got enough
room for these bits, we just need to bring
them out a little bit. So we'll come now to this bit. Now what I want to
do is, first of all, I want to come to
the bottom of it. Because you can
see at the moment this bit goes all the
way through there, and I really need to
grab this bottom. So let's even grab
this bottom first. So I'm going to press
Alt Shift and click, And that's not the right
bottom. Let's try it again. If it does do that, just press
L H. Hide out of the way, then we can grab this bottom. And then all we're
going to do is just pull it up way out of the way. Lth, bring it back. And then now we can come
in Alt Shift and click and pull it back down,
as you can see. All right, so now we work. That's a little
bit too far down. There we go. So now what we're going to
do is we're going to bring out a bottom piece on here and we're going to
have it coming up and then inserting on every one.
So let's work out then. Now we're going to
do that. First of all, we'll press control. We'll bring up one to there, We'll press control, we'll bring one down to
something like there. Now what I want to do is I
want to work out all of these. So I'm going to press
ol shifting, click. And then what I'm going
to do is I'm going to press and bring those in. So let's press again and
bring those in like, so I think now from here I'm
looking at this part on Jos, wondering if if I just
want this flat instead. So in other words, I can
do this a little bit of a different way and
I'm just thinking, yes, I'll probably do it a
little bit of a different way. I'm just going to press Tab. And then what I'm
going to do is I think I'll select
these and then just make them smaller and
we'll do it that way. I think in fact, you
know what we'll do. We'll come in and we'll
grab all of these going down like so, just these ones. You know what, we need
to split this off first. So Alt Shift and
click control plus, let's split that off as well. That'll make things much,
much easier for me. You can see I've grabbed
it going over there. I don't want that, so I'm just
going to grab them there. Control. And there we go. Let's split this one
off as well, so why? And now I should be able to come in and just
grab these ones. So what I'm gonna do
is I'm just gonna grab these ones because I want a flat edge on
these, not like this. So I'm going to grab these like, so, like, so, like so and like. So press control D,
and there we go. That is what I'm looking
for. Something like that. Because what I want to
do is I want to have these parts coming out
and this to be all wood. So now if I come in and what I'll do is I'll just
grab these parts. So this one in the side is fine because
it's just a panel. So we'll just keep
working our way round. And we should have one in
the other side as well, so. All right, so what I'll do now is then I will split these off. So I'm going to split
these off with Y. So Y split them off,
and there we go. Now what I need to do is
I need to bring these in. So I'm going to
press the eyeball just to bring them in
very, very slowly like so. And then what I'm
going to do is I'm going to press Enter. And then I'm going to press
alternates to bring them out, Jaws to there. And then what I want to
do now is press E again. Enter alternS, then we're going to bring them out
to something like there. And then finally
what we want to make sure is we've got
individual origins on, and we're going to press the
S button to bring them in. Now if you want them coming in more on the sides, for
instance, you can come in, put it on normal press, and I think it'll be. Or will it be X?
Yeah, it's S and X. And there we go.
We can bring them in on the sides like so. And that is pretty much
what we're looking for. All right, on the
next lesson then, what we'll do now is we
can grab all of this. As you can see, we
can grab all of this. And we'll actually
work on building out these panels 'cause
we want to build it up slowly just to make sure that it looks
really, really nice. All right, so we'll do
that on the next lesson. Let's save out what
we've got so far. This is the most
technical part as I said, so just bear with it and just see if you can
actually follow along. In the end, you'll
have something that looks absolutely
amazing, I'm sure. Alright everyone. So I
hope you enjoyed that and I'll see on the next one.
Thanks a lot. Bye bye.
205. Modeling the Foundation of Victorian Towers: Welcome back everyone. To plan for the Environment
Artists Guide, and this is where we left off. All right, so now let's come in and what we're going to
do is we're gonna press Alt Shift and click
and Alt Shift click. And then what I'm
going to do, I'm going to separate these out. And then what I'm
going to do from here is I'm going to grab
this one first. I'm going to press the button alternans and bring that one out to where I
actually want it. Let's look underneath
there just to make sure. And that is somewhere where I want it, I think
something like that. And then what I'll do
now is I'll come to this one Alt Shift
and click again, Alternans and bring
this one out like so. And finally then
we're just going to go into these side pieces now. And we're going to bring
these out as well. So let's come in to
these side pieces. So just grabbing them all we can make this honestly
as flamboyant as you want. Right. Let's grab all those. Let's press Enter alternates. And let's bring those
out just so they're fitting in there like so with this bottom one
especially fitting in. All right, and
there we go. We can see what we've got so far. Now let's come in and actually let's auto shade and
split these off at the moment because at the
moment I've got all of these and it's making it a little bit hard to
design the other parts. So all I'm going to do is LLL, just grab them all if I can. If not, I'll just press box
select and grab them all. Like that control plus and
then come to the next one. Grab these, grab these. And then all I'm going to do is press P selection and split
everything off from there. Then I can come in now
control old transforms. Right click, set
origin to geometry. Right click, shade,
auto, smooth. And this is what I'm
talking about now. Oh, we didn't actually
join these up either. Alright, I need to go back before and then just make sure that we
actually grab everything. L, L, L, L, and L on top of here. And then what I'm going to do is just press P selection
and separate it all off. Then what I'm going to
do is press control. All transforms rightly
set origin to geometry. Now finally, let's come in
and grab the front of each of these because at the moment these are definitely
not flat enough. So I'm going to grab each of these fronts like so
press control plus, and maybe Control
plus once more. And then what we're going
to do is right click and shade flat like so.
And there we go. They're looking much,
much better now from here then let's come in
and add in a modifier. So we'll bring in the bevel, we'll also put it on 0.3, double tap the a and just
look what that looks like, making sure that the bevel
is on all of these parts. Let's put it on object
mode. And there we go. We've got a much,
much better view now of what everything's going
to look like in there. And I think from here actually, because I've seen that now, I think we should actually
build in object mode. It just makes things
so much easier. All right, so we've
got that part now. Let's actually move to the
top now. So this part here. So what I want to do
is I want to come in, I want to bring in
another edge loop, so controller and bring it down to where I
want it roughly. So something probably
just at the top of here, so probably just at
the top of here. And then what I'm
going to do is now I'm going to split this off. So ol shift and click. I'm going to press, in fact, you know what, we'll
press P selection. I think that'll make it easier. Okay, And now what I'll do is we'll come in and I'll press control R. I'll press left
click and right click. I'll press Control.
Let's put this actually on Global before we do
anything else, control. And then all I'm
gonna do is move it up to roundabout here. And then what I'm gonna
do is press Enter alton and just bring that out. It wants to be quite thick this piece actually. So
something like this. And then what I'm gonna do
is bevel off this part now. So I want to come in
ol shift and click. I'm gonna press control B and bevel it off a little
bit like that. We're going to increase the
amount of bevels like so. And then left click
and then all I'm going to do now is
change the actual shape. So I want the shape to be
something more like this. As you can see, that's
looking much, much nicer. And we can also
change the distance, so I'm going to change the distance to maybe
something like that, so we've got a little
bit of an edge there. And from there then now we're
going to do the top part. So I'm going to bring
out this part here. So all I'm going to
do is I'm going to grab this Olt
shifting click again, Alan, and we're going to
bring that part out like so. And we want it out nearly
to the same length as here, because we're
actually going to put some parts on here that
are going to come up here. And finally then this
bottom part which we also want to pull
out, so ol shifting, click enter alternates and
bring that part out as well. So maybe that might be
a little bit too far. Well, I've looked
as, I've looked at that, you know what I think? Actually, that's looking
pretty nice from here. Then let's again do reset the transforms set
origin to geometry. Let's add in a modifier,
generate a bevel, let's put the bevel down to not 0.3 Let's find the right
click and shade auto smooth. And there we go.
That's that part then. All right, so now
working our way down. Let's come in then
to our Windows. So this is the main frame
going around our windows. You can see that these are split off as well, which
is what we wanted. And now we're going
to actually come in and just grab these windows and we're going to
make another frame for the inside first before
we do anything else. So what we're going to do
is press the eye button. Press it again to bring them in like so it's
going to be a much, much smaller frame, like so. And then what we're going to
do again is we'll press Y, and that enables us
to work on these. You know what, I might even just press P just to
separate them off. I think that's actually going to make it a little bit easier. All right, so these
are the main windows. Now the first thing we
want to do is we're going to need one going
straight down the middle. So we're gonna press control
left click, right click. Control left click, right click. And just one straight down
the center on all of these. Control left click, right click. Then what we're going
to do is we're going to want some going this way. So control L123, left
click, right click. Control 123, left
click, right click. I'm wondering if I can
press shift R on there. No kind, It just puts
it straight in there. Look, so control L three
left click, right click. Control three, left
click, right click. All right, so we've pretty much got all of these in and now all I want to do is I want to come in and level these out first. So straight down the
middle will be easier. So if I come into
each of these like, so I'm going to press control B, bring that back a little bit and probably bring it out
to something like that. And then now we'll
do the side part. So now we do have a number
of ways of doing this. I think actually probably easier if I just
press controls dead, go back and what I'm
going to do is grab them all and I'll be level them
all off at the same time. Because I think it will actually make it a little
bit easier for me. So let's go and do it that way. And then all I'm going
to do is press control B. Bevel them all off like so. And then I'm going
to press Enter AlternS and pull these out. And then finally I'm going to come to the fronts of these. I'll make sure I'm on face. Slight grab the front of these. So you can also
see at this point we can pretty much
do anything we want. Now enter because of the skill we've learned with everything that we're
doing, something like that. And we could even
come in and bring out each of these if
we wanted to as well, which I actually might do. I think it will add a little bit to this window that makes it look a little bit
more ornamental. So let's press Enter Alternates and bring out those
little parts. And there we go. All right, now let's move back
then to the windows. What I'll do is I'll
come to these parts first and I'll
grab all of these, the bottom and the top. And we know that we
want to grab them like that because then we can
actually split them off. So I'm going to
come in and split these ones of press
the Y button, and then what I'm going to do is just grab all of the sides. Now, work my way round. I think this part actually is the hardest part on what
we're actually doing. And then one going to do is
press and alternate again. And let's pull these out into
where I want them to go, which will be just in front of these parts here,
as you can see. All right, and now
the final part, which is these parts back here, that's pretty much
the windows done. We've obviously got this part to do which will actually sort out, but you can see
how we broke down the structure and made it very, very easy to actually
get this done. And that's what you
should be doing when you're creating
anything like this. Just break it down
into the little parts. It'll make it much, much easier. Let's press Y, and then
finally I can come in now and grab all
of these parts. Like this does make
it harder as well, Working on a cylinder
much, much harder. So let's press each enter alternS and bring that out
just in front of those. Now I can see that this top part is right and this bottom part
is a little bit too low. So what I'll do is I'll
come to this bottom part now I'll press Alt
Shift and click. And then what I'm
gonna do is press Alternate and bring it out just in front of
those windows like so. All right, that's looking
really, really nice. Now what we'll do is we'll
come back to our windows. And I think we're not
going to split this off, but I will split this part off. So I'm going to press Selection. And what that means now is I
can grab both of my windows. Hopefully press control J, and I'll join those altogether. Control or transforms
right click set origin. Set origin to geometry al
right, on the next less. And then what we'll
do is we'll start work on this part here. I think we'll split it into three or maybe one and then
Beverly out each side. I think we'll do it that way. We might need to pull this
back a little bit more. I'm just wondering if I
press alternSs from this. If I scale it, as you can see, I can scale it in like this. And then we want to press
Essence just to scale it back. And what I'm trying to do, it's pull it back a little bit further than
what it was now. If I press one, I can see now it's sticking through this
part here and this part here. So maybe sens just pull it
up a tiny, tiny bit like. So double tap the
and there we go. That's what I'm
actually looking for. To actually get these parts just sticking out that
little bit further, I might need to take it
back a little bit more. But I think at the moment I'm
happy with how that looks. All right, let's save
that our work and I hope you're really enjoyed
putting this one together. And I'll see on the
next one, everyone. Thanks a lot. Bye bye.
206. Constructing Second Floor Supports for Victorian Towers: Welcome back if you
want to blend for the environment artists guide and this is where we left off. All right, so now let's
come to these parts here. So these parts in here, what I'm going to do is I
want to put an edge loop in. So control law and I want it
going up like so left click, right click, control
left click, right click, control left click, right click, control left click, right click, and control left
click, right click. And from there then I'm
just going to grab each of these and I'm going
to be level them off. So grab each of
these. I'm going to press control B
and pull them out. Now what I want is
them to be thinner on each of these sides rather than the front like that, basically. And then what I want to do is I want to pull this out now. So I'm going to press
Enter Alternates, and let's pull it out. Not that way to
round about there, which is a little bit
further than these windows. Then what I'm going
to do is I'm going to grab the backs now
in face select. So I'm going to come
in, grab this back. We're going to now
pull these parts out, not quite as far as the
outer bits go. Grab these. Finally, where? This one. This one. And I want to grab the inside
of there to see that one. I'm actually going to
come in, put my x ray on, and now I should be
able to grab this one. Here, there it is. All
right, let's turn that off. And then what I'm going
to do is I'm going to press Enter Alternates and bring these out to
the sides of here. I'm also thinking I'm going to be happy with
that because they've got a little bit of
a gap down there, as you can see, because of how they've actually
been pulled out. I'm just wondering if I want
to make them a little bit bigger on the S and then maybe bring
them in a little bit. Just wondering if
I want to do that. Let's have a look what they look like once they're
actually beveled. What I'll do is
control or transforms. Add in a bevel, put it on naught
point naught three, right click, shade auto smooth. And the reason they're a
little bit out by the way, is because we made
these a little bit smaller and that's why it's
made them a little bit out. So what I can do,
I could come in and grab all of my windows, for instance, and pull them out a little bit,
so I could come in. I'm just wondering if I
can actually do this. So let me just see if I put
this on individual origins. If I put this on normal, is it going to allow
me to pull this out? You can see it's pulling
it all kind of over the place and that's not
really what I want to do. So I'm just wondering if I should make them
a little bit bigger. If I make this a
little bit bigger, let's see if we have
it onto medium point. Let's see if it's easier. You can see there now
they all actually fit. It's just the fact
that I want to them a little bit further back like so. So you know what I'm going
to do. I'm going to grab these and we're going to actually make them
a little bit bigger. Because I think
they're a little bit moving back a bit is what I
think. Let's grab them all. So I think we created them a little bit
bigger in object mode. I'm not sure about that.
But let's have a go. We'll make them a
little bit bigger. So I'm also looking, you can see here we actually not really
facing the normal. Yeah. I'm just thinking the
best way to do this now. You know what, I think
it's going to be probably grabbing the inside of each of these, inside of here. Let's try this. We'll make
those a little bit bigger. And I'm just wondering if I
can pull them in on the X. So let's just come
in and put it on individual origins and Y or Z. Let's try that. Yes, that
is what I'm going to do, G and Z, and we can pull
them in a little bit. All right. We got there, I
knew we would get somewhere. I knew we'd be able
to do it somehow, and that's the way that
we're going to do it. So we're going to come in
to each of these ones. Because I don't really
like that gap down there. So I'm actually wanting to fix that because it's
quite a big gap, that it's kind of ruining
the overall appeal of it. So I've grabbed all of
these now from here, and then what I'm going
to do is press G and Z. And now I'm going to pull them in hold in the shift button. So let's pull them in, yours to the sides of them like so. All right, now, there we go. Let's press control A again. I'll transform, set
origin to geometry. Double tap the A,
and there we go. That's looking much, much
better now as you can see. I'm much, much happier
with how that looks. We've still got this one coming out a little bit further
than the other one, So yeah, that's
looking pretty good. All right. Working
our way up then. Now what we want to do is we're definitely going to
want one in the center. So we can see our center
point is round about here, so this is going to be our
center point from here. What I can do is I don't want
to actually use this one. But what I do want to do is I want to base
it around this one. So in other words, level
it up with this one. It's probably going to be easier actually if
I just press Shift, bring it out and build from this build at an actual angle. But it does make things harder. So it's not necessarily
always the best way to do it. So what we're going to
do is we're going to use this for the scale.
So I'm going to press P. Selection. So I'm going
to come to it then. Control all transforms,
set origin to geometry. Shift S, cursor selected. Let's put this onto global. And then what we're
going to do now is make sure that we're on individual
origins from there. Then let's press Shift. And what we'll do is we'll
bring in a cube. We'll make the cube obviously
march much thinner, so I'm going to press and
y make it thinner again. And then, and because we know that's the scale
that we actually need it. So from there then let's
make it roughly the round, about the right size and X, let's pull it out like so. And then from there
what I'll do is then I think I'll make it a little bit
thinner, so S and Y. Now let's think
about the top bit. So what I'm going to do
is I'm going to grab the top, I'm going
to pull it down. And then what I'm going
to do is I'm going to press Shift and D, And then we're going
to press and pull that up to where it needs to go.
I'm going to grab the top. Then I'm going to press,
I can just pull it out. Actually, I'm going
to pull it out. I'm not sure actually where it's going to go on the top yet. I just need to get
it into place first. I'm just getting the overall
sizing of this right now. Then what I'm going to do is I'm going to bring in another one. So what I'll do is I'll
press Shift and D, and I'll pull that to the front, and then I'll pull
it to the back. And then what I'm
going to do with this is I'll grab the bottom now. And I'll bring it
over down to here. And press and X, bring it in a little bit, and then we'll bring
it over to here. Now, of course, this
needs some thickness, so I'm going to press L, I'm going to press E.
I'm going to pull it back, so some thickness. I think that's a
little bit too little. And then what I'll do is I'll
grab now the bottom of it. So I'll grab the bomb,
pull that into place, and then I'll come
in with my x ray. Grab this one here. I'm
going to press S and X, bring it in a little bit, turn it off, and there we go. Now we're actually
going somewhere. Pull it up. At this point. Now I can probably
get rid of this part, so delete and then I'll
come into this part. And what I'm going to do is
I'm going to press the eye. Let's reset the
transforms first just to make it a little bit easier
for us. Grab this one. And then I'm just going
to press the eye button. So, and then let's pull it back, pull it back into place. We'll want it something like this is looking pretty good now. Before we do the rest of it, let's now put it into place. We've already got the
transforms there. All I need to do now is grab this one where
the center was. So the center one is going
to be round about there. You can see that's round
about the center of it. I think this will be
where we can base it off. So we'll base it off
of V going up as well. Because if I come to this one, you can see it's more
or less in the same, although it's pulled
out a little bit. So we'll base it on there. What we'll do then
is come to this one, shift S, cursor selected, come to this one and then
what I'm going to do is shift S and selection to cursor. So let's pull it
up then, like so. And let's now rotate it round. So if I press seven, I want to rotate it round, so I'm going to hide
this part first. And then I'm going to
come to this part. And you can see now it
can actually rotate it on the Z and get it roughly in the position that
it wants to be. So there you go. Now
you can see it's in a nice position apart from the fact we
have to pull it out. So now if we go to normal, we can actually pull it
out into place like so. And from here then we can
actually build on this more so l tag, bring
back everything. And we can also see from here where we need to
build this out to. So I think this is actually
coming out far enough. I'm happy with how it looks. You can see it's
coming out this far. Maybe we should bring it out
a little bit more like so. And then what we'll do is we'll come to the
back of it then. So grab the back of these parts and pull them into
place like so. And then what I'm going to
do is grab the front now. So I'm going to grab this front. I'm going to go back
to Global again. I'm going to press
and bring it in. And then what I'm going to
do is press and bring it out like so finally I'm just going to level off these
edges here, I think. So I'll just grab these, press control B, Let me see if I can actually level
those off a little bit. And if not, never mind. So let's now cam over to here and what I'm going to do is I'm going to bring them up. Let's press tab right, plate shade, auto, smooth. Yes, there we go. That's
what I'm looking for. All right, so this is
looking pretty good now. How do we get this
to go around there? Well, luckily for us, we can actually use this part here
because we kept this part. Which means I can press
Lt shifting click, I can press shift S, cursor selected that then should put it right
in the center. So you can see now it's
right in the center of here. Which hopefully I should
now be able to grab this. What I should be able
to do, he's press a little sideways V and
go to three de cursor. And then I sure be able
to now press R and Z and rotate this around this part as you
can see perfectly. All right, so that
looks pretty good. Let's press Shift and D then. And then what we'll do is
we'll press Art and Z. And I think I'll move
it to nearly this end, so if I move it
round about there, so it's just over there. And then what I'll do is I'll now I want to put it
round to the other end. So I'm going to press Shift
and D, and then Art and Z. Let's put it round to
the other end here, so let's put it around about
the same distance away, so Art and Z roundabout there. And then what I'll do now is I want two more going this way. So I'm going to
press Shift and D, and then R and Z, and Jaws try and
line these up Now. Now there is another way
we can actually do this. We can also, you know, rotate them round and give them a 40 degree angle instead, or rotate them by 40. So let's actually try that
because that's something that might make them a
little bit more even. So if I grab this
one, for instance, shift D and then R z
40, Let's try that. That's a little bit too much, so let's try r z 20
and then shift 20. Shift 20 and shift 20. And there you go,
We've got pretty much the same thing as what we're
going for now with these. All we can do is shift
D z -20 and then shift D Z -20 shift D Z
-20 And there we go. Now you can see we've got
them roughly around the same. Now, if you're not
happy with those, we can actually grab them all
and rotate them all round. But you know what, I think I'm actually going to leave
these as they are, so I'm going to grab them all. I'm going to press control G
to join them all together, little V. Then I'm going to come down to put it on
individual origines. Again, control all transforms. Right click sergent geometry, adding the modifier and
we're going to generate a bevel nought point
naught naught three. And there we go. That's
the next stage of it done. So we've got everything
now lining up. We just need now this top
part putting on there. And from there then
we can actually keep working our way up and
we're on to the outside. So the bigger part now is
what we're actually on. All right everyone.
So I hope you enjoyed that and I'll
see you on the next one. Thanks a lot. Bye bye.
207. Crafting the Second Floor of Victorian Towers: Welcome Macro.
Everyone to Blender for the Environment
Artists Guide. And this is where we left off. All right, let's come in now and get rid of this part here. I don't know what that
is. So delete and faces. Let's get rid of that. Let's now think about this bottom section. So what I'm going to do
is I'm going to press control law, bring it down. Now the other thing is about
this bit now is we've got, we've basically got the
whole of the front of it, so in other words, it's going all the way
round to the back. So we just need to be
very careful when we're measuring here
that it's the same here and the same this side. You can see it's
a little bit out. And that's going to be a
little bit of an issue for us. So I'm just looking to try and level this up a little bit
more before moving on. So what I'm going to
do is just press L, and then I'm going
to press R and Z and just move it around, getting this one here
more into place. I'm looking at this
one and then I'm looking at that
side and that side. And it's still a
little bit thinking that I'm probably going to have to level these up
a little bit more. Why? I'm going to press Art and Ad and move them like that. So I've got this edge now. This edge, and they look
just about the right length. This then is nearly
in the center. Let's put it in the
center a little bit more. All right, We've got
that edge and that edge, and they look actually
better than what they did. Because the center,
we're never going to really find what the centers, it's really around here. I'm going to think,
let's have a look. I've just got to be
really careful about these edges now because of
the size difference on them. I think we can work with this. I'm going to need to level
them a little bit more. I'm just wondering whether
I want to bring in another cylinder instead and build around that because
that then will make it a little bit easier
for me to work with. I'm not actually sure what I want to do with
this at the moment. You know what, I
think we actually, we've got this one and this one. We might be a little bit
out on these as well. Let's get this into the center. First of all, I'm looking at that side, I'm
looking that side. I need to spin it around
a little bit more. So I'm going to spin it
back a little bit like so. And then we go there level. And then what I'm going to
do is I'm just going to come down and look now at these two. If I grab this one and this
one, but not this one. If I grab this one
and this one last, and then what I can do is
I can grab all of these. I'm just wondering whether I
want to spin them around so they're a little bit more even with this side and this
side more in the middle. You know what, I'm not
going to worry about, I'm not going to
worry about, it's too much worrying about
it sometimes. So what we're going to do is
we're going to actually come in and split this off. So where do I actually
want this going up to? I'm going to want
this part here, so I'm going to want
this part going up here. So let's press control lot. Let's bring in another
edge loop here. And then we're going to want
a top part which is going to be all the way, so I'm going to want
one here and one here. So control, let's
bring in another one. Let's try that again.
Control, there we go. And let's bring it in
level with this one. And then what I'm
going to do now is I'm going to actually
come to my top, so I'll grab my top Press
control control plus. And then what I'm going to
do is press P selection. And the reason I'm
doing that, by the way, is because I have a center
part in here which I can rotate things around from
if I actually need to. So from here then let's
hide this one out the way. And then what I can
do now is I can come in and get rid of the
parts that I don't need. So you can see Alt Shift click, you can see all of these parts. We can't see, same
for these parts. Alt Shift click and let's
press Delete and Faces. And let's now come in L
and delete and vertices. And then we're left with
something like this from there. Then that means now I can come in and make
this part here. So I'm going to press
Alt Shift and click, I'm going to press
Enter Alternates. And bring this out, Jaust in
front of those parts there. So you can see Jaust in front, maybe that's a little bit
too much, so alterns. We can also see that
they're not quite on this. I'm going to press control plus, and I'm going to pull them
down so the jaws don't on top of the. Don't worry. We'll do the back bit
now. We'll bring that in. So I'm going to
grab each of these. I'm going to press the button. You can see that's not
coming in the way I want it. So I'm going to
press alternates. Let's bring them in. No, also
not the way that I want it. I'll press and pull those. So then what I'll do is I'll try and bring
it in this way, grab all these alternates, and let's even bring
it in and there we go, bring them back to
there, and there we go. Alright, that's looking good. Now let's think about This part here. So
what I'm going to do, I'll put a little bit
of relief on here. Control, bring it up to
Jaws, this corner here. And then I'll press control, bring it back so
it's Jaws one bevel, bring it down so
it's going to be sat on top of there like so. And then press Enter alternates and just bring it
out a tiny bit. So now with this part, I'm going to bevel it
off this part here, I'm going to press
control, bevel it off, bring in a few bevels, so then we'll come down now. And what we're going to
do is we'll move down this one like so, and that's how we want it,
just something like this. And then from there then we
can actually put in one more. That's going to go over the top of here. Let's press control. Let's bring it down
to here, maybe. Let's grab this
one here like so. Enter alternates, bring
it out and there we go. Now we've actually got something that we can put
these on as well. All right, so far so good. Now what we need to think about is the center part of here. So we need to think about where we're actually
going to put this. So I think it's going to be, I need another one that's
going to come round to here. If I press control,
I'm going to bring one that's roughly around
this point here. And then from there,
what I can do is I can build out this part
on the front of here. So what I'm going to do is I'm going to show you what I'm
actually trying to build out. So if I come from here and here, I want to build out a part
that's going to go up here and rounded on the top of here. That's
what we want to do. So I'm going to, I think
the easiest way to do this is to split
probably this part off. So if I split this
part off here, and then what I can do
then is work just on this bit and then kind of fill in the back once I've
actually done it. So let's actually
do it that way. So what I'll do is I'll come in, face select, grab these
three, and these three. And then I'll just
press Y like so. And then shift H, hide everything else out
the way from there. Then I'll come in and I'll
grab these two edges. I'm going to press control
shift and be level those off. And I don't want them like that, I want them actually rounded, so I'm going to round them off. So let's come in and
bring them in like so. And then I'm going to
bring in an edge loop. So control left
click, right click. Grab the center then. And then let's put
proportionality on, let's put it on sharp. And let's pull that up. So, and that is exactly
what I'm looking for. All right, from here
then we're going to actually bring these in. First of all, let's press Tab. Let's press control
all transoms, right clicks at
origin to geometry. Now let's come to this part, grab it all, press the eye
button and bring that part in. All right, so now what
we can do is we've got this part on here. I'm
going to lift these up. So I'm going to come
across Alt, shift click, pull them all the way up
without portion editing on. Pull them up
something like there. And then what we'll do
now is this part here, we can work on this part here. I want to be careful
because I also want to make sure that this is straight. So
we'll do that first. I'm going to come
in K for the knife, tool A going across straight. And then on this side A going
across straight like so. And enter. And now let's
come into this part. So what I'm going to
do with this part is I'm going to bring this in, shift, select all these, press the eye button
and bring those in. So, and then on this
part we're going to do a little bit more of
a relief as well. So I'm going to bring this in, so I'm going to press Shift D. Bring it in
with the S button. And then really I want
to pull this out. Can I actually pull
it out with normal? Yes, I can. I can pull it out. Something like that. And now
let's shape this part here. So what I'm going
to do is I'm going to come in, grab both of these, control shift B and bring them back to
something like that. And then change this. So it's looking a little bit
different to the other one. All right. That is what I want. I think I've got pretty
much everything I'm going to do with this now. Okay. So what exactly
have we done there? So what I'm going to
do is I'm going to now come in and I'm going
to split this off, I think. So I'll grab this one. Coming all the way down to here. I'm going to press Y, and then I'm going to grab this one. Come all the way down
to here, press Y. And then what I'm
going to do is grab this all the way over to here, Press the Y button, like so. And then I'm going
to split these off. So LLP split them off. Now let's say press Tab. Oh, bring back everything, and this is what we
should be left with. And you can see at the moment it looks a little bit of a mess. But we're gonna tidy it up. We're gonna put
something behind here, so don't worry, it looks
a mess at the moment. But trust me, it's gonna turn
out really, really nice. Alright everyone. So I
hope you enjoyed that. I'll see you on the
next one. Thanks a lot. Bye bye.
208. Designing the Main Structure of Victorian Towers: Welcome back everyone. To blend for the environment
artists guide, and let's come in now and
start work then on this part. So first of all, I'm
going to come to this part and what we're
going to do is just make sure that all
of your transforms are reset like so adding a modifier and we're
going to bring in a solidify, let's bring that in. Let's pull it out
a little bit then. So something like
that, we're going to bring it up to this edge here. So right up to this edge.
Something like that. And then what we're
going to do now is we're going to
come to the next bit. So this bit on here, I'm going to split it
off first of all, so L and L, P and selection. So, and then what I'm going
to do is I'm going to come back to this part now and I want to bring these
parts out now. So all I'm going to
do is shift select. Control select, and I'm going to come to this
one. Shift select. Control select.
Press the Y button, and then I'm going
to grab this one. And this one I'm
going to press E. Then enter alternates
and bring this one out. So we want it coming out just within just a little bit in to the one we've already
created as you can see. And then finally
what we're going to do now is we're
going to come to this part and I'm going to basically bring
this out as well. So I'm going to press
Enter AlternS and bring this part out maybe even a little bit further
than the other parts. So like so. And what
we can do now is well, first of all we can write
click shade, auto smooth. We can see we actually
have a problem there with the
smoothing on that one. It's probably because
we haven't put in enough edge loops and it's
bending a little bit. So what I'm going to do
is I'm going to come in and see if I can actually
straighten that out. So I'm going to grab
this part here. If I press one, I can see then where
it's going to be. I'm going to press
K, grab this part. And then I'm going
to press A, just to make sure it's
going straight down. Slot it in there, press
the end to button. And you can see now it's actually starting
to fix that issue. So now we'll do the same here. A bring it down slot into place. Press the end button. And now, there you go. That
is nice and smooth. Now let's do the same on
the other side just in case that also ends
up with an issue. So we'll grab this one.
And we're only doing the front because no one's
gonna see the back anyway. Grab it down to
there, press Enter. And then the same on this one. So a grab it down
straight down to here, press the end bot,
and there we go. All right, so that's
looking pretty nice. And then from here
we're going to actually put on a
logo as you know. What I'm also going
to do though is I'm going to grab this
part now at the back. So I'm just going to
come to this part here and then what I'm gonna do is I'm going to pull it forward. So hopefully I shall be able
to pull it forward like so. Which will mean
then it's a little bit further forward
than this part here. I'm also going to come in and
delete this part other way. So delete and faces,
Delete that out the way. And then finally I'll
come to this part here. So the back part, press
alternate, bring it back. And then what I'm going to do now is bring this part down. So let's grab all
three of these. Let's press and Z, and just pull it down. So zed pull it down. Maybe go all the
way down to there. It won't really modify. Bring it all the way down P, let's put it on
Global. There we go. Pull it all the
way down. You can see we can bring
it through there. Let's bring it up just
to that point there. In fact, you know what, I'm just going to
see where it is. Just want it below
there as you can see. So that's looking
fine. Now let's turn that off then.
And there we go. That is what you should end
up with, something like this. And I think that's looking
pretty nice actually. All right, so now for
this bit on here, what I'm going to do now
is I want to bring it in. So basically if I
grab all of this, I want to actually bring this in a little bit and then bring
this back a little bit. So what I'm going to do is
I'm going to split this off. First of all, so I'm going to come, I want this bit down here. So all I'm going to do
is I'm going to come in, grab this top shift,
click, shift, click. You know what, I'll have to hide this part out
of the way first. Let's hide it out the way. Then let's come
back to this part. And then Alt shift click, and then what I'm
going to do is right click and mark a Sam. And from there then I'm going
to grab all of this part. So if I press L like, so I'm going to split this
off with and selection like. So now I want to scale
it from this point here. So what I'm going to do
is I'm going to grab this control all
transforms right click set origin 23 cursor. And from there then I should be able to scale this
in a little bit. So if I press S now I
should be able to scale it in like so then make it
a little bit taller. So S and Z, just so
it slots into there. And now bring back
the other part. So I'll take, bring
back the other part. And now you can see I've got
plenty of room to work with. I can actually pull
this back now. So what I'm going
to do now, I've still got my Slidify on. I sure be able to bring this
back into place like so. And then what I can do is
I can bring this out now, make it much, much thicker. You know what? That's
gone the wrong way. So I'll pull it out here, and I'm jaws looking if
I can bring this back. Yes, there we go.
That's what I want. I'll bring it back into
place, then bring it out. Like so. And I'm thinking
that now looks much, much better like that, just in front of that
part as you can see. All right, let's
press control then. On the Solidify, we've
got that and now let's work on this part
going around here. So I'm going to come
to this part first. This part here, I
want to lift up, because I want it to be, I want this part to be
roughly, let's have a look. So we've got our
bottom bit, we've got our top bit, and
then we've got this bit. I think I'm going to
lift both of these up. So out shift and click, bring them up just so
they're around there like so then what I'm going to
do is I'm going to press control B and pull them out, bring back the
bevel a little bit, so I'm going to pull them
out to something like this. And then finally
what I'm gonna do is I'm going to ad in
another edge loop. So control left click, right click. And then
same on this one. Control left click, right click. Grab them both can't control B. And then pull them out like so. Press control plus. And then what we're going to do
is we're going to press Ls and pull those out just
so there, behind there. So you can see here, we really don't want them
coming out so far, so I want to pull
them out there. In fact, I need to press old. They're not working,
so I'll just go back and then what I'll
do is press old S now. And there we go. So I'm going to pull this one out to
round about there. And then what I'm going to
do is get the center point, the center 0.1 So I'm going
to come from here to here. And then from here to all
the way round to here. And then again we're
going to press Ls and then we're going to
pull this part out like so. And there we go. All right, now one thing you
can see is that they need kind of pulling
in a little bit. So we'll do that as well. So all I'll do is
I'll grab this point, this point, this
point, and this point. And I'll try and pull
them in a little bit. So I'll grab this
point, this point, this point, and the
middle point here. And then I'll press and X, And let's see if I
can bring them in. So you can see here, not
quite what I wanted. You can see they're not coming
in the way that I want. Let's put it into
medium point as well. And let's press the S button. And there we go. We can
bring them in that way without any real distortion,
and that is what we want. All right, so that's
looking good. Now what we need to do is
we need to think about these little kind of slabs that are going to
come down here. We also need to think about
beveling all of this off, but let's deal with
the little slabs first that are going
to come down here. So they're just
going to be simple, you know, simple
structures on this part. Now, I'm just looking if I can use these that
we've already got. I think I think I can. What I'm also looking for, I'm thinking that this is a little bit out for
me at the moment. I'm wondering if I can rotate it round a
little bit. Let's grab. What I'm going to do is I'm
going to grab this and I'm just going to see if I press the little sideways
individual origins. I'm going to press Art and Z. What I want to do is
I want to rotate it. Let's press a little
sideways V again. Three cursor, there we go. Let's rotate it round. Then from here what I'm looking
for is to rotate to get it more into the middle
life soil because I didn't see that I've actually
messed up there. So I've messed up a little
bit there now, no problem. Because you know
you're going to mess up sometimes it's
just going to happen. But I think now that's
looking bed because it's more kind of in the center. I'm just looking
where the center is. Very hard to understand where the center is, but
let's have a look. If I grab both of these
and you can see here, now this looks roughly maybe
a little bit more so art and S D like so and I think that's
more in the center now. Rather than trying to
get this right again, what I'm going to do
instead is I will come in, I will grab this one
going from here, this one going all the
way round to there. Press Selection. And then what I'm going to do is just delete this out the way. So delete, and I'm
sorry about that, but I'm just going to
have to do this again. So what I'll do now is I'll
bring this all the way down. And I actually think
it's probably going to be better doing
it this way anyway. Bring it all the way
down like so making sure that you can see that these got a little bit of
lump sticking through. We'll sort those
out in a minute, so don't worry about that. Let's first of all
get these parts in. So control law bring it up and this might be
the only problem in that we just want to
make sure that we're not going to be
doing this in here. So we're just going to go
up to this point here. So what I'm then going to do is control B, bring this out. Control law, bring
in another one. So left click, right click. Control B, bring it out. And now from here
what I'm going to do is I'm just
going to make sure then that I select this
going all the way over here. So I can select this one
going all the way to here. And then select this one
going all the way to here. And you can see it's a
little bit out still. And I just need to be very careful that I'm not going
to be going over there. So I'm going to select it, going all the way over to here. Press control plus. So we're gonna press
control plus. Like so. And then all I want to
do is select these three like so and you can see
got a bit of a problem. All right, so I don't
really want that. So what I'm going to do is I'm going to bring in
another edge loop, going up here, move it across, ride about to there. And let's try that
once more then. So what we're going to do from
here all the way to here. From here, sorry, not that one. From here all the way to there. Press control and there we go. Now let's try that again. So enter al ness and
let's bring those out. So we're going to
bring them out, so look a bit more than that,
so we'll try that again. So alternates, bring them
out to something like there. And then what I'm going
to do is select this one, select this one, select
this one, select this one. And then I'm going to
press Enter Alternates, and bring them out
that little bit further without sticking
through to there. All right. Now we can see
Dad is more in the center. Dad is looking better
than what it had. It hopefully I'm not going
to have to do again. So 1234 windows
right in the center. All right, So sometimes you
can see we make mistakes, but as long as we
know how to fix them, everything should work out fine. So now on the next one,
what we'll do is we need to bring in the wooden slats
that are going to be here. I'm just going to have
look, there's 1123456. Well, 5.5 really. And then this side
there's going to be 123,455.5 You can see it's still not really fitting in on this part for
these wooden slats. So they're going to be a
little bit uneven as one. I'm saying I think we should
actually wit with that because because of how far
forward this building is, it's never going to look even. We don't need to make it,
you know, absolutely even. But what we do
need to do is make sure that it looks right still. All right, everyone. So
I hope you enjoyed that. I'll see on the next one.
Thanks a lot. Bye bye.
209. Detailing the Second Floor of Victorian Towers: Welcome back everyone to Blender Full the Environment
Artists Guide. And this is where we left off. All right, so now
let's think about the wooden slats that we
want to bring in here. So I'm thinking that I will bring them from
this part here, so we'll do everyone here. So like that, leaving
this gap here, I think. And then we'll come to this one, we'll bring them out like this. And again, we'll
leave that gap here. From there then let's actually
see if fire press control, I can bring them
out then like so. And then you can see that we've actually leveled off
these parts here. Maybe it's better if we actually come in and
separate this off. So if I separated this off
with Olt shift and click, and then what I do is I press selection like so. And
then I come back to this. Now press control
all transforms, right clicks,
origin to geometry. And now we should be able
to get these actually, probably more in line actually. So we can see here, no, you know what, we'll
leave it like this. What we'll do is then we'll come and do what we was doing. So I'm going to grab
this one. This one. This one. This one,
and then this one. This one. This one, and
this one. And this one. I'm going to press control, pull them out like so. And then we're going to
press Enter alternates and pull those out
into place like so. And that is what
I'm looking for. The only thing is I want to probably pull these
up a little bit so they're actually beyond
this part and then pull this part out a little
bit. We'll do that now. So what we'll do is we'll come to the tops of each of these. What we just have to be
careful is if I pull these up, you can seem a little
arrows over there still. Let's press a little sideways
V, Individual Origins. Yeah, that's what I want to do. I want to pull
these out a little bit and then decide if I
need to pull them back. Or I could come in, put an edge loop
down here instead, and then pull these
back a little bit. Let's try that,
actually. So what we'll do is we'll press control. Er, bring in an
edge loop like so. And then we're going to
bring you up maybe to there. And then what I'll
do is press control, Bring in another
edge loop like so. And now let's see if I can grab the tops of these and if I can press G and follow
the line of these, we're just going to
grab all of these. And then what we're going to
do is we're going to come now and put it onto normal. And then we're going
to come and put it onto individual origins. And then we're going
to press and Y or X like so and pull them
back holding the ship un, like so into place. There we go. Now we missed some here. Just wondering why those
didn't get missed. Let's try that another way then. So we'll grab all
these, we'll press Lns, and that's
not going to work. We'll press the burn, and that's not going to work. Let's try a medium point. Medium point, We'll
put it onto this. So we'll press the
little V again. Three D cursor, and then we'll
press S. And there we go. Now we can do it
that way instead. And actually just
looking around there. Yes. And I think that
actually looks pretty good. I'm just wondering about this. So what I'm going to do
now is just grab each of these on here and
make it a shop. So let's right click and mark
a shop. And there we go. I think that then double tap the is looking pretty
nice actually. All right. I'm happy with that. Now what we need to do is we just think about our top bit. And for the top bit I think
what I'll do is I'll create one because they're not quite level with this as you can see. And what I want to do is I want to create a part that's actually going to go into here and
then up to this top bit. So first of all,
before we do that, let's bring in another top bit. So I'm going to
press Control Law. I'm going to bring this down then to somewhere,
something like this. And then what I'm
gonna do is I'm going to press Alt Shift and click. I'm going to press
a little sideways, V again, make sure I'm
on Individual Origins. I'm going to press
Enter AlternS, and let's bring that out where
we want it. So like that. And then again, we'll bring out, I think we'll actually bring out just the bottom part on here. So control law,
bring in an edge, lo bring it down a
little bit like so. And then what we'll do is
we'll grab the bottom part. So Alt Shift and click Enter
alternS, bring that out. So there we go. Now we can see it sticking
through here a little bit. Let's go back a little bit. So let's press alters. Just go back a
little bit like so. All right, now from here
then we can see that this part here isn't quite level with that
now. So we'll fix that. So what we're going
to do is we'll come to the bottom of here. So grab the bottom, going
all the way through, press the S part
and just bring it back into place like so. And now finally, let's bring in the little wooden part that
we're going to have on here. So what I'm going to do is I'm going to grab the top of here. So this top part here, press shift S St selected. And then what I'm going to
do is going to press shift A. I'm going to bring in a cube. So bring in a cube. I'm going to rotate my cube
rounds just so it's level, so make it smaller
first, rotate it round, so R and Z just get it as, even as I possibly can. So if I come up to
underneath here, you can see that I'm kind
of a little bit out there. That looks about even. And then what I'm
going to do now is pull this back a little bit. So to do that, I'll make
sure I'm on normal, so it's best to work on normal. Let's grab the front face here. And then what I can do
with that is now I can pull that back into
place like so. And then what I can do
with the front is I can pull that back into
place like so. And finally then I can
pull this top part up into where I
actually want it, which will be something
roundabout there. Then let's grab the
bottom part now. So we're going to come
in, grab the bottom part, and I'm going to pull that
down then into this part here. So let's turn that back off. Let's pull it down,
and we're going to cut this part
away. So don't worry. We just want to kind of
level it out a little bit. So I'm going to
have it like that, and I think that looks good. What I'm going to do
though is bringing another edge loop onto
the top like here. And then I'm going to grab
this now Alt Shift and click Enter Alternates and
bring it out like so, making sure offset even is on. And there we go. Just something like this is what
we're going to have. Now what we're going
to do is we're going to move this to the side. So first of all, I want to get my cursor
right in the center. So again, we'll come
to this part here, we'll come right
to this part here. Press Shift Des,
cursor selected. And then what I'll do
is come down to this. Now I'm going to also, then what we'll do is we'll
press a little sideways. In fact, you know
what, we'll press. Control all transforms right clicks the origin
to three D cursor. And now if I duplicate this
with shift D, Art and z, we should be able to move this
now around the side like. So I'm looking now, where is it going
to come out to? And we can see it's a little bit too thick at the moment.
Now I've got a choice. I can either pull
this out a little bit or pull this back. I think I'll pull this back. So what I'm going to do is
just grab the front of here. So just this front. And I'm going to pull it
back a little bit like so. And let's try that again now. So if I grab this shift or
Z, move it to the side. So let's move it over to the side and let's have
look out that's fitting in. Yeah, and that's fitting
in much, much nicer. Al, right now we've got that. What I want to do
is now I want to move it a little
bit to the side. So on Z I want it kind of
in halfway point like that. And don't worry, we're
going to cut this out. So we're going to cut that out. That little part
that's there but one that we want to do
now is grab it again, shift D and then and Z. And move it to the other side. Now just so it's in like the other one then we'll do now is move it like
20 degrees or something. If I press shift
20 and then shift, maybe that's not enough. Let's delete that.
Let's come back. So we'll press control Z, and then we'll press 15. Let's try that.
No, let's try 17. Yeah, and I think that's
better like that. So shift D, zed 17. Shift D, zed 17. And do I need one more there? Shift D, zed 17. You know what, I
think I'll leave it like that and then
we'll go the other way. So we'll grab this one shift D, Z -17 Shift D, Z -17 and then shift
D z -17 There we go. That's looking pretty good. Okay, so the last
thing is though, we've got this
little bit in here. As you can see, it's stuck
through a few of these. We don't really
want that, so I'm thinking we could just pull
all of these out a tiny, tiny bit, or we can bring this
part back in a little bit. So let's grab all of this with Olt shift and
click going this way. So Ol shift and click
go in this way. And I'm just looking, it's on here and we
don't really want that. So what I'm going to do
is just put my X ray on. I don't want to minus this
off. So you can see here. Don't want this on all
the way over to here, Minus this off,
going all the way. Oops, let's try that again.
Let's double tap the A. Let's go again. So
we'll go this way. Old shift and click. Come on. Not that way over here. Yeah, but we don't want that one in because we've got X Rayon. It's making it a
little bit harder. Let's try it going
here, there we go. That's what we want. Now we
want to do is just shift, select each of these off. And I also want to make sure that I'm just
selecting this part. So now, there we go. That's what I want. All right, from there then we
want to take this off. And then what I want to do is I want to pull it
back a little bit. Alternate pull it back a little bit so we haven't got any of those sticking through. And now you can see D
is looking perfect. All right, so all of
this is looking perfect. What we'll do then
on the next lesson is we'll get rid
of this part here. We haven't actually, we've got a little bit sticking through
here, as you can see. Not on this one. So what we'll
do is we'll just get rid of this little bit here.
I'll just cut it away. It'll just be easy
enough to do that. And we'll get this
part cut away as well. All right, let's
save that our work. And I'll see here
on the next one. Everyone. Thanks a lot. Bye bye.
210. Initiating the Top Floor of Victorian Towers: Welcome back everyone. To blend for the environment
Artists guide. And this is where we left off. Now let's come in and what we'll do is then we will get rid
of this, like we said. So to do that, all I'm
going to do is I'm thinking the easiest way to
do it probably going to be, you see, it won't
work with well, it will work with the bullion. Yes, it will work
with the bullion. It won't work with the bicect. I think what I'll do is I'm just thinking the easiest
way to do this actually probably to use this. Probably to use this. Make it a little bit bigger and
then cut it away. We'll do it that way.
What I'll do is I'll come down to here,
grab this one, come down to here, and
then what I'll do is I'll press shift D, and
then I'll pull it out. And I don't want to
pull it out like that, I want to pull it
out on medium point. So then what I want
to do is press E. Can I actually pull it
along the Y? Yes, I can. Then what I'll do is I'll make
this a little bit bigger. You can see these aren't joins, so let's come in Mesh. Cleanup. Merged by a
distance two verts, which means now I should be able to select the
whole thing like so. And then what I'm
gonna do is I'm going to make it a
little bit bigger. And finally, then let's
join it all together. If I come in, I'll
join this one. This one, press the F and then will also do is
I'll grab the whole thing. Press P, selection, split it
off, and then I'll grab it. Shift and H, hide everything
else out of the way. And then what I'm
going to do is I'm just going to grab this, press the F, and grab this one. Press the F. I know it's a little bit lobsided.
Don't worry about that. Because as long as it cuts away that piece of
wood that we've got, it should be absolutely fine. So what I'm going
to do now is I want these three parts and I'm
going to join them together. We have control J
like so I'm going to press control all transform
set origin to geometry. And then what I'm
gonna do now is I'm going to try and
booling them off. So generate Boolean and Boolean, it's going to be
this here like so. And you can see there, it's done actually a pretty decent job. You can see probably
going to have to pull my Boolean
down a little bit, so I'll just come
into the bottom. And then what I'll
do is I'll pull this down a little bit like so. And now we'll go
back to these parts, and now you can see it's booling them off absolutely fine. All right, from there
then let's press control late, and
then we can come in. Now delete the boolean
and there we go. It's looking absolutely perfect. All right, so now before
we start this top part, let's come in and make sure that everything has a bevel on it, so you can see all
the way up to here, everything's got a bevel on. And now we're starting
on this part. So you can also see
on this part here, we do have a little
bit of a problem. And I'm just wondering if
I press shift H. Yeah, we've got a little
bit of a problem here, so let's fix that. Delete and Faces
and there we go. And I'm also wondering
about the insides of here. They also look a
little bit of a mess. Now the thing is we're not going to see the insides of here, so we might as well just
come in and clean those up. So delete faces.
Let's just come in, clean all of those up. And delete and faces. And we'll clean this up as well. Delete face, and this part
here as well. Delete faces. And we've got some
edges there as well, which we don't actually want. So we'll just come in
and fix those as well. So dissolve edges or delete
edges, Let's try that again. Dissolve edges. Delete
edges, and there we go. Sometimes you'll have to delete
edges a couple of times. I don't know why that happens, but it does, so just
take that into account. All right, let's come in there now and do the same
thing on here. So I'm going to delete
faces and then just work my way around
clean all of this up. I think it's very
important that we clean it up because we are going to be bringing in a bevel on these and if we don't clean up the faces, we are going to end
up with a little bit of a mess probably on the bevel. So now I'm going
to do is I'm going to come to this delete. We can also do a
different way as well, if you grab it all and
you come to mesh cleanup. And what we want to
do is we want to, where is it Delete loose. That might work. No, it didn't. So let's delete edges and
delete edges, and there we go. All right, we got
there in the end, so that's exactly what we want. All right, so let's now
come in and bevel this off. So control Yl transforms
syrogen geometry, generate a bevel, put
it on naught point. Not three. And there we go. Now let's press Alta
and work our way up. So we'll come to this part now. We've not got to solidify on,
it's already been applied. Let's see if we can generate
a bevel, let's put it on. Not naught three like
so. And there we go. That's exactly what I wanted. I wanted this split down
here as you can see. And now we'll come to the
next part. You know what? I'm going to hide that other way because I can see
now what I'm doing. I'll come to this part again. Generate a bevel and
then we'll put this on nought 0.3 like so. And you can see that's
looking really nice now. And then we'll work our
way to these parts here. So this is all of
these parts here. And what I'm going to do is
I'm going to press control a, reset all my transforms. Add in a modifier, generate a bevel n naught
naught, three, like so. And there we go, just
to make sure your devil's working on
all of those parts, which it is, and then
hide out of the way. And now we're onto
the final part. So this part here,
let's split it off. So what I'm going
to do, I'll come in Oak Shift and click right
click, and we'll mark a scene. Let's come in LP Selection. Split it off from that top part. And you can see as well that on here we've got it going
all the way around. We really don't want that ****. No, not shift H, It's
better actually, if we come in and
find it from here, Ol shift click, grab that one and then come
around to here. Oli click delete
faces and then grab the last part and L delete vertices just so we don't
leave any little empties. All right, let's see if we've
actually deleted something that we shouldn't have done
and know that looks fine. So now we should be able
to resell the transforms. Finally then let's
generate a bevel, put it on naught
point naught three. And there we go. Let's
hide that part of the way. And now we're on the final
part. This part here. Let's see if we
grab all of that. I'm just wondering if I
should split this off. I think I should selection,
let's split it off. And then what I'll do is
we'll resell the transforms, set origin to geometry, add in a bevel, let's put it on. Not three, so let's hide
that out of the way. And then we're on
the final part here. Let's join all of
these together. First of all, so, so, so press control J.
Join them all together. Control yo transforms,
set origin to geometry, Adding a modifier, generate
a bevel and nought point. Not three. And there we go. All right, let's press ltage,
Bring back everything. And this is what we should end up with, something like this. And it's looking fantastic. All right, so now then
we're working our way up. We're onto the top bit now. So we need a piece that's
going to go out there. And from there then we
need to actually put in the actual tiles on here. And we also want to bend these tiles off
a little bit as well. So let's see if we
can actually do that. So we've got this part
in here already and I'm thinking that we can use this part to actually create, you know, this
bigger part up here. So let's do that now. So what I'm going
to do is I'm going to come in, grab this part. I'm going to press control B and just Beverly it off
like so I don't want to bevel it too much
because I want it going above this part like
so and you know, kind of coming from this. So I'm going to pull it
up a little bit more like so just like it levels up
with all of that there. And then what I'm going to
do is I'm going to press Enter Alternates and bring it out like so. And there we go. And then I want another
part going underneath this, So I'm going to come in, I'm going to press Control
left click, right click. And then I'm going to come
in now and pull this down. So a shift and click, trying to get it going
all the way over here. And then what I'm going
to do is we're going to press E and Z and pull it down where we
actually want it like. So I'm just thinking, now I need to make it
a little bit bigger, so S like so. And there we go. That is
exactly what I wanted. And now my roof tiles can actually come over
the top of here. I can put my windows
in here as well. Now let's come in and
what I'll do is I'll select just the top
Alt Shift click, grab the top, and then
press selection from there. Then I'm going to hide
this out the way. Now what I want to
do is I want to actually select this one here. And I want to delete all
of these going around. You can see if I
select this one, you can see it's all
joined together. So what I want to do is I want to press Alt
Shift and click. I put x ray on and then I can, should be able to see
Ot shift and click like so is wearing wanting. I'm just wondering, can I get away with doing
that bit in there? I don't think so. I can get away with this
one in here, I think. Delete faces and let's
come in and see. Yeah, that's going up to there. That's going up to
there. Probably going to have to delete
this little bit here. Let's have a look
at that little bit. So you know what, O shift and click and I'm going to
delete that as well. So delete and faces
and there we go. All right, that's looking cool. I can bring out this a little
bit. I can make it all fit. In another words, once I've actually got
everything there, the one thing I'm nappy about, as you can see, is this part underneath here.
It's just not right. I'm not happy with it. I'm
going to actually press Alt Shift and click Selection. Separate that off now. I'm also going to come in now
and delete this back bit. Delete vertices. I think this part here, I might actually redo it again. I'm going to delete it.
I'm going to press Ola. What I'm going to do now
is on the next lesson, I'll do this part again and
get that up into place. It might also be better
at this stage to save our work and bring in the actual tiles before
we do anything else, I think that might actually maybe be the best
way to go with this. Al right everyone, So I
hope you enjoyed that. On the next one, I
think we'll do that. We'll bring in the tiles first, We'll get the tiles
on board then. And then we can actually create the top, so the top of this. And then from there we can work on this bit. Alright everyone. So I hope you enjoyed that
and I'll see on the next one. Thanks a lot. Bye bye.
211. Architectural Roof Design for Victorian Towers: Welcome back everyone to Blender for the
Environment Artists Guide. And this where we left it off. Now we're on to
the hardest part, which you've got
to make sure you follow along very
closely because it's very technical
and we need to get into this actual roof. And what we're gonna
do, first of all, is bring in our bullion. I'm gonna bring in my bullion.
I'm gonna pull it up. And then what I'm
gonna do is I'm gonna grab my roof here. I'm going to press Shift H. Hide everything else
out of the way, and let's come to our roof. So the first thing
I'm going to do is increase the
horizontal count, Perhaps 218,
something like that. We might need to go
a little bit more. I'm also looking at the length, so you can see here
I've got a length here, I need to go up a little bit. So let's increase the
count to maybe this much. We can bring it down if needed. Then from there, what
I'm going to do is I'm going to increase
the bottom bending, so I'm going to increase the bar bending slightly like so. And then I'll bring up
the subdivisions like so now I'm going to do is I'm going to come down
to the bottom one. So where it says
roof angle here, let's put it on compress
and let's put it on -180 like so. And then we sure get
something that's actually starting to go around
where we want from there. Then let's actually rotate this. So it's actually
the right angle. At the moment we can see
the rotation is here. We don't want that, we want
to actually bring it up. But the thing is, if
we rotate it on here, we're going to lose
our actual angle, this actual bend of this. And I'm not sure where
they really want that. Let's see, actually
let's put this, let's get it out. Can you see how that it's
actually losing now its angle? So you can see it's
not bending in so much, we're
losing all of that. So what I'm going to do
is press control head, put it back to what it
was, -55 if you need that. And then what I'm going
to do is press one. I'm going to press R and X and rotate it round two roughly. If I'm holding shift,
you can see that line going up roughly
the center point, which is going to be
roundabout there. You can see it's near
enough centered. Let's go over the top then. And we can see now that
we've got a long way to go on how big or small this is. So now we can see that the
top is nearly about right. But all of this
down to the bottom doesn't look very good at all. So let's first of all decrease. So what I'm going to do is
I'm going to come down, decrease my vertical count. So let's decrease it like so. And we'll see that it's been
brought in a little bit. And from here now I can
press the S button. Bring it in a little bit.
So press seven to go over the top. Let's
pull it over. And now we can see
we're near enough getting the right place
where we actually need it. Let's bring it in a
little bit like so. And then from there what I'm going to do is I'm
going to press and's head and pull it
up to where I need it. Let's pull it out
and just have a look where it's looking like. And you can see now that's
looking pretty nice. It just needs to be pulled
over into place like so. All right. So that's
looking good. You can see it's
near enough level, we're going to do
some more work in it. Don't worry, just
make sure that we've got enough subdivisions,
so it should be on nine. And then what I'm going
to do now here's, I'm actually going to apply
my jump node control A. And then I'm going to
come in and I'm going to grab this and I want to put
it right in the center. So I'm going to press control A, all transforms right click, set origin three de cursor, add in a modifier and we're
going to go onto a Generate, and we're going to
bring in a mirror. All right, from here then now we need to actually
join it altogether. So I'm going to press A,
and then what I'm going to do is I'm going to
move it now on Global. So let's move it on Global. And let's now try and
move it into play. So we need to bring these
closer, closer, closer. And there we go from here. Then let's hide out this roof and have a look what we've got. And there we go, You can see, wow, that's looking pretty good. You can see we've got
some gaps in here. Sometimes that's going to
happen, don't worry about it. We can also come in, grab this press tab, and we can either
rotate them around, for instance, so we can rotate
this a little bit around. As long as you've
got your V there, what you can do is you can
press a little sideways V, put it on three decursor, and then press R and Z and
rotate it around a little bit. You will see though, the moment you start rotating it around, you are going to cause
yourself some problems. So we don't really
want to do that, we want to leave it like this. And what we're going to
do is apply our mirror, so let's apply that out
of the way old tag. Bring back our actual roof then. And then what we're
going to do now is come to the temporary roof, press delete. And there we go. Now we've not finished
with this yet, because we need to get this into place and we also need
to bend it a little bit. But you can see at the moment, this is what it looks like. It's looking pretty nice. So now let's come
in and fix that. So what I'm going to do is
I've applied my mirror. I'm going to then press shift. I'm going to bring in a lattice. So let's bring in the lattice. Let's press S to make
it a little bit bigger. Let's bring it down then. And want to, want
to make sure that this lattice is covering
the entire roof. So if I press S
and's first of all, and bring it down this way, press a little V actually just to make sure on
individual origins, pull it up into
place and make sure that Ands is covering the
entire roof from there. Then what you want to do is
you want to go over the top. You want to press S then
and bring it all the way out just so it's
covering this entire roof. And then back to one
and then press S and Z. To get it as close to it
as possible like so now the lattice is an
amazing part of blend. It's an amazing function. It's just you need to
know how to use it. First of all, you need
to make sure that the, that you've reset all
of your transforms, resell you transform
set origin to geometry on the main
object from the lattice. Then what we want to do is
now we're want to come in, we're not going to resell transformations or
anything like that. We're going to come over and we want to go down to
this bottom one. And we want to increase this. And as we increase
this, you'll see that we end up with
more parts on here. And this is exactly
what we want, because now from here we
can go back to our roof. We can come over, add, and we're going to
deform with a lattice. Now when you click
on your lattice now, so when you click on this,
the roof should not move. If it shrinks down or, you know, moves over here
somewhere and disappears. You've done it wrong. So just make sure the roof is in place. Once you've got that from there, then we can come to
our lattice now, and the main thing
is about lives. We can come in, press B for box select, grab all of these. And then what we want
to do now is we want to bring in our movement tours, shift space bar,
bring in our move, and now we can actually
pull them down. And that is the best thing ever. And what we can also do then is you can see
the nearly there. I want to actually
bring these up a bit. So what I'm going to do is
I'm going to press one, I'm going to make sure
that proportional editing is on smooth. And then what I'm going
to do is I'm going to grab one of them, press B, and then I'm going to make
them a little bit bigger like so grab the bottom one and
I'm going to pull this up. So I'm going to pull this
up a little bit like so grab them both like so. And then pull them down
and you will see now that we've actually got it
sloping up a little bit. And that's really cool. That's exactly what I wanted. So it's now sloping up. Now let's come into
the rest of it then. You just have to be really
careful because you don't want to damage
the actual roof. What I recommend
is Jaws grabbing probably from here
to round about here. You can also play around with the shops and things because sometimes that actually helps. And then if you
press the S button, you will see I can bring it in and actually bend it
a little bit like so. Now what I'm wondering,
where is my, where is my little circle select Joe looking, where is it? You know what? I don't know why actually
know where it is. Circle select isn't
working on here. And this should be on here,
this should be on here. I'm just going to see
if I can grab this. I'm going to just check out, and if I grab this, if I've
got proportion editing on. Yeah, my little circles there. Let's press tab,
Grab one of these. My little circles there. I come to this, I grab this, my little circles are not there. Normally this should work
on look medium point. Yeah, there we go. It's
because I was on medium point. All right, we're on
medium point now, which will make
it easier anyway. So what I'll do now
is I'll come in. Oh, well, select. Let's
select all of these first. Like, so let's press the
Bourne. And there we go. That is what I'm looking for. And now you can see I'm
starting to bring them in. You can see though, the problem
is I've got one of these grabbed and it made it a
little bit out of line. So I'm just going to grab all of these and then I'm going
to press the S Bourne. And now you can see
that it brings it in. Very, very nice.
Let's bring it out. I don't want to break my mesh. That's what I'm very
concerned with. I'm also going to put this
onto Sharp. Let's try that. And maybe it might be better me actually coming in and
grabbing these ones first. I'll grab one of these,
press B and then S bring it in like this instead. Just work my way up. And then this one here, and then this one here,
and finally this one here. And Joe, want to be careful
that don't break my mesh. I really don't want
to break my mesh up there. And there we go. That is looking very nice. That is exactly what
we wanted from here. Then what we can do
is we can now come in and we can apply our
lattice with control. We can delete our
lattice out the way. And now what we can
do is we can go to any of those side
points like this, and we need to fix these. The other thing is
we could really do with putting something
behind this as well. So we'll do that as well.
Let's fix these first though. So what I'm going to do, I'm
just going to grab this, I'm going to put it
on, connect it only, and I'll put it on smooth. And then if I move this over, you'll see that we can
actually move it over then. And then we can also
move it over like so, and just fiddle around with
it so we can bring it in. And then do the
same thing on here, just so there's not obviously those huge gaps there.
And there we go. Now on the next lesson, what we'll do is
then we'll save that our work because we don't
want to do that again. We'll actually get
in the wooden parts that are going to
go under there. And then we'll
actually put the top of this on here as well. All right everyone. So
hope you enjoyed that. I'll see on the next
one. Thanks a lot. Bye bye.
212. Finishing the Tower Roof: Welcome back everyone to Blender for the Environment
Artists Guide. And this is where
we left off now. Just make sure that your
cursor is right in the center. And then what you're going
to do is you're going to bring in a cylinder, shift A, let's bring in a cylinder, let's put our cylinder
on something like 24, so something like 24. And let's press S
without portion editing on and bring it in
to where it needs to go. So it's going to go on
the outside of S first of all and's let's bring it in to the
place where we want it. I'm thinking something,
something like this. Maybe pop it down a little bit and then this is going to be the wooden part of
this top part here. From here, then we can actually
work with the metal part. Now what I'm going
to do first of all, is I'm going to come in, I'm going to duplicate this. So I'm going to duplicate shift, I'm going to bring it down
without portion of it. And on again, I'm going to
press Selection Selection. And then what I'm going to
do, I'm going to grab this, I'm going to grab
my roof shift H, hide everything else
out of the way. And then from there
then I'm going to delete the bottom And the top, if you can't see the top,
just go in like this. This part here, press
delete and faces. Now from here, what we're
going to do is we're going to start bringing
this into place. If I go up to the top, I'm
going to press the S button. Bring it in, bring it
in, it's Jaws in place. So now we're going to go
under and pick it up. So we're going to
pull it into place. Then what I'm going to
do is I'm going to grab the bottom shift click. I'm going to press one. I'm
going to make sure that I've got my x ray on. So now I can see exactly where I'm going. I'm going
to bring it over. Then right down to here, I'm going to press the born, pull it out near
enough to the edge. And then what I'm going to do now is bring in some edge loops. So let's bring in
some edge loops. Left click, right click. And let's come to
this one first. So I'm going to grab
this 10 shift and click, press the born, just make
sure that it is in there. Next one oth click, bring it in, bring it in. Bring it in, and bring it in. Now let's see if
that is actually in. So what I'm going to do is
turn this off and there we go. That is what I'm looking for. The reason we did
that is because we're going to actually
bring in some wood here. Now we might need to
come in for instance, can you see this one here? So we've got some gap showing through there.
And actually fix that. So if we come in, we
should be able to come in now and bring this
in a little bit. And bring this top one in a
little bit as well like so. And then turn that off,
and now you can see it's hidden in a little
bit better away. So you can see that it's
hidden a little bit better. But we'll see once we
actually bring the wood in, now we're not going to
worry about it too much. We're going to press
al tage and bring back the next bit.
And here we are. Okay, so let's
come to this part. Now what I'm going to do is grab the top. Grab the bottom of it. I'm going to press the button
like so, and bring it in. And then from there
what I'm going to do is I'm going to right click. And I'm going to come in and
click Loop Tools and Bridge. Now this is going to be the wood that's going to go
around the top of here. I'm thinking it's probably a little bit too thick
at the moment, so I'm going to make it a
little bit thinner like so. And now I need the metal part
that's going to go on here. So to get the metal
part I'm just going to grab the inside
of here, Shift D, and then I'm going to press
the S button and bring it out to where I want it,
so something like this. And then I'm going
to press E and Z and bring it up from there. Then I'm going to bring it in, so bring it in slightly
and then Enter, bring it in a little
bit more like so. And then what I'm
going to do is press and Z, bring it up. And from here now I'm going
to make the top part of it. So I want it kind of to go in like this and then put
some bevels on the top of it. Now, let's see, First of
all, is that tall enough? I think once it's got the
actual top of it on here, this will be tall enough. So what I'm going to do now
is I'm going to come in, I'm going to press control er, five, left click, right click. Grab just the one
above the center. So this one here,
proportion editing on. And let's put it
onto maybe short. Let's try short first. Here's Sharp going to do it. No it's not. So let's try the other favorite
which is the root. And bring it in,
and there we go. That is looking much bare. It's just this top part
that I'm not happy with. You know what? I'm
happy with that. Let's try another one. We'll try inverse square.
Let's try that one. Yes, there we go. That is what I'm wanting.
Something like this. Okay. From there then we now want to bring
this part down. If I grab this part, I'm going to bring
it down without the proportionality
on, of course. And then press the Born. And bring it in. Now it's
going to bear like this. And then I'm going to
press, bring it in and then bring it up and then
finally bring it in. And from there then we're
going to put the spike on. I'm going to pick it up. E. Z, pull it up to
where we want it. So maybe something like that. And then what we'll do is now
we'll bring in this spike. So before we bring
in this though, we'll actually press controller, bring in some edge loops,
left click, right click. Grab the top of it like so. And then let's pick one that's going to do the job for us. It's probably going to be this
root. Let's try the root. So we'll press one, we'll
grab the top of it. Press the B, we'll bring it
out to something like this. There we go. Alright,
let's press, put that top on, right
click, shade, auto, smooth. There we go. That's
looking pretty good. Now what I want to do is
want to split this part off. So if I come in, this
will be the wooden part. So I'm going to press
selection. Split that off. And I'll do the
Wooden part first. So if I just hide everything
else out the way. And what I want to
do is split this off so I'm not sure if
I can get four in, so 123123, like so, and just every other third. So I'm just going to
go round every other 33 and split 123
and there you go. So I've got 123123 bands or edge loops on each one of
these and it fits perfectly. Right click mark scene. And then all we're going
to do is split these off so L, L, L, Y. And then I'm going to
press A to grab them all. Mesh, clean up, fill holes. So then finally now I just want to make them
a little bit uneven. So I'm going to come in, I will pull them up a little bit. So let's put this onto random
and let's pull them up. And we also want to make
sure connected only is on. Pull it out. So let's pull
this one out like so. Now from here let's
circle in and press control all
transforms right? Clicks the origin to geometry. Adding to modify it, it's
going to be a bevel and let's put it onto not 0.3 like so. And that's what we
should end up with. So these are going to
be the wooden parts. Now let's come back now to this part because we're not finished with this part yet. And what I want is
every other one. So in other words, I
want to select them, miss three, and
then select them. So what I'm going to do
is I'm going to come in, grab this, and then
three between it, grab this, and then the same. It should work out perfectly
where this three left. Hopefully, hopefully,
there we go. And there we go. You can
see that's worked out fine. And from there then, let's
press Enter Alterns. And let's bring them out without proportionality
on alters. Bring them out into place. And that is exactly what I wanted to do with
this from here. Let's press on. Whoops, Let's
go back and's pull it down. And then pull these down on
the blue like so into place. That is what I wanted. Okay, now we've done that. Let's see if I can actually
just looking at it, making sure if I
go over the top. Yeah, it's level,
perfect, level. Let's press control
all transforms, right click, set origin to
geometry, shade auto, smooth. Add in a modifier. And let's
not boler, let's put it on. Not three and let's have a
look at that. Looks like. And I think when that's
got some metal in, it's going to look very nice and exactly what
we're looking for, really, really happy with that. Now from here then
on the next lesson, all we've got left to do
on this bit really is to create the underside of here and then get
these windows in here. If I click on this, we can see, yeah, we should be
able to use this now. We can even rotate this around to make them
a little bit more. Even if I come in, I should
be able to grab all this. I'm just wondering
where it's actually, yeah, it's all rotated
round to there. So you can see we've
got some bits missing. If I press a little sideways V, come down to three D cursor. Let's see if I rotate
it round to zed. Yes, I should be able to rotate that round. So that's
what I'm going to do. I'm going to rotate
it round just to get these bits even on each side. You can see at the moment
if I rotate it this way, so this way, that's
the gap there. A little bit too much there.
That's the gap there. That's the gap
there. A little bit more. That's the gap there. That's the gap there. And
now we can see the nearly a little bit more even now, now they're even now on the next lesson we can actually
get our windows in here. We actually pretty
much done with this and we can get all the materials on and
everything like that. And then we're on
the final part. Well, we just need
to fix these bits. Actually just making sure that all of these sides
go in properly. We can see that this
part here maybe needs pulling back this way a little bit and
things like that. So we'll do that after.
All. Right everyone. So I hope you
enjoyed that. See on the next one. Thanks
a lot. Bye bye.
213. Finalizing the Tower Modeling: Welcome back everyone to Blender for the Environment
Artists Guide. And this is where
we left the art. All right, let's come
then to this top part. And what I'm going to do,
control law, let's bring it up. And what I want to do is make a little bit of a
relief on here. So I'm going to probably
start with this part. I'm going to press
Control Law again. Bring up another part. So there we go. And then from there then what
I'll do is press old shift, click shift, click, press the B and split
them all like so. And then what we'll
do from here, we'll grab this
control or transforms. I'm going to put the
orientation to my cursor. So right click set
origin three D cursor. Now let's work on these parts. First of all, we want
this part pulling out, of course. Grab this part. I'm going to press
Enter Alternates, and then let's bring it out right about there so it
actually covers that. And inside there we're going to have that wood as we know, just looking around here making sure
everything's covered, we might need to delete
a tile off there or two. And then what we'll
do is we'll come to this part now and
Alt Shift and click. And we'll press at Enter
Alterna and bring this one out. Jot to Tad, like so. All right, Dad's
looking pretty nice. And now we can start
work on this part here. In fact, before we do
that, let's just come in and add in a bevel, so we'll put this on 0.3 then that's parts done and now we've got a
bevel on everything. I think there's a bevel on
here as well. Yes, there is. So now we can come in this part. Now we need windows in here, so I'm going to press control, bring up one to
round about there. Press control, bring one
down to round about there. And then what I'm
going to do now is decide on my windows. So I'm going to
bring a window here, maybe miss two,
let's have a look. Miss miss to miss two. And that's where my window
is going to go and yeah, that's worked out perfectly,
so something like this. And then finally
what we'll do is we'll press Enter Alternate, bring these back,
and then this is where our windows are
going to go from there. I think it's
probably going to be easier to split these off. So we'll press Selection. Split those off, and then
we'll come back to these. Now what we'll do is we'll
grab both of all of these. We might as well
press a actually. And then what we can
do is we can press the eye button and
bring these in. These will be the actual
frames going around them. And then from there
what I'll do is I'll, I'll press selection,
split those off. And then what I'm going to do is I'm just going to press Shift H. Hide everything else
out of the way from here. Then let's bring in
now actual edge loop, left click, right
click. It's five. All I'm going to do
just hover over, rear control five
on the number pad. Press the born right click
and then control five, enter. You can do it that way as well. Control five, enter, Enter. And there we go. All
right, that's those. Now let's make the
actual frames. All I'm going to do, I could probably grab all
of these like so. And we'll make the
frames, simple frames. On this one from this we'll just grab it
going all the way around. Press control and bevel
them off from there. Then let's press Enter
alterns, bring them out. So then what I'll do
is I'll come in now and press tab Alt.
Bring back everything. And there we go. Now let's
come to these actual frames. And again, we want
to split these off. So I'm just going to
come in face select. I'm going to grab the top and bottom of each of these
because when we bevel them, we know that they'll be level
off very nicely if we do it this way by
splitting them off. So press the Y button, press A, then to
grab everything, alternates, bring them
out, and there we go. That is exactly what I wanted, set back in there, and that's looking very,
very nice from here. Then let's come in
and bevel these off. So we're going to add in a
modifier, generate a bevel, put it on naught point, not three like so come
to these parts now. And I'm thinking that
probably might be there to, you know, select the windows
and split all of those off. So we'll do that. I
think we can come in and select similar by area. No, I don't think so.
Let's turn this up. Nope, that's actually
not going to work. Let's try and see if we're going to select
them another way. Select similar by polygon sides. No, it's just going to select
them all. You know what? I'm just going to select
all of these like so now let's see if we're going to
select them similar by area. There we go. All right, now I've selected them all. Let's, I'm just
making sure I've not selected any of the
insides of here. Let's press select. So let's then come to
these add modifier, Generate a bevel, let's put it on naught point.
Naught, naught three. Then we go, I'm happy
with those now, everything is basically done on this part here except
the front perfume sign. We'll do that in a bit. We'll make sure now all of this part is done before
doing that. All right. Now let's come in though
before doing that, and what we'll do is
make sure that all of these are working as intended. We can see here,
we've got a little bit here sticking through.
We don't really want that. So what I'm going
to do is just grab this on the edge, select, and I'm going to make
sure that I press a little sideways V and put
it to individual origins. And then I should be able
to pull this over like so. And then I'm just going to
work my way up and down, making sure that
everything's in line. It should be pretty easy on
this part, to be honest. You can see that this
is a little bit out. So let's come in, move
this to the side, so we want this to be in here. So there we go. That's fitting in bare,
apart from this top bit. So maybe I want to move
this in a little bit more. Let's just move it
all the way over. Just have a look at what it's actually
going to look like. We can see it's the back bit there that's
actually causing us a problem. I don't want it that far over, so I'm just going to pull
it back a little bit. What I think that is maybe a
little bit too far over now. Something there that's
right in the side now, this goes back, double tap, the A, something like that. Maybe even a little
bit further over. Let's pull it over.
Double tap the Yeah. Now it's fitting in beautifully. That's what I want.
Okay. Now what we can do is we can
grab each of these. We want to pull them
out individually. What I want to do is
I want to come on to individual and X pull them out. And now let's pull
these into place. If I pull these into
place just here, like pull this
more in line then, and then pull these ones into place over here,
Double tap the A. And I'm just looking
to make sure all of those are fitting
in which they are. All right, that's that bit done. Now let's come round
to this side so we can see it's going
round about to there. I don't think we need to
do anything about that. Actually, I'm at this one here. Should I pull it out a little
bit? Let's have a look. If I pull it out a little bit, what's it
going to look like? Actually, it looks a
little bit better. Just looking at the top now, I can see that this bit here
is also looking better. Like I'm thinking though, that probably so pick it up a little bit or pull
this more to the side. Let's have a lucky fi pull
this more to the side. Not this, this part here. Yes, that is looking better now. I'll grab this one. Pull
it more over. There we go. Now I'm looking at this
part going all the way up. That is looking
much, much better. As you can see,
I'm even thinking that maybe I can get away with pulling out just
that tiny little bit more. Let's put it back,
pull out tiny, tiny bit there, then
go all the way up. You know what? I think I will also lift up this
part a little bit. So I'm going to
grab both of these. I'm going to lift it
up into place like, So there we go. Now I'm looking at
this part here. I think we need to pull it. Yeah, I think now
we've pulled that up. We also need to
make this bit fit. So I'm going to come under here, I'm going to pull it
down to that like, so double tap the
A, there we go, and let's work our way up. And then from here I obviously need to pull this bit down, let's pull that bit down
into place. There we go. All of that now is
fitting in beautifully. It's all come together. So on the next lesson then, I'm just going to
look at this bit. If I need to spin this round, so Sd -90 is it going to look better
if I spin that round? That's what I want to
know what no, it's not. So I'm going to leave it
exactly where it was. Let's all come together
now and on the next list. And then what we can
do is we can start getting all of the materials
in and after that, then we can do these
bullions for this. We can do them all in one go. Actually, same as
this one, you know, with the actual roundness of them making that three D effect. And from there then
we can actually start with the actual
perfume sign on here. But yeah, really, really good. If you've got this
four, congratulations we're nearly there now. But you can see just how
nice this final one looks. Let's save out our work, and I'll see on the next
one, everyone thanks a lot. Bye bye.
214. Starting the Tower Texturing Process: Welcome Microvone Blender for the Environment Artists Guide. And this is where we left off. Okay, so let's
work from the top. So we'll come up to the top. Let's put it on Material View. Let it load up. And
then once that's done, then we can start getting
these materials in. We'll also look
and see if we need to apply mirrors or
anything like that. Of course, we can
see on the roof. We need to do
something with that. Let's first of all
come into this one, then let's press Smart
UV Project. Click Okay. And then we'll come in now
and bring in a material, and I think we'll put in metal. The one we'll look for is, let's have a look
at black metal. Let's apply that.
And there we go. That's looking pretty good. And then what we'll do now
is the red wood on here. A smart UV project. Click Okay. And then we'll click
the down arrow. And we're looking for
red painted wood. There we go. So. And then
we'll come to this one. We'll minus off both of
these. We'll grab this. We'll press a Smart UV Project. Click Okay. And the roof roof. This one here, press
Tab, double tap A. Now we need to go on
the inside of here. Now let's have look, see if we've got an modifiers on there. No, we've not. Let's
come to this one then. Right click, shade,
auto, smooth a. We'll actually bring in
a seam for this one, we'll just bring it
around the back here. We'll press Shift, click, right click, and mark. We'll press, we'll
press and we'll press, you see there we've got
a problem with the wrap. Instead of that we'll
press control a, reset all the transforms. So set origin to
geometry, tab and unwrap. And now there's no problem. And now what we'll do is
we'll bring in the wood. So if I come in, bring in wood. So we're looking for, I think it's dark wood
we've been using. And there we go, you can see it's kind of spiraling around. Let's see if we can
actually fix that. So I'm going to press
Tab, go to UV Editing. I'm going to press
alternate. And there we go. Let's seven. Straighten
that up. Yes I can. Let's press the S born. Bring it out like so. Maybe that's too much there. Too much. There we go. A little bit of,
you can see it's a little bit bent in there. It always happens when you're dealing with anything which is, you know, round and actually
going in like this. So just be aware of
that press ultage. Bring back this part
then. And there you go. Now you can see that's
looking really, really nice. Now let's come to
this part here. So this part here is
going to be our wall. Now the thing is,
with this part, it might be better
to wrap normally. Unwrap. Okay, we can see we've
got all of these parts in. Let's change this then to green and the one we
want is wall green. And let's have a look at that. Looks like, is there
any points where, you know, there's issues? You know what I actually think? Yeah, you can see here
there's a little bit of one and I don't
really want that. So what I'm going to
do is press shift H. And then what
I'm going to do, instead of doing that, I'm
just going to grab it. Going all the way around here,
all the way around here, we're going to mark in a
seam because sometimes we just need to do that just
to make it look good. Right click and mark a seam. And then just mark a seam on the top part of here
where no one can see it. So like so, right click, mark seam, grab the whole thing. Then you should be able
to pressure and unwrap. And there we go, That's
looking much better. And now let's have a look
at what that looks like. And now you can see it's much, much better
than where it was. All right, so that's
that. Let's press all tage, Bring back everything. Let's come to this
part. Smart UV project. Click okay, little down arrow, and we're looking for
red painted wood. There we go, Working
our way down. Then we're on this part now, again, a smart UV project. Okay, down arrow,
red painted wood. And now let's do
this part in here. So I'm going to press a, You
can see here we've got all of this we don't really want that, can actually grab this. Let's press L. No, it's going to grab
the whole thing. So I'm just going to
press old shift click, going all the way over here, like right click marks. Then from there I'll
come in and hopefully I should be able to press
L and just grab this. Unwrap. And there we go. And let's put this on green. Green. Wall green. So of course it's going
to do it on this one. We can just come
in now though and press Smart UV
Project. Click okay. Click the plus down,
red painted wood. Click a sign, and there we go. All right. Now let's
just carry on down. We'll do this part first. So we can see here
we need all of this, so all of these red painted
wood. So all I'm going to do. I'm, you know what, I think it will
be easier to grab all of this smart UV project. Click okay and then what we'll do is we'll put red
painted wood on. First, click the plus button, down arrow, and then we'll
put green wall green. And then all I'm going to
do is I'll come into this. Shift select. Control select
just each one of these. Just work your way down. Make sure you grab the
inside of this one as well. And then all we're going to
do is a sign that Wall Green, so again, lay on it all the way. Wall Green, click a sign. Okay, there we go. Now
let's do this part. Let's see if we've
got any modifiers on. So we've got a bevel
on, so that's good. Let's press tab a Smart
UV Project. Click Okay. Back to material, then red
painted, red painted wood. There we go. Let's come
to the next bit then, same thing on this bit, Smart
UV Project, click okay. And then red painted
wood like so. All right, so we've
got this, let's now come to these parts. So all of these parts
very easy to do. Smart UV Project, click okay. It's making sure the
devil's on which it is. And then red painted wood. Click Okay. And there we go. Now let's work our
way up a little bit. We need some wood on these. We might have red painted on
the inside, have some wood. So what I'll do is
I'll grab these. First Smart UV project. Click okay. Click
the down arrow, red paint wood, and then we go. And then on the inside, we'll grab the Smart UV
Project. Click okay. Click the down arrow
and we'll go for wood. And we'll have it. Let's try the light wood. See
what that looks like? We can see that we've got a lot of problems on some of them. This is mainly because we
didn't unwrap these separately. It basically messes it up. There is an easy way
probably, to deal with this. You can see these ones
are going this way. These ones are going
the right way. These ones are the
wrong way on here. They're all wrong. As you
can see, you know what? I'm just going to
come in and I'll just grab the ones that are
going the wrong way. I think it's just going to be
the easiest way to do this. So you can see on here all of these and we'll
just spin them around on the UV map,
we'll grab these. And then finally all of these didn't take
too long anyway, we'll do the windows last. Actually a R 90. Spin them around,
and there we go. Now they're all looking
absolutely fine. Now let's work our
way down this part. A Smart UV project. Click okay. Down arrow,
red painted wood. And then these are the
same red painted wood. And then now we're on this part. This part is going to
be the green wrap, the green wall green. There we go. All right, so now we've got down to
here. Now with yours one. All of this is going to
be basically red paint, a smart UV project. I'll actually come
in and do the more. First we can see though
all of this is joined, which is going to make it
a little bit hard for us. See if I can actually
come in though. You can see the
selecting all of this. This is actually
going to make it a little bit hard
for me actually. I don't really want
that, that one. Let's give this
one the red paint first and then we can
come back to these, the red painted wood. Then what we need to do is
come into these basically. Can we select all of
these? Yes, we can. We'll do these parts first. All of these ones here, like so. And so I'm going
to split them off. I'll press selection.
Split them off. Control all transforms, right. Click the origins geometry, just so it makes it a
little bit easier for me. And then a smart UV Project. Click okay. And then red
painted wood. And there we go. Now then these parts
here, these are, we can, if I press
Alt Shift click, you can see it's going
to select all of those. We can see though, if I select this, that
will make it easier. Let's first of all
split these off. That then will make it
a little bit easier. So selection and then what I'm going to do
is grab all of these. Now think that these on the
inside, these should be wood. And then these on
the outside should be red painted wood. So
we'll do it like that. We'll actually save
our work though, and we'll do it on
the next lesson because we are
running out of time. All right everyone. So hope you enjoyed that. I'll
see on the next one. Thanks a lot. Bye bye.
215. Fixing Major Texturing Issues: Welcome back to
everyone's Blender for the Environment
Artists Guide, And this is where we left off. All right, so let's come in then and try and split these off, so let's have a look. So if I come in, I'm thinking
the easiest way to do this, if I select this control, plus it's going to actually
select it to there, that might actually be the
easiest way. So let's do that. So what we'll do
is we'll come to the front press control. Yes, that's right. Press
control plus again. Okay. We'll do it that way
then that's going to work out. So all we'll do is
we'll just come in, select the front
of all of these. This definitely will be much quicker then trying to
select them any other way. I think they only need a little bit of wood
texture on them anyway, that we'll go to here. And then what we'll do
is we'll press control. First of all, we'll
split them off. We'll press Y, let's
split them off like so. And then what we'll
do is just make sure that they're still
beveled as you can see, they're still beveled in there, which is absolutely fine. I'm just making sure
they're all leveled. And then what I'm going
to do now is I'm going to press Smart UV Project. Click Okay. And then
I'm first of all, bring in what we'll
bring in the wood first. I think that's going to
be easier if I put in wood and then light
wood like so. And then what I'll do is
grab the outside now. So I'm going to grab all
of them on the outside. Work my way around like so. And then plus down arrow. And then we'll put
in red painted wood. Click a sign. There we go. All right. It didn't
take that long. So old page bring
back everything. And now we'll come to
these parts in the center. Now all I need to
do with these is I'll just separate
out the windows. It's just going to make it much, much easier to
separate them out. I'm just wondering if I
select these like that. Can I then come up
to select Select similar by area. There we go. That's selected all
those from there. Then I can press selection,
Separate those out. Come back then to my
Wood Smart UV project. Click Okay. And then from there I can click the down arrow wood. And we're probably going to
have to turn some around. Let's have a look. All those
are going the right way. I've got lucky here. No, no, we have some. So let's select these ones here that are going
the wrong way around. It's just the wood grain really irritates me when the wood
grain is going the wrong way. I see in so many
people's work as well, so I always make
sure with my own, I always spin it round so the wood grain is always
following the right way. You can see quickly,
if I just show you, spin this round like the wood green going this
way just doesn't look right. As you can see, it looks so much bear
going the other way. So that's why I do it.
So R 90. Spin it round. Now let's come to the
bottom parts then I might be able to get away with doing
this all in one go. So smart UV Project. Click okay. And let's turn this
then to the red paints, a red painted wood.
And there we go. Let's double tap the, and let's see what we've actually
achieved here. So I know the
windows aren't done, but this is a
pretty exciting one because now we've actually, let's go to modeling first. Before we do anything
else, let's save our work. So save out our
work and let's put this onto rendered view and
let's see what we've done. Whoa, that's looking
amazing, Al right. I'm really happy with
how that turned out. Hopefully, hopefully you will be happy as well with how
yours has turned out. And now what we'll
do is we'll actually get in our windows. So what I'm going to do is
we'll do the top one first. Gonna put it back on there. We'll go over to EUV. We'll come over to this,
we'll grab one of them. First we'll put this, first of all, we want
glass lit windows like. So let's come in, then grab one of them and
then we're going to steers. And we're going to
press U and unwrap. I'm going to press S and then bring it into place like so. And then what I'll do is
I'll press and we're going to go down to the
same thing as what we've done many times before. Press a, grab them all,
copy paste default. And there we go a once
you're over there. And now we're just going to
move these around into place. And there's a lot
of windows here. And I understand it's a little
bit of a pain in the bum, but it's something that we've just got to get on with and do. And I've tried it where
we can, you know, grab a few of them
and move those round, but honestly, this is the fastest way that you're
going to be able to do it. So I'm just going to put this over here and then I'm going
to come to the next one. Yeah, we'll move this one.
Actually, grab this one. We'll leave that
one. Move this one. Hopefully we haven't
done that many windows. It's not like we're doing
a great exhibition or something where it's
all windows and glass. So that's one good thing. At least maybe on
another course. But I think this
course, to be honest, is about the longest I think
I've ever done a course, and I'm ever likely to
do a course because it was some challenge to build
all of these buildings. Let me know if it
was worth it or if I should stick
to smaller courses. We just just one building like we've done
with the other ones. Or if I should continue building huge scenes like this because we do end up
with a lot of repeat. And that's one thing that
worries me about these courses. So you'll have to let me
know what you think in the reviews section of wherever you've got
this course from. All right, so we pretty much made short work of these anyway, so I'm or going to carry on moving these over
and then we've just got those bottom windows do I don't think
there's actually as many pains on those
pain which is what it is. All right. So now this is
around about the same. I think we're missing
just a bottom row. So let's come to these ones now. And what we'll do is we'll
put it onto glass glass. And then I'll go
to this first one. So I'll grab it, I'll
press and unwrap. And then I'll press S, and I'll put it into place like so. And then what I'll
do is press U, copy, copy, default like so. And then I'll press
A, and then you, and hopefully it will work because there's a
split in the middle. Default A to grab everything, and let's have a look, then we can see if we grab
this one and just looking, let's just grab
this one a minute. So I'm just going to
grab both of those. We can see where
is the other one? So you can see here,
we've got this one. Where is the other one on here? That's something
that's bothering me. They're underneath each other. You can see that they're underneath and that's
not worked out. Let's try on wrapping again. There we go. That is the problem that sometimes
happens with these. You can see now I've got this. I can press, I can
copy copy default. Let's on this one, Copy paste Deft. There we go. Okay, I didn't think it was going to work, so
now I'll grab the mall. And hopefully I should be
able to paste Default. There we go. Let's see. Now I think, yeah,
it's not worked. Again, as you can see. So you can see now all it did was
paste it on all of them. So what we're going
to have to do is we're going to have
to grab them all, we're going to have to press
unwrap and unwrap them all. And do it a little bit
of a different way. So all I'm going to do now
is make them roundabout. I'm just going to focus on one. So you can see here,
this one here. I'm going to focus on this one. And then press G, Get into
the place where I want it. And then what I'm
going to do from there is I'm just going to come in like this, press L and just set it
up in a different way, L. It is going to take a little
bit longer on these ones, but unfortunately I can't
get rid of that split because these are
slightly rounded windows, we need to keep that
roundness on them. If we get rid of that split, it's going to flatter them out. We really don't
actually want that. We'll take a little
bit extra time and make them look a little bit different from here. Of course. We then are going
to be moving on on the next lesson to
the bullion parts. Then after that, we'll be
moving on to the shop symbol. That's a nice part to make. Then from there,
we'll be moving on to just making sure all of the little scene
assets are in there. Maybe moving this over a little
bit because I think it's a little bit too close to
the back of our butchers. Then from there we're
onto our terrain. Then once that's done,
we are finished. Really, not a lot left on this. Now, I wonder how many days you did this over because
I'd be very surprised if you did this in not one sitting. But I'd be interested
in how many days it took to
actually do this. Or if you just, you
know, how mad it down for however many hours. I think it's near to 40 hours, maybe some of you did it in four days or something
crazy like that. So let's finish this and finally last one,
and there we go. All right, all of those
look different like. All right, let's just have one more look on our rendered view. Just make sure they're
all looking good. We can already see something
in there as you can see, but we're going to
sort that out anyway. So we'll do that on the next
lesson. All right everyone. So I hope you enjoyed that
and I'll see on the next one. Thanks a lot. Bye bye.
216. son 215 Finishing the Tower Interior: Welcome back everyone to Blend for the Environment
Artists Guide. And this will left off now. Let's quickly go
over to modeling. And what we'll do is
we'll come to our roof. I'm going to hide the other way, Hide this part of
the roof other way. And what I want to do
is get a cylinder, first of all, to put into
here on the bottom bit. So what I'm going to do is
actually I'll grab this part, press shift to selected, press shift eight, and I'm
going to bring in a cylinder. Let's make sure the cylinders
on 24, that should be fine. And then from there let's make it a little bit bigger like so now obviously we want
the inside of the cylinder, so not this outside. So what we really
want to do is kind of bring it in, so squish it in. And then rotate it round. So what I'm going to
do is I'm going to press and X, let's squish it in. And let's go over the top again. Let's press Art and Z and
squish it round like so. And then what we want to do
is just make sure we can fit it into place like so. Now of course we're
going to have to move it round a
little bit as well. We're going to have to
play around with it a bit just to get it into place. So first of all
though, let's come in and grab the top
and the bottom. And then what I'm going to
do is delete and faces. And then what I'm going to
do is grab the sides of it. So I'm going to come
from this one here, all the way up to that one. So press Delete and Faces, and now I've got something
I can actually work with. All right, so let's pull
it down into place. We can see it's way, way
too big at the moment. Let's press S and's Ed pull
it into place like so. And then I'm going to pull
it up. So pull it up. And then what I'm
also going to do now is I'm going to grab
all of this bit. Grab this part as well. I can see then where my
windows are going to be, so I'll grab all of
this part here like so. I'm going to then press Shift in H and just hide everything
else out the way. Now you can see this
is not quite in place because we need to rotate it around a little
bit more like so. And we just want to spend a little bit of
time really making sure that this is going to
go in place very nicely. So I'm just going to
pull it out like soap. So something like
that is a good start. Now what I want to do is
I want to pull this part back a little bit because we don't want to see down
into nothingness. So what I want to
do is I want to come in and grab all of this, and it's going to be a
little bit of a mess. I'll be honest. And the reason is
because, you know, we've got to fit this in there so that it's just like looking at the
inside of somewhere. So as long as it's not sticking through
anywhere like this, so you can see it's sticking
through a little bit. We don't really want that.
You know what I think, actually I'm going to do
this a different way. I'm going to grab
this part here. I'm going to grab this
one and this one. Yeah, I think actually
this will be easier. Grab this. Press the
button. Yeah, there we go. We'll do it this way. So
I'm going to press Y, and then what I'll do is I
will bring this forward. So I'm going to press control. Bring in some edge loops. You can see it's not
working properly, so just press the limited
dissolve control. Bring in some edge loops, make sure there's
one in the center. And then what we'll do is we'll put proportion editing on. Maybe the sphere might be
a good way of doing this. And then just press and then all I'm going to do is
make sure that this is connected only on start
bringing it in and then G. Yep, that's not gonna work as
cars have grabbed them all. I don't know why it
grabbed them all, but let's try that again. So there we go. That's what I want.
Ring it in like so. And there we go. That
is exactly what I want. And I think actually that's
going to work out very, very nicely for us. All right, so that's that one. Now what we'll do
is we'll press Tab. In fact, we'll
split it off first. So we'll press L Selection. Split that off, and there we go. And then what I'm
going to do now, I'm actually going to
unwrap this first, so I'm going to press a wrap. And then what I'm
going to do now, I'm going to give
it, I think we've got one that says perfume,
perfume shop two. And this one's
obviously not lit, but we need to make sure
it's facing the right way. So what I'm going to do
now is good to editing, and now actually we've got a really, really
nice view of this. So what I'm going to
do, come across to the left hand side or
90, and there we go. And now we should be
able to pick this in and we're going to pull it
down a little bit like so. So there's a little bit of
a floor there and it looks like some kind of store room
is what we're going for now. We want this to be a little
bit different on the bottom. So what I'm going to do with
this is press and X, sorry. Yeah, S and X should
be able to pull it in. And now it just looks like
there's a load of storage in there for different perfumes
and things like that. And that is what
I'm looking for. So if I look from this side, you can see maybe it needs to come out a little
bit more. Maybe it does. What we'll do is we'll come in and we'll grab this center part. We'll press seven
to go over the top. And then what we'll
do is we'll pull it in a little bit closer like, so let's have a look at that. Let's go around the
side. And there we go. That's what we're
looking for now. It fits in very nicely. All right, from there then, what we'll do now
is we'll press Alt. We'll bring back everything. And what I want to do now is I want to keep
that bit in there, so I'm just going
to hide that I want this part and I
want this part on the inside. I want all of this. If I press, then you can see
I can grab this center part. And there we go.
And then I want to grab this and I want
to press Shift. Shift, There we go.
Now let's grab this. Let's press Shift D.
Let's bring it down. I'll press control or transoms. Right click, set
origin to geometry. And then I can bring it down in place and you can see it's much, much
too big on this one. We're your going
to press the Born, bring it down into place
just making sure it's not stuck through any walls or anything like that.
We're going to rotate it. Just make this fitting, make it a little bit smaller. And then what I'm going to
do is you can see on here, it's not quite fitting in. So we're going to pull
it out a little bit. And then I'll stretch
it out as well, so I'm going to grab this edge, pull it out into
place. There we go. That's looking pretty good. And then all I want to do is pull it down further
to the floor. Lt, shift and click,
and then pull this down to the floor. So All right, that's
looking good. Now what we'll do is we'll
press a unwrap and then R 90. Spin it around the right way, and then let's get this in place and let's make it look as though there's
a floor in there. So you can see now it looks as though there's actually
a floor going in there. The one thing I would say
about this one actually, is if we press control. And then what I might
be able to do is just bring these a
little bit closer. So bend them out a little bit. So all I'm going to do, I'm
going to go over the top. So I'm going to put this onto object mode just for now so I can
see what I'm doing. And then I'm just
going to press, and I'm going to pull
those out over there. And then I'm going to grab
the bottom part of here, pull this part out, bring it in, And then bring this
part out if I can. So this down here, so seven. And then pull this part out, so just make sure it's not
poking through anywhere. And then bring it
in like so like so. And then let's bring
this part out as well. Now it might look
a bit of a mess, but I think we can actually
get away with that. Again, let's put it
on rendered view. Let's see if we need
to unwrap this again. We'll try it again. Now we'll press control A all transform. Right click said
origin to geometry. We can also as well instead
of that we can just press a and we can project from view if we go to
project from view like so. And then I can press
without portion editing on and then bring
this into place. And we can see there's a
little bit sticking out there. We don't want that,
but we do want a little bit of the
floor in there. As we can see, now we've got
a little bit of floor and then all I want to do now is just bring this bit
back a little bit, pull it back into place like so, making sure there's nothing
stuck out this side either, which it looks like there is. So we can see here
the bit stuck out. Well, let's press, pull
that back into place. Double tap the A, There we go. That's looking pretty nice. I would say though, that maybe
this one stretching out. So this is hanging a little
bit further up here. What I'll do is I'll
come back into it, press A, and then
I'll press and Y. Then we go like that, I think. Looks much, much better. All right, that's
looking pretty good. Now let's press Tab and let's press T.
Bring back everything. Double tap the A and just have a look what
that looks like. I think that's actually
looking pretty good, so we can see all
the way through there into the perfume shop. I'm happy with that. I'm happy
with the top one as well. We've got no windows in there, we've got no curtains in there. We don't need them
in this bit yet. I think that looks perfect. All right, so now let's
go back to modeling. Now what we'll do is
we'll actually start work on this part here. So let's go back to modeling.
Let it all load up. We'll save our work,
so let's save out our work file and save. And now let's start with this part that's
going to go onto here. So first of all, what
I'm going to do is I'm going to create the part
that's going to come out. So if I press shift, let's in fact grab this part. So what I'll do is
just press shift S cursor, selected shift. And then what we'll
do is bring in a que. I'm going to make my
que much, much smaller. And I know it's not
going to be level yet. I'm not too concerned with it
being level at the moment. But what I want to do is just get it into some sort of place. So we can see here,
if I move this over press S and Y, that
looks roundabout. A little bit
thinner. So essence, head round about the right size. Now if I pull this jost
into some sort of place, I can see if I come
and bring this out to, let's say here, that
should be just enough. All right, so now
we've got that. Let's actually work
from that then. So I'm just going
to pull it over. Then what I'm going to do is I'm going to be level off the edges. First of all, control all transforms set
origin to geometry. Bring in edge, select,
grab this edge, press control B, increase them, so we'll just have a little
bit of a rounded edge. And then what we'll do
now is do the bottom bit. We'll make use of this. I'm going to press
Shift and D like, so I'm going to bring it down, then I'm going to press and y, bring it in a little bit. And then from there I'm going
to bring it down even more. I'm looking where to
bring it down to. It should be coming down
nearly to there. Down to here. And we'll check it,
so don't worry. So first of all though, we'll grab it, we'll
press pull it out. And then finally
I'm going to level this bit off, this bit here, Press control, bevel it off, and I'm going to
increase the amount. And I'm also going to change
the size of this now. Again, I'm going to pull
this into place now. It's going to look
something like that. Actually, I think that roundabout
bite the right height, I also, this bit wants
to be a little bit thinner and this bit also wants to be a
little T thinner like. All right, from there then I'm just going to grab them both. I'm going to lift them
up very slightly. And then what I'm
going to do now is come to the bottom bit. And I want to bring
it down a little bit. I don't think it's long
enough to bring it down. All I'll do will
come round to here. I can see inside there. Then I'm going to
click, control, click, click, control, click. And then bring it down to where I want it, which is there. Okay, so that's the
first bit done. Now let's grab this
bit and what we'll do is we'll press Shift
S, cursor selected. And then I'm going to bring in, first of all, we'll do
the perfume bottle. So let's get that
actually sorted. So what I'll do is
I'll press Shift. We'll bring in a cylinder. We'll keep it on 24 because we need a fair
few edges on this. So we'll bring it down to here. And then I'm going
to bring it over. I'm going to pull
it down like so. And how far is it
going to go down to? I'd say down to here somewhere. And then what I'll
do is I'll come in, take off my x ray, grab the bottom of it, and I'm just going to pull
it out like so. And then we'll work from
there on the next lesson. Let's say that our work, and I'll see you on the
next one, everyone. Thanks a lot. Bye bye.
217. Creating the Perfume Shop Sign: Welcome back everyone to Blender for the Environment
Artists Guide. And this is where we left off. All right, from here.
Then what I'm gonna do is I'm just gonna
grab the top of this. I'm gonna lift it
up a little bit. And then what I'm going to
do is I want to bring it in. Bring in some edge loops. So control left
click, right click. Make sure you've
got a center one. And then what we'll do is put
proportional editing on and we'll put it onto probably
going to be root. Let's see if it's root.
Yes, there we go. So roots going to do it like so. And then what I want to do is
bring down the bottom now, so make sure portion
editing is off press and, and bring it in. All right, so that's that bit. Now let's bevel off
this part as well. So I'm going to grab this part. Press control B, like so I want to turn that
down to one maybe, and then just pull
this up maybe two. And then pull it up to make
it a little bit more rounded, right click shade or to smooth. And that's what we've
got to start with. So now from here then we
can work in the top part. So I think the top actually is a little bit too
thick, so again, put punctual editing on, bring it out and let's bring
it all the way in like so. And that then is a much, much better shape as we can see. And then finally turn it off, and what we'll do is we'll
just bring out this top part. So press the button. So now we need to
make a top for it. So what I'm going
to do for this is just press, I bring it in. And then what I'm going
to do is press again, bring it out like so. And then bring it out a
little bit more like so. And then, and then, and bring it in, so you should end up with
something like this. And from there then
I'll press I like, so Right so now
we've got basically the actual perfume bowl. And from there then
we want to actually have the spray
mechanism from here. What I'm going to do is I'm
going to bring in a path. So I'll bring in a path and I'll basically bring
it around here. So all I'm going to
do, first of all, press shift S, Ursa
selected shift. Let's bring in where's my path? So curve, bring in a path. So let's press one, so in straight on y 90. Spin it around, let's
press the S button. Just get it into place, we want it to
something like that. And all we need to do
on this one actually is just extrude it
out because we just actually just A
simple flat curve. Well, not flat but, you know, I mean a rounded curve. Nope, that's not work
because it's not extrude. So let's put it on zero and bring out the depth.
What am I talking about? Depth? It's been a long one. Okay, bring it up. There we go. And then turn down the resolution to maybe
five, something like that. And then what I'll
do is I'll bring it out a little bit more. And then I'm going to press
one and bring this around. If I bring this around now, I'm going to bring it round and have this bit
coming round as well. Grab them both, pull them down. And then what I want to do is I want to now be straight on. Basically, I want
to, first of all, make sure that this bit
here is coming up to here. So I'm going to grab both of these and I'm going
to pull them down into place and then
pull these into place. It's going to be
up and under here. Now the thing is,
I think my balls a little bit further away here. I also think it's a little
bit too tight there. So all I'm going to do then
is come back to this now, grab them both, pull
them up like so. And from here then I
can bring this over. And that is what
I'm looking for. Now from here, what I'm going
to do is press and then, and then, and then, and then, and then, and finally onto here. Okay, so we've got
pretty much that. Now what I'm going to
do is pull these down. So I'll grab all three of these, pull them down into place, and you can see now that
is looking pretty nice. The one problem we've got is that we need to
pull them all out. So I'm just going to
grab all of these, then I'm going to pull
them out this way. So I'm going to also
pull out this one. All right, from here then
I'm going to grab this one. I'm going to press alternates. And I should be able
to pull it out. But what I'm going to do instead is I'll grab it from here. I'll press alternates,
pull it out from here, and then grab this
one Al, pull it out. So grab this part all
to ness and pull it in. And then just put it so it's
jaws touching up to there. All right, that's
looking so far, so good. Now what we'll do is
we'll come to this part. We'll press Shift S,
Cursor selected shift. Let's bring in a plane. So we'll bring in a plane x 90. Let's spin it around. We know
it's in the halfway point, so now we can put that there. And then what we'll
do is now we'll bring in a, another curve. So if I press Shift, in fact, we could use this curve as well. So we've already
got a curve here. No, we won't actually,
because what it will mean is it will mean that it takes that and we don't want it rounded like this. This is only for
this bit. So yeah, we'll just bring in a
curve, first of all. And I'll bring, you know what, we could use our curve, we've
already got this one here. Let's use that one. We'll
press Shift, bring it there. Press Shift S Selection. Cursor. And there we go. Now let's make it much, much smaller than what it
is. So press the S born. We want it even there. I would say that it's
still not right. Let's actually what we won't
bring it in like that. What we'll do instead
is we'll come over to our curve and we'll bring down
the extrude first of all, then what we'll do is
we'll come over to here and there's a reason
why I'm doing that. I'm going to bring
down my thickness. My thickness is going to
be round about there, so you can see just
on the front of here. And then we can alter
those as we work. But what it means is
now I can come in, press delete
vertices, press one. And what I can do is
now come to my drawer, make sure surface is on. And now I'm just going to draw this out. How do I want this? I want it to come from here round and then go all
the way to there. And then come back round and then go up all
the way to here, all the way up to here, and then go down here and
then round to here like so. All right, then you can see, look, we've got the
things in that we need. I think not these parts, the flat parts have
gone onto there. Let's fix that first. So what
I'm going to do is I'm just going to press delete
on the actual path. And then what I'm
delete on the plane, then what I'm going to do
is I'm just going to come in Vcm move tool and delete both of these
delete vertices and then we'll flat
that all out for us. Now the next thing we want
to do is just make sure that this is looking
how we want it. So I'm going to come right click and we're
going to shade flat. And that's going to give us
a much, much better view. Now you can see here as well. This bit hasn't
worked out too well. It's fine. All we need to do is just
delete vertices and then it'll
straighten it out. And then we can add in
another vertice or two. Right click subdivide and
then we can work from here. So let's press one first of all, and we'll do this part first. I'm going to press and we're
going to get this in place, grab this one, let's smooth
this circuit curve out. So we should know at this point exactly how
to smooth things out, especially when it
comes to curves. So smooth it out. And then let's have this
one smoothed out as well. How we're going to
smooth that one out? Do we want it going down
so or do we actually want it to be more
in line with this? I think actually
what I'll do with this one is they'll
just delete this. Delete vertices,
and there we go. That's what I wanted. Now what I want to do is smooth this out. If I bring this in,
I should be able to. Let's move that out over there. And then let's smooth this one out as well as you can see. Now that's looking much,
much better from there. Then let's move these over. So I'm going to move these over just so they're stuck in there. And then I'm also
going to come into this and move these over
just so it's stuck in there. And now finally, let's
come to this part. So we can see here this needs
smoothing out a lot more. So let's smooth it out again. If it's not working,
just come in, delete vertices like so. And then just add
in a new vertice, or come to this one and actually smooth it out with what
you've already got. Which is most of the
time the better option. All right, so now
we can see this is nice and smoothed out like. So we can see that
this one here, I'm going to need a lot
more smoothing out like, so let's grab it,
let's pull it over. Now this has really,
really taken effect and it's
looking very nice. This one He, I'm just not
sure whether I want to round it off a little bit more like. So there we go, Beautiful. Now let's try and flatten
this out a little bit. So how do we want this
nice and round? All right. That to me is looking exactly what I intended it to
be. Everything is in there. Yeah, I think that's
looking perfect now. I'll just come into the end old and I'll come into this end as well old and there we go. All right. I'm happy with that. What we'll do now
is we'll save that our work. So file and save. We'll also first of all come down and put this on
something like six. Just make sure you
still got the shape. Maybe a little bit higher,
something like nine. I think we'll keep the shape. And there we go. We
can work from that. All right. I'll see on
the next on everyone. Thanks a lot. Bye bye.
218. Finishing the Perfume Shop: Welcome back everyone to Blend for the Environment
Artists Guide, and this is where we left off. All right, so now I'm
going to do is I'm just going to grab all of
these and I'm going to come to object and
I'm going to go down to convert and mesh from there. Then I should be able
to join it all up. But before I do that, I actually want to bring in
just these ends. So what I'm going to do is I'm going to come to these ends, grab both of them like so I'm going to make sure
I've got fort editing on and then what I'm going
to do is press and Y and bring them in like so. And there we go. It looks
much, much better now. Right click, shade,
auto, smooth. And that is exactly
what I wanted. Okay, so now we can
join them all together. So let's grab them all.
Is this one still curve? No, it's not. So we
can join them all. Let's press control J. Join them all together.
Control then all transforms. Right click, set origin, geometry, right click,
shade, auto, smooth. And sometimes if to smooth
doesn't work on here, just come over and turn
it up a little bit. A very tiny bit should
actually do it. Okay, so from there then let's now position ourselves
right at the back of here. I'm just going to
grab this shift, Ursa selected and
then right click. Let's do that again.
Let's put it down there. Not really sure. Yeah,
okay, we'll do this. So what we'll do is right
click the origin 23d cursor. Now let's come to this bit. And what I'm going
to do is I'm j going to grab this part here. I'm going to press
Shift cursor selected. And then I'm going
to grab this bit, shift S and selection
two cursor. Now I want to pull it down. First of all, let's
pull it down now. We already know it should
be right in the sense now. So all we need to
do is press R and zed and move it around
just so it's in place. And we can see perfectly if
it's in place with this, because you can see how much
is actually stuck in there. So if I come over
the top like this, you can see that if
I press R and Ed, we can move it round and
put it right in there, against there like so. And that then is fit in there perfectly
from here as well. We can come in and
put it on normal, and I can actually pull that in to place where we
actually want it. And there we go, that
is perfectly aligned. Now let's go to our materials. It's pretty easy to do
this part, to be honest. All we're going to do
is just let it load up. Press tab to grab everything. Smart UV project and
bring in the metal, metal and black metal like. So double tap the And now what I'm going to do is I'm going to save out my work. So file and save, and then look at it
under the render. So let's see how that looks. Shift right click, and there we go is
looking really nice. Everything is done
now on that bit. All right, so from here then let's now come in and
what we're going to do is we're going to hide our floor. So where
is our floor? We've got all of these parts in, so let's just press H on this. Hide it out of the way.
We're not going to need this part anymore. So
I'm going to delete it. I'm going to come up to
where my booling is. And you can see we've got
some other parts in here. So we've got this part in here, we've got the roof in here. We don't really want those in. So what I'm going to do
then is go over the top. I'm going to press B,
grabbing everything, press just to make sure
I've got everything. And then we're going to
press, and we're going to put them into our perfume
shop like that. Okay, what that means is, well, we've also put
our human in there. Don't really want him in there. What I'm going to do is
press M and I'm going to stick him back into
the human part of it. Okay, so now let's delete our bullion. We're not
going to need that. And finally, just a little bit of tidying up Now
what we need to do. So if I press, you can see this is actually just an empty, those empties I'm talking about. If you zoom in, you'll see
there's nothing there. And it's just called an empty. So let's just delete
that other way. All right, so now let's look
at what we've actually got. So I'm thinking,
let's hide our human. Let's bring in our coffee shop, Let's bring in our subway. Let's bring in our bookstore. Let's bring in our scene assets. And let's bring our
butchers and our cars. And now we've just
got the floor. So what is the floor under? Let's have a look. If I press Alt H, we can see here is our floor. Let's give our ground
plane and actually put it in its own collection. So new collection,
Let's put in terrain. So enter twice, and there we go. We've got terrain now as well. All right, so from here then, now what we can do is we
can actually, first of all, you see how much this
needs to come out further with the terrain and also how much more room
you can see here. This is a little bit tight
on the back of the airfield. So what I'm going to do is
I'm just going to come to my perfume shop and I'm going to select one of them and
go all the way down. All the way down.
There's going to be a lot of parts on here, so just keep scrolling
all the way down like so. And the good thing
is now we can go over the top and
actually pull this out, so we can pull this out a
little bit more into place. And I think that actually
looks tons better, like so now the last thing we need to do is we
need to bring in, I think, another lamppost. Or two lampposts. So what I'm going to do
is I'm going to grab this lamppost here and I'm
going to go over the top. And what I'm gonna do
is I'm going to press Shift and put it around here. And spin it around, so
our D 180 spin it around. So let's put that
round about there. And also when I put that there, I want to pull it out a
little bit, so really, really get it in some
nice place like, so something like that. And then what I'm going
to do is going to grab one more, so this one here. And I'm going to press Shift D, and then I'm going to bring this over to the place over here. And then I'm going to
press seven to go over the top or Z 90. Spin it round and we want it now where it's
actually going to make sense. So maybe a little bit
over here like Soap. Now from here now we can
work on our actual terrain. So what I'm going to do is
I'm going to grab my terrain here and we're going to
come into this edge. And what I want to
be careful of is that if I pull this
all the way over, it's not going to pull this. That's the main thing. So what I'm going to do is I'm
going to come over, I'm going to bring it over with that portion on, of course. I'm going to bring it over
to something like that, giving us a little bit
of room down here. Maybe. Maybe, Yeah. I think actually
that's about right. And let's also give us
a little bit more room over here, so
something like that. And then let's also bring it
out a little bit over here. Make sure we've
grabbed them all. So all of them. And you can see I've got this on
normal, so let's put it over. So now let's finally
bring this part out. This part, bring it out. All right, so that is the first part of
the terrain built. Now let's just have
one quick look. So we'll just save it out. One quick look on
our render just to make sure that we're
happy with everything before we actually continue. So we're just going to
put it on Render view. We're just looking now at
the distance of all of this. We can see how close
is the bookstore, how is everything fitting in, I think actually, how far
is the rain away from here? You know what? I think
this is perfect. Actually, really, really
nice you through there. Really nice for you
all the way around. And yeah, that's
looking perfect. So very, very happy with that. Now let's come in and actually make the first part
then of our terrain, which will be the outside of it. Before we do that though, we really want to
round off these bits. So what I'm going to do
is I'm going to grab each of these corners like so. So grab this one and this one. And then what I'm going
to do is I'm going to press control shift and B. And hopefully I
should be able to now see they're not actually
rounding off very well. So all I'm going to do,
control al transforms, set origin to geometry. And then all I'm going to do,
press control shift and B, I'm going to see if I can
actually round those off. Let's increase this. Let's also then bring
this down like so. And there we go.
That is round off. That is exactly what I want. Now from here then
what I want to do is I want to
actually grab these. I'm just making sure these are rounded off
in the right way, so you can see here, it's a little bit of a mess on there. Can I get away with that? That's the question. Same
on this side as well. We are going to come in and actually edit this,
so don't worry. So out shift and click Control. Click and you can see and we're going to get that
roundness on there. That's the question.
That is the question. So what I'm going
to do instead is I'm going to grab it all the way round here as you can see. And then I'm going
to press Shift D, Enter and then pull it down. Then what I'm going to do is
I'm going to grab it from here to here, all the
way over to there. I'm going to press shift
D. And then what I'm going to do is pull it over
and then spin it around, R x 180. Spin it around. And now I'm going to
do is put that into place so we can see
if I go over the top, actually it's a little bit out, so let's pull it over,
fits in perfectly there. Jaws just in, So
it's jaws touching. Jaws touching like So now what we'll do
is just join these together so I can
join this one and this one. This one
and this one with. And then we'll come
round to this side and join this one
and this one with. And now we've got
the same roundness on both of those from here. Then what I can do is
I can actually press L. I can grab it, all I can pull it
up then into place. And then what I can
do is press Eat and Z and just pull it up. And these then are going
to be the first part of the actual stone that's actually going to go round
there for now as well. I'm going to come in, I'm
going to grab this part here. And then what I'm going
to do is press selection and separate that off. And now on the next lesson then we'll actually start
work on this stone first. So we'll do the stone first, and then from there
we can actually work on our terrain
which is over here. And, you know, this
is the final step. Basically everything
else is done. We know how to render it, we
know how to composite it. We've got all of the
windows in, you know, all of the buildings
in, everything's done. It's just now the terrain. All right everyone. So
hope you enjoyed that. I'll see on the next one.
Thanks a lot. Bye bye.
219. Creating Authentic Victorian Terrains and Edges: Welcome back everyone. To blend for the environment
artists guide, and this is where
we left the off. All right, so now let's come
in to our actual terrain, these stones around here. And what I'm going to do
is I think I already set. I think what I'll do first
of all is let's put it on S so we can actually see a little bit more
what we're doing. It is a lot of parts
in the end now, so it will take much longer. I'm actually just wondering
where my wall is there. So this is the wall there. I just need to check
that. I think it's just the grid actually
going across. So once this loads up, then I'll actually
be able to see. So let it load up. There we go. All right. Yeah, it's just
the grid, so that's fine. So what I'll do is I'll
just change this over to stone flags like so. And now what I'll do is
I'll bring in a modifier. So we're going to
bring in a solidify. So let's bring in a solidify, let's pull it out a little
bit. So let's go this way. You can see it's
acting very weird. Let's press a shift. Just spin it round so it's going all around the right way. Now and now what we need to do is just make sure
this is thick enough. So I'm going to bring it out.
Bring it out, bring it out. And then I'm going to pull
it back in a little bit like so just to make sure that
it's covering all of that. All right, from here
then what I can do is I can come in
now and apply that. I can then press Shift H. Hide everything
else out the way. And from here then I'm going to actually bring in
some edge loops. So I'm going to
press control law, bring in some edge loops. Don't be afraid bringing
a lot of edge loops. You're going to need them like, so left click, right click. And then what we'll do is we'll do the same thing over here. So control law, bring in
a load of edge loops, left click, right click. And it might seem a bit tedious what we're actually
doing now, but trust me, it's going to really benefit in the long run because
it's going to make them, your blocks very randomized. And that's exactly
one I'm thinking, yeah, this is probably
going to be about right. I think I will
subdivide it once. So what I'm going to do is
I'm going to press control A, all transforms set
origin to geometry, adding the modifier generate
subdivision surface. And once we've got that in, we just want to turn it
onto simple like so. And then press control A. Now what you'll have is it'll
be subdivided even more. And from there then we
just want to delete this one and this one
going all the way around, so all the way around making
sure as well the bottom one, so the bottom one here
and the inside one, so the inside one here. And then you're just
going to click, delete, and dissolve
edges like so. All right, from this then now we can actually start
our work from. So what I'm going to do is I
want to bring in some seams. So all I'm going to do, I'm
going to mark some seams going all the way around
here, randomized. So you want them random 1-3 so if you could even get
away with four properly, just make sure that they're
actually random though. So 222 and 3.214 like so. And I know, again
it seems tedious, but it's definitely worth
doing it like this. Because as you'll
see in the long run, what we're actually
going to do again, just make sure it's all random. I wish there was a way to select these edge
loops randomly, but as far as I
know there isn't. It would make my life much easier on this
part, to be honest. But anyway, we
actually, I tend to, when I go on the round bits, stick to these corners. So I tend to stick
to the corners like so then what I'm
going to do is just randomize these and just
keep working your way round. So randomizing in there may
be a bigger stone there. I also know there's a
lot of parts, it seems. Why do we need so many? It's because these are actually the stone
blocks that are going to go around the outside
of the terrain. If you get tired of
holding Alt and Shift, just stop here, right
click and mark, Double tap the E
and then you can carry on whenever you want. Want to go to here, around here. And then maybe I can
get away with this. I'll go there, a
bigger one here. So then what we're
going to do on the next part is we're actually going to be
splitting these off. Then from there we're actually going to fill in those holes like we do with planks when
we've done those before. Then from there we're
actually going to be beveling them off. Then once we've
beveled them off, then we're going to be
using a randomized. We might do the randomized
before beveling them. You can see now we're
actually nearly there. Right click mark seen, double tap the eight and
just carry on working round. It probably only takes
5 minutes actually. It just seems longer because it's pretty tedious
doing all these. But I think it looks
good in the end. I think it's worth it. You
might not want to do it. You might want to see the result first, and that's fair enough. But I'm just going
to go in and do it because I've done
a lot of these. I think it's
definitely worth it. We go 223,121.1 right click
mark seen. There we go. All right, so now we've
got more selected. Now we just need to go in
and select every other one. Let's come in and we'll go with selection tool,
which is face select. And now we should
be able to come in and just select every other one. Just work your way down. Probably better off
actually going over the top to do this makes
it a little bit quicker, I think every other one. Try not to miss any, keep your focus up on this bit. I know it's tedious, but
try and keep your focus up. It's not as tedious as the first bit because you don't want to miss one
because it won't look right. So just keep your
focus up and keep, just make sure you don't
miss any, All right? Not like that one.
If you do miss some, just press shift
L and then you'll just minus it off, that's fine. And then we can go and check them once we've
actually done this. And this part, obviously
you can see is a little bit quicker then the first bit, then that's strut
work all way down, so we're nearly there now. The home street, this one seems to be taking not
as long, so that's good. Okay, and then the last bits. And then all I'm going
to do is check it. So I'm going to press Y, H, Hide them out of the way. And then just have
a quick check. And just make sure like this one here, you can see I missed it. So I'm just going to go in. I'm just going to
have a final check making sure that I've not got they've got a on them. So going all the way,
all the way around, all the way around and back. So I think that's the only one. So again, why split it off, Lth, hide them out the way. Now from here what we're going to do is we're just
going to go in, press A and we're
going to come to mesh. I'm going to go to
clean up fill holes. And then from there
we're going to press control A, all transforms. Right click the
origin to geometry, add in the modifier and we're
going to generate a bevel naught point naught
three. And there we go. We can't really see much at the moment as you can
see, but don't worry. We will be able to in
a minute if I increase this and then increase
this. There you go. Now we're starting
to get somewhere, maybe a little bit more. Now they look like
paving stones. Now the best thing
is we can come in now with our randomize, grab one of them.
Just grab this one. And then what I'm going to
do is I'll come to this way. Actually I think it makes
it a little bit easier. I'm going to pull it all
the way out and we can see that we need to put it on
to take off connected. Only, there we go. Now we want to be very,
very gentle with this. You can also just come in and pull it up
like this as well. So just so you're aware of that, you just want to check
every single time you do it that you've not
pulled them up too much. Just be very gentle with this. I'll just grab one going
around here and I'm going to randomize them
as well in other ways. So don't worry, we're just going to randomize
these ones first. Like this, Randomize
them, not too much. Let's have a look what
we've got so far. You can see here probably
going a little bit too much. That's what I'm
actually worried about. And this one here,
I'm just going to go back until I get to this one. There we go. And then what
I'm going to do is just lift them up very slightly. Let's have a look. Yeah,
that's looking okay now. I think so. Have a look. Then let's come to this and
we'll pull this one up. Yes, that's looking fine. And then this one
here. All right, from here then what
we'll do is we'll press a mesh transform and
come down to randomize. And then we'll turn
this down all the way down to Nor point naught one. We'll have a look at those now and now you can see that's
what they're looking like. Then finally what
we'll do is we'll come in now and I'm going
to grab the sides of them. I'm going to move them
very, very slowly. Just grab some and then just have a look
at what they look like. And there we go. And I think now we'll work around
this other side. Pull them around
like same for these, pull them over and then these do the same thing and then
we'll grab this side. Now I'll just have
a look at those. Double tap, the A, there we go. I think they look nice. I think they look her. Not realistic but very stylized. That's the look we're
actually going for. Yeah, I think I'm
happy with that. The next lesson then
is the terrain. I'll show you how to actually
do the terrain really, really interesting, how
you can do the terrain. So you've got a lot
to learn on that one. All right everyone. So
hope you enjoyed that. I'll see on the next one.
Thanks a lot. Bye bye.
220. Advanced Techniques in Terrain Shading: Welcome back everyone. To Blend, the Ford the Environment
Artists Guide. And this is where we left off. Okay, so let's press LtHe.
Let's bring it back. Everything we will have to
wait a bit because it's a lot of stuff to bring
back at this stage, we can probably hide all of our shops and things
like that just for now, just to get this terrain done. And then we'll
need to bring them back just to actually
paint on the terrain. So I'll show you
exactly how that works, let it all load up. The other thing is
as well, I could probably do this in object mode. Either way, let's
double tap the A, and this is what we
should end up with. So you can see now this is our actual bricks and they're looking very
nice as you can see. And sometimes you might
want to go in and, you know, apply your bevel and then use your randomize as well. I think I'll show
you actually if I press Contro to apply that, then just grab everything
and then come to mesh transform and come
down to randomize. You will see if I
put this on naught 0.1 this is actually what
you're going to get. So if I now press tab, you can see now they're
looking even more, kind of uneven, which
is what we want. I think I'll have
them like that. All right, so that's
looking good. Let's also have a look on our Renderview to let it
load up. There you go. So you can see now as well that the bricks are
slightly different colors as you can see as well. And that's looking pretty nice. And yeah, that's looking good. Now let's go back to
object mode for now. And then what I'll do is now I'm just going to
grab my terrain. So if I press Shift Age, hide everything else
out of the way. I need to actually do
something with this terrain. In other words, I need
to actually remesh it. That's what I really need to do. So what I'm going to
do, and you have to be very careful
when you do this. So first of all,
what I'm going to do is I'm going to
grab the whole thing. I'm going to press and pull it down because if you
remassion something, you have to make sure that it's a three D object because it's going to find it so much easier. Now, one of the problems
I've got here is, as you can see, is that
this doesn't look right. So what I'm going to do
is I'm going to go back, I'm going to press Delete, and I'm going to go
to limited dissolve. So limited dissolve that. And then I'm hoping
now if I press G, take off my randomness. I'm hoping that if I press
now and pull it down, is that going to be a bit bare? Yes, it is. All right, from here then, don't
worry about your center. It might get destroyed. That's sometimes what's
going to happen. And all we're going to
do now is press control. They all transforms
to origin geometry. Highly recommend at this point that you save out your work. And that's because when you
bring in the re measure it sometimes can it can crash because you
go too far with it. So what I want to do
is go to re mesh. Bring that in and you can see now this is what
mine has brought in. So it's brought in like this. To be honest with you, I don't really want to do
anything else with this, because this to me
is pretty perfect. So what I want to do
now is if I press Tab, you won't be able
to see anything. But if I come over press control and now you can see
what it's done, that looks perfect, that mesh. Now of course, we've got a lot of broken parts around here. These broken parts we
don't actually want. So what I'm going to do is
I'm going to press one. I'm going to go into wire frame. So Z wire frame. And then what I'm
going to do is I'm going to probably bisect it. I think bisecting it is
just the easiest way because it means I can get right halfway on these points here. So what I'm going to do,
I'm going to come to mesh. I'm going to go down to
bisect and I'm going to put it right across,
around there like. So I'm going to make sure
then that it's set to zero, so making sure it's halfway. And then what I'm
going to do is clear the outer or clear the inner. We don't need to
fill it in. All we need to do is just make sure they're actually happy with it. You can also come
in and put it on object mode and then you can see even bear what it looks like. You know what that is.
Pretty much perfect. That is what I want. And
that is then going to enable me then to bring in my terrain. All right, so I'm happy with
that. Let's press Tab again. Control A all transforms right click the
origin to geometry. And now what we're going to
do is just go over the top, press the tab button, press A, and I should be able
to just press and unwrap. Now the moments of truth. There's a lot of
polygons in here. It's going to take a little
bit of time to unwrap this. Once we've actually done this, we can actually bring down
the amount of polygons, but we need this
many polygons on, first of all to bring
in our terrain. So what I'm going to do
now is going to press Tab. I'm going to bring in
then a, a texture. And I'm going to go over
to masset manager because the one I want is going
to be, let's have a look. We've got roof,
we've got wood we're looking for, let's
have a look for it. Backdrop clay, clove
floor. There we go. This is the one that we want.
So what I'm going to do is drag this onto there
and replace that. And then if we go onto
our texture mode, this is what you're
actually looking at. Now from here, what
we want to do is we want to do this very,
very delicately, so we do want the kind
of soil underneath, but over the top of there we actually want some cobblestone. So what I'm going to do now is show you how we actually use. This actual shader,
first of all. So let's go to our
shading options. And if I go to my shade, if I zoom out of here, you will see at the moment we've got three shaders on here. So let's just go back to it. We've got one that is the dirt, We've got one that is going
to be the cobblestones. Let's have a look
where this one is. This one is stylized tiles. And we've got one
that is the tile. So you'll notice we plug
all these in together. So the simple basically textures that have been brought
in messed around just with how bright each
one of them is and then they're plugged into
separate color. And then what that
enables us to do is whichever color
we paint on the ear. So in other words, when we
go to our vertex painting, let's say we pick red. That then will enable you to paint a different
actual texture. So that's what we're
actually going to do. And finally we join them
all up together and then they go into our output. Now it's funny because you
can probably only get away with doing this with three
different textures, Blend. Doesn't really have
a really good way of painting textures on top of textures like unreal or unity or something like that. So you end up doing this
as a roundabout way. All right, so now
we've got that, let's now go back to modeling. And then what I'm going
to do, press Tab, I'm going to put it
onto Material mode. And what I'm going
to do now is go to vertex paint and show
you what I mean. As soon as I go to vertex paint, this is always what happens. You'll see I can't paint
on anything at the moment. I've just got to make
sure yes, it's selected. I've just got to make sure. Now, if I come to this one and I put it on
red for instance, now you can see I can actually
start painting this in. So what I tend to do
is I'll go to red first and I'll paint
all of this in, so we all love it in. The tiles are basically the one that I'm going to
want over the top. Now if we go to blue, we should be able to
paint over the top here, our actual cobblestones.
That is what I want. But first of all,
before we do that, I don't want them
to be this bright. So what I'm going to do is
I'm going to come down, turn the strength
all the way down. And now come in and
paint my cobblestones. So you can see now now, especially if I bring in
now all of the stuff. So in other words,
let's come in and what we'll do is we'll pull this up and then we'll
bring these back on. So if you bring up
my perfume shop, let's bring these back in. So all I'm going
to do is press all tag and will that actually work? It won't, so we'll just have
to go to model in a minute. So object mode, I'll teach bring everything back,
let it all load up. Then from here we can actually start painting on all
of those little parts. Getting in all of those little
gritty parts like we've got our stones that go
around the outside. It needs to be darker
going down these bits here where the actual probably horse and carriage would go down
there or something like that. So let's come back to it now. Let's come back to vertex paint. We should already
have it on blue, which means now we
can come in and paint in case you do too. I'm just pressing it. So yours like this because we want some dirt
and we want some variation. The other problem I found with this is that sometimes it's very hard to paint over certain areas once you'd
like painted one in. It's very hard to go
back and unpaint them. So just be aware
of that as well. I'm going to try and do some of that and see if it
actually works, but just giving your heads up. Here we go. There we go. That's looking
quite nice already. Now, let's press seven. Let's see when actually go back. If I go back to red now, does it bring in my dirt? Yes, it does. That's good. Blue and red is great. We can use those. There you go. And then we'll just
make those a little bit white here around here. Because obviously people aren't going to walk around
there as much. Nothing's going to
crash into them. The stand. All right, that's looking pretty cool. Now what I want to do is I want to come in now with
my actual tiles. Let's even get the tiles. I think the tiles
may be on the white, so let's put it on the white. No, they're not. Let's come
in and put it on black. No, they're not
on there as well. And sometimes that
is what I'm saying. Let's try the green, I think. Let's put our
strength up to one. And then what we'll
do is we'll come back to where it says Add. We'll put it on Ad let's see
some white. There we go. That is what I want Now, I'm going to turn our
strength all the way down. Now if I draw in very carefully, you can see why I'm
actually getting here. This is what I actually want. I want to start the
actual stone slabs around all of these parts, maybe even under here as well. And from there then we can actually start drawing these in. As you can see, this
looking quite nice and this is how we got
that actual look like. So don't draw them
in too much though. Just just be very,
very easy with it. Alright everyone. So
we'll finish that off on the next
lesson. Thanks a lot. Bye bye.
221. Final Render and Presentation of Your Scene: Welcome back everyone to Blender for the Environment
Artists Guide. And from here I think
what I'm going to do is I'm actually
going to zoom in. And I can make this a little bit smaller as well
as you can see. I can make it a little
bit smaller like so. We can also use the blur tool, this is very handy or
smear or, you know, blur this one here, so
you can actually come in and you can see it actually
blurs them both together. So that's really,
really handy to use. But what I'm going to
do now is just come in and just work my way
around each of these. Bringing in the stone
slabs as you can see, working all the way up to here, bringing them in a
little bit more. Just wondering, there we go. So it's better actually if you're a, they're
a little bit more. And even as you can see
here these are coming in. I'm going to think I might turn the strength up on this.
Let's bring them in. Let's string the strength
up a little bit, make it a little bit easier for me, and then I'll go round. Once I've done this, I'll probably come in and blur
them out a little bit. If bring all over here, especially in there, these ones will need to go over
a little bit more. And then this one is
pretty much nearly done. All right, so that's
that one done, I think. Now let's come over with the blur tool and
then what I'm going to do is just blur also. Let's try the smear as
well, so we can try that. As you can see,
let's smear it over. There we go, That's
looking very nice. Smearing it over. We're doing
this all with the mouse, by imagining a tablet might
work a little bit more. There we go. And let's
now come to this part. Smear it in. There we go. And smear this part. All right, this part, then
let's smear this part in and we'll work on this part. Now what I'm going to
do now is go back to my drawing to draw
these parts in, and then I'm going
to smear them. Going to go around
the outside of here, all the way back around to here. Now let's go back to our smear, all the way back around to here. Now, then we go, that's that one done. Now let's come to
the next one then. So we're going to draw these in. So we're going to hold them all to maybe up to here
where the benches are. We'll get some dirt in between
them, especially this one. We don't really want to
smear this inside here, so we want to bring
it all in like so, because we want them to actually have
something there where they actually sat on
these parts here, on the inside here, down here, and then going around the back, and especially on
this part here. So just keep drawing
them in there. All right, let's come now
to the smear once more. Let's smear it in
especially around here, Especially down there in this bit mean you can see
just how powerful that is. It takes the edge off it and makes it look nice
and really breaks it up. It actually looks
as though we've got many different
things in here, and it's a really, really cool technique to learn how to use. All right, so we've got
that. Now let's come to this part here. All I'm going to do is
just grab all of these. All right? Something like this. And now let's grab the
smear tool once more. Let's bring it in and
on this part here. There we go. I think we're pretty much done. Let's do the front
of here as well. So I'll go to draw. So
I think, you know what, I'm going to leave that bit apart from a little
bit of smear, tiny bit just on the edges. So there we go. All right. Na is
looking amazing. Okay, so now let's
go back to object. Let's double tap the eight. Let's come up and save our work. So we're going to save our work, and then what we're
going to do is just click on our render bone. And let's have a
look around this. So let's have a look
what that looks like. And it's looking very, very nice as you can see. Okay, so finally then
before we finish, let's actually come
in with our camera. So we've got our camera here, let's come in and lock
our camera to view. And what I'm going
to do is zoom out my camera around about
something like this. Just to get everything
in. So zooming in everything in like this. And then what I'm going
to do and then what I'm going to do is turn
off the cameras view off. I'm going to make sure
that I'm on wire frame. Everything should be set up in here now as
we've set them up. And what we're going to do
now is our first render. So all I'm going to do,
again make sure your work is saved out and then click
Render and Render Image. Now this image
should render out, and then once it's rendered out, the actual compositor should
do the rest of the work. But you can see
jewels down. Nice. This actually looks, and
don't forget as well, to move your sun round because at the moment we've put the
sun in a certain place, so don't forget, I
do actually like this view because how the
sun's shining down here, I think this looks
really, really nice. Let it render out though, and let's see what we actually get. Now, of course, the more
that's in the scene, definitely the longer it's gonna take to
actually render out. I can see here as
well that maybe maybe this has just stuck a little
bit too high off there. I might go in and fix that. But I'm first of all, just
gonna let it render out, but you can see how much detail we've actually got in here now. And once we've done this, what you need to do then is make sure you're
happy with everything. Make sure the sun position
is in the right place, and then render it out
at a higher level. At the moment we're
doing it on 200 samples, I recommend going up to 2000 samples or something like that. It's going to take much,
much longer amount of time, but you're going to get
such a better render so you can see all of the detail now in the floor
is starting to come out. Now the render is starting
to get closer to the 200. You can see all of
the details in here. You can see inside
the shops and it looks like a bustling
active world. All right, so now let
the compositor do its work and then we'll
have a final look at this. And there we go
everyone. So that will be my final render. I'm not going to go in
and do more renders at, you know, four K or
anything like that. You can go ahead
and do that now, but you can see just
how nice this looks. So the first thing I
do once I've actually finished a scene is a look at what I could
have done better. What's not working, you know, if I could move
some things over. Now, Barry, in mine I built
this scene up already and I kind of tested it out where
I wanted to put everything. So it's a little bit harder to do that once you've done
something like this. And also, don't forget, I've got a lot of experience
actually doing these. So it gets less and less
points where you'll actually find you need to improve
something or change something. But generally looking for if you're happy
with the textures, if you're happy with the
shape of the buildings, if it looks as though
it's a living, breathing world, if
it looks as though you know there's bits of it
that look a bit too plain. Basically what you're
looking for is every single wall has
got something on it. It's something happening,
it's something alive. And it does take a lot longer. But you do end up with
amazing results like this. If you actually stick to that. Also look at your terrain. Your terrain is one of the
most important things. People overlook it all the time. Look at the lighting as well. Is the lighting looking good? Could the sky texture be, you know, changed in any way? I do think, you know, HDRIs, the very good. But the sky texture within blender is really, really good. Now, I would say on here that
probably on the compositor, I've got a little bit overboard on the actual lighting here. So maybe it's a little bit
too bright it needs bring it back a little bit and I think that would look much
better at the moment. This looks like a kind of
four 05:00 evening scene. You know, the sun's just
starting to go down a little bit and this is what this scene actually
looks like to me. So also take that into account. What time of day are you
wanting to actually render out? Now the other things then
are textures making sure, do you have enough textures? Do you have the right
textures in this really, we didn't actually use
that many textures and it shows you just how
much you can actually do with the textures
as long as you know how to change them
within the shader panel. So a lot of these
textures, for instance, like the greenwood,
the blue wood, the red wood, it
was all done with the same texture except we messed around with
it in the shader. So I'll recommend as
well go into the shades, have a look at the
textures we've used, and realize how to actually
change those as well. All right everyone.
So that brings us to the final lesson
of this course. I hope you really,
really enjoyed it. If you got this far, I've
got to congratulate you. It's the largest
course I've ever done, and it took a lot of work to
actually put this together. I'm sure you can
see that you can't create something
like this without going through lots and lots of the same sort of things
over and over again. There's just no way of
getting around that. But hopefully, you got to end of this and you've got some really, really amazing result that you never thought
you would achieve. Now for those of you did finish, please leave us review being
as you finished the course, hopefully it'll
be a good review. So leave us a review.
What you thought, what you thought we
can improve on and all that sort of good stuff.
All right everyone. So that's it from me. Happy
modeling, everyone. Cheers.
 3D Tudor, Bestselling Blender Author & 3D Educator