Transcripts
1. Introduction : Hello, I'm ally, a
mixed media artist from Cumbria in the
Northwest of England. I paint local landscapes of the Lake District Fells
where I enjoy walking. I enjoy teaching
drawing and painting here on Skillshare
and on YouTube. I sell my own work online
and at local galleries. In this class,
you'll be learning how to draw and
paint a rose flower. We will start with observing the basic shapes of
the overall outline of the flower before going on to draw and paint it in
ink and watercolor. This will help to simplify
the drawing process and make the complex rose flower
less daunting to draw. We will talk about
the importance of relaxing and enjoying the process of creating artworks to reflect your
personality and style. I have included three
roses to choose from or you can put your
own to work from life. For your project,
you will complete an ink and watercolor
rose on watercolor paper. There is a list of materials required for you in
the resources section. Let's get started with some
observations and warm up exercises before we draw
this pretty rose flower.
2. Warm up and observation: Fore starting any drawing or any finished
piece of artwork, it's always a good idea
to have a warm up. This warms up both your
muscles and your eye, especially if you've
not done anything for a day or two in the way
of drawing and sketching. So try and get in the habit
of practicing and warming up. Have some inexpensive
paper to hand, some scraps of card, anything that you can save
up and I have a draw of scraps of paper
that I can practice on that it doesn't matter
when I throw them away. So don't start on your
watercolor paper. Start by having a little bit of a warm up to look
at these shapes. So we've got three
pictures here, your rose might look slightly different if you've got one
in a vase in front of you. But you can see we've got one
looking down on the rose, one at an angle with the
buds as well included, which is rather nice
and one from the side. And I think the thing
that puts people off roses is the amount of petals that they
have puts them off drawing it and
attempting to draw it. But really, we don't have
to count every petal. We just got to get the
essence and the shapes. So if we look at the shapes, with most roses, and
they're not all the same. Obviously, you have to use your eye and this
is why I say we need to warm our eye up by
looking carefully at things. But most roses have this little point at the
end of some of the petals, and it's a similar point to the one that you
find on the end of the leaf there and
that can make it very distinctly rose like. These little bits
that are taken out. The way they curl
up there as well. So that's quite distinctive. The way that they fixed next to the stem here and this
part of the stem where it goes fatter and the way that the leaves go
around the bud there. There's all sorts of things that make it a rose, but mostly, one thing that really
does is the way that the petals are fixed
around each other, the way that they overlaps. We've got lots of overlaps here and lots of overlaps in here. Now, when you come later on to doing your
finished drawing, you might want to
spend hours and hours getting all these
petals where they are, right amount of petals, I rarely do that because nobody's going to
count later and say, well, there's 12 petals there
and you've only drawn ten. As long as it looks like a rose, that's what we're looking for, the essence of the plant
and the overall shape. Okay, so let's look
at these shapes. So this one, if we look
at this one first, would very much fit into
more or less a box shape. So you might want to
start with drawing a box to put it in
because of course, we can erase these
lines later on. But this is just a practice, like I say on a rough
piece of paper. So it's more or less
fitting into a box, and then you've got your
stem going down here. So use your whole arm, use your shoulder when you
practice in these shapes. This petal here is
a lovely shape. Although we're in a box, it's kind of just going
over the edge there. It's a guide is the box
that you need to fit into. We've got this one
going up here and out, another one coming up here, and always get that distinct
shape at the edge there. We're just playing warming
up, having a look. Then we can tighten it up and
tighten it up and be more detailed as we go along and look at the way
that comes down, that lovely shape of
that bit of a leaf, another one here, and that's
very much distinctly a rose. Look at all these little
bits coming off the leaf. Nice pointy edges
going to a fine tip. So one thing when
drawing any flower, but particularly with these, if you imagine this big
bloom out in the garden, what happens when
it comes to the end of its life is it
disintegrates and all the petals fall off because
they've lost the fixing. So if we imagine
this point here, and behind here
where we can't see, they're all anchored
to the stem. So every petal needs to
come from that anchor. Otherwise, it's not
going to look realistic. So if you have a petal that
starts up here somewhere, it's not anchored to this stem, and it's not going to look real. So everything, all your lines have to come back to this point. Okay, and when that
goes, they all fall out. We've got this how
it's blooming, as it starts blooming, it's
all opening up like that. And just imagine this
as a goblet shape. So the problem we have when we're doing
any drawing or painting is that we are creating an artwork on a two
D flat surface. But the thing that we're
drawing is a three D object, and we need to make that three D. So we've always got to in our mind,
imagine what we're doing. Even if it's from
a flat photograph, imagine that we're
going around it and working around it and that
that is a three D object. So this could fit
into a goblet shape. So when we come later on to
put color on and things, you can see you can
make that goblet shape by getting these
shadows in here. This is a very distinct shape
where it's all going down. And round and you can
picture that, can't you? Those petals anchored there, all going round and
up and this way. So they're not just
going around this way. They're coming towards us
and away from us as well. Okay, so well, let's
look at this next one. So this would more or
less fit into a circle, so you might begin with
getting a nice big circle, and you might put a second
circle in for this part here. Again, everything is anchored. Although we can't see the
top of that stem there, if in your mind's
eye, don't draw it, don't draw it like I have,
but if in your mind's eye, you know where that anchor is and that you've got the
stem coming down here. When you're drawing, you want all your petals to
be anchored to that. So we'll start if you
look at that line there, put that line because
that's the base. We imagine it has that
part of your hand there, that's the base
of it, where it's going to come up from
there and curl around. Okay. So with this one
and with the next one, we really need to
look at the way they are curling
around each other. Now, this is a little
bit messy now cause I've obviously gone over these
lines several time, but I'll try and press
on and show you. So if you start with the first
petal in the center here, and it's going around like that. You can't see the actual down into the center
because it's quite dark. But then you start building up, putting the petals around and they overlap in each other and you're seeing
the edges of them. And then build that
up and build it. Until we get. So we've got all those tight
little ones in there. Like I said, nobody's
going to be counting that you've got all these tight
ones correctly done. And then when we come out,
we've got the ones that are slightly opening
up, and that's a shape. So if we look at this shape
here, it's like a boomerang. So don't think of it as a petal. Think of it as a shape. Same when you're
drawing people, same when you're drawing
animals or anything, look at each shape.
Can you see a circle? Can you see a square and fit the things
into those shapes. If you start thinking petals, especially when you're
drawing people, if you start thinking
eyes or noses, or whatever, you
start panicking. Just look at basic
shapes that you can see there and then build it up and build it up and build it up. And then as we go out,
the more and more open, and as I say, we get those
distinctive petal shapes, and then opening up to the very big ones
that are really open, and again, getting
those shapes in. And don't forget those
are coming towards us. So this isn't accurate, but it's coming towards us. So when we put some
lines, in afterwards, if we come this way
with our arm, stand up, move your arm so that we get
some feeling of movement, and we get some feeling
of it coming towards us. These lines here,
the veins, very, you might not be able to see
them from the camera here. But the not straight,
the not like that. Quite often people will draw
lines like that on flowers. Get some movement, the
curving, the nice and curly. Okay. So we'll take a
quick look at this one, and then we'll go ahead
and do a finish piece. So this is a bit
of a combination of the other two, really. So we've got that oblong
shape in the center there. Of the ones that are still
curled up and around. And then we've got it going
out in a circle this way. So it's starting
off, it's looking a bit like a daffodil
there, isn't it? You've got some
opening up and you've got some there and
then we've got this. Again, we know
where the stem is. It's here. And so
if we start here, again, we'll start
with that middle one, and then you've got
all the ones going around it. I'm not
going to do all those. I'll just squiggle. And then the more open ones again
anchored down here, and then these ones coming
out and towards you. Now, if you look at this one, and it's one the same
on some of the others, I'll just turn to
that up here a bit. If you look at
these petals here, you've got the petal going up, and then it's curling over. So the shape we're getting here is something like
this. Can you see that? This is the outside of the
petal where it's curled over. That's an important
observation to make and look at that
where that happens. Look at where
they're overlapping. If you're not confident
with drawing an ink, do everything in
pencil first because when you come to
put your ink on, it's very easy to go over some lines where they
wouldn't be criss crossing. Here, we're running out
of paper a little bit. But this one here is a
particularly lovely shape because it's going
right towards us, you see the flat line of
the top of the petal, and then from the
back of the petal, you see this shape here. And then it's going down there. So it's like this. I'm bending right over now, so it's coming towards us with
its shape over like that. Okay. So I hope that wasn't just a big
squiggly mess to you. I hope that all made sense. Have a really good play looking at these shapes
before you go on. And I should have
said about the buds, but the buds are so easy. Just got that oval shape. You've got and then you've
got the leaves coming around. Okay. So look at what makes them distinctive.
Look at these points. You're going to need a nice
point on your pen or on your brushes to get
these lovely shapes of these points at the
end of everything. So I'm going to get some
watercolor paper now. Try and get a nice smooth
paper that's easy to draw on that your pens are going
to bounce along too much on, and one that takes a
nice bit of water. So anything over 140 pounds in weight is what
I would recommend.
3. Pencil guidelines: Paper I'm using is a
saunters Waterford, so it's really nice
and smooth to drawn. And I've taped this to a board. You might be using a pad. You might have a gummed pad, and if you're using a loose pad, make sure you just tape
it around the edge or pop a pin over it or something to hold it down when you
put the water on. Okay, so I'm choosing to
do this one just because I really love the shapes of these leaves. Well,
they're not really leaves. They're the case that's sort of opened and gone down as
it's come out of its bud. So I'd love to see you do
the other two as well, and it'd be great to
see what you've done afterwards when you
upload your projects. I do thank you for
uploading your projects. It's lovely to see
everybody's work, but don't ever feel obliged to. You know, it's not compulsory, but it is nice to see, and I can give you feedback
then as well. Okay, so like I said before, it's more or less fitting
into a square shape. So one thing you can
do to check that, is measure with your pencil. So from the top to the
bottom there is about that. And then it more or less
goes from there to there, so we've got this little
bit here and this bit here breaking
out of that shape. So you could start by putting a square shape in just to
give you a guide to work to but you don't have to do that because you could just have that in your mind
that that's what it's going to fit into and use
the whole paper if you can. Okay. So I'm going to start with this with this
central one here. Which comes about
half the way up. It sets off, so it sets off
about here somewhere up over. And that's the only lines you
can see of that one there. Then you've got one that
comes right across it. As I said before, it's one of
those that's curling over. So you're seeing the lip, if you like, the edge of the petal air as
it's curled over. And then you've got one
coming the other way. So this is this goblet shape you can see here, the
line coming down. And then up. As I said, this one breaks
the line a little bit. Again, you're seeing
the back here. But this is detail
we can add later. To begin with, we're just
getting the basic shapes. And that goes all the way
up that line, and again, out at the top there
across and down, the goblet shaping
there, and again, we're seeing a little bit of the outside edge
of that petal. Into the center because they tend to overlap like
that, if you like. So you wouldn't find one
going across that they're always going to be
going you know, two lining up there. This is just the top of some other ones from the
other side you can see a couple of tops
there you can see, and then this one going
out and a into here. And again, it's got
that nice point there. This is the best shape
here, it swoops right down, and then you've got
that goblety shape. I tend to curve things a
little bit more than they are. So you'll find
something like that. I'll perhaps tend to
come out a bit far. I think it's about light drawing curves and getting some
shape into things, and this comes back
to what we were saying before about getting that your own personality into things and a little
bit of imagination as well. I do it without thinking
putting extra curves in things. This is one of those
leafy things coming down. And then we've got
this really big one, big petal that's
coming towards us. So as you're drawing, imagine you're drawing around that and it's
coming towards you. And you've got that
petal again folded over. So we're seeing both sides. And it's difficult to do
this just with the pencil, unless you're using lots
of shading and things. You would actually be going to be easier once
you get the colors in to distinguish which is the back and which is
the front of the petal. Again, it goes in, and it comes
out towards us like this. We can see the underside
of this petal. So this petal here, we
can see the underside again in a little
bit of a tulip. Goblet shape, and then
you've got the back of another petal there or the
front of another petal there. So we've not actually got
that many petals showing. We've got one, two,
three, four, five, sit, seven, and then those
few little bits at the top where they're
all nice and tight. So it's perhaps an
easier one to choose than the other two. As far as detail is concerned, but nice with those shapes. And that's got a lot of
these jiggled ibits, whatever the word is. And then, of course, the stem itself, you
mustn't forget about. And it has got some
leaves lower down, but I think I'm going
to leave those off for now and just
concentrate on this. So as far as pencil lines
goes, that's probably enough. You don't want to
put every little detail in with pencil line. You can quickly
look back and I'm thinking that needs to
be a bit wider there, and do a few alterations. Perhaps go away, have
a brew and come back and see things that you want
to change a little bit, and hopefully you'll have
more time than me on this. So I'm seeing here now
this petal isn't one. There's another part of
another petal behind it. So you get your eraser. Some of the lines
that are wrong. You can take those out before you come
back with your pen. But just spend a
little bit of time. But you've got the
feel for the rose. You don't have to
be exactly right. And another thing I should have mentioned with the leaves, can you see how they're
serrated on the edge? So again, that's something
that's quite distinct with the rose. I haven't
mentioned thorns. None of these pictures have
actually got thorns on. So we'll come back in the next little clip with some ink and do the actual
drawing of the ink.
4. Erasing lines and assessing drawing: How much detail and shading you put on there is
entirely up to you. Don't be afraid to
go dark in places. The light can't get into all
the bases of those petals. The light is being blocked
from getting in there. So there are places where
it's really, really dark. You can see here,
it's really dark. So press on a little bit harder with your pen in places and get that contrast between
the darkest and the lightest areas a
bit darker along here. So don't forget after you've
done your watercolor, you can always come
back with your pen. So don't overdo it
with your pen because you can put extra on
later if you want to. And as I said before, it's a very delicate thing,
very delicate petals. You don't want to
be heavy handed and have really dark
lines on there. So give it a few minutes to dry just to make sure
it's completely dry, and then have a
nice soft eraser. So the thing is, if you
have a good quality paper, And a good quality eraser. It's going to make life
much easier for you. Don't use an old razor
that you find in the back of a cupboard that you had from when you
were at school, and it's going to take all the paper off and all the ink off. Have a decent eraser,
a nice soft one. And if you're not sure
how good it is, again, practice on a different
piece of paper, test it out, see how good it is. Get all those pencil lines off, and then we'll come
back with some color. And again, how much
color we put on and how details we go with that
is entirely up to you. You can see that looks
completely different. Now I've got rid of
those pencil lines. Actually, I've just
missed one there. Whoops. It looks entirely
different, much crisper. And I'm quite happy with it. I think what we wanted to achieve was to get the
essence of a rose. We know it's a rose.
It's not a daffodil. It's not a daisy. It's
distinctly a rose. So it doesn't matter if things aren't exactly as
they are on here, if they're not exactly as I
said in the introduction, nobody's going to have
this photograph or that particular rose to say,
you've got that wrong. As long as you've
got the feel for it, as long as it looks
believable as a rose, so everything's hinged
on that stem there. And it looks Rose
like Rose character, then you should be happy
with yourself for that. Again, I've just missed
a little bit there. So, like I said,
the actual painting of it is really a
personal preference. The whole thing about
income water color is that you've got
that combination of the detailed or more detailed
drawing with a bit of a loose paint wash because
there's no point drawing and going details
with your paint when you've already
got that there. You don't want to hide all that lovely drawing
that you've done, and all that character that
you've got of your flower. We're just adding
a touch of color. Now, if you wanted, you could do this very dark
background so it pops out. I'm just going to do it
against a white background. So just be patient, let things dry, go off and do something else,
come back to it. I'm just going to look for
those other two photographs. If you look at these, you could do a lovely
background with this one, just wetting the paper and dropping some pinks
and greens in so that you've got the
background there before you put your
colors on top, and you would just do
that in layers coming forward and do these
lovely buds as well. And then that gives
you the feel of that being outside in the garden. So this is just one
color. It's just pink. So I think what I'm going to do, excuse me, I'm losing
my voice today. I'm just going to make
different strengths of the same pink,
the same color. So with different
amounts of water. So some stronger with more
paint pigment and less water, and some with
slightly more water. And you start off with the more watery paint and then build up to the stronger paint
as you're putting it on. We'll do the flower first, and then we'll do
some of the stem as well and those little
bits of green in there. But I'm not going to
overdo it with the paint because the drawing is there, and I'm quite happy
with the drawing, and you want to show
that drawing off. And also, you could lift out some highlights
with a bit of tissue or something or just with your brush as well
if you wanted to.
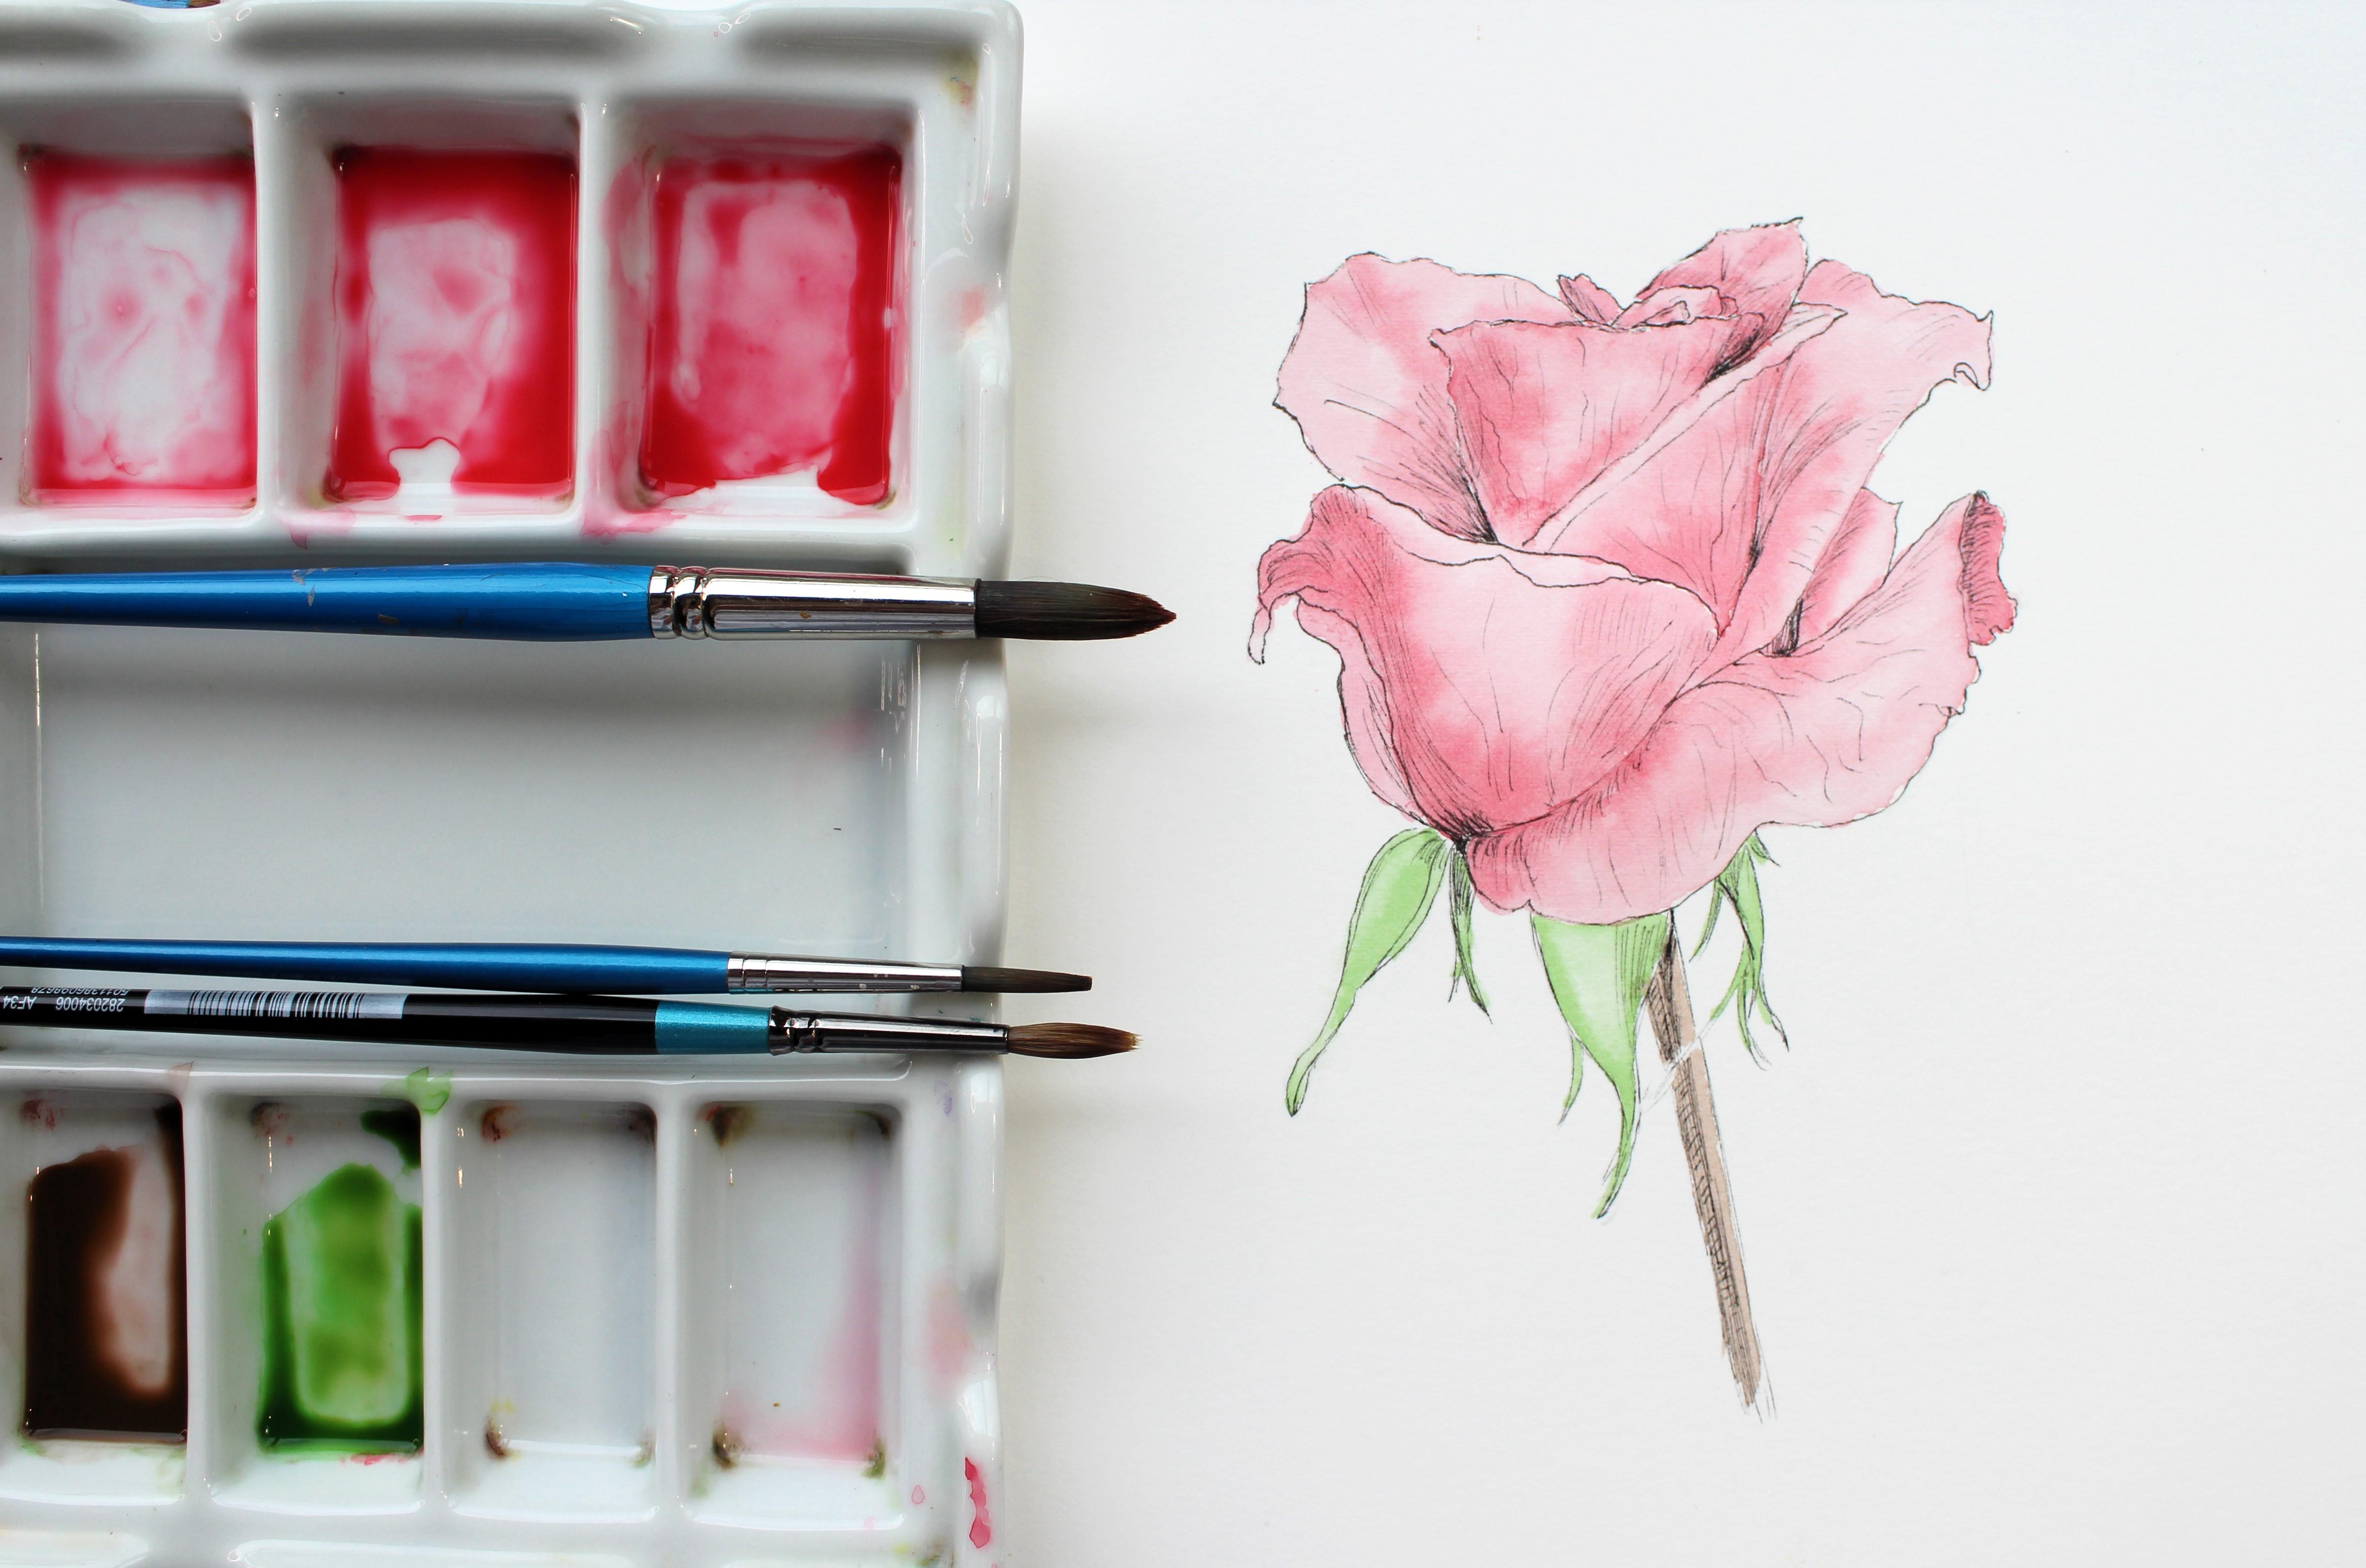
5. Ink Drawing: Ink pen that I'm using
is a UNI pin fine liner, and it's a size note 0.5. And you'll see there it says
waterproof and fade proof. So it doesn't matter what
make of pen you use. There are lots of different
ones on the market. It just matters that
it's waterproof, because if you're
going to be adding your watercolor paints to it, you don't want to to to smudge. So if you've not used
your pens before with watercolor paints,
give them a test. Again, get some scraps of paper. If you've got a little
bit of a scrap of watercolor paper or the back of something else that
you're throwing out, use those scraps to test
out your materials. So test out that your
ink once it's dry. Well, you can go over it
with watercolor paints. So do let them dry, cause even though you
know, it's in a pen, it's not a dip pen or
anything like that. It just does need a
few little minutes to dry before you go
on with your paint. So one good thing about getting the pencil
lines in first is so that we're not
going to be going over those lines crossing
where they shouldn't be. So you need to do a little
bit of concentrating now, being a bit more free and easy with to get the character
with the pencil. And now we need to tighten it up a little bit with the pen. So, I like to start at
the top and work down so that my hand isn't smudging
what I've already done. You know, it's an easier
way for me to work. And I will sit down
at this point to do the pen drawing because it's going to take
me a little while. And I don't have to worry about moving my
arm just as much. So I would start with these little ones at
the top where we said, you know, they were
just poking out and very distinctive shape here. And I'm holding a
pen quite lightly. I don't want to you know, a rose is a delicate thing. I don't want to be
putting a lot of pressure on and making
very heavy black lines. And that's the reason I chose
a size not 0.5 as well. I don't want a
really heavy line. I don't want to be
doing this with a sharpie or anything like that. So we've just got
those few little bits of lines there where those petals are
showing above there. And then I'm going to put
this lovely crinkly shape of the top petal there,
which is going round. And as you're looking, you
can see it going down here. And you go along
here and we've seen a little bit of the lip,
it's a bit thicker. We go backwards and forwards. We have a couple of
little lines there. At the end as well we've
got a nice bit of a shape with where it's poking up down. Like I said, we've got that
goblet shape as it goes down to where it
meets that one there. If we look carefully now, there's lots of veins on
this and they're all light, and they're going in
different directions. They're not all uniform. Again, we're getting a
feel for those shapes. It doesn't matter if you
put every single vein in, you get looking at where
they're curling around, the shapes of them around that lip there because they're
coming down and toward us. And then look at the shadows. Now, there was some shot
shade on this top one. So in ink drawing, it's up to you how
you do the shadows. Some people like
to do little dots. I tend to do dashes. But I put very
little pressure on my pen and do some
bits of dashes there. Okay? So that shadow is just going to start and
give us the impression of the fact that this is more three D. The lights hit
in the front there, but it can't get
around the sides. We'll put all the petals
in and then come back and build up some of
the shadowy shapes. So what I'm going to do now is I'm going to
carry on with that. I'm not going to talk
through the whole thing. So very carefully,
looking at each petal, getting those shapes
in of the edges, wether nice and pointy and get a few of those shadows and veins starting
to build it up.
6. Painting the petals: What I've done here is I've mixed I've put the
same amount of water, just a little drop of water
in all three of those, and I've put some of
this rows in here. It's a Windsor and Newton one. And then I'm going to take
some of that out of there. So that's nice and thick. Pop it in the next one. And then take some of that out of there and
pop it in the next one. So then you've got
three strengths. You've got dilute going
to much stronger. So if we wet one
petal at a time, Have a good brush
with a good tip. So the tip of your brush is the most important
thing here with roses because we've got those shapes where they go into
those little points, get your water into that
point and cover that petal. This is where we need to take our time, one petal at a time. You could go over the whole
thing if you wanted to, make it a bit looser. But we've got those
distinct petals. I think it'd be nice
to do them and get the shadows and shapes in
where they're overlapping. Obviously, they cast
shadows on each other. So that's all wet. So that
one petal is all wet. So we'll go to that
loose pink when I mean loe the one with the water in
it, and we'll pop that in. You don't really need
to paint with it. You just need to let it flow into that water
that's already there. And obviously, it's not
going to matter too much if you overlap the
lines here a little bit. It's this outer line that
you don't want to go over. You're just pushing the
pigment around really in that water and not
overworking it. And then if you look here,
where we've got the shadow, and we've already done
that shadow with the ink. But if we get the
strongest mix now, so we're not going to
go with that medium mix because actually this
one is very light. It's just this dark bit here, and we're just going to pop that thicker mix into this area. And again, we don't
need to work it. We don't need to
brush it too much. We're just dropping in the
pigment and letting it flow. And it'll keep
moving as it dries, and that'll dry nicely
without any help from you, don't start pushing
and pulling it around. I'm just going to put
a bit here because it sort of folded around on
itself as well there. So you're just
dropping in the color, where you can see
those bits of shadows and folds and letting it flow. Now, what I would do
now is instead of doing this one
that's right next to it because they can
flow into each other, I would go and do one over here or here and build
it up like that. As that's drying, I'm
doing one over here, and then I can come
back to that area. So just do one at a time using either the two colors well, they're all
the same color, the two mixes that I've just
used or all three of them depending on how many shades and shadows you can
see in each petal. If you're using
different colors, that's absolutely fine too. You might want a few
different colors. You might want to
put some orange or something underneath
for the light shining through and then
some more colors on top. Just have a really good look at the rows that you're doing. Obviously, this
one, not this one here is different altogether because you've got quite
a lot of white there. You need to think
about your shadow colors as well for that. I'm going to carry on
and do all of those. I'm not actually going
to film that because I've shown you what
we've done there, and then we'll come back and
do the stem and the leaves.
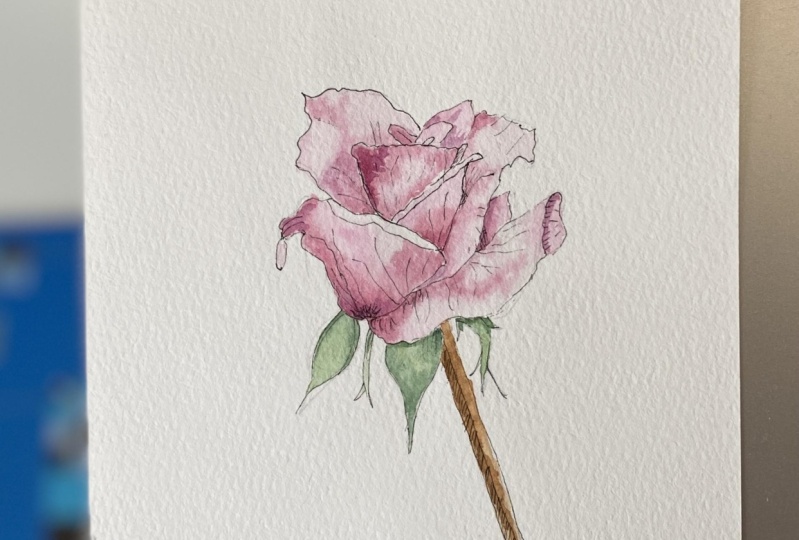
7. Painting the stem: I'm reasonably happy with that. And I've kept it very, very simple using just
that one color. Of course, you could expand
on that and use more colors. You could allow that to dry and then put layers over the top. Just remember when
you're putting layers over layers
with water color, to be very careful just to imagine that you're painting on glass and do it very lightly. You don't want to lift
the colors from below. So one thing to remember, this technique is called
painting wet in wet, which you're probably
familiar with. So we wet the paper, and then we add the paint to each other whilst
it's all still wet. And the only thing you really need to remember
that with that is to always be adding a stronger
mix the second time. So you start with one
that's more watery, and as you go on, you have a stronger mix with more
pigment and less water. If you do it the other way around, you'll end
up with a mess. So that's really the one thing you must
remember with this. All we need to do now is put a little dash of color on
the stem and the leaves, and because I've kept
the flowers so simple, I want to keep those
simple as well. Those of you that
are gardeners will observe your flowers
and see that lots of red flowers and pink flowers have that color going
through the stem. If you look at the stem here,
it's a little bit ready. Because I don't want to introduce lots more
colors to this, I'm just going to use one green, probably a sap
green and add some of this pink to it to
get a ready color, and then I'll just
put a tiny light bit of sap green on the leaves here. Now, because we've
used that wet in wet technique on the
flower with the petals, we want to use the same
technique going further down. Otherwise, it's going to look like two separate paintings. So we need to use
the same technique. So wet your leaves, the not leaves, what
casings, whatever they are. I'll do two at once here. Using the tip of that
brush, get your green. They're actually very,
very light in color. So we've only got
one. I've only mixed one mix of green up not lots
like I did with the pink. Oops, I've gone over
the line there. Don't worry about if you've got a good paper and you
go over the line, get a nice synthetic brush, and you can lift that color out. So this is a lot
lighter in some areas. So what you can do
while it's still wet, to give it a bit more shape is just lift some
of that color out. So this is a dry brush, and this is a synthetic brush, so it's easier to lift out with a synthetic brush rather than
with your sable brushes. And where I've gone
over the line, I can also lift that
out very carefully. You won't make as
much mess as I have. I'm looking forward to seeing what you do with these
lovely rose photographs. Okay, so I'll do
the rest of those and then we'll come
and do the stem. So like I said, the stem color, I've mixed that sap
green with the rose red, and it's actually
made a lovely color that's just right for this stem. So we'll wet the stem. F. And we'll pop that color in. And you could go darker with that and red if you wanted to. But really, the flower
is the star of the show, so you don't want lots
of detail in your stem. So we've already got the shadow there coming
down the side with the pen. Like I said before,
once it's dry, you can always put more
pen on if you want to. But I really think
that's enough for mine. So if you want, you can expand, you can put more colors on, you can put a background on. You can try all three of those. So for your project, I'd like you to do at least one, but maybe two or three
and pop those in the, like I say, upload those if you can, and if
you would like to. Because if you do that, I can then give you some feedback. Okay. So just to recap, the main thing when you're
painting any flower, drawing any flower, should
I say, is to first of all, look at the overall shapes, the shapes of the
flower and each petal, rather than getting stuck right in the detail
to begin with. Keep it loose to begin with, and then you can add
the detail later.
8. Conclusion: Okay, so I hope
you enjoyed that. If you've got any
questions at all about the process about the drawing and the painting of any flowers, these ones in particular,
please do ask. You can ask me here on
Skillshare or you can ask me over on Instagram
in the messages. I'll always get
back to you when I can as soon as I have the time. You can also see
lots more flower demonstrations over on
YouTube, which, of course, are free to see
there on YouTube, and I do do some on my
Facebook page as well. So if you go over to my website, you'll see all the links there. So that's just ally
lawson do U K. Let me know what you think,
and I really look forward to seeing your projects and seeing all these
beautiful roses. Thank you very much for taking my skill share course today, and I'll be back again soon with another one. Good bye for now.
 Cally Lawson, “Paint like no one is watching"