Transcripts
1. 01 Intro: Hey, everybody. Stella here. Happy New Year. We
made it to 2026. So today, we're
going to talk about standard pocket and zipper
designs for handbags. This class is actually
requested by Yusuf, who is one of the students
on my Skillshare. So thank you so much, Yusuf. Now, let's get it started. What you will learn is that
by the end of this class, you'll be able to identify standard pocket and
zipper styles and understand how to apply them
to your own handbag designs.
2. 02 Standard Pocket Designs: Let's start with patch pocket. It's basically a
very simple piece of either leather or fabric pocket stitch directly onto
the bag surface. So this is how we will indicate a patch pocket in
pattern making drawing. Now, like I said,
it is very simple. It is flat, and it can be
attached onto a handbag either using top stitch or your regular turn edge
with insin construction. It does not have
any zip closure, so it's an open pocket. You can easily put stuff
in and take it out. So this toe it's in
canvas, I believe, and it has a very
simple patch pocket on this front panel. And as you can
see, it is secured by the overlay straps
on the front panel, basically, overlapping
on top of the pocket. And because this is
made out of canvas, so they added a piece of binding to finish
off the canvas edge. Now, again, like I said,
it is very simple. It is a flat construction. This is supposed
to be, you know, for quick access to whatever items you
want to put into it. Um, I normally will not make it too big
because think about it. If the opening is too big, anything can just kind of
spilled out if you don't put your toe or whatever bag you have, you know,
down properly. This is another
patch pocket with a very fancy curve,
you know, design. And this one actually features the top stitch that I was
talking to you about. It's literally like a patch. You just kind of put it on
top of the handbag service. I usually don't make
this pocket very large. As you can see,
like I said before, there's really no security. Anything valuable that you put in there can
easily come out. So I would consider this when you are designing a patch
pocket for your handbag. The second pocket and the most common pocket that
we create is zip pocket. It's basically a pocket with a zip closure to protect
what's on the inside. This is how we would
draw a zip pocket. Again, this is where
you put your valuable, such as keys, your credit cards, and even small electronics. There are two types of zip
pockets on this image. So the first one is this is what we call a flat zip zipper tape, you literally die cut a hole
on the leather surface and you sew the zipper on the back side of this
leather opening, you won't see it because
it's all covered up by the lining and you can just basically
throw your life into the zip pocket. Now, the second type of zip closure we see here
is actually on top. We usually if a handbag, its entire main closure
has a zipper on it. We call this the zip closure or top because it's on
the top, top zip closure. And so the tape
itself is sewn to the front panel
and the back panel to create this entire closure. Now, the third pocket
that we use a lot is flat pocket with gusset. So we add the guzzet
to add depth, especially for items
that are bulky. So this is a rendering
a gusset pocket. You see the gusset
in brown over here. It has a flap. And the flap, you can use magnetic closure. You know, you can also use
regular button closure. Doesn't matter.
Some people don't even add the Macnap or button. It's just a flop, you know, doesn't really like
attach to anything. So anyways, coming back to this, so Guzzet can be extendable, or it could just be one
single solid guzzet. And we usually do
this when we want to carry bulky stuff
like sunglasses, cameras, anything that
needs protection, but still with a bit
of an easy access, it's not zip, it's flap. You can just open it up, put your hand in it, and grab it. Okay, so this is actually a flat pocket with Guzzett
and a zip pocket with gusset. So you can see the gusset
on the side lights, it gives it that depth to
hold on to bulkier stuff. Usually, when you add
a pocket like this, it does look a bit more
utilitarian and more masculine. So you have to think about that when you're designing your bag. Now, let's really talk about a masculine looking
cargo flat pocket, which is military inspired. It's deep. It's
got flat closure. It's there to serve a purpose. It can carry a lot. This is how you will
draw it pattern wise. It's mainly used
for travel bags, utility bags, outdoor gear. So this is a backpack
I found on fuel USA. So you can see, there are one, two, three different types
of cargo flat pocket. Actually, no, this
one is only this one has a flat, but
you get the gist. This is a single solid gusset. It does not expand or collapse, but it gives it so
much more depth. And you can see this one
has the top zip closure, and this is the
exposed zipper tape. I'll talk more about zipper
anatomy in the later slides. Now, this one is interesting. This one almost looks
like a pencil case, and it has a zip
closure in the front, so you can only access the
items from the front panel. Again, this is ways that you can incorporate zipper closure, not just on top of the pocket, but you can also do it
on the front surface of the pocket. Weld pocket. Now, we're moving towards a more classic and sleek
design with welted edges. I'm sure you've
seen weld pockets before because they used
to be super famous. Well, not famous, but
they will utilize a lot on your grandfather's
tuxedo suit. I mean, just like,
go into, you know, his closet and
rummage your fines. So this was actually
invented you know, for men's wear and some
women's wear, too. We're talking about
from the 30s, 1930s, all the way to the 50s. Any type of suit you find,
you'll see this pocket. And then it ended up being
utilized in handbag design. I want to say in the
late 90s and early 2000, I could be wrong about
this, but that was the first time I started seeing
well pockets showing up. It has this really clean look. And this type of weld design is actually not that easy to sew
to make it so crisp, sharp. So it shows craftsmanship. It shows this tailor finished. So when you add this to a bag, it creates a very structured
and refined look like this. So, this particular bag, I find it really interesting
because as you can see, the weld packet is slanted. It is not straight. And I
like to believe the designer did that to add a bit of a
contemporary edge to it. If we just take this as and put it right
across the handbag, it just looks kind of dated. So yeah, I think this is a
really awesome incorporation. And as a designer, this is also what you
need to think about. It's like, how do I reinterpret something that's been
around for very long time and make it more modern
and more contemporary and accessible to
audience of today. Now, another thing you notice is that there's a zipper polar. So that means that
this is a zip closure, which makes total sense. Why is that? This is
the front of the bag. So you will access and put your stuff in this way,
okay, horizontally. Now imagine if there's
no zip you know, zipper closure to protect it. Literally, when you put
the bag down each time, or even as you're
walking and the bag starts swinging, your
stuff will come out. So again, as a designer, you have to think about
the functionality and the aesthetics. And how do you marry the two? You can't have aesthetics without the functionality
and vice versa. Accordion, Gusset. So, um, if you have seen her
accordion, I'm sure you have. It's a multiple photo sections created creating this really organized
and expendable storage. So this is how the pattern
piece will look like. I'll be honest with you. Like, this thing was
created, I would say, around the mid 30s, all the way to the 1950s. Look at your grandma's old bag, vintage bags or walk
into any vintage stores. A lot of them had this little accordion
gusset construction to create internal organizations and also to create
internal compartments. I have only seen two brands who incorporate this
accordion gusset onto, you know, um, pocket. I will say this. It wasn't very successful because the
pocket was very small. And here's another thing. When the pocket is small, and then you try to add
this much leather or fabric on the side and trying
to sew it on the machine, you are really testing the
sewer's skill and patience. I will say only use
this when it serves A real purpose. Okay, now let's talk about
additional design features. You can add to individual pocket design to
make it your own. This is where we
designers have some fun. Again, we talked about
the accordion gusset. You can also do lots of gathers. You can add a single
solid gusset. You can tuck it. And if you tuck both the top
and the bottom, it becomes the bellows. You can do a box, and then
you can do it, please. I mean, you can just
go on and on and on. And this is how we
designers create that branded look that sets it apart from other competitors. Now, this particular page is actually pulled from
the slideshare.net. So if you like, just go
and take a look and see how people incorporate these
little design features. Last but not least, let's talk about
interior pocket design. So this is the actual
tet pack that I did. And usually for
interior pockets, we do the standard pockets, meaning that we don't
really spend that much time trying to make it
different because it's on the inside of the bag. So it doesn't matter.
Like, nobody will see it except you when
you purchase the bag. So we usually start with
interior back wall. And what that means is that
on the back wall of the bag, we will usually
add a zip pocket. It's very standard.
The only thing we change is how long is it? And then does the pocket go all the way down to
the bottom of the bag or do you just kind
of create a pocket that's like midway through
the bag up to you? One thing we do have
fun with is creating this leather window trim. You know, if you open
up any bags you own, you'll see that this is
where we put our logo. It could be debos
emboss, stamped, whatever it is that you want, or even a metal plaque,
if you like. Some brands don't even
have leather window trim. They literally just put
their metal logo down below, and that's it, and that's
totally fine, too. Now, the next thing
is we usually add two Miscellaneous pocket on
the interior front wall. Again, just open up any bags
you own. You'll see them. The only catch with these two little open pocket is you have to make
sure if, you know, if this pocket is too high up and your customer decides
to put her phone in it, it might actually extend
beyond the closure of the bag, and you can't close your bag. So you always had to
make sure that the drop from top of the closure of the bag to where you start your open pocket,
there's enough room. You might have to
lower the pocket completely or whatever
it is that you do, you know, make sure
that the bag can close. Second of all, you also have
to make sure the width of the bag is wide enough if somebody wants
to put their foot in it, if they want to put
something bulky in it. A lot of times that
wasn't accounted for, and then you basically have two useless open pocket
just sitting here.
3. 03 Standard Zipper Designs: Last but not least, let's
talk about the zippers. Basically, one of the
most essential hardware for secure closures on bags. This is actually a YKK
zipper swatch card I got years ago, so you can see it's
kind of fading up. So a couple of things
Zipper anatomy. This is called zipper head. And on top of the head, I think you can see it better
here, is a zipper polar. Zipper polar, you can
actually custom design it, and most brands do that. Or you can buy Stender
zipper pole from the market. It doesn't even matter.
This entire thing is called a zipper tape. This track that you see the metal track is
called a zipper track. It has metal teeth, or it has Nylon teeth. Obviously, metal
teeth will always be more expensive
than Nylon teeth. On this note, you may ask me, so when do you use Nylon?
When do you use metal? For the most part, when the zip par is
visible to customers, like on the outside,
like the main closure, we will use metal teeth because metal teeth looks more
expensive and luxurious, and then the customer feel like that's what
their money is worth. Nylon teeth, we usually
put it on the inside of the bag for any interior pockets because people don't see it, and it just needs to
serve a function and, you know, save you some
money in the process. Now, coming back to the anatomy, this is called a metal stopper. It stops the zipper
track right there. You can always ask your
factory to add it, and you indicate that
on the tet pack. A lot of times, we don't
even add metal stopper. We basically just
tell, you know, the factory to tuck away
this end of the zipper tape, which is called the zipper tail. So here's the head.
Here's the tail. Now, another thing I want
to talk about is that there are standard sizes that we use when it
comes to zipper. It's number five. So we
use a number five zipper, which is this, it's the
width of the middle track. The wider it is, the
larger the number. So a number eight zipper will
have a much wider track. And we usually use
number eight zipper for larger bags like utility
bags, sports bag, backpacks. But for ladies bag or you
know, everyday men's bag, we just use a number five for outside of the
bag, the main closure. For inside the bag, again, we switch to Nylon zipper teeth, and we use a smaller zipper size called number three.
That's a standard. We also use number three, zipper on small accessories
like wallets, like, you know, coin purse, anything that is small, because a number five
may just look too wide on a smaller bag
or a smaller accessory. So when you work with any zipper supplier
like YKK or whomever, they will usually give you
these swatch cards for free, I will show you the metal
finish, that they offer. This is like, go. I
think this is like, Mt black or antique.
I can't remember. They will also give
you a swatch card of all the tape colors that you
can dye, your zipper tape. Let's say in black or
pink or whatever it is. And obviously,
anytime when you try to custom make or dye anything, you will have to buy into the
MOQ minimum order quantity. It could be as
little as 10 yards. It could be as large
as 1,000 yards depending on the supplier
and what they're asking for. So let me see what else. So yes, so this is a
zipper Oh, one more thing. So the tape itself is what
you sew onto the bag. This top and bottom, this is actually tape, not on polyester tape. This is usually half an
inch, half an inch each. So together is one whole
each one whole inch. And then if you add the
width of the tract, the metal track, it's usually one and three
16th of an inch. The total width. What
does that even mean? It means three
centimeter in metric. So if working metric is easier, stick to three centimeter. I think that's
usually a sendersize, but I have had
experience working with two different zipper supplier whose standardsize is actually
not three centimeter, but it's a minor detail. You can make it worse. So
long as there's enough, at least 1 centimeter of width, you can always sew
it onto the leather. Okay, so I promise this
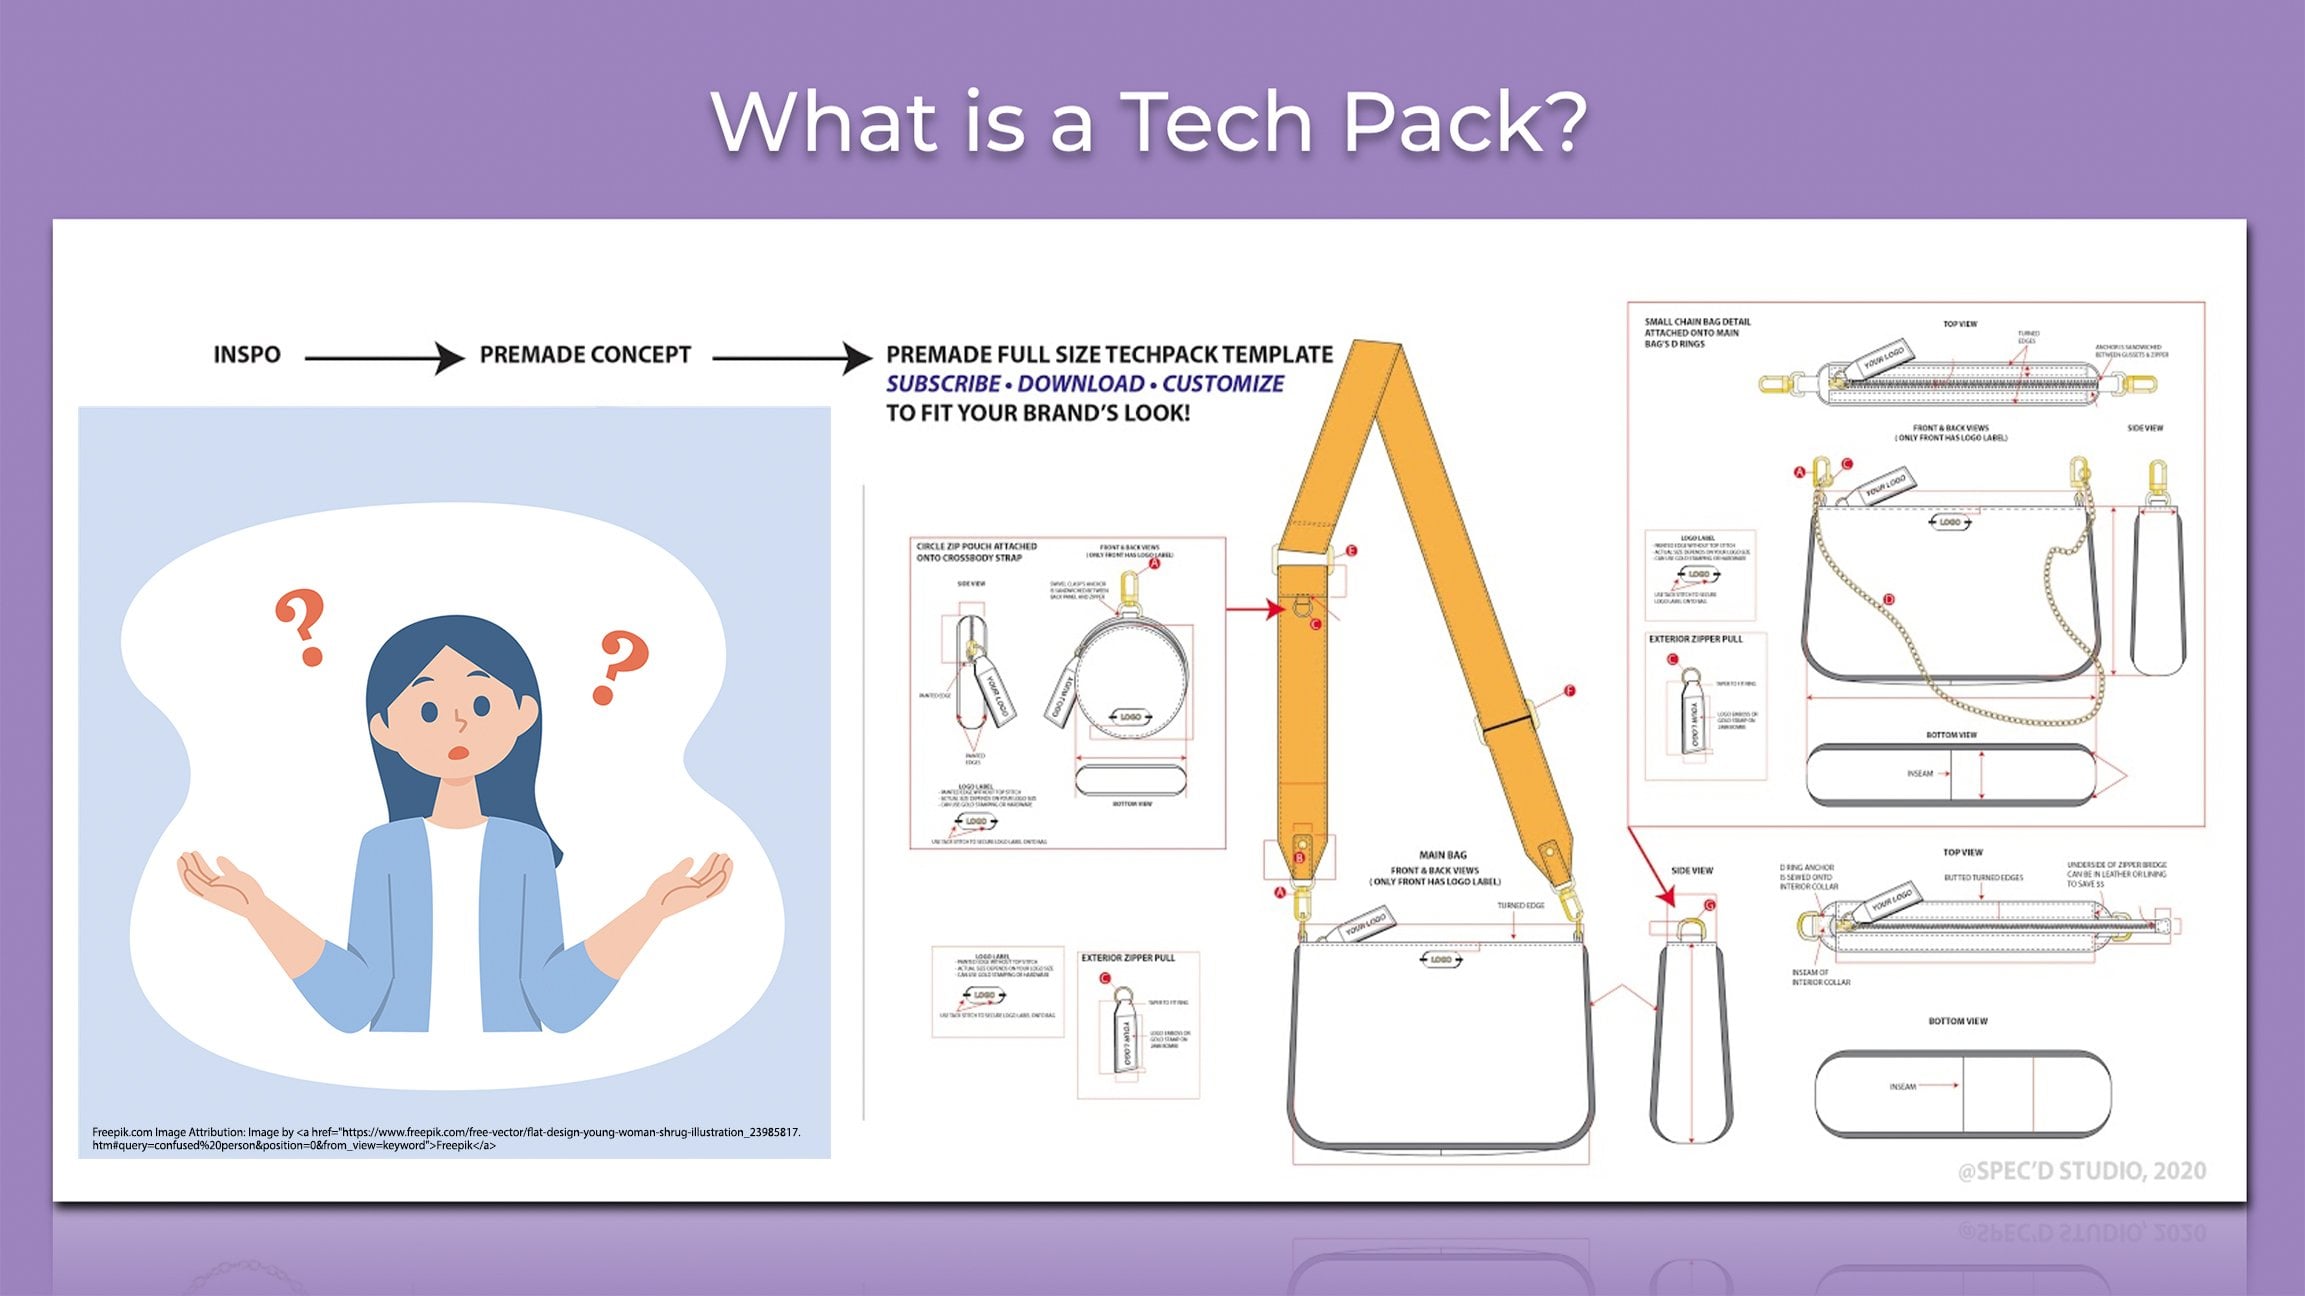
is the last slide. So how do you indicate
all that information on your tet pack specifically
on the BOM bill of material. If you have no
idea what this is, please go back to my
previous beginnssGuide to how to create a
tapack 111 video. So in the bill of materials, this is where you indicate so that your factory
knows what to do. First thing is main closure, let's use number five metal
teeth with zipper tape. DTM, that just
means dye to match blue or DTM body means dye to match whatever
the body color is. And then the next
thing you need to talk about for interior zipper. You know, if you have
interior pocket and it's a zip pocket, you
have to indicate this. Let's use a number
three Nylon teeth Zip t DTM to lining color. And again, this is to
save you some money. It's on the inside.
No one will see it. No one's going to make their purchasing decision
based on what type of Nylon te or metal teeth zipper you use
on the inside of the bag. Now, because you have exterior
main closure, interior, you know, pocket, you will also have maybe two exterior
polar interior polar. So the exterior polar, this is your brand
branded ziperpolar. It may have your logo
on it, whatever it is. So when a factory reads this, they the pattern maker, the workers will
know that, okay, anytime when there's
a main closure, because it's on the outside, I'll use the exterior polar, which is, you know, the brand signature zipper
cool whatever that is. Now, for the interior packets, I will use interpolar, and it's smaller,
whatever that is. And a lot of times, you know, some brands like maybe a smaller brand, they
want to save more money. They don't even
develop their own branded Zipper polar for
the interior pocket. They just use the
standard pocket. I'm sorry, standard
Zipper Pool they found in the market. Yeah. Again, if your zipper polar
needs to be Brandon custom, I usually add a section
called tooling, especially if this is your first time working
with the factory. They had to tool
or create mod for your Zipper polar. This
is where you put it. Or tooling, you know, signature zipper polar in
regular small sizes, and then you will send a
separate design tet pad to the factory and they
will send it to their hardware supplier to
create that mod for you.
4. 04 Design Project Homework & The End: Okay, so that
concludes the class. And obviously, we always end on the class project. So
this is very simple. Why don't you design
your pocket plan? So choose one to two
pocket types from this presentation
and incorporate them into your bag design. I don't care what they
are. Just make sure that it's aesthetically
pleasing and it serves, you know, a purpose
and it's functional. And label each pocket with closure type,
whether it's zip, snap, open, magnetic
doesn't matter, and whether it has
Guzzet or not. Yes, and then there will be a worksheet that you
can download below, and then you can fit
it into Illustrator. If you don't want to work with a workset that's
totally fine, too. So, these are the image credit if you want to look at the bags. Alright, thank you all. I will see you in my next class, how
 Stella Chang, Retired Handbag Design Director