Transcripts
1. Intro: Hi everybody,
Welcome to my class. My name is Stella Chen. As you can see from all
the items behind me, I am an artist, but I have
also been in fashion. Handbags is smaller, the goods designer for the last 15 years, I'd be happy they
retire, says 2019. They occur to me, you know what, it's time for me to pass out my skill set
that I have learned working as a professional
fashion designer in New York and the brands I've
worked for include Coach, K, spay, VCB, rack and bow. And basically this skill set is about technical design skill. If your dream doesn't matter, if you are a fascist student
or a fashion designer, is to work for big
brands like the coaches, the k-space that Michael Kors, or to literally start your own private label or
your own personal level. This skill set is absolutely
crucial and unfortunately, I don't think fashion school focus enough on
teaching about it. So the first thing
you will learn, and this is literally
the most basic skill and all the companies look
for is how to create a industry standard
tech pack for bags for smaller the girls
for shoes, for everything. This class will teach
you number one how to draw anything up to scale. How to set up the workstation, how to actually look at the construction and
start from there. Construction leads to patterns. And obviously when you draw
everything up to scale, you put down your
bills and materials, then the factory
will be able to, number one query patterns, samples, give you
estimate a pricing, and we go from there. This is actually the
day-to-day responsibility any designer needs to fulfill for whatever
company you work for. So it's extremely important. So let's get started.
2. Set Up Illustrator Workstation : Hello everybody is stellar here. Welcome to the class. So now I'm going
to show you how to set up your workstation
in Illustrator so that you can go ahead and start creating industry standard for size tech pack for any
product you want to create. The first thing is please
open up your Illustrator. Now, go to new file. Normally, we'd like to
create our tech pack using the tabloid size 17 by 11 with landscape
orientation paper. But I have seen
different companies using the regular
letter size 8.5 by 11, and sometimes they even do
the portrait orientation. So definitely this
is something that you need to follow your
company's Skyline. Keep the measurement
in inches for now. Make sure your color mode is
RGB for printing purposes. And make sure that the raster
effect is high as 300 ppi. Again, this is for
printing purpose. Now let's create this art board. Now with your art board, open, press down and hold Command R. Now we pull up the ruler
across, which is great. You can see the 17 " long
and 11 " vertically. Go to Illustrator, go to
Preferences, go to Units. And we're going to change
the inches to centimeters. Oh my gosh. Why are we doing this? Two reasons. Number one, designing it inches is actually
not that accurate. Let's go back to change
the units back 2 ". The hardest thing for
the pattern maker to figure out is what is this number in-between, let's say 5.125 and a quarter. This is a pretty wide gap
when you draw a line. It is a wide gap. Usually when your products start to look kind
of wonky and out of proportion is because
Pattern Maker is having a hard
time determining, well, how far do
I go in the gap? Let's just go back to the
metrics and call it a day. And you will learn how to read a metro system because
it's actually quite easy. Stroke, keep a metrics
type, keep a point. 11-12. You can literally count the in-between gaps
as 11.1, 11.23, 456. You get the idea. So
nothing is left to the imagination when
the pattern maker is reading this measurement, He literally just
counting 123,450.10. 0.2 is two by three. So you can literally
designed into the minutest detail number 290. 9% of the factories are based overseas outside
of the United States. So they are trained to
read and understand metrics more so than the
imperial system in inches. So what has been happening is every time when we issue a
10-pack to any factories, doesn't matter if it's
in Italy or in China. They literally had to assign a person to sit there spending time morning converting all
the inches, two metrics. It is highly inefficient and sometimes that's when
mistakes happen. That was actually
my job when I first started out working in
the fashion industry, I was stationed and live
in a factory for year converting everything
from English to Chinese and also fun, the imperial system to metrics. The next thing we
need to do is set up this drop-down menu is
very, very important. Now as you can see,
I have layers. If you don't have
your Layers open up, go to Windows, and
half layers selected. Any of these drop-down
menus you don't have, just go down to Windows,
find them and select them. You can set this up
however you want. This is my preference. I like to start with layers, and then I love
working with symbols, which I will be teaching
you in the next video, how to use symbols and why swatches extremely important,
make sure you have it. Obviously the art boards. Sometimes I liked the
art board right next to a layer so you
can reorganize it. Just click hold and
drag however you want. If this is all new to you,
that's how you do it. The next very important menu, you should have a stroke. Again. Go to Windows and make sure
your stroke is selected, is right over here. And because we'll be working with different
types of stroke, will use different weights and different create different
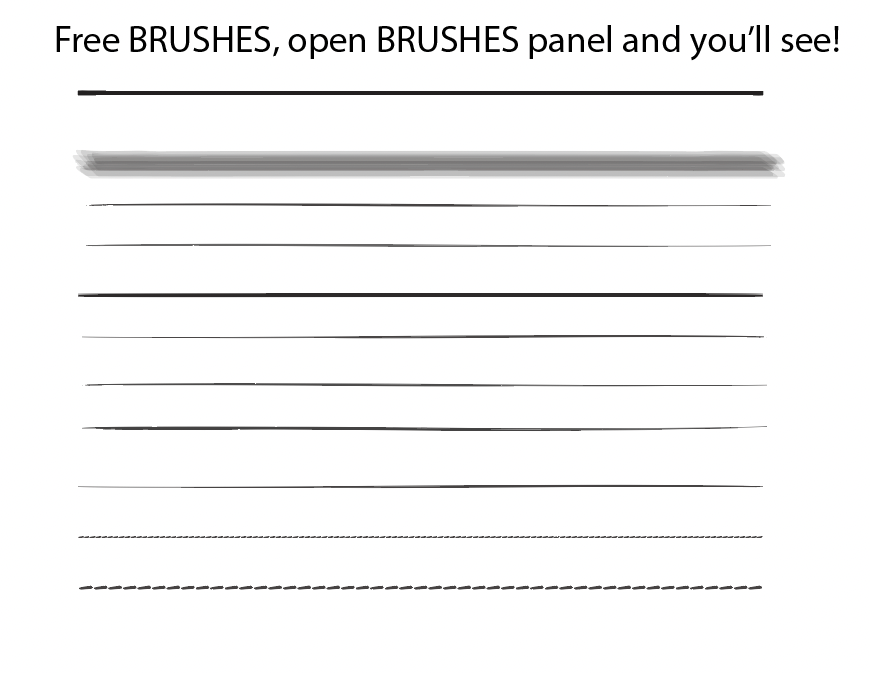
gaps to create stitches. Next is brushes. Again, you can actually add
more brushes into this menu, but these are the basics
that we'll be using. Transparency is also
quite important, but we don't always use
it, but I like to keep it. In one of the later videos
you will see how to use transparency if you've
never used it before. Next one I like to
have is Pathfinder. Just have this open again. I'll have another video
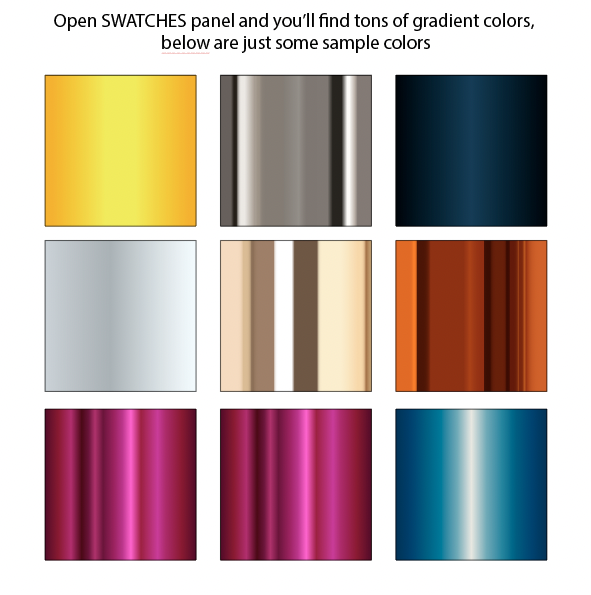
talking about how to work with Pathfinder. And lastly, gradient. This is where you want
to create some sort of metallic or gradient finished. We use this a lot in
creating metal hardware. So again, another video, we'll talk about
this specifically. So now let's say your
menus are all set up. Makes sure you have this
toolbar showing up. If for whatever reason
it's not showing up, try to do Come in, tap, it makes it disappear. Do Command Tab again,
it should come back. The next thing we're
gonna do is go to View. Make sure you have
selected a smart guys. Because when we start drawing, this is very important. Illustrator program
will automatically help you figure
out the distance, help you measure things visually and make sure
you Snap to Point. Don't do grid, don't do Pixel
Snap to Point, show slices. This is also important
because this will highlight the lines that you create so you can actually see
what you're doing. So make sure this is
selected as well. This is pretty much
it. Hunger ads.
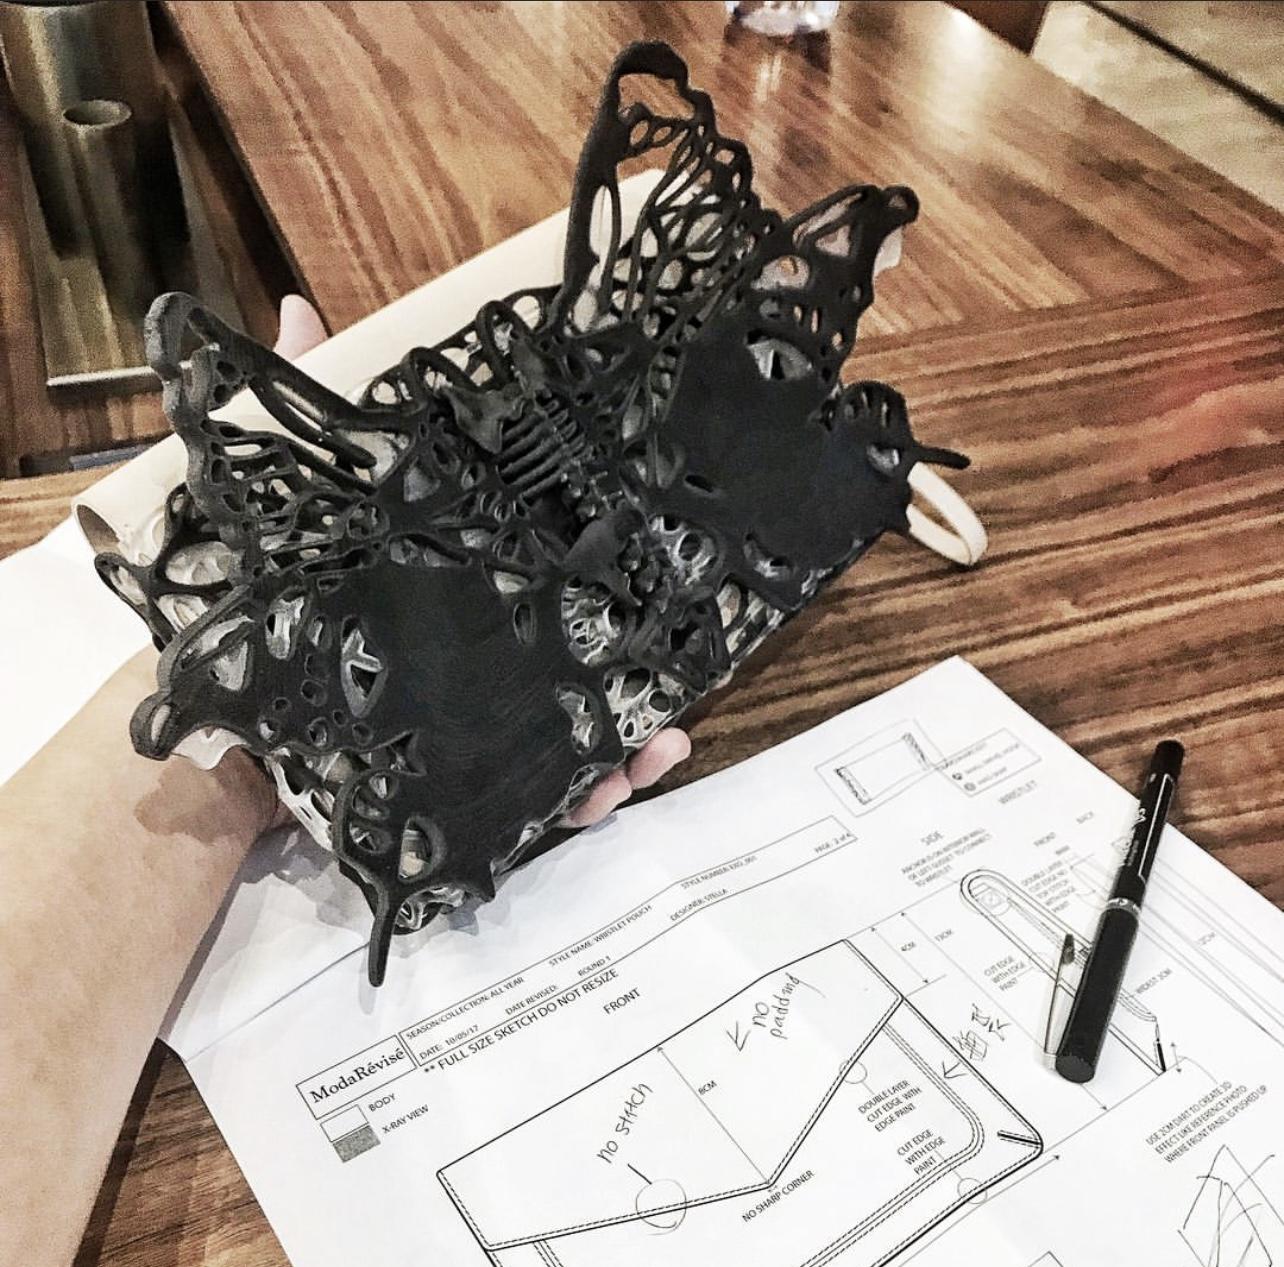
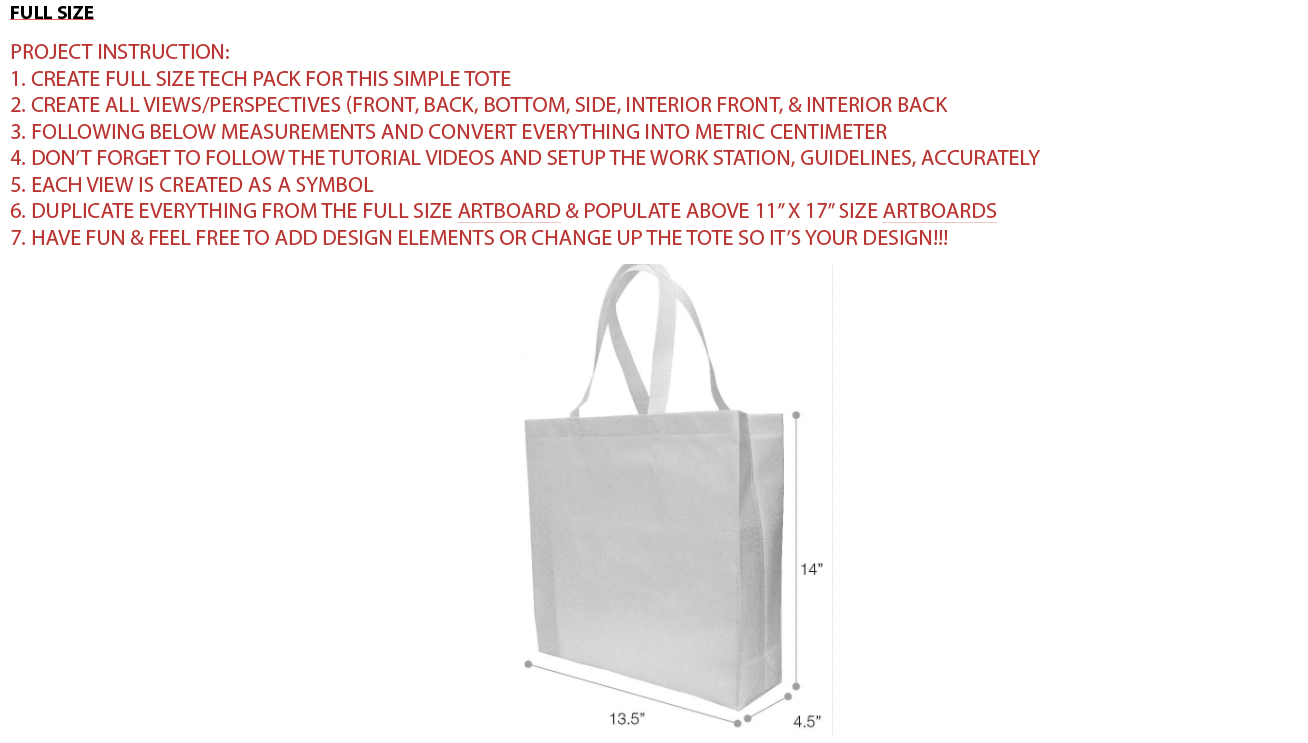
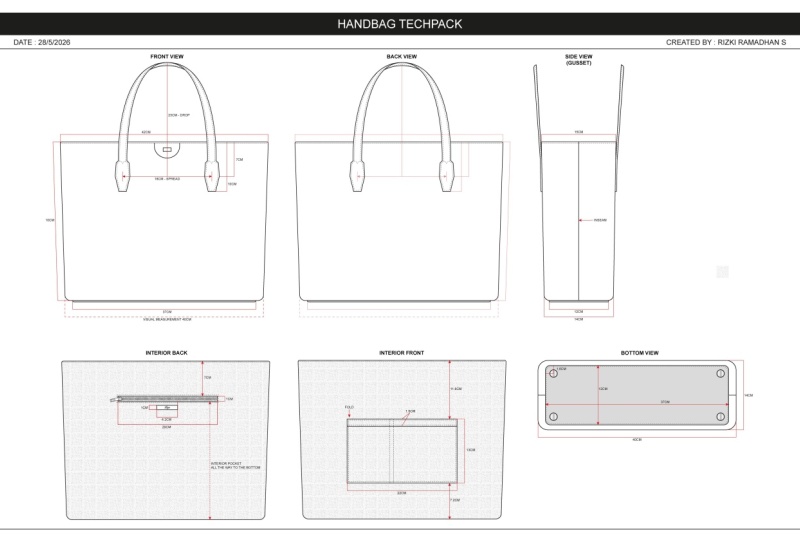
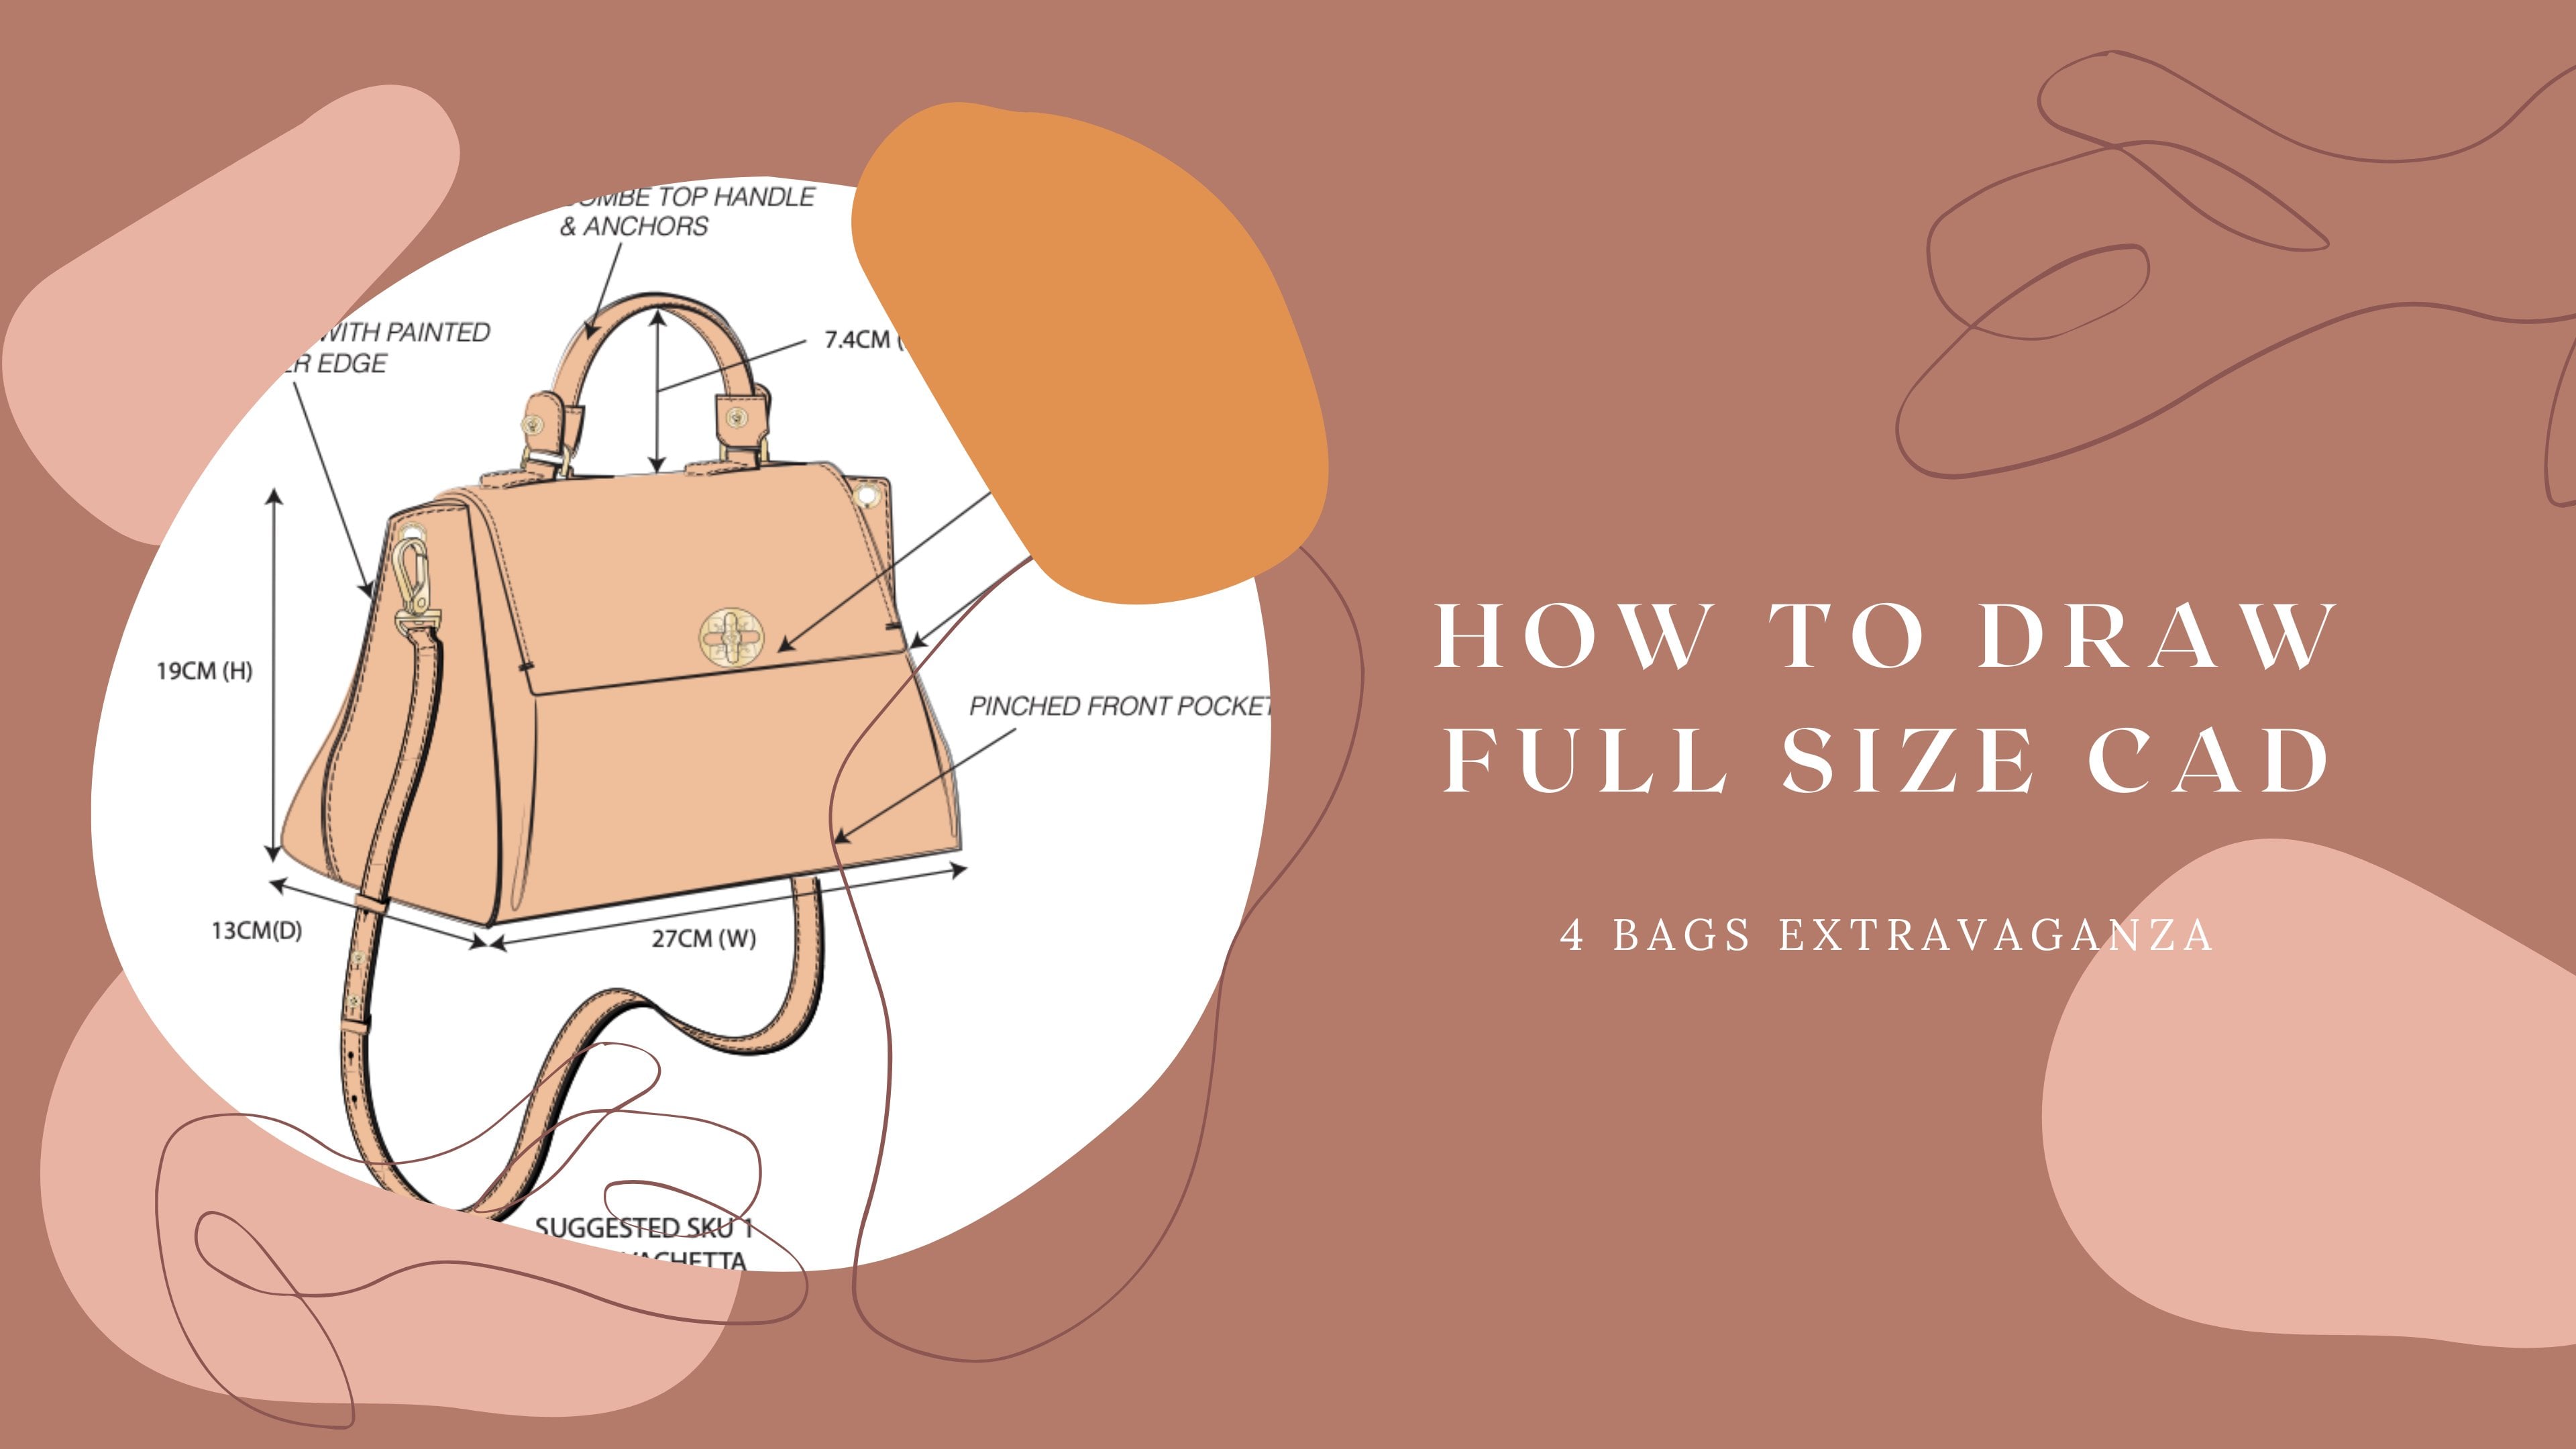
3. Drawing A Full Size Tote Bag 101: How do you draw a tote bag
that has 11.5 inch in height, 15.8 inch in width, and 52 inch in depths. So let's just write this down because someone might not
know what this means. So height obviously
is a vertical. You measure this width
for the most part. For handbags, we measure
from the bottom. So when we talk about width
is usually the bottom width. A, sometimes certain companies
will measure from the top. So that's what you had to read a product description
very carefully. Now, 5.2 inch is your depth and you may
be asking, is it this? Yes, it is depths
because your product, remember, shoes, handbags, or whatever is
three-dimensional. So 5.2 is your depths. 11.5 height, 5.8 is this,
you're sorry, width. Now, we have established
that you may be asking, well, this is in inches, you just told us to draw. Everything is centimeter. So that is when you need to pull up conversion calculator. Let's start with the hype
11.5. That'll be 29.2. Usually I'll just drop this second decimal
because it's so tiny, you're not going to
see the difference. So now let's do select
this line segment tool. Excuse me, my throat is a
little bit itchy today, so draw it out. Now, there are two ways you can measure exactly what's 29.2. Did you see how
when I'm actually dragging this line tool
if I hold down Shift, so it will be a straight line. You can already see, see that 4.72 cm. So you can literally
drag it to 29.2. Or you can select it
and go up to this bar, find your height, and
right now it's 46. So go to 29.2 there
that show 29.2. At this point, you may
be light, but Stella, the bag is going to be bigger
than the art board itself. What do I do? Go to your art board. Add a second art board, go to Documents setup. At the art board. Did you see how you can
select your art board now? Perfect, the way I like
to work is I like to drag this art board down
and see the bounding box. Select the corner anchor. Oh, sorry, I totally
did not select that. Let's do it again. Always when you need to undo, just press Command,
hold it down with z. Drag a mega big,
however big you want. Just know that when you do this, it will slow down your
computer a tiny bit, especially if you end up
filling up the entire artboard. But that's pretty
much how we worked. I shouldn't be too much
of an issue here because this is going to be a
very simple design. So now what I'm going to
do is to remind myself this is full size key, the original art board
as is on the top. And this will be our
working art board where I'm going to add all
my full-size drawing here. I'm going to also make
this live sicker. So when you select it, right now, 0.0 279, which is too thin, I like to
keep it as 0.07 centimeter. Their driver make a difference? No, because I didn't select it. There we go. Alright, so this is actually
the height which we found is 22.29, 0.2 centimeter. Now, what about the width? The width is 15 point a. So let's go to 15.8 in
the calculator is 40.1. Should I keep the 0.1? It's up to you. It is very tiny, is not going to make a
difference if you drop it. So in our case, I am going to drop it. There is no rule that says you can only working
whole numbers, so I just do it when
it makes sense. Alright, so this is
with, change it to 40. Perfect. Now this is what I'm
actually going to do. I'm going to select both. I'm going to center it. Now the question is, so you have ECM. What about the top width? Well, the top width, if we decide to go with
this lovely picture, and I will explain what
the triangle is for later. If you want this to be an
upside down trapezoid where the top width is longer than your bottom width than the
way you find your top width. Select the bottom
hold down Option key. If you are Mac users
see the double arrow. This means duplicate. You just duplicate
your second life. I will make sure all the
lines are centered correctly. Now you click the top width. And make a longer
your bottom is 40. Maybe the top can
be, I don't know, 40 to see that when we
extend or retract any line, we use this tiny little grid, cold of reference point grid. What it does is that, let's say you select
this top center point. What will happen is when you change the length of the line, Let's say we make it to 46. It does. It will start in the center
and extend to the sides. Let's say, okay, I'm
going to undo this. Let's say, instead of
selecting the center point, I select any of these
three points on the left. What will happen when
I extend this to 46? Did you see only the
right side extended, not the left side? Because what I'm telling
the computer while the program to do
is the left point, It's my reference point. From here, this point, I'm extending the line so
this point will not move. So this is very, very important. Now, I'm going to
backtrack what I just did. Okay, So you can either
you can look at it. Does it looks similar to
the shape of this tote. Maybe a little bit too low. So I'm going to select this. I'm just going to maybe
bring it down from 1 cm. Okay? Now, it looks about right, but it might be a
little bit too short. Okay, fine. Then let's do 41.5. Okay, it kinda makes sense. So now we close up the lines. We connect all the lines
by using a pen tool. Click on the anchor, connect. See that, that little square, white square. That
means connect. It's very important to connect your drawings because then
you create a service. When you connect all the
anchors, it creates a service. And then that's
when you can add, go to swatches different colors. If you don't close up the
points, it will look. Let's connect
actually this point so you can see what will happen. It will look
something like this. You see this is not closed up. And so when I move it,
it looks kind of weird. So let's just close it up. Okay, and let's for now just keep a y so it's
easier for you to see. Now here's a funny thing. If you ever use a
actual sample photo, just know that the photo, the shape that you see inside
a photo would never quite match the sizes given to
you underneath the photo. Because when the photographers prepping a handbag or
even a pair of shoes, well more so hemmed back
to be photographed. They add a lot of stuffing. They stretch it so the shape and the size
don't always match. So as a designer, if you use a reference image, that's when you have to use your better judgement
to figure it out. In our case, I'm
looking at this and I feel like I'm
missing some height. I am also missing
some top width. So what I'm doing is, oh, actually it did. You see this is now
centered correctly. Did you see how this line, the space created is smaller
than the space over here. Interesting. So let me redo. There we go. So that tells me
this is a really actually a very good
lesson right here. Is this. The top and the bottom width
are not aligned properly. There we go. You see it was not
aligned properly. So now let's just do it again. On this. No, just know that it's better for you to start
remembering the hockey, especially when you have a lateral designs you
had to pump out per day. Honestly, going back
to the toolbar like every few seconds is
quite exhausting. So as I'm using the hotkeys, I'm just called them out and
then you can memorize them. So now when I look at it, I feel like the
height is not there, so I'm going to add
one centimeters. So let's make this 30.2. There we go. Oh, by the way, let's go back to our
reference point. Do I want the top to extend or the bottom to extend up to you depending on
what the designers, if you don't want
anything to move, they'll change on the
top that may show you select your reference
point on the top. If it doesn't matters, then you can do it
however you want. So let's say my case, I don't want the top to move, I only want the
bottom to extend. So I selected the
top reference point and I change this
to 30.2 centimeter. Perfect. So now just make a
note 30-point to you changed it and I'm
going to delete this so I don't confuse myself. Now. Delete that. When I look at it, I realize the bottom is a bit more
tapered and the top. So I have two ways
of fixing this. I can either extend
this top line again or I can retract
the bottom line. For learning purpose. I'm going to retract
the bottom line. So go back to your line tool. And the hockey is the slash. So let me de-select this and
I'm pressing the slash key. There we go. So the bottom was 40 centimetre. How long is this? 36 less than I bring
it down to 39. Okay, tiny little bit. Now, remember you
need to center this. The shape is not
going to be right. Alright, perfect. Match, a match. Whoops, sorry. Will you select anchors? Make sure, like I said before, make sure you use
this white arrow key, which is direct selection tool. So now I'm pretty sure,
yep, I've matches. So now I can delete the skyline. I don't need it anymore. Now let's just say
this is what we want. But now here's the thing. You see how there's a very
nice curvature on the side. This is because
leather has weight. So when you let
it sit on itself, it will start to drip downwards because the weight
is going to carry down. And it will create a
really nice curvature. When we create paper patterns, we don't cut the paper curved unless you
want it to be curved. We cut the paper straight. That's a reason why when we
do the actual tech pack, we also do not make the line curved because that will
confuse the pattern maker. They may actually
go there and cut the leather in a
curvature shape. Look, if that's what you
want, you draw a curved line. But for the most part we
know this is a straight cut, so we'll keep the lie
here, here straight. Now, one thing for aesthetics, did you see how there's
a very nice corner? How do you create a corner? Switch to your direct
selection tool, which, whose hockey is
a, select the anchor. You see this tiny little circle. This is the corner radius. You select the circle. And then you will get this
little menu called corners. You can change it to 1 cm
corner radius like that. Or you can select this corners tab and
then you can do it here. It doesn't matter. Now, let's do it
over here as well. So it's symmetrical. 1 cm. So this is one, this is three, this is two. And then we can zoom out
to see the difference. When I look at it,
one makes more sense. So let's change
this site back two. Now, certain companies
I've worked for, but they're very stringent about making the tech pack as
accurate as possible. They may even add a
tiny little corner like 0.2 over here to make
it look more realistic. In case you don't know, you, it's very difficult to solve a straight line on
the sewing machine. That's a reason why if you
were to look at any bags, so any leather goods, even apparel very carefully, there's no straight edges whatsoever because of the way the sewing machine is built. So we usually curved
at all the corners. Some companies, they don't care, then you don't need
to worry about it. So this is your
silhouette for the toe. If you still feel
like it's not really matching back and find that you can make
a slightly longer, okay, now I see it's a bit more. I just drag it randomly, just 31.7, that doesn't make
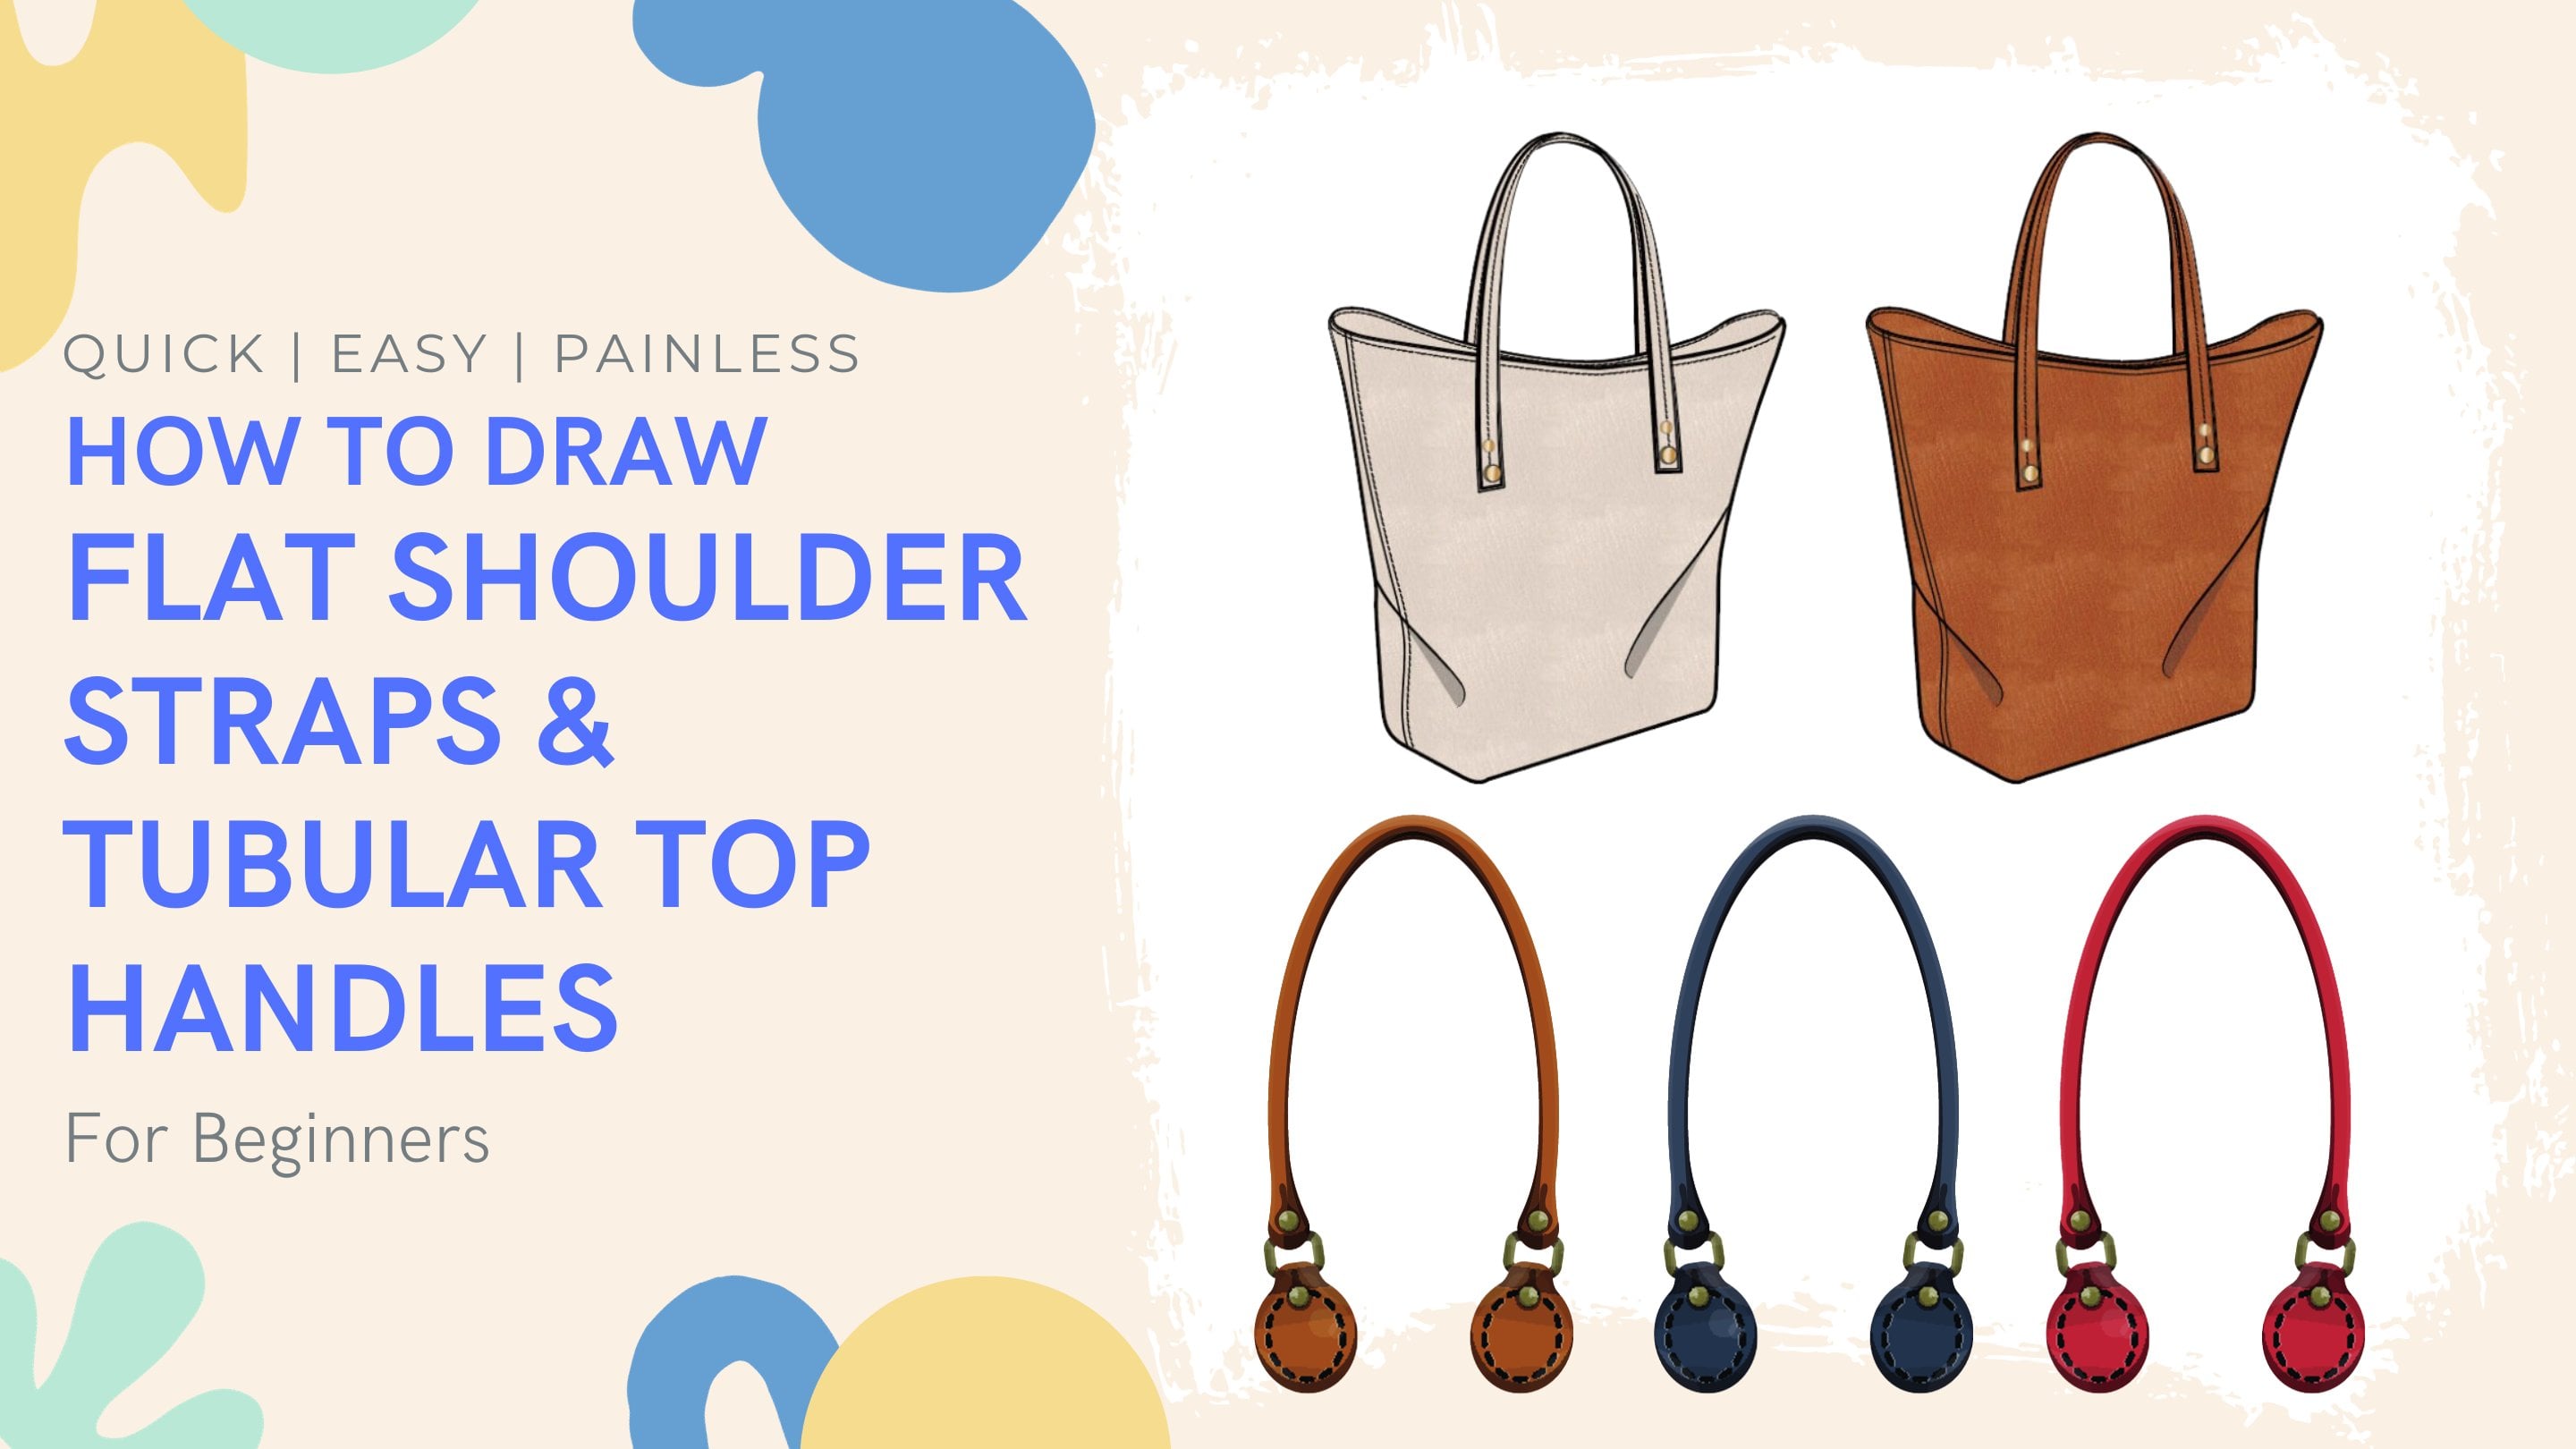
us 32, I call it a day. Great. We are going to learn how to create
shoulder straps. So there are many,
many a gazillion, different types of
shoulder strap and top handle designs.
As you can see. The trick is this. This is called a spread. I'm going to type it out spread. I'm gonna make it red
so you can see there. So it is the distance between
the center of this anchor. This is called an anchor
attachment connected to a strap to the center
of this strap anchor. And we measure from the center because when the pattern maker is creating a paper pattern, they literally use either
a pen on all and then they will mark the center aware the
anchor attachment will go. And this is why we
create a tech pack to mimic what they do in reality. So the wider the spread,
this is a trick. The wider the spread, the shorter your strap drop needs to be to go
over your shoulder. So let me just write down drop. We measure this length drop. Okay? So the wider the spread, the shorter to drop, the narrower the spread, the longer the drop, get it. Normally, standard drop size is anywhere from eight
inch to an inch. I do apologize. Was switching between metrics and period because unfortunately consumers in the retail world in the United States
still go by inches. So again, we have our trusted
conversion calculator here, nine inch 22 playing. I'll round this
up to 22.9 or 23. You don't want that
just make a 23. And then that's the
night inch to 8 " 20.3. So let's just funny, 0.20 0.3 CAN to why was it 23? So this is the standard drops. Shoulder drop. If you want the shoulder strap
to go over your shoulder. If you are only thinking
about what we call a handheld top handle
that's not going to go over your shoulder. Then the draft for
that standard drop. Let me just type this out. For the top handles. It can go anywhere from
three inch to five or six. Let's just say 6 ". Actually, no, I'm sorry. It's five-sixths is
neither here nor there. Three is 7.6 to what is 5 ". Oh, sorry. Mom plays 12.7. Okay. So this is the shoulder strap top handle
rule that we follow. However, all that being said, if your company or if you yourself want to
design for plus size. Now, all these sizes do
not really apply anymore. You will literally have
to go by your plus size, model size and
calculate from there. But this is for the
rest of the market. Nafld, NAFLD plus size. This is a standard size
guideline we follow. In my other classes, I'll be teaching the
different types of shoulder strap designs
and top handle designs. For today's purpose, I'm
just going to show you the simplest way of creating
a flat leather strap, following the measurement rules
that we just established. So the first thing you need
to decide two things is how wide is your straps
gonna be, the spread? We're going to find
a spread and how far down on the bag do
you want it to go? Now, use your slash,
hockey slash. Get this tool, the line tool, and make sure you're
touching the top line. When you touch it, you'll
see the blue highlight happening because we have
the smart guides selected. Hello smart guy,
right over here. Yay. We also have, what was it? The show slices selected. That's a reason why
you can see it. Alright, so as you're dragging
press and hold shift. So it's a straight line. Let's say I want to go, how far down do want to go? That's actually a good
question, isn't it? You know what? Let's see. That might
be a bit too far down. So reference point,
I'm selecting the top because I don't
want to talk to move. Let's say we retract this 266, maybe a little bit too high up. Let's do seven. Okay, so now I'm going to go into change this color to red. The reason why I'm
changing it to raise because this is not
part of the drawing. This is just a
guideline I'm using. Now. I'm going to select
this ruler whole drag. Make sure it touches the edge, the end anchor of the slide. If it's not that easy, you just select that and
okay, now it's touching. You can delete this. Now. Select the guideline again, press and hold command
to we lock it. So now I'm working with
a guideline right there. So this is how far down? Seven centimeter down that I want to attach the
shoulder strap. What about the spread? Let's just randomly drew
a line slash line tool. So now this is 10.55,
It's too short. 16.7, almost there, but what about if I
change it to 18th? Okay, let me zoom out again. Zoom is come in. Zoom in is Command
Plus, Plus sign. And then Zuma has come
in with minus sign. Let's center this center line. Okay? I really like this. Go to the site of the ruler. Here's my mouse, cursor. Drag it here. Once you get a hang
of this, you don't, you don't even need to create all these guidelines all over the place there for
me when I draw, I do it so quickly, I just do it and you will
get there with practice. So hold down command to
number two, you lock it. Now let's also drag another guideline to
the end of the spread. Zoom in Command Plus side. Okay, make sure you my
thing is not snapping, snap to points, so
it should work. Yeah. So usually what happens
is that when you have snap to points selected, this line, the skyline and any other guideline
will just snap to point. Okay, there we go. Okay. Delete. I don't
need that anymore. So now I know my shoulder
strap attachment. This is a central Foy. One anchors here,
the other anchor will be here and
it will go across, oh, now we need to find. Well, the drop is remember
we said usually is 8-9, ". Why does it go tonight? Inches. Sometimes we
need to want that. Sometimes we also
need to account for people wearing winter coats, which sometimes we'll even add a one-fourth inch
to the drop length. And so if this particular bag, let's say it's very seasonal, We only solid during a
winter usually that's what I will increase the drop
lengths tonight inch. So that'll be 23 centimeter. So let's do it. Again. Kinda Iowa, where
to send it out. See that guy like
so here's a center. Use your line tool. Make sure it intersect
with this top edge. Lie. There we go. My bad. I'm supposed
to hold it down. Hold down your Shift, click and drag.
How much is that? 23.08. So 23, awesome. Let's do we go? You know what I do? I'm paranoid, so I'm constantly centering this and
I always zoom in. And then I drag
another blue highlight down and made sure it's touching
and command to lock it. And then I will do another guideline just to find the center
point and lock it. You can delete this. We're ready to do this. Okay. How Why do you want it to be, let's say 2.5 centimeter. Okay. So I want this to be full
of filled. I'm sorry. Okay. So I arbitrarily just drew a line and it's definitely
not 2.5 centimeter wide. So let me just type 2.5 right over here
now we're talking. Now remember this is the center. So let's say I want this
to be exactly maybe too. Yeah. To sorry. To trust me with practice. You can finish this
toe in 10 min. I'm just slowing down
my entire process so you can see. Okay. Okay. Makes your top it's alive. No. You know what toes
too short as 23. So three is there and
let's just hit it. And make sure you see how
the center point is here, but you centralize here, that's what you had to drag
it to make it intersect. Cool. Now, this is why we do. So that was three. So I can make it six. So remember the
distance from here, this is your center point
font here is three, from here should be 32. But as you can see, my 6.02 is very minor, but I want it to be perfect. So I select this. And then I mentioned
my reference points at the bottom because I don't
want the bottom to move. I want the bottom
to extend upward. I retract this, okay by two is somebody
new canvas see anyways. And then on this side, pen tool matches shift. Okay, stop right here. Now we're gonna do the phone, what I call the Golden Arch. Alright. Pen tool selected, click the same point. Remember this is your 23 drop. Click, hold down,
Shift and drag, and then you can adjust your arch curvature
however you want. If you don't hold down Shift, that's when you can do
something crazy like this, but I'm going to hold it down
so it's so it's perfect. Okay. From this point on top, you come down here, come back. Oh, you see what happened? I don't have enough paper
view, so that's okay. You just select the handle. Make sure the lines
don't overlap. See, this was overlapping now it's not I
just opened it up. And you have your
very first strap. You see how you can
still see the line for the body because
the strap is not fill. So just press that It's fill. Let's say I want to make a strap more feasible
to jump out. I can make this thicker
layer, 0.07 centimeter in. Wait. There we go. Or I can go to brushes. I pick a different brush. So you know, it's darker
or this one or that, or that doesn't matter. There most of the time
we just use the basic. So now I'm going to
stick to the basic. I'm going to redo
this so it's thicker. I'm gonna do 0.1. Now, what do you do with the
outer part of the strap? This part, super-simple, select, hold down option, duplicate, see the two arrows. But this isn't not facing
the right direction. Suppose the face that way. So what do you do? Mirror it. So the hockey for mirror is 0. So it's right over here. The mirror tool reflect, I like to call a
mirror, but it's actually reflects
the same thing. So now you just flip
it. There we go. Alright. So you just have
to make sure you come back to the
center and then you select this I want this strap
to match the placement. And align it at the bottom. So a line at the bottom. Finish. Know you have enough. There's one last
step you have to do, which is, what about this part? Undecided the strap. So even though
this is a 10-pack, this is not a perfect
imagery we want and oh, and did you see that
when I zoom in, there's a fricking gap. So I just had to be they
could touch a kiss. There we go. So coming back to
what I was saying, the point of the tub pack
is for the pattern maker to figure out how to
construct your bag. Most of the time,
picked when you draw something and you forgot to draw the other flap that I'm sorry, on the strap is fine. But nowadays, a lot of the
sales team, the merge T, will expect to use the image of the cat that you have
created as a sales tool. So you want this cat
to look as realistic, Reflecting real life
construction as possible. So in this case, we are going to add the underflow under strap. My apology. So what you do is use the pen tool
P is the hockey. Pick a point somewhere
over here to make sure that the width over here will match the width of
the strap over here. So when I, I feel
like it's over here. And then let's say the width
is somewhere over here. Drag it and see that it lines
up with the other anchor. And then you just
drag and Finish. Now you have a realistic strap
with the underside of it. Some people will say that, well, this is how to y, that's okay. Then just select used to dress selection tool
and just make it skinnier. There. Problem-solve. Now
this is more realistic. So now you have your spread. Speaking of that, how do
we add your measurements? First thing you
do is you need to indicate what view is this. This is the front view. In the next video, I'm going to go into, show you
how to draw all the views. Because remember the pattern maker needs to see all the views to figure out how to
actually create a patterns. So this thing up into
3D realistic bag. But before we get there, labeled this as a front view. So you remember, and one trick I have learned
is that go to your Layers, create a separate
layer for texts only and double-click
changed layer 12 artworks. What happened is that
when this gets really complicated and you need to
go in and change things, a lot of times there
are so many texts all over the face of the bag. You can't even you
had to de-select everything to delete what
you really need to delete. And sometimes you end up
accidentally deleting the tax that's overlapping
on top of your drawing. So I have learned to separate
the text from the drawing. So now you have created
two separate layers. Select all the
texts that you want it to go on the second layer. So once you select all, see there's a blue button here. Just click hold, drag
it up to the red. Now everything, all
the texts is on this red layer which corresponds
to this array highlight. But how can I tell, how can I double-check these selectors? Oh, I made this layer invisible. So all the texts,
all the content on this layer will disappear. Like these. I didn't put it on that
layer, the red layer. So let me just select all
whole drag up. There we go. And now just click on the I icon to make it visible again there. Now so what I'm going to do, I'm going to lock
the artwork layer. I'm going to select
the text layer and I am going to add
the measurements. First thing I do is I use red. For the most part. Most companies that use red
lines as an indicator line, but some companies prefer blue. Some company I've seen
company using the green, so just follow your company
and you should be fine. So the first thing I'm
going to do is indicate the drop length of the strap is from
the topmost part of the strap to the top
most part of your back. So let's make this a little bit thicker
so you can see it. Okay? So now remember I was saying that you need to have
your stroke panel open. This is why I go to arrowheads. Let's change it to arrow. You see that? Let's do again
arrow, that's the top. Another arrow, that's detail. Okay, so now you
have two arrows. Now, you type, what was it that we say 23,
23, center meter. But this is a little bit today, so let's take this
down a little bit. 16 might be too
small, let's do 24. There we go. 24 points. And some people like
to just also add drop, like literally spelled it out for the factoring
because they don't know that 23 centimeter meter
is indicating the drop. That's totally fine, not
the end of the world. Now let's measure the spread. Again from the center, you can do it however you want. You could just do it like this. Because we snap to point. You will feel a bit of a resistant once you hear
the point right here. Do double arrows. And because I am
a perfectionist, I just like to add
this indicator lying to make sure the pattern
maker fully understands. It stops right here
in the center. And then again,
select Duplicate. How wide is the spread?
I forgot already. So what do you do? Select a line itself. The indicator line,
17.99 is really 18. So 18 centimeter spread there. Because I'm crazy there. I just want to make
sure it really hits. So now do you see
how important it is when you add an
indicator lines, you had to touch the point, even if you're just 10.1
centimeter off, you are off. So you had to be zooming
in all the time. You had to, you had to
turn on a smart guy. You had to turn on snap to
points so you can feel it literally as your
work when the lines are hitting the points
that you need it to hit. Okay, so now we have that. Why do we indicate next? Well, how big is this bag? That's kind of important.
So this is what I do. I use the pen tool or you
can use the line tool. It doesn't even
matter. I usually like to see that it's touching. Let me zoom in. Touching the 0.09. Exactly. Okay. Now it's touching
appointment. There. Go here, touching the point. Select. Now we need to find a width. So here's a high, we don't care. Here's a width, 41.48, 41.5. So let's do here. You can add a top width. For the most part. If you work with a really wild experience
while repute a factory, you don't really need
to add top with. They know, they know exactly what you're
trying to measure. Now let's do the height. Height. Okay? So I like to zoom in
just to make sure it's really sitting on the line. So I'm measuring OC is
already off slightly. There we go. Now we need a height, 32. We don't need to care about the width because the
width is this part. That's not necessarily,
that's not needed. So again, duplicate.
Now the bottom, bottom is very important. There are two different
ways to measure the bottom. If this bag does not
have any bottom panel, is literally this front piece and the back piece it together. Then you have to measure it. From here, lying what I call
edge to edge, line to line. And then zoom in to make
sure it's touching. Oh, by the way, to
do technical design. Make sure you have multiple cups of water and coffee and have a really awesome music
lists because is laborious. Okay, So anyways
jokes the size 39.1. Okay, so deny 0.1. Again because 0.1 is so tiny, we can literally drop it. It's not going to affect
the pattern-making at all. So let's do that. If it's 39.5 and don't
drop it, keep it. My rule of thumb has always
been anything beyond a 0.2. I should keep it. You just found a measurement. Isn't this great? Cool. Oh wait, no, the couple of things
we forgot to do. How why is this strap we need to indicate that touching it. Oh, did you see
what just happened? This thing is wavy
because I forgot to hold down my Shift key. So it's a good
thing I should make that mistake so you can see it. Okay. Hold down, Shift. If you want any straight line, drag it out, they would go. How wide is this? 2.5. Like we said, it
would be awesome. Let's do it. And I forgot to indicate, where do I want this? How far down the bag do I
want them to start creating? Attaching, not creating,
attaching the strap. Now, the reason why
this became light, this was because prior
to drawing the line, I was writing it, so it's just matching
back to the writing. So all you have to do,
remember the eyedropper, press the Eye dropper,
select what you want. There it is. So we
said this will be how 77 cm from
measure from the top. And I, you will also need
to give the length over here so the pattern
maker can actually measure then from how, how far down they need to
start measuring this part. So this is the high three we go. So this part of the strap is actually
ten centimeter long. So when you indicate a so clearly there is
absolutely no way, absolutely no way the
pattern maker will make a mistake unless he
wasn't paying attention. And in one of the
future classes, I will actually show you why full-size specking
is so important. Because what we end up
doing is we will literally, when we receive the
sample in real life, we will print now this
tote in full size paper, will tape it
together and we will lay it right next to the sample derives on the floor and compare and contrast literally
right there. In real life. Sometimes when I print
out the paper and I put the tote bag
right next to it. I can tell immediately as missing something
or it's perfect. Hopefully it's perfect. So there you have it. This is the front view of
a very simple tote bag. I will see you in the next video where I'm going to show you how to complete the rest of
the views for pattern-making.
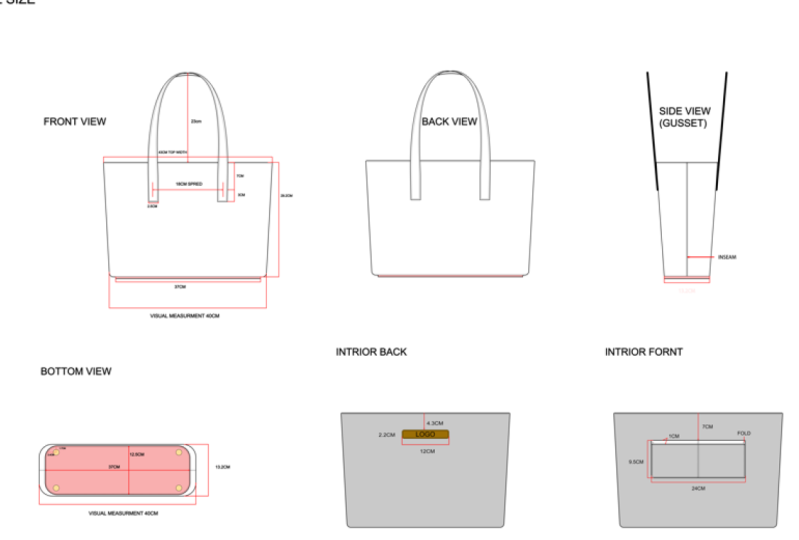
4. Extra Credit - How To Draw & Measure Bottom Construction: Coming back to the bottom, how do you measure if you
actually have a bottom panel? And the first thing you need to do is you actually have
to draw the bottom panel. And sometimes I just do
a very quick like that. And then what I will
do is literally another piece of
leather you add to the bottom of your
bag to prop it up. We usually add filler
to the bottom, so then you're back and
actually stand on its own. The reason why I just opened
up the shape head all, because I want to change all of the corner radius
at the same time. So I will lock it
and I'll do 0.1. Let me see. Do I see a difference? Yeah,
I see a difference. So it's more rounded
now perfect. If your word for mid to
higher level companies, like coach or a product, they do expect you to show them the actual
thickness of the letter. It can range from anywhere from 0.6 to 2.8 depending on how
sick of whether you're using, I usually keep around
0.25 or two a, we actually measure the
width of the bottom panel. So now the bottom panel
will be Doo-doo-doo-doo 37. 37. Now you may be like, well, what about over here? What have over there that's
still part of the bag? Yes, it is. So what we will do
is I was into k. So I will indicate that and I will make this into
a dotted line. So how do you create data line? Go to stroke, dashed
line like that. And this should be 39, like
we mentioned before, 39.1. So at this point, this is a
powerful visual measurement. Such nice centimeter. Basically what that would
tell the factory is, you cut this bottom panel
to be 37 centimeter long. This extra front panel. And later back panel
happens when you let it, when you sew it to
the bottom petal, it will do a natural drape. It will be slightly wider
than the bottom panel. And because it's visually
wider than the bottom panel, therefore, we write visual measurement
as 39th centimeter. Doesn't make any sense. If you guys are confused, please comment on this
and I will try to do another video with actual
leather sample bags for you guys to see why. It's not possible for us to
give measurement of how, why? Because remember this
front panel will be so and connected
on the size scene. And depending on what
type of leather we use, how heavy it is, it
will drape differently. So this is as far as we can go. So we're basically telling
the factory visually cut, makes sure that the
front panel and the back panel off the toe will look a little bit wider than the bottom,
bottom panel width. And visually it will look like almost 2 cm wider than
the bottom panel. And that's when
the pattern maker, based off of this number
and cut the leather the way it should be caught
to create this effect.
5. Completing Remaining Full Size Perspectives: Now that we have created the front view of a
Pharaoh simple tote bag, why do we didn't
need to do next? We need to create the rest of the views of how
this bag looks like. Because remember the
whole point of creating a tech pack is so that
you can send it to the factory for them to create actual paper patterns
to cut the leather, assemble each piece into
a bag in real life. So we are still
missing the back view, side view interior back into
your front, a bottom view. And as you can see, we need a lot more art board
to be able to do that. So what you do is Documents
setup the art board, make it big or I think
that should be enough. Yep. Alright, let's get started. So remember I locked all
these blue guidelines. So go to Object, Unlock All I am going to hide. Actually, I'm going to
lock in my texts for now under the layer panel. And this is what I'm
actually going to do. I am going to select all the pieces that made
up this front view. All the artworks. I select. All Right-click Group. Now this one single front view is grouped together so it
moves the whole thing. I also want to make sure that this body is filled so there's a service
we can work with, but then it made
a kind of skinny. So let's just make
sure this is fat. And now let's make the straps. But different stroke. There we go. Don't worry about
the stitching Xia. I'm going to show you how
to do that in a moment. Actually, I changed my mind. I'm going to show that
how to do that right now. The way you create
stitching as this, you don't just arbitrarily, let's say use the pen tool, I'll say, Okay,
this is my stitch. Go to stroke. Dashed line. Looks about right. No, this is wrong. What you should do
to make your life much easier is
select this object, go to object path. Go to offset path is
very important back in my day when I first
learned about Illustrator distinct
didn't even exist. Goes to show how
you do negative. If you want the stitch
line to go inside, you had to use the
negative symbol. And 0.25. Click, Okay. See that the 0.25 basically means starting from the
edge would go in 0.25 cm. To create this, to offset
this brand new path. You go to dash line, you make it, let me see. 0.3 makes sense,
actually makes sense. Your 0.30, 0.3, or
maybe it's a little bit long to 0.20, 0.3. I like it round head. So select a round
cap, round corner. You see how you
rounded off because he looks at real stitch
line in real life, no. Nothing is angled or sharp
in real life. Am I done? No, you're not. You
see what happens? The stitch line
closes up over here. But if you look at the
reference image we have over here, when you, So anything that line continues, all we're all the way through. So we're going to make this mimic real life as
much as possible. Press C, The Hockey to
select the scissor tool. Cut here. And I like to cut
where this anchor is at and use the Y arrow, which is direct selection tool. Just select this piece, delete, and then extend Pen
Tool, select extent. Alright, oh, did you
see what just happened, this thing, the stitch
line is filled. That's why you see
this white color covering up the rest of the
straps so you just fill it. There we go. It comes back. What do you do with this one? We'll take a look at
your reference image or whatever reference bad you're currently looking
at in real life, this stitch line will
disappear towards the back and we'll come
around towards the strap. So what you do, we
do exactly that way. Make it disappear. So it looks like it extends into this part. And then we add. And then we had another one. Now that looks a
lot more realistic. Now, why do we need
to do offset as 0.25? Because if you ever work
with a real sewing machine, you will realize that
from the needle and the foot of the machine to
the edge of your material. It's exactly 0.25 millimeter. So this is an actual space confined by the sewing machine in real life that
we had to respect. And in later classes you will
learn what happens when you just draw this top stitch
however you want arbitrarily. So I selected go to Object Path, Offset Path because it's on the inside where I want
it, so it's -0.25. And then make sure
you do dashed line. Make sure the caps and
corner I selected. Remember the stitch line
should not end right here. So I'm going to cut hotkeys. See, cut. Delete this one line by itself. Extend this. So it looks like this stitch goes all
the way around here. And this one, it's
also extend it. So this also goes continues on, on the underside of the flap and then just
make sure it's not filled. Stitches are never filled. Okay. Now you have a more
realistic looking strap. Now what I do is I select
the outline of the strap. I'll make it thicker
like I was doing before. So there's a variation in a separation from
the stitch line. So let me select the
top end of bias. I'll group it. Perfect. Why do I do that? I like to group
different anatomy of the bag so that when you need to zero in
on this one segment, you can just select
this one segment and not the rest of the bag. Now, we also need to add
stitch line on the top. In later classes, I'm
going to talk about the anatomy of the bag
and the construction of a bag where you
ask stitch line depends on how you're going
to cut this and sold us. So for now, let's not worry about how this bag is
actually going to be cut. And so let's just add a stitch line for the
sake of doing it, I just arbitrarily
added as lime. And it's definitely not 0.25 centimeter away
from the top edge. So what you should have done, or I should have done is select this object path, offset path. There we go. I draw this. This is wrong because you
don't stitch the panel I, that the front panel will be so all the way to
the size scenes. So you caught and cot
and you get rid of this. That's all you're going to have. The top stitch look at your own TO you'll
see how it's done. Now all of this is finished, and let's say I'm happy with it. Select everything and group it. Next. We're going to do back
view, select this, duplicate that, and make
sure it's lined up properly. There we go. You literally just do your own backfill for some bad design back in front of you are
completely different. For instance, some people may
add a pocket in the front, but there's no
pocket on the back, and that's totally fine. You can still
duplicate the front and when you make
it into the back, just delete the pocket. So what I'm actually doing
now is I'm lining up the top and bottom. We go. That's your backfill. If the front and the
back view are the same, a lot of times to save paper, I don't even draw the back view. I literally say front and back. So then the pattern maker
will understand that the front of the bag is
exactly the same measurement, exactly the same design. But for our purpose, I'm just going to drag it
out so you can see it. Okay. So we literally did the
back view in 2 s. Now, the side view, the side view
is sometimes called Gaza. Gaza is SIPs, but not all the bad construction
will feature a gas it. So if that's the case, then we will just call
this a side view. So how do you draw the side? This is when this
lovely measurement of 5.2 inch in depth comes in. We start with the height. We always start with the height. What is the height we already established is 32 centimeter. And we can see that's
the reason why I dragged this
guideline over here. So bottom height is 33. So the simplest way to do this, make sure you select
the right layer. We're working off of
the artwork layer. Let's lock the text
so we don't make any mistakes. Just drag. There we go. What did we say? 55.2 inch is in centimeter. I cannot remember. Let's go to our trust it
conversion calculator, like my 213.2, 0.2, 13.2. This one is 17.9 to y. So 13 point to perfect. You got your starting point to. Now here's the thing though. It shouldn't be
tubular and I'm sorry, I shouldn't be uniform
like this mean that the top width should be longer
than the bottom width y, because we have a trapezoid. See this, this total length is longer than the bottom line. So technically the top, It's a little bit longer. In our case, I'm going
to add 1 cm longer. How do we know how long it is? We don't know because when the pattern maker is
cutting this front, at this front and
this back piece, they will cut it based off of the total
length of the top. But because the front is this way to the
back is that way. And then they come
and meet right in the center of your side view. We don't really know how, why the top we'll go when we look at it from the
side because he changes. So when something
like this happens, all I would do is I would
just kinda IS slightly, just slightly like that. There we go. I will not give him
measurement because I already gave the pattern
maker this measurement. So he's going to cut the leather based off
of this measurement. He doesn't need as
measurement anymore. And because I aligned the side view up
together with this, I can also line up. I don't need to do the offset. I can line up the stitch line. Sorry, Just like that. There we go. And remember, I kept yapping about
the front panel. Panel. Back panel is going
to meet on the side, right in the center. That's when you do one
solid line like this, which is not solid, so just
uncheck the dashed line. And what is this? This is your inseam. Your front panel,
your back panel. Your front is this your back? Is this meeting
right in the center. And did I not also said we have a bottom panel which I just realize was not grouped with. So just double-check it. I mean, sorry, double-click
it, add it back. There we go. So I'm gonna do the
same with that. Make sure it's centered,
doesn't look weird. There we go. Looks good. I also need to add
that to this day. All we mentioned is a center. There we go. Okay. So some people said, Do I have to add the strap? Not necessarily. Some people do. Some people don't meet depends
on how much time I have. If I have time, I
literally just do this. I drag guidelines so I can see we're okay, It's right here. I locked the guideline. I just do a very
thick line going all the way up touching
that make us sick. Oh, you can't see it
because I felt like that. Just make sure this recall. And I was selected. I will actually
right-click arrange, send to the back. There we go. So it looks more realistic. Because this is a flat handle. You really don't need to show
anything more than that. It's just the placement of it. That is your side view. I'm going to do the rounded
rectangle tool selected. Okay? You know what,
let me do this. Let me line it up with the
widest part of the toe. The part I says a
visual measurement. They don't cut they don't
create cut edge like that. But when it drapes, it drapes wider than
what it really is. So I imagine it is 39 centimeter
the visual measurement. Ok, that looks right and
let me fill it so I can see it and let me make this
thick so you can see it. Now. What about width? That width is this width. So clearly this is way too wide, so I need to bring it down. So 2.2, 13.2, this is
right now is 1932. There we go. You got this. That's your
bottom view, but not quite. We have this bottom piece. Remember, this, is
this, not this. I'm gonna make this a
different color so you can see what I'm talking about. Let me just make this an
obnoxious orange. There we go. So now we're gonna do
this orange bottom panel. Let me do this again. You see how the corner
says three centimeter. Let's make a smaller oh, sorry, I just made so press a whole the down arrow key on your
bottom right keyboard. You see the numbers going
down to two pi 3623, just make it go all
the way down to 1 cm. Almost there. I couldn't get exactly to 1 cm. So at this point
you go to shape. Make sure this is also
like to type one. There we go, 1 cm. So this is going
to be what was it? 37. Or I can meet us 32.2. So now there's a there's a thought process
we have to do now, a decision we had to make. I can make this panel as wide
as the overall bag depths. But as you can see, it's already kind of pushing out because the overall bag has a much larger curvature at each corner compare
to the bottom panel. So when something
like this happens, you had to make a decision. I want to keep the width, the length of this, but I need to tone
down on the depths. Let's bring it to ten. Does that make sense to you? So what will happen is
when a pattern maker sees the bottom panel is smaller
than your overall bag size, what is telling him is 0, the front panel and
the back panel. I had to so it into
the bottom panel. So there will be a
very nice curvature when they fold the
leather inward, downward into the bottom panel. And the smaller
the bottom panel, the more room the pattern maker will have to fold a
piece of leather. So right now when I look at it, it looks a little bit
too narrow for me, so I'm going to increase it. Does this make sense? Let me center efforts. Okay. You know what? It makes sense? I want him, the pattern maker to just fall a little bit like
maybe five millimeter. It looks like it into
the bottom panel. But then I don't like how sharp the round corners are
compared to the overall bag. That's when I go
back to a shape, make sure all is locked and let me increase
the round the corner. Does that make more sense
now to two centimeter? You know what I think? I
think two makes more sense. Let's keep it like that. So now we have this, let's center it. Now. The bottom panel, well need
to have stitch because you're stitching the bottom panel
onto the bottom of the tote. So let's select that
path, offset path. Perfect. And I'm going to use
the eyedropper tool. I draw the dash line. That's it. You can add little
feet if you like. You know what? I'll just show you
how to do that. In the next class, we
will actually talk in depth about how to create metal hardware
and how to utilize them. So we don't need a
dashed line for this. I already have a pre-made
hardware finishing. Shiny goes, so I'm just
going to select this. The hardware pieces actually
come a very specific sizes. So the numbers
cannot be arbitrary. The numbers had to
be matching back to what your hardware supplier half or unless your customer
care for our case, I'm going to keep a one by
five because I know this is a custom size that you can
buy in a material market. So you have one feet. But before I go to
another feet, this is, I need to show you how to
measure it so then we can put placement or other
feet in the correct place. We usually put out
the four corners or in the center
tool, doesn't matter. And we had to measure
how far from the edge of the bottom panel do we
start hammering the feet? Right now I just randomly
drew a line in red. This is the height is 1.7. It looks about right? I like 1.7, while the how
far away from this edge? I say one pi seven makes sense. Now, exactly 1.7.
Does that make sense? Let's do okay, Now I had to put reference point to the left because I don't want
the left to move. I want this line to extend out from the
left to the right. So I had to lock the left. So let's do 1.8. Okay. You know what? Let's also do this 11.89. So think about it,
it makes more sense. Okay? So now they both, these two lines connect
a center point. You see that? And then now what I
like to do is I like to select all and I duplicate all. And I do rotate, which is E? Hockey is e, the letter E, and user rotate there. Perfect. Then you do the same. Over here. Rotate. I didn't, I missed it. There we go. Now. Lastly, rotor. That is done. You have
your bottom panel. Oh wait, that's not done. You can look at what's
happening here. We have this insane. Okay, Where are you
from panel back panel actually connects
and soul together. Let me just drag this
over so you can see it. There we go. So this is the
continuation of that. See that from pedal, front panel, back
panel by panel. Let's also color this
orange. Your bottom panel. Bottom panel. What about your easing? Whoops, forgot to do the
insane. That's okay. Double-click on this ad. We go, just make sure it's centered because I'm
paranoid. Okay, and measure. Now, how do you center this? First, we need to
select this all defeat. Bottom panel with stitching. Grew up it select all center, okay, its center.
Natural bottom panel. We still need to
show two views that are required in all
the topics that you will ever do for bag
with smaller the goods interior back, interior front. We need to show
the pattern maker what do we want the inside
of the bag to look like? Okay? So usually what
we do is we give The pattern maker, the outline of the overall
bag that looks like this. In this case, I'm
going to ungroup it and delete the top handle. Why? Because I'm showing
the inside of the bag. So now, with that being said, I'm going to bring something. This particular swatch card. Let's just pretend
you didn't see this. Here. This is my trusted
lighting swatch. I will show you guys how
to actually create this. If you guys are interested,
leave a comment. I'll create a specific class just about how to
create repeat swatches. There. You just fill it up no-brainer. And the pattern looks tiny, so I'm actually going to right-click transform,
scale it up, make sure you don't
transform the objects were only transfer me the
patterns corner stroke, and in fact, let's
make this 150. You can do preview. That looks more like it. You like it. You click. Yes. That's it. In an interior back panel. If you look at any
bags you have, what what do you see? You usually see a
zipper compartment. This is your zipper compartment. Okay. So let's do this. So there are a couple of things about the zipper compartment. And the first thing you
need to give is obviously, how long is the zipper
compartment gonna be? This varies based on the
actual size of the bag, some smaller bags, we don't even add as if a compliment
because it's so small. This is Niven room to add a
zipper, foot bigger bags. It can go anywhere from
18 centimeter or 2022, 26, I think the largest
I ever worked on. The zipper compartment
was closest 30 cm long, which is so huge. Then you had to give how, why the zipper window, this is called zipper
window is going to be this one is 1.21, 0.2 is fairly standard. 1 cm is also standard, 2.52. However you want. I seen the maximum you
can do is probably fine because the
zipper tape is sell only goes up to five
centimeter long. So you had to give the
zipper window size. Then the zipper window length. I guess you can call this
the width or height, doesn't even matter
at this point. Usually for zippers, just to show you a little
bit of a BOM, which I will talk about
in my next class. I feel I'm digging
a hole for myself. We need to also talk about
what type of zipper is a YKK? What number is it,
what color is it? Is a metal versus nine on
all sorts of good stuff. We need to talk about it. But for now, this is the
measurement we need to give. Plus the measurement of fun. How far up, down do we start
making this zipper window? Certain companies, they don't tell the
factory want to do it. They have the factory
tell them what to do. Because when the
factory is actually creating the paper
pattern based on the material that you
select a realise that the number that you give
them probably won't work. They will start adjusting. Some companies they tell the factory exactly
what lengths they want. So again, just follow
your company skyline. So this is the drop from top. Recall. So these three are very
crucial measurements you need to give the factory. Sometimes I'm sure you have also seen as
you all the time, is people will put a logo
label right over there. If that's the case, just put it there if
you want Offset Path, this is your logo label. Now I'm just going to type logo because I don't know
why logo you use this. Okay. And in fact, let's
see if I can show you guys is why I'd say, okay. So when you type anything, you want to make
it into outlines so you can fill it
up with colors. You just select it, go to type, type is off here, go to Create Outlines. And now I can fill this
now becomes a metal logo. But let me just make sure I
also create a black outline. What do you see happening? Do you see how close the
logo is to the stitch line, a lateral ties because things
are not drawn up to scale. We literally see
designers sending us tech packs where it
looks like this. But in reality, when we start hammering the logo
onto the logo label is sitting on top of the
stitch line and break through both the
stitch line and label. And it's very ugly. And as a simple mistake that
should never have happened. This is a reason why drawing
full-size is so important. So you don't waste your time. You don't waste a factory is tight and you don't
make mistakes. So let's say, I don't
really quite like how the shape of this logo label looks compared to
the logo itself. So I want to make it a
bit narrower like this. And then just
central line group. Now you're done. If you do add a logo label, you have to give the size
of the logo label itself. And sometimes certain companies
are very detail oriented. We even give the distance
between the window, the zip window,
and the logo label you had to give the distance. Now, last but not least, the next view we had to do
is called interior from what's on the front
side of this toll, you have to tell the factory. We adding nothing. Are we adding the standard
pockets like these two? So this is what
we call a sender, miscellaneous pocket,
miscellaneous pocket. This could be a cell phone
pocket doesn't matter. So this is how we will show it. And let me just
align this group. It is not. Let me just group this so I
can have a piece of my okay. We'll pick repair interior,
front, interior back. So here's a funny thing. If you look at all
the bags you own, you will very quickly realized that the drop for the
interior back first, let's just draw for
the interior from It's not always the same mean that these two miscellaneous
pockets don't always line up with the height
of this zip window. Why is that? I very quickly realized that
if people are going to put pen or the iPhone here, pen, iPhone come in various
sizes and length, which means that sometimes this pocket knee needs to be much lower than
this is Zip window. You can measure
the iPhone swallow and then figure out
the drop yourself. So now let me just group
this and you have finished. This is all the views that's
required to finish a, what we call a full-size
standard Terrapin from back, psi, bottom interior,
back, interior front. Sometimes we will add in top
view or three-quarter view. Top view. I only add it. What if there's something
interesting about the closure? I want people to be able to see it from a bird's-eye view. Right now, this is
a totally open bag. There's no closure, so I'm not
going to add the top view.
6. How To Use Symbols: Let's talk about symbols. How do you create symbols? First thing, let's clean
up the workstation, the art board first,
let's unlock all. Let us delete all these
guidelines. There we go. So let's open that your
symbol menu as y over here. If you don't have it, you should be able to find it under, let me see windows. You see symbols, symbols right here that
it should pop up. So here's the thing
about symbols. The way you create it is you select the entire object
you just created. Literally drag and drop. You can name it. I
usually don't bother. Make a dynamic symbol and
export movie clip, click. Okay. Now, when you select it again, did you see how it's no
longer the bounding box with all the anchors in
lines is actually just a bounding box with
no anchors whatsoever. I'm going to explain
why that's the case. Let's also what the front
of the back is the same. So let me just use create
one symbol instead. Group all of them. Drag-and-drop. Bottom is important. Drag and drop. Okay. Let us do this one. Oh, did you see what I did? Some parts of it. The bottom panel is actually in the texts. Let's
drag it down. Let's group it. There we go. And then let's open
that symbol again. Drag and drop. Click. Okay. This one actually see
this, float it up. Okay, Let me see drag-and-drop. Alrighty. So these are your symbols, but why do we need it? A lot of times, let's say you've worked
on this back many, many, many, many times. And you'll design director says, I feel like this is a
little bit too small. Can you show me an option
when is 10% or 20% bigger? What do you do? You leave this as
is you duplicate. Right-click. Go to Transform Scale. This time, did you see how
I scaled it up by 50%? 100 is your original size, so 150 is 50% larger. Let's say you want to show your design director that
this bag is 20% larger, so it's an, a 150, you type 120. Okay, so it's a
little bit bigger. You can see that this is
already 20% bigger than that. Okay? Then what if your
boss, your CEO says, I feel like 20% is way
too big and I see it like maybe just 10%
bigger than the original. You'll like you serious. I had to do that
again. Okay, fine. So you drag the original and then you right-click
Transform Scale instead, a one-twenty, you do 110. There we go. Okay. You love your design director, loved it, the CEO loves it. And then all of a sudden you
show it to a buyer viruses, I know this is way too big, small bags that Kami back
give me something small. How about the original size? What if this conversation
happens three months later? What if nobody remembers? What do your original sizes? Well, this is where
the symbols comes in. All these changes I just made. Guess what happens when I want to find what the original is. Select right-click,
reset transformation. It bounces back to
this original size. Oh my gosh, that's it. So symbols saves all your
original cats inflammation. And here's another kicker. Let's say I create multiple art boards
for whatever reason. So I do edit art board and
then I just do option, duplicate, option
to pay like that. Let me delete everything. I don't need this. I mean, in the future. Okay. You have one bag over here. One bag over there. And let's say one of
your merchandise to say, Hey, can we add a flower on it? Okay. Flower. Sure, I can do that. So what do you do?
You double-click. When you double-click
any symbol, basically opens up the symbol so you can go into
the actual drawing. You just create it. You can add or delete anything. Now you're merge says she wants a flower and let's
say it's embroidery. So you drew a flower like this. Okay, Let's just pretend this, as far as I know it's not, but let's just pretend this. Okay, So you had this
beautiful flower, everybody loves it. And then now you have to update your entire tech pack
to reflect a flower. Guess what happened? Whatever changes you may hear, it happens over here. It happens over here. So whatever changes you
made to one single symbol, when you add a
symbol to any pages, that symbol will show the
changes that you've made. This is very helpful when
literally you're working on 5678 designs at the same time, so you don't have to go into individual drawing
at that flower. Now let's say, your design
director counts back and say, oh my gosh, the flowers,
such a bad idea, I hated it. Fine. Double-click the symbol. You can do it here
on the art board, or you can go to the symbol
and just double-click it. You see it's the same
thing and delete it. And then double-click anywhere
outside of the symbol, it comes back. Now
it's all gone. Not here. Not here. So that's how you keep all the inflammations
archive in a symbol. Sometimes when we work, we literally have hundreds
of symbols saved in Assemble menu because you never know when you
need to pull what. For instance, this
is a zipper poll. I create it and I saved it as a symbol so
I can add it to any bag. If I decide to add
a zipper closure to this Double-click on
the symbol, edit. It is. Let's say we decided not to have the little embossing the center Dilly. So you go to your symbol, you double-click on your
little to propose symbol. Unless they, nobody likes this, go anymore for next season, everyone's switching it
to silver Nicole color. I did that on my art board. Wherever this metal
zipper symbol is that it changes
automatically. So that's how we work. So symbol is
extremely important. I sometimes also save individual elements like
a pocket so as symbols. So that when I'm designing into different bags
and I realized, Oh, I can actually
use that pocket. I just drag and drop, drag and drop. That's
all I need to do. So I don't have to keep drawing
everything from scratch. And I do the same
with shoulder straps, especially when you have
multiple shoulder strap designs that rotates season
after season after season.
7. Adding Remaining Measurements & Final File Prep: Finished adding measurements. So front and back are
exactly the same. So I'm not going to
add measurements here. Thus began with a side view. You select the text layer, I'm going to lock
the artwork layers, so then my measurement doesn't end up on the artwork layer. And let's just begin. So we know as I'm working on it, I realized that I may have
missed make the oops, the bottom panel to shore. So all you had to do because I saved this as a symbol already. Double-click on symbol. You can double-click on
the art board itself or the symbol panel
like I did just now, and just make sure it
matches. That's all. Again, this is just me being me. You don't have to do it where it didn't know what
the height is. So we don't need to add that. What we do need to add is indicating to the
fashion what this is. This is actually insane. So they know how to sell it. They know they had to sell
this from the inside out. So if on the inside,
turn it outside. So that's what it needs to know. For the edge pain. How to finish edges. I will talk about that under
the bags anatomy class. So today we're just
going to skip that. Okay. So this is extra,
we can delete it. That was just me showing
you guys how to do it. Okay. So now let's do this. Sometimes I repeat measurements
from page to page, especially if there's a lot
of inflammation and I don't want the pattern
maker to have to flip back to the first page
to figure out what this is. So in this case, I will indicate the measurement for the bottom panel as well as the visual measurement for
the bottom of the toe itself. So select these two guidelines,
create a arrowheads. Okay? So the length, this is 37, the height of this is 12. Okay, cool. Now I remember this is 1.8 centimeter from
the edge, right? Yeah, I was right,
one point a. I also remember this is also 1.81, 0.8. So duplicate one point ACM. And really that's
all you need to do. You don't need to
repeat the same thing on the same page
over and over again. So I'm actually going
to delete these. I mean, look, if any family
needs you to do that, I don't think you should
be working with a factory. There we go. Okay, cool. In terms of what type of metal feet we're
currently using here. I will talk about that
a under the class when I talk about BOM
bills of materials. So stay tuned on that. Now, an experienced factory when they see a
drawing like this, they know exactly how to do it. But if you're working with a new factory or a factory who's not very good at
interpreting your tech pack. Sometimes I will add supporting information such
as what I'm doing now. I created a curve arrow. Over here. I will literally
write instructions. I'll spell it out.
Front and back panels. So into soul, into bottom
panel in case they need it. Honestly, if they need this, maybe you shouldn't
be working with. So this is the
visual measurement. Cool. I will also give
the overall what was it? 2.2, 13.2. There we go. And this will be sufficient
for the factory to start cutting patterns by seven long. And this is 1.2, I believe, 1.21, 0.2. For our purpose, I'm
gonna give it a drop. So this one says 5.5, good enough for me if I clarify. Now, I have to give this
bit of a gap distance. I think I said five millimeter. I was so close to 6 mm. When you start to work on
this on a daily basis, you'll literally can I
it and kinda know like, how wide, how long does this. I've been working as a technical
designer for 15 years. So I pretty much can I
since at this point. Yeah. There we go. So again, if this
is a logo label, you need to give the
label size on this 4.6. This is two. Okay, I don't like
how this zipper ball is floating as cutting
into the lining. So double-click on the symbol, double-click your end, and then just line it up properly the way you like
it and call it a day. Safe, always save. So now we also do
the same over here. Give it, sorry, hold on, shift. So we can do a straight. The length of it, the height of it. Again, the height and the length will change based
on what type of stuff you want
people to be able to put into it if you want. I don't like how this is curved. If you want people to be
able to put their iPhone, some people even want their iPad Mini Being
able to fill into it. So maybe you should do a
single pocket versus two. So it's up to you
whatever functions you want this pocket to perform, you had to make it a size-wise
to fit that function. This is actually
called a binding, which I will also talk about it in the handbag anatomy class. So stay tuned for that. But yes, you will have
to give a binding size so the pattern maker knows how why they need to cut
the paper pattern for it. Then you see a square stitch. So basically on the
sewing machine, but did they just do like a turnaround ago around
the merry-go-round. So let me grab so let's
just say this is how much? 11, 11 centimeter in height. This is 22 in width. And I'm just going to,
this is not accurate, but I'm just going
to say the binding is a millimeter long. And over here, I will
indicate a fold, swatch. Let me make this arrow one fold. If you have a really
good factory, don't know exactly what this is. What this is. If you look at your bag and just go to the miscellaneous pocket, you'll realize that there's
a bit of extra material. So your pocket is
not completely flat. Your pocket actually has depth. So then you can put your iPhone, you, because your iPhone is fat. And then this is
how you indicate that you want to
add a fold here. Any good factorial? Totally understand it. Sound company, we'll
call this a plead. That works too, because they are literally creating a plea. So either way works. And then like I said, you also need to add the drop here because
I want my customer to be able to put the
iPhone enough so I maximize to drop
as much as I can. This one is nine by seven. I shouldn't make
attend, but it's okay. Nothing has to be whole
number all the time. Oh, one thing I
forgot to mention. We also do this. We draw a dotted arrow
from the zip window all the way down to the
bottom of your bag. Why am I not selecting this? Here we go. And then we said, interior pocket all
the way to the bottom. Sometimes, sometimes
not all the time. Happens more now because
everyone's kinda like trying to stay
within budget. The factory will not make this pocket all the way
to the bottom of the bag. They will make it
about ten centimeter, 12 centimeter, and
cut it off like this. So this is actually
something you have to communicate
with the factory. If you don't tell
them, they'll just do it however they want. Anything you want them to do. You didn't write on the tap pat, there is your fault. Anything you want them to do, you wrote down the 10-pack,
they didn't do it. It's therefore, it is a very black and white world when it comes to
mass manufacturing. So it's always better
to overwrite things, over-explain things versus unexplained
on the right thing, because you don't even understand
how many emails I got. My junior designer sent something and they
didn't explain it. Well, next thing
I know we are on the 30 email chain trying
to figure out what it is. Do you really want? And it is absolutely exhausting. Alright? So there you have it. This is pretty much how a full-size tech
pack will look like. What's happening on
these two pages. Very good question. These two pages or
three pages are what we call tabloid size
pages in the factory, depending on where they are
located, for the most part, they can print letter
size up to tabloid size. That's the largest most
factories can print. But we drew everything so huge, clearly is not going
to fit onto tabloid. So in this case,
this is what we do. We select everything detects
and a drawing altogether. We duplicate everything. We re-size everything down. And we put it just like that. You reassign everything. Oh, did you see how
the texts disappeared? This actually is a really good glitch that we can talk about. Sometimes there's some error
within your file most, most of the times
within the symbol file. So the computer is not
able to process it. It will automatically
delete all your texts. So when something like this
happen, unfortunately, you do have to go into your symbol to see
which symbol is acting, acting up and delete that
symbol and remake it, usually dead by then
it should work. Let me see this one.
No, It's not that one. So you didn't need
to individually or is this one you
see what happened. So why did it do that? I have no idea. Let me see if I can
find a way to fix it. Okay. Okay. Let's not waste time
to fix that one. Let's focus on these
are the symbols for c. Now it duplicated
the texts as well. In EU resize it. Let's see, let's say
FirstPage, always, always. You put still too vague. So let's resize it more. Okay? So you two are here. Here. And then you realize, Oh, I can make it slightly bigger, you make it slightly bigger. Okay, you do this one here. Awesome. Then you do the last
page, your interior view. Now, for the purpose
of the video, I'm just going to
break link to symbol. So this is also a
very important trick. How do you get rid of the
symbol is just breaking, literally break link to
symbol. You right-click. It will showed up and
it will come back to this original drawing
where you see the bounding box with all the
anchor and stuff like that. But there's something else
I need to share with you. Let's use that one. Let's say
you made this very small. And you see how when
you right-click, you have both break link to symbol and reset transformation. You must reset this back to its original size dam break
link to symbol. Why is that? Because if you don't,
Let's go back. Let's say you make
a super small, you break link to symbol without resetting
of transformation. Sometimes what happen
is it will change. It's not doing it now, but it will change the
thickness of your lines and even the size of
your stitch line. And then next thing you know, you're spending all
that time trying to fix it back to your
original drawing. So just don't do that. It's such a hassle. Not always, always, always. Reset, right-click,
reset to transformation, then break link to
symbol and you're safe. Alright, so for this
one, bring it down. Make a small, at
least match the size. There we go. It doesn't match the size. It looks about the same. And then make sure you also get your interior from
which I didn't. Okay. There's a lot of
rule on the papers. I'm going to enlarge
it. Perfect. And I'm just gonna
make this thicker. One maybe to say is 0.07. Perfect. And I can also make
this a lot larger. There you go. There you have it. You have your full
size capac done. Congratulations.
 Stella Chang, Retired Handbag Design Director