Transcripts
1. 1. Intro: Hi guys, Welcome back to my class Stella here today is going to be
a very quick and easy, and hopefully painless
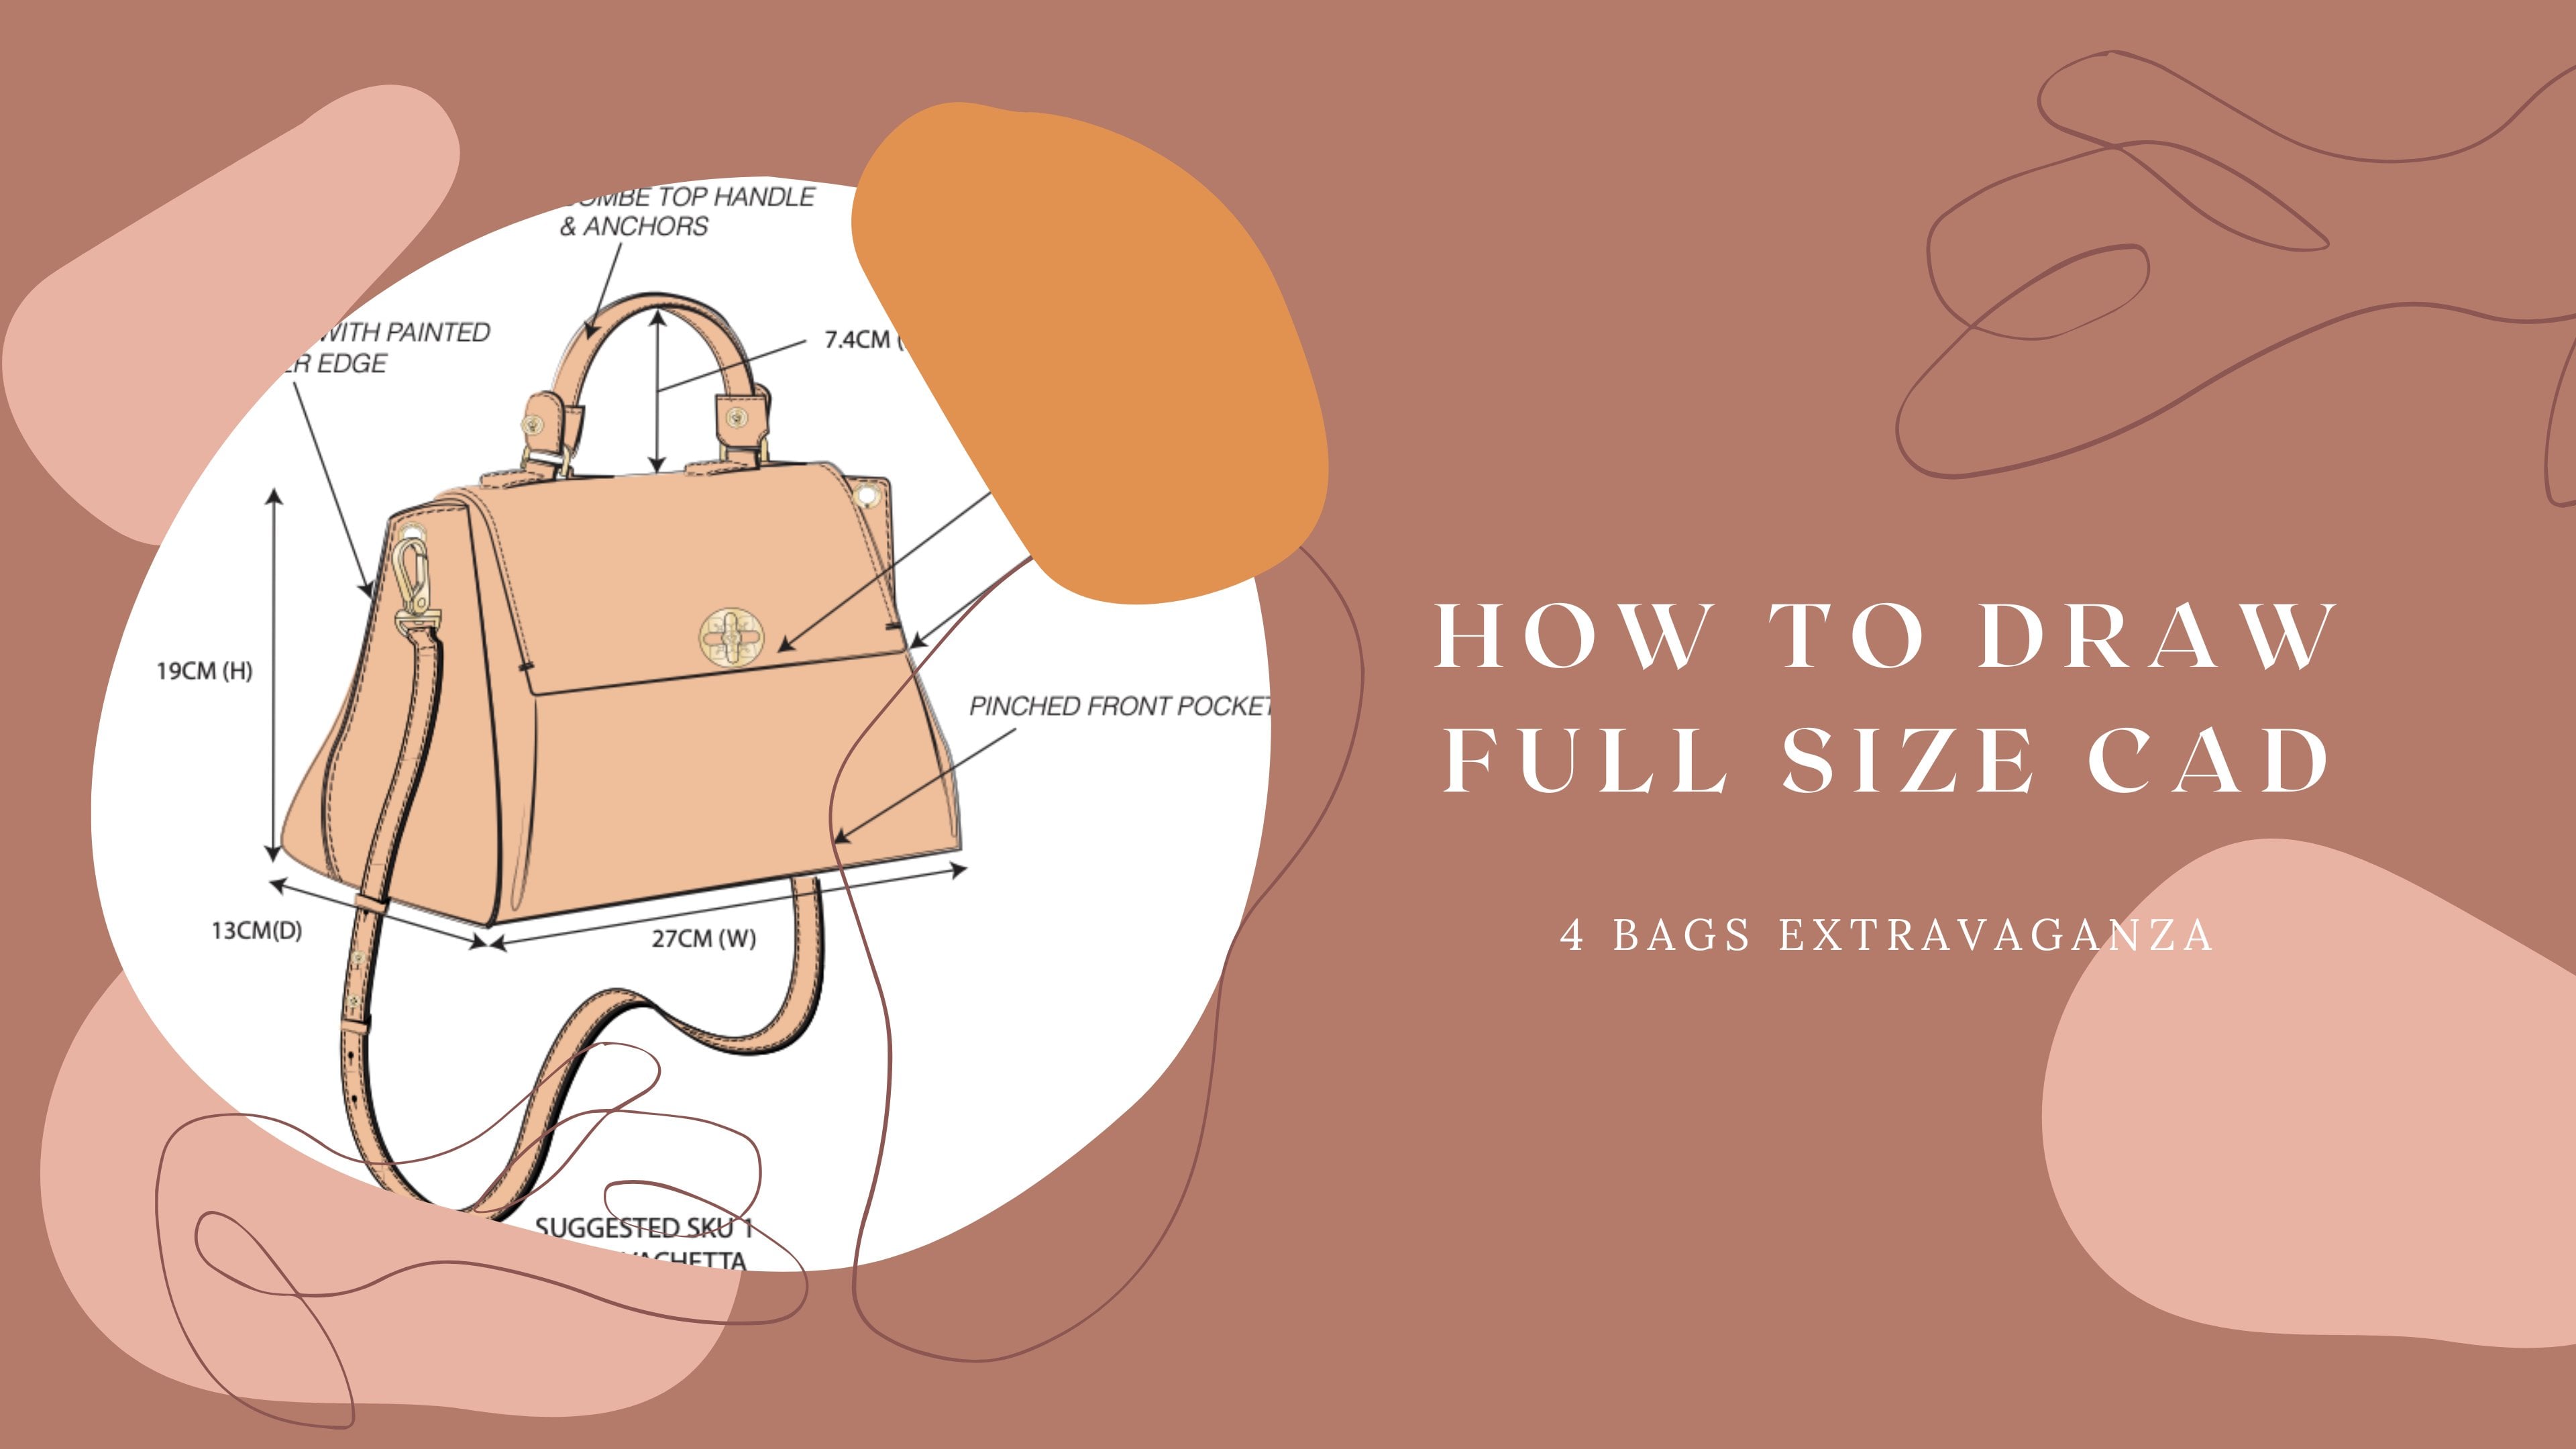
tutorial of how to draw flat handle and also top tubular handles
for any handbags. Sometimes SLG, not all the time. If you have any questions,
leave comments. Or if you would like to see other quick tutorials about
how to draw different parts, different anatomies of a
bag, just leave a comment. Let me know and I
will get to them. Okay, let's get it started.
2. 2. Flat Shoulder Strap Tutorial: Hello everybody. Welcome back. Today, it's going to
be a really quick and easy tutorial to show you how to create a flat shoulder strap that looks
something like this. Two pieces of leather bundle
and stitched together, so it gives you that really
nice, sturdy handfield. How do you create a
tubular top handle, where you either insert
a cotton rope to create the cylindrical shape or we
use a soft plastic tube. Now let's get it started. Next thing we're going to do
is I am actually going to lock the guidelines so that when I draw, they
don't move around. Just go to object, lock
selection, or comment two. There we go. Now if I try to select it, it
won't be selected. The first thing I like to do, I like to change the color to blue
so you can see it clearly against this bag. The way I like to
do it is I try to find how wide I want this to be. How wide do you want your
shoulder strap to be? Right now, it's about 0.87
Let's give it a whole number. Let's give it one full inch
so it's easier that way. And let's make this
very six so you can actually see what I'm
trying to do here now. This is 0.2 centimeter. The first thing I
like to do is I like to work on the innermost point, and then I totally
missed that point. There we go. And I come
to the center tip. Let me zoom in. I come to the
center tip of this arrow, like this, and I pull. When you pull, you can
press and hold the shift. This is a beautiful arch. So let's just do it like that. Okay, I like that arch. Now let's zoom out
a little bit and then use your general
selection tool. I'm sorry, go back
to your pen tool. Click on the anchor and then you connect the top point
to the bottom point. All right. Now let's do the
general selection tool. You pull at the handle and then you just eyeball it to see if
you like the shape or not. Some people do this
that just looks fake. Don't do that, because
what happens is that your shoulder strap will look like it's going
into the horizon. So it will actually tape it up. Let's say this is how I
love it and let me fill it so you're not being distracted
by all the other lines. I don't know if you can
see this but do you see how my point edge is? Very blunt square. Let's round it off so
you select it and just come to stroke and just run up the calf, run up the corner. It looks a little bit more
realistic and easy on the eye. Let's say this is
how we like it. I'm not going to do
the anchor design just because for
today's tutorial, I just want to show you how to get the curves, get the arches, get everything right
Now from here, remember the magic tool
that we use for adding stitch line is going to
object path offset path. Now let's just do negative
0.1% percent in 0.1 inch. This solid line that
shows up on the inside minus always means that the offset line
goes on the inside. Positive means the
offset line goes to a minus one on the inside. Next thing you need
to do is create dash line that is way
too thick, way too big. So let's bring it down
to 0.20 0.2 for the gap. And then let's make
sure the weight of the stroke is brought down to
0.07 Now look at it. Okay. It looks a little
bit more realistic. But wait, this is wrong. The reason why this is wrong
is in a real strap handle. Just take any of your bags that have straps and
take a look at it. This stitch line doesn't end right here and
come back down. No, this stitch line will go all the way across
to the other end. What you do is you need to either use for cut,
see it's a short cut. You cut this into two. And then you can use
the white arrow to move this away on
the other dash line. And then you pull
this dash line, just readjust it slightly,
go into horizon. As I'm working on it, I
realize that this is filled. You see how the
whiteness is changing. Come here, fill it. And then you can use
your pen tool again and simply connect it
to the other side. You have finished literally
half of the strap. You know what else
I do? I realize, hold on, the strap
looks finished. But how is this actually
connected to the bags? Well, you will
tell me that we're using the stitch line, right? Yes. But usually, again, look at any of the
bags that you own. We will add a box stitch
here as a reinforcement. Just use your line tool and then do a criss
cross like that. This is called a box stitch. This is the simplest way of attaching the strap on any bag. Once you're done, you
know what you do. You actually select all and then you're going to do a magical thing
called duplicate. Basically, press
and hold option. You see that double arrow? It means that it's duplicated. And then there's drags. In my previous class, I think I repeated
numerous times. We don't Everything. We draw
half of everything, then we duplicate it out a half. Now, another magic
tool is mirror, and the hot key is press
flip it. There we go. Now all you had to do
a zooming a little bit is to make sure
you lined this up properly to where the center, let's say somewhere over here of your spread
is going to be. Am I correct? Probably not. In this case, I'm actually going to group this temporarily. I'm going to go to object. I'm going to unlock
everything and I'm going to bring forward select on your
guideline for the spread. And then right click, arrange. Bring to front. There we go. All right, so now I can
see what I'm doing. This is actually the center, so this one needs to come in just a tiny bit because you're wondering
how I'm doing this. I'm just eyeballing it, like see here's the center. Okay, that looks great. Now the next thing
we need to do is, sorry, we need to line the shoulder strap
together with that. Line it up because this one, apparently it's a little bit too low compared
to that one. So I'm also going to group this part. Group the group bit. Okay, so you select, all right, click if you don't know how to group it and select
that's how you do it. Now I'm going to select this, press the whole shift,
select the other strap. Now everything is selected. You see this Align Tools
popping up on the top. Just click on, I'm going to
align to the top together. Then it looks okay. But now as I look at it,
this shoulder strap, it's a bit too short
in terms of spread. I had to widen it
just a tiny bit more. There we go. See
that I'm literally, let me just do a guideline, aligning the center of
this to that arrow head. And then I press the round tool, that's what I want. There we go. It should be over here.
Let me bring this out. There we go. Now that's a little bit too much
coming back a little bit. Okay, so I finally got
it correctly. Yeah. Hooray. Just one last time. I always like to make sure
it's really fully aligned. Now you take a look at
what's happening on the top. Did you see this grayish
piece That's actually the underside of the strap when we're drawing a flattened strap, always shows the underside. This is a visual cue for the
pattern maker and also the factory to understand
that because I can see the underside,
it is flat. Look at the tubular handle. You can't see the under side at all because it's cylindrical. It is not flat. So no
matter how you turn it, it just goes around and
around and around, All right? So this is like one of those things where
you start to realize, I should have taken
my geometry class a little bit more seriously. But anyways, you know
what I'm talking about. All right, guys, in case you're completely confused by
my explanation just now, I thought it would be easier
to show your visual weight. Basically, one single
strap is made out of two pieces of
leather top bottom, and it's usually glued together. And then two top stitches stitch lines added to with
so that it's very tall, strong and then it's
not going to come off. All we're trying to do when
we try to cut this out, we're literally drawing
them in this view. This is what we see. This is the front
view of the strap, and this is the underside
view of the strap. Obviously, it's
one single strap, but we had to do it, draw it
in three separate pieces. 12, we duplicate
the second piece, and then we add the
underside piece to it. This is really what
we're trying to do, just a simple flat strap, the way you show that
underside piece, so that the factual will get that visual cue and understand
this is a flat handle, especially if you forgot to
label this is a flat handle. I usually pick maybe like an inch or inch
and a half down. Just eyeball, this
is not exact size. Use a pen tool and then
I create a circle there. And then I press shift to go to the other side, so
it's a straight line. And then I drag I drag the
guideline on that guideline, I basically create a curvature. And then I press on it, then eyeball the center point
where the tool straps me, then I get rid of that little curve because I
want to create my own curve. That's an automatic curve
that's usually out of shape. And then close up points
and then match the curve. There we go. You can't really see it because I do not fill it. Let me use eyedropper and fill it now you have a
beautiful underside. Okay, we're not done yet. This stitch line is going to come all the way over the arch. This is the underside of, you'll see a little bit popping out on the underside and then
come out this way. This technically comes over here on the bottom of the underside and then
finishes over here. Remember the reason
why it's like this is because this is one
single strip of leather. This is not cut into three, but we break it up into three
when we draw it manually. This is what we do,
the same thing. You can free hand,
this is totally fine. Just make it parallel do eyedropper and then
do the stitch line. There you're done. Then let's
do it again for the top. Hey, you're done now, you may be like 0 castella. How is the stitch line
going to become like that? Well, very good question. Obviously on this side it is way too long,
so let's cut it. Okay. And then use
and delete the extra. Okay, and then we'll
do the same over here. Here. Supposed to
go down like that. Just following this
invisible line with my hand. Let's cut this. See again
is the short cut for cut. Cut here. And delete the extra. I delete the wrong one.
Delete the extra lengths. Now visually it
makes more sense. This ditch line on the under side is going
to connect to this. And then this should
extend into the horizon so you don't see it because it's being bent to the back side. It goes like this, comes out this way and then
come back down this way. And this one is going to
go all the way to the top. Come back on the other side. None of this makes any sense. Just look at your
own shoulder bag and then bend the strap, and you'll see it's exactly
the way we've drawn. Now, another measurement
that you always had to give, obviously other than the
spread and the drop, you also had to tell
the factory how far down they're supposed to attach and how much they're supposed to attach the strap
onto the body of the bag. This is what this
measurement is for. If you look at the height,
1.5 in, 1.56 51.6 ". They have to go down
onto the bag's body and attach the shoulder strap. Let me also bring this
forward so you can see the finished work. Into fun. Yeah. Now the next thing
that we need to do is, well, at least I like
to do it this way. Is I select all I group this entire show the strap
to become its own object. And then, let me just make
sure I'm doing this right. So you select that, you
select the overall bag. And I have separated the
bag in its own layer. Now I unlock that layer, I select the bag body, I select the strap,
and I do alignment. Again, center. Just
make sure this is, it wasn't
completely centered. Now, why do it
looked funny to me? Now this is completely
centered and you can always go
back and clean up your guidelines
to make sure that it's perfectly matching
what you're drawing. Because we literally sent to
the back. And that happens. Now next thing you do, and this is the last step,
is you duplicate. All right, Duplicate, Bring
this to the back side. Bring it down a little bit. Okay. And then right
click send to back also. Let me just erase the
original so it's not like distracting us.
There we go. Let me also. Okay. What I didn't do
right, I separated body. Let me bring this up. Okay. There we go. So what we just did was this is your front strap. When we duplicated
a second strap and then brought it
to the backside, it indicates that
that is the back. You're not going to
see all of it because it's going to be covered
up by the front strap. And this is how we
do a flat handle. And just make sure
that when you're moving things around,
don't be like me. I'm already missing
that stitch line because I didn't select it
while I was grouping it. But you know what I mean, This is how you do a flat strap. And obviously you can go and create a different anchor shape. Anchor design, you can add
ring or whatever it is. You're the designer, you
can do whatever you want.
3. 3. Tubular Top Handle Tutorial: Hi guys, welcome back. Now we're going to do
the tubular top handle. The first thing I
want you to do is to set your drop.
And set your spread. Now you know how to do that, there shouldn't
even be a problem. All right, so if
you need to pause the video, go ahead and do it. If not, let's just
continue forward. So here's the thing
about the drop. Usually for a
tubular top handle. We try not to go beyond a certain length in terms of
drop simply because it just wonky and weird when you have some a cylindrical
strip just hanging there and start the weight of the cotton rope actually will
collapse onto the leather, especially after wear
and tear usually. Now this one is about 12 inch. We usually try to
keep it eight inch, nine inch, As long as it
can go over your shoulder. That's a good drop to have. I'm bringing this
down to nine inch. Let me just look at the
overall size and shape of the bag so that I can see if the drop is in proportion
to the bag itself. It looks okay, But
you know what? Let's bring it down
just a bit more. Let's bring it down
to eight. There we go. That looks good. And make sure this is, there we go, center. Just like what we
have done before us lock all the guidelines
so they don't move. And we're adding the drawing
of the tubular handle. That will be come in two, press and hold, come in, and then press two and
then it will lock it. It's actually
extremely simple to create the tubular top handle. The first thing I will do
is I will make this blue. Our handle is blue so
you can see it will, I'll use the line,
the line segment. I will create the width. Let's keep it. Oh, sorry. Let's keep it around 1 " wide. Oh, here's the thing about
the tubular top handle, the plastic tube
that gets inserted into the leather to create
a cylindrical shape, they usually come in
crease set circumference. I mean, we're talking about
one in two inch, 34 inch. Yes, it does come
very, very tiny or like 122 inch, three inch. So it's not just a randomly circumference
that we come up with. We actually work
with a supplier. We figure out how wide does
it go, small does it go? And then we design into that. Whoever your company is, make sure that you have a good relationship
with the supplier. Make sure they send
you a Swatch car of all the the inserted
plastic tube. So then you know, you're
not randomly coming up with a circumference number for
them to customize for you. You're working with
what they have. Let's just say that the supplier that we have has it at 1 ". So let's make this into 1 ". Okay, and let's just
line it up properly. This time it's exactly the
same as drawing a flat handle. You start on the
inner corner, okay, And then you connect to the
center of your guideline. And then you can press down, Chef, create a nice arch. Okay, I think I like
this arch better, but instead of starting here, we're going to go
all the way down. Okay? And instead of
connecting to this point, we don't do that
because it is not flat. It doesn't bend. I mean, it doesn't fold over, so we're
going to come up on top. So we're going to do this now. Right off the bat, I can
tell you it looks too fat. So I'm going to bring
this down a tiny bit. All right, And I'm
going to kind of readjust the curvature so it makes it look more realistic. Yeah, this is stick. Okay, Now the next
thing you need to think about is your anchor. How do you want
the tubular handle to be attached onto your bag? I can tell you this
is not how it goes. The most standard way is
that somewhere over here, the inserted plastic tube or
the cotton rope will end. It will end either
here, it will end here. Somewhere that length, you give it to the factory and
they'll figure it out. This is actually
how we show that. First thing you
want, you know what, I actually like to do
free hand for this, so I'm going to use a brush. I create a little round
that doesn't look good. I actually do this like that. This signals the
end of the tube. And what will
happen is that from this point forward, downward, the leather will
spread out because it's not wrapped around
the tube anymore. Let me actually move this up, it looks a little bit realistic. There we go. Okay. And then I'm going to do
aesthetic adjustment. Now the first thing
I want to do is adding extra point
here and here. And I'm going to another point, just come down like about
a quarter of an inch. You can eye this. This
is not exact science. You can do this
however you want. And then you select
the white arrow or the direct selection tool. And then I'm going to bring this out again. You can eyeball this. This is not exact science because what's going
to happen is when a pattern maker or any factory worker gets
on that sewing machine, the angle that they sow
will be its own thing. We're only creating
a representation of how they're
supposed to do this, not the exact replica of how the sowing machine is going
to create that nice curve. Yes, don't worry
about. All right, so just make sure this
is level with that which is not supposed
up a little bit. All right. This is a very
crude drawing of how the leather it is a
wrap around a tube on the inside that you're
not going to see and express out when the tube ends. Right here, it looks like a four year old
did this. I'm sorry. I mean, actually, four year old can be
really great artist. I shouldn't even
say that. So let me just round the corner off. If you have watched
my previous videos, there is no straight angle being leather ware always
round up the corner. That's a tiny bit to
make it more realistic, we'll do the same over here. So select, just use a
direct selection tool. Select this, chor,
this a little round dot will show up. Select that. And corner will pop up on
the top and just do 0.1 You can do it at 0.10 0.2
it doesn't even matter. And I really do not like how I actually do this. It
just looks limpy. So I'm actually going
to delete this. I'm going to use the
brush tool again. I'm going to do a slightly thicker line
and I'm going to brush, I'm going to actually
change it to this one too thick but I
actually like the line. I like the curvature
and the line, let me make this skin skin. Let me just make sure the relion tool, I'm
going to grab this. Let me just make sure this. I'm also going to make this overall stroke thicker
for the tube seven, so. All right, so now select the entirety
of it and let's fill. Fill, fill, fill. Okay. Now that looks like a very
stender tubular type handle. Although it is so
fat, I don't like it. This is when you can adjust it, you can make a very skinny, okay, this is way too wide. Speaking of that, the
measurement you have to give this diameter, this
is way too wide. And then you also has
to give the width of, or when it's spread out, you can just like that. Let me zoom out to see if I
affected the overall shape. Okay, it's livable.
It's not the best, but it's totally livable. Then just come out a little bit. Come, there we go. We can make it slightly rounder. You can literally also take a photo of any existing
top handle design you like from any of your bag and import it into Illustrator
and just trace it. You can also do
it like that too. A lot of that's how they create. You just learn
about the industry. Now here's the next step. We use a direct selection tool. We only select the
overall shape. We're going to do our
magic object path. Offset path again
-0.1 then fill it. Fill it, and then
do your dash line. Go to stroke 0.20 0.2 great. And you see how
angle the edges are, so go to cap and
round the corner off. Now you see double dash line. Why is that? Because I
didn't fill up the top. What you do is we're
going to cut up the dash lines or the top
stitch that we don't want. Use your cut tool, the
hockey cut it here, here. And then use direct
selection tool. Again, delete anything
that does not belong. Okay, so are we done?
No, we're not done. And the reason why
we're not done is because if you look at
any tubulat handles, there's only one stitch
line towards the back. It doesn't work
like this. It's not two top stitch lines on the front because then
that will be a flat strap. So we had to come over here. All right, we're going to
use the cut tools again. Cut it right here,
direct selection line, and then select the top stitch that we don't want and delete. Okay, Including this
little part. Delete. Okay. So take a look at the top handle that you
have. What do you see? If you turn the top
handle to the back side, you will see that's where the
leather actually connects. This part represents
the back side. And then on here, this is
also we do the painted edge. Again, we're creating a
visual representation of that tells the pattern maker how they're supposed
to sold this. So this is all you need to show them and they will get it. Now again, I feel like something still not
right was the way I end the little inserted plastic tube or cut and rope depending
on which one you're using. So I'm going to do this,
I made it too big issue. It should really end right
there. Okay. So there's that. So when any season pattern
maker seed this or, you know, merchandise on the
factory side seed, they know how to read this cat, which is oh, okay, so there's no
intercepting part here like the flat strap which
means this is tubular. Another clue that
the designer give me is this little bowles shape, which means the end of the inserted cutting
rope or plastic tube. So I know this is a tubular top handle,
that is cylindrical. Here, You can always
add reinforcement. You can add another
box stitch you like. Or if you want, and we
see this all the time, you can add a hardware piece, literally use the oval tool, add it right in the center, and then you can fill
it with this color. If I can actually
select it. There we go. Now you're done, are
you? No, you're not. Why is that? We need to finish the other side
of the top handle. Alright, now lets students, I'm going to select all the
entirety of the top handle. Make sure I didn't
select anything else. I'm going to right click then
If you remember correctly, we got a whole and press option, so it has double
arrows showing up and okay, we drag it over here. And then the hot key
for mirror is 0. So now you have that little sign and then you just
flip it around. Now we're going to take
this to the center, somewhere over here,
but I cannot see. Let's go to object, unlock, and let's bring the guideline for the spread to the front. Okay? Okay. Let's use another guide line just
to be on the same side. Oh yeah, this one is
definitely central. Yes, this one not quite. Let me just do like this, so
you can see it very clearly. Hey, sorry, should
be zooming out. Now I select and zooming, so you can see I'm using the hardware to
center this strap. Okay. Now that is center, Okay, What are we going
to do with this simple? So the first thing
you do is make sure you group this strap. You also group that strap. Everything is on group now. Okay? And then, and then we're going to use
the direct selection tool. We're going to anchor, we're
going to make it match. Okay? We're going to anchor, we're going to make it match. Okay? And then
we're going to fix, would it be faster to
fix this or would it be faster if I just do the
opposite pass again? You know what?
Let's just fix it. It might look a
little bit wonky. That's okay. You just keep
going back and fix it until it looks perfect, okay? Okay. That doesn't look too bad. So they're not connected yet. They're just touching each other so that I will
connect them later. But I just want you
to guys to see. You see a little dent over
here and then goes up again. It's so ugly, so we had
to fix it slightly. Okay. Okay. Come to side. And I
just use the handle, drag it. Okay. Let me see.
Okay. It's less noticeable now. And
can I live with that? Not quite. I cannot. So I'm going
to bring up this. I'm okay, direct selection two. I'm going to bring
that up again. Okay. I'm going to
shorten the handle. Okay. Looks a lot better. Okay. Much better but the
stitch line is totally wrong. Maybe I should have done
that last, but it's okay. So I'm just going to
delete this because I'm going to show you
what happens next. Select the two points using
Direct selection tool group. Yeah, if you have the
latest illustrator, that little group
browser will show up. If it doesn't show up, you just literally selected do come in. J, press and hold, come in and then you
press J. There we go. This because it's
connecting out is covering up the little bulbous curve. So I'm going to unfold this so I can see that curve. I'm
going to select it. I'm are right click, arrange, bring to the front. Okay, you're done. And
then I'm going to use the general selection and I'm going to fill this up again. And then while it's selected, go to object, pass,
offset, pass. There we go one last time, unfold it and then do dash line. Go to stroke line, make it round, okay? And then do the
direct selection. We don't need the older line because they're just
floating there. And then you know the drill, you need to cut this cut. We're going to cut
it right here. We're going to come over here. This one, we're going
to cut it right here because you're not
supposed to see it. Let me zoom out so you can see. All right, that is your
tubular top handle. So yes, so try this out. And obviously with a
top handle like this, depending on the type of aesthetics that
you're going for, you can make it shorter,
you can make it taller. But do not ever drag
the way I just did, because you see what happens. It basically gets squished and that just
doesn't look right. So you will have to redraw it,
that will be the best way. The flat handle, it's a
little bit more forgiving. You can actually kind of
bring it down like this. As you can see, the shape
is still holding very well. But then even then, if you
bring it down too much, it started to look squishy. Don't do that. All right? That's don't be
lazy. Just redraw it. So this is how you do it. If you have any questions, just leave a comment on this video and then I will
try to respond to it. And also I'm going to start showing you a bunch of
short videos on how to do very specific elements and
different parts of a bag. So you're not drawing
the whole bag, you're drawing different
parts of it each time. All right, so thank you so much. I will see you at
the next class. Bye.
 Stella Chang, Retired Handbag Design Director