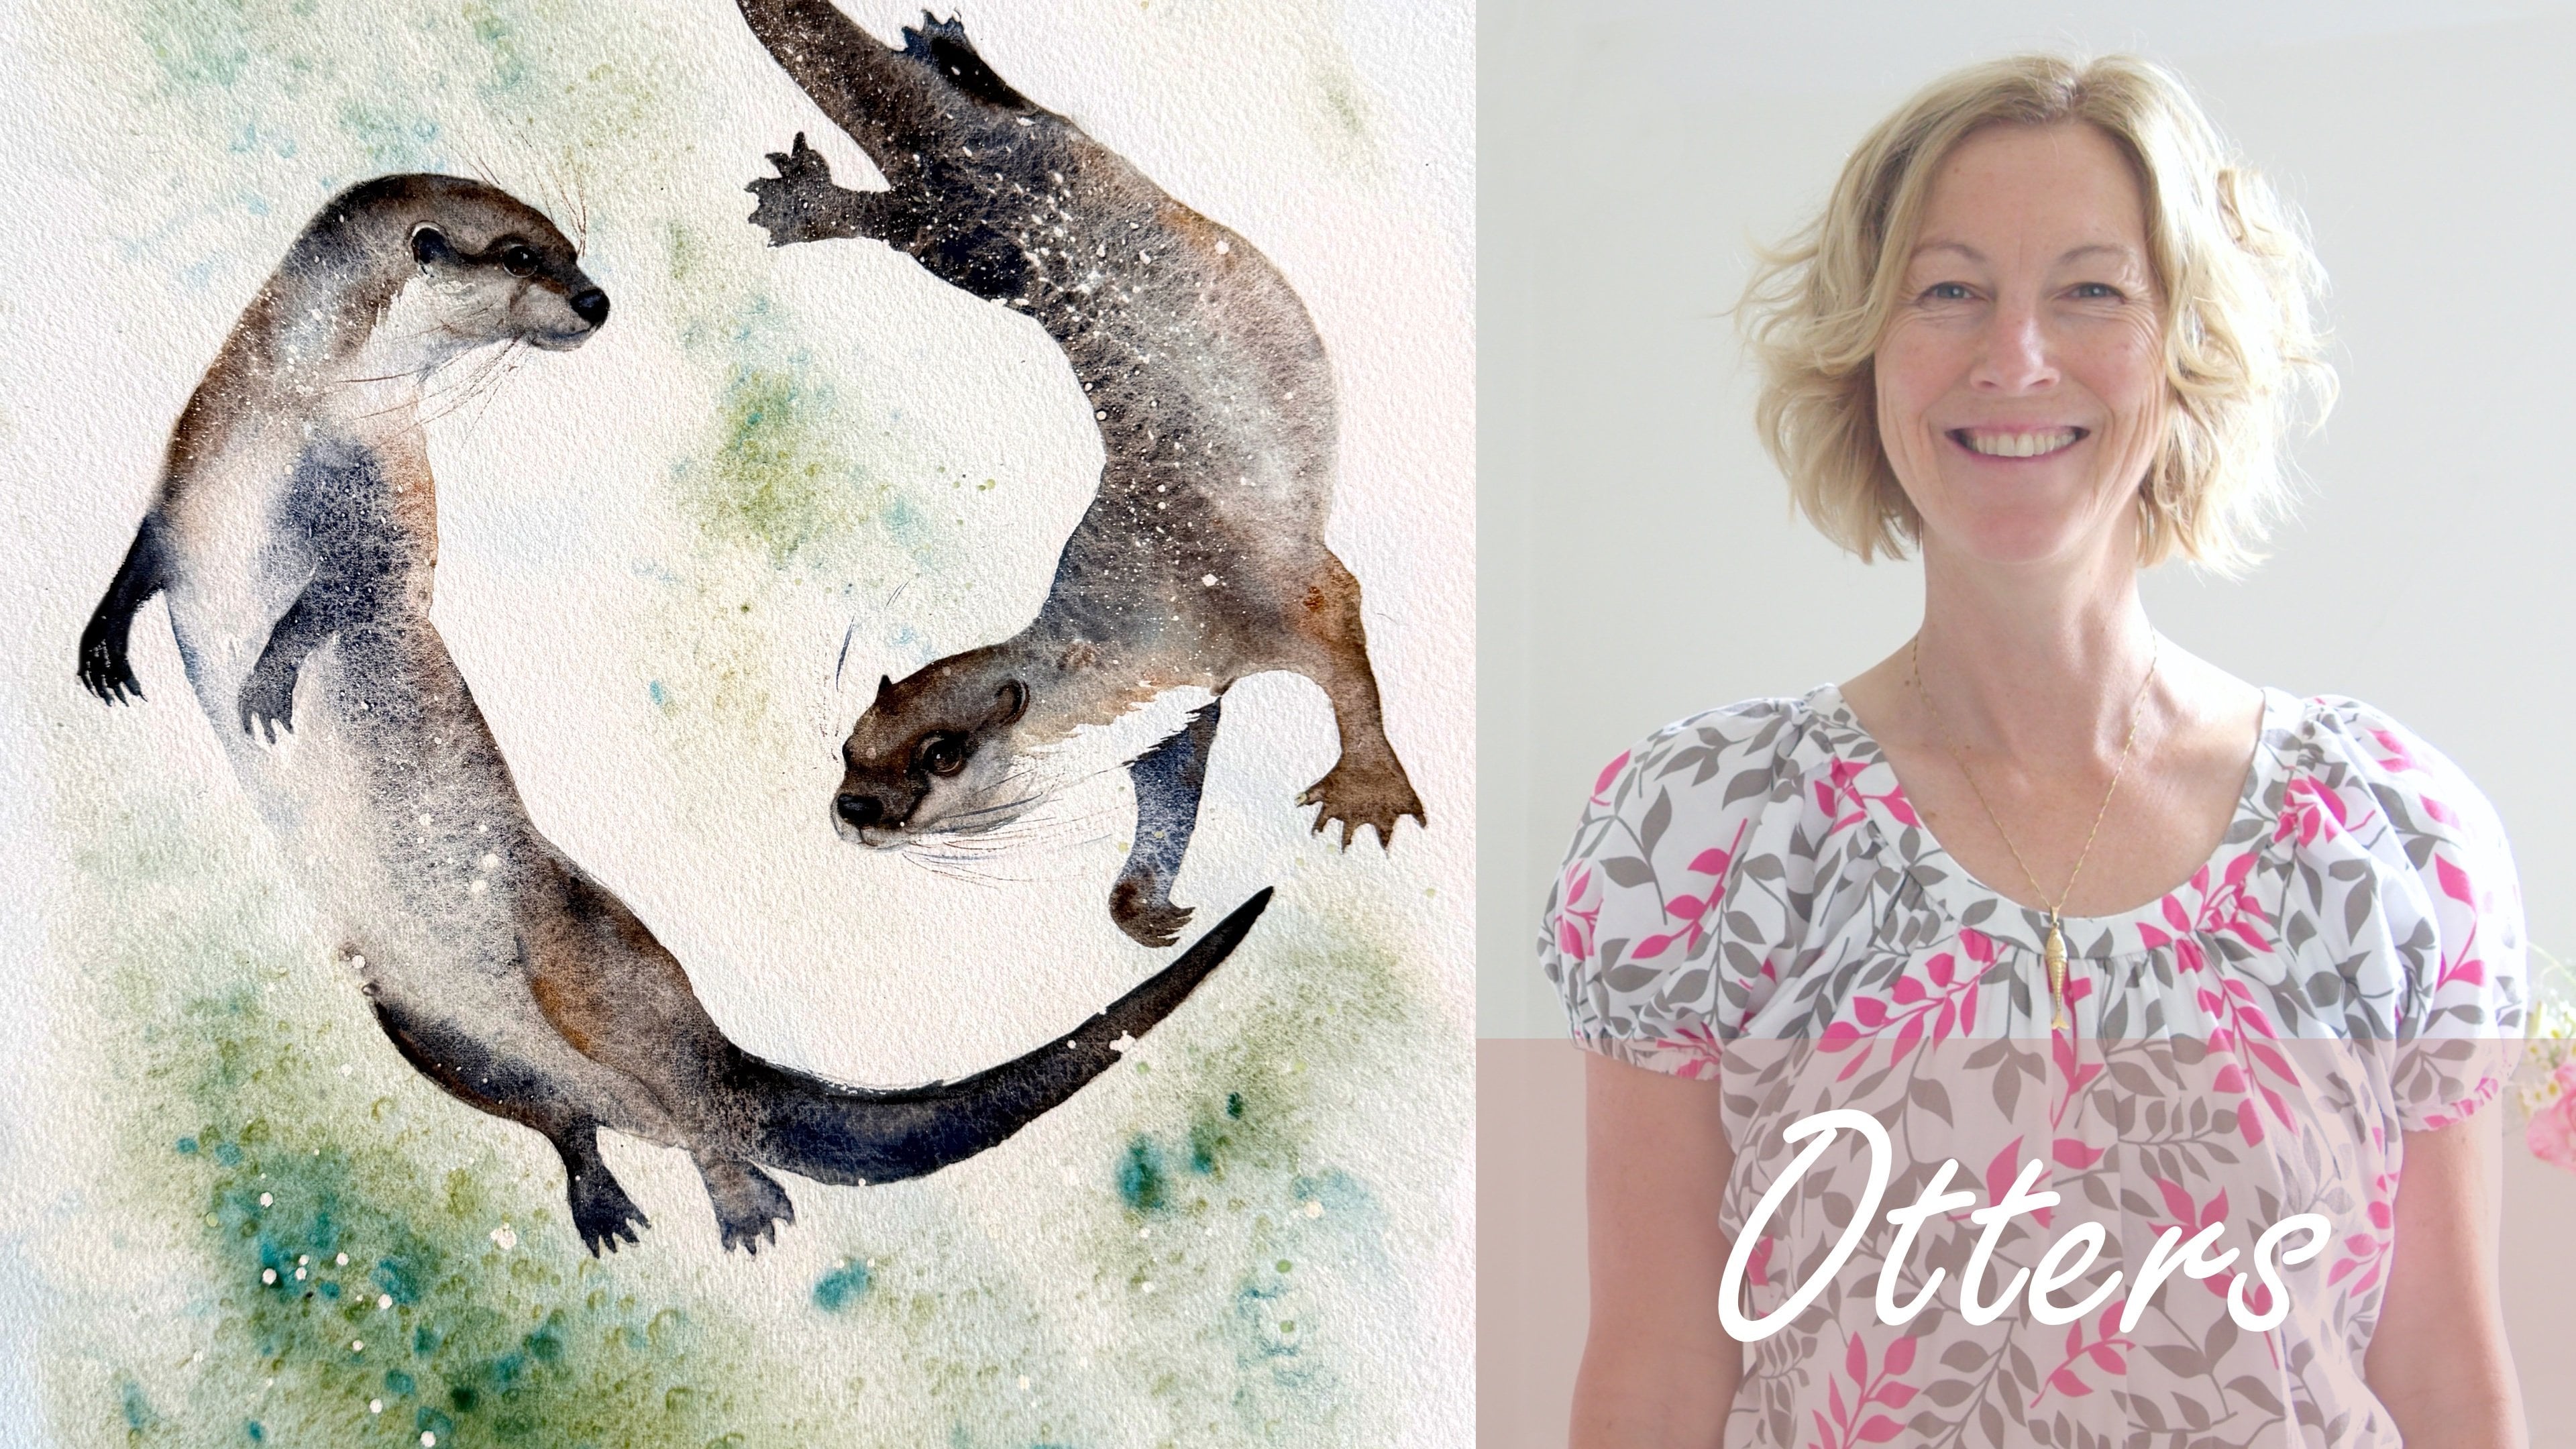
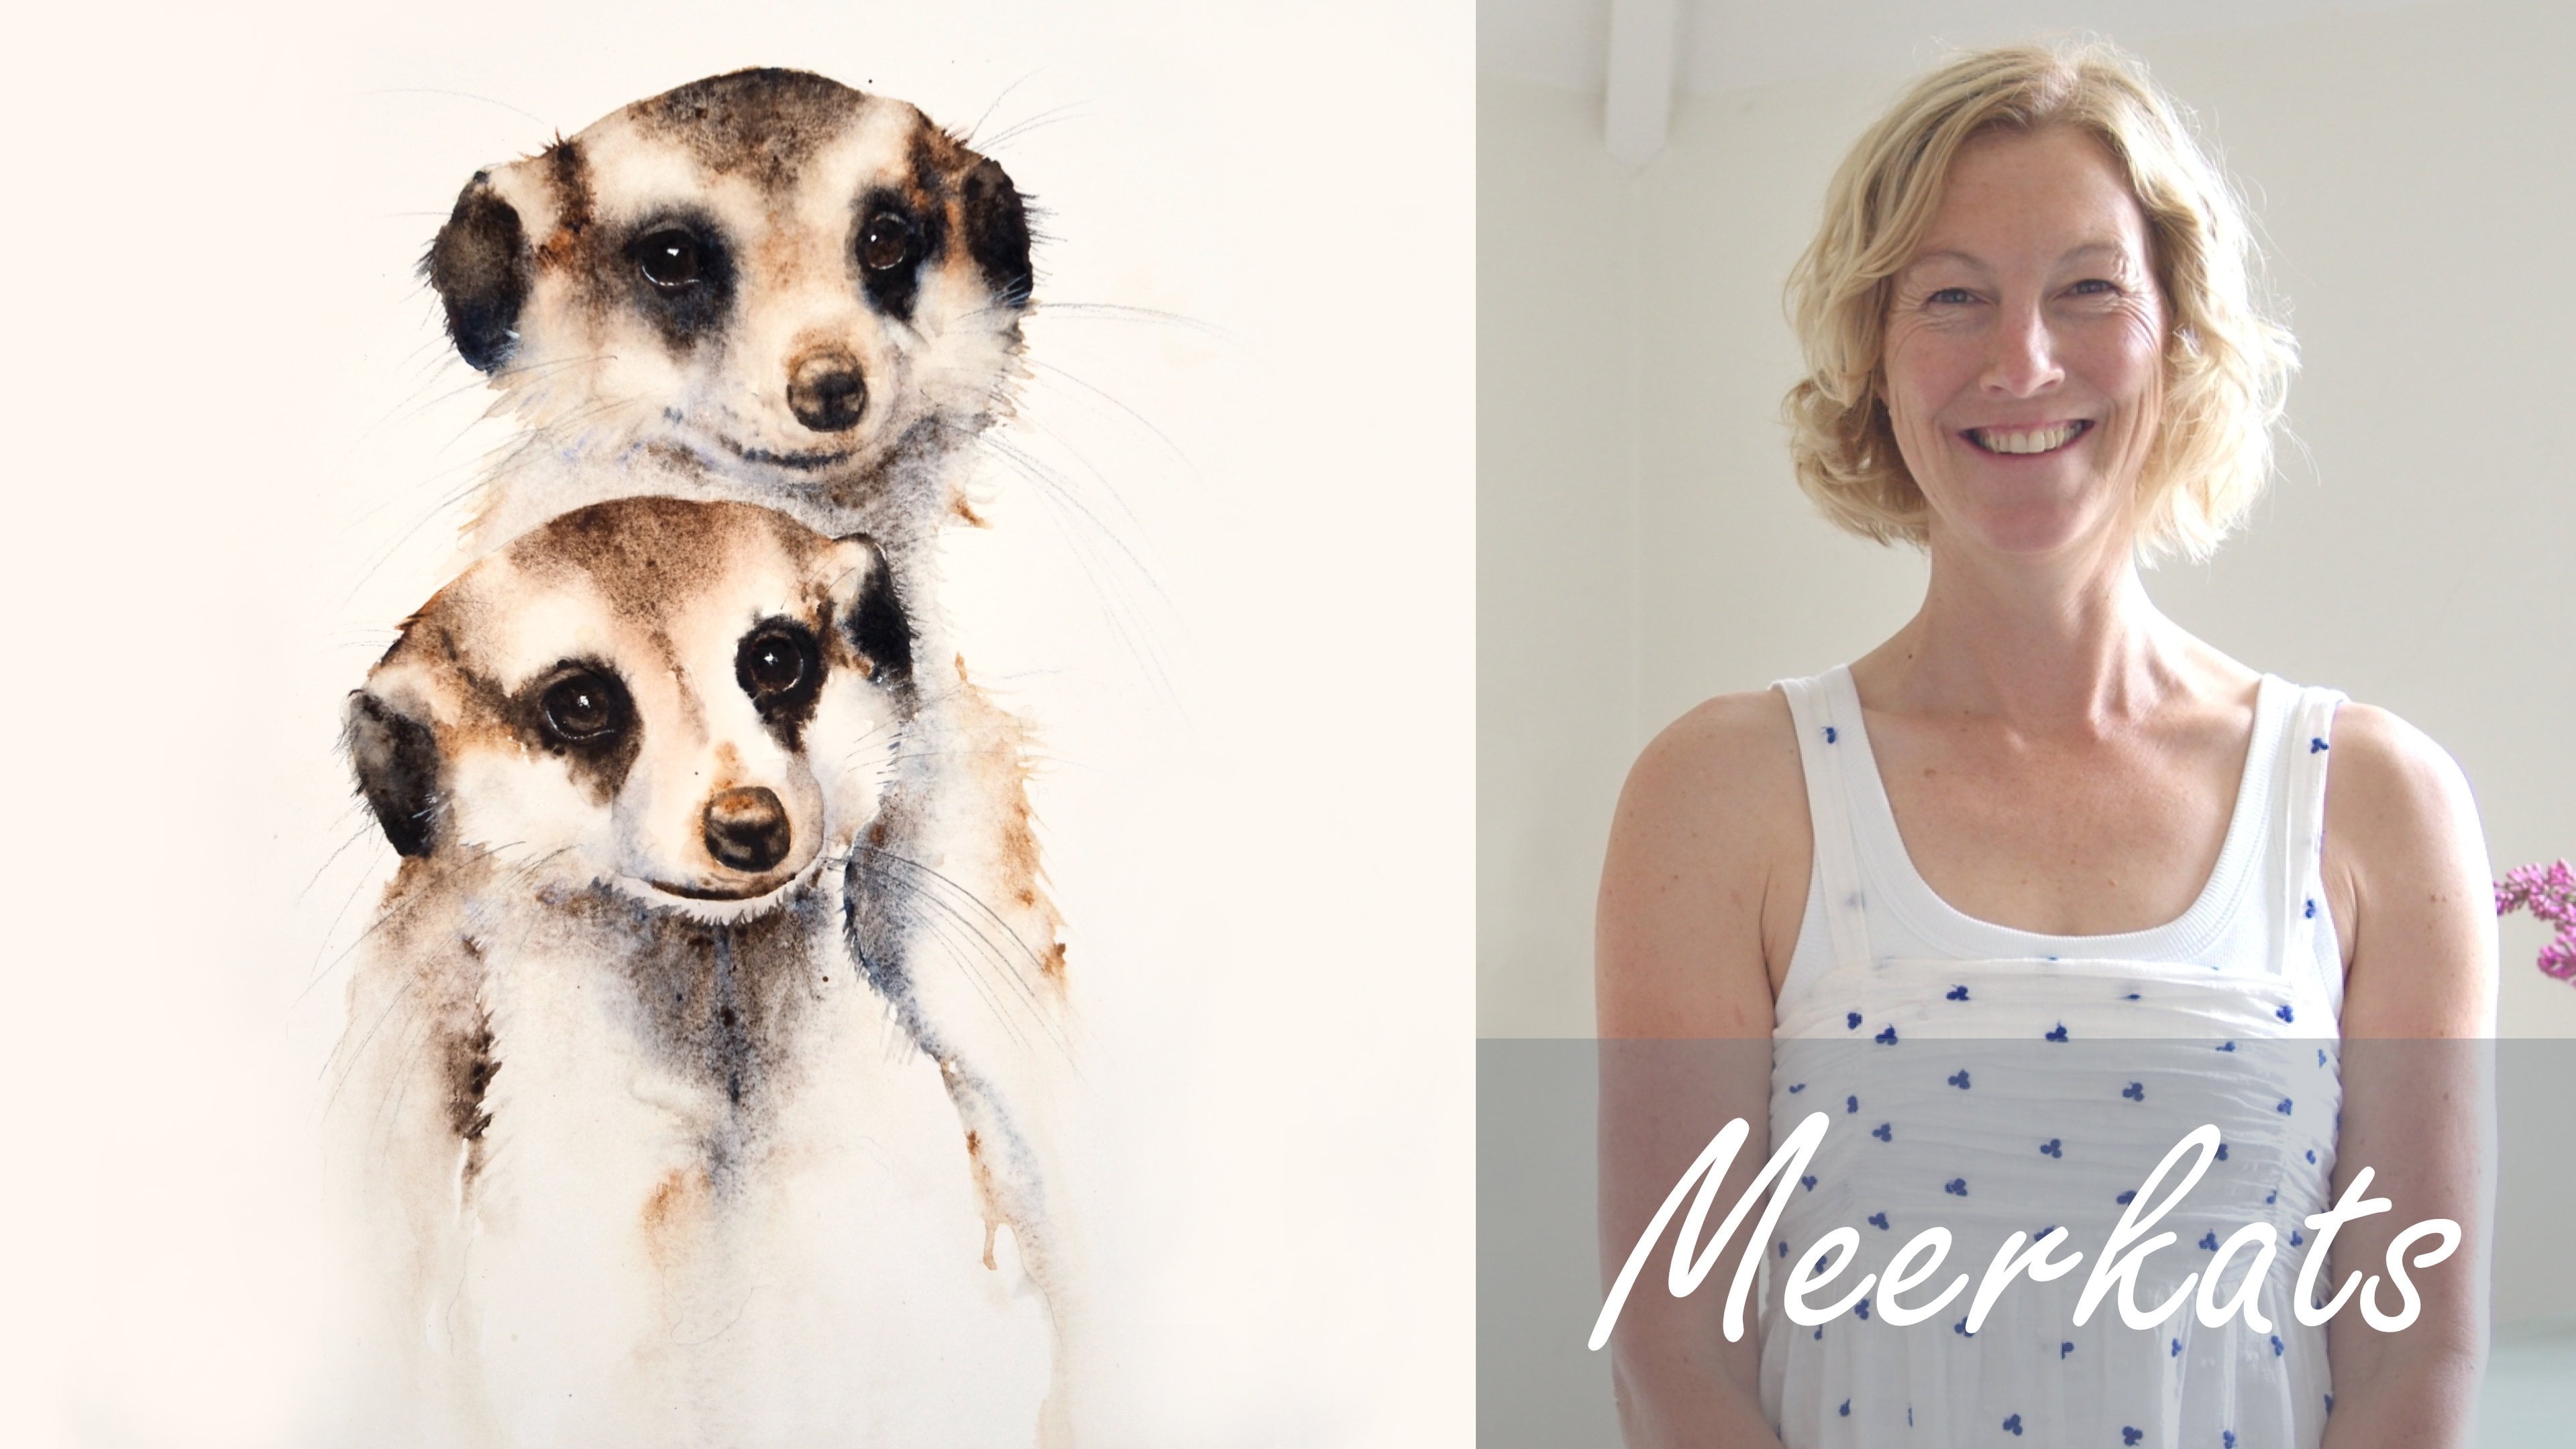
Transcripts
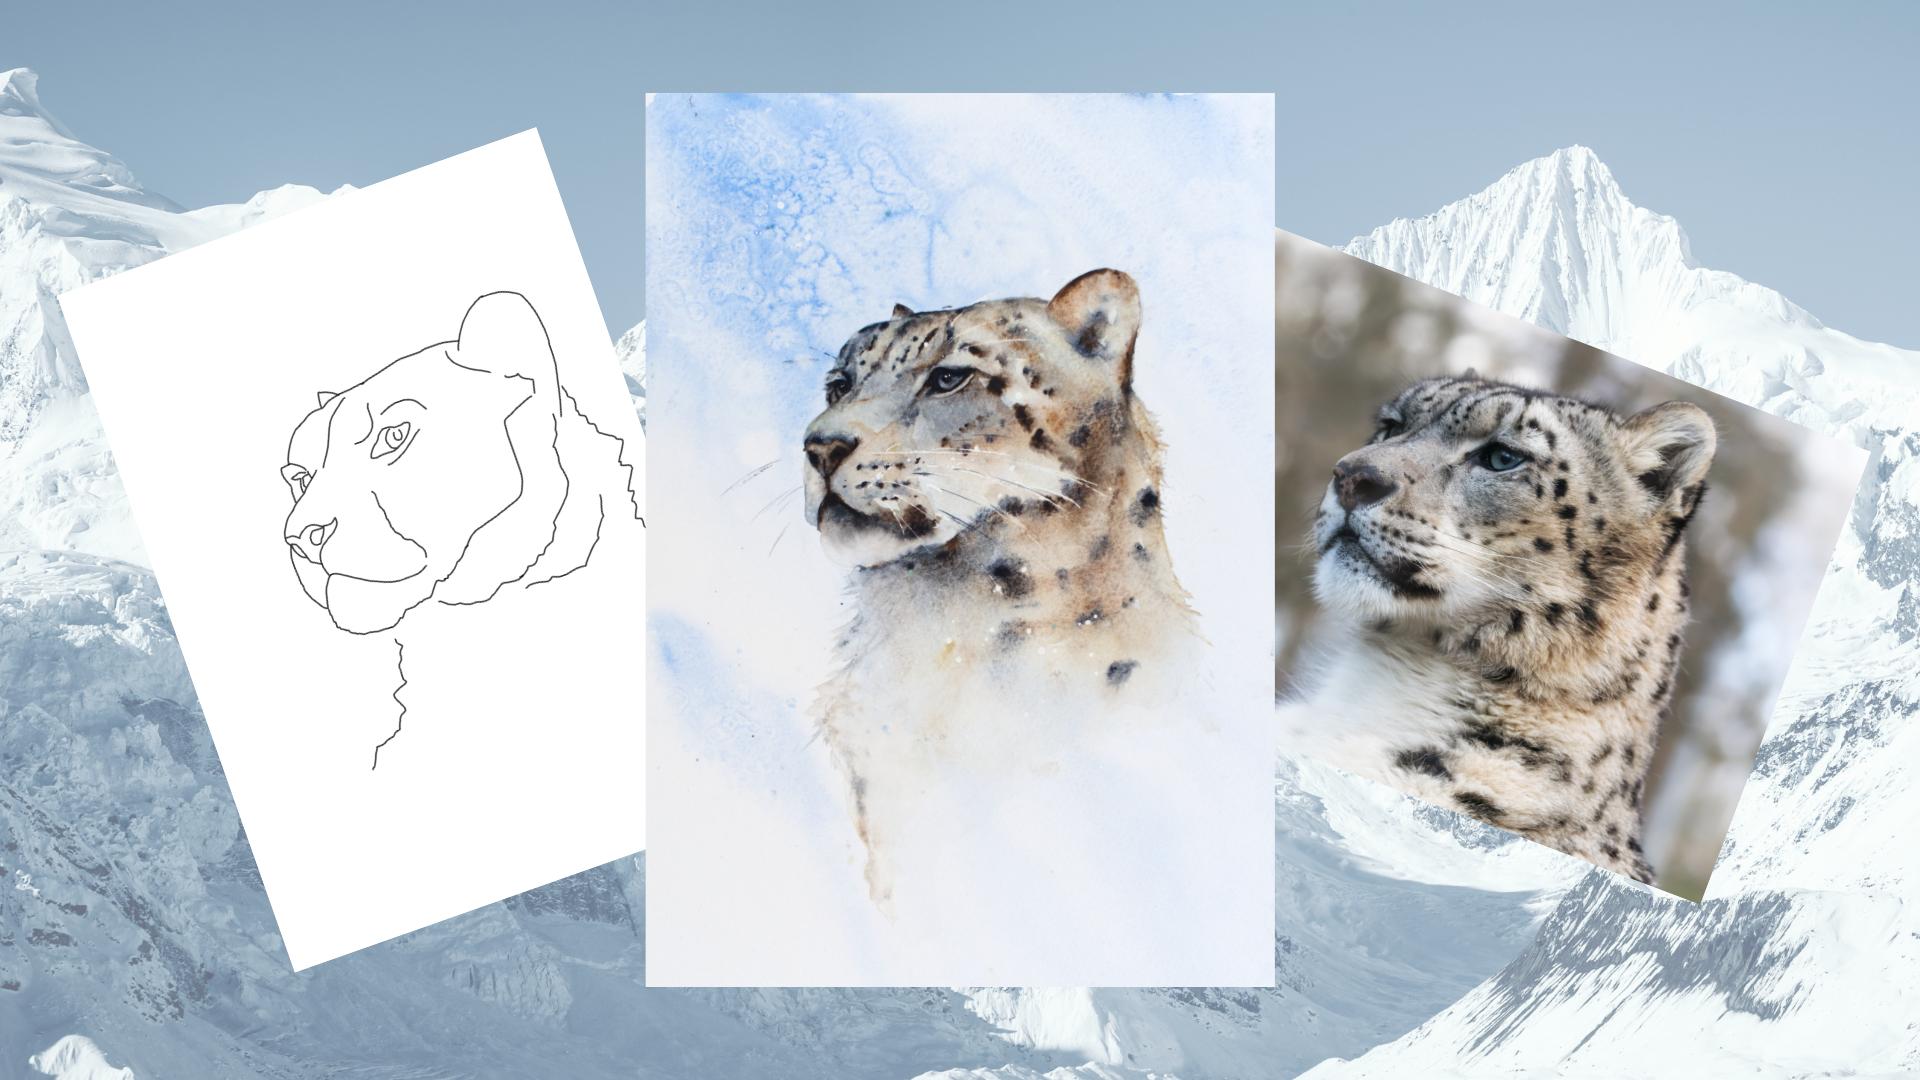
1. Introduction: Hello, and welcome to this
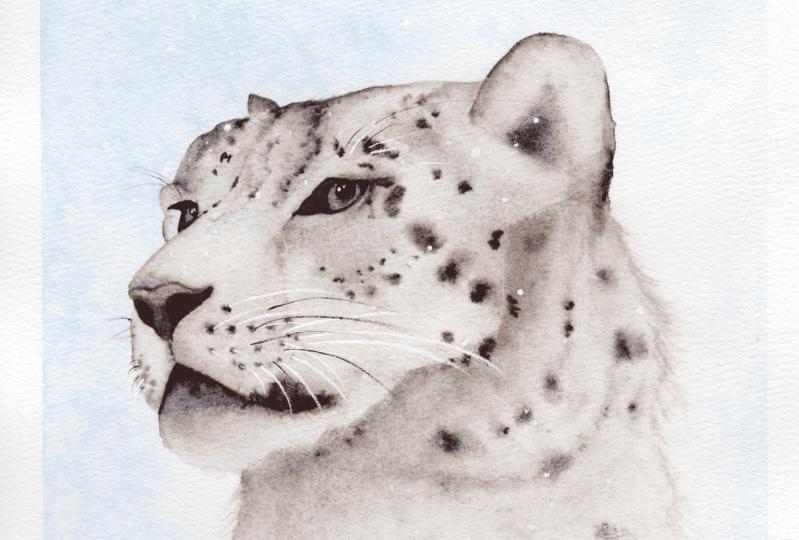
intermediate watercolor class. Today, we're going
to be painting this handsome snow
leopard together. He makes for a
wonderful subject. And there's a technique
I want to show you that even gets me out
of my comfort zone. I'm Jan Davis. I live, paint, teach, and walk my lovely spaniels in the beautiful South Downs
National Park in England. Over the last 20 years, I've taught myself the free flow technique that
you see today. Not having been to art school, finding my own way has been
fun and sometimes daunting, but has allowed me to
develop my own style. This has led me to teach others either on a
one to one basis or as part of a group in a wonderful studio in the
heart of the South Downs. I also run a successful
art business where two days are never the same from the thrill
of exhibiting to painting pet and
wildlife commissions in my own home studio. In all my classes, you will follow
along in real time, where I can guide you
to keeping your work loose and fresh
without overfussing. If you're just starting out, my three beginner
classes will guide you. With your first masterpiece
painted in only 15 minutes. Then you'll find dozens of
my master classes available, covering a wide range
of beautiful subjects. In each one, I share the techniques I use in
my own professional work. We'll have a lot
of fun together, and you'll gain the
understanding and confidence to
incorporate everything you learn into your own work. You'll be amazed at how
easy watercolor can be. As ever, I provided you with
a wonderful reference photo, along with a downloadable
template for you to print out. The template gives you a stress free drawing so you
can just enjoy the painting. I couldn't help but
share this short video. It's wonderful to see them, and I find watching them helps me to connect
with my painting. I'll be showing you
how to achieve that wonderful textured,
flowing background. How by painting
three simple layers, we can add subtle colors, bold markings, and
gentle structure. I will also show you
how to paint those soul searching eyes that are
so full of character. There's a wealth of other
tips and tricks I'll be sharing with you as we work our way through
the class together. If you'd like to learn
more about me or my work, then please pop over
to my website at Jane Davis watercolors.co dot. This can be found
on my profile page, along with the links to my
Instagram and Facebook pages. I'm very active on
my social media, where I love to share my art, especially on stories
with many ideas, works in progress, and
tales of studio life. I really hope you will share all your paintings on the
projects and resources pages. I love seeing your masterpieces. And don't forget
I'm here to help if you get stuck or
have any questions. I want you to experience that buzz of painting
in this liberating, wet and wet loose style. So, come on join me.
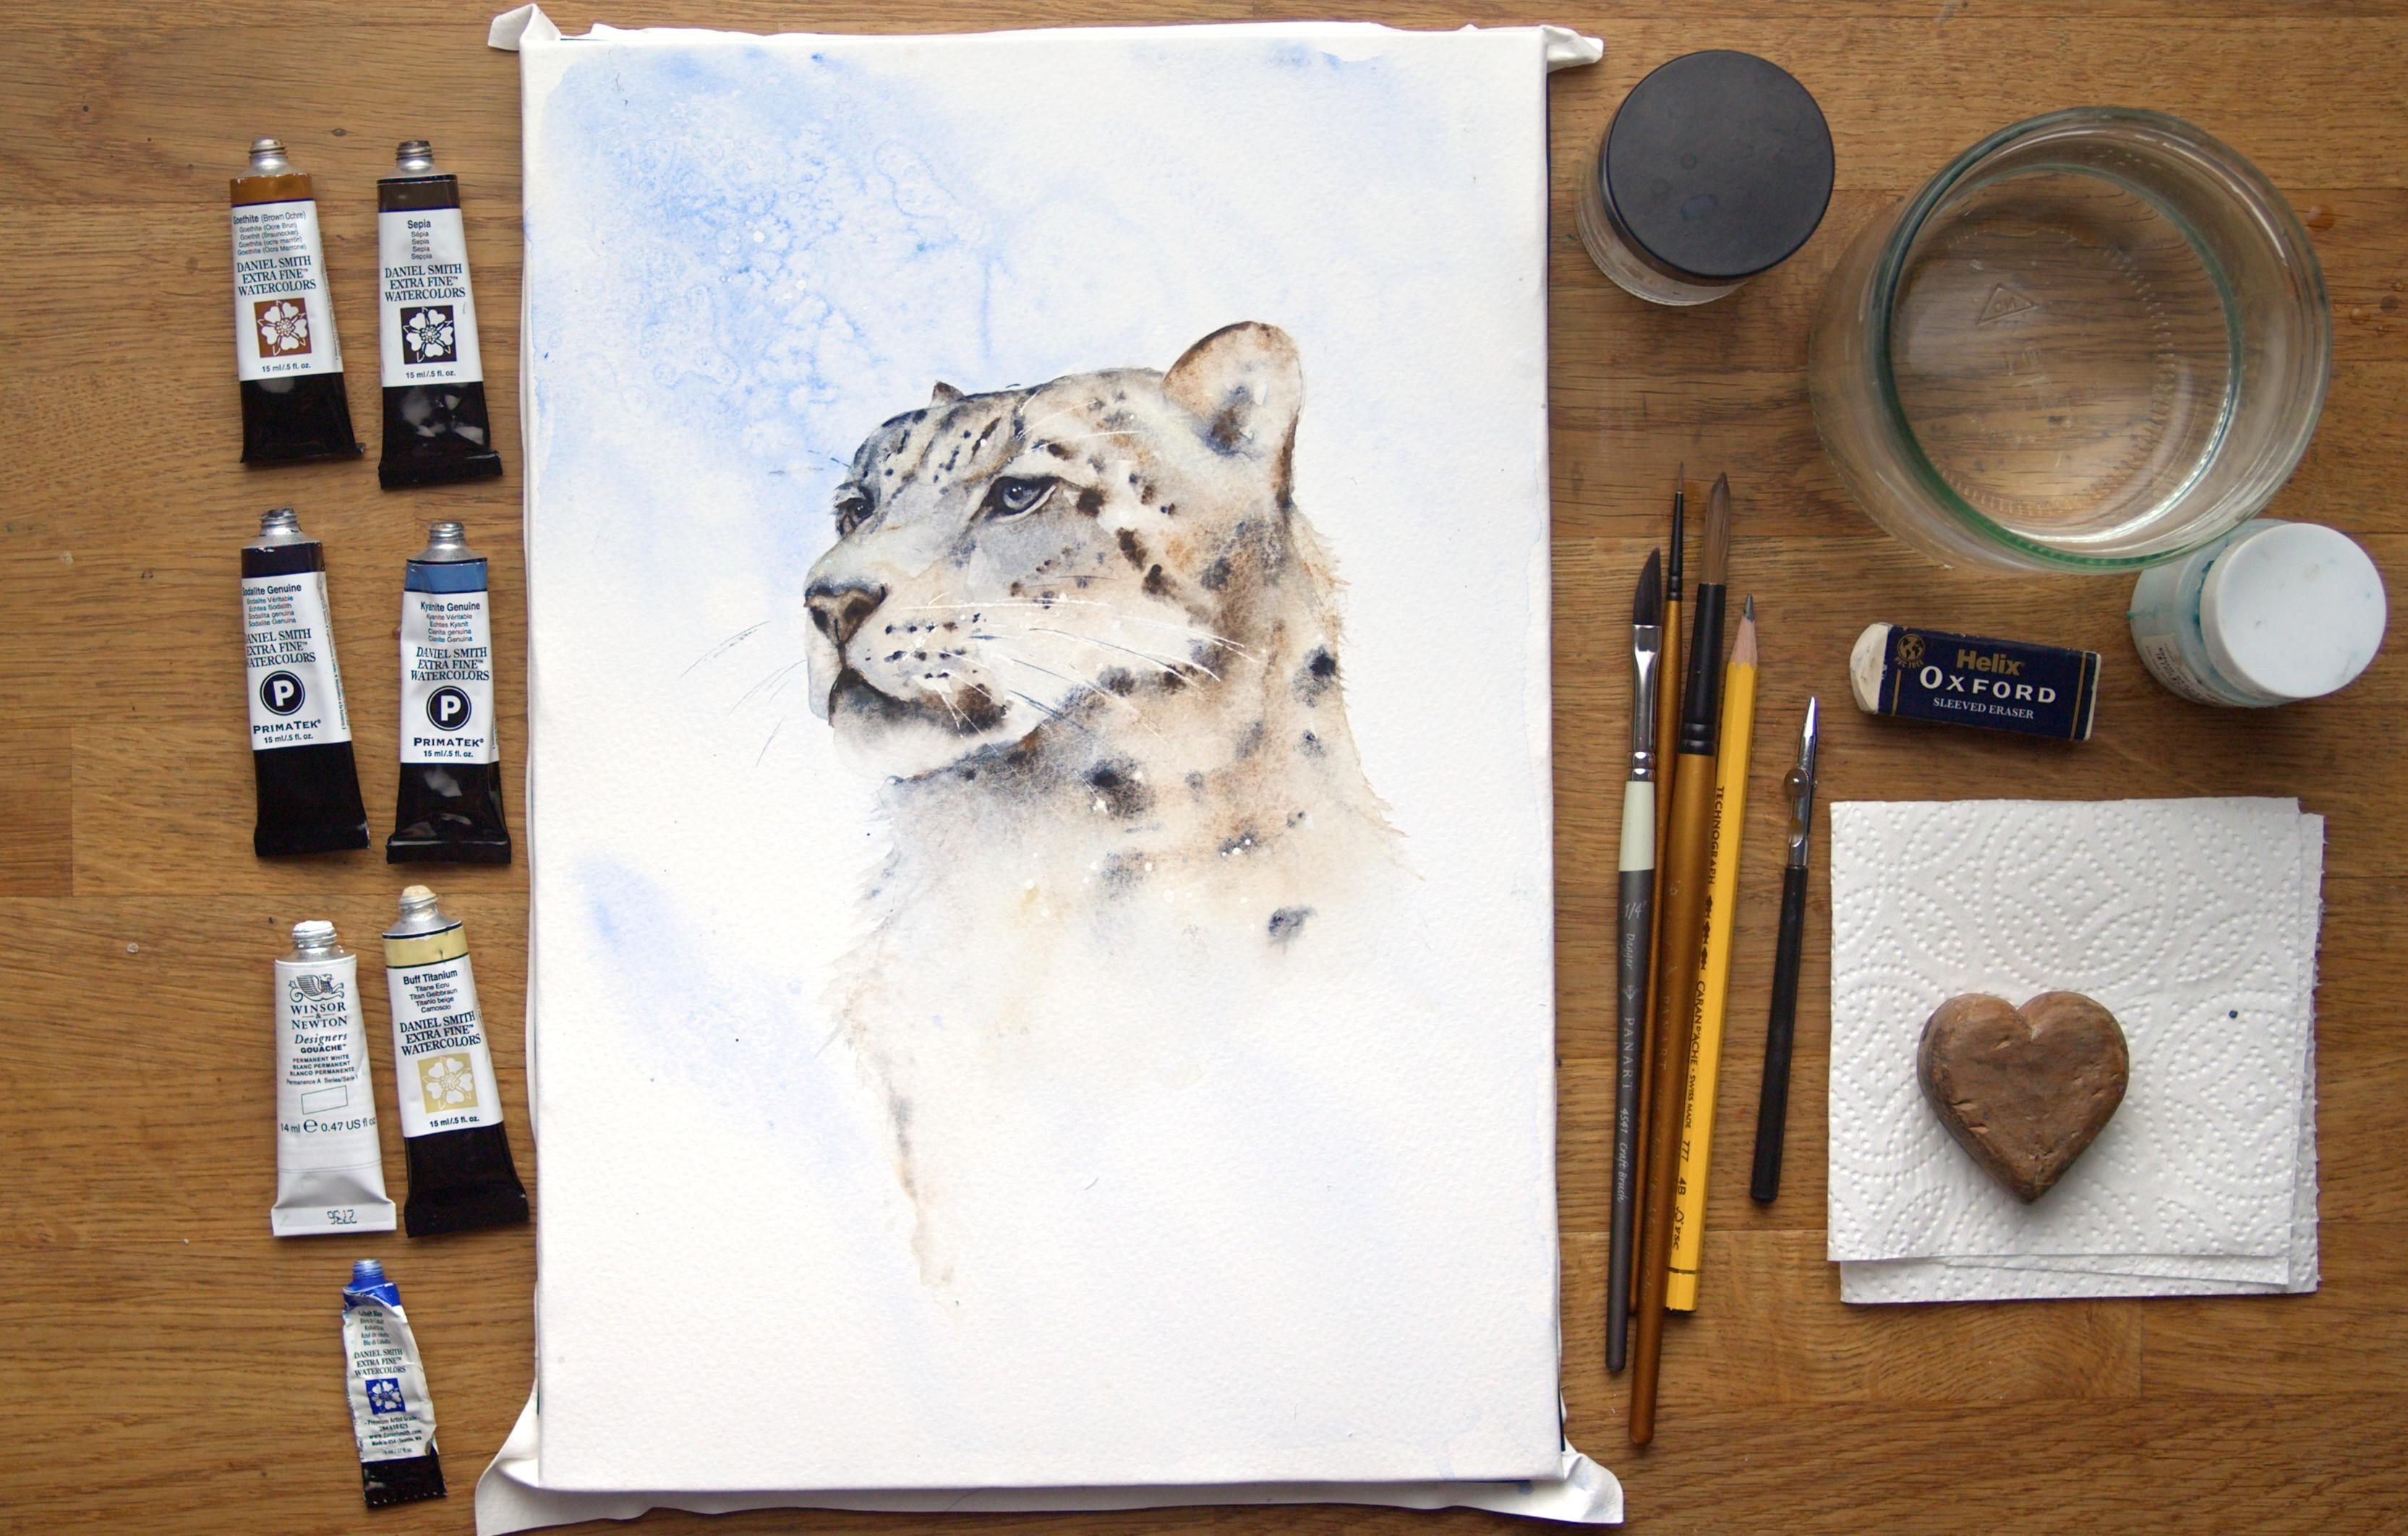
2. Materials: Let me run through
all the materials you need to paint this
gorgeous snow leopard. And I shall start with my collection of
Daniel Smith paints. Now, I love this brand, but if you haven't
got this brand or you haven't got the
paints in this brand, then please don't worry. Choose have a rummage around your paint drawer
wherever you keep your paint and have a play around
with the colors you have and you
think would work best for this snow leopard. Have a look at that
reference photo. Get a gauge of the
sort of subtle colors. I've only got five here
and a sort of six, but that's the blue
on the background. So, so, yes, I know I
always repeat this, but I don't I don't
want you to think, Oh, no, I can't do this class. I haven't got those
exact colors. You can, and you could
easily substitute them. But I shall run through. Obviously, what I'm using today, I have the gothite, brown ochre, a favorite of mine. It appears a lot in my classes, along with the Sepiu actually. And the soda genuine
and a lovely, rich dark blue that
granulates beautifully. Kinte genuine, a nice, kind of cool blue that's
got a little sparkle to it, as well. Nice, nice color. I've got Buff titanium, and I've got a tiny bit that
actually wins in Newton, a tiny, little bit of gouache. And it's just for doing the
catch lights, nothing else. You have to apologize for this. A very tired tube
of Colbert blue. I was looking for different
colours to do the background, and I just love
the Colbert blue, but I don't tend to use
blues a lot in my work, so hence why it's looking
a little sorry for itself. Okay. And my paper is Bockingford, and that's been
stretched on it's 200, 140 pound knot, and it's been stretched on a
perfect paper stretcher. And I'll pop a little link in the projects and
resources pages to that. And, of course, all these materials can be
found there, too. But the paper stretches
are a useful ball, so it's worth going to have
a little nose at that. I have some salt. I got my pot of water. I have some masking fluid. I have some rubbing alcohol. It's not something
I've used a lot. I have in the past, and I must admit I
completely forgot about it. It was somebody here on
Skillshare was using it. I'm like, Oh, I remember that. So it's quite fun. It just gives some really
unusual patterning. So I've used it on the very top. I haven't used a lot of it, but quite fun to have a play with if you're not familiar with that. I could have put this off camera 'cause it's a bit
of a bulky bottle. Um, I have my little rubber. I have a paper towel. I
have my little heart, which is about an inch high. And obviously, anything can
do that's an inch or so high, but it just allows
me to tilt my board, it gives the paint a
chance to run. Now I have. This is actually
a masking fluid. They call it a pen,
but obviously it's not hasn't got the fluid in it. It's just a little tall to be able to dip into
your masking fluid, but it gives lovely fine
lines for whiskers. I've got just a pencil, and I have three brushes today. I have my I've got a 16. That's really just for wetting areas down. I don't
actually paint with it. And I I found this quite useful. It's a little brush, and it's called a
a dagger brush. And it's from Pan art. Um, yeah, I've enjoyed using that
recently, so I've included that. And actually, I've
got a number naught. If I'm honest, I don't
actually pick it up much. I suddenly remembered
I had it on my board because this has a lovely
little point to it already. So yes, if you normally, I just have a little round
brush, such as this, which I tend to use instead
of that, dagger brush, if you obviously haven't
got one of these, most of my paintings are done
with little round brush, and then the smaller brush. Okay. I've got a little
hair dry off camera, which is just handy just for finishing the
drawing between layers, it just quickens the
process up a little bit. I've got my iPad with the
reference photo on so I can obviously see what
I'm painting and have a good look at that
reference photo as I'm working my way
through the class. So that's useful to have another
device to pop that onto. And, of course,
there's the template, which can be found in the
projects and resources pages. So that's useful to be
able to print out and get your shape right for your
lovely snow leopard. So as usual, I'm having
a quick glance around. Was there anything else
I was meant to tell you? Don't think so. Nope, let's
go and sketch him out, and then we can, as I say, get on with a fun bit
and do some painting.
3. Sketching Out: So, first thing, first, let's sketch out this
beautiful snow leopard. Aren't they? They're just
gorgeous, aren't they? They're beautiful beasts. Okay, this is a really
important part of the painting. I know I may stress
this every time, but it is so critical to
get your drawing right. And it also affects how you how you enjoy the whole process because you're halfway
through and you're like, Oh, something's not right. I can see something's out, but
I can't quite work it out. And quite often, it might be just your eye is
just a fraction out, something a little bit off
or gone a little tilted. So really take your time
to get this sketch right. Obviously, I know probably
sound like a broken record, but there's that
template in there. So use that and there's
guidelines in there, which will really help you. Also, if you can get
your reference photo up, I have just iPad with
my snow leopard on. And if I really flick
my eyes back and forth between the reference
photo and my sketched piece, I can see it often almost feels like it
superimposes itself on there, and I can see if there's anything that's a
little bit of amiss. Say, just take your time. Obviously, I've sketched
mine out already. But I'm just going to go round just a few little bits that might give you a
little helping hand. So, again, the outside is probably more critical
than the inside. Because if you make
this too wide, you're never going to
be able to squeeze that back in again once
you start painting. So make sure all your
outlines just right. All those curves are ice. The eye and the eye
placement, obviously, is quite critical,
too, and the nose. And just getting this nice sweep of the mouth and the chin. And I've probably said this
on some of the other classes, but it's quite important. Obviously, there's fluff
that comes out here. Don't draw up to the end
of the fluff because then you'll put more fluff
on and he's going to get quite a rather
fat snow leopard. So yeah, be mindful of that. So the line is where the body
is, not where the fluff is. Um, we're also sectioning some areas off as we paint this. So this is quite an
important line here. I'm going to call this a
face, and this is the body. Not very imaginative, but
hopefully it does the job. But this is the white area, and it is like a cuff of color. I've kind of done
a little sketch there just very roughly. And that's where the sort of the ochrey color that you see is. And this the body. So that's important
because we're going to be wetting this and
wetting this separately. So get that line
in there. You can roughly do some of these other lines just
to give you a guide. And it's really what
you find helpful. Don't get I find if
I get too detailed, then when I come to paint it, I'm a little bit
restricted because there's too many lines
for me to look at, and I'm not I don't feel free enough because I'm feeling constrained by all those
sort of lines I've made. So just the bare minimum
to give you enough guide. I think that's probably
it. But we are going to do a little bit
of masking fluid on here. Again, this is
kind of up to you. If you haven't got masking
fluid, don't worry. You can always do the whiskers, you know, a little
bit of white paint. They don't come
out quite so well. That's why I'm going to do a
little bit of masking fluid. I'm also going to do some
splats with the masking fluid, which can be rubbed off right
at the end and just gives you a little bit of
let me show you. I'm just gonna grab
one of my pieces. This is one of my
practice snow leopards, and you can see the
little spats here. It just gives a little
bit of movement and a little bit of
interest. I quite like it. But again, that's a personal choice and
up to you, really. But I will do the
fur hog, as it were. So, right. I have a
little masking fluid. They call it a pen,
but obviously, it's not it hasn't go
a Is called a nib, but it doesn't contain anything. I pop it in my masking fluid. But really, a game changer, actually, somebody
suggested this to me, one of my lovely students that came for a one to
watch a group class, and it gives you a
lovely fine line. So hopefully, let me show you. I've had to re record this little part
'cause I've splattered this all over my leopard
and all on my bits, so that's why the tops off. Okay, right. A
little bit on there, and let's see if we can
get these whiskers in. And if they go wrong, that
was the good thing about, we can just get those off.
That's got too thick. I will rub that one
out once it's dried. Give it a little bit of a tap. That's probably enough.
Because there's also some dark whiskers
there, aren't there? So we can put those in with
a little bit of paint. Just a couple up there
to break that up. And I'm just going
to do those splats. So again, load my
little pen up there, put that back there, and
again, just gonna tap the end. Just do them randomly.
Yeah, there you go. And if they gain, if they land
somewhere, you think, Oh, no, I don't want them there. Gone over the top of the eye. Then you could just rub
those out once it dries. So yeah, I think that's enough. We might actually
do 'cause we're gonna pop a background
in here as well, so I actually might do a
couple up here as well. Yeah, that should be enough. Again, like you
said, like I said, if you don't like what
you've splattered down, then allow it to completely dry cause it probably
takes 10 minutes. Then you can gently
rub those out. And yeah, and then you
can go from there. I will let this dry. I will rub that one
out because that's a little ugly and chunky, but other than that,
yeah, you're good to go. Once you've done all
this, then we can, like I said, get onto the fun bit and
start some painting.
4. Background: Once your masking fluid
is lovely and dry, then we're going to
do a background. Now, again, like I said earlier, it's entirely up to you
whether you do a background. I'm I'm never sure.
Again, let me show you. I have got one
with a background. I'm actually, that's used salt, and I'm going to try some
rubbing alcohol for a change. So that's going to give me a slightly different
effect anyway. So you can use
salt. And if you're not familiar with salt, it's very simple, and there'll
be lots of other classes that would demonstrate
me using salt. But you do the lovely wash, and then you just simply as
the paint starts to dry, you simply sprinkle
some table salt on and allow it to dry. I probably would allow it
to dry on a slight tilt, same as we're going to do
with the masking fluid. So it's the rubbing alcohol. Or I have one without. Um, if I'm totally honest,
I prefer it without. But this one's up to you, I'm filming this at Christmas
or coming up to Christmas. So I thought, snowy
background, Christmas. You know, let's do the
Let's do the background. And it gives you the choice for you to choose
whether you do or don't. It's entirely up to
you. Pops those back. Right, so we need to wet
the whole background. If we are, if you're not,
then you can just skip on to the next little class or
lesson, should I say? No class. Okay, so we
need to wet this down. Everything needs to
be nice and tatuated. We're going right over
the top of our leopard. I could have got a slightly
bigger brush for this. But if you've got a big brush, then you can wet that
down a little quicker. But you don't want to
leave any dry patches. You want it nice and wet cause the paint will just run
round a little dry patch, and it might be
necessarily wrong, but if you want it
to flow beautifully, it's best if the
whole piece of paper is lovely and wet and saturated because we're going
to give it a little tilt, as well, and allow that to run. I'll be a bit of a mess making. So if you're painting
somewhere very precious, you might want to move to the kitchen or
somewhere like that, so it's not going to spill on your best carpet or such thing. Alright, if I duck
my head up and down, I can see if there's
any dry patches. I think I'm nice, and that's nice and wet. Right, I'm going to
give it a little tilt, but I probably will hand
tilt it as we go along, but let's start with a
little bit of gradient. I kind of wanted to
run into this corner, so it's gonna run down here. Now, I was gonna use
this little brush. I've got a very, very
old Colbert blue. I don't use blue much
in my general work, so I was trying to
find a nice blue, and the ones I had weren't
didn't quite do it. Then I found this bit of
Colbert blue, and like, Oh, Iike, but it's a very old tube. So I'm gonna have to do a bit of a bit of squidging of color. Just want to wake
up enough here. And we're all simply going
to do. It's just a tap. If they had a nice tube, I this would be easier. I just allow it to run. The best thing is just to place it and try not to touch
and try to do it. In theory, you couldn't
be mounting this piece. So you want to add to the paint right at the
very top, in theory, where it would be
covered by the mount sometimes you do
little dots of paint, depending on your
paint, they will give little dots of
color and marks, and sometimes it look
a little bit spotty. I think that's probably enough. I don't want it too too bold. Alright, now we've got enough. I'm gonna pop that away. I'm going to say I'm gonna
give us a little bit of a proper old tilter
add a bit more water. I just want it to really flow. In theory, I don't
want too much over our leopard cause
we don't want to actually give that
a background color, but I can hear the I can hear this running
onto the carpet now. It's running right off my
board, which is ideal. I should just pop a little
bit and kitchen here. I was just going to
keep adding water. Pop back down for a minute. Just get a little bit of colour. What did I color
over on this side, little bit of little
bear over here. I give it another tilt. I say, the minute you
get something nice, it's done something interesting,
then just pop it down. That's kind of
looking quite nice, actually, I quite like that. I like put. Just a touch here. It's not Dew carried
away with this. And bear in mind, watercolor
will dry, a touch lighter. Yeah, that's looking nice. What if I could clover
it and turn it up on its side. Y, that's good. Okay. Right, I have
some rubbing alcohol. I have not used this for years, and somebody put a project up with rubbing alcohol
in the back I'm like. Oh, I've forgotten about that. So I bought myself some, and I've had a good old play with it, and it's
quite interesting. I think I probably prefer salt, but let's give this a go. Use an old brush, and before I forget to say, change your water once you've done this because
it will affect. Yet you don't want any
sort of contamination of alcohol on your painting. So just kind of try and get
a little bit of that away. I don't want to say I don't want too much colour
over the leopard, so it's just squish that away. I'm only going to put a
little bit at the top. Actually, no, I might actually add a little
bit of salt, as well, so just a couple of little down. It's a very full bottle. I don't know how
I'm going today. I'll probably spill
it. So there's just a little bit of tapping. It's a little bit down here. Yeah, that's probably
that's probably enough. I'm going to put some salt
in there as well on top, so give it a nice
bit of interest. But yeah, worth
experimenting with. But for most, I'd
probably prefer the salt. Let's put some salt down
on top of that, as well. So again, just table salt, and just go to sprinkle. And then I'm actually
going to allow this to dry at a really good tilt, actually. So I will probably
looking around my studio, trying to think of something I can give it a better tilt with. So I want to dry it. Really upright, so
it's almost you know, it's almost horizontal
horizontal vertical. So it's really got
a real angle to it. I won't hold it up
too long like that, 'cause I'm sure it's not a
good angle for the camera. But yes, that's how I will allow it to dry
and allow it to dry completely because the salt takes a little while
to have an effect. And we want it, you know, when we paint that snow leopard, everything to be
wonderfully dry. So, yes, take your
time and be patient. Go and have yourself a cup
of tea and allow it to dry.
5. First Ear: So if you've done
the background, how's it dried?
What do you think? Do you like it? I'm liking
the salt and the alcohol rub. It gives some
interesting texture for sure and actually giving a really good tilt
and allowing it to dry on that really
quite exaggerated tilt. Usually gives you a nice sort
of sense of flow as well, which is yeah, quite cool. Before I forget,
just to reaffirm, make sure you get rid of
your brush that you use your alcohol wash with or alcohol rubs and you've made sure you change
your water it, it can affect how your paints
sort of move and react. So make sure that you're
clear of all that. And I'm going to rub
some of this out, but after this can have a look, see what it looks
like, but be careful. You don't rub any of
your masking fluid inside your snow leopard
because we want to heat those. Yeah, I think it's all
quit's all just quite fun, isn't it interesting, but, uh, I think if they work well, they're good. They don't. Obviously, they don't. Um,
Yeah, I like that one. I still prefer them, I think, as a clean a nice
clean background, but nice for a change. Right. All we are going to do. No, this one bit here, we're going to do
the ear first, so nice and simple get us going. I quite often start
with a smaller area, and it's quite often the ears. It's just nice to get going, and you feel like,
Yes, I've started. I'm off. Let's go. Okay, so
I'm going to very carefully, wet down the inside of this ear. Okay, staying within your lines. Mm. Very simple. Gonna pick
up the buff titanium, a little bit of gothte. And I just start with these
two, actually, to start with. Now, these first
couple of layers, the layer over the head
and the layer of the body, it's really subtle,
'cause obviously, we're dealing with
quite a pale creature, and a lot of the interest is
in the spots and stripes, which we'll do in
a second layer. So make sure you go
nice and careful and gentle on these layers. I'm sorry, on these
first couple of layers, we're just adding a
la hint to color. Nice and subtle. I'm a bit born buff, again, I'm just tapping and allowing. Always tapping and allowing. Try not to do any bus strokes. Got a little heavy
handed there with that bit I add a little bit of a blob on my paint brush. I'll just add a bit more
water see if we can get some of that to move and do something
a bit more interesting. Just gonna pop those
down for a second. Now, we do wet the ear
down again so we can be a little very subtle if we want, because we can add a little bit more strength if we haven't sort of strengthened
it enough already. But I'll put a little bit of
CPO right on the head there. I don't want to go
all the way around and sort of outline it. It can look a little
regiment in a bit. It's kind of stuck. I keep everything
nice and light, and we're going to do the
inside that little marking. I've got so light genuine. Where would I be without
so light genuine? It's my favorite color. That and probably SP actually the gothte probably if you
follow a lot of my classes, you'll probably notice I
use them in most of them. Lovely. Alright. Okay.
Always, the minute you get something
you like, leave it. Even if I'm still carrying
on adding bits of color, if you put that color
down and go, I'm done. Leave it. It's the best thing. Just to allow the paint
to move and react on its own will give you
the best results by far. We never We can't
manipulate it as well as it does on its
own, if that makes sense. So just be confident and allow it to sort of blend
and move on its own. As ever now, that's
really got to dry. If you're really
push for time, when you come to the next lesson, if you want to move
on quite quickly, just leave a tiny
little dry line in between the ear and the head. But what we don't want
to do now is to go on to the next lesson, wet this down, and then all this lovely
color from the ear will then just run straight
into the head, which isn't what we really want.
6. Head: Onto the head then. So
I'm going to pick up my a little bit of a
bigger brush just so I can wet area down a
little bit quicker. And we're going to
go very careful. Actually, what I will do, and I know this, I
think this is helpful. I ain't gonna put a
tiny bit of color. This is really just so you
can see where I've wet down. You want your water lovely
and clear and clean. So we're gonna go right
up against that ear. We're gonna run down
that line we popped in. We round, and we're going
to miss out the chin. We want to keep that separate, just so we can get
a nice crisp line against that on that mouth line. On that little cheek,
the other side, we're going to get
around to the nose. Don't wet your nose
down. Up along here. Missing the actual
eye on the left. I'm gonna need a little a little smaller brush just to wet that little section there
beside the left eye. So make sure you
go around the eye and get really right up against it so you get a nice nice
and close to that line. You don't want any dry
lines around the eye. Again, round and what
there is obviously, if you look at that
reference photo, there's the eye ball, and then
what I call is the makeup. And there's sort of
the eye that darker, sort of seepier very dark blue. It's going to be sepier and so like genuine. That's why
I'm calling it that. But we're going to go around that as well. I'm going
to miss that out. It wouldn't matter too much, but it's easier without
getting paint on that as well. I definitely miss
out the eyeball. And then just back fill
it. So it's all wet. The rest of that's nice and wet. Hopefully, that makes sense. And again, duck your
head up and down, you don't want any eye patches, because again, especially if
you've got masking fluid, causes quite often
it sort of sits. It's easier to miss bits out around the masking
fluid cause you can quite often sit round it and
make funny little patterns. Okay, I see that is nice and We, if you've put over
your hair dryer, like I did with that ear, just to sort of finish
the last bits off, quite often your paper will be a little bit warm and will dry. This down. So yeah, make sure you've
got plenty of water, so even if you go round and then just add a bit more again, so you've got it lovely and wet, just allows that paint
when we do this now, and it allows that paint to
move and spread wonderfully. Okay, I'm gonna pick up the
kinite. Lovely color this. I'm just go to tap
a little bit, say, everything's really want
it, nice and subtle. So just a tiny little bit
on that left hand side, allow it to run. It's
absolutely fine. Let's put a little bit of bit of buff over the
top of it, as well. The buff titanium
is a great colour you see how that's
pushing the paint around. Obviously, I've got
a little bit of buff already on here because
I've used it as a color so you can see
where's wetting it down, so add a tiny let's have these all in
my hand at the same time. That's why I like working out a tubes that it's
so spontaneous. It's right there in front of me. So I'm not having to look at my palette and then
do a bit of mixing. That's one of the reasons
I love it so much. A little bit of
gain squinty eyes. You can see roughly
where that little bit of warth is. A little
bit over there. There's a section over here where it's a little
bit lighter, isn't it, the tops of It's
probably the skull and the actual big eye brow
probably coming in over there, so we don't want too much
color above the eye. But it's quite nice to have
a little bit underneath it. A, you just pop that in. You can see how that's
beautifully moving, and we just sort move it around and we want to put a little bit of
go fight underneath. And again, you can see
we're just tapping in squint your eyes and
we're just tapping in that very, very light color. Just want to incorporate some of underneath color into
that inite as well. So, if it's moved too
much, and you're like, Oh, my goodness that spread, clean
your bushy a little bit. Take the excess
moisture off and just gently push it back. Careful. When you're doing that, you're
not then actually drying the paper almost and leaving a dry patch because that
can happen as well. So say, keep everything
lovely light. A little bit round the nose. They make a great
subject, really, 'cause there's not a
lot, not a lot of color. And as I say, a lot
of the interest is all those beautiful spots. So we're just putting just
the merest of hints, okay? So that's always
say, you're sitting, even just pull yourself away, sort of get yourself a little
bit above it and see how it looks a quite often you can sit and hunched over it
and just tapping away, and you're not
actually looking at the whole painting and how
it's sort of spreading. Obviously, the colors keep on
spreading as you as you go, as you add the color, and then it then carries on spreading. While you've moved on
to something else, so it's always worth taking taking your hand away.
Take your brush away. See what you think. G my mantra. Take your brush away,
do what you think. But, yeah, it's a useful thing to do, just to keep the setting. A little bit of color. There's not a lot of color
on that left hand side is there of the cheek, but we need to put
something in there, especially if you haven't got a background and there's
nothing to sort of define it. So put a little bit just where
the mouth line comes in. I'll just kind of put a
little bit on the outside, so it just highlights
that there where it ends. So you've always got
something to see. We're not going to put any of those markings in the moment. We're just putting
the base color down. That very soft markings. You can see there a little
bit on the cheek area. And like I said, with the ear, the minute you have
something you like, and if it's hamster come
before mine, then do stop. And equally, try not to fiddle, 'cause we will wet this
down again in a minute, and we can add more colour. Add a little bit of was when
we do our stripes and spots, but we can also add
a little more colour if it's got a little pale. But it's better to go
pale cause some of my practice pieces I got a little dark and a
bit heavy handed, and it just looked too heavy. Um just gonna tie a little
bit just off that high with a bit of gothit.
Almost like a cat flick. I think that I'm going to
leave it there because I can see this is starting to
dry in this corner here. This is still quite puddly. But you'll get to a stage, you're like, Oh, no, I'm
fiddling too much now. I just need to stop, let it dry. As I say, we've got
the opportunity to the We'll do the body next, but then we wet the
whole lot down again, and then we've got
the opportunity to add a little bit more depth. So it's better to go, No, I'm going to leave it here, I'm going to see how it's dried, and then we can add little bits and pieces if
you feel you need it then. So yes, down towards, as they say, and
allow that to dry.
7. Neck: Right. Once that's dry, let's pick up my
bigger brush again, and we are going to wet, I won't put any more
color on this time, but I can see mine's gone a little creamy by
putting so much buff on there, but we're going to go
underneath the right up to that paint line where we've done the head
underneath the chin, so we'll make sure you
don't wet the chin down and we're going
to go halfway, we'll put a little bit
of color so you can see. We're gonna go kind of there. That makes sense. Then we'll pull some of the color
down in a minute. So we want just that section just for the minute.
Nice and wet. Again, it's the same things. We're just going
to be little hints of color very delicate. Their inks very subtle, but I am going to put this
on a little bit of a tilt. Just going to have it 'cause
obviously the background, if you've done a
background, we've tilted into that direction. I'm just going to tilt straight down so the paint will
run straight down. I think you can get a
little too much paint all going into the
same direction. Looks a little bit
almost too bizzy. So let's change the
direction a little bit. It's very technical term whizzy. Okay, once that's
nice and dry dry, nice and wet, sorry? Geez, we are going to put a
little bit of colours on. Let's pick up the gothte. Let's pick up knite, I think, just for
the time being. And we're gonna
you can see where that nice we're getting
that sort of roughing. Obviously, once we wipe this
down again in a minute, we can then blend that
into the face, as well. But just trying to
get a little bit of a bit of strength down here. And as we start to head
underneath the chin, then go a little
bit cooler colors go a little bit heavier with your kinite or whatever color you've picked just a
little bit cooler. You can put you don't have to have you can pop the colors on top
of one another as well, so you don't have to just use
the solo color each time. You can pop colour on
top of one another. But let's go a little bit cooler underneath the chin
a little warmer on top. S have a little bit of buff
up at the top, as well. So, keep your eye if you can, keep that reference
photo open so you can see and just keep
referring back to it. Use that as your guide. A little bit of colour
on the outside, even though there
isn't much there, again, bit like the
side of the cheek. You just we need the idea
to see where he finishes. So have a tiny tiny,
little bit of Spa. Just a little bit
more bump there. Okay, before I over fiddle, I'm going to pick up those down. Pick up my bigger brush, and
we're just going to wet. Just a little bit further down. That will draw that color
that we've already put on. And you can see how
that's not only have I got that on a tilt, I'm also now dragging
it down, as well. We can sort of drag it down to have a little
bit of a tip here. It's just something
pleasing, really, when you've got the
picture finished. It's a nice kind of
the angles are nice. It's a nice sort of tip there. If you blunt it off, it
looks a little bit blunt. So if you can just do something a little just to give it
a little bit more shape. Okay, again, squinting your eye. If it's moving too quickly, it's kind of whizzing a
little bit now for me, so I'm just gonna
lower it down so I can I'm then working
flattening to stop it. It's really pulling down. It will just gently sort
of flow back up again now. Let's have, again,
squinting my eyes. He's obviously got a lovely sort of white chest, hasn't he? So we're trying to
keep the chest area a little bit clearer. Put a tiny, little bit of's
back to my normal bush. Again, just tapping,
it's very gentle. And there's another nice line. Again, if you
squint, you can see this line coming
up here as well. It comes from the ear. Tucks
down here, doesn't it? It comes a little
bit too high here. Just go at a little
bit of water in there, just to break that up 'cause obviously there's a
white chest there. So if I drop some
water in there, it will give us a
little watermark. Stop break that sort of sense
of flow there to give us a little bit of hopefully a bit of interest and a
bit of texture. Okay, I think I'm
almost there, actually. What I am going to do, I'm going to drop a
little bit of water. You can see there's
a lighter area here. This is this brig rough. There's a lighter
area just there. I'm just going to drop
a little bit of water. And again, I'm just
going to allow that to sort of blend and push other colors around
and just leave the paint, as they say, to work its magic. It's a little bit of spot there. Move that. I won't be doing
any flicks that will be on the next layer we need to actually pop a
tiny little bit of colour. Just write down on this tip. It's quite wet. Actually,
what I will do. Can suck some of the water up? Quite lot of water sitting here. Partly, it's gonna take
a long time to dry if we don't I don't
get rid of some of it. Have a little bit of kinite. What do with gothte. Just just a tiny
little tint tint tit I can't get my
wet out today, can I? Just a little tit. Just very gentle,
just a little bit, just to give you again,
just something there. Beautiful. Again,
take your brush away, see what you think. I
think that's looking good. And again, I'm getting to that little bit of a stage where bits of potassium to dry. I've already put that
water in there on that little sectionare to
give a little highlight, so I don't want to sort
of fiddle with that. I've pop water here. There's enough color. Again, I can add more colour
on that next layer. So I think I am going to put my brush down and let it dry.
8. Eye Makeup and Nose: H. Right, a lovely easy
process to do these eyes. So first, I'm going
to pick up my sepia and let's have the
solt genuine as well. Be good Bush. And we're going
to do just the eye makeup, which is everything apart
apart from the eyebard, which you can see is the
colored bluey toned. So we are simply going
to do some painting, actually, bizarrely for me, and we're just going to go
very gently around the eye. Tell, we're just painting. You're not doing
anything no wet paper. So we don't have to kind of watch where
everything's going. The lines are gonna look a
little harsh to start with, so don't worry us when
we do the next layer, we can go right up against these strong lines
and soften them. It comes around here. I said, Take your time. I said, The beauty of this is we're not rushing. There's no hurry. We can be quite
gentle and mindful. It's rather the corny word,
is it sometimes, mindfulness. But it's very true. It's very gentle. It's nice. Okay, you don't have to
nothing really very fancy. Just put a little bit
more sepia in here. So like genuine top, get a little bit bluer. But honestly, it doesn't
really matter as long as make sure
you've got that eyeball nicely so that make sure this what's going to be
the blue eyeball is a really lovely shape. So careful about that
cause we don't really want this dark color merging
into the eyeball too much. Okay, that's as simple as that. We'll do the same
with the other side. The nice Nice little eyelash out there, isn't it? Go little bit too much. Pull it out a little fraction. I got to pull out my
old excuse again. I am working a little way
away from my painting, so it gets a little tricky doing these very small precise things 'cause I'm a little
way away from it. I always like to roll this
excuse out most of my classes. Better. Hopefully,
no excuse for you you can get nice
and close and neat. Okay, that's the
eyes at this stage, so we just need to
allow that to dry. But what you can do is the
nose a little bit the same, actually, we're going to
simply do some painting. But again, try to do just you can see there's
the colored part is now and then the
darker part on top, which we can then do
on the next layer. So we're just doing that sort of colored pinky Gothite color. I've used gothit
If you had a pink, you could probably do
a little pinky tone. But I think this is
This is adequate. Comes around a little bit, doesn't it? Does
something like that. Time we've tinkered with this, though that should be dry. If not, I will pop a little head dry over it very quickly just to make sure it is nice and dry, which I will probably do. I'm ducking my head up
it's a little wet still, so I'm just gonna whizz
a head dry over that to make sure it's nice and dry. If it's wet and we start
painting the eyeball, it's gonna bleed a bit too much.
9. Eyes and Nose Part 2: Okay. Once that's
lovely and dry, back to my brush, and we're going to
wet the inside and go right up against the dark eye makeup
we've just put in. Hopefully, you should get
a little bit of a bleed. It just softens. And then we're gonna pick
up the knite squitch and we're gonna pop the colour on the top and allow
it to run down. Tapping. Keep your eye
on that reference photo. Take the brush away.
You have a little peek. Let's add a little bit of so
light genuine at the top, because it's always lovely to have a little bit it's a
little bit darker at the top, underneath the top lid always helps to
give a little bit of definition to the eye. So just very gently tap, keep taking your brush away. Just very gentle. Again, there's
no desperate hurry here. We got a quite small laria. Yeah, that's looking
okay, actually. We'll pick up the sepia
and so like genuine. I'm gonna allow it just
to dry a little bit. Yeah, I think that's okay. I want to put that
eyeball in quite sticky. I haven't got too much water on my brush, and it's quite sticky. Quite a lot of paint on here. And we're just gonna
go from the middle. We just keep tapping. Idea of just having this
a little bit damp is that pupil then should
just nicely soften, okay, keep taking
your brush away. Let's clean my brush, take the excess off. And then we can
just very gently. It's that lovely
light, isn't it? Gently take that color out. Just gently tinker. Um, tiny, a little bit more um,
kind of in there. Looking at my reference
hotter, You know what? That's not too bad. Sometimes
they just come together, and if they do, yeah, be pleased, 'cause sometimes
they're a bit of a struggle. And if you might just get that a little bit lower so I can I'm just going into
now into the makeup, and just taking some of
that away, a fraction. Could have done with being
a little bit rounder. Yeah, that looks
good. It's going to look a bit weird
at the moment, because this is quite hard. It looks like somebody's
just stuck an eye on. Um, I say, once we
do that next layer, that will soften down. That's a nice thing
of putting the eyes in and the makeup before you, you know, finish off so you can do one more layer
and then soften. Alright, we need to go over to the other side. What
have I got in my hand? No, I don't want
those two colors. I'll pick up my inite again. This is well you can't
see much of this eye, really, so just pop a little
bit of inite in there. In theory, the same
principles apply. You want it a little
bit darker at the top, but I say, it's very minute. You can't really see a lot. I've made this alter
line a bit a bit thick, but uh Bush away. I think that's okay,
actually. I'm not going to thinker too much. Obviously, these lovely
stripes to put in yet. So, I say, it looks a little
isolated and a bit odd, but I think that's it's
looking good at the moment. Right, we can just do the nose, and it's a little bit the same. Let's let's keep it
a little bit warmer. Let's have the sepia,
and we're just going to literate, painting
the nostrils. Who knew I could
just simply paint? Without adding lots of water. So yeah, we're just
sculpting that. It's really that nostril. We want to get in there. And
again, same things apply. We can then soften all
these edges when we wet the next layer down. And I won't do the little
dark markings over the top. I'll do that in the next layer. That can be nice and soft. Okay, one, the other
side, isn't it? Pick brush away. It's
a little bit darker. I might actually have
a little so genuine, a bit cooler, a bit
darker on the other side. Okay, I think to this stage,
'cause I know I can say, do lots of tinkering
on the next stage, that is pretty good. Alright. Again, wind just need to allow it to dry
a little bit again. If I start wetting
all this down, it's going to run a
little bit too much, so I just need it to dry
before we can carry on.
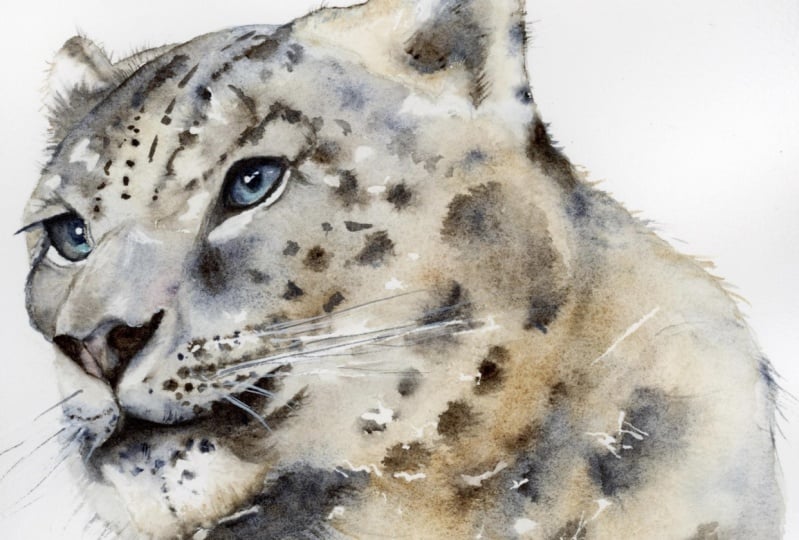
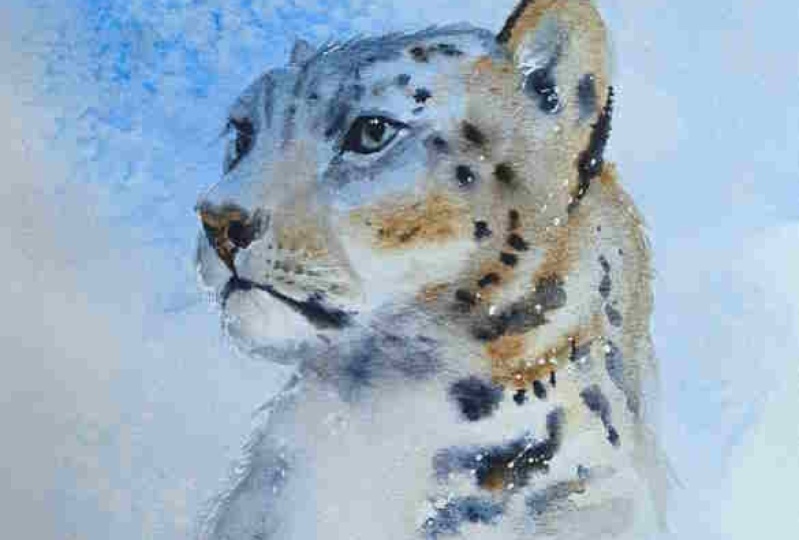
10. Coat Markings: Okay. I love this layer 'cause we really put
it all together, 'cause at the moment when
I look at it or him, it looks a little odd at
the moment, doesn't it? Some kind of odd phantom beast. But it's so we're going
to wet the ear down, the face down, and
the body down. And we're going to go up to
that line that we kind of did on the first
layer just so we can do exactly the
same and draw it down. So we're going to miss
out the chin again. So we're gonna leave
the chin right to the very end, so go around that. Again, go right up
against your nostril. Nostril? Nose, even. Carefully round. Now, when you're wetting
another layer down, go really gently because
what you've already created, you don't really want
to disturb too much. So go ever so gentle. And if you end up
with too much water, which is often the case because you have to
be quite gentle, you can always suck
any excess up. So it's better to have more on your paper and not have
disturbed those layers or layer. Ever so gentle. Some paints will move and shift
more than others, so that's just their characters, and you get to know that. But generally, yeah, I'm trying just to
let my brush fall. Coming down here. Right
up against that chin. Say, coming down to
that line again. Do that swishy one. I remember to do some flicks, as well on this layer, so
it's quite a big layer, so make sure it's plenty wet. And the same thing, if you've
whizzed your hair dry over, like I did just to
dry that eye off, bear in mind your papers
gonna dry quicker. Also if you're lucky enough to be somewhere
nice and warm, then your paper's going
to dry quicker, too. We are in November now, as I'm filming this, so
it's actually not too cold. But autumn is definitely here. Okay, I think I ducked
my head up and down. I think I have got
everything nice and wet. I can't see too many bobbles
of water sitting anywhere, but if you have, just
give those a little soak up before you start
adding the paint. Right. Now, we are
going to start adding some stripes and spots. But if you like I said,
on the first lay, if you feel you need
some more strengthening, strengthen the colors up now. So let me let me do a little bit so you
can see what I mean. So let's say I could have done maybe a little
bit more up here. So I'm just gonna
tap that in add. Let's have the so
light genuine CPR and the gothite. So strength. We want to kind of blend this area here as well,
where we had that join. So we can either give it
a little bit of rustle, add a little bit of paint just
to disguise any hard edge. So, you know, between the
two of rustling and adding, then you should create
a nice soft line then. A little bit of dark under here. Again, it's quite nice
to have the so genuine, the bluer colors
underneath the chin. Give that slightly
cooler effect. And any lines that may have
got a little bit misplaced, you can say you can now just gently I could go a
little higher with mine, that nice arc, so
I can do that now. Say, always keep taking
your brush away. We're in a little peek, see
how things are looking. Strengthen up this
line under here. That's quite a nice one.
Always pick up the ante. A little bunder there.
Careful not to go. Yes, I'm having to
rein myself back. It's very easy to
keep adding color, but bear in mind this snow leopard is quite
light in color, so we haven't got a lot of color to sort
of play with really, so it all has to
be quite subtle. Should put a bit of sepia. That was so genuine. I
meant to put Sepia there. I should put a little bit Sepia. That lovely dark line that runs off the
ear into the body. Again, if you wanted
to strengthen up your ear markings a little
bit more, you can do that. Again, it's just having a
little look at your own piece. Bear in mind now
'cause we're fiddling and we're adding all we're being we're adding sort of more color
and taking our time, so that does mean the paper starts to dry
if we're not careful. Adding a little bit more water, gives me more time
to play because I haven't touched any of
this at the moment. I'm not disturbing
anything I've just put on, so I can just carry on adding
a little bit more water. Back to almost where I started from on this layer
anyway. Yeah, Bablus. Right, having a little
squint again at my painting and my
reference photo. It's a nice little bit of light. No, not light, dark, even that way round. That runs between the eye. There's that nice sweep up
here and we can then start to add getting those spots
and stripes in there, that's a little bit
too bloomy, hasn't it? Just gently. It's just being really
light and just maneuvering it gently. Over here. It's always nice to
say the left hand side is probably going to be
a little bit cooler, so keep you a little bit of cooler colors outside and
warmer colors to the right. It's always quite a nice effect. Don't worry. I haven't
forgotten the ear. We'll do that right
at the very end. And a little catch light. I was gonna put the catch light in on the eye section,
but, you know, I love doing it, and
I'm just going to do it right at the
end and go, Tada. But you may have already
cracked on and done that. I don't blame you. Let's have a little bit of a little
bit more strength up here. Trying to keep it a
little bit warmer. Oh a little bit more down here. Just a little bit. Okay, I think I'm there
with extra colour. I tell you what I will do. Actually, we must do the little nose colorings at the top. So like, genuine. Just
when we did this nose, I left the dark area
off the top out. So if we put that in now
a little bit of light. See how it goes. Yeah. I think that's just about caught it. Lovely. Right, let's start some of these spots and stripes. I'm going to do little
mouthpiece first before I kind of forget. So there's a nice, really obvious sort of marking
there, isn't there? That's done with CP, and you see that hasn't really
moved very much, and we can just put a little bit of dark w to the very
doing that mouth line. Well, we also do it on the chin, but I want to keep
it raging soft. So if I do it on both sides, sort of this side and
this side, as it were, then both sides will
be nice and soft, rather than any hard lines. Start to get that nose line
in there as well. Right. I'm gonna start on
the left hand side, no obvious reason, really, but just be careful of
the wet paint here. Wet paint or wet. Paper. I say, just ever so gentle and just see where
those lines are tap them in. Switch over. You do use
a little bit Sepia, a little bit of so like genuine or whatever
your dark colours. Give them a little
switch around. You don't have to do a
line all the way down, some line, even though it
obviously shows a line. It's going all the way down. You could just do it a
little bit hard at the top, a little bit softer
in the middle. Just keep breaking it up. It's quite dark at the top. Let's just get a little bit of that dark up the top there. Okay. That's a nice one comes
off the eye to the eye. So I'm going to do mainly Sepi and these ones
are coming round. They're quite big, as well.
They're quite chunky, so nice bound to paint, Sepi is nice because it
doesn't really move very much. So I could pop that down. I've got this lovely
sweet spot at the moment. It's it's wet enough. It's just that and
it's wet enough, but it's not too dry.
Do that make sense? It's just that lovely stage where you know you put
that paint down in, it's just going to work. You're going to blend, but not blend too much. There's some little marks
along there, isn't there? I say you don't
have to follow them or do them all, in
fact, you know, if it's, um, it's a
little up to you. Each snow letter, I'm sure would have slightly
different markings. So even though this is
the markings of this one, it doesn't mean to say they
are marked, all the same. It's eyelash Eye.
That's nice, sort of. It's not even a stripe,
is it, I don't think so. Probably it's very soft stripe
here, just above the eye. Pop that in. Some
little ones coming off. Okay, and keep taking your brush away. One coming off the eye. Disappeared again, hasn't it? Okay, we need to make sure we soften this eye and made this effort to put the eye in a little
earlier than normal. So if it hasn't sort
of bleed or softened, just go along the
edge and just give it a little rustle just so we get a nice softness so it
doesn't look so stark then. We will be doing
some very subtle little layers under the eye, bits and pieces just to give it a little bit more distinction. So if it's so don't
worry to try and get this darker here
because we're gonna put a little very
soft layers in there. So again, I keep
taking my brush away. Having a little
mooch, having a look, make sure this is still nice
and wet 'cause we've still needed all the stripes on
the body and spots probably. There's not many
stripes on the body, is there just making sure that's a wet still
in anything around here. Again, I'm not going to worry about the whisker marks a we're gonna again do some very soft layer over
there in a minute. So I don't need to
worry about that at the moment. One in there. I think I'm about there. Alright, let's come
down here a bit. I think I'll be a little
more random here, not worry too much. There's a nice one up
there, isn't there in here? I got one under the chin. Okay, let's move this paint down now. Come
down a little bit. See how it's moved those spots, so then it's quite obvious how that paint moves once
you start moving the paint down
wetting further down. Yeah, that's nice. It's
just softened it for me. Again, we don't really want
any sort of hard line, so you can very gently
sort of tap any along that wet line just to really
keep it loving and soft. So some of those have gone
almost a little bit too much. I can pop a couple
more back in again. One down there maybe. Dark at the top. Ceciln. It's
concentration, isn't it? What looks as if
I'd smudge this. There's a one just
right up against the, it's quite hard to do
from that distance. There's one there, just
underneath the O beside the eye that's coming out there. Keep using this one
over top of the eye. Let's pop that back in again. Why that keeps
disappearing on me. Okay, I'm pretty
pleased with that. That's looking good,
but what I do need to remember to do
is those flicks, 'cause it's gonna start
drying if we're not careful. So I just need to
gain a small brush. We're just going
to pull a few out. If it doesn't do anything,
like it's doing anything, just pop a little bit of paint on your brush and then come in, little way in and
then flick out. Don't be careful not to go all the way down
very methodically. You just want a few random ones here and there just to give you a little bit of
interest and texture. It's almost a little
bit of movement. Of lovely ones on the front of the chest, and they're white, so it's tricky, 'cause, you know, so we only just
want a tiny hint of color. Painting white fluff onto white paper is
always challenging. I put a little bit
of blue in there. That's I haven't bore you with some, um, fats, have I? They have as you'd probably
imagine, some really, really, apparently,
very dense coat. Um, I think they're native to the Central and Southern Asia. Unfortunately, they are one of these um red list
vulnerable breeds, as well. She's sad. But, uh Yes, I think, apparently, according
to my facts, I've got here, there's
probably between 3,000 6,000, 7,000, you know, mature
individuals left in the wild. So there's alwaysly
some in captivity, aren't there, but, sad. They're very beautiful
majestic creatures. Right, I'm going
to down my brush. I know I can get
into that sort of awkward stage where it's things are beginning
to dry again. You usually have a window, about 50 minutes
where you're you can carry on tinkering and moving things around and
adding bits and pieces. Beyond that, you risk
overworking pieces, putting too much colour on, getting too caught up in putting all these stripes
and bits and pieces on. So you have to be a little bit careful that you don't
kind of get carried away with adding these
spots and stripes and overwork these pieces. So yes, give it a put your brush down and have a
little break from it. I'm sure you've added enough.
11. Second Ear: Okay, let's get this lovely
snow leopard kind of finished we've got a little
chin here that needs doing, and we're going to do
these lovely soft layers and that back of the ear. So let's let's start. Let's do this little ear. Let's get that on. That will
help. Very, very simple. So I'm just going to literally
wet the little triangle. They have got tiny little
ears, haven't they? For the size of the animal. So I'm just gonna
tap a little bit of color just at the back and just hopefully allow that to run forward just a little bit. Take your brush away
and see what you think. Yeah, that's probably enough.
Don't want to do too much. I just you can see there's another ear just
appearing on that side. Even that just brings it brings it a little bit of clarity,
doesn't it to the painting. Right, these lovely soft layers, these are this is something I'm not very
confident of doing. I must admit, so I'm a
kind of I say learning, but pushing my getting myself out of my comfort
zone with these. So we're just going to wet very gently, this little areas. There's a really lovely
obvious one, I think, underneath the eye because it's a nice light markings gear
directly underneath the eye. And then we can just tap
in a very soft layer. And it comes down to here, we can start joining
up even that crease of the eye that joint of the eye and just
allow it to blend in. So my inclation now is always trying to wet
everything back down again. Better. Let's give this a go
it's nice. I like seeing it. I like it in people's work
because it's very subtle. They're not strong lines. They're just very soft. And we can always do a
little bit of squidging with our fingers just to make
sure you don't get. Yeah, there's very, very hard water lines, but
you shouldn't do. Now there's sort of
two layers here. They shouldn't mark too
much. Okay, done that one. And there's a lovely one. Again, it runs from
that corner of the eye. And it does a sort of
muzzle area, doesn't it? Where we can put some
whisker marks on as well. I'm actually going to go right up against that nostril
and nose again, just to soften it down
a little bit more. Coming round,
incorporating that. A little darker marking.
Just run back up again. Again, let's have
the clutchy onto the Knite there.
Don't need the nite. Let's Let's have the gothte. Again, it's just tapping. Always, take your brush
away. See how it's looking. We've got to do
those whisker marks, but I'll let that dry a fraction because it's a
little bit too wet to do that. Yeah, that's looking quite nice. Let's have a little bit of I need a little bit
of kinite there. I can see that's
cooler. At the bottom. Sorry, there's a lot
of pausing, see, This is definitely pushing
me out of my comfort zone, especially trying to tell
you what I'm doing, as well. It's funny, isn't it? What
you're confident doing, what you're not confident doing? Okay. I think that's
enough for that. I keep losing this little line. This really lovely sweep
over the top of the eye, so I can if I can just gently tap some little
more colour in there. But see some but slightly
harder line in there. Again, as we work our
way through the classes, our pieces all start
to look different. And what I need to sort of adjust is maybe what
you don't need to adjust, or there's something equally. You're like, Oh,
no, I need to know, that doesn't look quite
right, so we have to kind of look at our
own piece and go, Yes, that needs a bit of attention and work on that rather than
necessarily following me. Just put a little bit
of put a little bit of warmth in there. Okay. Yes, I think I can do
that. That looks okay. I can see it's a
little hard line D. Um I'd say I don't like. It's just I'm not confident
of leaving lines like this. Right, be brave, Jane.
We need to do the chin. It's a little bit wet still, so let's I said what we will do. Let's take a little
bit. No, we won't. I'm just going to I just need to allow
that's dry, really, 'cause if I start doing
other little inkery bits there really for
the next lesson. So I'm gonna whizz a
hair dryer over that.
12. Chin: I'll tell you what we didn't do with those spots, wasn't it? But, uh, we'll do
those in a minute. Okay. Okay, let's do the chin. So we're gonna simply
war it down the chin. Go right up against those. That mouth line coming down. Again, touching
underneath the chin. Then we're gonna pick up
so like genuine and sepia. Op. Those together on the
brush at the same time. Start start right underneath the top of the mouth where it, um where it joins that nice create get that
little line in, as well, actually from the
nose, come down, reshape little bit of inite. Get that to move. That's better. That looks better, doesn't it? Filling in that?
A bit more Kinte. Yeah, That looks better. Let's get a little
bit stronger line down here, that mouth line. Just goes beyond that marking, that dark marking, doesn't it? Take my both away.
Keep looking at it. Yeah, I think I'm
there, actually. I think that's
looking pretty good. I still want a little
bit more strength from this sucked it back up again. I get a little bit
more strength from that lower part there.
Yeah, that's better. Co be the tiny
things you put in, and suddenly like,
Oh, that's it. That's what I needed. So you
just got to keep looking at reference photo and looking back at your painting and
seeing what you need. As I say, we all start to our pieces slowly start to get different as we
work our way through, so it becomes a bit more challenging
how to help you best. Okey doke. Yeah,
that looks better. Let's get those little
whisker marks in there, which I left after being silly about putting little layers on. Again, I'm just tapping
tapping some little spots in. I can soften them
from my finger. Is still a little
bit damp, actually, from the Obviously didn't
dry it completely. So they're just
blending quite nicely. It'll be a sepia,
switch up the colors. Yeah, that looks better. A, these little bits at the
end that start to pull it together and make the snow leopard or snow leopard cause there'll be
certain things about every animal that really
makes them what they are. They have very distinctive
whisker markings, don't they? Lovely. Righty H. I think that's
enough for the soft layers. Now, I have pondered doing one underneath here and flicking up, but personally, I don't need it. But if you've got a little bit, this is still a little light. You can do very similar to this. You can paint in a little layer, then you can flick
into the chin, make sure this chin is actually dry before you start doing that. And you can gently reshape some of that if needed.
I'm going to leave mine. That's dark enough
underneath there, so I don't want to really
alter any of that. But that was another one
I had on my list through a possible little layer. You could have done
the inside of the ear. I pondered that, but it
became a little segmented for me and how I like my pieces
to look. This is enough. This is getting me out of my comfort zone enough as it is. So, that's probably
enough for me. But obviously, if you like those sort of
little soft layers, then you can do a few
more in other places, but I'm going to leave
mine there for now.
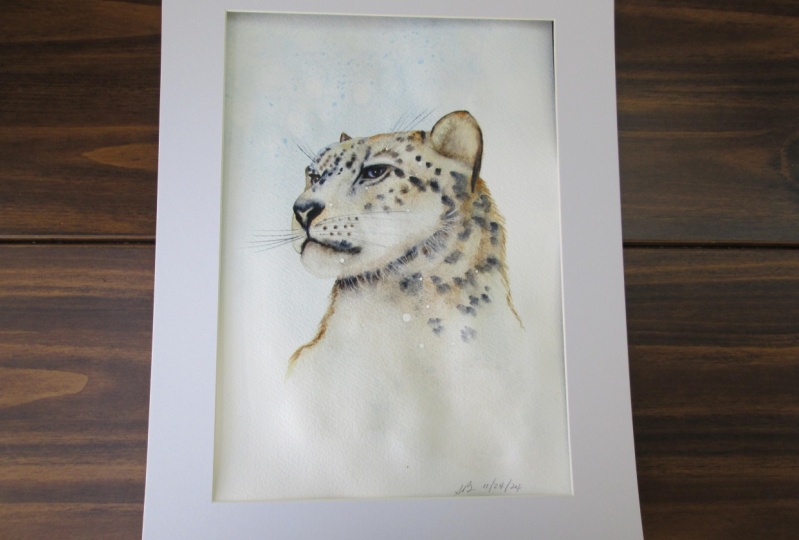
13. Finishing Off: Right, so we're
coming to the end. Or is reluctant to finish
and I want to finish now. So we're just going
to do some the last little bit. It's
a little bit tidy. We need catch light in. I want to sort of sort
the nose out a little bit more to give it a little
bit more definition. Rub out any of the masking fluid and put some whiskers
in, as well. So to start with, I'm gonna rub out
the masking fluid and make sure it's lovely
and dry before you do. Don't simply give it a rub. Should all come out? All
those lovely whiskers. That's the fun part. See what we've got. I'm going to rub any
pencil marks out, but there aren't many, but a couple on the chest here. A couple on the chin. One on the back. Be careful. If you've got some
really lovely patterning and you've got some
pencil lines, go careful. You don't want to
rub too much and to take out any that lovely background
you may have created. So go careful. Yes,
I think that I do. For now, right, let's
have a little access. So let's get that
catch light in. And also, I just want to make. This is purely mine. I say, your eye is
probably perfect. But I just want to take a little bit more light out and just make it a little deeper. God it's gone a little tiny,
little bit narrow for me. And there's something not
quite round enough here, so I'm just close that
in a little bit more. So I want this pupil
really loving and round. Now look at that
reference photo, it's nice and round, also tiny little bit up the top. Little bit of a flick
a bit higher up. Again, any shape you
make of this makeup will really change the character
of how they're looking. It's it gives a
lot of expression. So just by giving that a
tiny little tilt it softens. It makes them probably.
You have to be careful, it can make them a little
cute and like that. Whoa, what's up? You know, a worried kind of expression. So careful. And it's fun, actually,
if you have a piece, maybe not on this important
pot piece you're doing. But it's quite fun
experimenting, doing an eye and seeing how you can change the expression
of the animal we're working on just by the
tiniest of tweaks of how you form the eye
in the eye makeup. Just running a damp brush
around the top there. I still a little hard. For me. That's a little
bit of soup yeah. I've lost some of
the lymph, I think. Yes, that looks a
little bit better. Also, I think I've now, because I've closed that
eye in a little bit, I've pupils in slightly
the wrong place. All tiny little tinkers, which, as I say, they're becoming
a little personal now, so I should probably going
to leave that there. Um, Yeah, that looks a tiny little bit of colour out in the
middle, actually. It's quite nice if
you haven't got that. Just to soften it again
just to make sure it doesn't look like
it's the lies stuck on. And again, you can
give it a little sig squidg with your finger. I'm quite pleased
I'm happy with how this left hand eye has formed. I can take a little
bit of colour out just at that outside edge. But I wouldn't do too much. You don't really want your
eye drawn to that eye. Again, you can kind of reshape
the top of the muzzle. Just go in a little bit. You can see if you look
on that reference photo, it's slightly domed, isn't it? So you can sort of take
a bit of colour out. We'll sweep right round. Okay, let's have a little
look at this nose. I'm actually going to
rewet the whole nose. Just allow the colors to
blend a little bit more. She as, give it a little bit of a see what we can do shape wise. Going to take a little
bit of color out the top. It's quite spotty, isn't
it the nose, as well? I don't know if that's
a unique markings on this particular snow leopard. I should imagine it is,
actually. I don't know for sure. I'm only thinking. My mom's got a little border collie
border terrier cross. And she's got a little
mottle nose like this, so I'm thinking it might be an individual mottled
nose snow leopard, but say I could be wrong. Okay, just by doing that and just wetting the
whole area down, I can sculpt the
nose a little more. Yeah, that looks better. Okay, now you can take
little bits of light out. Our mind's quite light enough. There isn't a lot of
light I want to take out, but obviously got to be a little careful you don't start
then taking any spots out. But there's a nice as you can see on that
reference photo, it's really light across here. I know we tried to keep that nice and light as we
work through the layers, but you can always
take that out and say, be careful you don't start
rubbing the spots out, though. Squinting my eyes.
There's a nice little bit of light in front of the eye, as well, so that can
be gently taken out. Bit of squinch take a little bit I had
been problematic this. I'll stripe here above the eye, and I want to take
a bit out now. Okay. Again, there isn't I put that little water droplet
worked quite well there. That's given me a
nice little sense of light without having
to take any out. But you could, again, very gently with a damp brush. You could just give
it a little squige. And I would probably see
if that's removed enough. You don't want to take it much too much out because
it's very easy. At least the colors I'm
using are very easy to lift. You can either give
it a squige of your finger and if it's
still not lifting out, then you can, again, take it without the kitchen
roll or paper towel. The chest area is fine, again. That's worked fine. But again, you can take out little bits of light if you found you've
lost some of the light there. Front or chin,
sometimes the color can get a little bullish, as it were, and gets
right to the end there. So you can gain, you can
take a little bit out there if that's got
little too much. But, yeah, most of
that's worked okay. Right. Let's put that
little catch light on 'cause it's very
much needed, isn't it? So a little bit of white guash. Get it nice and creamy. I haven't even used my
little brush, have I? Let's use a little brush. I've had it on the
table the whole time. 'Cause that's the beauty of these little
brushes, actually. Brush, it's got a light
tip to it, as well. So you just want it
top and to the front. And it will make all
the difference that. I'm also going to do just the tiniest one on that
left eye as well. Yeah, they're good, aren't they? And really, oh, I don't know what else
we were going to do. Just a few whiskers, as well. So you can either do
this with a pencil, then you can rub them
out, or you can do them a little fine marker pen. But I'm gonna with
my little brush, I'm gonna do some
with the paint. You can always sort of test this on a practically on a little
piece of rough paper. I've got a tiny little bit here. You just trying to get the idea. That's going a bit
thick, isn't it? Yeah, that's that's better. And we only want a
few. Um, because most of them are
light, aren't they? Just want a little
just a handful. Again, some out the other side. Again, just very light. Couple couple up top. Sorry, if you can hear snoring, it's my dog in the
studio. Excuse her. Obviously finding the whole
process very stressful. Lovely. I think we are there. Obviously, like I often say, we've been painting together
for a little while. And it's always
nice to step away from these pieces and come back and look at them you can quite often go,
Oh, that's great. The problems I thought I
saw aren't there anymore, or you'll go, Yeah, that could just do a little bit of tinkering here and there. But it's really worth
stepping away at this stage. Getting a bit of
time away from it because this is where it's so easy to now carry on and ruin it because you're
desperate to finish it, but you don't know
what you're trying to finish or how you're trying to finish it,
if that makes sense. It just stepping away and getting looking at it with
a fresh pair of eyes, as I say, it's amazing how
you'll come back and go, Oh, it's that. I can see. That's so obvious now. So yes, I'm going to leave it I'm
going to leave this for now. If for any reason I come back, um and there's a lot of little tinky bits I feel would
be useful for you to see, then I will refilm it. Other than that, I can see this line needs a
little bit of tiding, but I think it's more the
case I'm a little way away, so it personally needs
a bit of tiding, but I think the rest of it
is, I'm pretty pleased. So I hope you are, too, and you've really
enjoyed this class, and it's got you maybe into the Christmas theme if you're painting this around Christmas. I know he's not the
traditional Christmas subject, but there's plenty
of others there. If you're wanting
a Christmas theme on skill share, there's, yes. Plenty of themed classes, and we thought I would go with a little wintery
wintery snow leopard. So anyway, before,
before I ramble away. Please do share these on the projects and
resources pages. Honestly, I love seeing them. It's brilliant. And they're
also unique and clever. And people come up with
some wonderful sort of tweaks as well
on these projects. So yes, please do share them. And equally, if you're stuck or there's
something you're like, Oh, I'm not sure. What
do you think of this? Pop it up on the projects page, and I will endeavor to get
back to you as soon as I can. I try to look at that
every two to three days, so bear with me if I'm
a little delayed on it. But yes, thank you very
much for joining me.
14. Final Thoughts: So I hope you enjoyed the class. And you found him a
satisfying subject to paint. How did the background go? Isn't it fun creating all that wonderful
texture and flow? I hope the three layers
worked well for you. They all have their
place in building up the color, identity, and form. Did you nail the eye? Remember, don't panic if it all seems to be
getting out of control. Allow it to dry and come
back and gently adjust. As I always say, it's
worth stepping away, coming back and looking
at your painting with a fresh pair of eyes and
tweak, if necessary. So we look forward to seeing
you in the next plus.
 Jane Davies, Professional Artist and Teacher