Transcripts
1. Introduction: Hello, Anna, welcome to this intermediate
watercour class. Today, we're going
to be painting these adorable puffins together. Now, do you struggle to create accuracy and looseness in
your watercolor painting? Then this is going to be a
brilliant class for you. I'm going to show
you how to paint those two elements so they sit side by side to create the perfect
watercolor for you. I'm Jan Davis. I live, paint, teach, and walk my lovely spaniels in the beautiful South Downs
National Park in England. Over the last 20 years, I've taught myself the free flow technique that
you see today. Not having been to art school, finding my own way has been
fun and sometimes daunting, but has allowed me to
develop my own style. This has led me to teach others either on a
one to one basis or as part of a group in a wonderful studio in the
heart of the South Downs. I also run a successful
art business where two days are never the same from the thrill
of exhibiting to painting pet and
wildlife commissions in my own home studio. In all my classes, you will follow
along in real time, where I can guide you
to keeping your work loose and fresh
without overfussing. If you're just starting out, my three beginner classes
will guide you with your first masterpiece
painted in only 15 minutes. Then you'll find dozens
of my master classes available covering a wide
range of beautiful subjects. In each one, I share the techniques I use in
my own professional work. We'll have a lot
of fun together, and you'll gain the
understanding and confidence to
incorporate everything you learn into your own work. You'll be amazed at how
easy watercolor can be. I provided you with a
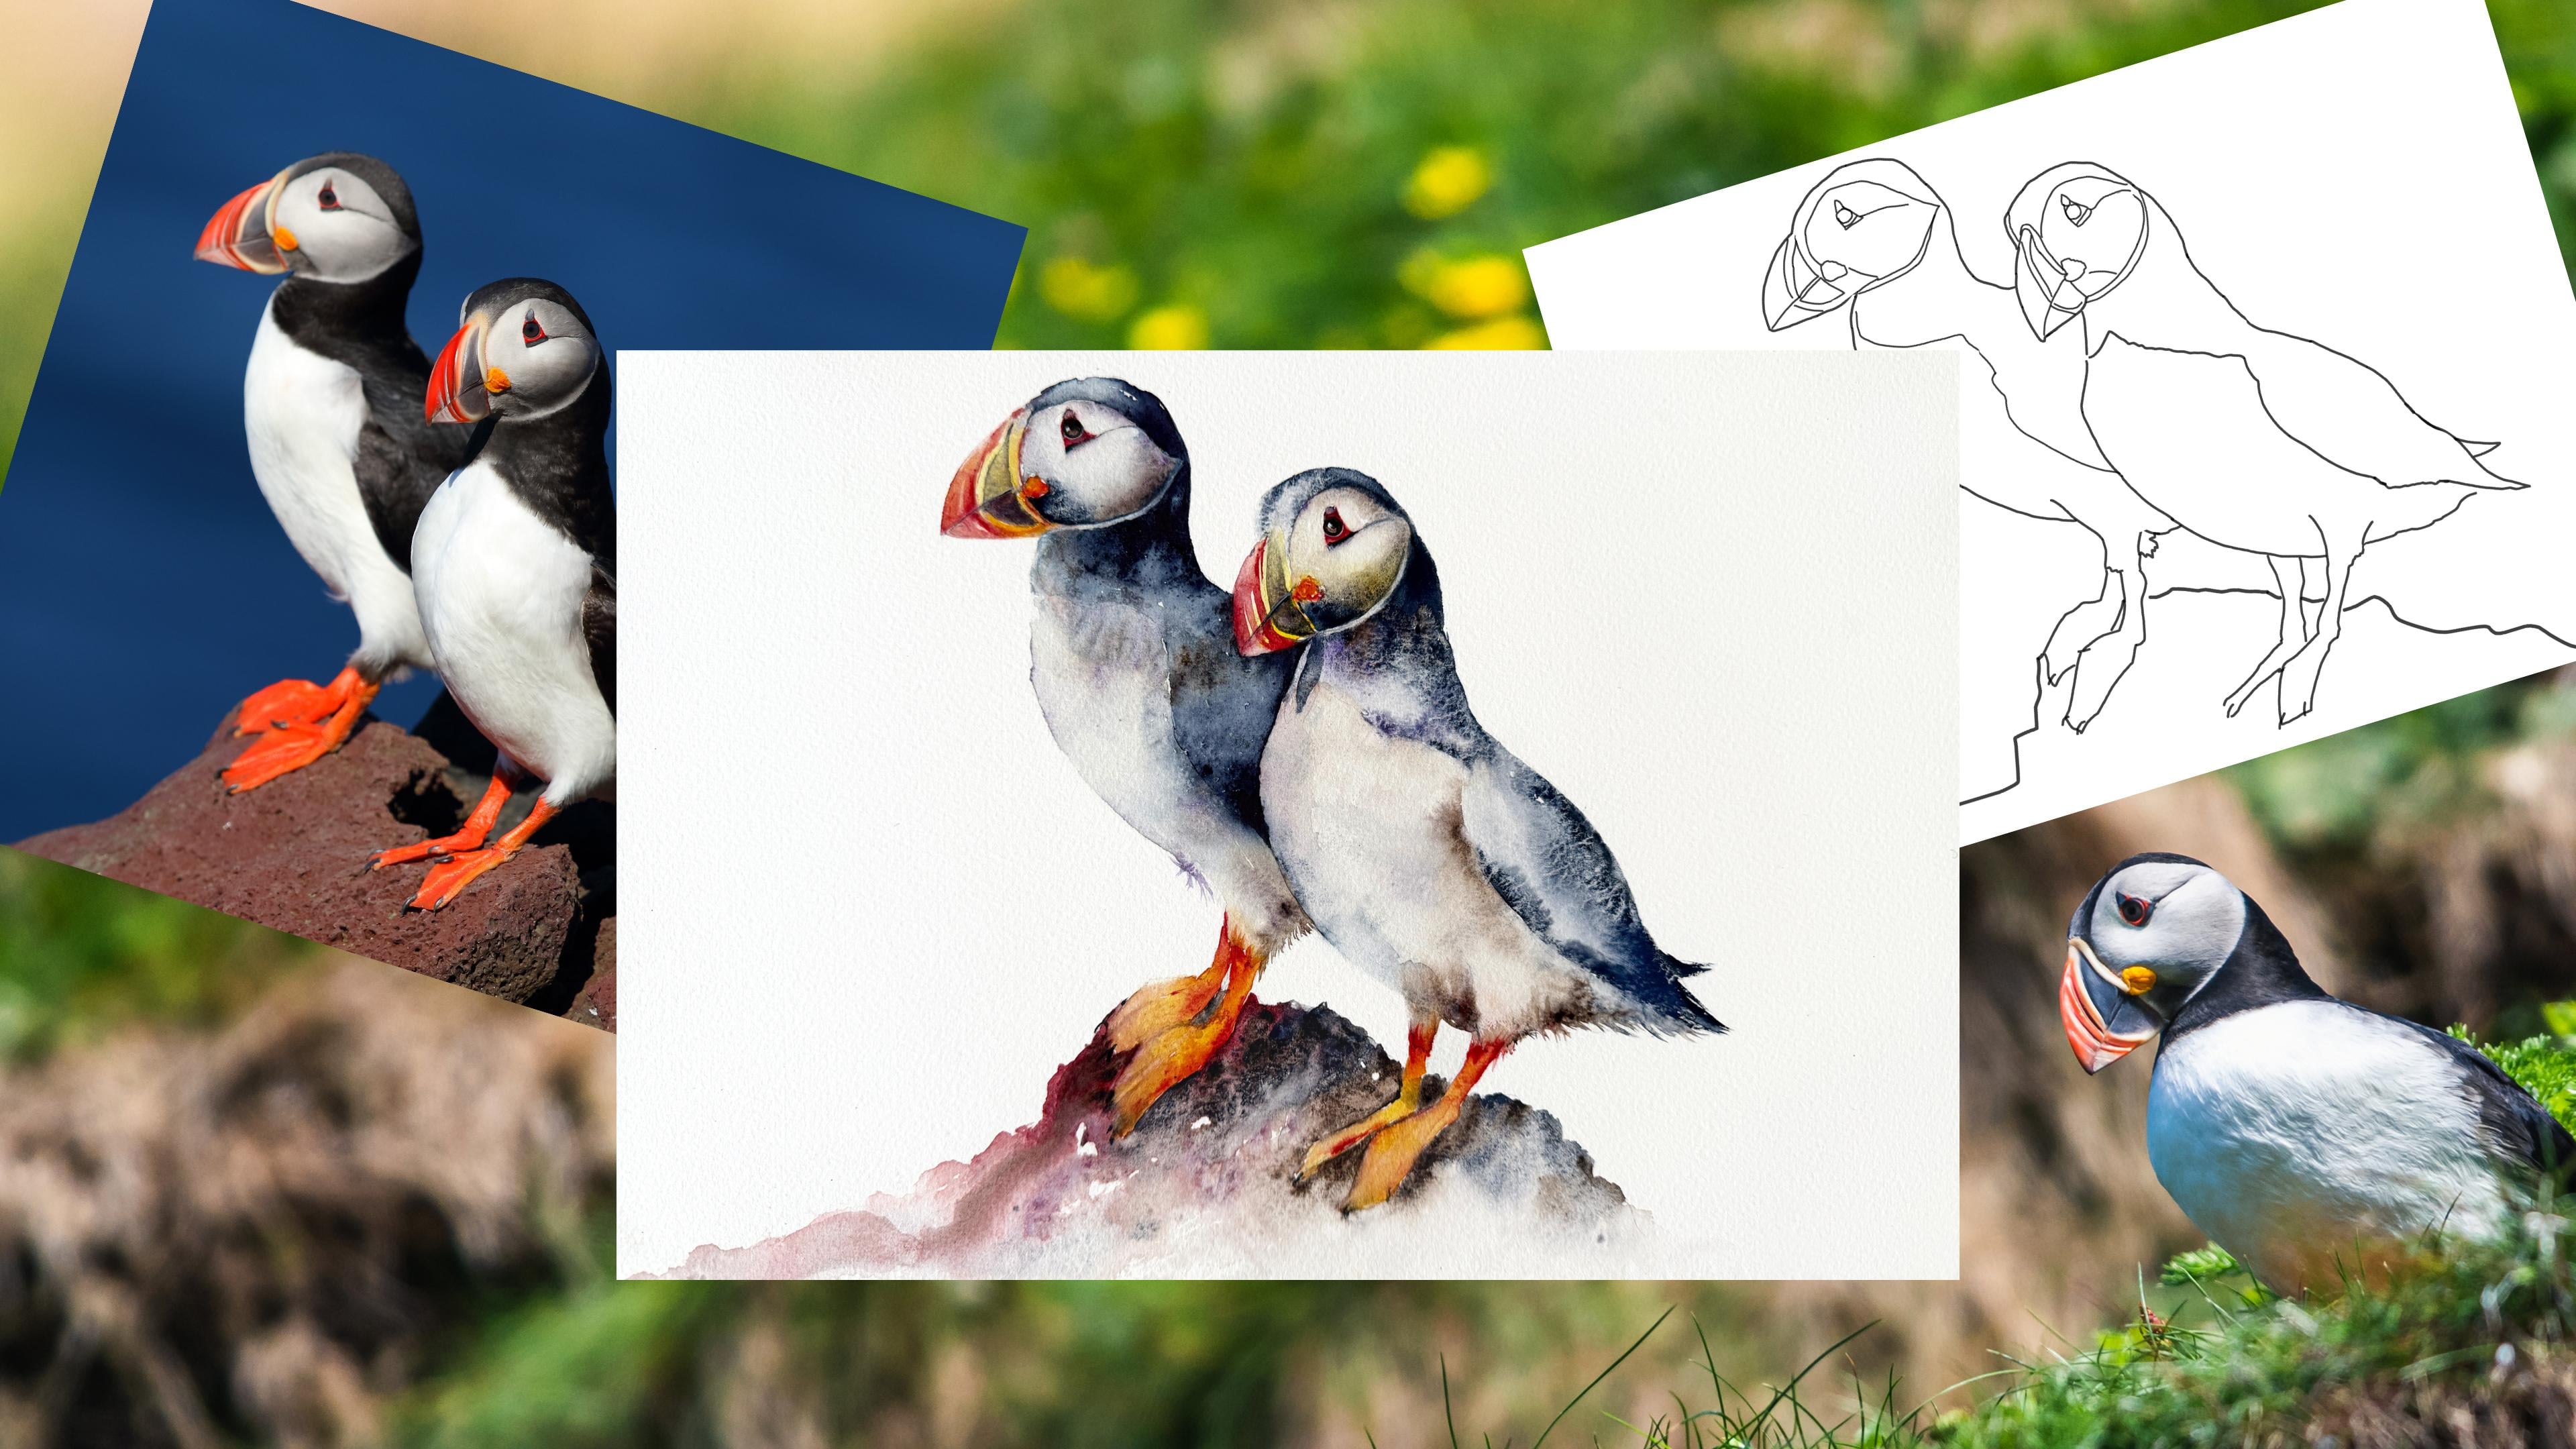
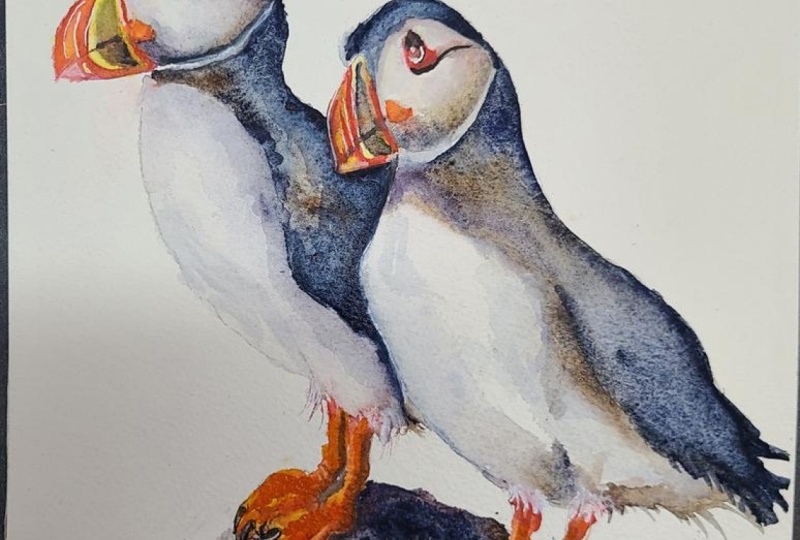
wonderful reference of these two beautiful puffins
and a downloadable template. The template will give you a stress free drawing so you
can just enjoy the painting. We will be boldly
adding paint using a lovely wet on wet technique that only
requires one layer. I want to show you how to
create those soft edges going from dark to light while
still working on wet paper. And if all that neatness
seems too much, there's a lovely,
flowing, textured rock. I'll be demonstrating
how best to create. And, of course, I'll be
showing you how to adjust, and dare I say fiddle at the end to bring this complex painting
to a brilliant finish. If you'd like to learn
more about me or my work, then please pop over
to my website at Jan Davis watercolors.co dot k. This can be found
on my profile page, along with links to my
Instagram and Facebook pages. I love to share my
art and adventures, especially on stories
with many ideas, works in progress, and
tales of judio life. I really hope you will share all your paintings on the
projects and resources pages. I love seeing your masterpieces. And don't forget
I'm here to help if you get stuck or
have any questions. I want you to experience that buzz of painting
in this liberating, wet on wet loose style.
So come and join me.
2. Materials: So let me run through all the materials
you're going to need to paint these rather
delicious pair of puffins. And what took me so long, they are fabulous to paint. Quite precise, but fabulous. Right, from the top. So I have A's Daniel Smith, and these and all
these materials can be found in the projects
and resources pages, so they're all there for
you to refer back to. But from the top, I have indigo, so delight Genuine,
my absolute favorite. I might be raving about
it throughout the class. You need it in your life if
you haven't got it already. Ultramarine violet. Sepia. I have the Hansa Yellow
Medium and Perylene red, and just a tiny little
bit of white gash, only for the eye,
dot, so nothing else. If you don't have
these exact colors, please don't panic,
like I always say, you will have colors in your collection that will
be amazing for these. So I did the back puffing in Indigo and the front
one in so light Genuine. You could either do
both of them in Indigo, both of them in So light
Genuine or another strong blue. I'm not sure if I'd go black, but honestly, it
really doesn't matter. Black might be quite punchy. So have a play,
see what you have, and work your work
with what you have. The paper is arches, and it's been stretched on
a perfect paper stretcher. I'll pop a link in
the projects and resources pages to the
perfect paper stretcher. I know a few of you have reached out and
asked about those. Hot of water. Salt. Good hint here now. Don't put your salt too
close to your water you drop water into
your salt pot, and then the salt
doesn't work very well. Um, I have a rubber. I have my trusty little heart, which is, if you haven't
followed me before, um, you probably don't
know about the heart, but it's just an inch high, and it allows me to
pop that underneath my board or piece of paper
and give me some tilt. I only use it for the ground, so we don't do a lot of
tilting in this class. Kit your roll or paper towel, and there is a pencil, but I don't seem to
have it. On camera. Pencil. And then I
have a Dagger brush, which I use
throughout the class, and I don't really
use anything else. I'm honest, and that's
just a quarter of an inch. I do have a I have it sitting beside me
for most of the class, I have a number naught, which if you haven't
got a Dagger brush, then that's great for
doing a small detail. And, again, if you haven't
got the Dagger brush, then a six, seven, eight brush would be great. These aren't very big. You get a rough comparison to my hand. So we're not doing
these on a big scale, which does bring me to the fact if you
want to do them big, I think these would
be terrific big. I'm just a little limited to my painting size and the
board I'm working on, so they aren't particularly big. Is there anything
else? Oh, hair dryer, hair dryer is off camera. Again, I do stress
throughout the class. It's not particularly
useful because you don't want to be
blowing a lot of these pigments around.
But it was quite quick. It's quite useful
to finishing off the very last little bits of drying, especially
on the ground. There's the template and the reference photo again on the projects and
resources pages, and say that template is just for you to get the
correct drawing down. So do take advantage of that. I think that's it. Come on.
Let's go skitch them out.
3. Sketching Out: Right then, before we can
crack on to the painting part, which I know we all
really want to, but we obviously have to
sketch them out first. So let me give you at a few
hopefully helpful tips. Firstly, and I quite
often forget to say this, keep your pencil marks
as light as you can. I know you're
probably looking at mine going, Well,
they're quite heavy. Basically, so you can kind of see easily what I'm painting. Um plus, it helps me see where I'm going because it's a little stressful
anyway filming. So if I'm struggling to see
my lines, it makes it harder. But it is beneficial in the end if you can't
see any pencil marks, especially anywhere
like the white, say, the white breast,
you really you want to be able to let me show
you my example here. You don't want to be able
to see these pencil marks. And sometimes they're
quite hard to get out, and then you start rubbing, and then you end up taking
little bits of paint out. Also, it's quite it applies to the back
of dark areas, too. If there's a strong pencil mark and you want to get
it out and you rub, you can quite often
take paint out. So keep your pencil
marks lovely and light. That would apply to all
my classes as well. But saying that, you obviously need some
down there for a guide. So there is the template in the projects and
resources page, which will help, and I'll put any relevant indicating
lines on there as well. But just take your time. However you can get this image
onto your piece of paper, there's lots of clever
ways these days. Just make sure it's right. Again, this is probably why
I always say step away. Just go and get yourself
a little cup of tea. A break, wander around
the garden, whatever, come back and just assess
your pencil marks or your sketch and see whether that looks right to
that reference photo. And once you're happy,
really, we can move on. I'm happy with mine. So let's
go and get these started.
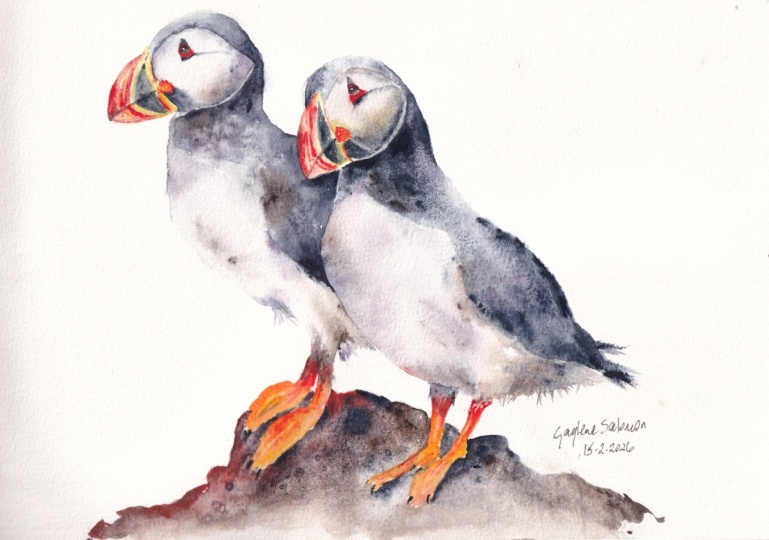
4. First Puffin: So dead dead easy to start with. We're going to try
trying to be organized. We're going to start
with this Bbird first, complete him or her, and then move on to the next one that will hopefully
allow everything to dry. So we're going to
start very easily. Got my little Oh,
actually, I tell you what? I'm going to have my tiny
little brush. Move the rubber. We don't need that. And
we're gonna pick up the red, and we're just going to go
round that red eye marking. It's a tiny little brush.
It's only a little bit. There's not a lot
to see, really. Let's see if I can I'm
actually wearing a pair of glasses, and funny enough, it's actually helping me
see what I'm painting, although I'm still a little
way away from my painting, but it's a bit of
a game changer, aren't they Glasseed
Who would have thought? Anyway. Yeah, go
carefully round. There's that funny little
blue mark up there, so we'll keep that
clear, as well. Just goes tips into the front, and there's a blue
mark under there. So it's literally just that. We need that obviously
to do the y, we need the red to be dry
and we need the red to be dry from when we
paint these as well. So it seemed the obvious
little bit to start with. Okay. Can you brush, and then we're going to
move on to the beak. We're going to paint
the whole thing, a very soft yellow. And then we can paint
over the top of that. So obviously, when you look
at that reference photo, it's mainly on this area here, isn't it? So what
we're going to do? We're going to wet the bottom part of the
beak. So where the join is. We're just going to
apply color to the top. Topping font, probably would be an
easier way of saying it. Honestly, just allow it
to allow it to bleed. Ideally don't necessarily
want it going into this area, but I don't want it to
be look too blocky. So and then just
gently bring it up. It comes over to this
bit, doesn't it, as well. They're quite complex looking colors and shapes, aren't they? But it's something like that. I'm gonna w that? I've got quite a lot
of water sitting here, so I don't need too much water. I have this beautiful, big disc light, which gives such a lovely
light, it's quite flat, and I find it at times quite hard to see how
much water I've got down, but Yeah, I think that's
just that's all you need, I say, we'll fill all that
in a little bit later. But we'll also do this little tiny and I think it's
called a rosette. Now, I did look up
some puffing facts, so I shall bore you with some of those as we work our way
through the class, but I think this
little funny area here is actually
called a rosette and when they open their beaks, it allows them to open them wide so they can get them out
of fish that they carry. So they're like a little
funnier elastic thing. A little odd, so it's
worth looking it up. While, see if I can remember to put a little picture of one. I did find one. So basically, sorry, I was picked up the red. I just swindled
round a little bit. Gonna pick up the yellow.
Gonna do the same. Don't get too wide. It's
obviously quite orange, isn't it probably
rattling away to you, telling you about what they are. I'm concentrating
on my painting. I'll try to make that a
little bit more orangy. Basically mixing the
two colors together on the paper and just allowing. If that runs in, it doesn't matter. Yeah, I
think that's enough. I'm not trying not
to get too trey. I'm too worried. Again, if that runs, that's
absolutely fine. That will stop it
looking too, sort of, um, thick and sort of clumpy. That blooming too much. Suck some of that up. I've got quite a lot of water
sitting there. Okay, ideally, we're just
going to allow that to dry, and then we can move on to the little bit of the body. But
5. First Puffin Back and Feet: Right. So the body
is really fun to do. And I've actually picked two different colors
for each bird. I'm going to do the
indigo for the back and sodalt for the front bird. Doesn't matter. You
can either swap them round or just one. I just I liked how
both of them worked, if I'm honest and how the paint gave us a
different texture. So I thought I'd chuck both in. Why not? Okay, so
what we're gonna do? Be careful. If
this is still wet, mine is a little bit wet still, so it doesn't matter because we shouldn't join them up because
we've got that lovely. They're very, very they're
lovely birds to paint, they almost section
themselves off as well, 'cause there's that nice
white little line there, which I have actually
forgotten to put in, but there's a nice
white line that separates the head
from the chest. So we're just going
to put a little bit. I don't actually want
to put any color here, but hopefully you can see I've just wet that little section. It doesn't it's not imperative
how far down you go. It's just somewhere like that. And we're also going to do
the same to the bottom. I'm actually just
going to join them up. So I've wet a little
V shape there. It's just cross there. Be careful, making sure you stay nice and neat because
that's running into the second bird's white
plumage, white chest. So make sure you
stay nice and neat. And we're going to
be really bold. We're going to put lots of paint particularly on the back the light's coming sort of
this way, isn't it? So go and keep everything neat. It's quite a neat
little painting this. There's not a lot of
sort of lots of flow. That's why I want to do
something a little bolder here, give us some probably nice to work with some
nice watercolor flow, rather than it all
being very exact, which it can become, I think. Ema bush doing exactly the same to this section down here. I got a little bit
more water there. That's probably helpful. So staying really neat. And then, Hey, bush,
we're gonna join them up. It doesn't matter how or which
way really doesn't matter. Just allow this to happen, 'cause this is gonna give you a lovely just texture, randomness. Again, a little bit tight.
We have to be careful. We go round this
beak here, as well. And then join it up. I'm actually not sure if
it's a beak or a bill. It's me looking all
my little facts up, and I don't know which
way around it is, actually, Beak or a bill. Probably whichever I choose
is probably the wrong one. Say, just literally
allow that to happen. Let's make sure we get a little bit of
color in the front, and we're gonna pop
a little bit of um spire in there as
well. Warm it up. And almost actually, if you get little lines like
that or diggle dots, I don't any that
matters in this case. Normally, I'm
always a bit of a I like I don't like to
see any white patches, but that's actually quite nice. It's running beautifully. I'm going to do because I can actually see this is sitting. A lot of wood sitting here.
Edge of my kitchen roll. I can just suck some of that up. That also encourages
that to run. I hope you saw that whizzes whizzes it a bit further down. We've put some salt
on here as well, which give us an extra
little bit of texture. Now I'm saying, I'm not sure if I do like those
little white spots. I might just fill them in. Don't know why I'm
whispering now. Okay, I'm going to
put just a tiny, tiny little bit of
Sepia just to give a little bit of warmth
in the front here. So making sure everything's
really lovely and neat. Anywhere else you think a little bit of warmth might help? Lovely. I think
that's looking right. Just a tiny bit of strength
right in this corner here. Although it doesn't necessarily indicate it on the
reference photo. I just wanted to get
that real contrast between the two birds. Right. And now, very carefully, we're going to join
the head up, as well. Just literally just
wet the whole head. Just be kept. Just
be a little mind for it if this is
still a bit damp. I think we drew a tiny little dry line between the two cause Indigo
is quite strong, and I don't really
want that whizzing down into that beak cause
Indigo is quite staining. We won't to get that out. It
will be a bit disastrous. Okay, it's not actually
running that much. I don't want to tilt it 'cause I love how this is flowing. If I tilt this bold, I'm gonna lose that
nice sense of flow. So 'cause I'm just seeing all that water
still sitting there. I'm going to put a little
bit more paint on there. There's actually a little
bit more paint towards the lower part of the head. Let's just add the paint
at the lower part. Again, it's just tapping, taking your brush away, having a little look where you
think you need that darker. They've been really
mindful 'cause they're quite small. I
would love to do it. One time, we do
something bigger, but I'm always a little
constrained with the filming and the sides we can actually
get the board on the paper. The board on the paper,
the board on this board on this board a little a little
be strange with that way. Just want a tiny little bit
of paint just up there, just so I can see
the top of the head. But I want to keep that as I like that. I like
that sense of light. And I can see that it's
just creeping into that yellow telling
you to be careful. I've actually taken
my glasses off 'cause my glasses are a
bit in betweene. They're not quite the right. Um, distance for should
give me a good clear, um, view from where I'm
standing, so I'm watching that. That's lovely. That'd be fine. Let's pop that back
there. Let's get some salt in here as
well before that dries because that's a really fun fun fun way to get some texture, 'cause indigo works
brilliantly with salt wares. So genuine, because
it's granulating, doesn't really work that well. So we'll get a nice
contrast between the two birds with a
nice bit of texture. Hopefully, a good tip is, I just noticed my
fingers are a little bit damp is to when you've got salt, make sure your fingers are
dry cause if the salt is already wet before you
put that on the paper, then it's already doing
half the job already, and it's soaked up
moisture from your finger and won't work quite
so well on the paper. Right. That just needs
to dry a little bit. Um, before we can do the body. So we're going to crack
on with a little feet. What I would ideally like
is this to dry almost, and then we can do
the body and we get a little bit of softness. But let's do the feet first while that carries on
drying. But be mindful. If you're in a very
hot place and you can see this drying now, then I would suggest doing the body and then
do the legs later. I don't know if that's helping
or just confusing matters, but let me just let
me paint my own bird, but that's worth just
keeping in mind. So I'm actually using
the two colors, say we're mixing the yellow
and the red together. I thought I would do this for a change rather
than actually having an orange on the table, the table gets a bit
clustered with paint, and I'm always mindful of
having too much on here. So I put the two colours
on the top of the leg. Very similar to
this sort of thing, where we did the body,
so a nice color there, and then we're just
going to pull down. That little tiny gaps. Just be mindful that little gap. There's a gap between that
back leg and this front one. That's quite nice to keep that. They be nice and neat, try not to make
those legs too fat. I think one of my
practice pieces, I had very chunky
legs, so be careful. Won't put any sort of
claws in a bit later. That's just I think
that's worked right. Put a little bit of red
at the back there just to give us a little bit of humph. Little tiny bit of yeo there. Just, again, just allow. We're gonna do the back leg. Same again, same thing. Nice and wet. I'm actually, it doesn't matter I'm
just gonna run that into that front foot Okay. Keeping on the shapes. I make sure your
shapes are nice. Lovely. Always just
take your brush away. How ready to look. Ideally, you want a little bit of
light on the top, a little bit of depth and
strength at the bottom, so it doesn't necessarily show that on the
reference photo, but it's still nice to put in cause I think it helps
make sense to the painting. Lovely. Yeah, I think that's go. Now, let me assess the state of dryness
of this chest area. I think it's still quite wet. Yeah, I'm gonna have to hang
on for a little minute. Look as though I can still
see a bit old puddle here. So this is gonna probably
take, I'll have said two or 3 minutes to get
to the stage of dryness. If I was to wet this now, all this would run
into the chest, and I really don't want that,
especially with indigo. So it needs to be just a
tiny little bit tacky. And also, ideally the
legs need to dry a touch. So, yes, I'm just going to be a little bit patient and watch it. I don't want to be
hair dry over it. It's always an option in
some cases, but for this, especially with the
salt down there, it will just blow it around, so it needs to dry
naturally, I'm afraid.
6. First Puffin Front: Okay, I'm thinking
this is a good time. It's just starting to go off. It took a bit longer
than I thought. I must admit, but I think I
rather oversaturated this. So hopefully you've
been haven't been quite so liberal
with your water, although it's always
a good thing, but, you know, you
can have too much. Um, yes, I can just see
it starting to go off. I have this sense if I wet this, it wouldn't move as much, but what we're going
to do just to prevent any huge um, bleeds. I'm going to start wetting from out across the so the
front of the chest. So I'm going to wet that down right at the very
end, touch those soy, touch the body right
at the very end and maybe just a few areas to
see how that's looking. When I come down here, I'm quite happy if the leg
bleeds a bit more, and I think that's dried. It's obviously not
such a strong color, so it wouldn't matter.
No see, that's nice. Softening. Had a
little bit of a bleed. We gained this big
really mindful. We've got a white chested
bird here in the front. Right. Let's see
how that's looking. Yeah, just a little bit. Indigo is a it likes
to move around. And so if I give it a give the opportunity,
it will certainly. You can see that's almost
a bit too much still, so you are going to
be a bit mindful, I might leave a tiny
little white line here and join it up in a minute. I don't really want
that. That salt starting to work beautifully. So if I start drawing a lot of this color here
into the chest, it's gonna lose some of that. I just have a leave a little
bit of something up there. What I want to try and avoid is this really stark line between the junction between that
dark body and the chest, which obviously there is, if you look at the reference photo, but I still like it to
look nice and stop. Let me just pull
this one down again. I've managed to get the
timing quite good there, and I just avoided
that very hard line. Right. If I squint my eyes, I can personally see a
little bit of violet, and we have a little
bit of sepia. And actually, I might use a so light genuine just 'cause
it's a bit softer. It's not quite so hard. And I'm just going to tap a
little bit of colour in here. So squint and you can
see those darker areas. And yeah, you can
exaggerate them a bit. Sometimes it's quite fun
to actually tinker with the reference photo if it's too It's a lively
reference photo here, but you can sort of
alter it just to pull up some more contrast or
soften things down. We'll do that to sort of bring more detail in
so sometimes you can sort of see where the shadows are if you tinker
with the photos. Okay, just tapping, so I'm still leaving out
little white lining. See see how much
that's bled steel. I was probably a bit gung ho. I probably should have left
it a tiny a little bit more. But I thought that's it.
You've had enough now. Surely you must be dry. Even went downstairs and
made myself a cup of tea. Okay, just putting a little bit of sepia there, a
little bit of violet. Again, just to sort of give us a little bit of something there. We do those nice flicks. Now, flicks, I find a
lot of people get these. They just do them a little bit too late. It's nice to do them. If it is still wet and we've
got a nice bit of paint, they flick out and give
you a really natural look. If we leave it too long
and you do them too late, they look like they'd
literally been stuck on. I doesn't look as natural. I put a little bit
of violet in there. I think I've managed to
contaminate my violet. This is the thing with
working out a tube sometimes. You can contaminate the tubes. If you keep dipping your
brush into different colours, just gonna squeeze that
in there for a minute. I said, We It's
quite a soft colour, this violet. Take
the top off of that. But I still maintain
it's not much different than contaminating
it on a palette. That's better. That's a
bit more violet, isn't it? But people find it up yet. I was easy to get carried
away and add too much here on the chest
because obviously, there is a white bird. We don't want to
get too much color. But we do need something along this edge a little bit, I think, just a draw so you can kind of see where the chest finishes. I still like to leave it quite light, but just a little bit. Yeah, again, I've
taken brush away, have a little have a
little gander at it. A little bit more. There's a
little bit more color here. You can see where the leg
this leg join comes in, so a little bit a little color
there to emphasize that. So a couple of
little flicks here. Why not? Right. No. I'm gonna gonna
clean a brush. I'm gonna take up a lot of
the excess water upside. Brush is quite just damp. What I don't want
to do is sort of spill some more water
into this indigo. See if we can creep that closer. Obviously, what I don't
want now is a white line, 'cause that's rather defeating my object of giving
it nice and soft. So we're gonna
just join them up. Yeah, that's a better stage. It's just giving a
little bit of something. I can soften the edges. I'll be mindful it's
up here as well. I'm just going to tie
a little bit more that CP just here. Kinda got a little
bit lost there. Is that nice flyer
looked, as well. Right. I'm just gonna allow
that to move and blend. We'll crack on with
number true Bud, but we can also keep a mindful watch on this
as we're working on the number number two bird sounds really
boring, doesn't it? Sorry, little bird. Just giving you a
number. Now, again, you can you can put
a little bit of salt in there if you want
a little bit more texture, but I think this is
gonna be salty already, and it can be quite
a lot of patterning, so I don't think I want to put that in there in
that bird, as well. I can't do anything
to the head to the head will have to
wait a little bit. So I was going to be
methodical, didn't I wait? So let me have a
little look. Yes, no. I'm just gonna allow this
to dry a little bit. I'm gonna finish
him a cup of tea. And this is still a little
bit damp on top of the head. Again, I quite like a
little bit of softness, but I would like I would like, some of these elements
to dry a little bit. I'm also really mindful
of putting my fist there. So I'm going to let that
little go off a little bit, have them a cup of tea,
and we'll do that head.
7. First Puffin Face: Okay, so this is
very nearly dry. So I'm going to crack on
with a little face area. So what we're going
to do, we're going to go carefully around these little settle blue patches go right up against that red, so it shouldn't bleed. It's not a great
one for escaping. And then we're gonna touch
the top of the head. I think I think
mine is mainly dry, but we still might get that nice little bit of
bleed, so touch it. And they have conveniently got this lovely little white line between the join of
the body and the head. So although I haven't
pencil marked it in, let just put a tiny little bit indigo on there, so you
can see what I mean. Hopefully you can see that on
the reference photo anyway, but they got a nice
little white line that runs right up to the back. So I'm gonna wet the
rest of that down. And there's also a nice cheek marking as well down
here. I'm not sure. I didn't see that in my
little facts about puffins, but what I did find out, bless them, they
pair up for life. They actually winter out at sea, come back, pair up again. And they actually burrow. They use quite often
use rabbit burrows, I think, to lay their one egg. They only lay one little
egg, one chick per year. And both parents will
help raise that chick. So yeah, they're really interesting little
characters, actually. They're worth having
a read about them. Right. I think Let me
duck my head up and down, 'cause I need to make sure
this is lovely and wet. It's gonna give that line a bit of rustle that wasn't ideal. But hopefully you can see what that little white line was. So what we do want
is exactly that, actually, just a little bit of, um a little bit of cheek
colour, get you see this. A nice sort of stiness. And actually, funny enough I probably was going to tell you the little tips on the beak or bill, whichever
way round it is. But they do actually lose
their color in the winter. Their beak color sort of fades. I don't think it actually
goes completely gray, but also their face
goes quite sotty, so this all sort of
crisps up, I suppose. The white plumage
becomes more white, and they get that
beak colour in, which is really interesting. I suppose it's a
mating kind of thing. Both female male and female, they're they're the same, so they're quite hard to tell
the difference, apparently. They're. I think the males
tends to be a tiny bit bigger. Anyway, I probably I've
bored you with enough fax, so I've picked up soy
a little bit of sepia. Obviously, can't do
too much multitasking, can I fax painting and filming. And so I've got a little
bit of violet there. I'm squinting my eyes. I'm trying to get in
that the darker area, a little bit warmer
up to the top. So a little bit
more violet there. And there's a nice little bit of light here behind the back
of the eye and on the cheek. So if we leave those colors out, then we'll, um Yeah, we reserve that white. Gain, keep take brush away,
have a little gander. Well, Ganda's my word
today, isn't it? If only I was painting geese. Okay, I think that's enough. I really don't want to lose
that white cheek marking, so I think that's
probably enough. But what I do want to
get in and actually, I might use sol
genuine for this, that little funny
little cheek area. It's just here. It goes right
up against the rousette. I wonder there, doesn't it? It doesn't have to be exact. I think each puffin
will probably have their own sort of
unique markings. You can cut this down or make this bit
smaller if that's if yours got a little bit
exaggerated like mine. Let's make that a
little bit smaller. Okay, well pop those in in a minute once it begins to dry. So we had little blue markings. So then we add nice softness. There's a lot of segmenting
on this puffing cast because we're dealing
obviously with a very dark black
markings and white. So trying to get that sort of juxta between the two to have it soft but not lose those
quite hard lines is tricky. Obviously, if you've
got two subjects, you can work on each
subject as we go along. I'm trying to be methodical
for you and not jump around too much otherwise it's going to get
a bit confusing, but if you have watched this through once,
and you're like, Oh, I, you know,
when that's drying, I can, you know, crack
on with doing the feet. So it would speed
the process along. If I was painting
this as a commission, that's exactly what I would do. I would allow some areas
to dry such as this, and I would probably get on with other parts of this bird, but say for the sake of ease and not confusing either of us, then I shall work like this. We've always got this
nice beak to do, so I think we can
probably do that now, but just be a little
mindful not to touch this sort of head
color into the beak, and we also need
to be mindful of the drying process
in an ideal world, we put those little blue patches on once it starts to go off. It's not critical.
We could put that in when it's dry and just
soft of the edges. So we'll see how we go with it. I'm not going to get
too panicky about it. Okay, so I've got a
little bit of violet, and I'm going to have
my so like genuine. I'm going to start with this
bluey move marking here. So I'm going to try to keep the colors a little
bit light at the top. I like a little bit
dark at the bottom, so I'm just gonna wet both
sections, top and bottom. And then a little
bit so like genuine. A little bit of
lavender, soy violet. And just tap, tap at the bottom and allow that
to spread up to the top. If it's not moving,
we can always put a little bit more colour in, but if we carry on
tapping at the bottom. And this is where I quite like tilting norm in
different circumstances, but I don't want to sort of shift anything around
at the moment. This is just forming
quite nicely, and the cheap color if I
was to lift the board up, that would obviously allow
that color to run so we don't want any tilting
on this class today. Which I do love a
bit of tilting. Okay, I'm gonna have to
paw this up a little bit. I'm just being
mindful push it back, so you hopefully get
that you've got a nice slightly darker
at the bottom, a little bit lighter at the top. Fabulous. Okay, so I'm
going to put those down. Let's do that red. Just gonna squidge into my iPad a little
bit more so I can see if you look at
that reference though to the backboard is a
little lighter, isn't it? Oh, sorry, not lighter.
It's a little out of focus. So I'm not going to hopefully
you can still make it out. It's almost quite good cause you can't see
too much detail, so you have to be a bit bolder
and just go for it cause there isn't the
opportunity to be too, too neat and analyze it too much because it's a
little bit fuzzy, isn't it? So you just have to go,
Yep, it's just about there. So, again, I'm going to start at the bottom and work my way up, hopefully to give
a little bit of dark at the bottom and a touch. Lighter at the top. That's
two lines in there, so we're just gonna
push those up. I try to keep a little gap. It fills in there, doesn't it? Is there
something like that? Make that a little bit dark, 'cause they are rather
splendid these, aren't they? They beaks or bills. Now I wish I had looked up. But I did find for you. Apparently, they can live up to 30 years. That's
quite old, isn't it? Bless them, 30 years with
the same partner, eh? Okay. Pull that up. Okay, keep taking your brush
away, having a little look. I say, they're very neat.
If you like neat things, you'll love this class. And if you followed this
on from the buffalo, which was quite, quite
free, quite freeing. There's lots of
paint being sposhed around and lots of ugly stages. Whereas this is very neat. You can see where you're
going, can't you with it? They are very
adorable. I'm not sure why I haven't painted
a puffing up till now. The lovely. Okay, then
we're just gonna wet. Just down the bottom
there. I'm gonna try and keep a tiny little dry line, 'cause that's quite pale at
the bottom there, isn't it? It's almost quite tricky
because we'd like to keep this lighter at the top to give the impression of light. But actually, this is
lighter at the bottom, so probably I say by design, but it is a lighter
color, isn't it? Take your little brush away, have a little. Let's try. I think I need to come
up a bit more here. Try and close it down a bit. Say, it probably doesn't
matter too much. I should imagine
it's one of those identifying things
where people could tell individual puffins from
their beak colors. But saying that, if they do change their
colors each year, then maybe that
wouldn't be the case. Thinking out loud, sorry. There's a tiny little bit
of red there, and again, be a little mindful you don't touch the
red into the blue. And a tiny little
bit of red here, and I think I can see that beginning to dry and
if that blezer touch, it wouldn't matter
either, 'cause it just had a little
bit of softness. I think that looks right. We can always do a little bit more sort of tinkering, as we go along. I do that without say or
say, yes, that's enough, and then straight away,
go back in again. I've lost what I could have
done with another line now. I've lost one of those
lines there, haven't I? But I don't think that matters. Right. Let's down brushes. So I have a little look, see if that blue is ready. Well, let's give
her a little go. I'm gonna lose so
like Genuine again. Main, it's a little easier
to control, generally. It probably won't
run quite so much. I can see I've got a loopy
bloom going on here. I see, I've probably put a little too much water in there. You see that bloom forming? And if something does
happen like that, and you're like, Oh,
I don't like that. That's not what I
wanted to happen. It's gonna be interesting to
see how that sort of forms. And to be honest with you, it's quite hard to
alter things like that as they sort of settle, and it would be better to let that completely
dry and address it. But I like anything like that, so I'm going to be intrigued to see how that actually
finishes up. It's a joy as a
watercolor, isn't it? You put it down. It's
not how it ends up. You just have to
trust the process. Okay, so a tiny little
bit of so light genuine. A little bit up here, as well. And we'll do the
we'll finish off the eye in a little
minute, I think. Should all be dry. I'm still still a bit mindful of
putting my fist in that. Okay, and then we've
got that nice, really identifying
puffing marking, which is that light
streak from that comes off the blue
into the Does it go? Yes, it goes right to
the end, doesn't it? All right to the back of
the hope what colour. B of the what am I trying
to say, back of the head. And what I can do, if this
is creeping up a little bit, this color here, I can always pop a little bit
of water in there. Just tap that a little
bit of water there, and that will hopefully either
give you some, you know, potential bloomings there, just give you something interesting, always after
something interesting because these are very
exact little things. So to get something that's
going to be a little makes it stand out a
little bit from just being a very you know, dark color, white color, very exact bill markings. So to try and get something
different is yeah, is is what I'm always
after something unique. Disappearing on me. Might be a little bit too wet. I could see spreading
a bit, so I can again, those that little line could
be put on right at the end, you're finding like me, this
is bleeding a bit too much. It might be better to do
it when we do the eye. Which I think Oh, the editing team, AKA, my husband can have a
lovely time with this one 'cause I'm jumping
all over the shot. But, let's do that eye now. There's no reason why
we can't really, say, This is still damp, yours probably is dry by
though I should be, and by practice, pieces
would have been dry by now. So just be a little bit careful. You don't
put your fist in it. But very, very carefully, we're just going to
start in the middle. We're just painting
this in it's too small to try and do anything
particularly clever with it. If for some reason,
you're doing this larger, then you've probably
got a little bit of scope to try and do
something a bit more. Um, you know, trying to get the colors atop and let things run,
but it's tiny. It's very hard to do that. But ideally, if you can leave
a tiny little white line, I've just managed to
achieve it so far. So if I may not lose
it. It's the joys of having a pair of glasses. Can I actually see a bit closer. Take your brush
away. Have a look. You know what? I think I'm
almost there, actually. And I might cause it obviously needs to dry before we
put that catch light in, but I can adjust when
that all dries 'cause what I don't want is to come further out and then
start getting into this, um drying face area. So I'm going to
leave it at that. And see how that
sort of pans out. I can't do much
little fiddly bits. These will probably all be done in the sort of last stages finishing off stages where
we put the line in the beak, we address any colors that
maybe need strengthening. So I think we've got the
main number one puffing. Sorry, little puffing. Maybe you can come up with some
good names for them. Yes, so we've
finished number one puffing for the time being. So we're going to move
on to the second one. But what I will do first, I'm going to clean
the kitchen roll, get some nice fresh water, and we'll start again. I
8. Second Puffin: Right, got myself a
bit of clean water. Nice, clean piece
of kitchen roll. Let's start again, and we'll literally rinse and
repeat it as it were, so we're doing exactly the same. I will try to stay in the same
order. I can't guarantee. So what we started off with was a tiny little bit of
red around that eye. Again, it's just painting with no wetting down,
nothing like that. Cut by little brush. I love these Dagger Bushes 'cause they've got
such a fine point. Obviously hold a
nice little water. Great for sticking in my
tube of paint. So sorry. I've just abandoned that
little lumber naked there, but if you haven't got a
little dag of brush, then, you know, pick up your very
small brush around the eye. Just take your time.
There's no hurry with this. It's better to get that
nice shape right, as well. It does create a loss of
character the shape of this. I can see just looking
at my bird over here. The eyeballs to me made it a little bit bigger
and some sweeps. But I say, if you're looking at yours going,
Oh, it looks a bit weird. So does mine, so don't worry. We'll address that in
the finishing off bits. Okay, I think that's
as round as I can get it over here, from
where I'm standing. And then when we did
the yellow, didn't we? So pick up your yellow. Be mindful. I can see there's a tiny little
bit damp still here. So I'm gonna be yours
is probably dry by now, but just be careful. I would ideally leave a
tiny little dry line, 'cause what we really don't
want that indigo running into number two puffins
A beak or bill. Now I just looked it up
actually while I was changing my water.
It can be either. It seems to be, so AI suggests, it's referred as
a beak or a bill. Of course, Mr. AI could be
wrong. This has been known. Okay, so a little bit of that yellow right at the
bottom, and just allow. Again, just be really mindful you don't touch that indigo. Just allow it to come
up. If it's not moving, then you can always
just drag it up. You don't want too much color 'cause it's quite
pale at the top. I want to make sure there's
a little bit there. Well, I think that's D's job. And then pick up a
little bit of red. And then we're
just going to sort of just swirl a little bit, so it looks like a little
rosette, I suppose. And then pop a little bit of
the yellow in there as well. I would go Yellow more yellow at the top we get a
nice orange look. And if it run say
if it runs into that big that's absolutely fine, but mine hasn't this time. Lovely. Take your brush away. I think I've achieved that. I seem to see painless. Lovely. Okay. And then we're going to move
on to the body, exactly the same,
but I'm going to use that Sodalite
Genuine on this one. So it'll be interesting
to see how that one goes. So same again, actually, what we will do. Let's do. Now, so I'd like genuine brush. It's quite It's not
particularly wet. It's got a bit of dryness to it. I want to see if I can
get this nice flick. So it's got a little bit. I brush it a little bit dry. Hopefully, I've achieved
something like that. So then we can wet
this area down. A nice little color here, especially with so
light, genuine. It's not as punchy as indigo. You need a nice amount. And, of course, you've lot
of ways to add it, as well, so then up to the top. Donde found the wrong
way, haven't I? Just be careful. Again, it's
just a little way down. Doesn't have to be no right
or wrong all the way down. But I would say, be careful of touching your number one bird,
number one puffing. And then, again,
nice lots of paint. I would go heavier
at the back again. Get a nice shape before we start wetting stuff down to a
nice amount on there. And your bush.
Let's join them up. Let's stay here. So pay aicularion attention
to the shape. Work our way down like that. I say, allow whatever happened. Oh, you'd have a little tinker. Let's see if I can not add so much water this time around. You can see it probably
gonna need a bit more paint. This is a slightly larger area than the number one puffing. I call it number one puffing. Should have thought
of some names. Right. You can see that's
a little bit too pale, so I can now start
adding a little bit. By sort of pay
attention to the I'm gonna towards the back a, you know, we've got
that least impression that the light's
coming from the front. So we just push it at the back. Actually, 'cause I've got quite a lot of
water you can see, it's almost not moving because this is
such a puddle here. It's sort of coming up
against that wall of water. So I can actually
edge my kitchen roll. It's suck a little bit of that up. Maybe I haven't
got too much. Come back down. Don't really want any dry patches,
particularly. But I would say the minute if you get something
that you really love, and I'm still
popping paint down, you're like, No, I love
what I've got. Leave it. Um, 'cause, because be
confident in your own piece, I say, it's um we all
work at different stages. Slightly different paint
and probably and paper, et cetera, et cetera,
time drying time. So yes, sometimes you have to be a little bit of a judge
of your own piece. Okay, I'm sorry, I picked
up a little bit of violet. Just add a little bit of warmth, something different,
another tone. Um, maybe a little bit of
brown in there as well. So I had brown sepia. I can see if I squint. I've got a nice wings quite dark here, isn't
it in the front here. So it's actually
put a little bit of color in here as well. It's quite thick, so genuine. Keeping it nice and sharp.
Take my brush away. Still, like, I love
how this is forming. I just wanted to come
down a little bit, so I'm going just pull down a little bit and add a little bit of violet
and the genuine together. So light genuine is
such a beautiful color. And if you haven't got
that in your collection, you need it in your collection. It's so lovely. Look at that granulation there. Beautiful. And it somehow always seems to go with
every other paint. Good, I had to say my favorite
paint off Daniel Smith, it would be so light genuine
and without much hesitation. Right. I'm gonna see
if I can come up against that. Front bird. Maybe it's that nice shadow in, but we'll put that shadow
in right at the very end. What I don't want is
a white line, really. Even if that bleeds
a little bit, it would be better than a white line between
the two of them. I like how that's forming. I think it's still
going to carry on moving as watercolor does. So although I
haven't got a lot of color here, I still like that. If I carry on fiddling, although it's not a
true representation of that reference photo,
I really like it. I like how that's yeah, how those colors
have sort of formed. So it's a good,
sort of, I suppose, lesson that if you get
something you like, but it's not the same as a
reference photo, don't worry. We're not trying to
copy a reference photo. They are just a guide for you. The ultimate thing is well, ultimate thing is to
enjoy the whole precess, isn't it and come out
with something you like. So there's no point
slaving away, trying to get something
to look exactly the same as a
reference photo cause nobody's going to see
your reference photo. It's slightly different,
obviously if you're doing a pet portrait
for somebody, and it has to look like the pet. But for this instance,
this isn't the case. So yeah, I'm going
to leave that. So I think what we Oh, no, we didn't we came
over, didn't we? So let's nattering away. While this is still a bit wet, let's come back over
the top of that head. Try not to put my hand in it. It's always a little
difficult when I'm filming. I also have a bar that goes
over the front of my desk, so I avoid putting my
head into the camera, so I'm always working
a little way away and having to work
around different angles. Than I normally would. So that hasn't really
run that much. So although, you know, it's created a bit softness
so we haven't had, you know, a joining sort of line, but it hasn't also
equally hasn't run up, so I'm going to add
the painting now. Bear in mind,
actually this bird, they have a puffinchh say. Colors more towards
the back, isn't it? And there's the tiny
little portion here, that's the front of the
flip side of the head, probably where the
eye started to come. So yeah, reserve that that would make sense
to the painting. And then I might just
wet that in allow that to move inwards. A little bit more color.
Oh, put her little photo, if I remember of how the
filming set ups here. Though when I'm
going, I can't see. I'm too far away. You'll be
able to see what I mean. Bush way that's looking nice. I know that will carry
on shifting forward. So I think that's enough. It's very easy to lose light and harder to
get it back naturally. So I shall leave that
at that for a minute, and we'll do those
feet in the sick.
9. Second Puffin Feet: Right. It is exactly
the same, again, as we did for the first bird. Let's get the two colors on
my brush at the same time. Gonna put my nice
little splodge there. G in my brush. Then we're gonna wet the rest of the leg down
and just allow that to run. If it's not moving, give
it a little rustle. Say, make sure you stay within
those nice lines, as well. Keep your eye on that
reference photo to Woodworth flicking your
eye back and forth. But a little bit
more strength in there. Yellow at the top. Normally I would have
pick an orange paint. I don't often mix, but as I say, for the sake of having so many paint tubes on my desk
and confusing everything, then I figured, really, red and yellow, obviously, make orange, so let's
do red and orange. That's why red and yellow. Well, then extra tube, but if you have a
tube of orange, you particularly
like what does a particular patterning
you like, so use that. Okay, that's done
exactly what I wanted. Nice and light, and we'll do exactly the same for the
back leg. Nice, Blodge. Little bit yellow. Top, a bit more. Yellow on top. Hema bush. Come down. I just dropped a nice
droplet of water in there. Suck that up. Come down. I can it either tiny little
line just for a minute. So I can pour this out
and get enough color. T Tai it's such a useful
thing to step away, take your brush away for a second and see where you're at. I actually quite like
that little gap. I think I might leave that there us 'cause that's formed
something quite nice. Look, up, bit. You can do some
flicks like that. The chance they will get lost anyway when we wet
them down, but way, some might stay, so it's
worth doing. Right. Let's see whether
the body had dried a bit quicker so we can get on with the body,
let me have a little look. Nearly there. I'm just
gonna give it just a couple of minutes just allow This
is quite wet down here. This is almost dry,
but I'm going to just allow that to sort
of just gently form. I'd say, same thing. I don't want to put a
hair dryer over there, 'cause I will lose that lovely granulating or I could lose some of
that lovely granulating, so I'm just gonna be patient. I
10. Second Puffin Front: Right. I reckon I
am ready to go. I will try to avoid this little section
here it's quite wet. Again, just be a judge
for your own peace. You may find yours
completely dried. Well, hopefully a
little bit tacky, what we want is just a tiny
little bit of dampness. So when we touch that body, it bleeds a little bit.
This should be safe. I'm still going to
be a little bit cautious 'cause it's
for some reason, taking a long time
to dry for me. I think I oversaturated it. But let's work our way down. By wetting this area
before we wet the body, it just gives a little
bit of barrier. It gives a water
barrier in some ways. If we do touch that, it's
not going to whiz as much. Whereas if I started
wetting here, I'm encouraging it
to pull out then. I'm down. We touched those
legs again. There a rustle. Allow any bleeding far were you. So I'm gonna leave a little it's quite wet sitting
on that edge there. Gonna come up. Actually gonna see how we're doing up here. I think this is almost dry. So dried at slightly quite
quite obvious different rates, actually. It should be. I think I did quite well
in my stretching of paper, but there's obviously
some reason it's sitting down the bottom there. Okay, I'm going to leave that little line there
just for a minute. Okay, and back up to that
reference photo and look again for the slightly
darker areas. And I've got the sepia and I
want sepia and the violet. Pop and why Bush
at the same time. I can see there's a nice
little patch there, isn't it? Getting a little
too violet for me. It's pop a little bit
of Cepio just to make that a bit more bit more brown. There's quite a lot
of violet there, and I've always got
a violet up here, so we try to avoid too
much more violet, I think. I just touched one with
that a little bit. That's nice. It's
dark underneath. The chest there, isn't it, where the legs are
coming joining. Put that violet down at you. I'm just gonna pick
up so light genuine. Stop me adding more violet. Say, pop that paint down,
take your bush away. We, we look. A little bit
so light genuine there. There is a little sort of plump breast line
here, isn't there? You see my pentil mark there, so see if I can get a little bit of that
so like genuine in there. Just to give that
slight impression. I don't want to make
it too exaggerated, but gonna pull that down a bit? I don't really want paint here stopping at the same line as the feather on this
front bird's legs pull it down a little bit. Always when you step away,
it's gonna look a little liny. Yeah, I think that's
looking alright. You gonna pop a little bit
more colour up top here? I'll have to be quite
careful because this is obviously is the dark markings, but because I've left
it to be quite soft, I don't want to add
too much colour on the white chest less we're
gonna get a reverse. The white chest is gonna
actually look darker than the should be. Yes, I'm going to get the light the chest is going to be lighter than the the body's going to
be lighter than the chest, so I'm concentrating and trying to think of
multiple things. Obvious see lovely. I think that's probably
enough, actually. I'm a little stepping
away for a minute. I say, I don't want to add too much more violet
in this front bird. He always put a little dobs of water because this one
hasn't got any salt. You could pop up a little
bit of salt down there. I probably won't think this is going to probably
be salty enough. Let's let's join this up
now, 'cause in some ways, it doesn't matter too much 'cause we've got a
little bit of darker marking anyway
underneath this tail. It's come down a little bit. Yeah, that's just bleeding
quite nicely now. I want to add a little bit
of strength underneath there just to give the
impression of shadowing. So pickup so light, genuine. That might have the
sepia back again. Just a little bit of a
tap with the two colors. And we can do some
little flicks, as well. Flicks coming down in the leg, and then flicks coming out. I had a bit paint on my brush to actually do some flicks with? Because my papers still wet, although I'm putting
it on my brush, they're still looking
quite natural because it's obviously,
that's still wet. And the paint that's already there is obviously still wet, so it's all just merging in. Yeah, I think that's
enough before I give it give it too many flicks. Just rustle that around a little bit so it
doesn't become spotty. Just join that up a little bit. I did quite well getting
some dry flicks, but let's get joining us it's a little bit odd if there's
a white little white line. Just gonna go round round,
make sure I haven't gone any other obvious white
line to where I've left it to Yes, well, I've left her God, you doing very well at
concentrating and talking today? Yes, I'm going round to make
sure there's no white lines where I separated the two to stop that
bleeding too quickly. So do the same to yours, make
sure there's nothing there. I've lost a little bit of
color still underneath there. I gonna be a bit bolder
under underneath this lake. It's so like genuine. Should be a tapping.
That's a bit better. Lost a little bit of
umph underneath there. I sure it doesn't
go into the leg. Pull it up a little bit, a
little bit of sepia to stop. Looking too blue. Even
have risky, I know. Tiny, little bit of red. Some of my lovely
practice pieces, I had a nice bleed
from the legs, actually, and that was
quite a nice color. Make sure that they're
nice and rounds nice little round
birds, aren't they? Might do the same
here, actually. A little bit tiny,
little bit of red. Tiny, little bit of the sepia. I say, as we work our way
through these classes, we all differ on what we would like to see
what we need to work on. So I'd love to be able to
see read work and help, but ultimately, I'll
have to do my own piece and hope what I'm
doing also guides you. I think that looks
that looks fine. I don't want to Ofddle. As she says, just join those up. I can see there's a little
bit of a gap there. Lovely. Right. We will
do the face next.
11. Second Puffin Face: A nice bit of clean
kitchen roll. My waters quite nice and clean, but if yours has got a bit
dirty, I'll suggest changing. It's always nice to work
with nice clean water. So again, exactly like we
did with a front bird, back bird number one
bird, puffing even. We're going to
carefully it down. The face go round that round the little what will be
the little blue markings. Touching the head wind quite
dry, I think, actually now. But if you get any bleeding, that is absolutely perfect. What we want, just a
little bit of softness. And we've got that nice
white line to reserve, so we reserve that white line. Coming right up
against the beak or bill around that rosette. Make sure you no dry patches. You don't really want
to dry patches on this one they will only
just go round the, you know, dry piece
of paper and leave you a funny little marking. Now, I'm going to pick up sepia, I'm going to do the minutest bit 'cause we show you on this
piece I quite like to this. Tiny little bit of yellow, just to give it a little bit of what most it
different color, really. It helps to sort of follow
through on certain elements. So I'm going to put the tiniest little
bit of yellow there. Let's start with those
two and see how we go on. So I'm going to
use a SEPia first. It's definitely more sushi this bird isn't it all puffing. So let's be a bit bolder. I'm gonna put the tiny, tiny, tiny sand a little bit, just to see how that feels cause this hana does move
quite readily, and I don't want
to make it greeny, but it was quite a nice. I just liked the
hint of color there. Yeah, that's looking nice. I might have a little
bit so light genuine. Don't want to use
any more yellow. I think I'm done with my
yellow. So like genuine? Just, again, just staying on the bottom here and low. You can see how
that's creeping up. The more paint I put on there, the more in theory, moves up. I've got that nice
sort of patch here, so quite thick. Pop that in. Just allow be brave. It's a bit scary when
it all moves, isn't it? But, you know, if it does move too quickly,
you don't like it. Let me show you
clean your brush. You can always just very gently
guide it back down again. So it's always nice just
allow things to move. And so you can very
gently without panicking, sort of call and correct. Sure got a nice thin line? I don't want this too fat. And we can soften that
down in a minute once, but I was a little
finishing off bits, but I'm gonna leave that quite a nice start for the time being. Then we're working our way
so I might have a little bit of a little bit of violet. Not too much, so I'm
a bit bit mindful. I've got quite a lot
of violet on my birds. Puffins. Pushes back down again a bit tiny bit
at the front here. See how powerful that
yellow weed, can't you? I put a little bit more
spy in this soft from that as and it's tiny. It's a bit I don't use. It's not a color I'm that familiar with. I tend to paint animals. There's not a yellow
in move animals, so you become familiar with what your each paint does in
their own characters, but it's quite as
quite a punchy color. Right. Oh, I think. We're
about there, actually. I don't want to close
it down too much. You want to try and keep that nice light around the cheek. Again, I can put a
bobble of water there, but the moment, I think this
is already quite saturated. I'd like to sort of crack
on with that beak next. So I'm just going to keep
pushing it down for a minute. Again, I could actually
tilt this a little bit and to leave it, and that would obviously
encourage you to run down. But I'm just gonna
keep an eye on it. I think that's
going to be alright. The worst comes the worst.
You can always take color out right at the very
end, and we may well do. So that's always an option. Right. Let me I'm go a
little mess down here, I'd like to have these
that blue at the top. I was like that, wasn't
it? Bit organized. Right. Again, we're
gonna do that little blue sort of marking
on the beak. So we're gonna wet down. It's
so like genuine, wasn't it? And the violet. It's wet that little
section down. Be careful you don't
touch this blue here on that little
dark cheek marking. And colors and brush at the
same time. Like genuine. Just gently pull it up. I just I do always
stand to paint, and I am standing now. But actually, the
puffin would be quite a nice one
to sit, actually. I can see sitting
would be advantageous. Take your weight off your feet and say it's all quite exact. Little sections, isn't it? To achieve that
lovely Christmas, there's no tracking
paint around on this one, 'cause
it doesn't work. So yeah, it's quite a
mindful, gentle piece. Okay, let's crack
on with the red, and we'll do hopefully
what we did last time. So we'll start. A little bit of red there. See if I can not. So if I can sort of keep
some of those lost one of the stripes now I say probably doesn't
matter too much, but quite nice to keep
one of those back. Right, clean my brush. I want to try and
keep this in theory, a little bit lighter at the top. So I'll just drag that color that's on
the bottom to the top. I should be a
little bit lighter. Come over and then come back down and
create those stripes. This should be dry. She says, Looking at it. But yeah, be a
little bit careful. If for some reason you're in a cool climate and it's not drying quickly, then be careful. Made that a little
bit stronger on the tip here, work our way up. Again, it's a little
bit reverse, isn't it? Again, 'cause this little area underneath the beak
is quite pale, so just gonna allow those that color from
there to run down. I'm like, leia don't
want all this. It's quite a lot of paint here, so I don't want that
particularly running into here, so Take brush away. I think that looks
alright, actually. Close this one down a bit. Yeah, I think that's right. Come up a little bit. So this is a lovely class if you love
being precise and gentle. Such mad fringing, allowing colours to flow
and move and tilt it. They are quite Oh, my goodness. They are very rewarding
to do at the end, though. When you step back, you're
like, Oh, I love these. And I think they're such great
characters in themselves. Lovely. I think
that looks alright. So, we can always tinker, just like we probably may
well do with this one, at the end, but it's probably better to let it
dry a little bit. How's yours looking? I'm just
gonna pour mine down a bit. Actually, I might put
a little blob of water now use that will push it back. And also gets that eye. The trouble now
with having added more water is we
were going to do these little tips of blue. But what I will do
actually, is just the eye. And then once I've done the eye, hopefully, that's
dried a little bit, so Okay, in the middle.
Swell you round. Nothing complicated,
if you can leave a little white line
at the bottom, it would be fabulous. Just be careful you don't
go outside this red, because you will start
touching the wet paint. I think that's right. I don't want to fiddle too much because I'm
obviously my fault, that this is all still
quite wet. Lovely. Okay. Put that down. Let's have a little look at this.
What I actually will do. It's just a wet this
little little part down, which the flip side. A little white part, isn't it? Other side of the head. Allow that so genuine, just to gently bleed in, and we can address anything
that maybe needs doing on the finishing off bits if we need a little
bit of paint here. But I'm just gonna
allow that to bleed. How are we doing with the blue? Well, let's have a little go. Right. So like genuine, make sure your brush
hasn't got any more Well, clean it first just to make
sure there's no excess paint. Make sure itsn't
nice, not dry dry, 'cause you won't
ever get it dried, but there's no excess
moisture there. Nice, thick bit of paint. We're just going to start. And if it's bleeding too much, that's bleeding too much, so I just need to hang
on a little bit. A little bit too quick. But see what the tops like. Top might not be quite so wet. I think that's right
there, isn't it? So if you ever get
something like that, don't panic. 'Cause
it can easily. I think that's what's
so lovely about these Daniel Smith paints
and probably other brands of Aunt Ollie's it's just
I haven't used them for a very long time is
so easy to pull out. You can see that's gone now. Obviously some paints in
some Atayme and others, it's not just Daniel
Smith paints, but so Genuine is a
very lovely paint, and it also lifts
out beautifully. So I think these little
tinky bits are probably best done once this bird
is completely dry, because I say, we're working
slightly cautiously, because this is obviously wet
here, and I don't want to. Oh, I don't want that to the eye mark is really
to bleed too much. So I'm going to allow that
to completely dry before we get on and do this
rock the rock is fun, nice and lots and lots
of paint flowing, and we can do a little bit
of tilting and things. So, yes, but I would let that this little face dry
because we don't want to tilt the paint and sort the paper and allow some and get some
of this paint running. So allow that to dry. Then we can do the
rock because we don't want the paint to run.
12. Rock: Okay, are you ready for
a bit of paint flowing? So I've got my
little trusty heart. I'm going to put this
underneath a board, and which will allow that
paint to run and flow. So if you've been dying
to kind of let things go, then this should be fun. Right. Well, I'm going to wet and be really
careful about the legs. Legs, legs and feet. You don't want the paint
flowing over the legs, so be carefully wet
around the legs, at least this top section here. We're only going to probably wet somewhere like a line there. On a sleep, it doesn't matter if you leave little dry patches, that'd be quite fun, so we're trying to
create a sort of a rock, so bit in there. I did leave that
little line there. D I between the feet
coal down. Bit in here. Okay. Now, let me
bring back this one. I quite like the
red, so I'm going to be gonna have quite
a lot of red here. They're so genuine, and the
Sepia gonna be a mixture, too, and I'm gonna pop some salt down to see if we can
get some nice salt. But yeah, if you don't like if you don't like those
colours and obviously, choose the colours you've got or something
may be different. But they'll be the
ones I'm using. So, let's get I've got
the red in my hand. Sepia a little bit
of so light genuine. So let's start start
with the red. Why not? No, we or wrong. I put the so light
genuine on top. It's only gonna go it's only gonna flow to where you've
obviously wet down. Use the dog, 'cause I might
just pause this for a minute. I think that's the post. I guess there's nothing
like keeping it real. That was the postwoman
with the delivery. Right, where was
I? All the times. So I had Sepia. Let's gather my paints
again, the red. And so like genuine. As I was saying, I
was going to put, I think, a little
bit of sepia here. To check my paint paper hasn't. No, I think it's still
nice and wet. Yep. As I was saying, I
think I was saying. Anyway, the paint will only
run to where you've wet down, so so you have a little
bit of control there. Just seeing I've just
gone over that foot, I'm telling you to go it
carefully around your feet. Let's get a bit more paint. Gonna go slightly
cooler to this side. Say say rock, so you can
make it rocky shapes. A bit of sepa in there as
well. Is a bit more rocky. Et's get that little
bit in there, as well, before we forget. It's easy to forget
that sort of thing. And you're suddenly like, Oh, I haven't got a bit of
rocking between their feet. It's catful that's
come down here. That's fab. It's a bit more red
there, I think. A little warmer on the outside. It's an interesting
rock, isn't it? I don't know where these
particular puffins are. I guess if you're stateside
and you're watching this, I don't think you
have that many, but what I think I can remember, you have them on the main. Excuse me, if I'm
pronouncing these badly, having never been to the states and not
knowing it that well. But yes, I think
you do have some. I think the main
colony of them is, um, Iceland and the
UK quite a few. Right. Let's put a little
bit of water here, and then we're
just going to pull out and just allow
everything to run. Come down. We can whip
a bit further down, if you want.'s come
right out here. Give it somewhere to run into. Hasn't got a lot
of room, really, 'cause we're off the page
in a minute. Aren't wave. If I run it down here,
gives it a little bit a little bit more room
for that paint to flow. Then you can add color
where you want to, really, it looks a little bit
red in one place, so we can add a bit more there. Careful you don't go too mad. It's probably more
of a p to myself. 'cause you don't
want to you want that lovely sort of
flow and lightness, so nice and dark at the top. And then flowing to nothing. Just be careful around the feet. I haven't done a
particularly good job at. But we've got here so lenue' be so light
genuine just there. Lovely. I think that's
probably enough. So it starts running again. Say, couple of little
drops of water. I'm gonna put a
little bit of salt, and then it really does
need to be left to dry. Around those feet
while it's still wet. Actually. There's a little
gap there as well, isn't it? I throw that in as
well. Just gonna nick a little bit of
paint from there. Out tiny bit. Oh, whispering, sorry.
Bring it out a tiny bit. So, yeah, take your
time, go round these little feet
quite nice and neatly, and then put some salt down. I don't think you necessarily
need to watch me do it, but you get what I mean
to go carefully round. And then with your salt, say, make sure your
fingers are dry. It might be one of the reasons
this salt hasn't worked particularly well in that
particular back puffing. So yeah, I think that's a thing. Yes, it might sticky and wet, so I'm going to get some dry. I think I've dropped
droplets of water from my pot of water
when I've been painting. So I will get some dry salt. But, yeah, I will
literally just sprinkle it so you'll get Hopefully, this little bit of effect
and you can see how well the socks worked on
this particular bird, given that really
nice sort of plumage. But, you know, that's
the joy as a watercolor. Some things work out
better than others, and you never get to the same. So be patient, put
your soak down, and just allow that to dry.
13. Finishing Off: Well, I hope you like how your ground has turned
out, quite like mine. Yes, quite like the salt to
have worked a little more. It's obviously seems to be a
running theme on this class, because this salt sadly hasn't
worked particularly well on my little puffing at the
back there. But never mind. Great. Let's finish this
painting off and do all the lovely little
tinkery bits that will pull the whole
painting together. We need to take some light out. We need to finish the eyes. We just need to
generally go around it and really tighten
up the details. And this is when the painting
really comes to life. But first, we're going
to rub any pencil marks that might be might
still be there, but be really careful that your painting
is definitely dry. I'm going to start with
that little one in there and go around here. Just nice to get rid
of any pencil marks. It just holds it
in, in my opinion, and this is why it's
nice to then take little bits of light out because you're achieving the same thing. You're allowing somehow
you're allowing lighting. It's a bit hard to explain. We can say we can get rid of any salt that might be remaining. So if you've got salt on your
body of your Eva penguin, which if you decided
to put some on here, get rid of that. I just gently sprush that
off onto the floor. Lovely. Good pencil marks. But you
generally get what I mean to go around and take
any pencil marks off. It tends to wobble
the board a bit, so I won't do too
much rubbing out. So I think we should
start off with the eye. Let's get that eye
done because it always helps to pull the whole
painting together, and then somehow you sort of see a more finished
product. So glasses on. I've got my little bit of
white Gerash here as well, which is always useful
for doing eyes. I rarely leave any white
dots when I'm painting. I always add it in
with the white garage. So let's see if we
can tidy these up. I would suggest going round and just let's have a little look excuse me while
I scrawl in a little bit. Hand in the way, arm in the way. So my little red has gone
it's a little bit too much, but what I might do to see if I can take a little bit
of color out first, just to it softened
some of that. This stage swap brushes. This sort of finishing
off stage is all about just really gently. There's not going
to be lots of paint flying around. You can sit down. You're just sculpting
at this point and just tinkering and
observing your piece and see how it's
sort of shaped up. Now I can sculpt she
said, hopefully. Just to get that liner. You see on that reference
photo, there's, like, a very gentle curve here, which gives the
impression of this white down on the puffing sort
of gives a roundness. So if we take light out and
just push that in a bit, let's use it a
very gentle curve. I'm going to get rid
of that little brush. I don't think I'm gonna use it until I suddenly
decide I need it. But you can see that's just given a little bit of rounds
a bit of light there. Oh, see, I've now taken out that line from the eye,
but that could be put in. It's better to get
the eye sorted. Now, God, a little raggedy. We were working with when that paint was still wet
around the face, wasn't it? So it feels a bit
easier now, doesn't it? Now it's dry. Be careful to try. If you manage to keep
that little white line, be careful you
don't lose it now. I think that looks right. I'm not sure if I
want to add it. I'm going to look back from it. From the reference
photo, it looks like that should be
a little bit higher, but actually, I
quite like the red. And I can always like I say, it's such a useful
thing to Obviously, we've probably
stepped away a little bit just to allow this to dry, but it's often the case. I'll come back and look at it, you know, with the
next day and go, Oh, yeah, that needs a
little bit tinkling. So these finishing
off bits are nice, but they're not always
necessarily the end. Right. Now, if you're very good and you can
get close enough, and maybe you've painted
this a little bit larger. But it's always
lovely just to take a little bit of light out at the bottom of this
eye, if you can. I know it's working
very tiny, that. Hopefully, you can
just see that. I think I probably,
yep, taken enough out, and then with a
tiny little bit of white gouache, nice,
sticky consistency. I'm gonna put that
little catch light in. I know there's not on
that reference photo, but I think it always
makes it look better. And if you've lost that
little white line here, it is at a time
you could put back in and then go
back over the eye, if that makes sense.
I'm not going to. I can see I've lost
it a little bit, but I might think with it later. I don't want you to
have to watch me do all these tiny things that might not be
relevant for you. But yes, if you've lost it, you can paint it back
in and then go back over it again with
the eye colour. I hope that makes sense. It's only a little
impression, anyway. I said, Yeah, don't
get too worried. Right, let's let's do
this birds as well. Um, yes, let's do this one. Always go the wrong
way around, don't I? I should have done
this to on thst. Same thing. I'm just going to let's put that
down for a minute. Huh, put it over there.
I'm gonna pick up my red. I think I've lost a little
bit round it eye, actually. Little bit of red. Should do a tiny little bit
of red up there. Almost a little bit misshapen. I say, Yours is going to
probably be different than mine, so it gets a bit tricky to help everyone and all be
relevant for everybody. But hopefully these little bits are let's take a little
bit of colour out here. So left both my reds are actually a bit
exaggerated, aren't they? So, What I might do.
So like genuine. If I don't put my arm in there. I just close it up a little bit. What I can do is that
makes it look too big, then to take a little
bit from underneath. I almost then start
to pour that out, as well, while I'm there. Get everything nice and soft. So when people say, Oh, watercolor, you can't it's down, it won't lift out, I think, particularly, say, Tiy lovely so light genuine. He's a very kind paint. And again, I can do the same. Just try and round
that little part up, as well, to try and get a
little bit of a curve if I can. Probably see it on
a reference photo. It's just a little bit
round. And lighter. Just by doing this, also, I'm making sure there's
light as well, 'cause there's a
nice lump of light. Lump's a horrible word
to say, isn't it? But you get what I mean? Yeah, it's nice and light
behind the back of the ear. Eye and little light the cheek. So if your cheek equally has got a little dark and a little bit too much paint
just you know, what I'm doing here
is actually taking colour out as well of this area. I give that a little naptchenll. Right. Again. Same
thing with your eye. I can take, if you can. Gone too blue now up here. Anyway, I shall fiddle
with that off camera. Um, right. Take a little bit of light
out here at the bottom. Squige it. Fingers great. Just give it a little squige
and that's just enough, it doesn't sing your
finger squidges to paint a bit more than it
does actually lift it out. So that looks quite good. So if these were painted bigger, you could really spend a
little more time getting that nice detailed eye, which actually brings
me to the point. There's a lovely artist
called Nadine on Skillshare, and she has also done
a pair of puffins. So I will put a link to her class on my projects
and resources pages. We paint quite similar. But obviously, we're
not identical, and I think you probably learn
a few little bits of her. And I think she paints
them a little bit larger, so she's had the chance to
make these eyes a little more. She's a little more
to move around. So just trying to bring back that
little white line, which I lost on this one. Yeah. So yes, she's worth
checking out, and her work is beautiful. She's got a few
classes on Skillshare, so worth having a little
look at her stuff. What? Let's not start
fiddling with my own piece. Because that's probably
not so relevant to you. Actually, while I'm thinking
of it and little lines, let's put that little
line on that number. Do puffing, 'cause
that's a nice one there. Okay, literally
just paint it in, clean your brush, and then
soften that edge underneath. Everything's just very
calm, very gentle. So we're not rushing
to beat any drawing. Time, it's all a
lovely time just to really observe your piece
and get it right and crisp. Okay, I think we've addressed both colors on cheeks and stuff. I like how this paint
sort of formed, but again, you could take
a little bit of color out. Let me show you on this 'cause it's a bit unfair to
say and not do it. So you could have a Again, you're just taking color out, you're scrubbing it
away in some ways. And then you could
dab the kitchen roll, and that would just lift and give you a little bit of light. But yeah, I'm
really pleased with how the paint has formed
really and fallen. Nothing's wet, is it? No. Okay, we can see if we can
knead it up any beak areas. Um, I don't really
want to necessarily try it on dry paper, but I quite like to
make sure that there's really sharp and clean line
that goes over the top. And I can just wipe
down that little area. Again. Is that tip
really tight, as well? One, I'm thinking
of other artists. I don't know if I might have mentioned him
in previous classes, but it must have been
quite a while ago. There is the most
amazing he would be. If there was ever
somebody I have liked for a very long time and admired his work for
a very long time. He's Carl Martin.
He only does birds. That's not strictly
true, actually. I think he started
doing some wildlife, but generally it's birds, and they're exquisite,
really worth doing. And it's a tiny little
he's not on social media. There's not a lot of presence
really on the Internet, but there is a little
YouTube video, which I think I did link
to at 1.1 of classes. Is him in his studio, um, basically he explains he
works quite large, as well. A lot of them anyway. But he will spend a lot of time really taking the time to sharpen up beaks and eyes. They
are his main thing. The rest of it is quite loose, but he will really
emphasize a very tight, clean beak and bill. It's that lovely contrast
between super loose, lots of salt and
that super crisp, rural attention to
detail that makes his work list in my
eyes, just pink. It's magic. So worth looking him up, if
I for some reason, forget to put that
up on the projects and resource, go and
have a look at his work. It's Cole Martin. Okay, I think I might have gone a little bit
far down here when I was chatting
away and just gone off pieced a bit,
but never mind. I think he looks alright, still. And again, this is fine. I don't think I want to alter
any of this, the colors. You know, I've got
that darker area and it's a little bit
lighter at the top here. So what I could do, although
I've tightened the shape, I can take a little bit of
colour out as well just to It's tricky because actually
on the reference photo, this is the brighter
part, isn't it? On the top. And it's
lighter underneath, which doesn't help trying to capture light when it's lighter underneath bib
design, as it were. I think I'm quite
happy with that. I don't think there's
much more tinkering. Oh, I know we need to do. It's a little line. I think I'm gonna use so light genuine. Say a really lema brush. I don't want to add much
water at any point, probably doing the fiddling
and finishing off bits. But there's that
line what is it that joins the two portions of the beak bill up. Paper
still a bit wet there. Yeah, that helps, doesn't it? I love it. Equally, you can actually
take color out, as well. So you could achieve
that with taking the color out rather than
putting it in taking it out. Put no line stronger
line in there. Lovely. Okay. I shan't fiddle anymore. If I'm going round,
let's go stick with this little puffing first. The back puffing. Let's just soften this line. So all I'm doing is running a damp brush around that line. Nothing more than that. It's a little bit darker at
the back, isn't it? So I've just rust it a little
bit more, but careful. It's very easy to
lose these lines, so that's probably enough. And then as I work my
way around, I like this. I don't think I want
to take much out, but I'll just get rid
of one of those lines. They'll say, this is lovely, like the pencil marks,
holds it in somehow. Be careful when you
do lots of dabbing that you've got a clean
piece of kitchen roll. Well, rather risking it here. Yeah, I think that's
turned. That nice. I'm not overkeen on the
way that way that's bloomed, but it's natural. It's how it's formed. I can't I don't think I could
really alter it. I have to wet everything down. And I don't think
I would achieve a better result at this stage because you're wetting
another area down. You're muddying everything up. And it's just what it is. It's a certain plumage. So I will leave that. I won't personally alter it. I don't want to add, you know, any don't tape particularly
any light out. My salt hasn't worked well, but hopefully yours has
worked a little bit more. There's no aspect
I want to change. So we're working
down to the feet. Again, we take little
bits of light out, maybe just a very top of
that little leg leg foot. Excuse me, while I just scroll out so I
can see what I'm looking at. Yes, then there's always the opportunity to put
little veins in equally, little bit made a little
bit of soda like genuine. You can put the claws in. I've been a little
tatty with my feet. I will probably just aton
these up, say off camera. But yeah, go around your feet. You can either gently add
little veins in Dicker claws. Just make sure we sort
of nice and tidy. So I won't I won't spend
a long time doing these. Hopefully you kind of get what I mean when you're going round
your piece and just tidy. Back to the top Bird again. Let's say, I'm happy
with everything here. That little white area
has worked quite well. But again, if you've
lost that edge, you can always put these
tiniest just wet that down that tiny little paint right on the edge just for
the eye to see, there's a little section there. But overall, I think that's given quite a
good impression of it. Obviously, we've tackled
the I and I will neaten up. So if you look at this piece, which we'll be on the projects and resources pages and go, Oh, sort quite how you
know, how she left it. Just like you, I will go
over it and sort of alter and tidy things up and
tighten things up, probably just relevant
for me, and I can get a bit closer to my work. Okay, would you put
that line in there for that beak does sweep over
a little bit, doesn't. We lost the original pencil
marks there that were there. It does have a little
bit more of a sweep. Fab. And let's soften
this join, as well. Is actually on the
bird. It's not one of our funny lily joins, so just soften that down. And there was also that
while I got so like genuine, I'm actually going
to paint this in. There's a nice shadow,
which is always the shadow of the beak orbil whichever way
you want to say it. I just runs in here, doesn't it? I think that's quite a fun
thing to put in there, so literally just painted in. Going round, we've addressed to sort of cheek
areas, haven't we? Again, you can tidy
anything up if that a little bit of that indigo has crept in
somewhere along the line. So I can just tidy that up. Ideally, it I don't really want it to have been
in there in the first place. You know, I'm just gonna get a clean pita kitchen right.
It's got a bit sodden. It's better. Give
a good old squig. Yeah, I I don't want to take
any color out, but again, if you've gone a little bit heavy handed
with the color here, you always gently take the
little bits of color out. But there's nothing I
particularly want to take out. Again, same thing with the feet. You can go around to
put little veins in, add the little claws in, and kat in anything up if it's gone a little raggedy
like mine has. When you put the
ground or the rock in, you can always just go
around very gently. You can tidy things up, so yeah, you're
just painting neat. And you can just
crisp everything up if you feel that's
going to be beneficial. Don't overtwet, though. It's easy to get a
little bit carried away, and everything's very
tight and precise. And as I said to somebody, if you want exact replica
of these two birds, obviously, you've
got a photo of it. So we're trying to
by painting it, we're trying to bring
some sort of magic, something for your the
mind to make up, as well. If it's all that information is on there, you've
lost something. You may as well have the
photo in my opinion, but that's only my opinion. Right. The rock, again, I think that is how it is. It's hard to then fiddle
with that, really. Hopefully, you've put enough painting it down and you've
got that lovely flow. Working our way around,
there's no flicks. I want to add.
They're tricky to add in once sisters are all dry, 'cause they tend to
look like they've been stuck on which they have. I don't want to
take any color out. This is all sort of blended, so I think I think they're
about there, actually. I did contemplate some
little splatters, which you could do if
you're feeling brave. I don't want to on this piece. I wasn't sure, but it does add a little bit of
movement to your piece, and it's quite a precise piece, so adding something like that
can sometimes break it up. But if some of this
hasn't made sense, or there's a little something
you want help with Please pop that on the discussion
section in each class. A few people have been
popping on a review, and sadly, I can't reply
to people's reviews. I can only reply to the discussion page where
I can obviously help you. And if Bob obviously put up in the projects and
resources pages, again, I can then see your
work and comment and help you. So you make use of that, it's amazing to see your work. And it's corny as it sounds. It is I love it. I love going on there,
seeing the projects pop up, but it's just so rewarding. So please do take the time, and I much appreciate
it when you do to load those projects up. Um, Fabulous. I think that's it. I almost don't want to stop now. It's been a pleasure taking this class and
taking this class, filming this class
and teaching it. And I look forward to seeing the projects roll in.
Thank you very much.
14. Final Thoughts: So I hope you enjoy painting. It's adorable, too. Aren't puffins just the
best thing to paint? How did it feel to boldly
add paint and join them up? A great technique to stop you
fiddling and overworking. Did you manage to achieve nice soft edges between that dark body and
a soft white chest? It's all about timing. Wasn't that rock fun to create, especially after being quite precise and neat on the puffins. It gives a great contrast
to the painting. As I always say, it's
worth stepping away, coming back and looking at your painting with a
fresh pair of eyes. This simple act still amazes me. So we look forward to seeing
you in the next class.
 Jane Davies, Professional Artist and Teacher