Transcripts
1. Introduction: Hello, and welcome to this
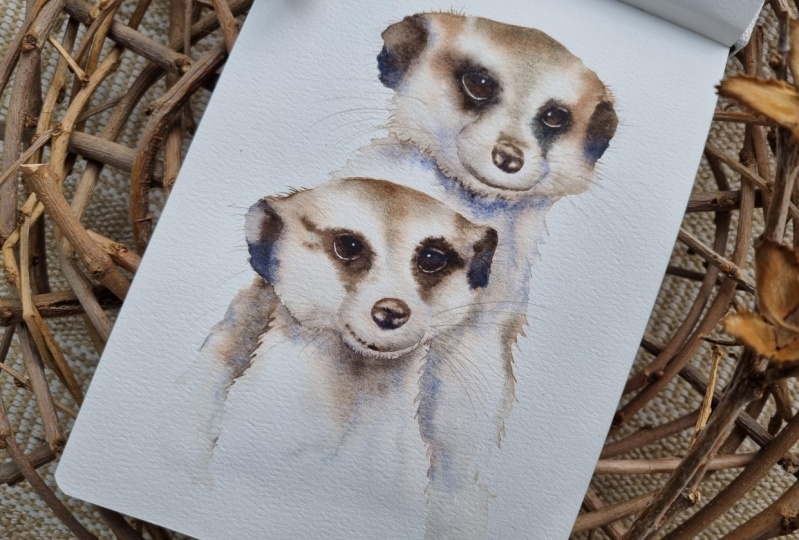
intermediate watercolor class. Today, we're going
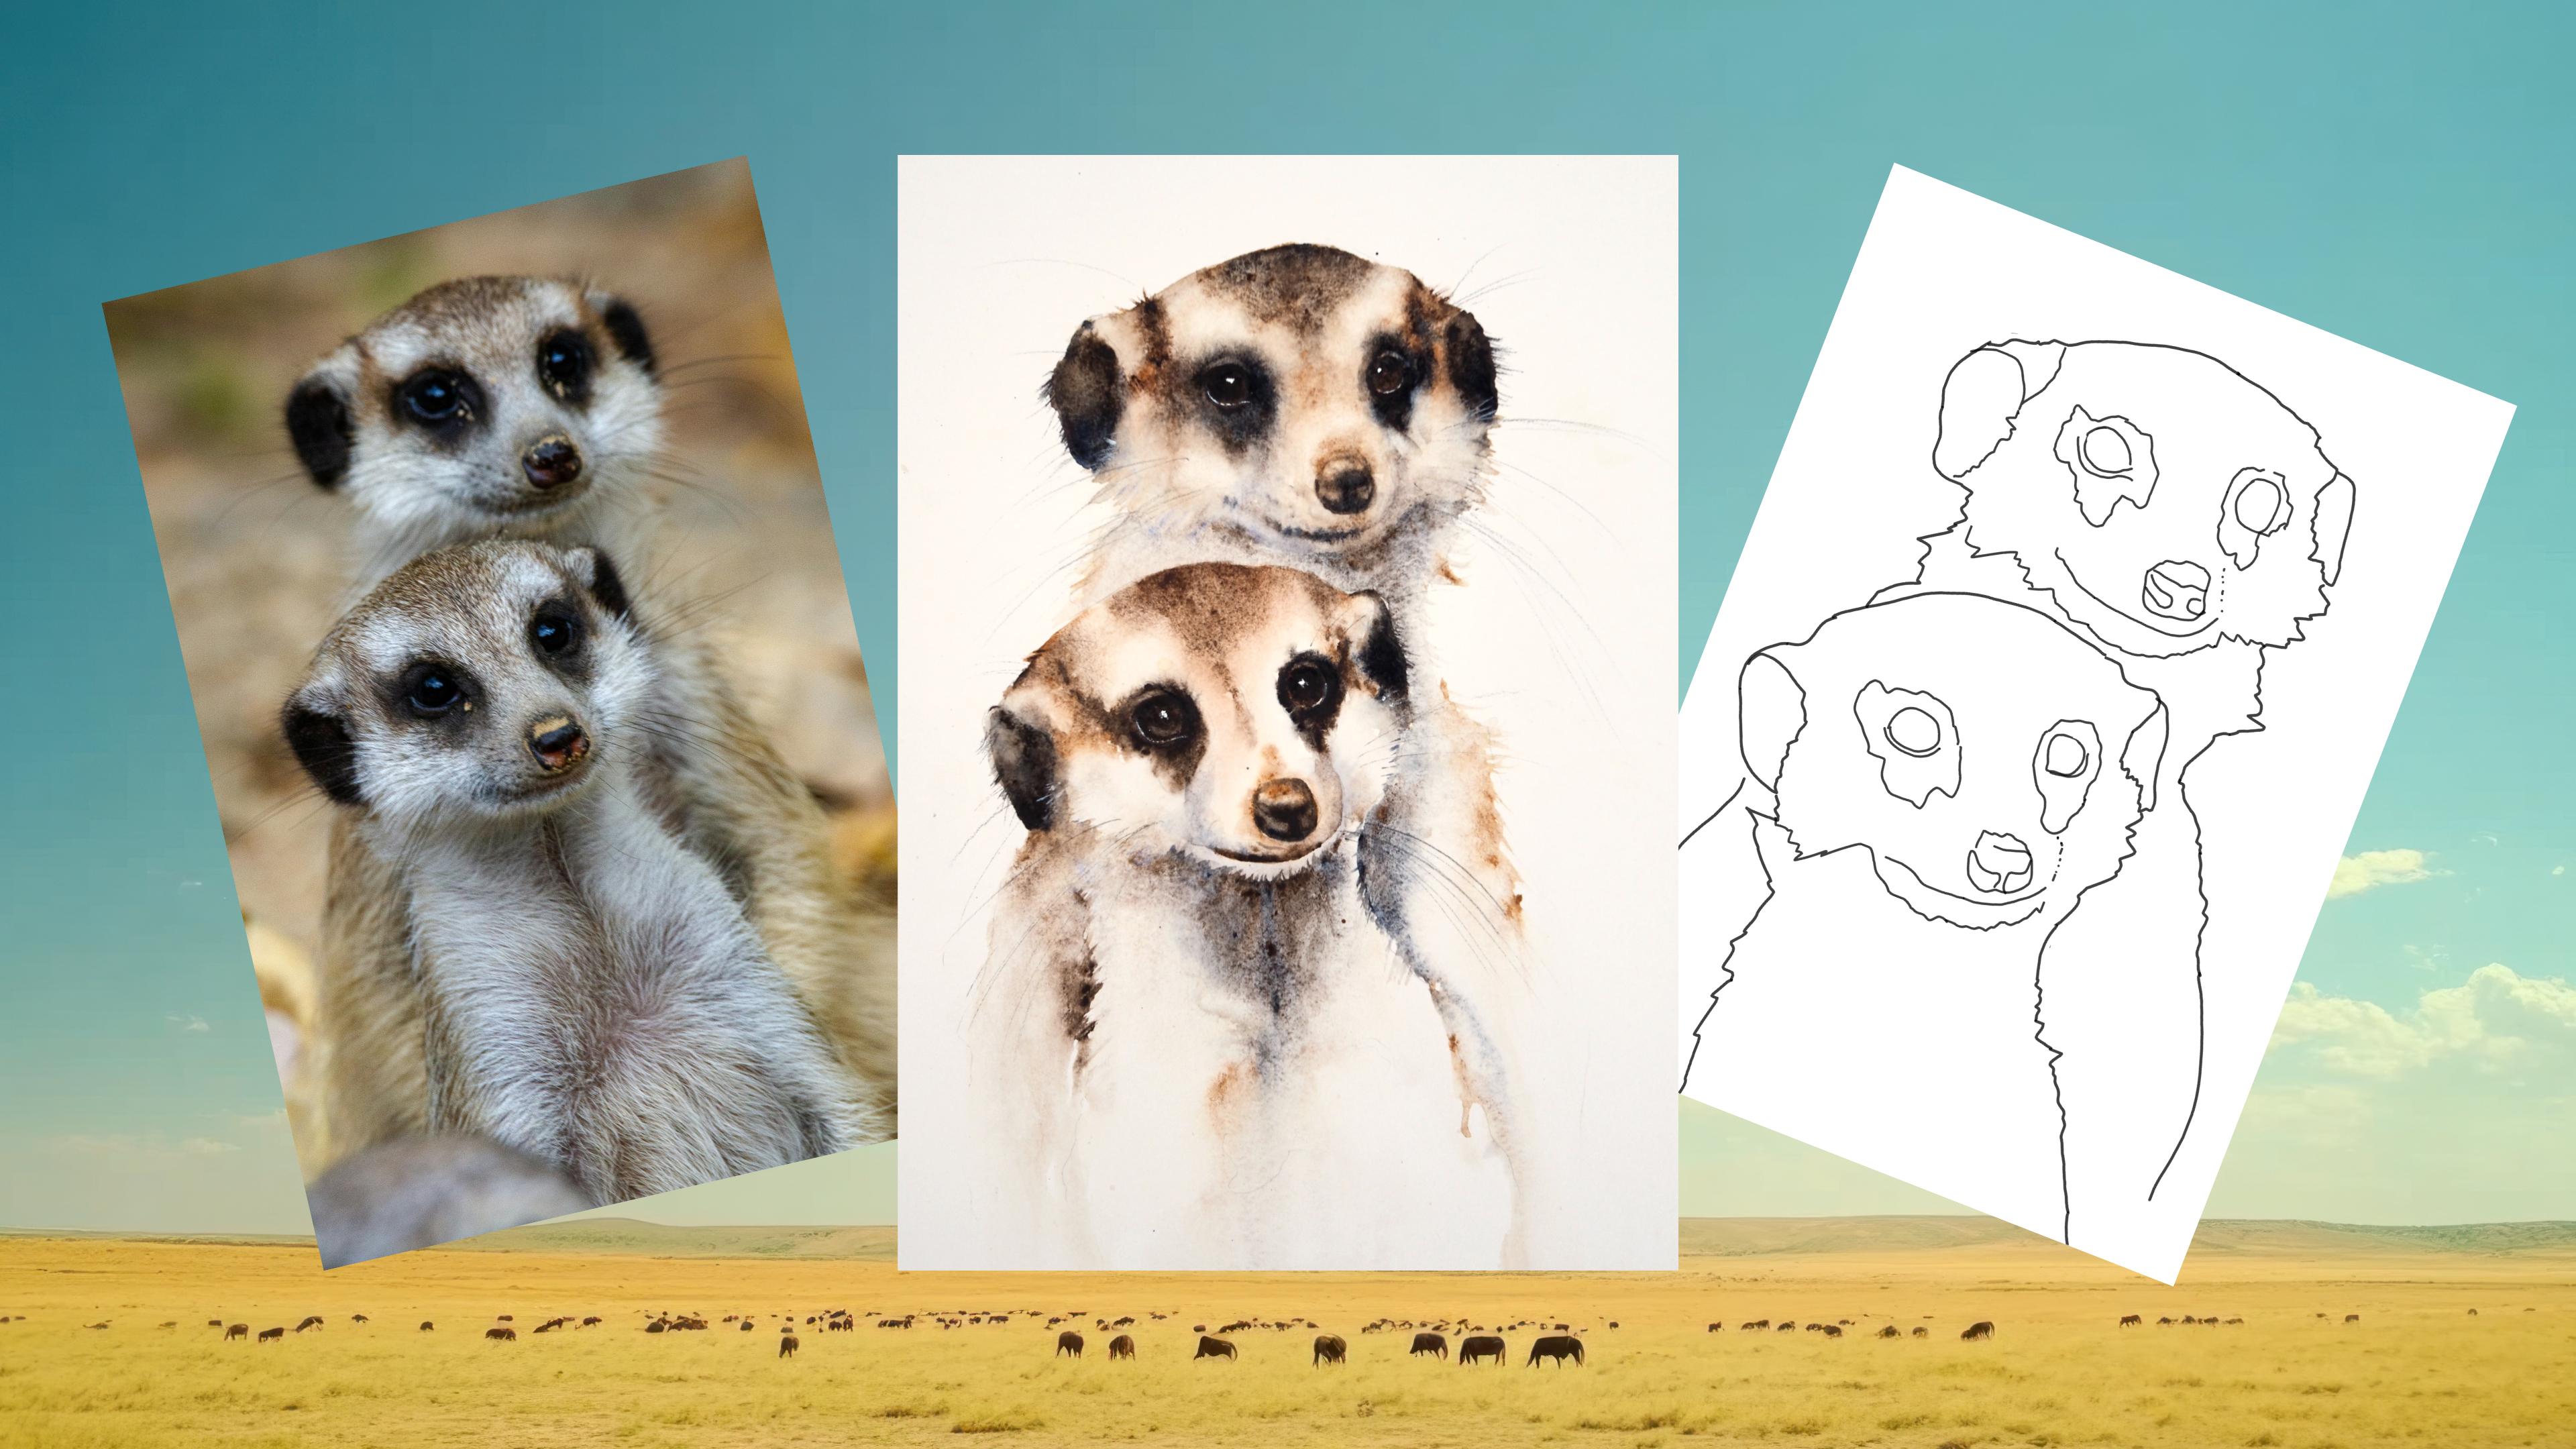
to be painting these adorable mere
cats together. This class contains many of my most useful free flow
watercolor techniques. And these mere
cats make just the loveliest of subjects in
which to demonstrate them. You're going to
love painting them. I'm Jan Davis. I live, paint, teach, and walk my lovely spaniels in the beautiful South Downs
National Park in England. Over the last 20 years, I've taught myself the free flow technique that
you see today. Not having been to art school, finding my own way has been
fun and sometimes daunting, but has allowed me to
develop my own style. This has led me to teach others either on a
one to one basis or as part of a group in a wonderful studio in the
heart of the South Downs. I also run a successful
art business where two days are never the same from the thrill
of exhibiting to painting pet and
wildlife commissions in my own home studio. In all my classes, you will follow
along in real time, where I can guide you
to keeping your work loose and fresh
without overfussing. If you're just starting out, my three beginner classes
will guide you with your first masterpiece
painted in only 15 minutes. Then you'll find dozens of
my master classes available, covering a wide range
of beautiful subjects. In each one, I share the techniques I use in
my own professional work. We'll have a lot
of fun together, and you'll gain the
understanding and confidence to
incorporate everything you learn into your own work. You'll be amazed at how
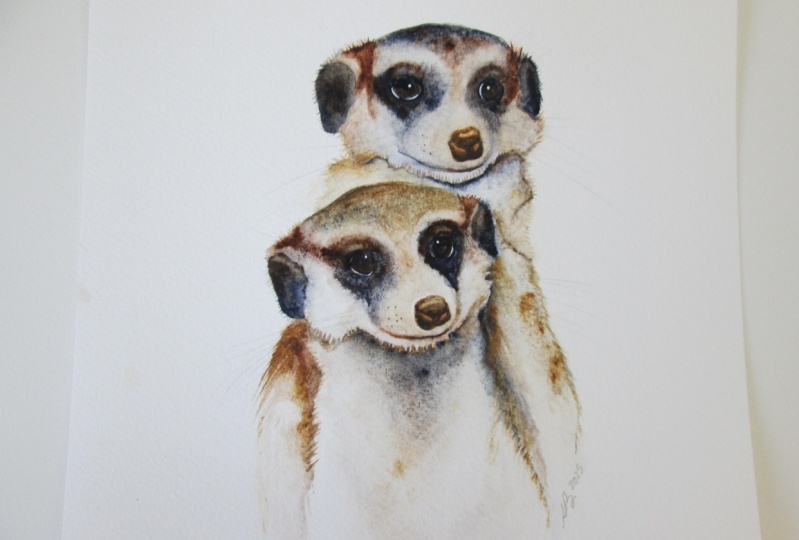
easy watercolor can be. As ever, I provided you with
a wonderful reference photo, along with that downloadable template for you to print out. The template will give you a stress free drawing so you
can just enjoy the painting. I'll be showing you the beauty of sectioning small areas off, giving you manageable sized
areas in which to work, how to apply soft wet on wet layers to give
depth of color, interest, and gentle form. I'll also be showing
you how to paint those all important eyes that give these mere cats
such character and life. There's a wealth of other
tips and tricks I'll be sharing as we work our way
through the class together. If you'd like to learn
more about me or my work, then please pop
over to my website at Jan Davis watercolors.co.uk. This can be found
on my profile page, along with the links to my
Instagram and Facebook pages. I'm very active on
my social media, where I love to share my art, especially on stories
with many ideas, works in progress, and
tales of studio life. I really hope you will share all your paintings on the
projects and resources pages. I love seeing your masterpieces. And don't forget
I'm here to help if you get stuck or
have any questions. I want you to experience
that buzz of painting in this liberating wet on wet loose style. So,
come and join me.
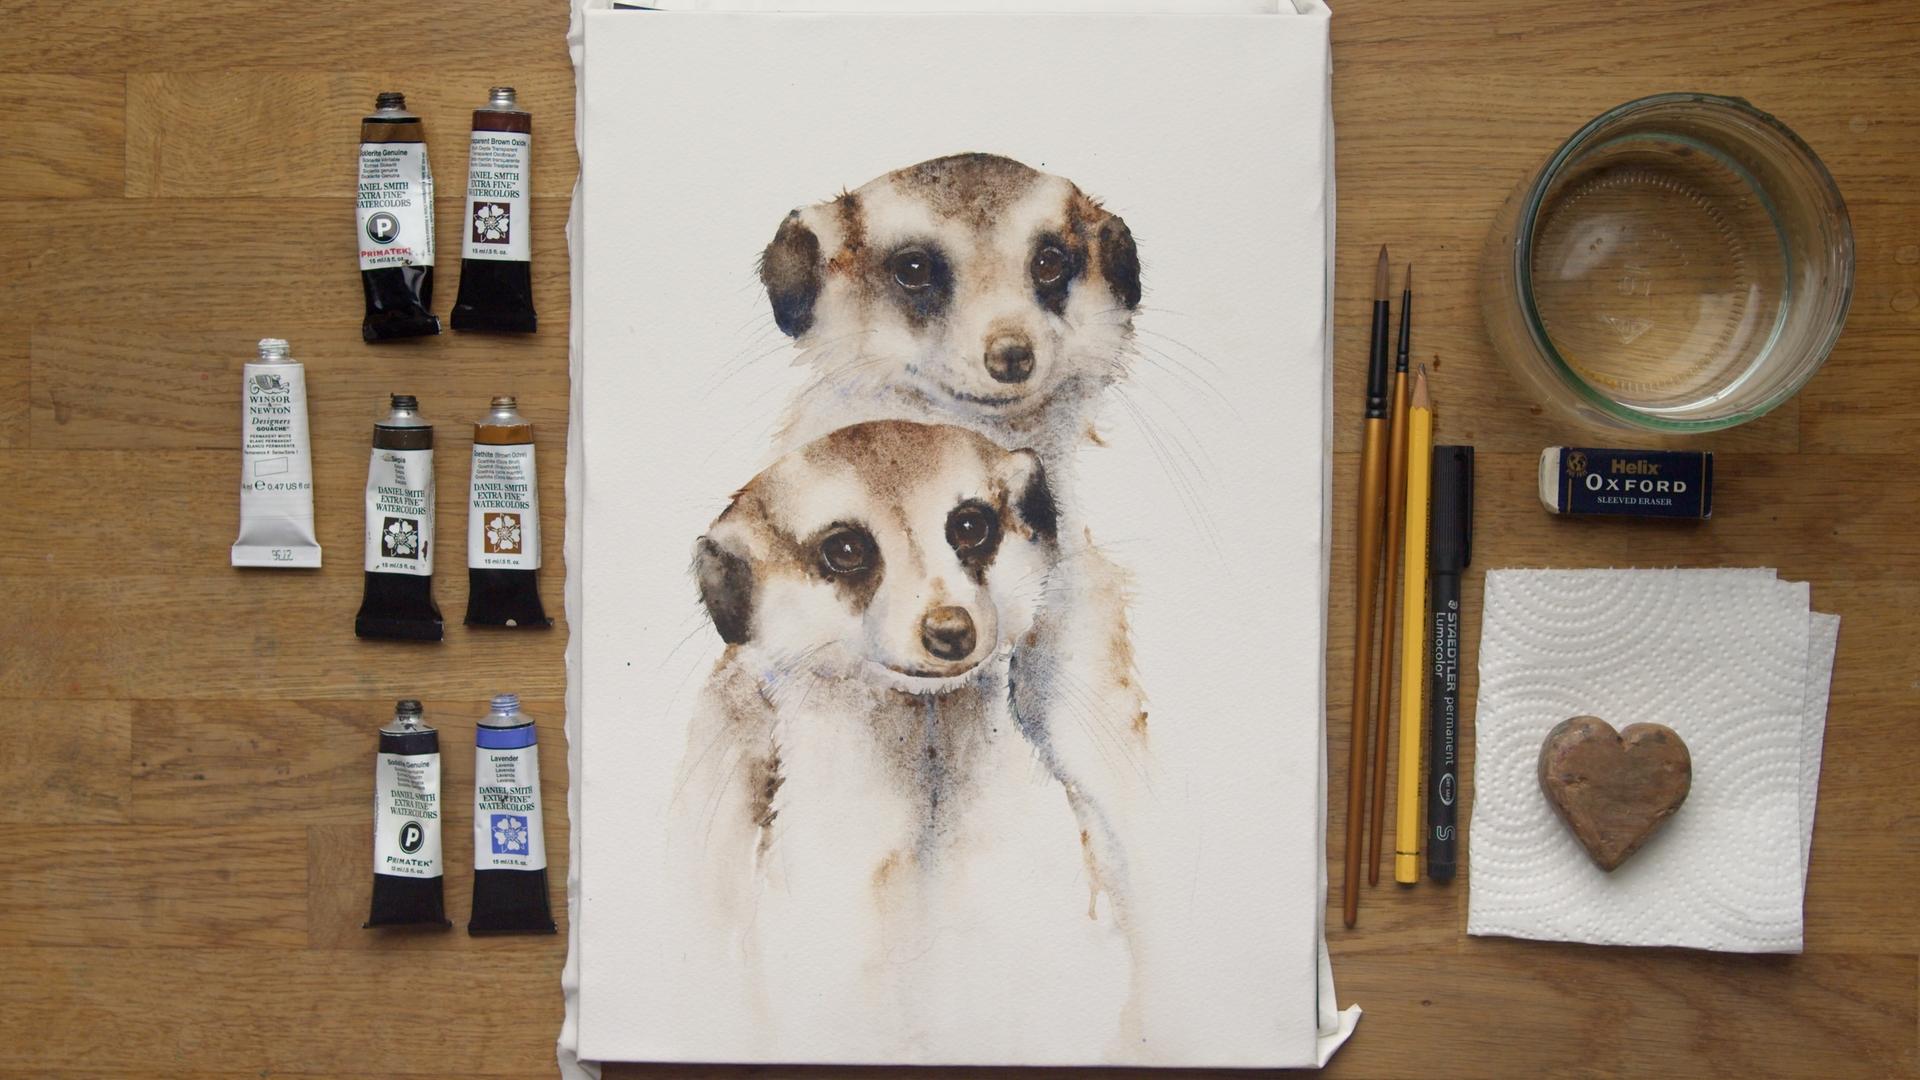
2. Materials: So let me go through all
the materials you're going to need to paint these
cutie pair. Look at them. I think you're going
to find this class a really enjoyable one, and with lots to learn,
too. Okay, right. I have a lovely collection
of Daniel Smith paints, and I shall start
from the very top. I've got sucalitGenuine.
One I've often used, but I quite like the color. It just seemed to
suit these mere cats. Transparent brown oxide. Um, it's just a really nice almost a bird
sienna kind of color. I like it. So it's a nice one. It does some unusual patterning. Not particularly in this class, I don't a huge amount, but an interesting one to get sepia and my trusted gothit. And also got Sol genuine
my usual roundup of Daniel Smith favorite
colors and Lavender. All of these can be
found on the projects and resources pages. They're all there
listed for you. The paper I'm using is arches, and it's 90 pound, and it's been stretched on
a perfect paper stretcher. And again, I'll pop
a little link in there for you to have
a look at that board, a really useful
stretching board. I've explained it
in several classes, so I won't go into it again, but there'll be a link there for you to have
a little look at. Obviously I got a
little pot of water. I have a rubber. I have my little heart, which is about an inch high, just for me to be able
to raise my board a little bit to give me some tilt. Kitchen roll or paper towel, depending where you
are in the world. I have just two brushes. I've got a number ten
and a number two. But honestly, a large one and a small one will be
perfectly adequate. A pencil of any kind, and I've also got a
little fine liner pen here, just to do the whiskers. Not necessarily, not necessary, but they just give you
another sort of whisker. Option. You can use a pencil or you can be really brave
and use your paint. They're very fine. Yes, with a very fine stroke.
What else is there? Obviously, there's
the reference photo and the downloadable template, which is on the projects
and resources page. It's all for you there. Um, I do have a hair
dryer off camera, which I do use just to dry
the layers in between, but it's not necessary
if you haven't got one. Um, I think that's it. So let's go and sketch them out.
3. Sketching Out: Okay, before we can start painting these cuties,
we have to sketch them out. It's never my most favorite
part if I'm totally honest, but I do know how
important it is. And if the sketch isn't right, then I won't find the painting bit to it fun because something will be out, something
won't be quite right. So it's really worth taking the time to get
your sketch right. Brace yourself, go, okay? I'm going to take quarter
of an hour just to make sure everything is lovely. And when I look at my drawing
or sketch, it looks right. So some little tips. Keep your pencil marks really lovely and light is
probably my first one. Obviously, mine are heavier than I would I would probably do if I was doing this as a commission or a
non teaching piece. It's just so you
can see my work. Um, especially anywhere
where there's light. You can see obviously the side, little cheeks here
and down the side. It's a light colored coat, so you don't really
want to be able to see your pencil marks in the finished piece or be able to rub them out nice and easily. So that's worth bearing in mind. And the other thing,
just make sure everything is lined up nicely. So in Well, not in
theory, I suppose. In practice, the nose tops of eyes or bottom of
the eyes and tops of head. Tops of ears, that sort of
thing, should all line up. So if you've got your eye
somewhere like this and your nose somewhere like that and your head somewhere
in the middle, then it's going to look out. It was a thing I did so
much when I first started. And that's why I've
had to be good and make sure my sketch is
right before I start. And then the rest of it
is a lot more enjoyable. So, yes, that's a good
little rule of thumb. It's to make sure
things are lined up. Obviously, you've
got that template that's in the projects
and resources pages. So use that as a guide. There's lots of
other ways you can get a correct sketch down
onto your piece of paper. There's gridding light boxes. So there's even
some clever apps, which I noticed the other day. I haven't looked
into them at all, but they almost so superimpose your image onto the paper so
you can just draw around it. So that might be worth
having a look at. I should have I I find
the time to do that, before this class gets released, I'll pop a little
link on the bottom. If not, have a little
look. Uh, right. Is there anything else?
I just take your time, I would say, when I sketch these out for say, for a
commission piece, I will always
sketch them out and head out for sort of 10 minutes, quarter of an hour, come back, and then I can reassess
and see how it looks. And hopefully you've
got it right, so you can just then go. That's it. De the paint
done with the drawing. I can get on to the fun bit. But just that stepping away
gives you a little bit of time away from the
painting, um drawing. So when you come
back, you'll be able to hopefully see if there's
anything that needs. Correcting. Right, I'm
starting to ramble. I need to stop, and we need
to get and do some painting. So I'll see you in
the next lesson.
4. Eyes Nose and Ears Part One: Right. I'm just going to
get these out of the way 'cause I don't need them for the time being,
particularly the rubber. Nice and easy start for you. We're actually going
to do the eyes first. If you follow me
regularly, you know, quite often, I'll do the
Is a little bit later. But today, we're
going to do eyes first and the ears and nose. So it is quite a nice, gentle, easy start, very simple. So let's I'll start
with the top top one. Sorry, that was my dog giving a big sigh, have you heard that? Sure she knows she's
in for the long haul. Right. No, I don't
want that color, I'm gonna pick up the transparent
brown and the gothite. And I'm just gonna wet down. The eyes, so nice, nice and wet. Don't
want it puddling. You just want it nice and wet. And then we're simply going to add these
two colors together. This is going to be underlayer. So there's gonna be two
layers over these eyes, but this will hopefully give a little bit of depth to them. So don't get too worried. You just want the
nice amount of color. It's nice starting, isn't it? We got a lot of working
up to this stage, and getting that sketch right, it's nice to start
your painting. Really take your time. There's no hurry,
really, with this. As long as that paper's damp, make sure you keep
that nice that eye nice, a good
shape, shall I say. And worst comes the worst. Meb cats are quite unforgiving. Or forgiving. Forgiving,
not unforgiving. In the fact that they have some really dark markings
and dark eyes. It's a little like I don't
know if you've done the panda, beginning one of the beginner
classes in the panda. Similar. So you can do the eye, and if something goes
a little misshapen, you can always sort
of correct it. But it's always worth getting
right at the beginning. All right, I'm going to while I've got those
colors in my hand, I'm gonna come down
and do the second one. I'm not sure if they're
male or female or both. I'm not sure on the
sex of these two, so I wouldn't like to
say what they're up to. I'm just going to keep
them to one and two. Okay, literally, same again,
just tapping that color in. No brushstroke, just tapping. Very just gently try not to put too much
pressure on that paper, all a case of just allowing a little bit darker
at the top in theory, so I'm starting at the top
and allowing it to blend down and just gently
teasing it down. I say, there'll be
another layer over this, so don't too much. Perfect. It doesn't have
to be exact or correct. It's nice to get the
eye ball a good shape. But like I say, they're quite
forgiving, so Fabulous. Right. And then pop
those down for a minute. And I'm going to wet the noses. So they've got it's quite
cute little aspect. They've obviously
had their noses into sand or something,
haven't they? You can see the yellow on top, I should I say, I think it's probably sand or
something like that. So we're going to try
and incorporate that. So we're going to
wet the nose down. Sort of up to that line where
you can see the yellow, and then there's another
little brown part isn't there, which obviously then
goes into the body. So that will be another layer. So we're just going
up to the edge and including that yellow. So let's do the first one. If you've got a yellow to hand, you can obviously use a yellow. I'm just going to
use the gothte. I didn't want to have too
many paints here on my desk, and it's only tiny,
tiny little bit, but it's just a little touch. And you can go into the rest of the nose. That doesn't matter. Obviously, it'll be painted
over a little like the eye, but we just want to
make sure you've got color over that yellow part. And literally the same
again on number two. In theory, you could
have painted this. It's just how I paint. I suppose, I always like to put the paint on wet paper
rather than on dry paper. I, rarely use watercolor or
dry draw it on dry paper. I just like I like
that it moves around. You want more there just
to make sure that is going to be colored. Keep within your lines.
Perfect. Don't overfiddle. He doesn't have to be anything. It's just cutting a
little bit of color down. Gonna scrap brushes, and
we're going to do the ear. Again, this is going to
have another layer over it. So it's just to get a little
bit of strength and depth. So wet down the ears. Careful of your number
two down here you don't But your fist in it. It's always a good
trick of mine that one. So we're gonna pick up the
sod genuine and sepia. I'm gonna try and keep a little bit sod like genuine at the bottom so it's
cooler and bluer. Again, just tapping.
We can add the sepia. Again, if you just keep
tapping, it should go up. And you can just tease it up. So it's more so light
sorry more sepia at the top, so light
at the bottom. But just like that. Try not to overthink it. It doesn't matter. If it ended up there
and the other way, it really wouldn't
matter too much. So like, genuine,
again, just tapping. We're not doing any some
fabulous little flicks and, um little flicks, really. Of the ears, but
we won't do that on this layer. We'll
do that on the next. And then again, just
tap in your Spa. Come around a little bit, and if you leave a little bit of
light, that's absolutely fine. Don't have to cover it all in, especially as we're
doing another layer. Foremost a little
bit too covered. Just gently teas
some of that down, so I've got a little
bit of light to it. Don't want it too
heavy. That's just taking the excess
moisture off my brush. So I clean my brush, excess
moisture off my brush, and then just very gently just slowing some of that
paint to suck up my brush. Just to remove a little bit
of that colour and strength. Okay, exactly the same with
the number two. Wet it down. Obviously, if you're working
somewhere really hot, just do them individually. You don't want it won't want
the paper drying on you. It's quite cool here today, so I know this paper
won't dry that quickly, but say, if you're
working somewhere hot, then just wet down the
ears individually. Okay, just tap a
little bit of sepew on top. Encourage it. It's always a minute if you've got something
you like the shape of or just how that paint's running the leave it. If
I'm still fiddling. But you've got a good result, then, just leave it and
move on to the next one. Exactly the same again.
You could Let's be wild. It's had two the colors on
my brush at the same time. In theory, I think I
probably default to this the lights normally
on the left hand side and the right hand size cooler. It doesn't indicate that at
all on the reference photo, but I think I obviously
have a default to that. So I will have, in theory, a little bit
cooler on the left hand side. So warmer goodness I'm
mugging my words today a little bit warmer on
the left hand side. It's always a bit nerve wracking when you start this teaching. And I haven't actually done a class for probably
about a month or so. And when I first start, it's always a little nerve
wracking, if I'm honest. Cam's over there.
You're starting. There's a whole fresh
new painting to teach. And it's, uh, it can
be a little daunting. So once I get into the painting, I usually relax a bit more. Hopefully won't be
muddling my words so much. Lovely. Right. We just need to allow that
to completely dry, and then we're going
to do some layers over the faces and the
bodies at the end. So just allow ideally, it's nice to allow it
just to dry on its own. If you're a little
hurried for time, you can always whiz
a hair dryer over, which I quite often do. But if it's sitting in puddles, just hang a fire 'cause you don't want to put a
hair dryer over it, and then obviously blow
your paint around. And it will mix the paint up as well if you put
a hair dryer over it. So ideally, it's nice to allow it to dry
thoroughly on its own.
5. Eyes Nose and Ears Part Two: I oh, no, this feels different finishing the ice before we even do anything else. But let's get these
eyes filled in. So very gently and make sure they are
properly dry as well, and your ears because again, it's easy to knock that with
your side of your hand, but go very gently. So my brush is just
falling on this eye. I don't really want to
rustle around too much. Again, if you're
working somewhere warm, just do one eye at a time, but as I say, quite cool here. But equally, if you put
a hair dry over it, you can warm up the paper, but don't worry too much. Right, Sepia and
so light genuine. Did same combinations
we did the ears. And like you said, like I said, if you look at the
reference photo, their eyes are terribly dark, so nice and easy in some ways, but I'm going to try and keep the so light genuine at the top. And the seep at
the bottom, again, don't overthink it
or worry too much if you want it all to merge. So pots so like
genuine in there, and then pot seep at the bottom. And what we will do when we clear the sort of catch lights and the tiny little
finishing off bits, we can take a little
bit of color here and hopefully you'll get that underlayer coming through
of the lighter brown. So goes the theory. Okay, exactly the same. It would be the same on
all these four eyes. Just tap, keep it ever so light. Try not to do any but strokes
or moving around you're just popping that color down
and allowing it to move. It will look like it's
just filled in, really, if I'm honest, but it's subtle, and when it dries,
just like here, you can see how that's
dried differently, obviously, till when it was wet. And it just adds to the
overall finished painting, and the eyes are ever so important that
they're worth getting right and taking a time over. Lovely. Same again. Nice and wet. You don't
want it puddling? Drip running down my brush. Again, you say, you
don't want it puddling, and they can puddle
on small areas. So if it does, just
clean your brush, take the excess moisture off, and then just very gently
pop your brush down. That should soak up any bubbles. And you'll be able to
see if it's sitting in a little hump of
water, as it were. But if you duck down, you'll see it in the light. Again. So like,
genuine at the top, just tapping and
allowing it to run. If it was sitting, it'd
be bobble of water. The paint sort of sits on
top and then doesn't move. So it's just getting
that right at that right stage is a lovely um, it's a lovely time when
the paper's just right. It's not too wet, a bit
of a goldilocks thing. It's not too wet and
it's not too dry. It's just the perfect sort
of time to add paint, and the paint will
just flow beautifully. It won't stick, yet it won't sit on a big puddle not move. Sometimes that's why
the paint isn't moving. You've always got
too much water. So it's just that goldilocks
kind of perfect stage. And it's worth practicing you're struggling with that ratio, it's worth just practicing
on little scraps of paper as boring as it is
just doing little squares and letting it dry
and just seeing as it dries, how the paint reacts. I always push people
to or suggest, should I say, simple trees. It was the very first class
I ever did on Skillshare, and it's the first one in
the beginning of the series. But it's a great little class for just practicing
exactly that. Yeah, it's a good little class. Okay, we just need to
allow those to dry. So be careful, and
we're just going to do the noises now. So
we're going to go. Completely cover them, a
little bit of nice and wet. Right up to the edge.
Let's do one at a time. Photo, right. Okay, let's have a
little bit of gothte, a little bit of sepia. I'm going to pop the sepia. You can see there's
a little nostril, so we're just going
to very gently. Again, it's getting that
sweet spot, really. If it's a little bit
too wet, it will sit. It's a little bit too
dry, it won't move. So it's not moving, just add a little
bit more water. And there's a little line. It comes up the top here,
isn't it? A dirt line? Just very gently use it will be also incorporated into
the body, as well. But and you'll lose it, and then you just
sort of suck it. You'll lose some of the nostril, very gently sort of suck
it up, move it around. Just maneuver and watch it. Might put a little bit of sort of genuine at
the bottom, as well. Again, it's just a cooler color. And if you lose those
nostrils completely, it doesn't matter because again, we can just very
gently once it's dry, just gently take that out and sculpt back in
those nostrils. Or you can do it. Well,
it's a little bit damp. Either way, have a little play. Squint your eyes, squint your eyes always
seem such a comical, arty thing to do, but it does. It does help. It
helps you see where those darker areas are. That's right, 'cause I
know I can take that. Once that dries, I can take that nostril
out a little bit more. But I don't want
to keep fiddling, 'cause I'm gonna lose
that freshness if I do. Alright, that's down
to this little one. Same again, nice and wet. Let's put a little bit of soup on the No, so so like genuine. Help if I have it
around the right way, I guess I'll my paint. A little bit of sepia. Again just tapping and
allowing. Get a nice. You need if you're
working with pans, there's no reason why you
can't know I work out tubes, but I know a lot of
you also use pans. There's no reason why you
can't give them a good rustle. You want a nice amount
of paint on your brush. I think that's what
gives this technique that lovely sort of freedom. It's partly I can just get a really nice bound
of paint on my brush, pop it down, and then it flows. If you're struggling,
you haven't got enough paint on your
brush, and obviously, there's not much
hitting the paper, so it's not really
moving very much because there's not enough
paint to move around. Getting squinty eye,
having a look at that. You want to keep that
little area of yellow. It's not yellow, but yellow on the reference photo
and go tht online. I don't actually used any G fit. H. I'm clinging onto it. Pop a little bit on this one. Lovely. Take your brush away, always worth doing and
having a little look. See what you think. I
think that looking right. Saving it looks if
I can take some of these nostril color
out now while it's sometimes
actually while it's just before it completely
dries, if you take color out, it can be quite nice and soft, whereas once it dries, it can be a little harder, a lot harder in difficulty
in getting the color out, but actually harder
in its lines. Okay, take your brush
away. It's just an impression. It doesn't
have to be exact. You just need to be
able to step away, almost squint and just see
that there's nostrils there. We don't want to get too
precise with everything. It just needs to give the impression there's
nostrils there. And they say the minute
you have something, you're like, Oh, yes, that's it. Put your paints
down and leave it. Um, right. I will do
the catch lights, I think, right at the very
end. I'm not entirely sure. If I change my mind
halfway through, and we put them in a little
bit sooner than we will, but I love putting those
little white dots in, and it's just that
cherry on the cake, and I like doing it at the end. I think that's why I like doing
eyes at the end, as well. So I think I'm going to
leave them at this stage. I would, again, just allow them to dry, if
you can, on their own. If not, once it's
almost gone off, you can whizz your
hair dry over it, and that will obviously
speed things along a bit.
6. Heads First Layer: Right, let's get a little bit of color over this little top one, and then we'll go straight on to the second one. Oh, bottom one. Just going back to the
catch lights on the eyes, if I were to do that now, to me, it feels a little
obviously it's incomplete, but I just need to have the painting finished or nearly finished to
get those lights in. It doesn't I feel
if I do them now, there's no other context
to gauge them against. Just a thought. Right. Let's wet down. Well, she'll do
the top one first. And big brush. We're going to go
right up against this up against the ears. If you get a little
blend, a little bit of bleeding, that's
absolutely perfect. We will do a second layer over the ear on the next
layer over the face. If you're wondering
why we didn't do that on the previous lesson. Now, be careful, try.
It doesn't matter. If you do lose that little
white line underneath the eye, don't panic because
we can always put it in with a
bit of white paint. But if you can reserve
it, that's fabulous. So go careful
underneath the eye. Hasn't really got one on the
right hand side so much, so don't worry as much on there. Go carefully around the eyes, but touch the color.
Does that make sense? You want to wet and go
right up against it, and some of it will bleed,
which is absolutely fine. Don't leave a little white
line around the top. You just want it around the bottom to reserve
that little white line. Alright, up against that. Yeah. And again,
same with the nose, go around the nose,
but touch the color. A little fiddly, but worth taking your time
down to the chin. I should have put a
little what I would do, 'cause this has been helpful. This is just for you to see
where I'm putting color. Don't add any color
at this stage, so you can see where
I'm putting the water. That probably helps
a bit, doesn't it? So, this is just
for me to show you, so keep it nice and clean. Above the forehead and just making sure you
stay within those lines. And it can get a little bit confusing where
you've wet stuff down. So if you duck your head, I'll say bobble your
head up and down. Like I've said in some
of the older classes, it just makes me chuckle. You'll be able to
see any dry patches. You don't want any dry dry
areas cause the paint will just whiz around that dry area and you'll be left with
a little funny mark. So it's good to get it
all wet to start with. Again, if you put a hair dry over this or you're
working somewhere warm, then make sure it is nice and wet still because
sometimes you can start, and the time you've
actually filled it all in, some of it's dry or
starting to dry. So I quite often do
that and then I'll add a little bit more water.
Same things apply. You don't want it
sitting in puddles, but you want it almost. Little the lighting here
is quite hard for me to see if I've left any bits. Right. So this first layer, there's going to be
two layers over here. The first layer is we won't be putting those eye markings on. It's just to get a little bit of color in I'll
probably start to add the lovely top color on top of their heads and some of
these markings here, just some very subtle
little bits of lavender. It's just to get a little bit of color down and get
us going, as well. So let me start where it is. Let's genuine, and let's have let's have
a little bit of gothit. Let's go easier. We can always strengthen
on the next layer. So let's tap that in.
It's just tapping. Try not to do any brushstrokes. Just tapping and allowing. If you've got your paper
wet enough, it should move. And if you're not using
these Daniel Smith paints, exactly the same as me, paints all have their own
little characters. If you're using non
Daniel Smith paints, honestly, I haven't not used
them for a very long time, so it's hard to give you a
sort of substitute color, one that would behave
in the same way because I'm just so used to
these colors now. But yes, they will
all have their own their own little quirks. Even within the
brand, each paint has its own littlest characters, little quirks of how it
behaves and how it runs. So you just build
up that knowledge. So if you squinty eyes, it's try and get a little bit
of that, um, redier colour. Actually, I will pick up
the transparent brown, which if I don't won't be using. That's just a little bit warmer. It's a little bit of that
supere color in there. So, um, Warmer colour. A little brighter color,
isn't it? Tapping. I say, we're not adding
those dark markings, but obviously, you can go into that dark markings, that
doesn't matter at all. Let's lavender, as well. I love adding a little
bit of lavender. Being randomly working my
way all around the place. But just squint your eyes. Just you're just finding
little bits of color. Let's pop a little bit of colour on my brush
would be helpful. So I've got a little
bit of lavender, a little bit of that stuck
at genuine and just tapping. I want the chin to
have a little bit of color or a little bit
of sort of shadow. Just when you come to do
it come to the mouth line, I find it was helpful to already have a little
bit of shadow there. I say, Oh, God in mind, this is a little bit
of a darker area. It doesn't I said, it doesn't show it on
the reference photo, so Lavender, tinually tapping, squinting your eyes, trying to find where those
darker areas are. A little bit of goth,
have that over the nose. You can see this nice color
around there as well. They've always been snuffling around, haven't they feeding? They are ever so cute. I think I've seen them
at the There's a town in England called Cotswold. They's I think they call themselves a
safari park these days. But yes, they have a
mere cla enclosure, and they are
fascinating to watch. Okay. That's a little bit
of color there, isn't it? I mean, too much. When you ever get too
much, don't ever panic. Just clean your
brush. Just gently. These always colors ever so soft and they
almost lift out. You can panic and then
try and get them out, and sometimes you can
lift them out completely. So they are very unforgiving. Now, as we work our way round, it will be starting to dry, so I don't want to go up into that head area
because that would be drying and that's formed something
really pretty there. You can see granulating there. If I was now go in
there and fiddle art, I'm going to lose
some of that nice sort of freedom
it's got up there. So the beauty of doing layers if you think
that isn't strong enough, then we've got the opportunity to strengthen it on
the second layer. So it's always better to leave
things if you think, Oh, it needed a bit more or a
little bit more something there is to leave it
for the next layer. Fabulous. I think that's enough. They're quite pale,
so it's very easy. I know on some of
my practice pieces, it's easy to overwork this
lay and put too much down. Because obviously, once
we do another one, we can add more
strength. So go easy. You want this quite pale and washed out really at this stage. So we're just gonna head
down to the low one. Exactly the same.
No, no different. Treating them pretty
much the same. Again, right up against
those that here. Just so you get a very
gentle blend and bleed. If it doesn't bleed,
don't worry, either. I'll try and reserve that little white line underneath the eye, and then over the top and touch the eye
then at that stage. Try not to go into it too much, but 'cause you'll find it all If I was to wet
the eye at this stage, I would find that it would
bleed and blend a lot, and I'd lose that nice
strength of color there, so you don't want
to go in there. You just want to touch
it, touch the edge. Same with the ear. I quite often go round
first, around the edge, and then I back fill, but no right or wrong, really. It's just you need to make sure you've got
everything covered. Duck your head up and
down if you're unsure, you'll be able to see
where that color is. It's interesting. There's
always an ugly stage. And I said that is
definitely an ugly stage. There's there's no detail there. The eyes haven't been finished. So it's worth. If you're feeling a bit like, Oh, no, this looks awful. I've got nothing nothing looks right. It's
all look messy. It will look messy and a bit,
obviously, very unfinished. So stick with it. Don't
let your head go down. It was, again, something I would do when I was sort of
learning, I suppose, or finding my way with this style is I'd get very
despondent at this stage, and then I would almost I wouldn't say I'd
mock it up on purpose, but you sort of get, oh,
goodness, this isn't working, and then you lose
that nice gentleness. So to stick with it, this is an ugly stage. Most of how I paint, there will always be this sort of middle ugly stage where we've done bits and then some things
aren't really joined up, and some things can be hard. Like, the ears are
very hard, eyes. So yeah, all I'm saying is
don't panic at this stage. You should expect
it to look ugly. But we will beautify
them, for sure. Okay, I'm going to pick
up the same colors. What do I have the
gophte suck ite genuine, lavender and the
transparent brown. Same thing. If you're working with pans,
give them a good old Rs, we'll get a nice
amount of paint. So I can beauty I like with working
straight at the tubes, I can get a nice amount,
and I'm straight there. I can just tap straight away. A few people said, Well, why did you start using
paint from the tubes? Honestly, I can't
really remember, but I think it was a case of not wanting to
waste the paint. Because if you pop
it onto tubes, it's running quite a lot, so I'm not gonna panic
just very gently. Talking, not paying attention. Oh. Sorry, that's my naughty dog hearing
the neighbor coming in. I've got both of them
sitting here in the studio, which a little risky
when I'm filming. What was I saying?
Yes. Don't ever panic. Um, clean your brush, take the excess moisture off. You can just gently blend. But you can see, I love
what that's created. So sometimes you just got
to go with the flow of it. Right. Where was I?
That was the postwoman. Right. Hopefully this
hasn't dried on me. No, I'm still good to go. Um, yes, as I say, I love how that's
created for me. So I'm just gonna go with it. Another layer, I can sort of soften any of those
funny it remarks, but it's a spontaneity that we love about
loose watercolor. So, the more you fiddle,
the more you'll lose that. A little easier that
transparent brown. I'm gonna pop that
down for a second. I think that's the
one that's say they all have their own
character, as I was saying, and it's quite a bold, punchy color that transparent brown. Okay, just squinting my
eyes and trying to get that a little bit of colouring. A little bit of lavender
down here, I'll say, same Just try and get
a little bit of colour underneath the
underneath the chin, it just helps with the mouth when we come to put that
in right at the very end. Little squint and it. So a little bit of lavender, similar to the other one. Looking let's strengthen that. I'm almost there, is
what I'm pondering W I need to actually
do much more 'cause my little
interruption with the docs this is starting
to dry a little bit, so I don't want to
add too much more. I think that's gonna gonna end end up with a little
bit of trouble there. Let's just pop a little
bit more colour lower down here just to give that
sense of sort of shadowing. It's still on the
reference photo. It's a little bit darker there. The risk is I'm trying
to keep this dark and that light and it doesn't really show it on
the reference photo, but there will be at
shadowing underneath. Um, generally. Right, I'm going to leave
her there, actually. I think that looks alright. It's given where that's run, I love how that's
sort of formed. So I'm going to down
my brushes and leave that to dry completely.
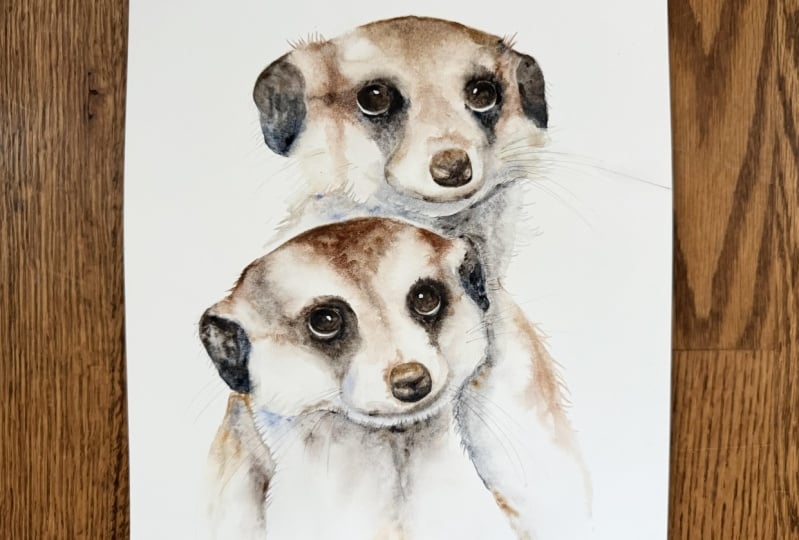
7. Top Head Second Layer: Okay, so once these layers are
nice and dry, I would say, make sure both are nice and dry, we can start on another layer, and this should should
bring them to life. Pop those lovely strong
eye markings in and just give them a little
bit more depth so we'll start to see
the painting emerge. Now, when you're
doing another layer, go as gently as you can. So get your brush nice and wet so you're
literally loading up, it's almost dripping
and we're just placing. For the time being,
we're going to go very carefully around the ear, and we'll wet that
down in a minute. We're just going
to tackle some of this other area like the eye markings
before we do the ears. But I want to try and get
them done before it dries completely just so we can get a nice little blend when we
add a little bit more colour. All makes sense in
a minute, I'm sure. Again, try to keep that little white line underneath the eyes
reserved if you can. So don't panic if you've gone over it because it can always be added keeping my
brush nice and light. And we're going over exactly what we did
in the first layer. Just keeping it nice, letting
your brush be nice and gentle. Ground the nose. My nose needs a
little bit of help, so, you know, if you're at
the same stage, don't worry. I could have done with a
little bit more detailing. So we can do all those in
the finishing off bits. Duck your head up and down, you don't want any dry patches. Come about there.
Is a little bit hard to see where this I've got a big disc light that shines. I find it a little bit hard to see where the
dry patches are. I usually come up with
some excuse during the class of why my painting
might not be as good. Okay, right, we just need to
add sort of strength now. If for some reason, the
top of your markings are strong enough already, you
don't have to add more. So as we work our
way through classes, we all start to differ,
so you have to sort of be a judge of
how yours looks. So I'm just gonna
pick up the browns. I'm gonna I won't use a
Sepia for the minute. I will once I start getting
those eye markings, but I'm just going to sort of
start strengthening some of these other areas up. So when it's wet, the places I want the paint to spread
the most, I will start there. I'm going to wait
a little minute, because I don't want
the paint to move as much when I do the eye marking, so I need to allow the paint so I need to allow the
paper to dry a little bit. But I will take the advantage
of it being nice and wet. We doing some you know, areas I want a lot of sort
of spread and softness. So I want my head here
a little bit stronger, so I'll just tap a little
bit more color in, keep an eye on that
reference photo, making sure I get
the shape right. I've got a little bit of a
dome head here at the moment. A bit better. Yeah, that looks better.
Coming down here, there's a she pick up
the lavender as well. Let's have four tubes. A little tapping. Sometimes you have to trust your
gut instincts. I know I may have said
this on previous classes, but if you have a feeling
like, you know what? I really want to
add that color in, do I sometimes you just have to trust your
sort of gut instincts, and as you become
more familiar, yeah, more confident with
your own style and how so that's a little
bit of transparent brown. You can probably see that
that will punch your color. You're just gain more confidence and more understanding
of how you want a certain thing to look
and how your paints work. At the beginning,
everything's new, isn't it? And as you get more confident, you're like, Oh, no, I know, if I put that down at this
stage and use that paint, that will react that way. And it all becomes
subconscious in the end. Just keep your eye flicking
guess that reference photo, looking for the darker areas. Often, if you've got a
light subject like this, they are quite light in color. It's quite easy to add
too much color I often find But the beauty is is that lovely kind
of lost and found. Now, before I tratle away here, we need to do those
lovely flicks. So they need to be
done ideally when the paper is nice and wet, and I won't be adding
much more color up here, so I can start to do a few
of those little brush, starting a little
way in and just very gently tease some
of that paint out. Don't go too crazy with them. They're only tiny little bits, but they're quite the
same with this side. They're only a little. They just a little bit of
something there, aren't they? Again, it's the
same with the face, but I want to sort
the cheek area. I put a little bit of
color there first, and let's pull
some of those out. Always try to work
a little way in. It's just if you work out here, it's so easy just to
sort of go too far. And then you end up with a I
seriously floffy beer cat. They won't show awfully because
we haven't got a lot of paint there, but
it's just enough. You'll be surprised
when it dries. It's just enough to be able to see you see sting to appear, can't you? I love
that when you there. As you progress through, they start little
character starts to shine through. Don't go too crazy. It's so easy to get carried away with those little flicks. But don't try. You've obviously
got your pencil marks in so don't go too
far beyond those. I was gonna look a bit
of a fat chap or hapess. Let's right wear my t out. Let's pop these lavender down. Gonna pick up the sepia, and they're so light genuine, so the two dark colors
that we did for the ears. And we're going to
start to try and tap that eye marking in now. The little mouth we do later, so don't worry too
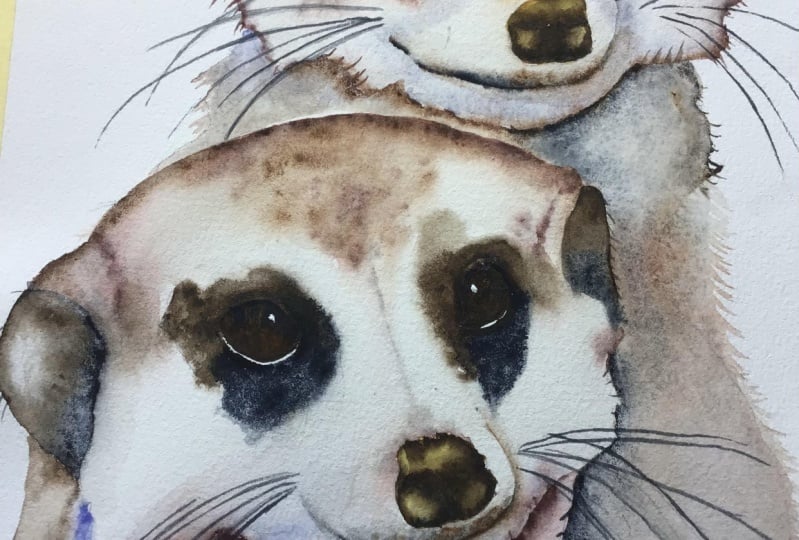
much about that. Well, I want to try and, you have to judge your own paper. Obviously, if you're
working somewhere warm, you need to sort of start with this eye marking a
little bit sooner. If you're cool and
it's still puddling, and you've still got
a little wet there. Just hold on a minute.
You just need to find that sweet spot where
it's just going to blend, but not too much. So I'm gonna start. See how it feels.
If it feels like it's whizzing too much,
just hold on a minute. It will probably be just
sort of a minute, if that. Don't have your brush too wet, have your paint nice and
sticky. SEP is lovely. I like using SP because
it doesn't move as much. It's not so spready,
so I'll try and go a little heavier on the CEPI and a little less on so genuine. And it moves you're finding
it's moving too much, that's got a little
bit too far there. I can just gently pull it down. It's best if you can try and
allow it to find its way. And don't get too wide
if it goes a little bit further than maybe it shows
on the reference photo. Obviously, you don't
want to go too wild, but if it's giving
you a nice pattern, sometimes that's
better than trying to be very accurate on where
those markings are going. I'm going to go a little
lighter on the top, so a little more
sleepy on the top, little more so light
genuine on the bottom. But honestly, that again,
doesn't matter too much. I'm going to just put
change what I'm saying. Is a tiny little bit of sllite genuine just at
the bottom there as well, 'cause that's a nice soft color. See how that's
blending quite nicely. Then you can be very
accurate with this line, I? It's excuse number two
if you're counting. I'm a little way away
from this painting. But you ought not to
be nice and thin, so mine might get
a little chunky, but try and keep yours
as thin as you can. Now, we want to head over to
number two I fairly quickly. And sometimes you'll
find even one side of the paper drying a little
bit quicker than the other. So, you know, find
the place that's drying at the right
speed for you. I thought a little bit more. I say, try not to
add too much water. So when you clean your
brush, make sure you take up off the excess moisture. If you add too much,
it's all going to start running a little bit too wildly. Does that a little bit of sepia? So just keep flicking
your eye back to that reference photo.
The color goes right. It touches the eye
above, so don't forget. Don't leave any white
line at the top. Comes out a little way here, doesn't it keep out, making sure you add enough
paint on your brush. That's why the tubes
are nice 'cause you can get a good amount. Let's see if I can
correct this from where I am and narrow
this down a bit. About there, I think. I can
pick up that SucalteGenuine, and just just nice. It's a little bit softer. It just blend a little bit more. I can work that way out. Always hand, take your brush
away. Have a little look. See what you think. I think
that's doing alright. I want to let's have that
transparent brown again. I'm gonna transparent brown, actually. Get
myself muddle here. Transparent brown and the
sucalite Let's have those two. I just want to join
up this earmarking. See you see how fill up the
little white patch here. That's where the little
bit of dry paper. You see how it makes a mark. I'll just fill that in.
Let's have a little look. I need to beware that I
need to pop wet those ears. I actually might do that now before that dries completely. So I'm just going to go into
the ear and wet that down. Same with the other ear. Just hang a minute 'cause
that's gonna be quite wet now. We're just going to let
that blend a little. I mean, other things
to be mindful of which I haven't
really mentioned. I've been working my way
round and it has actually left the eyebrow above the eye. There's that lovely sort
of lightness, isn't it? So, in theory, if you keep
looking for the dark areas, you should reserve the white. But yeah, very mind there's that nice white area
at the top there. Can you see this is spreading
quite a lot here me just. Just very gently, really gently. Just kind of push
it in a little bit. So of blend nice, and it's just finding
that sweet spot, really, and getting to know your paper and how
your paper works. I'm using arches, which I love, but I'm not as familiar as my bokingf which I feel
like I've grown up with. But I'm enjoying
using the arches. Right, let's do those ears before I'm in a
rattly mood today. Right. Clean the brush. Take the excess moisture off. And again, we're doing
exactly the same with the ears like we did
for the first time round, so so light at the bottom. Go careful. If it looks like
it's something whizzing out too much, then hold fights. Just a little bit too wet still. Just go to whiz straight over
to this other side while I've got the so
light on my brush. What I'm after is just
just a little bit of a blend, really, and a bleed. So those ears don't
look like they're stuck on and like they're wearing
a pair of earmuffs. I would have probably, if I was doing this trying
not to teach this, I probably would have
done the ears on the very first layer and just allowed them to
completely blend, but it all gets a little bit tricky to try
to teach and get everybody doing this at the same time and
getting a good result. So this is a little bit
kind of way of doing it. It does risk a little bit, they can end up looking
there being stuck on. There's a nice little bit
of colour that just goes from the ear over the
top, so just get that in. You can see there. Keep your
eye on that reference photo. I'm gonna put a little bit
more colour strength there. It's just about wet
enough still there. Losing. This is obviously, it was a little bit wetter here when I started this eye makeup. It's blend. It's it's
bled quite a lot. I just added a little bit
more strength, though. S, if yours is just right, don't me blindly, as they say. If yours looks good,
then don't follow me. I think that's looking right. And the minute, you need to
keep Kyla looking up from it somehow you can get so especially if you're sitting
'cause I always stand. I think that helps a little bit. I can sort of keep
myself away from it. But if you're sitting,
it's very easy to get so focused on little
areas that you don't see, as they say, the bigger picture. That's where the
sings come from. So, yes, take your butt away, even to stand up for a minute. Try not to lift your
paper because that will if it's quite wet, you'll encouraged to paint to move where you
probably don't want it. So try not to move your board or paper at this stage,
while it's still wet. But just try and get away
from it a little bit. Actually, I will while
that's still damp. Ti I've got a little bit
of sod light genuine and a tiny little bit of lavender
very only small amounts, probably a little
bit more than that. I just want to
make sure 'cause I know some of the
practice pieces, I didn't get this
strong enough down the lower down on the chin. It looked a little odd. So make sure you've got a
little bit of color. Only tiny, and say, keep, take your brush
away, how would it look. Now, I'm starting to get to the dangerous stage where
things are starting to dry. Some of this is probably
already dry. This is quite wet. I've probably got a slight
tilt, I think on my disk, so this is still wet
down the bottom here, but that's probably quite dry. So I don't want to keep fiddling too much at
this stage. Right. Leave that one, 'cause I think we've probably
done as much as we can. And we'll move on to
number the lower one. I can't be that's number
one or number two, if I'm honest now. So lower one.
8. Bottom Head Second Layer: We're going to do exactly the same as we did for the top one. So we're going to do very
carefully. Wet down. Going around the
ears to start with. We're not wetting the
ears down at the moment. We're just keeping those free. Clear. Okay, carefully around the eyes. Try to keep those little
white lines if you can. A little bit nearer. This one, I can see this one
a bit clearer. Okay, very gently. When you're adding adding
that second layer of water, go ever so careful because
I like what I've got there. If you really sort of scrub and add a little bit heavy handed, you'll move that and you'll
lose that sort of freshness. I think freshness
is hot, very hot. You won't ever get it
back once you've lost it. And it's ever so subtle,
you don't always know that just by doing that, you are just gently and very subtly over sort of the
period of the painting, sort of losing that magic. I say, duck your
head up and down, make sure you've
got it all all wet. No eye patches. And we're going to
do say I'm going to pretty much start on
the top of the head. Same thing. I'm
looking for where I need the most blend first. And we need to leave
a little bit later. Sorry, we need to allow the paper to dry a
little bit to add that eye marking on cause like I probably was a
little bit too soon there, and it's bled a
little bit too much. So I need it to sort of be a little bit drier so the
color holds a bit better. Doesn't move so much. Too much water down there.
I can see it puddling. Right. I got the
suck like genuine. Let's have sepia and
the got this time. I want to make that. I'd have like ideally that a
little bit stronger. So I might try and
make this low one a little bit have a little
bit more strength. But, you may find your top one
has been got enough there. I want to try and make is, say, a little bit more
strength. Just tapping. Let's have a tight
tight a little bit genuine in there as well.
Give it a little bit more. Um as they say, it's a little line that
runs down, isn't it? It's quite cute. Let's try
and get that in there. It's always sort of
bearing minded that those nice patches
above the eyes, the clear patch looking
my way down here. This is where the dogs
interrupted me, wasn't it? I went I think didn't
quite work out there. So let's tap that in. I was only saying, wasn't
being a bit risky having two dogs in the studio while filming and now
peacefully asleep. They picular lower Postwoman because she feeds them biscuits. So they can hear
that van turning up down the down our drive. Okay, again, I'm just
looking for strength. As I'm looking for
the stronger areas. Squeting and painting
and prattling. So I picked up a little
bit of lavender. They're very subtle.
If you gain, squint your eyes, you'll see
there's a very subtle, like, little muzzle line
there, isn't there, which is quite
important to get in cause it gives them a
little bit of form. But it's only very soft.
You don't need a lot. Again, take your brush away. You'll see if you've got
that. It's very soft. Let's have a little
bit round the nose. She's got a little bit. I've just called her
she. I have no idea why. Um, there's a little bit of go fighty color
there, isn't it? Yeah, that's sweet.
Where is that? I have a little bit
of transparent brown. Actually, no, I won't. I'm gonna leave that top one as
a transparent brown. I'm not gonna pop
it on this one. Does it give them a a
little bit of difference. Okay, I need to be mindful of how this paper is drying with. I'm ready to go.
Let's go for it. See how I go. You can
always start adding color, and it looks like it if
it's running too much, you can always sort
of, like I say, just hold on a few minutes. I but the trick is to
keep your brush clean, and without too much water
when you're doing this, adding water on your brush will encourage that
paint to move. So I'm going to start with the sepia and see how that goes cause the Sepia
isn't a great mover. Yeah, I think we're
ready to go on this one. I keep that little line. Say go gentle 'cause it
all carries on moving, so bear that in mind as well. I'm just looking for that
gentle bit of softness. Obviously, the minute
you have something, I'm still painting and you've got the perfect eye marking, then stop and just
sort of either hold on or move on
to the next one. But, sorry, I got a little
bit of suck like genuine. I just popped a little bit
of that on the lower part. Why to strengthen
that area there. Again, trying to keep
my eyes squinting. Do I worry about any
flicks at the moment, Because how can I explain this? There aren't really, I suppose, right on the end here, we
could do a tiny little flick, but the rest of it
is covered over with the back of this
mere cat behind. So if we do flicks now, they're just gonna be covered
when we do the bodies. So we could. She's just chopping and changing
a little bit. Just add a tiny little while. This is still just about damp. If it's dried a little bit, you can always add a tiny little bit of paint
on your brush. Gain same applies,
work a little way in. Let's just do a couple of little flicks just off
the end of the ears. Or the joint between the
ears. Yeah, that I do. Don't do too many.
Right, where was I? The next eye makeup. Gain, probably a
little bit too soon. I could have a little bit too much water on my brush, as well. I think it was probably
the case more than the paint, more than
the paper being. Too wet. I think I had a little bit
too much water on my brush. To try to reserve that ice
white line best I can. Okay, just keep squinting
back at that reference photo. If you've got it
open and, you know, it's quite close
to your painting, if you keep flicking
your eye back and forth, they can almost superimpose themselves so you
can kind of flick, flick back and forth,
back and forth. And you'll see where you need to add the color and strength. Just keep tapping. A bit
less. Suck under there. It's actually a
little bit paler. This one, actually a little
more in focus, isn't it? The back one has lost some
of the focus in the camera. Yeah, they're looking
cute. Gain, take your brush away. I
have a little look. I've got a bit of angle there, so I'm just going to
soften that very gently. Let's say, stay within
that rough guidelines of your pencil marks,
but don't be a slave. If you've got something
that's really pretty and just blended and it's not gone too far or too wacky
out. Then leave it. Sometimes that's
the better choice rather than keep
maneuvering it around and losing some of
that lovely freshness, 'cause that's that's always what we try to
achieve, isn't it? Again, I'm gonna
take my brush away. Yeah, I think she's
looking right. I am convinced that's a she. I'm going to pop up a
little bit of that lavender and so like genuine, there. Keep lost a little bit of that. Are you, muzzle line there. Again, I want to make sure I got enough color on
that chin, as well. I bench is a little
bit on a tilt. Seem to be collecting
water at the bottom, eh. Just a hint. It does show it fence on the
reference photo, particularly this
front mere cat. There's quite a lot of light, but it looked a little
odd if I didn't have these chins a
little bit darker. Right, I am Oh, I know what you haven't
done, the ears. Let's whip those ears
down. Again, just gently. Gonna sa, I'm almost there. If I'm not. Same thing applies. Just hold on a little minute. A, right. Let's pick up. Same thing again. So I'd
like in on the bottom. 'cause they are really dark on this refit
photo, aren't they? So it's really nice to get in that they've got a lot of
bitter strength to them. Again, I like Jenny in the bottom and a little bit
of sleeping on the top. But if, for instance, the very first lay you
did was dark enough, then you don't necessarily
need to do that. You can always leave a little
bit of light at the top. You don't need to be
necessarily filled in. But what I am after it is that is that softness
between the two joins, so it doesn't look like they've been stuck on there
wearing, say, ear muffs. There's always the risk when you section areas off
is you get left with. Um, hard lines. Okay, that's looking lovely. And as I was about to say,
I think I'm almost there. Lift my brush away.
Yep, I think I'm there. So I'm just gonna
allow that to dry. I'm gonna just watch. You
can just monitor this. These these little
as it is blend. If I might just watch that Somer that's moving a
little bit too much. I might have put that paint down a little bit
too soon there. You can see that's
blending a bit too much. But you should get that
nice sort of blurry look. A little bit more sepier there, 'cause I shouldn't move so much. Okay, I'm gonna watch Oh, I tell what we
haven't done as well. Just that tiny, tiny, little bit of line over
the top of the ear, a little bit of dark paint while the paper's still wet there. Doesn't show it so
much on that side on this left hand side, but Yep. That's lovely. Right. I'm going to down my brush and I'm
gonna allow that to dry. I say, I probably got to this sort of slightly awkward stage. That's almost probably dry
up there. This is still wet. And you can overfddle very
quickly at this stage, so it will be better. We aren't doing a third layer, but I w say it's better to put your brushes
down at this stage, rather than trying
to keep tinkering, is to then brush down. You could then add another
layer if you wanted to. I say, we aren't that's
always a better scenario than continuing continually
continuing to fiddle. I get my words out.
9. First Body: Right, then. Once
they are both dry, we are going to do the body
on the bottom mere cat, and I bought back
my trusty heart. If you're new to this,
this is a little heart my husband, um, carved me. And then the puppy ate
when she was young. So it's good now I've
got teeth marks in. But it's about an inch high, and it's great for tilting
my paper just a little bit. So, yes, it's become quite a celebrity,
my little woodeart. I had a one to one that came
and joined me in the studio, and she was quite excited to see the wooden heart
when I bought it. Right. We are going to
wet the front mere cat. So the reason for
doing the front first is when we do the back, if this is painted, we can then flick in giving the appearance of the
front mere cat having hairs. I hopefully will make
sense when I do it, but it's just getting
the order right, particularly with these
mere cats and the layering. So we're going to go.
Sort of halfway down. Oh, let's put a
little bit of color. I haven't done much of
that. Have I sub the goth. So we're going somewhere there. That color is just for you. So as far as I've wet
down, it's all wet. White up against the face. I'm going to put a nice little
bit of bit of strength. Um, underneath the chin, so bit the so light genuine. Let's have a little suckle
lite and start with the so light genuine and the stickt right on the
brush at the same time. I'm just going to place
and allow that to run. We're gonna wet further down, so a lot of that colors
going to be drawn down. So make sure you've got enough. And we do need to
make sure we flick up into the face in a minute. So we mustn't forget to
do that note to self. Just tapping, having squinting
where that color is. Let's have a little
bit of lilac. Lilac, Lavender. A little bit. Just to of pull
that colour down. Obviously, you've got a tiny
little touch of it up there, so just keep the
continuity going. A little bit of gothte as well. It's just trusting
your instinct, Eddie and where I think
the color should be. Not so light. Right. Before it, brides, we need to wet
this further down. Got a little bit of
line there, wife. Showed you where to wet up to, but hopefully you
shouldn't have that. Now, because it's on a
tilt, it should run. If it doesn't, it's not
particularly shifting, probably I just haven't got
quite enough colour up there. So the color will
only run so far. It needs a certain amount
of paint for it to run. So it's got a little bit
more strength there. Again, just give it
a little minute it will Oh, Can your brush. If you keep wetting this down, it should pull down. If it's not moving very much, I can always down. I've got another
little pot here. Just give me a bit
more of a tilt. Just allow it to run a bit more, and I can add if it's gay, not moving a bit more risky, but I can add a little
bit more water. It's all trying to encourage
it to do its own thing, rather than me
manipulating it too much, and trying to get the try
not to interfere too much, just allowing things to be, that give you that fabulous
sort of freshness. Let's put a tiny little
bit to go for it. Just running down
that left hand side. Just gonna let this
itchy blend out. I don't want to put too much. I got a little bit
of go through. Very gently. I mean, it's not so like genuine. I think that actually
almost might be enough. But there is quite a little line down there. Tiny,
little bit more. You just to be careful
because it does start to dry. And you can risk
sort of muddling it. Right. Before I get
carried over that, we need to sort of
flick up into the chin. This will give the appearance
of little white hairs. So you're almost
sort of reversing in your mind, if
that makes sense. So you're trying to create white hairs coming
down by pushing up. I always sort of throws
my mind a bit this. Keep an eye comes up a
little bit more here, doesn't it? Don't be uniforms. You don't have to go all
the way along and do very uniform little flicks. Just do a few, take your brush
away, have a little look. They can get a little bit too
much if you're not careful. Coming into the face. So
we're trying to create, say, the flicks coming out of the
cheek by putting colour in. Okay, just have a little look. That's a little bit sticky
cause a bit too much. I pop a little bit water on
that and get that to move. And I like the rest
of that. I don't want to do too much
more up there. If I add color now, that
it's beginning to dry. It would again, same thing
as applied with layers. It would be better to
go over and reapply. But I don't want it to be
too dark. She's quite light. She Um, So I think that's
enough, if I'm honest. So again, I just need
to allow that to dry. Ideally, if you've painted
something on a tilt, it's best to leave
it to dry on a tilt, as well, 'cause if
I lay that flat, it will encourage
that paint to move back up and you'll lose
that sense of movement.
10. Second Body: Right. Once that's lovely
and dry, I must admit, I did pop a hair dry over that, so it's dried a bit quicker. I'm just going to pop
that back down to its original height
with that heart height. That's about an inch high, and we're going to do
the back mere cat. Same things, really. We're going to wet this down, and we have to remember to
do the flicks quite quickly and the flicks into
the front me cat. So let's I'm going to start. I'm just gonna put I'm
going to wet to there. So sort of opposite her nose. I wasn't going to get too
gingerish with these mere cats, but I have obviously defaulted to being a
here in the front. Okay, be careful not
to go into the head of the little front mere
cat. Take your time. Avoid when you're wetting
stuff down. There's no hurry. It's better to get
everything nice and wet. And then if need be, you can add a little
bit more water. But just make sure
it's nice and neat. And no try patches. All
right up against the ear. It doesn't matter.
It'd be better to have a little bit of bleed from
the ear than it will be to leave a little dry line
because it will you'll get a little a little
white line up against the ear and it
look a little look a little could
look a little odd. So I'm going to pick up
the so light genuine and the sucalite and I'm
going to it's very similar. I'm gonna pop a lot of
strength underneath the chin and allow
it to bleed down. This is when you're sort
of shaping the mouth. So just be mindful of that. So by putting this color down, I'm creating really the shape of the face and how
that's running. Obviously, we'll do a couple
of those flicks in as well, so probably a little bit
more strength there. I'm not going to put quite so
much on the opposite side. I'm probably gonna
use the brown, like genuine, a little
bit of lavender. Just go to touch that in there. It's going to be a little
difficult 'cause it won't run very much
because obviously, she's sort of stopping
any paint flowing. So I just need to make
sure there's enough. I'll do those little flicks
now, actually, I think. Well, that's drying
before it dries, so just gonna flick
In too much lavender. Tight. Oh, that's too much, too. Now, I've got a bit of fluff. Very gently. Okay, look
at that reference photo. You're trying to create the
white hairs coming down. So by putting colour in, it's always a say a
bit of a mind bend, but it comes up a
little bit, doesn't it? Don't do too many, I say, just keep it light,
keep it sort of fresh. I'm do a couple here. I have to work
quite quickly here, so and if it's starting to dry, like mine's a little bit sticky. Just add a little bit
of paint on my brush. Got a little liny there. A bit more water. Stop
it looking too sticky. You go to wet this down again, to a bush, just to keep
it moving. Keep it wet. Or as long as the area you're kind of working on is still wet, you can add more water. So don't be afraid to add
more water as you go. Just be careful. If
areas start to dry, adding more water will
make it look very messy, but as long as the
area you're kind of working on at the
time is still damp, you can add more
water to give you a little bit more time
to continue playing. There you go. Probably a little flicker
out of this side as well. They'll be very pale once
that pencil marks gone, so let's clutching
paint here desperately. That's a little bit of gothte. It's tiny bit, very subtle,
but not that subtle. Too too strong now. Lovely, that'll do. I say, take your brush away. That's enough. I'll do the side as well before we allow this
to run all the way down. A little bit of
gothte on my brush, as well. Take your brush away. That's looking alright. Let's
move this all the way down. So we're gonna wet further down, allow that colour to move. You go to say, I'm going
to add a little more. This is all still wet here, so I can just add a bit more water and
encourage that to run. You see, hopefully you
can see that running. And we're gonna come all the
way down now. Don't make. There is a sort of sweep around. Probably this pencil marks probably come out a
little bit too far. I'm just gonna sweep
in a little bit more, and I can always come
out if I need to. But it's very hard to move
in the other direction. Okay. Nice bit of
strength this side, isn't there? Let's have that. So light genuine. And
let's have a little bit of suck a light. Okay, tap that colour in. I do love that so light genuine.
Just my favorite colour. Beautiful. Just picked up the
transparent brown as well. Give me a really nice
amount of paint there. I think I'm going
to add a little bit of the gothite down
this side as well. Lots of water. Water
is where the magic is. It's probing that right down. It's coming right off my board, so it's allowing that
right off the edge. That gives you a really
lovely scent to flow. Fairly quick because we need to do these flicks here as well. So I mean, ideally, these are always best done when the paper paper is nice and wet and you've got a nice bit of wet paint to
pull out, as well. And then equally, we need
to go in a little bit here. Don't do too many of these. They're very like the
guard hairs, aren't they? So we're just going to do a few make sure they come
in their direction. Obviously, the hairs are heading the white hairs are coming
out in this direction, so we need to make
sure we kind of create that effect of the
white hairs are coming up to that
right hand corner. So be careful not
to do too many. I think it can be
a bit distracting. We can always add a little bit of white
gouache and come out. It's not as obvious, but they're still subtle. That's probably enough. If I squint my eyes, I'll say though. They're like little
guard hairs more than very obvious hairs. I need to make sure I'm not making this front
me cat too fat. That line of water, it's running, it's beautiful, but it's going to make
it look a bit fat, I think, so I put a little
bit more color there. Just a hint. In theory, it would be
mounted somewhere here. So, you know, you'd lose a lot of that messy
bit at the bottom, so it's quite nice to
allow it to run off. Once you're happy with this, then we need to do
the other side. I'm just sort of pausing. I think there's
enough color in here. It would be a little
bit difficult out. I think it's probably
began to dry. Again, I I really felt I needed more color there
and more strength, I would wait for that to now dry it and then
add another layer. But I'm, I like that. I think that's enough there. So, let's let's let me put
these down. All right. We're going to just wet. We'll be halfway down.
I go to pick up. Sort of like genuine go tht
and go quite nice and strong, right up the I'm just gonna
tap, allow that to run down. Okay, what you wipe that down. Encourage that to run, she says, pop a little bit more water, and this is a little bit of how the Archer's
paper he's behaving. My normal Bockingford, that would have reacted
a little different. So you just get to
know your own papers that you use or like using. Yeah, I think that's enough. I don't want to add too much. You can kind of start
filling everything in, and I can feel he's beginning to look a bit wide if
I'm not careful. A little bit of lavender just to keep all those colours
sort of pulled together. And we needed to do
some little flicks. It's quite tricky. You can see there's
some darker hairs coming off this front mecat. But we're just
going to push a few in just to give that
impression there's a little some of the hairs are coming
off off the front mica. Just do a few say don't too carried away going all the way down and methodically
doing them. Yeah, and pop your brush
down. Have a little look. I am actually going to put a little bit more water here and try and run some of that off. Almost too much color for me, especially if I say
keeping bearing in mind, I'd like to keep that as the light coming on
the left hand side. I don't want to actually
have too much color there. It doesn't go spotty. Sometimes, I say, getting to know your
character, your paint. So paints when you
pup them down. That's going to be
a very bad example so light genuine
doesn't do that at all. I don't think any of
these do particularly. But when you do the
little tapping, it will leave a little
quite an obvious mark. So it's always worth just
checking when you've put those colors down that have that character or
trait to do that, you've softened it, but Right. I think I'm there
for that layer. There's enough depth. When
I step away, I can see. Obviously, the reference
photo, they're white. They white chests, and we
really were just creating a lot of it is shadowing. Obviously, they have got some sort of go fky
colors to them. So we've added those in as well. But we just want to try and keep things very
loose and light, and it doesn't have to be
exactly as the reference photo. It's better to get a nice
loose impression than to exactly copy the reference
photo in front of you. So I am going to leave it
there and allow that to dry, then we can do those
lovely finishing off bits. You know what, while I'm
standing here, actually, and looking and
looking at some of my other Oh, that's a nasty nois. Little practice pieces. I'd like to put a little bit
more color down there. So while that is actually still, um, wet said about
those guard hairs. I'm just a tiny lit. I've got a little bit
of suck like genuine. Let's have a tiny bit of
sepia, there's a sepia. Just want to give a little
bit of strength there. We'll just give that
nice clear definition between the two mere cats, as well, and a little
bit of flicking. Okay, that's all I
wanted to say, really.
11. Finishing Off: Right, we are nearly
there, aren't we? You can see. They're
almost almost finished. We just need to put those
catch lights in and really tidy and kind of
sharpen up that detail. So let me drop my painting down 'cause we don't need it on a rise at all. Now, make sure it's nice and
straight. Give the homes up. Give me a piece of kitchen roll. It's always worth sort of
swapping your water, as well. So you're working
with cleaner water. Mine's a little murky now, but it's not too bad. So what was I going
to say first? So it's always quite nice to rub any pencil lines
out at this stage, but make sure your
painting is really dry. I have just pop a
hair dry over this. I know it's dry, but it's nice to get
rid of those lines. So let's let's just very
gently rub them out. Again, just try to be gentle. I don't want to do too
much rubbing up so I can jig ball around and
make the camel wobble. I think you get
the general gist. So just go round carefully. And if you've left
any left in it, have you got any spots here, I don't know if
you've come across a magic sponge.
It's quite magic. It's actually This is only
a part of it, actually. They're actually a
cleaning product. So you can kind of
tear little bits off, and I will hopefully get rid of that really useful for
taking sort of spots off. Um, on things such as this. That's quite I've really
done a good old spot there. They're really
quite strong blobs, but they do a really
fantastic job of getting little marks out. You can see they were
really thick, actually. They must have been
Pop a glob paint. And voila. So I will pop a link to these on the projects
and resources pages, but you can buy them
atadas, Mr. Amazon. Um, or any probably
Cleaning place will probably stock them, but a really useful thing for getting little marks
off your white paper. I have seen some artists use
it for taking color out, actually on your
paper or painting. I find it a little hard. It can leave quite hard marks, and it's not specific enough. I can't be detailed enough, so I don't use it
on my painting, but great for any little mishaps we
have on the white paper. Write it home. Let's get this their little little smiles
in the little muzle line. We're just going to
be quite subtle, but that's gonna give them a lot of character at the moment, we haven't got their
smiley faces in, have we at the moment,
or smiley mouth in. That's going to hopefully bring them to life, as they say. So what I'm going to do, you
can see droplet of water. See this line here, and
that's the line of the mouth, and we're just going
to run up where we put that very subtle
line of the muzzle, we're just going to
wet that sort of lea. We can gently I don't do a lot of this because it can leave hard lines between
where the water the sort of water
line between the two, but we can just gently soften it seemed to be the best way to achieve these
mouth lines easily. So I've got a little bit of
cycle N. It's quite a soft, easy colour to
remove if I need to. Now, the trick is, I had some funny goofy looking mere cats when
I was practicing these, used to go really gentle and
see what they look like. And just gently place
the paint down, take your brush away,
have a little look. The slightest deviation down, up will change the character. Obviously, a smiley
face will go up, a sad face will go down. So if you want to keep
them quite cheery, the line needs to be subtly
going upwards, I would say. Just gently pull that
little line out. Again, you can soften if
it gets a little hard. I quite like a finger because
it just squidges the paint. It gives you enough
detail or strength, but gently take any color and
sort of move color around. So I say go gentle. To keep taking your
brush away a look. Do I put a little
bit of So genuine, a little bit more
strength there. I think he's looking right. Gently bring that line up there. It's very soft, very subtle. Tiny little bit of paint. These lines will be one of those things you'll be
able to alter maybe the next day or when
you sort of step away, you might you can
almost we've been painting we've been painting already for quite a long time. And you almost don't see
what you're looking at, and particularly
sort of characters like this. I quite like that. But I say, it may be the case
when I step away from it, come back, and I'll be like, Oh, no, it doesn't look quite the character's
not quite there, so I will just very
gently adjust. And again, you can do exactly as wet that little area
down and just tinker. It will be the tiniest
little tiniest amount of paint you have or haven't
put on or just need to move somewhere else
just very gently. Bring that up there.
Again, soften very very It's very subtle. Okay, let's let's do
the lower one as well. So exactly the same thing again. We're wetting the top line. So let me put a
little color there. It's there. That's
almost done. I'm done. And I just kind of pull it up a little bit, as well,
around the nose. Again, it has the
effect of softening the nose a little bit more. We can add that very soft
subtle line muzzle line. I think this one looks
a little naturally. Cross almost, doesn't it? Than the top one, so be careful. You may need to you may feel if you want a
little cheery me cat, just to go a little higher than maybe the
reference photo shows. That's too cheesy now. You can see how it alters so quickly to the
tiniest bit of paint. It's definitely got
a cheesy grin now. It's a little squidg. Yeah, that's better. You know
what? I think I'm there. I don't think I really
want to do too much else. No, I think dar iny bit Take your brush away. Yeah. We can have another
little tink if we need be. But let's get those
catch lights in. I think that's going
to make a difference. But what I want to do first before we start doing
those catch lights, I'm just to wiz hair
driver and make sure those little areas are nice and dry because we're sort of concentrating
on little eye details, it's, again, too easy to smudge. Right, then, I have got a
little bit of white garsh. Now, if you haven't
just like mine, mine haven't been kept
through clear enough. These little tiny,
little white lines underneath, we can put them in. So if you found like me, they've a little disappeared,
we're going to pop them in. So tiny little brush. And this is where you
can really want to if you've got your little
reference photo in front of me, really scroll into those
individual eyes where you can see that little
white line really clearly. Trying my best to not to
get my head in the camera, but to be close enough, so we're just going to start
up the top there. And if the line ends up being
a bit chunky, don't worry, because we can gently back fill that to make that look
smaller and fineer. It's probably enough. And
then we're going to do. This one doesn't show too much. Almost that's almost too much, so I might actually fill
that in in a minute. This little one here in front, again, I've lost I've
just lost the edge here. B just a way I when
I wet that down, sometimes it's your
wrist action and how you sort of sweep
around with you. And Again, there's not a very obvious one that size, so that's
probably enough. So what you can do if your line then
becomes quite chunky, which is really hard not to, or you can I got a
little bit of sepia. Very gently. Adjust where you
think needs to be. So maybe the e needs
to come a little out. So you go this side of the white line or
maybe vice versa, the eye needs to come
in a little bit, or that white line needs
to come in a little bit, then you'll go to the outside. I hope that makes sense and just make it really slithery fine. It's only a very
fine line, isn't it? So you don't want it
very thick and chunky. I'm gonna close this one down, actually, and get
almost rid of it. I don't need it that thick. It's just Yes, that's better. Game, same with this one. I probably need you to
make the eye a bit wider, so I'll make sure I
work in the eye ball. This is the joy of
having a subject with very dark eyes and very dark
eye makeup round the eyes. Yeah, you can see now
that's ever so fine now. Let's put those catch lights on they will make a difference. So that your white paint. Make sure you brush nicely
clean, excess moisture off. And you want it really
nice and thick and creamy. Now, just keep an eye on
that reference photo. One in there. Usually they're sort of
top and to one side. Usually a little
in to the center. Dame with this one? Don't
they make a difference. That's just why I like
doing it at the end. Suddenly, you have two little mere cats looking back at you, and it really does bring
that painting to light, doesn't it? Make it zing. We have nine. Stop
fiddling, Jane. I think you can always adjust these little
things afterwards. Right. My nose is a little
working on, so let me do that. This may be may not
apply to you at all. You may have just like this one, that
one's absolutely fine. This one I probably started
adding the water so the paint when there was too
much water sitting on there. So I'm just going to
wet that nose down. I'm going to leave out the little nostril marks
so the paint won't go into the nostrile area 'cause there's already
enough paint there to make it nice and soft. Okay, take my brush away. I only want a little bit. I just needs a little
bit more umph. I'll say, yours might
be absolutely fine, so don't necessarily
follow me on this part. But hopefully, it might
be useful for you to see how I can sort of
correct things. And if the nostriuls look a
little too much too obvious, where I have that they're dry. The little nostrils.
As it dries, I can always just wet that down. So then the nostrils
become quite soft. You don't get that hard line. You can almost
sculpt it this time. It's quite nice. You can just take little bits of color out. Again, keep taking that brush
away, having a little look. That little corner
popping taking off, but I can't do that
at the moment, if I start altering that
and wetting this area down, this paint will keep moving
out and keep moving outwards. Right. So Again, this is something I probably
need to dig at all. I think when I did this, I should have gone
a little higher up, but I will tinker with that in due course. That's
probably something. I don't know. Anyway, we can go round and sort of take any
color out that we need to. So if your eyebrows, for instance, have
gone a little bit, you've got lost a little
bit of that white paper, then you can very gently,
have a nice soft brush. Clean piece of kitchen roll, so make sure it's not dirty. You can very gently
take those out. And actually, although the color runs all the way along,
it's quite nice. It's almost like
releasing the energy out. I don't know what it is, but I like it's at lost and
found edge, really. So I'm actually going to
take some of that color out, although it shows it on
the reference photo. Just to release it a
little bit and give it a little bit of air
to breathe somehow. So it can be tricky. If an animal's got a
pticular marking that doesn't allow that to happen, sometimes you just have to go. Never mind. I'm
still taking it out. As you see that's hopefully
lightened everything up. I just allowed some
of that lightness in. Okay, I want to do a little
bit of that side as well. Now, I've done the thing I tell everybody not to do
or advise people not to do. This is really where I should
have just flicked out to, and I've gone a
little bit too wide, this looks a little
bit too too chubby in the cheeks to me. So I'm actually going to get
rid of some of this here, so I'm gonna scrub it out. You can see that
is automatically lost some of that
sort of chunkiness, and it's also bought a
little bit of lighting. I might do a few more
flicks once that's dried, so it just gives you can
see where the edges, but that for me has just
lightened things a little bit. A little bit the same
here, but not as bad. And I can come down here, do something similar to
this little mere cap. I mean, not so much. Again, you can very gently
take out any eye markings. So sorry, not my marking. Eye patch markings above, but go very gentle, D. I even squeege of your finger. It depends how
your paper reacts. All paper differs slightly on how it copes
with these things. Let's have a little look. I know what we didn't do
somewhere along the line. We didn't flick into the
cheek area there, did we? That's got a bit soggy.
That's about there for that. I'll still be alright. Let's see, a this'll be an interesting
little thing to do. If we can recreate them using a dry brush rather than how
it should have been done. So a tiny, little bit of so
light genuine and lavender. We're gonna go in, see if we can create those white
hairs coming out. You can see how it
can look a little bit stuck, but what we can do. It's very gently
with a bigger brush, and then just very gently
Just soften the edges of those hairs on the
body, the back body. Just with a finger, and
that just takes away any potential sort of water
line that might appear. I think they've come along
pretty well, actually. Is there any other areas
I want to take out? Light? A little bit
out of here, maybe. Just a touch. Lost a
little bit of light there. Again, I can squeege
from my finger. I think they're
looking pretty cute. I think what will also
help is to put some of those whiskers on
cause that really also helps bring the painting to life 'cause they're quite an intrinsic
part of these me cats. So let me close down. I have got that
little fine liner. I showed you at the beginning. Dine on these paints a little
bit. Now, you can do this. If you don't want
to do a fine liner, you can do it with a pencil
or if you're feeling brave, you can do it with
your paint brush. The paintbrush is a little risky 'cause you can do
some quite chunky lines, and once you've done that,
it's very hard to get rid of. But a little fine line
is a little safer to do, and a pencil is
also fairly safe. So let me do a pencil
one so you can see. Again, it's getting that lovely
sort of sweeping action, so it's just that, isn't it? So we'll do a few some with a pencil, some
with a fine liner. Some coup off with cheek here. Good ones down here as well, isn't it? It's just that sweep. If you're not sure, pract
it on a piece of paper. It's just the wrist action. Okay, let's swap to the
fine liner so we can get a difference in strength
and sort of type, really. Good ones that come right
out there, isn't it? Fantastic, aren't they? This is an expressive bit, isn't it? We're gonna do some little
flicks on those ears, as well. Down here. Up here. Can't quite see him
coming off the eyes, but a couple there as well. Yeah, doesn't that
make the difference? It's a bit like catch
lights, isn't it? So we can also do some little flicks off
these ears, as well. Just keep it 'cause they're
ever so fine those lines, so we can again do that. Try to keep them random. You need them in the
right direction, but do some thin, some thick. You can walk back to the pencil. No, that's not quite right.
A bit too bit thinner. I think you get the gist, so you can kind of work
your way around. But don't do too many. Flicks can get very addictive, and you can make it look
a little bit sort of static somehow and stuck on. But summer ice, these
whiskers are lovely to do. Fabulous. I think
we're almost there. These little flicks,
let me do that 'cause I'm hoping these
little things will help you, even though you probably
haven't had the same issue. So I'm just gonna put those
little flicks back in and try and sort of squish those cheeks up a bit because
they'd gone too wide. So make sure we don't do the same thing again, put
them in the same place. But we just need a few. Just enough for the eye to see where that body sort of where
the cheeks are finishing. So, honestly, that's
almost enough, actually. Boy it's really so easy
to put too much in. It's just to put a little
bit in, step away. If your brush away and see what you see what you think.
I think that's enough. Just see the eyes just
starting to go, Oh, yes, that's where the
end of the cheeks are. As well, could dump a
little bit higher up. Honestly, it's at that stage where I can now fiddle and
I'll fiddle and I won't necessarily help the
painting because I've been looking at this for
an hour and a half, at least here, haven't we? So, honestly, it's
better to step away, look at this, sometimes
it's only half an hour. You can come back and go, Oh,
I need to fiddle with this. I just need a little
bit of tinkering here. If I come back, I'm going
to go to have some lunch. I I come back and I
see some bits that I think that need
improving and would help you to achieve
yours as well, I will do another
diddle chapter. So for the time being, I would like me, I would resist fiddling, and I would step away, put
your paintbrushes down, and come back and
reassess your piece. Yours, when you come back, you might go, Perfect. I've done enough. That was, you know, I've done a
really good job there. And if I don't come
back and do anymore, I really hope you've
enjoyed this class. And like I always
say, please, please, please do share these
on the projects and resource these
pages because it is, honestly, such a lovely thing
to see your work pop up. And equally, if you
have any questions, I haven't said
something quite right. I've missed something
out, or you haven't quite, it doesn't
quite make sense. Please pop that on
the discussions. Um area of each class rather than doing a
general discussion. So yes, pop on the
little discussion area on the mere cat class, and I will endeavor to get
back to you as soon as I can. And, yes, I hope you enjoyed it. And thank you very much
as ever for joining me.
12. Bonus Tweaks: Okay, so I think this little lesson is probably something you'll
probably just watch. Um, so I'm hoping yours is just a little
mini masterpiece. But when I've come back into the studio for a
little bit of lunch, I've looked at this piece. He's got a little
strange expression. I'm not quite sure
what's going on, but there's a few things
I'd like to adjust. I think this ear
should have been a little bit more I think I've just missed a little
patch of darkness when I wet that down. And I'm going to see if I
can change the expression. And I think I mentioned
somewhere along the class that if you
wanted to adjust things, it's better to wet a whole area down and jingle,
jiggle with it then. So I'm going to do just that, so it might be used for, I might not be. So
we'll see how we go. Right. So what I would do, I would just wet the
whole thing down again. In some forms, it's not ideal because I've already
done these little flicks, so it has the potential for those flicks to look like
they've been stuck on. But it's I think
it's useful to see another layer going
down because we don't often do three layers
in a Skillshare class. And it always runs the risk of it becoming
muddy extra layers. But as long as you
go gentle, Also, I think I added this little
eye patch a little too soon, and the paint spread
instead of giving me a really nice
concentrated eye patch it spread a little bit too
much and a little bit weak, so we'll see if we
can alter this. Soften this nose a
little bit, as well, and take that little corn off. Okay. That looks a
little odd there. Just make sure it's
all nice and wet. You can see how it's
bleeding, can't you? That ear, Colors bleeding. And sometimes, if you've got colors and areas
that have got a little harsh and they've
got a bit stuck and it all looks a bit segmented, I suppose, sometimes
just wetting it down, softened, all those areas. And quite often
you go, that's it. I'm done. It's just softened. And I can see I've got a different almost a
different painting just by the fact of
wetting it down again. And allowing everything
to bleed and blend again. You still see a big chunk
of dry paper there. All right. Let's see if we can do some little alterations
on this little one. Trying to be ever so gentle
because there is that risk, as I say it getting quite muddy once you start
adding layers. Try and keep that
white reserved right. Also, I think I'm in a
little light on top. So let's see if I
can just give that a little bit more a little
bit more strength as well, so I think that would be nice. A little bit too
much like genuine. Go for a little bit of um silt. Keeping my eye on that
reference photo again. I can't really touch
this eye makeup that I want to sort of make a bit stronger 'cause it's too wet. I think this is what
I did last time. I just a little bit too wet. Dry patch there. Let's see if I can get that
ear moved up a bit. I think I've just
missed my line. Seen my line there. Yeah,
that looks at better already. Give a little bit more
strength forward here. A little bit of
shadow just here. See how soft these colors are. I've lost that mouth
line now, haven't I? But probably not a bad thing
'cause he was looking a little looked at miffed
somehow in his expression, but it would have been
the tiniest little bit of paint I put that wasn't
quite in the right place, giving him a little bit of
a funny old expression. Yeah, that's looking right. It's amazing by softening
areas down and doing a tiny little bit how it
can the whole painting. Right. I just want to do
a bit more strength here. Just give it a little
bit more punch. Back to my name same colors. Just the so like
genuine and the sepia. And with each layer, you find the paint doesn't move as much as it would
have done on the first. So if I was to put this
on the first layer, it would have moved a lot
more than it's doing now. So it's how you end up
gaining the control, but what you can lose
is the freshness. So it's that balance, really. And as I say, some papers
take this better than others. So I tend to probably do
less layers than I used to. I always think sort
of if you can do two, that seems to be ideal. Some subjects just just
demand more depth, something like a black subject or I would need to
do more layers. So I will probably do something
like a black labrador, for instance, that may
have up to five layers. But once I start hitting
that sort of five number, it can get muddy if
I'm not careful. So it's being really careful. You have to be ever so sort
of conscious that your paint sort of placement
is very light. When you wet down a another lay, it's done very carefully, just so you can keep it keep it as fresh as you
can, keeping your water clean. Just putting that
little muzzle line that little bit such a soft line, that one, but I think
it's quite important. IT be careful not to give him by chubby cheeks
again here, weren't I? Okay. I need a little bit of Sepia. Let's see how that mouth
line will take now. Sepia, 'cause I know that
won't move quite so much, it will be a little bit softer. See if we can get a
better expression, too. That's even better
now, isn't it? Just that tiny little bit
comical grin now, hasn't he? You know, that might
be it. It's not as pronounced as it is
on the reference photo, but you really have to
look at your own piece because nobody's going to
look at your painting, then the reference
photo and judge you as to whether you've
copied that well. It's just whether that painting looks appealing We
it's caught something. You're just after catching some character or
some inspiration, something that just you just feel like you've got a
con a little bit of magic? I'll say generally not necessarily following the
reference photo slavishly. And if I don't stop now, I'm going to run the
risk of over fiddling. Well, very tempted.
We'll do this. Now is to wet this body down. So I can because I've already, I've got a existing
sort of water lines and sectioned areas off that
they will remain underneath, but I will get myself
something a little bit softer. Run that down there.
Just squinch my finger. I don't want to get
water line down here. I can make sure I keep it light. The light areas light. W a nice light patch here. So again, this is the
thing with layers. Obviously, it gets this will get muddy and I will
lose the light, so I can take that out. A little bit more
sepier down here so we can bring back a little bit of strength underneath. The chin. How is it looking? So this is starting to get a bit
little washed out, isn't it? This mouth line again? It's
pot that back in again. I've gone quiet. I'm
concentrating. I like that. I think if I fiddle much more, I'm going to ruin what I've got. It's the biggest it's one of the biggest
things to know when to step away and
when to leave it. I just want to get rid of that little line
there a little bit. Quick look back to make sure
I've got those angles right. Yes, I think I stop, again, I will always run into the risk of over fiddling when
the areas start to dry, this will start to be this
will start drying here. I can see it's going off. For some reason, it's a
little damper down here. But yes, I really need
to leave that there, because the more layers
you've got, obviously, the more you risk
overmuddling and muddling going through one, two, three layers,
and pulling them up. So you have to be ever so
careful when you add layers to be gentle and not
over fuss them. So I'll leave it there and
see what that looks like. It would be nice to compare the two, actually, wouldn't it? So now that he's
thoroughly dried, I think it's interesting. What he's slightly
lost in freshness, he's gained in a little
more sort of clarity, I suppose, and a
little more realism. So with each layer, although you run
the risk of losing the lightness and
spontaneity of it, you then gain a little bit
more control on the detailing. So it almost swings how you
want to see your pieces. And sometimes some things
just work out really well. You'll do one piece, and it's beautifully light
and spontaneous. You'll do the whole
painting again. I'll just come out differently. My practice pieces have altered slightly on different almost depending on what paper
I've used as well, and the mood you're in if you're feeling a little bit glum, it will reflect in your work. So that's kind of worth
bearing in mind, too. And the other little I just made a tiny little adjustment
above the eye, which I think is quite nice. I hadn't actually done in
any of my practice pieces, but I was looking sort of
closely at the reference photo, taking a little bit of light
out at the top of these, so it was just
with a damp brush. I just took that up very carefully and then
squeezed it with my finger, and it's just given a little bit of relief over the
eyes, as well. Lifted them up a little bit and given them a little bit more of an expression, hasn't it? They've raising their eyes, I suppose, so it makes
them look cuter. So I hope this little extra
I don't sure it's a bonus, but this little extra lesson of me tweaking my mere
cat has been useful. Yes, and worth
experimenting with. If you've done one and you're really, really
pleased with it, do it again and maybe pick one of the mere cats and
put three layers over, and see how that feels to you. See how you cope with that.
It's all interesting. It's all worth playing
with. Nobody has to see these pieces of work. I think we all get a little
bit like, Oh, my goodness, I can't make I can't alter that or experiment with that
cause I don't know. We have this imaginary thing
that we're going to ruin it, and people are going to see
it and criticize us on it. But nobody has to
see these pieces. They're there for you to kind of gain the control and
understand this technique. So yes, use them as
experimental pieces as well. So before I chatter on too much, which I'm Always
always I'm able to. I will leave it to that
and say thank you again.
13. Final Thoughts: Did you enjoy piecing
these two together? Didn't they make just the
loveliest of subjects? Did you enjoy painting
the eyes and nose first? It's not my usual
way around, is it? What about setching
those areas off? A great way to build up your painting that doesn't
feel too overwhelming. Did you add a third layer over one of those mere cats.
And how did that feel? As I always say, it's
worth stepping away and coming back and looking at your painting with a
fresh pair of eyes. And tweak is necessary. So we look forward to seeing
you in the next class?
 Jane Davies, Professional Artist and Teacher