Transcripts
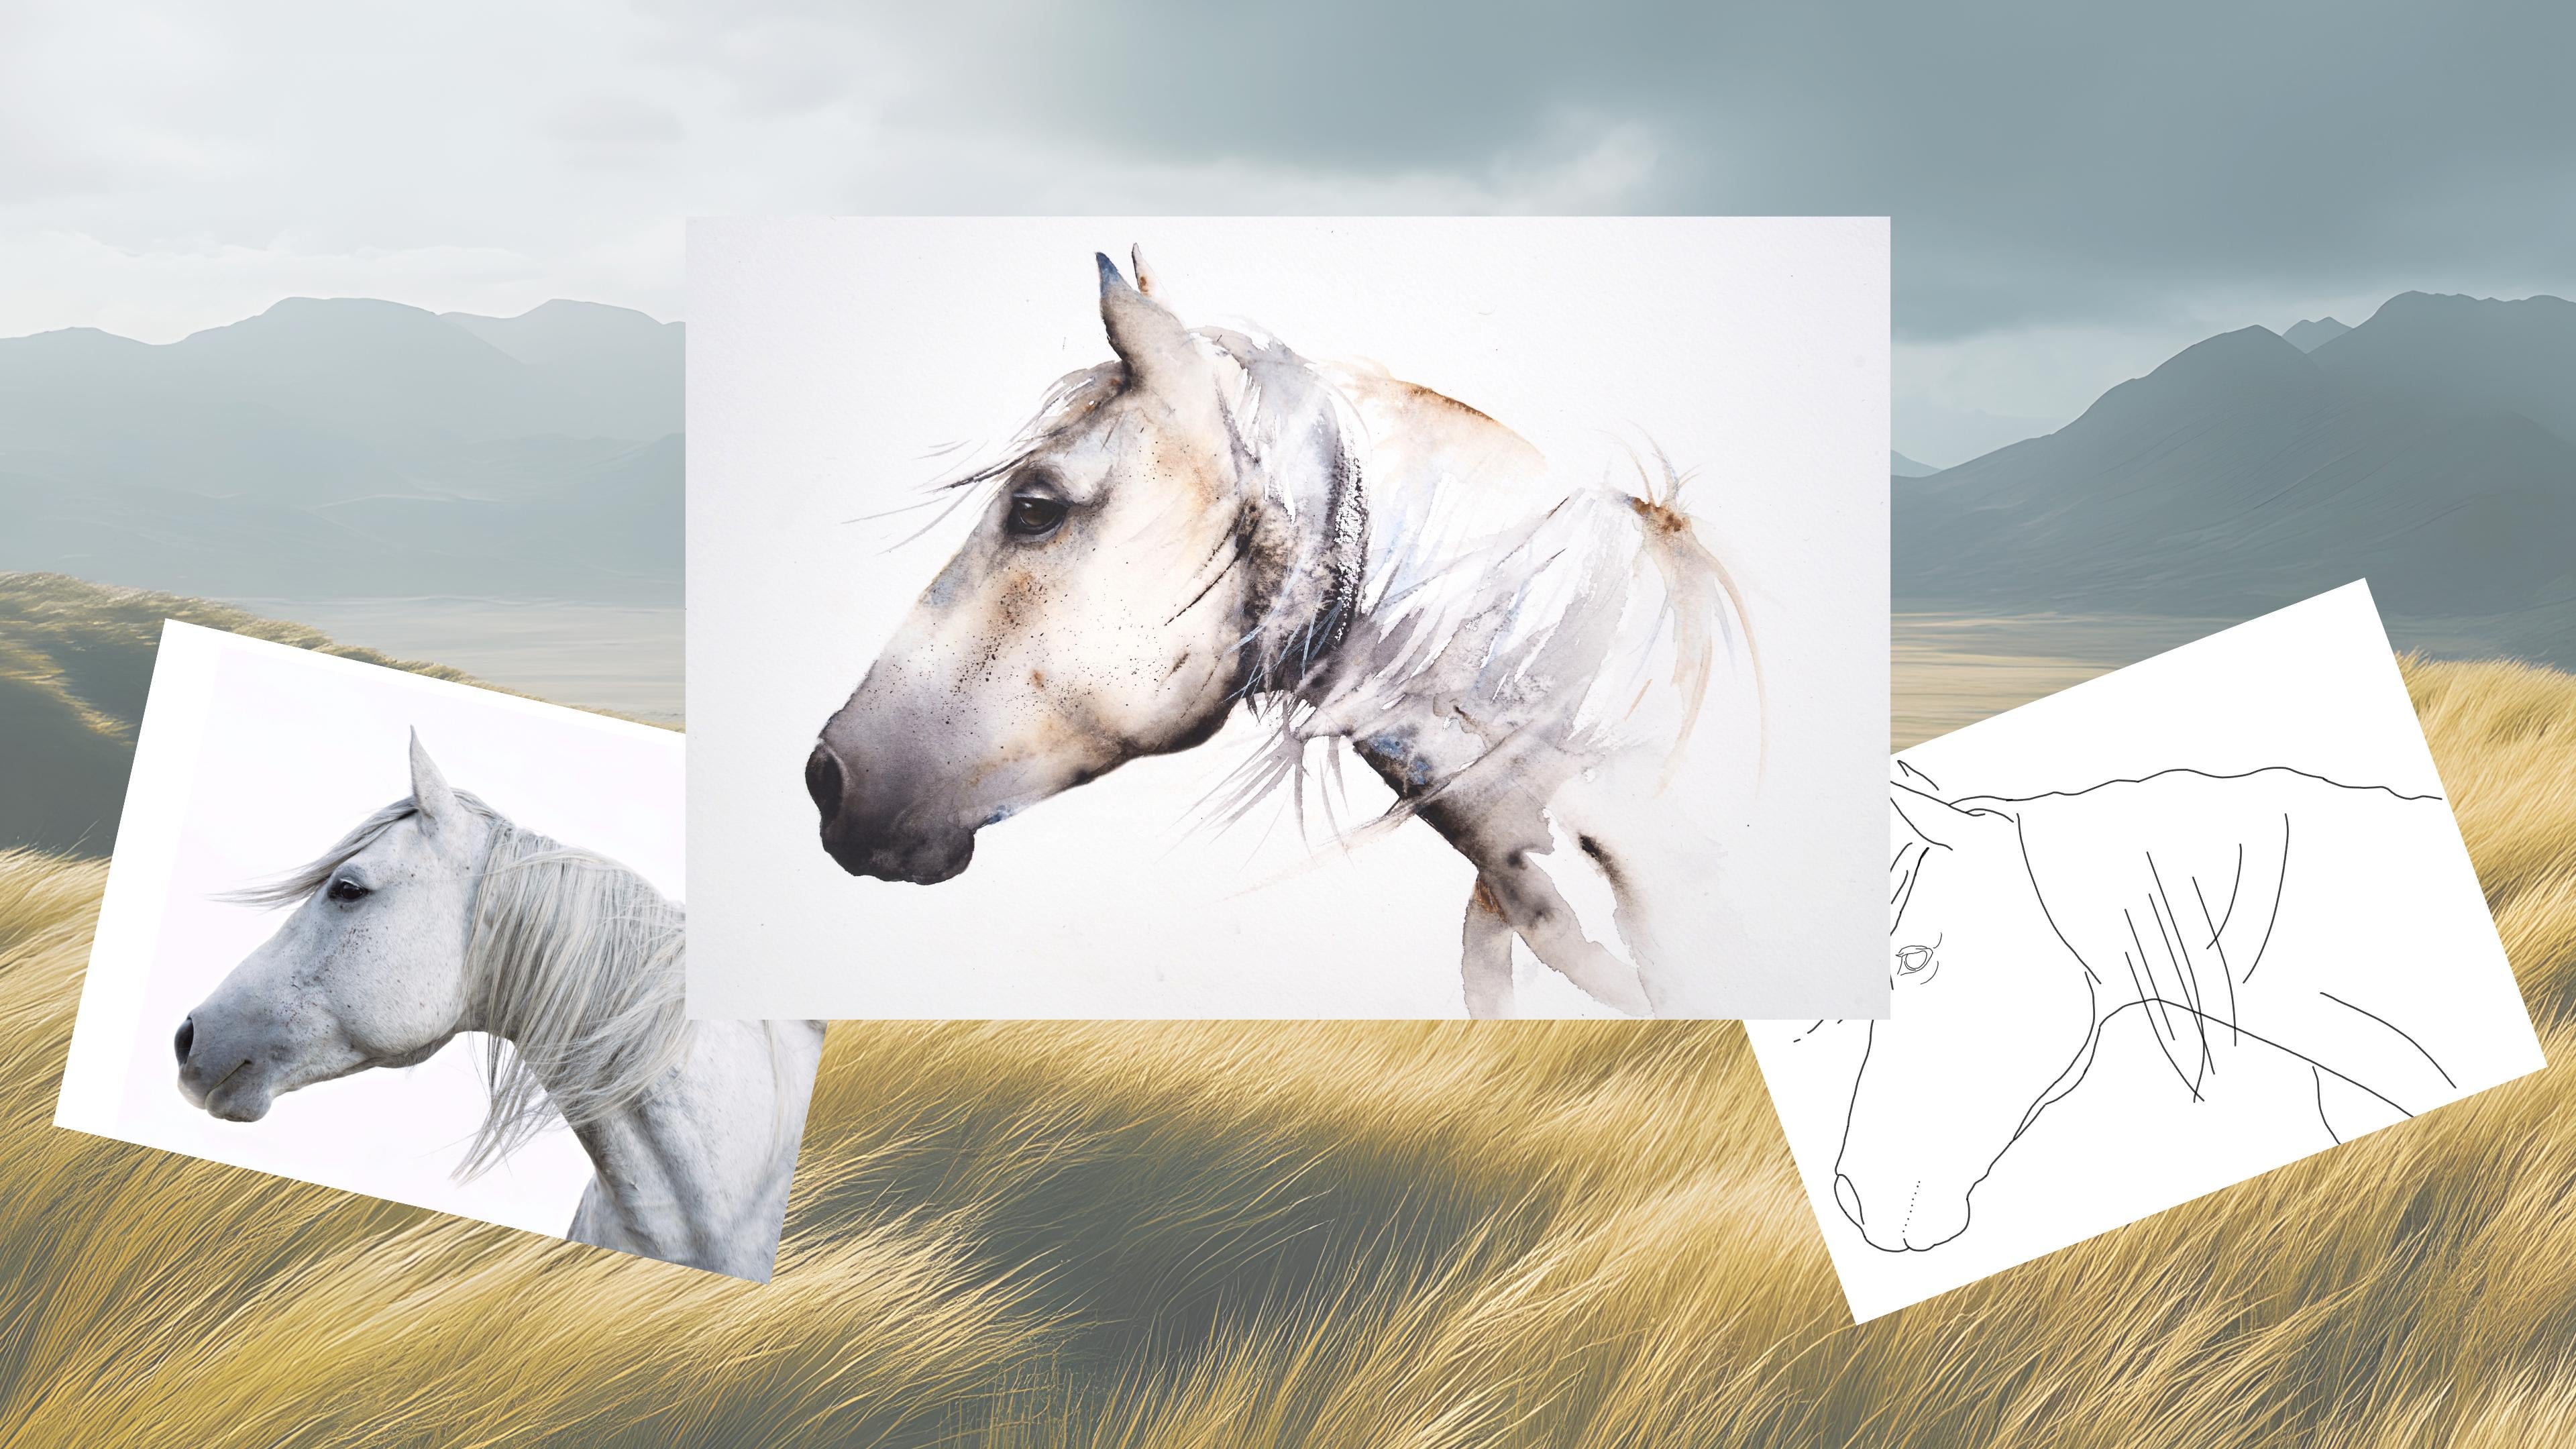
1. Introduction: Hello, and welcome to this
intermediate watercolor class. Today, we're going
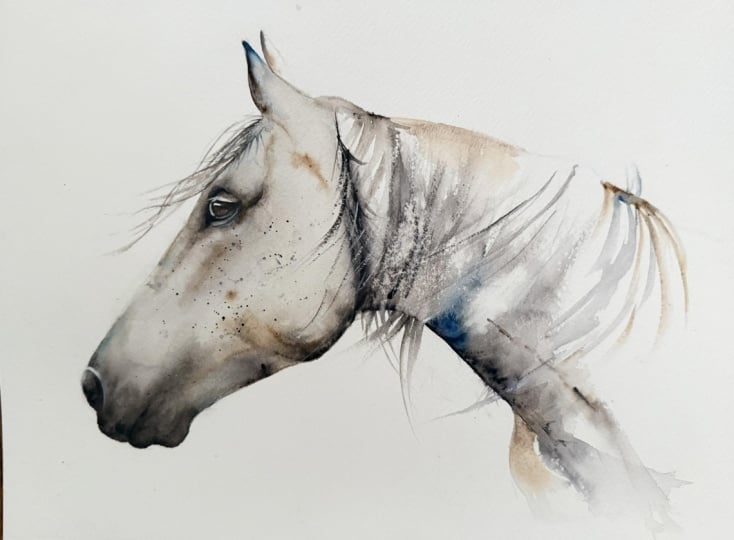
to be painting this gentle wind
tousled horse together. I taught this class in
Pulia Southern Italy to 18 students as my
grand finale piece. So I thought it would be
lovely to share him with you so you get a little taste of
what we got up to in Italy. The week long watercolor
retreat that I co hosted with a very lovely and
talented Sarah Stokes was a new but magical
experience for me. And it was fabulous to be joined by so many Skillshare students. What a brilliant community we've built up together over
the last five years. And so lovely to put faces
to those familiar aims. I'm Jan Davis. I live, paint, teach, and walk my lovely spaniels in the beautiful South Downs
National Park in England. Over the last 20 years, I've taught myself the free flow technique that
you see today. Not having been to art school, finding my own way has been
fun and sometimes daunting, but has allowed me to
develop my own style. This has led me to teach others either on a
one to one basis or as part of a group in a wonderful studio in the
heart of the South Downs. I also run a successful
art business where two days are never the same from the thrill
of exhibiting to painting pet and
wildlife commissions in my own home studio. In all my classes, you will follow
along in real time, where I can guide you
to keeping your work loose and fresh
without overfussing. If you're just starting out, my three beginner classes
will guide you with your first masterpiece
painted in only 15 minutes. Then you'll find dozens
of my master classes available covering a wide
range of beautiful subjects. In each one, I share the techniques I use in
my own professional work. We'll have a lot
of fun together, and you'll gain the
understanding and confidence to
incorporate everything you learn into your own work. You'll be amazed at how
easy watercolor can be. I provided you with a
wonderful reference photo of the horse and a
downloadable template. The template will give you
a stress free drawing, so you can just
enjoy the painting. I'll be showing
you how to create that lovely man that has so
much movement and texture. We'll be sectioning areas
off and adding layers, and I'll explain as
we go the whens, whys, and hows that will gradually build
up your painting. I will break down the
steps to painting that all important
character for eye. And, of course, I'll be
showing you how to adjust. And dare I say it fiddle at the end to bring your
painting to life. If you'd like to learn
more about me or my work, then please pop
over to my website at Jane Davis watercolors.co.uk. This can be found
on my profile page, along with the links to my
Instagram and Facebook pages. I'm very active on
my social media, where I love to share my art, especially on stories
with many ideas, works in progress, and
tales of studio life. I really hope you will share all your paintings on the
projects and resources pages. I love seeing your masterpieces. And don't forget
I'm here to help if you get stuck or
have any questions. I want you to experience that buzz of painting
in this liberating, wet and wet loose style.
So come and join me.
2. Materials: Right, then. Let me go
through all the materials you're going to need to paint this fabulous Italian Horse. Right, paints to start with. As usual, it's a
lovely collection of Daniel Smith paints, and these might actually be the actual paints that
I took out to Italy. Okay, so we have Joseph Z Z, a warm gray, a nice grain. It does some good
silk patterning. I like it for that. A little
more unpredictable, but fun. Sepia. And then we got
Goethite and a lapis lazare. And just a little
bit of white gouache just for doing tiny little bits of eyelashes, little
catch lights. Done a couple of flicks, but they never show
up particularly well. So obviously, if you haven't got these exact colors,
really don't worry. I think this clath particularly is open
to interpretations. A Paine's gray would be
a good substitute for the Joseph gray or a neutral tint would be
quite nice, as well. So don't worry too much on
that score with the gray. Sepia, I do love Sepia, and if you haven't got
that in your collection, I would highly recommend it. It's just a lovely warm gray
that holds its position. And if you follow me
for any length of time, you know, I love Goethite. But it's um I went
probably a bit heavier than I did on the
Italian Horse original, so let me show you that quickly. A lot cooler, actually. So I've only used a
touch of the gothite, so you could easily get away with not using gothite if you haven't got it or you don't want that sort of
warmth in there. The other practice
piece I did before has probably got about the
same amount. Uh, so yes. Blue. Again, it could
be any sort of blue. It doesn't matter.
It's just tiny hints, but just be careful. Your blue doesn't
mix too much with the browns and you end
up with a green horse. That's one of the reasons
I like that lapis, it's a lovely It's
just a lovely blue. Right. So the paper I
have here is arches, and it's 140 pound knot. And it's a bright
white, actually. It's a nice nice a little
bit warmer warmer. It's a little bit. You
see the difference there. It's a little bit brighter and whiter, as the name suggests. And it's been stretched on
a perfect paper stretcher. Again, I'll pop links in the projects and
resources pages for you. Then I have my pot of water. A little bit of salt. This is a little up to you,
if I'm honest. I did put a bit of salt there, but you may not like the salt. Did I put it in the original? I don't think I did on the
original Italian Horse. I just dropped a
little bits of water, so again, the salt is
a little up to you. I have my little heart, which is about an inch high. I use that throughout my classes just to tilt
my board a little. If I'm honest, I don't do
a lot of it on this class. I just didn't feel I needed it, but it's sometimes useful
to get your paint flowing. So, again, it might be something you'd
like to have to hand. Just a normal rubber. I've got kitchen
roll, paper towel, depending on where you
live in the world. And I've got a magic sponge. It's only that I I do some little splges and I clean it up using
the magic sponge, so I thought I'd incorporate
that just for you to see obviously not something
you need for this class, particularly, but it is helpful. If you're anything
like me, you get little splatters on your
white piece of paper, and these can be easily cleaned
up with a magic sponge. You just simply pull
a little piece off, pop it in your
water, and just rub. It's great. Also good for doing walls and actually
a product cleaner. It's not actually
designed for watercolor. What else is there I
do have a hair dryer, and I do use that just
to quicken the process. But again, that's not necessary. And there's the lovely
reference photo in the projects and
resources pages, along with the the
the three paintings. Obviously the class piece, the Italian Horse, and your practice piece, so
I've popped all those in. And I've also done a
close up of the eye for you as a photo version and the finished
horse eye for you. I think that is it. I don't think there's
anything else to tell you about
or suggest for you. So on to the important
bit of sketching out and don't miss that
part if you skip 'cause it's a really
good thing to get your sketch right
before you start this class,
particularly this one. I
3. Sketching Out: Righty, home. First things
first, as they say, we need to get a
really good sketch down before we start
this beautiful horse. Um, I know I repeat this a
few times in these classes, but it's such an
important element. I think if you're like me, you just want to rush on and start the painting
that's for me, anyway, the really fun bit, but it won't be fun unless
you've got your sketch right. So take your time with it. There's a lovely
reference photo on the projects and resources
page so use that. And there's also a painting
a picture of the painting. I'll probably pop a couple up there as well so you can
sort of see the difference. But it's all about
lines with horses. Um so just make sure you
get these sweeps in. The ears are start from the top. Let's try to be a
bit methodical. The reference photo
doesn't show a back ear, but they give so much character. If this little
back ear is just a little more forward
or a little bit back, it really makes me
look a bit more alert, a little bit more relaxed. So sketch it out,
see what you think. The character will
start to appear. The forelock kind of
runs into the head. So yeah, there's a
little sweep there. So, say, keep that eye
on that reference photo. The eye is the big one, because the rest of
this painting is ever so loose and if you were
to take away the eye, really, it's just a lot of
color in a horse shaped area. But what will bring your
painting to life is this eye. So again, scrolling, I'll try and remember I'm
doing this on the hop, but try and remember
I will try, sorry, I will try to remember
to put a cropped photo of the eye so you
can just sort of flick over and see
that really closely. Just take your time,
get that really right. And I would suggest using
that template in there, however you can get the image
correctly onto your paper, so you've got the eye
in the right place. Coming down again, these are
very gentle sweeps here. It's not just a straight line. If you look carefully, it pulls in a little bit, comes out. They're very subtle, but they will give you a
lot of character. And again, these lovely sort
of shapes around the mouth, sort of muzzle, nostril
area are important. You can see cheek
bones coming in here. And I love this bit. For some reason, I
love this little bit. There's a little square. It's
almost a squared off there, it's straight and
then comes down. There'll be a little sweep. This is a very gentle curve. Neck. You see the
shoulder coming in here. Pop that in. And then there's
a nice line that runs off. Again, pop that in. The thing I would say is don't
draw the man in. The only line I'm going to put because I've done this
a couple of times, um and the main needs to go up behind the back of
the ear, and for some reason, when I was doing the flicks, I was sort of leaving the main, sort of popping the main to here and forgetting that need
to go right up to here. So maybe that was
just a me thing. But I would just put a line there to remind
yourself as the main there. And I've just done a
couple of flicks just to give they're just reminders, really, that the main
sort of flicks over. Obviously, you've got that ef lovely reference photo
in front of you. The more detailed you try
and get the main in pencil, the more stuck your B. When you come to do that main, it's quite a quick action. So you don't want to be
looking at pencil marks, trying to get that
lovely brushstrokes, sort of spontaneous brush
strokes in the right place. So yes, don't do too
much of a detailed main. And keep your petal
marks lovely and light. I know mine aren't
particularly, but obviously, I need you to be able to
see what I'm painting, so I've done mine heavier than I would do if
I'm sketching out. But the most important ones to keep light are probably
on the front of the face, the back of the
man and the ears. I keep them nice and light, and any sort of forelock
guides here as well. Keep light. The
eye doesn't matter too much because
that's quite dark. But when you do sketch it out, try not to rub out a lot. I know if you're
anything like me, I've adjusted this
and gently rubbed. But yeah, if you do, just go gently because if
you do lots of rubbing, you'll actually take the surface of this lovely paper off, and you'll find
your pate doesn't really move particularly
well over it. So that's a nice little tip. Other than that, and again, I'm going to probably repeat
myself, sketch it out. Pop it away or just go away
for sort of 10 minutes, half an hour, make
yourself a cup of tea, whatever you can do,
just to step away. So when you come back in, you can look at your sketch and just go, Yep,
I'm happy with that. That looks right. Before you start, I'm just looking at this. I haven't told you
this. And I've just popped some very
subtle lines in there. They're just sort of
bone structures, again, just to remind me where to
gently place the paint, so they're subtle and very soft, so I haven't put too much
too many marks in there. Again, the more marks you do, I think the more rigid you
can get your painting because you're being constrained
by all those lines. Yes, so once you've
got that sketched out, we can, as I say, get
onto the fun bit.
4. Head and Front Ear First Layer: So once you're happy
with the sketch, we can start to get
some paint on there. This layer is lovely and soft. We don't put too much
on there, so it's a nice, gradual introduction. So I've picked up my
slightly larger brush. I almost contemplate I could, and I think most of
my practice pieces, I just use this one brush. So if you have only got
one brush, you'll be fine. I've just got this
it'll hopefully cover the pager quick quicker. So I'm just going to put a tiny little bit of
color here so you can kind of see the
areas I've wet down. But basically, it's the whole
head and the front here, not the back, just the front. And we're going to go up to
that main line we put there, just to give us so we don't run into the main
when we're painting this first layer and
plenty of water. If in doubt, add
more, I would say. And if you're in a hot country, so just going round the eye, go carefully round the eye. I'm going around,
even the sort of little makeup bits there.
It doesn't matter too much. As long as you don't go into
the eyeball or the eyelash, but you can see, where was I? Yes, if you're in a hot country, once you've wet it down, then go back over it and wet it down again, or at least look. So the best way I can
I can see whether my paper is nice and wet is just to bobble my head up and
down rather than lifting the paper you sometimes run the risk of doing
things like that. Run the risk of actually tilting the water off your Paper. So yes, bobble your
head up and down. You'll be able to see
what areas are dry. And you don't want
any dry patches cause the paint will just run
around those dry patches. But yeah, stay take your time. There's no hurry with
wetting stuff down. You just want to make
sure it is lovely and wet 'cause you want to stay within those lovely pencil marks you've probably taken a
while to get right. Okay, hopefully that little bit of colors given you enough. Hope you see fairly
self explanatory. It's just the whole head, basically, and the ear. As I say, this layer is
going to be ever so gentle. It's just almost gets
into the swing and get some paint on the paper. What shall I start with it? Let's start. I'm gonna
put that brush down. I go to use this lovely dagger. I like this dagger. It's
got a nice tip to it. And it just pop
that in the tube, and it's just nice and crisp. I like it. Right. I've got a tiny little
bit of Joseph warm gray. I'm just gonna start popping. She said, popping a little
bit of colour there. Almost see that it's I think I've got that
wet enough there. Obviously having wet right
to the tip of my ear. I just being a bit sticky, you have to get a little bit of go fighting there, as well. That's better. I had the tube sitting on my desk for too long and they've dried. The tops are dried a bit. Just tapping and allowing. Just come down a little bit. I say, we'll do another layer. So if any part of this isn't as strong as you'd like,
we can just go back over. Again, it's a gray horse, so there's not a lot of color, so we need to sort
of add color in. We'll put a bit of
lapis in there as well. A bit strong put a little
bit of water there run. Perfect. That's better. Okay, I'm just gonna
probably stay now with the lapis and the gothite. I'm making a mess
here today already. Cropping splatters everywhere. Okay, I'm just gonna look
at fitte and kind of squint my eyes and get a little bit
of this sort of browning. Very gentle. There's a
nice line going up here. Put a little a little bit of the lapis in trying to sort of bear in mind,
sort of the cooler. Obviously, the blue
a cooler color. So that's probably a bit liger cool underneath the forelock. Perhaps a little
warm around here. But you can pop the colors
on top of one other. They blend really beautifully. I'm not gonna start making that very sort of strong
dark makeup of there, but I can start to add a
little bit of color there. It's a little bit of blue there. But the really punchy, dark colors with the Joseph gray will be
on the second layer, as I say, just nice and soft. It's not squinting a little bit. There's this nice
line that comes here, so I can start to sort
of emphasize that. She put a tiny little bit of
Sepia on my brush as well. Start to get a
little bit of darker there as well. Sepia is nice. Again, you probably follow
some of my classes, you know, it's a bit of a sticky color, so it doesn't really
move very much. It's nice to get a bit of nice bit of depth
of color without it sort of whizzing too much.
Little bit of blue there. This lap a lovely color, not only is it a
beautiful color, but it also pushes the other
paint out the way, as well. So if I pop that on the Sepia, it almost encourages
the Sepia to move. So I'd often use colors, particularly for
their ability to move or give me sort of marks. Let's come down
here a little bit. Say, bearing in mind, it is probably underneath, so it's a little bit cooler, let's keep it a
little bit cooler. I don't want to go
around outline it. There's always a sort of risk when you're doing
little subtle colors. So let's run into the middle here before
we start outlining. It's gonna gain just little
really soft taps of color. A little bit of
lappe over the top. So, keep the sort of
squinting that nice, sort of really pale
color here, isn't it? Go to the front. Just keep
it a little bit warmer. Just need something
to sort of define the edge really too strong. Buy a little better
than lab is here. Let's start to build up
a little something here. So when we add that
really punchy color, down here, already
got a little bit of color. Sitting here already. One, it just helps to stop the paint moving
quite so quickly. So as the layers build up, you'll find the same
amount of color on your brush won't move as much. So as if I was to do three, four on the fourth layer, say, the same amount of paint will
just spread a little bit, whereas on the first
layer, it's moved a lot. So that's how you sort
of gain the control. These days, I don't do much
more than three layers now. I find it gets a bit muddy, but it is a nice way of
building up a bit of strength. I tend to say be probably a bit bolder these days and get
those colors a bit punchier. I'm almost there, if I'm honest, because I say, we've
got another layer. We've got the lovely
dark markings around the eyes to put in. Obviously, all around the
nostril and sort of cheek area. So we're probably
about there, actually, 'cause you can always add a little bit more on
the second layer, but it's harder to
take it away if you've added too much
and gotten a little bit bit carried away
with it all Fab, right, I am going to
take my own advice, and I'm gonna pop those
down, and we're going to allow that to dry before
we start the main, just so we sorry, avoid any paint
running into the head. When we do this, it's going
to be quite a lovely, hopefully loose quick action, and I want to be confident
enough that's nice and dry.
5. Mane: Okay, so we've been
lovely and soft. Now we need to be a bit bolder
because we're going to do this really sort of free man. Let me hop hop this one down. Hopefully, I give you a little bit explain a little
bit before we start. So I'm going to put a lot
of color down at the base, and we say, With
this just one brush, I'm just going to flick
up into the clear paper, giving that impression
there's main coming down. So we need to do them,
you know, fairly quickly. Nice, loose wrist, try
to be try to be bold. And if you're sitting, try
standing for a minute, I find sitting sort of
clamps me up a little bit. So if I stand, I feel a
little bit more open. So that might be
quite a nice idea. If you're feeling a little
bit unsure about this, try on it on a scrap of paper. You can always put a lot
of color there and just try sweeping and just see
how that feels for you. We're not going to
do the forelock, so we're just going
to do that main, so nice and bold. And yes. Just enjoy it. So we are going to pick up
the Joseph gray. Actually going to wet
this down a little bit, just to just a small area. I'll run it. Just down to there, so I can place my paint
onto wet paper. Just to stop it sort of
becoming a little bit spotty, if I put it onto
dry paper, it can. Get a little bit of sort
of market a little bit. I just pick up some
seafood as well. It doesn't matter,
honestly, where this goes. But we want a nice sort of
reservoir of color down here. So we've got we're using
this as a palette almost. Touch go right up to that, and I'll try not to
lose my nice shape that I like under here. You feel like you've
got a lot we can always add more
paint to your brush. Don't worry too much. Let's just make sure there's enough there. Right, clean my bush. I'm just gonna put
those down for a minute. And let's start. I'm going to start with a
little bit higher up, actually, 'cause I can make sure I
get that main higher up. And say, it's just a
very loose action. I'm not doing any
flicks into the head. We'll do that separately after
the seca lay on the head. Mm hmm. So think I've
got enough paint here. Let's put a bit more paint. So almost squint your eyes. You'll get the impression of
where that white paint is white paint where you're
leaving that white paper, which is obviously going to be the main you've always
had a little bit of blue, let's pop a little bit of
blue in there as well. Again, it's a nice colours
pushy things around. Adds another lother
dimension to it all. Keeping keeping an eye. So, if you can keep a picture of the finished painting,
that might help. Sweep it here a little bit. Take your brush away,
have a little ponder before you get too carried away, 'cause it's quite um
It's a nice thing to do, so you can kind of get a little bit like, Whoa,
I'm enjoying this. I was looking at my give a
bit more of a sweep there. I think I'm there
before I lose too much. I'm now going to
gain, nice, nice, um, loose brush, not holding it too close to the
end, too rigid. I'm gonna hold it a
little bit further. And then we're gonna
pull some of them out. So we get that love sweep. If you can imagine he's
standing in the wind maybe on a sort of a blowy moor. And you want to get
that lovely sort of sense of just breeze, just catching his man. Again, this can be
easily overdone, so I'm going to leave it
there cause once this dries, we can add more dry
brush marks in there. Um, and before we finish this little bit, I'm
just going to put a tiny. I've got a little
bit of got there. I'm just going to
put up a little bit up here on the top of the neck. Again, very quickly, wet
that bottom edge down. I just want. That's almost
a little bit too much. Little tap of water there. It's just so the eyes
got something to see where the neck
sort of finishes. But don't try not to
go all the way along. What's lovely, I think,
is the bits that are almost what the lovely part of this painting is what's not
there, not what is there. So it's nice to leave
some little gaps. Well, there's this lovely little funny little flicky
area down here again, where that man has just
again caught the wind. So again, I've added a
little bit of go fight. Let's pop a little bit
of the blue on top. And again, I'm just going to do some nice little flicks down and just some
flicks back up, so the winds again,
just catching. And you can start a
little bit further down, it doesn't allow that those flicks to get
too exaggerated. Okay, lift my brush away,
have a little look. I just softened
some of that down. So I've wet it all
down here now, so that will allow that
little touch of color to be Nice and soft. Right. Just going
back to this again, I'm gonna pop a little bit
of salt in here as well. And any if you haven't got
salt or we don't fancy salt, leave little water
marks can just be enough to break that up. What do I need?
Having a little look. Might put just a little bit of sepia here just
to warm that up. It's got a little cold
with that gray there. Again, some things obviously
become very personal. So have a look at your piece, and be a judge. Just come out there
a little bit. I think that's right, actually. I just want to
pulling that down a little bit further down,
clutching things here. And then we've got this
shoulder that just comes in. It's quite nice to add this now. So let's just sweep
that in and add just a tiny little
bit of gopte or something there just so
we can see that the neck. There's a neck running down and there's a shoulder
sort of joining it. So I'd add a little
bit more punch there. I think it's
a nervous thing. I think I just I
clutch my paints. A little nerve wracking
this, isn't it? It's knowing when to
stop because the beauty, as I say, is in what
you haven't put in. Right. Fore it
completely dries on us. Because obviously,
this man is coming down and it's white. Let's just take some
of those lines out. It can be done obviously
when it's dry, but it's also quite nice. Even just the brush
marks going in there and adding a little
bit of extra water, it can give us a nice sil let's bring this
little one back here. I think when I was
taking the color out, I've put almost too
much water on my brush, but it's given that nice
sort of water mark. So it's really
it's just anything to sort of break things up. I know this is gonna look a little stark like he's wearing
a jumper at the moment, but it will be fine. I think that's what I
like about this brush. It's got a nice point to it. Here what I think I'm there
before I ruin what I've got. So if in doubt, and you're going, Mm, should I fiddle a bit more? I really do need to
take my own device, then down tools and leave
it and see how it looks. I say, we've got the option to add a few more sort of
dry brush marks in there, but it's better to do less than it is to do more
and over fiddle. Oh, and before I
forget dry hands now. And I was just gonna
put a little bit of salt here. It's optional. I didn't on my first
practice piece or actually the horse that
went out to Italy with me. But the little practice piece
I've been showing you did. So I'm gonna put little bit of salt
there, 'cause why not? A little bit there. Are you? I just allow that to dry.
6. Eye First Layer: Right. So once your
man is nice and dry, we're going to
actually just do a really start of the eye. If I can show this on my phone, hopefully that'll
give you an idea of what we're trying to achieve. So we're going to be painting the eyeball and then just
this little triangle, leaving a little strip of light. And then we can carry on, do another layer and then
build up the eye from there. So it's quite simple, she says, I'm going to have a little bit of sepia
and a little bit of gothit. I'm almost going to
mix these in together, so they're gonna build my
brush at the same time. The only reason I say, make sure this man is nice
and dry because, you know, I tend to put my hand on the paper
just to support myself. So obviously, if that's wet,
I'm going to be smudging. So yeah, really simple. Actually it's brush a bit
dry bit wetter than that. We're just going to
put that eye boy. A little bit darker
us that or sepia. Always nice to have darker areas at the top
and light at the bottom. But with this horse's eye, at the moment, it doesn't
really matter too much. You say, it's just getting
some simple color in to start with And then we'll run over the top and just
join up that little triangle, just trying to keep that that tiny little white
sliver of white there. You can go in from
one way or the other. If the sliver of light
looks in the wrong place, just go from a different angle. I think that's on there. It's going to look
strange at the moment. It's only part of
the eye, really. It's the rest of it makes
up the horse's eye. But this angle with the
eyelash is so important. It slightly tilts up. What would that be
if that's 9:00? It's almost like a
10:00, isn't it? And that will give you
so much character. If that's tilted down, Obviously it looks a little sad. If it's tilted up a little more, it's going to make him
look a little more alert. And they're the tiniest, tiniest of movements of a brush. Right, I think I'm there, 'cause I can always go back
in in a moment and strengthen some stuff up, so lovely. Right. Just go to wet a
h over dry over. It's nice and dry 'cause I don't really want to start
wetting this down, touch any of this, and it's
all going to sort of flow.
7. Head and Front Ear Second Layer: So once the eight
is nice and dry, I'm gonna pick up
mine number ten, actually just gonna get
rid of some of that salt. Else, I don't want
salting me Head area. Okay, so bigger brush. I say, it could easily be
done with that dagger brush. It takes takes a bit longer. We are going to
wet down the ear, exactly what we did
on the first layer, and we're going to go do this now while I'm
talking about it. Gonna go right up
against that eye, leaving out the white eyelash. So we'll go round that, so we're keeping the
white eyelash white. And right up against
that edge of the little triangle
and around the top. And then, working our way
down, we'll touch this, especially I've got quite
a strong liner here, so I definitely want to
touch the line of this man. Just allow it to
soften, as well. I'm fly coming down
underneath the cheek. I did I did uplook up the name all the anatomy parts
of the horse's head. Gone a little confusing if
I'm honest and complicated. And the pronunciation, as
some of you might realize, or, know me by now if you've followed
a few of my classes. Pronunciation isn't
my strongest point, so I thought I would just go over the simple
versions of nose, muzzle, rather than getting a little carried away
with all the names. A lot of them were going
into Latin as well. Might know I'm really
not going there. Right. Again, we don't
want any dry patches. I want to make sure
it's all nice and wet. Don't worry about this forelock. That's gonna be done. As in the I do know that much
from a little kid, that the forelock is the
front of the um the main, I suppose, for want of
a better explanation. Right. I think that's I have
a lovely lovely disc, which really gives a
lovely subtle light. It's quite hard to see. What's covered? I
think I'm there. Okay, I'm just going
to put that down. And we are going
to do picture up. We're gonna put that
really dark muslin first or muzzle color. So I've got the gray
and I've got the sepia. I'm gonna try and emphasize a little bit more
gray at the bottom, and a little lighter, more
sepery at the top. So goes. My, the theory. So
really nice and bold. Just tapping. Now, I have
got my little heart here, which will tilt the board. So if you find it a little
sticky at any point, you can always give
that a little tilt. You'll find it'll start
running quite quickly. But I'm gonna stick with it
being flat at the moment. Pop that down and allow
it to flow back again. So I'm just going to keep
adding the color at the moment, it should move on its own. But what you want to be
careful of is just to keep those lovely shapes intact. So make sure when you're
tapping these colors in, you keep that mouth area or
the shapes around the mouth, so I say, and they're
sort of nostril. Cheek, wherever they all are? Okay, just keeps
squinting my eyes. I go a little bit of sepia on. Let's turn that around
the white waist, you can see, a
little bit of sepia. I'm not gonna worry
about too much about the nostril color that can be added and then
taken out afterwards. So I just want this
nice and dark. Probably it's darker than the reference photo, if I'm honest. There's a little lapis in here because I know my planking. You can see how that's
pushing that paint out. It's just a useful, you can use paint to achieve the
movement you want. And it's probably what I
do quite a lot, actually. Let's have a little bit more a little bit more
sleepy up there. Do you want to touch a goth art in there just
to kind of keep that warm? Okay, if it's wheezing
a little bit too much, either I can sort of tilt it
put those back down from it. Oh, I got myself covered,
I'm making a mess today. My heart and
everything, goodness. I can, as you can imagine, tilt. And, you can see that's
pushing it back down again. Almost a little bit
too exaggerated, so I'm gonna work with
it flat, I think. I'm just going to always
sort of watch it, really, monitor it, make sure I'm keeping those
lines nice and crisp. It's nice, plenty wet enough. It looks like it's kind of
moving in the right direction. Again, if you find,
it's moving too much. You got too much, you can very gently sort of push
it back down again. Or, again, if you haven't got enough colour, you
can add more color. As long as this is
lovely and wet still, you can tap more color in. I quite like to the muzzle
being really nice and dark. So I'm trying to make sure
I keep those nice lines. Right, we can start getting a little bit more
colour underneath this sort of cheekbone, as well, 'cause that's
really nice and punchy. Again, I'm going to try
and stay a little bit more gray to keep the sense of warmth and coolness. Down here. Again, squinting is
such a useful thing. So keep that reference photo
open and keep squinting. So you're just looking
for the darker areas. If you just add
the darker areas, in theory, the light should
take care of itself. So I'm going to clutch
all four paints. Right. And now I'm happy
with how that's progressing. I'm going to try and keep an
eye on it if I can remember. But I'm going to start adding a little bit of color again. Bear in mind if you're in
a hot country, and, yeah, some parts of this dart might
might be starting to dry, you can always add a
little bit more water. So't be afraid of that. I'm a little bit of blue there. All right. Let's
start working around. I probably don't leave
those two colors. Let's put those
down for a minute. Oh, somewhere, I have squidged
something, haven't I? Oh, I miss. Goodness. I'm
just going to tidy this up. Right. Nothing like keeping your workstation nice and clear. I'm going to play these colors actually came out
to Italy with me, and it's the first
time I've opened the tube since, and
they were quite new. So maybe it's all that
heat pushed them out. Right. As I was saying, I'm going to start tapping
that color in round the eye. You should start to probably
just going off a little bit, probably not quite
as wet as it was when you first started
wetting this down, so you should find the paint isn't moving
quite so swiftly. So you're just again, you're looking to build
up that dark area, but keeping that eyelash, don't go into the eyelash. The worst comes worst if you do, you can always put it
in with a white paint, but it's quite nice
if we can reserve it. It's a nice little bone
structure goes around there. Above the top of the eye. So you're touching
the colors we put in on that other separate
layer around the eye. This one coming in a little bit. Close the eye, lash
down a little bit. Again, just keep taking
that brush away, seeing how it is to keep
an eye on your muzzle, if it's something you
need to keep an eye on whether you need
to add more color. I think that's enough
there. Like a start. It's a nice bit of
bone structure there. I'm almost using the color
that's that's round the eye. It's spreading a bit much. I'm going to use my
light as a excuse here. Um, it's quite a diffused light, and I find it hard to
see how wet my paper is. I think it's actually
wetter than I think it is. You can see how well that's
spreading at the moment, so I probably wanted to have
held off a little minute. That was still get, okay. Okay, a little bit of a squint. Let's pick up that lapis. There's a little bit
of lapis in here. A bit under here. To darker
area it is here and it runs. There's a nice
little bit that runs from kind of the
ear joint as well. We've got those lovely flicks we can put on right
at the very end. You can see the
sort of freckles, so they're always fun to put on. Pick up those two colors again. Okay, I'm keeping an eye open. Um, I put a get above
it, Zi just seeing, trying to find
those darker areas, just looking for the dark
all the time in the shadows. Bearing in mind a sort of a
sense of warmth and coolness where where you think
it would be obvious, obviously underneath would be a cooler colors if I'm imagining the warmth
coming here really. So let's see if I can. This is going off a bit now. It's sticking a bit
more now, isn't it? I think I put on
a little bit too paper was still quite wet and
see how well it's spread. It's me going, Oh,
the second layer, the paint won't move so much. Obviously, if you paper it's still very wet,
it still will move. I'm keeping an eye on
that reference photo at the moment, I think
that's still wet. I'm still playing, and
it's spreading too much. So I think I just need to give this see that's sitting a
big old puddle down here. I think I need to give
this just a couple of minutes to go
off a little bit, so it will allow me
to add the color, and it's not spreading
quite so much. So I guess go give it 2 minutes. I pop those down and keep an eye on the paper and see how
that's beginning to dry. Right, I think my paper's a
little less saturated now. So I'm just gonna just
gonna go back in and just pull some of that color around
the eye back out a bit. This is probably
just a me thing, if I'm honest, a say, you've probably got a light you're more familiar
with looking at your painting with
so there's a nice, if you look at that
reference photo, obviously, there's the
eyeball that we put in. Then there's a nice sort of what I would call
the eye makeup, which is a dark rim round the
eyeball. You can see that. Then there's another sort
of shadow underneath. So I'm going to just need to pick some of this up a
little bit too much. This is the makeup, but it spread a little
bit too quickly on me. Gain. I've just to keep eye on that photo. Yeah,
that's better. But I have to be careful. I'm not then you can see, there's a nice sort of gray
shadow underneath that. The little makeup, so
I've got my joseph again, so I'm just gonna sort of
pop that almost back in, but just keep that little bit of light. That's underneath. I hope that makes sense. I think if you got your reference photo open, you'll see what I mean. This is just getting
very soft line. It weighs. I put my hand in it. The eyelash is a little bit high still close it down
a little bit more. But above the eye lash, there's a lighter
area, isn't it? Let's just take the color
out a little bit there. And we're gonna put probably
stick with the Joseph. Nice thick come out, so
our brush isn't too wet. I'm just gonna put
the very little line runs off the top of the eye
boon goes round. See that? Hopefully you can see
that it joins up with that nice sweep of the
which here would be a nice, um, bit of bone structure. So it runs down, sweeps round. Say, I could all be tinker. Once it sort of starts
to dry properly, we can have a little
bit of sculpting and adding with a nice with
paper a little bit drier. Yeah, I think that's
looking right. I just want to get
the softness in it at the moment
before that dries. So I say mine's taken a
little longer to dry. Trying to get a little bit of bone structure in
underneath it again. One that runs down here. I say, it's just keeping an eye on those darker
areas. Almost there. I got a little bit of go thigh. There's a nice one that
runs from the muzzle. Again, just tap. If it's nice and wet still, you should get a lovely soft, sort of shadowy sense of color. So the freckles are a bit
confusing, aren't they? Because they obviously
give you a line, but the line of spatters, which will put on the end. So bear in mind,
those very soft lines we put in, penciled in. Again, they're all
little bone strutches. Take my little brush away. That's how I did a look. I am so needy there. What I want to do actually before
this completely dries, is to actually flick some
main into the damp paper. I'm a little hesitant now 'cause my paper doesn't seem to be
very damp at the moment, but it's for that. So I've got my cleaner brush. Taking the excess moisture
off, you don't want it wet, and you want this quite sort of sticky so we can just do a
few flicks that can running. I just breaks up that line. Um, it keeps it nice and soft, as well, rather than
getting too hard. When we flick those in on
a very dry piece of paper, they can pick a little harsh. Just go to soften my edge. I got a touch hard there. Also got that lovely
forelock to put in, which will make give a look a little bold at the
moment, isn't he? But balled as not end bored. It's not getting fed putting
fed up with me fiddling. I'm gonna take that. You want to try and keep that
bone structure. Okay. Right. I'm gonna
take my brush away. I'm happy with how
that's all blending. I say, my paper was a
little on the wet side, it's very soft,
but it's it looks. Yeah, I think I think I'm there. The eyes obviously
still need work doing, but that's it's all part
of the neck sort of layer. Ears and we've got that
lovely forelock to put in.
8. Forelock and Wisps: Okay, so once the main
head is thoroughly dry, I hope you're pleased with
your what you've got. I really love how that
turned out. Ever so soft. I think it's ever
so soft because the paper was quite saturated. And that's what's
given me that really sort of exaggerated softness, I would have said. Right, we're gonna do
this little forelock. Let's give him a bit of a, um, Yes, he looks a bit bald
at the moment, doesn't he? So, that's gonna
definitely help. So I'm going to pick up a
little bit of CiPio I think, and we'll probably add let's
have the gray as well. A little like when we did
the bottom of the main, we're going to put
some color just here. We're going to use that
as a little reservoir. It goes right up against
the ear and just down. You can see on that
reference photo, the darker area where
that forelock is. And then clean your brush, and we're going to
use that paint to flick out some pick up some man. Again, keep that lovely sense
there's movement in there. He's he or, indeed, she is right up
against I don't know. I can just imagine her up in the more somehow
and there's wind blowing. It's a really nice
sort of sense. Again careful not to
get carried away. That flicks probably
gone a little bit too little gone too long, but I can always get that out. So I've a little bit of lapis, put a little tonch
of blue in there. Just right up against
that edge of that ear. Again just drop some water in, really so we can Get
some marks in there. I want to be careful
not to do too much. It's so easy, so I just
take my brush away. How it look. Just a tiny
little bit at the top there. I have a default, and some of you I'm probably
aging myself here, but some of you might
remember my little pony. So it was a little plastic toy with over exaggerated man and forelock that you would brush as a child and make to
plats and things. And my husband, Ben always says, I tend to get a bit
carried away with the mans and turn them
into my little pony. So the risk of doing that, I will probably stop
a bit sooner than I would normally fiddle and do cause maybe I like I don't
think I had my little pony, I must admit, but the idea of playing with that
sort of thing is, obviously coming out in my work, is what I'm trying to say. Right. I'm trying to look
at my work and talk, and it's not not
coming out very well. Right. A little bit of gothit in there as well for good measure, and
I'm going to leave. Let's pop those colors
down before I carry on. I just want to do a
little few more bits of wisps on the man, as well. When I look at my piece, I'd like a little bit more
up at the base of the ear. So I'm just gonna put
a little bit of goth, little bit of Sepe on my
brush at the same time. Again, a little bit
of touch of color. I'm just going to try and get lit a sense of swimping round. Again, I'm using that as a
little reservoir and come in. It's just the smallest
of touches is a little flick that sort of obviously joins
that forelock up. Take your brush away,
have a little ponder. Don't get too carried away. I say, as we progress
through these paintings, we all have our little issues to that we would ought
or want to address. So, you know, you may have plenty of main up there and you don't want
to fiddle with it, so don't let's say, as I go through these, as we latterly work our
way through the class, they become a little individual. Right. I think that's enough. I want to do too much. I don't want to try and
join these lined up. I want that lovely sort of sense of light that it's
got at the moment, but if I fiddle too
much, I will lose it. This could just do a few
more flicks down here. I didn't quite I wasn't quite heavy enough in my paper when I did this
little section here. So I just want to do a
few more into the body. That's probably
enough, actually. I don't want to do too much. It's so easy to overdo this. But I also want if you see
on the reference photos, there's nice swings across. So let's have a little bit of the Josh little
bit of the lapis, let's just do a couple of a couple of really
long vaguated swings. Say not too many 'cause it's, again, just so easy
to over egg it. I think I'm gonna
leave it there, 'cause I can always add more at a later stage
when I as they say, come back with it, come back and look at it with
a fresh pair of eyes once it's all done and see
whether I think I need more. There's this ugly line here,
but I think I'll do that. Yeah, I'm gonna do
that in a minute. Let's met we're going to
sort out that little eye. I think is the next
little bit to do. But I want just to let
this dry 'cause it's nice that you don't end up
putting your hand in it. So yeah, I'm gonna
allow that to dry, then we're gonna do a little
bit more to that eye.
9. Eye Second Layer and Mouth: Okay, let's get
this eye finished. So I'm gonna pick up
my little brush here. And I've got the Joseph gray. We're going to see if we
can pop that eye make up on so we can see it a
little bit more clearly. So now, actually a draw
actually gonna paint this in. So you can see where that
obviously got your eyeball, and then you've got that makeup. So I'm just putting
that makeup on. It comes swings
around. It comes to the back of the eye as well. Then we've got that
little triangle that we first painted in. They say, you may
want to emphasize that a little bit more, as well. Again, I've lost
mine a little bit. Like I said, a minute ago, all our paintings are
going to differ slightly. So just keep an eye on
that reference photo, no pun intended there and address the little
bits that need doing. So I've lost a little bit
of color over the top. So I'm just wetting
the top eyeball up the top little section,
sorry, above that. Little line we put in
there's the eyelash. Then there's that clear
kind of idle area, and then there's
that little line we put in that ran down and round. So it's just above that.
A little bit of Joseph. I'm just going to add a
little bit of colour there. To say all these things. As we move towards the
end of the painting, the little marks we do are going to be
very small and subtle. So there's nothing big. It's all very soft and very gentle. It's just building up. Little bit more tapping there. So I just want to keep that
area a little bit dark. You can see the
obvious dark area, but a little bit of
lapis in there as well. Joseph. Take my bush away. Yeah, you can see them start
to come to life, can't you? This is always a lovely part. And it can be the tiny
little thing you do, and it suddenly goes, Oh, that's comf I'll get in there. I'm actually gonna go back into the eyeball at this stage. Just get that shadow
underneath the eyelash. And just gently wet the eyeball. Careful you don't get it a
little bit muddy and you start drawing up the eye
makeup we just put on. It's just very gently. I take a little bit of light out to the bottom of the
eye, just a touch. It's very gentle, and this is where I would be
sitting. If I could sit. I generally stand
for all my classes, but I probably would sit at this stage because you can
get nice and close and just Well, get nice and close. I'm a little way away from this as I normally
am when I'm filming, so I'm having to do this
at a bit of a distance. But I think that's looking
quite nice, actually. What I did find was I've actually managed to keep
this quite nice and dark. But when I was doing
my practice pieces, there's a little section there
just in front of the eye. It's quite dark. And it runs round to that little lump triangle that
we first put in. And this is where, again,
you can sculpt the eye lash. If it's a little we will put some little flicks out in a
minute with some white paint. But at the moment, just
make sure you've got that angle right and
that dark underneath. I think we're there
for fiddling. Right. I just want to again emphasize that little area here, which I still lost, actually. So there's a little
line that comes from the corner of the
eye and runs down. So can I put it on a little
bit of Joseph again? Runs in the corner of
that and runs down. And then we can
soften that edge. Touch high, maybe Again, take your brush away.
No it'll ponder. That just seep you maybe? Just give it a little bit more strength
and a bit more warmth. That's too too liny. That's definitely too liny. Take it out again. Make sure I keep
that sort of sense that bone structure
underneath there, as well. I think the lovely thing with
these Daniel Smith paints, they are so soft and so lovely
to put on and take off. It'll almost be frustrating that they don't
stay on sometimes. You lift, keep taking
them off again. Yeah, I think that's looking
quite sweet, actually. It's just enough. See, I'm
just taking that off again. Okay. Yes. Right. Let's leave that for a minute. There's that catch light to put in and obviously
the nice eyelash, but we'll let that dry
completely. It's always worth. If you ever get sort of
panicky with an eye, it all starts to
go out of shape, it's best to let it dry and then see what it looks
like when it dries, then you can sort
of tinkle with it. I have got that little
fine liner pen, which is quite handy
just for doing tiny little bits to
neaten stuff up. So if it's a little raggedy,
just hang on a minute, let it dry and we'll in
the finishing off bits, we'll probably use
that little pen. Right. Let's do the nostril
'cause he's looking a little noseless, bless him. So all I'm gonna do
really simply is just to wet that nostral
kind of area down, so I lost my picture there. And with Joseph's Gray, I'm just going to simply
paint it in, really. We can take the light out in a minute to get that
lovely sort of line in, but just make it a
little bit darker. Now, the mouth is a
really tricky thing. It's very obvious on
this reference photo. But when I tried to put mouse
in, it looked a little odd. So I tend to go I sometimes you just happen to have if I show you this
little track back here again, it just happened to look
like there's a mouth there. I probably just was a little stronger with the
paint in that area. So that's enough
for me. I didn't want to put any more in there. Let me This is the actual piece that came
out to Italy with me. Again, there's just a hint of
something there, isn't it? It's just not an obvious line. So let's see very gently if we can kind
of get a sense of something there without actually putting a very strong line on. So sometimes it is just something
ever so soft like that. And then just wetting it down. Be really careful
because these paints, if you've used exactly
the same paints as me, they lift out quite easily, and you don't want to be
blotting 'cause you will blot out and take a big
lump of colour out. So very, very soft, very soft wet brush. And see what you think. Um, I it's silly. I don't really like
putting the mouths on. It always makes it look
a little bit cartoony. And yes, there I
sit my little pony. But I think that's
probably just enough. Do you ask to give a sent
there's something there. Gay, fingers are great. If you very gently, just tap, and then you can take out
at colour, but be careful, as I say, if you've used
the same colours as me, they lift ever so easily.
10. Back Ear: Right. So we're
just gonna do that back e. So really simple.
Just gonna whip that down. I say it's a bit weird. You
look at the reference voting. There's no ear there is
there. But let's put a tiny, little bit of Joseph gray there, just a tiny of hint just
along that front line, and that's probably
all you need. Don't need an awful lot. It's just to give
that impression there is another ear there. We put a little bit of goth out here if you don't
feel that's enough. So I need to look that just gives it a bit
more, doesn't it? But yeah, it's surprising
the difference, just a slight angle of the
ear will make. Lovely. Okay, we are nearly
nearly there. We just need to put this
line on here, as well. So let's get that on there. That would be quite nice to that lovely sort of neck line. So again, I'm going to
just wet that line down. We're just going to tap a
tiny little bit of color. I just got the Joseph, actually. Again, if you've
gone a little Joseph eat and you want to warm it up, you probably probably a
little bit CPa there. So have a little look, see what you think would be the appropriate color for you. I don't want to get
it too obvious, so I just white out there, just allow it all to flow. Squinting your eyes is
always such a useful thing. A little bit there. It looks like it almost follows through. Hokey doke. I'm going to allow that
to dry for a minute. And then we'll
finish off the very, very last little
bits and pieces. Yes, and then we're nearly done.
11. Finishing Off: Okay, it is the very final
last little bits to do. Let's get the eye
completely finished. There's still a little
bits of stuff to take out, which we couldn't do until the paint had completely dried. So there is again, get that lovely that nice
cropped version of the eye up. There's a nice
little bit of light, which is going to be
a bit hard for me to do on camera because I can't
quite get close enough, but there's a nice little bit of light actually in
the eye makeup. So very gently, I would
try and take that out. Um I am, I say, a little struggling
to get that close. Hopefully you can, you
can see what I mean. There it goes. I was in the eyeball. My eyeballs got a little score, but this is, again, a little bit going
to be the problem with me working a
little way away. So yeah, make sure hopefully your eyeballs are
nice and round. I will have a little fiddle with that in my own time, I think, because it would be an issue I probably had a I can't
quite get close enough. Yes, that nice little
bit of light out we took out just a second ago is
lovely cause that will, um, that light on that eye
makeup is nice to release. Uh, right, a little bit
of white gash let's. Let's get this up. Make sure
your brush isn't too wet. It's nice and creamy. I got a good old
creamy consistency, and we're just going to very gently and make sure if you've fiddled with the eye ball at any point and
any of this is wet, hold on, but I think
I should be right. We just need to flick out. Tiny tiny bit. It's
only a little bit. It's just coming
into that. You see the difference that makes.
You don't need a lot. It's very easy to
overdo these things. Again, if you've lost
the white there, that can be put in,
again, really carefully. Put it in. And then with that little fine marker
pen in a minute, we can adjust things. And then, of course,
the piervistanss, ever is that build catch light. That really does
help, doesn't it? Let's get rid of that. We don't need that anymore. I think. Coming down, I can start to take out little
bits of light. I always like to take
somewhere along, like, a line like this,
a bit like the main. You just get a little bit of
sense of light coming in, so it's not one line. So I'm just very gently
just taking it out. Bear in mind. These paints
do lift out ever so easy. I think we should
be kitchen roll. Very gently take that out. Again, there's that
nice nostril line as well, which you can take out. It comes out very easily in
the brush. A nice point. That's probably enough. Be careful you don't
lift out too much. Try and get rid of
the little line that actually joins it. And that's haven't sent. Dab. Then I can
go sort of round. My little tiny, little bit of
light here. Only tiny bit. If there's any watercolor that's actually sort of
collected on a line, so it looks like
it's almost sort of drawn in, I like to get rid of. It's not necessarily the color. You probably see that there. That's sort of probably
a good example. I won't do it around all parts, but if it is a little sticky and it looks like
it's been outlined, then it's always quite nice
to sort just very gently. Again, sometimes the fingers
enough to release it. All these flicks, I think I've done enough
flicks, if I'm honest. I can, again, take out if you've got very obvious one if you
feel it needs joining up. So if you had for example, this flick coming down here and it sort of comes
to a dead end, then you can take the color
out, if that makes sense. Let's find a better
example. I haven't got one. Say this one here. I just want
to make sure it comes out. And I can take the color out, so it looks like
it's continuing, so it looks like it's sweeping
down and then coming over. Just to break up that
neck line, really, so you haven't, again,
got a very strong line. I can do it with another one.
Probably take one out here, even add one in. Risky, I know. But just obviously just for
you to see what I mean. So it's just taking out so you can get yourself
another flicking there. Little bit much. And I got a little crazy that
one, hasn't it? I just we can kind of
soften that a little bit. But I hope you get what I mean, you can take this
very strong line and make it into a little flick. Over along the
back here, I think that's looking all looking nice. I quite like these harsh lines. It's very different. It gives a good contrast to
this lovely sort of softness. It's very spontaneous. If it really troubled me, I could take it out
with that magic sponge. Have I got a magic
sponge close by? As a little part of
one, they come in a little block, but I could. A little reluctant to do this, because I actually quite
like those hard lines, but I can very gently,
obviously take rub. And I can soften any hard
lines that I might not like. Hopefully you get the gist. Again, working away here, I've managed to keep
that nice light. I didn't there's not many
flicks out. It's enough. There's quite a lot of flicks
already going on there, so I don't want to
particularly add any more. Again, if you've
got a white gel and you feel you've lost too many flicks and
there's not enough, it's a little bit of
washed out version to do, but you can add a few
flicks in like this. They tend to disappear. You think you've done
a really strong one, and they've disappeared, but
I don't want to do too many. I've already got quite
a lot going on there. So if I carry on, it's going to look
my little pony. Um, I've got a little line here. It's almost like he's wearing
a jumper at a touchstone. Let me just get rid of that one wear scarf or
something, doesn't he? Snood. So let's just get rid
of that line there, again, just to break up the
line. I think he's there. Um, it's hard. If you've been painting
with me for the whole time, you you almost don't see
what you're painting, so it really, really important. And such a useful
thing is to step away. Sometimes I will
just go and make a cup of tea, walk
around the garden, stiff a few flowers
and come back and some things look really obvious
that you need to adjust. Oh, I know what we're
going to do that black fine line a
pen to show you. So, yes, it is always worth
stepping away before you Oh, it's so easy to
overfiddle at this stage. And there is a time. I always
say people don't fiddle, but there is a time for
fiddling, and it is now. But if you're feeling tired and you're not sure what
you should be fiddling, step away, it really will
stop you ruining your piece. But with a little fine
liner pen, if you've lost, you want to sharpen, mind you could put your
hand in anything. But yeah, it's
quite a good way to sharpen any some detail. You have to get a line like
the eyeball really crisp, the line around the
under under the eye, just to shape that
round probably I probably could do this
actually with a fine liner pen. I said I needed to make
that eyeball a bit rounder, the fine line of pen probably
be enough, actually. I wouldn't do it. I
wouldn't go around. I wouldn't do it with
a man. It's gonna look a little too harsh. But yeah, it's quite useful a useful tool use sometimes our brushes aren't
quite small enough, but this gives you a really
obviously a sharp sharp edge. Yes, I think I think this
lovely horse is completed. Say, oh, I know what
we haven't done. There's a little spatters, 'cause they're quite
a cool thing to do. So you will need
need forgot that. You will need a couple of pieces of clean kitchen roll.
Make sure they're clean. Don't pick up your scrappy
ones from your desk. But you just want to mask off
your white paper, really. Just roughly. Just something
along those lines. And then with your brown
would be CPa shall I say. Doesn't have to be CPia,
but I will use Spia. Will you bush. You might want to practice this somewhere on
a little scrap of paper. I'm just going to go for it and say Finger at the
end, and just flick. You can get that you can
see that flick line is, so you can get those in. They're quite nice to get in. It's a nice contrast,
especially as mine's got, you know, very soft. It's a nice sort of hard
line or hard not lines, but, yeah, something
quite exact. And then lift off your
piece to the kitchen roll. Obviously, you can reassess and reapply if you
haven't done enough. Obviously you just put your piece of the
kitchen roll back, but I think that's enough. You can again a little about the flicks you're gonna
quickly overdo, though. So yes, I think he is done. So I really hope you
enjoyed this class, and it was fun to share my
Italian horse with you. It was I love painting in
Italy, and I think, well, at least everybody told me
they enjoyed painting it. And, yes, it was a
fabulous experience to do that and share this technique with
people in person. And actually, some of the
skill sharing people, which was lovely to
meet you in person. So yes, thank you very
much for joining me, and I look forward to seeing all your projects on the
projects and resources pages. So please do share those. If you've got any questions, maybe you're even
halfway through a piece, you can pop your piece up there, say, Look, I've got here. What should I do? I don't
want to finish it quite yet. I try to reply within
two or three days, unless I'm obviously somewhere
swaning around Italy. I was a little delayed then. But I endeavor to help you if I can even send me an email.
Some people have done that. I'm happy to answer to any emails if that's
easy for you to do. So, yes, again, thank
you for joining me.
12. Final Thoughts: So I hope you enjoy
painting this horse. It's just one of my most
favorite of subjects. Did you enjoy painting that
lovely wind tousled man? It really is what you leave out, not what you put in that
gives the painting the magic. What about adding
those two layers? And the second really
did pack a punch. But did you notice
the paint wasn't quite so quick to move
as it was on the first? Did you enjoy painting the eye? It really is a good time to sit down and fiddle
and take your time. Sometimes it's the
merest of adjustments. As I always say, it's
worth stepping away, coming back and looking at your painting with a
fresh pair of eyes. It really does highlight the
bits that need adjusting. So we look forward to seeing
you in the next class.
 Jane Davies, Professional Artist and Teacher