Transcripts
1. Introduction: Hello, ladies and gentlemen, welcome to the second part of the course called Sketch of for Beginners or how to create a complete three d house from scratch even if you have never done it before, I'm really glad to see you here because it's tells me that you like the first part of this course, and you want to discover how to create the other elements off your treaty house. In the first part of this course, you have learned the basics of the sketch of interface and how to use a very important and useful tools. Most importantly, you have created the first element off your house, the ground floor that will be the front yard and the backyard off your house. In the second part of the course, you will discover how to create the paving and how to create the basement off your house. For both of these elements, we will be using these droving sweet measurements. If you want, you can follow these droppings from the Dollard Leagues that you can find below this video . So if you're ready to continue your sketch of journey with me, click the blow and roll button below this video and I'll see you in the next class where I will show you how to create the painting
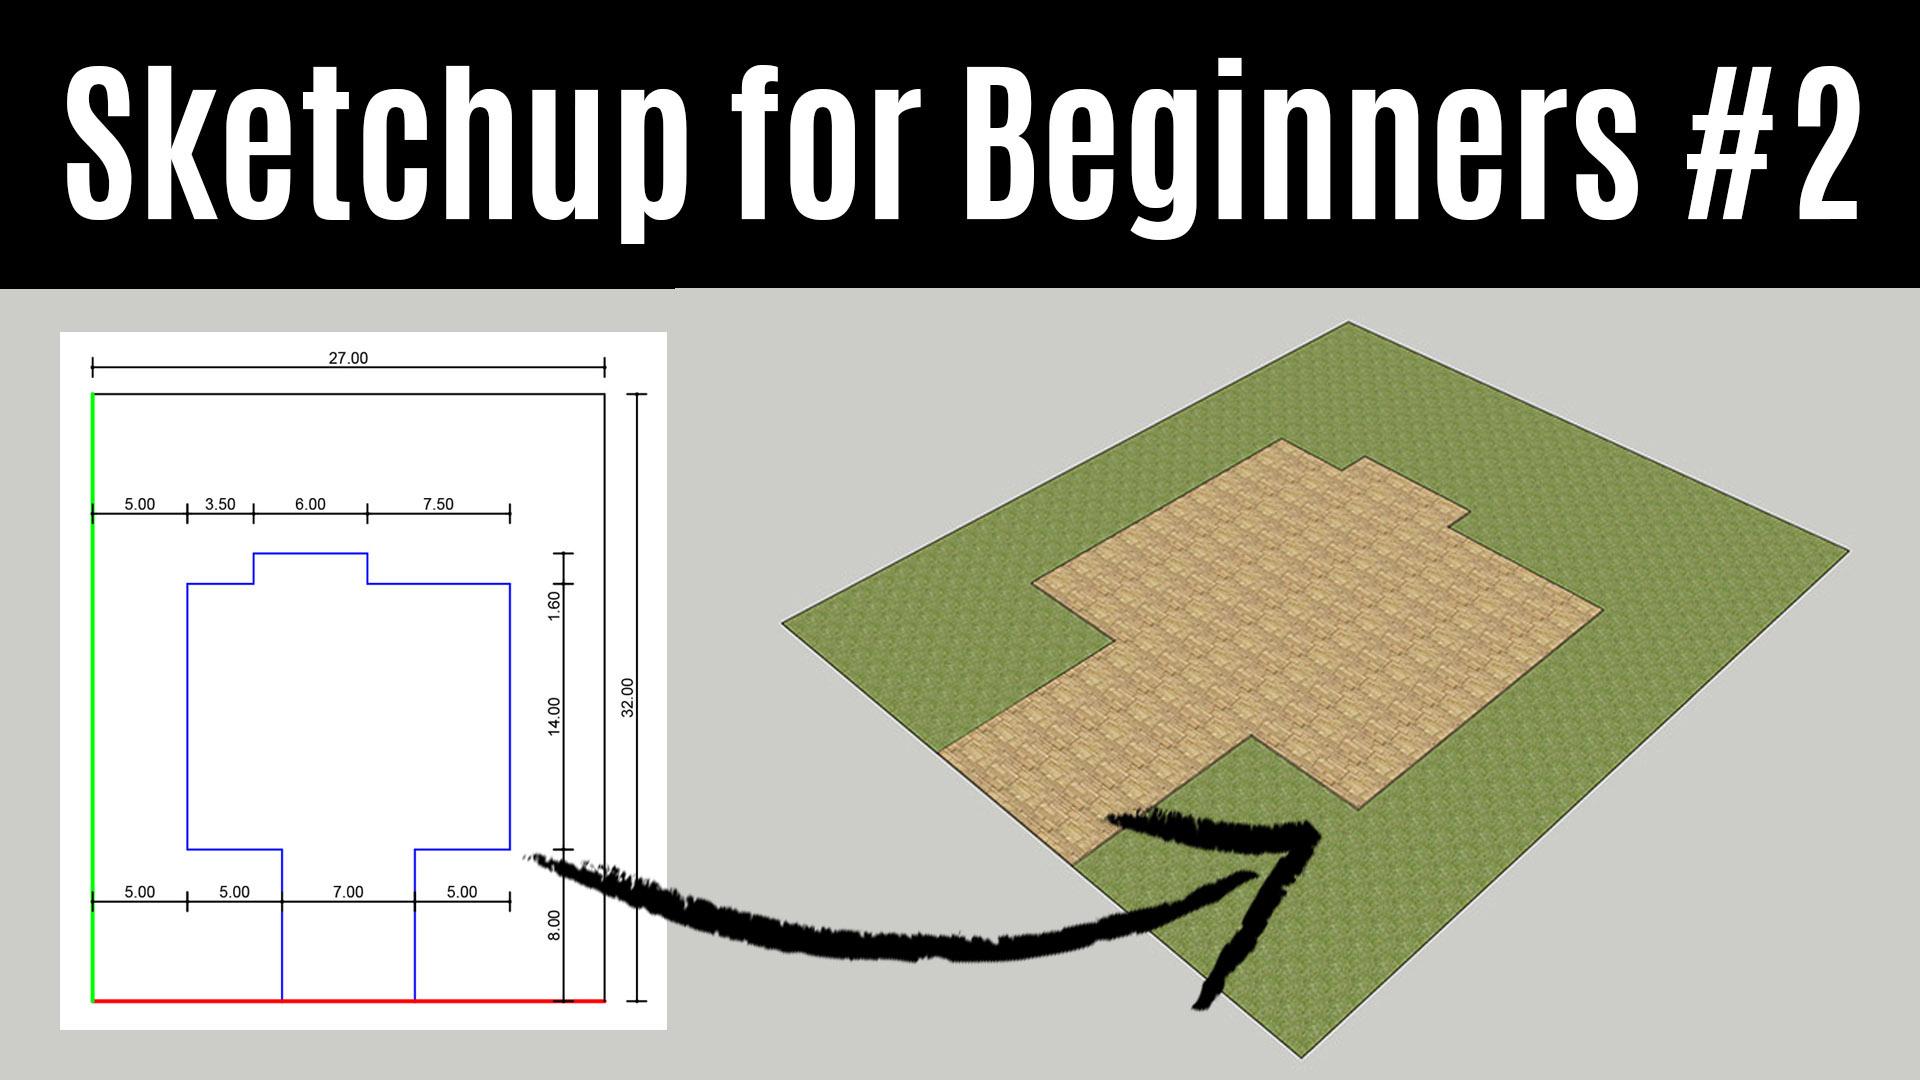
2. How to create the 3D Paving: Hello and welcome to the first lesson in the second part of this course. In this video, I will show you how to create a paving off your house in three D, as you can see on the image the paving is positioned inside the ground for, and we will use the exact measurements of the painting to create it. In order to start doing that, opened the file where you can already created the ground floor that is 27 meters wide and 32 meters long after opening the file and before doing anything else that will click the ground floor to select all its elements when selected right click on its from the drop down menu, select the May Group option and make sure that the layer of this group is marked his ground within the entity in for window. That way you have grouped all the elements off the ground floor into one group. We did that because group and it is don't stick toe entities outside their own group. We will talk more about groups in upcoming videos, so for now, just make sure that all the elements of the ground are in one group Now the time has come to create a paving for your house because this is a new element. Create a new layer within the layers window owned. Arrive by clicking the boss sign and by renaming the newly created layer round toe paving and clean the button on the left toe. Make it active. When the layer paving is selected, you can start creating the painting. When you open the image, you can see that from the green access the first side off. The paving is five meters from it, so in the model we will use the state matter tool and by starting from degree axis, move the guideline from it. Antique summer on the surface now and five in the bottom, right corner or the screen click. Enter toe position. The first guideline exactly five meters from the green access. Now we want to add additional guidelines that are 57 and five meters from each other. So opened the model again. First, we have the guideline that this five meters from the 1st 1 so enter five in the bottom right corner. The 3rd 1 is Sarah, meters from the 2nd 1 and for seven in the bottom right corner and the 4th 1 is five meters from the 3rd 1 So enter five in the bottom right court. Now you hear creative all the guidelines that are peril toe the green axis and 557 and five meters from each other. Now we need to create the guidelines that are parallel to the red access. So we opened the image again and we can see that the first guideline needs to be eight meters from the red access and then 14 and 1.6. So we opened the model again and starting from the right access we go Carol toe the green axis. Always take care, Toby Peril toe the main axis the green and red one. So eight meter. Enter eight in the bottom. Right corner toe. Position it exactly it eight meters from the red. Access, then 14 meters on the last. Funny is 1.6 meters from the 2nd 1 Now we have all the necessary guidelines to create the first shape and the second shape. And then we will create the 3rd 1 So select the rectangle tool. Click the first corner of the rectangle, drag your mouse and click the opposite corner off directing. This is the first shape the 2nd 1 is from here. So the opposite corner here now you can delete by using the areas tool, the unnecessary guidelines. You can leave all in this one because now we will create one guideline that this parallel to the side of the painting, at 3.5 meters and six meters, is the length off the third part. So we'll have 3.5 and six, so we can assume here on 3.5 on the 2nd 1 is six meters Now. We can create 1/3 rectangle off the shape like this have now we have all three necessary shapes to create the final shape of out. Baby, If you want, you can uncheck the ground layer so you can only the paving layer on your screen on you can relate all the necessary guidelines and if you zoom mean first village the first line by dragging with a raise to over on the second leg. And now we have only one face, as you can see. And because our paving is a treaty element off our house, we will use the push pull tool that makes elements three dimensional. So move it over the face, click on it and move your mouth up like this. Click somewhere. And because the height off the painting is 0.1 meter, we will enter 0.1 in the bottom right corner. If you zoom in, you will see that our paving is now three dimensional on. If you want to check the height, you can do it by using the tape measure Tool on it is 0.1 meter or 10 centimeters. If we use the zoom extends, you can see the whole model. Now what you need to do is tow triple click because this is now a treaty element. And rightly, Konitz make a group taken Care off that the layer This painting. Now you can uncheck the first layer off the ground to see them both on when you click on it , you can see that this is one group on. This is the second group, so everything is perfect. And now you have created your treaty painting now only to do before you close your file is to save it on your computer by using the file saves and name it as a treaty house or whatever. Like I will make my tree house on Save it on your computer. So that would be all for this video. If you have any questions, please don't hesitate to ask. You can do it by selecting the community below this video. Thanks for watching. And I'll see you in the next one where I will show you how to create the three D basement off our house.
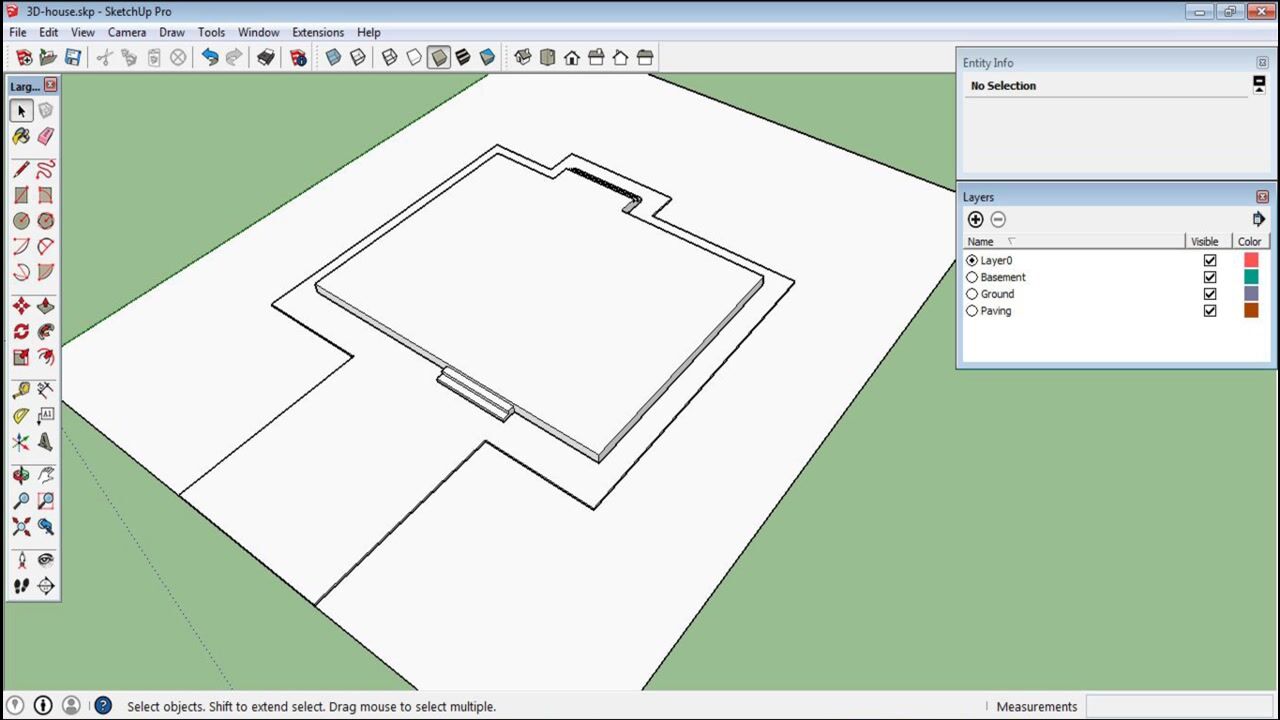
3. How to create the 3D Basement: Hello and welcome to the next lesson. In this video, I will show you how to create the basement, which is the 2nd 3 the element off your house. As you can see on your screen, the basement is positioned inside the paving, and we will use its exact measurements to create it. Similarly, toe the paving. The shape of our basement can be created from two separate rectangles. After we create the shape of the basement and make it three d, we will add toe to step stairs. Now the first thing we need to do is to open the previous file where we already created the ground and paving, and by clicking the plus side in the layers. Windows on the right create a new layer by renaming the layer one toe basement and to click the button on the left toe. Make it active. Now we will go back to the image of the basement, and as you can see, we have one big rectangle that is 15 by 11.4 meters on the 2nd 1 that is four by one meters big, so we will select direct angle tool and create our first bigger rectangle in the bottom left corner enter 15 comma 11.4 to make its exact measurements. Next we will create the second smaller one that these 3.5 meters from the left side off the basement. So we will zoom in. And now by using the tape measure to, we will create the first guideline that these 3.5 meters from besides and then the next one that this four meters from the first guideline and then the third's guidelines that is one meters from this site. Now we can create the second rectangle bill. It by using the area is still our guidance and this light here to create one shape. The height off the basement is 0.45 meters, so we will use the push pull tool, click on the shape and by moving the mouse up like somewhere and in the bottom right corner and 0.45 to make its heights. Next we need to do is to create these two to step stairs, this one and this one above. So the 1st 1 is four meters from the right side of the basement, and it is 3.4 meters long. So we'll go back to our brother again. So, like the tape measure tool and by going parallel toe, the red access entered 4.0 in the bottom right corner. Next, we need to create the second guideline that this 3.4 meters from this 1st 1 and now we need to great heights off the steps. So the 1st 1 is 0.15 on the next one is your 10.15 meters. Now we will use the pencil tool to draw them on this side of the basement like this. With the push, Balto will first create the bottom stair that 0.6 meters long on the upper one, that zero point treat me first block. After that, you can believe these unnecessary lines off the stairs related the guidelines allow, we will create the 2nd 1 that his position here. So we will again open our image. And as if this position here it has the same heights is the previous one. So we will use our tape measure to click here after 0.15 for the first height on 0.15 to the second high and by using the pencil tool draw two lines like this. And now, by using the post portal, we will create the bottom stair that 0.6 meters on the 2nd 1 That is your 10.3 meters. Really, the guidelines on. As you can see, we have just created our treaty basement no triple click or needs to select all its elements and right click on it and select the main group option toe. Make it a group off course. The layer is the basement because all the elements off the basement were already created in the basement player. So now we need to move our basement at the proper position above the paving. So we will again open our image on. As you can see, it is 1.6 meter from this side and one meter from this right side off the paving. So we will go back for model zoom a little bit and now, by using the move told from the Blob store, set to move the paving first toe, this score have again by using the move toe and taking care of that we are parallel to the green axis. We will move it 1.6 meters I'm then Carol toe rather axis. We will move it 1.0 meters. Now, when you're I think the zoom extents tool, you can see that our treaty basement is perfectly positioned above the pavement. So now you have the ground, the paving and the basement Perfect. The last thing you need to do before continuing east to save this file by going toe file and save. Because in the previous lesson, you already save this file so you don't need to use the same s comment. So that will be all for this video. If you have any questions, please don't hesitate to ask. You can do that by selecting the community below this video. Thanks for watching, and we'll see you in the third part of this course where we will continue the creation off our treaty house.
4. Before You Go... IMPORTANT!: Hello and welcome. Before you upload your work to the Project Gallery, please be so kind to recommend this class to other students. You can do that by clicking the yes button about this video. When the pop up window opens, you can include your short review, which is optional, and then click the blue Submit button bill in orderto upload the screenshot off your work. Clean the your project link below this video and in the provided section, enter the title upload image by clicking the leak on the right. Leave a short message about this class. Select the public option from the drop down menu and click creates. Thanks for watching, and I'm looking forward to seeing your projects.
 Alek Stanojevic, Every day is a new chance to learn a new skill!