Transcripts
1. What’s this course all about?: Hello, ladies and gentlemen, thank you so much for your interest and for watching this introduction video. My name is Alec, and in the next few moments I will tell you exactly what you can expect from this course called Sketch Up for Beginners or how to draw a complete three D house from scratch, even if you've never done it before. For those of you who don't know what's ketchup is, it is a three D modeling computer program off for a wide range of droving applications such as architectural, interior design, landscape architecture, seal on mechanical engineering. It is available in a fever version as sketch up make and the pain version with additional functionality as sketch a pro. Both versions are available for Windows and Mac users. Now that you know what's ketchup is, let me tell you how this course is different from any other course related to sketch. In every video, I will show you 2 to 3 tools, and right after that you will see how to implement them. By the end of this course, you will know exactly how to create a complete three D house. When I say complete, I mean a house with a living room, dining room and kitchen, two bedrooms, one master bedroom with the walking, close it, two bathrooms, utility room and the porch. Together we'll go step by step, starting from the ground or in this example of front yard and the backyard. After that, you will discover how to create intrigue, the paving, the basement, the porch exterior and interior walls, doors and windows, floors the roof. How toe add the car and trees, how toe add colors and textures. And much, much more. So I ready to discover how to create a complete three D house from scratch. I ready to go from someone who doesn't know how to draw a line sketch up to someone who knows how to create the complete training house with all its elements. If you answered yes to these two questions, click the blue Enroll button below this video and I'll see you in the first place.
2. How to Install SketchUp (PC & Mac): Hello and welcome to the first lesson in this video. I will show you how to download the trial version off sketching. If you're already can sketch up installed on your computer, you can skip this lesson and start watching the next one. If you don't open your Internet browser and go to sketch up dot com, then click on products and from the drop down menu, Select Schedule Pro. When the new page opens, click on Download free trial on the next page. Enter the following information in the first field. Select educational use, then enter your email address, first name and last name and schoolmate. Then select students from the drop down menu. After that, select whether you want to download the Windows or Mac version off schedule. Finally, select sketch of Pro 2016. Check that you agree to sketch a pro license agreement and click dollars ketchup and follow the installment process in order to install it on your computer. The trial of version will last 30 working days from the day you install it, and after that you can continue using the pro version that costs $695 or you can follow the light version off. Sketch a pro called sketch of Make by following the same procedure at sketch of the cold slash products slash sketch up make. After the installation, you will find a sketch of icon on your desktop. That's all for now. I'll see you in the next video and thanks for watching.
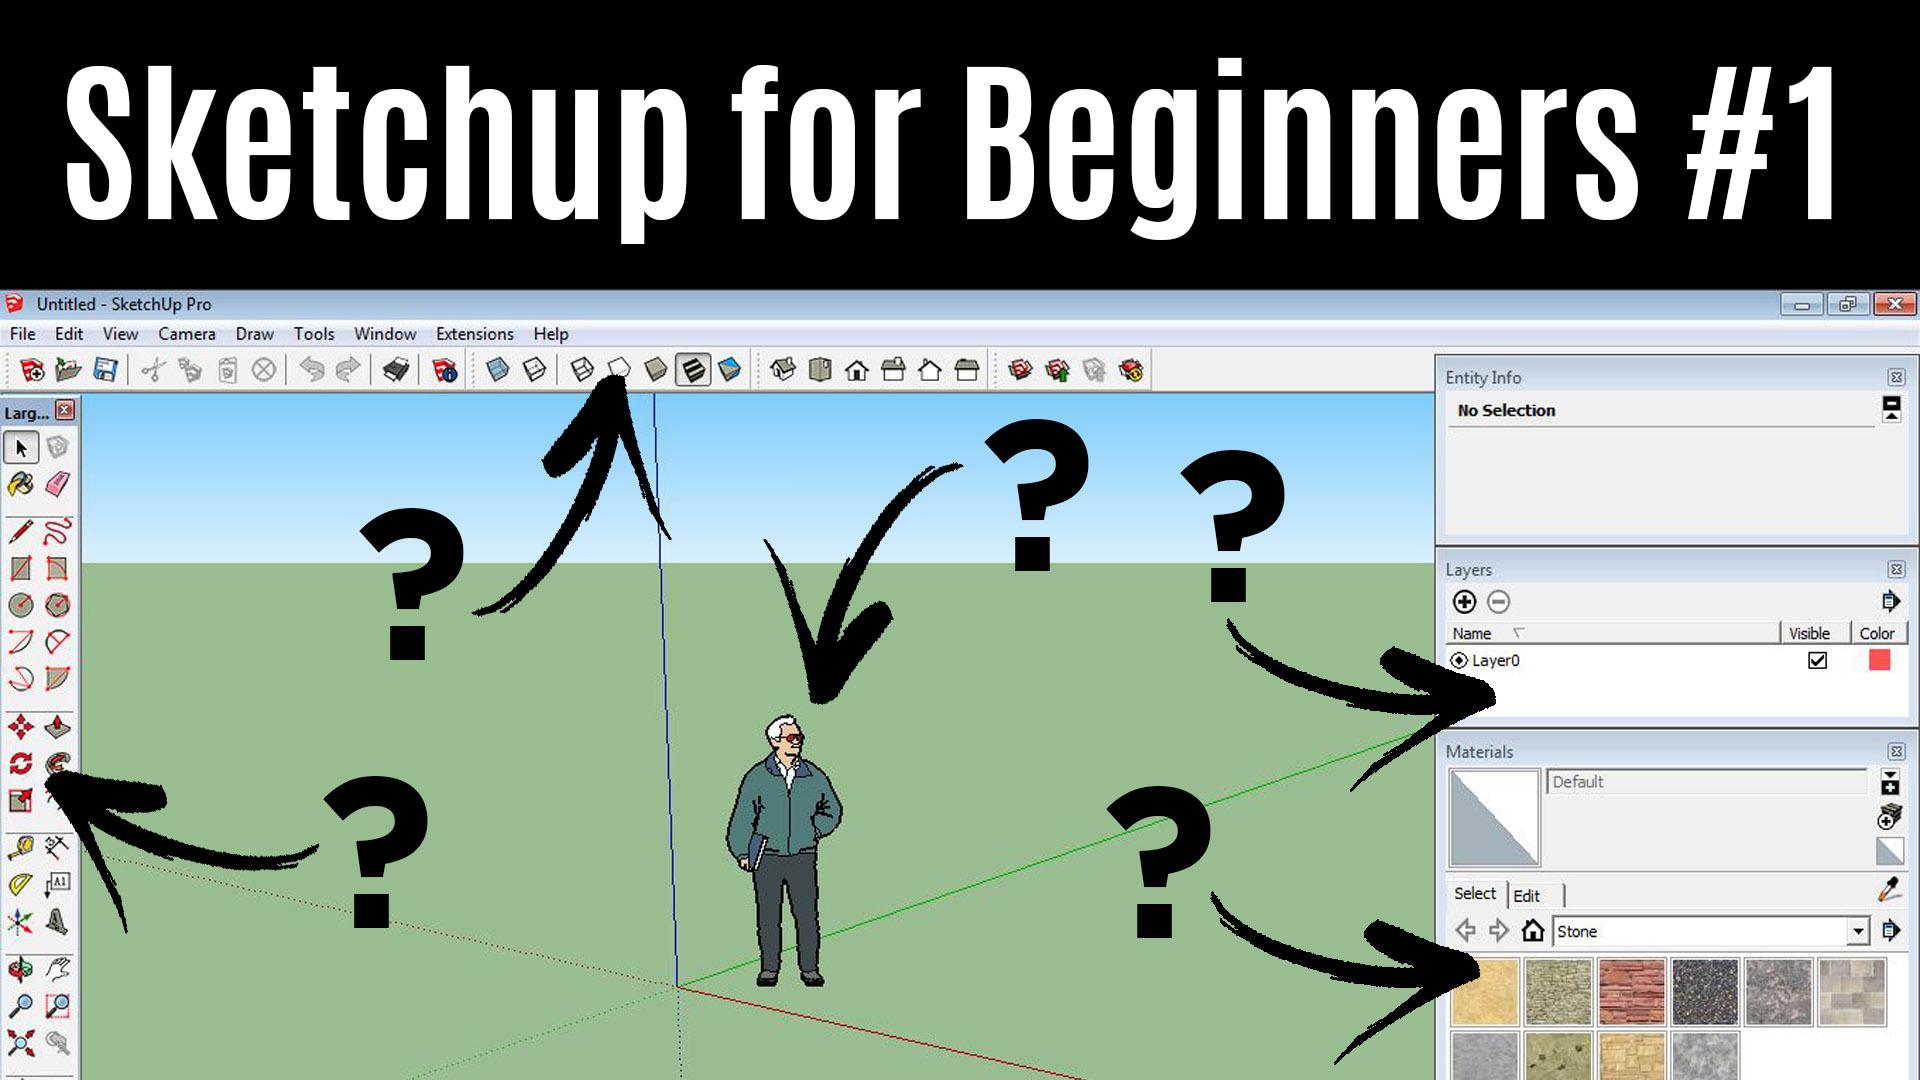
3. SketchUp Settings: Hello and welcome to the lesson Number two, where I will show you how to set up some basic sketch of options like how to choose a desired sketch of template and how to set up your sketch of interface. Open your sketch up by double clicking. It's icon on your desktop. When you do that, a new window will pop up where you can see three different sections. Learn license and templates playing the little template arrow on the left. If you scroll down, you will see a lot of pre made templates. You could choose from whatever template you choose. You can always choose another one, and more importantly, every template can be changed between sketch up. Throughout this course, we will be using the metric system, and I will select the 2nd 1 from the least called simple template meters. Don't worry if you're more familiar to feet and inches, because in every moment you could change the measuring system. Insights sketch up, but for the purpose of this course, I will use the decimal metric system. After you select the simple template dash meters template, click the stock using sketch of button in the bottom right corner, and this is how the sketch of interface will look like. At the top, you can see a menu bar with various manuals like File Edit, View, etcetera, and if you click on one of them, you will be presented with its corresponding drop down menu with related options. Underneath the menu bar is the toolbar, with some pre selected tools like New Open Save Etcetera. If you're toolbar doesn't look like mine that you can see on the screen, all you need to do is to click view tool bars and select standard styles and views options from the drop down menu Leek tops on the left hand side of the screen is the so called logical set, and these are the tools that we will be using in border to create our house. If you cannot say from your screen, you can do that by selecting you tool bars and select the large toe set option. Click close. If you hover your mouse over one of them, you will see a small window with its name and short description in the middle of your screen. You will see it to the image off the standing man. This man is here just for scaring purposes, but we don't need him for that, so you can just let him by clicking on it and press delete on your keyboard. What's more important are these three access derive the green and the blue access. Because ketchup is a three D modeling software, it is very important that you know where you are at every step off your treaty model creation. Besides that, they're here to help you draw the straight lights. Let me show you one example. Selling the line tool from the large tool sets. Click anywhere on the green surface between the red and green access. If you move your mouse around, you will see a stretching line that follows your mouse Move. If you move your mouse along the red access, you will see a red line, and if you click again the line that you just draw a spiral toe the red xs toe. Exit the line command, Press the space bar on your keyboard. What if you want to draw a line that this parallel to the grain access and it is 5.3 meters long? Well, you will select the line tool again click somewhere on the surface and start throwing the line that this federal toe, the great access. While you do that, you can see that the both of right corner off the screen. The length is changing while you're moving your mouth and you don't need to be so precise. Just click another point off your life. Now all you need to do is tied 5.3 in the last box and click enter. We will talk more about using the line tool in the upcoming videos. Okay, that will be all for this video in the next one. I will talk about some other tools that will be very useful for you. Thanks for watching, and I'll see you there.
4. SketchUp Navigation Tools: Hello and welcome to the third lesson where you will discover how to change the dimension units and how to use the navigation tools. If you remember in the introduction video, I said that we will be using the metric units where you select, we know, model in four and then select units. You can see that our current the imagining system is in meters because we selected that kind of template where the unit's former is decimal and the precision is 0.0 Whenever you want, you can change these parameters and if you do that, you units will be show as selected. For now, leave them as they are decimal meters and precision of 0.0 and then click the red X sign in the upper right corner to close the window. Now let me introduce you to the set of six navigation tools at the bottom of the large tool sets. These are the orbits, man zoom, zoom, window zoom, extents and previous in orderto better describe these tools how they were and their shortcuts. Let me drew a simple que by dropping a rectangle and then, by using a push pull toe No. If you select the orbit tool and click the left button off your mouth and drag it to the left right, Uh, and, uh, you can go around the cube and see all its sights. Instead of picking on the orbit I can. You can use its shortcut that is not on your keyboard, but on your mouse. Press your mouse wheel and move your mouth to go around the cube. Toe the left rives up, and though this is how the orbital works, if you select the mantle and click on the left button off your mouth and drag it to the left, all right up. And though you can move the view horizontally or vertically, the short cut off this, too, is the combination off the shift key on your keyboard and the mouse wheel. If you say like the zoom tool, then click the left button off your mouth and drag your mouse back and forth. You will zoom out or zoom in the view. The short cut off the stool is the mouse ville that you can drag back and forth for the same effect. A great trick about this story is that if you want to zoom in a specific part off your model. Move the pointers off your mouth. With that specific part and scroll, your mouse will resume in the zoom window. Tool will help you to see everything inside the selected window. The zoom extents to will help it to see the entire model. The previous tool will help you to get back to the previous you. That will be all for this video presentation in the next one. I will show you another great tool without which it will be impossible to work in. Sketch up. I'll see you there. Thanks for watching.
5. Selection Tool Usage: Hello and welcome to the lesson Number four, where you will discover how to use the selection tool and between those you need to prepare in order to start modeling the house. The selection tool is a tool that we use to select entities to modify with other tools or commence. There are several ways we can use the stool, and the best way to demonstrate how it works is to draw a simple rectangle. As you can see, the rectangle is made of four sides and one face in order to select one side of this rectangle is to select the Selection two and click on one side off the rectangle. What if you want to select 23 or all sides off this week, you will sell like the 1st 1 and then using the combination off the shift key on your keyboard and the selection to stop adding other sides off the rectangle one by one. If you want to de select the selected side, just click one son it again while holding the shift key on your keyboard. The second way to use the selection tool is to click the left button off your mouth and by dragging it from left to right, select all desired sides off the rectangle. Taken care off that these sides are reading the selection. The third way you can use the selection tool is for drag your mouse from right to left. The best selection rectangle was show up and every side that is touched by this rectangle and the face will be selected. The fourth and last way is to double click the rectangle face and all parts of this week tangle will be selected. Now that you know how to use the selection tool, we will add two additional videos Owner screen that needs to be open before we start drawing the first element off our future house. The 1st 1 is the entity in for window toe. Open it. Go to window and select entity info from the drop the homemade. You can move it whenever you want, but I suggest that you put it in the upper right corner off your screen. Why is this windows so important? If you select one side of direct angle, you will see to information about this site the layer where it belongs and the left off the line. Now If you say like the face off the rectangle, you will see to information about this face the layer where it belongs and the area off the face. Why the length and the area are self explanatory. The layer is something that you see for the first time how the layers work. First, let's add the second window to our screen, the layer window toe. Do that go to window and select layers from the drop down menu. As you can see, there is only one layer right now, the layer zero. Now let's add two additional layers to this window, the layer called sides and the layer called face. First click the plus sign in the upper left corner off the layers window and renamed the newly created layer. Layer +12 sides and click. Enter, then please the plus sign in the upper right corner off the layers leader again and renamed the newly created layer layer zero toe face and click Enter. Now we want to change the layer off the sides off our rectangle from layer zero to layer sites. To do that, select all sides of the rectangle and in the entity in for window changed the layer off the sides from layer zero toe layer sites. Now, when you click on any side of the rectangle, it will show the side slayer within the empathy for window. When you click on the face, it is still in the layer zero to change that, change its layer from layer zero toe layer face. Now I'm check the layer face from the layer swindle. That way, you have temporarily hide the face layer from the screen. If you check the side slayer, the size of the rectangle will disappear from the screen toe. Adding elements. The different layers is very useful when you're three. D Model has a lot of different elements, and layers are here to help. You better organize your work. We work a lot with layers in upcoming videos. And if this sounds too complicated to you, don't worry, because it's very easy when you work a little bit with them and this course is here to show you how to do it the right way. Thanks for watching, and I'll see you in the next video
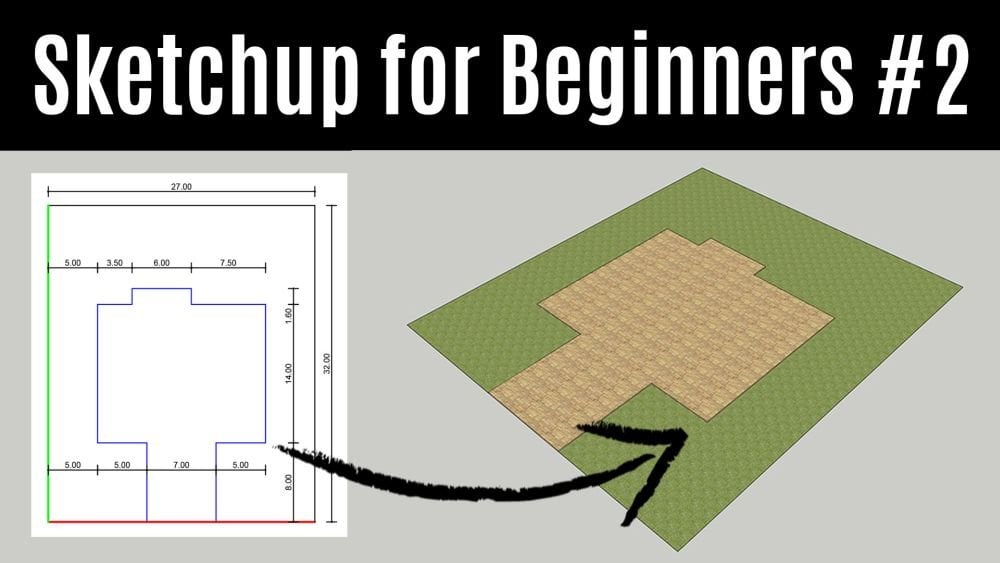
6. 3D Element #1 - The Ground: Hello and welcome to the lesson Number five. In the last four lessons, you can learn how to install sketch up on your computer. What are the basic elements of the sketch of interface? How to use the navigation tools, how to use the selection tool and how to work with layers. And now you are ready to draw the first element off the house. We will start from the simplest one, and this is why we will start with the ground off our house first. Before we start doing that, let's just check what you see on your screen. The man you are the toolbar, the large still set on the left, the entity in for window and the layers window. Now delete all the lines the cube and rectangle from your screen. Check the layers face and the layers sides to show your rectangle that we just draw in the previous lesson. Now will it. All the lines, the cube and the rectangle from the screen. Then from the layers window, the lead, the sites and the face layers that we created in the last video because we don't need them anymore. To do that, select the layer and click the minus sign in the upper left corner of the window slayer. Now everything is ready. The first thing we want to do is to create a new layer and everything we drove. From now on, we will be placed in that later. As a rule found whenever you create the new element in your treaty model, create its layer first. Now click the plus sign. We didn't the layer window and change the name off the newly created layer from layer one toe ground and select the button toe the left toe. Make it active. Now we want to draw a rectangle that will represent the ground or the front and back yards off our future house that is 27 meters wide and 32 meters long. There are two ways that we can do that, and I'm going to show you both off them. The easiest way is to draw a rectangle with its precise dimensions. To do that, select the rectangle pull from the large tool set on the left, start drawing the rectangle from the intersection, point off all three access or the origin and dragger miles going from the origin toe. The right and then click once more to define the second corner off the rectangle anywhere on the surface, as you can see in the bottom, right corner off your screen. Our rectangle is four points 56 meters by 6.72 meters big in order to make it 27 by 32 meters, just enter 27 comma 32 in the box and click enter to see the call rectangle. Click on the window extends school To see it a little better, use the orbital and then the zoom out tool. If you want to check if everything is OK and that the rectangle is really 27 meters wide and 32 meters long, sell a the tape measure tool from the large will set on the left and starting from the origin measured with and the length off your rectum. Now let me show you the second way how you can create the same rectangle of desire dimensions. Before we do that, he raised the existing rectangle from your screen. We will use the take measure tool, but this time we will create two guidelines that will help us create our 27 by 32 meters rectal. Select the tool and then click on the red access with the left. Click off your mouse, then move your mouse from the red Xs, taking care off that it's peril to the green access and click somewhere on the surface in the bottom right corner. Some value will be displayed typing 32 in the provided box and click enter. Now we want to create the second guideline that is 27 meters from the green axis and barrel . Tow it. Click on the green axes and drag your mouse barrel toe the red access and police somewhere on the surface again in the bottom right corner. Some value will be displayed typing 27 in the private box and click enter. Now you can start drawing your rectangle from the origin point to the opposite corner, and its size will be exactly 27 by 32 meters. Now you can delete the guidelines by using the eraser tool from the lodge tool set by dragging it over the first and second guideline. I know that this rectangle doesn't look spectacular at the moment, but this is just the beginning off our journey in the next video, I will show you how to draw the basement and the porch off our house. This video can be found in the second part of this class and the link will be provided below this video so you can enroll and continue to draw your treaty house. If you like how this class is organized and what you have learned so far, I would really like to see your common spend or suggestions. If you want. You can take a screenshot off your screen and uploaded toe the project gallery below this video so you can see your progress. Thanks for watching, and I'll see you in the next video.
7. Before You Go... IMPORTANT!: Hello and welcome. Before you upload your work to the Project Gallery, please be so kind to recommend this class to other students. You can do that by clicking the yes button about this video. When the pop up window opens, you can include your short review, which is optional, and then click the blue Submit button bill in orderto upload the screenshot off your work. Clean the your project link below this video and in the provided section, enter the title upload image by clicking the leak on the right. Leave a short message about this class. Select the public option from the drop down menu and click creates. Thanks for watching, and I'm looking forward to seeing your projects.
 Alek Stanojevic, Every day is a new chance to learn a new skill!